

Page 1
OPERATOR’S MANUAL
24
2 0
5
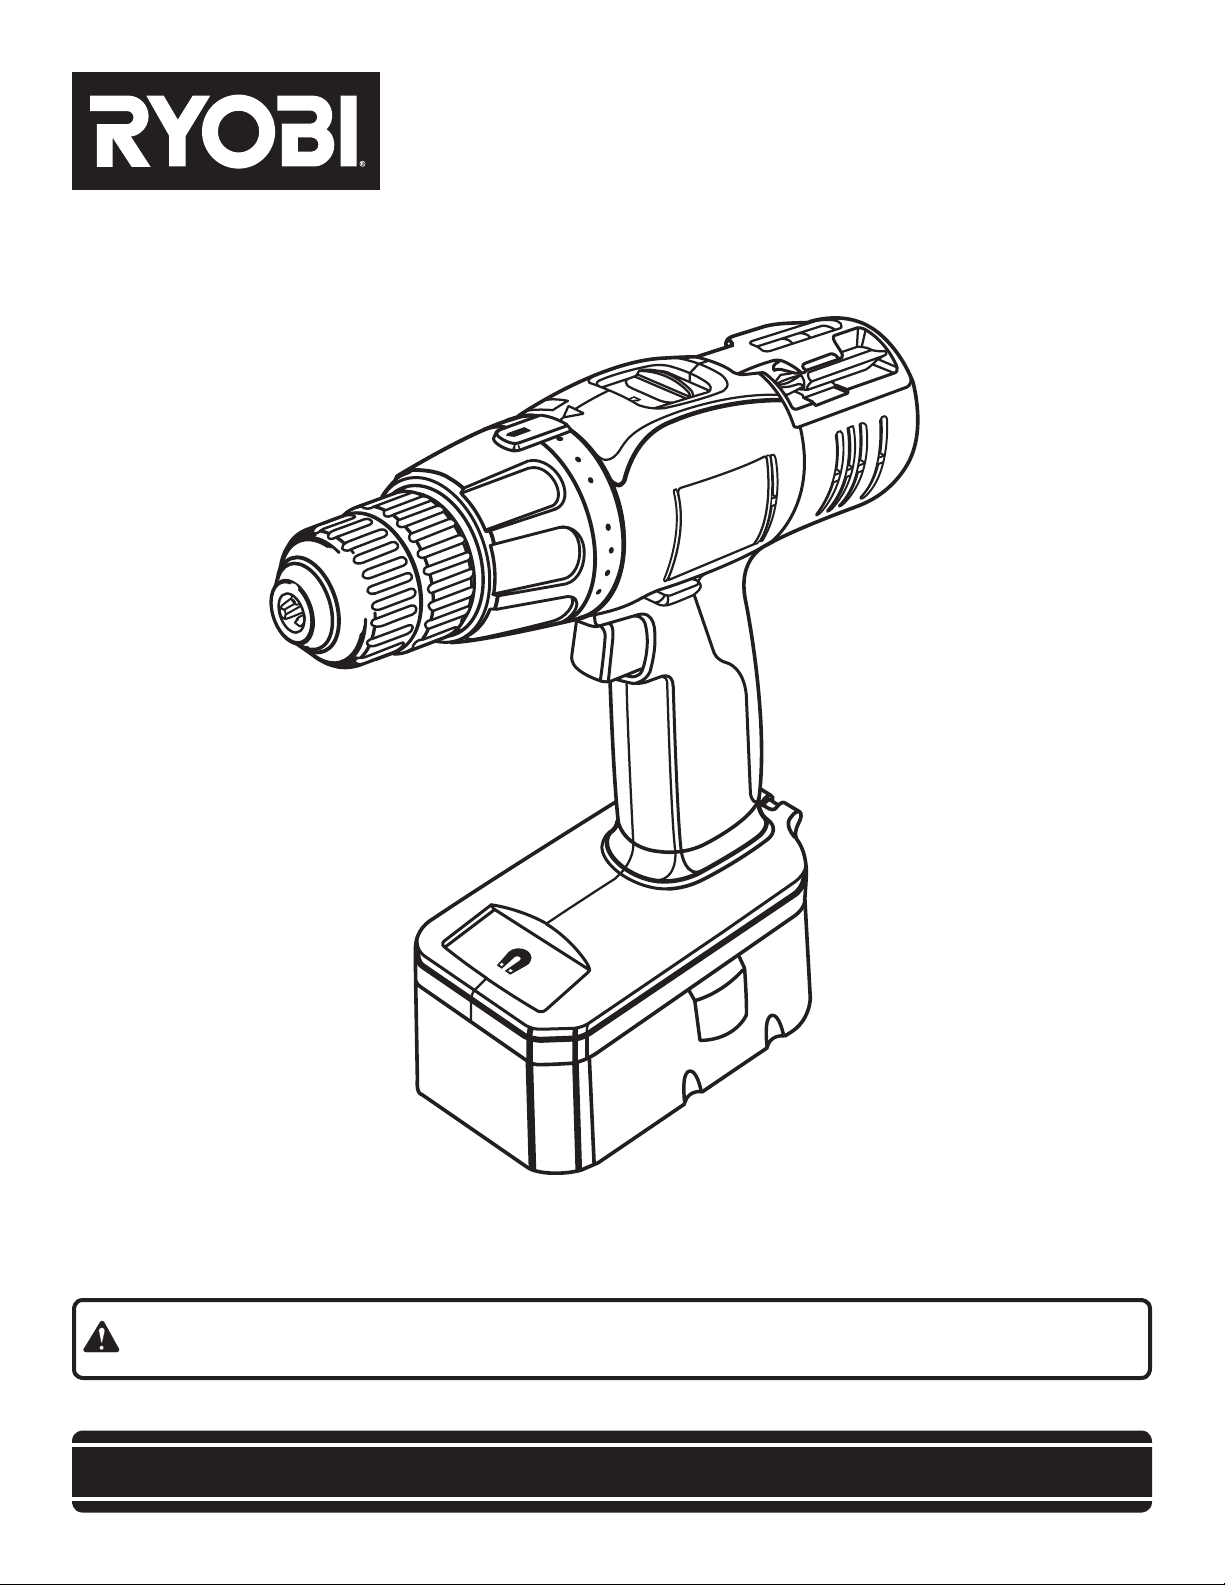
18 VOLT DRILL-DRIVER
2-SPEED
P200
Your drill-driver has been engineered and manufactured to Ryobi’s high standard for dependability, ease of operation, and
operator safety. When properly cared for, it will give you years of rugged, trouble-free performance.
WARNING: To reduce the risk of injury, the user must read and understand the operator’s manual before using
this product.
Thank you for buying a Ryobi product.
SAVE THIS MANUAL FOR FUTURE REFERENCE
Page 2

TABLE OF CONTENTS
n Introduction ..................................................................................................................................................................... 2
�n General Safety Rules .................................................................................................................................................... 3-4
�n Specific Safety Rules....................................................................................................................................................... 4
n Safety Rules for Charger ................................................................................................................................................. 5
�n Symbols........................................................................................................................................................................ 6-7
��n Features........................................................................................................................................................................8-9
��n Assembly ....................................................................................................................................................................... 10
�n Operation..................................................................................................................................................................11-17
n Maintenance ............................................................................................................................................................. 18-19
n Parts Ordering / Service ................................................................................................................................................ 20
INTRODUCTION
This tool has many features for making its use more pleasant and enjoyable. Safety, performance, and dependability have
been given top priority in the design of this product making it easy to maintain and operate.
2 3
Page 3

GENERAL SAFETY RULES
WARNING!
READ AND UNDERSTAND ALL INSTRUCTIONS. Fail-
ure to follow all instructions listed below, may result in
electric shock, fire and/or serious personal injury.
SAVE THESE INSTRUCTIONS
WORK AREA
n Keep your work area clean and well lit. Cluttered
benches and dark areas invite accidents.
n Do not operate power tools in explosive atmo-
spheres, such as in the presence of flammable
liquids, gases, or dust. Power tools create sparks which
may ignite the dust or fumes.
n Keep bystanders, children, and visitors away while
operating a power tool. Distractions can cause you to
lose control.
ELECTRICAL SAFETY
n A battery operated tool with integral batteries or a
separate battery pack must be recharged only with
the specified charger for the battery. A charger that
may be suitable for one type of battery may create a
risk of fire when used with another battery.
n Use battery operated tool only with specifically
designated battery pack. Use of any other batteries
may create a risk of fire.
n Use battery only with charger listed.
MODEL BATTERY PACK (P100) CHARGER (P110)
P200 130255004 1423701, 140237023
or 130224028 or 140237021
n Do not abuse the cord. Never use the cord to carry
the charger. Keep cord away from heat, oil, sharp
edges, or moving parts. Replace damaged cords
immediately. Damaged cords may create a fire.
PERSONAL SAFETY
n Stay alert, watch what you a re doing and use
common sense when operating a power tool. Do not
use tool while tired or under the influence of drugs,
alcohol, or medication. A moment of inattention while
operating power tools may result in serious personal
injury.
n Dress properly. Do not wear loose clothing or jewelry.
Contain long hair. Keep your hair, clothing, and gloves
away from moving parts. Loose clothes, jewelry, or long
hair can be caught in moving parts.
n Avoid accidental starting. Be sure switch is in the
locked or off position before inserting battery pack.
Carrying tools with your finger on the switch or inserting
the battery pack into a tool with the switch on invites accidents.
n Remove adjusting keys or wrenches before turning
the tool on. A wrench or a key that is left attached to a
rotating part of the tool may result in personal injury.
n Do not overreach. Keep proper footing and balance
at all times. Proper footing and balance enable better
control of the tool in unexpected situations.
n Use safety equipment. Always wear eye protection.
Dust mask, non-skid safety shoes, hard hat, or hearing
protection must be used for appropriate conditions.
n Do not wear loose clothing or jewelry. Contain long
hair. Loose clothes, jewelry, or long hair can be drawn
into air vents.
n Do not use on a ladder or unstable support. Stable
footing on a solid surface enables better control of the
tool in unexpected situations.
TOOL USE AND CARE
n Use clamps or other practical way to secure and sup-
port the workpiece to a stable platform. Holding the
work by hand or against your body is unstable and may
lead to loss of control.
n Do not force tool. Use the correct tool for your
application. The correct tool will do the job better and
safer at the rate for which it is designed.
n Do not use tool if switch does not turn it on or off.
A tool that cannot be controlled with the switch is
dangerous and must be repaired.
n Disconnect battery pack from tool or place the switch
in the locked or off position before making any adjustments, changing accessories, or storing the tool. Such
preventive safety measures reduce the risk of starting the
tool accidentally.
n Store idle tools out of reach of children and other
untrained persons. Tools are dangerous in the hands
of untrained users.
n When battery pack is not in use, keep it away from
other metal objects like: paper clips, coins, keys, nails,
screws, or other small metal objects that can make
a connection from one terminal to another. Shorting
the battery terminals together may cause sparks, burns,
or a fire.
n Maintain tools with care. Keep cutting tools sharp
and clean. Properly maintained tools with sharp
cutting edges are less likely to bind and are easier to
control.
n Check for misalignment or binding of moving parts,
breakage of parts, and any other condition that may
affect the tool’s operation. If damaged, have the tool
serviced before using. Many accidents are caused by
poorly maintained tools.
n Use only accessories that are recommended by the
manufacturer for your model. Accessories that may be
suitable for one tool may create a risk of injury when used
on another tool.
n Keep the tool and its handle dry, clean and free from
oil and grease. Always use a clean cloth when clean-
ing. Never use brake fluids, gasoline, petroleum-based
products, or any strong solvents to clean your tool. Following this rule will reduce the risk of loss of control and
deterioration of the enclosure plastic.
Page 4

GENERAL SAFETY RULES
SERVICE
n Tool service must be performed only by qualified re-
pair personnel. Service or maintenance performed by
unqualified personnel may result in a risk of injury.
SPECIFIC SAFETY RULES
n Hold tool by insulated gripping surfaces when per-
forming an operation where the cutting tool may contact hidden wiring. Contact with a “live” wire will also
make exposed metal parts of the tool “live” and shock
the operator.
n Know your power tool. Read operator’s manual care-
fully. Learn its applications and limitations, as well
as the specific potential hazards related to this tool.
Following this rule will reduce the risk of electric shock,
fire, or serious injury.
n Always wear safety glasses with side shields.
Everyday glasses have only impact resistant lenses. They
are NOT safety glasses. Following this rule will reduce
the risk of eye injury.
n Protect your lungs. Wear a face or dust mask if the
operation is dusty. Following this rule will reduce the
risk of serious personal injury.
n Protect your hearing. Wear hearing protection during
extended periods of operation. Following this rule will
reduce the risk of serious personal injury.
n Battery tools do not have to be plugged into an elec-
trical outlet; therefore, they are always in operating
condition. Be aware of possible hazards when not
using your battery tool or when changing accessories.
Following this rule will reduce the risk of electric shock,
fire, or serious personal injury.
n When servicing a tool, use only identical replacement
parts. Follow instructions in the Maintenance section
of this manual. Use of unauthorized parts or failure to fol-
low Maintenance Instructions may create a risk of shock
or injury.
n Do not place battery tools or their batteries near fire
or heat. This will reduce the risk of explosion and pos-
sibly injury.
n Never use a battery that has been dropped or
received a sharp blow. A damaged battery is subject to
explosion. Properly dispose of a dropped or damaged
battery immediately.
n Batteries vent hydrogen gas and can explode in the
presence of a source of ignition, such as a pilot light.
To reduce the risk of serious personal injury, never use
any cordless product in the presence of open flame. An
exploded battery can propel debris and chemicals. If
exposed, flush with water immediately.
n Do no t charge battery tool in a damp or wet
location. Following this rule will reduce the risk of electric
shock.
n For best results, your battery tool should be charged
in a location where the temperature is more than
50°F but less than 100°F. Do not store outside or in
vehicles.
n Under extreme usage or temperature conditions, bat-
tery leakage may occur. If liquid comes in contact with
your skin, wash immediately with soap and water, then
neutralize with lemon juice or vinegar. If liquid gets
into your eyes, flush them with clean water for at least
10 minutes, then seek immediate medical attention.
Following this rule will reduce the risk of serious personal
injury.
4 5
Page 5
SAFETY RULES FOR CHARGER
WARNING!
READ AND UNDERSTAND ALL INSTRUCTIONS.
Failure to follow all instructions listed below, may result in
electric shock, fire and/or serious personal injury.
n Before using battery charger, read all instructions and
cautionary markings in this manual, on battery charger,
battery, and product using battery to prevent misuse of
the products and possible injury or damage.
CAUTION:
To reduce the risk of electric shock or damage to
the charger and battery, charge only nickel-cadmium
rechargeable batteries as specifically designated on your
charger. Other types of batteries may burst, causing personal injury or damage.
n Do not use charger outdoors or expose to wet or damp
conditions. Water entering charger will increase the risk
of electric shock.
n Use of an attachment not recommended or sold by the
battery charger manufacturer may result in a risk of
fire, electric shock, or injury to persons. Following this
rule will reduce the risk of electric shock, fire, or serious
personal injury.
n Do not abuse cord or charger. Never use the cord to
carry the charger. Do not pull the charger cord rather than
the plug when disconnecting from receptacle. Damage
to the cord or charger could occur and create an electric
shock hazard. Replace damaged cords immediately.
n Make sure cord is located so that it will not be stepped
on, tripped over, come in contact with sharp edges
or moving parts or otherwise subjected to damage or
stress. This will reduce the risk of accidental falls, which
could cause injury, and damage to the cord, which could
result in electric shock.
n Ke ep cord and charger from heat to prevent
damage to housing or internal parts.
n Do not let gasoline, oils, petroleum-based products,
etc. come in contact with plastic parts. They contain
chemicals that can damage, weaken, or destroy plastic.
n An exten sion cord shou ld not be use d unles s
absolutely necessary. Use of improper extension
cord could result in a risk of fire and electric shock. If
extension cord must be used, make sure:
a. That pins on plug of extension cord are the
same number, size and shape as those of
plug on charger.
b. Tha t extension cord is properly wi r ed and in
good electrical condition; and
c. That wire size is large enough for AC ampere
rating of charger as specified below:
Cord Length (Feet) 25' 50' 100'
Cord Size (AWG) 16 16 16
NOTE: AWG = American Wire Gauge
n Do not operate charger with a damaged cord or
plug, which could cause shorting and electric shock. If
damaged, have the charger replaced by an authorized
serviceman.
n Do not operate charger if it has received a sharp blow,
been dropped, or otherwise damaged in any way. Take
it to an authorized serviceman for electrical check to
determine if the charger is in good working order.
n Do not disassemble charger. Take it to an authorized
serviceman when service or repair is required. Incorrect
reassembly may result in a risk of electric shock or fire.
n Unplug charger from outlet befor e att empting
any maintenance or cleaning to reduce the risk of
electric shock.
n Disconnect charger from the power supply when
not in use. This will reduce the risk of electric shock or
damage to the charger if metal items should fall into the
opening. It also will help prevent damage to the charger
during a power surge.
n Risk of electric shock. Do not touch uninsulated portion
of output connector or uninsulated battery terminal.
n Save these instructions. Refer to them frequently
and use them to instruct others who may use this
tool. If you loan someone this tool, loan them these
instructions also to prevent misuse of the product and
possible injury.
WARNING:
Some dust created by power sanding, sawing, grinding, drilling, and other construction activities contains chemicals
known to cause cancer, birth defects or other reproductive harm. Some examples of these chemicals are:
• lead from lead-based paints,
• crystalline silica from bricks and cement and other masonry products, and
• arsenic and chromium from chemically-treated lumber.
Your risk from these exposures varies, depending on how often you do this type of work. To reduce your exposure to
these chemicals: work in a well ventilated area, and work with approved safety equipment, such as those dust masks
that are specially designed to filter out microscopic particles.
Page 6
SYMBOLS
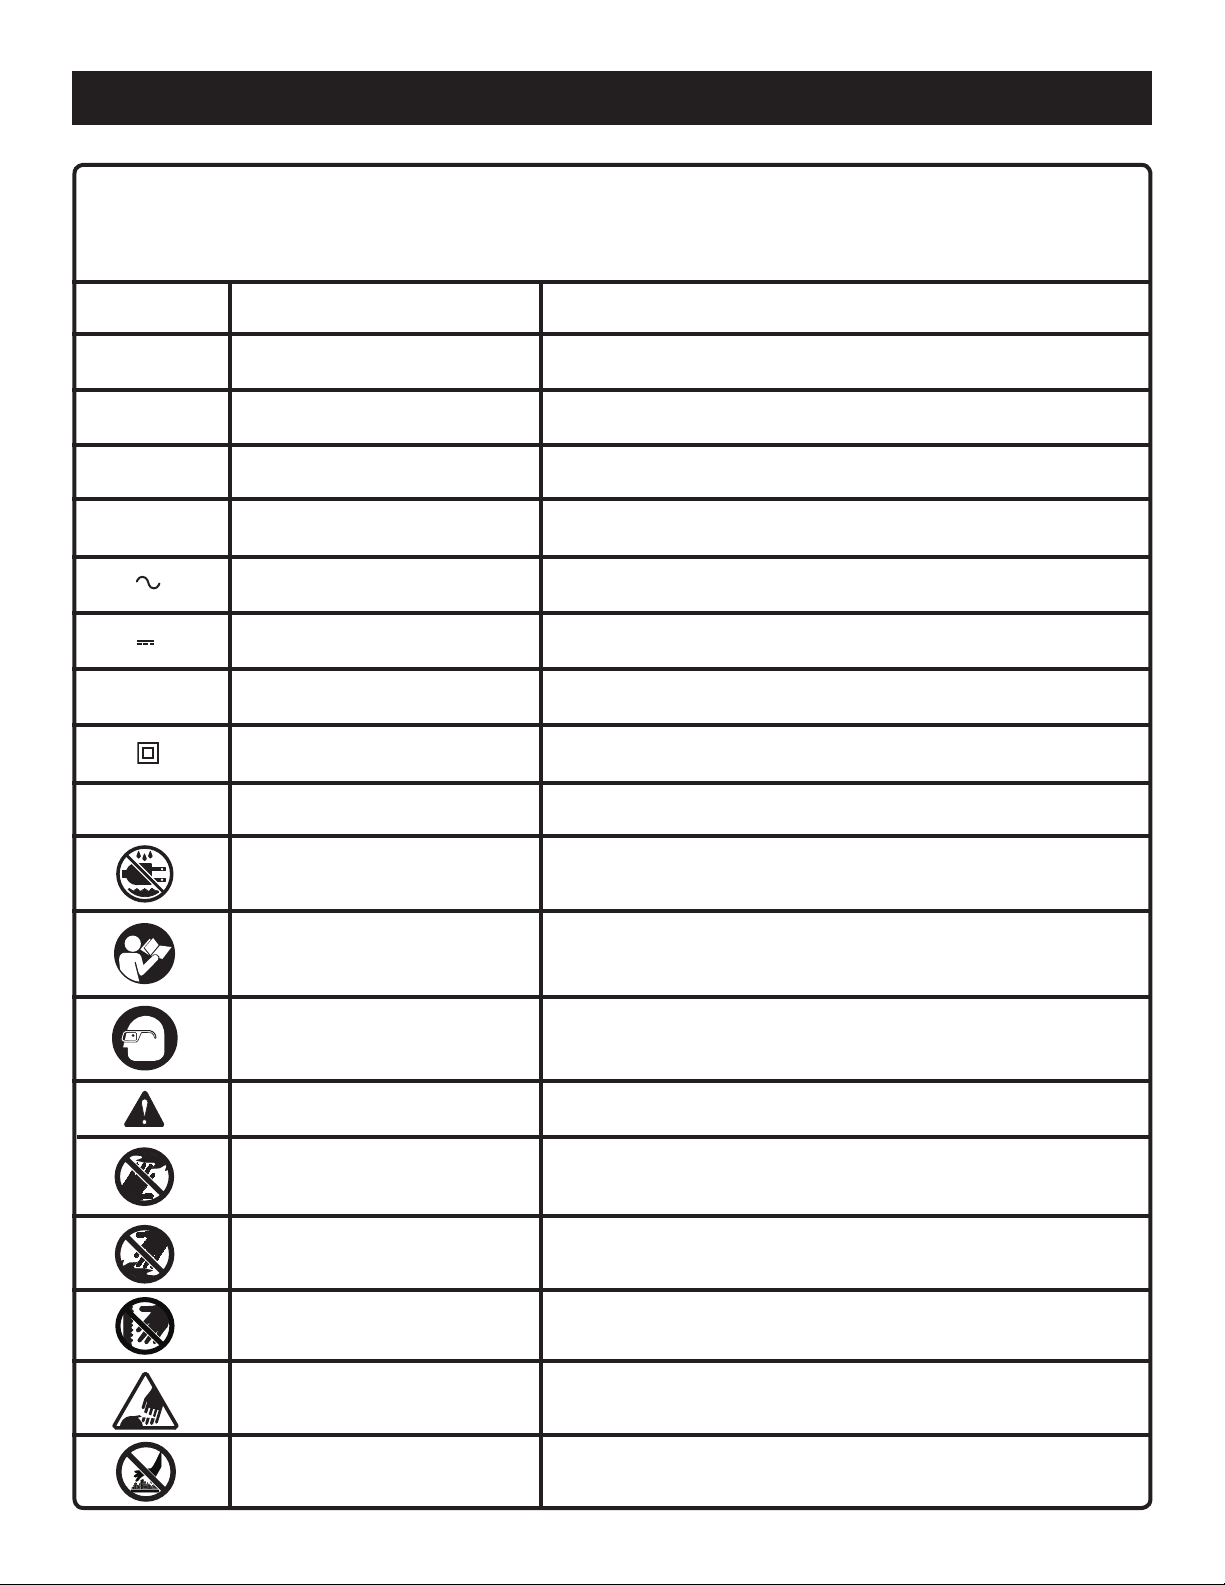
Some of the following symbols may be used on this tool. Please study them and learn their meaning. Proper interpretation of these symbols will allow you to operate the tool better and safer.
SYMBOL NAME DESIGNATION/EXPLANATION
V Volts
A Amperes
Hz Hertz
W Watt
min Minutes
Alternating Current
Direct Current
n
o
.../min
No Load Speed
Class II Construction
Per Minute
Wet Conditions Alert
Voltage
Current
Frequency (cycles per second)
Power
Time
Type of current
Type or a characteristic of current
Rotational speed, at no load
Double-insulated construction
Revolutions, strokes, surface speed, orbits etc., per minute
Do not expose to rain or use in damp locations.
Read The Operator’s Manual
Eye Protection
Safety Alert
No Hands Symbol
No Hands Symbol
No Hands Symbol
No Hands Symbol
Hot Surface
To reduce the risk of injury, user must read and understand
operator’s manual before using this product.
Always wear safety goggles or safety glasses with side shields
and a full face shield when operating this product.
Precautions that involve your safety.
Failure to keep your hands away from the blade will result in
serious personal injury.
Failure to keep your hands away from the blade will result in
serious personal injury.
Failure to keep your hands away from the blade will result in
serious personal injury.
Failure to keep your hands away from the blade will result in
serious personal injury.
To reduce the risk of injury or damage, avoid contact with
any hot surface.
6 7
Page 7
SYMBOLS
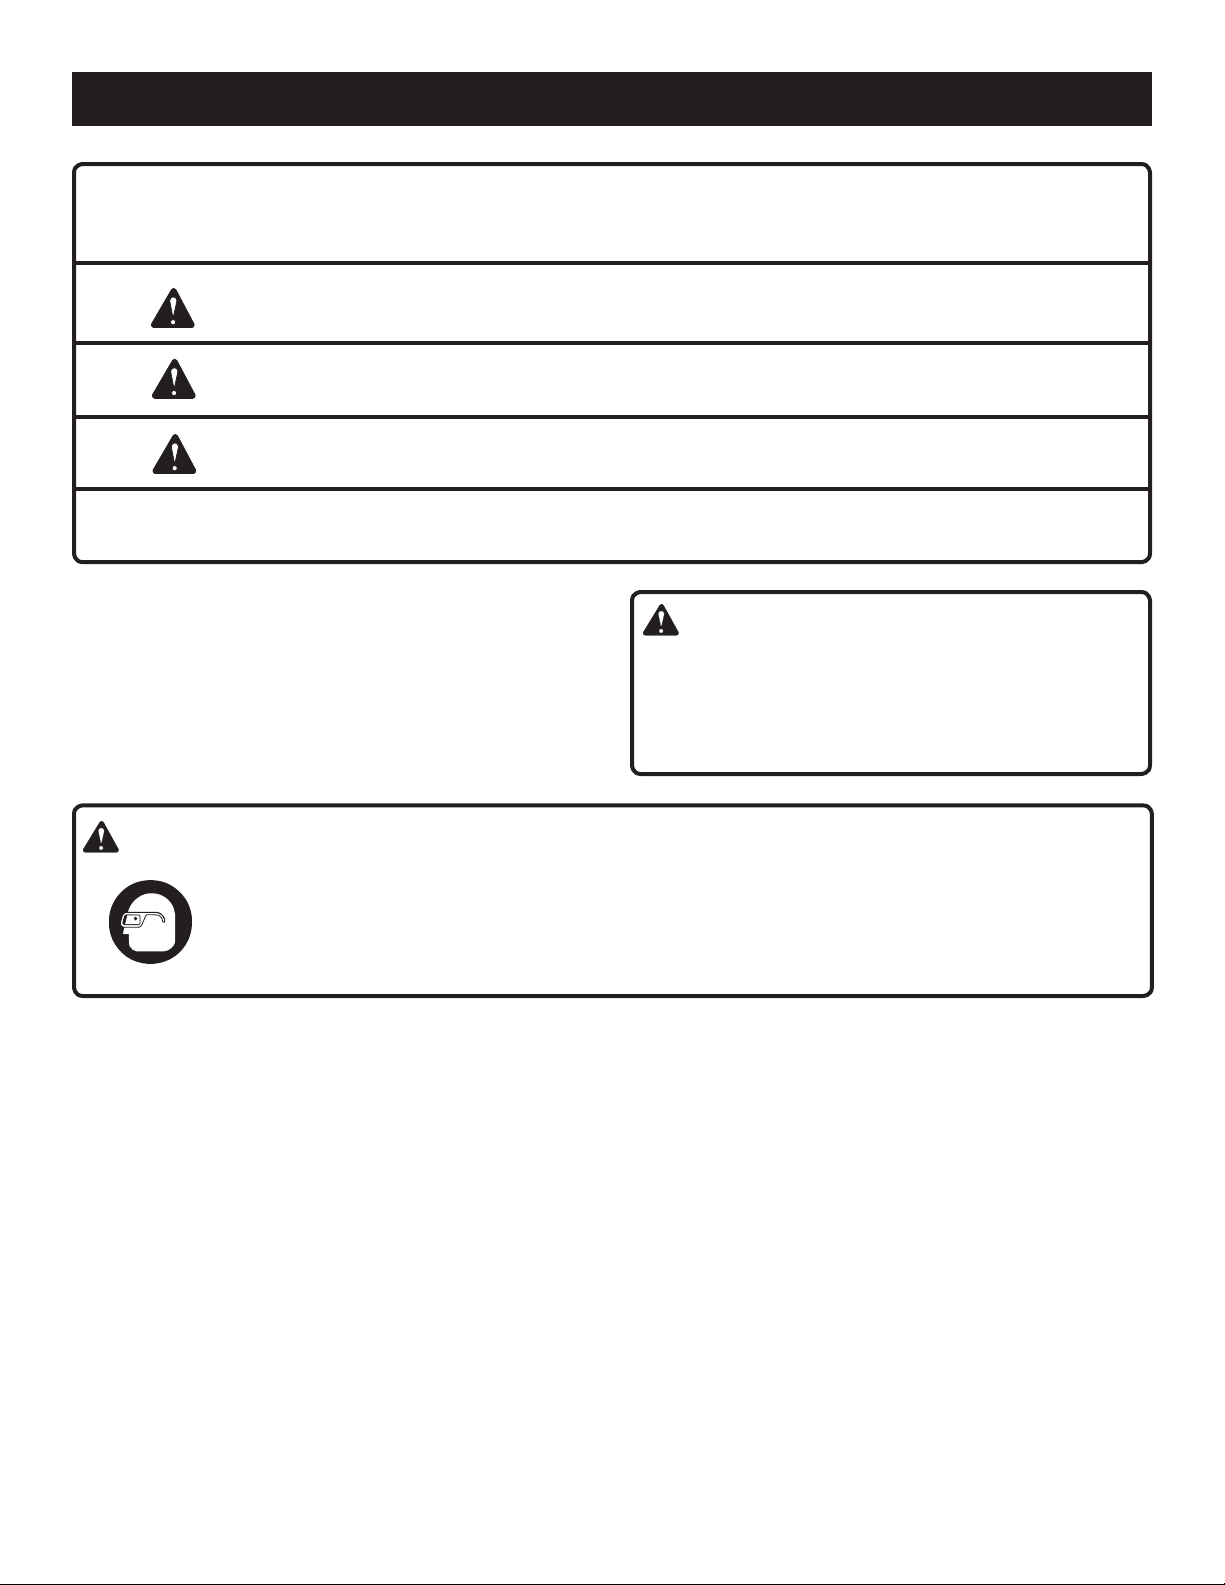
The following signal words and meanings are intended to explain the levels of risk associated with this product.
SYMBOL SIGNAL MEANING
DANGER: Indicates an imminently hazardous situation, which, if not avoided, will
result in death or serious injury.
WARNING: Indicates a potentially hazardous situation, which, if not avoided, could
result in death or serious injury.
CAUTION: Indicates a potentially hazardous situation, which, if not avoided, may
result in minor or moderate injury.
CAUTION: (Without Safety Alert Symbol) Indicates a situation that may result in
property damage.
SERVICE
Servicing requires extreme care and knowledge and should
be performed only by a qualified service technician. For
service we suggest you return the product to your nearest
AUTHORIZED SERVICE CENTER for repair. When servicing, use only identical replacement parts.
WARNING:
The operation of any power tool can result in foreign objects being thrown into your eyes, which can
result in severe eye damage. Before beginning power tool operation, always wear safety goggles or
safety glasses with side shields and a full face shield when needed. We recommend Wide Vision Safety
Mask for use over eyeglasses or standard safety glasses with side shields. Always use eye protection
which is marked to comply with ANSI Z87.1.
SAVE THESE INSTRUCTIONS
WARNING:
To avoid serious personal injury, do not attempt to use
this product until you read thoroughly and understand
completely the operator’s manual. Save this operator’s
manual and review frequently for continuing safe operation and instructing others who may use this product.
Page 8
24
2 0
5
FEATURES
PRODUCT SPECIFICATIONS
Motor.......................................................................................................................................................................18 Volt DC
Switch...............................................................................................................................................................Variable Speed
No Load Speed ..........................................................................................................................................0-350/0-1300/min.
Charger Input ........................................................................................................................................ 120 V, 60 Hz, AC only
Charge Rate ...................................................................................................................................................................1 hour
Torque....................................................................................................................................................... Maximum 400 in.lb.
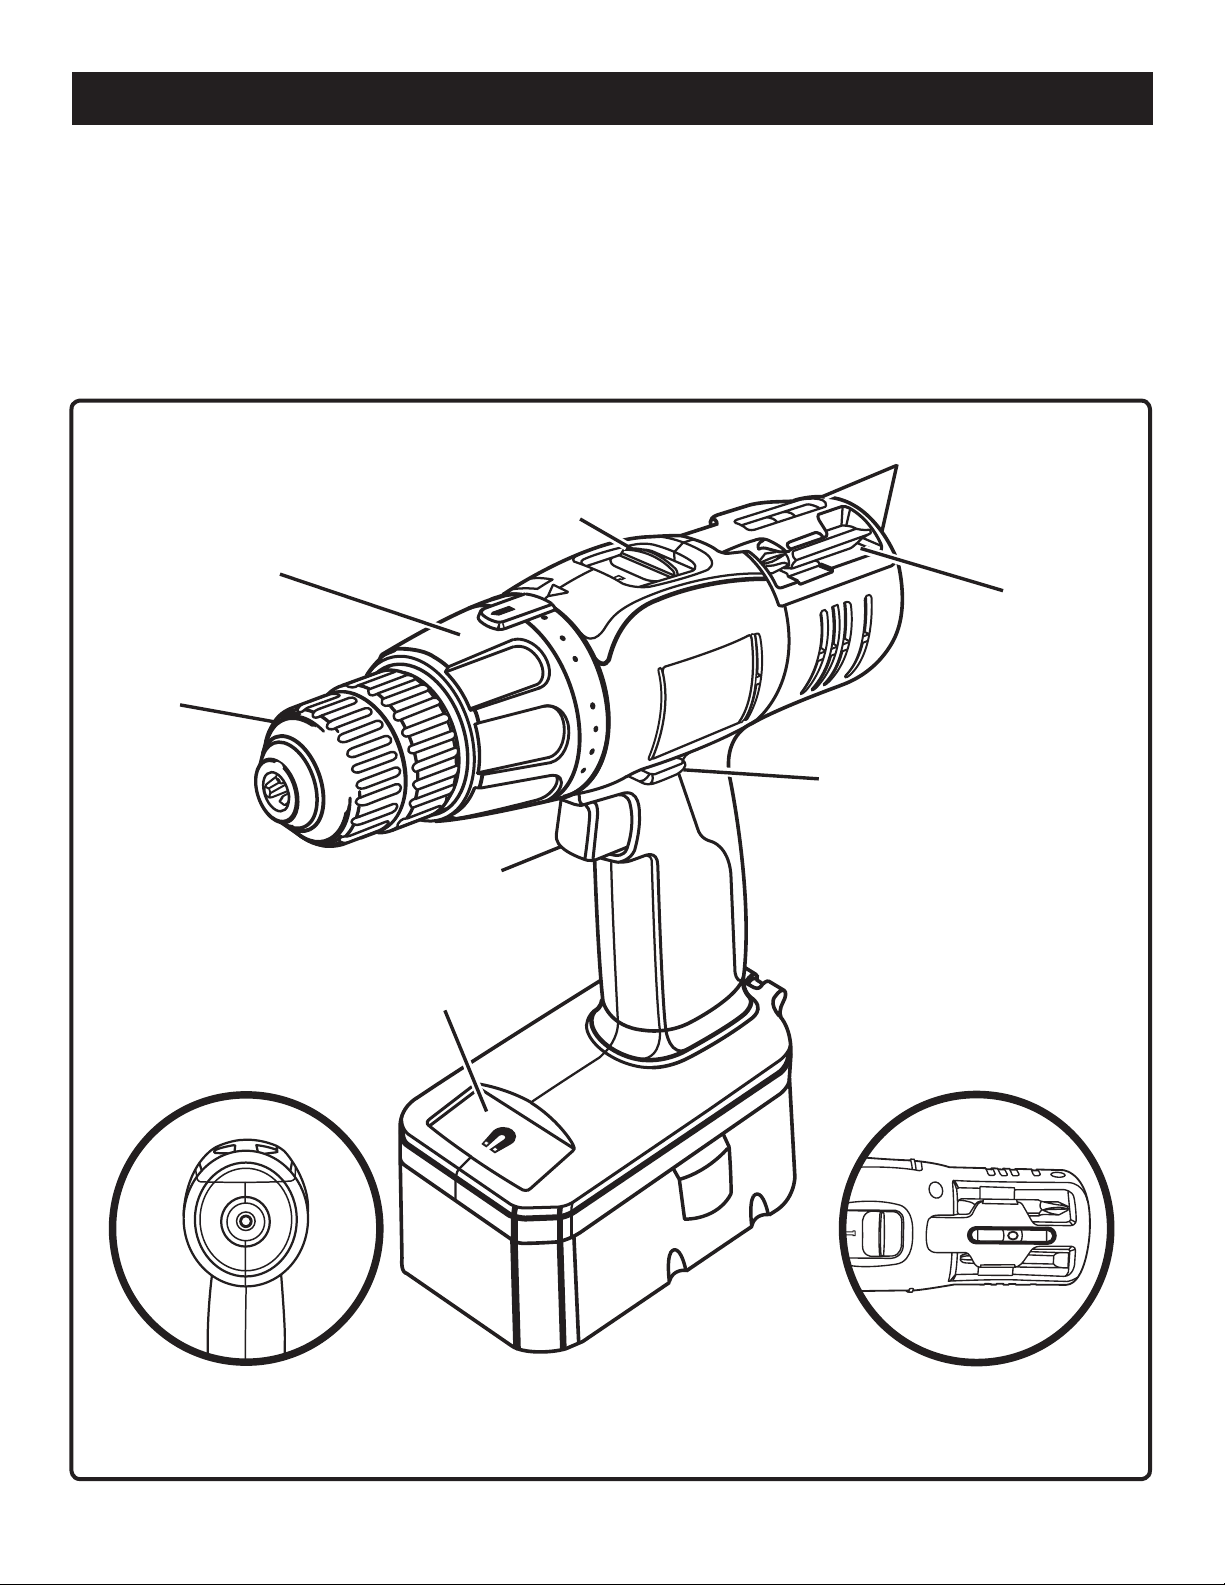
LEVEL
TWO SPEED
TORQUE
ADJUSTMENT
RING
GEAR TRAIN (HI-LO)
BIT
STORAGE
AREA
KEYLESS
CHUCK
(SCREW HOLDER)
DIRECTION OF
ROTATION SELECTOR
AND CENTER LOCK
SWITCH
TRIGGER
MAG TRAY™
END VIEW OF LEVEL FOR
VERTICAL DRILLING
TOP VIEW OF LEVEL FOR
HORIZONTAL DRILLING
Fig. 1
8 9
Page 9

FEATURES
KNOW YOUR DRILL-DRIVER
See Figure 1.
Before attempting to use this product, familiarize yourself
with all operating features and safety rules.
KEYLESS CHUCK
The drill-driver has a keyless chuck that allows you to hand
tighten or release drill bit in the chuck jaws.
VARIABLE SPEED SWITCH
This tool has a variable speed switch that delivers higher
speed with increased trigger pressure. Speed is controlled
by the amount of switch trigger depression.
SWITCH LOCK
The switch trigger can be locked in the OFF position. This
feature helps reduce the possibility of accidental starting
when not in use.
TWO-SPEED GEAR TRAIN
A slide switch is located on top of the drill to select either
LO (1) or HI (2) speed.
FORWARD/REVERSE SELECTOR
(DIRECTION OF ROTATION SELECTOR)
The drill-driver has a forward/reverse selector located above
the switch trigger.
BIT STORAGE
When not in use, bits provided with the drill-driver can be
placed in the storage area located on the top of the motor
housing.
LEVEL
To keep drill bit level during drilling operations, a level is
located on the top and end of the motor housing.
MAG TRAY
For your convenience, a Mag Tray capable of holding small
parts is located at the front of the drill-driver.
™
Page 10
ASSEMBLY
UNPACKING
This product has been shipped completely assembled.
n Carefully remove the tool and any accessories from the
box. Make sure that all items listed in the packing list are
included.
n Inspect the tool carefully to make sure no breakage or
damage occurred during shipping.
n Do not discard the packing material until you have care-
fully inspected and satisfactorily operated the tool.
n If any parts are damaged or missing, please call
1-800-525-2579 for assistance.
PACKING LIST
Drill-Driver
Double-ended Bits (2)
Operator’s Manual
Warranty Registration Card
WARNING:
If any parts are missing do not operate this tool until the
missing parts are replaced. Failure to do so could result
in possible serious personal injury.
WARNING:
Do not attempt to modify this tool or create accessories not recommended for use with this tool. Any such
alteration or modification is misuse and could result in a
hazardous condition leading to possible serious personal
injury.
WARNING:
To prevent accidental starting that could cause serious
personal injury, always remove the battery pack from the
tool when assembling parts.
10 11
Page 11
OPERATION
WARNING:
Do not allow familiarity with tools to make you careless. Remember that a careless fraction of a second is
sufficient to inflict serious injury.
WARNING:
Always wear safety goggles or safety glasses with side
shields when operating tools. Failure to do so could result in objects being thrown into your eyes, resulting in
possible serious injury.
WARNING:
Do not use any attachments or accessories not recommended by the manufacturer of this tool. The use of attachments or accessories not recommended can result
in serious personal injury.
APPLICATIONS
You may use this tool for the following purposes:
n Drilling in wood
n Drilling in ceramics, plastics, fiberglass, and laminates
n Drilling in both hard and soft metals
n Using driving accessories, such as driving screws with
screwdriver bits
n Mixing paints
CAUTION:
To prevent damage to the battery pack, remove the
battery pack from the charger immediately if no LED
comes on. Return the battery pack and charger to your
nearest service center for checking or replacing. Also,
if you are removing the battery pack from the charger
and no LEDs are on, return both the battery pack and
the charger to your nearest service center. Do not insert
another battery pack into the charger. A damaged charger
may damage a battery pack.
LED FUNCTIONS OF CHARGER
LED WILL BE ON TO INDICATE STATUS OF
CHARGER AND BATTERY PACK:
n Red LED on = Fast charging mode.
n Green LED on = Fully charged and in maintenance charge
mode.
n Green LED on = When battery pack is inserted into
charger, indicates hot battery pack or that battery pack
is out of normal temperature range.
n Yellow and Green LEDs on = Deeply discharged or
defective battery pack.
n No LED on = Defective charger or battery pack.
CHARGING THE BATTERY PACK
Battery packs for this tool are shipped in a low charge condition to prevent possible problems. Therefore, you should
charge it until the green LED on the front of the charger
comes on.
NOTE: Batteries will not reach full charge the first time they
are charged. Allow several cycles (operation followed by
recharging) for them to become fully charged.
CHARGING A COOL BATTERY PACK
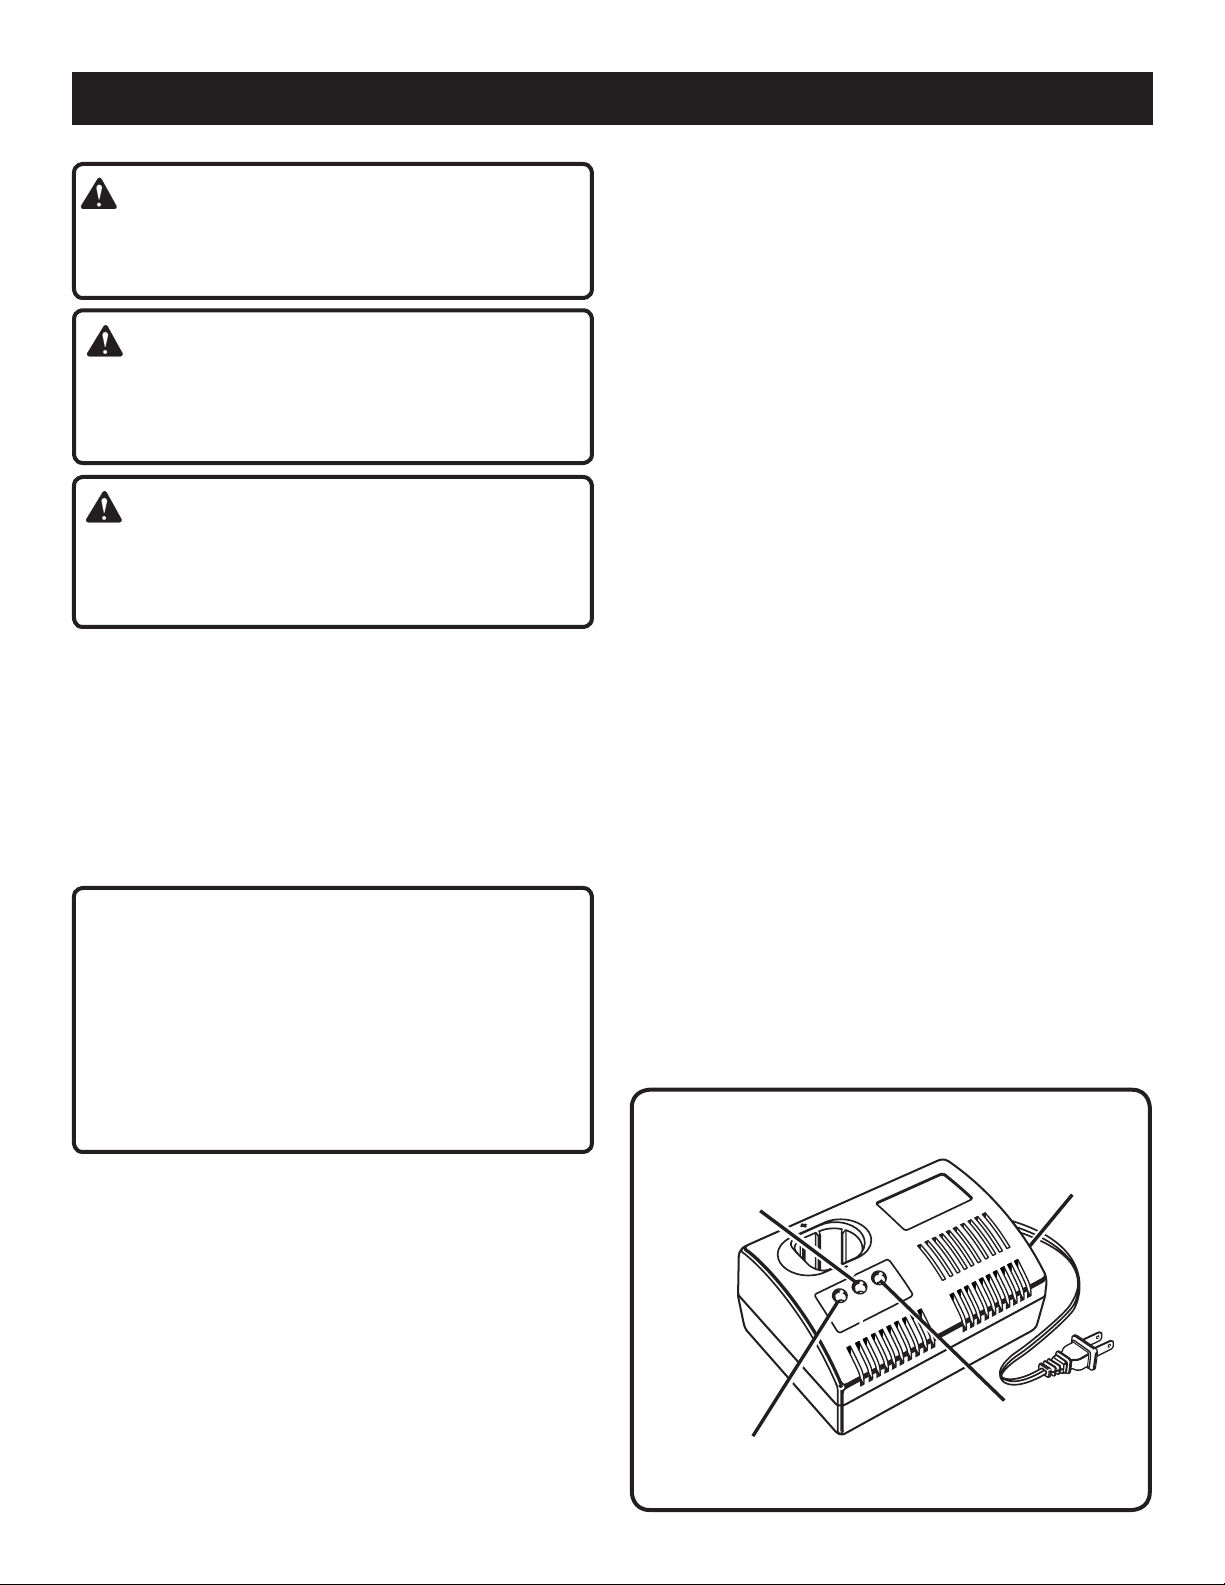
See Figures 2 - 3.
If battery pack is within normal temperature range, the red
LED on charger will come on.
NOTE: If the charger does not charge the battery pack
under normal circumstances, return both the battery pack and
charger to your nearest Ryobi Authorized Service Center for
electrical check.
n Charge the battery pack only with a recommended
charger.
n Make sure the power supply is normal household
voltage, 120 volts, 60 Hz, AC only.
n Connect the charger to the power supply.
n Place the battery pack in the charger aligning raised rib
on the battery pack with the groove in the charger.
n Press down on the battery pack to be sure contacts on
the battery pack engage properly with contacts in the
charger.
n Normally the red LED on charger will come on. This
indicates the charger is in fast charging mode.
n Red LED should remain on for approximately 1 hour
then the green LED will come on. Green LED on
indicates battery pack is fully charged and charger is
in maintenance charge mode.
NOTE: Th e gr e e n LED will remain on until the
battery pack is removed from the charger or charger is
disconnected from the power supply.
P110
GREEN LIGHT
RED LIGHT
YELLOW LIGHT
CHARGER
Fig. 2
Page 12
OPERATION
n If both yellow and green LEDs come on, this indi-
cates a deeply discharged or defective battery pack.
Allow the battery pack to remain in the charger for 15
to 30 minutes. When the battery pack reaches normal
voltage range, the red LED should come on. If the
red LED does not come on after 30 minutes, this may
indicate a defective battery pack and should be
replaced.
n After normal usage, a minimum of 1 hour of charging time
is required to fully recharge battery pack.
n The battery pack will become slightly warm to the
touch while charging. This is normal and does not
indicate a problem.
n Do not place the charger and battery pack in an area of
extreme heat or cold. They will work best at normal room
temperature.
NOTE: The charger and battery pack should be placed
in a location where the temperature is more than 50°F
but less than 100°F.
n When batteries become fully charged, unplug the
charger from power supply and remove the battery
pack.
CHARGING A HOT BATTERY PACK
When using the tool continuously, the batteries in the battery
pack will become hot. You should let a hot battery pack cool
down for approximately 30 minutes before attempting to
recharge. When the battery pack becomes discharged and
is hot, this will cause the green LED to come on instead of
the red LED. After 30 minutes, reinsert the battery pack in
the charger. If the green LED continues to remain on, return
battery pack to your nearest Ryobi Authorized Service Center
for checking or replacing.
NOTE: This situation only occurs when continuous use of
the tool causes the batteries to become hot. It does not
occur under normal circumstances. Refer to “CHARGING
A COOL BATTERY PACK” for normal recharging of batteries. If the charger does not charge your battery pack under
normal circumstances, return both the battery pack and
charger to your nearest Ryobi Authorized Service Center
for electrical check.
TO INSTALL BATTERY PACK
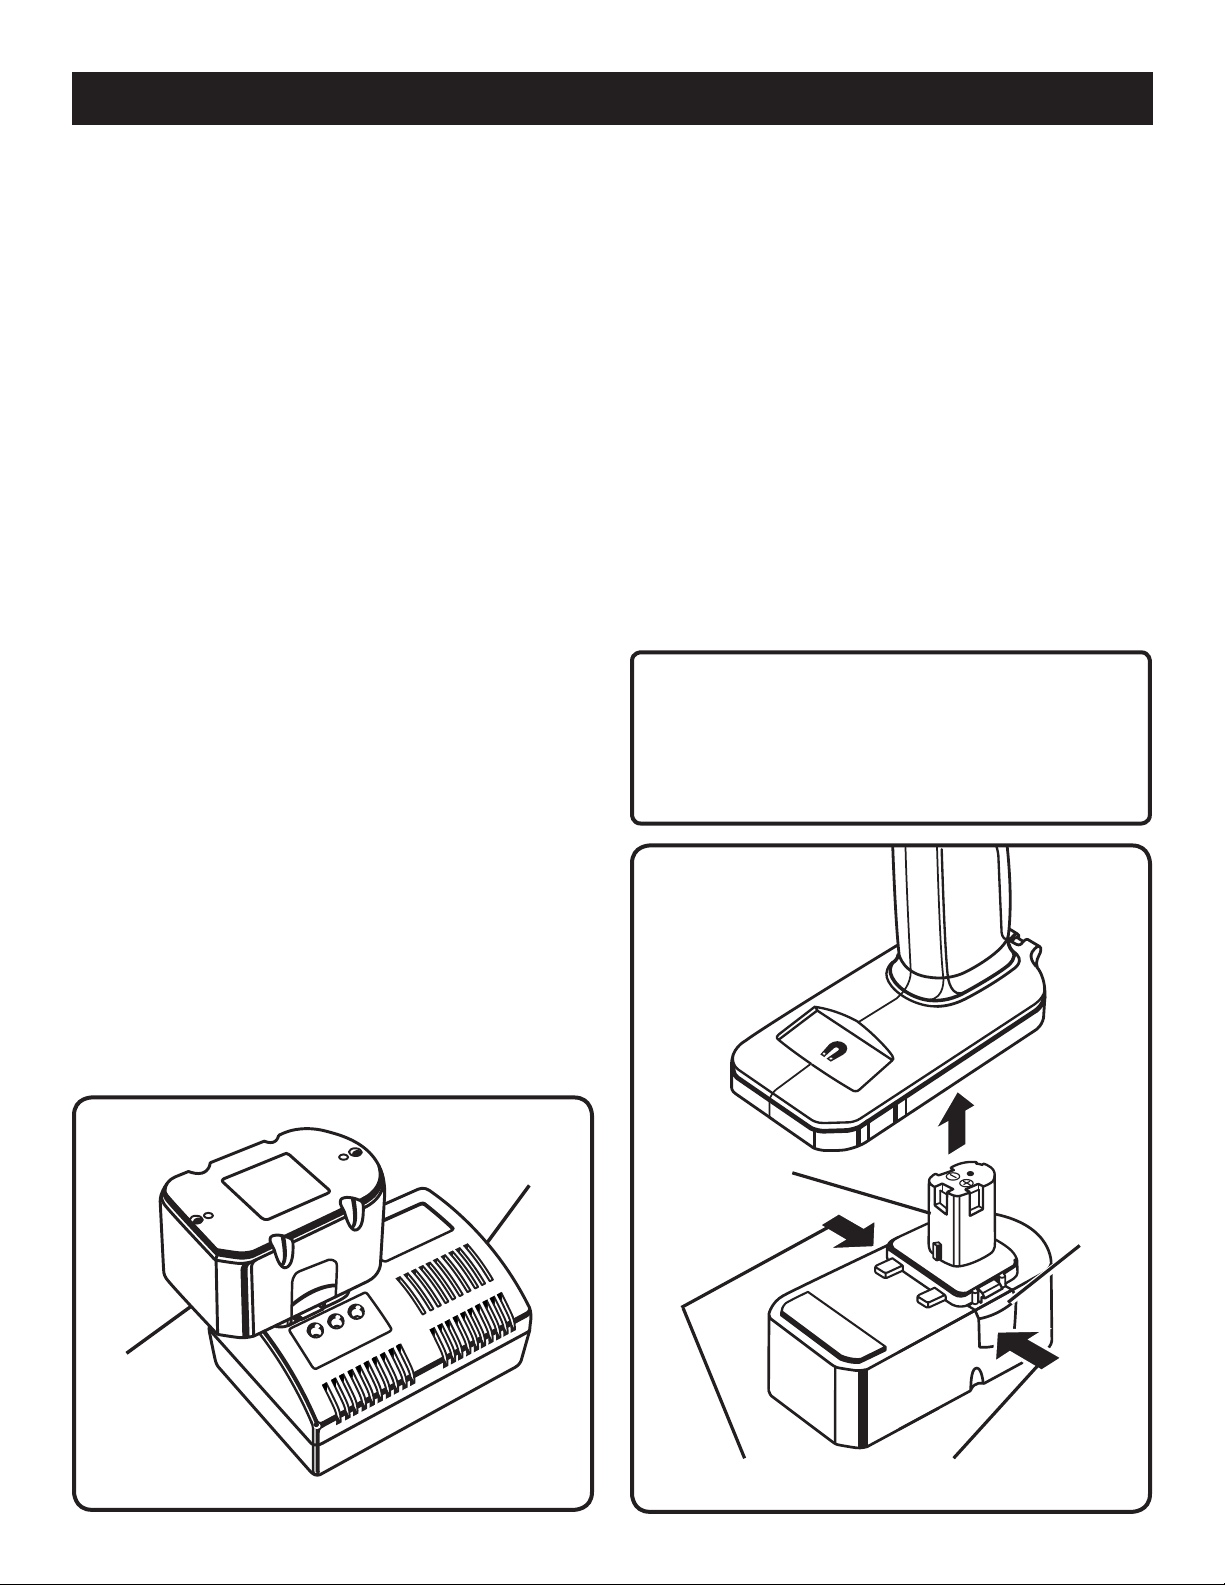
See Figure 4.
n Place the direction of rotation selector i n center
position.
�n Place the battery pack in your drill. Align raised rib on
battery pack with groove in drill’s battery port.
�n Make sure the latches on each side of the battery pack
snap in place and that battery pack is secured in drill
before beginning operation.
TO REMOVE BATTERY PACK
n Place the direction of rotation selector i n center
position.
�n Locate latches on side of battery pack and depress both
sides to release battery pack from the drill.
�n Remove battery pack from the drill.
CAUTION:
When placing battery pack in the tool, be sure raised
rib on battery pack aligns with the bottom of the drill
and latches into place properly. Improper installation of the battery pack can cause damage to internal
components.
BATTERY
PACK
CHARGER
Fig. 3
BATTERY PACK
LATCHES
DEPRESS LATCHES TO
RELEASE BATTERY PACK
12 13
Fig. 4
Page 13
24
2 0
5
24
2 0
5
OPERATION
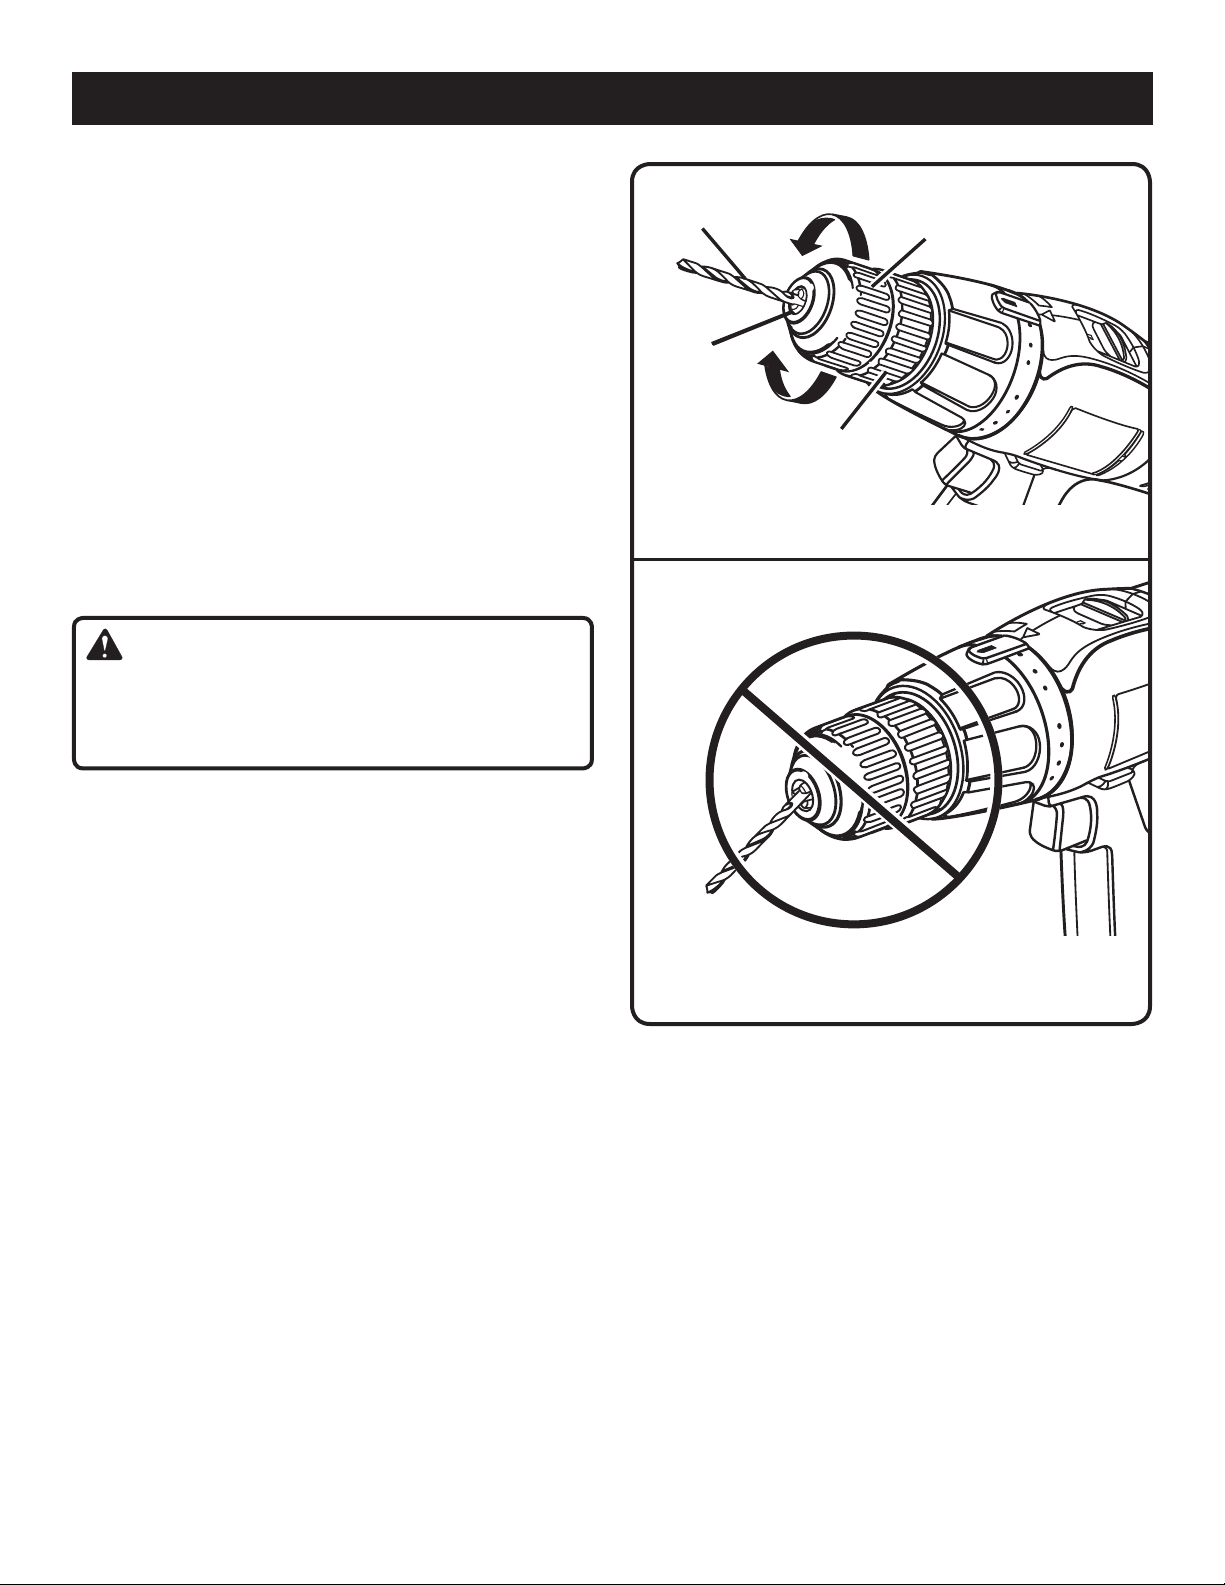
INSTALLING BITS
See Figures 5 - 6.
n Place the direction of rotation selector in center position.
This will lock the switch trigger in the off position.
�n Open or close the chuck jaws to a point where the open-
ing is slightly larger than the bit size you intend to use.
Also, raise the front of your drill slightly to keep the bit
from falling out of the chuck jaws.
�n Insert your drill bit into the chuck the full length of the
jaws.
�n Tighten the chuck jaws on the drill bit. To tighten, grasp
and hold the collar of the chuck with one hand, while
rotating the chuck body with your other hand.
NOTE: Rotate the chuck body in the direction of the ar-
row marked GRIP to tighten the chuck jaws.
n DO NOT use a wrench to tighten or loosen the chuck
jaws.
WARNING:
Do not insert drill bit into chuck jaws and tighten as
shown in figure 6. This could cause drill bit to be thrown
from drill resulting in possible serious personal injury or
damage to the chuck.
DRILL BIT
CHUCK JAWS
CHUCK BODY
CHUCK COLLAR
RIGHT
Fig. 5
REMOVING BITS
See Figure 5.
n Place the direction of rotation selector in center position.
This will lock the switch trigger in the off position.
n Loosen the chuck jaws from drill bit.
n To loosen: grasp and hold the collar of the chuck with one
hand, while rotating chuck body with your other hand.
NOTE: Rotate chuck body in the direction of the arrow
marked RELEASE to loosen chuck jaws.
n DO NOT use a wrench to tighten or loosen the chuck
jaws.
�n Remove drill bit from chuck jaws.
WRONG
Fig. 6
Page 14
24
2 0
5
24
2 0
5
OPERATION
24
2 0
5
WARNING:
Battery tools are always in operating condition. Therefore, switch should always be locked when not in use or
carrying at your side.
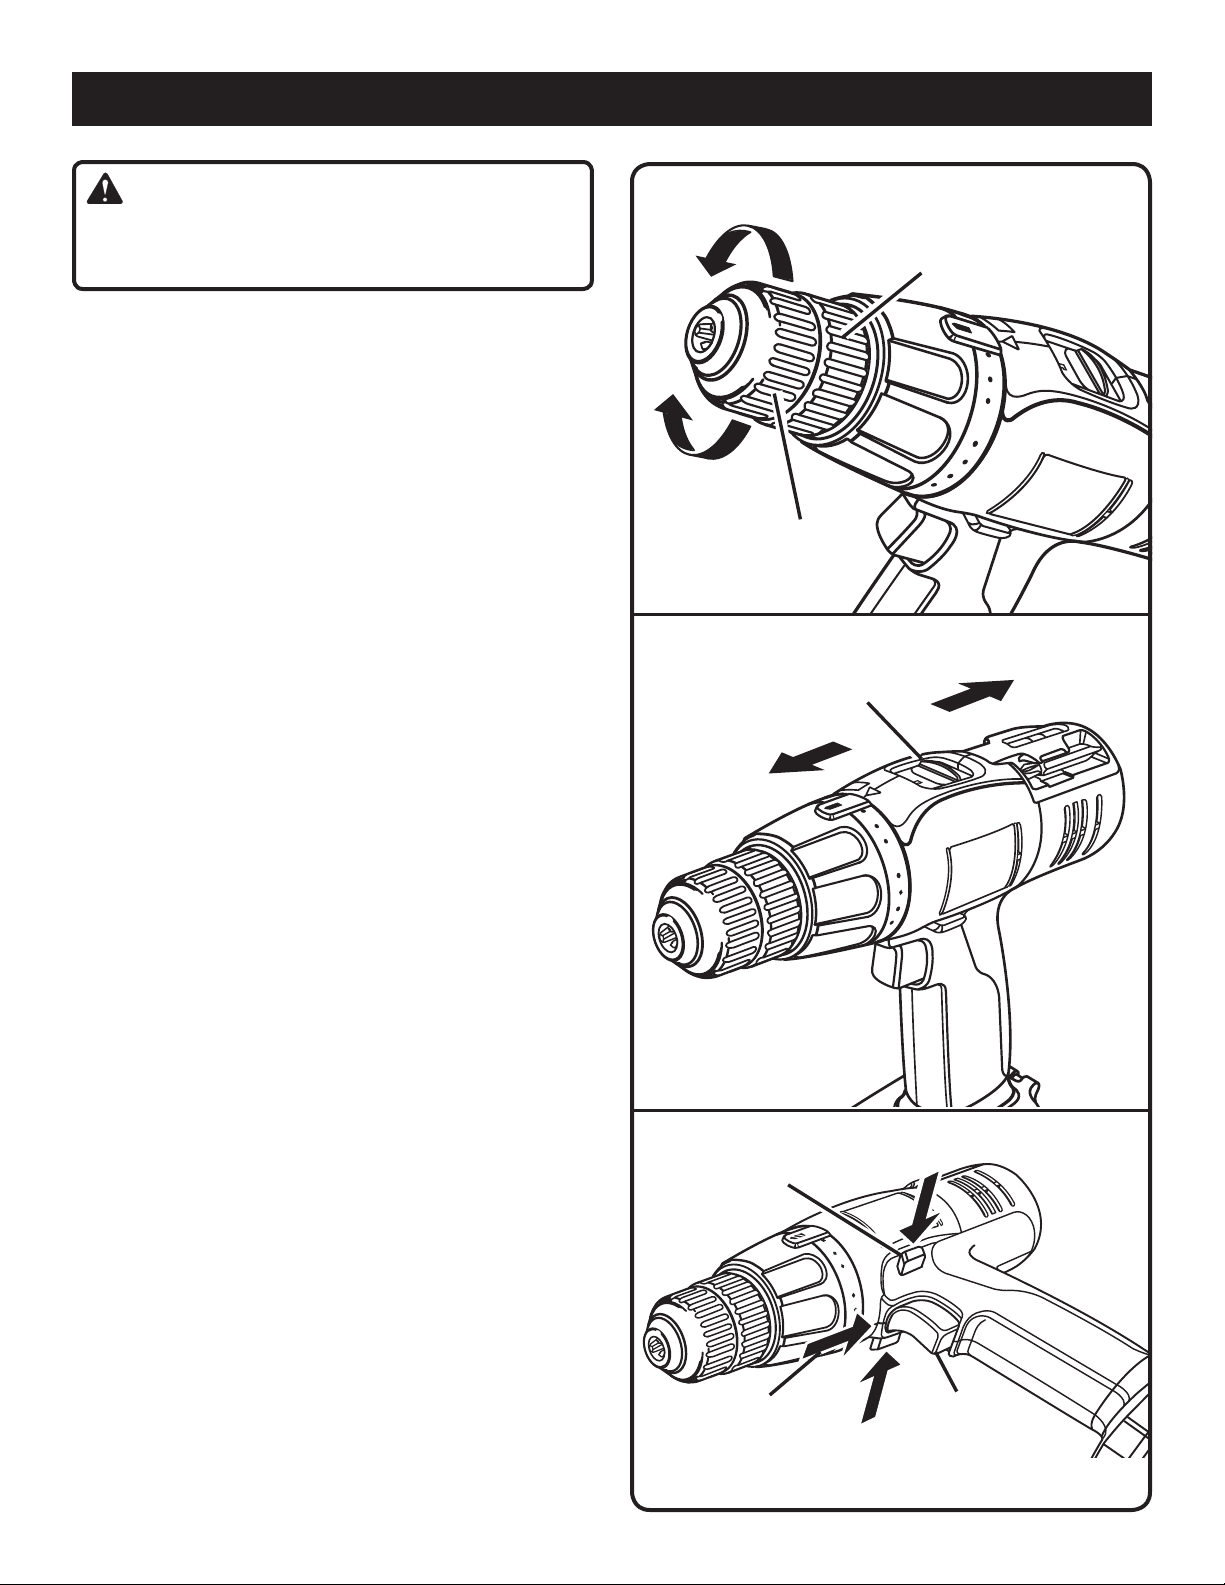
KEYLESS CHUCK
See Figure 7.
A keyless chuck has been provided with your drill to allow for
easy installation and removal of bits. As the name implies, you
can hand tighten or release drill bits in the chuck jaws. Grasp
and hold the collar of the chuck with one hand. Rotate the
chuck body with your other hand. The arrows on the chuck
indicate which direction to rotate the chuck body in order to
GRIP (tighten) or RELEASE (unlock) the drill bit.
TWO SPEED GEAR TRAIN
See Figure 8.
The drill has a two-speed gear train designed for drilling or
driving at LO (1) or HI (2) speeds. A slide switch is located on
top of your drill to select either LO (1) or HI (2) speed. When
using drill in the LO (1) speed range, speed will decrease
and unit will have more power and torque. When using drill
in the HI (2) speed range, speed will increase and unit will
have less power and torque. Use LO (1) speed for high power
and torque applications and HI (2) speed for fast drilling or
driving applications.
RELEASE
(UNLOCK)
GRIP
(TIGHTEN)
HI (2) SPEED
CHUCK COLLAR
CHUCK
BODY
TWO SPEED
GEAR TRAIN
(HI-LO)
Fig. 7
LO (1) SPEED
VARIABLE SPEED SWITCH
See Figure 9.
The drill starts and stops by depressing and releasing the
switch trigger. The switch delivers higher speed and torque
with increased trigger pressure. Speed is controlled by the
amount of switch trigger depression. Release the switch
trigger to turn drill OFF.
SWITCH LOCK
See Figure 9.
The switch trigger can be locked in the OFF position. This
feature helps reduce the possibility of accidental starting
when not in use. To lock the switch trigger, place the direction of rotation selector in the center position.
REVERSIBLE
See Figure 9.
This tool is reversible. The direction of rotation is controlled
by a selector located above the switch trigger. With the drill
held in normal operating position, the direction of rotation
selector should be positioned to the left of the switch for
drilling. The drilling direction is reversed when the selector
is to the right of the switch. When the selector is in center
position, the switch trigger is locked.
DIRECTION OF
ROTATION
SELECTOR
CENTER POSITION
(LOCK)
Fig. 8
REVERSE
SWITCH
TRIGGER
Fig. 9
14 15
Page 15
24
2 0
5
20
24
OPERATION
24
2 0
5
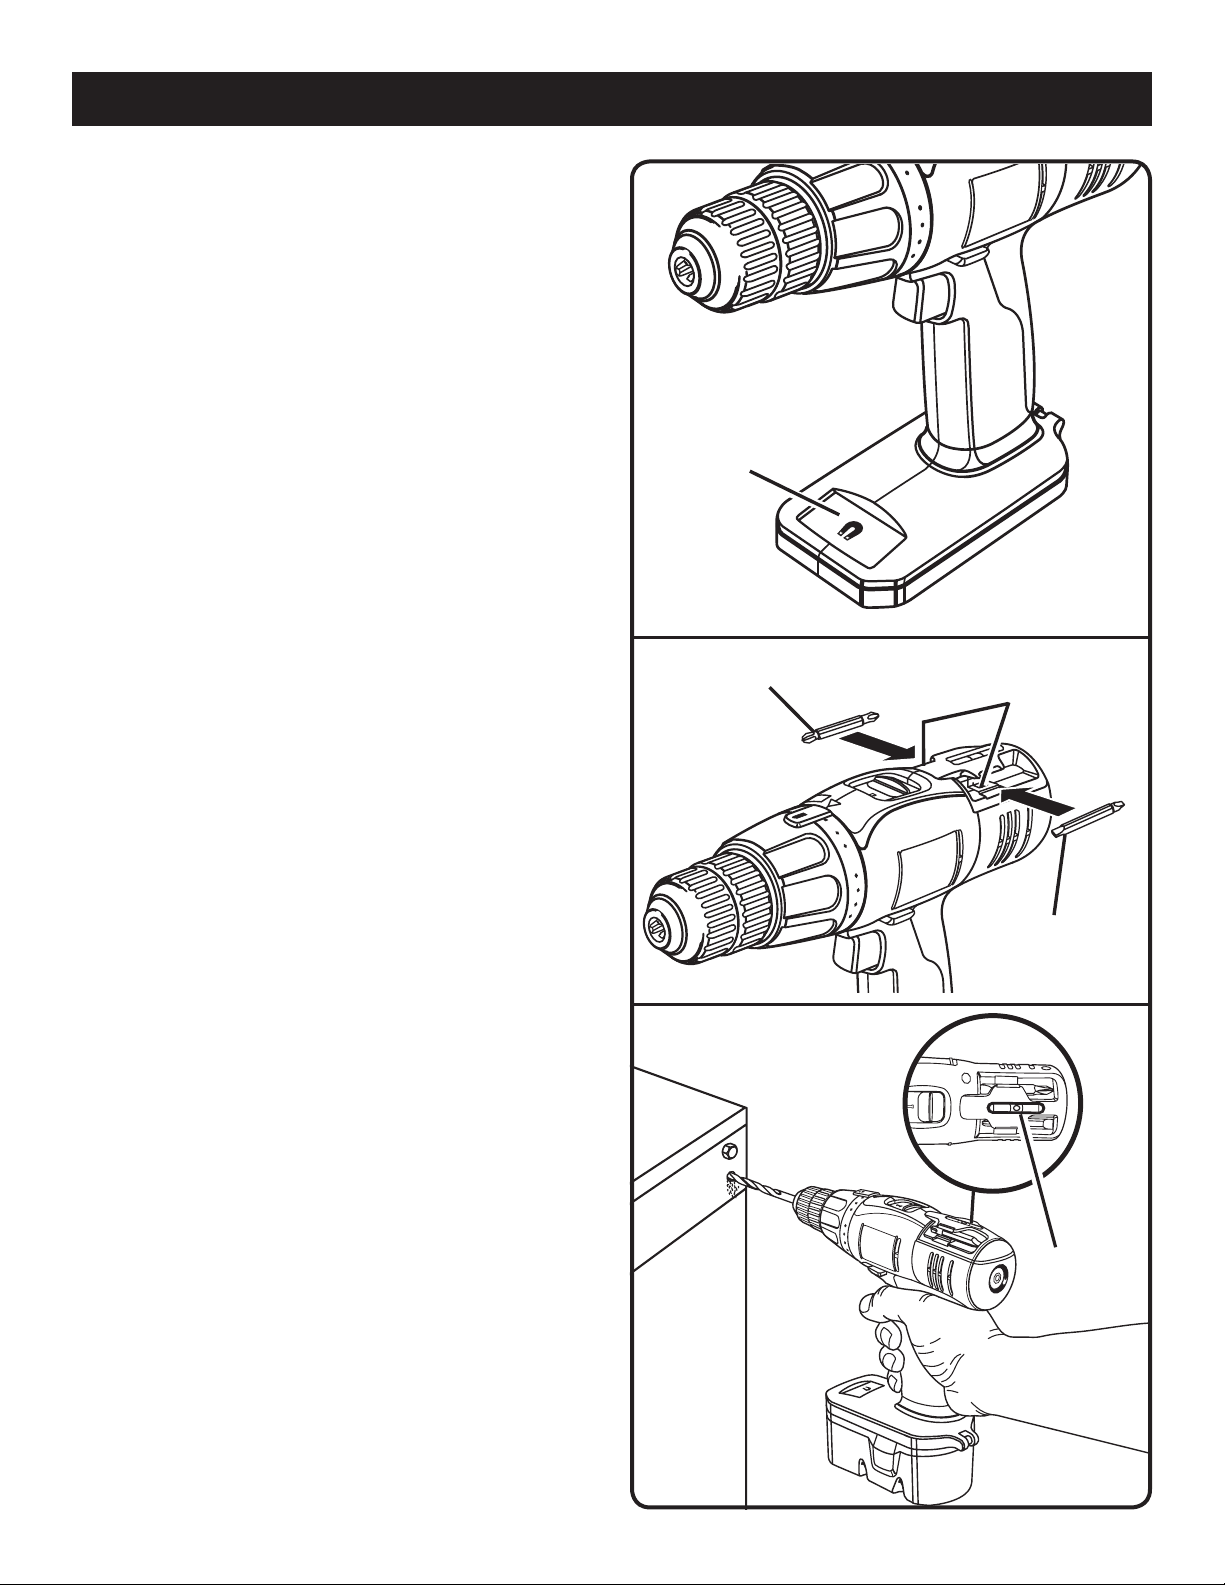
MAG TRAY™
See Figure 10.
For your convenience, the drill has a Mag Tray™ to place
small parts when doing a variety of tasks.
BIT STORAGE
See Figure 11.
When not in use, bits provided with the drill can be placed
in the storage area located on the top of the drill.
LEVEL DRILLING
See Figure 12.
Two levels are recessed in the motor housing of the drilldriver. One is located on top, while the other is located on
the end. They can be used to keep drill bits level during both
horizontal and vertical drilling operations.
MAG TRAY™
(SCREW HOLDER)
SCREWDRIVER BIT
Fig. 10
BIT
STORAGE
AREA
SCREWDRIVER BIT
Fig. 11
TOP VIEW
LEVEL
Fig. 12
Page 16
OPERATION
24
2 0
5
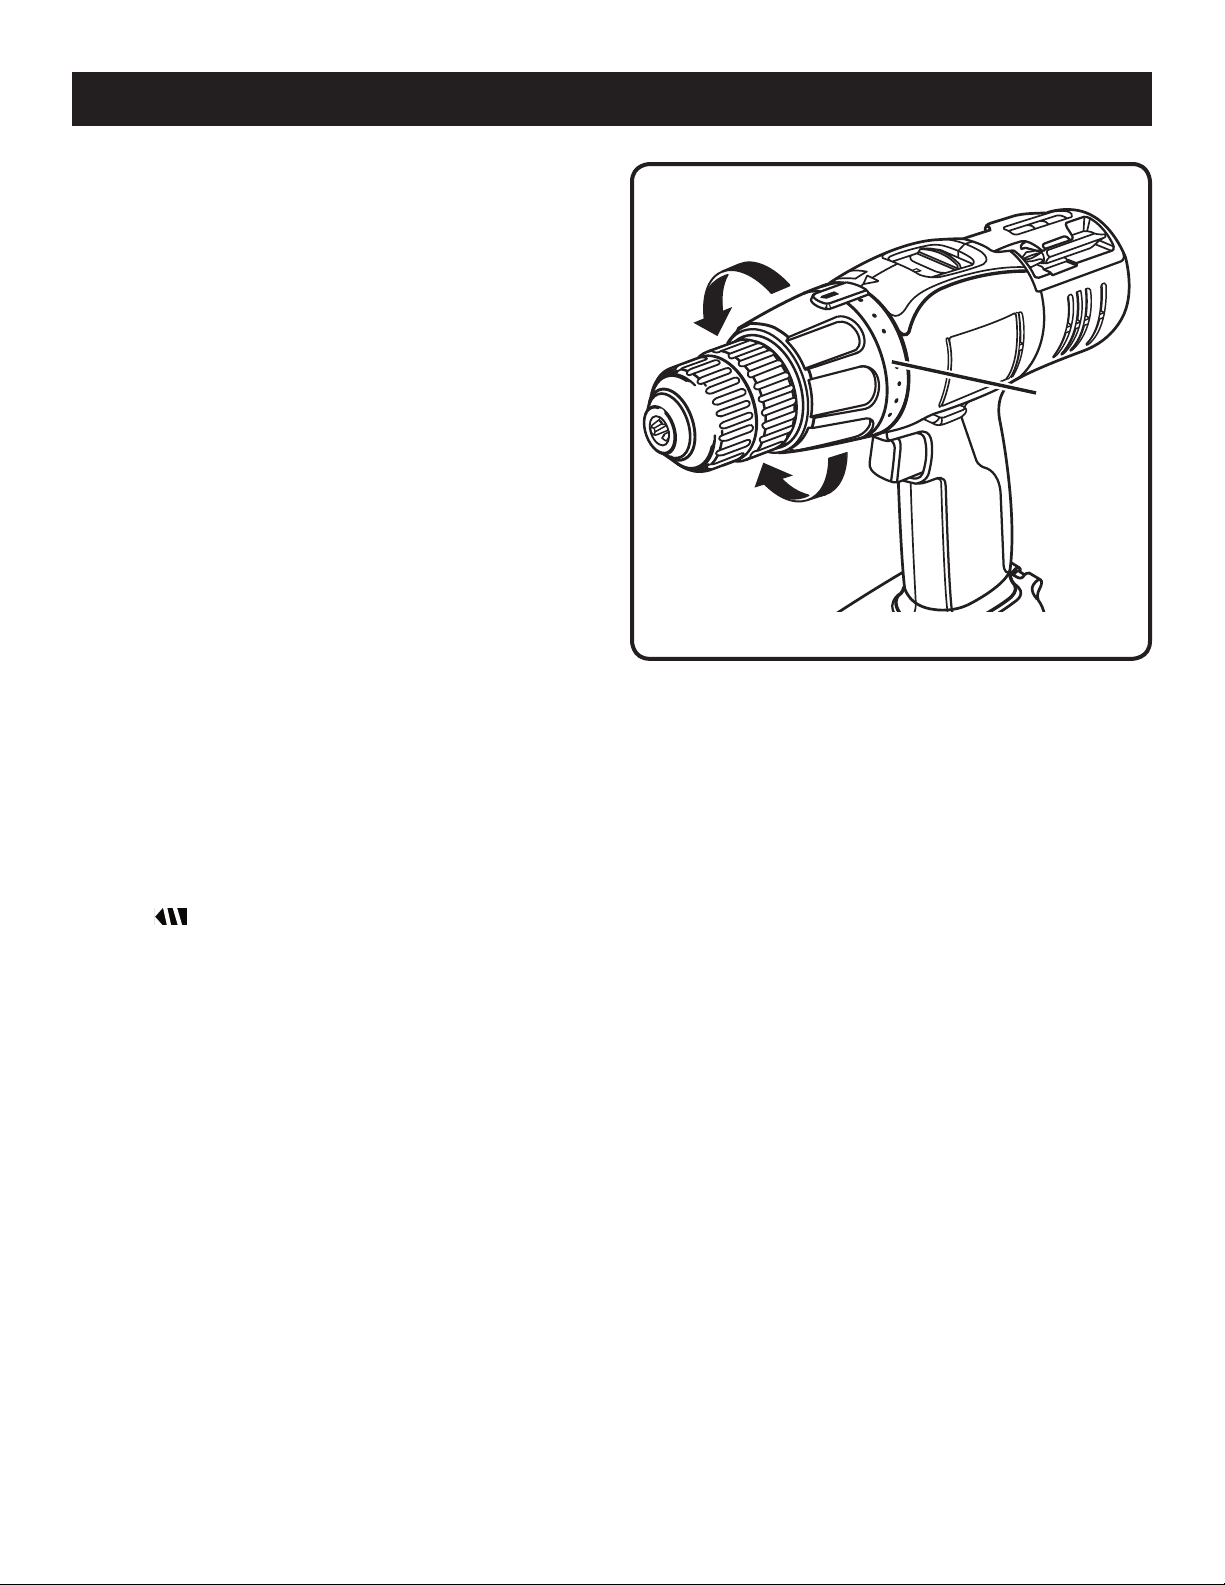
SCREWDRIVING TORQUE ADJUSTMENT
(DRIVING POWER OF THE DRILL-DRIVER)
See Figure 13.
When using the drill-driver for various driving applications,
it becomes necessary to increase or decrease the torque
in order to help prevent the possibility of damaging screw
heads, threads, workpiece, etc. In general, torque intensity
should correspond to the screw diameter. If the torque is
too high or the screws too small, the screws may be damaged or broken.
The torque is adjusted by rotating the torque adjustment
ring.
The torque is greater when the torque adjustment ring is
set on a higher setting. The torque is less when the torque
adjustment ring is set on a lower setting.
The proper setting depends on the type of material and the
size of screw you are using.
TO DECREASE
TORQUE
TORQUE
ADJUSTMENT
RING
TO INCREASE
TORQUE
TO ADJUST TORQUE
�n Identify the twenty four torque indicator settings located
on the front of the drill.
n Rotate adjustment ring to the desired setting.
• 1 - 4 For driving small screws
• 5 - 8 For driving screws into soft material
• 9 - 12 For driving screws into soft and hard
materials
• 13 - 16 For driving screws in hard wood
• 17 - 20 For driving large screws
• 21 - For heavy drilling
Fig. 13
16 17
Page 17
OPERATION
20
15
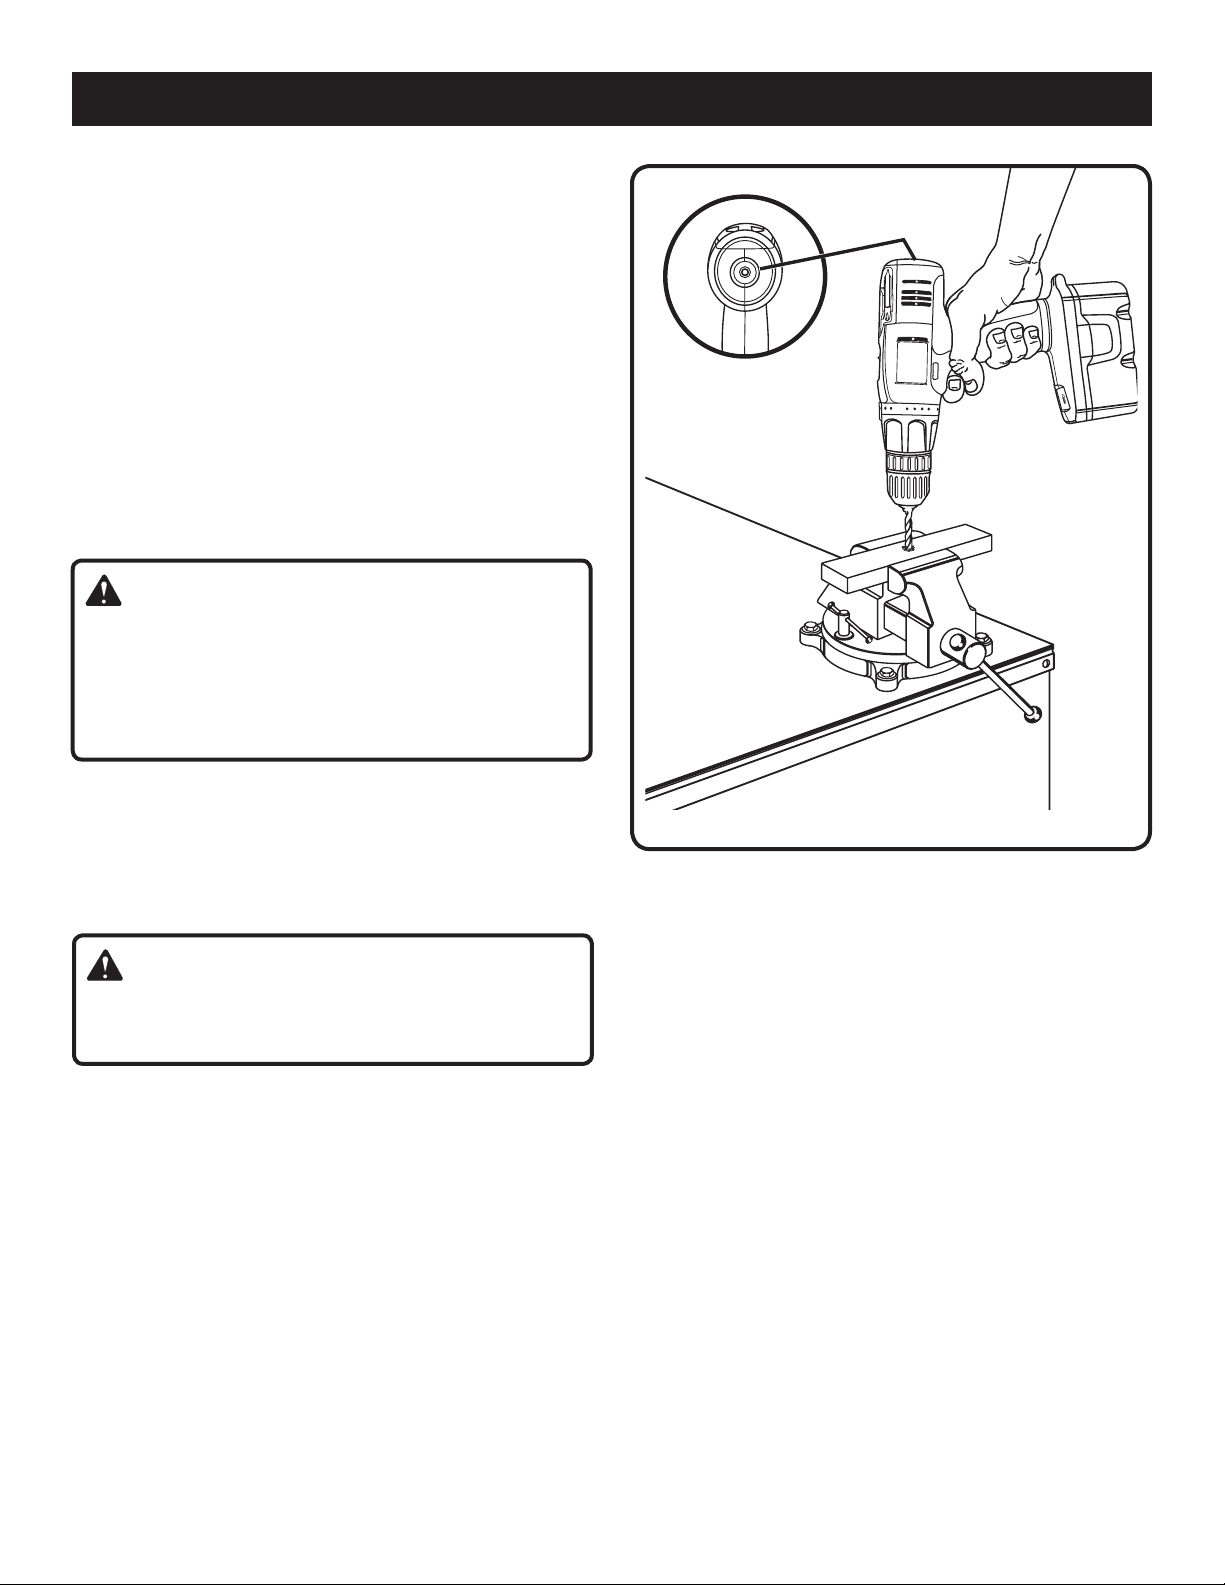
DRILLING
See Figure 14.
When drilling hard, smooth surfaces, use a center punch
to mark the desired hole location. This will prevent the drill
bit from slipping off center as the hole is started. However,
the lower speed feature allows starting holes without center
punching if desired. To accomplish this, simply operate the
drill at lower speed until the hole is started.
The material to be drilled should be secured in a vise or with
clamps to keep it from turning as the drill bit rotates.
Hold tool firmly and place the bit at the point to be drilled.
Depress the switch trigger to start tool.
Move the drill bit into the workpiece, applying only enough
pressure to keep the bit cutting. Do not force or apply side
pressure to elongate a hole.
WARNING:
Be prepared for binding at bit breakthrough. When these
situations occur, the drill has a tendency to grab and kick
opposite to the direction of rotation, and could cause
loss of control when breaking through material. If you are
not prepared, this loss of control can result in possible
serious injury.
LEVEL
END VIEW
When drilling metals, use a light oil on the drill bit to keep it
from overheating. The oil will prolong the life of the bit and
increase the drilling action.
If the bit jams in workpiece or if the drill stalls, release switch
trigger immediately. Remove the bit from the workpiece and
determine the reason for jamming.
WARNING:
Do not force tool. Forcing tool can result in jamming and
loss of balance or footing, which could result in personal
injury.
Fig. 14
Page 18
24
2 0
5
MAINTENANCE
24
2 0
5
WARNING:
When servicing, use only identical Ryobi replacement
parts. Use of any other parts may create a hazard or
cause product damage.
WARNING:
Always wear safety goggles or safety glasses with side
shields during power tool operation or when blowing
dust. If operation is dusty, also wear a dust mask.
WARNING:
To avoid serious personal injury, always remove the
battery pack from the tool when cleaning or performing
any maintenance.
GENERAL MAINTENANCE
Avoid using solvents when cleaning plastic parts. Most
plastics are susceptible to damage from various types of
commercial solvents and may be damaged by their use. Use
clean cloths to remove dirt, dust, oil, grease, etc.
CHUCK REMOVAL
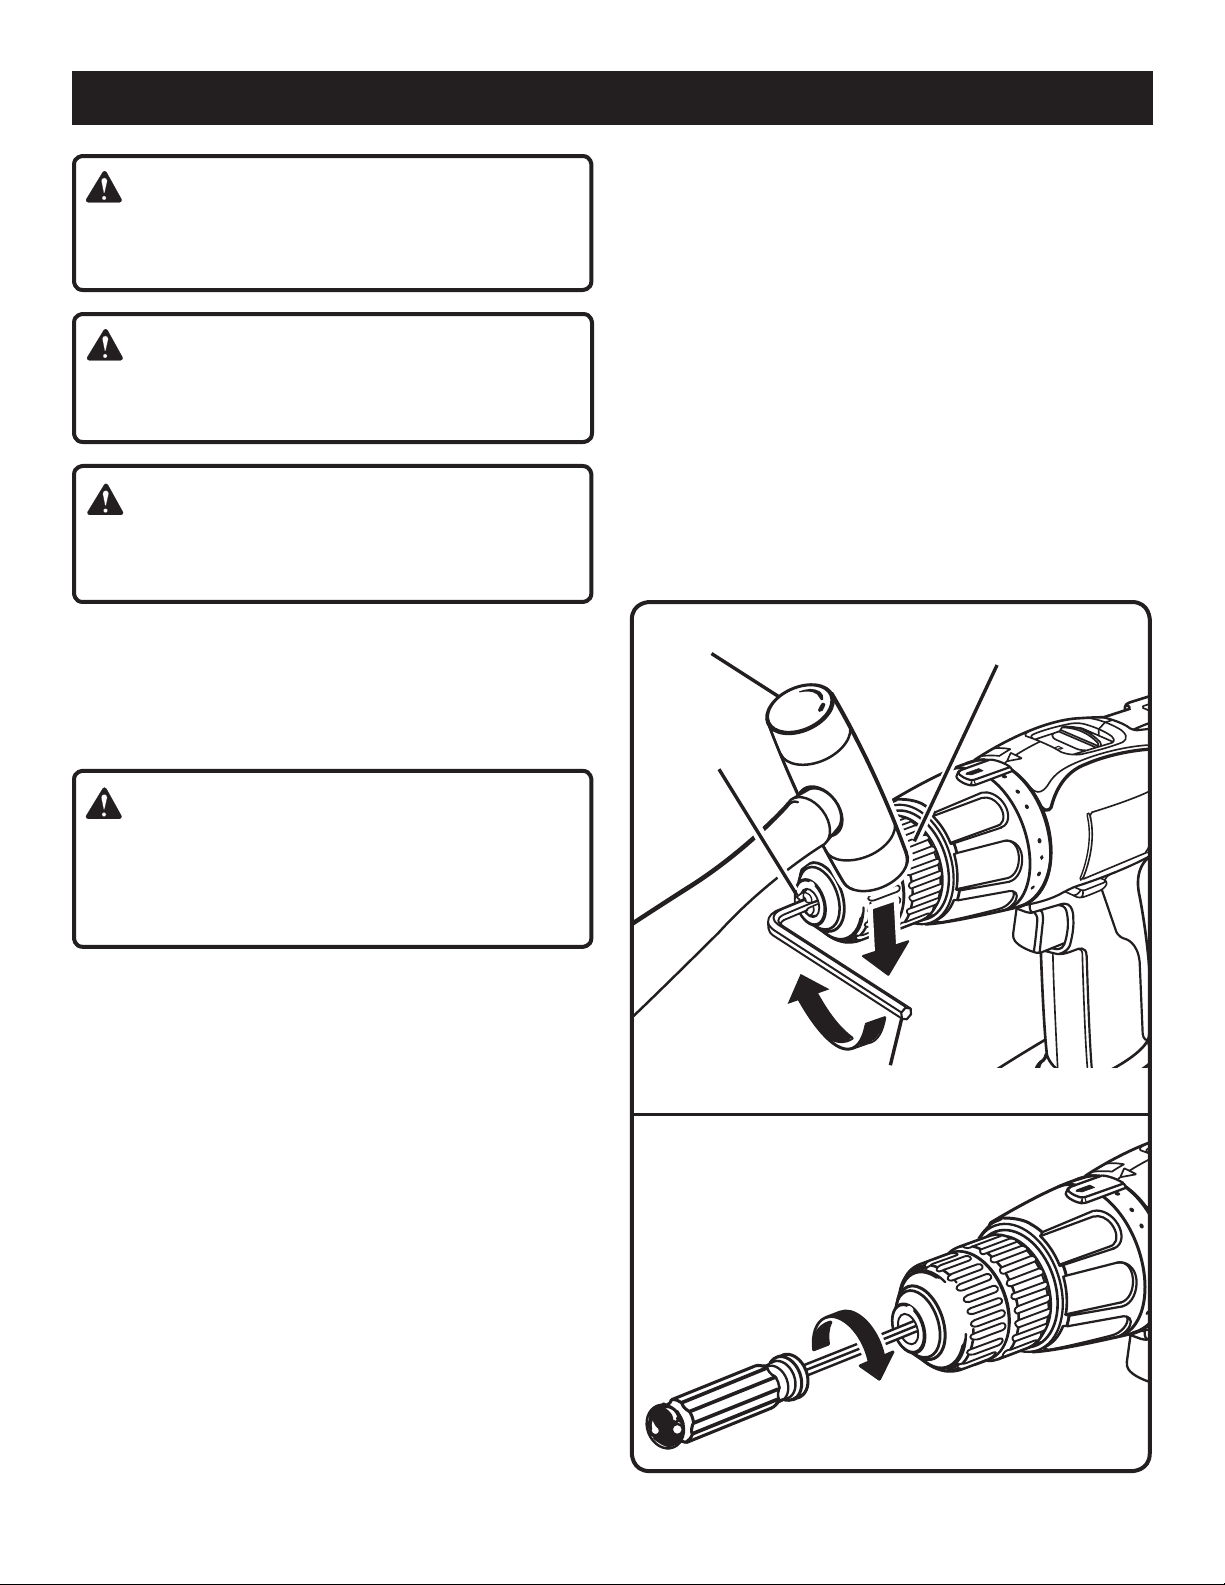
See Figures 15 - 17.
�n Lock the switch trigger by placing the direction of rotation
selector in center position.
�n Insert a 5/16 inch or larger hex key into the chuck of the
drill and tighten the chuck jaws securely.
��n Tap the hex key sharply with a mallet in a clockwise
direction. This will loosen the screw in the chuck for
easy removal.
��n Open chuck jaws and remove hex key. Remove the chuck
screw by turning it in a clockwise direction.
NOTE: The screw has left hand threads.
�n Insert hex key in chuck and tighten chuck jaws securely.
Tap sharply with a mallet in a counterclockwise direction. This will loosen chuck on the spindle. It can now be
unscrewed by hand.
MALLET
CHUCK
JAWS
KEYLESS
CHUCK
WARNING:
Do not at any time let brake fluids, gasoline, petroleumbased products, penetrating oils, etc., come in contact
with plastic parts. Chemicals can damage, weaken or
destroy plastic which may result in serious personal
injury.
Only the parts shown on the parts list are intended to be
repaired or replaced by the customer. All other parts should
be replaced at a Ryobi Authorized Service Center.
HEX KEY
Fig. 15
18 19
Fig. 16
Page 19
MAINTENANCE
24
2 0
5
BATTERIES
The battery pack for this tool is equipped with nickel-cadmium
rechargeable batteries. Length of service from each charging
will depend on the type of work you are doing.
The batteries in this tool have been designed to provide
maximum trouble-free life. However, like all batteries, they
will eventually wear out. Do not disassemble battery pack
and attempt to replace the batteries. Handling of these
batteries, especially when wearing rings and jewelry, could
result in a serious burn.
To obtain the longest possible battery life, we suggest the
following:
n Remove the battery pack from the charger once it is fully
charged and ready for use.
For battery storage longer than 30 days:
n Store the battery pack where the temperature is below
80°F.
n Store battery packs in a “discharged” condition.
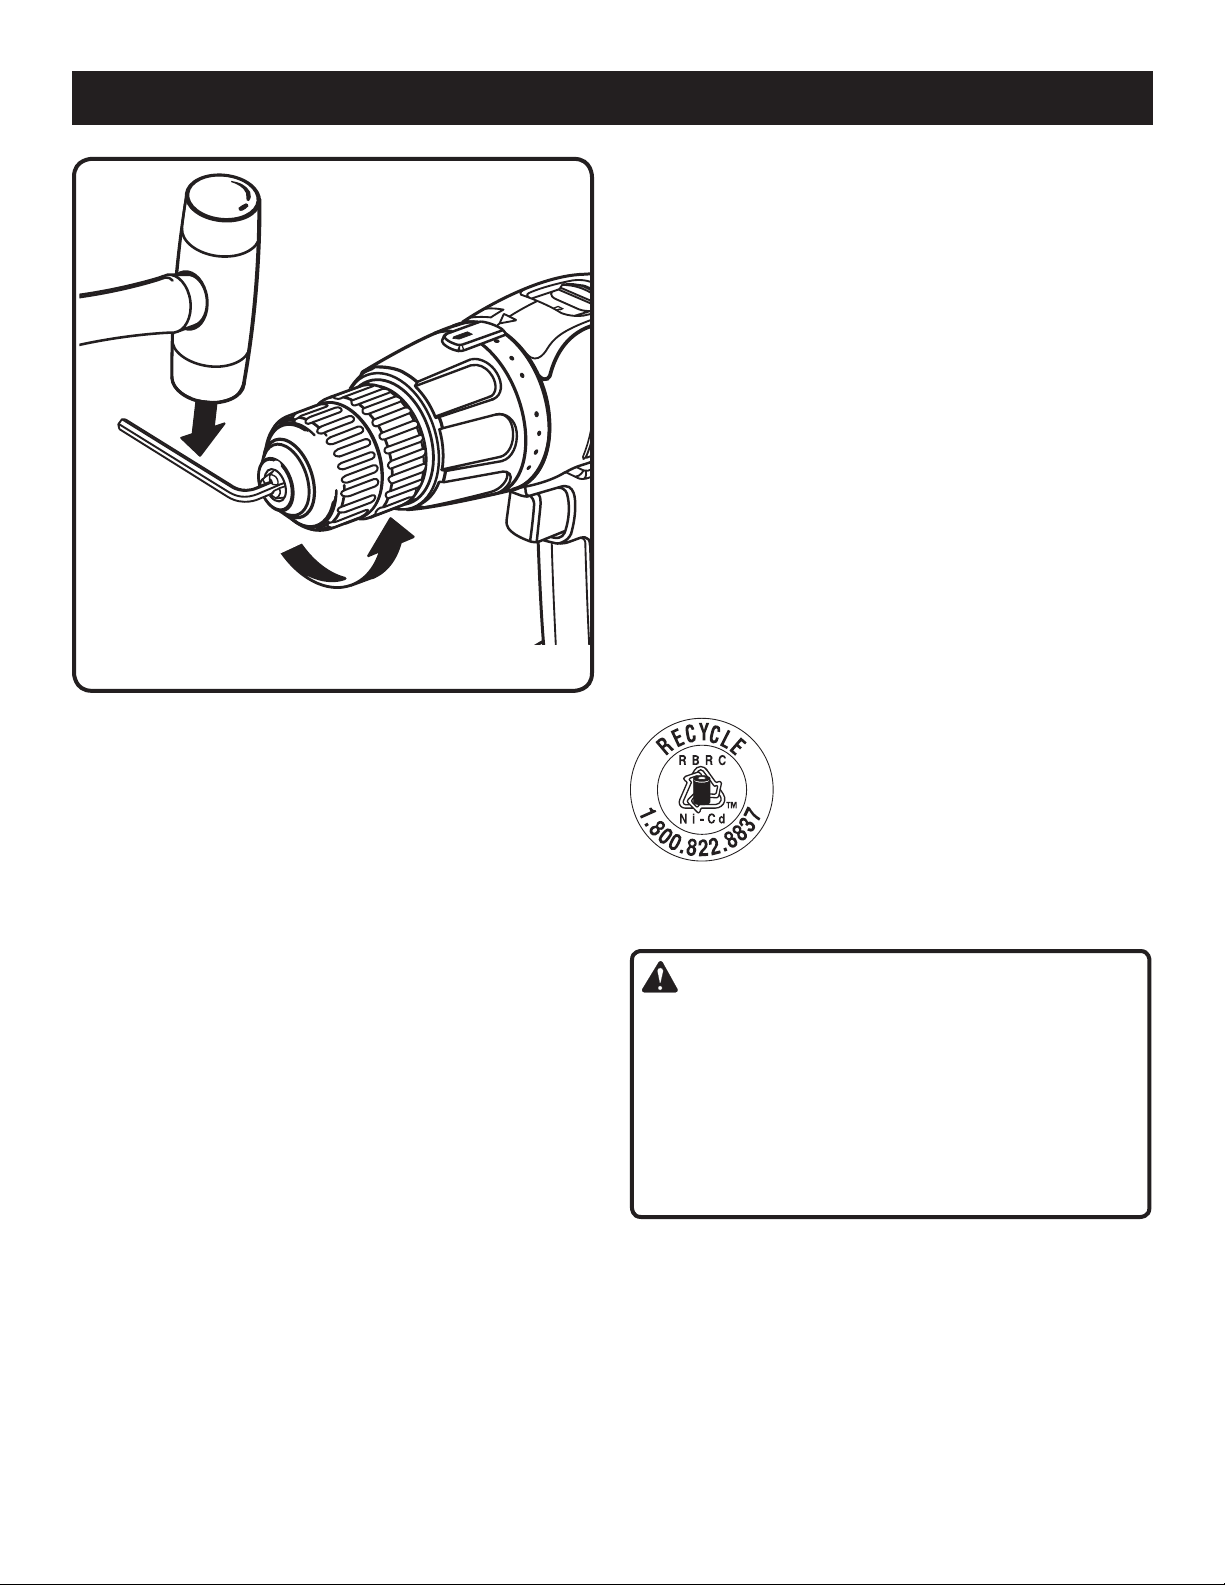
Fig. 17
TO RETIGHTEN A LOOSE CHUCK
The chuck may become loose on spindle and develop a
wobble. To tighten:
��n Lock the switch trigger by placing the direction of rotation
selector in center position.
�n Open the chuck jaws.
�n Insert hex key into chuck and tighten chuck jaws securely.
Tap hex key sharply with a mallet in a clockwise direction.
This will tighten chuck on the spindle.
��n Open the chuck jaws and remove hex key.
��n Tighten the chuck screw.
NOTE: The chuck screw has left hand threads.
BATTERY PACK REMOVAL AND
PREPARATION FOR RECYCLING
To preserve natural resources, please
re c y c l e or dispose of batterie s
properly.
This product contains nickel-cadmium
batteries. Local, state or federal laws
may prohibit disposal of nickel-cadmium
batteries in ordinary trash.
Consult your local waste authority for information regarding
available recycling and/or disposal options.
WARNING:
Up on removal, c over th e batte ry pack ’s ter minals with heavy-duty adhesive tape. Do not attempt to destroy or disassemble battery pack or
remove any of its components. Nickel-cadmium
batteries must be recycled or disposed of properly. Also,
never touch both terminals with metal objects and/or
body parts as short circuit may result. Keep away from
children. Failure to comply with these warnings could
result in fire and/or serious injury.
Page 20

OPERATOR’S MANUAL
18 VOLT DRILL-DRIVER
2-SPEED
P200
• SERVICE
Now that you have purchased your tool, should a need ever exist for repair parts or
service, simply contact your nearest Ryobi Authorized Service Center. Be sure to provide
all pertinent facts when you call or visit. Please call 1-800-525-2579 for your nearest Ryobi
Authorized Service Center. You can also check our web site at www.ryobitools.com for a
complete list of Authorized Service Centers.
• MODEL NO. AND SERIAL NO.
The model number of this tool will be found on a plate attached to the motor housing.
Please record the model number and serial number in the space provided below.
• HOW TO ORDER REPAIR PARTS
When ordering repair parts, always give the following information:
• MODEL NUMBER
• SERIAL NUMBER
RYOBI TECHNOLOGIES, INC.
1428 Pearman Dairy Road, Anderson, SC 29625
Post Office Box 1207, Anderson, SC 29622-1207
P200
Phone 1-800-525-2579
www.ryobitools.com
983000-510
9-04
 Loading...