

Page 1
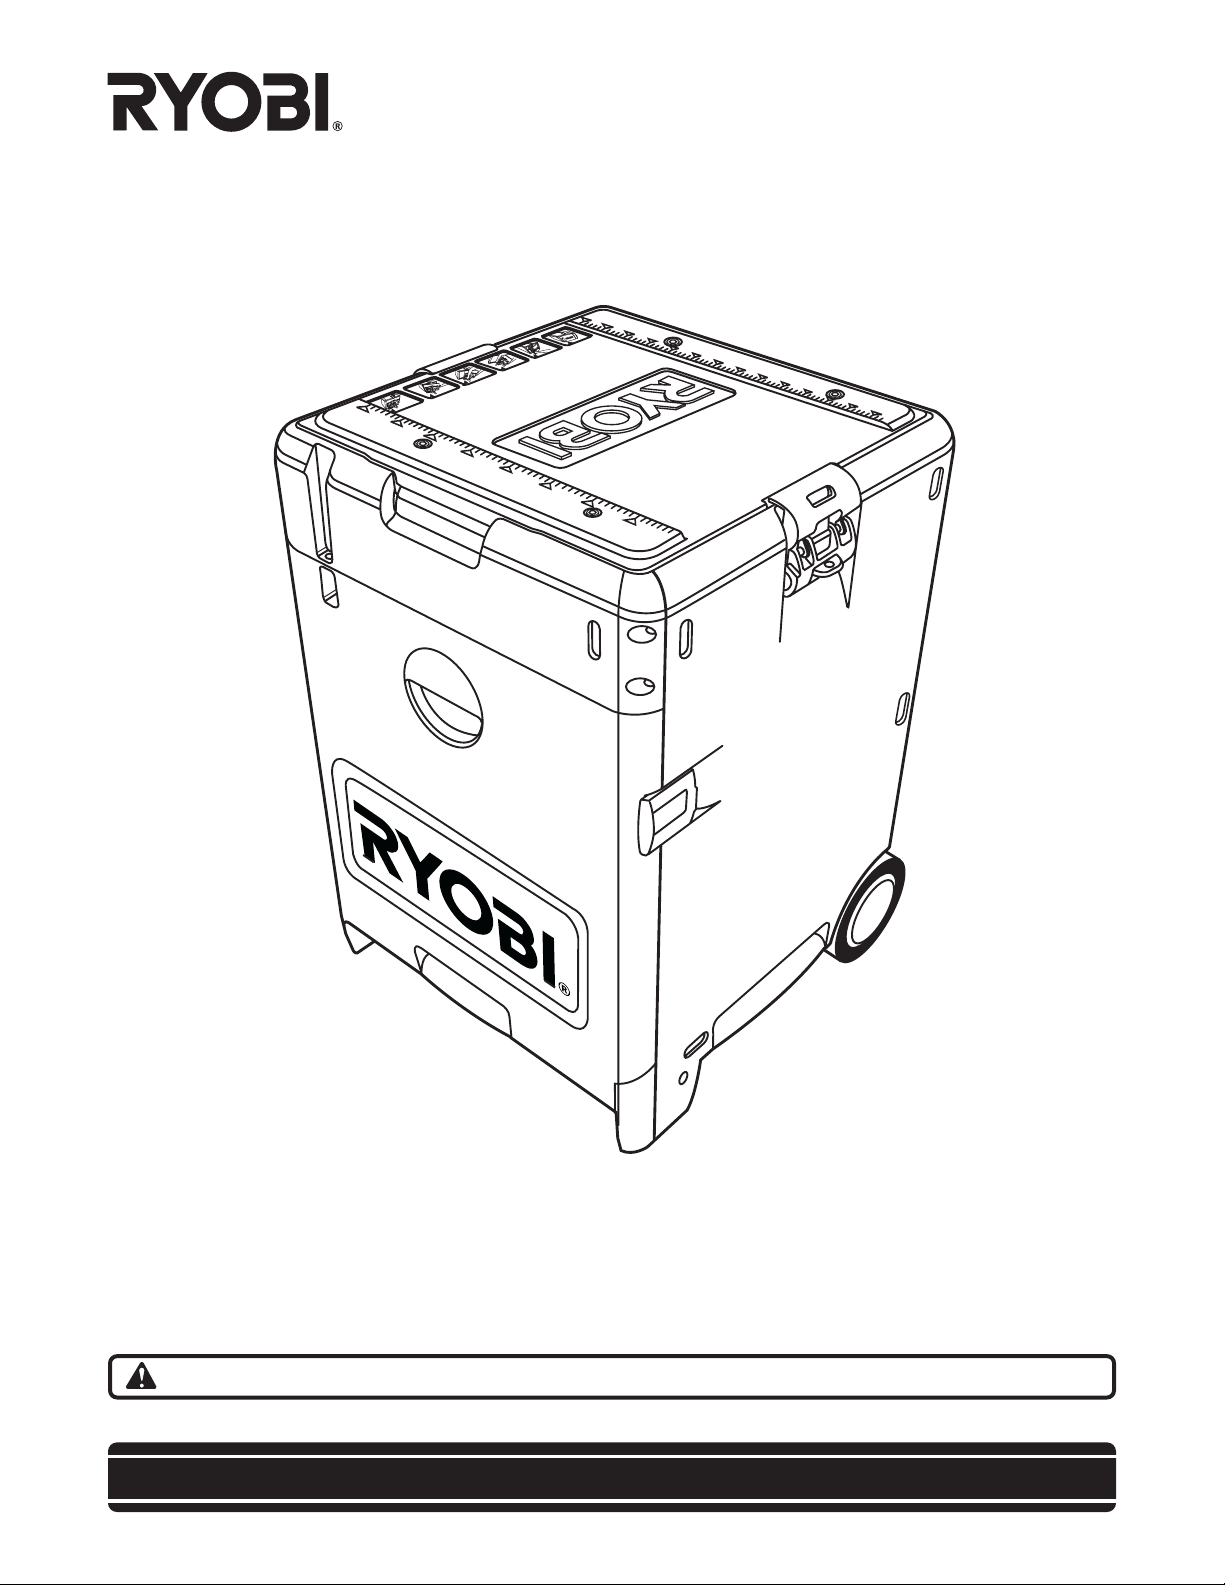
OPERATOR'S MANUAL
18.0 V Cordless
SPC18
R
“Six Pack”
Your new
operation, and operator safety. Properly cared for, it will give you years of rugged, trouble-free performance.
Thank you for buying the Ryobi 18.0 V Cordless
“Six Pack”
WARNING: To reduce the risk of injury, the user must read and understand the operator’s manual.
has been engineered and manufactured to Ryobi's high standard for dependability, ease of
“Six Pack
.”
SAVE THIS MANUAL FOR FUTURE REFERENCE
Page 2
TABLE OF CONTENTS
■ Introduction........................................................................................................................................................2
■ Rules For Safe Operation..................................................................................................................................3
■ Symbols.............................................................................................................................................................4
■ Specifications ....................................................................................................................................................4
■ Unpacking..........................................................................................................................................................4
■ Features .........................................................................................................................................................5-6
■ Operation......................................................................................................................................................7-10
■ Maintenance .................................................................................................................................................... 11
■ Parts, Ordering, and Service ...........................................................................................................................12
INTRODUCTION
Your
“Six Pack”
this case more pleasant and enjoyable. Safety,
performance, and dependability have been given top
priority in the design of this product making it easy to
maintain and operate.
has many features for making the use of
WARNING:
Do not attempt to use the
case until you have read thoroughly and understand
completely the operator’s manuals. Pay close
attention to the safety rules, including Dangers,
Warnings, and Cautions. If you use your
properly and only for what it is intended, you will enjoy
years of safe, reliable service.
“Six Pack”
tools or the
“Six Pack”
WEAR
YOUR
SAFETY
FORESIGHT IS BETTER
GLASSES
THAN NO SIGHT
Look for this symbol to point out important safety
precautions. It means attention!!! Your safety is involved.
The operation of any power tool can result in foreign objects being thrown into your
eyes, which can result in severe eye damage. Before beginning tool operation, always
wear safety goggles or safety glasses with side shields and a full face shield when
needed. We recommend Wide Vision Safety Mask for use over eyeglasses or standard
safety glasses with side shields. Always wear eye protection which is marked to comply
with ANSI Z87.1.
2
Page 3

RULES FOR SAFE OPERATION
READ ALL INSTRUCTIONS
■ Know your product. Read the operator’s manual
carefully. Learn the product’s applications and
limitations as well as the specific potential hazards related to this product.
■ Read thoroughly these instructions and the in-
structions for each tool before using this
Pack
.”
■ Use safety equipment. Always wear eye protection. Dust mask, non-skid safety shoes, hard hat, or
hearing protection must be used for appropriate conditions.
■ Stay alert and exercise control. Watch what you
are doing and use common sense. Do not operate
tool when you are tired. Do not rush.
■ Use the right tool. Do not force the tool or attach-
ment to do a job for which it was not designed. Do
not use it for a purpose not intended.
■ Do not overreach. Keep proper footing and balance
at all times.
■ Never stand or sit on the case. Serious injury could
result if the case is tipped, jarred, or rolled.
■ Never stand in the drawers or use the drawers
of the Six Pack case as a ladder.
■ Dress properly . Do not wear loose clothing, gloves,
neckties, rings, bracelets, or other jewelry . They can
get caught and draw you into moving parts. Rubber
gloves and nonslip footwear are recommended when
working outdoors. Also wear protective hair covering to contain long hair.
■ Do not lift the case without help. The
weighs 70 lbs. Hold it close to your body , keep your
knees bent, and lift with your legs. Ignoring these
precautions could result in back injury.
■ Keep children and visitors away . All visitors should
wear safety glasses and be kept a safe distance from
the work area. Do not let visitors contact tool while
operating.
■ Make product child-proof with padlocks.
“Six
“Six Pack”
■ Keep your work area clean and well lit. Cluttered
benches and dark areas invite accidents.
■ Always place each tool, accessory, and battery
in their specific location in the case to assure
proper balance and prevent shifting.
■ Remove battery pack from all tools and place the
switch in the locked or off position before storing the tool. Such preventive safety measures re-
duce risk of starting the tool accidentally.
■ Always store batteries in the case, stem side down
when not being charged or in use.
■ Always make sure the contents are secure and
that all latches are securely latched before moving the
latches for additional security.
■ Do not place any object on the top surface when
the miter saw is in use. Clutter invites accidents
and can intefere with the safe operation of the saw.
■ Maintain tools with care. Keep tools sharp and
clean for better and safer performance. Follow instructions for lubricating and changing accessories.
■ When servicing use only identical Ryobi replacement parts. Use of any other parts may create a
hazard or cause product damage.
■ Use recommended accessories. The use of im-
proper accessories may cause risk of injury. Refer
to this operator’s manual for recommended accessories.
■ Save these instructions. Refer to them frequently
and use them to instruct others who may use this
tool. If you loan someone this tool, loan them
these instructions also. Following this rule will
reduce the risk of electric shock, fire, or serious
personal injury.
“Six Pack
.” If transporting, padlock the
3
Page 4
SYMBOLS
The purpose of safety symbols is to attract your attention to possible dangers. The safety symbols, and the
explanations with them, deserve your careful attention and understanding. The safety warnings do not by
themselves eliminate any danger. The instructions or warnings they give are not substitutes for proper accident
prevention measures.
SYMBOL EXPLANATION
SAFETY ALERT SYMBOL: Indicates Danger, Warning, or Caution. May be used in conjunction
with other symbols or pictographs.
DANGER: Failure to obey a safety warning will result in serious injury to yourself or to others.
Always follow the safety precautions to reduce the risk of fire, electric shock and personal injury.
WARNING: Failure to obey a safety warning can result in serious injury to yourself or to others.
Always follow the safety precautions to reduce the risk of fire, electric shock and personal injury.
CAUTION: Failure to obey a safety warning may result in property damage or personal injury to
yourself or to others. Always follow the safety precautions to reduce the risk of fire, electric shock
and personal injury.
NOTE: Advises you of information or instructions vital to the operation or maintenance of the
equipment.
SAVE THESE INSTRUCTIONS
SPECIFICATIONS
Height 28-1/2 in. (72.4 cm) Maximum Height with handle 41 in. (104.1 cm)
Width 21-3/8 in. (54.3 cm) Wheel Diameter 6 in. (15.2 cm)
Depth 21-3/8 in. (54.3 cm) Weight with tools 70 lbs. (32 kg)
UNPACKING
Your
“Six Pack”
■ Carefully remove the tools and accessories from
the case. Make sure that all items listed in the
packing list are included.
■ Inspect the tools, accessories, and case carefully
to make sure no breakage or damage has
occurred during shipping.
■ Do not discard the packing material until you have
carefully inspected and satisfactorily operated the
tools.
■ If any parts are damaged or missing, please call
1-800-525-2579 for assistance.
If any parts are missing, do not operate these
products until the missing parts are replaced. Failure
to do so could result in possible serious personal
injury.
has been shipped completely assembled.
WARNING:
PACKING LIST
“Six Pack”
Miter Saw with accessories (MS181)
Circular Saw with accessories (R10632)
Drill with accessories (HP1802M)
Speed SawTM with accessories (SS180)
Reciprocating Saw with accessories (RJC181)
Flashlight (FL1800)
Battery Packs (3) (Part No. 1322401)
Battery Charger (Part No. 1423701)
Miter Saw Extension Rails (Part No. 6953801) with
Screws (Part No. 5686602)
Speed Saw circle cutting kit (Part No. 1263301)
Operator's Manuals (7)
(Case) (SPC18)
4
Page 5
FEATURES
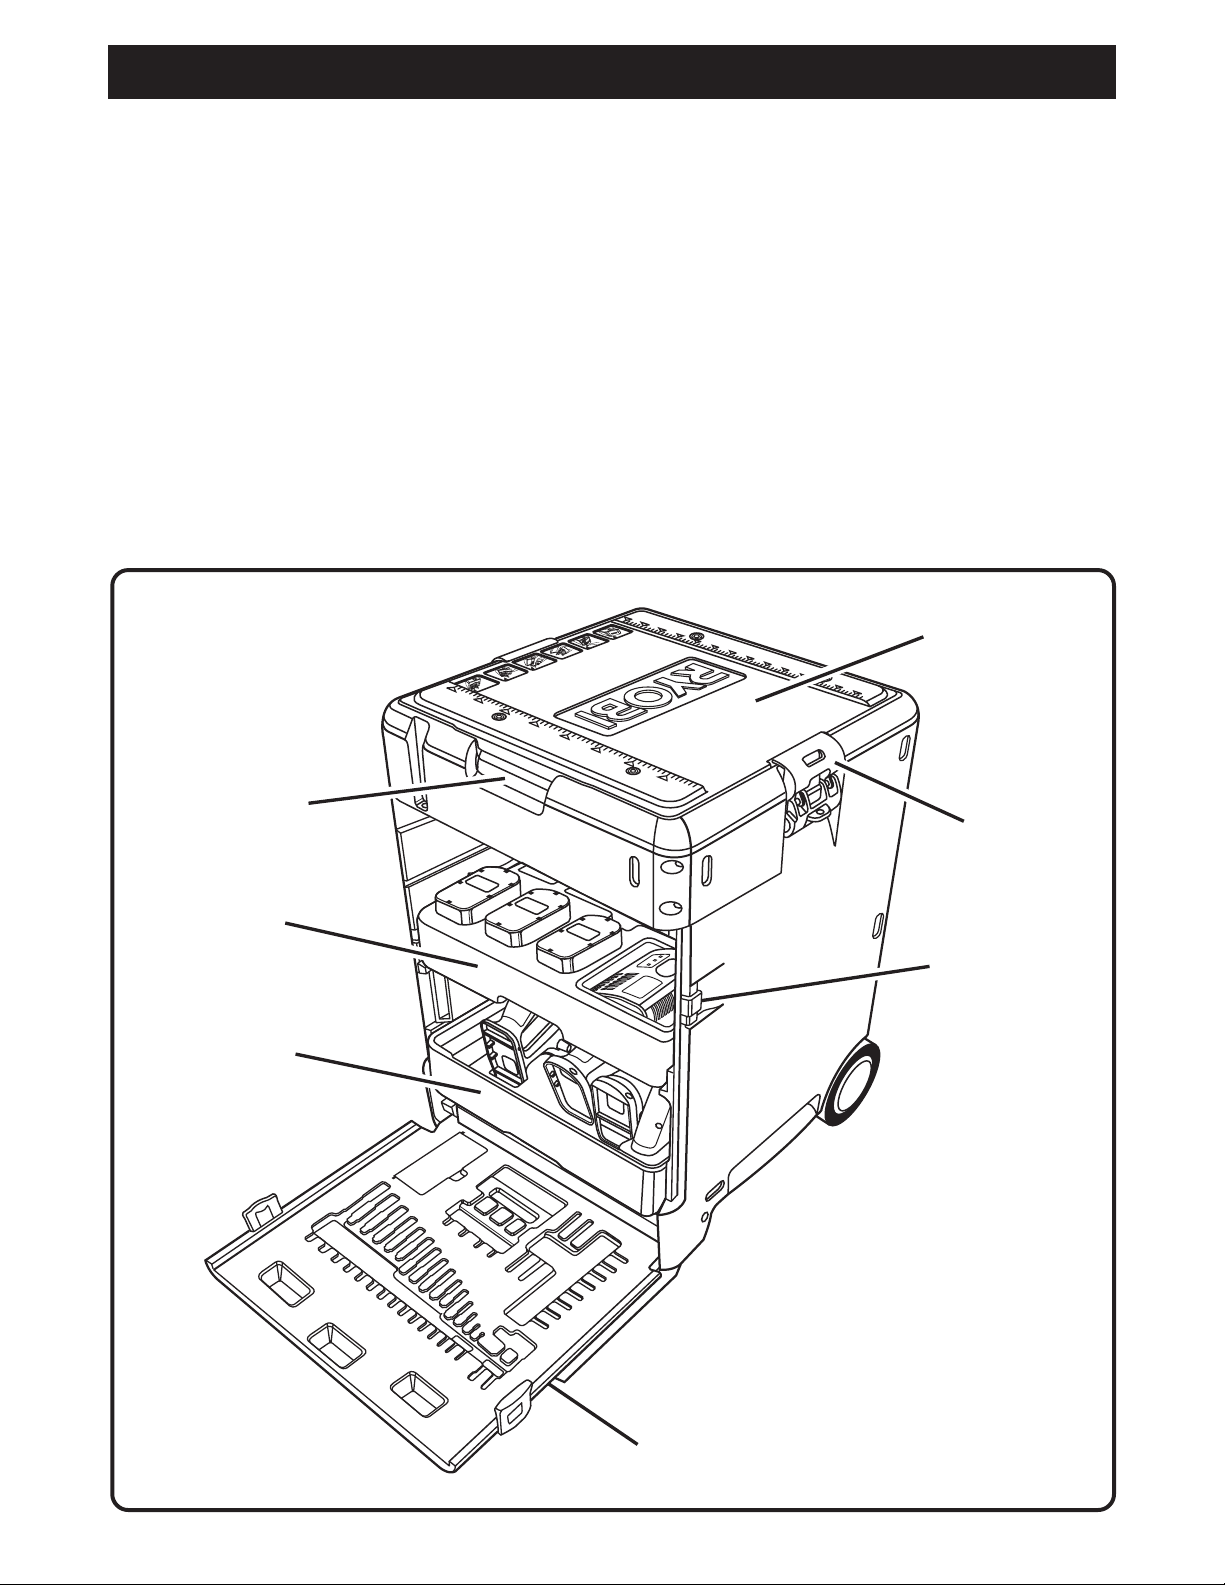
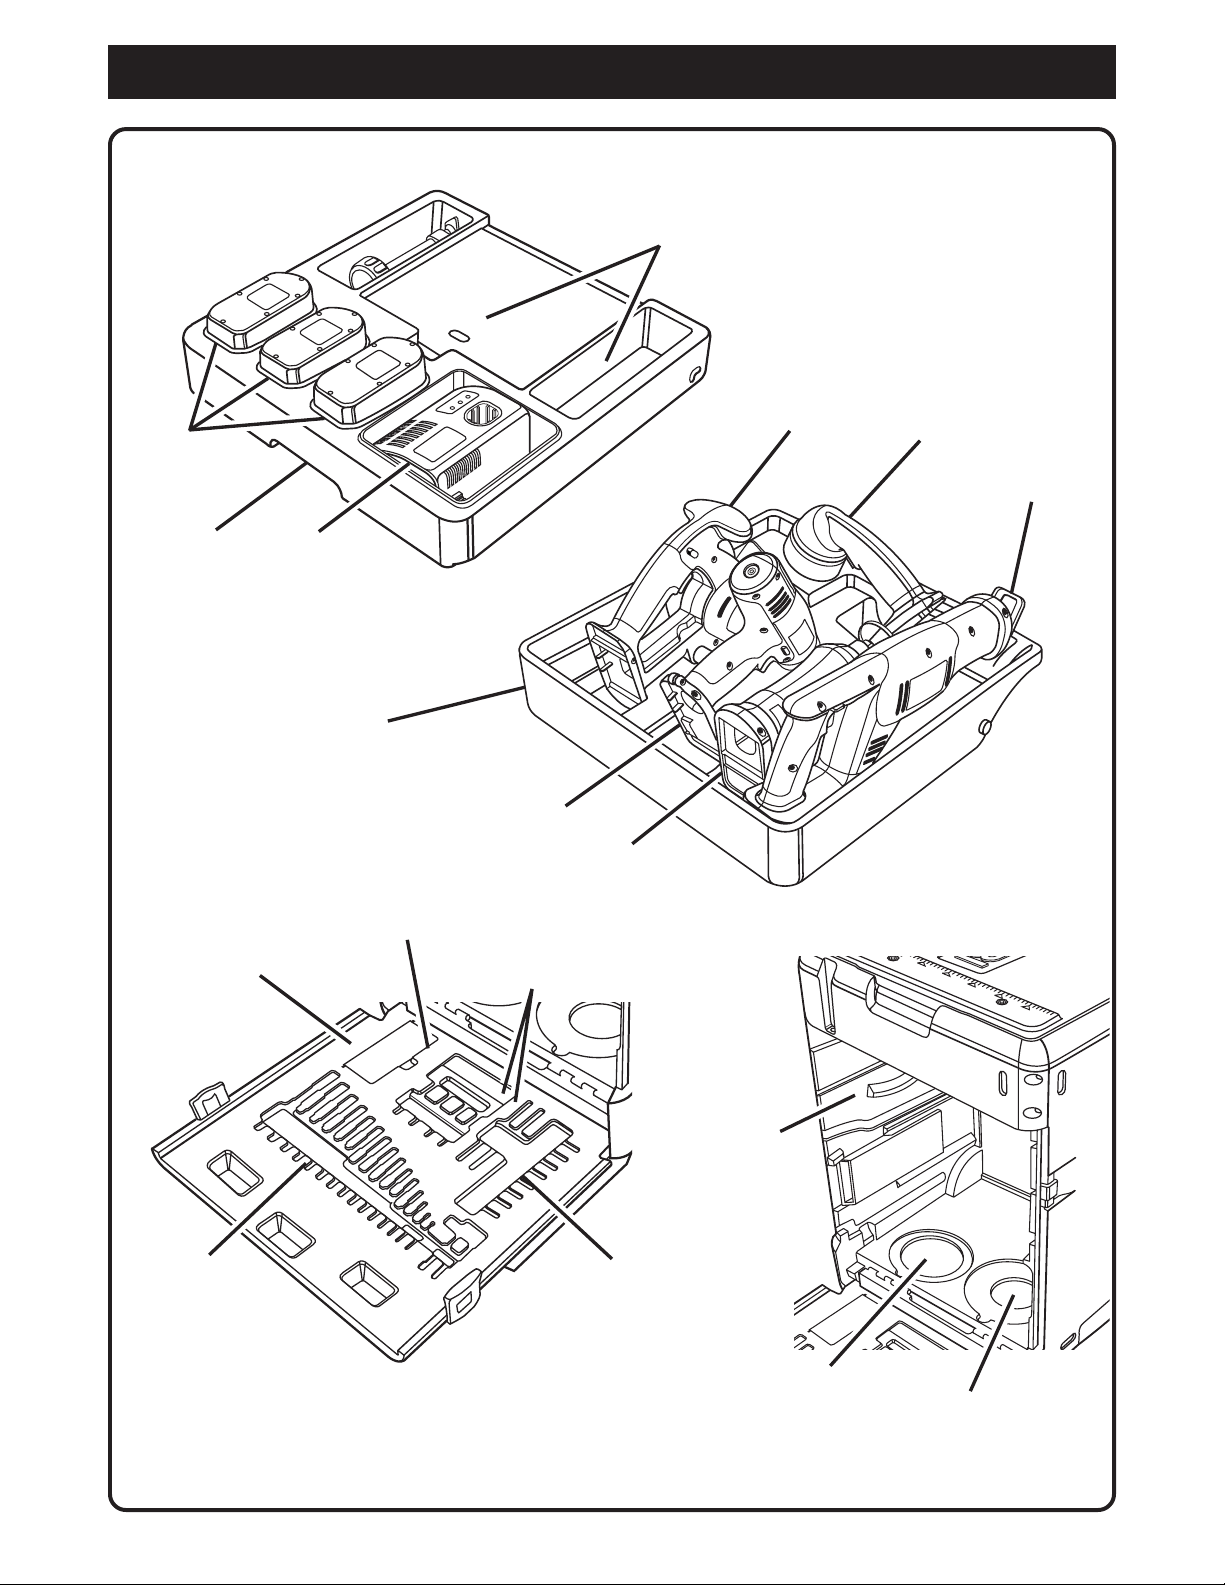
LID STORAGE
The lid provides a work surface and secure storage for
the miter saw.
UPPER DRAWER STORAGE
The upper drawer provides storage for three battery
packs, the battery charger, and the miter saw work
clamp.
LOWER DRAWER STORAGE
The lower drawer provides storage for the circular saw,
drill, Speed Saw, reciprocating saw, and flashlight.
FRONT PANEL STORAGE
The front panel provides storage for wood boring bits,
screwdriver bits, and drill bits (Bits not included).
SIDE AND BOTTOM STORAGE
Each side of the case provides storage for the miter saw
extension rails and the bottom of the case provides
storage for the miter saw and circular saw blades.
MISCELLANEOUS STORAGE
Miscellaneous storage is available in the upper drawer
and in the front panel.
MOBILITY
The telescopic handle and sturdy wheels make the six
pack easy to move.
SECURITY
The lid and the front panel feature lockable latches that
allow you to attach padlocks to prevent unauthorized
use.
R
LID
SIDE
HANDLE
UPPER DRAWER
LOWER DRAWER
LID
LATCH
FRONT PANEL
LATCH
FRONT PANEL
5
Fig. 1
Page 6
BATTERY
R
R
PACKS
FEATURES
MISCELLANEOUS
STORAGE
CIRCULAR
SAW
FLASHLIGHT
RECIPROCATING
SAW
UPPER
DRAWER
MISCELLANEOUS
STORAGE
BATTERY
CHARGER
LOWER
DRAWER
DRILL
SPEED SAW
WOOD BORING
BIT STORAGE
SCREWDRIVER
BIT STORAGE
DRILL BIT
STORAGE
EXTENSION RAIL
SCREWDRIVER
BIT STORAGE
6
MITER SAW
STORAGE
CIRCULAR
SAW BLADE
STORAGE
MITER SAW
BLADE
STORAGE
Fig. 2
Page 7
OPERATION
1
R
2
6
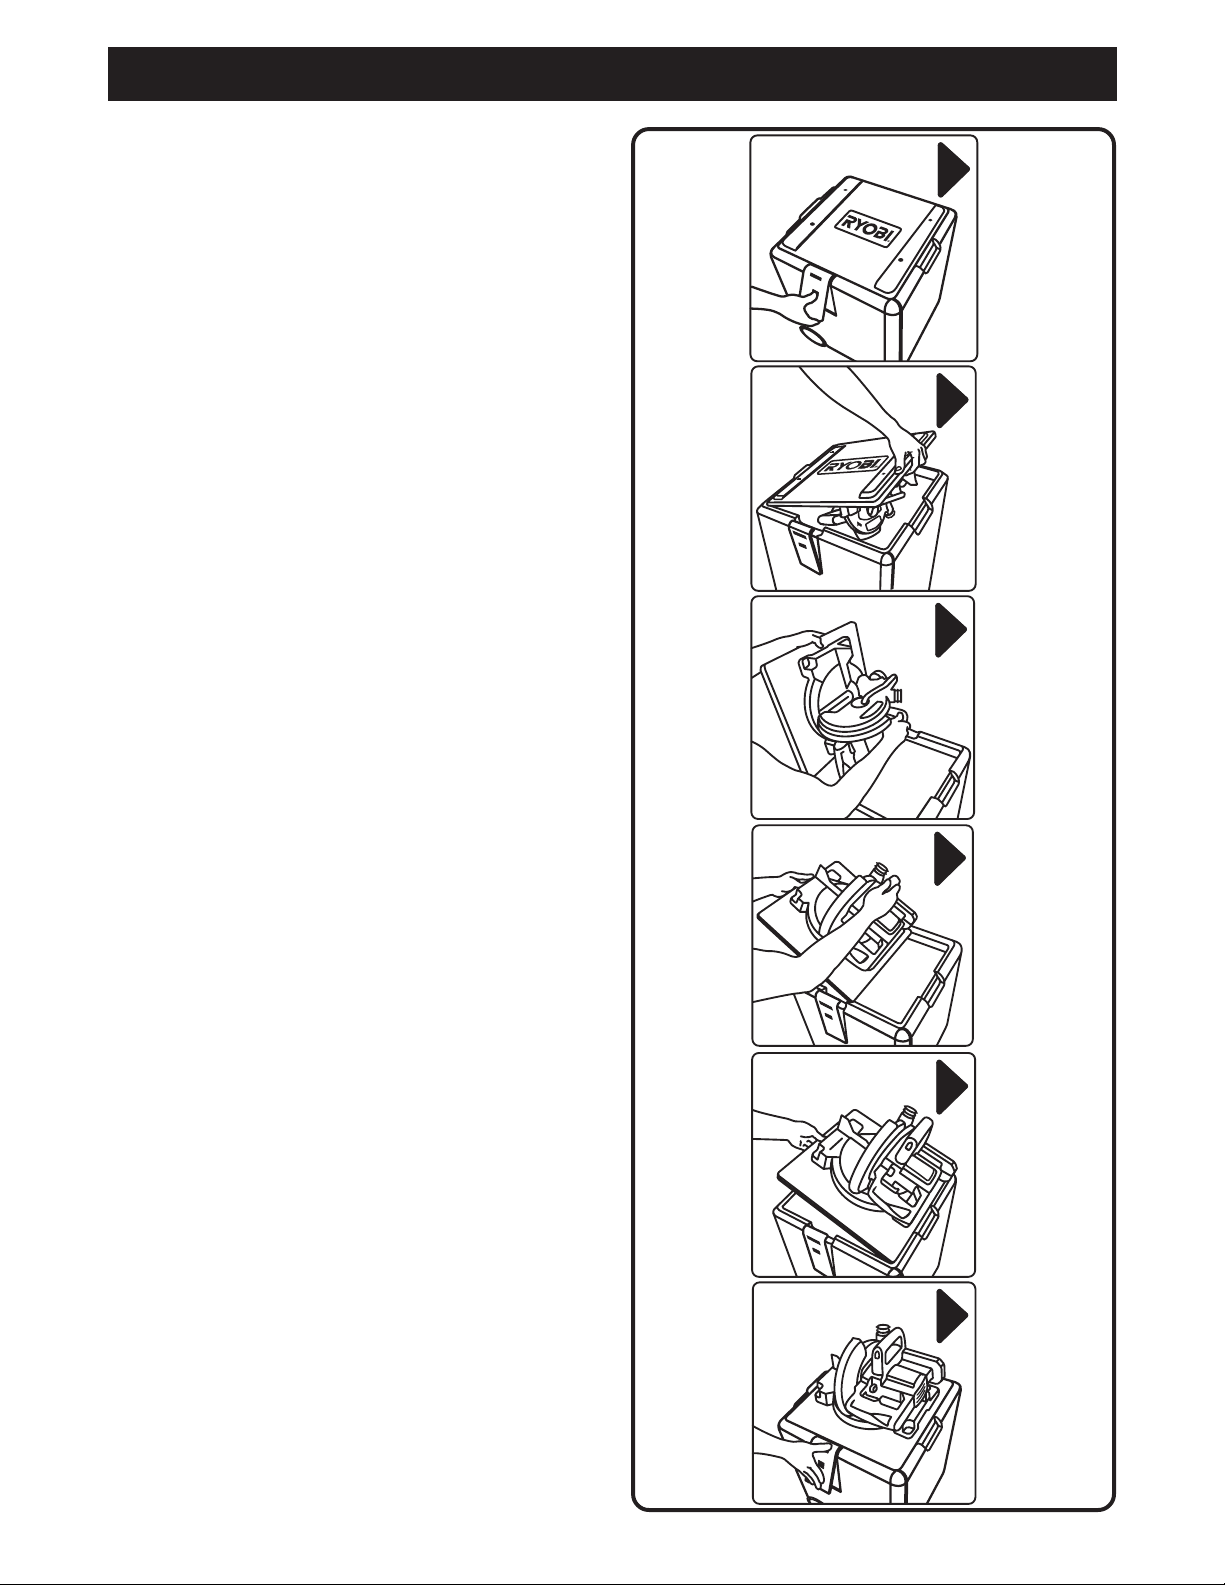
SETTING UP THE MITER SAW
The MS181 Miter Saw provided in the
been securely attached to the top lid. This convenient
mounting allows a quick and simple set up and stow
away procedure. These procedures are illustrated on
the top, front surface of the lid for easy reference.
See Figure 3.
Follow these directions to set up the miter saw.
■ Loosen each lid latch by pulling out on the bottom of
the latch, lifting the latch, and then lowering the top
of the latch. (1)
■ Stand in front of the case. (The case handle will be
on the left.)
■ Reach across the lid with your left hand, grasp the
right side handle, and raise the lid. (2)
■ Grasp the miter saw carrying handle with your right
hand. (3)
■ Rotate and lower the lid and saw assembly smoothly
into position, allowing the lid to sit squarely on the
base. (4 and 5)
■ Secure the lid latches. (6)
The MS181 Miter Saw is now ready for use on the
Pack”
work surface. Refer to the MS181 Operator’s
Manual for safety rules and operation instruction. Release
the lock pin to raise the saw head. Make all necessary
set up and adjustments. When ready for the cut, insert a
battery and proceed safely.
“Six Pack”
has
“Six
3
4
5
Fig. 3
7
Page 8
OPERATION
3
4
5
R
6
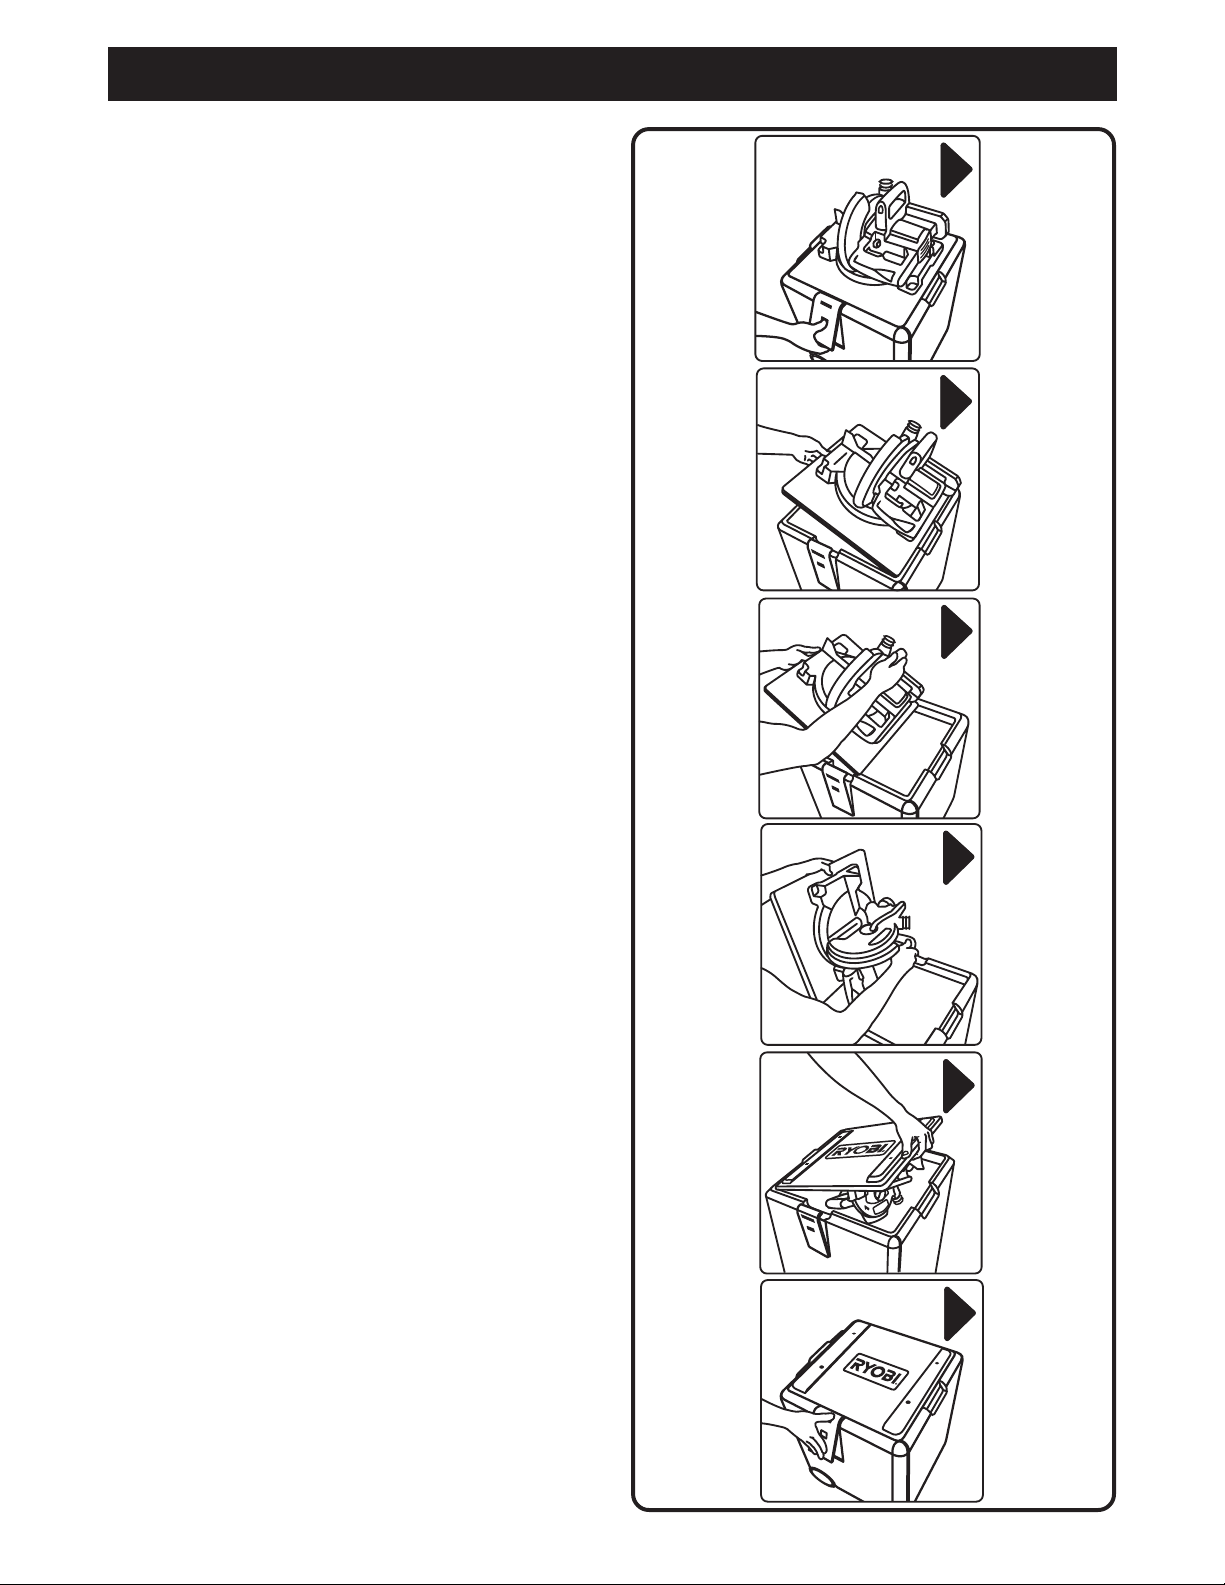
STORING THE MITER SAW
See Figure 4.
Follow these directions to store the miter saw.
■ Remove the battery from the saw.
■ Remove the work clamp and any accessories that
you have used.
o
■ Place the saw head in a 90
cure the bevel lock.
■ Place the saw in a 90o position to the fence.
■ Lower the saw head and lock it into place.
■ Loosen each lid latch by pulling out on the bottom of
the latch and then lowering the top of the latch. (1)
■ Stand in front of the case. (The case handle will be
on the left.)
■ Grasp the left side handle with your left hand and
raise the lid. (2)
■ Grasp the miter saw carrying handle with your right
hand. (3)
■ Rotate and lower the lid and saw assembly smoothly
into position, allowing the lid to sit squarely on the
base. (4 and 5)
■ Secure the lid latches. (6)
The MS181 Miter Saw is now safely stored. For additional
security and to prevent unauthorized use, areas for
padlocks have been provided.
bevel position and se-
1
2
Fig. 4
8
Page 9
OPERATION
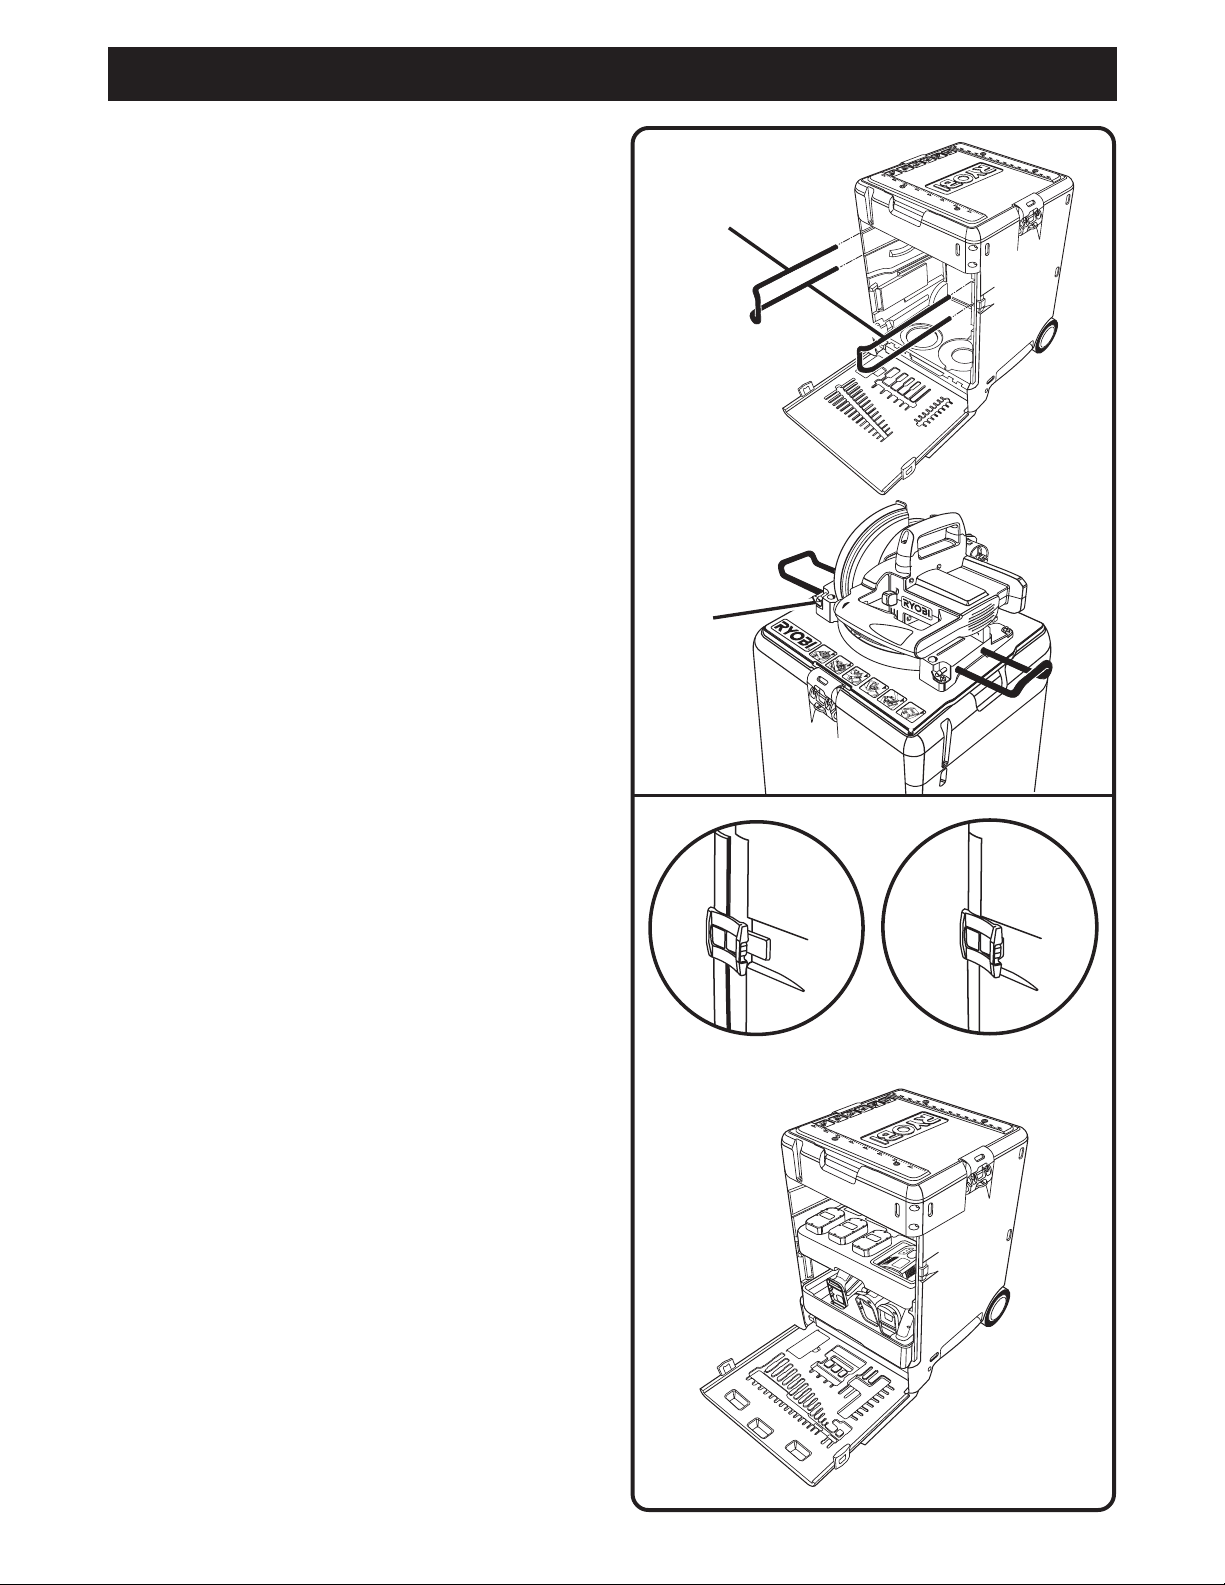
ATTACHING THE MITER SAW EXTENSION
RAILS
See Figure 5.
Follow these directions to attach the miter saw extension
rails.
■ Remove the extension rails from the side storage
area.
■ Slide the extension rails into the correct locations on
the miter saw.
■ Secure the extension rails using the wing screws pro-
vided.
OPENING THE FRONT PANEL
See Figure 6.
Follow these directions to open the front panel.
■ Pull the front panel latches out.
■ Lower the front panel.
EXTENSION
RAILS
WING
SCREW
R
3
0
2
2
.5
1
5
0
1
5
2
2
.
5
3
0
31.62
4
1
2
5
3
4
R
5
6
OPENED
Fig. 5
CLOSED
R
Fig. 6
9
Page 10
OPERATION
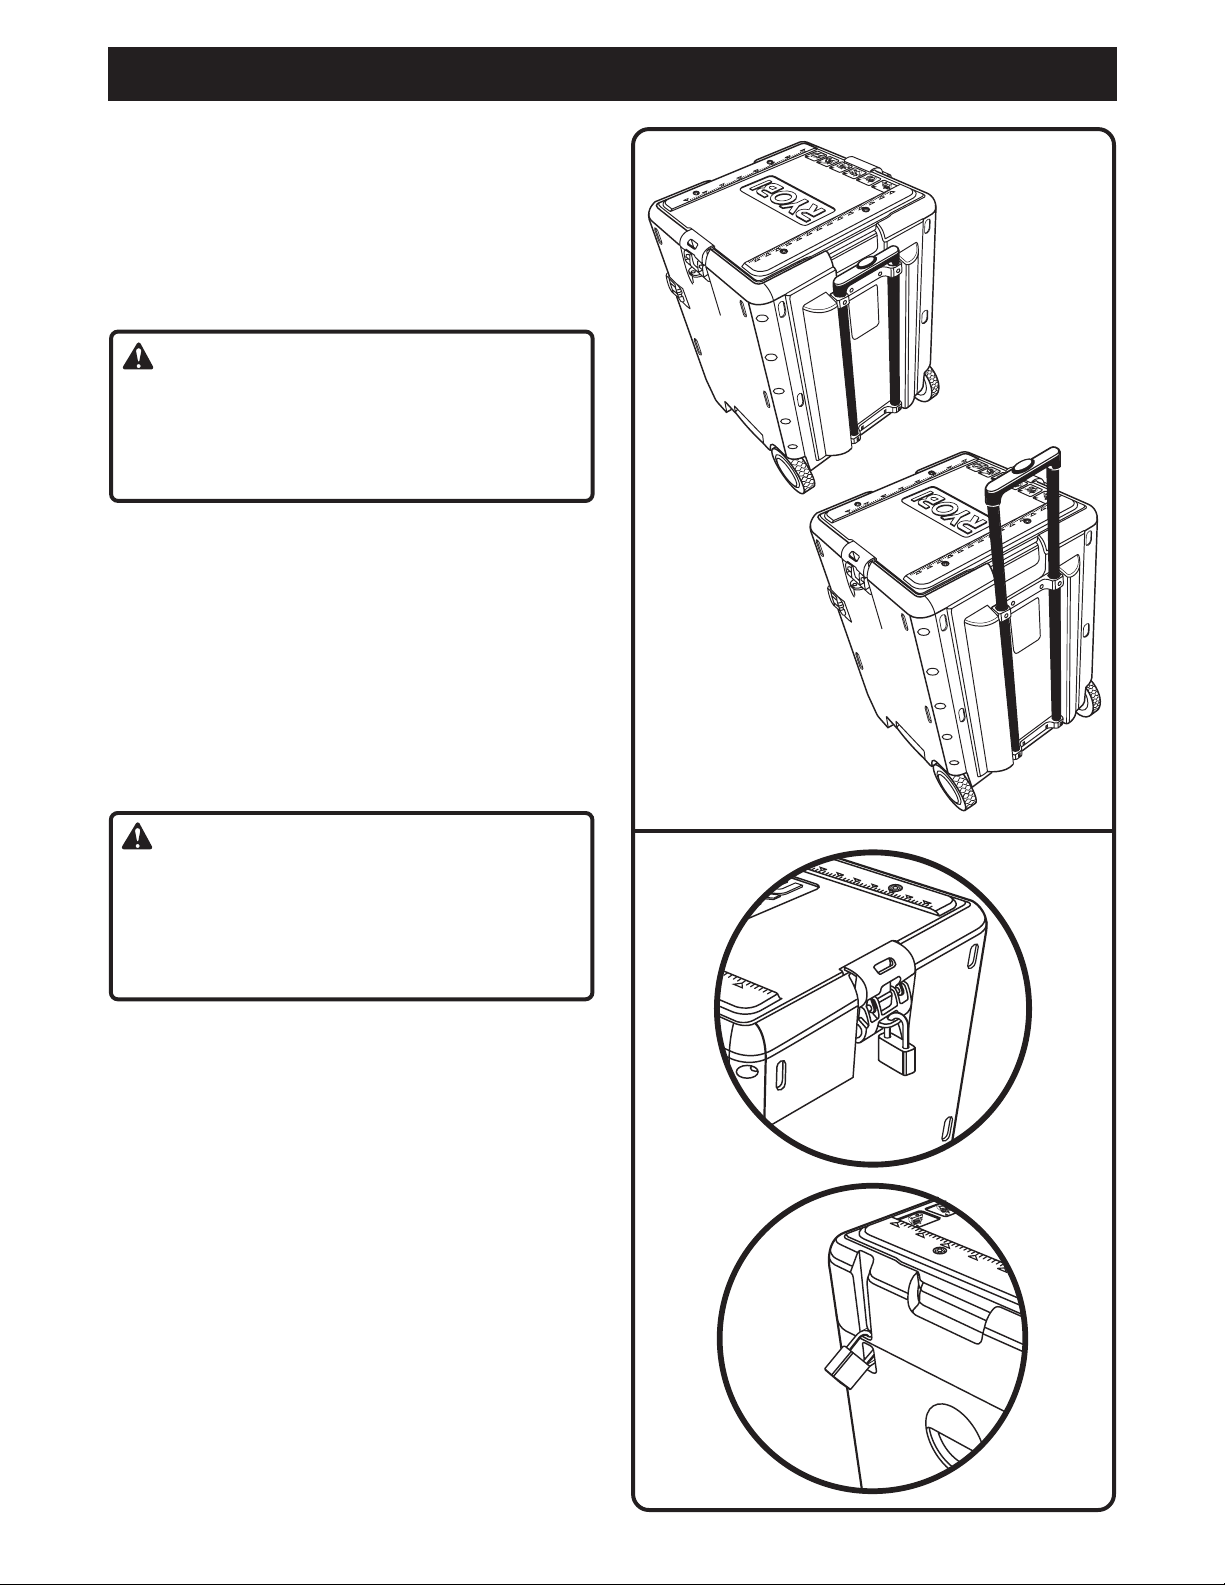
LIFTING/LOWERING HANDLE
See Figure 7.
Follow these directions to lift and lower the handle.
■
To lift handle
the handle, pull up the handle, and snap into place.
To lower handle
■
of the handle, lower the handle, and snap into place.
: Push the button located on the top of
: Push the button located on the top
WARNING:
Always make sure the handle is all the way up and
firmly in the locked position before you move the
Pack
.” Failure to heed this warning can result in loss
of control and serious personal injury.
SECURING THE
“SIX PACK”
See Figure 8.
To prevent unauthorized use of the
suggest that you install padlocks in the areas provided.
Follow these directions to secure the
■ Stow safely all the tools and accessories in the
Pack”
case.
■ Secure the latches.
■ Install padlocks in the areas provided.
■ Store the padlock keys in another location.
“Six Pack
“Six Pack
“Six
,” we
.”
“Six
R
R
Fig. 7
WARNING:
Never attempt to move or shift the
the case is securely packed and the latches firmly
secured. We recommend padlocks when transporting
the
“Six Pack
result in serious personal injury.
.” Failure to heed these warnings can
“Six Pack”
until
10
Fig. 8
Page 11
MAINTENANCE
WARNING:
When servicing use only identical Ryobi replacement parts. Use of any other parts may create a hazard or
cause product damage.
GENERAL
Avoid using solvents when cleaning plastic parts. Most
plastics are susceptible to damage from various types of
commercial solvents and may be damaged by their use.
Use clean cloths to remove dirt, carbon dust, etc.
WARNING:
Do not at any time let brake fluids, gasoline,
petroleum-based products, penetrating oils, etc.
come in contact with plastic parts. They contain
chemicals that can damage, weaken, or destroy
plastic.
REPLACEMENT PARTS
Top Lid (Part No. 5834101)
Front Panel Latches (Part No. 3076701)
Lid Latches (Part No. 5100102)
Handle (Part No. 6953301)
Upper Drawer (Part No. 3077001)
Lower Drawer (Part No. 5834901)
Wheel Assembly (Part No. 3071601)
11
Page 12

OPERATOR'S MANUAL
18.0 V Cordless
“Six Pack”
SPC18
• SERVICE
Now that you have purchased your tool, should a need ever exist for repair parts or
service, simply contact your nearest Ryobi Authorized Service Center. Be sure to
provide all pertinent facts when you call or visit. Please call 1-800-525-2579 for your
nearest Ryobi Authorized Service Center. You can also check our Web site at
www.ryobitools.com for a complete list of Authorized Service Centers.
•PART NO.
The part number of this product is found on a plate attached to the rear of the case.
• HOW TO ORDER REPAIR PARTS
When ordering repair parts, always give the following information:
PART NUMBER
1428 Pearman Dairy Road Anderson, SC 29625
Post Office Box 1207 Anderson, SC 29622
983000-080
SPC18
RYOBI TECHNOLOGIES INC.
www.ryobitools.com
Phone 1-800-525-2579
 Loading...