

Page 1

X5 Controller Streamer Ampli er
Installation Manual
Page 2
2 Russound X5 Controller Streamer Ampli er Installation Manual
The lightning ash with arrowhead symbol,
within an equilateral triangle, is intended to alert
the user to the presence of uninsulated dangerous
voltage within the product’s enclosure that may
be of su cient magnitude to constitute a risk of electric
shock to persons.
The exclamation point within an equilateral
triangle is intended to alert the user to
the presence of important operating and
maintenance (servicing) instructions in the
literature accompanying the appliance.
Safety Instructions
1. Read Instructions - All the safety and operating instructions
should be read before the appliance is operated.
2. Retain Instructions - The safety and operating instructions
should be retained for future reference.
3. Heed Warnings - All warnings on the appliance in the
operating instructions should be adhered to.
4. Follow Instructions - All operating and user instructions
should be followed.
5. Water and Moisture - The appliance should not be used near
water; for example, near a bathtub, washbowl, kitchen sink,
laundry tub, in a wet basement, or near a swimming pool.
The apparatus shall not be exposed to dripping or splashing
liquids and no objects lled with liquids, such as vases, shall
be placed on the apparatus. Do not touch the appliance
with wet hands. Do not handle the appliance or power cor d
with wet or damp hands. If water or any other liquid enters
the appliance cabinet, take it to quali ed service personnel
for inspec tion.
SAFETY INSTRUCTIONS
6. Cleaning - The appliance should be cleaned only as
recommended by the manufacturer. From time to time you
should wipe o the front and side panels and the cabinet
with a soft cloth. Do not use rough material, thinners, alcohol
or other chemical solvents or cloths since this may damage
the nish or remove the panel lettering.
7. Ventilation - The appliance should be situated so that
its location or position does not interfere with its proper
ventilation. For example, the appliance should not be
situated on a bed, sofa, rug, or similar surface that may
block the ventilation openings, or placed in a built-in
installation, such as a bookcase or cabinet that may impede
the ow of air through the ventilation openings. Place the
unit in a well-ventilated location, leaving at least 2 inches
(5 cm) of clearance on all sides, top and rear of unit for air
ow. If ventilation is blocked, the unit may overheat and
malfunction.
8. Heat - The appliance should be situated away from heat
sources such as radiators, heat registers, stoves, or other
appliances (including ampli ers) that produce heat.
9. Grounding or Polarization - Precaution should be taken so
that the grounding or polarization means of an appliance is
not defeated.
10. Power Cord Protection - Power supply cords should be
routed so that they are not likely to be walked on or pinched
by items placed upon or against them, paying particular
attention to cords at plugs, receptacles, and the point where
they exit from the appliance.
11. Power Sources - The appliance should be connected to a
power supply only of the type described in the operating
instructions or as marked on the appliance.
12. Main Power Disconnect - The power switch is a single-pole
switch. When the switch is in the “O ” position, the appliance
is not completely disconnected from the main power. The
main power plug is used as the disconnect device and shall
remain readily operable. When installing the product, ensure
that the plug is easily accessible.
13. Non-Use Periods - The power cord of the appliance should
be unplugged from the outlet when left unused for a long
period of time.
14. Attachments - Only use attachments/accessories speci ed
by the manufacturer.
15. Carts and Stands - The appliance should
be used only with a cart or stand that is
recommended by the manufacturer. An
appliance and cart combination should be
moved with care. Quick stops, excessive
force and uneven surfaces may cause the appliance and cart
combination to overturn.
16. Wall or Ceiling Mounting - The appliance should be
mounted to a wall or ceiling only as recommended by the
manufacturer.
17. Location of the Ampli er - Do not mount this unit under a
kitchen cabinet. Do not expose the ampli er to direct sun
light or heating units as the ampli er internal components’
temperature may rise and shorten the life of the components.
Avoid damp and dusty places.
18. Object and Liquid Entry - Care should be taken so that
objects do not fall and liquids are not spilled into the
enclosure through the openings.
19. Servicing - The user should not attempt to service the
appliance beyond that described in the operating
instructions. All other servicing should be referred to
quali ed service personnel.
20. Damage Requiring Service - The appliance should be
serviced by quali ed service personnel when: A. The power
supply cord or the plug has been damaged; B. Objects have
fallen, liquid has been spilled into the appliance; C. The
appliance has been exposed to rain; or D. The appliance does
not appear to operate normally; or E. The appliance has been
dropped or the enclosure is damaged.
CAUTION: TO REDUCE THE RISK OF ELECTRIC
SHOCK, DO NOT REMOVE THE COVER. NO USERSERVICEABLE PARTS INSIDE. REFER SERVICING
TO QUALIFIED SERVICE PERSONNEL.
WARNING: TO REDUCE THE RISK OF FIRE
OR ELECTRIC SHOCK, DO NOT EXPOSE THIS
APPLIANCE TO RAIN OR MOISTURE.
Note: This equipment has been tested and found to comply
with the limits for a Class B digital device, pursuant to part 15 of
the FCC rules. These limits are designed to provide reasonable
protection against harmful interference in a residential
installation. This equipment generates, uses and can radiate radio
frequency energy and, if not installed and used in accordance
with the instructions, may cause harmful interference to radio
communications. However, there is no guarantee that interference
will not occur in a particular installation. If this equipment does
cause harmful interference to radio or television reception, which
can be determined by turning the equipment o and on, the
user is encouraged to try to correct the interference by one of or
more of the following measures: reorient or relocate the receiving
antenna; increase the separation between the equipment and
receiver; connect the equipment into an outlet on a circuit
di erent from that to which the receiver is connected, or consult
the dealer or an experienced radio/TV technician for help.
This Class B digital apparatus complies with Canadian ICES-003.
Cet appareil numérique de la classe B est conforme à la norme
NMB-003 du Canada.
Page 3

Russound X5 Controller Streamer Ampli er Installation Manual 3
Safety Instructions ..................................................................................................................2
Product Overview ...................................................................................................................4
X5 Front Panel Illustration ....................................................................................................5
X5 Back Panel Illustration .....................................................................................................6
Setting Up X5 ............................................................................................................................ 7
Connecting X5 to Home Network ..............................................................................8-11
Wired Network .................................................................................................................... 9
Wireless Network ..............................................................................................................10
Setting AirPlay Name ......................................................................................................11
Russound Interfaces ...................................................................................................... 12-16
TS3 Touchscreen ...............................................................................................................12
MDK-C6 ......................................................................................................................... 13-15
SLK-1 .....................................................................................................................................16
Installation Overview .................................................................................................... 17-18
Basic Operation ............................................................................................................... 19-20
Listening to AirPlay Streaming .........................................................................................21
Listening to Pandora Internet Radio .......................................................................22-23
Listening to SIRIUSXM Internet Radio ..................................................................... 24-25
Listening to vTuner Internet Radio ..........................................................................26-27
Listening to TuneIn Internet Radio .......................................................................... 28-29
Listening to Network Audio Files (Media Server) ...............................................30-31
Controller/Keypad Connection ........................................................................................32
Speaker Connection .............................................................................................................33
Adding Controller Ampli er or A-BUS to X5 ................................................................34
Source Audio Connection ........................................................................................... 35-37
IR Connection .........................................................................................................................38
Zone 12 VDC Trigger Outputs ...........................................................................................39
USB Devices Connection ....................................................................................................40
TABLE OF CONTENTS
Ethernet Connections ..........................................................................................................40
SCS Software Download .....................................................................................................41
SCS Software Programming ..............................................................................................42
Technical Speci cations ......................................................................................................43
Troubleshooting ....................................................................................................................43
Tech Tip .....................................................................................................................................44
LED Diagnostic Chart ...........................................................................................................45
Warranty ...................................................................................................................................46
Page 4

4 Russound X5 Controller Streamer Ampli er Installation Manual
Introduction
Thank you for choosing the Russound XStream X5 Controller Streamer
Ampli er to ll your home with audio everywhere.
The Russound XStream X5 is the rst-of-its-kind room-by-room distributed
audio system. Unlike its hard-wired predecessors, the X5 is a certi ed Wi-Fi
device that wirelessly synchronizes audio across all X5-powered rooms. It’s
designed to be subtle, unobtrusive and blend easily into any décor. Removable
side panels reveal mounting brackets so you can easily mount and hide the
unit behind furniture, TV displays or in a closet. The X5 puts your music up
front and keeps the hardware out of the way.
Every room in your home is unique, and the X5 is the only product capable of
o ering customized options for each room. The back panel of the X5 features
a number of wired connections, o ering customized options to bring audio
into each room of your home. The X5 is a streamer, an ampli er and a room
controller all in one product and much more. The X5 is the rst to be built
on an all-digital platform. Digital inputs, digital streaming content, digital
ampli cation at 50 watts per channel, and a high-end DAC deliver better
audio performance. Designed for custom installation professionals, the X5 can
change the way you approach distributed audio.
Russound was the rst multiroom audio company to embrace Apple AirPlay
and o er popular on-board streaming services. Stream your iTunes library
and other audio content from any AirPlay-enabled Apple device to the X5
and listen to it throughout your home. The X5 also supports Bluetooth®
streaming through an optional external receiver, the BTC-1X. The external
Bluetooth option allows you to locate the receiver for maximum reception and
performance, unlike most products that can be limited by internal Bluetooth
reception capabilities.
Unlike other streaming solutions, the X5 gives the user real control of their
listening experience. The X5 is the only single-room audio streamer, ampli er
and controller with a keypad connection for complete control. Russound has
three di erent keypad options for the X5:
• TS3 touchscreen
• MDK-C6 multi-line display keypad
• SLK-1 single-line display keypad
PRODUCT OVERVIEW
Features
• Wi-Fi Certi ed Device with built-in onboard streaming
• Built in AirPlay streaming with full metadata to app or keypads
• High de nition audio streaming up to 192kHz
• App or Keypad controlled (My Russound App for iOS or Android, TS3,
MDK-C6, SLK-1)
• IR controller with built in library of popular commands and learning
capabilities
• Bluetooth ready (requires BTC-1X)
• Class D 50WRMS x 2 ampli er with subwoofer out
• Digital inputs
• Fixed/variable line audio outputs
• 12V trigger output
Additionally, every X5 zone can be controlled by the My Russound App,
available for iOS and Android devices. The app and keypad can be con gured
to control other AV devices connected to X5. Every X5 has an IR database with
universal and learning commands to control other AV devices. The X5 can
also be controlled by other home automation systems through RIO, our open
IP protocol. The power to control your musical universe, right there in your
hands.
The XStream X5 o ers several bene ts for the installer. Wireless connectivity
simpli es installation because no centralized wiring is needed in the home.
All connections between X5 products are wireless through standard 802.11
Wi-Fi or wired Ethernet connections, making the X5 an excellent solution
for retro t and pre-existing homes. If you’re familiar with current Russound
systems, there are no new software programs to learn; our X5 unit uses the
same programming tools used with our C-Series systems. The X5 also uses
the same keypads and app for control as our C-Series system. Everything
from remotes to the speakers, ampli ers and controllers can be hidden in
each room, removing the AV clutter. With the X5, you can also personalize the
user experience in each room while the operation and control is consistent
throughout the system.
Page 5
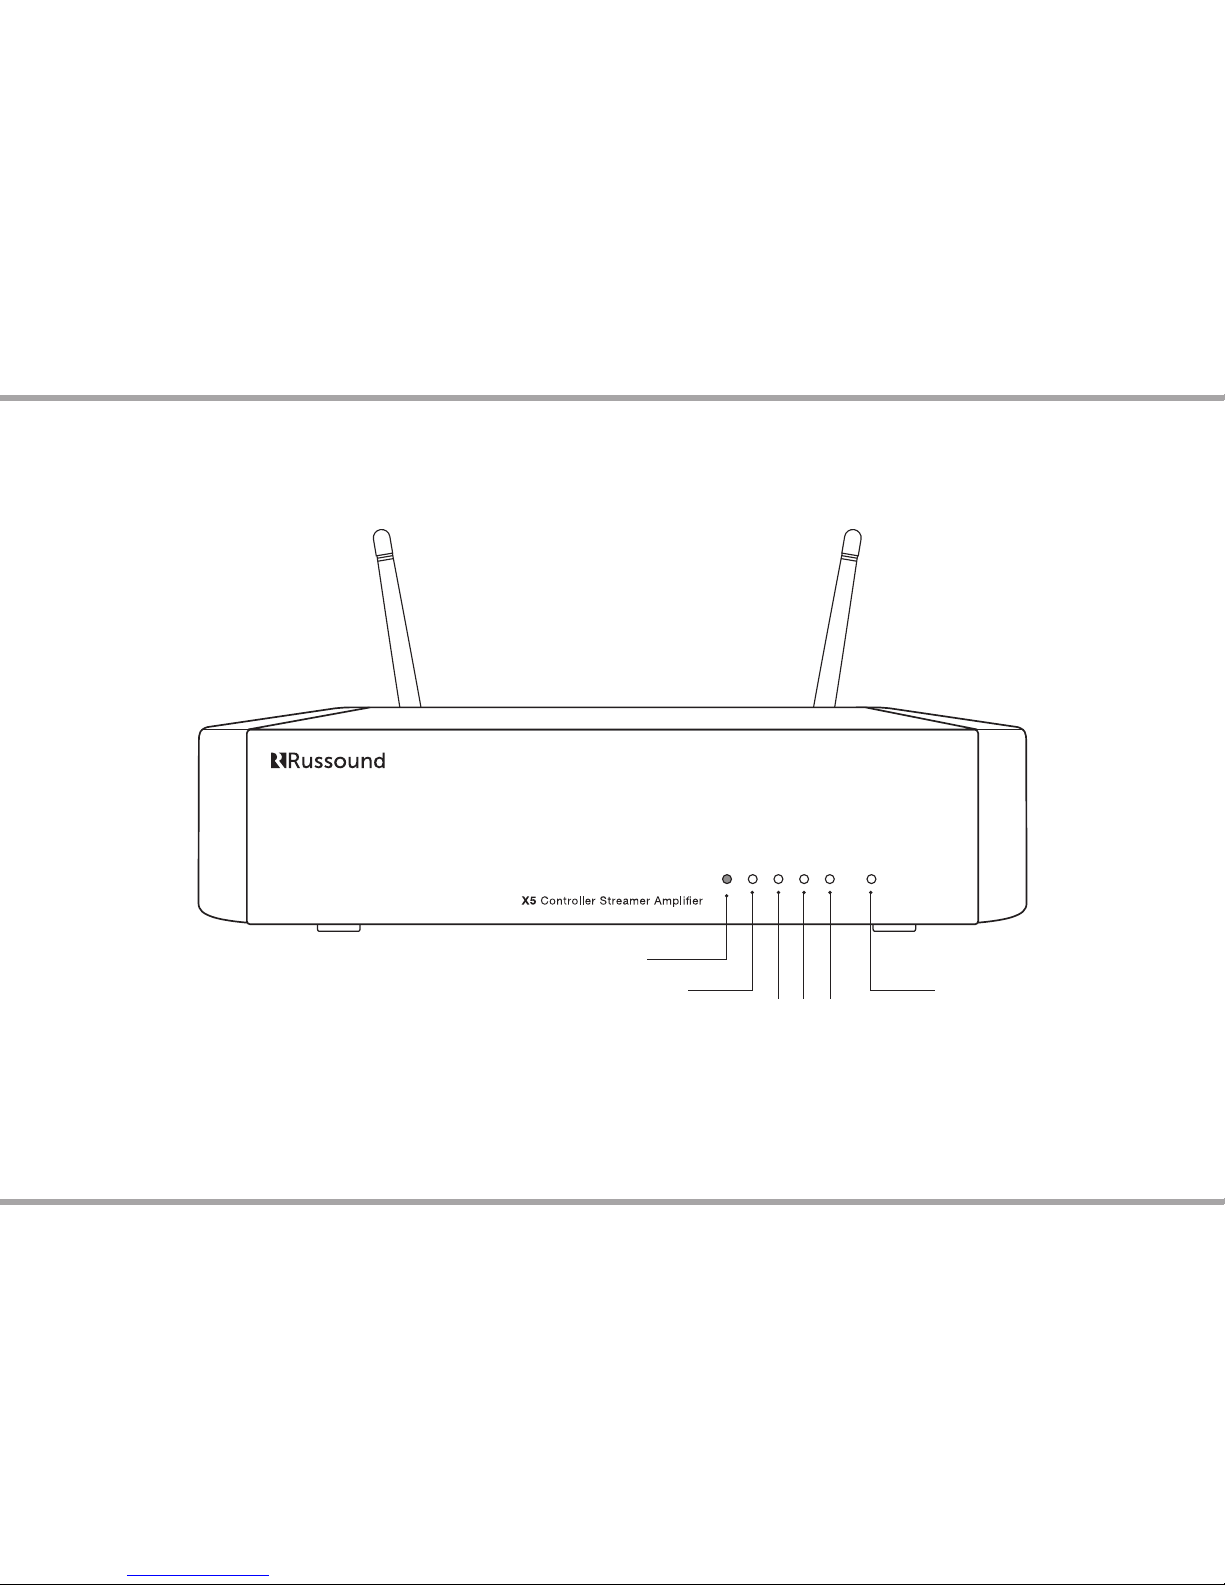
Russound X5 Controller Streamer Ampli er Installation Manual 5
FRONT PANEL
IR Learning
IR Talkback
(yellow green red)
System On LED
System Status LEDs
(blue)
(red ashing)
Page 6
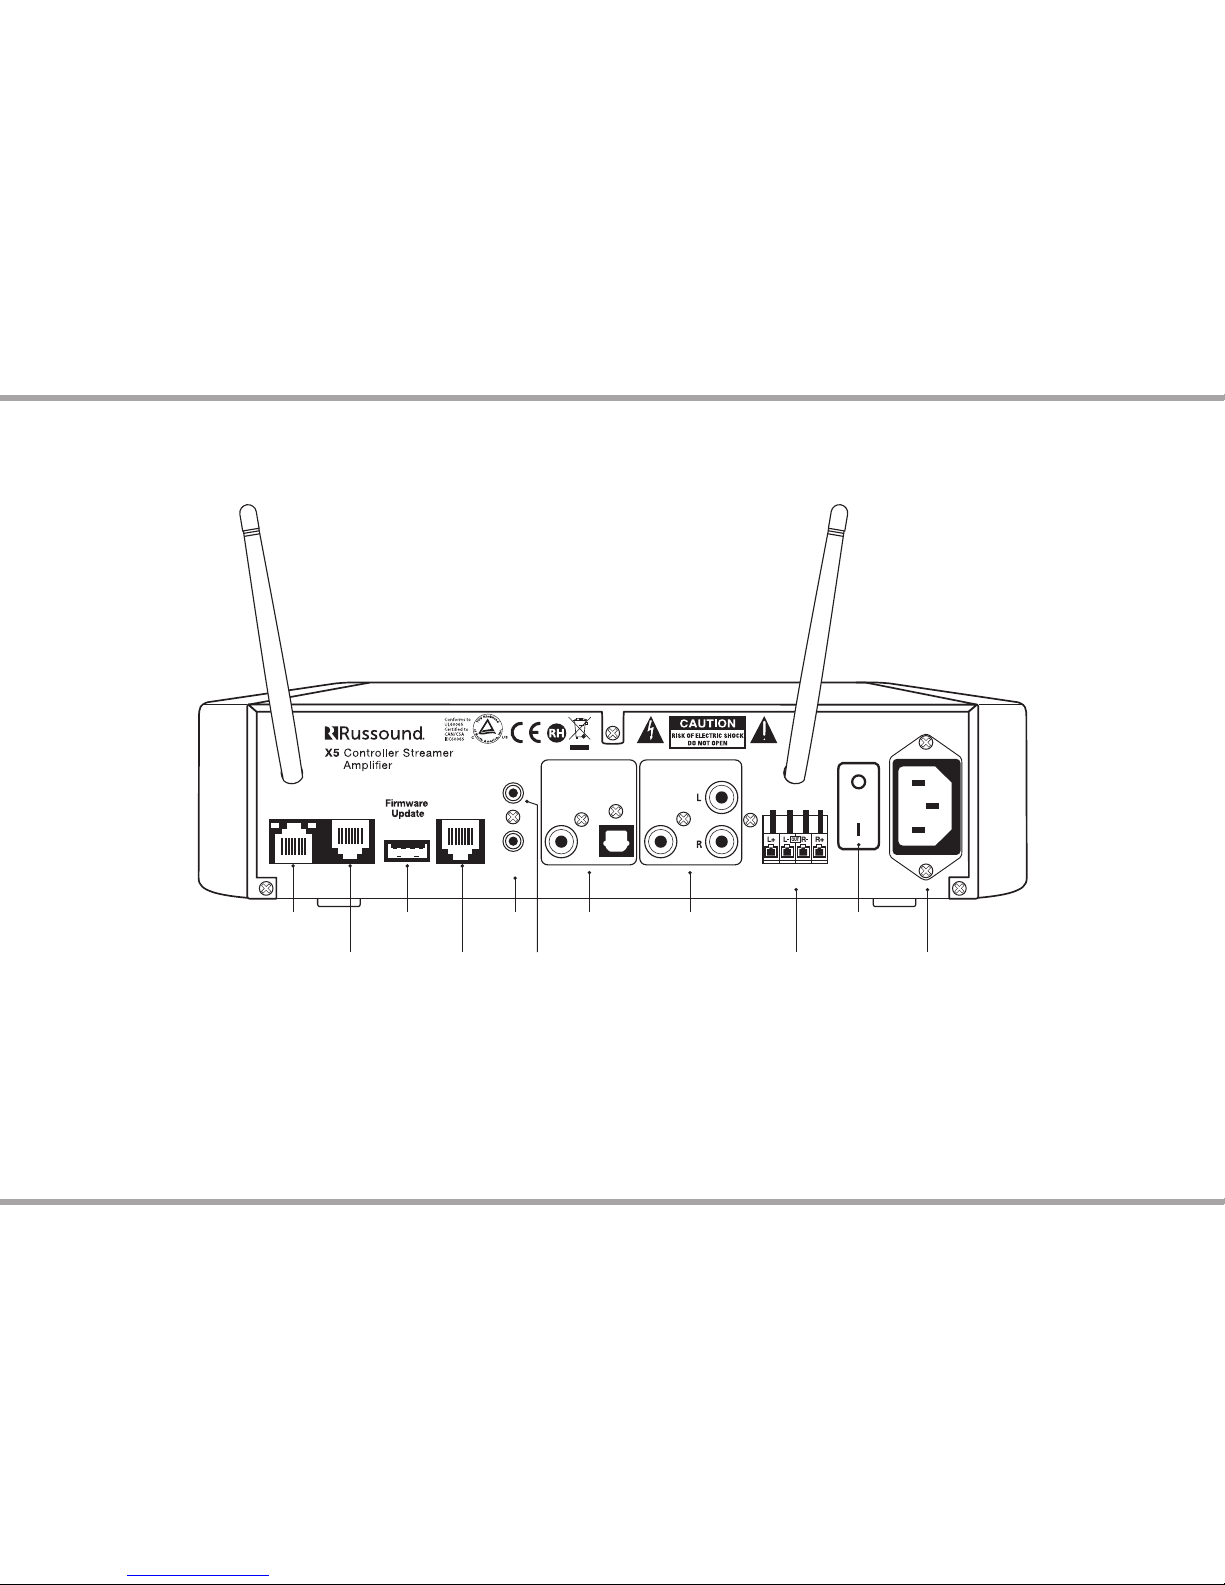
6 Russound X5 Controller Streamer Ampli er Installation Manual
Ethernet
Line Out
Speaker Out
4 ohms min
Power
Keypad
Antenna
Antenna
Bluetooth
OpticalCoax
Digital Audio In
Subwoofer
Made in China
Trigger Out
12VDC 100mA
IR Out
100-240V~
50/60Hz 2.5A
IR OutEthernet Port
Keypad Port
Bluetooth® Port
Digital Audio
Input
12VDC Trigger Speaker Output
Line Output Power Switch
AUX USB Port
AC 120/240V Input
Detachable grounded
power cord connection
BACK PANEL
Page 7
Russound X5 Controller Streamer Ampli er Installation Manual 7
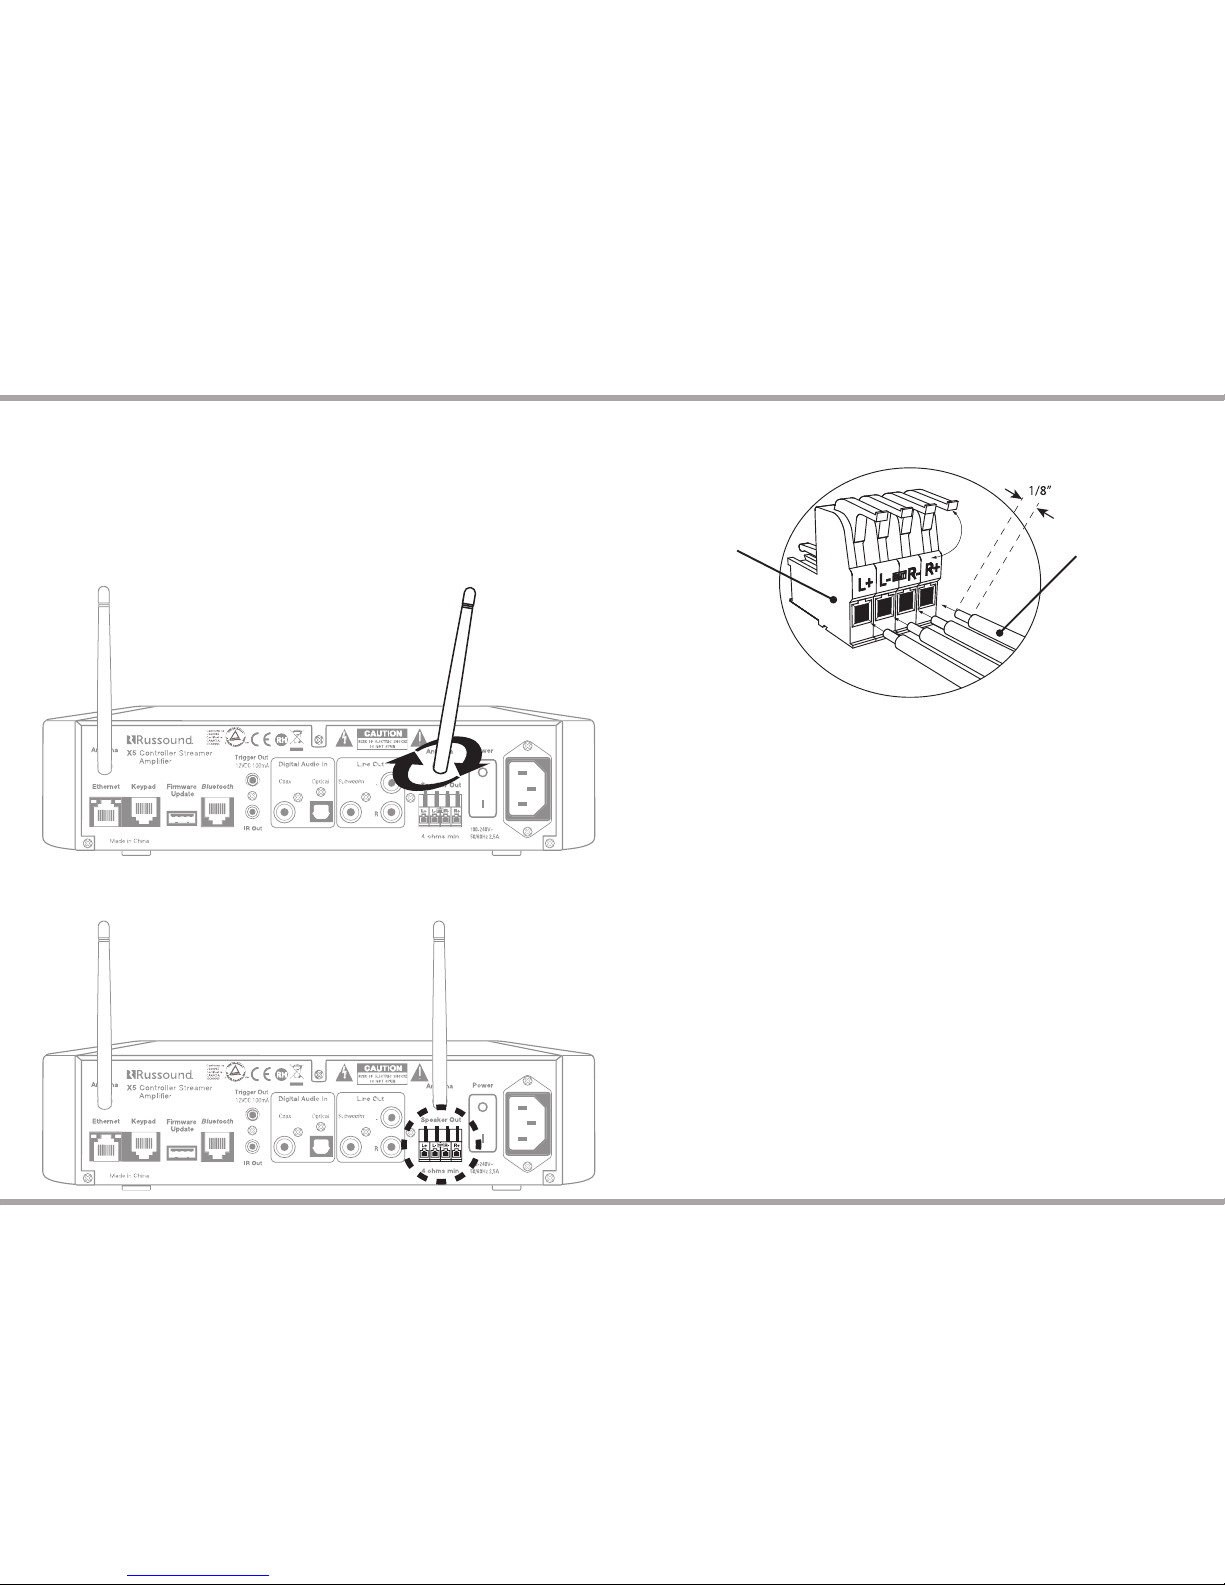
1. Unpack the X5 and all of its contents:
1 X5 Controller Streamer Ampli er
1 Power cord
2 Wi-Fi antennas
1 IR emitter
2. Screw the two antennas on the antennae posts as shown
3. Remove the detachable speaker connector from the X5
SETTING UP XSTREAM X5
4. Strip back 1/8” of the insulation on the speaker wire and twist the end of
each wire to tighten the bundle of copper strands on each wire.
5. Place the stripped end of the wire into the appropriate terminal and
collapse the latch. Check to make sure there are no strands of copper showing
and check the security of the wire in the connector. Between each terminal,
take caution to not let the wire fray or touch another connection.
6. Connect the other end of the wire to each speaker. Be careful to maintain
polarity.
7. Re-connect the detachable speaker terminal.
Snap connector
Speaker wires
Page 8
8 Russound X5 Controller Streamer Ampli er Installation Manual
1. Plug in power cable. (All other cables, including Ethernet should be
disconnected.) Locate and turn on power switch near AC inlet on the back of
the X5. The XStream X5 will turn on to Access Point Mode. Wait for yellow and
green lights to be solid. Like other Wi-Fi enabled devices, Access Point Mode
will allow you to directly connect to the X5 via Wi-Fi.
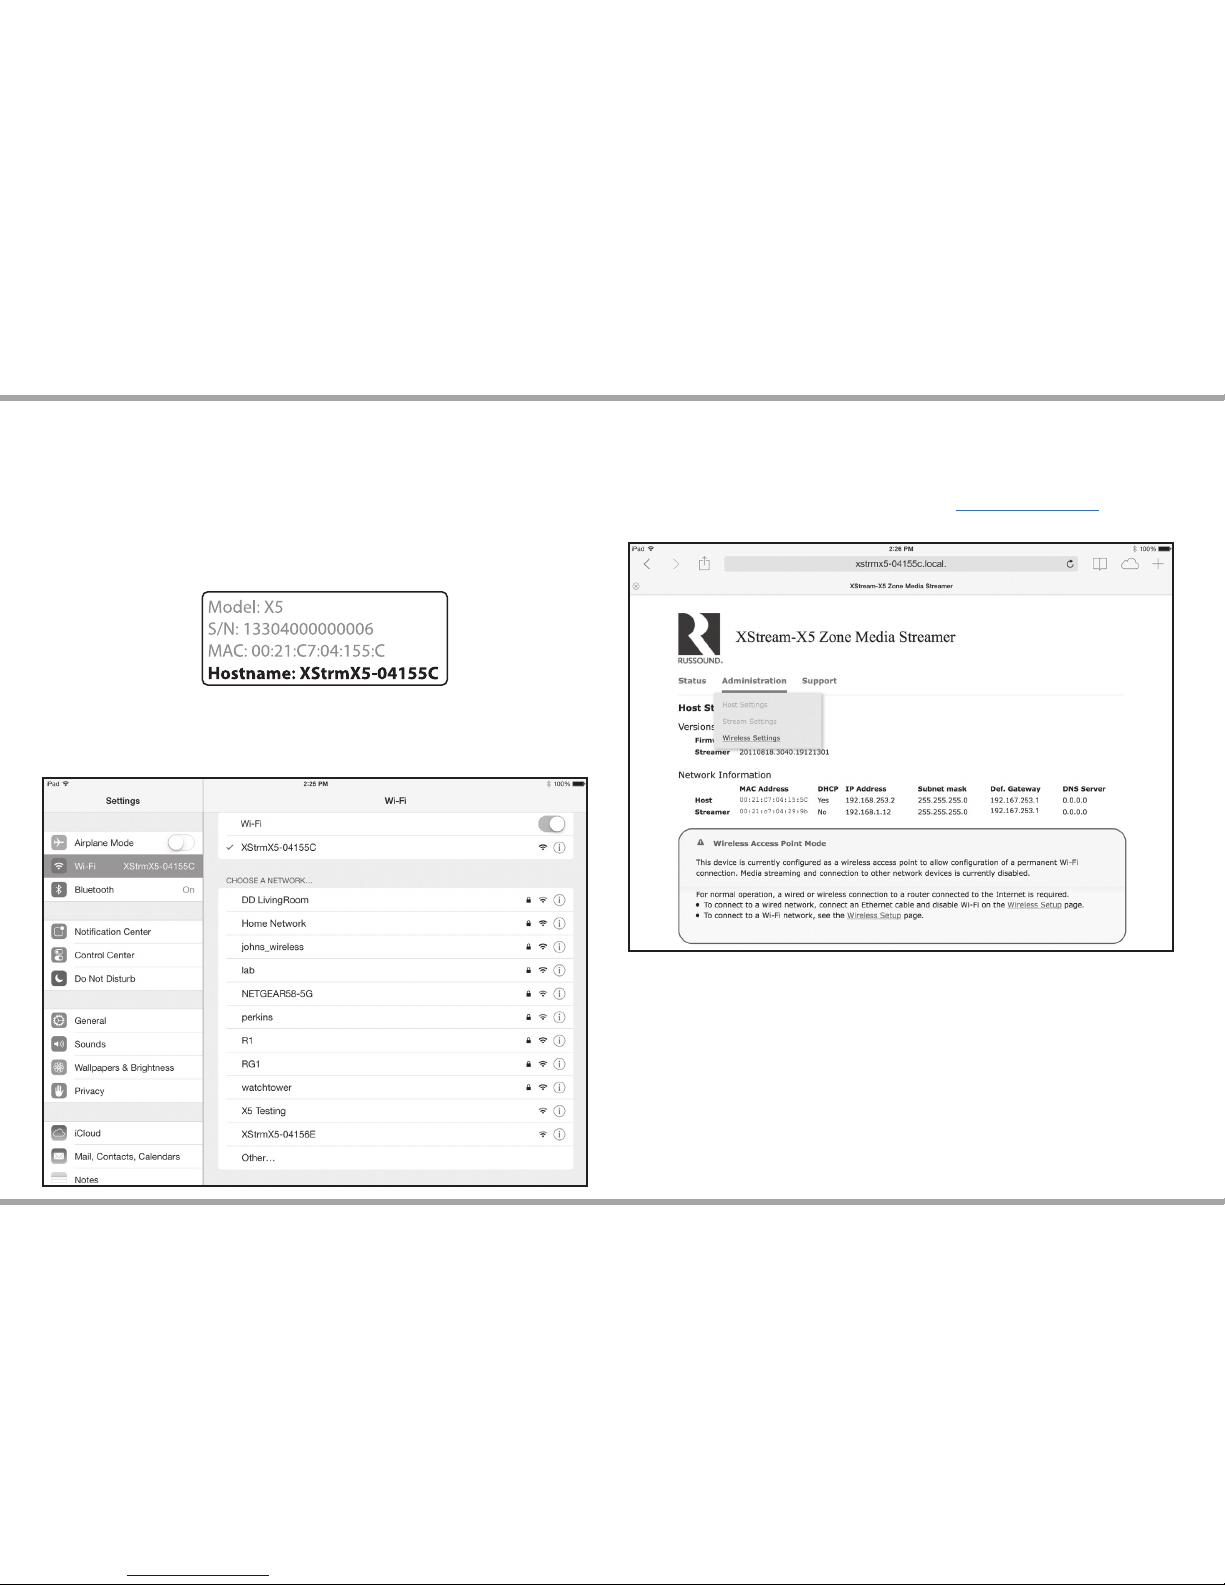
Refer to the sticker on bottom of X5 to nd host name.
3. Open a browser on mobile device or laptop. For iOS (Safari browser),
browse to http://XStrmX5-XXXXXX. local.
Again reference sticker on bottom of unit to nd host name.
Alternatively, for other browsers, browse to http://192.168.253.2
2. Find hostname in wireless access point list on mobile device and connect.
CONNECTING XSTREAM X5 TO YOUR HOME NETWORK
Sticker example:
Page 9
Russound X5 Controller Streamer Ampli er Installation Manual 9
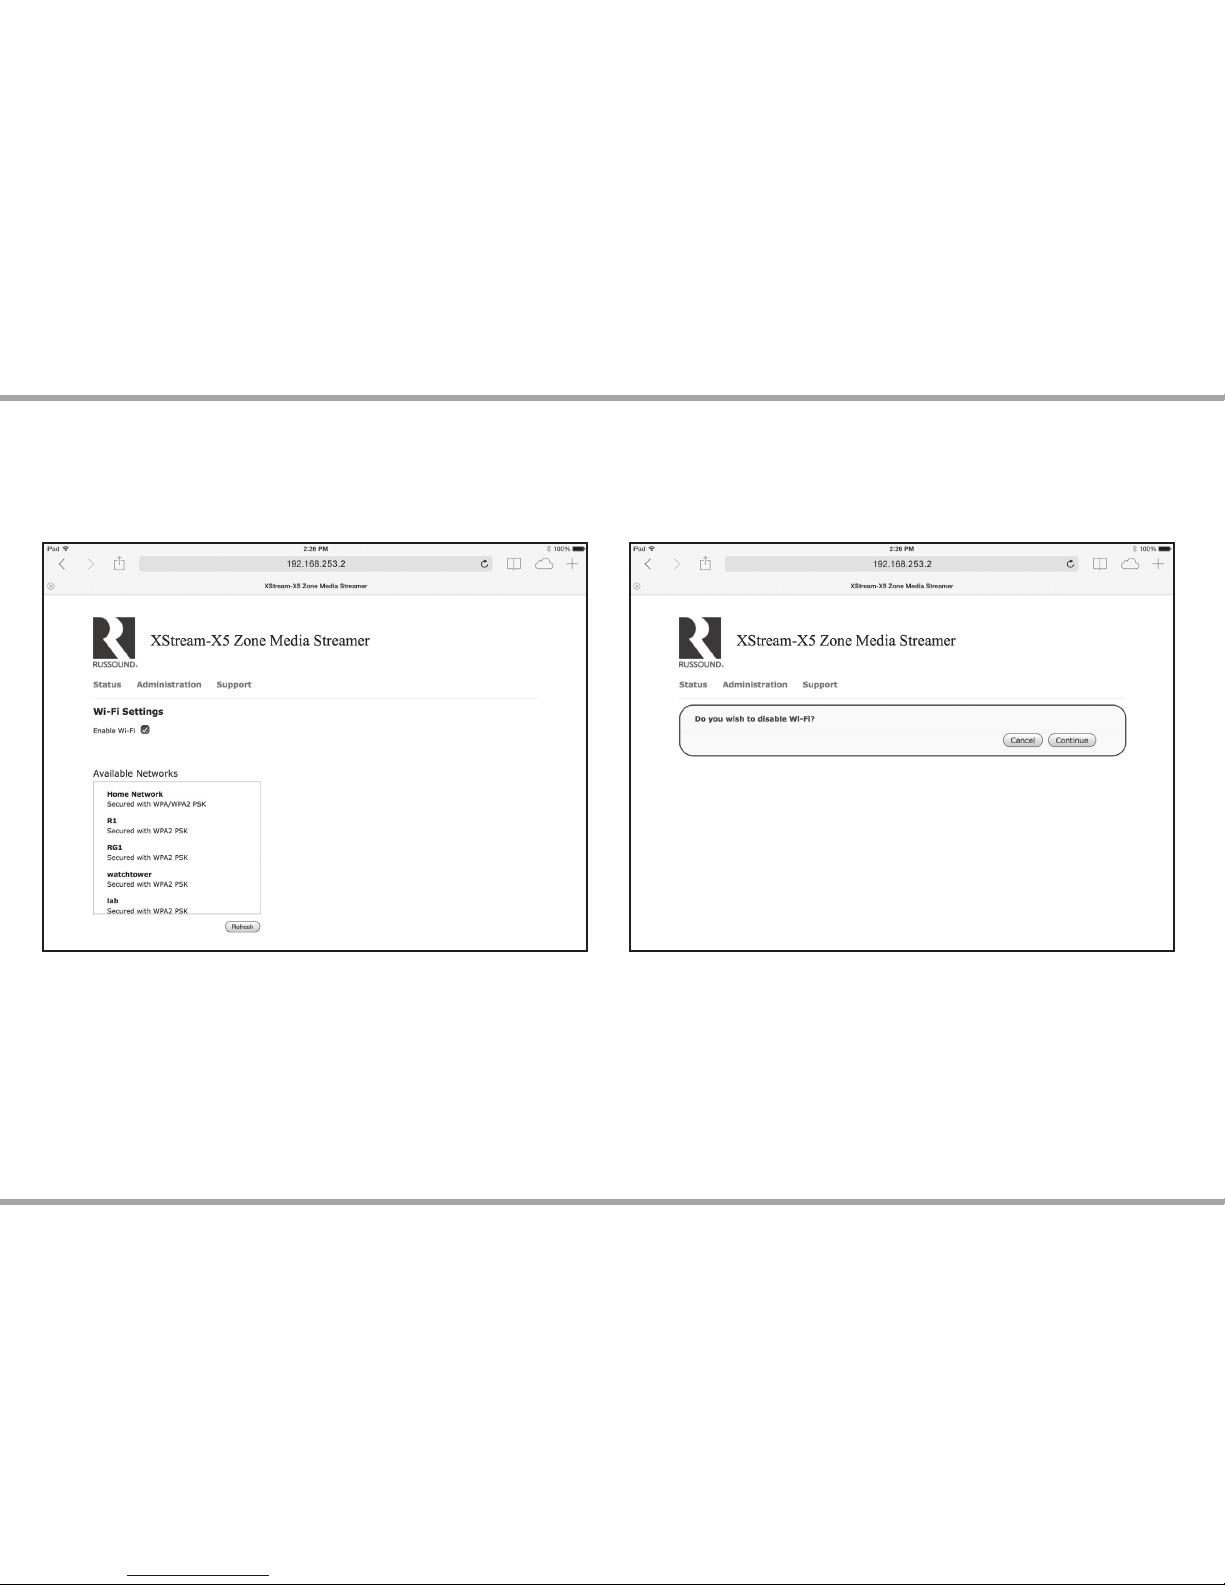
Connecting to a wired network
To connect to a wired network, de-select “Enable Wi-Fi” and press continue.
Attach Ethernet cable. The X5 will reboot in wired mode.
CONNECTING XSTREAM X5 TO YOUR HOME NETWORK
Page 10

10 Russound X5 Controller Streamer Ampli er Installation Manual
Connecting to a wireless network
To connect to a wireless network, pick the desired network from the list of
available Wi-Fi networks. If the Wi-Fi network does not broadcast its SSID, you
can also manually setup a wireless network by selecting “Add Wi-Fi” from the list.
Enter security information and press connect. On the con rmation screen,
press continue. The X5 will now connect to the new network; wait for green LED
to turn on solid. If yellow LED begins to blink, the X5 could not connect to the
speci ed network.
See instructions on page 45 for the Re-initializing Access Point Mode.
CONNECTING XSTREAM X5 TO YOUR HOME NETWORK
Follow the steps shown in the dialog box below
Page 11
Russound X5 Controller Streamer Ampli er Installation Manual 11
Setting AirPlay name
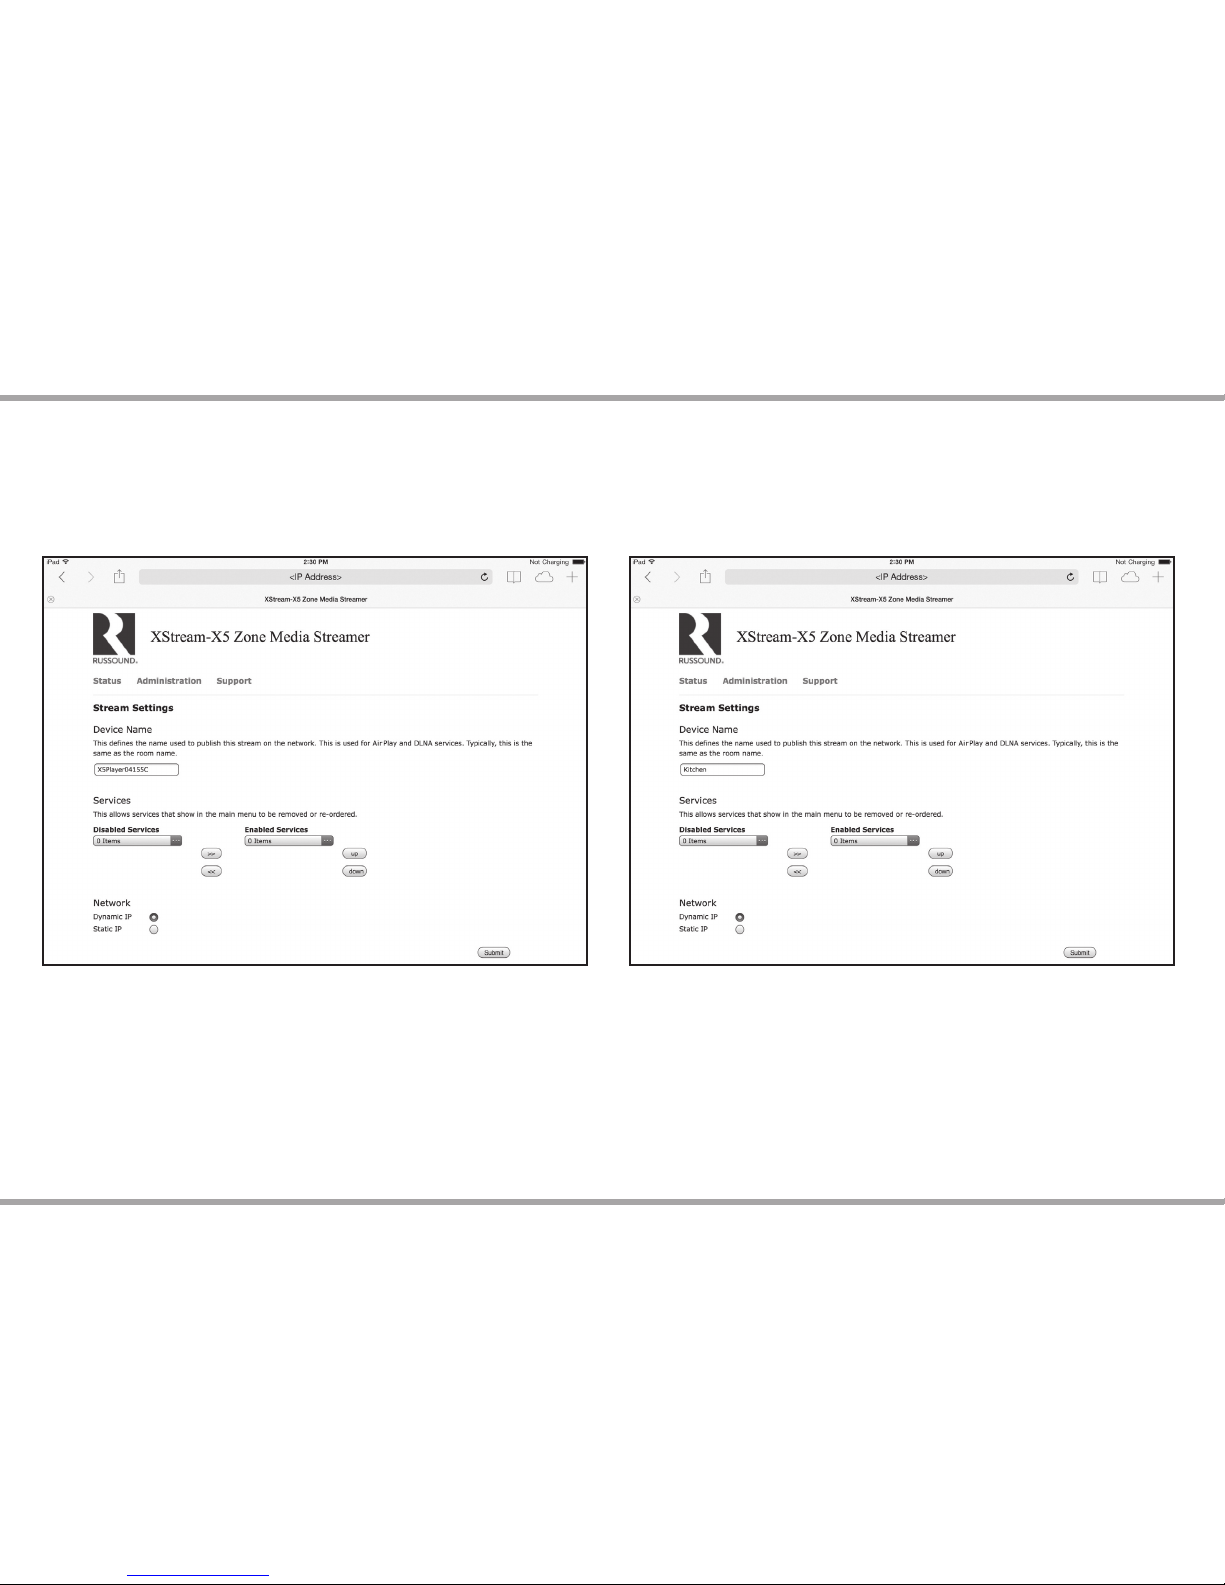
Once connected to the home network, you can set the AirPlay name by
changing the “Device Name” eld on the “Stream Settings” page. To view the
Stream Settings page, select Administration (from the dropdown menu), then
Stream Settings.
Now the XStream X5 can be fully con gured using Russound SCS (SCS)
con guration software.
SCS software o ers zone customization, local source set up, IR management and
power management options.
SCS is available to registered dealers only via download on the Russound Dealer
Portal.
CONNECTING XSTREAM X5 TO YOUR HOME NETWORK
Page 12
12 Russound X5 Controller Streamer Ampli er Installation Manual
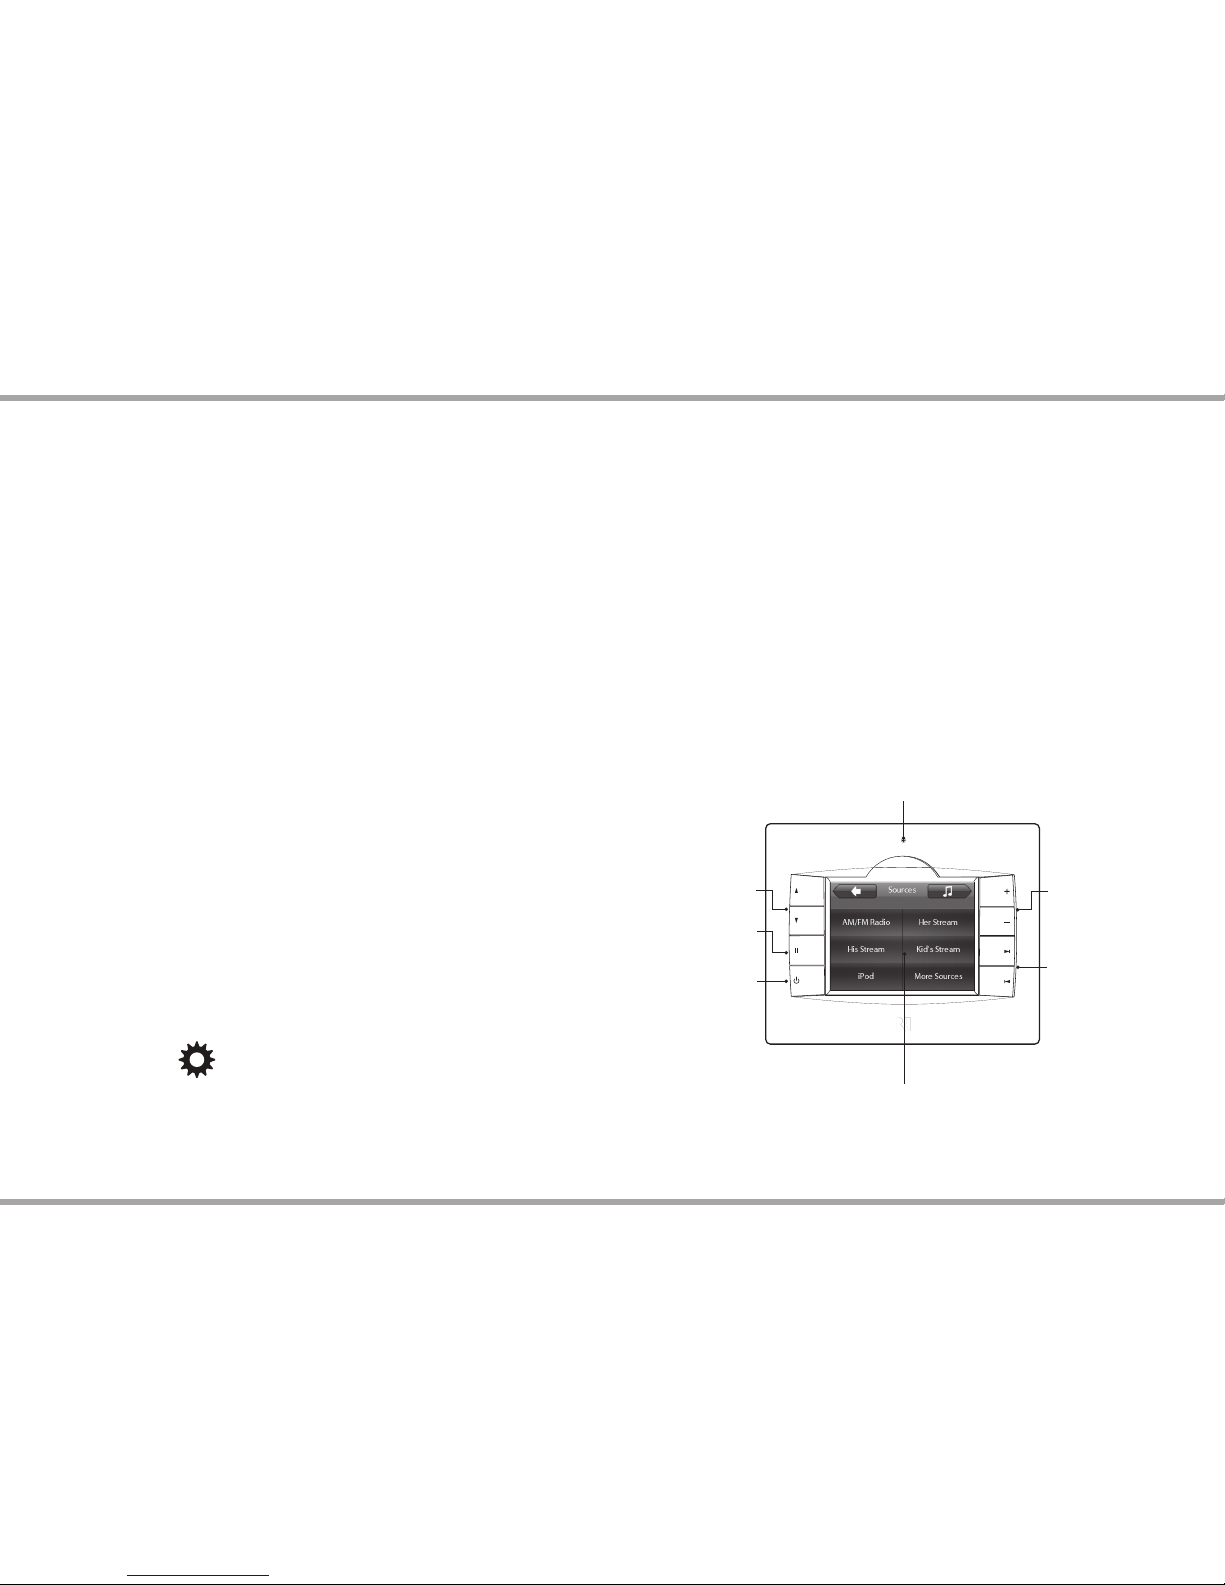
TS3 Touchscreen
The TS3 touchscreen is a full-featured color touchscreen that provides a
powerful user interface for Russound's C-Series and XStream X5 multiroom
audio systems. The user can easily access, control and enjoy music from
anywhere in the home. Housed in an attractive bezel, the TS3 features
beautifully rendered screens and elegantly simple displays.
The TS3 offers touch-sensitive screen templates for defined source controls,
with audible feedback and a detailed display of source functions. It also
features responsive hard buttons for most-often used commands and a front
IR receiver that can be disabled.
The TS3 is designed for use with C-Series controllers, XStream X5 and works
with Russound sources. The touchscreen displays valuable information such as
Channel, Artist, Song Title, Genre and more, all in real time. It supports custom
names for presets, banks, themes and favorites for a truly personal touch.
The TS3 makes a great addition to an installed Russound system, as it can be
installed into an existing double-gang junction box and built into your home.
Most of the controller, zone audio and source setup functions are performed
through SCS programming software; however, a few steps are completed
through the TS3 menus, such as setting, setting time and date, keypad
brightness, adjusting room audio properties and setting the associated zone.
Now Playing Screen
The main screen is the starting point for using the TS3. The touchscreen
displays the currently selected source info.
Source Screens
Each source device is controlled through screens designed specifically for
that source. Control choices and content menus are located on the source
screens, and additional functions may be available through the hard buttons.
Options Screens
(top right corner of screen)
Zone preferences can be set through the options screens. These include
sound control, features (DND), time and date, screen setup (brightness and
installer setup).
Hard Buttons
RUSSOUND USER INTERFACES
There are eight hard buttons that frame the touchscreen, each of which
perform a basic function.
IR Receiver
The IR receiver is hidden behind a tinted window at the top of the bezel and
transmits IR signals from a remote control back to the controller in order to
control the sources. This can be disabled if desired.
Touchscreen - Full color resistive touchscreen with
multi-sound feedback. Screen can be programmed
to go blank after a period of inactivity. Touching the
screen anywhere reactivates it.
Power -
Turns
keypad and
zone audio o
or on. Press and
hold to turn o /
on audio on all
enabled X5s on
the network.
TS3 Front Panel
Showing Source Selection Screen
Volume - Turn room
volume up or down
Pause - Pause/mute
for selected source
Next/Back - Go to
next or previous
selection
Plus/Minus - Adjust
setting for selected
source
IR Receiver - Receives IR
signals from remote controls.
Can be disabled if desired.
Page 13
Russound X5 Controller Streamer Ampli er Installation Manual 13
RUSSOUND USER INTERFACES
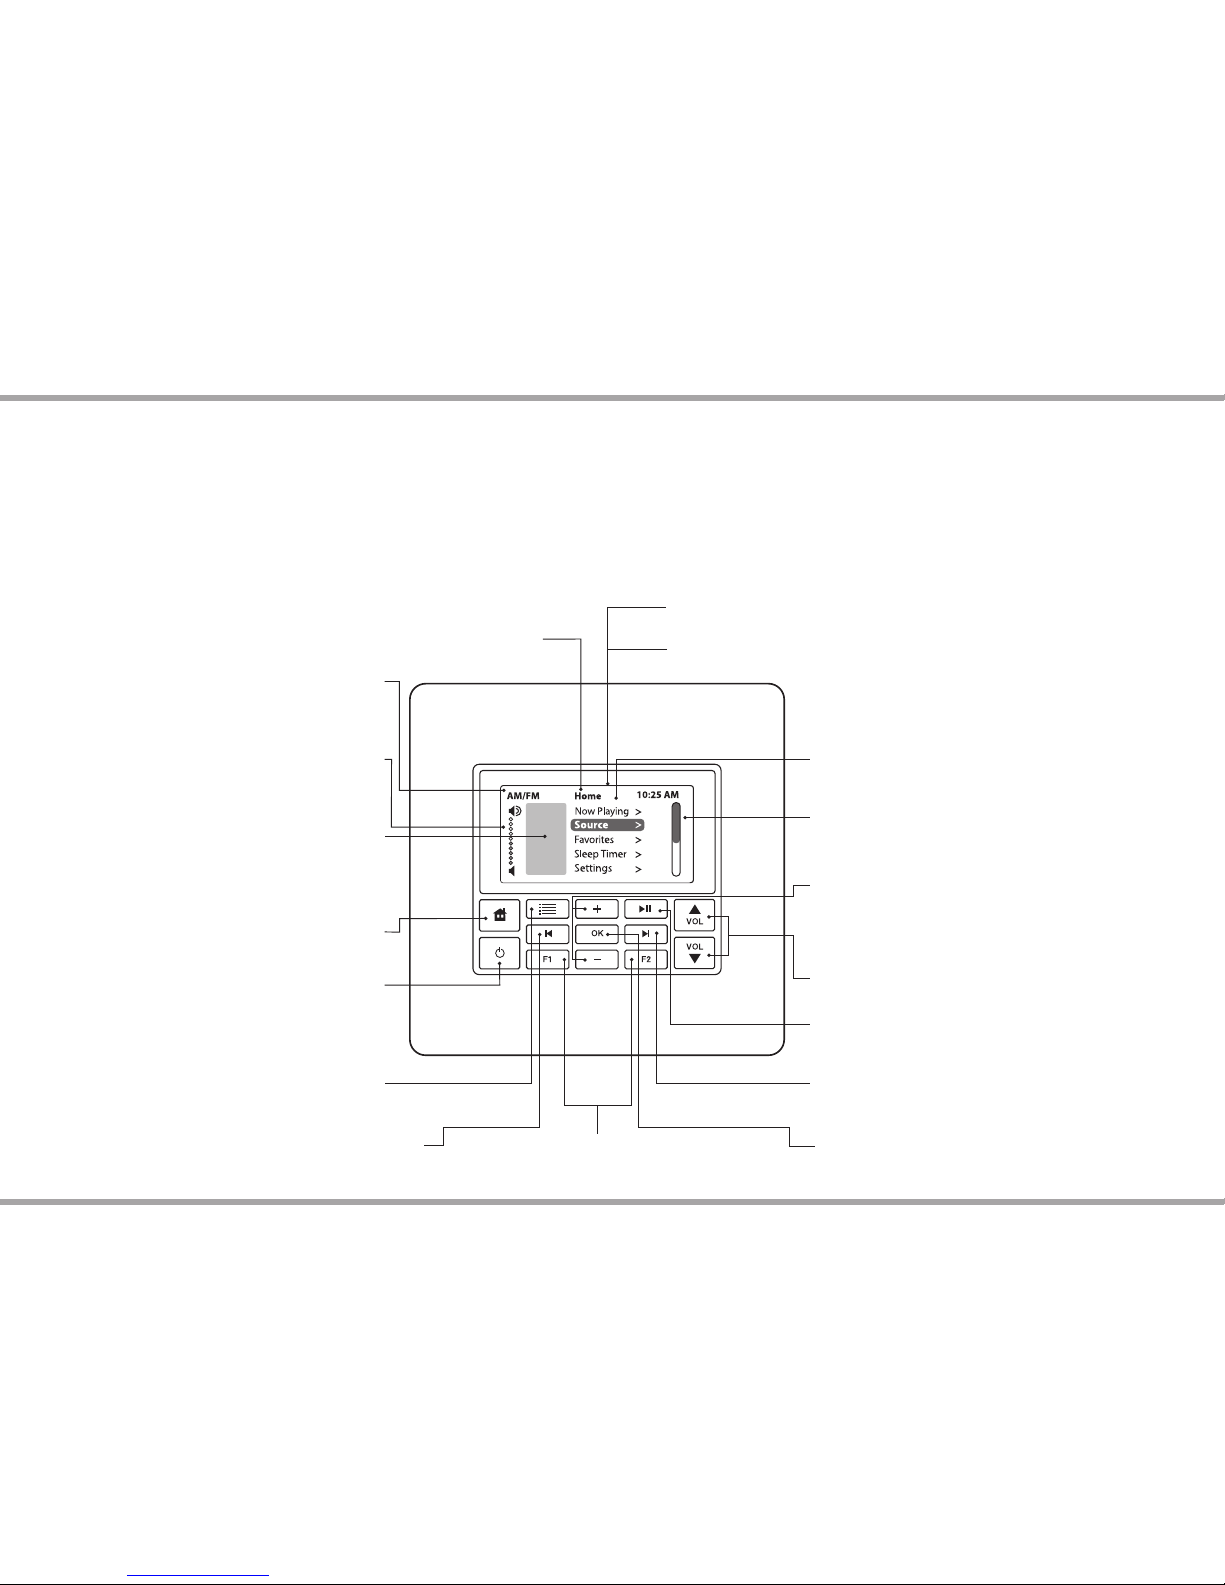
MDK-C6 Multiline Display Keypad
The MDK-C6's buttons and menus allow the user to easily nd and control
music sources and to make changes to system settings and room audio levels.
Thirteen backlit buttons access power on/o , music, volume up/down, menu
shortcuts and zone favorites. The OK button in the center activates a menu
choice and the navigation buttons allow you to move through menus and
lists. All music sources, audio adjustments and system settings are arranged
in menus and lists. The navigation buttons also act as source controls to select
next/previous song, etc., depending upon the type of source.
The keypad’s home screen, buttons and navigation buttons are described
below.
The main menu options include: Now Playing, Sources, Sleep Timer, Do Not
Disturb, and Settings. The Settings menu includes the audio, clock, display, and
installer options. The audio settings include bass, treble, balance, loudness,
and turn on volume.
Source name - Shows
you what source you are
listening to
Menu - Returns view to main
menu (for current source)
Menu - List of options
to choose from, with
highlighted item selected
Menu Navigation - Navigates
through menus, press (slow)
or press and hold (fast) to
move up/down a menu list
OK - Press to select highlighted item
from the menu, or access source list
from Now Playing
Previous - Navigates backwards through
menus or play previous selection
Scroll bar - Shows that more
menu choices are available
through scrolling
Home - Returns view to
the home screen
Status box - Shows
system status messages
Title bar - Current menu name
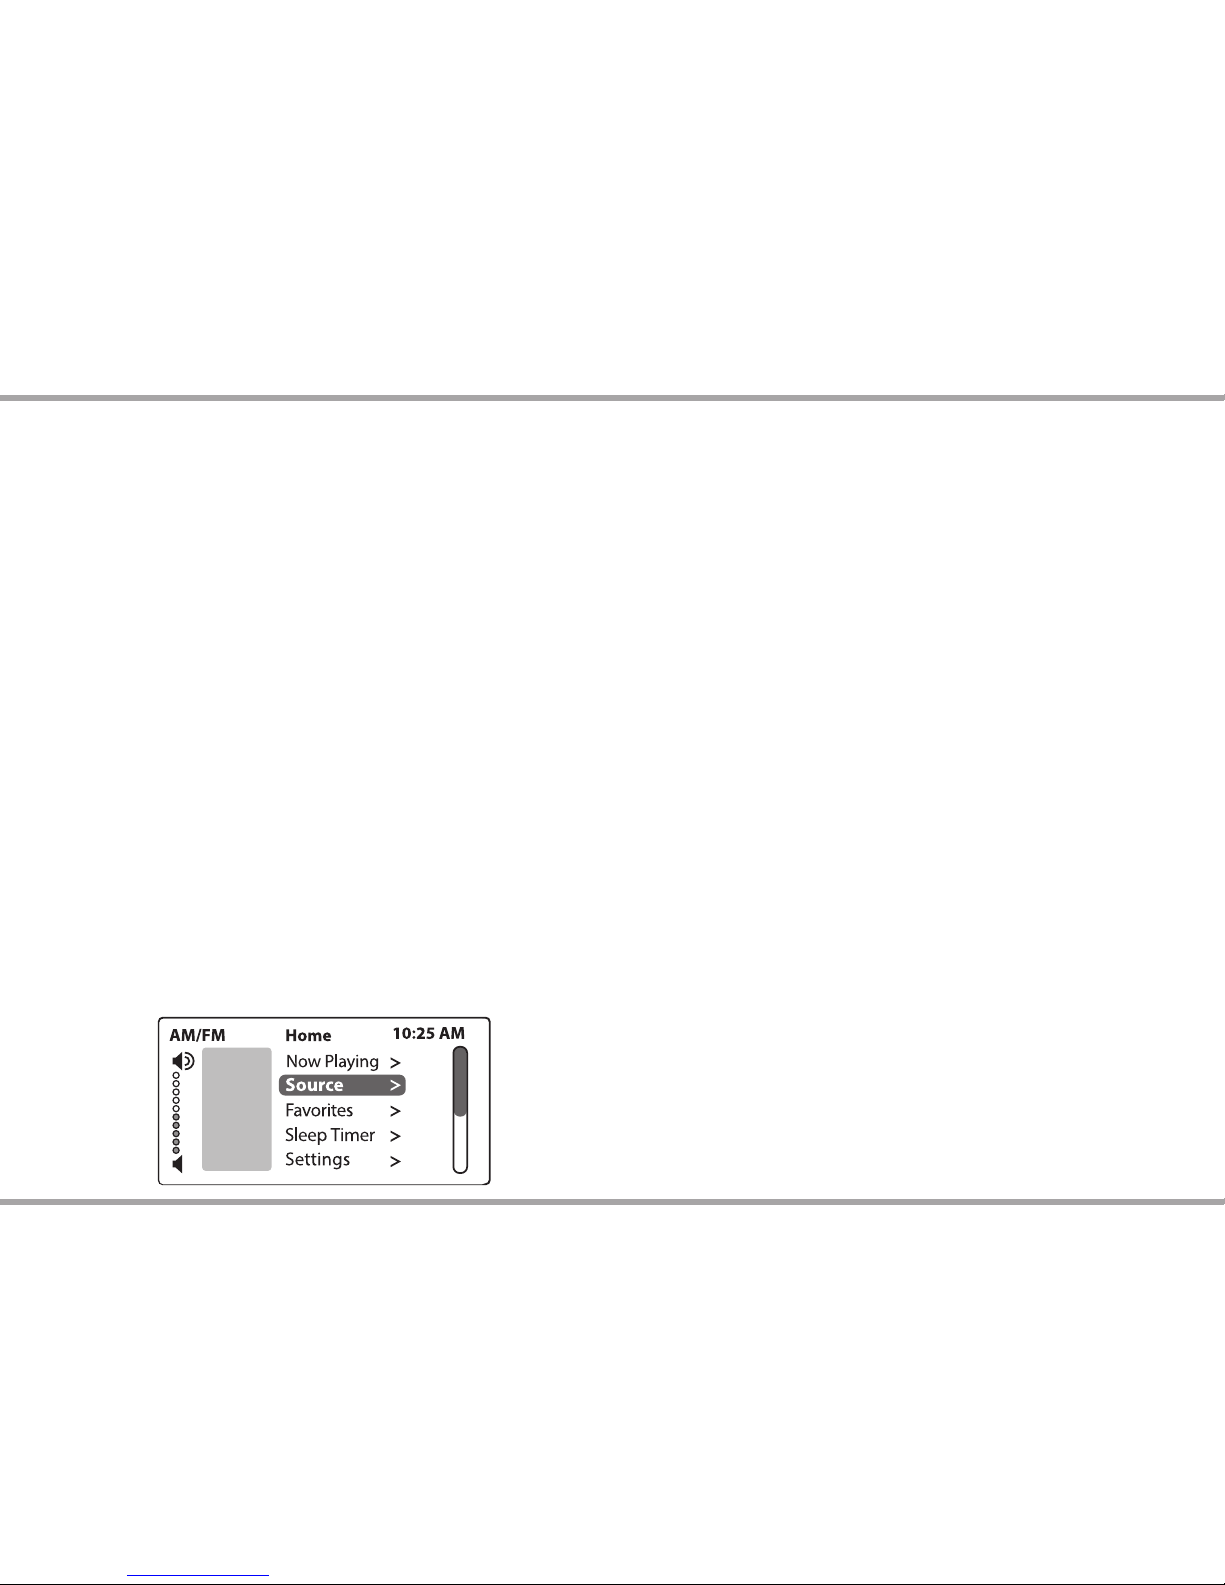
Volume indicator -
Shows volume level for
the room or if Mute is on
Volume - Adjusts the
volume up or down
Play/Pause - Toggles between
play and pause/mute
Power - Turns keypad and zone
audio o or on. Press and hold to
turn o /on audio on all enabled
X5s on the network.
IR Receiver - Receives IR signals from
remote controls
Forward - Press to forward through
menu or play next selection
LCD Screen - Gray scale graphic screen shows
source and system navigation screens
Favorites - The F1 and F2 buttons selects
Favorite 1 or Favorite 2 - preset user-selected
favorite settings per room
Page 14
14 Russound X5 Controller Streamer Ampli er Installation Manual
MDK-C6 Basic Operation
Turn on the zone - Press the power button on the keypad or press power on
the USRC remote control to turn on the zone and hear music. The zone will
default to the last playing source before being turned o . Press and hold the
power button (when ON) to turn on all the keypads.
Turn o the zone - Press the power button on the keypad or press the power
button on the USRC remote control to turn o the keypad and music. Press
and hold the power button (when OFF) to turn o all other keypads.
Volume adjustments - Press the volume up/down buttons on the side of the
keypad, or press the VOL +/- button on the USRC remote control.
Mute Audio - Press the mute button on the USRC.
Home Menu - Sources
From the home screen, select "Sources." A list of available audio sources
appears. Select a source, press OK, or press a numbered "Source" button on the
USRC remote control.
Once selected, choose music from that source. Each source has its own menu
and screens. Main menus list what is available: channels, genres, playlists,
songs, or artists.
Home Menu - Favorites
Favorites - Save a source or a radio station/channel as a favorite.
Add new - Tune to the music source you want to save as a favorite. From the
Favorites menu, select "Add New." Name the favorite using the +/- buttons
to move through the alphabet and the forward button to move to the next
character. Press the OK button to save.
Edit name - Choose the favorite to rename from the favorite menu select edit
and use the +/- buttons to scroll through the alphabet and the forward button
to move to the next character.
Delete favorite - Choose the favorite to be deleted, from the favorite manu
select delete and press the OK button to delete.
F1 and F2 buttons - The MDK-C6 features 2 zone speci c presets. These
presets can be selected at any time to recall source selection, favorite channel,
disc, etc. To store an F1 or F2 favorite preset, select a source to be stored. Press
and hold the desired F1 or F2 button until “F1 SAVED” or “F2 SAVED” is displayed
on the LCD panel. Now a press and release of the button will recall the favorite
preset. To set a favorite numbered disc or channel, use + or - to select a disc or
channel (e.g., channel 45). Wait for the keypad to show the source name, then
press and hold the F1 or F2 within 15 seconds of setting the numeric selection
to save the setting.
Note: Bluetoth will be available as a favorite at later time.
F1 and F2 buttons on MDK-C6 correspond with F1 and F2 buttons on the
USRC Remote Control.
RUSSOUND USER INTERFACES
Page 15
Russound X5 Controller Streamer Ampli er Installation Manual 15
Home Menu - Sleep Timer
You can set the timer so the zone turns o in one of the following increments:
15, 30, 45, or 60 minutes.
Installer Options
IR enable/disable - The default is Enabled. If an external IR receiver is used,
the keypad IR receiver should be disabled. From the main menu, select
"Settings," then "Installation," then IR Enable/Disable. Select "disable" and
exit back to the menu.
Diagnostics - The MDK-C6 provides rmware version information for
Controller 1 and the keypad. Network information such as Controller IP
and MAC address are also provided.
AM/FM
9:30 PM
Sleep Timer
After 15 minutes
Cancel
After 30 minutes
After 45 minutes
After 60 minutes
Home Menu - Settings
Audio - From the home screen, scroll to and select "settings," and choose
"audio settings." You’ll see items to adjust, such as bass, treble and balance.
Each selection has its own screen and shows levels for real-time adjustments.
Clock
Set time - From the clock menu, select "Set Time." Press the +/- buttons to
move through numbers. Press the |< or >| buttons to move the cursor and
press OK to save.
Set date - From the clock menu, select "Set Date." The date format is month/
day/year. Press the +/- buttons to move through numbers. Press the |< or
>| buttons to move the cursor, and press OK to save.
Clock format - From the home menu, select "Settings," then "Clock." Choose
"Clock Format," and select 12 hour (AM/PM) or 24 hour (1200) format.
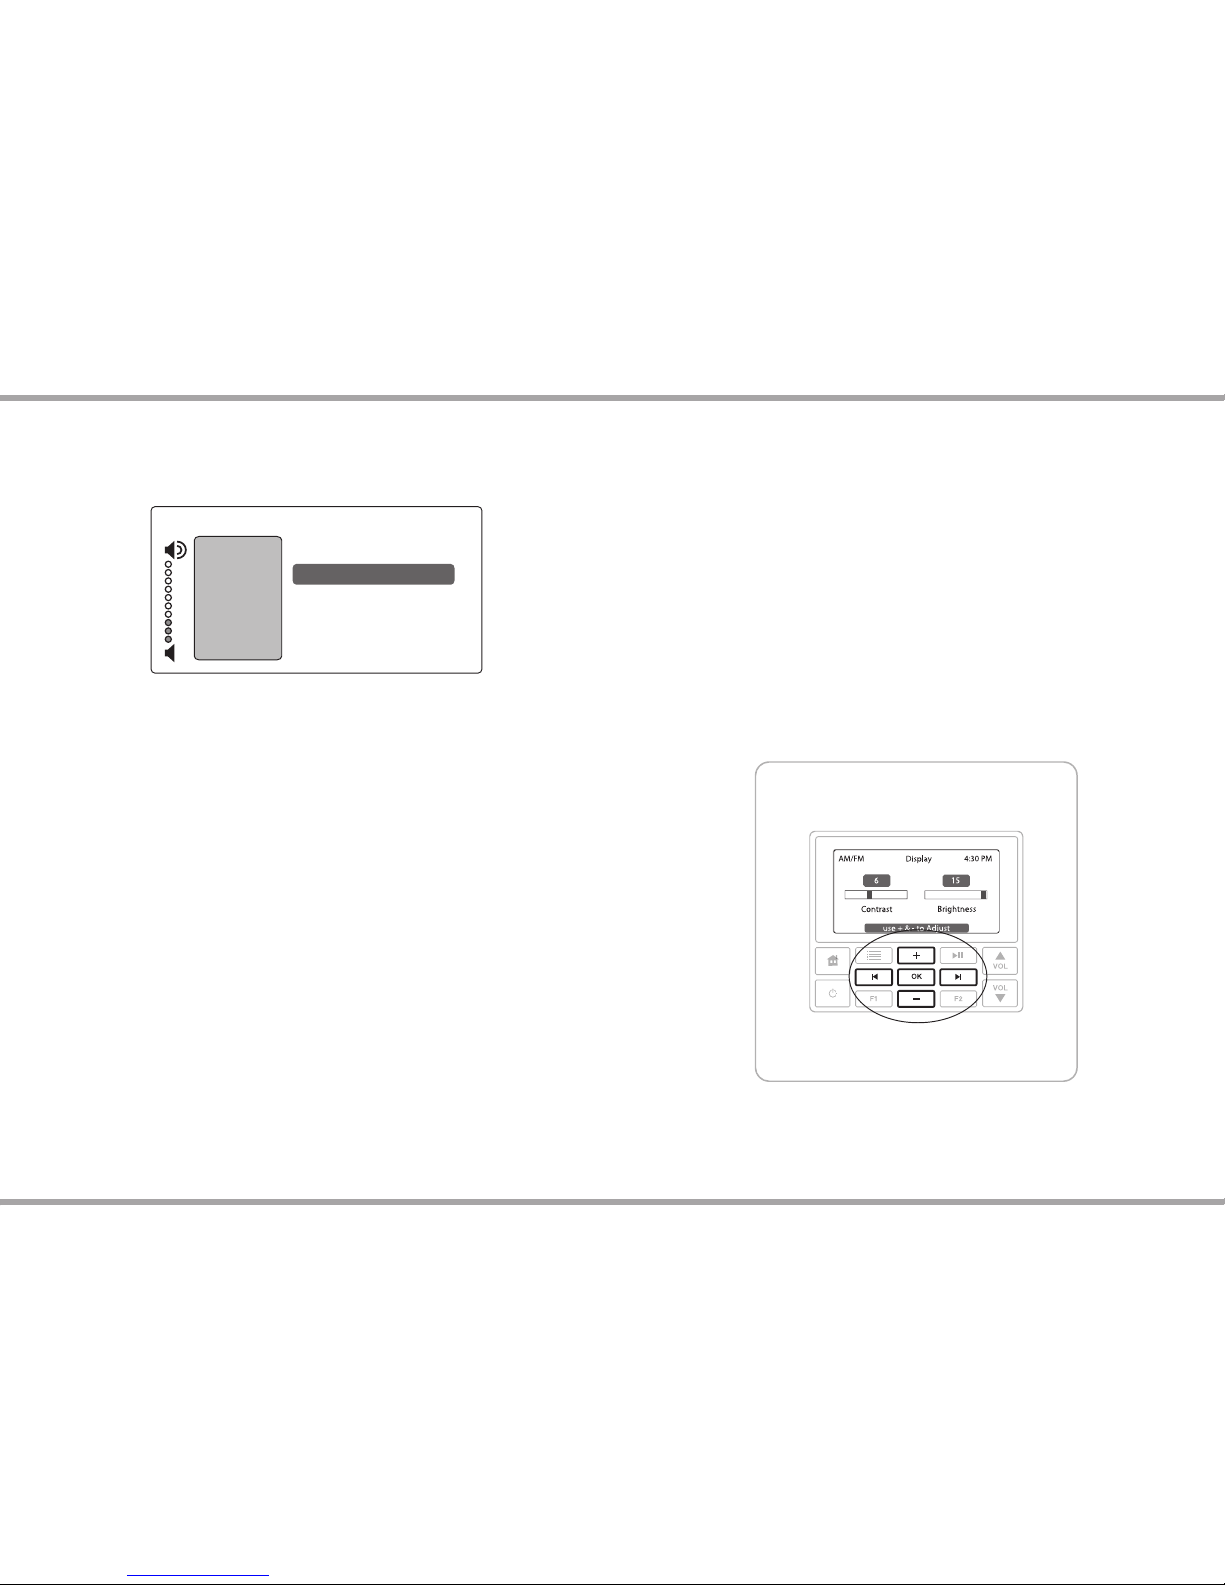
Display - Set the contrast and brightness for the keypad display. Use the
buttons (as shown) to move the cursor to the desired level.
RUSSOUND USER INTERFACES
Adjusting display contrast and brightness
Page 16

16 Russound X5 Controller Streamer Ampli er Installation Manual
RUSSOUND USER INTERFACES
SLK-1
The SLK-1 keypad is an in-wall, Decora® style single-gang keypad designed for
individual zone control of MCA-C3/MCA-C5 Multiroom Controller Ampli er and
XStream X5 product. (Wall plate not included).
2
3
5
4
6
7
8
1
System Info - SYS ON indicates other active zones and SHARED indicates the selected
source is in use in another zone.
LCD Panel - 5-character white backlit display shows source
name, volume and room status.
Volume Level - 21-segment volume level bars increase from
left to right to indicate volume level.
IR Con rmation/Loudness LED - Red LED blinks to con rm IR signal reception.
Volume UP/Down - Raises/ lowers the volume for the room.
Source Select - Press and release scrolls through the available sources.
Previous - Navigates backwards through menus or play previous selection.
Forward - Press to forward through menu or play next selection
Power - Turns room ON or OFF when pressed once, button remains lit when OFF if
any other zone in the system is ON.
IR RECEIVER - Receives IR signals and passes them to the controller and source
equipment. Also used when the keypad is operated using the USRC remote controls.
Favorite - Selects preset user selected favorite settings per room
Play/Pause - Toggle between play and pause
2
3
4
5
6
7
8
9
1
SLK-1 User Guide
The SLK-1 allows the user to select an audio source, adjust the volume level in the zone,
turn the zone on / o , and issue system-wide All On / All O commands.
To turn the zone on or o , press and release the power button. A press and hold while
in the On state will issue an All On command and a press and hold in the O state will
issue an All O command.
To select a source, press and release the source button to increment to the next available
source. The con gured source name will be displayed on the keypad's LCD panel.
Incremental volume adjustments can be made by either pressing and releasing
the volume up or down button, while pressing and holding will ramp the level until
released or the maximum / minimum level is reached. The volume level is displayed by
a bar graph at the bottom of the LCD panel and a numeric value is displayed during
adjustment.
The SLK-1 is designed for basic zone control. As such, it does not provide complete
control of connected sources or adjustment of zone audio properties such as Bass, Treble,
Loudness or Balance. These can be con gured through SCS Con guration Software.
The SLK-1 is an ideal companion for systems using the My Russound application on
supported hand-held devices.
The FAV button is a user favorite preset. The preset can be selected at any time to recall
source selection and volume.
To store a preset, select a source to be stored. Press and hold the Fav button until "F1
SAVED" is displayed on the LCD panel. Now a press and release will recall the favorite
preset. When used with the DMS-3.1, the current medial will always be saved (e.g.
SiriusXM station or internet radio station)
The FAV button corresponds to the F1 button on URSC remote.
Press
Volume Up
or Down
buttons to
adjust volume
level
Press and
release source
button to
scroll through
the available
sources
Red LED will
blink to indicate
IR remote
reception
9
Page 17

Russound X5 Controller Streamer Ampli er Installation Manual 17
Ventilation Requirements
Important: The XStream™ X5 should be situated so that its location or
position does not interfere with its proper ventilation. Do not block vents
above of the unit, as it requires ventilation for proper operation. Do not expose
to excessive dust, and do not allow dust to build up on the unit and block
vent holes. Do not place the XStream™ X5 above or below a heat-generating
component such as an audio ampli er.
Be sure to leave at least 2 inches of space to the sides of the unit with open air
ow above. A single-space rack mount vent or about 1.75 inches must be kept
clear above and below the unit.
Installation
The XStream™ X5 controller can be wall mounted, cabinet mounted or placed
on a shelf in an equipment rack. The controller will occupy very little space.
The side covers can be removed to reveal mounting tabs. Once mounted the
side panels can be repositioned to hide the mounting hardware. (See diagram
of removable side panels)
Note:
Mount side panels back in place before applying power.
Side Panel
Stud
Side Panel
INSTALLATION OVERVIEW
Page 18

18 Russound X5 Controller Streamer Ampli er Installation Manual
Electrical Power
The XStream™ X5 operates at 100-120VAC ~60 Hz or 220-240VAC ~50 Hz.
Voltage is selected automatically by the power supply and the appropriate
detachable power cord. It is recommended that the XStream™ X5 and the
source equipment be plugged into a dedicated 15-amp circuit. The power
switch for the unit is on the rear panel as shown.
Important Considerations
• Disconnect the power cord before making any connections to the
controller.
• Verify that all connections and polarity are correct.
• Keep all power cords away from all signal cables to prevent humming from
induced noise.
• Choose reliable signal cables and patch cords.
• Label all wires with the room location at both ends of the wire.
• Avoid running speaker wires or signal cables close to house electrical
wiring for any distance. If you have to run them parallel, make sure to space
the wires at least two feet from the AC line. If you need to cross an AC line it
should be at a 90° angle.
Do not connect the controller’s main power feed until all other
connections have been made and veri ed. Live connection or
removal of the keypad wiring or other wiring when the system
is powered can cause communication problems in the network.
Double-check terminations during each phase of the installation
to prevent accidental damage. Incorrect wiring is the number one
cause for non-warranty product damage.
INSTALLATION OVERVIEW
Page 19

Russound X5 Controller Streamer Ampli er Installation Manual 19
XStream™ X5 can be accessed from the source list or through a dedicated
button on keypads or touchscreen devices. The X5 stream will be displayed as
the name con gured through SCS (SCS) con guration software.
The MDK-C6 ‘Home’ button returns the user to the home menu for the X5
controller. The ‘Menu’ button enters the source menu while a second press
enters the X5 mode source selection menu.
After selecting a music selection from the source list, any currently playing
content will be displayed. Pressing the Menu button once will enter a currently
playing mode. If no mode is currently selected it will enter the main menu
for mode selection. When a menu is displayed, pressing the Previous button (
I<) will step back through the menu levels, Pressing Next (>I) or OK will enter
the menu selection. Use Plus (+) and Minus (-) buttons to move up and down
within a menu list. Navigation within each mode is similar in many cases.
Some di erences can exist as the particular music service provider.
Turn on the zone - Press the power button on the keypad, App or the USRC
remote control to turn on the zone and listen to music from the last source
listened to from the previous session. Press and hold the power button (when
ON) to turn on all the zones.
Turn o the zone - Press the power button on the keypad, App or the USRC
remote control to turn o the zone and music. Press and hold the power
button (when OFF) to turn o all other zones
Volume adjustments - Press the Volume up/down buttons on the side of the
keypad, or press and hold the VOL +/- button on the USRC remote control to
change to the desired volume level.
Mute Audio - Press the Mute button on the USRC.
Home Menu - Sources
From the home screen, select "Sources." A list of available audio sources
appears. Select a source, or press a numbered "Source" button on the USRC
remote control.
Once selected, choose music from that source. Each source has its own menu
and screens. Main menus list what is available: channels, genres, playlists,
songs, or artists.
BASIC OPERATION
Home Menu - Favorites
Favorites - Save a source or a radio station/channel as a favorite.
Add new - Select the music source you want to save as a favorite. From the
Favorites menu, select "Add New." Name the favorite using the +/- buttons
to move through the alphabet and the forward button to move to the next
character. Press the OK button to save.
Edit name - Choose the favorite to rename and use the +/- buttons to scroll
through the alphabet and the forward button to move to the next character.
Delete favorite - Choose the favorite to be deleted, press the OK button to
delete.
F1 and F2 buttons - The MDK-C6 features 2 zone speci c presets.
These presets can be selected at any time to recall source selection, favorite
channel, disc, etc. To store an F1 or F2 favorite preset: rst, adjust the room
settings and select a source to be stored.
Press and hold the desired F1 or F2 button until “F1 SAVED” or “F2 SAVED” is
displayed on the LCD panel. Now a press and release of the button will recall
the favorite preset. To set a favorite numbered disc or channel, use + or - to
select a disc or channel (e.g., channel 45). Wait for the keypad to show the
source name, then press and hold the F1 or F2 within 15 seconds of setting the
numeric selection to save the setting. F1 and F2 buttons on MDK-C6.
Note: Bluetoth will be available as a favorite at later time.
Main Menu - Sleep Timer
You can set the timer so the zone turns o in one of the following increments:
15, 30, 45, or 60 minutes.
Page 20

20 Russound X5 Controller Streamer Ampli er Installation Manual
Settings
Audio - From the home screen, scroll to and select "settings," and choose
"audio settings." You’ll see items to adjust, such as bass, treble and balance.
Each selection has its own screen and shows levels for real-time adjustments.
Clock
• Set Time - From the Clock menu, select "Set Time." Press the +/- buttons to
move through numbers. Press the |< or >| buttons to move the cursor and
press OK to save.
• Set Date - From the Clock menu, select "Set Date." The date format is month/
day/year. Press the +/- buttons to move through numbers. Press the |< or >|
buttons to move the cursor, and press OK to save.
• Clock Format - From the home menu, select "Settings," then "Clock." Choose
"Clock Format," and select 12 hour (AM/PM) or 24 hour (1200) format.
Display - Set the contrast and brightness for the keypad display. Use the
buttons to move the cursor to the desired level.
Installer Options
• Diagnostics (Version) - This screen displays rmware versions for the
controller and the keypad, and the keypad's boot loader version.
• IR Enable/Disable - The default is enabled. If an external IR receiver is used,
the keypad IR receiver should be disabled. From the home menu, select
"Settings," then "Installation," then IR Enable/Disable. Select "disable" and exit
back to the menu.
• Network Settings - This screen displays an IP and MAC address for the
XStream X5 when the controller is connected to a network. This screen also
provides diagnostic messages when IP assignment is incomplete. From the
Home screen, choose "Settings", then "Installation." From the Installation menu,
choose "Network Settings" to see the controller’s IP address and MAC address.
BASIC OPERATION
Page 21

Russound X5 Controller Streamer Ampli er Installation Manual 21
LISTENING TO AIRPLAY STREAMING
The XStream™ X5 has Apple’s AirPlay technology built into the streamer.
AirPlay works over your Wi-Fi network. Using your Wi-Fi, high quality audio
content can be sent wirelessly to any X5 powered room in the system. With
AirPlay, your iOS device becomes an extension of each X5. From iTunes, you
can also simultaneously stream to multiple X5 devices. Just choose multiple
X5 powered rooms from the AirPlay menu. It’s that simple!
AirPlay also streams more than just music to your X5 device. It shares
metadata and simple control commands from your iOS device. AirPlay is
completely integrated and simple to use.
iPhone 5 iOS 7 example:
Open your music app and chose an artist from your playlist.
Using the swipe feature in iOS 7,
swipe from the bottom of the screen
to the top of the screen to reveal the
AirPlay menu.
Press the AirPlay menu button
to reveal a list of AirPlay capable
devices. Your X5 devices will appear
in this box as the X5 room name or
the default MAC address. Choose
the appropriate X5 device and music
will begin playing. If you have a
connected keypad, the keypad will
show the metadata and controls
such as volume up and down can
now be controlled bi-directionally
between the keypad and iOS device.
Page 22

22 Russound X5 Controller Streamer Ampli er Installation Manual
LISTENING TO PANDORA® INTERNET RADIO
Pandora provides a customized experience allowing you to create up to 100
stations based on your musical preferences. You can access the same Pandora
account on all - network connected - X5 streams.
To listen to Pandora, you will need to subscribe to Pandora Radio service
and obtain a valid username and password. This is done easily by accessing
the Pandora Radio web-site to create either a free or paid account. The X5 will
allow you to login to Pandora and start your listening experience. If you have
not created any stations prior to logging into the X5, you will be prompted to
do so after entering the Pandora menu option.
You can now play any Pandora stations that exist in your library as well as
using the options available to create new stations using any of these three
features.
• Create New Station: this allows you to search by artists, song titles, and
genres.
• New Station from Track: this will create a new station based on the song
that is currently playing
• New Station from Artist: this will create a new station based on the artist
that is currently playing
You will have the ability to rate songs by giving them a ‘Thumbs Up’ or
‘Thumbs Down’. Giving a song thumbs up will cause Pandora to play that song
more often on a particular station. Give a song a ‘Thumbs Down’ will cause
Pandora to remove the song from being played on a particular station. You
will also have access to other Pandora features such as bookmarking tracks,
putting tracks on the shelf for a while, renaming stations, deleting stations, and
nding out more information about why a track is playing.
NOTE: When using the MDK-C6 keypads, you will need to press the Previous
(|<) button in order to access the Pandora Options menu.
TS3 Menu for X5
TS3 Menu Navigation for X5
Page
Indicators
Back Button
Now Playing
Button
Page 23

Russound X5 Controller Streamer Ampli er Installation Manual 23
LISTENING TO PANDORA® INTERNET RADIO
SLK-1 Menu Navigation for X5
MyRussound App Menu for X5
Press
Volume Up
or Down buttons to
adjust volume level
Press and release source
button to scroll through
the available sources
Red LED will blink to
indicate IR remote
reception
1. Screen Name / Current Mode / Menu Name
2. SiriusXM Channel Category
3. Channel Number and Name
4. Artist Name
5. Song Name
Stream 1 2:03 PM
Pandora
Shinedown Radio
use for options
Shinedown
Amaryllis
For My Sake
1
2
4
3
5
1. Screen Name / Current Mode / Menu Name
2. From a Now Playing screen, rst press enters mode speci c
menu, second press enters mode selection menu
3. Return to the Home Menu
4. Move back to previous menu level
5. Move down in menu list
6. Move up in menu list
7. Enters a sub-menu (as indicated by > next to a menu list item)
8. Selects item chosen in menu list or enters a sub-menu
MDK-C6 Menu Navigation for X5
1
2
5
3
4
6
7
8
Page 24

24 Russound X5 Controller Streamer Ampli er Installation Manual
SiriusXM Internet radio permits one instance of streaming content per
subscription. So while, the same user account credentials can be entered
into all streaming modules of the multiple X5 products, only one can stream
content at any given time. Selection from another streaming module will
disconnect prior instances of SiriusXM internet radio streaming. Once account
credentials are entered, they are saved. After logging out the username and
password can be cleared from the log in screen to prevent unwanted access.
SiriusXM channels are ltered by categories so the user will rst be prompted
for the selection of the category, then the list of all channels within that
category will be presented for selection.
To listen to SiriusXM Internet Radio, you’ll need to subscribe to SiriusXM
Internet Radio service and obtain a username and password. SiriusXM Internet
Radio is available to residents of the United States and Canada.
SiriusXM Internet Radio delivers a variety of commercial-free music including
Pop, Rock, Country, R&B, Hip-Hop, Jazz, Classical and much more, plus expert
sports talk and analysis. You also get exclusive entertainment, talk, comedy,
family programming, local tra c and weather and news from your most
trusted sources
There are a variety of programming packages available, including the option
of adding “The Best of XM” programming to the SiriusXM Internet Radio
service. “The Best of XM” service is not available to Sirius Canada subscribers at
this time. Please check with Sirius Canada for any updates using the numbers
and web address below.
Family friendly packages are also available to restrict channels that feature
mature programming.
To subscribe to SiriusXM Internet Radio, U.S. customers should visit
www.sirius.com/internetradio
or call 1-888-539-SIRI (1-888-539-7474).
Canadian customers should visit www.siriuscanada.ca
Current XM Radio Online subscribers will need to log into the XM online
account manager and update their password in order for their credentials to
work on a SiriusXM Internet Radio compatible device. If the username is over
50 character subscribers need to update the username on the same screen.
LISTENING TO SIRIUSXM® INTERNET RADIO
TS3 Menu Navigation for X5
Page
Indicators
Back Button
Now Playing
Button
TS3 Menu for X5
Page 25

Russound X5 Controller Streamer Ampli er Installation Manual 25
LISTENING TO SIRIUSXM™ INTERNET RADIO
Stream 1
12:30 PM
26: Classic Vinyl
use + & – for channel
Rock
Derek & The Dominos
Bell Bottom Blues
SiriusXM
1. Screen Name / Current Mode / Menu Name
2. SiriusXM Channel Category
3. Channel Number and Name
4. Artist Name
5. Song Name
MyRussound App Menu for X5
1
2
4
3
5
SLK1 Menu Navigation for X5
Press
Volume Up
or Down buttons to
adjust volume level
Press and release source
button to scroll through
the available sources
Red LED will blink to
indicate IR remote
reception
1. Screen Name / Current Mode / Menu Name
2. From a Now Playing screen, rst press enters mode speci c
menu, second press enters mode selection menu
3. Return to the Home Menu
4. Move back to previous menu level
5. Move down in menu list
6. Move up in menu list
7. Enters a sub-menu (as indicated by > next to a menu list item)
8. Selects item chosen in menu list or enters a sub-menu
MDK-C6 Menu Navigation for X5
1
2
5
3
4
6
7
8
Page 26

26 Russound X5 Controller Streamer Ampli er Installation Manual
vTuner Internet Radio can be accessed on any through any supported user
interface. vTuner Internet Radio provides access to thousands of internet
radio stations and Podcasts from around the world. Users can lter
content by Local Stations, Location, Genre, New Stations, Most Popular,
and Favorites.
Users can access the online web portal at http://russound.vtuner.com
Using the X5 and vTuner, users can search stations & podcasts, create
favorites, and even add stations not listed in the vTuner database.
Users can create an account for the vTuner online web portal, users will
need to provide the Access Code of their DMS-3.1 as well as a valid email
address and a password. Select the “Get access code” option within the
Internet Radio menu to display the access code.
LISTENING TO vTUNER INTERNET RADIO
TS3 Menu Navigation for X5
Page
Indicators
Back Button
Now Playing
Button
TS3 Menu for X5
Page 27

Russound X5 Controller Streamer Ampli er Installation Manual 27
Stream 3
12:30 PM
26: Radio Paloma
use + & – for channel
Rock
Mikky Ekkou
Rihanna ft.
vTuner
1. Screen Name / Current Mode / Menu Name
2. SiriusXM Channel Category
3. Channel Number and Name
4. Artist Name
5. Song Name
MyRussound App Menu for X5
1
2
4
3
5
SLK1 Menu Navigation for X5
Press
Volume Up
or Down buttons to
adjust volume level
Press and release source
button to scroll through
the available sources
Red LED will blink to
indicate IR remote
reception
1. Screen Name / Current Mode / Menu Name
2. From a Now Playing screen, rst press enters mode speci c
menu, second press enters mode selection menu
3. Return to the Home Menu
4. Move back to previous menu level
5. Move down in menu list
6. Move up in menu list
7. Enters a sub-menu (as indicated by > next to a menu list item)
8. Selects item chosen in menu list or enters a sub-menu
MDK-C6 Menu Navigation for X5
1
2
5
3
4
6
7
8
LISTENING TO vTUNER INTERNET RADIO
Page 28

28 Russound X5 Controller Streamer Ampli er Installation Manual
TuneIn™ Internet Radio can be accessed on the X5 and is supported through
all supported user interfaces. TuneIn™ lets you listen to the world’s radio from
the any X5 connected in the home. Whether you love sports, music, news, or
comedy, TuneIn gives you the best of what’s live with 70,000 radio stations as
well as two million on-demand programs. Over 40 million listeners use TuneIn
every month, across 200 platforms worldwide. You do not need to subscribe to
TuneIn radio with the X5 to enjoy content streaming from the cloud. Listening
is easy and the choices are abundant.
For more information on TuneIn and to access online, visit at http://www.
tunein.com
LISTENING TO TUNEIN™ INTERNET RADIO
TS3 Menu Navigation for X5
Page
Indicators
Back Button
Now Playing
Button
TS3 Menu for X5
Page 29

Russound X5 Controller Streamer Ampli er Installation Manual 29
LISTENING TO TUNEIN™ INTERNET RADIO
1. Screen Name / Current Mode / Menu Name
2. Last breadcrumb of current selection
3. Station Name
4. Album Name
5. Song Name
MyRussound App Menu for X5
Stream 1
12:30 PM
WUNH 91.3 FM
use + & + for station
College
The Breeders
Cannonball
Internet Radio
1
2
4
3
5
SLK1 Menu Navigation for X5
Press
Volume Up
or Down buttons to
adjust volume level
Press and release source
button to scroll through
the available sources
Red LED will blink to
indicate IR remote
reception
1. Screen Name / Current Mode / Menu Name
2. From a Now Playing screen, rst press enters mode speci c
menu, second press enters mode selection menu
3. Return to the Home Menu
4. Move back to previous menu level
5. Move down in menu list
6. Move up in menu list
7. Enters a sub-menu (as indicated by > next to a menu list item)
8. Selects item chosen in menu list or enters a sub-menu
MDK-C6 Menu Navigation for X5
1
2
5
3
4
6
7
8
Page 30

30 Russound X5 Controller Streamer Ampli er Installation Manual
The X5 can access audio les that reside on a network connected computer
or storage device that is UPnP/DLNA compliant. The X5 can play various
le formats which are listed in the technical speci cations in this manual.
However, any content that is protected with DRM (Digital Rights Management)
can’t be played back. AAC and AAC+ le formats which are used by Apple for
music purchased through iTunes can also be played. AirPlay can be used for
streaming content from iTunes media player on a computer. Users can also
install UPnP/DLNA media server software on their computers to allow access
and control of iTunes library content from a Russound user interface instead
of only having AirPlay select and control what is listened to from within iTunes.
LISTENING TO NETWORK AUDIO FILES MEDIA SERVER
TS3 Menu Navigation for X5
Page
Indicators
Back Button
Now Playing
Button
TS3 Menu for X5
Page 31

Russound X5 Controller Streamer Ampli er Installation Manual 31
Stream 1
12:30 PM
Blues Brothers
Music
Made in America
Green Onions
Media Server
LISTENING TO NETWORK AUDIO FILES MEDIA SERVER
1. Screen Name / Current Mode / Menu Name
2. Last breadcrumb of current selection
3. Artist Name
4. Album Name
5. Song Name
MyRussound App Menu for X5
1
2
4
3
5
SLK1 Menu Navigation for X5
Press
Volume Up
or Down buttons to
adjust volume level
Press and release source
button to scroll through
the available sources
Red LED will blink to
indicate IR remote
reception
1. Screen Name / Current Mode / Menu Name
2. From a Now Playing screen, rst press enters mode speci c
menu, second press enters mode selection menu
3. Return to the Home Menu
4. Move back to previous menu level
5. Move down in menu list
6. Move up in menu list
7. Enters a sub-menu (as indicated by > next to a menu list item)
8. Selects item chosen in menu list or enters a sub-menu
MDK-C6 Menu Navigation for X5
1
2
5
3
4
6
7
8
Page 32

32 Russound X5 Controller Streamer Ampli er Installation Manual
The MDK-C6 keypad is designed for use with our popular C-Series controllers
and XStream™ X5, and connects to a keypad port on the rear of the X5.
Connections are made using CAT-5e with RJ-45 connectors using T568A wire
con guration. For a clean installation when wiring from a keypad port, use
a CAT-5e patch cable to connect from the keypad port to a RJ-45 wall plate
(optional). Using the same T568A RJ-45 wiring con guration, use CAT-5e cable
from the wall plate to the keypad. The maximum CAT-5e cable length is 250
feet between the controller and the keypad.
If more keypads are desired for a zone, use an optional SA-ZX3 keypad
splitter with a Russound 1201A (12VDC 1A) power supply at the controller end.
All keypads on an SA-ZX3 control the same zone. More detailed information
regarding SA-ZX3 installation and operation can be found in its installation
manual.
CONTROLLER / KEYPAD CONNECTION
CAT-5e Cable
MDK-C6
///
/
Page 33

Russound X5 Controller Streamer Ampli er Installation Manual 33
SPEAKER CONNECTION
Speaker Output Connections
CAUTION:
Do not connect L- and R- together. Use four-conductor cable and wire
each ground individually. Do not use a common ground. Shorting between
terminals will cause damage to the digital ampli er.
The XStream™ X5 supports speaker outputs for one room of audio. The 50
watt per channel stereo speaker level outputs have high-current two-channel
digital ampli ers. Each speaker connection requires a 4 to 8-ohm load.
The speakers connect to the XStream™ X5 using the supplied modular snap
speaker connector. Each of these color coded connectors is designated for the
speaker pair connected in that room.
Strip 1 to 2 inches (2.5 to 5 cm) o the end of each speaker cable jacket. Then
strip 1/4 inch (0.7 cm) of insulation o each wire. Twist the speaker wire strands
together so there are no strands separated from the bundle.
Lift the lever for each connection until it’s fully open and insert the proper
speaker wire, matching polarity for all four wires. Snap the lever down. Check
to make sure there are no stray strands of wire outside the terminals. If there
are, remove the wire, twist the strands together, and reconnect the wire to the
terminal. Insert the modular connector into its designated output on the back
of the XStream™ X5.
The XStream™ X5 has RCA line outs for expansion. Use the RCA outputs
to connect A-BUS hubs, larger ampli ers or multichannel ampli ers. These
connections are set as xed or variable output through SCS software.
The X5 also o ers a subwoofer output connection. This connection is
crossover at 120Hz and is used with active subwoofers when more bass is
desired
Snap Speaker Connector
(detachable)
RCA Cable
Speaker Cable
RCA Cable
Page 34

34 Russound X5 Controller Streamer Ampli er Installation Manual
RCA Cable
RCA Cable
D250LS Ampli er
A-H4 A-BUS Hub
ADDING CONTROLLER AMPLIFIER OR ABUS TO X5
Set the Line Output to Variable in the SCS menu.
Set the Line Output to Fixed in the SCS menu.
Page 35

Russound X5 Controller Streamer Ampli er Installation Manual 35
SOURCE AUDIO CONNECTIONS
Cable length - 300’ (CAT-5) BTC-1X to X5
CAT-5e Cable
BTC-1X
///
/
CAT-5 Keypad Wire Color Type
Brown............................................+12V
Brown/White ..............................+12V
Green ............................................L -
Green/White ...............................L +
Orange .........................................R -
Orange/White ............................ R +
Blue ................................................ COM A
Blue/White .................................. COM B
Bluetooth Audio Sensing
The X5 Bluetooth connection can be set to enable a feature that overrides
the last source selected when a Bluetooth audio signal is sensed. The feature
will require that a BTC-1X is connected. The BTC-1X must be paired to a handheld Bluetooth device and the X5 be programmed using the SCS programming
software tool. To enable the feature, open the SCS programming tool to the X5
Settings page.
When both the Bluetooth sensing and digital audio input sensing are enabled,
the X5 will determine the audio signal by a last source sensed approach. For
example, if you are watching TV and you decide to stream Bluetooth audio
to the BTC-1X transceiver, the X5 will switch from the TV audio signal to the
Bluetooth audio signal automatically when the feature is enabled. When the
Bluetooth audio signal isn’t present, the X5 will revert to the previous state
which was the TV digital audio signal in this case. Disabling the feature
requires the user to select the Bluetooth source input on the keypad or My
Russound App and then push audio to the BTC-1X from the device. If no music
is playing from the hand-held Bluetooth device, the X5 zone will be quiet when
the Bluetooth source input is selected. It will not automatically switch back
to the previous source state when sensing is disabled. Disabling the feature
will also avoid automatic switching from a Bluetooth audio connection made
from a phone call. It is recommended, if using a phone to stream audio, that
you disable the feature so that phone calls won’t automatically interrupt the
previous state of the X5.
Page 36

36 Russound X5 Controller Streamer Ampli er Installation Manual
SOURCE AUDIO CONNECTIONS
Connect the source output using a quality digital cable. Connect the digital
audio output from the source to digital input on the XStream™ X5. Typical
applications using the digital inputs are shown below. The connection type is
selected in SCS software.
Digital input – automatic selected source enabled feature
The X5 can be programmed to enable automatic switching of the digital
source inputs. This feature will automatically select and play the digital source
when there is an active digital connection made to the X5. The X5 zone will
turn on when the TV digital signal is active. If using a keypad in that zone,
the keypad will also turn on and indicate the source TV on the keypad display.
If the My Russound app is being used as the control of the X5, the app will
indicate that the zone is on and the TV source is active. Additionally, if you
were listening to music from one of the onboard streaming services, the X5
will automatically switch the audio to the TV when an active digital signal is
present.
To enable or disable this feature, programming edits must be made within
the SCS dealer programming tool. The feature is easily set up by using the
wizard. Once the wizard has nished, sources connected to the X5 will be
visible in the con guration tree. Choosing X5 Settings from the programming
tree will open the X5 con guration settings for that zone. Once on the X5
Settings page, the S/PDIF Input con guration can be enabled or disabled.
To enable the auto selected source feature, chose the connection type, coaxial
or digital, and use the drop down box to highlight the source that will be used
to sense the digital signal. The source chosen will be the device the keypad
and the My Russound app will show as active. In most cases this will be a TV.
The X5 is audio device only. Sources will be routed through the TV inputs
and the digital audio connection from the TV will connect to the X5. (See the
connection diagram on the next page)
Page 37

Russound X5 Controller Streamer Ampli er Installation Manual 37
SOURCE AUDIO CONNECTIONS
MDK-C6
USRC
TV SpeakerSpeaker
Cable box
Subwoofer
SCS dealer programming tool
X5 Settings – S/PDIF Input con guration
Page 38

38 Russound X5 Controller Streamer Ampli er Installation Manual
IR CONNECTION
Common IR Output
The common IR output is supported by the IR engine and programming
tool in SCS. This comprehensive list of universal source codes and learning IR
capabilities supports the controller features built into the X5. They are also
carried by the keypad IR receiver and allows for use of the USRC hand held
remote control. There is an IR receiver located on the front panel of the X5 for
learning IR commands. See SCS software for more details on setting universal
codes, learning commands or building Macros to control source devices
connected to the X5.
Attach the end of the IR emitter with the 3.5mm plug to the IR emitter
port. Remove the adhesive back at the other end of the emitter and attach
the emitter over the source component’s IR window. In order to control the
connected source component with IR, the source must be selected at the
keypad or the app receiving the command. See the diagram below.
12V Trigger Cable
IR emitter
Russound
845.1
857
Connecting
Block
12V Trigger Cable
D250LS Ampli er
Page 39

Russound X5 Controller Streamer Ampli er Installation Manual 39
ZONE 12VDC TRIGGER OUTPUTS
There is one 12VDC trigger on the back of the XStream™ X5. The 3.5mm jack
provides 12VDC 100mA when the X5 is turned on and is disengaged when
the zone is turned o . The trigger can be used to engage any 12VDC trigger
device or component that does not exceed 100mA such as a subwoofer or
another ampli er. The connection for the trigger output is made using a twoconductor cable with 3.5mm male mono plug at each end. The tip is positive
(+) and sleeve is negative (-).
12V Trigger Cable
12V Trigger Cable
RCA Cable
RCA Cable
RCA Cable
Subwoofer
Set the Line Output to Variable in the SCS menu.
Page 40

40 Russound X5 Controller Streamer Ampli er Installation Manual
ETHERNET CONNECTIONUSB DEVICE CONNECTION
screen, choose Settings, then Installation. From the Installation menu, choose
Network settings to see the controller’s IP address and MAC address.
During the DHCP process, messages may appear in the IP address window:
LINK DOWN - the Ethernet port is not detecting a link
DHCP WORKING - DHCP attempting to acquire an address
DHCP FAILED - DHCP was unable to acquire an address or no DHCP server
UNKNOWN ERROR - error other than DHCP failure
To restart DHCP, the Ethernet cable must be disconnected and reconnected
to the XStream™ X5, or power cycle the controller.
Ethernet Port
The XStream™ X5 has a connectivity to the local Ethernet network to perform
SCS con guration over an IP network (read from device/write to device).
It also supports RIO over IP (8 maximum sessions). Refer to the RIO protocol
document for more details.
When the controller is connected to the local network, the network's DHCP
server assigns an IP address to the controller. This IP address is then entered in
the SCS start-up screen to enable con guration over IP.
The IP address can be seen on the MDK-C6 keypad. From the keypad's Home
CAT-5e Cable
Network Router
The XStream™ X5 has a USB 2.0/1.1 port on the rear panel for easy rmware
updating of controller. Software can be updated by Ethernet, Wi-Fi or by USB
if necessary. If no internet connection is available, the USB rmware update
is available as an option. You can download the update onto a USB stick from
another location and upgrade the X5 at the site.
Page 41

Russound X5 Controller Streamer Ampli er Installation Manual 41
THE XSTREAM™ X5 INTEGRATED STREAMER SCS SOFTWARE DOWNLOAD
The XStream™ X5 integrated streamer o ers AirPlay, optional Bluetooth® and
multiple popular digital cloud-based streaming services such as Pandora®,
TuneIn™, SiriusXM® and others. To simplify and recognize which XStream™ X5
device you want to operate within the distributed audio system, it is suggested
that a unique name be assigned to each device. Each stream can provide status
and network pro le information through its built in web server. Additionally,
users can rename the X5 stream for personalized identi cation. The X5 uses
Apple’s Bonjour service discovery protocol. It is recommended to use the Safari
web browser as it provides simpli ed access to devices using Bonjour. Within
the Safari browser, rst select Bookmarks. The Safari browser shows collections
of bookmarks including devices that are discovered using the Bonjour service.
By selecting "Bonjour" in the collections list, all devices discovered will be listed
as a bookmark within the list. All X5 streams that are enabled will be displayed
in the Bookmark list for selection. Double-click the particular stream for which
you would like to view details for.
Once selected from the Bookmark list, the X5 stream will serve up its web
portal. The third option is “AirPlay”. This displays the X5 stream name as seen
when using AirPlay. To change the name, simply enter the new name in the
“AirPlay Speaker Name” text box and hit the “Apply” button to save. The X5
web portal also provides information about the selected streaming module.
The rst option is ‘Status’. This provides information about the streaming
module which would primarily be used for troubleshooting. The second
option in the web portal is ‘Administration’. This displays the device name
and network pro le information for the selected X5 streaming module. This is
primarily used for wireless con gurations, wired con gurations and network
set up and troubleshooting. The third is “Support’ and is used primarily for
checking system updates, contacting Russound for support and corporate
contact information. See the Quick Guide for more information about the web
server tools built into the XStream™ X5.
The SCS software used to program and con gure the X5 is available to
registered dealers via download at www.russound.com. With your PC laptop,
you can con gure the system prior to connecting with the XStream™ X5
controller. You can also con gure the controller over Ethernet (read from
device/write to device) when the XStream™ X5 is connected to the network.
If your system contains more than one X5, you will use SCS to program each
unit. The software has a ‘Setup Wizard’ to simplify source con gurations. Once
con gured, the system information and con guration can be saved to a le.
Saving this le and writing it to another X5 can help speed up the process of
programming individual X5 products in the system. Details and help menus
are built into SCS to help you through the programming.
Note: A USB driver is included with the SCS download in the same folder.
Have the "driver.zip" le unzipped and waiting (not installed yet) in a working
directory. With the XStream™ X5 connected on the same LAN as your PC,
Windows will prompt the user for driver information for the XStream™
X5. Point the prompt to the working directory with the USB driver. It will
automatically download and update the X5. Don’t attempt to operate the X5
during rmware updates. Doing so could cause undesired results.
Note: The X5 and other Russound controllers require professional installation.
Like many Russound products, the X5 requires signi cant training, construction
knowledge and networking experience.
Page 42

42 Russound X5 Controller Streamer Ampli er Installation Manual
SCS SOFTWARE PROGRAMMING
Note: detailed information can be attained in the help menus within SCS
Items to be programmed with SCS software include:
Zone (room name) and Source Names - a list of prede ned names for
both are available and will be visible upon keypads and My Russound App.
Custom naming is also possible following the character parameters.
Source Exclusion – enables or disables the set of sources available to each
audio zone.
All ON Participation - de nes whether or not the zone will respond to All
ON commands from X5' connected on the network.
Power Management of Sources - enabled / disabled per source. If
enabled, the 12VDC trigger will turn on when the X5 is turned on.
The Source IR command feature will also be sent as part of the power
management feature. The source will turn o 5 minutes after the last zone
is turned o . This feature uses IR commands and audio signal sensing to
power up sources and initiate audio to con rm source power states.
Sound Controls - Adjust Bass, Treble, Balance, and Loudness initial settings.
Fixed / Variable Line Output - Determines if zone preamp output gain is
at a xed level or controllable with the zone volume adjustment.
IR Learning - Source IR codes can be learned, saved, and managed.
IR Macros – Source IR codes can be programmed together in a sequence to
transmit as many as 30 IR commands from a touch of button.
IR Universal Code Library – Universal commands are stored in the X5
database to simplify programming.
FIRMWARE UPDATE - If an update is released, it will be available online at
www.russound.com. Firmware updates are available via IP and USB download.
You can use SCS to check for updates.
IR Learning
Page 43

Russound X5 Controller Streamer Ampli er Installation Manual 43
TECHNICAL SPECIFICATIONS TROUBLESHOOTING
Specifications
Specification Type* Specification Text
Shipping Dimensions 13.75” x 13.75” x 4” (350mm x 350mm x 102mm)
Product Dimensions 10.625”x 9.5”x 2.375” (290mm x 240mm x 60mm)
Shipping Weight 8.0lbs. (3.63kg)
Product Weight 7.0lbs. (3.14kg)
Audio Source Inputs (2) Digital inputs, Coaxial or Optical (TOSLINK)
(1) Bluetooth
(1) Internal Streamer
Communication Ports (1) Rear- 1 USB 2.0/1.1
(1) Ethernet RJ-45, 10/100 Base T
(1) Keypad RJ-45 T568A standard
(1) Bluetooth RJ-45 T568A standard
Frequency Response 20Hz-20kHz +/- 1 dB at 1W output into 8 ohms
Audio File Types MP3, WAV, AAC, AAC+, Real Audio
Max. Audio Sampling
Rate
192kHz
Fuse Rating 100-120V/T5.0A 250V US and Canada
220-240V/T3.15A 250V Europe
IR Outputs (1) 1/8” mono jack, tip positive, common
Keypad Outputs (1) RJ-45 T568A standard
Power Consumption 11W 100-250VAC 50/60Hz
Ethernet 10/100 Base T
Wi-Fi 802.11 b/g
Signal to Noise Ratio 93 dB unweighted, 96 dB A-weighted
Audio Connection(s) (1) Detachable, 4 pole color coded speaker connector
(1) Subwoofer connection, single RCA jack
(1) L&R line audio output (fixed or variable).
Total Harmonic
Distortion
<0.4%, 50W output into 8 ohms 20Hz-20kHz
Trigger Output(s) (1) 12VDC 100mA
Watts per channel 50WRMS x 2
• Make sure the power switch is in the On position. The power switch is in the
rear panel of the product.
• Follow the quick guide instruction sheet to initialize the XStream™ X5 in
each room. Refer the LED Diagnostic guide for more information.
• When the controller and the keypads are powered ON all the corresponding
LEDs on the face of the controller will be green. Improper connection may
cause one or more LEDs not to be lit. Check all connections. See LED diagnostic
guide (next) for additional information.
• Cycle power by pressing the power switch, waiting 10 seconds, and then
pressing the power switch again.
• Check connections from the keypads and speakers to the controller.
If the keypad doesn't respond to commands ensure the OS update jumper on
the rear of the keypad is in the RUN position.
Page 44

44 Russound X5 Controller Streamer Ampli er Installation Manual
Streaming SiriusXM and Pandora.
Q: Why does the stream say “Are you listening?” or stops playing after 90
minutes?
A: Online services often will send out a popup notice to see if you’re still
listening. This happens every 90 minutes for SiriusXM If you see
this message, just click the OK button to continue listening. If you don’t
click through, the stream will shut down within 5 minutes of the alert. This
will cause the keypad to display “Stopped”.
https://listenercare.siriusxm.com/app/answers/detail/a_id/3641/related/1
https://help.pandora.com/customer/portal/articles/24252-%22are-you-stilllistening-%22
Q: Why do I get a “Stopped” message when I try listening to the X5?
A: If a service is interrupted or has timed out the X5 will display
“Stopped” which will require you to then press the Menu button to select a
streaming service to play to continue.
Q: Why do I get a “Stopped” message on the X5 when I try to listen to
my account on another device?
A: The Stopped message is also caused by multiple devices using the same
username and password.
Most streaming services like Sirius XM and Pandora can be used on
more than one device - but only on one device at a time. So chances are,
you’ve shared your login with friends or family and it’s currently being used
in another location. The most recent person to log in will be the one who
is able to listen to the stream. https://listenercare.siriusxm.com/app/
answers/detail/a_id/3642/related/1
https://help.pandora.com/customer/portal/articles/1392219-simultaneousstreaming
TECH TIP
Q: Why does the channel I’m listening to keep closing down?
A: Re-bu ering is something all live Internet streaming experiences. It’s
mostly due to your Internet connection speed (56K or lower) or excess
network tra c. You could try waiting a few minutes or accessing the
channel later when there might be less tra c if it is an ongoing issue
check how your X5 is connected to the network. Reference the DMS
Troubleshooting guide for best practices.
https://listenercare.siriusxm.com/app/answers/detail/a_id/3611/related/1
Q: Can I get multiple logins for online listening?
A: Some of the popular services, SiriusXM and Pandora limited accounts
to just one login at a time, pe r subscription. If another member of your
household is sharing your login and you both like to listen often, you may
want to consider adding another subscription. For SiriusXM users, you may
be eligible for a reduced rate when you add another SiriusXM Internet
Radio subscription to your existing account. You can add a SiriusXM
Internet Radio subscription using their Online Account Center
https://listenercare.siriusxm.com/app/answers/detail/a_id/3615/related/1
https://help.pandora.com/customer/portal/articles/1392219-simultaneousstreaming
Page 45

Russound X5 Controller Streamer Ampli er Installation Manual 45
X5 LED DIAGNOSTIC CHART
Reset Button
Note: use non
conductive tool to
depress the button
IR Learning
IR Talkback
System On LED
System Status LEDs
Yellow Green Red Blue
Booting
Solid yellow LED.
Access Point
Solid green LED and solid yellow LED. Yellow
LED may initially blink for a short period of time.
Ready
Solid green LED.
Zone On
Solid blue LED.
Firmware Update
Blinking green LED
Firmware Update During Initialization
Solid yellow, blinking green LED.
Network Error
Blinking yellow LED.
Access Point - Error
Solid green LED with yellow LED blinking continuously. May require reinitializing access point mode.
Error Codes
All LEDs can be used to display various error codes.
Error codes are derived from the number of times
each LED blinks.
X5 Bottom Panel
Reinitializing Access Point Mode
Depress the button on the bottom panel for
2 seconds. Yellow and green LEDs will blink
6 times then go solid. If the Ethernet cable is
connected, the Red LED will blink as a warning
that the X5 will reboot in wired-ethernet mode.
See page 5 “Connecting to a wireless network”
Factory-Initialization
Depress the button on the bottom panel for
more than 10 seconds. The red LED will go solid
while the X5 is initialized to factory defaults.
The device will then enter Access Point mode.
Page 46

46 Russound X5 Controller Streamer Ampli er Installation Manual
WARRANTY
War ra nty
The Russound XStream X5 is fully guaranteed against all defects in materials
and workmanship for two (2) years from the date of purchase. During this
period, Russound will replace any defective parts and correct any defect in
workmanship without charge for either parts or labor.
For this warranty to apply, the unit must be installed and used according
to its written instructions. If service is necessary, it must be performed by
Russound. The unit must be returned to Russound at the owner’s expense and
with prior written permission. Accidental damage and shipping damage are
not considered defects, nor is damage resulting from abuse or from servicing
by an agency or person not speci cally authorized in writing by Russound.
This Warranty does not cover:
• Damage caused by abuse, accident, misuse, negligence, or improper
installation or operation
• Power surges and lightning strikes
• Normal wear and maintenance
• Products that have been altered or modi ed
• Any product whose identifying number, decal, serial number, etc. has been
altered, defaced or removed.
Russound sells products only through authorized Dealers and Distributors
to ensure that customers obtain proper support and service. Any Russound
product purchased from an unauthorized dealer or other source, including
retailers, mail order sellers and online sellers will not be honored or serviced
under existing Russound warranty policy. Any sale of products by an
unauthorized source or other manner not authorized by Russound shall void
the warranty on the applicable product.
Damage to or destruction of components due to application of excessive
power voids the warranty on those parts. In these cases, repairs will be made
on the basis of the retail value of the parts and labor. To return for repairs,
the unit must be shipped to Russound at the owner’s expense, along with a
note explaining the nature of service required. Be sure to pack the unit in a
corrugated container with at least three (3) inches of resilient material to
protect the unit from damage in transit.
Before returning a unit for repair, call Russound at (603) 659-5170 for a Return
Authorization number. Write this number on the shipping label and ship to:
Russound
ATTN: Service
5 Forbes Road
Newmarket, NH 03857
Due to continual e orts to improve product quality as new technology and
techniques become available, Russound/FMP, Inc. reserves the right to revise
system speci cations without notice.
Page 47

Russound X5 Controller Streamer Ampli er Installation Manual 47
Page 48

Russound, Inc.
5 Forbes Road, Newmarket, NH 03857
tel 603.659.5170 • fax 603.659.5388
email: tech@russound.com www.russound.com
28-1379 07/31/14 , Rev.3
X5 Controller Streamer Ampli er
Installation Manual
The Wi-Fi CERTIFIED Logo is a certi cation mark of the Wi-Fi Alliance. The Wi-Fi CERTIFIED Logo is a registered trademark of Wi-Fi Alliance.
SiriusXM Internet Radio Service is available in the USA, PR or Canada. SiriusXM Internet Radio subscriptions are sold separately and are governed by the Sirius Terms and Conditions
(see www.sirius.com). Be sure to read this agreement before you purchase your subscription. Sirius, XM and all related marks and logos are trademarks of Sirius XM Radio Inc. and its
subsidiaries. All rights reserved.
The Bluetooth® word mark and logos are registered trademarks owned by Bluetooth SIG, Inc. and any use of such marks by Russound is under license. other trademarks and trade
names are those of their respective owners.
AirPlay works with iPhone, iPad, and iPod touch with iOS 4.3.3 or later, Mac with OS X Mountain Lion, and Mac and PC with iTunes 10.2.2 or later.
AirPlay, the AirPlay logo are trademarks of Apple Inc., registered in the U.S. and other countries.
©2014 Russound. All rights reserved.All trademarks are the property of their respective owners. Speci cations are subject to change without notice.
Russound is not responsible for typographical errors or omissions.
 Loading...