

Page 1
TVA2.1
2-Channel Digital Amplier
Installation Manual
Page 2
2 Russound TVA2.1 Installation Manual
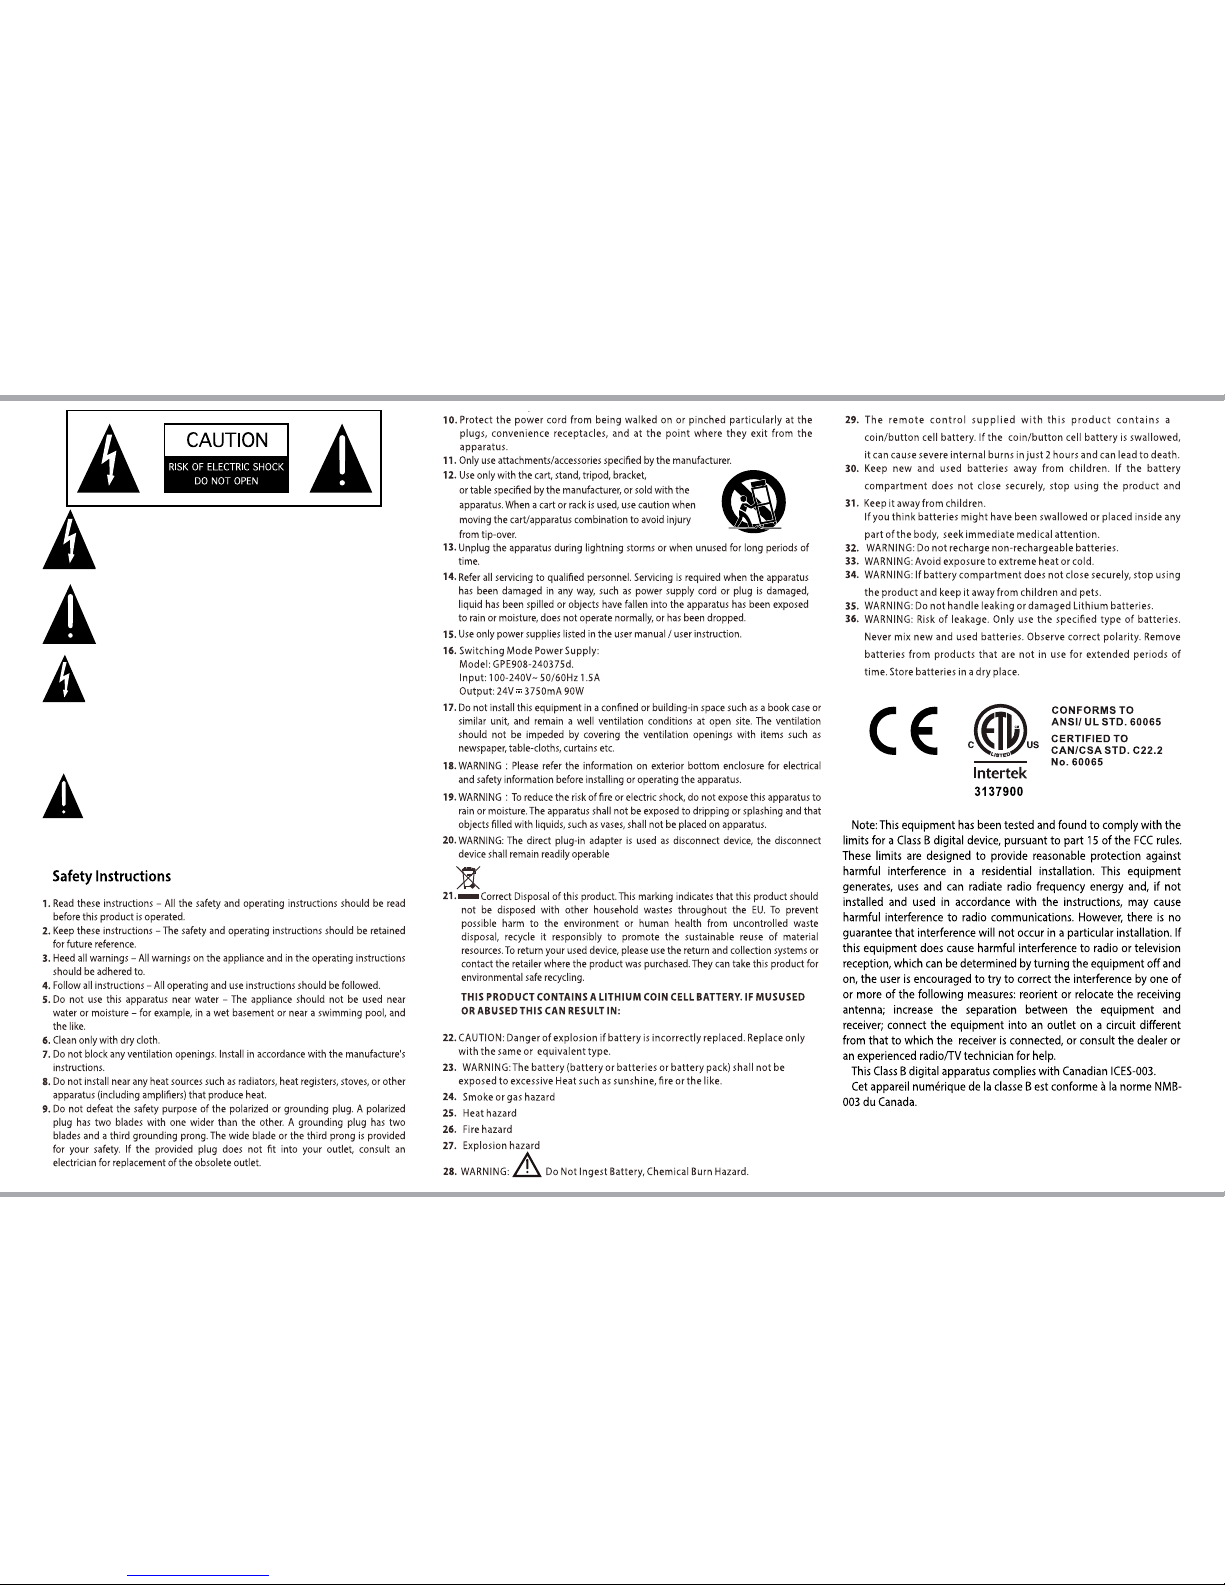
The lightning ash with arrowhead symbol,
within an equilateral triangle, is intended to alert
the user to the presence of uninsulated dangerous
voltage within the product’s enclosure that may
be of sucient magnitude to constitute a risk of electric
shock to persons.
The exclamation point within an equilateral
triangle is intended to alert the user to
the presence of important operating and
maintenance (servicing) instructions in the
literature accompanying the appliance.
SAFETY INSTRUCTIONS
CAUTION: TO REDUCE THE RISK OF ELECTRIC
SHOCK, DO NOT REMOVE THE COVER. NO USERSERVICEABLE PARTS INSIDE. REFER SERVICING
TO QUALIFIED SERVICE PERSONNEL.
WARNING: TO REDUCE THE RISK OF FIRE
OR ELECTRIC SHOCK, DO NOT EXPOSE THIS
APPLIANCE TO RAIN OR MOISTURE.
Page 3

3
Russound TVA2.1 Installation Manual
Introduction
The Russound TVA2.1 is a 2-channel low-prole amplier, designed to be used
to bring Better Sound for TV by allowing a high quality, easy-to-use, easy-toinstall amplier to be added to any television installation.
Its thin footprint means the TVA2.1 can be hidden behind the television or
mounted in an in-wall panel behind a television for convenience. The builtin IR learning function allows for ANY typical remote control to be used and
eliminates the need for an external control system. This can dramatically
reduce the cost of adding additional rooms of audio to a home and keeps the
operation simple and intuitive for the homeowner by letting them use their
current remote control device.
The 2 channels of amplication are available for up to two pairs of 8-ohm
speakers, while also oering a connection for a subwoofer to enhance a room’s
sound.
The TVA2.1 provides an array of useful features, such as IR Learning, use of a
high quality low-prole external IR sensor, an LED Power Light that can be
toggled on and o, as well as a low-prole chassis design.
The high quality class-D digital amplier sends a respectable 30 Watts per
channel of power into 8 ohms. There is a line level subwoofer output to support
2.1 Audio, making the TVA2.1 an easy solution for improving the audio quality
in any room with enhanced bass response.
The TVA2.1 features three input options for exibility. A traditional analog
RCA line level input, and both Digital Coax and Optical S/PDIF. The TVA2.1 also
supports 24bit/96khz digital audio in a PCM stereo format.
Product Features
• Class-D amplier 2 x 30W RMS into 8 ohm
• 24-bit/96kHz S/PDIF support
• S/PDIF, optical and analog line level inputs
• 4-pole speaker detachable screw connector and line level RCA subwoofer
output
• IR Learning for basic volume control.
• Small footprint with mounting options for discreet installation
• External 24v power supply
PRODUCT OVERVIEW
Thermal Protection
All Russound ampliers are designed with special circuitry to safeguard the
amplier under a thermal overload condition. Thermal protection mode can
only engage when the unit has been run at high volume for extended periods
of time without adequate ventilation and/or when speaker impedances
are below the minimum levels for the amplier. If this fault occurs, turn
o the amplier, and check that the speaker impedance rating is above the
minimum rating. Also check for adequate ventilation around the amplier and
make adjustments if necessary. Once the unit has cooled to safe operating
temperatures, the amplier may be powered back on.
Protection Circuitry
All Russound ampliers are designed with special circuitry to safeguard the
amplier under a short-circuit condition. A faulty speaker can also cause a
short circuit condition. The front panel LED illuminates orange when the
amplier is in short circuit protection. If this fault condition occurs, turn o the
amplier and check speakers for short circuit conditions when appropriate.
Mounting
The mounting wings on the sides of the TVA2.1 can be used for various
mounting options:
1. Mounting into a structured wiring type behind-the-tv box. The width of
the TVA2.1 does not allow 6” on-center holes, but the TVA2.1 can be secured
on either side and a simple Zip Tie can be used for securing the amplier in
any location within the structured wiring box.
2. Mounting to the rear of a TV using any 3rd party VESA type mounting
panel, or simply by attaching it to a TV mount. The thin form factor allows
it to t on many tilt or pivot type mounts. In this type of installation, it is
recommended to disable the Power LED light so that it does not bother the
end user.
3. Wall Mounting (screws not included) – The installer can easily mount the
TVA2.1 to a wall or cabinet.
Page 4

4 Russound TVA2.1 Installation Manual
FRONT PANEL CONNECTORS
1
Power Switch: Turns the amplier On/O. This switch does not disconnect
the main power feed from the amplier; this requires that the power cord be
unplugged from the outlet, or from the rear of the TVA2.1.
2
Power LED: On start-up, the power LED (next to the power switch) lights
red to show power on. This will remain on, but can be disabled to remove
distraction when installed behind a TV.
Note: Disabling the LED will only disable the "normal" power status LED. The
LED will always illuminate for any trouble conditions and for the rst 2 minutes
during power up of the device.
3
Power Supply: The TVA2.1 requires a 24VDC (3.75A) power supply which is
included. The external dual voltage 24VDC 3.75A power supply provides high
output power to support the full range of amplier operation.
By using an IEC compatible outlet, international customers will be able to
easily swap power cords with the appropriate plug type for their market.
4
Speaker Outputs: The speaker outputs are in parallel to the zone amplier
output. We recommend using 6-8 ohm speakers with the TVA2.1.
5
Subwoofer Output
6
Audio Line Input: Analog stereo audio input for a single input source.
7
Optical Input: Digital optical input for a single input source.
8
Coaxial Input: Digital coaxial input for a single input source.
9
IR Sensor: Receives the IR commands during the IR Learning process.
This sensor is used only for IR Learning. The external IR Receiver is used during
operation of the TVA2.1 for controlling volume and mute.
10
IR Input: 3.5mm jack for an IR Receiver. A Russound IR Receiver is included.
If wiring your own 3.5mm plug to a receiver, the tip - is positive and the sleeve
is negative. The external IR receiver is used to control the volume of the TVA2.1
using a standard remote control once the commands have been taught to the
TVA2.1.
11
IR Conrm LED: Provides a visual conrmation that the TVA2.1 is receiving
IR Signals when in the IR Learning Mode only.
12
IR Learning Button: Press for 2 seconds to initiate the IR Learning mode
feature.
Press and Hold for at least 10 seconds during power up to toggle the use of the
Power LED during normal operation.
Remote Control
The TVA2.1 comes supplied with a small credit card sized three button remote
control that can be used for independent volume commands if a 3rd party
remote control system is being used. For most installations, the supplied credit
card remote will not be used.
The TVA2.1 features IR learning for the purpose of using a pre-existing TV
or Universal Remote.
1 2 3 4 5 6 7 8
1211109
MUTE
IR CONTROLLER
TVA2.1 Digital Amplier
TVA2.1RC Remote Control
Page 5

5
Russound TVA2.1 Installation Manual
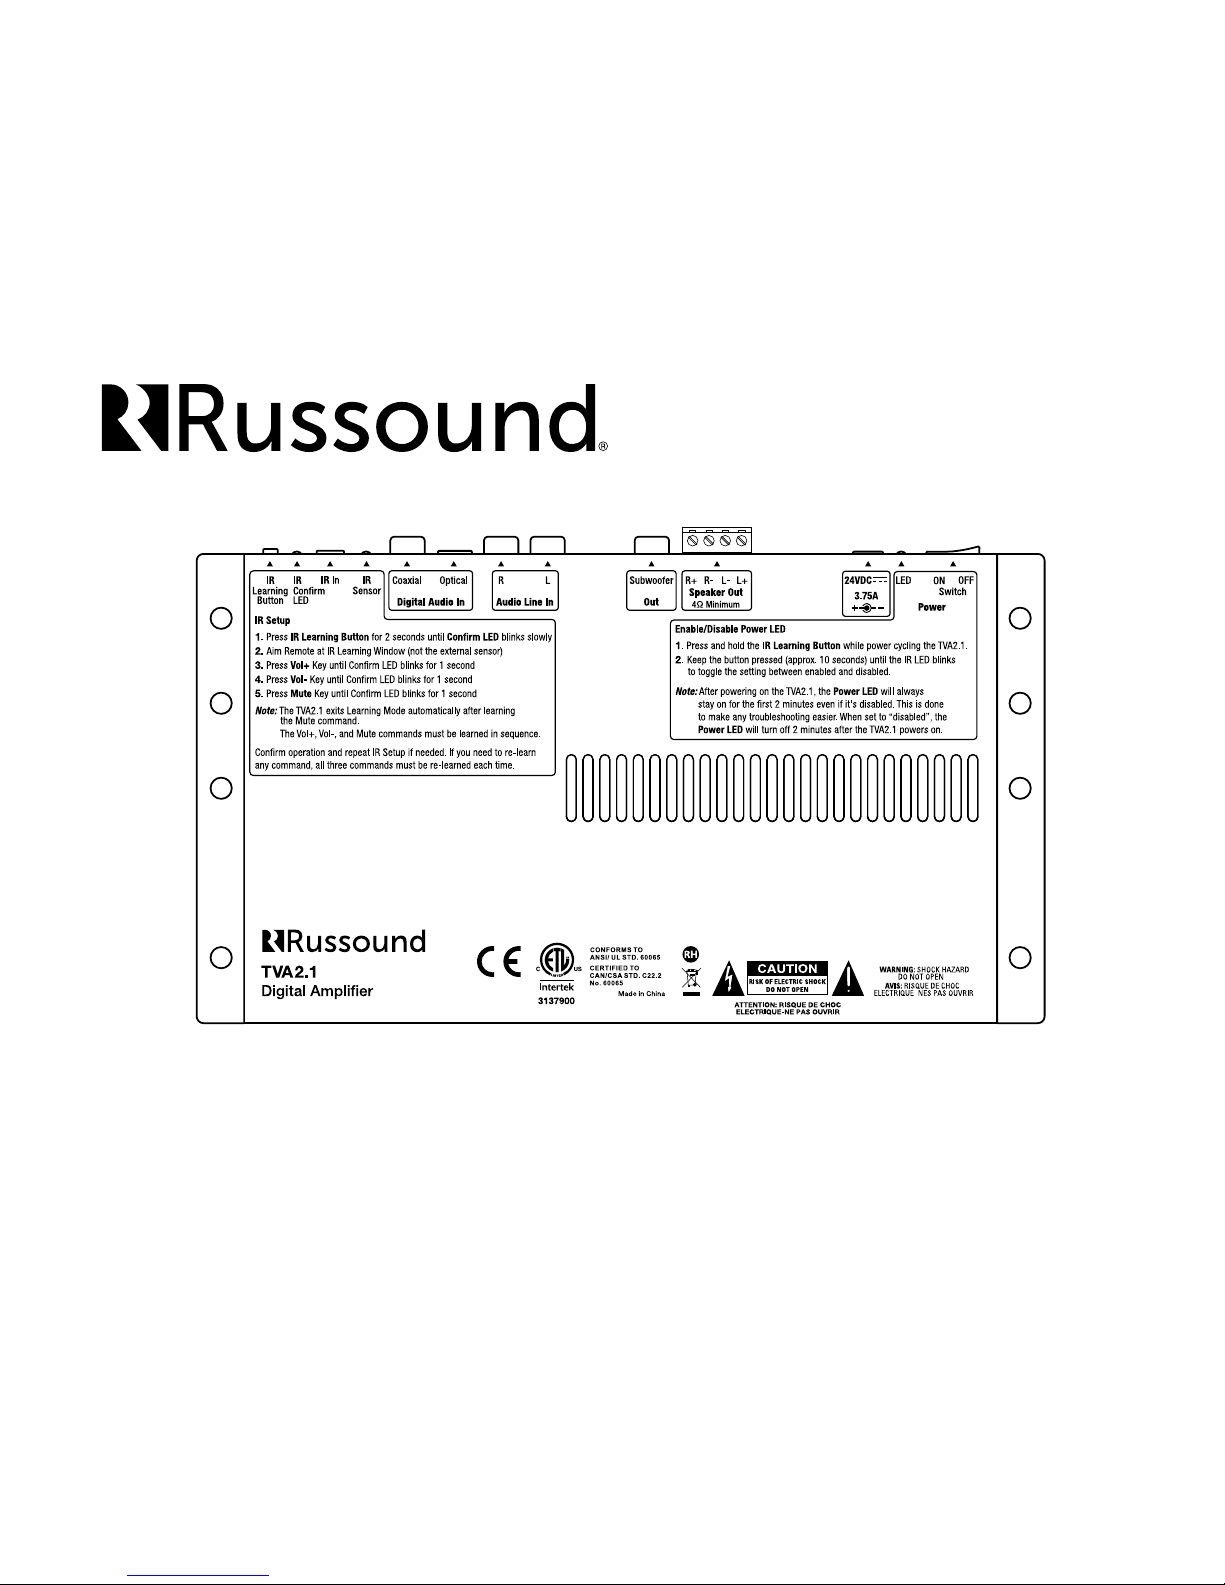
PROGRAMMING INSTRUCTIONS
Simple TVA2.1 Amplier Programming Instructions
Learning IR Mode Setup
This process allows you to learn the three volume-related IR commands
(Vol +, Vol -, and Mute) from your current remote control.
1. Press the IR Learning Button for 2 seconds until the IR Conrm LED blinks
slowly.
2. Place your remote control about 3-4 inches (7-10cm) away from the IR
Learning window of the TVA2.1, aiming the remote directly at the IR Learning
window.
3. Press the TV remote’s Vol + key until the IR Conrm LED blinks for 1 second.
4. Press the remote’s Vol – key until the IR Conrm LED blinks for 1 second.
5. Press the remote’s Mute– key until the IR Conrm LED blinks for 1 second.
6. Conrm proper operation of all three volume commands. If any of the
three commands must be re-learned, all three commands must be relearned in order. Repeat ALL 6 steps again; then re-test for proper operation.
Note: The TVA2.1 exits the IR Learning Mode automatically after learning the
Mute command.
The Vol +, Vol -, and Mute commands must be learned in sequence
(1st Vol+, then Vol -, then Mute.)
Power LED Disabling (Toggle)
In some installations, such as bedrooms, it may be desirable to disable the
Power LED so that it is not visible in a dark room.
To disable the Power LED:
1. Press and hold the IR Learning Button for approximately 10 seconds while
powering on the TVA2.1 until the IR LED (next to the IR Learning Button)
begins to blink. The IR Conrm LED will blink twice when toggling from
"Enabled" to "Disabled" and will blink once when togging from "Disabled"
to Enabled". Once the IR Conrm LED has blinked, you can release the IR
Learning Button.
Note: After powering on the TVA2.1 Amplier, the Power LED will always
remain on for the rst 2 minutes of operation EVEN IF you have disabled it. If
the Power LED has been disabled, it will turn o after 2 minutes has passed.
The LED will always illuminate for any trouble conditions. Disabling the LED
only aects the LED for normal status conditions.
To Enable the Power LED, repeat the same process.
Typical TVA2.1 Amplier Installation
RSF-610 RSF-610
IR
Receiver
Remote Control
TVA2.1
Subwoofer
Power Supply
TV Settings
Certain settings must be changed on the TV when using the TVA2.1. Refer to
your TV's owner's manual for exact instructions for your particular TV. These
settings are typically found in the TV's setup conguration menu.
1. Disable TV Speakers - Since you will be using the TVA2.1 for all of your TV
audio, your TV's internal speakers should be disabled.
2. If using a digital audio signal from your TV to the TVA2.1, make sure that
the TV is congured to use stereo PCM for its audio output.
Connecting loudspeakers
The TVA2.1 is designed to be used with a pair of either 6 or 8 ohm speakers.
Speaker connections should only be made while the TVA2.1 is powered o.
The TVA2.1 features a removable, screw-down speaker terminal.
Page 6

6 Russound TVA2.1 Installation Manual
TECHNICAL SPECIFICATIONS
Audio Inputs: Stereo Line Level, coaxial or optical (PCM format)
Outputs: 30W per channel at 8 ohms <1% THD+N
Speaker out - removable screw-down connector for up to 12AWG wire,
Subwoofer out - (RCA) with integrated 120Hz low pass lter
IR Sensor Input: 3.5mm stereo jack
Amplier Channels: 2
Signal-to-Noise Ratio: >90dB 20Hz to 20KHz
Frequency Response: 40Hz to 20KHz +/- 1dB, 20Hz -3dB, Sub Out: -3dB at 170Hz
Input Impedance: >22 ohms
Power Requirements: 24VDC 3.75A (External power supply)
Dimensions: 6.0”H x 9.875”W x 1.375”D (15.2 x 25.0 x 3.5 cm)
Weight: 2.0lbs. (0.9kg)
Page 7

7
Russound TVA2.1 Installation Manual
LIMITED WARRANTY
The Russound TVA2.1 Amplier is guaranteed against all defects in materials
and workmanship for two (2) years from the date of purchase. During this
period, Russound will replace any defective parts and correct any defect in
workmanship without charge for either parts or labor.
For this warranty to apply, the unit must be installed and used according to its
written instructions. If service is necessary, it must be performed by Russound.
The unit must be returned to Russound at the owner’s expense and with
prior written permission. Accidental damage and shipping damage are not
considered defects, nor is damage resulting from abuse or from servicing by an
agency or person not specically authorized in writing by Russound.
This Warranty does not cover:
• Damage caused by abuse, accident, misuse, negligence, or improper
installation or operation
• Power surges and lightning strikes
• Normal wear and maintenance
• Products that have been altered or modied
• Any product whose identifying number, decal, serial number, etc. has been
altered, defaced or removed.
Russound sells products only through authorized Dealers and Distributors
to ensure that customers obtain proper support and service. Any Russound
product purchased from an unauthorized dealer or other source, including
retailers, mail order sellers and online sellers will not be honored or serviced
under existing Russound warranty policy. Any sale of products by an
unauthorized source or other manner not authorized by Russound shall void
the warranty on the applicable product.
Damage to or destruction of components due to application of excessive
power voids the warranty on those parts. In these cases, repairs will be made
on the basis of the retail value of the parts and labor. To return for repairs,
the unit must be shipped to Russound at the owner’s expense, along with a
note explaining the nature of service required. Be sure to pack the unit in a
corrugated container with at least three (3) inches of resilient material to
protect the unit from damage in transit.
Before returning a unit for repair, call Russound at (603) 659-5170 for a Return
Authorization number. Write this number on the shipping label and ship to:
Russound
ATTN: Service
1 Forbes Road
Newmarket, NH 03857
Due to continual eorts to improve product quality as new technology and
techniques become available, Russound/FMP, Inc. reserves the right to revise
system specications without notice.
Page 8

Russound, Inc.
1 Forbes Road, Newmarket, NH 03857
tel 603.659.5170 • fax 603.659.5388
email: tech@russound.com www.russound.com
28-1396 08.27.15, Rev. 3
©2015 Russound. All rights reserved.
All trademarks are the property of their respective owners.
Specications are subject to change without notice.
TVA2.1
Digital Amplier
Installation Manual
 Loading...