

Page 1

Color Touchscreen TS3
Installation Manual
Page 2
2 Russound TS3 Installation Manual
SAFETY INSTRUCTIONS
WARNING: TO REDUCE THE RISK OF FIRE OR ELECTRIC SHOCK,
DO NOT EXPOSE THIS APPLIANCE TO RAIN OR MOISTURE
CAUTION: TO REDUCE THE RISK OF ELECTRIC SHOCK, DO NOT
REMOVE THE COVER. NO USER-SERVICEABLE PARTS INSIDE.
REFER SERVICING TO QUALIFIED SERVICE PERSONNEL.
The lightning ash with arrowhead symbol, within an
equilateral triangle, is intended to alert the user to the presence
of uninsulated dangerous voltage within the product’s
enclosure that may be of su cient magnitude to constitute a
risk of electric shock to persons.
The exclamation point within an equilateral triangle is
intended to alert the user to the presence of important
operating and maintenance (servicing) instructions in the
literature accompanying the appliance.
Safety Instructions
1. Read Instructions - All the safety and operating
instructions should be read before the appliance
is operated.
2. Retain Instructions - The safety and operating
instructions should be retained for future
reference.
3. Heed Warnings - All warnings on the appliance in
the operating instructions should be followed.
4. Follow Instructions - All operating and user
instructions should be followed.
5. Water and Moisture - The appliance should
not be used near water; for example, near a
bathtub, washbowl, kitchen sink, laundry tub,
in a wet basement, or near a swimming pool.
The apparatus shall not be exposed to dripping
or splashing liquids and no objects lled with
liquids, such as vases, shall be placed on the
apparatus.
6. Wall Mounting - The appliance should be
mounted to a wall only as recommended by the
manufacturer.
7. Ventilation - The appliance should be situated
so that its location or position does not interfere
with its proper ventilation. For example, the
appliance should not be situated on a bed,
sofa, rug, or similar surface that may block
the ventilation openings, or placed in a builtin installation, such as a bookcase or cabinet
that may impede the ow of air through the
ventilation openings.
8. Heat - The appliance should be situated away
from heat sources such as radiators, heat
registers, stoves, or other appliances (including
ampli ers) that produce heat.
9. Power Sources - The appliance should be
connected to a power supply only of the type
described in the operating instructions or as
marked on the appliance.
10. Grounding or Polarization - Precaution should
be taken so that the grounding or polarization
means of an appliance is not defeated.
11. Power Cord Protection - Power supply cords
should be routed so that they are not likely to
be walked on or pinched by items placed upon
or against them, paying particular attention to
cords at plugs, receptacles, and the point where
they exit from the appliance.
12. Non-Use Periods - The power cord of the
appliance should be unplugged from the outlet
when left unused for a long period of time.
To remove all power (supply mains) from the
appliance, remove the plug from the wall outlet.
13. Object and Liquid Entry - Care should be taken
so that objects do not fall and liquids are not
spilled into the enclosure through the openings.
14. Cleaning - The appliance should be cleaned only
as recommended by the manufacturer.
15. Damage Requiring Service - The appliance
should be serviced by quali ed service personnel
when: A) The power supply cord or the plug has
been damaged; or B) Objects have fallen, liquid
has been spilled into the appliance.
16. Ser vicing - The user should not attempt to service
the appliance beyond that described in the
operating instructions. All other servicing should
be referred to quali ed service personnel.
Note: This equipment has been tested and found to comply
with the limits for a Class B digital device, pursuant to part
15 of the FCC rules. These limits are designed to provide
reasonable protection against harmful interference in a
residential installation. This equipment generates, uses and
can radiate radio frequency energy and, if not installed and
used in accordance with the instructions, may cause harmful
interference to radio communications. However, there is
no guarantee that interference will not occur in a particular
installation. If this equipment does cause harmful interference
to radio or television reception, which can be determined by
turning the equipment o and on, the user is encouraged to try
to correct the interference by one of or more of the following
measures: reorient or relocate the receiving antenna; increase
the separation between the equipment and receiver; connect
the equipment into an outlet on a circuit di erent from that
to which the receiver is connected, or consult the dealer or an
experienced radio/TV technician for help.
This Class B digital apparatus complies with Canadian ICES-
003.
Cet appareil numérique de la classe B est conforme à la
norme NMB-003 du Canada.
Page 3

3Russound TS3 Installation Manual
Product Overview ...................................................................................... 4
Front Panel .................................................................................................... 5
Back Panel ..................................................................................................... 6
Touchscreen Location ............................................................................... 7
Touchscreen Installation .......................................................................... 8
Controller Connections ............................................................................ 9
External IR Connection ...........................................................................10
Front IR Disable .........................................................................................10
Zone and Controller ID ...........................................................................11
Alarm Settings ...........................................................................................12
Time and Date ...........................................................................................12
Sound Control ...........................................................................................13
Features .......................................................................................................13
Screen Setup ..............................................................................................14
Installers Setup Functions .....................................................................14
IP and MAC Address ................................................................................14
Firmware Version and update ..............................................................14
Diagnostics .................................................................................................15
Factory Init ..................................................................................................15
Setting Favorites .......................................................................................16
Source Screen Features and Examples ...................................... 17-19
Technical Speci cations .........................................................................20
Warranty ......................................................................................................20
TABLE OF CONTENTS
Page 4
4 Russound TS3 Installation Manual
The TS3 Touchscreen is a full-featured color touchscreen that
provides a powerful user interface for Russound's C-Series
multiroom audio systems. The user can easily access, control
and enjoy music from anywhere in the home. Housed in an
attractive bezel, the TS3 features beautifully rendered screens
and elegantly simple displays.
The TS3 offers touch-sensitive screen templates for defined
source controls, with audible feedback and a detailed display
of source functions. It also features responsive hard buttons for
most-often used commands and a front IR receiver that can be
disabled.
The TS3 is designed for use with C-Series controllers and works
with Russound sources, including the DMS-3.1 Media Streamer,
SMS3 Smart Media Server, iBridge® Dock and Bay, ST1 and ST2
tuners, and legacy (IR controlled) sources. The touchscreen
displays valuable information such as Channel, Artist, Song Title,
Genre and more, all in real time. It supports custom names for
presets, banks, themes and favorites for a truly personal touch.
The TS3 makes a great addition to an installed RNET system, as it
can be installed into an existing double-gang junction box.
Most of the controller, zone audio and source setup functions
are performed through SCS-C5 programming software; however,
a few steps are completed through the TS3 menus such as
alarms, setting time and date, keypad brightness, and adjusting
room audio properties.
PRODUCT OVERVIEW
Now Playing Screen
The main or “home” screen is the starting point for using the
TS3. The touchscreen displays the currently selected source info.
and system setup configured for the C-Series system.
Source Screens
Each source device is controlled through screens designed
specifically for that source. Control choices and content menus
are located on the source screens, and additional functions may
be available through the hard buttons.
Options Screens
(top right corner of screen)
Zone preferences can be set through the options screens.
These include sound control, features (DND, Party mode), time
and date, alarm, screen setup (brightness and installer setup)
Hard Buttons
There are eight hard buttons that frame the touchscreen, each
of which performs a basic function.
IR Receiver
The IR receiver is hidden behind a tinted window at the top of
the bezel and transmits IR signals from a remote control back
to the controller to control the sources. This can be disabled if
desired.
Page 5
5Russound TS3 Installation Manual
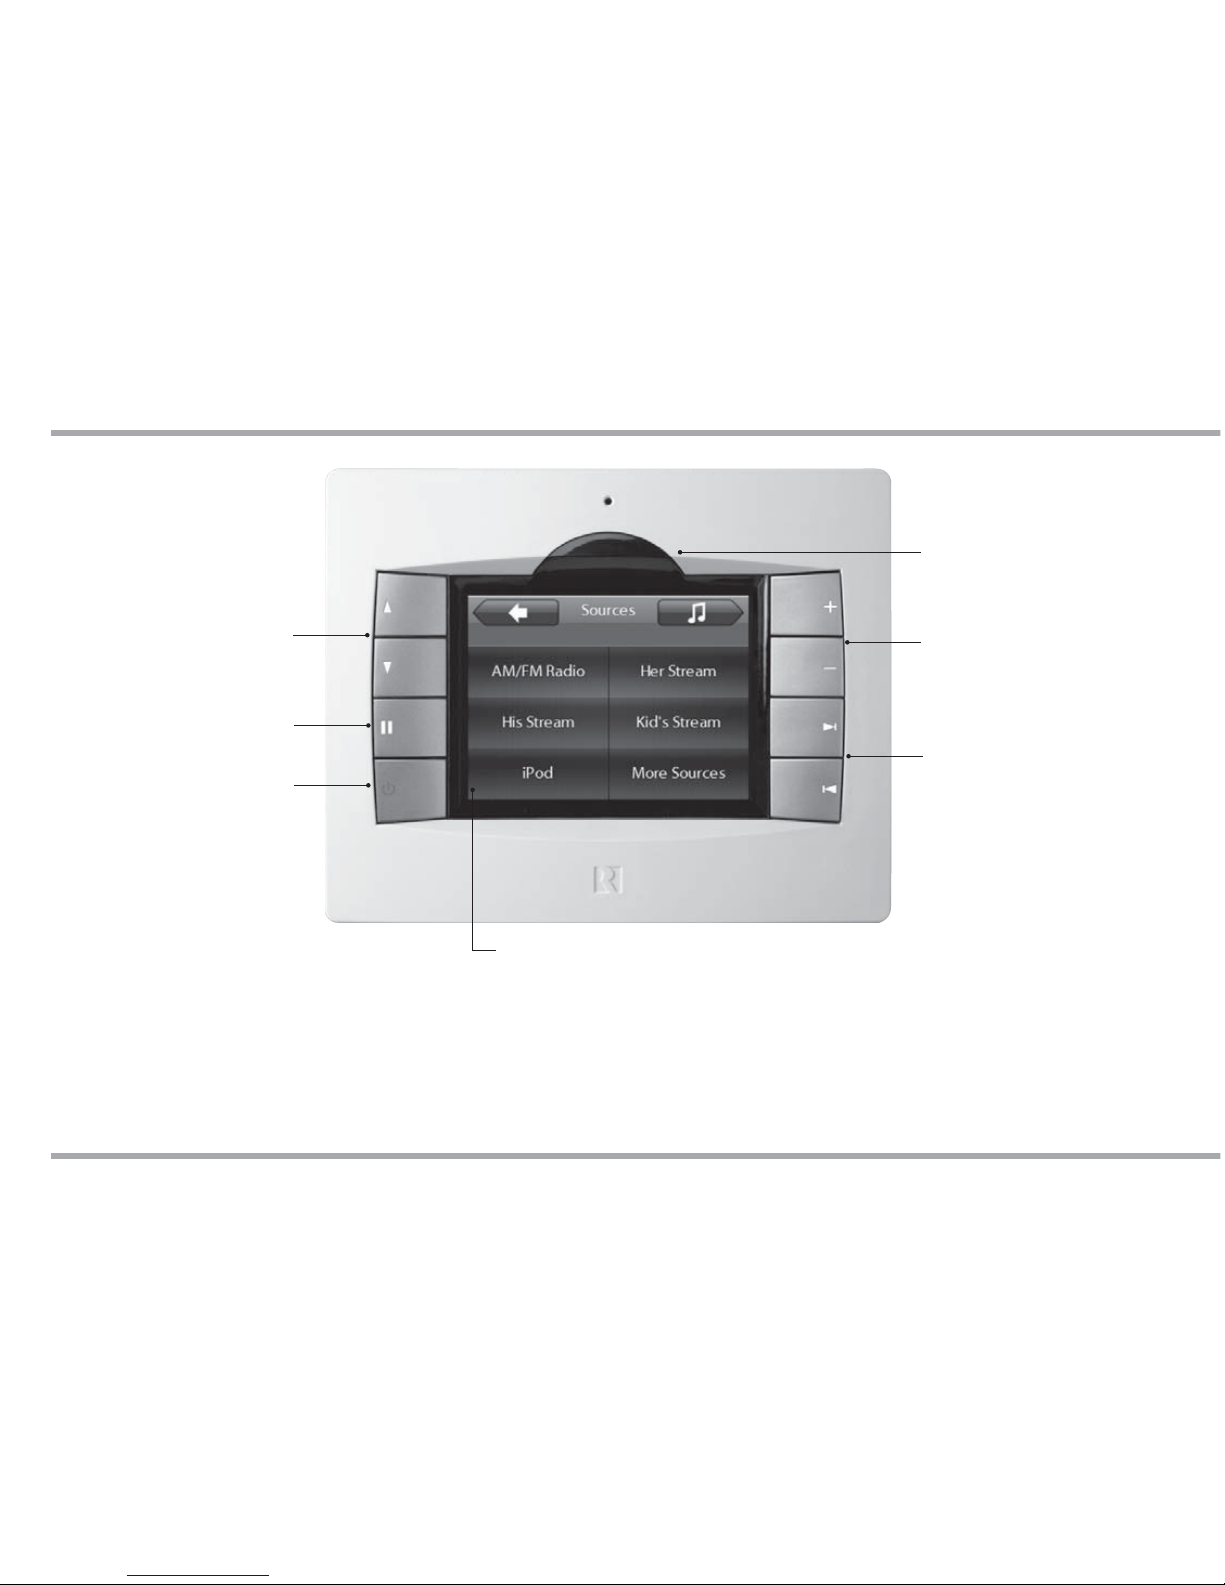
Touchscreen - Full color resistive touchscreen with
multi-sound feedback. Screen can be programmed
to go blank after a period of inactivity. Touching the
screen anywhere reactivates it.
Power - Turn room power on/
o . Press and hold for system
all on/o
TS3 Front Panel
Showing Source Selection Screen
FRONT PANEL
Volume - Turn room
volume up or down
Pause - Pause/mute for
selected source
Next/Back - Go to next or
previous selection
Plus/Minus - Adjust setting
for selected source
IR Receiver - Receives IR
signals from remote controls.
Can be disabled if desired.
Page 6
6 Russound TS3 Installation Manual
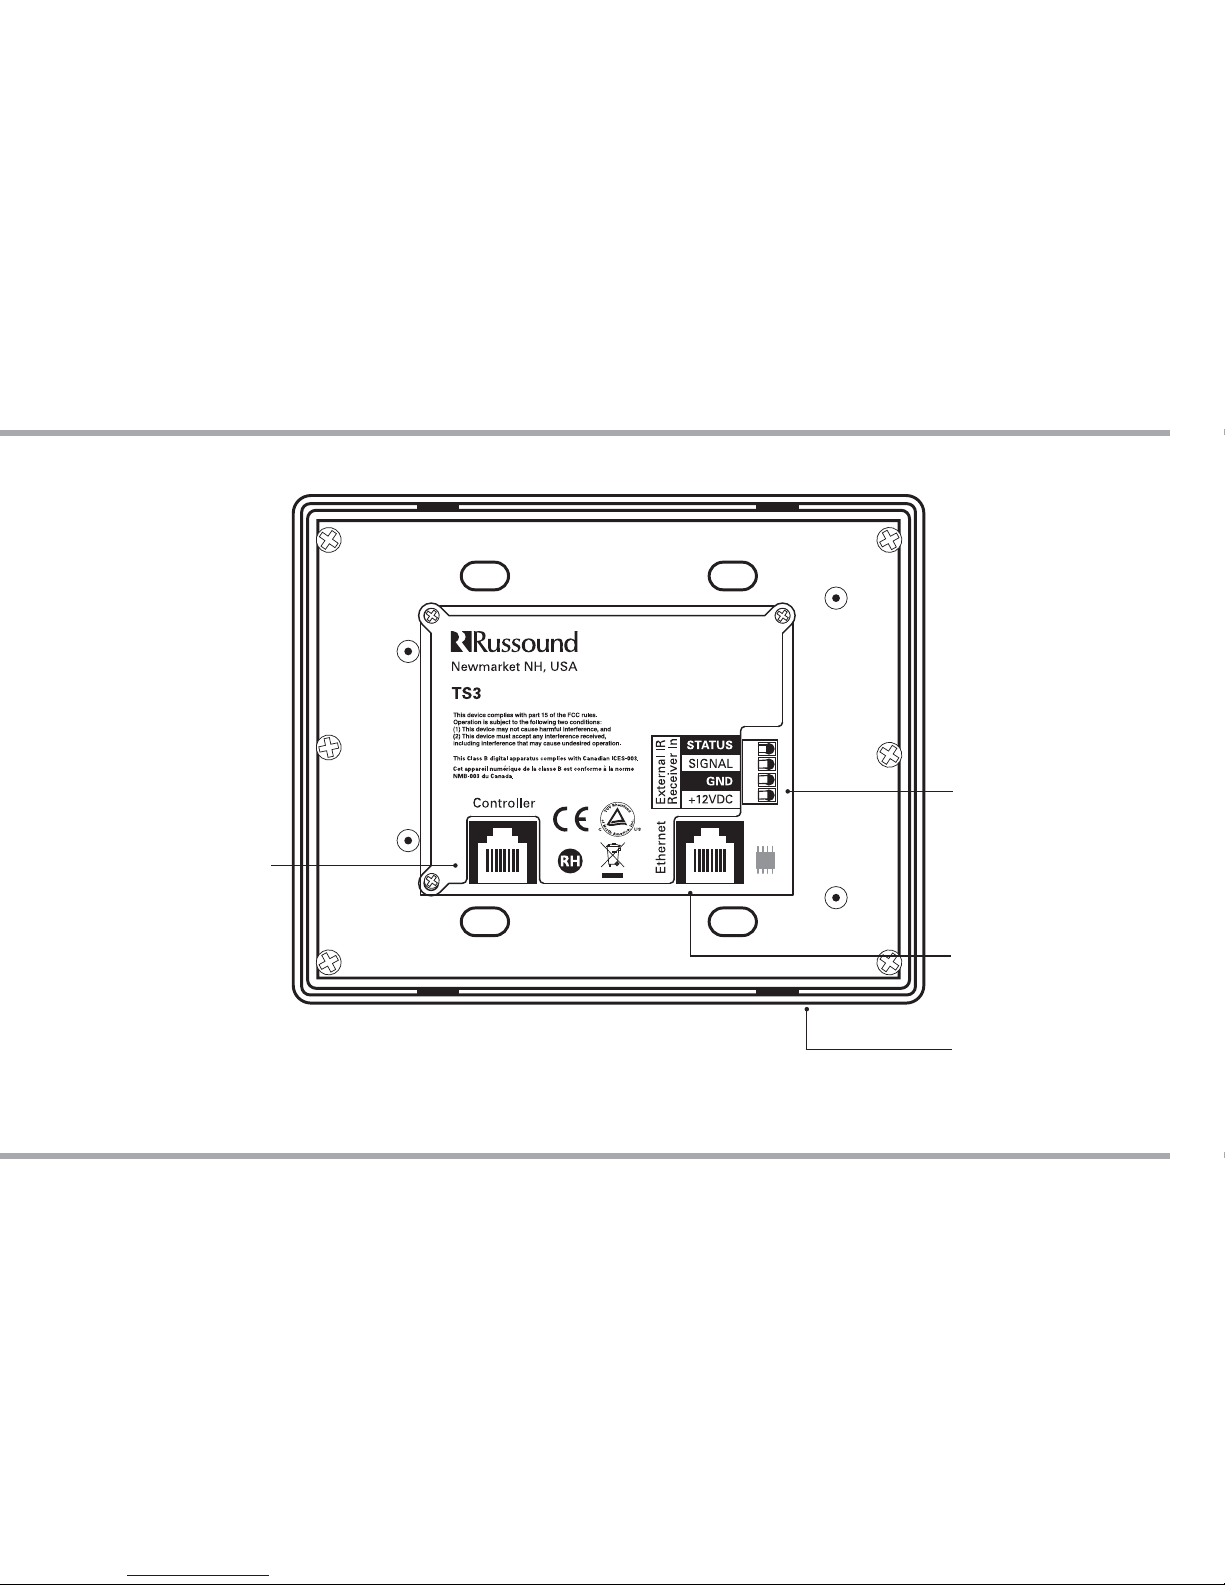
BACK PANEL
External IR Connection Four pole detachable
screw down connection for
optional external IR receiver
Controller - RJ-45 CAT-5
connection to controller
keypad input
Ethernet - RJ-45 CAT-5e port
for future use
Update Port - USB 2.0
port for software updates
(on bottom edge of
touchscreen)
TS3 Rear Panel
Page 7
7Russound TS3 Installation Manual
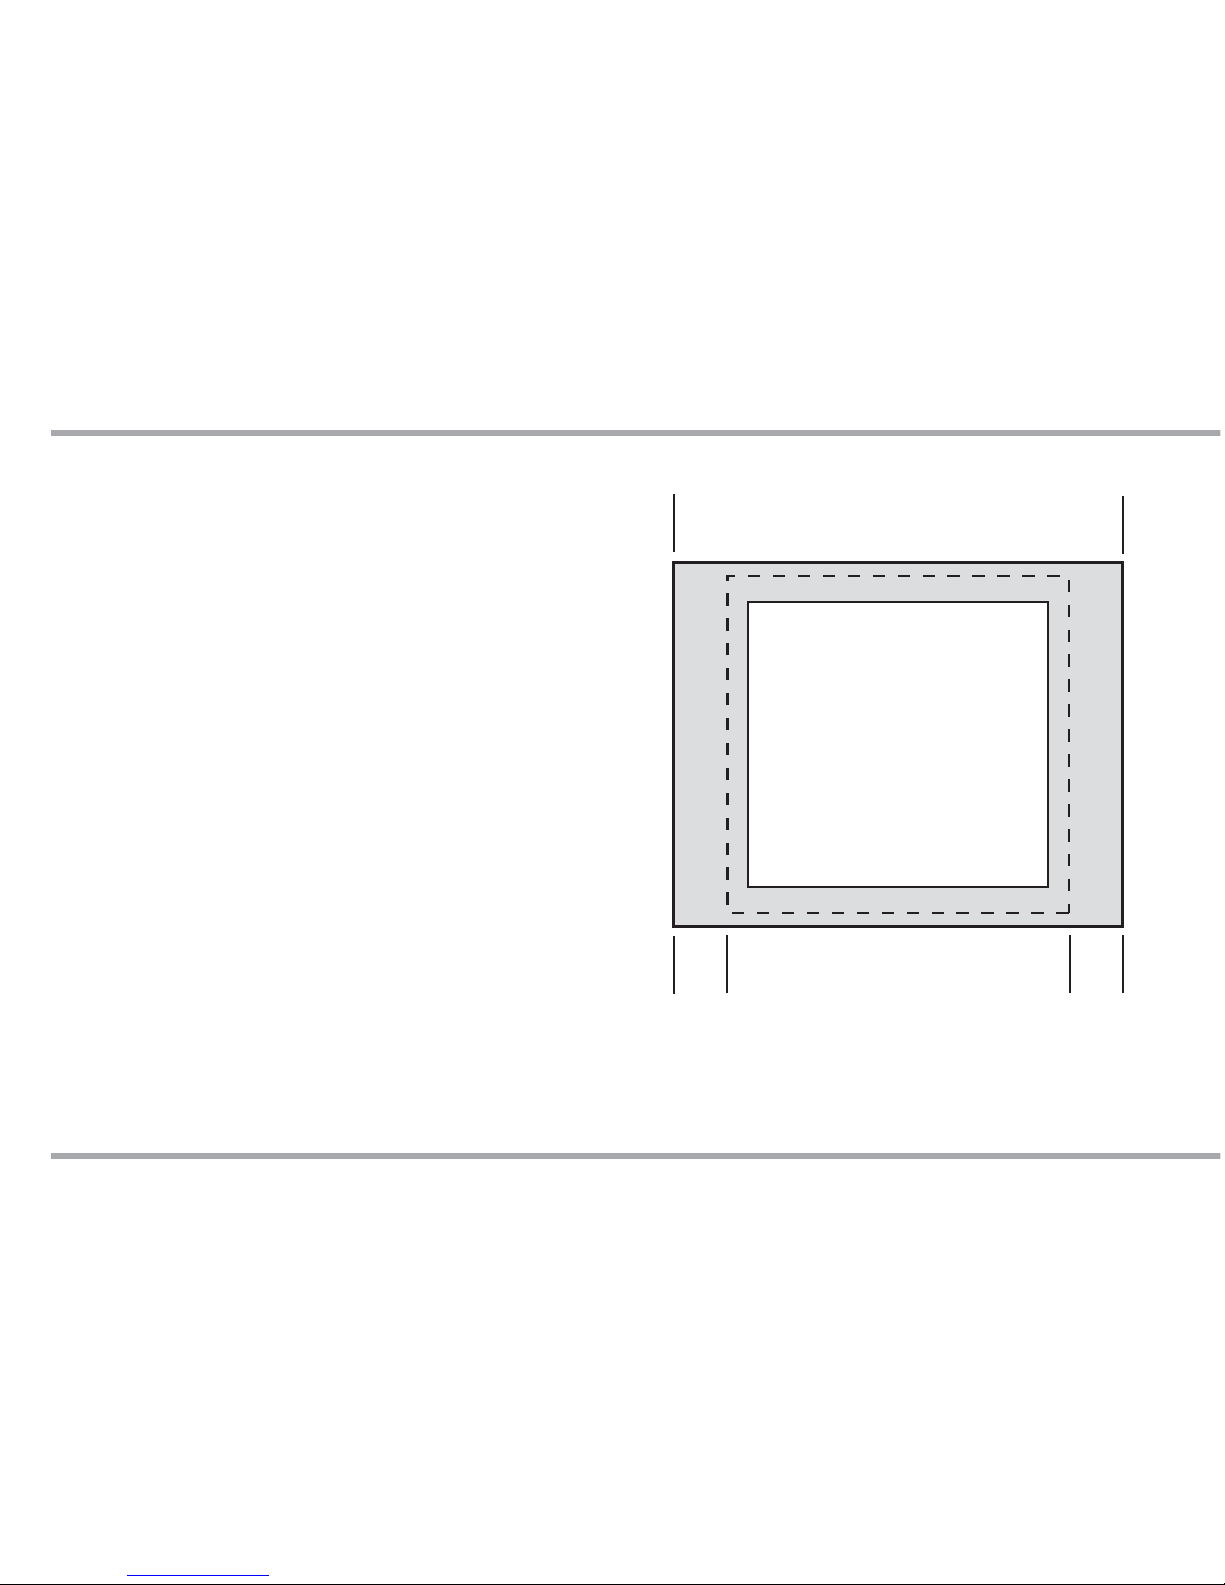
The TS3 is an in-wall touchscreen. For installation, you will need
a UL/CSA approved plastic 32ci double-gang electrical box.
Notice the minimum clearance around the electrical box
required for the bezel. This is larger than a typical light switch
cover, so additional space may be necessary. The diagram at
right provides measurements of a standard 2-gang wallplate
and of the TS3 bezel.
For best viewing and usage, the TS3 should be mounted at
thermostat height, or about 59” from the oor.
DTS-1 Keypad Desktop Stand enables placement on nightstand, counter or desk - sold separately.
TOUCHSCREEN LOCATION
TS3 bezel size vs. standard wallplate
Size of standard 2-gang box
4.0” W x 3.81” H
Size of standard 2-gang wallplate
4.56” W x 4.5” H
Size of TS3 bezel
6.0” W x 4.875” H
Width
difference
0.72”
Width
difference
0.72”
Page 8
8 Russound TS3 Installation Manual
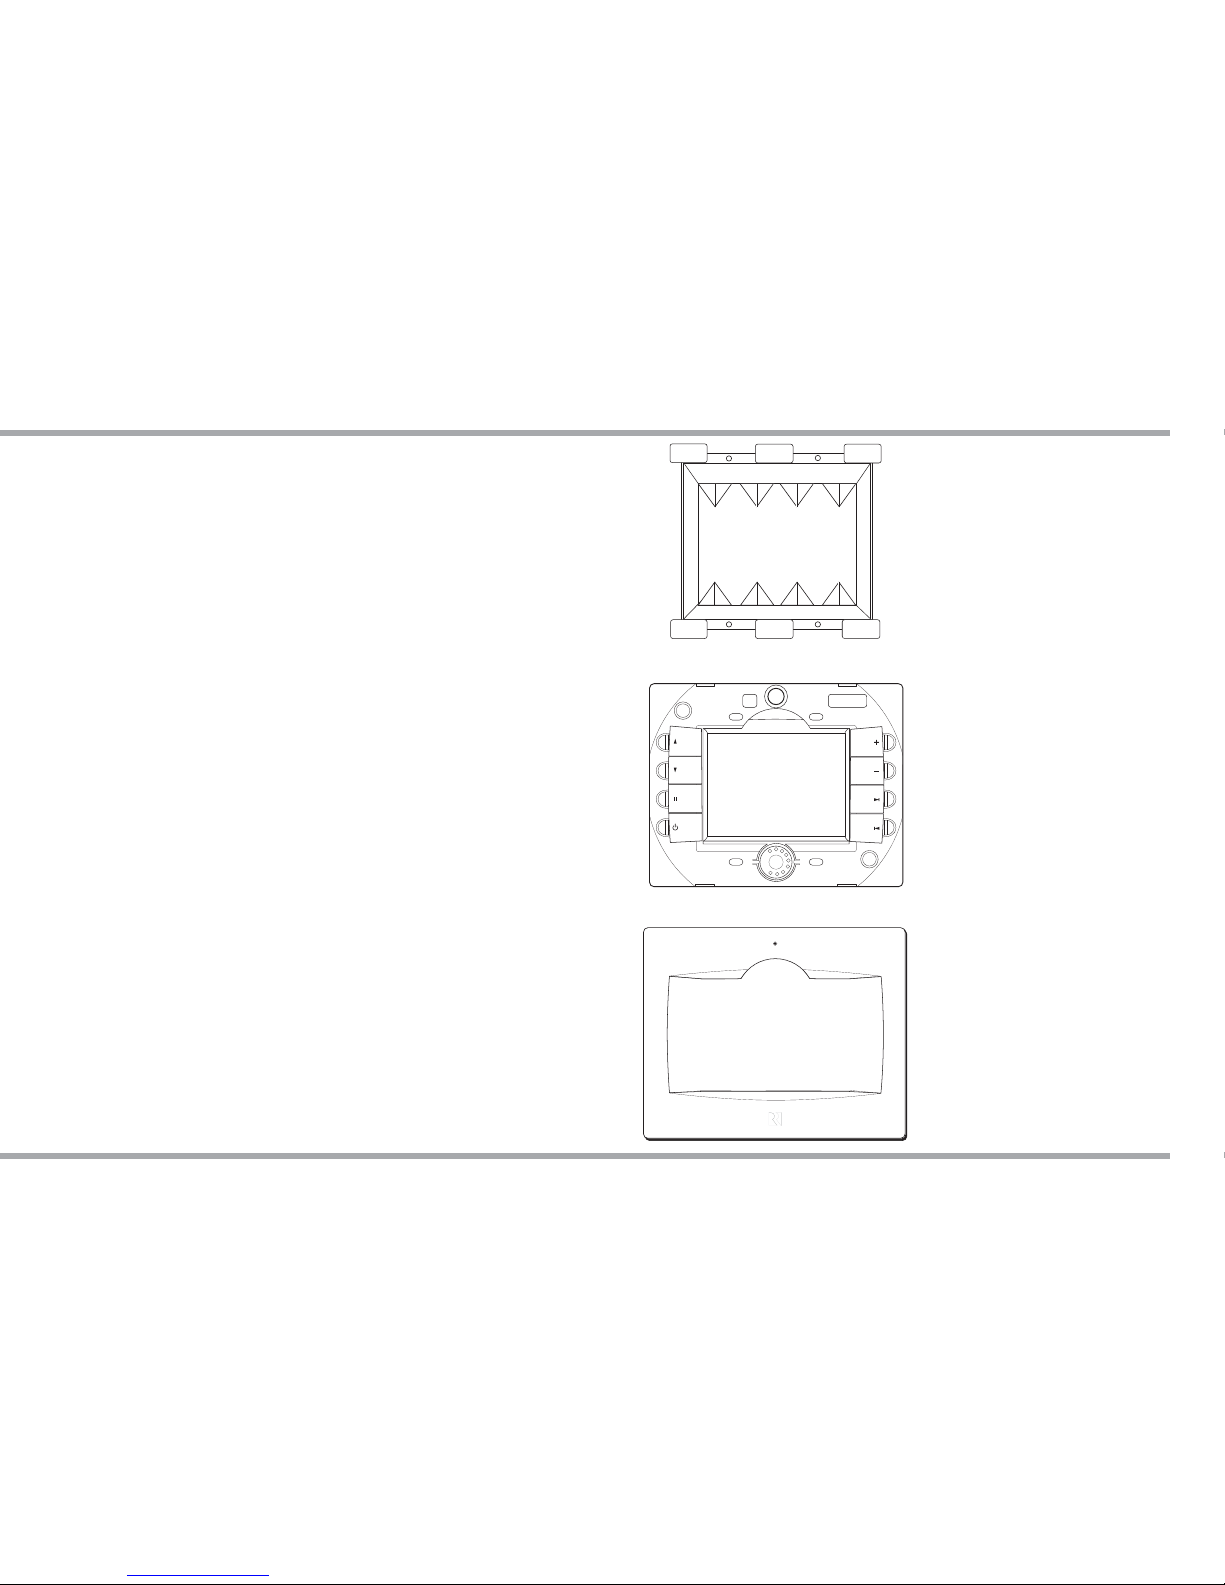
After the touchscreen location is selected and the wall box is
temporarily in place, route CAT-5e cable to the wall box from
the controller. There should be not more than 250 feet of CAT-5e
cable between the touchscreen and the controller.
Terminate the CAT-5e cable with an RJ-45 connector, using the
T568A wiring standard. Insert the RJ-45 connector into the jack
marked “Controller” on the back of the touchscreen.
Mount the touchscreen in the electrical box and attach
the cover plate. Repeat the steps until all touchscreens are
installed.
Touchscreen Bezel Removal
To remove the bezel from the front of an installed touchscreen,
you will need a at screwdriver. Place the screwdriver blade in
the slot between the bezel and the molding, located below the
“R” on the bottom edge of the bezel. Twist the blade until a loud
click is heard; this sound is the bezel locking tabs releasing from
the frame catch.
The bezel can now be lifted from the touchscreen. To replace
the bezel, center it over the front of the touchscreen and press
rmly until the bezel clicks into place.
TOUCHSCREEN INSTALLATION
32ci plastic junction box
TS3 Touchscreen
TS3 bezel
Page 9

9Russound TS3 Installation Manual
The TS3 Touchscreen is designed for use with the C-Series
controllers, and connects to a keypad port on the back of the
controller. Connect the touchscreen to the controller keypad
TS3 Touchscreen
CAT-5e Cable
(250 ft. max)
MCA-C3 Controller
RJ-45
RJ-45
RJ-45
CONTROLLER CONNECTIONS
input with CAT-5e cable using an RJ-45 connector with T568A
wiring standard. Cable length from the touchscreen back to the
controller should be no more than 250 feet.
Page 10

10 Russound TS3 Installation Manual
2 twisted
pair cable
Shield wired
to ground
DO NOT
CONNECT
SHIELD
Russound 858
IR receiver (back)
The TS3 Touchscreen has an External IR Receiver In terminal for
connecting an external IR Receiver such as the Russound 858,
SaphIR 862 Eye, or SaphIR 860 Phantom.
Use 2 twisted pair wire with one pair connecting GND
(GROUND) and IR (SIGNAL) and the other pair connecting ST
(STATUS) and V+ (+12VDC). Do not connect the shield to the IR
receiver terminals.
If using an external IR receiver, you can avoid “double” receipt
of IR signals sent from a remote by disabling the keypad’s IR
receiver (see screen example below). From the Home screen,
select Options. Select Screen Setup, then press and hold
Installers Setup until the Installer Setup screen appears. Select
Front IR Receiver.
Disable Front IR Receiver
EXTERNAL IR CONNECTION / FRONT IR DISABLE
External IR connection
Page 11

11Russound TS3 Installation Manual
INSTALLERS SETUP ZONE AND CONTROLLER ID
After the touchscreen is installed, connected to the controller
and powered on, the Zone and Controller ID numbers must be
manually set on the TS3.
From the Main screen, select Options. Select Screen Setup,
then press and hold Installers Setup until the "Installer Setup"
screen appears. Select Zone and Controller ID.
On this screen, enter the zone number the TS3 is controlling
and the ID number of the controller to which it is connected.
Page 12

12 Russound TS3 Installation Manual
OPTIONS ALARM SETTINGS / TIME AND DATE
Setting Clock and Date
From the Main screen, select Options
(top right corner of screen)
Select Time and Date to edit the clock or calendar eld, touch
it, use the +/- to move through the numbers. For clock format,
select 12 hour (AM/PA)or 24 hour (1200) format.
Setting Alarm
From the Main screen, select Options
(top right corner of screen)
Select Alarm Settings for the following options (on screen 1 of 2):
Alarm on/o - Activates alarm on or o . If an alarm is set a
bell icon will appear on the keypad display.
Wake time - Set the time for the alarm to go o .
Choose days - Set the alarm to go o on weekdays, all days
or just once.
Select More to set the following options:
Alarm Volume - Set the volume of the alarm.
Wake to - Choose the music source or Favorite.
Set snooze - Choose the interval (1 to 30 minutes) before the
alarm goes o again.
Alarm is active - The touchscreen displays a screen showing a
ringing alarm clock.
To Turn o active alarm - Press the Alarm O button on the TS3
or press the Power button on the SRC-C5 remote control.
To Snooze - Press the snooze button on TS3, or pause button
on the SRC-C5 remote control.
Page 13

13Russound TS3 Installation Manual
OPTIONS SOUND CONTROL / FEATURES
The options screen also allows for customizing the room audio
properties.
Sound Control
The sound control screen brings up a variety of room setting
options.
Bass- adjust the bass level for the room
Treble - adjust the treble for the room
Balance - adjust the left to right speaker balance for the
room
Loudness - Turn loudness (more bass, fuller sound at low
volumes) on or o for the room. A check mark appears to
indicate loudness activation.
Features
The features screen brings up a variety of room setting options.
Turn On Volume - sets the rooms's default volume when the
room is turned on.
Party and Master - The keypad that shows Master has started
a "party" and keypads that show Party are "attending."
All rooms are listening to the same music, and only the
Master can change the music. Volume can be adjusted
independently but will be overridden by the Master.
Do Not Disturb - Someone in another room has chosen a
source and locked out anyone else from controlling it. That
room also won’t be disturbed by paging.
Page 14

14 Russound TS3 Installation Manual
SCREEN SETUP / INSTALLER SETUP FUNCTIONS
The Screen Setup screen allows for adjustment of the
touchscreen's brightness and time to blank. It is also the gateway
to the Background image and Installers Setup screens.
Brightness - Adjust the touchscreen brightness
Screen Blank (min) - The screen blank darkens the screen after
a period of inactivity. A touch to the screen reactivates it. Adjust
the time (from 0 to 60 minutes) it takes for the touchscreen
to activate its screen-saving darkening feature after the last
use. A value of 0 (zero) disables the screen blank feature.
"Background Selection " Icon
(status bar - bottom of screen)
This icon allows selection of the background graphic .
Installers Setup
This series of screens provides access to installer-only functions.
Press and hold Installers Setup to enter.
About
The About screen displays the touchscreen's rmware version,
and IP and MAC addresses when applicable. It also shows the
IP and MAC addresses of the controller to which the TS3 is
connected.
Firmware Update
When rmware updates are issued for the TS3, they will be
available for download from the Support Center. The rmware
les are loaded onto the touchscreen from a USB device using
the USB port on the bottom edge of the touchscreen.
Refer to Russound's online
Support Center for detailed
instructions.
Page 15

15Russound TS3 Installation Manual
INSTALLERS SETUP / DIAGNOSTICS / FACTORY INIT
Languages
Provides a list of available options for the display language. Not
all screen data will be translated into the selected language.
Diagnostics
The diagnostics screens provide simple testing methods of the
touchscreen's performance.
Hard Button Test - This screen is a tool for testing the hard
buttons on the sides of the touchscreen. As each button is
pressed, the button's name is spoken by the keypad, e.g.,
volume up, volume down, pause, etc.
Touch Test - This screen is a tool for checking the touch sensitivity
and calibration of the keypad. As each letter/number is pressed,
the touchscreen "speaks" the letter/number.
White, Blue and Red Screen - Turns the entire screen white, blue
or red. This allows you to see any bad pixels. Returns to the
Diagnostics screen if you touch the display.
Factory Init
This option allows a factory initialization to be performed on
the touchscreen. This sets the unit back to its factory settings.
Diagnostics and Factory Init are
accessed by selecting the page
down button on the right side of
Installer Setup screen.
Page 16

16 Russound TS3 Installation Manual
SETTING FAVORITES
Favorites
(top leftt corner of screen)
The TS3 supports 32 system favorites. These choices can be
selected at any time to recall a source selection, mode, channel,
station, etc.
Saving a Favorite
Favorites are saved from the Favorites screen. Before storing a
favorite, select a source to be stored, choose the desired station,
channel, etc.
To add a favorite, press the 'add' button. A keyboard screen
appears for typing in the desired name for the Favorite. To
type numbers, press the '123+/-_' button. When the name is
complete, save the Favorite by pressing Enter.
To overwrite, rename or delete a Favorite, press and hold the
Favorite in the list on the Favorites screen. The Edit Favorite
screen appears. Pressing Overwrite or Rename brings up the
keyboard screen. Press Delete to delete the Favorite from the
list.
Playing a Favorite
To play a favorite, press the name of the Favorite in the list on
the Favorites screen. This selects the source, channel, station,
etc. of the saved favorite.
Page 17

17Russound TS3 Installation Manual
Although there are di erent screens for di erent sources, they
do share some common features.
Main Display
All source screens contain a main display window which
shows the current source name, system messages and display
messages from some sources.
Source Selection
Press the current source name to access the system source list.
Volume Bar
This thin blue rectangle runs along the left side of the main
display. The size of the bar indicates the current volume for the
room, expanding from bottom to top.
"Party" Icon
(status bar - bottom of screen)
The small Party icon becomes highlighted on the right side of
the main display when the system is in the Party mode and it is
active in the current room.
"Shared" Icon
(status bar - bottom of screen)
The small graphic “S” becomes highlighted on the right side
of the main display when the selected source is also selected in
one or more other rooms.
SOURCE SCREENS COMMON FEATURES
Party
Party
Volume Bar
Shared Icon
Party Icon
Source Selection
Page 18

18 Russound TS3 Installation Manual
Master Icon
Page
Indicators
Back Button
Alarm Icon
Now Playing Button
DND Icon
"Master" Icon
(status bar - bottom of screen)
When a zone initiates a party, the Master icon is displayed. The
Party Master controls zones in the system that are on and have
party mode enabled.
"DND" Icon
(status bar - bottom of screen)
The small graphic “DND” becomes highlighted when the
current zone and source is in the Do Not Disturb mode. When in
this mode, other rooms are prevented from changing the state
of the source (change channels, etc.). The DND icon also appears
on keypads for all other rooms that select this source.
"Alarm Icon"
(status bar - bottom of screen)
The small clock graphic will indicate that the zone's alarm is
actively set.
Back Button
(top left corner of screen)
This button returns to the previously displayed screen
Now Playing Button
(top right corner of screen)
Press the music note button in the top right corner.
Page Indicators
If more than one page of information is available the page
indictor icons will be displayed to the right of the list allowing
you to page up or down.
Master
Master
SOURCE SCREENS COMMON FEATURES
Page 19

19Russound TS3 Installation Manual
SOURCE SCREENS EXAMPLES
IR controlled legacy device
DMS-3.1 Streamer
iBridge Dock
RNET AM/FM TunerSources selection menu
Press the source Now Playing screen to access source speci c options.
Page 20

20 Russound TS3 Installation Manual
TECHNICAL SPECIFICATIONS
TS3 Touchscreen
Dimensions: Inside Standard Double-gang J-Box
3.675”W x 1.150”D x 2.850”H
(9.3 x 2.9 x 7.2 cm)
Front Panel
5.750”W x 1.0”D x 4.650”H
(14.6 x 2.5 x 11.8 cm)
Fits UL/CSA Approved Double-gang
Junction Box
Weight: 1 lb. 2.5 oz. (524 g)
Power requirement: 200mA @ 12VDC Max
External IR connection: 100mA @ 12VDC Max
CAT-5e connection: RJ-45 (T568A standard)
Software update port: USB 2.0
Operating temperature range: 32-86º F (0-30º C) max (indoor use only)
Warranty
The Russound TS3 is fully guaranteed against all defects in materials
and workmanship for two (2) years from the date of purchase. During
this period, Russound will replace any defective parts and correct any
defect in workmanship without charge for either parts or labor.
For this warranty to apply, the unit must be installed and used according
to its written instructions. If service is necessary, it must be performed
by Russound. The unit must be returned to Russound at the owner’s
expense and with prior written permission. Accidental damage and
shipping damage are not considered defects, nor is damage resulting
from abuse or from servicing by an agency or person not speci cally
authorized in writing by Russound.
This Warranty does not cover:
• Damage caused by abuse, accident, misuse, negligence, or improper
installation or operation
• Power surges and lightning strikes
• Normal wear and maintenance
• Products that have been altered or modi ed
• Any product whose identifying number, decal, serial number, etc.
has been altered, defaced or removed.
Russound sells products only through authorized Dealers and
Distributors to ensure that customers obtain proper support and service.
Any Russound product purchased from an unauthorized dealer or other
source, including retailers, mail order sellers and online sellers will not be
honored or serviced under existing Russound warranty policy. Any sale
of products by an unauthorized source or other manner not authorized
by Russound shall void the warranty on the applicable product.
Damage to or destruction of components due to application of excessive
power voids the warranty on those parts. In these cases, repairs will be
made on the basis of the retail value of the parts and labor. To return for
repairs, the unit must be shipped to Russound at the owner’s expense,
along with a note explaining the nature of service required. Be sure to
pack the unit in a corrugated container with at least three (3) inches of
resilient material to protect the unit from damage in transit.
Before returning a unit for repair, call Russound at (603) 659-5170 for a
Return Authorization number. Write this number on the shipping label
and ship to:
Russound
ATTN: Service
5 Forbes Road
Newmarket, NH 03857
Due to continual e orts to improve product quality as new technology
and techniques become available, Russound/FMP, Inc. reserves the right
to revise system speci cations without notice.
WARRANTY
Page 21

21Russound TS3 Installation Manual
Page 22

22 Russound TS3 Installation Manual
Page 23

23Russound TS3 Installation Manual
Page 24

Russound, Inc.
5 Forbes Road, Newmarket, NH 03857
tel 603.659.5170 • fax 603.659.5388
email: tech@russound.com www.russound.com
28-1358 01/29/13, Rev. 2
Color Touchscreen TS3
Installation Manual
©2013 Russound. All rights reserved.
All trademarks are the property of their respective
owners. Speci cations are subject to change without
notice. Russound is not responsible for typographical
errors or omissions.
 Loading...