

Page 1
TCH1
RNET® Touchpoint
Installation Manual
Page 2

SAFETY INSTRUCTIONS
WARNING: TO REDUCE THE RISK OF FIRE
OR ELECTRIC SHOCK, DO NOT EXPOSE THIS
APPLIANCE TO RAIN OR MOISTURE.
CAUTION: TO REDUCE THE RISK OF
ELECTRIC SHOCK, DO NOT REMOVE THE
COVER. NO USER-SERVICEABLE PARTS
INSIDE. REFER SERVICING TO QUALIFIED
SERVICE PERSONNEL.
The lightning ash with arrowhead symbol, within
an equilateral triangle, is intended to alert the user
to the presence of uninsulated dangerous voltage
within the product’s enclosure that may be of
sucient magnitude to constitute a risk of electric
shock to persons.
The exclamation point within an equilateral
triangle is intended to alert the user to the presence
of important operating and maintenance (servicing)
instructions in the literature accompanying the
appliance.
Safety Instructions
Read Instructions - All the safety and operating 1.
instructions should be read before the appliance
is operated.
Retain Instructions - The safety and operating 2.
instructions should be retained for future
reference.
Heed Warnings - All warnings on the appliance in 3.
the operating instructions should be adhered to.
Follow Instructions - All operating and user 4.
instructions should be followed.
Water and Moisture - The appliance should 5.
not be used near water; for example, near a
bathtub, washbowl, kitchen sink, laundry tub,
in a wet basement, or near a swimming pool.
The apparatus shall not be exposed to dripping
or splashing liquids and no objects lled with
liquids, such as vases, shall be placed on the
apparatus.
Wall or Ceiling Mounting - The appliance 6.
should be mounted to a wall or ceiling only as
recommended by the manufacturer.
Ventilation - The appliance should be situated so 7.
that its location or position does not interfere with
its proper ventilation. For example, the appliance
should not be situated on a bed, sofa, rug, or
similar surface that may block the ventilation
openings, or placed in a built-in installation, such
as a bookcase or cabinet that may impede the
ow of air through the ventilation openings.
Heat - The appliance should be situated away 8.
from heat sources such as radiators, heat
registers, stoves, or other appliances (including
ampliers) that produce heat.
Power Sources - The appliance should be 9.
connected to a power supply only of the type
described in the operating instructions or as
marked on the appliance.
Grounding or Polarization - Precaution should 10.
be taken so that the grounding or polarization
means of an appliance is not defeated.
Power Cord Protection - Power supply cords 11.
should be routed so that they are not likely to
be walked on or pinched by items placed upon
or against them, paying particular attention to
cords at plugs, receptacles, and the point where
they exit from the appliance.
Cleaning - The appliance should be cleaned only 12.
as recommended by the manufacturer.
Non-Use Periods - The power cord of the 13.
appliance should be unplugged from the outlet
when left unused for a long period of time.
To remove all power (supply mains) from the
appliance, remove the plug from the wall outlet.
Object and Liquid Entry - Care should be taken so 14.
that objects do not fall and liquids are not spilled
into the enclosure through the openings.
Damage Requiring Service - The appliance should 15.
be serviced by qualied service personnel when:
A. The power supply cord or the plug has been
damaged; or
B. Objects have fallen, liquid has been spilled
into the appliance; or
C. The appliance has been exposed to rain; or
D. The appliance does not appear to operate
normally; or
E. The appliance has been dropped or the
enclosure is damaged.
Servicing - The user should not attempt to service 16.
the appliance beyond that described in the
operating instructions. All other servicing should
be referred to qualied service personnel.
Precautions:
Power – WARNING: BEFORE TURNING ON 1.
THE POWER FOR THE FIRST TIME, READ THE
FOLLOWING SECTION CAREFULLY.
Do Not Touch The Unit With Wet Hands – Do not 2.
handle the unit or power cord when your hands
are wet or damp. If water or any other liquid
enters the cabinet, unplug the unit from power
immediately and take it to a qualied service
person for inspection.
Location of Unit – Place the unit in a well-3.
ventilated location. Take special care to provide
plenty of ventilation on all sides of the unit
especially when it is placed in an audio rack. If
ventilation is blocked, the unit may overheat and
malfunction. Do not expose the unit to direct
sun light or heating units as the unit internal
components temperature may rise and shorten
the life of the components. Avoid damp and
dusty places.
Care – From time to time you should wipe o 4.
the front and side panels of the cabinet with a
soft cloth. Do not use rough material, thinners,
alcohol or other chemical solvents or cloths since
this may damage the nish or remove the panel
lettering.
2 Russound TCH1 Installation Manual Rev. 2
Page 3

Product overview ................................................................................................. 4
Front and rear views ............................................................................................5
Installation connections ....................................................................................6-7
Conguration .........................................................................................................8-11
Firmware update .................................................................................................. 12
User interface ......................................................................................................... 13
Zone selection and settings .............................................................................14
Source selection and control ...........................................................................15
Content browsing ................................................................................................ 16
Technical specications .....................................................................................17
Warranty .................................................................................................................. 18
TABLE OF CONTENTS
Agency Approvals - TCH1 Touchpoint Station
3Russound TCH1 Installation ManualRev. 2
Page 4

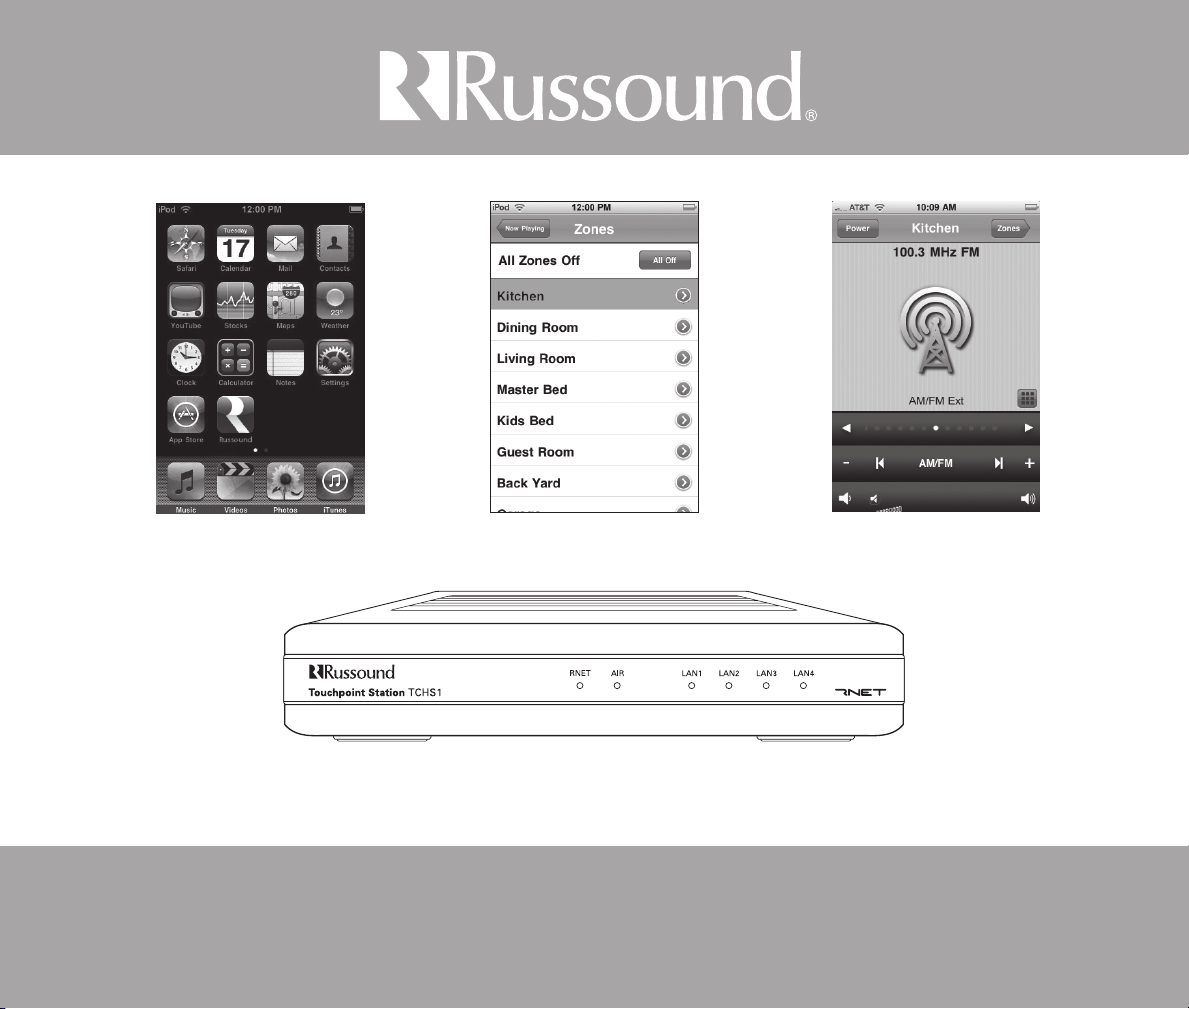
pROdUCT OVERVIEW
NOTE: A home network with wireless capability is necessary for
control of the system via Touchpoint
Russound's RNET® Touchpoint model TCH1 provides direct access
and remote control of a Russound multiroom audio system from an
Apple® iPhone™ or iPod touch®. Touchpoint allows for two-way WiFi
remote control of any zone in a Russound RNET enabled multiroom
audio system and provides real time display of system and source
information.
Touchpoint consists of an interface device called the TCH1S for
integration between the local area network and the Russound
multiroom audio system and required adapters and cables. The TCH1S
serves up web pages for display and control of the Russound multiroom
system over the WiFi network to an iPhone™ or iPod Touch® whose web
browser is pointed to the IP address of the TCH1S. The TCH1S is easily
congured via a direct connection with a computer running Internet
Explorer 7, Firefox 3.x or Safari.
Other items included are:
6' CAT-5 network patch cable for connection from the TCH1S to the •
existing LAN
USB to RS232 Serial adapter •
DB9 extension cable required for connection to the Russound multi-•
room audio system
Antenna•
Power supply•
Features
Compatible with the Apple® iPhone™ and iPod touch®•
Supports all Russound RNET enabled and CAA66 controllers•
Controls any zone and any source in the system including RNET and •
IR-controlled sources
Multi-controller support - up to six controllers and 48 zones•
Displays real-time metadata from Russound RNET sources•
Ability to control zones for Bass, Treble, Loudness, Balance, DND, •
and Party Mode
Zone volume control with mute option•
Displays zone and source names•
Easy to congure via PC - set the IP address, Netmask (Subnet mask), •
and Default gateway for the network; select the Russound controller
type, and enter zone and source names as desired to be displayed
10/100 Ethernet connectivity to home network (preferred •
connection)
802.11b, 802.11g wireless interface to the home network when a •
hardwired connection isn't possible
Wireless security - WEP 40 and 128 bit, WPA (PSK), and WPA2 (PSK)•
Firmware upgradable via a web browser interface•
4 Russound TCH1 Installation Manual Rev. 2
Page 5
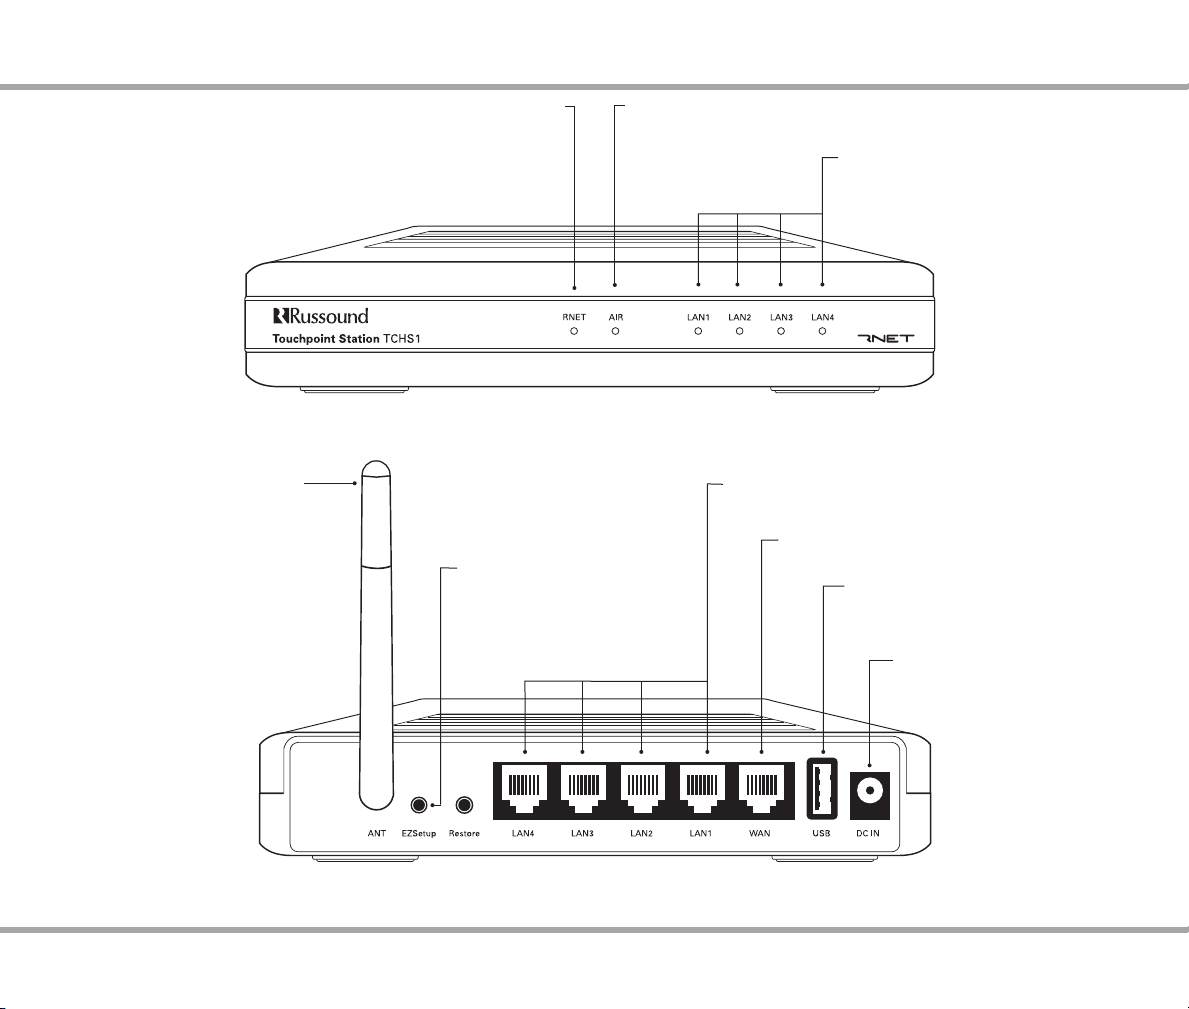
FRONT ANd REAR VIEWS
RNET- LED indicates active RNET connection with
Antenna - Screw to the ANT jack
for WiFi communication to the
home network router
the RNET Controller
TCHS1 front view
EZ Setup - Will restore the
unit's IP address back to factory
default
AIR - LED indicates successful wireless connection. When
ashing, unit is actively sending or receiving data wirelessly.
LAN 1, 2, 3, 4 - LEDs indicate connection and
activity of corresponding back panel ports
LAN 1, 2, 3, 4 - 10/100 Ethernet switches. RJ45
connectivity to home network over CAT-5 cable
WAN - Not used
USB - Use supplied adapter to connect
to the controller's RS232 serial port
DC - Connect interface power
supply and plug into 120VAC
outlet
TCHS1 rear view (with antenna attached)
5Russound TCH1 Installation ManualRev. 2
Page 6
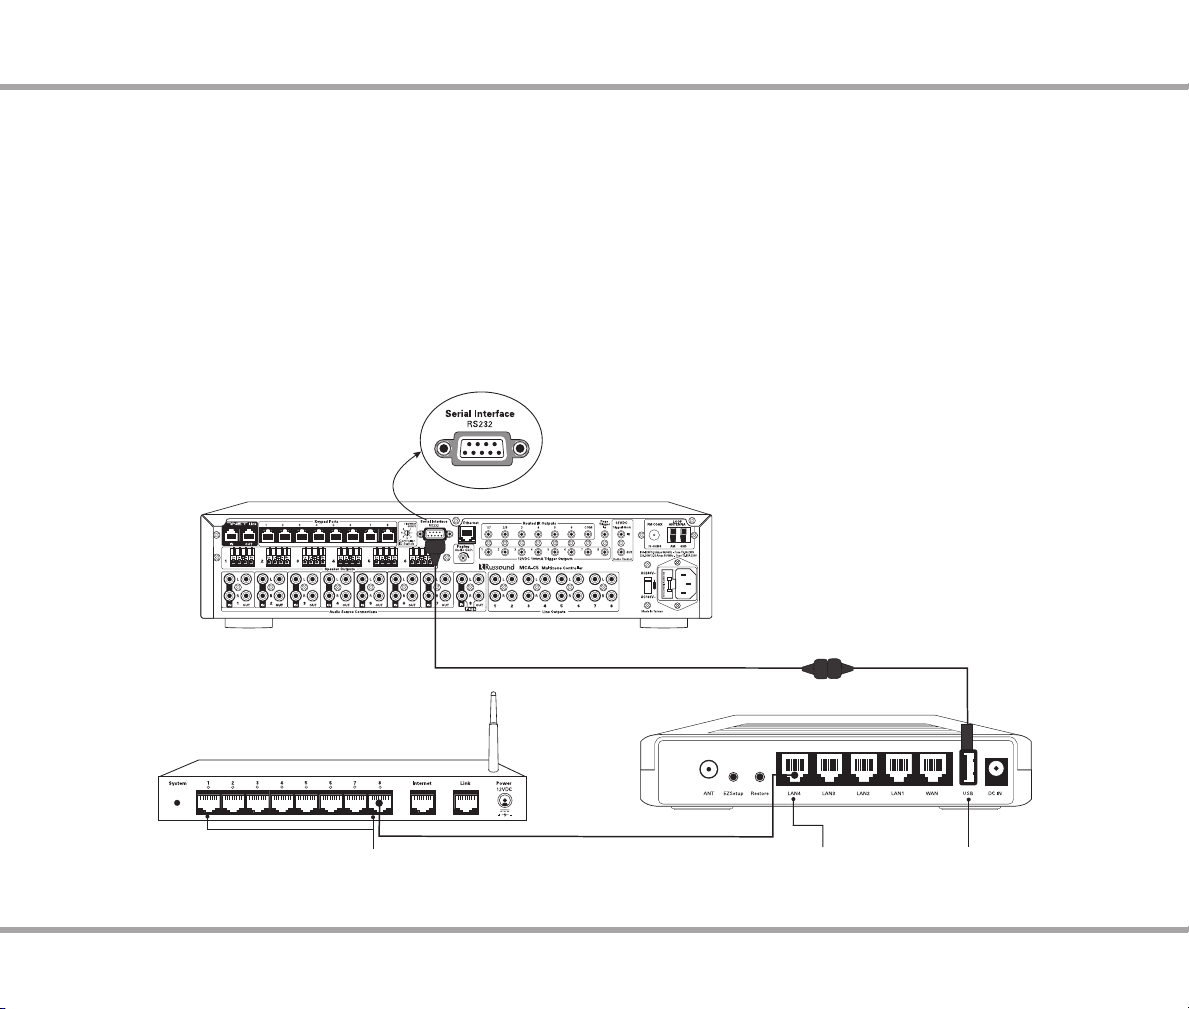
INSTALLATION ANd CONNECTIONS
USB/Serial adapter
CAT-5 cable
Controller
Home Network Router
TCHS1 Interface
Serial extender cable
Basic installation
Note: Connect all cables from TCHS1 to controller and router BEFORE
powering the unit.
What you will need:
Home network WiFi router (• Note: A wireless access point to the
home network must be enabled in the setup process for proper use
by iPhone or iPod touch devices)
RNET enabled controller•
PC with browser capability•
iPhone or iPod touch•
Connect the TCHS1 to your home network router via a CAT-5 wired 1.
Ethernet (LAN) connection (recommended), or attach the antenna
to communicate with the router via a WiFi connection. The TCHS1
must be on the same network as any Ethernet connections to RNET
controllers or components.
Connect the supplied adapter to the USB port on the TCHS1, and 2.
connect the serial extender cable to the RS232 port on the RNET
controller (on ACA-E5 multiroom controller, use RS232 port 'A'). If
it is a multiple controller system, the TCHS1 must be connected to
controller #1.
The RNET LED on the front lights to indicate an active RNET 3.
connection. There may be a delay before the LED lights to show a
change in state.
LAN Port
USB Port
LAN Ports
(CAT-5 connection between Network Router and TCHS1)
Recommended conguration
6 Russound TCH1 Installation Manual Rev. 2
Page 7

USB/Serial adapter
Controller
Home network router
TCHS1 Interface
Serial cable
Connection
to Controller
CAT-5 Ethernet Cable
Computer
TCH1 Power Supply
TCHS1 Interface
INSTALLATION ANd CONNECTIONS
Basic Installation (cont'd)
Connect the computer to a TCHS1 LAN port (WAN port is not 4.
used) with an Ethernet cable either directly, or through a switch
on the home network. If you will be using the wireless capability
of the TCHS1 to communicate with the network router, then the
connection with the computer won't be needed after the initial
setup.
Connect the power supply and plug in to an AC outlet.5.
USB/Serial adapter
Alternate installation
If it is not feasible to run a CAT-5 cable between the TCHS1 and the
home network router, the wireless capability can be enabled during
setup. There must be a hard wired connection from the TCHS1 to the
computer to perform the setup.
WiFi
Antenna
Computer connection for initial setup
USB Port
Alternate conguration
(If TCHS1 location prevents wired connection to Network Router)
7Russound TCH1 Installation ManualRev. 2
Page 8

CONFIGURATION
Initial Setup
Obtain your computer's IP address, subnet mask and default gateway.
For a PC running Windows, either check the settings in the TCP/IP
properties or type "ipcong" in the command line prompt. For a Mac,
under System Preferences, select Network.
To set up the TCH1 from your computer, make sure it is on the
192.168.1.x network. You may have to temporarily change this on your
computer to rst congure the IP address of the TCHS1 to the required
settings of the local area network. (e.g., set the PC to 192.168.1.100 with
a net mask of 255.255.255.0)
Properties - Press to view
screen below
Control Interface Setup
Connect to the Administrative Console.
Open a Web browser and enter: http://192.168.1.200/admin.html.
When prompted, enter: User name: admin, Password: russound.
Administrative Console
8 Russound TCH1 Installation Manual Rev. 2
Page 9

Network Conguration
Congure the network interface on the TCHS1. Do this step even if you
plan to connect to the TCHS1 via wireless.
Select "Network" from the Main menu on the administrative console
Enter the IP address for the TCHS1. Use an unused IP address on 1.
your existing home network (e.g., if your PC is congured to use
192.168.1.20, use the default IP address of 192.168.1.200).
Enter the netmask for your existing home network. The default is 2.
255.255.255.0
Enter the default gateway IP address. This is the IP address of your 3.
home router.
Click Save Changes.4.
CONFIGURATION
IP Address- Enter an unused static
address on your network.
Netmask - Mask indicates what addresses are
included in your LAN.
Default Gateway - Enter your home
network IP address.
Save Changes - must be clicked
to save information
9Russound TCH1 Installation ManualRev. 2
Page 10

CONFIGURATION
Wireless Conguration Only
Wireless functionality is disabled by default. Follow these steps to
enable wireless communication when a hardwired connection to the
Local area network isn't possible.
Obtain the wireless network security settings from the wireless 1.
router or access point being used in the residence.
Select "Wireless" from the Network Menu.2.
Click the On button to enable the wireless interface.3.
Enter the ESSID of your home network. Check the settings on your 4.
access point to make sure you have the correct ESSID.
Enter the encryption settings of your home network. If you are not 5.
using encryption, set Encryption Type to disabled.
If using WEP security, enter the passphrase for your wireless router 6.
and generate the WEP keys accordingly then select one of the WEP
keys to use.
If using WPA (PSK) or WPA2 (PSK), enter the PSK for the wireless 7.
security.
Verify that the wireless security settings match those of the home 8.
network router.
Click Save Changes.9.
Wireless Interface - Choose
"On" to use wireless
connectivity to the
home router
Channel - Choose appropriate
ESSID - Must match home network
Save Changes - Must be clicked
to implement
10 Russound TCH1 Installation Manual Rev. 2
Page 11

CONFIGURATION
Controller Setup
Note: the system's controller ID, source assignments and room names
should be readily available for controller and source setup.
Select "Controller Setup" from the Main menu under "System."
Select the controller type for your specic conguration. 1.
Enter unique zone names for each zone in use. Leave zone names 2.
blank for unassigned zones to prevent them from showing up on
the Zone List page of the user interface.
Click Save Changes. 3.
Source Setup
Enter a source name and source type for each source. If the 1.
source does not support RNET, the source type should be set to
"Standard IR."
When a source input is not being used, leave the source name blank 2.
and select ‘None’ in the corresponding source type combo box.
Click Save Changes.3.
Controller Type
Choose appropriate
Zone Names
Enter names - No duplicates
Must be clicked to save information
Save Changes (Not shown)
Source Name
Enter appropriate
No duplicates
Source Type
Choose appropriate -
enter "Standard IR" for
non-RNET sources
Save Changes
Must be clicked to save
information
11Russound TCH1 Installation ManualRev. 2
Page 12

FIRmWARE UpdATE
Update Procedure or Restore Defaults
The TCHS1 may be eld upgraded to provide additional features and
functionality. It may also be restored to factory default settings.
To update the TCH1 you will need the Firmware Image le from
the Russound Document Center, and a PC, MAC, or Linux computer
connected to your home network.
Download the le to a known location on your computer from 1.
which you can retrieve the le.
Connect to the TCH1 administrative console: http://<IP Address of 2.
the TCH1>/admin.html
Enter the user name (admin) and password (russound)3.
Select System Conguration from the main menu of the 4.
Administrative Console.
Click the Browse button and locate the Firmware Image le 5.
previously downloaded.
Click the Upgrade button. The update can take up to 3 minutes.6.
When the update is complete, the TCH1 displays a message 7.
indicating that the upgrade was successful and will then reboot.
The new version number shows in the Administrative Console on
the top right corner of the Web page.
Alternate Method to Restore Defaults
If the IP address is not readily available, an alternate method to
restore defaults is to press and hold the EZ Setup button on the back
of the unit and cycle power at the same time. Continue to hold the
button down for 90 seconds until the RNET LED illuminates for two
seconds. Release button.
Firmware Update screen
Firmware Update progress screen
12 Russound TCH1 Installation Manual Rev. 2
Page 13

USER INTERFACE
User Interface from iPhone or iPod touch
Open the Safari browser application and type the following URL: 1.
http://(the TCHS1 IP address). Bookmark the address as a shortcut by
pressing the "+" at the bottom of the screen. Select "Add to home
screen" to place the shortcut/icon on the home screen.
Press the shortcut icon or select the bookmarked address. The "Now 2.
Playing" page will be displayed. The page will open to the last zone
being controlled before exiting the interface.
Now Playing
RNET sources: The source name, channel and song information will be
displayed. The control keys and sliders are available at the bottom of
the screen and can be touched to change source, channel, volume, etc.
Legacy Sources: Only source name will be displayed. Buttons will be
available to change channel, disc, etc.
RNET Source Controls (No "Press and Hold" commands exist)
AM/FM and Satellite Tuners
- Selects next lower channel / frequency
+ Selects next higher channel / frequency
|< Selects previous preset (current bank)
>| Selects next preset (current bank)
"AM/FM" Toggles between AM and FM bands
SMS3 Smart Media Server
- Selects previous theme
+ Selects next theme
|< Restarts current song / selects previous song in queue
>| Selects next song in queue
>|| Pause/Unpause
iBridge
- Selects previous playlist
+ Selects next playlist
|< Plays previous song in playlist
|> Plays next song in playlist
>|| Pause/Unpause
Power - Turns zone on/o
Title Bar - Name of zone
being controlled
Zones - Changes to Zone
Selection Page
Now Playing Page - Shows source
and channel / song information.
Tap in this area to open a numeric
entry page
Source Name and Selection
- Touch either arrow to scroll
through and change sources or
touch the bar to go to Source Page
Keypad / List Button -
Depending on what type
of source, press to bring up
Numeric Entry or List screen
Source specic controls - Press
-, +, |<, |> and AM/FM (or >||) for
control of sources (listed at left)
Volume Control - Press speaker
icons to decrease, mute or
increase volume
Numeric Entry - Press
appropriate digits for numeric
entry for standard IR devices and
Russound RNET sources (except
SMS3 and iBridge)
13Russound TCH1 Installation ManualRev. 2
Page 14

zONE SELECTION ANd SETTINGS
Access zones
From the "Now Playing" screen, touch the "Zones" button. The Zone
page is displayed. Touch the zone you want to control, and the Now
Playing page shows what's on in that zone.
Back - Touch to return to
Zone page
Now Playing - Touch to return
to Now Playing page
All O - Touch to turn o all
zones
Zone Page - Touch zone name
to select that zone for control
Zone Settings - Touch for the
menu to view/change zone
audio settings and mode
status (Master, Party, DND, and
Shared)
Zone Settings
On the Zones page, touch the small blue arrow button to access the
Zone Settings menu.
When an individual option is selected, the adjustment window
appears for choosing specic setting options/levels.
Audio Options - Touch to
change settings
DND - Change zone or
source to Do Not Disturb
Party - Turn on, exit or
participate in Party Mode
Audio / Mode Option -
Touch to control
Done - Saves setting and returns
to Zone Edit page
Previous / Next - Goes to previous
or next zone setting
14 Russound TCH1 Installation Manual Rev. 2
Page 15

Source Selection
The source selection page can be accessed by touching the source
selection bar on the "Now Playing" page. After selecting a source it will
return to the Now Playing screen.
Now Playing - Touch to return
to Now Playing page
SOURCE SELECTION ANd CONTROL
Source Name - Touch to
select Source
Source Control (RNET-enabled sources)
Once the source has been selected, the source's home page is
displayed. To access the content selection, touch the small box in the
lower right corner.
For tuner sources, a keypad button shows. Press the button to access
the Numeric Entry page for station selection.
For the SMS3 Media Server and iBridge Bay and Dock, a list button
shows. Press the button to access content lists.
List Button - Shows on RNETenabled sources SMS3, iBridge
Dock and Bay
Keypad Button - Shows on
RNET-enabled tuners and IR
sources
15Russound TCH1 Installation ManualRev. 2
Page 16

CONTENT BROWSING
Access content
Digital content is made available for browsing through specic lters.
Filters such as Themes, Playlists, Genres, Artists, Albums and Songs can
be used to narrow the search for specic content on specic sources.
For example, the Russound SMS3 Media Server has "Themes" but the
iBridge source products do not.
Each lter provides an option to play the selected item or drill down
deeper into more specic levels of content - right down to a particular
song if desired. Use the "Back" button to retrace navigation steps to go
from more specic or more general ltering of content.
The following iBridge Dock example shows how the album "Back in
Black" is selected from an iPod in an iBridge Dock.
Source Main Page Request Main Page Artists Main Page View Main Page Albums Main Page
16 Russound TCH1 Installation Manual Rev. 2
Page 17

TCH1 RNET Touchpoint
Dimensions: 6.5"W x 4.5"D x 1.2"H
(165 x 114 x 30 mm)
Weight: 1 lbs. (0.45 kg)
Power Supply: 5 VDC max 2A current
Wireless Technology: IEEE 802.11b/g
Antenna: 1 x 2dBi Built-in
Frequency Band/Bandwidth: 2.4 GHz IEEE 802.11b/g ISM
Channels: 1 to 11 IEEE 802.11b/g North America
Wireless Transmission Speed: 54Mbps
Transmission Speed Details: 54Mbps Auto-fallback
IEEE 802.11g6Mbps
Interfaces/Ports: 4 x RJ45 10/100Base-TX
LAN1 x RJ45 10/100Base-TX
Connectivity Media: 10/100Base-TX Category 5 Twisted Pair
Wired Data Transfer Rate: 100Mbps Fast Ethernet
Serial Interface: 19200 Baud
TECHNICAL SpECIFICATIONS
17Russound TCH1 Installation ManualRev. 2
Page 18

WARRANTY
Warranty
The Russound RNET Touchpoint (TCH1) is fully guaranteed against all
defects in materials and workmanship for two (2) years from the date of
purchase. During this period, Russound will replace any defective parts
and correct any defect in workmanship without charge for either parts
or labor.
For this warranty to apply, the unit must be installed and used
according to its written instructions. If service is necessary, it must be
performed by Russound. The unit must be returned to Russound at the
owner’s expense and with prior written permission. Accidental damage
and shipping damage are not considered defects, nor is damage
resulting from abuse or from servicing by an agency or person not
specically authorized in writing by Russound.
This Warranty does not cover:
Damage caused by abuse, accident, misuse, negligence, or improper •
installation or operation
Power surges and lightning strikes•
Normal wear and maintenance•
Products that have been altered or modied•
Any product whose identifying number, decal, serial number, etc. •
has been altered, defaced or removed.
Russound sells products only through authorized Dealers and
Distributors to ensure that customers obtain proper support and
service. Any Russound product purchased from an unauthorized dealer
or other source, including retailers, mail order sellers and online sellers
will not be honored or serviced under existing Russound warranty
policy. Any sale of products by an unauthorized source or other manner
not authorized by Russound shall void the warranty on the applicable
product.
Damage to or destruction of components due to application of
excessive power voids the warranty on those parts. In these cases, repairs
will be made on the basis of the retail value of the parts and labor. To
return for repairs, the unit must be shipped to Russound at the owner’s
expense, along with a note explaining the nature of service required.
Be sure to pack the unit in a corrugated container with at least three (3)
inches of resilient material to protect the unit from damage in transit.
Before returning a unit for repair, call Russound at (603) 659-5170 for a
Return Authorization number. Write this number on the shipping label
and ship to:
Russound
ATTN: Service
5 Forbes Road
Newmarket, NH 03857
Due to continual eorts to improve product quality as new technology
and techniques become available, Russound/FMP, Inc. reserves the right
to revise system specications without notice.
18 Russound TCH1 Installation Manual Rev. 2
Page 19

NOTES
19Russound TCH1 Installation ManualRev. 2
Page 20

TCH1
RNET® Touchpoint
Installation Manual
©2010 Russound. All rights reserved.
All trademarks are the property of their respective owners.
iPhone and iPod touch are registered trademarks of Apple, Inc.
Specications are subject to change without notice.
Russound is not responsible for typographical errors or omissions.
Russound, Inc.
5 Forbes Road, Newmarket, NH 03857
tel603.659.5170•fax603.659.5388
email: tech@russound.com www.russound.com
28-1344 Rev. 2 04/07/10
 Loading...