

Page 1
INSTRUCTIONS AND WARRANTY
MODEL NO. RHUV23
DESCRIPTION
Congratulations on purchasing our RUSSELL HOBBS UPRIGHT VACUUM. Each unit is
manufactured to ensure safety and reliability. Before using this appliance for the first
time, please read the instruction manual carefully and keep it for future reference.
Page 2

2
FEATURES OF THE RUSSELL HOBBS UPRIGHT VACUUM
IMPORTANT SAFEGUARDS
When using any electrical appliance, basic safety precautions should always be followed
including the following:
1. Please read the instructions carefully before using any appliance.
2. Always ensure that the voltage on the rating label corresponds to the mains
voltage in your home.
3. Incorrect operation and improper use can damage the appliance and cause injury
to the user.
4. The appliance is intended for household use only. Commercial use invalids the
warranty and the supplier can not be held responsible for injury or damage
caused when using the appliance for any other purpose than that intended.
5. Avoid any contact with moving parts.
6. Close supervision is required when any appliance is used near or by children or
invalids.
7. Check the power cord and plug regularly for any damage. If the cord or the plug
is damaged, it must be replaced by the manufacturer or a qualified person in
order to avoid an electrical hazard.
8. Do not use the appliance if it has been dropped or damaged in any way. In case
of damage, take the unit in for examination and/or repair by an authorised service
agent
9. To reduce the risk of electric shock, do not immerse or expose the motor
assembly, plug or the power cord to water or any other liquid.
10. Never immerse the unit in water or any other liquid for cleaning purposes.
11. Remove the plug from the socket by gripping the plug. Do not pull on the cord to
disconnect the appliance from the mains. Always unplug the unit when not in
use, before cleaning or when adding or removing parts.
12. The use of accessory attachments that are not recommended or supplied by the
manufacturer may result in injuries, fire or electric shock.
13. A short cord is provided to reduce the hazards resulting from becoming
entangled in or tripping over a longer cord.
Page 3

3
14. Do not let the cord hang over the edge of a table or counter. Ensure that the cord
is not in a position where it can be pulled on inadvertently.
15. Do not allow the cord to touch hot surfaces and do not place on or near a hot gas
or electric burner or in a heated oven.
16. Do not use the appliance on a gas or electric cooking top or over or near an open
flame.
17. Use of an extension cord with this appliance is not recommended. However, if it
is necessary to use an extension lead, ensure that the lead is suited to the power
consumption of the appliance to avoid overheating of the extension cord,
appliance or plug point. Do not place the extension cord in a position where it can
be pulled on by children or animals or tripped over.
18. This appliance is not suitable for outdoor use. Do not use this appliance for
anything other than its intended use.
19. DO not carry the appliance by the power cord.
20. Do not leave this appliance unattended during use. Always unplug the unit when
not in use or before cleaning.
21. Always operate the appliance on a smooth, even, stable surface. Do not place
the unit on a hot surface.
22. Ensure that the switch is in the “Off” position after each use.
23. Do not pick up anything that is burning or smoking, such as cigarettes, matches,
or hot ashes.
24. Do not use without dust bag and/or filter in place.
25. The manufacturer does not accept responsibility for any damage or injury caused
by improper or incorrect use, or for repairs carried out by unauthorised
personnel.
26. In case of technical problems, switch off the machine and do not attempt to repair
it yourself. Return the appliance to an authorised service facility for examination,
adjustment or repair. Always insist on the use of original spare parts. Failure to
comply with the above mentioned pre-cautions and instructions, could affect the
safe operation of this machine.
Page 4
4
PARTS DIAGRAM
1
2
3
4
5
6
7
8
20
21
19
18
17
16
15
9
10
11
12
13
14
28
27
26
25
24
23
22
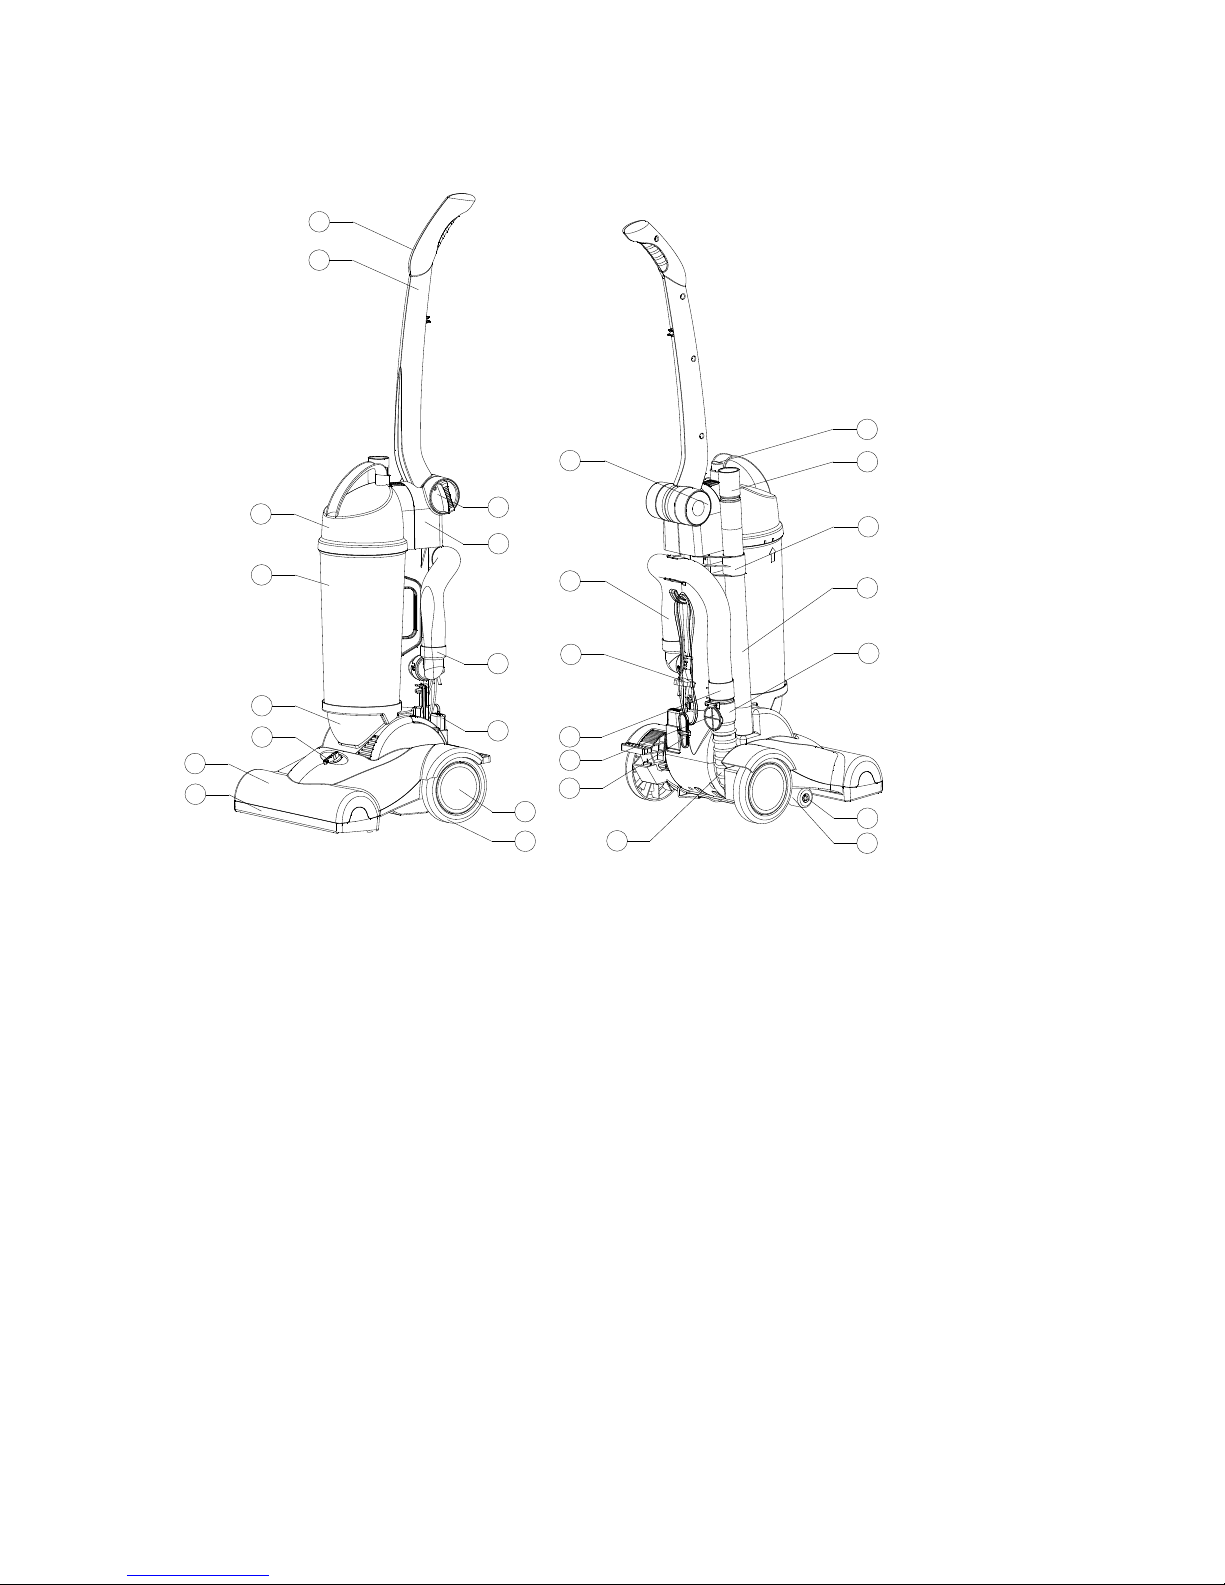
1. Left handle 16. Extendable hose
2. Right handle 17. Power cord
3. Cover of dust barrel 18. Front adapter of extendable hose
4. Dust barrel 19. Cover of connection hose
5. Upper cover of motor 20. Support of power cord
6. Body of lifting knob 21.Air-inlet hose of floor brush
7. Upper cover of floor brush 22. Lifting wheel
8. Lower cover of floor brush 23.Shaft of lifting wheel
9. Big wheel 24.Coupler of connecting hose of air outlet
10. Central wheel 25.Hose for lengthening
11. Power switch 26.Support of spile
12. Rear adapter of extendable hose 27.Flat nozzle
13. Hose of main body 28.Button of dust barrel
14. Handle knob
15. Right end cover of bolt
Page 5
5
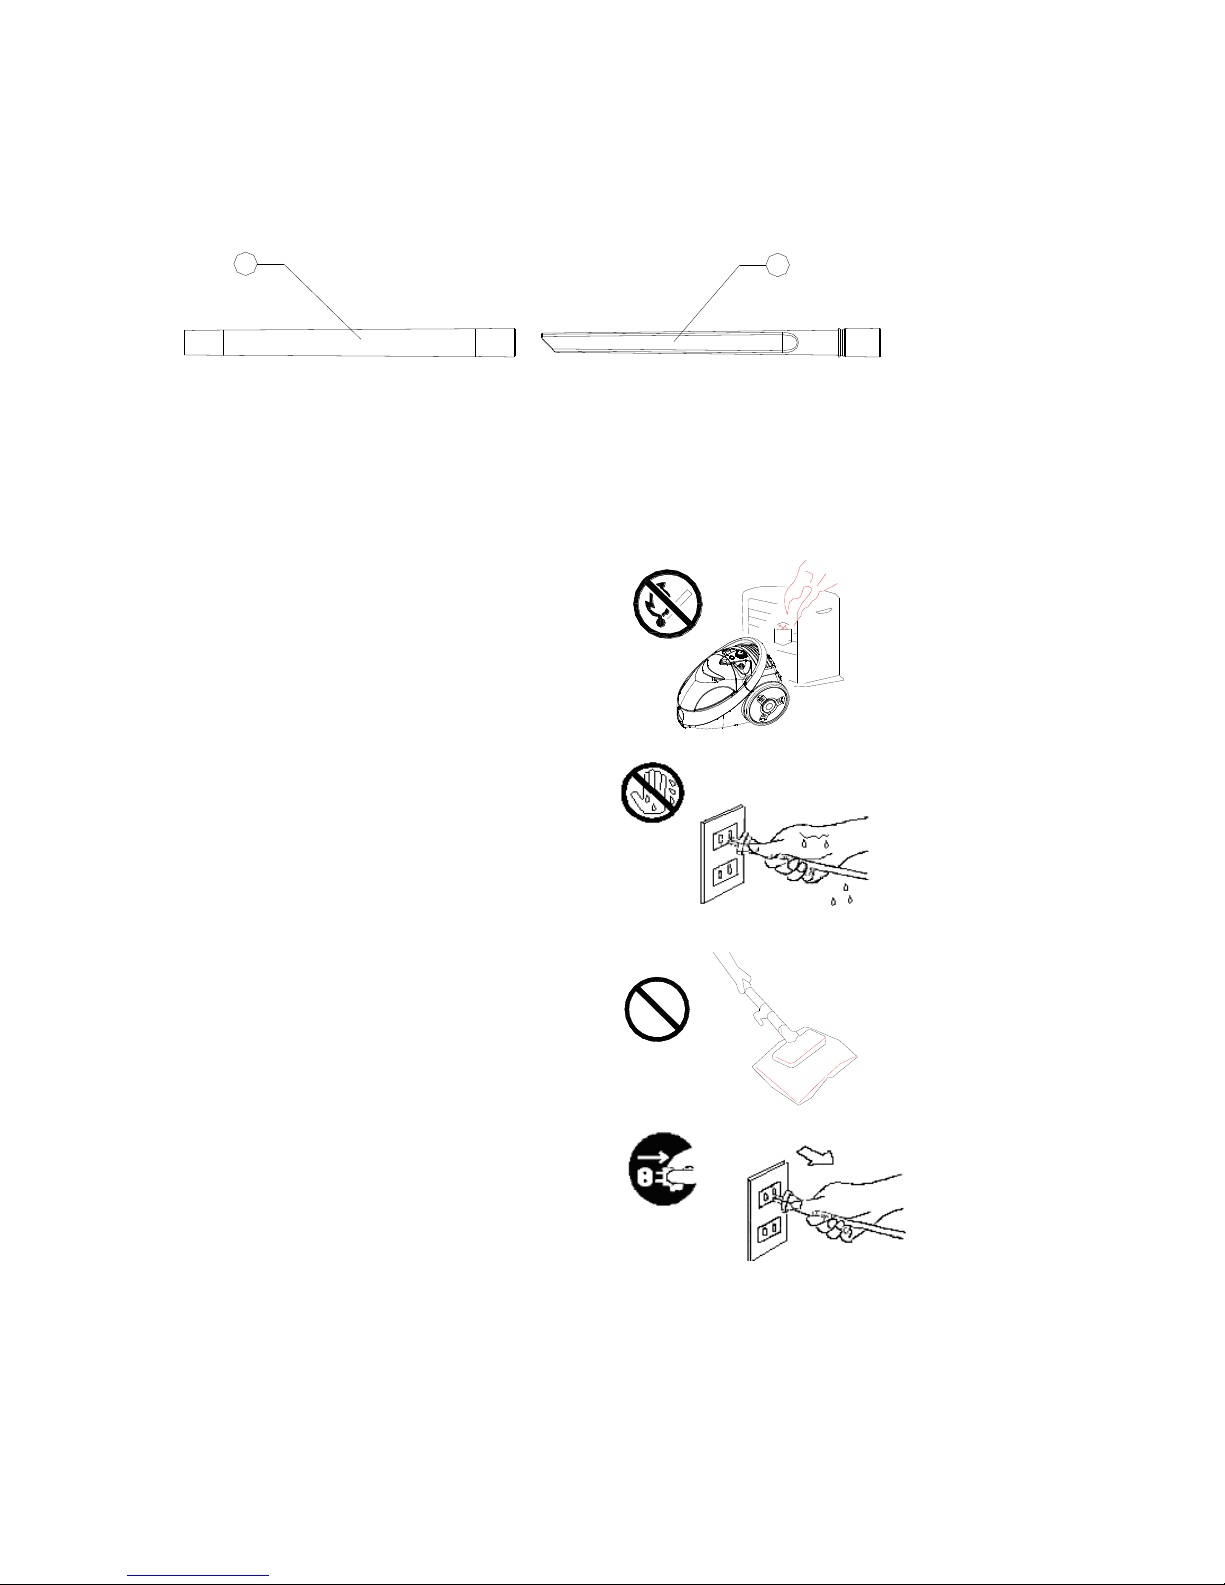
Accessories:
2
1
1. Hose for lengthening 2. Flat nozzle
PRECAUTIONARY MEASURES
If the opening that sucks in the air, the suction pipe or the telescopic wand on the
pipe is blocked, you should switch off the vacuum cleaner at once. First clear the
blocked substance before you attempt to start the vacuum cleaner again.
1. Do not operate the vacuum
cleaner too close to heaters,
radiators, cigarette
butts etc.
2. Before inserting the plug
into the wall contact, make
sure your hand is dry.
3. Before using the vacuum cleaner,
please remove large or sharp objects
from the floor in order to prevent damage
to the filters and unit.
4. When pulling the plug from
the wall contact, please do
so by pulling the plug itself and not
by means of the electrical cable.
This vacuum cleaner is equipped with a plug and a cable.
If anything gets damaged, both the plug and the cable must be repaired by a
qualified repairman or electrician.
Page 6
6
OPERATING INSTRUCTIONS
打螺丝固定
Fixing with screws
Before assembling the cleaner, please confirm that all parts and components for the
cleaner are received by referring to the Parts and Components List.
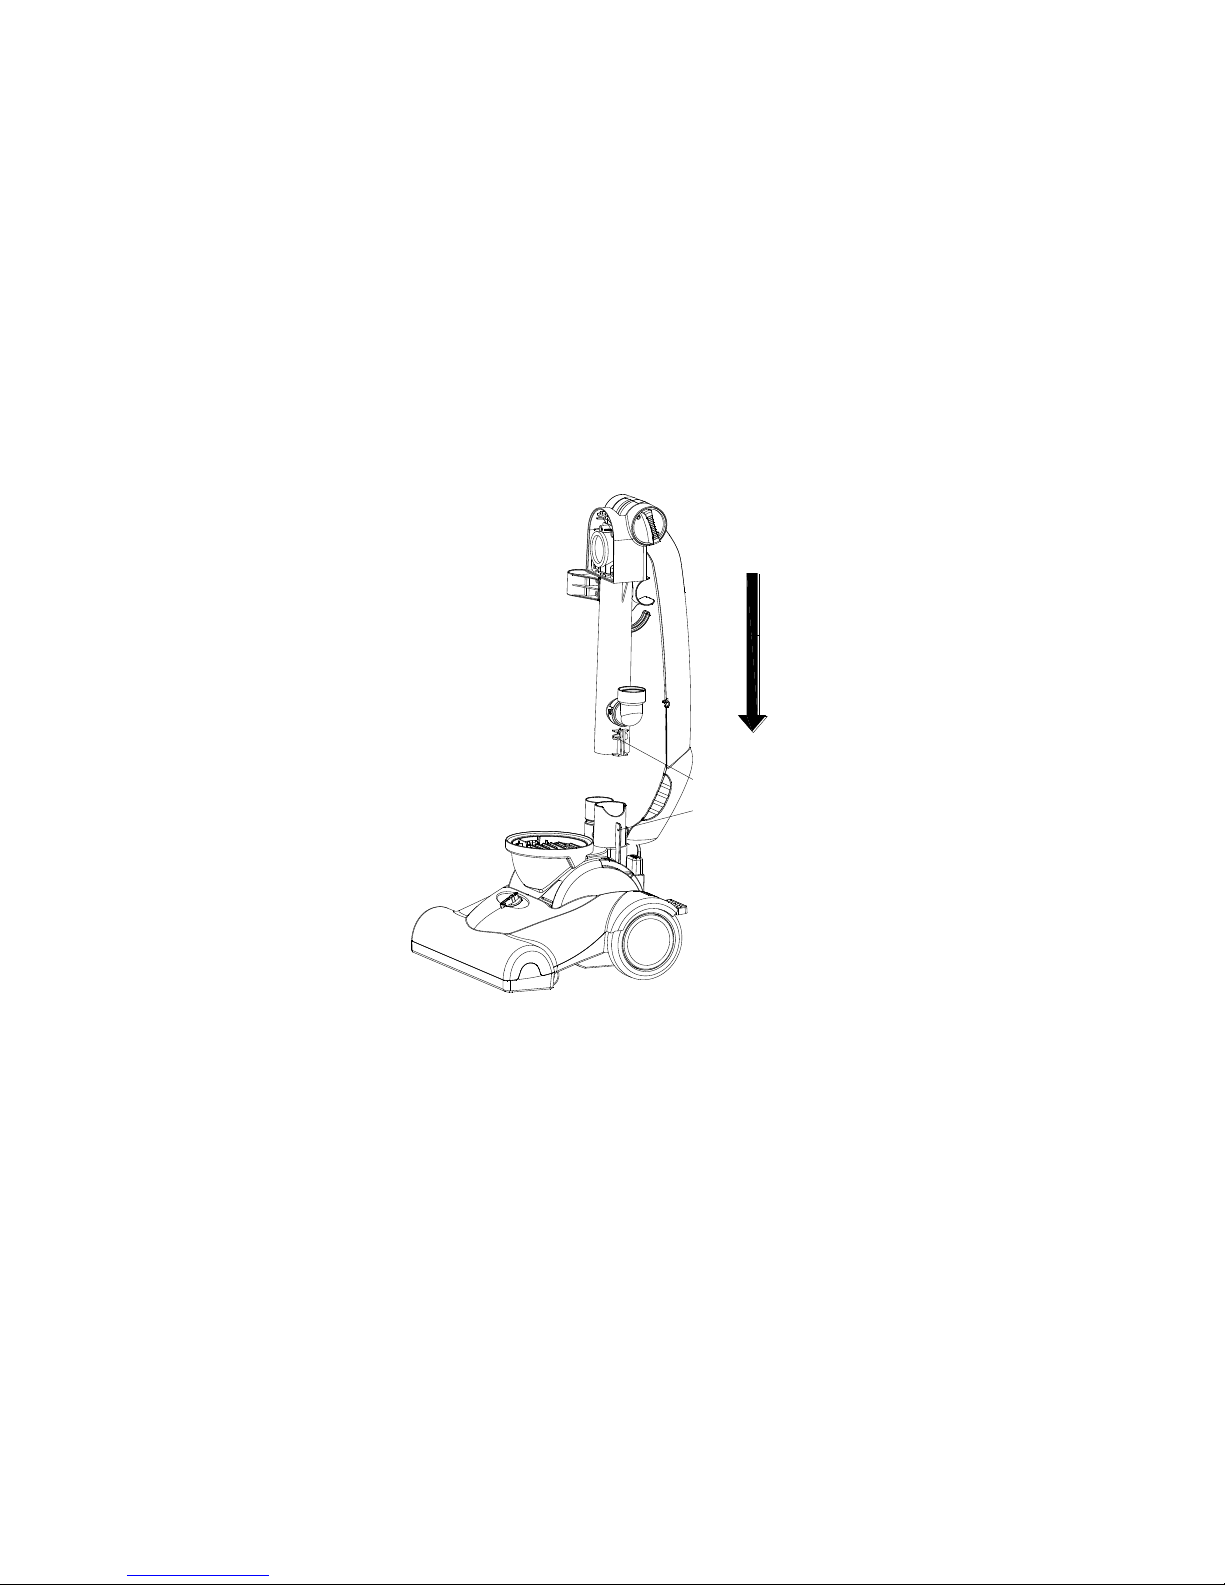
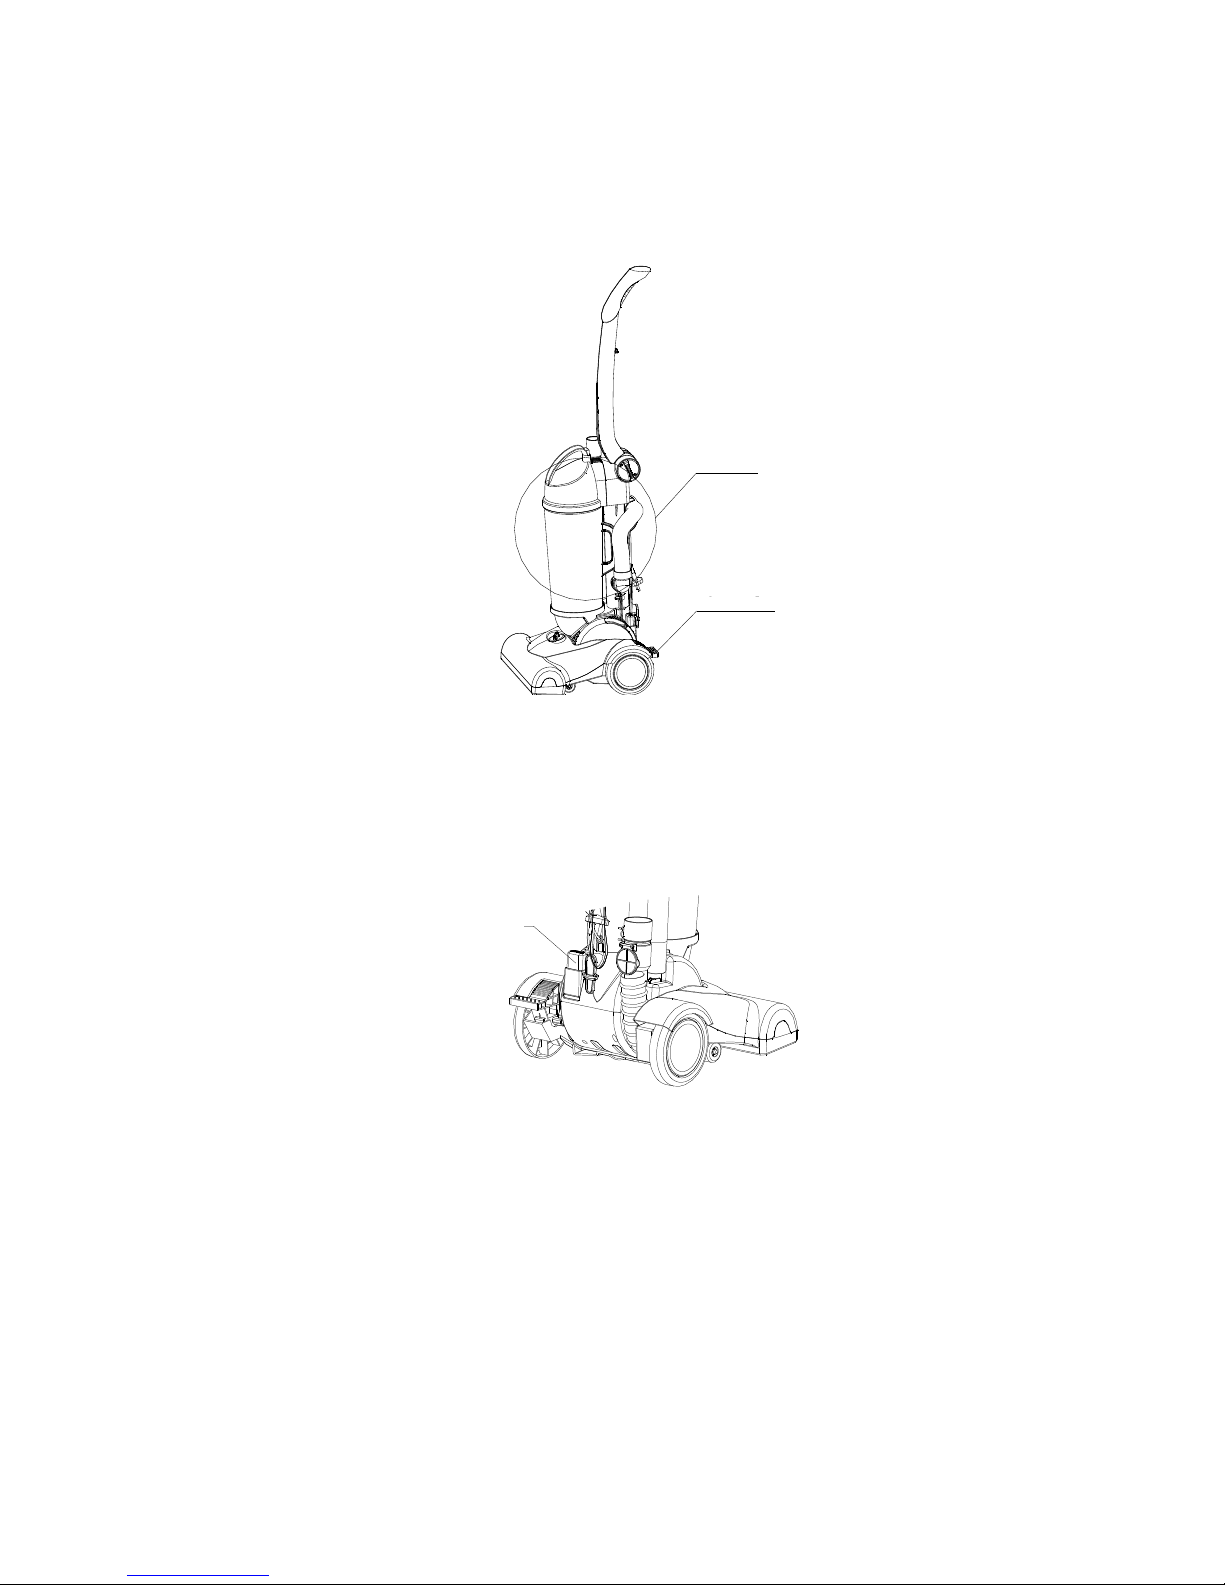
I. Assembly instructions
1. Assembly of handle
i. Insert vertically the assembly of the handle in the end port of the upper cover of
motor, and fasten it with screws (see Fig.1).
ii. Press down the button on the cap of the dust barrel to make the bayonet in the
handle assembly engage with the buckle in the cap of the dust barrel correctly in
order to realize the overall positioning of the whole machine.
Fig. 1
Page 7

7
扁吸嘴
加长管
插管支架
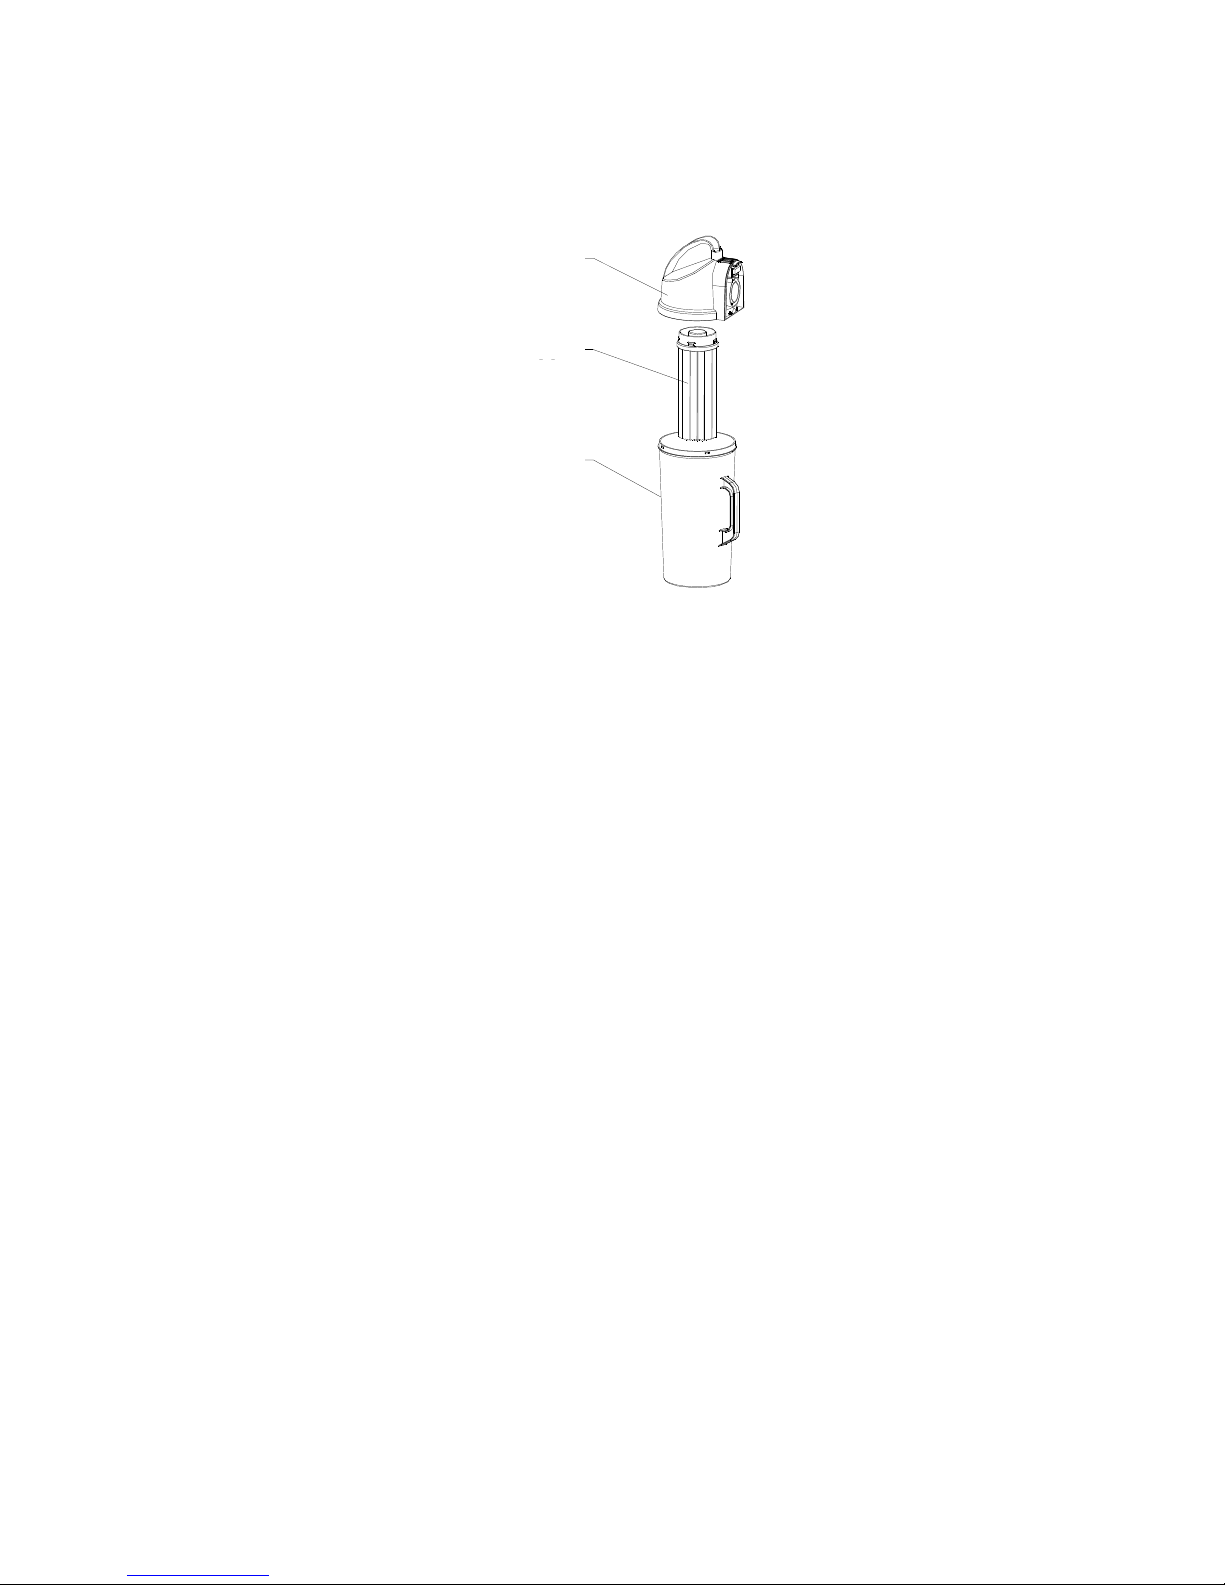
2. Assembly of dust barrel
卡扣固定处
按钮
Button
Fixing positions
of buckles
Flat nozzle
Spile support
Lengthening Hose
i. Cover the cap of dust barrel vertically on the dust barrel and rotate it until it joins with
the barrel perfectly (see Fig.2).
ii. Insert the combination of the cap of the dust barrel and the dust barrel mentioned in
the previous step in the combination of the upper cover of the motor and the electric
brush (see Fig.2).
Fig. 2
3. Assembly of accessories
After assembly of the handle, you may assemble the accessories.
i. Insert the flat nozzle vertically to the hose for lengthening, and then insert them
together in the spile support for fixing (see Fig.3).
Fig. 3
Page 8

8
电源线支承
电源线
电机外
罩上壳
Power cord
Power cord support
Upper cover of
motor
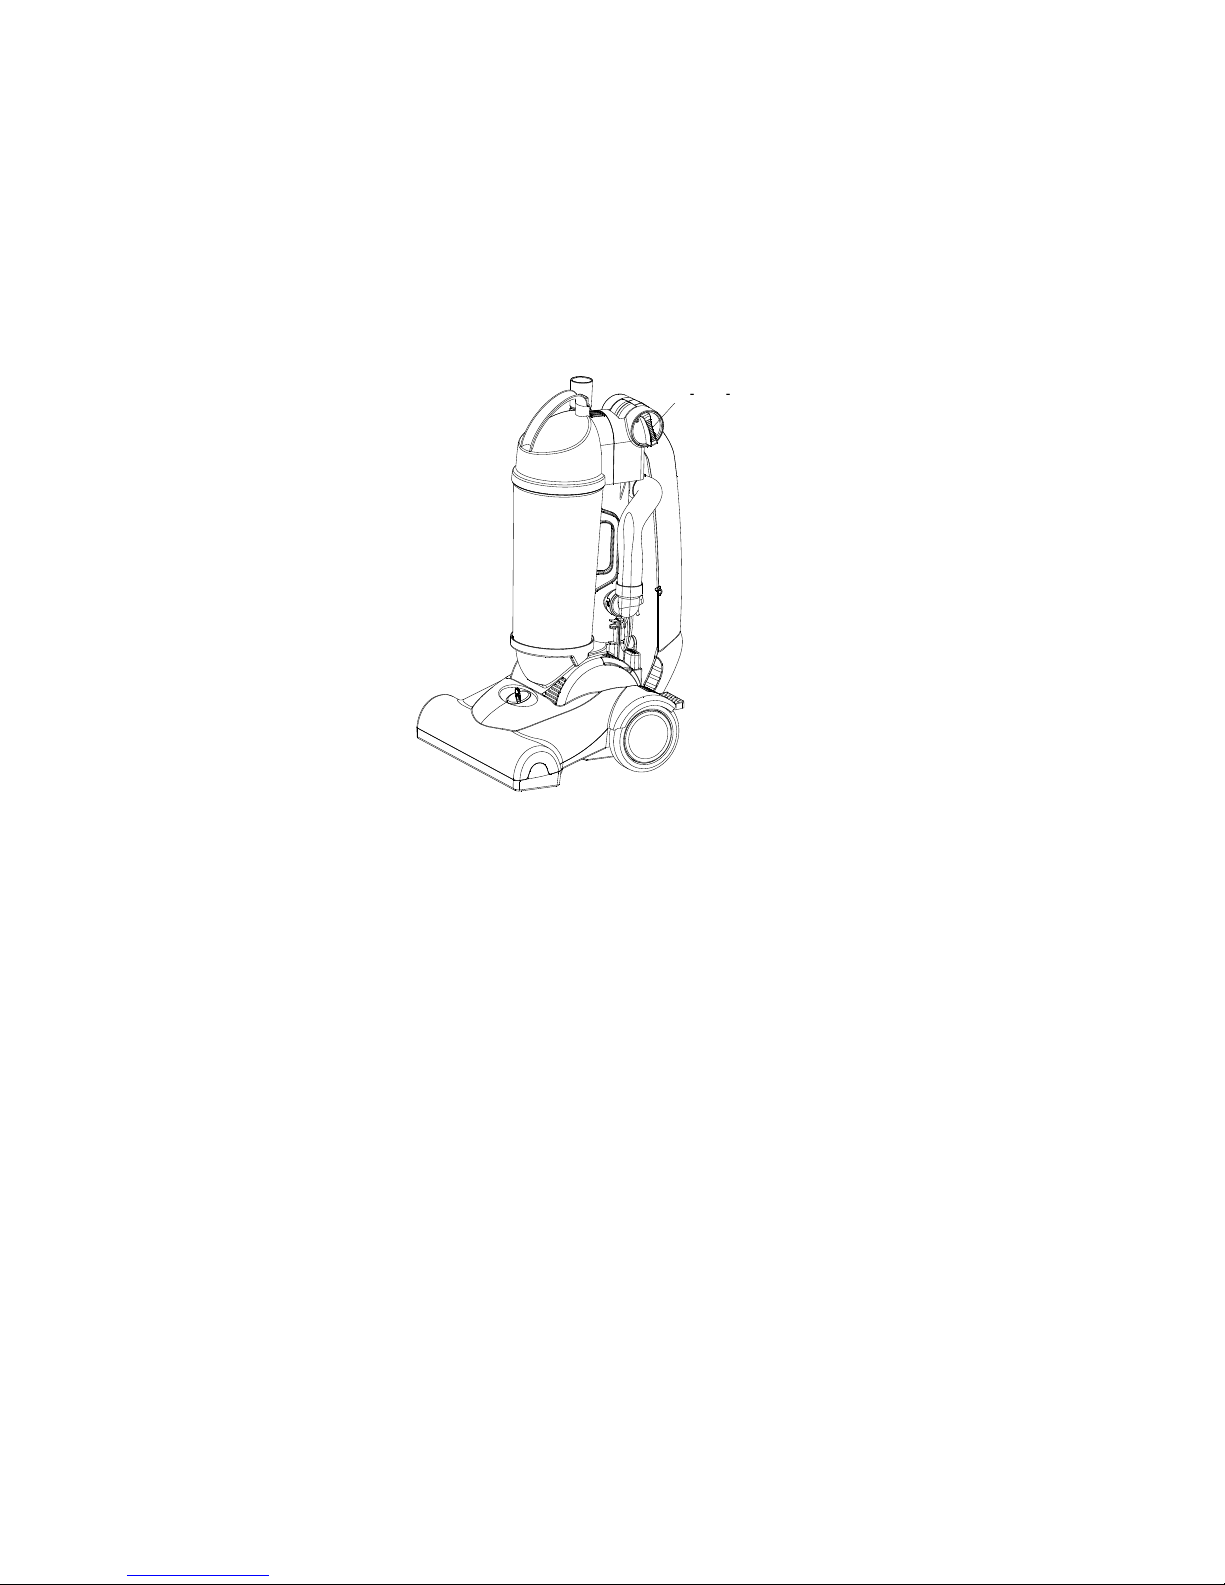
INSTRUCTIONS FOR USE
I. Getting started
Before using the appliance insert the plug into the power socket.
1. First, turn the support of power cord upward at 1800 to release the power cord.
Fig. 4
2. Take the power plug attached to the power cord, and release the power
cord from the pothook. Finally, check whether the power cord has been
released from the pothook completely.
II. Choice and Setting on The Height of The Floor
Choice and setting on the height of the floor brush:
When the floor brush (roller brush) works, you may adjust it to the appropriate position
by rotating the lifting knob of the floor brush according to the length of the carpet.
There are three height grades: high, middle and low (see Fig. 5).
When using accessories, please set the floor brush at the “High” position to avoid
damaging carpet.
Fig.5
Page 9
9
锁紧踏板
主体
电源开关
Main body
Locking
Power switch
III. Adjustment of The Main Body Angle
Step on the plate to release the footplate and rotate the handle backward to disengage
the cleaner from the upright locking position.
Fig.6
IV. Start/Stop
Insert the power plug into the power socket, and then step on the power switch to control
the start and stop function of the cleaner (see Fig. 7).
Fig. 7
Page 10
10
V. Handle Folding and Unfolding
手柄旋钮
Handle
Rotate the handle knob anticlockwise to enable the handle to rotate freely in the vertical
plane and then rotate the handle to the folded state (see Fig. 8). If you want to use the
cleaner, rotate the handle to the vertically upward position to ensure the handle is secure
through automatic locking.
Fig. 8
PROTECTIVE DEVICES OF MOTOR
1. There is a temperature controller designed in the body of the cleaner motor,
which can automatically cut off power supply to motor to prevent overheating.
When the air-inlet or air-outlet pipe is overloaded or blocked, the temperature of
motor rises, then the temperature controller cuts off the power of the motor to
cool the motor thus preventing the cleaner from being damaged.
2. If the temperature controller is cut off, stop the cleaner immediately by pulling out
the power plug to cool the cleaner. Check and remove the object/s blocking the
air inlet (including the hose and the spile) and replace the filter HEPA or filter
gauze when necessary.
3. After cooling the motor for about 30mins, plug in the unit and check whether the
temperature controller has reset. If the power of the cleaner hasn’t been cut off,
the temperature controller of the motor won’t be reset even when the motor has
cooled down.
Page 11

11
MAINTENANCE
1. The daily maintenance and repair should be done after the power plug has been
pulled out.
2. Remove the rubbish in the paper bag/canister frequently to avoid the failure of
the cleaner, and replace the bag when necessary.
3. Never wipe the surface of the cleaner with gasoline or oily liquid. Wipe it with
water or a neutral detergent.
4. Caution: Be sure to use a damp cloth only for cleaning the unit. It is dangerous
for water to infiltrate into electrical elements of the cleaner.
5. When the floor brush is not used, it should not be exposed to direct sun or
dampness.
6. Before using the cleaner, check whether all accessories such as hose, power
cord and HEPA support (filter gauzes), etc, are in good condition. In case of
damage, the damaged accessory should be immediately sent to the service
centre for replacement.
7. When it is not used, the cleaner should be locked in upright position.
8. Upon the completion of the operation of the cleaner, turn off its power, pull the
power plug out of the power socket and wrap it around the pothook.
9. Place the cleaner in the dry indoor environment.
Page 12
12
CLEANING AND MAINTENANCE
尘桶
尘桶盖
HEPA组件
Dust barrel cover
HEPA
Dust barrel
I. Cleaning of dust barrel
Fig. 9
1. Remove the rubbish in the dust barrel frequently to avoid the failure and damage
to the cleaner.
2. Clean the dust barrel only after the power plug of the cleaner has been pulled
out.
3. Rotate and open the cap of the dust barrel.
4. Remove the dust barrel, and empty it.
5. Mount the dust barrel well, and rotate the cap on the barrel.
II. General
This appliance is for household use only and is not user-serviceable.
Do not open or change any parts by yourself. Please refer to a qualified electrical
service department or return to the supplier if servicing is necessary.
Always remember to unplug the unit from the electrical outlet when not in use
and before cleaning. Ensure that the speed control is set to “0”.
It is much easier to clean the accessories directly after they have been used.
Wash them in warm, soapy water, rinse and dry well.
The body of the appliance and the stand should be cleaned with a damp cloth.
Do not let water enter the appliance or the stand.
Do not use bleach or other abrasive substance or solvents to clean your
appliance as it can be damaging to the finish.
Page 13

13
Do not immerse the mixer in water or any other liquid, or hold it under a running
tap to clean.
To remove stubborn spots/marks, wipe the surfaces with a cloth slightly
dampened in soapy water or mild non-abrasive cleaner. Use a clean soft cloth
that has been rinsed and dried.
III. Belt Replacement and Roller Brush Cleaning
Fig.10
Both the replacement of the belt and the cleaning of the roller should be done after the
power supply has been cut off, in order to prevent electric shock.
1. Firstly, disengage the cleaner from the upright locking position by stepping on the
releasing footplate. Adjust the lifting knob to the appropriate position, and then
turn over the cleaner to take down the upper cover of brush by removing the
screws.
2. Carefully remove all leftover dirt around the belt.
3. Grasp the roller brush support carefully at the belt side and remove it from the
hold-down groove. Remove the support on the other side from the hold-down
groove in a similar way. (Note: the belt may have certain tension.)
4. Remove the old belt from the shaft of the motor and the end of the roller brush.
5. Carefully remove all leftover dirt on the roller brush.
6. After replacement of the belt, insert both supports of the roller brush into the
corresponding hold-down grooves on the bedplate, and check whether they are
well fixed and whether the roller brush can rotate freely.
7. Assemble the upper cover of the floor bush, and screw down the screws.
Page 14

14
STORING THE APPLIANCE
Faults
Solution
Cleaner
refuses to
work.
1. Check whether the power plug is plugged in firmly. Unplug
it, and insert it the socket again.
2. Check whether the socket is powered on.
3. Check whether the switch of cleaner is set at “ON” position.
Suction
force is
decreased
1. Check the floor brush, hose and spile for blockage. If there
is any blockage, remove it immediately.
2. Check whether the filter gauze of air inlet or outlet is dusty.
Please clean or change the filter HEPA (or filter gauzes) of
air inlet and outlet frequently.
3. Check whether the front cover of the cleaner body is
assembled well.
Abnormal
sound is
heard while
the motor
is rotating
1. Stop using the cleaner immediately.
2. Check the floor brush, hose and spile for blockage. If there
is any blockage, remove it immediately.
Roller
brush
refuses to
rotate
1. Check whether the power plug is plugged in firmly.
2. Pull out the plug to cut off the power, then open the cover
of floor brush, after that check whether there is tension
between roller brush and flat belt to judge whether the flat
belt is in good condition.
Indicator
light is OFF
1. Check whether the power plug is plugged in firmly.
2. Pull out the plug to cut off the power, the open the light
cover to check whether the light is in good condition.
Unplug the unit from the wall outlet and clean all the parts as instructed above.
Ensure that all parts are dry before storing.
Store the appliance in its box or in a clean, dry place.
Never store the appliance while it is still wet or dirty.
Never wrap the power cord around the appliance.
TROUBLESHOOTING
In case of abnormality with this product, please treat it in the way as stated hereinafter. If
the cleaner still refuses to work normally, please get in touch with the retailer from where
this product was bought or with the service department.
Page 15
15
AFTER SERVICE
Dust
barrel
capacity
Rated
voltage
Rated
frequency
Rated
power
Maximum
degree of
vacuum
Noise
3L
120V/2
40V
50Hz
1400W
≥16kPa
≤84dB(A)
When abnormality or problems are found with the product in use, please get in touch
with the service department appointed by our company for consultation or repair.
TECHNICAL PARAMETER
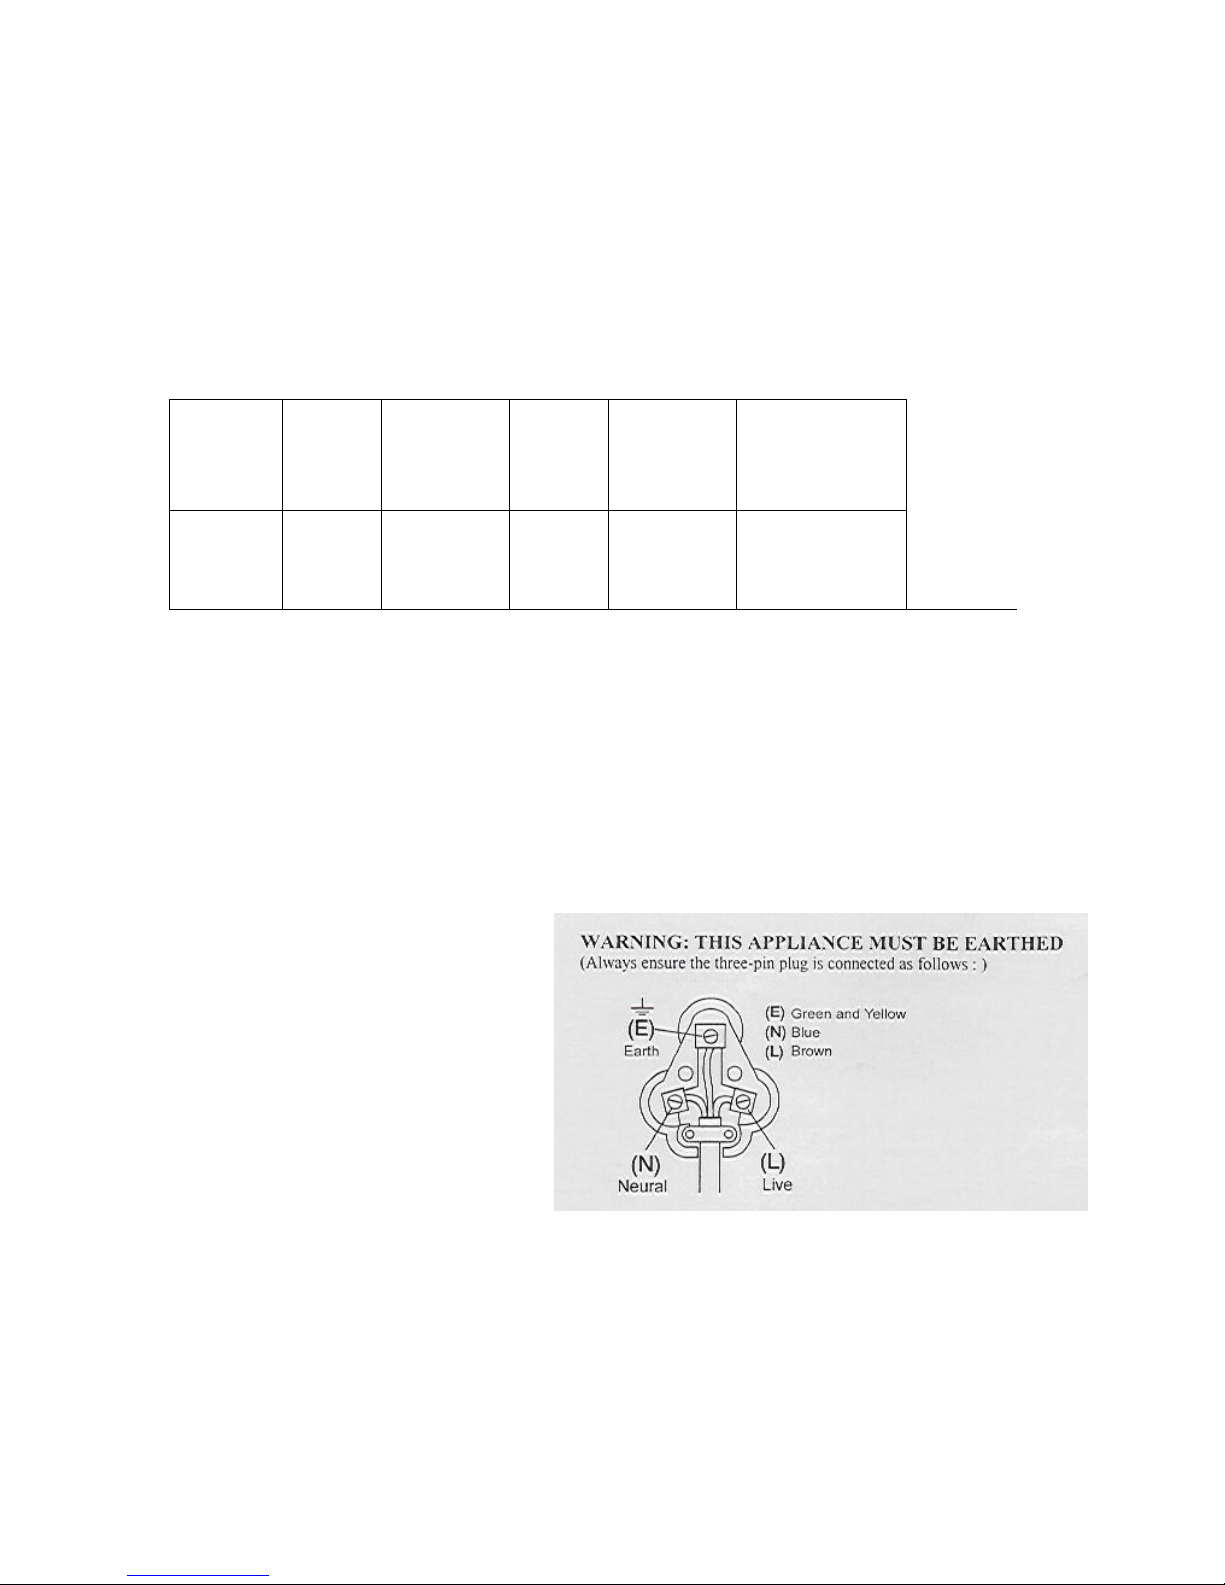
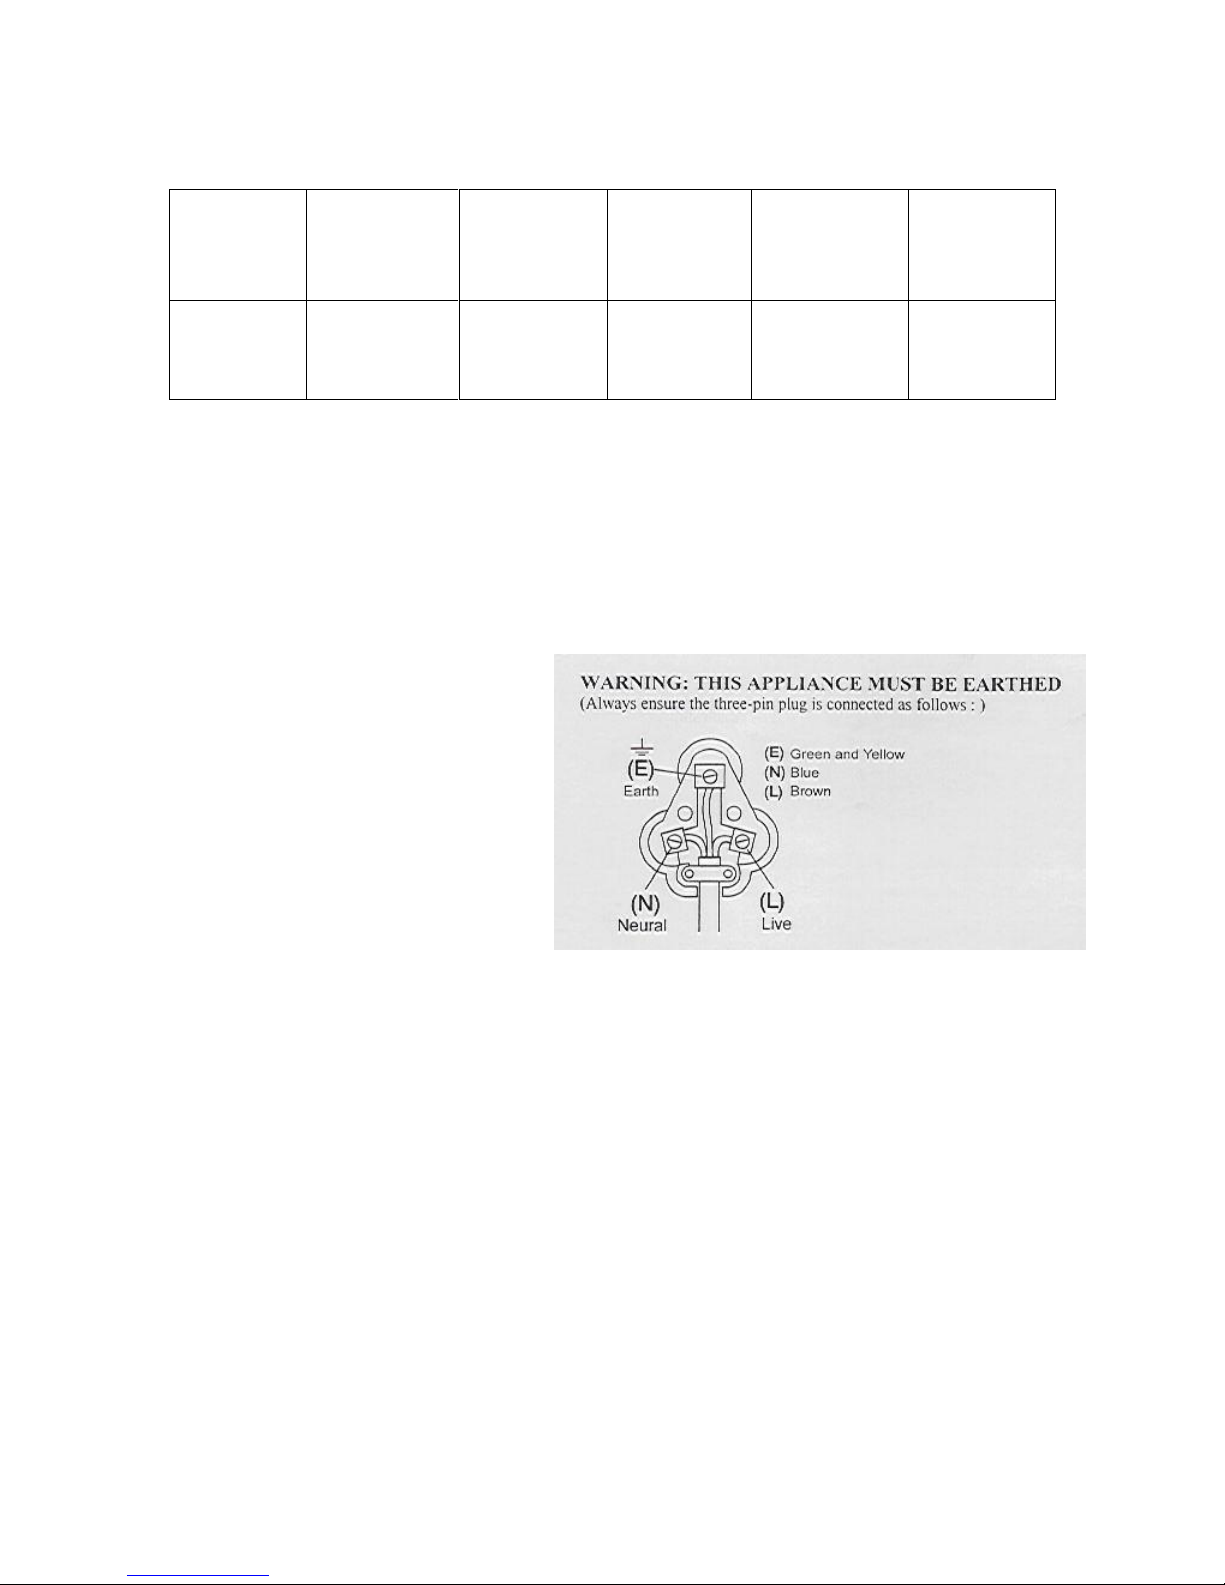
CHANGING THE PLUG
Should the need arise to change the fitted plug, follow the instructions below.
This unit is designed to operate on 230V-240V current only. Connecting to other
power sources may damage the appliance. Connect a three-pin plug as follows:
The wires in this mains lead are coloured in accordance with the following code:
Green/Yellow = Earth
Blue = Neutral
Brown = Live
Page 16

16
PLEASE AFFIX YOUR PROOF OF PURCHASE/RECEIPT HERE
IN THE EVENT OF A CLAIM UNDER WARRANTY THIS RECEIPT MUST BE PRODUCED.
W A R R A N T Y
1. Tedelex Trading (Pty) Limited (“Tedelex”) warrants to the original purchaser of this
product (“the customer”) that this product will be free of defects in quality and
workmanship which under normal personal, family or household use and purpose may
manifest within a period of 1 (one) year from the date of purchase (“warranty period”).
2. Where the customer has purchased a product and it breaks, is defective or does not
work properly for the intended purpose, the customer must notify the supplier from
whom the customer bought the product (“the supplier”) thereof within the warranty
period. Any claim in terms of this warranty must be supported by a proof of purchase. If
proof of purchase is not available, then repair, and/or service charges may be payable
by the customer to the supplier.
3. The faulty product must be taken to the supplier's service centre to exercise the
warranty.
4. The supplier will refund, repair or exchange the product in terms of this warranty subject
to legislative requirements. This warranty shall be valid only where the customer has
not broken the product himself, or used the product for something that it is not
supposed to be used for. The warranty does not include and will not be construed to
cover products damaged as a result of disaster, misuse, tamper, abuse or any
unauthorised modification or repair of the product.
5. This warranty will extend only to the product provided at the date of the purchase and
not to any expendables attached or installed by the customer.
6. If the customer requests that the supplier repairs the product and the product breaks or
fails to work properly within 3 (three) months of the repair and not as a result of misuse,
tampering or modification by or on behalf of the customer, then the supplier may
replace the product or pay a refund to the customer.
7. The customer may be responsible for certain costs where products returned are not in
the original packaging, or if the packaging is damaged. This will be deducted from any
refund paid to the customer.
TEDELEX TRADING (PTY) LTD
www.amap.co.za
011 490-9600 (Jhb)
031 792-6000 (Dbn)
021 535-0600 (CT)
Page 17

17
INSTRUCTIONS ET GARANTIE
MODÈLE N° RHUV23
DESCRIPTION
Félicitations pour l’achat de notre ASPIRATEUR BALAI RUSSELL HOBBS. Chaque
unité est fabriquée afin de d’assurer la sécurité et la fiabilité. Avant d’utiliser cet appareil
pour la première fois, merci de lire le manuel avec soin et de le garder à titre de
référence.
Page 18

18
CARACTERISTIQUES DE L’ASPIRATEUR BALAI RUSSELL HOBBS
GARANTIES IMPORTANTES
Lors de l’utilisation de n’importe quel appareil électrique, des précautions de sécurité
élémentaires devraient toujours être suivies, ainsi que les points suivants :
1. Merci de lire les instructions avec attention avant d’utiliser tout appareil quel qu’il
soit.
2. Toujours vous assurer que le voltage indiqué sur la plaque signalétique
correspond aux voltages principaux dans votre maison.
3. Une opération incorrecte et une utilisation inappropriée peuvent endommager
l’appareil et entraîner des blessures pour l’utilisateur.
4. L’appareil est destiné à uniquement à un usage domestique. Une utilisation
commerciale annule la garantie et le fournisseur ne peut pas être tenu pour
responsable des blessures ou des dommages causent lors de l’utilisation de
l’appareil pour tout autre usage que celui auquel il est destiné.
5. Eviter tout contact avec les parties mobiles.
6. Une surveillance étroite est requise lorsque tout appareil est utilisé près d’enfants
ou de personnes invalides.
7. Vérifier le cordon d’alimentation et brancher régulièrement pour éviter que le
cordon ne soit endommagé. Si le cordon ou la prise sont endommagés, ils
doivent être remplacés par le fabricant ou par une personne qualifiée afin d’éviter
un danger électrique.
8. Ne pas utiliser l’appareil s’il est tombé ou s’il a été endommagé de quelque
manière que ce soit. En cas de dommage, rapporter l’unité pour un examen et /
ou une réparation par un agent de maintenance agréé.
9. Pour éviter le risqué de choc électrique, ne pas immerger ou exposer l’ensemble
du moteur, la prise, ou le cordon d’alimentation dans l’eau ou bien dans tout
autre liquide.
10. Ne jamais immerger l’unité dans l’eau ou dans tout autre liquide pour le nettoyer.
11. Retirer la fiche de la prise en tenant la fiche. Ne pas tirer sur le cordon pour
déconnecter l’appareil du secteur. Toujours débrancher l’unité lorsqu’elle n’est
pas utilisée, avant le nettoyage ou lors de l’ajout ou du retrait de parties.
Page 19

19
12. L’utilisation d’accessoires se fixant à l’unité qui ne sont ni recommandés ou
fournis par le fabricant pourrait entraîner des blessures, un incendie ou un choc
électrique.
13. Un cordon court est fourni pour réduire les risques résultant d’un entremêlement,
ou de trébuchement sur ce dernier.
14. Ne pas laisser le cordon dépasser du bord de la table ou du comptoir. S’assurer
que le cordon n’est pas dans une position ou il peut être tire par inadvertance.
15. Ne pas laisser le cordon de toucher des surfaces chaudes et ne pas le placer sur
ou près d’un réchaud à gaz ou électrique ou d’un four chaud.
16. Ne pas utiliser l’appareil sur une plaque à gaz ou électrique ou au-dessus d’une
flamme.
17. L’utilisation d’un cordon d’extension avec cet appareil n’est pas recommandée.
Cependant, s’il s’avère nécessaire d’utiliser une rallonge électrique qui est
adaptée à la consommation d’énergie de l’appareil, afin d’éviter le
surchauffement du cordon d’extension, de l’appareil ou de la prise de courant.
Ne pas mettre la rallonge dans une position où elle peut être tirée par des
enfants, ou des animaux, ou bien où ils risquent de trébucher dessus.
18. Cet appareil n’est pas recommandé pour un usage extérieur. Ne pas utiliser cet
appareil pour quoique ce soit d’autre que l’utilisation à laquelle il est destiné.
19. NE PAS porter l’appareil en le prenant par le cordon d’alimentation.
20. Ne pas laisser cet appareil sans surveillance pendant son utilisation. Débrancher
toujours l’unité lorsqu’elle n’est pas utilisée, ou avant de la nettoyer.
21. Faire toujours fonctionner l’appareil sur une surface régulière et stable. Ne pas
placer l’unité sur une surface chaude.
22. S’assurer que l’interrupteur est en position « ARRET » après chaque utilisation.
23. Ne rien ramasser qui ne soit en train de brûler ou de fumer, comme des
cigarettes, des allumettes ou des cendres chaudes.
24. Ne pas utiliser sans que les sacs à poussières/ou filtres ne soient installés dans
l’aspirateur.
25. Le fabricant n’accepte de prendre aucune responsabilité pour tout dommage ou
blessure que ce soit, qui seraient dues à une utilisation incorrecte ou
inappropriée, ou celle de réparations exécutées par un personnel non-agréé.
Page 20

20
26. En cas de problèmes techniques, éteindre la machine et ne pas essayer de la
1
2
3
4
5
6
7
8
20
21
19
18
17
16
15
9
10
11
12
13
14
28
27
26
25
24
23
22
réparer vous-même. Renvoyer l’appareil à un service de maintenance habileté
pour un examen, un ajustement ou pour une réparation. Insister toujours pour
que les pièces détachées d’origines soient utilisées. Le non-respect avec les
précautions et les instructions mentionnées ci-dessus pourrait empêcher le bon
fonctionnement de cette machine.
SCHEMA DES PIECES
1. Poignée à gauche 16. Tuyau extensible
2. Poignée à droite 17. Cordon d'alimentation
3. Couvercle du réservoir à poussière 18. Adaptateur avant du tuyau extensible
4. Réservoir à poussière 19. Protection du tuyau de connexion
5. Couvercle supérieur du moteur 20. Support du cordon d’alimentation
6. Corps du bouton levier 21. Tuyau d’aspiration de la brosse de sol
Page 21

21
7. Couvercle supérieur de la brosse de sol 22. Roue de soulèvement
2
1
8. Couvercle inférieur de la brosse de sol 23. Axe de la roue de soulèvement
9. Grande roue 24. Raccord de sortie d’air du tuyau
10. Roue centrale 25. Tuyau d’extension
11. Interrupteur 26. Support du tube
12. Adaptateur arrière du tuyau extensible 27. Embout plat
13. Tuyau du corps principal 28. Bouton du réservoir à poussière
14. Bouton de la poignée
15. Couvercle droite de la vis
Accessoires :
1. Tuyau d’extension 2. Embout plat
MESURES DE PRECAUTION
Si l’ouverture qui aspire l’air, le tuyau aspirant ou le manchon télescopique sur le
tuyau, sont bloqués, vous devriez éteindre l’aspirateur d’un seul coup. Dégagez
d’abord la substance bloquée avant d’essayer de rallumer l’aspirateur.
1. Ne pas faire fonctionner l’aspirateur
trop près de chauffages, de
radiateurs, de mégots de cigarettes
etc.
2. Avant d’insérer la prise dans le
contact mural, assurez-vous d’avoir les
mains sèches.
Page 22

22
3. Avant d’utiliser l’aspirateur, veuillez
enlever les objets volumineux ou
tranchants du sol pour éviter
d’endommager les filtres et l’unité.
4. Pour retirer la fiche de la prise
murale, procédez en tirant sur la fiche
elle-même et non pas sur le câble
électrique.
L’aspirateur est équipé d’une prise et d’un câble.
Si quoique ce soit est endommagé, la prise et le câble doivent être réparés par un
réparateur qualifié ou par un électricien.
Page 23

23
INSTRUCTIONS D’UTILISATION
打螺丝固定
A fixer avec les vis
Avant de procéder au montage de l’aspirateur, vérifiez que vous êtes en possession de
tous les éléments et composants de l’aspirateur en vous basant sur la Liste des
Composants et Eléments.
I. Instructions d’assemblage
1. Assemblage du manche
i. Insérez verticalement l’ensemble du manche dans l'extrémité du couvercle supérieur
du moteur, et fixez-le avec les vis (Fig. 1).
ii. Appuyez sur le capuchon du réservoir à poussière pour que la baïonnette de
l’ensemble du manche s’engage avec la boucle correctement, dans le capuchon du
réservoir à poussière afin de permettre le positionnement complet de tout l'engin.
Fig. 1
Page 24

24
扁吸嘴
加长管
插管支架
2. Assemblage du réservoir à poussière
卡扣固定处
按钮
Bouton
Positions de fixation
des boucles
Embout plat
Support du tube
Tuyau d’extension
i. Ajustez le couvercle du réservoir à poussière verticalement sur le réservoir à
poussière et tournez-le jusqu'à ce qu'ils s’ajustent parfaitement (voir Fig. 2).
ii. Insérez l'ensemble capuchon du réservoir à poussière et réservoir à poussière
mentionnés dans l'étape précédente, sur l'ensemble couvercle supérieur du moteur
et brosse électrique (voir Fig.2).
Fig. 2
3. Assemblage des accessoires
Après avoir assemblé le manche, vous pouvez assembler les accessoires.
i. Insérez l’embout plat verticalement dans le tuyau d'extension et insérez-les
ensemble dans le support du tube pour les fixer. (voir Fig.3).
Fig. 3
Page 25

25
电源线支承
电源线
电机外
罩上壳
Cordon d'alimentation
Support du cordon
Couvercle
supérieur
du moteur
INSTRUCTIONS D’UTILISATION
I. Démarrage
Avant d’utiliser l’appareil, insérez la fiche dans la prise murale.
1. Premièrement, tournez le support du cordon d’alimentation vers le haut à 180 °
pour libérer le cordon d’alimentation.
Fig. 4
2. Prenez la prise du cordon d'alimentation et décrochez le cordon du
crochet. Enfin, vérifiez si le cordon d’alimentation est bien complètement
libéré du crochet.
II. II. Choix et réglage de la hauteur du sol
Choix et réglage de la hauteur de la brosse à planchers :
Quand la brosse à planchers (brosse à rouleau) fonctionne, vous pouvez en ajuster la
position en tournant le bouton levier de la brosse à planchers, en fonction de la longueur
du tapis.
Il existe trois variantes de hauteur : haut, moyen et bas (voir Fig. 5).
Lors de l’utilisation des accessoires, veuillez placer la brosse de parquets en position «
Haut » pour éviter d’abîmer le tapis.
Fig. 5
Page 26

26
锁紧踏板
主体
电源开关
Corps principal
Pédale de verrouillage
Interrupteur
III. Réglage de l’angle de la partie principale
Posez votre pied sur la pédale pour la libérer et tourner la poignée vers l'arrière pour
débloquer l'appareil de sa position verticale verrouillée.
Fig. 6
IV. Marche/Arrêt
Insérez la fiche dans la prise électrique et appuyez sur l'interrupteur pour allumer
et éteindre l'aspirateur (voir Fig. 7).
Fig. 7
Page 27

27
V. Pliage et dépliage du manche
手柄旋钮
Bouton de la
poignée
Tournez le bouton du manche dans le sens contraire des aiguilles d’une montre, pour
permettre au manche de pivoter librement sur le plan vertical, et faites pivoter le manche
en position pliée (voir Fig.8). Si vous voulez utiliser l'aspirateur, faites pivoter le manche
en position verticale haute, pour vérifier que le manche est bien stable grâce au
verrouillage automatique.
Fig. 8
DISPOSITIFS DE SECURITE DU MOTEUR
1. Un contrôleur de température est intégré dans le corps du moteur de l'aspirateur,
qui coupe automatiquement l’alimentation électrique du moteur, pour éviter la
surchauffe. Quand le tuyau d’entrée ou de sortie d’air est surchargé ou bouché,
la température du moteur augmente, ensuite le contrôleur de température coupe
l’alimentation du moteur pour qu’il refroidisse, évitant ainsi d’endommager
l’aspirateur.
2. Si le contrôleur de température est coupé, arrêtez immédiatement l'aspirateur en
3. Après avoir laissé le moteur refroidir pendant 30 minutes, rebranchez l’appareil
retirant la fiche de la prise électrique pour laisser refroidir l'aspirateur. Vérifiez et
retirez le ou les objets bloquant l'entrée d’air (y compris le tuyau et le tube) et
replacez le filtre HEPA, ou la gaze du filtre si c’est nécessaire.
et vérifiez que le contrôleur de température fonctionne. Si l’alimentation de
l’aspirateur n’a pas été coupée, le contrôleur de température ne sera pas
réinitialisé même si le moteur est refroidi.
Page 28

28
MAINTENANCE
1. Entretien et réparation doivent être faits quand l'appareil est débranché.
2. Videz régulièrement les déchets du sac/réservoir, pour éviter les pannes de
l’aspirateur, et remplacez le sac quand c’est nécessaire.
3. N’essuyez jamais l’extérieur de l’aspirateur avec de l’essence ou un liquide gras.
Essuyez-le avec de l'eau ou un nettoyant neutre.
4. Attention : N’utilisez un chiffon humide que pour nettoyer l’appareil. Il serait
dangereux que l’eau s’infiltre dans les éléments électriques de l’aspirateur.
5. Quand la brosse à planchers n'est pas utilisée, ne pas l'exposer directement au
soleil ou à l'humidité.
6. Avant d’utiliser l’aspirateur, vérifiez que tous les accessoires, comme le tuyau, le
cordon d’alimentation, le filtre HEPA (gaze du filtre), etc. soient en bon état. En
cas de détérioration, l’accessoire endommagé doit être envoyé immédiatement
au centre de service après-vente pour être remplacé.
7. Quand l’aspirateur n’est pas utilisé, il doit être verrouillé en position verticale.
8. Quand vous avez fini d’utiliser l’aspirateur, éteignez-le, retirer la fiche de la prise
électrique et enroulez-la sur le crochet.
9. Gardez l’aspirateur dans un espace intérieur sec.
Page 29

29
NETTOYAGE ET MAINTENANCE
尘桶
尘桶盖
HEPA组件
Réservoir à
poussière
Assemblage
HEPA
Couvercle du réservoir à
poussière
I. Nettoyage du reservoir à poussière
Fig. 9
1. Videz régulièrement les déchets du réservoir à poussière, pour éviter la panne et
la détérioration de l’aspirateur.
2. Nettoyez le réservoir à poussière seulement après avoir débranché l’aspirateur.
3. Faites pivoter et ouvrez le couvercle du réservoir à poussière.
4. Retirez le réservoir à poussière et videz-le.
5. Replacez bien le réservoir à poussière et vissez le couvercle sur le réservoir.
II. Informations générales
Cet appareil est destiné uniquement à un à usage domestique et il ne peut pas
être réparé par l’utilisateur.
Ne pas ouvrir ou changer aucune des parties vous-même. Veuillez-vous référer
auprès d’un service électrique qualifié ou renvoyer le batteur manuel au
fournisseur si cela s’avère nécessaire pour son entretien.
Souvenez-vous de toujours débrancher l’unité de la prise électrique lorsqu’elle
n’est pas utilisée et avant de la nettoyer. S’assurer le contrôle de vitesse est
réglé sur « 0 ».
Il est plus facile de nettoyer les accessoires directement une fois qu’ils ont été
utilisés. Les nettoyer dans de l’eau chaude et savonneuse, les rincer et bien les
sécher.
Page 30

30
Le corps du appareil et le support devrait être nettoyés avec un chiffon humide.
Ne pas laisser l'eau pénétrer dans l'appareil ou dans le support.
Ne pas utiliser d’eau de javel ou d’autres substances abrasives ou encore
d’autres solvants pour nettoyer votre appareil, car cela peut endommager le
revêtement.
Ne pas immerger l’appareil dans de l’eau ou dans tout autre liquide, et le
maintenir sous un robinet pour le nettoyer.
Pour enlever les tâches/marques résistantes, essuyer la surface avec un chiffon
légèrement humidifié dans de l’eau savonneuse ou avec un nettoyant non abrasif
doux. Utilisez un chiffon doux et propre, qui a été rincé et séché.
III. Remplacement de la Courroie et Nettoyage de la Brosse à
Rouleau
Fig. 10.
Le changement de la courroie et le nettoyage du rouleau devront se faire après coupure
de l’alimentation électrique pour éviter l'électrocution.
1. Premièrement, désengagez l’aspirateur de sa position verticale en appuyant sur
la pédale. Placez le bouton levier dans la position convenable, et retournez
l'aspirateur pour retirer le couvercle recouvrant la brosse en dévissant les vis.
2. Retirez soigneusement tous les restes de saleté autour de la courroie.
3. Saisissez soigneusement le support de la brosse à rouleau sur le côté de la
courroie et retirez-le de la rainure de maintien. Retirez le support de l’autre côté,
de sa rainure de maintien, de la même façon. (A noter : la courroie pourra être
tendue)
Page 31

31
4. Retirez la courroie usagée de l’axe du moteur et de l’extrémité de la brosse à
rouleau.
5. Retirez soigneusement tous les restes de saleté sur la brosse à rouleau.
6. Après avoir remplacé la courroie, insérez les deux supports de la brosse à
rouleau dans les rainures de maintien correspondantes sur le châssis, et vérifiez
qu’ils soient bien fixés et que la brosse tourne librement.
7. Remontez le couvercle supérieur de la brosse à planchers et revissez les vis.
RANGEMENT DE L'APPAREIL
Débrancher l’unité de l’alimentation électrique et nettoyer les pièces comme il l’a
été recommandé ci-dessus. S’assurer que toutes les pièces sont sèches avant
de les ranger.
Ranger l'appareil dans sa boîte ou bien dans un endroit propre et sec.
Ne jamais ranger l'appareil s'il est encore humide ou sale.
Ne jamais enrouler le cordon d’alimentation autour du appareil.
Page 32

32
DEPANNAGE
Problèmes
Solutions
L’aspirateu
r refuse de
fonctionner
4. Vérifiez que la fiche soit bien branchée. Débranchez-la et
rebranchez-la dans la prise.
5. Vérifiez que la prise est bien alimentée.
6. Vérifiez si l’interrupteur de l’aspirateur est bien en position
« Marche ».
La force
d’aspiration
est réduite
4. Vérifiez que la brosse à planchers, le tuyau et le tube ne
soient pas bouchés. S’il y a une obstruction, retirez
immédiatement ce qui bloque.
5. Vérifiez si la gaze du filtre d'entrée et sortie d’air est
poussiéreuse. Veuillez changer régulièrement le filtre
HEPA d’entrée et sortie d’air (ou les gazes du filtre).
6. Vérifiez que le couvercle avant du corps de l'aspirateur soit
bien monté.
Bruit
anormal
pendant
que le
moteur
tourne
3. Arrêter immédiatement d’utiliser l’aspirateur.
4. Vérifiez que la brosse à planchers, le tuyau et le tube ne
soient pas bouchés. S’il y a une obstruction, retirez
immédiatement ce qui bloque.
La brosse
à rouleau
ne tourne
pas
3. Vérifiez que la fiche soit bien branchée.
4. Débranchez la prise, pour couper l’alimentation, ensuite
ouvrez le couvercle de la brosse à rouleau, vérifiez alors
s’il y a une tension entre la brosse à rouleau et la courroie
plate, pour voir si la courroie est en bon état.
Le voyant
est éteint
1. Vérifiez que la fiche soit bien branchée.
2. Débranchez la prise pour couper l’alimentation et ouvrez le
couvercle du voyant pour voir s’il est en bon état.
En cas d’anomalie concernant ce produit, veuillez appliquer les instructions ci-après. Si
l'aspirateur refuse toujours de fonctionner normalement, veuillez contacter le revendeur
chez qui le produit a été acheté ou le service après-vente.
SERVICE APRES VENTE
En cas de problème ou anomalie de fonctionnement constatés lors de l’utilisation du
produit, veuillez contacter pour une réparation ou des renseignements, le service aprèsvente désigné par notre société.
Page 33
33
PARAMETRES TECHNIQUES
Capacité
du
réservoir à
poussière
Tension
nominale
Fréquence
nominale
Puissance
nominale
Degré
maximum
d’aspiration
Bruit
3L
120V/240V
50 Hz
1400W
≥16 kPa
≤84dB(A)
LE CHANGEMENT DE LA PRISE
Si la prise intégrée devait être change, suivez les instructions ci-dessous.
Cette unité est conçue pour fonctionner uniquement sur un courant continu de
230 V - 240 V. La connexion à d’autres sources d’alimentation pourrait
endommager l’appareil. Connecter la prise à trois chiffes de la manière suivante :
Les fils de ce réseau sont colorés selon le code suivant :
Vert/jaune = Terre
Bleu = Neutre
Marron = Actif
[Image]
AVERTISSEMENT : CET APPAREIL DOIT ÊTRE RACCORDE A UNE PRISE DE TERRE
(Il faut toujours s’assurer que la prise à trois fiches est connectée de la manière suivante :)
(T) (T) Vert et jaune
Terre (N) Bleu
(A) Marron
(N) (A)
Neutre Actif
Page 34

34
VEUILLEZ APPOSER VOTRE PREUVE D’ACHAT / RECU ICI
EN CAS DE RECLAMATION PENDANT LA PERIODE DE GARANTIE CE RECUS DOIT ETRE
PRESENTE.
GARANTIE
1. Tedelex Trading (Pty) Limited (« Tedelex ») garantie à l’acheteur d’origine de ce produit (« le
client »), que ce dernier ne présentera pas de défauts de qualité, ni de fabrication qui dans
le cadre d’une utilisation normale, familiale ou domestique pourrait apparaître en l’espace
d’1 (d’une) année suivant la date d’achat (« période de garantie »).
2. Lorsque le client a acheté un produit qui se casse, présente des défauts ou qui ne
fonctionne pas correctement pour l’utilisation pour laquelle il était destiné, le client doit
signaler cela au fournisseur auprès duquel il a acheté le produit (« le fournisseur ») durant la
période de garantie. Toute réclamation selon les conditions de la garantie doit être
accompagnée d’une preuve d’achat. Si la preuve d’achat, n’est pas disponible, à ce
moment-là, les frais de réparation et / ou d’entretien peuvent être à la charge du client vis-àvis du fournisseur.
3. Un produit défectueux doit être rapporté au centre d’entretien du fournisseur pour faire jouer
la garantie.
4. Le fournisseur remboursera, réparera ou échangera le produit selon les termes de cette
garantie qui est assujettie aux exigences légales. Cette garantie devrait être valable
uniquement quand le client n’a pas cassé lui-même l’appareil, ou utilisé ce dernier pour faire
quelque chose pour lequel il n’était pas destiné. La garantie ne comprend pas et ne peut pas
être saurait être considérée comme couvrant les dommages affectant l’appareil, qui seraient
le résultat d’un accident, d’une mauvaise utilisation, d’une modification, d’un abus ou de
toute modification ou réparation non-autorisée de l’appareil.
5. La garantie couvrira uniquement le produit fournit à la date d’achat et elle ne s’appliquera
pas à toute pièces ajoutée ou installée par le client.
6. Si le client demande au fournisseur de réparer le produit et si le produit casse ou ne
fonctionne pas correctement dans les 3 (trois) mois de la réparation, et si ceci n’est pas le
résultat d’une mauvaise utilisation, à ce moment-là le fournisseur pourrait remplacer le
produit ou rembourser le client.
7. Le client pourrait être tenu pour responsable de certains frais lorsque les produits ne sont
pas renvoyés dans leur emballage d’origine, ou si l’emballage est endommagé. Ceci sera
déduit de tout remboursement fait au client.
TEDELEX TRADING (PTY) LTD
www.amap.co.za
011 490-9600 (Johannesbourg)
031 792-6000 (Durban)
021 535-0600 (Cape Town)
Page 35

35
INSTRUÇÕES E GARANTIA
MODELO N.º RHUV23
DESCRIÇÃO
Parabéns por ter comprado o nosso ASPIRADOR VERTICAL DA RUSSELL HOBBS.
Cada unidade é fabricada de forma a garantir segurança e fiabilidade. Antes de utilizar
este aparelho pela primeira vez, leia o manual de instruções atentamente e guarde-o
para futura referência.
Page 36

36
CARACTERÍSTICAS DO ASPIRADOR VERTICAL DA RUSSELL
HOBBS
SALVAGUARDAS IMPORTANTES:
Quando utilizar qualquer aparelho elétrico, deve seguir sempre as precauções de
segurança básicas, incluindo o seguinte:
1. Leia atentamente as instruções antes de utilizar qualquer aparelho.
2. Certifique-se sempre de que a tensão na etiqueta de classificação corresponde à
tensão da corrente elétrica na sua residência.
3. A operação incorreta e utilização imprópria podem danificar o aparelho e causar
lesões no utilizador.
4. O aparelho destina-se apenas a utilização doméstica. A utilização comercial
invalida a garantia e o fornecedor não pode ser responsabilizado por lesões ou
danos causados quando o aparelho for utilizado para qualquer outra finalidade
diferente da prevista.
5. Evite qualquer contacto com as peças em movimento.
6. É necessária uma supervisão de perto quando qualquer aparelho for utilizado
perto ou por crianças ou pessoas com incapacidades.
7. Verifique o cabo de alimentação e a ficha regularmente para verificar a
existência de quaisquer danos. Se o cabo ou a ficha estiverem danificados,
devem ser substituídos pelo fabricante ou por uma pessoa qualificada de forma
a evitar um perigo elétrico.
8. Não utilize o aparelho se este tiver sido deixado cair ou estiver danificado de
qualquer forma. Em caso de danos, devolva a unidade para verificação e/ou
reparação por parte de um agente de assistência autorizado
9. Para reduzir o risco de choque elétrico, não mergulhe ou exponha o conjunto do
motor, ficha ou cabo de alimentação em água ou em qualquer outro líquido.
10. Nunca coloque a unidade dentro de água ou qualquer outro líquido para fins de
limpeza.
11. Remova a ficha da tomada ao agarrar na ficha. Não puxe pelo cabo para
desligar o aparelho da corrente elétrica. Desligue sempre a unidade quando esta
não estiver a ser utilizada, antes de limpar ou quando adicionar ou remover
peças.
Page 37

37
12. A utilização de acessórios não recomendados ou fornecidos pelo fabricante
pode resultar em lesões, incêndios ou choque elétrico.
13. É fornecido um cabo pequeno para reduzir os riscos resultantes de ficar preso
ou de tropeçar num cabo maior.
14. Não deixe o cabo suspenso pela extremidade de uma mesa ou balcão.
Certifique-se de que o cabo não se encontra numa posição em que possa ser
puxado inadvertidamente.
15. Não permita que o cabo toque em superfícies quentes e não o coloque sobre ou
perto de uma caldeira elétrica ou a gás quente ou num forno aquecido.
16. Não utilize o aparelho sobre uma superfície de cozimento a gás ou elétrica ou
sobre ou perto de uma chama.
17. A utilização de uma extensão com este aparelho não é recomendada. No
entanto, caso seja necessário utilizar uma ficha de extensão, certifique-se de
que a ficha é adequada para o consumo de energia do aparelho para evitar o
sobreaquecimento do cabo da extensão, aparelho ou tomada. Não coloque o
cabo da extensão numa posição em que possa ser puxada por crianças ou
animais ou que possibilite o tropeçamento.
18. Este aparelho não é adequado para ser utilizado no exterior. Não utilize este
aparelho para outra finalidade diferente da prevista.
19. NÃO transporte o aparelho pelo cabo de alimentação.
20. Não deixar este aparelho não supervisionado durante a utilização. Desligue
sempre a unidade quando não estiver a ser utilizada ou antes de limpar.
21. Utilize sempre o aparelho numa superfície suave, uniforme e estável. Não
coloque a unidade numa superfície quente.
22. Certifique-se de que o interruptor está na posição "Off" (desligado) após cada
utilização.
23. Não aspire nada que esteja a queimar ou a deitar fumo, como cigarros, fósforos
ou cinzas quentes.
24. Não utilize sem o saco para o pó e/ou filtro nos respetivos locais.
25. O fabricante não aceita responsabilidade por qualquer dano ou lesão causados
devido a uma utilização imprópria ou incorreta ou a reparações realizadas por
pessoal não autorizado.
Page 38

38
26. Em caso de problemas técnicos, desligue a máquina e não tente repará-la você
1
2
3
4
5
6
7
8
20
21
19
18
17
16
15
9
10
11
12
13
14
28
27
26
25
24
23
22
próprio. Devolva o aparelho a um agente de assistência autorizado para
verificação, ajuste ou reparação. Insista sempre em utilizar peças
sobresselentes originais. O não cumprimento das precauções e instruções
acima poderá afetar o funcionamento seguro desta máquina.
DIAGRAMA DE PEÇAS
1. Pega esquerda 16. Mangueira extensível
2. Pega direita 17. Cabo de alimentação
3. Tampa do depósito de pó 18. Adaptador frontal da mangueira extensível
4. Depósito de pó 19. Tampa da mangueira de ligação
5. Tampa superior do motor 20. Suporte do cabo de alimentação
6. Corpo do botão de elevação 21. Mangueira de entrada de ar da escova para chão
7. Tampa superior da escova para chão 22. Roda de elevação
Page 39

39
8. Tampa inferior da escova para chão 23. Eixo da roda de elevação
2
1
9. Roda grande 24. Acoplador da mangueira de ligação da saída de ar
10. Roda central 25. Mangueira para alongamento
11. Interruptor de alimentação 26. Suporte de cavilha
12. Adaptador posterior da mangueira extensível 27. Bocal plano
13. Mangueira do corpo principal 28. Botão do depósito de pó
14. Botão da pega
15. Tampa da extremidade direita do parafuso
Acessórios:
1. Mangueira para alongamento 2. Bocal plano
MEDIDAS DE PRECAUÇÃO
Se a abertura que aspira o ar, o tubo de sucção ou a vara telescópica no tubo
estiverem bloqueados, deve desligar o aspirador imediatamente. Primeiro,
desobstrua a substância bloqueada antes de tentar ligar o aspirador novamente.
1. Não utilize o aspirador
demasiado perto de aquecedores,
radiadores, pontas de
cigarros, etc.
2. Antes de inserir a ficha
na tomada elétrica, certifique-se de que
as suas mãos estão secas.
3. Antes de começar a utilizar o aspirador,
remova os objetos grandes ou afiados
do chão para evitar danificar os filtros
e a unidade.
Page 40

40
4. Quando retirar a ficha
da tomada elétrica, agarre na
própria ficha e não
no cabo elétrico.
Este aspirador está equipado com uma ficha e cabo.
Se algum item ficar danificado, tanto a ficha como o cabo têm de ser reparados
por um técnico qualificado ou eletricista.
Page 41

41
INSTRUÇÕES DE FUNCIONAMENTO
打螺丝固定
Fixar com parafusos
Antes de montar o aspirador, confirme se todas as peças e componentes para o
aspirador estão presentes, de acordo com a lista de peças e componentes.
I. Instruções de montagem
1. Montagem da pega
iii. Inserir verticalmente o conjunto da pega na porta final da tampa superior do motor e
apertar com os parafusos (consultar a Fig. 1).
iv. Pressionar o botão na tampa do depósito de pó para que a baioneta no conjunto da
pega se fixe à fivela na tampa do depósito de pó, de modo correcto, para aplicar o
posicionamento global de toda a máquina.
Fig. 1
Page 42

42
扁吸嘴
加长管
插管支架
2. Montagem do depósito de pó
卡扣固定处
按钮
Botão
Posições de fixação das
fivelas
Bocal plano
Suporte de cavilha
Mangueira de alongamento
iii. Cubra a tampa do depósito de pó verticalmente no depósito de pó e rode-a até
encaixar no depósito na perfeição (consultar a Fig. 2).
iv. Insira a combinação da tampa do depósito de pó e o depósito de pó mencionada no
passo anterior ca combinação da tampa superior do motor e escova eléctrica
(consultar a Fig. 2).
Fig. 2
3. Montagem dos acessórios
Após a montagem da pega, poderá montar os acessórios.
ii. Insira o bocal plano verticalmente à mangueira de alongamento e depois, insira-os
em conjunto no suporte com cavilha para a respectiva fixação (consultar a Fig. 3).
Fig. 3
Page 43

43
电源线支承
电源线
电机外
罩上壳
Cabo de alimentação
Suporte do cabo de
alimentação
Tampa superior do
motor
INSTRUÇÕES DE UTILIZAÇÃO
VI. I. Primeiros passos
Antes de utilizar o aparelho, insira a ficha na tomada de alimentação.
1. Em primeiro ligar, rode o suporte do cabo de alimentação para cima a 180º para
libertar o cabo de alimentação.
Fig. 4
2. Pegue na ficha de alimentação encaixada no cabo de alimentação e
liberte o cabo de alimentação do gancho. Por fim, verifique se o cabo de
alimentação foi completamente libertado do gancho.
VII. II. Escolha e definição da altura do chão
Escolha e definição da altura da escova para chão:
Quando a escova para chão (escova em rolo) está a funcionar, poderá ajustá-la na
posição apropriada ao rodar o botão de elevação da escova para chão de acordo com o
comprimento da carpete.
Existem três graus de altura: alto, médio e baixo (consultar a Fig. 5).
Quando utilizar os acessórios, defina a escova para chão na posição "Alto” para evitar
danificar a carpete.
Fig. 5
Page 44

44
锁紧踏板
主体
电源开关
Corpo principal
Plataforma de bloqueio
Interruptor de
alimentação
VIII. Ajuste do ângulo do corpo principal
Coloque um pé na placa para libertar a plataforma e rode a pega para trás para
desengatar o aspirador da posição de bloqueio vertical.
Fig. 6
IX. Iniciar/parar
Insira a ficha de alimentação na tomada eléctrica e depois pressione o
interruptor de alimentação para controlar a função de início e paragem do
aspirador (consultar a Fig. 7).
Fig. 7
Page 45

45
X. Dobrar e desdobrar a pega
手柄旋钮
Botão da pega
Rode o botão da pega no sentido contrário ao dos ponteiros do relógio para permitir que
a pega rode livremente no plano vertical e depois rode a pega para o estado dobrado
(consultar a Fig. 8). Se pretende utilizar o aspirador, rode a pega para a posição
superior verticalmente, para garantir que a pega está fixa através de bloqueio
automático.
Fig. 8
DISPOSITIVOS PROTECTORES DO MOTOR
1. Existe um controlador de temperatura incorporado no corpo do motor do
aspirador, que é capaz de interromper automaticamente a alimentação do motor,
para evitar o sobreaquecimento. Quando o cabo de entrada ou saída de ar é
sobrecarregado ou está bloqueado, a temperatura do motor aumenta. Depois, o
controlador da temperatura corta a alimentação do motor para arrefecer o motor,
evitando que o aspirador se danifique.
2. Se o controlador da temperatura cortar a alimentação, pare imediatamente o
3. Depois de arrefecer o motor durante 30 minutos, ligue a unidade e verifique se o
aspirador ao puxar a ficha de alimentação para arrefecer o aspirador. Verifique e
remova os objectos que estão a bloquear a entrada de ar (incluindo a mangueira
e a cavilha) e substitua o filtro HEPA ou gaze do filtro, quando necessário.
controlador da temperatura reinicia. Se a alimentação do aspirador não tiver sido
cortada, o controlador da temperatura do motor não será reiniciado, mesmo
depois de o motor ter arrefecido.
Page 46

46
MANUTENÇÃO
1. A manutenção diária e reparação devem ser realizadas depois de retirar a ficha
da tomada.
2. Retire o lixo no saco de papel/recipiente com frequência para evitar avarias no
aspirador e substitua o saco quando necessário.
3. Nunca limpe a superfície do aspirador com gasolina ou líquido oleoso. Limpe-a
com água ou um detergente neutro.
4. Cuidado: Certifique-se de que utiliza um pano humedecido apenas para limpar a
unidade. É perigoso caso a água se infiltre nos elementos eléctricos do
aspirador.
5. Quando a escova para chã não é utilizada, não deve estar exposta à luz solar
directa ou humidade.
6. Antes de utilizar o aspirador, verifique se todos os acessórios, como a
mangueira, cabo eléctrico e suporte HEPA (gazes de filtro), etc., estão em boas
condições. Em caso de danos, o acessório danificado deve ser imediatamente
enviado para o centro de assistência para substituição.
7. Quando o aspirador não está a ser utilizado, deve ser fechado na posição
vertical.
8. Depois de utilizar o aspirador, desligue a alimentação, puxe o cabo de
alimentação da tomada eléctrica e envolva-o em redor do gancho.
9. Coloque o aspirador num ambiente interno e seco.
Page 47

47
LIMPEZA E MANUTENÇÃO
尘桶
尘桶盖
HEPA组件
Depósito de pó
Montagem HEPA
Tampa do depósito de pó
IV. Limpeza do depósito de pó
Fig. 9
6. Retire o lixo do depósito de pó com frequência para evitar avarias e danos no
aspirador.
7. Limpe o depósito de pós apenas depois de desligar a ficha de alimentação do
aspirador.
8. Rode e abra a tampa do depósito de pó.
9. Retire o depósito de pó e esvazie-o.
10. Monte bem o depósito de pó e rode a tampa no depósito.
V. General
Este aparelho destina-se apenas a utilização doméstica e não é reparável pelo
utilizador.
Não abra nem substitua quaisquer peças. Consulte um departamento de apoio
elétrico qualificado ou devolva o aparelho ao fornecedor, caso seja necessário
repará-lo.
Nunca se esqueça de desligar a unidade da tomada elétrica quando não está a
ser utilizado e antes de limpar. Certifique-se de que o controlo de velocidade
está na posição “0”
É muito mais simples limpar os acessórios imediatamente depois de serem
utilizados. Lave-os com água quente e detergente, enxague e seque bem.
Page 48

48
O corpo do aparelho e o suporte devem ser limpos com um pano humedecido.
Não deixe entrar água no aparelho ou no suporte.
Não utilize lixívia ou outra substância abrasiva ou solventes para limpar o
aparelho, uma vez que poderá danificar o acabamento.
Nunca mergulhe o aparelho em água ou em qualquer outro líquido nem o
coloque debaixo de água a correr para o limpar.
Para remover manchas/marcas persistentes, limpe a superfície com um pano
ligeiramente humedecido em água com detergente ou agente de limpeza suave
não abrasivo. Utilize um pano suave limpo que tenha sido enxaguado e seco.
VI. Substituição da correia e limpeza da escova em rolo
Fig. 10.
Tanto a substituição da correia como a limpeza do rolo devem ser efectuadas depois de
desligar a fonte de alimentação, para prevenir o choque eléctrico.
1. Em primeiro lugar, desengate o aspirador da posição de bloqueio vertical ao
pressionar a plataforma de libertação. Ajuste o botão de elevação na posição
apropriada e depois vire o aspirador ao contrário para retirar a tampa superior da
escova ao remover os parafusos.
2. Retire cuidadosamente a sujidade restante em redor da correia.
3. Agarre no suporte da escova em rolo cuidadosamente no lado da Correia e
remova-o da ranhura pressionada. Remova o suporte do outro lado da ranhura
pressionada de modo semelhante. (Nota: a correia pode ter ume certa tensão.)
4. Remova a correia antiga do eixo do motor e a extremidade da escova em rolo.
5. Retire cuidadosamente toda a sujidade restante na correia em rolo.
Page 49

49
6. Após a substituição da correia, insira ambos os suportes da escova em rolo nas
ranhuras pressionadas correspondentes na placa de apoio e verifique se estão
7. Monte a tampa superior da escova para chão e aperte os parafusos.
bem fixados e se a escova em rolo roda livremente.
GUARDAR O APARELHO
Desligue a unidade da tomada e limpe todas as peças conforme instruído acima.
Certifique-se de que todas as peças estão secas antes de guardar.
Guarde o aparelho na sua embalagem num local limpo e seco.
Nunca guarde o aparelho enquanto estiver molhado ou sujo.
Nunca enrole o cabo de alimentação à volta do aparelho.
Page 50

50
Avarias
Solução
O
aspirador
não
funciona
7. Verifique se a ficha de alimentação está devidamente
ligada. Desligue-a e insira-a novamente na tomada.
8. Verifique se a tomada está ligada.
9. Verifique se o interruptor do aspirador está na posição
“ON” (ligado).
A forção de
aspiração
diminuiu
7. Verifique a escova para chão, a mangueira e a cavilha
quanto à existência de bloqueio. Caso exista algum
bloqueio, remova-o imediatamente.
8. Verifique se a gaze do filtro de entrada ou saída de ar tem
poeira. Limpe ou substitua o filtro HEPA (ou gazes do filtro)
da entrada ou saída de ar com frequência.
9. Verifique se a tampa frontal do corpo do aspirador está
bem montada.
Som
anormal
durante a
rotação do
motor
5. Pare imediatamente de utilizar o aspirador.
6. Verifique a escova para chão, a mangueira e a cavilha
quanto à existência de bloqueio. Caso exista algum
bloqueio, remova-o imediatamente.
A escova
em rolo
não roda
5. Verifique se a ficha de alimentação está devidamente
ligada.
6. Retire a fiche para cortar a alimentação, depois abra a
tampa da escova para chão. Depois disso, verifique se
existe tensão entre a escova em rolo e a correia plana
para ver se a correia plana está em boas condições.
A luz
indicadora
está
desligada
1. Verifique se a ficha de alimentação está devidamente
ligada.
2. Retire a fiche para cortar a alimentação e depois abra a
tampa da luz para verificar se a luz está em boas
condições.
RESOLUÇÃO DE PROBLEMAS
Em caso de anomalias com este produto, trate-o da forma indicada abaixo. Se o
aspirador continuar a não funcionar normalmente, contacte o revendedor onde este
produto foi comprado ou o departamento de assistência.
SERVIÇO DE PÓS ASSISTÊNCIA
Quando ocorrerem anomalias ou problemas com o produto durante a utilização,
contacte o departamento de assistência designado pela nossa empresa para consulta
ou reparação.
Page 51

51
PARÂMETROS TÉCNICOS
Capacid
ade do
depósito
de pó
Tensã
o
nomin
al
Frequênc
ia
nominal
Potênc
ia
nomin
al
Nível de
aspiração
máximo
Ruído
3 L
120V/2
40V
50 Hz
1400
W
≥16kPa
≤84dB(A)
SUBSTITUIÇÃO DA FICHA
Cumpra com as instruções seguintes caso seja necessário substituir a ficha.
Esta unidade foi concebida para funcionar apenas com a corrente de 230V-240V.
A ligação a outras fontes de alimentação poderá danificar o aparelho. Ligue uma
ficha de três pinos da seguinte maneira:
Os fios neste terminal de alimentação estão coloridos de acordo com o seguinte código:
Verde/Amarelo = Terra
Azul = Neutro
Castanho = Vivo
[Image]
AVISO: ESTE APARELHO DEVE ESTAR LIGADO À TERRA
(Certifique-se sempre de que a ficha de três pinos está ligada da seguinte maneira:)
(E) (E) Verde e amarelo
Terra (N) Azul
(L) Castanho
(N) (L)
Neutro Vivo
Page 52

52
ANEXE A SUA PROVA DE COMPRA/RECIBO AQUI
EM CASO DE RECLAMAÇÃO AO ABRIGO DE GARANTIA, É NECESSÁRIO PRODUZIR
ESTE RECIBO.
GARANTIA
1. A Tedelex Trading (Pty) Limited (“Tedelex”) garante ao comprador original deste produto (“o
cliente") que este produto não apresenta defeitos de material e fabrico que se manifestam
na utilização normal pessoal, familiar ou doméstica num período de 1 (um) ano desde a
data de compra (“período de garantia”).
2. No caso de um cliente comprar um produto e este se quebrar, apresentar defeitos ou não
funcionar corretamente para a finalidade prevista, o cliente tem de notificar o fornecedor ao
qual comprou o produto ("o fornecedor") desse fato dentro do período de garantia. Qualquer
reclamação nos termos da garantia deve ser acompanhada por uma prova de compra.
Caso não esteja disponível uma prova de compra, então as despesas da reparação e/ou
manutenção poderão ter de ser pagas pelo cliente ao fornecedor.
3. O produto avariado tem de ser devolvido ao centro de assistência do fornecedor para
aplicar a garantia.
4. O fornecedor irá reembolsar, reparar ou trocar o produto nos termos desta garantia, sujeito
aos requisites legislativos. Esta garantia será válida apenas quando o cliente não tiver
quebrado ele próprio o produto ou utilizado o produto para outro fim que não o previsto. A
garantia não inclui e não será interpretada como abrangendo produtos danificados como
resultado de um desastre, utilização imprópria, manipulação, abuso ou qualquer
modificação não autorizada ou reparação do produto.
5. Esta garantia aplicar-se-á apenas ao produto fornecido na data de compra e não a
quaisquer acessórios incluídos ou instalados pelo cliente.
6. Se o cliente solicitar que o fornecedor repare o produto e o produto se quebrar ou não
funcionar corretamente nos 3 (três) meses após a reparação, considerando que não seja
resultado de utilização imprópria, manipulação ou modificação por ou em nome do cliente,
então o fornecedor poderá substituir o produto ou pagar um reembolso ao cliente.
7. O cliente poderá ser responsável por certos custos quando os produtos devolvidos não
estiverem na embalagem original, ou caso a embalagem esteja danificada. Este custo será
deduzido de qualquer reembolso pago ao cliente.
TEDELEX TRADING (PTY) LTD
www.amap.co.za
011 490-9600 (Joanesburgo)
031 792-6000 (Durban)
021 535-0600 (Cidade do Cabo)
 Loading...