

Page 1
INSTRUCTIONS AND WARRANTY
MODEL NO. 18663-56
FUTURA 1.5L FILTER COFFEE MAKER
1
Page 2

Congratulations on purchasing our Russell Hobbs Futura 1.5L Filter Coffee Maker. Each
unit is manufactured to ensure safety and reliability. Before using this appliance for the first
time, please read the instruction manual carefully and keep it for future reference.
FEATURES OF THE RUSSELL HOBBS FUTURA 1.5L FILTER COFFEE MAKER
1.5L/ 12 cup capacity
97°C brewing temperature
Automatic Pause and Anti-drip system allows serving while the machine continues to
brew
Water Tank with visible level indicator
Removable filter holder for easy cleaning
Hot plate to keep your coffee warm
Glass carafe with flip top lid
Includes permanent removable filter
950-1150W
Suitable for ground coffee
IMPORTANT SAFEGUARDS
When using any electrical appliance, basic safety precautions should always be followed
including the following:
1. Please read the instructions carefully before using any appliance.
2. Always ensure that the voltage on the rating label corresponds to the mains voltage
in your home.
3. Incorrect operation and improper use can damage the appliance and cause injury to
the user.
4. This appliance is intended for household use only. Commercial use invalids the
warranty and the supplier cannot be held responsible for injury or damage caused
when using the appliance for any other purpose than that intended.
5. Avoid any contact with moving parts.
6. This appliance is not intended for use by persons (including children) with reduced
physical, sensory or mental capabilities, or lack of experience and knowledge, unless
they have been given supervision or instruction concerning use of the appliance by a
person responsible for their safety.
7. Children should be supervised to ensure that they do not play with the appliance.
2
Page 3

8. Check the power cord and plug regularly for any damage. If the cord or the plug is
damaged, the manufacturer or a qualified person must replace it in order to avoid an
electrical hazard.
9. Do not use the appliance if it has been dropped or damaged in any way. In case of
damage, take the unit in for examination and/or repair by an authorised service agent
10. To reduce the risk of electric shock, do not immerse or expose the unit, plug or the
power cord to water or any other liquid. Do not use it with wet hands.
11. Never immerse the unit in water or any other liquid for cleaning purposes.
12. Remove the plug from the socket by gripping the plug. Do not pull on the cord to
disconnect the appliance from the mains.
13. Always unplug the unit to cool and unplug it when not in use, before cleaning or when
adding or removing parts.
14. Insert and use only original parts.
15. The use of accessory attachments that are not recommended or supplied by the
manufacturer may result in injuries, fire or electric shock.
16. A short cord is provided to reduce the hazards resulting from becoming entangled in
or tripping over a longer cord.
17. Do not let the cord hang over the edge of a table or counter. Ensure that the cord is
not in a position where it can be pulled on inadvertently.
18. Do not allow the cord to touch hot surfaces and do not place on or near a hot gas or
electric burner or in a heated oven.
19. Keep the appliance and cord away from direct radiating heat from the sun,
dampness, sharp edges and other dangers.
20. Do not use the appliance on a gas or electric cooking top or over or near an open
flame.
21. Use on a hard, flat level surface only, to avoid interruption of airflow underneath the
appliance.
22. Do not remove the filter holder during water or coffee flow.
23. Do not allow the power cord to come into contact with hot parts of the appliance e.g.
cup warming plate, filter holder, steam nozzle.
24. Keep hands away from hot parts of the appliance, including the carafe and the
dispenser.
25. Do not set a hot carafe on a wet or cold surface.
26. Use of an extension cord with this appliance is not recommended. However, if it is
necessary to use an extension lead, ensure that the lead is suited to the power
consumption of the appliance to avoid overheating of the extension cord, the
3
Page 4

appliance or plug point. Do not place the extension cord in a position where it can be
pulled on by children or animals or tripped over.
27. This appliance is not suitable for outdoor use. Do not use this appliance for anything
other than its intended use.
28. This appliance is intended to be used in household and similar applications such as:
o Staff kitchen areas in shops, offices and other working environments;
o Farm houses;
o By clients in hotels, motels and other residential type environments;
o Bed and breakfast type environments.
29. Do not operate this appliance by means of an external timer or separate remote
control system.
30. Never move the machine during operation!
31. Never operate the machine without water. Always ensure there is water in water tank
not less than minimum level.
32. Never touch very hot parts of the machine (e.g. brew unit during operations).
33. Do not touch the steam or water jets.
34. Do not move the operating lever when the machine is still under pressure making
coffee.
35. Never cover the machine during operation
4
Page 5
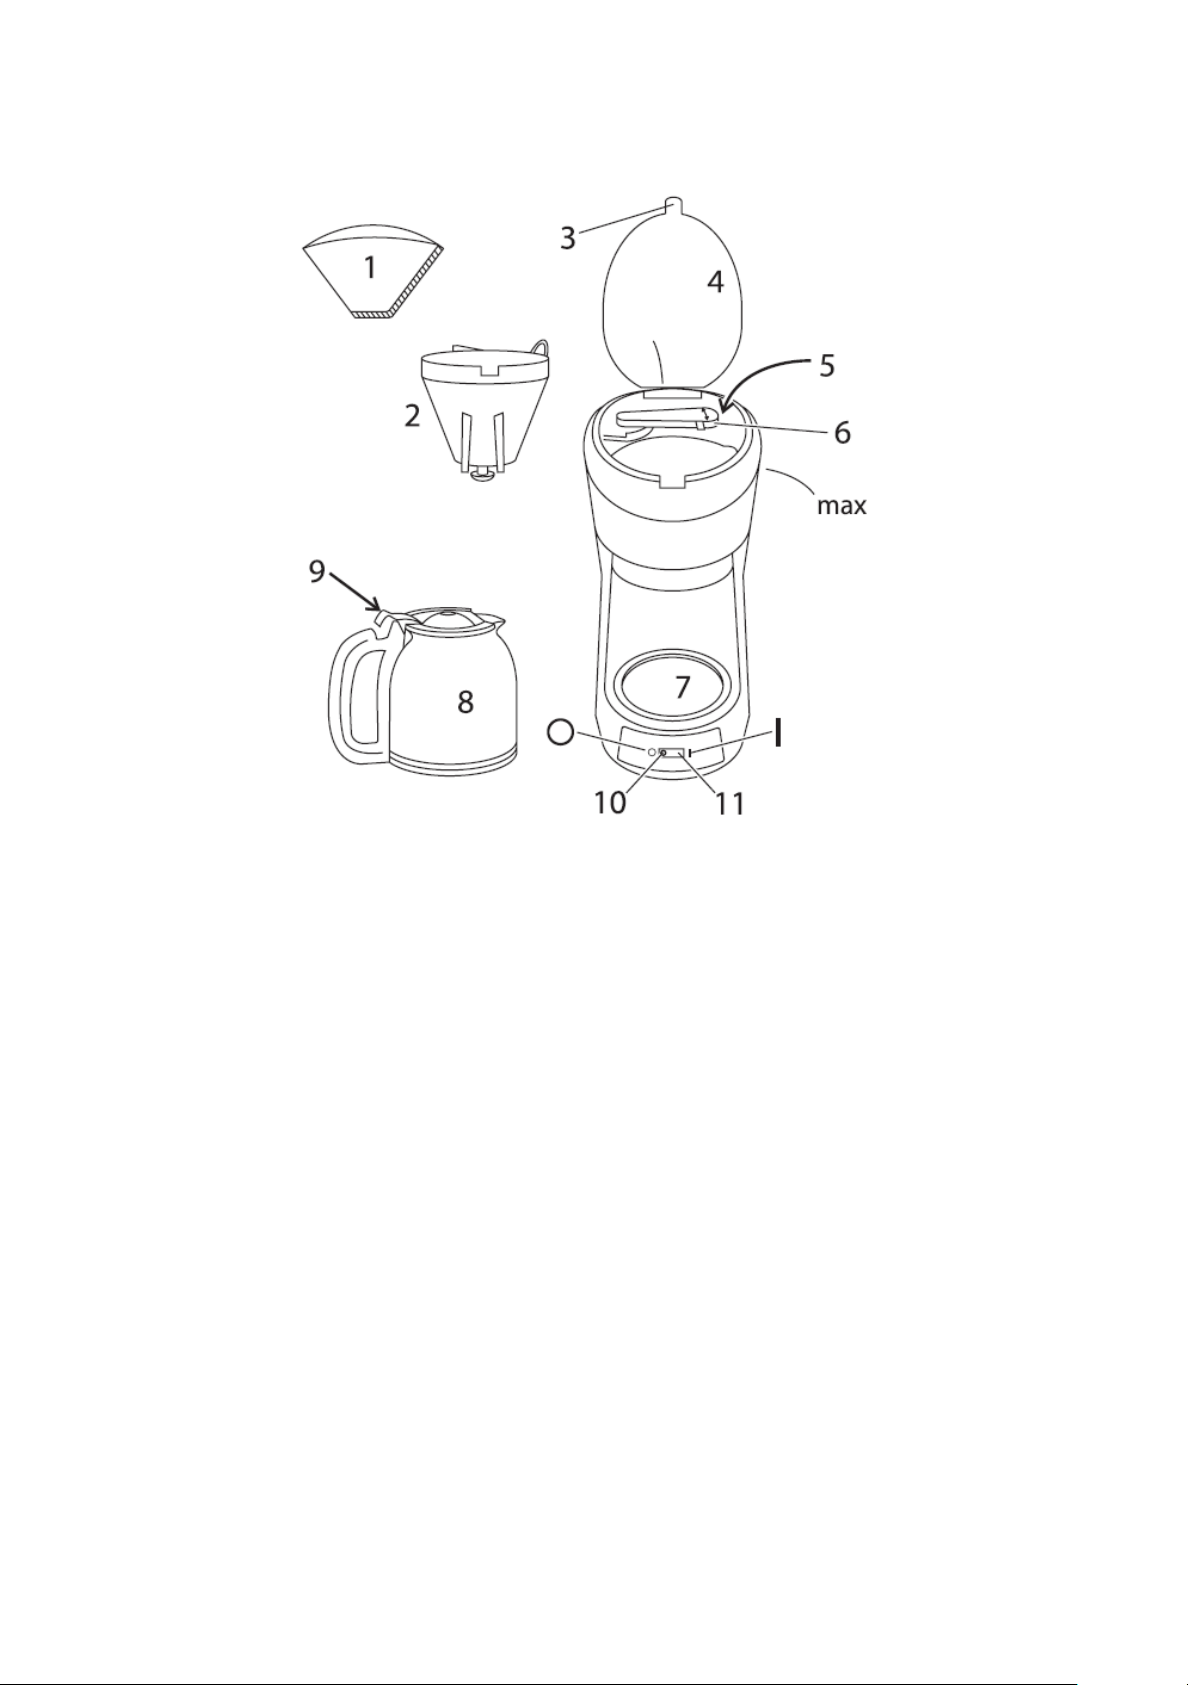
PARTS DIAGRAM
1. Paper filter #4 (not supplied)/ 7. Hotplate
Permanent removable filter (supplied)
2. Filter holder 8. Glass carafe
3. Grip 9. Press to open
4. Lid 10. Light
5. Insert Water O. Off I. On
6. Water pipe 11. Power switch
HINTS AND TIPS TO GET THAT PERFECT BREW
COFFEE
For best results, use medium-ground filter coffee. The amount will vary with the type of
coffee used and your personal taste. We suggest starting with two rounded teaspoons of
medium coffee per cup. However there is no hard and fast rule as tastes will vary.
5
Page 6

MILK
In this regard, personal taste should rule, not convention. What we do say is that if you like
milk in your coffee – we recommend using warm or hot milk to avoid overcooling the coffee.
To extract maximum flavour from the coffee, it should be cool enough not to scold or burn
the mouth but hot enough to let the flavour fill the mouth, sinuses and nose… not just the
taste buds.
BOTTLED WATER
If you use bottled water, make sure that is has no added ingredients, flavourings, etc. and
use ‘flat/ still’ water, not ‘sparkling’. The carbon dioxide which gives the ‘sparkle’ will
adversely affect the flavour of your coffee.
BEFORE USING FOR THE FIRST TIME
Carefully unpack the coffee maker and remove all protective packing materials. Please keep
all protective packing materials away from babies and children to avoid any possible danger.
It is recommended to dispose of these as soon as possible.
You may wipe the outside of the machine using a clean damp cloth. Do not immerse the
coffee maker in water or other liquids. To remove any dust that may have accumulated
during packing, wash the carafe, lid and filter holder with warm soapy water. Thereafter
rinse with clean water and let dry. Do not use any type of harsh abrasive cleaners.
We recommend that you rinse the machine prior to brewing your first pot of coffee. This will
remove any dust that may have settled inside the coffee maker. To do this, fill the reservoir
to the max mark and run the appliance without coffee. Let it cool, discard the water, then
use it normally.
Note: We recommend that you use only cold water. The automatic brewing system has
been designed to work at its best with cold water.
6
Page 7

OPERATING THE APPLIANCE
1. Place the coffee maker on a flat, level surface, such as a countertop.
2. Check that the switch on the appliance is set to the “0” or OFF position.
3. Put the plug into the power socket.
4. Open the top lid and insert the permanent filter or a paper filter into the filter holder.
5. Put filter-ground coffee into the filter. The amount will vary with the type of coffee and
individual taste, but we suggest two rounded teaspoons per cup of water. Note: Be
sure not to over-fill the filter with too much coffee. Tip: We recommend using fresh
top quality ground coffee specifically for an automatic filter coffee maker. Experiment
to learn how much ground coffee to use for the strength of coffee you prefer. Tastes
vary and there are no hard and fast rules.
6. Open the hinged lid to the water reservoir located on the top of the coffee maker. Fill
the glass carafe with cold water up to the marked level for the desired amount of
coffee. NOTE: We recommend using only cold water as the automatic brewing
system has been designed to work best with cold water.
7. Empty the cold water from the carafe into the water reservoir. Close the hinged lid.
Place the glass carafe with the lid in place on to the warming plate.
8. Move the switch to the “1”/ ON position. The light will glow to show that the unit is
operating. The light will stay on until the switch is turned to the “O” or OFF position.
9. Shortly afterwards, hot water will disperse slowly through the ground coffee, brewing
hot tasty coffee. Here you will see coffee starting to drip into the glass carafe.
10. Once all the water has been pumped out of the water reservoir, the heating process
will switch itself off automatically and move the power to the hotplate for the “keep
warm” mode which is designed to keep your coffee at the proper serving
temperature.
11. Move the switch to the “O” or OFF position once you have finished using the coffee
maker. The light will go off.
12. Unplug, and let the appliance and carafe cool down fully before cleaning, or for about
10 minutes before refilling.
TIP: We recommend keeping the unused coffee in a tightly sealed container in your
refrigerator.
7
Page 8

TO MAKE A QUICK CUP OF COFFEE
You can remove the carafe at any time. To prevent the filter holder from overflowing,
replace the carafe on the hotplate within approximately 20 seconds.
NON-DRIP FEATURE
Your Russell Hobbs coffee maker has been designed with a non-drip feature. If you
wish at any time during the brewing cycle, you may temporarily remove the glass
carafe from the unit and pour a cup of hot coffee. The warming cycle will be
interrupted and hot coffee will drip from the filter basket. This feature is also designed
so that coffee will not drip onto the warming plate if you remove the glass carafe from
the coffee maker during the brewing process.
SERVING AND KEEPING WARM
After brewing is completed you may remove the glass carafe from the warming plate.
For the best flavour serve the coffee immediately after brewing.
Put the glass carafe back on to the warming plate to keep the coffee warm.
As long as the coffee maker is turned on, the warming plate will keep the coffee at
drinking temperature.
Once the coffee is finished, or you do not wish to keep the coffee hot, switch the
coffee maker off.
NOTE: Always allow the coffee maker to cool down between brewing cycles for
approximately 5 minutes.
CARE AND MAINTENANCE
Unplug the appliance when not in use, before moving and before cleaning.
The permanent filter may be removed for easy cleaning. Ensure that you tip the
contents of the filter holder into the bin before starting the cleaning process.
Clean the outside of the coffee maker with a damp cloth, and buff with a dry cloth.
The heating element may be wiped with a clean, damp cloth when necessary.
Do not use any type of abrasive cleaner on any part of your coffee maker.
Do not use abrasive cleaning agents.
8
Page 9

Be sure that the warming plate is cold before cleaning.
Never immerse the appliance in water.
Never use a cloth to clean the inside of the water reservoir as this may leave fuzzy
deposits in the reservoir. Just rinse with cold water periodically.
You may clean the carafe and filter holder in warm soapy water. Rinse thoroughly
afterwards, to remove all traces of soap.
Do not put any part of the appliance in a dishwasher.
DESCALING
To prevent a build-up of deposits due to water conditions in certain areas, do ensure
that the reservoir is completely cleaned after each use. It may be necessary to
periodically descale your machine.
We recommend that you descale your machine every 3-4 months, although this
period will depend on the hardness of water and frequency of use of the machine.
To do this, pour a measure of half water/half vinegar into the water reservoir and
operate the coffee maker as if you were making coffee. Alternatively, dissolve 2
dessert spoons of tartaric acid in half a litre of lukewarm water.
Repeat the process a further three times but using CLEAN COLD WATER ONLY to
thoroughly rinse out the appliance.
Alternatively, a well-known brand of descalent suitable for coffee makers or plastic
kettles can be used. In this case, follow the instructions given by the manufacturer
Note: Products returned under guarantee with faults due to scale will be subject to a
repair charge.
ENVIRONMENTAL PROTECTION
To avoid environmental and health problems due to hazardous substances in electrical and
electronic goods, appliances marked with this symbol must not be disposed of with unsorted
municipal waste, but recovered, reused, or recycled.
STORING THE APPLIANCE
Unplug the unit from the wall outlet and clean all the parts as instructed above.
Ensure that all parts are dry before storing.
9
Page 10

Store the appliance in its box or in a clean, dry place.
Never store the appliance while it is still wet or dirty.
Never wrap the power cord around the appliance.
SERVICING THE APPLIANCE
There are no user serviceable parts in this appliance. If the unit is not operating correctly,
please check the following:
You have followed the instructions correctly
That the unit has been wired correctly and that the wall socket is switched on.
That the mains power supply is ON.
That the plug is firmly in the mains socket.
If the appliance still does not work after checking the above:
Consult the retailer for possible repair or replacement. If the retailer fails to resolve the
problem and you need to return the appliance, make sure that:
The unit is packed carefully back into its original packaging.
Proof of purchase is attached.
A reason is provided for why it is being returned.
If the supply cord is damaged, it must be replaced by the manufacturer or an authorised
service agent, in order to avoid any hazard. If service becomes necessary within the
warranty period, the appliance should be returned to an approved Home of Living Brands
(Pty) Limited service centre. Servicing outside the warranty period is still available, but will,
however, be chargeable.
10
Page 11

CHANGING THE PLUG
Should the need arise to change the fitted plug, follow the instructions below.
This unit is designed to operate on the stated current only. Connecting to other power
sources may damage the appliance. Connect a three-pin plug as follows:
The wires in this mains lead are coloured in accordance with the following code:
Green/Yellow = Earth
Blue = Neutral
Brown = Live
A FEW RECIPES TO GET YOU STARTED
IRISH COFFEE
Ingredients:2 tbsp. Irish Whiskey
1-2 tsp. sugar
Hot Coffee
Double Cream
Method:-
Warm a stemmed glass or goblet by running under hot water.
Pour the Irish Whiskey into the warmed glass adding the sugar.
Fill with hot coffee to within 1 inch of the brim and stir well.
Slowly pour some double cream over the back of the teaspoon allowing it to float on top of the
coffee.
Drink through the cream without stirring.
11
Page 12

Variations:-
For Highland Coffee, prepare in the same manner, using Scotch Whiskey instead of Irish
Whiskey.
For Calypso Coffee, prepare in the same manner using Tia Maria.
For Cherry Coffee, prepare in the same manner using Cherry Brandy. Drizzle an additional
teaspoon of Cherry Brandy over the Cream, so that it is tinged pink and garnish with one or two
un-stemmed cherries.
For Café Menthe, prepare in the same manner using Crème de Menthe and lightly whipped
double cream. Serve with thin chocolate mint wafers.
For Mexican Coffee, prepare in the same manner using Kahlua and lightly whipped double
cream. Serve sprinkled with finely grated chocolate.
JAMAICAN COFFEE COCKTAIL
Ingredients:2 tbsp. dark Jamaican Rum
170-220ml freshly made coffee, well chilled and sweetened to taste
Ice Cubes
Double cream, chilled and lightly whipped
Ground Cinnamon, grated nutmeg or chocolate
Method:-
Combine the rum and chilled coffee in a tall glass. Stir well and add ice.
Spoon the cream over the coffee.
Sprinkle with Cinnamon, nutmeg or chocolate.
Serve with straws and a cocktail spoon.
CAFÉ A L’ORANGE FRAPPE
Ingredients:30ml freshly made and chilled coffee, sweetened to taste
2 tbsp. Grand Marnier
1 tbsp. double cream, chilled
Grated orange zest and a twist of orange peel
Crushed Ice
12
Page 13

Method:-
Stir the coffee, Grand Marnier and cream together until thoroughly blended.
Put some crushed ice into a small cocktail glass and pour the cocktail over the ice.
Sprinkle with some grated orange zest and garnish with a twist of orange peel.
Serve with a short straw.
CAFÉ RUMBA
Ingredients:170ml freshly made and chilled coffee, sweetened to taste
1 scoop Vanilla or Coffee ice-cream
2 tbsp. Jamaican Rum
Ground Cinnamon, grated nutmeg or chocolate
Method:-
Pour coffee, ice-cream and Rum into a Russell Hobbs Electric Blender and blend until
completely smooth.
Serve in a tall glass, sprinkled with Cinnamon, nutmeg or chocolate.
CAFÉ ALEXANDER
Ingredients:30ml freshly made coffee, well chilled and sweetened to taste
2 tbsp. dark Cream de Cacao
2 tbsp. brandy
30g double cream, chilled
Ground Cinnamon, grated nutmeg or chocolate
Crushed ice
Method:-
Put some crushed ice into a cocktail shaker.
Add coffee, Crème de Cacao, brandy and cream. Shake well until frothy and strain into a
cocktail glass.
13
Page 14

Top with finely grated chocolate, nutmeg or cinnamon.
Coffee blends well with a range of flavours, try some of the following ideas…
Infuse coffee with pieces of cinnamon stick, crushed cardamom pods or cloves for a delicious
hint of spiciness.
Add a thinly pared slice of lemon or orange zest to black coffee or add a little strained juice of
an orange or lemon for just a hint of fresh citrus flavour.
Grated chocolate served in iced coffee improves the flavour OR add a swirl of whipped cream
to black coffee and decorate with a flourish of chocolate curls.
To round off a dinner party, try a Café Royal. Put a sugar lump on a spoon, pour over cognac
and set alight. Pour immediately into a cup of hot coffee and stir until the sugar is dissolved.
14
Page 15

PLEASE AFFIX YOUR PROOF OF PURCHASE/RECEIPT HERE
IN THE EVENT OF A CLAIM UNDER WARRANTY THIS RECEIPT MUST BE PRODUCED.
W A R R A N T Y
1. Home of Living Brands (Pty) Limited warrants to the original purchaser of this product
(“the customer”) that this product will be free of defects in quality and workmanship
which under normal personal, family or household use and purpose may manifest within
a period of 1 (one) year from the date of purchase (“warranty period”).
2. Where the customer has purchased a product and it breaks, is defective or does not
work properly for the intended purpose, the customer must notify the supplier from
whom the customer bought the product (“the supplier”) thereof within the warranty
period. Any claim in terms of this warranty must be supported by a proof of purchase. If
proof of purchase is not available, then repair, and/or service charges may be payable
by the customer to the supplier.
3. The faulty product must be taken to the supplier's service centre to exercise the
warranty.
4. The supplier will refund, repair or exchange the product in terms of this warranty subject
to legislative requirements. This warranty shall be valid only where the customer has not
broken the product himself, or used the product for something that it is not supposed to
be used for. The warranty does not include and will not be construed to cover products
damaged as a result of disaster, misuse, tamper, abuse or any unauthorised
modification or repair of the product.
5. This warranty will extend only to the product provided at the date of the purchase and
not to any expendables attached or installed by the customer.
6. If the customer requests that the supplier repairs the product and the product breaks or
fails to work properly within 3 (three) months of the repair and not as a result of misuse,
tampering or modification by or on behalf of the customer, then the supplier may replace
the product or pay a refund to the customer.
7. The customer may be responsible for certain costs where products returned are not in
the original packaging, or if the packaging is damaged. This will be deducted from any
refund paid to the customer.
HOME OF LIVING BRANDS (PTY) LTD (JOHANNESBURG)
JOHANNESBURG TEL NO. (011) 490-9600
CAPE TOWN TEL NO. (021) 552-5161
DURBAN TEL NO. (031) 792-6000
www.homeoflivingbrands.com
www.russellhobbs.co.za
www.facebook.com/RussellHobbsSA
15
Page 16

Félicitations pour l’achat de notre machine à café filtre Futura de 1,5 L Russell Hobbs.
Chaque unité est fabriquée afin de d’assurer la sécurité et la fiabilité. Avant d’utiliser cet
appareil pour la première fois, merci de lire le manuel avec soin et de le garder à titre de
référence.
LES CARACTÉRISTIQUES DE LA MACHINE À CAFÉ FILTRE FUTURA DE 1,5 L
RUSSELL HOBBS
Capacité de 1,5 L / 12 tasses
Température d’infusion de 97°C
La pause automatique et le système anti-goutte, permettent de servir, pendant que la
machine continue de préparer le café
Indicateur de niveau du réservoir d’eau visible
Porte-filtre amovible pour un nettoyage facile
La plaque chauffante garde votre café au chaud
Pot en verre avec couvercle à clapet
Inclut un filtre amovible permanent
950-1150W
Convient au café moulu
GARANTIES IMPORTANTES
Lors de l’utilisation de n’importe quel appareil électrique, des précautions de sécurité
élémentaires devraient toujours être suivies, ainsi que les points suivants :
1. Merci de lire les instructions avec attention avant d’utiliser tout appareil quel qu’il soit.
2. Toujours vous assurer que le voltage indiqué sur la plaque signalétique correspond
aux voltages principaux dans votre maison.
3. Une opération incorrecte et une utilisation inappropriée peuvent endommager
l’appareil et entraîner des blessures pour l’utilisateur.
4. Cet appareil est destiné à uniquement à un usage domestique. Une utilisation
commerciale annule la garantie et le fournisseur ne peut pas être tenu pour
responsable des blessures ou des dommages causent lors de l’utilisation de
l’appareil pour tout autre usage que celui auquel il est destiné.
5. Eviter tout contact avec les parties mobiles.
6. Cet appareil n’est pas destiné aux personnes (y compris les enfants) dont les
capacités physiques, sensorielles et intellectuelles sont limitées, ou qui ont un
16
Page 17

manque d’expérience et de connaissances à moins qu’elles n’aient été supervisées
ou qu’elles aient reçu des instructions sur l’utilisation de l'appareil par une
responsable de leur sécurité.
7. Les enfants devraient être surveillés pour s’assurer qu’ils ne jouent pas avec
l’appareil.
8. Vérifier le cordon d’alimentation et brancher régulièrement pour éviter que le cordon
ne soit endommagé. Si le cordon ou la prise sont endommagés, ils doivent être
remplacés par le fabricant ou par une personne qualifiée afin d’éviter un danger
électrique.
9. Ne pas utiliser l’appareil s’il est tombé ou s’il a été endommagé de quelque manière
que ce soit. En cas de dommage, rapporter l’unité pour un examen et / ou une
réparation par un agent de maintenance agréé.
10. Pour éviter le risqué de choc électrique, ne pas immerger ou exposer l’unité, la prise,
ou le cordon d’alimentation dans l’eau ou bien dans tout autre liquide. Ne l’utilisez
pas avec les mains humides.
11. Ne jamais immerger l’unité dans l’eau ou dans tout autre liquide pour le nettoyer.
12. Retirer la fiche de la prise en tenant la fiche. Ne pas tirer sur le cordon pour
déconnecter l’appareil du secteur.
13. Débranchez toujours l’unité pour qu’elle refroidisse et lorsqu’elle n’est pas utilisée,
avant de la nettoyer ou d’ajouter ou de retirer des pièces.
14. Insérez et utilisez uniquement les pièces d’origine.
15. L’utilisation d’accessoires se fixant à l’unité qui ne sont ni recommandés ou fournis
par le fabricant pourrait entraîner des blessures, un incendie ou un choc électrique.
16. Un cordon court est fourni pour réduire les risques résultant d’un entremêlement, ou
de trébuchement sur ce dernier.
17. Ne pas laisser le cordon dépasser du bord de la table ou du comptoir. S’assurer que
le cordon n’est pas dans une position ou il peut être tire par inadvertance.
18. Ne pas laisser le cordon de toucher des surfaces chaudes et ne pas le placer sur ou
près d’un réchaud à gaz ou électrique ou d’un four chaud.
19. Maintenez l’appareil et son cordon d’alimentation à l’écart de la chaleur directe du
soleil, de l’humidité, des bords tranchants et d’autres dangers.
20. Ne pas utiliser l’appareil sur une plaque à gaz ou électrique ou au-dessus d’une
flamme.
21. Utilisez l’appareil uniquement sur une surface dure, horizontale, pour éviter
l’interruption du débit d’air en-dessous de ce dernier.
22. Ne retirez pas le porte-filtre pendant que l’eau ou le café s’écoulent.
17
Page 18

23. Ne laissez pas le cordon d’alimentation entrer en contact avec éléments chauffants
de l’appareil, par ex. la plaque chauffe-tasse, le porte-filtre, la buse à vapeur.
24. Gardez vos mains à distance des éléments chauffants de l’appareil, y compris le pot
et le distributeur.
25. Ne placez pas un pot chaud sur une surface humide ou froide.
26. L’utilisation d’un cordon d’extension avec cet appareil n’est pas recommandée.
Cependant, s’il s’avère nécessaire d’utiliser une rallonge électrique qui est adaptée à
la consommation d’énergie de l’appareil, afin d’éviter le surchauffement du cordon
d’extension, de l’appareil ou de la prise de courant. Ne pas mettre la rallonge dans
une position où elle peut être tirée par des enfants, ou des animaux, ou bien où ils
risquent de trébucher dessus.
27. Cet appareil n’est pas recommandé pour un usage extérieur. Ne pas utiliser cet
appareil pour quoique ce soit d’autre que l’utilisation à laquelle il est destiné.
28. « Cet appareil est conçu pour une utilisation domestique ou dans des applications
comparables, comme:
o La cuisine du personnel dans les boutiques, dans les bureaux ou dans
d’autres environnements professionnels ;
o Maisons de champagne ;
o Par les clients des hôtels, motels et d’autres environnements de type
résidentiels ;
o Environnements de type chambres d’hôtes ;
29. Ne faites pas fonctionner cet appareil au moyen d’une prise minuterie ou un système
de télécommande à distance séparée.
30. Ne déplacez jamais la machine lorsqu’elle fonctionne !
31. Ne faites jamais fonctionner la machine lorsqu’elle ne contient pas d’eau. Assurez-
vous toujours que la quantité d’eau du réservoir d’eau ne soit pas inférieure au
niveau minimum.
32. Ne touchez jamais les éléments très chauds de la machine (par ex. le
fonctionnement du système d’infusion).
33. Ne touchez jamais les jets de vapeur ou d’eau.
34. Ne retirez pas le levier de commande, lorsque la machine est encore sous pression
en train de faire du café.
35. Ne couvrez jamais la machine lorsqu’elle fonctionne
18
Page 19

SCHEMA DES PIECES
1. Filtre en papier #4 (non fourni)/ 7. Plaque chauffante
Filtre amovible permanent (fourni)
2. Porte-filtre 8. Pot en verre
3. Poignée 9. Appuyer pour ouvrir
4. Couvercle 10. Témoin lumineux
5. Remplissez d’eau O. Arrêt I. Marche
6. Tuyau d’eau 11. Interrupteur
ASTUCES ET CONSEILS POUR OBTENIR CE CAFÉ PARFAIT
CAFÉ
Afin d’obtenir les meilleurs résultats, utilisez un café moyennement moulu. La quantité
variera en fonction du type de café utilisé et de votre goût personnel. Nous suggérons que
vous commenciez avec deux cuillères à café arrondies de café moyennement moulu par
tasse. Cependant, il n’existe pas de règle précise, puisque le goût varie.
19
Page 20

LAIT
À cet égard, c’est le goût qui décide, pas l’usage. Que disons-nous si vous aimez mettre du
lait dans votre café - nous vous conseillons d’utiliser du lait tiède ou chaud, pour éviter que
le café de refroidisse trop. Pour extraire la saveur maximum du café, il devrait être
suffisamment tiède pas trop froid ou chaud au point de vous brûler la langue, mais juste
assez pour laisser l’arôme envahir votre bouche, sinus et nez…. pas seulement les papilles.
EAU EN BOUTEILLE
Si vous utilisez de l’eau en bouteille, assurez-vous qu’elle ne contient pas d’ingrédients
ajoutés, des arômes, etc. et utilisez de l’eau « plate » et non « pétillante ». Le dioxyde de
carbone qui donne « l’éclat », affectera négativement le goût de votre café.
AVANT LA PREMIÈRE UTILISATION
Déballez soigneusement la machine à café et retirez tous les emballages de protection.
Veuillez tenir tous les emballages de protection, hors de portée des bébés et des enfants
pour éviter tout danger possible. Il est conseillé de jeter ces derniers dès que possible.
Vous pouvez essuyer l’extérieur de la machine, en utilisant un chiffon propre humide.
N’immergez pas la machine à café dans de l’eau ou dans d’autres liquides. Pour enlever
toutes les poussières qui ont pu s’accumuler pendant l’emballage, nettoyer le pot, le
couvercle, le porte-filtre dans de l’eau chaude savonneuse. Ensuite, rincez avec de l’eau
propre et laissez sécher. N’utilisez aucun nettoyant abrasif qui soit agressifs.
Nous recommandons que vous rinciez la machine avant de préparer votre premier pot de
café. Cela enlèvera toutes les poussières qui ont pu se déposer dans la machine à café.
Pour faire cela, remplissez le réservoir jusqu’à la marque max et faites fonctionner l’appareil
sans café. Laissez refroidir, jetez l’eau, puis utilisez-la normalement.
Note : Nous recommandons que vous utilisiez uniquement de l’eau froide. Le système
d’infusion automatique a été conçu pour fonctionner au mieux avec de l’eau froide
20
Page 21

FONCTIONNEMENT DE L’APPAREIL
1. Placez la machine à café sur une surface plate et horizontale, comme un comptoir de
cuisine
2. Vérifiez que l’interrupteur de l’appareil est réglé sur la position « 0 » ou « ARRÊT ».
3. Branchez la prise sur le courant.
4. Ouvrez le couvercle supérieur et insérez le filtre permanent ou un filtre en papier
dans le porte-filtre.
5. Mettez du café moulu dans le filtre. Le volume dépendra du type de café et du goût
personnel, mais nous suggérons deux cuillères à thé bombées par tasse d’eau.
Note : Assurez-vous de ne pas remplir le filtre avec trop de café. Conseil : Nous
recommandons que vous utilisiez la café frais moulu de la meilleure qualité,
spécialement conçu pour machine à café filtre Expérimentez pour apprendre quelle
quantité de café utiliser, pour obtenir l’intensité de café que vous préférez. Les goûts
varient et il n’existe pas de règles absolues.
6. Ouvrez le couvercle articulé du réservoir d’eau situé au sommet de la machine à
café. Remplissez le pot en verre avec de l’eau froide, jusqu’au niveau marqué pour
la quantité souhaité de café. REMARQUE : Nous recommandons d’utiliser
uniquement de l’eau froide, car le système de préparation automatique a été conçu
pour fonctionner au mieux avec de l’eau froide.
7. Versez l’eau froide du pot en verre dans le réservoir d’eau. Fermez le couvercle
articulé. Placez le pot en verre, avec le couvercle en place, sur la plaque chauffante.
8. Déplacez l’interrupteur sur la position « 1 »/MARCHE. Le témoin lumineux s’allumera
pour indiquer que l’unité fonctionne. Le témoin restera allumé jusqu’à ce que
l’interrupteur soit sur la position « O » ou ARRÊT.
9. Juste après, l’eau chaude commencera à se disperser lentement à travers le café
moulu, pour préparer un savoureux café chaud. Ici, vous verrez le café commencer
à s’égoutter dans le pot en verre.
10. Une fois que toute l’eau a été pompée du réservoir, le processus de chauffage
s’éteindra automatiquement de lui-même et déplacera la puissance de la plaque
chauffante sur le mode « garder au chaud », qui est conçu pour garder votre café à
une température de dégustation correcte.
11. Si vous avez terminé d’utiliser la machine à café, déplacez l’interrupteur sur la
position « 0 » ou « ARRÊT ». Le témoin s’éteindra.
12. Débranchez et laissez l’appareil et la carafe refroidir complètement avant le
nettoyage, ou pendant 10 minutes avant de le remplir à nouveau.
21
Page 22

CONSEIL : Nous recommandons de conserver le café inutilisé dans un récipient
hermétiquement fermé dans le réfrigérateur.
POUR FAIRE VITE UNE TASSE DE CAFÉ
Vous pouvez retirer la carafe à n’importe quel moment. Pour éviter que le porte-filtre
ne déborde, replacez la carafe dans les 20 secondes sur la plaque chauffante.
CARACTÉRISTIQUE ANTI-GOUTTES
Votre machine à café Russell Hobbes a été conçue avec une caractéristique anti-
goutte.- Si vous souhaitez, à n’importe quel moment, au cours du cycle de la
préparation du café, retirer le pot en verre de l’unité et verser une tasse de café
chaud. Le cycle de réchauffement sera interrompu et le café chaud s’égouttera du
porte-filtre. Cette caractéristique est également conçue, pour que le café ne s’égoutte
pas sur la plaque chauffante dans le cas où vous retirez le pot en verre de la
machine à café pendant le processus de préparation du café.
SERVIR ET GARDER AU CHAUD
Après que la préparation du café soit terminée, vous pouvez retirer le pot en verre de
la plaque chauffante.
Pour obtenir un meilleur arôme, servez le café immédiatement après sa préparation.
Mettez le pot en verre sur la plaque chauffante, pour garder le café au chaud.
Tant que la machine à café est allumée, la plaque chauffante conservera le café à
une température de dégustation.
Une fois que le café est terminé, ou si vous ne souhaitez pas garder le café au
chaud, éteignez la machine à café.
NOTE : Laissez toujours le café refroidir, pendant environ 5 minutes, entre les
cycles de préparation.
ENTRETIEN ET MAINTENANCE
Débranchez l'appareil lorsqu’il n’est pas utilisé, avant de le déplacer et de le nettoyer.
22
Page 23

Pour un nettoyage facile, le filtre permanent peut être retiré. Assurez-vous d’avoir
vidé le contenu du porte-filtre dans la poubelle, avant de commencer le processus de
nettoyage.
Nettoyez l’extérieur de la machine à café, avec un chiffon humide et polissez avec un
chiffon sec.
Lorsque cela est nécessaire, l’élément chauffant peut être essuyé avec un chiffon
humide.
N’utilisez pas n’importe quel type de nettoyant abrasif sur les parties de la machine à
café.
N’utilisez pas de produits de nettoyage abrasifs.
Assurez-vous que la plaque chauffante est froide avant de la nettoyer.
Ne jamais immerger l’appareil dans l’eau.
N’utilisez jamais un chiffon pour nettoyer à l’intérieur du réservoir d’eau, car il pourrait
laissez des dépôts duveteux dans le réservoir. Rincez simplement périodiquement
avec de l’eau froide.
Vous pouvez nettoyer la carafe et le porte-filtre dans de l’eau chaude savonneuse.
Rincez-les ensuite soigneusement afin de retirer toutes les traces de savon.
Ne mettez aucune partie de la cafetière dans le lave-vaisselle.
DETARTRER
Pour éviter une accumulation de dépôts du fait des conditions hydrologiques dans
certaines régions, assurez-vous que le réservoir soit complètement nettoyé après
utilisation. Il peut être nécessaire de périodiquement détartrer votre machine.
Nous recommandons que vous détartriez votre machine tous les 3-4 mois, mais
cette période dépend de la dureté de l’eau et de la fréquence d’utilisation de la
machine.
Pour faire cela, versez une mesure moitié eau/moitié vinaigre dans le réservoir d’eau
et faites fonctionner la machine, comme si vous prépariez du café. Sinon, dissolvez
deux cuillères à soupes d’acide tartrique dans un demi-litre d’eau tiède.
Recommencez le processus encore trois fois, mais utilisez UNIQUEMENT DE L’EAU
FROIDE ET PROPRE, pour rincer soigneusement l’appareil.
Sinon, un détartrant d’une marque bien connue qui convient aux machines à café ou
aux bouilloires, peut être utilisé. Dans ce cas, suivez les instructions données pas le
fabriquant
23
Page 24

Note : Les produits sous garantie, qui auront été renvoyés avec des défauts causés
par le tartre seront sujets à des frais de réparation.
PROTECTION ENVIRONNEMENTALE
Pour éviter des problèmes environnementaux et sanitaires qui pourraient être causés par
des substances dangereuses contenues dans les biens électriques et électroniques, les
appareils marqués de ce symbole ne doivent pas être jetés avec les déchets municipaux
non triés ; mais ils doivent être recouverts, réutilisés ou recyclés.
RANGEMENT DE L'APPAREIL
Débrancher l’unité de l’alimentation électrique et nettoyer les pièces comme il l’a
été recommandé ci-dessus. S’assurer que toutes les pièces sont sèches avant
de les ranger.
Ranger l'appareil dans sa boîte ou bien dans un endroit propre et sec.
Ne jamais ranger l'appareil s’il est encore humide ou sale.
Ne jamais enrouler le cordon d’alimentation autour du appareil.
MAINTENANCE DE L’APPAREIL
Il n’existe pas de pièces dans cet appareil, dont la maintenance puisse être faite par
l’utilisateur. Si l’unité ne fonctionne pas correctement, veuillez vérifier les points suivants :
Vous avez correctement suivi les instructions.
Que l’unité a été correctement connectée et que toutes les prises murales sont
allumées.
Que l’alimentation secteur est sur MARCHE.
Que la fiche est solidement ancrée dans la prise de courant.
Si cet appareil ne fonctionne toujours pas après avoir vérifié les points énoncés cidessus :
Consulter un détaillant pour la possibilité d’une réparation ou bien d’un replacement. Si le
détaillant ne réussit pas à résoudre le problème est que vous devez renvoyer l’appareil,
assurez-vous que :
L’unité est emballée avec soin dans son emballage d’origine.
La preuve d’achat est jointe.
La raison pour laquelle l’appareil est renvoyé.
24
Page 25

Si le cordon d’alimentation est endommagé, il doit être remplacé par le fabriquant ou par un
agent de maintenance agréé, afin d’éviter tout danger. Si la maintenance devient nécessaire
pendant la durée de la garantie, l’appareil devrait être renvoyé à un centre de maintenance
agréé par Home of Living Brands (Pty) Ltd. La maintenance au-delà de la garantie est
toutefois possible, mais elle sera cependant facturée.
LE CHANGEMENT DE LA PRISE
Si la prise intégrée devait être change, suivez les instructions ci-dessous.
Cette unité est uniquement conçue pour fonctionner au courant indiqué. La
connexion à d’autres sources d’alimentation pourrait endommager le appareil.
Connecter la prise à trois chiffes de la manière suivante :
Les fils de ce réseau sont colorés selon le code suivant :
Vert / jaune = Terre
Bleu = Neutre
Marron = Actif
25
Page 26

EN CAS DE RECLAMATION PENDANT LA PERIODE DE GARANTIE CE RECUS DOIT
ETRE PRESENTE.
GARANTIE
1. Home of Living Brands (Pty) Limited garantie à l’acheteur d’origine de ce produit (« le
client »), que ce dernier ne présentera pas de défauts de qualité, ni de fabrication qui
dans le cadre d’une utilisation normale, familiale ou domestique pourrait apparaître en
l’espace d’1 (d’une) année suivant la date d’achat (« période de garantie »).
2. Lorsque le client a acheté un produit qui se casse, présente des défauts ou qui ne
fonctionne pas correctement pour l’utilisation pour laquelle il était destiné, le client doit
signaler cela au fournisseur auprès duquel il a acheté le produit (« le fournisseur »)
durant la période de garantie. Toute réclamation selon les conditions de la garantie doit
être accompagnée d’une preuve d’achat. Si la preuve d’achat, n’est pas disponible, à ce
moment-là, les frais de réparation et / ou d’entretien peuvent être à la charge du client
vis-à-vis du fournisseur.
3. Un produit défectueux doit être rapporté au centre d’entretien du fournisseur pour faire
jouer la garantie.
4. Le fournisseur remboursera, réparera ou échangera le produit selon les termes de cette
garantie qui est assujettie aux exigences légales. Cette garantie devrait être valable
uniquement quand le client n’a pas cassé lui-même l’appareil, ou utilisé ce dernier pour
faire quelque chose pour lequel il n’était pas destiné. La garantie ne comprend pas et ne
peut pas être saurait être considérée comme couvrant les dommages affectant l’appareil,
qui seraient le résultat d’un accident, d’une mauvaise utilisation, d’une modification, d’un
abus ou de toute modification ou réparation non-autorisée de l’appareil.
5. La garantie couvrira uniquement le produit fournit à la date d’achat et elle ne s’appliquera
pas à toute pièces ajoutée ou installée par le client.
6. Si le client demande au fournisseur de réparer le produit et si le produit casse ou ne
fonctionne pas correctement dans les 3 (trois) mois de la réparation, et si ceci n’est pas le
résultat d’une mauvaise utilisation, à ce moment-là le fournisseur pourrait remplacer le
produit ou rembourser le client.
7. Le client pourrait être tenu pour responsable de certains frais lorsque les produits ne sont
pas renvoyés dans leur emballage d’origine, ou si l’emballage est endommagé. Ceci sera
déduit de tout remboursement fait au client.
HOME OF LIVING BRANDS (PTY) LTD
011 490-9600 (Johannesburg)
031 792-6000 (Durban)
021 552-5161 (Cape Town)
www.homeoflivingbrands.com
www.russellhobbs.co.za
www.facebook.com/RussellHobbsSA
26
Page 27

Parabéns por ter comprado a nossa Máquina de café filtro Futura de 1,5 litros da Russell
Hobbs. Cada unidade é fabricada de forma a garantir segurança e fiabilidade. Antes de
utilizar este aparelho pela primeira vez, leia o manual de instruções atentamente e guarde-o
para futura referência.
CARACTERÍSTICAS DA MÁQUINA DE CAFÉ FILTRO FUTURA DE 1,5 LITROS
DA RUSSELL HOBBS
Capacidade para 1,5L/12 chávenas
Temperatura de preparação de 97 °C
O sistema de pausa automática e anti-gotejamento permite-lhe servir enquanto a
máquina continua a preparar o café
Depósito de água com indicador de nível visível
Suporte de filtro removível para uma limpeza fácil
Placa quente para manter o seu café quente
Jarro de vidro com tampa articulada
Inclui um filtro removível permanente
950-1150W
Adequado para café moído
SALVAGUARDAS IMPORTANTES
Quando utilizar qualquer aparelho elétrico, deve seguir sempre as precauções de segurança
básicas, incluindo o seguinte:
1. Leia atentamente as instruções antes de utilizar qualquer aparelho.
2. Certifique-se sempre de que a tensão na etiqueta de classificação corresponde à
tensão da corrente elétrica na sua residência.
3. A operação incorreta e utilização imprópria podem danificar o aparelho e causar
lesões no utilizador.
4. Este aparelho destina-se apenas a utilização doméstica. A utilização comercial
invalida a garantia e o fornecedor não pode ser responsabilizado por lesões ou
danos causados quando o aparelho for utilizado para qualquer outra finalidade
diferente da prevista.
5. Evite qualquer contacto com as peças em movimento.
6. Este aparelho não se destina a ser utilizado por pessoas (incluindo crianças) com
capacidades físicas, sensoriais ou mentais reduzidas, ou com falta de experiência e
27
Page 28

conhecimentos, a não ser que tenham sido supervisionados ou ensinados a utilizar o
aparelho por uma pessoa responsável pela sua segurança.
7. As crianças devem ser supervisionadas para garantir que não brincam com o
aparelho.
8. Verifique o cabo de alimentação e a ficha regularmente para verificar a existência de
quaisquer danos. Se o cabo ou a ficha estiverem danificados, devem ser
substituídos pelo fabricante ou por uma pessoa qualificada de forma a evitar um
perigo elétrico.
9. Não utilize o aparelho se este tiver sido deixado cair ou estiver danificado de
qualquer forma. Em caso de danos, devolva a unidade para verificação e/ou
reparação por parte de um agente de assistência autorizado
10. Para reduzir o risco de choque elétrico, não mergulhe ou exponha a unidade, ficha
ou cabo de alimentação em água ou em qualquer outro líquido. Não utilize com as
mãos molhadas.
11. Nunca coloque a unidade dentro de água ou qualquer outro líquido para fins de
limpeza.
12. Remova a ficha da tomada ao agarrar na ficha. Não puxe pelo cabo para desligar o
aparelho da corrente elétrica.
13. Desligue sempre a unidade para arrefecer e desligue quando esta não estiver a ser
utilizada, antes de limpar ou quando adicionar ou remover peças.
14. Introduza e utilize apenas peças originais.
15. A utilização de acessórios não recomendados ou fornecidos pelo fabricante pode
resultar em lesões, incêndios ou choque elétrico.
16. É fornecido um cabo pequeno para reduzir os riscos resultantes de ficar preso ou de
tropeçar num cabo maior.
17. Não deixe o cabo suspenso pela extremidade de uma mesa ou balcão. Certifique-se
de que o cabo não se encontra numa posição em que possa ser puxado
inadvertidamente.
18. Não permita que o cabo toque em superfícies quentes e não o coloque sobre ou
perto de uma caldeira elétrica ou a gás quente ou num forno aquecido.
19. Mantenha o aparelho e o cabo afastados do calor radiante directo da luz solar, de
fontes de humidade, de extremidades afiadas e de outros perigos.
20. Não utilize o aparelho sobre uma superfície de cozimento a gás ou elétrica ou sobre
ou perto de uma chama.
21. Utilize apenas numa superfície rígida e nivelada, para evitar a interrupção do fluxo
de ar por baixo do aparelho.
22. Não remova o suporte do filtro durante o fluxo de água ou café.
28
Page 29

23. Não permita que o cabo de alimentação entre em contacto com as peças quentes do
aparelho, por ex., placa de aquecimento de chávenas, suporte do filtro ou bocal de
vapor.
24. Mantenha as mãos afastadas das peças quentes do aparelho, incluindo o jarro e o
dispensador.
25. Não coloque um jarro quente numa superfície húmida ou fria.
26. A utilização de uma extensão com este aparelho não é recomendada. No entanto,
caso seja necessário utilizar uma ficha de extensão, certifique-se de que a ficha é
adequada para o consumo de energia do aparelho para evitar o sobreaquecimento
do cabo da extensão, aparelho ou tomada. Não coloque o cabo da extensão numa
posição em que possa ser puxada por crianças ou animais ou que possibilite o
tropeçamento.
27. Este aparelho não é adequado para ser utilizado no exterior. Não utilize este
aparelho para outra finalidade diferente da prevista.
28. "Este aparelho destina-se a ser utilizado em ambientes domésticos e aplicações
semelhantes, como:
o Áreas da cozinha do pessoal em lojas, escritórios e outros ambientes de
trabalho;
o Quintas;
o Por clientes nos hotéis, motéis e outros ambientes semelhantes a
residenciais;
o Ambientes do tipo Bed and breakfast;
29. Não utilize este aparelho através de um temporizador externo ou sistema de controlo
remoto separado.
30. Nunca desloque a máquina durante o funcionamento!
31. Nunca opere a máquina sem água. Certifique-se sempre de que existe água no
depósito de água a um nível superior ao mínimo.
32. Nunca toque nas peças muito quentes da máquina (por ex., unidade de preparação
durante as operações).
33. Não toque nos jactos de vapor ou água.
34. Não mova a alavanca de funcionamento quando a máquina ainda estiver sob
pressão a fazer café.
35. Nunca cubra a máquina durante o funcionamento
29
Page 30

DIAGRAMA DE PEÇAS
1. Filtro de papel #4 não fornecido)/ 7. Placa quente
Filtro permanente removível (fornecido)
2. Suporte do filtro 8. Jarra de vidro
3. Pega 9. Pressione para abrir.
4. Tampa 10. Luz
5. Para água O. Desligado I. Ligado
6. Tubo de água 11. Interruptor de alimentação
30
Page 31

DICAS E SUGESTÕES PARA OBTER O RESULTADO PERFEITO
CAFÉ
Para obter melhores resultados, utilize café de moagem média de filtro. A quantidade irá
variar dependendo do tipo de café utilizado e do seu gosto pessoal. Sugerimos começar
com duas colheres de chá redondas de café médio por chávena. No entanto, não existe
nenhuma regra rigorosa, uma vez que o gosto varia.
LEITE
A este respeito, deverá seguir o gosto pessoal, não uma convenção. O que indicamos é
que se gostar de colocar leite no seu café, recomendamos usar leite quente para evitar
arrefecer o café. Para extrair o máximo de sabor do café, deverá estar suficientemente frio
para não escaldar ou queimar a boca, mas quente o suficiente para permitir que o sabor
encha a boca, seios nasais e nariz...não só as papilas gustativas.
ÁGUA ENGARRAFADA
Se utilizar água engarrafada, certifique-se de que não tem quaisquer ingredientes
adicionados, aromatizantes, etc., e utilize água sem gás, não com gás. O dióxido de
carbono nas águas com gás irá afectar adversamente o sabor do seu café.
ANTES DE UTILIZAR PELA PRIMEIRA VEZ
Retire cuidadosamente a máquina de café da embalagem e remova todos os materiais
protectores da embalagem. Mantenha todos os materiais protectores da embalagem
afastados de bebés e crianças para evitar qualquer possível perigo. Recomenda-se
eliminar estes materiais o mais rapidamente possível.
Pode limpar o exterior da máquina utilizando um pano limpo humedecido. Não mergulhe a
máquina de café em água ou outros líquidos. Para remover qualquer poeira que se possa
ter acumulado durante o embalamento, lave o jarro, a tampa e o suporte do filtro com água
morna com sabão. Em seguida, lave com água limpa e deixe secar. Não utilize quaisquer
agentes de limpeza abrasivos rígidos.
31
Page 32

Recomendamos que lave a máquina antes de preparar o seu primeiro bule de café. Isto irá
remover qualquer poeira que se possa ter alojado dentro da máquina de café. Para o fazer,
encha o reservatório até à marca de máx. e ligue o aparelho sem café. Deixe arrefecer,
elimine a água e, em seguida, utilize normalmente.
Nota: Recomendamos que utilize apenas água fria. O sistema de preparação automática
foi concebido para funcionar no seu melhor com água fria.
UTILIZAR O APARELHO
1. Coloque a máquina de café numa superfície plana e nivelada, como uma bancada.
2. Verifique se o interruptor no aparelho está na posição "0" ou OFF (Desligado).
3. Ligue a ficha à tomada de alimentação.
4. Abra a tampa superior e insira o filtro permanente ou um filtro de papel no suporte do
filtro.
5. Coloque café moído filtrado no filtro. A quantidade irá variar dependendo do tipo de
café e gosto individual, mas sugerimos duas colheres de chá redondas por copo de
água. Nota: Certifique-se de que não enche demasiado o filtro com café.
Sugestão: Recomendamos que utilize café moído novo de elevada qualidade
especificamente para uma máquina de café com filtro automática. Experimente para
saber a quantidade de café a utilizar para obter a intensidade de café que prefere.
Os gostos variam e não existem regras rigorosas.
6. Abra a tampa articulada do depósito de água localizada na parte superior da
máquina de café. Encha o jarro de vidro com água fria até ao nível assinalado para
a quantidade desejada de café. NOTA: Recomendamos que utilize apenas água
fria, uma vez que o sistema de preparação automática foi concebido para funcionar
melhor com água fria.
7. Esvazie a água fria do jarro para o depósito de água. Feche a tampa articulada.
Coloque o jarro de vidro com a tampa no devido lugar na placa de aquecimento.
8. Mova o interruptor para a posição "1"/ON (Ligado). A luz irá brilhar para indicar que a
unidade está em funcionamento. A luz permanece acesa até que o interruptor seja
colocado na posição "O" ou OFF (Desligado).
9. Pouco tempo depois, a água quente é lentamente libertada através do café moído,
preparando café quente saboroso. Aqui começará a ver o café a cair em gotas para
o jarro de vidro.
32
Page 33

10. Depois de toda a água ser bombeada para fora do depósito de água, o processo de
aquecimento desliga-se automaticamente e move a alimentação para a placa quente
para o modo "manter quente", que se destina a manter o seu café na temperatura de
servir adequada.
11. Mova o interruptor para a posição "O" ou OFF (Desligado) quando terminar de
utilizar a máquina de café. A luz apaga-se.
12. Desligue a máquina e deixe o aparelho e o jarro arrefecerem totalmente antes de
limpar ou durante cerca de 10 minutos antes de voltar a encher.
SUGESTÃO: Recomendamos manter o café não usado num recipiente bem selado no
seu frigorífico.
PARA FAZER UMA CHÁVENA DE CAFÉ RÁPIDA
Pode remover o jarro a qualquer altura. Para prevenir a sobrecarga do suporte do
filtro, coloque novamente o jarro na placa quente dentro de aproximadamente 20
segundos.
FUNÇÃO ANTI-GOTEJAMENTO
A sua máquina de café Russell Hobbs foi concebida com uma funcionalidade de não
gotejamento. Se desejar, a qualquer altura durante o ciclo de preparação, pode
remover temporariamente o jarro de vidro da unidade e servir uma chávena de café
quente. O ciclo de aquecimento será interrompido e o café quente sairá do cesto do
filtro. Esta funcionalidade também foi concebida para que o café não caia em gotas
para a placa de aquecimento se remover o jarro de vidro da máquina de café
durante o processo de preparação.
SERVIR E MANTER QUENTE
Após a preparação estar concluída, pode remover o jarro de vidro da placa de
aquecimento.
Para obter o melhor sabor, sirva o café imediatamente depois da preparação.
Coloque novamente o jarro de vidro na placa de aquecimento para manter o café
quente.
33
Page 34

Enquanto a máquina de café estiver ligada, a placa de aquecimento irá manter o
café à temperatura de beber.
Quando o café terminar ou quando não desejar manter o café quente, desligue a
máquina de café.
NOTA: Deixe sempre a máquina de café arrefecer entre os ciclos de
preparação durante aproximadamente 5 minutos.
CUIDADOS E MANUTENÇÃO
Desligue o aparelho quando não estiver em funcionamento, antes de o deslocar e
antes de o limpar.
O filtro permanente pode ser removido para uma limpeza fácil. Certifique-se de que
verte os conteúdos do suporte do filtro para o lixo antes de iniciar o processo de
limpeza.
Limpe o exterior da máquina de café com um pano humedecido e seque com um
pano seco.
O elemento de aquecimento pode ser limpo com um pano limpo e humedecido,
quando necessário.
Não utilize qualquer tipo de agente de limpeza abrasivo em qualquer peça da sua
máquina de café.
Não utilize agentes de limpeza abrasivos.
Certifique-se de que a placa de aquecimento está fria antes de limpar.
Nunca coloque o aparelho dentro de água.
Nunca utilize um pano para limpar a parte interna do depósito de água, uma vez que
pode deixar depósitos crespos no depósito. Basta enxaguar com água fria
periodicamente.
Pode limpar o jarro e o suporte do filtro em água quente com detergente. Enxague
bem depois para remover todos os vestígios de detergente.
Não coloque nenhuma parte do aparelho numa máquina de lavar louça.
DESCALCIFICAÇÃO
Para impedir a acumulação de depósitos devido às condições da água em certas
áreas, certifique-se de que o depósito está completamente limpo após cada
utilização. Poderá ser necessário descalcificar periodicamente a sua máquina.
34
Page 35

Recomendamos descalcificar a sua máquina a cada 3-4 meses, embora este
período dependa da dureza da água e frequência de utilização da máquina.
Para o fazer, verta uma medida de metade água/metade vinagre para dentro do
depósito de água e ligue a máquina de café como se fosse fazer café.
Alternativamente, dissolva 2 colheres de sobremesa de ácido tartárico em meio litro
de água morna.
Repita o processo três vezes, mas utilizando APENAS ÁGUA LIMPA E FRIA para
enxaguar bem o aparelho.
Alternativamente, poderá utilizar uma marca conhecida de descalcificante adequado
para máquinas de café ou chaleiras de plástico. Neste caso, siga as instruções
fornecidas pelo fabricante
Nota: Os produtos devolvidos ao abrigo da garantia com avarias devido ao calcário
estarão sujeitos a um custo de reparação.
PROTECÇÃO AMBIENTAL
Para evitar problemas ambientais e de saúde devido a substâncias perigosas em produtos
eléctricos e electrónicos, os aparelhos marcados com este símbolo devem ser eliminados
com os resíduos municipais normais, mas recuperados, reutilizados ou reciclados.
GUARDAR O APARELHO
Desligue a unidade da tomada e limpe todas as peças conforme instruído acima.
Certifique-se de que todas as peças estão secas antes de guardar.
Guarde o aparelho na sua embalagem num local limpo e seco.
Nunca guarde o aparelho enquanto estiver molhado ou sujo.
Nunca enrole o cabo de alimentação à volta do aparelho.
REPARAÇÃO DO APARELHO
O aparelho não contém componentes que possam ser reparados pelo utilizador. Se a
unidade não estiver a funcionar corretamente, verifique o seguinte:
Se seguiu as instruções corretamente.
Se a unidade foi devidamente ligada e se a tomada de parede está ligada.
Se a fonte de alimentação elétrica está ligada.
35
Page 36

Se a ficha está firmemente encaixada na tomada elétrica.
Se o aparelho continuar sem funcionar depois de verificar os itens acima:
Consulte o revendedor para uma possível reparação ou substituição. Se o revendedor não
for capaz de resolver o problema e necessitar de devolver o aparelho, certifique-se de que:
A unidade está devidamente embalada na sua embalagem original.
Apresenta uma prova de compra.
É fornecida uma razão para a devolução.
Se o cabo de alimentação estiver danificado, deve ser substituído pelo fabricante ou por um
agente de assistência autorizado de forma a evitar qualquer perigo. Caso seja necessário
reparar o aparelho dentro do período de garantia, o aparelho deve ser devolvido a um
centro de assistência da Home of Living Brands (Pty) Limited aprovado. A reparação fora do
período de garantia continua a ser possível, mas, contudo, será cobrada.
SUBSTITUIÇÃO DA FICHA
Cumpra com as instruções seguintes caso seja necessário substituir a ficha.
Esta unidade destina-se a operar apenas na corrente indicada. A ligação a outras
fontes de alimentação poderá danificar o aparelho. Ligue uma ficha de três pinos da
seguinte maneira:
Os fios neste terminal de alimentação estão coloridos de acordo com o seguinte código:
Verde/Amarelo = Terra
Azul = Neutro
Castanho = Vivo
36
Page 37

EM CASO DE RECLAMAÇÃO AO ABRIGO DE GARANTIA, É NECESSÁRIO PRODUZIR
ESTE RECIBO.
GARANTIA
1. Home of Living Brands (Pty) Limited garante ao comprador original deste produto (“o cliente")
que este produto não apresenta defeitos de material e fabrico que se manifestam na
utilização normal pessoal, familiar ou doméstica num período de 1 (um) ano desde a data de
compra (“período de garantia”).
2. No caso de um cliente comprar um produto e este se quebrar, apresentar defeitos ou não
funcionar corretamente para a finalidade prevista, o cliente tem de notificar o fornecedor ao
qual comprou o produto ("o fornecedor") desse fato dentro do período de garantia. Qualquer
reclamação nos termos da garantia deve ser acompanhada por uma prova de compra. Caso
não esteja disponível uma prova de compra, então as despesas da reparação e/ou
manutenção poderão ter de ser pagas pelo cliente ao fornecedor.
3. O produto avariado tem de ser devolvido ao centro de assistência do fornecedor para aplicar
a garantia.
4. O fornecedor irá reembolsar, reparar ou trocar o produto nos termos desta garantia, sujeito
aos requisites legislativos. Esta garantia será válida apenas quando o cliente não tiver
quebrado ele próprio o produto ou utilizado o produto para outro fim que não o previsto. A
garantia não inclui e não será interpretada como abrangendo produtos danificados como
resultado de um desastre, utilização imprópria, manipulação, abuso ou qualquer modificação
não autorizada ou reparação do produto.
5. Esta garantia aplicar-se-á apenas ao produto fornecido na data de compra e não a quaisquer
acessórios incluídos ou instalados pelo cliente.
6. Se o cliente solicitar que o fornecedor repare o produto e o produto se quebrar ou não
funcionar corretamente nos 3 (três) meses após a reparação, considerando que não seja
resultado de utilização imprópria, manipulação ou modificação por ou em nome do cliente,
então o fornecedor poderá substituir o produto ou pagar um reembolso ao cliente.
7. O cliente poderá ser responsável por certos custos quando os produtos devolvidos não
estiverem na embalagem original, ou caso a embalagem esteja danificada. Este custo será
deduzido de qualquer reembolso pago ao cliente.
HOME OF LIVING BRANDS (PTY) LTD
011 490-9600 (Joanesburgo)
031 792-6000 (Durban)
021 552-5161 (Cidade do Cabo)
www.homeoflivingbrands.com
www.russellhobbs.co.za
www.facebook.com/RussellHobbsSA
37
 Loading...