

Page 1
®
R&S
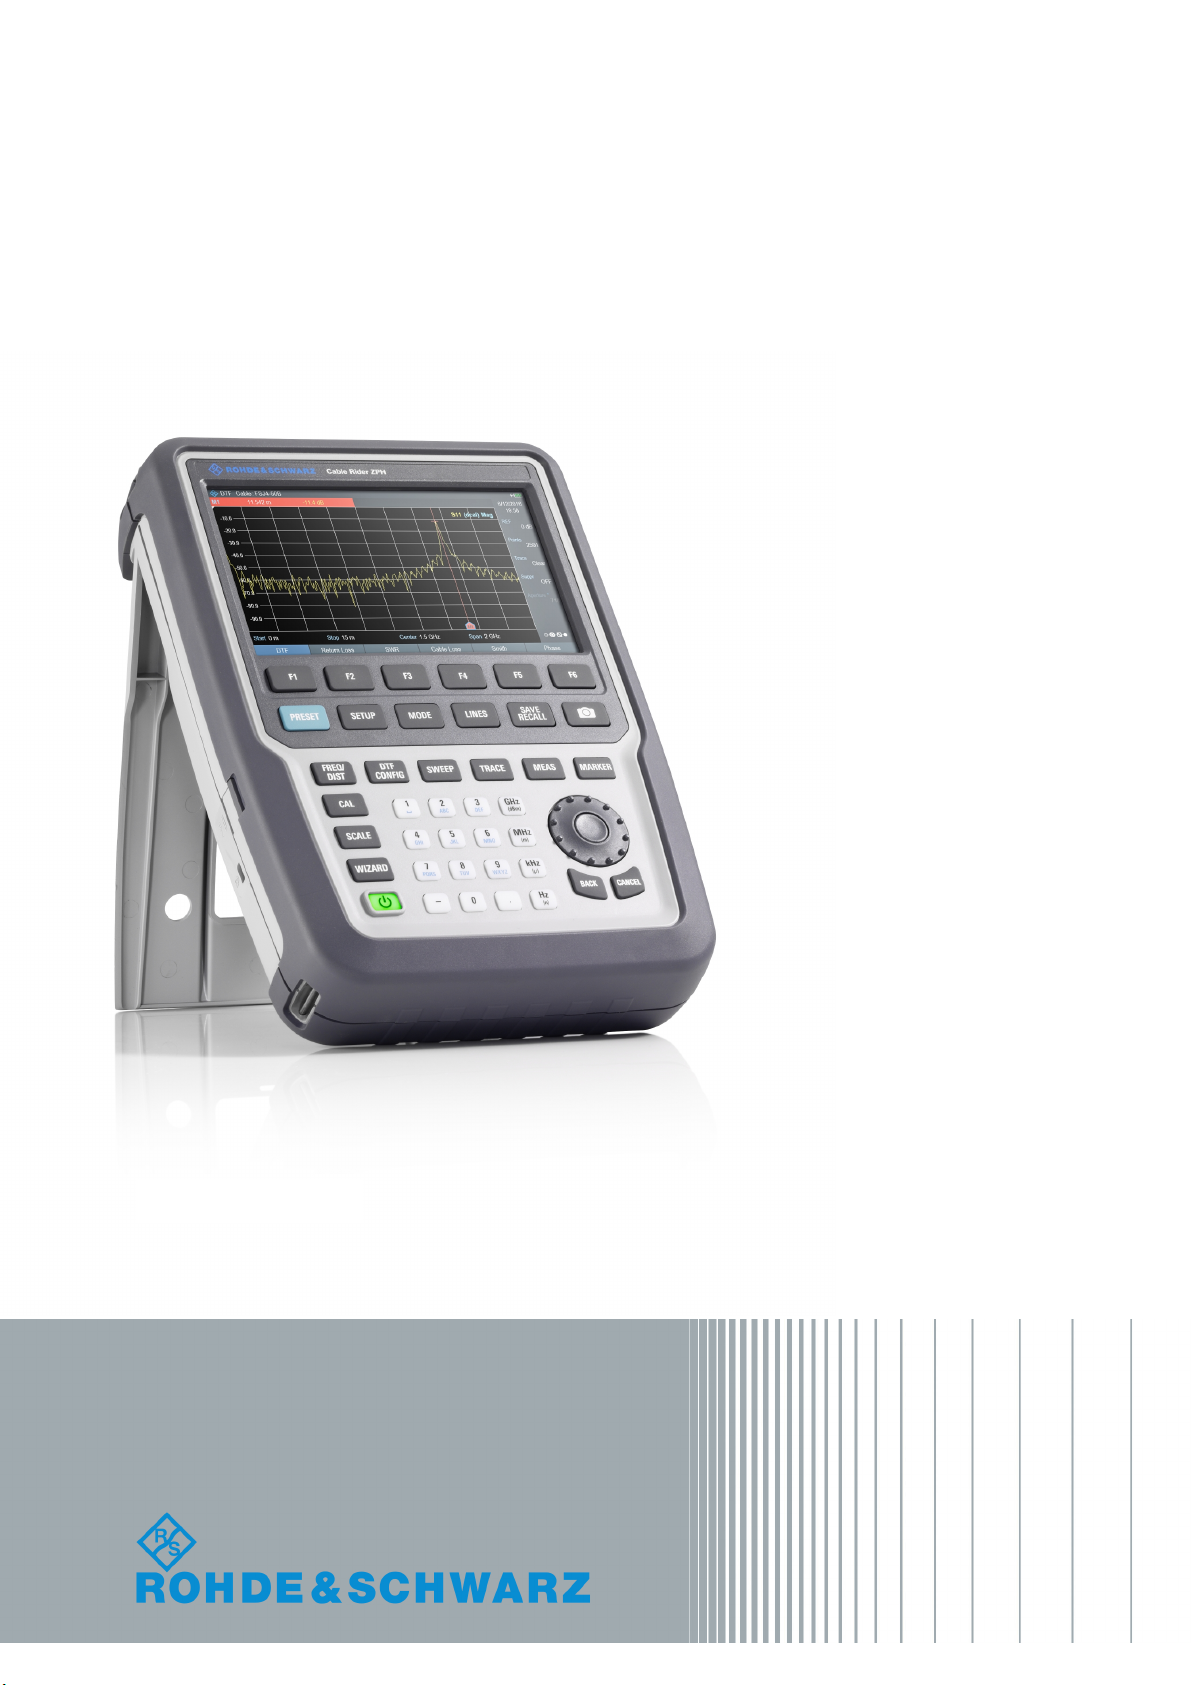
Cable Rider ZPH
Handheld Cable and
Antenna Analyzer
Getting Started
(=E9\2)
1321094402
Version 06
Getting Started
Page 2

This document describes the following R&S®Cable Rider ZPH models:
●
R&S®ZPH (1321.1211.02)
●
R&S®ZPH (1321.1211.12)
●
R&S®ZPH (1321.1211.52, equivalent to 1321.1211.02)
The contents of this manual correspond to firmware version 1.40 or higher.
The software contained in this product uses several valuable open source software packages. For information, see the "Open Source Acknowledgment" document, which is available for download from the R&S
Cable Rider ZPH product page at http://www.rohde-schwarz.com/product/zph.html > "Downloads" > "Firmware".
Rohde & Schwarz would like to thank the open source community for their valuable contribution to embedded computing.
© 2019 Rohde & Schwarz GmbH & Co. KG
Mühldorfstr. 15, 81671 München, Germany
Phone: +49 89 41 29 - 0
Fax: +49 89 41 29 12 164
Email: [email protected]
Internet: www.rohde-schwarz.com
Subject to change – Data without tolerance limits is not binding.
R&S® is a registered trademark of Rohde & Schwarz GmbH & Co. KG.
Trade names are trademarks of the owners.
1321.0944.02 | Version 06 | R&S®Cable Rider ZPH
Throughout this manual, products from Rohde & Schwarz are indicated without the ® symbol , e.g.
R&S®Cable Rider ZPH is indicated as R&S Cable Rider ZPH.
Page 3
1
Risk of injury and instrument damage
The instrument must be used in an appropriate manner to prevent electric shock, fire,
personal injury or instrument damage.
● Do not open the instrument casing.
● Read and observe the "Basic Safety Instructions" delivered as printed brochure with
the instrument.
● Read and observe the safety instructions in the following sections.
Note that the data sheet may specify additional operating conditions.
● Keep the "Basic Safety Instructions" and the product documentation in a safe place
and pass them on to the subsequent users.
Riesgo de lesiones y daños en el instrumento
El instrumento se debe usar de manera adecuada para prevenir descargas eléctricas,
incendios, lesiones o daños materiales.
● No abrir la carcasa del instrumento.
● Lea y cumpla las "Instrucciones de seguridad elementales" suministradas con el
instrumento como folleto impreso.
● Lea y cumpla las instrucciones de seguridad incluidas en las siguientes secciones.
Se debe tener en cuenta que las especificaciones técnicas pueden contener
condiciones adicionales para su uso.
● Guarde bien las instrucciones de seguridad elementales, así como la
documentación del producto, y entréguelas a usuarios posteriores.
Safety Instructions
Instrucciones de seguridad
Sicherheitshinweise
Consignes de sécurité
1171.1307.52 - 05
Page 4
2
Gefahr von Verletzungen und Schäden am Gerät
Betreiben Sie das Gerät immer ordnungsgemäß, um elektrischen Schlag, Brand,
Verletzungen von Personen oder Geräteschäden zu verhindern.
● Öffnen Sie das Gerätegehäuse nicht.
● Lesen und beachten Sie die "Grundlegenden Sicherheitshinweise", die als
gedruckte Broschüre dem Gerät beiliegen.
● Lesen und beachten Sie die Sicherheitshinweise in den folgenden Abschnitten;
möglicherweise enthält das Datenblatt weitere Hinweise zu speziellen
Betriebsbedingungen.
● Bewahren Sie die "Grundlegenden Sicherheitshinweise" und die
Produktdokumentation gut auf und geben Sie diese an weitere Benutzer des
Produkts weiter.
Risque de blessures et d'endommagement de l'appareil
L'appareil doit être utilisé conformément aux prescriptions afin d'éviter les
électrocutions, incendies, dommages corporels et matériels.
● N'ouvrez pas le boîtier de l'appareil.
● Lisez et respectez les "consignes de sécurité fondamentales" fournies avec
l’appareil sous forme de brochure imprimée.
● Lisez et respectez les instructions de sécurité dans les sections suivantes. Il ne faut
pas oublier que la fiche technique peut indiquer des conditions d’exploitation
supplémentaires.
● Gardez les consignes de sécurité fondamentales et la documentation produit dans
un lieu sûr et transmettez ces documents aux autres utilisateurs.
1171.1307.52 - 05
Page 5
Safety instructions for rechargeable lithium ion
Risk of serious personal injury or even death.
You must fully observe the following instructions in order to
avoid serious personal injury ‒ or even death ‒ due to an
explosion and/or fire.
batteries
1. Do not dismantle, open or crush the batteries or drop them from a great height. If
mechanical damage occurs, there is a risk that chemicals may be released. Gases
that are released can cause breathing difficulties. Immediately ventilate the area and
in serious cases consult a doctor.
Irritation can occur if the chemicals that are released come in contact with the skin or
eyes. If this happens, immediately and thoroughly rinse the skin or eyes with water
and consult a doctor.
2. Do not expose cells or batteries to heat or fire. Do not store them in direct sunlight.
If overheating occurs, there is the risk of an explosion or a fire, which can lead to
serious personal injuries.
3. Keep the batteries clean and dry. If the terminals become soiled, clean them with a
dry, clean cloth.
4. Charge the batteries prior to using them.
Only use the appropriate Rohde & Schwarz charger to charge the batteries. See the
device manual or data sheet for the exact designation of the charger.
If the batteries are improperly charged, there is a risk of explosion, which can cause
serious personal injury.
5. The charging temperature must be between 0 °C and 45 °C
(see manual for information on possible restrictions).
6. Discharging may take place only at temperatures between 0 °C and 50 °C
(see manual for information on possible restrictions).
7. Only charge batteries until they are fully charged. Frequent overcharging can reduce
the battery lifetime.
8. Remove the battery from the device when the battery is not being used. Following a
longer period of storage, it may be necessary to charge and discharge the battery
several times in order to obtain the full capacity.
9. Only use the battery with designated Rohde & Schwarz devices. See the device
manual for details.
10. Do not dispose of the batteries with unsorted municipal waste. The batteries must be
collected separately. After the end of their life, dispose of the batteries at a suitable
collection point or via a Rohde & Schwarz customer service center.
EU labeling for batteries and secondary cells
11. Follow the transport stipulations of the carrier (IATA-DGR, IMDG-Code, ADR, RID)
when returning lithium batteries to Rohde & Schwarz subsidiaries.
12. Keep this safety information for future reference.
1171.1507.71 - 02 1
Page 6

Instrucciones de seguridad
Posibilidad de lesiones graves que en determinadas
circunstancias puede causar la muerte.
Tenga en cuenta los siguientes avisos en caso de explosión y/o
incendio para impedir lesiones graves en personas que, en
determinadas circunstancias, podrían incluso causar la muerte.
para baterías recargables de ión litio
1. No desarme las baterías, no las abra, no las triture ni las deje caer desde una gran
altura.
En caso de daños mecánicos existe el riesgo de salida de sustancias químicas.
En caso de salida de gases pueden producirse dificultades respiratorias. Ventile
inmediatamente la habitación y acuda a un médico en casos graves.
Si sustancias químicas provenientes de la batería entran en contacto con la piel o
los ojos pueden producirse irritaciones. Enjuague en estos casos la piel y los ojos
inmediatamente con abundante agua y acuda a un médico.
2. No exponga las celdas o baterías al calor ni al fuego. No las almacene bajo la luz
solar directa. En caso de sobrecalentamiento existe peligro de explosión o de
incendio, lo que puede provocar lesiones graves en personas.
3. Mantenga las baterías limpias y secas. Si los conectores están sucios, límpielos con
un paño seco y limpio.
4. Cargue las baterías antes de su uso.
Solamente está permitido cargar la batería con el correspondiente cargador de
Rohde & Schwarz. Consulte en el manual o en las especificaciones técnicas del
equipo la denominación exacta del cargador.
Si las baterías se cargan de forma incorrecta existe peligro de explosión, lo que
podría causar lesiones graves en personas.
5. La temperatura de carga debe encontrarse entre 0 °C y 45 °C
(consulte el manual para posibles restricciones).
6. La descarga solamente puede efectuarse entre 0 °C y 50°C
(consulte el manual para posibles restricciones).
7. Cargue las baterías solamente el tiempo necesario hasta que se hayan cargado por
completo. La sobrecarga frecuente reduce la vida útil de la batería.
8. Extraiga la batería del equipo si no se va a utilizar. Después de un periodo de
almacenamiento prolongado puede ser necesario cargar y descargar varias veces la
batería para recuperar su capacidad completa.
9. Utilice la batería exclusivamente con los equipos Rohde & Schwarz
correspondientes. Consulte para ello el manual del equipo.
10. No elimine las baterías junto con los residuos urbanos sin clasificar, sino por
separado. Para eliminar la batería una vez finalizada su vida útil, diríjase a un punto
de recogida de residuos adecuado o a una oficina de representación de
Rohde & Schwarz.
Etiquetado de la UE para baterías y acumuladores
11. En caso de devolver baterías de litio a las filiales de Rohde & Schwarz, debe
cumplirse las normativas sobre los modos de transporte (IATA-DGR, código IMDG,
ADR, RID).
12. Conserve estas instrucciones de seguridad para fines de información y consulta
posterior.
1171.1507.71 - 02 2
1171150771_02_00_man_1_de_en_fr__001-0
Page 7

Sicherheitshinweise
Mögliche schwere Verletzungen, unter Umständen mit
Todesfolge.
Beachten Sie die folgenden Hinweise vollständig, um schwere
Verletzungen von Personen - unter Umständen mit Todesfolge -
durch Explosion und/oder Brand zu verhindern.
für wiederaufladbare Li-Ion-Batterien
1. Batterien nicht zerlegen, öffnen, zerkleinern oder aus großer Höhe fallen lassen.
Bei mechanischer Beschädigung besteht die Gefahr des Austritts von Chemikalien.
Austretende Gase können zu Atembeschwerden führen. Sofort lüften, in schweren
Fällen einen Arzt konsultieren.
Bei Haut- oder Augenkontakt mit austretenden Chemikalien können Hautirritationen
und Reizungen auftreten. In diesen Fällen die Haut oder Augen sofort gründlich mit
Wasser ausspülen und einen Arzt konsultieren.
2. Zellen oder Batterien weder Hitze noch Feuer aussetzen. Nicht im direkten
Sonnenlicht lagern. Bei Überhitzung besteht die Gefahr einer Explosion oder eines
Brandes, was zu schweren Verletzungen bei Personen führen kann.
3. Batterien sauber und trocken halten. Falls die Anschlüsse verschmutzt sind, mit
einem trockenen, sauberen Tuch reinigen.
4. Batterien vor dem Gebrauch laden.
Die Batterie darf ausschließlich mit dem entsprechenden Rohde &Schwarz
Ladegerät geladen werden. Siehe Handbuch oder Datenblatt des Gerätes für die
genaue Bezeichnung des Ladegerätes.
Wenn Batterien unsachgemäß geladen werden, besteht Explosionsgefahr, was zu
schweren Verletzungen bei Personen führen kann.
5. Die Ladetemperatur muss zwischen 0 °C und 45 °C betragen
(für mögliche Einschränkungen siehe Handbuch).
6. Ein Entladen darf nur zwischen 0 °C und 50 °C erfolgen
(für mögliche Einschränkungen siehe Handbuch).
7. Batterien nur so lange laden, bis sie vollständig aufgeladen sind. Ein häufiges
Überladen führt zu einer geringeren Lebensdauer der Batterie.
8. Die Batterie aus dem Gerät entfernen, wenn sie nicht benutzt wird. Nach längerer
Lagerzeit kann es erforderlich sein, die Batterie mehrmals zu laden und zu entladen,
um die volle Leistungsfähigkeit zu erlangen.
9. Die Batterie nur mit dafür vorgesehenen Rohde & Schwarz-Geräten betreiben. Siehe
dazu das Handbuch des Gerätes.
10. Die Batterien nicht über unsortierten Siedlungsabfall entsorgen, sondern getrennt
sammeln. Nach Ende der Lebensdauer über eine geeignete Sammelstelle oder eine
Rohde&Schwarz-Kundendienststelle entsorgen.
EU - Kennzeichnung für Batterien und Akkumulatoren
11. Bei Rücksendungen von Lithiumbatterien zu Rohde & Schwarz - Niederlassungen
müssen die Transportvorschriften der Verkehrsträger (IATA-DGR, IMDG-Code, ADR,
RID) befolgt werden.
12. Diese Sicherheitsinformationen für zukünftige Informations- und Nachschlagezwecke
aufbewahren.
1171.1507.71 - 02 3
1171150771_02_00_man_1_de_en_fr__001-0
Page 8

Consignes de sécurité pour batteries rechargeables
Risque de blessures graves pouvant entraîner la mort.
Respecter intégralement les consignes ci-dessous afin
d'éliminer tout risque de blessures graves voire mortelles par
suite d'explosion et/ou d'incendie.
lithium-ion
1. Ne pas démonter, ouvrir ou découper les batteries ni les faire tomber d'une hauteur
importante. Des produits chimiques peuvent s'écouler en cas de détérioration
mécanique et les gaz libérés peuvent provoquer des difficultés respiratoires. Aérer
immédiatement les locaux. Dans les cas graves, consulter un médecin. Si la peau ou
les yeux entrent en contact avec les produits chimiques libérés, des irritations
peuvent se produire. Rincer immédiatement et abondamment la peau ou les yeux à
l'eau claire et consulter un médecin.
2. Ne pas exposer les cellules ou les batteries à la chaleur ou au feu. Ne pas les
stocker dans un endroit exposé à la lumière directe du soleil. Toute surchauffe risque
de provoquer une explosion ou un incendie, ce qui peut entraîner des blessures
graves.
3. Conserver les batteries dans un lieu sec et propre. Nettoyer les points de contact
sales à l'aide d'un chiffon sec et propre.
4. Charger les batteries avant utilisation. Utiliser seulement le chargeur
Rohde & Schwarz approprié pour recharger les batteries. Les références exactes du
chargeur sont indiquées dans le manuel ou la fiche technique de l'appareil. Une
recharge incorrecte des batteries peut entraîner des explosions susceptibles de
causer des blessures graves.
5. Recharger impérativement à des températures comprises entre 0 °C et 45 °C
(restrictions éventuelles : voir le manuel).
6. Décharger impérativement à des températures comprises entre 0 °C et 50 °C
(restrictions éventuelles : voir le manuel).
7. Terminer la charge dès que les batteries sont complètement rechargées. Une
surcharge répétée diminue la longévité des batteries.
8. Retirer les batteries de l'appareil lorsqu'elles ne sont pas utilisées. Après un
stockage prolongé, plusieurs cycles de recharge et de décharge peuvent s'avérer
nécessaires pour rétablir la pleine capacité des batteries.
9. Utiliser les batteries exclusivement dans les appareils Rohde & Schwarz auxquels
elles sont destinées. Voir le manuel fourni avec chaque appareil.
10. Ne pas éliminer les batteries avec les déchets municipaux non triés mais s'assurer
qu'elles soient collectées séparément. Recycler les batteries en fin de vie en les
confiant à un point de collecte compétent ou à un point de service après-vente
Rohde & Schwarz.
Marquage UE pour batteries et accumulateurs
11. Lors des renvois de batteries au lithium à des filiales Rohde & Schwarz, il convient
de respecter les prescriptions de transport (IATA-DGR, code IMDG, ADR, RID)
fixées par les transporteurs.
12. Conserver ces consignes de sécurité de sorte à pouvoir vous y reporter ou vérifier
ultérieurement certains points.
1171.1507.71 - 02 4
1171150771_02_00_man_1_de_en_fr__001-0
Page 9

Customer Support
Technical support – where and when you need it
For quick, expert help with any Rohde & Schwarz equipment, contact one of our Customer
Support Centers. A team of highly qualified engineers provides telephone support and will
work with you to find a solution to your query on any aspect of the operation, programming
or applications of Rohde & Schwarz equipment.
Up-to-date information and upgrades
To keep your instrument up-to-date and to be informed about new application notes related
to your instrument, please send an e-mail to the Customer Support Center stating your
instrument and your wish.
We will take care that you will get the right information.
Europe, Africa, Middle East
North America
Latin America
Asia/Pacific
China
Phone +49 89 4129 12345
Phone 1-888-TEST-RSA (1-888-837-8772)
Phone +1-410-910-7988
Phone +65 65 13 04 88
Phone +86-800-810-8228 /
+86-400-650-5896
1171.0500.22-06.00
Page 10

R&S®Cable Rider ZPH
Contents
Contents
1 Preface....................................................................................5
1.1 Documentation Overview.....................................................................5
1.2 Conventions Used in the Documentation...........................................6
1.2.1 Typographical Conventions.....................................................................7
1.2.2 Conventions for Procedure Descriptions................................................ 7
1.2.3 Other Conventions.................................................................................. 7
2 Welcome to the R&S Cable Rider ZPH................................ 8
3 Preparing for Use...................................................................9
3.1 Putting into Operation.......................................................................... 9
3.1.1 Unpacking and Checking the Instrument.............................................. 11
3.1.2 Accessory List....................................................................................... 11
3.1.3 Setting up the R&S Cable Rider ZPH................................................... 12
3.1.4 Using the AC Adapter........................................................................... 13
3.1.5 Battery Operation..................................................................................14
3.1.6 Battery Maintenance............................................................................. 16
3.2 Switching the Instrument On and Off............................................... 18
4 Instrument Tour................................................................... 20
4.1 Front View............................................................................................20
4.2 Top View...............................................................................................21
4.3 Left View.............................................................................................. 24
4.4 Right View............................................................................................25
4.5 Rear View.............................................................................................26
4.6 Display Overview................................................................................ 26
Index..................................................................................... 28
3Getting Started 1321.0944.02 ─ 06
Page 11

R&S®Cable Rider ZPH
Contents
4Getting Started 1321.0944.02 ─ 06
Page 12

R&S®Cable Rider ZPH
Documentation Overview
Preface
1 Preface
1.1 Documentation Overview
This section provides an overview of the R&S Cable Rider ZPH user documentation. You find it on the product page at:
http://www.rohde-schwarz.com/product/zph.html > "Downloads"
Getting started manual
Introduces the R&S Cable Rider ZPH and describes how to set up and start working with the product. A printed version is included in the delivery.
User manual
The user manual contains the description of all instrument modes and functions.
It also provides an introduction to remote control, a complete description of the
remote control commands with programming examples, and information on maintenance, instrument interfaces and error messages.
In addition to the R&S Cable Rider ZPH user manual, there is a separate user
manual for the InstrumentView software package. This manual contains a
description of all features of the InstrumentView software package.
Service manual
Describes the performance test for checking the rated specifications, module
replacement and repair, firmware update, troubleshooting and fault elimination,
and contains mechanical drawings and spare part lists.
The service manual is available for registered users on the global
Rohde & Schwarz information system (GLORIS, https://gloris.rohde-
schwarz.com).
Basic safety instructions
Contains safety instructions, operating conditions and further important information. The printed document is included in the delivery.
5Getting Started 1321.0944.02 ─ 06
Page 13

R&S®Cable Rider ZPH
Conventions Used in the Documentation
Data sheet and brochure
The data sheet contains the technical specifications of the R&S Cable Rider ZPH.
It also lists the options and their order numbers as well as optional accessories.
The brochure provides an overview of the R&S Cable Rider ZPH and shows its
specific characteristics.
Release notes and open source acknowledgment (OSA)
The release notes list new features, improvements and known issues of the current firmware version, and describe the firmware installation.
The open source acknowledgment document provides verbatim license texts of
the used open source software.
See http://www.rohde-schwarz.com/product/zph.html > "Downloads" > "Firm-
ware".
Preface
Application notes, application cards, white papers, etc.
These documents contain information about possible applications and background information on various topics, see www.rohde-schwarz.com/appnotes.
Calibration certificate
The calibration certificates of your device are available online. Visit the R&S
Cable Rider ZPH product page and select the item to download the calibration
certificate. You will be forwarded to a Gloris page.
https://gloris.rohde-schwarz.com/calcert.
Enter the device ID of your R&S Cable Rider ZPH and download the certificate.
You can find the device ID either in the "Setup" menu or on the label on the rear
panel.
1.2 Conventions Used in the Documentation
The following conventions are used throughout the R&S Cable Rider ZPH manual.
6Getting Started 1321.0944.02 ─ 06
Page 14
R&S®Cable Rider ZPH
Preface
Conventions Used in the Documentation
1.2.1 Typographical Conventions
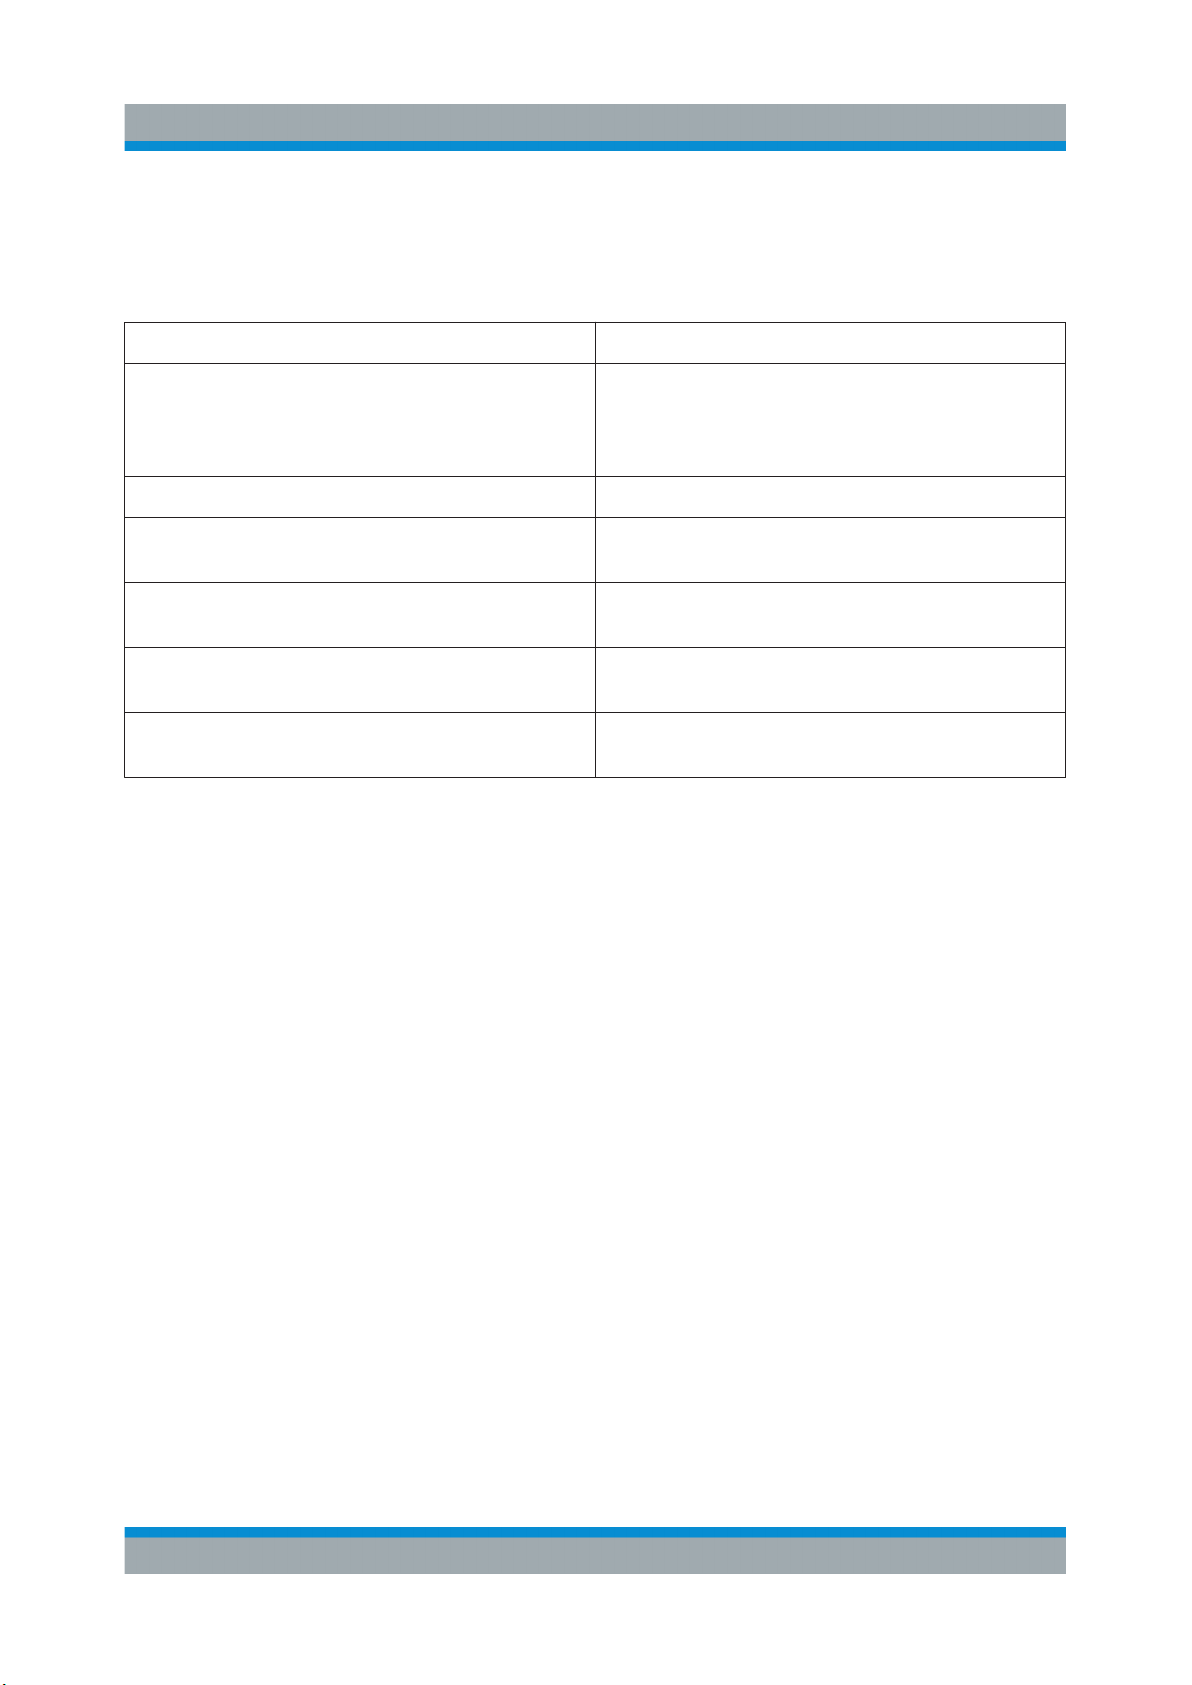
The following text markers are used throughout this documentation:
Convention Description
"Graphical user interface elements" All names of graphical user interface elements
on the screen, such as dialog boxes, menus,
options, buttons, and softkeys are enclosed by
quotation marks.
[KEYS] Key names are written in capital letters.
File names, commands, program code Filenames, commands, coding samples and
screen output are distinguished by their font.
Input Input to be entered by the user is displayed in
italics.
Links Links that you can click are displayed in under-
line blue font.
"References" References to other parts of the documenta-
tion are enclosed by quotation marks.
1.2.2 Conventions for Procedure Descriptions
When describing how to operate the instrument, several alternative methods may
be available to perform the same task. In this case, the procedure using the
touchscreen is described. The alternative procedure using the keys on the instrument or the on-screen keyboard is only described if it deviates from the standard
operating procedures.
The term "select" may refer to any of the described methods, i.e. using a finger on
the touchscreen or a key on the instrument or on a keyboard.
1.2.3 Other Conventions
Remote commands may include abbreviations to simplify input. In the description
of such commands, all parts that have to be entered are written in capital letters.
Additional text in lower-case characters is for information only.
7Getting Started 1321.0944.02 ─ 06
Page 15

R&S®Cable Rider ZPH
Welcome to the R&S Cable Rider ZPH
2 Welcome to the R&S Cable Rider ZPH
The R&S Cable Rider ZPH is a new generation Rohde & Schwarz cable and
antenna analyzer developed to meet demanding customer requirements. Offering
touchscreen input, the analyzer enhances user experience in making measurements fast and easy.
This user manual contains a description of the functionality that the instrument
provides. The latest version is available for download at the product homepage
(http://www.rohde-schwarz.com/product/zph.html).
8Getting Started 1321.0944.02 ─ 06
Page 16
R&S®Cable Rider ZPH
Preparing for Use
Putting into Operation
3 Preparing for Use
3.1 Putting into Operation
This chapter describes the basic steps to be taken when setting up the R&S
Cable Rider ZPH for the first time.
Risk of injury and instrument damage
The instrument must be used in an appropriate manner to prevent electric
shock, fire, personal injury, or damage.
●
Do not open the instrument casing.
●
Read and observe the "Basic Safety Instructions" delivered as a printed
brochure with the instrument.
In addition, read and observe the safety instructions in the following sections. Notice that the data sheet may specify additional operating conditions.
Risk of instrument damage
Note that the general safety instructions also contain information on operating conditions that prevent damage to the instrument. The instrument's data
sheet may contain additional operating conditions.
9Getting Started 1321.0944.02 ─ 06
Page 17
R&S®Cable Rider ZPH
Risk of electrostatic discharge (ESD)
Electrostatic discharge (ESD) can cause damage to the electronic components of the instrument and the device under test (DUT). ESD is most likely
to occur when you connect or disconnect a DUT or test fixture to the instrument's test ports. To prevent ESD, use a wrist strap and cord and connect
yourself to the ground, or use a conductive floor mat and heel strap combination.
For details, refer to the basic safety instructions delivered as a printed brochure with the instrument.
Preparing for Use
Putting into Operation
Risk of instrument damage during operation
An unsuitable operating site or test setup can cause damage to the instrument and to connected devices. Ensure the following operating conditions
before you switch on the instrument:
●
The instrument is dry and shows no sign of condensation.
●
The instrument is positioned as described in the following sections.
●
The ambient temperature does not exceed the range specified in the
data sheet.
●
Signal levels at the input connectors are all within the specified ranges.
●
Signal outputs are correctly connected and are not overloaded.
EMI impact on measurement results
Electromagnetic interference (EMI) may affect the measurement results.
To suppress generated electromagnetic interference (EMI):
●
Use suitable shielded cables of high quality. For example, use doubleshielded RF and LAN cables.
●
Always terminate open cable ends.
●
Note the EMC classification in the data sheet.
10Getting Started 1321.0944.02 ─ 06
Page 18
R&S®Cable Rider ZPH
Preparing for Use
Putting into Operation
3.1.1 Unpacking and Checking the Instrument
Unpack the R&S Cable Rider ZPH carefully and check the contents of the package.
●
Check the equipment for completeness using the delivery note and the accessory lists for the various items.
●
Check the instrument for any damage. If there is damage, immediately contact
the carrier who delivered the instrument.
●
Keep the box and packing material.
Risk of damage during transportation and shipment
Insufficient protection against mechanical and electrostatic effects during
transportation and shipment can damage the instrument.
●
Always make sure that sufficient mechanical and electrostatic protection
is provided.
●
When shipping an instrument, the original packaging should be used. If
you do not have the original packaging, use sufficient padding to prevent the instrument from moving around inside the box. Pack the instrument in antistatic wrap to protect it from electrostatic charging.
●
Secure the instrument to prevent any movement and other mechanical
effects during transportation.
Packing material
Retain the original packing material. If the instrument needs to be transported or shipped at a later date, you can use the material to protect the control
elements and connectors.
3.1.2 Accessory List
The instrument comes with the following accessories:
●
Power supply cable and adapter set
●
Li-ion rechargeable battery
●
USB2.0 cable A-Mini
11Getting Started 1321.0944.02 ─ 06
Page 19
R&S®Cable Rider ZPH
●
Side strap
●
Printed Getting Started manual
●
Document folder containing safety instructions, KC and CE certificate
Optional accessories and their order numbers are listed in the data sheet.
Preparing for Use
Putting into Operation
3.1.3 Setting up the R&S Cable Rider ZPH
The R&S Cable Rider ZPH is mainly used for diagnostic purpose during the
installation of RF feeder cables and antennas for all kinds of radio transmitters.
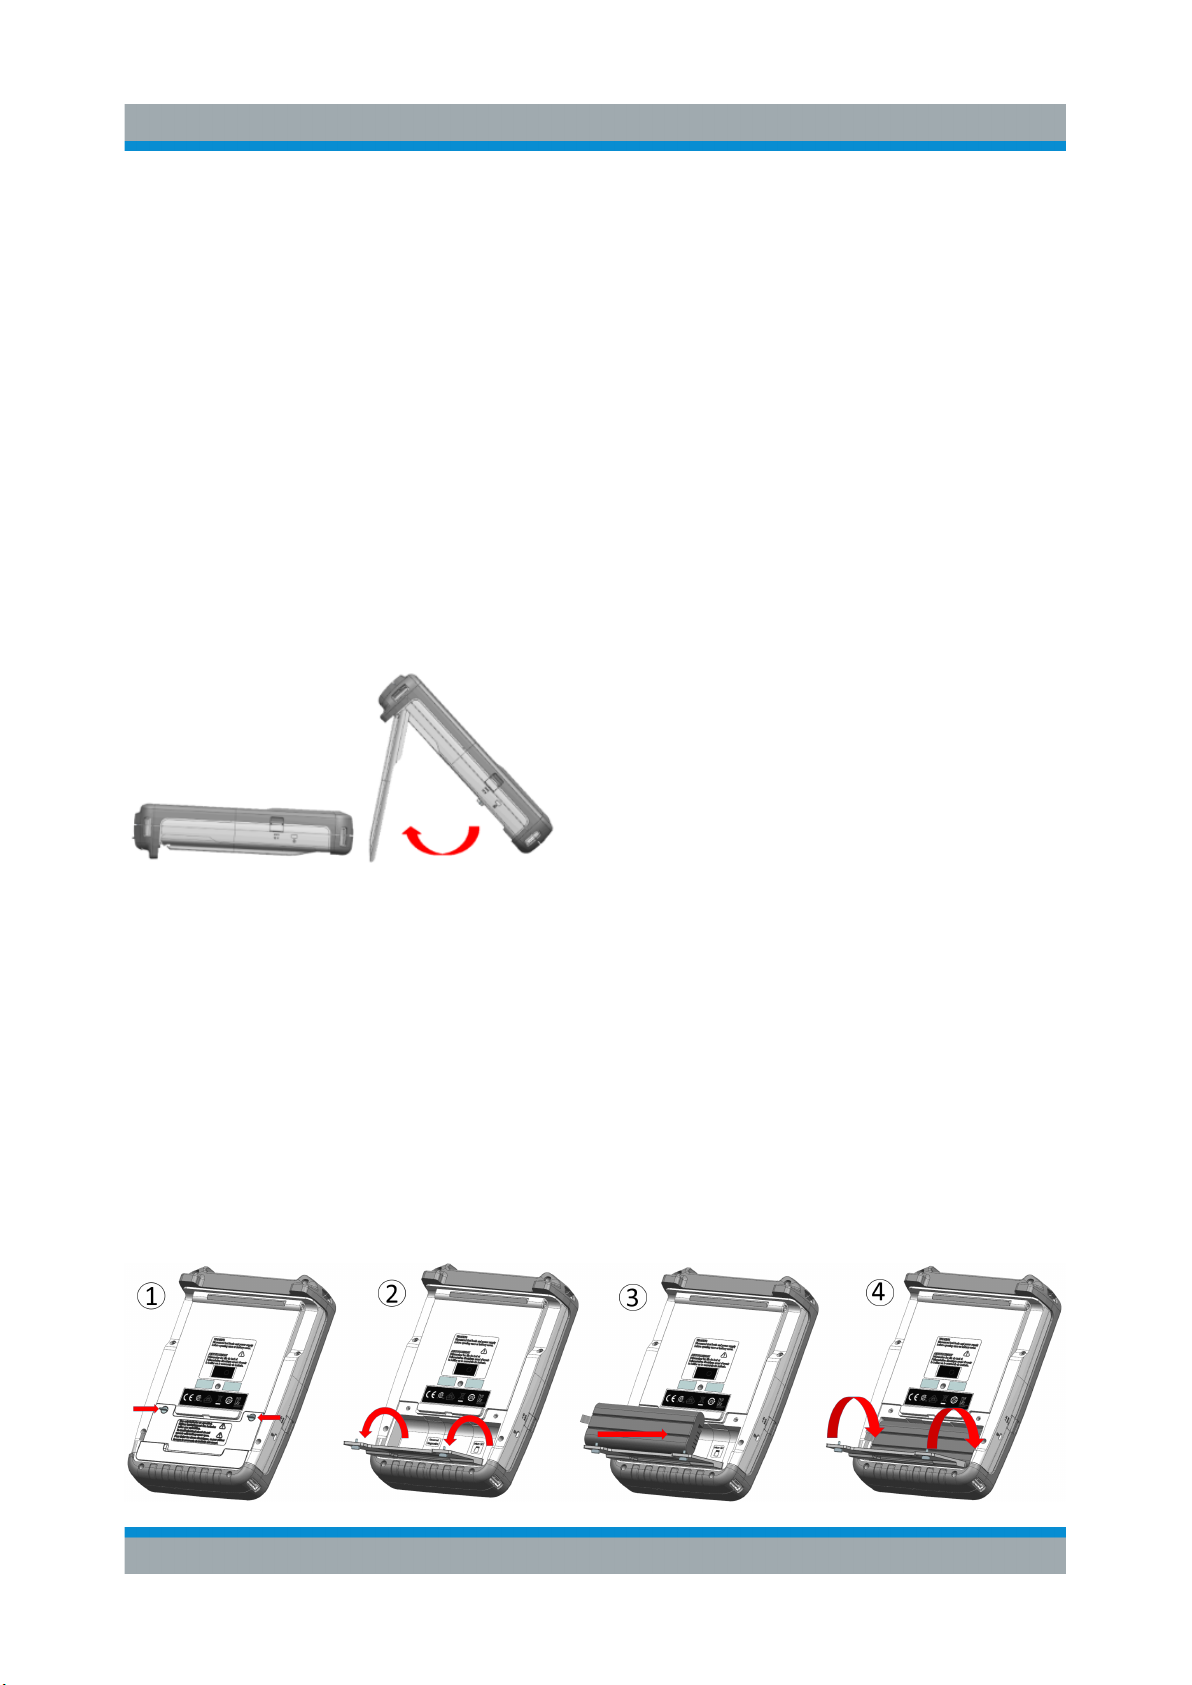
Depending on the environment, you can adjust the viewing angle of the display
and either lay it out horizontally or prop it up using the support on the back of the
R&S Cable Rider ZPH.
When laid out horizontally for operation from above, the R&S Cable Rider ZPH is
tilted slightly due to the micro-stand at the back. This position provides the optimum viewing angle for the display.
To allow easy operation from the front and still be able to read the display, you
can swing out the support on the back of the R&S Cable Rider ZPH.
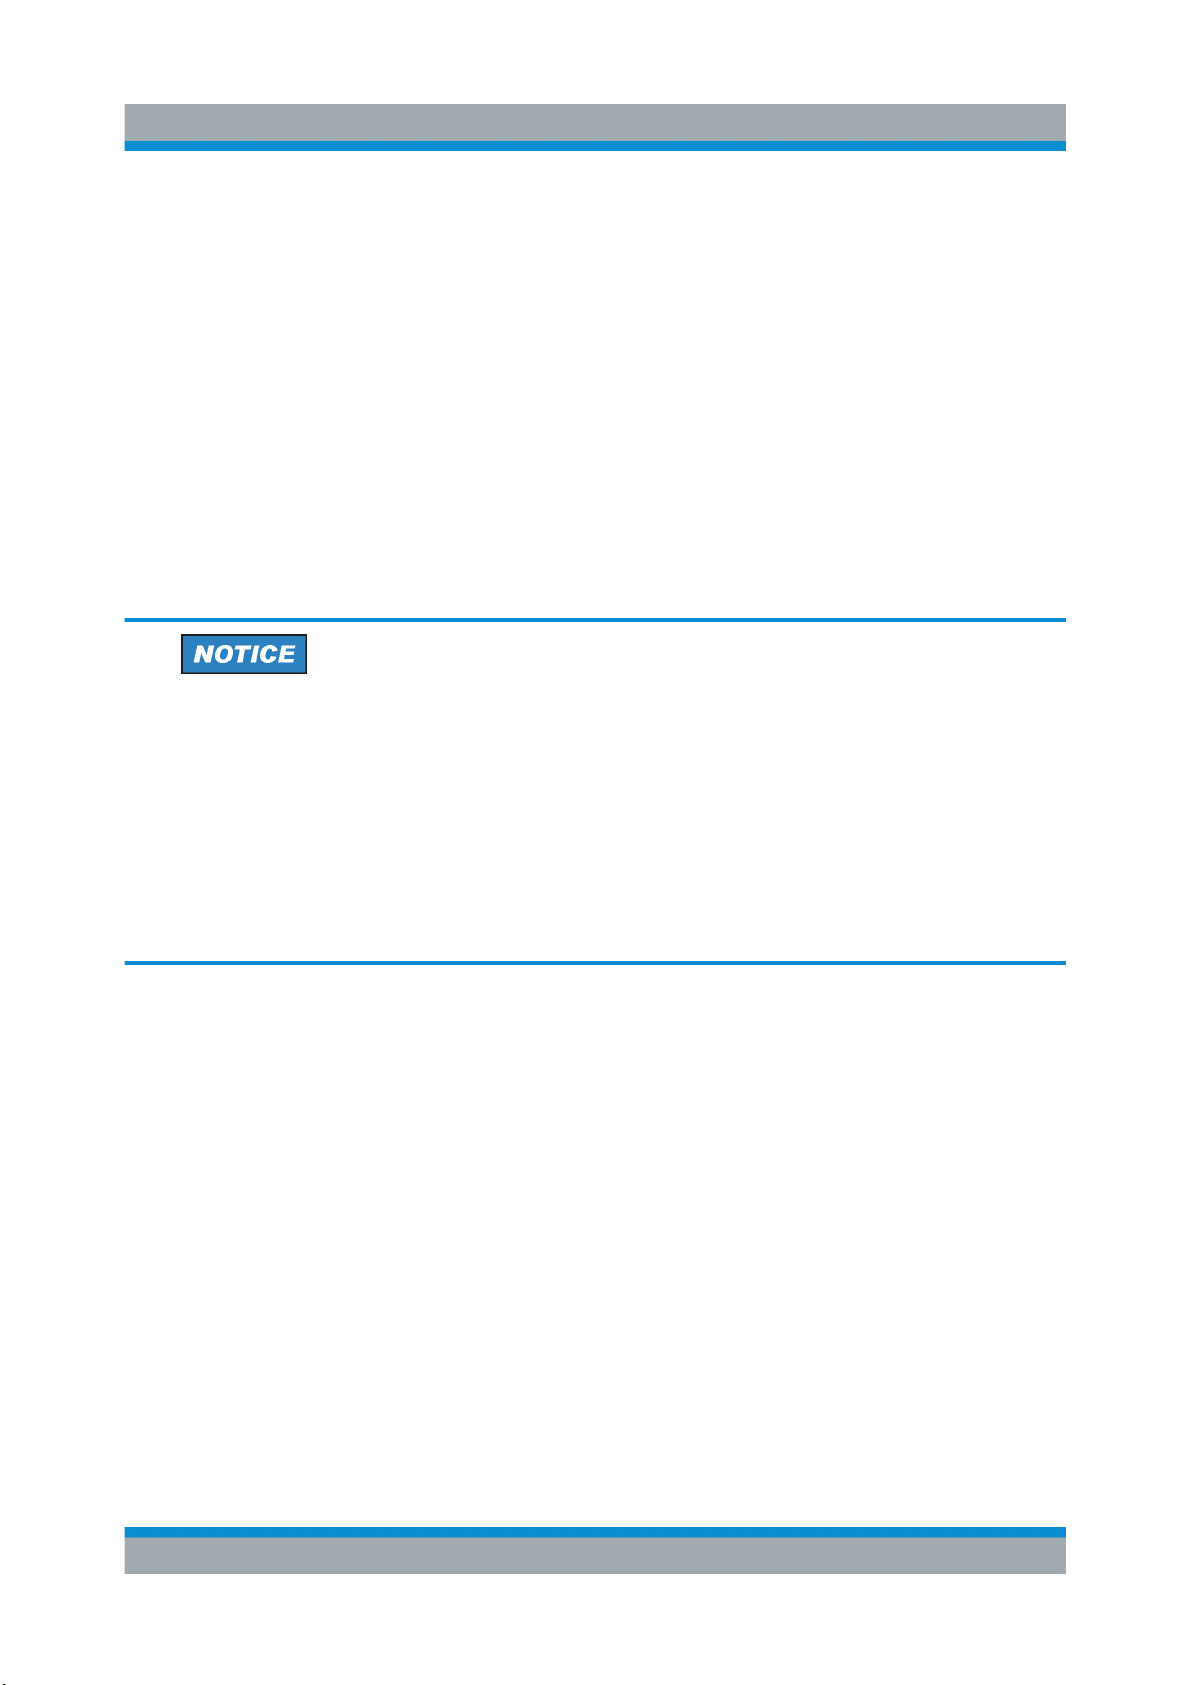
Before you turn on the R&S Cable Rider ZPH, you should insert the lithium ion
battery included in the delivery into the battery compartment located at the back
of the R&S Cable Rider ZPH.
Insert battery
12Getting Started 1321.0944.02 ─ 06
Page 20
R&S®Cable Rider ZPH
1. Unscrew the two thumb screws located on the battery compartment.
2. Open the cover.
3. Insert the battery into the R&S Cable Rider ZPH.
4. Close the cover and screw back the thumb screws.
You can operate the R&S Cable Rider ZPH with the AC adapter or the battery.
Both are included in the delivery.
Preparing for Use
Putting into Operation
3.1.4 Using the AC Adapter
Risk of instrument damage
To avoid instrument damage,
●
Only use the power supply (R&S HA-Z301, order number 1321.1386.02)
included in the delivery.
●
Make sure that the AC supply voltage is compatible to the voltage specified on the power supply unit.
●
Attach the appropriate adapter to the power supply.
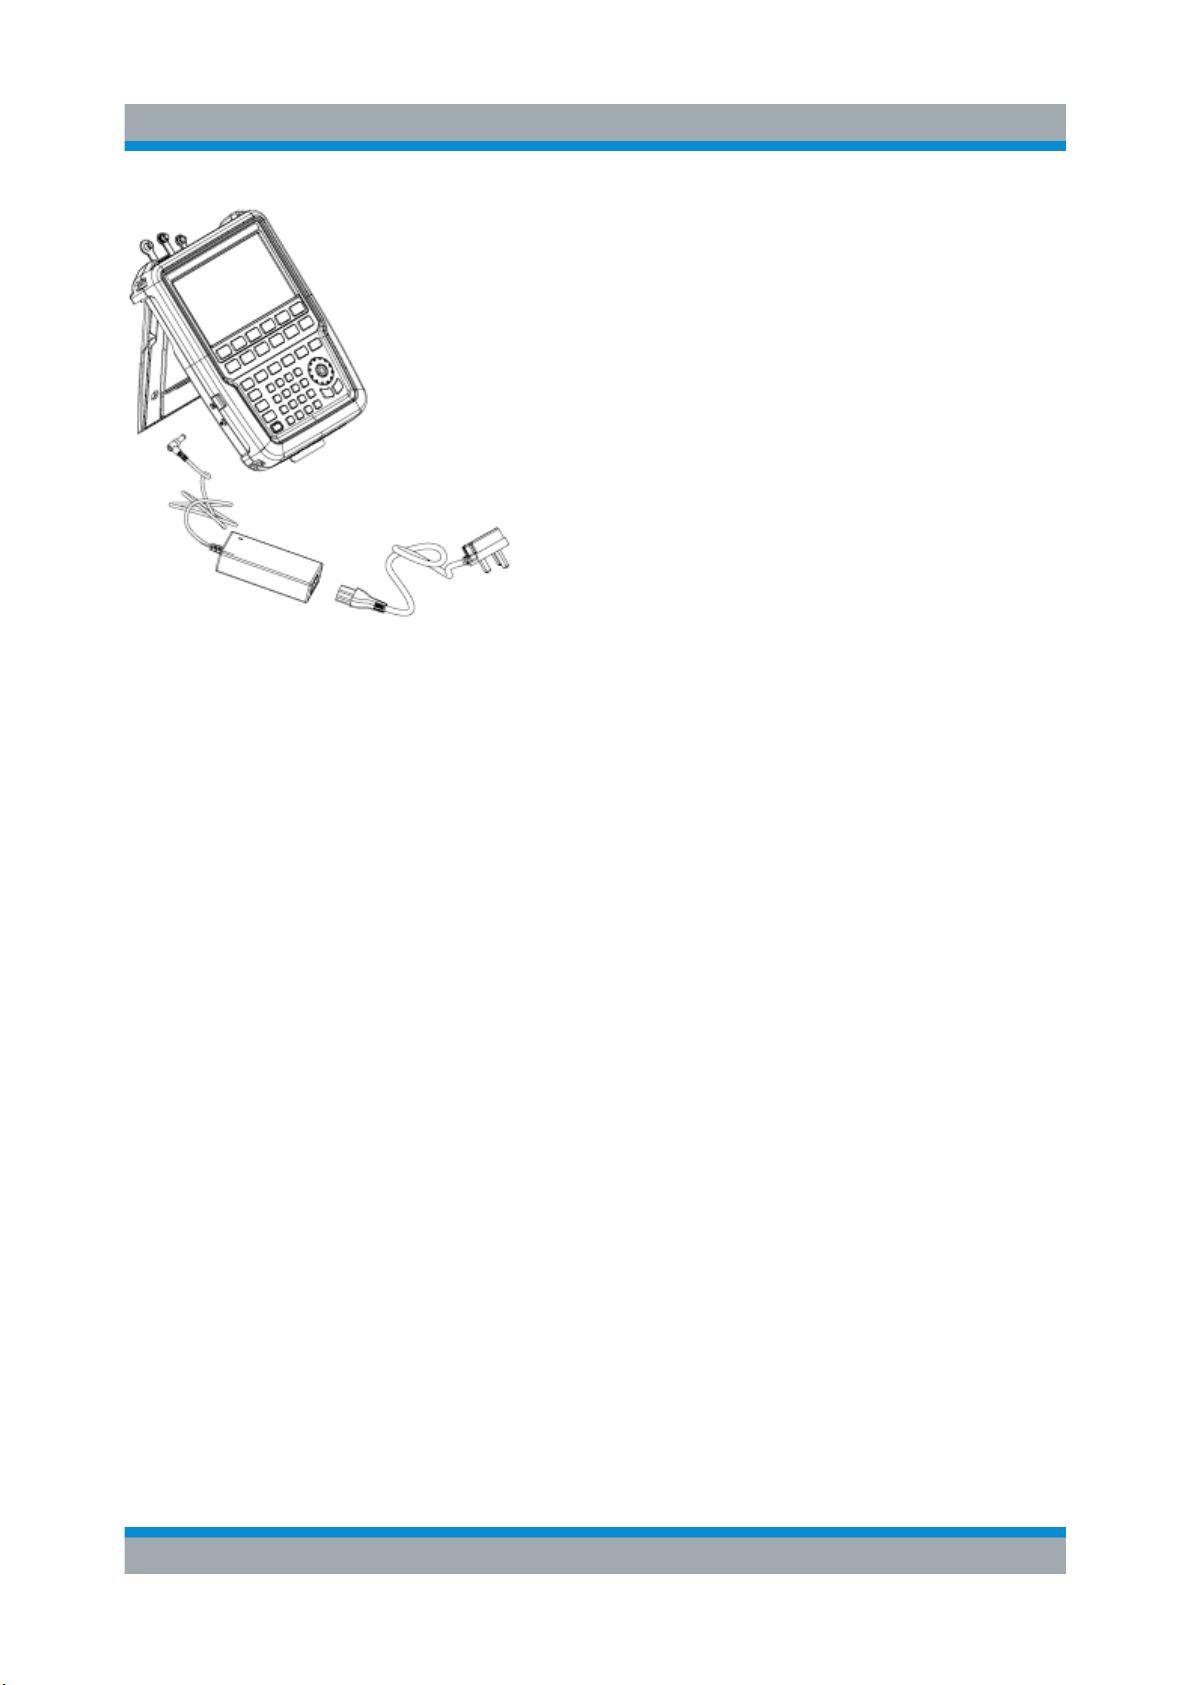
Connect the AC adapter to the DC port on the left side of the R&S Cable Rider
ZPH (item 1 of Figure 3-1). Make sure to fully insert the AC adapter plug into the
DC port.
Depending on the system you need, firmly connect the appropriate power cable
included in the delivery to the AC adapter (item 2 of Figure 3-1 ).
Finally, connect the power cable plug to an AC power outlet.
13Getting Started 1321.0944.02 ─ 06
Page 21
R&S®Cable Rider ZPH
Figure 3-1: AC adapter
1 = AC adapter
2 = Power cable
Preparing for Use
Putting into Operation
The voltage range of the AC power supply is 100 V to 240 V AC.
After the R&S Cable Rider ZPH is connected to the power supply, you can turn it
on with the [Power] key on the front panel.
3.1.5 Battery Operation
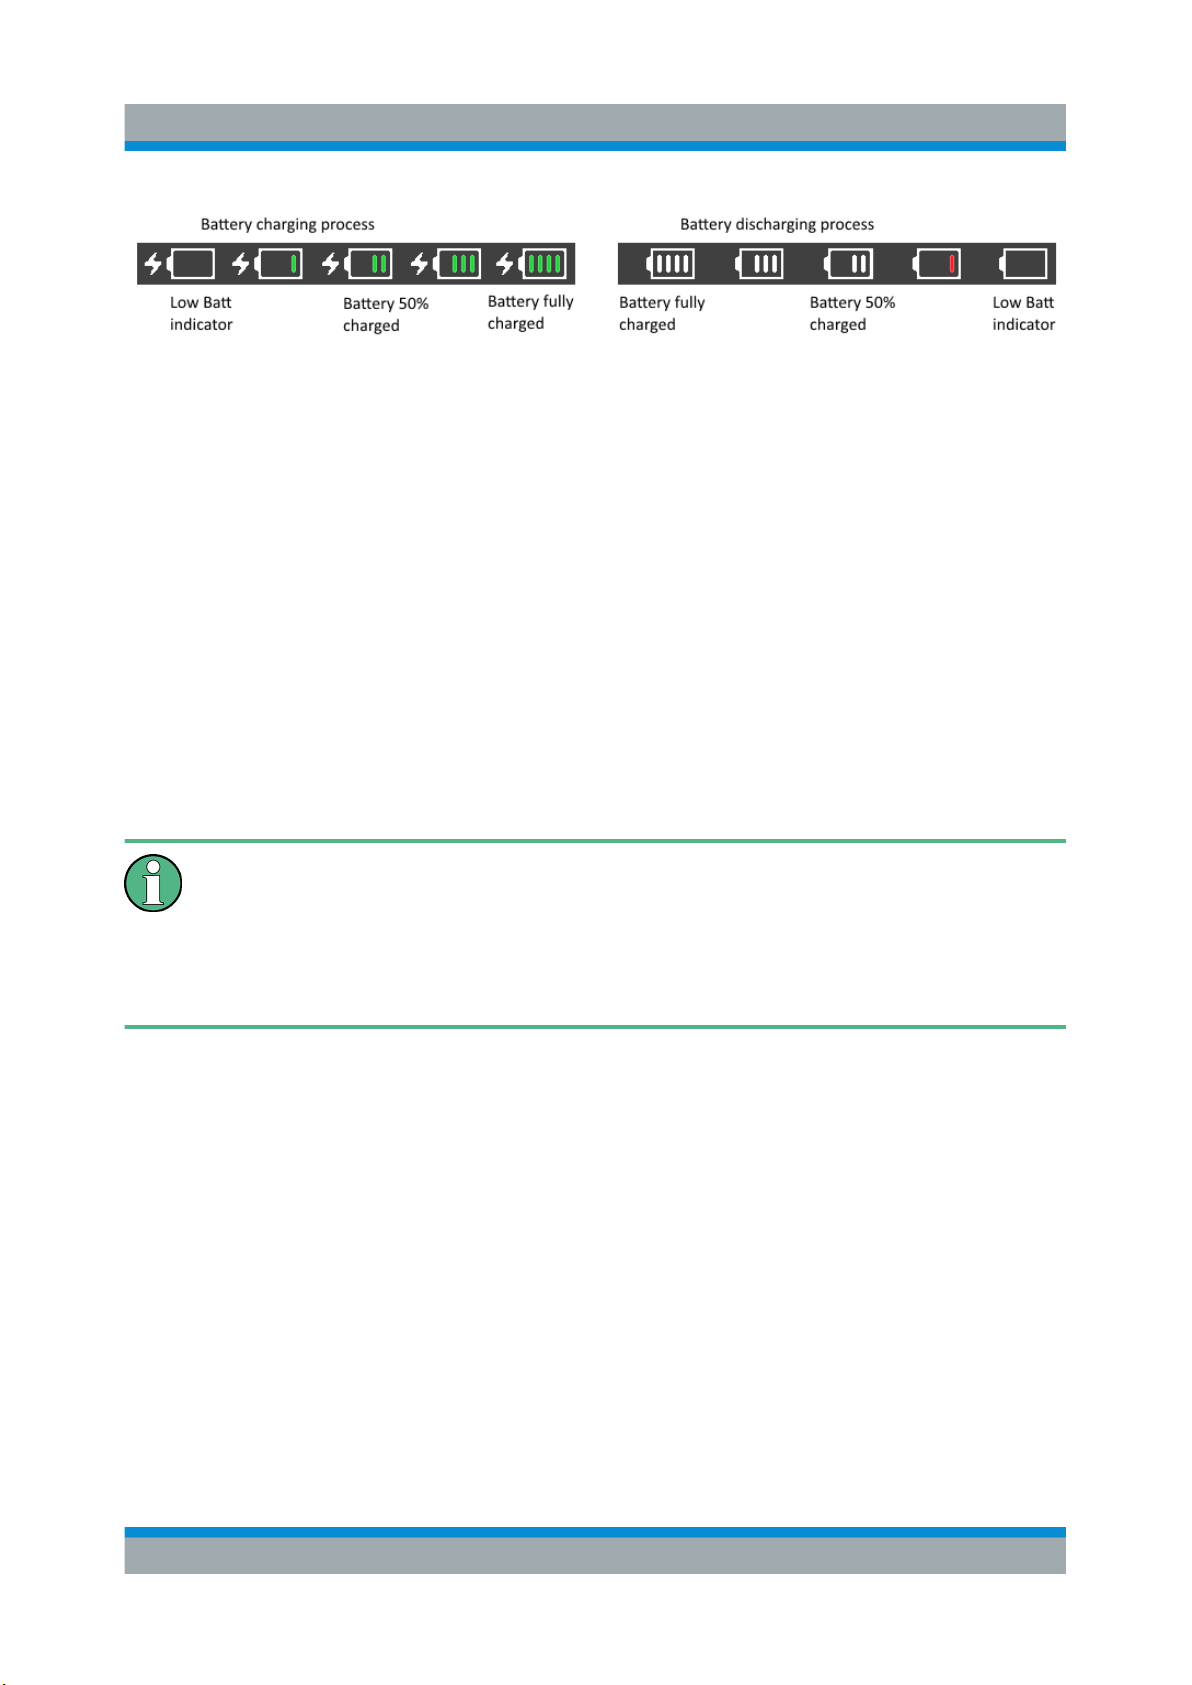
The R&S Cable Rider ZPH has a smart battery indicator which displays the battery charging status on the [Power] key as well as the battery icon shown at the
top right corner of the display screen. See Chapter 4.6, "Display Overview",
on page 26.
The lithium ion battery has a capacity of 6.4 Ah and it allows operation of up to
nine hours when it is fully charged.
The actual operation time depends on the current charged status (see Fig-
ure 3-2), the ambient temperature and the operating mode of the R&S Cable
Rider ZPH.
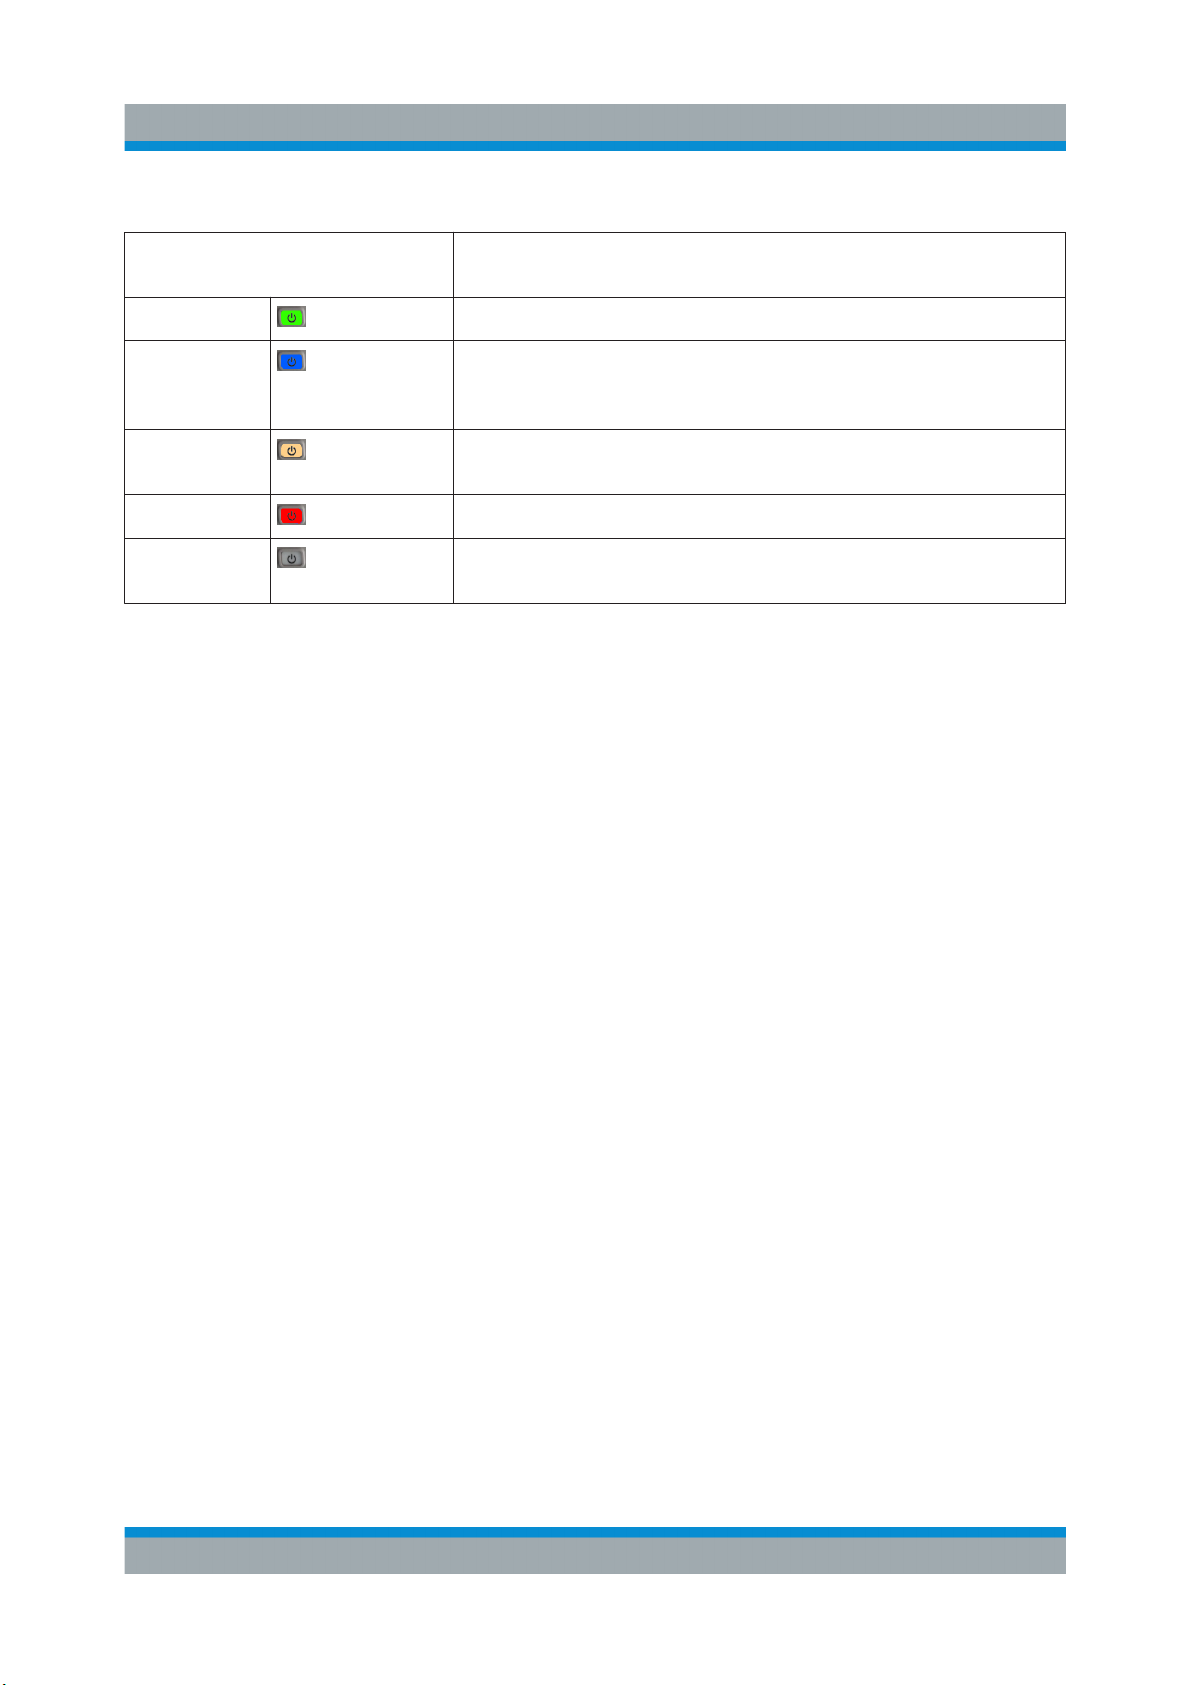
For a summary of the LED indication of the [Power] key, see Table 3-1.
The battery charging and discharging process of the battery icon indicated in the
display screen is illustrated below:
14Getting Started 1321.0944.02 ─ 06
Page 22
R&S®Cable Rider ZPH
Preparing for Use
Putting into Operation
Figure 3-2: Battery charging and discharging process
Charging time is about three hours when the R&S Cable Rider ZPH is in inactive
mode (i.e. R&S Cable Rider ZPH is switched off). If the instrument is in active
mode (i.e. R&S Cable Rider ZPH is switched on), the charging time is extended
to about four hours because the charging current is reduced as the power is partially drained by the usage of the R&S Cable Rider ZPH.
During operation in the field, you can also charge the battery with the car adapter
(R&S HA-Z302, order number 1321.1340.02). You can connect the car adapter to
the DC port. With the car adapter, you are able to charge the R&S Cable Rider
ZPH via the car's cigarette lighter socket. A replacement battery (R&S HA-Z306,
order number 1321.1334.02) with the same capacity and charging time as the
battery included in the standard delivery is also available if necessary.
Battery dispatched during delivery is not fully charged, for battery operation
you have to charge it first.
To charge the battery, connect the charger to AC power adapter included in
the delivery. For more information, see "Using an external battery charger"
on page 15.
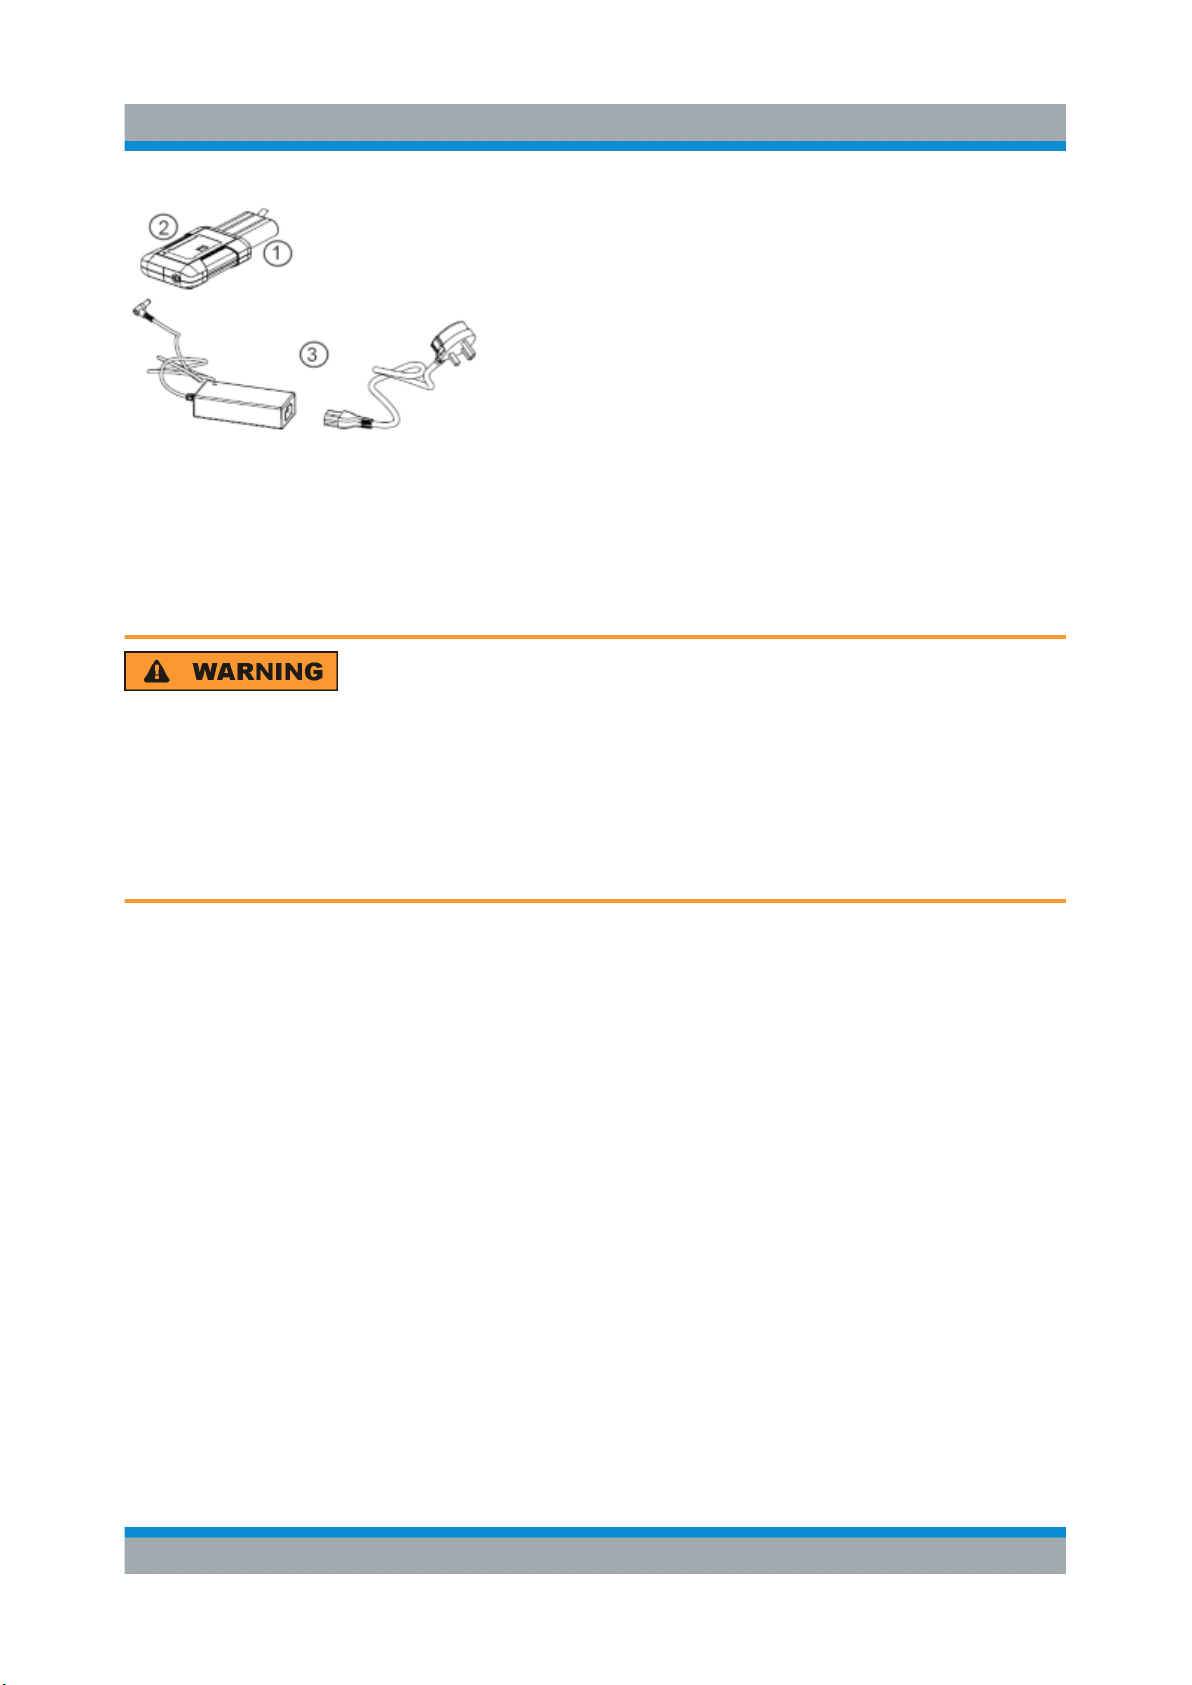
Using an external battery charger
You can also use an external battery charger (R&S HA-Z303, order number
1321.1328.02) to charge the battery.
To charge the battery externally, put the battery into the external charger and supply it with power via the AC power adapter.
An amber LED on the charger indicates the charging process. The LED turns to
green when the battery is fully charged. A red LED on the charger indicates that
the battery is not charging or the charging failed.
15Getting Started 1321.0944.02 ─ 06
Page 23
R&S®Cable Rider ZPH
Figure 3-3: External battery charger
1 = Lithium ion battery R&S HA-Z306
2 = External charger R&S HA-Z303
3 = Power supply unit R&S HA-Z301 or car adapter R&S HA-Z302
Preparing for Use
Putting into Operation
Risk of traffic accidents, physical injury and property damage
●
Turn off the R&S Cable Rider ZPH while driving or while the engine is
on.
●
Operation of the R&S Cable Rider ZPH via the cigarette lighter socket
while driving or while the engine on is prohibited.
3.1.6 Battery Maintenance
The R&S Cable Rider ZPH comes with a lithium-ion battery. In general, these batteries are easy to handle. When you handle the battery, follow the instruction
mentioned in the safety instructions and in the following chapters.
3.1.6.1 Handling
●
The battery has been designed for a specific application. Do not use it for any
other applications.
●
Do not connect batteries in series or parallel as it can cause serious damage.
●
Observe correct polarities during installation and charging.
●
Do not heat over 70°C. The battery contains thermal fuses that could activate
and render the battery inoperable.
16Getting Started 1321.0944.02 ─ 06
Page 24

R&S®Cable Rider ZPH
●
The battery contains an electronic device for protection against deep discharge, overcharge and short-circuiting between the terminals.
– If you cannot discharge the battery, it may be deep discharged. Charge the
battery for 0.5 hours and check again.
– If you cannot charge the battery, it may be overcharged. Discharge the
battery and check again.
– If the battery has been short-circuited, charge it to reset the electronics.
– If the battery still does not work, contact the Rohde & Schwarz customer
support.
●
Do not allow metallic objects to come into contact with the terminals.
●
Do not solder directly to the battery.
3.1.6.2 Storage
Preparing for Use
Putting into Operation
The battery self-discharges while not in use. When storing the battery for an
extended period of time, make sure to
●
Handle the battery carefully to avoid short circuits. Make sure that leads and
terminals are insulated.
●
Keep the battery in the supplied packaging before use. The temperature
should not exceed 30°C.
●
Store the battery at an initial state of charge between 15% and 50% of its
capacity. When calculating the initial state of charge, consider
– The maximum consumption of electronic devices
– The self-discharge of the battery - the higher the state of charge, the
higher the rate of self-discharge
●
Avoid a deep discharge of the battery. A deep discharge occurs when the
state of charge falls below 5% of the battery's capacity.
●
Recharge the battery at least every six months.
Should the battery voltage be low or even 0 V, the battery protection circuit may
have gone into a sleep mode. In that case, reset the battery with an approved
charger.
17Getting Started 1321.0944.02 ─ 06
Page 25
R&S®Cable Rider ZPH
Switching the Instrument On and Off
3.1.6.3 Transportation
No special regulations apply for transporting the battery. The battery cells contain
no metallic lithium.
3.1.6.4 End of Life
The capacity of the battery decreases after it has gone through numerous charge
cycles and nearing its end of life. When the battery is dead, do not open the battery. Do not dispose battery in fire.
Preparing for Use
3.2 Switching the Instrument On and Off
The instrument can be powered with an AC or DC (battery operated or via car
adapter) input. See Chapter 3.1.4, "Using the AC Adapter", on page 13.
► Press the [Power] key to switch on the instrument.
During booting, the R&S Cable Rider ZPH displays a splash screen to indicate
the operable frequency range of the instrument. Depending on the frequency
upgrade option installed, the respective splash screen is loaded.
After booting, the instrument is ready for operation.
Refer to the instrument brochure for the list of options available.
► Press the [Power] key to switch off the instrument.
Risk of losing data
If a running instrument (without battery) is disconnected directly from the
power cord, the instrument loses its current settings. Furthermore, program
data may be lost.
Press the [Power] key first to shut down the application properly.
The following shows the [POWER] key behavior in different operation modes.
18Getting Started 1321.0944.02 ─ 06
Page 26
R&S®Cable Rider ZPH
Switching the Instrument On and Off
Table 3-1: Summary of LED indication on POWER key
Preparing for Use
LED indication on [Power]
key
Green LED Instrument is in operation mode.
Blue LED Instrument is in switch off mode with a fully charged battery.
Amber LED Instrument is in switch off mode with AC supply and there is
Red LED There is an error in the battery charging.
LED "OFF" This is an indication that there is no AC or DC supply to the
Descriptions
A blinking blue LED indicates that the battery charging is in
process.
no battery in it.
instrument. The instrument is in a switch off mode.
19Getting Started 1321.0944.02 ─ 06
Page 27
R&S®Cable Rider ZPH
4 Instrument Tour
This chapter describes the instrument in different views.
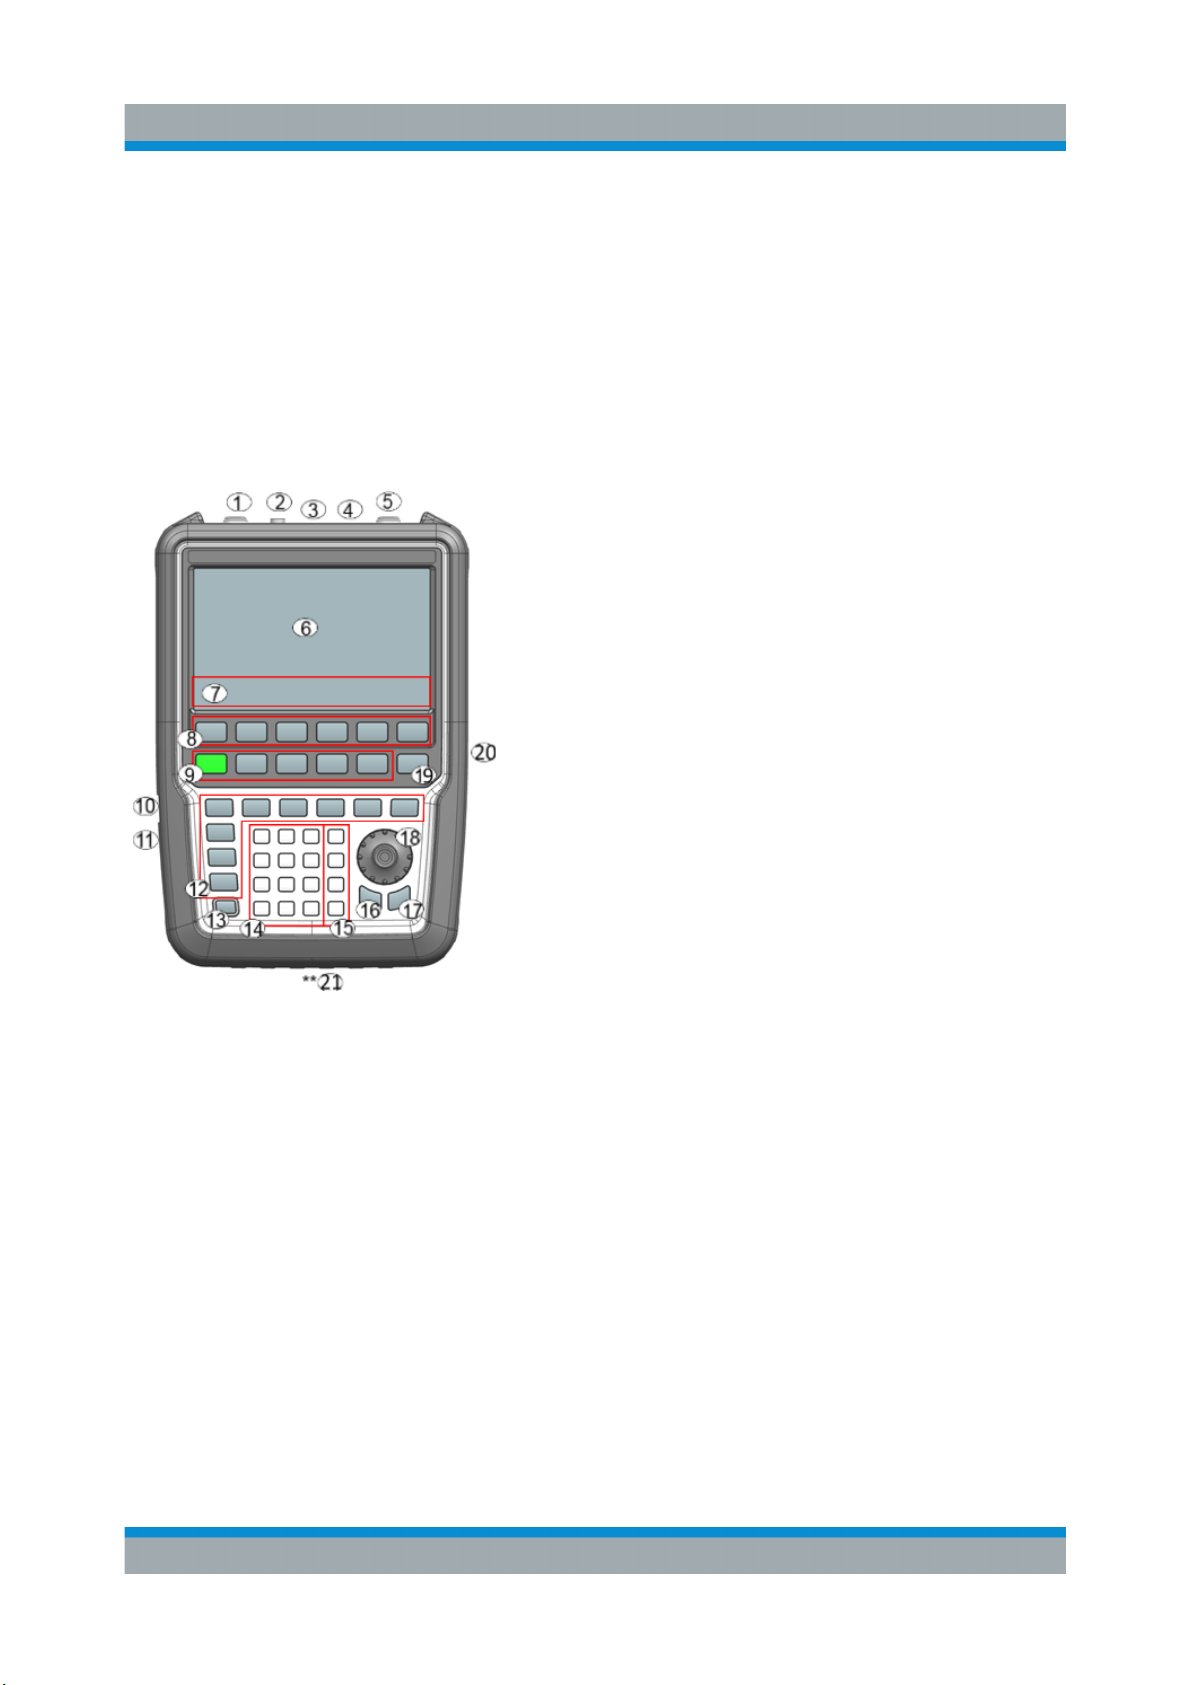
4.1 Front View
Instrument Tour
Front View
1 = Power meter input / RF Input
2 = BNC connector for model .12
3 = Headphone jack for model .12
4 = USB ports
5 = Signal source output / Reflection (N-connector)
6 = Touch-sensitive screen area
7 = Softkey labels (on display)
8 = Softkey
9 = Systems keys
10 = DC port (behind protective cap)
11 = Kensington lock
12 = Function keys
13 = On/off key
14 = Alphanumeric key
15 = Unit keys
16 = Back key
17 = Cancel key
18 = Rotary knob
20Getting Started 1321.0944.02 ─ 06
Page 28
R&S®Cable Rider ZPH
19 = Screenshot key
20 = LAN and mini USB port (behind protective cap)
21 = Micro-SD card slot (not visible as it is located behind the battery compartment)
Instrument Tour
For a description of the keys, see R&S Cable Rider ZPH user manual.
Instrument damage caused by cleaning agents
Cleaning agents contain substances that may damage the instrument. For
example, cleaning agents that contain a solvent may damage the front
panel labeling, plastic parts, or the display.
Never use cleaning agents such as solvents (thinners, acetone, etc.), acids,
bases, or other substances.
The outside of the instrument can be cleaned sufficiently using a soft, lintfree dust cloth.
Top View
4.2 Top View
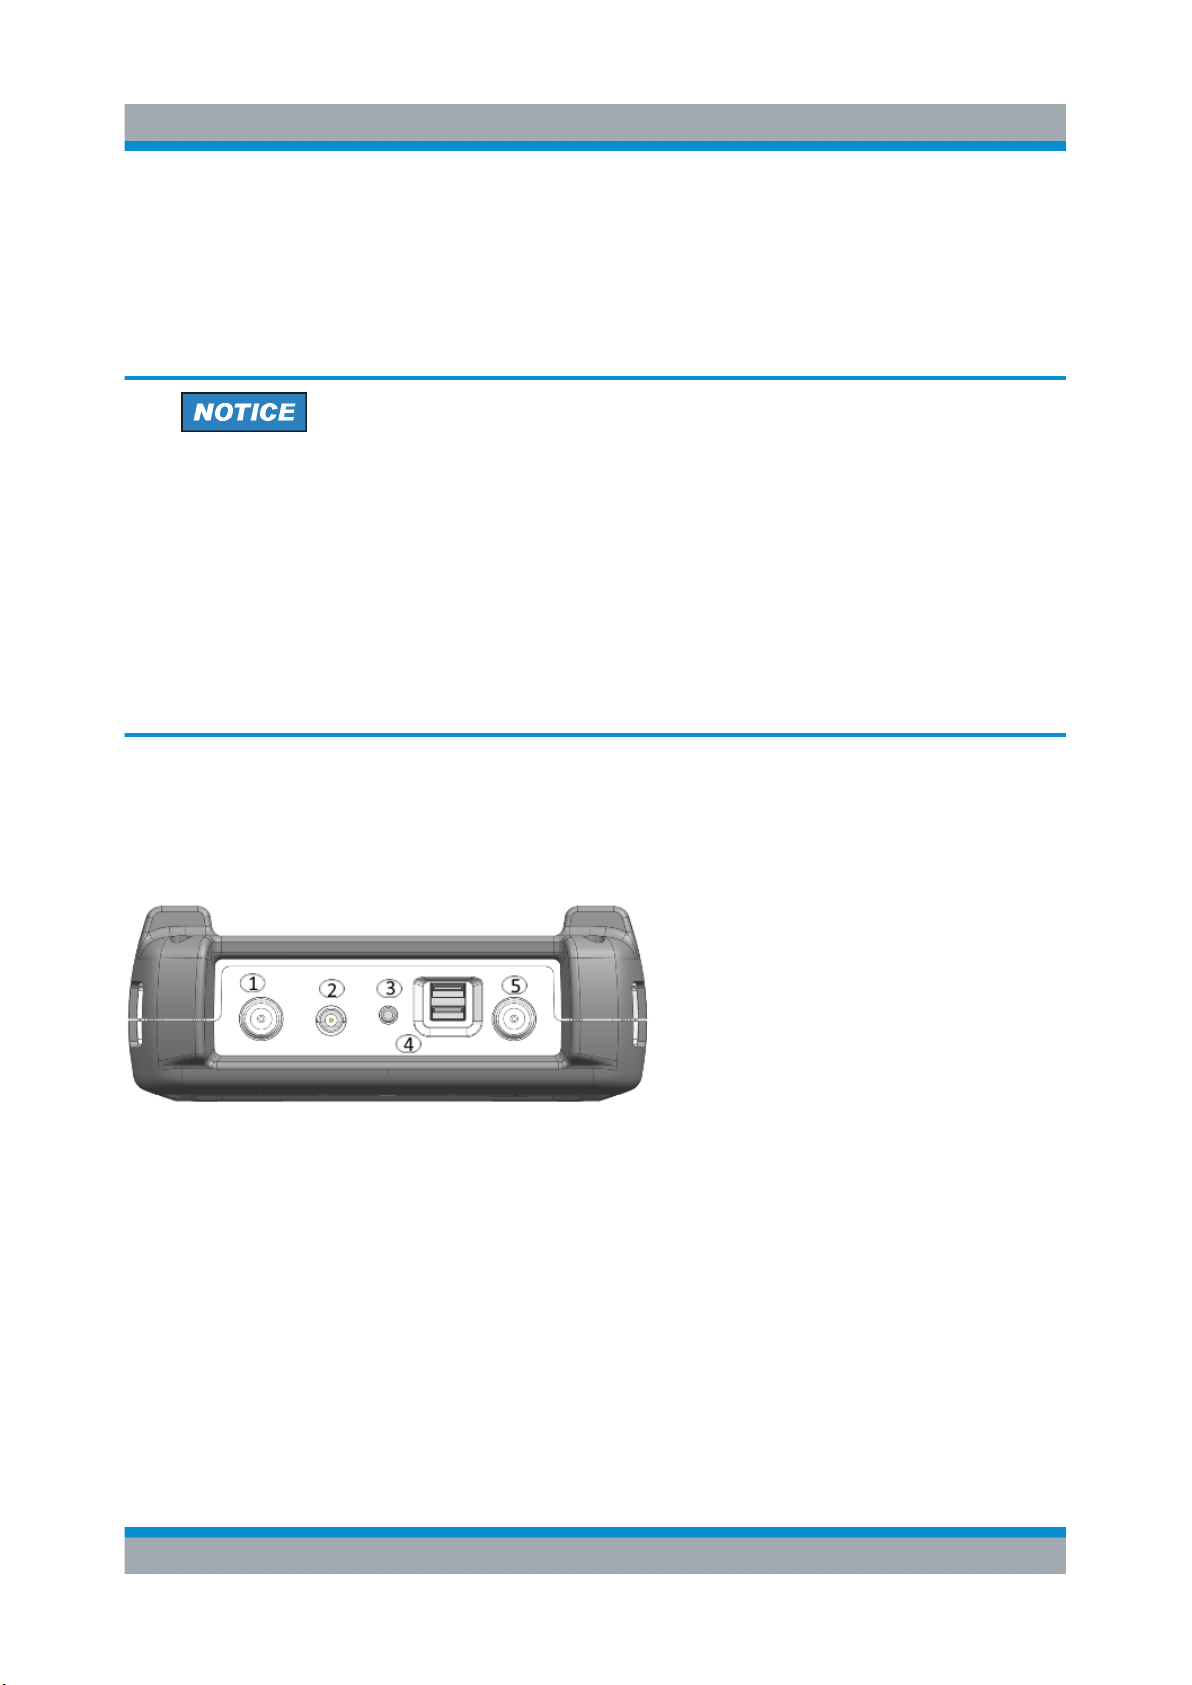
1 = Power meter input / RF Input
2 = BNC connector for model .12 only
3 = Headphone jack for model .12 only
4 = USB type A connector
5 = RF out / Reflection
Power meter input / RF Input
For model .02, the built-in power-meter provides a maximum power measurement
of 30 dBm (or 1 W) at the RF input port. Connect a cable or DUT to the RF input
with an N-type connector. Use a cable to connect the DUT to the R&S Cable
Rider ZPH, if necessary.
21Getting Started 1321.0944.02 ─ 06
Page 29
R&S®Cable Rider ZPH
For model .12, the RF input allows a maximum power of 20 dBm (or 100 mW) at
the RF input port. The R&S Cable Rider ZPH may be loaded with up to 30 dBm
(or 1W) for up to three minutes. If you apply 1 W for a longer period, the R&S
Cable Rider ZPH maybe destroyed. The RF input is protected from static discharges and voltage pulses by a limiting circuit. Connect a cable or DUT to the
RF input with an N-type connector. Use a cable to connect the DUT to the R&S
Cable Rider ZPH, if necessary.
Risk of electrical shock
To avoid electrical shock, the DC input voltage must never exceed the value
specified on the housing.
Instrument Tour
Top View
Risk of instrument damage
To avoid damage to the coupling capacitor, input attenuator or the mixer,
the DC input voltage must never exceed the value specified in the data
sheet.
BNC connector
You can connect the BNC connector for various applications. It supports an external trigger signal or an external reference signal. It can also be configured as a
BIAS port.
When the BNC connector is configured as a trigger input, it controls the start of a
measurement. The trigger mode is selected in the SWEEP menu. The trigger
threshold is similar to that of TTL signals.
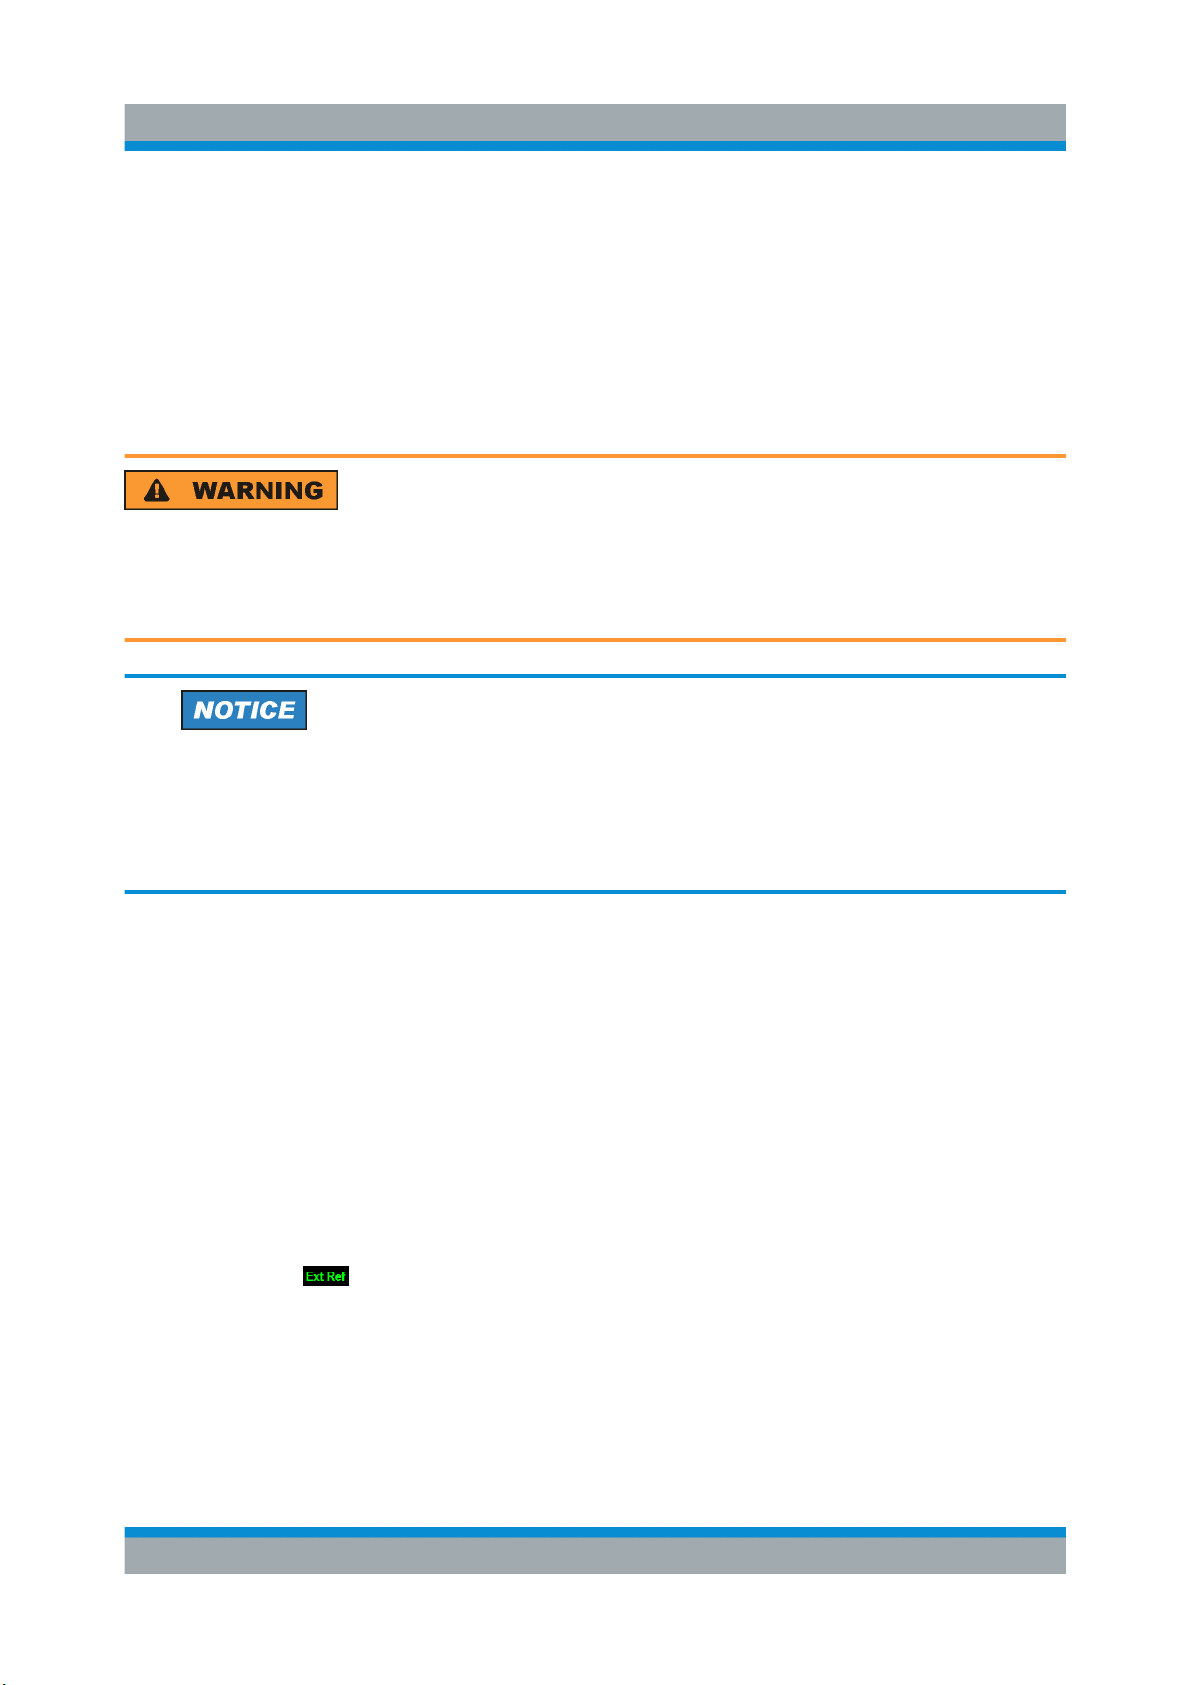
When the BNC connector is configured as reference input, you can apply a 10
MHz external reference signal to it for frequency synchronization. The external
reference label is displayed at the top right corner of the trace window to indicate that the reference signal is supplied via external signal input. The label turns
green when the reference signal is detected.
The level of the reference signal must be larger than 0 dBm. If there is no reference signal present at the BNC connector, the R&S Cable Rider ZPH displays an
appropriate message. Thus, measurements without a valid reference can be avoided.
22Getting Started 1321.0944.02 ─ 06
Page 30

R&S®Cable Rider ZPH
When the BNC connector is configured as an internal DC bias port, the BNC connector provides direct current output. Active equipment under test can be supplied with power via the bias port.
Risk of instrument damage
To avoid damage to the tracking generator output, never apply currents
greater than 600 mA or voltages greater than 20 V to the BNC connectors if
the BNC connectors are not configured as BIAS output ports.
If they are configured as BIAS ports, never apply currents greater than 600
mA or voltages greater than 50 V.
Headphone jack
Instrument Tour
Top View
The 3.5 mm connector for headphones has an internal impedance of approximately 10 Ω.
USB type A connector
The USB port provides the USB interface to connect a memory stick and store
data sets or screenshots. It can also be used to control the operation of the external power sensor.
RF out / Reflection
For model .02, the RF out connector provides a signal source output power at
-10.00 dBm nominal.
For model .12, the RF out connector provides the following ways to generate a
signal source output power at -10.00 dBm nominal.
●
Tacking generator output
●
Continuous signal source output
●
Coupled continuous signal source output
For model .12, the RF out connector can also be configured as an internal DC
bias port. When the RF out is configured as a BIAS port, the RF out connector
provides direct current output. Active equipment under test can be supplied with
power via the bias port.
23Getting Started 1321.0944.02 ─ 06
Page 31
R&S®Cable Rider ZPH
Risk of electrical shock
To avoid electrical shock, the DC input voltage must never exceed the value
specified on the housing.
Risk of instrument damage
●
Make sure not to overload the RF input and keep within the maximum
allowed signal levels. Refer to the datasheet for the maximum allowed
signal levels.
●
To avoid damage to the coupling capacitor, input attenuator or the mixer,
the DC input voltage of 50 V must never be exceeded.
Instrument Tour
Left View
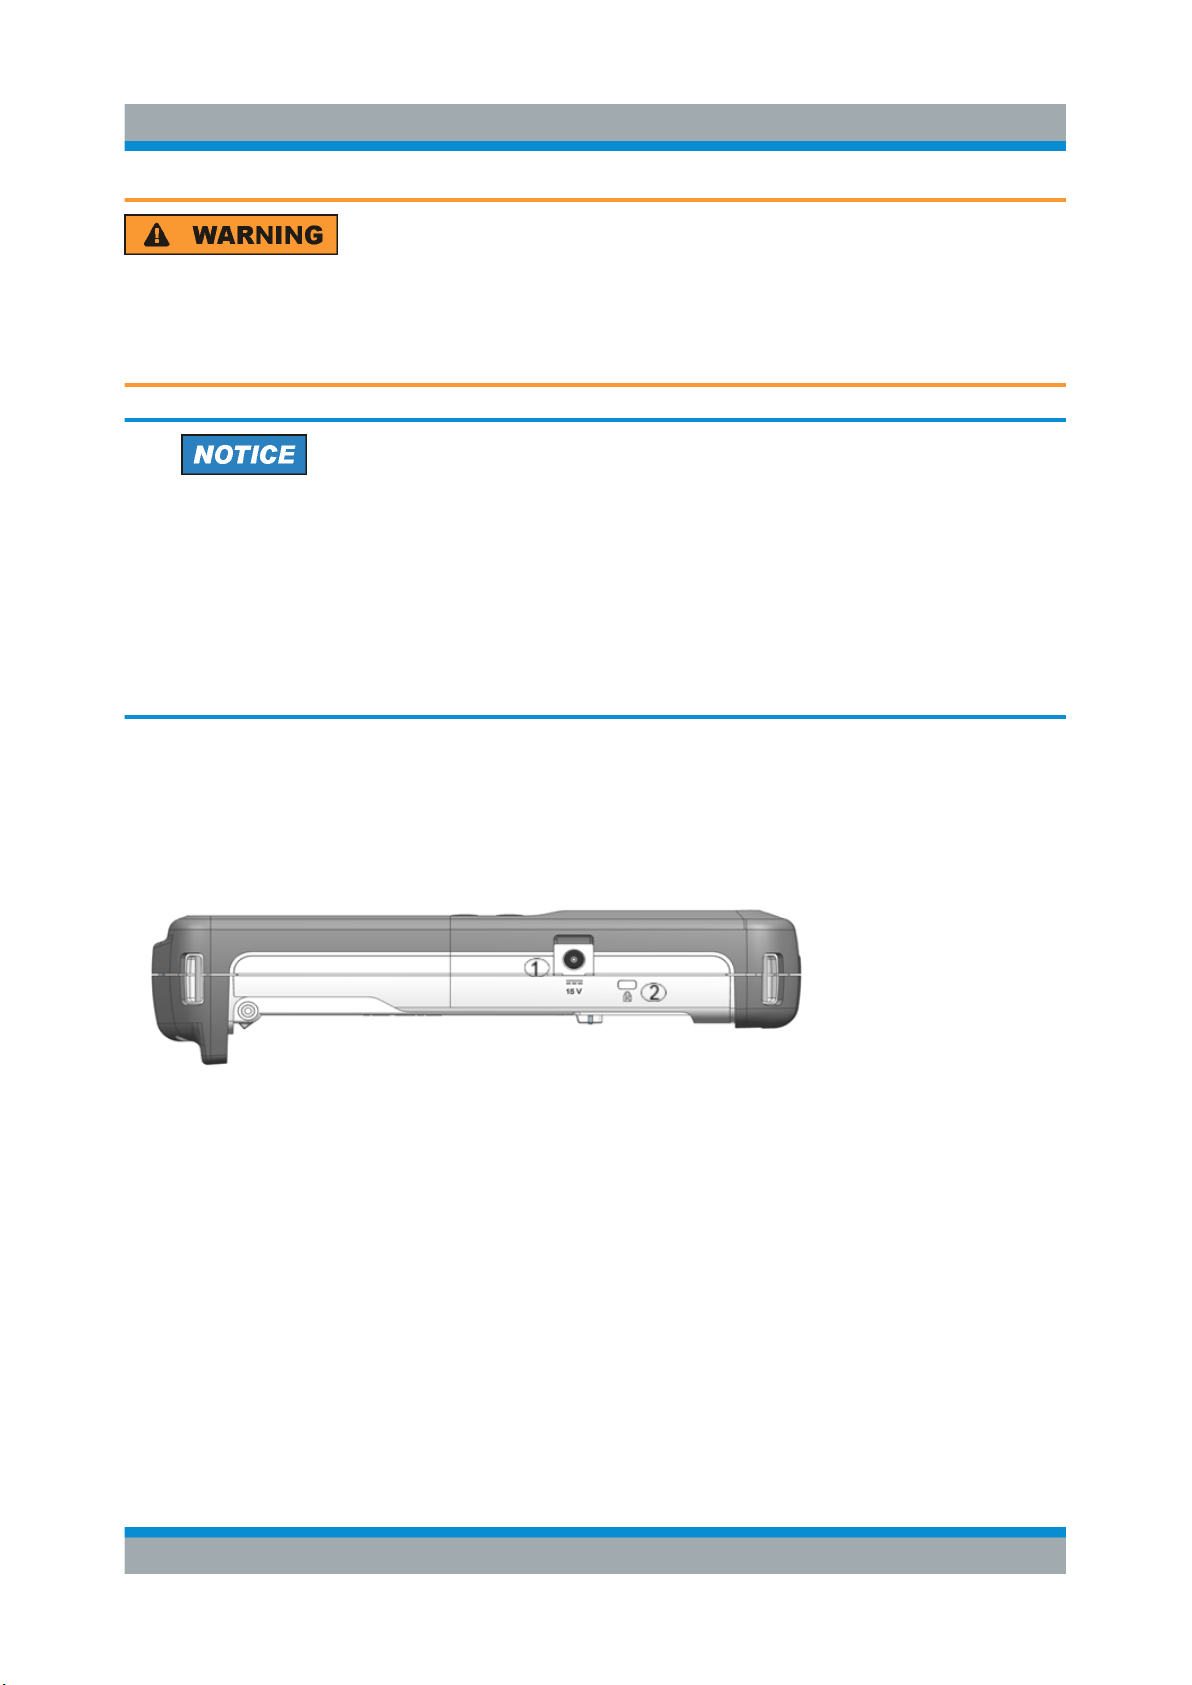
4.3 Left View
1 = DC input
2 = Kensington lock slot
DC input
The R&S Cable Rider ZPH is supplied with power by the AC/DC transformer
power supply via the DC connector. You can also use the DC connector to charge
the battery.
24Getting Started 1321.0944.02 ─ 06
Page 32
R&S®Cable Rider ZPH
Kensington lock slot
A Kensington lock can be anchored to the R&S Cable Rider ZPH housing to
secure it to a workstation mechanically.
Instrument Tour
Right View
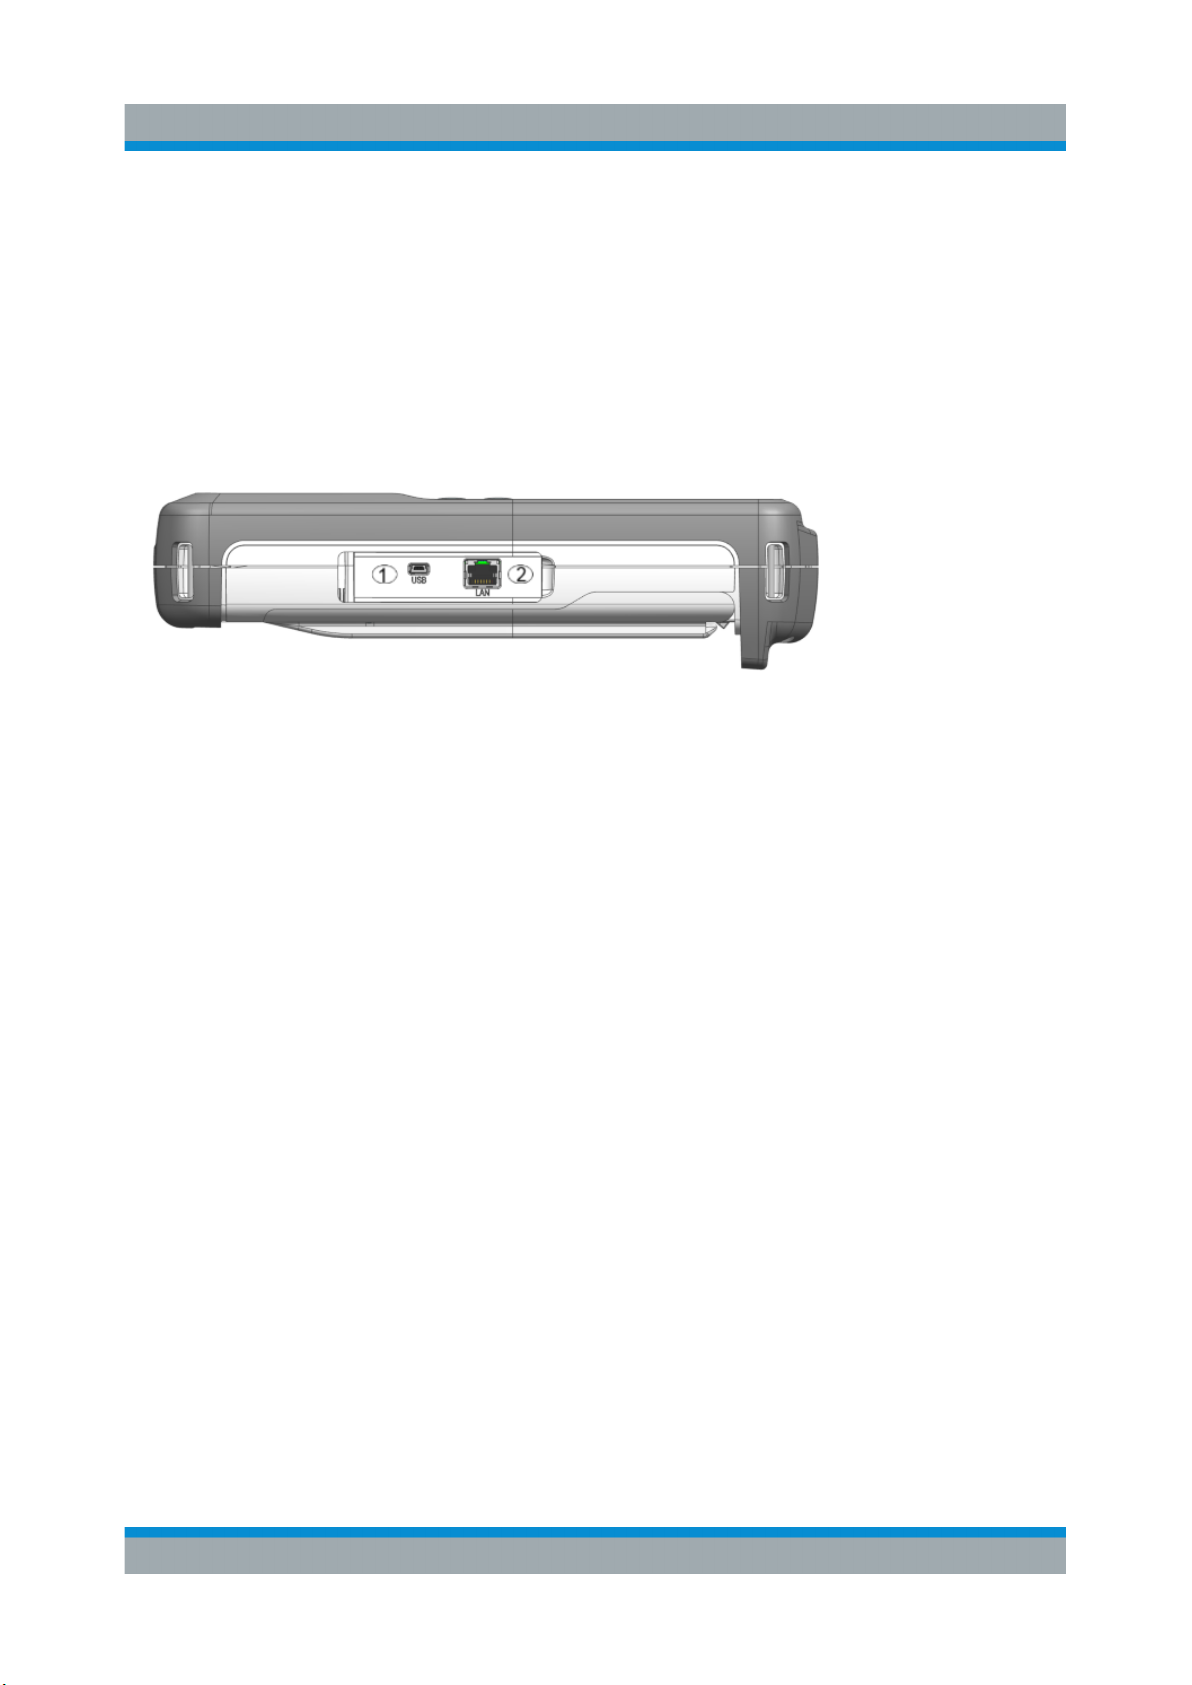
4.4 Right View
1 = Min USB port
2 = LAN port
LAN connector
RJ-45 connector to connect the instrument to a Local Area Network (LAN) and
transfer data in both directions. It supports up to 100 Mbit/s.
USB type B connector (mini USB)
Mini USB connector to connect a computer for remote control of the instrument
and transfer data in both directions.
25Getting Started 1321.0944.02 ─ 06
Page 33
R&S®Cable Rider ZPH
Instrument Tour
Display Overview
4.5 Rear View
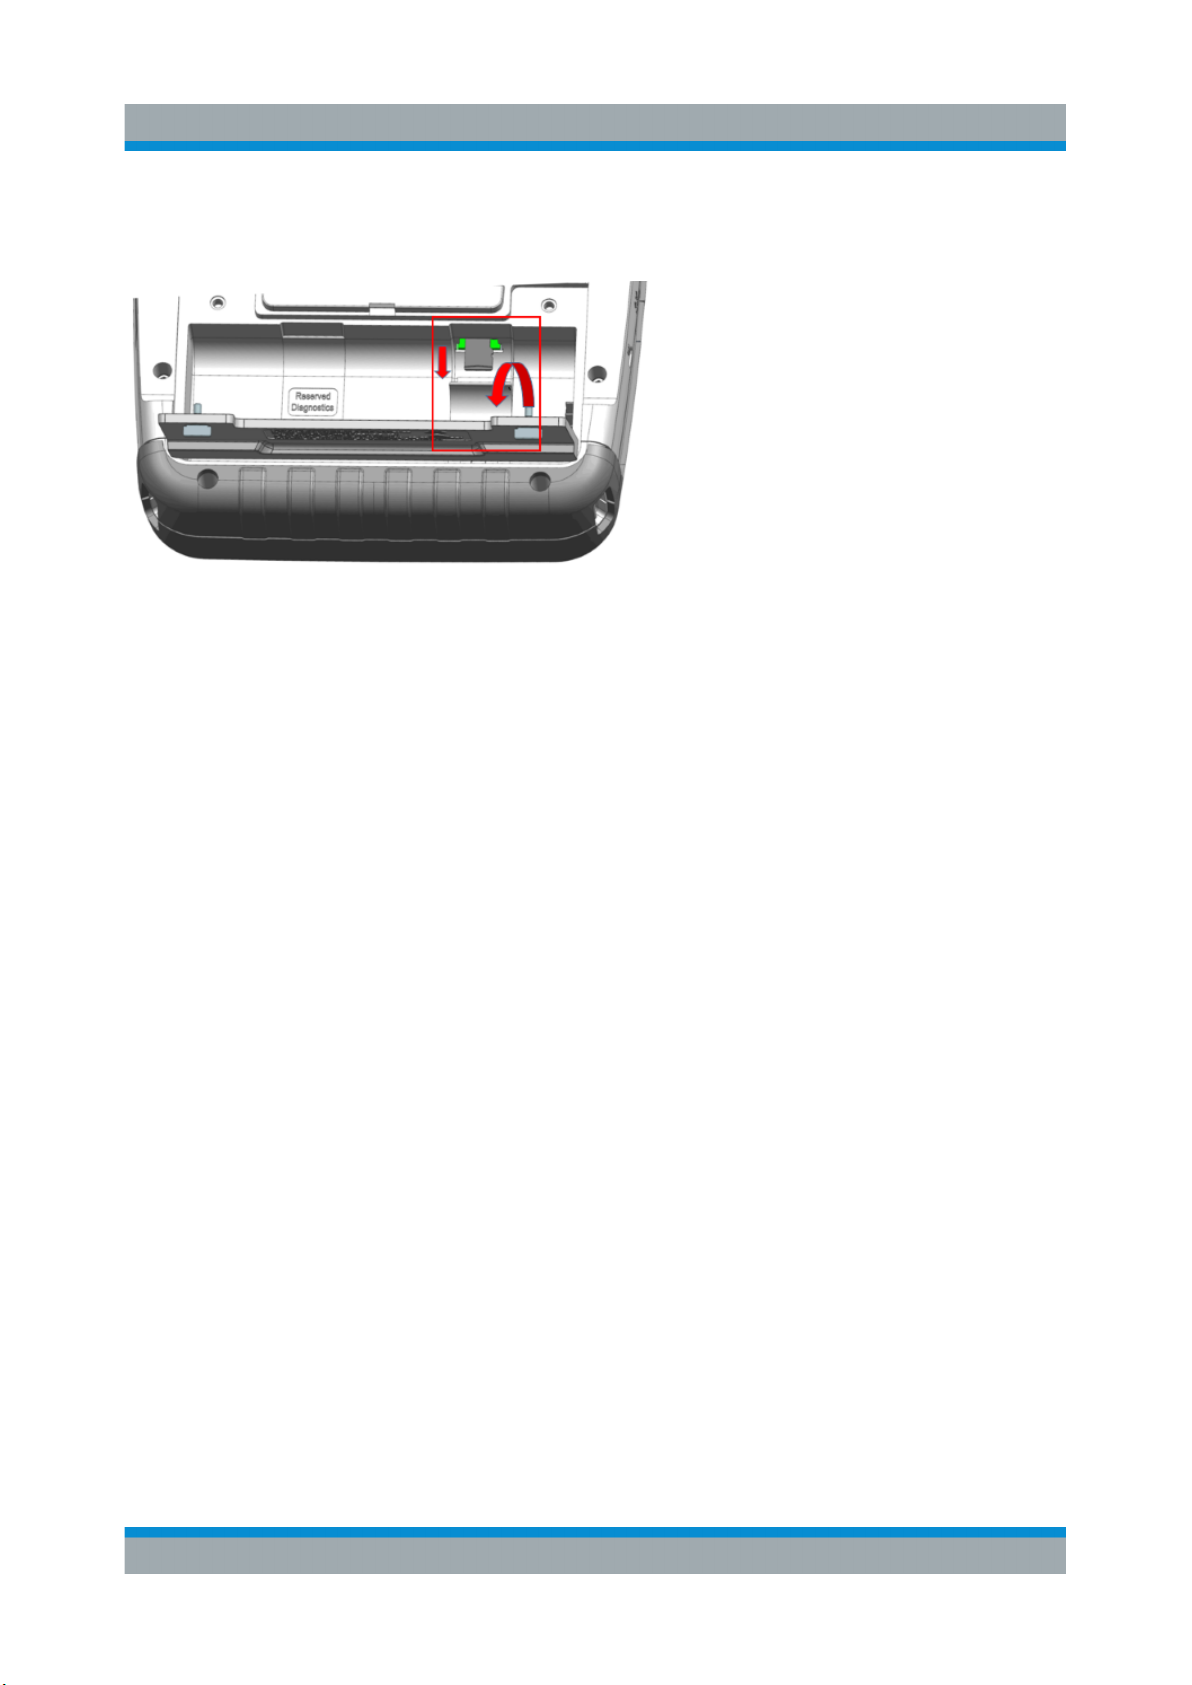
The micro-SD card slot is located behind the battery compartment of the R&S
Cable Rider ZPH.
Peel open the micro-SD card protective cap to access to the micro-SD card slot.
You can use the micro-SD card to store datasets or screenshots.
4.6 Display Overview
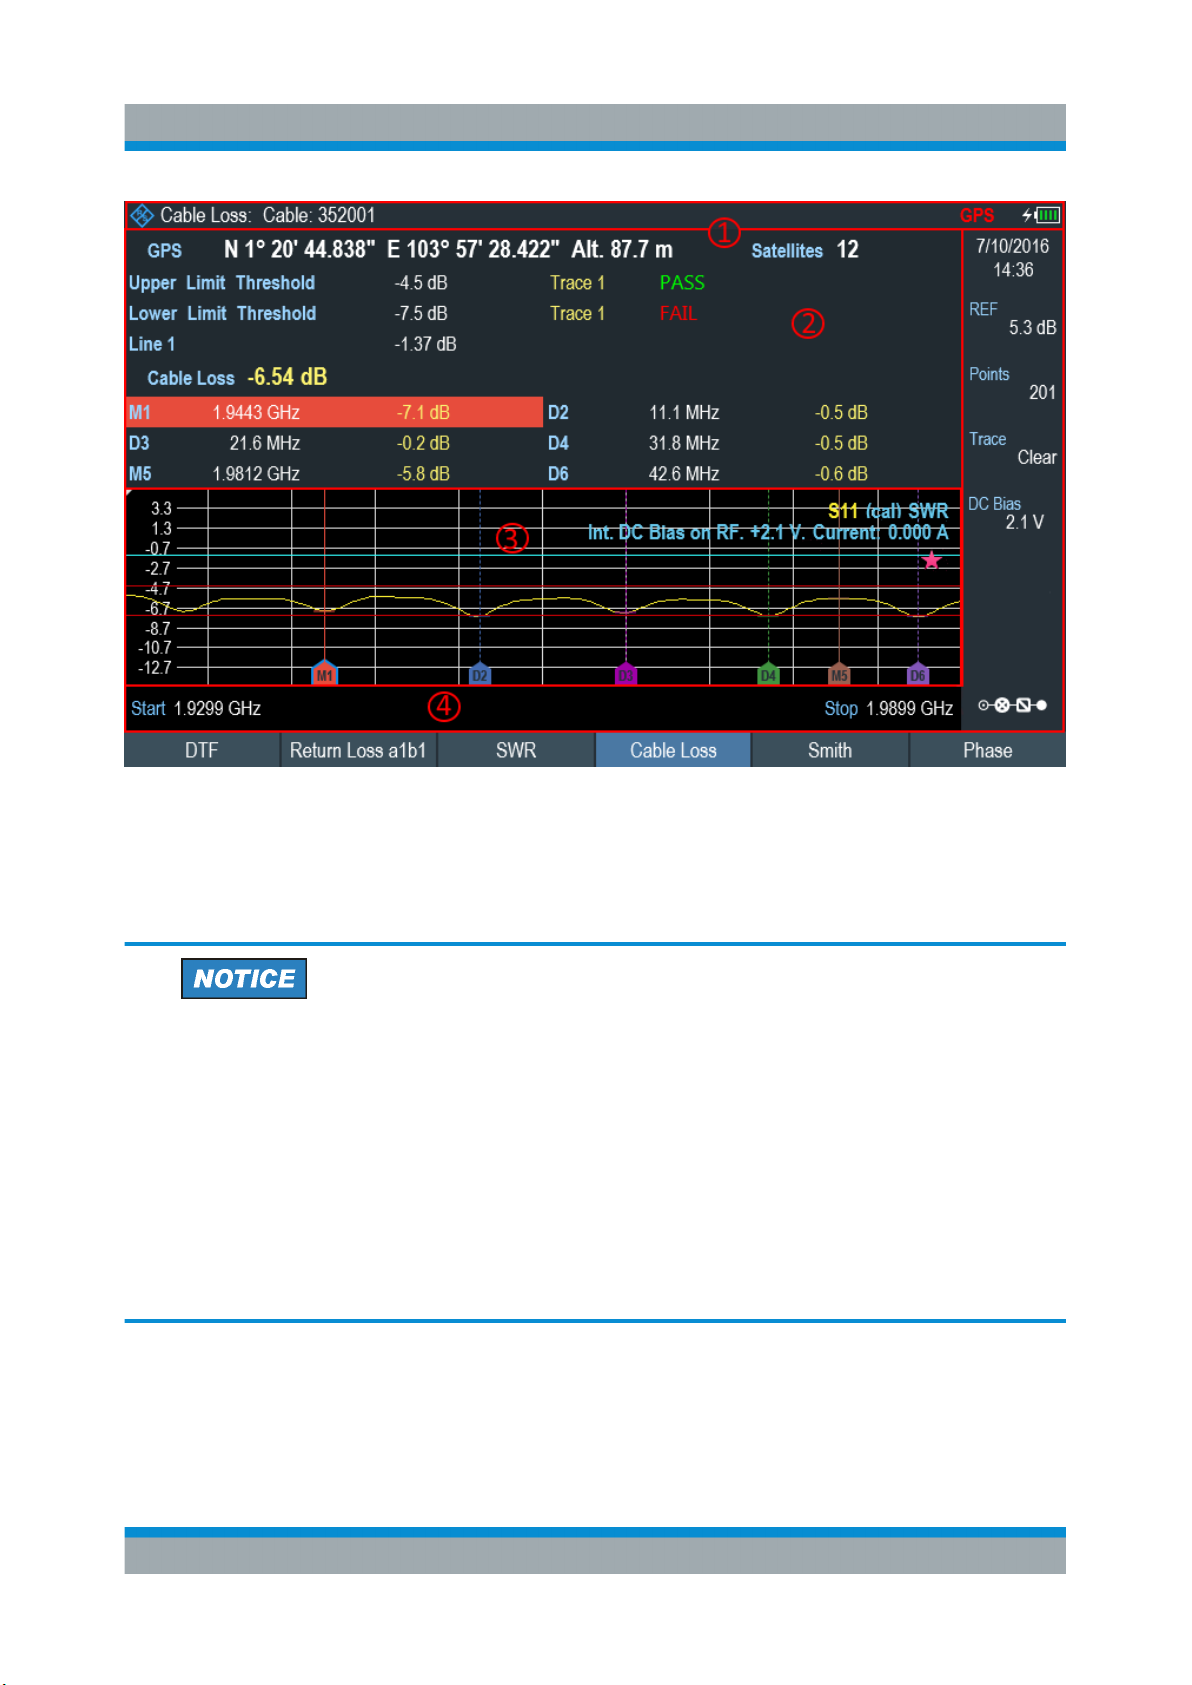
The display area has a touch-sensitive screen, the touch functionality can be
turned on or off in the instrument setup menu.
For information of the display areas and touchscreen gestures, see the R&S
Cable Rider ZPH user manual.
26Getting Started 1321.0944.02 ─ 06
Page 34
R&S®Cable Rider ZPH
Instrument Tour
Display Overview
1 = Title bar
2 = Measurement result view
3 = Measurement trace window
4 = Parameter view
Risk of touchscreen damage during operation
●
Never touch the screen with ball point pens or other pointed objects with
sharp edges.
●
It is recommended that you operate the touchscreen by finger only. As
an alternative, you may use a stylus pen with a smooth soft tip.
●
Never apply excessive force to the screen. Touch it gently.
●
Never scratch the screen surface, e.g. with a finger nail. Never rub it
strongly, for example with a dust cloth.
27Getting Started 1321.0944.02 ─ 06
Page 35

R&S®Cable Rider ZPH
Index
Index
A
AC adapter .............................................. 13
Application cards ....................................... 6
Application notes ....................................... 6
B
Battery insertion ...................................... 12
Battery maintenance ............................... 16
Battery operation
Battery (car adapter) ...........................14
Battery (charging) ............................... 14
Battery (external charger) ................... 14
Battery (replacement) ......................... 14
Brochure ....................................................6
C
Calibration certificate .................................6
Conventions .............................................. 6
D
Data sheet ................................................. 6
Documentation overview ........................... 5
W
White papers ............................................. 6
G
Getting started ...........................................5
I
Instrument tour ........................................ 20
P
Package contents .................................... 11
Positioning
Support ............................................... 12
Putting into operation ................................ 9
R
Release notes ........................................... 6
S
Safety instructions ..................................... 5
Service manual ..........................................5
Switching on and off the instrument ........ 18
U
Unpacking and checking the instrument ..11
User manual .............................................. 5
28Getting Started 1321.0944.02 ─ 06
 Loading...