

Page 1
Owner's Manual
HIGH SPEED BILL COUNTER WITH
COUNTERFEIT DETECTION
RBC-5000
Royal Sovereign International, Inc.
To register your product, please go to www.royalsovereign.com
Please read and retain these instructions.
Page 2
Thank you for purchasing the Royal Sovereign High Speed Bill Counter
with Counterfeit Detection, RBC-5000. This manual will provide you with
safety information, instructions for optimal use, and proper care and
maintenance for your product. Please read this manual carefully
before operating.
CONTENTS
SAFETY INSTRUCTIONS ............................................................................... 2
BOX CONTENTS & PRODUCT VIEW .................................................................. 3
QUICK START GUIDE ................................................................................... 4
CONTROL PANEL ........................................................................................ 5
PRODUCT OPERATION ................................................................................. 6 - 7
MAINTENANCE OF THE MACHINE ................................................................... 8
SPECIFICATIONS ....................................................................................... 8
TROUBLESHOOTING ................................................................................... 9
ERROR CODE DISPLAY AND SOLUTIONS ............................................................ 10
WARRANTY ............................................................................................. 11
1
Page 3
SAFETY INSTRUCTIONS
When using this machine follow these basic safety precautions to reduce risk of fire, electric shock, or injury.
WARNING
1. Only use the power cord that comes with the machine. Using a different power cord may result in electric
shock, fire, or cause serious damage to the machine. Plug the power cord into a properly grounded wall outlet.
2. Do not use the machine if the power cord is damaged. This may result in electric shock, fire, or other hazards.
3. Do not place the machine in an area where it may be exposed to water or other liquids.
4. To reduce the risk of electrical shock, do not take apart the machine. When service or repair is needed bring
to a qualified service repair technician.
5. When unplugging the power plug, grip the plug to pull it out. Pulling the cord may result in electric shock, fire,
or damage to the machine.
6. Do not place objects on the power cord and do not bend it excessively. This may result in electric shock, fire,
or other hazards.
CAUTION
1. Before dusting the machine with a brush, unplug the machine from the wall. Do not use liquid or aerosol
cleaners on the machine.
2. Do not use the machine in areas w
working properly.
ith high tem
3. When not using the machine for long periods of time, unplug the power cord from the outlet.
perature or
high humidity. This may result in the machine not
Read & Fully U
nderstand This Owner’s Manual Before Using This Machine.
2
2
Page 4
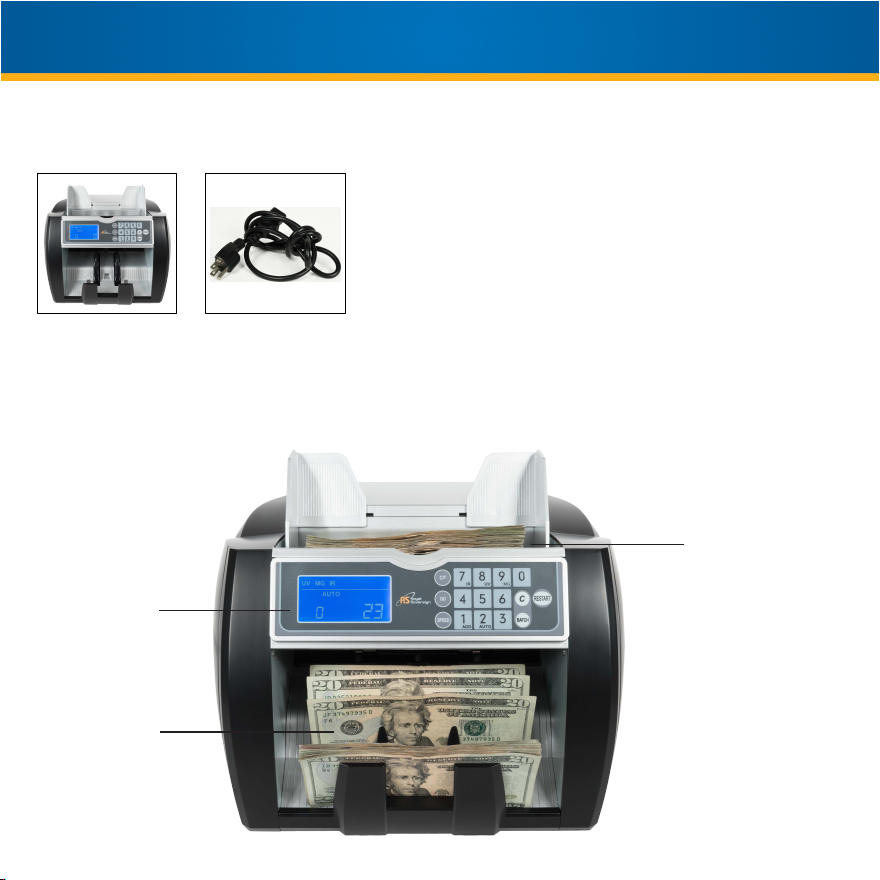
BOX CONTENTS
Bill Counter Power Cord
PRODUCT VIEW
Control Panel
Hopper
Bill Receiving
Vanes
3
Page 5

QUICK START GUIDE
1. Plug the power cable into the back of the unit and into the wall power outlet.
2. On the back of the machine, flip the power switch to power on.
3. The machine will go through an automatic self-diagnostics test to ensure accurate bill
counting. The counting wheels in the bill counter will spin several times to ensure it is ready for
use. When the machine has completed its test run and "0" displays on the machine, it is now
ready for counting.
4. Place your currency into the hopper to automatically begin counting.
For More Detailed Instructions, Go To Page 6
Carrying Handle
Power Switch
Power Socket
4
Page 6

CONTROL PANEL
UV Counterfeit Detection
Counterfeit bills often use white or bleached paper, which will glow under ultraviolet light. To use ultraviolet
counterfeit detection, press the "CF" button and then the "UV" button (#8 on the numeric keypad). Press the "CF"
button and then the "UV" button to disengage the UV function.
Magnetic Counterfeit Detection
If the magnetic detector does not find the presence of magnetic components that are standard in authentic bills, the
machine will stop counting to allow removal of the counterfeit bill. To use magnetic counterfeit detection, press the
"CF" button and then the "MG" button (#9 on the numeric keypad). Press the "CF" button and then the "MG" button to
disengage the MG function.
Infrared Counterfeit Detection
Most bills often have infrared markings. Infrared light is used to validate these markings. To use infrared counterfeit
detection press the "CF button" and then the "IR" button (#7 on the numeric keypad). Press the "CF" button and then
the "IR" button to disengage the IR function.
Dimensional Detection
The dimension detector measures the width of the center of each bill by using infrared light. If the detector finds an
odd-sized bill, the machine will stop counting to allow removal of the bill and display the error code on the preset
display. To use dimensional counterfeit detection, press the "DD" button. To adjust the DD level press the “DD” button
for 3 seconds, the display will show the current size (dd- -5). Press the numeric key 1 to 9 to adjust the level, 1 for
lowest, 9 for highest. After choosing the level number press the "RESTART" button to confirm. To disengage this
function press the "DD" button again.
5
Page 7

PRODUCT OPERATION
1. Attach power cable to back of machine, plug into a three prong outlet, and turn power switch on.
- The unit will conduct an automatic self-diagnostic test to ensure accurate counts.
- After five seconds, the screen will display a "0" on the left and on the right of the display with the
word "AUTO" above the zeros.
- If there is a problem, the preset display will show an error code. (See ERROR CODE DISPLAYS
-LOCATED ON PAGE 10.)
2. Select bill counting settings: Before counting, select counting settings that are related to your counting
needs:
- ADD mode:
To continuously add totals for a cumulative total when counting press the "CF" key on the control
panel, then the "ADD" button on the keypad (#1 on the keypad). Press the "CF" key then the "ADD"
button to cancel the add mode.
- BATCH mode:
The machine is preset to common counting mode, which automatically counts all bills placed into the
hopper. To count bills in predetermined batches, press the "BATCH" button. To clear the batch
function and return to original bill counting, press the "CLEAR" button.
• Press once for a batch quantity of 10
• Press twice for a batch quantity of 20
• Press three times for a batch quantity of 25
• Press four times for a batch quantity of 50
• Press five times for a batch quantity of 100
• CUSTOM BATCH MODE - Select the "BATCH" button, and use the numeric keypad to enter a
batch number between 1 and 999
- Bill Counting Speed:
Press the "SPEED" button on control panel and continue to press the key until you come to speed
setting you wish to use (800, 1,200, 1,600, 1,900).
6
Page 8

PRODUCT OPERATION (CONTINUED)
- Counterfeit Detection Methods
Ultraviolet and Magnetic Counterfeit Detection Methods are automatically on when the unit is powered
up. To manually turn off any or all methods see (CONTROL PANEL - LOCATED ON PAGE 5.)
- AUTO or MANUAL Start
The machine is preset to automatically start counting bills once placed into the hopper. To change to
the manual start mode, press the "CF" button and then the "AUTO" button (#2 on the numeric keypad).
MNL will appear on the display. Insert the bills into the hopper, and press "RESTART" button. Press the
"CF" button and then the "AUTO" button (#2 on the numeric keypad) to return to Auto mode.
- Bill Counting Mode
The bill counting mode is preset on type 2. To adjust the counting mode, press "SET" twice. Preset
display window will display "F". Use the keypad to select a type 1-3.
• Type 1 will not count counterfeit or irregular bills and stop counting to allow the removal of
bill(s) in question, and allow re-insertion of all bills into the hopper to restart counting from
zero.
• Type 2 will stop counting when a counterfeit or irregular bill is detected and include these
bills in the master count (shown on the count display).
• Type 3 will count counterfeit or irregular bills and continue counting, unless there is a jam
error (either EA2, two or more bills counted as one, or EA3, part of one bill overlapping
another bill), in which case the count may be inaccurate. In this case, bill(s) in question are
counted, and the machine will stop to allow re-insertion of all bills into the hopper to restart
counting from zero.
3. Place bills into the hopper to begin counting; press "RESTART" if in manual mode
7
Page 9

MAINTENANCE OF THE MACHINE
WARNING: Before doing any dusting, turn the power switch off and disconnect the power cord from the machine. It is very
important to clean all the sensors in the machine with a soft brush to avoid any paper particles or dust from sticking to the
light transmitter or the light-receiver sensors. It is important to clean the inside of the machine occasionally. Unplug the
machine and lift the top cover to gain access to the interior.
If necessary, the glass surfaces of the detectors may also be wiped with a soft cloth damped with alcohol.
To get the best results out of your bill counter, Royal Sovereign recommends using Royal Sovereign Cleaning Cards
(RBC-CLN) to remove dirt, dusts, oils, and other contaminates from bill counters. With the machine on, simply run the
cleaning card through the machine like a bill. This cleaning card will run through and clean the sensors of dirt and other
contaminates. Cleaning cards are recommended to be used after every 100 cycles.
CAUTION: DO NOT CHANGE THE POSITION OF THE DETECTORS AND/OR OPTICAL SENSORS
SPECIFICATIONS
Model
Power
Power Consumption
Temperature Range of Operation
Hopper Capacity
Counting Speed
Accepted Note Size
Display Range
Dimensions
Net Weight 10.80 lbs. / 4.90kg
100Vac/60Hz (240Vac/50Hz)
75W (Max)
0~40°C / 32~104°F
300 notes
800 / 1,200 / 1,600 / 1,900 bills per minute
L:50~100mm(1.9 - 3.9 in) W:90~190mm(3.5-7.5 in)
Counting: 4 Digits / Batch Counting: 3 Digits
250 × 230 × 255 mm (9.80 x 9.10 x 10.00 in)
RBC-5000
8
Page 10

TROUBLESHOOTING
Note: when counting and detecting is not accurate, please check the machine as follows:
Problem Reason Solution
Bills get Hopper To loosen the tension, please turn the bill thickness adjuster (located on the
damaged Tension
is too
tight
top of the machine) one notch to the right (+). Repeat bill counting and
adjust if problem continues.
Machine runs
slow
Bills eject from the
machine
Displayshows
miscount
9
Hopper
Tension
is too
tight
Hopper
Tension
is too
loose
Hopper
Tension
is too
loose
To loosen the tension, please turn the bill thickness adjuster (located on the
top of the machine) one notch to the right (+). Repeat bill counting and
adjust if problem continues.
To tighten the tension, please turn the bill thickness adjuster (located on
the top of the machine) one notch to the left (-). Repeat bill counting and
adjust if problem continues.
To tighten the tension, please turn the bill thickness adjuster (located on
the top of the machine) one notch to the left (-). Repeat bill counting and
adjust if problem continues.
Page 11

ERROR CODE DISPLAY AND SOLUTIONS
The display may show some error code in counting, which means there are some problems with the machine. Refer
to the chart below to solve the error.
Error Code Messages Solutions
A suspicious bill is detected by the UV function;
Problem with the UV function Lower the UV sensitivity level
Remove the suspicious bill from the stacker, press
“RESTART” to continue
A suspicious bill is detected by the MG function;
Problem with the MG function
A suspicious bill is detected by the IR function;
Problem with the IR function Lower the MG sensitivity level
A suspicious bill is detected by the DD function;
Problem with the DD function Lower the DD sensitivity level
Half note
Double note
Problem with the right counting sensor.
Problem with the left counting sensor.
Problem with main motor and control circuit.
Problem with drive belt. Problem with the feeding
sensor or the control circuit.
Problem with the reset sensor or the control circuit.
Remove the suspicious bill from the stacker, press
“RESTART” to continue;
Lower the MG sensitivity level
Remove all the bills from the stacker, press
“RESTART” to continue;
Remove all the bills from the stacker, press
“RESTART” to continue;
Remove all the bills from the stacker, press
“RESTART” to continue;
Remove all the bills from the stacker, press
“RESTART” to continue;
Clean the sensor.
Clean the sensor.
Contact Royal Sovereign Product Support.
Contact Royal Sovereign Product Support.
Most of the errors listed above may be caused by dust or dirt on the inside of the machine. Keeping the machine
clean is highly recommended
(Please refer to MAINTENANCE OF THE MACHINE - LOCATED ON PAGE 8).
10
Page 12

ONE YEAR LIMITED WARRANTY
Royal Sovereign International, Inc. warranties this product to be free from defects in material and workmanship for a
period of one (1) year. This warranty is extended to the original purchaser only.
This warranty only covers products that are properly installed, properly maintained, and properly operated in accordance
with the instructions provided. This limited warranty does not cover any failures or operating difficulties due to normal
wear and tear, accident, abuse, misuse, alteration, misapplication, improper installation, or improper maintenance and
service by you or any third party.
Returned product will not be accepted without a Return Authorization number. To request a Return Authorization number,
please visit us at www.royalsovereign.com. All transportation costs for the return of damaged product or parts will be the
responsibility of the purchaser. Return defective product, in original packaging, to the address below.
Royal Sovereign International, Inc. requires reasonable proof of your date of purchase from an authorized retailer or
distributor. Therefore, you should keep your receipt, invoice, or canceled check from the original purchase. The limited
warranty shall be limited to the repair or replacement of parts which prove defective under normal use and service within
the warranty period.
Royal Sovereign International, Inc. (and its affiliated companies) SHALL HAVE NO LIABILITY WHATSOEVER TO
PURCHASER OR ANY THIRD PARTY FOR ANY SPECIAL, INDIRECT, PUNITIVE, INCIDENTAL, OR CONSEQUENTIAL
DAMAGES. Some states do not allow the exclusion or limitation of incidental or consequential damages so the above
exclusion and limitations may not apply to you.
ROYAL SOVEREIGN INTERNATIONAL, INC.
2 Volvo Dr., Rockleigh, NJ 07647 USA
TEL: +1) 800-397-1025
Email: info@royalsovereign.com
For Product Support and Warranty Questions, Please Go To
www.royalsovereign.com/Customer Support
11
 Loading...