

Page 1
PROFESSIONAL PHOTO LAMINATOR
EDNord - Istedgade 37A - 9000 Aalborg - Telefon 9633 3500
OWNER'S MANUAL
NPH-1200N/900N
NPH-1200 / 900
PLEASE READ AND SAVE INSTRUCTIONS
ROYAL SOVEREIGN INTL.INC.
1
Page 2

-
-
-
-
-
-
-
-
-
-
-
-
-
-
-
-
-
-
TABLE OF CONTENTS
EDNord - Istedgade 37A - 9000 Aalborg - Telefon 9633 3500
TOPICS PAGE
INTRODUCTION ----------------------------------------SAFETY PRECAUTIONS ----------------------------------CHARACTERISTICS OF NPH-1200N/900N --------------------SPECIFICATIONS ---------------------------------------SETUP -----------------------------------------------MAJOR PARTS IDENTIFICATION ----------------------------CONTROL PANEL INSTRUCTIONS ----------------------------
1.CONTROL PANEL SETTINGS ----------------------------
2.LCD WINDOW --------------------------------------
3.BUTTON FUNCTIONS ---------------------------------
4.HOW TO SET THE BUTTONS --------------------------*SET TEMPERATURE -------------------------------*SPEED CONTROLS --------------------------------*CHECK TEMPERATURE ON THE ROLLER ----------------*MEMORY WORKING CONDITION AND
USING THE MEMORY SETTING -----------------*COLD MODE --------------------------------------
LAMINATING STEPS --------------------------------------
1.HOT LAMINATING ------------------------------------
2.COLD LAMINATING -----------------------------------
3.COLOR FOIL LAMINATING -----------------------------
4.MOUNT BOARD LAMINATING ---------------------------
HOW TO CLEAN ROLLERS AND REMOVE STUCK
OR JAMMED FILMS ---------------IMPORTANT SAFETY CONCERNS ---------------------------MAINTENANCE -----------------------------------------A/S PARTS -------------------------------------------TROUBLE SHOOTING ------------------------------------ONE YEAR LIMITED COMMERCIAL/PROFESSIONAL WARRANTY -----
3
3
4
5
5
6
7
7
8
9
10
10
10
10
11
11
12
12
13
14
15
16
17
17
17
17
18
2
Page 3

g
INTRODUCTION
EDNord - Istedgade 37A - 9000 Aalborg - Telefon 9633 3500
Thank you for purchasing a Royal Sovereign Laminating Machine.
To insure high quality lamination, please read this instruction manual thoroughly.
For additional product support or factory-direct ordering information, call Royal
Sovereign Customer Service at (201)568-0830 or toll free call, (800)397-1025.
SAFETY PRECAUTIONS
The safety recommendations outlined in this section are to be read,
understood and followed before operating the machine.
Keep this information for future reference. Failure to comply with any of
the following safety procedures could result in serious personal injuries
1. To prevent the possibility of electrical shock, do not immerse machine
in water or permit liquids to get inside.
2. Do not allow articles of clothing (neckties, scarves, etc.) or papers near
the front or rear of the machine while operating as they could get cought
by the rollers and be pulled inside, causing personal injury.
3. Do not attemp to laminate that exceed total recommended material
thickness.
4. Do not operate machine for any other purpose than its intended use.
5. Do not operate machine when electrical plug or power cord is damaged.
6. Turn off the power when not in use. Unplug machine
before movin
7. This machine is indoor use only.
8. Do not alter the electric plug in any use.
it or when it is not in use for an extended period of time.
3
Page 4

CHARACTERISTICS OF LAMINATOR NPH-1200N/900N
EDNord - Istedgade 37A - 9000 Aalborg - Telefon 9633 3500
This machine has been designed using the latest laminating technology.
1. This machine is controlled by a state-of-the-art Microprocessor.
a) Protect the rollers--When the power is off or a power failure occurs, rollers
continue to turn until the unit properly cools down.
b) Automatic overheating protection--If a temperature sensor should fail,
the heating elements will not heat up.
c) You can set your own operating conditions into "Memory".
2. Temperature and speed can be adjusted, to properly laminate various
film thickness.
3. A buzzer rings, alerting you that a butten has been pressed. This prevents
accidental setting changes.
4. Roller cover may be opened for easy access to clean the rollers.
5. Thermostats are used to economically maintain consistent temperature.
4
Page 5

SPECIFICATIONS
EDNord - Istedgade 37A - 9000 Aalborg - Telefon 9633 3500
Description
Dimensions(w x d x h)
Max.Laminating Width
Max.Lam. Thickness
Film Thickness
Transport Type
Heat Source
Pre-Heating Time
Temp. Operating Range
Cooling Fan Type
Motor Type
Max. Laminating Speed
Weight
Voltage / Cycle AC 120V/60Hz (AC230~240V ,50/60Hz)
Power Consumption
NPH - 1200N
580x290x135mm
(22.8"x11.4"x5.3")
330mm
(13")
2mm
(1/12")
75 ~ 250mic
(3 ~ 10 mil)
Four Roller (no carrier)
Hot Roller Type
4 ~ 5 min
20 ~ 160℃
DC FAN
DC GEARED MOTOR
750mm/min
(29.5" per min)
11Kg
(24 lbs)
1000W 850W
NPH - 900N
505x290x135mm
(19.9"x11.4"x5.3")
240mm
(9.4")
9Kg
(20 lbs)
SETUP
Place laminator on a sturdy, flat work surface. Allow ample clearence behind laminator
for laminated document or photograph to exit completely without bending.
Connect laminator to an electrical outlet that matches laminator's rated voltage and
power requirements.
If an extension cord is required, use a cord rated higher than the laminator's capacity.
5
Page 6
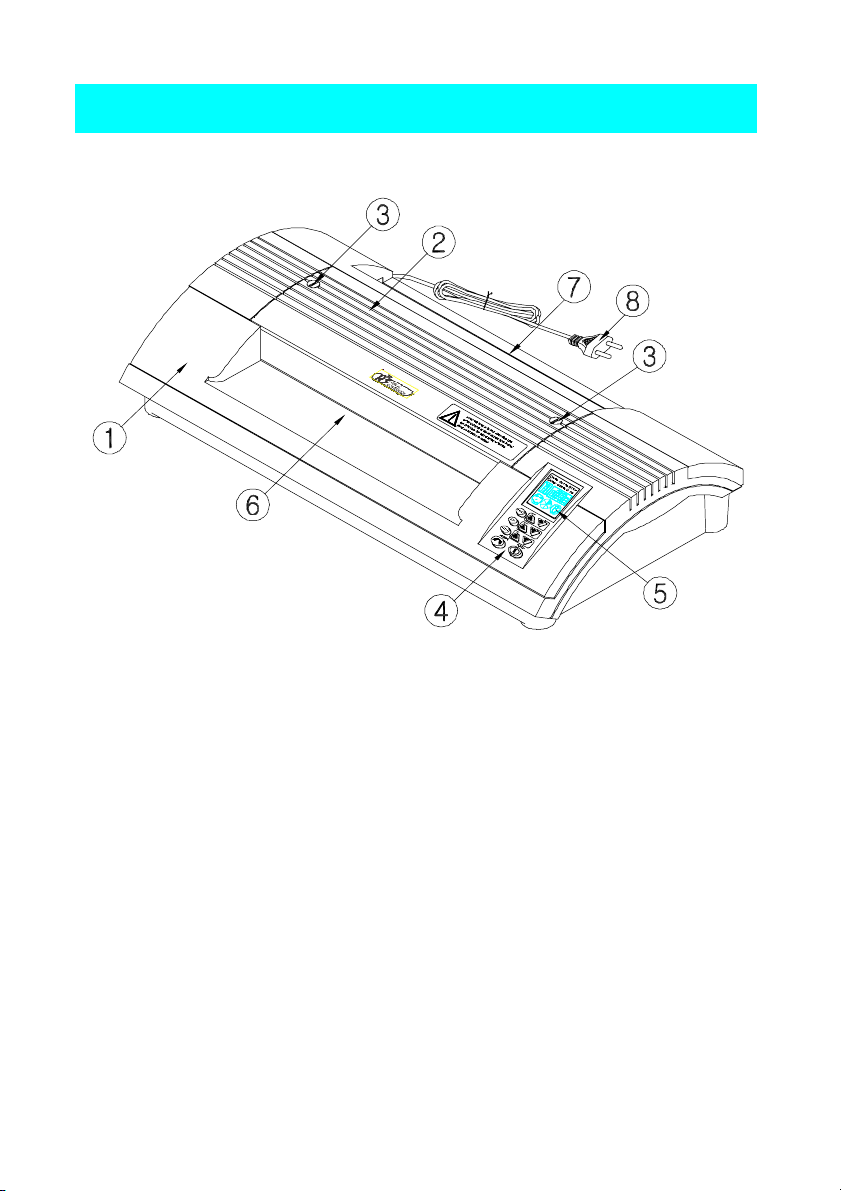
MAJOR PARTS IDENTIFICATION
EDNord - Istedgade 37A - 9000 Aalborg - Telefon 9633 3500
1. Top Cabinet
2. Roller Cover
3. Roller Cover Screws
4. Control Panel
5. LCD Window
6. Input
7. Output
8. Power Cord
6
Page 7

CONTROL PANEL INSTRUCTIONS
EDNord - Istedgade 37A - 9000 Aalborg - Telefon 9633 3500
Appropriate speed and temperature may be set, using the LCD controller.
The LCD panel was designed for convenience, by incorporating the ability to program
your settings into "Memory".
1. CONTROL PANEL SETTINGS
LCD DISPLAY
T-Check
HOT/COLD
COLD
BUTTONS
MEMORY
7
Page 8

2. LCD WINDOW
EDNord - Istedgade 37A - 9000 Aalborg - Telefon 9633 3500
1.
* 6 film thickness options
75 Mic=3 mil, 100 Mic=4 mil, 125 Mic=5 mil
175 Mic=7 mil, 250 Mic=10 mil
2. SPEED
* 7 speed options
Setting 1 is slowest / Setting 7 is fastest
3. TEMPERATURE
Display the present temperature.
4. Is displayed when the
present temperature is
reached.
5. Indicates to wait till
blinking stops.
Current temperature is
higher or lower than the
preset temperature.
6. Displayes the direction
of the rollers.
7. Shows cold function.
8
Page 9

3. BUTTON FUNCTIONS
EDNord - Istedgade 37A - 9000 Aalborg - Telefon 9633 3500
T-Check
T-Check
: Check current temperature
HOT/COLD
: Hot/Cold function
HOT/COLD
COLD
MEMORY
: Working condition and
MEMORY
Cold function cancel
: Reverse function
: Power On/Off
: Increase temperature
: Decrease temperature
: Increase speed
: Decrease speed
: Restore the memorized
working setting
: Restore the memorized
working setting
9
Page 10

4. HOW TO SET THE BUTTONS
EDNord - Istedgade 37A - 9000 Aalborg - Telefon 9633 3500
(Buzzer rings each time you press the button.)
***SET TEMPERATURE***
1.Temperature available range from
20℃ to 160℃.
2.Each time you press or to set temperature,
it will change 1℃(1℉) at a time. If you press the
button for more than 2 seconds, temperature will
change automatically.
***SPEED CONTROLS***
1.You can use 7 different lamination speed.
2.You can change speed with or
***CHECK TEMPERATURE ON THE ROLLER ***
1. Press button when check the current temperature.
T-Check
2. The current temperature will blink on the display
for a second and turns back to the setting mode.
T-Check
10
Page 11

n
MEMORY
EDNord - Istedgade 37A - 9000 Aalborg - Telefon 9633 3500
***MEMORIZING WORKING CONDITION AND
USING THE MEMORIZED WORKING CONDITION***
1) Memorizing working condition
1. The laminator can memorize up to 6 settings.
2. Use up and down arrows to set or
3. When you complete the optimum laminating conditions
(Speed & Temperature), button.
MEMORY
This setting is memorized and confirmed when the
light blinks.
4. To enter other settings into memory, repeat steps
2 and 3.
2) Using the memorized settings
1. You can choose any one of 6 settings in memory.
2. Use the up and down arrows to select or
a setting form memory.
***COLD MODE***
1. Press button. It will show a on the display.
HOT/COLD
2. The speed will always be shown "2" and there is no memory
setting this function.
3. Speed can be varied 0 to 7 by selecting or butto
4. You can release the machine from cold mode by
HOT/COLD
pressing
HOT/COLD
11
Page 12

LAMINATING STEPS
EDNord - Istedgade 37A - 9000 Aalborg - Telefon 9633 3500
1. HOT LAMINATING
1. Press the power button.
2. Please refer Information Panel on the front of product.
3. Select a memory setting by pressing the and button.
4. It is ready when the LCD window shows and the buzzer rings three times.
5. After Insert document or photograph to be laminated into a laminating pouch,
insert pouch squarely into opening slot.
6. Finished laminated pouch will exit through rear of machine.
7. Emerging laminated document is hot to touch. Please handle it to be cooled down.
(If document is not laminated well, do lamination again.)
8. When the machine is on for an extended period of time, use a slightly lower
temperature setting as the internal temperature of the machine may actually be
higher than the preset temperature, which may cause the document may ripple
or bend.
9. When you are finished laminating, press the power button to turn off.
***USEFUL INFORMATION***
* When continuously laminating, the ready signal ( ) may disappear and the
waiting signal may be displayed on LCD window.
At this time, if pouch is being laminated, finish laminating and then
laminate new one after is showed.
* Do not laminate empty or thin pouch on a thick film setting.
The pouch could stick to the roller.
* Do not unplug laminator while laminating.
This could be fatal for the rollers due to the high internal temperature.
12
Page 13

2. COLD LAMINATING
EDNord - Istedgade 37A - 9000 Aalborg - Telefon 9633 3500
1. Press the power button to turn on.
2. Press
HOT/COLD
3. It is ready when LCD window shows and the buzzor rings three times.
4. Insert document into a Royal Sovereign cold laminating pouch as follows.
**HOW TO ATTACH DOCUMENT ON COLD POUCH FILM**
1) Prepare cold pouch film.
Back
2) Remove protective paper inside cold pouch.
(Be careful not to allow the pouch to close and
seal itself closed. If the pouch closes on itself
and seals,you will not be able to the document
to be laminated inside.)
Front
3) Place document squarely into the pouch, where
the protecting paper was.
Cold film's minimum border of about 3mm(1/8")
is necessary to provide a proper edge seal.
4) Beware of dust while inserting document.
k
a
c
B
5) Feed pouch squarely into opening slot.
5. Finished laminated pouch will exit through rear of machine.
6. When you are finished laminating, press the power button to turn off.
***USEFUL INFORMATION***
If it has recently been used for hot lamination, allow the rollers to be
cooled down about 20~30 minutes.
13
Page 14

3. COLOR FOIL LAMINATING
EDNord - Istedgade 37A - 9000 Aalborg - Telefon 9633 3500
**Your laminator has ability to add color by applying color foil to documents copied
or printed by lasor printer or toner copier.**
**PAPER CARRIER is required**
1. Press the power button to turn the laminator on.
2. Find FOIL FUNCTION using the up arrow.
3. It is ready when LCD window shows and the buzzer rings 3 times.
4. Position the color foil on document and put it in paper carrier.
5. Feed paper carrier squarely into opening slot.
6. Finished laminated paper will exit through rear of machine.
7. When you are finished laminating, press the power button to turn off.
***USEFUL INFORMATION***
* The document, which has been foil laminated, is pretty hot and easily
bent. Try not to touch the document until it has cooled down.
* When you are applying foil to small areas or using several colors, use tape provided,
to hold the foil in place.
(Foil laminating temperature is set for a bond paper.)
14
Page 15

4. MOUNT BOARD LAMINATING
EDNord - Istedgade 37A - 9000 Aalborg - Telefon 9633 3500
**You can laminate photographs or pictures on a hard mounting
board up to 2mm thickness**
1. Press the power button to turn on.
2. Temperature 130 and speed 1 is set for Foil function.
3. It is ready when LCD window shows and the buzzor rings 3 times.
4. Set material on Mount board then slide them into the opening slot
5. Finished board will exit through the rear slot of machine.
6. When finish, press the power button and turn off.
***USEFUL INFORMATION***
* The document, which has been mounting board laminated, is pretty hot
and easily bent. Try not to touch the document until it has cooled down.
* When laminating to mounting board 2mm, pressure adjustment is needed for
good quality lamination.
***LAMINATION PRESSURE ADJUSTMENT***
1. Unscrew 6 retaining screws of bottom and lift off top cover.
2. Locate each end of left and right pressure spring and set in the upper position, as
shown.
3. Reassemble top cover with retaining screws and do lamination.
*For general lamination, set pressure springs to lower position.
15
Page 16

HOW TO CLEAN ROLLERS AND REMOVE
EDNord - Istedgade 37A - 9000 Aalborg - Telefon 9633 3500
STUCK OR JAMMED TO FILMS
1. Cleaning rollers with a clean and thick paper
1) If film adhesive apears on the laminated pouch surface, Insert a sheet of clean, thick
paper (about 0.5mm(1/50") thickness) into the machine 2~3 times on 100℃(212℉)
setting. The paper will attract the excess adhesive from the roller.
2. Cleaning rollers with cleaning solvent.
1) When rollers are hot, turn on and set
"COLD" mode to cool them down.
2) After cooling, the machine automatically stops.
3) Unscrew 2 retaining screws on the cover
Roller Cover
by using a screw driver or a coin. Turn them
towards counterclockwise. After remove them,
lift off the cover.
4) Use a recommended silicon roller cleaning
solvent such as Laminex Poly-Off or
equivalent, on a lint-free cloth to clean
residue of laminate adhesive on exposed
roller surface.
You can clean every corner of the rollers
as turn the power switch and make them roll
Prevent any liquid from spilling into the unit.
5) Re-assemble the unit in reverse-order of
disassembling.
* Do not turn the unit on until the rollers are completely dry. Wet rollers
could cause serious harm.
16
Page 17

IMPORTANT SAFETY CONCERNS
EDNord - Istedgade 37A - 9000 Aalborg - Telefon 9633 3500
1. Please be cautious that neckties, necklaces, long hair and clothing are
kept well away while operating the laminator.
2. Prevent children from accessing the machine.
3. Make certain that the machine is connected to an adequate power source.
4. Do not use for any purpose other than lamination.
MAINTENANCE
1. Width of upper and lower side of film should be same in order not to
allow melted adhesive resin to stick to the rollers.
2. Routine cleaning of rollers is required to prevent adhesive build-up.
3. Always keep the area around the machine clean.
To remove dust, finger prints, etc. from housing, use diluted alcohol
on lint-free cloth and do not permit liquids to get into laminator.
(Do not use strong alcohol or petroleum-based cleaning solvents or
abrasives.)
ASSEMBLY PARTS
1. Owner's manual : 1
2. Roller cleaning papeer : (A3) 3 pcs
TROUBLE SHOOTING
* Motor doesn't work. . Power cord may not be . Check the power cord.
plugged in.
. Power switch is OFF . Check that the switch is on.
* Film is not laminated. . Cold mode may be set. . Change the function to
* Result of lamination . Temperature on the . Increase temperature
is not clear. roller is too low or or decrease speed.
laminating is too fast.
17
Check pointSymptom Cause
hot lamination
Page 18

ONE YEAR LIMITED COMMERCIAL/PROFESSIONAL WARRANTY
EDNord - Istedgade 37A - 9000 Aalborg - Telefon 9633 3500
This product is warranted for 1 year from date of purchase to be free from
electrical or mechanical defects in material and workmanship. Should product
fail to operate during warranty period, return it, freight prepaid, to Royal
Sovereign Corporation, 100 West Sheffield Avenue, Englewood, NJ 07631,
for service. There will be no charge for parts and labor to repair or replace this
product whthin warranty period. When returning machine, purchaser must
include a photo copy of purchase receipt and a check or money order for
$20.00 to cover return shipping and handling. Please include a brief note
explaining the problem.
This warranty is voided in cases of improper use, abuse, mishandling and
unauthorized modifications or repairs. This warranty does not cover suitability of
this product for specific applications. Determining suitability of each application
is solely the reponsibility of the user. This warranty does not cover incidental or
consequential damages resulting from its use.
This warranty is not to be considered a service contract, and does not cover
routine adjustment, cleaning, jams or removal of materials that have become
stuck inside machine.
This warranty does not cover damage or injury resulting from improper use or
failure to follow the instruction manual provided. In no event will manufacturer,
importer, warranty service center, its agents or assigns, be liable for losses,
either direct or indirect, including but not limited to special, incidental, consequential, or punitive damages whatsoever incurred arising out of any breach of
warranty by manufacturer, importer, warranty service center, their heirs or assigns
or successors in interest. Purchaser hereby accepts and agrees to these
conditions by returning the registration card to the warranty service center.
There are no other warranties either expressed or implied other than this written
limited warranty. This warranty gives you specific legal rights, and you may also
have other rights which vary from state to state. Warranty registration card must
be mailed within ten days of purchase.
WARNING: Please read all safety warnings and instructions before using this
product. Improper use or failure to read and follow instructions may cause a
fire, the unit to overheat, or serious personal injury.
18
 Loading...