

Page 1
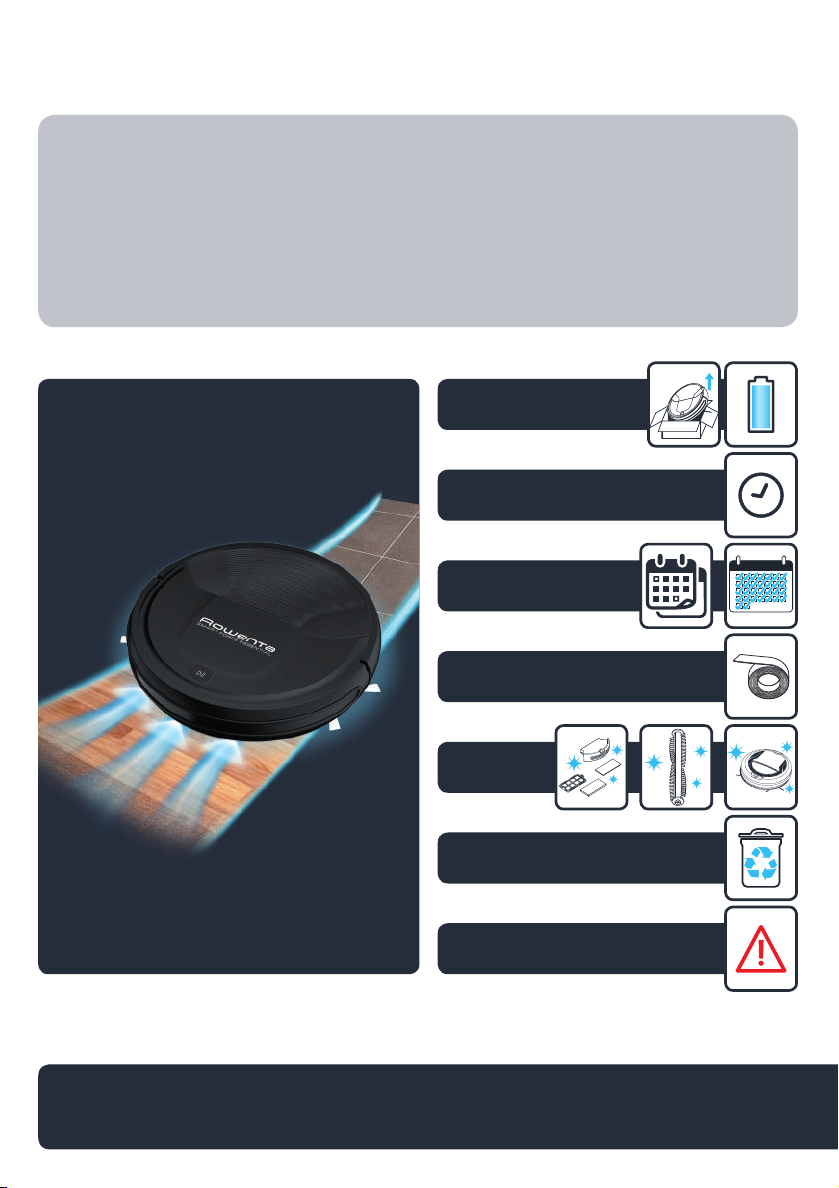
EN User’s guide
month
FR Guide de l’utilisateur
ES Guía del usuario
IT Manuale d’uso
DE Bedienungsanleitung
NL Gebruiksaanwijzing
PT Manual do utilizador
RO Ghidul utilizatorului
BG Ръководство на потребителя
CS Navod k použiti
SK Používateľská príručka
UK Інструкції з експлуатації
1.
2.
3.
*
4.
5.
6.
7.
Smart ForceTM Essential
Page 2

2
Page 3

FR Veuillez lire attentivement le livret “Consignes de sécurité et d’utilisation“ avant la première utilisation / EN
Please read carefully the “Safety and use instructions” booklet before first use / DE Lesen Sie vor dem erstmaligen
Gebrauch aufmerksam die Broschüre „Sicherheits- und Bedienungshinweise“ durch. / NL Gelieve vóór het eerste
gebruik aandachtig het boekje met de veiligheids- en gebruiksvoorschriften door te nemen / ES Lea detenidamente
el libro «Instrucciones de seguridad y de uso» antes de utilizar el aparato por primera vez / PT Leia atentamente o
manual «Instruções de segurança e utilização» antes da primeira utilização / IT Leggere con attenzione il libretto
“Norme di sicurezza e d’uso” al primo utilizzo / RO Înainte de prima utilizare, citiţi cu atenţie manualul „Instrucţiuni
de siguranţă şi de utilizare” / BG Моля, прочетете внимателно книжката “Препоръки за безопасност и употреба”
преди първоначална употреба / CS Před prvním použitím si, prosím, pečlivě prostudujte „Bezpečnostní pokyny pro
použití“ / SK Pred prvým použitím si pozorne prečítajte „Bezpečnostné pokyny pre použitie“ / UK Перед першим
використанням уважно прочитайте посібник «Правила техніки безпеки та рекомендації щодо використання»
FR Pour plus d’informations / EN For more information / DE Weitere Informationen / NL Voor meer informatie / ES
Para más información / PT Para mais informações / IT Per ulteriori informazioni / RO Pentru informaţii suplimentare
/ BG За повече информация / CS Více informací naleznete zde / SK Pre viac informácií / UK Для отримання
детальнішої інформації
www.rowenta.com
3
Page 4
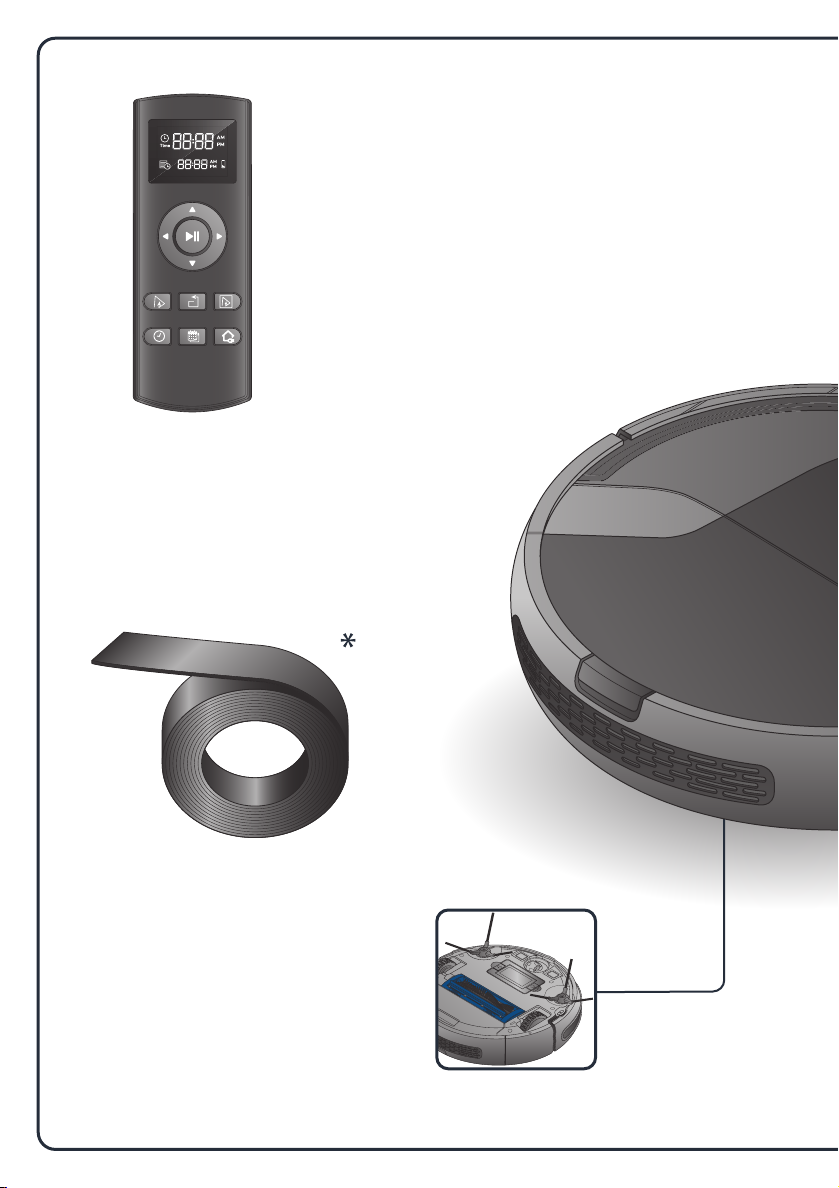
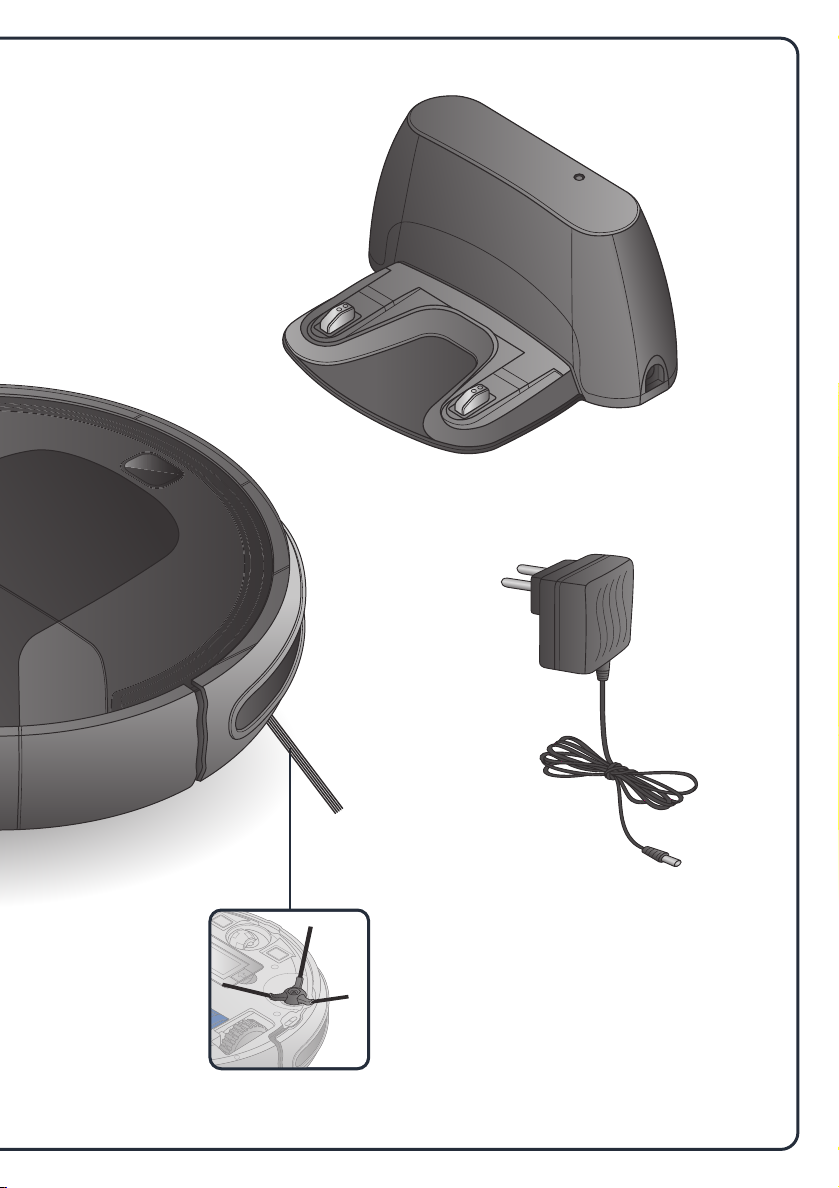
*
FR Selon modèle / EN Depending on model / DE nur für Modelle mit Magnetsensor / NL Afhankelijk van het model / ES Según modelo / PT
Consoante o modelo / IT Secondo i modelli / RO În funcţie de model / BG В зависимост от модела / CS podle modelu / SK podľa modelu / UK
*
залежно від моделі
4
Page 5
5
Page 6
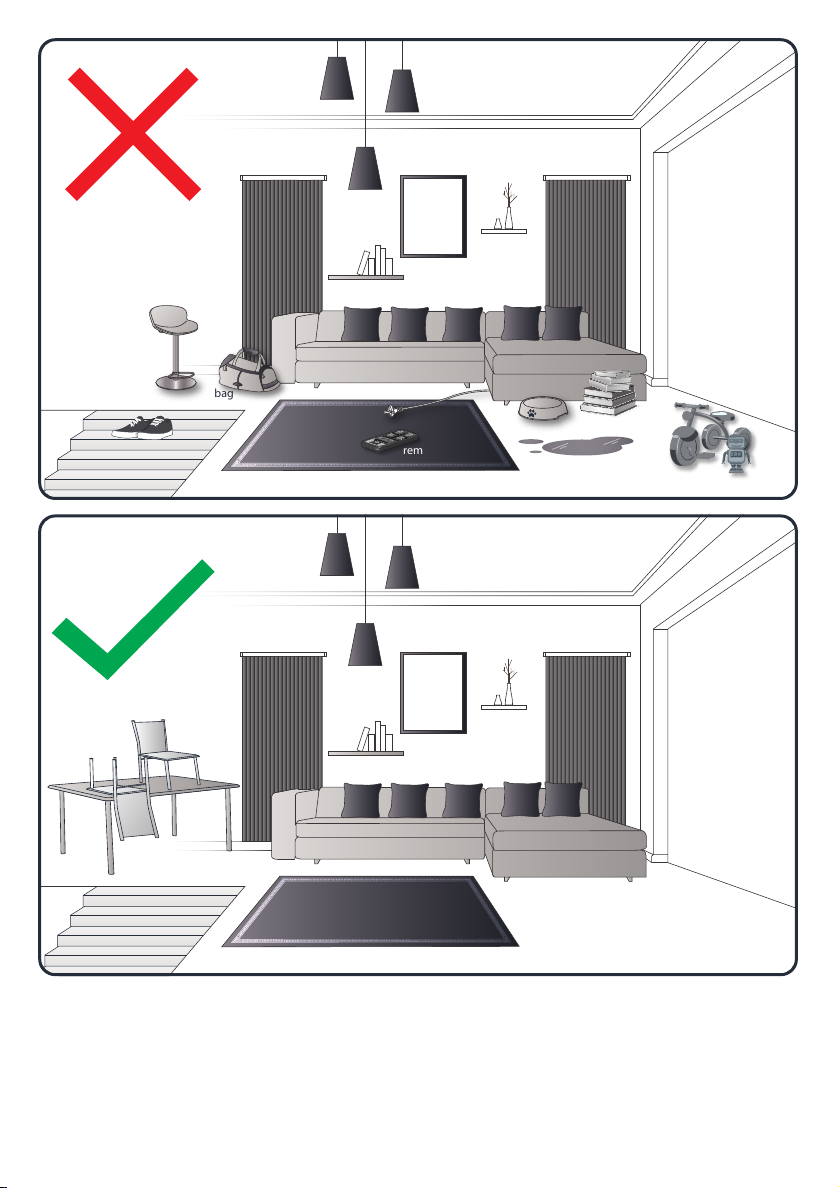
stool
books
bowl
kid’s toys
remote control
liquid
bag
cable
obstructions
on staircases.
ex. shoes
FR Votre robot peut rencontrer des difficultés sur les tapis : s’il a des franges trop épaisses ou de longs poils, s’il est trop léger (ex: tapis de salle de bain) / EN Your robot may encounter
some difficulties on carpets: with fringes, too thick, with long piles, too light (ex: bathroom carpet) / DE Es kann vorkommen, dass Ihr Roboter auf Teppichboden Probleme hat: Fransen, zu dick,
langflorig, zu leicht, schwarze Farbe / NL Uw robot kan tijdens een werking op vloerbekleding (met franjes, te dik, hoogpolig, te licht, zoals een badkamermat) problemen ondervinden /
ES Su robot puede tener problemas con las alfombras: con flecos, demasiado gruesas, de pelo largo, excesivamente ligera (por ejemplo la alfombra de un baño) / PT O seu robot pode
encontrar algumas dificuldades em carpetes, com franjas, muito espessas, com pêlo grande, muito leve (como os tapetes da casa de banho) / ITIl robot potrebbe avere qualche difficoltà
sui tappeti con frange, troppo spessi, a pelo lungo, troppo leggeri (ad es. i tappetini da bagno) / RO Este posibil ca robotul dumneavoastră să întâmpine dificultăți pe covoare: cu ciucurii, dacă
sunt prea groase, prea lungi, prea ușoare (de ex. covorașele de baie) / BG Вашият робот може да се сблъска със затруднения по килима: ръба на килима, ако е много плътен, с дълъг косъм,
твърде лек (напр.: килим в банята) / CS Váš robot může mít na kobercích potíže: se střapci, s koberci, které jsou příliš silné, mají dlouhý vlas, jsou příliš lehké (např. koupelnová předložka) / SK
Váš robot môže mať na kobercoch ťažkosti: so strapcami, s kobercami, ktoré sú príliš hrubé, majú dlhý vlas, sú príliš ľahké (napr. Kúpeľňová predložka) / UK Робот може зіткнутися з деякими
труднощами під час прибирання килимів з бахромою, якщо вони занадто товсті, з довгим ворсом або занадто легкі (наприклад, килимки для ванної кімнати)
6
Page 7
1.81.
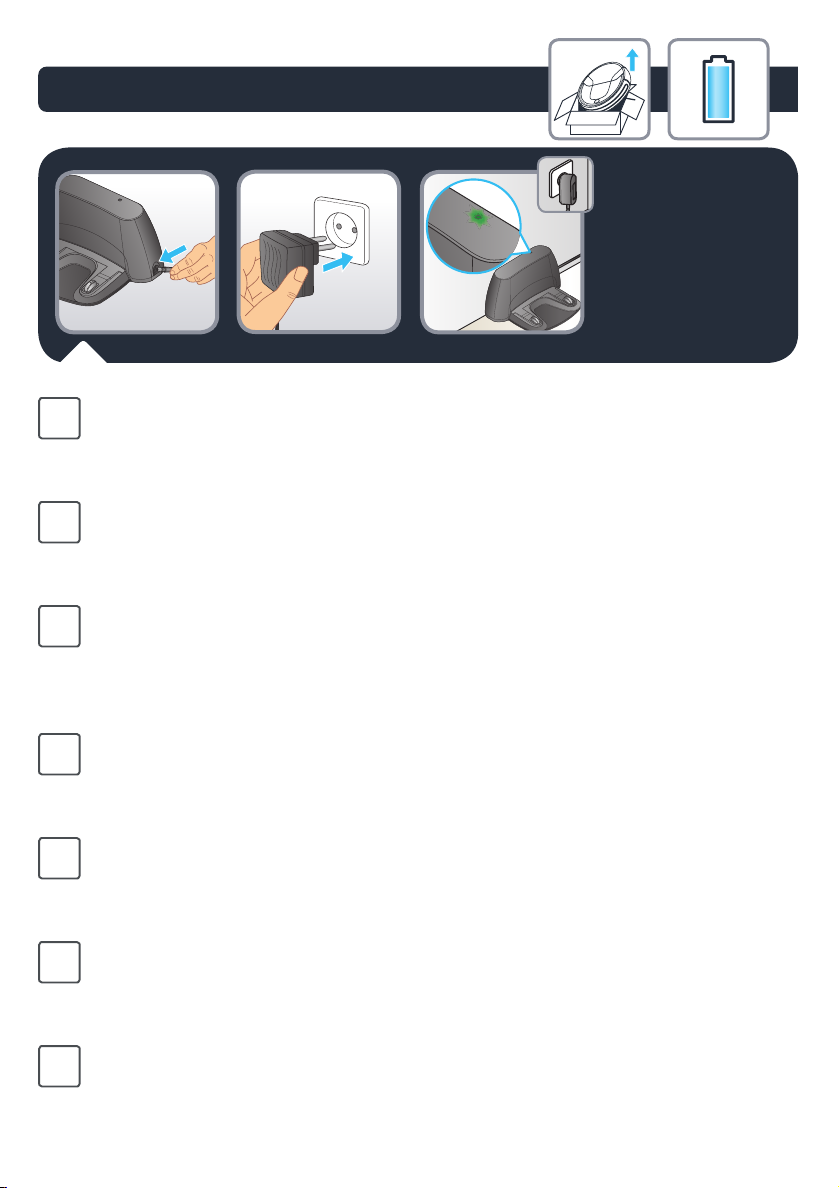
Plug the adaptor to the power jack on the side of the base. Only use the charger
EN
provided with the robot: do not use universal chargers.
Connect the power cord plug to the main socket. When the power cord is plugged
check the upper side of the base if the green light is shining.
Branchez l’adaptateur secteur dans la prise d’alimentation située sur le côté de la base.
FR
Utilisez uniquement le chargeur fourni avec le robot: n’utilisez pas de chargeur universel.
Branchez le câble d’alimentation à une prise secteur. Lorsque le câble d’alimentation
est branché, vériez si l’indicateur vert est allumé sur la partie supérieure de la base.
Conecte el adaptador a la toma de corriente y al lateral de la base. Utilizar solo el
ES
cargador suministrado con el robot: no utilizar cargadores universales.
Conecte la clavija del cable de alimentación en la toma de corriente. Cuando el
cable de alimentación esté conectado compruebe la parte superior de la base para
comprobar que la luz verde está encendida.
Collegare l’adattatore alla presa di ricarica sul lato della base. Usare esclusivamente il
IT
caricabatteria fornito insieme al robot; non usare caricabatteria universali.
Collegare il cavo di alimentazione a una presa di corrente. Quando il cavo di alimentazione
è collegato, vericare che la spia verde sulla parte superiore della base sia accesa.
Verbinden Sie das Netzteil mit der Anschlussbuchse an der Seite der Basis. Verwenden Sie
DE
nur das mitgelieferte Ladegerät mit dem Roboter: Benutzen keine Universal-Ladegeräte.
Schließen Sie den Stecker des Netzkabels an die Steckdose. Prüfen Sie nach Einstecken des
Steckers, ob das grüne Licht oben auf der Ladestation leuchtet.
Sluit de stekker aan op de stroomaansluiting aan de zijkant van het station. Gebruik
NL
alleen de lader die met de robot is meegeleverd. Gebruik geen universele lader.
Steek de stekker in het stopcontact. Als de stroomkabel is ingestoken, moet u de
bovenkant van de voet controleren, of er een groen lampje brandt.
Ligue o adaptador na entrada da alimentação na parte lateral da base. Use apenas o
PT
carregador fornecido com o robot. Não use carregadores universais.
Ligue a cha a uma tomada. Quando o cabo de alimentação estiver ligado verique
se a luz verde está acesa na parte superior da base.
7
Page 8

Introduceți mufa jack în oriciul de alimentare din partea laterală a bazei. Utilizați
RO
numai încărcătorul furnizat împreună cu robotul: nu utilizați încărcătoare universale.
Conectați ștecherul la priza de alimentare. Când cablul de alimentare este racordat,
vericați partea superioară a bazei dacă indicatorul luminos verde este aprins.
Включете адаптера в захранващия жак отстрани на базата. Използвайте само
BG
зарядното, предоставено с робота: не използвайте универсални зарядни.
Включете щепсела на захранващия кабел в контакта. Когато захранващият кабел
е включен, проверете дали в горната част на основата свети зелена светлина.
Připojte adaptér k napájecímu konektoru na boku základny. Používejte pouze nabíječku
CS
dodávanou s robotem: nepoužívejte univerzální nabíječky.
Zapojte zástrčku napájecího kabelu do zásuvky. Po zapojení napájecího kabelu na
horní straně základny zkontrolujte, zda svítí zelené světlo.
Pripojte adaptér do napájacieho konektora na bočnej strane základne. Používajte len
SK
nabíjačku dodávanú s robotom: nepoužívajte univerzálne nabíjačky.
Pripojte zástrčku napájacieho kábla do hlavnej zásuvky. Keď je napájací kábel
zasunutý, skontrolujte hornú stranu základne, či svieti zelené svetlo.
Підключіть адаптер до гнізда живлення збоку на базі. Використовуйте лише
UK
зарядний пристрій, що постачається з приладом. Не використовуйте універсальні
зарядні пристрої.
Під’єднайте шнур живлення до електричної розетки. Після під’єднання шнура
живлення переконайтеся, що на верхній частині бази горить зелений індикатор.
Page 9

1m
1m
2m
✔
1.
To place the docking station, make sure there is an empty area of 1m on each side and
EN
2m in front of the docking station. Do not install the docking station near stairs. The
cable must be tight. Always place the docking station on hard oor. Donot place the
docking station on carpet.
Pour placer la base de charge, assurez-vous qu’il y a un espace vide de 1 m sur le
FR
côté et 2 m en face de la base de charge. N’installez pas la base de charge près d’un
escalier. Le câble doit être serré. Placez toujours la station d’accueil sur un sol dur. Ne
placez pas la base de charge sur un tapis.
Para colocar la estación de carga, asegúrese de que hay una supercie libre de 1m
ES
en el lateral y 2m delante de la base de carga. No instalar la base de carga cerca de
escaleras. El cable debe estar extendido. La base de carga siempre se debe colocar
sobre suelo duro. No colocar la base de carga sobre una alfombra.
Per il posizionamento della base di ricarica, assicurarsi di lasciare un’area vuota di
IT
1 m ai lati e 2 m di fronte alla base. Non posizionare la base in prossimità di scale.
Il cavo deve essere teso. Posizionare la base di ricarica su un pavimento duro. Non
posizionare la base su un tappeto.
Achten Sie beim Aufstellen der Ladestation darauf, dass sich beidseitig ein freier Bereich von
DE
1m und vor der Ladestation ein freier Bereich von 2m bendet. Stellen Sie die Ladestation
nicht in der Nähe von Treppen auf. Das Kabel muss gestrat sein. Stellen Sie die Ladestation
immer auf harten Untergrund. Stellen Sie die Ladestation nicht auf Teppichboden auf.
Plaats het dockingstation in een omgeving met een vrije ruimte van 1m aan
NL
weerskanten en 2m aan de voorkant van het dockingstation. Installeer het
dockingstation niet in de buurt van een trap. Het snoer moet strak zijn. Plaats het
dockingstation altijd op een harde ondergrond. Plaats het dockingstation niet op
tapijt.
Coloque a base de carregamento num local com um espaço vazio de 1m de cada
PT
lado, e 2 metros à frente. Não instale a base de carregamento perto de escadas. O
cabo tem de car esticado. Coloque sempre a base de carregamento num piso duro.
Não coloque a base de carregamento sobre uma carpete.
9
Page 10
1.
Pentru a amplasa stația de încărcare, asigurați-vă că există un spațiu gol de 1m în
RO
părțile laterale și 12m în fața stației de încărcare. Nu instalați stația de încărcare în
apropierea scărilor. Cablul trebuie să e tensionat. Întotdeauna amplasați stația de
încărcare pe pardoseală dură. Nu instalați stația de încărcare în apropierea scărilor.
За да инсталирате докинг станцията, първо се уверете, че има празно пространство
BG
от 1 м отстрани и 2 м пред докинг станцията. Не инсталирайте докинг станцията в
близост до стълби. Кабелът трябва да не виси хлабаво. Винаги инсталирайте докинг
станцията на твърд под. Не инсталирайте докинг станцията върху килим.
Pokud chcete umístit dokovací stanici, ujistěte se, že je kolem dokovací stanice volný prostor
CS
1 m na boku a 2 m vpředu. Neinstalujte dokovací stanici u schodů. Kabel musí být pevný.
Vždy umístěte dokovací stanici na pevnou podlahu. Nedávejte dokovací stanici na koberec.
Ak chcete niekde položiť dokovaciu stanicu, uistite sa, že je pred dokovacou stanicou
SK
prázdny priestor v dĺžke 2 m a na boku 1 m. Dokovaciu stanicu neinštalujte v blízkosti
schodov. Kábel musí byť napnutý. Dokovaciu stanicu vždy položte na tvrdú podlahu.
Dokovaciu stanicu nedávajte na koberec.
Розміщуючи базу, переконайтеся в наявності вільного місця збоку на відстані 1м
UK
і спереду на відстані 2 м від неї. Не встановлюйте базу поблизу сходів. Шнур має
бути натягнутий. Завжди розміщуйте базу на твердій поверхні. Не розміщуйте
базу на килимі.
10
Page 11
1.
3 sec
ON
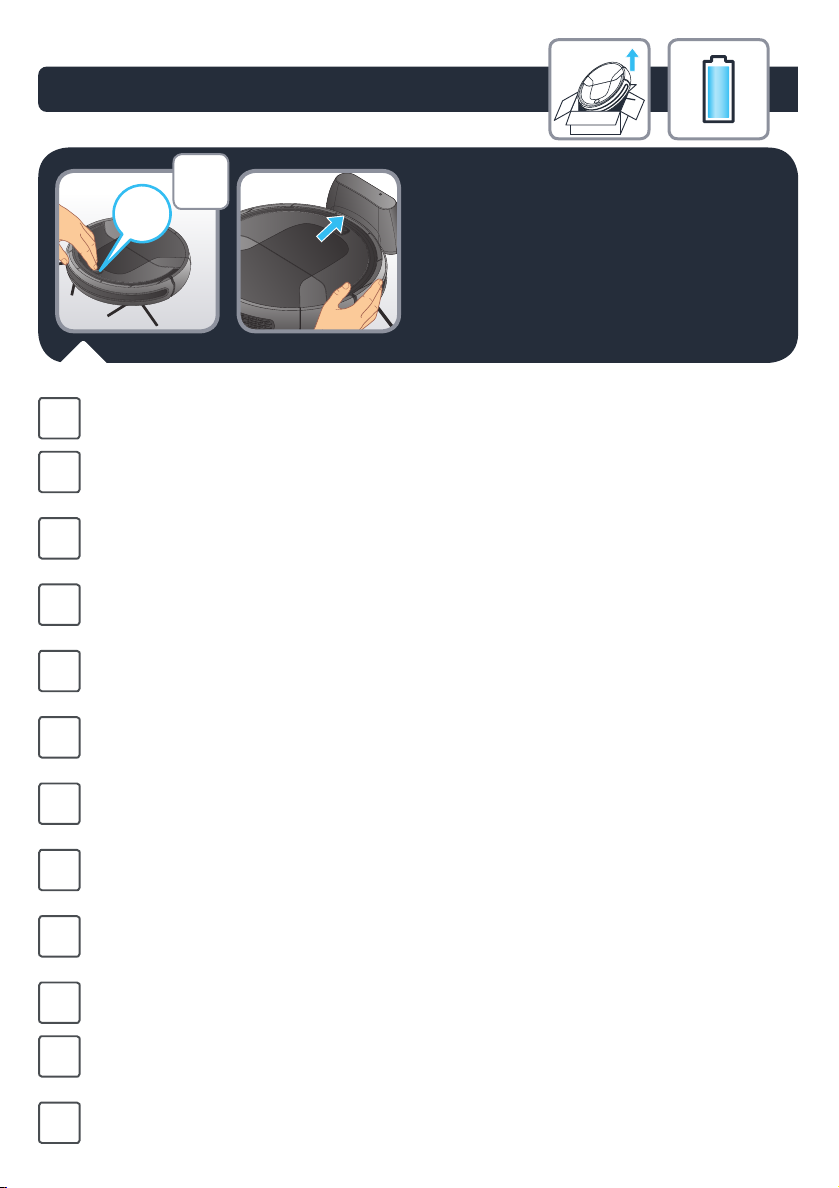
To charge the robot turn it on by pushing the on/o button for 3 seconds. Place the robot on
EN
the docking station: the charging plates on the robot must touch those on the docking station.
Pour charger le robot, allumez-le en appuyant sur le bouton marche / arrêt pendant 3 secondes.
FR
Placez le robot sur la station d’accueil : les plaques de charge du robot doivent toucher celles de
la station d’accueil.
Para cargar el robot, deberá encenderlo pulsando el botón encender / apagar durante 3
ES
segundos. Coloque el robot en la base de carga: las placas de carga del robot deben estar en
contacto con las de la base de carga.
Per ricaricare il robot, accenderlo tenendo premuto il pulsante di accensione/spegnimento per
IT
3 secondi. Collegare il robot alla base di ricarica: le piastre di ricarica sul robot devono toccare
quelle sulla base di ricarica.
Schalten Sie den Roboter zum Auaden ein, indem Sie die Ein/Aus-Taste 3 Sekunden lang
DE
gedrückt halten. Stellen Sie den Roboter auf die Ladestation. Die Ladeplatten des Roboters
müssen dabei die Ladeplatten der Ladestation berühren.
Om de robot op te laden, schakelt u deze aan door de aan-/uitknop gedurende 3 seconden
NL
ingedrukt te houden. Plaats de robot op het dockingstation. De laadplaatjes op de robot moeten
de laadplaatjes op het dockingstation aanraken.
Para carregar o robot ligue-o premindo o botão on/o (ligar/desligar) durante 3 segundos.
PT
Coloque o robot na base de carregamento: As placas de carregamento do robot têm de tocar
nas placas da base de carregamento.
Pentru a încărca robotul, porniți-l prin acționarea timp de 3 secunde a butonului on/o (pornit/
RO
oprit). Amplasați robotul pe stația de încărcare: plăcile de încărcare de pe robot trebuie să le
atingă pe cele de pe stație.
За да заредите робота, трябва да го включите, като натиснете копчето за вкл./изкл. за
BG
3 секунди. Поставете робота върху докинг станцията: зареждащите плочи на робота
трябва да докосват тези на докинг станцията.
Chcete-li robota nabít, zapněte ho stisknutím tlačítka zap/vyp po dobu 3 sekund. Umístěte robot
CS
na dokovací stanici: nabíjecí destičky na robotu se musí dotýkat destiček v dokovací stanici.
Ak chcete robot nabiť, zapnite ho stlačením tlačidla zapnutia/vypnutia po dobu 3 sekúnd. Robot
SK
položte na dokovaciu stanicu: nabíjacie platne na robotovi sa musia dotýkať platní na dokovacej
stanici.
Щоб зарядити робота, увімкніть його, натиснувши й утримуючи кнопку ввімк./вимк.
UK
впродовж 3 секунд. Помістіть робота на базу: зарядні пластини на роботі мають торкатися
пластин на базі.
11
Page 12
1.
6h
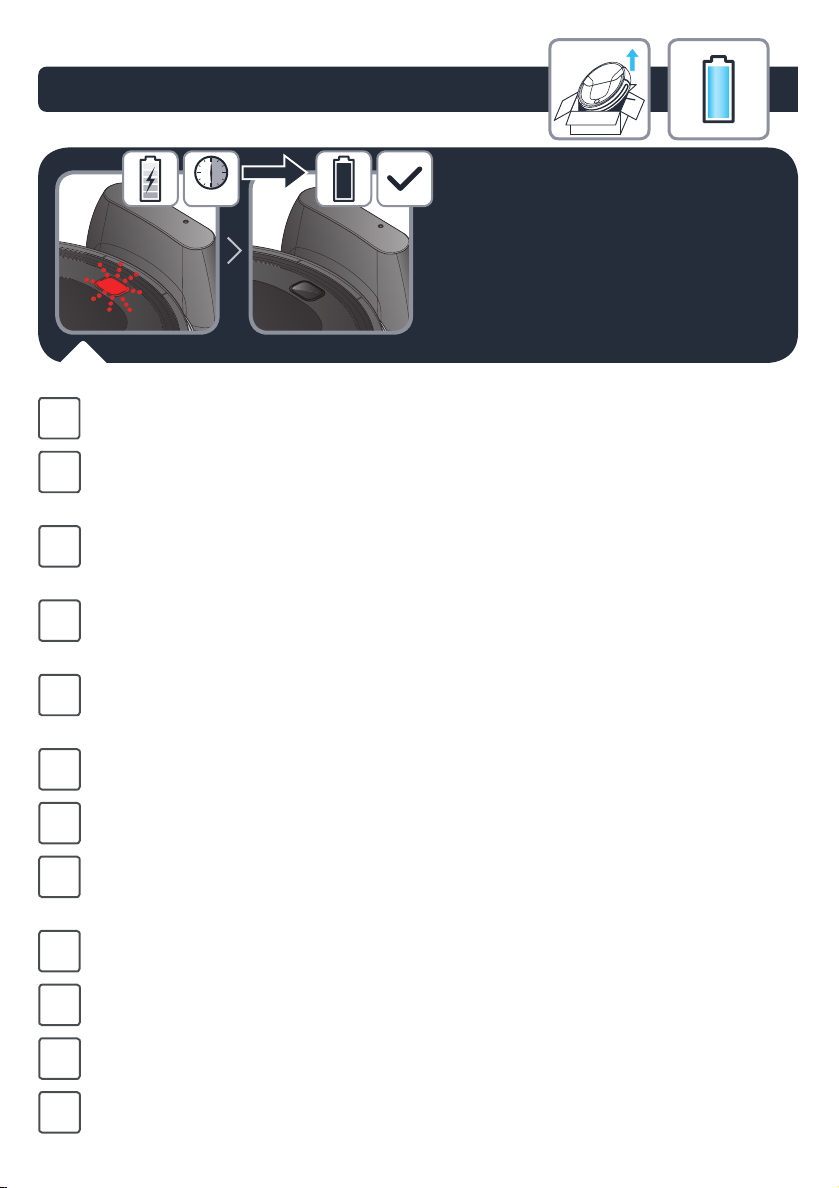
When the on/o button blinks the robot is charging. Once the on/o button stops
EN
blinking it is fully charged (6h for the battery to be fully charged).
Lorsque le bouton marche / arrêt clignote, le robot se charge. Lorsque le bouton
FR
marche / arrêt cesse de clignoter, le robot est complètement chargé (6h pour que la
batterie soit complètement chargée).
Cuando el botón encender/apagar esté parpadeando, el robot se estará cargando.
ES
Cuando el botón encender / apagar deje de parpadear, estará totalmente cargado (la
carga completa de la batería se consigue tras 6 horas).
Quando il pulsante di accensione/spegnimento lampeggia, il robot è sotto carica.
IT
Quando il pulsante di accensione/spegnimento smette di lampeggiare, il robot è
completamente carico (la ricarica completa della batteria richiede 6 ore).
Solange die Ein/Aus-Taste blinkt, wird der Roboter aufgeladen. Sobald die Ein/Aus-
DE
Taste nicht mehr blinkt, ist der Roboter vollständig aufgeladen (ein kompletter
Ladevorgang dauert ca. 6 Stunden).
Wanneer de aan-/uitknop knippert, wordt de robot opgeladen. Zodra de aan-/uitknop stopt
NL
met knipperen, is hij volledig opgeladen (6 uur om de accu volledig op te laden).
Quando o botão on/o pisca o robot está a carregar. Quando o botão on/o para de
PT
piscar, o robot está totalmente carregado (6 h para a bateria carregar totalmente).
Când butonul on/o (pornit/oprit) clipește, robotul este în curs de încărcare. Când
RO
butonul on/o (pornit/oprit) se oprește din clipit, înseamnă că robotul este încărcat
complet (durează 6 ore ca bateria să e încărcată complet)
Когато копчето за вкл./изкл. мига, роботът се зарежда. След като копчето за вкл./изкл
BG
престане да мига, роботът е напълно зареден (6 часа за пълно зареждане на батерията).
Pokud bliká tlačítko zap/vyp, robot se nabíjí. Jakmile tlačítko zap/vyp přestane blikat, je
CS
baterie plně nabitá (za 6 hodin se baterie zcela nabije).
Keď tlačidlo zapnutia/vypnutia bliká, robot sa nabíja. Keď tlačidlo zapnutia/vypnutia
SK
prestane blikať, je plne nabitý (6 hodín pre úplné nabitie batérie).
Якщо кнопка ввімк./вимк. блимає, робот заряджається. Як тільки кнопка ввімк./
UK
вимк. припиняє блимати, робот повністю зарядився (повний цикл зарядження
триває 6 годин).
12
Page 13

1.
The robot has drop sensors to detect stairs and gaps. The robot will change direction
EN
when detecting them. In order to correctly detect the oor level dierence, make sure
there are no objects (bags, shoes…) on the oor next to gaps, stairs or on the stairs’
steps.
Le robot dispose de capteurs de chute pour détecter les escaliers et les vides. Le robot
FR
changera de direction lors de la détection. An de détecter correctement la diérence
de niveau du sol, assurezvous qu’il n’y a pas d’objets (sacs, chaussures, etc.) sur le sol
près des espaces vides, des escaliers ou des marches.
El robot tiene dos sensores anticaídas para detectar escaleras y huecos. El robot
ES
cambiará de dirección cuando los detecte. Para detectar correctamente cualquier
diferencia en el nivel del suelo, asegúrese de que no hay ningún objeto (bolso,
zapatos, ...) en el suelo junto a un hueco, escalera o en los escalones.
Il robot è dotato di sensori anticaduta che rilevano scale e fessure. Il robot cambierà
IT
direzione se le rileva. Anché il robot rilevi correttamente la dierenza di livello tra
due superci, assicurarsi che sul pavimento in prossimità di fessure e scale, o sugli
scalini, non siano presenti oggetti (borse, scarpe, ecc.).
Der Roboter ist mit Absturzsensoren versehen, um Treppen und abfallende Kanten zu
DE
erkennen und dann die Richtung zu ändern. Damit der Roboter Treppen und abfallende
Kanten korrekt erkennen kann, stellen Sie bitte sicher, dass sich keine Gegenstände
(Taschen, Schuhe ...) auf dem Boden in der Nähe von Treppen oder abfallende Kanten
benden.
De robot is voorzien van valsensoren om trappen en openingen te detecteren. De
NL
robot verandert van richting zodra deze worden gedetecteerd. Om het verschil in
vloerniveau juist te kunnen detecteren, zorg dat er zich geen voorwerpen (tassen,
schoenen,...) op de vloer naast de opening, trap of op de treden van de trap bevinden.
O robot tem sensores de queda que permitem detetar escadas e espaços vazios.
PT
O robot muda de direção quando os detetar. De modo a detetar corretamente a
diferença nos níveis do piso, certique-se de que não há objetos (sacos, sapatos...) no
chão perto dos espaços vazios, escadas ou nos degraus das escadas.
13
Page 14
1.
Robotul este echipat cu senzori de cădere pentru a detecta scările și spațiile goale.
RO
Robotul își va schimba direcția când le va detecta. Pentru a detecta corect diferențele
de nivel ale solului, asigurați-vă că pe solul din apropierea spațiilor a scărilor sau pe
treptele acestora nu se aă obiecte (genți, încălțări...).
Роботът разполага със сензори против падане, за да отчита стълби или дупки.
BG
Роботът ще промени посоката си на движение, когато отчете стълби или дупки. За да
отчита правилно разликите в нивата на пода, уверете се, че няма предмети (чанти,
обувки...) по пода в близост до дупки, стълби или по стъпалата на стълбите.
Robot má senzory pádu, které zaznamenají schody a štěrbiny. Robot změní směr, jakmile
CS
je zaznamená. Aby správně zaznamenal rozdíl v úrovni podlahy, ujistěte se, že na podlaze
vedle štěrbin, schodů nebo stupňů nejsou žádné předměty (tašky, boty ...).
Robot má senzory pádu na detekciu schodov a medzier. Pri ich zistení robot zmení
SK
smer. Na správne zistenie rozdielu úrovne podlahy sa uistite, že na podlahe vedľa
medzier a schodov nie sú žiadne predmety (tašky, topánky ...).
Робот оснащений датчиками падіння для виявлення сходів і провалів. Робот
UK
змінить напрямок у разі їх виявлення. Щоб робот правильно визначав різницю
в рівні підлоги, переконайтеся, що на підлозі поруч із перепадами рівня або
сходами немає предметів (сумок, взуття тощо).
14
Page 15
1.
EN
To start the cleaning session, press the start button on the robot or on the remote.
Pour démarrer la session de nettoyage, appuyez sur le bouton de démarrage du robot
FR
ou de la télécommande.
Para iniciar la sesión de limpieza, pulse el botón de inicio en el robot o el mando a
ES
distancia.
Per avviare la sessione di pulizia, premere il pulsante Avvio sul robot o sul telecomando.
IT
Zum Starten der Reinigung drücken Sie die Start-Taste am Roboter oder auf der
DE
Fernbedienung.
Om de reinigingssessie te starten, drukt u op de startknop op de robot of op de
NL
afstandsbediening.
Para iniciar a sessão de limpeza, prima o botão iniciar no robot ou no comando.
PT
Pentru a demara sesiunea de curățare, apăsați butonul start situat pe robot sau de pe
RO
telecomandă.
За да започнете програма за чистене, натиснете копчето за стартиране на робота
BG
или на дистанционното управление.
Pro zahájení úklidu stiskněte tlačítko Start na robotu nebo na dálkovém ovládání.
CS
Ak chcete spustiť vysávanie, stlačte na robotovi alebo na diaľkovom ovládači tlačidlo
SK
Štart.
Щоб розпочати прибирання, натисніть кнопку на роботі або на пульті.
UK
15
Page 16
1.
x 2
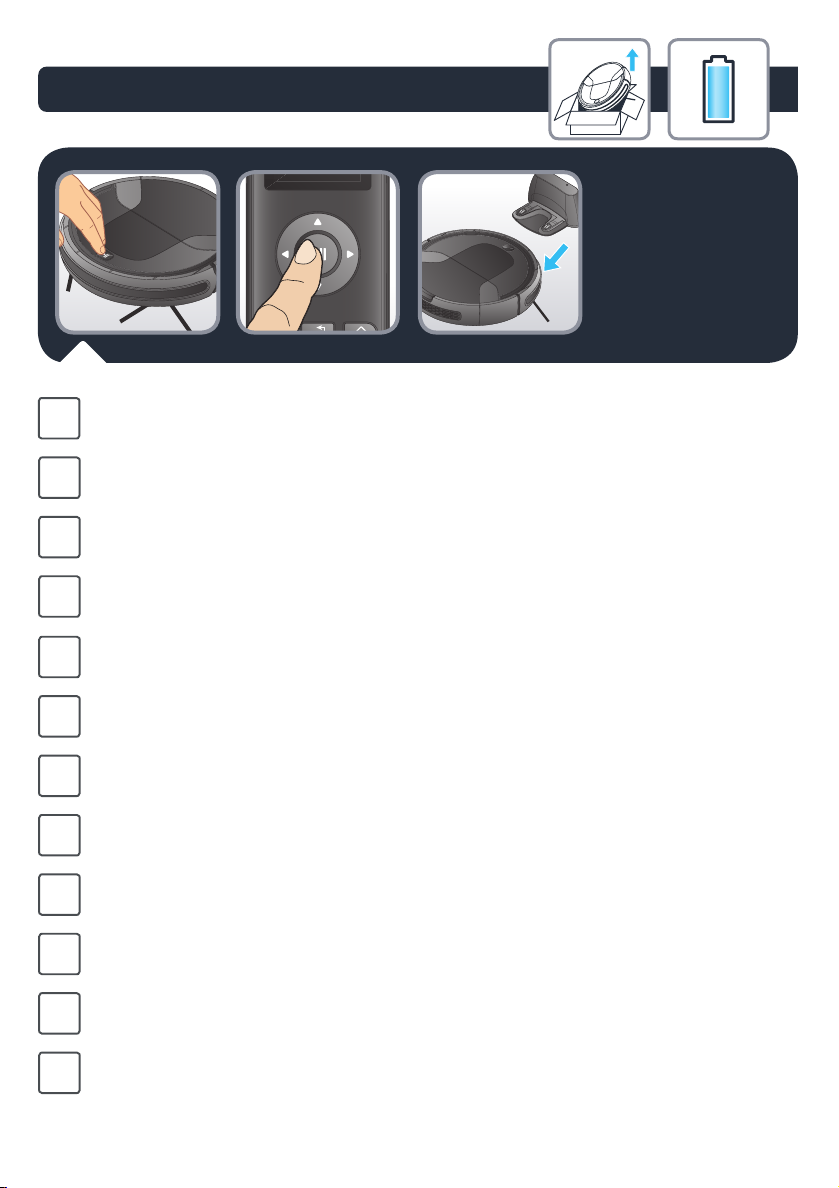
To end the cleaning session, press the button on the robot or on the remote control.
EN
To send the robot back to its docking station, press twice on the robot’s button or
press the button of your remote control.
Pour mettre n à la session de nettoyage, appuyez sur le bouton du robot ou de la
FR
télécommande.
Pour renvoyer le robot à sa station d’accueil, appuyez deux fois sur le bouton du robot
ou sur le bouton de votre télécommande.
Para nalizar la sesión de limpieza, pulse el botón en el robot o el mando a distancia.
ES
Para volver a enviar el robot a la estación de carga, pulse dos veces el botón del robot
o pulse el botón del mando a distancia.
Al termine della sessione di pulizia, premere il pulsante sul robot o sul telecomando.
IT
Per inviare il robot alla base di ricarica, premere due volte il pulsante del robot o
premere il pulsante sul telecomando.
Zum Beenden der Reinigung drücken Sie die Start/Pause-Taste am Roboter oder auf
DE
der Fernbedienung.
Um den Roboter zurück zur Ladestation zu schicken, betätigen Sie zweimal die Taste
am Roboter oder auf der Fernbedienung.
Om de reinigingssessie te beëindigen, drukt u op de knop op de robot of op de
NL
afstandsbediening.
Om de robot terug te sturen naar het dockingstation, drukt u twee keer op de knop
van de robot of op de knop van uw afstandsbediening.
Para terminar a sessão de limpeza, prima o botão no robot ou no comando.
PT
Para enviar o robot para a base de carregamento, prima duas vezes o botão do robot
ou prima o botão no comando.
Pentru a opri sesiunea de curățare, apăsați butonul de pe robot sau de pe telecomandă.
RO
Pentru a trimite robotul înapoi la stația de încărcare, apăsați de două ori pe butonul
robotului sau apăsați butonul de pe telecomandă.
16
Page 17
1.
За да прекратите програма за чистене, натиснете копчето на робота или на
BG
дистанционното управление.
За да изпратите робота обратно в докинг станцията, натиснете два пъти копчето на
робота или натиснете копчето на дистанционното управление.
Pro ukončení úklidu stiskněte tlačítko na robotu nebo na dálkovém ovládání.
CS
Chcete-li poslat robota zpět do dokovací stanice, stiskněte dvakrát tlačítko robota nebo
stiskněte tlačítko dálkového ovládání.
Ak chcete ukončiť vysávanie, stlačte tlačidlo na robotovi alebo na diaľkovom ovládači.
SK
Ak chcete robota poslať späť do dokovacej stanice, dvakrát stlačte tlačidlo na robotovi
alebo stlačte tlačidlo na diaľkovom ovládači.
Щоб завершити прибирання, натисніть кнопку на роботі або на пульті.
UK
Щоб направити робота назад до бази, двічі натисніть кнопку на роботі або
натисніть відповідну кнопку на пульті.
17
Page 18
1.
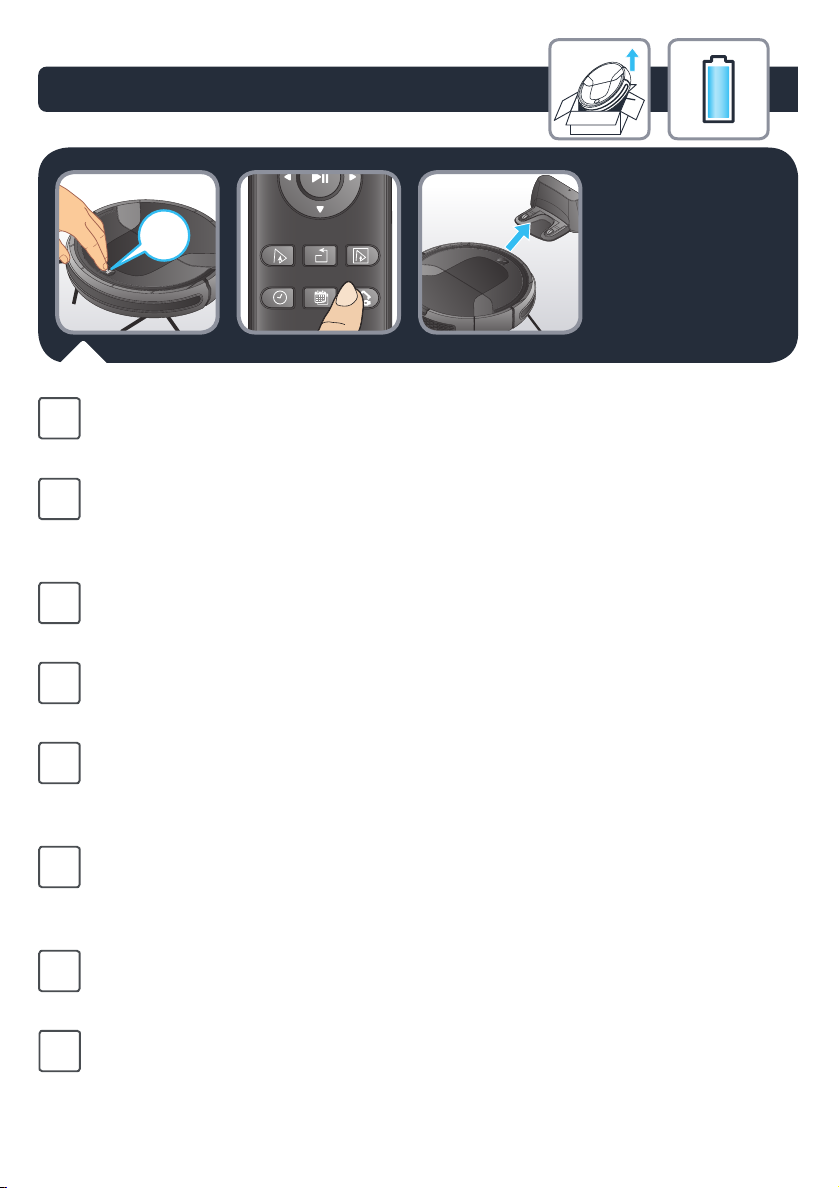
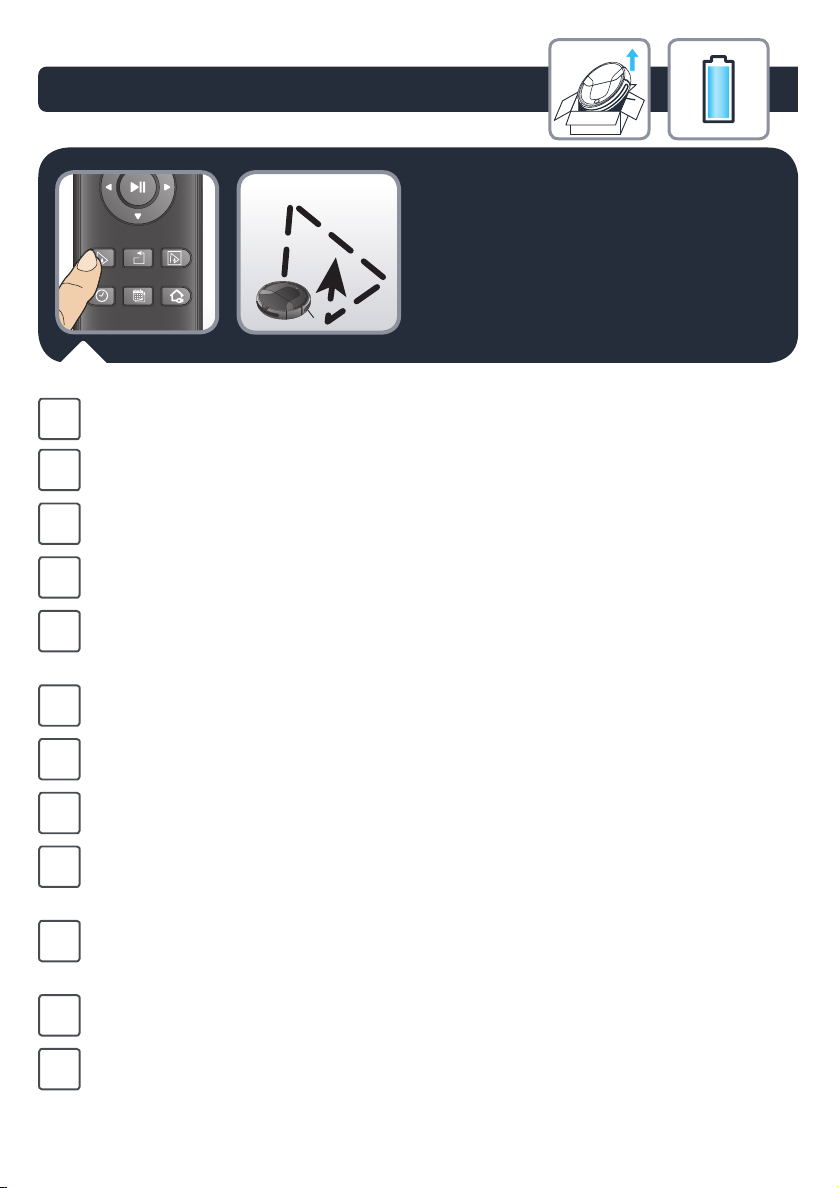
RANDOM
To clean all accessible areas of your home, use the random mode of the robot : press
EN
the random mode button on the remote.
Pour nettoyer toutes les zones accessibles de votre maison, utilisez le mode “aléatoire”
FR
(Random) du robot : appuyez sur le bouton du mode “aléatoire” de la télécommande.
Para limpiar todas las zonas accesibles de su casa, utilice el modo aleatorio del robot:
ES
pulse el botón de modo aleatorio en el mando.
Per pulire tutte le aree accessibili della casa, usare la modalità casuale del robot:
IT
premere il pulsante Modalità casuale sul telecomando.
Um alle zugänglichen Bereiche Ihrer Wohnung zu reinigen, verwenden Sie am besten
DE
den Zufallsmodus des Roboters. Der Roboter saugt dann so lange, bis die Batterie fast
leer ist und fährt dann zum Auaden zur Ladestation zurück.
Gebruik de willekeurige modus van de robot om alle toegankelijke gebieden van uw
NL
huis te reinigen: druk op de knop voor de willekeurige modus op de afstandsbediening.
Para limpar todas as áreas acessíveis da sua casa, utilize o modo “aleatório” (Random)
PT
do robot: prima o botão do modo “aleatório” no comando.
Pentru a curăța toate zonele accesibile din locuința dumneavoastră, utilizați modul
RO
aleatoriu al robotului: apăsați butonul modului aleatoriu de pe telecomandă.
За да почистите всички достъпни зони на вашия дом, използвайте произволния
BG
режим на робота: натиснете копчето за избор на произволен режим на
дистанционното управление.
Chcete-li uklidit všechny dostupné prostory Vašeho domova, použijte režim pro pohyb
CS
náhodným směrem (Random): stiskněte tlačítko pro pohyb náhodným směrem na
dálkovém ovládání.
Ak chcete povysávať všetky dostupné oblasti vašej domácnosti, použite náhodný
SK
režim robota: stlačte tlačidlo náhodného režimu na diaľkovom ovládači.
Щоб прибрати всю площу будинку, виберіть довільний режим: натисніть кнопку
UK
довільного режиму на пульті.
18
Page 19
1.
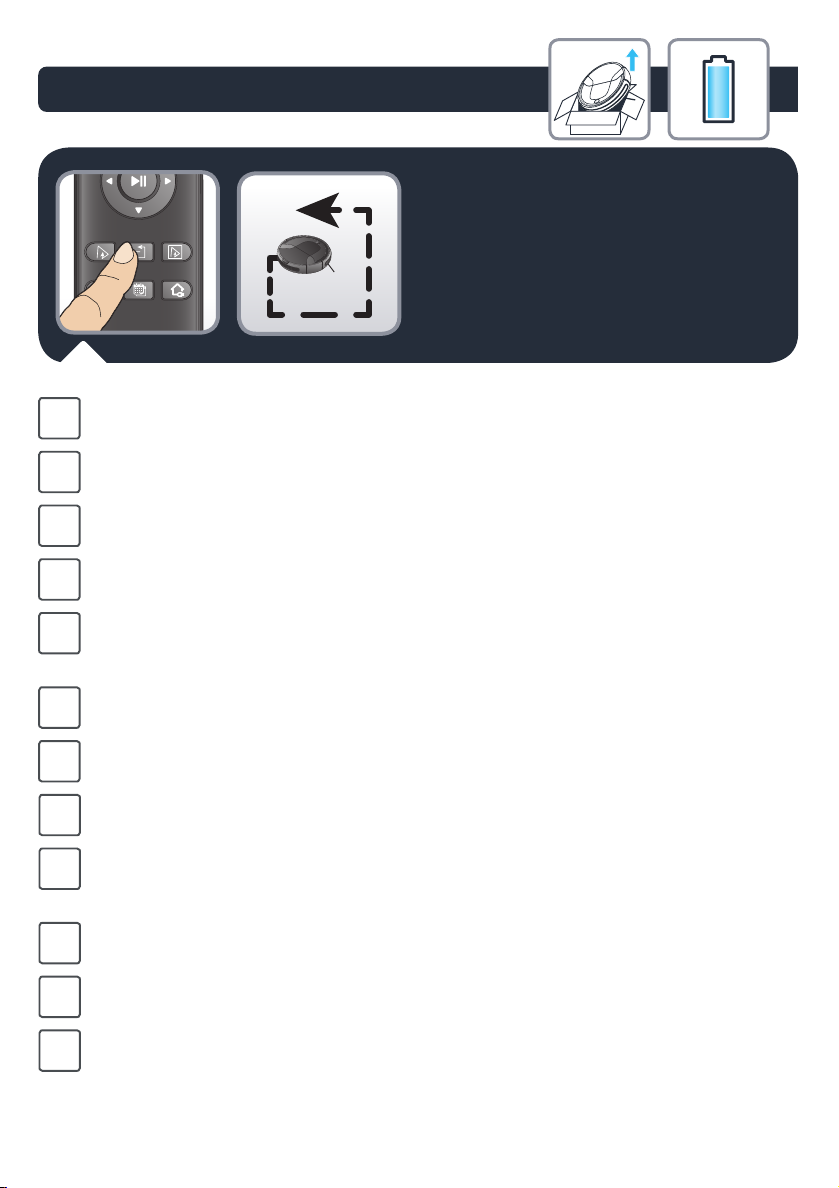
EDGE
To clean along the walls and in the corners use the edge mode of the robot : press the
EN
edge mode button on the remote.
Pour nettoyer le long des murs et dans les coins, utilisez le mode “bord” (Edge) du
FR
robot: appuyez sur le bouton Mode “bord” de la télécommande.
Para limpiar a lo largo de las paredes y los rincones, utilice el modo bordes (edge) del
ES
robot: pulse el botón del modo bordes (edge) en el mando a distancia.
Per pulire lungo le pareti e negli angoli, usare la modalità bordi del robot: premere il
IT
pulsante Modalità bordi sul telecomando.
Zur Reinigung entlang den Wänden und in den Ecken verwenden Sie am besten den
DE
Kantenmodus des Roboters. Diesen wählen Sie durch Betätigen der KantenmodusTaste auf der Fernbedienung.
Gebruik voor het reinigen langs de muren en in de hoeken de hoekmodus van de
NL
robot: druk op de hoekmodusknop op de afstandsbediening.
Para limpar ao longo das paredes e nos cantos utilize o modo “bordas” (Edge) do
PT
robot: prima o botão do modo “bordas” no comando.
Pentru a curăța de-a lungul pereților și în colțuri, utilizați modul margini al robotului:
RO
apăsați butonul modului margini de pe telecomandă.
За да почистите стените и ъглите, използвайте режима на робота за почистване
BG
на ръбове: натиснете копчето за избор на режим за почистване на ръбове на
дистанционното управление.
K úklidu podél stěn a rohů použijte režim pro pohyb v rozích a podél stěn (Edge): stiskněte
CS
tlačítko pro pohyb v rozích a podél stěn na dálkovém ovládání.
Ak chcete vysávať pozdĺž stien a v rohoch, použite na robotovi režim čistenia po
SK
obvode: stlačte tlačidlo režimu čistenia po obvode na diaľkovom ovládači.
Щоб прибрати площу вздовж стін і кути, виберіть режим периметра: натисніть
UK
кнопку режиму периметра на пульті.
19
Page 20
1.
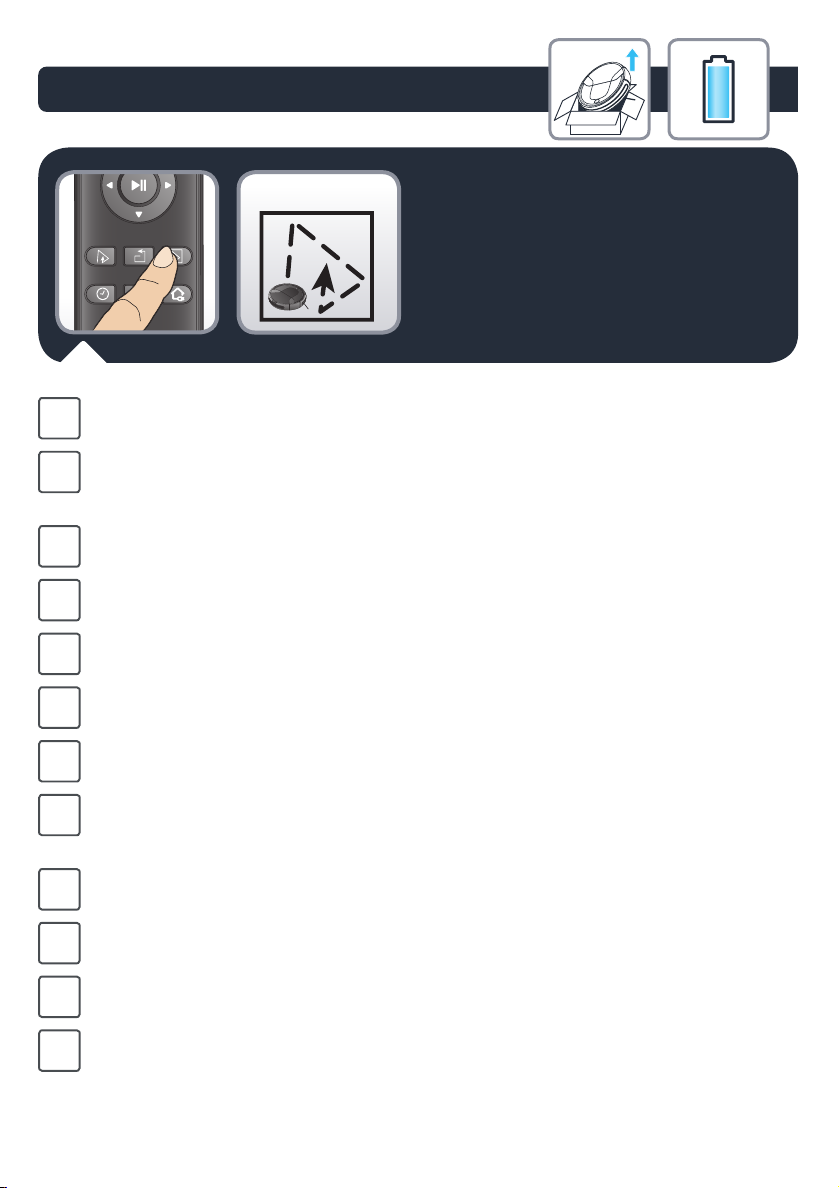
RANDOM room
To launch a short 30 minutes cleaning session in all accessible areas of your home :
EN
press the random room mode on the remote.
Pour lancer une courte session de nettoyage de 30 minutes dans toutes les zones
FR
accessibles de votre maison : appuyez sur le mode “pièce aléatoire” (Random room)
de la télécommande.
Para ejecutar una corta sesión de limpieza de 30 minutos en todas las zona accesibles de
ES
su hogar: pulse el modo de habitación aleatoria (random room) en el mando a distancia.
Per avviare una breve sessione di pulizia di 30 minuti in tutte le aree accessibili della
IT
casa: premere il pulsante Modalità casuale stanza sul telecomando.
Um eine kurze 30-minütige Reinigung eines Zimmers durchzuführen, drücken Sie die
DE
Zimmermodus-Taste auf der Fernbedienung.
Om een korte reinigingssessie van 30 minuten te starten in alle toegankelijke gebieden
NL
van uw huis: druk op de willekeurige kamermodus op de afstandsbediening.
Para realizar uma breve sessão de limpeza de 30 minutos em todas as áreas acessíveis
PT
da sua casa: prima o modo “divisão aleatória” (Random room) no comando.
Pentru a demara o sesiune rapidă de curățare de 30 de minute în toate zonele
RO
accesibile din locuința dumneavoastră: apăsați butonul modului încăpere aleatorie
de pe telecomandă.
За да стартирате кратка 30-минутна програма за всички достъпни зони в дома си:
BG
натиснете режима за произволна стая на дистанционното управление.
Chcete-li zahájit krátký třicetiminutový úklid ve všech dostupných prostorách Vašeho
CS
domova: stiskněte tlačítko režimu pro pohyb náhodným směrem na dálkovém ovládání.
Ak chcete začať s krátkym 30-minútovým vysávaním vo všetkých dostupných oblastiach
SK
vašej domácnosti: stlačte režim náhodnej miestnosti na diaľkovom ovládači.
Щоб запустити 30-хвилинний цикл швидкого прибирання на всі доступній площі
UK
будинку, виберіть режим довільних кімнат на пульті.
30 min.
20
Page 21

1.
6 sec
Attention: The remote may not automatically be connected to the robot and the
EN
connection needs to be set up manually. To do that press 6 seconds the start button on
the robot until the button blinks in orange.
Next press the start button on the remote while pressing the start button on the robot
as well. When the robot gives a bip noise the connection was successful.
In case you are not able to connect the remote to the robot please have a look at safety
book. To use the remote control, you need 2 AAA batteries not included in the pack.
Attention : La télécommande ne peut pas être automatiquement connectée au robot et la
FR
connexion doit être congurée manuellement. Pour ce faire, appuyez 6 secondes sur le
bouton de démarrage du robot jusqu’à ce que le bouton clignote en orange.
Appuyez ensuite sur le bouton de démarrage de la télécommande tout en appuyant sur le
bouton de démarrage du robot. Lorsque le robot émet un bip sonore, la connexion est établie.
Si vous ne pouvez pas connecter la télécommande au robot, veuillez consulter le manuel
de sécurité. Pour utiliser la télécommande, insérez 2 piles de type AAA non incluses dans
l’emballage.
Atención: El mando a distancia podría no estar automáticamente conectado al robot
ES
y deberá realizar la conexión de modo manual. Para poder hacerlo, pulse el botón de
inicio durante 6 segundos en el robot hasta que el botón parpadee en naranja.
A continuación, pulse el botón de inicio en el mando a distancia mientras a la vez
pulsa el botón de inicio en el robot. Cuando el robot emita un pitido, la conexión se
habrá realizado correctamente.
Si no consigue conectar el mando a distancia al robot, consulte el folleto de seguridad.
Para utilizar el mando a distancia, necesita 2 pilas AAA no incluidas en el pack.
21
Page 22

1.
Attenzione! Il telecomando potrebbe non essere collegato automaticamente al
IT
robot; in tal caso, è necessario collegarlo manualmente. Per fare ciò, tenere premuto
il pulsante Avvio sul robot per 6 secondi, nché il pulsante non inizia a lampeggiare
di arancione.
Quindi premere il pulsante Avvio sul telecomando tenendo premuto simultaneamente
il pulsante Avvio sul robot. Quando il robot emette un segnale acustico, il collegamento
è stato eettuato correttamente.
Se il collegamento tra il telecomando e il robot non viene eettuato, consultare il libretto
di sicurezza. Il telecomando richiede 2 batterie AAA, non incluse nella confezione.
Achtung: Die Verbindung zwischen Fernbedienung und Roboter wird nicht automatisch
DE
hergestellt. Dies muss manuell durchgeführt werden. Halten Sie die Start-Taste am Roboter
6 Sekunden lang gedrückt, bis das Licht orange zu blinken beginnt.
Betätigen Sie dann gleichzeitig die Start-Taste auf der Fernbedienung und die Start-Taste am
Roboter. Wenn der Roboter einen Piepton von sich gibt, wurde die Verbindung erfolgreich
hergestellt.
Zur Verwendung der Fernbedienung sind 2x AAA-Batterien notwendig. Diese sind nicht im
Lieferumfang enthalten.
Falls die Fernbedienung trotz eingelegten Batterien nicht funktioniert, koppeln Sie die
Fernbedienung mit dem Roboter wie folgt:
1. Start Taste direkt am Roboter 4 Sekunden gedrückt halten bis das Licht orange blinkt
oder leuchtet. Wenn es nicht klappt, den Knopf loslassen und noch einmal versuchen.
2. Wichtig! Sobald die Start-Taste am Roboter leuchtet nicht loslassen, sondern gedrückt
halten.
3. Jetzt zusätzlich die Start-Taste an der Fernbedienung gedrückt halten, bis es piept.
Opgelet: De afstandsbediening is mogelijk niet automatisch verbonden met de
NL
robot, waardoor de verbinding handmatig moet worden ingesteld. Druk hiervoor 6
seconden op de startknop van de robot totdat de knop oranje knippert.
Druk vervolgens op de startknop op de afstandsbediening terwijl u ook op de
startknop op de robot drukt. Als de robot een piep laat horen, is het verbinden
succesvol.
Als u de afstandsbediening niet kunt koppelen met de robot, lees dan het
veiligheidsboekje. Om de afstandsbediening te gebruiken, hebt u 2 AAA-batterijen
nodig die niet zijn inbegrepen.
Atenção: O comando pode não estar ligado automaticamente ao robot e a ligação
PT
necessita de ser estabelecida manualmente. Para o fazer prima 6 segundos o botão
on/o no robot até a luz laranja piscar.
De seguida prima o botão iniciar no comando enquanto prime também o botão on/
o no robot. Quando o robot emitir um aviso sonoro, a ligação foi estabelecida.
Caso não consiga ligar o comando ao robot consulte o manual de segurança. Para
utilizar o comando, necessita de 2 pilhas AAA não incluídas na embalagem.
22
Page 23

1.
Atenție: Este posibil ca telecomandă să nu e automat conectată la robot și conexiunea
RO
să necesite executarea manuală. În acest scop, apăsați 6 secunde pe butonul de
pornire de pe robot până când butonul clipește portocaliu.
Apoi apăsați butonul start de pe telecomandă în timp ce apăsați simultan și butonul
start situat pe robot. Când robotul emite un semnal sonor reprezintă realizarea cu
succes a conexiunii.
Dacă nu reușiți să conectați telecomanda la robot, vă rugăm consultați manualul cu
instrucțiuni de siguranță. Pentru a utiliza telecomanda, veți avea nevoie de 2 baterii
de tip AAA care nu sunt incluse cu produsul.
Внимание: Възможно е дистанционното управление да не е автоматично свързано
BG
към робота и да се наложи ръчно да настроите връзката. За да го направите натиснете
копчето за стартиране на робота за 6 секунди, докато бутонът не светне в оранжево.
След това натиснете копчето за стартиране на дистанционното управление, докато
същевременно натискате и копчето за стартиране на робота. Когато роботът подаде
звуков сигнал, връзката е осъществена.
В случай че не можете да свържете дистанционно управление към робота,
погледнете ръководството за безопасност. За да използвате дистанционното
управление се нуждаете от 2 батерии AAA, които не са включени в опаковката.
Upozornění: Dálkové ovládání se nemusí k robotu připojit automaticky a spojení tak musí
CS
být nastaveno ručně. Ruční nastavení provedete stisknutím tlačítka Start na robotu po dobu
6 sekund, dokud tlačítko nebliká oranžově.
Dále současně stiskněte tlačítko Start na dálkovém ovládání a tlačítko Start na robotu. Když
robot zapípá, spojení bylo úspěšné.
Pokud se Vám nedaří spojit robota s dálkovým ovládáním, viz bezpečnostní příručka. Pro
použití dálkového ovládání budete potřebovat 2 baterie AAA, které nejsou součástí balení.
Upozornenie: Diaľkové ovládanie sa nemusí k robotu pripojiť automaticky, v tom
SK
prípade spojenie musí byť nastavené manuálne. Na manuálne nastavenie pripojenia
stlačte na 6 sekúnd tlačidlo Štart na robotovi, až kým tlačidlo nezačne blikať oranžovo.
Potom stlačte tlačidlo Štart na diaľkovom ovládači a zároveň stlačte tlačidlo Štart na
robotovi. Keď robot pípne, pripojenie bolo úspešné.
V prípade, že nie je možné prepojiť diaľkové ovládanie s robotom, pozrite si
bezpečnostnú knihu. Ak chcete použiť diaľkové ovládanie, potrebujete 2 batérie typu
AAA, ktoré nie sú súčasťou balenia.
Увага! Пульт може не підключитися до робота автоматично. Отже, необхідно
UK
налаштувати підключення вручну. Для цього натисніть і утримуйте кнопку пуску
на роботі впродовж 6 секунд, доки кнопка не почне блимати помаранчевим.
Потім натисніть кнопку пуску на пульті одночасно з натисканням кнопки пуску на
роботі. Звуковий сигнал означає, що підключення відбулося.
Якщо вам не вдалося підключити пульт до робота, прочитайте інструкції з техніки
безпеки. Для живлення пульта вам знадобляться 2 елементи живлення типу AAA
(не входять до комплекту).
23
Page 24

-
+
+
-
BIP
2.
To set up the time of the day for your robot press the clock button on the remote.
EN
1. Set the hour of the day with the up and down arrows on the remote.
2. When the hour is set, press the right arrow to continue setting the minutes. To set
the minutes, use the up and down arrows on the remote.
3. When the hours and minutes are set, conrm the conguration by pressing the
start button on the remote. The robot will conrm the setting with a bip noise.
Pour régler l’heure de la journée pour votre robot, appuyez sur le bouton “horloge”
FR
(clock) de la télécommande.
1. Réglez l’heure du jour à l’aide des èches haut et bas de la télécommande.
2. Une fois l’heure réglée, appuyez sur la èche vers la droite pour continuer le
réglage et congurer les minutes. Pour régler les minutes, utilisez les èches haut
et bas de la télécommande.
3. Une fois les heures et les minutes réglées, conrmez le réglage en appuyant sur
le bouton de démarrage de la télécommande. Le robot conrmera le réglage en
émettant un bip sonore.
Para congurar la hora del día en el robot, pulse el botón del reloj en el mando a distancia.
ES
1. Congure la hora del día con las echas arriba y abajo del mando a distancia.
2. Cuando la hora esté congurada, pulse el botón de echa derecha para continuar con
la conguración de los minutos. Para congurar los minutos, utilice las echas arriba y
abajo del mando a distancia.
3. Cuando las horas y los minutos estén congurados, conrme la conguración pulsando
el botón de inicio del mando a distancia. El robot conrmará el ajuste con un pitido.
*
24
Page 25

2.
Per impostare l’orario di funzionamento del robot, premere il pulsante Orologio sul
IT
telecomando.
1. Impostare l’ora del giorno con le frecce Su e Giù del telecomando.
2. Dopo aver impostato l’ora, premere la freccia Destra per procedere all’impostazione
dei minuti. Per impostare i minuti, usare le frecce Su e Giù del telecomando.
3. Dopo aver impostato l’ora e i minuti, confermare l’impostazione premendo il
pulsante Avvio sul telecomando. Il robot confermerà l’impostazione emettendo
un segnale acustico.
Zum Einstellen der Uhrzeit für Ihren Roboter drücken Sie die Uhrzeit-Taste auf der
DE
Fernbedienung.
1. Um die Stunde einzustellen, drücken Sie die “Oben” oder “Unten”-Taste auf der
Fernbedienung.
2. Drücken Sie dann die “Rechts” Taste, um die Minute einzustellen, indem Sie wieder
die “Oben” oder “Unten”-Taste drücken.
3. Zum Speichern der Uhrzeit drücken Sie auf die Start-Taste auf der Fernbedienung.
Der Roboter bestätigt die Einstellung mit einem Piepton.
Om de tijd voor uw robot in te stellen, drukt u op de klokknop op de afstandsbediening.
NL
1. Stel het uur in met de omhoog- en omlaag-pijlen op de afstandsbediening.
2. Wanneer het uur is ingesteld, drukt u op de pijl naar rechts om door te gaan
met het instellen van de minuten. Gebruik de omhoog- en omlaag-pijlen op de
afstandsbediening om de minuten in te stellen.
3. Wanneer de uren en minuten zijn ingesteld, bevestigt u de conguratie door op
de startknop op de afstandsbediening te drukken. De robot bevestigt de instelling
met een piepje.
Para denir a hora do dia no seu robot prima o botão “relógio” no comando.
PT
1. Acerte a hora do dia com as setas ascendentes e descendentes no comando.
2. Quando acertar a hora, prima a seta da direita para continuar a acertar os minutos.
Para acertar os minutos, utilize as setas ascendentes e descendentes no comando.
3. Depois de acertar as horas e os minutos, conrme a conguração premindo o botão
iniciar no comando. O robot conrmará a conguração com um aviso sonoro.
Pentru a seta ora de pornire a robotului, apăsați butonul cu ceas de pe telecomandă.
RO
1. Setați ora cu ajutorul săgeților sus și jos de pe telecomandă.
2. Când ora este setată, apăsați săgeata dreaptă pentru a continua setarea minutelor.
Pentru a seta minutele, utilizați săgețile sus și jos de pe telecomandă.
3. Când orele și minutele sunt setate, conrmați congurația apăsând butonul start
de pe telecomandă. Robotul va conrma setarea prin emiterea unui semnal sonor.
*
25
Page 26

2.
За да настроите часа за вашия робот, натиснете копчето за часовник на
BG
дистанционното управление.
1. Настройте часа, като използвате стрелките нагоре и надолу на дистанционното
управление.
2. Когато часът е настроен, натиснете дясната стрелка, за да настроите и
минутите. За да настроите минутите, използвайте стрелките нагоре и надолу
на дистанционното управление.
3. Когато часът и минутите са настроени, потвърдете конфигурацията, като
натиснете копчето за стартиране на дистанционното управление. Роботът ще
потвърди настройката със звуков сигнал.
Pro nastavení času pro robota stiskněte tlačítko hodin na dálkovém ovládání.
CS
1. Nastavte hodiny pomocí šipky nahoru a dolů na dálkovém ovládání.
2. Po nastavení hodin pokračujte stisknutím pravé šipky a nastavte minuty. Minuty
nastavíte pomocí šipky nahoru a dolů na dálkovém ovládání.
3. Po nastavení hodin a minut potvrďte konguraci stisknutím tlačítka Start na
dálkovém ovládání. Robot potvrdí nastavení pípnutím.
Ak chcete nastaviť čas dňa pre robota, stlačte tlačidlo hodín na diaľkovom ovládači.
SK
1. Nastavte hodiny pomocou šípky hore a dole na diaľkovom ovládaní.
2. Po nastavení hodiny, stlačte pravú šípku a pokračujte v nastavení minút. Pomocou
šípok hore a dole na diaľkovom ovládači nastavte minúty.
3. Po nastavení hodín a minút potvrďte konguráciu stlačením tlačidla Štart na
diaľkovom ovládači. Robot potvrdí nastavenie pípnutím.
Щоб налаштувати час роботи робота, натисніть кнопку годинника на пульті.
UK
1. Налаштуйте годину дня за допомогою стрілок угору і вниз на пульті.
2. Після налаштування години натисніть стрілку вправо, щоб налаштувати
хвилини. Налаштуйте хвилини за допомогою стрілок угору і вниз на пульті.
3. Після налаштування годин і хвилин підтвердіть створену конфігурацію
натисканням кнопки пуску на пульті. Звуковий сигнал означає підтвердження
налаштувань.
*
26
Page 27

3.
month
-
+
-
+
-
BIP
To set up an every day scheduled cleaning session for your robot press the schedule button on
EN
the remote.
1.
Set the hour to start the cleaning with the up and down arrows on the remote.
2.
When the hour is set, press the right arrow to continue setting the minutes. To set the minutes,
use the up and down arrows on the remote.
3.
When the hours and minutes are set, conrm the conguration by pressing the start button
on the remote. The robot will conrm the setting with a bip noise. The Robot will start cleaning
everyday at the scheduled hour.
Pour congurer une session de nettoyage planiée tous les jours de votre robot, appuyez sur le
FR
bouton de programmation de la télécommande.
1.
Réglez l’heure de démarrage du nettoyage avec les èches haut et bas sur la télécommande.
2.
Une fois l’heure réglée, appuyez sur la èche vers la droite pour continuer le réglage
et congurer les minutes. Pour régler les minutes, utilisez les èches haut et bas de la
télécommande.
3.
Une fois les heures et les minutes réglées, conrmez le réglage en appuyant sur le bouton de
démarrage de la télécommande. Le robot conrmera le réglage en émettant un bip sonore.
Le robot commencera à nettoyer tous les jours à l’heure prévue.
Para congurar una sesión de limpieza diaria por el robot, pulse el botón de programación en el
ES
mando a distancia.
1.
Congure la hora de inicio de limpieza con las echas arriba y abajo del mando a distancia.
2.
Cuando la hora esté congurada, pulse el botón de echa derecha para continuar con la
conguración de los minutos. Para congurar los minutos, utilice las echas arriba y abajo del
mando a distancia.
3.
Cuando las horas y los minutos estén congurados, conrme la conguración pulsando el
botón de inicio del mando a distancia. El robot conrmará el ajuste con un pitido. El Robot
comenzará a limpiar todos los días a la hora programada.
27
Page 28

3.
month
Per programmare una sessione di pulizia quotidiana, premere il pulsante Calendario sul
IT
telecomando.
1.
Impostare l’ora di avvio della pulizia con le frecce Su e Giù del telecomando.
2.
Dopo aver impostato l’ora, premere la freccia Destra per procedere all’impostazione dei
minuti. Per impostare i minuti, usare le frecce Su e Giù del telecomando.
3.
Dopo aver impostato l’ora e i minuti, confermare l’impostazione premendo il pulsante Avvio
sul telecomando. Il robot confermerà l’impostazione emettendo un segnale acustico. Il robot
eettuerà la pulizia ogni giorno all’ora impostata.
Zum Einstellen einer täglichen Reinigungszeit für Ihren Roboter drücken Sie die Kalender-Taste
DE
auf der Fernbedienung.
1.
Um die Stunde einzustellen, drücken Sie die “Oben” oder “Unten”-Taste auf der Fernbedienung.
2.
Drücken Sie dann die “Rechts” Taste, um die Minute einzustellen, indem Sie wieder die “Oben”
oder “Unten”-Taste drücken.
3.
Zum Speichern der Uhrzeit drücken Sie auf die Start-Taste auf der Fernbedienung. Der
Roboter bestätigt die eingestellte Reinigungszeit mit einem Piepton.
Om een dagelijks reinigingsschema voor uw robot in te stellen, drukt u op de schemaknop op
NL
de afstandsbediening.
1.
Stel het uur in waarop moet worden gestart met het reinigen met behulp van de omhoog- en
omlaag-pijlen op de afstandsbediening.
2.
Wanneer het uur is ingesteld, drukt u op de pijl naar rechts om door te gaan met het instellen
van de minuten. Gebruik de omhoog- en omlaag-pijlen op de afstandsbediening om de
minuten in te stellen.
3.
Wanneer de uren en minuten zijn ingesteld, bevestigt u de conguratie door op de startknop
op de afstandsbediening te drukken. De robot bevestigt de instelling met een piepje. De
robot begint elke dag te reinigen op het geplande tijdstip.
Para congurar uma sessão de limpeza diária programada para o seu robot prima o botão de
PT
programação no comando.
1.
Acerte a hora para iniciar a limpeza com as setas ascendentes e descendentes no comando.
2.
Depois de acertar a hora, prima a seta da direita para continuar a acertar os minutos. Para
acertar os minutos, utilize as setas ascendentes e descendentes no comando.
3.
Depois de acertar as horas e os minutos, conrme a conguração premindo o botão iniciar
no comando. O robot conrmará a conguração com um aviso sonoro. O robot começará a
limpar diariamente à hora programada.
Pentru a seta o sesiune zilnică de curățare programată pentru robotul dumneavoastră, apăsați
RO
butonul programare de pe telecomandă.
1.
Setați ora de pornire a curățării cu ajutorul săgeților sus și jos de pe telecomandă.
2.
Când ora este setată, apăsați săgeata dreaptă pentru a continua setarea minutelor. Pentru a
seta minutele, utilizați săgețile sus și jos de pe telecomandă.
3.
Când orele și minutele sunt setate, conrmați congurația apăsând butonul start de pe
telecomandă. Robotul va conrma setarea prin emiterea unui semnal sonor. Robotul va
începe curățarea zilnică la ora programată.
28
Page 29

3.
month
За да настроите програма за ежедневен график на чистене за вашия робот, натиснете
BG
копчето за график на дистанционното управление.
1.
Настройте началния час на чистенето, като използвате стрелките нагоре и надолу на
дистанционното управление.
2.
Когато часът е настроен, натиснете дясната стрелка, за да настроите и минутите. За
да настроите минутите, използвайте стрелките нагоре и надолу на дистанционното
управление.
3.
Когато часът и минутите са настроени, потвърдете конфигурацията, като натиснете
копчето за стартиране на дистанционното управление. Роботът ще потвърди
настройката със звуков сигнал. Всеки ден роботът ще започва чистенето в определения
час.
Chcete-li nastavit každodenní plánovaný úklid pro robota, stiskněte tlačítko pro plánování na
CS
dálkovém ovládání.
1.
Pomocí šipky nahoru a dolů na dálkovém ovládání nastavte hodinu pro zahájení úklidu.
2.
Po nastavení hodin pokračujte stisknutím pravé šipky a nastavte minuty. Minuty nastavíte
pomocí šipky nahoru a dolů na dálkovém ovládání.
3.
Po nastavení hodin a minut potvrďte konguraci stisknutím tlačítka Start na dálkovém
ovládání. Robot potvrdí nastavení pípnutím. Robot začne uklízet každý den v naplánovanou
hodinu.
Pre nastavenie každodenné plánovaný upratovanie pre robota, stlačte tlačidlo pre plánovanie
SK
na diaľkovom ovládaní.
1.
Pomocou šípok hore a dole na diaľkovom ovládači nastavte hodinu spustenia vysávania.
2.
Po nastavení hodiny, stlačte pravú šípku a pokračujte v nastavení minút. Pomocou šípok hore
a dole na diaľkovom ovládači nastavte minúty.
3.
Po nastavení hodín a minút potvrďte konguráciu stlačením tlačidla Štart na diaľkovom
ovládači. Robot potvrdí nastavenie pípnutím. Robot začne vysávať každý deň v naplánovanej
hodine.
Щоб налаштувати для робота щоденне прибирання за розкладом, натисніть кнопку
UK
розкладу на пульті.
1.
Налаштуйте годину початку прибирання за допомогою стрілок угору і вниз на пульті.
2.
Після налаштування години натисніть стрілку вправо, щоб налаштувати хвилини.
Налаштуйте хвилини за допомогою стрілок угору і вниз на пульті.
3.
Після налаштування годин і хвилин підтвердіть створену конфігурацію натисканням
кнопки пуску на пульті. Звуковий сигнал робота означає підтвердження налаштувань.
Робот почне прибирати щодня в налаштований за розкладом час.
29
Page 30

3.
month
BIP
To cancel the every day scheduled cleaning session press 3 seconds the schedule
EN
button again. When the every day scheduled cleaning session is canceled the robot
will conrm this with a bip noise and the schedule timing will disappear from the
remote.
Pour annuler la session de nettoyage planiée tous les jours, appuyez à nouveau sur
FR
le bouton de programmation pendant 3 secondes. Lorsque la session de nettoyage
planiée tous les jours est annulée, le robot le conrme en émettant un bip sonore et
le minuteur de programmation disparaît de la télécommande.
Para cancelar la sesión de limpieza diaria programada, pulse de nuevo el botón de
ES
programación durante 3 segundos. Cuando la sesión de limpieza diaria programada
sea cancelada, el robot lo conrmará con un pitido y el tiempo programado
desaparecerá del mando a distancia.
Per annullare la pulizia quotidiana programmata, tenere premuto il pulsante
IT
Calendario per 3 secondi. Dopo aver annullato la pulizia quotidiana programmata,
il robot emetterà un segnale acustico di conferma e l’orario della pulizia quotidiana
scomparirà dal telecomando.
Zum Löschen einer täglichen Reinigungszeit halten Sie die Reinigungszeit-Taste 3
DE
Sekunden lang gedrückt. Die Löschung der täglichen Reinigungszeit wird mit einem
Piepton bestätigt und die geplante Uhrzeit erlischt auf der Fernbedienung.
Om het dagelijkse reinigingsproces te annuleren, drukt u opnieuw 3 seconden lang op
NL
de schemaknop. Wanneer het dagelijkse reinigingsproces is geannuleerd, bevestigt
de robot dit met een piepje waarna het schema verdwijnt van de afstandsbediening.
Para cancelar a sessão de limpeza diária programada prima novamente o botão de
PT
programação durante 3 segundos. Quando a sessão de limpeza diária programada for
cancelada o robot conrmará o cancelamento com um aviso sonoro e a programação
desaparecerá do comando.
30
Page 31

3.
month
Pentru a anula sesiunea zilnică de curățare programată reapăsați timp de 3 secunde
RO
butonul de programare. Când sesiunea zilnică de curățare programată este anulată,
robotul va conrma acest lucru emițând un semnal sonor și ora programată va
dispărea de pe telecomandă.
За да отмените програмата за ежедневен график на чистене, отново натиснете
BG
копчето за график за 3 секунди. Когато програмата за ежедневен график на чистене
е отменена, роботът ще потвърди със звуков сигнал и зададеното време ще изчезне
от дистанционното управление.
Chcete-li zrušit každodenní plánovaný úklid, opět stiskněte na dobu 3 sekund tlačítko pro
CS
plánování. Robot potvrdí zrušení každodenního plánovaného úklidu pípnutím a plánovaný
čas zmizí z dálkového ovládání.
Ak chcete zrušiť každodenné plánované vysávanie, stlačte na 3 sekundy tlačidlo
SK
plánovania. Po zrušení každodenného plánovaného vysávania robot potvrdí zrušenie
pípnutím a z diaľkového ovládača zmizne časový plán.
Щоб відмінити щоденне прибирання за розкладом, ще раз натисніть і утримуйте
UK
кнопку розкладу впродовж 3 секунд. На підтвердження відміни щоденного
прибирання за розкладом пролунає звуковий сигнал, а таймер запланованого
прибирання зникне з пульта.
31
Page 32

4.
Should you like to restrict access of the robot to some areas, use the magnetic stripe.
EN
Put the magnetic stripe on the oor to mark a no-go zone for the robot.
You can cut the magnetic stripe in pieces to adjust its length to your need. Please cut
it only vertically and never along the stripe.
Si vous souhaitez limiter l’accès du robot à certaines zones, utilisez la bande magnétique.
FR
Placez la bande magnétique sur le sol pour marquer une zone interdite pour le robot.
Vous pouvez couper la bande magnétique en morceaux pour adapter sa longueur à
vos besoins. Veuillez couper la bande verticalement seulement et jamais en longueur.
Si desea restringir el acceso del robot a determinadas zonas, utilice la cinta magnética.
ES
Coloque la cinta magnética en el suelo para marcar una zona de no acceso al robot.
Puede colocar la cinta magnética por trozos para ajustar su longitud a sus necesidades.
Corte solo verticalmente y nunca a lo largo de la cinta.
Per impedire l’accesso del robot a determinate zone, usare la banda magnetica.
IT
Posizionare la banda magnetica sul pavimento per marcare un’area inaccessibile al robot.
È possibile tagliare la banda magnetica a pezzi per regolarne la lunghezza. Tagliarla
esclusivamente in verticale, e mai nel senso della lunghezza.
Wenn ihr Roboter einen Magnetsensor hat, wird ein Magnetband mitgeliefert. Mit
DE
dem Magnetband können Sie Bereiche abgrenzen, die nicht gereinigt werden sollen.
Bei Bedarf kann das Magnetband auf die gewünschte Länge zugeschnitten werden.
Bitte schneiden Sie es nur vertikal und nie der Länge nach zu.
Als u de toegang van de robot tot bepaalde gebieden in de woning wilt beperken,
NL
kunt u gebruik maken van de magneetstrip.
Plaats de magneetstrip op de vloer om een no-go zone voor de robot te markeren.
U kunt de magneetstrip in stukken snijden om de lengte al naar wens aan te passen.
Alstublieft alleen in verticale richting en niet in de lengte van de strip knippen.
Se pretende restringir o acesso do robot a algumas áreas, utilize a banda magnética.
PT
Coloque a banda magnética no chão para marcar a zona interdita ao robot.
Pode cortar a banda magnética para ajustar o comprimento às suas necessidades.
Corte-a apenas no sentido vertical e nunca sobre o comprimento.
FR Selon modèle / EN Depending on model / DE nur für Modelle mit Magnetsensor / NL Afhankelijk van het model / ES Según modelo / PT Consoante
o modelo / IT Secondo i modelli / RO În funcţie de model / BG В зависимост от модела / CS podle modelu / SK podľa modelu / UK залежно від моделі
*
32
*
Page 33

4.
Dacă doriți să împiedicați accesul robotului la anumite zone, utilizați fâșiile magnetice.
RO
Amplasați fâșia magnetică pe podea pentru a marca zona restricționată pentru robot.
Puteți tăia fâșia magnetică în segmente pentru a-i regla lungimea în funcție de
dorințe. Vă rugăm decupați-o numai vertical nu și de-a lungul fâșiei.
Ако искате да ограничите достъпа на робота до някои зони, използвайте магнитната
BG
лента.
Поставете магнитната лента на пода, за да отбележите зоната, в която роботът да не
навлиза.
Можете да срежете магнитната лента на парчета, за да регулирате дължината й
според вашите нужди. Режете я винаги вертикално и никога по нейната дължина.
Chcete-li omezit přístup robota do některých prostor, použijte k tomu magnetickou pásku.
CS
Umístěte magnetickou pásku na podlahu, abyste označili zónu, kam robot nesmí.
Magnetickou pásku můžete nastříhat na kusy a přizpůsobit tak její délku Vašim potřebám.
Stříhejte pouze svisle a nikdy ne po délce pásky.
Ak by ste chceli obmedziť prístup robota do niektorých oblastí, použite magnetický
SK
prúžok.
Položte magnetický prúžok na podlahu, aby ste vyznačili oblasť, kam robot nemôže
ísť.
Magnetický prúžok môžete narezať na kúsky, aby ste podľa potreby upravili jeho
dĺžku. Režte ho iba vertikálne a nikdy nie pozdĺž prúžku.
Використовуйте магнітну стрічку, якщо хочете обмежити доступ робота до
UK
деяких зон.
Закріпіть магнітну стрічку на підлозі для позначення зони, кордони якої робот не
повинен перетинати.
Ви можете нарізати магнітну стрічку на відрізки потрібної довжини. Наріжте
стрічку вертикально. Не розрізайте її вздовж.
*
FR Selon modèle / EN Depending on model / DE nur für Modelle mit Magnetsensor / NL Afhankelijk van het model / ES Según modelo / PT Consoante
o modelo / IT Secondo i modelli / RO În funcţie de model / BG В зависимост от модела / CS podle modelu / SK podľa modelu / UK залежно від моделі
*
33
Page 34

4.
Do not put anything on top of the magnetic stripe.
EN
Ne posez rien sur la bande magnétique.
FR
No coloque nada encima de la cinta magnética.
ES
Non posizionare alcun oggetto sulla banda magnetica.
IT
Stellen Sie nichts auf das Magnetband.
DE
*
Plaats niets op de magneetstrip.
NL
Não coloque nada sobre a banda magnética.
PT
Nu așezați nimic deasupra fâșiei magnetice.
RO
Не поставяйте нищо върху магнитната лента.
BG
Na magnetickou pásku nic nepokládejte.
CS
Na povrch magnetického prúžku nikdy neklaďte žiadne predmety.
SK
Нічого не ставте на магнітну стрічку.
UK
FR Selon modèle / EN Depending on model / DE nur für Modelle mit Magnetsensor / NL Afhankelijk van het model / ES Según modelo / PT Consoante
o modelo / IT Secondo i modelli / RO În funcţie de model / BG В зависимост от модела / CS podle modelu / SK podľa modelu / UK залежно від моделі
*
34
Page 35

5.
month
The robot should be emptied and cleaned at least once a week. Push the button on
EN
the backside of the robot and pull out the dust container. To empty it, ip o the
cover.
Le robot doit être vidé et nettoyé au moins une fois par semaine. Appuyez sur
FR
le bouton à l’arrière du robot et sortez le bac à poussière. Pour le vider, retirez le
couvercle.
El robot se debe vaciar y limpiar al menos una vez a la semana. Pulse el botón del
ES
reverso del robot y extraiga el depósito de suciedad. Para vaciarlo, abra la tapa
deslizándola hacia arriba sin apretar el botón.
Il robot deve essere svuotato e pulito almeno una volta a settimana. Premere il
IT
pulsante situato sulla parte posteriore del robot e rimuovere il contenitore della
polvere. Per svuotarlo, aprire il coperchio.
Der Roboter sollte mindestens einmal pro Woche ausgeleert und die Filter
DE
ausgeklopft werden. Drücken Sie die Pfeiltaste an der Rückseite des Roboters, um den
Staubbehälter zu entnehmen. Fassen Sie an den Knopf und heben Sie den Deckel an,
um den Behälter zu entleeren.
De robot moet minstens één keer per week worden geleegd en schoongemaakt.
NL
Druk op de knop aan de achterkant van de robot en trek het stofreservoir eruit. Om
hem te legen, klapt u het deksel open.
O robot deve ser esvaziado e limpo pelo menos uma vez por semana. Prima o botão
PT
na parte traseira do robot e retire o depósito do pó. Para o esvaziar, retire a tampa.
Robotul trebuie golit și curățat cel puțin o dată pe săptămână. Apăsați butonul de pe
RO
spatele robotului și scoateți colectorul pentru praf. Pentru a-l goli, ridicați capacul.
Роботът трябва да се почиства и контейнерът да се изпразва поне веднъж
BG
седмично. Натиснете копчето в задната част на робота и издърпайте контейнера
за прах. За да го изпразните, отворете капака.
Robota je třeba minimálně jednou týdně vyprázdnit a vyčistit. Stiskněte tlačítko na
CS
zadní straně robota a vytáhněte nádobu na prach. Pro vyprázdnění odklopte kryt.
Aspoň raz za týždeň sa musí robot vyprázdniť a vyčistiť. Stlačte tlačidlo na zadnej
SK
strane robota a vytiahnite nádobu na prach. Ak ju chcete vyprázdniť, odklopte kryt.
Необхідно спорожнювати і очищати робота принаймні щотижня. Натисніть
UK
кнопку на зворотному боці робота і витягніть пилозбірник. Відкиньте кришку,
щоб спорожнити пилозбірник.
35
Page 36

5.
month
To clean the lters remove them from the dust container. Clean the lter grid with soft
EN
punches on the backside above a bin.
Wash the foam lter, lter grid and dust container with clear water. Do not wet the
ne dust lter (white lter).
Pour nettoyer les ltres, retirez-les du bac à poussière. Nettoyez la grille du ltre en
FR
tapotant l’arrière au-dessus d’une poubelle.
Lavez le ltre en mousse, la grille du ltre et le bac à poussière à l’eau claire. Ne
mouillez pas le ltre à poussière n (ltre blanc).
Para limpiar los ltros, extráigalos del depósito de polvo. Limpie la rejilla del ltro con
ES
pequeños golpes en la parte posterior y encima de una papelera.
Lave el ltro de espuma, la rejilla del ltro y el depósito de suciedad con agua limpia.
No moje el ltro no de polvo (ltro blanco).
Per pulire i ltri, rimuoverli dal contenitore della polvere. Pulire la griglia del ltro
IT
dandole dei colpetti sopra un cestino.
Lavare il ltro in spugna, la griglia del ltro e il contenitore della polvere con acqua
pulita. Non bagnare il ltro anti-polveri sottili (ltro bianco).
Nehmen Sie den Staublter zum Reinigen aus dem Staubbehälter. Reinigen Sie
DE
das Filtergitter über einem Mülleimer durch sanftes Klopfen auf die Rückseite des
Filtergitters.
Waschen Sie den Schaumstolter, das Filtergitter und den Staubbehälter mit klarem
Wasser. Achten Sie darauf, dass der Feinstaublter (weißer Filter) nicht nass wird.
Verwijder de lters uit het stofreservoir om ze te kunnen reinigen. Reinig het
NL
lterrooster door zacht ertegen te kloppen als u hem boven een vuilnisbak houdt.
Was de schuimstof lter, het lterrooster en de stofcontainer met schoon water. Maak
de jnstolter (witte lter) niet nat.
Para limpar os ltros retire-os do depósito do pó. Limpe a grelha do ltro com
PT
pancadas suaves na parte traseira por cima de um caixote do lixo.
Lave o ltro de espuma, a grelha do ltro e o depósito do pó com água limpa. Não
molhe o ltro do pó no (ltro branco).
36
Page 37

5.
month
Pentru a curăța ltrele, detașați-le de colectorul de praf. Curățați sita ltrului lovindu-i
RO
ușor dosul deasupra unui coș de gunoi.
Spălați ltrul de spumă, sita ltrului și colectorul pentru praf cu apă curată. Nu udați
ltrul de particule ne (ltrul alb).
За да почистите филтрите, трябва да ги извадите от контейнера за прах. Почистете
BG
филтърната решетка с леки потупвания в задната част над кофа за боклук.
Измийте филтъра от порест материал, филтърната решетка и контейнера за прах с
чиста вода. Не мокрете филтъра за фин прах (белия филтър).
Pro vyčištění vyjměte ltry z nádoby na prach. Vyčistěte ltrační mřížku lehkým poklepáním
CS
na zadní straně nad košem.
Pěnový ltr, ltrační mřížku a nádobu na prach umyjte čistou vodou. Jemný ltr prachu (bílý
ltr) nenamáčejte.
Ak chcete vyčistiť ltre, vyberte ich z nádoby na prach. Pomocou mäkkého dierkovača
SK
na zadnej strane nad nádobou vyčistite mriežku ltra.
Penový lter, mriežku ltra a nádobu na prach umyte čistou vodou. Neumývajte lter
jemného prachu (biely lter).
Щоб очистити фільтри, вийміть їх з пилозбірника. Очистіть сітчастий фільтр,
UK
злегка постукавши зворотним боком фільтра по стінці смітника.
Промийте поролоновий фільтр, сітчастий фільтр і пилозбірник під чистою водою.
Не намочуйте фільтр для дрібного пилу (білий фільтр).
37
Page 38

12h
5.
month
Let all parts dry approximately 12hours. Do not use wet lter or dust container. When
EN
dry put the lters back in the dust container.
Laissez toutes les pièces sécher environ 12 heures. N’utilisez pas les ltres ni le bac à
FR
poussière s’il sont encore humides. Une fois secs, remettez les ltres dans le bac à poussière.
Deje que todas las piezas se sequen durante aproximadamente 12 horas. No utilice
ES
el ltro ni el recipiente de polvo mojados. Cuando estén secos, vuelva a colocar los
ltros en el depósito de suciedad.
Lasciare che le parti si asciughino per circa 12 ore. Non usare ltri o contenitori della
IT
polvere bagnati. Quando i ltri sono asciutti, riposizionarli nel contenitore della polvere.
Lassen Sie alle Filterelemente ca. 12 Stunden lang trocknen. Verwenden Sie die Filter
DE
oder den Staubbehälter nicht, solange diese nicht komplett getrocknet sind. Setzen
Sie den vollständig getrockneten Staublter wieder in den Staubbehälter ein.
Laat alle onderdelen ongeveer 12 uur lang drogen. Gebruik geen nat lter of
NL
stofreservoir. Plaats de lters terug in het stofreservoir zodra ze droog zijn.
Deixe secar todas as partes durante, aproximadamente, 12 horas. Não use o ltro nem
PT
o depósito do pó molhados. Quando secos, volte a colocar os ltros no depósito do pó.
Lăsați toate componentele la uscat timp de aproximativ 12 ore. Nu utilizați un ltru sau
RO
un colector de praf ud. Când sunt uscate, repuneți ltrele la loc în colectorul pentru praf.
Оставете всички части да изсъхнат за около 12 часа. Не използвайте мокър филтър
BG
или мокър контейнер за прах. Когато изсъхнат, поставете филтрите обратно в
контейнера за прах.
Nechte všechny díly uschnout přibližně 12 hodin. Nepoužívejte mokrý ltr ani mokrou
CS
nádobu na prach. Po uschnutí vložte ltry zpět do nádoby na prach.
Všetky časti nechajte vyschnúť po dobu približne 12 hodín. Nepoužívajte mokrý lter
SK
ani vlhkú nádobu na prach. Po vyschnutí vložte ltre späť do nádoby na prach.
Залиште всі частини сохнути приблизно на 12 години. Не використовуйте
UK
вологий фільтр або вологий пилозбірник. Після висихання встановіть фільтр
назад у пилозбірник.
38
Page 39

5.
month
year
NEW
NEW
Every 6 months replace the ne dust and foam lter with new ones to maintain
EN
optimal performance.
Tous les 6 mois, remplacez le ltre à poussières nes et le ltre en mousse des ltres
FR
neufs an de maintenir des performances optimales.
Cada 6 meses, debe sustituir el ltro no y el ltro de espuma por unos nuevos para
ES
mantener el funcionamiento óptimo.
Sostituire il ltro anti-polveri sottili e il ltro in spugna ogni 6 mesi per mantenere
IT
prestazioni ottimali.
Ersetzen Sie den Feinstaublter und den Schaumstolter alle 6 Monate gegen neue
DE
Filter, um eine optimale Staubsaugerleistung zu gewährleisten.
Vervang elke 6 maanden de jnstolter en schuimstof lter door nieuwe om de
NL
optimale prestaties te behouden.
A cada 6 meses substitua o ltro de espuma e o ltro do pó no por novos para
PT
manter excelentes desempenhos.
la ecare 6 luni, înlocuiți ltrul de particule ne și ltrul de spumă cu unele noi pentru
RO
a menține o performanță optimă a robotului.
На всеки 6 месеца подменяйте филтъра за фин прах и филтъра от порест материал с
BG
нови, за да поддържате работата оптимална.
Pro zachování optimálního výkonu vyměňujte jemný ltr prachu a pěnový ltr každých 6
CS
měsíců za nový.
Aby ste zachovali optimálny výkon, vymeňte každých 6 mesiacov lter na jemný
SK
prach a penový lter za nové.
Для ефективного прибирання кожні півроку замінюйте фільтр для дрібного пилу
UK
й поролоновий фільтр на нові.
39
Page 40

1
2
month
5.
Clean the brush of the robot once a week. To do that turn the robot upside down.
EN
To remove the brush, open the brush guard by pushing the 2 snap latches and pull it up. Then
pull out the brush from the robot.
Nettoyez la brosse du robot une fois par semaine. Pour ce faire, retournez le robot. Pour retirer la
FR
brosse, ouvrez le protège-brosse en appuyant sur les deux loquets à pression et tirez-le. Retirez
ensuite la brosse du robot.
Limpie el cepillo central del robot una vez a la semana. Para poder hacerlo, gire el robot del revés.
ES
Para retirar el cepillo central, abra el protector del cepillo empujando los 2 cierres de presión y
estirando hacia arriba. Después extraiga el cepillo central del robot.
Pulire la spazzola del robot una volta a settimana. Per fare ciò, capovolgere il robot. Per rimuovere
IT
la spazzola, aprire la protezione della spazzola premendo i 2 fermagli e sollevarla. Quindi estrarre
la spazzola dal robot.
Reinigen Sie die Bürste des Roboters einmal pro Woche. Drehen Sie dazu den Roboter auf
DE
den Kopf. Zum Herausnehmen der Bürste entfernen Sie den Bürstenschutz, indem Sie die 2
Verriegelungen betätigen und den Bürstenschutz dann abnehmen. Entnehmen Sie dann die
Bürste aus dem Roboter.
Reinig de borstel van de robot één keer per week. Draai de robot ondersteboven om dit te doen.
NL
Om de borstel te verwijderen, opent u de borstelbeschermer door op de 2 klikvergrendelingen
te drukken en deze omhoog te trekken. Trek vervolgens de borstel uit de robot.
Limpe a escova do robot uma vez por semana. Para o fazer, vire o robot ao contrário. Para retirar
PT
a escova, abra a proteção da escova empurrando os 2 fechos e puxe-os para cima. Depois retire
a escova do robot.
Curățați peria robotului o dată pe săptămână. În acest scop, puneți invers robotul. Pentru a
RO
îndepărta peria, desfaceți apărătoarea periei apăsând cele 2 cleme de prindere și ridicând-o. Apoi
scoateți peria din robot.
Почиствайте четката на робота веднъж седмично. За да го направите, обърнете робота
BG
наобратно. За да махнете четката, отворете предпазителя на четката, като натиснете 2
щракащи ключалки и го издърпате. След това издърпайте четката от робота.
Jednou za týden vyčistěte kartáč robota. Otočte robota vzhůru nohama. Pro vyjmutí kartáče
CS
otevřete kryt kartáče zatlačením 2 jazýčků a kryt sejměte. Pak vyjměte kartáč z robota.
Raz týždenne vyčistite kefku robota. Aby ste ju vyčistili, otočte robot hore dnom. Ak chcete vybrať
SK
kefku, otvorte ochranný kryt kefky tak, že zatlačíte 2 západky otvoru. Potom vytiahnite kefku z robota.
Очищуйте щітку робота щотижня. Для цього переверніть робота на зворотний бік. Щоб
UK
зняти щітку, відкрийте фіксатор щітки, натиснувши на 2 засуви, і витягніть його. Потім
витягніть щітку з робота.
40
Page 41

5b.
month
* *
To clean the brush, use scissors to cut o the hair.
EN
Clean the lateral brushes of the robot with a dry clean cloth.
Pour nettoyer la brosse, utilisez des ciseaux pour couper les poils et cheveux.
FR
Nettoyez les brosses latérales du robot avec un chion propre et sec.
Para limpiar el cepillo, utilice las tijeras para cortar los pelos.
ES
Limpie los cepillos laterales del robot con un paño seco y limpio.
Rimuovere i capelli intrappolati nella spazzola tagliandoli con delle forbici.
IT
Pulire le spazzole laterali del robot con un panno asciutto e pulito.
Schneiden Sie zum Reinigen der Bürste verfangene Haare und Fusseln mit einer
DE
Schere ab bzw. durch.
Reinigen Sie die seitlichen Bürsten des Roboters mit einem trockenen, sauberen Tuch.
Gebruik een schaar om het haar af te knippen van de borstel te knippen.
NL
Reinig de zijborstels van de robot met een droge schone doek.
Para limpar a escova, utilize uma tesoura para cortar os pelos.
PT
Limpe as escovas laterais do robot com um pano seco e limpo.
Pentru a curăța peria, utilizați o foarfecă pentru a tăia rele de păr.
RO
Curățați periile laterale ale robotului cu o cârpă uscată și curată.
За да почистите четката, използвайте ножици, за да срежете космите.
BG
Почистете страничните четки на робота със суха, чиста кърпа.
Pro vyčištění kartáče použijte k odstřihnutí namotaných vlasů nůžky.
CS
Boční kartáče robota vyčistěte čistým suchým hadříkem.
Na čistenie kefky použite nožnice a odstrihnite vlasy.
SK
Suchou čistou handričkou vyčistite bočné kefky robota.
Щоб очистити щітку, за допомогою ножиць зріжте волосся.
UK
Протріть бічні щітки робота чистою сухою серветкою.
41
Page 42

5b.
month
NEW
* *
Replace lateral brushes every 6 months.
EN
Throw away the old brushes and replace them with new ones. Screw the new brushes
on the robot.
Remplacez les brosses latérales tous les 6 mois.
FR
Jetez les anciennes brosses et remplacez-les par des brosses neuves. Vissez les
nouvelles brosses sur le robot.
Sustituya los cepillos laterales cada 6 meses.
ES
Tire los cepillos viejos y sustitúyalos por nuevos. Atornille los nuevos cepillos al robot.
Sostituire le spazzole laterali ogni 6 mesi.
IT
Gettare le spazzole vecchie e sostituirle con spazzole nuove. Avvitare le spazzole
nuove sul robot.
Wechseln Sie die seitlichen Bürsten alle 6 Monate aus.
DE
Werfen Sie die alten Bürsten weg und ersetzen Sie sie durch neue. Bringen Sie die
neuen Bürsten am Roboter an.
Vervang de zijborstels elke 6 maanden.
NL
Gooi de oude borstels weg en vervang ze door nieuwe. Schroef de nieuwe borstels
op de robot.
Substitua as escovas laterais a cada 6 meses.
PT
Deite fora as escovas usadas e substitua-as por novas. Insira as novas escovas no robot.
Înlocuiți periile laterale la ecare 6 luni.
RO
Aruncați periile vechi și înlocuiți-le cu unele noi. Înșurubați noile perii pe robot.
Сменяйте страничните четки на всеки 6 месеца.
BG
Изхвърлете старите четки и ги заменете с нови. Завийте новите четки на робота.
Boční kartáče vyměňujte každých 6 měsíců.
CS
Odstraňte staré kartáče a vyměňte je za nové. Nové kartáče našroubujte do robota.
Bočné kefky vymeňte každých 6 mesiacov.
SK
Staré kefky vyhoďte a nahraďte ich novými. Nové kefky naskrutkujte na robot.
Замінюйте бічні щітки кожні піроку.
UK
Викиньте старі щітки й замініть їх на нові. Закрутіть нові щітки на роботі.
*
*
FR Selon modèle / EN Depending on model / DE nur für Modelle mit Magnetsensor / NL Afhankelijk van het model / ES Según modelo / PT Consoante
o modelo / IT Secondo i modelli / RO În funcţie de model / BG В зависимост от модела / CS podle modelu / SK podľa modelu / UK залежно від моделі
*
42
Page 43

5b.
month
OFF
Attention: Before touching sensitive parts of the robot make sure it is turned o by
EN
pressing the on / o button 3 seconds.
Attention : Avant de toucher les parties sensibles du robot, assurez-vous qu’il est
FR
éteint en appuyant sur le bouton marche / arrêt pendant 3 secondes.
Atención: Antes de tocar las partes sensibles del robot, compruebe que está apagado
ES
pulsando el botón encender / apagar durante 3 segundos.
Attenzione! Prima di toccare le parti sensibili del robot, assicurarsi che sia spento
IT
tenendo premuto il pulsante di accensione/spegnimento per 3 secondi.
Achtung: Stellen Sie vor dem Berühren empndlicher Teile des Roboters sicher, dass
DE
dieser ausgeschaltet ist, indem Sie die Ein/Aus-Taste 3 Sekunden lang gedrückt halten.
Opgelet: Voordat u gevoelige onderdelen van de robot aanraakt, moet u ervoor zorgen
NL
dat deze is uitgeschakeld door 3 seconden lang op de aan-/uitknop te drukken.
Atenção: Antes de tocar nas partes sensíveis do robot certique-se de que está
PT
desligado premindo o botão on/o durante 3 segundos.
Atenție: Înainte de a atinge părțile sensibile ale robotului, asigurați-vă că acesta este
RO
oprit apăsând butonul on/o (pornit/oprit) timp de 3 secunde.
Внимание: Преди да докоснете сензорните части на робота се уверете, че е той
BG
изключен, като натиснете копчето за вкл./изкл. за 3 секунди.
Upozornění: Než se dotknete citlivých částí robota, ujistěte se, že je robot vypnutý stisknutím
CS
tlačítka zap/vyp po dobu 3 sekund.
Upozornenie: Predtým, ako sa dotknete citlivých častí robota skontrolujte, či je
SK
vypnutý, stlačením tlačidla zapnutia/vypnutia po dobu 3 sekúnd.
Увага! Перш ніж торкатися чутливих частин робота, переконайтеся, що він
UK
вимкнений натисканням і утриманням кнопки увімк./вимк. впродовж 3 секунд.
43
Page 44

5b.
month
Once a week clean the following parts with a dry soft cloth: charging plates of the
EN
robot, drop sensors, distance sensor and charging plates at the docking station.
Une fois par semaine, nettoyez les pièces suivantes avec un chion doux et sec :
FR
plaques de charge du robot, capteurs de chute, capteur de distance et plaques de
charge de la station d’accueil.
Una vez por semana, se deben limpiar las siguientes piezas con un paño suave y seco:
ES
las placas de carga del robot, los sensores anticaída, sensor de distancia y placas de
carga de la estación de carga.
Una volta a settimana, pulire le seguenti parti con un panno morbido e asciutto: le
IT
piastre di ricarica del robot, i sensori anti-caduta, il sensore di distanza e le piastre di
ricarica sulla base di ricarica.
Reinigen Sie einmal pro Woche die folgenden Teile des Roboters mit einem trockenen,
DE
weichen Tuch: Ladeplatten des Roboters, Absturzsensoren, Entfernungssensor und
die Ladeplatten der Ladestation.
Maak één keer per week de volgende onderdelen schoon met een droge, zachte
NL
doek: laadplaten van de robot, druppelsensoren, afstandssensor en laadplaten van
het dockingstation.
Uma vez por semana limpe as peças seguintes com um pano seco suave: placas
PT
de carregamento do robot, sensores de queda, sensor de distância e placas de
carregamento na base de carregamento.
O dată pe săptămână, curățați următoarele piese cu o cârpă uscată și moale: plăcuțele
RO
de încărcare ale robotului, senzorii pentru prevenirea căderilor, senzorul de distanță și
plăcuțele de încărcare de pe stația de încărcare.
Веднъж седмично почиствайте със суха мека кърпа следните части: зареждащите
BG
дискове на робота, сензорите против падане, сензорът за разстояние и
зареждащи дискове на докинг станцията.
Jednou týdně vyčistěte následující části robota suchým měkkým hadříkem: nabíjecí
CS
destičky robota, senzory proti pádu, senzor vzdálenosti a nabíjecí destičky na
dokovací stanici.
Raz za týždeň vyčistite suchou mäkkou handričkou tieto časti: nabíjacie platne robota,
SK
senzor proti pádu, senzor vzdialenosti a nabíjacie platne na dokovacej stanici.
Щотижня протирайте чистою сухою серветкою такі частини: зарядні пластини
UK
робота, датчики падіння, датчик відстані і зарядні пластини бази.
44
Page 45

5b.
month
Component Cleaning the component Replacing the component
Dust collector After each use Not applicable
Filter Once a week Twice per year
Brush Once a week If required
Charging base Once a week Not applicable
Fall sensors Once a week Not applicable
Front wheel Once a week Not applicable
Brush heads Once a month Twice per year
Composant Nettoyage du composant Remplacement du composant
Bac à poussière Après chaque utilisation Non applicable
Filtre Une fois par semaine Deux fois par an
Brosse Une fois par semaine Si nécessaire
Plots de charge Une fois par semaine Non applicable
Capteurs chute Une fois par semaine Non applicable
Roue avant Une fois par semaine Non applicable
Brossettes Une fois par mois Deux fois par an
Componente Limpieza del componente Sustitución del componente
Depósito de polvo Después de cada uso No aplicable
Filtro Una vez a la semana Dos veces al año
Cepillo Una vez a la semana Si es necesario
Base de carga Una vez a la semana No aplicable
Sensores anticaída Una vez a la semana No aplicable
Rueda delantera Una vez a la semana No aplicable
Cepillos pequeños Una vez al mes Dos veces al año
45
Page 46

5b.
month
Componente Pulizia del componente Sostituzione del componente
Contenitore della
polvere
Filtro Una volta alla settimana Due volte all’anno
Spazzola Una volta alla settimana Se necessario
Piastre di ricarica Una volta alla settimana Non applicabile
Sensori anti-caduta Una volta alla settimana Non applicabile
Ruota anteriore Una volta alla settimana Non applicabile
Spazzole Una volta al mese Due volte all’anno
Dopo ogni utilizzo Non applicabile
Bestandteil
Staubbehälter Nach jedem Gebrauch Nichtzutreend
Filter Einmal pro Woche Zweimal pro Jahr
Bürste Einmal pro Woche Wenn erforderlich
Ladekontakte Einmal pro Woche Nichtzutreend
Absturzsensoren Einmal pro Woche Nichtzutreend
Vorderrad Einmal pro Woche Nichtzutreend
Kleine Bürsten Einmal pro Monat Zweimal pro Jahr
Onderdeel
Stofcontainer Na elk gebruik Niet van toepassing
Filter Een keer per week Twee keer per jaar
Borstel Een keer per week Indien nodig
Laadcontacten Een keer per week Niet van toepassing
Valsensoren Een keer per week Niet van toepassing
Voorwiel Een keer per week Niet van toepassing
Reinigung des
Bestandteils
Reiniging van het
onderdeel
Auswechseln des Bestandteils
Vervanging van het onderdeel
Borsteltjes Een keer per maand Twee keer per jaar
46
Page 47

5b.
month
Limpeza do
componente
Recipiente de poeiras Após cada utilização Não aplicável
Filtro Uma vez por semana Duas vezes por ano
Escova Uma vez por semana Se necessário
Placas de carregamento Uma vez por semana Não aplicável
Sensores de queda Uma vez por semana Não aplicável
Roda dianteira Uma vez por semana Não aplicável
Escovas Uma vez por mês Duas vezes por ano
Piese componente
Compartiment de praf După ecare utilizare Nu se aplică
Filtru O dată pe săptămână De două ori pe an
Perie O dată pe săptămână Dacă este necesar
Plăcuțe de încărcare O dată pe săptămână Nu se aplică
Senzori de cădere O dată pe săptămână Nu se aplică
Roata din față O dată pe săptămână Nu se aplică
Periuțe O dată pe lună De două ori pe an
Limpeza do componente Substituição do componente
Curățarea piesei
componente
Înlocuirea piesei componente
Компонент
Кошче за прах След всяка употреба Не е приложимо
Филтър Веднъж седмично Два пъти годишно
Четка Веднъж седмично Ако е необходимо
Контактни точки за
зареждане
Падащи сензори Веднъж седмично Не е приложимо
Предно колело Веднъж седмично Не е приложимо
Четки Веднъж месечно Два пъти годишно
Почистване на
компоненти
Веднъж седмично Не е приложимо
47
Подмяна на компонента
Page 48

5b.
month
Díl Vyčištění dílu Výměna dílu
Nádoba na prach Po každém použití Neprovádí se
Filtr Jednou týdně Dvakrát za rok
Kartáč Jednou týdně V případě potřeby
Nabíjecí plošky Jednou týdně Neprovádí se
Senzory proti pádu Jednou týdně Neprovádí se
Přední kolo Jednou týdně Neprovádí se
Kartáčky Jednou za měsíc Dvakrát za rok
Čistenie komponentu Čistenie komponentu Výmena komponentu
Nádoba na prach Po každom použití Nevzťahuje sa
Filter Raz týždenne Dvakrát ročne
Kefa Raz týždenne V prípade potreby
Nabíjacie kolíky Raz týždenne Nevzťahuje sa
Snímače pádu Raz týždenne Nevzťahuje sa
Predné koleso Raz týždenne Nevzťahuje sa
Kefky Raz mesačne Dvakrát ročne
Компонент Очищення компонентів Заміна компонентів
Пилозбірник
Фільтр Щотижня 2 рази на рік
Щітка Щотижня За необхідності
Зарядні контакти Щотижня Не застосовується
Датчики падіння Щотижня Не застосовується
Переднє колесо Щотижня Не застосовується
Щіточки Щомісяця 2 рази на рік
Після кожного
використання
48
Не застосовується
Page 49

6.
Do not throw the robot in the bin.
EN
Always wear gloves and protection.
Ne jetez pas le robot avec les autres déchets.
FR
Portez toujours des gants et une protection.
No tire el robot en el cubo de basura.
ES
Utilice siempre guantes y protección.
Non smaltire il robot insieme ai riuti generici.
IT
Indossare guanti e protezioni.
Werfen Sie den Roboter nicht in den Mülleimer.
DE
Tragen Sie Schutzhandschuhe.
Gooi de robot niet weg met het gewone huisvuil.
NL
Draag altijd handschoenen en gepaste beschermingsmiddelen.
Não deite o robot no lixo comum.
PT
Use sempre luvas e proteção.
Nu aruncați robotul la coșul de gunoi.
RO
Întotdeauna purtați mănuși și echipament de protecție.
Не изхвърляйте робота в коша.
BG
Винаги носете ръкавици и защита.
Nevyhazujte robota do popelnice.
CS
Vždy používejte rukavice a ochranné prvky.
Robot nehádžte do koša.
SK
Použite vždy rukavice a ochranné prvky.
Не викидайте робота в смітник.
UK
Завжди надягайте рукавички і захисні засоби.
49
Page 50

6.
1
2
3
OFF
Attention: Before removing the battery turn o the robot. Turn the robot upside down
EN
to get access to the battery slot. Remove the battery by pressing snap latches of the
battery slot and pull the battery up. Disconnect the battery from the robot. Recycle
the battery and robot.
Attention : Avant d’enlever la batterie, mettez le robot hors tension. Retournez le
FR
robot à l’envers pour accéder au compartiment de la batterie. Retirez la batterie
en appuyant sur les loquets du compartiment de la batterie et retirez la batterie.
Déconnectez la batterie du robot. Recyclez la batterie et le robot.
Atención: Apague el robot antes de extraer la batería. Ponga el robot del revés para
ES
acceder a la ranura de la batería. Extraiga la batería pulsando los cierres de presión de
la ranura de la batería y estirando de la batería hacia arriba. Desconecte la batería del
robot. Recicle la batería y el robot.
Attenzione! Spegnere il robot prima di rimuovere la batteria. Capovolgere il robot
IT
per accedere al vano batteria. Rimuovere la batteria premendo i fermagli del vano
batteria e sollevare la batteria. Scollegare la batteria dal robot. Riciclare la batteria e
il robot.
Entsorgung: Schalten Sie vor dem Herausnehmen des Akkus den Roboter aus. Drehen
DE
Sie den Roboter auf den Kopf, um Zugang zum Akkufach zu erhalten. Nehmen Sie
den Akku heraus, indem Sie die Verriegelungen des Akkufachs betätigen und den
Akku herausnehmen. Trennen Sie den Akku vom Roboter. Führen Sie den Akku und
den Roboter der Wiederverwertung zu.
Opgelet: Voordat u de batterij verwijdert, moet u de robot uitschakelen. Draai de
NL
robot ondersteboven om toegang te krijgen tot de batterijhouder. Verwijder de
batterij door op de klikvergrendelingen van de batterijhouder te drukken en de
batterij omhoog te trekken. Verbreek de verbinding van de batterij met de robot.
PT
Recycle de batterij en de robot.
Atenção: Antes de retirar a bateria desligue o robot. Vire o robot ao contrário para
ter acesso ao compartimento da bateria. Retire a bateria premindo os fechos do
compartimento da bateria e puxe-a para cima. Desligue a bateria do robot. Recicle
a bateira e o robot.
50
Page 51

6.
Atenție: Înainte de a îndepărta bateria, opriți robotul. Întoarceți robotul pentru a avea
RO
acces la compartimentul acumulatorului. Îndepărtați acumulatorul apăsând clemele
de prindere de pe slotul acumulatorului și scoateți-l. Deconectați acumulatorul de la
robot. Reciclați acumulatorul și robotul.
Внимание: Преди да махнете батерията, изключете робота. Обърнете наобратно за
BG
достъп до отделението за батерии. Извадете батерията, като натиснете заключващите
скоби на отделението за батерии и издърпате батерията нагоре. Извадете батерията
от робота. Рециклирайте батерията и робота.
Upozornění: Před vyjmutím baterie robota vypněte. Otočte robota vzhůru nohama, abyste
CS
získali přístup k prostoru pro baterii. Vyjměte baterii zatlačením jazýčků přihrádky pro baterii
a baterii vyjměte. Odpojte baterii od robota. Baterii a robota recyklujte.
Upozornenie: Pred vybratím batérie vypnite robot. Otočte robot hore dnom, aby
SK
ste získali prístup k otvoru na batériu. Stlačte západky otvoru na batériu a batériu
vytiahnite nahor. Batériu odpojte od robota. Robot a batériu recyklujte.
Увага! Перед вийманням акумулятора вимкніть робота. Переверніть робота
UK
на зворотний бік для доступу до акумуляторного відсіку. Вийміть акумулятор,
натиснувши на засуви на акумуляторному відсіку, і витягніть його. Від’єднайте
акумулятор від робота. Утилізуйте акумулятор і робота.
51
Page 52

7.
40°C - 104°F
0°C - 32°F
52
Page 53

7.
IS THERE A PROBLEM WITH YOUR APPLIANCE?
EN
According to model:
• The charger is getting hot:
4 This is perfectly normal. The vacuum cleaner can remain permanently connected to the charger
without any risk.
• The charger is connected but your appliance is not charging:
- The charger is incorrectly attached to the appliance or is faulty.
4 Check that the charger is properly connected or contact an Approved Services Centre to change
the charger.
• Your appliance stops during use:
- Your appliance may be overheating.
4 Stop the appliance and leave cool for at least 1 hour.
4 If it overheats on repeated occasions, contact the Approved Services Centre.
• The appliance stopped after the charge light was ashing:
- The appliance has run out of battery charge.
4 Recharge the vacuum cleaner.
• The power-brush is not working properly or makes a noise:
- The rotating brush or hose are obstructed.
4 Stop the vacuum cleaner and clean them.
- The brush is worn.
4 Contact an Approved Service Centre to change the brush.
- The belt is worn.
4 Contact an Approved Service Centre to change the belt.
• The power-brush stops during vacuuming:
- The safety function has been triggered.
4 Stop the vacuum cleaner. Check that nothing is obstructing the rotation of the brush; if there is an
obstruction, remove it and clean the power-brush, then turn on the vacuum cleaner.
• Your vacuum cleaner is not vacuuming as well, is making noise, whistling:
- The intake channel is partially blocked.
4 Unblock it
- The dust collector is full.
Empty it and clean it.
- The dust collector is not properly tted.
4 Re-position it correctly.
- The intake head is clogged.
4 Remove the power-brush and clean it.
- The protective foam lter is saturated.
4 Clean it.
53
Page 54

7.
RR69XX
Error
Indicator Light
The red indicator light
blinks twice and beeps
The red indicator light
blinks three times and
beeps
The red indicator light
blinks ve times and
beeps
The red indicator light
blinks six times and
beeps
The red indicator light
blinks seven times and
beeps
The red indicator light
blinks eight times and
beeps
The red indicator light
blinks nine times and
beeps
The red indicator light
blinks ten times and
beeps
The red indicator light
blinks eleven times and
beeps
The red indicator light
blinks twelve times and
beeps
The red indicator light
blinks fourteen times
and beeps
Error
Error Forms Solutions
Designations
Failure of the left wheel The left wheel does not
Failure of the right wheel The right wheel does
Failure of the front wheel The front wheel is blocked
Failure of the ground
inspection
Low current or battery The battery power sup-
Failure of the front
bumper
Failure of the main brush The wheel of the main
Failure of the side brush The side sweeper wheel
Failure of the wall inspection
Failure of the fan The fan only turns with
Load failure The device cannot be
turn and is overloaded.
not turn and is overloaded
and no longer turns.
There is a problem with
the ground inspection.
ply was extremely low
(but not at the recharge
voltage critical point).
The impact switches
on the front left and
right shells cannot be
restored.
brush is overloaded or
insuciently charged.
is overloaded or insuciently charged.
There is a problem with
the wall inspection.
signicant current ow.
supplied with power
or cannot indicate the
charge status.
Please conrm that the
device's left wheel is not
covered.
Please conrm that the
device's right wheel is not
covered.
Please conrm that the
small wheels of the front
wheel are not covered.
Please conrm that the sensor window at the bottom
of the device is not unusually concealed.
Please replace the device
on the docking station to
recharge it.
Please check whether or not
the device's stop is normal.
Please conrm that no foreign bodies are present on
the device's main brush.
Please conrm that elements such as hair or fabric
are not wound around the
side brush.
Please conrm that the wall
inspection clear window is
not concealed or obstructed
by hair or fabric.
Please conrm that the
fan blades are not loose or
jammed by hair or fabric.
Please conrm that the
device is connected to the
docking station.
Please keep this user manual.
54
Page 55

7.
UN PROBLÈME AVEC VOTRE APPAREIL ?
FR
Selon modèle :
• Le chargeur chaue :
4 Il s’agit d’un phénomène tout à fait normal. L’aspirateur peut rester connecté au chargeur en
permanence sans aucun risque.
• Le chargeur est connecté mais votre appareil ne charge pas :
- Le chargeur est mal connecté à l’appareil ou est défaillant.
4 Vériez que le chargeur est bien connecté ou adressez-vous à un Centre de Services Agréés pour faire
changer le chargeur.
• Votre appareil s’arrête pendant son fonctionnement :
- Votre appareil est peut-être en surchaue.
4 Arrêtez l’appareil et laisser l’appareil refroidir pendant au moins 1 heure.
4 En cas de surchaue répétée, se référer au Centre de services agréés.
• L’appareil s’est arrêté après que le voyant de charge ait clignoté :
- L’appareil est déchargé.
4
Rechargez l’aspirateur.
• L’électrobrosse fonctionne moins bien ou fait un bruit anormal :
- La brosse rotative ou le exible sont obstrués.
4 Arrêtez l’aspirateur et nettoyez-les.
- La brosse est usée.
4 Adressez-vous à un Centre de Services Agréés pour faire changer la brosse.
- La courroie est usée.
4 Adressez-vous à un Centre de Services Agréés pour faire changer la courroie.
• L’électrobrosse s’arrête en cours d’aspiration :
- La sécurité a fonctionné.
4 Arrêtez l’aspirateur. Vériez qu’aucun élément ne gêne la rotation de la brosse, si c’est le cas retirez
l’élément bloquant et nettoyez l’électrobrosse, puis remettez l’aspirateur en marche.
• Votre aspirateur aspire moins bien, fait du bruit, sie :
- Le canal d’aspiration est partiellement bouché.
4 Débouchez-le
- Le réceptacle à poussière est plein.
4 Videz-le et nettoyez-le.
- Le bac à poussière est mal positionné.
4 Replacez-le correctement.
- La tête d’aspiration est encrassée.
4 Démontez l’électrobrosse et nettoyez-la.
- Le ltre mousse de protection du moteur est saturé.
4 Nettoyez-le.
55
Page 56

7.
RR69XX
Voyant lumi-
neux d'erreur
Le voyant rouge clignote
deux fois et émet un
signal sonore
Le voyant rouge clignote
trois fois et émet un
signal sonore
Le voyant rouge clignote
cinq fois et émet un signal sonore
Le voyant rouge clignote
six fois et émet un signal
sonore
Le voyant rouge clignote
sept fois et émet un
signal sonore
Le voyant rouge clignote
huit fois et émet un signal sonore
Le voyant rouge clignote
neuf fois et émet un
signal sonore
Le voyant rouge clignote
dix fois et émet un signal
sonore
Le voyant rouge clignote
onze fois et émet un
signal sonore
Le voyant rouge clignote
douze fois et émet un
signal sonore
Le voyant rouge clignote
quatorze fois et émet un
signal sonore
Dénominations
Formes d'erreur Solutions
d'erreur
Défaillance de la roue
gauche
Défaillance de la roue
droite
Défaillance de la roue
avant
Défaillance de l'inspection du sol
Courant ou batterie
faible
Défaillance du parechocs avant
Défaillance de la brosse
principale
Défaillance de brosse
latérale
Défaillance de l'inspection de mur
Défaillance du ventilateur
Défaillance de charge L'appareil ne peut pas
La roue gauche ne
tourne pas et est en
surcharge.
La roue droite ne tourne
pas et est en surcharge.
La roue avant est coincée et ne tourne plus.
Il y a un problème au
niveau de l'inspection
du sol.
L'alimentation de la batterie a été extrêmement
faible (mais pas au point
critique de tension de
recharge).
Les commutateurs
d'impact sur les coques
avant gauche et droite
ne peuvent être restaurés.
La roue de la brosse
principale est en surcharge ou insusamment chargée.
La roue balayeuse latérale est en surcharge ou
insusamment chargée.
Il y a un problème au
niveau de l'inspection
de mur.
Le ventilateur ne tourne
plus qu'avec un important ux de courant.
être alimenté ou indique
l'état de charge.
Veuillez vérier si la roue
gauche de l'appareil n'est
pas voilée.
Veuillez vérier si la roue
droite de l'appareil n'est pas
voilée.
Veuillez vérier si les petites
roues de la roue avant ne
sont pas voilées.
Veuillez vérier si la vitre de
détection en bas de l'appareil n'est pas anormalement
masquée.
Veuillez remettre l'appareil
sur la station d'accueil pour
la recharge.
Veuillez vérier si la butée
de l'appareil est normale
ou non.
Veuillez vérier si des corps
étrangers ne sont pas présents sur la brosse principale de l'appareil.
Veuillez vérier si des éléments tels que des cheveux
ou du tissu ne sont pas
enroulés dans la brosse
latérale.
Veuillez vérier si la vitre
transparente de l'inspection
de mur n'est pas masquée
ou obstruée par des cheveux et du tissu.
Veuillez vérier si les pales
du ventilateur ne sont pas
desserrées ou coincées par
des cheveux et du tissu.
Veuillez vérier si l'appareil
est connecté à la station
d'accueil.
Merci de conserver ce mode d’emploi.
56
Page 57

7.
¿SU APARATO TIENE UN PROBLEMA?
ES
Según el modelo:
• El cargador calienta:
4 Se trata de un fenómeno totalmente normal. La aspiradora puede estar conectada al cargador
constantemente sin riesgos.
• El cargador está conectado pero el aparato no carga:
- El cargador está mal conectado o el aparato está averiado.
4 Compruebe que el cargador está bien conectado o diríjase a un Centro de Servicio Autorizado para
cambiar el cargador.
• Su aparato se apaga mientras está funcionando:
- El aparato puede haberse recalentado.
4 Apague el aparato y deje que se enfríe durante 1 hora, por lo menos.
4 Si se sigue calentando demasiado, póngase en contacto con un Centro de Servicio Autorizado.
• El aparato se ha apagado después de que el piloto de carga haya parpadeado:
- La batería del aparato no está cargada.
4 Recargue la aspiradora.
• El cepillo eléctrico funciona peor o emite un ruido anómalo:
- El cepillo giratorio o el tubo exible están obstruidos.
4 Apague la aspiradora y límpielos.
- El cepillo está gastado.
4 Diríjase a un Centro de Servicio Autorizado para cambiar el cepillo.
- La correa está gastada.
4 Diríjase a un Centro de Servicio Autorizado para cambiar la correa.
• El cepillo eléctrico se apaga durante la aspiración:
- La seguridad ha funcionado.
4 Apague la aspiradora. Compruebe que nada impide la rotación del cepillo. Si es así, retire el
elemento de bloqueo y limpie el cepillo eléctrico, luego encienda nuevamente la aspiradora.
• Su aspiradora aspira peor, hace ruido o silba:
- El canal de aspiración se ha obstruido parcialmente.
4 Desobstrúyalo
- El receptáculo de polvo está lleno.
4 Vacíelo y lávelo.
- El compartimento de polvo está mal colocado.
4 Vuelva a colocarlo correctamente.
- El cabezal de aspiración está obstruido.
4 Desmonte el cepillo eléctrico y límpielo.
- El ltro de espuma protector del motor está saturado.
4 Límpielo.
57
Page 58

7.
RR69XX
Indicador in-
termitente de
errores
Luz roja intermitente dos
veces con un solo sonido
Luz roja intermitente tres
veces con un solo sonido
Luz roja intermitente
cinco veces con un solo
sonido
Luz roja intermitente seis
veces con un solo sonido
Luz roja intermitente
siete veces con un solo
sonido
Luz roja intermitente
ocho veces con un solo
sonido
Luz roja intermitente
nueve veces con un solo
sonido
Luz roja intermitente diez
veces con un solo sonido
Luz roja intermitente
once veces con un solo
sonido
Luz roja intermitente
doce veces con un solo
sonido
Luz roja intermitente
catorce veces con un solo
sonido
Nombre del
error
Fallo en la rueda izquierda
Fallo en la rueda derecha La rueda derecha no rota
Fallo en la rueda delantera
Fallo del sensor de suelo Hay un problema con el
Batería con poca energía
eléctrica
Fallo del amortiguador
delantero
Fallo del cepillo principal La rueda del cepillo prin-
Fallo del cepillo lateral La rueda del cepillo late-
Fallo del sensor de paredes
Fallo del ventilador El ventilador solo
Fallo en la carga El dispositivo no se carga
Descripción del
error
La rueda izquierda no
rota y está sobrecargada.
y está sobrecargada.
La rueda delantera se
atranca y no rota.
sensor de suelo.
Batería con energía eléctrica extremadamente
baja (pero no en el punto
crítico de tensión de
recarga).
Los interruptores de impacto en las estructuras
delanteras izquierda y
derecha no pueden restablecerse.
cipal está sobrecargada o
poco cargada.
ral está sobrecargada o
poco cargada.
Hay un problema con el
sensor de paredes.
funciona con fuerte corriente.
ni muestra el estado de
la carga.
Soluciones
Compruebe que la rueda
izquierda del dispositivo
no tenga partículas que la
bloqueen.
Compruebe que la rueda
derecha del dispositivo
no tenga partículas que la
bloqueen.
Compruebe que las ruedas pequeñas de la rueda
delantera no tengan partículas que las bloqueen.
Verique que la ventana
con sensores en la parte
inferior del dispositivo no
esté demasiado tapada.
Devuelva el dispositivo
a la estación de acoplamiento para recargarlo.
Verique si el amortiguador de impactos del dispositivo está en buenas
condiciones.
Compruebe que no haya
materias extrañas en el
cepillo principal del dispositivo.
Compruebe que no haya
pelos o hilos en el cepillo
lateral.
Verique que la ventana
transparente del sensor
de paredes no esté
tapada u obstruida por
pelos o hilos.
Compruebe que las aspas
del ventilador no estén
sueltas o tengan pelos
o hilos.
Compruebe que el dispositivo esté conectado
con la estación de acoplamiento.
Conserve este manual de instrucciones.
58
Page 59

7.
PROBLEMI CON IL VOSTRO APPARECCHIO?
IT
A seconda del modello:
• La base di carica si riscalda:
4 Si tratta di un fenomeno assolutamente normale. L’aspirapolvere può rimanere sempre collegato alla
base di carica senza alcun rischio.
• La base di carica è collegata ma l’apparecchio non ricarica:
- La base di carica è mal collegata all’apparecchio o è difettosa.
4 Vericare che la base di carica sia collegata correttamente, o rivolgersi a un Centro assistenza autorizzato
per far ricaricare la base di carica.
• L’apparecchio si arresta durante l’uso:
- L’apparecchio potrebbe essere surriscaldato.
4 Spegnere l’apparecchio e lasciarlo rareddare per almeno un’ora.
4 In caso di surriscaldamento ripetuto, rivolgersi ad un Centro assistenza autorizzato.
• L’apparecchio si è spento dopo che il segnale luminoso di carica ha lampeggiato:
- L’apparecchio è scarico.
4 Ricaricare l’aspirapolvere.
• La spazzola elettrica funziona meno bene o emette un rumore anomalo:
- La spazzola rotante o il essibile sono ostruiti.
4 Spegnere l’aspirapolvere e pulirlo.
- La spazzola è usurata.
4 Rivolgersi a un Centro assistenza autorizzato per far sostituire la spazzola.
- La cinghia è usurata.
4 Rivolgersi a un Centro assistenza autorizzato per far sostituire la cinghia.
• La spazzola elettrica si arresta durante l’aspirazione:
-Il dispositivo di sicurezza si è attivato.
4 Spegnere l’aspirapolvere. Vericare che non vi siano elementi che impediscono alla spazzola di ruotare, e
se ve ne sono, toglieteli e pulite la spazzola elettrica, quindi riaccendete l’aspirapolvere.
• L’aspirapolvere non aspira bene come prima, fa rumore, schia:
- Il canale di aspirazione è parzialmente ostruito.
4 Disostruirlo
- Il contenitore raccogli-polvere è pieno.
4 Svuotarlo e pulirlo.
Il contenitore raccogli-polvere non è posizionato correttamente:
4 Riposizionarlo correttamente.
- La testa di aspirazione è incrostata.
4 Smontare la spazzola elettrica e pulirla.
- Il ltro schiuma di protezione del motore è saturo.
4 Pulirlo.
59
Page 60

7.
RR69XX
Spia luminosa di
errore
La spia rossa lampeggia
due volte con un suono
La spia rossa lampeggia
tre volte con un suono
La spia rossa lampeggia
cinque volte con un
suono
La spia rossa lampeggia
sei volte con un suono
La spia rossa lampeggia
sette volte con un suono
La spia rossa lampeggia
otto volte con un suono
La spia rossa lampeggia
nove volte con un suono
La spia rossa lampeggia
dieci volte con un suono
La spia rossa lampeggia
undici volte con un
suono
La spia rossa lampeggia
dodici volte con un
suono
La spia rossa lampeggia
quattordici volte con un
suono
Nomi guasto Forme guasto Soluzioni
Guasto ruota sinistra La ruota sinistra non gira
Guasto ruota destra La ruota destra non gira
Guasto ruota frontale La ruota frontale si
Guasto dell'ispezione
del suolo
Bassa elettricità della
batteria
Guasto del paraurti anteriore
Guasto della spazzola
principale
Guasto della spazzola
laterale
Guasto dell'ispezione
parete
Guasto ventilatore Il ventilatore ruota solo
Guasto di carica Il dispositivo non si ca-
o è in sovraccarico
o è in sovraccarico
blocca e non gira.
C'è un problema con
l'ispezione del suolo
Il livello della batteria è
molto basso (ma non al
punto critico di tensione
di ricarica).
Non è possibile ripristinare gli interruttori di impatto sulla scocca sinistra
e destra.
La ruota a spazzola principale è in sovraccarico o
sotto-caricata.
La ruota a spazzola laterale è in sovraccarico o
sotto-caricata.
C'è un problema con
l'ispezione parete.
con molta corrente.
rica o non indica lo stato
della carica.
Si prega di vericare
l'eventuale presenza di
torsioni sulla ruota sinistra del dispositivo.
Si prega di vericare
l'eventuale presenza di
torsioni sulla ruota destra del dispositivo.
Si prega di vericare l'eventuale presenza di torsioni sulle ruote piccole
della ruota frontale
Si prega di vericare se la
nestra di rilevazione alla
base del dispositivo è coperta in modo anomalo.
Si prega di riportare il
dispositivo alla docking
station per la ricarica.
Si prega di vericare la
normalità del paracolpi.
Si prega di vericare
l'eventuale presenza di
materiale estraneo sulla
ruota a spazzola principale del dispositivo.
Si prega di vericare
l'eventuale presenza di
oggetti come capelli o
tessuti che avvolgono la
spazzola laterale.
Si prega di vericare
l'eventuale ostruzione da
parte di capelli o tessuto
della nestra trasparente
dell'ispezione parete.
Vericare se le pale del
ventilatore sono allentate o avvolte da capelli
o tessuto.
Vericare se il dispositivo
è connesso alla docking
station.
Conservare le presenti istruzioni per l’uso.
60
Page 61

7.
EIN PROBLEM MIT IHREM GERÄT?
DE
Je nach Modell:
• Das Ladegerät wird heiß:
4 Das ist völlig normal. Der Staubsauger kann problemlos ständig am Ladegerät angeschlossen bleiben.
• Das Ladegerät ist angeschlossen, aber Ihr Gerät wird nicht aufgeladen:
- Das Ladegerät ist schlecht an das Gerät angeschlossen oder es ist defekt.
4 Prüfen Sie den korrekten Anschluss des Ladegerätes oder wenden Sie sich an ein zugelassenes
Kundendienstzentrum, um das Ladegerät austauschen zu lassen.
• Ihr Gerät hält während des Betriebs an:
- Ihr Gerät ist möglicherweise überhitzt.
4 Schalten Sie das Gerät aus und lassen Sie es mindestens 1 Stunde lang abkühlen.
4 Wenden Sie sich bei wiederholter Überhitzung an ein zugelassenes Kundendienstzentrum.
• Das Gerät hat sich ausgeschaltet, nachdem die Kontrollleuchte für den Ladezustand geblinkt hat:
- Der Akku des Geräts ist leer.
4 Laden Sie den Staubsauger wieder auf.
• Die Elektrobürste funktioniert nicht mehr so gut oder macht ungewöhnliche Geräusche:
- Die Drehbürste oder der Schlauch ist verstopft.
4 Schalten Sie den Staubsauger aus und reinigen Sie die Drehbürste bzw. den Schlauch.
- Die Bürste ist abgenutzt.
4 Wenden Sie sich an ein zugelassenes Kundendienstzentrum, um die Bürste austauschen zu lassen.
- Der Riemen ist abgenutzt.
4 Wenden Sie sich an ein zugelassenes Kundendienstzentrum, um den Riemen austauschen zu lassen.
• Die Elektrobürste hält während des Saugvorgangs an:
- Die Sicherung wurde ausgelöst.
4 Schalten Sie den Staubsauger aus. Prüfen Sie, ob die Drehung der Bürste von keinem Element behindert
wird. Ansonsten entfernen Sie das blockierende Element, reinigen Sie die Elektrobürste und schalten Sie
den Staubsauger anschließend wieder ein.
• Ihr Staubsauger hat eine weniger gute Saugleistung, er macht Lärm, er pfeift:
- Der Saugkanal ist teilweise verstopft.
4 Legen Sie ihn wieder frei.
- Der Staubbhälter ist voll.
4 Leeren und reinigen Sie ihn.
- Der Staubbehälter ist nicht richtig eingesetzt.
4 Setzen Sie den Behälter richtig ein.
- Der Saugkopf ist verschmutzt.
4 Demontieren Sie die Elektrobürste und reinigen Sie diese.
- Der Schaumsto-Motorschutzlter ist gesättigt.
4 Reinigen Sie ihn.
61
Page 62

7.
RR69XX
Fehleranzeige Fehlerbezeich-
nungen
Rotes Blinklicht 2x und
einzelner Ton
Rotes Blinklicht 3x und
einzelner Ton
Rotes Blinklicht 5x und
einzelner Ton
Rotes Blinklicht 6x und
einzelner Ton
Rotes Blinklicht 7x und
einzelner Ton
Rotes Blinklicht 8x und
einzelner Ton
Rotes Blinklicht 9x und
einzelner Ton
Rotes Blinklicht 10x und
einzelner Ton
Rotes Blinklicht 11x und
einzelner Ton
Rotes Blinklicht 12x und
einzelner Ton
Rotes Blinklicht 14x und
einzelner Ton
Störung des linken Rades Das linke Rad dreht sich
Störung des rechten
Rades
Störung des vorderen
Rades
Störung - Bodenerkennung
Geringer Ladestand der
Batterie
Störung des vorderen
Stoßschutzes
Störung der Hauptbürste Das Rad der Hauptbürste
Störung der Seitenbürste Das Rad der Seitenbürste
Störung - Wanderkennung
Störung des Gebläses Das Gebläse funktioniert
Ladefehler Das Gerät kann nicht ein-
Fehlerbeschreibungen
nicht und ist überlastet.
Das rechte Rad dreht sich
nicht und ist überlastet.
Das vordere Rad klemmt
fest und dreht sich nicht.
Es liegt ein Problem mit
der Bodenerkennung vor.
Die Batterieleistung
ist äußerst niedrig (der
kritische Punkt für das
Auaden der Batterie
ist allerdings noch nicht
erreicht).
Die Stoßsensoren, die
sich links und rechts
vorne am Stoßschutz
benden, können nicht
zurückgesetzt werden.
ist überlastet oder unterbelastet.
ist überlastet oder unterbelastet.
Es liegt ein Problem mit
der Wanderkennung vor.
nur bei hoher Stromzufuhr.
geschaltet werden oder
kann den Ladestatus
nicht anzeigen.
Lösungen
Prüfen Sie das linke Rad des
Geräts auf Fremdkörper, die
es blockieren.
Prüfen Sie das rechte Rad des
Geräts auf Fremdkörper, die
es blockieren.
Prüfen Sie die kleinen Räder
des Vorderrades auf Fremdkörper, die es blockieren.
Prüfen Sie, ob das Sensorfenster an der Unterseite des
Geräts stark verschmutzt ist/
verdeckt wird.
Setzen Sie das Gerät auf die
Ladestation, um es aufzuladen.
Prüfen Sie den Stoßschutz
des Geräts auf ordnungsgemäßen Zustand.
Prüfen Sie die Hauptbürste/
Haarbürste des Geräts auf
Fremdkörper.
Prüfen Sie die Seitenbürste
auf Blockierungen durch
Haare oder andere Elemente.
Prüfen Sie das transparente
Fenster der Wanderkennung
auf Haare oder andere Elemente, die es verdecken oder
blockieren.
Prüfen Sie das Gebläse auf
lose Flügel bzw. Haare oder
andere die Flügel blockierende Elemente.
Prüfen Sie, ob das Gerät
ordnungsgemäß mit der Ladestation verbunden ist.
Bewahren Sie diese Anleitung bitte auf.
62
Page 63

7.
The languages NL, PT, RO, BG, CS, SK and UK are included in the safety instructions.
EN
Les langues NL, PT, RO, BG, CS, SK and UK sont disponibles dans la notice de sécurité .
FR
Los idiomas NL, PT, RO, BG, CS, SK y UK están disponibles en el manual de seguridad.
ES
Le lingue NL, PT, RO, BG, CS, SK e UK sono disponibili nel manuale di sicurezza.
IT
Die Sprachen NL, PT, RO, BG, CS, SK und GB sind in den Sicherheitshinweisen erhältlich.
DE
De talen NL, PT, RO, BG, CS, SK en UK zijn in de veiligheidshandleiding beschikbaar.
NL
Estão disponíveis as línguas NL, PT, RO, BG, CS, SK e UK no manual de segurança.
PT
Limbile NL, PT, RO, BG, CS, SK și UK sunt disponibile în instrucțiunile de siguranță.
RO
NL, PT, RO, BG, SK, SK и UK езиците са налични в предупреждението за безопасност.
BG
Jazykové verze NL, PT, RO, BG, CS, SK a UK jsou k dispozici v bezpečnostních pokynech.
CS
Jazyky NL, PT, RO, BG, CS, SK a UK sú k dispozícii v bezpečnostnom oznámení.
SK
Інструкцію з техніки безпеки перекладено на такі мови: NL, PT, RO, BG, CS, SK й УКР.
UK
63
Page 64

2220001549/07
 Loading...