

Page 1
Rowenta Werke GmbH, 63016 Offenbach am Main
1103476480-index 01 51/07
1103476480 Index01 DX1300F1 19/12/07 16:31 Page 1
Page 2
1103476480 Index01 DX1300F1 19/12/07 16:31 Page 2
Page 3
Please read carefully the instructions for use and the Safety Points to Note. Pay particular attention to
the fold-out page with the illustrations.
Bitte lesen Sie diese Gebrauchsanweisung und die Sicherheitshinweise aufmerksam durch.
Beachten Sie dabei die Abbildungen auf der ausklappbaren Bildseite.
Lire attentivement le mode d’emploi (et le conserver pour pouvoir le consulter). Pendant
la lecture, déplier la page avec les illustrations.
Lees de gebruiksaanwijzing en de veiligheidsvoorschriften in zijn geheel door en bewaar deze
zorgvuldig. Klap tijdens het lezen de bladzijde met afbeelding uit.
Leggere atteritamente le presenti istruzioni per l’uso e le norme di sicurezza. Osservare la figura
sui risvolli illustrati.
Lea en su totalidad el modo de empleo, conservándolo para consultas posteriores. Para su
lectura, abra por la página ilustrada.
E favor ler com toda a atenção estas instruções de serviçio, assim como as instruções de
segurança. Sera convenlente consultarem se as figuras que se encontram nas página ilustrada
desdobraveil.
Læs venligst brugsanvisningen og sikkerhedshenvisningerne omhyggeligt igennem.
Fold billesiden ud og føld denne ved gennemlæsning af brugsanvisningen.
Var vänlig läs uppmärksamt igenom bruksanvisningen och säkerhetsanvisningarna. Vik ut
figursidan och studera tillhörande bild.
Les nøye igjennom bruksanvisningen og sikkerhetshenvisningene. Brett ut billedsiden og følg
med på illustrasjonen.
Lue käyttöohje ja siihen liittyvät turvallisuusohjeet huolellisesti läpi. Huomaa lukiessasi myös
laskostetuilla sivuilla olevat kuvat.
GB
D
F
NL
I
E
P
DK
S
N
SF
Palun lugege kasutusjuhend ja ettevaatusabinõud hoolikalt läbi. Pöörake erilist tähelepanu
illustratsioonidega voldikule.
EST
LV
AR
LT
1
6
11
16
21
26
31
36
41
46
51
56
61
66
71
76
81
86
91
96
101
106
111
116
125
1103476480 Index01 DX1300F1 19/12/07 16:31 Page 3
Page 4
1
2
3
4
5
6
7
8
9
10
11
SYNTHETICS
SYNTHETIK
SYNTHÉTIQUES
CHEMIEVEZELS
FIBRAS
QUIMICAS
FIBRE
SINTETICHE
SILK / WOOL
SEIDE / WOLLE
SOIE / LAINE
ZIJDE / WOL
SEDA / LANA
SETE / LANA
COTTON / LINEN
BAUMW /LEINEN
COTON / LIN
KATOEN/LINNEN
ALGODON /LINO
COTONE / LINO
ANT I
CAL C
AN TI D RI P
A
C
D
B
E
F
E1
E2
E3
E4
F1
F2
F3
SILK / WOOL
SEIDE / WOLLE
SOIE / LA INE
ZIJDE / WOL
SEDA / LANA
SETE / LANA
SYNTHETICS
SYNTHETIK
SYNTHÉTIQUES
CHEMIEVEZELS
FIBRAS QUIMICAS
FIBRE SINTETICHE
COTTON / LINEN
BAUMW. /
LEINEN
COTON / LIN
KATOEN / LINNEN
ALGODÓN/ LINO
1103476480 Index01 DX1300F1 19/12/07 16:31 Page 4
Page 5
1103476480 Index01 DX1300F1 19/12/07 16:31 Page 6
Page 6
1
English
Safety instructions
Dear customer,
thank you for purchasing this appliance and for your confidence
in us. Please read the operating instructions carefully and keep
them in a safe place.
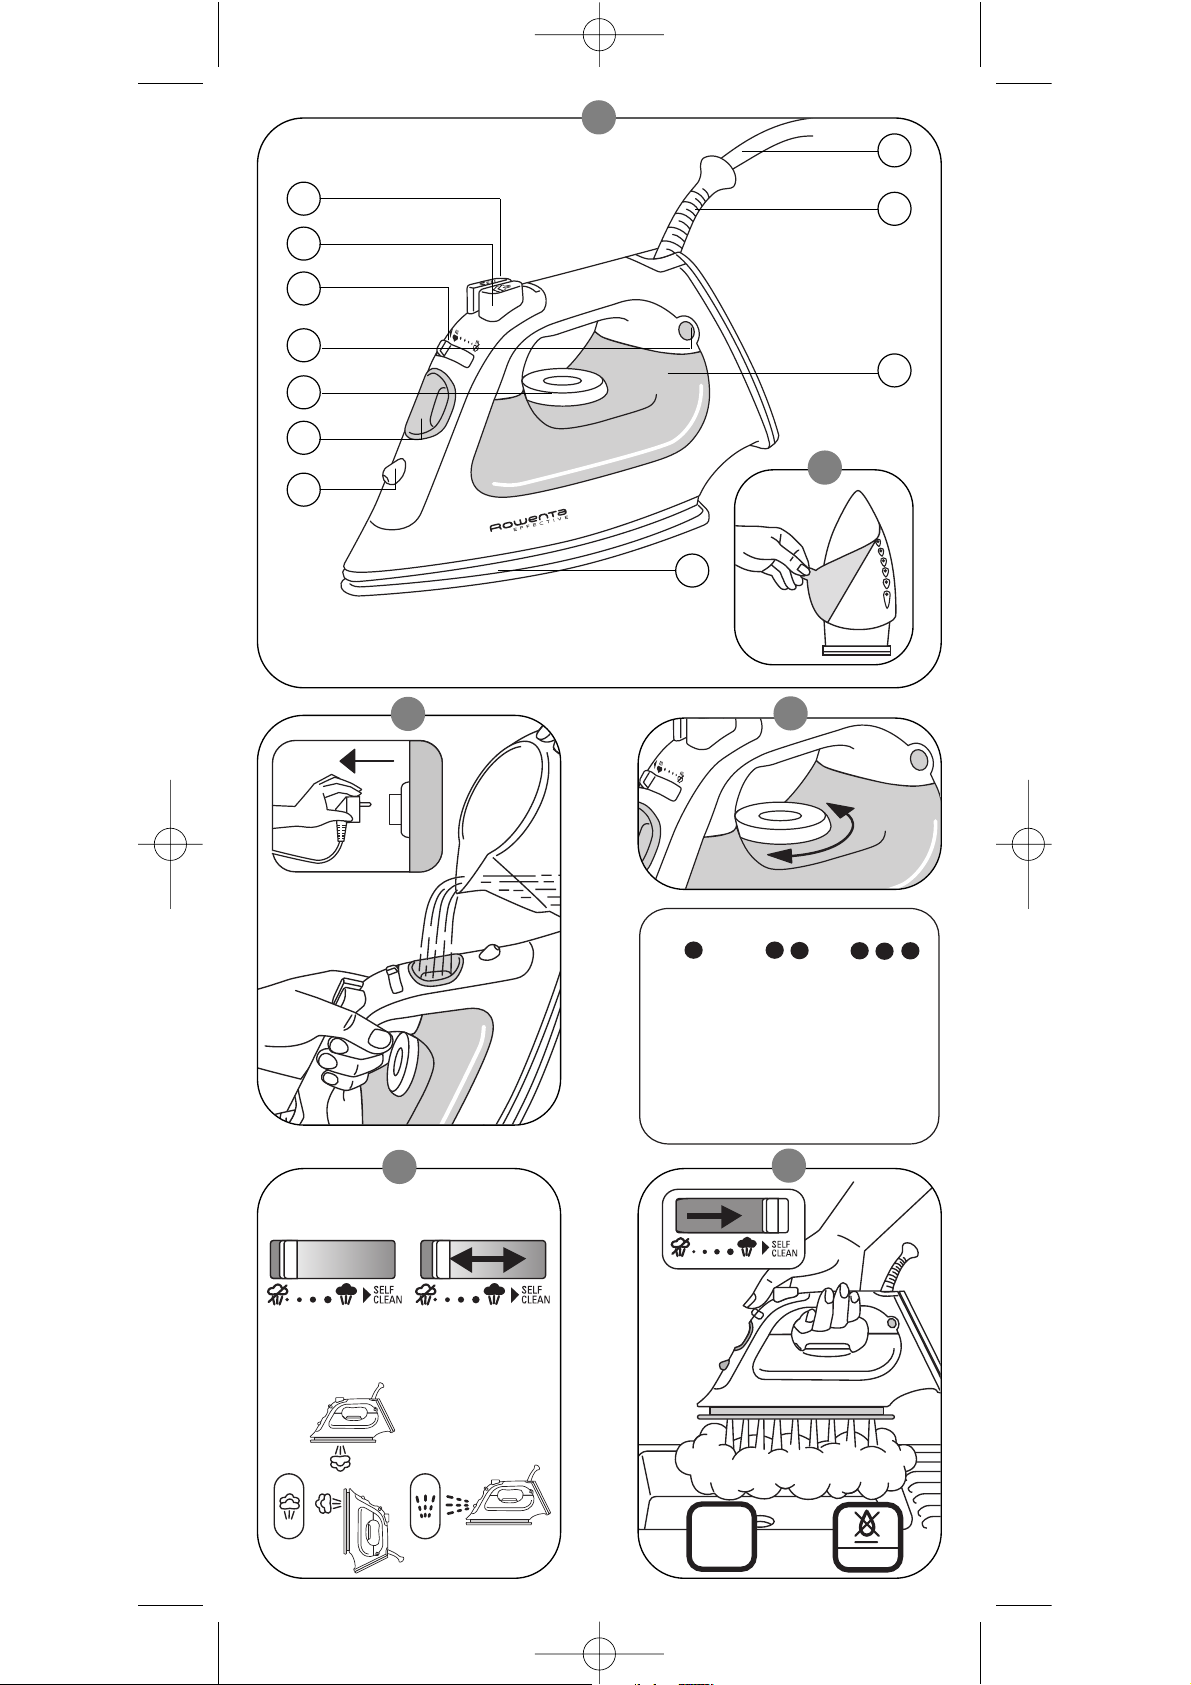
Appliance description
1 Spray button
2 Power steam button
3 Variable steam control
with Self Clean Function
4 Thermostat light
5 Temperature control dial
6 Filling inlet
7 Spray nozzle
8 Mains supply cord
9 Flexible cord support
10 Water tank with maximum
water level indicator
11 Soleplate
12 Integrated cord winding
facility
• The appliance complies with EU directives 72/23/EEC and 89/336/EEC.
• The appliance may only be connected to alternating current as
specified on the rating plate.
• An electrical appliance is not a toy. Use and store the appliance
out of reach of children. Do not let the supply cord hang down.
• Do not leave the appliance unattended while it is connected to
the mains supply.
• Electrical appliances generate high temperatures. Always use the
handles provided and warn other users of the potential dangers (e.g.
escaping steam or hot water, especially when ironing vertically).
• Never iron clothing which is being worn.
• Always disconnect the appliance:
– before filling or emptying the water tank;
– before leaving the room (even for a short time);
– after use.
• Never unplug the appliance by tugging on the cord.
• Only use an extension lead or cord reel which is rated at 10A or
greater and has an earth.
• Do not immerse the appliance in water.
• An electrical appliance should not be used if:
– the appliance, the supply cord or the cord protector is damaged;
– the appliance has been dropped;
– the appliance is obviously leaking. In this case the appliance
should be returned to an approved Rowenta Service Dealer for
repair. (See enclosed list for addresses.)
• Repairs to electrical appliances may only be carried out by specia-
lists. Improperly carried out repairs can cause serious danger to
users. To avoid danger to users, a defective or damaged supply cord
may only be replaced by an authorised Rowenta service centre.
• This product has been designed for domestic use only. Any com-
mercial use, inappropriate use of failure to comply with the
Instructions, the manufacturer accepts no responsibility and the
guarantee will not apply.
• When the appliance has reached the end of its operational life it
should be disposed of through the correct channels.
A
1103476480 Index01 DX1300F1 19/12/07 16:31 Page 1
Page 7
2
Before use
BEFORE DOING ANYTHING ELSE, REMOVE THE SOLEPLATE PROTECTOR AND DISCARD.
Before using the iron for the first time:
– Heat the appliance at the maximum setting without
water (see D). A little smoke and a slight smell may be
emitted, but this is only temporary. The water tank can
then be filled directly with untreated tap water using a
jug (see C).
– Each time you begin ironing, allow the iron to emit
steam for at least 1 minute. During this time press the
power steam button from time to time to release
several bursts of steam. Any particles released through
the soleplate during first use are harmless and are due
to the newness of your iron
Filling the water tank
Before filling the water tank, unplug from the mains and
set the steam control to the position.
Tilt the iron and pour in untreated tap water up to the
maximum level (➓).
What water may be used?
Your iron has been designed to operate using untreated
tap water. However, if your water is very hard, you can
mix it 50% untreated tap water with 50% distilled or
demineralised water.
Do no add anything to the contents of the water tank
and do not use water from clothes dryers, scented or
softened water, water from refrigerators, batteries or air
conditioners, pure distilled water or rain water. These
contain organic waste or mineral elements that become
concentrated when heated and cause spitting, brown
staining or premature wear to your iron.
Tip: Spray starch onto the reverse side of the fabric to be
ironed.
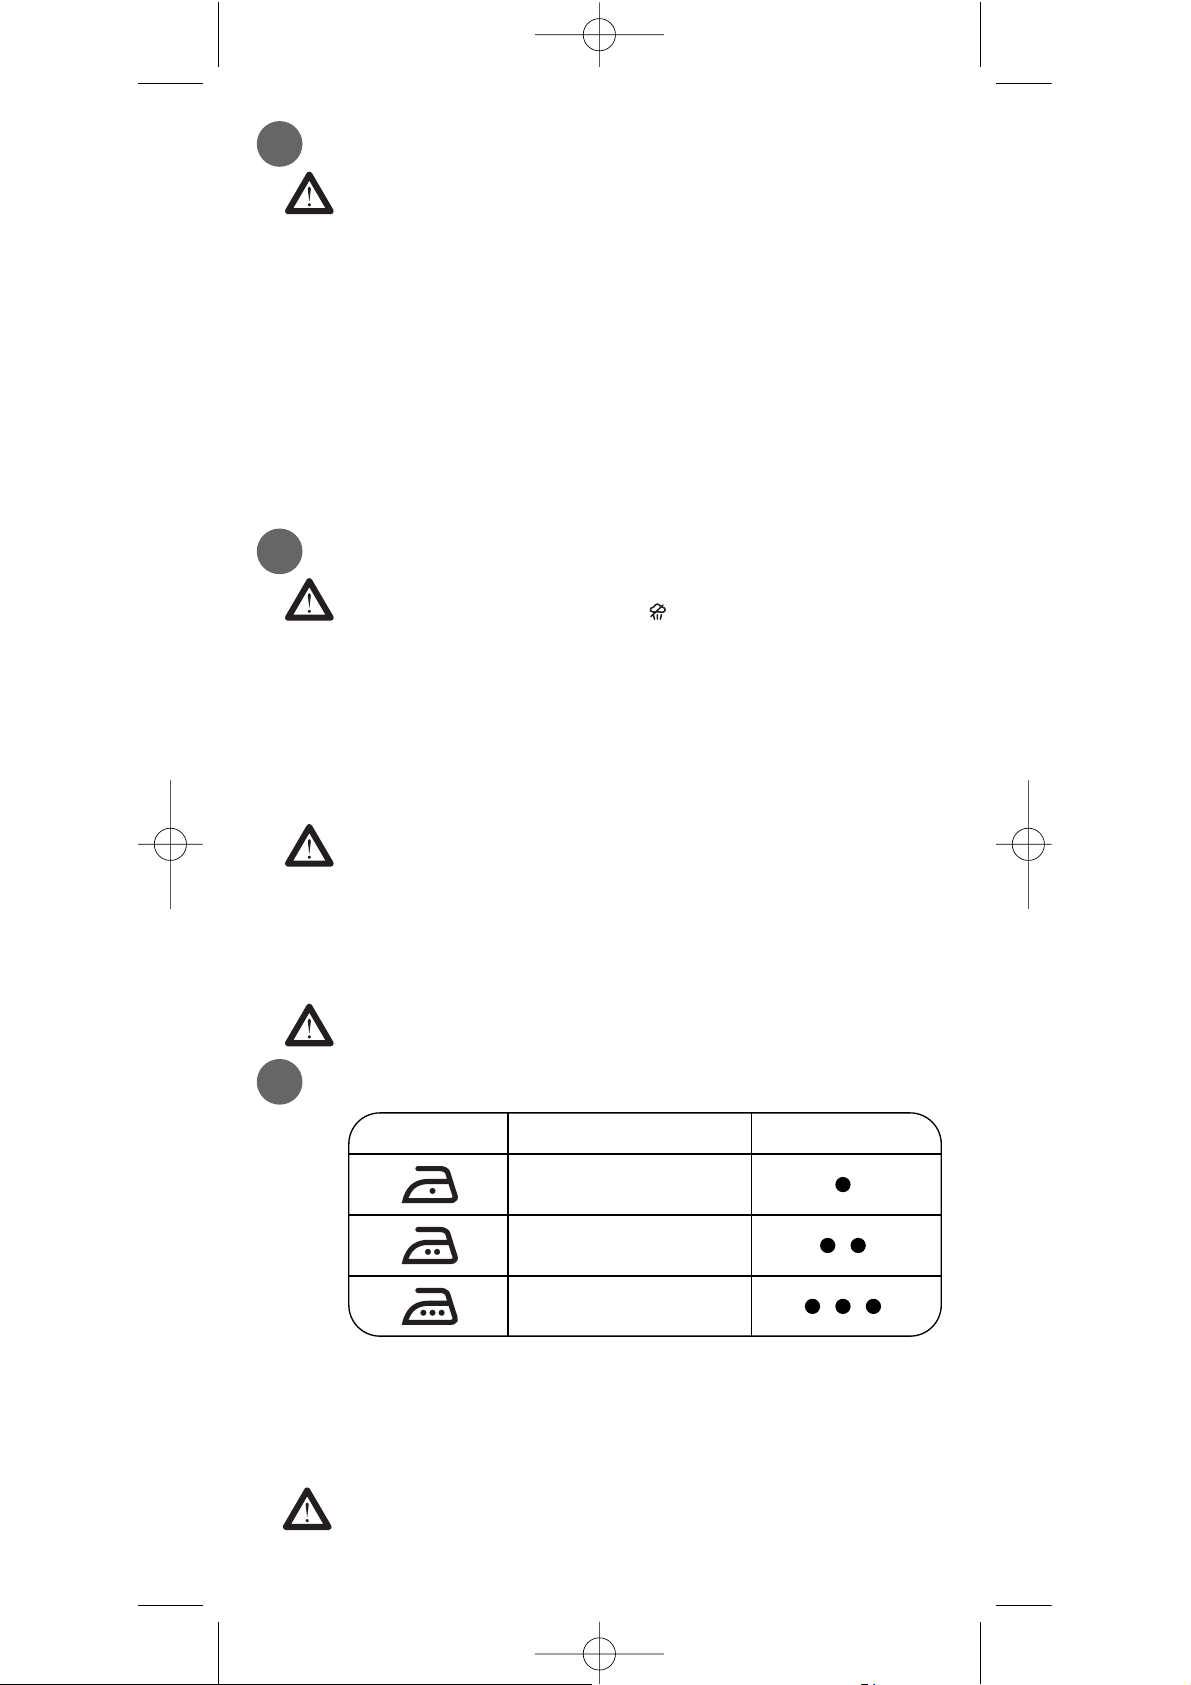
Setting the temperature
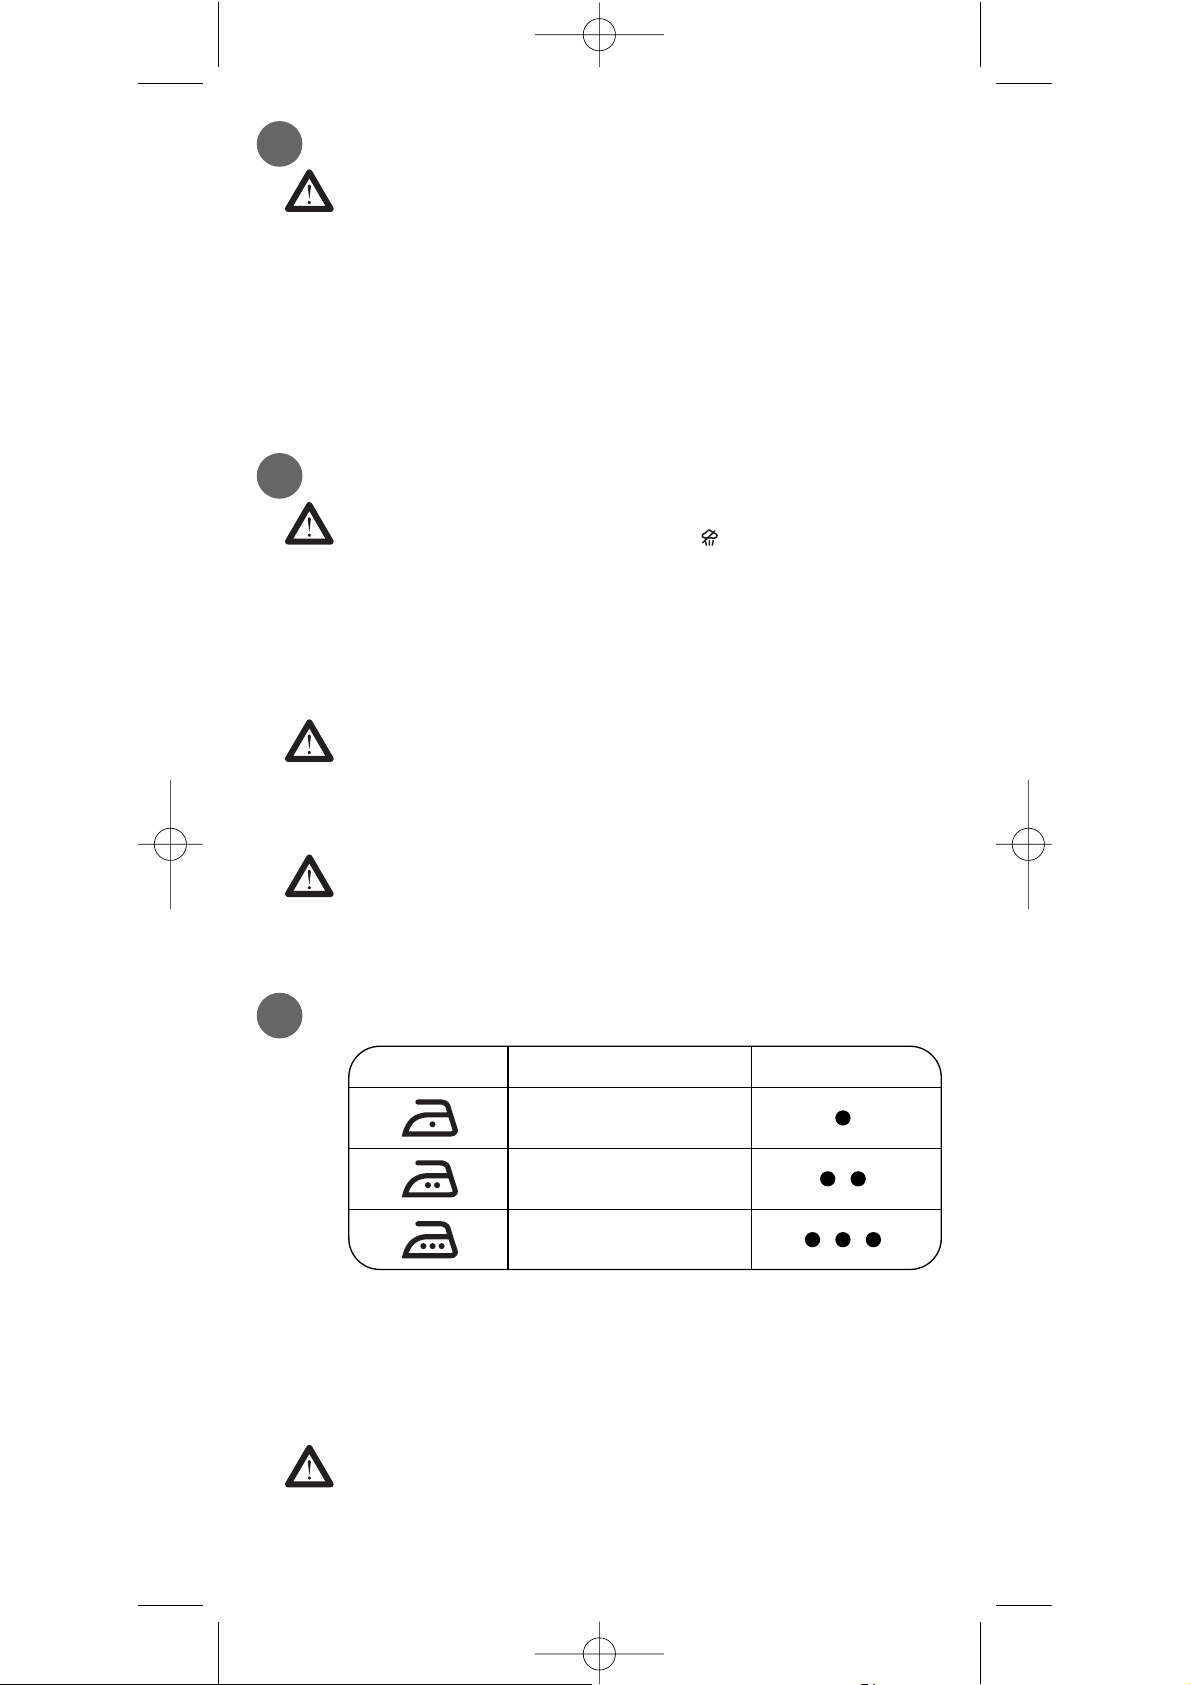
Using the temperature control (➎), set the iron temperature to suit the type of material. We recommend using
the above table as a guide. The thermostat light (➍) indicates that the soleplate is heating up. When the light
goes out, the required temperature has been reached.
Please note: When heating up the iron from cold, wait
until the thermostat light has gone out a second time.
Only then is the set temperature reached.
B
C
D
Ironing label Fabric
Synthetic fibres e.g.
viscose, polyester
silk, wool
cotton, linen
Temperature
control
1103476480 Index01 DX1300F1 19/12/07 16:31 Page 2
Page 8
3
Tip: We recommend that you start with fabrics to be
ironed at a low temperature as the iron takes longer to
cool down than to heat up. For mixed fabrics set the
temperature for the most delicate fabrics.
Ironing and Steam functions
E1 Dry ironing
To iron without continuous steam, turn the steam control
(➌) to the position and set the temperature to suit the
type of material (care points •, •• or •••).
E2 Steam ironing
You can steam iron by setting the temperature in the marked
steam zone (after ••). The steam quantity can be set to
between (no steam position) and (maximum steam
quantity). We recommend setting to maximum steam
quantity only when the iron is set at temperature setting •••.
E3
Shot steam button (temperature setting after ••in the steam
zone)
To generate a powerful jet of steam to remove stubborn
creases, press the power steam button.
Vertical steam ironing (temperature setting after •• in the
steam zone)
Ideal for removing creases from suits, jackets, skirts, hanging curtains etc.
Important:
Never steam or iron clothing that is being worn!
• Hang the garment on a hanger
• Set the thermostat control to maximum steam
• Hold the iron a few centimetres away from the garment
to avoid burning delicate fabrics
• Press the power steam button repeatedly, moving the
iron from top to bottom
The power steam and vertical steam functions (E3) are
also possible to use if the steam control is set to the
position. The interval between bursts of steam should be
about4 seconds.
Important: Never direct the steam at persons or animals!
Do not touch delicate fabrics with the hot soleplate!
E4 Spray function
To dampen stubborn creases, press the spray button.
Additional functions
F1 Self Clean – prolongs the life of the iron
The Self clean function flushes dirt and scale particles
out of the steam chamber.
To operate:
• Fill the tank with untreated tap water up to the maximum mark and heat the iron to max. temperature.
• Unplug from the mains.
• Hold iron over a sink horizontally, push the steam control
(➌) past the position and into the Self Clean position and hold it there: steam will now begin to build up.
After a few seconds water and steam will emerge from
the soleplate, rinsing dirt and scale particles out of the
steam chamber.
E
F
1103476480 Index01 DX1300F1 19/12/07 16:31 Page 3
Page 9
4
• After approx. 1 minute move the steam control slide to
the position.
• Insert mains plug and allow the iron to heat up again.
• Wait until the remaining water has evaporated.
• Unplug from the mains and allow iron to fully cool
down.
• When cool, the soleplate can be wiped with a damp
cloth.
We recommend using the Self Clean function approx.
Every 2 weeks. If the water is very hard, the iron should
be cleaned weekly.
Self Clean Valve
The self clean valve prevents the drip hole into the steam
chamber from furring or blocking up. To ensure the iron
continues to function properly, open and close the valve
by sliding the steam control to max then min a few times
after use.
F2 Anti-scale system (depending on model)
Your iron contains an anti-scale cartridge to reduce scale
deposits. This considerably prolongs the operational life
of you iron. The anti-scale cartridge is an integral part of
the water tank and does not need to be replaced.
Do not use descaling agents, as they will damage the
lining of the steam chamber and so may impair the
steam function.
F3 Anti-Drip System (depending on model)
If the temperature is set too low, the iron cannot produce
steam because of the anti-drip technology which prevents droplets of water leaking from the soleplate.
After ironing
• Unplug from the mains, pour away remaining water
and set steam control to . Then allow the appliance to
cool down.
• Do not wind the cord round a hot soleplate.
• Use the integrated cord winding facility for storage.
• Store the iron standing on its heel.
Cleaning and maintenance
When cool, the iron and the soleplate can be wiped with
a damp cloth.
Do not use corrosive or abrasive cleaning agents or
sharp objects to clean the soleplate. Depending on the
model, if the soleplate is stainless steel it can be cleaned
using a Rowenta Soleplate Cleaning Stick.
Important:
If the appliance has been standing unused for long periods, hold it horizontally and allow it to emit steam for 1
minute to clean the steam ducts and remove any residue
from the iron.
G
H
1103476480 Index01 DX1300F1 19/12/07 16:31 Page 4
Page 10
5
Problems?
If you are unable to trace the cause of the fault, contact an
official Rowenta Customers Service Centre. The addresses
are shown in the enclosed service centre adress list.
Further hints and tips are obtainable from our homepage:
www.rowenta.com
I
Problem
No power supply.
The temperature control is on position “0”
or set too low.
This is normal.
The steam control is
set on position .
There is insufficient
water in the tank.
The Anti-Drip function is active (depending on model).
You are using chemical descaling agents.
Pure distilled/demineralised or softened
water is being used.
Your linen is not rinsed sufficiently or
your have ironed a
new garment before
washing it.
You are using a too
high temperature.
You are using starch.
Over use of power
steam button.
You have placed your
iron flat on a metallic
rest plate.
You have ironed over
a zip.
Check that the mains plug
is properly inserted or try plugging the iron into a dif-ferent
socket.
Turn the temperature control
to the required setting.
When the thermostat light
goes on and off, the iron is
heating up. As soon as the
light goes off, the choosen
temperature has been reached.
Turn the steam control to the
required setting area.
Fill the tank (C).
Wait for the soleplate to reach
the correct temperature.
Do not add any descaling
agents to the water in the
water tank.
Only use untreated tap
water or mix half tap water
with half distilled/demineralised water.
Ensure linen is rinsed thoroughly to remove any soap deposits or chemicals on new garments which may be sucked
up by the iron.
See the temperature table to
correctly set the thermostat.
Clean the soleplate as indicated in section H. Always spray
starch onto the reverse side of
the fabric to be ironed.
Allow more time between
each burst.
Always set the iron on its
heel.
Try to avoid ironing over zips
which may have rough edges.
Possible cause Solution
The soleplate
does not heat
up or the thermostat light
does not come
on.
Thermostat
light goes on
and off.
None or too little steam is
being emitted.
Brown streaks
come through
the holes in the
soleplate and
stain the fabric.
The soleplate is
dirty or brown
and can stain
the linen.
Iron is leaking.
The soleplate is
scratched or
damaged.
1103476480 Index01 DX1300F1 19/12/07 16:31 Page 5
Page 11

6
Deutsch
Sicherheitshinweise
Liebe Kundin, lieber Kunde,
herzlichen Glückwunsch zum Kauf dieses Gerätes und vielen Dank
für Ihr Vertrauen.
Die Gebrauchsanleitung bitte sorgfältig lesen und aufbewahren.
Produktbeschreibung
1 Spraytaste
2 Dampfstoßtaste
3 Dampfregler mit
Self Clean Funktion
4 Kontrolllampe
5 Temperaturregler
6 Einfüllöffnung
7 Sprühdüse
8 Netzzuleitung
9 Knickschutztülle
10 Wassertank mit Anzeige
für maximale Füllhöhe
11 Sohle
12 Integrierte Kabelaufwick-
lung
• Das Gerät entspricht den EU-Richtlinien 73/23/EWG und
89/336/EWG.
• Gerät nur an Wechselstrom gemäß der Typenschildaufschrift
anschließen.
• Bei Haus-/Wohnungsinstallationen mit einer Fehlerstrom-
Schutzschaltung, bitte sicherstellen, dass es sich um einen
pulsstromsensitiven Schutzschalter handelt.
• Gerät nicht unbeaufsichtigt lassen, während es am Netz
angeschlossen ist.
• Gerät außer Reichweite von Kindern benutzen und aufbe-
wahren.
• Das Bügeleisen und austretendes Wasser und Dampf sind
heiß. Benutzen Sie die vorgesehenen Griffe.
• Dampf nicht auf Personen und Tiere richten oder am Körper
befindliche Kleidungsstücke behandeln.
• Vor jedem Befüllen und Entleeren sowie nach dem Gebrauch
und vor Reinigung und Pflege den Netzstecker ziehen.
• Stecker nicht an der Leitung aus der Steckdose ziehen.
• Gerät nicht ins Wasser tauchen.
• Nehmen Sie das Gerät nicht in Betrieb, wenn:
– das Gerät, die Zuleitung oder Knickschutztülle defekt oder
beschädigt sind.
– das Gerät heruntergefallen oder undicht ist.
Das beschädigte Gerät an eine Rowenta Kundendienststelle
schicken (Adressen siehe Servicespiegel). Reparaturen sowie Austausch von Zuleitungen dürfen nur von Rowenta Kundendienststellen durchgeführt werden, um Gefährdungen zu vermeiden.
• Wird das Gerät zweckentfremdet oder falsch bedient, kann
keine Haftung für einen eventuellen Schaden übernommen
werden.
• Am Ende der Lebensdauer das Gerät ordnungsgemäß
entsorgen.
A
1103476480 Index01 DX1300F1 19/12/07 16:31 Page 6
Page 12
7
Vor dem Gebrauch
ENTFERNEN SIE ZUERST DEN SOHLENSCHUTZ!
Vor dem ersten Bügeln:
– das Gerät ohne Wasser auf höchster Stufe aufheizen
lassen (siehe Punkt D). Es kann zu leichten Rauch- und
Geruchsbildungen kommen, die schnell vorüber gehen.
Anschließend kann der Wassertank befüllt werden
(siehe Punkt C).
– Das Bügeleisen nach dem Befüllen und Aufheizen min-
destens 1 Minute dampfen lassen und dabei gelegentlich die Dampfstoßtaste drücken, um evtl. Fertigungsrückstände in der Sohle zu beseitigen.
Wassertank füllen
Vor dem Befüllen des Wassertanks Netzstecker ziehen
und Dampfregler auf die Position stellen.
Halten Sie das Bügeleisen schräg und füllen Sie Wasser
bis zur Markierung Max. (➓) ein.
Welches Wasser dürfen Sie verwenden ?
Bis zu einem Härtegrad von 17° dH kann reines Leitungswasser verwendet werden. Bei härterem Wasser empfehlen wir ein Mischverhältnis von 1:1 mit destilliertem Wasser.
Bitte kein Wasser mit Zusätzen jeglicher Art (wie Stärke,
Bügelwasser, Duftstoffe, Weichspüler, etc.) sowie Batterie- u. Kondenswasser (z.B. aus Kondensat-Wäschetrocknern) verwenden, da sonst die Dampffunktion der Sohle
dauerhaft geschädigt wird.
Bitte keine Entkalkungsmittel verwenden, da sie die
Dampfkammerbeschichtung beschädigen und folglich
die Dampfleistung beeinträchtigt werden kann.
Tipp: Sprühen Sie Stärke nur auf die Rückseite des zu
bügelnden Stoffes
Temperatur einstellen
Stellen Sie die Bügeltemperatur mit Hilfe des Temperaturreglers (➎) je nach Art des Stoffes ein. Wir empfehlen
Ihnen, sich an der oben stehenden Tabelle zu orientieren.
Das Aufleuchten der Kontrolllampe zeigt das Aufheizen
der Sohle an. Das Erlöschen der Kontrolllampe (➍) zeigt
an, dass die gewünschte Temperatur erreicht ist.
Bitte beachten Sie: Beim Aufheizen eines kalten Bügeleisens warten Sie, bis die Kontrolllampe zum 2. Mal
erloschen ist. Erst dann ist die eingestellte Temperatur
erreicht.
B
C
D
Wäscheetikett Gewebeart
Chemiefaser
z.B. Viskose, Polyester
Seide, Wolle
Baumwolle,
Leinen
Temperaturregler
1103476480 Index01 DX1300F1 19/12/07 16:31 Page 7
Page 13

8
E
Tipp: Da das Abkühlen länger dauert als das Aufheizen,
empfehlen wir, zuerst empfindliche Stoffe auf der niedrigsten Temperatureinstellung zu bügeln.
Bügeln und Dampffunktionen
E1 Bügeln OHNE Dampf
Zum Bügeln ohne konstanten Dampf stellen Sie den
Dampfregler (➌) auf die Position und stellen die Temperatur je nach Stoffart ein. (Pflegepunkte •, •• oder •••).
E2 Bügeln MIT Dampf
Zum Bügeln mit Dampf muss die Temperatureinstellung
über der Position ••im markierten Dampfbereich liegen.
Die Dampfmenge kann zwischen (kein Dampf) und
(maximale Dampfmenge) eingestellt werden. Für die maximale Dampfmenge empfehlen wir die Temperatureinstellung
•••
.
E3 Bügeln mit Dampfstoß (Temperatureinstellung über
Pos.
••
)
Um hartnäckige Falten mit einem kräftigen Dampfstoß zu
entfernen, drücken Sie die Dampfstoßtaste (➋).
Vertikaler Dampfstoß (Temperatureinstellung über
Pos. ••)
Zum Entknittern und Auffrischen hängender Kleidungsstücke, Gardinen usw. halten Sie das Gerät vertikal und
drücken Sie die Dampfstoßtaste.
Empfindliche Stoffe nicht mit der heißen Sohle
berühren.
Horizontaler und vertikaler Dampfstoß (E3) sind auch
möglich, wenn der Dampfregler auf steht. Der
Abstand zwischen den Dampfstößen sollte ca. 4 Sekunden betragen.
Wichtig:
Dampfstoß niemals auf Personen und Tiere richten!
E4 Sprayfunktion
Zum Anfeuchten hartnäckiger Falten drücken Sie die
Spraytaste (➊).
Weitere Funktionen
F1 Self Clean – für eine verlängerte Lebensdauer Ihres
Bügeleisens.
Durch die Selbstreinigungsfunktion werden Schmutzund Kalkpartikel aus der Dampfkammer gespült.
Funktionsweise:
• Tank bis zur Max. Markierung mit Leitungswasser befül-
len und Bügeleisen auf Max. Temperatur aufheizen.
• Netzstecker ziehen.
• Bügeleisen waagerecht über ein Spülbecken halten und
den Dampfregler (➌) über die Stellung hinaus in die
„Self Clean“ Position schieben und kontinuierlich festhalten: nun setzt starke Dampfbildung ein. Nach einigen
Sekunden tritt auch Wasser aus der Sohle aus und spült
lose Schmutz- und Kalkpartikel aus der Dampfkammer.
• Nach ca. 1 Minute den Dampfregler auf die Position
stellen.
• Netzstecker stecken und das Gerät nochmals aufheizen
lassen.
F
1103476480 Index01 DX1300F1 19/12/07 16:31 Page 8
Page 14

9
• Warten bis das restliche Wasser verdampft ist.
• Netzstecker ziehen und Bügeleisen vollständig abkühlen
lassen.
• Die abgekühlte Sohle kann mit einem feuchten Tuch
abgewischt werden.
Wir empfehlen, die Selbstreinigung ca. alle 2 Wochen
durchzuführen. Bei sehr kalkhaltigem Wasser ist die
wöchentliche Reinigung ratsam.
Ventil
Wir empfehlen den Dampfregler nach jedem Bügeln einige Male zu öffnen und zu schließen, um das Verkalken
des Ventils zu verhindern.
F2 Anti-Kalk System (je nach Modell)
Die im Bügeleisen enthaltene Anti-Kalk Kartusche reduziert deutlich die Kalkbildung. Dadurch wird die Lebensdauer Ihres Bügeleisens wesentlich verlängert. Die AntiKalk Kartusche ist fester Bestandteil des Wassertanks und
nicht austauschbar.
F3 Anti-Drip System (je nach Modell)
Diese Funktion vermeidet, dass bei zu geringer Sohlentemperatur Wasser aus der Sohle ausläuft.
Nach dem Bügeln
• Netzstecker ziehen, Restwasser ausgießen und den
Dampfregler auf stellen. Danach das Gerät abkühlen
lassen.
• Niemals das Kabel um die heiße Sohle wickeln.
• Benutzen Sie die integrierte Kabelaufwicklung zur Auf-
bewahrung.
• Das Gerät auf dem Heck stehend aufbewahren.
Reinigung und Pflege
Im abgekühlten Zustand können Gerät und Sohle mit
einem feuchten Tuch oder Schwamm abgewischt werden.
Tipp: Bei Bedarf können Sie Handgeschirrspülmittel zur
Reinigung des Gerätes und der Softkomponenten verwenden.
Keine scharfen oder scheuernden Reinigungsmittel oder
Gegenstände zur Reinigung der Sohle verwenden.
Wichtig:
Nach längeren Standzeiten das Gerät vor dem Bügeln
waagerecht halten und 1 Minute dampfen lassen, um die
Dampfwege zu reinigen und mögliche Rückstände aus
dem Bügeleisen zu entfernen.
G
H
1103476480 Index01 DX1300F1 19/12/07 16:31 Page 9
Page 15

10
Mögliche Störungen und deren Behebung
Falls Sie die Ursache des Defekts nicht finden können, wenden Sie sich an eine offizielle ROWENTA Kundendienststelle.
Die Adressen finden Sie im beigefügten Servicespiegel.
Weitere Tipps und Tricks finden Sie auf unserer Homepage:
www.rowenta.com
Änderungen vorbehalten
Problem
Die Bügelsohle
bleibt kalt oder
heizt nicht auf.
Kontrolllampe
geht an und
aus.
Es tritt kein
oder nur wenig
Dampf aus.
Aus den
Dampflöchern
austretende
Verunreinigungen beflecken
die Wäsche.
Aus der Sohle
läuft Wasser
aus.
Keine Stromzufuhr.
Der Temperaturregler
steht auf der Position
„0“ bzw. ist zu niedrig eingestellt.
Normaler Vorgang.
Der Dampfregler
steht auf Position .
Es ist nicht genug
Wasser im Tank.
Die Anti-Drip Funktion (F3) ist aktiv.
Eventuelle Rückstände in der Dampfkammer/Sohle.
Sie verwenden
chemische Zusätze.
Sie verwenden pures
destilliertes bzw. enthärtetes Wasser.
Sie verwenden
Stärke.
Zu niedrige Sohlentemperatur durch zu
häufiges Drücken der
Dampfstoßtaste.
Versichern Sie sich, dass
der Netzstecker steckt oder
probieren Sie das Gerät an
einer anderen Steckdose
aus.
Drehen Sie den Temperaturregler in den gewünschten
Bereich (D).
Das An- und Ausgehen der
Kontrolllampe zeigt die Aufheizphase an. Sobald die
Lampe erlischt, ist die eingestellte Temperatur erreicht.
Stellen Sie den Dampfregler in den gewünschten
Bereich (E2).
Füllen Sie den Tank (C).
Warten Sie, bis die Sohle
wieder die richtige Temperatur erreicht hat.
Führen Sie die Selbstreinigung (F1) durch.
Fügen Sie dem Wasser im
Tank keine chemischen
Zusätze bei.
Verwenden Sie reines Leitungswasser oder ein
Mischungsverhältnis 1:1
aus Leitungswasser und
destilliertem Wasser.
Stärke immer auf die Rückseite des Stoffes sprühen.
Lassen Sie etwas mehr
Zeit zwischen den Dampfstößen (E3).
Mögliche Ursache Abhilfe
I
1103476480 Index01 DX1300F1 19/12/07 16:31 Page 10
Page 16

11
Français
Consignes de sécurité
Chère cliente, cher client,
Nous vous félicitons d’avoir acheté cet appareil et nous vous
remercions beaucoup de votre confiance. Prière de lire attentivement le mode d’emploi et de le conserver soigneusement.
Description de l'appareil
1 Commande du spray
2 Bouton jet de vapeur
3 Curseur de réglage de la
vapeur avec fonction Self
Clean
4 Voyant de contrôle de
température
5 Thermostat
6 Orifice de remplissage
7 Spray
8 Cordon
9 Passe-fil
10 Réservoir d'eau avec indi-
cation du niveau de rem-
plissage maximal
11 Semelle
12 Fonction d'enroulement
du cordon intégré
•
L'appareil est conforme aux directives UE 73/23/CEE et 89/336/CEE.
• Vérifier que la tension du réseau corresponde bien à celle
indiquée sur la plaque de l'appareil.
• Dans les installations domestiques/d’immeubles comportant
un interrupteur de protection contre les courants de court-circuit, prière de vous assurer qu’il s’agit d’un interrupteur de
protection sensible aux impulsions de courant.
• Ne jamais laisser le fer sans surveillance lorsqu'il est branché.
• Utiliser et ranger l'appareil hors de la portée des enfants.
• Le fer à repasser ainsi que l’eau et la vapeur sortante sont
chauds. Toujours saisir le fer par la poignée.
• Ne pas orienter la vapeur sur des personnes et des animaux
et ne pas traiter les vêtements portés sur le corps.
• Toujours débrancher l’appareil avant chaque remplissage et
vidage ainsi qu’après l’utilisation et avant le nettoyage et
l’entretien.
• Pour débrancher l'appareil, ne jamais tirer sur le cordon.
• Ne jamais plonger l'appareil dans l'eau.
• Un appareil électroménager ne doit pas être utilisé si:
– l'appareil, le cordon ou le passe-fil présentent des défauts
ou des anomalies;
– l'appareil est tombé ou qu'il fuit.
Retourner l’appareil endommagé à un Centre Service Agréé
Rowenta (pour les adresses, se reporter à la liste du service
après-vente). Les réparations et le remplacement de cordons
ne doivent être confiés qu’à un Centre Service Agréé Rowenta en vue d’éviter des risques éventuels.
- Aucune responsabilité ne peut engager Rowenta pour
d'éventuels dommages dus à une utilisation non appropriée
ou non conforme au mode d'emploi.
• A la fin de la durée de vie de l'appareil, il y a lieu de s'en
débarrasser de façon appropriée.
A
1103476480 Index01 DX1300F1 19/12/07 16:31 Page 11
Page 17

12
Avant l'utilisation
ENLEVER EN PREMIER LIEU LA PROTECTION DE LA
SEMELLE.
Avant le premier repassage:
– Faire chauffer l’appareil sans eau avec le thermostat en
position maximum (voir point D). Il peut y avoir un
léger dégagement de fumée et d’odeurs, s’arrêtant
toutefois rapidement.
– Le réservoir d'eau peut ensuite être rempli (voir point C).
– Il est conseillé de procéder à un dégagement de
vapeur pendant au moins une minute après le
remplissage et lorsque le fer chauffe en vue d’éliminer
d’éventuels résidus de fabrication de la semelle..
Remplir le reservoir d'eau
Avant le remplissage du réservoir d’eau, débrancher
l’appareil et régler le curseur de réglage de la vapeur sur
la position .
Tenir le fer à repasser dans une position oblique et remplir de l’eau jusqu’au repère Max. (➓).
Quelle eau peut-on utiliser?
Il est possible d’utiliser de l’eau du robinet jusqu’à un
degré de dureté de 17 °dH (= dureté allemande). En cas
d’une eau plus dure, nous recommandons un rapport de
mélange de 1:1 avec de l’eau distillée.
Prière de ne pas utiliser de l’eau contenant de quelconques additifs (comme amidon, eau de repassage, parfum, substances aromatiques, adoucissant, etc.), ni de
l’eau de batterie ou de condensation (par exemple de
séchoirs à linge à condensation), celle-ci risque d’endommager durablement la fonction de vapeur de la semelle.
Prière de ne pas utiliser de produits anticalcaires, ceux-ci
risquent d’endommager le revêtement de la chambre de
vapeur et de détériorer ainsi le débit de vapeur.
Conseil utile: Vaporiser uniquement l’amidon sur
l’envers du tissu à repasser.
Régler la température de repassage
Régler la température de repassage ave la commande du
thermostat (➎), en fonction du type de tissu. Nous vous
recommandons de vous reporter au tableau ci-dessus. Le
voyant de contrôle de température s’allume, indiquant que
la semelle chauffe. Lorsque le voyant de contrôle (➌)
s’éteint , la température voulue est atteinte.
B
C
D
Étiquette des tissus Type de tissu
Fibres synthétiques p.e.
viscose, polyester
Soie, laine
Coton, lin
Thermostat
1103476480 Index01 DX1300F1 19/12/07 16:31 Page 12
Page 18

13
E
Prière de tenir compte de ce qui suit:
En chauffant un fer à repasser froid, attendre la
deuxième extinction du voyant de contrôle. Ce n’est
qu’à ce moment que la température réglée est atteinte.
Conseil utile:
Comme la période de refroidissement du fer est plus
longue que la période de chauffe, nous vous
recommandons de repasser les tissus délicats d’abord à
la température minimale.
Repassage et fonctions de vapeur
E1 Repassage SANS vapeur
Pour repasser sans vapeur, régler le curseur de réglage
de la vapeur (➌) sur et régler la température en
fonction du type de tissu (symboles •, •• ou •••).
E2 Repassage AVEC vapeur
Pour repasser à la vapeur, le bouton de réglage du
thermostat doit être réglé au-dessus de la position
••
dans l’intervalle de vapeur marqué. Le débit de vapeur
peut être réglé entre (pas de vapeur) et (débit de
vapeur maximal).
Pour le débit de vapeur maximal , nous recommadons
de régler la température sur •••.
E3 Repassage au jet de vapeur (Réglage de la température
sur la pos. ••)
Pour éliminer les plis tenaces par un jet de vapeur
puissant, appuyer sur la touche vapeur (➋).
Jet de vapeur vertical (Réglage de la température sur la
pos. ••)
Pour défroisser et rafraîchir des vêtements suspendus,
des tentures, etc., tenir le fer dans une position verticale
et appuyer sur la touche de diffusion de vapeur à grand
souffle.
Eviter un contact entre la semelle chaude et les tissus
sensibles.
Un jet de vapeur horizontal et un jet de vapeur vertical
(E3) sont aussi possibles lorsque le curseur de réglage de
la vapeur est réglé sur . L’intervalle entre les jets de
vapeur devrait correspondre à environ 4 secondes.
Important:
Ne jamais orienter le jet de vapeur sur des personnes et
des animaux.
E4 Fonction spray
Pour humecter des plis tenaces, appuyer sur la touche
spray (➊).
Autres fonctions
F1 Self Clean – pour une durée de vie accrue de votre fer.
La fonction d’auto-nettoyage élimine par rinçage les
saletés et les particules de calcaire de la chambre de
vapeur.
Mode de fonctionnement:
• Remplir le réservoir jusqu’au repère max. avec de l’eau du
robinet et chauffer le fer à repasser à la température max.
F
1103476480 Index01 DX1300F1 19/12/07 16:31 Page 13
Page 19

14
• Débrancher l’appareil
• Tenir le fer dans une position horizontale au-dessus
d’un évier et faire glisser le curseur de réglage de la
vapeur (➌) au-delà de la position sur la position
„Self Clean“ et le tenir en continu: il y a maintenant une
forte production de vapeur. Après quelques secondes,
l’eau sort également de la semelle et élimine par
rinçage les saletés et les particules de calcaire de la
chambre de vapeur.
• Régler le curseur de réglage de la vapeur sur la position
après environ 1 minute.
• Brancher l’appareil et faire chauffer le fer une nouvelle fois.
• Attendre l’évaporation de l’eau résiduelle.
• Débrancher l’appareil et le laisser refroidir complètement.
• La semelle refroidie peut être essuyée avec un chiffon
humide.
Nous recommandons de procéder à un auto-nettoyage environ toutes les 2 semaines. En cas d’une eau fortement calcaire, il est conseillé de faire un nettoyage hebdomadaire.
Soupape
Nous recommandons d’ouvrir et de fermer à plusieurs
reprises le curseur de réglage de la vapeur après chaque
repassage pour empêcher un entartrage de la soupape.
F2 Système anti-calcaire (selon le modèle)
La cartouche anti-calcaire contenue dans le fer à repasser
réduit nettement la formation de calcaire. La durée de vie
de votre fer à repasser est ainsi notablement accrue. La
cartouche anti-calcaire est un composant fixe du
réservoir d’eau et il n’est pas possible de la remplacer.
F3 Système anti-gouttes (selon le modèle)
Cette fonction empêche une sortie d’eau de la semelle en
présence d’une température de la semelle trop basse.
Après le repassage
• Débrancher l’appareil, vider l’eau résiduelle et régler le
curseur de réglage de la vapeur sur . Laisser ensuite
refroidir le fer.
• Ne jamais enrouler le câble autour de la semelle chaude.
• Utilisez la fonction d'enroulement du cordon intégré
pour la rangement.
• Ranger le fer en position verticale sur le socle.
Nettoyage et entretien
Vous pourrez essuyer le fer à repasser et la semelle
refroidis avec un chiffon humide ou une éponge.
Conseil utile: Si nécessaire, vous pourrez utiliser un produit à vaisselle pour nettoyer le fer à repasser et les
composants mous.
Prière de ne pas utiliser de produits de nettoyage et
d'objets tranchants ou abrasifs pour nettoyer la semelle.
Important:
Si l'appareil est resté inutilisé pendant longtemps, avant
le nettoyage, faire fonctionner la vapeur en tenant le fer
à l'horizontale pendant une minute pour évacuer des
circuits vapeur les éventuels résidus qui s'y trouvent.
G
H
1103476480 Index01 DX1300F1 19/12/07 16:31 Page 14
Page 20

15
Dérangements possibles et leurs solutions
Si vous n’arrivez pas à déterminer la cause d’un défaut, vous
pourrez vous adresser à un service après-vente officiel agréé
ROWENTA. Vous trouverez les adresses à la liste du service
après-vente jointe.
Vous trouverez d’autres conseils et astuces sur notre page
d’accueil: www.rowenta.com
Sous réserve de modifications.
Problème
La semelle du
fer à repasser
reste froide ou
ne chauffe pas.
Le voyant de
contrôle s’allume et s’éteint.
Il n’y a pas de
sortie de
vapeur ou la
quantité de
vapeur sortante
est insuffisante.
Des impuretés
sortant des orifices de sortie
de la vapeur
salissent le
linge.
De l’eau sort de
la semelle.
Pas d’alimentation
de courant.
Le thermostat est
réglé sur la position
„0„ ou est réglé à
une température
trop basse.
C'est normal.
Le curseur de réglage
de la vapeur est réglé
sur la position .
Il n’y a pas assez
d’eau dans le réservoir.
La fonction anti-gouttes (F3) est actif.
Résidus éventuels
dans la chambre de
vapeur/la semelle.
Vous utilisez des
additifs chimiques.
Vous utilisez de l’eau
distillée pure ou de
l’eau déminéralisée.
Vous utilisez de l’amidon.
Température trop
basse de la semelle
par suite d’un appui
trop fréquent sur la
touche vapeur.
Contrôler si la fiche est bien
insérée dans la prise ou
essayer de brancher l’appareil sur une autre prise.
Placer le thermostat sur la
position souhaitée (D).
Le voyant de contrôle s’allume et s’éteint pour indiquer la phase d’échauffement. Dès que le voyant est
éteint, la température voulue est atteinte.
Régler le curseur de réglage de la vapeur sur la position souhaitée (E2).
Remplir le réservoir (C).
Attendre jusqu’à ce que la
semelle ait de nouveau
atteint la température voulue.
Procéder à un auto-nettoyage (F1).
Ne pas ajouter d’additifs
chimiques à l’eau contenue
dans le réservoir.
Utiliser de l’eau de robinet
pure ou un rapport de
mélange de 1:1 avec de
l’eau distillée.
Toujours vaporiser l’amidon
sur l’envers du tissu.
Espacer davantage les jets
de vapeur (E3).
Cause possible Solution
I
1103476480 Index01 DX1300F1 19/12/07 16:31 Page 15
Page 21

16
Nederlands
Veiligheidsadviezen
Van harte gefeliciteerd met de aankoop van dit product en dank u
wel voor uw vertrouwen.
Wij raden u aan de gebruiksaanwijzing zorgvuldig te lezen en te
bewaren.
Beschrijving van het apparaat
1 Sproeiknop
2 Knop extra-stoomstoot
3 Stoomregelaar met Self
Clean functie
4 Controlelampje
5 Thermostaatinstelling
6 Vulopening
7 Sproeiopening
8 Netsnoer
9 Snoerbescherming
10 Waterreservoir met
aanduiding max. niveau
van het water
11 Strijkzool
12 Geïntegreerde oprolfunctie
van het snoer
• Het apparaat voldoet aan de EU-richtlijnen 73/23/EEG en
89/336/EEG.
• Sluit het apparaat uitsluitend op wisselstroom overeenkom-
stig het typeplaatje aan.
• Zorgt u er bij huis- en woninginstallaties met een kortsluit-
schakeling voor, dat het hierbij een pulsstroomsensitieve
veiligheidsschakelaar betreft.
• Laat het strijkijzer niet onbeheerd achter, zolang de stekker in
het stopcontact zit.
• Gebruik en bewaar het strijkijzer buiten het bereik van kinderen.
• Het strijkijzer en de geproduceerde stoom zijn heet. Gebruik
de aanwezige handgreep.
• Richt de stoom niet op personen en dieren. Behandel geen
kledingsstukken, terwijl iemand deze aan heeft.
• Trek voor elk vullen en legen, na het gebruik en voor het
reinigen en onderhoud de stekker uit het stopcontact.
• Trek de stekker niet aan het snoer uit het stopcontact.
• Dompel het strijkijzer niet onder in water.
• Het apparaat mag niet worden gebruikt, als:
– het apparaat, het snoer of de snoerbescherming defect of
beschadigd is.
– het apparaat gevallen is of lekkage vertoont.
Het beschadigde apparaat naar een ROWENTA Service
Center sturen (zie voor adressen de bijgevoegde lijst).
Reparaties en vervanging van het snoer mogen ter
voorkoming van gevaren uitsluitend door een ROWENTA
Service Center worden uitgevoerd.
• Wanneer het apparaat voor andere doeleinden of verkeerd
wordt gebruikt, vervalt de aanspraak op garantie en staan
wij niet borg voor eventuele schade.
• Zorg, dat het apparaat aan het einde van zijn levensduur
overeenkomstig de voorschriften wordt afgevoerd.
A
1103476480 Index01 DX1300F1 19/12/07 16:31 Page 16
Page 22

17
In gebruik nemen
ALS EERSTE DE BESCHERMING VAN DE STRIJKZOOL
VERWIJDEREN!
Voor het strijken:
– Het apparaat op de hoogste stand laten warm worden
(zie punt D). Hierbij kan een lichte rook- en
geurvorming optreden, die snel weer weggaat.
Daarna kan het waterreservoir worden gevuld (zie punt C).
– Na het vullen en opwarmen het strijkijzer minimaal
1 minuut laten stomen en daarbij nu en dan op de
stoomstootknop drukken, om eventuele verontreinigingen van de productie uit de zool te verwijderen.
Waterreservoir vullen
Trek voor het vullen van het waterreservoir de stekker uit
het stopcontact en zet de stoomregelaar op de stand .
Houd het strijkijzer schuin en vul water tot aan de
aanduiding Max. (➓).
Wat voor water mag u gebruiken?
Zuiver leidingwater tot een hardheid van 17 °dH (= Duitse
graad voor waterhardheid) kan worden gebruikt. Bij
harder water raden wij een mengverhouding van 1:1 met
gedestilleerd water aan.
Gebruik geen water met toevoegsels (zoals stijfsel,
strijkvloeistof, parfum, reukstoffen, wasverzachter, etc.)
en accu- en condenswater (bv. uit condensaatwasdrogers), aangezien anders de stoomfunctie van de
zool onherstelbaar beschadigd wordt.
Gebruik geen ontkalkingsmiddelen, aangezien deze de
coating van de stoomkamer beschadigen en daardoor
het stoomvermogen kan worden verslechterd.
Tip: Sproeit u stijfsel uitsluitend op de binnenzijde van
het strijkgoed.
Temperatuur instellen
Stelt u de strijktemperatuur met behulp van de thermostaatknop (➎) al naar gelang de soort stof in. Wij raden u
aan, zich naar de bovenstaande tabel te richten. Het
branden van het controlelampje geeft aan, dat de zool
wordt opgewarmd. Het uitgaan van het controlelampje
(➍) geeft aan, dat de ingestelde temperatuur is bereikt.
Let u op het volgende: Bij het opwarmen van een koud
strijkijzer wachten, tot het controlelampje voor de tweede keer is uitgegaan. Pas dan is de ingestelde temperatuur bereikt.
B
C
D
Etiket wasgoed Soort weefsel
Synthetische vezels
bv. viscose, polyester
Zijde, wol
Katoen, linnen
Thermostaatinstelling
1103476480 Index01 DX1300F1 19/12/07 16:31 Page 17
Page 23

18
E
Tip: Daar het afkoelen langer duurt dan het opwarmen,
adviseren wij eerst de tere stoffen op de laagste stand te
strijken.
Strijken en stoomfuncties
E1 Strijken ZONDER stoom
Om zonder constante stoom te strijken, de stoomregelaar
(➌) op stand zetten en de temperatuur al naar gelang
de soort stof instellen (punten •, •• of •••).
E2 Strijken MET stoom
Voor het strijken met stoom moet de temperatuur hoger
dan stand ••in het gemarkeerde stoombereik worden
ingesteld. De stoomhoeveelheid kan tussen (geen
stoom) en (maximale stoomhoeveelheid) worden
ingesteld. Voor de maximale stoomhoeveelheid
adviseren wij als temperatuurinstelling
•••
.
E3 Strijken met stoomstoot (temperatuurinstelling hoger
dan ••)
Voor het verwijderen van hardnekkige plooien drukt u op
de stoomstootknop (➋).
Verticale stoomstoot (temperatuurinstelling hoger dan ••)
Voor het verwijderen en opfrissen van hangende
kledingstukken, gordijnen enz. houdt u het apparaat
verticaal en drukt u op de stoomstootknop.
Tere stoffen niet met de hete strijkzool aanraken.
Horizontale en verticale stoomstoot (E3) zijn ook
mogelijk, wanneer de stoomregelaar op staat. De
afstand tussen de stoomstoten dient ongeveer
4 seconden te bedragen.
Belangrijk:
Richt de stoomstoot nooit op personen en dieren.
E 4 Sprayfunctie
Voor het bevochtigen van hardnekkige plooien drukt u op
de sproeiknop (➊).
Extra functies
F1 Self Clean – voor een langere levensduur van uw
strijkijzer
Door de functie zelfreiniging worden vuil- en kalkdeeltjes
uit de stoomkamer gespoeld.
Werkwijze:
• Reservoir tot de "Max."-markering met leidingwater
vullen en strijkijzer op maximale temperatuur
opwarmen.
• Stekker uit het stopcontact trekken.
• Strijkijzer horizontaal boven een wasbak houden en de
stoomregelaar (➌) over de stand heen in de stand
„Self Clean„ schuiven en zo vasthouden: nu ontstaat
stoom in grote hoeveelheid. Na enkele seconden komt
water uit de zool dat losse vuil- en kalkdeeltjes uit de
stoomkamer spoelt.
• Na ong. 1 minuut de stoomregelaar op stand zetten
• De stekker weer in het stopcontact steken en het
apparaat nogmaals warm laten worden.
F
1103476480 Index01 DX1300F1 19/12/07 16:31 Page 18
Page 24

19
• Wachten tot het resterende water verdampt is.
• Stekker uit het stopcontact trekken en strijkijzer geheel
laten afkoelen.
• De afgekoelde zool kan met een vochtige doek worden
schoongemaakt.
Wij adviseren de zelfreiniging ongeveer eens per 2
weken uit voeren. Bij zeer kalkhoudend water is een
wekelijkse zelfreiniging raadzaam.
Ventiel
Wij adviseren de stoomregelaar na iedere keer strijken
enkele malen te openen en te sluiten, om het verkalken
van het ventiel te voorkomen.
F2 Anti-kalk systeem (al naar gelang het model)
Het in het strijkijzer ingebouwde anti-kalkpatroon
vermindert de kalkvorming. Daardoor wordt de
levensduur van uw strijkijzer aanzienlijk verlengd. Het
anti-kalkpatroon is een vast onderdeel van het
waterreservoir en kan niet worden vervangen.
F3 Anti-Drip systeem (al naar gelang het model)
Deze functie voorkomt, dat bij een te lage zooltemperatuur water uit de zool loopt.
Na het strijken
• Trek de stekker uit het stopcontact, giet het resterende
water weg en zet de stoomregelaar op . Laat het
apparaat daarna afkoelen.
• Wikkel het snoer niet om de nog hete zool.
• Gebruik de geïntegreerde oprolfunctie van het snoer
voor het opbergen.
• Bewaar het apparaat staand op de achterkant.
Reiniging en onderhoud
Zodra het strijkijzer en de zool zijn afgekoeld, kunt u deze
met een vochtige doek schoonmaken.
Gebruik geen scherpe of schurende schoonmaakmiddelen en voorwerpen voor het schoonmaken van de
strijkzool.
Belangrijk:
Als u het strijkijzer lang niet heeft gebruikt, houdt u het
voor u begint te strijken horizontaal en weg van het
strijkgoed en laat u het 1 minuut stomen, om de stoomkanalen te reinigen en mogelijke resten uit het strijkijzer
te verwijderen.
G
H
1103476480 Index01 DX1300F1 19/12/07 16:31 Page 19
Page 25

20
Mogelijke problemen en oplossingen
Als u de oorzaak van het defect niet kunt vinden, neem dan
contact op met een officieel ROWENTA Service Center.
De adressen vindt u in het boekje met service-adressen.
Verdere tips en informatie vindt u op onze website:
www.rowenta.com
Wijzigingen voorbehouden.
Probleem
De strijkzool blijft koud of
wordt niet goed
warm.
Het controlelampje gaat aan
en uit.
Er komt geen of
maar weinig
stoom uit de
strijkzool.
Vuil dat uit de
stoomgaten
komt, maakt
vlekken op het
strijkgoed.
Uit de strijkzool
loopt water.
Geen stroom.
De temperatuurregelaar staat op stand
„0„ of is te laag
ingesteld.
Normale situatie.
De stoomregelaar
staat op stand
.
Er is niet genoeg
water in het reservoir.
De Anti-Drip-functie
(F 3) is actief.
Mogelijke vuil- of
kalkresten in de
stoomkamer of strijkzool.
U gebruikt chemische toevoegsels.
U gebruikt puur
gedestilleerd water
en water met ontharder.
U gebruikt stijfsel.
Te lage zooltemperatuur door te vaak
drukken op de
stoomstootknop.
Controleer of de stekker
goed in het stopcontact zit
of probeer het strijkijzer op
een ander stopcontact uit.
Draai de thermostaatknop
in het gewenste bereik (D).
Het aan- en uitgaan van het
controlelampje geeft aan,
dat het apparaat opgewarmd wordt. Zodra het
lampje uitgaat, is de ingestelde temperatuur bereikt.
Draai de stoomregelaar in
het gewenste bereik (E2).
Vul het reservoir (C).
Wacht, tot de zool weer de
juiste temperatuur heeft
bereikt.
Voer een zelfreiniging (F1)
uit.
Gebruik geen chemische
toevoegsels in het water in
het reservoir.
Gebruikt u puur leidingwater of een mengverhouding 1:1 van leidingwater en gedestilleerd water.
Stijfsel altijd op de binnenzijde van het strijkgoed
sproeien.
Laat u iets meer tijd verstrijken tussen de stoomstoten (E3).
Mogelijke oorzaak Verhelpen
I
1103476480 Index01 DX1300F1 19/12/07 16:31 Page 20
Page 26

21
Italiano
Avvertenze di sicurezza
Gent.le cliente,
Ci congratuliamo con Lei per l’acquisto di questo apparecchio e
La ringraziamo per la fiducia dimostrataci.
Leggere attentamente e conservare le istruzioni per l’uso.
Descrizione dell‘apparecchio
1 Pulsante spray
2 Pulsante getto vapore
3 Regolatore del vapore con
funzione Self Clean
4 Lampada spia
5
Regolatore della temperatura
6 Foro di riempimento
7 Ugello spray
8 Cavo di alimentazione
9 Guaina antipiega
10 Serbatoio dell‘acqua con
indicazione di massimo
livello
11 Piastra
12 Avvolgicavo integrato
• L
’
apparecchio è conforme alle norme 73/23/CEE e 89/336/CEE.
• Collegare l’apparecchio solo a corrente alternata conforme
alla dicitura della targhetta del modello.
•
Se l’apparecchio viene installato in case / alloggi dotate/i di un circuito di sicurezza per correnti di guasto, assicuratevi che si tratti di
un interruttore automatico sensibile alla corrente ad impulsi.
• Non lasciare incustodito l’apparecchio mentre è collegato alla
rete elettrica.
• Impiegare e riporre l’apparecchio in luoghi non accessibili ai
bambini.
• Il ferro da stiro così come l’acqua ed il vapore che ne fuorie-
scono sono bollenti. Usare le impugnature previste.
• Non dirigere il vapore verso persone o animali e non trattare
i capi mentre sono indossati.
• Prima di riempire il ferro da stiro di acqua e prima di svuotar-
lo così come dopo averlo utilizzato e prima della pulizia e
manutenzione, staccare sempre la spina elettrica.
• Non staccare la spina dalla presa tirando il cavo.
• Non immergere l’apparecchio in acqua.
• Non mettere in funzione un elettrodomestico qualora:
– l'apparecchio, il cavo di alimentazione o la guaina antipiega
fossero danneggiati.
– l'apparecchio fosse caduto o dovesse perdere acqua.
Inviare l’apparecchio danneggiato ad un centro di assistenza
Rowenta (per gli indirizzi dei centri di assistenza vedi foglio
allegato). Onde evitare pericoli, la riparazione e la sostituzione dei cavi di alimentazione devono essere eseguite esclusivamente dai centri di assistenza Rowenta.
• Non viene assunta responsabilità alcuna in caso di danni
risultanti da un uso dell
’
apparecchio non appropriato.
• Quando l’apparecchio non è più utilizzabile si deve provvede-
re al suo corretto smaltimento.
A
1103476480 Index01 DX1300F1 19/12/07 16:31 Page 21
Page 27

22
Prima dell’uso
RIMUOVERE INNANZITUTTO LA PROTEZIONE DELLA PIASTRA!
Prima della prima stiratura:
–
Riscaldare l’apparecchio senza acqua al massimo livello (vedi
punto D). È possibile una leggera formazione di fumo o di
odori che tuttavia spariranno in breve tempo.
Dopo di che si può riempire il serbatoio dell'acqua
(vedi punto C).
– Dopo il riempimento e il riscaldamento, lasciare
fuoriuscire il vapore per almeno 1 minuto premendo di
tanto in tanto il pulsante vapore per eliminare
eventuali residui di fabbricazione nella piastra.
Riempire il serbatoio
Prima di riempire il serbatoio dell’acqua estrarre la spina
e portare il regolatore del vapore sulla posizione .
Tenete il ferro da stiro in posizione inclinata e aggiungete
acqua fino alla marcatura Max. (➓).
Che tipo di acqua si può utilizzare?
Si può utilizzare acqua pulita del rubinetto fino ad un
grado di durezza di 17 °dH (= durezza secondo le norme
tedesche). In caso di acqua con grado di durezza più elevato consigliamo di mescolarla in proporzione 1:1 con
acqua demineralizzata.
Sono vietati l’aggiunta nell’acqua di qualsiasi tipo di
additivo (sia esso amido, profumo, essenze profumate,
ammorbidenti ecc.) e l’uso di acqua di batteria o di condensazione (per es. proveniente da asciugabiancheria a
condensazione), in quanto il funzionamento del sistema
di emissione del vapore dalla piastra verrebbe irrepara-
bilmente danneggiato.
Non utilizzate prodotti decalcificanti, in quanto essi possono danneggiare il rivestimento della camera del vapore e quindi compromettere il funzionamento e il rendimento del sistema a vapore.
Consiglio utile:l’amido deve esser spruzzato solo sul
rovescio del tessuto da stirare.
Selezionare la temperatura di stiratura
Impostate la temperatura di stiratura a seconda del tipo di
tessuto con l’ausilio del regolatore di temperatura (
➎
). Vi
consigliamo di orientarvi in base alla tabella qui sopra. La
lampada spia accesa segnala che la piastra è in fase di riscaldamento. Lo spegnimento della lampada spia (
➍
) seg-
nala che è stata raggiunta la temperatura desiderata.
B
C
D
Tipo di tessuto
fibre sintetiche
per es. viscosa, poliestere
seta, lana
cotone, lino
Regolatore della temperatura
Etichetta indumenti
1103476480 Index01 DX1300F1 19/12/07 16:31 Page 22
Page 28

23
E
Avvertenza: Per il riscaldamento di un ferro da stiro
freddo, occorre aspettare che la spia di controllo si
spenga per la 2a volta. Solo a questo punto è stata
raggiunta la temperatura selezionata.
Consiglio utile: Poiché il raffreddamento richiede più
tempo del riscaldamento, consigliamo di stirare prima i
tessuti delicati sulla regolazione della temperatura più
bassa.
Stiratura e funzioni vapore
E1 Stirare SENZA vapore
Per stirare senza la costante emissione di vapore, portare
il regolatore del vapore (➌) su e selezionare la
temperatura a seconda del tipo di tessuto (punti di
trattamento •, ••, •, ••).
E2 Stirare CON vapore
Per stirare con vapore, la regolazione della temperatura
deve essere effettuata a partire dalla posizione ••, nella
zona vapore evidenziata. La quantità di vapore emessa
può venire impostata tra (no vapore) e (quantità di
vapore massima). Per la quantità di vapore massima
consigliamo la regolazione della temperatura di •, ••.
E3 Stirare con emissione vapore (Regolazione della
temperatura oltre pos. ••)
Per eliminare le pieghe più ostinate con un forte getto di
vapore, premere il pulsante Supervapore (➋).
Colpo di vapore verticale (Regolazione della temperatura
oltre pos. ••)
Per ravvivare capi appesi, tendine, ecc. e per stenderne
ed eliminarne le pieghe, tenete l’apparecchio in posizione
verticale e premete il tasto di espulsione del vapore.
Impedire che stoffe sensibili vengano a contatto con la
piastra bollente del ferro.
Il colpo di vapore orizzontale e il colpo di vapore
verticale (E3) sono possibili anche quando il regolatore
del vapore è impostato su . Si consiglia un intervallo
tra i colpi di vapore di circa 4 secondi.
Importante:
Non dirigere mai il Supervapore verso persone o animali.
E4 Funzione spray
Per inumidire pieghe ostinate, premete il pulsante spray (➊).
Ulteriori funzioni
F1 Self Clean – per una maggiore durata del Vostro ferro da
stiro.
Mediante la funzione autopulente, le particelle di sporco
e di calcare vengono espulse dalla camera del vapore.
Funzionamento:
• Riempire il serbatoio fino al segno max. con acqua di
rubinetto e riscaldare il ferro da stiro fino alla
temperatura max.
• Staccare la spina di alimentazione.
F
1103476480 Index01 DX1300F1 19/12/07 16:31 Page 23
Page 29

24
• Tenere il ferro da stiro in posizione orizzontale sopra un
lavandino e portare il regolatore del vapore (➌) oltre la
posizione mantenendolo continuamente fermo nella
posizione „Self Clean„: dapprima si forma un forte
vapore. Dopo alcuni secondi, dalla piastra fuoriesce
anche dell’acqua, la quale espelle e sciacqua via dalla
camera del vapore le singole particelle di sporco e di
calcare che si sono formate.
• Dopo circa 1 minuto, portare il regolatore del vapore
sulla posizione .
• nserire la spina di alimentazione e far riscaldare ancora
una volta l’apparecchio.
• Aspettare che l’acqua residua sia evaporata.
• Staccare la spina e fare raffreddare completamente il
ferro da stiro.
•
La piastra raffreddata può essere pulita con un panno umido.
Consigliamo di effettuare l'autopulizia ca. ogni 2 settimane. In caso di acqua fortemente calcarea, è consigliabile
un’autopulizia settimanale.
Valvola
Consigliamo di aprire e chiudere più volte il regolatore
del vapore al termine di ogni stiratura, ai fini di impedire
la calcificazione della valvola.
F2 Sistema anticalcare (a seconda del modello)
La cartuccia anticalcare contenuta nel ferro da stiro riduce
notevolmente la formazione del calcare. In tal modo
viene prolungata considerevolmente la durata del vostro
ferro da stiro. La cartuccia anticalcare è un componente
fisso del serbatoio dell’acqua e non è sostituibile.
F3 Sistema Anti-Drip (a seconda del modello)
Questa funzione evita che a temperature troppo basse
della piastra l’acqua fuoriesca da quest’ultima.
Dopo la stiratura
• Staccare la spina, scaricare l’acqua residua e portare il
regolatore del vapore su . Dopo di che lasciar raffreddare l’apparecchio.
• Non avvolgere mai il cavo attorno alla piastra calda.
• Per maggiore practicità, utilizzare l'avvolgicavo integrato.
• Ritirare l’apparecchio appoggiandolo verticalmente
sulla parte posteriore.
Pulizia e manutenzione
Una volta raffreddati, l'apparecchio e la piastra possono
essere puliti con un panno umido o con una spugnetta.
Consiglio utile: In caso di necessità, per pulire sia l’apparec-
chio sia i componenti consistenti in materiali duttili, potete
utilizzare detersivi adatti al lavaggio a mano di stoviglie.
Per la pulizia della piastra non usare detersivi corrosivi e
abrasivi o oggetti appuntiti.
Importante:
Se l’apparecchio è rimasto per lungo tempo
inutilizzato, prima di usarlo nuovamente tenetelo in posizione
verticale e lasciate fuoriuscire il vapore per 1 minuto ai fini di
pulire i canali del vapore e scaricare eventuali depositi residui.
G
H
1103476480 Index01 DX1300F1 19/12/07 16:31 Page 24
Page 30

25
Possibili guasti e loro eliminazione
In caso non riusciate a trovare la causa dell’anomalia,
rivolgetevi ad un centro di assistenza autorizzato ROWENTA.
Gli indirizzi sono indicati nel foglio allegato.
Con riserva di modifiche!
Problema
La piastra rimane fredda o non
si riscalda.
La lampada
spia si accende
e si spegne.
Il vapore fuoriesce solo in
ridotta quantità
o non fuoriesce
del tutto.
Le impurità che
fuoriescono dai
fori del vapore
macchiano gli
indumenti.
Dalla piastra
fuoriesce
dell’acqua.
Non vi è alimentazio-
ne di corrente.
Il regolatore della
temperatura è sulla
posizione „0„ o è
regolato troppo basso.
Procedura normale.
Il regolatore del
vapore è sulla posi-
zione .
Non vi è acqua a suffi-
cienza nel serbatoio.
La funzione Anti-Drip
(F 3) è attivata.
Possibili residui nella
camera del
vapore/piastra.
State utilizzando
additivi chimici.
State utilizzando
acqua distillata pura
o acqua addolcita.
State utilizzando
dell’amido.
Temperatura della
piastra troppo bassa
a causa dell’aziona-
mento troppo fre-
quente del pulsante
Supervapore.
Controllare se la spina è
correttamente inserita o
provate ad inserirla in
un’altra presa.
Portare il regolatore della
temperatura nel campo
desiderato (D).
L’accensione e lo spegnimento
della lampada spia segnalano
la fase di riscaldamento del
ferro da stiro. Non appena
viene raggiunta la temperatura
impostata, la lampada spia si
spegne.
Portare il regolatore del
vapore nel campo desiderato (E2).
Riempite il serbatoio (C).
Attendete fino a quando la piastra non ha nuovamente raggiunto la corretta temperatura.
Effettuare l’autopulizia (F1).
Non aggiungere additivi chimici all’acqua nel serbatoio.
Usare acqua del rubinetto
pura o una miscela 1:1 di
acqua del rubinetto e acqua
demineralizzata.
Spruzzare l’amido sempre
sul rovescio del tessuto.
Aumentare leggermente
l’intervallo fra i getti di
vapore (E3).
Possibile causa Rimedio
I
1103476480 Index01 DX1300F1 19/12/07 16:31 Page 25
Page 31

26
Español
Instrucciones de seguridad
Apreciado/a cliente:
Le felicitamos por la compra de este aparato y le agradecemos la
confianza depositada en nuestra marca. Lea atentamente este
modo de empleo y consérvelo para su uso futuro.
Descripción del aparato
1 Pulsador pulverizador
2 Botón de chorro de vapor
3 Regulador de vapor con
función Self Clean
4 Luz piloto
5 Regulador de temperatura
6 Orificio de llenado
7 Pulverizador
8 Cable de alimentación
9 Protector del cable
10 Depósito de agua con
indicación del nivel
máximo de agua
11 Suela
12 Dispone de un enrolla-
cable integrado
• El aparato cumple las normativas 73/23/CE y 89/336/CE.
• Conectar la plancha únicamente a corriente alterna y com-
probar que la tensión de la red corresponde a la indicada en
la placa de características del aparato.
• Asegúrese de conectar la plancha a una instalación que dis-
ponga de toma de tierra y de dispositivos de seguridad eléctricos (magnetotérmico y diferencial).
• No deje de vigilar el aparato mientras esté conectado a la red.
• Utilizar y guardar la plancha fuera del alcance de los niños.
• La plancha, el agua y vapor que salen de ella están calientes.
Utilice las asas existentes.
• No dirigir el chorro de vapor contra personas o animales y
no planchar encima de prendas sobre el cuerpo.
•
Antes de cada llenado y vaciado, así como después del uso y
antes de la limpieza y mantenimiento, retirar el enchufe de la red.
• No extraer nunca la clavija de enchufe tirando del cable.
• No sumergir la plancha en el agua.
• No se debe utilizar un electrodoméstico si:
– el aparato, el cable de alimentación o el protector del
cable están deteriorados.
– se ha caído al suelo o se aprecian fugas.
Enviar el aparato deteriorado a un Servicio Oficial de Asistencia al
Cliente de Rowenta (para las direcciones, ver la lista de Servicios
adjunta). Para evitar peligros, las reparaciones, así como el cambio
de cables de alimentación deben ser llevados a cabo únicamente
por un Servicio Oficial de Asistencia al Cliente de Rowenta.
• Este aparato ha sido diseñado para uso doméstico única-
mente. Declinamos toda responsabilidad en caso de eventuales averías debidas a uso incorrecto o no conforme a estas
indicaciones.
• Al final de su vida útil, el aparato debe destinarse a la correc-
ta eliminación de residuos.
A
1103476480 Index01 DX1300F1 19/12/07 16:31 Page 26
Page 32

27
Antes del uso
ELIMINAR PRIMERO LA PROTECCION DE LA SUELA.
Antes del primer planchado:
– Calentar el aparato sin agua al nivel máximo (ver
punto D). Se puede producir una ligera formación de
humo y olores que cesará rápidamente.
A continuación, se puede llenar el depósito de agua
(ver punto C).
– Después del llenado y calentamiento, se debería dejar
salir vapor durante al menos 1 minuto y al mismo
tiempo apretar el pulsador de golpe de vapor, para eliminar eventuales impurezas en la suela.
Llenar el depósito
Antes de llenar el depósito de agua, retirar el enchufe de
la red y ajustar el regulador de vapor a la posición .
Mantener la plancha en posición inclinada e introducir
agua hasta la marca Máx. (➓).
¿Qué tipo de agua se puede utilizar?
Se puede utilizar agua del grifo limpia con un grado de
dureza calcárea de entre 20 y 35 mgr / L. Con agua más
dura recomendamos una proporción de mezcla de 1:1
con agua desmineralizada.
No utilizar agua que contenga ningún aditivo (como almidón,
agua para planchar, perfumes, suavizante, etc.), ni agua para
baterías o agua condensada (p.ej. de secadores de ropa por
condensación); de lo contrario, la función de vapor de la suela
quedaría dañada de forma irreversible.
No utilizar descalcificadores, dado que estos dañan el
recubrimiento de la cámara de vapor, perjudicando la
producción de vapor.
Consejo: Aplique almidón exclusivamente en la parte
interior del tejido que va a ser planchado.
Ajustar la temperatura
Seleccionar la temperatura de planchado con la ayuda
del regulador de temperatura (➎) según el tipo de tejido. Recomendamos consultar la tabla anterior. Al encenderse la luz piloto, se indica el calentamiento de la suela.
Cuando la luz piloto (➍) se apague se indica que se ha
alcanzado la temperatura deseada.
Tenga en cuenta: Al calentar una plancha fría, espere
hasta que la luz pilo-to se haya apagado por segunda vez.
Entonces se habrá alcanzado la temperatura ajustada.
B
C
D
Etiqueta en
las prendas
Clase de tejido
Fibras sintéticas
p.ej. viscosa, poliéster
Seda, lana
Algodón, lino
Regulador de
temperatura
1103476480 Index01 DX1300F1 19/12/07 16:31 Page 27
Page 33

28
E
Consejo:
Debido a que la plancha tarda más en enfriarse que en
calentarse, recomendamos comenzar primero a
planchar los tejidos sensibles con el ajuste de temperatura más bajo. Si plancha tejidos de fibras mezcladas,
utilice la temperatura ajustada al tejido más delicado.
Planchado y funciones de vapor
E1 Planchado SIN vapor
Para planchar sin vapor constante, colocar el regulador
de vapor (➌) en y ajustar la temperatura según el tipo
de tejido (símbolos de puntos •, •• o •••).
E2 Planchado CON vapor
Para planchar con vapor, el ajuste de temperatura deberá
encontrarse por encima de la posición •• en la escala de
vapor. El volumen de vapor se puede ajustar entre
(sin vapor) y (volumen de vapor máximo).
Para el volumen de vapor máximo recomendamos el
ajuste de temperatura •••.
E3 Planchado con golpe de vapor (Ajuste de temperatura en
la zona vapor por encima de la Pos. ••)
Para eliminar arrugas rebeldes con un golpe de vapor
fuerte, presione el pulsador de golpe de vapor (➋).
Golpe de vapor vertical (Ajuste de temperatura en la
zona vapor por encima de la Pos. ••)
Para eliminar arrugas de prendas colgadas, cortinas, etc.,
o repasarlas, mantener el aparato en posición vertical y
pulsar la tecla de golpe de vapor.
Importante:
Nunca planche las prendas puestas sobre la persona
• Cuelgue la prenda en una percha.
• Ajuste el termostato en la máxima posición.
• Mantenga la plancha alejada unos centímetros de la
percha para evitar quemar los tejidos delicados.
• Presione el pulsador de golpe de vapor repetidamente
y realizando movimientos de arriba hacia abajo.
El vapor horizontal y el vapor vertical (E3) también son
posibles cuando el regulador de vapor se encuentra en la
posición . El intervalo entre los golpes de vapor
debería ser de aproximadamente 4 segundos.
Importante:
¡No dirigir el golpe de vapor nunca contra personas o
animales!
E4 Función Spray
Para humedecer arrugas rebeldes, pulse la tecla Spray (➊).
Otras funciones
F1 „Self Clean“: prolonga la vida útil de la plancha
Mediante la función de autolimpieza („Self clean“) se
eliminan de la cámara de vapor restos de suciedad y
partículas de cal.
Modo de funcionamiento: • Llenar el depósito hasta la
marca "Max." con agua del grifo y calentar la plancha
seleccionando la temperatura máxima.
F
1103476480 Index01 DX1300F1 19/12/07 16:31 Page 28
Page 34

29
• Retirar el enchufe de la red.
• Mantener la plancha en posición horizontal sobre un fregadero y colocar el regulador de vapor (➌) más allá de la
posición hasta la posición „Self Clean“ y mantenerlo
en dicha posición de forma constante: ahora empezará
una importante formación de vapor. Tras unos segundos,
también sale agua de la suela de la plancha y expulsa restos de suciedad y partículas de cal de la cámara de vapor.
• Transcurrido aprox. 1 minuto, volver a colocar el
regulador de vapor en la posición .
•
Volver a conectar el enchufe para que la plancha se caliente.
• Espere hasta que se evapore el resto del agua.
• Retirar el enchufe de la red y esperar hasta que se
enfríe la plancha.
• Limpiar la suela fría con un paño húmedo.
Le recomendamos llevar a cabo el proceso de autolimpieza aproximadamente cada 2 semanas. En caso de agua
muy calcárea, es aconsejable una limpieza semanal.
Válvula
Aconsejamos abrir y cerrar el regulador de vapor varias
veces cada vez después de planchar y así evitar la
calcificación de la válvula.
F2 Sistema antical (según el modelo)
El cartucho antical incorporado a la plancha, reduce
notablemente la formación de cal. De este modo se
prolonga considerablemente la vida útil de su plancha.
El cartucho antical es un componente fijo del depósito de
agua y no se puede cambiar.
F3 Sistema Antigoteo (según el modelo)
Esta función evita la expulsión de agua a través de la suela
cuando la temperatura de la suela es demasiado baja.
Después de planchar
• Retirar el enchufe de la red, verter el agua residual y
colocar el regulador de vapor en la posición .
A continuación, dejar enfriar la plancha.
• No enrollar nunca el cable alrededor de la suela caliente.
• Utilice el dispone de enrolla-cable integrado cuando
guarde el aparato.
• Guardar la plancha colocada verticalmente sobre su
parte posterior.
Limpieza y cuidados
Una vez frío, el aparato y la suela pueden limpiarse con
un paño húmedo o una esponja.
No utilizar productos de limpieza y objetos cortantes o
abrasivos para la limpieza de la suela.
Según el modelo, si la suela es de acero inoxidable, puede
utilizar el limpiador específico para suelas Rowenta PC05.
Importante
Antes de la limpieza y si el aparato no se ha utilizado
durante un tiempo prolongado, colocar la plancha
durante 1 minuto en posición horizontal y dejar salir
vapor para limpiar las vías de vapor y eliminar posibles
residuos de la plancha.
G
H
1103476480 Index01 DX1300F1 19/12/07 16:31 Page 29
Page 35

30
Posibles fallos y su corrección
Si no encuentra la causa de un fallo, consulte un Servicio Oficial de
Asistencia al Cliente ROWENTA. Las direcciones se encuentran en
la lista de Servicios adjunta.
Más consejos y sugerencias los encontrará en nuestra página Web:
www.rowenta.com
Modificaciones reservadas.
Problema
La suela de la
plancha permanece fría o la luz
piloto no se
enciende.
La luz piloto se
enciende y se
apaga.
No sale vapor o
sale muy poco.
La suciedad que
sale de los orificios de vapor
provoca manchas en los tejidos.
La suela está
sucia o marrón y
puede manchar
la ropa.
Sale agua de la
suela.
La suela está
rayada o dañada.
No hay alimentación
eléctrica.
El regulador de temperatura se encuentra en
la posición „0“ o está
configurado en una
posición baja.
Proceso normal.
El regulador de vapor
se encuentra en la
posición .
No hay suficiente
agua en el depósito.
La función antigoteo
(F3) está activada.
Posibles restos en la
cámara de vapor o la
suela.
Está utilizando productos químicos para descalcificar la plancha.
Está empleando agua
destilada pura o descalcificada.
La ropa no está suficientemente aclarada
o ha planchado una
prenda nueva antes de
lavarla.
Está utilizando una
temperatura demasiado alta.
Está empleando almidón.
Temperatura de la suela
demasiado baja debido a
una presión frecuente
del pulsador de golpe de
vapor.
Ha colocado la plancha
sobre una reposa-planchas metálico.
Ha planchado sobre
una cremallera.
Asegúrese de que el enchufe
esté conectado correctamente,
o pruebe el aparato en otra
caja de enchufe.
Coloque el regulador de temperatura en la zona deseada
(D).
Al encender y apagar la luz
piloto se indica la fase de calentamiento. Cuando la luz piloto
se apague, se indica que la
suela ha alcanzado la temperatura seleccionada.
Coloque el regulador de
vapor en la zona deseada
(E2).
Llenar el depósito (C).
Esperar hasta que la suela
haya alcanzado de nuevo la
temperatura correcta.
Llevar a cabo un proceso de
autolimpieza (F1).
No añada ningún producto
descalcificante en el depósito
de agua.
Emplear sólo agua del grifo o
una mezcla 1:1 de agua del grifo
y agua desmineralizada.
Asegúrese que la ropa está
suficientemente aclarada para
eliminar los restos de jabón o
sustancias químicas de las
prendas nuevas.
Consulte la tabla de temperaturas para ajustar correctamente el termostato.
Aplicar el almidón siempre en la
parte interior de los tejidos.
Dejar transcurrir más tiempo
entre los golpes de vapor
(E3).
Coloque la plancha siempre
sobre su talón.
Evite planchar sobre las cremalleras ya que pueden tener
bordes asperos.
Posible causa Corrección
I
1103476480 Index01 DX1300F1 19/12/07 16:31 Page 30
Page 36

31
Português
Instruções de segurança
Estimado(a) cliente
Parabéns pela aquisição deste aparelho; agradecemos a confiança
que depositou na nossa marca. Leia atentamente o manual de
instruções e guarde-o para futuras utilizações.
Descrição do aparelho
1 Comando do spray
2 Comando super vapor
3 Regulador do vapor com
função de auto-limpeza
4 Luz piloto do termóstato
5 Termóstato
6 Orifício de enchimento
7 Spray
8 Cabo de alimentação
9 Invólucro de protecção do
cabo
10 Reservatório de água
com nível máximo de
enchimento
11 Base
12 Enrolador de cablo integrado
• O aparelho está em conformidade com as directivas EU
73/23CE e 89/336/CEE
• Certifique-se de que a tensão de alimentação corresponde à
tensão indicada na placa do aparelho.
• Nas instalações domésticas/prédios dotadas de um
interruptor de protecção contra os curtos circuitos,
certifique-se de que se trata de um interruptor sensível aos
impulsos de corrente eléctrica.
• Nunca deixe o ferro ligado sem vigilância.
• Utilize e arrume o ferro fora do alcance das crianças.
• O ferro de engomar, a água e o vapor ficam quentes
aquando da utilização. Segure sempre o ferro pela pega.
• Nunca oriente o ferro em direcção a pessoas ou animais,
nem engome directamente a roupa que traz vestida.
• Desligue sempre o aparelho antes de proceder ao
enchimento do reservatório, após cada utilização e aquando
da limpeza ou manutenção.
• Nunca puxe pelo cabo de alimentação para desligar o aparelho.
• Nunca coloque o aparelho dentro de água.
• Não utilize o seu aparelho se:
– o aparelho, o cabo de alimentação ou o invólucro de
protecção estiverem de algum modo danificados.
– o aparelho caiu e apresenta fugas de água.
Envie o aparelho defeituoso a uma Assistência Técnica da
Rowenta (moradas, ver lista anexa). As reparações bem
como a substituição dos cabos de alimentação devem ser
efectuadas apenas pela Assistência Técnica da Rowenta de
modo a evitar qualquer perigo.
• Uma utilização não apropriada ou não conforme ao manual de
instruções liberta a Rowenta de qualquer responsabilidade.
• No fim de vida, o aparelho deve ser eliminado de forma
apropriada.
A
1103476480 Index01 DX1300F1 19/12/07 16:31 Page 31
Page 37

32
Antes da primeira utilização
Em primeiro lugar remova a película protectora da base!
Antes da primeira utilização:
- Aqueça o aparelho sem água até à temperatura
máxima (ver ponto D). A emanação de fumos ligeiros
e odores passageiros é perfeitamente normal.
Em seguida pode encher o depósito de água (ver
ponto C).
- Antes de utilizar o ferro (após enchimento e
aquecimento) produzir vapor durante pelo menos um
minuto e carregar, por impulsos, na tecla do vapor
para soltar eventuais resíduos existentes na base.
Enchimento do reservatório
Antes de proceder ao enchimento do reservatório, desligue o
aparelho e coloque o regulador de vapor na posição .
Incline ligeiramente o ferro (posição oblíqua) e encha o
reservatório até o nível "Max." (➓).
Que tipo de água pode ser utilizado ?
É possível utilizar água da torneira com grau de dureza
até 17º dH (= classificação alemã). No caso de uma água
de alcalinidade superior (pode informar-se na Câmara
Municipal ou nos Serviços Municipalizados de Água e
Saneamento), aconselhamos que misture 50% de água
da torneira e 50% de água destilada.
Nunca utilize água que possa conter aditivos (goma, perfume,
substâncias aromáticas, amaciador, etc.), nem água de bateria
ou de condensação (por exemplo água proveniente de secadores da roupa), de modo a não danificar o aparelho.
Nunca utilize produtos anti-calcários de modo a não
danificar o revestimento da câmara de vapor nem o
débito de vapor.
Conselho útil: Aplique goma apenas no verso do tecido
que passar.
Ajustar a temperatura
Ajuste a temperatura com o termóstato (➎) consoante o
tipo de tecido. Refira-se ao quadro mais acima. A luz
piloto do controlo da temperatura acende, a base está a
aquecer. Quando a luz piloto de controlo (➍) se apaga,
indica que a temperatura desejada foi atingida.
Preste atenção: Aquando do aquecimento do ferro, aguarde
até que a lâmpada piloto de controlo tenha apagado 2
vezes. Apenas então a temperatura ideal foi atingida.
B
C
D
Etiqueta dos tecidos
Tipo de tecidos
Fibras sintéticas
p.ex. Viscosa, Poliéster
Seda, lã
Algodão, linho
Termóstato
1103476480 Index01 DX1300F1 19/12/07 16:31 Page 32
Page 38

33
E
Conselho útil: Recomendamos que engome primeiro tecidos
delicados com baixa temperatura, visto o período de
arrefecimento do ferro ser superior ao período de
aquecimento. No caso de fibras mistas, regule o termóstato
para a temperatura indicada para a fibra mais delicada.
Engomar e funções vapor
E1 Engomar SEM vapor
Para engomar sem vapor, coloque regulador do vapor
(➌) na posição e ajuste a temperatura consoante o
tipo de tecido (símbolos •, •• ou •••).
E2 Engomar COM vapor
Para engomar com vapor o termóstato deve estar na
posição ••ou acima, na posição de vapor marcada. O
débito de vapor pode ser regulado entre (sem vapor)
e (débito de vapor máximo). Para a regulação do
débito de vapor máximo recomendamos a regulação
de temperatura •••.
E3 Engomar com Super Vapor ( regulação de temperatura
acima da pos. ••)
Para remover vincos mais difíceis com um forte jacto de
vapor, carregue na tecla de Super Vapor (➋).
Jacto de vapor vertical (regulação de temperatura acima
da pos. ••)
Para engomar peças de roupa penduradas, cortinados,
etc., mantenha o ferro na posição vertical e carregue no
botão de vapor.
Importante:
Nunca engome a roupa enquanto esta se encontra vestida.
• Pendure a peça de roupa num cabide
• Regule o termóstato na potência máxima
• Segure no ferro a alguns centímetros por forma a não
queimar peças de roupa delicadas
• Prima o botão do vapor repetidamente, efectuando
movimentos com o ferro na vertical de cima para baixo.
Também é possível obter super vapor na horizontal e na
vertical (E3) quando o cursor de regulação do vapor está
na posição . O intervalo entre cada emissão de vapor
é de cerca de 4 segundos.
Importante:
Nunca orientar a emissão de vapor na direcção de
pessoas ou animais.
Tecidos delicados não devem ser tocados pela base quente.
E4 Função spray
Para humedecer vincos difíceis, carregar na tecla spray (➊).
Outras funções
F1
Self Clean – para uma vida útil prolongada do ferro de engomar.
Através da função de auto-limpeza são removidas
partículas de calcário e sujidades da câmara de vapor.
Modo de funcionamento:
•
Encha o reservatório de água até a marcação máxima com
água da torneira e ligue o ferro na temperatura máxima.
• Retire a ficha da tomada.
F
1103476480 Index01 DX1300F1 19/12/07 16:31 Page 33
Page 39

34
• Coloque o ferro em posição horizontal sobre o
lava-loiça e coloque o regulador de vapor (➌) para
além da posição até a marca de “Self Clean“ (autolimpeza) e segure-o nesta posição: agora é gerado
muito vapor. Após alguns segundos sai também água
pela base e a câmara de vapor é lavada de partículas de
calcário e sujidades.
•
Após aprox. 1 minuto, coloque o termóstato na posição .
• Coloque a ficha na tomada e deixe o aparelho aquecer
novamente.
• Aguarde até que a água restante tenha evaporado.
• Retire a ficha da tomada e deixe o ferro arrefecer
completamente.
• A base fria pode ser limpa com um pano húmido.
Recomendamos fazer a auto-limpeza em intervalos de
2 semanas. No caso de água com alto grau de
alcalinidade recomendamos uma limpeza semanal.
Válvula
Recomendamos abrir e fechar o regulador de vapor
algumas vezes após utilização do ferro para evitar a
calcificação da válvula.
F2 Sistema anti-calcário (consoante modelo)
O ferro é dotado de um cartucho anti-calcário que reduz
a formação do calcário. O que aumenta a longevidade do
seu aparelho. O cartucho anti-calcário é um componente
fixo do reservatório de água, não é possível substituido.
F3 Sistema anti-gota (consoante modelo)
Esta função Impede as fugas de água pela base, se a
temperatura da mesma for demasiado baixa.
Após utilização do ferro
• Retire a ficha da tomada, despeje a água e coloque o
regulador do vapor na posição . Deixe arrefecer o
ferro.
• Nunca enrole o cabo de alimentação à volta do ferro
com a base ainda quente.
• Utilize o enrolador de cablo integrado para arrumar o
seu ferro.
• Arrume o ferro na posição vertical.
Limpeza e manutenção
Limpe o aparelho e a base, em estado frio, com um pano
ou uma esponja húmida.
Não utilize produtos de limpeza nem objectos cortantes
ou abrasivos para limpar a base.
Consoante o modelo, se a base for em aço inoxidável,
poderá utilizar um produto de limpeza específico disponível nos Serviços de Assistência Técnica Rowenta
(ver lista de moradas em anexo).
Importante:
Se o aparelho não for utilizado durante algum tempo,
coloque o ferro na horizontal e faça funcionar o vapor
durante um minuto de modo a evacuar dos circuitos de
vapor eventuais resíduos.
G
H
1103476480 Index01 DX1300F1 19/12/07 16:31 Page 34
Page 40

35
Possíveis problemas e soluções
Se não conseguir determinar qual a causa de um defeito,
dirija-se a um Serviço de Assistência Técnica ROWENTA.
Ver lista anexa.
Outros conselhos úteis podem ser vistos na nossa
Homepage: www.rowenta.com
Reservam-se os direitos de modificações.
Problem
A base permanece fria ou
não aquece.
A luz piloto de
controlo acende
e apaga.
O vapor não sai
ou débito de
vapor é
insuficiente.
Sujidades que
escapam dos
orifícios de
vapor sujam a
roupa.
A base está
suja ou
castanha e
pode manchar
a roupa
Escapa água da
base.
A base está
riscada ou
danificada.
Não há corrente
eléctrica.
O termóstato está na
posição „0“ ou com
ajuste demasiado baixo.
Processo normal.
O regulador do vapor
está na posição .
Falta de água no
reservatório.
A função anti-gota
(F3) está activada.
Estão a ser utilizados
aditivos químicos.
Está a ser utilizada
água destilada pura
ou água com baixo
teor de alcalinidade.
A roupa não está
bem enxaguada ou
engomou uma peça
de roupa nova sem a
lavar previamente.
Está a engomar com
uma temperatura
demasiado elevada.
Está a utilizar goma.
Temperatura da base
insuficiente em razão
de ter carregado com
muita frequência na
tecla de Super Vapor.
C
olocou o ferro sobre
um suporte metálico.
Engomou por cima
de um fecho éclair.
Certifique-se de que a ficha
está correctamente inserida
na tomada ou tente ligar o
aparelho a outra tomada.
Coloque o termóstato na
posição desejada (D).
Quando a luz piloto acende e
apaga, o ferro está a aquecer.
Quando a luz piloto apaga, a
temperatura foi atingida.
Coloque o regulador do vapor
na posição desejada (E2).
Encha o reservatório (C).
Aguardar que a base atinja
novamente a temperatura
desejada.
Não adicione aditivos químicos a água no reservatório.
Utilize apenas água de
torneira ou uma relação de
mistura de 1:1 de água de
torneira e água destilada.
Certifique-se de que a
roupa está perfeitamente
enxaguada e sem depósitos
de detergentes que possam
pegar à base do ferro.
Veja o quadro referente à
temperatura e coloque o termóstato na posição correcta.
Limpe a base (ver § H)
Aplicar amido sempre no
verso do tecido.
Efectuar maiores intervalos
entre os jactos de vapor
(E3).
Coloque sempre o ferro na
vertical.
Tente evitar engomar os
fechos éclair.
Causas possíveis Solução
I
1103476480 Index01 DX1300F1 19/12/07 16:31 Page 35
 Loading...