

Page 1

RDG-1520
POWER
123
456
789
NETWORK USBAUX
MEMORY0 DAB i-RADIOFM
RDG-1520
Digital Gateway
Puerta de Acceso Digital
Passerelle numérique
QUEUE
BACK REPLY
PLAY
PAUSESTOP
SKIP+
SKIP--
PUSHSELECT
Owner’s Manual
Manual de Instrucciones
Manuel de l’utilisateur
Page 2
2
RDG-1520 DIGITAL GATEWAY
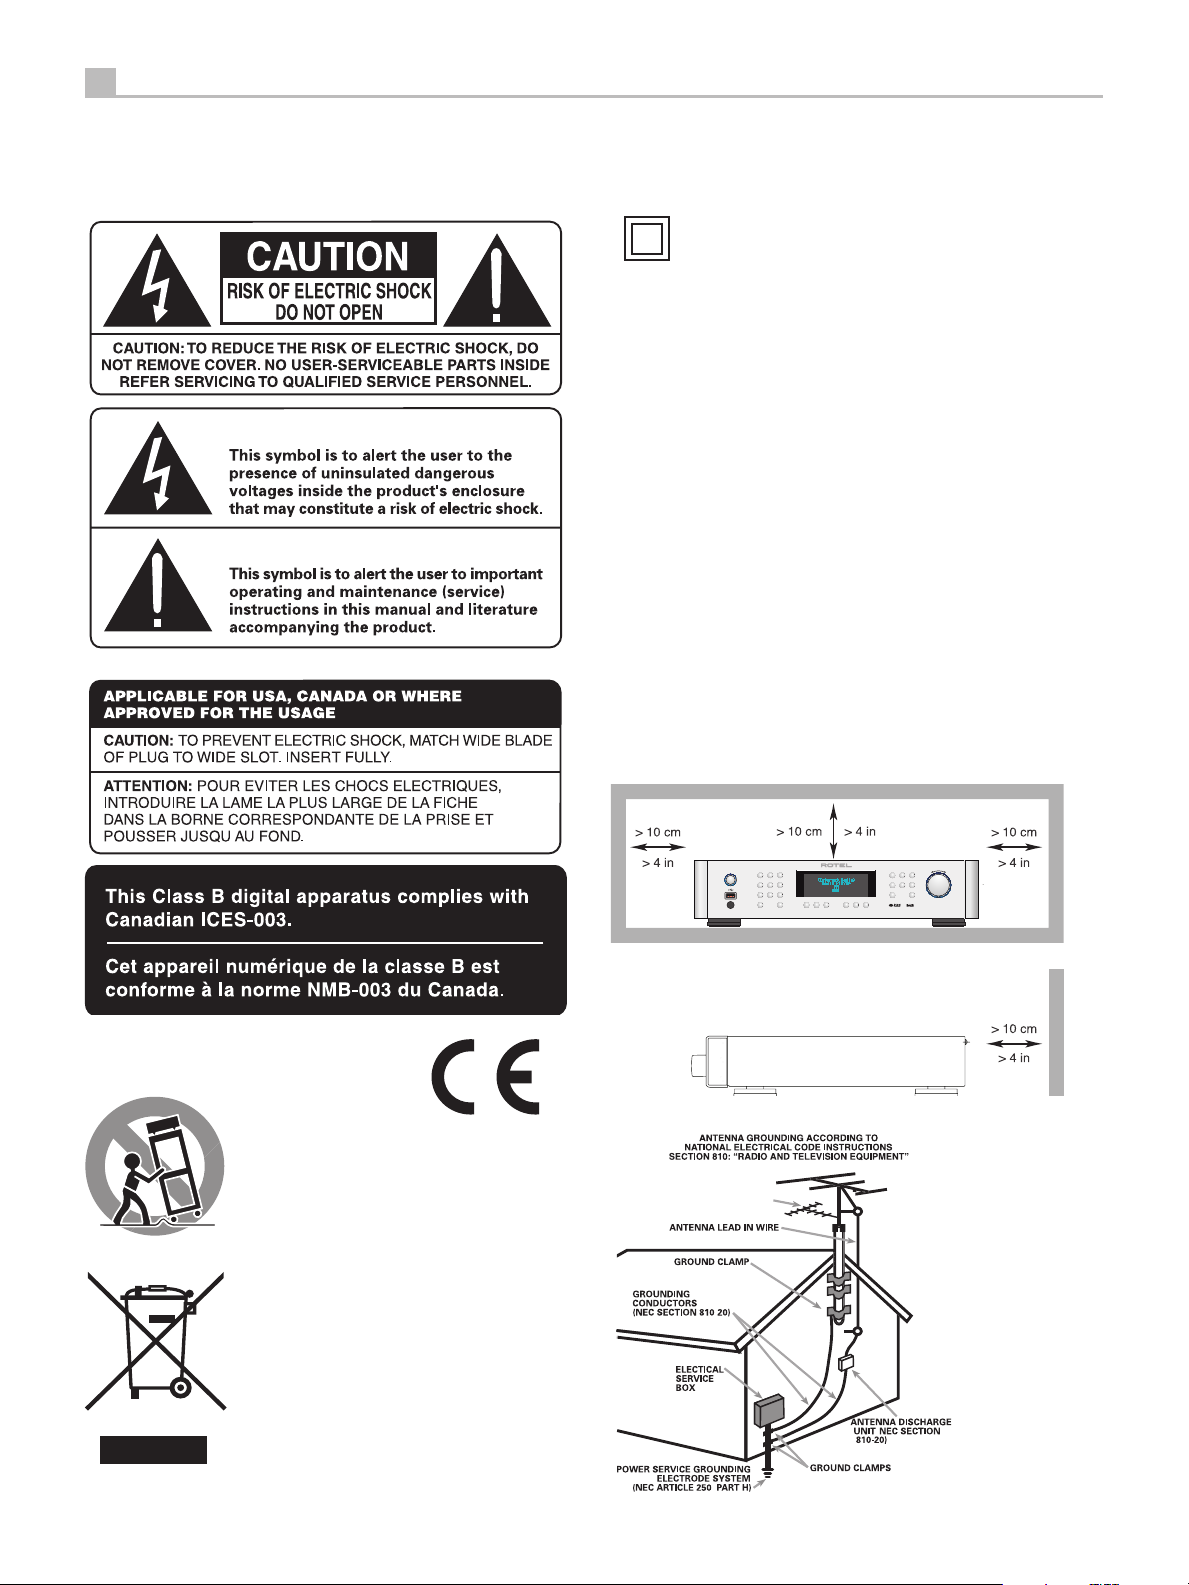
This symbol means that this unit is double insulated. An earth
connection is not required.
Rotel products are designed to comply with international
directives on the Restriction of Hazardous Substances
(RoHS) in electrical and electronic equipment and
the disposal of Waste Electrical and Electronic
Equipment (WEEE). The crossed wheelie bin symbol
indicates compliance and that the products must be
appropriately recycled or processed in accordance
with these directives.
DAB
Page 3
English
The COMPUTER I/O connection should be handled by authorized persons only.
FCC Information
This equipment has been tested and found to comply with the limits for a Class B digital device,
pursuant to Part 15 of the FCC Rules. These limits are designed to provide reasonable protection against
harmful interference in a residential installation. This equipment generates, uses and can radiate radio
frequency energy and, if not installed and used in accordance with the instruction, may cause harmful
interference to radio communications.
However, there is no guarantee that interference will not occur in a particular installation. If this
equipment does cause harmful interference to radio or television reception, which can be determined
by turning the equipment off and on, the user is encouraged to try to correct the interference by one
or more of the following measures:
UÊ,iÀiÌÊÀÊÀiV>ÌiÊÌiÊÀiViÛ}Ê>Ìi>°/6]ÊÀ>`]ÊiÌV°®
UÊVÀi>ÃiÊÌiÊÃi«>À>ÌÊLiÌÜiiÊÌiÊiµÕ«iÌÊ>`ÊÀiViÛiÀ
UÊiVÌÊÌiÊiµÕ«iÌÊÌÊ>ÊÕÌiÌÊÊVÀVÕÌÊ`vviÀiÌÊvÀÊÌ>ÌÊÌÊÜVÊÌiÊÀiViÛiÀÊÃÊ
connected.
UÊÃÕÌÊÌiÊ`i>iÀÊÀÊ>ÊiÝ«iÀiVi`ÊÀ>`É/6ÊÌiVV>ÊvÀÊ>``Ì>Êi«°
Caution
This device complies with part 15 of the FCC Rules. Operation is subject to the following to conditions:
(1) This device may not cause harmful interference, and (2) this device must accept any interference
received, including interference that may cause undesired operation.
NOTE TO CATV SYSTEM INSTALLER: Call the CATV system or antenna installer’s attention to
Article 820-40 of the NEC. This provides guidelines for proper grounding and, in particular , specifies
that the cable ground shall be connected to the grounding system of the building, as close to the point
of cable entry as practical. See installation diagram.
NOTE: This equipment has been tested and found to comply with the limits for a Class B digital device,
pursuant to Part 15 of the FCC Rules. These limits are designed to provide reasonable protection against
interference in a residential installation. This equipment generates and can radiate radio frequency
energy and, if not installed and used in accordance with the instructions, may cause interference to
radio or TV communications. There is no guarantee that interference will not occur in a particular
installation. If this equipment does cause interference to radio or television reception, which can be
determined by turning the equipment off and on, try to correct the interference by one or more of
the following measures:
UÊ,iÀiÌÊÀÊÀiV>ÌiÊÌiÊÀiViÛ}Ê>Ìi>°
UÊVÀi>ÃiÊÌiÊÃi«>À>ÌÊLiÌÜiiÊÌiÊÕÌÊ>`ÊÌiÊÌiiÛÃÊÌÕiÀ°
UÊiVÌÊÌiÊÕÌÊÌÊ>ÊÊ«ÜiÀÊÕÌiÌÊÊ>Ê`vviÀiÌÊiiVÌÀV>ÊVÀVÕÌ°
UÊÃÕÌÊÞÕÀÊ>ÕÌÀâi`Ê,ÌiÊÀiÌ>iÀÊvÀÊ>ÃÃÃÌ>Vi°
3
Important Safety InstructionsNotice
WARNING: There are no user serviceable parts inside. Refer all servicing to qualified service
personnel.
WARNING: To reduce the risk of fire or electric shock, do not expose the unit to moisture or water.
Do not expose the unit to dripping or splashing. Do not place objects filled with liquids, such as vases,
on the unit. Do not allow foreign objects to get into the enclosure. If the unit is exposed to moisture,
or a foreign object gets into the enclosure, immediately disconnect the power cord from the wall. Take
the unit to a qualified service person for inspection and necessary repairs.
Read all the instructions before connecting or operating the component.
Keep this manual so you can refer to these safety instructions.
Heed all warnings and safety information in these instructions and on the product itself. Follow all
operating instructions.
Clean the enclosure only with a dry cloth or a vacuum cleaner.
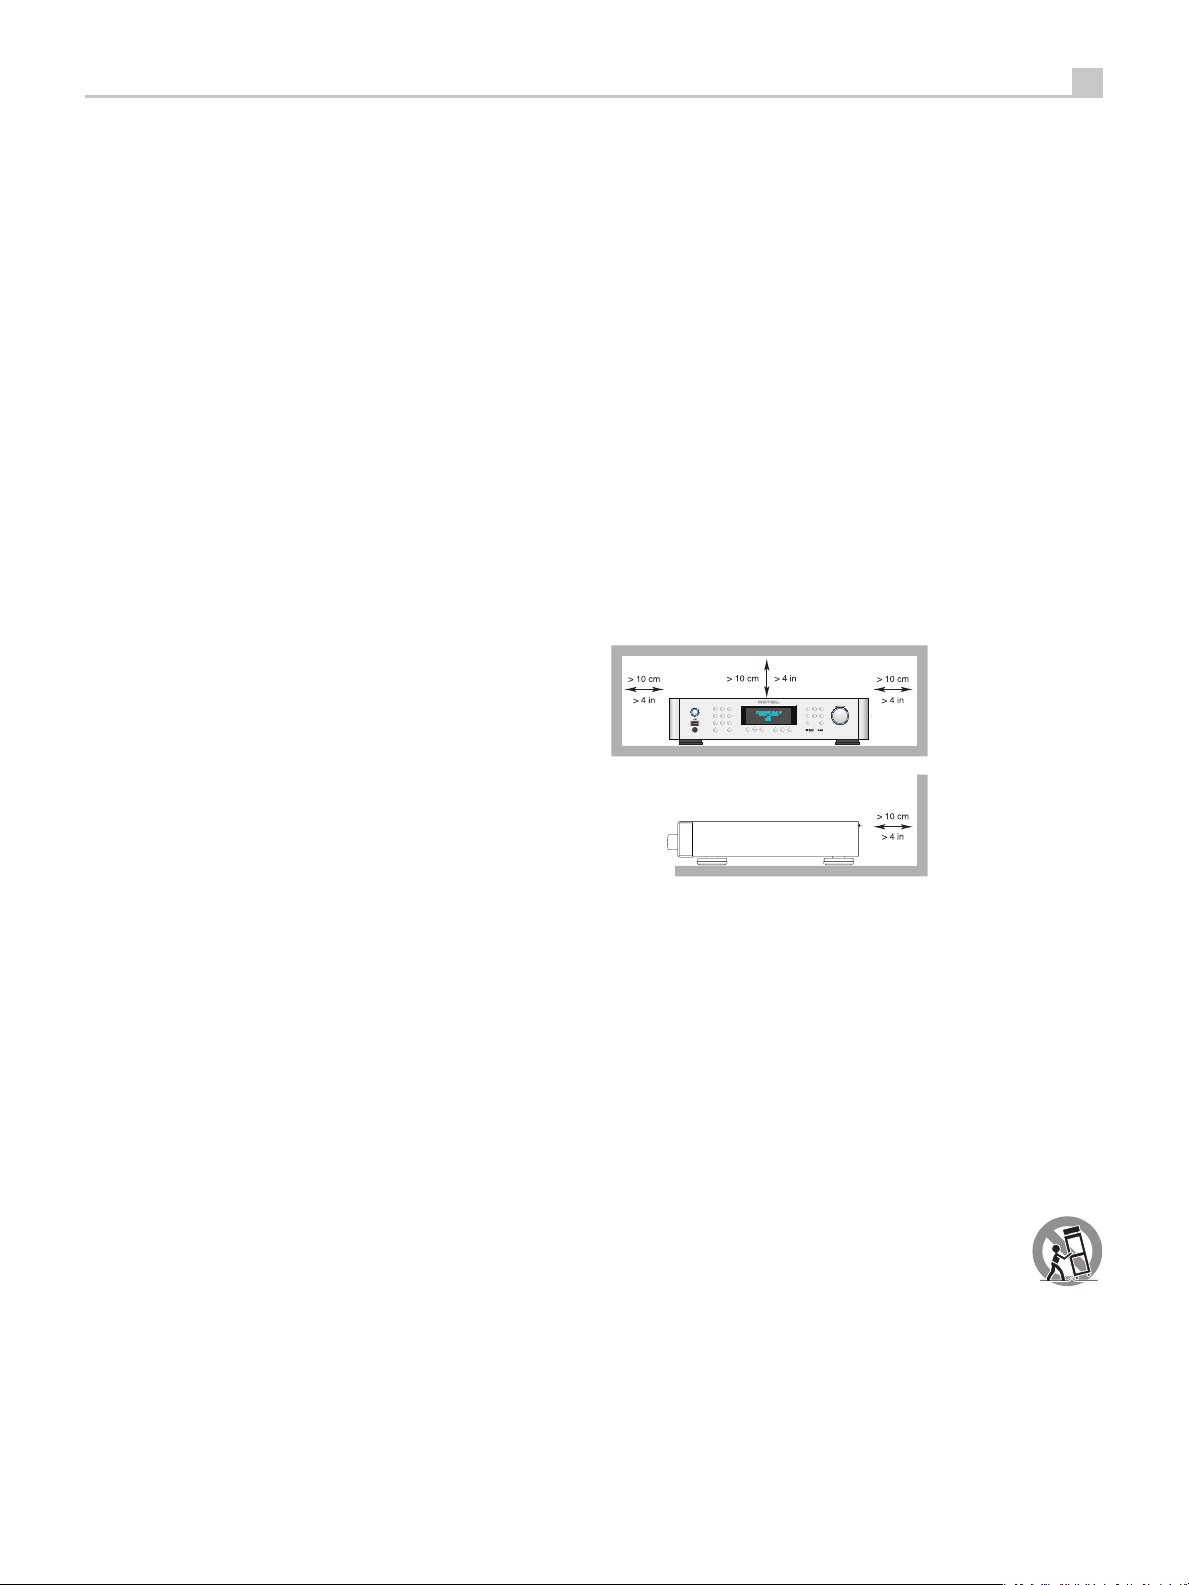
Do not use this unit near water.
You must allow a minimum 10 cm or 4 inches of unobstructed clearance around the
unit.
Do not place the unit on a bed, sofa, rug, or similar surface that could block the ventilation openings.
If the unit is placed in a bookcase or cabinet, there must be ventilation of the cabinet to allow proper
cooling.
Keep the component away from radiators, heat registers, stoves, or any other appliance that
produces heat.
WARNING: The rear panel power
cord connector is the mains power
disconnect device. The apparatus must
be located in an open area that allows
access to the cord connector.
The unit must be connected to a
power supply only of the type
and voltage specified on the
rear panel. (USA: 120 V/60Hz,
EC: 230V/50Hz)
Connect the component to the power
outlet only with the supplied power supply cable or an exact equivalent. Do not modify the supplied
cable. A polarized plug has two blades, with one wider than the other. A grounding plug has two blades
plus a third grounding prong. These are provided for your safety. Do not defeat grounding and/or
polarization safety provisions. If the supplied plug does not fit your outlet, please consult an electrician
for replacement of the obsolete outlet. Do not use extension cords.
The main plug of the power cord set is a disconnect device of the apparatus. In order to completely
disconnect the apparatus from the supply mains, the main plug of the power cord set should be
unplugged from the mains (AC) outlet. The stand-by LED indicator will not be lit up to show the power
cord is unplugged. The disconnect device shall remain readily operable.
Do not route the power cord where it will be crushed, pinched, bent, exposed to heat, or damaged
in any way. Pay particular attention to the power cord at the plug and where the cord exits the back
of the unit.
The power cord should be unplugged from the wall outlet during a lightning storm or if the unit is to
be left unused for a long period of time.
Use only accessories specified by the manufacturer.
Use only with a cart, stand, rack, bracket or shelf system recommended by Rotel. Use
caution when moving the unit in a stand or rack to avoid injury from a tip-over.
Immediately stop using the component and have it inspected and/or serviced by a
qualified service agency if:
UÊ /iÊ«ÜiÀÊÃÕ««ÞÊVÀ`ÊÀÊ«Õ}Ê>ÃÊLiiÊ`>>}i`
UÊ "LiVÌÃÊ>ÛiÊv>iÊÀʵÕ`Ê>ÃÊLiiÊëi`ÊÌÊÌiÊÕÌ
UÊ /iÊÕÌÊ>ÃÊLiiÊiÝ«Ãi`ÊÌÊÀ>
UÊ /iÊÕÌÊÃÜÃÊÃ}ÃÊvÊ«À«iÀÊ«iÀ>Ì
UÊ /iÊÕÌÊ>ÃÊLiiÊ`À««i`ÊÀÊ`>>}i`ÊÊ>ÞÊÜ>Þ
The batteries in remote control shall not be exposed to excessive heat such as sunshine, fire or the
like.
Page 4
4
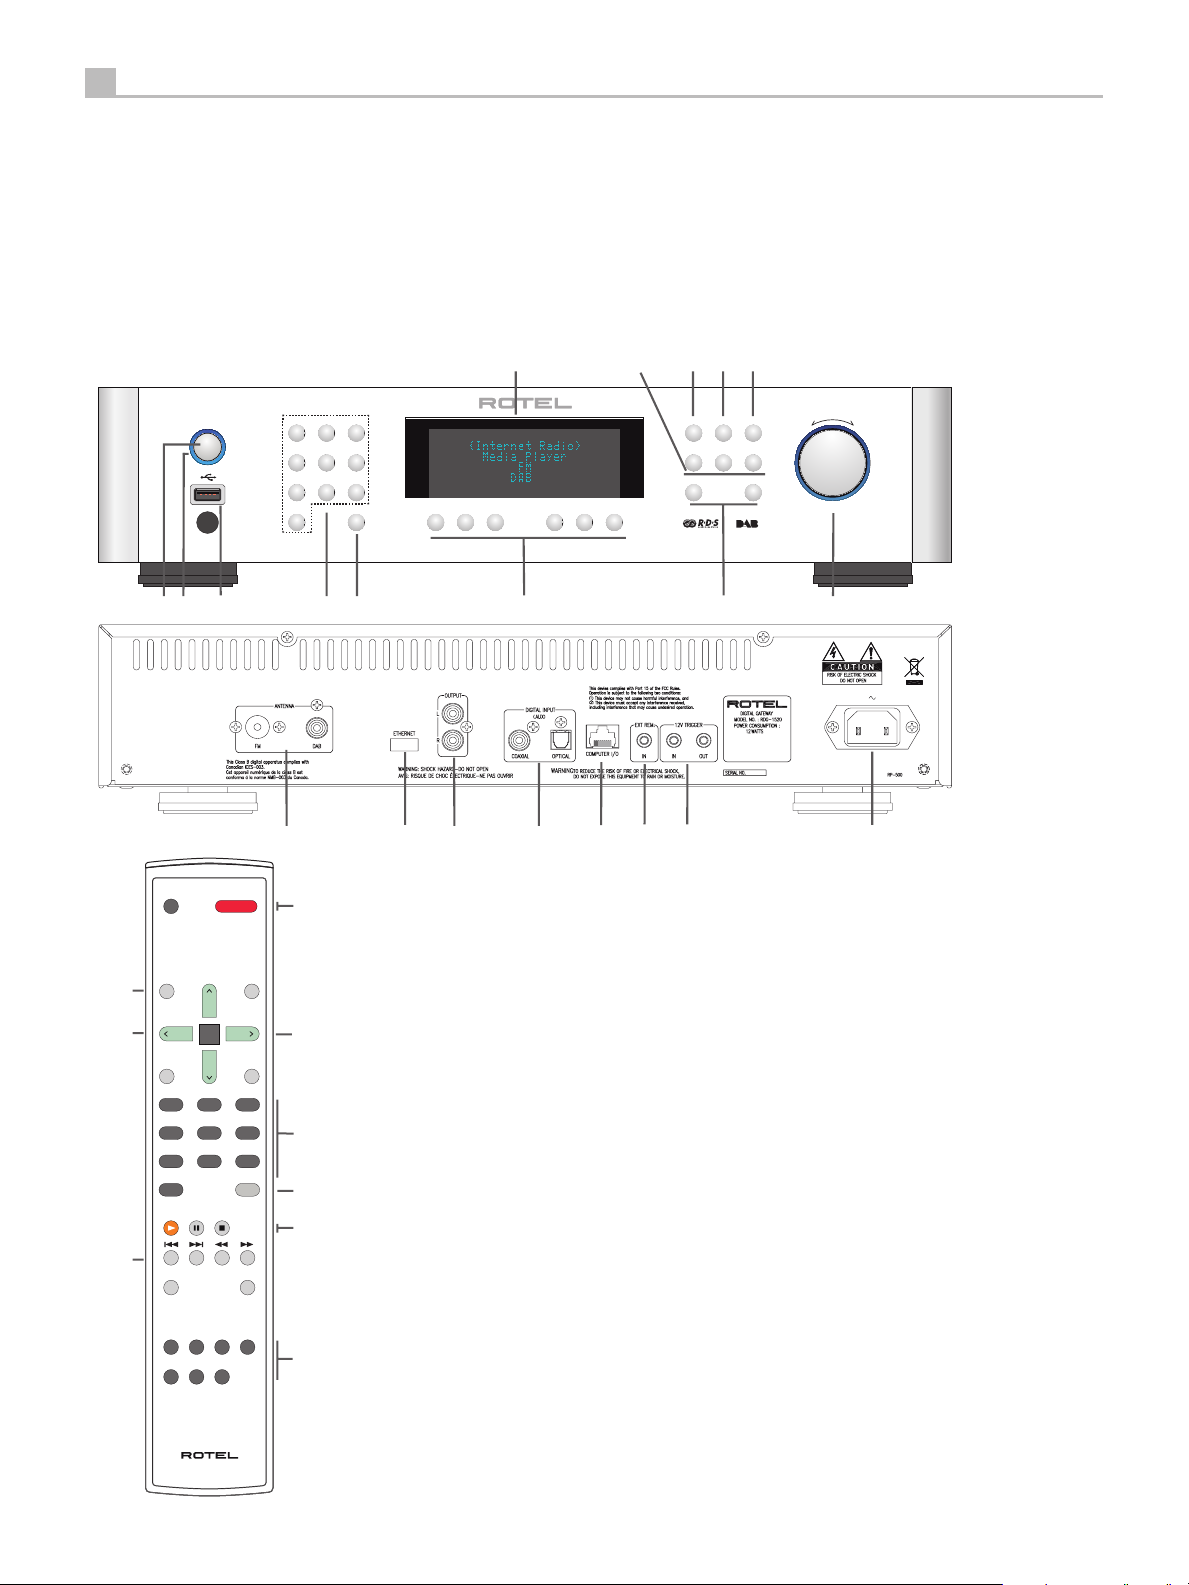
Figure 1: Controls and Connections
RDG-1520 DIGITAL GATEWAY
RDG-1520
POWER
123
456
789
MEMORY0 DAB i-RADIOFM
NETWORK USBAUX
VDQSXTH N
Front and Remote common function buttons
, : Power on/off buttons
: iPod/mp3 USB slot
, : Set and call out preset
: Display
: Music source select
: Playback button
: Queue ( Radio preset list )
: Back to upper level menu
: iRadio menu
: Previous /Next track
^
P ^ SEL : Navigate and Select
Rear Slots
V : FM/DAB Antenna
D : Wi-Fi/Ethernet dongle slot
Q : Analogue output
S : Digital Input
X : Computer I/O
T : Ext remote In
H : 12v Trigger signal
N : Power mains connection
OFF
QUEUE
BACK REPLY
DIM
123
456
789
0
REPT RANDOM
FM DAB i-RADIO CD
NETWORK USB AUX
ON
SETUP
SEL
EXIT
MEM
QUEUE
PLAY
SKIP --
BACK REPLY
PAUSESTOP
SKIP +
PUSH SELECT
P
Remote Unit advanced buttons
SETUP & EXIT : Enter and Exit Factory menu
[ & ] : Auto search FM stations.
RANDOM/SHUFFLE : Playback mode
Note :
1. Most remote control keys duplicate front panel button
functions. Some controls can only be accessed through
the remote, which will be explained separately.
2. Front panel keys are used to explain most operations
of the unit. You can also use corresponding remote
control keys. For example, the alternative operation
of turning and pressing the push select knobP is
pressing ^ and ^ then SEL button of the remote to
select the desired function.
RR-CX92
Page 5
English
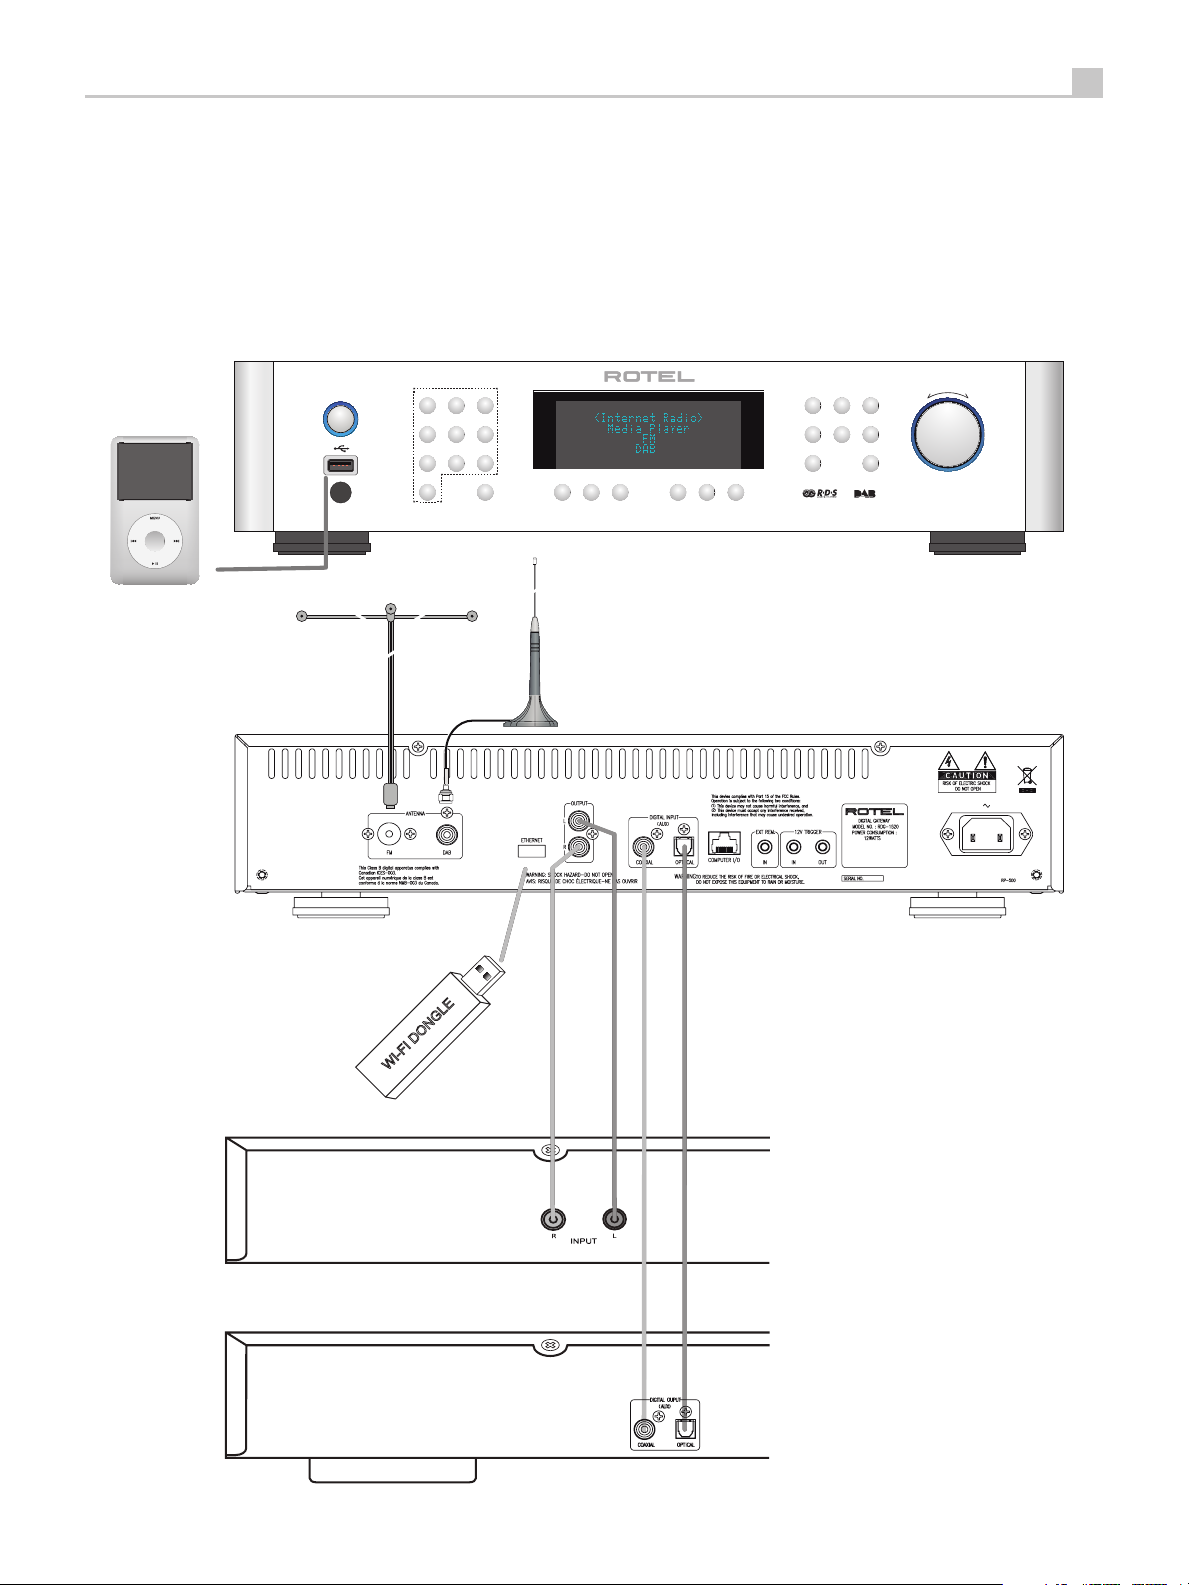
Figure 2: Hook-up Illustration
5
RDG-1520
POWER
123
456
789
MEMORY0 DAB i-RADIOFM
NETWORK USBAUX
QUEUE
PLAY
SKIP --
BACK REPLY
PAUSESTOP
SKIP +
PUSH SELECT
WI-FI DONGLE
PRE AMPLIFIER
DIGITAL AUDIO DEVICE
Important Notes
When making connections be sure to:
✔ Turn off all the components in the system
before hooking up any components,
including loudspeakers.
✔ Turn off all components in the
system before changing any of the
connections to the system.
It is also recommended that you:
✔ Turn the volume control of the amplifier
all the way down before the amplifier
is turned on or off.
Page 6

6
RDG-1520 DIGITAL GATEWAY
Contents
Important Safety Instructions .......................................3
Figure 1: Controls and Connections 4
Figure 2: Hook-up Illustration 5
Important Notes 5
About Rotel ....................................................6
Overview – the Rotel internet radio tuners/digital gateway products. ......... 7
DAB and FM radio 7
Internet radio 7
Network access 7
The Rotelradio website – managing your stations 7
Playback from iPods, mp3 players and flash drives 7
Playback from network servers 7
Getting Started ................................................. 8
Features 8
A Few Precautions 8
Placement 8
AC Power and Control ............................................8
AC Power Input N 8
Power Switch and Indicator Light 8
12V Trigger Input H 8
12V Trigger Output H 8
Connection Overview .............................................8
DAB/FM Broadcasting V 8
DIGITAL INPUT-AUX S 9
Network Connection D 9
Computer I/O X 9
USB Connection 9
OUTPUT Q 9
Internet Radio Quick Start .........................................9
What you need before starting 9
First Time Connection To The Network 9
Choosing A Radio Station 10
Internet Radio Station Playing 10
Storing a radio station in a preset 10
Playing a preset radio station 10
Media Player Quick Start .........................................11
UPnP Servers 11
Setting up UPnP Server in PC 11
Play media files using UPnP Server. 11
Clear Queue 12
Playback Mode 12
iPod/USB Connection Quick Start ................................... 12
USB Storage Device Connection 12
iPod/iPhone Connection 12
FM RADIO Quick Start ...........................................13
FM Radio Station Playing 13
Storing a radio station in a preset 13
Playing a preset radio station 13
DAB RADIO Quick Start ..........................................13
DAB Radio Station Playing 13
Storing a DAB station in a preset 13
SETTINGS OVERVIEW ............................................14
Configure “My Stuff”. . . . . . . . . . . . . . . . . . . . . . . . . . . . . . . . . . . . . . . . . . . . 15
Configure “My Stations” ......................................... 15
Configure “My Streams” ......................................... 15
Remote Unit Advanced Buttons ..................................... 15
Troubleshooting ................................................16
Specifications .................................................18
About Rotel
Our story began nearly 50 years ago. Over the decades, we have received
hundreds of awards for our products and satisfied hundreds of thousands
of people who take their entertainment seriously- like you!
Rotel was founded by a family whose passionate interest in music led
them to manufacture high-fidelity components of uncompromising quality.
Through the years, that passion has remained undiminished and the family
goal of providing exceptional value for audiophiles and music lovers,
regardless of their budget, is shared by all Rotel employees.
Rotel’s engineers work as a close team, listening to, and fine tuning,
each new product until it reaches their exacting musical standards. They
are free to choose components from around the world in order to make
that product the best they can. You are likely to find capacitors from
the United Kingdom and Germany, semiconductors from Japan or the
United States, while toroidal power transformers are manufactured in
Rotel’s own factory.
We all have concerns about our environment. And, as more and more
electronics are produced and later discarded, it is especially important for
a manufacturer to do all it can to engineer products that have a minimum
negative impact on landfill sites and water tables.
At Rotel, we are proud to do our part. We have reduced the lead content
in our electronics by using special RoHS solder, while our new Class D
(not digital) amplifiers are up to five times more efficient than our legacy
designs and still deliver power and performance. These products run
cool, give minimum wasted energy, are good for the environment and
give better sound too.
Finally, we have printed this brochure on recycled paper stock.
While we understand that these are small first steps, they are still important
ones. And we continue to pursue new methods and materials for a cleaner
and greener manufacturing process.
All of us at Rotel thank you for buying this product. We are sure it will
bring you many years of enjoyment.
Page 7

English
7
Overview – the Rotel internet radio tuners/
digital gateway products.
This product does not operate without the Wi-Fi or Wired dongle being connected.
We recommend that you read this introduction first. FAQs will be found on
the Rotel website www.rotel.com/NA/support/FAQ.htm
This Rotel product brings together conventional radio reception facilities
for FM and DAB, plus from the world of computers the ability to access
literally thousands of radio stations available on the internet. In addition
to this, this new range of Rotel tuners/digital gateways offers the facility
to interface with personal audio players (iPods and mp3 players) and
your music files stored on a network server.
These notes expand on the ‘quick start’ notes later in this manual.
Firstly, it does not matter if a wired or Wi-Fi network is not available to
use – however it is essential that the Wi-Fi or wired dongle is inserted into
it’s socket on the rear panel of the product for it to work. Use an extension
cable to relocate the dongle if space is limited at the rear of the tuner.
Each time that the product is turned on, it will be locked into search mode
for about 15/20 seconds. Once this has being accomplished other radio
modes can be used.
The USB input is active from turn on.
DAB and FM radio
This is the most conventional part of the product and if you have previous
experience of tuning, memorizing and selecting radio stations from the
present DAB and FM radio services you will be familiar with the way
the tuner is operated to receive these services. All of this is explained
under relevant quick start sections. Keep in mind to select the antenna
(aerial) input socket to use, find this option in the set-up menu. This does
not obviate the need to install correctly designed antenna (aerials) to
maximise reception on FM and DAB services.
Internet radio
Using internet radio requires the use of two additional services – access
to the internet via a computer network and once this works a feed via
one of the internet-based services which allows access to internet radio
stations. This latter requirement is built into the tuner; we will deal with
access to your network first.
Network access
The installation of computer networks are beyond the scope of these notes,
so we assume that you have a working Wi-Fi network in your home. If
you are using a wired network please refer to Network Config. under
“Settings Overview” section. (Wired networks will provide the most reliable
Ethernet streaming. Ethernet over powerline adaptors are available from
3rd parties if running an Ethernet cable is otherwise impractical)
At start-up, the unit looks for Wi-Fi networks, and once the search has been
completed you will find one or more listed networks listed in the display to
choose from. You need to select the network name which applies to your
installation. This will have been assigned when your network was installed
and is often pre-allocated by the router central to your network.
The next requirement is to enable your tuner to ‘log-on’ to your network
and you allow this by entering the wireless ‘WEP key’ (or WPA, WPA2
key) appropriate to your network. It is likely that you will have used the
key code when setting up a computer to log onto your network and it
is often contained in the instructions for your router. This is a first-time
only setting, so just carefully scroll though the alpha-numeric characters
selecting the correct upper or lower case characters to create your WEP
key. When completed, scroll through to and select END or simply press
the REPLY key on the front panel.
You can use the Previous and Next keys of the handset to help you enter
this information. Do not confuse the letter ‘O’ with the numeral ‘0’.
When successfully logged on to your network, the tuner will automatically
log in to the website where you to be able to select the area of the world that
interests you and choose radio stations by country, genre and name.
Registering the radio at www.rotelradio.com will allow you to search for
and save internet radio stations, as well as set up other music services
when available for your region.
The Rotelradio website – managing your stations
Managing the thousands of radio stations available via the internet would
be impossible without being able to organise and manage stations to suit
your particular needs. Rotel have provided an easy way to accomplish this
by means of a dedicated website where you can pre-select stations.
The URL for this site is http://rotelradio.com.
Like many websites you will need to register a user name and password
in order to create an account on the site. Before you can do so, you will
need to register the product on the site and there is a special registration
key in the Rotel which you will need to copy to the website registration
form. This registration key will be found under the settings>register
menu. You need to be connected to the internet to access this one time
only key.
After registration, the website will show the radio serial number of your
Rotel unit. This is different from the serial number of your Rotel unit. The
radio serial number can be found in the menu of the Rotel unit under
Settings --> Version.
Note that to update the display of the Rotel to indicate your choices, you
will need to power-cycle and re-select ‘internet radio’. Your new list of
‘My Stuff’ will be updated automatically.
Playback from iPods, mp3 players and flash drives
Most iPod and mp3 players can be plugged into the USB socket on the
front panel to replay the music files stored within. The display will update
to show the file structure and will list the files which can be played. Files
copied to a standard flash drive will also behave in the same way.
Playback from network servers
Music playback from computers configured as music servers provides
another opportunity to link replay via the Rotel unit and thus make use of
the audiophile decoding stages designed into these products.
As with internet radio, a prerequisite is a working network, plus the music
server connected to it. A server will have been configured to share files
and methods of achieving this with appropriate software are shown under
‘Media Player Quick Start’ later in this manual.
Page 8
8
RDG-1520 DIGITAL GATEWAY
Getting Started
Thank you for purchasing the Rotel Digital Gateway. When used in a
high-quality music or home theater system, your Rotel Digital Gateway
will provide years of musical enjoyment.
Features
Wireless or wired connection to access internet radio.UÊ
Access LAN PCs and music with ‘Media Player’ ModeUÊ
Connect with iPod/MP3/media music player for home UÊ
enjoyment.
Listen to DAB, FM broadcasting stationUÊ
A Few Precautions
Please read this manual carefully. In addition to basic installation and
operating instructions, it provides valuable information on various system
configurations as well as general information that will help you get the
optimum performance from your system. Please contact your authorized
Rotel dealer for answers to any questions you might have. In addition,
all of us at Rotel welcome your questions and comments
Save the shipping carton and all enclosed packing material for future
use. Shipping or moving the unit in anything other than the original
packing material may result in severe damage to your unit and void
the warranty.
Fill out and send in the owner’s registration card packed with the unit.
Also be sure to keep the original sales receipt. It is your best record of
the date of purchase, which you will need in the event warranty service
is ever required.
Placement
Place the unit on a solid, level surface away from sunlight, heat, moisture,
or vibration.
Don’t stack other components or objects on top of the unit. Don’t let any
liquid fall into the unit.
Note the weight and size of the unit. If placing the unit on a shelf, cabinet
or rack, make sure the full weight of the unit can be supported.
The unit generates heat during normal operation. Do not block ventilation
openings. Allow a minimum of 10 cm or 4 inches of unobstructed space
around the unit. If installed in a cabinet, make sure that there is adequate
ventilation.
AC Power and Control
AC Power Input N
Your unit is configured at the factory for the proper AC line voltage in
the country where you purchased it (USA: 120 volts/60 Hz, Europe:
230 volts/50 Hz). The AC line configuration is noted on a label on the
back panel.
The unit is supplied with the proper AC power cord. Use only this cord
or an exact equivalent. Do not modify the supplied cord. Do not use an
extension cord.
Be sure the power switch on the front panel is turned off. Then, plug one
end of the cord into the AC power connector on the back panel of the
amplifier. Plug the other end into an appropriate AC outlet.
If you are going to be away from home for an extended period of time,
it is a sensible precaution to unplug your digital gateway.
Power Switch and Indicator Light
The power switch is located on the left side of the front panel. To turn
the unit ON (or to activate the automatic power-on modes), push the
switch in.
The indicator light around the switch will light, indicating that the unit
is turned on. To turn the unit off, push the button again and return it to
the out position.
12V Trigger Input H
An input jack for connecting the wires carrying a +12 volt trigger signal
from a Rotel preamp or surround sound processor to turn the unit on
and off.
The TRIGGER INPUT accepts any control signal (AC or DC) ranging from
3 volts to 30 volts. Use a cable with mono 3.5 mm mini-plugs on both
ends. The +12V DC signal appears at the “tip” connector.
12V Trigger Output H
The 12V TRIG jack labeled OUT is used to pass the remote turn-on signal
to another Rotel unit. Any 12V Trigger signal at the INPUT jack will be
passed through to the OUT jack.
Connection Overview
Before continuing further to other sections in the manual, please make
sure all the cable connections are made properly. Refer to figure 2.
NOTE: You must insert the Wi-Fi dongle (or wire adaptor) to the
ETHERNET port on the rear panel. The unit will first search for
available networks before allowing access to DAB and FM functions.
If networks are not available, the unit will display “Network Error”.
FM and DAB functions will operate normally after the initial network
search.
DAB/FM Broadcasting V
Please use the supplied indoor antenna to connect the DAB and FM
connector on the rear panel. To receive the best FM signal, make sure
there is enough room for the T-shaped indoor antenna to fully extend.
Eyelets at both ends of the T allow tacking the antenna to a wall if desired.
Experiment with different positions to maximize reception.
Page 9
English
9
DIGITAL INPUT-AUX S
The unit can receive digital music signal from other sources and convert
them to analog signals then output to a pre-amplifier or processor connected
through OUTPUT Q jacks. There are two connector on the AUX Digital
Input area on the rear panel, labeled with coaxial and optical. Connect
the coaxial or optical output of your source to the coaxial or optical
input of the unit.
Network Connection D
Use the Rotel supplied a USB Wi-Fi (Wired) dongle. Connect it to the USB
socket on the rear panel labeled ETHERNET. The unit has been configured
to work with the supplied USB dongle. No additional software/setup is
required. The unit is now ready to connect to your wireless network or
LAN. Refer to Internet Radio section for detailed setup.
NOTE: This Rotel model is design to work only with the supplied dongles.
Please use the ones that come with the Rotel unit.
Computer I/O X
This unit can be operated from a computer with audio system control
software from third-party developers. This control is accomplished by
sending operating codes from the computer via a hard-wired RS-232
serial connection. This model can be updated using special software
from Rotel.
For additional information on the connections, cabling, software, and
operating codes for computer control or updating of the unit, contact
your authorized Rotel dealer.
Internet Radio Quick Start
What you need before starting
Before you can use your Internet radio, you need the following:
A broadband Internet connection. UÊ
Access point to internet through wireless LAN. (wired LAN connection UÊ
is also possible with a Rotel supplied USB Ethernet adaptor)
With wireless LAN connection, internet radio should work within 100
metres of the wireless access point, subject to the router/Wi-Fi gateway
being placed in the optimum area for your location. The user can confirm
the WiFi Strength under the settings menu. (Network--->Settings-->WiFi
Strength)
Make sure that your LAN is connected properly and is able to access
the internet. To access internet radio stations an internet connection is
required.
First Time Connection To The Network
Plug in the USB Wi-Fi dongle to the rear USB port and push the POWER
button to power up this unit. The display on the front will light up and
display:
Starting ... ...
SCANNING NETWORK.. ...
USB Connection
The socket on the front panel below the POWER Switch is for USB
connection. Music storage devices can be accessed through this input.
Music storage devices such as MP3 players, iPod, USB memory sticks or
any other form of memory devices with USB interface can be connected
through the front USB socket and the unit will automatically search music
files from the connected storage device.
NOTE: This model uses USB class 2.0 memory storage to access music
files. The unit can playback music files stored on storage devices that
are compliant with USB 2.0 standard. However, it will not operate
with devices that require additional drivers.
OUTPUT Q
The unit outputs a stereo analog signal. Use the supplied audio cable to
connect it with input jacks of your pre-amplifier or processor. Be careful
and make sure that connections correspond to each other. Right channel
output must be connected to right channel of pre- amplifier’s or processor’s
right channel and vice versa.
After a few seconds, it start to scan network.
If it can not find one the display will say:
NO NETWORK FOUND
When the radio finds your network, it displays the ESSID for the access
point on the screen – this is a name that is allocated to the access point
by the person who set up the network – for example:
< MY NETWORK >
It is possible, and in some locations highly likely, that your unit will find
more than one wireless access point if using wireless connection, in which
case you can choose which one you want to connect to. Turn the knob on
the panel to see the ESSID for each access point the radio has found.
If the screen displays “Enter WEP key” or “Enter WPA key” then the network
is using one of the encryption systems, Wired Equivalent Privacy (WEP)
or Wi-Fi Protected Access (WPA). Please obtain the access code from
the person who set up your wireless network, or check the user manual
of your router for this information. Input the code into the unit to gain
access to the wireless LAN.
Note: If you would like to use a static IP address, or if the unit can not
automatically get an IP address, then please see the ‘Network config’
section under the ‘Settings’ section at the end of the manual.
Page 10
10
RDG-1520 DIGITAL GATEWAY
Choosing A Radio Station
Once a network is found and the network connections made, The toplevel menu will be displayed, please select “Internet Radio”, the display
will show as
< Internet Radio >
Media Player
FM
DAB
Now you can select internet radio stations to listen to by turning and
pushing the knob through one of the options below.
<LOCATION> enables you to choose radio stations provided in the
specific area and countries:
Africa
< America >
Asia
Caribbean
1. Turn the push select knobduntil the display shows the area and country
you want, then press on the knob.
2. Turn the knob until the display highlights the desired station. Push
knob to select.
3. Wait until the unit connects to that station.
<GENRE> enables you to choose radio stations according to their
content, for example Classic Rock, Sport, News, etc.
80S
< 90S >
Adult
Adult contemporary
1. Turn the knob until the display highlights the type of content desired,
then press the “push select” knob to select.
2. Turn the knob to highlight the station desired, then press knob to
select.
3. Wait until the radio connects to that station.
< Location >
Genre
Search
< XXX1 LIVE RADIO >
XXX2 LIVE RADIO
XXX3 LIVE RADIO
XXX4 LIVE RADIO
XXX1 LIVE RADIO
< XXX2 LIVE RADIO >
XXX3 LIVE RADIO
XXX4 LIVE RADIO
Internet Radio Station Playing
After connecting to a station, the display will display station name, type
of audio file and bit rate.
BBC RADIO
BUFFERING xx%
BBC RADIO
xxx kbPs WMA XX:XX
Storing a radio station in a preset
While a radio station is playing, hold down the memory button , then
press the number preset to assign from numeric pad , the display
will show
BBC RADIO
xxx kbit WMA
M Preset #
Store this current radio station into the preset number, and you can store
up to 30 preset radio stations for FM/DAB/Internet Radio.
Assign to Preset
#
Playing a preset radio station
While a radio station is playing, you can switch to other preset stations
as below:
1. From the numeric pad , press number button of the preset number
for desired station. Or.
2. Press QUEUE button to call out preset number and corresponding
station, turn the knob to choose the station, then press the knob to select
it. The display will show as
01 preset radio 1
02 preset radio 2
> 03 preset radio 3
04 preset radio 4
Press QUEUE button again to exit the queue menu and back to playing
status.
<SEARCH> enables you to search for a specified type of radio with a
short keyword.
Station Name
END <> A BCDEFGHIJKLNO
ART
1. Turn the knob until the display moves to the character to input, then
press the knob to select.
2. Repeat step 1 to input the complete keyword. Select “END” to confirm
the keyword or press the REPLY key.
3. Press the knob to enable searching. The display will show stations
which match the keyword.
4. Turn the knob to highlight the desired station, press knob to select and
connect to that station.
Note: Internet Radio stations and other music services can be easily set
up at www.rotelradio.com
xxx ART xx Radio1
x ARTxx xx Radio2
ARTxxxx xx Radio3
Note: You can review stored radio stations by using the Queue
feature. This will help you avoid accidently overwriting a preset.
Page 11
English
11
Media Player Quick Start
The Media Player feature allows you to play audio files (AAC, AIFF,
AU, FLAC (CD quality 16 bit) , MP3,WAV and WMA (except lossless))
and playlists (M3U) created by your computer’s Media Player, such as
Window Media Player 11. It has been verified to work on Windows
2000, Windows XP and Windows Vista.
Note: File sharing may need to be enabled on your computer, and not
all Media Players will allow sharing of music files. Please refer to your
computer’s manual for instructions.
UPnP Servers
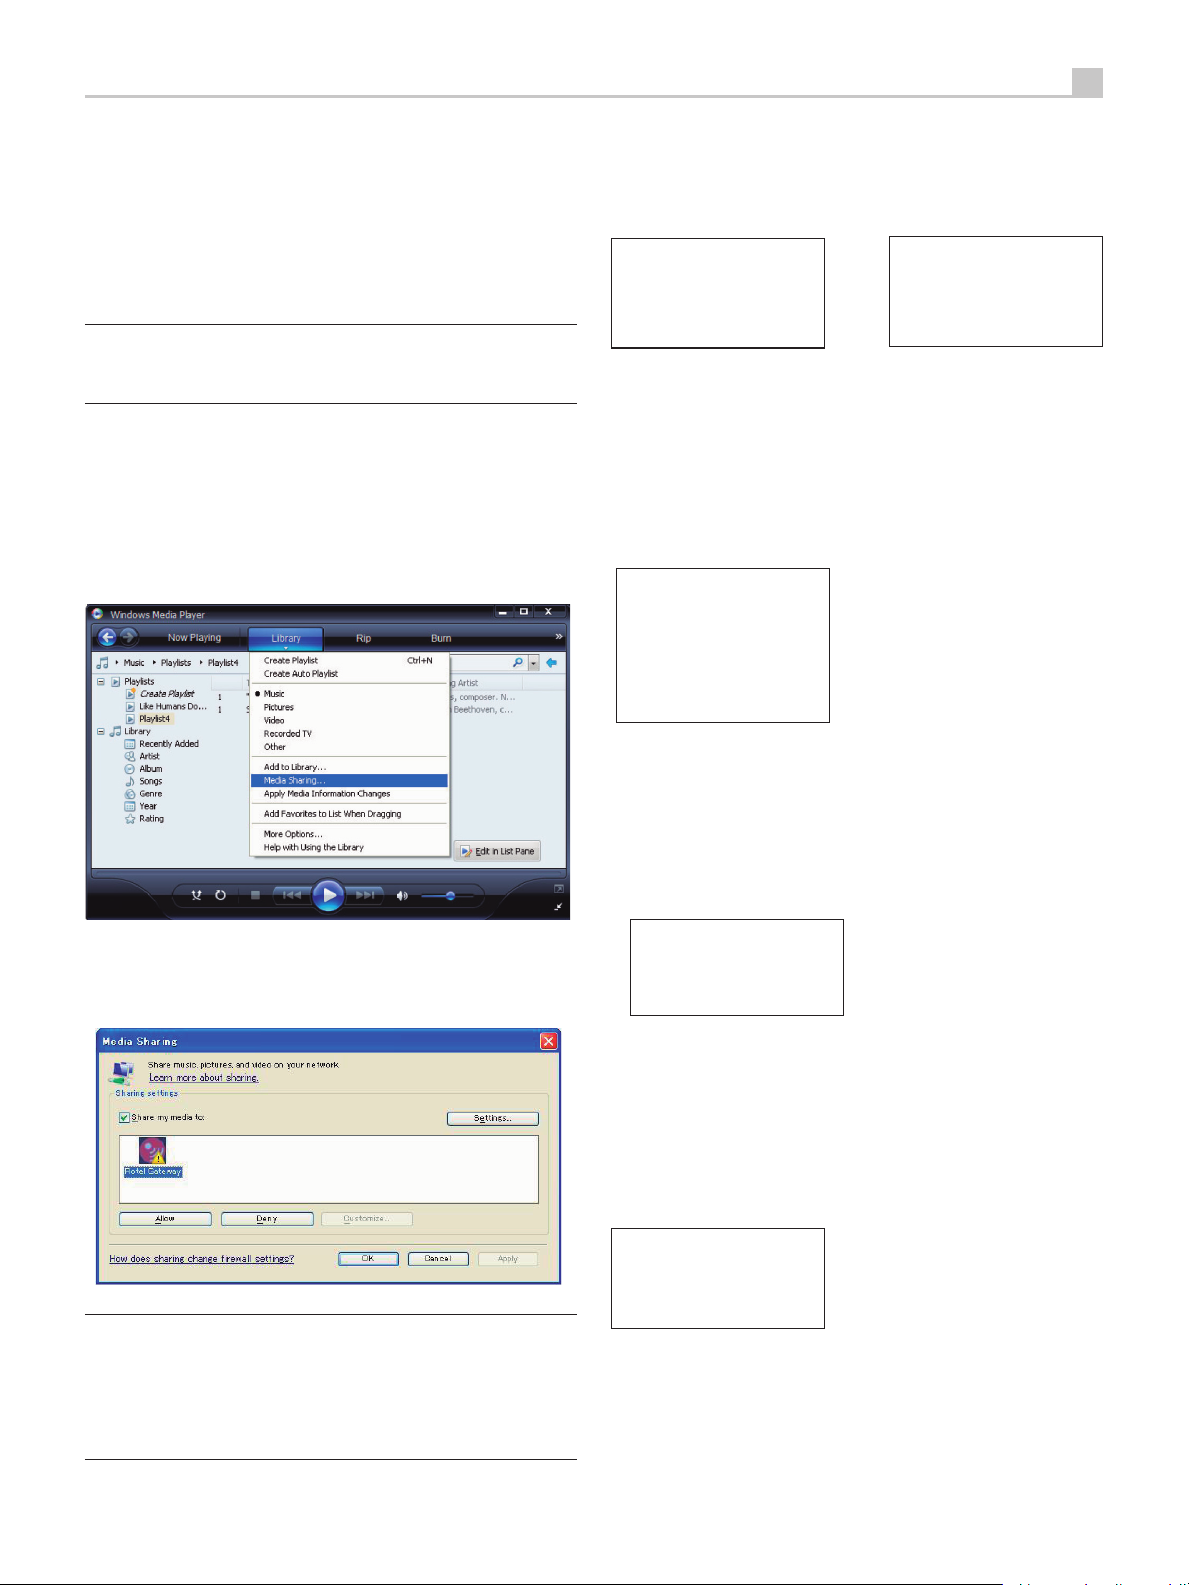
Setting up UPnP Server in PC
1. Use Windows Media Player 11(or 12 if you use Windows 7)to setup
the PC as an UPnP Sever, click the ‘Library’ tab from Windows Media
Player 11 and select ‘Media Sharing’ to open the ‘Media Sharing’
window to set the option.
3. Go into ‘Media Player’ menu, and select ‘UPnP Servers’ sub menu by
turning and pressing the knob, The unit will scan for all available UPnP
servers. It will display ‘[Empty]’ if no UPnP servers are found.
Internet Radio
< Media Player >
FM
DAB
< UPnP Servers >
Playback Mode
Queue
Play media files using UPnP Server.
1. After a successful scan, select your UPnP server by rotating the knob
if there is more than one UPnP server, highlight, then press the knob to
select the desired server.
2. RDG-1520 will list the options or folders available. This varies depending
on the setup of your music server, and version of software you are using.
It will typically show the following menus.
<All Music >
All Artists
Albums
Music Playlists
Folders
[Search]
2. Your PC will now prompt you that a device has attempted to connect
to your UPnP server. Please click Allow button.
Note: As of this writing, Windows Media Player 11 does not support
AAC decoding used by Apple as the default selection in iTunes. We
recommend that you change the default import setting to WAV, AIFF,
or MP3 formats for maximum compatibility across many devices. You
can set Windows Media Player to mirror your iTunes folders. Windows
Media Player 12 (for Windows 7) does support AAC.
You can search for songs by scrolling through the All Music option or
search for specific artists using All Artists or specific albums using Albums.
In each case, you can drill down to the song level.
Enter [Search] function and the following menu will be displayed.
Then enter either Artists, Album or Music sub menus. You can enter a
< Artists >
Album
Music
letter or letters the Artist/Album/Music starts with. Example, enter “M” in
Artists, then press REPLY key to start searching. All artists in your library
starting with the letter “M” will be returned.
3. Once the desired track is found, push the knob to select. The selected
track will be displayed on the menu as the unit attempts to connect to the
music server. The information displayed on the Rotel unit depends on the
information contained in the track, it will typically show the following.
“Album/Artist Name”
“Track title”
00:50
309kbps WMA
Page 12

12
RDG-1520 DIGITAL GATEWAY
Note: Using the QUEUE feature, A short press on SELECT for any song
or album will start that selection playing. You can also create a custom
QUEUE to create a song mix by holding the SELECT button for 5 seconds.
The selected track(s) will be added to the QUEUE and will be played in
the order selected. Push QUEUE button to call up tracks waiting to be
played. A 5 second push on the STOP button will remove specifc songs
from the QUEUE. You can clear QUEUE by pressing the QUEUE button
and selecting CLEAR QUEUE.
Clear Queue
You can clear QUEUE by pressing the QUEUE button and selecting
[Clear Queue] or by going into QUEUE menu from the Media Player
submenu.
UPnP Servers
Playback Mode
< Queue >
You can clear individual tracks in QUEUE by selecting the track and
press STOP key for 5 seconds.
< [Clear Queue] >
Playback Mode
UPnP Servers
< Playback Mode >
Queue
< Repeat * >
Shuffle
iPod/USB Connection Quick Start
<< iPod/USB >>
001/009
00:01:41
123.MP3
USB Storage Device Connection
1. Plug your USB storage device containing music files, or through a
USB adaptor into the front panel’s USB interface.
2. Press USB button on the front panel to enter iPod/USB mode. And the
unit will automatically search music files from the root directory. Once the
directory is found, the unit will start playing. The display shows song’s
information, such as name, time, tracks.:
3. If your music files are in sub directories, turn the knob to display all
directories. Turn and press the knob to enter the desired directory. Then
look for the desired music files turning and pressing the knob.
4. Press BACK button to return previous menu and select another
directory.
iPod/iPhone Connection
1. Apple’s iPod/iPhone can be connected via the iPod’s USB cable to
the USB front socket.
2. The iPod/iPhone will send a digital music signal to the unit. All
operations can be made from the iPod/iPhone. Only simple commands
can be made through the Rotel unit as explained below.
> 01_Folder
music-files-002. wav
music-files-003. mp3
music-files-004. aac
Turn the knob to select sub-meunu ‘Media Player’ -->‘Playback Mode’,
there are 2 sub-menu, “Repeat” and “Shuffle”. Select either Repeat,
Shuffle or both. A mark will indicate the selection made.
REPEAT: Tracks are played one after another and will start from the first
track again when the last track is finished.
SHUFFLE: Plays tracks in random.
Note: If both REPEAT and SHUFFLE are on, The unit will first play the
list in random, after all tracks are played one time, it will continue to
play the list in random until STOP is pressed
Note: Using shuffle feature with large music libraries may not be
possible or may take an excessively long time. We recommend that
you create shorter playlists in Windows Media Player and then shuffle
these.
3. The iPod/iPhone screen will remain active while connected to the
unit. If no operations are made from the iPod/iPhone for an extended
period, the screen will turn to “charging”.
PlayBack Control Buttons
1. Use the STOP button to stop playback.
2. Use the PAUSE button to either pause a currently playing track or to
restart a currently paused track or to restart a stopped track.
3. Use the SKIP-- button to start playback of the previous track in the
queue.
4. Use the SKIP+ button to start playback of the next track in the
queue.
5. Push and hold the STOP button for 5 seconds to safely remove the
USB device from the unit.
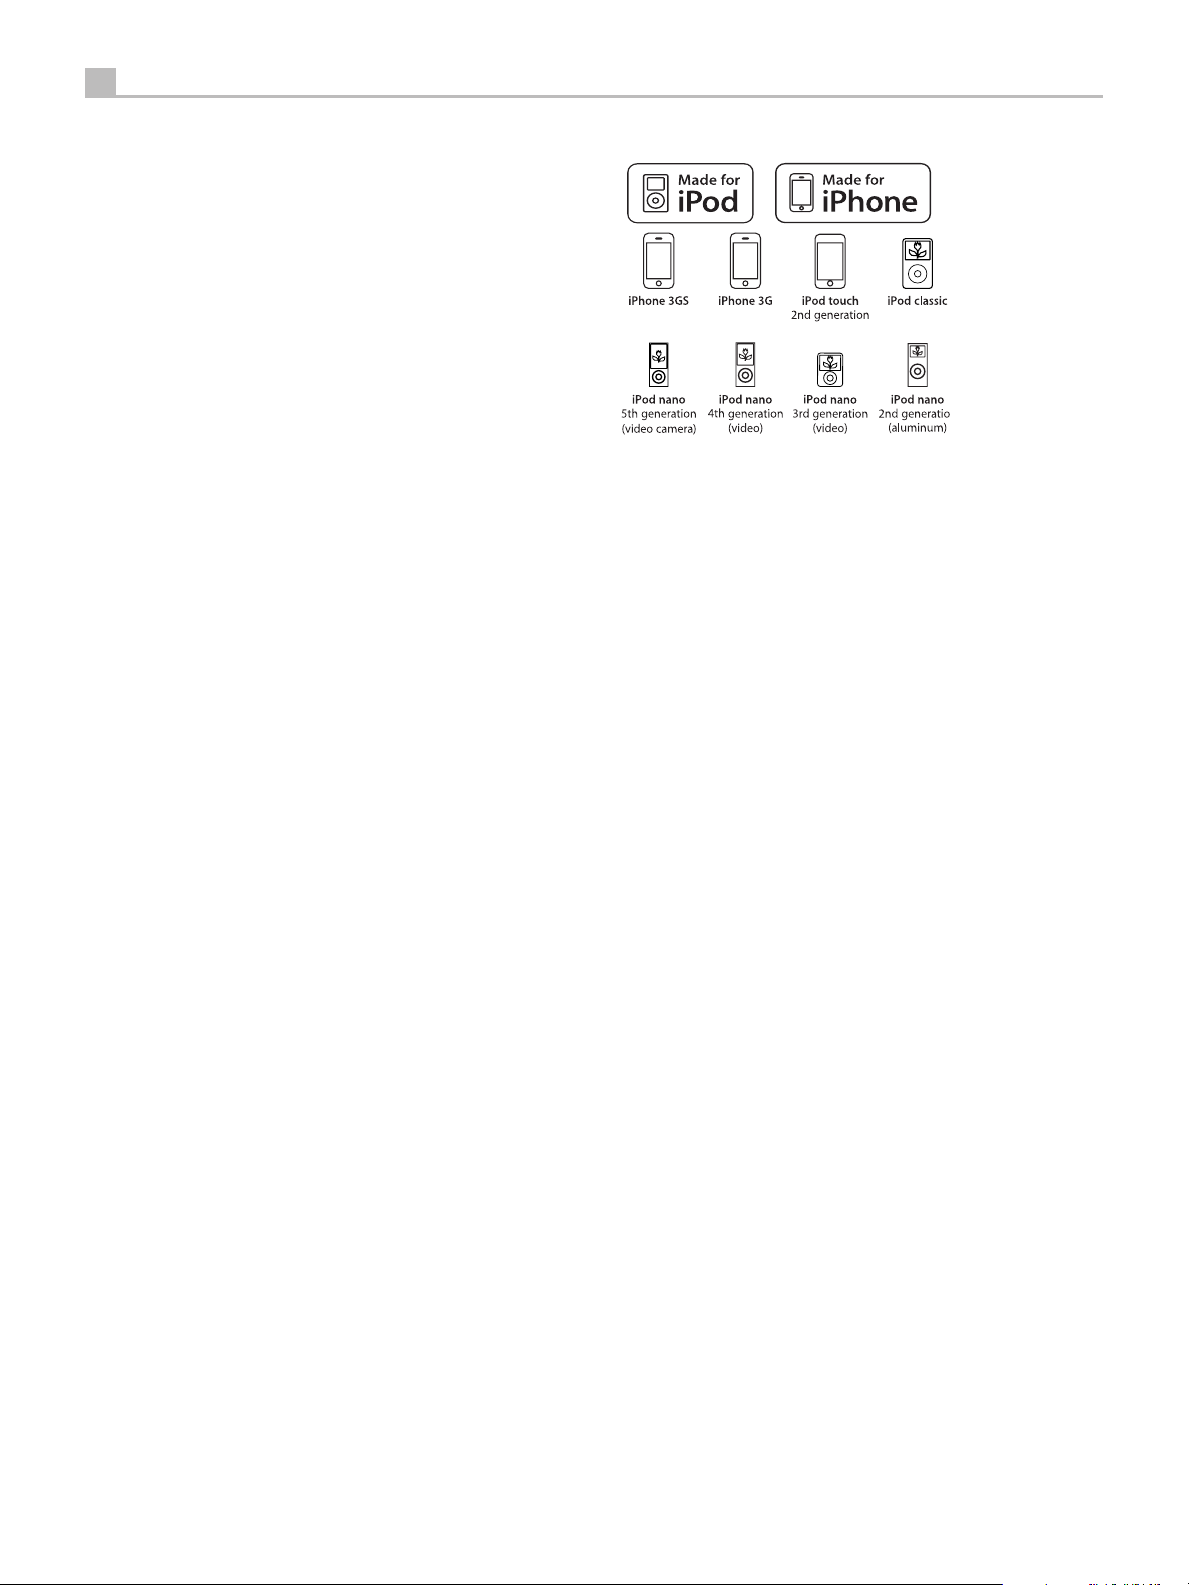
Note: The Rotel unit will operate with iPhone 3GS, iPhone 3G, iPod
Classic, iPod touch 2G, iPod Nano 2G, iPod Nano 3G, iPod Nano
4G, and iPod Nano 5G.
Page 13
English
13
FM RADIO Quick Start
Before listening to FM radio, make sure that the FM antenna have been
properly connected, and the correct FM format has been selected. Go
into ‘Settings’ menu and select FM tuner region.
FM Radio Station Playing
1. Select FM Button from the front panel. Or keep pressing BACK button
to return to top-level menu. Turn and press the knob to select FM menu.
The display will show as
Internet Radio
Media Player
< FM >
DAB
2. Turn the knob to change the frequency of radio station.
3. Use the scan buttons ] and [ on the remote unit to auto search for
FM stations.
4. Use track buttons on the remote } and { to manually search for
FM stations.
Storing a radio station in a preset
While a radio station is playing, hold down the memory button , then
press the number of preset assigned from numeric pad , the display
will show, (also it can be done by the remote unit with buttons MEM,
numeric pad)
BBC RADIO
xxx kbit WMA
M Preset #
Store this FM radio station into the preset number. Up to 30 preset FM
radio stations may be stored.
87.50MHz FM
Assign to Preset
#
DAB RADIO Quick Start
Make sure that your local area can receive Digital Audio Broadcast (DAB)
broadcasting signal. Before using this feature, please go to the Settings
Quickstart section for DAB setting to select your DAB REGION and scan
available DAB stations.
After setting up, press the DAB button on the front of the panel, or select
DAB menu from the top-level menu to enter this feature. Select stations to
listen to by turning and pressing the knob.
DAB channels are categorized into ensembles, which are also known
as multiplexes. Each multiplex provides a number of stations and each
service contains a primary service that can contain secondary services.
DAB technology allow broadcasters to transmit additional data along
with the audio, which can include other audio channels, text and even
images and computer data in the future.
DAB Radio Station Playing
1. Select DAB Button from the front panel. Or keep pressing BACK button
to return to the top-level menu, turn and press the knob to select DAB
menu. The display will show as
Internet Radio
Media Player
FM
< DAB >
The unit will scan for available DAB stations. Select the desired station
with the knob.
Storing a DAB station in a preset
While a DAB station is playing, hold down the memory button , then
press the number of preset assigned from numeric pad , the display
will show. (also it can be done by the remote unit with buttons MEM,
numeric pad) Stores this DAB radio station into the preset number. Up to
30 preset DAB radio stations may be stored.
Playing a preset radio station
When a radio station is playing, you can switch to other preset station
in one of the following two ways.
1. From the numeric pad , press preset number of the desired
station.
2. Press QUEUE P button to call out preset numbers and corresponding
station. Turn the knob to choose the desired station, then press the knob
to select it. The display will show as
01 preset radio 1
02 preset radio 2
> 03 preset radio 3
04 preset radio 4
Press QUEUE button again to exit the queue menu and back to playing
status.
Radio Station Presets
FM,DAB and the Internet have 30 Pre-set Stations a total of 90 stations
can be logged in the unit. Many more stations can be stored on line at
your My Stuff account.
Note: For easier sorting, only the stations that are log in as Pre-sets will
be visible. Each station will be marked with an F for FM, D for DAB
and I for Internet Radio presets.
Page 14
14
RDG-1520 DIGITAL GATEWAY
SETTINGS OVERVIEW
Media Player
FM
DAB
< Settings >
Keep pressing the BACK button to back to the top-level menu. Select the
Setting menu to enter its sub-menu by turning and pressing the knob, it
has 9 setting sub-menus. Turn the knob to find hidden menus.
Network Config
1. Scan for networks
Turn and push the knob to select this menu. The display will show
“Scanning”, which will take a few seconds. Once the network is found,
the display will show the network ID. Turn the knob to select, push to
confirm.
< Scan for networks >
Enter network name
View Config
Edit Config
( only for wireless connection)
< Network Config >
Version
Upgrade Firmware
Register
Set Time/Date
FM Tuner
DAB Settings
UPnP
WiFi Strength
To enter the value, press knob, then rotate the knob to adjust the value up
or down. Press again to enter the value and move on to the next field.
Continue until all information has been entered.
5. Signal Warning ( only for wireless connection)
Select YES or NO to enable or disable warning of low Wi-Fi signal.
Version
This menu displays software and hardware information of the unit.
Upgrade Firmware
Use this option to download new firmware for the internet radio. If new
firmware is available, there will be a prompt to download.
Note: At this stage, you can press the BACK button to cancel the firmware
upgrade. A firmware upgrade may take several minutes, do not switch
off the power to the unit or put it into standby until the operation is
complete, otherwise, the unit may become permanently damaged.
Upgrading can take 15 to 60 mins, depending on the speed of your
internet connection.
Register
This will display a key that can be used to register the unit on the Rotel
Radio Customer portal: www.rotelradio.com
Set Time/Date
Set you local time and date. Push knob to start entering value, rotate
knob to change value. Press again to confirm value entered and move
on to the next field.
2. Enter network name ( only for wireless connection)
If the unit can not find any networks, the network ESSID can be entered
manually.
Use the knob to keep selecting letters of the device name by turning
and pressing, and select “END” or hit REPLY on front panel or remote
to confirm the name.
Network Name
< END <> A BCDEFGHIJK >
NAME1
3. View Config
Show current network configuration details. Turn the knob to see next/
previous page of “Mode”-->”ESSID”-->”MAC Address”--> “IP Address”
-->”Netmask”-->”Gateway”-->”DNS Servers”. Display as below:
< Mode >
Auto DHCP
< ESSID >
XXXXXX
4. Edit Config
This menu can be used to edit the current network configuration. This
menu is useful for entering a static IP address. Select this function with
the knob and enter the static IP address, MAC address, DNS of the
selected network.
FM Tuner
Select the FM Tuner region with this function.
DAB Setting
There are 3 sub menus: Scan, Clear List, DAB Region. Please select the
menu by turning and pressing the knob.
“Scan” will scan for all available DAB service, it will display list of service
name when successful, or say “no services found “ if DAB broadcasting
is not available.
“Clear List” will clear available service list found by “Scan”.
“DAB Region” will show regions that provide DAB service, you can select
the desired region by turning and press the knob.
UPnP
Use this setting to set any UPnP device name. This is the name that your
music server will pickup in Media Player mode. Default name is Rotel
Gateway. Use the knob to keep selecting letters of the device name by
turning and pressing, and select “END” word to confirm the name.
DEVICE NAME
< END <> A BCDEFGHIJ >
DEVICE
WiFi Strength
Shows a percentage to indicate the WiFi strength.
Page 15
English
15
Configure “My Stuff”
Register an account on http://rotelradio.com website
A personalized menu “My Stuff” can be setup in the top level menu.
Open the website, http://rotelradio.com, from your internet browser.
Please enter the registration key, this can be found in ‘Settings > Register’
menu. Enter this registration key into the website and follow the instructions
to setup an user name and password. Remember the user name and
password, you will need this to access the site.
After logging into your account, you will be able to edit your information
for ‘My Stations’, ‘My Streams’, ‘My Podcast’ and ‘My Radios’.
Follow the instructions on the website to personalize your menu.
Configure “My Stations”
There are an enormous choice of stations that are available in the
database from the website. Please follow instructions on the website to
search for stations. When search results are displayed, there will be a
link to ‘Add to my stations’, Click on this and the station selected will be
added to My Stations. A new top level menu ‘My Stuff’ will appear on
the display, with a sub-menu ‘My Stations’.
Remote Unit Advanced Buttons
Setup menu
To enter the setup menu, press the SETUP button on the remote control
and you will see the following display:
< 1 DIMMER >
2 FACTORY DEFAULT
3 VERSION
4 ANTENNA SELECT
5 EXIT
1. DIMMER controls the brightness of the front panel display, it can be
dimmed with seven steps. You can access this control directly with the
DIM button on the remote control.
2. FACTORY DEFAULT sets the unit into the original state as when it left
the factory. Presets and network configurations will be lost, and sets the
remote code 1 (see below).
3. VERSION shows this unit’s version.
4. ANTENNA SELECT choose AUTO(default), FM or DAB antenna.
5. EXIT returns to previous menu.
After the initial registration, you can add to ‘My stations’ while connected
to a radio station by pressing the REPLY key. The display will ask if you
want to add selection to ‘My stations’ press the push select knob to add
selection.
Note: You may further organize your stations into FOLDER (for
instance JAZZ, ROCK, OPERA etc.) These FOLDERS will be displayed
on your Rotel unit.
Configure “My Streams”
While logged into your website account, you can add your own internet
radio streams to the ‘My Streams’ section which will be listed under ‘My
Account’.
Click on ‘My Streams’, a prompt will appear to enter the station’s name
and its media stream URL. The media stream URL should be a link to the
website’s actual audio stream.
Note: ‘My Stuff’ menu and stations under ‘My Stations’,’My Streams’
will appear after the unit has updated the stations list. Please power
OFF then ON and enter ‘Internet Radio’ from the top level menu for the
unit to update the stations list.
Second Remote Code
The factory setting is remote code 1. If you find that the remote is
conflicting with other Rotel products, you can change to remote code 2
with the following steps:
1. While pointing the remote at the unit, press on the remote control ‘FM’
and ‘2’ keys at the same time. Release the ‘FM’ key and continue
to press the ‘2’ key for 5 seconds. The unit will show ‘Audio Custom
Code 1--> 2’.
2. Repeat the above procedure and press ‘1’ key instead of ‘2’ to change
the unit back to Code 1.
3. The unit remote keys, such as PLAY, STOP, PAUSE, use Rotel’s standard
codes for CD players. If you find that this is conflicting with your Rotel
CD player, press ‘CD’ and ‘2’ keys at the same time. Release ‘CD’ key
and continue to press ‘2’ key for 5 seconds. The display will show ‘CD
Custom Code 1 --> 2’.
4. Repeat step 3 above and press ‘1’ key instead of ‘2’ to change the
unit back to Code 1.
Page 16

16
Troubleshooting
Most difficulties in audio systems are the result of incorrect connections,
or improper control settings. If you encounter problems, isolate the area
of the difficulty, check the control settings, determine the cause of the
fault and make the necessary changes. If you are unable to get sound,
refer to the suggestions for the following conditions:
Power Indicator Is Not Lit
The power Indicator should be lit whenever the unit is plugged into the
wall power outlet and is pushed in. If it does not light, test the power
outlet with another electrical device, such as a lamp. Be sure the power
outlet being used is not controlled by a switch that has been turned off.
Network Does Not Work
If you have trouble connecting to your wireless network, check your network
setting carefully, these steps may help to resolve the problem.
1. Confirm that a Wi-Fi network works, ie, PC can access the Internet
using the same network.
2. Check that a DHCP server is available, or that you have configured a
static IP address on the unit. Please refer to Network Config section.
RDG-1520 DIGITAL GATEWAY
3. Check that your network’s firewall is not blocking any outgoing
ports.
4. Do a hard power off (unplug the AC mains) and let the unit restart the
network scanning cycle.
5. Use an USB extension cord to move the WiFi dongle up higher or to
a different location to maximize reception.
No Sound
1. Check the cables between the output and the pre-amplifier inputs, be
sure they are connected properly. Refer to Fig. 2.
2. Music played from Internet Radio stations are affected by the speed
of your internet connection. If you find that music is cutting out regularly,
contact your internet service provider.
3. Make sure the station you selected is operating at the current hour.
The station can be broadcasting from a different time zone.
4. Please insert the Wi-Fi dongle (or wired adaptor) to the ethernet port
on the rear panel even if no networks are available. After power ON,
the unit will look for available networks before allowing the user to access
FM and DAB features.
Page 17

English
17
Glossary
Bit rate – Speed of data transfer – how many bits of information are
sent each second.
Buffering – data downloading and being assembled before
playback.
Codec – [Coder/Decoder] software capable of encoding and/or decoding
a digital data stream or signal.
Data Encryption – the encryption of data for security purposes. For
wireless networks this is normally WEP and WPA.
DHCP [Dynamic Host Control Protocol] – A protocol for assigning IP
addresses to devices on a network.
DNS Server – A remote server that provides the translation of web
addresses into the corresponding numeric IP addresses.
ESSID – [Extended Service Set Identifier] The ESSID is a unique identifier
for your wireless network.
Ethernet – Network technology for local area networks. Cat5 cable
carries information between computers at a rate of 10/100/1000
megabits per second.
File format – The type of file e.g. a music file in the format of .mp3.
Network adapter – A hardware device, installed inside computers
that connect computer devices together to create a network.
Podcast – An audio file delivered via an RSS feed over the Internet to
a subscriber.
Router – A device that joins multiple networks or computers together.
RSS feed – [Really Simply Syndication feed] used to publish content on
the web which people can then subscribe to and receive updates.
Server – A computer that provides client computers with access to files
and printers as shared resources on a computer network.
Subnet mask – A method of splitting IP networks into subgroups.
UPnP – [Universal Plug and Play] a method of auto configuration used
in devices such as PCs, peripherals, wireless devices and intelligent
appliances.
URL – [Uniform Resource Locator] the format of the address for a particular
page of a website.
USB – [Universal Serial Bus] Connection commonly used with computer
peripherals.
WAN – [Wide Area Network] computer network that spans a wider
area than a local area network e.g. the Internet.
File Server – A computer or device that provides workstations on a
network with controlled access to shared files.
Firmware – embedded software in a device that provides the devices
with operational instructions.
Gateway –The access point from LAN to WAN.
Internet – a computer network consisting of a worldwide network of
computer networks.
IP Address – is a numerical label that is assigned to devices in a
computer network.
ISP – Internet service provide.
Kbps – Short for kilobits per second, a measure of data transfer
speed.
LAN – [Local Area Network] a local computer network for communication
between computers.
MAC – [Media Access Control] is a unique identifier assigned to
network adapters or network interface cards by the manufacturer for
identifcation.
Modem – [Modulator/Demodulator] device used to connect computers
by a telephone line.
WEP – [Wired Equivalent Privacy] a wireless security protocol to prevent
access to the network by “intruders” using similar wireless LAN equipment
and capture of wireless LAN traffic through eavesdropping.
WPA – [WiFi Protected Access] a wireless security protocol that replaced
the weaker WEP.
WiFi – [Wireless Fidelity] – a radio frequency standard that is used to
connect devices, such as computers and iPods, together using a wireless
connection.
Network – A system of interconnected electronic components or
computers.
Page 18
18
Specifications
FM Tuner
Usable Sensitivity 22.2dBf
50dB Quieting Sensitivity 27.2dBf(mono)
Signal to Noise Ration (at 65 dBf) 63 dBf (mono)
60 dBf (stereo)
Harmonic Distortion (at 65 dBf) 0.2% (mono)
0.3% (stereo)
Frequency Response 10 Hz-15kHz, ±3dB
Stereo Separation
(100Hz/1kHz/10kHz) 40dB/45dB/35dB
Output level 1.1V
Antenna Input 75 ohms unbalanced
DAB Tuner
Sensitivity -80dBm
Tuning Range Band III
(174-240MHz)
Audio Data Rate 224Kbps (Max)
Frequency Response 20 - 20KHz +/- 1.0dB
Analog Output 2.1V at 0dBFS
Antenna Input 75 ohms F connector
RDG-1520 DIGITAL GATEWAY
“
Made for iPod” means that an electronic accessory has been designed to
connect specifically to iPod and has been certified by the developer to meet
Apple performance standards.
“Made for iPhone” means that an electronic accessory has been designed
to connect specifically to iPhone and has been certified by the developer to
meet Apple performance standards.
Apple is not responsible for the operation of this device or its compliance with
safety and regulatory standards.
General
Network connection 802.11b/g
Security WEP, WPA1 (TKIP)
WPA2 (TKIP)
File formats (UPnP Music Server) AAC, MP3,
WMA (except lossless)
OGG vorbis, WAV, AIFF,
and AU.
Power consumption 12 watts
Power Requirements (AC) 120V, 60Hz(USA)
230V, 50Hz(Europe)
Weight 6.5 kgs (14.33 lbs)
Dimensions (W x H x D) 431 x 99 x 312 mm
Front panel height 2U (3
All specifications are accurate at the time of printing.
Rotel reserves the right to make improvements without notice
Rotel and the Rotel Hifi logo are registered trademarks of The Rotel Co.,
Ltd. Tokyo, Japan.
(17x3
7
/8x121/4 in)
1
/2 in)
iPod is a trademark of Apple Inc., registered in the U.S. and other
countries.
iPhone is a trademark of Apple Inc.
Windows, Windows XP, Windows 2000, Windows Vista, Windows 7,
Windows Media are either registered trademarks or trademarks of Microsoft
Corporation in the United States and/or other countries.
“This product includes technology owned by Microsoft Corporation and under
a licence from Microsoft Licensing GP. Use or distribution of such technology
outside of this product is prohibited without a license from Microsoft Corporation
and/or Microsoft Licensing, GP as applicable.”
Page 19

Español
PRECAUCION
RIESGO DE ELECTROCUCION
NO ABRIR
PRECAUCION: PARA REDUCIR EL RIESGO DE RECIBIR UNA DESCARGA ELECTRICA, NO QUITAR LA CUBIERTA
SUPERIOR. NO HAY COMPONENTES MANIPULABLES POR EL USUARIO EN EL INTERIOR DEL APARATO.
CUALQUIER OPERACION DE MANTENIMIENTO DEBE SER LLEVADA A CABO POR PERSONAL CUALIFICADO.
Este símbolo sirve para alertar al usuario
sobre la presencia de tensiones peligrosas no
aisladas en el interior del aparato susceptibles
de constituir un riesgo de electrocución.
Este símbolo sirve para alertar al usuario
sobre la presencia de instrucciones
importantes relacionadas con el
funcionamiento y el mantenimiento (servicio
técnico) tanto en este manual como en la
literatura que acompaña al producto.
19
Este símbolo significa que el aparato está doblemente aislado,
por lo que no requiere ninguna conexión a tierra.
Los productos Rotel están diseñados para satisfacer
la normativa internacional en materia Restricción
del Uso de Sustancias Peligrosas (RoHS) en equipos
eléctricos y electrónicos y la eliminación de Residuos
Procedentes de Equipos Eléctricos y Electrónicos
(WEEE). El símbolo del carro de la basura tachado
indica la plena satisfacción de las citadas normativas
y que los productos que lo incorporan deben ser
reciclados o procesados debidamente en concordancia
con las mismas.
CONEXIÓN A MASA DE LA ANTENA EN CONCORDANCIA
CON EL ARTÍCULO 810 DEL NATIONAL ELECTRIC CODE:
“APARATOS DE RADIO Y TELEVISIÓN”
CABLE DE ENTRADA
FIJACIÓN DE TOMA DE MASA
CONDUCTORES DE
LA CONEXIÓN A MASA
(SECCIÓN 810-20 DEL NEC)
CAJA DE SERVICIO
DE LA INSTALACIÓN
ELÉCTRICA
SISTEMA DE ELECTRODOS
DE CONEXIÓN A MASA
DE LA INSTALACIÓN
ELÉCTRICA (ARTÍCULO 250,
APARTADO H DEL NEC)
DAB
DE ANTENA
UNIDAD DE DESCARGA DE LA ANTENA
(SECCIÓN 810-20 DEL NEC)
FIJACIÓN DE TOMA DE MASA
Page 20

20
RDG-1520 Puerta de Acceso Digital
NOTA IMPORTANTE
La conexión COMPUTER I/O debería ser realizada únicamente por personal autorizado.
Información Referente a la FCC
Este aparato ha sido debidamente probado y satisface los límites de funcionamiento correspondientes
a un componente digital de Clase B especificados en el Apartado 15 de la Normativa FCC. Dichos
límites han sido diseñados para proporcionar una protección razonable frente a interferencias en
instalaciones domésticas. Este equipo genera y puede radiar energía de radiofrecuencia y en el caso
de que no sea instalado y utilizado siguiendo las instrucciones suministradas por el fabricante, puede
causar interferencias en comunicaciones de radio o televisión.
Sin embargo, no se garantiza que la citada interferencia no pueda tener lugar en una instalación
particular. Si este aparato interfiere la recepción de programas de radio o televisión, lo que puede
determinarse activándolo y desactivándolo, intente corregir la interferencia aplicando una o varias
de las siguientes medidas:
UÊ,iÀiÌiÊÊÀiÕLµÕiÊ>Ê>Ìi>Ê`iÊÀiVi«VÊ/6]ÊÀ>`]ÊiÌV°®°
UÊÕiÌiÊ>ÊÃi«>À>VÊiÌÀiÊiÊ>«>À>ÌÊÞÊiÊÃÌâ>`ÀÊ`iÊÌiiÛÃÀ°
UÊÊiVÌiÊiÊ>«>À>ÌÊ>ÊÕÊiVÕviÊ«iÀÌiiViÌiÊ>ÊÕÊVÀVÕÌÊijVÌÀVÊ`viÀiÌiÊ`iʵÕiÊ>iÌ>Ê
al receptor.
UÊÊÃÕÌiÊ>ÊÃÕÊ`iÌ>ÃÌ>ÊÊ>ÊÕÊÌjVVÊiÊÀ>`ÊÉ/6ÊiÝ«iÀiÌ>`ÊiÊV>ÃÊ`iʵÕiÊiViÃÌiÊ>ÞÕ`>Ê
adicional.
Precaución
Este dispositivo satisface parte del Apartado 15 de la Normativa FCC, estando sujeto a las siguientes
condiciones: (1) Este dispositivo no debe provocar interferencias molestas y (2) este dispositivo debe
aceptar cualquier interferencia que reciba, incluyendo aquellas susceptibles de influir negativamente
en su funcionamiento.
NOTA PARA INSTALADORES DE SISTEMAS DE TELEVISIÓN POR CABLE
(“CATV”):
(“National Electric Code”), en el que suministran líneas de actuación para llevar a cabo una adecuada
conexión a masa y, en concreto, se especifica que el cable utilizado para la misma deberá ser conectado
al sistema de conexión a masa del edificio. Ver al respecto el diagrama de instalación que figura en
la página anterior.
Recuerde, a quien instale el sistema o la antena CATV, el Artículo 820-40 del NEC
NOTA: Este aparato ha sido debidamente probado y satisface los límites de funcionamiento
correspondientes a un componente digital de Clase B especificados en el Apartado 15 de la Normativa
FCC. Dichos límites han sido diseñados para proporcionar una protección razonable frente a interferencias
en instalaciones domésticas. Este equipo genera y puede radiar energía de radiofrecuencia y en el caso
de que no sea instalado y utilizado siguiendo las instrucciones suministradas por el fabricante, puede
causar interferencias en comunicaciones de radio o televisión. No se garantiza que tal interferencia no
pueda tener lugar en una instalación particular. Si este aparato interfiere la recepción de programas
de radio o televisión, lo que puede determinarse activándolo y desactivándolo, intente corregir la
interferencia aplicando una o varias de las siguientes medidas.
UÊ,iÀiÌiÊÊÀiÕLµÕiÊ>Ê>Ìi>Ê`iÊÀiVi«V°
UÊÕiÌiÊ>ÊÃi«>À>VÊiÌÀiÊiÊ>«>À>ÌÊÞÊiÊÃÌâ>`ÀÊ`iÊÌiiÛÃÀ°
UÊiVÌiÊiÊ>«>À>ÌÊ>ÊÕÊiVÕviÊ«iÀÌiiViÌiÊ>ÊÕÊVÀVÕÌÊijVÌÀVÊ`viÀiÌi°
UÊÊÃÕÌiÊ>ÊÃÕÊ`ÃÌÀLÕ`ÀÊ>ÕÌÀâ>`Ê`iÊ«À`ÕVÌÃÊ,ÌiÊiÊV>ÃÊ`iʵÕiÊÌi}>ÊVÕ>µÕiÀÊÌÀ>Ê`Õ`>°
Instrucciones Importantes Relacionadas con
la Seguridad
ADVERTENCIA: No hay componentes manipulables por el usuario en el interior del aparato. Cualquier
operación de mantenimiento debe ser llevada a cabo por personal cualificado.
ADVERTENCIA: Para reducir el riesgo de que se produzca un incendio o una descarga eléctrica, no
exponga el aparato al agua o la humedad. No permita que ningún objeto extraño penetre en el interior
del aparato. Si el aparato está expuesto a la humedad o algún objeto extraño penetra en su interior,
desconecte inmediatamente el cable de alimentación de la red eléctrica. En caso de que fuera necesario,
envíe el aparato a un especialista cualificado para su inspección y posterior reparación.
Lea todas las instrucciones del presente manual antes de conectar o hacer funcionar el aparato.
Conserve este manual cerca de usted para el caso de que necesite revisar las instrucciones de seguridad
que se indican a continuación.
Tenga siempre en mente las advertencias y la información relativa a seguridad que figuran tanto en estas
instrucciones como en el propio aparato. Siga al pie de letra todas las instrucciones relacionadas con el
funcionamiento del mismo.
Limpie el exterior del aparato únicamente con una gamuza seca o un aspirador.
Debería dejar unos 10 centímetros de espacio libre alrededor del aparato.
No coloque nunca el aparato sobre una cama, un sofá, una alfombra o una superficie similar susceptible
de bloquear las ranuras de ventilación. Si el aparato está ubicado en la estantería de una librería o un
mueble, debe haber suficiente espacio a su alrededor y ventilación en el mueble para permitir una
refrigeración adecuada.
Mantenga el aparato alejado de radiadores, estufas, cocinas o de cualquier otra instalación que produzca
calor.
ADVERTENCIA: El conector para
el cable de alimentación del panel
posterior hace las funciones de
dispositivo de desconexión de la
red eléctrica. En consecuencia, el
aparato debe colocarse en una zona
abierta que permita un fácil acceso
a dicho conector.
El aparato debe ser conectado
únicamente a una fuente de
alimentación del tipo y tensión
especificados en su panel posterior
(230 V/50 Hz para los países de
la Comunidad Económica Europea y
115 V/60 Hz para Estados Unidos).
Conecte el aparato a una toma de corriente eléctrica únicamente a través del cable de alimentación polarizado
de dos clavijas suministrado de serie o un equivalente exacto del mismo. No modifique de ningún modo
dicho cable. No intente desactivar los terminales destinados a la conexión a tierra o polarización. El cable
debería ser conectado a una toma de corriente eléctrica de dos terminales que se adapten perfectamente
a las clavijas del cable de alimentación del aparato. No utilice ningún tipo de cable de extensión.
El cable de alimentación hace las funciones de dispositivo de desconexión del aparato. Para desconectar
completamente el aparato de la red eléctrica, debería retirar dicho cable de la toma correspondiente
(situada en el panel posterior del aparato). El testigo luminoso de posición de espera (“standby”) no se
activará para indicar la desconexión del cable de alimentación. Este dispositivo de desconexión deberá
permanecer accesible en todo momento.
No coloque el cable de alimentación en lugares donde pueda ser aplastado, perforado, doblado en ángulos
críticos, expuesto al calor o dañado de algún modo. Preste particular atención al punto de unión entre el
cable y la toma de corriente y también a la ubicación de esta última en el panel posterior del aparato.
El cable de alimentación debería desconectarse de la red eléctrica durante tormentas con fuerte aparato
eléctrico o cuando el aparato no vaya a ser utilizado durante un largo período de tiempo (por ejemplo
durante las vacaciones de verano).
Este aparato debería ser conectado a una toma de corriente eléctrica equipada con una toma de tierra.
Utilice únicamente accesorios especificados por el fabricante.
Utilice el aparato únicamente con una carretilla, un soporte, un mueble o un sistema
de estantes recomendado por Rotel. Tenga cuidado cuando mueva el aparato junto con
el mueble o pie que lo soporte ya que en caso de caída podría lastimarle.
Deje inmediatamente de utilizar el aparato y envíelo a un servicio técnico cualificado
para su inspección/reparación si:
UÊ ÊV>LiÊ`iÊ>iÌ>VÊÊ>}Õ>ÊV>Û>Ê`iÊÃÊ>ÊÃ`Ê`>>`°
UÊ >ÊV>`ÊLiÌÃÊÊÃiÊ>Ê`iÀÀ>>`ʵÕ`ÊiÊiÊÌiÀÀÊ`iÊ>«>À>Ì°
UÊ Ê>«>À>ÌÊ>ÊÃ`ÊiÝ«ÕiÃÌÊ>Ê>ÊÕÛ>°
UÊ Ê>«>À>ÌÊÕiÃÌÀ>ÊÃ}ÃÊ`iÊvÕV>iÌÊ>`iVÕ>`°
UÊ Ê>«>À>ÌÊ>ÊÃ`Ê}«i>`ÊÊ`>>`Ê`iÊ>}ÖÊ`°
Las pilas del mando a distancia no deberían ser expuestas a fuentes de calor excesivo tales como luz
solar directa, fuego o cosas por el estilo.
Page 21

Español
Figure 1: Controles y Conexiones
21
RDG-1520
POWER
123
456
789
MEMORY0 DAB i-RADIOFM
NETWORK USBAUX
VDQSXTH N
Botones comunes del Panel Frontal y el
Mando a Distancia
, : Botones de puesta en marcha/
: Toma USB para reproductor de
, : Ajuste y recuperación de
: Visualizador de funciones
: Selección de la fuente de música
: Botón de reproducción
: Cola (lista preseleccionada)
: Volver al menú superior
: Menú iRadio
: Pista anterior/siguiente
P ^ SEL
Conectores del Panel Posterior
^
: Navegar y Seleccionar
V : Antena de FM/DAB
D : Ranura para Ethernet Wi-Fi
Q : Salida analógica
S : Entrada digital
X : Entrada/Salida para ordenador
T : Entrada para control remoto
H : Tomas para señal de disparo
N : Conector de alimentación
OFF
QUEUE
BACK REPLY
DIM
123
456
789
0
REPT RANDOM
FM DAB i-RADIO CD
NETWORK USB AUX
ON
SETUP
SEL
EXIT
MEM
RR-CX92
desconexión
iPod/MP3
preselecciones
externo
de 12 V
QUEUE
PLAY
SKIP --
BACK REPLY
PAUSESTOP
SKIP +
PUSH SELECT
P
Botones avanzados del mando a distancia
SETUP & EXIT : Entrar y Salir del menú Factory
[ & ] : Búsqueda automática de emisoras
de FM
RANDOM/ : Modo de reproducción
SHUFFLE
Notas:
1. La mayoría de botones del mando a distancia
duplican funciones del panel frontal. No obstante,
algunos controles solamente son accesibles desde
el mando a distancia, por lo que serán explicados
por separado.
2. Los caracteres que figuran en el panel frontal explican
las funciones realizadas por los controles
correspondientes. Si lo desea, también puede utilizar
las pertinentes teclas de control del mando a distancia.
Por ejemplo, la operación alternativa de girar y pulsar
el botón giratori P es pulsar los botones ^ y ^ y a
continuación el botón SEL en el mando a distancia
para seleccionar la función deseada.
Page 22

22
Figure 2: Ilustración de las Conexiones
RDG-1520 Puerta de Acceso Digital
RDG-1520
POWER
123
456
789
MEMORY0 DAB i-RADIOFM
NETWORK USBAUX
QUEUE
PLAY
SKIP --
BACK REPLY
PAUSESTOP
SKIP +
PUSH SELECT
WI-FI DONGLE
PRE AMPLIFIER
DIGITAL AUDIO DEVICE
Notas Importantes:
Cuando realice las conexiones, asegúrese
de que:
✔ Desactiva todos los componentes
del equipo, cajas acústicas incluidas,
antes de conectar cualquier nuevo
componente en el mismo.
✔ Desactiva todos los componentes del
equipo antes de cambiar cualquier
conexión del mismo.
También le recomendamos que:
✔ Reduzca el nivel de volumen de
su amplificador a cero antes de
activarlo o desactivarlo.
Page 23

Español
23
Índice
Instrucciones Importantes Relacionadas con la Seguridad ..................20
Figure 1: Controles y Conexiones 21
Figure 2: Ilustración de las Conexiones 22
Notas Importantes 22
Acerca de Rotel ................................................ 23
Repaso – Los sintonizadores de radio por Internet/componentes digitales
avanzados de Rotel ............................................. 24
Radio DAB y FM 24
Radio de Internet 24
Acceso a redes 24
El sitio web Rotelradio – gestionando sus emisoras de radio favoritas 24
Reproducción desde iPod, reproductores de MP3 y memorias flash 25
Reproducción desde servidores conectados en red 25
Para Empezar .................................................25
Características Relevantes 25
Algunas Precauciones 25
Ubicación 25
Alimentación y Control ...........................................26
Entrada de Corriente Eléctrica Alterna
Conmutador e Indicador Luminoso de Puesta en Marcha
Entrada para Señal de Disparo de 12 V
Salida para Señal de Disparo de 12 V
Repaso de las Conexiones .........................................26
Emisoras de Radio DAB/FM
Entrada Digital AUX
Conexión a Redes
Entrada/Salida para Ordenador
Conexión USB
SALIDA
Radio por Internet – Inicio Rápido ................................... 27
Lo que usted necesita saber antes de empezar 27
Conexión a la red por vez primera 27
Elegir una emisora de radio 27
Reproducción de emisoras de radio por Internet 28
Guardar una emisora en una preselección 28
Reproducción de una emisora de radio preseleccionada 28
Reproductores Multimedia – Inicio Rápido .............................29
Servidores UPnP 29
Borrar Cola 30
Modo de Reproducción 30
Conexión iPod/USB – Inicio Rápido ..................................31
Conexión de Dispositivos de Almacenamiento USB 31
Conexión de iPod/iPhone 31
Botones de Control de la Reproducción 31
Radio FM: Inicio Rápido ..........................................31
Reproducción de Emisoras de Radio FM 31
Guardar una emisora de radio en una preselección 31
Reproducción de una emisora de radio preseleccionada 32
Radio DAB: Inicio Rápido .........................................32
Reproducción de Emisoras de Radio DAB 32
Guardar una emisora DAB en una preselección 32
AJUSTES: INICIO RÁPIDO .........................................33
Configurar “My Stuff” (“Mis Aparatos”) .............................34
Configurar “My Stations” (“Mis Emisoras”) ...........................34
Configurar “My Streams” (“Mis Descargas Directas”) .................... 35
Botones Avanzados del Mando a Distancia .............................35
Problemas y Posibles Soluciones ....................................36
Glosario .....................................................36
Características Técnicas ..........................................37
27
Q
Configuración de un servidor UPnP en un PC 29
Reproducción de archivos multimedia utilizando un servidor UPnP 29
V
26
S
26
D
27
26
N
26
26
H
26
H
26
26
X
Acerca de Rotel
Nuestra historia empezó hace casi 50 años. A lo largo de todas estas
décadas, hemos recibido cientos de premios por nuestros productos y
satisfecho centenares de miles de clientes que se toman muy en serio,
al igual que usted, sus momentos de ocio.
Rotel fue fundada por una familia cuyo entusiasta interés por la música le
condujo a diseñar y construir componentes de Alta Fidelidad sin ningún
tipo de compromiso. Esta pasión ha permanecido inalterada durante todo
este tiempo, hasta el punto de que el objetivo de los fundadores de la
compañía -proporcionar productos de la máxima calidad a melómanos
y audiófilos independientemente de cuales sean sus posibilidades
económicas- es compartido por todos sus empleados.
Los ingenieros de Rotel trabajan como un equipo compacto, escuchando
y llevando a cabo el ajuste fino de cada nuevo producto hasta que
satisface de manera exacta los estándares de calidad musical para los
que fue diseñado. Para lograrlo, disponen de la máxima libertad para
escoger los mejores componentes allí donde se encuentren. Le sorprenderá
agradablemente encontrar exquisitos condensadores procedentes del
Reino Unido y Alemania o semiconductores de Japón o Estados Unidos,
mientras que los transformadores de alimentación toroidales son fabricados
en la propia factoría de Rotel.
Todos nosotros nos preocupamos por nuestro entorno. Y a medida que se
producen y posteriormente desechan más y más aparatos electrónicos,
para un fabricante resulta especialmente importante hacer todo lo que
le sea posible para poner a punto productos que tengan un impacto
negativo mínimo en los vertederos de basura y las capas freáticas.
En Rotel estamos orgullosos de contribuir con nuestra parte. Hemos
reducido el contenido en plomo de nuestros componentes electrónicos
utilizando una soldadura RoHS especial, mientras que nuestros
nuevos amplificadores en Clase D (que no digitales) son hasta cinco
veces más eficientes que nuestros diseños tradicionales a la vez que
siguen ofreciendo una excelente dosis de potencia y prestaciones. La
temperatura de funcionamiento de estos productos es baja y la energía
que desperdician es mínima, a la vez que son amables con el medio
ambiente y proporcionan un sonido superior.
Finalmente, queremos que sepa que hemos impreso este catálogo en
papel reciclado.
Aunque entendemos que estas últimas consideraciones son sólo unos
primeros pasos, también tenemos muy claro que ello no quita que sean
importantes. Y continuaremos buscando nuevos materiales y métodos de
fabricación para conseguir que nuestros procesos de fabricación sean
lo más limpios y ecológicos posible.
Le agradecemos que haya adquirido este producto. Estamos seguros
de que le proporcionará largos años de disfrute en la escucha de sus
grabaciones musicales favoritas.
Page 24

24
RDG-1520 Puerta de Acceso Digital
Repaso – Los sintonizadores de radio por
Internet/componentes digitales avanzados
de Rotel
Este producto no funcionará si previamente no le ha sido conectado el módulo o
llave electrónica (“dongle”) para conexión inalámbrica o por cable suministrado
de serie con el mismo. Le recomendamos que lea esta introducción en primer
lugar. Las Preguntas Más Frecuentes (FAQ’s) pueden encontrarse en el sitio
web de Rotel (www.rotel.com/NA/support/FAQ.htm)
Este producto Rotel combina funciones de recepción de radio convencionales
para FM y DAB más la capacidad –vía informática– de acceder a
literalmente miles de emisoras de radio de todo el mundo disponibles
en Internet. Además, esta nueva gama de sintonizadores/componentes
digitales avanzados de Rotel ofrece la posibilidad de interactuar con
reproductores personales de audio (tipo iPod y MP3) y archivos de música
almacenados en un servidor conectado en red.
Estas notas se amplían en las de “inicio rápido” que figuran más adelante
en el presente manual.
En primer lugar, no tiene sentido hablar de la no existencia de una red
por cable o inalámbrica, aunque es esencial que un módulo que facilite
dicha conexión esté insertado en el conector pertinente disponible en el
panel posterior del aparato para que todo pueda funcionar. Utilice un
cable de extensión para reubicar dicho módulo si el espacio disponible
en el panel posterior del sintonizador es limitado.
Cada vez que el producto sea activado, se situará en el modo de
búsqueda durante 15/20 segundos. Una vez finalizado el proceso, se
podrán utilizar otros modos radiofónicos.
La entrada USB está activa desde el momento de la puesta en marcha
del aparato.
Radio DAB y FM
Esta es la parte más convencional del producto, porque si usted tiene
una experiencia previa en sintonización, memorización y selección de
emisoras de radio con los servicios de radio DAB y FM actualmente
existentes estará familiarizado con la forma en que el sintonizador
es manejado para recibir estos servicios. Todo esto se explica en las
correspondientes secciones de “inicio rápido”. Acuérdese de seleccionar
el conector de antena de entrada que vaya a utilizar; busque esta opción
en el menú de configuración. Esto no le exime de la necesidad de instalar
antenas correctamente diseñadas para maximizar la recepción de los
servicios DAB y FM.
Radio de Internet
El uso de radio por Internet implica a su vez el de dos servicios adicionales:
acceso a Internet a través de una red informática y, una vez que esto
funcione, disponer de uno de los servicios basados en Internet que
permiten acceder a emisoras de radio de Internet. Esta última exigencia
está incorporada en el sintonizador; hablaremos en primer lugar del
acceso a su red.
Acceso a redes
La instalación de redes informáticas supera el propósito de las presentes
notas, por lo que suponemos que usted dispone de una red Wi-Fi
operativa en su casa. Si está utilizando una red por cable, le rogamos
que consulte el apartado “Configuración de Redes” de la sección
“Repaso de los Ajustes”. (Las redes por cable suelen proporcionar la
conexión Ethernet más fiable. También se dispone de adaptadores de
Ethernet para líneas de alimentación fabricados por otras marcas para
el caso de que la colocación de un cable de Ethernet convencional
resulte poco práctica.)
En el momento del arranque, el aparato busca redes Wi-Fi, de manera
que una vez que la búsqueda haya sido completada usted encontrará
una lista con una o más redes en el visualizador de funciones para que
pueda elegir una de ellas. Necesitará seleccionar el nombre de la red
que corresponda a su instalación. Dicho nombre tuvo que ser asignado
en el momento de instalar dicha red y suele estar preasignado en el
“router” central de la misma.
Lo siguiente que tiene que hacer es permitir que su sintonizador acceda
(“log on”) a su red, cosa que usted hará posible introduciendo la
“clave WEP” inalámbrica (o clave WPA o WPA2) apropiada para su
red. Lo más probable es que usted haya utilizado la clave de entrada
en el momento de configurar un ordenador para entrar en su web y la
misma esté contenida en las instrucciones para su “router”. Este ajuste
se realiza una sola vez, por lo que debe desplazarse cuidadosamente
a través de los caracteres alfanuméricos con el fin de seleccionar los
que necesite para crear su clave WEP. Una vez completado el proceso,
desplácese de nuevo hasta llegar a –y seleccionar– END o simplemente
pulse el botón REPLY.
Puede utilizar las teclas Anterior y Posterior del mando a distancia para
que le ayuden a introducir esta información. No confunda la letra “O”
con el número “0”.
Cuando haya accedido con éxito a su red, el sintonizador se conectará
automáticamente al sitio web en el que usted podrá seleccionar la zona
del mundo que le interese y elegir emisoras de radio en función del país,
género y nombre.
Si se registra en www.rotelradiocom, podrá buscar y guardar emisoras
de radio por Internet, así como configurar otros servicios de música
cuando los mismos estén disponibles para su región.
El sitio web Rotelradio – gestionando sus emisoras de radio
favoritas
La gestión de los miles de emisoras de radio disponibles en Internet sería
imposible sin la capacidad de organizar y gestionar las que se adapten
a sus necesidades particulares. Rotel ha puesto a punto una manera fácil
de hacer esto mediante un sitio web dedicado en el que usted puede
preseleccionar las emisoras que desee.
El URL para este sitio es http://rotelradio.com.
Page 25

Español
25
Al igual que sucede con muchos sitios web, usted deberá registrarse
con un nombre de usuario y una contraseña para crear una cuenta
en dicho sitio. Antes de que pueda hacer esto, necesitará registrar el
producto en el sitio, disponiéndose para ello una clave de inscripción
especial en su sintonizador Rotel que usted necesitará copiar en el
formulario de inscripción del sitio web. Esta clave de inscripción podrá
ser encontrada a través de la secuencia Settings>Register del menú de
su producto Rotel. En el momento de realizar este proceso deberá estar
conectado a Internet.
Una vez registrado, el sitio web mostrará el número de serie radiofónico
de su componente Rotel. Dicho número es diferente del número de serie
del aparato propiamente dicho. El número de serie radiofónico podrá
ser encontrado a través de la secuencia Settings>Version del menú de
su producto Rotel.
Observe que para actualizar el visualizador de funciones de su
producto Rotel a fin de que el mismo indique los contenidos por usted
elegidos necesitará apagar el aparato, volver a ponerlo en marcha y
seleccionar “Internet radio”. Su nueva lista “My Stuff” será actualizada
automáticamente.
Reproducción desde iPod, reproductores de MP3 y memorias flash
La mayoría de reproductores de MP3 e iPod pueden ser conectados a la
toma USB del panel frontal para reproducir los archivos de música que
contienen. El visualizador de funciones se actualizará para mostrar la
estructura de los archivos y confeccionará una lista de los que pueden
ser reproducidos. Los archivos copiados en una memoria flash estándar
también se comportarán de la misma manera.
Reproducción desde servidores conectados en red
La reproducción de música desde ordenadores configurados como
servidores de audio proporciona otra oportunidad para enlazar la
escucha a través del componente Rotel a la vez que permite utilizar las
etapas de descodificación de grado audiófilo incorporadas en dichos
productos.
Al igual que para acceder a la radio vía Internet, un prerequisito
fundamental es disponer de una red operativa, así como del servidor
de audio conectado a la misma. Para más detalles, le rogamos que
se dirija a la sección “Reproductores Multimedia: Inicio Rápido” del
presente manual.
Para Empezar
Gracias por haber adquirido la Puerta de Acceso Digital Rotel RDG-1520.
Utilizado en un sistema de reproducción musical o audiovisual de alta
calidad, le proporcionará largos años de disfrute musical.
Características Relevantes
Conexión por cable o inalámbrica para acceder a radio de UÊ
Internet.
Acceso a PC’s y música mediante conexión en red (LAN) con el UÊ
Modo “Media Player”.
Conexión de reproductores multimedia portátiles iPod/MP3 para UÊ
el disfrute de sus grabaciones musicales favoritas.
Escucha de emisiones de radio DAB y FM.UÊ
Algunas Precauciones
Le rogamos que lea cuidadosamente el presente manual de instrucciones.
Además de las instrucciones básicas de instalación y puesta a punto
del RDG-1520, incluye información de gran valor sobre las diferentes
configuraciones que permite el aparato, así como información general
que le ayudará a optimizar las prestaciones de su sistema. Le rogamos
que contacte con su distribuidor Rotel autorizado para cualquier duda o
consulta que se le pueda plantear. No le quepa la menor duda de que
todos sus comentarios y observaciones serán tenidos en cuenta.
Guarde el embalaje del RDG-1520 y todo el material en él contenido
para un posible uso futuro del mismo. El embalaje o transporte del
RDG-1520 en condiciones diferentes de las originales puede provocar
serios datos en el aparato no cubiertos por la garantía.
Rellene y envíe la tarjeta de garantía suministrada junto con el RDG-1520.
Asimismo, asegúrese de mantener en su poder la factura de compra
puesto que es la mejor manera de que usted se acuerde de la fecha de
compra, un dato esencial en caso de que necesitara asistencia técnica
durante el período de garantía.
Ubicación
Coloque el RDG-1520 sobre una superficie sólida y nivelada que esté
alejada de la luz solar, el calor, la humedad y las vibraciones.
No coloque otros componentes u objetos en la parte superior del
RDG-1520. No permita que ningún líquido se vierta en el interior del
aparato.
Tenga en cuenta el peso y el tamaño del amplificador cuando seleccione
una ubicación determinada para la instalación del mismo- En consecuencia,
asegúrese de que la estantería, mueble o rack utilizado pueda soportarlo
sin mayores problemas.
El RDG-1520 genera calor como una parte de su funcionamiento normal.
No bloquee las ranuras de ventilación. Deje un mínimo 10 centímetros
de espacio libre alrededor del aparato. En el caso de que el RCX-1520
esté instalado en un mueble, asegúrese de que se dispone de una
ventilación adecuada.
Page 26

26
RDG-1520 Puerta de Acceso Digital
Alimentación y Control
Entrada de Corriente Eléctrica Alterna N
Su RDG-1520 está configurado en fábrica para que trabaje con la tensión
de red correcta que corresponda al país en el que ha sido comprado (120
V/60 Hz para EE.UU. ó 230 V/50 Hz para Europa). Dicha configuración
está indicada en un receso del panel posterior del aparato.
El RDG-1520 se suministra de serie con un cable de alimentación
adecuado. Utilice únicamente dicho cable o un equivalente exacto del
mismo. No modifique el cable de alimentación suministrado de serie.
No utilice ningún tipo de cable de extensión.
Asegúrese de que el conmutador de puesta en marcha del panel frontal
del RDG-1520 esté desconectado y a continuación conecte uno de los
extremos del cable de alimentación suministrado de serie al receptáculo
correspondiente del panel posterior del aparato. Conecte el otro extremo
a una toma de corriente eléctrica alterna adecuada.
Si va a estar fuera de su casa durante un largo período de tiempo,
será una buena precaución que desconecte su amplificador de la red
eléctrica.
Conmutador e Indicador Luminoso de Puesta en Marcha
El conmutador de puesta en marcha está ubicado en la parte izquierda
del panel frontal. Para activar el aparato (o activar los modos de puesta
en marcha automáticos) pulse el conmutador hacia dentro.
El visualizador luminoso que rodea el conmutador se activará, indicando
que el aparato está listo para funcionar al cien por cien. Para desactivar
el aparato, pulse de nuevo el botón para que regrese a su posición
“hacia fuera”.
Entrada para Señal de Disparo de 12 V H
Es una toma de entrada par conectar cables que transportan una señal
de disparo de +12 voltios continuos procedente de un preamplificador
o procesador de sonido envolvente Rotel para activar y desactivar el
aparato.
La toma TRIGGER INPUT acepta cualquier señal de control (alterna o
continua) de valor comprendido entre 3 y 30 voltios. Utilice un cable
monofónico equipado con mini-clavijas de 3’5 mm en ambos extremos.
La señal de +12 V continuos aparece en la “punta” del conector.
Repaso de las Conexiones
Antes de proseguir con otras secciones del manual, le rogamos que se
asegure de que todas las conexiones por cable han sido realizadas
correctamente. Consulte al respecto la figura 2.
NOTA: Debe insertar el módulo Wi-Fi (o adaptador por cable) al
puerto ETHERNET del panel posterior. Lo primero que hará el aparato
es buscar redes disponibles antes de permitir el acceso a las funciones
DAB y FM. Si no hay redes disponibles, el aparato mostrará “Network
Error” (“Error de Red”). Una vez completada con éxito la búsqueda de
redes inicial, las funciones DAB y FM funcionarán de manera normal.
Emisoras de Radio DAB/FM V
Utilice la antena interior suministrada de serie para unirla a los conectores
DAB y FM del panel posterior. Para tener una buena recepción de señal
FM, asegúrese de que haya espacio suficiente para colocar la antena
interior en forma de “T” lo más extendida posible. Los ojetes situados
en los dos extremos de la “T” permiten colocar la antena en una pared
en caso de que así lo desee. Experimente con varias posiciones para
maximizar la recepción.
Entrada Digital AUX S
El RDG-1520 puede recibir señales musicales digitales procedentes de
otras fuentes y convertirlas en analógicas para a continuación enviarlas
a un preamplificador o procesador conectado a través de las tomas
OUTPUT Q. En el área de entradas digitales AUX del panel posterior se
dispone de dos conectores designados como coaxial y óptico. Conecte
la salida óptica o coaxial de su fuente a la correspondiente entrada
óptica o coaxial del RDG-1520.
Conexión a Redes D
Conecte el módulo Wi-Fi USB suministrado de serie con el Rotel al puerto
USB del panel posterior del RDG-1520 designado como ETHERNET.
El RDG-1520 ha sido diseñado para funcionar con el módulo Wi-Fi
USB suministrado de serie. No se requiere ningún software ni ninguna
configuración adicional. El RDG-1520 está ahora listo para ser conectado
a su red LAN inalámbrica. Para más información, consulte la sección
dedicada a Radio de Internet.
NOTA: No todos los módulos USB Wi-Fi funcionarán con el
RDG-1520. En consecuencia, le rogamos que utilice el suministrado
por Rotel.
Salida para Señal de Disparo de 12 V H
La toma para señal de disparo de 12 V designada por OUT se utiliza
para enviar la señal de arranque a distancia a otro producto Rotel.
Cualquier señal de disparo de 12 V presente en la toma INPUT será
enviada a la toma OUT.
Entrada/Salida para Ordenador X
El RDG-1520 puede ser gobernado desde un ordenador equipado con
software de control de sistemas de audio creado por desarrolladores
de otras marcas. Este control se lleva a cabo enviando códigos de
funcionamiento desde el ordenador a través de una conexión serie RS232 por cable. Además, el RDG-1520 puede ser actualizado utilizando
software especial creado por Rotel.
Si desea recibir más información sobre las conexiones, el cableado, el
software de gestión y los códigos de funcionamiento para control desde
ordenador o la actualización del aparato, contacte con su detallista
Rotel autorizado.
Page 27

Español
27
Conexión USB
La toma situada en el panel frontal justo debajo del conmutador POWER
está destinada a la conexión vía USB. El RDG-1520 puede acceder a
dispositivos de almacenamiento de música a través de esta entrada. Los
dispositivos de almacenamiento de música tales como reproductores de
MP3 o iPod, memorias USB o equivalentes equipados con una interfaz
USB pueden ser conectados al RDG-1520 a través de esta toma. El
RDG-1520 buscará automáticamente archivos de música contenidos en
el dispositivo de almacenamiento conectado al mismo.
NOTA: El RDG-1520 utiliza el estándar USB 2.0 para acceder a
los archivos de música. El aparato puede reproducir archivos de
música almacenados en dispositivos que sean compatibles con dicho
estándar. Sin embargo, no funcionará con dispositivos que requieran
la presencia de “drivers” adicionales.
SALIDA Q
El RDG-1520 suministra una señal analógica estereofónica. Utilice el
cable de audio suministrado de serie para conectarlo a las tomas de
entrada de su preamplificador o procesador. Sea cuidadoso y asegúrese
de que estas conexiones se correspondan entre sí. Así, el canal derecho
de la salida del RDG-1520 debe ser conectado al canal derecho de
entrada del preamplificador o procesador y lo mismo vale para el canal
izquierdo.
Radio por Internet – Inicio Rápido
Lo que usted necesita saber antes de empezar
Antes de que pueda utilizar su radio de Internet, necesitará lo
siguiente:
Una conexión de banda ancha a Internet.UÊ
Un punto de acceso a Internet vía LAN inalámbrica (la conexión UÊ
LAN por cable también es posible con un adaptador de Ethernet
USB suministrado por Rotel).
Con una conexión LAN inalámbrica, la radio por Internet debería funcionar
en un rango de 100 metros del punto de acceso inalámbrico sujeto al
hecho de que el “router” utilizado esté ubicado en el emplazamiento
óptimo de su zona de residencia. El usuario puede confirmar la intensidad
de la señal Wi-Fi desde el menú de ajustes (Settings>WiFi Strenght”).
Asegúrese de que su red LAN esté conectada adecuadamente y es capaz
de acceder a Internet. Para que el RDG-1520 pueda acceder a emisoras
de radio por Internet se necesita una conexión a Internet.
Conexión a la red por vez primera
Conecte el módulo Wi-Fi USB al puerto USB del panel posterior y pulse
el botón POWER para poner en marcha el aparato. El visualizador de
funciones del panel frontal se activará y mostrará:
Starting ... ...
SCANNING NETWORK.. ...
Si no puede encontrar una, el visualizador de funciones mostrará:
NO NETWORK FOUND
Cuando el aparato encuentre su red, mostrará en pantalla el ESSID para
el punto de acceso. Se trata de un nombre que ha sido asignado al punto
de acceso por la persona que configuró la red. Por ejemplo:
< MY NETWORK >
Es posible, y en ciertas ubicaciones altamente deseable, que su RDG-1520
encuentre más de un punto de acceso inalámbrico si utiliza conexión sin
cables, en cuyo caso usted podrá elegir a cual de ellas desea conectarse.
Gire el control del panel frontal para ver el ESSID para cada uno de los
puntos de acceso que el aparato haya encontrado.
Si la pantalla muestra “Enter WEP key” (“Introducir clave WEP”) o “Enter
WPA key” (“Introducir clave WPA”) significa que la red está utilizando uno
de los dos sistemas de encriptación, “Wired Equivalent Privacy” (WEP)
o “Wi-Fi Protected Access” (WPA). Le rogamos que obtenga el código
de acceso a partir de la persona que configuró esta red inalámbrica, o
compruebe el manual de instrucciones de su “router” para obtener esta
información. Introduzca el código en el RDG-1520 para acceder a la
red LAN inalámbrica.
NOTA: En caso de que usted quisiera dar al RDG-1520 una dirección
IP estática, o si el aparato no puede obtener automáticamente una
dirección IP, le rogamos que consulte el apartado “Configuración de
Redes” de la sección “Ajustes” que figura al final del presente manual.
Elegir una emisora de radio
Una vez que a red y han sido realizadas las conexiones pertinentes, se
mostrará en pantalla el menú superior. Seleccione “Internet Radio”. El
visualizador de funciones mostrará:
< Internet Radio >
Media Player
FM
DAB
Ahora usted puede seleccionar emisoras de radio de Internet para
escucharlas mediante una de las opciones que se describen a
continuación.
<LOCATION> (“UBICACIÓN”) – Le permite elegir emisoras de radio
disponibles en áreas y países especificados.
Africa
< America >
Asia
Caribbean
< Location >
Genre
Search
< XXX1 LIVE RADIO >
XXX2 LIVE RADIO
XXX3 LIVE RADIO
XXX4 LIVE RADIO
Al cabo de unos pocos segundos, empezará a explorar para buscar
una red.
1. Gire el botón/selector hasta que el visualizador de funciones muestre
la zona y el país por usted deseados y a continuación pulse el botón/
selector para seleccionarlos.
Page 28

28
RDG-1520 Puerta de Acceso Digital
2. Gire el botón/selector hasta que el visualizador de funciones muestre
le emisora deseada. Pulse el botón/selector para seleccionarla.
3. Espere hasta que el aparato se conecte a esa emisora.
<GENRE> (“GÉNERO”) – Le permite elegir emisoras de radio en
función de sus contenidos, como por ejemplo Música Clásica, Rock,
Deportes, Noticias, etc.
80S
< 90S >
Adult
Adult contemporary
1. Gire el botón/selector hasta que el visualizador de funciones resalte
el tipo de contenido por usted deseado y a continuación pulse el botón/
selector para seleccionarlo.
2. Gire el botón/selector para resaltar la emisora deseada y a continuación
púlselo para seleccionarla.
3. Espere hasta que el aparato se conecte a esa emisora.
<SEARCH> – (“BÚSQUEDA”) – Le permite buscar un tipo de emisora
concreto con una corta palabra clave.
Station Name
END <> A BCDEFGHIJKLNO
ART
XXX1 LIVE RADIO
< XXX2 LIVE RADIO >
XXX3 LIVE RADIO
XXX4 LIVE RADIO
xxx ART xx Radio1
x ARTxx xx Radio2
ARTxxxx xx Radio3
El RDG-1520 guardará esta emisora de radio en el número de
preselección. El RDG-1520 puede almacenar hasta 30 emisoras de
radio preseleccionadas.
Reproducción de una emisora de radio preseleccionada
Mientras se está reproduciendo una emisora de radio, usted puede acceder
a otras emisoras preseleccionadas procediendo del modo siguiente:
1. En el mando a distancia, pulse los botones del teclado numéric
correspondientes al número de preselección de la emisora deseada.
2. Pulse el botón QEUE (“COLA”) para invocar el número de
preselección y la emisora correspondiente. Gire el botón/selector
para elegir la emisora y a continuación púlselo para seleccionarla. El
visualizador de funciones mostrará:
01 preset radio 1
02 preset radio 2
> 03 preset radio 3
04 preset radio 4
Pulse de nuevo el botón QEUE para salir del menú de colas y volver al
estado de reproducción.
NOTA: Puede revisar emisoras de radio que tenga guardadas
utilizando la función Queue. De este modo evitará que se produzca la
sobregrabación accidental de una preselección determinada.
1. Gire el botón/selector hasta que el visualizador de funciones se
desplace hacia el carácter a introducid y a continuación pulse el botón/
selector para seleccionarlo.
2. Repita el paso 1 para introducir la palabra clave completa. Seleccione
“END” para confirmar la palabra clave.
3. Pulse el botón/selector para activar la búsqueda. El visualizador de
funciones mostrará emisoras que coincidan con la palabra clave.
4. Gire el botón/selector para resaltar la emisora deseada y a continuación
púlselo para seleccionar dicha emisora. El RDG-1520 se conectará a
esa emisora.
Reproducción de emisoras de radio por Internet
Una vez que el RDG-1520 se haya conectado a una emisora, el
visualizador de funciones mostrará el nombre de la misma, el tipo de
fichero de audio y la velocidad de transferencia binaria.
BBC RADIO
BUFFERING xx%
BBC RADIO
xxx kbPs WMA XX:XX
Guardar una emisora en una preselección
Mientras se esté reproduciendo una emisora, mantenga pulsado el botón
de memorización del mando a distancia y a continuación pulse un
número con el teclado numérico para asignarla a la preselección
pertinente. El visualizador de funciones mostrará:
BBC RADIO
xxx kbit WMA
Assign to Preset
#
M Preset #
Page 29

Español
29
Reproductores Multimedia – Inicio Rápido
La función Media Player (“Reproductores Multimedia”) le permite reproducir
archivos (AAC, AIFF, AU, FLAC (calidad CD de 16 bits), MP3, WAV y
WMA (excepto la versión sin pérdidas) y listas de audio (M3U) creados
por el Reproductor Multimedia de su ordenador, como por ejemplo el
Windows Media Player 11.
NOTA: Es necesario activar la función de compartición de archivos
(“file sharing”) de su ordenador. Para más detalles al respecto, le
rogamos que consulte el manual de instrucciones de su ordenador.
Servidores UPnP
Configuración de un servidor UPnP en un PC
1. Utilice el Windows Media Player 11 para configurar el PC como
un servidor UPnP, haga “clic” en la pestaña “Library” (“Biblioteca”) de
Windows Media Player 11 y seleccione “Media Sharing” (“Compartición
de Contenidos”) para abrir la ventana “Media Sharing” y configurar
la opción deseada.
2. Ahora su PC le responderá que un dispositivo ha intentado conectarse a
su servidor UPnP. Por favor, haga “clic” en el botón Allow (“Permitir”).
NOTA: En el momento de redactar estas líneas, Windows Media Player
11 no soporta la descodificación de audio AAC utilizada por Apple como
selección por defecto en iTunes. Le recomendamos que cambie el ajuste
importad por defecto a los formatos WAF, AIFF o MP3 para garantizar
la máxima compatibilidad con el mayor número de dispositivos posible.
Si lo desea, puede configurar Windows Media Player para que copie
sus carpetas de iTunes. Windows Media Player 12 (para Windows 7)
sí soporta la descodificación AAC.
3. Diríjase al menú “Media Player” del RDG-1520 y seleccione el submenú
“UPnP Servers” con ayuda del botón/selector. El aparato explorará
todos los servidores UPnP disponibles, mostrando “[Empty]“ (“Vacío”)
si no encuentra ninguno.
Internet Radio
< Media Player >
FM
DAB
< UPnP Servers >
Playback Mode
Queue
Reproducción de archivos multimedia utilizando un servidor UPnP
1. Una vez completado con éxito el proceso de exploración, todos los
servidores UPnP disponibles serán mostrados en pantalla. Seleccione
su servidor UPnP con el botón/selector y a continuación púlselo para
seleccionar el servidor deseado.
2. El RDG-1520 mostrará la lista de opciones o carpetas disponible en
el servidor UPnP, como por ejemplo “Music”, “Playlists”, etc. Seleccione
la categoría deseada girando y pulsando el botón/selector.
<All Music >
All Artists
Albums
Music Playlists
Folders
[Search]
Puede buscar canciones desplazándose a través de la opción “All
Music” o buscar un artista específico utilizando “All Artists” o un álbum
concreto mediante “Albums”. En cada caso, usted puede ir afinando
hasta el nivel de canción.
Introduzca la función [Search] y se mostrará en pantalla el siguiente
menú:
< Artists >
Album
Music
A continuación entre en los submenús “Artist”, “Album” o “Music”. Puede
introducir una letra o letras para iniciar cualquiera de dichos submenús.
Por ejemplo, puede introducir “M” en “Artists” y a continuación pulsar
la tecla REPLY para iniciar la búsqueda. Aparecerán en pantalla todos
los artistas de su biblioteca cuyo nombre comience por “M”.
Page 30

30
RDG-1520 Puerta de Acceso Digital
3. Una vez que haya encontrado la pista deseada, pulse para seleccionarla.
La pista seleccionada se mostrará en el menú en el momento en que el
aparato intente conectarse al servidor de música. Antes de que empiece
la reproducción, se mostrarán el título de la pista, el tipo de archivo y
la velocidad de transferencia binaria. Cuando comience la reproducción,
se mostrará el tiempo transcurrido en vez del tipo de archivo.
“Album/Artist Name”
“Track title”
00:50
309kbps WMA
NOTA: Uso de la función QUEUE (“COLA”): Una corta pulsación en
botón/selector para una determinada canción o álbum hará que dicha
selección empiece a ser reproducida. Usted también puede poner a punto
una COLA (“QUEUE”) a medida para crear una mezcla de canciones
manteniendo pulsado el botón/selector durante 5 segundos. La pista
o pistas seleccionadas se añadirán a la COLA y se reproducirán en el
orden seleccionado. Pulse el botón QUEUE para invocar pistas que estén
esperando para ser reproducidas. Una pulsación de 5 segundos en el
botón STOP suprimirá canciones específicas de la COLA. Puede borrar
la COLA pulsando el botón QUEUE y seleccionando CLEAR QUEUE.
Borrar Cola
Gire el botón/selector para seleccionar el menú “Clear Queue” (“Borrar
Cola”) y a continuación púlselo. La cola de temas almacenada en
memoria será borrada.
NOTA: Si tanto el modo REPEAT como el SHUFFLE están activados, el
RDG-1520 reproducirá en primer lugar la lista de manera aleatoria
–después de que todas las pistas hayan sido reproducidas una vez- y
continuará reproduciéndola de manera aleatoria hasta que se pulse
STOP.
NOTA: El uso de la función de reproducción aleatoria con bibliotecas
musicales de gran envergadura no siempre será posible o puede que
requiera una cantidad de tiempo excesiva. Le recomendamos que
cree listas de reproducción más cortas en Windows Media Player y
luego las reproduzca aleatoriamente.
UPnP Servers
Playback Mode
< Queue >
Puede borrar pistas individuales de una COLA (“QUEUE”) seleccionando
la pista pertinente y pulsando el botón STOP durante 5 segundos.
< [Clear Queue] >
Modo de Reproducción
UPnP Servers
< Playback Mode >
Queue
Utilice el botón/selector para seleccionar el submenú “Media
Player”>”Playback Mode”. Hay dos submenús, “Repeat” (“Repetir”)
y “Shuffle” (“Reproducción Aleatoria”). Gire el botón/selector para
seleccionar uno de los dos o ambos y a continuación responda YES o
NO girándolo y pulsándolo.
REPEAT (“REPETIR”): Las pistas son reproducidas una después de otra y
comenzarán de nuevo con la primera de ellas cuando haya terminado
la última.
< Repeat * >
Shuffle
SHUFFLE (“REPRODUCCIÓN ALEATORIA”): Las pistas se reproducen
en orden aleatorio.
Page 31

Español
31
Conexión iPod/USB – Inicio Rápido
<< iPod/USB >>
001/009
00:01:41
123.MP3
Conexión de Dispositivos de Almacenamiento USB
1. Conecte su dispositivo de almacenamiento USB –o a través de un
adaptador USB- que contenga archivos musicales a la toma USB del
panel frontal.
2. Pulse el botón USB del panel frontal para entrar en el modo iPod/USB.
El aparato buscará automáticamente archivos musicales en el directorio
raíz. Una vez encontrado el directorio, el aparato empezará a reproducir
música. El visualizador de funciones mostrará información relacionada
con la canción, como por ejemplo el nombre, la duración o la pista.
3. Si sus archivos de música están guardados en subdirectorios, gire
el control para ver todos los directorios. Gire y pulse el botón/selector
para introducir el directorio deseado. A continuación busque los archivos
musicales deseados girando y pulsando dicho control.
4. Pulse el botón BACK (“ATRÁS”) para volver al menú anterior y
seleccionar otro directorio.
Conexión de iPod/iPhone
1. El Apple iPod/iPhone puede ser conectado a la toma USB del panel
frontal del RDG-1520 mediante el cable USB del iPod. Cuando el iPod
esté conectado al RDG-1520, el visualizador de funciones del iPod se
apagará y mostrará el logotipo de Rotel indicando que el iPod está en
el modo de “protocolo extendido” y todas las gestiones para acceder a
los archivos de música deben realizarse desde el RDG-1520.
2. El iPod enviará una señal digital de música al aparato. El funcionamiento
del menú es similar al del media Player. Para más detalles, consulte la
sección dedicada al Media Player.
> 01_Folder
music-files-002. wav
music-files-003. mp3
music-files-004. aac
Radio FM: Inicio Rápido
Antes de escuchar una emisora de radio FM, asegúrese de haber
conectado adecuadamente la antena correspondiente y que haya sido
seleccionado el formato de FM correcto. Diríjase al menú “Settings”
(“Ajustes”) y seleccione la región de FM del sintonizador.
Reproducción de Emisoras de Radio FM
1. Seleccione el botón FM del panel frontal. O mantenga pulsado el
botón BACK para regresar al menú superior y entrar en el menú FM. El
visualizador de funciones mostrará:
Internet Radio
Media Player
< FM >
DAB
2. Utilice el botón/selector para cambiar la frecuencia de la emisora
de radio.
3. Utilice los botones de exploración rápid ] y [ del mando a distancia
para buscar automáticamente emisoras de FM.
4. Utilice los botones } y { del panel frontal o el mando a distancia
para buscar emisoras de FM manualmente.
Guardar una emisora de radio en una preselección
Mientras se esté reproduciendo una emisora de FM, pulse el botón de
memorización y a continuación pulse el número de preselección que
desee asignarle con los botones del teclado numérico . Este proceso
también se puede realizar con ayuda del botón MEM y el teclado numérico
del mando a distancia. Aparecerá en pantalla lo siguiente:
BBC RADIO
xxx kbit WMA
M Preset #
87.50MHz FM
Assign to Preset
#
Botones de Control de la Reproducción
1. Utilice el botón STOP para detener la reproducción.
2. Utilice el botón PLAY/PAUSE para detener momentáneamente una
pista que se esté reproduciendo en ese momento o reiniciar otra que
haya sido detenida previamente.
3. Utilice el botón SKIP- para iniciar la reproducción de la pista anterior
de la cola.
4. Utilice el botón SKIP+ para iniciar la reproducción de la siguiente
pista de la cola.
5. Pulse y mantenga pulsado durante 5 segundos el botón STOP para
retirar de modo seguro el dispositivo USB del aparato.
NOTA: El Rotel funcionará con los modelos iPhone 3GS, iPhone 3G,
iPod Classic, iPod touch 2G, iPod Nano 2G, iPod Nano 3G, iPod
Nano 4G e iPod Nano 5G.
El RDG-1520 guardará esta emisora de radio FM en el número de
preselección. El RDG-1520 puede almacenar hasta 30 emisoras de
radio FM preseleccionadas.
Page 32

32
RDG-1520 Puerta de Acceso Digital
Reproducción de una emisora de radio preseleccionada
Mientras se está reproduciendo una emisora de radio, usted puede
cambiar a otra a través de uno de los dos procesos que se reseñan a
continuación:
1. En el teclado numérico , pulse el número de preselección de la
emisora deseada.
2. Pulse el botón QUEUE P para invocar números de preselección y sus
correspondientes emisoras. Gire el control/selector para elegir la emisora
deseada y a continuación púlselo para seleccionarla. El visualizador de
funciones mostrará lo siguiente:
01 preset radio 1
02 preset radio 2
> 03 preset radio 3
04 preset radio 4
Pulse de nuevo el botón QUEUE para salir del menú de colas y volver
al estado de reproducción.
Radio DAB: Inicio Rápido
Asegúrese de que su zona de residencia pueda recibir señales DAB
(“Digital Audio Broadcasting”). Antes de utilizar esta función, le rogamos
que se dirija a la sección “Settings Quickstart” correspondiente a la
DAB para seleccionar su DAB REGION (“REGIÓN DAB”) y explorar
emisoras DAB disponibles.
Una vez realizada la configuración, pulse el botón DAB del panel
frontal o seleccione el menú DAB del menú superior para entrar en esta
función. Selecciones emisoras para su escucha girando y pulsando el
botón/selector.
Los canales DAB están organizados en conjuntos, también conocidos
como “multiplex”. Cada multiplex proporciona numerosas emisoras y
cada servicio contiene un servicio primario que a su vez puede contener
servicios secundarios. La tecnología DAB permite a las emisoras transmitir
datos originales junto con la señal de audio, pudiéndose incluir entre
ellos otros canales de audio, texto e incluso –en el futuro- imágenes y
datos informáticos.
Reproducción de Emisoras de Radio DAB
1. Seleccione el botón DAB del panel frontal. O mantenga pulsado el
botón BACK para regresar al menú superior. Gire y pulse el botón/selector
para seleccionar el menú DAB. El visualizador de funciones mostrará:
Internet Radio
Media Player
FM
< DAB >
El aparato buscará emisoras DAB disponibles. Seleccione la emisora
deseada con el botón/selector.
Guardar una emisora DAB en una preselección
Mientras se esté reproduciendo una emisora de DAB, mantenga pulsado
el botón de memorización y a continuación pulse el número de
preselección que desee asignarle con los botones del teclado numérico
. Este proceso también se puede realizar con ayuda del botón MEM y
el teclado numérico del mando a distancia. La emisora DAB seleccionada
será guardada en ese número de preselección. El RDG-1520 puede
almacenar hasta 30 emisoras DAB preseleccionadas.
Emisoras de Radio Preseleccionadas
Se dispone de un total de 30 preselecciones para FM, DAB y radio por
Internet, lo que significa que el RDG-1520 puede memorizar un total de
90 emisoras. Pero, si lo desea, puede almacenar muchas emisoras más
“online” utilizando su cuenta “My Stuff”.
NOTA: Para facilitar el proceso de ordenación, sólo serán visibles
las emisoras guardadas como preselecciones. Cada emisora será
marcada con una F para las preselecciones de FM, una D para las de
DAB y una I para las de radio por Internet.
Page 33

Español
33
AJUSTES: INICIO RÁPIDO
Media Player
FM
DAB
< Settings >
Mantenga pulsado el botón BACK para volver al menú superior y seleccione
el menú “Settings” (“Ajustes”) con el fin de entrara en los submenús girando
y pulsando el botón/selector. Se dispone de un total de 9 submenús de
ajuste. Gire el botón/selector para encontrar menús ocultos.
Configuración de Redes
1. Exploración para encontrar redes
(sólo para conexión inalámbrica)
Para seleccionar este menú, gire y pulse el botón/selector. Una vez que
haya entrado en dicho menú, el visualizador de funciones mostrará
“Scanning” (“Explorando”), proceso que puede tardar varios segundos
en completarse. Una vez que se haya encontrado una red, el visualizador
de funciones mostrará la identificación (ID) de la misma. Gire el control
para seleccionar y púlselo para confirmar.
< Scan for networks >
Enter network name
View Config
Edit Config
2. Introducción del nombre de la red
(sólo para conexión inalámbrica)
Si el RDG-1520 no puede encontrar ninguna red, el ESSID puede ser
introducido manualmente.
Utilice el botón/selector para seleccionar las letras del nombre del
dispositivo girándolo y pulsándolo y a continuación seleccione “END”
para confirmar dicho nombre.
< Network Config >
Version
Upgrade Firmware
Register
Set Time/Date
FM Tuner
DAB Settings
UPnP
WiFi Strength
4. Editar Configuración
Este menú puede utilizarse para editar la configuración de red actual.
También puede resultar útil para introducir una dirección de IP estática
para el RDG-1520. Seleccione esta función con las teclas de navegación
e introduzca la dirección de IP estática, la dirección MAC o el DNS de
la red seleccionada.
Para introducir el valor, pulse primero el botón/selector y a continuación
gírelo para incrementar/disminuir dicho valor. Pulse de nuevo para
introducir el valor y desplazarse al campo siguiente. Continúe hasta que
haya introducido toda la información.
5. Advertencia de Señal Baja (sólo para conexión inalámbrica)
Seleccione YES o NO para activar o desactivar la advertencia de nivel
de señal Wi-Fi bajo.
Version (“Versión”)
El menú muestra información sobre el software y el hardware del
aparato.
Upgrave Firmware (“Mejorar Software de Gestión)
Utilice esta opción para descargar nuevo firmware para radio por Internet
desde el portal Reciva. Si se dispone de nuevo firmware, el RDG-1520
le preguntará si desea descargarlo.
NOTA: Llegado a este punto, usted puede pulsar el botón BACK
para cancelar la mejora de firmware. La descarga de una mejora de
firmware puede tardar varios minutos. No apague el aparato ni lo
sitúe el modo de espera hasta que la operación haya sido completada
ya que en caso contrario es posible que sufra daños permanentes.
Register (“Registrarse”)
Esta opción mostrará una clave que puede ser utilizada para registrar el
aparato en el portal “Radio Customer” de Rotel: www.rotelradio.com.
Set Time/Date (“Ajustar Hora y Fecha”)
Ajuste su hora y fecha local. Pulse el botón/selector para comenzar a
introducir el valor y gírelo para modificar dicho valor. Pulse de nuevo para
confirmar el valor introducido y desplazarse hasta el campo siguiente.
FM Tuner (“Sintonizador de FM”)
Utilice esta función para seleccionar la región del sintonizador de FM.
Network Name
< END <> A BCDEFGHIJK >
NAME1
3. Ver Configuración
Muestra los detalles de la configuración actual. Gire el botón/selector
para ver la página anterior/siguiente de “Mode”>”ESSID”>”MAC
Address”>”IP Address”>”Netmask”>”Gateway”>”DNS Servers”. El
visualizador de funciones mostrará lo siguiente:
< Mode >
Auto DHCP
< ESSID >
XXXXXX
DAB Settings (“Ajustes DAB”)
Se dispone de 3 submenús: Scan (“Explorar”), Clear List (“Borrar Lista”)
y DAB Region (“Región DAB”). Seleccione el menú girando y pulsando
el control.
“Scan” explorará para buscar todos los servicios DAB disponibles. Si el
proceso acaba con éxito, se mostrará una lista de nombres de servicios;
si no hay emisoras DAB, se mostrará “no services found” (“no se han
encontrado servicios”).
“Clear List” borrará la lista de servicios disponibles encontrada por
“Scan”.
“DAB Region” mostrará regiones con servicios DAB. Usted puede
seleccionar la región deseada girando y pulsando el botón/selector.
Page 34

34
RDG-1520 Puerta de Acceso Digital
UPnP
Utilice este ajuste si desea cambiar el nombre de dispositivo UPnP asignado
al RDG-1520. Utilice el botón/selector para seleccionar –girándolo
y pulsándolo- las letras del nombre del dispositivo y a continuación
seleccione “END” para confirmar el nombre.
DEVICE NAME
< END <> A BCDEFGHIJ >
DEVICE
WiFi Strength (“Intensidad de la Señal Wi-Fi”)
Muestra un porcentaje para indicar la intensidad de la señal Wi-Fi.
Configurar “My Stuff” (“Mis Aparatos”)
Abrir una cuenta en el sitio web Rotelradio
Es posible configurar un menú “My Stuff” (“Mis Aparatos”) personalizado
en el menú superior.
Acceda al sitio web www.rotelradio.com desde su navegador de Internet.
Introduzca la clave de registro, que puede encontrarse en el menú
“Settings”>”Register”. Introduzca la clave de registro en el sitio web y siga
las instrucciones para configurar un nombre de usuario y una contraseña.
Acuérdese de ambos porque los necesitará para acceder al sitio.
Una vez haya accedido a su cuenta, podrá editar información para
los apartados “My Stations”, “My Streams”, “My Podcasts” y “My
Radios”.
Siga las instrucciones que se indican en el sitio web para personalizar
el menú de su RDG-1520.
NOTA: El sitio www.rotelradio.com funciona mejor con navegadores
de última generación, como por ejemplo el Internet Explorer 8 y el
Safari 5.0. Si tiene problemas para ver todos los iconos del sitio web,
le rogamos que actualice su navegador a la versión más reciente del
mismo. Por regla general, esto puede hacerse gratuitamente.
Configurar “My Stations” (“Mis Emisoras”)
En la base de datos del sitio web se dispone de una cantidad enorme de
emisoras. Para seleccionar las que más le gusten, sigla las instrucciones
que figuran en el sitio web. Cuando se muestren en pantalla resultados
de una búsqueda, aparecerá un enlace a “Add to my stations” (“Añadir
a mis emisoras”). Haga “clic” encima de esta opción y la emisora
seleccionada será añadida a My Stations. Aparecerá en pantalla un
nuevo menú superior “My Stuff” con un submenú “My Stations”.
Después del registro inicial, usted puede añadir emisoras de radio a
“My Stations” mientras esté conectado a las mismas pulsando la tecla
REPLY. El visualizador de funciones le preguntará si desea añadir una
determinada selección a “My Stations”. En caso afirmativo, pulse el
botón SELECT para añadir dicha emisora a su lista.
NOTA: Si lo desea, puede organizar sus emisoras en CARPETAS
(“FOLDERS”) para, por ejemplo, JAZZ, ROCK, OPERA, etc. Estas
carpetas serán mostradas en su RDG-1520.
Page 35

Español
35
Configurar “My Streams” (“Mis Descargas
Directas”)
Una vez que haya entrado en su cuenta de Rotelradio, puede añadir
sus propias descargas directas de Internet a la sección “My Streams”,
donde serán ordenadas en una lista bajo el nombre “My Account” (“Mi
Cuenta”).
Haga “clic” en “My Streams”. Se le solicitará que introduzca el nombre
de la emisora y el URL del medio correspondiente. El URL debería ser
un enlace al flujo de datos de audio real del sitio web.
NOTA: El menú “My Stuff” y las emisoras guardaras en “My Stations”
y “My Streams” aparecerán una vez que el aparato haya actualizado
su lista de emisoras. Para que el aparato actualice la lista de
emisoras, desactívelo, vuelva a ponerlo en marcha de nuevo y entre
en “Internet Radio” en el menú superior.
Botones Avanzados del Mando a Distancia
Menú de Configuración
Para entrar en el menú de configuración, pulse el botón SETUP del mando
a distancia y aparecerá la siguiente visualización:
< 1 DIMMER >
2 FACTORY DEFAULT
3 VERSION
4 ANTENNA SELECT
5 EXIT
1. DIMMER (“ATENUACIÓN”): Controla la luminosidad del visualizador
de funciones, que puede atenuarse en siete pasos. Si lo desea, puede
acceder a este control directamente con el botón DIM del mando a
distancia.
2. FACTORY DEFAULT (“AJUSTES DE FÁBRICA”): Sitúa el RDG-1520
en su estado original, es decir tal y como salió de fábrica. Se perderán
las preselecciones y las configuraciones de red, a la vez que situará el
aparato en el código de control remoto 1 (ver más adelante).
3. VERSION (“VERSIÓN”): Muestra el número de versión del aparato.
4. ANTENNA SELECT (“SELECCIÓN DE LA ANTENA”): Elige entre AUTO
(opción por defecto), antena de FM y antena DAB.
5. EXIT (“SALIR”): Vuelve al menú anterior.
Segundo Código de Control Remoto
El RDG-1520 se suministra de fábrica para que funcione con el código
de control remoto 1. Si observa que el mando a distancia del aparato
tiene algún conflicto con otros componentes Rotel, puede ajustar tanto
el RDG-1520 como su mando a distancia al código de control remoto
2 siguiendo los pasos siguientes:
1. Con el mando a distancia apuntando hacia el RCX-1500, pulse
simultáneamente los botones “FM” y “2” del mando a distancia. Libere
el botón “FM” y continúe pulsando el botón “2” durante 5 segundos.
El RDG-1520 mostrará “Audio Custom Code 1 > 2” en su pantalla de
visualización.
2. Para cambiar de nuevo al código de control remoto 1, repita el
procedimiento anterior pulsando el botón “1” en vez del “2”.
3. Los botones del mando a distancia del RDG-1520, como por ejemplo
PLAY, STOP o PAUSE, utilizan los códigos de control estándar de Rotel
para reproductores de discos compactos. Si considera que esto puede
crear conflictos con su reproductor de CD de Rotel, pulse simultáneamente
los botones “CD” y “2”. Libere el botón “CD” y continúe manteniendo
pulsado el botón “2” durante 5 segundos. El visualizador de funciones
del RDG-1500 mostrará “CD Custom Code 1 > 2”.
4. Para cambiar de nuevo al código de control remoto 1, repita el paso
3 pulsando el botón “1” en vez del “2”.
Page 36

36
RDG-1520 Puerta de Acceso Digital
Problemas y Posibles Soluciones
La mayoría de dificultades que suelen producirse en los sistemas de audio
son el resultado de conexiones realizadas incorrectamente o ajustes
inapropiados. En caso de que usted se encuentre con algún problema,
aísle en primer lugar el área afectada, compruebe los ajustes de control
realizados, determine la causa del fallo y haga los cambios necesarios.
Si se ve incapaz de hacer funcionar de nuevo el RDG-1520, considere
las sugerencias que le damos para las siguientes condiciones:
El Indicador Luminoso de Puesta en Marcha No Se Activa
El indicador luminoso de puesta en marcha debería activarse en el
momento de conectar el RDG-1520 a una toma de corriente eléctrica
alterna. Si no es así, compruebe dicha toma con otro dispositivo eléctrico,
como por ejemplo una bombilla, y asegúrese de que la misma no esté
controlada por un conmutador situado en su posición off.
La Conexión en Red No Funciona
Si tiene problemas para conectar el RDG-1520 a su red inalámbrica
compruebe cuidadosamente la configuración de la misma. Es posible
que los pasos siguientes le ayuden a resolver el problema:
1. Confirme que dispone de una red Wi-Fi. Compruebe que otros
ordenadores pueden acceder a Internet utilizando la misma red.
2. Compruebe que se dispone de un servidor DHCP o que ha configurado
una dirección de IP estática en el aparato. Le rogamos que consulte al
respecto la sección de Configuración de Redes.
3. Compruebe que el cortafuegos de su red no esté bloqueando ningún
puerto de salida.
Glosario
Bit rate (“Velocidad de Transferencia Binaria”) – Velocidad a
la que se produce la transferencia de datos, es decir el número de bits
de información enviados cada segundo.
Buffering (“Uso de Etapas Separadoras”) – Descarga y
reconstrucción de los datos antes de ser reproducidos.
Codec – (“Codificador/Descodificador”) – Software capaz de
codificar y/o descodificar una señal o un flujo de datos digitales.
Data Encryption (“Encriptación de Datos”) – Encriptación de datos
por motivos de seguridad. En lo que concierne a las redes inalámbricas,
por regla general se trata de WEP y WPA.
DHCP (“Dynamic Host Control Protocol”/”Protocolo de Control
Dinámico del Huésped”) – Es un protocolo que permite asignar
direcciones IM a dispositivos de una red.
DNS Server (“Servidor DNS”) – Servidor remoto que lleva a cabo
la traducción de direcciones web en las correspondientes direcciones
IP numéricas.
ESSID (“Extended Service Set Identifier”/”Identificador de
Grupos de Servicios Extendido”) – El ESSID es un identificador
único para su red inalámbrica.
Ethernet – Tecnología de conexión en red para redes de área local
(LAN). El cable CAT5 transporta información entre ordenadores a una
velocidad de 10/100/1.000 megabits por segundo.
4. Desactive por completo el aparato (desenchufándolo de la red eléctrica)
y deje que reinicie el ciclo de búsqueda de redes.
5. Asegúrese de que el RDG-1520 pueda recibir señales Wi-Fi en la
ubicación en la que esté. Utilice un cable de extensión USB para colocar
el módulo Wi-Fi en una posición más alta o en un lugar diferente con el
fin de maximizar la recepción.
No Hay Sonido
1. Compruebe los cables que van de las salidas del RDG-1520 a las
entradas del preamplificador o amplificador integrado y asegúrese de que
estén conectados adecuadamente. Consulte al respecto la figura 2.
2. La música reproducida por emisoras de radio de Internet será afectada
por la velocidad de su conexión a Internet. Si la música se interrumpe
de manera regular, contacte con su proveedor de Internet.
3. Asegúrese de que la emisora que haya seleccionado funcione en ese
momento del día. Es posible que dicha emisora esté emitiendo en una
franja horaria distinta de la de su lugar de residencia.
4. Le rogamos que inserte el módulo Wi-Fi (o un adaptador de cable)
en el puerto Ethernet situado en el panel posterior del RDG-1520 incluso
en el caso de que no haya ninguna red disponible. Una vez puesto en
marcha, el aparato buscará redes disponibles antes de permitir al usuario
acceder a las funciones de FM y DAB.
File format (“Formato de archivo”) – El tipo de archivo para
un determinado contenido, como por ejemplo el formato para música
MP3 .
File Server (“Servidor de Archivos”) – Es un ordenador o dispositivo
que proporciona estaciones de trabajo en una red con acceso controlado
a archivos compartidos.
Firmware – Software incrustado en un determinado dispositivo que
proporciona instrucciones operacionales al mismo.
Gateway – Es el punto de acceso de LAN a WAN.
Internet – Red de ordenadores consistente en una red mundial de
redes de ordenadores.
IP Address – Etiqueta numérica que es asignada a los dispositivos de
una red informática.
ISP (“Internet Service Provider”) – Proveedor de Servicios de
Internet.
Kbps – Acrónimo de kilobits (miles de bits) por segundo. Es una forma
de medir la velocidad de transferencia de datos.
LAN (“Local Area Network”/”Red de Area Local”) – Es una red
informática local para facilitar la comunicación entre ordenadores.
Page 37

Español
37
MAC (“Media Access Control”/”Control de Acceso a Soportes”)
– Es un identificador único asignado a adaptadores de red o tarjetas
para conexión a redes por su fabricante con el fin de facilitar su
identificación.
Modem (“Modulador/Desmodulador”) – Dispositivo utilizado
para conectar ordenadores mediante una línea telefónica.
Network (“Red”) – Sistema de componentes electrónicos u ordenadores
conectados entre sí.
Network adapter (“Adaptador para conexión en red”) –
Circuitería electrónica instalada en el interior de los ordenadores que
permite conectarlos entre sí para crear una red.
Podcast – Archivo de audio suministrado vía RSS a través de Internet
o un servicio de suscripción.
Router – Dispositivo que une entre sí múltiples redes u ordenadores.
RSS feed (“Really Simply Syndication feed”) – Protocolo que se
utiliza para publicar contenidos en una web de tal forma que la gente
puede suscribirse a los mismos y recibir actualizaciones.
Server (“Servidor”) – Es un ordenador que proporciona ordenadores
clientes con acceso a archivos e impresoras como recursos compartidos
en una red informática.
Subnet mask (“Máscara de subgrupo”) – Es un método que
permite dividir redes IP en subgrupos.
UPnP (“Universal Plug and Play”) – Método de configuración
automática utilizado en dispositivos tales como PC’s, periféricos, dispositivos
inalámbricos y electrodomésticos inteligentes.
URL (“Uniform Ressource Locator”/”Localizador de Recursos
Uniforme”) – Es el formato de la dirección correspondiente a un sitio
o página web particular
USB (“Universal Serial Bus”/”Bus Serie Universal”) – Conexión
comúnmente utilizada en periféricos informáticos.
WAN (“Wide Area Network”/”Red de Área Extendida”) –
Red de ordenadores que abarca un área más amplia que una de tipo
local (por ejemplo Internet).
Características Técnicas
[Sección de Radio FM]
Sensibilidad útil 22 dBf
Sensibilidad para un nivel de 50 dB 27’2 dBf
Relación señal/ruido (a 65 dBf) 63 dBf en mono y
60 dBf en estéreo
Distorsión armónica total (a 65 dBf) 0’2% en mono y
0’3% en estéreo
Respuesta en frecuencia 10-15.000 Hz, +/-3 dB
Separación en estéreo (100 Hz/1 kHz/10 kHz) 40 dB/45 dB/35 dB
Nivel de salida (a 75 kHz) 1’1 V
Entrada de antena no balanceada de 75 ohmios
[Sección de Radio DAB]
Sensibilidad -80 dBm
Rango de sintonía Banda III (174-240 MHz)
Velocidad de transferencia de los datos de audio máxima de 224 Kbps
Respuesta en frecuencia 20-20.000 Hz, +/-1 dB
Nivel de salida (a 0 dBfs) 2’1 V
Entrada de antena no balanceada de 75 ohmios
con conector en “F”
[Sección General]
Tipo de conexión en red 802.11b/g
Protocolos de seguridad WEP, WPA1 (TKIP) y WPA2
(TKIP)
Formatos de archivo compatibles Real Audio, MP3, Windows
Media Stream, OGG Vorbis,
AAC, WAV, AIFF y AU
Consumo 12 vatios
Alimentación 120 V/60 Hz para EE.UU. y
230 V/50 Hz para Europa
Peso neto 6’5 kg
Dimensiones (An x Al x P) 431x99x312 mm
Altura del panel frontal 8’9 mm
Todas estas especificaciones son correctas en el momento de la impresión del
presente manual de instrucciones.
Rotel se reserva el derecho a realizar modificaciones en las mismas sin aviso
previo.
Rotel y el logotipo Rotel HiFi están registrados por The Rotel Co., Ltd., Tokio,
Japón.
WEP (“Wired Equivalent Privacy”/”Privacidad Equivalente a
una Red por Cable”) – Protocolo de seguridad para redes inalámbricas
que tiene por objeto prevenir el acceso a una red por parte de “intrusos”
que utilicen equipos LAN inalámbricos similares con el fin de capturar
el tráfico de datos presente en la misma.
WPA (“WiFi Protected Access”/”Acceso Wi-Fi Protegido”) – Es
un protocolo de seguridad para redes inalámbricas que ha sustituido
al más débil WEP.
Wi-Fi – (“Wireless Fidelity”/”Fidelidad Inalámbrica”) – Estándar
de radiofrecuencia que es utilizado para conectar dispositivos –como
por ejemplo iPod y ordenadores- entre sí empleando una conexión
inalámbrica (es decir sin cables).
Page 38

38
2ª generación
5ª generación 4ª generación 3ª generación 2ª generación
(videocámara) (vídeo) (vídeo) (aluminio)
“Made for iPod” significa que un determinado accesorio electrónico ha sido diseñado
específicamente para poder ser conectado a un iPod y ha sido homologado por el
desarrollador para satisfacer los estándares de calidad y prestaciones establecidos
por Apple.
“Made for iPhone” significa que un determinado accesorio electrónico ha sido
diseñado específicamente para poder ser conectado a un iPhone y ha sido
homologado por el desarrollador para satisfacer los estándares de calidad y
prestaciones establecidos por Apple.
RDG-1520 Puerta de Acceso Digital
Apple no es responsable del funcionamiento de este dispositivo o su compatibilidad
con la normativa de seguridad vigente.
iPod es una marca comercial de Apple Inc. registrada en EE.UU. y otros países.
iPhone es una marca comercial de Apple Inc.
Windows, Windows XP, Windows 2000, Windows Vista, Windows 7 y Windows
Media son marcas comerciales de Microsoft Corporation registradas en EE.UU.
y/u otros países.
“Este producto incluye tecnología propiedad de Microsoft Corporation que es
utilizada bajo una licencia de Microsoft Licensing GP. El uso o la distribución de
dicha tecnología fuera de este producto está prohibido sin una licencia expresa
de -según proceda- Microsoft Corporation y/o Microsoft Licensing GP.
Page 39

Français
ATTENTION :
RISQUE D’ÉLECTROCUTION.
NE PAS OUVRIR
ATTENTION : POUR RÉDUIRE LE RISQUE D’ÉLECTROCUTION, NE PAS
RETIRER LE CAPOT. IL N’Y A À L’INTÉRIEUR AUCUNE PIÈCE
SUSCEPTIBLE D'ÊTRE MODIFIÉE PAR L’UTILISATEUR. EN CAS DE
PROBLÈME, ADRESSEZ-VOUS À UN RÉPARATEUR AGRÉÉ.
L’éclair dans un triangle équilatéral indique
la présence interne de tensions électriques
élevées susceptibles de présenter des
risques graves d’électrocution.
Le point d’exclamation dans un triangle
équilatéral indique à l’utilisateur la
présence de conseils et d’informations
importantes dans le manuel d’utilisation
accompagnant l’appareil. Leur lecture est
impérative.
39
Ce symbole signifie que l’appareil bénéficie d’une double
isolation électrique. Une liaison à la terre n’est pas
obligatoire.
Tous les appareils Rotel sont conçus en totale conformité
avec les directives internationales concernant les
restrictions d’utilisation de substances dangereuses
(RoHS) pour l’environnement, dans les équipements
électriques et électroniques, ainsi que pour le recyclage
des matériaux utilisés (WEEE, pour Waste Electrical
and Electronic Equipment). Le symbole du conteneur
à ordures barré par une croix indique la compatibilité
avec ces directives, et le fait que les appareils peuvent
être correctement recyclés ou traités dans le respect
total de ces normes.
DAB
Page 40

40
Le branchement repéré COMPUTER I/O ne concerne que des techniciens agréés uniquement.
Information FCC
Cet appareil a été testé afin de vérifier sa conformité avec les normes minima des appareils numériques
de classe B, suivant l’article 15 des normes FCC. Ces normes garantissent une protection suffisante
contre les interférences, dans le cadre d’une utilisation domestique. Cet appareil génère, utilise et peut
rayonner des fréquences radio et peut, s’il n’est pas utilisé selon les conseils prodigués dans ce manuel
d’utilisation, causer des interférences avec les communications radio.
Il n’y a cependant aucune garantie que ces interférences n’interviennent dans certaines installations.
Si vous notez la présence de parasites sur la radio ou la télévision (détectées par la mise sous et
hors tension de l’appareil), vous pouvez essayer d’éliminer ces interférences en essayant une des
procédures suivantes :
UÊ,jÀiÌiâÊÕÊ`j«>Viâʽ>ÌiiÊ`iÊÀjVi«ÌÊ/6]ÊÀ>`]ÊiÌV°®Ê
UÊÕ}iÌiâʽj}iiÌÊ«ÞõÕiÊiÌÀiÊiÊÀjVi«ÌiÕÀÊiÊV>ÕÃiÊiÌʽ>««>Ài°Ê
UКА>ViвКiГК>ХМАiГК>ГКГХАКХiК«АГiКГiVМiХАК`vvjАiМiК`iКViiКГХАК>µХiiКiГМКLА>VjКiК
récepteur.
UÊÃÕÌiâÊÛÌÀiÊÀiÛi`iÕÀ]ÊÕÊÕÊÌiVViÊëjV>ÃÌiÊ`iÊViÃʵÕiÃÌÃÊ`iÊÀjVi«ÌÊÀ>`É/6°Ê
Attention
Cet appareil répond aux normes de l’article 15 de la FCC sous les conditions suivantes : 1) Cet appareil
ne doit pas causer d’interférence très sensible. 2) Cet appareil doit pouvoir accepter n’importe quelle
interférence externe, y compris celles dues à une utilisation fortuite.
NOTE AUX INSTALLATEURS D’UNE ANTENNE CATV : L’installation d’un
système CATV doit être faite par un technicien qualifié, selon les normes de l’article 820-40 de la
NEC. La mise à la terre, notamment, doit être correctement effectuée, reliée au système de mise à la
terre de l’immeuble, le plus près possible du point d’entrée du câble correspondant. Voir le schéma
d’installation page précédente.
NOTE : Cet appareil a été testé afin de vérifier sa conformité avec les normes minima des appareils
numériques de classe B, suivant l’article 15 des normes FCC. Ces normes garantissent une protection
suffisante contre les interférences, dans le cadre d’une utilisation domestique. Cet appareil génère, utilise
et peut rayonner des fréquences radio et peut, s’il n’est pas utilisé selon les conseils prodigués dans ce
manuel d’utilisation, causer des interférences avec les communications radio. Il n’y a cependant aucune
garantie que ces interférences n’interviennent dans certaines installations. Si vous notez la présence de
parasites sur la radio ou la télévision (détectées par la mise sous et hors tension de l’appareil), vous
pouvez essayer d’éliminer ces interférences en essayant une des procédures suivantes :
Dans tous les cas, en cas de problème de réception, vérifiez que les points suivants sont respectés :
UÊ"ÀiÌiâÊVÛi>LiiÌʽ>ÌiiÊ`iÊÀjVi«Ì°Ê
UÊ}iâÊiÊ«ÕÃÊ«ÃÃLiʽ>««>ÀiÊ`iÊÛÌÀiÊÀjVi«ÌiÕÀÊ`iÊÌjjÛðÊ
UÊ1ÌÃiâÊÕiÊ«ÀÃiÊÃiVÌiÕÀÊÕÀ>iÊ`j«i`>ÌiÊ«ÕÀʽ>««>ÀiÊ`iÊÀjVi«Ì°Ê
UÊ ½jÃÌiâÊ«>ÃÊDÊVÌ>VÌiÀÊÛÌÀiÊÀiÛi`iÕÀÊ>}ÀjjÊ,ÌiÊÃÊiÊ«ÀLmiÊ«iÀÃÃÌi°Ê
RDG-1520 Passerelle numérique
Remarques importantes concernant la sécurité Remarque
ATTENTION : Il n’y a à l’intérieur aucune pièce susceptible d’être modifiée par l’utilisateur. Adressezvous impérativement à une personne qualifiée.
ATTENTION : Pour réduire tout risque d’électrisation ou d’incendie, ne pas exposer l’appareil à une
source humide, ou à tout type de risque d’éclaboussure ou de renversement de liquide. Ne pas poser
dessus d’objet contenant un liquide, comme un verre, un vase, etc. Prenez garde à ce qu’aucun objet
ou liquide ne tombe à l’intérieur de l’appareil par ses orifices de ventilation. Si l’appareil est exposé à
l’humidité ou si un objet tombe à l’intérieur, débranchez-le immédiatement de son alimentation secteur,
et adressez-vous immédiatement et uniquement à une personne qualifiée et agréée.
Tous les conseils de sécurité et d’installation doivent être lus avant de faire fonctionner l’appareil.
Conservez soigneusement ce livret pour le consulter à nouveau pour de futures références.
Tous les conseils de sécurité doivent être soigneusement respectés. Suivez les instructions. Respectez les
procédures d’installation et de fonctionnement indiquées dans ce manuel.
L’appareil doit être nettoyé uniquement avec un chiffon sec ou un aspirateur.
Ne pas utiliser cet appareil près d’un point d’eau.
L’appareil doit être placé de telle manière que sa propre ventilation puisse fonctionner,
c’est-à-dire avec un espace libre d’une dizaine de centimètres minimum autour de lui.
Il ne doit pas être posé sur un fauteuil, un canapé, une couverture ou toute autre surface susceptible
de boucher ses ouïes d’aération ; ou placé dans un meuble empêchant la bonne circulation d’air autour
des orifices d’aération.
Cet appareil doit être placé loin de toute source de chaleur, tels que radiateurs, chaudières, bouches de
chaleur ou d’autres appareils (y compris amplificateurs de puissance) produisant de la chaleur.
ATTENTION : La prise secteur
en face arrière constitue le
moyen principal pour connecter/
déconnecter l’appareil de son
alimentation secteur. L’appareil doit
donc être installé de telle manière
que ce câble d’alimentation soit
accessible en permanence.
Cet appareil doit être branché
sur une prise d’alimentation
secteur, d’une tension et d’un
type conformes à ceux qui sont
indiqués sur la face arrière de
l’appareil (USA : 120 V/60 Hz,
CE : 230 V/50 Hz)
Brancher l’appareil uniquement grâce au cordon secteur fourni, ou à un modèle équivalent. Ne pas
tenter de modifier ou changer la prise. Notamment, ne pas tenter de supprimer la prise de terre
(troisième broche de la prise) si celle-ci est présente. Si la prise n’est pas conforme à celles utilisées
dans votre installation électrique, consultez un électricien agréé. Ne pas utiliser de cordon rallonge.
Prendre garde à ce que ce cordon d’alimentation ne soit pas pincé écrasé ou détérioré sur tout son
trajet, et à ce qu’il ne soit pas mis en contact avec une source de chaleur. Vérifiez soigneusement la
bonne qualité des contacts, à l’arrière de l’appareil comme dans la prise murale.
La prise d’alimentation secteur constitue le moyen radical de déconnexion de l’appareil. Elle doit donc
rester en permanence accessible, car sa déconnexion constitue la seule assurance que l’appareil n’est
plus alimenté par le secteur. La diode LED de mise en veille Standby ne s’allume plus lorsque ce cordon
d’alimentation est débranché.
Prendre garde à ce que ce cordon d’alimentation ne soit pas pincé, écrasé ou détérioré sur tout son
trajet, et à ce qu’il ne soit pas mis en contact avec une source de chaleur. Vérifiez soigneusement la
bonne qualité des contacts, à l’arrière de l’appareil comme dans la prise murale.
Débranchez le câble d’alimentation en cas d’orage, ou si l’appareil ne doit pas être utilisé pendant une
longue période.
Cet appareil doit être connecté à une prise murale pourvue d’une liaison protégée avec mise à la terre.
N’utilisez que des accessoires préconisés par le constructeur.
N’utilisez que des meubles, supports, systèmes de transport recommandés par Rotel.
Procédez toujours avec la plus extrême précaution lorsque vous déplacez l’appareil,
afin d’éviter tout risque de blessure. Utilisez un câble de type Classe 2 pour la liaison
avec les enceintes acoustiques, afin de garantir une installation correcte et de minimiser
les risques d’électrocution.
L’appareil doit être immédiatement éteint, débranché puis retourné au service après-vente agréé dans
les cas suivants :
UÊ iÊV@LiÊ`½>iÌ>ÌÊÃiVÌiÕÀÊÕÊÃ>Ê«ÀÃiÊiÃÌÊi`>}j°Ê
UÊÊ 1ÊLiÌÊiÃÌÊÌLj]ÊÕÊ`ÕʵÕ`iÊ>ÊVÕjÊDʽÌjÀiÕÀÊ`iʽ>««>Ài°Ê
UÊÊ ½>««>ÀiÊ>ÊjÌjÊiÝ«ÃjÊDÊ>Ê«Õi°Ê
UÊÊ ½>««>ÀiÊiÊvVÌiÊ>viÃÌiiÌÊ«>ÃÊÀ>iiÌ°Ê
UÊÊ ½>««>ÀiÊiÃÌÊÌLj]ÊÕÊiÊVvvÀiÌÊiÃÌÊi`>}j°Ê
Les piles de la télécommande ne doivent pas être exposées à une température excessive, comme
l’exposition directe au soleil, au feu ou équivalent.
Page 41

Français
Figure 1: Commandes et Branchements
41
RDG-1520
POWER
123
456
789
MEMORY0 DAB i-RADIOFM
NETWORK USBAUX
VDQSXTH N
Touches et commandes de la face avant et de la
télécommande
, : Touches d’allumage/extinction
: Entrée USB iPod/MP3
, : Retour au niveau supérieur dans le
: Affichage
: Sélection de la source musicale
: Touche Play
: Liste d’attente (mémoires station
: Retour au menu supérieur
: Menu iRadio
: Piste suivante/précédente
P ^ SEL
^
: Navigation/sélection
Interfaces avant et arrière
V : Antenne FM/DAB
D : Adaptateur Wi-fi/Ethernet
Q : Sortie analogique
S : Entrée numérique
X : Entrée/sortie ordinateur
T : Entrée télécommande externe
H : Sortie trigger 12 v
N : Prise secteur
OFF
QUEUE
BACK REPLY
DIM
123
456
789
0
REPT RANDOM
FM DAB i-RADIO CD
NETWORK USB AUX
ON
SETUP
SEL
EXIT
MEM
menu
radio)
QUEUE
PLAY
SKIP --
BACK REPLY
PAUSESTOP
SKIP +
PUSH SELECT
P
Télécommande : commandes avancées
SETUP & EXIT : Entée et sortie dans le menu usine
[ & ] : Recherche automatique des
radios M
RANDOM/ : Lecture dans un ordre aléatoire
SHUFFLE
Remarque :
1, La majorité des touches de la télécommande reprend
les touches présentes en face avant. Quelques fonctions
ne sont accessibles qu’à partir de la télécommande, ce
qui est expliqué séparément pour chaque cas.
2, Les touches du panneau avant sont utilisables pour
la plupart des opérations. Mais vous pouvez bien sûr
utiliser les touches correspondantes de la télécommande.
Par exemple, la commande consistant à tourner puis
presser le bouton principal de la façade P correspond
à la pression sur les touches SEL ^ et^ de la
télécommande, pour la même fonction désirée.
RR-CX92
Page 42

42
Figure 2: Branchements principaux
RDG-1520 Passerelle numérique
RDG-1520
POWER
123
456
789
MEMORY0 DAB i-RADIOFM
NETWORK USBAUX
QUEUE
PLAY
SKIP --
BACK REPLY
PAUSESTOP
SKIP +
PUSH SELECT
WI-FI DONGLE
PRE AMPLIFIER
DIGITAL AUDIO DEVICE
Remarques importantes
Pendant les branchements, assurez-vous que :
✔ Tous les maillons sont éteints avant leur
branchement, quels qu’ils soient, y
compris les enceintes acoustiques.
✔ Éteignez tous les maillons avant de
modifier quoi que ce soit au niveau
de leurs branchements, quels qu’ils
soient.
Il est également recommandé de :
✔ Toujours baissez le niveau sonore via le
contrôle de volume, avant d’allumer
ou d’éteindre l’amplificateur.
Page 43

Français
43
Sommaire
Remarques importantes concernant la sécurité .........................40
Figure 1: Commandes et Branchements 41
Figure 2: Branchements principaux 42
Remarques importantes 42
Au sujet de Rotel ...............................................43
Vue d’ensemble – les produits radio internet/ passerelles numériques Rotel ....44
DAB et Radio FM 44
Radio Internet 44
Accès réseau 44
Le site Internet RotelRadio : la gestion de vos stations de radio 44
Lecture à partir de iPods, lecteurs MP3 et lecteurs flash 45
Lecture à partir de serveurs réseau 45
Pour démarrer .................................................45
Caractéristiques 45
Quelques précautions 45
Installation 45
Alimentation électrique et mise sous tension ...........................46
Prise d’alimentation secteur N 46
Interrupteur de mise sous tension/veille (Standby) et indicateur lumineux 46
Entrée Trigger 12 V H 46
Sortie Trigger 12V H 46
Branchements .................................................46
Réception radio DAB/FM C V 46
/,Ê 1,+1Ê18ÊS 46
Connexion réseau D 46
Prise ordinateur Computer I/O X 46
Branchement USB 46
Sortie Q 46
Guide rapide Radio Internet .......................................47
Ce que vous devez savoir avant utilisation 47
Première connexion au réseau (Network) 47
Choisir une station de radio 47
Ecoute /lecture d’une station de radio Internet 48
Mémoriser une station de radio dans une présélection (télécommande uniquement) 48
Lire une station de radio présélectionnée 48
Guide rapide lecteur Media Player .................................. 49
Serveurs UPnP 49
Paramétrer un service UPnP dans le PC 49
Lecture de fichiers multimédias en utilisant un serveur UPnP 49
Effacer la liste d’attente 50
Playback Mode 50
Guide rapide liaison iPod/USB .....................................51
Branchement d’une unité de stockage USB 51
Connexion iPod / iPhone 51
Touches de contrôle de la lecture 51
Guide rapide radio FM ...........................................51
Lecture des stations de radio en FM 51
Mémoriser une station FM dans une présélection 51
Ecouter une station de radio présélectionnée 51
Guide rapide radio DAB ..........................................52
Lire une station de radio DAB 52
Mémoriser une station DAB dans une présélection 52
Présentation des paramètres ......................................52
Configurer “My Stuff” ..........................................54
Configurer “Mes stations” .......................................54
Configurer “My Streams” ........................................54
Touches avancées de la télécommande ...............................54
Problèmes de fonctionnement . . . . . . . . . . . . . . . . . . . . . . . . . . . . . . . . . . . . . . 55
Glossaire ..................................................... 55
Spécifications ..................................................56
Au sujet de Rotel
Notre histoire commence il y a environ 50 ans. Depuis, au fil des années,
nous avons reçu des centaines de prix et de récompenses, et satisfait des
centaines de milliers de personnes – comme vous !
Rotel a été fondée par une famille passionnée de musique, qui a décidé
de fabriquer des maillons Haute Fidélité sans compromis aucun. Depuis
sa création, cette passion est restée intacte, et cette famille s’est fixée
comme objectif de proposer à tous les audiophiles et mélomanes les
meilleurs appareils possibles, quel que soit leur budget. Une volonté
partagée par tous les employés de Rotel.
Les ingénieurs Rotel travaillent selon une équipe très soudée, écoutant,
peaufinant chaque nouveau modèle jusqu’à ce qu’il atteigne exactement
leurs standards – très élevés – de musicalité. Ils sont libres de choisir des
composants en provenance du monde entier, afin de concevoir le produit
le meilleur possible. C’est ainsi que vous trouverez dans nos appareils
des condensateurs d’origine britannique ou allemande, des transistors
japonais ou américains, tandis que les transformateurs toriques sont
toujours fabriqués dans nos propres usines Rotel.
Nous sommes tous concernés par la qualité de l’environnement. Et, comme
de plus en plus de produits électroniques sont fabriqués puis éliminés
quelques années plus tard, il est désormais essentiel qu’un constructeur
fabrique tous ses produits en veillant à ce qu’ils aient un impact minimum
sur la terre et les nappes phréatiques.
Chez Rotel, nous sommes très fiers d’apporter notre pierre à ce nouvel
édifice. Nous avons réduit la teneur en plomb de nos électroniques, en
utilisant notamment une soudure spéciale ROHS, tandis que notre nouvelle
gamme d’amplificateurs fonctionnant en classe D (non numérique) présente
un rendement cinq fois supérieur aux générations conventionnelles
précédentes, délivrant pourtant encore plus de puissance, avec une
qualité encore supérieure. Ces appareils ne chauffent pas, dépensent
beaucoup moins d’énergie, sont donc très bons pour l’environnement
tout en étant encore plus musicaux.
En plus, nous imprimons tous nos catalogues et manuels sur papier
recyclé.
Ce ne sont certes que de petites étapes. Mais ne sont-ce pas justement
les plus importantes ? Nous continuons activement la recherche et la mise
au point de nouvelles méthodes, et l’utilisation de nouveaux matériaux
pour aboutir à un processus de fabrication général plus écologique et
plus propre.
Tous les membres de l’équipe Rotel vous remercient pour l’achat de cet
appareil. Nous sommes persuadés qu’il vous offrira de nombreuses
années d’intense plaisir musical.
Page 44

44
RDG-1520 Passerelle numérique
Vue d’ensemble – les produits radio
internet/ passerelles numériques Rotel
Cet appareil ne fonctionnera pas si l’adaptateur Wi-fi ou filaire n’est pas
connecté. Nous vous invitons à lire en premier cette introduction. Vous pourrez
trouver les réponses aux questions fréquentes (FAQ) sur le site Web de Rotel :
www.rotel.com/NA/support/FAQ.htm
Ce produit Rotel offre à la fois les possibilités traditionnelles de réception
FM et DAB et, venue du monde des ordinateurs, la possibilité d’accéder
à littéralement des milliers de stations de radio disponibles sur Internet.
En outre, cette nouvelle gamme de tuners/passerelles numériques Rotel
peut lire et exploiter le contenu de vos lecteurs audio personnels (iPod
et lecteurs MP3) ainsi que vos fichiers musicaux stockés sur un serveur
réseau.
Ces indications complètent celles du “démarrage rapide” contenues un
peu plus loin dans cette notice
En premier lieu, il n’est pas essentiel qu’il y ait un réseau Wi-fi ou filaire
disponible. Toutefois, il est indispensable que l’adaptateur Wi-fi ou filaire
soit inséré dans son logement pour que l’appareil fonctionne. Utilisez le
cas échéant une rallonge si l’espace est limité à l’arrière du tuner.
A chaque fois que l’appareil est mis en route, il se verrouille en mode
« recherche » pendant 15 à 20 secondes. Une fois qu’il a terminé les
autres modes radio peuvent être utilisés.
L’entrée USB est active quand l’appareil est en marche.
DAB et Radio FM
C’est la partie la plus conventionnelle du produit, et si vous avez l’habitude
de chercher, mémoriser et sélectionner des stations de radio à partir des
services radio DAB et FM, vous n’aurez pas de difficultés avec la façon
dont ce tuner traite ces services. Tout cela est expliqué dans les sections
de démarrage rapide correspondantes. Gardez en mémoire de bien
sélectionner l’antenne (aérienne) comme entrée à utiliser, vous trouverez
cette option dans le menu de configuration. Vous devrez aussi installer
et orienter correctement l’antenne dédiée pour optimiser la réception
des services DAB et FM.
Radio Internet
L’utilisation des radios Internet nécessite deux services supplémentaires :
un accès Internet via un réseau informatique et quand cela fonctionne la
connexion à un site Internet qui permet l’accès à des stations de radios
Internet. Cette dernière fonctionnalité étant intégrée dans le tuner, nous
allons donc traiter en premier de l’accès à votre réseau.
Accès réseau
L’installation d’un réseau informatique dépasse le cadre de ce manuel,
par conséquent nous allons supposer que vous avez déjà un réseau
Wi-fi en service chez vous. Si vous utilisez un réseau filaire référez vous
à la section « Configuration Réseau » à l’onglet « Réglages généraux »
Les liaisons filaires constituent les liaisons Ethernet les plus fiables. Des
adaptateurs Ethernet par courant porteur sont également disponibles
auprès de fournisseurs tiers si le passage d’un câble Ethernet s’avère
impossible.
A la mise sous tension, l’appareil recherche les réseaux Wi-fi qui sont à
portée. Une fois sa recherche terminée, vous verrez les noms d’un un ou
plusieurs réseaux s’afficher sur la face avant. Vous devrez sélectionner
le nom du réseau correspondant à votre installation. Ce nom a été en
général attribué une fois pour toutes quand votre réseau a été installé et
est souvent déterminé par le routeur principal de votre réseau.
Vous devrez ensuite autoriser votre tuner à accéder à votre réseau en
entrant la clé WEP (ou WPA, ou WPA2) de votre réseau Wi-fi , exactement
comme quand vous voulez y accéder avec un ordinateur. Cette clé se situe
généralement au niveau du paramétrage de votre routeur. Vous n’aurez
à rentrer qu’une seule fois cette suite de caractères alphanumériques,
faites juste attention à bien respecter la casse (majuscules ou minuscules)
de votre clé WEP. Quand vous avez terminé, faites la défiler jusqu’au
bout et sélectionnez END ou appuyez simplement sur la touche REPLY
pour terminer la procédure.
Vous pouvez utiliser les touches Suivante ou Précédente de l’appareil
pour vous aider à rentrer ces informations. Ne confondez pas la lettre
O avec le chiffre 0.
Une fois que vous serez connecté avec succès au réseau, le tuner va
automatiquement se connecter au site Web à partir duquel vous pourrez
choisir la partie du monde qui vous intéresser et sélectionner les stations
de radios par pays, genre et nom.
En vous enregistrant sur www.rotelradio.com vous pourrez rechercher et
sauvegarder vos radios Internet préférées et accéder à d’autres services
musicaux disponibles dans votre région.
Le site Internet RotelRadio : la gestion de vos stations de radio
La gestion de milliers de stations de radio disponibles sur Internet serait
quasi impossible sans un outil pour organiser et gérer ces stations en
fonction de vos besoins. Pour ce faire, Rotel a mis en place un moyen
très facile grâce à un site Internet dédié à partir duquel vous pourrez
présélectionner vos stations de radios favorites.
L’adresse de ce site est http://rotelradio.com .
Comme sur de nombreux sites web, vous devrez tout d’abord enregistrer
un nom d’utilisateur et mot de passe afin de créer un compte sur le site.
Avant de pouvoir le faire, vous devez enregistrer votre produit sur le site.
Il existe une clé d’enregistrement spéciale dans votre appareil Rotel que
vous aurez besoin de copier dans le formulaire d’inscription site. Cette
clé d’enregistrement se trouve dans le menu Settings > Register Menu
(Paramètres -> Menu Enregistrement). Vous devez être connecté à Internet
pour accéder à cette clé unique.
Après cette inscription, le site web affichera le numéro de série radio de
votre appareil Rotel. Celui-ci est différent du numéro de série. Le numéro
de série radio peut être trouvée dans le menu de appareil Rotel au niveau
du menu Settings -> Version (Paramètres -> Version).
Notez que pour mettre à jour l’affichage de votre appareil Rotel indiquant
vos choix, vous aurez besoin de l’éteindre et de le rallumer puis de
sélectionnez « Internet radio ». Votre nouvelle liste “My Stuff” sera mise
à jour automatiquement.
Page 45

Français
45
Lecture à partir de iPods, lecteurs MP3 et lecteurs flash
La plupart des iPod et lecteurs MP3 pourront être connectés sur la prise
USB du panneau avant afin de pouvoir lire les fichiers musicaux qui y
sont stockés. L’affichage sera mis à jour et indiquera la liste des fichiers
qui pourront être lus. Les fichiers copiés sur un lecteur flash standard (clé
USB) se comporteront exactement de la même manière.
Lecture à partir de serveurs réseau
La diffusion de musique à partir d’ordinateurs configurés en tant que
serveurs musicaux est une occasion supplémentaire d’utiliser les fonctions
de votre Rotel et de faire usage des circuits de décodage audiophiles
intégrés à votre appareil
Comme pour les radios Internet, il faut disposer d’un réseau informatique
ainsi que d’un serveur musical correctement implémenté. Reportez vous
aux instructions indiquées dans la rubrique « Media Player Quick Start »
un peu plus loin dans ce manuel.
Pour démarrer
Nous vous remercions pour votre acquisition de cet Passerelle Numérique
Rotel. En tant que maillon d’un système haute-fidélité de très haute qualité,
il vous apportera des années de plaisir musical.
Caractéristiques
Connexion par fil ou sans fil pour accès aux radios Internet.UÊ
Accès aux fichiers musicaux par liaison LAN, en mode « Media UÊ
Player ».
Branchement direct des baladeurs MP3/iPod.UÊ
Écoute des stations de radio DAB, FM.UÊ
Quelques précautions
Veuillez lire très soigneusement ce manuel d’utilisation. Il vous indique
tout ce qu’il faut savoir pour intégrer parfaitement cet appareil dans votre
chaîne, et comment en tirer les performances optimales. Si vous vous
posez ensuite encore des questions, veuillez contacter votre revendeur
agréé Rotel, qui se fera un plaisir d’y répondre.
Déballez soigneusement l’appareil, la télécommande et les accessoires.
Conservez le carton d’emballage et tous ses composants. Il constitue le
meilleur moyen pour transporter l’appareil dans le futur, sans risque de
détérioration ni d’annuler la garantie.
Remplissez et renvoyez la carte de garantie que vous avez trouvée
dans l’emballage de l’appareil. Conservez également la facture de
votre appareil : c’est la meilleure preuve de votre propriété et de la
date réelle d’achat. Elle vous sera utile en cas de nécessité de retour au
service après-vente.
Installation
Installez l’appareil sur une surface rigide et plane, éloignée des
rayons directs du soleil, de toute source de chaleur, d’humidité ou de
vibrations.
Ne posez pas sur l’appareil d’autres maillons ou objets. Ne laissez aucun
liquide pénétrer à l’intérieur de son châssis.
Tenez compte du poids et des dimensions de l’appareil. Si vous posez
l’appareil sur une étagère, un meuble ou dans un rack, vérifiez que ceux
ci sont parfaitement en mesure de supporter son poids.
L’appareil génère de la chaleur pendant son fonctionnement normal. Ne
bloquez donc pas ses ouïes de refroidissement. Il doit y avoir environ 10
cm de dégagement tout autour lui pour permettre le bon fonctionnement
de sa ventilation, et une bonne circulation d’air tout autour du meuble
qui le supporte.
Page 46

46
RDG-1520 Passerelle numérique
Alimentation électrique et mise sous tension
Prise d’alimentation secteur N
Votre appareil est configuré en usine, sa tension correcte étant indiquée
sur une étiquette en face arrière (USA : 120 volts/60 Hz ou Europe :
230 volts/50 Hz).
L’appareil est livré avec son propre câble d’alimentation. N’utilisez que
celui-ci ou un équivalent exactement identique. Ne modifiez pas ce câble
secteur. N’utilisez pas de câble-rallonge.
Assurez-vous que l’interrupteur général en face avant est bien en position
éteinte (Off). Puis branchez le cordon secteur à l’arrière de l’appareil.
Branchez ensuite l’autre extrémité dans une prise d’alimentation secteur
murale appropriée.
Si vous quittez votre domicile pendant une longue période (un mois ou
plus), débranchez la prise d’alimentation secteur (de même que celles
des autres maillons audio et vidéo).
Interrupteur de mise sous tension/veille (Standby) et indicateur
lumineux
L’interrupteur de mise sous tension Power se trouve sur le côté gauche de
la façade. Pressez cette touche pour allumer l’appareil.
La couronne lumineuse autour de lui s’allume alors indiquant la mise
sous tension effective. Une nouvelle pression sur cette touche POWER
éteint l’appareil.
Entrée Trigger 12 V H
C’est une prise d’entrée pour le raccordement de câble transportant un
signal trigger +12 volts issu d’un préamplificateur Rotel ou processeur
ambiophonique et qui permet de mettre l’appareil sous et hors tension.
Réception radio DAB/FM C V
Veuillez utiliser l’antenne intérieure fournie, branchée sur la prise DAB
et FM de la face arrière. Pour recevoir le meilleur signal FM possible,
vérifiez qu’il y ait assez d’espaces pour déployer complètement l’antenne
en T. Des oeillets à chaque extrémité permettent si désiré de la fixer aux
murs de la pièce. Il faut essayer différentes positions pour obtenir la
meilleure réception possible.
/,Ê 1,+1Ê18ÊS
L’appareil peut recevoir directement des signaux numériques issus de
différentes sources. Il y a deux prises repérées dans une zone AUX Digital
Input, sur la face arrière, pour câble coaxial ou fibre optique. Branchez
la sortie numérique coaxiale ou optique de votre source dans les entrées
correspondantes de l’appareil.
Connexion réseau D
Branchez la clé USB Rotel Wi-Fi (Dongle) fournie dans la prise USB
repérée ETHERNET. L’appareil a été configuré en usine pour fonctionner
avec cette clé Dongle USB Wi-Fi fournie. Aucun logiciel/ paramétrage
supplémentaire n’est nécessaire. L’appareil est alors prêt à être relié à
votre réseau sans fil LAN. Reportez-vous au chapitre concernant la Radio
Internet pour les réglages détaillés nécessaires.
NOTE : Cet appareil Rotel a été conçu pour fonctionner uniquement
avec les adaptateurs fournis. Utilisez uniquement ceux fournis avec
l’appareil.
Prise ordinateur Computer I/O X
L’appareil peut être piloté à partir d’un ordinateur, grâce à un logiciel de
contrôle d’un système audio développé par certaines sociétés tierces. Ce
pilotage se fait via les codes de commandes, envoyés par l’ordinateur en
liaison câblée de type série RS-232. De plus, cette prise permet l’éventuelle
mise à jour de l’appareil avec des softwares fournis par Rotel.
L’entrée TRIGGER accepte tout signal de commande (AC ou DC) allant
de 3 volts à 30 volts. Utilisez un câble avec un connecteur mini jack
mono 3,5 mm aux deux extrémités. Le signal +12 V DC devra être relié
à l’âme centrale du connecteur.
Sortie Trigger 12V H
La prise 12V TRIG OUT permet de faire suivre le signal de commande
à une autre unité Rotel. Tout signal 12V Trigger présent à la prise INPUT
sera transmis à la prise OUT.
Branchements
Avant que de continuer plus avant dans ce manuel, veuillez vérifier
que tous les branchements sur l’appareil sont correctement effectués.
Reportez-vous à la Figure 2.
Note : Vous devez aussi insérer le dongle Wi-Fi (ou l’adaptateur pour
liaison filaire) sur la prise ETHERNET de la face arrière. L’appareil
recherche tous les réseaux disponibles avant d’autoriser l’accès aux
fonctions DAB et FM. Si aucun réseau n’est disponible, l’afficheur de
l’appareil indique « Network Error » (erreur de réseau). Les fonctions
FM et DAB fonctionnent alors normalement après cette recherche
initiale de réseau.
Pour de plus amples informations concernant ces connexions, le câblage
utilisé, les logiciels de contrôle ou la mise à jour de l’appareil, veillez
contacter votre revendeur agréé Rotel.
Branchement USB
La prise présente en face avant, sous l’interrupteur général STANDBY,
est prévue pour une liaison USB. L’appareil ainsi accéder directement
aux fichiers audio stockés sur des systèmes de stockage informatiques.
Ainsi, des baladeurs MP3, iPod, clés USB et toute autre forme de mode
de stockage communiquant via une liaison USB peuvent être branchés
sur l’appareil. L’appareil recherche alors automatiquement les fichiers
musicaux sur ces éléments de stockage.
Note : Le RCX-1500 utilise le standard USB 2.0 pur accéder aux
fichiers musicaux. Il peut donc lire ceux-ci sur les systèmes de stockage
compatibles avec le standard USB 2.0. Cependant, il ne peut
pas fonctionner avec les appareils nécessitant des pilotes (drivers)
additionnels spéciaux.
Sortie Q
L’appareil délivre un signal analogique stéréo. Utilisez le câble fourni pour
le connecter à l’une des entrées de votre préamplificateur ou processeur
audio. Faites attention et assurez vous que chaque connexion correspond
bien celle qui lui est assignée. Le canal de sortie droit doit être connecté
au canal droit du préamplificateur ou du processeur et inversement.
Page 47

Français
47
Guide rapide Radio Internet
Ce que vous devez savoir avant utilisation
Avant de pouvoir profiter de la radio par Internet, vous avez besoin des
éléments suivants :
Une connexion Internet. UÊ
Un point d’accès Internet via un réseau local sans fil. (une connexion UÊ
filaire est également possible avec l’adaptateur Ethernet USB fourni
par Rotel).
Avec une connexion sans fil, la radio Internet devrait fonctionner dans
un rayon de 100 mètres autour du point d’accès sans fil, sous réserve
que le routeur / passerelle Wi-Fi soient placés dans la zone optimale
par rapport à votre emplacement. L’utilisateur peut vérifier la puissance
du signal Wi-Fi dans le menu Paramètres : Settings (Paramètres) -> WiFi
Strength (Puissance)
Assurez-vous que votre connexion LAN est correcte, et capable d’accéder
au réseau Internet. Pour que l’appareil puisse accéder aux radios Internet,
une connexion Internet est bien sûr nécessaire.
Première connexion au réseau (Network)
Connectez le dongle Wi-Fi USB au port USB arrière et appuyez sur le
bouton STANDBY pour mettre l’appareil sous tension. L’écran en face
avant s’illumine et indique :
Starting ... ...
Après quelques secondes, l’appareil va commencer à chercher le
réseau.
S’il ne trouve aucun réseau, l’indication suivante s’affiche :
NO NETWORK FOUND
SCANNING NETWORK.. ...
Si l’écran affiche « Enter WEP key » (Entrez la clé WEP) ou « Enter
WPA key » (Entrez la clé WPA) dans ce cas le réseau utilise l’un de
ces systèmes de protection : Wired Equivalent Privacy (WEP) ou Wi-Fi
Protected Access (WPA). Demandez le code d’accès à la personne qui
a mis en place le réseau sans fil, ou regardez dans le manuel de votre
routeur pour trouver cette information. Entrez ce code dans l’appareil
pour accéder au réseau sans fil.
Note: Si vous souhaitez utiliser une adresse IP statique, ou si votre
appareil ne parvient pas à obtenir automatiquement une adresse IP,
reportez vous au paragraphe « Network Config » (config réseau) dans
la section « Settings » (« Paramètres ») à la fin de ce manuel.
Choisir une station de radio
Une fois que le réseau a été trouvé et la liaison effectuée, le menu principal
étant affiché, veuillez sélectionner « Internet Radio ». L’afficheur devient
alors comme suit :
< Internet Radio >
Media Player
FM
DAB
Vous pouvez alors choisir les stations de radio Internet que vous souhaitez
écouter en tournant, puis en poussant le bouton de la face avant, suivant
les options ci-dessous.
<LOCATION> vous permet de choisir des stations situées dans un
emplacement géographique particulier, zone du Monde ou pays
particulier :
Africa
< America >
Asia
Caribbean
1. Tournez le bouton de sélection jusqu’à ce que l’écran affiche la zone
et le pays que vous souhaitez, puis pressez le bouton.
2. Tournez le bouton pour mettre en surbrillance la station désirée.
Appuyez sur le bouton pour la sélectionner.
3. Attendez que l’appareil se connecte à cette station.
< Location >
Genre
Search
< XXX1 LIVE RADIO >
XXX2 LIVE RADIO
XXX3 LIVE RADIO
XXX4 LIVE RADIO
S’il trouve votre point d’accès Internet sans fil, il affiche les références de
ce point d’accès (ESSID) – il s’agit du nom donné au boîtier de réception
par votre fournisseur d’accès – par exemple :
< MY NETWORK >
Il est possible, et dans certains cas c’est très probable, que votre appareil
détecte plus d’un point d’accès sans fil lorsque vous utilisez une connexion
sans fil, dans ce cas vous devrez choisir celle que vous souhaitez pour vous
connecter. Tourner le bouton sur la face avant pour afficher l’ESSID (nom
du réseau sans fil) de chaque point d’accès que l’appareil a trouvé.
<GENRE> vous permet de choisir les stations de radio en fonction de
leur contenu, par exemple musique classique, sport, infos, etc.
80S
< 90S >
Adult
Adult contemporary
1. Tournez le bouton de sélection jusqu’à ce que l’écran affiche le contenu
désiré, puis pressez le bouton.
2. Tournez le bouton pour mettre en surbrillance la station désirée.
Appuyez sur le bouton pour la sélectionner.
3. Attendez que l’appareil se connecte à cette station.
XXX1 LIVE RADIO
< XXX2 LIVE RADIO >
XXX3 LIVE RADIO
XXX4 LIVE RADIO
Page 48

48
RDG-1520 Passerelle numérique
<SEARCH> vous permet de rechercher un type de station désirée, à
partir d’un court mot-clé.
Station Name
END <> A BCDEFGHIJKLNO
ART
1. Tournez le bouton de sélection jusqu’au caractère à entrer, puis pressez
le bouton pour sélectionner.
2. Répétez l’étape 1 pour entrer le mot complet. Sélectionnez « END »
pour confirmer le mot-clé ou appuyez sur la touche REPLY
3. Pressez le bouton pour lancer la recherche. L’écran va afficher les
stations qui correspondent au mot-clé.
4. Tournez le bouton pour mettre en surbrillance la station désirée,
Appuyez sur le bouton pour la sélectionner et pour vous connecter à
cette station.
Note: Les stations de radio Internet et autres services musicaux peut
être facilement ajustées en vous rendant sur www.rotelradio.com
xxx ART xx Radio1
x ARTxx xx Radio2
ARTxxxx xx Radio3
Ecoute /lecture d’une station de radio Internet
Une fois connecté sur une station, l’afficheur indique le nom de cette
station, le format du fichier audio diffusé et son taux de transfert.
BBC RADIO
BUFFERING xx%
BBC RADIO
xxx kbPs WMA XX:XX
2. Appuyez sur la touche QUEUE pour rappeler le numéro de
préréglage et la station correspondante, tourne le bouton pour choisir
la station. L’écran va indiquer :
01 preset radio 1
02 preset radio 2
> 03 preset radio 3
04 preset radio 4
Pressez de nouveau la touche QUEUE pour sortie de la liste des stations
présélectionnées et revenir à l’affichage standard.
Note: Vous pouvez consulter les stations de radio mémorisées en
utilisant la fonction de « file d’attente ». Cela vous aidera à ne pas
écraser accidentellement une station mémorisée.
Mémoriser une station de radio dans une présélection
(télécommande uniquement)
Pendant la lecture d’une station de radio, maintenez la pression sur la touche
MEM de la télécommande, puis pressez le numéro de présélection
que vous souhaitez lui assigner, en utilisant le clavier numérique .
L’afficheur indique alors :
BBC RADIO
xxx kbit WMA
M Preset #
Mémorisez cette actuelle station de radio à l’aide d’un des numéros de
présélection. Vous pouvez ainsi mémoriser jusqu’à 30 stations de radio
pour les bandes FM / DAB et radios Internet.
Assign to Preset
#
Lire une station de radio présélectionnée
Pendant qu’une station de radio est en lecture, vous pouvez passer à
l’écoute d’une autre station en procédant comme suit :
1. À partir du clavier numérique de la télécommande, pressez la
ou les touches correspondant au numéro de présélection de la station
désirée.
Page 49

Français
49
Guide rapide lecteur Media Player
La fonction Media Player vous permet de lire des fichiers audio (AAC, AIFF,
AU, FLAC (qualité CD 16 bits), MP3, WAV et WMA (sauf lossless) et les
listes de lecture (M3U), créé par lecteur multimédia de votre ordinateur,
comme Windows Media Player 11. Il a été testé et fonctionne avec
Windows 2000, Windows XP et Windows Vista.
Note : Il sera peut être nécessaire d’activer le partage de fichiers sur
votre ordinateur, et tous les lecteurs multimédia ne permettent pas
le partage de fichiers musicaux. Reportez vous à la notice de votre
ordinateur pour plus d’informations.
Serveurs UPnP
Paramétrer un service UPnP dans le PC
1. Utilisez Windows Media Player 11 (ou 12 si vous utilisez Windows 7)
pour configurer votre PC comme serveur UPnP, cliquez sur l’onglet ‘Library’
(Bibliothèque) de Windows Media Player 11 et sélectionnez ‘Media
Sharing’ (partage de fichiers multimédias) pour ouvrir la fenêtre ‘Media
Sharing’ et mettre en place cette fonction.
Note: A ce jour, Windows Media Player 11 ne prend pas en charge
le décodage AAC utilisé par Apple comme format par défaut dans
iTunes. Nous vous recommandons de changer ce paramètre par
défaut lors de l’importation de fichiers WAV, AIFF ou MP3 pour
avoir une compatibilité maximale entre plusieurs appareils. Vous
pouvez configurer Windows Media Player pour refléter vos dossiers
iTunes. Media Player, voir Tools (Outils)> Options> onglet Library
(Bibliothèque)> Monitor Folders (dossiers). Windows Media Player 12
(pour Windows 7) ne prend pas en charge l’AAC.
3. Allez dans le menu du lecteur multimédia et sélectionnez le sous menu
« serveurs UPnP » en tournant puis en appuyant sur le bouton de sélection.
L’appareil va chercher tous les serveurs UPnP disponibles. Il va afficher
‘[Empty (Vide)]’ si aucun serveur UPnP n’a été trouvé.
Internet Radio
< Media Player >
FM
DAB
< UPnP Servers >
Playback Mode
Queue
Lecture de fichiers multimédias en utilisant un serveur UPnP
1. Après une recherche fructueuse, tous les serveurs UPnP disponibles
sur le réseau seront affichés. Sélectionnez votre serveur UPnP en tournant
puis en pressant le bouton de sélection
2. L’appareil va afficher la liste des options ou des dossiers disponibles.
Cela dépend de la configuration de votre serveur musical, et la version
du logiciel que vous utilisez. Vous obtenez généralement les menus
suivants:
<All Music >
All Artists
Albums
Music Playlists
Folders
[Search]
2. Votre PC va maintenant vous indiquer qu’un périphérique a tenté de
se connecter à votre serveur UPnP. Cliquez sur le bouton “Autoriser”.
Vous pouvez rechercher des chansons en faisant défiler les titres dans
le dossier « All Music » ou rechercher un artiste spécifique dans « All
Artists » ou un disque dans « All Albums ». A chaque niveau, vous
pouvez naviguer jusqu’à la chanson ou vous pouvez utiliser la fonction
Search (Recherche].
Activez la fonction [Recherche] et le menu suivant sera affiché :
< Artists >
Album
Music
Ensuite, entrez dans les sous menus Artistes, Album ou Music. Vous pouvez
saisir une ou plusieurs lettres du début de nom de l’artiste / de l’album
/ de la chanson. Par exemple, rentrez «M» dans Artistes, puis appuyez
sur la touche REPLY pour lancer la recherche. Tous les artistes de votre
bibliothèque dont le nom commence par la lettre “M” seront affichés.
Page 50

50
RDG-1520 Passerelle numérique
3. Une fois que la chanson désirée est trouvée, appuyez sur le bouton
pour la sélectionner. La chanson électionnée sera affichée sur le menu
pendant que l’appareil essaiera de se connecter au serveur musical.
Avant le début de la lecture, le titre de la plage, le type de fichier et le
débit binaire seront affichés. Lorsque la lecture commence, le temps
écoulé s’affichera à la place du type de fichier.
“Album/Artist Name”
“Track title”
00:50
309kbps WMA
Remarque : Utilisation de la fonction « file d’attente »: Une brève
pression sur SELECT au niveau de n’importe quelle chanson ou album
va entrainer la lecture de cette sélection. Vous pouvez aussi créer
une file d’attente personnalisée et faire votre propre liste d’écoute en
appuyant sur le bouton SELECT pendant 5 secondes. La ou les pistes
sélectionnées seront ajoutées à la file d’attente et seront lues dans
l’ordre choisi. Appuyez sur le bouton QUEUE pour rappeler les pistes
en attente d’être jouées. Un second appui de 5 secondes sur le bouton
STOP va supprimer ces morceaux spécifiques de la file d’attente.
Effacer la liste d’attente
Vous pouvez effacer la file d’attente en appuyant sur le bouton QUEUE
(file d’attente) et en choisissant l’option [Clear Queue] ou en allant dans
le menu QUEUE à partir du sous-menu Media Player.
Note : Utiliser la fonction « shuffle » avec les grandes bibliothèques
musicales n’est pas toujours possible ou peut prendre un temps
excessivement long. Nous vous recommandons de créer des courtes
listes de lecture dans Windows Media Player et puis les mélanger
avec la fonction « shuffle ».
UPnP Servers
Playback Mode
< Queue >
Vous pouvez également supprimer les pistes une par une de la file
d’attente en sélectionnant le titre et appuyant sur la touche STOP pendant
5 secondes.
< [Clear Queue] >
Playback Mode
UPnP Servers
< Playback Mode >
Queue
Tourner le bouton pour sélectionner “Media Player” -> “Mode de
Lecture”. Il y a 2 sous-menus : Repeat (Répéter)” et “Shuffle (Aléatoire)”.
Vous pouvez choisir Repeat, Shuffle ou les deux. Une marque indique
la sélection choisie.
REPEAT : les morceaux de musique sont répétés l’un après l’autre, en
redémarrant à chaque fois du premier morceau jusqu’au dernier morceau
de la liste.
< Repeat * >
Shuffle
SHUFFLE : Ecouter les pistes dans un ordre aléatoire.
Note : Si à la fois REPEAT et SHUFFLE sont sélectionnées, l’appareil
lira toute la liste dans un ordre aléatoire, puis lorsque toutes les pistes
auront été lues une fois, il continuera à lire la liste dans un ordre
aléatoire jusqu’à que la touche STOP soit enfoncée.
Page 51

Français
51
Guide rapide liaison iPod/USB
<< iPod/USB >>
001/009
00:01:41
123.MP3
Branchement d’une unité de stockage USB
1. Branchez directement votre unité de stockage USB contenant des
fichiers musicaux, ou via un adaptateur USB, dans la prise USB de la
face avant.
2. Appuyez sur le bouton USB en face avant pour passer en mode iPod/
USB. L’appareil va automatiquement rechercher des fichiers musicaux
à partir du répertoire racine. Une fois que le répertoire a été trouvé,
l’appareil va lancer la lecture. L’écran affiche les informations de la
chanson comme le nom, la durée, les pistes...
3. Si vos fichiers musicaux sont organisés en sous-répertoires, tournez le
bouton pour afficher tous les répertoires. Puis tournez et appuyez sur le
bouton pour entrer dans le répertoire souhaité. Ensuite recherchez les fichiers
de musique souhaités en tournant et en appuyant sur le bouton.
4. Pressez la touche BACK pour revenir au menu précédent et choisir
un autre dossier.
Connexion iPod / iPhone
1. Un iPod / Iphone Apple peut être connecté par le câble USB de l’iPod
à la prise de l’USB qui est en façade.
2. L’iPod / iPhone lira la musique et l’enverra sous la forme d’un signal
numérique à l’appareil. Toutes les manipulations pourront être faites à
partir de l’iPod/iPhone. Seules les commandes simples peuvent être
réalisées au niveau du Rotel, comme expliqué ci-dessous.
> 01_Folder
music-files-002. wav
music-files-003. mp3
music-files-004. aac
Guide rapide radio FM
Avant que d’écouter une radio FM, assurez-vous que l’antenne FM a été
correctement branchée, et que le format FM correct a été sélectionné.
Pour cela, allez dans le menu « Settings » (Réglages) et sélectionnez la
zone géographique FM correcte (FM tuner region).
Lecture des stations de radio en FM
1. Sélectionnez la touche FM sur la face avant, ou pressez la touche
BACK pour revenir au menu principal. Tournez et appuyez sur le bouton
de sélection pour sélectionner le menu FM. L’afficheur indique alors les
informations suivantes :
Internet Radio
Media Player
< FM >
DAB
2. Tournez le bouton pour changer la fréquence de la station de radio
3. Utilisez les touches de défilement ] et [ sur la télécommande pour
faire une recherche automatique des stations FM.
4. Utilisez les touches } et { sur le panneau avant ou sur la télécommande
pour faire une recherche manuelle des stations FM.
Mémoriser une station FM dans une présélection
Pendant la lecture d’une station de radio FM, maintenez la pression sur
la touche MEM , puis pressez le numéro de présélection que vous
souhaitez lui assigner, en utilisant le clavier numérique (ce qui peut
également être effectué à partir des touches MEM et du clavier numérique
de la télécommande).
BBC RADIO
xxx kbit WMA
87.50MHz FM
Assign to Preset
#
3. L’écran de l’iPod / iPhone restera actif tant qu’il sera connecté à
l’appareil. Toutefois si aucune opération n’est réalisée au niveau de
l’iPod / iPhone pendant une période prolongée, l’écran passera en
mode «charge».
Touches de contrôle de la lecture
1. Utilisez la touche STOP pour arrêter la lecture.
2. Utilisez la touche PAUSE, pour mettre en pause une piste en cours ou
pour redémarrer une piste en pause ou une piste arrêtée.
3. Utilisez le bouton BACK TRACK { pour lancer la lecture de la piste
précédente dans la liste.
4. Utilisez le bouton FORWARD TRACK } pour lancer la lecture de la
piste précédente dans la liste.
5. Pressez et gardez appuyer le bouton STOP pendant 5 secondes pour
retirer en toute sécurité le périphérique USB de l’appareil
Note: Votre appareil Rotel fonctionnera avec l’iPhone 3GS, l’iPhone
3G, l’iPod Classic, l’iPod touch 2G, l’iPod nano 2G, l’iPod Nano 3G,
l’iPod Nano 4G, 5G et l’iPod Nano.
M Preset #
Mémoriser cette station de radio FM dans l’une des mémoires de
présélection. Jusqu’à 30 stations de radio préréglées FM peuvent ainsi
être mémorisées.
Ecouter une station de radio présélectionnée
A partir d’une station radio active, vous pouvez passer à d’autres stations
préréglées de l’une des deux manières suivantes.
1. Sur le pavé numérique , appuyez sur le numéro de préréglage de
la station désirée.
2. Appuyez sur le bouton QUEUE P pour afficher les numéros de
présélection et les stations correspondantes, tournez le bouton pour
choisir la station désirée. L’afficheur indiquera :
01 preset radio 1
02 preset radio 2
> 03 preset radio 3
04 preset radio 4
Appuyez sur le bouton QUEUE de nouveau pour quitter le menu de file
d’attente et pour revenir en mode de lecture.
Page 52

52
RDG-1520 Passerelle numérique
Guide rapide radio DAB
Vérifiez tout d’abord que votre zone géographique vous permet
bien de recevoir des stations de radio numériques émises selon le
principe DAB. Avant que d’utiliser cette fonction, allez plus loin dans
la section Paramétrages rapides « Quick Start » pour choisir votre
zone géographique DAB REGION et lister les stations de radio DAB
effectivement disponibles.
Après mise en place, appuyez sur la touche DAB sur le panneau avant,
ou sélectionnez le menu DAB depuis le premier menu pour utiliser dans
cette fonction.
Les canaux DAB sont regroupés en ensembles, connus sous le nom de
multiplex. Chaque multiplex propose un certain nombre de stations, et
chaque service contient un service principal et des services secondaires.
La technologie DAB permet aux émetteurs d’envoyer des données
additionnelles en plus du signal audio, données qui peuvent être composées
d’autres signaux audio, du texte ou même des images, ou, dans le futur,
de données informatiques.
Lire une station de radio DAB
1. Pressez la touche DAB de la face avant, ou sélectionnez l’option DAB
dans le menu principal sur l’afficheur. L’afficheur indique alors :
Internet Radio
Media Player
FM
< DAB >
L’appareil est prêt à balayer toutes les stations DAB disponibles. Choisissez
alors la station désirée.
Mémoriser une station DAB dans une présélection
Si une station DAB est en lecture, maintenez enfoncé le bouton MEM ,
puis appuyez sur le numéro de présélection doit être attribué à partir de
pavé numérique . Stocker cette station de radio DAB dans le numéro
de présélection. Jusqu’à 30 stations de radio préréglées DAB peut ainsi
être mémorisées.
Stations de radios présélectionnées
Les bandes FM, DAB et Internet disposent chacune de 30 mémoires
par conséquent un total de 90 stations pouvant être enregistrées dans
l’appareil. Vous pouvez mémoriser beaucoup plus de stations en ilgne
en vous rendant sur votre compte My Stuff.
Note: Pour faciliter le tri, seules les stations qui sont mémorisées sont
visibles. Chaque station sera marquée d’un F pour la FM, D pour DAB
et I pour les radios Internet.
Présentation des paramètres
Media Player
FM
DAB
< Settings >
Appuyer successivement sur le bouton BACK pour revenir au premier
niveau du menu. Sélectionnez le menu Paramètres pour entrer dans
ses sous-menus en tournant et en appuyant sur le bouton. Il y a 9 sous
menus. Tournez le bouton de sélection pour faire apparaître les sous
menus cachés.
Configuration du réseau (Network Config)
1. Recherche de réseaux
Tourner et appuyer sur le bouton pour sélectionner ce menu. L’écran
affichera “Scanning” (Recherche), ce qui prend quelques secondes.
Une fois que le réseau est trouvé, l’écran affiche l’ID (le nom) du réseau.
Tournez le bouton pour le sélectionner, et appuyez pour confirmer.
< Scan for networks >
Enter network name
View Config
Edit Config
(seulement pour des connexions sans fil)
2. Entrez le nom de réseau (seulement pour des connexions sans fil)
Si l’appareil ne parvient pas à trouver de réseau, l’ESSID (le nom) du
réseau peut être saisi manuellement.
Utilisez le bouton de sélection pour choisir les lettres du nom de réseau,
puis appuyez sur “END” pour confirmer ou appuyez sur la touche REPLY
sur le panneau avant ou sur la télécommande.
Network Name
< END <> A BCDEFGHIJK >
NAME1
3. Voir la configuration (View Config)
Affiche le détail de la configuration choisie. Tournez le bouton pour passer
de la page précédente à la suivante :i Mode -> Nom ESSID -> adresse
MAC -> adresse IP -> masque de réseau -> port -> serveurs DNS, qui
s’affichent de la manière suivante :
< Mode >
Auto DHCP
< Network Config >
Version
Upgrade Firmware
Register
Set Time/Date
FM Tuner
DAB Settings
UPnP
WiFi Strength
< ESSID >
XXXXXX
4. Edition de la configuration (Edit Config)
Ce menu peut être utilisé pour modifier la configuration actuelle du réseau.
Ce menu est utile pour choisir une adresse IP statique. Sélectionnez cette
fonction avec le bouton de sélection et saisissez l’adresse IP statique,
l’adresse MAC, DNS du réseau sélectionné.
Page 53

Français
53
Pour saisir une valeur appuyez sur le bouton puis tournez pour ajuster.
Appuyez de nouveau pour saisir une autre valeur et passer au champ
suivant. Continuez ainsi jusqu’à ce que toutes les informations aient été
saisies.
5. Avertissement de signal faible (Signal Warning) (seulement pour
des connexions sans fil)
Sélectionnez YES (oui) ou NO (non) pour activer ou désactiver l’indication
d’un signal Wi-Fi trop faible.
Version
Ce menu affiche les numéros des versions logicielles (software) et matériel
(hardware) de l’appareil.
Mise à jour Firmware
Utilisez cette option pour télécharger un nouveau firmware pour les
radios Internet. Si un nouveau firmware est disponible, vous serez invité
à le télécharger.
Note : À ce stade, vous pouvez encore appuyer sur le bouton
BACK pour annuler la mise à niveau du firmware. Une mise à
niveau du firmware peut prendre plusieurs minutes, surtout ne pas
couper l’alimentation ou ne passez pas en mode standby avant que
l’opération soit terminée, vous pourriez endommager définitivement
votre appareil. Une mise à jour peut prendre 15 à 60 minutes, en
fonction de la vitesse de votre connexion internet.
UPnP
Utilisez cette option si vous souhaitez changer le nom de périphérique
UPnP. C’est le nom que votre serveur de musique aura pris en mode Media
Player. Le nom par défaut est ROTEL GATEWAY. Utilisez le bouton de
sélection pour sélectionner les lettres du nom du périphérique en tournant
et en pressant le bouton, puis sélectionnez «END» ou appuyez sur REPLY
pour confirmer ce nom.
DEVICE NAME
< END <> A BCDEFGHIJ >
DEVICE
Force du signal WiFi (WiFi Strength)
Indique la force du signal de réception WiFi sous forme de
pourcentage.
Enregistrement
Cette fonction permet de récupérer une clé qui peut être utilisée pour
enregistrer l’appareil sur le portail Radio Rotel : www.rotelradio.com
Réglage de la date et l’heure (Set Time/Date)
Réglez l’heure locale et la date. Pressez le bouton pour commencer à
entrer la valeur, tournez le pour changer la valeur. Appuyez de nouveau
pour confirmer la valeur entrée, et passer au champ suivant.
FM Tuner
Sélectionnez la région du Tuner FM via cette option.
Réglages DAB
Il y a ici trois sous-menus : Scan, Clear List et DAB Region. Leur sélection
se fait par rotation/pression sur le bouton principal.
« Scan » permet de balayer tous les services DAB disponibles, avec
affichage de leur nom ou de l’indication « no services found » si aucun
service DAB n’est disponible.
« Clear List » efface tous les services disponibles précédemment trouvés
via l’option « Scan ».
« DAB Region » indique les régions fournissant un service DAB. La sélection
d’une région se fait par rotation/pression sur le bouton principal.
Page 54

54
RDG-1520 Passerelle numérique
Configurer “My Stuff”
Créer un compte sur le site Web Radio Rotel
Le menu personnalisé “My Stuff” peut être configuré dans le premier
menu.
Ouvrez le site Web www.rotelradio.com à partir de votre navigateur
Internet. Saisissez la clé d’enregistrement, qui se trouve dans le menu
« Settings (Paramètres) > Register (Enregistrement). Entrez cette clé
d’enregistrement sur le site et suivez les instructions pour choisir un nom
d’utilisateur et un mot de passe. Rappelez-vous de ce nom d’utilisateur et de
ce mot de passe : vous en aurez besoin ensuite pour accéder au site.
Après être entré sur le site, vous pourrez informer les rubriques « My
Stations », « My Streams », « My Podcast » et « My radios », soit vos
programmes préférés.
Suivez également les instructions données sur le site pour personnaliser
votre menu.
Configurer “Mes stations”
Il y a un très grand choix de stations disponibles dans la base de données
du site. Suivez les instructions sur le site pour rechercher les stations.
Lorsque les résultats de recherche sont affichés, vous trouverez un lien
vers ‘Add to my stations (Ajouter à mes stations)’, cliquez sur ce lien et
la radio sélectionnée sera ajoutée à Mes stations. Un nouveau menu
principal « My Stuff » apparaitra sur l’afficheur, avec un sous-menu
«Mes Stations. »
Touches avancées de la télécommande
Menu des réglages Setup
Pour entrer dans ce menu de réglage Setup, pressez la touche SETUP de
la télécommande, vous obtiendrez l’affichage suivant :
< 1 DIMMER >
2 FACTORY DEFAULT
3 VERSION
4 ANTENNA SELECT
5 EXIT
1. DIMMER contrôle la luminosité de l’afficheur de la face avant, qui peut
être atténuée selon sept étapes graduelles. Vous pouvez aussi accéder
directement à ce réglage via la touche DIM de la télécommande.
2. FACTORY DEFAULT remet l’appareil dans son état de fonctionnement
original, tel qu’il était en sortie d’usine. Les présélections et les réglages
réseau sont perdus, avec son code de télécommande initial (voir
ci-dessous).
3. VERSION affiche la version en cours de l’appareil.
4. ANTENNA SELECT permet de choisir entre AUTO (par défaut),
antenne FM ou DAB.
5. EXIT permet de revenir directement au menu précédent.
Second code de commande
Après l’enregistrement, vous pouvez ajouter une station de radio à «Mes
stations» à laquelle vous êtes connectée à en appuyant sur la touche
RÉPONSE. Vous serez invité sur l’écran à ajouter à la sélection actuelle
à ‘Mes stations’, pour confirmer pressez le bouton de sélection.
Note: Vous pouvez ensuite organiser vos stations par genre dans des
dossiers (par exemple, Jazz, Rock, Opera etc). Ces dossiers seront
affichés sur votre appareil Rotel.
Configurer “My Streams”
Une fois connecté à votre compte personnel sur le site Web, vous pouvez
ajouter vos propres flux de radios Internet dans la section « My Streams
», apparaissant sous le titre « My Account » (Mon compte).
Cliquez sur «My streams (Mes flux), et vous serez invité à saisir le nom
de la station et l’adresse URL du flux multimédia. L’adresse URL du flux
multimédia doit être un lien vers un site proposant un flux audio.
Note : Le menu « My Stuff » et les stations dans la rubrique « Mes
stations » et « Mes flux » s’afficheront une fois que l’appareil aura
mis sa liste de stations. Eteignez puis rallumer l’appareil puis entrez «
Radio Internet » à partir du menu principal pour mettre à jour la liste
des stations.
L’appareil est configuré en sortie d’usine pour fonctionner avec le code
de télécommande 1. Si ce code entre en conflit avec celui d’autres
appareils Rotel, vous pouvez choisir de piloter l’appareil à partir du
code de commande 2, en suivant les étapes suivantes :
1. Tout en pointant la télécommande vers l’appareil, appuyez simultanément
sur les touches FM et « 2 » du clavier numérique. Relâchez la touche FM,
mais continuez à presser la touche « 2 » pendant 5 secondes. L’appareil
doit alors afficher la phrase « Audio Custom Code 1 -> 2 ».
2. Répétez la procédure précédente, mais en pressant « 1 » au lieu de
« 2 » si vous souhaitez revenir au code de commande 1.
3. Les touches de la télécommande de l’appareil comme PLAY, STOP,
PAUSE utilisent le code de commande des lecteurs de CD. Si cela entraîne
un conflit avec votre lecteur de CD Rotel, pressez les touches CD et « 2 »
du clavier numérique. Relâchez la touche CD, mais continuez à presser
la touche « 2 » pendant 5 secondes. L’appareil doit alors afficher la
phrase « CD Custom Code 1 -> 2 ».
4. Répétez la procédure 3. ci-dessus, mais en pressant « 1 » au lieu de
« 2 » si vous souhaitez revenir au code de commande 1.
Page 55

Français
55
Problèmes de fonctionnement
La majorité des problèmes dans une chaîne haute-fidélité provient de
mauvais branchements, ou de sélecteurs ou commandes mal positionnés.
En cas de difficulté, essayez de cerner le problème (quelle source, quel
canal, etc.), vérifiez la position des différents interrupteurs et sélecteurs
et effectuez les modifications nécessaires. Si aucun son ne sort de votre
appareil, vérifiez les points suivants :
La diode Power ne s’allume pas
La diode POWER doit être allumée lorsque l’appareil est relié au secteur.
Vérifiez que la prise murale est bien enfoncée, le bouton Power pressé.
Vérifiez que la prise est bien alimentée, en branchant par exemple
une lampe d’éclairage à la place de l’appareil. Vérifiez qu’il n’y ait
pas d’interrupteur général sur la prise utilisée pour l’alimentation de
l’appareil.
Le réseau ne fonctionne pas
Si vous rencontrez des problèmes en reliant votre appareil à votre réseau
sans fil, vérifiez soigneusement les réglages intrinsèques de ce réseau,
et vérifiez ensuite les étapes suivantes.
1. Assurez-vous que le réseau sans fil est bien en fonctionnement,
par exemple sur votre PC, avec un accès Internet utilisant la même
configuration/réseau.
2. Vérifiez que l’option serveur DHCP est bien disponible, ou que vous
avez configuré une adresse IP statique (fixe) sur l’appareil. Voir la section
Configuration du réseau.
Glossaire
Débit – Vitesse de transfert des données – nombre de bits d’informations
envoyés chaque seconde.
Buffering (tampon) – données téléchargées et mémorisées avant la
lecture
Codec [codeur / décodeur] : logiciel capable de coder et / ou de
décoder un flux de données numériques ou un signal.
Data Encryption (cryptage des données) à des fins de sécurité. Pour
les réseaux sans fil c’est en général WEP et WPA.
DHCP [Dynamic Host Control Protocol] – Protocole permettant d’attribuer
des adresses IP aux périphériques d’un réseau.
(Serveur) DNS – serveur distant qui traduit des adresses web en
adresses IP numériques correspondantes
ESSID – [Extended Service Set Identifier]. L’ESSID est l’identifiant unique
de votre réseau sans fil.
Ethernet – Technologie de réseau pour les réseaux locaux utilisant un
Cat5 câble Cat5 pour transporter l’information entre les ordinateurs à
un taux de 10/100/1000 mégabits par seconde.
Format de fichier – Le type de fichier par exemple un fichier de
musique à un format .mp3.
3. Vérifiez qu’il n’y ait aucun dispositif anti-intrusion (Firewall) bloquant
les ports de sortie.
4. Débranchez complètement l’appareil de son alimentation secteur, puis
faites le redémarrer en le laissant reprendre à zéro toute la procédure
de recherche automatique de réseau.
5. Utilisez un câble USB pour pouvoir éloigner et orienter la clé USB
Dongle WiFi, afin d’améliorer la qualité de réception.
Pas de son
1. Vérifiez les câbles entre la sortie de l’appareil et les entrées du
préamplificateur. Voir la figure 2.
2. La musique lue depuis les stations de radio Internet est affectée par la
vitesse de votre connexion Internet. Si la musique se coupe régulièrement,
contactez votre fournisseur d’accès Internet.
3. Assurez-vous que la station sélectionnée émet bien à l’heure où vous
souhaitez l’écouter. La station peut émettre en fonction d’un fuseau horaire
différent du vôtre.
4. Veuillez insérer la clé USB WiFi (ou un adaptateur Ethernet) même
si vous n’avez pas de réseau proche à disposition. Une fois l’appareil
allumé (ON), celui-ci doit en effet effectuer une recherche des réseaux
présents (même s’il n’y en a pas) avant de permettre l’accès aux fonctions
radios FM et DAB.
Serveur de fichiers – Un ordinateur ou un élément qui fournit aux postes
de travail sur un réseau un accès contrôlé à des fichiers partagés.
Firmware – logiciel embarqué dans un appareil qui fournit aux appareils
leurs instructions opérationnelles.
Passerelle – Point d’accès du LAN au WAN.
Internet – réseau informatique constitué d’un réseau mondial de réseaux
informatiques.
IP (Adresse) – label numérique qui est assigné aux éléments d’un
réseau informatique.
ISP (FAI) – Fournisseur de services Internet.
Kbits / s – Abréviation de kilobits par seconde, une mesure de la vitesse
de transfert des données.
LAN – [Local Area Network] un réseau informatique local de communication
entre ordinateurs.
MAC – [Media Access Control] est un identifiant unique attribué par le
fabricant aux adaptateurs réseau ou de cartes d’interface réseau pour
permettre leur identification.
Modem – [modulateur / démodulateur] Périphérique utilisé pour connecter
des ordinateurs via une ligne téléphonique.
Réseau – système de composants électroniques ou d’ordinateurs
interconnectés.
Page 56

56
RDG-1520 Passerelle numérique
Réseau (adaptateur) – dispositif matériel, installé dans les ordinateurs
qui connecte les appareils informatiques entre eux afin de créer un
réseau.
Podcast – fichier audio livré via un flux RSS sur Internet à un abonné.
Routeur – dispositif qui relie plusieurs réseaux ou ordinateurs
RSS (Flux) – [Really Simply Syndication flux] utilisé pour publier du
contenu sur le web auquel les personnes peuvent ensuite s’abonner pour
recevoir des mises à jour.
Serveur – ordinateur qui fournit aux ordinateurs clients l’accès aux fichiers
et imprimantes et ressources partagée d’un réseau informatique.
Subnet mask (Masque de sous réseau) – méthode de fractionnement
des réseaux IP en sous-groupes.
UPnP – [Universal Plug and Play] une méthode d’auto-configuration utilisée
dans des appareils tels que les ordinateurs, périphériques, appareils sans
fil et des composants intelligents.
URL – [Uniform Resource Locator], format de l’adresse d’une page
particulière d’un site web.
USB – [Universal Bus] Connexion série couramment utilisée par les
périphériques d’ordinateur.
WAN – [Wide Area Network] Réseau informatique qui s’étend sur une
zone plus large d’un réseau local par exemple Internet.
WEP – [Wired Equivalent Privacy] protocole de sécurité sans fil
pour empêcher l’accès au réseau par des “intrus” utilisant les mêmes
équipements LAN sans fil et la capture de trafic réseau local sans fil
grâce à un système d’écoute.
WPA – [WiFi Protected Access] protocole de sécurité sans fil plus robuste
que le WEP.
WiFi – [Wireless Fidelity] – standard de fréquence radio utilisé pour
connecter des périphériques, tels que des ordinateurs et iPod, à l’aide
d’une connexion sans fil.
Spécifications
[Section Tuner FM]
Sensibilité utile 22,2 dBf
Sensibilité pour S/B 50 dB 27,2 dBf
Rapport signal sur bruit (à 65 dBf) 63 dBf (mono),
60 dBf (stéréo)
Distorsion harmonique (à 65 dBf) 0,2 % (mono), 0,3 % (stéréo)
Réponse en fréquence 10 Hz – 15 kHz, ± 3 dB
Séparation stéréo (1 000 Hz/1 kHz/10 kHz) 40 dB/45 dB/35 dB
Niveau de sortie (à 75 kHz) 1,1 V
Entrée antenne 75 ohms asymétrique
[Section Tuner DAB]
Sensibilité – 80 dBm
Gamme d’accord Bande III (174-240 MHz)
Taux transfert données 224 Kbps (maxi)
Réponse en fréquence 20 – 20 kHz (± 1 dB)
Niveau de sortie (0 dBfs) 1,1 V
Entrée antenne 75 ohms, prise F
[Section Général]
Connexion réseau 802.11b/g
Sécurité WEP, WPA1 (TKIP), WPA2
(TKIP)
Formats de fichiers (serveur UPnP) AAC, MP3, WMA sauf sans
pertes (lossless), OGG Vorbis,
WAV, AIFF, FLAC et AU
Consommation 12 watts
Alimentation 120 volts, 60 Hz (USA)
230 volts, 50 Hz (Europe)
Poids 6,5 kg
Dimensions (L x H x P) 431 x 99 x 312 mm
Hauteur face avant 2U ( 3
Toutes les spécifications sont certifiées exactes au moment de l’impression.
Rotel se réserve le droit d’améliorer les performances sans préavis.
Rotel et le logo Rotel sont des marques déposées de The Rotel Co, Ltd.,
Tokyo, Japon
(17x3
7
/8x121/4 in)
1
/2 in)
Page 57

Français
« Made for iPod » signifie qu’un accessoire électronique a été conçu
spécifiquement pour l’iPod et a été certifié par le fabricant pour répondre
aux normes de performances requises par Apple.
« Made for iPhone » signifie qu’un accessoire électronique a été conçu
spécifiquement pour l’iPhone et a été certifié par le fabricant pour répondre
aux normes de performances Apple.
57
Apple n’est pas responsable du fonctionnement de cet appareil ou sa conformité
aux normes de sécurité et de réglementation.
iPod est une marque déposée par Apple Inc, enregistrée aux États-Unis et
dans d’autres pays.
iPhone est une marque déposée de Apple Inc.
Windows, Windows XP, Windows 2000, Windows Vista, Windows 7,
Windows Media sont soit des marques déposées soit des marques appartenant
à Microsoft Corporation aux États-Unis et / ou dans d’autres pays.
« Ce produit comprend une technologie détenue par Microsoft Corporation
et sous licence de Microsoft Licensing GP. L’utilisation ou la distribution d’une
telle technologie en dehors de ce produit est interdite sans accord de licence
de Microsoft Corporation et / ou Microsoft Licensing, GP, selon le cas. »
Page 58

The Rotel Co. Ltd.
Endo TN Building 2F.,
6-12-21, Meguro-Honcho,
Meguro-Ku, Tokyo 152-0002
Japan
Rotel of America
54 Concord Street
North Reading, MA 01864-2699
USA
Phone: +1 978-664-3820
Fax: +1 978-664-4109
Rotel Europe
Dale Road
Worthing, West Sussex BN11 2BH
England
Phone: + 44 (0)1903 221 761
Fax: +44 (0)1903 221 525
Rotel Deutschland
Vertrieb: B&W Group Germany GmbH
Kleine Heide 12
D-33790 Halle/Westf., Deutschland
Tel.: 05201 / 87170
Fax: 05201 / 73370
E-Mail: info@bwgroup.de
www.rotel-hifi.de
www.rotel.com
082 OMRDG1520 081310 }ÃÊUÊë>ÊUÊÀ>X>Ã
 Loading...