

Page 1
HOBS
INSTRUCTIONS FOR USE AND INSTALLATION
TABLES DE CUISSON
NOTICE D’EMPLOI ET D’INSTALLATION
GB
FR
ІНСТРУКЦІЯ
ВБУДОВАНОЇ ІНДУКЦІЙНОЇ ПОВЕРХНІ
З ЕКСПЛУАТАЦІЇ ТА ПІДКЛЮЧЕННЯ
UK
Model:RPI430 / RPIF430 / RPI430MM
2
1
USINES DE ROSIÈRES
3
4
- SA DES USINES DE ROSIERES LUNERY
Model:
RPI342 / RPIF342 / RPI342MM / RPI346
2
3
1
18400
Page 2
GENERAL WARNINGS
READ THE INSTRUCTIONS BOOKLET CAREFULLY TO MAKE THE MOST OF YOUR HOB.
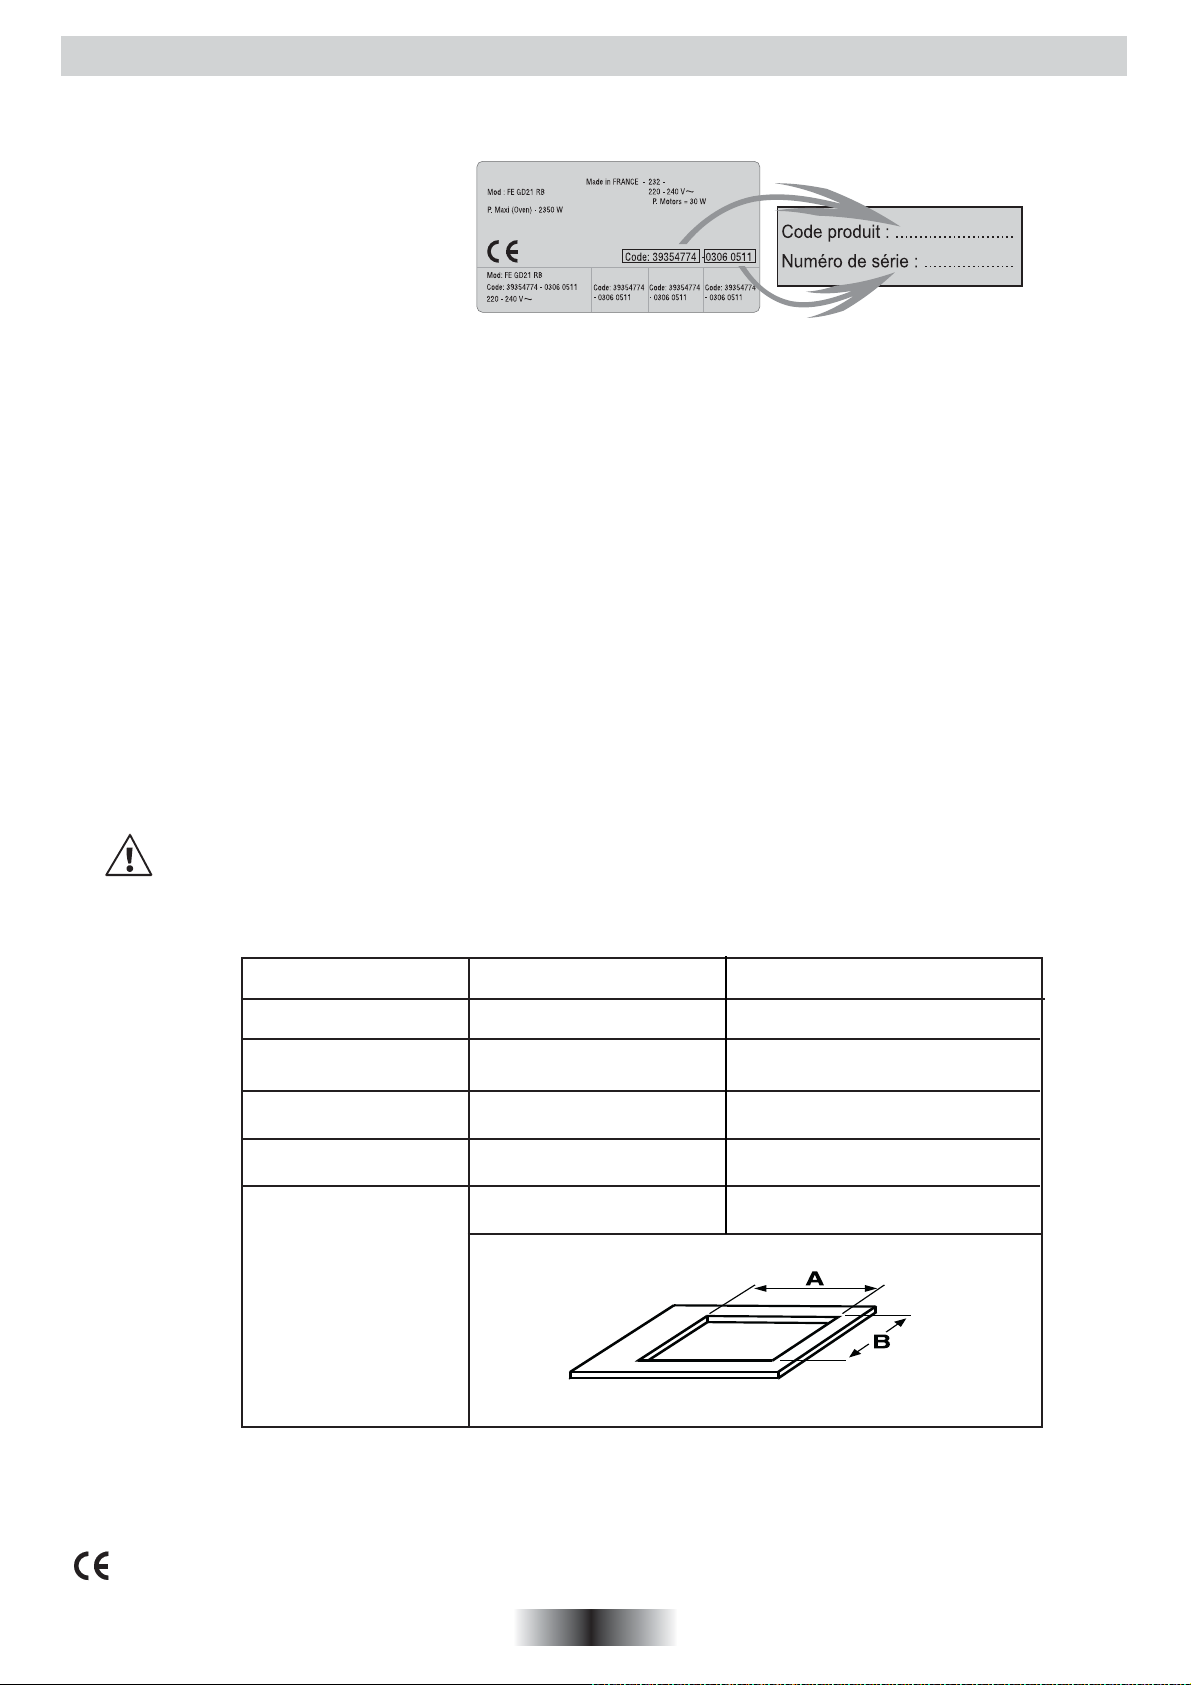
We recommend you keep the instructions for installation and use for later reference, and before installing the hob, note its serial number
below in case you need to get help from the after sales service.
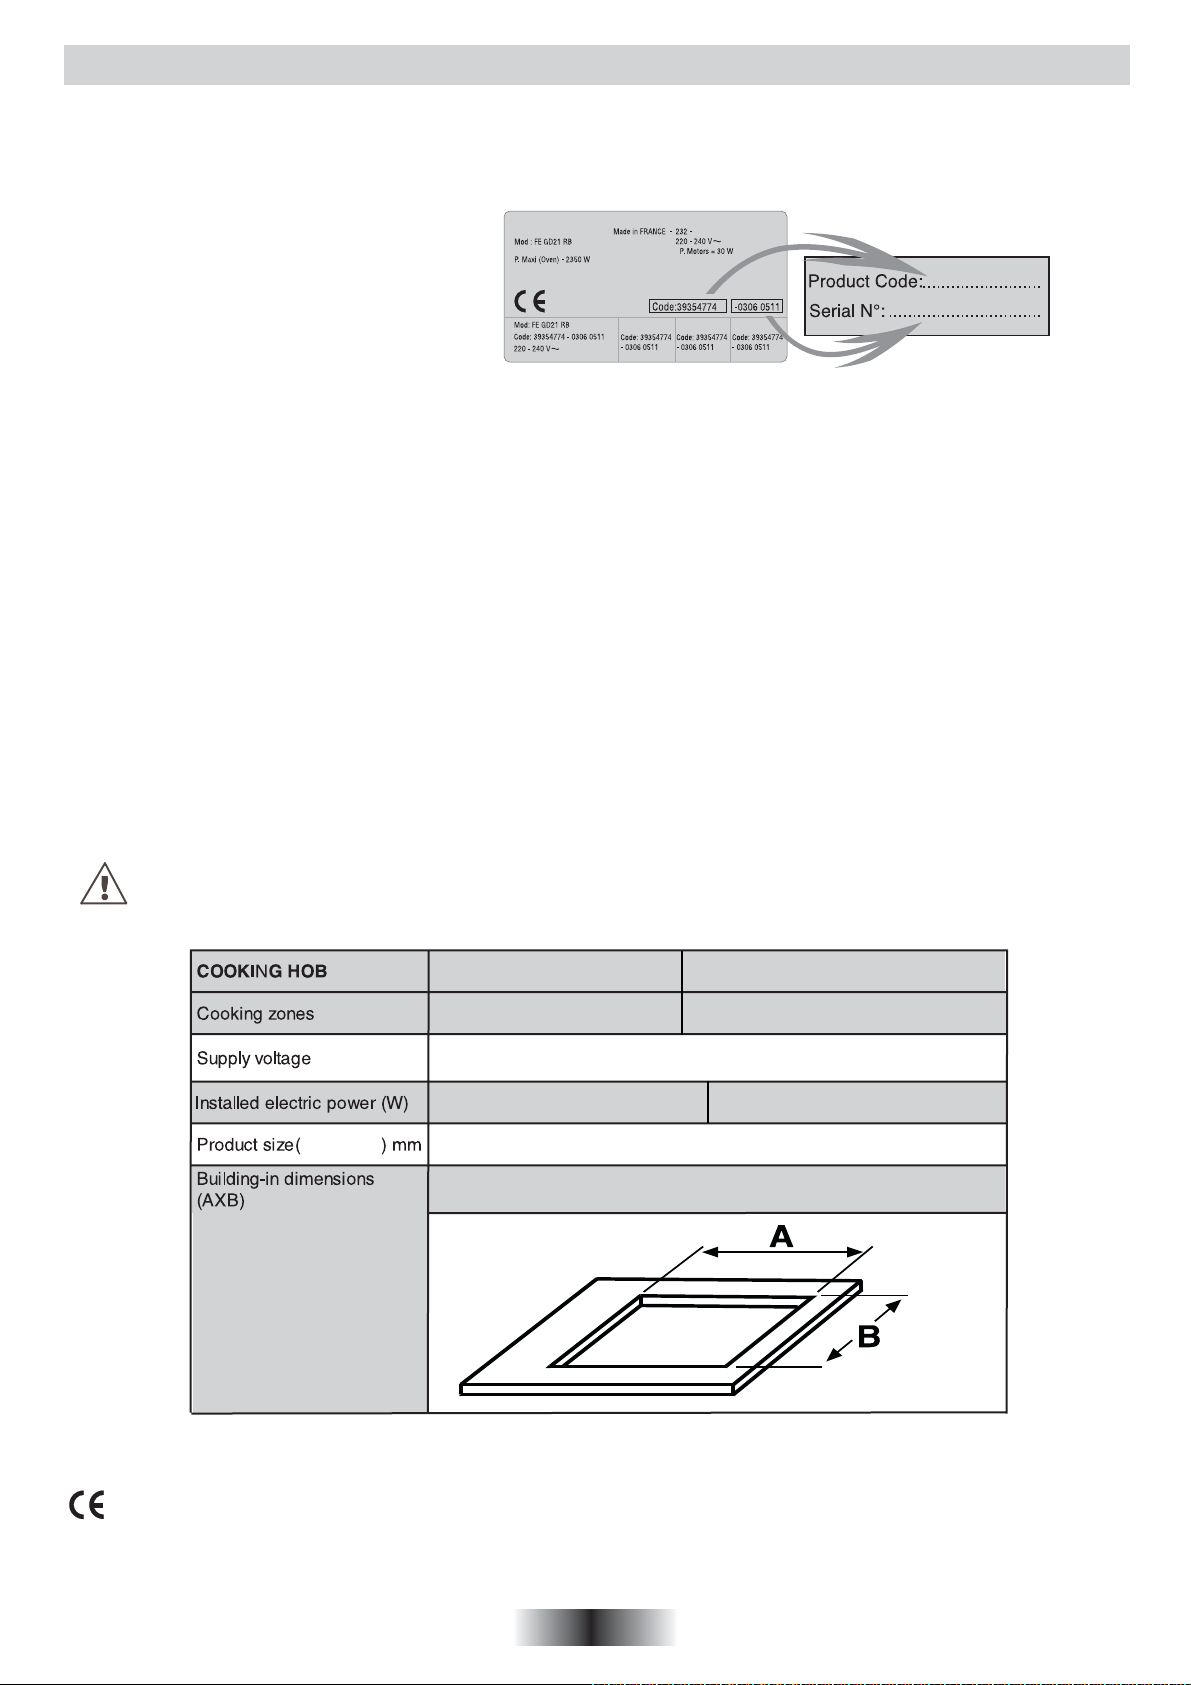
Identification plate
• It is strongly recommended to keep children away from the cooking zones while they are in operation or when they are switched off,
so long as the residual heat indicator is on, in order to prevent the risks of serious burns.
• When cooking with fats or oils, take care always to watch the cooking process as heated fats and oils can catch fire rapidly.
• The hob’s control area is sensitive, do not place hot containers on it.
• Aluminium foil and plastic pans must not be placed on heating zones.
• After every use, some cleaning of the hob is necessary to prevent the build up of dirt and grease. If left, this is recooked when the
hob is used and burns giving off smoke and unpleasant smells, not to mention the risks of fire propagation.
• Do not left metallic objects such as knives, forks, spoons or lids on the induction zone,because if they are too large or too heavy, they
could become hot.
• Never cook food directly on the glass ceramic hob. Always use the appropriate cookware.
• Always place the pan in the centre of the unit that you are cooking on.
• Do not use the surface as a cutting board.
• Do not slide cookware across the hob.
• Do not store heavy items above the hob. If they drop onto the hob, they may cause damage.
• Do not use the hob as a working surface.
• Do not use the hob for storage of any items.
• In the unlikely event of a surface crack appearing, do not use the hob. Immediately disconnect the hob from the electrical power supply
and call the After Sales Service.
This appliance is not intended for use by persons (including children) with reduced physical, sensory or mental capabilities, or lack
•
of experience and knowledge, unless they have been given supervision or instruction concerning use of the appliance by a person
responsible for their safety.
Children should be supervised to ensure that they do not play with the appliance.
•
(located under the hob's bottom casing)
Warning: this appliance complies with current safety regulations and electromagnetic compatibility regulations. Nevertheless,
people with a pacemaker should not use this appliance. It is impossible to guarantee that all such devices found on the market
comply with current safety regulations and electromagnetic compatibility regulations, and that dangerous interference will not
occur. It is also possible that people with other types of device, such as a hearing aid, could experience some discomfort.
RPI430/RPIF430/RPI430MM
4 INDUCTION
220-240V~ 50/60 Hz
400 V 50/60Hz
7000
d X w X h
RPI342/RPIF342/RPI342MM/RPI346
3 INDUCTION
7200
590 X 520 X 55
560 X 490
We are constantly striving to improve product quality and as such may modify appliances to incorporate the latest technical improvements.
Induction hobs conform to European Directives 73/23/CEE and 89/336/CEE, replaced by 2006/95/EC and 2004/108/EC,
and subsequent amendments.
1 GB
Page 3
INSTALLATION
Installing a domestic appliance can be a complicated operation which if not carried out correctly, can seriously affect consumer
safety. It is for this reason that the task should be undertaken by a professionally qualified person who will carry it out in
accordance with the technical regulations in force. In the event that this advice is ignored and the installation is carried out
by an unqualified person, the manufacturer declines all responsibility for any technical failure of the product whether or not
it results in damage to goods or injury to individuals.
BUILT-IN
The furniture in which your hob will be installed and all adjacent
furniture, should be made from materials that can withstand high
temperatures. In addition, all decorative laminates should be fixed
with heat-resistant glue.
Installation:
• A watertight seal is supplied with the hob.
Before fitting:
- turn the hob upside down, with the glass surface facing downwards.
Make sure the glass is protected.
- fit the seal round the hob.
- make sure that it is correctly fitted to avoid any leakage into the
supporting cabinet.
• It it important to fit the hob on a level supporting surface.
• Deformations caused by incorrect fitting can alter the specifications
of the worktop and the performance of the hob.
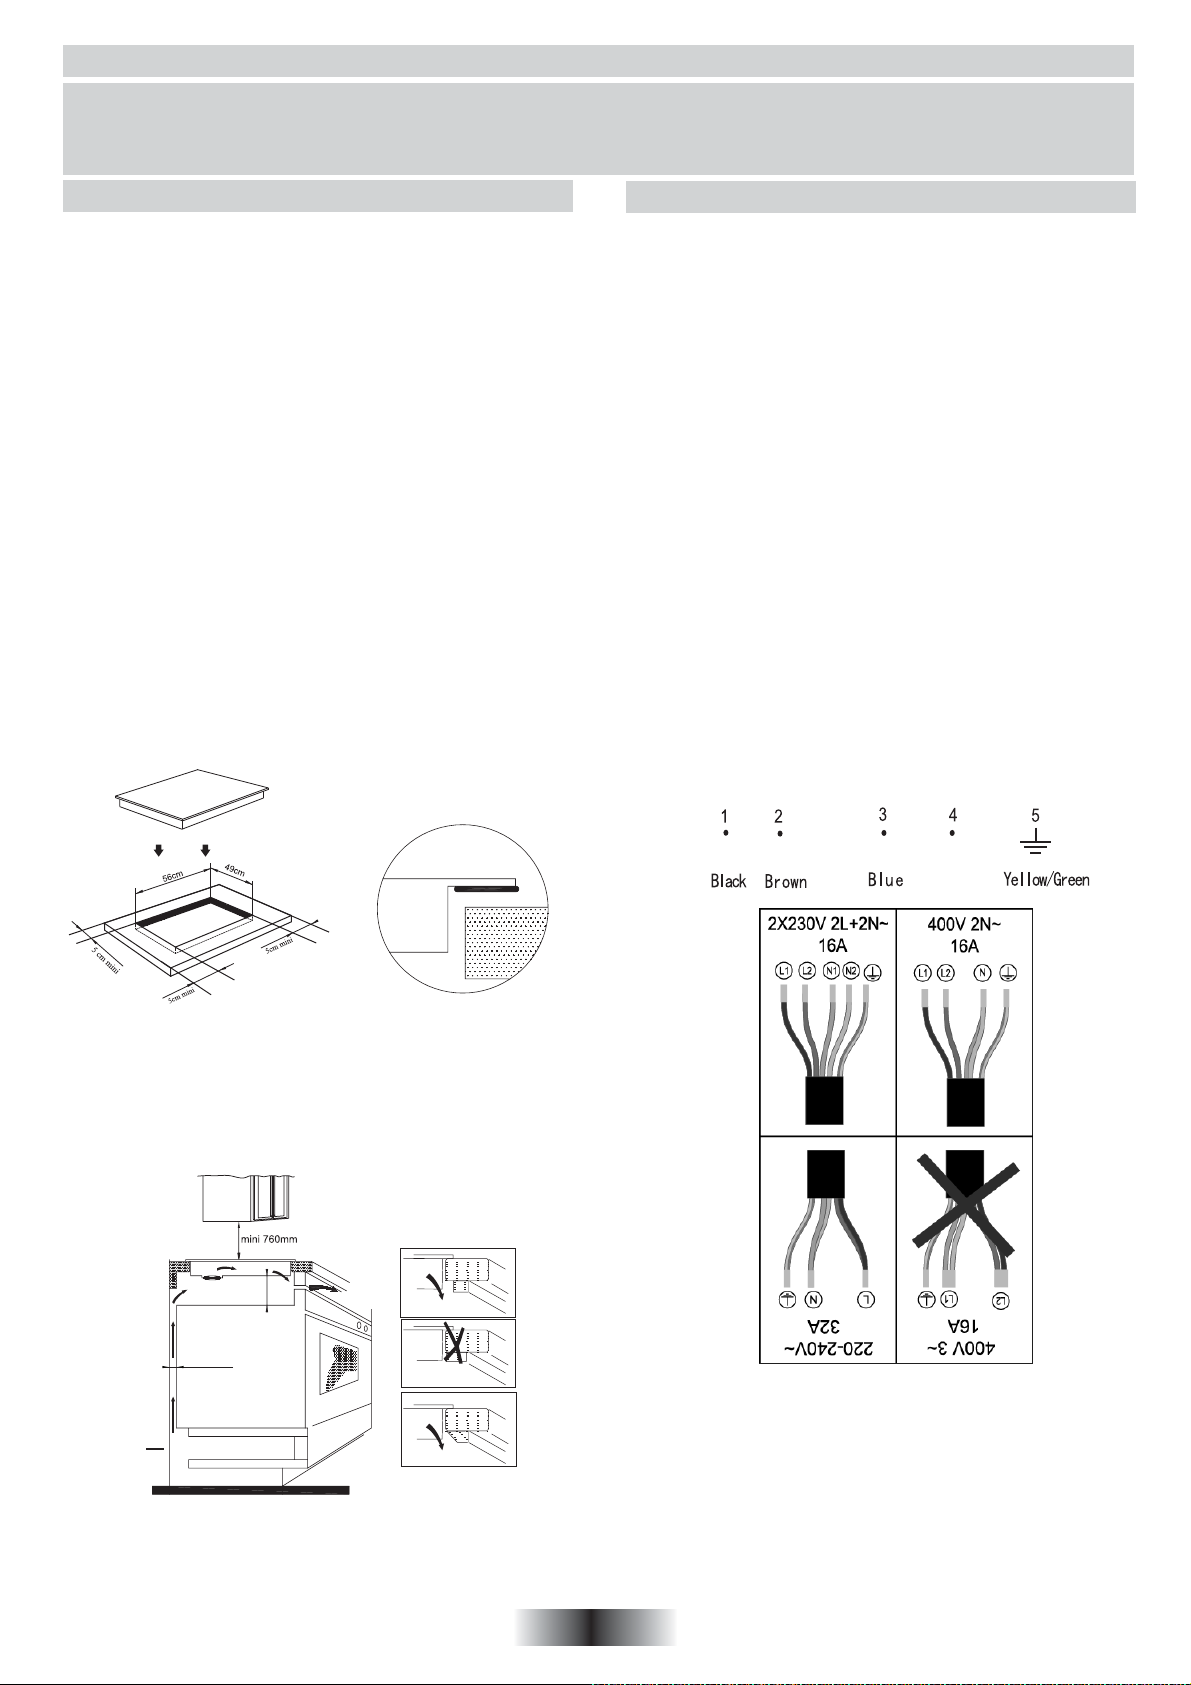
• Leave a gap of at least 5 cm between the appliance and any
neighbouring vertical surfaces.
• It is absolutely essential that the recess conforms with the
dimensions indicated.
• Cut a hole in the worktop of the dimension shown in the
diagram below.A minimum of 50 mm space should be left
around the hole.
• The worktop should be at least 30 mm thick and made of
heat-resistant material.As shown in the Figure(1)
ELECTRICAL CONNECTION
"The installation must conform to the standard directives."
The manufacturer declines all responsibility for any damage that
may be caused by unsuitable or unreasonable use.
Warning :
• Always check before any electrical operation, the supply tension
shown on the electricity meter, the adjustment of the circuitbreaker, the continuity of the connection to earth to the installation
and that the fuse is suitable.
• The electrical connection to the installation should be made via
a socket with a plug with earth, or via an omnipole cut-out switch
with an opening gap of at least 3 mm.
If the appliance has a socket outlet, it must be installed so that
the socket outlet is accessible.
• The yellow/green wire of the power supply cable must be
connected to the earth of both power supply and appliance
terminals.
• The manufacturer cannot be held responsible for any accidents
resulting from the use of an appliance which is not connected
to earth, or with a faulty earth connection continuity.
• Any queries regarding the power supply cord should be referred
to After Sales Service or a qualified technician.
• I f the cable is damaged or to be replaced, the operation must
be carried out the by sale agent with dedicated tools to avoid
any accident.
Connection to power supply
The socket shall be connected in compliance with the relevant
standard, to a single-pole circuit breaker. The method of
connection is shown in Figure(3):
Seal
•You can not build the hob in above an oven with no fan, a
dishwasher, fridge, freezer or washing machine.
• It is essential that the induction hob is well ventilated and
that the air intake and exit are not blocked.
Make sure the hob is correctly installed as shown in Figure(2)
JIKI D HJ
JIKI B HJ
A`i `ekXb\
A`i \o`k
JIKI D JJ
L1 L2
The cable must not be bent or compressed.
N1 N2
Grey
NB: For safety, the gap between the hob and any cupboard
above it should be at least 760mm.
2 GB
Page 4
INDUCTION
Control unit
USE PROCEDURE
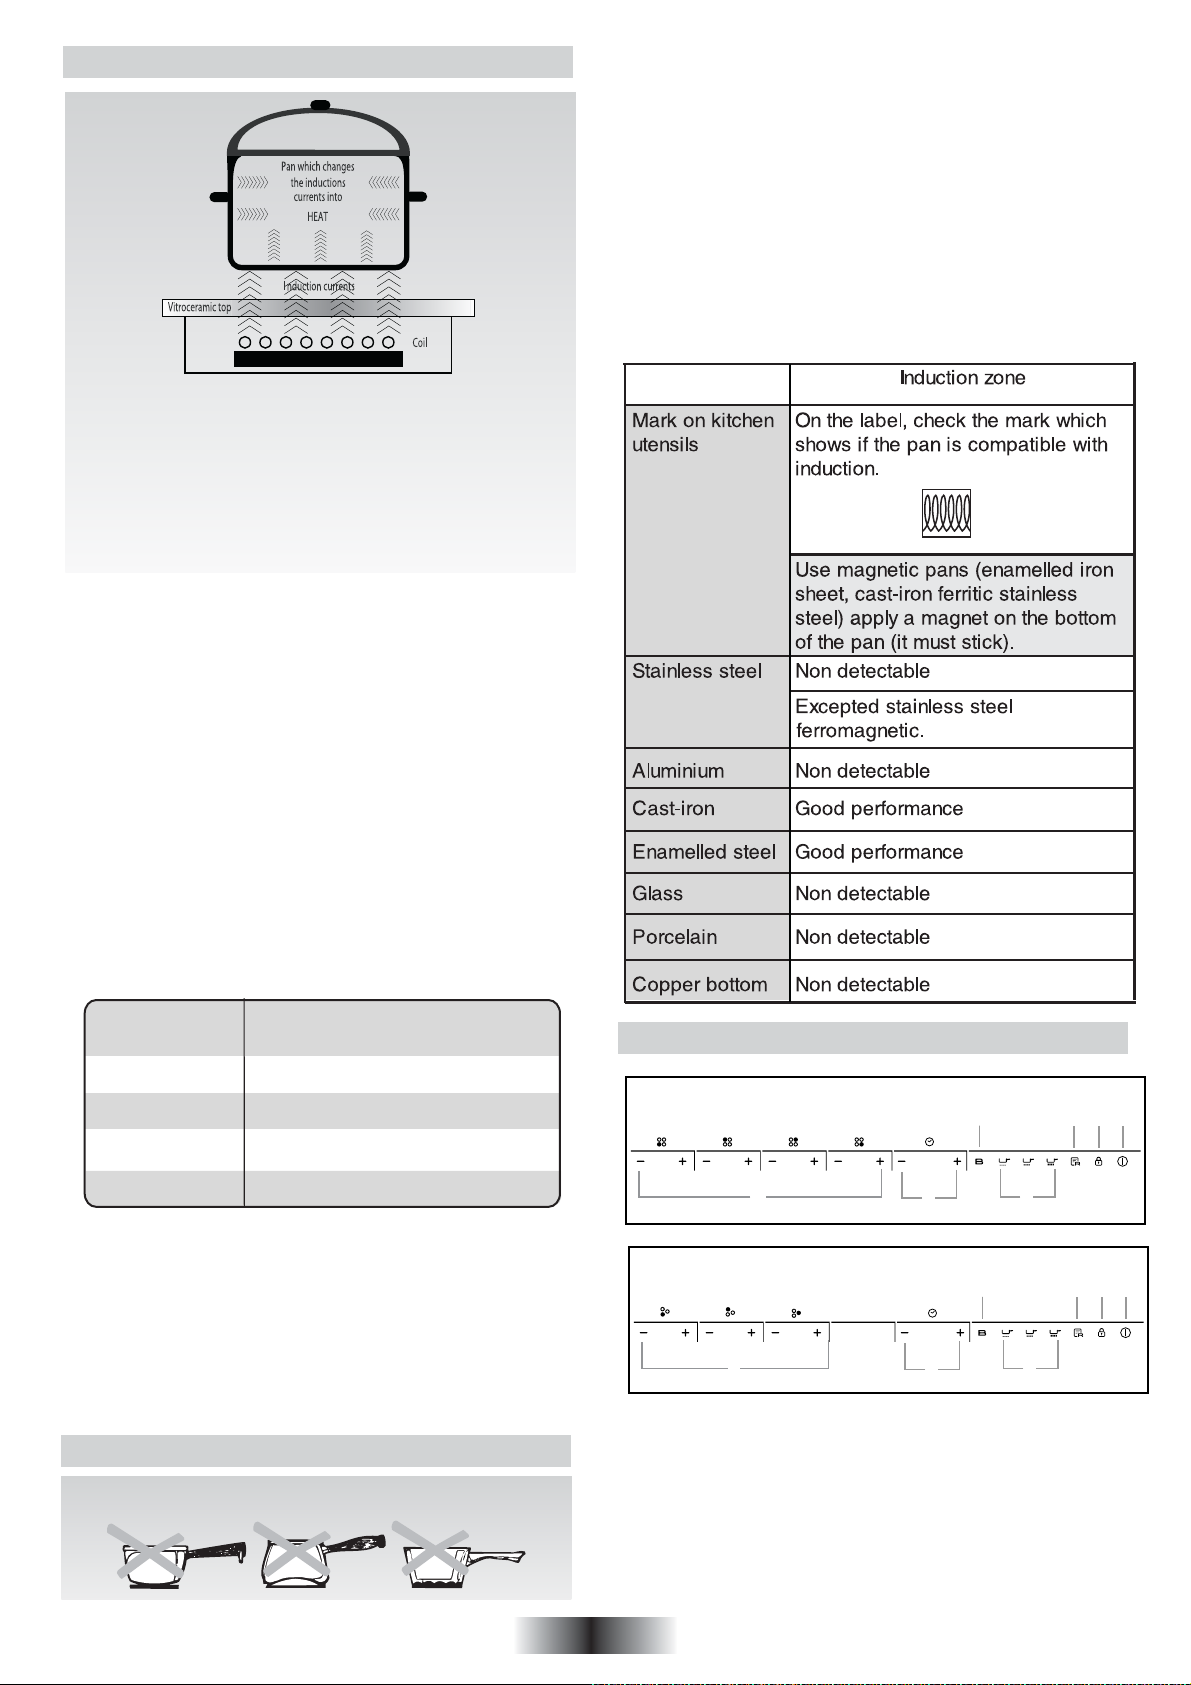
An electronic generator powers a coil located inside the appliance.
This coil creates a magnetic field, so that when the pan is placed
on the hob, it is permeated by the induction currents.
These currents make the pan into a real heat transmitter,
while the glass ceramic hob remains cold.
This system is designed for use with magnetic-bottomed
pans.
Put simply, induction technology has two main advantages :
- as heat is emitted only by the pan, heat is maintained at its
maximum level and cooking takes place without any heat loss.
- There is no thermal inertia, as cooking automatically starts when
the pan is placed on the hob and stops when it is removed.
• Always use good quality cookware with perfectly flat and
thick bases : using this type of cookware will prevent hot spots
that cause food to stick. Thick metal pots and pans will provide
an even distribution of heat.
• Ensure that the base of the pot or pan is dry : when filling
pans with liquid or using one that has been stored in the
refrigerator, ensure that the base of the pan is completely dry
before placing it on the hob. This will help to avoid staining the hob.
• Use pans whose diameter is as large as the graphic of
the zone selected.
used at its maximum efficiency.If you use smaller pot efficiency
could be less than expected.Pot less than 140 mm could be
undetected by the hob.
The following information will help you select the pans best adapted
to obtain good results.
Using a pot a slightly wider energy will be
A HIGH SAFETY APPLIANCE
• Protection from over-Temperature
A sensor monitors the temperature in the cooking zones.
When the temperature exceeds a safe level.the cooking zone
is automatically switched off.
• Residual heat warning
When the hob has been operating for some time,there will be
some residual heat.The letter"H"appears to warn you to keep
away from it.
• Auto shutdown
Another safety feature of the induction hob is auto shutdown.
This occurs whenever you forget to switch off a cooking zone.
The default shutdown times are shown in the table below.
Oem[h b[l[b
6q:
;q65
66q69
6:
When the pan is removed from the cooking zone, it stops
heating immediately and switches itself off after the buzzer
sounded for one minute.
RE
N D :
M I
the guidance of the doctor.
R^[ ^[Wj_d] ped[ i^kj Zemd
WkjecWj_YWbbo W\j[h
= ^ekhi
9 ^ekhi
7 ^ekhi
6^ekhi
shall use this product underThe patient with a heart pace
mak er
LTYV^ReZT UZRXcR^ `W eYV T`_ec`] aR_V]
RPI430/RPIF430/RPI430MM
3
1 2
RPI342/RPIF342/RPI342MM/RPI346
1 2
4
3
4
6
5
7
6
5
7
HOB COOKWARE ADVICE
Using good quality cookware is critical for setting the best
performance from your hob.
1. Power regular key
2. Timer regular key
3. Booster
4. Special function
5. Memory
6. Lock
7. On/Off
3 GB
Page 5
E`efdgUf[a`e Xad NeW
U^[d j^[ fem[h _i im_jY^[Z ed1 j^[ Xkpp[h m_bb
WdZ Wbb j^[ _dZ_YWjehi m_bb Yec[ ed
]e ekj3 R^[ ^eX _i dem
Y[djh[ e\ j^[ Yeea_d] ped[3
j^[
_d ijWdZXo ceZ[3
\eh ed[ i[YedZ WdZ j^[d
iekdZ edY[
ObWY[ j^[ fWd _d
Operating instructions
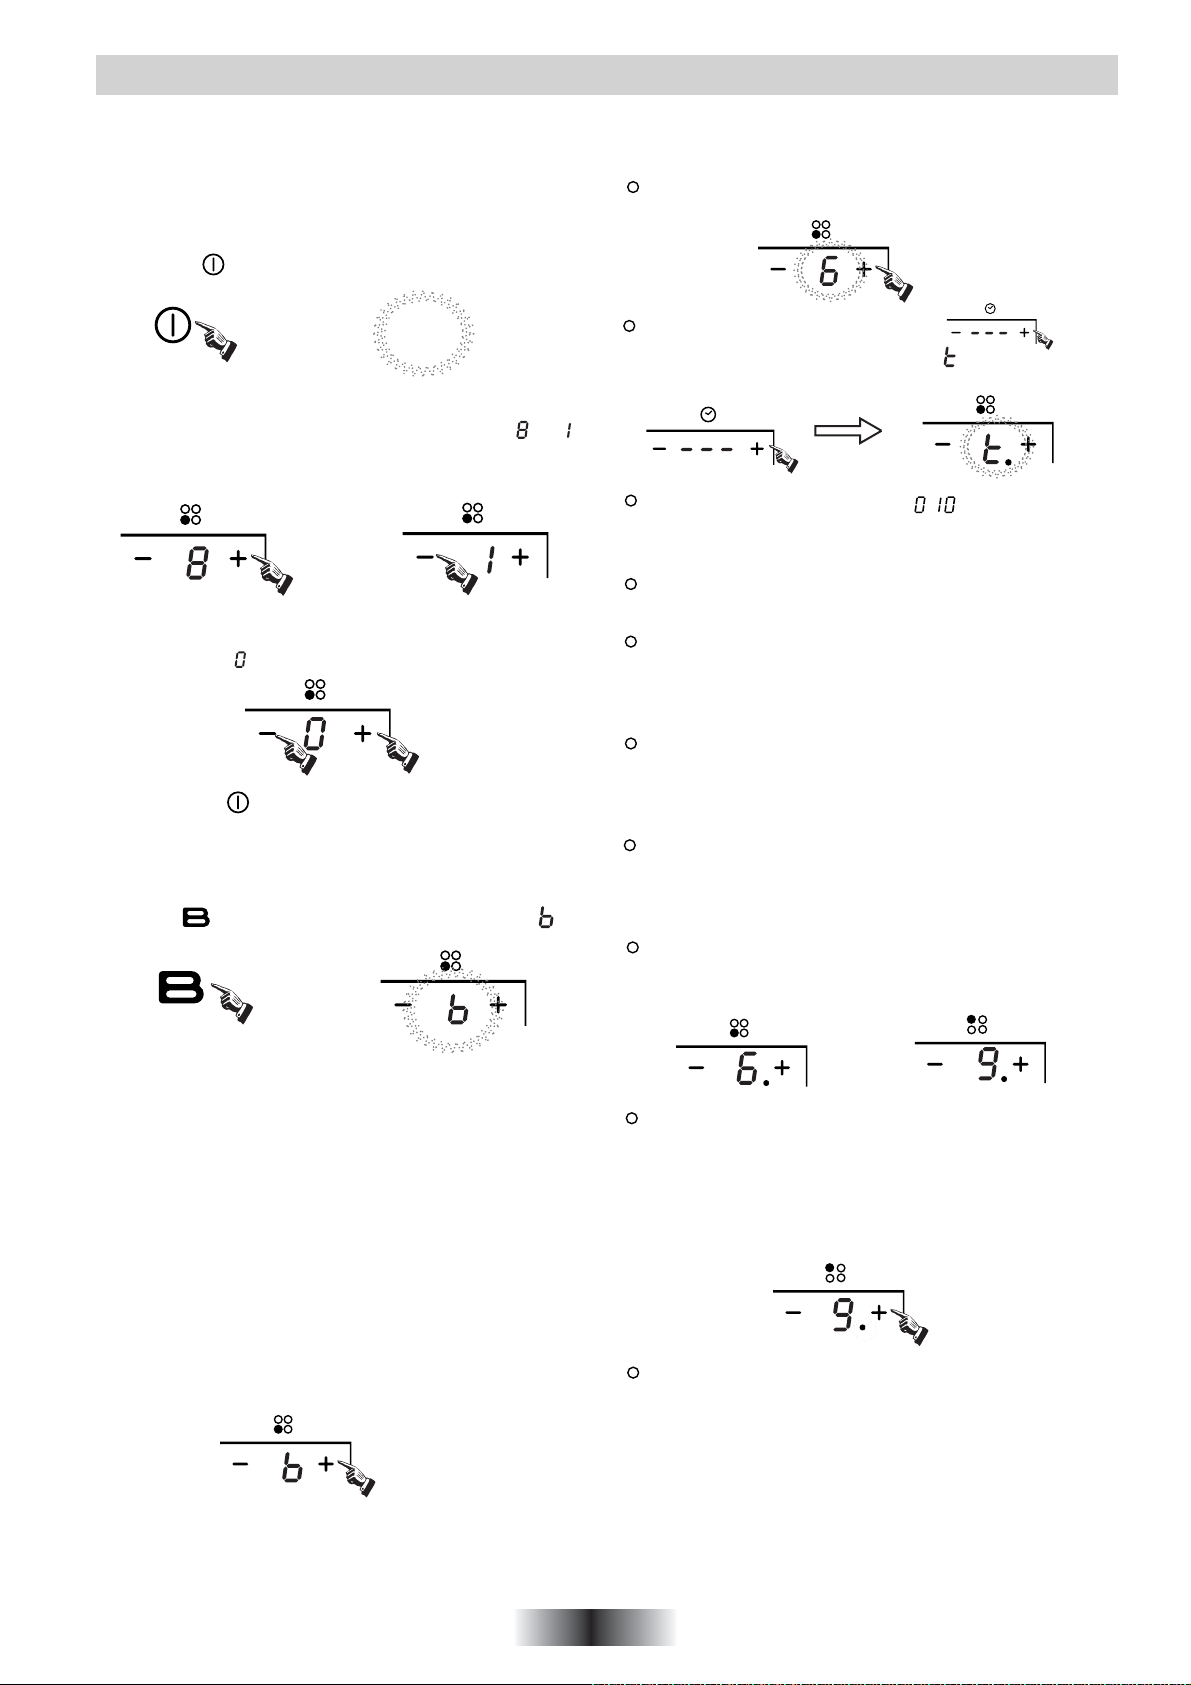
1.Press the " " key, all the indicators show "--".
--
Select the power level by pressing the "+" or "-" key for the
relevant hotplate. To begin with the indicator shows" "or " "
by pressing the "+" or "-" key. Adjust up or down by pressing
the "+" or "-" key.
If you press the "+" and "-" keys simultaneously, the power
setting returns to" "and the cooking zone switches off.
Timer function
If more than 1 zone is switch on :
activate the selected zone by pushing "+" or "-" key of that
zone,the corresponding digits will be flashing.
then press the " + " or " - " timer key power
level indicator flashing and showing " " and the timer
indicator flashes
To begin with the indicator shows" ",set the time by
pressing the "+" or "-" key. After setting the time, you can
select the power level of the cooking zone.
Then set the time for between 1 minute and 9 hours 59
minutes by pressing the "+" or "-" key.
Press the "+" key once increases the time by one minute ;
hold down the "+" key increases the time by 10 minutes ;
When the time exceeds 1 hour, hold down the "+" key
increases the time by 30 minutes .
:
NB : When the " " key is pressed, the induction hob returns
to standby mode if no other operation is carried out
within two minutes.
Boost function
Press the“ " key, the power level indicator showing " "
Warning:
1. The boost function only operates for 5 minutes, after which
the cooking zone will revert to its original setting.
2. The boost function works on the all cooking zone.
3. As the boost function of the 1st cooking zone is activated,
the 2nd cooking zone is limited under level 2 automatically,
vice versa. As the boost function of the 3rd cooking zone is
activated,the 4th cooking zone is limited under level 2
automatically, vice versa.
Press the "-" key once decreases the time by one minute ;
hold down the "-" key decreases the time by 10 minutes ;
When the time exceeds 2 hours, hold down the "-" key
decreases the time by 30 minutes .
You can set the power level during the timer mode.
If the timer is set on more than 1 zone:
Timer can be set on all 4 cooking zones. When you set the
time for several cooking zones simultaneously, decimal
dots of the relevant cooking zones are on.
on the timer display will be shown the timer than will expire
first. The dot of the corresponding zone will be on but
flashing.Once the countdown timer expires the
corresponding zone will be switch off. Then it will be shown
the new first expiring timer and the corresponding zone will
have the dot flashing.
Cancelling the "BOOST" mode
Cancel the "Boost" mode by pressing the "+" or "-" key of the
corresponding zone.
If the timer is set but not active on any zone, it will work
simply as timer countdown.
Note:
1. When the timer is 0 minute, the timer is cancelled.
2. When time elapses, the relevant cooking zone is switched
off.
3. After setting the timer, the timing indicator has been flashing
for 5 seconds, the set time will be automatically confirmed.
4 GB
Page 6
E`efdgUf[a`e Xad NeW
4. In timer mode, pressing the "+" or "-" key of the timer
simultaneously, timer setting returns to"0", time is cancelled.
Safety mode
To ensure the safety of children, the induction hob is fitted with
an interlock device.
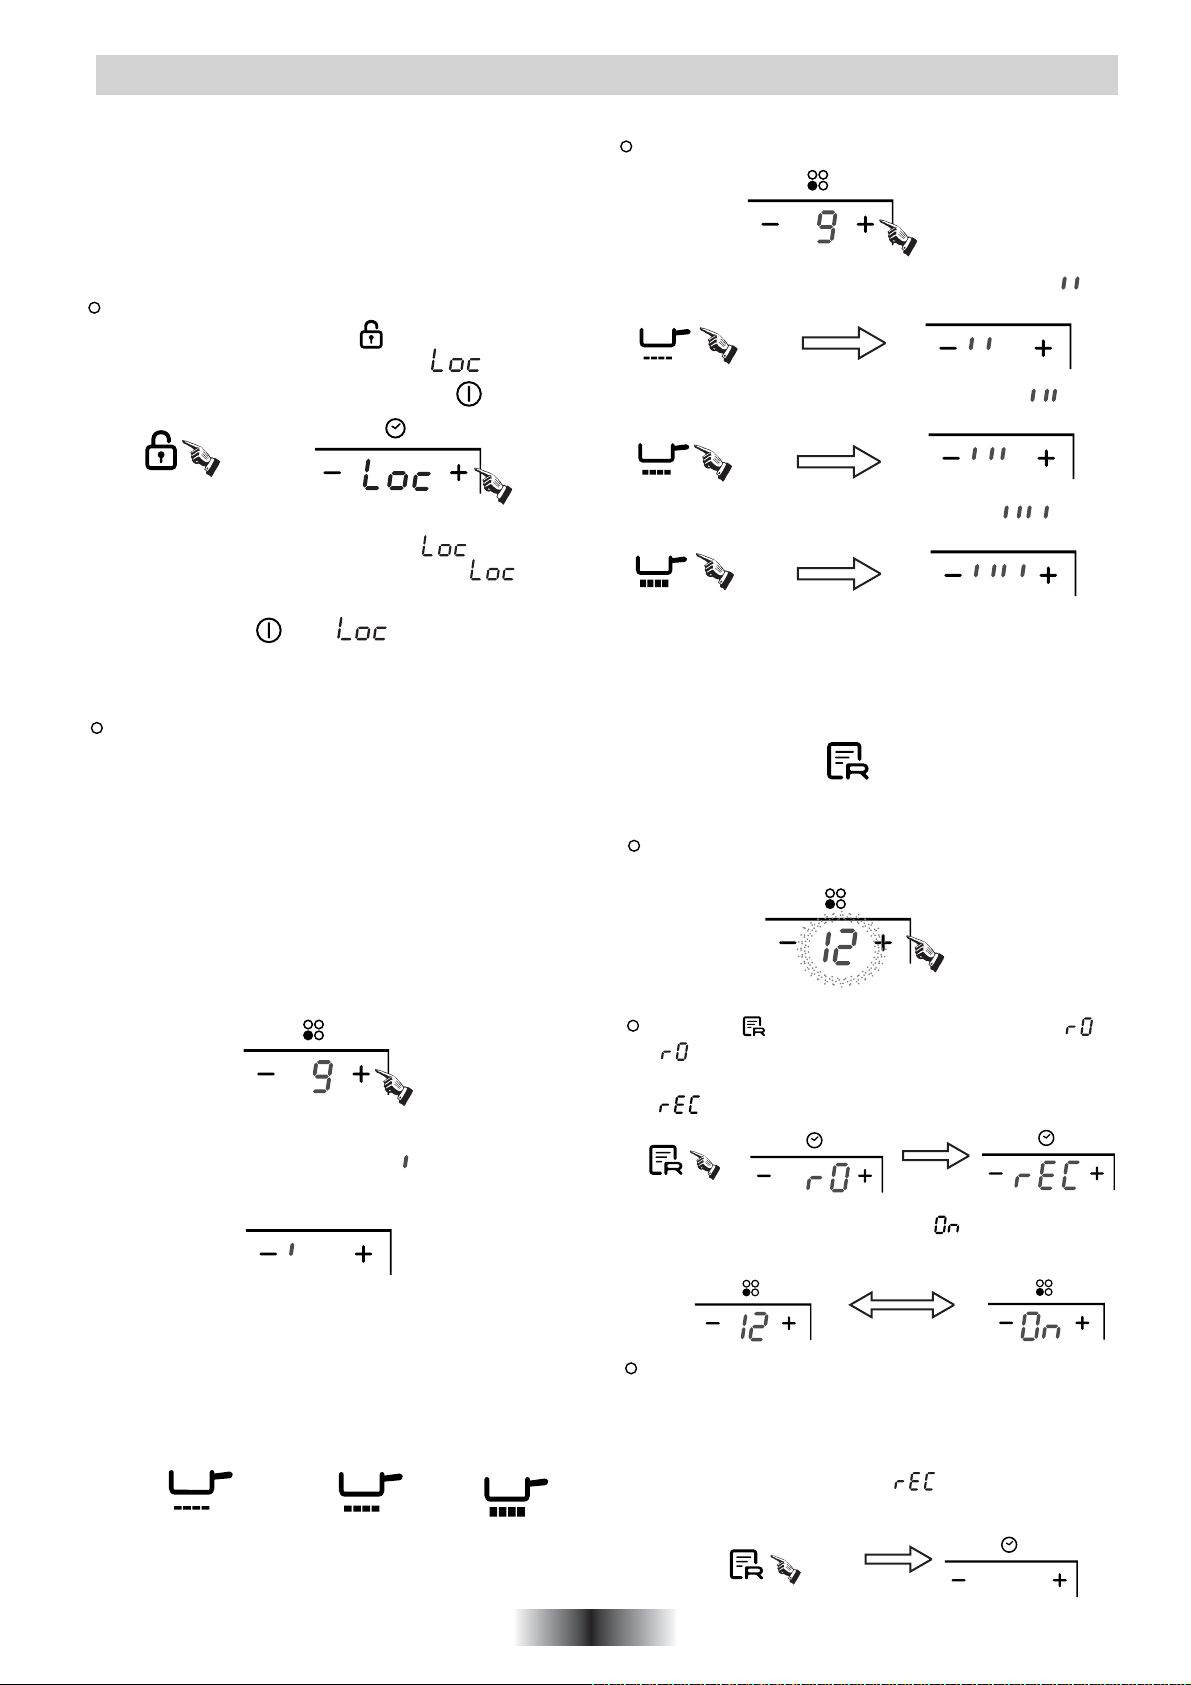
Lock:
In working mode, press the " " key, the hob then goes
into the lock mode, timer will display " " and the
rest of the keys are disabled except the " " key.
In standby mode, press the "lock" key, the hob then goes
into the lock mode, the timer shows" " and the rest
of the keys are disabled.The timer shows" " for a
while and then goes out.
If you press the key, " " will be displayed for a
while.
Unlock:
Hold down the"Lock" key for 3 second, and the lock
function will be deactivate.
Ativate the selected zone by pushing "+" or "-".
press the SIMMERING key, the indicator will be show “ ”
press the MEDIUM key, the indicator will be show “ ”
press the HIGH key, the indicator will be show “ ”
Memory function
You can use the memory function to store the power level
settings and duration for one zone.
Keep warm mode
This function will allow to keep the food warm for up to
2 hours.
Activate the selected zone by pushing the "-" or "+"
button
Press the "-" till when you reach the level between 0 and
1, you will see the keep warm level. " "will appear under
the area selected.
Cancelling the Keep warm mode
To exit for the keep warm function, set any other power
level
Special function
SIMMERING key
(level 1)
MEDIUM key
(level 8)
HIGH key
(level 15)
Recording
Select the desired cooking zone by pressing the "+" or "-"
key, with the power level indicator of that zone flashing,
press the" " key, with the timer indictor showing " ",
" "means "no cooking cycle in memory". hold down the
memory key for 3 seconds, with the timer indicator show
" ", recording is started.
the power level indicator showing " " and power level
alternately.
The maximum number of operations is 10 power level
variations in 8 hours. Any power level variation lasting less
than 15 seconds will not be recorded.
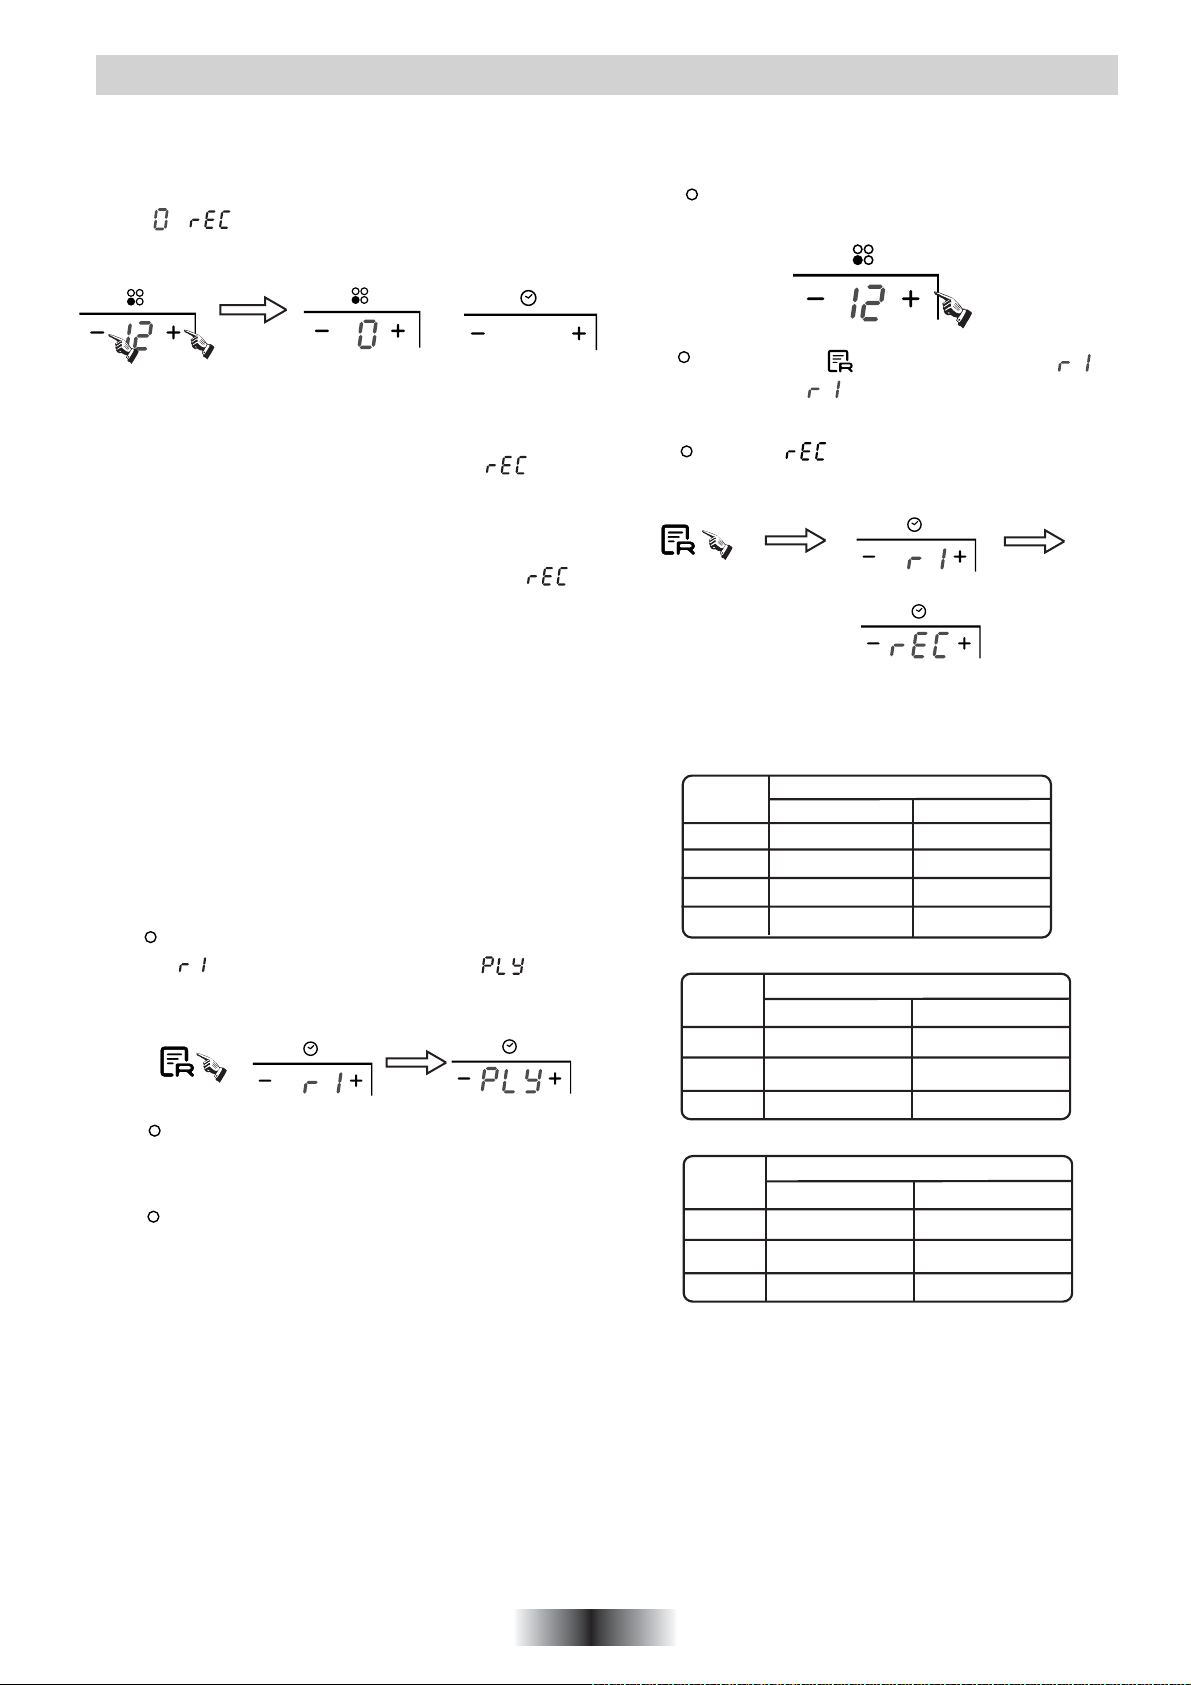
Stop recording
Press again the memory key, " " will be no more
display on the timer display and the cooking cycle will be
stored
5 GB
Page 7
E`efdgUf[a`e Xad NeW
OR
Switch off the corresponding cooking zone by pressing
"+" and "-" simultaneously or by setting the power level
to , " " will be no more display on the timer
display and the cooking cycle will be stored.
OR
Remove the pan from the corresponding cooking zone.
When the zone detects missing pan,then " " will
be no more display on the timer display and the cooking
cycle will be stored
OR
Do more than 10 power level setting variations, " "
will be no more display on
OR
switch off the hob,in that case the recording of the
cooking cycle is automatically aborted.
OR
switch off the a recorded cooking zone before 15
second since the starting of the recording in that case
the recording of the cooking cycle is automatically
aborted.
Execute a recorded cooking cycle
Press the memory key, the timer indicator displays
" ",key for 5 seconds, then
zone corresponding at the recorded cooking cycle
will switch on and starts performing the cycle.
If the corresponding zone was already on, the
recorded cooking cycle will take the priority and
be performed.
If during the execution of a recorded cooking cycle
on the corresponding zone “+” or “-” key,the
recorded cooking cycle is aborted and normal
managing is restored.anyway the stored cooking
cycle is kept in memory.
displays" ". The
How to record one new cooking cycle
if we have already recorded one:
Activate the cooking zone we want to record by
pressing"+" or "-"
Hold down the" " key for a while,and the " "
will appear. " " means "cooking zone stored in
memory".
Then the" " will be displayed,the recording of
the cycle on the selected zone starts.
The maximum power of cooking zones is
as follows:
Heating
zone
6
7
8
9
Heating
zone
6
7
8
Heating
zone
6
7
R^[ WXel[ cWo lWho e j^[ i_p[
j^[ cWj[h_Wb _j _i cWZ[ \hec
RPI430 / RPIF430 / RPI430MM
MehcWb
1200
2300
1200
2300
RPI342 / RPIF342 / RPI342MM
MehcWb
1200
2300
3000
MehcWb
1200
2300
8
3000
WYYehZ_d] j
RPI346
Beeij
1500
3000
1500
3000
Beeij
1500
2600
4200
Beeij
1500
2600
4600
fWd WdZ
j^[
e\
6 GB
Page 8
CLEANING AND MAINTENANCE
• Before carrying out any maintenance work on the hob, allow it
to cool down.
• Only products, (creams and scrapers) specifically designed for
glass ceramic surfaces should be used. They are obtainable
from hardware stores.
• Avoid spillages, as anything which falls on to the hob surface
will quickly burn and will make cleaning more difficult.
• It is advisable to keep away from the hob all substances which
are liable to melt, such as plastic items, sugar, or sugar-based
products.
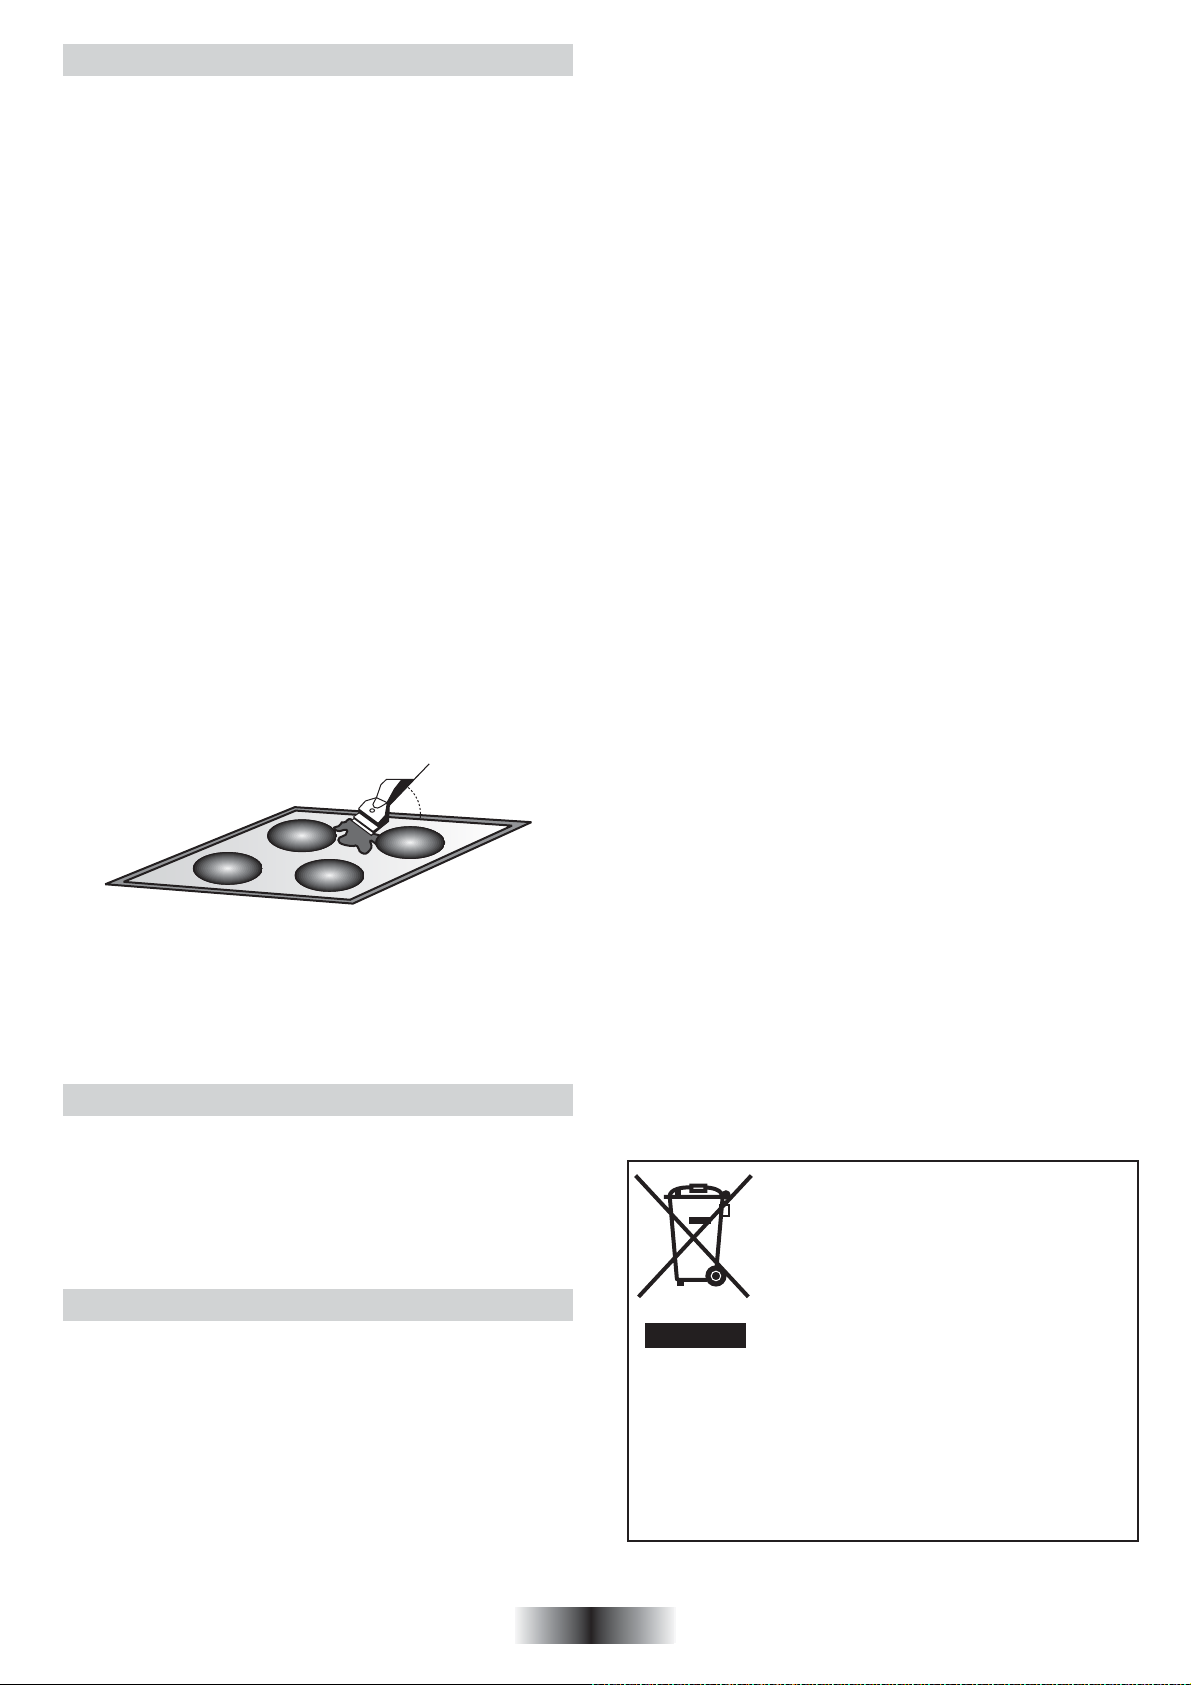
MAINTENANCE:
- Place a few drops of the specialised cleaning product on the
hob surface.
- Rub any stubborn stains with a soft cloth or with slightly damp
kitchen paper.
- Wipe with a soft cloth or dry kitchen paper until the surface is
clean.
If there are still some stubborn stains:
- Place a few more drops of specialised cleaning fluid on the
surface.
- Scrape with a scraper, holding it at an angle of 30° to the hob,
until the stains disappear.
- Wipe with a soft cloth or dry kitchen paper until the surface is
clean.
- Repeat the operation if necessary.
A FEW HINTS:
Frequent cleaning leaves a protective layer which is essential to
prevent scratches and wear. Make sure that the surface is clean
before using the hob again. To remove marks left by water, use
a few drops of white vinegar or lemon juice. Then wipe with
absorbent paper and a few drops of specialised cleaning fluid.
The glass ceramic surface will withstand scraping from flatbottomed cooking vessels, however, it is always better to lift them
when moving them from one zone to another.
NB:
30° Maxi
Foods cook slowly.
• Improper cookware being used. Pan bases should be flat, fairly
heavy-weight and the same diameter as the heat zone selected.
Tiny scratches (may appear as cracks or abrasions) on the
glass surface of the hob.
• Incorrect cleaning methods, cookware with rough bases, or
coarse particles (salt or sand) trapped between the cookware
and the surface of the hob.
Use recommended cleaning procedures, be sure cookware
bases are clean before use and use cookware with smooth
bases.
Metal markings (may appear as scratches).
• Do not slide aluminium cookware across the surface.
Use recommended cleaning procedure to remove marks.
• Incorrect cleaning materials have been used, spillage or grease
stains remain on the surface, use a razor scraper and
recommended cleaning product.
Dark streaks or specks.
• Use a razor scraper and recommended cleaning product.
Areas of discoloration on cooktop.
• Marks from aluminium and copper pans as well as mineral
deposits from water or food can be removed with the cleaning
cream.
Hot sugar mixtures / plastic melted to the surface.
• See the Glass Hob Cleaning section.
The hob is out of order, or some heat zones do not work.
• The shunt bars are not properly fitted on the terminal block.
Check the connection is made in conformity with the instructions
page 2.
The hob does not operate.
• The control panel is locked. Press the “Locking” button to release.
The hob does not cut off
• The control panel is locked. Press the “Locking” button to release.
Refer to the section, page 5.
The hob stops automatically
• The cooking zones stop automatically if they are left on for too
long. Refer to the section, page 3.
Frequency of on/off operations for cooking zones
• The on-off cycles vary according to the required heat level:
- low level: short operating time,
- high level: long operating time.
Do not use a sponge which is too wet.
Never use a knife or a screwdriver.
A scraper with a razor blade will not damage the surface, as
long as it is kept at an angle of 30°.
Never leave a scraper with a razor blade within the reach of
children.
Never use abrasive products or scouring powders.
AFTERCARE
Before calling out a Service Engineer please check the
following:
— that the plug is correctly inserted and fused;
If the fault cannot be identified:
switch off the appliance — do not tamper with it — call the Aftercare
Service Centre. The appliance is supplied with a guarantee
certificate that ensures that it will be repaired free of charge at the
Service Centre.
PROBLEM SOLVING
The induction hob gives shorings out.
• Normal. The cooking fan of the electronic components is on.
The induction hob gives a light whistling out.
• Normal. According to the working frequency of the inductors, a
light whistling can occur when using several cooking zones on
maximum power.
Cooking zones that do not maintain a rolling boil or a fast
enough frying rate.
• You must use pans which are absolutely flat.
• Pan bottoms should closely match the diameter of the heat zone
selected.
This appliance is marked according to the
European directive 2002/96/EC on Waste
Electrical and Electronic Equipment (WEEE).
By ensuring this product is disposed of correctly,
you will help prevent potential negative
consequences for the environment and human
health, which could otherwise be caused by
inappropriate waste handling of this product.
The symbol on the product indicates that this
product may not be treated as household waste.
Instead it shall be handed over to the applicable collection point
for the recycling of electrical and electronic equipment
Disposal must be carried out in accordance with local
environmental regulations for waste disposal.
For more detailed information about treatment, recovery and
recycling of this product, please contact your local city office,
your household waste disposal service or the shop where you
purchased the product.
7 GB
Page 9
INSTRUCTIONS GENERALES
LIRE ATTENTIVEMENT LA NOTICE POUR VOUS PERMETTRE DE TIRER LE MEILLEUR PARTI DE VOTRE APPAREIL.
Nous vous conseillons de conserver la notice d'installation et d'utilisation pour toute consultation ultérieure, et de noter ci-dessous, avant
installation de la table, le numéro de série de l'appareil en cas d'éventuelle demande d'intervention du service après-vente.
Plaque signalétique
(située sous le caisson inférieur de la table)
• Pendant son fonctionnement ou dans le cas de l'extinction d'un foyer, tant que l'indicateur de chaleur résiduelle est allumé, il est
vivement conseillé de tenir les enfants à l'écart de la plaque afin d'éviter les risques de brûlure grave.
• Lorsque vous cuisinez avec des graisses ou de l'huile, prenez garde de toujours surveiller le déroulement de la cuisson car les graisses
ou l'huile surchauffées peuvent s'enflammer rapidement.
• La plage de commande de la table est sensible, ne pas placer dessus des récipients chauds.
• Les feuilles d'aluminium et les récipients en matière plastique ne doivent pas être placés sur les surfaces chaudes.
• Après chaque utilisation, un petit nettoyage de la table est nécessaire, pour éviter l'accumulation des salissures et des graisses. Cellesci recuiraient à chaque nouvel usage et se carboniseraient en dégageant une fumée et des odeurs désagréables, sans compter les
risques de propagation d'incendie.
• Ne pas déposer d’objets métalliques tels que couteaux, fourchettes, cuillères ou couvercle sur la table car si leur dimension ou leur
masse métallique est suffisamment importante, ils peuvent s’échauffer et endommager la table.
• Ne jamais cuisiner directement sur la table, employer des récipients.
• Placer toujours la casserole bien centrée sur le foyer utilisé.
• Ne pas utiliser la surface de la table comme planche à découper, ou plan de travail.
• Ne pas faire glisser les casseroles sur la table : risque de rayures.
• Ne pas stocker d'objets lourds au dessus de la table, ils pourraient tomber et endommager la table.
• Ne pas entreposer sur la table des objets quels qu'ils soient.
• Dans le cas improbable où une fêlure apparaîtrait sur le verre, déconnecter immédiatement l'appareil de l'alimentation et adressezvous directement au Service après-vente.
• Cet appareil n’est pas destiné à être utilisé par des personnes (notamment les enfants) incapables, irresponsables ou sans connaissance
sur l’utilisation du produit, à moins qu’elles ne soient surveillées, ou instruites sur l’utilisation de l’appareil, par une personne responsable
de leur sécurité.
• Surveillez les enfants pour être sûr qu’ils ne jouent pas avec l’appareil.
Attention: cet appareil répond à la directive en matière de sécurité et de compatibilité électromagnétique. Toutefois,
il est recommandé que les personnes ayant un stimulateur cardiaque ne s'approchent pas de l'appareil. Il est impossible
de garantir que chaque stimulateur cardiaque sur le marché répond à la directive applicable en matière de sécurité
et de compatibilité électromagnétique et qu'il n'y aura pas d'interférences qui compromettent le fonctionnement correct
de l'appareil. Eventuellement, des dérangements peuvent aussi survenir sur d'autres appareils, tels que des appareils
auditifs.
MODELE
Foyers de cuisson
Alimentation électrique
Puissance totale
électrique (W)
Dimensions de l’appareil
(l x p x h) mm
Dimensions
d’encastrement
(A x B)
RPI430/RPIF430/RPI430MM
4 INDUCTIONS (4 Boosters)
220-240V~ 50/60 Hz
400 V 50/60Hz
7000 W
590 X 520 X 55
560 x 490
RPI342/RPIF342/RPI342MM/RPI346
3 INDUCTIONS (3 Boosters)
220-240V~ 50/60 Hz
400 V 50/60Hz
7200 W
590 X 520 X 55
560 x 490
Toutes ces caractéristiques sont données à titre indicatif. Soucieux de toujours améliorer la qualité de sa production, le constructeur
pourra apporter à ses appareils des modifications liées à l'évolution technique en respectant les conditions fixées à l'article R 132-2
du Code de la Consommation.
Produit compatible avec les Directives Européennes 73/23/EEC et 89/336/EEC, remplacées par 2006/95/EC et 2004/108/EC,
et les modifications successives.
8 FR
Page 10

INSTALLATION
La mise en place fonctionnelle des appareils ménagers dans leur environnement est une opération délicate qui, si elle n'est pas correctement
effectuée, peut avoir de graves conséquences sur la sécurité des consommateurs. Dans ces conditions, il est impératif de confier cette tâche
à un professionnel qui la réalisera conformément aux normes techniques en vigueur. Si malgré cette recommandation, le consommateur
réalisait lui-même l'installation, le constructeur déclinerait toute responsabilité en cas de défaillance technique du produit entraînant ou non
des dommages aux biens et/ou aux personnes.
ENCASTREMENT
Le meuble ou le support dans lequel doit être encastrée la table,
ainsi que les parois du meuble qui pourraient juxtaposer celui-ci,
doivent être d'une matière résistant à une température élevée.
De plus, il est nécessaire que le revêtement qui recouvre le meuble
ou le support soit fixé par une colle résistant à la chaleur afin
d'éviter le décollement.
Installation:
• Un joint d'étanchéité est livré avec la table de cuisson.
Avant encastrement:
• retourner la table face verre vers le bas, en prenant soin de
protéger le verre.
• Placer le joint tout autour de la table.
• Veiller particulièrement à le placer correctement afin d’éviter
toute infiltration dans le meuble support.
• S’assurer que la surface sur laquelle va reposer la table soit
parfaitement plane.
• Les déformations éventuelles provoquées par une mauvaise
pose de la table risquent d’entraver les performances de l’appareil.
• Prévoir un espace de 5 cm minimum entre l’appareil et les parois
verticales avoisinantes.
• La découpe du meuble pour encastrer la table à induction doit
impérativement être conforme aux cotes indiquées sur le dessin.
• Découper une ouverture sur le plan de travail, aux dimensions
spécifiées sur le schéma ci-dessous.
• Pour pourvoir installer correctement la table à induction, vous
devez disposer d’un espace d’au moins 50 mm entre le bord de
la découpe et le mur et/ou les meubles.
• S’assurer que l’épaisseur du plan de travail soit d’au moins
30 mm et que le matériau dont il est fait soit résistant aux hautes
températures. Voir dessin (Fig. 1).
LE RACCORDEMENT ELECTRIQUE
"L’installation recevant l’appareil cité en référence doit être
conforme à la norme en vigueur dans le pays d’installation.”
Le constructeur décline toute responsabilité en cas de non respect
de cette disposition.
Attention :
• Avant de procéder au raccordement, le technicien doit vérifier
la tension d'alimentation indiquée au compteur, le réglage du
disjoncteur, le calibre du fusible (25 A) et la continuité de la terre
de l'installation.
• Le raccordement électrique au réseau doit être effectué par une
prise de courant avec prise de terre, ou par l'intermédiaire d'un
dispositif à coupure omnipolaire ayant une distance d'ouverture
des contacts d'au moins 3 mm.
Si l'appareil comporte une prise de courant, il doit être installé
de telle façon que la prise de courant soit accessible.
• Le fil de protection vert/jaune doit être relié aux bornes de terre,
de l’appareil d’une part, et de l’installation d’autre part.
• Notre responsabilité ne saurait être engagée pour tout incident
ou ses conséquences éventuelles qui pourraient survenir lors
de l’usage d’un appareil non relié à la terre, ou relié à une terre
dont la continuité serait défectueuse.
• Toute intervention se rapportant au câble d’alimentation doit
impérativement être réalisée par le Service après-vente ou une
personne de qualification similaire.
ATTENTION:
Au cas où il serait nécessaire de remplacer le cable d’alimentation,
les codes couleurs dans le branchement de chacun des fils
doivent être respectées comme ci-dessous :
BLEU - NEUTRE (N)
MARRON - PHASE (L)
JAUNE-VERT - TERRE ( )
Joint
• L’encastrement de la table de cuisson au dessus d’un four non
ventilé, lave-vaisselle, réfrigérateur, congélateur ou lave-linge
n’est pas possible.
• Toujours s’assurer que la table à induction est bien encastrée
dans le plan de travail et qu’elle est bien ventilée par de l’air
entrant et sortant (Fig. 2).
mini 760 mm
mini 5 cm
mini 2 cm
SORTIE D’AIR
mini 5 mm
RACCORDEMENT ELECTRIQUE
Suivre la procédure comme indiqué ci-dessous (Fig. 3) :
L1 L2
N1 N2
Grey
PRISE D’AIR
Attention: pour des raisons de sécurité, prévoir un espace d’au
moins 760 mm entre la table de cuisson et le bas des meubles
situés au-dessus.
• Le cordon d’alimentation ne doit être ni plié ni écrasé.
9 FR
Page 11

INDUCTION
Récipient
qui transforme
le flux d’induction
en chaleur
Flux d’induction
Dessus vitrocéramique
Module commande/contrôle
PRINCIPE DE FONCTIONNEMENT
Un module électronique alimente et commande électriquement
une bobine située à l’intérieur de l’appareil.
Cette bobine créé un champ magnétique de telle sorte que le
récipient posé sur le support se trouve traversé par des courants
dits “d’induction”.
Ces derniers transforment le récipient en véritable émetteur de
chaleur, le dessus vitrocéramique restant froid.
Ce procédé implique l’utilisation de récipients magnétiques.
Concrètement, la technologie de l’induction conduit à deux
résultats fondamentaux :
- la chaleur n’étant émise que par le récipient, la puissance de
chauffe restituée est maximale et la cuisson s’effectue sans
déperdition calorifique.
- il n’y a pas d’inertie thermique puisque la pose ou le retrait du
récipient sur le support déclenche instantanément le démarrage
ou l’arrêt de cuisson.
Bobine
• Veiller à ce que le fond des récipients soit sec: lors du rem-
plissage du récipient ou lorsqu’on utilise une casserole sortant
du réfrigérateur, par exemple, s’assurer que l’ustensile est bien
sec, cette précaution évitera toute salissure sur le plan de cuisson.
• Les foyers inductions sont auto-dimensionants. Mais pour
générer la puissance maximale, nous vous recommandons
d’utiliser des casseroles qui couvrent le dessin de la zone.
Ainsi, l’idéal est d’utiliser une casserole légèrement plus
grande que le dessin afin d’obtenir le meilleur rendement.
Si vous utilisez une casserole plus petite que la zone, la puissance
obtenue sera moindre. Il est donc important de toujours choisir le
foyer le plus adapté à la taille de la casserole.A noter que les
casseroles d’un diamètre inférieur à 140mm risquent, elles, de ne
pas être détectées par le foyer induction.
Les informations suivantes vous aideront à choisir les récipients
les mieux adaptés pour obtenir de bons résultats.
UN APPAREIL DE HAUTE SECURITE ....
• Protection anti-surchauffe : un capteur contrôle la température
à l’intérieur de la table de cuisson. S’il relève une chaleur excessive,
la table de cuisson s’éteindra automatiquement.
• Indication de chaleur : lorsque l’utilisation de la table de cuisson
se prolonge dans le temps, la température de la zone de cuisson
s’élève. Dans ce cas, le témoin lumineux “H” s’allume, vous
avertissant ainsi que la surface du foyer est encore chaude.
• Sécurité coupure automatique : une autre sécurité de la
plaque induction est la coupure automatique. Elle fonctionne
lorsque vous oubliez d’éteindre un foyer de cuisson. La coupure
automatique dépend du niveau de puissance et du temps de
fonctionnement, comme indiqué dans le tableau ci-dessous.
Niveau La zone de cuisson s’éteint
de puissance automatiquement après
1-5 8 heures
6-10 4 heures
11-14 2 heures
15 1 heures
Lorsqu’une casserole est retirée du foyer de cuisson, il s’arrête
de chauffer immédiatement et s’éteint après un signal sonore
d’une minute.
Rappel : le patient porteur d’un pacemaker peut utiliser la table
de cuisson seulement sous les recommandations du médecin.
PRESENTATION DU TABLEAU DE BORD
RPI430/RPIF430/RPI430MM
3
1 2
RPI342/RPIF342/RPI342MM/RPI346
3
5
4
6
7
6
5
7
LE CHOIX DES USTENSILES
L’utilisation de récipients de qualité est nécessaire
pour obtenir de bons résultats de cuisson.
• Utiliser des récipients de bonne qualité à fond plat et épais:
le fond rigoureusement plat supprimera les points de surchauffe
sur lesquels les aliments attachent, et l’épaisseur du métal
permettra une parfaite répartition de la chaleur.
10 FR
1 2
1. Power regular key
2. Timer regular key
3. Booster
4. Special function
5. Memory
6. Lock
7. On/Off
4
Page 12

Instructions d’utilisation
À la mise sous tension de la plaque de cuisson, l’avertisseur
émet une sonnerie et tous les voyants s'allument pendant
une seconde avant de s'éteindre. La plaque est à présent en
mode de veille.
Placez la casserole au centre de la zone de cuisson.
Consignes d'utilisation
1. Appuyez sur la touche « », tous les indicateurs affichent
« -- ».
‐‐
Sélectionnez le niveau de puissance en appuyant sur la
touche « + » ou « - » pour la plaque chauffante concernée.
L’indicateur affiche tout d'abord « » ou « » lorsque vous
appuyez sur la touche « + » ou « - ». Faites un réglage
vers le haut ou vers le bas en appuyant sur la touche « + »
ou « - ».
Annulation du mode « BOOST »
Annulez le mode boost en appuyant sur la touche « + » ou « - »
de la zone correspondante.
Fonction minuteur
Si plusieurs zones sont activées
- activez la zone sélectionnée en appuyant sur la touche « + »
ou « - » de cette zone, les chiffres correspondants clignotent.
6
- appuyez alors sur la touche de minuteur « + » ou « - »,
l'indicateur de niveau de puissance clignote et affiche « »
et l’indicateur du minuteur clignote.
Si vous appuyez simultanément sur les touches « + » et
« - », le niveau de puissance revient à « » et la zone de
cuisson s'éteint.
0
0
Remarque : Si vous appuyez sur la touche « », la plaque
à induction se remet en mode de veille si aucune opération
n’est effectuée dans les deux minutes.
Fonction boost
Appuyez sur la touche « », l’indicateur de niveau de
puissance affiche « ».
Avertissement :
1. La fonction boost ne fonctionne que pendant 5 minutes,
après quoi la zone de cuisson revient à son réglage
d’origine.
2. La fonction boost fonctionne sur toutes les zones de
cuisson.
3. Lorsque la fonction boost de la 1ère zone de cuisson
est activée, la 2ème zone de cuisson se limite
automatiquement sous le niveau 2, et inversement.
Lorsque la fonction boost de la 3ème zone de cuisson
est activée, la 4ème zone de cuisson se limite
automatiquement sous le niveau 2, et inversement.
- L’indicateur affiche tout d'abord « »,appuyez sur la touche
« + » ou « - » pour régler le temps.
Une fois le temps réglé, sélectionnez le niveau de puissance
de la zone de cuisson.
- Réglez alors le temps entre 1 minute et 9 heures 59 minutes
en appuyant sur la touche « + » ou « - ».
- Si vous appuyez une fois sur la touche « + », le temps
augmente d’une minute ;
Si vous maintenez la touche « + » enfoncée, le temps
augmente par intervalles de 10 minutes ;
lorsque le temps dépasse 1 heure, si vous maintenez la
touche « + » enfoncée, le temps augmente par intervalles de
30 minutes.
- Si vous appuyez une fois sur la touche « - », le temps diminue
d’une minute ;
si vous maintenez la touche « - » enfoncée, le temps diminue
par intervalles de 10 minutes ;
Lorsque le temps dépasse 2 heures, si vous maintenez la
touche « - » enfoncée, le temps diminue par intervalles de
30 minutes.
- Vous pouvez régler le niveau de puissance en mode minuteur.
:
Si le minuteur est activé sur plusieurs zones
- Le minuteur peut être réglé pour les 4 zones de cuisson.
Lorsque vous réglez les temps de plusieurs zones de cuisson
simultanément, les points décimaux des zones de cuisson
concernées s’affichent.
6
9
11 FR
Page 13

Instructions d’utilisation
- le temps qui apparaît sur l’afficheur est celui qui expirera
en premier. Le point de la zone correspondante est éclairé
mais clignote. Une fois que le compte à rebours du premier
minuteur est terminé, la zone correspondante s'éteint. Le
temps qui apparaît sur l'afficheur correspond alors au
prochain minuteur à expirer et le point de la zone
correspondante clignote.
9
- Si le minuteur est réglé mais n'est actif sur aucune zone,
il ne servira que de minuteur.
Remarque :
1. Lorsque le minuteur est sur 0 minute, il est annulé.
2. Une fois le temps écoulé, la zone de cuisson concernée
s'éteint.
3. Une fois le réglage du minuteur terminé, l’indicateur du
minuteur clignote pendant 5 secondes et le temps réglé
est automatiquement confirmé.
4. En mode minuteur, si vous appuyez simultanément sur
les touches « + » et « - », le réglage de la puissance
revient à « 0 » et le temps est annulé.
Appuyer sur le bouton “-” jusqu’à atteindre le niveau entre
correspond au mode « Maintien au chaud ». Le
apparaît sur la zone sélectionnée.
Annuler la fonction « Maintien au chaud »
Pour annuler la fonction « Maintien au chaud », programmer n’importe
quelle autre température.
symbole “
0 et 1,
qui
”
Fonction spéciale
Touche SIMMERING
(mijotage) (niveau 1)
- Activez la zone sélectionnée en appuyant sur « + » ou « - ».
Appuyez sur la touche SIMMERING, l’indicateur affiche « ».
Touche MEDIUM
(moyen) (niveau 8)
Touche HIGH
(élevé) (niveau 15)
Mode de sécurité
Pour garantir la sécurité des enfants, la plaque à induction
est équipée d’un dispositif de verrouillage.
- Verrouillage
En mode de fonctionnement, appuyez sur la touche « »,
la plaque entre alors en mode de verrouillage ; le minuteur
affiche « » et les autres touches sont désactivées, à
l’exception de la touche « ».
En mode de veille, appuyez sur la touche « lock » ; la
plaque entre alors en mode de verrouillage, le minuteur
affiche « » et les autres touches sont désactivées. Le
minuteur affiche « » pendant un moment puis s’éteint.
Si vous appuyez sur la touche , « » s’affiche
pendant un moment.
- Déverrouillage :
Maintenez la touche « Lock » enfoncée pendant 3
secondes pour désactiver la fonction de verrouillage.
Appuyez sur la touche MEDIUM, l’indicateur affiche « ».
Appuyez sur la touche HIGH, l’indicateur affiche « ».
Fonction mémoire
Vous pouvez utiliser la fonction de mémoire pour stocker les
réglages des niveaux de puissance et les durées pour une zone.
Enregistrement
- Sélectionnez la zone de cuisson en appuyant sur la touche
« + » ou « - », l'indicateur du niveau de puissance de cette
zone clignote.
Fonction “Maintien au chaud”
Cette fonction vous permet de maintenir au chaud vos
plats pendant une durée maximum de 2 heures.
Activer la zone souhaitée en appuyant sur les boutons
“-“ ou “+”.
- Appuyez sur la touche « », l'indicateur du minuteur affiche
« », « » signifie « aucun cycle en mémoire ». Maintenez
la touche de mémoire enfoncée pendant 3 secondes,
l'indicateur du minuteur affiche « » et l'enregistrement
commence.
12 FR
Page 14

Instructions d’utilisation
L’indicateur du niveau de puissance affiche alternativement
« » et le niveau de puissance.
- Le nombre maximal d’opérations est de 10 variations de
niveaux de puissance en 8 heures. Aucune variation du
niveau de puissance d’une durée de moins de 15 secondes
ne sera enregistrée.
Arrêt de l’enregistrement
Appuyez à nouveau sur la touche mémoire, « » disparaît
de l'afficheur du minuteur et le cycle de cuisson est mémorisé.
OU
Éteignez la zone de cuisson correspondante en appuyant
simultanément sur « + » et « - » ou en réglant le niveau de
puissance sur « »; « » ne s'affiche plus sur l’afficheur
du minuteur et le cycle de cuisson est mémorisé.
- Si la touche «+» ou « - » est manipulée au cours de
l’exécution d’un cycle de cuisson enregistré sur la zone
correspondante, le cycle de cuisson enregistré est
abandonné et une gestion normale est restaurée ;
néanmoins, le cycle de cuisson enregistré est conservé en
mémoire.
Comment enregistrer un nouveau cycle de
cuisson si vous en avez déjà enregistré un
- Activez la zone de cuisson à enregistrer en appuyant sur « + »
ou « - ».
- Maintenez la touche « » enfoncée un moment ; « »
s’affiche. « » signifie « zone de cuisson mémorisée ».
- Ensuite, le « » s’affiche et l'enregistrement du cycle de la
zone sélectionnée démarre.
OU
Retirez la casserole de la zone de cuisson correspondante.
Lorsque la zone détecte l’absence de casserole, « »
disparaît de l'afficheur du minuteur et le cycle de cuisson
est mémorisé.
OU
Effectuez plus de 10 variations de réglage du niveau de
puissance, « » disparaît de l'afficheur du minuteur et le
cycle de cuisson est mémorisé.
OU
Éteignez l’interrupteur ; dans ce cas, l'enregistrement du
cycle de cuisson sera automatiquement abandonné.
OU
Éteignez une zone de caisson dans les 15 secondes à
partir du début de l’enregistrement ; dans ce cas,
l’enregistrement du cycle de cuisson est automatiquement
abandonné.
Exécution d'un cycle de cuisson enregistré
- Appuyez sur la touche de mémoire, l’indicateur du minuteur
affiche « » pendant 5 secondes, puis affiche « ». La
zone correspondant au cycle de cuisson enregistré s’allume
et démarre le cycle.
- Si la zone correspondant était déjà activée, le cycle de
cuisson enregistré prendra la priorité et sera exécuté.
La puissance maximale des zones de
cuisson est la suivante
Zone de
chauffe
6
7
8
9
Zone de
chauffe
6
7
8
Zone de
chauffe
K[i fk_iiWdY[i _dZ_gkw[i f[kl[dj lWh_[h [d \edYj_ed Z[ bW
cWj_vh[ [j Z[i Z_c[di_edi Z[i
RPI430 / RPIF430 / RPI430MM
MehcWb
1200
2300
1200
2300
RPI342 / RPIF342 / RPI342MM
MehcWb
1200
2300
3000
MehcWb
6
7
8
1200
2300
3000
Beeij
1500
3000
1500
3000
Beeij
1500
2600
4200
RPI346
Beeij
1500
2600
4600
YWii[heb[i3
13 FR
Page 15

ENTRETIEN DE LA SURFACE
• Il est important lors du nettoyage de la surface vitrocéramique
de la table, d’attendre le refroidissement complet de cette dernière.
• Seuls les produits spécifiques, pour le nettoyage de la surface
vitrocéramique, crème et grattoir, doivent être utilisés. Vous les
trouverez facilement dans le commerce.
• Eviter les débordements, les salissures qui tombent sur le plan
de cuisson se carbonisent rapidement et sont donc plus difficiles
à nettoyer.
• Il est recommandé de tenir à l’écart du plan de cuisson tout ce
qui susceptible de fondre tels que les objets en matière plastique,
sucre ou produits à forte teneur en sucre.
ENTRETIEN:
- Disposer quelques gouttes d’un produit nettoyant spécifique
pour la surface vitrocéramique.
- Frotter en insistant sur les parties tachées s’il en existe, à l’aide
d’un chiffon doux ou un papier légèrement humide.
- Essuyer avec un chiffon doux ou papier essuie-tout sec jusqu’à
ce que la surface soit nette.
Si après cet entretien courant des taches persistent :
- Disposer à nouveau quelques gouttes d’un produit spécifique.
- Gratter à l’aide d’un grattoir en respectant un angle de 30° par
rapport à la table jusqu’à disparition des taches récalcitrantes.
- Essuyer avec un chiffon doux ou papier essuie-tout sec jusqu’à
ce que la surface soit nette.
- Répéter l’opération si nécessaire.
CONSEILS:
Un nettoyage fréquent laisse une couche protectrice essentielle
pour la prévention des rayures et de l’usure.
S’assurer que la surface soit propre avant de réutiliser la table.
Pour enlever les traces d’eau et de calcaire, utiliser quelques
gouttes de vinaigre blanc, ou jus de citron. Rincer et essuyer à
l’aide d’un papier absorbant puis appliquer quelques gouttes de
produit spécifique et essuyer.
Le verre vitrocéramique supporte le frottement des ustensiles de
cuisson à fond plat, mais il est quand même conseillé de les
soulever pour les déplacer.
NB:
Eviter d’employer une éponge trop humide.
Ne jamais utiliser un outil en acier tel que couteau ou tournevis.
L’utilisation du grattoir avec lame de rasoir ne peut
endommager la surface si un angle de 30° est respecté.
Ne pas laisser le racloir avec lame de rasoir à la portée des
enfants.
Ne pas utiliser de produits abrasifs ou de poudres récurantes.
30° Maxi
Cuissons trop lentes.
• Utilisation de récipients non adaptés. N’utiliser que des ustensiles
avec fond plat et d’un diamètre au moins égal au foyer.
Petites rayures ou éraflures sur la surface vitrée de la table.
• Une mauvaise méthode de nettoyage, ou des récipients avec
fond rugueux sont utilisés, des particules tels que grains de sable,
ou sel se trouvent entre la table et le fond du récipient. Se reporter
au chapitre “Entretien”, s’assurer que les fonds des récipients
sont propres avant utilisation et n’utiliser que des récipients avec
fond lisse. Les rayures peuvent être atténuées seulement si un
bon nettoyage est réalisé.
Marques de métal.
• Ne pas faire glisser des récipients en aluminium sur la table. Se
reporter aux recommandations d’entretien.
• Vous n’utilisez pas les bons matériaux, les taches quelles qu’elles
soient persistent. Aidez-vous d’une lame de rasoir et suivre le
chapitre “Entretien”.
Taches sombres.
• Utiliser une lame de rasoir et suivre le chapitre “Entretien”.
Surfaces claires sur la table.
• Marques provenant de récipient en aluminium ou cuivre, mais
aussi de dépôts de minéraux, de l’eau ou des aliments ; ils peuvent
être enlevés avec de la crème nettoyante.
Caramélisation ou plastique fondu sur la table.
• Se reporter au chapitre “Entretien”.
La table ne fonctionne pas ou certains foyers sont sans
fonction.
• Les barrettes shunts ne sont pas positionnées correctement sur
la plaque à bornes. Faire vérifier que le raccordement est effectué
conformément aux recommandations.
La table ne fonctionne pas.
• Le tableau de bord est verrouillé. Appuyer sur la touche
“Verrouillage”.
La table ne se coupe pas
• Le tableau de bord est verrouillé. Appuyer sur la touche
“Verrouillage”.
La table s’arrête automatiquement
• Les foyers s’arrêtent automatiquement si on les laisse fonctionner pendant une période assez longue. Se reporter au
chapitre “Durée de fonctionnement”.
Fréquence de fonctionnement arrêt/marche sur foyers.
• Les cycles coupure-fonctionnement varient en fonction du niveau
de puissance demandé :
- niveau faible : temps de fonctionnement court,
- niveau élevé : temps de fonctionnement long.
ASSISTANCE TECHNIQUE
Avant d’appeler le Service d’Assistance Technique:
Si la table de cuisson ne fonctionne pas, nous vous conseillons
de :
- vérifier que la fiche soit bien introduite dans la prise de courant;
Si la cause du dysfonctionnement n’est pas trouvée,
- éteindre l’appareil, ne pas y toucher et appeler le Service
d’Assistance Technique.
Veiller à ce que le coupon de garantie fourni avec le produit soit
correctement rempli, avec la date d’achat de la table de cuisson.
PROBLEMES ET SOLUTIONS
La table à induction émet un ronflement.
• Normal. La turbine de refroidissement des composants
électroniques est en fonctionnement.
La table à induction émet un léger sifflement.
• Normal. Etant donné la fréquence de fonctionnement des
inducteurs, un léger sifflement peut se produire lors de l’utilisation
de plusieurs foyers à puissance maximale.
Les foyers ne maintiennent pas les petits bouillons ou friture
peu vive.
• N’utiliser que des récipients à fond plat.
• Le fond du récipient doit recouvrir entièrement le diamètre du
foyer choisi.
Cet appareil est commercialisé en accord avec
la directive européenne 2002/96/CE sur les
déchets des équipements électriques et électroniques (DEEE). En vous assurant que ce produit
est correctement recyclé, vous participez à la
prévention des conséquences négatives sur
l’environnement et la santé publique qui pourrait
être causé par une mise au rebut inappropriée
de ce produit. Le symbole sur ce produit indique
qu’il ne doit pas être traité comme un déchet ménager. Il doit
être rapporté jusqu’à un point de recyclage des déchets électriques
et électroniques. La collecte de ce produit doit se faire en accord
avec les règlementations environnementales concernant la mise
au rebut de ce type de déchets.
Pour plus d’information au sujet du traitement, de la collecte et
du recyclage de ce produit, merci de contacter votre mairie, votre
centre de traitement des déchets ou le magasin où vous avez
acheté ce produit.
14 FR
Page 16

ДЯКУЄМО ВАМ ЗА ВИБІР ПРОДУКЦІЇ ROSIERES!
ЗАГАЛЬНІ ПОЛОЖЕННЯ
Длѐ оптимального використаннѐ Вашої варильної панелі, уважно прочитайте дану інструкція. Ми рекомендуюмо зберегти буклет, длѐ
подальших консультацій, а перед встановленнѐм запишіть серійний номер виробу, на випадок, ѐкщо Вам буде потрібне сервісне
обслуговуваннѐ.
Ідентифікаційна панель (Табличка з основними даними прикріплена до нижнього края варильної поверхні.).
УВАГА: Цей пристрій відповідаю
сучасним вимогам правил безпеки .
Також Доводимо до Вашого відома,
що цей виріб сертифікований згідно
з вимогами безпеки органом по
сертифікації промислової продукції
Державним комітетом України з
питань технічного регуляваннѐ та
споживчої політики державна
система сертифікації УкрСЕЙРО.
ЗАЯВА ПРО ВІДПОВІДНІСТЬ
На підставі протоколу сертифікаційних випробувань №06-08/08 від 7.08.08, виданого ТОВ «Українська ВЛ ВЕСНА», 49036, м.
Дніпропетровськ, вул. Ленінградська, 68, атестат акредитації №2Н557 від 12.07.2007, висновку ОС №1985 від 07.08.2008.
Цей символ на виробі або на його упаковці позначаю, що з ним не можна поводитисѐ, ѐк із побутовим сміттѐм. Замість
цього його необхідно повернути до відповідного пункту збору длѐ переробки електричного та електронного
обладнаннѐ. Забезпечуячи належну переробку цього виробу, Видопомагаюте попередити потенційні негативні
наслідки длѐ навколишнього середовища та здоров’ѐ лядини, ѐкі могли би виникнути за умов неналежного
позбавленнѐ від цього виробу. Щоб отримати детальнішу інформація стосовно переробки цього виробу, звернітьсѐ до
свого місцевого офісу, Вашої служби утилізації або до магазина, де Ви придбали цей виріб.
ЗАСТЕРЕЖЕННЯ
Длѐ того щоб уникнути травм, не підпускайте дітей, коли виріб ввімкнено.
Уважно слідкуйте за приготуваннѐм на олії або на жирі, тому що вони можуть швидко загорітисѐ.
Область управліннѐ варильноя поверхнея дуже чутлива, тому не ставте на неї гарѐчі предмети.
Не ставте на нагрівальні зони пластиковий або алямініювий посуд.
Післѐ кожного використаннѐ протирайте панель, щоб запобігти накопичення бруду та жиру. Якщо цього не робити, при наступному
використанні залишки жиру почнуть диміти, спричинѐячи не приюмний запах, не кажучи вже про ризик займаннѐ.
Не залишайте металеві предмети, такі ѐк ножі, виделки, ложки або кришки на зоні індукції, тому що ѐкщо вони занадто великі або
занадто важкі, вони можуть нагрітисѐ.
Ніколи не готуйте їжу на керамічній поверхні, завжди використовуйте відповідний посуд.
Завжди ставте каструля на середину зони нагріву.
Не використовуйте панель ѐк обробну дошку.
Не тѐгніть кухонний посуд по поверхні.
Не складайте важкі предмети над панелля, ѐкщо вони впадуть, то можуть її пошкодити.
Не використовуйте варильну панель в ѐкості робочої поверхні.
Не використовуйте полиці длѐ зберіганнѐ будь-ѐких предметів.
На панелі не повинно бути тріщин, ѐкщо вони з’ѐвлѐтьсѐ, від’юднайте електроживленнѐ і звернітьсѐ до сервісного центру.
ТЕХНІЧНІ ХАРАКТЕРИСТИКИ
Варильна панель
RPI430/RPIF430/RPI430MM
Зони приготування 4 індукції
Напруга живлення
Встановлена електрична
7000 Вт
потужність
Розміри мм.
220-240 В 50/60 Гц
400 В 50/60 Гц
590 X 520 X 55
RPI342/RPIF342/RPI342MM/RPI346
3 індукції
7200 Вт
Розміри вбодованих
частин (АхВ)
560 Х 490
15 UK
Page 17

ІНСТРУКЦІЇ З ТЕХНІКИ БЕЗПЕКИ
Установку приладу та його підкляченнѐ по електромережі повинен проводити лише кваліфікований фахівець.
Є деѐкі елементарні правила безпеки, ѐкі підходѐть длѐ будь-ѐкої побутової техніки.
Індукційна поверхнѐ призначена длѐ використаннѐ лише в домашньому господарстві.
Установку приладу у кухонну поверхня та підкляченнѐ повинен проводити тільки фахівець відповідної кваліфікації.
Не залишайте дітей без наглѐду, ѐкщо вони знаходѐтьсѐ поруч з працяячоя плитоя: вони можуть отримати опіки.
Ніколи не розміщуйте порожній посуд на конфорках.
Переконайтесь, що деталі конфорок установлені правильно.
Індукційні варильні поверхні не можна використовувати ѐк робочі поверхні. Гострі предмети можуть залишити на ній подрѐпини.
Даний прилад виготовлений відповідно до вимог стандартів безпеки. Тим не менш, ми наполегливо рекомендуюмо особам, що маять
фізичні вади, психічні розлади, або таким, що не маять достатньо досвіду, не користуватисѐ приладом без допомоги досвідченої особи
або під її пильним наглѐдом. Такі ж поради стосуятьсѐ і неповнолітніх дітей.
ВБУДОВУВАННЯ
• Установку приладу у робочу поверхня та її
підкляченнѐ по електромережі повинен
проводити лише кваліфікований фахівець.
• Одоблявальний матеріал кухонних
меблів, куди буде установлена варильна
поверхнѐ, маю бути стійким до впливу
високих температур 100ºС), у
іншому разі оздобленнѐ робочої поверхні
може втратити колір або деформуватисѐ.
• Герметичні пломби поставлѐятьсѐ разом з
панелля.
Перед установкоя:
Переверніть панель, склѐноя поверхнея до
низу;
Переконайтесѐ, що скло захищене;
Зафіксуйте пломби довкола панелі;
Переконайтесѐ, що вони зафіксовані
правильно, щоб нічого не затікало в шафу;
Важливо, щоб панель була зафіксована на
одному рівні з опорноя поверхнея.
Пошкодженнѐ панелі під час установки,
можуть вплинути на продуктивність її
роботи.
Залиште відстань, принаймні, 5 см між
панелля та сусідньоя вертикальноя
поверхнея;
В край важливо, щоб відстань відповідала
зазначеним параметрам;
Виріжіть отвір у стільниці, ѐк показано на
малянку нижче. Не менше 50 мм, навколо
отвору маю бути простір;
mm
Стільницѐ маю бути ѐк найменше 30 мм
товщиноя, та термостійкоя. Як показано на
малянку 1.
16 UK
Ви не можете вбудовувати панель над плитоя
без вентилѐції, над посудомийноя машиноя,
холодильником або пральноя машиноя.
Дуже важливо забезпечити належну
вентилѐція.
Переконайтесѐ, що панель встановлена
правильно, ѐк це показано на малянку 2:
Page 18

ПІДКЮЧЕННЯ ДО ЕЛЕКТРОМЕРЕЖІ
Даний пристрій відповідає Директивам 89/336/EEC, 73/23/EEC і наступним доповненнямдо них.
1 2
L 1
Чорний Коричневий Синій
L 2
3
N 1
4
N 2
Сірий
5
Жовто-зеленийї
Запам’ятайте: Відстань між панеллю та шафою над нею має бути
не менше 760мм.
Електричне під’єднання
«Установка маю відповідати стандартним директивам».
Виробник не несе відповідальності за не правильну установку, чи не
належне використаннѐ панелі.
УВАГА: Перед використаннѐм електричного приладу завжди
перевірѐйте напругу на лічильнику, настройку електричного
вимикача, заземленнѐ;
Жовто-зелений провід кабеля живленнѐ повинен бути заземлений
ѐк від джерела живленнѐ, так і від терміналів пристроя. Виробник
не може нести відповідальність за будь-ѐкі нещасні випадки в
результаті використаннѐ приладу, ѐкий не заземлено. З будь-ѐкими
питаннѐми, щодо джерела живленнѐ звертайтесѐ до сервісних
центрів.
Якщо кабель пошкоджено і його слід замінити, звертайтесѐ зо
кваліфікованих спеціалістів.
Під’еднання до джерела живлення
Розетка повинна бути підклячена згідно з відповідними
стандартами, в однополясний вімикач. Спосіб підкляченнѐ
показано на малянку :
Кабель не повинен мати згинів або утисків.
ІНДУКЦІЯ
СПОСІБ ВИКОРИСТАННЯ
Електронний генератор живленнѐ знаходитьсѐ всередині приладу.
Цѐ котушка створяю магнітне поле, так що, коли каструлѐ
знаходитьсѐ на вогні, вона пронизана індукціюя струмів.
Ці струми передаять тепло таким чином, що страва нагріваютьсѐ, а
каструлѐ залишаютьсѐ холодноя.
Цѐ система призначена длѐ каструль з магнітним дном.
Простіше кажучи, індукційниі технології маять дві основні переваги:
Так ѐк тепло вивільнѐютьсѐ тільки каструлея, то використовуютьсѐ
його максимальна кількість.
Немаю термальної інерції, так ѐк тепло вивільнѐютьсѐ тільки коли
каструлѐ заходитьсѐ на нагрівальній зоні, і зупинѐютьсѐ коли
каструля прийнѐти.
ПРИСТРІЙ ПІДВИЩЕНОЇ БЕЗПЕКИ
Захист від перенагрівання
Сенсори регуляять температуру нагрівальних зон. Коли
температура перевищую допустиму норму, нагрівальна зона
автоматично вимикаютьсѐ.
Попередження залишкового тепла.
Коли панель використовуютьсѐ протѐгом деѐкого часу, з’ѐвитьсѐ
залишкове тепло. З’ѐвитьсѐ літера «Н», щоб попередити Вас про це.
Автоматичне вимкнення
Ще один вид безпеки варильної панелі – авто вимкненнѐ. Воно
спрацьовую коли Ви забуваюте вимкнути нагрівальну зону.
За замовчуваннѐм періодичність вимкненнѐ наведено нижче в
табличці:
17 UK
Page 19

Рівень потужності
1-5 8 год.
6-10 4 год.
11-14 2 год.
15
Якщо каструля прибрати з зони нагріву вона автоматично вимикаютьсѐ нагрів, і післѐ хвилинного звоника автоматично
вимикаютьс
Конфорка вимикається
автоматично після
год.
1
ПОСУД ДЛЯ ВАРИЛЬНОЇ ПОВЕРХНІ
ПОСУД ДЛЯ ВАРИЛЬНОЇ ПОВЕРХНІ
Використаннѐ ѐкісного посуду, забезпечить найбільшу продуктивність варильної поверхні.
Завжди використовуйте посуд високої ѐкості з ідеально гладким та товстим дном: Використаннѐ такого типу посуду попереджаю
пригораннѐ страв. Товсті металеві каструлі та сковорідки забезпечуять рівномірний розподіл тепла.
Переконайтесѐ, що дно каструлі чи сковорідки сухе: післѐ того ѐк Ви налили рідину, чи дістали каструля з холодильника,
переконайтесѐ, що дно сухе. Це допоможе уникнути забрудненнѐ панелі.
Використовуйте каструлі, діаметр ѐких закриваю вся нагрівальну зону: розмір каструлі маю бути не менший ніж нагрівальна зона.
Якщо вона трохи більша, то буде використовуватисѐ максимальна кількість енергії.
Наступна інформаціѐ допоможе Вам обрати найбільш підходѐщий посуд, длѐ отриманнѐ оптимального результату.
Зона індукції
Перевірте, на етикетці, позначку, що посуд
Маркування на кухонному
приладді
Нержавіюча сталь Не виявляється
Алюміній Не виявляється
Чавун Хороші показники
Емальована сталь Хороші показники
Скло Не виявляється
Порцеляна Не виявляється
Мідне дно Не виявляється
підходить для індукції.
Використовуйте каструлі з магнітами
(емальоване залізо, чавунна феритна
нержавіюча сталь), приліпіть магніт до дна
каструлі (вона має прилипати)
Прийнятна нержавіюча феромагнітна сталь
СХЕМАТИЧНА ДІАГРАМА ПАНЕЛІ УПРАВЛІННЯ
RPI430/RPIF430/RPI430MM
6
5
7
1 2
3
4
1. Клавіша регуляваннѐ
потужності
2. Регуляваннѐ часу
3. Бустер
4. Спеціальні функції
5. Пам'ѐть
6. Замок
7. Вкл / Викл
18 UK
Page 20

RPI342/RPIF342/RPI342MM/RPI346
6
5
3
7
1 2
ІНСТРУКЦІЇ З ВИКОРИСТАННЯ
--
4
Натисніть і всі індикатори покажуть «--»
Оберіть рівень напруги відповідної зони натиснувши «+»
або «-». На початку індикатор показую « » або
« ». Налаштуйте на більшу або меншу потужність,
натиснувши «+» або «-».
Якщо Ви натискаюте «+» або «-» одночасно, індикатор
покаже нуль і панель автоматично вимкнетьсѐ.
Примітка: При натисканні на кнопку ,
варильна панель переходить в режим очікуваннѐ,
ѐкщо протѐгом двох хвилин не були виконані ніѐкі
інші дії.
ФУНКЦІЯ ПІДВИЩЕННЯ ПОТУЖНОСТІ
Натисніть кнопку « ", індикатор рівнѐ
покаже « ".
Увага:
1. Функціѐ підвищеннѐ дію тільки протѐгом 5 хвилин,
післѐ чого конфорки повертаятьсѐ до свого
попереднього налаштуваннѐ.
2. Цѐ функціѐ дію длѐ всіюї панелі
3. Якщо підвищуютьсѐ функціѐ першої зони, функціѐ
другої зони автоматично обмежуютьсѐ до рівнѐ 2, і
навпаки. Якщо підвищуютьсѐ функціѐ третьої зони,
функціѐ четвертої зони автоматично обмежуютьсѐ до
рівнѐ 2, і навпаки.
19 UK
ВІДМІНА ФУНКЦІЇ ПФДВИЩЕННЯ
ПОТУЖНОСТІ
Щоб відмінити функція підвищеннѐ натисніть «+»
або «-» у відповідній зоні.
Page 21

ФУНКЦІЇ ТАЙМЕРУ
Якщо ввімкнена більш ніж одна зона:
Щоб активувати потрібну зону натисніть «+» або «-», загорѐтьсѐ
відповідні символи.
Запам’ятайте:
Коли таймер встановлено на «0» хв., він автоматично вимикаютьсѐ.
Коли час закінчуютьсѐ, відповідна зона вимикаютьсѐ.
Післѐ встановленнѐ часу, індикатор буде блимати протѐгом 5 сек., а
потім автоматично активуютьсѐ.
Якщо одночасно натискати, налаштуваннѐ часу встановляятьсѐ на нуль,
час скасовуютьсѐ.
РЕЖИМ БЕЗПЕКИ
Длѐ забезпеченнѐ безпеки длѐ дітей, панель обладнана внутрішнім
замком.
-Блокування
• Спочатку індикатор покаже , налаштуйте
таймер, натиснувши «+» або «-». Післѐ налаштуваннѐ
таймеру, Ви можете обрати рівень потужності та зону
приготуваннѐ.
•Потім виставіть час, від 1хв. до 9 год. 59 хв., натискаячи
«+» або «-».
•Щоб збільшити час на одну хв. натисніть «+»; Щоб
збільшити час на 10хв. натисніть «+» і затримайте. Коли
встановлений час досѐгне 1 год., продовжуйте тримати
«+» і час буде збільшуватись на 30 хв.
•Ви можете встановити рівень потужності під час
налаштуваннѐ таймера.
"0:10"
Якщо таймер встановлюється більш ніж на одну
зону:
Таймер можна встановлявати длѐ всіх чотирьох
нагрівальних зон. Якщо ви одночасно налаштовуюте
декілька нагрівальних зон, в кожній зоні загорѐтьсѐ
десѐткові дроби.
Якщо таймер встановлено, а ніѐка зона не активована, то
піде просто відлік часу.
20 UK
Page 22

Підігрів
Дана функція дозволить зберегти страву теплою до двох годин.
Активуйте обрану зону нагріву натиснувши кнопку «-» або «+»
Натискайте «-» доки не досягнете рівня між 0 та 1, під обраною зоною загориться значок підігріву
”
“
Відміна функції підігріву
Для того, щоб відмінити функцію підігріву, ввімкніть будь-який інший рівень потужності.
Активуйте обрану зону натискаячи «+» або «-».
Натисніть кип’ѐтіннѐ на повільному вогні,
індикатор відобразить
Натисніть «Середнѐ температура», індикатор
відобразить
Натисніть «Високе нагріваннѐ», індикатор
відобразить
21 UK
Page 23

ФУНКЦІЇ ПАМ’ЯТІ
Ви можете використовувати функція пам'ѐті длѐ зберіганнѐ параметрів рівнѐ потужності обраної зони.
ЗАПИС
Виберіть необхідну конфорку, натиснувши кнопку "+" або "-".
22 UK
Page 24

Максимальна потужність зон приготування:
Зона
нагрівання
6
7
8
9
Зона
нагрівання
6
7
8
RPI430 / RPIF430 / RPI430MM
Звичайна
1200
2300
1200
2300
Звичайна
1200
2300
3000
Бустер
RPI346
Бустер
(підвищення
(підвищення
потужності)
1500
3000
1500
3000
потужності)
1500
2600
4600
Зона
нагрівання
6
7
8
23 UK
RPI342 / RPIF342 / RPI342MM
Звичайна
1200
2300
3000
Бустер
(підвищення
1500
2600
4200
потужності)
Page 25

ЧИЩЕННЯ ТА ЕКСПЛУАТАЦІЯ
Перед виконаннѐм будь-ѐких робіт на панелі, дайте їй охолонути.
Слід використовувати тільки продукція (креми і шкребки) призначену длѐ керамічних поверхонь.
Уникайте розливів, ѐкщо те що попаде на панель швидко згорить, це ускладнить чищеннѐ.
Бажано тримати подалі від панелі такі речовини, ѐкі можуть розплавитисѐ, такі ѐк пластмаса, цукор, та речовини на цукровій основі.
Експлуатаціѐ
Додайте кілька крапель спеціального миячого засобу на поверхня панелі.
Змочіть стійкі плѐми м’ѐкоя тканиноя, або вологим кухонним папером.
Протирайте м’ѐкоя тканиноя, або сухим кухонним папером, доки поверхнѐ не буде сухоя.
Якщо залишилисѐ ѐкісь стійкі плѐми:
Додайте ще декілька крапель спеціального миячого засобу.
Пошкребіть шкребком під кутом 30 градусів по плѐмі, доки вона не зникне.
Протирайте м’ѐкоя тканиноя, або сухим кухонним папером, доки поверхнѐ не буде чистоя.
Повторіть операція, ѐкщо необхідно.
ДЕКІЛЬКА ПОРАД:
Часта чистка залишаю захисний шар, ѐкий необхідний длѐ запобіганнѐ подрѐпин і зносу. Переконайтесѐ, що панель чиста перед
наступним використаннѐм. Щоб позбутисѐ розводів протріть укусом або лимонним соком. Потім протріть спеціальним поглинаячим
папером та спеціальним миячим засобом. Склокерамічна поверхнѐ захищаю від подрѐпин, однак, краще переставити каструля в однії
зони в іншу, чим перетѐгувати.
Запам’ятайте:
Не використовуйте губку, ѐка надто волога.
Ніколи не використовуйте ніж або викрутку.
Скребок з лезом не призведе до пошкоджень поверхні, ѐкщо його тримати під кутом 30 градусів.
Ніколи не залишайте скребок з лезом в межах досѐжності дітей.
Ніколи не використовуйте абразивні матеріали або чистѐчі порошки.
УСУНЕННЯ НЕСПРАВНОСТЕЙ
РЕМОНТ
Перед викликом майстра перевірте наступне:
Чи правильно вставлена вилка в розетку. Якщо несправність не можна визначити, то вимкніть прилад з розетки і звернітьсѐ у сервісний
центр. Прилад продаютьсѐ з гарантійним сертифікатом, що означаю, що Вам його відремонтуять безкоштовно.
РІШЕННЯ ПРОБЛЕМИ
Індукційна варильна поверхнѐ даю легкий свист: Нормально. Відповідно з робочоя частотоя індуктора, легкий свист може виникнути
при використанні декількох зон приготуваннѐ їжі на максимальній потужності.
Старви повільно готуятьсѐ: Використовуютьсѐ не підходѐщий посуд. Дно каструлі маю бути плоским, не дуже важким, а діаметр маю
відповідати діаметру нагрівальної зони.
З’ѐвлѐятьсѐ маленькі подрѐпини (тріщини): Не правильні методи чищеннѐ, посуд із грубим дном, або великі частки цукру або піску
потрапили між посудом і панелля. Використовуйте рекомендовані миячі засоби, чистий посуд із гладким дном.
Металеві маркуваннѐ (можуть з’ѐвитисѐ подрѐпини). Не тѐгніть алямініювий посуд по панелі.
Використовуйте рекомендовані засоби, щоб видалити маркуваннѐ.
Темні смуги або плѐми: Використовуйте рекомендовані засоби длѐ чищеннѐ.
Знебарвленнѐ на панелі: Сліди від алямініювих або мідних каструль, так само ѐк і вапнѐний наліт, можна відчистити за допомогоя
спеціального крему.
На панелі розплавивсѐ цукор або пластмаса: Дивітьсѐ в розділі «Чищеннѐ»
Панель вийшла з ладу або деѐкі нагрівальні зони не працяять.: Не правильно під’юднаний термінальний блок.
Варильна поверхнѐ не працяю: Варильна панель заблокована. Натисніть кнопку длѐ розблокуваннѐ.
Панель автоматично вимикаютьсѐ: Зона приготуваннѐ автоматично вимикаютьсѐ, ѐкщо вона надто довго працяю.
Застереження: Усі зазначені вище ушкодженнѐ стосуятьсѐ естетичного виглѐду варильної поверхні і не впливаять на її
функціонуваннѐ. Такі ушкодженнѐ не підлѐгаять гарантійному обслуговування.
24 UK
Page 26

УМОВИ ГАРАНТІЙНОГО ОБСЛУГОВУВАННЯ
Термін діїї гарантіїї складає 12 місяців з дати продажу.
Під час гарантійного періодубудь-який ремонт може бути виконаний тільки кваліфікованим фахівцем сервісного центру.
Перед початком ремонту прилад треба відклячити від електромережі, знѐвши запобіжник або витѐгнувши шнур живленнѐ з
розетки. Непрофесійне втручаннѐ та ремонт апарату небезпечні, вони можуть викликати враженнѐ електричним струмом та коротке
замиканнѐ; отже, не намагайтесѐ усунути несправності самотужки. Залиште ця роботу спеціалістам або представникам сервісного
центру. Якщо у роботі апарату виникли ѐкісь незначні проблеми, перевірте за допомогоя наступних інструкцій, чи здатні Ви упоратисѐ
з ними самі. Візит спеціаліста із авторизованого сервісного центру повинен бути оплаченим Вами, ѐкщо буде встановлено, що прилад
не працяю через неналежне чи недбале використаннѐ. Зберігайте інструкція таким чином, щоб вона завжди була під рукоя у разі
потреби; ѐкщо передаватиме прилад іншій особі,передайте також і інструкція.
УМОВИ :
Сертифікат
Гарантіѐ дійсна тільки при наѐвності дійсного Гарантійного Сертифікату.
Гарантійний сертифікат не дійсний при наѐвності в ньому помилок, виправлень чи невідповідностей.
В Сертифікаті маять біти заповнені пункти: назва виробу, модель, серійний номер виробу, дата продажу, підпис продавцѐ, печать
торгової організації. При відсутності дати продажу термін гарантії автоматично вичисляютьсѐ з дати виготовленнѐ пристроя.
Транспортування і зберігання
Будь-ѐкі дефекти виробу, спричинені недбайливим транспортуваннѐм і зберіганнѐм виробу, не підлѐгаять безкоштовному
гарантійному ремонту;
Установка та експлуатація
Безкоштовний гарантійний ремонт не проводитьсѐ, ѐкщо дефект виробу викликаний:
• Неправильним підкляченнѐм виробу до джерела електро-, водо- і газопостачаннѐ, а також невідповідність параметрів
вищевказаних джерел параметрам, що пред’ѐвлѐятьсѐ обов’ѐзковими Державними стандартами та Інструкціюя з експлуатації.
• Експлуатаціѐ виробів, підклячених до мережі 220В без заземленнѐ, а також підклячених до джерела водопостачаннѐ без
окремого крану подачі води до виробу-ю суттювим порушеннѐм Інструкції з експлуатації та може бути підставоя длѐ знѐттѐ виробу з
гарантійного обслуговуваннѐ.
• Використаннѐ приладу не в відповідності до Інструкції, а також неправильноя експлуатаціюя, що викликало поѐву механічних та
інших видів дефектів;
• Використаннѐ виробу не в відповідності з його прѐмим призначеннѐм або не в домашніх потребах.
• При порушенні пломбуваннѐ та з інших причин, ѐкі не залежать від завода-виробника.
• Недбалості при зберіганні, експлуатації та транспортуванні власником, торговоя або транспортноя організаціюя.
• У випадку втрати гарантійного талона ба чека, власник позбавлѐютьсѐ права на безкоштовне сервісне обслуговуваннѐ.
• У разі підкляченнѐ техніки не сертифікованим сервісним центром, виріб знімаютьсѐ з гарантії.
Ремонт
Безкоштовний гарантійний ремонт не проводитьсѐ, ѐкщо виріб:
• Маю сліди стороннього втручаннѐ або ремонту не уповноваженими особами;
• Маю не санкціоновані фірмоя зміни конструкції або неприйнѐтні комплектуячі;
• Маю пошкодженнѐ, викликані непередбачуваними ѐвищами і діѐми стихій;
• Маю пошкодженнѐ , викликані, використаннѐм нестандартних матеріалів і пристроїв;
• Маю пошкодженнѐ, викликані попаданнѐм в середину виробу сторонніх предметів, тварин або комах;
• Не маю серійного номеру або його неможливо встановити;
• Маю некомплектність післѐ його продажу;
• Маю механічні пошкодженнѐ (склѐні та пластикові вироби);
Гарантіѐ не розповсяджуютьсѐ на розхідні матеріали і аксесуари.
Відповідальність
Фірма не несе відповідальності за збитки причинені Вам чи оточуячим в зв’ѐзку з невідповідним використаннѐм приладу.
Введеннѐ виробу в експлуатація й доробку мереж електро-, водо- і газопостачаннѐ длѐ сумісності з виробом не ю зоноя
відповідальності Фірми й Фірмоя не оплачуютьсѐ.
В випадку виникненнѐ будь-ѐких проблем з вашим приладом, перед тим ѐк викликати майстра, перевірте правильність установки
і функціонуваннѐ в відповідності до інструкції. Оплату виклику майстра Ви будете проводити за свій рахунок, ѐкщо виріб був в
робочому стані або був неправильно встановлений, або неправильно використовувавсѐ.
За ѐкість гарантійного ремонту відповідальність несе обслуговуяча організаціѐ(служба сервісу).
ДОДАТКОВУ ІНФОРМАЦІЮ ЩОДО ПРОДУКЦІЇ МАРКИ ROSIERES ВИ МОЖЕТЕ ОТРИМАТИ НА САЙТІ
WWW.ROSIERES.IN.UA
ЧИ ЗА ТЕЛЕФОНОМ ГАРЯЧОЇ ЛІНІЇЇ
, WWW.ROSIERES.FR
044 383 44 25
0 800 501 509
25 UK
Page 27

СЕРВІС ПРОДУКЦІЇ ROSIERES, ОРИГІНАЛЬНІ ЗАПАСНІ ЧАСТИНИ, ВИТРАТНІ МАТЕРІАЛИ, АКСЕСУАРИ
Місто Сервісний центр Адреса Телефон
Алчевск СЦ "Булат-Сервис" 94204,г. Алчевск, ул. Белинского 11 (06442) 2-58-09, 4-84-01
Белаѐ Церковь АТЛАНТ ПЛЮС 09113, ул. Клиническаѐ, 6 (04463) 6-75-15
Белаѐ Церковь КПП Сервис-Мастер 09100 г. Белаѐ Церковь, ул. Вокзальнаѐ 5 (0456)33-29-44
Белаѐ Церковь Сервіс-Цент "Вега" 09100 вул. Гординського, 2А (04463)3-51-01
Бердѐнск Дека-Сервис 71112, г. Бердѐнск, ул. Энгельса 42 (06153) 4-32-31, 3-85-14
Винница ВФ ТОВ „ІНТЕРСЕРВІС” 21000, вул Келецька, 61А (0432) 69-95-73,69-91-93
Винница КП "Гарант-Сервіс" 21027 пр. Космонавтів, 42 (0432)46-50-01, 46-64-18
Винница СЦ „Спеціаліст” 21021 г. Винница ул. Порика 1 (0432) 57-91-91, 50-91-91
(0432) 46-43-93, 46-82-13, 51-92-
Винница СЦ Скормаг-Сервис 21030 Винница, пр. Юности, 16
51934, Днепродзержинск, пр. Ленина, 66,
Днепродзержинск СЦ "Росток"
Днепропетровск СЦ "Европроект-Сервис" 49000, г.Днепропетровск, ул.Краснаѐ 20 А (056) 371-15-06
Днепропетровск ТОВ „ІНТЕРСЕРВІС” 49101, пр-т Кірова, 59 (0562) 35-67-05, 31-29-57
Донецк СЦ "ФОКСТРОТ" 83000 г.Донецк, пр.Дзержинского,4 (062) 345-41-23
Дрогобич "Сервіс-2000" 82100 вул. Галицького,5 (0324)45-00-62
Евпаториѐ ТОВ „НК-Центр” 97401, пр.Перемоги, 67 (06569) 4-47-74
Житомир КАРТАЛ 10001, ул. Киевскаѐ, 106 (0412) 41-27-97
Житомир Профмастер г. Житомир, ул. Л. Украинки, 2 (0412) 42-22-54
Запорожье "Альфатехноцентр" 69002 вул. Дзержинського, 83 (061)212-03-03
Запорожье ЗФ ООО ИНТЕРСЕРВИС 69095, ул.Гоголѐ, 175 (061)220-65-96, 787-50-51
Запорожье Маэстро 69006, Запорожье, ул.Малаѐ, 3 (061) 270-40-94, (061) 224-58-58
Ивано-Франковск "Бріз ЛТД" 76002, вул. Нова 19А (0342) 75-07-77, 55-95-25
Ивано-Франковск ПП Колодий/Гарант Холод 76009 вул. Мира, 90
Ивано-Франковск ЧП Волков
Измаил СЦ „ЕКРАН” 68600, вул. Котовського, 59 ((04841) 6-34-53, 2-22-37
Каменец-Подольский Сервіс-Центр 32300 вул. Пушкінська, 51 (03849)3-24-88
Керчь СЦ МЕРКУРИЙ 98302, ул. Пирогова, 1 (06561) 2-13-73
Керчь ф. ЧП Фокскрымсервис 98300 г.Керчь, ул.Советскаѐ д.15 (06561) 2-30-62
Киев ООО "Аматі Сервіс" вул.Бориспільська 9 (044) 369-50-01
Киев ООО ДТС 04218, ул. Кибальчича 2а
Киев РАВИС ул. Героев Днепра 2а 0-800-504-504
Киев Фокстрот Сервис 04060, г. Киев, ул. Щусева, 44
Кировоград КФ ООО ИНТЕРСЕРВИС 25015, вул. Короленко, 2 (0522) 35-79-23
Кировоград СЦ "Оптрон"
СЦ „ROLLING
Кишинев
Конотоп ЧП "Алексей"
Кременчуг ЧП Шамрай ул. Переѐславскаѐ 55 (0536) 74-72-10, (0536) 74-71-53
Кременчуг ЭС EXCLUSIVE-SERVICE 39600 г. Кременчугул. Халаменяка, 10 (05366) 780-235
Кривой Рог АСЦ "Фокстрот".
Кривой Рог ЕВРОСЕРВИС 50027, пр-т. Гагарина, 42 (0564) 74-61-03
Кривой Рог КрФ ТОВ „ІНТЕРСЕРВІС” 50064, вул. Косіора, 64-7 (056) 440-07-79,(056) 440-01-19
Лубны ФЛП Коханенко 37500 вул. Радѐнська, 4/3 (050)457-49-65
INTERNATIONAL”
СЦ "Росток"
76491, г. Ивано-Франковск, ул.
Вовчинецкаѐ, 223
25006, г.Кировоград, пр-т
Коммунистический, 1
MD2009 вул. Фередеулуй, 4/6 (0-0-373-22) 870536, 870837
41615, г. Конотоп, Сумской обл., пр.
Ленина,11
50103, г. Кривой Рог, ул. Револяционнаѐ,
73
52 , 51-92-54
(0569) 53-54-80, (067) 363-29-29
(0342)78-30-00, 26-15-82 /
(093)328-27-07
(0342)71-28-13
(044) 501-91-34, 542-79-40, 54293-65
(044) 467-08-59, 467-23-75, 46714-97, 440-43-89
(0522) 24-96-47, 24-45-22, (098)
0804138, (066) 16
(05447) 6-13-56
(056) 440-07-64
91000, Луганск, ул. Фрунзе, 136-б
(Крупно-бытоваѐ техника), ул.
Луганск Луганск-Сервис
Луганск СЦ Миртекс ул.16-ѐ Линиѐ, д.7 642-248; 42-03-05
Луцк "Софт Лайн" 43006 вул. Стуса, 11 (0332)77-10-23
Луцк СЦ „Ваш майстер” 43005 пр-кт. Перемоги,22 8(0332)23-01-03
Львов ЛФ СП „ТРАНС СЕРВІС” 79008, вул. Вінниченка, 30 (032) 239-92-75, 297-55-88
Львов СЦ "Мілленіум" 79040, Львів, вул. Курмановича 9 (032)267-07-10
Львов ТОВ „РОСІМПЕКС” 79034, вул.Хмельницького, 116 (032) 231-78-87
Макеевка СПД Гордейчук В.А
Мариуполь ООО "Лотос"
Мариуполь СЦ „Марсервіс” 87500, пр-т Металургів, 94 (0629) 41-06-60, 41-06-50
Советскаѐ, 66 (Мелко-бытоваѐ
техника, GSM), ул. Советскаѐ, 6
(Аудио-видео).
Донецкаѐ обл., г.Макеевка, ул генерала
Данилова 71а
87500 г Мариуполь бр. 50-лет Октѐбрѐ,
32/18
(ул. Фрунзе, 136-б ((0642) 49-
54-50, 49-44-17, 49-3
(062) 327-51-23
(0629) 49-300-5, 49-300-6,
26 UK
Page 28

89600,Закарпатська обл., м.Мукачево, вул.
Мукачево АСЦ "Гарант Мукачево"
Николаев МФ ТОВ „ІНТЕРСЕРВІС” 54008, Внутрікварт.проїзд, 2 (0512) 58-06-47
Николаев СПД ФОП Дадашев А.О. 54050, Миколаїв, вул. Металургів, 8
Николаев СЦ "Николаев-Фокстрот" 54003, г. Николаев, пр. Ленина, 177-А (0512) 55-29-04
Николаев СЦ „ІНТЕРТЕХНОСЕРВІС” 53210, вул. Гагаріна, 62а (0512) 22-24-88
Николаев ЧП Воронин 54001, ул. Большаѐ Морскаѐ, 30 (0512) 35-97-99
Никополь ПП "Імпорттехносервіс" 53210, ул. Гагарина, 62а (05662) 2-24-88
Никополь ПП "Лікс"
Новаѐ Каховка СЦ "Електрон" 74900 вул. Горького, 48 (05549)7-83-98
Одесса ОФ СП ТРАНС СЕРВИС 65029, ул. Новосельского, 64 (048) 777-11-40
Фокстрот-Сервис-Одесса,
Одесса
Одесса
Павлоград Лотос (Интерсервис) 51400, Павлоград, ул.Шевченко, 67 (05632) 6-15-54, 6-23-42
Павлоград ПгФ ООО ИНТЕРСЕРВИС 51400, ул. Шевченко, 67 (05632) 6-15-54, 6-23-42
Павлоград СЦ "Пинфок" 51404 Павлоград, ул.Днепровскаѐ, 73 Б (05632) 3-11-93
Полтава Айкон-Сервіс 36000 вул. Жовтнева, 40Б (0532)50-67-89
Полтава НВО „ПРОМЕЛЕКТРОНІКА” 34022, вул. Пролетарська, 22 (0532) 57-21-66
Полтава ПФ ТОВ „ІНТЕРСЕРВІС” 36023, вул. Красіна, 71 А ((0532) 69-42-62, 50-98-89
Ровно РАДИОМАСТЕРСКАЯ 33000 г. Ровно ул. Почтоваѐ 2 (0362) 22-68-19
Ромны ПП Строй вул. Калнишевського,34 (05448)2-17-48
Севастополь КАУФ 99011 вул. Промислова, 9 (0692)45-60-72
Севастополь ООО ПАНОРАМА-С 99053, ул. Руднева, 7 (0692) 45-01-88
Севастополь СЦ ДИАДЕМА 99008, ул. Пожарова, 26 (0692) 55-56-43, 45-36-99
Северодонецк ПП "СДРТ"
Северодонецк
Симферополь НК-центр 95001 вул. Некрасова, 17/1 (0652)54-47-71
Симферополь РСЦ Фокстрот
Симферополь ЧП ГАРАНТ 95051, ул. Павленко, 54 (0652) 52-15-08
Стаханов АСЦ "Альбит" 94000 вул. Кірова, 15 (06444)4-02-89
Сумы "СЛТ-Сервис" 40030 Кооперативнаѐ 7 (0542) 781-013
Сумы ПВКФ "СЕРВІСЦЕНТР" 40000, Суми, вул. Петропавлівська, 86/1 (0524) 660-300, 650-340, 655-510
Сумы СЦ "Сигма-сервіс" Инд.40024,г.Сумы, ул.Прокофьва 19. (0542) 36-50-58
Тернополь СЦ "Репорт-сервіс" 46000, Тернопіль, пр.Злуки, 39 (0352)511247
Тирасполь СЦ "Бриз-групп"
Ужгород ТзОВ Миллениум 88007, м.Ужгород, вул. Гагаріна 101 (031) 266-12-97
Феодосиѐ ЧП Фокскрымсервис филиал 49000, г. г.Феодосиѐ, ул.Базарнаѐ, 4 (06562) 3-12-84
Харьков РСЦ ФОКСТРОТ-СЕРВИС 61125 г. Харьков, ул. Вернадского, 2 (057) 758-10-39, 758-10-40
Харьков СЦ НЕО 61052, ул. Косарскаѐ, 43 (057) 763-09-12, 763-02-89
Харьков ХФ СП ТРАНС СЕРВИС 61072, ул. Иванова, 24 (057) 714-24-72, 58-85-63
Херсон ООО"Ремонт и Сервис" 73027, г.Херсон, ул.Рабочаѐ 66 (0552) 48-58-88, 48-50-00
Херсон ХФ ТОВ „ІНТЕРСЕРВІС” ул. Карбошева, 28А (0552)43-40-33
Хмельницкий ООО ТРИТОН ЛТД 28009, ул. Курчатова, 18 (0382) 78-37-73
Хмельницкий СЦ Прілядіѐ" 29016 вул. Львівське шосе, 27 (0382)66-46-16
Хмельницкий
Червоноград ТзОВ "Побутрадіотехніка" 80105 вул. Сокальська, 6 (03249)2-25-63
Черкассы "ТЕХНО-ХОЛОД" 18000, Черкаси, вул. Громова, 146, оф.102 (0472) 56-98-68
Черкассы ЕВРАЗИЯ-С 18023, ул. Одесскаѐ, 8 (0472) 66-36-53
Черкассы КВАРЦ 18029, ул. 30 лет Победы, 30 (0472) 540-124
Черкассы ООО ОФИСНАЯ ТЕХНИКА 18000, ул. Смелѐнскаѐ 118, оф. 105 (0472)-63-84-01, 63-66-66
Черкассы СЦ Сервисный Центр 18005, г. Черкассы, ул. Калинина 115 (0472) 72-35-58
Черкассы
Чернигов ВЕНА-СЕРВИС 14000, ул. Проектнаѐ, 1 (0462) 60-15-85
Чернигов ООО ЛАГРОС 14005, пр-т Мира, 180а (04622) 5-99-39, 5-33-06
Чернигов РСЦ Фокстрот 14000,Чернигов,Шевченко 4 (046) 267-58-58
Черновцы Фокстрот Сервис 58000, г.Черновцы ул.Головна 265 (0372) 58-43-01
Шостка КП ТД "БЕРЕЗКА-СЕРВИС"
Ялта СЦ „АВІ-ЕЛЕКТРОНІКС” 98600, ул. Жадановского, 3 (0654) 38-60-18
Ялта ТОВ "Лікс-Лайн"
Площадка 1
Фокстрот-Сервис-Одесса,
Площадка 2
СЕВЕРОДОНЕЦК
РАДИОТЕХНИКА
Сервисный центр
"Радиодонор"
ТОВ "Фабрика побутового
сервісу"
Берегівська обїзна,12
53213, Дніпропетровська обл., м.
Нікополь, вул. Карла Лібкнехта 167
65029,вул. Транспортна 7-Е (048) 784-20-85 , 784-20-86
65029 вул. Базарна, 76 (0482)37-21-92
93400, Луганська обл., м.Сювюродонецк,
вул. Мюндюлюева, 46
93400, ул. Маѐковского, 13 (06452) 4-30-30, (0645) 70-28-16
95040, г. Симферополь,
ул.Балаклавской,68
3300 Молдова, г Тирасполь, пер.
Набережный,1
29009, г.Хмельницкий, переулок
Ипподромный 2
18000, Черкаси, вул. Ільіна, 605 (0472) 383-124, (063) 624-24-43
41100 г.Шостка, Сумскаѐ обл.,ул.Рабочаѐ
д. 5
98600, АР Крим, м. Ялта, вул.
Дзержинського,15
(03131)2-33-33
(0512) 25-23-35, 59-24-05, (066)
797-66-22
(0566) 65-00-89, (099) 200-56-83,
(093) 918-39-62
(06452) 4-49-62
(0652)520-565
(373) 533-77202
(0382)704-700, 66-46-16
(05449)4-07-07
(0654) 27-67-86, (095) 066-85-56,
(097) 242-72-97
27 UK
 Loading...