

Roper WU3OOOX, WU3000X, WU3006X, WU4400X, WU4406X Use And Care Manual
...
Undercounter Dishwashers
Useand
CareGuide
Home Appliances
WU3OOOX
wu3006x
viKwloo*
wu4406x
wU565ox
Thank you for choosing a
Roper appliance.
This Use and Care Guide will help you
operate and maintain your new, qualitybunt Roper undercounter dishwasher.
Keep this Use and Care Guide in a safe
place for future reference.
Complete and mail the
Product Registration Card.
This card enters your warranty into our
warranty system that ensures efficient
claim processing, can be used as a proof
of purchase for insurance claims and
helps Roper to contact you immediately
in the unlikely event of a product-safety
recall.
You are responsible for
It is your responsibility to be sure your
dishwasher:
. Is installed by a qualified installer.
. Has been installed where it is
protected from the elements.
. Has been installed on a floor strong
enough
to support its weight.
. Has been properly connected to
electricity, water and dram.*
. Has been properly electrically
grounded.*
n
Has had all hang tags and
temporary labels removed.
. Is not used by children or anyone
unable to operate it properly.
. Is properly maintained.
l
See Installation Instructions for
complete information.
Contents
Page
Important Safety lnslxuctions
2
Euergy Saving Tfps
Using Your Dishwasher
i
Before starting dishwasher
3
%uting dishwasher
3
Cycles and options
(Models WU3OOOX and WU3006X) -4
Cycles and options‘
(Models WU44OOX and WU4406X) -4
Cydes and options
(Model
WU565OX)
5
To add a dish after starting
Changing a setthrg
t
Proper Leading
Top rack loading
E
Bottom rack loading
6
Silverware
basket loading
7
Adding Detergent
7
Using Rinse Agent
For Best Results
8”
Dishwasher Care And Cleaning
9
Common Dishwashing Problems -
Before You Call For Service
:s
How to get service or assistance -
::
Important Safety Instructions
To reduce the risk of fire, electrical shock, or injury when using your dishwasher, follow
basic precautions including the following:
1. Read all instructions before using
the dishwasher.
2. Properly connect to electricity and
water.
3. DISHWASHER MUST BE
ELECTRICALLY GROUNDED.
Read the Installation Instructions
for details.
4. Be sure your dishwasher is
installed on a level floor that will
hold the weight, and in an area
suitable for its size and use.
5.
When discarding an old
dishwasher, always remove the
door to prevent accidental
entrapment or suffocation.
6. REMEMBER, use your dishwasher
only for the job it was designed to
do.
7. Store dishwasher detergent in a
cool, dry place WHERE CHILDREN
CAN’T REACH IT.
8. Use ONLY detergents and rinse
agents recommended for use in a
dishwasher.
9. Locate sharp items and knives so
that they are not likely to damage
door seal or cut the user.
10. DO NOT let children play in or on
the dishwasher.
11. DO NOT reach into the area below
the bottom rack until the heating
element has cooled for at least 20
minutes.
12. DO NOT wash plastic items unless
marked “Dishwasher Safe” or the
equivalent. If not marked. check
manufacturer’s recommendations.
13. DO NOT use your dishwasher
unless all enclosure panels are
properly in place.
14.
DO NOT sit on, stand on or abuse
the dishwasher door or dish racks.
15.
DO NOT tamper with controls.
16. If hot water has not been used
recently (usually two weeks or
longer), hydrogen gases may build
up in the water heater and the hot
water pipes. HYDROGEN GAS IS
EXPLOSIVE. To prevent injury or
damage, before using your
dishwasher, turn on all hot water
faucets and allow water to run for
several minutes. This will allow
gases to escape. Do not smoke or
use any open flame near the faucet
while it is open.
17.
Disconnect electrical power to the
dishwasher before attempting to
service.
SAVE THESE INSTRUCTIONS
Energy Saving Tips
You can help save energy if you:
1. Wash full loads. Running a halffilled dishwasher uses the same
amount of electricity and hot water
as a fully loaded machine.
2. Use the Light Wash Cycle whenever
possible. It uses less hot water and
energy than the Normal Wash
Cycle.
3. Air dry dishes when you don’t need
a rapid drying cycle. Allow longer
drying times (overnight). Use a
rinse agent to improve drying.
4. Load correctly for best washing
results. Incorrect loading may cause
poor washing and the need to
rewash all or part of the load.
5.
Do not pre-rinse normally soiled
dishes. Select the correct cycle for
the load and use the recommended
amount of detergent for good
washing results without hand
rinsing.
7. Kitchen cleanup can be done
quickly and efficiently through the
use of your dishwasher. Most
appliance parts that can fit in the
dishwasher can be cleaned by it.
Burned-on soil, however, should be
cleaned by hand.
6. Use your dishwasher during offpeak hours. Local utilities
recommend this to avoid heavy
usage of energy at certain times of
day.
Page 2
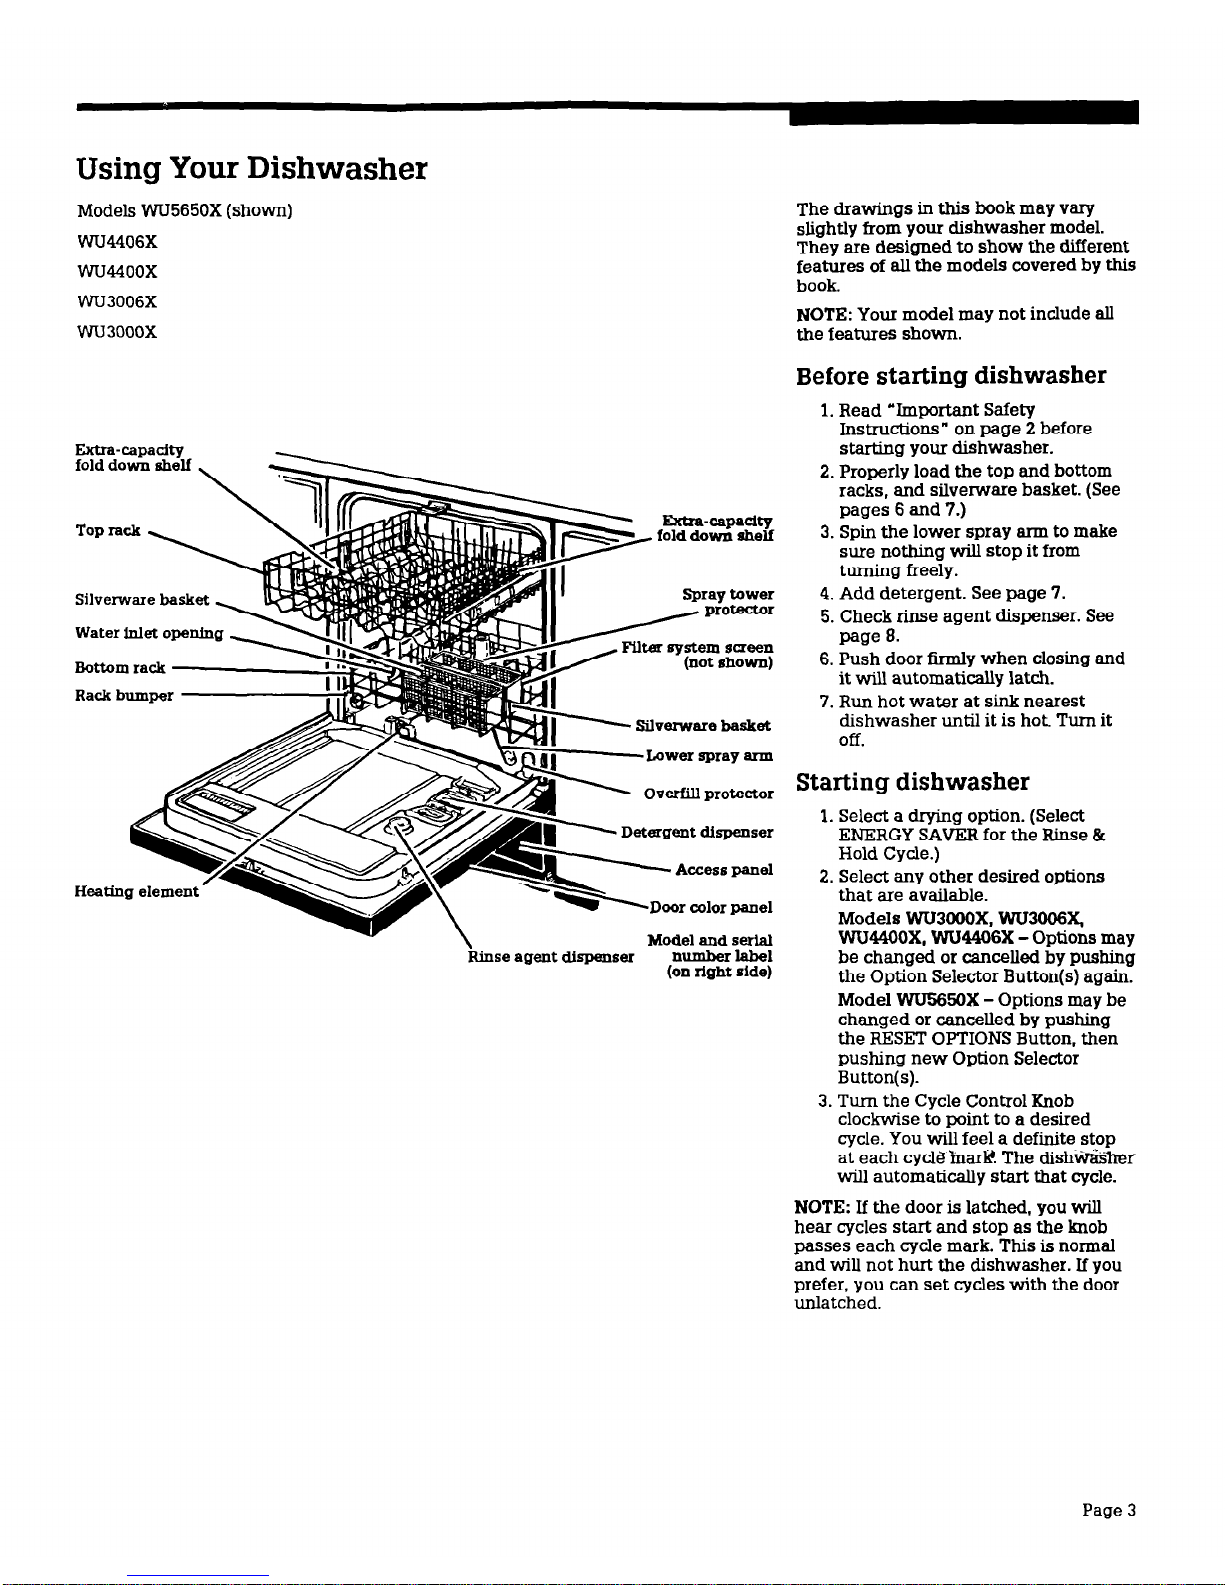
Using Your Dishwasher
Models WU565OX (shown)
WU4406X
wu44oox
WU3006X
wu3ooox
Fktra-capadty
fold
down shelf
Silverware basket
Spray tower
Bottom rack
1 Sh3nmre basket
-Lower spray arm
1 Overfill protector
- Detergent dispenser
L Access panel
Heating
element
color panel
Model and serial
nr--- ^-_-A -lx----- -..I%.^- I-L-I
nluse ayeuL cus-SeI u- -A
(on right side)
The drawings in this book may vary
slightly from your dishwasher model.
They are designed to show the different
features of all the models covered by this
book
NOTE: Your model may not include all
the features shown.
Before starting dishwasher
1. Read ‘Important Safety
Instructions” on page 2 before
starting your dishwasher.
2. Properly load the top and bottom
racks, and silverware basket. (See
pages 6 and 7.)
3. Spin the lower spray arm to make
sure nothing will stop it from
turning freely.
4. Add detergent. See page 7.
5. Check rinse agent dispenser. See
page 8.
6. Push door firmly when closing and
it will automatically latch.
7. Run hot water at sink nearest
dishwasher until it is hot. Turn it
Off.
Starting dishwasher
1. Select a drying option. (Select
ENERGY SAVER for the Rinse &
Hold Cycle.)
2. Select any other desired options
that are available.
Models WU3WOX, WU3666X,
WU44OOX, VVU4466X - Options may
be changed or cancelled by pushing
the Option Selector Button(s) again.
Model WU565oX - Options may be
changed or cancelled by pushing
the RESET OPTIONS Button, then
pushing new Option Selector
Button(s).
3. Turn the Cycle Control Knob
clockwise to point to a desired
cycle. You will feel a definite stop
at each cycle mark? The dishv&i%her
will automatically start that cycle.
NOTE: If the door is latched, you will
hear cycles start and stop as the knob
passes each cycle mark. This is normal
and will not hurt the dishwasher. If you
prefer, you can set cycles with the door
unlatched.
Page 3

Normal
Wash cycle
A double wash for normal, everyday
loads. (The Energy Guide Label Data is
based on this cycle.)
Select the mark next to NORMAL WASH
with the Cycle Control Knob. The cycle
sequence will be:
Wash+Rinse+Rinse+Wash-,Rinse-+
Rinse-, Rinse-+Dry+Off
Light Wash cycle
A single wash for pre-rinsed or lightly
soiled loads.
Select the mark next to LIGHT WASH
with the Cycle Control Knob. The cycle
sequence will be:
Rinse & Hold cycle
For rinsing a few items to be washed
one or more days later.
Select the mark next to RINSE & HOLD
with the Cycle Control Knob. Push the
ENERGY SAVER Option Selector Button.
Using the Heated Drying option may
cause food to bake onto dishes. Do not
use detergent. The cycle sequence will
be:
Rinse+Rinse+Off
Cycles and options (Models WU44OOX and WU4406X)
Dry Select
options
If the HEAT DRY Option Selector Button
is pushed, air in the dishwasher is
heated during the “dry” part of the
cycle.
For best drying results, use a liquid rinse
agent.
If the ENERGY SAVER Option Selector
Button is pushed, air in the dishwasher
is not heated. Using this option helps
save energy, but dishes take longer to
dry (overnight) and some water spotting
may result. Some items (such as plastics)
may need towel drying.
For best drying results, use a liquid rinse
agent.
Pots & Pans cycle
A double wash with an extra rinse for
maximum cleaning of cooked-on or
baked-on foods.
Push the POTS & PANS Cycle Selector
Button and select the mark next to POTS
& PANS with the Cycle Control Knob.
The cycle sequence will be:
Wash-tRinse+Rinse+Rinse-rWash-t
Rinse+Rinse+Rinse+Dry+Off
Normal Wash Cycle
A double wash for normal, everyday
loads. (The Energy Guide Label data is
based on this cycle.)
Push the NORMAL/LIGHT WASH Cycle
Selector Button and select the mark next
to NORMAL WASH with the Cycle
Control Knob. The cycle sequence
will be:
Wash+Rinse-rRinse+Wash+Rinse+
Rinse+Ri.nse~Dry-+Off
Light Wash Cycle
A single wash for pre-rinsed or lightly
soiled loads.
Select the mark next to LIGHT WASH
with the Cycle Control Knob. The cycle
sequence will be:
-Wash-Rinse+Rinse+Rinse’Dry-+Off
Rinse & Hold cycle
For rinsing a few items to be washed
one or more days later.
Select the mark next to RINSE & HOLD
with the Cycle Control Knob. Push the
ENERGY SAVER DRY Option Selector
Button. Using the Heat Dry option may
cause food to bake on dishes. The cycle
sequence will be:
Rinse+Rinse+Off
Heat Dry option
If the HEAT DRY Option Selector Button
is pushed, air in the dishwasher is
heated during the “dry” part of the
cycle.
For best drying results, +se a liquid-e _.agent
Energy Saver Dry option
If the ENERGY SAVER DRY Option
Selector Button is pushed, air in the
dishwasher is not heated. Using this
option helps save energy, but dishes
take longer to dry (overnight) and some
water spotting may result. Some items
(such as plastics) may need towel
dryaL
For best drying results, use a liquid rinse
agent.
Page 4
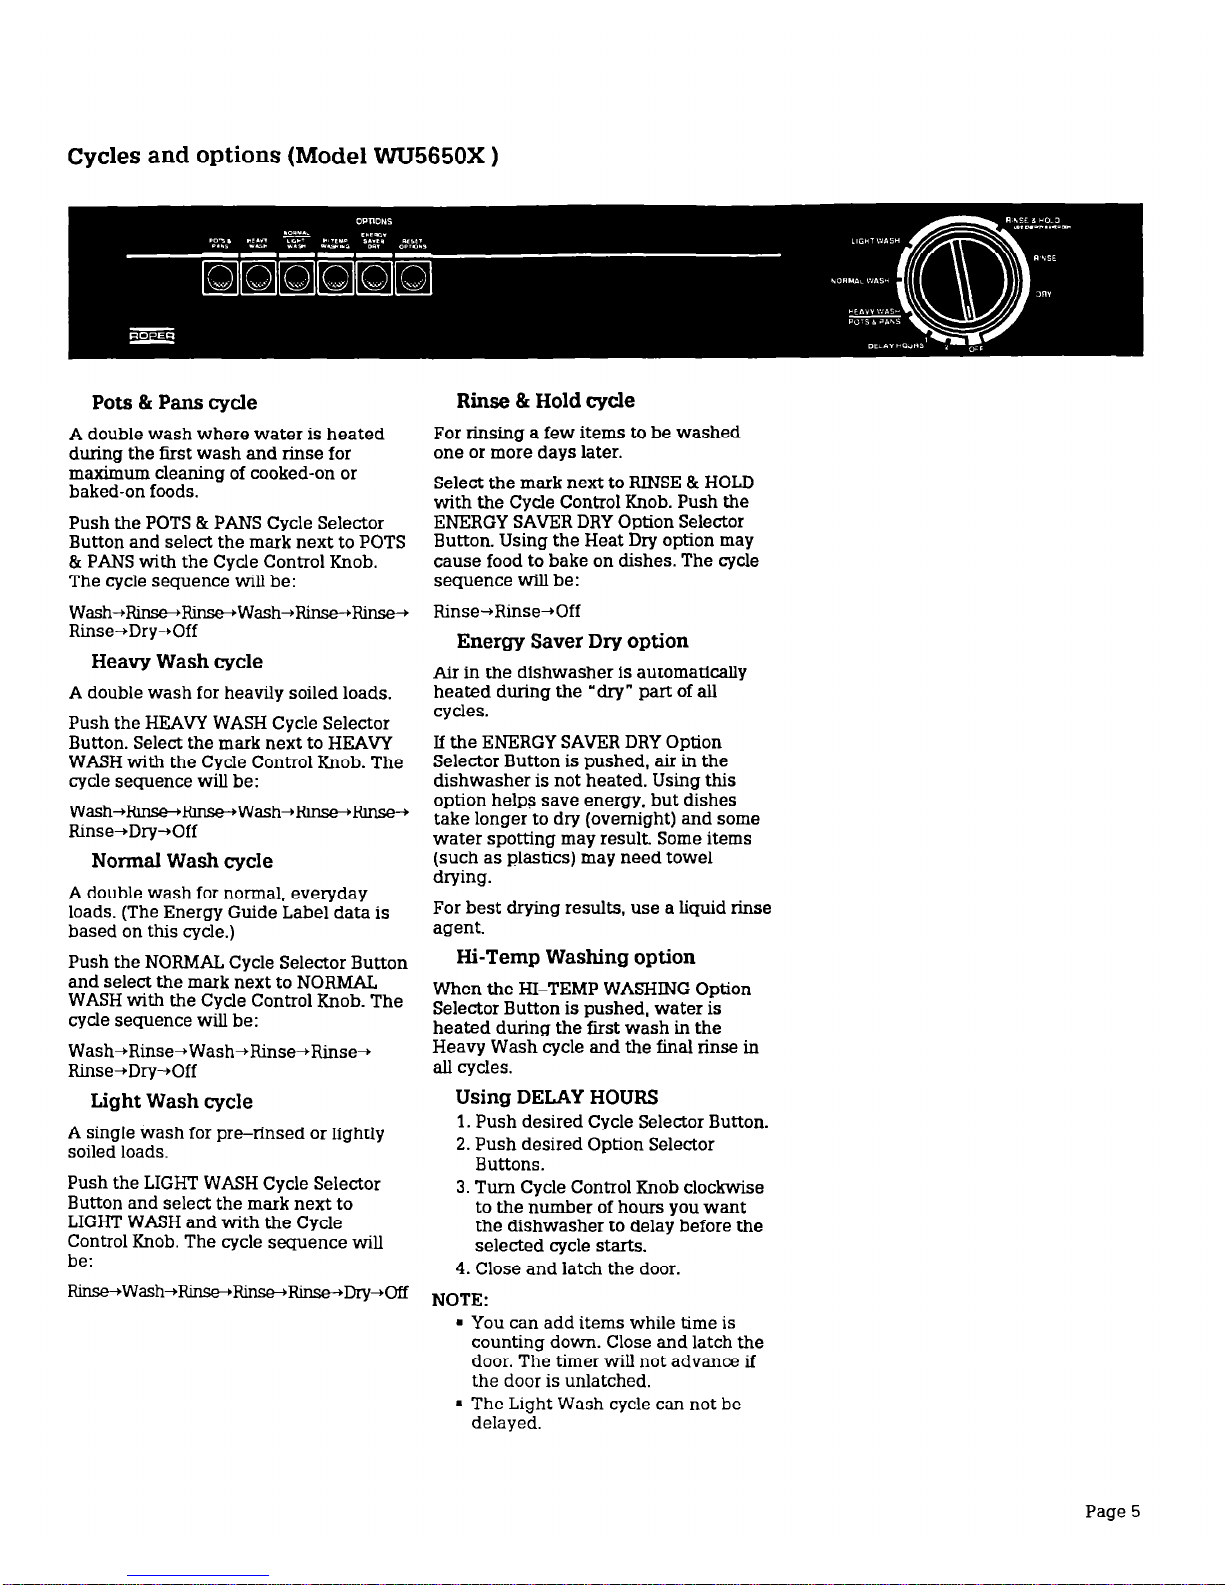
Cycles and options (Model WU565OX )
Pots & Pans cycle
A double wash where water is heated
during the first wash and rinse for
maximum cleaning of cooked-on or
baked-on foods.
Push the POTS & PANS Cycle Selector
Button and select the mark next to POTS
& PANS with the Cycle Control Knob.
The cycle sequence will be:
Wash+Rins.e+Rmse+Wash+Rinse+Rinse+
Rinse-+Dry+Off
Heavy Wash cycle
A double wash for heavily soiled loads.
Push the HEAVY WASH Cycle Selector
Button. Select the mark next to HEAVY
WASH with the Cycle Control Knob. The
cycle sequence will be:
Wash-Rinse+Rinse-+Wash+~Rinse+
Rinse+Dry-+Off
Normal Wash cycle
A double wash for normal, everyday
loads. (The Energy Guide Label data is
based on this cycle.)
Push the NORMAL Cycle Selector Button
and select the mark next to NORMAL
WASH with the Cycle Control Knob. The
cycle sequence will be:
Wash+Rinse+Wash+Rinse+Rinse+
Rinse+Dry+Off
Light Wash cycle
A single wash for pre-rinsed or lightly
soiled loads.
Push the LIGHT WASH Cycle Selector
Button and select the mark next to
LIGHT WASH and with the Cycle
Control Knob. The cycle sequence will
be:
Rinse+Wash+inse+RRinse+Dry+Off
Rinse & Hold cycle
For rinsing a few items to be washed
one or more days later.
Select the mark next to RINSE & HOLD
with the Cycle Control Knob. Push the
ENERGY SAVER DRY Option Selector
Button. Using the Heat Dry option may
cause food to bake on dishes. The cycle
sequence will be:
Rinse+Rinse+Off
Energy Saver Dry option
Air in the dishwasher is automatically
heated during the “dry” part of all
cycles.
If the ENERGY SAVER DRY Option
Selector Button is pushed, air in the
dishwasher is not heated. Using this
option helps save energy, but dishes
take longer to dry (overnight) and some
water spotting may result. Some items
(such as plastics) may need towel
drying.
For best drying results, use a liquid rinse
agent.
Hi-Temp Washing option
When the I-II-TEMP
WASHING
Option
Selector Button is pushed, water is
heated during the first wash in the
Heavy Wash cycle and the final rinse in
all cycles.
Using DELAY HOURS
1. Push desired Cycle Selector Button.
2. Push desired Option Selector
Buttons.
3. Turn Cycle Control Knob clockwise
to the number of hours you want
the dishwasher to delay before the
selected cycle starts.
4. Close and latch the door.
NOTE:
. You can add items while time is
counting down. Close and latch the
door. The timer will not advance if
the door is unlatched.
a The Light Wash cycle can not be
delayed.
Page 5
 Loading...