

Roper MCE04XW Use And Care Manual
Microwave Oven
Use and
Care Guide
ROPER
Appliances
MCE04XW
Thank you for choosing a Roper
appliance
This Use and Care Guide will help you operate
and maintain your new, qualitybuilt Roper
microwave oven. Keep this Use and Care
Guide in a safe place for future reference.
Complete and mail the Product
Registration Card
This card enters your warranty into our
warranty system that insures efficient claim
processing, can be used as a proof of
purchase for insurance claims and helps
Roper to contact you immediately in the
unlikely event of a product-safety recall.
Please remember
It is your responsibility to be sure that your
microwave oven:
l
Has been properly installed and leveled
where it is protected from the elements and
on a surface strong enough to support its
weight. (See the Installation Instructions.)
The microwave oven should be at a
temperature above 50°F (10%) for proper
operation.
l
Has been properly connected to electrical
supply, and grounded. (See the Installation
Instructions.)
l
Is not used by children or anyone unable to
operate it properly.
l
Is properly maintained.
. Is used only for jobs expected of a home
microwave oven.
c
Precautions To Avoid Possible
Exposure To Excessive
Microwave Energy
. . .
Do not attempt to operate this oven with the
door open since open-door operation can
result in harmful exposure to microwave
energy. It is important not to defeat or tamper with the safety interlocks.
Do not place any object between the oven
front face and the door or allow soil or
cleaner residue to accumulate on sealing
surfaces.
Do not operate the oven if it is damaged. It
is particularly important that the oven door
close properly and that there is no damage
to the:
(1)
Door (bent),
(2) Hinges and latches (broken or loosened),
(3) Door seals and sealing surfaces.
Do not operate the microwave oven if the
door window is broken.
The microwave oven should be checked
for microwave leakage by qualified service
personnel after a repair is made.
The oven should not be adjusted or re-
paired by anyone except properly qualified
service personnel.
Do not operate the microwave oven with the
outer cabinet removed.
-2-
IMPORTANT SAFETY INSTRUCTIONS
Microwave ovens have been thoroughly tested for safe and efficient operation. However, as
with any appliance, there are special installation and safety precautions which must be
followed to ensure safe and satisfactory operation and prevent damage to the unit.
l Read all instructions before using
l Do not let cord hang over edge of table or
appliance.
counter. Electrical shock may result.
l Read and follow the specific “Precau-
l Follow door surface and interior cleaning
tions To Avoid Possible Exposure To instructions on page 14.
Excessive Microwave Energy” found on
page 2.
l To reduce the risk of fire in the oven cavity:
l This appliance must be grounded. Con-
- Do not overcook food. Carefully attend
nect only to properly grounded outlet. See
appliance if paper, plastic, or other
Grounding Instructions found on page 5.
combustible materials are placed
inside the oven to facilitate cooking.
l Install or locate this appliance only in
Paper can char or burn, and some
accordance with the povided Installation
plastics can melt if used when heating
Instructions found on page 6.
foods.
l Some products such as whole eggs and
sealed containers, for example, closed
glass jars-may explode and should not be
heated in this oven.
l Use this appliance only for its intended
use as described in this manual.
l As with any appliance, close supervision
is necessary when used by children.
l Do not operate this appliance if it has a
damaged cord or plug, if it is not working
properly, or if it has been damaged or
dropped. Electrical shock, fire or other
hazards may result.
l This appliance should be serviced only by
qualified service personnel. Call an
authorized Roper”” service company for
examination, repair or adjustment.
l Do not cover or block any opening on the
appliance. Fire may result.
l Do not use outdoors. Damage to the oven
or electrical shock may result.
l Do not immerse cord or plug in water.
Electrical shock may result.
l Keep cord away from heated surfaces.
Electrical shock may result.
- Do not deep fry in oven.
- Test dinnerware or cookware before
using. See page 17. Some dishes
(melamine, Centura@, etc.) absorb
microwave energy, becoming too hot to
handle and slowing cooking times.
Remove wire twist-ties from paper or
plastic bags before placing bag in
oven. Cooking in metal containers can
damage the oven. So can containers
with hidden metal (twist-ties, foil lining,
staples, metallic glaze or trim).
- If materials inside the oven should
ignite, keep oven door closed, turn
oven off, and disconnect the power
cord, or shut off power at the fuse or
circuit breaker panel.
l Do not heat, store or use flammable
materials in or near the oven. Fumes can
create a fire hazard or explosion.
l Read and follow “SAFETY PRECAU-
TIONS” on page 13.
SAVE THESE INSTRUCTIONS
-3-
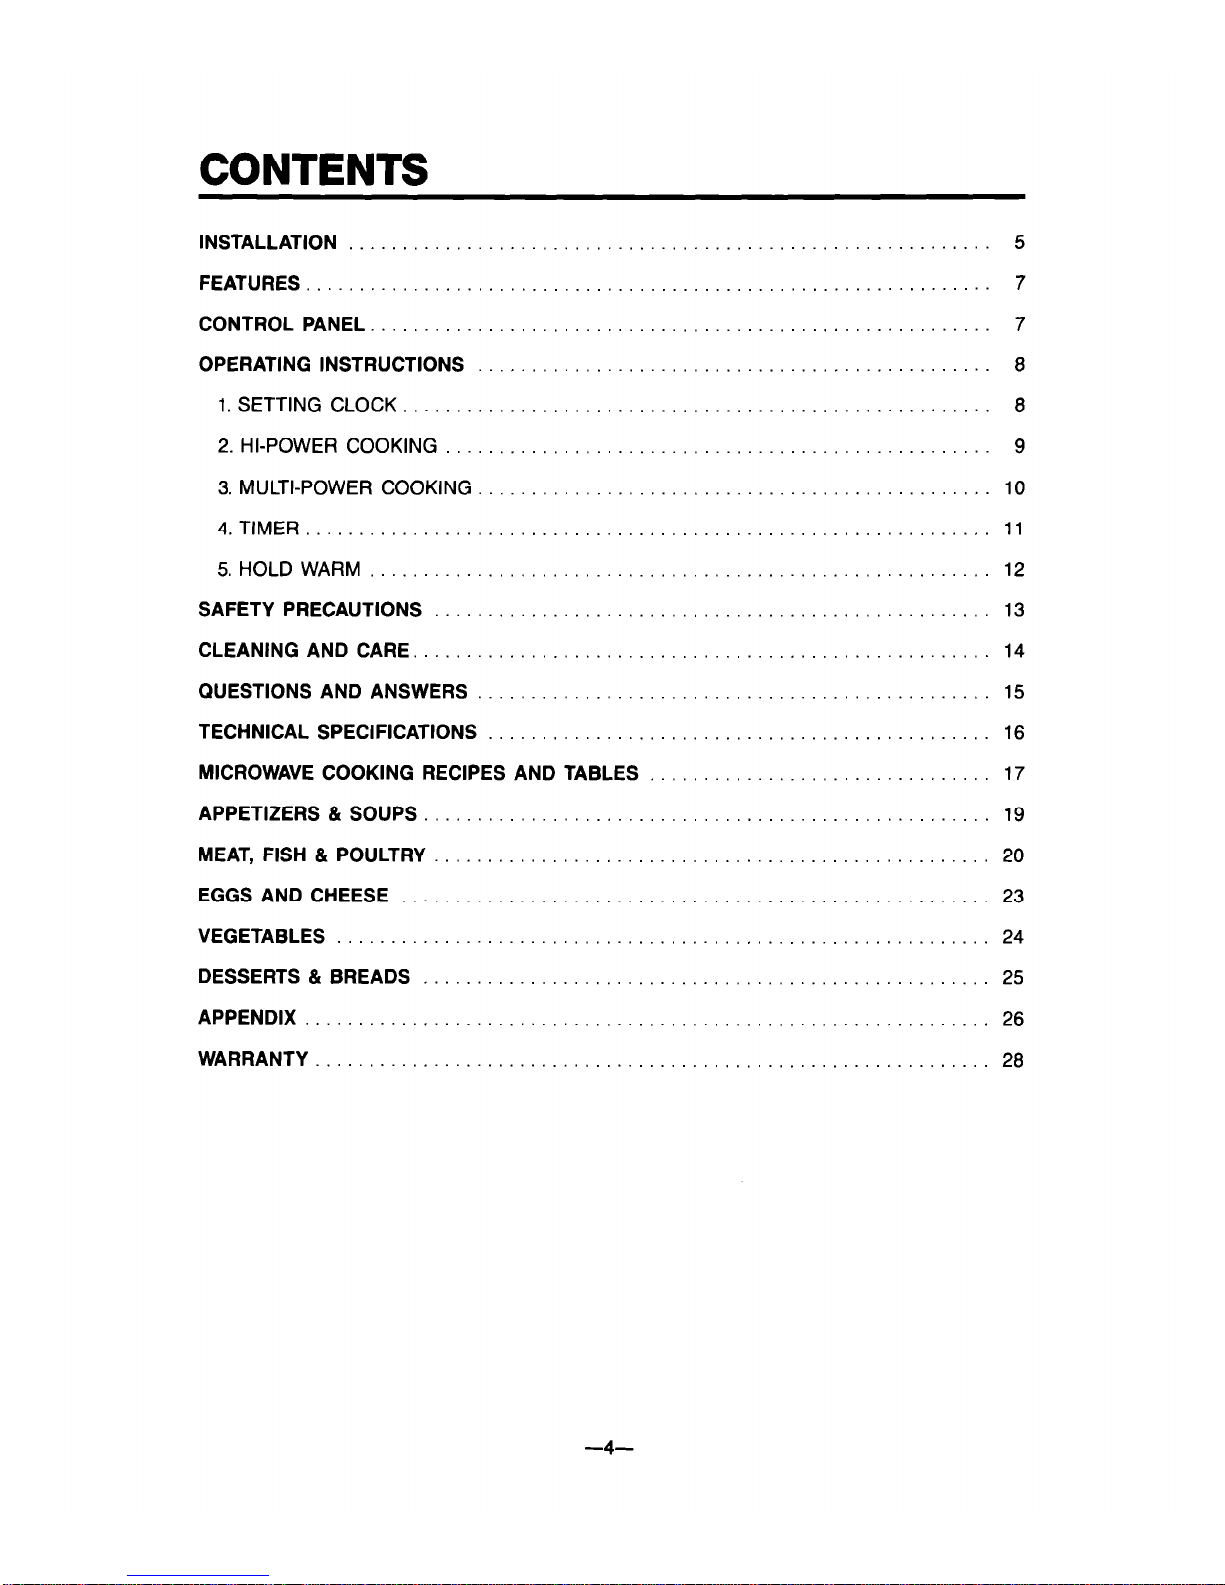
CONTENTS
INSTALLATION . . . . .
FEATURES .
CONTROL PANEL.
OPERATING INSTRUCTIONS
1. SETTING CLOCK
2. HI-POWER COOKING
3. MULTI-POWER COOKING
4. TIMER. .
5. HOLD WARM
SAFETY PRECAUTIONS
CLEANING AND CARE.
QUESTIONS AND ANSWERS
TECHNICAL SPECIFICATIONS
.
.......
.......
.......
.......
.......
.......
.......
.......
.......
MICROWAVE COOKING RECIPES AND TABLES
APPETIZERS 81 SOUPS .....................
MEAT, FISH 81 POULTRY ....................
EGGS AND CHEESE .......................
VEGETABLES .............................
DESSERTS & BREADS .....................
APPENDIX ................................
WARRANTY ...............................
.
.
.
. 5
7
7
8
12
13
14
15
16
17
19
20
23
24
25
26
28
-4-
INSTALLATION
A. EXAMINE OVEN
Empty the microwave oven and clean inside it with a soft, damp cloth. Check for damage such as
misaligned door, damage around the door or dents inside the oven or on the exterior. If there is
any damage, please do not operate the unit until it has been checked by an authorized service
technician and any repairs made.
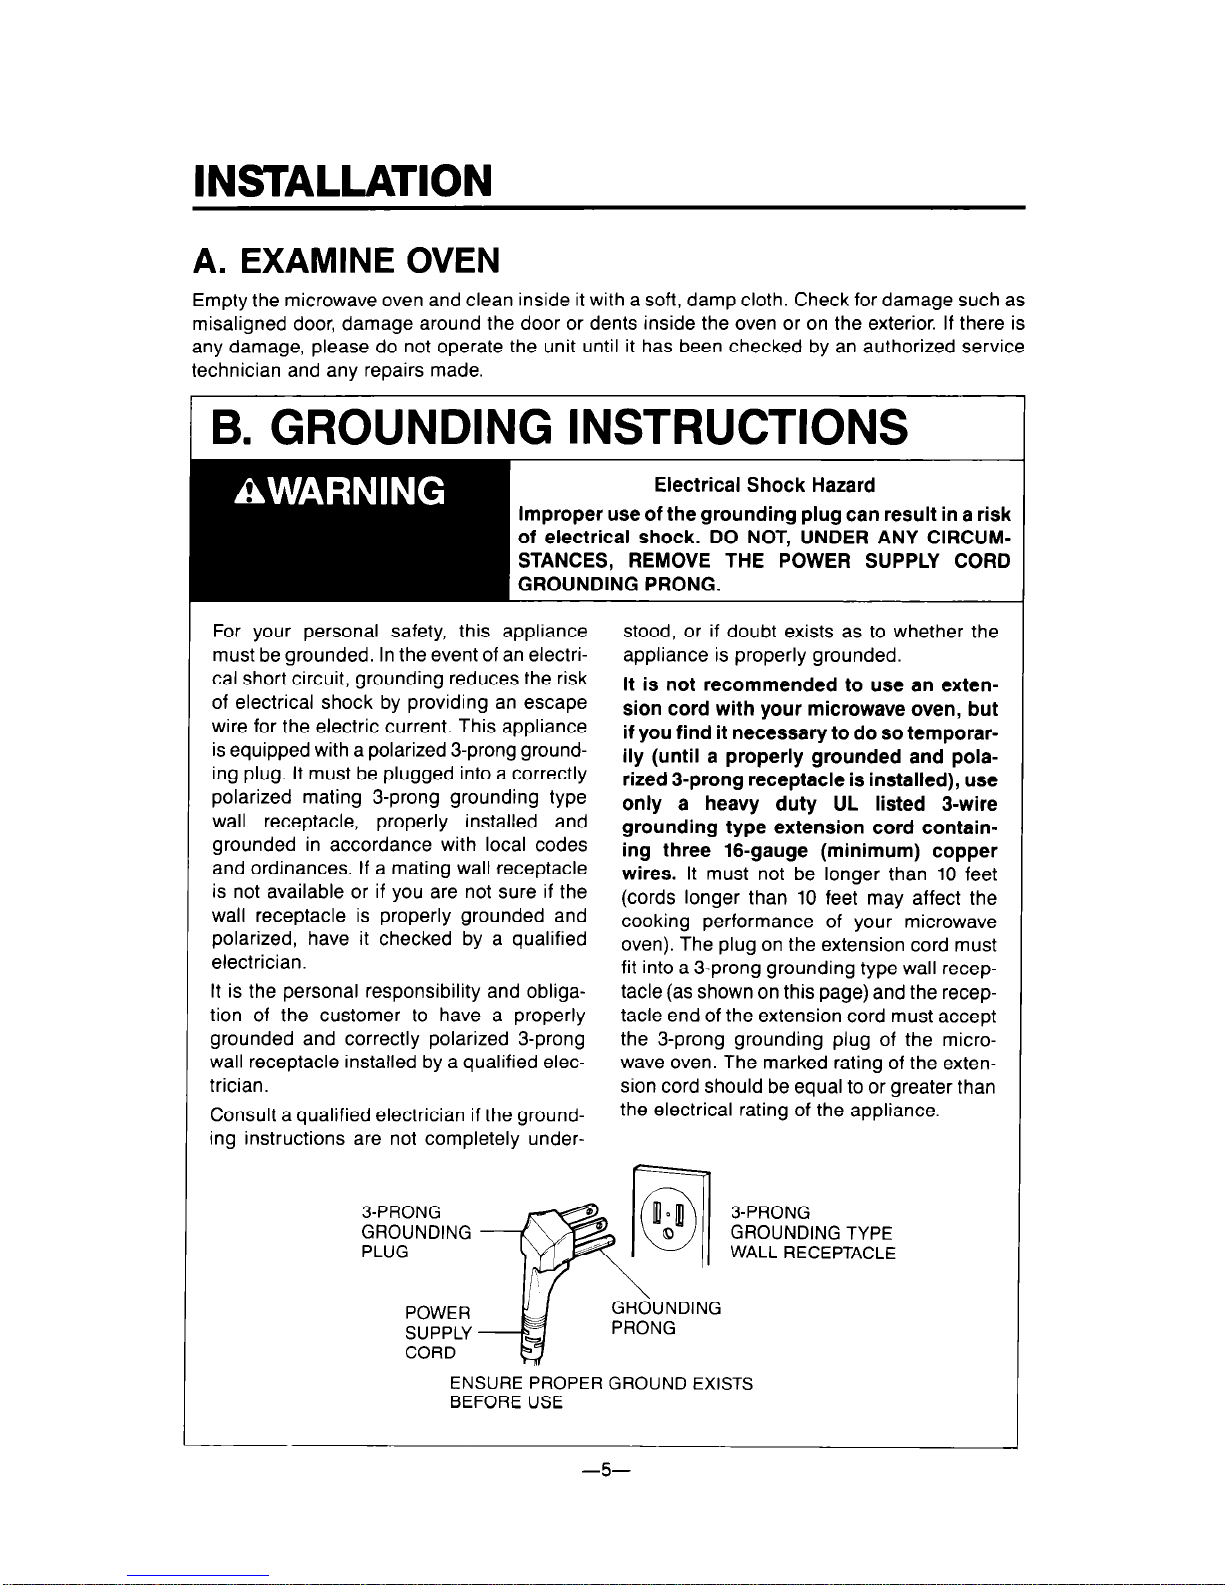
B. GROUNDING INSTRUCTIONS
Electrical Shock Hazard
Improper use of the grounding plug can result in a risk
of electrical shock. DO NOT, UNDER ANY CIRCUMSTANCES, REMOVE THE POWER SUPPLY CORD
GROUNDING PRONG.
For your personal safety, this appliance
stood, or if doubt exists as to whether the
must be grounded. In the event of an electri-
appliance is properly grounded.
cal short circuit, grounding reduces the risk
It is not recommended to use an exten-
of electrical shock by providing an escape
wire for the electric current. This appliance
sion cord with your microwave oven, but
is equipped with a polarized 3-prong ground-
if you find it necessary to do so temporar-
ing plug. It must be plugged into a correctly
ily (until a properly grounded and pola-
polarized mating 3-prong grounding type
rized 3-prong receptacle is installed), use
wall receptacle, properly installed and
only a heavy duty UL listed 3-wire
grounded in accordance with local codes
grounding type extension cord contain-
and ordinances. If a mating wall receptacle
ing three 16-gauge (minimum) copper
is not available or if you are not sure if the
wires. It must not be longer than 10 feet
wall receptacle is properly grounded and
(cords longer than 10 feet may affect the
polarized, have it checked by a qualified
cooking performance of your microwave
electrician.
oven). The plug on the extension cord must
fit into a 3-prong grounding type wall recep-
It is the personal responsibility and obliga-
tacle (as shown on this page) and the recep-
tion of the customer to have a properly
tacle end of the extension cord must accept
grounded and correctly polarized 3-prong
the 3-prong grounding plug of the micro-
wall receptacle installed by a qualified elec-
wave oven. The marked rating of the exten-
trician. sion cord should be equal to or greater than
Consult a qualified electrician if the ground-
the electrical rating of the appliance.
ing instructions are not completely under-
3-PRONG
3-PRONG
GROUNDING
GROUNDING TYPE
PLUG WALL RECEPTACLE
POWER
SUPPLY
CORD
ENSURE PROPER GROUND EXISTS
BEFORE USE
-5-

C. CIRCUITS
Observe all governing codes and ordinances. A 120 Volt, 60Hz, AC only, 15 or 20 amp fused
electrical supply is required. (Time-delay fuse is recommended.) It is recommended that a
separate circuit serving only this appliance be provided.
D. VOLTAGE WARNING
The voltage used at the wall receptacle must be the same as specificed on the oven serial plate
located on the back or on the side of the control panel of the oven. Use of a higher voltage is
dangerous and may result in a fire or other type of accidet causing oven damage. Low voltage will
cause slow cooking.
E. LOCATION OF THE OVEN
Your microwave oven can easily be placed in your kitchen, family room or any other room in your
home. Place the oven on a flat surface such as a kitchen countertop or a specially-designed
microwave oven cart. (The control side of the unit is the heavy side. Use care when handling.)
The weight of the oven is approximately 23 Ibs. (10.4 kg). Do not place oven above a gas or electric
range. Free air flow around the oven is important. The microwave oven should be placed three
inches or more away from the edge of the countertop or cart to avoid accidental tipping of the
oven.
F. DO NOT BLOCK VENTS
All air vents should be kept clear during cooking. If air vents are covered during oven operation,
the oven may overheat. In this case a sensitive thermal safety device automatically turns the oven
off. The oven will be inoperable until it has cooled sufficiently. Make sure the microwave oven legs
are in place to ensure proper air flow.
G. TEST THE OVEN
To test the oven, plug it into the proper electrical outlet. Put about one cup (250mL) of cold water
in a glass container in the oven. Close the door. Make sure it latches. Follow the directions on page
10 to set the oven to cook for 2 minutes. When the time is up, the water should be heated.
H. USE OVEN PROPERLY
This microwave oven is designed for use in the household only and must not be used for
commercial purposes.
Do not remove the door, control panel or cabinet at any time. The unit is cquipcld with high
voltage and should not be serviced unless by an authorized service technician.
-6-
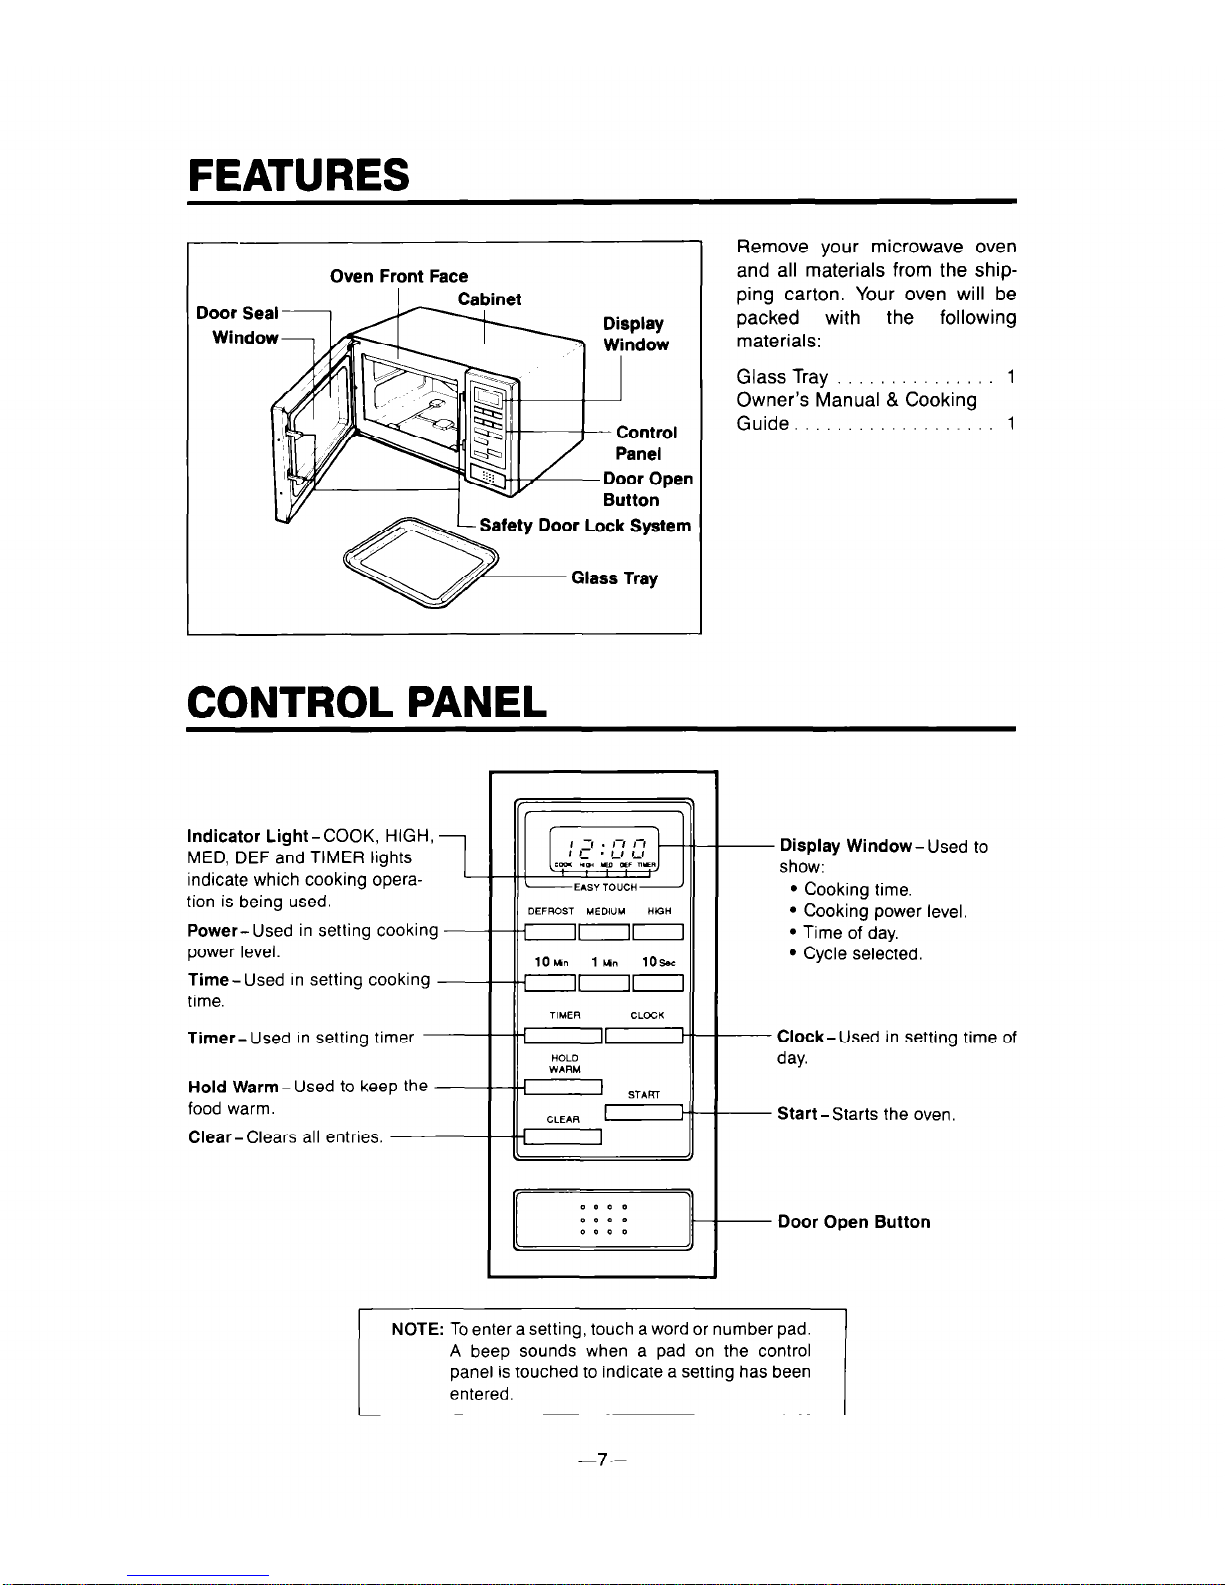
Oven Front Face
Safety Door Lock System
CONTROL PANEL
Remove your microwave oven
and all materials from the shipping carton. Your oven will be
packed with
the following
materials:
Glass Tray 1
Owner’s Manual & Cooking
Guide. 1
Indicator Light-COOK, HIGH,
MED, DEF and TIMER lights
indicate which cooking operation is being used.
Power- Used in setting cooking
power level.
Time- Used In setting cooking
time.
Timer- Used In setting timer.
Hold Warm-Used to keep the
food warm.
Clear-Clears all entries.
10un lun lOsac
non
CLEAR u
I
I
- Display Window- Used to
show:
l
Cooking time.
l
Cooking power level.
l
Time of day.
l
Cycle selected.
- Clock-Used in setting time of
day.
- Start-Starts the oven.
- Door Open Button
NOTE: To enter a setting, touch a word or number pad.
A beep sounds when a pad on the control
panel is touched to indicate a setting has been
entered.
-7-
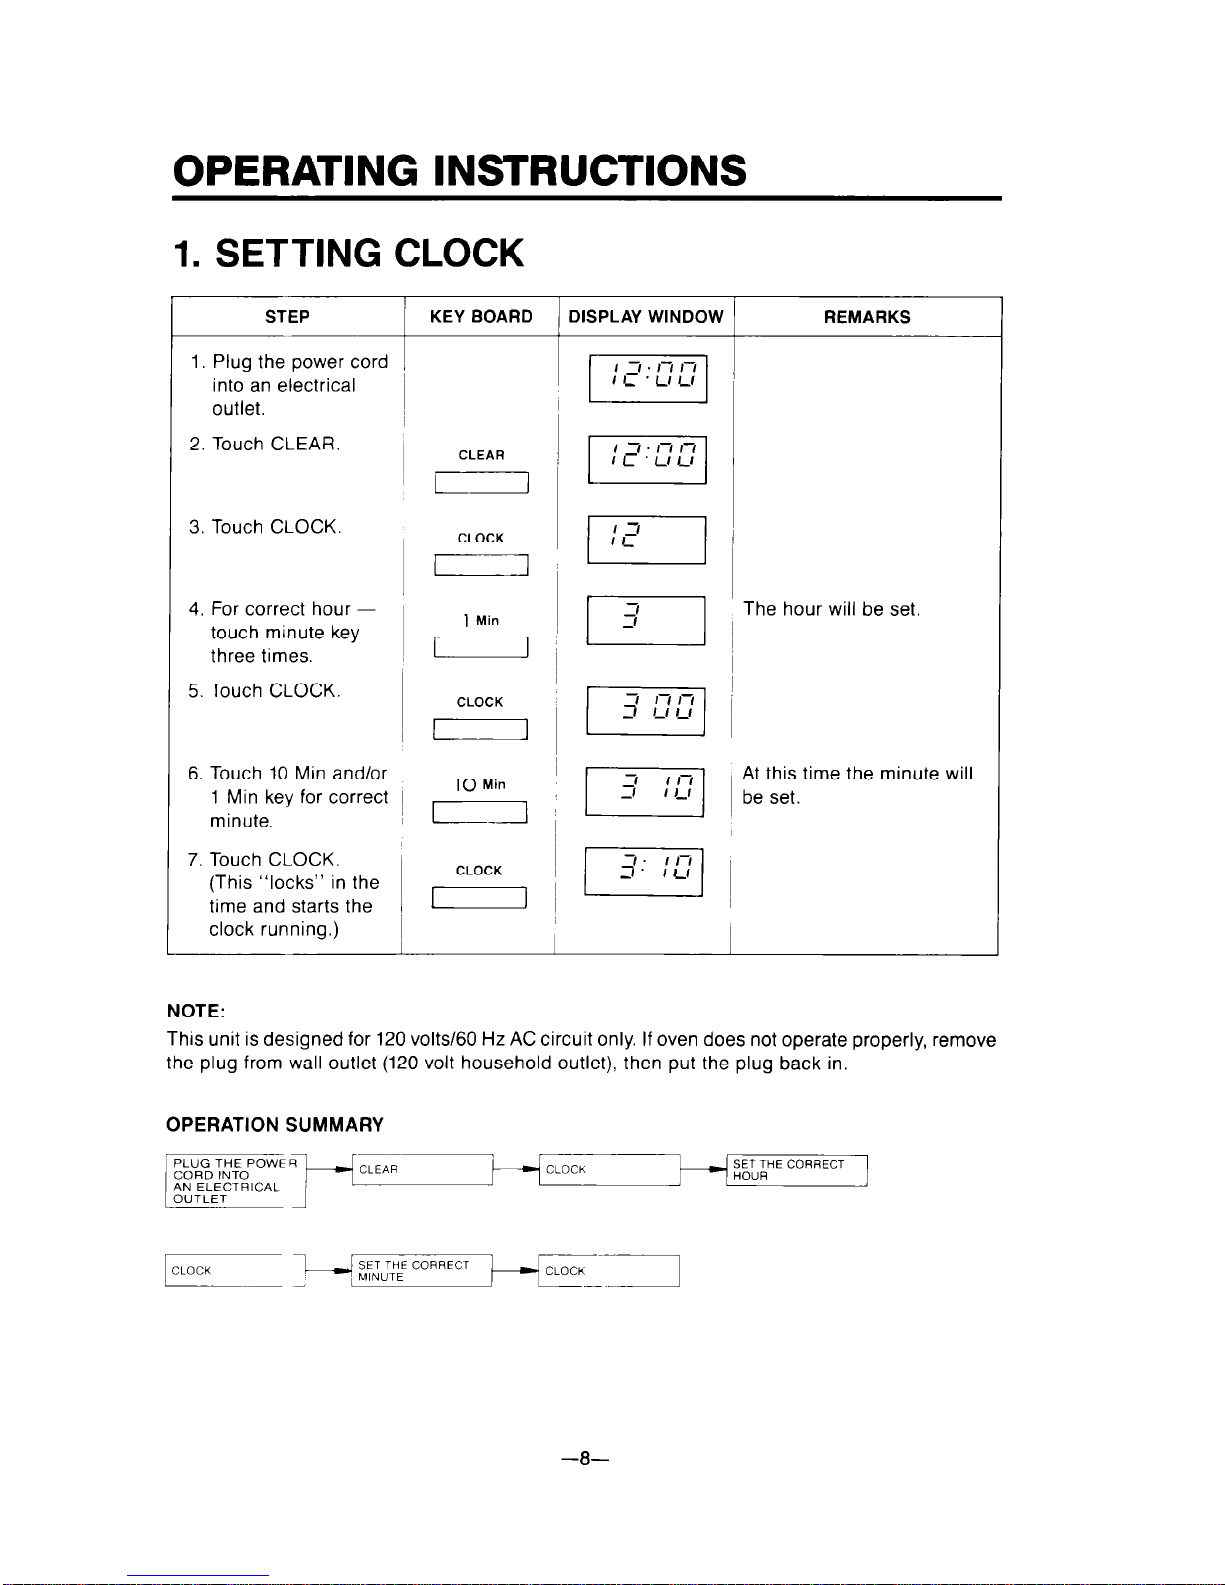
OPERATING INSTRUCTIONS
1.
SETTING CLOCK
STEP
KEY BOARD DISPLAY WINDOW
REMARKS
1. Plug the power cord /
into an electrical
outlet.
2. Touch CLEAR.
3. Touch CLOCK.
, CLOCK , /I ~
4. For correct hour touch minute key
, Min
three times.
~ [31 ~ The hour will be set.
1-I
5. Touch CLOCK.
6. Touch 10 Min and/or
1 Min key for correct
minute.
, ,C Min , ~ 11 ~ t;tfsres,time the minute will
~
7. Touch CLOCK.
(This “locks” in the
time and starts the
I
, CLOCK , ~ 13::o) ~
clock running.) I
NOTE:
This unit is designed for 120 volts/60 Hz AC circuit only. If oven does not operate properly, remove
the plug from wall outlet (120 volt household outlet), then put the plug back in.
OPERATION SUMMARY
PLUG THE POWER
SET THE CORRECT
HOUR
SET THE CORRECT
MINUTE
-a-
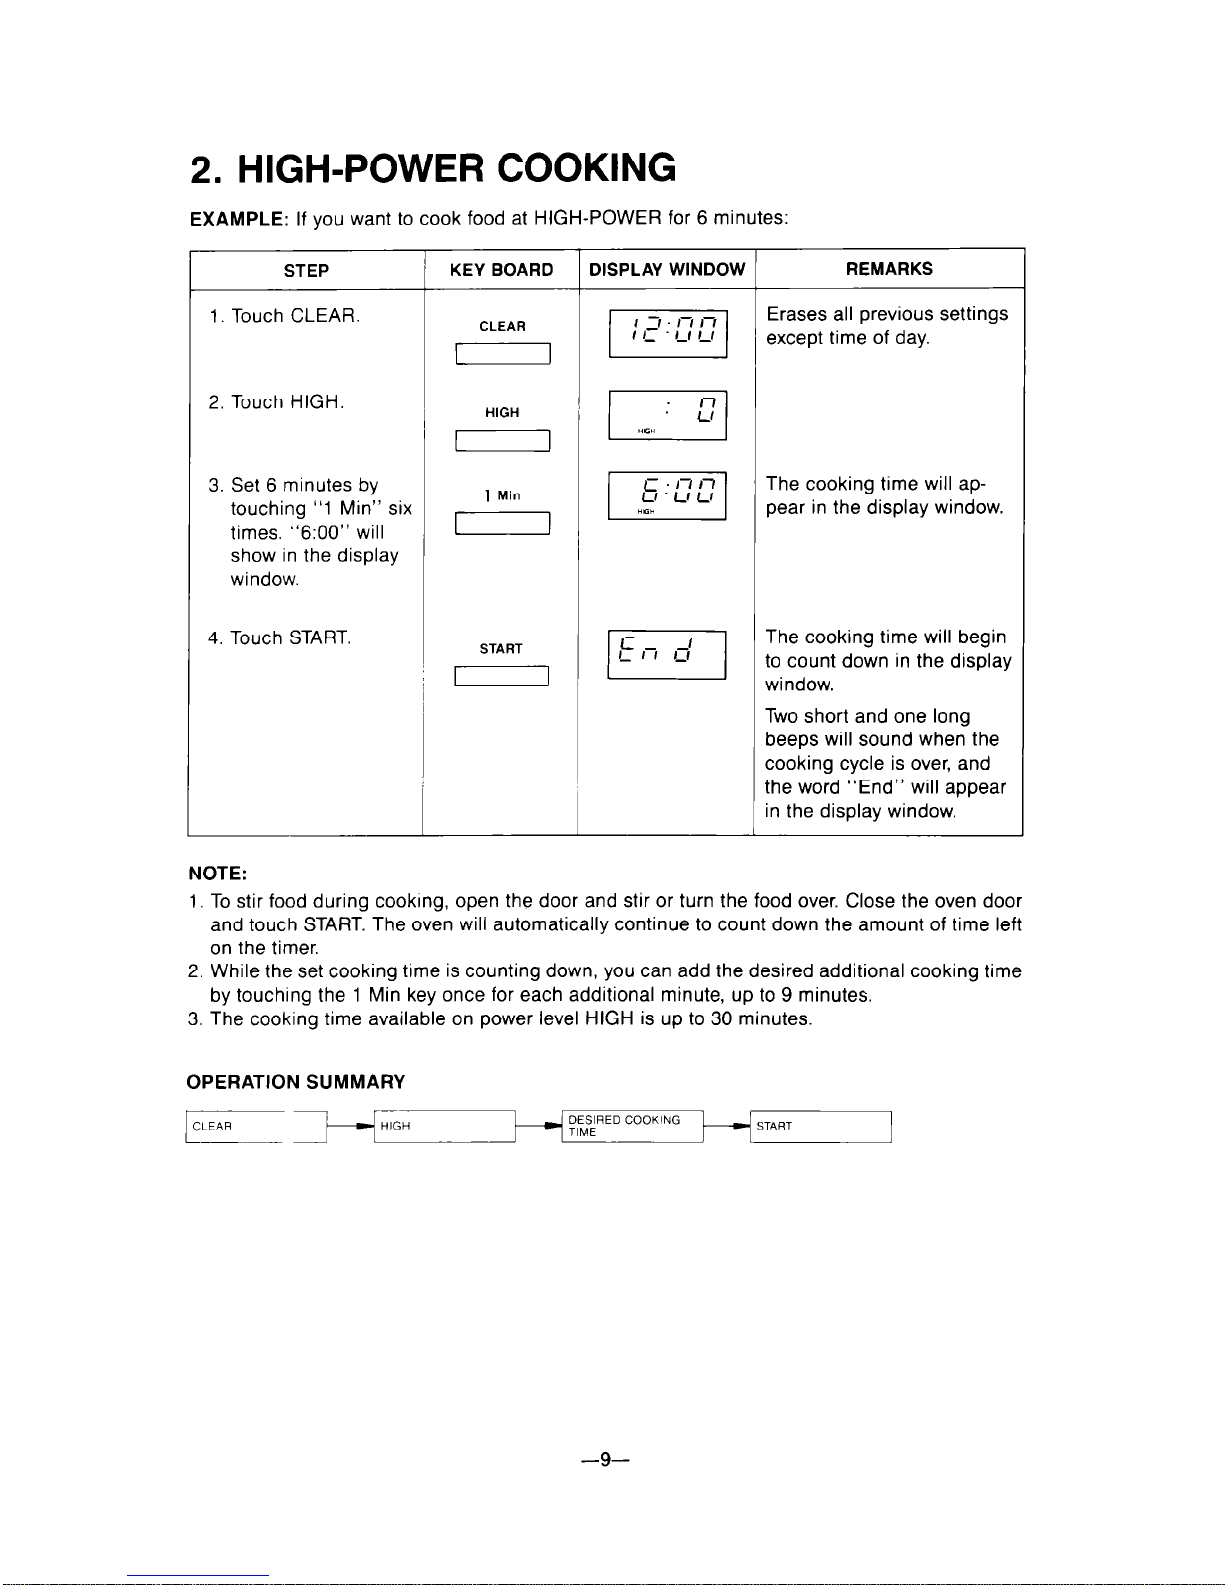
2.
HIGH-POWER COOKING
EXAMPLE:
If you want to cook food at HIGH-POWER for 6 minutes:
STEP
1. Touch CLEAR.
KEY BOARD
DISPLAY WINDOW
REMARKS
, CLEAR , j ~~~~“,~~~,“~~~a~ settings
2. Touch HIGH.
‘&
pTj
3. Set 6 minutes by
touching “1 Min” six
times. “6:OO” will
, 1 Min , /I ~~,er~~s”,kng,~~~~~~~~~~w.
show in the display
window.
4.
Touch START.
START
:I
p-j ~n~~~~~~~t~~~~;~y
Two short and one long
beeps will sound when the
cooking cycle is over, and
the word “End” will appear
in the display window.
NOTE:
1. To stir food during cookrng, open the door and stir or turn the food over. Close the oven door
and touch START. The oven will automatically continue to count down the amount of time left
on the timer.
2. While the set cooking time is counting down, you can add the desired additional cooking time
by touching the 1 Min key once for each additional minute, up to 9 minutes.
3. The cooking time available on power level HIGH is up to 30 minutes.
OPERATION SUMMARY
pr-+iL
DESIRED COOKING
TIME
-9-
 Loading...