

Page 1
Central Monitor Display (CMD-11c) User Instructions, Version 1
The Rondish Central Monitor Display by Rondish is an affordable fall management and nurse call solution
for a small home or hospital ward. Caregivers can conveniently read a large LED display from a distance,
and the panel will forward signals to a Caregiver Alert Pager that will display call type and device ID.
Straightforward programming allows users to quickly set up the system, and easily add or remove
devices based on changes in daily requirements.
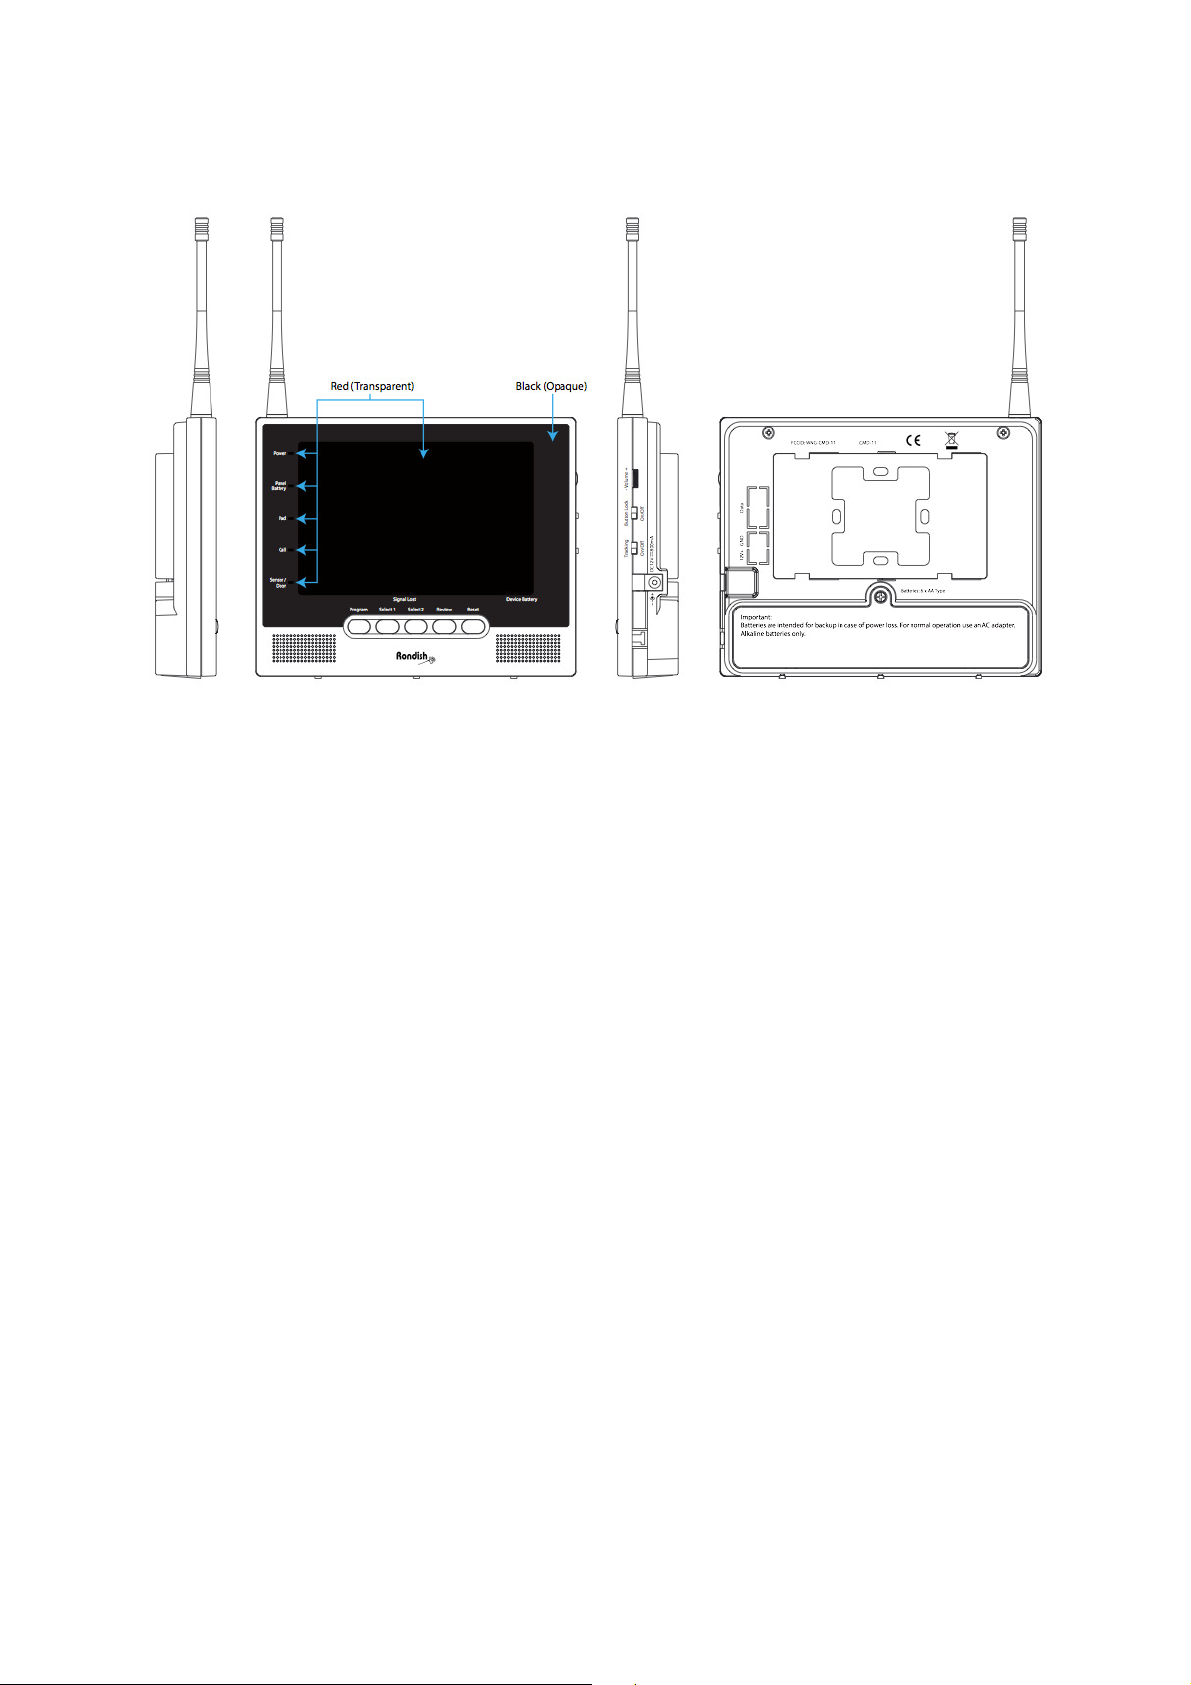
1. Set-Up
Open battery case and inert 6 x AA alkaline batteries. Batteries are intended in case of power loss only,
and will give approximately 4 hours of operation. The product must be connected to a power supply for
normal operation.
Screw on antenna to improve the range of wireless devices
Adjust volume to desired level by using the wheel on the right side. Tracking should only be ON if mobile
devices (wheelchairs or pendant call buttons) will be used. Otherwise set this switch to OFF.
Program devices and settings (see programming section for details)
• Assign a site code if other 433MHz devices will be used nearby, and turn off call forwarding for
any additional panels.
• Add wireless devices to memory as needed
If necessary, activate the lock on the right side to deactivate buttons on face of display. This will lock the
programming and disable the ability to reset alarms at the panel.
Place display on a desk or mount on the wall in a clearly visible location
Page 1 of 4
Page 2

Central Monitor Display (CMD-11c) User Instructions, Version 1
Device
Type
Display
During Alarm
Floor Mat
Device ID + Pad
LED
Pendant
Device ID + Call
LED
Enuresis
Device ID + Sensor
/Door
LED
Door
Device ID + Sensor
/Door
LED
Epilepsy
Device ID + Sensor
/Door
LED
2. Operation
The CMD-11 will only accept most* alarm signals from devices that have been entered into memory. For
instructions on how to add/delete devices go to the next section.
The Power Indication LED will be steady ON when connected to a power supply. It will flash if the
display is using battery power, and a beep will sound after AC is lost.
The Panel Bat LED indicates the status of the panel only. It will flash if there is low battery or batteries
have not been inserted. This LED can only be reset by changing the batteries.
The two LEDs next to the large digits indicate the status of wireless devices:
• Signal Lost will turn on if tracking is active and the panel cannot detect one of the devices in
memory
• Device Bat will turn on if a wireless device is low on batteries
When the CMD-11 receives a 433MHz alarm signal it will display the device ID (01-99), sound an audible
alarm, and transmit the alarm details to the PAG-11 pager to help the caregiver determine where they
should provide aid. An LED will flash on the left side of the panel to indicate the type of device that made
the call.
Bed/Chair Exit Device ID + Pad LED
Call Button Device ID + Call LED
BTX Monitor Device ID + Call LED
Press Cancel to silence the alarm. The call type and ID will continue to display and will sound again if the
signal is received from the point of origin. Holding Cancel ~5s will erase the display. If there are multiple
devices programmed to a memory slot, a reset signal from any device in this slot will reset the display.
Press Review to cycle through events from the last 15 minutes, beginning with the most recent. If there
have not been any recent alarms there will be no display.
*Note: DMS door strips and BTX monitors are programmed at the device. To make more convenient for
end-users the CMD will display the assigned door/bed number without first being paired. End-users
should make sure they do not program other devices into a memory slot with the same display.
Page 2 of 4
Page 3

Central Monitor Display (CMD-11c) User Instructions, Version 1
3. Programming
To enter/exit programming mode, press and hold the Program button for ~5s. The display will beep
once and continue flash “PP” when programming has been entered. The display will flash “FF” when
programming has finished.
Use the Select1 button to adjust the tens-digit, and Select2 to adjust the ones-digit to choose a memory
slot. The Pad Alarm, Call, and Sensor LEDs on the left side will indicate whether any devices occupy the
memory slot.
• To add a device to CMD memory, just trigger an alarm from the device you want to add. The
indication LED for the device type will turn on to indicate this slot is now occupied.
• To delete a device from CMD memory, select the memory slot and hold Reset for ~5s. You should
see the indication LED turn off to indicate the device is no longer present in memory.
To configure the call-forward feature, press Program again. The tens digit will display “t”. Use Select2
to change the setting:
• t = 0 indicates the transmitter is OFF
• t = 1 will send signals to PAG-03DV
• t = 2 is not used
• t = 3 will send signals to PAG-11
• t = 4 will make the panel a slave monitor only
• t = 5 will bump signals from another CMD-11
To set a site code, press Program until the tens digit displays “S”. Use Select2 to set 0-7
4. Troubleshooting
Paging
• If a pager is not receiving signals, first check that the CMD-11 is configured to repeat signals.
Enter programming mode and press Program until the left digit displays “t”: setting t = 1 will turn
the transmitter ON. If this does not solve the issue, check that the pager is configured to turn
Direct Signaling OFF.
• Erase the pager memory and reprogram the settings
• Contact your local distributor with details for further assistance
LEDs
• If you cannot reset an error LED, enter programming mode and erase the memory slot. If multiple
devices have been entered into this slot you will need to reprogram them into memory.
Warning:
This device complies with Part 15 of the FCC Rules. Operation is subject to the following two
conditions: (1) this device may not cause harmful interference, and (2) this device must accept any
interference received, including interference that may cause undesired operation.
Page 3 of 4
Page 4

Central Monitor Display (CMD-11c) User Instructions, Version 1
NOTE: This equipment has been tested and found to comply with the limits for a Class B
digital device, pursuant to Part 15 of the FCC Rules. These limits are designed to provide
reasonable protection against harmful interference in a residential installation. This
equipment generates uses and can radiate radio frequency energy and, if not installed and
used in accordance with the instructions, may cause harmful interference to radio
communications. However, there is no guarantee that interference will not occur in a
particular installation. If this equipment does cause harmful interference to radio or
television reception, which can be determined by turning the equipment off and on, the
user is encouraged to try to correct the interference by one or more of the following
measures:
-- Reorient or relocate the receiving antenna.
--Increase the separation between the equipment and receiver.
--Connect the equipment into an outlet on a circuit different from that to which the receiver
is connected.
-- Consult the dealer or an experienced radio/TV technician for help.
CAUTION:
RISK OF EXPLOSION IF BATTERY IS REPLACED BY AN INCORRECT TYPE.
DISPOSE OF USED BATTERIES ACCORDING TO THE INSTRUCTIONS.
Notice
Changes or modifications are not expressly approved by the party responsible for
compliance could void the user's authority to operate the equipment.
Page 4 of 4
 Loading...