

Page 1

Preface
Thank you for purchasing this camera. This camera will help you fulfill all
your digital pictures processing needs.
The camera is equipped with five modes (Capture Mode, Playback
Mode, DSC Setup Mode, Video Mode, and Macro Mode) for your exploration.
This light and handy digital camera offers 3.23 mega pixels high-quality
image along with precise 12 x zoom (3 x optical plus 4 x digital) The builtin 16MB memory can store your images. The stylish metallic case is
crafted from aluminum alloy, making this camera light and portable.
Through a USB cable connection, pictures can be easily transmitted from
the camera to the PC. Nine recorded images can be displayed on the
high resoultion LCD. Continuous shooting function is also available for
users to take multiple frames of scenes in quick succession.
Note:
1. The company keeps the right to change the contents of this document, spec of this camera in the
future, without prior notice.
i
Page 2

Table of Contents
Preface.........................................................................i
Prior to Operating the Camera ..................................1
Unpacking the camera. ........................................................... 1
Identifying components ........................................................... 2
Loading the battery and SD Card............................................ 3
Basic Settings.......................................................................... 4
Formatting the SD Card .......................................................... 4
Basic Operating Procedure .......................................5
Turning the Camera ON/OFF.................................................. 5
Basic Shooting ........................................................................ 5
Auto-Focus Function ............................................................... 6
Zooming In/Out........................................................................ 6
Flash Setting. .......................................................................... 6
Playback.................................................................................. 6
Five Main Camera Mode and Instructions................ 7
Video Mode ............................................................................. 9
Capture Mode.........................................................................10
Playback Mode.......................................................................14
Macro Mode ...........................................................................16
DSC Setup Mode....................................................................17
Making Connections..................................................20
Installing software...................................................................20
Connecting through the mini USB. ......................................... 20
Connecting through TV-out via docking station (optional)......22
Recharging through the docking station (optional).................22
APPENDIX ..................................................................23
Specifications .........................................................................23
E N
Table of Contents ii
Page 3
Prior to Operating the Camera
Set this digital camera by following these quick and simple instructions.
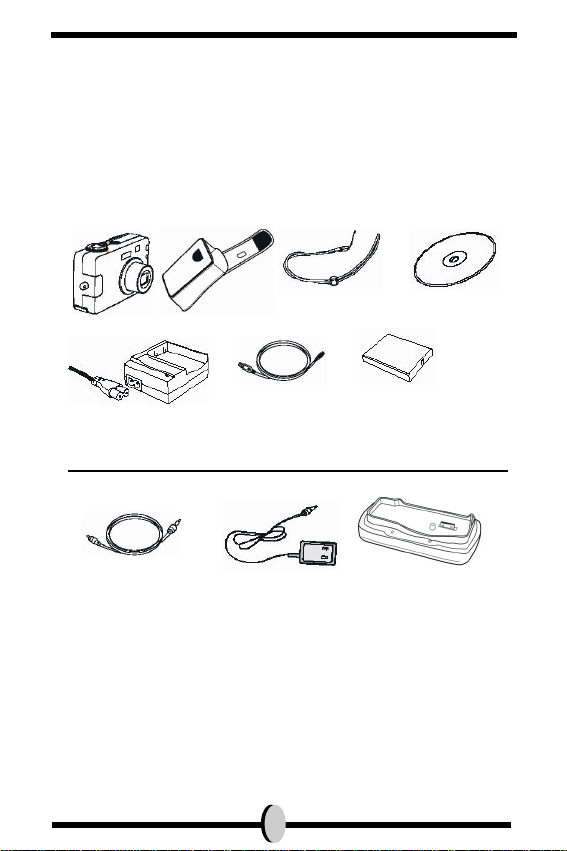
Unpacking the camera
1. Clear all items from the box. (It is highly recommended th at the box and wrappings are kept for future usage)
2. Double check for the following items:
CD-ROM
Battery
Camera
Battery Charger
Handstrap
Pouch
Mini USB Cable
Optional Items:
Video Cable
AC Adapter Docking Station
1
Page 4
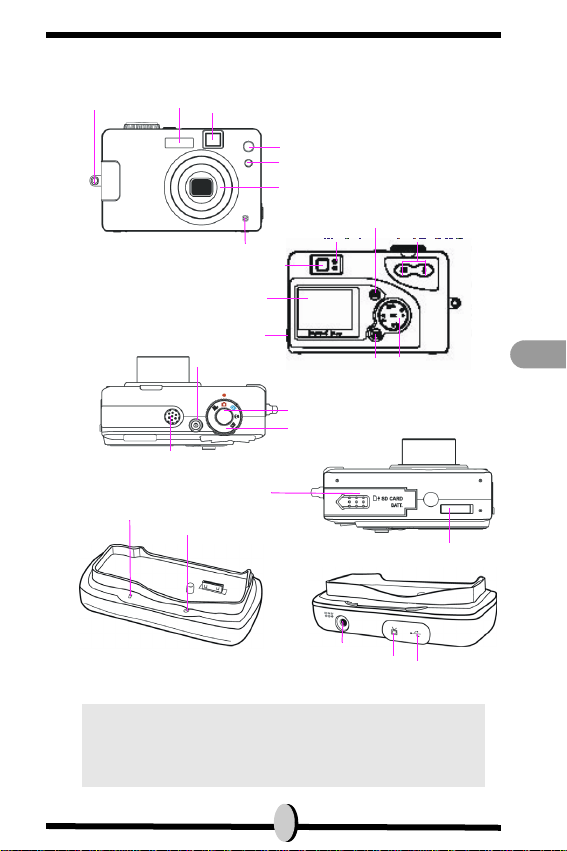
Identifying components
Flash
Handstrap Hook
Viewfinder
Auto-Focus LED
Self timer LED
Zoom Lens
Microphone
DC-in & USB Connector
Power Button
Speaker
Battery & SD Card
Battery Charging Status LED
Red (Charging), Green ( Done)
CAUTION!
Compartment
AC Adapter LED
1. Use the rechargeable Li-ion for docking only. Do not
2. Use only the specified battery or AC power adapter
Display Button
Power/Flash LED
.
Viewfinder
TFT LCD
Menu Selection
Shutter
Mode Dial
DC-In
use non-rechargeable batteries while docking.
specified (5V 2A) for use with this camera. Other
power sources may cause fire.
Zoom Button
Five-way Switch
Docking Connector
TV-Out
USB
E N
2
Page 5
Page 6
Page 7
Basic Operating Procedure
This section provides simple and basic directions to get you started with
your camera. From this section, you will learn how to turn the camera on
and off, shoot pictures, zoom In and Out, set your flash, and playback
your pictures.
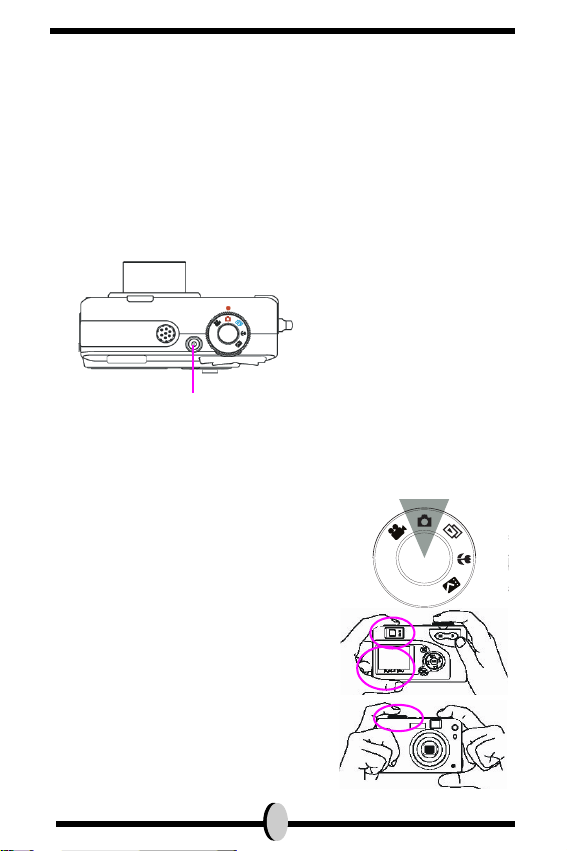
Turning the Camera ON/OFF
1. Locate the power button on top of the camera.
2. Press the power button down to turn the camera ON or OFF,
Power ON/OFF Button
The backside LED indicator will remain green while the power is turned
ON
Basic Shooting
1. Turn the mode dial to the capture mode
2. Look into the viewfinder/LCD and try to align
your subject in the crop mark.
3. When you are set, press the shutter button
once.
5
Page 8
Page 9

Five Main Camera Mode and
Instructions
This section describes the five modes included in this camera. An indepth coverage of these modes will be further described. Here are the
five main functions of this camera:
Camera Mode Function Setting
Video Mode
Capture Mode
Playback Mode
1. Record Movies
1. Resolution
2. Image Quality
3. Color Effect
4. White Balance
5. Scene
6. Metering
7. Sharpness
8. EV Adjust
9. ISO
1. Erase Picture
2. Protect Picture
3. DPOF
4. Slide Show
5. Voice Memo
Page
Page 9
Page 10
Page 14
7
Page 10

Macro Mode
1. Resolution
2. Image Quality
3. Color Effect
4. White Balance
5. Scene
6. Metering
7. Sharpness
8. EV Adjust
9. ISO
Page 17
DSC Setup Mode
NOTE:
1. Date and Time
2. Auto Power Off
3. DPOF
4. Slide Show
5. Sound Effect
6. Languages
7. TV-out
8. Restoring
1. Press the display button once to delete the icons
from the LCD display. To turn the LCD display simply press the display button a second time. To save
your battery power, it is best to not leave your display ON for a long period of time.
Page 17
E N
8
Page 11

Page 12

Capture Mode
Capture mode will allow you to shoot single, continuous images, set your
flash and self-timer. Depending on the environment and setting, the camera’s settings will work accordingly. To exit the setting menu, simply press
the menu button.
Flash
Capture Mode
White Balance
ISO (100/200)
Metering
Resolution
Image Quality
Zoom Bar
of Pictures
Self Timer
Battery Status
Remaining Number
* The icons can be removed from the display by pressing
the display button once.
EV Icon
Continuous
Shot
Date
• Shooting images
1. Under Capture Mode, press the shutter button. The camera will start checking
whether the memory is sufficient to store the image. If it is full, a warning “Memory Full” icon will display on the LCD.
2. Once the picture is taken, you can erase the image under instant review. user
can protect image when in playback mode
3. If you decide to erase this image, press down. An erase icon will appear on the
LCD, press OK to achieve this function.
10
E N
Page 13

• FLASH Setting
1.To set the Flash, press the Five-Way Switch to the Left to select the
desired Flash setting. You will have the four types of Flash settings: Flash
Off, Auto Red-eye reduction, Flash Force On, and Night. Once you’ve set
your Flash setting, proceed with your picture taking.
Flash Off The Flash will not fire.
Auto Red-eye
reduction
Flash Force On The Flash always fire with
Night (Slow) The camera extends the
The Flash will fire depending
on the light source. Red eye
deduction will also be active
when needed. (Flash will
blink twice, picture will be
shot when the second flash is
fired.)
every shot.
mechanical shutter action,
and allow flash delay.
•Self Timer
To set the self timer under the capture mode, please press Five-Way
Switch to the Right button once to activate the self timer. You will have
ten seconds to get ready for your pose. The countdown number will be
displayed on the LCD as well followed by a beep sound.
• Shooting Continuously Setting
Pictures can be shoot in successive orders.
1. Keep pressing the right button twice until Shooting Continuously icon appears
on the LCD Display.
2. Keep pressing the shutter button to activate Shooting Continuously. Then
release the shutter after the three sequences have been taken.
11
Page 14

Page 15

White Balance Users can select the fol-
lowing white balance:
Auto
Shade
Sun
Tungsten
Fluorescent
It adjusts the relative brightness under
different condition.
The default is Auto.
Sharpness
EV Adjust Users can select the fol-
Scene Users can select the fol-
ISO Users can select the fol-
Users can select the following sharpness:
Normal
High
Low
lowing EV adjust:
from EV+2.0~ toEV -2.0, in
EV 0.5 step increase
lowing scene:
Night
Portrait
Landscape
Night Portrait
Off
lowing ISO setting:
100
200
Auto
Enhance of edge
detail. The default is
Normal.
This function allows
users to control the
exposure value, to
either lighten or
darken images the
camera is trying to
focus. The default is
0.
This pre-defined settings make it even
more convient for
users to take pictures. Users will not
need to make any
further adjustment to
the camera. The
scenes are already
pre-defined.
It adjusts the sensitivity of the camera.
The higher the number, the more sensitive it is to light. The
default is Auto.
13
Page 16

Page 17

• Displaying Thumbnails
1. Turn the Mode Dial to Playback Mode.
2. Press the display button two times to thumbnails in sets of nine.
3. Use the Five-Way Switch to change the image selection.
4. Press OK button to magnify images to standard size.
5. Press the left or right button to view other images.
• Display with Digital Zoom
The camera has 4x digital zoom.The picture can be zoomed up to four
times the original size. The five-way switch controls left, right, up, and
down of the image. Press the OK button to quit Digital Zoom Display.
1. Turn the MODE DIAL to Playback Mode.
2. To enter/exit Playback Mode Setup, press the Menu button.
3. While you are in the Playback Mode menu setting, use the Five-Way Switch to
select.
Function Setting Selection Definition
Protect Picture Users can select the fol-
lowing:
Protect all
Uprotect current
Unprotect all
Protect current
Protection setting for
your pictures against
accidental erasure. Once
you are set, press OK to
confirm.
Slide Show Users can select from:
From current (picture)
From first (picture)
From last (picture)
Erase Pictures Users can select from:
Current
All
Format
15
Pictures will be displayed
in an orderly way. While
you are in the Slide Show
setting, press OK to start/
exit slide show.
Erasing options for your
pictures. When formatting, a warning message
will appear. Press the OK
button to confirm. Format
will permanently remove
all data such as internal
memory/ SD card.
Page 18

Digital Print Order
Format or DPOF
Users can select from:
Frame Set
Reset all
It is a standard for printing the pictures directly
from the SD card. Pictures can be printed on
printers compatible with
the DPOF standard.
frame set --> set for one
image
reset all --> set for all
Voice Memo You are allowed 20 sec-
onds to record voice
memo. Users can select
from:
Record
Erase
Play
1. Select the picture you
wish you add voice
memo.
2. Press menu button.
3. Choose Voice Memo.
4. Select record
4. Press the shutter to
start or end recording.
Macro Mode
Macro mode is best used for taking close-up images with franges from
15-50 cm.
White Balance
Flash
Macro Mode
Remaining Number
of Pictures
* The icons can be removed from the display by pressing
the display button once.
Please refer back to Capture Mode section (page 11) for shooting images,
and continuous shooting.
ISO (100/200)
Metering
Battery Status
Resolution
Picture Quality
EV Icon
Scene
Continuous
Shot
Date
E N
16
Page 19

DSC SETUP MODE
Under this mode, you will be able to set your desired settings. There are
a total of eight different settings.
Languages
Sound Effect
Auto Power Off
Date and Time
1. Turn the mode dial to enter the DSC Setup Mode.
Slide Show Order
2. Select the type of setup you want to perform by pushing the left or right button.
Press the UP or Down arrow to select the function setting.
DPOF
TV-out
Restoring
Function Setting Selection Definition
Date and Time Users can select to set:
Time
Date
Auto Power Off Users can select the fol-
DPOF Users can select the
lowing minutes to Auto
Power Off the camera.
number of copies of
images they want to
print, and whether turn
the date and the no. of
files on or off in the picture.
Reset date and time
when change battery.
This setting automatically
turns off the camera.
(Prior to shutting off, the
LCD will shut itself automatically)
It is a standard for printing the pictures directly
from the SD card. Pictures can be printed on
printers compatible with
the SD card. Users can
set certain pictures to
DPOF.
17
Page 20

Slide Show Users can select the:
Interval
Repeat
Direction
Under this setting, users
can set the number of
seconds they want the
slide show to proceed
per slide, repeat the
show or not, and the
direction where these
slides should proceed.
Sound Effect Users can select either
Languages Users can select from
TV-Out Users can select from:
on or off
the following languages:
Deutsch
English
French
Italian
Japanese
Korean
Spanish
Simplified Chinese
Traditional Chinese
NTSC
PAL
This function allows
users to turn the sound
ON or OFF.
There are a total of nine
languages you can
choose to navigate this
camera. Camera will
keep your language setting but users will need to
reset when change battery. Press the Up or
Down button to select.
Press OK to confirm.
Depending on where
your location, different
region requires different
system for TV-out function. Please use the
docking station to set the
TV-Out. Press the Up or
Down button to select.
Press OK to confirm.
E N
18
Page 21

Restoring Reset back to default. To revert the setting back
to the default setting.
Press the OK if you want
to, if not, press the “right”
or “left” button to continue next setting. When
restoring is completed,
"done" will appear on the
LCD.
19
Page 22

Making Connections
In this section you will be able to connect the camera to your PC to download or edit photos. The docking station can also be used for TV out and
to charge battery.
Installing software
1. Insert the CD-ROM into your CD-ROM drive.
2. Click “Digital Camera Driver” and Install if your operating system is Windows
98. Users can pick 4 selections and press Install (it can all be done at the
same time). Driver is for uploading pictures to you computer, if the operation
system is Win 98
3. The installation wizard will guide you through the installation.
4. You will be able to use the application once it’s installed.
E N
Caution:
1. If you didn’t install the driver before plugging in the
USB device. System will detect new device. Please
insert the CD-ROM and complete the driver installation.
Connecting through the mini USB
Both camera and docking station have mini USB port. Transfering
images and video clip (movies) can be realized through these two
way.This section will show you how to download images from camera to
PC through mini USB cable. While the station is connected through an
USB port, it will download pictures and video clips from the camera to the
PC.
20
Page 23

A. Editing with ArcSoft
1. Turn the computer ON.
2. Connect the camera and the computer with the USB port cable.
3. Turn the camera ON.
4. Launch Photo Impression (the inclusive software which you have downloaded
from the CD-ROM.)
5. Select "from folder", you can find your camera as a new disk to upload your
images to edit.
6. Shortly follow the prompts and you will start downloading your pictures to the
computer..
B. Accessing images through your PC
If users decide to not download images with the application software, the
pictures or videos can still be located under “My Computer.” Before downloading images from camera to your PC, please make sure the camera is
in DSC mode. ( Please refer back to DSC Setup Mode, under page 17)
1. This c amera allows users to move the im ages or movies f rom camera to PC by
MSDC support.
2. When the camera is connected to your PC, there will be an external storage
under “My computer” named “ 300_CAMERA”.
3. Simply click the folder named “1003MDSC”, you can find the images or movies
you taken.
4. Copy or remove these files to from camera to your PC. You can start to edit the
images according to your desired.
NOTE:
1. Once the pictures are downloaded into the computer, they will be available in three different format:
JPEG, WAV, and HTML. The recommended format
for users (desiring to include their recorded voice
memo in their selected pictures) is HTML.
21
Page 24

Connecting through TV-out via docking
station (optional)
Before you proceed, please determine your corresponding TV-Out mode.
This camera will you to achieve full camera functions by TV-out connection. User can operate each function through the TV monitor instead of
the LCD display.
1. Connect the video cable into the docking station’s video out connector.
2. Connect the other end of the video cable into the TV’s video-in jack.
3. Turn the camera ON, you should then be able to operate the camera with TV
screen. (The LCD will turn off while connected to TV-out)
Recharging through the docking station
(optional)
The optional docking station will serve as a battery charger. Before you
proceed in charging the battery with the docking station, please make
sure that the battery is compatible. When you dock the camera into the
docking station, the camera will automatically turn OFF. The docking station will detect the battery status. If the battery is in its low state, docking
will start charging by drawing the DC-in power. The red LED will change
to the green LED when the battery is fully charged.
While the station is connected through an USB port, it will download pictures and video clips from the camera to the PC.
E N
22
Page 25

APPENDIX
Specifications
Features Content
Effective pixels 3.23M sensor, scale up to 5.5M
Removable storage
card
Internal memory 16MB NAND Flash Memory
Estimated number of
storable pictures
Video mode display QVGA @15~20fps
Lens 3X Optical Zoom Lens, F2.8-4.8
Focus/ Shooting distance
Digital zoom 4x digital zoom
View finder Virtual image viewfinder
SD/MMC
Compression ratio@ 1 : 8, 16MB SD card
5.5M: 8 pictures
3.0M: 15 pictures
1.3M: 35 pictures
VGA:140 pictures
Macro: 15~50 cm
Normal: 50cm~ infinity
Flash mode Flash Off/Auto Red Eye Reduction/ Flash
LCD monitor 1.6" TFT LCD, 80,000 pixel and above
Force On/ Night
23
Page 26

Camera Interface Mini USB/DC-in
Multiple language UI English/French/German/Italian/Spanish/
Compatible Battery Li-ion battery
Battery Level High/ Middle/ Low/ Empty
AC Adapter
(optional)
Japanese/Traditional and Simplified Chinese/ Korean
5 V 2A
Docking interface
(Optional)
Dimension (WxHxD) 96 x 61 x 32 (mm)
Weight 185 (g) without battery
System requirements
Windows Win98,WinME,Win2000,WinXP
Macintosh Mac 9.1 and above
Mini USB/ TV Out(through docking)/DC
In(through docking)"
24
E N
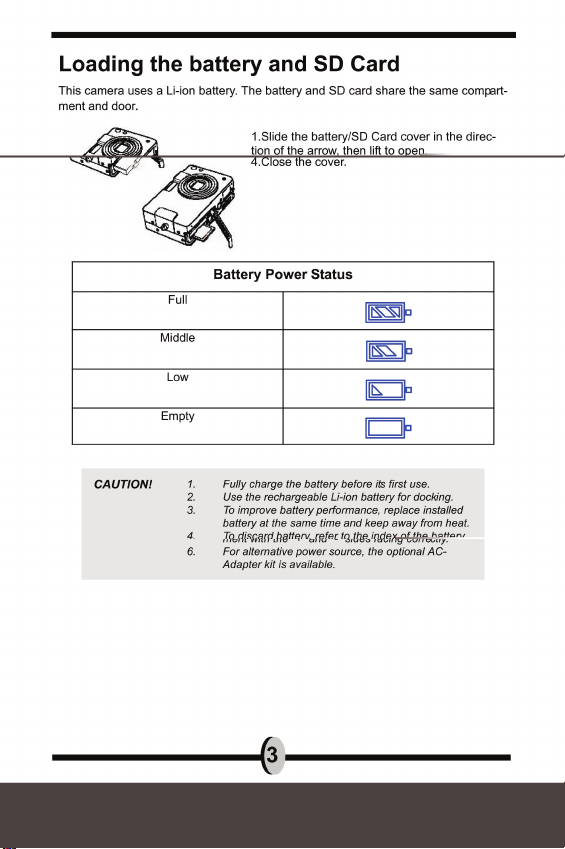
 Loading...