

Rollei dr4, dr5 Software User's Manual

Software User Guide
For the safe use of your camera, be sure to read the Safety Precautions thoroughly before use.
2
Using These Manuals
The two manuals included are for your Camera.
1. Getting to know the usage of the
camera
Camera User Guide (Printed manual)
This guide explains the usage and functions
of the camera.You will also see how to install
the provided software on your computer.
2. Getting to enjoy images on your
computer
Software User Guide (This booklet)
This guide explains how to download images
from the camera to your computer, and how
to display and edit them on your computer.
How to Use the
Software User Guide
Display examples:
The LCD Monitor Display examples may be
different from actual display screens.
Terms:
In this guide, still images, movies, and
sounds are all referred to as "images" or
"files."
Symbols:
This guide uses the following symbols and
conventions:
Important
This indicates important notices and restrictions for
using this camera.
Note
This indicates supplementary explanations and useful
tips about camera operations.
Refer to
This indicates page(s) relevant to a particular function.
"p.xx" is used to refer you to pages in this manual.
Term
This indicates terms that are useful for understanding
the explanations.

3
Contents
Using These Manuals ............................................ 2
1. Getting to know the usage of the camera............... 2
2. Getting to enjoy images on your computer............. 2
How to Use the Software User Guide .................... 2
Display examples: ...................................................... 2
Terms: ........................................................................ 2
Symbols:..................................................................... 2
Contents................................................................. 3
Chapter 1 Getting to Enjoy Images
on Your Computer
(For Windows)
Section 1 Downloading Images to Your
Computer
Connecting the Camera to a Computer ................. 5
For Windows XP......................................................... 5
Downloading Images to Your Computer ................ 7
For Windows 98/98SE/Me/2000/XP........................... 7
How to Use DL-10.................................................. 9
Starting ....................................................................... 9
Quitting ....................................................................... 9
Restarting ................................................................... 9
The DL-10 Window..................................................... 9
How to Use the Optional Settings............................. 11
How to Use the Background Illustration Settings ..... 12
Downloading Images from an SD Memory Card.. 12
Images in an SD Memory Card................................ 12
Section 2 Displaying Thumbnail Images
(How to Use DU-10)
Starting and Quitting DU-10 ................................. 14
The DU-10 Window .................................................. 14
Quitting DU-10.......................................................... 14
Thumbnail Display Description............................. 15
Switching the Ordering of Images ........................ 16
Changing the Display Size ................................... 17
Viewing Images in a Slide Show.......................... 18
To View a Slide Show............................................... 18
Using Auto Slide Show............................................. 19
How to Use the Slide Show Dialog Box.................... 19
Playing Back the Sound Recorded with an Image 20
To Play Back the Sound Recorded with an Image... 20
Refreshing the View ............................................. 20
Renaming an Image............................................. 21
How to Rename an Image........................................ 21
Renaming Image Files in Batch (Sequential
Rename) .............................................................. 21
Copying a Reduced Image File............................ 22
How to Copy an Reduced Image File....................... 22
Deleting Images ................................................... 23
Using the File Menu.................................................. 23
Using the Shortcut Menu.......................................... 23
Using the Keyboard.................................................. 23
Viewing Image Information................................... 24
Displaying the Viewer Screen.............................. 25
Using the Viewer Screen........................................... 25
What You Can Do with the Toolbar........................... 26
What You Can Do with the Toolbar........................... 29
Printing an Image................................................. 31
To Print an Image...................................................... 31
Using the [Print Setup] Dialog Box............................ 31
Checking the Printing Layout .................................... 32
Making printer settings.............................................. 32
Printing Images ......................................................... 32
Chapter 2 Getting to Enjoy Images
on Your Computer
(For Macintosh)
Section 1 Downloading Images to a
Computer
Connecting the Camera to a Computer ............... 34
Downloading Images to Your Computer.............. 34
For Mac OS 8.6 to 9.2.2............................................ 35
For Mac OS X 10.1.2 to 10.3..................................... 36
How to Use DL-10 ............................................... 37
Starting...................................................................... 37
Quitting...................................................................... 37
Restarting.................................................................. 37
The DL-10 Window.................................................... 37
How to Use the Optional Settings ............................. 38
Troubleshooting
About computer connection and software ........... 40

Chapter 1
Getting to Enjoy
Images on Your
Computer
(For Windows)
Section 1
Downloading Images to
Your Computer
This section explains how to display still images and
movies you have downloaded to your computer.
5
Connecting the Camera
to a Computer
After installing the software on your
computer, connect your camera to it.
1. Make sure the camera power is
off.
2. Connect the USB cable to the
USB port of your computer.
3. Connect the USB cable to the
USB terminal of your camera.
Your camera turns on.
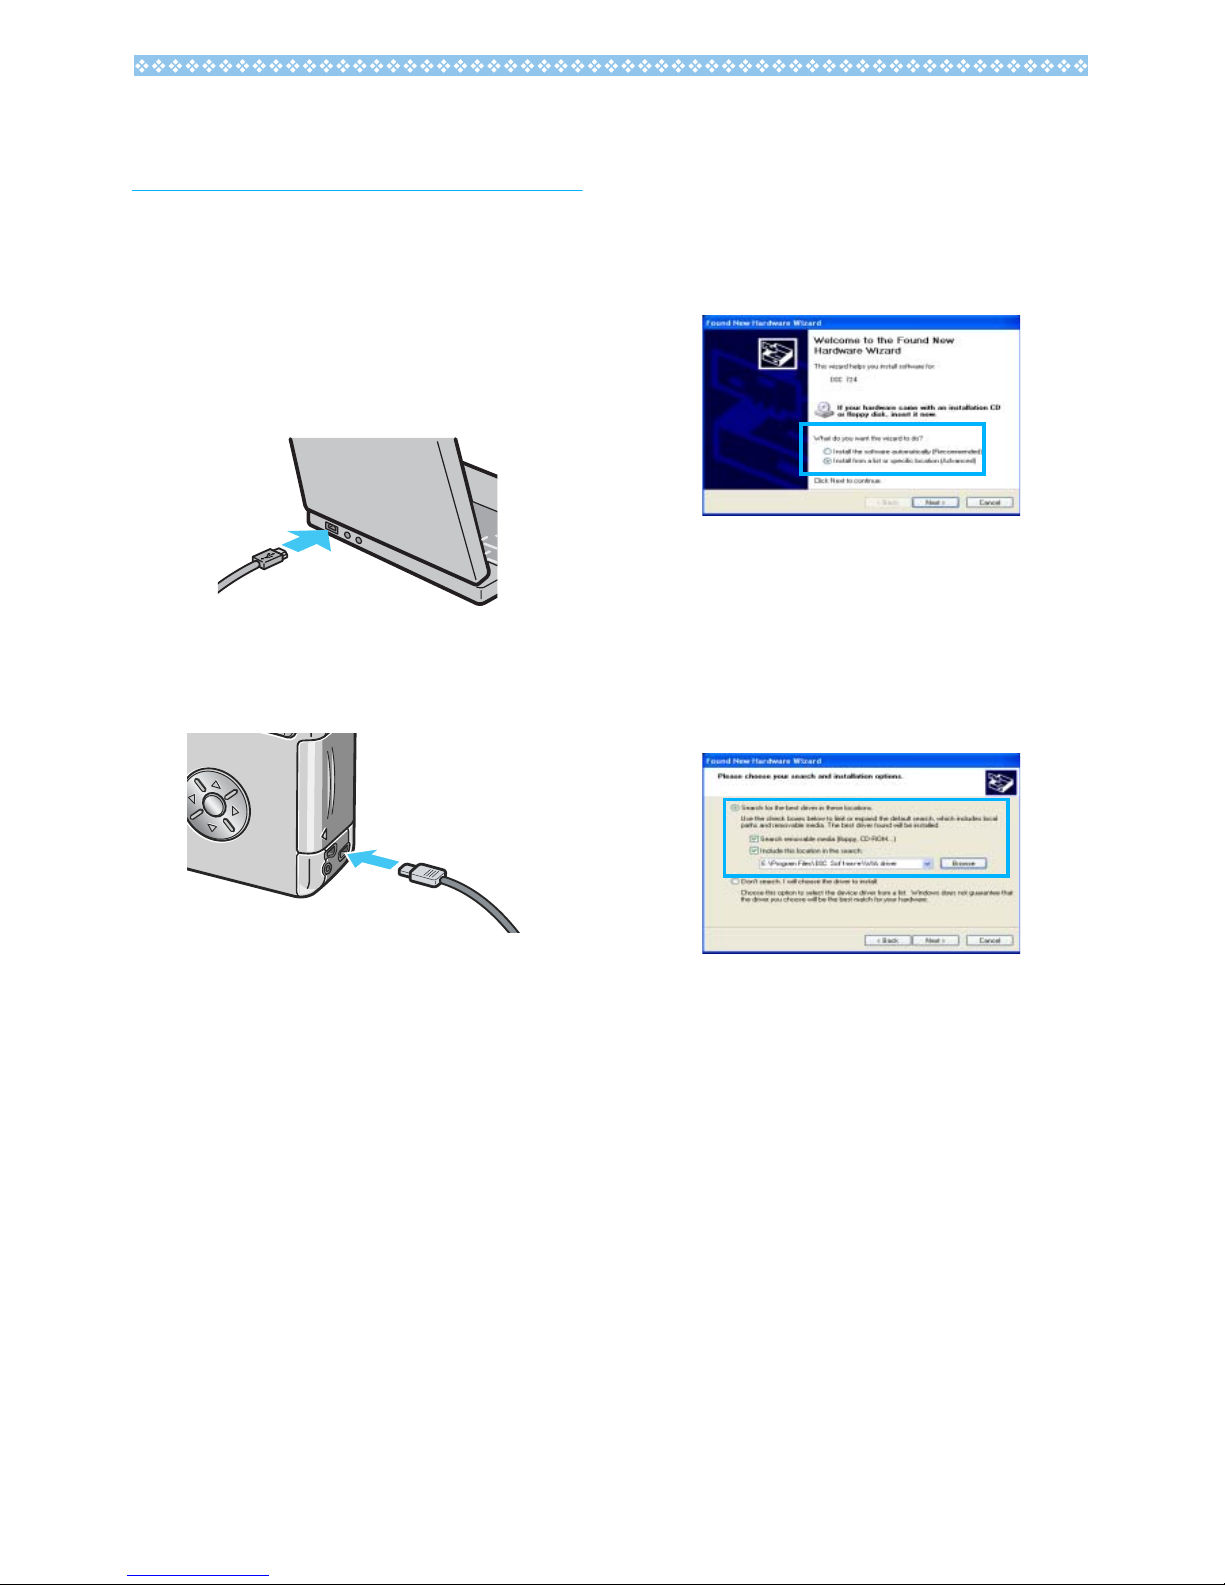
For Windows XP
The first time you connect your camera to the
computer using a USB cable, the [Found
New Hardware Wizard] screen will appear.
1. Select [Install from a list or
specific location (Advanced)].
2. Select [Next].
3. Select [Search for the best
driver in these locations.] [Include this location in the
search] and then press the
[Browse] button.
4. Browse to the folder where the
WIA driver was installed (by
default this should be
C:\Program Files\DSC
Software\WIA driver) and then
select [Next].
The WIA Driver is installed.
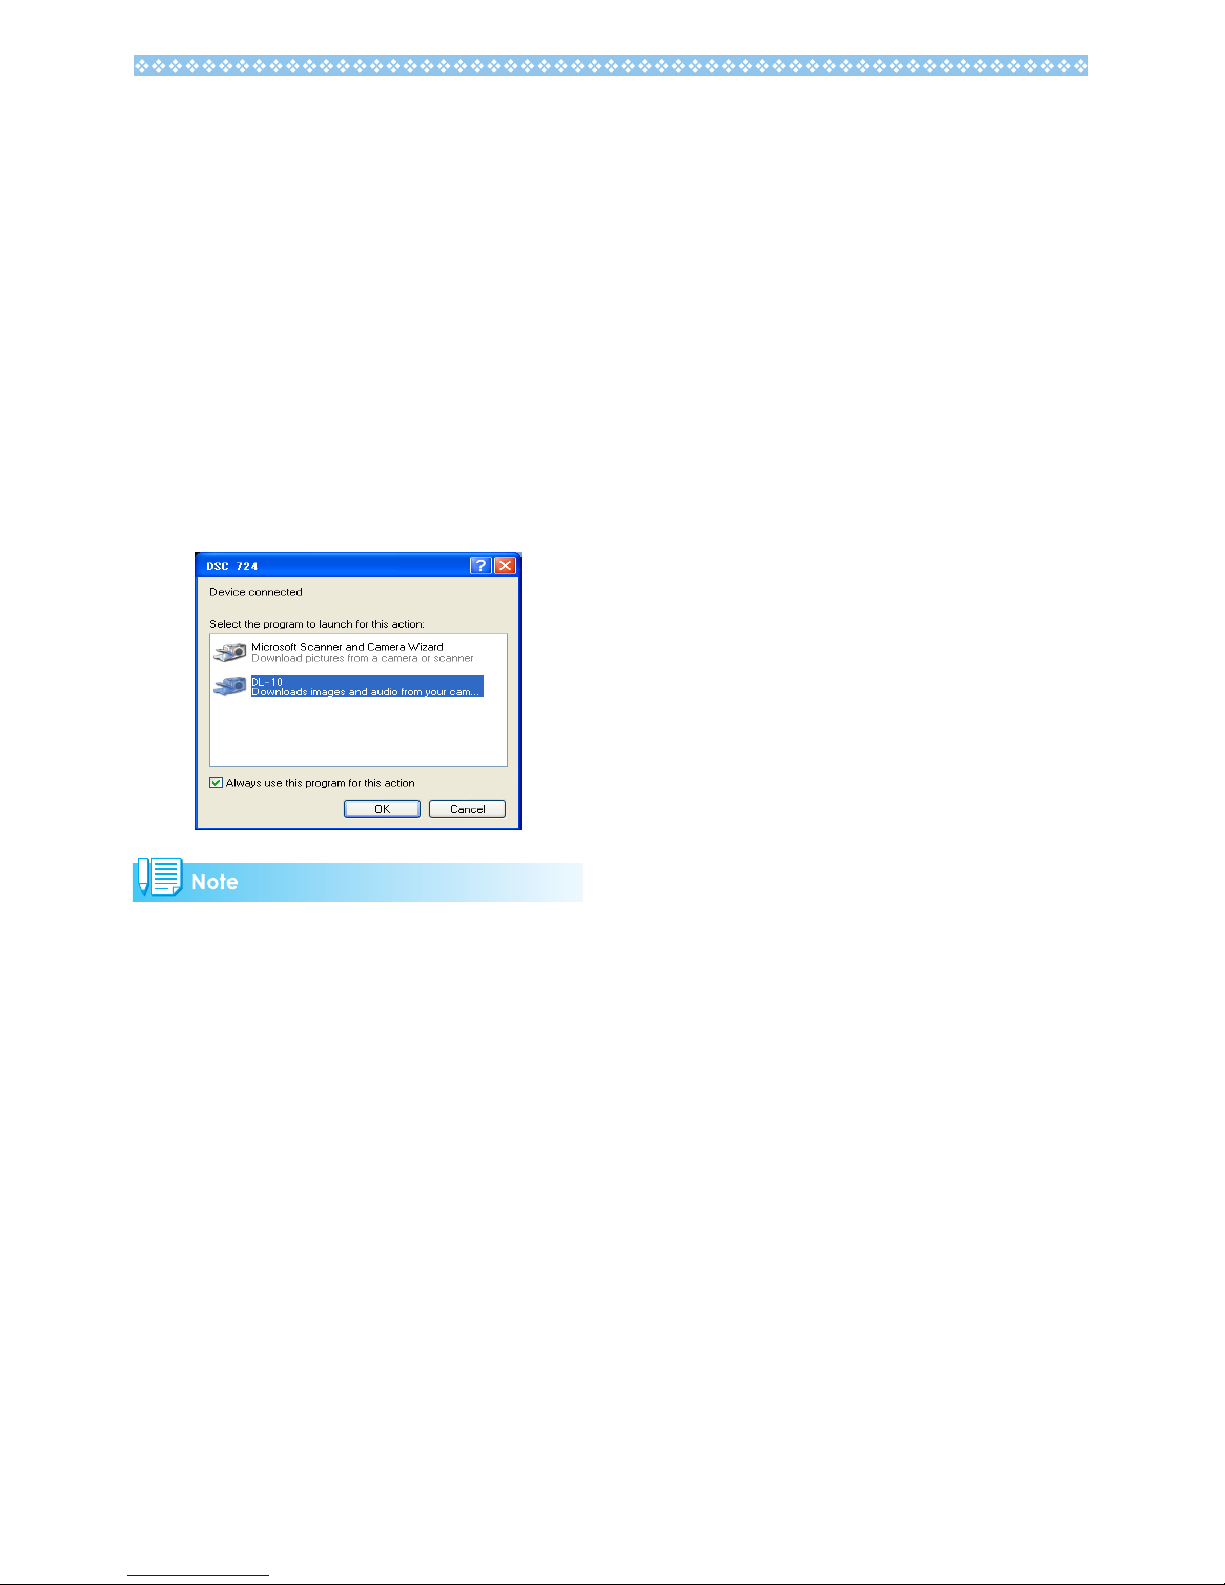
The [DSC 724] screen is displayed.
6
5. Select [DL-10], check [Always
use this program for this action]
check box, and then click [OK].
• To load images from the camera with
assistance from the Windows XP
Scanner and Camera Wizard, select
[Scanner and Camera Wizard].
• Leaving the [Always use this program
for this action] check box unchecked
will cause the [DSC 724] screen to be
displayed each time you transfer
images from the camera, thereby
allowing you to choose whether to use
DL-10 or the Scanner and Camera
Wizard for image transfers.
• To disconnect the camera from your computer:
• It is recommended that you use the AC Adapter
(sold separately) when you are downloading images
from your camera.
1. Turn your camera off.
2. Unplug the USB cable.

7
Downloading Images to
Your Computer
When you connect the camera to your
computer, the images from the camera are
automatically downloaded to the computer.
DL-10 is provided for downloading images.
When no SD memory card is inserted, the camera
loads from the internal memory; when an SD memory
card is inserted, it loads from the SD memory card.
For Windows 98/98SE/Me/2000/XP
DL-10 automatically creates a folder called
[Digital Camera] inside your [My Documents]
folder. Downloaded images are saved in
folders with the date of each shot, inside the
[Digital Camera] folder.
1. Connect the USB cable to the
USB port of your computer.
2. Connect the USB cable to the
USB terminal of your camera.
The camera turns on, DL-10 starts, and
the DL-10 window appears.
Image transfer begins automatically.
• Images are stored with sequential numbers so that
they have unique file names.
• File names given by the camera are not used.
• Even when the storage folder is changed, the file
number will be continuous. The number cannot be
initialized.
• When transferring images to a computer, if a file
already exists with the same name in the destination
folder, your image is renamed before saving to avoid
overwrite problem.
• When transferring images to a computer via DL-10,
the files are assigned names like IMAG****.jpg (****
indicates the number of the image), even if
SEQUENTIAL NO." is set to ON.
Once download finishes, DU-10
launches, and you can view the images.
When no memory card is
loaded
When an SD Memory
Card is loaded
Loads from internal
memory
Loads from the SD
Memory Card
8
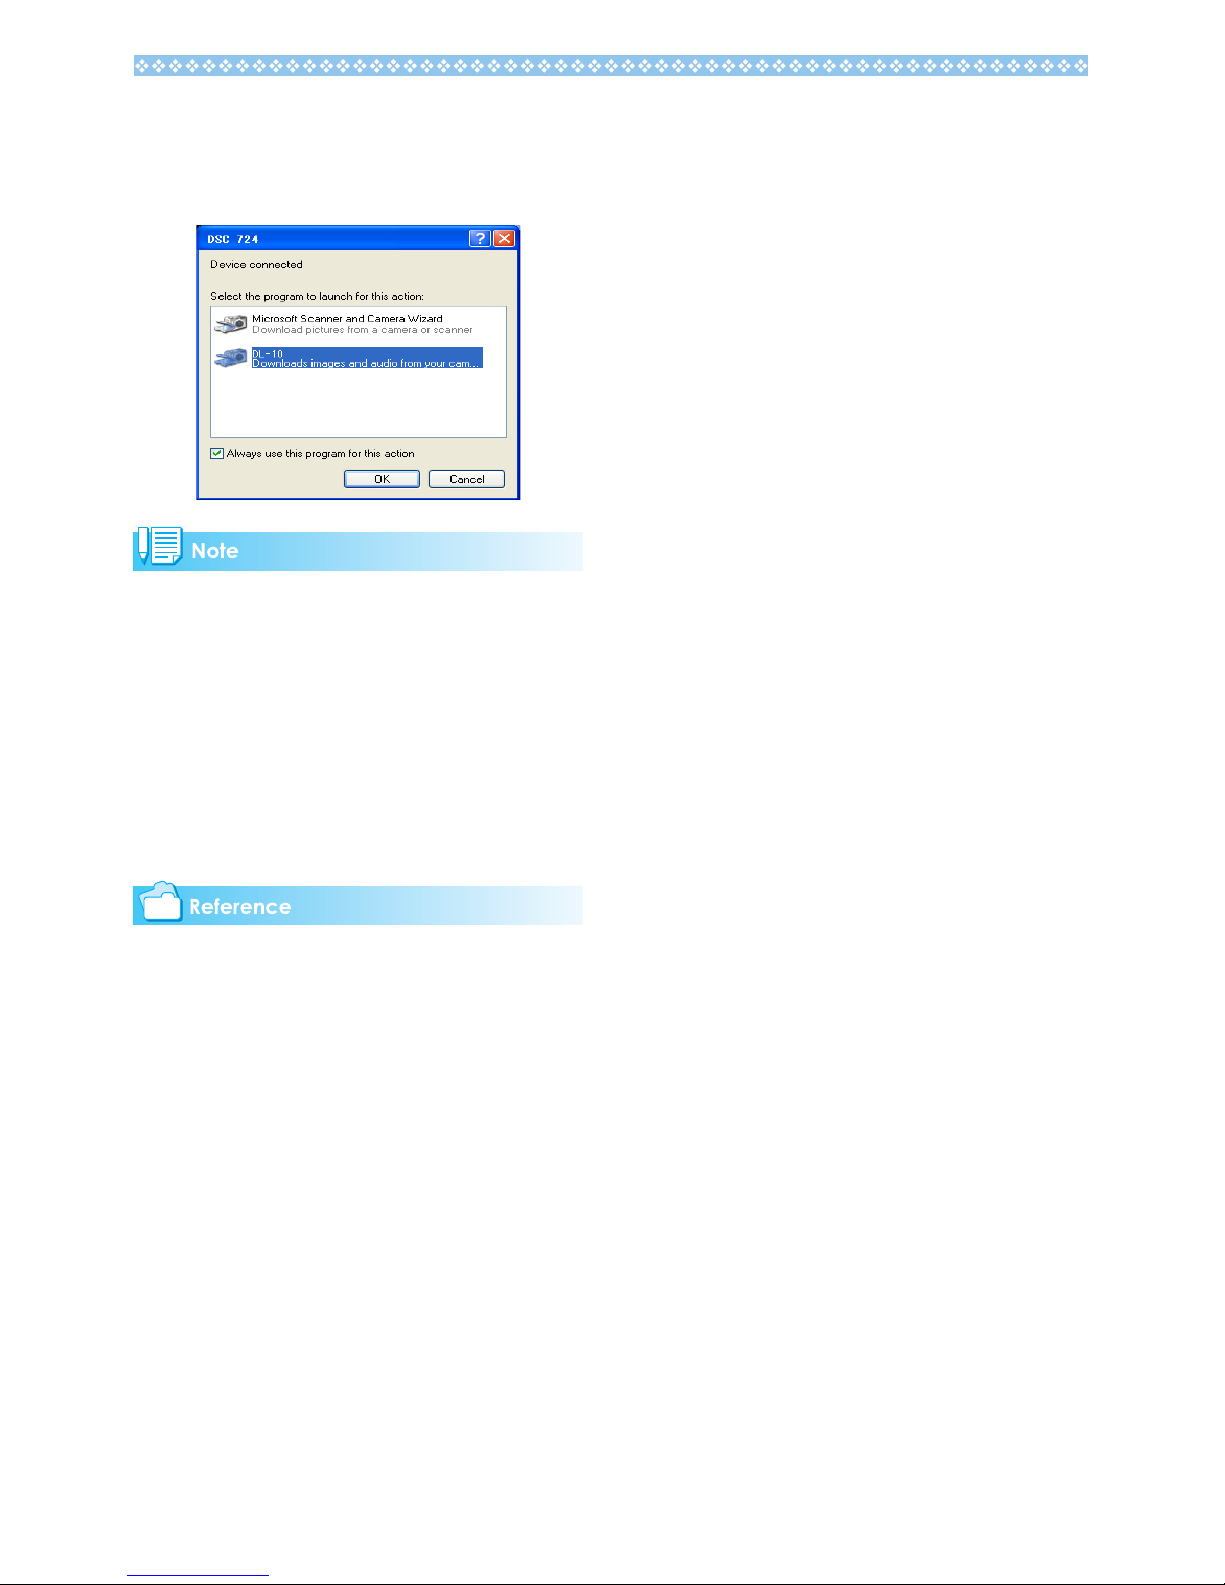
If the screen below appears, select "DL10", check the box next to "Always use
this program for this action" and then
press [OK].
• Before closing DL-10, if you turn the camera power
off, or unplug the USB cable, the DL-10 window is
minimized and displayed as an icon on the Windows
task bar. If you click the icon, the window will be
displayed again.
• After exiting DL-10 by pressing the [MENU] button
and selecting [Close], if you want to restart DL-10,
select [Programs] from the [Start] menu then select
DSC Software then DL-10.
• You can change the folder for downloading your
images (Save Destination).
• For how to change the Save Destination Folder, see
P. 11 .
• For how to start DL-10, see P.9
• For DL-10 screen, see P.9
9
How to Use DL-10
DL-10 is a software program to import
images from the camera to a computer.
By simply connecting the camera to your
computer via a USB cable, images are
automatically imported to the computer.
On the DL-10 window, you can make various
settings including auto-saving upon
connection and the destination folder (where
images will be saved).
Starting
DL-10 is already installed with DSC
Software.
Connecting the camera to your computer
automatically starts the software and begins
downloading of images from the camera.
Quitting
To quit DL-10, follow either of the steps
below.
• Click the [MENU] button on the DL-10
window and select [Quit] from the
displayed menu (see "DL-10 Window").
• Right-click the DL-10 icon on the task bar
and select [Quit] from the displayed menu.
Restarting
To restart DL-10 after quitting, follow the
steps below.
• From the [Start] menu, select [All
programs] (or [Programs]) → [DSC
Software] → [DL-10].
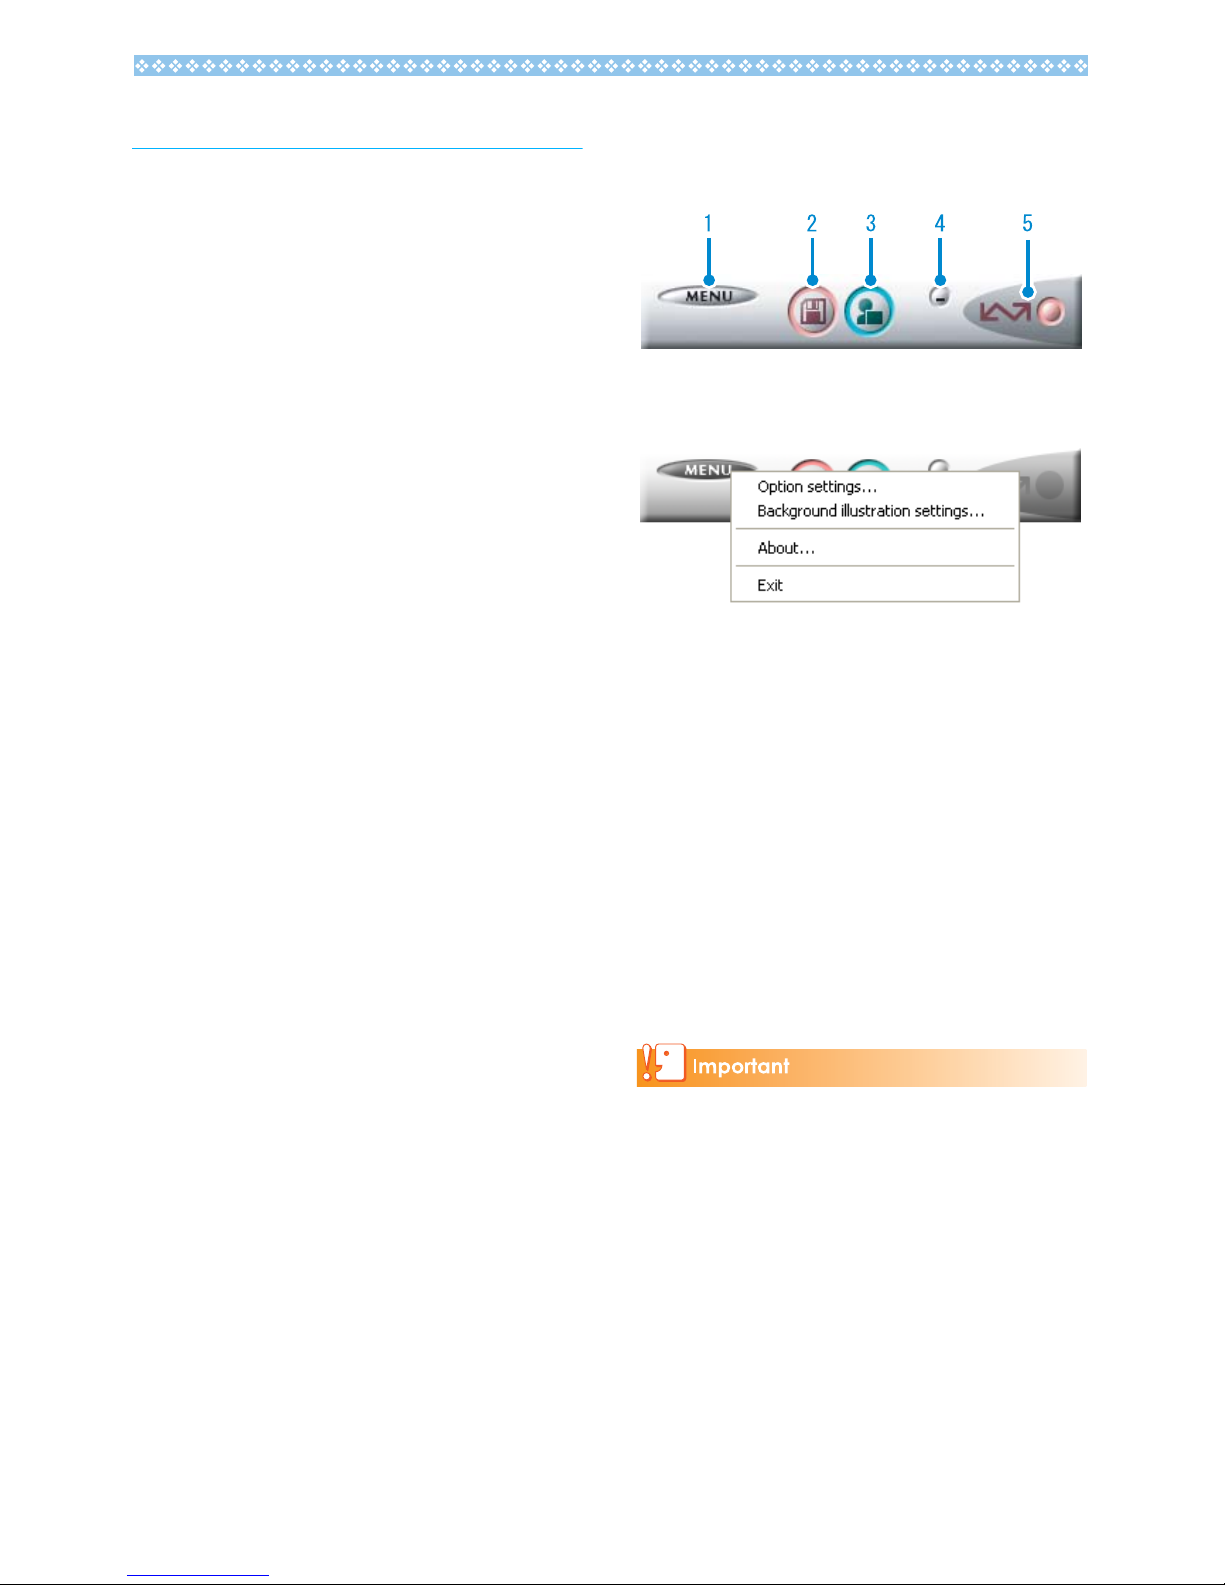
The DL-10 Window
Once DL-10 starts up, the following DL-10
window appears on your computer screen.
1. [MENU Button]
Click this and the following menu appears.
2. [Save Button]
Click this and the images are downloaded
from your camera.
If the message indicating that "The camera is waiting
to be connected... , Press the ADJ. button to initiate
direct printing" appears on the camera LCD monitor,
do not press the Save button.
3. [Application Button]
The application registered in Optional
Settings is launched. DU-10 is specified
initially.
[Option settings] Specifies where to save
images, or which application to
launch when you press the
Application button and after
saving. (P.11)
[Background
illustration settings]
Changes the background
design in the DL-10 window.
(P.12)
[About] Displays the version of DL-10.
[Quit] Closes DL-10.

10
4. [Minimize Button]
Minimizes the window and displays its icon
on the Windows task bar. If you click on the
icon, the window will be displayed again.
5. [Indicator]
The [indicator] lights if the camera is
connected via USB cable. When lit, if you
put the mouse pointer on the [Indicator], it
displays "Camera Connected." When your
camera is not connected, the [Indicator] is
grayed out, and if you put the mouse
pointer on it, "Camera Connected" does
not appear.
11
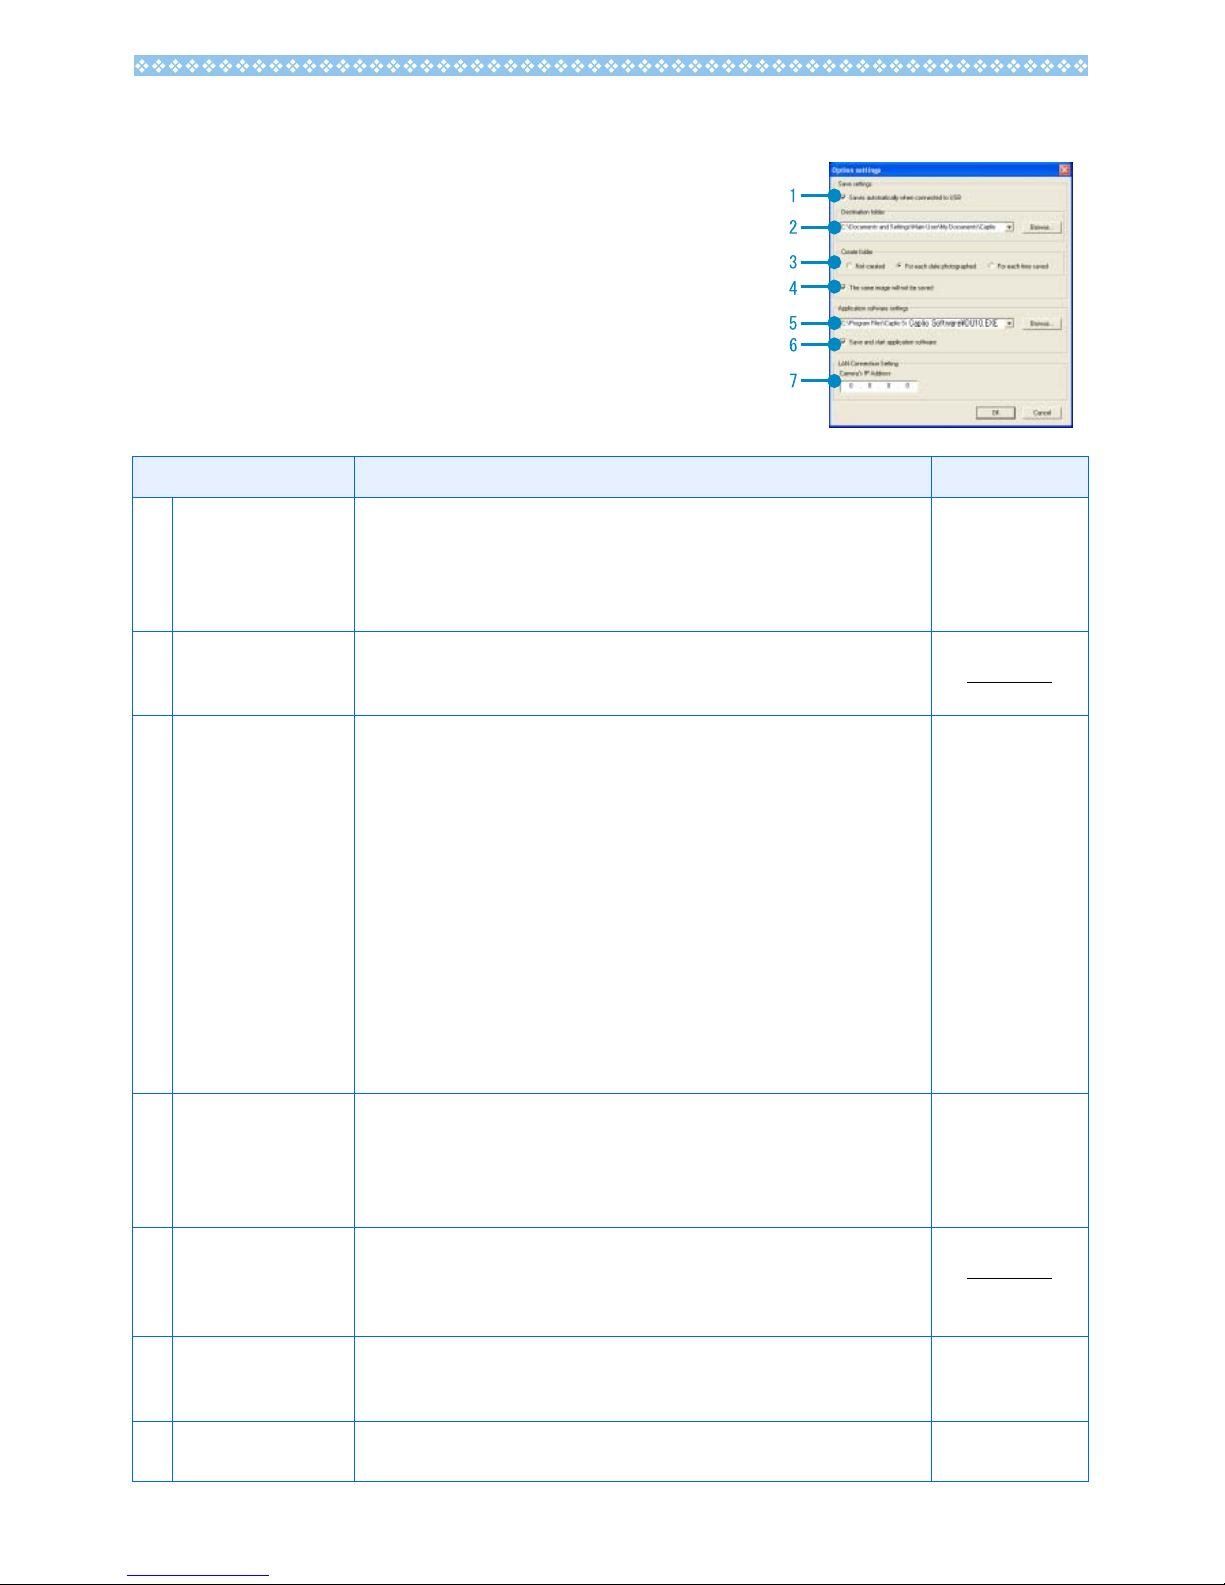
How to Use the Optional Settings
If you select [Option settings] from the menu
displayed on a button in the DL-10 window, the
[Option settings] dialog box appears.
Item Description Initial Setting
1. [Automatically save
on connection]
If you check this box, once your camera is connected to the computer,
images are automatically downloaded and saved. If you uncheck the box,
your images will not be download automatically when you connect your
camera to the computer. Click the [Save] button when you want to
download.
Execute auto save
2. [Destination folder] Specifies which folder to save your images in. The [Digital Camera] folder
inside [My Documents] is specified initially; if you want to change this, click
the [Browse] button to display the dialog box and then specify the folder.
3. [Create folder] Specifies how to create a folder.
[Do not Create]
Your downloaded images will all be saved in the folder specified in item 2.
[For each date photographed]
Creates a new folder assigning the date the images were shot as the folder
name, and saves images shot on the same day in the same folder.
For example, if shot on May 1, 2004: [20040501] folder
[For each time saved]
Creates a new folder for each time images are saved and saves the images
shot at the same time in the same folder. If you save several times in one
day, they are saved in separate folders each time.
The name of the folder created is "Date, Underscore, and 3 digits sequence
number".
For example, if you saved twice on May 1, 2004: [20040501_001] folder,
[20040501_002] folder
Each day shot.
4. [The same image will
not be saved.]
You can specify this only when you have selected either [Do not Create] or
[Each Day Shot] in [Create a Folder] or if in [Create a Folder] you did not
check [Do not save same image when saving].
Images imported once are not imported anymore.To allow the function to
work properly, the camera's clock information must be set properly.
Do not save same
image.
5. [Application software
settings]
Specify the name of the application you want to launch after you save.The
DU-10.exe (the file name of DU-10) is specified initially; if you want to
change this, click the [Browse] button to display the dialog box and then
specify which application to use.
6. [Save and start
application software]
If this is checked, an application will be launched after saving.
If this is unchecked, no application will be launched.
After saving.
Launch
application.
7. [Camera IP Address] Not used by this model but used by other models of camera. For details,
see the documentation that came with the camera.
0.0.0.0
12
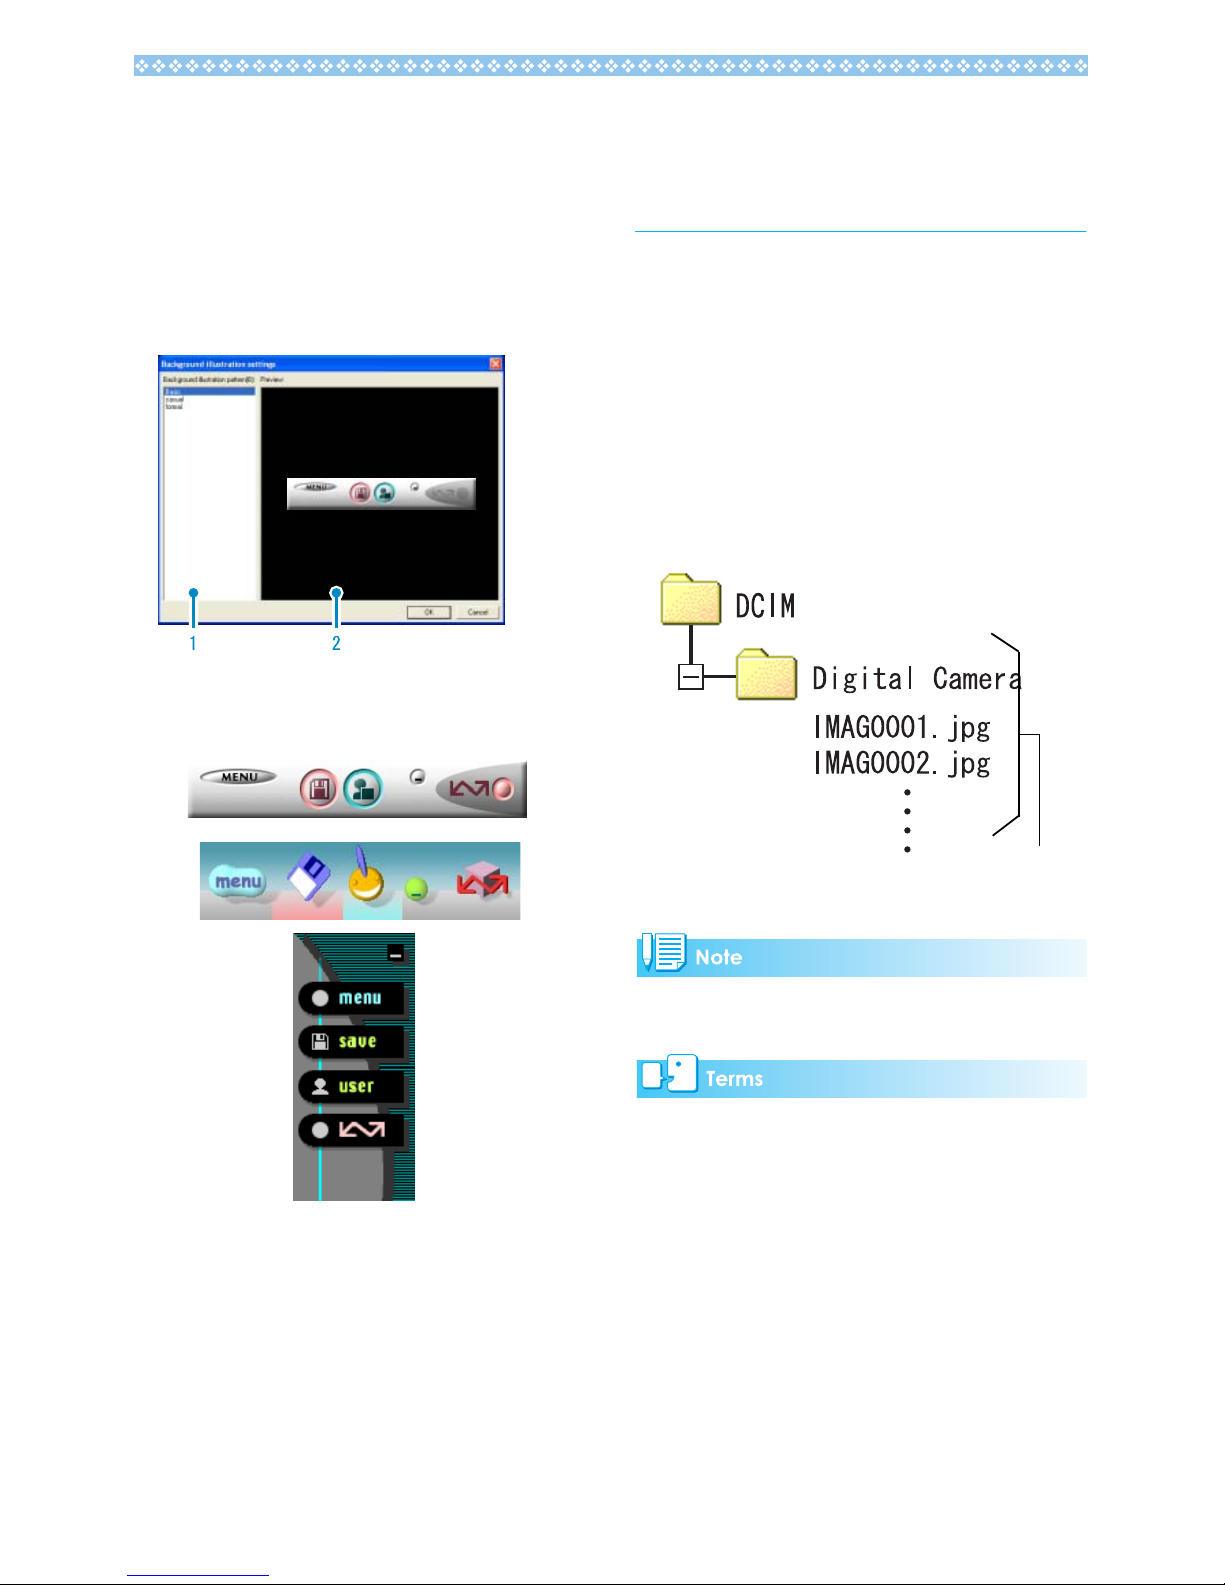
How to Use the Background
Illustration Settings
You can select a background for the DL-10
window from three types of patterns.
If you select [Background illustration setting]
from the menu displayed by the [MENU]
button in the DL-10 window, the [Background
illustration settings] dialog box appears.
1. [Background illustration pattern]
Select the pattern you wish to use from
the three available.
2. [Preview]
The pattern selected in [Background
illustration pattern] appears, and you can
configure it.
Downloading Images
from an SD Memory
Card
It is possible to download images from a
memory card to computer via a PC Card Slot
or Card Reader.
To load an SD Memory Card into a PC Card
Slot or Card Reader, use the PC Card
Adapter (sold separately).
Images in an SD Memory Card
Images are stored on an SD Memory Card in
a hierarchy, as shown here.
If the card reader is SD Memory Card compatible
(directly loadable), no PC Card Adapter is required.
Card Reader
This is a device that connects to a computer and can
read the contents of cards. In addition to the PC Card
type, there are Card Readers compatible with various
types of cards, into which you can directly load a
memory card.
Image files

Section 2
Displaying Thumbnail
Images (How to Use DU-
10)
DU-10 allows the following edits and corrections on
images downloaded to your computer:
•Listing
• Resizing
•Cropping
• Rotation
•Auto/manual correction
• Renaming a file
•Copying/Reduced copying
• Deleting
• Viewing image information
•Printing
This section explains how to use DU-10.
DU-10 runs in a Windows environment.
14
Starting and Quitting DU10
There are two methods for starting DU-10:
• Auto Start from DL-10In the DL-10option
settings, if the Application Software is set
to DU-10, and if [After saving, launch
Application software] is checked, DU-10
will start automatically after image files
have downloaded from your camera with
DL-10.
• Start from Windows [Start] menu
Select [Program] then [DSC Software] then
[DU-10] from the [Start] menu to start the
software.
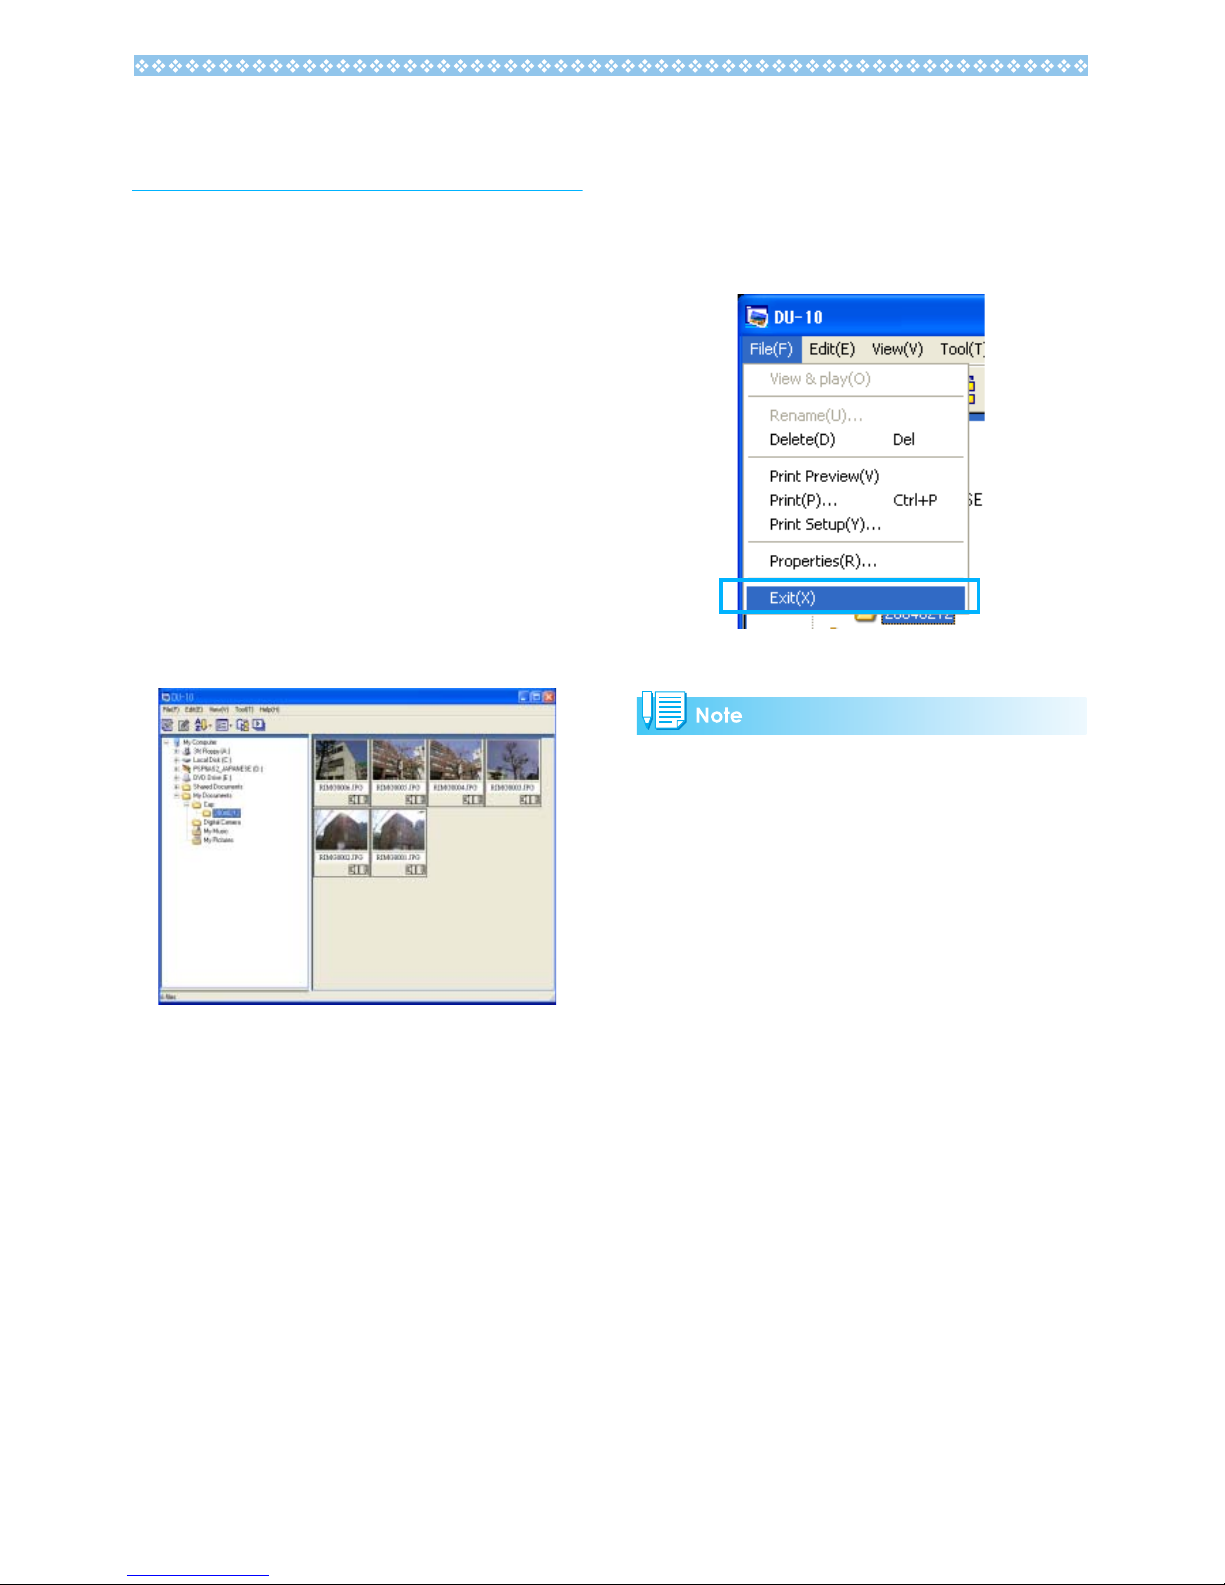
The DU-10 Window
Once you start DU-10, a window like the one
below appears.
The images you saved are displayed all in
one window. This method of displaying
reduced size images is called thumbnail
display.
Quitting DU-10
To quit DU-10 and close its window, select
[File] from the menu bar, then select [Exit]
from the menu displayed, or click the [X]
(Close) button in the upper right corner of the
screen.
For how to set DU-10 so that it does not launch
automatically, see P.9.
15
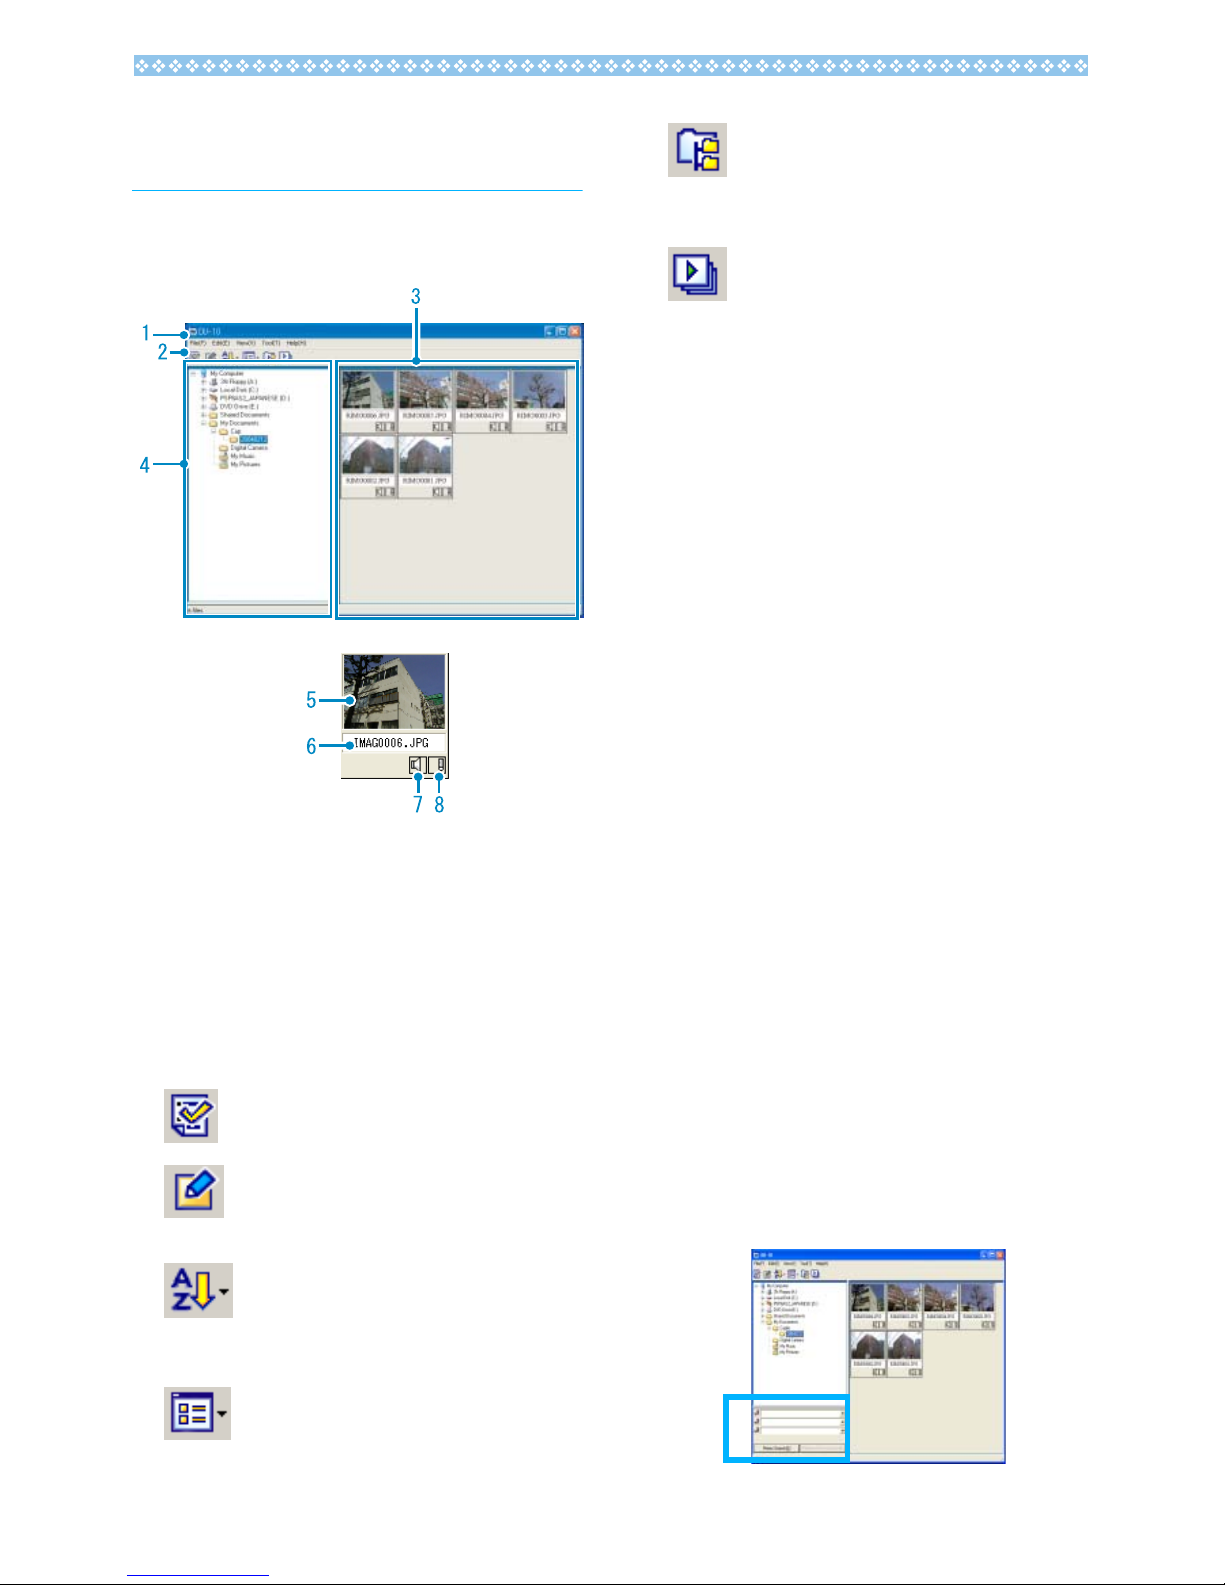
Thumbnail Display
Description
Once you start DU-10, images appear as
thumbnails.
1. Menu Bar
You can change the display size and
ordering of images.
2. Tool Bar
Of the functions available in the menu, the
icons of those most frequently used are
displayed, so you can use those functions
with just one simple click.
Properties (see P.24)
Displays image information.
Open (see P.25)
The Viewer screen opens to
display selected images.
Arrange (see P.16)
Images are rearranged
according to the option selected
from the menu.
Display size (see P.17)
Thumbnails are displayed in a
size selected from the menu.
Display all files below folder
Selecting this option displays the
images in all subfolders as
thumbnails.
Auto Slide Show (see P.19)
In Auto slide show, all the images
displayed as thumbnails appear in
order.
3. Thumbnail Display Area
The reduced images are displayed at one
glance.
4. Folder Display Area
The folders inside [My Computer] are
displayed in a hierarchy. The images
inside folders selected here appear in the
Thumbnail Display Area.
5. Thumbnail Image
6. File Name
7. Sound Setting Y/N Display
A yellow speaker icon is displayed for an
image with sound.
Double-clicking the speaker icon allows
you to play back the sound.
8. Memo Setting Y/N Display
A red pencil icon is displayed for an image
with camera memo.
Double-click the pencil icon to display the
[Edit Memo] dialog box, where you can
edit the camera memo.
Note This Camera does not allow camera
memos to be attached to images.
9. Search Bar Area
By specifying a keyword, you can search
images with corresponding camera
memos and display them as thumbnails.
This option is displayed only when the
[Enable Camera Memo Function] check
box is selected.
 Loading...