

Brief Instructions for Digital Camera
These brief instructions will help you to take pictures with
your digital camera, install the software supplied and link the
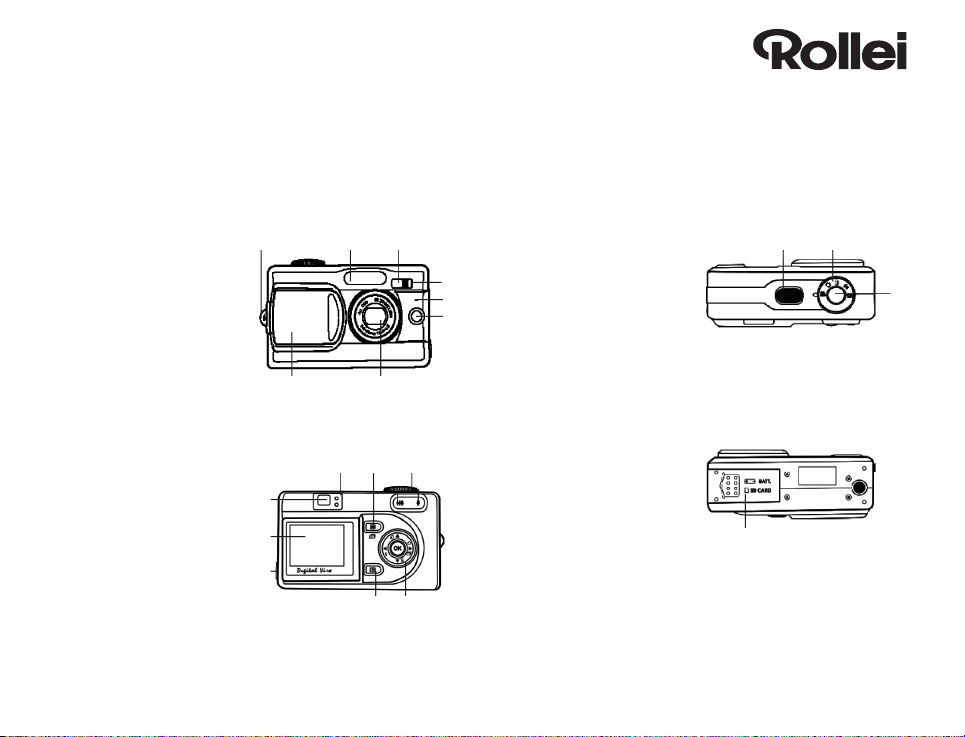
Parts Designations
Front view
1 Handstrap hook
2 Flash
3 Viewfi nder
4 Self timer LED
5 Microphone
6 Autofocus-LED
7 Zoom lens
8 Lens barrier
Rear view
1 Power/Flash Charge-LED
2 Display button
3 Zoom button
4 Five-way switch
5 Menu selection
6 DC-in/USB/
TV-out-connector
7 TFT-LCD
8 Viewfi nder
123
78
12
8
7
6
3
45
camera up with your computer. For detailed information, see
the CD-ROM supplied with the camera.
Top view
1 Speaker
2 Mode dial
4
3 Shutter release
5
6
Bottom view
1 Battery and
SD-Card compartment
1
12
3
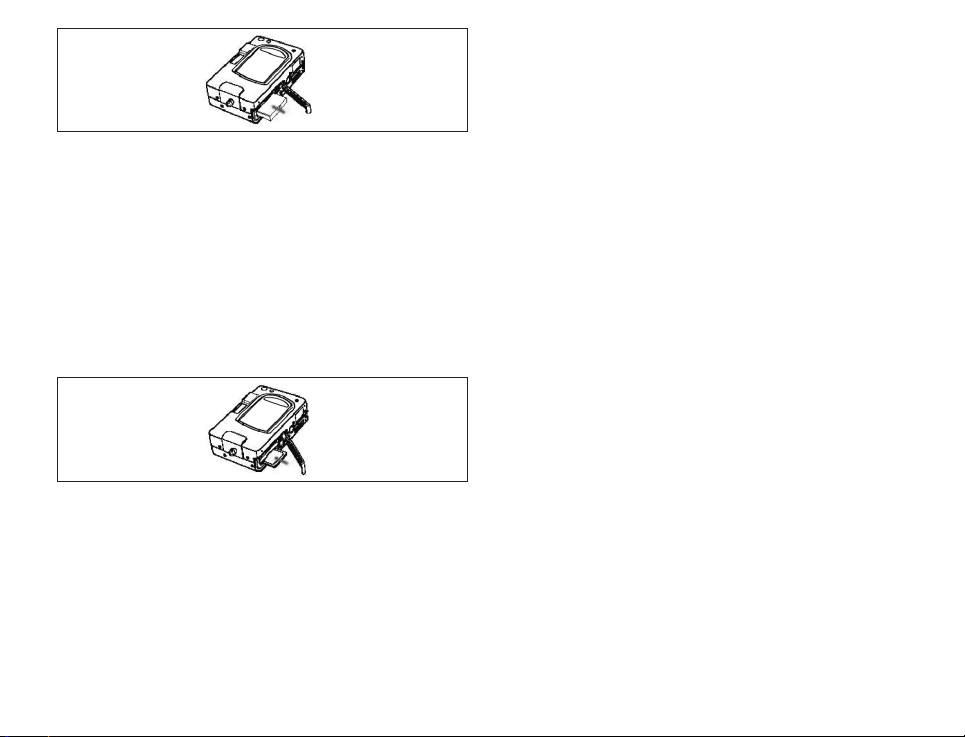
Loading the battery
1. Open the battery/SD-card compartment by pressing down its
cover and pushing it in the direction of the arrow towards
the outer edge of the camera body.
2. Open the compartment.
3. Insert the Li-Ion battery into the compartment, making sure
that its contacts are properly oriented.
4. Close the battery-compartment cover.
5. Fully charge the battery before using the camera for the fi rst
time.
Inserting the SD/MM card
Insert the memory card so that its cut-off corner is opposite the
outer edge of the camera (the gold-plated circuits should be
facing towards the front of the camera).
When there is no SD/MM card in the camera, the TFT screen
will display the number of pictures available on the internal
memory.
Without a memory card in the camera, the latter can save
a limited number of pictures in its internal memory.
Taking pictures
1. Turn the mode switch to „Camera“ so that the camera icon
points at the mode selector.
2. The camera is ready to shoot when the LED next to the
viewfi nder eyepiece lights green.
3. Check battery status on the LCD.
4. Press the navigation switch to the left to select the desired
fl ash mode.
5. Press the shutter release halfway and wait until the green
LED signals that the camera is ready to fi re. As soon as this
is the case, you may press down the shutter release fully to
take your picture.
6. After the exposure, the counter in the TFT screen indicating
the approximate number of pictures still available will read
one frame less.
Caution:
To avoid loss of data, do not switch off the camera after an
exposure before your picture has been properly saved. While
saving is in progress, the bottom viewfi nder LED will blink red.
Note:
The LCD display may drain your battery. It is therefore advisable
to switch it off whenever you don‘t actually take pictures. The
camera will automatically switch itself or the LCD off after 1, 3
or 5 minutes of non-use (selectable).
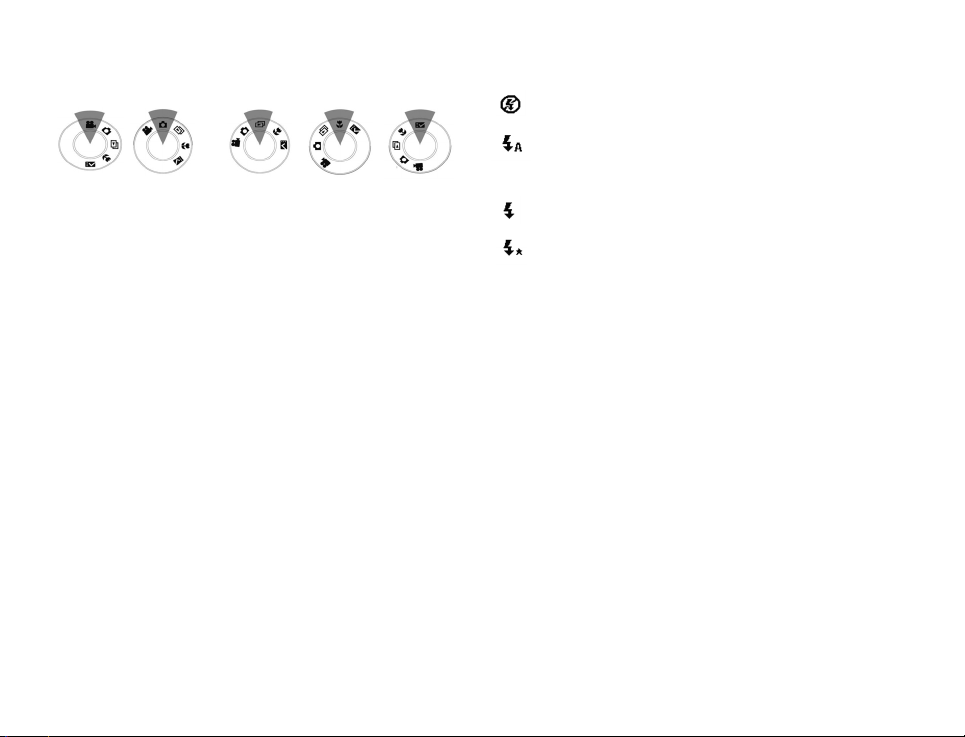
Using the mode selector
The camera has fi ve operating modes:
Video Camera
Operating mode Selection of functions
(by pressing the menu button*)
Video Recording of videoclips
(by pressing the shutter release button down)
Camera* Resolution, image quality, color effect,
white balance, scene, metering, focus,
EV setting, ISO
Playback* DPOF, slide show, voice memo, erase picture,
protect picture
Macro* Resolution, image quality, color effect,
white balance, scene, metering, focus,
EV setting, ISO
DSC Setup* Date and time, automatic cutoff, DPOF,
slide show, sound effect, language, TV out,
LCD brightness, restore
Playback Macro DSC Setup
Confi guring your camera
Selecting image quality (resolution)
1. Turn the mode switch to „Camera“.
2. Press the menu button to call up or fi nish the confi guration
mode.
3. Press the left or right-hand button to select the „image
quality“ option.
4. Press the up or down arrow to select the desired image
quality and confi rm by pressing OK.
Setting the fl ash mode
To select the desired fl ash option, press the navigation switch
to the left.
Flash off: No fl ash will be fi red.
Red-eye reduction: The fl ash will fi re in low light. If
necessary, red-eye reduction is also enabled. Two fl ashes
will be fi red, the second one being for exposure.
Forced fl ash: The fl ash will fi re with every exposure.
Night mode: The camera uses a slow shutter speed and
delays the fl ash.
Installing the software
Caution:
Please connect the USB cable with the computer before installing the driver. The system will detect a new device. Then
insert the CD-ROM in your CD-ROM drive and complete the
installation.
1. Place the CD-ROM in your CD-ROM drive.
2. If you use Windows 98, click on „Digital Camera Driver“,
then on „Install“. There is a choice of 2 options. Then click
on „Install“. All options will be installed. You will need the
drivers for downloading your pictures to your computer only
if you use Win98.
3. The installation assistent will lead you through the installation.
4. You can use the application immediately after installation.

Linkup via mini-USB cable
The camera has a mini-USB terminal. There are two ways of
downloading your pictures and videoclips. This section tells you
how to download your pictures via the mini-USB cable.
Using ArcSoft
1. Switch on your computer.
2. Connect the camera to your computer via the mini-USB
cable.
3. Switch the camera on.
4. Start PhotoImpression (the software contained on the
CD-ROM supplied with the camera).
5. Select „From Folder“. The camera will now be displayed on
your computer as a data medium, and you can download
your pictures for editing.
6. Follow the instructions for downloading.
Accessing your pictures via your PC
You can fi nd your pictures or videoclips under „Desktop“, even
if you do not use the application software for downloading.
1. Your camera supports MSDC and allows your pictures or
videoclips to be dragged from the camera to your PC.
2. With the camera linked up with your PC, you will see
an external memory device called „400_CAMERA“ under
„Desktop“.
3. Simply click on the folder „400_CAMERA“ that contains
your pictures or videoclips.
4. Copy the pictures from the camera to your computer or
delete them in the camera. The pictures can now be edited
at will.
Note:
After downloading the pictures to your computer, they can be
saved and opened in three different formats: JPEG, WAV and
HTML. We suggest you use the HTML format if you wish to add
voice memo to selected images.
Rollei Fototechnic GmbH
P.O. Box 3245
D-38022 Braunschweig
www.rollei.de
Germany
PA / 07-03
 Loading...