

Page 1

Page 2

INDEX
English version
Deutsche Version
Versión Española
Versão
Versi one Italian
Ελληνική έκδοση
Version Fr
Nederlandse versie
Wersja
Українська
Por
polsk
English
tuguesa
ançaise
a
версія
German
Spain
Portuguese
Italian
Greek
French
Dutch
Polish
Russian
Page 3

English version
Accessories
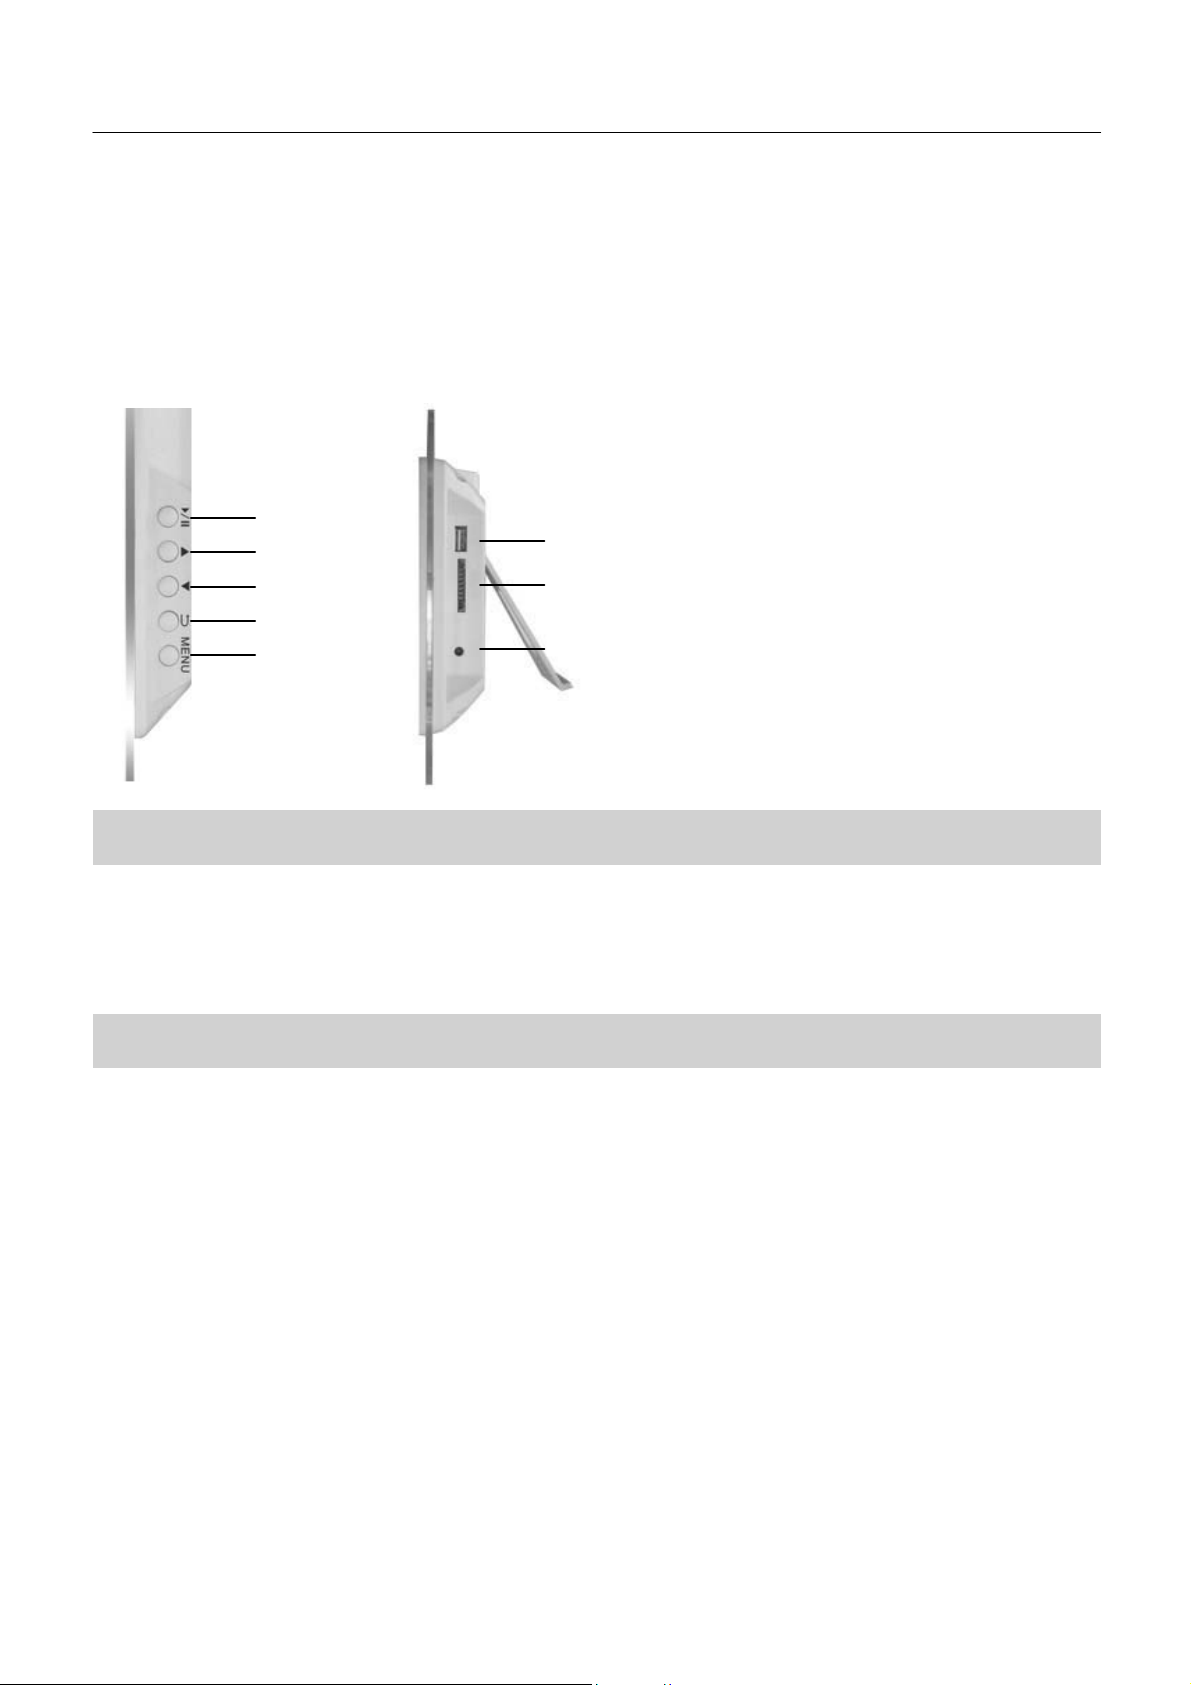
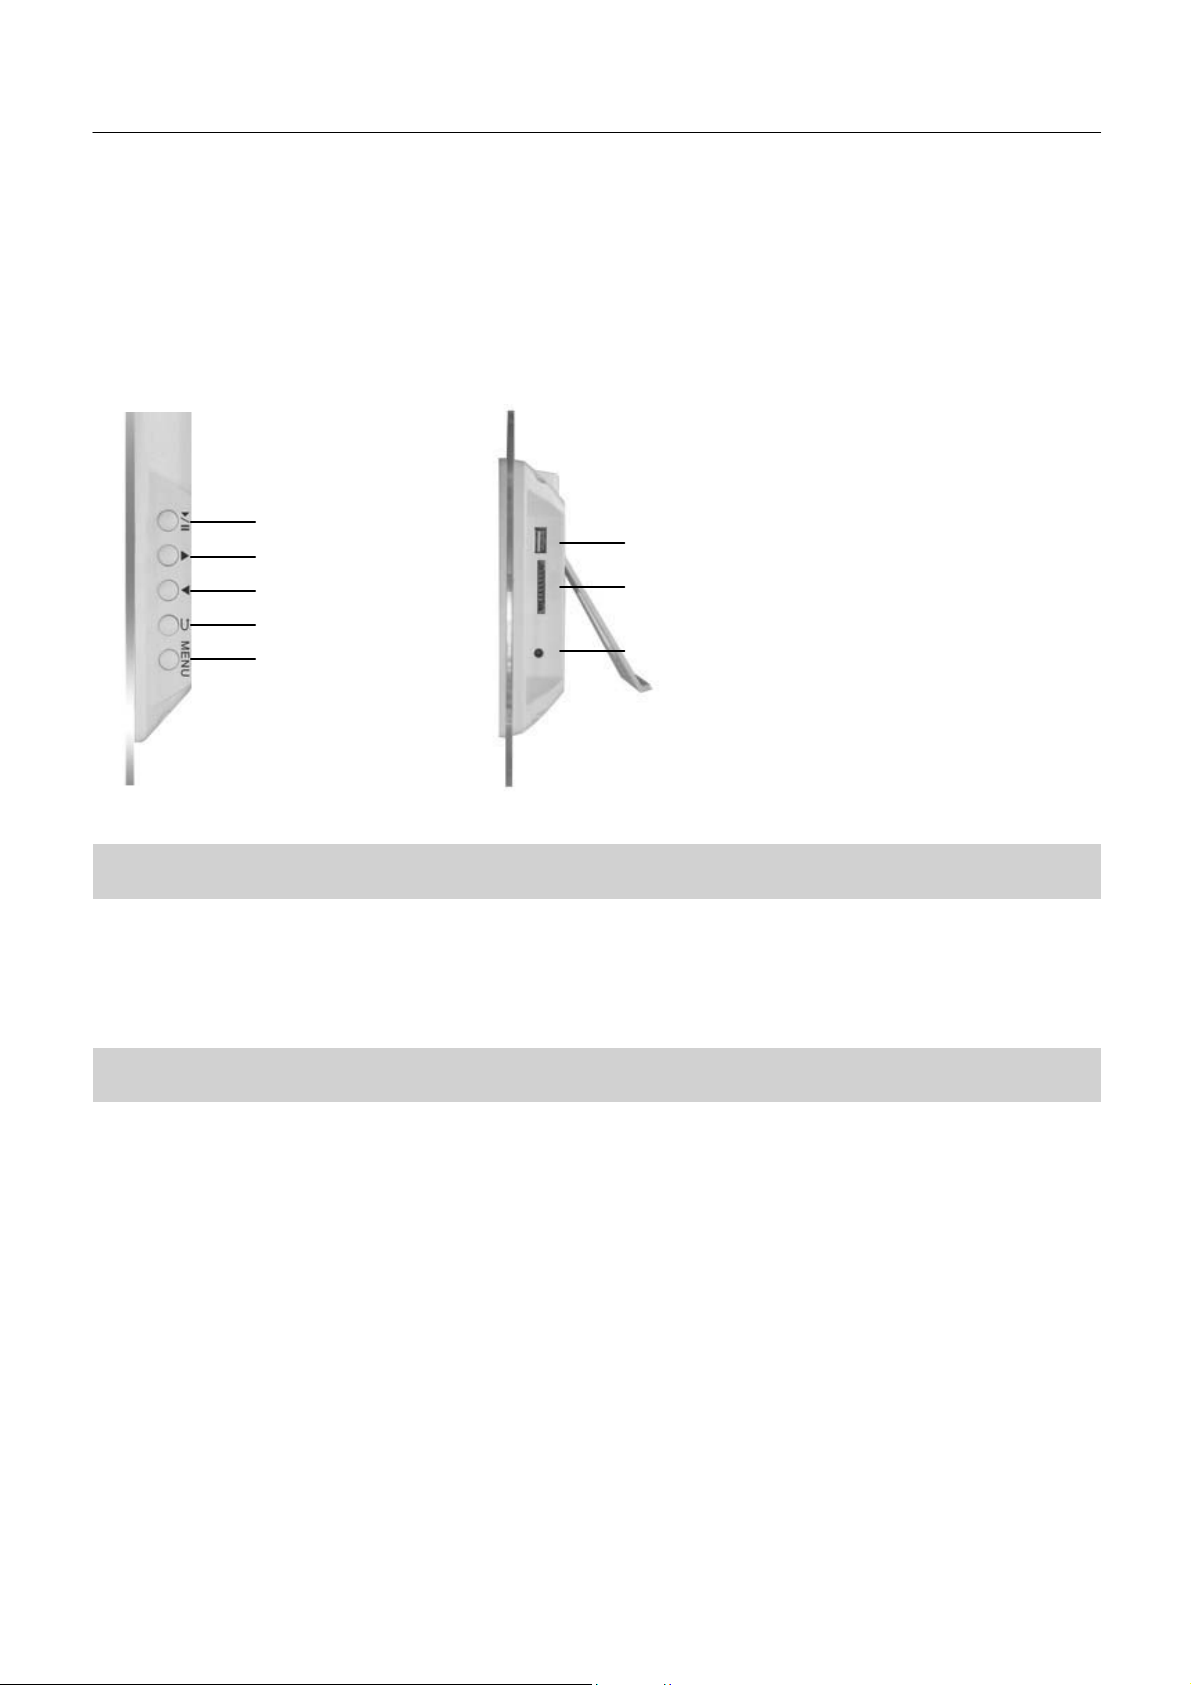
PLA
Y/P
LEFT/UP
RIGHT/DOWN
EXIT
SETUP
7" Digital Photo Fr
AUSE/ENTER
ame
USB PORT
SD/MMC
POWER CONNECTION
CARD SLOT
•
Power supply
•
User
•
Bracket
manual
adapter
First steps
•
Assemble the Photo Fr
•
Connecting
Insert a memory card containing supported files into the card slot of the Photo Fr
formats: SD/MMC
•
Connecting the power supply
Insert one end of the power adapter into the
Frame.
•
Switching on
The Photo Fr
•
Switching off
If you pull out the power supply adapter, the Photo Fr
storage media
ame switches on automatically when it is connected to the power
ame
AC
power socket and the other end into the
ame will switch off.
ame or use USB
DC
supply.
memory. Supported card
socket at the back of the
Photo
44
Page 4

F
unctions
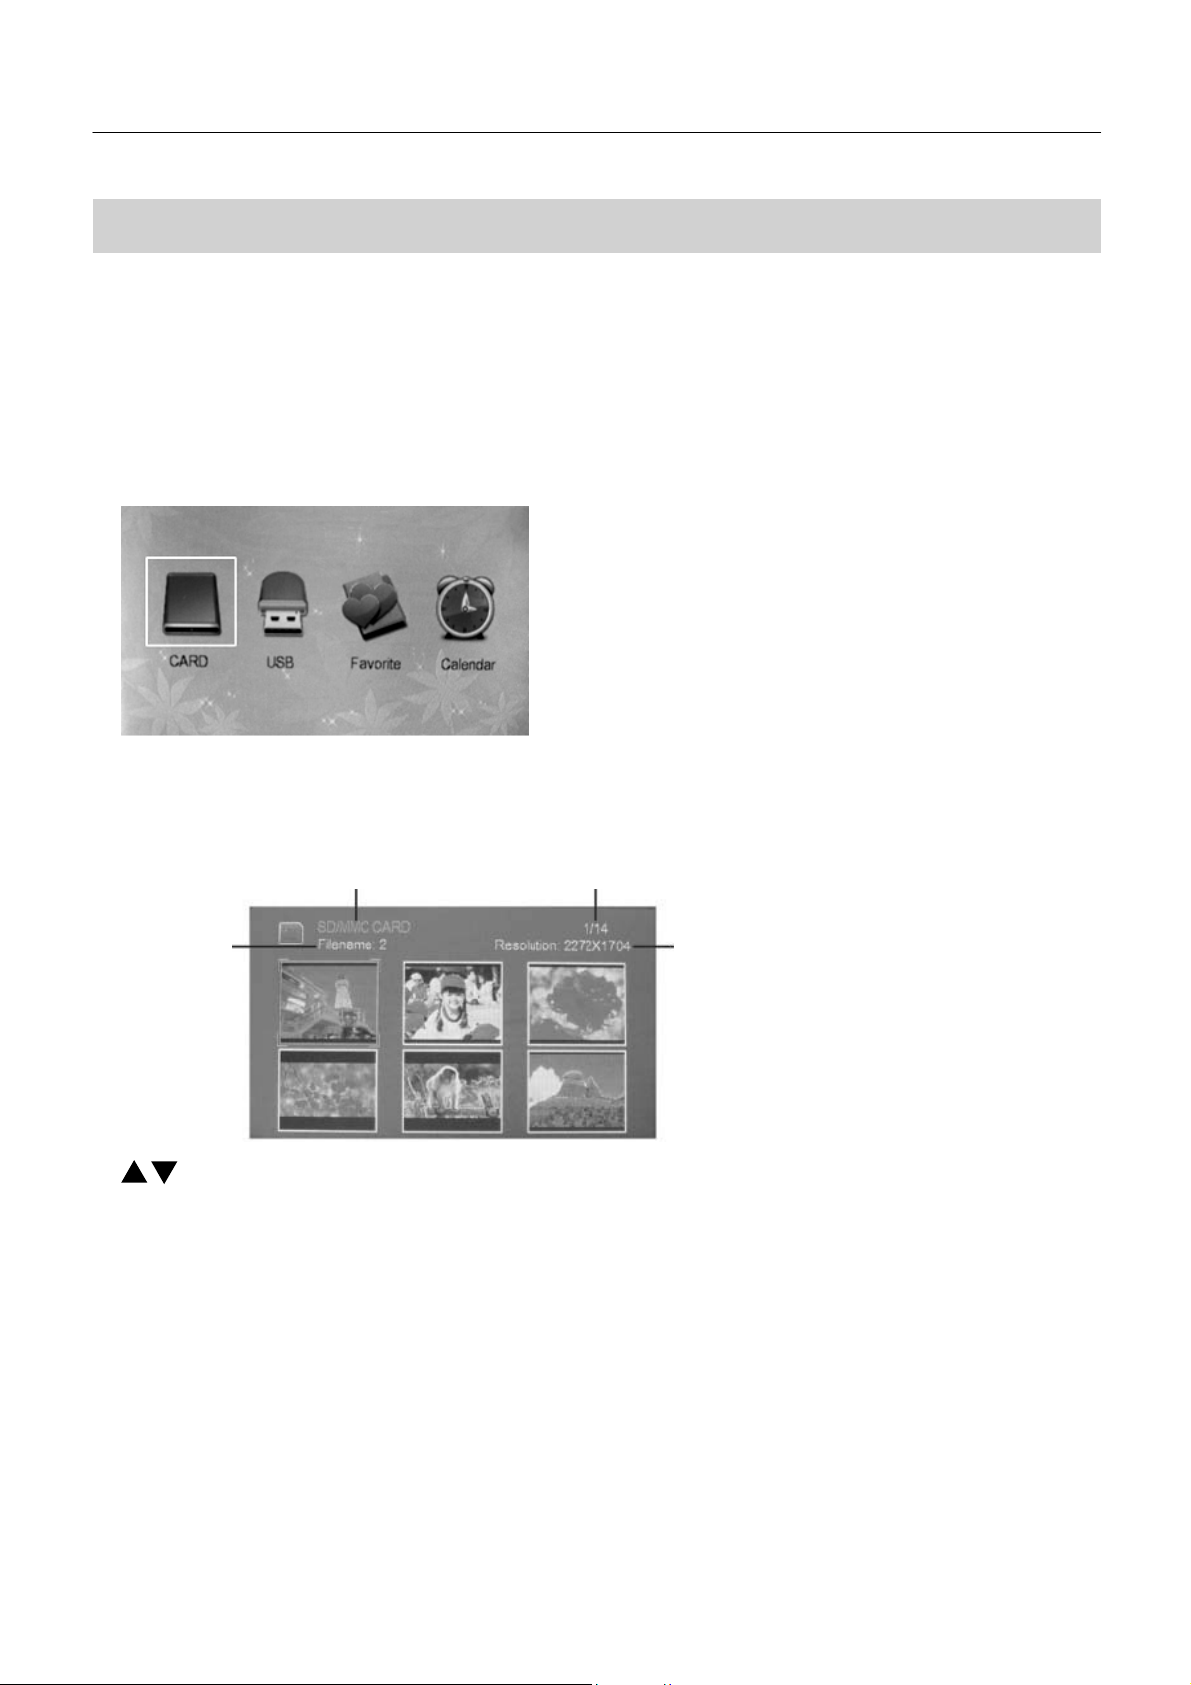
Main Menu
1. After the device is switched on, it will display the main menu by
2. You can now use the arrow buttons to select the option you require.
default.
English version
3. You can select from the following options: Memory Card, USB Drive, My
4. Inserted storage media or the option that is currently selected
is highlighted in white.
Memory Card/USB Drive/My Favorites
1. When you select any of above mentioned modes, press
below:
STORAGE MEDIA
FILENAME
Modes:
“PLAY/PAUSE” to enter. You will see the six pictures mode shown
CURRENT PAGE/TOTAL PA
favourites, Calendar and
GE
RESOLUTION OF PICTURE
Settings.
as
Use the
Use “PLAY/PAUSE”button to enter the slide show mode. It will display the pictures in the selected storage media
Use “PLAY/PAUSE”button
Single Picture Edit
A: only for Memory and USB Drive
1. In the slide show mode, when you see the picture you want to edit, press “Play/Pause” button to stop the picture from slide
.
show
2. Press “Setup” button to enter the sub menu as below
3. Follow
buttons to select pictures.
to pause or play the pictures.
the instructions to edit the picture.
modes
automatically
.
5
Page 5

English version
B: only for
1. In the slide show mode, when you see the picture you want to edit, press “Play/Pause” button to stop the picture from slide
show
2. Press “Setup” button to enter the sub menu of “Delete” and “Exit”
3. Follow
“my favorites” mode
.
the instructions to edit the picture.
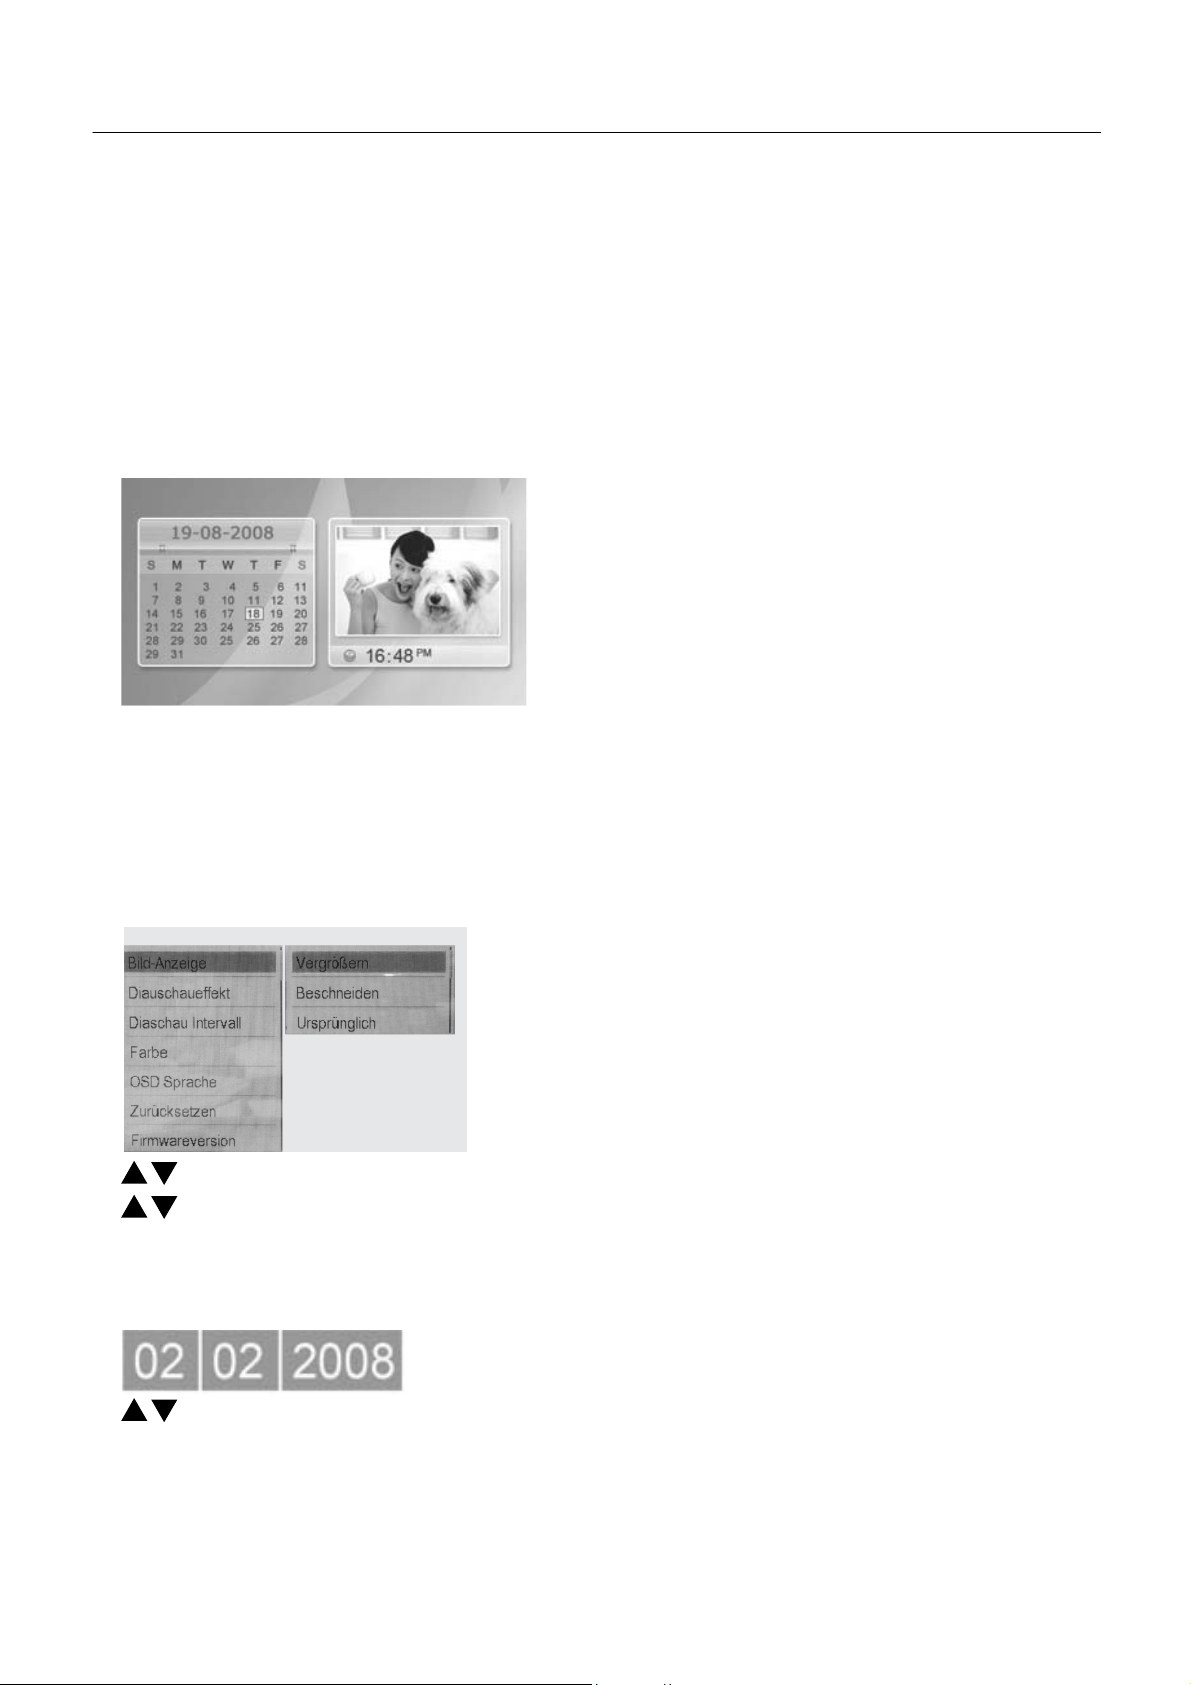
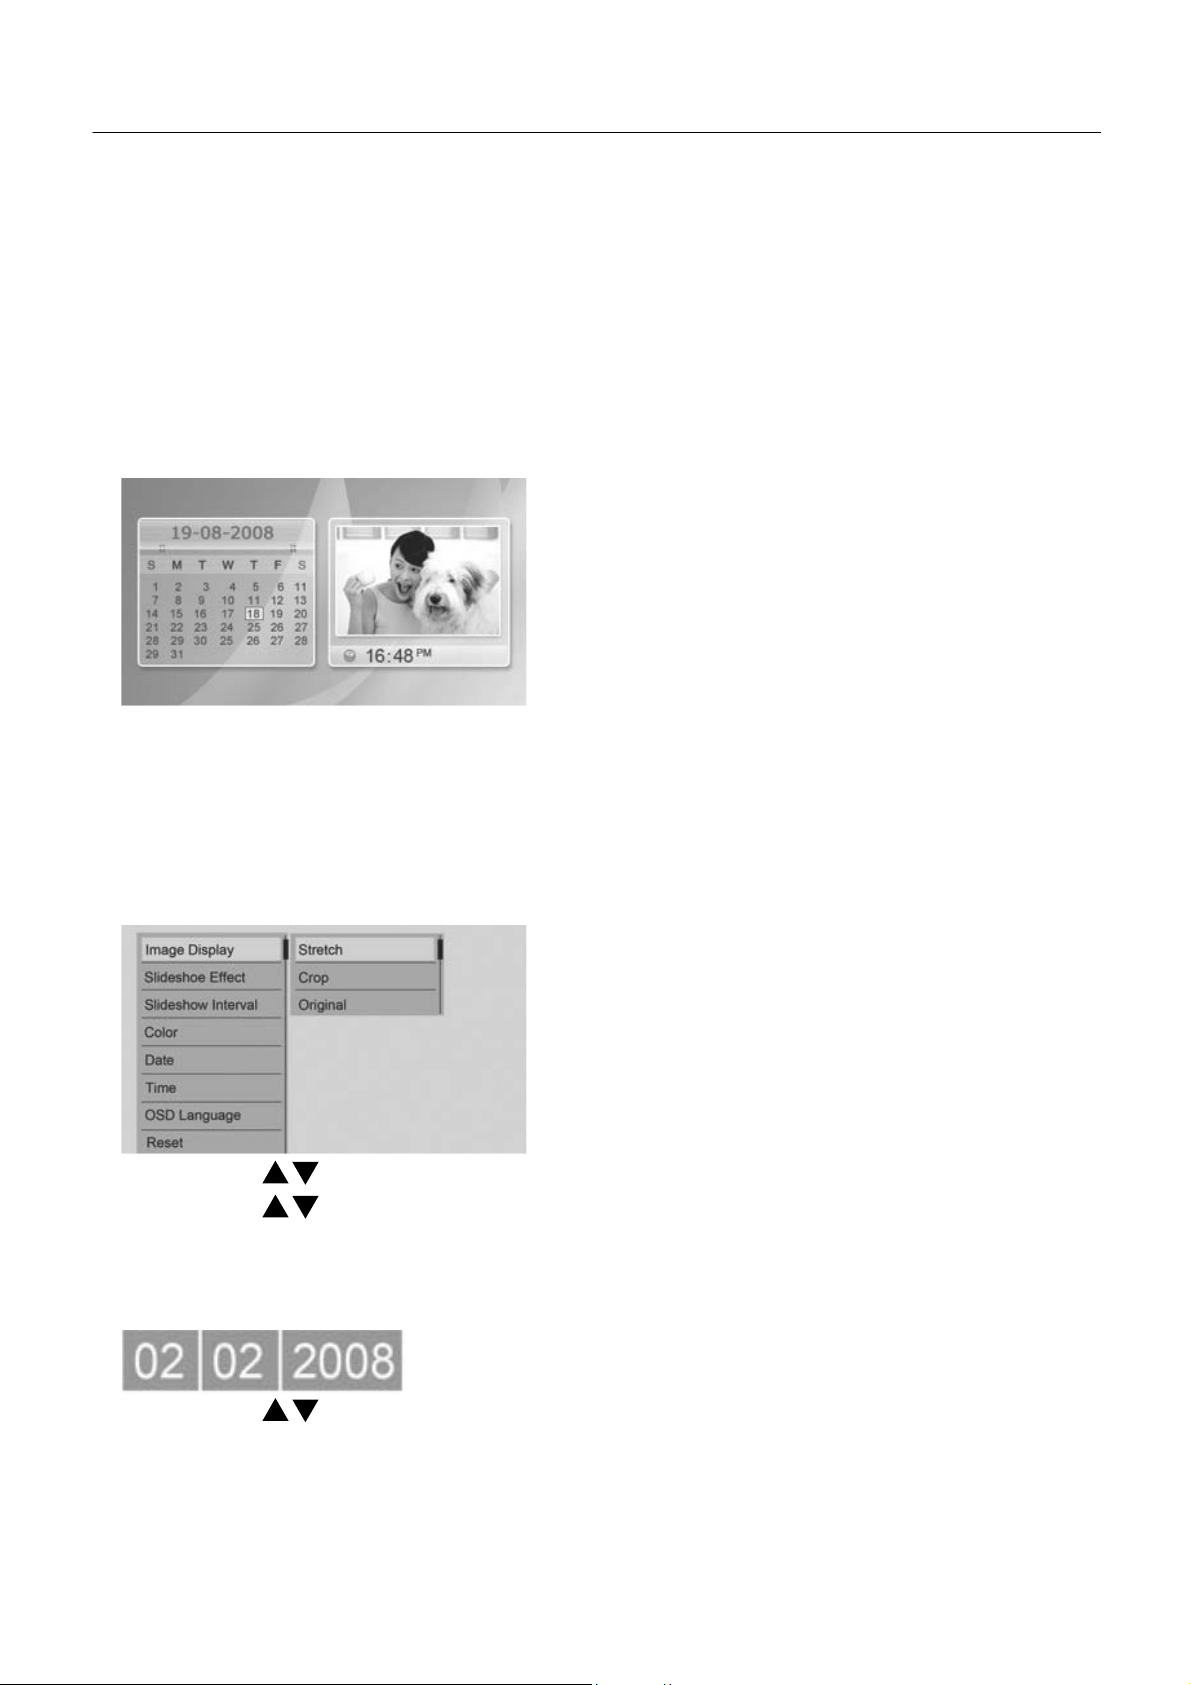
Calendar
1. When “Calendar” is selected, press “PLAY/PAUSE” button to enter the calendar display mode, you will
as
below:
Mode
see the calendar shown
Please note only the pictures saved in “my favourites” can be shown in the right
Use “exit” button to go back to the main menu. To set the date and time, please enter into ”settings” mode.
window.
Settings Mode
When “setting”
is selected, press “Play/Pause” mode to enter the sub menu as
below:
Use
the
Use
the
If you don’t want to save the new settings, press “exit” to go back to sub menu without saving.
Date/Time setting:
buttons to select the sub menu and press “Play/Pause” to enter the sub menu.
buttons to select the option you require and press “Play/Pause” to save.
After saving the submenue appears on your screen again.
Use
Notice
Under the six pictures mode or calendar display mode, you can press “setup” button to enter the
“Setting”
buttons to change the values and use “setup” button to change the column.
ins
tructions.
sub menu also, please refer to
6
Page 6
Deutsche Version
Zubehör
PLA
LINKS/NACH OBEN
RECHT
BEENDEN
SETUP
Y/P
AUSE/EINGABE
S/N
ACH UNTEN
7" Digitaler Fotorahmen
USB-PORT
SD/MMC-KARTENSTECKPLATZ
STROMANSCHLUSS
• St
romver
•
Benutz
•
Halterung
sorgungsadapter
erhandbuch
Erste Schritte
•
Aufstellen des Fotorahmens
•
Anschluss
Setzen Sie eine Speicherkarte mit unterstützten Dateien in den Kartens
USB-Speicher. Unterstützte Kartenformate: SD/MMC
•
Anschluss der Stromversorgung
Stecken Sie ein Ende des Netzteils in eine Wechselstromsteckdose und das andere Ende in die Gleichstrombuchse auf der Rückseite
des Fotorahmens.
•
Einschalten
Der Fotorahmen schaltet sich beim Anschluss an die Stromversorgung
•
Ausschalten
Wenn Sie das Netzteil herausziehen, wird der Fotorahmen
der Speichermedien
teckplatz des Fotorahmens ein oder verwenden Sie
automatisch ein.
ausgeschaltet.
einen
7
Page 7
Deutsche Version
F
unktionen
Hauptmenü
1. Nachdem das Gerät eingeschaltet ist, zeigt es standardmäßig das Hauptmenü
2. Sie können nun die Pfeiltasten zum Auswählen der erforderlichen Option verwenden.
an.
3. Sie können folgende Optionen auswählen: Memory Card
(Favoriten), Calendar (Kalender) und Settings
4. Das vorhandene Speichermedium oder die gegenwärtig ausgewählte Option ist weiß
(Eins
(Speicherkarte),
tellungen).
USB Drive (USB-Laufwerk), My
Modi Memory Card
1. Wenn Sie eine der zuvor genannten Modi auswählen, drücken Sie zum Aufrufen die Taste
Modus wird wie folgt
DATEIN
AME
(Speicherkarte)/USB Drive (USB-Laufwerk)/My Favorites (Favoriten):
dargestellt:
SPEICHERMEDIUM
AKTUELLE
SEITE/SEITEN INSGES
AUFLÖSUNG DES BILDES
AMT
markiert.
“PLAY/PAUSE”.
favourites
Der Sechs-Bilder-
Verw
enden Sie die Tasten, um die Bilder
Verw
enden Sie die Taste
Speichermedium automatisch angezeigt. Verwenden Sie die Taste
“PLAY/PAUSE”, um den
auszuw
ählen.
Dia-Show-Modus aufzurufen. Dadurch werden die Bilder
“PLAY/PAUSE”,
um die Bilder anzuzeigen bzw. zu
Einz
elbild-Bearbeitung
A: nur im Speicher- und
1. Wenn Sie im Dia-Show-Modus ein Bild sehen, das Sie bearbeiten möchten, drücken Sie die Taste
Show
anzuhalten.
2. Drücken Sie die Taste
3. Befolgen Sie die Anweisungen zum Bearbeiten des Bilds.
USB-Laufw
“Setup”, um das Untermenü wie folgt aufzurufen
erk
-Modus
8
auf dem gewählten
pausieren.
“Play/Pause”, um die Dia-
Page 8
Deutsche Version
B: Nur im Modus “My favorites
1. Wenn Sie im Dia-Show-Modus ein Bild sehen, das Sie bearbeiten möchten, drücken Sie die Taste
Show
anzuhalten.
2. Drücken Sie die Taste
3. Befolgen Sie die Anweisungen zum Bearbeiten des Bilds.
K
alender-Modus
1. Wenn “Calendar (Kalender)” ausgewählt ist, drücken Sie die Taste
K
alender wird wie folgt
(Favoriten)”
“Setup”, um das Untermenü von “Delete (Löschen)” und “Exit
dargestellt:
“PLAY/PAUSE”, um den Kalender-Modus aufzurufen. Der
“Play/Pause”, um die Dia-
(Beenden)” aufzurufen
Bitte beachten Sie, dass nur die unter “My favourites (Favoriten)” gespeicherten Bilder im rechten Fenster
k
önnen.
Verw
enden Sie die Taste
Sie bitte den Modus ”Settings (Einstellungen)”
“Exit (Beenden)”, um zurück zum Hauptmenü zu wechseln. Um Datum und Uhrzeit
auf.
angezeigt werden
einzustellen, rufen
Eins
tellungs-Modus
Wenn “Setting (Einstellung)” ausgewählt ist, drücken Sie die Taste
“Play/Pause”, um das Untermenü wie folgt aufzurufen:
Verw
enden Sie die Tasten zum Auswählen des Untermenüs und drücken Sie
Verw
enden Sie die Tasten zum Auswählen der erforderlichen Option und drücken Sie
Nachdem die Option gespeichert ist, wird das Untermenü automatisch wieder aufgerufen. Wenn Sie die neuen Einstellungen nicht
speichern möchten, drücken Sie “Exit (Beenden)”, um ohne Speichern zurück zum Untermenü zu
Einstellung von
Datum/Uhrzeit:
“Play/Pause”, um das Untermenü aufzurufen.
“Play/Pause”, um zu speichern.
gehen.
Verw
enden Sie die Tasten zum Ändern der Werte und drücken Sie die Taste
Hinw
eis
In Sechs-Bilder-Modus oder Kalender-Modus können Sie auch die Taste
Anweisungen finden Sie im Abschnitt “Setting
(Eins
tellung)”.
“setup” drücken, um das
“Setup”, um die Spalte zu ändern.
Untermenü aufzurufen.
9
Page 9
Versión Española
Marco de fotografías digital de
7''
REPRODUCCIÓN/P
IZQUIERDA/ARRIBA
JO
DERECHA/ABA
S
ALIR
SETUP
AUS
A/ENTRAR
PUERTO
USB
RANURA PARA TARJETA
CONEXIÓN DE
ALIMENT
ACIÓN
SD/MMC
Accesorios
• Adaptador de alimentación
•
Manual de usuario
•
Soporte
Primeras
etapas
•
Montaje del marco de fotos
•
Conexión
Introduzca una tarjeta de memoria que incluya los archivos soportados en la ranura de tarjetas del marco de fotos o utilice
memoria USB.
•
Conexión del suministro
Introduzca un extremo del adaptador de alimentación en la ranura de alimentación de
ubicada en la parte trasera del marco de fotos
•
Encendido
El
marco de fotos se enciende automáticamente al conectarse al suministro
•
Apagado
del medio de almacenamiento
Formatos de tarjetas aceptadas: SD/MMC
de alimentación
CA
y el otro extremo en la ranura de CC
de alimentación.
una
Si saca el adaptador de alimentación, el marco de fotos
se apagará.
19
Page 10

Versión Española
F
unciones
Menú principal
1. Una vez que se haya encendido el dispositivo, mostrará el menú principal por
2. Ahora podrá utilizar los botones de flechas para seleccionar la opción
defecto.
que necesite.
3. Podrá seleccionar a partir de las opciones siguientes: Tarjeta
Conf
iguración.
4.
El
medio de almacenamiento existente o la opción que esté actualmente seleccionada aparecerá subrayada en blanco.
de memoria, unidad USB, Mis favoritos, Calendario y
Modos de Tarjeta de memoria/
1. cuando seleccione uno de los modos mencionados anteriormente, pulse
V
erá el modo de seis imágenes tal y como se indica a continuación:
MEDIO DE ALMACENAMIENTO
NOMBRE DEL ARCHIVO
Unidad USB
/Mis fav
PÁGINA ACTUAL/TOTAL DE PÁGINAS
oritos:
"PLAY/PAUSE" (REPRODUCIR/PAUSA) para
RESOLUCIÓN DE
LA
IMAGEN
acceder
.
Utilice los botones
Utilice el botón "PLAY/PAUSE" (REPRODUCIR/PAUSA)
las imágenes incluidas en el medio de almacenamiento seleccionado automáticamente.
(REPRODUCIR/PAUSA) para pausar o reproducir
Edición de una única
A:
sólo para los modos de memoria y unidad USB
1. En el modo de presentación de diapositivas, cuando vea la imagen que desee editar, pulse el botón de
(Reproducir/Pausa) para parar la imagen de la presentación de diapositivas.
2. Pulse el botón de "Setup" (Configuración) para acceder al submenú tal y como aparece a continuación
3. Siga las instrucciones
para seleccionar
imagen
para editar la imagen.
las imágenes.
las imágenes.
para acceder al modo de presentación de diapositivas.
Utilice el botón
2
Mos
"PLA
Y/P
"Play/P
trará
AUSE"
ause"
Page 11
B:
sólo para el modo de "mis favoritos"
1. En el modo de presentación de diapositivas, cuando vea la imagen que desee editar, pulse el botón de
Versión Española
"Play/P
ause"
(Reproducir/Pausa) para parar la imagen de la presentación de diapositivas.
2. Pulse el botón de "Setup" (Configuración) para acceder al submenú de "Delete" (Borrar) y "Exit"
3. Siga las instrucciones
Modo de calendario
1. cuando haya seleccionado "Calendar" (Calendario), pulse el botón
de muestra del calendario y verá el calendario tal y como se indica a continuación:
para editar la imagen.
(Salir)
"PLAY/PAUSE" (REPRODUCIR/PAUSA)
para acceder al modo
Por favor,
Utilice el botón de "exit" (salida) para regresar al menú principal. Para fijar la fecha y la hora, por favor, acceda al modo de
"settings"
Modo de
Una vez que haya seleccionado "setting" (configuración), pulse el modo de "Play/Pause" (Reproducir/pausa) para acceder
tenga en cuenta que sólo las imágenes guardadas en "mis favoritos" podrán mostrarse en la ventana de la derecha
(configuración).
conf
iguración
al
submenú tal y como se indica
más abajo
Utilice los botones
Utilice los botones
Una vez guardada la opción, regresará al submenú automáticamente. Si no desea guardar la nueva configuración, pulse "exit"
(salida) para regresar al submenú sin guardar.
Fijación de fecha y
hora:
para seleccionar el submenú
para seleccionar la opción que necesite
y pulse "Play/Pause" (Reproducir/Pausa) para acceder
al submenú.
y pulse "Play/Pause" (Reproducir/Pausa) para
guardar.
Utilice los botones
A
viso
En
el modo de seis imágenes o en el modo de muestra del calendario, podrá pulsar el botón "setup" (configuración) para acceder
también al submenú, por favor, véase las instrucciones de "Setting" (Configuración).
para cambiar los valores
y utilice el botón "setup" (configuración) para cambiar la columna.
21
Page 12

Versão
Por
tuguesa
Moldura para fotografias digitais de 7"
PLAY/PAUSE/ENTER
LEFT/UP (ESQUERDA/CIMA)
RIGHT/DOWN
EXIT (SAIR)
SETUP
(DIREIT
Acessórios
• Adaptador de fonte de alimentação
•
Manual do utilizador
•
Suporte
Primeiros
passos
(REPRODUZIR/P
A/BAIX
O)
AUS
A/ENTER)
USB PORT (PORTA
SD/MMC
(RANHURA DO CARTÃO
POWER CONNECTION
(
LIGAÇÃO DE C
USB)
CARD SLOT
ORRENTE)
SD/MMC)
•
Colocar a moldura da fotografia na
•
Ligar o suporte de
Insira um cartão de memória que contenha os ficheiros suportados na ranhura para cartão da Moldura da fotografia ou utilize
memória USB.
•
Ligar
a fonte de alimentação
Insira uma extremidade do adaptador de corrente na tomada de alimentação de
de trás da Moldura da fotografia.
•
Ligar
A
Moldura da fotografia acende-se automaticamente quando é ligada à
•
Desligar
Se retirar o adaptador de alimentação, a Moldura da fotografia desliga-se.
armazenamento
Formatos de cartão suportados: SD/MMC
vertical
CA
e a outra extremidade na tomada
fonte de alimentação.
CC
2
na
a
par
te
Page 13

Versão
Por
tuguesa
F
unções
Menu principal
1. Depois do dispositivo ser ligado, é apresentado o menu principal por
2. Em seguida, pode utilizar os botões de seta para seleccionar a opção
predef
pre
tendida.
inição.
3. Pode seleccionar uma das seguintes opções: Cartão de memória, Unidade USB, Os meus favoritos, Calendário e Def
4. Suporte de armazenamento existente ou a opção que estiver seleccionada é realçada a branco.
Modos Memory Card/USB Drive/My Favorites (Cartão de memória/Unidade USB/Os meus fav
1. Se seleccionar um dos modos indicados acima, prima
as seis imagens, tal como indicado abaixo:
STORAGE MEDIA
(SUPORTE DE ARMAZENAMENTO)
FILENAME
(NOME DO
FICHEIRO)
“PLAY/PAUSE”
CURRENT PAGE/TOTAL PAGE
(Reproduzir/Pausa) para
(P
ÁGINA
ACTUAL/TOTAL)
RESOLUTION OF PICTURE
(RESOLUÇÃO DA
IMAGEM)
introduzir.
Serão apresentadas
inições.
oritos):
Utilize os botões
Utilize o botão “PLAY/PAUSE”
apresentadas automaticamente no suporte de armazenamento seleccionado.
para parar ou apresentar as imagens.
Editar
imagens individualmente
A:
apenas para os modos Memory (Memória) e
1. No
modo de apresentação de diapositivos, quando aparecer a imagem que pretende editar, prima o botão
(Reproduzir/Pausa) para parar a imagem mostrada na apresentação de diapositivos.
2. Prima o botão “Setup” (Configurar) para aceder ao submenu, tal como indicado abaixo
3. Siga as instruções para editar a
para seleccionar
(Reproduzir/Pausa) para
as imagens.
imagem.
introduzir o modo de apresentação de diapositivos.
USB Drive
(Unidade USB)
Utilize o botão “PLAY/PAUSE” (Reproduzir/P
23
As
imagens são
ausa)
“Play/P
ause”
Page 14

Versão
Por
tuguesa
B:
apenas no modo “my favorites” (os meus favoritos)
1. No
modo de apresentação de diapositivos, quando aparecer a imagem que pretende editar, prima o botão
“Play/P
ause”
(Reproduzir/Pausa) para parar a imagem
2. Prima o botão “Setup” (Configurar) para aceder ao submenu de “Delete” (Apagar) e “Exit”
3. Siga as instruções para editar a
Modo de calendário
1. Se aparecer “Calendar” (Calendário), prima o botão
calendário, o calendário é apresentado do seguinte modo:
imagem.
mos
trada.
“PLAY/PAUSE”
(Sair)
(Reproduzir) para aceder ao modo de visualização do
T
enha em conta que apenas as imagens guardadas em “my favourites” (os meus favoritos) podem ser apresentadas na janela
da direita.
Utilize o botão “exit” (sair) para voltar para o menu principal. Para definir a data e a hora, aceda ao modo ”settings”
Modo Settings
Quando “setting” (definições) estiver seleccionado, prima o modo
(Definições)
(def
“Play/Pause” (Reproduzir/Pausa) para aceder ao submenu,
ini
ções).
tal como indicado abaixo:
Utilize os botões
Utilize os botões
opção ser guardada, o submenu é apresentado automaticamente. Se não quiser guardar as novas definições, prima “exit”
para voltar para o submenu sem guardar as alterações.
Definição
de data/hora:
para seleccionar o submenu e
para seleccionar
a opção necessária e prima “Play/Pause” (Reproduzir/Pausa) para guardar.
prima “Play/Pause” (Reproduzir/Pausa) para aceder ao submenu.
Utilize os botões
A
viso
No modo de seis imagens ou de visualização do calendário, também pode premir o botão “setup” (configurar) para aceder
submenu, consulte as instruções “Setting”
para alterar os valores e utilize o botão “setup” (configurar) para alterar a
(Def
inição).
coluna.
Depois
(sair)
ao
da
2
Page 15

Versione Italiana
RIPR
SINIS
DES
ESCI
SETUP
ODUCI/P
TRA/SU
TRA/GIU'
Cornice Fotografica Digitale 7"
AUS
A/ENTER
PORTA
USB
SLOT SCHEDA
SD/MMC
COLLEGAMENTO
ELETTRICO
Accessori
• Adattatore di alimentazione
•
Manuale
• St
Primi
•
Posizionamento in verticale della cornice fo
•
Collegamento del supporto di archiviazione
Inserire una scheda di memoria contenente i file supportati nello slot della scheda della Cornice Fotografica o utilizzare
memoria USB.
•
Collegamento dell'alimentazione
Inserire un'estremità dell'adattatore di alimentazione nella presa di alimentazione
affa
passi
d'uso
Formati scheda supportati: SD/MMC
ele
ttrica
tograf
ica
AC
e l'altra estremità nella presa
la
DC sul ret
ro
della Cornice Fotograf
•
Accensione
La Cornice Fotografica si
•
Spegnimento
Se si estrae l'adattatore di alimentazione, la
ica.
accende automaticamente quando viene collegata alla corrente
Cornice Fotografica si
1
spegnerà.
ele
ttrica.
Page 16

F
unzioni
Menu Principale
1. Dopo che il dispositivo è acceso, visualizzerà il menu principale di
2. Ora è possibile utilizzare i tasti freccia per selezionare l'opzione
default.
desiderata.
Versione Italiana
3. E' possibile selezionare le seguenti opzioni: Scheda di memoria, Unità
4. Il
supporto di archiviazione esistente o l'opzione correntemente selezionata viene evidenziata di colore bianco.
Modalità Scheda di
1. Quando viene selezionata una delle modalità citate di sopra, premere
a sei immagini come di seguito:
NOME FILE
memoria/Unità USB/Preferiti:
SUPPORTO DI ARCHIVIAZIONE
PAGINA CORRENTE/PAGINA
USB, Preferiti, Calendario e Impos
“RIPRODUCI/P
TOT
ALE
RISOLUZIONE DELL'IMMAGINE
AUSA” per entrare. Comparirà la
tazioni.
modalità
Utilizzare i
Utilizzare il tasto
supporto di archiviazione selezionato. Utilizzare il tasto
Modifica Immagine
A:
solo per le modalità Memoria e Unità USB
1. Nella modalità di presentazione, quando viene visualizzata l'immagine che si desidera modificare, premere il tasto
Pausa” per fermare l'immagine dalla presentazione.
2. Premere il tasto “Configurazione” per entrare nel sottomenu come di
3. Seguire le istruzioni per modificare
tasti
“RIPRODUCI/P
per selezionare le immagini.
AUSA” per entrare nella modalità presentazione. Visualizz
Singola
l'immagine.
“RIPRODUCI/P
erà automaticamente le immagini nel
AUSA” per mettere in pausa o riprodurre le immagini.
seguito.
“Riproduc
i/
11
Page 17

Versione Italiana
B:
solo per la modalità “preferiti”
1. Nella modalità di presentazione, quando viene visualizzata l'immagine che si desidera modificare, premere il tasto
“Riproduc
i/
Pausa” per fermare l'immagine dalla presentazione.
2. Premere il tasto “Configurazione” per entrare nel sottomenu “Cancella” e “Esci”
3. Seguire le istruzioni per modificare
l'immagine.
Modalità Calendario
1. quando viene selezionato “Calendario”, premere il tasto
calendario, comparirà il calendario come di seguito:
“RIPRODUCI/P
AUSA” per entrare nella modalità di visualizzazione del
Si prega di notare che solo le immagini salvate nei "preferiti" possono essere mostrate nella finestra di
Usare il tasto “esci” per tornare al menu principale. Per impostare la data e l'ora, entrare nella modalità
Modalità Impos
Quando viene selezionato “impostazione”, premere la modalità “Riproduci/Pausa” per entrare nel sottomenu come di
tazioni
des
"im
tra.
pos
tazioni".
seguito:
Usare i tasti per selezionare il sottomenu e premere
Usare i tasti per selezionare l'opzione desiderata e premere
salvata, tornerà automaticamente al sottomenu. Se non si desidera salvare le nuove impostazioni, premere “esci” per
sottomenu senza salvare.
Impostazione
data/ora:
“Riproduci/Pausa” per entrare nel so
“Riproduci/Pausa” per salvare.
ttomenu.
Dopo che l'opzione è st
tornare al
Usare i tasti per modificare i valori e usare il tasto “configurazione” per cambiare la colonna
A
vviso
Nella modalità sei immagini o nella modalità di visualizzazione del calendario, è possibile premere il tasto "configurazione" anche
per entrare nel sottomenu, si rimanda alle istruzioni “Impos
tazione”.
.
ata
1
Page 18

Ελληνική
έκδοση
Ψηφιακή κορνίζα φωτογραφιών 7"
ΑΝΑΠΑΡΑΓΩΓΗ/ΠΑΥΣΗ/
ΕΙΣΑΓΩΓΗ
ΑΡΙΣΤΕΡΑ/ΠΑΝΩ
ΔΕΞΙΑ/ΚΑΤΩ
ΕΞΟΔΟΣ
SETUP
Αξεσουάρ
• Προσαρμογέας τροφοδοσίας
• Εγχειρίδιο χρήστη
• Στήριγμα
Τα πρώτα βήματα
ΘΥΡΑ USB
ΥΠΟΔΟΧΗ ΚΑΡΤΑΣ SD/MMC
ΣΥΝΔΕΣΗ ΤΡΟΦΟΔΟΣΙΑΣ
• Στερέωση της κορνίζας φωτογραφιών σε όρθια θέση
• Σύνδεση του μέσου αποθήκευσης δεδομένων
Τοποθετήστε στην υποδοχή κάρτας της κορνίζας φωτογραφιών μια κάρτα μνήμης που περιέχει τα
υποστηριζόμενα αρχεία. Εναλλακτικά χρησιμοποιήστε μνήμη USB. Υποστηριζόμενοι τύποι καρτών:
SD/MMC
• Σύνδεση του τροφοδοτικού
Εισάγετε το ένα άκρο του προσαρμογέα τροφοδοσίας στην πρίζα ρεύματος AC και το άλλο
υποδοχή ρεύματος DC στο πίσω μέρος της κορνίζας φωτογραφιών.
• Ενεργοποίηση
Η κορνίζα φωτογραφιών ενεργοποιείται αυτόματα όταν συνδεθεί στο τροφοδοτικό.
• Απενεργοποίηση
Η κορνίζα φωτογραφιών θα απενεργοποιηθεί αν αποσυνδέσετε τον προσαρμογέα τροφοδοσίας.
άκρο στην
2
Page 19

η
Ελληνική
έκδοσ
Λειτουργίες
Βασικό μενού
1. Όταν ενεργοποιηθεί η συσκευή, θα εμφανιστεί από προεπιλογή το βασικό μενού.
2. Τότε μπορείτε να χρησιμοποιήσετε τα πλήκτρα βέλους για να κάνετε την επιλογή που επιθυμείτε.
3. Μπορείτε να επιλέξετε από τις εξής δυνατότητες: Memory Card (Κάρτα μνήμης), USB Drive
(Μονάδα USB), My favourites (Τα αγαπημένα μου), Calendar (Ημερολόγιο) και Settings
(Ρυθμίσεις).
4. Το υπάρχον μέσο αποθήκευσης ή
η τρέχουσα επιλογή επισημαίνεται με λευκό χρώμα.
Τρόποι λειτουργίας Κάρτας μνήμης/Μονάδα US/Τα αγαπημένα μου:
1. Όταν επιλέξετε οποιουσδήποτε από τους παραπάνω τρόπους λειτουργίας, πατήστε το πλήκτρο
“ΑΝΑΠΑΡΑΓΩΓΗ/ΠΑΥΣΗ” για είσοδο στην επιλογή σας. Θα δείτε την εμφάνιση έξη εικόνων όπως
φαίνεται πιο κάτω:
ΜΕΣΟ ΑΠΟΘΗΚΕΥΣΗΣ ΔΕΔΟΜΕΝΩΝ
ΤΡΕΧΟΥΣΑ ΣΕΛΙΔΑ/ΣΥΝΟΛΙΚΕΣ ΣΕΛΙΔΕΣ
ΟΝΟΜΑ
ΑΡΧΕΙΟΥ
ΑΝΑΛΥΣΗ ΤΗΣ ΕΙΚΟΝΑΣ
Χρησιμοποιήστε τα πλήκτρα για να επιλέξετε εικόνες.
Χρησιμοποιήστε το πλήκτρο “ΑΝΑΠΑΡΑΓΩΓΗ/ΠΑΥΣΗ” για να εισέλθετε στη λειτουργία προβολής
διαφανειών. Οι εικόνες στο επιλεγμένο μέσο αποθήκευσης δεδομένων θα εμφανίζονται αυτόματα.
Χρησιμοποιήστε το πλήκτρο “ΑΝΑΠΑΡΑΓΩΓΗ/ΠΑΥΣΗ” για παύση ή αναπαραγωγή των εικόνων.
Επεξεργασία μιας εικόνας
A: μόνο για τρόπους λειτουργίας Κάρτας μνήμης και
1. Στη λειτουργία προβολής διαφανειών, όταν δείτε την εικόνα που θέλετε να επεξεργαστείτε, πιέστε το
πλήκτρο “ΑΝΑΠΑΡΑΓΩΓΗ/ΠΑΥΣΗ” για να σταματήσετε την προβολή στην εικόνα.
Μονάδας USB
2. Πατήστε το πλήκτρο “Setup” (Διαμόρφωση) για είσοδο στο υπομενού όπως πιο κάτω
3. Ακολουθήστε τις οδηγίες για επεξεργασία της εικόνας.
29
Page 20

η
Ελληνική
έκδοσ
B: μόνο για τον τρόπο λειτουργίας "Τα αγαπημένα μου"
1. Στη λειτουργία προβολής διαφανειών, όταν δείτε την εικόνα που θέλετε να επεξεργαστείτε, πιέστε το πλήκτρο
“ΑΝΑΠΑΡΑΓΩΓΗ/ΠΑΥΣΗ” για να σταματήσετε την προβολή στην εικόνα.
2. Πατήστε το πλήκτρο “Setup” (Διαμόρφωση) για είσοδο στο υπομενού “Delete” (Διαγραφή) και “Exit” (Έξοδος)
3. Ακολουθήστε τις οδηγίες για επεξεργασία
Λειτουργία Ημερολογίου
1. Όταν επιλεγεί “Calendar” (Ημερολόγιο) πατήστε το πλήκτρο “ΑΝΑΠΑΡΑΓΩΓΗ/ΠΑΥΣΗ” για είσοδο στη λειτουργία εμφάνισης
ημερολογίου και θα εμφανιστεί το ημερολόγιο όπως πιο κάτω:
της εικόνας.
Έχετε υπόψη σας ότι στο δεξιό παράθυρο μπορούν να εμφανιστούν μόνο φωτογραφίες που έχουν αποθηκευτεί ως “My
favourites” (Τα αγαπημένα μου).
Για επιστροφή στο βασικό μενού χρησιμοποιήστε το πλήκτρο “ΕΞΟΔΟΣ”. Για να ρυθμίσετε την ημερομηνία και ώρα εισέλθετε
στη λειτουργία “Settings” (Ρυθμίσεις).
Λειτουργία Ρυθμίσεις
Όταν επιλεγεί “Settings” (Ρυθμίσεις), πατήστε το πλήκτρο “ΑΝΑΠΑΡΑΓΩΓΗ/ΠΑΥΣΗ” για
είσοδο στο υπομενού όπως πιο κάτω:
Χρησιμοποιήστε τα πλήκτρα για να επιλέξετε το υπομενού και πατήστε “ΑΝΑΠΑΡΑΓΩΓΗ/ΠΑΥΣΗ” για είσοδο στο
υπομενού.
Χρησιμοποιήστε τα πλήκτρα για να επιλέξετε τη ρύθμιση που επιθυμείτε και πατήστε “ΑΝΑΠΑΡΑΓΩΓΗ/ΠΑΥΣΗ”
για αποθήκευση. Αφού αποθηκευτεί η ρύθμιση, η συσκευή θα επιστρέψει αυτόματα στο υπομενού. Αν δεν επιθυμείτε να
αποθηκεύσετε τις καινούριες ρυθμίσεις
Ρύθμιση ημερομηνίας/ώρας:
, πατήστε το πλήκτρο “ΕΞΟΔΟΣ” για επιστροφή στο υπομενού χωρίς αποθήκευση.
Χρησιμοποιήστε τα πλήκτρα για να αλλάξετε τις τιμές και το πλήκτρο “Setup” (Διαμόρφωση) για να αλλάξετε τη στήλη.
Σημείωση
Στη λειτουργία έξη εικόνων ή στη λειτουργία εμφάνισης ημερολογίου μπορείτε να πατήσετε και το πλήκτρο “Setup”
(Διαμόρφωση) για είσοδο στο υπομενού. Ανατρέξτε στις οδηγίες για τη λειτουργία “Settings” (Ρυθμίσεις).
51
Page 21

Version Fr
ançaise
LECTURE/PAUSE/ENTREE
GAUCHE/HAUT
DROITE/BAS
QUITTER
SETUP
Cadre photo numerique 7"
PORT USB
LOGEMENT CARTES
SD/MMC
RACCORDEMENT ELECTRIQUE
Accessoires
• Adaptateur électrique
•
Manuel Utilisateur
•
Support
Premières
•
Mettre en place le cadre pho
•
Raccorder le support de stock
Insérez la carte mémoire contenant les fichiers dans le logement pour cartes du cadre photos ou utilisez une
de carte compatibles sont : SD/MMC
•
Raccorder l'alimentation
Insérez l'une des extrémités de l'adaptateur électrique dans une prise de courant
étapes
électrique
tos
age
CA
et l'autre extrémité dans la prise
clé USB. Les
CC
qui se
formats
trouve derrière le cadre pho
•
Allumage
Le
cadre photos s'allume automatiquement dès qu'il est raccordé
•
Extinction
Si vous débranchez l'adaptateur électrique, le cadre photos
tos.
à l'alimentation électrique.
s'é
teint.
1
Page 22

Version Fr
ançaise
Fonctions
Menu Principal
1. Après avoir allumé l'appareil,
2. Vous pouvez alors utiliser les flèches pour sélectionner l'option voulue.
3. Vous avez le choix entre les options suivantes : Memory Card (Carte mémoire),
Favoris), Calendar (Calendrier) et Settings (Paramètres).
4. Le
il affiche par défaut le menu principal.
support de stockage existant ou l'option sélectionnée sont en surbrillance.
Modes Carte
1. lorsque vous sélectionnez l'un des modes mentionnés ci-dessus, appuyez sur
le mode 6 images apparaître comme
Mémoire/Disque USB/Mes Favoris :
suit:
SUPPORT DE ST
OCKAGE
PAGE EN COURS/TOTAL
DE PA
USB Drive (Disque USB), My
LECTURE/PAUSE
GES
pour y accéder. Vous voyez
favourites (Mes
alors
NOM DU FICHIER
RESOLUTION DE L'IMAGE
Utilisez les touches
Utilisez la touche
automatiquement.
Edition
A
1. Dans ce mode Diaporama, lorsque vous voyez une photo que vous souhaitez éditer, appuyez sur la touche Lecture/Pause pour
stopper le diaporama.
2. Enfoncez la touche “Setup” (Installation) pour accéder au
3. Suivez les instructions pour éditer la pho
d'une seule image
: Uniquement pour les modes Mémoire et Disque USB
LECTURE/PAUSE
Utilisez la touche
pour sélectionner les
pho
tos.
pour accéder au mode Diaporama. Cela permet d'afficher les photos du support de s
LECTURE/PAUSE
to.
pour visualiser les photos ou mettre le diaporama
sous-menu
en pause.
tock
age
17
Page 23

Version Fr
ançaise
B
: Uniquement pour le mode "Mes Favoris"
1. Dans ce mode Diaporama, lorsque vous voyez une photo que vous souhaitez éditer, appuyez sur la touche Lecture/Pause pour
stopper le diaporama.
2. Enfoncez la touche “Setup” (Installation) pour accéder au sous-menu “Delete”(Supprimer) et “Exit”
3. Suivez les instructions pour éditer la pho
Mode Calendrier
1. Lorsque le mode Calendrier est sélectionné, appuyez sur
calendrier apparaît alors comme suit :
(Quitter)
to.
LECTURE/PAUSE
pour accéder au mode d'affichage du calendrier et le
Seules les photos sauvegardées dans Mes Favoris
Utilisez la touche “exit” (Quitter) pour revenir au menu principal. Pour paramétrer la date et l'heure, accédez au mode
aramétrage).
(P
Mode Paramétrage
Lorsque
le mode “setting” (Paramétrage) est sélectionné, appuyez sur Lecture/Pause pour accéder au sous-menu qui suit :
peuvent être affichées sur la partie droite.
”se
ttings”
Utilisez
les touches
Utilisez les touches
sauvegardée, vous revenez automatiquement au sous-menu. Si vous ne souhaitez pas sauvegarder les nouveaux
appuyez sur “exit” (Quitter) pour revenir au sous-menu sans effectuer
Réglage de la date et de l'heure :
pour sélectionner le sous-menu puis appuyez sur Lecture/Pause pour y accéder.
pour sélectionner l'option voulue
et appuyez sur Lecture/Pause pour sauvegarder. Une fois
de sauvegarde.
l'option
paramètres,
Utilisez les touches
Remarque
En mode 6 images ou Calendrier, vous pouvez appuyer sur la touche “setup” (Installation) pour accéder au sous-menu. Référezvous aux instructions concernant le Paramétrage.
pour modifier les valeurs et
utilisez la touche “setup” (Installation) pour changer de colonne.
1
Page 24

Nederlandse versie
7" Digitaal
fotolijs
tje
WEERGAVE/P
LINKS/OMHOOG
RECHT
EXIT
SETUP
AUZE/ENTER
S/OMLAAG
USB POORT
SD/MMC
KAART
SLOT
DC
VOEDINGSAANSLUITING
Accessoires
• Netvoedingadapter
•
Gebruikershandleiding
• St
andaard
De eerste st
appen
•
Zet het fotolijstje
•
Aansluiten
Steek een geheugenkaart met de fotobestanden in het kaartslot van het fotolijstje of gebruik het USB-geheugen. Ondersteunde
kaartformaten: SD/MMC
•
Aansluiten van de netvoedingadapter
Steek het stekkertje van de netvoedingadapter in de
het stopcontact.
•
Inschak
elen
Het fotolijstje schakelt automatisch in zodra de netvoedingadapter aangesloten is.
•
Uitschak
Als
u de netvoedingadapter loskoppelt, dan schakelt het fotolijstje
elen
neer.
van opslagmedium
DC
voedingsaansluiting van het fotolijstje en steek de netvoedingadapter in
uit.
13
Page 25

Nederlandse versie
F
uncties
Hoofdmenu
1. Nadat het apparaat ingeschakeld is, verschijnt
2. Nu kunt u met de pijltjestoetsen de door u gewenste keuze
standaard het hoofdmenu.
mak
en.
3. U kunt kiezen uit de volgende mogelijkheden: Memory Card
favorieten), Calendar (Kalender) en Settings (Ins
4. Het actuele opslagmedium of de optie die actueel geselecteerd is wordt met een witte markering weergegeven.
tellingen).
(Geheugenkaart),
USB Drive
(USB-geheugen), My favourites (Mijn
Geheugenkaart / USB-geheugen / Mijn
1. Druk
na het selecteren van een van de bovenstaande modi op de 'Weergave/Pauze' knop.
afbeelding hieronder):
OPSLAGMEDIUM
BESTANDSN
AAM
favorieten modi:
ACTUELE PAGINA / TOTAAL AANTAL PA
RESOLUTIE VAN
GIN
A'S
Er verschijnen
DE FOTO
nu zes foto's (zie
Gebruik
Gebruik
automatisch weergegeven. Gebruik
Bewerken van een foto
A: alleen voor
1. Druk tijdens de diashow, zodra u de foto ziet die u wilt
2. Druk op de 'Setup' knop om naar het submenu
3. Volg de instructies om de foto te bewerk
de
de 'Weergave/Pauze' knop om de diashow te starten.
knoppen om de foto's te selecteren.
de 'Weergave/Pauze'
'Geheugenkaart' en
'USB-geheugen' modi.
en.
te gaan.
De in het geselecteerde medium opgeslagen foto's worden
knop om de diashow tijdelijk te stoppen of weer te
bewerken, op de 'Weergave/Pauze' knop om bij deze foto te stoppen.
hervatten.
nu
1
Page 26

Nederlandse versie
B: alleen voor 'Mijn
1. Druk tijdens de diashow, zodra u de foto ziet die u wilt
2. Druk
3. Volg de instructies om de foto te bewerk
op de 'Setup' knop om naar het submenu van 'Delete' (Verwijderen) en 'Exit' (Verlaten)
favorieten' modus.
bewerken, op de 'Weergave/Pauze' knop om bij deze foto te stoppen.
en.
te gaan.
K
alender modus
1. Druk
na het selecteren van 'Calendar' (Kalender) op de 'Weergave/Pauze' knop om naar de kalender weergavemodus
Nu
wordt de kalender weergegeven (zie hieronder):
NB:
in het venster rechts kunnen alleen de foto's weergegeven worden die u in 'My favourites' (Mijn favorieten) opgeslagen
Gebruik de 'Exit' knop om naar het hoofdmenu terug te gaan. Ga voor het instellen van datum en tijd naar de
(Instellingen) modus.
'Se
ttings'
te gaan.
heef
t.
Instellingen modus
Druk
na het selecteren van 'Settings' (Instellingen) op de 'Weergave/Pauze' knop om naar het volgende menu
Gebruik
Gebruik
te slaan. Nadat de nieuwe instelling opgeslagen is, keert u automatisch terug naar het submenu.
wilt opslaan, druk dan op 'Exit'. De nieuwe instelling wordt niet opgeslagen en u keert terug naar het
Instellen van datum en tijd:
de
de
knoppen om het submenu te selecteren en druk op 'Weergave/Pauze' om naar het submenu
knoppen om de door u gewenste optie te selecteren en druk op 'Weergave/Pauze' om de nieuwe instelling op
Gebruik de knoppen om de waarden te veranderen en gebruik de 'Setup' knop om van kolom
te gaan:
te gaan.
Als
u de nieuwe instelling
submenu.
te veranderen.
nie
t
NB:
In de 'Zes foto's' of 'Kalender' weergavemodus, kunt u ook naar het submenu gaan door op de 'Setup' knop te drukken.
'Settings' (Instellingen)
ins
tructies.
15
Zie de
Page 27

Wersja
polsk
a
7" cyfrowa ramka do zdjęć
ODTWARZANIE/PAUZA/WPR
LEWO/GÓRA
PRAWO/DÓŁ
WYJDŹ
SETUP
OW
ADŹ
ZŁĄCZE
USB
CZYTNIK KART
ZŁĄCZE
ZASILANIA
SD/MMC
Ak
cesoria
•
Zasilacz
•
Instrukcja obsługi
•
Wspornik
Pierwsze kroki
•
Ustawianie ramki
•
Podłączanie nośników danych
Włóż kartę pamięci zawierającą pliki w obsługiwanych formatach do wejścia czytnika kart ramki lub użyj przenośnej pamięci USB.
Obsługiwane formaty kart: SD/MMC
•
Podłączanie
Włóż jeden koniec kabla zasilacza do gniazda zasilania prądem zmiennym a
do zdjęć.
•
Ramka do zdjęć włącza się automatycznie po podłączeniu do
• Wyłączanie
Po odłączeniu zasilacza, ramka do zdjęć wyłączy
Włączanie
zasilania
drugi koniec do gniazda prądu stałego z tyłu ramki
się.
zasilania.
25
Page 28

Wersja
polsk
a
F
unkcje
Menu główne
1. Po włączeniu urządzenia, przy ustawieniach domyślnych, wyświetli
2. Można teraz używać przycisków strzałek do wybrania żądanej opcji.
się menu główne.
3. Można wybierać spośród następujących opcji: Memory Card (Karta pamięci),
ulubione), Calendar (Kalendarz) i Settings (Us
4. Dostępne nośniki lub aktualnie wybrana opcja są wyróżnione
tawienia).
na biało.
Tryby Memory Card (Karta
1. Po wybraniu jednego z powyższych trybów, naciśnij przycisk
sześć zdjęć, zgodnie z ilustracją poniżej:
NAZWA
PLIKU
pamięci)/USB Drive (Pamięć USB)/My Favorites (Moje ulubione):
„ODTWARZANIE/P
BIEŻĄCA
NOŚNIK
STRONA/WSZYSTKIE STRONY
USB Drive (Pamięć USB), My
AUZA”,
aby go uruchomić. Wyświetlone zost
ROZDZIELCZOŚĆ ZDJĘCIA
favourites (Moje
anie
Użyj przycisków
Naciśnij przycisk
automatycznie po kolei. Do włączenia lub wyłączenia pokazu służy przycisk
Edycja
A:
dotyczy tylko trybu karty pamięci i pamięci USB
1. Podczas pokazu slajdów, kiedy wyświetlone jest zdjęcie, które chcesz poddać edycji, naciśnij przycisk
zatrzymać pokaz na wybranym zdjęciu
2. Naciśnij przycisk „Setup” (Konfiguracja), aby otworzyć podmenu pokazane
3. Postępuj zgodnie z instrukcjami wyświetlanymi na ekranie, aby dokonać edycji
pojedynczego zdjęcia
do wybrania zdjęć.
„ODTWARZANIE/P
AUZA”,
aby włączyć pokaz slajdów. Ramka będzie wyświetlać zdjęcia z wybranego
„ODTWARZANIE/P
poniżej
zdjęcia
AUZA”.
nośnik
a
„Odtwarzanie/Pauza”, aby
2
Page 29

Wersja
polsk
a
B: dotyczy tylko trybu “Moje
1. Podczas pokazu slajdów, kiedy wyświetlone jest zdjęcie, które chcesz poddać edycji, naciśnij przycisk
zatrzymać pokaz na wybranym zdjęciu
2. Naciśnij przycisk „Setup” (Konfiguracja), aby otworzyć podmenu z opcjami „Delete” (Usuń) i „Exit” (W
3. Postępuj zgodnie z instrukcjami wyświetlanymi na ekranie, aby dokonać edycji
ulubione"
„Odtwarzanie/Pauza”, aby
yjdź)
zdjęcia.
Tryb k
alendarza
1. Po wybraniu „Calendar” (Kalendarz), naciśnij przycisk
czym wyświetli się kalendarz, zgodnie z ilustracją poniżej:
„ODTWARZANIE/P
AUZA”,
aby włączyć tryb wyświetlania
Proszę zwrócić uwagę, że tylko zdjęcia zapisane w „Moje ulubione” mogą być wyświetlane w oknie po prawej stronie.
Użyj przycisku „Exit” (Wyjdź), aby powrócić do głównego menu.
Aby ustawić datę
i czas, włącz tryb „Settings” (Us
kalendarza, po
tawienia).
Tryb "Ustawienia"
Po wybraniu „Settings” (Ustawienia), naciśnij przycisk
„Odtwarzanie/Pauza”, aby
otworzyć podmenu pokazane poniżej:
Użyj przycisków
Użyj przycisków
ustawień opcji, urządzenie automatycznie przełączy się do podmenu. Jeśli nie chcesz zapisać nowych ustawień, naciśnij „Exit”
(Wyjdź), aby powrócić do podmenu bez zapisyw
Ustawienia
daty/czasu:
do wybrania podmenu i naciśnij przycisk
do wybrania żądanej opcji i naciśnij przycisk
ania.
„Odtwarzanie/Pauza”, aby je otwor
„Odtwarzanie/Pauza”, aby zapisać ustawienia. Po zapisaniu
zyć.
Za pomocą przycisków
zmieniaj wartość, a przyciskiem „Setup” (Ustawienia) przełączaj na inną k
olumnę.
Uwaga
W
podmenu. Patrz instrukcje na temat „Konf
trybie wyświetlania sześciu zdjęć lub kalendarza można również nacisnąć przycisk „Setup” (Ustawienia), aby otwor
iguracj
27
zyć
Page 30

Українська версія
ПРОГРАТИ/ПАУЗА/ВХІД
ВЛІВО/ВГОРУ
ВПРАВО/ДОНИЗУ
ВИХІД
SETUP
7" цифрова фоторамка
ПОРТ USB
ГНІЗДО КАРТКИ SD/MMC
ПІДКЛЮЧЕННЯ ЖИВЛЕННЯ
Аксесуари
• Адаптер електроживлення
• Керівництво користувача
• Тримач
Перші кроки
• Встановлення фоторамки
• Підключення запам’ятовувального пристрою
Встановіть картку пам’яті, на якій містяться файли в форматі, що підтримується, в гніздо
для картки фоторамки або скористайтесь пам’яттю USB. Підтримувані формати карток:
SD/MMC
• Підключення живлення
Вставте один кінець адаптера живлення в розетку змінного струму, а інший кінець - в
гніздо на задній поверхні
• Увімкнення
Фоторамка вмикається автоматично, коли вона підключена до джерела живлення.
• Вимкнення
Якщо Ви відключите адаптер живлення, фоторамка вимкнеться.
фоторамки.
52
Page 31

Українська версія
Функції
Основне меню
1. Після ввімкнення пристрою на екрані з’явиться основне меню.
2. Після цього Ви зможете використовувати кнопки зі стрілками для вибору необхідних
параметрів.
3. Ви можете обрати наступні варіанти: Memory Card (Картка пам’яті), USB Drive (Носій
USB), My favourites (Улюблені), Calendar (Календар) та Settings (Настройки).
4. Існуючий запам’ятовувальний пристрій або обраний параметр підсвічуються білим.
Режими Memory Card (Картка пам’яті)/USB Drive (Носій USB)/My Favorites (Улюблені):
1. Після вибору будь-якого з вищезгаданих режимів натисніть “PLAY/PAUSE” (ПРОГРАТИ/
ПАУЗА). Ви побачите шість зображень, наведені нижче:
ЗАПАМ’ЯТОВУВАЛЬНИЙ ПРИСТРІЙ
ПОТОЧНА СТОРІНКА/ВСЬОГО СТОРІНОК
ІМ’Я ФАЙЛУ
РОЗДІЛЬНА ЗДАТНІСТЬ
ЗОБРАЖЕННЯ
Скористайтесь кнопками , щоб обрати зображення.
Скористайтесь кнопкою “PLAY/PAUSE” (ПРОГРАТИ/ПАУЗА), щоб увійти в режим слайдшоу. В цьому режимі фотографії з обраного запам’ятовувального пристрою будуть
відображатися автоматично. Скористайтесь кнопкою “PLAY/PAUSE” (ПРОГРАТИ/ПАУЗА),
щоб зупинити або розпочати перегляд.
Редагування однієї фотографії
A: лише для режимів Картка пам’яті та Носій USB
1. В режимі слайд
-шоу коли Ви бачите фотографію, яку Ви бажаєте редагувати, натисніть
кнопку “Play/Pause” (Програти/Пауза), щоб вийти з режиму слайд-шоу.
2. Натисніть кнопку “Setup” (Налаштування), щоб увійти в підменю, як показано нижче
3. Виконайте інструкції для редагування зображення.
53
Page 32

Українська версія
B: лише для режиму “my favorites”
1. В режимі слайд-шоу коли Ви бачите фотографію, яку Ви бажаєте редагувати, натисніть кнопку “Play/Pause”
(Програти/ Пауза), щоб вийти
2. Натисніть кнопку “Setup” (Налаштування), щоб увійти в підменю “Delete” (Видалити) та “Exit”
3. Виконайте інструкції для редагування
Рeжим Calendar
1. Коли обрано режим “Calendar” (Календар), натисніть кнопку “PLAY/PAUSE” (ПРОГРАТИ/ПАУЗА), щоб увійти
режим перегляду календаря, Ви побачите календар, як показано
(Календар)
Будь ласка відмітьте, що в правому вікні можуть відображатися лише фотографії, збережені як “my favourites”
(улюблені)
з
режиму
слайд-шоу.
(Вийти)
зображення.
нижче:
в
(улюблені).
будь ласка, перейдіть до меню ”settings”
Режим Settings
Коли обрано меню “setting” (настройки), натисніть кнопку “Play/Pause” (Програти/Пауза), щоб перейти до
підменю,
Скористайтесь кнопкою “exit” (вихід), щоб повернутися в головне меню. Щоб встановити дату та час,
(настройки).
(Настройки)
як
показано на
малюнку:
Скористайтесь
щоб
ввійти
Скористайтесь
щоб
зберегти настройки. Після збереження настройок Ви автоматично повернетеся до попереднього підменю.
Якщо Ви
збереження
кнопками ,
в підменю.
кнопками ,
не
бажаєте зберігати нові настройки, натисніть “exit” (вихід), щоб повернутися до підменю без
настройок.
щоб обрати необхідне підменю та натисніть кнопку “Play/Pause” (Програти/Пауза),
щоб обрати необхідний параметр, та натисніть “Play/Pause” (Програти/Пауза),
Встановлення
дати/часу:
Скористайтесь
Примітка
В режимі шести зображень або в режимі відображення календаря Ви можете натиснути кнопку “setup”
(налаштування), щоб перейти до підменю; будь ласка, ознайомтесь
кнопками ,
щоб змінити значення, та кнопкою “setup” (налаштування), щоб змінити
з
інструкціями розділу “Setting”
стовпчик.
(Настройки).
Page 33

REMOTE CONTORL
POWER: Press POWER to turn on and off the player.
SETUP: Press for setup.
LEFT: To right thumbnail.
RIGHT: To left thumbnail.
UP: Up to previous thumbnail.
DOWN: Down to next thumbnail.
ENTER: Confirm your operation; Pause/Play photo
EXIT: Exit to the previous menu.
ROTATE: Rotate pictures at 90°/180°/270°.
ZOOM: Zoom in the photo.
SLIDE SHOW: Slide show your digital pictures
at the desired transition effect.
UU
2
Page 34

 Loading...