

GETTING TO KNOW YOUR CAMERA
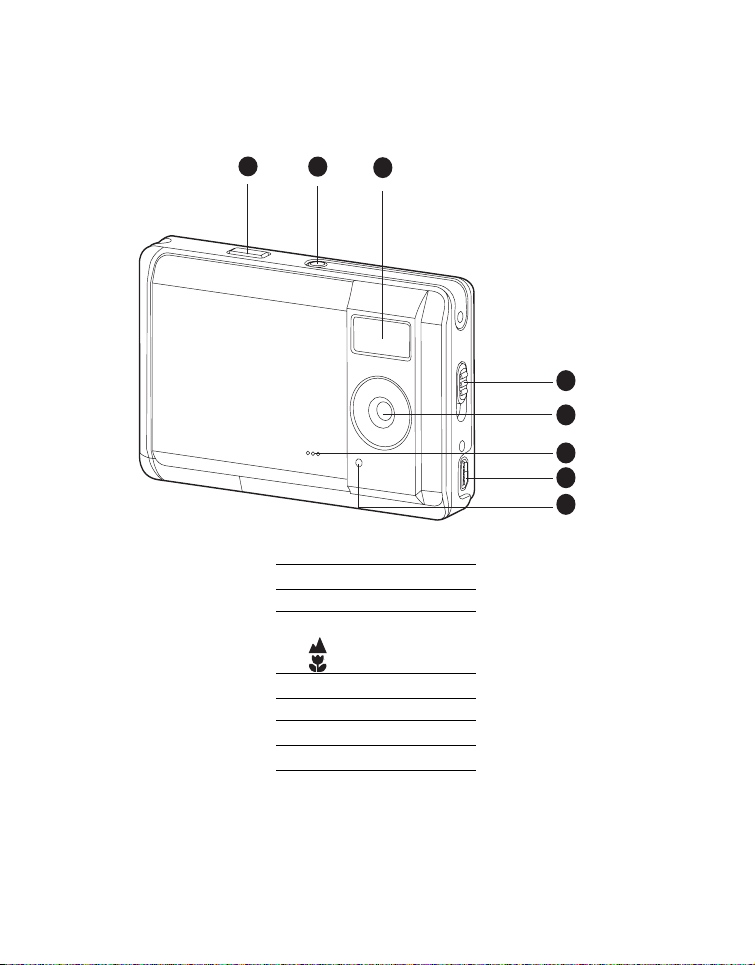
Front View
1
2
1. Shutter button
2. Power button
3. Flash
4. Focus switch
[ ]Normal mode
[ ]Macro mode
5. Lens
6. Beeper
7. USB connector
8. Self-timer LED
3
4
5
6
7
8
EN-1
Rear View
1
2
3
4
5
6
9
8
1. LCD monitor
2. Status LED
3. OK OK button
Digtal Zoom button
4. Strap holder
5. 4-way control button
S
Up button
MENU Menu button
X
Right button
Flash button
T
Down button
MODE
Mode button
W
Left button
Self-timer button
6. Playback button
7. Battery cover
8. SD/SDHC memory card slot
9. Tripod socket
EN-2
7
GETTING STARTED
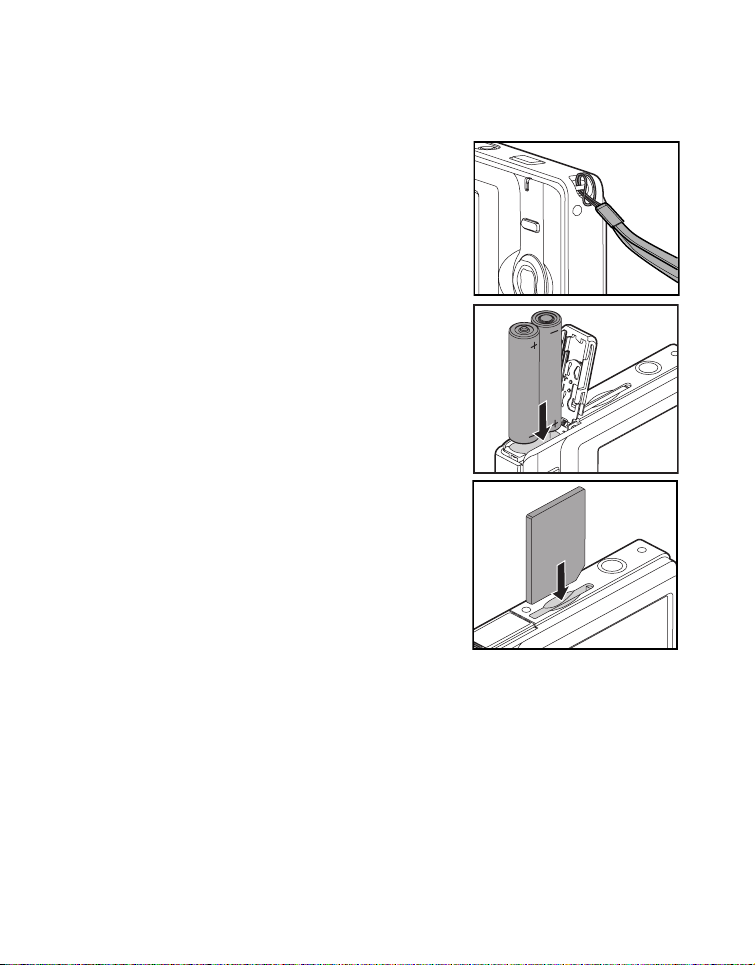
Preparation
1. Attach the camera strap.
2. Open the battery cover.
3. Load the batteries with correct orientation as shown.
4. Close the battery cover and make sure it is locked
securely.
5. Insert an SD/SDHC memory card (Optional).
The camera has 16MB internal memory (13.5MB
available for image storage), but you can load an
SD/SDHC memory card (SDHC memory card up
to 4GB) to expand the camera’s memory
capacity.
Be sure to format the memory card with this
camera before its initial usage.
EN-3

Turning the Power On/Off
Load the battery and insert an SD/SDHC memory card before starting.
Press the POWER button until the digital still camera
turns on.
To turn the power off, press the POWER button
again.
Capturing Images
Your camera is equipped with a 2.48" full color LTPS-TFT LCD monitor to help you compose
images, playback recorded images/video clips or adjust menu settings.
1. Press the Power button to turn the power on.
2. Compose the image on the monitor screen so that the main subject is within the focus
frame.
3. Press the shutter button to capture the image.
Setting the Scene Mode
You can select the scene mode according to the shooting scene. There are 6 available
modes in this scene mode.
[ ] Auto: Select this mode to adjust point-and-shoot action.
[ ] Sport: Select this mode when you want to photograph fast-moving
[ ] Night: Select this mode when you want to capture dark scenes such as
[ ] Portrait: Select this mode when you want to capture an image that makes
[ ] Landscape: Select this mode to capture an image with infinity focus, hard
[ ] Backlight: Select this mode when you want to capture images as the
1. Press the MENU button.
The [Capture] menu is displayed.
2. Select [Scene Mode] with the c / d buttons, then press the OK button.
3. Select the desired scene mode with the c / d buttons, then press the OK button.
4. To exit from the menu, press the e button.
subjects.
night views.
the person stand out against a defocused (blurred) background.
sharpness and high saturation.
light comes from behind the object.
EN-4

Recording Video Clips
VGA
+1/3
59:59
00: 11
100-0001
VGA
This mode allows you to record video clips at a resolution of VGA (640 x 480) / QVGA (320
x 240) pixels.
1. Press the MODE button to set the camera mode
to [ ].
59:59
59:59
2. Compose the image.
3. Press the shutter button.
The recording of the video clip will start.
Pressing the shutter button one more time will
end the recording of the video clip.
The recording time depends on the storage
+1/3
+1/3
VGA
VGA
size and the subject of the image to be
recorded.
Playing Back Video Clips
You can play back recorded video clips on the camera.
1. Press the [ ] button.
The last image appears on the screen.
2. Select the desired video clip with the e / f buttons.
3. Press the OK button.
A press of the f / e buttons during playback
allows fast forward play / fast reverse play.
To stop video playback, press the d button.
This stops playback and returns to the
start of the video clip.
To pause video playback, press the OK button.
This pauses video playback.
To cancel pause, press the OK button again.
00:11
00:11
VGA
VGA
100-0001
100-0001
EN-5

Playing Back Still Images
100 -0 004
2.0 X
You can play back the still images on the LCD monitor.
1. Press the [ ] button.
The last image appears on the screen.
2. The images can be displayed in reverse or forward
sequence with the e / f buttons.
To view the previous image, press the e button.
To view the next image, press the f button.
3. Press the OK / button to adjust the zoom ratio. The
magnification factor is displayed on the LCD monitor.
4. To view different portion of the images,press the c / d
/ e / f button to adjust the display area.
2.0X
2.0X
100-0004
100-0004
EN-6

Erasing Images
Erasing single image / Erasing all images
1. Press the [ ] button.
The last image will be displayed on the screen.
2. Select the image you want to erase with the e / f
buttons.
3. Press the MENU button.
4. Select [Delete] with the c / d buttons and press the
OK button.
5. Select [Single], [All], or [Select] with the c / d
buttons, and press the OK button.
[Single]: Erases the selected image or the last
image.
[All]: Erases all of the images except for the
protected images.
[Select]: Select the image you want to erase in
thumbnail mode.
6. Select [Execute] with the c / d buttons, and press
the OK button.
To not erase, select [Cancel], and press the OK
button.
Delete
Copy to Card
Slide Show
DPOF
Protect
Thumbnail
Delete
Single
All
Select
Delete
Delete This File?
Cancel
Execute
Play
Next Menu
Next Menu
3 sec.
Next Menu
Next Menu
Next Menu
EN-7

TRANSFERRING FILES TO YOUR
COMPUTER
System Requirement
Windows Macintosh
Pentium 166 MHz or higher
Windows 2000/XP/Vista
128MB RAM
128MB hard disk space
CD-ROM drive
Available USB port
Downloading Your Files
1. Connect one end of the USB cable to an available
USB port on your computer.
2. Connect the other end of the USB cable to the USB
terminal on the camera.
3. Select [PC] using the c / d buttons, and press the
OK
button.
4. From the Windows desktop, double click on “My
Computer”.
5. Look for a new “removable disk” icon.
This “removable disk” is actually the memory (or memory card) in your camera.
Typically, the camera will be assigned drive letter “e” or higher.
6. Double click on the removable disk and locate the DCIM folder.
7. Double click on the DCIM folder to open it to find more folders.
Your recorded images and video clips will be inside these folders.
8. Copy & Paste or Drag-N-Drop image and video files to a folder on your computer.
PowerPC G3/G4/G5
OS 9.0 or later
128MB RAM
128MB hard disk space
CD-ROM drive
Available USB port
Mac users: Double-click the “untitled” or “unlabeled” disk drive icon on your desktop. iPhoto
may automatically launch.
EN-8
 Loading...