

Page 1
❚
Introduction
Thank you for purchasing the Roland XP-80 Music
Workstation. The XP-80 effectively combines a synthesizer sound source and sequencer whose performance
and functions are on a par with the Roland XP-50, along
with extended functions for easier operation and a wide
scope of music production. From live performance to
desk top music applications, the XP-80 delivers all the
power to produce great music.
❚
Using the XP-80 manuals
To be able to enjoy the full music-making potential of
the XP-80, become completely familiar with its functionality and have trouble-free use, please take some
time to read this Quick Start and the Owner’s Manual.
Quick Start
This manual explains how you can quickly and easily
begin enjoying the XP-80. To take complete advantage
of the many advanced functions of the XP-80, first read
the Quick Start manual, then the Owner’s Manual.
Owner’s Manual
Be sure to read Chapter 1 which explains XP-80 basic
concepts and operation. The remaining chapters can be
read for more information as necessary, referring to the
contents or indices.
❚
Contents
Names and functions of buttons and
controls..............................................2
Connect your XP-80..........................6
Turn the power on.............................7
Play a demo song..............................8
Play sounds.....................................10
Reset to default factory settings.................................10
Select and play Patches.............................................10
Play percussion sounds from the keyboard...............11
Try out performance functions ...................................12
Play arpeggios (Arpeggiator) .....................................14
Try out the demo disk.....................15
Listen to the demo songs...........................................15
Play back a pattern by pressing specific keys (RPS).16
Combine Patterns for playback..................................16
Add rhythmic ‘feel’ to the songs.................................18
Try out some user groove templates..........................18
Playing songs in sequence (Chain Play)....................20
Record a song.................................21
Select a Performance.................................................21
Clear internal memory................................................22
Record the drums using realtime recording...............22
View the recorded data..............................................25
Record the bass using step recording........................25
Record the melody using realtime recording..............27
Create an appropriate Performance
for the song .....................................29
Select a different Patch for the melody......................29
Assign a new name to the Performance....................29
Store the Performance...............................................30
Save your new song........................31
Format a disk .............................................................31
Save your song to disk...............................................32
DanceKit...........................................33
Profiles of composers.....................36
1
QUICK START
Copyright 1996 ROLAND CORPORATION
All rights reserved. No part of this publication may be
reproduced in any form without the written permission of
ROLAND CORPORATION.
Page 2
2
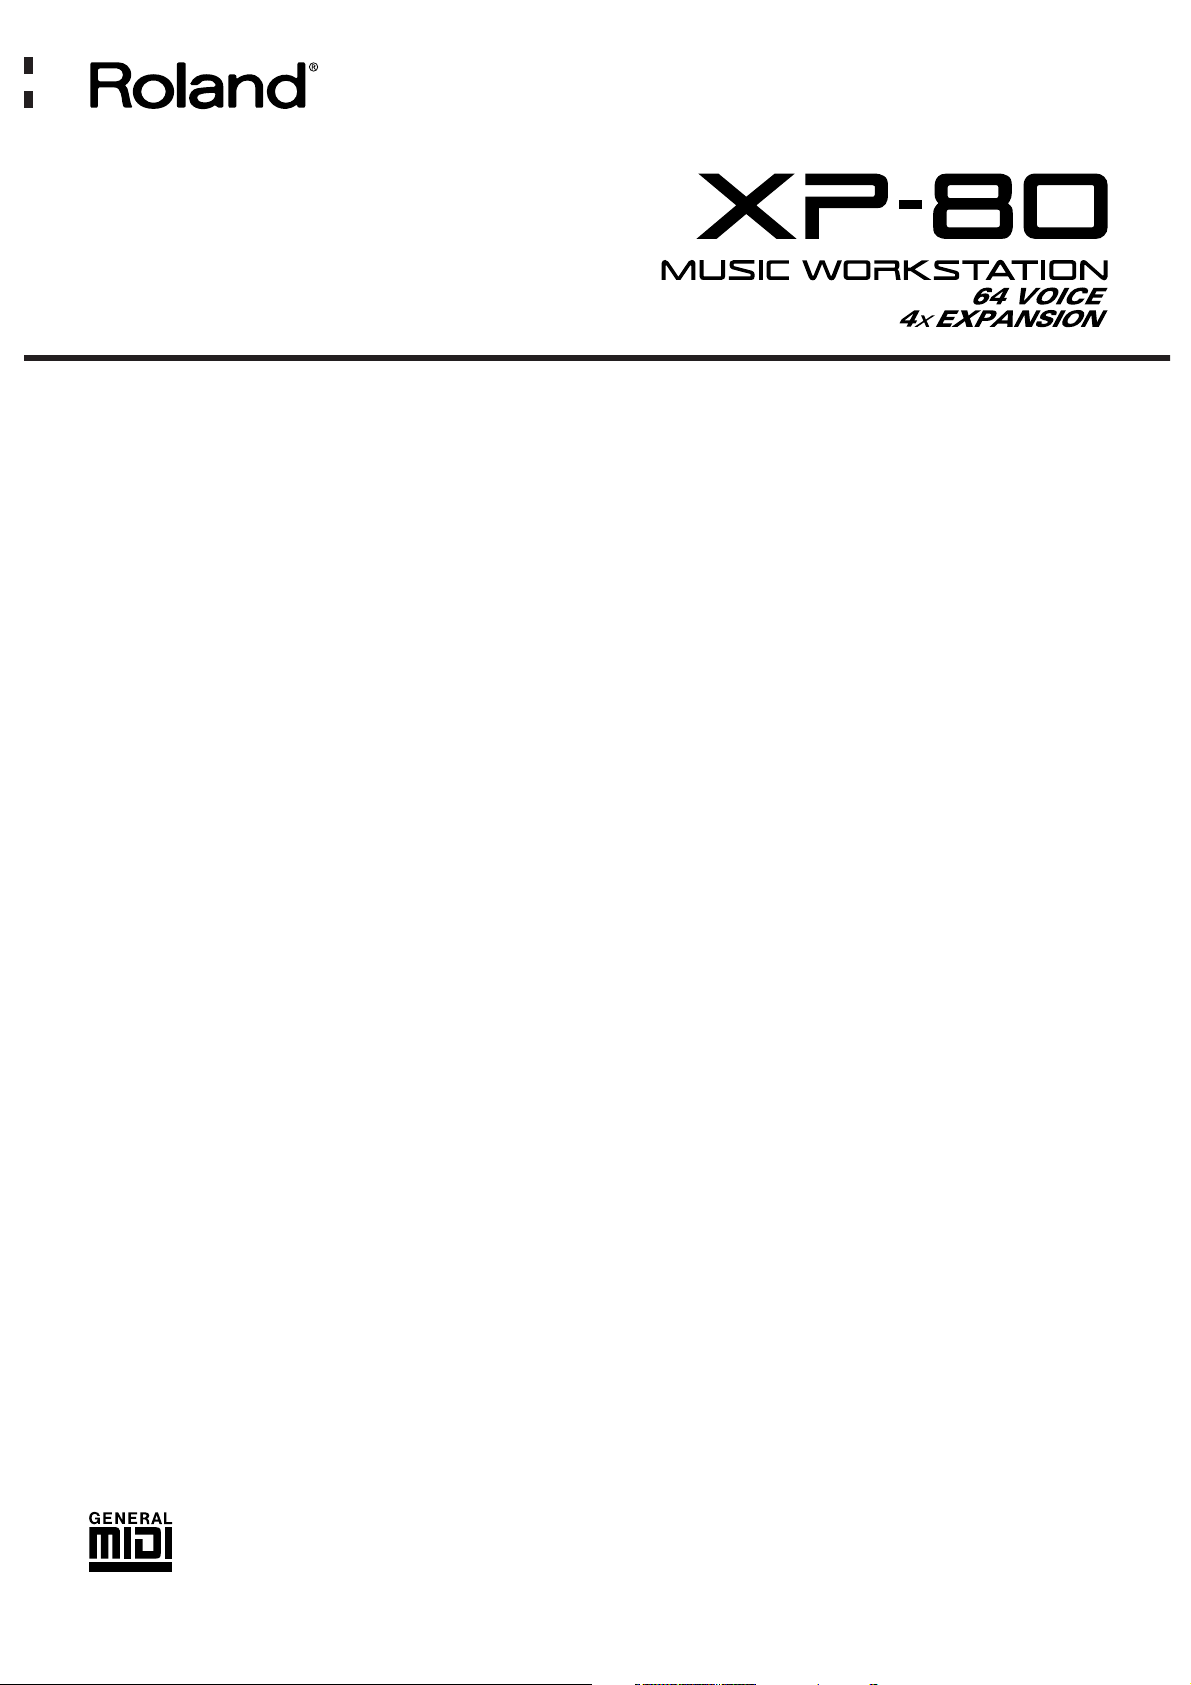
❚
Front panel
A. SOUND PALETTE section
Use the four sliders to modify sounds in real time.
[FILTER/ENV]
Press this button ON when modifying filter and/or
envelope settings in real time using the four sliders.
[LEVEL]
Press this button ON when adjusting volume balance
in real time using the four sliders.
B. KEY EFFECTS section
The buttons in this section allow you to assign various
functions to the keys of the XP-80’s keyboard.
[RPS]
Switches RPS on/off.
[ARPEGGIO]
Switches Arpeggiator on/off.
[PORTAMENTO]
Switches Portamento on/off.
[SOLO]
Specifies playing a single note at a time.
[TRANSPOSE]
Specifies transposing the keyboard in semitone steps.
[+OCT], [-OCT]
These buttons adjust the pitch of the keyboard in
octave steps.
Pressing either of these buttons while holding down
[TRANSPOSE] allows you to set the desired amount
of transposition.
C. MODE section
The buttons in this section select modes. The button
indicator of the selected mode will light.
D. EFFECTS section
The buttons in this section turn their respective internal effects (EFX, Chorus and Reverb) on/off.
[EFX]
Switches the multiple effects unit (EFX) on/off.
[CHORUS]
Switches Chorus on/off.
[REVERB]
Switches Reverb on/off.
E. [F1]–[F6] (Function buttons)
Each of these buttons corresponds to a function indicated at the display bottom. The functions of these
buttons change depending on the selected mode or the
current display.
F.
[LOCAL/TX/RX]
This button opens the LOCAL/TX/RX window for
switching Local, Transmit and Receive switches
on/off.
[EXIT]/[PANIC]
The function of this button changes depending on
whether you hold down [SHIFT] or not.
EXIT: Press this button to return to the Play display of
a mode, or when you want to cancel the current operation.
PANIC: If notes stick or do not sound, hold down
[SHIFT] and press this.
GM PANIC
F1
EFFECTS
MODESOUND PSOUND PALEALETTETE
KEY EFFECTS
F2 F3 F4 F5 F6
EXIT
CHAIN PLAYSEQUENCER
RHYTHMPATCH
UNDO/ REDO
l
LOCATE
+ OCT- OCTTRANSPOSE
PORTAMENTO SOLO
ARPEGGIO
REVERBCHORUSEFX
SOUND LIST
12345678
9 10111213141516
12345678
1
TRACK/ PART
TRACK/ PART
BANK
NUMBER
2345678
LOCAL/ TX/ RX
PERFORMFILTER/ ENV
l
LEVEL
UTILITYSYSTEM DISK
RPS
FILTER/ENV
l
LEVEL
1
DECAYRESO. ATTACKCUTOFF
234
PART
TEMPO/ BEAT PA TTERN
TONE SWITCH
TONE SELECT
DEMO
A B
C
D
G
E
K
F
F
a/b/c/d
Names and functions of buttons and controls
Page 3
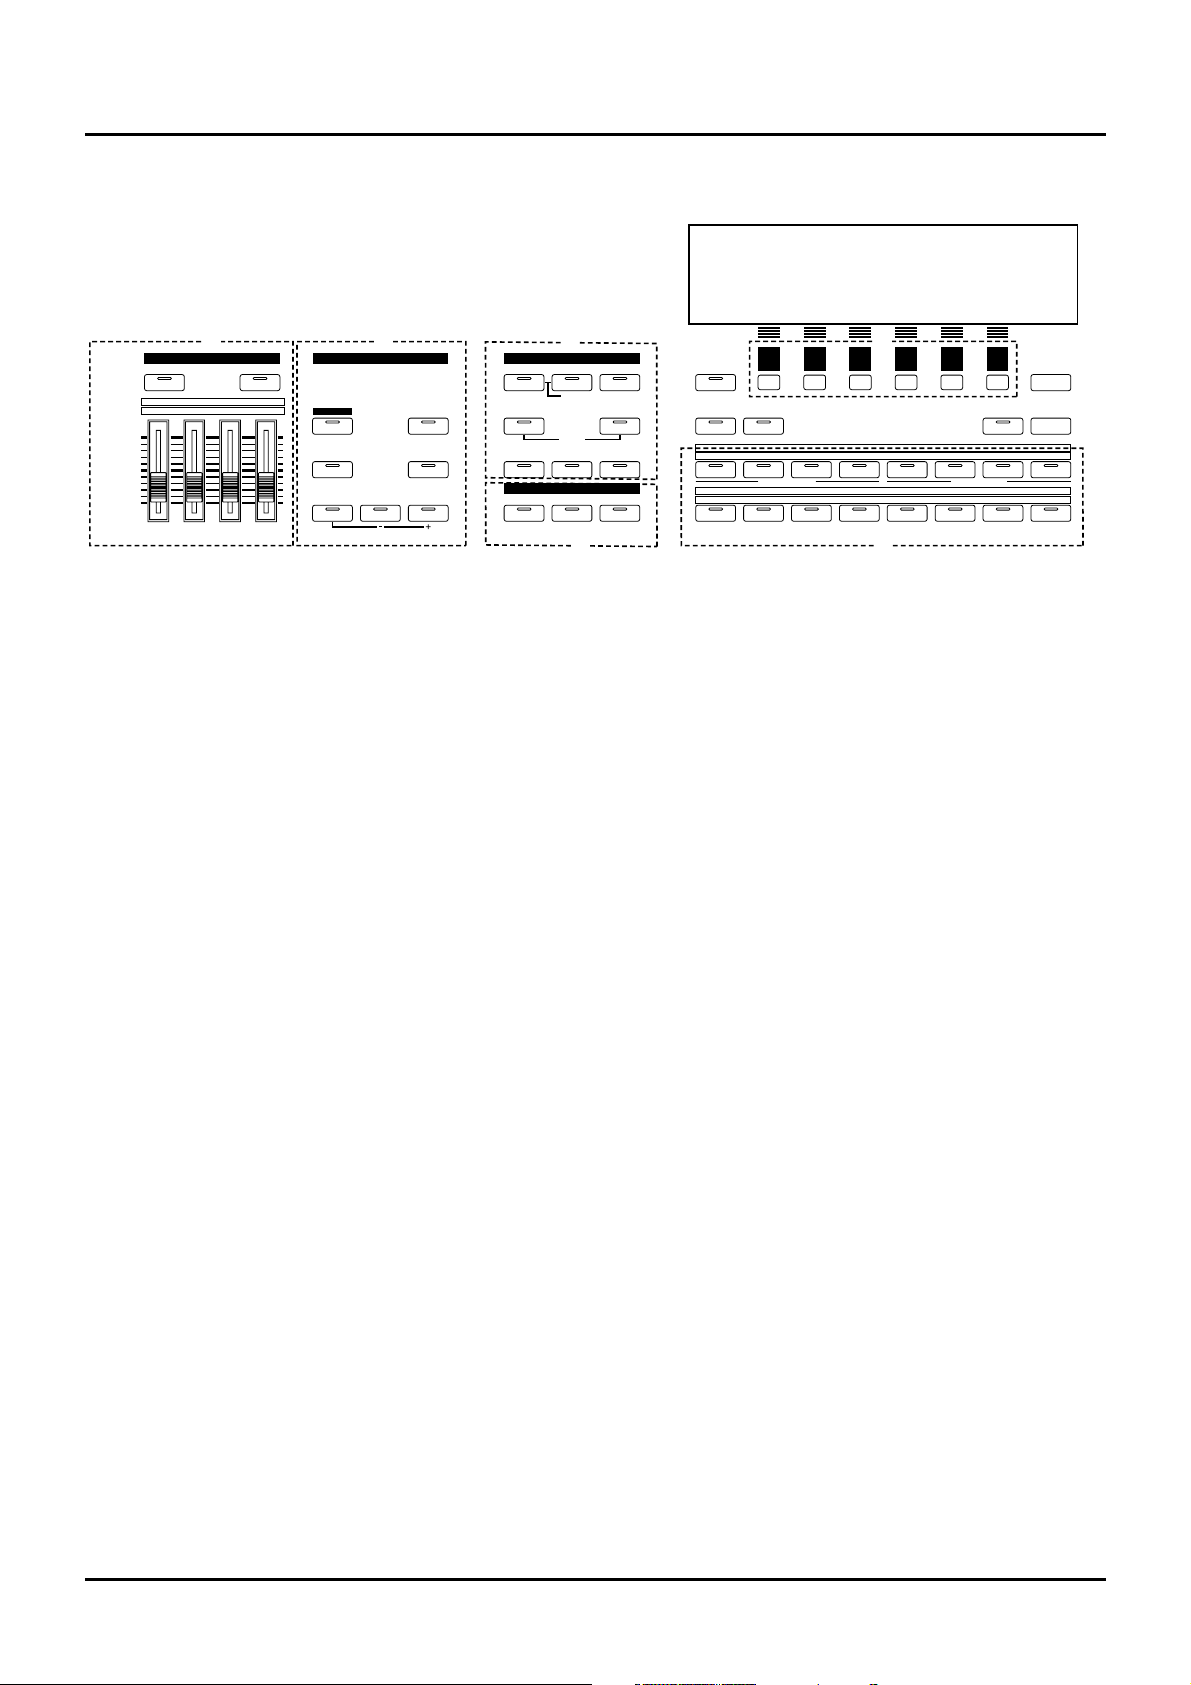
[SOUND LIST] / [TEMPO/BEAT]
The function of this button changes depending on the
selected mode.
SOUND LIST: Opens the Sound List window when a
sound source mode display is up.
TEMPO/BEAT: Press this button for selecting a tempo
track or beat track when a Sequencer mode display is
up. If you have temporarily modified the tempo and
wish to play back the song with its initial tempo, press
it while holding down [SHIFT].
[a/b/c/d] / [PATTERN]
The function of this button changes depending on the
mode on display.
a/b/c/d: Select a subgroup (a/b/c/d) when selecting
a Patch/Performance/Rhythm Set using the
Bank/Number method.
PATTERN: Select a Pattern when a Sequencer mode
display is up.
[LOCATE]
This button opens the Locate window to specify and
move the locate position.
[UNDO/REDO]
Press this button to restore a modified value to its previous (pre-modified) state, or when cancelling recording or a currently executing operation. Pressing this
button again will restart the recording/operation.
G.
BANK [1]–[8], NUMBER [1]–[8] / TRACK / PART
[1]–[16]
The functions of these buttons change depending on
the display which is showing.
Play display of a sound source mode: Selects a
Patch/Performance/Rhythm Set with the Bank
/Number method. Use BANK [1]–[8] buttons to select
a bank and NUMBER [1]–[8] buttons to select a number.
Performance edit display: Use TRACK/PART [1]–[16]
buttons to select the Part to be modified.
Patch edit display: TRACK/PART [1]–[4] buttons
(TONE SWITCH) are used to switch a Tone on/off.
Use TRACK/PART [5]–[8] buttons (TONE SELECT) to
select the Tone to be modified.
Rhythm Set edit display: Use TRACK/PART [5]–[8]
buttons (TONE SELECT) to select the note of the keyboard to be modified.
Sequencer mode: Use TRACK/PART [1]–[16] buttons
to select a phrase track or Part. During song playback/recording, these buttons can be used to switch
between the Play and Mute of a phrase track.
H.
[l], [r], [u], [d] (Cursor buttons)
Move the cursor (black box) with these.
[INC], [DEC]
Use these buttons to modify values. If you keep on
holding down one button and pressing the other, the
value change accelerates. If you press one of these buttons while holding down [SHIFT], the value will
change in bigger increments.
I. SEQUENCER section
The buttons in this section are used for playback and
recording of the XP-80’s sequencer.
[REC]
Press this to begin recording.
BEAT indicator
This blinks in sync with the tempo and beat of the
song.
[LOOP]
Press this to turn Loop Play and Loop Recording
on/off.
[BWD]
Press this to “rewind” a song. Pressing this button
while holding down [SHIFT] moves you right back to
the beginning of the song. If you hold down this button as you press [FWD], the song will “rewind” faster.
[STOP/PLAY]
Press this button to start or stop playback of the song.
3
E F
G
B
C
A DIGIT HOLD
l
D
3
3
3
+ -
SEQUENCER
YZ!VWXSTU
PQRMNOJKL
GHIDEFABC
ENTERSHIFT SPACE
REC BEAT
BWD FWDSTOP/ PLAY
l
I
LOOP
DEC INC
VALUE
0
123
456
789
L
H
I
J
Page 4
4
[FWD]
Use this button to fast-forward the song. Pressing this
button while holding down [SHIFT] moves you to the
end of the song. If you hold down this button as you
press [BWD], the song will fast-forward faster.
J.
[0]–[9] (Numeric keys)
Use these to set a value. They can be used to enter
numeric values as well as alphabetical characters and
notes.
[SHIFT]
This is used in combination with other buttons. Some
buttons on the front panel include grey-printed characters. They indicate the button’s function when
[SHIFT] is held down.
[ENTER] / [DIGIT HOLD]
The function of this button changes depending on
whether [SHIFT] is being held down or not.
ENTER: Use this button to finalize a value.
DIGIT HOLD: Press this button while holding down
[SHIFT] to turn the Digit Hold function on/off. With
the Digit Hold on, the 100’s place and 10’s place will
be fixed and only the 1’s place will change. This means
that you can select Patches simply by pressing the
numeric key for the 1’s place, without having to press
[ENTER].
K.
Display
Shows various information for the currently selected
function or operation.
L.
VALUE dial
This dial is used to modify values. If you hold down
[SHIFT] as you turn the VALUE dial, the value will
change in greater increments.
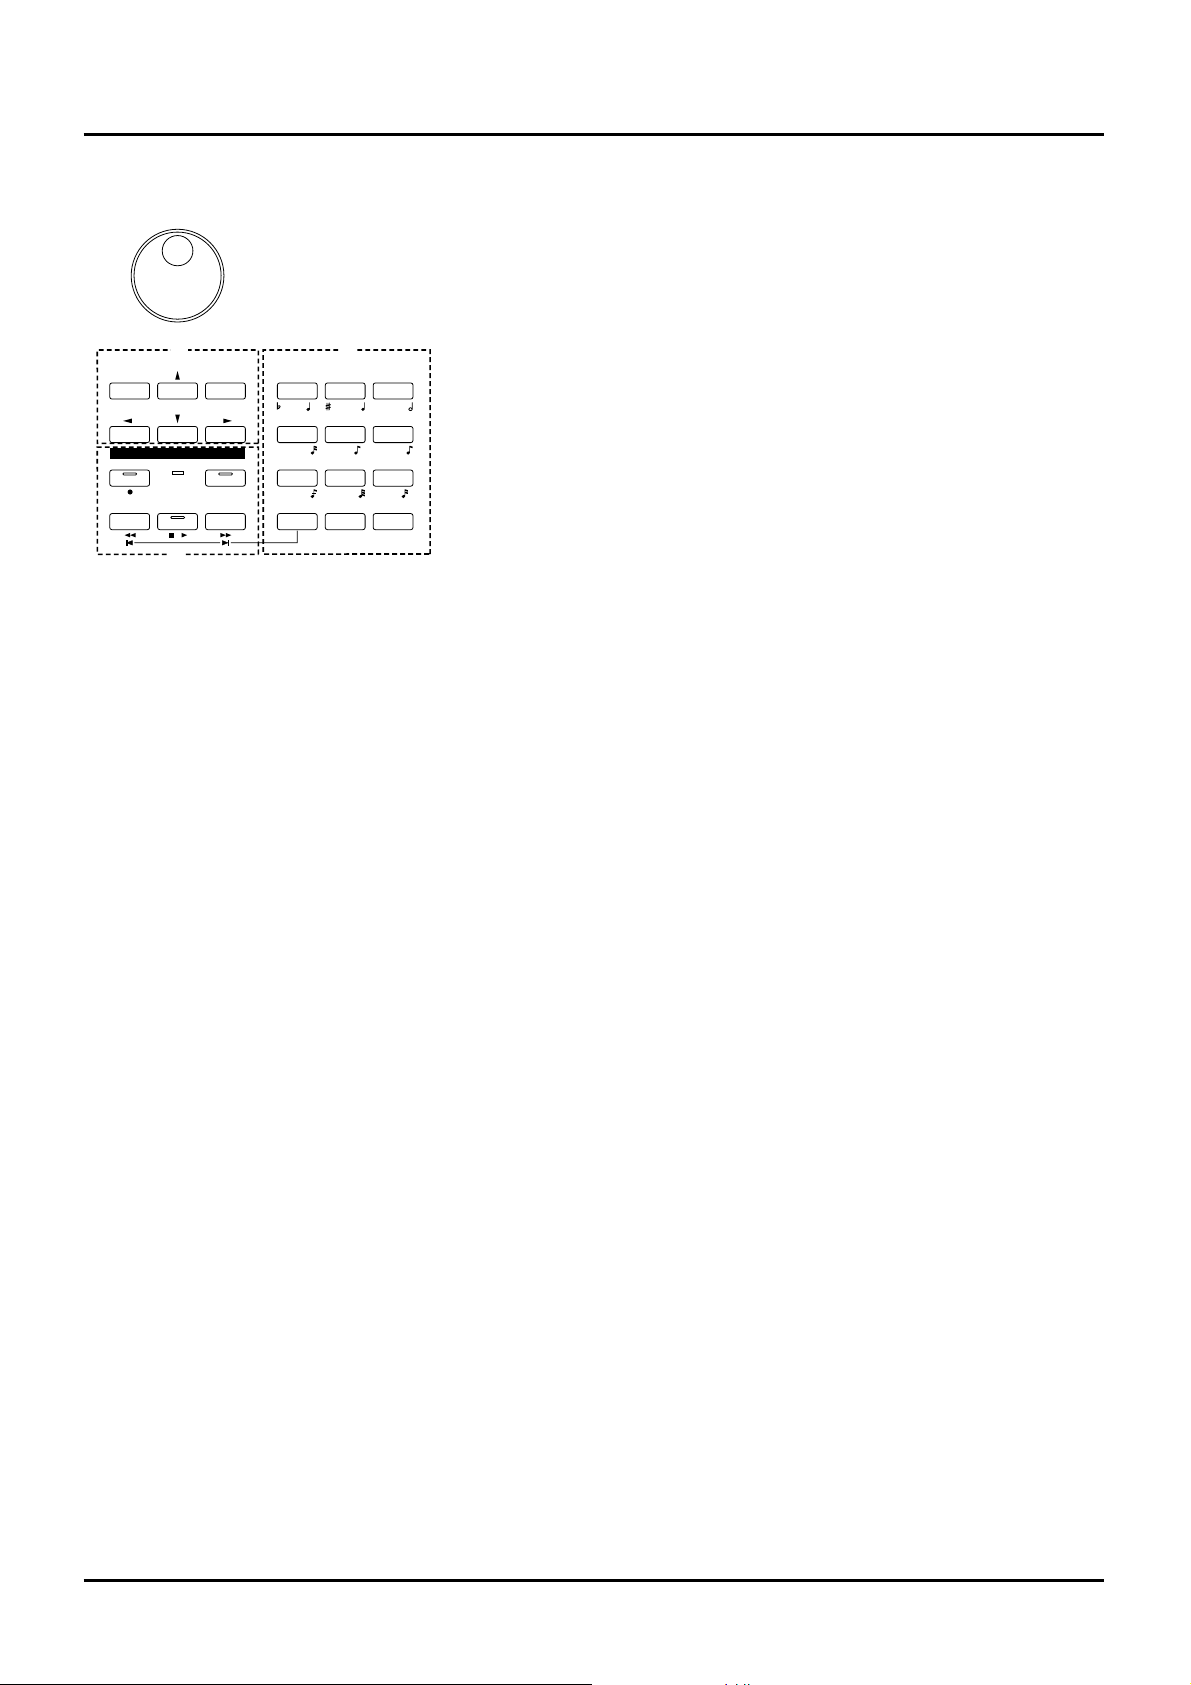
❚
Side panel
VOLUME slider
This slider adjusts the overall output level from the
rear panel OUTPUT and PHONES jacks.
C1 slider, C2 slider
Various parameters or functions can be assigned to
these sliders, so you can control the sound source section as you play.
Pitch bend / modulation lever
This allows you to control pitch bend or apply vibrato.
Depending on the settings, other specified parameters
can also be controlled.
Floppy disk drive
3.5” 2DD/2HD floppy disks can be used. Press the
eject switch located at the lower right of the disk drive
to remove a disk.
VOLUME C2C 1
Page 5
❚
Rear panel
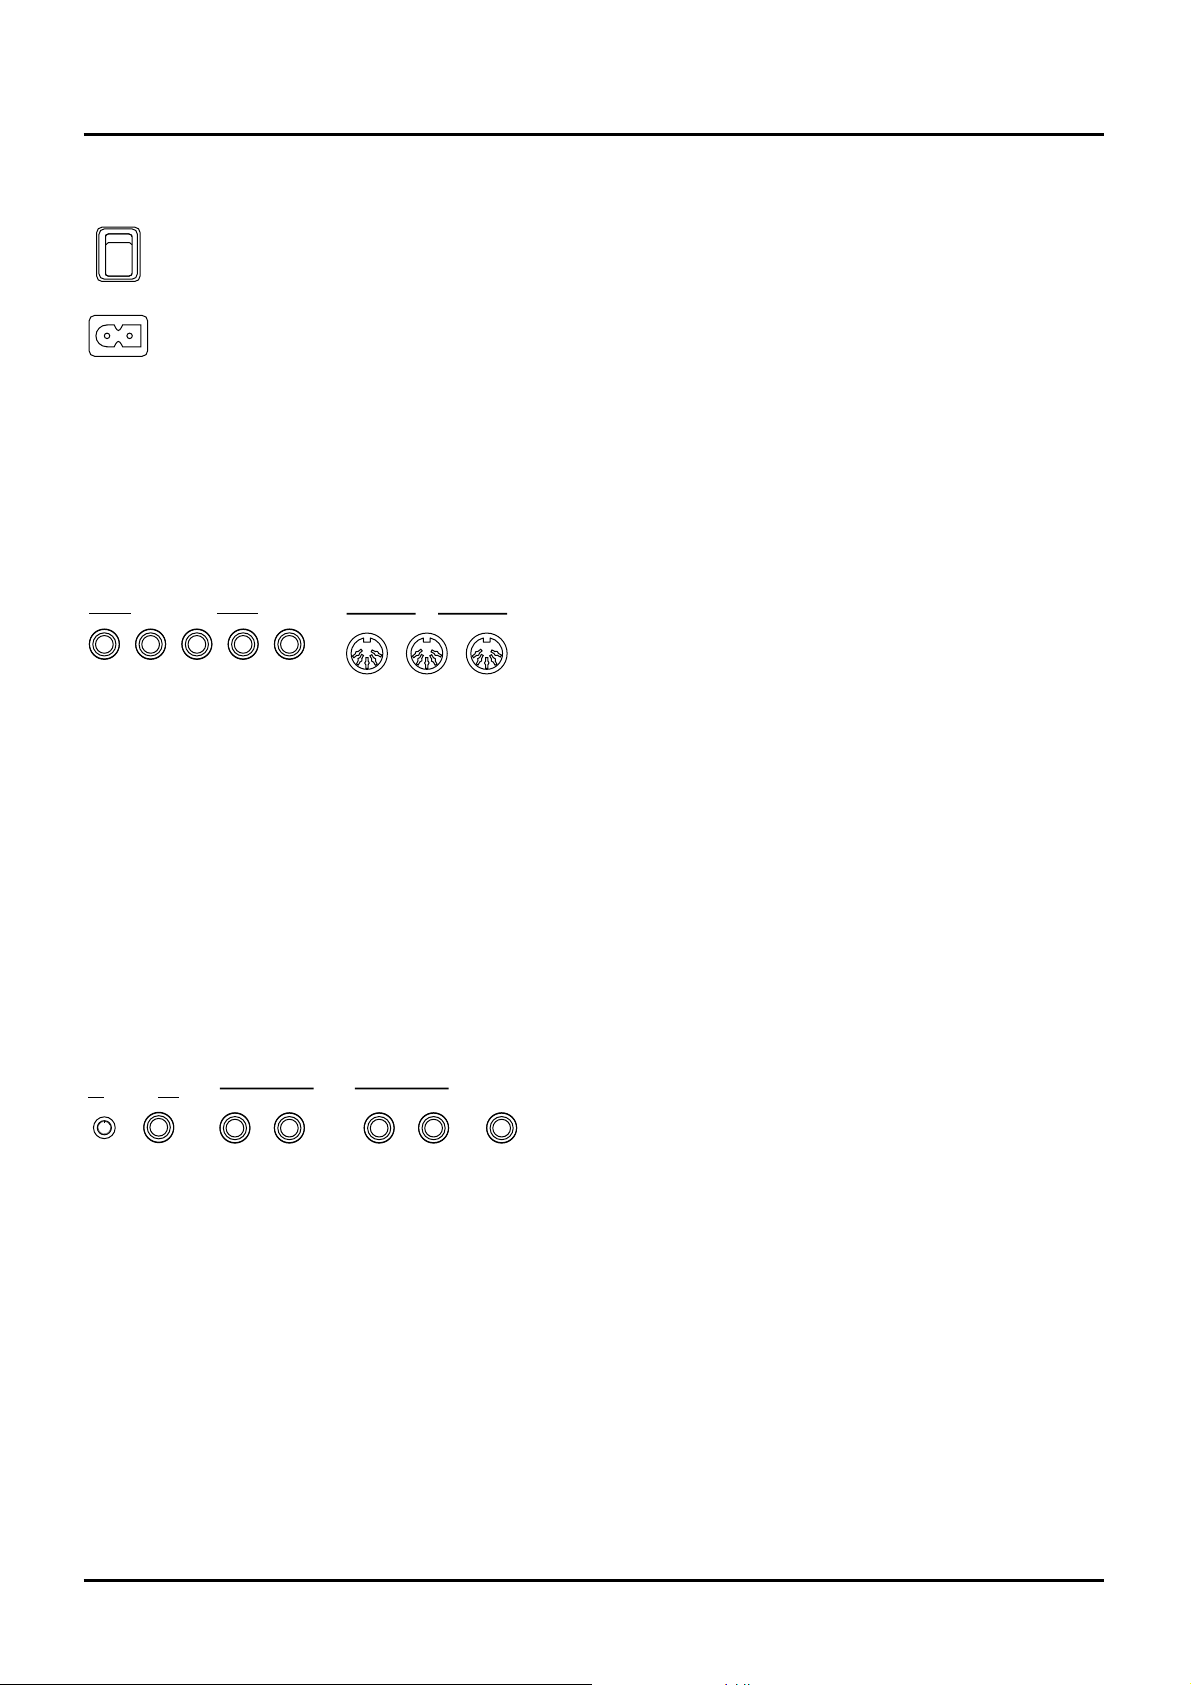
Power switch
Press to turn the power on/off.
AC inlet
Connect the AC power cable (included) to this inlet.
✳ With units rated for 117V operation, the AC cable is
already connected to the unit.
CONTROL PEDAL 1–4 jacks
You can connect optional expression pedals to these
jacks. By assigning a desired function to a pedal, you
can use it to select or modify sound or perform various other control. You can also connect optional pedal
switches to sustain sound.
HOLD jack
An optional pedal switch can be connected to this jack
for use as a hold pedal.
MIDI connectors
These connectors can be connected to other MIDI
devices to receive and transmit MIDI messages.
CLICK OUT LEVEL knob
Adjusts the level of the click sound to be output to
external devices.
CLICK OUT OUTPUT jack
Connect a cable to this jack when sending clicks to
external devices.
OUTPUT DIRECT R jack, OUTPUT DIRECT L jack
These jacks output only the direct sound (no effects
applied) or EFX’d sound in stereo.
OUTPUT MIX R jack, OUTPUT MIX L jack
These jacks output the audio signal to the connected
mixer/amplifier system in stereo. For mono output,
use the L jack.
PHONES jack
An optional set of headphones can be connected to
this jack. Make sure that your headphones have an
impedance of 8–150 ohms.
AC
POWER
OUTTHRU
IN
MIDI
1
CONTROL PEDAL
324
HOLD
R
OUTPUTLEVEL
OUTPUT
CLICK OUT
L
R
PHONES
L
MIX
DIRECT
5
Page 6
6
The XP-80 does not contain an amp or speakers. In order to hear sound, you will need to connect it to a keyboard amp, audio system, or headphones. Refer to the following diagram and
connect the XP-80 to the external equipment you are using.
<Procedure>
❶ Before you make connections, make sure that power is turned off for all devices.
✳ If the power is on when you make connections, you may damage your speakers.
❷ Connect supplied AC power cable to the XP-80, and plug the other end into an AC power out-
let.
✳ On 117V models the AC cable is permanently attached to the unit.
❸ Connect audio cables and MIDI cables as shown in the diagram. If you are using headphones,
plug them into the PHONES jack. Connect pedal switches or expression pedals as necessary.
✳ In order to take full advantage of the XP-80’s performance, we recommend using a stereo
amp/speaker system, If you are using a mono system, make you connections to the MIX OUTPUT jack L.
✳ CONTROL PEDAL 1–4 jacks can also accommodate pedal switches.
R
o
la
n
d
R
o
la
n
d
Power outlet
Expression pedal or pedal switch
Pedal Switch
External MIDI device
Sterero headphones
Stereo set, etc. Speaker with built-in amp,
keyboard amp, etc.
OUTTHRU
IN
MIDI
1
CONTROL PEDAL
3
2
4
HOLD
AC
POWER
OUTPUT
R
PHONES
L
MIX
Connect your XP-80
Page 7
Once the connections have been completed (p.6), turn on power to your various devices in the
order specified. By turning on devices in the wrong order, you risk causing malfunction and/or
damage to speakers and other devices.
<Procedure>
❶ Before you turn the power on, check to make sure that:
All external devices are correctly connected to the XP-80.
The volume controls of the XP-80 and the amp/mixer system are turned down all the way.
No disk is in the floppy disk drive.
❷ Turn on the power switch located on the rear panel of the XP-80.
✳ This unit is equipped with a protection circuit. A brief interval (a few seconds) after power up
is required before the unit will operate normally.
❸ Turn the power on of your amp or audio system.
❹ Play the XP-80 and gradually raise the volume controls of the XP-80, your amp or mixer to an
appropriate volume level.
✳ Be careful not to raise the VOLUME slider of the XP-80 too much. Excessive volume may dam-
age your amp/speaker system or could cause hearing problems.
To turn power off
<Procedure>
❶ Before you turn power off, check to make sure that:
The volume controls of the XP-80 and the amp/mixer system are turned down all the way.
No disk is in the floppy disk drive.
Important data has been saved to a disk (p.32).
❷ Turn off your amp/mixer system.
❸ Turn off the XP-80 power.
POWER
VOLUME C2C 1
7
Turn the power on
Page 8
8
The XP-80 contains a demo song and you use ‘demo play’ to play it. It’s the easiest introduction
to the XP-80’s exceptional sounds and effects.
✳ If you play a demo song, the current song existing in internal memory will be lost. To keep the
song in the internal memory, save the song to disk (p.32) before executing demo play.
Demo song Composer
The AXE Alex Wurman Copyright © 1996 Sonart Productions BMI
✳ Warning: All rights reserved. Unauthorized use of the demo song for concerts, broadcasting, or
any other purposes than personal enjoyment, as well as storage to disk form a violation of
applicable laws.
✳ Refer to page 36 for the profile of the composer.
<Procedure>
❶ Hold down [SEQUENCER] and press [CHAINPLAY].
The confirmation message “DEMO PLAY OK?” will appear.
❷ Press [F5] (OK) to start demo song playback.
If you wish to cancel playback, press [F6] (Cancel). Playback will stop automatically when the
song ends. To interrupt playback, press [STOP/PLAY] again.
❸ You can control the volume level or effects parameters of each Part during playback. To modify
the values, press [PERFORM] and follow the procedure below.
GM
MODE
CHAIN PLAYSEQUENCER
RHYTHMPATCHPERFORM
UTILITYSYSTEM DISK
PART
DEMO
F1 F2 F3 F4 F5 F6
EXIT
LOCAL/ TX/RX
SEQUENCER
REC BEA T
BWD FWDSTOP/ PLAY
l
I
LOOP
DEC INC
PANIC
3
2
11
Play a demo song
Page 9
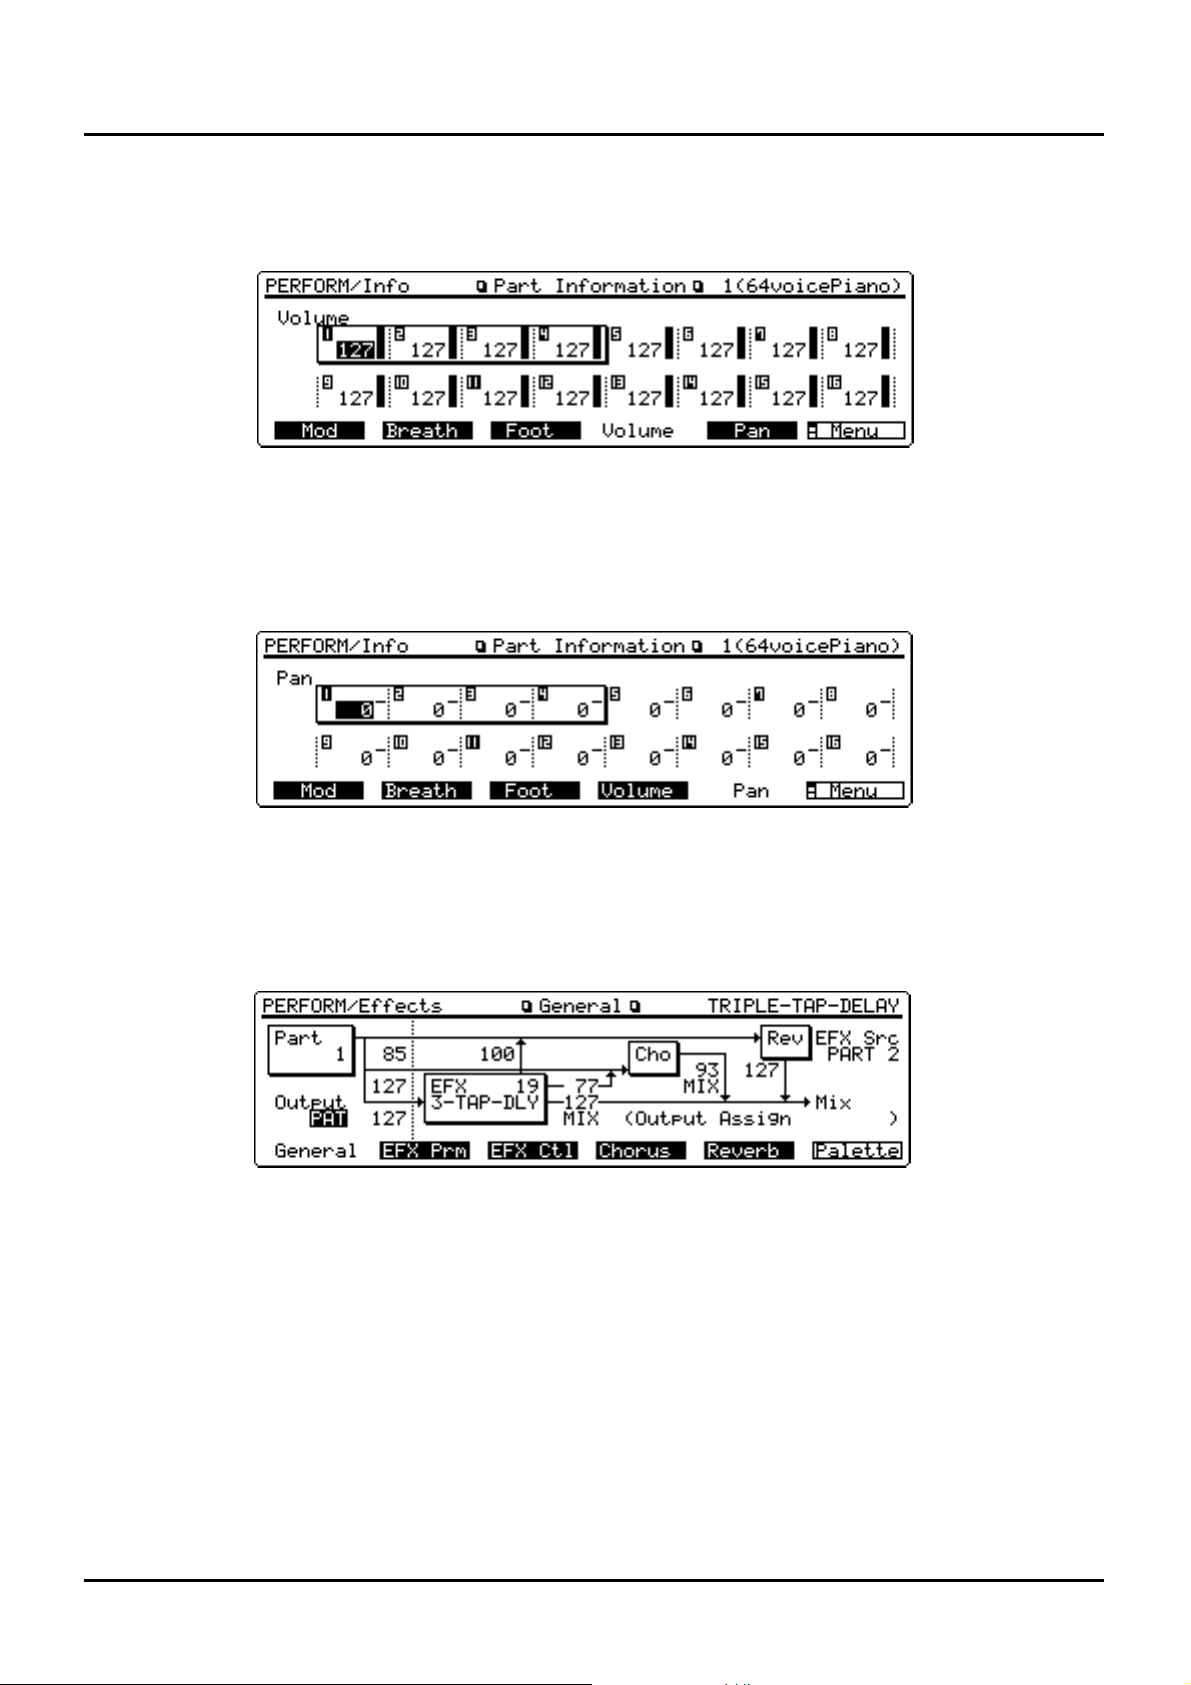
To modify the volume level of each Part
Press [F6] (Info), then [F4] (Volume) to call up the Part Information display for Volume. Press
[l], [r], [u] or [d] to move the cursor (black box) to the Part whose volume level you want to
modify and set the desired volume level.
To change panning
Press [F6] (Info), then [F5] (Pan) to call up the Part Information display for Pan. Press [l], [r],
[u] or [d] to move the cursor (black box) to the Part whose panning you want to change and
set the desired panning value.
To modify effects settings
Press [F5] (Effects) to call up the General display, then select the Part whose effects settings you
want to modify by pressing TRACK/PART [1]–[16]. Next press [l], [r], [u] or [d] to move
the cursor (black box) to the parameter you want to modify and specify the value.
✳ You can also modify other parameters. For details regarding each parameter, refer to
“Functions of Performance parameters” (p.65) in the Owner's Manual.
9
Page 10
10
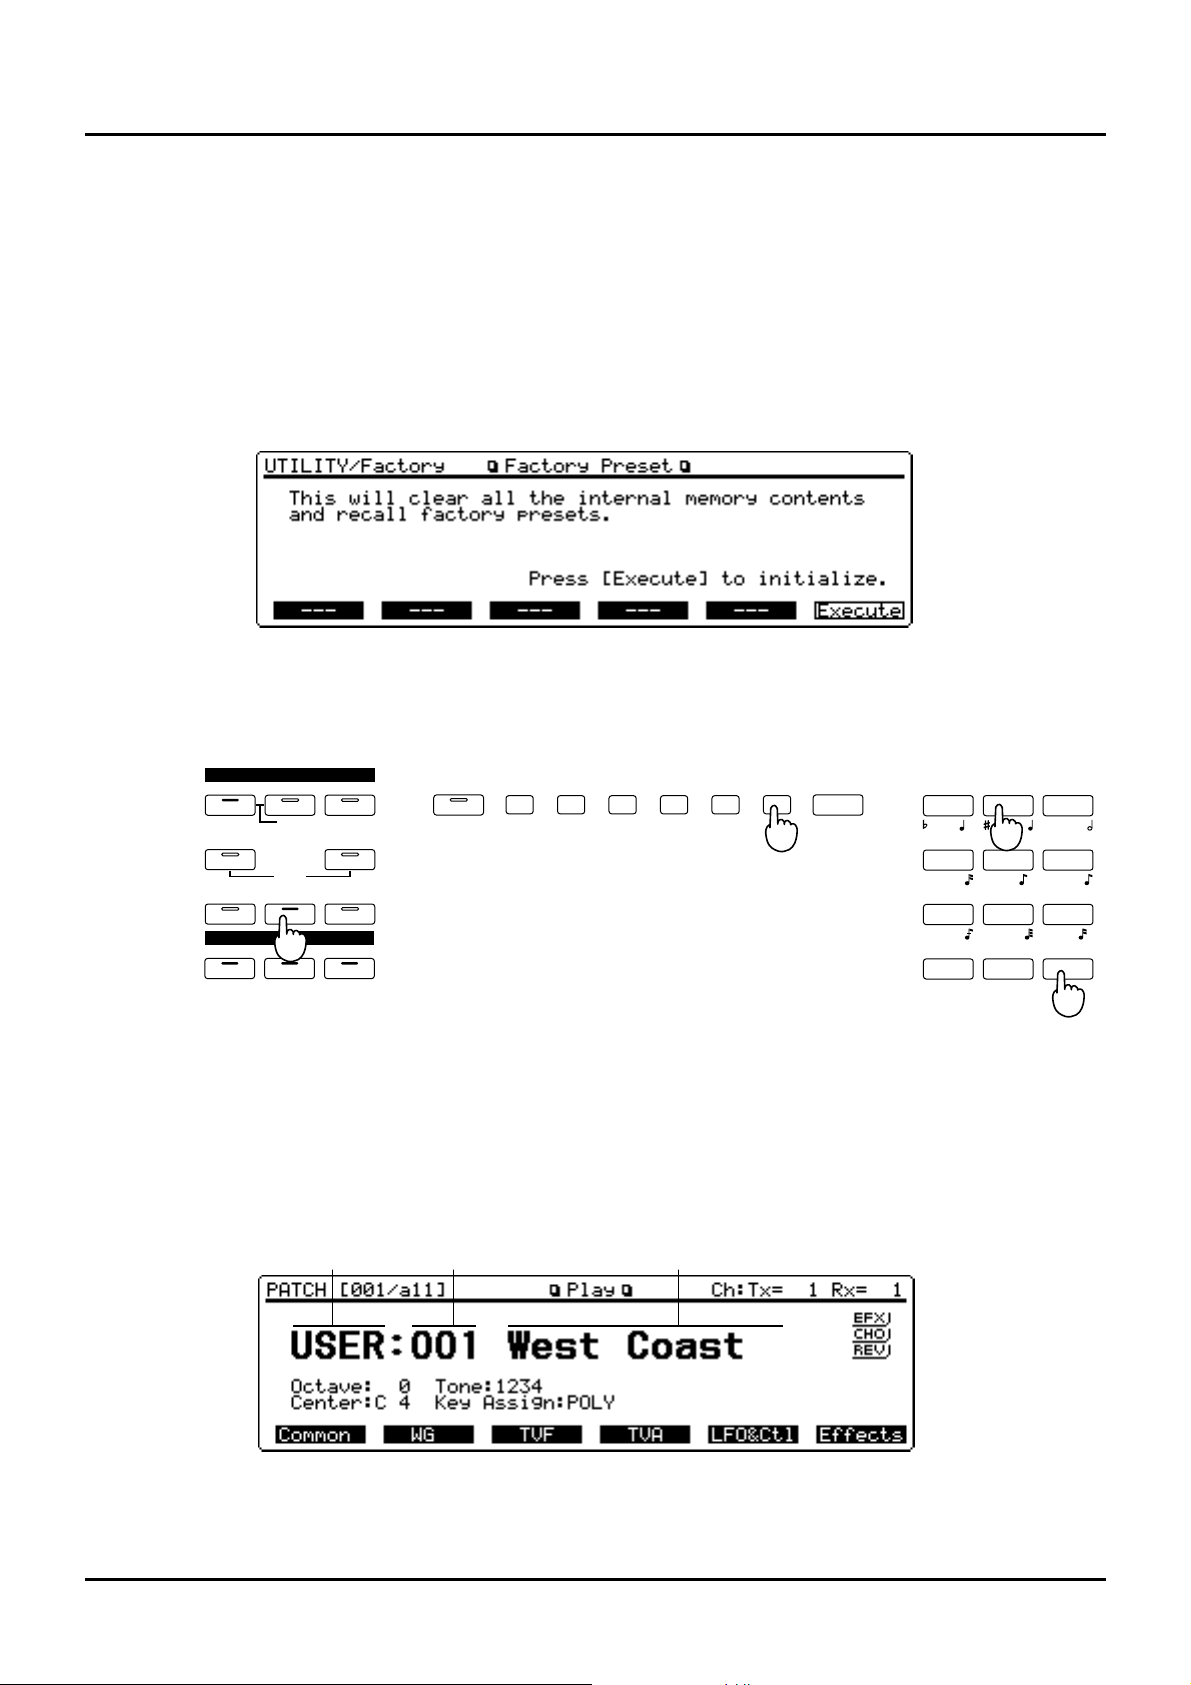
Reset to default factory settings
Before using XP-80 for the first time, reset it to its default factory settings using Factory Preset.
Different settings may result in unexpected effects.
✳ Factory Preset operation resets all data in the internal memory and user memory to factory pre-
sets. Save any important data to a disk before executing this operation (p.168) in the XP-80
Owner’s Manual.
<Procedure>
❶ Press [UTILITY].
❷ Press the numeric key [8], then [ENTER].
The Factory Preset display (UTILITY/Factory) will appear.
❸ Press [F6] (Execute).
If “Write Protect ON” message is displayed, press [DEC] to turn the setting OFF. After pressing
[EXIT] to clear the message, press [F6] (Execute) again to reset to the factory preset settings.
Select and play Patches
The XP-80 contains a large number of sounds ready for you to play. The sounds that you select
and play on the XP-80 are generally called ‘Patches.’ Here’s how to select and play Patches.
<Procedure>
❶ Press [PATCH].
The Play display (PATCH) will appear.
GM
MODE
CHAIN PLAYSEQUENCER
RHYTHMPATCHPERFORM
UTILITYSYSTEM DISK
PART
DEMO
F1 F2 F3 F4 F5 F6
EXIT
LOCAL/ TX/RX
PANIC
EFFECTS
REVERBCHORUSEFX
EF
G
B
C
A DIGIT HOLD
l
D
+ -
YZ!VWXSTU
PQRMNOJKL
GHIDEFABC
ENTERSHIFT SPACE0
123
456
789
1
3
2
2
Patch group Patch number Patch name
Play sounds
Page 11
❷ Play the keyboard and listen to the sound.
❸ To select a different Patch, turn the VALUE dial or press [INC]/[DEC].
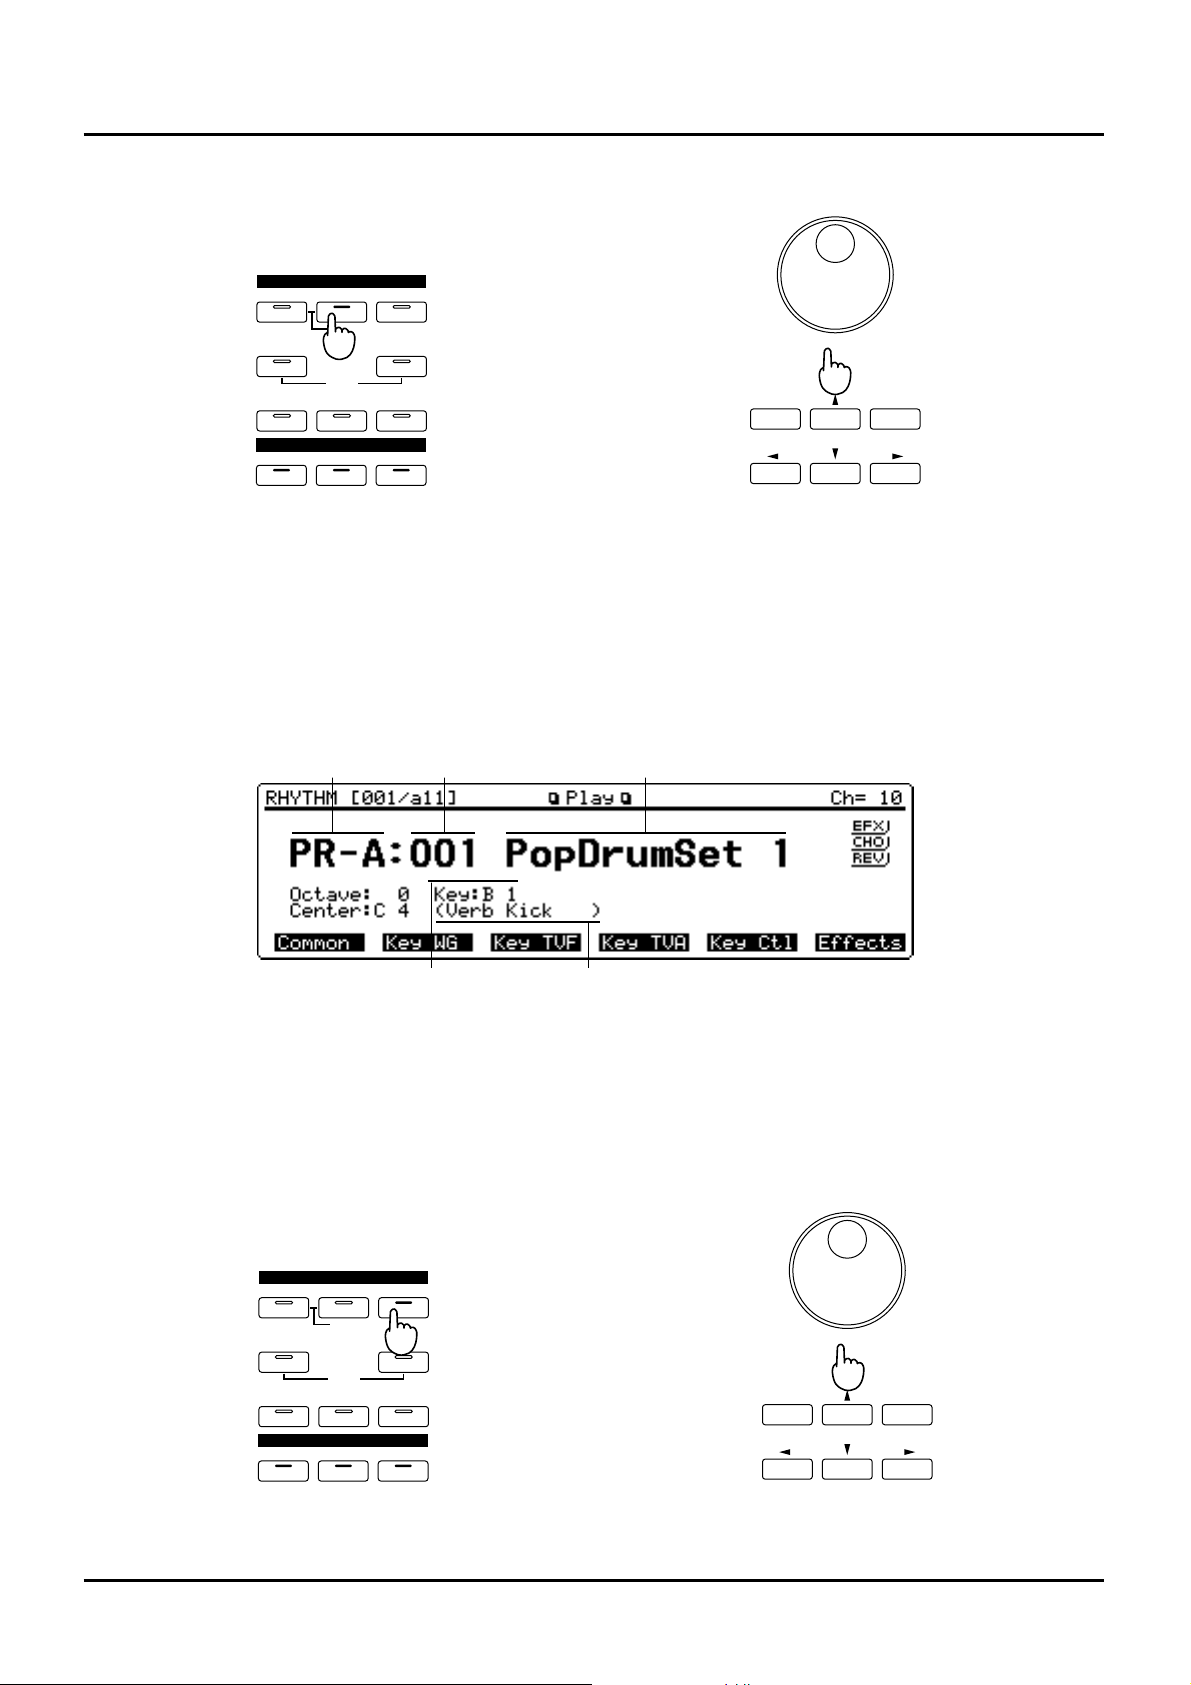
Play percussion sounds from the keyboard
The XP-80’s Rhythm Sets contain a wide variety of percussion sounds and special effects.
Here’s how to select a Rhythm Set and play percussion sounds.
<Procedure>
❶ Press [RHYTHM].
The Play display (RHYTHM) will appear.
❷ Press different keys to play different percussion instruments.
The display will indicate the last-pressed key (note name) and the percussion instrument (wave
name) assigned to that key.
✳ The percussion instrument played by each key will depend on the selected Rhythm Set. For
details, refer to “Factory preset settings” (p.206) in the Owner’s Manual.
❸ To select another Rhythm Set, turn the VALUE dial or press [INC]/[DEC].
GM
MODE
CHAIN PLAYSEQUENCER
RHYTHMPATCHPERFORM
UTILIT YSYSTEM DISK
PART
DEMO
EFFECTS
REVERBCHORUSEFX
DEC INC
VALUE
1
3
Rhythm set group Rhythm set number Rhythm set name
Note name Wave name
GM
MODE
CHAIN PLAYSEQUENCER
RHYTHMPATCHPERFORM
UTILIT YSYSTEM DISK
PART
DEMO
EFFECTS
REVERBCHORUSEFX
DEC INC
VALUE
1
3
11
Page 12
12
Try out performance functions
The XP-80 provides various controllers that can modify the sound. While playing patches, try
out these controllers and listen to effects they can produce.
✳ The effect that the controllers have will depend on the settings of the selected Patch. If the
effects of the controllers are difficult to detect, select another Patch.
Velocity/Aftertouch
The force with which you play the keyboard (velocity) can affect the volume or timbre of the
sound. Aftertouch (pressure you apply to a key after playing a note) can also affect the sound.
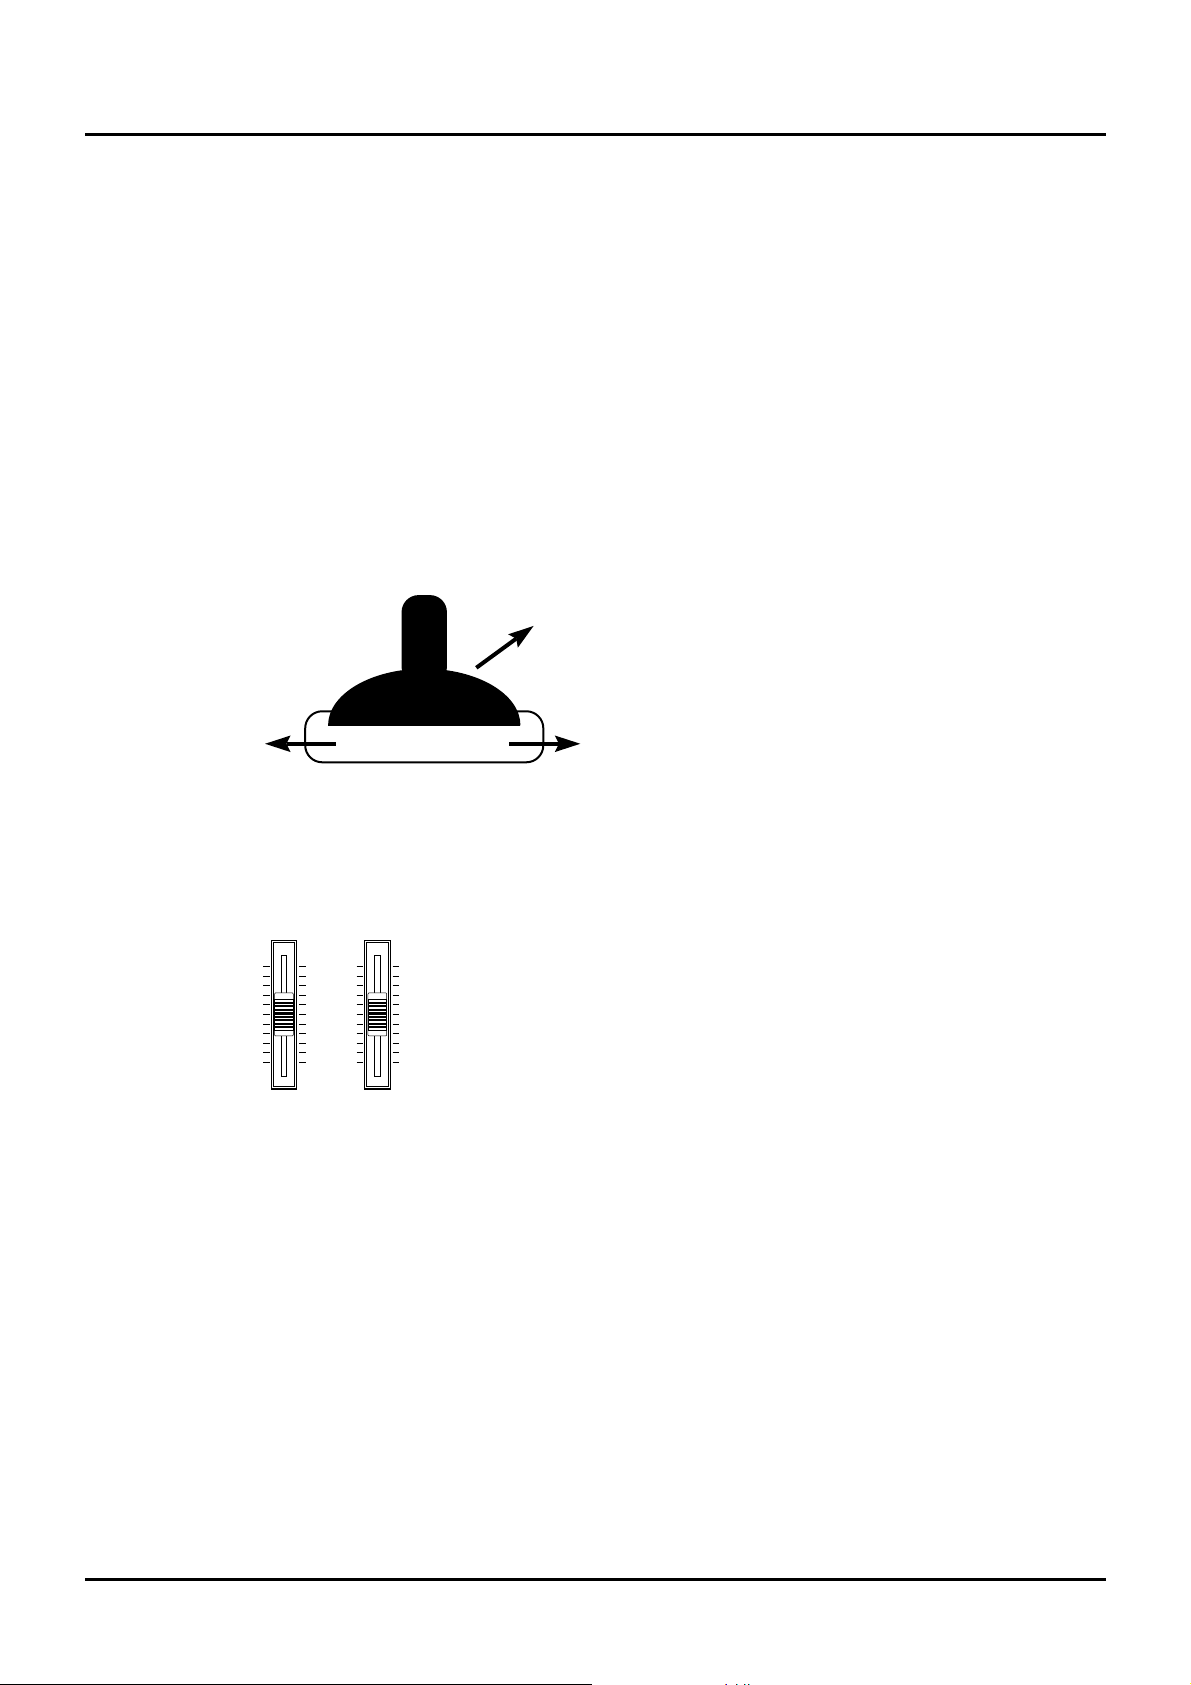
Pitch Bend/Modulation lever
While playing the keyboard, move the lever to the left to lower the pitch, or to the right to raise
the pitch. This is known as ‘Pitch Bend.’ You can also apply vibrato by manipulating the lever
away from you. This is known as ‘Modulation.’
If you move the lever away from you and at the same time move it to the right or left, you can
apply both effects simultaneously.
C1 slider/C2 slider
While playing the keyboard, you can move the sliders up or down to modify the volume level
or timbre.
✳ How sound varies depends on the current setting. For details, refer to “XP-80 operating envi-
ronment setup (System parameters and their functions)” (p.88) in the Owner’s Manual.
Hold pedal
If an optional pedal switch is connected to the rear panel HOLD jack, pressing the pedal switch
will sustain (hold) the sound even if the keys are released.
Expression pedal
If an optional expression pedal is connected to any of the rear panel CONTROL PEDAL jacks
1–4, you can use the pedal to control the volume or timbre of sound.
✳ How sound will vary depends on the current setting. For details, refer to “XP-80 operating
environment setup (System parameters and their functions)” (p.88) in the Owner’s Manual.
Pitch Bend
Modulation
C2C1
Page 13

Solo
You can play using single notes, by pressing [SOLO] (indicator lights). This function is especially effective when playing a sax, flute or other monophonic instrument.
Using [PORTAMENTO] with [SOLO] ON allows you to simulate performance techniques like
violin glissandos.
✳ For details, refer to “Playing single notes (Solo)” (p.28) in the Owner’s Manual.
Portamento
As you play the keyboard, you can make pitch slide smoothly from one key to another, by
pressing [PORTAMENTO] (indicator lights).
✳ For details, refer to “Creating smooth pitch changes (Portamento)” (p.28) in the Owner’s
Manual.
Sound Palette
While playing the keyboard, you can move the sliders up or down to modify volume level or
sound character.
To change sound character, press [FILTER/ENV] to light the indicator and move the sliders.
To change the volume level, press [LEVEL] to light the indicator and move the sliders.
✳ For details, refer to “Quick sound character changes (Sound Palette)” (p.28) and (p.32) in the
Owner’s Manual.
KEY EFFECTS
+
OCT- OCTTRANSPOSE
PORTAMENTO SOLO
ARPEGGIO
RPS
KEY EFFECTS
+
OCT- OCTTRANSPOSE
PORTAMENTO SOLO
ARPEGGIO
RPS
SOUND PSOUND PALEALETTETE
FILTER/ ENV
l
LEVEL
FILTER/ENV
l
LEVEL
1
DECAYRESO. ATTACK
CUTOFF
23
4
13
Page 14
14
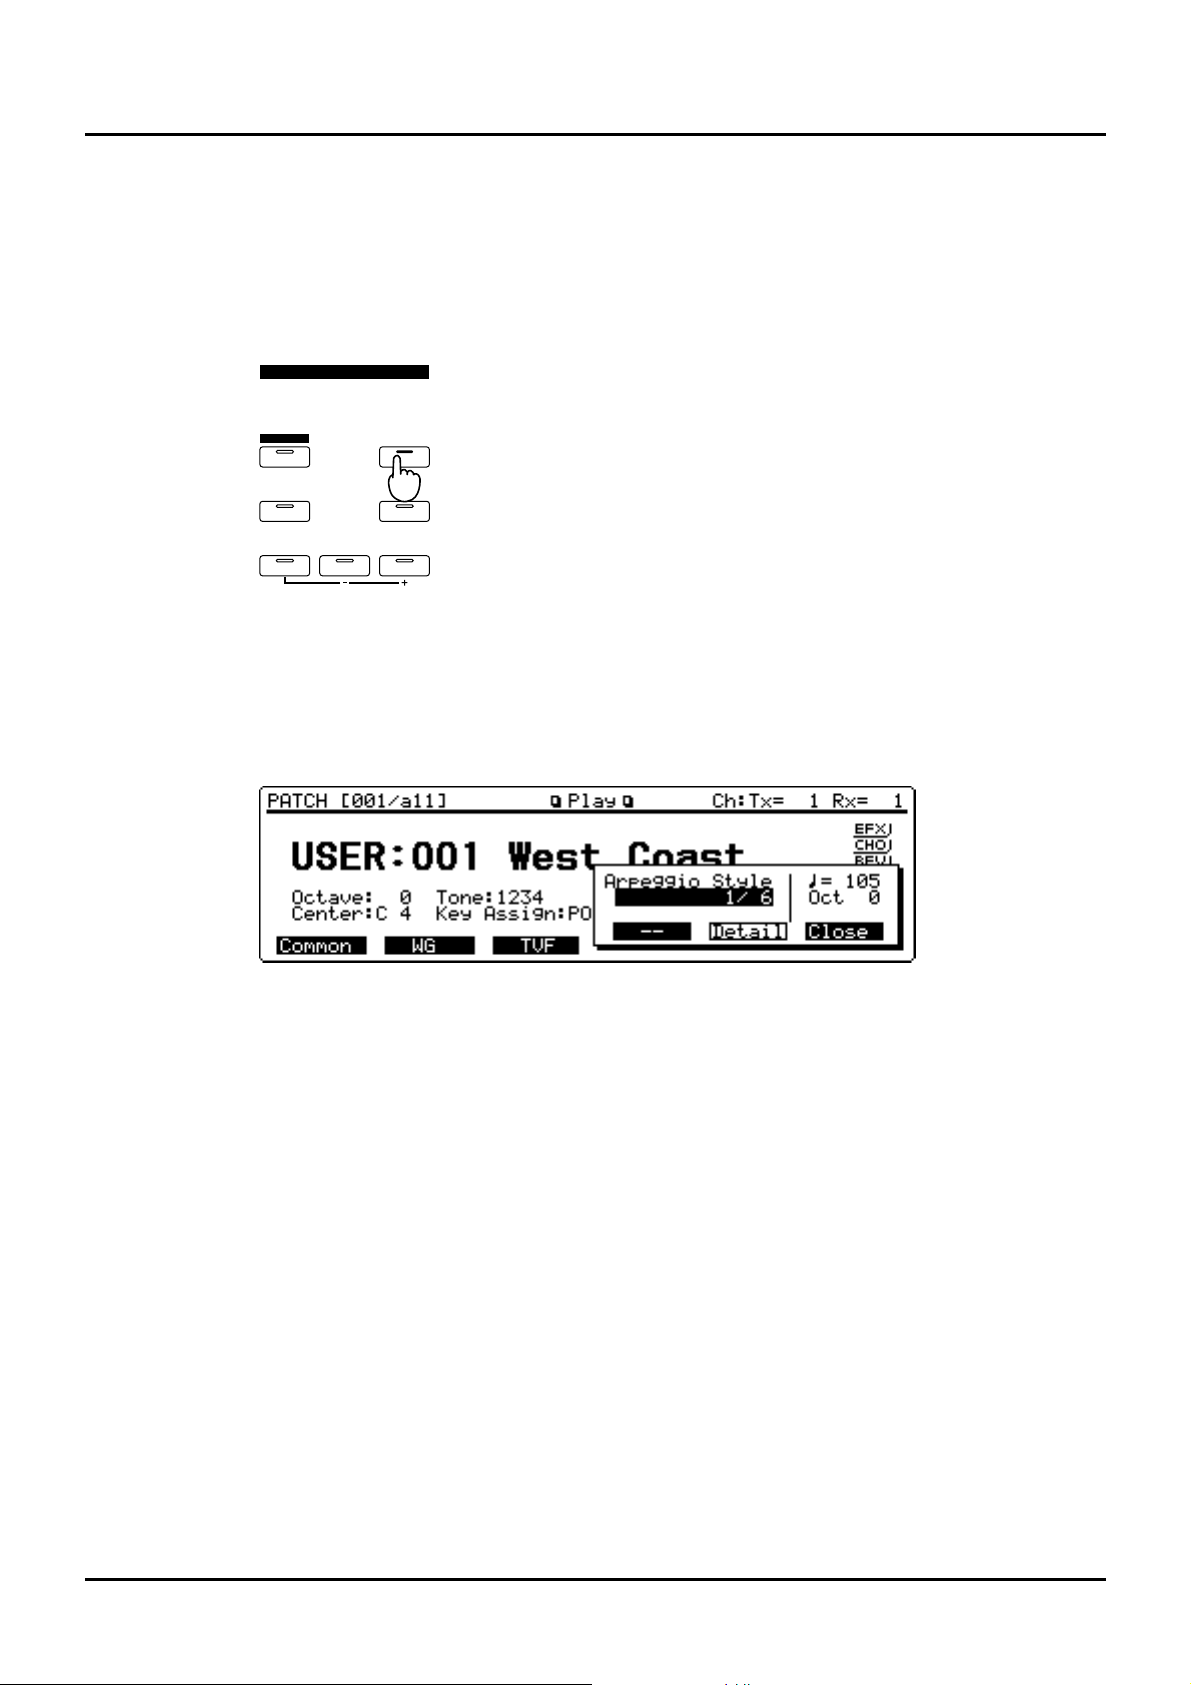
Play arpeggios (Arpeggiator)
You can play a broken chord (arpeggio) automatically, by simply pressing a chord. For example, if you press a C major chord, the XP-80 plays an arpeggio such as C → E → G → C → E →
G...
<Procedure>
❶ Press [PATCH].
❷ Press [ARPEGGIO] to turn the indicator on.
❸ Play a chord.
XP-80 will play an arpeggio, according to the notes forming the chord you have just voiced.
❹ Press [u] or [d] to move the cursor to the “Arpeggio Style” and enter various values by turn-
ing the VALUE dial.
Depending on the value you enter, the way arpeggios play will vary.
✳ For details regarding playing arpeggios, refer to “Playing an arpeggio” (p.35) in the Owner’s
Manual.
❺ To finish playing arpeggios, press [ARPEGGIO] again so the indicator turns off.
KEY EFFECTS
+
OCT- OCTTRANSPOSE
PORTAMENTO SOLO
ARPEGGIO
RPS
Page 15

Listen to the demo songs
The disk supplied with XP-80 contains 8 demo songs. Listen to the demo songs to get a better
idea of just what the XP-80 can do.
No. File Name Song Name Composer
01 DEMO_000.SVQ The AXE Alex Wurman Copyright © 1996
Sonart Productions BMI
02 DEMO_001.SVQ New Age Express Jean-Philippe Rykie l Copyright © 1996
Tactic Music
03 DEMO_002.SVQ Sound Pile /#4 Scott Wilkie Copyright © 1995 Scott Wilkie
for BeachHouse Music
04 DEMO_003.SVQ Ten Years Marvin Sanders Copyright © 1995
Marvster Music
05 DEMO_004.SVQ Saga Masashi Hirashita, Kazuko Hirashita
Copyright © 1996 Roland Co.
06 DEMO_005.SVQ Body Noise Pendulumn Copyright © 1996 Roland Co.
07 DEMO_006.SVQ RPS City Naoki Matsuura Copyright © 1996 Roland Co.
08 DEMO_007.SVQ HyperGroove4XP Mitsuru Sakaue Copyright © 1996 Idecs Inc.
✳ Warning: All rights reserved. Unauthorized use of these songs for any other purposes than per-
sonal enjoyment is a violation of applicable laws.
✳ Refer to page 36 for composer profiles.
✳ The demo song DEMO_007.SVQ (HyperGroove4XP) has been created using the optional wave
expansion board “SR-JV80-09 SESSION.” To play back this demo song correctly, install this
wave expansion board in any of EXP-A–D slots. This song is created using the data libraries
“Hyper Groove” from Idecs Inc.
<Procedure>
❶ Insert the demo disk into the disk drive.
❷ Press [SEQUENCER].
The Play (SEQ(Song)) display will appear.
❸ Make sure that the cursor (black box) is located at the song number.
If the cursor is elsewhere, move it by pressing [u] or [d].
❹ Select the demo song that you wish to hear, either by turning the VALUE dial, or using the
[INC] or [DEC] to select the song number 01–08.
❺ Press [STOP/PLAY] to start demo song playback.
To interrupt playback, press [STOP/PLAY] again. Listening to the demo song, you can modify
the volume level and/or effects of each Part. To modify values, follow the same procedure as
you use for “Playing a demo song” (p.8).
✳ If you interrupt song playback, a “+” symbol may appear at the side of the displayed measure
number (M=). This indicates that the song is stopped in the middle of a measure.
✳ If you play the keyboard after a song has been played back and experience problems such as no
sound or incorrect pitch, hold down [SHIFT] and press [EXIT] for several seconds (the Panic
function).
Song number File name Song name
Volume label
15
Try out the demo disk
Page 16

16
Play back a pattern by pressing specific keys (RPS)
The RPS (Realtime Phrase Sequencing) function allows you to assign a Pattern to a key on the
keyboard and play it back simply by pressing the assigned key. Since different phrases can be
played back by pressing different keys, this function is especially effective for live performance.
The demo disk contains a demo song “09:RPS_DEMO.SVQ (Try RPS)” that allows you to try
out the RPS function. Here’s how.
No. File name Song name Composer
09 RPS_DEMO.SVQ Try RPS Tatsuya Senoh Copyright © 1995 Roland Corporation
✳ Warning: All rights reserved. Unauthorized use of this song for any other purposes than per-
sonal enjoyment is a violation of applicable laws.
✳ Refer to page 36 for the profile of the composer.
<Procedure>
❶ Insert the demo disk into the disk drive.
❷ Press [SEQUENCER].
❸ Make sure that the cursor is located at the song number.
If the cursor is elsewhere, move it using [u] or [d].
❹ Press the numeric key [9] to select “09:RPS_DEMO.SVQ (Try RPS).”
❺ Press [STOP/PLAY] to begin playback.
❻ As you listen to the song, press keys on the keyboard referring to the diagram below.
Pressing a key will play back the pattern once.
✳ If you press F2, the pattern will repeatedly play back. To interrupt playback of the pattern,
press F2 again or press a key lower than C2. To interrupt playback of other patterns, press a key
lower than C2.
❼ To stop playback, press [STOP/PLAY] again.
Combine Patterns for playback
The included demo disk also contains various Pattern collections which you can use in various
playing situations. These Pattern collections are contained in the songs numbers from 10 to 20.
You may use these Pattern collections to create your own songs. The demo song
DEMO_006.SVQ (RPS City) has been created using the Pattern set PTNSET11.SVQ (Trance Set).
These Pattern collections will not play back even when you press [STOP/PLAY]. By pressing
specific keys, however, you can play back drum, bass or other instrument phrases. Here’s how
you can play a song combining these Patterns.
Stop
C2 F2
Page 17

No. File name Song Name
10 PTNSET01.SVQ Acid Set
11 PTNSET02.SVQ Acid Swing Set
12 PTNSET03.SVQ Dancehall Set
13 PTNSET04.SVQ Euro Beat Set
14 PTNSET05.SVQ Funk Set
15 PTNSET06.SVQ Ground Beat Set
16 PTNSET07.SVQ Hip Hop Set
17 PTNSET08.SVQ House Set
18 PTNSET09.SVQ Jazz Set
19 PTNSET10.SVQ Lovers Set
20 PTNSET11.SVQ Trance Set
The produsers of all songs are Mitsuru Sakaue and Kiyotaka Takiyama. Copyright © 1995
Roland Corporation
✳ Roland Corporation holds the copyrights to all the Phrases of these Patterns. You may use these
Phrases when creating new works of your own without requesting permission from Roland.
Roland Corporation, however, assumes no responsibility or liability whatsoever with regard to
any infringements upon the copyrights of any third parties that may result through your use of
these materials.
✳ Refer to page 36 for the profile of the Producer.
<Procedure>
❶ Insert the demo disk into the disk drive.
❷ Press [SEQUENCER].
❸ Make sure that the cursor is located at the song number, and select the demo song that you
wish to hear, either by turning the VALUE dial, or by pressing [INC]/[DEC] to select the song
number from 10–20.
If the cursor is elsewhere, move it using [u] or [d].
❹ Press [STOP/PLAY].
No sound will play, but the sounds to be used for Pattern playback will be selected. By putting
the XP-80 in playback mode, you can synchronize the timing at which each Pattern will begin
playback.
❺ Press various keys to play back the Patterns, referring to the figure below.
As long as you keep the key pressed, the pattern continues to play back. You can play back up
to eight Patterns simultaneously.
✳ The keys assigned to each pattern will vary slightly depending on the pattern collection select-
ed.
✳ To interrupt playback of the pattern, press a key lower than C2.
❻ To stop playback, press [STOP/PLAY] again.
Stop
C2
Drum Bass
Bass
Fil in
Others
17
Page 18

18
Add rhythmic ‘feel’ to the songs
The Groove Quantize function allows you to add a rhythmic ‘feel’ to your song by putting in
accents and changing timing for a more human or natural feel. You can easily vary the playing
‘feel’ by selecting different templates of different musical styles. Here’s how you can use
Groove Quantize with the “21:QTZ_GRV!.SVQ(Try Groove)” contained in the demo disk.
No. File name Song name
21 QTZ_GRV!.SVQ Try Groove
<Procedure>
❶ Insert the demo disk into the disk drive.
❷ Press [SEQUENCER].
❸ Make sure that the cursor is located at the song number, and press the numeric key [2] and [1]
to select “21:QTZ_GRV!.SVQ(Try Groove).”
If the cursor is elsewhere, move it using [u] or [d], then select the song.
❹ Press [STOP/PLAY] to play back the song.
Check the song’s rhythm before performing Groove Quantize.
❺ Press [F2] (Quantiz).
The message “This Song is not Internal Song. Load anyway?” will be displayed.
❻ Press [F5] (OK) to load the song into internal memory.
❼ Press [F3] (Groove).
The Groove Quantize display (SEQ/Quantize) will appear.
❽ Press [STOP/PLAY] to audition the song (Preview).
❾ Make sure that the cursor is positioned at the “Template Number,” and turn the VALUE dial to
select a template from PRE:001–PRE:071.
If the cursor is elsewhere, move it using [u], then select the template.
As you switch templates, you’ll notice the rhythmic ‘feel’ also changes.
✳ If you select a number from USER:001–USER:016 before loading a user groove template,
Groove Quantize will not work.
❿ To end preview, press [STOP/PLAY] again.
Try out some user groove templates
In addition to the templates stored in the XP-80’s memory (PRE:001–PRE:071), you can also
select user groove templates for Groove quantization. User groove templates are those you can
manipulate for a Groove Quantize based on the feel of any songs you like.
The demo disk contains a user groove template file (U_TEMPLA.SVT) that holds 16 different
user groove templates. This lets you access various user groove templates covering different
musical categories. Load “21:QTZ_GRV!.SVQ (Try Groove)” into the XP-80’s memory and try it
out.
<Procedure>
❶ Insert the demo disk into the disk drive.
❷ Press [SEQUENCER].
❸ Make sure that the cursor is positioned at the song number, and press the numeric key [2] and
[1] to select “QTZ_GRV!.SVQ(Try Groove).”
If the cursor is elsewhere, move it using [u] or [d], then select a song.
Page 19

❹ Press [ENTER] to finalize the song selection.
The box surrounding the song number and file name will disappear, and the cursor will be
positioned at the song number.
❺ Press [F2] (Quantiz).
The message “This Song is not Internal Song. Load anyway?” will be displayed.
❻ Press [F5] (OK) to load the song into the internal memory.
❼ Press [F3] (Groove).
❽ Press [F4] (Load).
The LoadTemplate display (SEQ/Quantize/Load) will appear.
❾ Make sure that the cursor is positioned at the “File Type,” and make sure that “GROOVE” is
selected.
❿ Press [d] to move the cursor to the “File Name,” and make sure that “U_TEMPLA.SVT” is
selected.
Press [F6] (Execute) to load the user groove template file.
When the user groove template file has been loaded, the Groove Quantize display
(SEQ/Quantize) appears.
Press [STOP/PLAY] to preview the song.
Make sure that the cursor is positioned at the “Template Number,” and turn the VALUE dial to
select a template you like from USR:001–016.
By switching from one template to another, you’ll notice the rhythmic ‘feel’ of the song also
changes.
If the cursor is elsewhere, move it by pressing [u], then select the template.
Template Explanation
USR:001 (16 Norm. Dance H.Acc) Dance (large dynamics)
USR:002 (16 Norm. Fusion H.Acc) Fusion (large dynamics)
USR:003 (16 Norm. Reggae H.Acc ) Reggae (large dynamics)
USR:004 (16 Heavy Dance H.Swg) Dance (dragging beats, heavy swing)
USR:005 (16 Heavy Fusion H.Swg) Fusion (dragging beats, heavy swing)
USR:006 (8 Norm. Pops H.Acc) Pops (large dynamics)
USR:007 (8 Norm. Rhumba H.Acc) Rhumba (large dynamics)
USR:008 (8 Heavy Pops H.Swg) Pops (dragging beats, heavy swing)
USR:009 (Human Swing Feel) Swinging groovy rhythm
USR:010 (Break Beats Feel) Rhythm with the 4th beat delayed like breakbeats
USR:011 (Slowing Down/Draggin) Rhythm with the first beat gradually becoming longer
within a measure.
USR:012 (16 Beat Swing) 16-beat swing
USR:013 (Axe Music Feel) Axe rhythm
USR:014 (Flat Swing Feel) Swing rhythm with no grooves and dynamics
USR:015 (5 Against 2) Quintuplets over two beats
USR:016 (Lagging 6/8 Feel) Dragging Ethnic feel in 6/8
To end the preview, press [STOP/PLAY] again.
19
Page 20

20
Playing songs in sequence (Chain Play)
Chain Play successively plays back songs on disk in the order you specify. The demo disk contains “XP-80.SVC” which is preset to play back song numbers 01–08 successively. Here’s how
to perform chain play.
<Procedure>
❶ Insert the demo disk into the disk drive.
❷ Press [CHAIN PLAY].
❸ Make sure that the cursor is positioned at the chain file number.
If the cursor is elsewhere, move it by pressing [u].
❹ Turn the VALUE dial clockwise to select “XP-80.SVC.”
❺ Press [STOP/PLAY] to start playback.
After a slight pause, chain play will start.
❻ To end the chain play, press [STOP/PLAY] again.
Chain file name
Chain file number
Page 21

Here’s how to use the XP-80 to record a simple song. On the XP-80, the musical performance
data for one song or composition is called a ‘song.’ As you record the following sample song,
you’ll become familiar with basic recording procedures.
Multitrack recording allows you to record musical performances consisting of two or more
instruments. The XP-80 performs multitrack recording by recording new Parts while you monitor the playback of Parts previously recorded on Phrase tracks. Generally, multitrack recordings are made in order of “drums → bass → accompaniment → melody.” This order makes it
easier to keep each Part rhythmically correct, since you can record the accompaniment or
melody while listening to drums and bass.
Select a Performance
If you wish to use two or more Patches to play, select Performance mode. There are two types
of Performances; single and layer. If you wish to record ensemble playing, select a single
Performance. A single Performance allows only the specified Part to sound during recording,
and to play back the song with multiple instruments.
In recording a sample song, use the Performance “PR-A:12 Pop Set 1.”
<Procedure>
❶ Press [PERFORM].
The Play display (PERFORM) will appear.
❷ Turn the VALUE dial, or press [INC]/[DEC] to select Performance “PR-A:12 Pop Set 1.”
<Bass>
<Melody>
<Drums>
Snare drum
Bass drum
Hi-hat
Low tom
Closed hi-hat
Performance group
Performance number Performance name
21
Record a song
Page 22

22
Clear internal memory
A song to be recorded must first be loaded into internal memory. You will need to clear the
memory before recording a new song.
<Procedure>
❶ Press [UTILITY].
❷ Press [6], then [ENTER].
The Song Initialize display (UTILITY/SngInit) appears.
❸ Press [F6] (Execute) to clear internal memory.
Record the drums using realtime recording
Realtime recording allows you to record your performance as you play. It’s pretty difficult to
record multiple percussion instruments in realtime recording. We’ll use the Loop function to
record a bass drum, snare drum, hi-hat, etc., over a specified area repeatedly until your drum
set is complete. For the this drum set, we’ll use the “PR-A:001 PopDrumSet 1” sounds assigned
to Part 10 of a Performance.
<Procedure>
❶ Press [SEQUENCER].
❷ Make sure that “00:InternalSong” is selected.
If another song is selected, move the cursor to the song number and select the song by turning
the VALUE dial or pressing [DEC], then pressing [ENTER].
❸ Press [REC].
The Realtime Rec Stand-by display (SEQ) appears.
✳ To cancel recording, press [EXIT] or [REC].
❹ Press [d] to move the cursor to “ ,” and set the tempo to 70. You can obtain this tempo by
turning the VALUE dial counterclockwise or pressing [DEC].
❺ Press [r] to move the cursor to “Loop,” and select 4, by turning the VALUE dial clockwise or
pressing [INC].
This allows you to record four measures repeatedly.
❻ Press [d] to move the cursor to “Mode,” and make sure that MIX is selected.
This allows you to record the measures with multiple percussion instruments played separately.
Page 23

❼ Select Phrase track for the recording destination. Press TRACK/PART [10] and the indicator
will blink.
When you select Phrase track 10, the drum sound of the correspondingly numbered Part 10 will
automatically be selected for recording.
This completes preparations for recording. Now let’s record the following musical passage
using percussion instruments.
❽ Press [STOP/PLAY].
❾ After listening to one measure of the metronome count, press the C2 key to record the bass
drum (Hybrid Kick1).
❿ When you finish recording the 4th measure, the song will return to measure 1, and the bass
drum passage you have just recorded will play back. While listening to the playback, record the
snare drum (Natural SN2) by pressing the D2 key.
In the same way, record the remaining percussion instruments using A2 (Verb Tom Hi), G2
(Verb Tom Lo) and F#2 (C1 HiHat 1) keys.
When you finish recording all notes of the percussion instruments, press [STOP/PLAY] to end
the session.
12345678
9 10111213141516
12345678
1
TRACK/P ART
TRACK/P ART
BANK
NUMBER
2345678
TONE SWITCH
TONE SELECT
Closed hi-hat
High tom
Low tom
Bass drum
Snare drum
C2 D2 G2 A2
F#2
23
Page 24

24
........................................................................................................................................................................................................
<Rehearsal>
In recording mode, the Rehearsal function allows you to confirm which percussion instrument
is assigned to each key or practice the passage, without actually recording the notes.
<Procedure>
❶ Press [F6] (Rehrsal) while in recording mode.
A “❚” symbol will be displayed next to “Rehrsal.”
❷ To return to normal recording mode, press [F6] (Rehrsal) again.
........................................................................................................................................................................................................
........................................................................................................................................................................................................
<Realtime Erase>
If the notes were not recorded as you expected, use the Realtime Erase function to erase the
wrong notes.
<Procedure>
❶ Press [F5] (Erase) while in recording mode.
Now you will be ready to use the Realtime Erase function.
❷ Press the key corresponding to the percussion sound you wish to erase, and the notes will erase
as long as you continue pressing the key.
If you wish to erase all percussion instrument notes, press [F6] (ErsALL). All the notes will be
erased during the time that you hold down the button.
❸ When you finish erasing, press [EXIT] to close the Realtime Erase window.
........................................................................................................................................................................................................
Page 25

View the recorded data
The notes you record on the sequencer are recorded as MIDI messages. Let’s use the
Microscope display (SEQ/Micro) to check the drum performance data you recorded just now.
<Procedure>
❶ While holding down [SHIFT], press [BWD] to move right to the beginning of the first measure
of the song.
❷ Press [F4] (Micro).
The Microscope display (SEQ/Micro) will appear.
❸ Press [ ] to view the recorded performance data.
Pressing [ ] will move the “>” symbol to the next data. Pressing [ ] will move the “>” symbol to the previous data.
✳ A “*” symbol displayed at the left of performance data indicates that other data has also been
recorded at the same Song position.
Record the bass using step recording
The Step Recording function allows you to input notes and rests one by one. It is suitable for
recording a bass line that should be rhythmically correct, or other Parts you may have difficulties playing by hand. Use “PR-B:013 Finger Bass” assigned to Part 2 of a Performance.
✳ Mix-recording data on one Phrase track is not possible when step recording. If you want to mix
(combine) sequencer data into a single Phrase track, you need to conduct separate step recording sessions and merge the takes using the Track Edit function (Owner's Manual p. 130).
<Procedure>
❶ Press [PERFORM].
❷ Press [ ] or [ ] until “Part 2(PR-B:013 Finger Bass)” is on the display so that you can play a
bass line on the keyboard.
❸ Press [SEQUENCER], then [F4] (Micro) to call up the Microscope display (SEQ/Micro).
❹ Hold down [SHIFT] and press [BWD] to return to measure 1.
❺ Select Phrase track 2 as the recording destination by pressing TRACK/PART [2].
Song position (Measure-Beat-Clock)
Performance data
The part played by the keyboard
25
Page 26

26
❻ Press [REC].
The Step Recording display (SEQ/Micro) will appear.
This completes preparations for recording. Now let’s record the notes by following the staff
notation.
❼ Select the step time (note length) for the first note. The first note to be input is a quarter note.
Move the cursor to “Step Time,” and make sure that “ ” is displayed.
❽ Press the G2 key for the first note.
Releasing the key finalizes the value so that you can enter the next note.
✳ To correct a wrong note entry, press [F2] (StpBack) or [BWD] to erase the most recently-entered
note, and input it again.
G2
Page 27

❾ Next, you’ll input an eighth-note rest. Select an eighth note as the step time, by turning the
VALUE dial counterclockwise or pressing [DEC], then press [F6] (REST).
❿ Next you’ll enter two sixteenth notes. Select a sixteenth note as the step time, by turning the
VALUE dial counterclockwise or pressing [DEC], then press the G2 key twice.
Now you’ll enter a half-note rest. Select a half note as the step time, by turning the VALUE dial
clockwise or pressing [INC], then press [F6] (REST).
This completes the first measure. Record the second and following measures in the same way.
When you finish recording, press [STOP/PLAY].
Press [EXIT] to return to the Play display (SEQ(Song)).
Record the melody using realtime recording
Here’s how to realtime record a melody using the “PR-A:001 64voice Piano” which is assigned
to Part 1 of a Performance.
<Procedure>
❶ Press [REC] to call up the Realtime Rec Stand-by display (SEQ).
❷ Return the song to the measure 1. To do this, press [u] or [d] to move the cursor to “M,” then
turn the VALUE dial counterclockwise or press [DEC] to set 1.
❸ Press [LOOP] to turn the indicator off.
This turns off the Loop function. As repeated recording is not needed for recording a melody,
you should turn this off.
❹ Press [d] to move the cursor to “Mode,” then set the recording mode to REPLACE, by turning
the VALUE dial counterclockwise or pressing [DEC].
Select REPLACE because you won’t be mix recording.
27
Page 28

28
❺ Select Phrase track 1 as the recording destination of the melody, by pressing TRACK/PART [1].
The indicator will blink. By selecting the Phrase track 1, “64voice Piano” assigned to the correspondingly numbered Part 1 will be ready for recording.
At this time, TRACK 2 and 10 button indicators are on. This indicates that Phrase tracks 2 and
10 contain recorded material.
❻ Press [STOP/PLAY] to begin recording.
After one-measure metronome count, play the melody as you monitor the percussion and bass
parts you laid down earlier.
❼ When you finish recording, press [STOP/PLAY].
This completes recording of the sample song. Hold down [SHIFT] and press [BWD] to return to
measure 1, then press [STOP/PLAY] to listen to the song.
12345678
9 10111213141516
12345678
1
TRACK/P ART
TRACK/P ART
BANK
NUMBER
2345678
TONE SWITCH
TONE SELECT
Page 29

The sample song you’ve just recorded uses a preset Performance. However, that Performance’s
settings may not be ideal for your song. This section will explain how you can modify the
Performance to better suit your song. Different aspects of a Performance can be modified, but
as an example, let’s change the Patch “PR-A:001 64voice Piano” that is selected for the melody.
Then we’ll modify the name of the Performance and save the new settings.
Select a different Patch for the melody
<Procedure>
❶ Press [PERFORM] to call up the Play display (PERFORM).
❷ Press [F3] (Part).
The Part Param display (PERFORM/Part) will appear.
❸ Press TRACK/PART [1] to select Part 1.
❹ Press [u] or [d] to move the cursor to “Patch Group” or “Patch Number.”
❺ Select a Patch you like by turning the VALUE dial or pressing [INC]/[DEC].
Play the keyboard to listen to the sounds while you select a Patch.
❻ When you finish making settings, press [EXIT] to return to the Play display (PERFORM).
An asterisk “*” appears at the left of the Performance group on the display. This indicates that
the Performance settings have been modified.
Assign a new name to the Performance
The currently selected performance is named “Pop Set 1.” Let’s assign a new name to the newly
created Performance.
<Procedure>
❶ Press [F1] (Common).
The Common display (PERFORM/Common) will appear.
❷ Press [u] to move the cursor to “Performance name.”
❸ Press [l] or [r] to move the cursor to the location where you want to enter a character.
❹ Turn the VALUE dial, or press [INC]/[DEC] to select the desired character.
❺ Repeat steps 3 and 4 to finish assigning the new Performance name.
❻ Press [EXIT] to return to the Play display (PERFORM).
29
Create an appropriate Performance for the song
Page 30

30
Store the Performance
The Performance settings that you modify are temporary. They will be lost if you turn the
power off or select another Performance. If you wish to retain the modified settings, you must
store them in user memory.
<Procedure>
❶ Press [UTILITY].
❷ Press the numeric key [1], then [ENTER].
The Perform Write display (UTILITY/Write) will appear.
❸ Turn the VALUE dial or press [INC]/[DEC] to select a Performance of the writing destination.
In this example, select any Performance you wish to overwrite.
❹ Press [F6] (Execute) to save the Performance settings into the selected memory destination.
If a message “Write Protect ON” is displayed, press [DEC] to turn the setting “OFF.”
Then, press [EXIT] to clear the message, and [F6] (Execute) again.
< The temporary area >
When you modify a Performance or Patch, you are not actually modifying the Performance or
Patch that is stored in memory.
You are modifying the Performance or Patch data which has been copied into a temporary
work area, referred to as the "temporary area." The reason for this is that if you were to directly
modify the original Performance or Patch that is stored in memory, it would not be possible to
return it to the original settings.
One way of thinking about this is to imagine that you have copied a Performance or Patch that
is stored in your desk drawer, and are modifying it on your desktop (the temporary area). If
you leave the Performance or Patch on your desktop, it will be thrown away. If you wish to
keep the Performance or Patch that you have been working, you need to store (save) it back in
the desk drawer.
Page 31

The song you’ve just recorded will be lost if you turn the power off. If you wish to keep the
song, you must save it to disk.
Format a disk
New disks or disks that have been formatted for use on another device must be formatted by
the XP-80 before songs can be saved to them.
<Procedure>
❶ Check the disk.
The XP-80 uses 2DD or 2HD 3.5 inch floppy disks. When you format a disk, all data existing on
that disk will be lost. If you will be using a disk that has been used with another device, make
sure that it does not contain data you wish to keep.
❷ Set the protect tab of the disk to the Write position.
❸ Insert the disk into the disk drive.
❹ Press [DISK].
❺ Press the numeric key [3], then [ENTER].
The Format display (DISK/Format) will appear.
❻ Press [F6] (Execute).
At this time, the message “Format OK?” appears to prompt your confirmation.
❼ Press [F5] (OK) to execute formatting.
When formatting is completed, the display will indicate “COMPLETE.”
✳ If you wish to cancel formatting, press [F6] (Cancel).
❽ Press [EXIT] to return to the Disk Menu display (DISK/Menu).
Protect tab
Write (writing permitted)
Protect (writing prohibited)
31
Save your new song
Page 32

32
Save your song to disk
You can save your song to the disk you just formatted.
<Procedure>
❶ Make sure that the Disk Menu display (DISK/Menu) is up.
If another display is showing, press [DISK] to call up the Disk Menu display.
❷ Press the numeric key [2], then [ENTER].
The Save display (DISK/Save) will appear.
❸ Make sure that SONG is selected for “File Type.”
❹ Press [r] to move the cursor to “Save Mode,” and make sure that “SONG + SOUND” is select-
ed.
This allows you to save the Performance settings to disk along with the song.
❺ Press [d] to move the cursor to “File Name.”
❻ Press [l] or [r] to move the cursor to the location where you wish to enter a character.
Modify the temporary file name “SONG_000” and assign a new file name as you like.
❼ Turn the VALUE dial, or press [INC]/[DEC] to select the desired character.
❽ Repeat steps 6 and 7 to finish assigning the new file name.
❾ Press [F6] (Execute) to save the file to the disk.
When saving is completed, the display indicates “COMPLETE.”
Page 33

The “Dance Kit” disk contains carefully selected sounds and music data geared toward the current dance music scene. By using this disk, you will be able to hear for yourself how the XP-80
can be used to its full potential. Maybe it will provide some hints which can be used for your
own music!
In the “Dance Kit” you will find the following data and materials:
Demo songs: 6
Demo songs (for RPS): 14
Data files: 1 (DANCEKIT.SVD)
✳ “DANCEKIT.SVD” contains 128 patches, 32 performances, and 2 rhythm sets.
Caution
Before listening to the demo data on the disk, you have to overwrite your User memory and
System memory. If you have created any important data in the XP-80, be sure to back up your
data onto another disk first.
To store your data onto a disk, press the [DISK], press the numeric key [2], the [ENTER] to call
up the Save display (DISK/Save). On that screen, select “SOUND” for File Type parameter, and
then name your file and press the [F6] (Execute) to save the data.
After playing the demos, you will want to load your important data back into the XP-80. To do
so, Press the [DISK], Press the numeric key [1], then [ENTER] to call up the Load display
(DISK/Load). From that screen, select “SOUND” for File Type parameter, and then select your
file and press the [F6] (Execute) to load the data.
✳ For details, refer to p.167 in the XP-80 Owner’s Manual.
Loading Data Needed for the Demos
❶ Insert the “Dance Kit” disk into the disk drive.
❷ Press the [DISK], press the numeric key [1], then [ENTER] to call up the Load display
(DISK/Load). From that screen, select “SOUND” for File Type parameter, and then select the
“DANCEKIT. SVD” and press [F6] (Execute) to load the data.
✳ Keep the disk inserted while listening to the demos.
Playing Back Demo Songs
❶ Press the [SEQUENCER].
❷ Choose a demo song you want to play back and press the [STOP/PLAY].
Playing Back Patterns Using RPS
❶ Press the [SEQUENCER] and choose the RPS demo data you want to play back.
❷ Press the [STOP/PLAY]. Although this won’t cause songs to play, it sets patches in the
Performance and sets the playback tempo of the patterns.
❸ Try pressing the keys and play various patterns. To stop play of the patterns, press the white
key at the far left side (C2).
❹ When finished, press the [STOP/PLAY].
Playing Various Patches
❶ After pressing the [PATCH], select the Patch you wish from the User Group (USER 1-128). To
enable selection from the USER group, press the [PATCH] and press [0] while holding down
the [SHIFT].
Also, try the C1/C2 slider to modify patches. You will see a “*” next to the names of patches
with sounds that you can vary using the sliders.
33
DanceKit
DanceKit
Page 34

34
Demo Songs
File Name Song Name Composer/Arranger
DKIT_01.SVQ NEXTGENERATION Music by Masayuki Kurihara *1
DKIT_02.SVQ Echoes of Jungle Arranged by Shun Takai (Ten Factory) *1
DKIT_03.SVQ Trip Hop Bop Arranged by Naoki Matsuura,
Noriyuki Nakahashi (Ten Factory) *1
DKIT_04.SVQ Resonance Music by Ryeland Allison*2
DKIT_05.SVQ Jungle Juice Arranged by Naoki Matsuura (Ten Factory) *1
DKIT_06.SVQ Hemenway Music by Shigeyoshi Kawagoe *1
*1 : Copyright © 1995 Roland Corporation *2 : Copyright © 1995 Ryeland Allison
✳ All rights reserved. Unauthorized use of these materials is a violation of applicable laws.
Masayuki Kurihara
Masayuki is a techno-artist who currently resides in Tokyo. His activities include providing musical selections, creating sound tracks and special effects, and the production of music for T.V. commercials. In
another vein, his work has been released on 12-inch records and CDs by Gaia Records of Germany, and
Psy-harmonics of Australia (among others). He has performed at a variety of clubs and outdoor parties in
Tokyo, Berlin, Hamburg and Paris. In May of 1995, he established the T.T.T. Records company, in partnership with DJ Kuni and others. He is currently looking forward to being able to release a variety of new
musical material to the world.
Ryeland Allison
Ryeland makes electronics groove at the speed of sound including computer controlled transistor rhythm.
He is honored to introduce this to you.
Shigeyoshi Kawagoe
Shigeyoshi entered the Berklee College of Music in 1985, and majored in jazz composition and arrangement. He studied under Bret Willmotte (guitar) and Hal Crook (composition, arrangement, and improvisation). While in school, he got together with Jeff Ramsey, Chris Parks, Dave Delhomme, and Zack Alford
to form the group: “One Mind, One Soul.”They performed mainly in the Boston area, and on numerous
occasions they were the opening act along with Roy Ayers and Stacy Lauisaw. Moving to New York after
graduation in December of ‘88, he continued his work as a performer along the East coast. He returned to
Japan in March of ‘93. Since then, he has been kept busy as a guitarist, composer, arranger and MIDI programmer.
Ten Factory
Syun Takai, Naoki Matsuura, Noriyuki Nakahashi. Ten Factory consists of Roland Japan Staff.
Demo Songs for RPS
File Name Song Name RPS Keys
DUB.SVQ Dub RPS E2–C4
DUB_L.SVQ Dub RPS_L D2–D#4
FUNK2.SVQ Funk2 RPS E2–C#4
FUNK2_L.SVQ Funk2 RPS_L D2–Bb3
HIPH2.SVQ HipHop2 RPS E2–G#4
HIPH2_L.SVQ HipHop2 RPS_L D2–C4
JNGL_T.SVQ Jungle_Tc RPS E2–C4
JNGL_T_L.SVQ Jungle_Tc RPS_L D2–C#4
JUNGLE.SVQ Jungle RPS F2–C#4
JUNGLE_L.SVQ Jungle RPS_L D2–C4
TECHNO.SVQ Techno RPS E2–F4
TECHNO_L.SVQ Techno RPS_L E2–F4
TRIP_H.SVQ Trip Hop RPS E2–D4
TRIP_H_L.SVQ Trip Hop RPS_L D2–C4
Copyright © 1995 Roland Corporation
✳ Songs that have an “_L” at the end of their names are designed so they are easy to play during a live per-
formance—the instrument parts have been arranged so they sound as a group when a single key is
pressed.
✳ Roland Corporation holds the copyrights to all the Phrases of these Patterns. You may use these Phrases
when creating new works of your own without requesting permission from Roland. Roland Corporation,
however, assumes no responsibility or liability whatsoever with regard to any infringements upon the
copyrights of any third parties that may result through your use of these materials.
DanceKit
Page 35

35
DanceKit
Performance (user)
No. Name Key Mode
1 Maze Magic LAYER
2 WhatIsThis? LAYER
3 Pulsey Hamng LAYER
4 Sublimation LAYER
5 Cheesy LAYER
6 Low Pressure LAYER
7 Labyrinth 2 LAYER
8 Childhood LAYER
9 Piper LAYER
10 Sirens Pad LAYER
11 Dual Juno LAYER
12 Power Saw LAYER
13 S&H Pad 5th LAYER
14 Bs+AnaSeq LAYER
15 HyperHit LAYER
16 Fx Split LAYER
17 DanceSplit 1 LAYER
18 DanceSplit 2 LAYER
19 Bass/Lead 2 LAYER
20 Bass/Lead 3 LAYER
21 Tekno Set 1 SINGLE
22 Tekno Set 2 SINGLE
23 NEXTGENER.. SINGLE
24 Resonance SINGLE
25 Hemenway SINGLE
26 Dub RPS SINGLE
27 Funk2 RPS SINGLE
28 JungleTc RPS SINGLE
29 Jungle RPS SINGLE
30 Trip Hop RPS SINGLE
31 Hip Hop2 RPS SINGLE
32 Techno RPS SINGLE
Patch (user)
No. Name V No. Name V
1 Mission LFO 4 65 Sick Brass 4
2 Trance Pad 1 2 66 4 ChordTrick * 4
3 Taurus/S&H 4 67 Cyber Swing1 4
4 S&H VCF * 1 68 Cyber Swing2 4
5 Trailer 1 69 Ravesequence 4
6 BPF-SweepPad 2 70 Panned Claps 4
7 Do Ya See? 4 71 Dance Brass * 2
8 Wow!! 3 72 OB Voyages * 2
9 Vocal Phrase 3 73 Planet XP... * 3
10 Chucka-Clav 3 74 Juno Texture * 3
11 Raver Clav 1 75 Wet & Wild * 4
12 Synscat * 2 76 20 Years ago 3
13 Sweep Delay 1 77 Pygmalion * 4
14 JX3P Poly 4 78 Micro Cosmos 4
15 Poly Pulse 4 79 AmbientIntro 4
16 FAT JP6 * 2 80 AmbientChoir * 3
17 After Rave * 2 81 Tekno Vox * 4
18 Bend Me ! * 2 82 Future Split * 4
19 Chroma Poly * 4 83 BPF OrganVox* 3
20 Acid Octaves 2 84 Ace of Vox * 4
21 Froggy Wave 2 85 Injection * 2
22 FeedbckSynth * 2 86 Dance Piano * 3
23 5th Synth * 2 87 HousePiano 2 * 2
24 DLM Synth * 3 88 Space Piano * 4
25 High Rasp * 2 89 Sine Rhodes * 1
26 Insectacid 2 90 Retrosquares * 2
27 U SAW it ? * 2 91 Filthy EP * 2
28 Porta Juno * 3 92 Perc Marcato * 3
29 Keep the Owz 2 93 Soul Pad * 3
30 Basic Reso * 3 94 Tecno Bells 2
31 Rave Wave 3 95 Sqr Organ 1 * 2
32 Pigale Synth * 3 96 SH-101 Bass * 2
33 Rubber Synth * 2 97 TB-303 Bass * 2
34 Tape Strings * 1 98 Acid 404 * 1
35 Dirty Str. * 4 99 READ * 2
36 House Strngs * 4 100 Goa Bass 1 * 2
37 Flange Pad * 2 101 Goa Bass 2 * 3
38 Symphonie * 4 102 Infra Bass * 4
39 Raw Saw * 1 103 Jungle Bass * 4
40 Simple Pad * 3 104 Ecta Bass * 2
41 JX Squares * 1 105 Metal Bass * 2
42 Dance Lead * 4 106 MC-202 Bass * 2
43 Joe le Remix * 2 107 JP-4 Bass * 2
44 Ring Leader * 2 108 Super Sine * 4
45 Woody Synth 4 109 NoDry Bass ! * 2
46 Soft S&H 1 110 Ana Bass 1 * 2
47 FXM Lead * 4 111 Sweepy Bass * 2
48 HipHop Lead 3 112 Ana Bass 2 * 2
49 MidRiff 1 * 3 113 PWM Bass * 2
50 Cheep Square * 2 114 V-ResMicroBs * 3
51 Rough Wave * 2 115 PhoneIn Bass * 2
52 Acid Guitar * 2 116 Sub 8va Bass * 2
53 SQU Sequ. 2 117 Moody Bass * 3
54 Plik-Plok * 2 118 Fat Bass * 2
55 Velo Click * 2 119 Modular Bass * 2
56 Sequence it! * 2 120 Dance Bass * 2
57 Analog Seq 2 2 121 Bubble Bass * 2
58 Xmod Attack * 2 122 HUGE Bass 1
59 Minor Chord * 4 123 Saucers 2
60 Computer BPM 3 124 Working Rezo 2
61 FXM Saw Horn * 2 125 WhatWasThat? * 4
62 Dyna Hit * 3 126 IntrudeAlert 4
63 Owz it ! 3 127 Sync Sirens 4
64 Scratch Auto 4 128 TR909 36/38 4
V: number of voices
Rhythm set (user)
1: Dance Kit 1 2: Dance Kit 2
Scratch 1 808 Kick
Round Kick Round Kick
808 SN 808 Kick
Natural SN2 Natural SN1
Piccolo SN 808 Claps
Ballad SN 808 SN
808 Kick 808 SN
Cl HiHat 1 606 HiHat Cl
Dry Tom Lo Op HiHat
Pedal HiHat 606 HiHat Cl
Dry Tom Hi Op HiHat
Op HiHat 606 HiHat Op
Dry Tom Hi Op HiHat
808 Kick 808 Kick
Crash 1 Crash 1
808 SN Tin Wave
Ride 2 Voice Breath
REV Crash 1 Tin Wave
Ride Bell 1 Tin Wave
606 HiHat Cl R8 Click
Crash 1 Cl HiHat 1
606 HiHat Cl R8 Click
Crash 1 Round Kick
606 HiHat Op Crash 1
Ride 2 Ballad SN
Bongo Hi 808 Kick
Bongo Lo REV Crash 1
Cga Mute Hi Ballad SN
Cga Open Hi Crash 1
Cga Open Lo Ballad SN
Timbale Op HiHat
Timbale Tin Wave
Agogo Op HiHat
Agogo Tin Wave
Cabasa Cut Op HiHat
Maracas Tin Wave
Soft Pad B 808 Claps
Heavy Gtr B+ Hybrid Kick1
Long Guiro BreathNoise
Long Guiro Natural SN1
Claves Round Kick
Wood Block 808 SN
Wood Block 808 Kick
Cuica 606 HiHat Cl
Cuica 808 SN
Open Triangl 606 HiHat Cl
Open Triangl 808 SN
Cabasa Cut 606 HiHat Op
Tambourine 606 HiHat Cl
Old Kick Round Kick
Scratch 1 Lite Kick
Natural SN2 Ballad SN
Scratch 3 Natural SN1
White Noise Ballad SN
Synth Saw 1 Lite Kick
Synth Pulse1 Op HiHat
Back Hit Lite Kick
Tekno Hit Op HiHat
Orch. Hit Spectrum
Philly Hit Op HiHat
REV Back Hit Finger Snaps
Scratch 1 China Cym
R8 Click R8 Click
MC500 Beep 2 Metronome 2
35
39
40
41
43
45
47
42
44
46
36
38
37
87
88
84
86
85
51
52
53
55
57
59
54
56
58
48
50
49
63
64
65
67
69
71
66
68
70
60
62
61
75
76
77
79
81
83
78
80
82
72
74
73
C2
C3
C4
C5
C6
Note No.
89
91
93
95
90
92
94
96
98
97
C7
Page 36

36
Alex Wurman
Born in Chicago, IL 1966 into a family of musicians, Wurman
has been playing the piano and composing music since the
age of five, With a background in Classical and Jazz composition, Wurman moved to Los Angels in 1991 to score films.
After working with Hans Zimmer and Media Ventures on
films such as “Younger and Younger”, “I’ll do Anything”
and “The Lion King”, Wurman went on to score films to his
own credit. Titles include “French Exit”, “The Grave”, “The
Crew”, “Getting In”, and “Dorminion”.
Jean-Philippe Rykiel
Born blind in 1961, Jean-Philippe Rykiel taught himself
piano from a very early age. His technical mastery of the
synthesizer and unique creative intuition rapidly bought
him recognition by his contemporaries, providing him many
experiences and collaborations. As programmer or sound
designer, instrumentalist of composer, arranger or (co) producer, Jean-Philippe Rykial has worked with Vangelis, Steve
Hillage, Jon Hassell, Leonard Cohen, Salif Keita, Youssou
N’Dour... To name a few... Recent credits include the albums
“Songs of Awakening”, a collection of Tibetan prayers
arranged and performed with master singer Lama Gyurme
(Sony), and “Folon”, Salif Keita’s latest release featuring
tracks arranged and produced by Jean-Philippe.
Scott Wilkie
Scott Wilkie is a keyboardist and composer originally from
Detroit, Michigan. His work as a studio musician and sound
designer can be heard on many projects. He has performed
live with various artists, including Ronnie Foster, EarlKlugh,
Jeff Baxter, David Goldblatt, Ricky Lawson, Mike Miller and
others. In addition, he has worked as a synth programmer,
most recently for Disney’s Broadway production of Beauty
and the Beast. For Roland, Scott appears frequently throughout the United States, Asia, Europe and South America as a
clinician and product demonstrator. Now living in Los
Angeles, he performs with his own group and is involved as
a musician and producer on various projects.
Mavin Sanders
Marvin Sanders is a musician with credits including Toyota,
Bocing, Disney, Intel, Miller Beer, and Max Factor. He has
written music for the syndicated television show
Highlander, and worked as a sound designer for Van Dyke
Parks, E, Warner Brothers, and Michael Jackson. A former
Keyboard Product Manager and international clinician for
Roland, he has also compose demos for the RD-500, JD-990,
and JV-880.
Masashi Hirashita, Kazuko Hirashita
Masashi and Kazuko both started studying classical piano
when they were in their infancy. Both went on to study composition. At the same time, they had started their own music
careers as keyboardists and composers. Their work covers a
wide spectrum of styles and activities, including pop, fusion
and jazz music as well as many writing and producing jobs.
Pendulum (Yuuichi Ootsuka, Toshiki Nunokawa)
Yuuichi Ootsuka: Born Dec. 17, 1958 in Tokyo. Began his
professional music career while still a member of Keio
University’s “Modern Jazz Society.” He won recognition
through his skillful use of the synthesizer to produce a
refreshingly colorful sound. While performing as supporting
musician for a wide range of popular artists, he also formed
his own group, named “SO–DA!”. He is currently regarded
as one of Japan’s top keyboardists. His warm arrangements,
which capture some of the essences of jazz, have received
wide acclaim.
Toshiki Nunokawa: Born Jul. 29, 1958 in Tokyo. With the
Beatles as his first inspiration, he picked up a guitar and
started playing in a rock band while still in his early teens.
By the time he got to high school, however, his attention had
shifted to the music of Wes Montgomery, and he began
playing jazz. During his college days (Tokyo Industrial) he
played with the Mickey Curtis band. That gig triggered the
beginning of his professional career. He has since been kept
busy as an accompaniment artist with a wide range of talent,
including Tsuyoshi Yamamoto, Masanori Sasaji, Peter
Erskine and Mark Johnson. His work from 1985-87 with “Hit
and Run” by “MALTA” is especially memorable.
Naoki Matsuura (GigBag)
While living in the USA for 10 years, he started playing as a
professional bass player. Mainly he was playing local live
and studio sessions around New England area. Naoki joined
many sessions and gigs with Paquito De Rivera, Tommy
Campbell, etc. He joined Tiger Okoshi's band: Tiger's Baku.
Since 1991 Naoki joined Roland as a musical director of
MIDI Data. At present he has left the company, and is
recharging his batteries for new projects.
Mitsuru Sakaue
From his college days, Mitsuru Sakaue has been active as a
keyboard player and arranger in studio and commercial
music production. At present he is involved in production of
commercials for TV and radio as a composer, arranger, keyboard player and computer music expert. His highly
acclaimed musical abilities go beyond borders of musical
genre. He is the chief director of the Idecs Inc. group of creative musical artists.
Idecs Inc.
Through the SMF data creations they offer, this professional
sound production unit continues to generate new excitement
throughout the realm of music data. The overwhelming
quality of their music has created for them an enormous following among consumers of music data. Additionally, their
other activities within the realm of music reach into almost
every area—whether it be composing, arranging, producing,
or education.
Tatsuya Senoh
A Roland engineer who is a member of the XP-80 development team, and also the possessor of a deep understanding
of music. The included disk contains demo songs created by
Mr. Senoh that introduce the RPS function which he himself
developed.
Kiyotaka Takiyama
Born in 1964 in Tokyo, Mr. Takiyama entered the Berkeley
College of Music in 1986, majoring in theory, arrangement,
and drum. While still in school he participated in both live
and recording sessions with numerous musicians. Since his
return to Japan he has continued to be involved in recording
with many different artists, and has also done television
commercial work. At present he continues to be active in
both live performance and in recording.
01011334 '97-9-B3-51D
Profiles of composers
QUICK START
 Loading...