

Page 1
SI-AD4 / SO-DA4 Installation Manual
tightenloosen
This guide describes how to install SI-AD4 (input) and SO-DA4 (output) modules in your S-4000S.
Before you attempt installation, please read this document carefully.
© 2005 Roland Corporation
All rights reserved. No part of this publication may be reproduced in any form without the written permission of
ROLAND CORPORATION.
For the Purchaser — Please Read
When installing or detaching the SI-AD4 or SO-DA4, be sure to consult your RSS Authorized Service Center.
For the Installer (Service Technician) — Please Read
After installing the SI-AD4 or SO-DA4, please be sure to return this document to the purchaser.
Cautions When Installing the SI-AD4 or SO-DA4
• Always turn the unit off and unplug the AC plug before attempting installation of the
SI-AD4 or SO-DA4.
• Install only the specified option. Remove only the specified screws.
• To avoid the risk of damage to internal components that can be caused by static electricity,
please carefully observe the following whenever you handle the board.
❍
Before you touch the board, always first grasp a metal object (such as a water pipe), so
you are sure that any static electricity you might have been carrying has been
discharged.
❍
When handling the board, grasp it only by its edges. Avoid touching any of the
electronic components.
❍
Save the bag in which the board was originally shipped, and put the board back into it
whenever you need to store or transport it.
• Do not touch any of the printed circuit pathways.
• Never use excessive force when installing a circuit board. If it doesn’t fit properly on the
first attempt, remove the board and try again.
• When the SI-AD4 or SO-DA4 installation is complete, double-check your work.
• Use a Philips screwdriver of the appropriate size to avoid damaging the screw heads (a
number of 2 screwdriver).
• Turn the screwdriver counter-clockwise to loosen the screws-turn it clockwise to tighten
them.
• Be careful not to let the screws drop inside the each unit.
• Never leave a module uninstalled. Cover any unused slots with optional S-BP blank panels.
• Be careful not to cut your hand on the edge of the circuit board or the opening edge wile
removing the S-BP.
1
Page 2
SI-AD4 / SO-DA4 Installation Manual
Installing an SI-AD4/SO-DA4
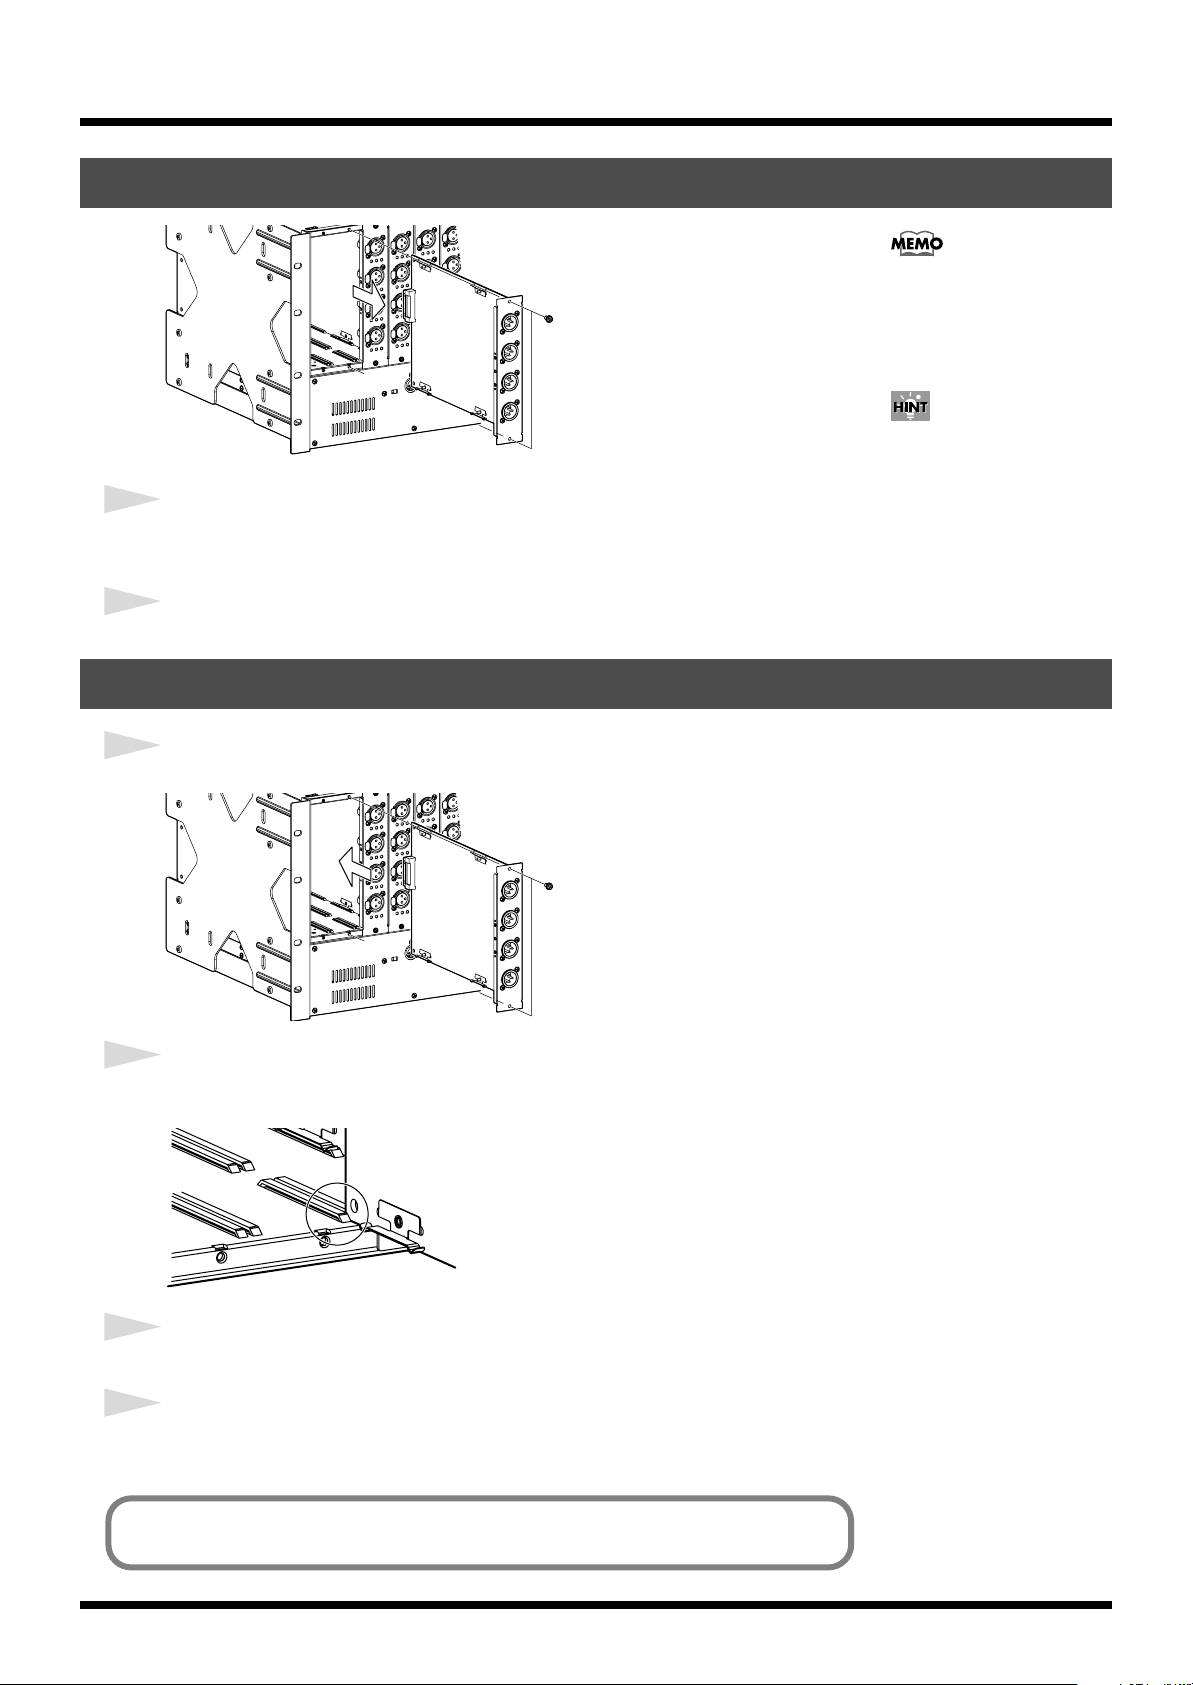
1
Remove the two screws from each module (SI-AD4 or SO-DA4) installed in the
S-4000S.
2
Extract the module from the S-4000S.
The module shown in the
figure is the SO-DA4. The
removal procedures for the
SI-AD4 and SO-DA4 are the
same.
Extraction of the SI-AD4 or
SO-DA4 may be accomplished
more easily by inserting an
XLR plug into a connector on
the module, then pulling out
the module while gripping the
plug.
Installing an SI-AD4/SO-DA4
1
Load the modules (SI-AD4 or SO-DA4) into the S-4000S.
2
Align the module's circuit board with the slot in the S-4000S, and insert
slowly.
2
3
Press in the module firmly until you feel resistance.
4
Secure the module in place using the two screws removed when detaching
the module.
Refer to the Service Notes issued by Roland and perform the operational checks
necessary to ensure that each module has been installed correctly.
Page 3

Module Installation Rules
SI SI SI SI
SI SI SI SI SI SI SI SI SI SI SI SISI SI
SO SO SO
SO SO SO SO
SO SO SO
You must not begin an installation
from an even-numbered slot.
Empty
Empty Empty
Never insert modules of a different type
in the middle of a series of identical modules.
SI SI SI SI SI SO SO SO SO
Modules of a different type
cannot be installed
in even-numbered slots first.
■ Installation must start from an odd-numbered slot.
■ Group together modules
of the same type.
■ On a device for which the
REAC mode is Master,
be sure to install modules
in slots 1 and 2.
Never leave slots 1 and 2
on a Master device empty.
The rules for installing modules (SI-AD4/SO-DA4) are as follows.
Be sure to follow these rules when installing.
SI-AD4 / SO-DA4 Installation Manual
SI
= SI-AD4
SO
= SO-DA4
On a Slave or Split device,
leaving slots 1 and 2 empty
poses no problem.
■
The modules installed in a device serving as the counterpart to a device
for which the REAC mode is Master need to be of a different type.
Master device
SI-AD4
SI-AD4
SI-AD4
SI-AD4
SI-AD4
SI-AD4
SI-AD4
SI-AD4
SO-DA4
SO-DA4
Slave/Split
device
SO-DA4
SO-DA4
SO-DA4
SO-DA4
SI-AD4
SI-AD4
SI-AD4
SI-AD4
The audio input into the Master device is transmitted to the modules
on the connected device (a Slave device or the like).
No audio is transmitted to empty slots.
No audio can be transmitted when the modules installed on the
connected device (a Slave device or the like) are of the same type.
Signals can be transmitted from a Slave device to the Master device.
However, transmission from a Split device to the Master device
is not possible.
3
Page 4

Examples of Module Setup
32x8 (32 in 8 out) System
■ Master device ■ Slave device
SI SI SI SI SI SI SI SI SI SISO SO SO SO SO SO SO SO SO SO
Master device Slave device
■ Split device
SO SO SO SO SO SO SO SO
Split device
20x12 (20 in 12 out) System
■ Master device ■ Slave device
SI SI SI SI SI SOSOSO SI SI SISOSO SO SO SO
Master device Slave device
Split device
SI-AD4, SO-DA4
■ Split device
SOSO SO SO
As shown in the figure (Split
device), modules in
even-numbered slots for which
no output is required can be
removed.
*04232834-01*
04232834 1REC
 Loading...