

Page 1
Restoring the original settings
(Factory Reset)
お買い上げ時の設定への戻しかた(ファクトリー・リセット)
When you carry out a Factory Reset, the user patches, phrases, and
arpeggio settings you’ve created will disappear.
1.
While together holding down both the PRESET and
USER buttons, switch on the SH-201.
2.
Press the blinking WRITE button.
If you decide to cancel, press the CANCEL button.
Patch list
PRESET
Name
Reso Bass
A-1
A-2 Fat Saw Lead
A-3 SilkyStrings
A-4 RingModBell
A-5 OSC SyncLead
A-6 SuperSawBrs
A-7 Electro Seq
A-8 Logic Noize
B-1 Fat Bass
B-2 201 Lead
B-3 SlowSoft Pad
B-4 SuperSawKey
B-5 FB OSC Lead
B-6 Poly Synth
B-7 Sweep Arp
B-8 S&H FX 1
C-1 Deep Bass
C-2 Soft Lead
C-3 BriteStrings
C-4 SH-201 EP
C-5 Sweep Up
C-6 Trancy 201
C-7 Sliced Pd/Bs
C-8 NoiseWhistle
D-1 SH Bass 101
D-2 JP 5th Lead
D-3 JP-8 SoftPAD
D-4 JP-8 Clav
D-5 JP-8SweepPad
D-6 JUNO Brass
D-7 S&H FX 2
D-8 INIT PATCH
/パッチ・リスト
Bank Select
MSB LSB
87 64
87 64
87 64
87 64
Program
Change
1
2
3
4
5
6
7
8
9
10
11
12
13
14
15
16
17
18
19
20
21
22
23
24
25
26
27
28
29
30
31
32
ファクトリー・リセットを行うと、作成したユーザー・パッチやフ
レーズ、アルペジオの設定などは消えてしまいます。
PRESET ボタンとUSER ボタンを押しながら、SH-201 の
1.
電源を入れます。
点滅している WRITE ボタンを押します。
2.
中止する場合は CANCEL ボタンを押します。
USER
Name
TB Dist Lead
A-1
A-2 SoftSaw Lead
A-3 StackStrings
A-4 RingBellStk
A-5 SBF FeedBack
A-6 Stack Brass
A-7 Trance Seq
A-8
FormantMover
B-1
Brite Bass
B-2
OnlyTimeLead
B-3
SquPadSplit
B-4
OD Glass Pad
B-5
Club Split
B-6
modest
B-7
PolyChordArp
B-8
mod-e-rate
C-1
Angry Bass
C-2
Simple SquLd
C-3
Alaska Pad
C-4
Soft Keys
C-5
5th Pad
C-6
ProfessorKey
C-7
Trance Keys
C-8
AsteroidBelt
D-1
d&b Bass
D-2 Cheesy Lead 26
D-3 Retro Str 27
D-4 Distant Ring 28
D-5 FB Ring Lead 29
D-6 Stack Saws 30
D-7 Mayhem 31
D-8 Gamelan Bell 32
Bank Select
MSB LSB
87 0
87 0
87 0
87 0
Program
Change
1
2
3
4
5
6
7
8
9
10
11
12
13
14
15
16
17
18
19
20
21
22
23
24
25
Effect template list
DELAY Name DELAY Name
1 Simple Delay 5 Analog Delay
2 1 Shot Delay 6 Mod Delay
3 Medium Delay 7 Chorus 1
4 Long Delay 8 Chorus 2
/エフェクト・テンプレート・リスト
For details on selecting an effect template, refer to p. 45 of the
SH-201 owner’s manual.
SH-201 LEAFLET
REVERB Name REVERB Name
1 Room 1 5 Hall 1
2 Room 2 6 Hall 2
3 Studio 1 7 Plate 1
4 Studio 2 8 Plate 2
エフェクト・テンプレートの選びかたについては、SH-201
取扱説明書 P.45 をご覧ください。
Page 2
Notice of changed specifications
Due to a change in the specifications of this product, it operates
differently than described in the owner’s manual. Please accept
our apologies, and make the following correction to the manual.
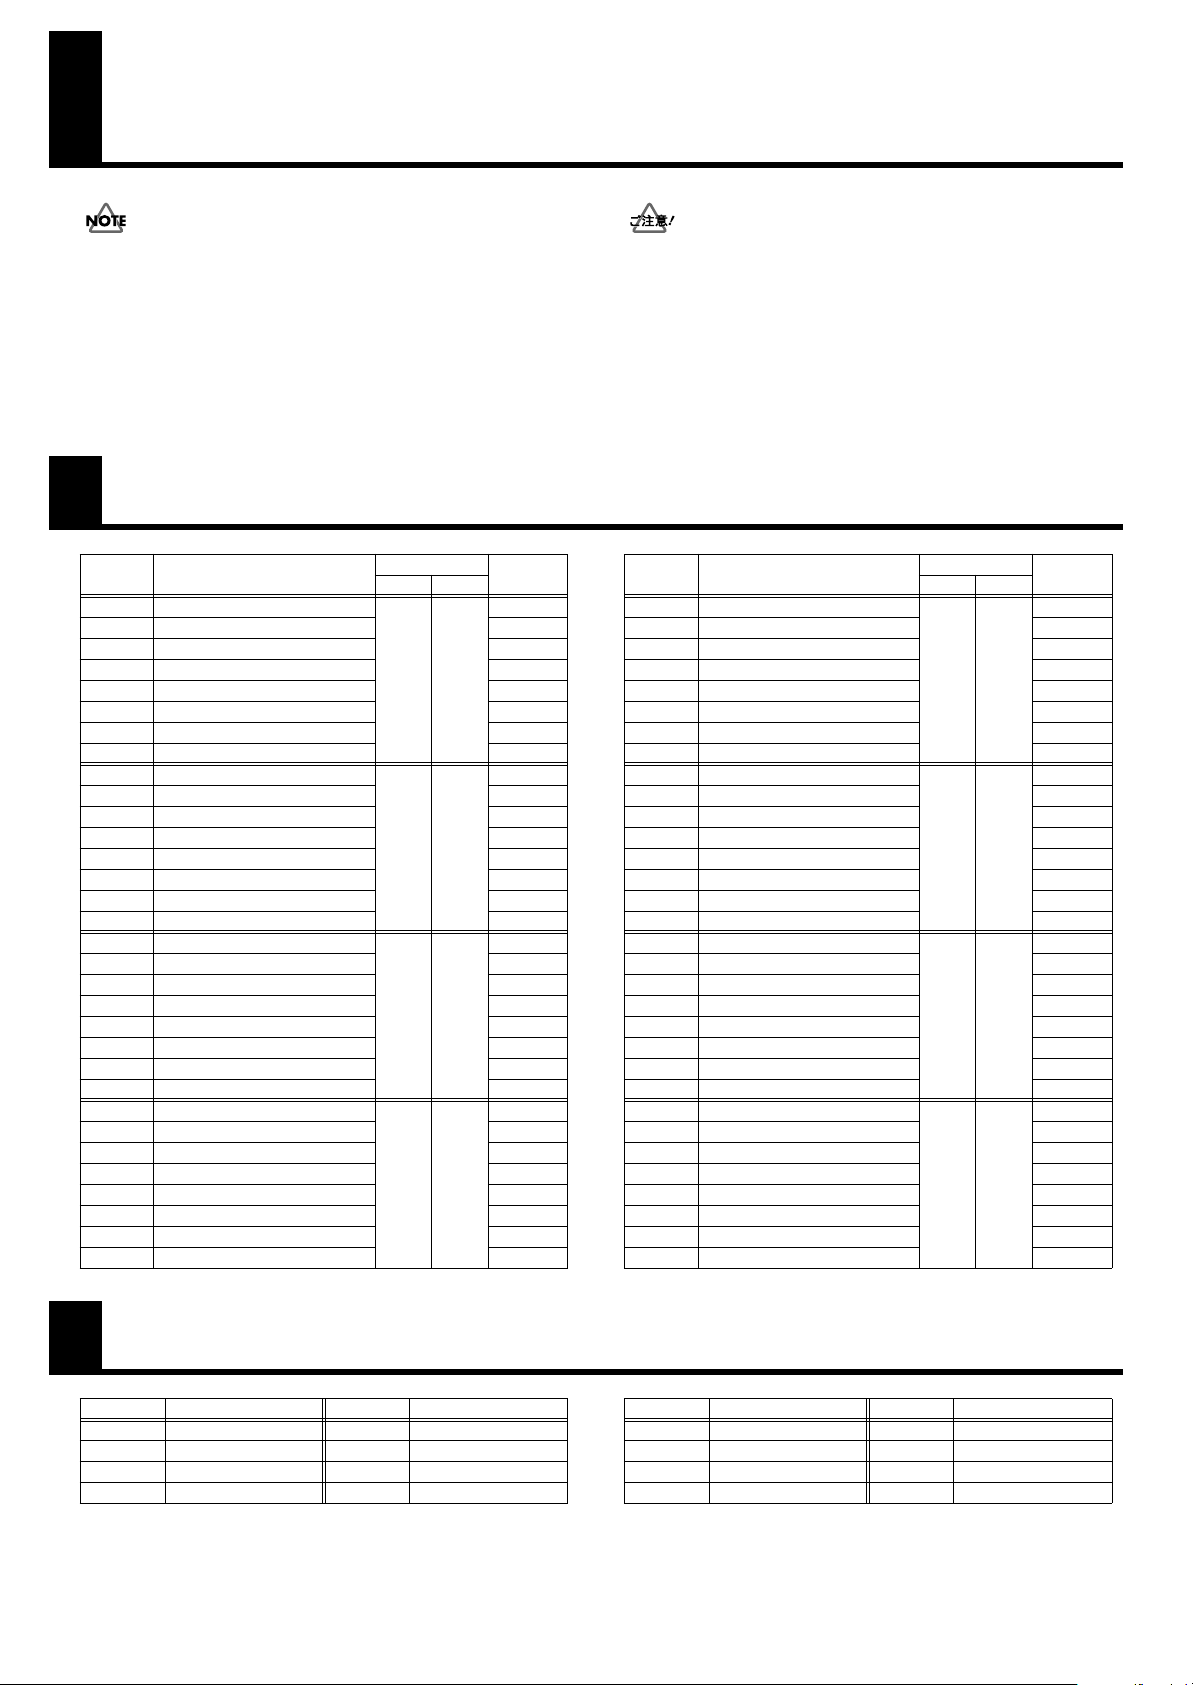
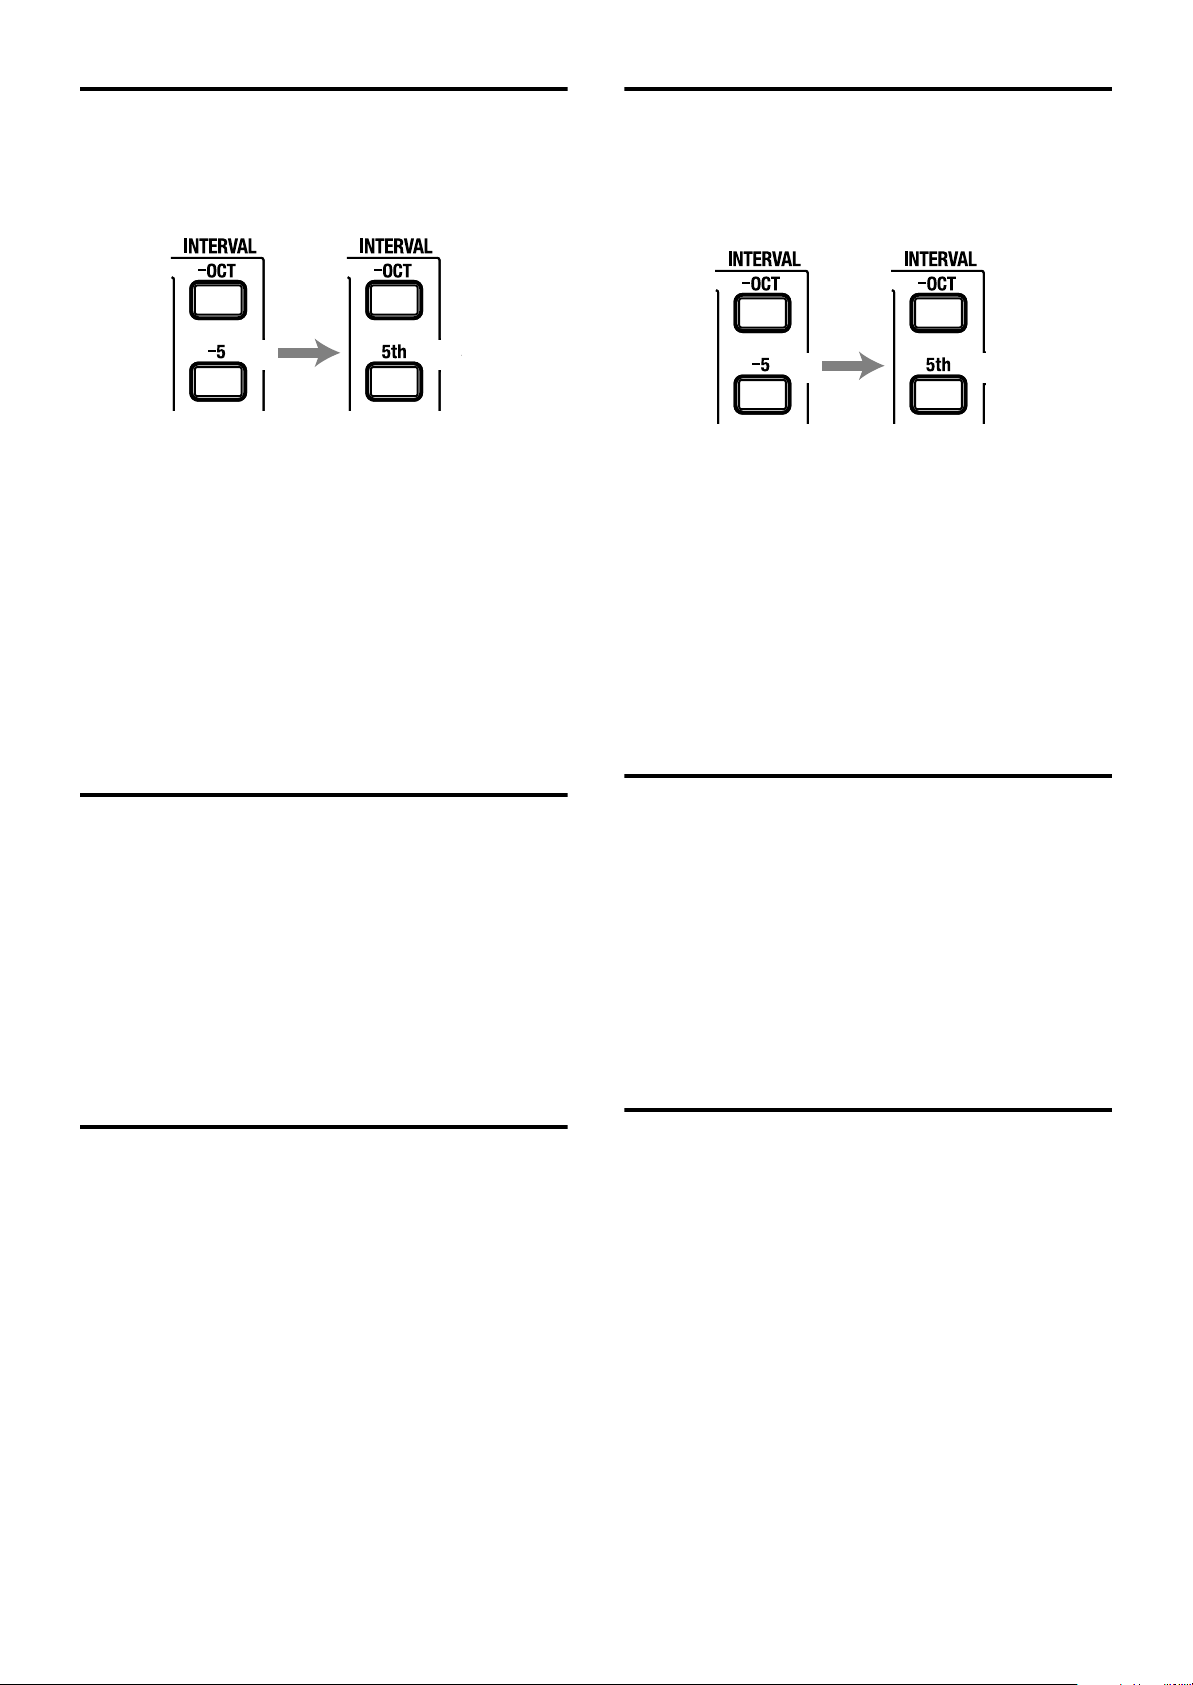
INTERVAL buttons (p. 30)
Change: -5 button → 5th button
Effect template list
仕様変更のお知らせ
製品仕様の変更により、取扱説明書とは動作が異なる部分が
あります。ここに謹んでお詫び申し上げるとともに、以下の
ように訂正させていただきます。
////エエエエフフフフェェェェククククトトトト・・・・テテテテンンンンププププレレレレーーーートトトト・・・・リリリリスススストト
INTERVAL ボタン(P.30)
変更:-5 ボタン → 5th ボタン
トト
When you press the 5th button, the pitch of OSC 2 is
raised 7 semitones (a perfect fifth) above OSC 1.
* Parameters other than PITCH will not be changed.
* The INTERVAL button will not light.
Selecting a tone when using DUAL/SPLIT
(p. 46, 47)
If you press the UPPER button or LOWER button while using
Dual or Split,
, and the indicator of the other button will light.
blink
Now when you operate the panel buttons or knobs,
changes will affect the tone whose indicator is blinking
the indicator of the button you pressed will
your
Functionality added to the
recorder
Now you can choose the type of data that will be recorded (p.
24) or erased (p. 25).
From the REC standby state or while recording a phrase,
press a BANK button (A–D).
•
A (All):
•
B (Bender):
•
C (Controller):
•
D (notes):
All of the following (B, C, D) listed
below (Default state)
Pitch bender lever operations only
Knob operations
(only parameters in the table on p. 72)
Keyboard’s performance data only
5th ボタンを押すと、OSC 2 のピッチが OSC 1 より
7 半音(完全 5 度)高くなります。
※ PITCH 以外のパラメーターは変化しません。
※ INTERVAL ボタンは点灯しません。
DUAL/SPLIT 時のトーン選択(P.46、47)
デュアル/スプリットの状態で UPPER ボタンまたは
LOWER ボタンを押すと、押したボタンのランプが点滅
し、もう一方のボタンのランプは点灯します。
.
パネル上のボタンやつまみを操作すると、ランプが点滅
しているほうのトーンが変化します。
レコーダーの追加機能
レコーディング(P.24)、およびイレース(P.25)するデー
タの種類を選べるようになりました。
REC スタンバイ状態、またはフレーズの記録中に BANK ボ
タン(A 〜 D)を押します。
A(All): 下記 B、C、D すべて(初期状態)
•
B(Bender): ピッチ・ベンド・レバーの操作のみ
•
•
C(Controller): つまみの操作
(P.72 の表にあるパラメーターのみ)
•
D(notes): 鍵盤の演奏情報のみ
Other notes
• Don’t set the
“MIDI” or “USB” unless you’re synchronizing the SH201 to MIDI clock received from an external device.
With these settings, the arpeggiator, recorder, and
tempo-synchronized LFO will not operate correctly.
• If, while recording (p. 24), you specify the length of the
phrase to be recorded, all performance data previously
recorded for that phrase will be erased.
•
If you want to control Active Expression
the D Beam controller
parameter (p. 65) “ON.” (Hold down the CANCEL
button and press the EXPRESS button.)
Copyright © 2006 ROLAND CORPORATION
No part of this publication may be reproduced in any form without the written permission of ROLAND CORPORATION.
©
2006 ローランド株式会社 本書の一部、もしくは全部を無断で複写・転載することを禁じます。
CLOCK SOURCE parameter
, turn the ACTIVE EXPRESSION
(p. 68) to
(p. 20)
from
その他の注意事項
CLOCK SOURCE パラメーター(P.68)は、SH-201 を
•
外部機器からの MIDI クロックに同期させる場合以外、
「MIDI」、「USB」にしないでください。
アルペジエーターやレコーダー、テンポに同期させた
LFO などが正しく動作しなくなります。
レコーディング時(P.24)に、記録するフレーズの長さ
•
を設定すると、そのフレーズに記録されていた演奏デー
タは消去されます。
•
D ビーム・コントローラーでアクティブ・エクスプレッ
ション(P.20)を使う場合は、ACTIVE EXPRESSION
パラメーター(P.65)を「ON」にしてください。
(CANCEL ボタンを押しながら EXPRESS ボタンを押す)
40674656 2MP
2
 Loading...