

Page 1
Owner’s Manual
Bedienungsanleitung
Mode d’emploi
Manuale d’uso
Manual del usuario
Thank you, and congratulations on your choice of the SD-20.
Before using this unit, carefully read the sections entitled: “USING THE UNIT
SAFELY” and “IMPORTANT NOTES” (Owner’s manual pp. 3--5). These
sections provide important information concerning the proper operation of the
unit. Additionally, in order to feel assured that you have gained a good grasp
of every feature provided by your new unit, Owner’s manualshould be read in
its entirety. The manual should be saved and kept on hand as a convenient
reference.
Copyright © 2002 ROLAND CORPORATION
All rights reserved. No part of this publication may be reproduced in any form without
the written permission of ROLAND CORPORATION.
Page 2
For the U.K.
IMPORTANT: THE WIRES IN THIS MAINS LEAD ARE COLOURED IN ACCORDANCE WITH THE FOLLOWING CODE.
BLUE:
BROWN:
As the colours of the wires in the mains lead of this apparatus may not correspond with the coloured markings identifying
the terminals in your plug, proceed as follows:
The wire which is coloured BLUE must be connected to the terminal which is marked with the letter N or coloured BLACK.
The wire which is coloured BROWN must be connected to the terminal which is marked with the letter L or coloured RED.
Under no circumstances must either of the above wires be connected to the earth terminal of a three pin plug.
This product complies with the requirements of European Directive 89/336/EEC.
NEUTRAL
LIVE
For EU Countries
For the USA
FEDERAL COMMUNICATIONS COMMISSION
RADIO FREQUENCY INTERFERENCE STATEMENT
This equipment has been tested and found to comply with the limits for a Class B digital device, pursuant to Part 15 of the
FCC Rules. These limits are designed to provide reasonable protection against harmful interference in a residential
installation. This equipment generates, uses, and can radiate radio frequency energy and, if not installed and used in
accordance with the instructions, may cause harmful interference to radio communications. However, there is no guarantee
that interference will not occur in a particular installation. If this equipment does cause harmful interference to radio or
television reception, which can be determined by turning the equipment off and on, the user is encouraged to try to correct the
interference by one or more of the following measures:
– Reorient or relocate the receiving antenna.
– Increase the separation between the equipment and receiver.
– Connect the equipment into an outlet on a circuit different from that to which the receiver is connected.
– Consult the dealer or an experienced radio/TV technician for help.
This device complies with Part 15 of the FCC Rules. Operation is subject to the following two conditions:
(1) This device may not cause harmful interference, and
(2) This device must accept any interference received, including interference that may cause undesired operation.
Tested To Comply With FCC Standards
FOR HOME OR OFFICE USE
Unauthorized changes or modification to this system can void the users authority to operate this equipment.
This equipment requires shielded interface cables in order to meet FCC class B Limit.
For Canada
NOTICE
This Class B digital apparatus meets all requirements of the Canadian Interference-Causing Equipment Regulations.
AVIS
Cet appareil numérique de la classe B respecte toutes les exigences du Règlement sur le matériel brouilleur du Canada.
For the USA
DECLARATION OF CONFORMITY
Compliance Information Statement
Model Name :
Type of Equipment :
Responsible Party :
Address :
Telephone :
SD-20
Sound Module
Edirol Corporation North America
425 Sequoia Drive, Suite 114, Bellingham, WA 98226
(360) 594-4276
Page 3
USING THE UNIT SAFELY
Used for instructions intended to alert
the user to the risk of death or severe
injury should the unit be used
improperly.
Used for instructions intended to alert
the user to the risk of injury or material
damage should the unit be used
improperly.
* Material damage refers to damage or
other adverse effects caused with
respect to the home and all its
furnishings, as well to domestic
animals or pets.
001
• Before using this unit, make sure to read the
instructions below, and the Owner’s Manual.
................................................................................................
002c
• Do not open (or modify in any way) the unit
or its AC adaptor.
................................................................................................
003
• Do not attempt to repair the unit, or replace
parts within it (except when this manual
provides specific instructions directing you
to do so). Refer all servicing to your retailer,
the nearest EDIROL/Roland Service Center,
or an authorized EDIROL/Roland
distributor, as listed on the "Information"
page.
................................................................................................
004
• Never use or store the unit in places that are:
• Subject to temperature extremes (e.g.,
direct sunlight in an enclosed vehicle, near
a heating duct, on top of heat-generating
equipment); or are
• Damp (e.g., baths, washrooms, on wet
floors); or are
• Humid; or are
• Exposed to rain; or are
• Dusty; or are
• Subject to high levels of vibration.
................................................................................................
007
• Make sure you always have the unit placed
so it is level and sure to remain stable. Never
place it on stands that could wobble, or on
inclined surfaces.
The symbol alerts the user to important instructions
or warnings.The specific meaning of the symbol is
determined by the design contained within the
triangle. In the case of the symbol at left, it is used for
general cautions, warnings, or alerts to danger.
The symbol alerts the user to items that must never
be carried out (are forbidden). The specific thing that
must not be done is indicated by the design contained
within the circle. In the case of the symbol at left, it
means that the unit must never be disassembled.
The ● symbol alerts the user to things that must be
carried out. The specific thing that must be done is
indicated by the design contained within the circle. In
the case of the symbol at left, it means that the powercord plug must be unplugged from the outlet.
008c
• Be sure to use only the AC adaptor supplied
with the unit. Also, make sure the line
voltage at the installation matches the input
voltage specified on the AC adaptor’s body.
Other AC adaptors may use a different
polarity, or be designed for a different
voltage, so their use could result in damage,
malfunction, or electric shock.
................................................................................................
009
• Do not excessively twist or bend the power
cord, nor place heavy objects on it. Doing so
can damage the cord, producing severed
elements and short circuits. Damaged cords
are fire and shock hazards!
................................................................................................
010
• This unit, either alone or in combination with
an amplifier and headphones or speakers,
may be capable of producing sound levels
that could cause permanent hearing loss. Do
not operate for a long period of time at a high
volume level, or at a level that is uncomfortable. If you experience any hearing loss or
ringing in the ears, you should immediately
stop using the unit, and consult an audiologist.
................................................................................................
011
• Do not allow any objects (e.g., flammable
material, coins, pins); or liquids of any kind
(water, soft drinks, etc.) to penetrate the unit.
3
Page 4
012c
• Immediately turn the power off, remove the
AC adaptor from the outlet, and request
servicing by your retailer, the nearest Roland
Service Center, or an authorized Roland
distributor, as listed on the "Information"
page when:
• The AC adaptor or the power-supply cord
has been damaged; or
• Objects have fallen into, or liquid has been
spilled onto the unit; or
• The unit has been exposed to rain (or
otherwise has become wet); or
• The unit does not appear to operate
normally or exhibits a marked change in
performance.
................................................................................................
012d
• Immediately turn the power off, and request
servicing by your retailer, the nearest Roland
Service Center, or an authorized Roland
distributor, as listed on the "Information"
page when:
• Objects have fallen into, or liquid has been
spilled onto the unit; or
• The unit has been exposed to rain (or
otherwise has become wet); or
• The unit does not appear to operate
normally or exhibits a marked change in
performance.
................................................................................................
013
• In households with small children, an adult
should provide supervision until the child is
capable of following all the rules essential for
the safe operation of the unit.
................................................................................................
014
• Protect the unit from strong impact.
(Do not drop it!)
................................................................................................
015
• Do not force the unit’s power-supply cord to
share an outlet with an unreasonable number
of other devices. Be especially careful when
using extension cords—the total power used
by all devices you have connected to the
extension cord’s outlet must never exceed the
power rating (watts/amperes) for the
extension cord. Excessive loads can cause the
insulation on the cord to heat up and
eventually melt through.
................................................................................................
016
• Before using the unit in a foreign country,
consult with your retailer, the nearest Roland
Service Center, or an authorized Roland
distributor, as listed on the "Information"
page.
023
• DO NOT play a CD-ROM disc on a conventional audio CD player. The resulting sound
may be of a level that could cause permanent
hearing loss. Damage to speakers or other
system components may result.
101b
• The unit and the AC adaptor should be
located so their location or position does not
interfere with their proper ventilation.
................................................................................................
102d
• Always grasp only the plug or the body of
the AC adaptor when plugging into, or
unplugging from, an outlet or this unit.
................................................................................................
103b
• Whenever the unit is to remain unused for an
extended period of time, disconnect the AC
adaptor.
................................................................................................
104
• Try to prevent cords and cables from
becoming entangled. Also, all cords and
cables should be placed so they are out of the
reach of children.
................................................................................................
106
• Never climb on top of, nor place heavy
objects on the unit.
................................................................................................
107d
• Never handle the AC adaptor body, or its
plugs, with wet hands when plugging into,
or unplugging from, an outlet or this unit.
................................................................................................
108b
• Before moving the unit, disconnect the AC
adaptor and all cords coming from external
devices.
................................................................................................
108c
• Disconnect all cords coming from external
devices before moving the unit.
................................................................................................
109b
• Before cleaning the unit, turn off the power
and unplug the AC adaptor from the outlet .
................................................................................................
110b
• Whenever you suspect the possibility of
lightning in your area, disconnect the AC
adaptor from the outlet.
................................................................................................
118
• Should you remove the optical connector
caps, make sure to put them in a safe place
out of children's reach, so there is no chance
of them being swallowed accidentally.
4
Page 5

IMPORTANT NOTES
291a
In addition to the items listed under “USING THE
UNIT SAFELY” on page 3--4, please read and
observe the following:
Power Supply
301
• Do not use this unit on the same power circuit with
any device that will generate line noise (such as an
electric motor or variable lighting system).
302
• The AC adaptor will begin to generate heat after
long hours of consecutive use. This is normal, and is
not a cause for concern.
307
• Before connecting this unit to other devices, turn off
the power to all units. This will help prevent
malfunctions and/or damage to speakers or other
devices.
Placement
351
• Using the unit near power amplifiers (or other
equipment containing large power transformers)
may induce hum. To alleviate the problem, change
the orientation of this unit; or move it farther away
from the source of interference.
352a
• This device may interfere with radio and television
reception. Do not use this device in the vicinity of
such receivers.
352b
• Noise may be produced if wireless communications
devices, such as cell phones, are operated in the
vicinity of this unit. Such noise could occur when
receiving or initiating a call, or while conversing.
Should you experience such problems, you should
relocate such wireless devices so they are at a greater
distance from this unit, or switch them off.
354a
• Do not expose the unit to direct sunlight, place it
near devices that radiate heat, leave it inside an
enclosed vehicle, or otherwise subject it to temperature extremes. Excessive heat can deform or
discolor the unit.
355
• To avoid possible breakdown, do not use the unit in
a wet area, such as an area exposed to rain or other
moisture.
Maintenance
401a
• For everyday cleaning wipe the unit with a soft, dry
cloth or one that has been slightly dampened with
water. To remove stubborn dirt, use a cloth impregnated with a mild, non-abrasive detergent. Afterwards, be sure to wipe the unit thoroughly with a
soft, dry cloth.
402
• Never use benzine, thinners, alcohol or solvents of
any kind, to avoid the possibility of discoloration
and/or deformation.
Additional Precautions
553
• Use a reasonable amount of care when using the
unit’s buttons, sliders, or other controls; and when
using its jacks and connectors. Rough handling can
lead to malfunctions.
556
• When connecting / disconnecting all cables, grasp
the connector itself—never pull on the cable. This
way you will avoid causing shorts, or damage to the
cable’s internal elements.
558a
• To avoid disturbing your neighbors, try to keep the
unit’s volume at reasonable levels. You may prefer
to use headphones, so you do not need to be
concerned about those around you (especially when
it is late at night).
559a
• When you need to transport the unit, package it in
the box (including padding) that it came in, if
possible. Otherwise, you will need to use equivalent
packaging materials.
562
• Use a cable from Roland to make the connection. If
using some other make of connection cable, please
note the following precautions.
• Some connection cables contain resistors. Do not
use cables that incorporate resistors for
connecting to this unit. The use of such cables can
cause the sound level to be extremely low, or
impossible to hear. For information on cable
specifications, contact the manufacturer of the
cable.
Handling CD-ROMs
801
• Avoid touching or scratching the shiny underside
(encoded surface) of the disc. Damaged or dirty CDROM discs may not be read properly. Keep your
discs clean using a commercially available CD
cleaner.
5
Page 6

Contents
USING THE UNIT SAFELY.......................................................3
IMPORTANT NOTES................................................................ 5
Features of the SD-20..............................................................8
Check the contents of the package........................................9
Names of things and what they do.......................................10
Front Panel..........................................................................................................................10
Rear Panel ...........................................................................................................................11
Exchanging MIDI data with your computer..................................................................12
Basic connections ...............................................................................................................13
About the sound generator modes...................................... 14
About parts and sounds....................................................................................................16
Different types of part.......................................................................................................16
Polyphony and voices .......................................................................................................16
Getting connected and installing drivers (Windows).........17
USB connection...................................................................................................................18
Serial connection ................................................................................................................29
Settings and checking........................................................................................................39
Enabling background services .........................................................................................41
Checking for sound output...............................................................................................42
Getting connected and installing drivers (Macintosh).......43
USB connection...................................................................................................................44
Serial connection ................................................................................................................51
Deutsch
Anschlüsse herstellen und Treiber installieren (Windows)
.................................................................................................58
USB-Verbindung................................................................................................................59
Serielle Verbindung...........................................................................................................71
Einstellungen und Überprüfung .....................................................................................82
Aktivierung der Hintergrunddienste..............................................................................84
Überprüfung der Soundausgabe.....................................................................................85
Anschlüsse herstellen und Treiber installieren (Macintosh)
.................................................................................................86
USB-Verbindung................................................................................................................87
Serielle Verbindung...........................................................................................................95
6
Page 7

Français
Installation des pilotes et connexions (Windows)............102
Connexion USB.................................................................................................................103
Connexion série................................................................................................................115
Configuration et contrôle................................................................................................125
Activation des services en tâche de fond......................................................................127
Vérification de la sortie son............................................................................................128
Installation des pilotes et connexions (Macintosh)..........129
Connexion USB.................................................................................................................130
Connexion série................................................................................................................138
Italiano
Collegamenti e installazione dei driver (Windows) ..........145
Connettore USB................................................................................................................146
Collegamento seriale .......................................................................................................157
Configurazione e verifica................................................................................................167
Attivazione dei servizi in background..........................................................................169
Verifica dell’audio............................................................................................................170
Collegamenti e installazione dei driver (Macintosh) ........171
Collegamento USB...........................................................................................................172
Collegamento seriale .......................................................................................................180
Español
Contents
Conexión e instalación de los controladores (Windows)
...............................................................................................189
Conexión USB...................................................................................................................190
Conexión en serie.............................................................................................................201
Configuración y comprobación .....................................................................................212
Habilitación de servicios en segundo plano ................................................................214
Comprobación de la salida de sonido...........................................................................215
Conexión e instalación de los controladores (Macintosh)
...............................................................................................216
Conexión USB...................................................................................................................217
Conexión en serie.............................................................................................................224
Troubleshooting...................................................................232
Appendices...........................................................................247
Instrument list (GM2 / Native mode) ..........................................................................247
Instrument list (GS mode)...............................................................................................252
Instrument list (XGlite mode) ........................................................................................254
Drum set list (GM2 / Native mode)..............................................................................256
Drum set list (GS mode)..................................................................................................263
Drum set list (XGlite mode)............................................................................................266
Specifications.......................................................................272
7
Page 8
Features of the SD-20
32-part, 64-voice polyphony
Complete studio module including 32-part MIDI synthesizer and 64-voice polyphony for
computer music, karaoke, huge orchestrations and more….
GM2/GS/XGlite 660 tones, 23 drum sets
The standard GM2/GS/XGlite compatible sound selections provide a variety of music genres such
as classicals, contemporary, pop and beyond… Play the realistic instruments tones from Grand
Pianos, Rippin’ Guitars, Jazzy Sax and ethnic drums!!
Optical Digital Output (S/P DIF)
Optical digital connection allows for exceptional MIDI sound quality output not found on any
sound module in its price range.
USB bus powered, adaptor free
USB connection supplies power as well as data. The convenience of having all the mobile elements
of music production.
Easy connection to computer (Serial / USB)
Legacy compatible with serial computers or simply connect through USB for Mac or PC.
ADD
* XG ( ) and XGlite ( ) are trademarks of YAMAHA Corporation.
203
* GS ( ) is a registered trademark of Roland Corporation.
204
* Microsoft and Windows are registered trademarks of Microsoft Corporation.
206c
* Windows® 98 is known officially as: “Microsoft® Windows® 98 operating system.”
206e
* Screen shots in this documents are reprinted with permission from Microsoft Corporation.
206f
* Windows® 2000 is known officially as: “Microsoft® Windows® 2000 operating system.”
206g
* Windows® Me is known officially as: “Microsoft® Windows® Millennium Edition operating system.”
ADD
* Windows® XP is known officially as: “Microsoft® Windows® XP operating system.”
207
* Apple and Macintosh are registered trademark of Apple Computer, Inc.
209
* MacOS is a trademark of Apple Computer, Inc.
220
* All product names mentioned in this document are trademarks or registered trademarks of their
respective owners.
231
* OMS is a registered trademark of Opcode Systems, Inc.
232
* FreeMIDI is a trademark of Mark of the Unicorn, Inc.
8
Page 9
Check the contents of the package
The following items are included in the SD-20 package. After opening the
package, check to see whether any items are missing. If any items are missing,
please contact the dealer from whom you purchased the SD-20.
* The SD-20 package does not include an external amp or speakers, or headphones.
You will need to provide these separately.
fig.SD-20
❏SD-20
The SD-20 is a 32-part, 64voice multitimbral sound
module.
It supports General MIDI 2,
GS format (the universal specification for Roland sound generators), and the
XGlite promoted by Yamaha Corporation.
❏AC adaptor
This is the only AC adaptor you should use with the SD-20.
Do not use any AC adaptor other than the supplied one, since doing so may
cause malfunction.
You may want to mark the
relevant check box as you
confirm the presence of
each item.
❏CD-ROM
This contains drivers used by the SD-20 and demo songs.
On the disc, you'll also find a PDF file containing detailed information that
should prove helpful if you intend to make full use of the SD-20's advanced
functionality (Appendix.pdf).
fig.0-6a
DO NOT play a CD-ROM disc on a conventional audio CD player.
The resulting sound may be of a level that could cause permanent
hearing loss. Damage to speakers or other system components may
result.
fig.0-7
❏USB cable
❏Conversion cable
Stereo miniature phone type <-> RCA phono type
fig.0-10e_30
Owner’s Manual
This is the manual you are holding. Please read this first.
This manual explains how to install the drivers and make the settings
required in order to use the SD-20. Please read the sections that are relevant
to your system.
Avoid touching or
scratching the shiny
underside (encoded
surface) of the disc.
Damaged or dirty CDROM discs may not be
read properly. Keep your
discs clean using a
commercially available CD
cleaner.
9
Page 10
Names of things and what they do
Front Panel
fig.front
USB Indicator
C
POWER Indicator
B
A
MODE Button
OUTPUT Level Indicator
D
E
MODE Indicator
G
Headphone Jack
F
VOLUME Knob
A. MODE Button
The sound-module mode changes each time you press this button. (->About the sound generator
modes (p. 14))
Order of selection
Native mode (at power-up) -> GM2 -> GS -> XGlite
B. POWER Indicator
Lights in blue when the power is on.
C. USB Indicator
Lights in orange when data can be transmitted or received via USB.
D. OUTPUT Level Indicator
This will light in four stages to indicate the output level of the sound module.
E. MODE Indicator
This indicates the sound-module mode that’s been selected using the MODE button.
F. VOLUME Knob
This adjusts the volume that is output from the headphone jack and the OUTPUT jacks.
G. Headphone Jack
A set of headphones can be connected to this jack.
Sound will still be output from the OUTPUT jacks even if headphones are connected.
10
Page 11
Rear Panel
fig.rear
Power Switch
AC Adaptor Jack
I
H
OPTICAL OUT Jack
L
Names of things and what they do
Computer Switch
O
J
INPUT Jack
K
OUTPUT Jacks
MIDI IN Connector
M
N
SERIAL Connector
N
USB Connector
H. Power Switch
Provides for selection of either ON, OFF, or BUS as the setting for the power supply.
BUS POWER
The SD-20 can be operated on bus power.
"Bus power" refers to power that is supplied to the SD-20 from a computer via a USB cable. In this
case, it is not necessary to connect the AC adaptor.
* Depending on the manner in which your computer supplies power to the USB connector, you may not be able
to run the SD-20 on bus power. In this case, please use the supplied AC adaptor.
I. AC Adaptor Jack
Connect the supplied AC adaptor to this jack.
J. INPUT Jack
Connect the audio output jack of your computer sound card or audio device to this jack. The sound
that is input here will be mixed with the sound of the SD-20, and output from the OUTPUT jacks
and the headphone jack.
K. OUTPUT Jacks
These jacks output the sound produced by the SD-20 sound generator in combination with the
sound that is input through the INPUT jack.
L. OPTICAL OUT Jack
This jack outputs the sound of the SD-20 sound generator. Sound being input through the INPUT
jack will not be mixed in.
M. MIDI IN Connector
Connect your MIDI keyboard or MIDI controller to this connector.
N. SERIAL Connector
Use this connector if you want to connect the SD-20 to your computer via a computer cable.
11
Page 12
Names of things and what they do
O. Computer Switch
Set this switch as appropriate for the computer or interface to which the SD-20 is connected.
* If you change the setting of the computer switch, the SD-20 must be restarted. Turn the SD-20’s power
switch OFF, then ON again.
USB If using a USB connection
Mac If using a serial connection to Macintosh
PC If using a serial connection to Windows
MIDI
If connected to an external MIDI device
* Never connect a USB cable when the Computer switch is set to MIDI.
P. USB Connector
Use this connector if you want to connect the SD-20 to your computer via a USB cable.
Exchanging MIDI data with your computer
There are three ways to connect the SD-20 to your computer and play it.
Method Number of available parts
Using the USB connector Maximum 32 parts
Using the serial connector Maximum 32 parts
Using the MIDI connector Maximum 16 parts
* Your computer needs to be equipped with a MIDI interface board or adaptor if you intend to use the MIDI
connector
THRU function: ON
fig.flow
12
MIDI IN
USB or SERIAL
Part group A
PART A1 - A16
Part group B
PART B1 - B16
The number of sound generator parts that
can be controlled will depend on your
software. Refer to the owner’s manual for
the software you are using.
SD-20
Page 13
Basic connections
* To prevent malfunction and/or damage to speakers or other devices, always turn down the volume, and turn
off the power on all devices before making any connections.
* To avoid short circuits or broken connections, grasp the plug when disconnecting a cable.
* Use the included cables to make connections. If you are using a connection cable made by another
manufacturer, please note the following.
• Some connection cables contain a resistor. Do not use a cable with a built-in resistor to connect with the SD-90. Doing
fig.connect
so may make the sound extremely weak, or inaudible. For details on your cable, please contact its manufacturer.
Power switch
To turn on
the power
To turn off
the power
To use BUS power
Personal computer
Audio
cable
Computer cable
USB
connector
Names of things and what they do
USB cable
AC adaptor
Stereo set
Powered speaker
LINE OUT
Audio
cable
Optical digital
MD
cable
DIGITAL
INPUT
MIDI OUT
When connecting via a
computer cable to a
Windows machine
When
connecting via a
computer cable
to a Macintosh
When controlling
the SD-20 from a
MIDI device
MIDI cable
MIDI keyboard etc..
When connecting
via a USB cable
Computer switch
13
Page 14
About the sound generator modes
The SD-20 has four sound generator modes: Native, GM2, GS, and XGlite. GM2 and Native modes
offer three sound sets.
■ Native mode
This mode is unique to the SD-20. It provides three sound sets that can be switched using MIDI
bank select messages.
The way in which sounds are selected is different than in GM2 mode. For this reason, song data
you create in Native mode will not play back correctly on GM2 sound modules other than the SD-
20.
Other functions are the same as in GM2 mode.
Sound sets in GM2/Native modes
The sound sets in GM2 mode and Native mode consist of three variations, which are classified
according to their characteristics.
fig.1
SD-20
Use NRPN or
exclusive messages
to switch
GM2
Classical
Contemporary
Solo
GS
Native
Classical
Contemporary
Solo
XGlite
Use bank
select to switch
Classical
This is the basic sound set that blends well into an ensemble. This set is also used when GM2 data
compatibility is important.
Contemporary
This sound set emphasizes the realism of each individual instrument. It contains numerous sounds
that use velocity switching for expressive dynamics.
Solo
This sound set contains mainly sounds that are designed to be distinctive when used to play solos.
These sounds include spacious stereo-sampled sounds, as well as sounds that are switched by
velocity.
14
Page 15
■ GM2 mode
This sound generator mode is compatible with the “GM2” sound generator format.
GM2 is “recommended practice,” and it is backwardly compatible with GM. It was created in order
to allow more sophisticated performance expression and greater compatibility. It includes detailed
definitions concerning sound editing and the use of effects (things that weren’t covered by the
earlier GM format), and it also expands the sound set. GM2-compatible sound generators will
correctly play back music data bearing either the GM or GM2 logos.
When it is necessary to make a distinction, this manual will sometimes refer to “GM1” to indicate
the earlier GM format which does not include the extended specifications of GM2.
■ GS mode
This sound generator mode supports the “GS” sound generator format promoted by Roland
Corporation.
In addition to the General MIDI functionality, this format expands the sound set, and also enhances
compatibility by providing detailed specifications for functionality such as sound editing and
effects (reverb and chorus). For flexibility in meeting future needs, it also provides for the addition
of new sounds and expanded functionality. Since the GS format is compatible with GM, it allows
GM scores to be played in the same way as GS music data (music data created in conformity with
the GS format).
About the sound generator modes
■ XGlite mode
XG is a sound generator format promoted by Yamaha Corporation, which is based on GM1
(General MIDI 1). It provides detailed specifications concerning expansion of the sound sets,
editing methods, and effects structures and types.
XGlite is a reduced-functionality (“lite”) version of XG, which allows simple playback of XG music
data on a sound generator bearing the XGlite logo. Since XGlite has some limitations on the
parameters and effects that can be controlled, the XG music data may sound different than the
original data.
15
Page 16
About the sound generator modes
About parts and sounds
The SD-20 is able to produce 32 different sounds at once. A sound generator such as the SD-20 that
is able to produce many different sounds simultaneously is called a “multitimbral sound
module.” “Timbre” refers to the unique characteristics that result in the sound of one instrument
being different from that of another. The ability to simultaneously produce 32 different instrument
sounds means that, using the analogy of an orchestra, you can produce an ensemble consisting of
32 different instrumental parts. On the SD-20, the sound produced by each part is called an
Instrument (“Instrument list (GM2 / Native mode) ”(p. 247)). You can assign a desired instrument
to each of the 32 parts, creating a 32-part ensemble.
Different types of part
The SD-20 has 32 parts, which are divided into groups A and B. Each group is numbered from 01-
16; i.e., A01-A16 and B01-B16.
Each part can be set either as an Inst part or a Drum part. Inst parts are used to play melody, bass,
etc. Drum parts are used to play percussion-type sounds. This setting is called the Part Mode.
By default, the following part mode is selected for each part.
Part mode Corresponding parts
Inst part A01-09, A11-16, B01-09, B11-16
Drum part A10, B10
When using the MIDI connector to play the SD-20
When using the MIDI connector to play the SD-20, MIDI IN is correlated with Group A.
In other words, the MIDI messages received at MIDI IN will be passed to the Group A parts.
For example, MIDI messages arriving on channel 5 at MIDI IN will sound part 5 of group A (A05)
(at the default settings). When using the MIDI IN connector to play the SD-20, it is not possible to
play the Group B parts.
Polyphony and voices
Each of the SD-20’s sounds consist of units called “voices.” There is a limit to the number of voices
that can be used, and the SD-20 is able to use 64 voices simultaneously. Some sounds
(instruments) use more than one voice (“Instrument list (GM2 / Native mode) ”(p. 247)). The main
reason that an instrument uses some voices is so that velocity can be used to shift between different
sounds, or so that multiple sounds can be layered to create a richer tone.
When you attempt to play more than 64 voices on the SD-20, the most-recently played note will be
given priority, and the oldest of the currently-sounding notes will be turned off one by one. If you
are using only instruments that consist of only one voice, you will be able to play 64 notes
simultaneously. However, if you use instruments that consist of two or four voices, fewer than 64
notes can be played simultaneously. Even if a MIDI note-off message is received, a voice will
continue to be used as long as that note continues to sound. You need to remain aware of this,
particularly when using sounds that have a long release time.
16
Page 17
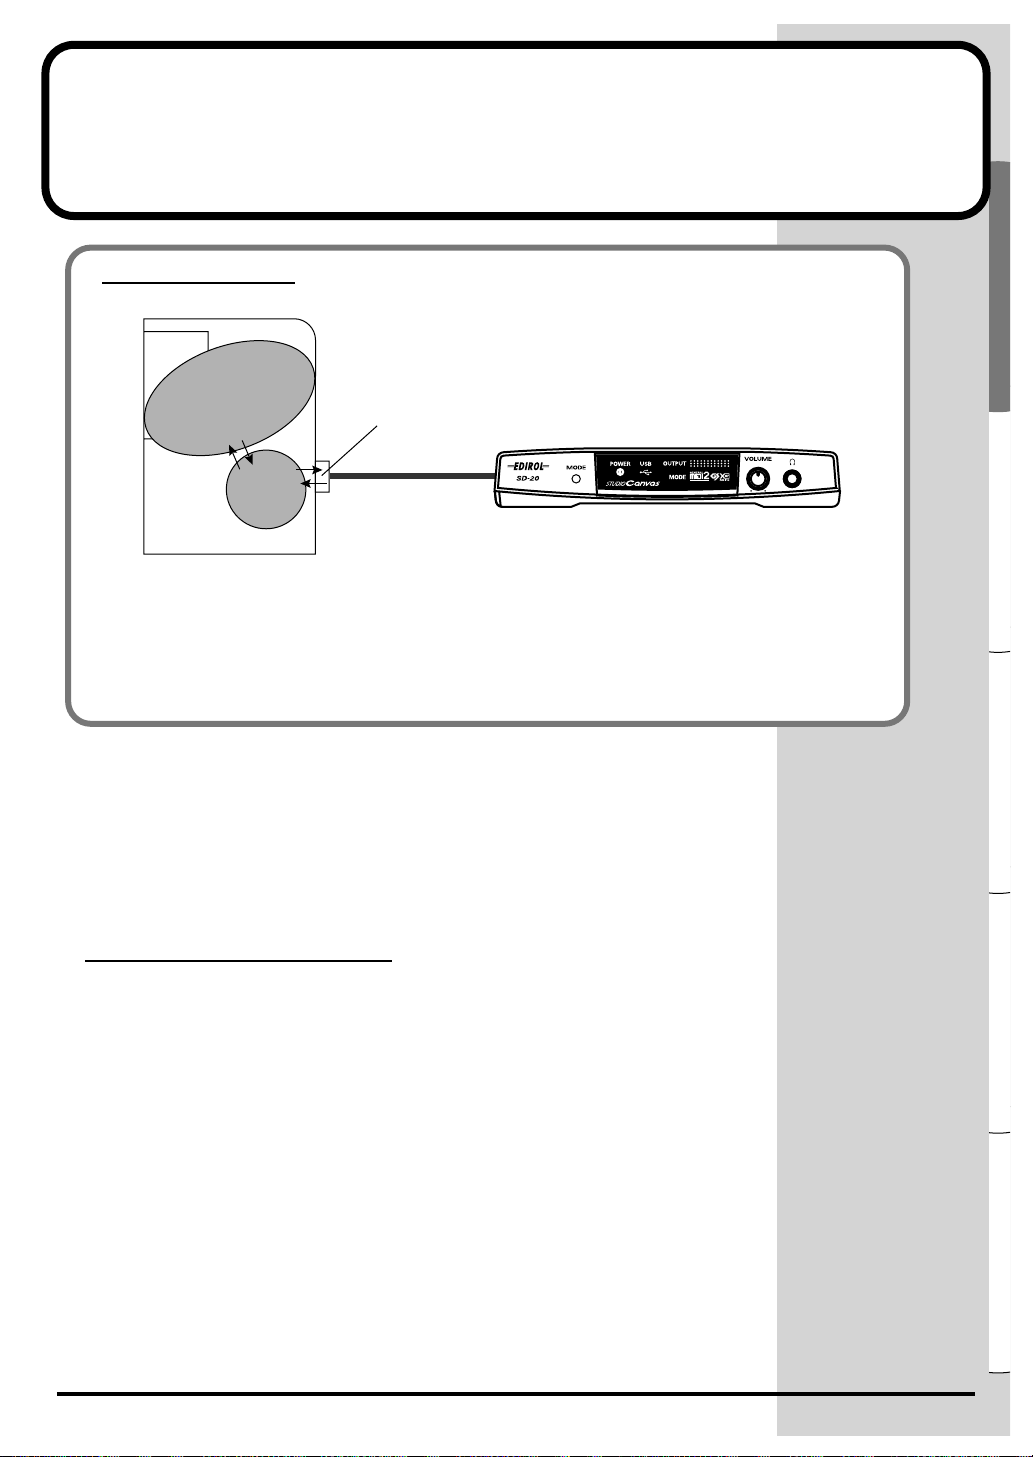
Español Italiano Français Deutsch English
Getting connected and installing drivers (Windows)
What is a driver?
fig.2-0
Application
Driver
Computer
A “driver” is software that transfers data between the SD-20 and application software
running on your computer, when your computer and the SD-20 are connected by a USB
cable. The driver sends data from your application to the SD-20, and from the SD-20 to your
application.
The SD-20 is able to operate using the “BUS power” that is supplied via the
USB cable. This means that the supplied AC adaptor is not necessary.
However, if you are using a USB hub, or if not enough power can be supplied
via USB, the SD-20 may not operate correctly. In this case, connect the
supplied AC adaptor power supply to the SD-20.
When installing the driver, you must connect the AC adaptor and turn the
POWER switch ON.
USB/Serial
port
USB/Computer
Cable
SD-20
Which type of connection?
You can either use the USB cable, or use the computer cable to make a serial
connection. Depending on the type of connection you are using, install the
appropriate driver and make the appropriate settings.
USB connection................................................(p. 18)
Serial connection..............................................(p. 29)
17
Page 18
Getting connected and installing drivers (Windows)
USB connection
The following items are required for connections and installation. Please
have the following items ready.
• SD-20
• AC adaptor
• USB cable
• CD-ROM
The installation procedure will differ depending on your system.
Please proceed to one of the following sections, depending on the system you
use.
• Windows XP users ..................................................... (p. 18)
• Windows 2000 users................................................... (p. 23)
• Windows Me/98 users .............................................. (p. 27)
■ Windows XP users
1
With the SD-20 disconnected, start up Windows.
Disconnect all USB cables except for a USB keyboard and USB mouse (if
used).
2
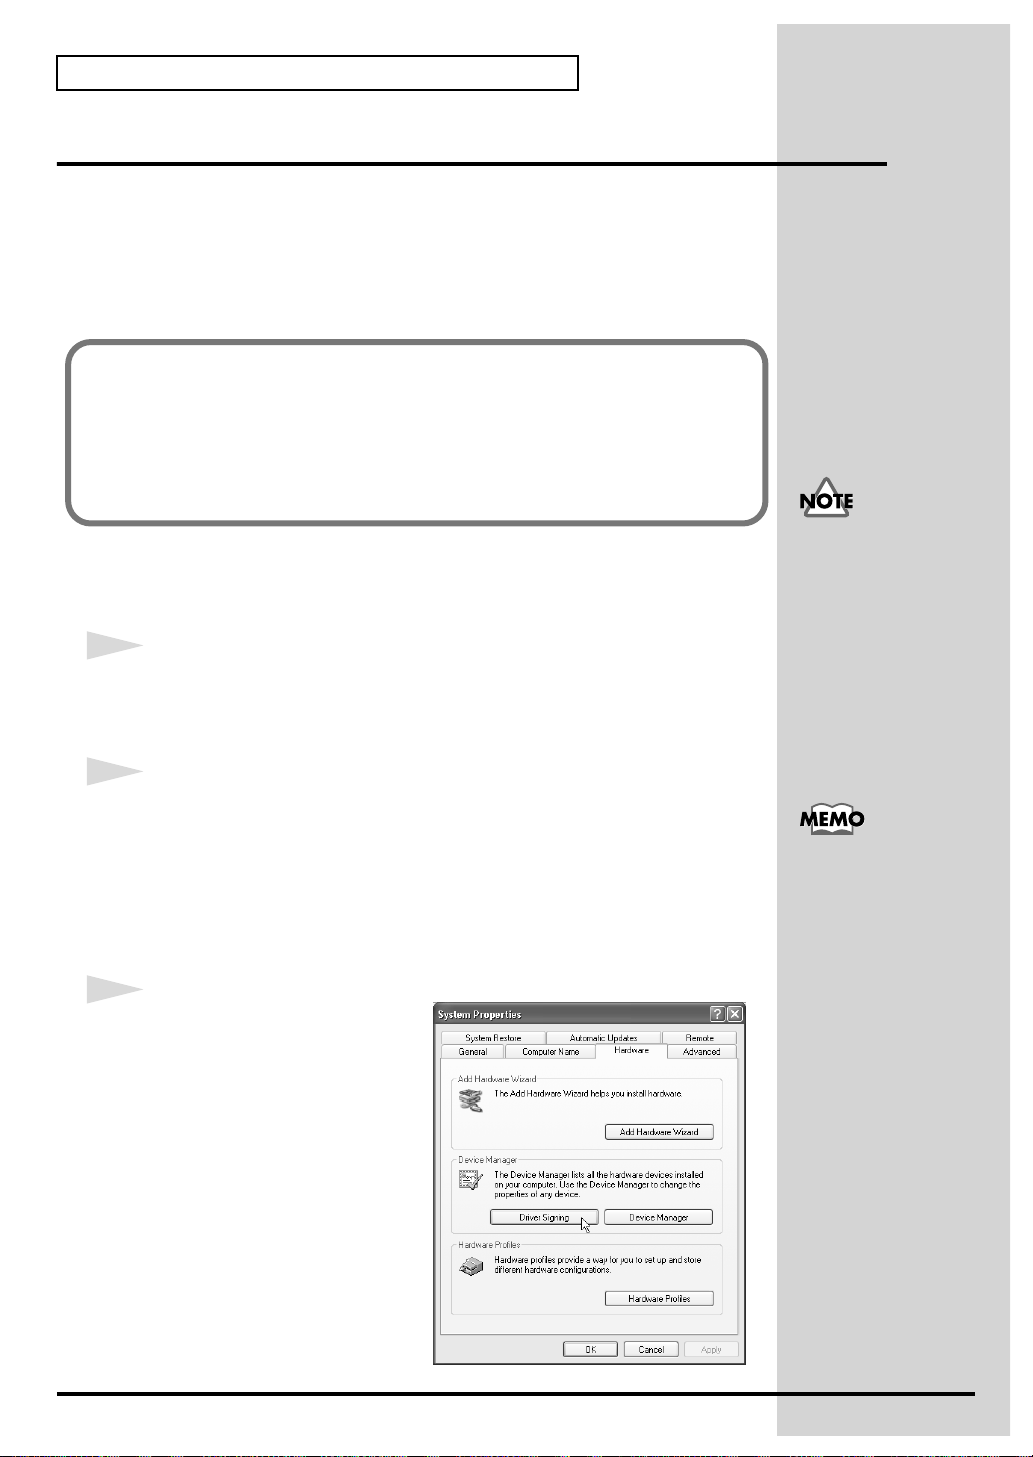
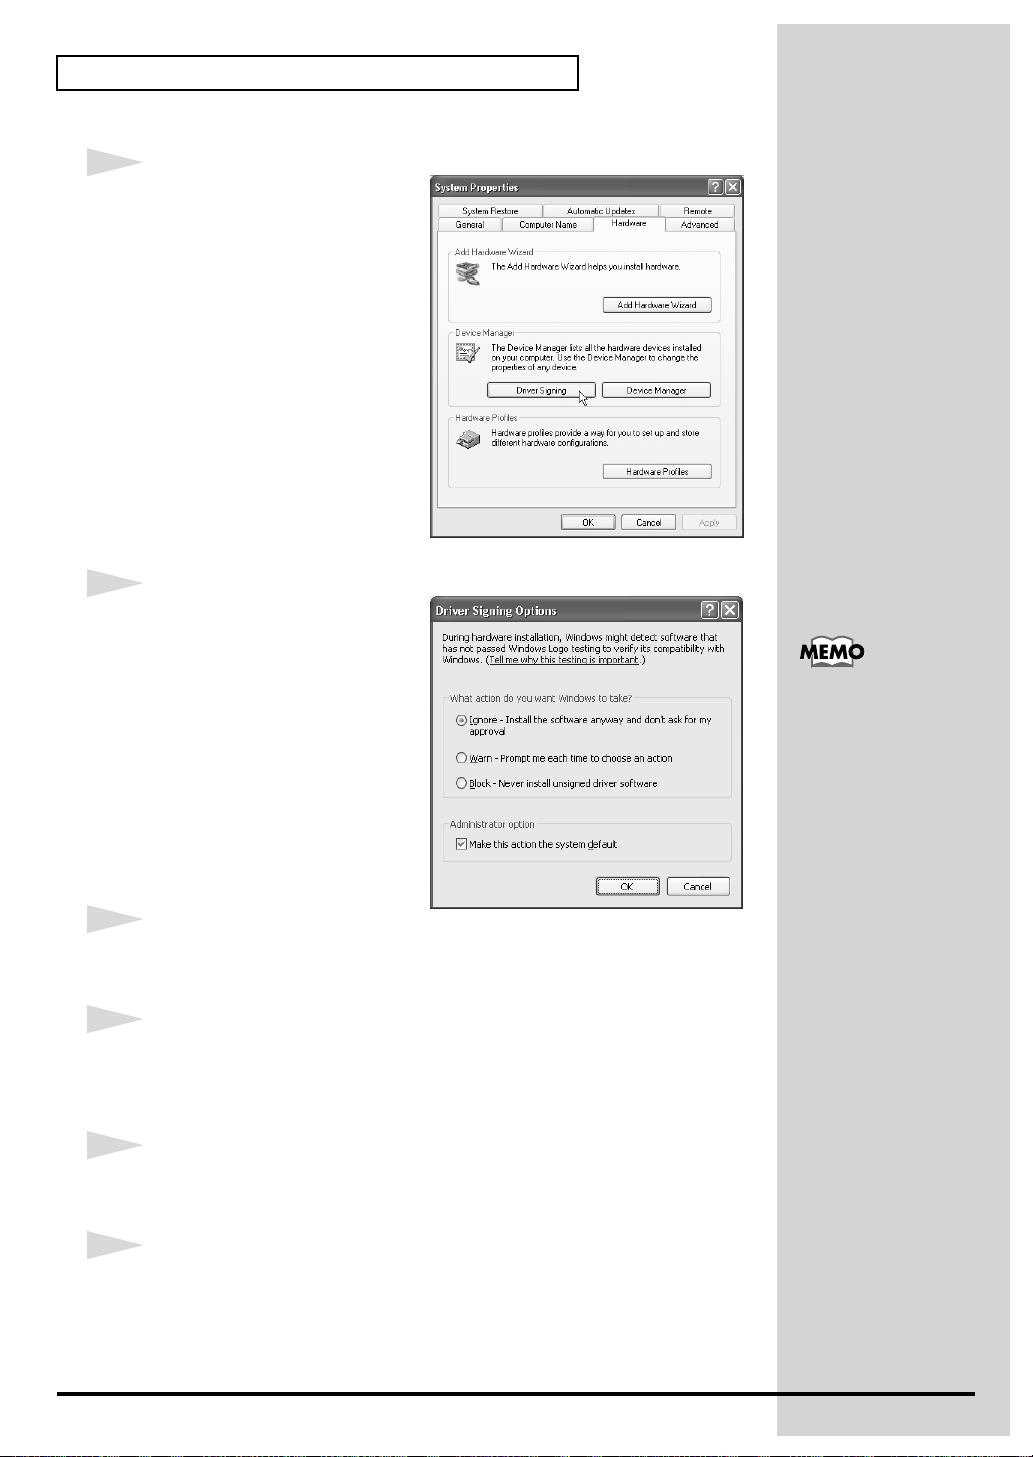
Open the System Properties dialog box.
If you are using Windows
XP Professional, you must
log on using a user name
with an administrative
account type (e.g.,
Administrator). For details
on user accounts, please
consult the system
administrator of your
computer.
1. Click the Windows Start menu, and from the menu, select Control
Panel .
2. In " Pick a category," click "Performance and Maintenance."
3. In "or pick a Control Panel icon," click the System icon.
fig.2-1
3
Open the Driver Signing
Options dialog box.
Click the Hardware tab, and then
click [Driver Signing].
Depending on how your
system is set up, the
System icon may be
displayed directly in the
Control Panel (the Classic
display). In this case,
double-click the System
icon.
18
Page 19
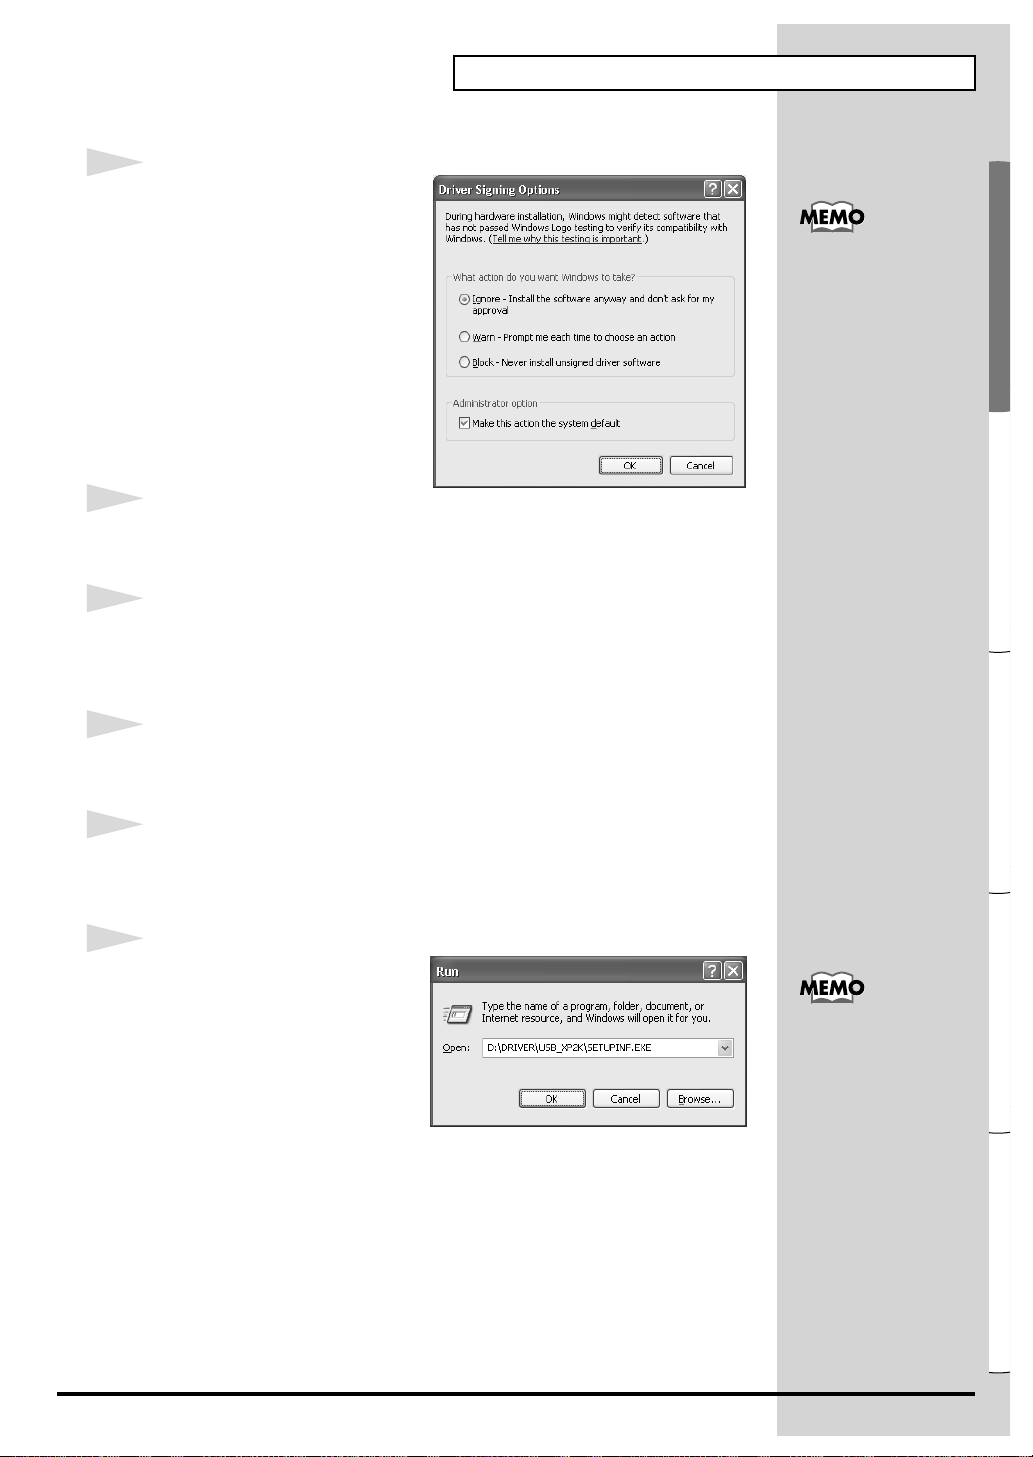
Español Italiano Français Deutsch English
fig.2-2
4
Make sure that “What action do
you want Windows to take?” is
set to “Ignore.”
If it is set to “Ignore”, simply click
[OK].
If it is not set to “Ignore”, make a
note of the current setting
(“Warn” or “Block”). Then change
the setting to “Ignore” and click
[OK]
5
Close the System Properties dialog box.
Click [OK].
6
Exit all currently running software (applications).
Getting connected and installing drivers (Windows)
If you changed “What
action do you want
Windows to take?” in
step 4, you must restore
the previous setting after
you have installed the
driver. (->If you changed
“What action do you
want Windows to take?”
(p. 22))
Also close any open windows. If you are using virus checking or similar
software, be sure to exit it as well.
7
Prepare the CD-ROM.
Insert the CD-ROM into the CD-ROM drive of your computer.
8
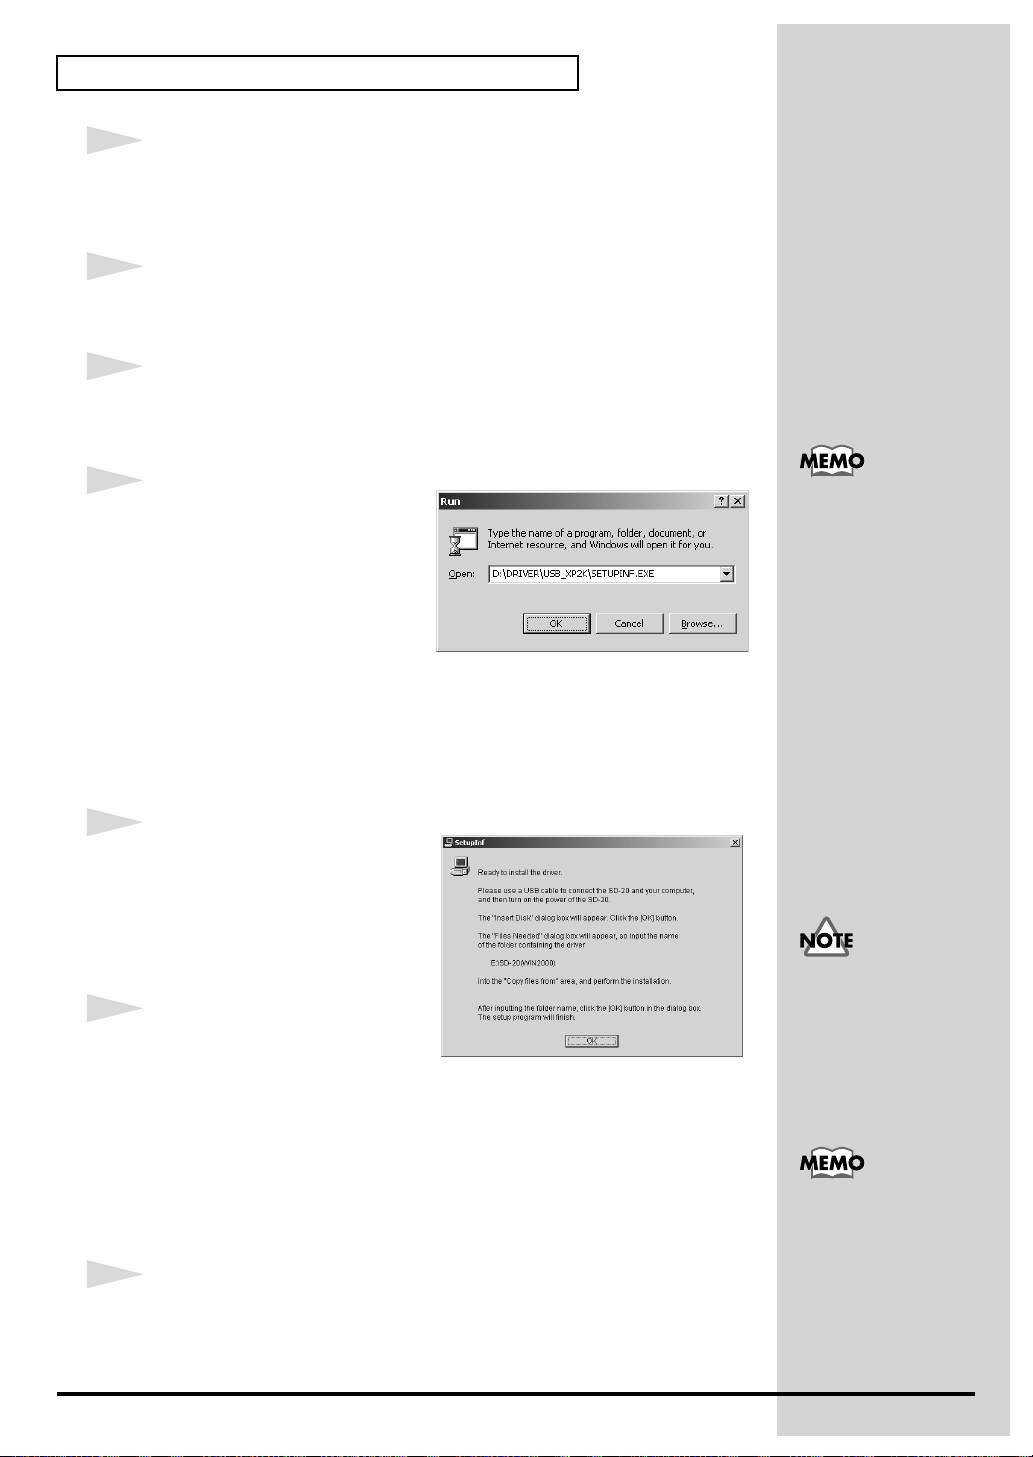
Open the “Run...” dialog box.
Click the Windows start button. From the menu that appears, select “Run...”
fig.2-3_30
9
In the dialog box that appears,
input the following into the
“Open” field, and click [OK].
D:\DRIVER\USB_XP2K\SETUPINF.EXE
* The drive name “D:” may be different for your system. Specify the drive name of your
CD-ROM drive.
In this manual, the location
of folders and files is given
in terms of the file path,
using \ as the delimiter. For
example,
USB_XP2K\SETUPINF.E
XE indicates the
SETUPINF.EXE file found
in the USB_XP2K folder.
19
Page 20
Getting connected and installing drivers (Windows)
b
b
fig.2-4_30
10
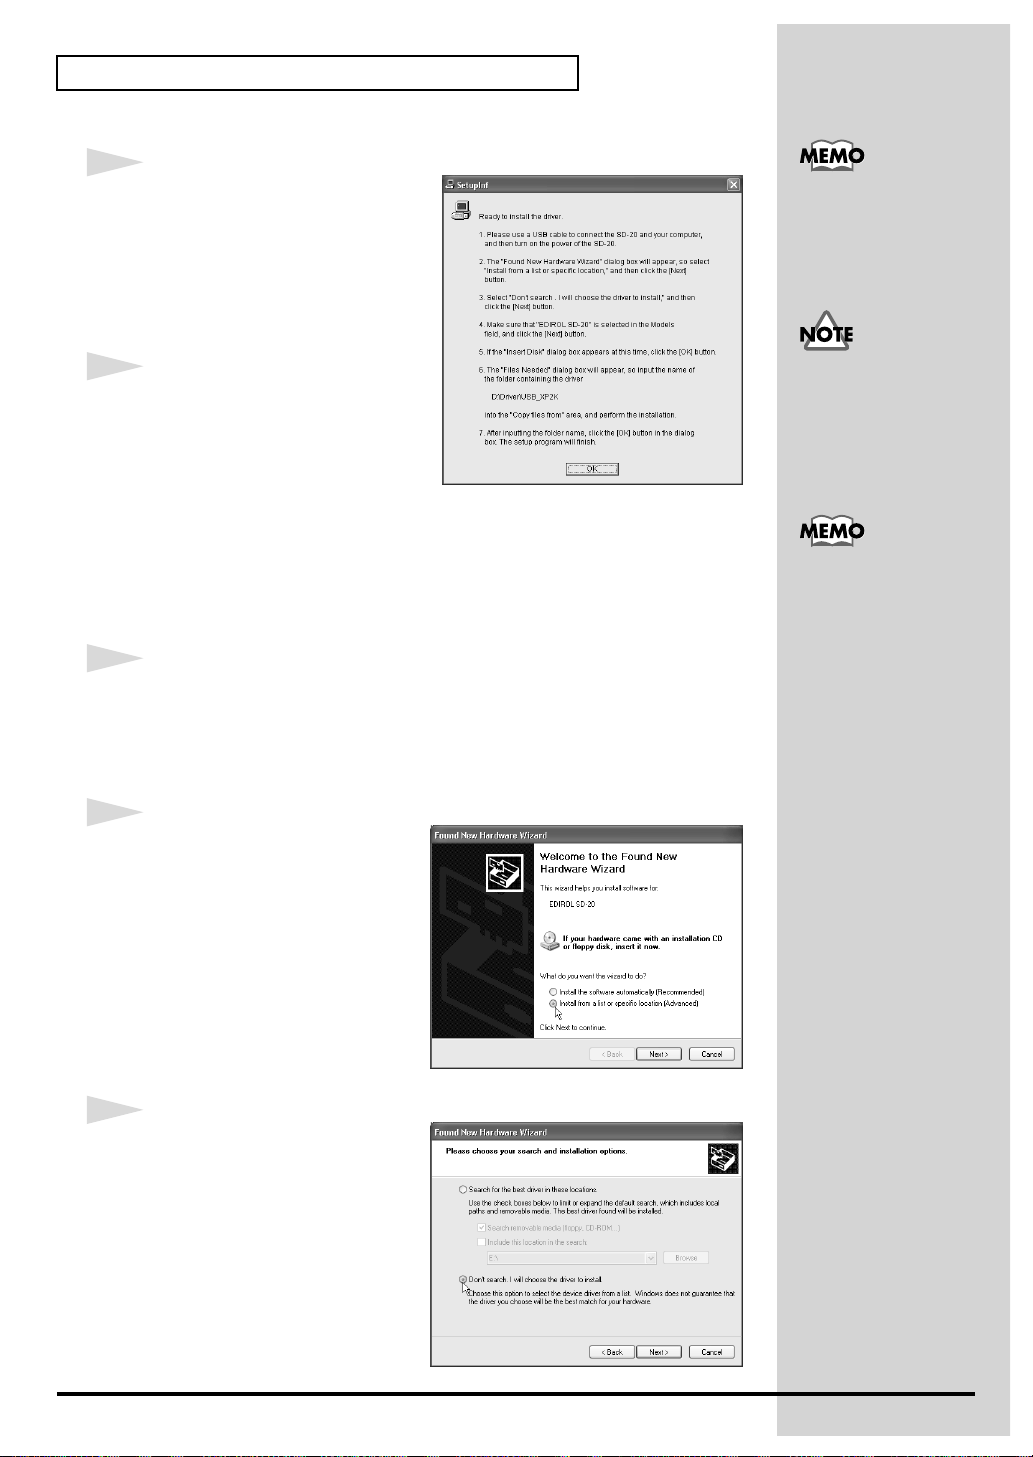
The SetupInf dialog box will
appear.
You are now ready to install the
driver.
* Do not click [OK] at this time.
If a message of “The
driver is already
installed” appears, you
can connect the SD-20 to
your computer and use it.
11
Connect the SD-20.
1. Set the computer switch of the
SD-20 to USB.
2. With the SD-20’s power switch turned off, connect it to the AC
adaptor.
3. Plug the AC adaptor into an AC power outlet.
4. Use the USB cable to connect the SD-20 to your computer.
12
Set the SD-20’s power switch to the ON position.
Near the task bar, your computer will indicate “Found New Hardware.”
Please wait.
fig.2-6
13
The Found New Hardware
wizard will appear.
Make sure that the screen
indicates “EDIROL SD-20,” select
“Install from a list or specific
location (Advanced),” and click
[Next].
Even if you will normally
e using the SD-20 with
BUS power, please use the
AC adaptor while you are
installing the driver and
making settings.
This unit is equipped with
protection circuit. A brief
interval (a few seconds)
after power up is required
efore the unit will operate
normally.
fig.2-7
14
The screen will indicate “Please
choose your search and
installation options.”
Select “Don’t search. I will
choose the driver to install,” and
click [Next].
20
Page 21
Getting connected and installing drivers (Windows)
Español Italiano Français Deutsch English
fig.2-8_20
15
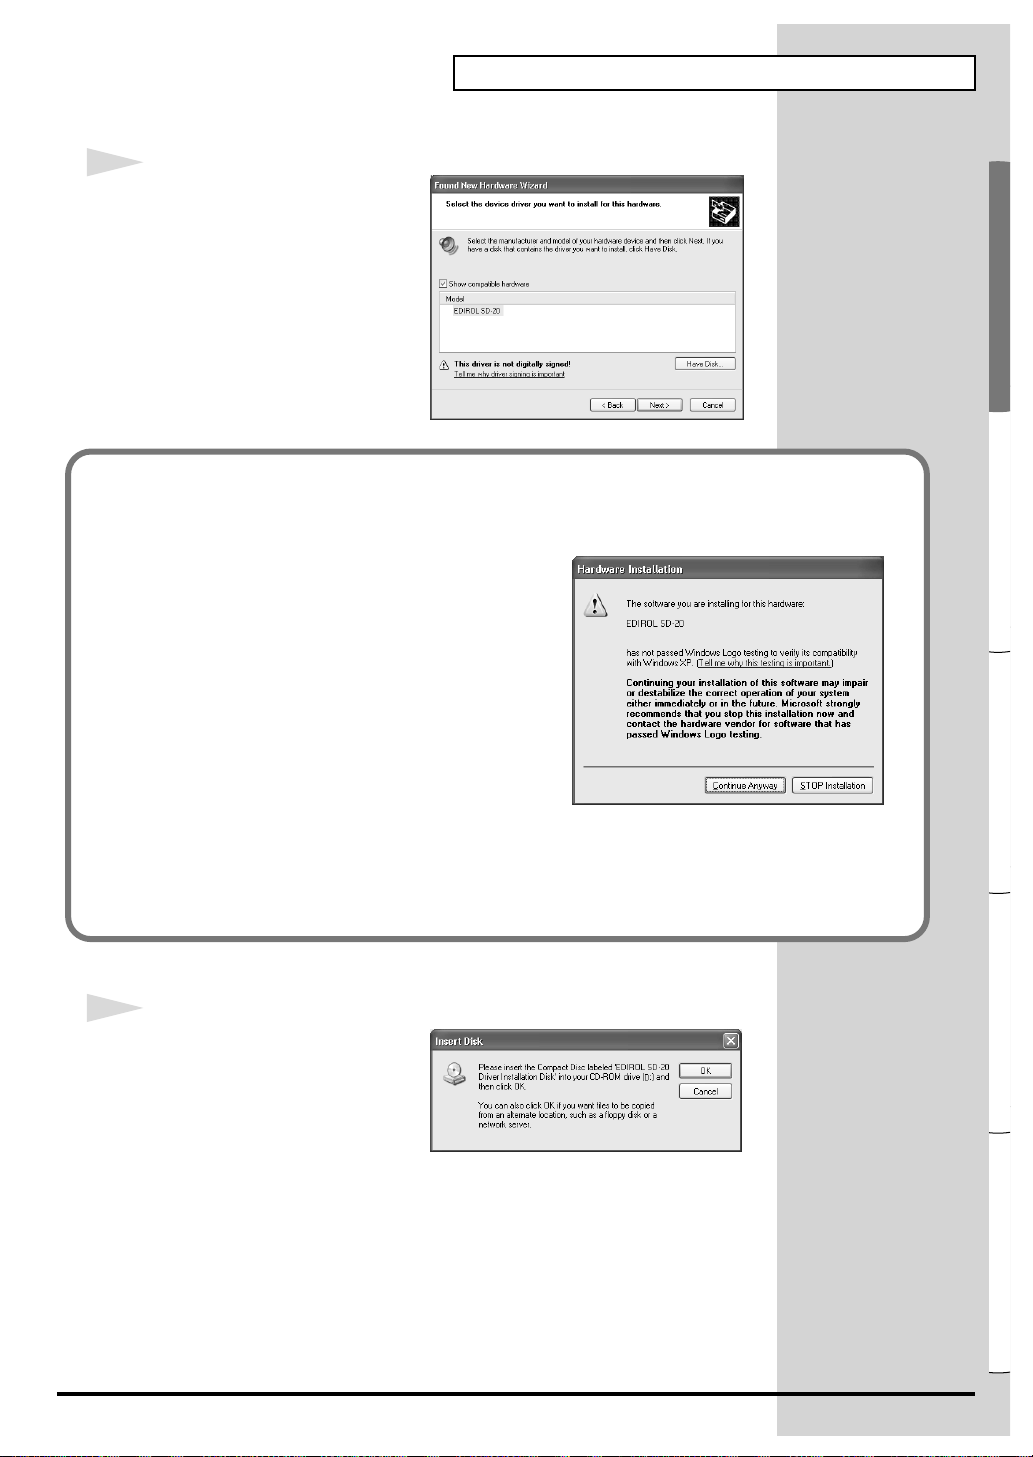
Make sure that the “Model” field
indicates “EDIROL SD-20,” and
click [Next]. Driver installation
will begin.
If in step 4 the “What action do you want Windows to take?” setting was not set to
“Ignore”, a “Digital signature not found” dialog box will appear.
fig.2-5
If “What action do you want Windows to
take?” is set to “Warn,”
1. Click [Continue Anyway].
2. Continue the installation.
If “What action do you want Windows to
take?” is set to “Block”
1. Click [OK].
2. When the “Found New Hardware Wizard”
appears, click [Finish].
3. Perform the installation as described in the “Troubleshooting” section on Device
Manager shows “?”, “!”, or “USB Composite Device” (p. 235).
fig.2-9_30
16
The Insert Disk dialog box will
appear.
Click [OK].
21
Page 22
Getting connected and installing drivers (Windows)
fig.2-10_30
17
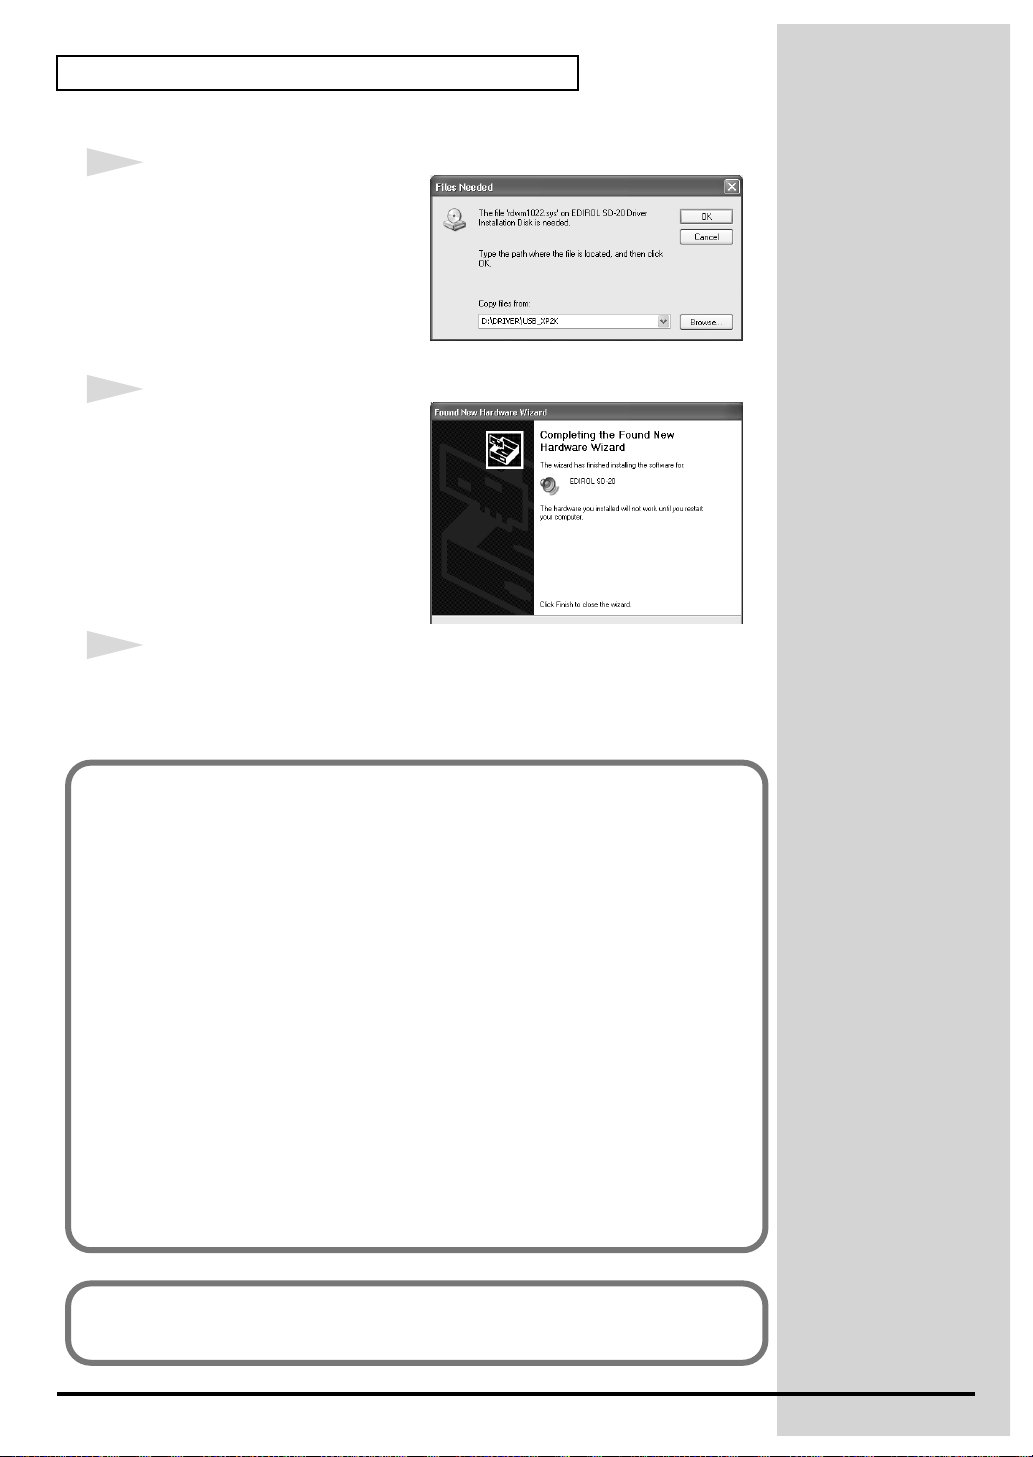
The Files Needed dialog box will
appear.
In the "Copy files from" area, type
"D:\DRIVER\USB_XP2K" and
click [OK].
fig.2-11_20
18
The Found New Hardware
wizard will appear.
Make sure that the display
indicates "EDIROL SD-20," and
click [Finish].
Wait until "Found New
Hardware" appears near the
taskbar.
19
Restart Windows.
When driver installation has been completed, the System Setting Change
dialog box will appear. Click [Yes].
If you changed “What action do you want Windows to take?”
If you changed the What action do you want Windows to take? setting in
step 5, restore the original setting after Windows restarts.
1. If you are using Windows XP Professional, log on to Windows using
the user name of an administrative account (e.g., Administrator).
2. Click the Windows start menu, and from the menu, select Control
Panel.
3. In "Pick a category," click "Performance and Maintenance."
4. In "or pick a Control Panel icon," click the System icon. The System
Properties dialog box will appear.
5. Click the Hardware tab, and then click [Driver Signing]. The Driver
Signing Options dialog box will appear.
6. Return the What action do you want Windows to take? setting to the
original setting (either “Warn” or “Block”), and click [OK].
7. Click [OK]. The System properties dialog box will close.
22
Next, you need to make the driver settings.
(-> Settings and checking (p. 39))
Page 23
Español Italiano Français Deutsch English
■ Windows 2000 users
1
With the SD-20 disconnected, start up Windows.
Disconnect all USB cables except for a USB keyboard and USB mouse (if
used).
2
Log on to Windows as a user with administrative privileges (such as
Administrator).
3
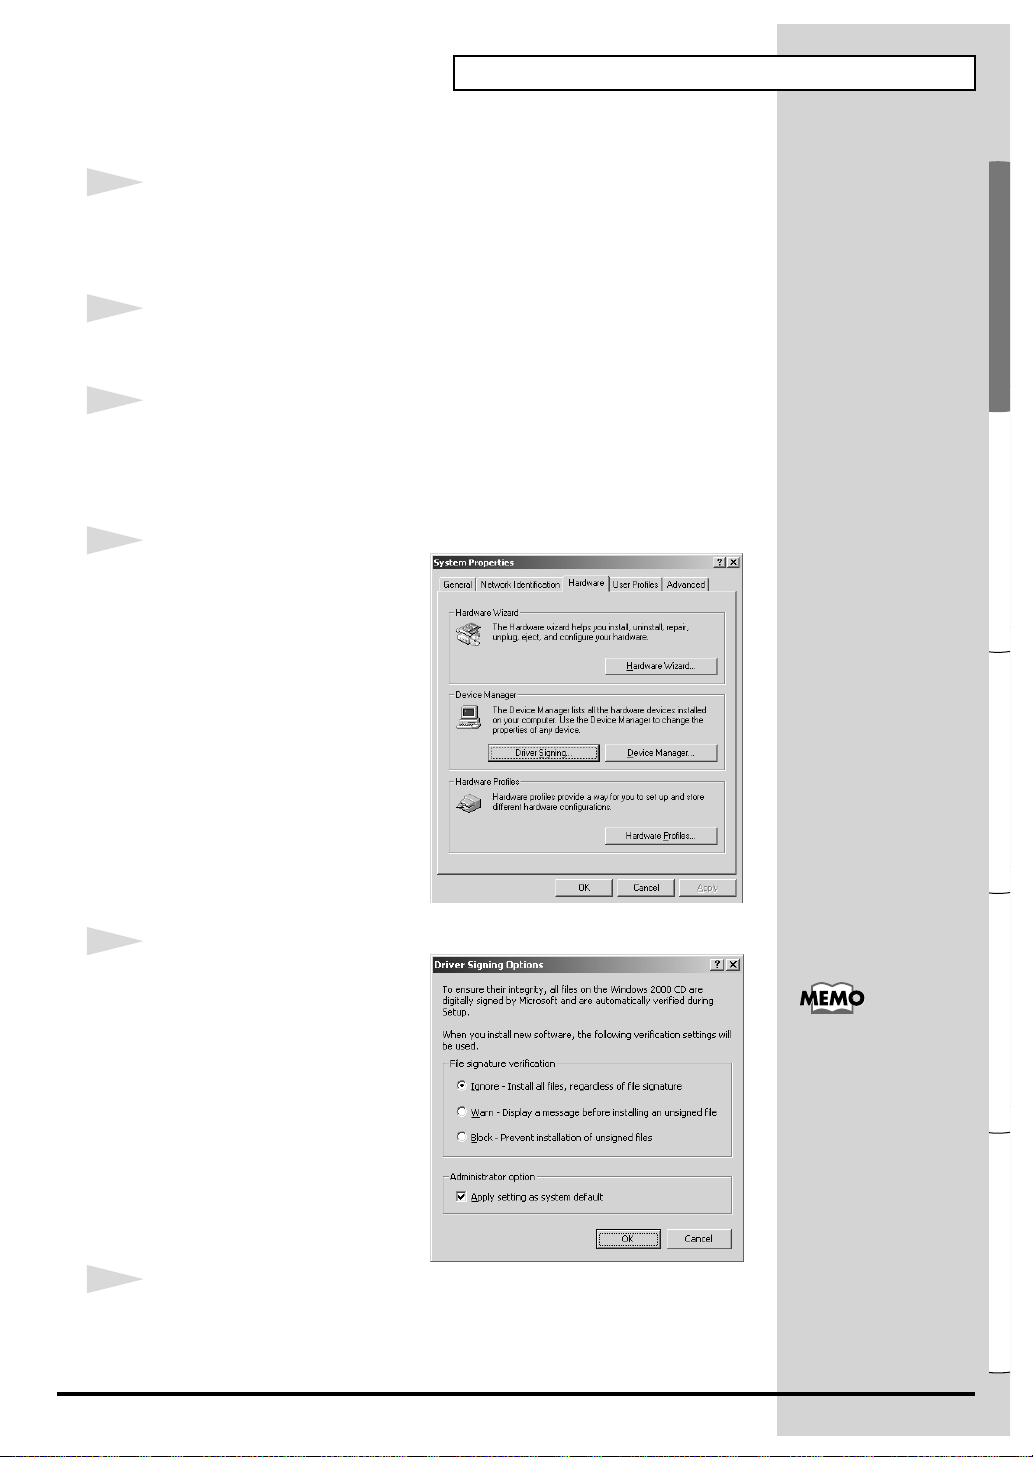
Open the System Properties dialog box.
Click the Windows Start button, and from the menu that appears, select
Settings | Control Panel. In Control Panel, double-click the System icon.
fig.2-12
4
Open the Driver Signing
Options dialog box.
Click the Hardware tab, and then
click [Driver Signing].
Getting connected and installing drivers (Windows)
fig.2-13_50
5
Make sure that “File signature
verification” is set to “Ignore.”
If it is set to “Ignore”, simply click
[OK].
If it is not set to “Ignore”, make a
note of the current setting
(“Warn” or “Block”). Then change
the setting to “Ignore” and click
[OK].
6
Close the System Properties dialog box.
Click [OK].
If you changed the “File
signature verification”
setting in step 5, restore
the original setting after
Windows restarts. (->If
you changed “File
signature verification” (p.
26))
23
Page 24
Getting connected and installing drivers (Windows)
b
b
7
Exit all currently running software (applications).
Also close any open windows. If you are using virus checking or similar
software, be sure to exit it as well.
8
Prepare the CD-ROM.
Insert the CD-ROM into the CD-ROM drive of your computer.
9
Open the “Run...” dialog box.
Click the Windows Start button. From the menu that appears, select “Run...”
fig.2-14_40
10
In the dialog box that appears,
input the following into the
“Open” field, and click [OK].
D:\DRIVER\USB_XP2K\SETUPINF.EXE
* The drive name “D:” may be different for your system. Specify the drive name of your
CD-ROM drive.
fig.2-15_40
11
The SETUPINF dialog box will
appear.
You are now ready to install the
driver.
* Do not click [OK] at this time.
12
Connect the SD-20.
1. Set the computer switch of the SD-20 to USB.
In this manual, the location
of folders and files is given
in terms of the file path,
using \ as the delimiter. For
example,
USB_XP2K\SETUPINF.E
XE indicates the
SETUPINF.EXE file found
in the USB_XP2K folder.
Even if you will normally
e using the SD-20 with
BUS power, please use the
AC adaptor while you are
installing the driver and
making settings.
2. With the SD-20’s power switch turned off, connect it to the AC
adaptor.
3. Plug the AC adaptor into an AC power outlet.
4. Use the USB cable to connect the SD-20 to your computer.
13
Set the SD-20’s power switch to the ON position.
24
This unit is equipped with
protection circuit. A brief
interval (a few seconds)
after power up is required
efore the unit will operate
normally.
Page 25
Español Italiano Français Deutsch English
If in step 5 the “File signature verification” setting was not set to “Ignore”,
b
a “Digital signature not found” dialog box will appear.
fig.2-16_30
If “File signature verification” is set to “Warn,”
1. Click [Yes].
2. Continue the installation.
If “File signature verification” is set to “Block”
1. Click [OK].
2. When the “New hardware detection wizard”
appears, click [Finish].
3. Perform the installation as described in the
“Troubleshooting” section on Device Manager shows “?”, “!”, or
“USB Composite Device” (p. 235).
fig.2-17_30
14
The Insert Disk dialog box will
appear.
Click [OK].
fig.2-18_30
Getting connected and installing drivers (Windows)
If the Insert disk dialog
ox does not appear,
please read The The
“Insert Disk” dialog box
does not appear (p. 235))
15
The Files Needed dialog box will
appear.
In the "Copy files from" area, type
"D:\DRIVER\USB_XP2K" and
click [OK].
fig.2-17b_30
16
The “Found New Hardware
Wizard” may be displayed.
Verify that “EDIROL SD-20” is
displayed, and click [Finish].
25
Page 26
Getting connected and installing drivers (Windows)
17
Restart Windows.
The System Settings Change dialog box may appear. Click [Yes].
Windows will restart automatically.
If you changed “File signature verification”
If you changed the “File signature verification” setting in step 5, restore the
original setting after Windows restarts.
1. After Windows restarts, log in to Windows as a user with
administrative privileges, (such as Administrator).
2. In the Windows desktop, right-click the My Computer icon, and from
the menu that appears, select Properties. The System Properties
dialog box will appear.
3. Click the Hardware tab, and then click [Driver signature]. The Driver
Signing Options dialog box will appear.
4. Return the “File signature verification” setting to the original setting
(either “Warn” or “Block”), and click [OK].
5. Click [OK]. The System properties dialog box will close.
Next, you need to make the driver settings.
(-> Settings and checking (p. 39)
26
Page 27
Español Italiano Français Deutsch English
■ Windows Me/98 users
1
With the SD-20 disconnected, start up Windows.
Disconnect all USB cables except for a USB keyboard and USB mouse (if
used).
2
Exit all currently running software (applications).
Also close any open windows. If you are using virus checking or similar
software, be sure to exit it as well.
3
Prepare the CD-ROM.
Insert the CD-ROM into the CD-ROM drive of your computer.
4
Open the “Run...” dialog box.
Click the Windows Start button.
From the menu that appears, select “Run...”
fig.2-19a_30
5
In the dialog box that appears,
input the following into the
“Open” field, and click [OK].
\
D:\DRIVER\USB_ME98\SETUPINF.EXE
Getting connected and installing drivers (Windows)
In this manual, the location
of folders and files is given
in terms of the file path,
using \ as the delimiter. For
example,
USB_ME98\SETUPINF.E
XE indicates the
SETUPINF.EXE file found
in the USB_ME98 folder.
* The drive name “D:” may be different for your system. Specify the drive name of your
CD-ROM drive.
fig.2-19_30
6
The SETUPINF dialog box will
appear.
You are now ready to install the
driver.
* Do not click [OK] at this time.
27
Page 28
Getting connected and installing drivers (Windows)
b
b
7
Connect the SD-20.
1. Set the computer switch of the SD-20 to USB.
2. With the SD-20’s power switch turned off, connect it to the AC
adaptor.
3. Plug the AC adaptor into an AC power outlet.
Even if you will normally
e using the SD-20 with
BUS power, please use the
AC adaptor while you are
installing the driver and
making settings.
4. Use the USB cable to connect the SD-20 to your computer.
5
Set the SD-20’s power switch to the ON position.
fig.2-20_30
6
If you are using Windows 98, an
Insert Disk dialog box will
appear.
Click [OK].
fig.2-21a_40
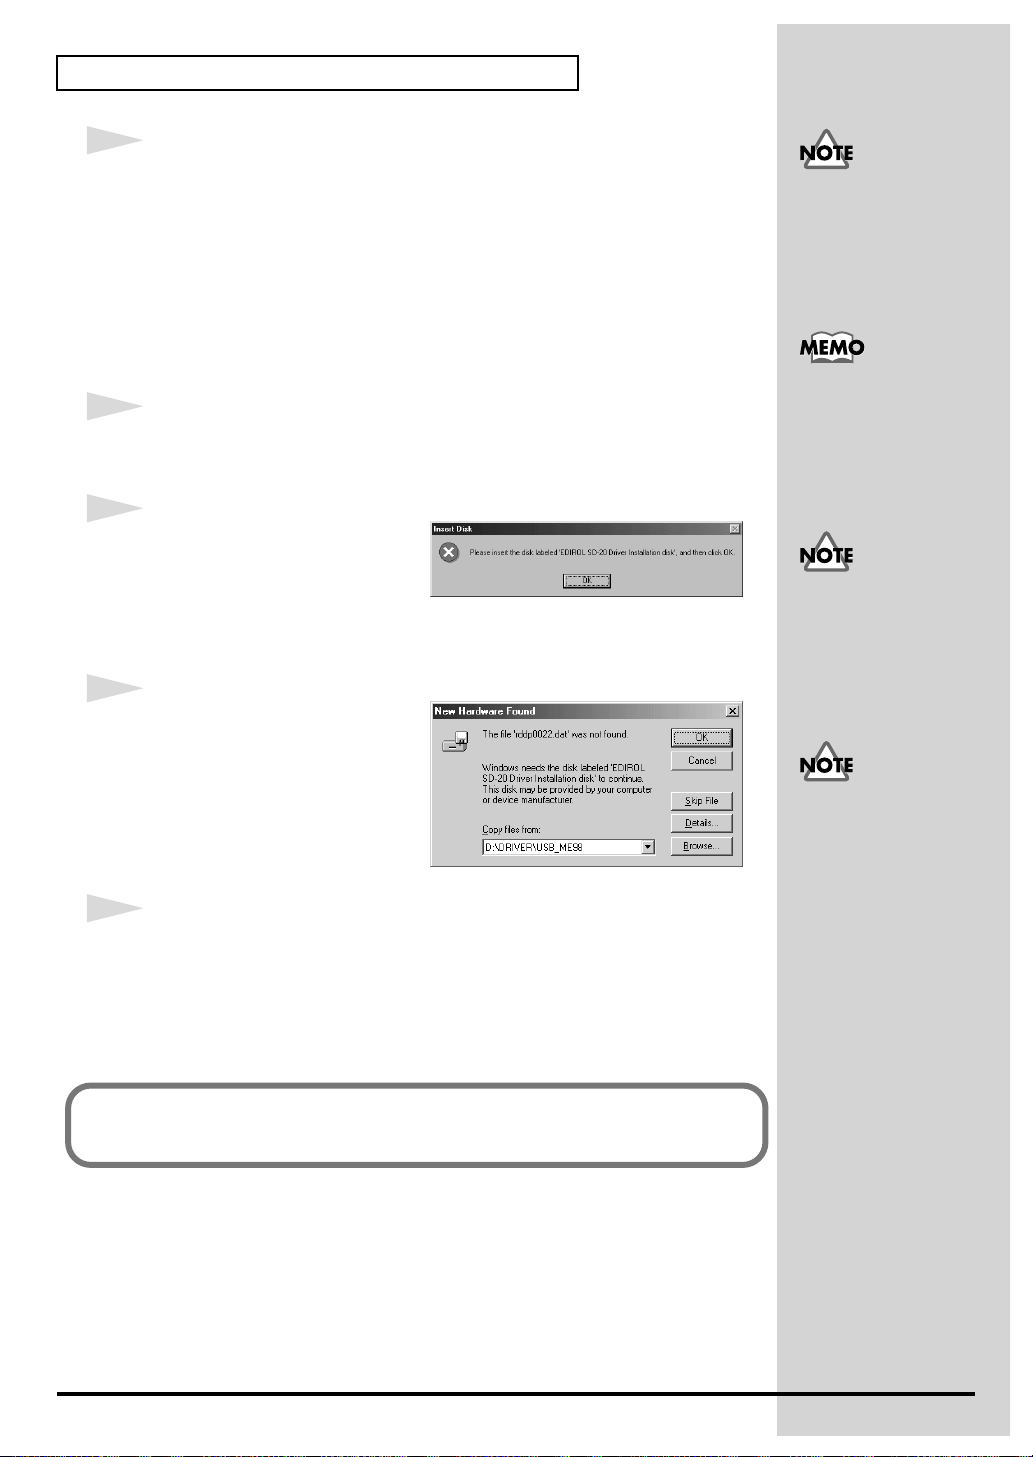
7
The New Hardware Found
dialog box will appear.
In the "Copy files from" area, type
"D:\DRIVER\USB_ME98" and
click [OK].
8
Once the driver has been installed, New Hardware Found dialog box will
close.
In the SETUPINF dialog box, click [OK]. The SETUPINF dialog box will
close.
This unit is equipped with
a protection circuit. A brief
interval (a few seconds)
after power up is required
efore the unit will operate
normally.
If you are using Windows
98 and the Insert Disk
dialog box dose not
appear, please read The
“Insert Disk” dialog box
does not appear (p. 235).
If the New Hardware
Found dialog box does not
appear, re-install the
driver using the same
procedure as described in
The “Insert Disk” dialog
box does not appear (p.
235).
Next, you need to make the driver settings.
(-> Settings and checking (p. 39)
28
Page 29
Español Italiano Français Deutsch English
Serial connection
The following items are required for connections and installation. Please
have the following items ready.
• SD-20
• AC adaptor
• Computer cable
• CD-ROM
The installation procedure will differ depending on your system.
Please proceed to one of the following sections, depending on the system you
use.
• Windows XP users ..................................................... (p. 29)
• Windows 2000 users................................................... (p. 33)
• Windows Me/98 users .............................................. (p. 37)
Getting connected and installing drivers (Windows)
■ Windows XP users
1
Make sure that the power is turned off for the SD-20, your computer, and all
peripheral devices.
2
Set the computer switch of the SD-20 to PC.
3
Use the computer cable to connect the serial connector of your computer to
the SD-20.
4
With the SD-20’s power switch turned off, connect it to the AC adaptor.
5
Plug the AC adaptor into an AC power outlet.
6
Turn on the power of the SD-20 and your computer, and start up Windows.
7
Open the System Properties dialog box.
If you are using Windows
XP Professional, you must
log on using a user name
with an administrative
account type (e.g.,
Administrator). For details
on user accounts, please
consult the system
administrator of your
computer.
For details on connections,
refer to Basic
connections (p. 13)
1. Click the Windows start menu, and from the menu, select Control
Panel.
2. In “Pick a category,” click “Performance and Maintenance.”
3. In “or pick a Control Panel icon,” click the System icon.
Depending on how your
system is set up, the
System icon may be
displayed directly in the
Control Panel (the Classic
display). In this case,
double-click the System
icon.
29
Page 30
Getting connected and installing drivers (Windows)
fig.2-1
8
Open the Driver Signing
Options dialog box.
Click the Hardware tab, and then
click [Driver Signing].
fig.2-2
9
Make sure that “What action do
you want Windows to take?” is
set to “Ignore.”
If it is set to “Ignore”, simply click
[OK].
If it is not set to “Ignore”, make a
note of the current setting
(“Warn” or “Block”). Then change
the setting to “Ignore” and click
[OK]
10
Close the System Properties dialog box.
If you changed “What
action do you want
Windows to take?” in
step 8, you must restore
the previous setting after
you have installed the
driver. (->If you changed
“What action do you
want Windows to take?”
(p. 22))
30
Click [OK].
11
Exit all currently running software (applications).
Also close any open windows. If you are using virus checking or similar
software, be sure to exit it as well.
12
Prepare the CD-ROM.
Insert the CD-ROM into the CD-ROM drive of your computer.
13
Open the “Run...” dialog box.
Click the Windows start button. From the menu that appears, select “Run...”
Page 31

Español Italiano Français Deutsch English
fig.2-22_40
Getting connected and installing drivers (Windows)
14
In the dialog box that appears,
input the following into the
“Open” field, and click [OK].
D:\DRIVER\SER_XP2K\SETUP.EXE
* The drive name “D:” may be different for your system. Specify the drive name of your
CD-ROM drive.
15
The Welcome dialog box will appear.
Click [Next].
fig.2-22b_30
16
A dialog box like the following
will appear.
Click [Next].
In this manual, the location
of folders and files is given
in terms of the file path,
using \ as the delimiter. For
example,
SER_XP2K\SETUP.EXE
indicates the SETUP.EXE
file found in the
SER_XP2K folder.
If in step 9 the “What action do you want Windows to take?” setting was not set to
“Ignore”, a “Hardware Installation” dialog box will appear.
fig.2-22c_30
If “What action do you want Windows to take?”
is set to “Warn,”
1. Click [Continue Anyway].
2. Continue the installation.
If “What action do you want Windows to take?”
is set to “Block”
1. Click [OK].
2. When the “Found New Hardware Wizard”
appears, click [Finish].
3. Perform the installation as described in the “Troubleshooting” section on Device
Manager shows “?”, “!”, or “USB Composite Device” (p. 235).
31
Page 32

Getting connected and installing drivers (Windows)
17
The Roland Serial MIDI Driver Settings dialog box will appear.
Set the following items. Click [OK].
fig.2-23_30
COM Ports
Select the serial port (COM
port) to which the SD-20’s
serial port is connected.
Switches
Check “Use multiple ports.”
Click the ▼ symbol at the right
of the [Sound module] field,
and select SD-20.
* Do not check “Activate CTS/RTS
Flow Control.”
18
When driver installation has been
completed, the Restart your
computer dialog box will appear.
Restart your computer.
If you changed “What action do you want Windows to take?”
If you changed the What action do you want Windows to take? setting in
step 5, restore the original setting after Windows restarts.
1. If you are using Windows XP Professional, log on to Windows using
the user name of an administrative account (e.g., Administrator).
2. Click the Windows Start menu, and from the menu, select Control
Panel.
3. In "Pick a category," click "Performance and Maintenance."
4. In "or pick a Control Panel icon," click the System icon. The System
Properties dialog box will appear.
5. Click the Hardware tab, and then click [Driver Signing]. The Driver
Signing Options dialog box will appear.
6. Return the What action do you want Windows to take? setting to the
original setting (either “Warn” or “Block”), and click [OK].
7. Click [OK]. The System properties dialog box will close.
Next, you need to make the driver settings.
(-> Settings and checking (p. 39))
32
Page 33

Español Italiano Français Deutsch English
■ Windows 2000 users
1
Make sure that the power is turned off for the SD-20, your computer, and all
peripheral devices.
2
Set the computer switch of the SD-20 to PC.
3
Use the computer cable to connect the serial connector of your computer to
the SD-20.
4
With the SD-20’s power switch turned off, connect it to the AC adaptor.
5
Plug the AC adaptor into an AC power outlet.
Getting connected and installing drivers (Windows)
Log on to Windows using
a user name with an
administrative account
type (e.g., Administrator).
For details on user
accounts, please consult
the system administrator
of your computer.
6
Turn on the power of the SD-20 and your computer, and start up Windows.
7
Open the System Properties dialog box.
1. Click the Windows Start menu, and from the menu that appears, select
Settings | Control Panel.
2. In “Control Panel,” double-click the System icon.
fig.2-12
8
Open the Driver Signing
Options dialog box.
Click the Hardware tab, and then
click [Driver Signing].
For details on connections,
refer to “Basic
connections (p. 13).”
33
Page 34

Getting connected and installing drivers (Windows)
fig.2-13_50
9
Make sure that “File signature
verification” is set to “Ignore.”
If it is set to “Ignore”, simply click
[OK].
If it is not set to “Ignore”, make a
note of the current setting
(“Warn” or “Block”). Then change
the setting to “Ignore” and click
[OK].
10
Close the System Properties dialog box.
Click [OK].
11
Exit all currently running software (applications).
Also close any open windows. If you are using virus checking or similar
software, be sure to exit it as well.
12
Prepare the CD-ROM.
Insert the CD-ROM into the CD-ROM drive of your computer.
13
Open the “Run...” dialog box.
Click the Windows Start button.
From the menu that appears, select “Run...”
fig.2-24_40
14
In the dialog box that appears,
input the following into the
“Open” field, and click [OK].
D:\DRIVER\SER_XP2K\SETUP.EXE
* The drive name “D:” may be different for your system. Specify the drive name of your
CD-ROM drive.
15
The Welcome dialog box will appear.
Click [Next].
In this manual, the location
of folders and files is given
in terms of the file path,
using \ as the delimiter. For
example,
SER_XP2K\SETUP.EXE
indicates the SETUP.EXE
file found in the
SER_XP2K folder.
34
Page 35

Getting connected and installing drivers (Windows)
Español Italiano Français Deutsch English
fig.2-22b
16
A dialog box like the following
will appear.
Click [Next].
If in step 9 the “File signature verification” setting was not set to “Ignore”, a “Digital
signature not found” dialog box will appear.
fig.2-16b_40
If “File signature verification” is set to
“Warn,”
1. Click [Yes].
2. Continue the installation.
If “File signature verification” is set to
“Block”
1. Click [OK].
2. When the “New hardware detection wizard” appears, click [Finish].
3. Perform the installation as described in the “Troubleshooting” section on Device
Manager shows “?”, “!”, or “USB Composite Device” (p. 235).
17
The Roland Serial MIDI Driver Settings dialog box will appear.
Set the following items. Click [OK].
fig.2-23b_40
COM Ports
Select the serial port (COM
port) to which the SD-20’s
serial port is connected.
Switches
Check “Use multiple ports.”
Click the ▼ symbol at the right
of the [Sound module] field,
and select SD-20.
* Do not check “Activate CTS/RTS
Flow Control.”
35
Page 36

Getting connected and installing drivers (Windows)
18
When driver installation has been completed, the Restart your computer
dialog box will appear. Restart your computer.
If you changed “File signature verification”
If you changed the “File signature verification” setting in step 5, restore the
original setting after Windows restarts.
1. After Windows restarts, log in to Windows as a user with
administrative privileges, (such as Administrator).
2. In the Windows desktop, right-click the My Computer icon, and from
the menu that appears, select Properties. The System Properties
dialog box will appear.
3. Click the Hardware tab, and then click [Driver signing]. The Driver
Signing Options dialog box will appear.
4. Return the “File signature verification” setting to the original setting
(either “Warn” or “Block”), and click [OK].
5. Click [OK]. The System properties dialog box will close.
Next, you need to make the driver settings.
(->Settings and checking (p. 39)
36
Page 37

Español Italiano Français Deutsch English
■ Windows Me/98 users
1
Make sure that the power is turned off for the SD-20, your computer, and all
peripheral devices.
2
Set the computer switch of the SD-20 to PC.
3
Use the computer cable to connect the serial connector of your computer to
the SD-20.
4
With the SD-20’s power switch turned off, connect it to the AC adaptor.
5
Plug the AC adaptor into an AC power outlet.
Getting connected and installing drivers (Windows)
6
Turn on the power of the SD-20 and your computer, and start up Windows.
7
Exit all currently running software (applications).
Also close any open windows. If you are using virus checking or similar
software, be sure to exit it as well.
8
Prepare the CD-ROM.
Insert the CD-ROM into the CD-ROM drive of your computer.
9
Open the “Run...” dialog box.
Click the Windows Start button.
From the menu that appears, select “Run...”
fig.2-25_40
10
In the dialog box that appears,
input the following into the
“Open” field, and click [OK].
D:\DRIVER\SER_ME98\DISK1\SETUP.EXE
* The drive name “D:” may be different for your system. Specify the drive name of your
CD-ROM drive.
For details on connections,
refer to “Basic
connections (p. 13).”
In this manual, the location
of folders and files is given
in terms of the file path,
using \ as the delimiter. For
example,
SER_ME98\SETUP.EXE
indicates the SETUP.EXE
file found in the
SER_ME98 folder.
11
The Welcome dialog box will appear.
Click [Next].
37
Page 38

Getting connected and installing drivers (Windows)
fig.2-26_80
12
The Select Port dialog box will
appear.
Select the serial port to which the
SD-20 is connected, and click
[Next].
The number of COM ports will
depend on your computer system.
fig.2-27_40
13
The Select MIDI OUT Port
Number dialog box will appear.
Select SD-20, and click [Next].
14
The Installation information dialog box will appear.
Check the displayed contents, and click [Next].
15
The Computer Switch Setting dialog box will appear.
Make sure that the computer switch on the rear of the SD-20 is set to [PC], and
click [Next].
If it is not set to [PC], perform this procedure again from step 1.
16
When driver installation has been completed, the Restart Computer dialog
box will appear. Restart your computer.
Next, you need to make the driver settings.
(-> Settings and checking (p. 39))
38
Page 39

Español Italiano Français Deutsch English
Settings and checking
■ Windows XP/2000/Me users
1
Open Control Panel.
Click the Windows Start button, and from the menu that appears, select
Settings | Control Panel.
Windows XP
Click the Windows start button, and from the menu that appears, select
Control Panel.
2
Open the Sounds and Multimedia Properties dialog box (or in Windows
XP, Sounds and Audio Devices Properties).
Windows 2000/Me
In Control Panel, double-click the Sounds and Multimedia icon to open
the “Sounds and Multimedia Properties” dialog box.
Windows XP
In “Pick a category,” click “Sounds, Speech, and Audio Devices.”
Next, in “or pick a Control Panel icon,” click the sounds and Audio
Devices icon.
Getting connected and installing drivers (Windows)
Depending on how your
system is set up, the
Sounds and Audio
Devices icon may be
displayed directly in the
Control Panel (the Classic
display). In this case,
double-click the Sounds
and Audio Devices icon.
3
Click the Audio tab.
fig.2-28_30
4
For MIDI music playback, click the ▼
located at the right of [Preferred device]
(or in Windows XP, [Default device]),
and select the following from the list that
appears.
For a USB
connection
For a serial
connection
5
Click OK to complete the settings.
Proceed to the following page.
Windows XP users............................................................ (p. 41)
Windows 2000/Me users................................................. (p. 42)
EDIROL SD-20 PART A
Roland Serial MIDI Out A
39
Page 40

Getting connected and installing drivers (Windows)
■ Windows 98 users
1
Open Control Panel.
Click the Windows Start button, and from the menu that appears, select
Settings | Control Panel.
2
Open the Multimedia Properties dialog box.
In Control Panel, double-click the Multimedia icon to open the "Multimedia
Properties" dialog box.
3
Click the MIDI tab.
fig.2-29_30
4
Set "MIDI output."
Select [Single instrument], and
choose one of the following from the
list that appears.
For a USB
connection
For a serial
connection
5
Click OK to complete the settings.
Proceed to the following page.
(-> Checking for sound output (p. 42))
EDIROL SD-20
PART A
Roland Serial MIDI
Out A
40
Page 41

Español Italiano Français Deutsch English
Enabling background services
In Windows XP, perform these settings to make MIDI processing occur more
smoothly. These settings are unavailable in Windows 2000/Me/98.
1
Click the Windows start button, and from the menu that appears, select
Control Panel.
2
In "Pick a category," click "Performance and Maintenance."
3
In "or pick a Control Panel icon," click the System icon.
4
Click the Advanced tab.
5
At the right of the Performance field, click [Settings]. The Performance
Options dialog box will appear.
6
Click the Advanced tab.
fig.2-30
Getting connected and installing drivers (Windows)
7
In the Processor Scheduling
field, select "Background
services," and click [OK].
8
In the System Properties dialog
box, click [OK].
The System Properties dialog
box will close.
Proceed to the following page.
(-> Checking for sound output (p. 42)
41
Page 42

Getting connected and installing drivers (Windows)
Checking for sound output
Now let's play back the sample data to verify that connections, driver
installation, and settings were made correctly.
■ Playing back the sample data
Here we will use standard Windows functionality to play the sample data.
The sample data is found on the CD-ROM.
1
Prepare the CD-ROM.
Insert the CD-ROM into the CD-ROM drive of your computer.
2
From the DemoSong folder of the CD-ROM, drag Demo01(.MID) to your
desktop, copying it.
fig.2-31_80
3
Right-click the copied file
Demo01(.MID), and select Properties
(Play for Windows XP/2000/Me).
fig.2-32_30
4
Play back the sample data.
Click the Preview tab, and then click the
button.
The music starts playing.
Use of the song data
supplied with this
product for any
purpose other than
private, personal
enjoyment without the
permission of the
copyright holder is
prohibited by law.
Additionally, this data
must not be copied, nor
used in a secondary
copyrighted work
without the permission
of the copyright holder
What you actually see
on your computer
screen may be different,
depending on your
computing
environment and the
operating system you're
using.
Was the sample data played back?
If it was played back correctly, this means that the computer and the SD-20
are connected correctly, and that the drivers have been installed correctly.
42
If it did not play back
correctly, refer to
Troubleshooting (p.
232) to determine the
reason. This section
contains information on
how to solve problems
such as no sound, or
failure to play back
correctly.
Page 43

Español Italiano Français Deutsch English
Getting connected and installing drivers (Macintosh)
What is a driver?
fig.2-0
Application
Driver
Computer
A “driver” is software that transfers data between the SD-20 and application software
running on your computer, when your computer and the SD-20 are connected by a USB
cable. The driver sends data from your application to the SD-20, and from the SD-20 to your
application.
The SD-20 is able to operate using the “bus power” that is supplied via the
USB cable. This means that the supplied AC adaptor is not necessary.
However, if you are using a USB hub, or if not enough power can be supplied
via USB, the SD-20 may not operate correctly. In this case, connect the
supplied AC adaptor power supply to the SD-20.
Even when using the SD-20 with bus power, please connect the AC adaptor
when you install the driver.
USB/Serial
port
USB/Computer
Cable
SD-20
Which type of connection?
You can either use the USB cable, or use the computer cable to make a serial
connection. Depending on the type of connection you are using, install the
appropriate driver and make the appropriate settings.
USB connection................................................(p. 44)
Serial connection..............................................(p. 51)
43
Page 44

Getting connected and installing drivers (Macintosh)
USB connection
The following items are required for connections and installation. Please
have the following items ready.
• SD-20
• AC adaptor
• USB cable
• CD-ROM
1
Turn off the power of the Macintosh and all peripheral devices connected to
the Macintosh.
2
Set the computer switch of the SD-20 to USB.
3
With the SD-20’s power switch turned off, connect it to the AC adaptor.
4
Plug the AC adaptor into an AC power outlet.
5
Turn on the peripheral devices connected to the Macintosh, except for the
SD-20. Then turn on the power of the Macintosh itself.
* Do not turn on the power of the SD-20 at this time.
If the power of the SD-20 is turned on, a message like the following will
appear when the Macintosh is started up. Perform the steps described below
as appropriate for the message that is displayed.
If the screen indicates:
“Driver required for USB device `unknown device’ is not available.
Search for driver on the Internet?”
-> click [Cancel].
If the screen indicates:
“Software required for using device `unknown device’ cannot be found.
Please refer to the manual included with the device, and install the
necessary software.”
-> click [OK].
Use either OMS or FreeMIDI as the MIDI driver.
• If you are using OMS.................................................(p. 45)
• If you are using FreeMIDI......................................... (p. 49)
* Either OMS or FreeMIDI must be installed in your Macintosh, as appropriate for
the sequencer software you are using.
44
Page 45

Español Italiano Français Deutsch English
■ Installing the SD-20 driver (OMS)
b
b
Use the following procedure to install the SD-20 driver.
The included SD-20 OMS driver is an add-on module for using the SD-20
with OMS. In order for you to use it, OMS must already be installed on the
hard disk from which you started up.
If you would like to learn more about OMS, refer to OMS_2.3_Mac.pdf
(online manual) in the OMS2.3.8 folder within the OMS folder of the CDROM.
* Disconnect the SD-20 from the Macintosh before you perform the installation.
1
Exit all currently running software (applications).
If you are using a virus checker or similar software, be sure to exit this as well.
2
Prepare the CD-ROM.
Insert the CD-ROM into the CD-ROM drive.
3
Double-click the SD-20 USB Installer icon (found in the Driver - OMS
Driver of the CD-ROM) to start up the installer.
Getting connected and installing drivers (Macintosh)
Requires OMS 2.3.5 or
later.
OMS can be found in the
OMS2.3.8 folder within the
OMS folder of the CDROM.
You will need the Adobe
Acrobat Reader in order to
view OMS_2.3_Mac.pdf.
The latest version of
Adobe Acrobat Reader can
e downloaded from the
Adobe website. http://
www.adobe.com (This
URL may change without
notice.)
4
Verify the installation location, and click [Install].
fig.3-2_40
5
If a message like the following is
displayed, click [Continue].
The other currently running
applications will exit, and
installation will continue.
6
A dialog box will indicate Installation completed.
Click [Restart] to restart your Macintosh.
7
Use the USB cable to connect the SD-20 to your computer.
8
Set the SD-20’s power switch to the ON position.
This unit is equipped with
a protection circuit. A brief
interval (a few seconds)
after power up is required
efore the unit will operate
normally.
45
Page 46

Getting connected and installing drivers (Macintosh)
OMS settings
1
From the CD-ROM, drag the Driver-OMS Driver-OMS Settings folder to
the hard disk of your Macintosh to copy it.
fig.3-4
2
In the Opcode-OMS Application folder where you
installed OMS, double-click OMS Setup to start it up.
fig.3-5_35
3
If a dialog box like the one shown
here appears, click [Turn It Off]. A
confirmation dialog box will then
appear, so click [OK].
fig.3-6_35
4
The Create New Setup dialog box will
appear.
Click [Cancel]. If you accidentally
clicked [OK], click [Cancel] in the next
screen.
fig.3-7
5
Choose “Open” from the File menu.
From the OMS Settings folder that
you copied in step 1, select the SD-20
USB file, and click [Open].
fig.3-8_35
A screen like the one shown here will
appear.
46
Page 47

Español Italiano Français Deutsch English
fig.3-9_35
6
From the Edit menu, select OMS MIDI
Setup.
In the OMS MIDI Setup dialog box that
appears, check Run MIDI in background,
and click [OK].
fig.3-10
7
From the File menu, choose Make Current.
If you are unable to select Make Current, it
has already been applied, and you may
continue to the next step.
Getting connected and installing drivers (Macintosh)
fig.3-11_50
8
Verify that MIDI transmission and reception
can be performed correctly. From the Studio
menu, choose Test Studio.
fig.3-22_50
9
When you move the mouse cursor near the
sound generator icon, the cursor will change
to a shape.
Click on the sound generator icons that are
encircled in the following illustration. If
sound is heard from the SD-20, the settings
are correct. If MIDI is not being transmitted,
the Macintosh will produce an alert sound.
47
Page 48

Getting connected and installing drivers (Macintosh)
Does the OUTPUT level indicator of the SD-20 move?
If the OUTPUT level meter in the SD-20’s display is moving but you do not
hear sound, check whether the volume of the SD-20 or your speaker system
has been lowered. If the OUTPUT level meter does not move, check the
connections and OMS settings once again.
After you have made settings correctly, choose Test once again from the
Studio menu, and perform step 9.
10
Exit OMS Setup.
From the File menu, choose [Exit]. If the AppleTalk confirmation dialog box
appears, click [OK] to close the dialog box.
This completes connections for the SD-20 and Macintosh, and installation of
the MIDI driver. Now, MIDI data can be input and output (recorded and
played).
If the SD-20 does not
produce sound, refer to No
sound (p. 237).
48
Page 49

Español Italiano Français Deutsch English
■ Installing the SD-20 driver (FreeMIDI)
b
Use the following procedure to install the SD-20 driver. The included SD-20
FreeMIDI driver is an add-on module for using the SD-20 with FreeMIDI. In
order to use it, FreeMIDI must be installed on the hard disk from which
you started up.
* Disconnect the SD-20 from the Macintosh before beginning the installation.
1
Exit all currently running software (applications).
If you are using a virus checker or similar software, be sure to exit this as well.
2
Prepare the CD-ROM.
Insert the CD-ROM into the CD-ROM drive.
3
Double-click the SD-20 USB Installer icon (found in the Driver - FreeMIDI USB Connection folder of the CD-ROM) to start up the installer.
4
Verify the installation location, and click [Install].
fig.3-2_40
Getting connected and installing drivers (Macintosh)
5
If a message like the following is
displayed, click [Continue].
The other currently running
applications will exit, and
installation will continue.
6
A dialog box will indicate Installation completed. Click [Restart] to restart
your Macintosh.
7
Use the USB cable to connect the SD-20 to your computer.
8
Switch ON the SD-20’s Power switch.
FreeMIDI settings
1
From the CD-ROM, copy the Driver - FreeMIDI Driver - Settings folder
onto the hard disk of your Macintosh.
2
Open the FreeMIDI Applications folder from the location into which you
installed FreeMIDI, and double-click the FreeMIDI Setup icon to start it up.
This unit is equipped with
a protection circuit. A brief
interval (a few seconds)
after power up is required
efore the unit will operate
normally.
3
When “OMS is installed on this computer...” appears, click [FreeMIDI].
49
Page 50

Getting connected and installing drivers (Macintosh)
4
The first time the software is started up, a dialog box saying “Welcome to
FreeMIDI!” will appear. Click [Continue].
5
When the FreeMIDI Preferences dialog box appears, click [Cancel].
6
When the About Quick Setup dialog box appears, click [Cancel].
7
From the File menu, choose Open.
8
Select SD-20 USB from the FreeMIDI Settings folder you copied in step 1,
and click [Open].
9
Verify that MIDI transmission and reception occur correctly.
From the MIDI menu, choose Check Connections.
fig.3-13_40
10
The mouse cursor will change to the
shape of a note. Click the sound
generator icons encircled in the
diagram at right.
If you hear sound, MIDI messages are
being sent from the Macintosh to the
SD-20.
Does the OUTPUT level indicator of the SD-20 move?
If the OUTPUT level meter in the SD-20’s display is moving but you do not
hear sound, check whether the volume of the SD-20 or your speaker system
has been lowered. If the OUTPUT level meter does not move, check the
connections and OMS settings once again.
After you have made settings correctly, choose Test once again from the
Studio menu, and perform step 10.
11
Once again choose the MIDI menu command Check Connections to end
the test.
12
From the File menu, choose Quit to exit FreeMIDI Setup.
This completes connections for the SD-20 and Macintosh, and installation of
the MIDI driver. Now, MIDI data can be input and output (recorded and
played).
If the SD-20 does not
produce sound, refer to No
sound (p. 237).
50
Page 51

Español Italiano Français Deutsch English
Serial connection
b
b
The following items are required for connections and installation. Please
have the following items ready.
• SD-20
• AC adaptor
• Computer cable
• CD-ROM
1
Turn off the power of the Macintosh and all peripheral devices connected to
the Macintosh.
2
Set the computer switch of the SD-20 to Mac.
3
Use a computer cable to connect the modem port or printer port of your
Macintosh to the SD-20.
4
With the SD-20’s power switch turned off, connect it to the AC adaptor.
5
Plug the AC adaptor into an AC power outlet.
Getting connected and installing drivers (Macintosh)
This unit is equipped with
a protection circuit. A brief
interval (a few seconds)
after power up is required
efore the unit will operate
normally.
6
Turn on the power of the SD-20 and your Macintosh.
■ Installing the SD-20 driver (OMS)
Use the following procedure to install the SD-20 driver.
The included SD-20 OMS driver is an add-on module for using the SD-20
with OMS. In order for you to use it, OMS must already be installed on the
hard disk from which you started up.
If you would like to learn more about OMS, refer to OMS_2.3_Mac.pdf
(online manual) in the OMS2.3.8 folder within the OMS folder of the CDROM.
1
Exit all currently running software (applications).
If you are using a virus checker or similar software, be sure to exit this as well.
2
Prepare the CD-ROM.
Insert the CD-ROM into the CD-ROM drive.
fig.3-14_40
3
Double-click the SD-20 Serial Installer icon (found in the Driver - OMS
Driver of the CD-ROM) to start up the installer.
Requires OMS 2.3.5 or
later.
OMS can be found in the
OMS2.3.8 folder within the
OMS folder of the CDROM.
You will need the Adobe
Acrobat Reader in order to
view OMS_2.3_Mac.pdf.
The latest version of
Adobe Acrobat Reader can
e downloaded from the
Adobe website. http://
www.adobe.com (This
URL may change without
notice.)
51
Page 52

Getting connected and installing drivers (Macintosh)
4
Verify the installation location, and click [Install].
fig.3-2_40
5
If a message like the following is
displayed, click [Continue].
The other currently running
applications will exit, and
installation will continue.
6
A dialog box will indicate Installation completed.
Click [Restart] to restart your Macintosh.
OMS settings
1
From the CD-ROM, drag the Driver-OMS Driver-OMS Settings folder to
the hard disk of your Macintosh to copy it.
fig.3-4
2
In the Opcode-OMS Application folder where you
installed OMS, double-click OMS Setup to start it up.
fig.3-5_35
3
If a dialog box like the one shown
here appears, click [Turn It Off]. A
confirmation dialog box will then
appear, so click [OK].
fig.3-6_35
4
The Create New Setup dialog box will
appear.
Click [Cancel]. If you accidentally
clicked [OK], click [Cancel] in the next
screen.
52
Page 53

Español Italiano Français Deutsch English
fig.3-7
5
Choose “Open” from the
File menu.
Open the OMS Settings
folder copied in Step 1,
select the file for the name
of the port to which the SD20 is connected, and click
[Open].
A screen like the one shown here will appear.
fig.3-15_90
Opening the SD-20 Modem Port file
Getting connected and installing drivers (Macintosh)
When connecting to a
combined modem/printer
port such as on
PowerBooks, select the
“SD-20 Modem Port” file.
Opening the SD-20 Printer Port file
6
From the Edit menu, select OMS MIDI Setup.
In the OMS MIDI Setup dialog box that appears, check Run MIDI in
background, and click [OK].
fig.3-18
Opening the SD-20 Modem Port file
Opening the SD-20 Printer Port file
53
Page 54

Getting connected and installing drivers (Macintosh)
7
From the File menu, choose Make Current.
If you are unable to select Make Current, it has already been applied, and you
may continue to the next step.
fig.3-20_90
A diamond mark (◊) indicates the settings are enabled.
Opening the SD-20 Modem Port file
fig.3-11_50
8
Verify that MIDI transmission and reception
can be performed correctly. From the Studio
menu, choose Test Studio.
fig.3-22_50
9
When you move the mouse cursor near the
sound generator icon, the cursor will change
to a shape.
Click on the sound generator icons that are
encircled in the following illustration. If
sound is heard from the SD-20, the settings
are correct. If MIDI is not being transmitted,
the Macintosh will produce an alert sound.
Opening the SD-20 Printer Port file
Does the OUTPUT level indicator of the SD-20 move?
If the OUTPUT level meter in the SD-20’s display is moving but you do not
hear sound, check whether the volume of the SD-20 or your speaker system
has been lowered. If the OUTPUT level meter does not move, check the
connections and OMS settings once again.
After you have made settings correctly, choose Test once again from the
Studio menu, and perform step 9.
54
Page 55

Getting connected and installing drivers (Macintosh)
Español Italiano Français Deutsch English
10
Exit OMS Setup.
From the File menu, choose [Exit]. If the AppleTalk confirmation dialog box
appears, click [OK] to close the dialog box.
This completes connections for the SD-20 and Macintosh, and installation of
the MIDI driver. Now, MIDI data can be input and output (recorded and
played).
If the SD-20 does not
produce sound, refer to No
sound (p. 237).
55
Page 56

Getting connected and installing drivers (Macintosh)
■ Installing the SD-20 driver (FreeMIDI)
Use the following procedure to install the SD-20 driver. The included SD-20
FreeMIDI driver is an add-on module for using the SD-20 with FreeMIDI. In
order to use it, FreeMIDI must be installed on the hard disk from which
you started up.
1
Exit all currently running software (applications).
If you are using a virus checker or similar software, be sure to exit this as well.
2
Prepare the CD-ROM.
Insert the CD-ROM into the CD-ROM drive.
3
Double-click the SD-20 Serial Installer icon (found in the Driver - FreeMIDI
Driver - Serial Connection folder of the CD-ROM) to start up the installer.
4
Click [Install].
5
A dialog box will inform you that you will need to restart your Macintosh
when installation is finished. Click [Continue].
6
When the installation is complete, click [Restart].
FreeMIDI settings
1
From the CD-ROM, copy the Driver - FreeMIDI Driver - Settings folder
onto the hard disk of your Macintosh.
2
Open the FreeMIDI Applications folder from the location into which you
installed FreeMIDI, and double-click the FreeMIDI Setup icon to start it up.
3
When “OMS is installed on this computer...” appears, click [FreeMIDI].
4
The first time the software is started up, a dialog box saying “Welcome to
FreeMIDI!” will appear. Click [Continue].
5
When the FreeMIDI Preferences dialog box appears, click [Cancel].
56
6
When the About Quick Setup dialog box appears, click [Cancel].
Page 57

Español Italiano Français Deutsch English
7
From the File menu, choose Open.
Open the FreeMIDI Settings folder copied in Step 1, select the file for the
name of the port to which the SD-20 is connected, and click [Open].
8
Verify that MIDI transmission and reception occur correctly.
From the MIDI menu, choose Check Connections.
9
The mouse cursor will change to the shape of a note. Click the sound
generator icons encircled in the diagram at right.
If you hear sound, MIDI messages are being sent from the Macintosh to the
SD-20.
ig.3-25
Getting connected and installing drivers (Macintosh)
f
Does the OUTPUT level indicator of the SD-20 move?
If the OUTPUT level meter in the SD-20’s display is moving but you do not
hear sound, check whether the volume of the SD-20 or your speaker system
has been lowered. If the OUTPUT level meter does not move, check the
connections and OMS settings once again.
After you have made settings correctly, choose Test once again from the
Studio menu, and perform step 9.
10
Once again choose the MIDI menu command Check Connections to end
the test.
11
From the File menu, choose Quit to exit FreeMIDI Setup.
This completes connections for the SD-20 and Macintosh, and installation of
the MIDI driver. Now, MIDI data can be input and output (recorded and
played).
If the SD-20 does not
produce sound, refer to No
sound (p. 237).
57
Page 58

Anschlüsse herstellen und Treiber installieren (Windows)
Was ist ein Treiber?
fig.2-0
Application
Driver
Computer
Ein “Treiber” ist Software, die Daten zwischen dem SD-20 und Anwendungssoftware auf
Ihrem Computer überträgt, wenn Ihr Computer und das SD-20 mit einem USB-Kabel
miteinander verbunden sind. Der Treiber überträgt die Daten der Anwendung an das
SD-20 sowie die Daten vom SD-20 an die Anwendung.
Das SD-20 kann mit Hilfe der “BUS-Spannung” betrieben werden, die via
USB-Kabel geliefert wird. Das bedeutet, dass der Wechselstromadapter im
Lieferumfang nicht erforderlich ist. Wenn Sie jedoch einen USB-Hub
einsetzen oder wenn die Spannung, die via USB geliefert wird, nicht
ausreicht, funktioniert das SD-20 eventuell nicht richtig. Wenn das der Fall
ist, schließen Sie den mitgelieferten Wechselstromadapter an das SD-20 an.
Bei der Installation des Treibers müssen Sie den Wechselstromadapter
anschließen und den POWER-Schalter einschalten.
USB/Serial
port
USB/Computer
Cable
SD-20
Welche Anschlussart?
Sie können entweder das USB-Kabel verwenden oder mit Hilfe des
Computerkabels eine serielle Verbindung herstellen. Die Installation der
Treiber und die Konfiguration der Einstellungen erfolgt entsprechend dem
verwendeten Anschlusstyp.
58
USB-Verbindung...............................................(S. 59)
Serielle Verbindung..........................................(S. 71)
Page 59

Español Italiano Français Deutsch English
USB-Verbindung
Folgende Komponenten sind für die Anschlüsse und die Installation
erforderlich. Bitte halten Sie sie bereit.
• SD-20
• Wechselstromadapter
• USB-Kabel
• CD-ROM
Die Vorgehensweise bei der Installation hängt von Ihrem System ab.
Bitte lesen Sie abhängig von dem von Ihnen verwendeten System in einem
der folgenden Abschnitte weiter.
• Windows XP-Anwender ........................................... (S. 59)
• Windows 2000-Anwender......................................... (S. 65)
• Windows Me/98-Anwender .................................... (S. 69)
■ Windows XP-Anwender
1
Starten Sie Windows, wobei das SD-20 ausgesteckt ist.
Stecken Sie alle USB-Kabel außer der USB-Tastatur und der USB-Maus aus
(falls vorhanden).
2
Öffnen Sie das Dialogfeld Systemeigenschaften.
1. Klicken Sie auf die Windows-Schaltfläche [Start] und wählen Sie im
daraufhin angezeigten Menü Systemsteuerung.
2. Klicken Sie in “Wählen Sie eine Kategorie”, auf “Leistung und
Wartung”.
3. Klicken Sie in “oder wählen Sie ein Symbol der Systemsteuerung”
auf das Symbol System.
Anschlüsse herstellen und Treiber installieren (Windows)
Wenn Sie Windows XP
Professional verwenden,
müssen Sie sich mit einem
Benutzernamen vom Typ
Administrationskonto
(zum Beispiel
Administrator) anmelden.
Einzelheiten zu
Benutzerkonten erfahren
Sie vom
Systemadministrator Ihres
Computers.
Abhängig von der
Konfiguration Ihres
Systems kann es
vorkommen, dass das
SymbolSystem nicht
sofort in der
Systemsteuerung (in der
klassischen Anzeige)
angezeigt wird.
Doppelklicken Sie in
diesem Fall auf das
Symbol System.
59
Page 60

Anschlüsse herstellen und Treiber installieren (Windows)
fig.2-1
3
Öffnen Sie das Dialogfeld
Treibersignaturoptionen.
Klicken Sie auf die Registerkarte
Hardware und klicken Sie
anschließend auf
[Treibersignierung].
fig.2-2
4
Stellen Sie sicher, dass für
“Welche Aktion soll Windows
durchführen?” “Ignorieren”
aktiviert ist.
Wenn “Ignorieren” bereits
aktiviert ist, klicken Sie auf [OK].
Wenn “Ignorieren” nicht
aktiviert ist, notieren Sie sich die
aktuelle Einstellung (“Warnen”/
“Sperren”). Ändern Sie danach
die Einstellung auf Ignorieren
und klicken Sie auf [OK].
5
Schließen Sie das Dialogfeld Systemeigenschaften.
Klicken Sie auf [OK].
6
Beenden Sie alle aktuell ausgeführten Programme (Anwendungen).
Schließen Sie außerdem alle noch geöffneten Programmfenster. Wenn Sie ein
Virenschutzprogramm oder ähnliche Software verwenden, müssen Sie diese
ebenfalls beenden.
7
Halten Sie die CD-ROM bereit.
Legen Sie die CD-ROM in das CD-ROM-Laufwerk Ihres Computers ein.
Wenn Sie die Option für
Welche Aktion soll
Windows durchführen?
in Schritt 4 geändert
haben, müssen Sie die
Einstellungen wieder
herstellen, nachdem Sie
den Treiber installiert
haben.
(->Wenn Sie “Welche
Aktion soll Windows
durchführen?”
geändert haben (S. 64))
60
Page 61

Anschlüsse herstellen und Treiber installieren (Windows)
Español Italiano Français Deutsch English
b
b
8
Öffnen Sie das Dialogfeld “Ausführen...”.
Klicken Sie auf die Windows-Schaltfläche Start. Wählen Sie im daraufhin
angezeigten Menü die Option Ausführen
fig.2-3_30
9
Geben Sie im angezeigten
Dialogfeld Folgendes in das Feld
“Öffnen” ein und klicken Sie auf
[OK].
D:\DRIVER\USB_XP2K\SETUPINF.EXE
* Der Name des Laufwerks “D:” kann abhängig von Ihrem System anders lauten.
Geben Sie statt dessen den Laufwerknamen Ihres CD-ROM-Laufwerks an.
fig.2-4_30
In diesem Dokument wird
die Position der Ordner
und Dateien als
Dateipfade unter
Verwendung von \ als
Trennzeichen angegeben.
USB_XP2K\SETUPINF.
EXE informiert Sie z.B.
darüber, dass sich
SETUPINF.EXE im
Ordner USB_XP2K
efindet.
10
Das Dialogfeld SetupInf wird
angezeigt.
Jetzt kann der Treiber installiert
werden.
* Klicken Sie noch nicht auf [OK].
11
Schließen Sie das SD-20 an.
1. Stellen Sie den
Computerschalter des SD-20
auf USB.
2. Verbinden Sie das ausgeschaltete SD-20 mit dem
Wechselstromadapter.
3. Verbinden Sie den Wechselstromadapter mit einer elektrischen
Steckdose.
4. Verwenden Sie das USB-Kabel, um das SD-20 mit Ihrem Computer zu
verbinden.
12
Bringen Sie den Netzschalter des SD-20 in die Position ON.
Der Computer zeigt neben der Task-Leiste folgende Meldung an: “Neue
Hardware gefunden”. Bitte warten Sie einen Moment.
Wenn die Meldung “Der
Treiber ist bereits
installiert” angezeigt
wird, können sie das SD-20
an Ihren Computer
anschließen und
verwenden.
Auch wenn Sie
normalerweise das SD-20
mit BUS-Spannung
etreiben werden,
verwenden Sie bitte den
Wechselstromadapter,
während Sie den Treiber
installieren und
Einstellungen vornehmen.
Dieses Gerät wurde mit
einem Schutzschaltkreis
ausgestattet. Nach dem
Einschalten benötigt das
Gerät eine kurze
Zeitspanne (einige
Sekunden), bis es den
normalen Betrieb
aufnimmt.
61
Page 62

Anschlüsse herstellen und Treiber installieren (Windows)
fig.2-6
13
Der Assistent Neue Hardware
gefunden erscheint.
Prüfen Sie, ob der Bildschirm
“EDIROL SD-20” anzeigt, wählen
Sie “Aus einer Liste wählen oder
Speicherort angeben
(Erweitert)” und klicken Sie auf
[Weiter].
fig.2-7
14
Im Bildschirm wird folgende
Meldung angezeigt: “Bitte
wählen Sie Optionen für die
Suche und Installation”.
Wählen Sie “Nicht suchen. Ich
werde den Treiber für die
Installation auswählen” und
klicken Sie auf [Weiter].
fig.2-8_20
15
Prüfen Sie, ob das Feld “Modell”
“EDIROL SD-20” anzeigt und
klicken Sie auf [Weiter]. Die
Installation des Treibers beginnt.
62
Page 63

Anschlüsse herstellen und Treiber installieren (Windows)
Español Italiano Français Deutsch English
Wenn in Schritt 4 für Welche Aktion soll Windows durchführen? “Ignorieren” nicht
aktiviert wurde, erscheint ein Dialogfeld mit der Meldung “Digitalsignatur nicht
gefunden”.
fig.2-5
Wenn für Welche Aktion soll Windows
durchführen? “Warnen” aktiviert wurde,
1. klicken Sie auf [Fortfahren].
2. Setzen Sie die Installation fort.
Wenn für “Welche Aktion soll Windows
durchführen?” “Sperren” aktiviert wurde,
1. klicken Sie auf [OK].
2. Wenn der “Neue Hardware gefunden”
erscheint, klicken Sie auf [Beenden] .
3. Führen Sie die Installation aus, wie im Abschnitt “Fehlerbehebung” in Device
Manager shows “?”, “!”, or “USB Composite Device” (S. 235) beschrieben.
fig.2-9_30
16
Das Dialogfeld Diskette einlegen
wird angezeigt.
Klicken Sie auf [OK].
fig.2-10_30
17
Daraufhin wird das Dialogfeld
Benötigte Dateien angezeigt.
Geben Sie im Bereich “Dateien
kopieren von”
D:\DRIVER\USB_XP2K ein und
klicken Sie auf [OK].
fig.2-11_20
18
Der Assistent Neue Hardware
gefunden erscheint.
Prüfen Sie, ob EDIROL SD-20
angezeigt wird, und klicken Sie
auf [Beenden].
Warten Sie, bis die Meldung
“Neue Hardware gefunden” in
der Nähe der Task-Leiste
angezeigt wird.
63
Page 64

Anschlüsse herstellen und Treiber installieren (Windows)
19
Starten Sie Windows neu.
Nachdem der Treiber installiert wurde, wird das Dialogfeld Geänderte
Systemeinstellungen angezeigt. Klicken Sie auf [Ja].
Wenn Sie “Welche Aktion soll Windows durchführen?” geändert
haben
Wenn Sie Welche Aktion soll Windows durchführen? in Schritt 5 geändert
haben, sollten Sie die ursprüngliche Einstellung nach dem Neustart von
Windows wiederherstellen.
1. Unter Windows XP Professional melden Sie sich in Windows mit einem
Benutzernamen für das Administrationskonto an (z.B. Administrator).
2. Klicken Sie auf die Windows-Schaltfläche [Start] und wählen Sie im
daraufhin angezeigten Menü Systemsteuerung.
3. Klicken Sie in “Wählen Sie eine Kategorie aus”, auf “Leistung und
Wartung”.
4. Klicken Sie in “oder wählen Sie ein Symbol der Systemsteuerung”
auf das Symbol System. Daraufhin werden die Systemeigenschaften
angezeigt.
5. Klicken Sie auf die Registerkarte Hardware und klicken Sie
anschließend auf [Treibersignierung]. Daraufhin werden die
Treibersignaturoptionen angezeigt.
6. Stellen Sie die ursprünglichen Einstellungen für Welche Aktion soll
Windows durchführen? wieder her (entweder “Warnen” oder
“Sperren”), und klicken Sie auf [OK].
7. Klicken Sie auf [OK]. Das Dialogfeld Systemeigenschaften wird
Als nächstes nehmen Sie die Einstellungen für den Treiber vor.
(-> Einstellungen und Überprüfung (S. 82))
64
Page 65

Español Italiano Français Deutsch English
■ Windows 2000-Anwender
Wenn Sie die Einstellung für
“Dateisignaturverifizierung”
in Schritt 5 geändert haben,
sollten Sie die ursprüngliche
Einstellung nach dem
Neustart von Windows
wiederherstellen.
(->Wenn Sie
“Dateisignaturverifizierung
” geändert haben (S. 68))
1
Starten Sie Windows, wobei das SD-20 ausgesteckt ist.
Stecken Sie alle USB-Kabel außer der USB-Tastatur und der USB-Maus aus
(falls vorhanden).
2
Melden Sie sich in Windows als Benutzer mit Administratorrechten an
(z.B. als Administrator).
3
Öffnen Sie das Dialogfeld Systemeigenschaften.
Klicken Sie in Windows auf Start und wählen Sie im daraufhin angezeigten
Menü Einstellungen - Systemsteuerung. Doppelklicken Sie in der
Systemsteuerung auf das System-Symbol.
fig.2-12
4
Öffnen Sie das Dialogfeld
Treibersignaturoptionen.
Klicken Sie auf die Registerkarte
Hardware und klicken Sie
anschließend auf
[Treibersignierung].
Anschlüsse herstellen und Treiber installieren (Windows)
fig.2-13_50
5
Stellen Sie sicher, dass für
“Dateisignaturverifizierung”
“Ignorieren” aktiviert ist.
Wenn “Ignorieren” bereits
aktiviert ist, klicken Sie auf [OK].
Wenn “Ignorieren” nicht aktiviert
ist, notieren Sie sich die aktuelle
Einstellung (“Warnen” oder
“Sperren”). Ändern Sie dann die
Einstellung auf “Ignorieren” und
klicken Sie auf [OK].
65
Page 66

Anschlüsse herstellen und Treiber installieren (Windows)
b
6
Schließen Sie das Dialogfeld Systemeigenschaften.
Klicken Sie auf [OK].
7
Beenden Sie alle aktuell ausgeführten Programme (Anwendungen).
Schließen Sie außerdem alle noch geöffneten Programmfenster. Wenn Sie ein
Virenschutzprogramm oder ähnliche Software verwenden, müssen Sie diese
ebenfalls beenden.
8
Halten Sie die CD-ROM bereit.
Legen Sie die CD-ROM in das CD-ROM-Laufwerk Ihres Computers ein.
9
Öffnen Sie das Dialogfeld “Ausführen...”.
Klicken Sie auf die Windows-Schaltfläche Start. Wählen Sie im daraufhin
angezeigten Menü die Option Ausführen
fig.2-14_40
10
Geben Sie im angezeigten
Dialogfeld Folgendes in das Feld
“Öffnen” ein und klicken Sie auf
[OK].
D:\DRIVER\USB_XP2K\SETUPINF.EXE
* Der Name des Laufwerks “D:” kann abhängig von Ihrem System anders lauten.
Geben Sie statt dessen den Laufwerknamen Ihres CD-ROM-Laufwerks an.
fig.2-15_40
In diesem Dokument
wird die Position der
Ordner und Dateien als
Dateipfade unter
Verwendung von \ als
Trennzeichen angegeben.
USB_XP2K\SETUPINF.
EXE informiert Sie z.B.
darüber, dass sich
SETUPINF.EXE im
Ordner USB_XP2K
efindet.
11
Das Dialogfeld SETUPINF wird
angezeigt.
Jetzt kann der Treiber installiert
werden.
* Klicken Sie noch nicht auf [OK].
66
Page 67

Anschlüsse herstellen und Treiber installieren (Windows)
Español Italiano Français Deutsch English
b
b
12
Schließen Sie das SD-20 an.
1. Stellen Sie den Computerschalter des SD-20 auf USB.
2. Verbinden Sie das ausgeschaltete SD-20 mit dem
Wechselstromadapter.
3. Verbinden Sie den Wechselstromadapter mit einer elektrischen
Steckdose.
4. Verwenden Sie das USB-Kabel, um das SD-20 mit Ihrem Computer zu
verbinden.
Auch wenn Sie
normalerweise das SD-20
mit BUS-Spannung
etreiben werden,
verwenden Sie bitte den
Wechselstromadapter,
während Sie den Treiber
installieren und
Einstellungen
vornehmen.
13
Bringen Sie den Netzschalter des SD-20 in die Position ON.
Wenn in Schritt 5 für “Dateisignaturverifizierung” “Ignorieren” nicht aktiviert wurde, erscheint
die Meldung “Digitalsignatur nicht gefunden”.
fig.2-16_30
Wenn für “Dateisignaturverifizierung” “Warnen”
aktiviert ist,
1. klicken Sie auf [Ja].
2. Setzen Sie die Installation fort.
Wenn für “Dateisignaturverifizierung”
“Sperren” aktiviert ist,
1. klicken Sie auf [OK].
2. Wenn der “Suche nach neuen Hardwarekomponenten” erscheint,
klicken Sie auf [Beenden].
ieses Gerät wurde mit
inem Schutzschaltkreis
usgestattet. Nach dem
inschalten benötigt das
erät eine kurze
eitspanne (einige
ekunden), bis es den
ormalen Betrieb
ufnimmt.
3. Führen Sie die Installation aus, wie im Abschnitt “Fehlerbehebung” in Device Manager
shows “?”, “!”, or “USB Composite Device” (S. 235) beschrieben.
fig.2-17_30
14
Das Dialogfeld Diskette einlegen
wird angezeigt.
Klicken Sie auf [OK].
Wenn das Dialogfeld
“Diskette einlegen” nicht
angezeigt wird, lesen Sie
itte The “Insert Disk”
dialog box does not
appear (S. 235))
67
Page 68

Anschlüsse herstellen und Treiber installieren (Windows)
fig.2-18_30
15
Daraufhin wird das Dialogfeld
Benötigte Dateienangezeigt.
Geben Sie im Bereich “Dateien
kopieren von”
D:\DRIVER\USB_XP2K ein und
klicken Sie auf [OK].
fig.2-17b_30
16
Möglicherweise wird der “Neue
Hardware gefunden” angezeigt.
Prüfen Sie, ob “EDIROL SD-20”
angezeigt wird und klicken Sie auf
[Beenden].
17
Starten Sie Windows neu.
Möglicherweise wird das
Dialogfeld Geänderte Systemeinstellungen angezeigt. Klicken Sie auf [Ja].
Windows startet anschließend automatisch neu.
Wenn Sie “Dateisignaturverifizierung” geändert haben
Wenn Sie die Einstellung für “Dateisignaturverifizierung” in Schritt 5
geändert haben, sollten Sie die ursprüngliche Einstellung nach dem Neustart
von Windows wiederherstellen.
1. Nachdem Windows neu gestartet ist, melden Sie sich als Benutzer mit
Administratorrechten an (z.B. als Administrator).
2. Klicken Sie auf dem Windows Desktop mit der rechten Maustaste auf
das Symbol Arbeitsplatz und wählen Sie im daraufhin angezeigten
Menü Eigenschaften. Das Dialogfeld Systemeigenschaften wird
angezeigt.
3. Klicken Sie auf die Registerkarte Hardware und klicken Sie
anschließend auf [Treibersignierung]. Daraufhin werden die
Treibersignaturoptionen angezeigt.
4. Stellen Sie die ursprünglichen Einstellungen für
Dateisignaturverifizierung wieder her (entweder “Warnen” oder
“Sperren”) und klicken Sie auf [OK].
5. Klicken Sie auf [OK]. Das Dialogfeld Systemeigenschaften wird
geschlossen.
Als nächstes nehmen Sie die Einstellungen für den Treiber vor.
(-> Einstellungen und Überprüfung (S. 82)
68
Page 69

Español Italiano Français Deutsch English
■ Windows Me/98-Anwender
b
1
Starten Sie Windows, wobei das SD-20 ausgesteckt ist.
Stecken Sie alle USB-Kabel außer der USB-Tastatur und der USB-Maus aus
(falls vorhanden).
2
Beenden Sie alle aktuell ausgeführten Programme (Anwendungen).
Schließen Sie außerdem alle noch geöffneten Programmfenster. Wenn Sie ein
Virenschutzprogramm oder ähnliche Software verwenden, müssen Sie diese
ebenfalls beenden.
3
Halten Sie die CD-ROM bereit.
Legen Sie die CD-ROM in das CD-ROM-Laufwerk Ihres Computers ein.
4
Öffnen Sie das Dialogfeld “Ausführen...”.
Klicken Sie auf die Windows-Schaltfläche Start.
Wählen Sie im daraufhin angezeigten Menü die Option Ausführen.
fig.2-19a_30
Anschlüsse herstellen und Treiber installieren (Windows)
5
Geben Sie im angezeigten
Dialogfeld Folgendes in das Feld
“Öffnen” ein und klicken Sie auf
[OK].
D:\DRIVER\USB_ME98\SETUPINF.EXE
* Der Name des Laufwerks “D:” kann abhängig von Ihrem System anders lauten.
Geben Sie statt dessen den Laufwerknamen Ihres CD-ROM-Laufwerks an.
fig.2-19_30
6
Das Dialogfeld SETUPINF wird
angezeigt.
Jetzt kann der Treiber installiert
werden.
* Klicken Sie noch nicht auf [OK].
In diesem Dokument wird
die Position der Ordner
und Dateien als
Dateipfade unter
Verwendung von \ als
Trennzeichen angegeben.
USB_ME98\SETUPINF.
EXE informiert Sie z.B.
darüber, dass sich
SETUPINF.EXE im
Ordner USB_ME98
efindet.
69
Page 70

Anschlüsse herstellen und Treiber installieren (Windows)
b
b
7
Schließen Sie das SD-20 an.
1. Stellen Sie den Computerschalter des SD-20 auf USB.
2. Verbinden Sie das ausgeschaltete SD-20 mit dem
Wechselstromadapter.
3. Verbinden Sie den Wechselstromadapter mit einer elektrischen
Steckdose.
4. Verwenden Sie das USB-Kabel, um das SD-20 mit Ihrem Computer zu
verbinden.
8
Bringen Sie den Netzschalter des SD-20 in die Position ON.
fig.2-20_30
9
Unter Windows 98 wird ein
Dialogfeld Diskette einlegen
angezeigt.
Klicken Sie auf [OK].
fig.2-21a_40
Auch wenn Sie
normalerweise das SD-20
mit BUS-Spannung
etreiben werden,
verwenden Sie bitte den
Wechselstromadapter,
während Sie den Treiber
installieren und
Einstellungen vornehmen.
Dieses Gerät wurde mit
einem Schutzschaltkreis
ausgestattet. Nach dem
Einschalten benötigt das
Gerät eine kurze
Zeitspanne (einige
Sekunden), bis es den
normalen Betrieb
aufnimmt.
10
Das Dialogfeld Neue Hardware
gefunden wird angezeigt.
Geben Sie im Bereich “Dateien
kopieren von”
D:\DRIVER\USB_ME98 ein und
klicken Sie auf die Schaltfläche
[OK].
11
Sobald der Treiber installiert wurde, wird das Dialogfeld Neue Hardware
gefunden geschlossen.
Klicken Sie im Dialogfeld SETUPINF auf [OK]. Das Dialogfeld SETUPINF
wird geschlossen.
Als nächstes nehmen Sie die Einstellungen für den Treiber vor.
(-> Einstellungen und Überprüfung (S. 82)
Wenn Sie Windows 98
verwenden und das
Dialogfeld Diskette
einlegen nicht angezeigt
wird, lesen Sie bitte The
“Insert Disk” dialog box
does not appear (S. 235).
Wenn das Dialogfeld
Neue Hardware
gefunden nicht angezeigt
wird, installieren Sie den
Treiber neu, wobei Sie die
Schritte befolgen wie
inThe “Insert Disk”
dialog box does not
appear (S. 235)
eschrieben.
70
Page 71

Español Italiano Français Deutsch English
Serielle Verbindung
Folgende Komponenten sind für die Anschlüsse und die Installation
erforderlich. Bitte halten Sie sie bereit.
• SD-20
• Wechselstromadapter
• Computerkabel
• CD-ROM
Die Vorgehensweise bei der Installation hängt von Ihrem System ab.
Bitte lesen Sie abhängig von dem von Ihnen verwendeten System in einem
der folgenden Abschnitte weiter.
• Windows XP-Anwender ........................................... (S. 71)
• Windows 2000-Anwender......................................... (S. 76)
• Windows Me/98-Anwender .................................... (S. 80)
Anschlüsse herstellen und Treiber installieren (Windows)
■ Windows XP-Anwender
1
Stellen Sie sicher, dass das SD-20, Ihr Computer und alle peripheren Geräte
ausgeschaltet sind.
2
Stellen Sie den Computerschalter des SD-20 auf PC.
3
Verwenden Sie das Computerkabel, um eine Verbindung mit dem seriellen
Anschluss Ihres Computers und dem SD-20 herzustellen.
4
Verbinden Sie das ausgeschaltete SD-20 mit dem Wechselstromadapter.
5
Verbinden Sie den Wechselstromadapter mit einer elektrischen Steckdose.
6
Schalten Sie das SD-20 und Ihren Computer wieder ein und starten Sie
Windows.
Wenn Sie Windows XP
Professional verwenden,
müssen Sie sich mit einem
Benutzernamen vom Typ
Administrationskonto
(zum Beispiel
Administrator) anmelden.
Einzelheiten zu
Benutzerkonten erfahren
Sie vom
Systemadministrator Ihres
Computers.
Nähere Informationen zur
Herstellung der
Verbindungen erhalten Sie
unter Basic connections
(S. 13)
7
Öffnen Sie das Dialogfeld Systemeigenschaften.
1. Klicken Sie auf die Windows-Schaltfläche[Start] und wählen Sie im
daraufhin angezeigten Menü Systemsteuerung.
2. Klicken Sie in “Wählen Sie eine Kategorie aus”, auf “Leistung und
Wartung”.
3. Klicken Sie in “oder wählen Sie ein Symbol der Systemsteuerung”
auf das Symbol System.
71
Page 72

Anschlüsse herstellen und Treiber installieren (Windows)
fig.2-1
8
Öffnen Sie das Dialogfeld
Treibersignaturoptionen.
Klicken Sie auf die Registerkarte
Hardware und klicken Sie
anschließend auf
[Treibersignierung] .
fig.2-2
9
Stellen Sie sicher, dass für
“Welche Aktion soll Windows
durchführen?” “Ignorieren”
aktiviert ist.
Wenn “Ignorieren” bereits
aktiviert ist, klicken Sie auf [OK].
Wenn “Ignorieren” nicht
aktiviert ist, notieren Sie sich die
aktuelle Einstellung (“Warnen”
oder “Sperren”). Ändern Sie dann
die Einstellung auf Ignorieren
und klicken Sie auf [OK]
10
Schließen Sie das Dialogfeld Systemeigenschaften.
Klicken Sie auf [OK].
Abhängig von der
Konfiguration Ihres
Systems kann es
vorkommen, dass das
Symbol System nicht
sofort in der
Systemsteuerung (in
der klassischen Anzeige)
angezeigt wird.
Doppelklicken Sie in
diesem Fall auf das
Symbol System.
Wenn Sie die Option für
Welche Aktion soll
Windows durchführen?
in Schritt 9 geändert
haben, müssen Sie die
Einstellungen wieder
herstellen, nachdem Sie
den Treiber installiert
haben.
(->Wenn Sie “Welche
Aktion soll Windows
durchführen?”
geändert haben (S. 64))
72
11
Beenden Sie alle aktuell ausgeführten Programme (Anwendungen).
Schließen Sie außerdem alle noch geöffneten Programmfenster. Wenn Sie ein
Virenschutzprogramm oder ähnliche Software verwenden, müssen Sie diese
ebenfalls beenden.
12
Halten Sie die CD-ROM bereit.
Legen Sie die CD-ROM in das CD-ROM-Laufwerk Ihres Computers ein.
Page 73

Anschlüsse herstellen und Treiber installieren (Windows)
Español Italiano Français Deutsch English
b
13
Öffnen Sie das Dialogfeld “Ausführen...”.
Klicken Sie auf die Windows-Schaltfläche Start. Wählen Sie im daraufhin
angezeigten Menü die Option Ausführen
fig.2-22_40
14
Geben Sie im angezeigten
Dialogfeld Folgendes in das Feld
“Öffnen” ein und klicken Sie auf
[OK].
D:\DRIVER\SER_XP2K\SETUP.EXE
* Der Name des Laufwerks “D:” kann abhängig von Ihrem System anders lauten.
Geben Sie statt dessen den Laufwerknamen Ihres CD-ROM-Laufwerks an.
15
Das Dialogfeld Welcome wird angezeigt.
Klicken Sie auf [Next].
fig.2-22b_30
In diesem Dokument wird
die Position der Ordner
und Dateien als
Dateipfade unter
Verwendung von \ als
Trennzeichen angegeben.
SER_XP2K\SETUP.EXE
informiert Sie z.B. darüber,
dass sich SETUP.EXE im
Ordner SER_XP2K
efindet.
16
Ein Dialogfeld ähnlich dem
folgenden wird angezeigt.
Klicken Sie auf [Next].
73
Page 74

Anschlüsse herstellen und Treiber installieren (Windows)
Wenn in Schritt 9 für Welche Aktion soll Windows durchführen nicht “Ignorieren”
aktiviert wurde, erscheint die Meldung “Hardware-Installation”.
fig.2-22c_30
Wenn für Welche Aktion soll Windows
durchführen? “Warnen” aktiviert wurde,
1. klicken Sie auf [Trotzdem fortsetzen].
2. Setzen Sie die Installation fort.
Wenn für “Welche Aktion soll Windows
durchführen?” “Sperren” aktiviert wurde,
1. klicken Sie auf [OK].
2. Wenn der “Neue Hardware gefunden” erscheint,
klicken Sie auf [Beenden].
3. Führen Sie die Installation aus, wie im Abschnitt “Fehlerbehebung” in Device
Manager shows “?”, “!”, or “USB Composite Device” (S. 235) beschrieben.
17
Das Dialogfeld Roland Serial MIDI Driver Settings wird angezeigt.
Nehmen Sie folgende Einstellungen vor. Klicken Sie auf [OK].
fig.2-23_30
COM Ports
Wählen Sie den seriellen
Anschluss (COM-Anschluss)
aus, mit dem der serielle
Anschluss des SD-20
verbunden ist.
Switches
Aktivieren Sie “Use multiple
ports”.
Klicken Sie auf das ▼-Symbol
rechts vom Feld [Sound
module] und wählen Sie
SD-20.
* Aktivieren Sie nicht “Activate CTS/
RTS Flow Control”.
18
Nachdem der Treiber installiert
wurde, wird das Dialogfeld Computer neu starten angezeigt. Starten Sie
Ihren Computer neu.
74
Page 75

Anschlüsse herstellen und Treiber installieren (Windows)
Español Italiano Français Deutsch English
Wenn Sie “Welche Aktion soll Windows durchführen?”
geändert haben
Wenn Sie Welche Aktion soll Windows durchführen? in Schritt 5 geändert
haben, sollten Sie die ursprüngliche Einstellung nach dem Neustart von
Windows wiederherstellen.
1. Unter Windows XP Professional melden Sie sich in Windows mit einem
Benutzernamen für das Administrationskonto an (z.B. Administrator).
2. Klicken Sie auf die Windows-Schaltfläche [Start] und wählen Sie im
daraufhin angezeigten Menü Systemsteuerung.
3. Klicken Sie in “Wählen Sie eine Kategorie aus”, auf “Leistung und
Wartung”.
4. Klicken Sie in “oder wählen Sie ein Symbol der Systemsteuerung”
auf das Symbol System. Daraufhin werden die Systemeigenschaften
angezeigt.
5. Klicken Sie auf die Registerkarte Hardware und klicken Sie
anschließend auf [Treibersignierung]. Daraufhin werden die
Treibersignaturoptionen angezeigt.
6. Stellen Sie die ursprünglichen Einstellungen für Welche Aktion soll
Windows durchführen? wieder her (entweder “Warnen” oder
“Sperren”), und klicken Sie auf [OK]
7. Klicken Sie auf [OK]. Das Dialogfeld Systemeigenschaften wird
geschlossen.
Als nächstes nehmen Sie die Einstellungen für den Treiber vor.
(-> Einstellungen und Überprüfung (S. 82))
75
Page 76

Anschlüsse herstellen und Treiber installieren (Windows)
■ Windows 2000-Anwender
1
Stellen Sie sicher, dass das SD-20, Ihr Computer und alle peripheren Geräte
ausgeschaltet sind.
2
Stellen Sie den Computerschalter des SD-20 auf PC.
3
Verwenden Sie das Computerkabel, um eine Verbindung mit dem seriellen
Anschluss Ihres Computers und dem SD-20 herzustellen.
4
Verbinden Sie das ausgeschaltete SD-20 mit dem Wechselstromadapter.
5
Verbinden Sie den Wechselstromadapter mit einer elektrischen Steckdose.
6
Schalten Sie das SD-20 und Ihren Computer wieder ein und starten Sie
Windows.
7
Öffnen Sie das Dialogfeld Systemeigenschaften.
1. Klicken Sie in Windows auf Start und wählen Sie im daraufhin
angezeigten Menü Einstellungen - Systemsteuerung.
2. Doppelklicken Sie in der Systemsteuerung auf das System-Symbol.
fig.2-12
Melden Sie sich in
Windows mit einem
Benutzernamen vom Typ
Administrationskonto an
(zum Beispiel
Administrator).
Einzelheiten zu
Benutzerkonten erfahren
Sie vom
Systemadministrator
Ihres Computers.
Nähere Informationen
zur Herstellung der
Verbindungen erhalten
Sie unter Basic
connections (S. 13)
76
8
Öffnen Sie das Dialogfeld
Treibersignaturoptionen.
Klicken Sie auf die Registerkarte
Hardware und klicken Sie
anschließend auf
[Treibersignierung].
Page 77

Español Italiano Français Deutsch English
fig.2-13_50
b
9
Stellen Sie sicher, dass für
“Dateisignaturverifizierung”
“Ignorieren” aktiviert ist.
Wenn “Ignorieren” bereits
aktiviert ist, klicken Sie auf [OK].
Wenn “Ignorieren” nicht
aktiviert ist, notieren Sie sich die
aktuelle Einstellung (“Warnen”
oder “Sperren”). Ändern Sie dann
die Einstellung auf “Ignorieren”
und klicken Sie auf [OK].
10
Schließen Sie das Dialogfeld Systemeigenschaften.
Klicken Sie auf [OK].
11
Beenden Sie alle aktuell ausgeführten Programme (Anwendungen).
Anschlüsse herstellen und Treiber installieren (Windows)
Schließen Sie außerdem alle noch geöffneten Programmfenster. Wenn Sie ein
Virenschutzprogramm oder ähnliche Software verwenden, müssen Sie diese
ebenfalls beenden.
12
Halten Sie die CD-ROM bereit.
Legen Sie die CD-ROM in das CD-ROM-Laufwerk Ihres Computers ein.
13
Öffnen Sie das Dialogfeld “Ausführen...”.
Klicken Sie auf die Windows-Schaltfläche Start.
Wählen Sie im daraufhin angezeigten Menü die Option Ausführen
fig.2-24_40
14
Geben Sie im angezeigten
Dialogfeld Folgendes in das Feld
“Öffnen” ein und klicken Sie auf
[OK].
D:\DRIVER\SER_XP2K\SETUP.EXE
* Der Name des Laufwerks “D:” kann abhängig von Ihrem System anders lauten.
Geben Sie statt dessen den Laufwerknamen Ihres CD-ROM-Laufwerks an.
In diesem Dokument wird
die Position der Ordner
und Dateien als
Dateipfade unter
Verwendung von \ als
Trennzeichen angegeben.
SER_XP2K\SETUP.EXE
informiert Sie z.B. darüber,
dass sich SETUP.EXE im
Ordner SER_XP2K
efindet.
77
Page 78

Anschlüsse herstellen und Treiber installieren (Windows)
15
Das Dialogfeld Welcome wird angezeigt.
Klicken Sie auf [Next].
fig.2-22b
16
Ein Dialogfeld ähnlich dem
folgenden wird angezeigt.
Klicken Sie auf [Next].
Wenn in Schritt 9 für “Dateisignaturverifizierung” nicht “Ignorieren” aktiviert wurde,
erscheint die Meldung “Digitalsignatur nicht gefunden”.
fig.2-16b_40
Wenn für “Dateisignaturverifizierung”
“Warnen” aktiviert wurde
1. Klicken Sie auf [Ja].
2. Setzen Sie die Installation fort.
Wenn für “Dateisignaturverifizierung”
“Sperren” aktiviert ist,
1. Klicken Sie auf [OK].
2. Wenn der Assistent “Suche nach neuen Hardwarekomponenten”
erscheint, klicken Sie auf [Beenden].
3. Führen Sie die Installation aus, wie im Abschnitt “Fehlerbehebung” in Device
Manager shows “?”, “!”, or “USB Composite Device” (S. 235) beschrieben.
78
Page 79

Anschlüsse herstellen und Treiber installieren (Windows)
Español Italiano Français Deutsch English
17
Das Dialogfeld Roland Serial MIDI Driver Settings wird angezeigt.
Nehmen Sie folgende Einstellungen vor. Klicken Sie auf [OK].
fig.2-23b_40
COM Ports
Wählen Sie den seriellen
Anschluss (COM-Anschluss)
aus, mit dem der serielle
Anschluss des SD-20
verbunden ist.
Switches
Aktivieren Sie “Use multiple
ports”.
Klicken Sie auf das ▼-Symbol
rechts vom Feld
module]
* Aktivieren Sie nicht “Activate CTS/
RTS Flow Control”.
18
Nachdem der Treiber installiert wurde, wird das Dialogfeld Computer neu
starten angezeigt. Starten Sie Ihren Computer neu.
[Sound
und wählen Sie
SD-20
.
Wenn Sie “Dateisignaturverifizierung” geändert haben
Wenn Sie die Einstellung für “Dateisignaturverifizierung” in Schritt 5
geändert haben, sollten Sie die ursprüngliche Einstellung nach dem Neustart
von Windows wiederherstellen.
1. Nachdem Windows neu gestartet ist, melden Sie sich als Benutzer mit
Administratorrechten an (z.B. als Administrator).
2.
Klicken Sie auf dem Windows Desktop mit der rechten Maustaste auf das
Symbol
Eigenschaften
3. Klicken Sie auf die Registerkarte Hardware und klicken Sie
anschließend auf [Treibersignierung]. Daraufhin werden die
Treibersignaturoptionen angezeigt.
4.
Stellen Sie die ursprünglichen Einstellungen für
wieder her ( “
5. Klicken Sie auf [OK]. Das Dialogfeld Systemeigenschaften wird
geschlossen.
Als nächstes nehmen Sie die Einstellungen für den Treiber vor.
(->Einstellungen und Überprüfung (S. 82)
Arbeitsplatz
. Das Dialogfeld
Warnen
und wählen Sie im daraufhin angezeigten Menü
” oder “
Systemeigenschaften
Dateisignaturverifizierung
Sperren
”) und klicken Sie auf
wird angezeigt.
[OK]
.
79
Page 80

Anschlüsse herstellen und Treiber installieren (Windows)
■ Windows Me/98-Anwender
1
Stellen Sie sicher, dass das SD-20, Ihr Computer und alle peripheren Geräte
ausgeschaltet sind.
2
Stellen Sie den Computerschalter des SD-20 auf PC.
3
Verwenden Sie das Computerkabel, um eine Verbindung mit dem seriellen
Anschluss Ihres Computers und dem SD-20 herzustellen.
4
Verbinden Sie das ausgeschaltete SD-20 mit dem Wechselstromadapter.
5
Verbinden Sie den Wechselstromadapter mit einer elektrischen Steckdose.
6
Schalten Sie das SD-20 und Ihren Computer wieder ein und starten Sie
Windows.
7
Beenden Sie alle aktuell ausgeführten Programme (Anwendungen).
Schließen Sie außerdem alle noch geöffneten Programmfenster. Wenn Sie ein
Virenschutzprogramm oder ähnliche Software verwenden, müssen Sie diese
ebenfalls beenden.
8
Halten Sie die CD-ROM bereit.
Legen Sie die CD-ROM in das CD-ROM-Laufwerk Ihres Computers ein.
9
Öffnen Sie das Dialogfeld “Ausführen...”.
Klicken Sie auf die Windows-Schaltfläche Start.
Wählen Sie im daraufhin angezeigten Menü die Option Ausführen
fig.2-25_40
10
Geben Sie im angezeigten
Dialogfeld Folgendes in das Feld
“Öffnen” ein und klicken Sie auf
[OK].
D:\DRIVER\SER_ME98\DISK1\SETUP.EXE
* Der Name des Laufwerks “D:” kann abhängig von Ihrem System anders lauten.
Geben Sie statt dessen den Laufwerknamen Ihres CD-ROM-Laufwerks an.
Nähere Informationen
zur Herstellung der
Verbindungen erhalten
Sie unter Grundlegende
Anschlüsse (S. 17)
In diesem Dokument wird
die Position der Ordner
und Dateien als
Dateipfade unter
Verwendung von \ als
Trennzeichen angegeben.
SER_ME98\SETUP.EXE
informiert Sie z.B.
darüber, dass sich
SETUP.EXE im Ordner
SER_ME98 befindet.
80
Page 81

Español Italiano Français Deutsch English
11
Das Dialogfeld Welcome wird angezeigt.
Klicken Sie auf [Next].
fig.2-26_80
12
Daraufhin wird das Dialogfeld
Select port angezeigt.
Wählen Sie den seriellen
Anschluss (COM-Anschluss) aus,
mit dem der serielle Anschluss
des SD-20 verbunden ist, und
klicken Sie auf [Next].
Die Anzahl von COMAnschlüssen variiert abhängig
vom PC-System.
fig.2-27_40
13
Das Dialogfeld Select MIDI OUT
Port Number wird angezeigt.
Anschlüsse herstellen und Treiber installieren (Windows)
Wählen Sie SD-20 und klicken Sie
auf [Next].
14
Das Dialogfeld Installation information wird angezeigt.
Prüfen Sie den angezeigten Inhalt und klicken Sie auf [Next].
15
Das Dialogfeld Computer Switch Setting wird angezeigt.
Prüfen Sie, ob der Computerschalter auf der Rückseite des SD-20 auf [PC]
eingestellt ist und klicken Sie auf [Next].
Wenn der Schalter nicht auf [PC] steht, führen Sie die angegebenen Schritte
ab Schritt 1 erneut aus.
16
Nachdem der Treiber installiert wurde, wird das Dialogfeld Computer neu
starten angezeigt. Starten Sie Ihren Computer neu.
Als nächstes nehmen Sie die Einstellungen für den Treiber vor.
(-> Einstellungen und Überprüfung (S. 82))
81
Page 82

Anschlüsse herstellen und Treiber installieren (Windows)
Einstellungen und Überprüfung
■ Windows XP/2000/Me-Anwender
1
Öffnen Sie die Systemsteuerung.
Klicken Sie in Windows auf Start und wählen Sie im daraufhin angezeigten
Menü Einstellungen - Systemsteuerung.
Windows XP
Klicken Sie in Windows auf Start und wählen Sie im daraufhin angezeigten
Menü Systemsteuerung.
2
Öffnen Sie das Dialogfeld Eigenschaften von Sounds und Multimedia
(bzw. in Windows XP Sounds und Audiogeräte-Eigenschaften).
Windows 2000/Me
Doppelklicken Sie in der Systemsteuerung auf das Symbol Sounds und
Multimedia, um das Dialogfeld “Eigenschaften von Sounds und
Multimedia” zu öffnen.
Windows XP
Klicken Sie in “Wählen Sie eine Kategorie”, auf “Sounds, Sprache und
Audiogeräte”. Als nächstes klicken Sie in “oder wählen Sie ein Symbol
in der Systemsteuerung” auf das SymbolSounds und Audiogeräte.
3
Klicken Sie auf die Registerkarte Audio.
fig.2-28_30
4
Klicken Sie bei
das
▼
, das sich rechts von
Gerät]
[Standardgerät]
Optionen aus der angezeigten Liste aus.
MIDI-Musikwiedergabe
[Bevorzugtes
befindet (oder in Windows XP,
und wählen Sie folgende
auf
Abhängig von der
Konfiguration Ihres
Systems kann es
vorkommen, dass das
SymbolSounds und
Audiogeräte nicht sofort
in der Systemsteuerung
(in der klassischen
Anzeige) angezeigt wird.
In diesem Fall
doppelklicken Sie auf das
Symbol Sounds und
Audiogeräte.
82
Für eine USBVerbindung
Für eine serielle
Verbindung
5
Klicken Sie auf OK, um die Konfiguration abzuschließen.
Wechseln Sie zur folgenden Seite:
Windows XP-Anwender.................................................. (S. 84)
Windows 2000/Me-Anwender....................................... (S. 85)
EDIROL SD-20
PART A
Roland Serial MIDI
Out A
Page 83

Español Italiano Français Deutsch English
■ Windows 98-Benutzer
1
Öffnen Sie die Systemsteuerung.
Klicken Sie in Windows auf Start und wählen Sie im daraufhin angezeigten
Menü Einstellungen - Systemsteuerung.
2
Öffnen Sie das Dialogfeld Eigenschaften für Multimedia.
Doppelklicken Sie in der Systemsteuerung auf das Symbol [Multimedia],
um das Dialogfeld Eigenschaften für Multimedia zu öffnen.
3
Klicken Sie auf das Register MIDI.
fig.2-29_30
4
Konfigurieren Sie die “MIDIAusgabe”.
Wählen Sie [Einzelnes Instrument]
und wählen Sie eine der folgenden
Optionen aus der angezeigten Liste.
Anschlüsse herstellen und Treiber installieren (Windows)
Für eine USBVerbindung
Für eine serielle
Verbindung
5
Klicken Sie auf OK, um die Konfiguration abzuschließen.
Wechseln Sie zur folgenden Seite:
(-> Überprüfung der Soundausgabe (S. 85))
EDIROL SD-20
PART A
Roland Serial
MIDI Out A
83
Page 84

Anschlüsse herstellen und Treiber installieren (Windows)
Aktivierung der Hintergrunddienste
Nehmen Sie unter Windows XP folgende Einstellungen vor, um eine
reibungslose MIDI-Verarbeitung zu ermöglichen. Diese Einstellungen sind
unter
Windows 2000/Me/98 nicht verfügbar.
1
Klicken Sie in Windows auf Start und wählen Sie im daraufhin angezeigten
Menü Systemsteuerung.
2
Klicken Sie in “Wählen Sie eine Kategorie aus”, auf “Leistung und
Wartung”.
3
Klicken Sie in “oder wählen Sie ein Symbol der Systemsteuerung” auf
das Symbol System.
4
Klicken Sie auf die Registerkarte Erweitert.
5
Klicken Sie auf [Einstellungen] rechts vom Feld Leistung. Daraufhin wird
das Dialogfeld Systemleistungsoptionen angezeigt.
6
Klicken Sie auf die Registerkarte Erweitert.
fig.2-30
7
Wählen Sie im Feld
Prozessorzeitplanung die
Option Hintergrunddienste und
klicken Sie auf OK.
8
Klicken Sie im Dialogfeld
Systemeigenschaften auf [OK].
Das Dialogfeld
Systemeigenschaften wird
geschlossen.
84
Wechseln Sie zur folgenden Seite:
(-> Überprüfung der Soundausgabe (S. 85)
Page 85

Anschlüsse herstellen und Treiber installieren (Windows)
Español Italiano Français Deutsch English
Überprüfung der Soundausgabe
Als nächstes spielen Sie die Beispieldaten ab, um sicherzustellen, dass die
Verbindungen, die Treiberinstallation und Einstellungen korrekt sind.
■ Abspielen der Beispieldaten
In diesem Beispiel wird Standard-Windows-Funktionalität für die
Wiedergabe der Beispieldaten verwendet. Die Beispieldaten befinden sich
auf der CD-ROM.
1
Halten Sie die CD-ROM bereit.
Legen Sie die CD-ROM in das CD-ROM-Laufwerk Ihres Computers ein.
2
Öffnen Sie den Ordner DemoSong der CD-ROM und ziehen Sie die Datei
Demo01(.MID) auf Ihren Desktop, um sie zu kopieren.
fig.2-31_80
3
Klicken Sie mit der rechten Maustaste auf
die kopierte Datei
wählen Sie
unter Windows XP/2000/Me).
fig.2-32_30
4
Spielen Sie die Beispieldaten ab.
Demo01
Eigenschaften (Wiedergabe
(.MID) und
Die Verwendung von
Songdaten, die mit diesem
Produkt ausgeliefert
werden, für andere als
private Zwecke oder
persönlichen Gebrauch
sind ohne Genehmigung
des Urheberrechtsinhabers
gesetzlich verboten.
Darüber hinaus dürfen
diese Daten nicht kopiert
oder in einem sekundären
urheberrechtsgeschützten
Werk ohne Genehmigung
des Urheberrechtsinhabers
verwendet werden.
Die tatsächlich
angezeigten Optionen
auf Ihrem PC können
abhängig von Ihrer PCUmgebung und dem
von Ihnen verwendeten
Betriebssystem
unterschiedlich sein.
Klicken Sie auf die Registerkarte
Vorschau und klicken Sie
anschließend auf die
Schaltfläche.
Die Musikwiedergabe beginnt.
Wurden die Beispieldaten wiedergegeben?
Wenn die Beispieldaten einwandfrei wiedergegeben wurden, bedeutet das,
dass Ihr PC und das SD-20 richtig angeschlossen sind und die Treiber
vorschriftsmäßig installiert wurden.
Wenn die Wiedergabe
nicht einwandfrei
erfolgte, lesen Sie bitte
Troubleshooting
(S. 232), um den Grund
festzustellen. Dieser
Abschnitt enthält
Informationen dazu,
wie Probleme wie z.B.
fehlender Sound oder
nicht einwandfreie
Wiedergabe gelöst
werden können.
85
Page 86

Anschlüsse herstellen und Treiber installieren (Macintosh)
Was ist ein Treiber?
fig.2-0
Application
Driver
Computer
Ein “Treiber” ist Software, die Daten zwischen dem SD-20 und Anwendungssoftware auf
Ihrem Computer überträgt, wenn Ihr Computer und das SD-20 mit einem USB-Kabel
miteinander verbunden sind. Der Treiber überträgt die Daten der Anwendung an das
SD-20 sowie die Daten vom SD-20 an die Anwendung.
Das SD-20 kann unter Verwendung der “Bus-Spannung” betrieben werden,
die via USB-Kabel geliefert wird. Das bedeutet, dass der mitgelieferte
Wechselstromadapter nicht erforderlich ist. Wenn Sie jedoch einen USB-Hub
einsetzen oder wenn die Spannung, die via USB geliefert wird, nicht
ausreicht, funktioniert das SD-20 eventuell nicht richtig. Wenn das der Fall
ist, schließen Sie den mitgelieferten Wechselstromadapter an das SD-20 an.
Auch wenn Sie das SD-20 mit Bus-Spannung betreiben, sollten Sie den
Wechselstromadapter verwenden, wenn Sie den Treiber installieren.
USB/Serial
port
USB/Computer
Cable
SD-20
Welche Anschlussart?
Sie können entweder das USB-Kabel verwenden oder mit Hilfe des
Computerkabels eine serielle Verbindung herstellen. Die Installation der
Treiber und die Konfiguration der Einstellungen erfolgt entsprechend dem
Typ Anschluss, den Sie verwenden.
USB-Verbindung...............................................(S. 87)
Serielle Verbindung..........................................(S. 95)
86
Page 87

Español Italiano Français Deutsch English
USB-Verbindung
Folgende Komponenten sind für die Anschlüsse und die Installation
erforderlich. Bitte halten Sie sie bereit.
• SD-20
• Wechselstromadapter
• USB-Kabel
• CD-ROM
1
Schalten Sie den Macintosh und alle Peripheriegeräte aus, die mit dem
Macintosh verbunden sind.
2
Stellen Sie den Computerschalter des SD-20 auf USB.
3
Verbinden Sie das ausgeschaltete SD-20 mit dem Wechselstromadapter.
4
Verbinden Sie den Wechselstromadapter mit einer elektrischen Steckdose.
5
Schalten Sie die Peripheriegeräte ein, die mit dem Macintosh verbunden
sind. Lassen Sie das SD-20 dabei ausgeschaltet. Danach schalten Sie den
Macintosh ein.
Anschlüsse herstellen und Treiber installieren (Macintosh)
* Schalten Sie zu diesem Zeitpunkt das SD-20 noch nicht ein.
Wenn das SD-20 eingeschaltet wird, wird eine Nachricht ähnlich der
folgenden angezeigt, wenn der Macintosh hochgefahren wird. Gehen Sie
abhängig von der angezeigten Nachricht vor wie nachfolgend beschrieben.
Wenn die Meldung lautet:
“Driver required for USB device `unknown device' is not available.
Search for driver on the Internet?”
-> Klicken Sie auf [Cancel].
Wenn die Meldung lautet:
“Software required for using device `unknown device' cannot be found.
Please refer to the manual included with the device, and install the
necessary software.”
-> Klicken Sie auf [OK].
Verwenden Sie entweder OMS oder FreeMIDI als MIDI-Treiber.
• Wennn Sie OMS verwenden.....................................(S. 88)
• Wenn Sie FreeMIDI verwenden............................... (S. 92)
* Entsprechend der von Ihnen verwendeten Sequenzer-Software muss auf Ihrem
Macintosh entweder OMS oder FreeMIDI installiert sein.
87
Page 88

Anschlüsse herstellen und Treiber installieren (Macintosh)
■ Installation des SD-20-Treibers (OMS)
Installieren Sie den SD-20-Treiber wie anschließend beschrieben.
Der SD-20 OMS-Treiber im Lieferumfang ist ein Add-On-Modul für die
Verwendung des SD-20 mit OMS. Damit Sie dieses Modul verwenden
können, muss OMS auf der Festplatte, von der der Computer gestartet
wird, bereits installiert sein. Requi
Der OMS Treiber für
dieses Produkt benötigt
OMS 2.3.5 oder später.
Wenn Sie mehr über OMS erfahren möchten, lesen Sie bitte die Datei
OMS_2.3_Mac.pdf (Online-Handbuch) im Ordner OMS2.3.8, der sich im
Ordner OMS der CD-ROM befindet.
* Trennen Sie das SD-20 vom Macintosh, bevor Sie die Installation ausführen.
1
Beenden Sie alle aktuell ausgeführten Programme (Anwendungen).
Wenn Sie ein Virenschutzprogramm oder ähnliche Software verwenden,
müssen Sie diese ebenfalls beenden.
2
Halten Sie die CD-ROM bereit.
Legen Sie die CD-ROM in das CD-ROM-Laufwerk ein.
3
Doppelklicken Sie auf das Symbol SD-20 USB Installer (das sich im Ordner
Driver – OMS Driver auf der CD-ROM befindet), um das
Installationsprogramm zu starten.
4
Prüfen Sie, ob der richtige Installationsordner ausgewählt ist, und klicken
Sie auf [Install].
fig.3-2_40
OMS befindet sich im
Ordner OMS2.3.8, der
sich im Ordner OMS der
CD-ROM befindet.
Sie benötigen den Adobe
Acrobat Reader, um
OMS_2.3_Mac.pdf
anzeigen zu können. Sie
können die neueste
Version des Adobe
Acrobat Reader von der
Adobe Webseite http://
www.adobe.com
herunterladen (diese URL
kann ohne
Vorankündigung
geändert werden).
88
5
Falls eine Nachricht wie
abgebildet angezeigt wird, klicken
Sie auf [Continue].
Alle anderen aktuell ausgeführten
Anwendungen werden
anschließend beendet und die Installation wird fortgesetzt.
6
Ein Dialogfeld zeigt Folgendes an: Installation completed
Klicken Sie auf [Restart] , um den Macintosh neu zu starten.
7
Verwenden Sie das USB-Kabel, um das SD-20 mit Ihrem Computer zu
verbinden.
8
Bringen Sie den Netzschalter des SD-20 in die Position ON.
Dieses Gerät ist mit
einem Schutzschaltkreis
ausgestattet. Nach dem
Einschalten benötigt das
Gerät eine kurze
Zeitspanne (einige
Sekunden), bis es den
normalen Betrieb
aufnimmt.
Page 89

Anschlüsse herstellen und Treiber installieren (Macintosh)
Español Italiano Français Deutsch English
OMS-Einstellungen
1
Ziehen Sie den Ordner Driver OMS Driver-OMS Settings auf der CD-ROM
auf die Festplatte Ihres Macintosh, um ihn zu kopieren.
fig.3-4
2
Doppelklicken Sie im Ordner Opcode-OMS
Application, in dem Sie OMS installiert haben, auf
OMS Setup, um die Installation zu starten.
fig.3-5_35
3
Wenn ein Dialogfeld ähnlich dem
abgebildeten Dialogfeld angezeigt
wird, klicken Sie auf [Turn It Off].
Anschließend wird ein Dialogfeld für
die Bestätigung angezeigt. Klicken Sie
hier auf [OK].
fig.3-6_35
4
Daraufhin wird das Dialogfeld Create
New Setup angezeigt.
Klicken Sie auf [Cancel]. Wenn Sie
versehentlich auf [OK] geklickt haben,
klicken Sie im nächsten Bildschirm auf
[Cancel].
fig.3-7
5
Wählen Sie im Menü File die Option
“Open”.
Wählen Sie im Ordner OMS Settings,
den Sie in Schritt 1 kopiert haben, die
Datei SD-20 USB, und klicken Sie auf
[Open].
fig.3-8_35
Ein Dialogfeld ähnlich dem hier
gezeigten Dialogfeld wird angezeigt.
89
Page 90

Anschlüsse herstellen und Treiber installieren (Macintosh)
fig.3-9_35
6
Wählen Sie im Menü Edit die Option OMS
MIDI Setup.
Aktivieren Sie im daraufhin angezeigten
Dialogfeld OMS MIDI Setup die Option
Run MIDI in background und klicken Sie
auf [OK].
fig.3-10
7
Wählen Sie im Menü File die Option Make
Current.
Wenn Sie die Option Make Current nicht
auswählen können, wurde sie bereits
angewendet und Sie können mit dem
nächsten Schritt weiterarbeiten.
fig.3-11_50
8
Prüfen Sie, ob die MIDI-Übertragung und
der MIDI-Empfang fehlerfrei funktionieren.
Wählen Sie im Menü Studio die Option Test
Studio.
fig.3-22_50
9
Wenn Sie den Mauszeiger über das
Soundgenerator-Symbol bewegen, ändert
sich der Mauszeiger zu einem .
Klicken Sie auf die Soundgeneratorsymbole,
die in der Abbildung mit einem Kreis
markiert wurden. Wenn das SD-20 Sound
ausgibt, wurden die Einstellungen korrekt
vorgenommen. Wenn keine MIDI-Daten
übertragen werden, gibt der Macintosh einen
Warnton aus.
90
Page 91

Anschlüsse herstellen und Treiber installieren (Macintosh)
Español Italiano Français Deutsch English
b
Bewegt sich die OUTPUT-Pegelanzeige des SD-20?
Wenn sich die Output-Pegel-Messanzeige in der Anzeige des SD-20 bewegt,
aber kein Sound zu hören ist, prüfen Sie, ob die Lautstärke des SD-20 oder
Ihres Lautsprechersystems zurückgedreht wurde. Wenn sich die OUTPUT-
Pegel-Messanzeige nicht bewegt, prüfen Sie noch einmal die Anschlüsse und
die OMS-Einstellungen.
Nachdem Sie die erforderlichen Einstellungen vorgenommen haben, wählen
Sie erneut Test aus dem Menü Studio und führen Schritt 9 aus.
10
Beenden Sie OMS Setup.
Wählen Sie im Menü File die Option [Exit]. Klicken Sie im Dialogfeld
AppleTalk Confirmation auf [OK], um das Dialogfeld zu schließen.
Damit wurden die Anschlüsse des SD-20 und des Macintosh sowie die
Installation des MIDI-Treibers fertiggestellt. Nun können MIDI-Daten
eingegeben und ausgegeben (aufgezeichnet und abgespielt) werden.
Wenn das SD-20 keinen
Sound ausgibt, lesen Sie
itte No sound (S. 237).
91
Page 92

Anschlüsse herstellen und Treiber installieren (Macintosh)
■ Installation des SD-20-Treibers (FreeMIDI)
Installieren Sie den SD-20-Treiber wie anschließend beschrieben. Der SD-20
FreeMIDI-Treiber im Lieferumfang ist ein Add-On-Modul für die
Verwendung des SD-20 mit FreeMIDI. Damit Sie dieses Modul verwenden
können, muss FreeMIDI auf der Festplatte installiert sein, von der Sie den
Computer gestartet haben.
* Trennen Sie das SD-20 vom Macintosh, bevor Sie die Installation ausführen.
1
Beenden Sie alle aktuell ausgeführten Programme (Anwendungen).
Wenn Sie ein Virenschutzprogramm oder ähnliche Software verwenden,
müssen Sie diese ebenfalls beenden.
2
Halten Sie die CD-ROM bereit.
Legen Sie die CD-ROM in das CD-ROM-Laufwerk ein.
3
Doppelklicken Sie auf das Symbol SD-20 USB Installer (das sich im Ordner
Driver – FreeMIDI – USB Connection auf der CD-ROM befindet), um das
Installationsprogramm zu starten.
4
Prüfen Sie, ob der richtige Installationsordner ausgewählt ist, und klicken
Sie auf [Install].
fig.3-2_40
5
Falls eine Nachricht wie
abgebildet angezeigt wird, klicken
Sie auf [Continue].
Alle anderen aktuell ausgeführten
Anwendungen werden
anschließend beendet und die
Installation wird fortgesetzt.
6
Ein Dialogfeld zeigt Folgendes an: Installation completed. Klicken Sie auf
[Restart], um den Macintosh neu zu starten.
7
Verwenden Sie das USB-Kabel, um das SD-20 mit Ihrem Computer zu
verbinden.
8
Betätigen Sie den Netzschalter des SD-20.
Dieses Gerät ist mit einem
Schutzschaltkreis
ausgestattet. Nach dem
Einschalten benötigt das
Gerät eine kurze
Zeitspanne (einige
Sekunden), bis es den
normalen Betrieb
aufnimmt.
92
Page 93

Anschlüsse herstellen und Treiber installieren (Macintosh)
Español Italiano Français Deutsch English
b
Einstellungen für FreeMIDI
1
Ziehen Sie den Ordner Driver - FreeMIDI Driver - Settings auf der
CD-ROM auf die Festplatte Ihres Macintosh, um ihn zu kopieren.
2
Öffnen Sie den Ordner FreeMIDI Applications an dem Ort, an dem Sie
FreeMIDI installiert haben, und doppelklicken Sie auf das Symbol FreeMIDI
Setup, um die Installation zu starten.
3
Wenn “OMS is installed on this computer...” angezeigt wird, klicken Sie
auf [FreeMIDI].
4
Wenn die Software zum ersten Mal ausgeführt wird, wird das Dialogfeld
“Welcome to FreeMIDI!” angezeigt. Klicken Sie auf [Continue].
5
Wenn das Dialogfeld FreeMIDI Preferences angezeigt wird, klicken Sie auf
[Cancel].
6
Wenn das Dialogfeld About Quick Setup angezeigt wird, klicken Sie auf
[Cancel].
7
Wählen Sie im Menü File die Option Open.
8
Wählen Sie im Ordner FreeMIDI Settings , den Sie in Schritt 1 kopiert
haben, die Datei SD-20 USB, und klicken Sie auf [Open].
9
Prüfen Sie, ob die MIDI-Übertragung und der MIDI-Empfang fehlerfrei
erfolgen.
Wählen Sie im Menü MIDI die Option Check Connections.
fig.3-13_40
10
Der Mauszeiger nimmt die Gestalt
einer Note an. Klicken Sie auf die
Soundgenerator-Symbole, die in der
Abbildung rechts mit einem Kreis
gekennzeichnet wurden.
Wenn Sie Sound hören, werden MIDI-
Nachrichten vom Macintosh an das
SD-20 gesendet.
Wenn das SD-20 keinen
Sound ausgibt, lesen Sie
itte No sound (S. 237).
93
Page 94

Anschlüsse herstellen und Treiber installieren (Macintosh)
Bewegt sich die OUTPUT-Pegelanzeige des SD-20?
Wenn sich die Output-Pegel-Messanzeige in der Anzeige des SD-20 bewegt,
aber kein Sound zu hören ist, prüfen Sie, ob die Lautstärke des SD-20 oder
Ihres Lautsprechersystems zurückgedreht wurde. Wenn sich die OUTPUT-
Pegel-Messanzeige nicht bewegt, prüfen Sie noch einmal die Anschlüsse und
die OMS-Einstellungen.
Nachdem Sie die erforderlichen Einstellungen vorgenommen haben, wählen
Sie erneut Test aus dem Menü Studio und führen Schritt 10 aus.
11
Wählen Sie im Menü MIDI erneut den Befehl Check Connections, um den
Test zu beenden.
12
Wählen Sie im Menü File die Option Quit, um FreeMIDI Setup zu beenden.
Damit wurden die Anschlüsse des SD-20 und des Macintosh sowie die
Installation des MIDI-Treibers fertiggestellt. Nun können MIDI-Daten
eingegeben und ausgegeben (aufgezeichnet und abgespielt) werden.
94
Page 95

Español Italiano Français Deutsch English
Serielle Verbindung
Folgende Komponenten sind für die Anschlüsse und die Installation
erforderlich. Bitte halten Sie Folgendes bereit.
• SD-20
• Wechselstromadapter
• Computerkabel
• CD-ROM
1
Schalten Sie den Macintosh und alle Peripheriegeräte aus, die mit dem
Macintosh verbunden sind.
2
Stellen Sie den Computerschalter des SD-20 auf Mac.
3
Verwenden Sie ein Computerkabel, um den Modemanschluss oder
Druckeranschluss Ihres Macintosh mit dem SD-20 zu verbinden.
4
Verbinden Sie das ausgeschaltete SD-20 mit dem Wechselstromadapter.
5
Verbinden Sie den Wechselstromadapter mit einer elektrischen Steckdose.
6
Schalten Sie das SD-20 und Ihren Macintosh ein.
Anschlüsse herstellen und Treiber installieren (Macintosh)
Dieses Gerät ist mit
einem Schutzschaltkreis
ausgestattet. Nach dem
Einschalten benötigt das
Gerät eine kurze
Zeitspanne (einige
Sekunden), bis es den
normalen Betrieb
aufnimmt.
■ Installation des SD-20-Treibers (OMS)
Installieren Sie den SD-20-Treiber wie anschließend beschrieben.
Der SD-20 OMS-Treiber im Lieferumfang ist ein Add-On-Modul für die
Verwendung des SD-20 mit OMS. Damit Sie dieses Modul verwenden
können, muss OMS auf der Festplatte, von der der Computer gestartet
wird, bereits installiert sein.
Wenn Sie mehr über OMS erfahren möchten, lesen Sie bitte die Datei
OMS_2.3_Mac.pdf (Online-Handbuch) im Ordner OMS2.3.8, der sich im
Ordner OMS der CD-ROM befindet.
1
Beenden Sie alle aktuell ausgeführten Programme (Anwendungen).
Wenn Sie ein Virenschutzprogramm oder ähnliche Software verwenden,
müssen Sie diese ebenfalls beenden.
2
Halten Sie die CD-ROM bereit.
Legen Sie die CD-ROM in das CD-ROM-Laufwerk ein.
fig.3-14_40
Der OMS Treiber für
dieses Produkt benötigt
OMS 2.3.5 oder später.
OMS befindet sich im
Ordner OMS2.3.8, der sich
im Ordner OMS der
CD-ROM befindet.
Sie benötigen den Adobe
Acrobat Reader, um
OMS_2.3_Mac.pdf
anzeigen zu können. Sie
können die neueste
Version des Adobe
Acrobat Reader von der
Adobe Webseite
herunterladen (diese URL
kann ohne
Vorankündigung geändert
werden)
95
Page 96

Anschlüsse herstellen und Treiber installieren (Macintosh)
3
Doppelklicken Sie auf das Symbol SD-20 Serial Installer (das sich im
Ordner Driver – OMS Driver auf der CD-ROM befindet), um das
Installationsprogramm zu starten.
4
Prüfen Sie, ob der richtige Installationsordner ausgewählt ist, und klicken
Sie auf [Install].
fig.3-2_40
5
Falls eine Nachricht wie
abgebildet angezeigt wird, klicken
Sie auf [Continue].
Alle anderen aktuell ausgeführten
Anwendungen werden
anschließend beendet und die Installation wird fortgesetzt.
6
Ein Dialogfeld zeigt Folgendes an: Installation completed.
Klicken Sie auf [Restart], um den Macintosh neu zu starten.
OMS-Einstellungen
1
Ziehen Sie den Ordner Driver OMS Driver-OMS Settings auf der CD-ROM
auf die Festplatte Ihres Macintosh, um ihn zu kopieren.
fig.3-4
2
Doppelklicken Sie im Ordner Opcode-OMS Application,
in dem Sie OMS installiert haben, auf OMS Setup, um die
Installation zu starten.
fig.3-5_35
3
Wenn ein Dialogfeld ähnlich dem
abgebildeten Dialogfeld angezeigt
wird, klicken Sie auf [Turn It Off].
Anschließend wird ein Dialogfeld für
die Bestätigung angezeigt. Klicken Sie
hier auf [OK].
96
Page 97

Español Italiano Français Deutsch English
fig.3-6_35
4
Daraufhin wird das Dialogfeld Create
New Setup angezeigt.
Klicken Sie auf [Cancel]. Wenn Sie
versehentlich auf [OK] geklickt haben,
klicken Sie im nächsten Bildschirm auf
[Cancel].
fig.3-7
5
Wählen Sie im Menü File
die Option “Open”.
Öffnen Sie den Ordner
OMS Settings, der in
Schritt 1 kopiert wurde,
wählen Sie die Datei für
den Anschluss, mit dem das
SD-20 verbunden ist, und
klicken Sie auf [Open].
Anschlüsse herstellen und Treiber installieren (Macintosh)
Ein Dialogfeld ähnlich dem hier gezeigten Dialogfeld wird angezeigt.
fig.3-15_90
Opening the SD-20 Modem Port file
Opening the SD-20 Printer Port file
Beim Anschluss an einen
kombinierten Modem/
Druckeranschluss, wie z.B.
PowerBooks, wählen Sie
die Datei “SD-20 Modem
Port”.
97
Page 98

Anschlüsse herstellen und Treiber installieren (Macintosh)
6
Wählen Sie im Menü Edit die Option OMS MIDI Setup.
Aktivieren Sie im daraufhin angezeigten Dialogfeld OMS MIDI Setup die
Option Run MIDI in background und klicken Sie auf [OK].
fig.3-18
Opening the SD-20 Modem Port file
7
Wählen Sie im Menü File die Option Make Current.
Wenn Sie die Option Make Current nicht auswählen können, wurde sie
bereits angewendet und Sie können mit dem nächsten Schritt weiterarbeiten.
fig.3-20_90
A diamond mark (◊) indicates the settings are enabled.
Opening the SD-20 Modem Port file
fig.3-11_50
8
Prüfen Sie, ob die MIDI-Übertragung und
der MIDI-Empfang fehlerfrei funktionieren.
Wählen Sie im Menü Studio die Option Test
Studio.
Opening the SD-20 Printer Port file
Opening the SD-20 Printer Port file
98
Page 99

Anschlüsse herstellen und Treiber installieren (Macintosh)
Español Italiano Français Deutsch English
b
fig.3-22_50
9
Wenn Sie den Mauszeiger über das
Soundgenerator-Symbol bewegen, ändert
sich der Mauszeiger zu einem .
Klicken Sie auf die Soundgeneratorsymbole,
die in der Abbildung mit einem Kreis
markiert wurden. Wenn das SD-20 Sound
ausgibt, wurden die Einstellungen korrekt
vorgenommen. Wenn keine MIDI-Daten
übertragen werden, gibt der Macintosh einen
Warnton aus.
Bewegt sich die OUTPUT-Pegelanzeige des SD-20?
Wenn sich die Output-Pegel-Messanzeige in der Anzeige des SD-20 bewegt,
aber kein Sound zu hören ist, prüfen Sie, ob die Lautstärke des SD-20 oder
Ihres Lautsprechersystems zurückgedreht wurde. Wenn sich die OUTPUT-
Pegel-Messanzeige nicht bewegt, prüfen Sie noch einmal die Anschlüsse und
die OMS-Einstellungen.
Nachdem Sie die erforderlichen Einstellungen vorgenommen haben, wählen
Sie erneut Test aus dem Menü Studio und führen Schritt 9 aus.
Wenn das SD-20 keinen
Sound ausgibt, lesen Sie
itte No sound (S. 237).
10
Beenden Sie OMS Setup.
Wählen Sie im Menü File die Option [Exit]. Klicken Sie im Dialogfeld
AppleTalk Confirmation auf [OK], um das Dialogfeld zu schließen.
Damit wurden die Anschlüsse des SD-20 und des Macintosh sowie die
Installation des MIDI-Treibers fertiggestellt. Nun können MIDI-Daten
eingegeben und ausgegeben (aufgezeichnet und abgespielt) werden.
■ Installation des SD-20-Treibers (FreeMIDI)
Installieren Sie den SD-20-Treiber wie anschließend beschrieben. Der SD-20
FreeMIDI-Treiber im Lieferumfang ist ein Add-On-Modul für die
Verwendung des SD-20 mit FreeMIDI. Damit Sie dieses Modul verwenden
können, muss FreeMIDI auf der Festplatte installiert sein, von der Sie den
Computer gestartet haben.
1
Beenden Sie alle aktuell ausgeführten Programme (Anwendungen).
Wenn Sie ein Virenschutzprogramm oder ähnliche Software verwenden,
müssen Sie diese ebenfalls beenden.
99
Page 100

Anschlüsse herstellen und Treiber installieren (Macintosh)
2
Halten Sie die CD-ROM bereit.
Legen Sie die CD-ROM in das CD-ROM-Laufwerk ein.
3
Doppelklicken Sie auf das Symbol SD-20 Serial Installer (das sich im
Ordner Driver – FreeMIDI Driver - Serial Connection auf der CD-ROM
befindet), um das Installationsprogramm zu starten.
4
Klicken Sie auf [Install].
5
Es wird ein Dialogfeld angezeigt, das Sie darüber informiert, das Sie Ihren
Macintosh neu starten müssen, sobald die Installation abgeschlossen ist.
Klicken Sie auf [Continue].
6
Wenn die Installation abgeschlossen ist, klicken Sie auf [Restart].
Einstellungen für FreeMIDI
1
Kopieren Sie den Ordner Driver - FreeMIDI Driver – Settings auf der CD-
ROM auf die Festplatte Ihres Macintosh, um ihn zu kopieren.
2
Öffnen Sie den Ordner FreeMIDI Applications an dem Ort, an dem Sie
FreeMIDI installiert haben, und doppelklicken Sie auf das Symbol FreeMIDI
Setup, um die Installation zu starten.
3
Wenn “OMS is installed on this computer...” angezeigt wird, klicken Sie
auf [FreeMIDI].
4
Wenn die Software zum ersten Mal ausgeführt wird, wird das Dialogfeld
“Welcome to FreeMIDI!” angezeigt. Klicken Sie auf [Continue].
5
Wenn das Dialogfeld FreeMIDI Preferences angezeigt wird, klicken Sie auf
[Cancel].
6
Wenn das Dialogfeld About Quick Setup angezeigt wird, klicken Sie auf
[Cancel].
7
Wählen Sie im Menü File die Option Open.
100
Öffnen Sie den Ordner FreeMIDI Settings, der in Schritt 1 kopiert wurde,
wählen sie die Datei für den Anschluss, mit dem das SD-20 verbunden ist,
und klicken Sie auf [Open].
 Loading...