

Page 1
®ÂØÒňÎ
®
SonicCell
Workshop
Expandable Synthesizer Module
and Audio Interface
Using SonicCell with a DAW
© 2008 Roland Corporation U.S.
All rights reserved. No part of this publication may be reproduced in any form without the written permission of Roland Corporation U.S.
Windows XP™, Windows XP 64-bit Edition™ , Windows Vista™, and Windows Vista 64-bit Edition™ are trademarks of Microsoft Corporation. Mac OS X™, Logic Pro™, and GarageBand™ are
trademarks of Apple Inc. SONAR LE™ and SONAR are trademarks of Twelve Tone Systems, Inc. Ableton Live ™ is a trademark of Ableton. Digital Performer™ is a trademark of Mark of the
Unicorn, Inc. Microsoft Corporation, Apple Inc., Twelve Tone Systems, Inc, Ableton, and Mark of the Unicorn Inc. are not associated or aliated with Roland in any manner.
SCWS01
1
Page 2
About the Workshop Booklets
Hot Links
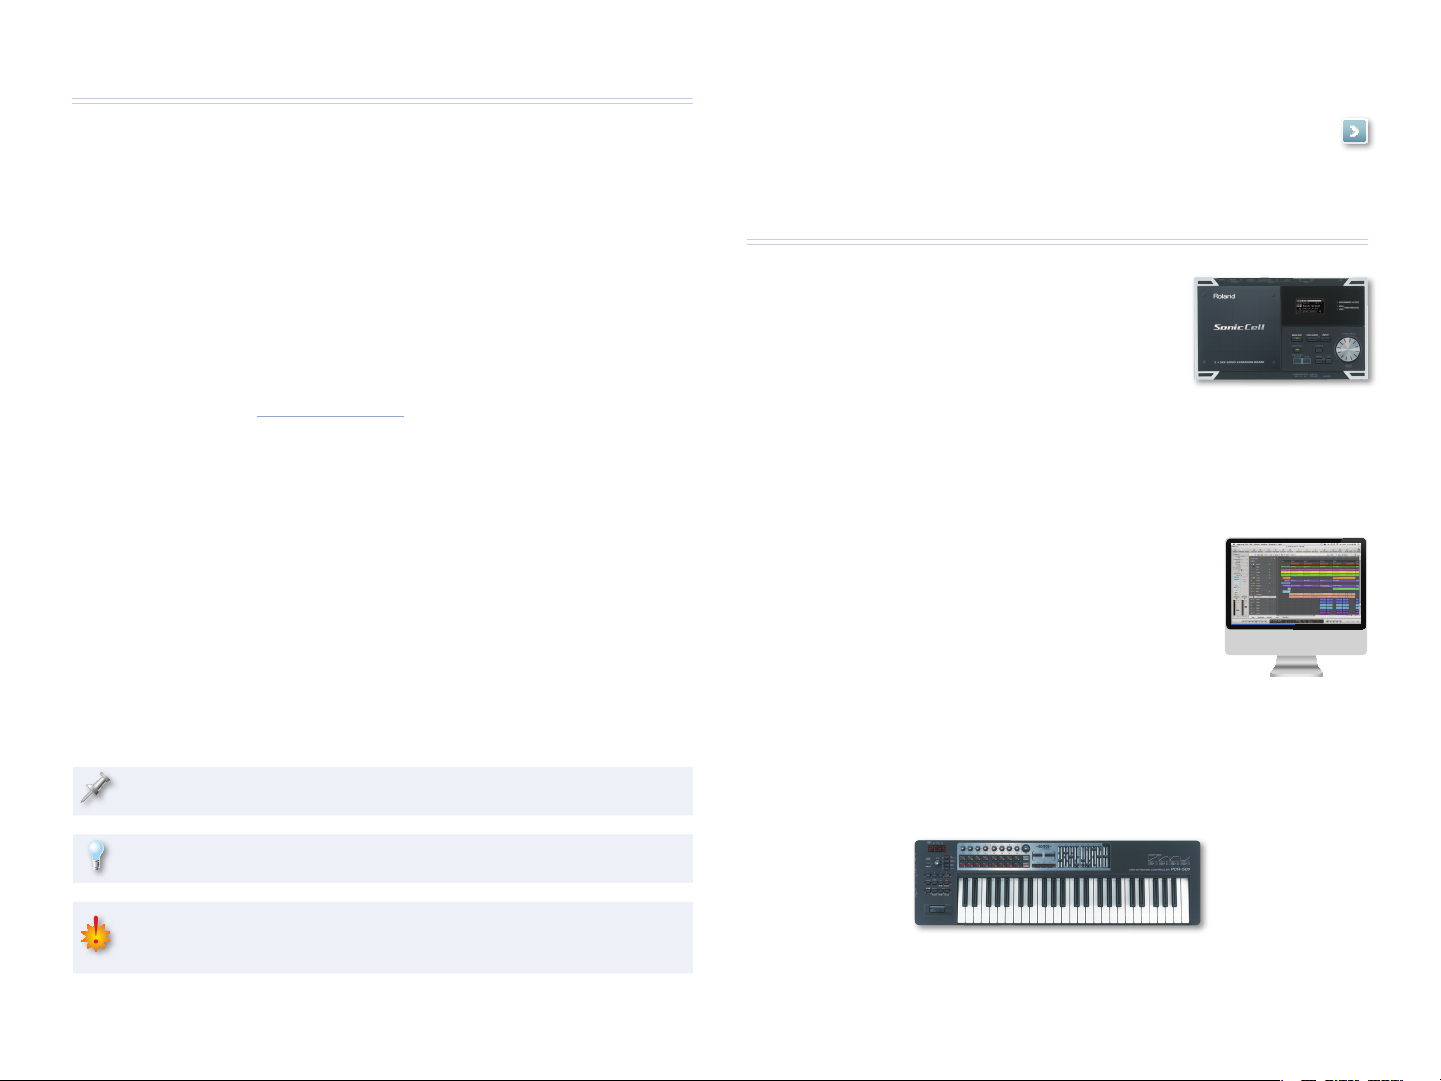
Roland’s SonicCell is designed for modern musicians. Using USB, It adds a
huge set of sounds to your digital audio workstation (or “DAW”) without
adding to your computer’s workload. It’s also an audio interface that can get
signals from mics, instruments, or other devices to DAW tracks for recording.
SonicCell’s Editor software allows you to program SonicCell from within your
DAW. Onstage, its compact size also makes SonicCell the ideal companion
for a laptop DAW, letting you perform and sing along with recorded tracks.
Or use it to play back sequences and audio files from a USB memory stick.
Each SonicCell Workshop booklet focuses on one SonicCell topic, and is
intended as a companion to SonicCell Owner’s Manual. This booklet requires
SonicCell O.S. Version 1.11 or higher. You can download the latest SonicCell
O.S. for free from www.RolandUS.com.
About This Booklet
This booklet provides an overview of using SonicCell with a DAW. We’ll also
provide instructions for installing SonicCell’s driver and Editor, Librarian,
and Playlist Editor software, and for configuring your computer for use with
SonicCell. Other booklets get into the details of using SonicCell as an audio
interface and of using it with specific DAWs.
Understanding the Symbols in This Booklet
Throughout this booklet, you’ll come across information that deserves
special attention—that’s the reason it’s labeled with one of the following
symbols.
Each Workshop booklet is meant to be read in order from beginning
to end. However, if we mention an upcoming section—and you see
this arrow—you can click the arrow to jump there immediately.
The Players in a SonicCell/DAW System
SonicCell
Your SonicCell acts as
• that contributes sounds to a
a synthesizer—
musical arrangement in your DAW.
• that can send live audio from mics and instruments
an audio interface—
into the DAW, and through which you listen to what you’re doing.
• that passes MIDI data from your controller to the
a MIDI THRU box—
DAW for recording, or “sequencing.”
Your Computer
Your computer acts as host for the software you use,
including
• in which you record and play back
your DAW—
MIDI and/or audio data.
• in which you select and edit SonicCell’s patches.
the SonicCell Editor—
• you use for archiving SonicCell
the SonicCell Librarian and Playlist Editor—
patches and for organizing files to be played from a USB memory stick.
A note is something that adds information about the topic at hand.
A tip offers suggestions for using the feature being discussed.
Warnings contain important information that can help you avoid
possible damage to your equipment, your data, or yourself.
A MIDI Controller
When you play your MIDI controller—typically a keyboard—the controller
sends out MIDI data representing your performance through SonicCell to
2
Page 3
your DAW, which records the data on a MIDI track. The DAW also passes the
MIDI data is passed
Live audio...
goes to DAW for recording. DAW output is heard...
through SonicCell.
M
I
D
I
through SonicCell...
...to DAW for recording.
plays SonicCell patches.
MIDI data from DAW...
U
S
B
U
S
B
U
S
B
U
S
B
MIDI data back to SonicCell, where it triggers SonicCell’s synth, causing notes
to play.
You can directly connect a MIDI controller to your computer and DAW
if the controller supports MIDI over a USB connection or if you have a
separate MIDI interface. In these booklets, though, we’ll assume you’re
connecting your MIDI controller to SonicCell’s MIDI IN jack.
The SonicCell/DAW Workflow
While we’ll discuss each of the following actions in greater detail in
subsequent booklets, here’s an overview of how you can use SonicCell with
a DAW.
Some SonicCell Synth Stuff You Need to Know First
After connecting your SonicCell, computer, and MIDI controller to AC power,
you connect
• to SonicCell using a MIDI cable.
your MIDI controller—
• using the included SonicCell USB cable.
SonicCell to your computer—
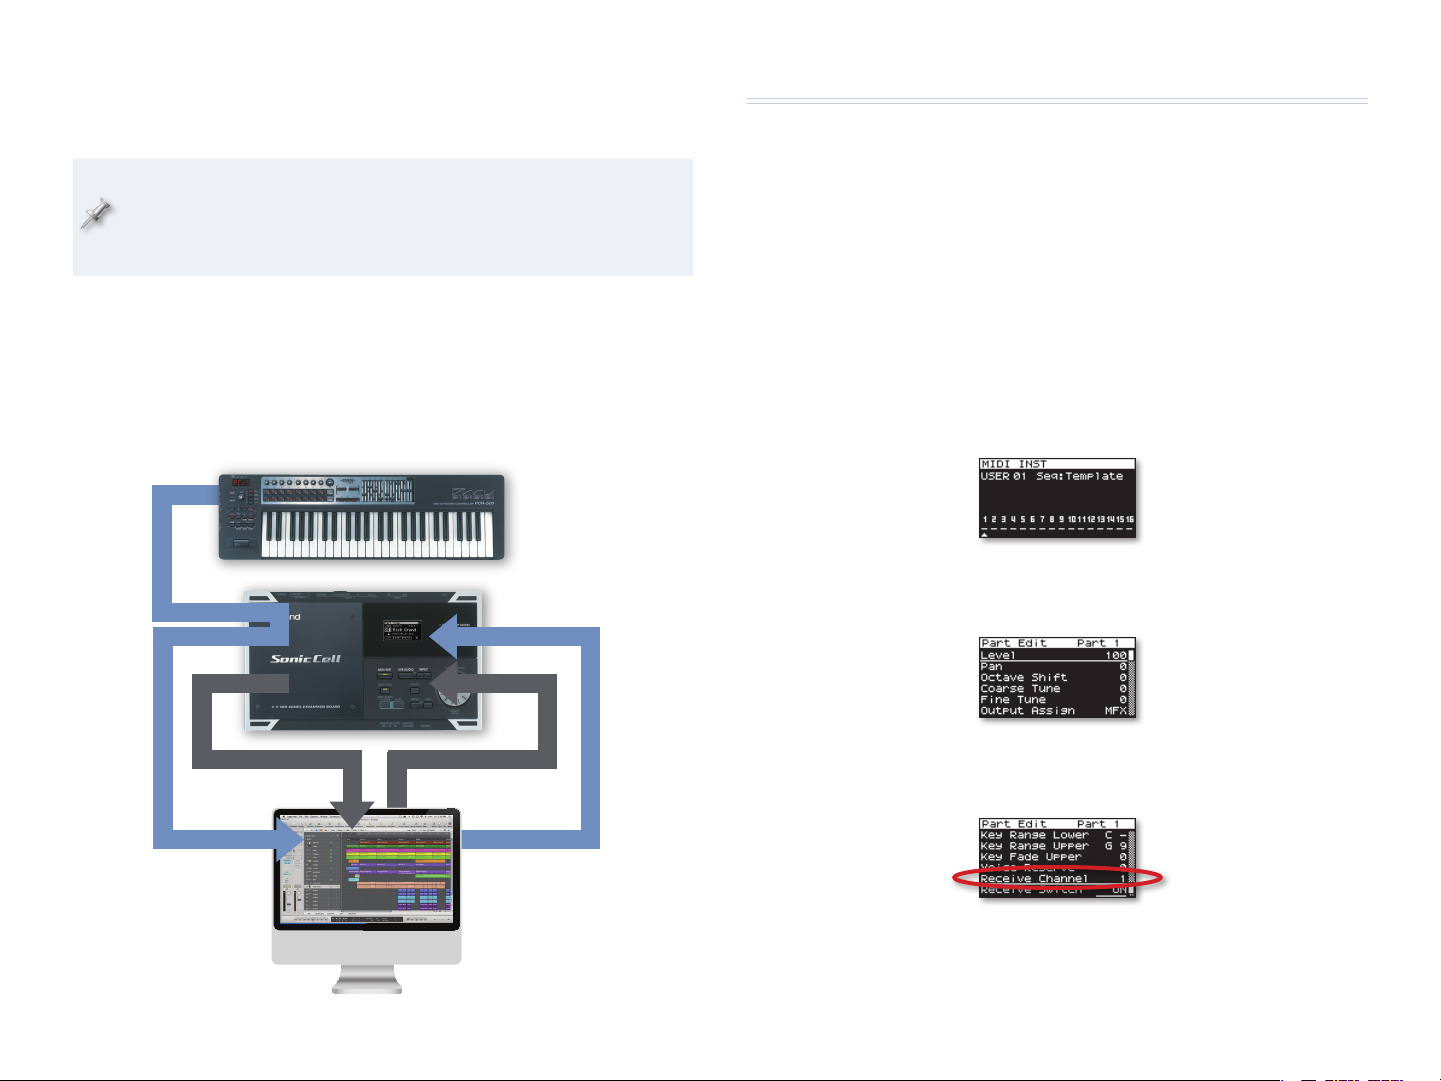
Here’s how MIDI and audio data moves between the system’s components:
About SonicCell’s Performance Mode
SonicCell is a 16-part multitimbral synth module, meaning that you can
play 16 of its patches at once when SonicCell is in Performance mode. This
is generally the best mode to use for sequencing. Here are a few things you
need to know about Performance mode:
•
Each patch is played by one of Performance mode’s 16 available “parts.”
Parts 1-16 appear in SonicCell’s default startup screen.
Each part has its own settings that determine how its patch plays.•
This is the first screenful of settings for Part 1.
Each part receives MIDI data from the DAW on a specific MIDI channel.•
The MIDI channel to which Part 1 is currently set to respond.
3
Page 4
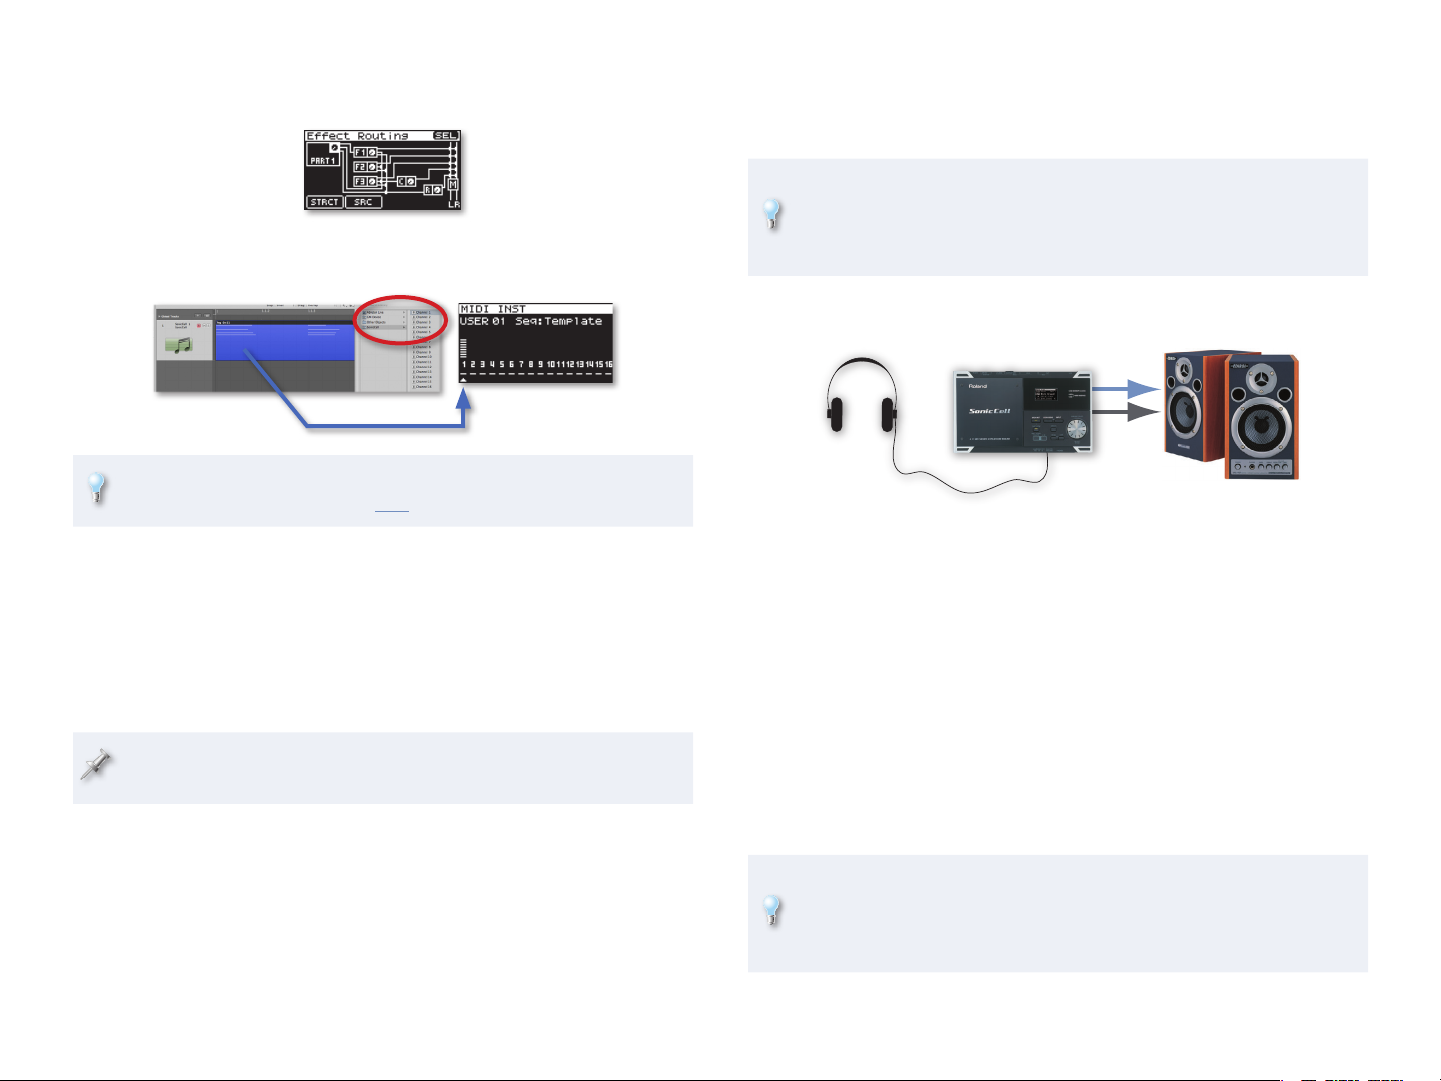
All 16 parts share an effect setup consisting of three multi-effects (MFX 1-3), •
a global reverb, and a global chorus.
When you record and play back MIDI tracks in your DAW, the data is sent to •
SonicCell on the MIDI channel assigned to the desired part and patch.
To learn more about MIDI, see the Introduction to MIDI InFocus booklet,
which you can download from here.
• as audio tracks. You can
You’ll bring your SonicCell sounds into the DAW—
do this as you develop your arrangement, or, since you’ll be able to hear
SonicCell’s output as you work, when you’ve finished it.
If your DAW allows you to do a realtime, online bounce to capture
your final stereo mix, you don’t have to record SonicCell’s sounds as
audio tracks at all. You can simply set up an audio track to listen to
SonicCell’s output so that its sounds are included in the mix.
Listening Strategy
About SonicCell’s Patch Mode
If you need only one of SonicCell’s patches, you can use SonicCell’s Patch
mode, where all of SonicCell’s effect-processing power is dedicated to
making that single patch sound its best. When you use Patch mode, send
MIDI data to SonicCell on its Patch Receive Channel (shown as “RX Ch” on
the Patch Play screen).
To learn about changing between Performance and Patch mode, see the
SonicCell Owner’s Manual.
What You’ll Do with Your SonicCell and DAW
You’ll sequence a MIDI track in your DAW—• for each SonicCell patch you
want to use. For a new song, use SonicCell’s PRST 01 Seq: Template
performance, with its 16 parts conveniently set to MIDI Channels 1-16.
• using the
You’ll select, set up, and edit SonicCell’s sounds and effects—
SonicCell Editor plug-in on one of your DAW’s other tracks.
When you use SonicCell with a DAW, the best way to work is to listen
through SonicCell. Plug your headphones into SonicCell’s PHONES output,
or connect your speaker amp or powered speakers to SonicCell’s L/MONO
and R OUTPUT jacks. Once you’ve connected SonicCell to your computer, the
DAW’s output will automatically be sent into SonicCell so you’ll hear:
• playing from SonicCell.
SonicCell’s own patches—
• including your already-recorded DAW audio
the output of your DAW—
tracks and soft synths.
• live through SonicCell.
mics or instruments plugged into SonicCell—
This setup provides zero-latency monitoring that allows you to work without
hearing any time lag between your patches, live sounds, and the DAW.
If you’re an advanced Mac user, you can take advantage of Audio/
MIDI Setup’s ability to receive audio from SonicCell while monitoring
through a different audio interface by creating an aggregate audio
interface that includes both SonicCell and that other audio interface.
4
Page 5
Setting Up Your MIDI Controller
Connecting the MIDI Controller
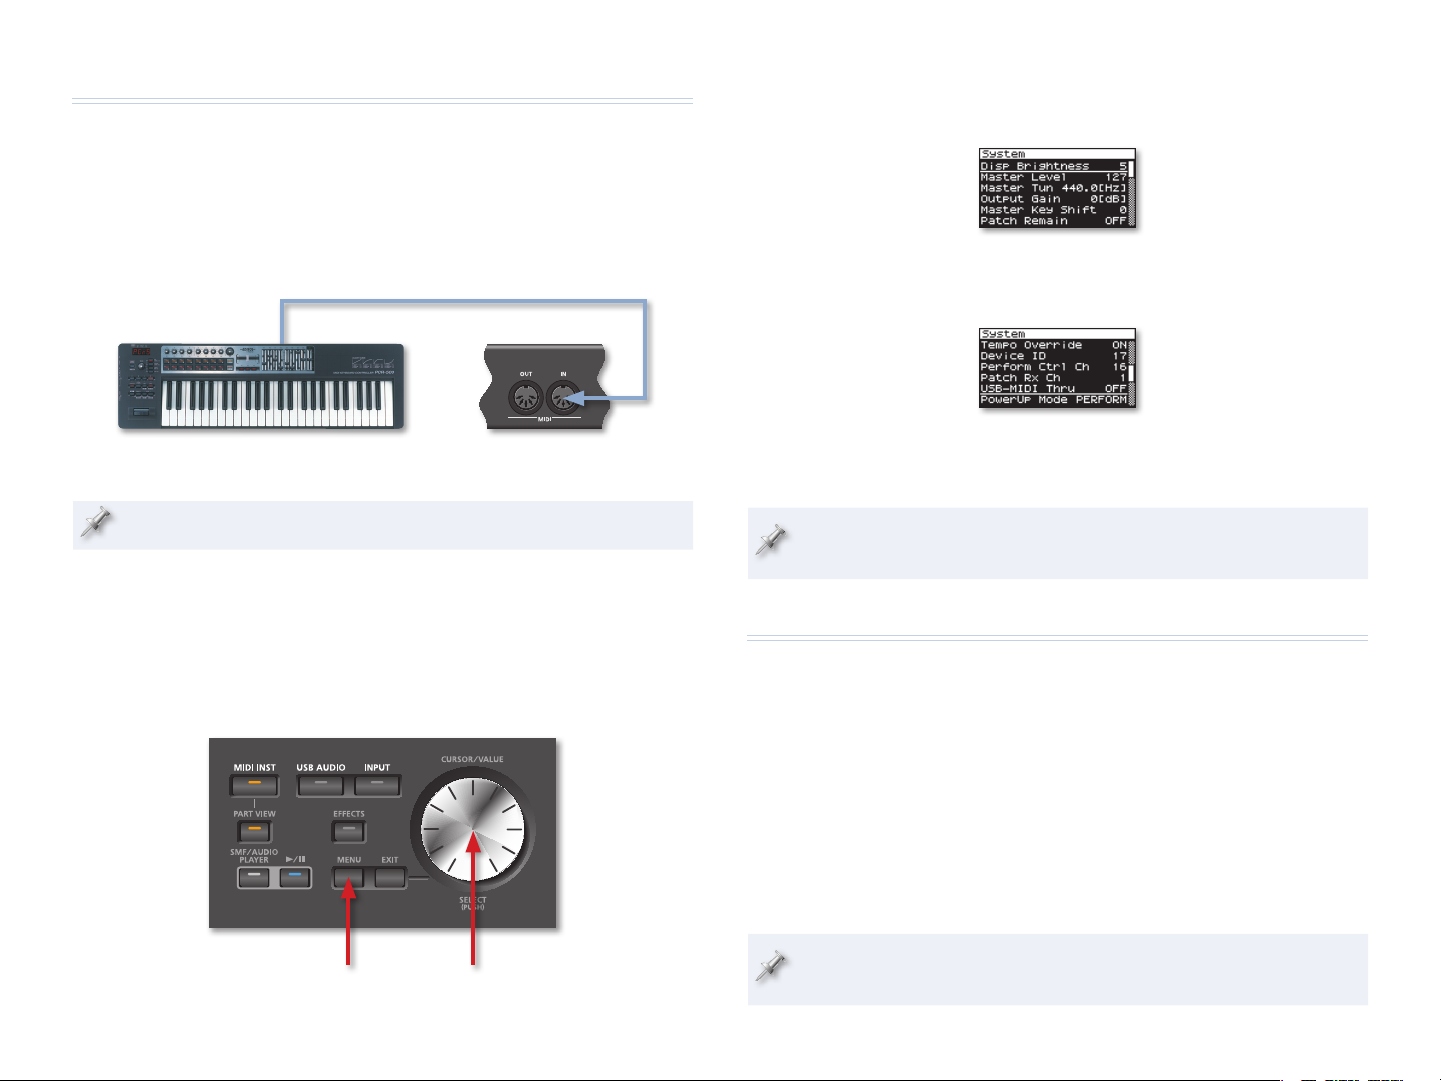
First, connect your controller to SonicCell by connecting a MIDI cable from
the controller’s MIDI OUT jack of to SonicCell’s MIDI IN jack.
Press the CURSOR/VALUE dial to display the System menu.2
MIDI cable connected to
controller’s MIDI OUT jack
SonicCell’s rear-panel
To learn how to use your MIDI controller, see its documentation.
Configuring SonicCell
Here’s how to set SonicCell to pass a connected MIDI controller’s data to your
DAW via USB:
1
Press SonicCell’s MENU button, and then turn the CURSOR/VALUE
dial to select SYSTEM.
The top of the System menu
Turn the CURSOR/VALUE dial to select the USB-MIDI Thru parameter.3
Press the CURSOR/VALUE dial and set USB-MIDI Thru to ON.4
Press EXIT twice to complete the operation.5
To preserve this setting, press USB AUDIO or INPUT, and then MENU, and
then the CURSOR/VALUE dial. Select Ok and press the dial again.
Setting Up Your Computer
Installing the SonicCell Driver and Editor
SonicCell works with the following computer operating (OS) systems:
Windows XP™ • • Windows XP 64-bit Edition™
Mac OS X™•
Windows Vista 32-bit Edition™ • • Windows Vista 64-bit Edition™
In the following steps we’ll describe the installation of drivers for Windows
XP 32-bit and Mac OS X, the two most common operating systems. (All of the
SonicCell driver installers come with installation instructions in any event.)
MENU button CURSOR/VALUE dial
The following instructions assume you’re familiar with the operation of
your computer. If you’re not, consult its documentation.
5
Page 6

Downloading the Driver and Editor
Each driver installer includes details regarding the OS system
requirements for its driver, as well as a list of cautions and
limitations.
Point your browser to the following URL or click the link below:1
http://www.rolandus.com/products/productdetails.aspx?ObjectId=897
2
In your browser, click the Downloads tab.
Locate the desired driver, and click its name.3
In the “End-User License Agreement,” click “I AGREE AND WISH 4
TO PROCEED WITH DOWNLOAD”—the file downloads to your
computer.
5
On a
PC—• the downloaded file is automatically uncompressed. Locate
the driver folder called “SonicCell_WinXPDrvXXX,” and the Editor
folder called “SonicCell_PLE_vXXX.” (“XXX” in both folder names
here is the current version number.)
• go to your standard download location and find the
Mac—
driver folder called “SonicCell_MAC_USBDrvXXX” and an Editor
folder called “SonicCell_PLE_vXXX.” (“XXX” in both folder names
here is the current version number.)
Windows XP Driver Installation
Power up your PC with all USB cables disconnected except for your 1
keyboard and mouse.
2
If any applications are running, quit them.
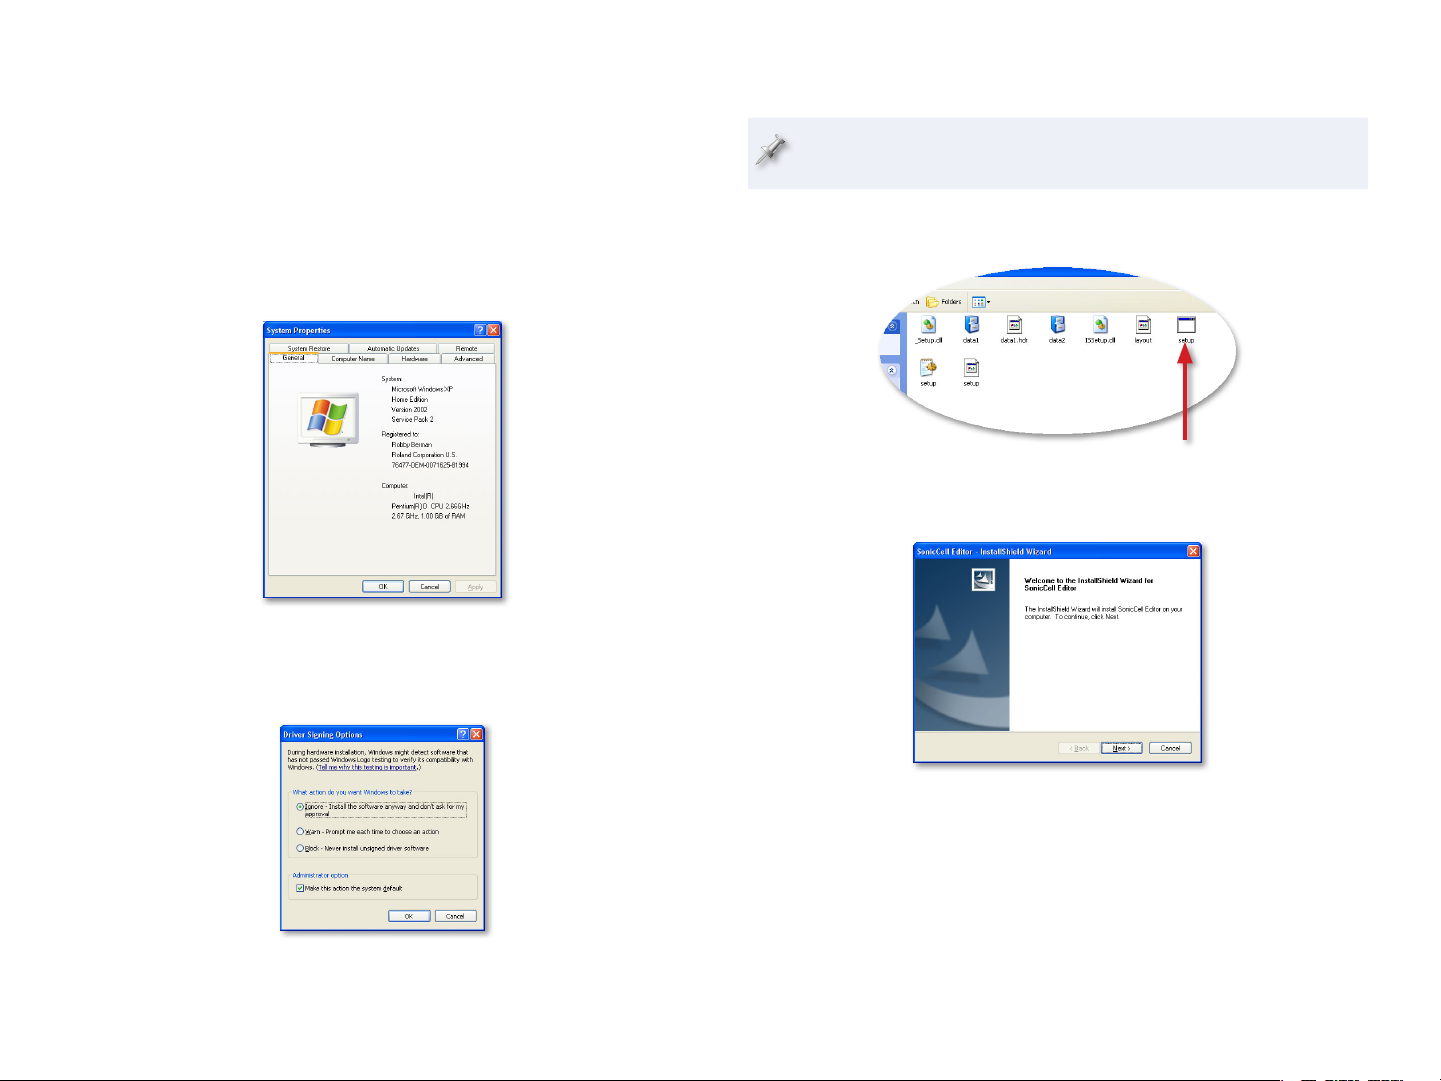
Open up the SonicCell_WinXPDrvXXX [“XXX” is the current driver 3
version] folder, and double-click the Setup file inside to display the
following window:
If an “Install Program as Other User” dialog appears, quit the installer,
and then log in as the system administrator before re-launching the
Setup application from Step 3.
Depending on your version of Mac OS X, you may need to double-click
the downloaded driver and Editor files to create the folders above—the
files are called “SonicCell_MAC_USBDrvXXX.zip” and “SonicCell_MAC_
PLE_vXXX.zip,” respectively.
Inside each download’s folder, you’ll find its installer file.6
Click Next to display the installation start window:4
6
Page 7

If you see the Software Installation window instead of the one shown
above, click Continue Anyway. If you can’t continue, see “About Driver
Signing Options” later in this booklet.
Click Next—the driver is installed and instructions appear telling you 5
what to do next.
We’ll take you through these instructions in this booklet, so you can
close this window or drag it over to the side of the screen if you want
to keep it open.
6
With SonicCell’s power turned off, plug one end of the included USB
cable into its USB jack, and the other end into the USB jack you want
to use on your computer.
7
Turn on SonicCell—after a few moments, the PC’s Found New
Hardware Wizard window appears, as shown in the following
screenshot.
Click the button to the left of “Install the software automatically 8
(Recommended),” and then click Next to install the driver.
When the driver’s installed, the wizard announces the completion of
the installation process.
If the “Software installation” window appears after you click
Next, click Continue Anyway. If you can’t continue, see “About
Driver Signing Options” later in this booklet.
If the “System Settings Change” window appears, click Yes to
restart Windows, and jump ahead to “System Settings on Your
Computer” after restarting.
Click Finish.9
Windows displays “Your new hardware is ready to use.”
10
If the Driver Setup window’s still open, click its Close button.
Jump ahead to “System Settings on Your Computer.”11
If, instead of seeing the Found New Hardware window, you’re asked if
you want to connect to Windows Update, select No, not this time, and
then click Next to display the Found New Hardware window.
Should you ever need to remove the SonicCell driver from your system,
the driver installer folder also contains an uninstaller. You can hold
onto this file, or re-download the driver folder later should you need
it.
7
Page 8
About Driver Signing Options
Windows XP Editor Installation
The Driver Signing window lets you select whether Windows should block
the installation of an unknown driver, warn you about it, or just install it.
1
In the Start menu, select Control Panel.
If you’re in2
Category View—• click Performance and Maintenance, and then
click System.
• double-click System.
Classic View—
Click the Hardware tab, and then click Driver Signing.3
Set “What action do you want Windows to take?” to 4 Ignore or Warn.
5
Click OK to close the Driver Signing window.
By default, this procedure also installs the SonicCell Librarian and
Playlist Editor onto your computer’s hard drive.
Locate the SonicCell_PLE_vXXX—where “XXX” is the current version 1
number—and double-click the Setup executable file.
Double-click
this Setup file.
The installer opens.
Click Next.2
Read the License Agreement, and if you’d like to proceed with the 3
installation, click Yes.
4
In the Choose Destination Location window, you can select a
location on your hard drive for the SonicCell Editor—unless you have
a specific reason to choose a different location, leave the default
Click OK to close the System Properties window.6
Return to the driver installation instructions earlier in this booklet.7
location as is—and then click Next to display the Setup Type window,
shown on the next page.
8
Page 9

Mac OS X Driver Installation
Close all other applications, and In the SonicCell_MAC_USBDrv101 1
folder, double-click the SonicCellUSBDriver.pkg file to launch the
driver installer.
2
If you see the following sheet, click Continue.
Highlight the Complete installation to install all of the SonicCell 5
applications, and then click Next.
If you’d like to install only particular SonicCell applications, click
Custom to highlight it, and then click Next. Checkmark the items you
want to install, and then click Next.
Again, unless you have a reason to select a new location for the 6
installed SonicCell files, leave the installer set to the default location,
and click Next. ( To select another location, click Browse...)
7
The installer displays your installation selections and tells you it’s now
ready to install the SonicCell Editor. Click Next to proceed—the files
are installed.
8
When the installer tells you it’s finished, click Finish to close the
installer.
If you ever decide to remove the SonicCell Editor from your computer’s
hard drive, simply run the same Setup file you ran back in Step1. If
the installer sees the Editor is already installed, it presumes you now
want to remove it. You can hold onto your Editor installer folder, or
re-download it later on should you decide you need it.
The installer splash screen opens:
On some Macs, this screen may look different, with the smaller text on
top telling you you’re working with the driver installer and the larger
text saying it’s the Editor installer. This doesn’t indicate a problem.
Click Continue.3
9
Page 10

The installer presents this window in which you can change the
installation location for the driver if you wish to. By default, the driver
will be installed at /Library/Audio/MIDI Drivers so that any user of
your computer can use the SonicCell. While we recommend you click
Install without changing the default location, you can limit the use
of the SonicCell to a specific user by changing the location to [user
name]/Library/Audio/MIDI Drivers if you like.
4
Click Install, or Upgrade if you’ve previously installed an earlier
version of the driver.
5
If the computer asks you to enter your computer’s administrator
password, type it in and click OK.
When a sheet appears telling you that you’ll need to restart your Mac 6
after installation is complete, click Continue Installation to install the
SonicCell driver.
7
When you see “Install Succeeded,” click Restart to restart your Mac.
Should you ever need to remove the SonicCell driver from your system,
the driver installer folder also contains an uninstaller. You can hold
onto this file, or re-download the driver folder later should you need
it.
Mac OS X Editor Installation
By default, this procedure also installs the SonicCell Librarian and
Playlist Editor onto your computer’s hard drive.
Double-click the SonicCell Editor Installer.mpkg file. The installer 1
window appears.
Click Continue.2
After reading the software license agreement, click Continue, and the 3
click Agree in the sheet that appears.
A window appears in which you can change the installation location
for the editor software, we recommend you leave the default setting
as is and simply proceed to the next step.
4
Click Install.
When the installer asks for your administrator password, type it in, 5
and then click OK to install the software.
After the software’s been installed, the SonicCell Editor folder opens
and “Installation Successful” appears.
6
Click OK to close the installer.
10
Page 11

System Settings for Your Computer
Optimizing Your Windows PC for Audio
To optimize Windows XP for DAW audio operations
1
In the Start menu, select Control Panel.
If you’re in2
Category View—• click Performance and Maintenance, and then
click System.
• double-click System.
Classic View—
In the Performance Options window, click the Advanced tab.4
Select 5 Background Services as shown here.
Click OK to close the Performance Options window, and then click OK 6
to close the System Properties window.
You’ll find more tips on tweaking Windows XP for recording and
playback at MusicXP.net, http://musicxp.net/tuning_tips.php.
Click the Advanced tab, and then click the Performance Settings 3
button.
11
Page 12
Using SonicCell for System Sounds
Sending Windows XP System Sounds to SonicCell
In the Start menu, select Control Panel.1
If you’re in2
Category View—• click Sounds, Speech, and Audio Devices, and
then click Sounds and Audio Devices.
• double-click Sounds and Audio Devices.
Classic View—
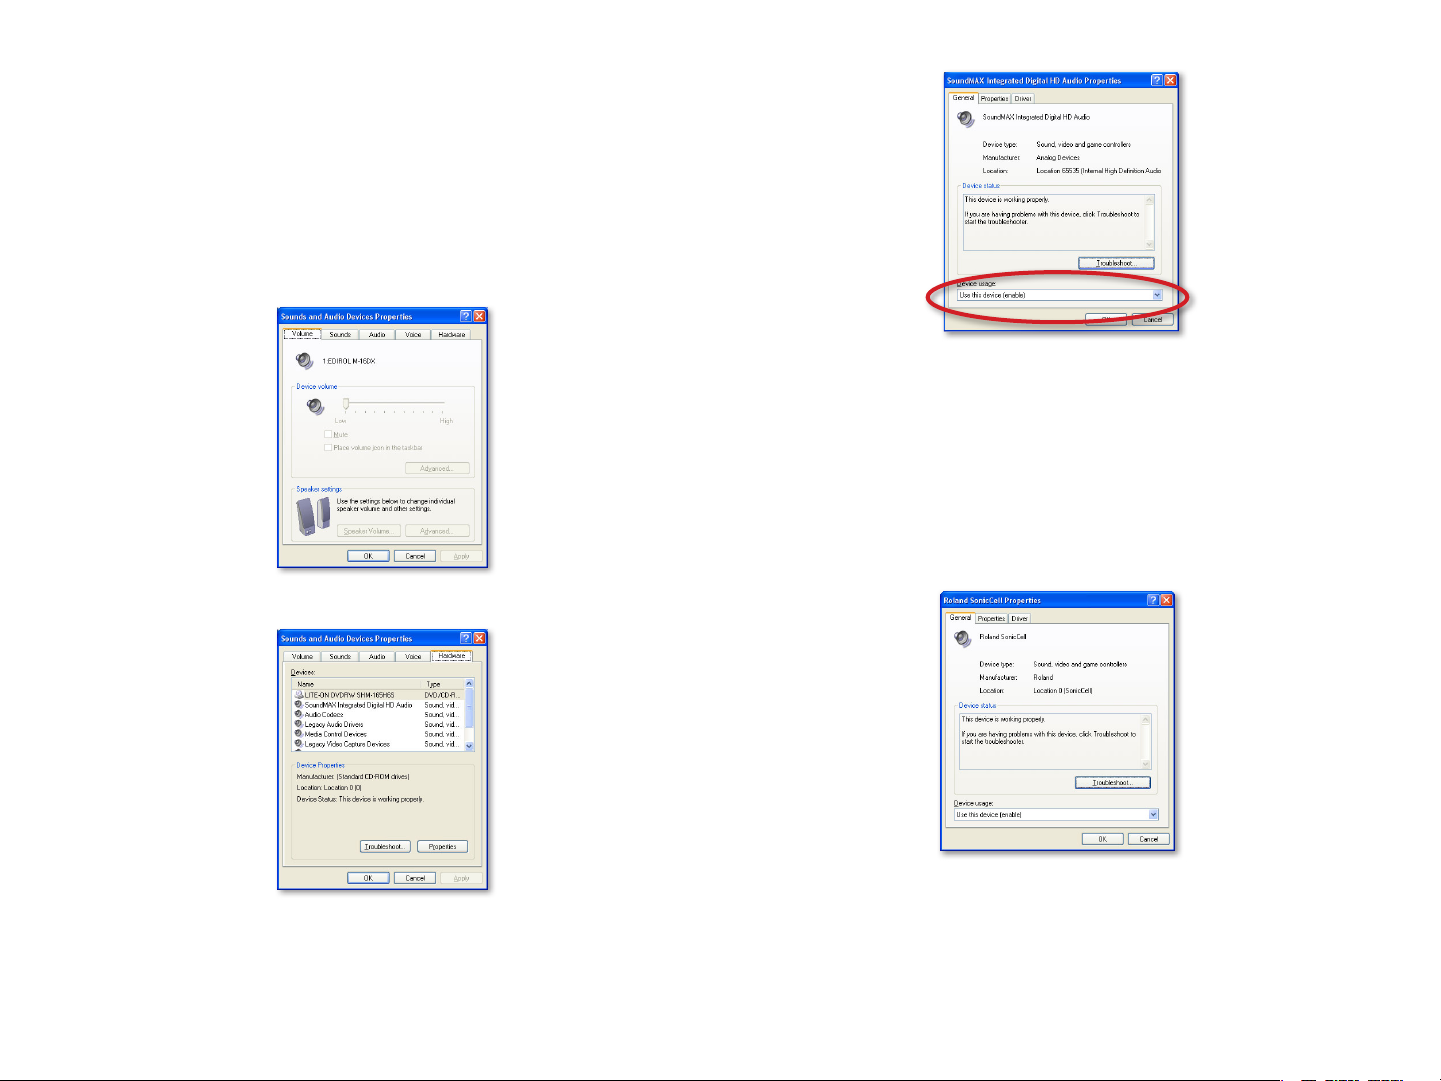
Click the Hardware tab to display a list of devices.3
You’ll need to disable the sound card so it doesn’t conflict with 5
SonicCell. If you want to disable the card
• set Device usage to Do not use this
for the current user of the PC—
device in the current hardware profile (disable).
• set Device usage to Do not use this device
for all users of the PC—
in any hardware profile (disable).
6
Click OK.
In the list, double-click 7 Roland SonicCell.
Set Device usage to 8 Use this device (enable), and then click OK.
Double-click your current sound card in the list.4
12
Page 13

Sending Mac OS X System Sounds to SonicCell
Open your System Preferences window.1
The SonicCell Driver Settings
The SonicCell driver installer adds an SonicCell control panel to Windows,
and a Preferences pane to Mac OS X. In these windows, you’ll find controls
you may need as you work with your DAW.
Windows XP Mac OS X
Click Sound—circled above—to open the Sound control panel.2
Click the Output tab, and select Roland SonicCell.3
In the Sound control panel, you’ll see SonicCell’s current sample rate
after “Roland SonicCell.” We’ll discuss sample rates in a bit.
Close the Preferences window.4
The Audio Buffer size parameter can be helpful if you’re having trouble
successfully record or playing back in your DAW. Larger buffer settings can
get rid of clicks and pops, though they also increase latency in the DAW.
Matching Sample Rates
In digital audio, the number of times per second that a sample—
essentially a snapshot—is taken of your audio is called the “sample
rate.” CDs use a sampling rate of 44.1 kHz, or 44,100 samples per
second.
SonicCell can operate at 44.1 kHz, 48 kHz, and 96 kHz sampling rates, and
you can select any one with which your DAW is also compatible. Use
• if you’re recording music strictly for CD. Since 44.1 kHz is
44.1 kHz—
the sampling rate CDs use, you’ll avoid having to apply sample-rate
conversion later on.
13
Page 14
48 kHz—• for slightly better audio quality than 44.1 kHz if your destination
media isn’t a CD. If it is, you can still use 48 kHz, but the sample-rate
conversion process you’ll need to get the recording onto a CD will
probably take away any benefits the higher sample rate’s gotten you.
• for very high-quality audio. Again this is mostly for recordings
96 kHz—
not destined for CD, for the same reasons as 48 kHz.
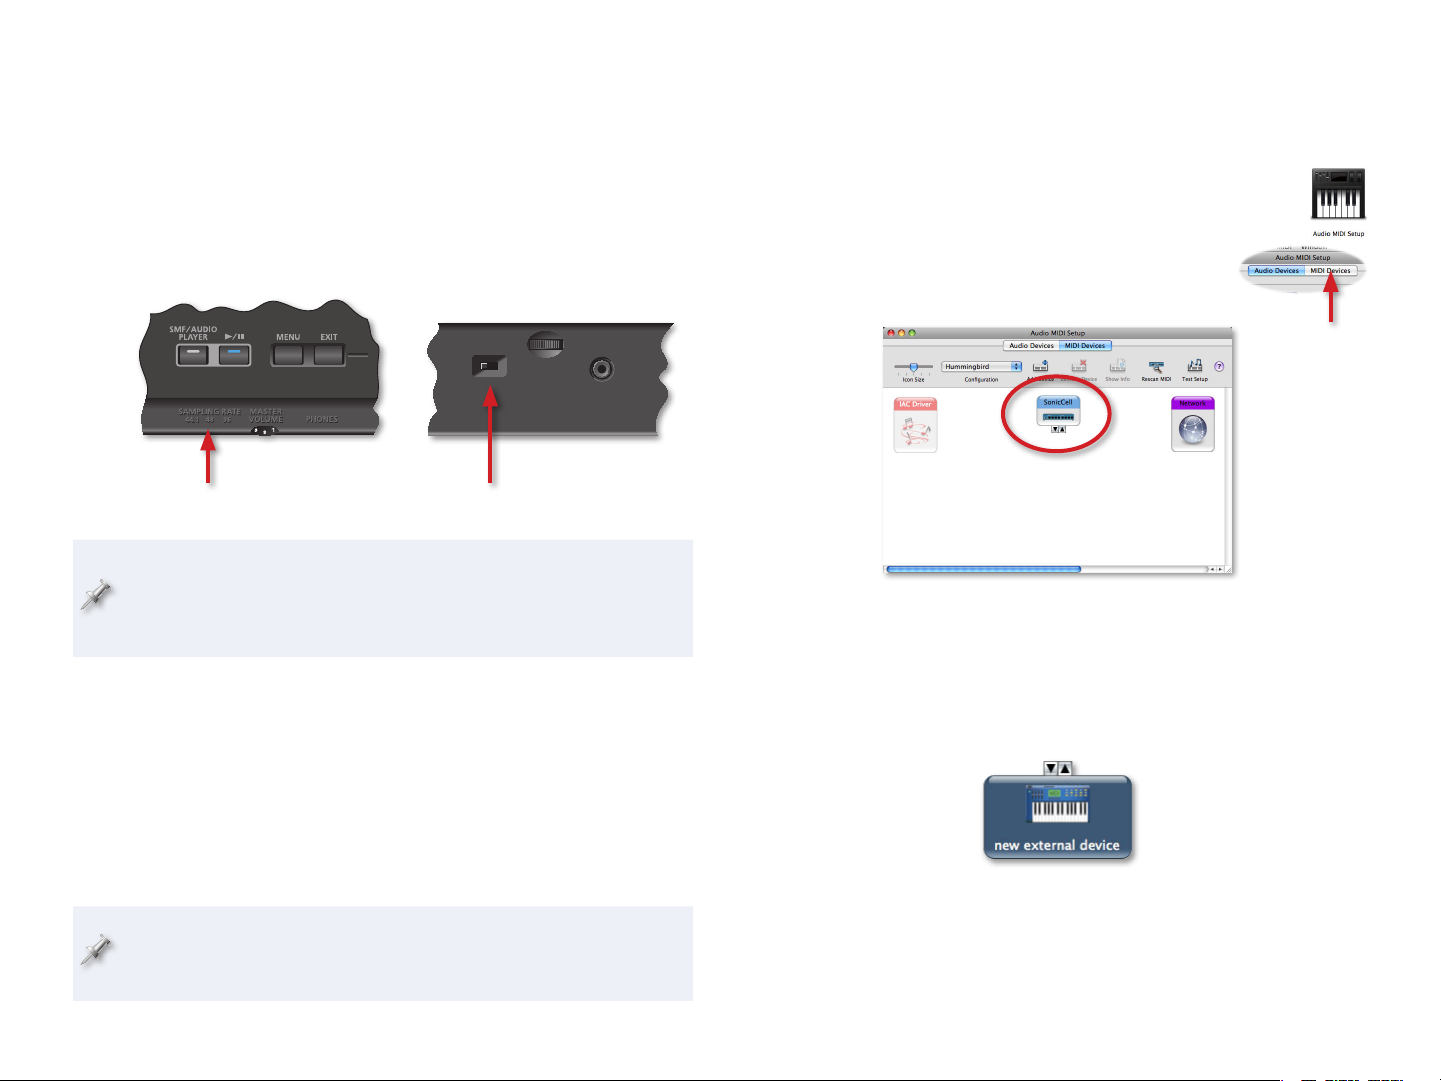
You set the sample rate for SonicCell using its front-panel SAMPLING RATE
switch—simply set the switch to the desired sample rate.
Switch location viewed from the top. SAMPLE RATE switch on front panel
After you change SonicCell’s sample rate while it’s connected to a
computer via USB, you’ve got to either power it off and back on for the
sample rate change to take effect, or unplug and re-plug either end of
the USB cable connecting SonicCell and the computer.
If you’re using Windows, you should now head over to the Using SonicCell as
an Audio Interface Workshop booklet.
Mac OS X Audio/MIDI Setup Settings
If you’re using LogicPro, GarageBand, or Ableton Live, you should now head
over to the Using SonicCell as an Audio Interface Workshop booklet.
Here’s how to create an Audio/MIDI Setup SonicCell device:
1 Launch Audio/MIDI Setup by double-clicking it—you’ll
find Audio/MIDI Setup in the Utilities folder within your
Applications folder.
2
At the top of the Audio/MIDI Setup window,
click the MIDI Devices button to open the MIDI
pane of Audio/MIDI Setup.
In the Audio/MIDI Setup window—and circled in red above—you see 3
SonicCell as a MIDI interface. This object represents the MIDI jacks
SonicCell provides to your Mac.
4
Click the Add Device button at the top of the screen—or select Add
New External Device from the MIDI menu—to create a new external
device object in the window.
For some DAWs—such as Logic Pro™, GarageBand™, and Ableton™ Live—
there’s no further setup required before you launch your DAW. For others—
such as Mark of the Unicorn’s Digital Performer™—you’ll need to create a
SonicCell device in Mac OS X’s Audio/MIDI Setup (AMS) application.
If you can’t see SonicCell among the destinations you can select for
MIDI data in your DAW, you need to create a SonicCell Audio/MIDI
MIDI device.
Setup
This device will represent SonicCell’s synthesizer, with its 16 parts.
Double-click the device, and enter its settings as shown on the next 5
page.
14
Page 15
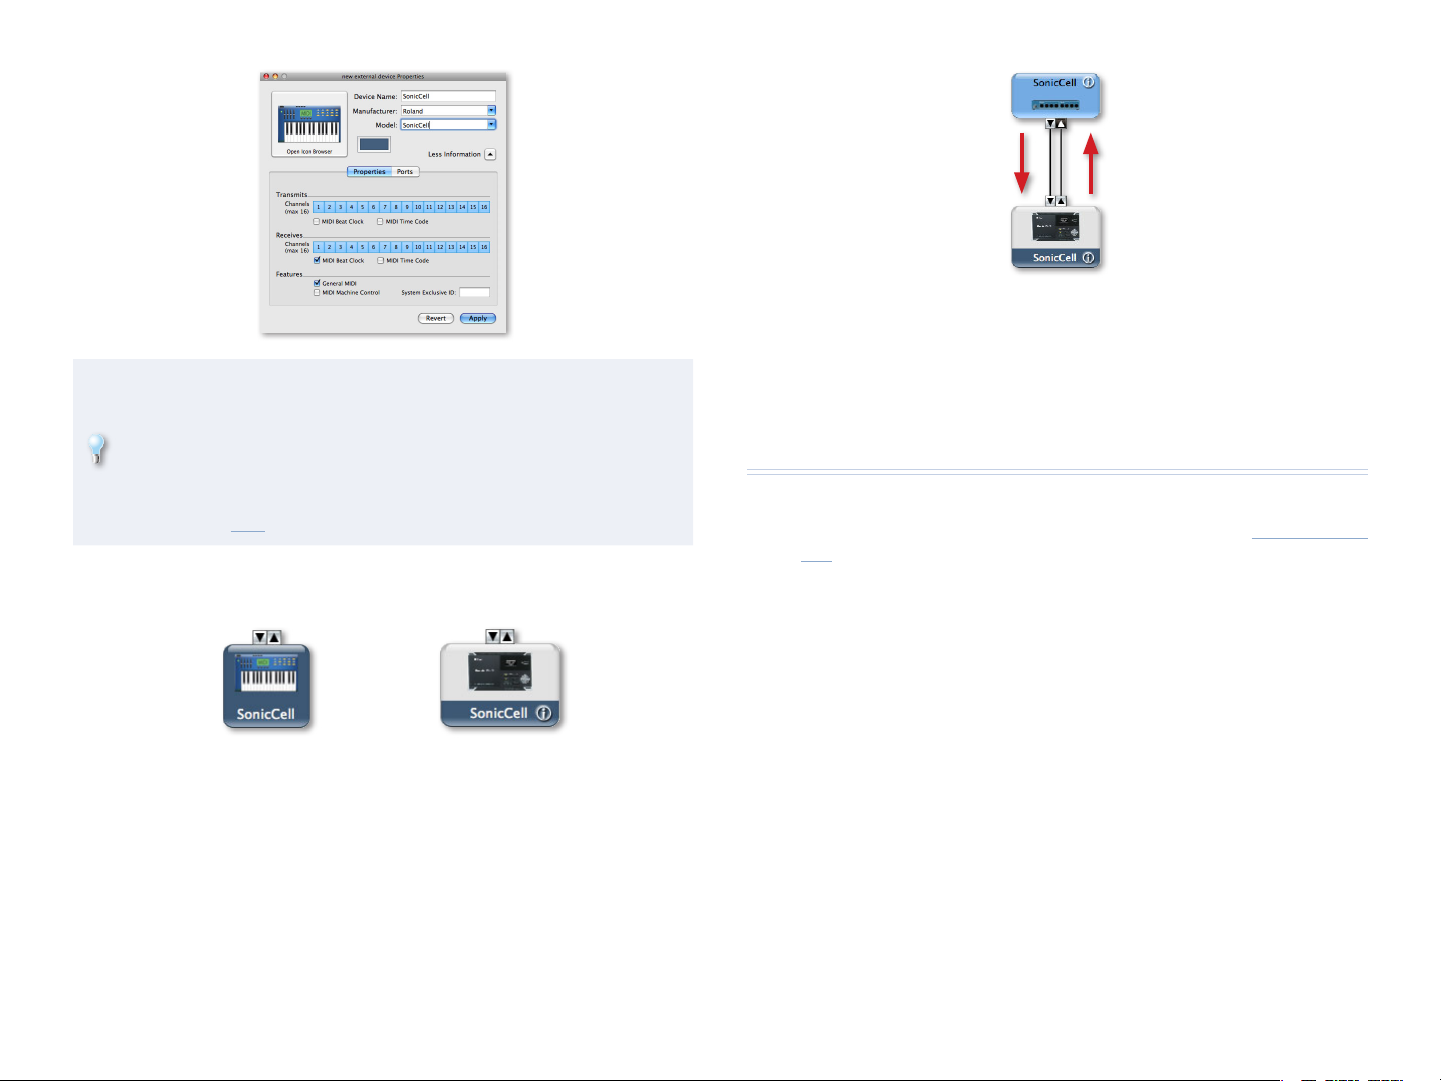
The red arrows here show the direction in
which you drag—you won’t see them in
Audio/MIDI Setup
You can make the SonicCell Audio/MIDI Setup device look like
SonicCell. Go to your Library/Audio/MIDI Devices folder, and create a
Roland folder there. Place a picture of SonicCell in the Roland folder.
Once you do this, you’ll be able to click the Open Icon Browser button
shown above and select the SonicCell picture for your new device. If
you have a live internet connection, you can download a picture to use
by clicking here.
Click Apply and close the window. Your new device is now called 6
“SonicCell.”
If you didn’t add an icon to it,
the SonicCell MIDI device looks
like this.
If you added an icon to it, the
SonicCell MIDI device looks like
this.
Click and drag the left-hand arrow at the bottom of the SonicCell 7
MIDI interface object—the one on top—to the left-hand arrow on
the SonicCell synth object, and do the same for the objects’ right-side
arrows until the connection between the two looks like the following
picture.
Quit Audio/MIDI Setup. If you’re using Digital Performer, head over 8
now to the Using SonicCell as an Audio Interface Workshop booklet.
The End
We hope you’ve found this workshop helpful. Keep an eye out for other
SonicCell Workshop booklets available for downloading at www.RolandUS.
com.
15
 Loading...