

Page 1
Owner’s Manual
Contents
Operation Guide ...............................................2
Performing ..................................................2
Playing Back Songs ..........................................4
Using Automatic Accompaniment (Rhythm) That Matches
Your Chords ................................................. 5
Recording Performances .....................................6
Playing Songs from a USB Flash Drive (Sold Separately) .........7
Panel Descriptions .............................................8
Front Panel ..................................................8
Rear Panel Connections ...................................... 9
Bottom Panel (Connecting Headphones or Memory) ...........9
Before You Play ...............................................10
Opening/Closing the Lid ....................................10
Turning the Power On/O ...................................10
Setting the Reference Pitch ..................................10
Various Settings (Function Mode) .............................11
Basic Operation in Function Mode ...........................11
Adjusting the Keyboard Sensitivity (Key Touch) ...........11
Changing the Way in Which the Sound Is Heard
(Twin Piano Mode)
......................................11
Dividing the Keyboard for Two-Person Performance
(Twin Piano) ............................................11
Specifying What the Transpose Will Aect
(Transpose Mode) .......................................11
Transposing the Keyboard or Song (Transpose) ...........11
Applying a Headphones 3D Ambience Eect to the Piano
Sound (Headphones 3D Ambience) ......................11
Matching the Pitch with Other Instruments (Master Tuning) 11
Changing the Tuning Method (Stretch Tuning) ............12
Changing How the Pedals Work ..........................12
Specifying How the Bass Part Behaves (Leading Bass) ......12
Chord Recognition When Split Is On ......................12
Preventing Doubled Notes When Connected to a
Sequencer (Local Control) ...............................12
Copying a Song (Copy Song) .............................12
Bluetooth Function .....................................12
Bluetooth Page-Turning/MIDI Switching .................12
Bluetooth Page-Turning Pedal Assignment ...............12
Making the Power Automatically Turn O After a Time
(Auto O) ..............................................13
Saving the Settings (Memory Backup) ....................13
Restoring the Factory Settings (Factory Reset) ................13
Specifying the Maximum Volume (Volume Limit) .............13
Using the Bluetooth® Functionality ...........................14
Here’s What You Can Do .....................................14
Using the Pedal to Turn Pages on a Music Score App ..........14
Connecting an Already-Paired Mobile Device .............14
Changing the Operating Keys of the Page Turning Function 15
Transferring MIDI Data ......................................15
Problems with Bluetooth Functionality ......................15
Troubleshooting ..............................................16
Message List ..................................................17
USING THE UNIT SAFELY ......................................18
IMPORTANT NOTES ...........................................18
Main Specications Roland RP501R: Digital Piano
Keyboard
Sound Generator
Bluetooth
Power Supply AC adaptor
Power Consumption
88 keys (PHA-4 Standard Keyboard: with Escapement and Ivory
Feel)
Piano Sound: SuperNATURAL Piano Sound
MIDI Format: Conforms to GM2/GS/XGlite
MIDI, Turning music sheet: Bluetooth Ver 4.0 (Only on Bluetoothequipped models)
9 W (3 W–22 W)
9 W: Average power consumption while piano is played with
volume at center position
3 W: Power consumption immediately after power-up; nothing
being played
22 W: Rated power consumption
Dimensions
(with music rest)
Weight 40.8 kg / 90 lbs
Accessories
Options
(Sold Separately)
* This document explains the specications of the product at the time that the document
was issued. For the latest information, refer to the Roland website.
1,378 (W) x 423 (D) x 992 (H) mm
54-1/4 (W) x 16-11/16 (D) x 39-1/16 (H) inches
Owner’s manual, Leaet “Assembling the Piano,“
Leaet “USING THE UNIT SAFELY,” AC adaptor, Power cord
(for connecting AC adaptor), Headphone Hook, Music Rest
USB Flash Memory
* Use a commercially available USB ash drive or a USB ash
drive sold by Roland. However, we cannot guarantee that all
commercially available USB ash drives will work with this unit.
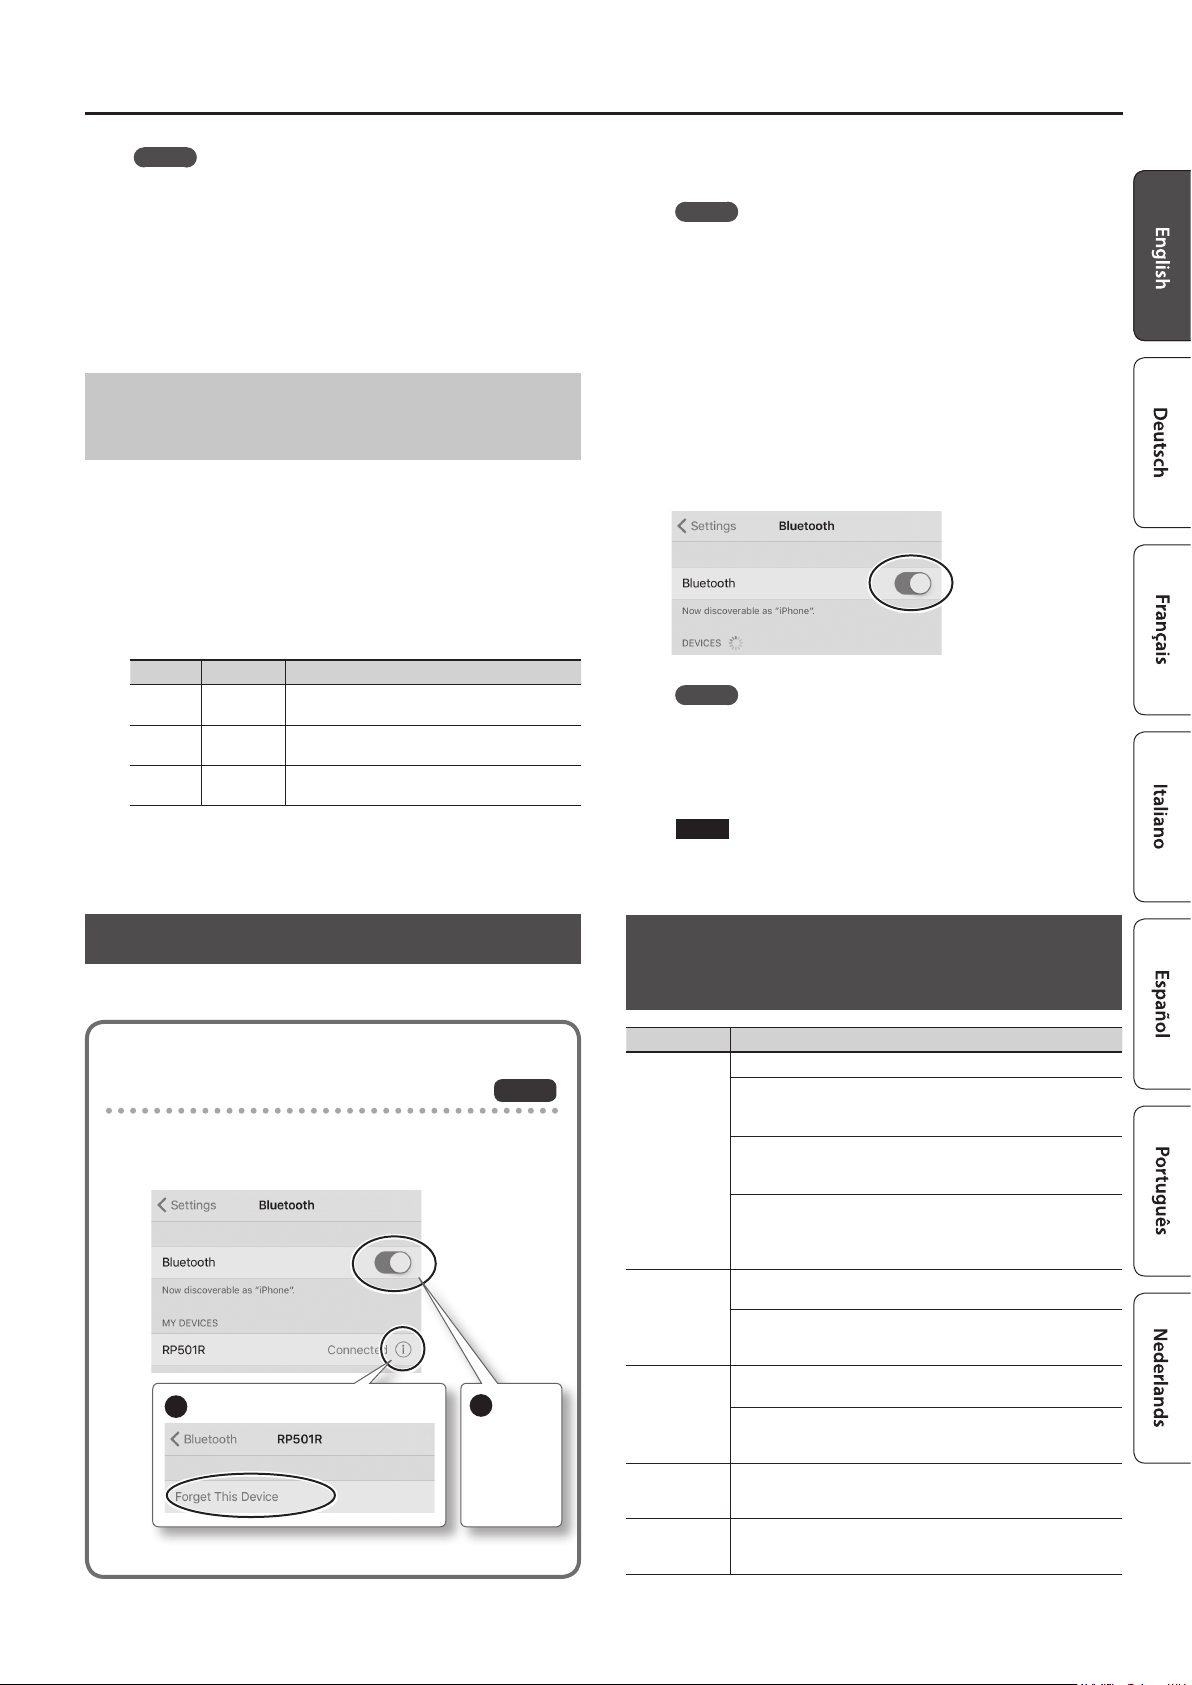
Provision of Bluetooth functionality
Please be aware that depending on the country in which you purchased the unit, Bluetooth functionality might not be included.
If Bluetooth functionality is included
The Bluetooth logo appears
when you turn on the power.
Before using this unit, carefully read the sections entitled “USING THE UNIT SAFELY” and “IMPORTANT NOTES” (leaet “USING THE UNIT SAFELY” and Owner’s
Manual p. 18). After reading, keep the document(s) where it will be available for immediate reference.
Copyright © 2016 ROLAND CORPORATION
Page 2
B1 B6
Operation Guide
Performing
Selecting Tones ([Piano] [Other] Buttons)
Settings for items with this icon
are saved by Memory Backup
(p. 11).
This digital piano lets you enjoy playing a variety of piano tones (sounds) and other
types of tones.
You can select a tone and adjust the way that it sounds.
Selecting a piano tone Press the [Piano] button.
Selecting other tones Press the [Other] button.
Selecting various tones
Adjusting the spaciousness
of the sound
(Ambience)
Adjusting the brightness of
the sound
(Brilliance)
[Piano] button
Display Explanation
Concert Piano
The sound of a splendid concert grand piano. This piano sound has our
1
highest recommendation, and can be used for any style of music.
Press the [Piano] or [Other] button, and then press
the [-] [+] buttons.
Hold down the [Piano] button and press the [-] [+]
buttons.
* If you’re using headphones and the Headphones
3D Ambience eect (p. 11) is set to “On,“ this
lets you adjust the depth of the Headphones 3D
Ambience eect.
Hold down the [Other] button and press the [-] [+]
buttons.
Display Explanation
Ballade Piano
2
A mellow grand piano sound, recommended for quiet songs.
Bright Piano
3
A brilliant grand piano sound, recommended when you want the piano to
stand out in an ensemble.
Magical Piano
4
A charming sound that layers synth bells with Concert Piano.
Piano+Strings
5
Strings layered with Concert Piano.
Piano+Pad
6
A pad layered with Concert Piano.
Piano+Choir
7
A choir layered with Concert Piano.
Rock Piano
8
A robust piano sound, recommended for boogie-woogie playing.
Ragtime Piano
g
A honky-tonk piano sound, recommended for ragtime playing.
Harpsichord
10
A type of keyboard instrument widely used in Baroque music, producing a
delicate sound.
Coupled 8+4
11
The sound of a harpsichord layered with sound an higher octave.
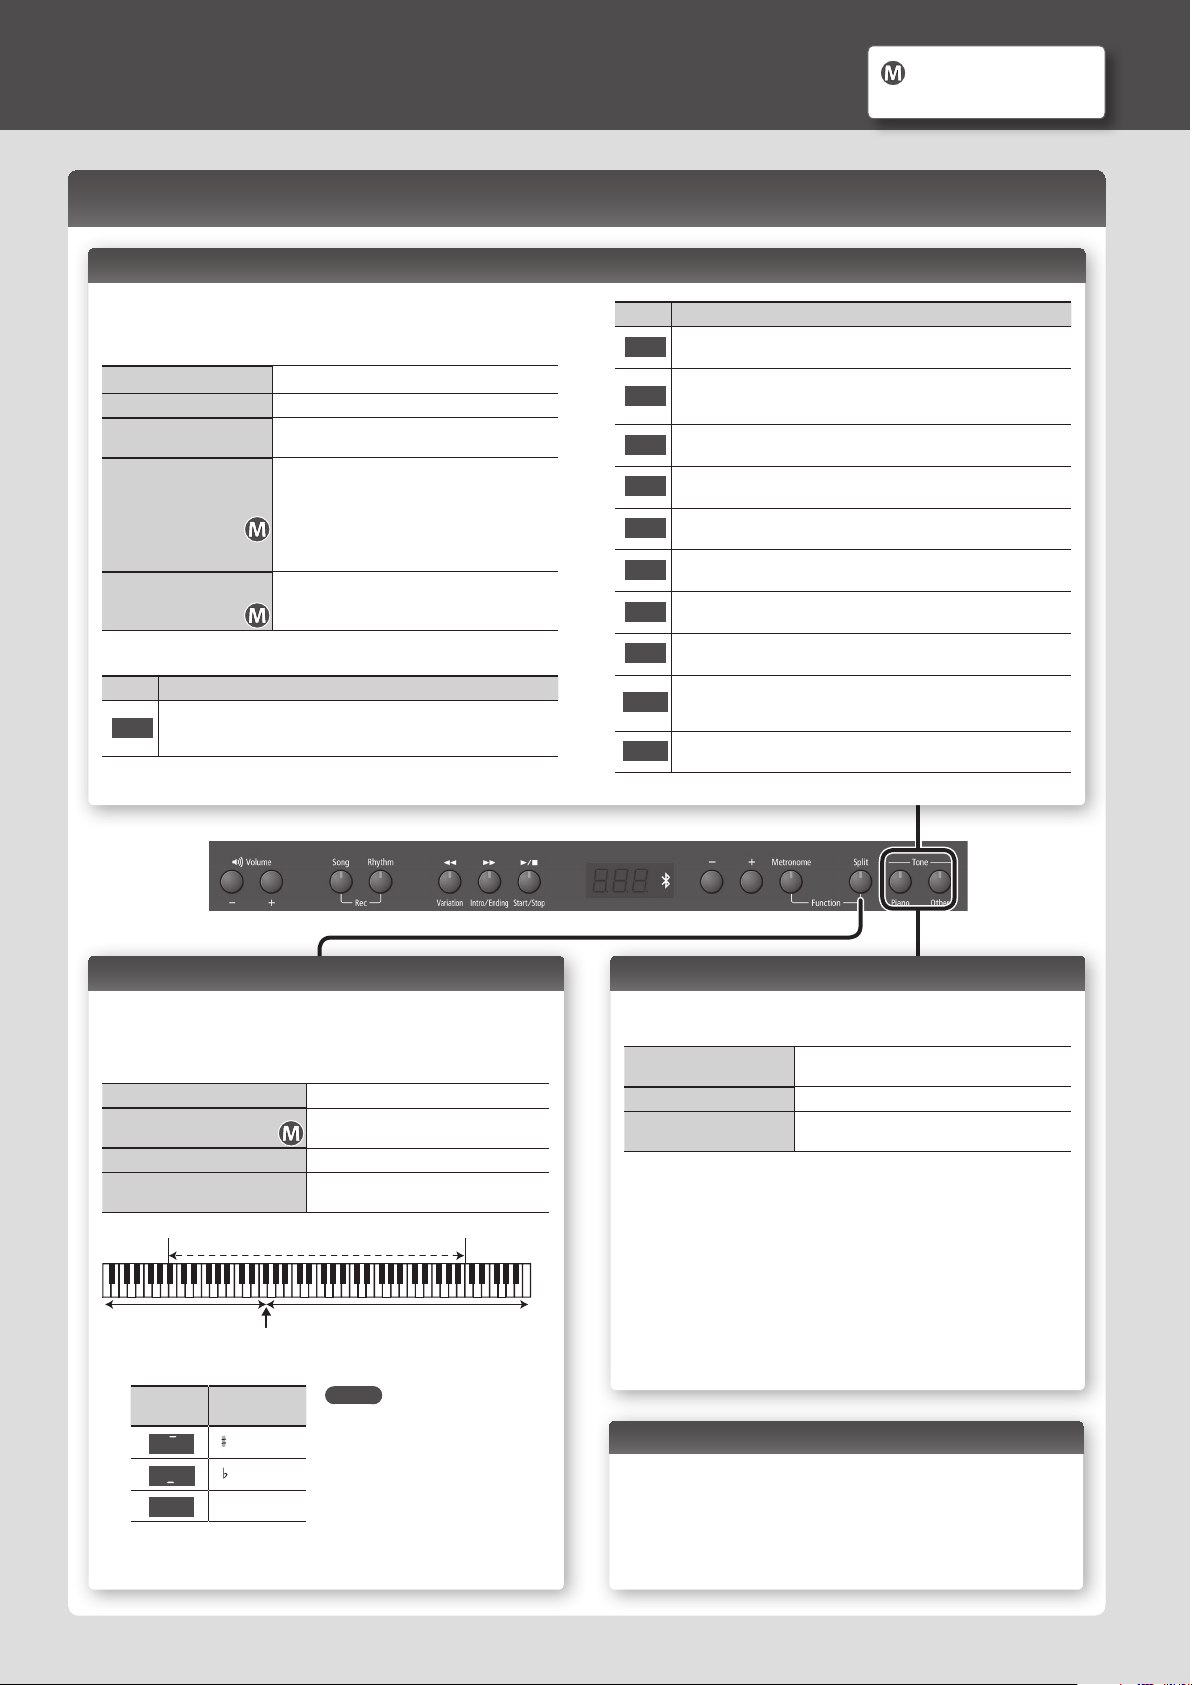
Playing Dierent Tones with the Right and Left Hands ([Split] Button)
You can play dierent tones in the left and right sides of the keyboard, divided at a
certain key.
This feature is called “Split Play,“ and the key at which the keyboard is divided is
called the “Split Point.”
Turning the split feature on Press the [Split] button so it’s lit.
Changing the keyboard’s
split point
Changing the Right-Hand Tone Same as “Selec ting Tones.”
Changing the Left-Hand Tone
Range in which you can specify the split point
Left-Hand Tone Right-Hand Tone
Split point when the power is turned on: F#3
* The split point is the highest note of the left-hand tone.
Display
(example)
F 3
A 4
C 4
Pitch
F 3
A 4
C4
Hold down the [Split] button and press the
key at the desired split point.
Hold down the [Split] button and use the
steps described in “Selecting Tones.”
MEMO
Separate, independent settings
for Split can be made for the
Song mode (p. 4) and the
Rhythm mode (p. 5).
Layering Two Tones (Dual Play)
You can play two tones simultaneously from each note of the keyboard. This feature
is called “Dual Play.”
Turning Dual on
Turning Dual o Press the [Piano] or the [Other] button.
Selecting tones
Hold down the [Piano] button and press the
[Other] button.
Select tones for the [Piano] button and [Other]
button before you turn Dual on.
1. Press the [Piano] button, and then use the [-] [+] buttons to
select a tone.
2. Press the [Other] button, and then use the [-] [+] buttons to
select a tone.
3. Hold down the [Piano] button and press the [Other] button to
turn Dual on.
Tone 1 and tone 2 are heard together.
To turn Dual o, press the [Piano] button or the [Other] button.
Changing the Key (Transpose)
The Transpose function lets you shift the pitch of the keyboard in semitone steps.
You can use this to play the song in a dierent key.
For details, refer to “Transposing the Keyboard or Song (Transpose)” (p. 11).
2
Page 3
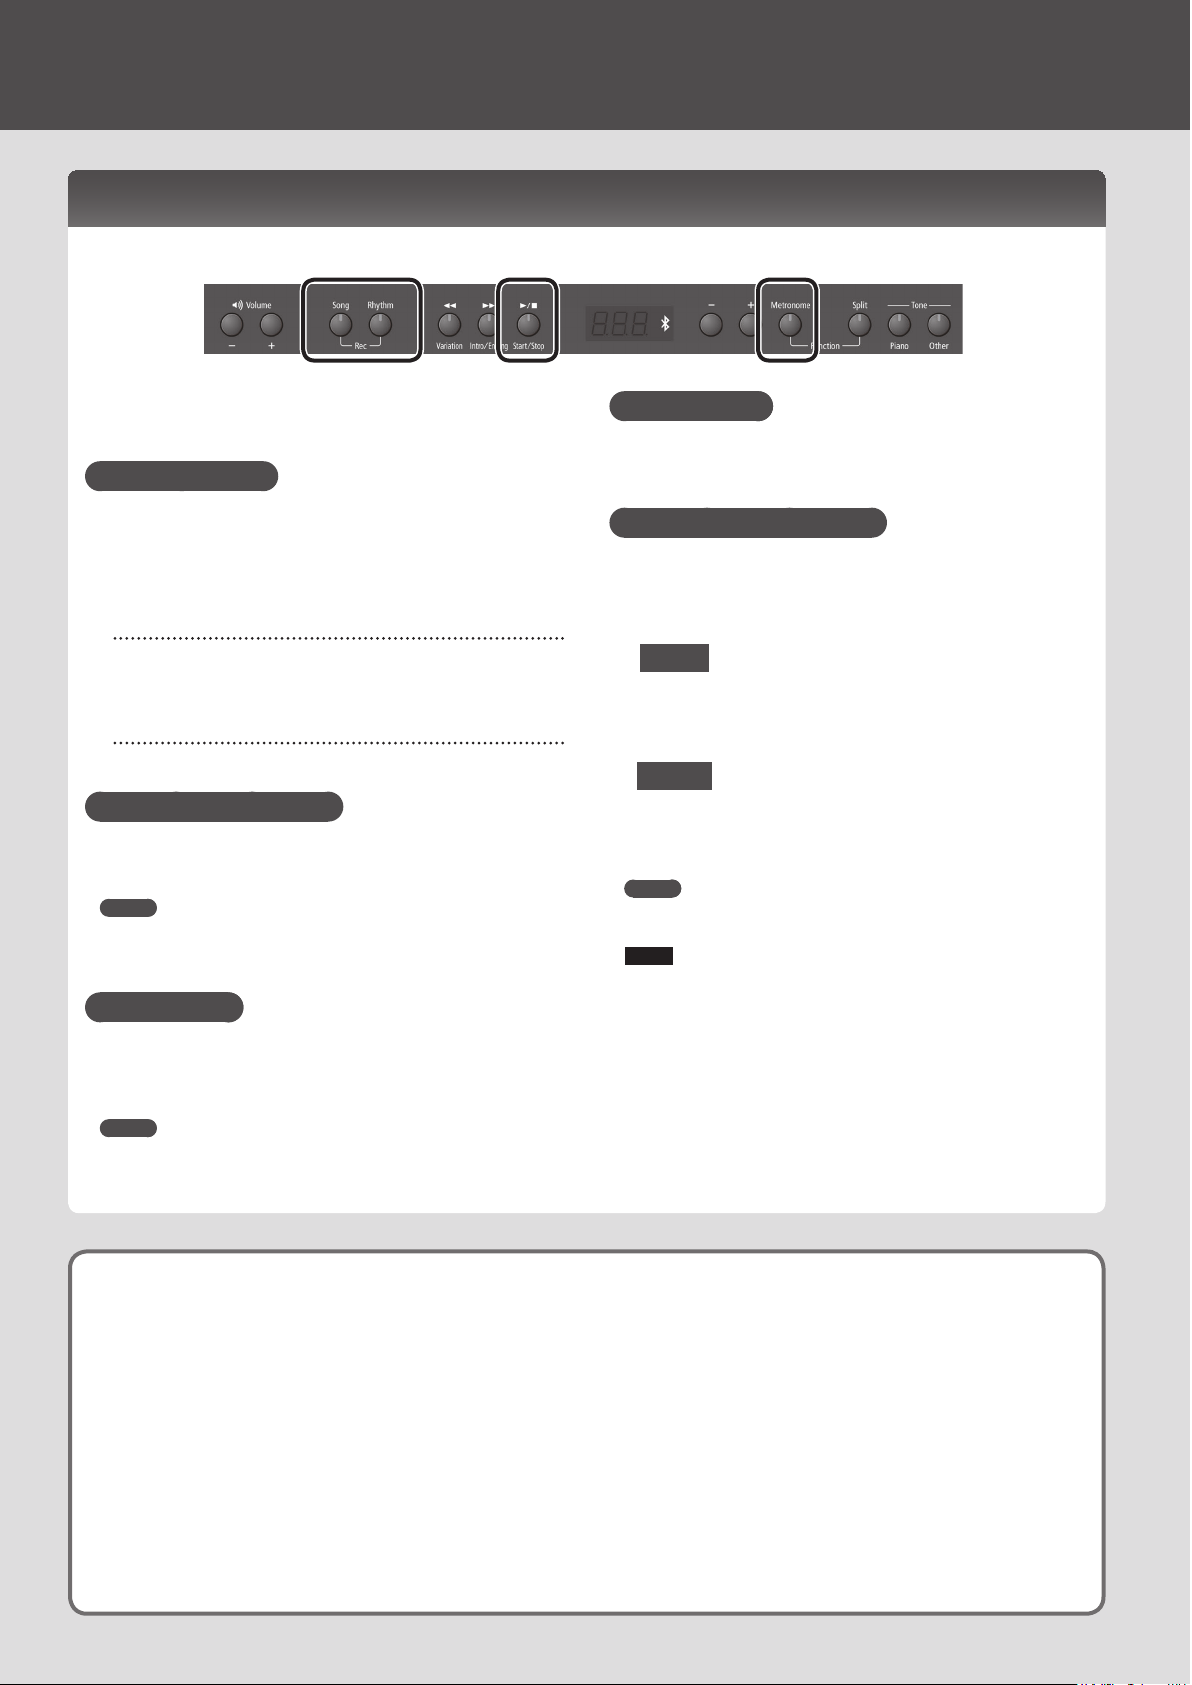
Using the Metronome ([Metronome] Button)
You can perform while the metronome sounds. You can adjust the
tempo or beat of the metronome.
If a song is playing, the metronome will sound at the tempo and
beat of that song.
Using the Metronome Press the [Metronome] button so it blinks.
Turn on the [Metronome] button to display the
Changing the Tempo
tempo, and then use the [-] [+] buttons.
108
Hold down the [Metronome] button and press the
[-] [+] buttons.
Changing the Beat
Adding a count-in
Changing the metronome
volume
4.4
For details on the available time signatures, refer to
“List of Time Signatures.”
Turn on the metronome, and then press the [s
(Start/Stop)] button.
Hold down the [Metronome] button and use the
Volume buttons.
Soft
–
10
Loud
0
List of Time Signatures
Display Beat Display Beat
2/2
2.2
Only weak beats will be
0.4
sounded.
2/4
2.4
3/4
3.4
4/4 (default)
4.4
5/4
5.4
6.4
7.4
3.8
6.8
g.8
12.8
6/4
7/4
3/8
6/8
9/8
12/8
Adjusting the Keyboard Sensitivity (Key Touch)
Here’s how to change the way in which the sound responds to your keyboard
dynamics. You can adjust the response as appropriate for your playing strength.
1. Hold down the [Metronome] button and press the [Split]
button.
2. Use the [-] [+] buttons to choose “
button.
3. Use the [-] [+] buttons to change the settings.
Value Explanation
(Fixed)
F
(Super Light) An even lighter setting than L1 (Light).
L2
(Light)
L1
(Medium)
N
(Heavy)
H1
(Super Heavy) An even heavier setting than H1 (Heavy).
H2
The sound plays at one set volume, regardless of the
force used to play the keys.
Sets the keyboard to a light touch.
You can achieve fortissimo () play with a less forceful
touch than “N (medium),” so the keyboard feels lighter.
This setting makes it easy to play, even for children.
Sets the keyboard to the standard touch.
This sets the standard keyboard touch. You can play
with the most natural touch. This is the closest to the
touch of an acoustic piano.
Sets the keyboard to a heavy touch.
You have to nger the keyboard more forcefully than
“N (medium)” in order to play fortissimo ( ), so the
keyboard touch feels heavier. Dynamic ngering adds
even more feeling to what you play.
4. Hold down the [Metronome] button and press the [Split]
button to exit Function mode.
” and press the [s]
F01
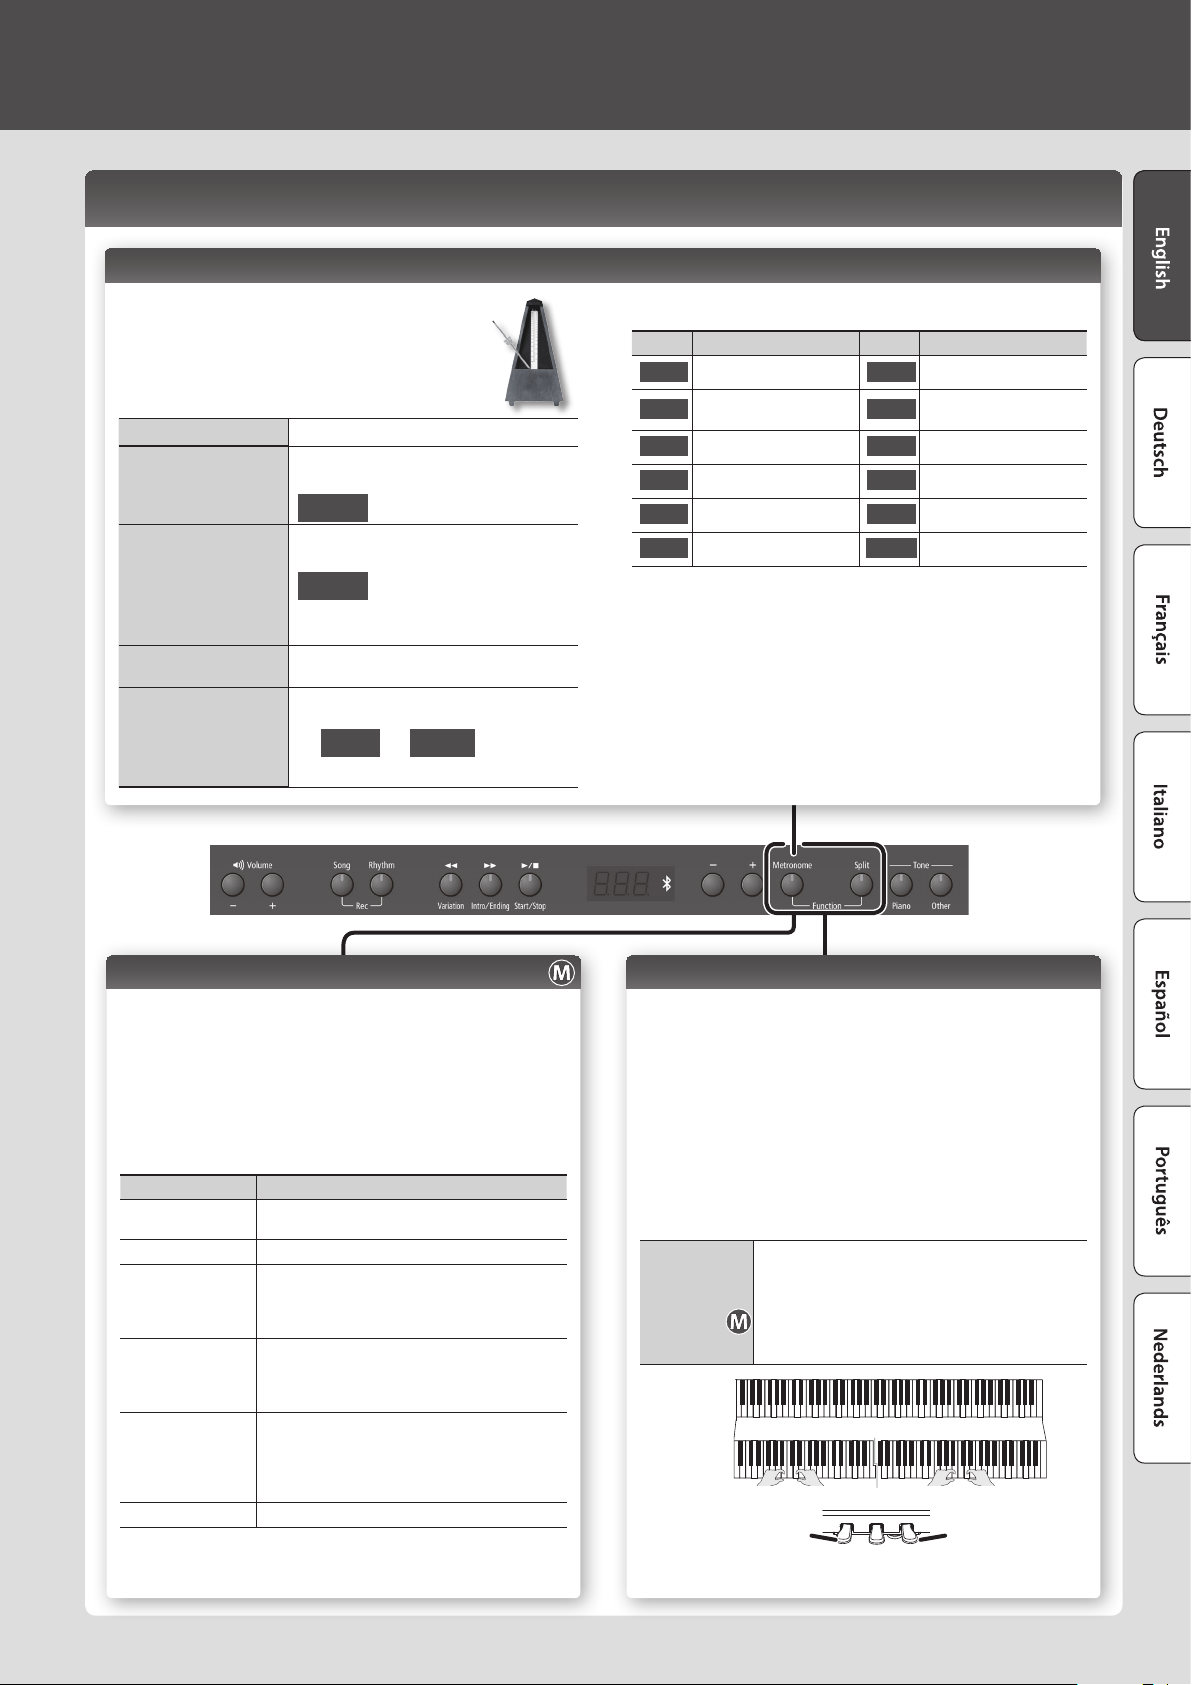
Dividing the Keyboard in Two (Twin Piano)
You can divide the keyboard into left and right sections so that two people can play
the same pitch ranges.
1. Hold down the [Metronome] button and press the [Split]
button.
2. Use the [-] [+] buttons to choose “
button.
3. Choose the “
On
” setting.
* Concert Piano is selected.
4. Hold down the [Metronome] button and press the [Split]
button to exit Function mode.
In function mode, select “
0 Notes in the right section are louder in the right
Changing how
Twin Piano
sounds
Conventional
keyboard
Twin Piano
The damper pedal for
1
speaker; notes in the left section are louder in the
left speaker.
0 Notes in the right section are heard only from the
2
right speaker; notes in the left section are heard only
from the left speaker.
Divide point
the left area
” and press the [s]
F03
” and choose “1” or “2.”
F02
C4 C5 C6 C7 C8C3C2C1
C4 C5 C6C3C4 C5C3 C6
The damper pedal for
the right area
3
Page 4
Operation Guide
Playing Back Songs
How to Use Song Mode ([Song] Button)
Press the [Song] button to select Song mode.
Selecting a Song
Changing the
number of
measures in a
song
Press the [Song] button, and then use the [-] [+] buttons.
In the middle of a song, pressing the [-] button will return you
to the beginning of the song.
Recorded songs Internal songs
– –
• Songs indicated by “
For details, refer to “Internal Song List” at the end of this manual.
• Songs indicated by “
memory.
• Songs indicated by “
ash drive.
* To switch between categories “a, b,
the [Song] button and press the [-][+] buttons.
Use the [x] [y] buttons to specify the number of measures.
a, b, c, d
U
N
a.01 d.36U.10N.01
” are internal songs.
” are songs that were recorded in internal
” are songs that were recorded on a USB
,” hold down
,
d, U, N
c
1.
Changing the
Tempo
Changing the
Volume of the
Song
Playing all songs
Press the [Metronome] button.
Use the [-] [+] buttons to change the tempo.
108
Hold down the [Song] button and use the Volume buttons to
adjust the volume of the song.
Song volume – Manual performance volume
g 1
(Song is louder)
Hold down the [Song] button and press the [s] button
(All Song Play).
– –
g g
(Same loudness)
1 g
(Manual
performance is
louder)
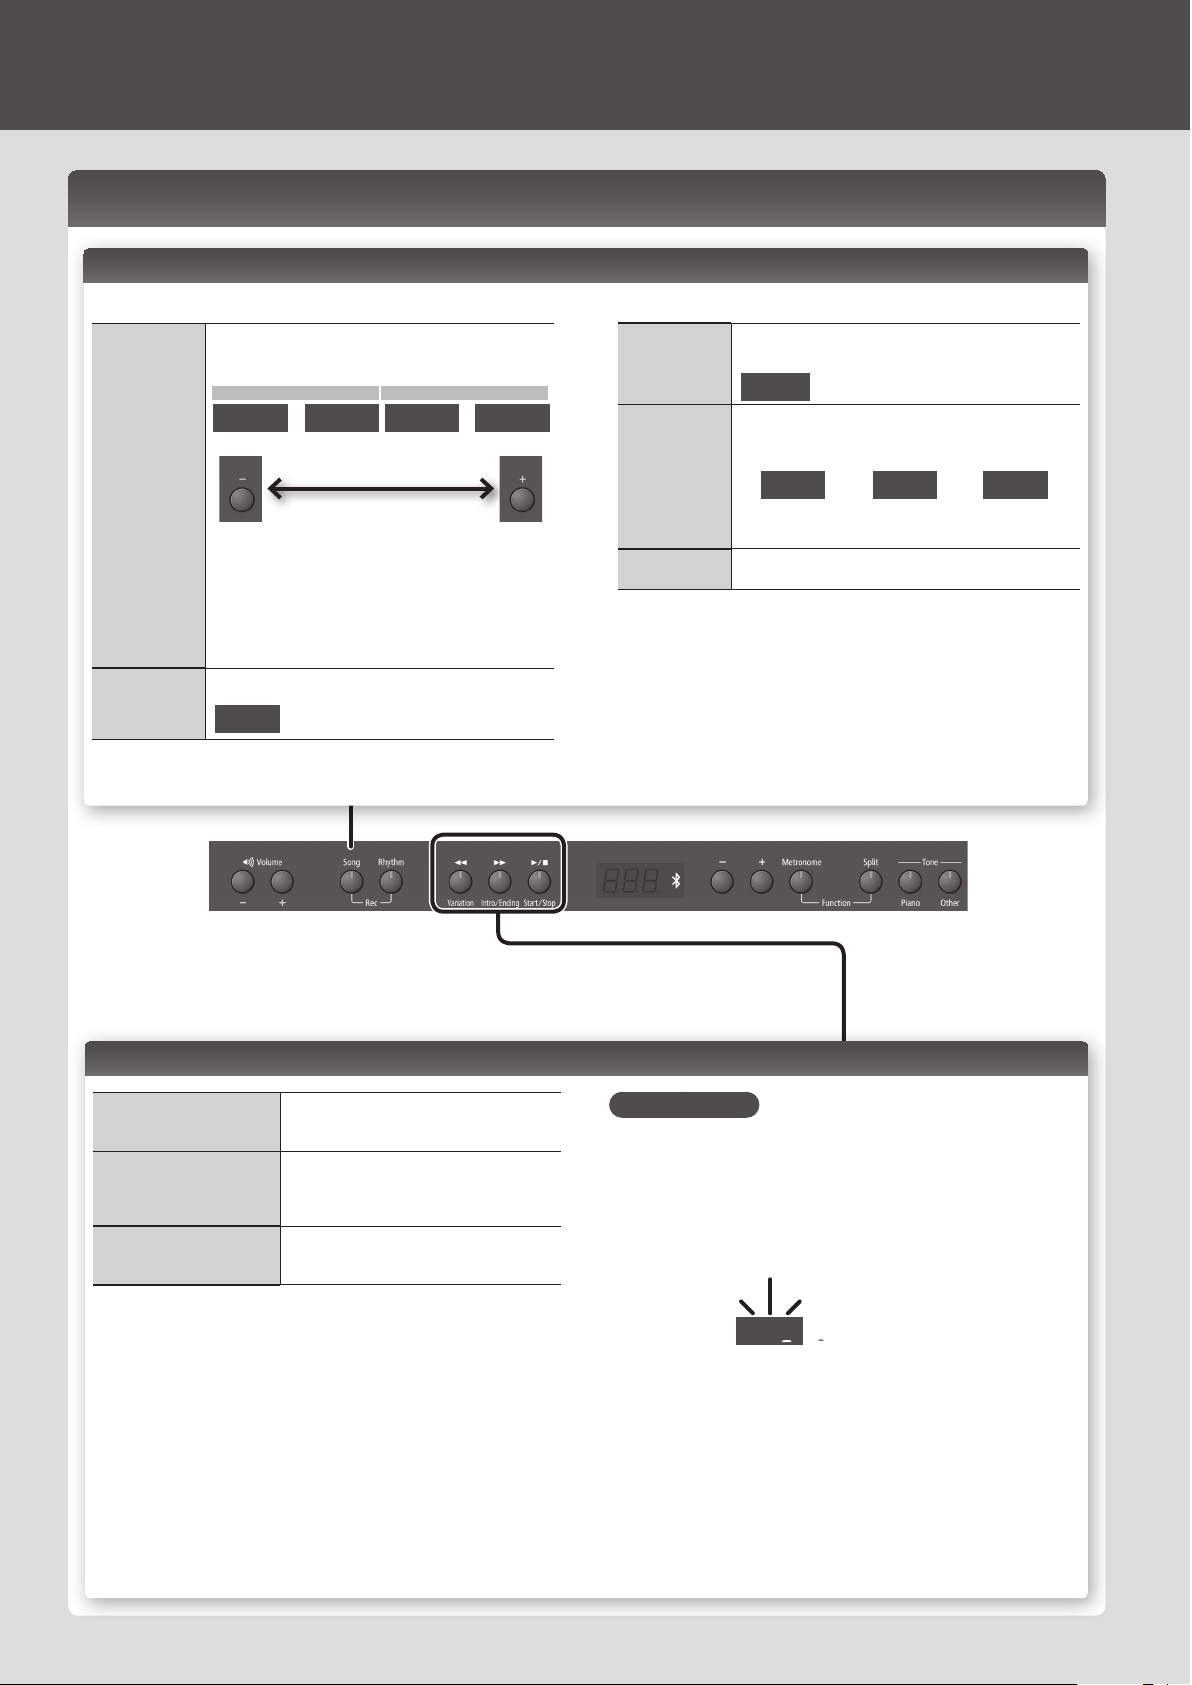
Functions of the [x] [y] [s] Buttons
Starting/Stopping Song
Playback
Fast-Forward
Rewind
4
Press the [s] button.
When the song has nished playing to the end,
it will stop.
Press the [y] button.
By holding down the [y] button and pressing
the [x] button, you can fast-forward more
quickly.
Press the [x] button.
By holding down the [x] button and pressing
the [y] button, you can rewind more quickly.
Selecting Parts to Play
1. Hold down the [s] button and use the [-] [+] buttons to select
the parts to be played.
Through successive presses of these buttons, you can turn on or o the
accompaniment part, left-hand part, and right-hand part to achieve the
desired arrangement of played/muted parts.
Playback part play/mute status indication
Left-hand part
Accompaniment
part
* When using Twin Piano, what you play in the left section is recorded to the left-hand
part, and what you play in the right section is recorded to the right-hand part.
* When using Split, the left-hand tone is recorded to the left-hand part, and the
right-hand tone is recorded to the right-hand part.
* When using Dual, tone 1 is recorded to the right-hand part and tone 2 is recorded to
the accompaniment part.
* When playing anything other than Twin Piano, Split, or Dual, everything is recorded
on the right-hand part.
oo
Right-hand part
0 Sound will be heard (played)
o
0 Sound will not be heard (muted)
Page 5

Using Automatic Accompaniment (Rhythm) That Matches Your Chords
C C# D E E F
How to Use Rhythm Mode ([Rhythm] Button)
Press the [Rhythm] button to select Rhythm mode.
Split is turned on.
While the rhythm is playing, the left-hand part will not sound, since that section is
dedicated to the recognition of chords.
Press the [Rhythm] button, and then use the [-] [+] buttons.
Selecting a
Rhythm
Changing the
Tempo
Changing the
Volume of the
Rhythm
1-1 g-6
For details, refer to “Rhythm List” at the end of this manual.
* To switch the genre of rhythm, hold down the [Rhythm] button
and press the [-] [+] buttons.
Press the [Metronome] button.
Use the [-] [+] buttons to set the tempo.
108
Tempo range
Hold down the [Rhythm] button and use the Volume buttons to
adjust the volume of the rhythm.
(Rhythm is louder)
–
20
Rhythm volume – Manual performance volume
g 1
250
–
– –
g g
(Same volume)
1 g
(Manual
performance is
louder)
About the rhythm function
This unit contains many built-in rhythms in various musical styles, such as jazz and
rock.
Rhythms include not only drum sounds, but also accompaniments featuring
instruments such as piano, guitar, bass, and strings.
You can also add intros and endings to your rhythms, and insert ll-ins. These
features make it easy to develop eective and expressive rhythmic accompaniment.
Rhythm Flow
Intro
There are two types of rhythms: original accompaniment patterns, and variation
accompaniment patterns, which embellish the original patterns.
It can be eective to use the quieter original patterns in the rst half of the song, and
then use the variation patterns in the latter half, when you want to build excitement.
How to play chords
When a chord is played on the keyboard, a rhythm based
on the chord that was played is sounded. (When the keys
marked with “ ” in the illustration are played, the result is
recognized as “C.”)
Note that it is not necessary to press all of the constituent notes of the chord; chords
can be specied using simple ngering. (When the key marked with “
illustration is played, it is recognized as “C.”)
For details, refer to “Chord Recognition When Split Is On” (p. 12), and the “Chord
Fingering List” at the rear of this manual.
Accompaniment
Ending
” in the
What the [x (Variation)] [y(Intro/Ending)] [s (Start/Stop)] Buttons Do
Starting/Stopping the
Rhythm
Adding an Intro
Adding an Ending
Adding Variation to the
Rhythm
Inserting a Fill-in When
You Switch Variations
(Auto Fill)
Starting the Rhythm by
Playing a Key (Sync)
Press the [s (Start/Stop)] button.
Turn on the [y(Intro/Ending)] button, and then play
the rhythm.
While the rhythm is playing, turn on the
[y(Intro/Ending)] button.
An ending is played, and then playback stops.
Press the [x (Variation)] button.
O 0 A simple accompaniment pattern is played.
On 0 A more amboyant accompaniment pattern is
played.
While holding down the [x (Variation)] button, use the
[-] [+] buttons to select “On,” and then switch variations.
What’s a “Fill-In?”
A short improvisational phrase inserted at the transition
is called a “Fill-In.”
Press the [Rhythm] button.
The rhythm starts playing when you play the keyboard.
Snc
Playing Only the Drums or Another Specic Part
1. While holding down the [s (Start/Stop)] buttons, use the [-]
[+] buttons to select the mute setting.
Through successive presses of these buttons, you can turn on or o the
drums, bass, and other instruments to achieve the desired arrangement of
played/muted parts.
Play/mute status indication for the rhythm parts
Bass
Drums
NOTE
For some rhythms, you’ll hear other instruments even in the bass part.
oo
Other instruments
0 Sound will be heard (played)
o
0 Sound will not be heard (muted)
5
Page 6
Operation Guide
Recording Performances
You can record your performance, including accompaniment.
You can play back a recorded performance to check your playing, or to play along with
it.
Getting Ready to Record
1. Select the tone that you want to play on the keyboard (p. 2).
2. Start the metronome if desired.
Press the [Metronome] button.
While the metronome is sounding, specify the tempo and time signature of
the song (p. 3).
If you want rhythm to play
3. If you want a rhythm accompaniment to be heard while you
perform, press the [Rhythm] button.
Specify the rhythm and tempo settings (p. 5).
If you don’t want rhythm to play
3. Press the [Song] button so the button is lit.
Entering Recording-standby Mode
4. Hold down the [Song] button and press the [Rhythm] button.
The [Song] button and the [Rhythm] button will light; the unit will enter
recording-standby mode.
MEMO
If you decide not to record (i.e., if you want to exit recording-standby
mode), hold down the [Song] button once again and press the [Rhythm]
button.
Starting Recording
5. Press the [s] button.
A two-measure count will sound, and then recording will start.
During the count, measure numbers “-2” and then “-1” will appear in the
display.
MEMO
Recording will start automatically if you play the keyboard while in
recording-standby mode.
Stopping Recording
6. Press the [s] button.
By pressing the [s] button once again, you can hear the song that you
just recorded.
Selecting the Destination of the Save
7. Use the [-] [+] buttons to select the destination at which to save,
and then press the [Metronome] button.
(User)
U
U.01–U.10
(USB)
N
N.01–N.gg
v01
U.01
MEMO
If you decide not to carry out the save, hold down the [Song] button and
press the [Rhythm] button to cancel it.
NOTE
If you select a song that already contains data (song number with an
uppercase “U” or “N”) and save, the previously recorded data will be
lost.
* While the song is being saved, an animation of a rotating “o” symbol
will appear in the display for several seconds. Do not turn o the
power during this time. Doing so might cause the saved song to
be lost.
A song with no recorded data (empty song)
• Song number shown with lowercase “v” (User memory)
• Song number shown with lowercase “n” (USB ash drive)
• No dot shown
A song with recorded data
• Song number shown with uppercase “U” (User memory)
• Song number shown with uppercase “N”
(USB ash drive)
• Dot shown
If you want to erase the recorded song
You can erase a song by recording an empty song as follows.
1. Press the [Song] button.
2. Hold down the [Song] button and press the [Rhythm] button.
3. Press the [s] button to hear the two-measure count, and then press the [s] button without playing the keyboard.
4. Select the song number that you want to erase, and press the [Metronome] button.
A song containing no notes will be recorded; the song has been erased.
6
Page 7
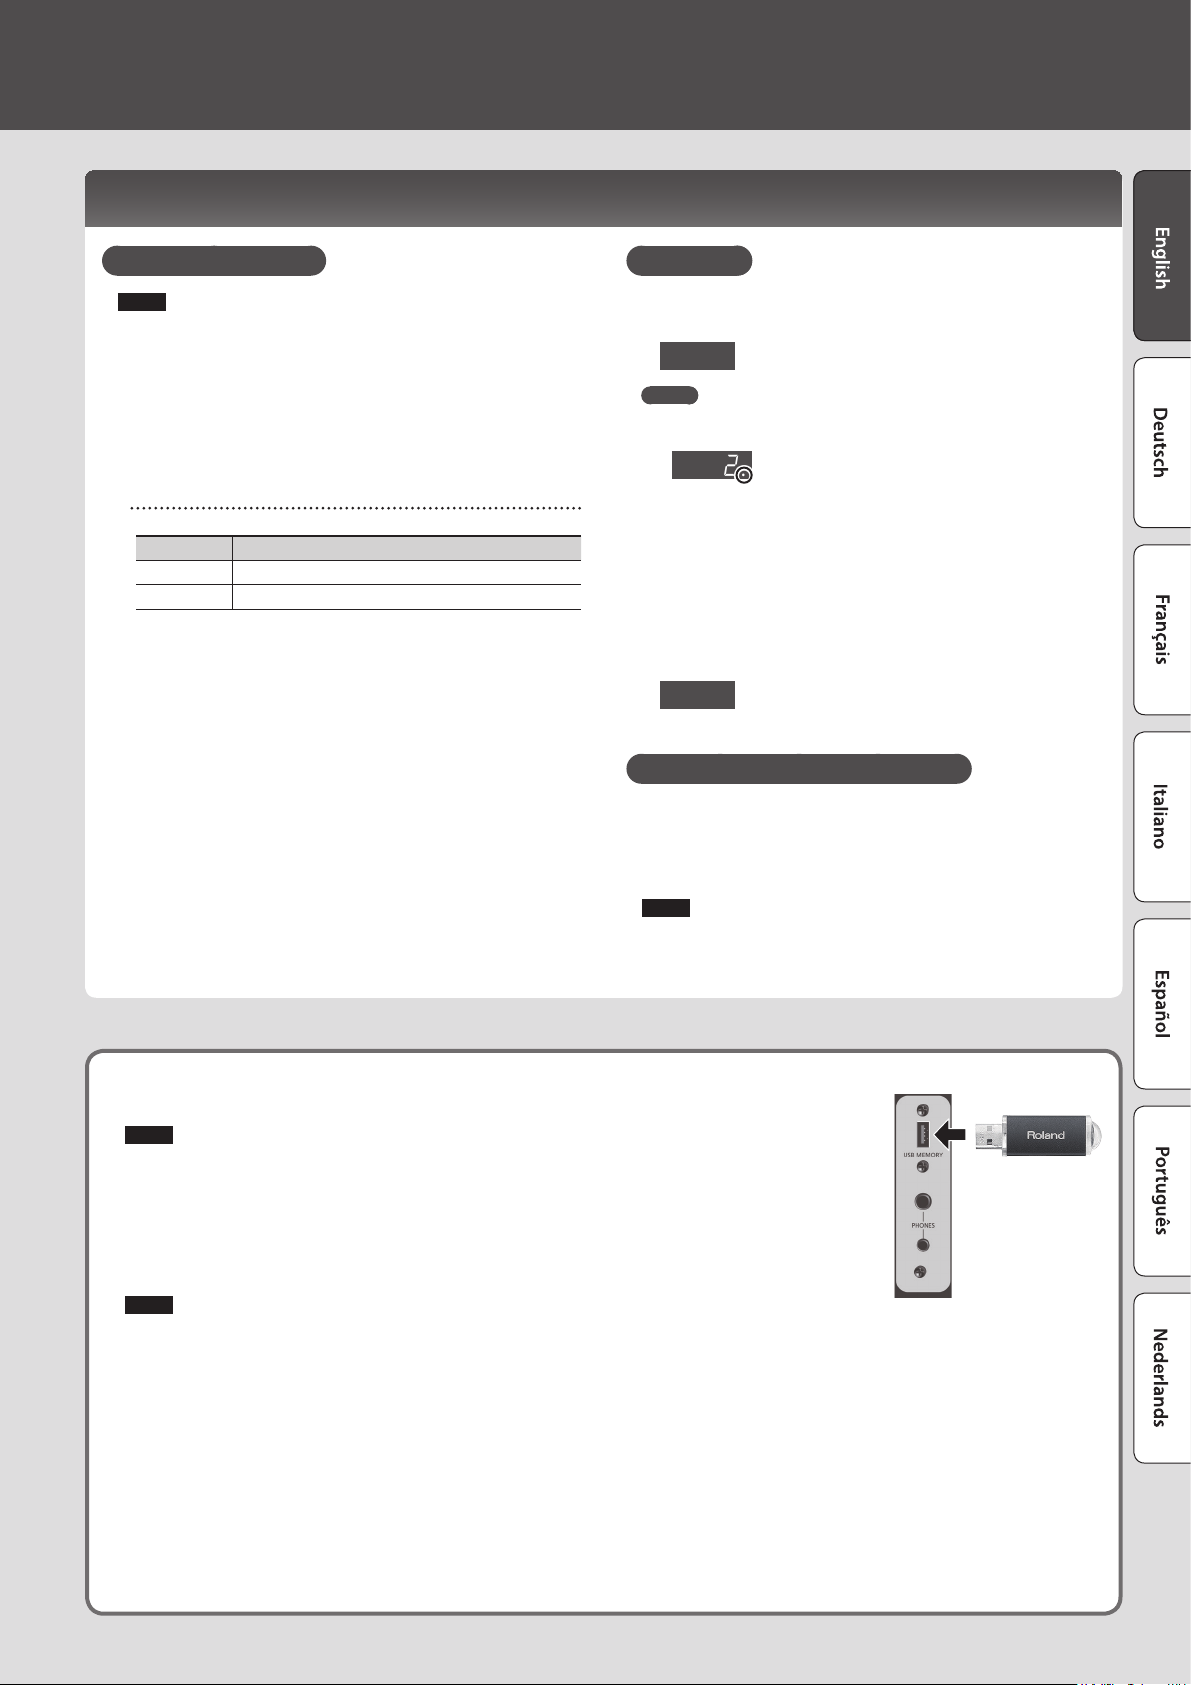
Playing Songs from a USB Flash Drive (Sold Separately)
Connecting a USB Flash Drive
NOTE
• If the USB ash drive contains a large number of song les, it may take
some time for the data to be read.
• Use only single-byte alphanumeric characters in the le names.
1. Using your computer, copy your favorite songs onto your USB
ash drive (sold separately).
This digital piano is able to play back SMFs (Standard MIDI Files) or audio
les (WAV) from a USB ash drive.
Playable formats
Type Explanation
SMF Standard MIDI les (format 0, 1)
WAV WAV format, 44.1 kHz, 16-bit linear
2. Connect your USB ash drive to the USB MEMORY port of the
digital piano.
Playing Songs
1. Press the [Song] button.
2. Use the [-] [+] buttons to select a song.
N.01
MEMO
• If you’ve selected an audio le (WAV le), a dot is displayed following the
last digit.
N.02.
The les on the USB ash drive are shown. “N” indicates a USB ash drive.
The numbers are assigned automatically. If you later add or delete a le,
the numbers will be automatically reassigned.
• All les on the USB ash drive begin with “N.”
• If you use the [-] [+] buttons to make the display indicate “U” or “a,” les in
the digital piano’s internal memory are displayed.
3. Press the [s] button to play the selected song.
The display shows the measure number of the currently playing SMF.
If a WAV le is playing, the elapsed playback time is shown.
1.01
(Example: 1 minute 1 second has elapsed)
Lower the Level of an Audio File’s Central Sound
This feature lets you reduce the loudness of the central sound of the audio
(Center Cancel).
1. When a song is selected, hold down the [s] button and use the
[-] [+] buttons to turn this feature “On.”
NOTE
This feature does not work perfectly with every song. In some cases it may
be unable to fully eliminate the central sound, or may alter the recording’s
tone quality.
About USB Flash Drives
If you’re using a newly purchased USB ash drive, you must rst format it on the digital piano.
NOTE
• Never insert or remove a USB ash drive while this unit is turned on. Doing so may corrupt the unit’s data or the data on the
USB ash drives.
• Use a commercially available USB ash drive or a USB ash drive sold by Roland. However, we cannot guarantee that all
commercially available USB ash drives will work with this unit.
Formatting a USB Flash Drive
Here’s how to initialize (format) the entire contents saved on a USB ash drive.
NOTE
• Formatting will erase everything that has been saved on the USB ash drive.
• Before using a new USB ash drive with this digital piano for the rst time, you must format the USB ash drive.
1. Connect the USB ash drive that you want to format to the USB MEMORY port.
2. While holding down the [Song] button, turn the power on.
Keep holding down the [Song] button until it indicates as “
To cancel, press the [y] button.
3. To execute the format, press the [s] button.
When all the LEDs on the buttons are lit, the operation is complete.
4. Turn the power o, then on again.
” on the display.
Svr
Bottom panel of digital piano
7
Page 8
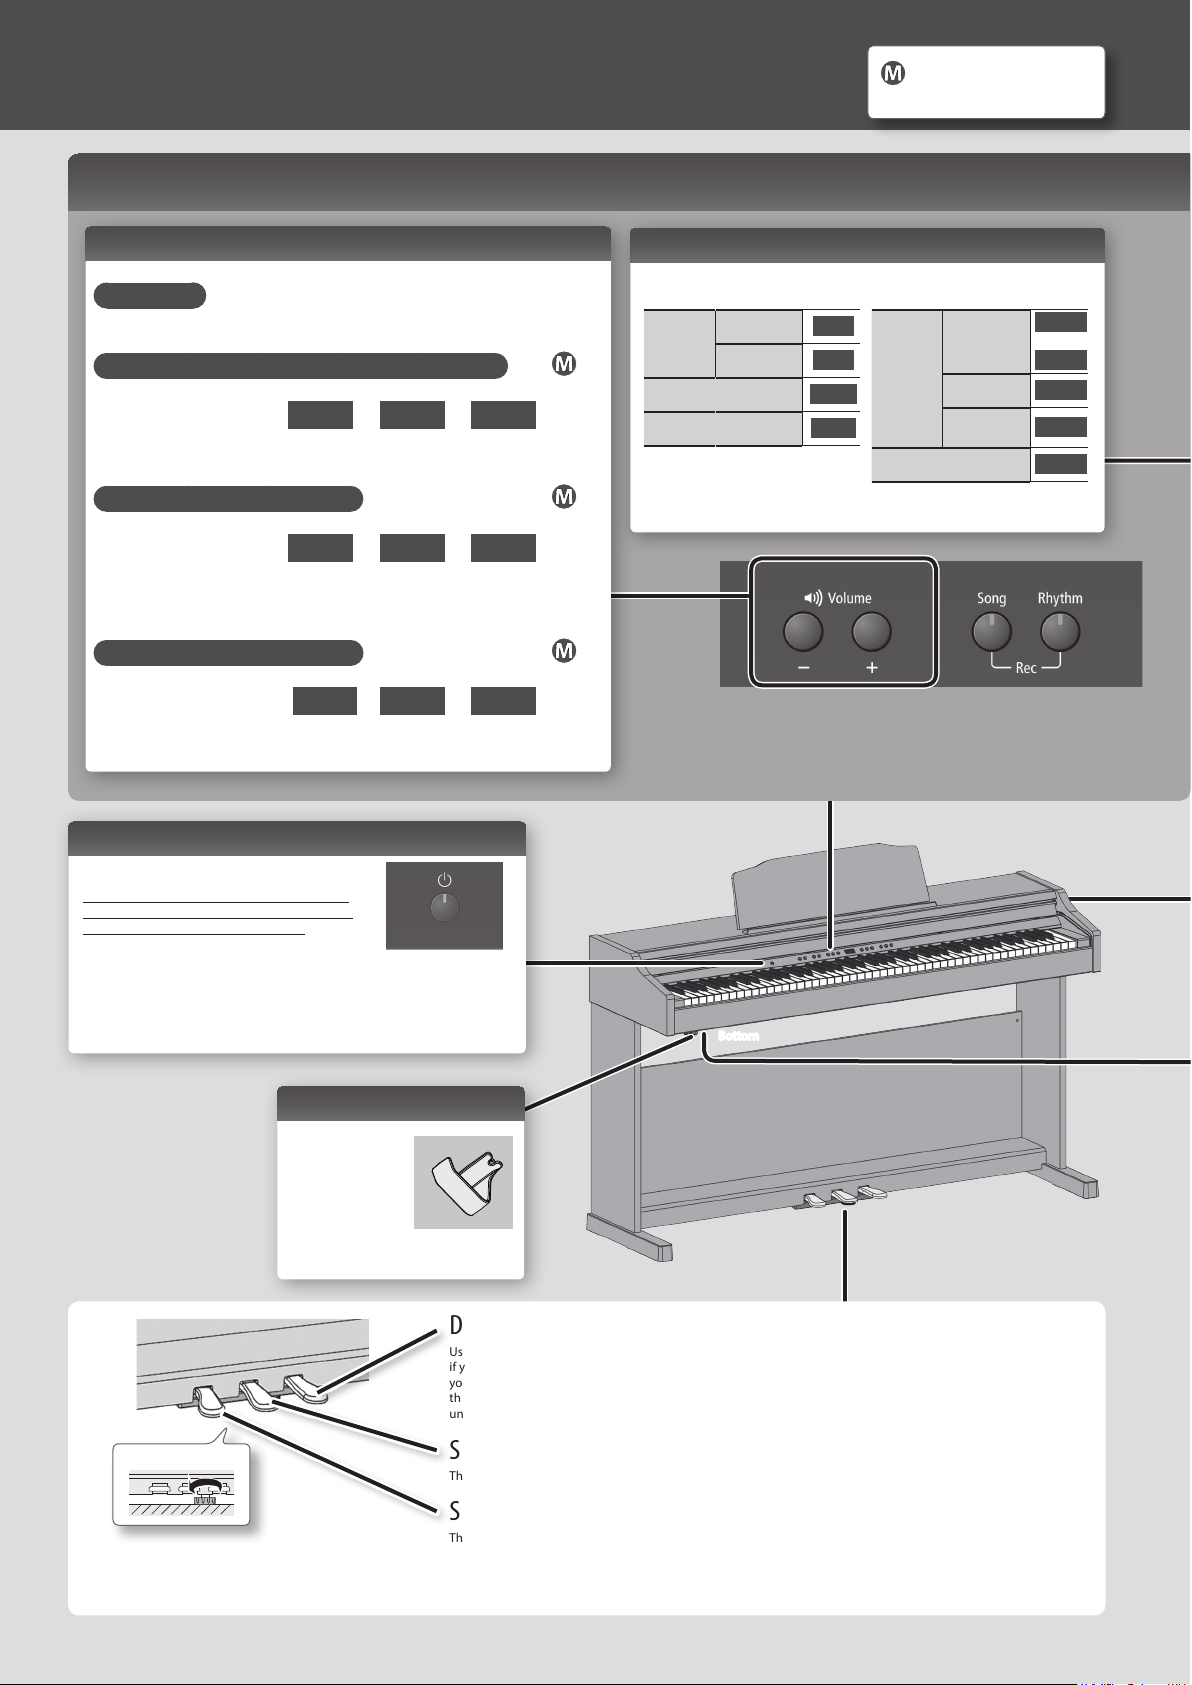
Panel Descriptions
Front Panel
Settings for items with this icon
are saved by Memory Backup
(p. 11).
Adjusting the Volume and Balance (Volume Buttons)
Overall Volume
Use the Volume buttons to adjust the volume.
Volume Balance Between Song/Rhythm and the Keyboard (Song Balance)
While holding down the
[Song] button or [Rhythm]
button, use the Volume
buttons to adjust the
balance.
Relative Balance of Dual Tones (Dual Balance)
This is available if Dual is on.
While holding down the
[Piano] button and [Other]
button, use the Volume
buttons to adjust the
balance.
Relative Balance of Split Tones (Split Balance)
This is available if Split is on.
Hold down the [Split]
button and use the Volume
buttons to adjust the
balance.
Volume of the song – Volume of the manual performance
g 1
(Song is louder)
Volume of the piano sound – Volume of the other sound
g 1
(Piano is louder)
g 1
(Left-hand is
– –
g g
(Same volume)
– –
g g
(Same volume)
Left-hand volume – Right-hand volume
– –
g g
louder)
(Same
volume)
1 g
(Manual performance
is louder)
1 g
(Other is louder)
1 g
(Right-hand is louder)
About the Display
This indicates the tone number, song number, measure number, tempo, selected
function, or value.
Tone
number
Tempo
Measure number
* For details on how to use the other buttons, refer to “Operation Guide” (p. 2)–(p. 7).
Piano
Other
1
1
108
1.
Song
number
Rhythm
Internal song
User
USB ash
Drive
a.01
c.01
U.01
N.01
1-1
[L] Switch
This turns the power on/o (p. 10).
With the factory settings, the unit’s power will
automatically be switched o 30 minutes after
you stop playing or operating the unit.
If the unit’s power has been turned o
automatically, you can use the [L] switch to turn the unit back on again. If you
don’t want the power to turn o automatically, change the “Auto O” setting to
“OFF” as described on “Making the Power Automatically Turn O After a Time
(Auto O )” (p. 13).
Headphone Hook
Whenever you
are not using the
headphones, you
can hang them on
the headphone
hook.
Damper pedal
Use this pedal to sustain the sound. While this pedal is held down, notes will be sustained for an extended time even
if you release your ngers from the keyboard. The length of the sustain will change subtly depending on how deeply
you press the pedal. On an acoustic piano, holding down the damper pedal will cause the strings for notes other
than the ones you actually play to vibrate in sympathy with what you’ve played, producing a rich resonance. This
unit simulates this sympathetic vibration (damper resonance).
Rear
Bottom
Adjuster
Turn the adjuster to lower it until the adjuster is in rm
contact with the oor. In particular, when you’ve placed
the piano on carpet, you must turn the adjuster until it is
pressing rmly against the oor.
8
Sostenuto pedal
This pedal sustains only the notes of the keys that were already pressed when you pressed the pedal.
Soft pedal
This pedal is used to make the sound softer. Playing with the soft pedal depressed produces a sound that is not
as strong as when otherwise played with the equivalent strength. This is the same function as the left pedal of an
acoustic piano. The softness of the tone can be varied subtly by the depth to which you press the pedal.
Page 9

Adjusting a Value ([-] [+] Buttons)
Use the [-] [+] buttons to adjust a value.
Changing a value
continuously
Changing a value rapidly
Restoring the default value Press the [+] button and [-] button simultaneously.
Hold down the [+] button or [−] button.
While holding down the [+] button, press the [-] button to
rapidly increase the value.
While holding down the [-] button, press the [+] button to
rapidly decrease the value.
Bluetooth indicator
Rear Panel Connections
Disabling the Buttons ( Panel Lock)
When you activate Panel Lock, all buttons other than [Volume] are disabled.
This prevents the tones or settings from being changed if you inadvertently
press a button.
Press the [Other] button for a longer than usual amount of time.
Cancelling Panel Lock
Once again, press the [Other] button for a longer than usual amount of time.
Output Jack
If you connect this jack to amplied
speakers, the sound of this unit will be heard
through them.
USB Computer Port
By using a commercially available USB
cable to connect the USB Computer
port of this digital piano to a USB port
on your computer, you can produce
and edit music using MIDI-compatible
software on your computer.
* To prevent malfunction and equipment failure, always turn down the volume, and turn o all the units before making any connections.
DC In Jack Pedal Connector
Place the AC adaptor so the side with the indicator
(see illustration) faces upwards and the side with textual
information faces downwards.
The indicator will light when you plug the AC adaptor into
an AC outlet.
Input Jack
If you use a cord with a stereo mini-plug to connect a audio
player or similar device, the sound of the connected device will be
heard through this unit. Use the controls of the connected device
(audio player) to adjust the volume.
Power cord
To AC outlet
Connect the pedal
cord of the dedicated
stand here.
Bottom Panel (Connecting Headphones or Memory)
PHONES Jacks
Since this unit has two headphone jacks,
two people can also use headphones
simultaneously.
A Headphones 3D Ambience eect will be
applied, producing the sensation that the
sound is emanating from the piano itself
even when using headphones (p. 11).
Stereo phone plug
Stereo-mini plug
USB MEMORY Port
You can connect a USB ash drive here (p. 7).
Use a commercially available
USB ash drive or a USB
ash drive sold by Roland.
guarantee that all commercially available USB ash
drives will work with this unit.
However, we cannot
9
Page 10
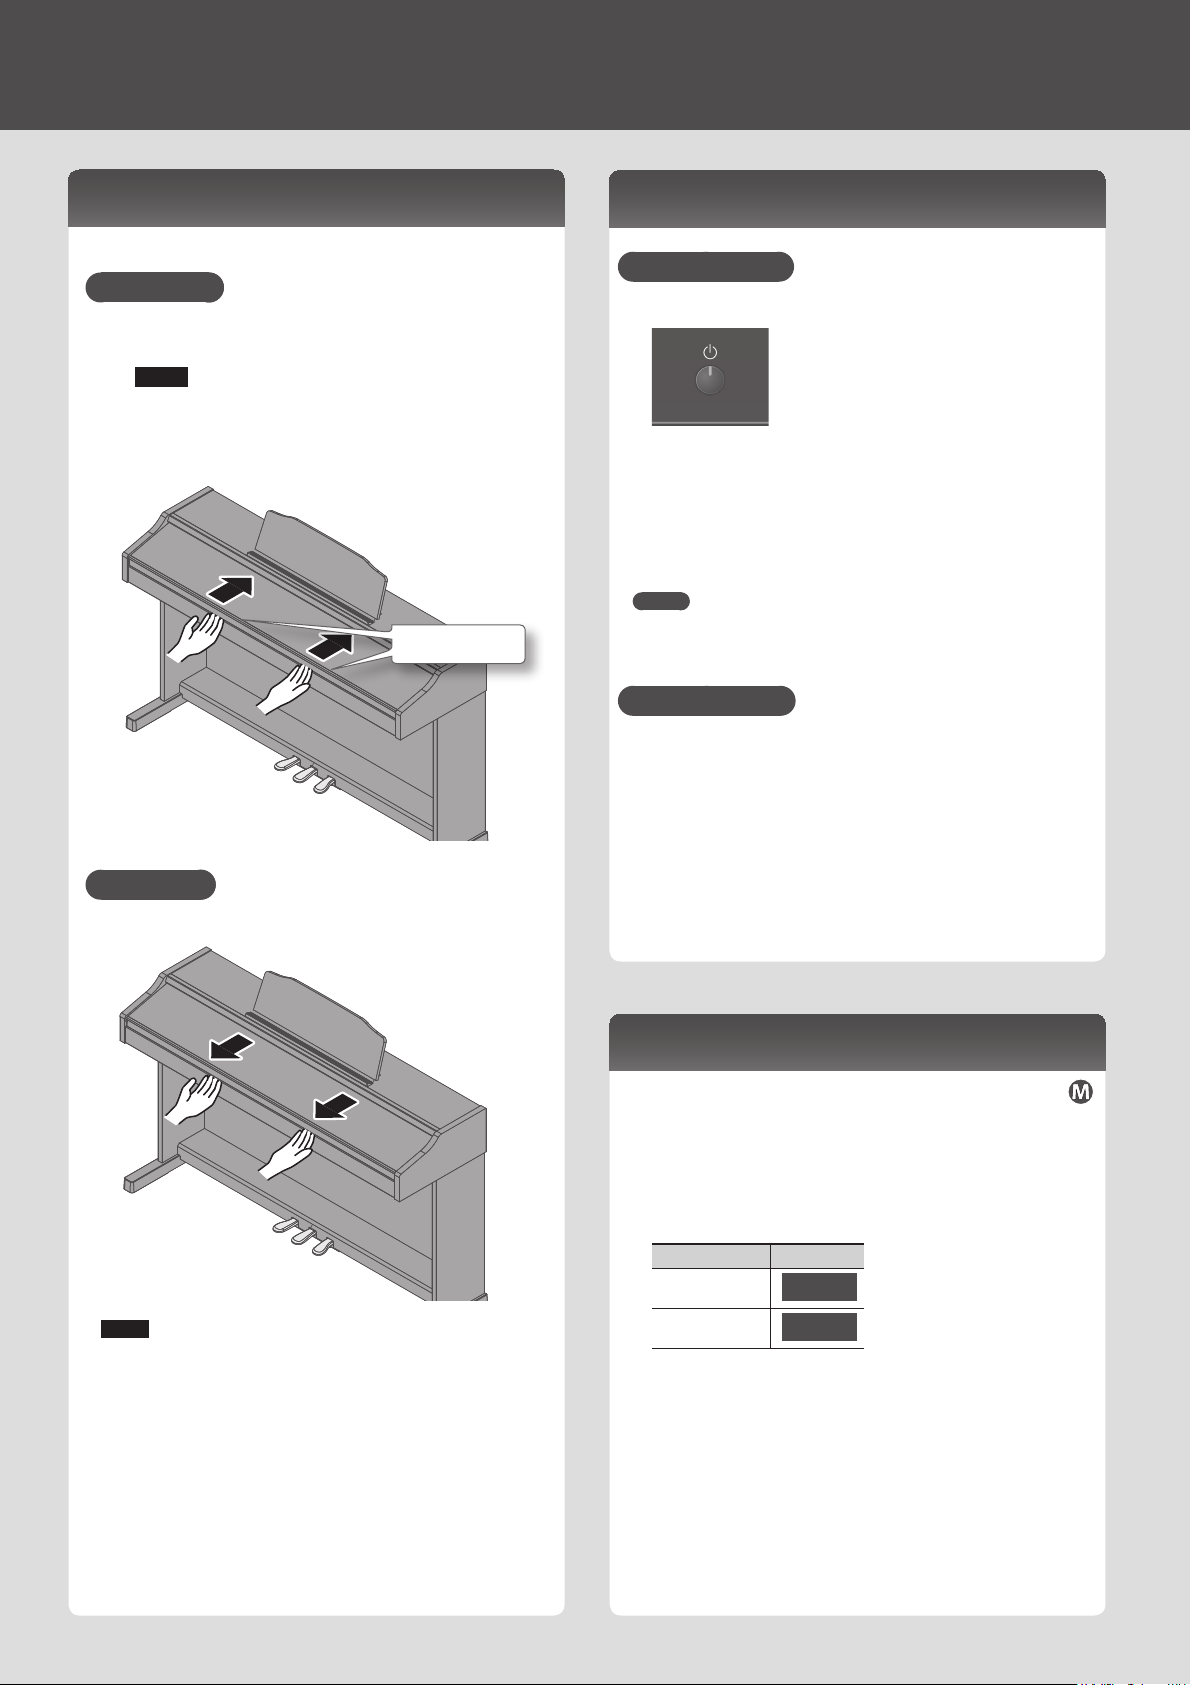
Before You Play
Opening/Closing the Lid
You must use both hands to open or close the lid.
Opening the Lid
1. Use both hands to lift the edge of the lid, and push it away from
yourself.
NOTE
If you have any objects (papers, metal objects, etc.) placed
on top of the keyboard cover, do not open the cover.
Otherwise, such objects may slip inside the instrument,
and then become irrecoverable.
Edge of lid
Turning the Power On/O
Turning the Power On
1. Turn the [L] switch ON.
After a brief interval, you’ll be able to produce sounds by playing the
keyboard.
2. Use the Volume buttons to adjust the volume.
The volume increases when you press the Volume [+] button, and
decreases when you press the Volume [-] button.
This will adjust the volume of the speakers if you’re using the speakers of
the unit, or the volume of the headphones if headphones are connected.
Each volume setting (for speaker or headphone) is saved automatically.
MEMO
The unit is designed so that nuances in the dynamics of your playing will
be clearly heard even at low volume, and that the sound will remain clear
even at high volume.
Turning the Power O
1. Turn the [L] switch OFF.
Closing the Lid
1. Grasp and gently lower the edge of the lid with both hands.
NOTE
• When opening or closing the lid, please be careful not to get your
ngers pinched between the movable part and the panel. In places
where small children are present, make sure that an adult provides
supervision and guidance.
• If you need to move the piano, make sure the lid is closed rst to
prevent accidents.
• Do not apply undue force to the music stand while it is in use.
• Do not open the lid while objects (papers or metal items) are resting on
the lid. The objects could fall into the piano and become irretrievable.
Setting the Reference Pitch
When playing ensemble with other instruments and in other such instances,
you can match the standard pitch to another instrument (Master Tuning).
1. In “Various Settings (Function Mode)” (p. 11), choose “
and then press the [s] button.
2. Use the [-] [+] buttons to set the reference pitch.
Examples:
Reference pitch Display
440.0 Hz (default)
442.0 Hz
Press the [s] button to return to the previous screen.
40.0
42.0
3. If you want to save the setting, carry out the Memory Backup
procedure (p. 11).
4. Hold down the [Metronome] button and press the [Split] button
to exit Function mode.
F07
”
10
Page 11

Various Settings (Function Mode)
°
Basic Operation in Function Mode
1. Hold down the [Metronome] button and press the [Split]
button.
Function mode is selected.
2. Use the [-] [+] buttons to select the function that you want
to set, and press the [s] button to display the setting
screen.
3. Use the [-] [+] buttons to adjust the setting.
Press the [s] button to return to the previous screen.
4. Hold down the [Metronome] button and press the [Split]
button to exit Function mode.
Function settings
Display Value Explanation
(Fixed),
F
(Super Light),
F01
L2
(Light),
L1
(Medium),
N
(Heavy),
H1
(Super Heavy)
H2
Adjusting the Keyboard Sensitivity (Key Touch)
Here’s how to change the way in which the sound responds to your keyboard dynamics. You can adjust the response as appropriate for
your playing strength.
Memory backup
The settings of this digital piano will return to their default state when you turn o
the power. However, you can save the settings so they will remain unchanged even
after the power has been turned o, then on again.
The settings of items marked with the “
saved by using the Memory Backup function.
1. In Function mode, choose “
the [s] button.
” symbol in this operating manual can be
” (Memory Backup) and press
F1g
F02
F03
F04
F05
(Pair),
1
(Separate)
2
Off, On
(Keyboard & Song),
1
(Keyboard),
2
(Song)
3
-6–0–5
[semitone]
Changing the Way in Which the Sound Is Heard (Twin Piano Mode)
This setting species how the sound will be heard when Twin Piano is on.
page
3
Dividing the Keyboard for Two-Person Performance (Twin Piano)
This setting turns Twin Piano on/o.
page
3
Specifying What the Transpose Will Aect (Transpose Mode)
This setting species what the transpose will aect. You can use the transpose to change the pitch of both the song and the keyboard,
only the pitch of the song, or only the pitch of the keyboard.
Transposing the Keyboard or Song (Transpose)
Here you can specify the transposition value.
For example, if the song is written in E major but you want to play it using the ngering of the key of C major, you would set Transpose
to “4.”
If you play C E G 0 It will sound E G B
* If this is set to “0,” the Transpose function will be o.
F06
F07
Off, On
(415.3)–
15.3
(440.0)–
40.0
(466.2) [Hz]
66.2
Applying a Headphones 3D Ambience Eect to the Piano Sound
(Headphones 3D Ambience)
You can apply a Headphones 3D Ambience eect which produces the sensation that the sound is emanating from the piano itself even
when using headphones.
* The Headphones 3D Ambience eect applies only to piano tones; it does not apply to other tones.
On 0 Headphones 3D Ambience is on.
O 0 Headphones 3D Ambience is o .
Matching the Pitch with Other Instruments (Master Tuning)
This setting species the reference pitch for this piano (the pitch of middle A).
page
10
11
Page 12

Various Settings (Function Mode)
Display Value Explanation
F08
1, 2
Changing the Tuning Method (Stretch Tuning)
This setting changes the type of stretch tuning, a tuning method that is used specically for pianos, in which the high notes are tuned
slightly sharper and the low notes are tuned slightly atter.
Normally, you should use the “1” setting (standard tuning curve).
F0g
F10
F11
F12
F13
(Sostenuto, Soft),
1
(Start/Stop),
2
(Intro/Ending),
3
(Variation),
4
(Fill-in),
5
(Leading Bass)
6
Off, On
(Intelligent),
1
(Standard)
2
Off, On
Changing How the Pedals Work
Here you can assign the functions of the center pedal (
0 Sostenuto pedal (
1
0 Same function as the [s (Start/Stop)] button
2
0 Intro/Ending function on/o (same function as the [y(Intro/Ending)] button)
3
0 Variation on/o (same function as the [x (Variation)] button)
4
0 Fill-in
5
0 Leading Bass function on/o
6
F0g
), soft pedal (
F10
)
) and left pedal (
F0g
F10
).
Specifying How the Bass Part Behaves (Leading Bass)
The function that sounds the lowest note of a ngered chord as the bass tone is called “Leading Bass.”
O 0 The bass part of the rhythm plays the root of the chord. For example, if you play the chord E-G-C (C major), the note C is
sounded as the bass.
On 0 The bass part plays the lowest note of the chord you play. If you play the chord E-G-C (C major), the note E is sounded as the
bass.
The Leading Bass feature is always on while Split is o.
Chord Recognition When Split Is On
Sets how the unit recognizes rhythm chords while Split function (p. 2) is on.
Intelligent 0 Plays chords even when basic chord tones are missing, allowing you to generate chords with very simple keyboard
Standard 0 Normal chord recognition.
playing. For details on how to play chords, refer to “Chord Fingering List” at the end of this manual.
Preventing Doubled Notes When Connected to a Sequencer (Local Control)
If a software synthesizer is connected to USB MIDI, turn this item “OFF.”
Since most software synthesizer have their Thru function turned on,
notes you play on the keyboard may be sounded in duplicate, or get
dropped. To prevent this, you can enable the “Local O” setting so that
the keyboard and internal sound generator will be disconnected.
If you choose “OFF,” the keyboard is disconnected from the internal
sound generator,and playing the keyboard will not produce sound.
Local Control
Sound Generator
USB MIDI
In
USB MIDI
Out
Software
Synthesizer
Computer
12
U.01–U.10
(USER 01–10)
F14
N.01–N.gg
(USB 01–99)
B
OFF, On
F15
B
-P-,-N-,P-N
F16
B
1,2,3
F17
: Only on Bluetooth-equipped models
B
Copying a Song (Copy Song)
A song that you recorded on this unit can be copied to a USB ash drive.
The copy-source song number is displayed; use the [-] [+] buttons to select the desired number, and press the [s] button to conrm
it.
The copy-destination song number is displayed; use the [-] [+] buttons to select the desired number, and press the [s] button to
conrm it.
Bluetooth Function
Turns the Bluetooth function on/o.
page
14
Bluetooth Page-Turning/MIDI Switching
Species whether the Bluetooth function is used to turn pages or to transmit/receive MIDI messages.
0 Operates (turns pages in) a music score display app on your mobile device
-P-
0 Transmits/receives MIDI messages
-N-
0 Operates page-turning and transmits/receives MIDI messages
P-N
page
14
Bluetooth Page-Turning Pedal Assignment
Assigns the pedals of this unit to act as key operations for the music score display app that you’re using.
0 Cursor Up/Down
1
0 Page Up/Page Down
2
0 Cursor Left/Right
3
page
15
Page 13

Restoring the Factory Settings (Factory Reset)
Display Value Explanation
Making the Power Automatically Turn O After a Time (Auto O)
F18
OFF, 10, 30, 240
[min.]
This species the auto-o setting.
The remaining time blinks before the power turns o. When there is less than one minute remaining, the countdown will be in seconds.
* This setting is saved automatically when you change it.
Saving the Settings (Memory Backup)
F1g
Restoring the Factory Settings (Factory Reset)
°
The settings you’ve changed in Function mode can be restored to their factory-set condition. This operation is called “Factory Reset.”
NOTE
The “Factory Reset” operation will erase all settings stored by the Memory Backup function, as well as all songs you’ve recorded in internal
memory.
None
The settings of this digital piano will return to their default state when you turn o the power. However, you can
save the settings so they will remain unchanged even after the power has been turned o, then on again.
The display indicates “
”; press the [y] (cancel) button or the [s] (execute) button to cancel or execute.
Svr
page
11
1. While holding down the [Metronome] button and the
[Split] button, turn on the power.
Keep holding down the buttons until it indicates as “
display.
To cancel, press the [y] button.
Specifying the Maximum Volume (Volume Limit)
°
You can specify the maximum Volume setting. This will prevent undesirably high volumes even if the volume buttons are operated unintentionally.
Svr
” on the
2. To execute the Factory Reset, press the [s] button.
When the Factory Reset has been completed, the display will
indicate “End.”
* Never turn o the power before the display indicates “End.”
3. Press the [L] switch to turn the power o, then on again.
1. Hold down the Volume [-] button and the Volume [+]
button, and press the [-] [+] buttons to adjust the value.
Value 20, 40, 60, 80, 100
MEMO
This setting is saved automatically when you change it.
13
Page 14

Using the Bluetooth® Functionality
°
1. Place the mobile device that you want to connect nearby
Provision of Bluetooth functionality
Please be aware that depending on the country in which
you purchased the unit, Bluetooth functionality might
not be included.
If Bluetooth functionality is included
The Bluetooth logo appears
when you turn on the power.
2. In Function mode ([Metronome]+[Split] buttons), select
3. Use the [-] [+] buttons to select “
4. Select “
5. Use the [-] [+] buttons to select “
this unit.
MEMO
If you have more than one unit of this model, power-on only the
unit that you want to pair (power-o the other units).
“
” and press the [s] button (p. 12).
F15
,” and then press the
On
[s] button.
” and press the [s] button.
F16
,” and then press the
-P-
[s] button.
Here’s What You Can Do
Bluetooth functionality creates a wireless connection between
a mobile device such as a smartphone or tablet (subsequently
referred to as the “mobile device”) and this unit, allowing you to do
the following.
Page-turning
A music score display app on the mobile device can be controlled
from this unit.
MIDI data transmission and reception
MIDI data can be exchanged between this unit and the mobile
device.
Using the Pedal to Turn Pages on a Music Score App
Here’s how to use this unit’s pedal to operate (turn pages on) a
music score app on your mobile device.
You can use the sostenuto pedal to turn to the next page, or the
soft pedal to turn to the previous page.
Note when using an already-paired iOS
device
The following operation is required after each time that you
switch the Bluetooth page-turning/MIDI function or execute
a factory reset.
iOS
MEMO
By selecting “
and the MIDI transmit/receive function simultaneously.
For example, this lets you use the pedal to operate the
page-turning function while receiving MIDI to play from this
instrument.
” here, you can use the page-turning function
P-N
6. Turn on the Bluetooth function of the mobile device.
MEMO
The example shown here uses the iPhone. For details, refer to
the owner’s manual of your mobile device.
7. On your mobile device, tap “RP501R.”
This unit will be paired with the mobile device. When pairing
succeeds, the model name of this unit (“RP501R”) is added to the
“Paired Devices” list of the mobile device.
MEMO
• If you’re using an iOS device (iPhone or iPad), the screen of the
iOS device indicates “Bluetooth Pairing Request.” Tap the [Pair]
button.
• If the screen of the mobile device requests you to enter a “Pass
Key,” enter “0000” (four zeros).
8. Hold down the [Metronome] button and press the [Split]
button to exit Function mode.
14
1
Disconnect “RP501R.”
For details, refer to the owner’s manual of your iOS device.
2
Turn o.
If the keyboard is no longer shown on the
mobile device
In some cases, depending on the mobile device app that you’re
using, the keyboard might stop being displayed (i.e., the keyboard
might become unavailable).
If you want the mobile device’s keyboard to be shown while you’re
using the page turning function, hold down this unit’s [Metronome]
button and press the [Piano] button.
To hide the mobile device’s keyboard, once again hold down the
[Metronome] button and press the [Piano] button.
Connecting an Already-Paired Mobile Device
1. Proceed with steps 1–3 and 6 of “Using the Pedal to Turn
Pages on a Music Score App” (p. 14).
This unit will be wirelessly connected to the mobile device.
Page 15
Using the Bluetooth® Functionality
MEMO
• If the above steps do not succeed in establishing a connection,
tap the model name (“RP501R”) that is shown in the Bluetooth
device screen of the mobile device.
• To end the connection, either turn this unit’s Bluetooth “
setting “
“o .”
” or turn your mobile device’s Bluetooth function
OFF
F15
2. Hold down the [Metronome] button and press the [Split]
button to exit Function mode.
Changing the Operating Keys of the Page Turning Function
The key operations for turning pages will dier depending on the
music score display app that you’re using. You can choose which
keys of this unit will operate the page turning function.
1. In Function mode ([Metronome]+[Split] buttons), select
“
” and press the [s] button (p. 12).
F17
2. Use the [-] [+] buttons to select setting, and then press the
[s] button.
Indication S etting Explanation
1
2
3
Cursor Up/
Down
Page Up/
Page Down
Cursor Left/
Right
The [H] [I] keys of the keyboard are used by the
page turning app.
The [Page Up] [Page Down] keys of the keyboard are
used by the page turning app.
The [K] [J] keys of the keyboard are used by the
page turning app.
1. Place the mobile device that you want to connect nearby
this unit.
MEMO
”
If you have more than one unit of this model, power-on only the
unit that you want to pair (power-o the other units).
2. In Function mode ([Metronome]+[Split] buttons), select
“
” and press the [s] button (p. 12).
F15
3. Use the [-] [+] buttons to select “
,” and then press the
On
[s] button.
4. Select “
5. Use the [-] [+] buttons to select “
” and press the [s] button.
F16
,” and then press the
-N-
[s] button.
6. Turn on the Bluetooth function of the mobile device.
MEMO
The example shown here uses the iPhone. For details, refer to
the owner’s manual of your mobile device.
7. In the mobile device’s app (e.g., GarageBand), establish a
connection with this unit.
3. Hold down the [Metronome] button and press the [Split]
button to exit Function mode.
Transferring MIDI Data
Here’s how to make settings for transmitting and receiving MIDI
data between this unit and the mobile device.
Note when using an already-paired iOS
device
The following operation is required after each time that you
switch the Bluetooth page-turning/MIDI function or execute
a factory reset.
1
Disconnect “RP501R.”
For details, refer to the owner’s manual of your iOS device.
iOS
2
Turn o.
NOTE
Do not tap the “RP501R” that is shown in the Bluetooth settings
of the mobile device.
Problems with Bluetooth Functionality
Problem Items to check/Action
This unit does
not appear in
the Bluetooth
device list of
your mobile
device
Can’t connect to
Bluetooth page
turning
Can’t connect to
Bluetooth MIDI
Can’t connect
via MIDI
Can’t pair
Could the Bluetooth function be turned “
If the Bluetooth function (
function (
A device named “RP501R” appears.
If the Bluetooth function (
function (
You can check this from a setting inside your app such as GarageBand.
If the Bluetooth function (
function (
A device named “RP501R” appears. And you can check this from a
setting inside your app such as GarageBand.
In some cases, the connection with the mobile device might become
unavailable when you switch the Bluetooth Turn/MIDI function (
After unpairing the “RP501R” that is registered on the mobile device,
turn the mobile device’s Bluetooth function o and then on again,
and reconnect it.
In some cases, the connection with the mobile device might become
unavailable when you switch the Bluetooth Turn/MIDI function (
After unpairing the “RP501R” that is registered on the mobile device,
turn the mobile device’s Bluetooth function o and then on again,
and reconnect it.
Bluetooth MIDI is only compatible with iOS. Also, you must make the
connection not from the mobile device’s Bluetooth setting but from
the setting within GarageBand or other app that you’re using.
This unit’s Bluetooth function establishes pairing the rst time you
select and pair it from your mobile device. You don’t need to initiate
pairing from this unit.
F16
F16
F16
) is set to “
) is set to “
) is set to “
F15
-P-
F15
-N-
F15
P-N
”
”
”
Off
) is “On” and the Bluetooth Turn/MIDI
) is “On” and the Bluetooth Turn/MIDI
) is “On” and the Bluetooth Turn/MIDI
”?
).
F16
).
F16
15
Page 16

Using the Bluetooth® Functionality
Problem Items to check/Action
Can’t use the
page turning
function and
MIDI function
simultaneously
Can’t connect a
paired mobile
device
Keyboard no
longer appears
(becomes
unavailable)
on the mobile
device
Set the Bluetooth Turn/MIDI function (
If the connection breaks immediately after it is established, or when
you switch the page turning function and MIDI data transmit/receive
function, turning the Bluetooth device’s Bluetooth switch o and
then on again may allow connection to occur.
When using the page turning function, the keyboard might not be
shown (might be unavailable) depending on the mobile device that
you’re using.
If you want the mobile device’s keyboard to be shown while you’re
using the page turning function, hold down this unit’s [Metronome]
button and press the [Piano] button.
To hide the mobile device’s keyboard, hold down the [Metronome]
button and press the [Piano] button.
Troubleshooting
°
F16
) to “
P-N
.”
Problem Cause/Action
Even though
you’re using
headphones
and the sound
is muted, a
thumping sound
is heard when
you play the
keyboard
Power turns o
on its own
Power does not
turn on
Pedal does
not work, or is
“stuck”
Insucient
volume
The volume
level of the
instrument
connected to
Input jack is too
low
No sound/No
sound when
you play back a
song
Not all the notes
you play are
sounded
This unit uses a hammer action keyboard in order to simulate an
acoustic piano’s playing touch as realistically as possible. For this
reason, you’ll hear the hammers thump when you play the keyboard,
just as you would when playing an acoustic piano. Since this unit
allows you to adjust its volume, you might notice the sound of the
hammers in certain situations, but this does not indicate a malfunction. If vibration transmitted to the oor or walls is a concern, you may
be able to minimize the vibration by moving the piano away from the
wall, or by laying down a commercially available anti-vibration mat
designed for use with pianos.
When 30 minutes have elapsed since you last played or operated this
unit, the power will turn o automatically. (This is the factory setting.)
If you don’t need the power to turn o automatically, turn the “Auto
O” setting o (p. 13).
Is the AC adaptor connected correctly? (p. 9)
Is the pedal connected correctly?
Plug the cord rmly into the pedal connector (p. 9).
If you disconnect the pedal cord from the unit while the power is on,
the pedal eect may remain “stuck” in the On condition.
You must power-o the unit before connecting or disconnecting the
pedal cord.
Could Twin Piano be turned on?
If Twin Piano is on, the right pedal will aect only the right-hand
keyboard zone and the left pedal will aect only the left-hand
keyboard zone (p. 3).
Could you have changed the function of the pedal
(
F0g, F10
Could you be using the page-turning function? (p. 14)
Could the volume limit setting have lowered the maximum volume?
The volume can’t be louder than the specied volume limit. Change
the volume limit setting (p. 13).
Could you be using a connection cable that contains a resistor?
Use a connection cable that does not contain a resistor.
Could the unit’s volume or the volume of the connected equipment be
turned down?
Could headphones be connected?
Could there be a plug inserted in a headphone jack?
The speakers will not produce sound if headphones or plug are
connected to the headphone jacks (p. 9).
Has Local Control been set to “O”?
When Local Control is set to O, no sound is produced on the
keyboard. Set Local Control to On (p. 12).
The maximum simultaneous polyphony is 128 voices. If you’re using
the Dual tone (p. 2), if you’re playing along with a song, or if you’re
making extensive use of the damper pedal, the performance data may
exceed the available polyphony, possibly causing some of the notes
you play to drop out.
16
)? (p. 12)
Problem Cause/Action
Could you have made Transpose settings? (p. 11)
Pitch of the
keyboard or
song is incorrect
Sounds are
heard twice
(doubled) when
the keyboard is
played
Reverberation
remains even
though you’ve
turned o the
Ambience eect
The sound
of the higher
notes suddenly
changes from a
certain key
High-pitched
ringing is heard
Sound wrong, or
are buzzy
Is the Master Tune setting appropriate? (p. 10)
The notes of a piano are tuned using a unique method
(stretched tuning), which makes upper-range notes slightly higher in
pitch, and lower-range notes slightly lower in pitch. For this reason,
you might perceive the pitch as being incorrect, but this is the way an
acoustic piano should sound.
Could you have selected a dual tone? (p. 2)
When this unit is connected to an external sequencer, set the Local
Control to o. Alternatively, the sequencer could be set so its Soft Thru
feature is O (p. 12).
The piano sounds of this digital piano faithfully simulate the sense of
depth and resonance of an acoustic piano. For this reason, it may seem
as though there is some reverberation even when the Ambience eect
is turned o.
On an acoustic piano, the approximately one and a half octaves
of notes at the upper end of the keyboard will continue sounding
regardless of the damper pedal. These notes also have a somewhat
dierent tonal character.
This unit faithfully simulate this characteristic of acoustic pianos. On
this unit, the range that is unaected by the damper pedal will change
according to the transpose setting.
If you hear this in headphones:
Piano sounds that have a brilliant and crisp character contain substantial high-frequency components that may sound as though a metallic
ringing has been added. This is because the characteristics of an actual
piano are being faithfully reproduced, and is not a malfunction. This
ringing is more obtrusive if the ambience eect is applied heavily, so
you may be able to minimize it by decreasing the ambience.
If you don’t hear this in headphones:
It is likely that there is some other reason (such as resonances within
the unit). Please contact your dealer, the nearest Roland Service Center,
or an authorized Roland distributor, as listed on the “Information.”
If you set the volume to the maximum setting, the sound may be
distorted depending on how you perform. If this occurs, turn down
the volume.
If you don’t hear this in headphones:
Performing at high volumes may cause the speakers or objects
near the unit to resonate. Fluorescent lights or glass doors may also
resonate sympathetically. In particular, this is more likely to occur for
lower notes and higher volumes. You can take the following measures
to minimize resonances.
• Locate this unit 10–15 cm (4–6 inch) away from walls or other
surfaces.
• Keep the volume down.
• Move away from the objects that are resonating.
If you hear this in headphones:
It is likely that there is some other reason. Please contact your dealer,
the nearest Roland Service Center, or an authorized Roland distributor,
as listed on the “Information.”
Page 17

Message List
°
Indication Meaning
E.01
E.02
E.10
E.11
E.14
E.15
E.16
E.18
E.30
E.40
E.51
E.65
---
The music le you attempted to save is read-only. It cannot be saved.
An error occurred while writing. It may be that the protect tab of the
external media is in the “Protect (write prohibit)” position, or that the
external media has not been formatted.
No USB ash drive connected. Connect a USB ash drive and try the
operation again.
There is insucient free space at the save destination. Either connect a
dierent USB ash drive, or delete unwanted data (song data) and try
the operation again.
An error occurred while reading. The USB ash drive may be damaged.
Connect a dierent USB ash drive and try the operation again. You may
also format the USB ash drive (p. 7).
The le could not be read. The data format is not compatible with the
unit.
The data could not be read fast enough during song playback. After
waiting several seconds, you may be able to play back the song by
pressing the [s] button once again.
This audio format is not supported. Please use WAV format, 44.1 kHz,
16-bit linear audio les.
The unit’s internal memory is full.
The unit cannot deal with the excessive MIDI data sent from the external
USB MIDI.
Reduce the amount of MIDI data sent to the unit.
There may be a problem with the system.
Repeat the procedure from the beginning. If it is not solved after you
have tried a number of times, contact the Roland service center.
The USB ash drive connector was subjected to excessive current.
Make sure that there is no problem with the external media, then turn
the power o, then on again.
The Panel Lock function is on (p. 9).
PU
Blinking
number
When playing back a song, this is shown if the song starts on an upbeat.
When the Auto O function is activated, the remaining time blinks
before the power turns o.
17
Page 18

USING THE UNIT SAFELY
°
WARNING CAUTION CAUTION
Concerning the Auto O function
The power to this unit will
be turned o automatically
after a predetermined
amount of time has passed
since it was last used for
playing music, or its buttons or controls
were operated (Auto O function). If you
do not want the power to be turned o
automatically, disengage the Auto O
function (p. 13).
Use only the supplied AC adaptor
and the correct voltage
Be sure to use only the AC
adaptor supplied with the
unit. Also, make sure the line
voltage at the installation
matches the input voltage
specied on the AC adaptor’s body.
Other AC adaptors may use a dierent
polarity, or be designed for a dierent
voltage, so their use could result in
damage, malfunction, or electric shock.
Use only the supplied power cord
Use only the attached power
cord. Also, the supplied
power cord must not be
used with any other device.
CAUTION
Cautions when moving this unit
If you need to move the
instrument, take note of the
precautions listed below.
At least two persons are
required to safely lift and
move the unit. It should be handled
carefully, all the while keeping it level.
Make sure to have a rm grip, to protect
yourself from injury and the instrument
from damage.
• Check to make sure the screws
securing the unit to the side boards
have not become loose. Fasten them
again securely whenever you notice
any loosening.
• Disconnect the power cord.
• Disconnect all cords coming from
external devices.
• Raise the adjusters on the stand (p.
8).
• Close the lid.
• Remove the music stand.
Take care so as not to get ngers
pinched
When handling the following
moving parts, take care so
as not to get ngers, toes,
etc., pinched. Whenever
a child uses the unit, an
adult should be on hand to provide
supervision and guidance.
• Lid cover (p. 10)
• Pedals (p. 8)
Precautions concerning use of
bench
When using the bench,
please observe the following
points:
• Do not use the bench as a
toy, or as a stepping stool.
• Do not allow two or more
persons to sit on the
bench.
• Do not adjust the height
while sitting on the bench.
• Do not sit on the bench if the bolts
holding the bench legs are loose. (If
the bolts are loose, immediately retighten them using the supplied tool.)
• Never insert your hand into the
gap (the metal height adjustment
mechanism) under the seat lid. Doing
so may cause your hand to be pinched
or injured.
Keep small items out of the reach
of children
To prevent accidental
ingestion of the parts listed
below, always keep them
out of the reach of small
children.
• Included Parts/Removable Parts
Screws
IMPORTANT NOTES
°
Placement
• Do not allow lighting devices that
normally are used while their light
source is very close to the unit (such as
a piano light), or powerful spotlights to
shine upon the same area of the unit
for extended periods of time. Excessive
heat can deform or discolor the unit.
• Do not allow objects to remain on top
of the keyboard. This can be the cause
of malfunction, such as keys ceasing to
produce sound.
Maintenance
• To clean the unit, use a dry, soft cloth;
or one that is slightly dampened. Try
to wipe the entire surface using an
equal amount of strength, moving the
cloth along with the grain of the wood.
Rubbing too hard in the same area can
damage the nish.
Care of the Keyboard
• Do not write on the keyboard with
any pen or other implement, and
do not stamp or place any marking
on the instrument. Ink will seep
into the surface lines and become
unremovable.
• Do not ax stickers on the keyboard.
You may be unable to remove stickers
that use strong adhesives, and the
adhesive may cause discoloration.
• To remove stubborn dirt, use a
commercially available keyboard
cleaner that does not contain
abrasives. Start by wiping lightly.
If the dirt does not come o, wipe
using gradually increasing amounts
of pressure while taking care not to
scratch the keys.
Repairs and Data
• Before sending the unit away for
repairs, be sure to make a backup of
the data stored within it; or you may
prefer to write down the needed
information. Although we will do our
utmost to preserve the data stored in
your unit when we carry out repairs, in
some cases, such as when the memory
section is physically damaged,
restoration of the stored content may
be impossible. Roland assumes no
liability concerning the restoration of
any stored content that has been lost.
Additional Precautions
• Any data stored within the unit can be
lost as the result of equipment failure,
incorrect operation, etc. To protect
yourself against the irretrievable loss
of data, try to make a habit of creating
regular backups of the data you’ve
stored in the unit.
• Roland assumes no liability concerning
the restoration of any stored content
that has been lost.
• Never strike or apply strong pressure
to the display.
• The sound of keys being struck and
vibrations produced by playing
an instrument can be transmitted
through a oor or wall to an
unexpected extent. Please take care
not to cause annoyance to others
nearby.
• Do not apply undue force to the music
stand while it is in use.
• Do not use connection cables that
contain a built-in resistor.
• Do not hang anything other than
headphones on the headphone hook.
Do not apply undue force to the hook.
Otherwise, you risk damaging the
hook.
Using External Memories
• Please observe the following
precautions when handling external
memory devices. Also, make sure to
carefully observe all the precautions
that were supplied with the external
memory device.
• Do not remove the device while
reading/writing is in progress.
• To prevent damage from static
electricity, discharge all static
electricity from your person before
handling the device.
Caution Regarding Radio
Frequency Emissions
• The following actions may subject you
to penalty of law.
• Disassembling or modifying this
device.
• Removing the certication label
axed to the back of this device.
Intellectual Property Right
• It is forbidden by law to make an audio
recording, video recording, copy or
revision of a third party’s copyrighted
work (musical work, video work,
broadcast, live performance, or other
work), whether in whole or in part,
and distribute, sell, lease, perform, or
broadcast it without the permission of
the copyright owner.
• Do not use this product for purposes
that could infringe on a copyright
held by a third party. We assume no
responsibility whatsoever with regard
to any infringements of third-party
copyrights arising through your use of
this product.
• The copyright of content in this
product (the sound waveform data,
style data, accompaniment patterns,
phrase data, audio loops and
image data) is reserved by Roland
Corporation.
• Purchasers of this product are
permitted to utilize said content
(except song data such as Demo
Songs) for the creating, performing,
recording and distributing original
musical works.
• Purchasers of this product are NOT
permitted to extract said content
in original or modied form, for the
purpose of distributing recorded
medium of said content or making
them available on a computer
network.
• MMP (Moore Microprocessor Portfolio)
refers to a patent portfolio concerned
with microprocessor architecture,
which was developed by Technology
Properties Limited (TPL). Roland has
licensed this technology from the TPL
Group.
• XGlite (
• The Bluetooth® word mark and logos
• Roland, BOSS, SuperNATURAL and
• Company names and product names
) is a registered trademark or
a trademark of Yamaha Corporation.
are registered trademarks owned by
Bluetooth SIG, Inc. and any use of such
marks by Roland is under license.
GS are either registered trademarks
or trademarks of Roland Corporation
in the United States and/or other
countries.
appearing in this document are
registered trademarks or trademarks of
their respective owners
18
Page 19
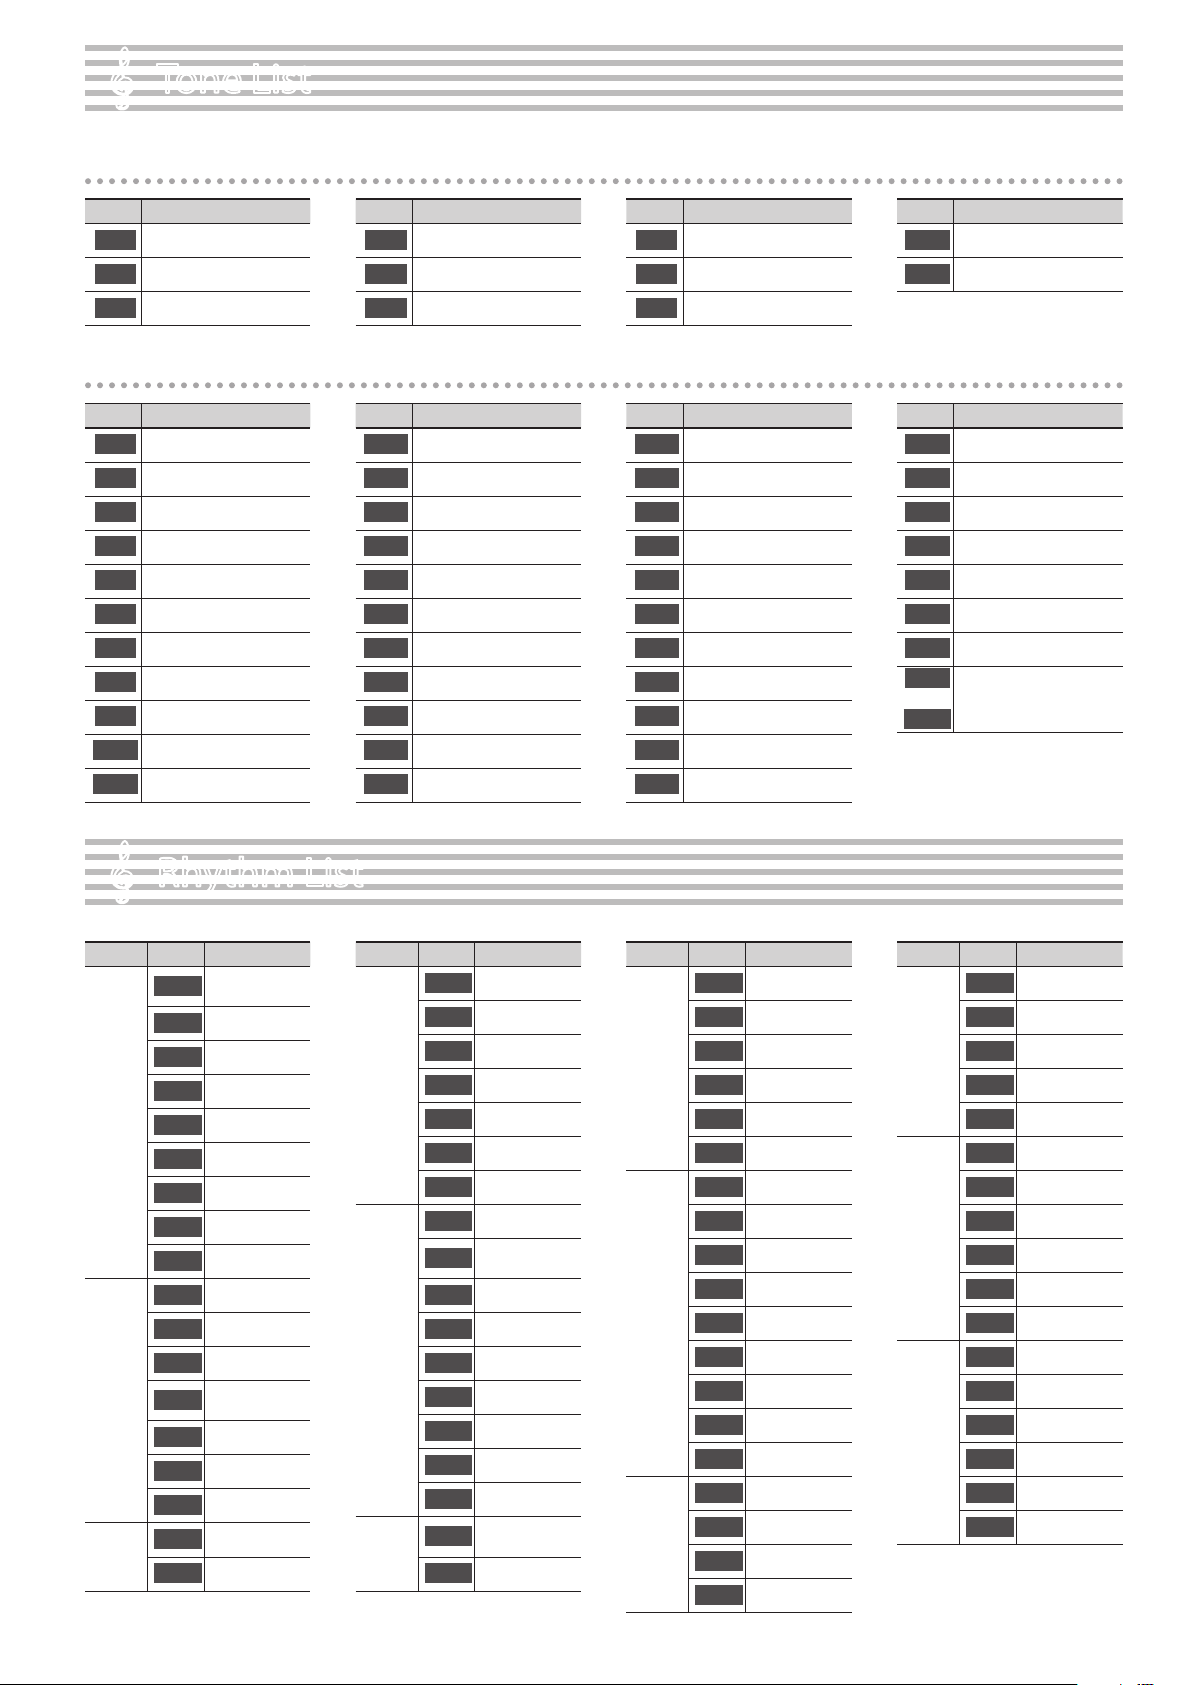
Tone List
°
[Piano] button
No. Name
Concert Piano
1
Ballade Piano
2
Bright Piano
3
[Other] button
No. Name
Trem. TineEP
1
Pop E.Piano
2
Tine EP
3
FM E.Piano
4
Bright FM EP
5
Vib. ReedEP
6
Clav.
7
PhaserTineEP
8
Vibraphone
g
Marimba
10
Celesta
11
No. Name
Magical Piano
4
Piano + Strings
5
Piano + Pad
6
No. Name
Mallet Isle
12
Morning Lite
13
SymphonicStr
14
Rich Strings
15
OrchestraStr
16
DecayStrings
17
Harp
18
PizzicatoStr
1g
ChurchOrgan1
20
ChurchOrgan2
21
Combo Jz.Org
22
No. Name
Piano + Choir
7
Rock Piano
8
Ragtime Piano
g
No. Name
Ballad Organ
23
Full Stops
24
Mellow Bars
25
Accordion
26
Aerial Choir
27
Jazz Scat
28
Female Aahs
2g
Male Aahs
30
Decay Choir
31
Thum Voice
32
Soft Pad
33
No. Name
Harpsichord
10
Coupled Harpsichord
11
No. Name
Dcy ChoirPad
34
Nylon-str.Gt
35
Steel-str.Gt
36
Jazz Guitar
37
AcousticBass
38
A.Bass+Cymbl
3g
FingeredBass
40
41
:
GM2 tones
305
Rhythm List
°
Genre No. Name
Gold Medium
1-1
Beat
Frank's Way
1-2
Gold Slow Beat
1-3
Gold Beat
1-4
Pop
Ballad
Rock
Disco
1-5
1-6
1-7
1-8
1-g
2-1
2-2
2-3
2-4
2-5
2-6
2-7
3-1
3-2
Jessie Beat
US Shue
Strummin' Pop
Unplugged Pop
Amazing Gospel
Easy Ballad
Acoustic Ballad
Love Slow Rock
Unplugged
Ballad
Spring Rock
Joe's Rock
Breaky Rock
Seventies
Jamiro Dance
Genre No. Name
Gold Disco
3-3
Survive Disco
3-4
Hitmix
3-5
Disco
Jazz
Blues
Ball
Room
3-6
3-7
3-8
3-g
4-1
4-2
4-3
4-4
4-5
4-6
4-7
4-8
4-g
5-1
5-2
Club House
Baby Beat
Breath Rap
Now Hip Hop
Gold Swing
Midnight Slow
Swing
Big Band Medium
Slow Jazz Waltz
Cool Soul
Cool Blues
Go! Rock'N
Blue Boogie
Rock'N Slow
It Valzer
Gold Wien Waltz
Genre No. Name
Gold Slow Waltz
5-3
Polka Disco
5-4
Gold Tango
Ball
Room
Latin
Tradit
World
5-5
5-6
5-7
5-8
6-1
6-2
6-3
6-4
6-5
6-6
6-7
6-8
6-g
7-1
7-2
7-3
7-4
Gold Foxtrot
Quick Step
Go! Twist
Gold Rhumba
Beguine
Gold Cha Cha
That's Mambo
Cuba Salsa
Acoustic Samba
Jazz Bossa
Fast Bossa
Samba
Pop Reggae
Love Reggae
Gospel Shue
Ska
Genre No. Name
German Polka
7-5
German Waltz
7-6
Tradit
World
Country
Pianist
7-7
7-8
7-g
8-1
8-2
8-3
8-4
8-5
8-6
g-1
g-2
g-3
g-4
g-5
g-6
6_8 March
US March
Orchestral Waltz
Country Rock
Country Flyer
Southern Twang
Country Ballad
Country Beat
Country Pop
P. Arpeggio
P. Pop
P. Classic Polka
P. Waltz
P. Boogie
P. Ragtime
Page 20

Chord Fingering List
C C# D E E F
°
CM7 C#M7 DM7 E M7 EM7 FM7
C7 C#7 D7 E 7 E7 F7
Cm C#m Dm E m Em Fm
Cm7 C#m7 Dm7 E m7 Em7 Fm7
CmM7 C#mM7 DmM7 E mM7 EmM7 FmM7
Cdim C#dim Ddim E dim Edim Fdim
Cm7 ( 5 )
Caug C#aug Daug E aug Eaug Faug
Csus4 C#sus4 Dsus4 E sus4 Esus4 Fsus4
Dm7 ( 5 ) Em7 ( 5 )
Fm7 ( 5 )E m7 ( 5 )C#m7 ( 5 )
C7sus4 C#7sus4 D7sus4 E 7sus4 E7sus4 F7sus4
C7/13 C#7/13 D7/13 E 7/13 E7/13 F7/13
Page 21

F# G A A B B
F#M7
F#7
F#m
F#m7
F#dim
F#aug
F#7sus4
F#m7 ( 5 )
F#sus4
F#7/13
F#mM7
GM7 A M7 AM7 B M7 BM7
G7 A 7 A7 B 7 B7
Gm A m Am B m Bm
Gm7 A m7 Am7 B m7 Bm7
GmM7 A mM7 AmM7 B mM7 BmM7
Gdim A dim Adim B dim Bdim
Gm7 ( 5 ) Am7 ( 5 ) Bm7 ( 5 )
Gaug A aug Aaug B aug Baug
Gsus4 A sus4 Asus4 B sus4 Bsus4
G7sus4 A 7sus4 A7sus4 B 7sus4 B7sus4
B m7 ( 5 )A m7 ( 5 )
G7/13 A 7/13 A7/13 B 7/13 B7/13
Page 22

Internal Song List
°
No. Song Name Composer
a.01
a.02
a.03
a.04
a.05
a.06
a.07
a.08
a.0g
a.10
a.11
a.12
a.13
a.14
a.15
a.16
a.17
a.18
a.1g
a.20
a.21
a.22
a.23
a.24
a.25
a.26
a.27
a.28
a.2g
a.30
a.31
a.32
a.33
a.34
a.35
a.36
a.37
a.38
a.3g
a.40
a.41
a.42
a.43
a.44
a.45
a.46
a.47
a.48
a.4g
a.50
a.51
a.52
a.53
a.54
a.55
a.56
a.57
a.58
a.5g
a.60
Valse, op.34-1 Fryderyk Franciszek Chopin
Polonaise op.53 Fryderyk Franciszek Chopin
Nocturne No.20 Fryderyk Franciszek Chopin
Die Forelle
Reets dans l'Eau Claude Achille Debussy
La Fille aux Cheveux de Lin Claude Achille Debussy
La Campanella Franz Liszt
Scherzo No.2 Fryderyk Franciszek Chopin
Étude, op.10-12 Fryderyk Franciszek Chopin
Sonate Nr.16 C Dur Wolfgang Amadeus Mozart
Liebesträume Nr.3 Franz Liszt
Étude, op.10-3 Fryderyk Franciszek Chopin
Je te veux Erik Satie
Valse, op.64-1 Fryderyk Franciszek Chopin
Golliwog's Cakewalk Claude Achille Debussy
Fantaisie-Impromptu Fryderyk Franciszek Chopin
1ère Arabesque Claude Achille Debussy
An der schönen, blauen Donau Johann Strauss, Sohn
Auf Flügeln des Gesanges Felix Mendelssohn
Mazurka No.5 Fryderyk Franciszek Chopin
1ère Gymnopédie Erik Satie
Étude, op.25-1 Fryderyk Franciszek Chopin
Clair de Lune Claude Achille Debussy
Étude, op.10-5 Fryderyk Franciszek Chopin
Dr. Gradus ad Parnassum Claude Achille Debussy
Grande Valse Brillante Fryderyk Franciszek Chopin
La prière d'une Vierge Tekla Badarzewska
Course en Troïka Peter Ilyich Tchaikovsky
To The Spring Edvard Hagerup Grieg
Valse, op.64-2 Fryderyk Franciszek Chopin
Radetzky Marsch Johann Baptist Strauss
Träumerei Robert Alexander Schumann
Moments Musicaux op.94-3 Franz Peter Schubert
Prélude, op.28-15 Fryderyk Franciszek Chopin
The Harmonious Blacksmith Georg Friedrich Händel
Ungarische Tänze Nr.5 Johannes Brahms
Türkischer Marsch Ludwig van Beethoven
Nocturne, op.9-2 Fryderyk Franciszek Chopin
Frühlingslied Felix Mendelssohn
Präludium C Dur BWV846 Johann Sebastian Bach
Jägerlied Felix Mendelssohn
Passepied Claude Achille Debussy
Für Elise Ludwig van Beethoven
Türkischer Marsch Wolfgang Amadeus Mozart
Ständchen Franz Peter Schubert
Humoreske Antonín Dvořák
Blumenlied Gustav Lange
Alpenglöckchen Theodor Oesten
Menuett G dur Ludwig van Beethoven
Venezianisches Gondellied Felix Mendelssohn
Alpenabendröte Theodor Oesten
Farewell to the Piano Ludwig van Beethoven
Brautchor Wilhelm Richard Wagner
Forget-Me-Not Heinrich Lichner
Wiener Marsch Carl Czerny
Le Coucou Louis Claude Daquin
Menuett G Dur BWV Anh.114 Johann Sebastian Bach
Spinnerlied Albert Ellmenreich
Gavotte François Joseph Gossec
Heidenröslein Gustav Lange
Franz Peter Schubert,
Arranged by Franz Liszt
No. Song Name Composer
a.61
a.62
a.63
a.64
a.65
a.66
a.67
a.68
a.6g
a.70
a.71
a.72
a.73
a.74
a.75
a.76
a.77
Zigeuner Tanz Heinrich Lichner
La Cinquantaine Gabriel Marie
Csikos Post Hermann Necke
Dolly's Dreaming Awakening Theodor Oesten
La Violette Louis Streabbog
Fröhlicher Landmann Robert Alexander Schumann
Sonatine op.36-1 Muzio Clementi
Sonatine op.20-1 Friedrich Kuhlau
Sonatine No.5 Ludwig van Beethoven
Twinkle Twinkle Little Star French Folk Song
Mary Had a Little Lamb Traditional
Bear Song American Folk Song
Ich Bin Ein Musikante German Folk Song
Grand Father's Clock Henry Work
Maple Leaf Rag Scott Joplin
Le Quattro Stagioni "La Primavera" Antonio Vivaldi
Marche Militaire Nr.1 Franz Peter Schubert
b.01
:
Czerny 100-1–99 Carl Czerny
b.gg
b. 0
Czerny 100-100 Carl Czerny
c.01
:
Hanon 1–20 Charles Hanon
c.20
d.01
d.36
Major Scales,
:
Minor Scales (Harmonic, Melodic)
* All rights reserved. Unauthorized use of this material for purposes
other than private, personal enjoyment is a violation of applicable
laws.
* Musical scores are not included with this unit. You can purchase
musical scores from their respective publishers.
—
Page 23

Page 24

For the U.K.
IMPORTANT: THE WIRES IN THIS MAINS LEAD ARE COLOURED IN ACCORDANCE WITH THE FOLLOWING CODE.
BLUE:
BROWN:
As the colours of the wires in the mains lead of this apparatus may not correspond with the coloured markings identifying
the terminals in your plug, proceed as follows:
The wire which is coloured BLUE must be connected to the terminal which is marked with the letter N or coloured BLACK.
The wire which is coloured BROWN must be connected to the terminal which is marked with the letter L or coloured RED.
Under no circumstances must either of the above wires be connected to the earth terminal of a three pin plug.
NEUTRAL
LIVE
For the USA
DECLARATION OF CONFORMITY
Compliance Information Statement
Model Name :
Type of Equipment :
Responsible Party :
Address :
Telephone :
RP501R
Digital Piano
Roland Corporation U.S.
5100 S. Eastern Avenue Los Angeles, CA 90040-2938
(323) 890-3700
Page 25

For the USA
This transmitter must not be co-located or operated in conjunction with any other antenna or transmitter.
(FCC Part15 Subpart C §15.247, 15.253, 15.255)
This equipment complies with FCC radiation exposure limits set forth for an uncontrolled environment and meets the FCC
radio frequency (RF) Exposure Guidelines. This equipment has very low levels of RF energy that it deemed to comply
without maximum permissive exposure evaluation (MPE).
(FCC Part15 Subpart C §15.247, 15.253, 15.255)
For Canada
This device complies with Industry Canada licence-exempt RSS standard(s). Operation is subject to the following two conditions:
(1) this device may not cause interference, and (2) this device must accept any interference, including interference that may
cause undesired operation of the device.
Le présent appareil est conforme aux CNR d'Industrie Canada applicables aux appareils radio exempts de licence.
L'exploitation est autorisée aux deux conditions suivantes : (1) l'appareil ne doit pas produire de brouillage, et (2) l'utilisateur
de l'appareil doit accepter tout brouillage radioélectrique subi, même si le brouillage est susceptible d'en compromettre le
fonctionnement.
(RSS-Gen §7.1.3)
This equipment complies with IC radiation exposure limits set forth for an uncontrolled environment and meets RSS-102 of
the IC radio frequency (RF) Exposure rules. This equipment has very low levels of RF energy that it deemed to comply
without maximum permissive exposure evaluation (MPE).
Cet équipement est conforme aux limites d’exposition aux rayonnements énoncées pour un environnement non contrôlé et
respecte les règles d’exposition aux fréquences radioélectriques (RF) CNR-102 de l’IC. Cet équipement émet une énergie
RF très faible qui est considérée conforme sans évaluation de l’exposition maximale autorisée.
(RSS-102 §2.6)
For EU countries
European Community Declaration of Conformity
Hereby, Roland Corporation, declares that this RP501R is in compliance with the essential requirements and other relevant provisions of Directive
2014/53/EU.
English
Bulgarian
Czech
Danish
German
Estonian
Greek
Spanish
French
Italian
Latvian
Lithuanian
Hungarian
Dutch
Polish
Portuguese
Romanian
Slovak
Slovenian
Finish
Swedish
The Declaration of Conformity may be consulted in Downloads menu of this product at www.roland.com.
This unit has an RF transmitter(s) with the following specication.
• Operating frequency: 2400–2483.5 MHz
• Maximum RF transmit power: 2.5 mW
Hereby, Roland Corporation, declares that this RP501R is in compliance with the essential requirements and other relevant
provisions of Directive 2014/53/EU.
С настоящето, Roland Corporation, декларира, че RP501R е в съответствие със съществените изисквания и
другитеприложими разпоредби на Директива 2014/53/EU.
Roland Corporation tímto prohlašuje, že RP501R splňuje základní požadavky a všechna příslušná ustanoveni Směrnice 1999/5/ES.
Undertegnede Roland Corporation erklærer herved, at følgende udstyr RP501R overholder de væsentlige krav og øvrige
relevante krav i direktiv 1999/5/EF.
Hiermit erklärt Roland Corporation, dass sich das Gerät RP501R in Übereinstimmung mit den grundlegenden Anforderungen und
den übrigen einschlägigen Bestimmungen der Richtlinie 1999/5/EG bendet.,
Käesolevaga kinnitab Roland Corporation seadme RP501R vastavust direktiivi 1999/5/EÜ põhinõuetele ja nimetatud direktiivist
tulenevatele teistele asjakohastele sätetele.
ΜΕ ΤΗΝ ΠΑΡΟΥΣΑ Roland Corporation ΔΗΛΩΝΕΙ ΟΤΙ RP501R ΣΥΜΜΟΡΦΩΝΕΤΑΙ ΠΡΟΣ ΤΙΣ ΟΥΣΙΩΔΕΙΣ ΑΠΑΙΤΗΣΕΙΣ ΚΑΙ ΤΙΣ ΛΟΙΠΕΣ
ΣΧΕΤΙΚΕΣ ΔΙΑΤΑΞΕΙΣ ΤΗΣ ΟΔΗΓΙΑΣ 1999/5/ΕΚ
Por la presente, Roland Corporation, declara que este RP501R cumple con los requisitos esenciales y otras exigencias relevantes de
la Directiva 2014/53/EU.
Par la présente, Roland Corporation déclare que l’appareil RP501R est conforme aux exigences essentielles et aux autres
dispositions pertinentes de la directive 1999/5/CE.
Con la presente Roland Corporation dichiara che questo RP501R è conforme ai requisiti essenziali ed alle altre disposizioni
pertinenti stabilite dalla direttiva 1999/5/CE.
Ar šo Roland Corporation deklarē, ka RP501R atbilst Direktīvas 1999/5/EK būtiskajām prasībām un citiem ar to saistītajiem
noteikumiem.
Šiuo Roland Corporation deklaruoja, kad šis RP501R atitinka esminius reikalavimus ir kitas 1999/5/EB Direktyvos nuostatas
A Roland Corporation ezzennel kijelenti, hogy a RP501R típusú beren-dezés teljesíti az alapvető követelményeket és más 1999/5/
EK irányelvben meghatározott vonatkozó rendelkezéseket.
Hierbij verklaart Roland Corporation dat het toestel l RP501R in overeenstemming is met de essentiële eisen en de andere
relevante bepalin-gen van richtlijn 1999/5/EG.
Niniejszym Roland Corporation deklaruje że RP501R jest zgodny z zasadniczymi wymaganiami i innymi właściwymi
postanowieniami Dyrektywy 2014/53/EU.
Eu, Roland Corporation, declaro que o RP501R cumpre os requisitos essenciais e outras provisões relevantes da Directiva 2014/53/
EU.
Prin prezenta, Roland Corporation, declară că aparatul RP501R este în conformitate cu cerinţele esenţiale şi cu alte prevederi
pertinente ale Directivei 1999/5/CE.
Roland Corporation týmto vyhlasuje, že RP501R spĺňa základné požiadavky a všetky príslušné ustanovenia Smernice 1999/5/ES.
Roland Corporation izjavlja, da je ta RP501R v skladu z bistvenimi zahtevami in drugimi relevantnimi določili direktive 1999/5/ES.
Roland Corporation vakuuttaa täten että RP501R tyyppinen laite on direktiivin 1999/5/EY oleellisten vaatimusten ja sitä koskevien
direktiivin muiden ehtojen mukainen.
Härmed intygar Roland Corporation att denna RP501R står I överensstämmelse med de väsentliga egenskapskrav och övriga
relevanta bestämmelser som framgår av direktiv 1999/5/EG.
Page 26

* 5 1 0 0 0 5 2 9 0 2 - 0 1 *
 Loading...