

Page 1
Page 2
Before using this unit, carefully read the sections entitled: “IMPORTANT SAFETY INSTRUCTIONS,” “USING THE UNIT
CAUTION
RISK OF ELECTRIC SHOCK
DO NOT OPEN
ATTENTION: RISQUE DE CHOC ELECTRIQUE NE PAS OUVRIR
CAUTION: TO REDUCE THE RISK OF ELECTRIC SHOCK,
DO NOT REMOVE COVER (OR BACK).
NO USER-SERVICEABLE PARTS INSIDE.
REFER SERVICING TO QUALIFIED SERVICE PERSONNEL.
The lightning flash with arrowhead symbol, within an
equilateral triangle, is intended to alert the user to the
presence of uninsulated “dangerous voltage” within the
product’s enclosure that may be of sufficient magnitude to
constitute a risk of electric shock to persons.
The exclamation point within an equilateral triangle is
intended to alert the user to the presence of important
operating and maintenance (servicing) instructions in the
literature accompanying the product.
INSTRUCTIONS PERTAINING TO A RISK OF FIRE, ELECTRIC SHOCK, OR INJURY TO PERSONS.
IMPORTANT SAFETY INSTRUCTIONS
SAVE THESE INSTRUCTIONS
WARNING - When using electric products, basic precautions should always be followed, including the following:
1. Read these instructions.
2. Keep these instructions.
3. Heed all warnings.
4. Follow all instructions.
5. Do not use this apparatus near water.
6. Clean only with a dry cloth.
7. Do not block any of the ventilation openings. Install in
accordance with the manufacturers instructions.
8. Do not install near any heat sources such as radiators,
heat registers, stoves, or other apparatus (including
amplifiers) that produce heat.
9. Do not defeat the safety purpose of the polarized or
grounding-type plug. A polarized plug has two blades with
one wider than the other. A grounding type plug has two
blades and a third grounding prong. The wide blade or the
third prong are provided for your safety. If the provided plug
does not fit into your outlet, consult an electrician for
replacement of the obsolete outlet.
10. Protect the power cord from being walked on or pinched
particularly at plugs, convenience receptacles, and the
point where they exit from the apparatus.
11. Only use attachments/accessories specified by the
manufacturer.
12. Use only with the cart, stand, tripod, bracket,
or table specified by the manufacturer, or
sold with the apparatus. When a cart is used,
use caution when moving the cart/apparatus
combination to avoid injury from tip-over.
13. Unplug this apparatus during lightning storms or when
unused for long periods of time.
14. Refer all servicing to qualified service personnel. Servicing
is required when the apparatus has been damaged in any
way, such as power-supply cord or plug is damaged, liquid
has been spilled or objects have fallen into the apparatus,
the apparatus has been exposed to rain or moisture, does
not operate normally, or has been dropped.
IMPORTANT: THE WIRES IN THIS MAINS LEAD ARE COLOURED IN ACCORDANCE WITH THE FOLLOWING CODE.
BLUE:
BROWN:
As the colours of the wires in the mains lead of this apparatus may not correspond with the coloured markings identifying
the terminals in your plug, proceed as follows:
The wire which is coloured BLUE must be connected to the terminal which is marked with the letter N or coloured BLACK.
The wire which is coloured BROWN must be connected to the terminal which is marked with the letter L or coloured RED.
Under no circumstances must either of the above wires be connected to the earth terminal of a three pin plug.
NEUTRAL
LIVE
For the U.K.
WARNING: To reduce the risk of fire or electric shock, do not expose this apparatus to rain or moisture.
SAFELY” (p. 6), and “Important Notes” (p. 9).
These sections provide important information concerning the proper operation of the unit. Additionally, in order to
feel assured that you have gained a good grasp of every feature provided by your new unit, owner’s manual should
be read in its entirety. The manual should be saved and kept on hand as a convenient reference.
IMPORTANT SAFETY INSTRUCTIONS
Copyright © 2009 ROLAND CORPORATION
All rights reserved. No part of this publication may be reproduced in any form without the written permission of ROLAND CORPORATION.
3
Page 3
Look at All You Can Do with the RM-700!
Full-fledged Piano Performance
Piano Sounds with Rich Resonance and Wide-Ranging Expressiveness
The stereo multi-sampled piano sound generator vividly reproduces even the sound of the
hammer striking the strings and the subtle sound of a key being released, faithfully delivering
the sound of a high-quality concert grand piano.
“Ivory Feel” Keyboard Provides Grand Piano Touch and Feel
The “Ivory Feel Keyboard” uses cutting-edge technology to reproduce the tactile sensation of
ivory and ebony, considered to be the ultimate materials for a piano keyboard. Together with
the “Progressive Hammer Action II (PHA II)” mechanism, which simulates the distinctive touch
of a piano action, you can enjoy the playing feel and response that top-level performers expect
from a grand piano.
Use “Piano Designer” to Customize Your Piano Sound p. 29
This feature simulates the sound and expressive power of the grand piano, including aspects
such as the sympathetic resonance of the piano strings, the way in which the sound is affected
by the opened or closed position of the piano lid, and the subtle sounds that occur when the
damper pedal is pressed to release the strings. You can create your own personalized piano
sound by adjusting these factors to your taste.
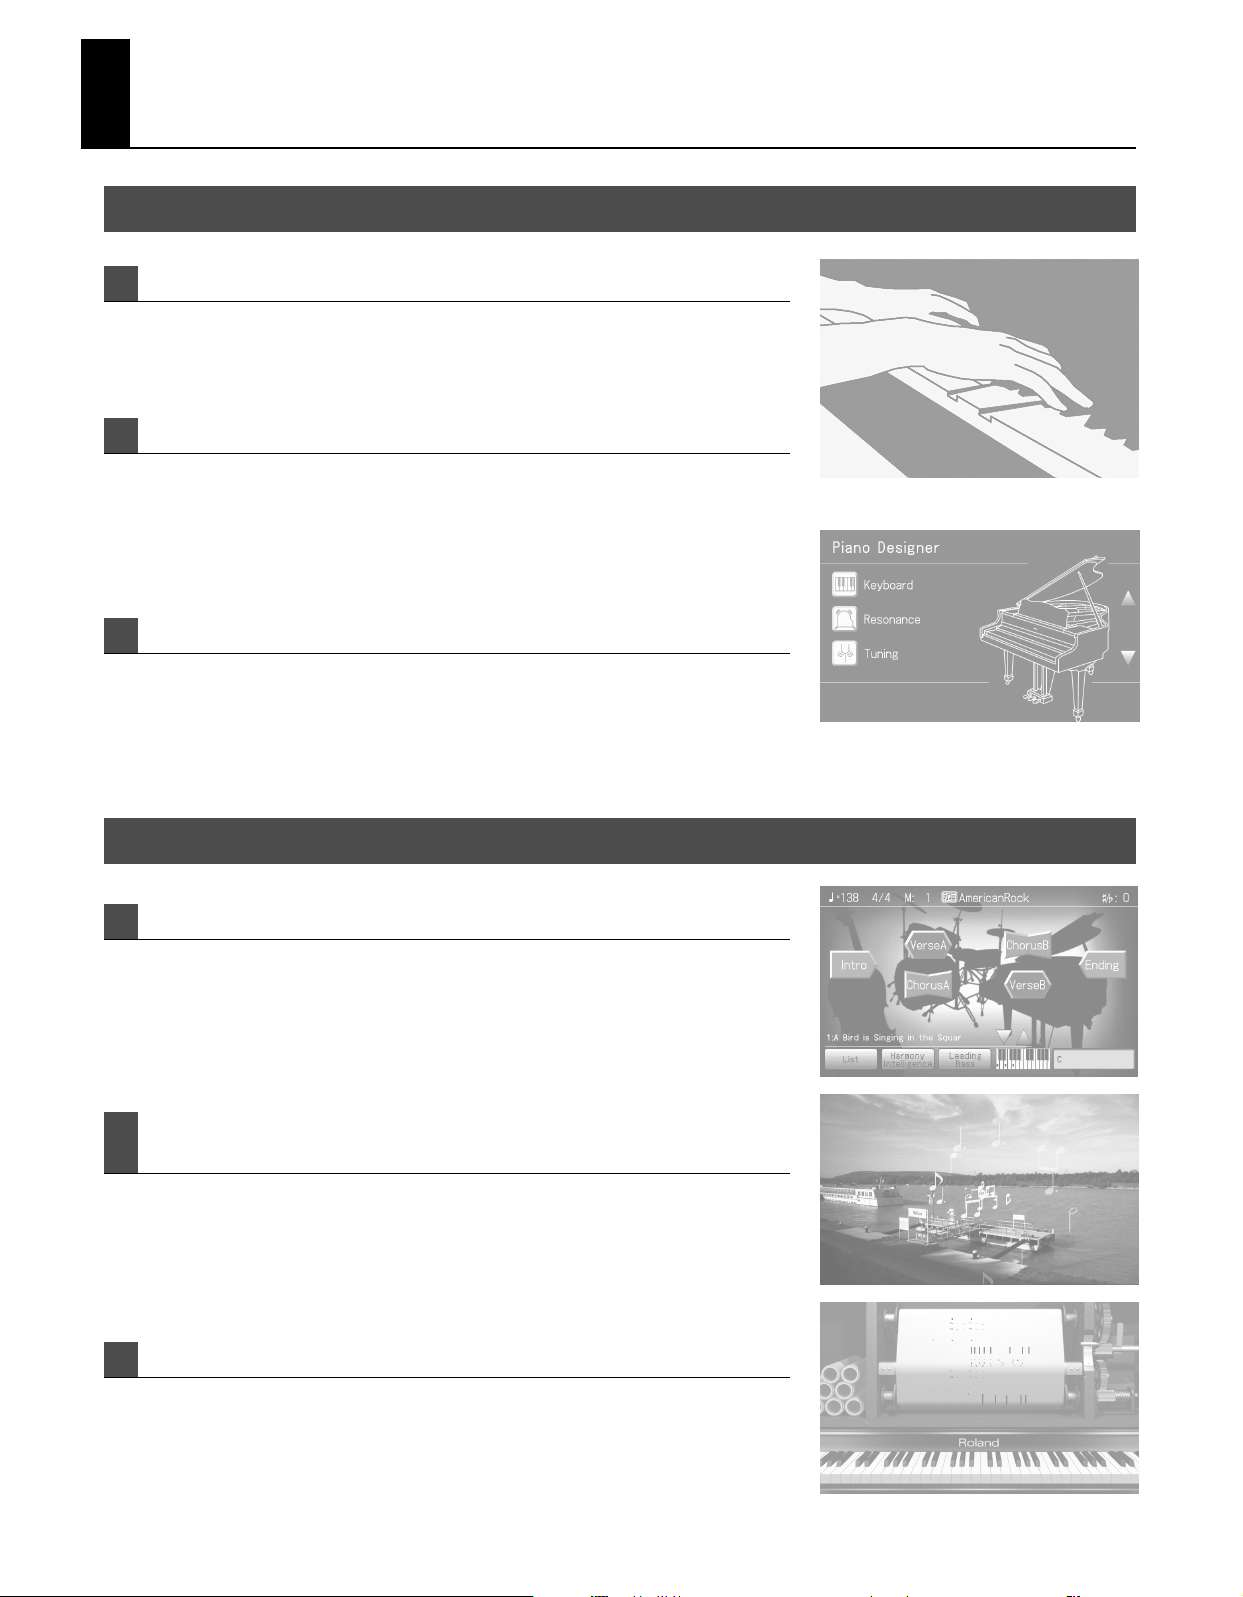
Enjoy Performing
Enjoy Performing with Automatic Accompaniment p. 52
Built into the RM-700 are a broad range of Music Styles (rhythm and automatic
accompaniment patterns) that cover favorite musical genres from around the world.
The “One Touch Song” function makes it easy to add the ideal accompaniment or sound to the
songs you want to play.
Use “Slide Show” and “Anime” to Visually Enhance Your Performance
p. 90, p. 94
“Slide Show” automatically switches between images at the specified timing. By using this in
conjunction with the “Anime” function, which displays graphics or text in time with your
keyboard performance or the song playback, you can enjoy a variety of images that change
along with the performance.
Enjoy the Music Visually With the Piano Roll Screen p. 96
The on-screen keyboard can automatically move according to the notes while a song plays, or
you can watch a visual representation of the pitch and duration of the notes. This means that
you can enjoy music not just with your ears, but also with your eyes.
4
Page 4
Take Advantage of a Wide Range of Music File p. 75
The RM-700 supports the GM2 specification—the universal standard for SMF music file. You
can connect separately available USB memory or a CD drive (or floppy disk drive) and take
advantage of a rich variety of SMF music file.
You can also play back music CD or audio/MP3 format songs, or use VIMA TUNES (CD-ROMs
produced for VIMA) to enjoy music and slide shows.
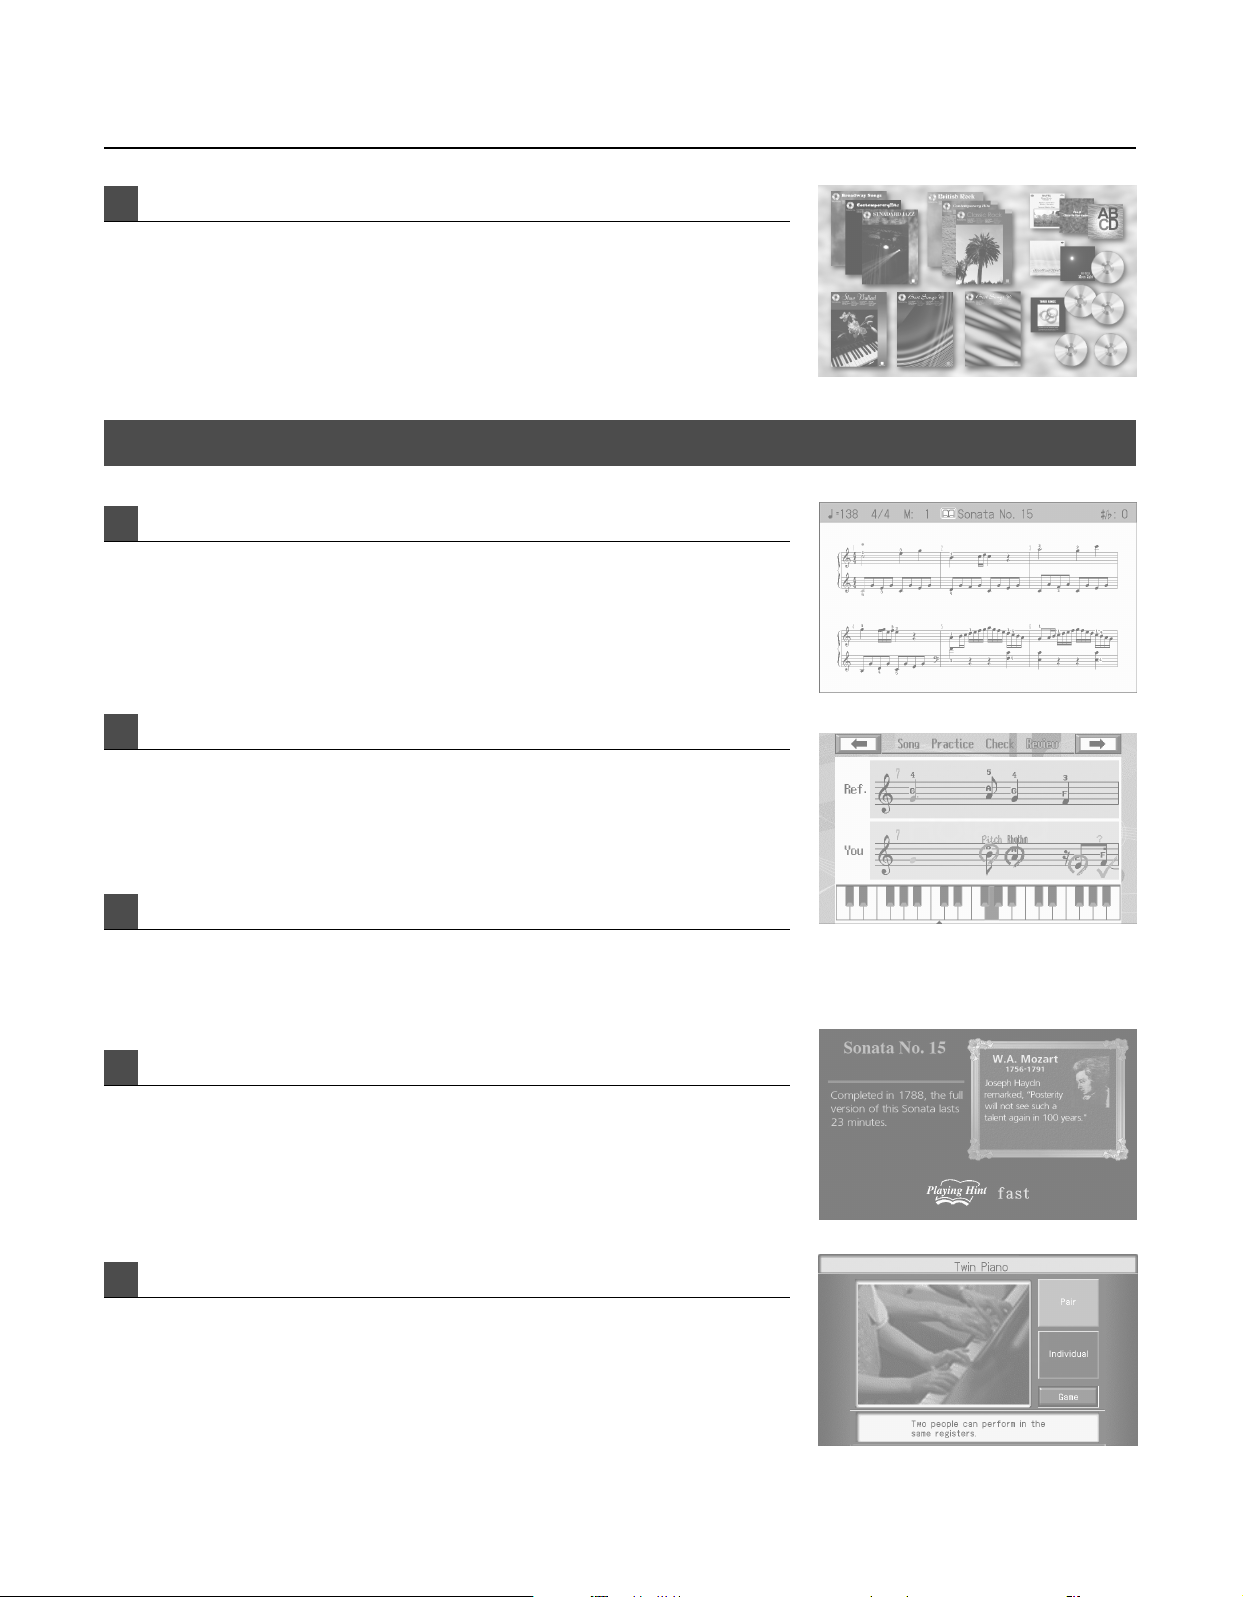
Learn and Practice Enjoyably
DigiScore p. 106
The “DigiScore” function can display notation in the display not only for the internal songs but
also for SMF format songs or performances you’ve recorded on the RM-700.
This convenient function lets you perform while viewing the notation, or check a performance
that you’ve recorded.
Look at All You Can Do with the RM-700!
Visual Lesson p. 99
As you play along with the accompaniment, this function evaluates and grades your playing.
You can view the results as musical notation to see how it differs from the model. You can also
print your performance results as notation.
Wonderland p. 98
This lets you have fun listening to the sound of various instruments and playing musical
games. It's an enjoyable way to discover new enjoyment of sound and musical instruments.
Playing Hint p. 78
Some of the internal songs let you take advantage of “Playing Hints,” which provide
suggestions for your performance as the song progresses.
You can also view information about the song or a profile of the composer.
Twin Piano p. 104
This function lets you split the keyboard into left and right regions so that two people can
perform in the same register.
When one person is mirroring the other’s playing, this is an easy way to check whether the two
are playing the identical notes.
You can also have fun with “Twin Piano Games” for enjoyably practicing music in a game-like
fashion.
5
Page 5
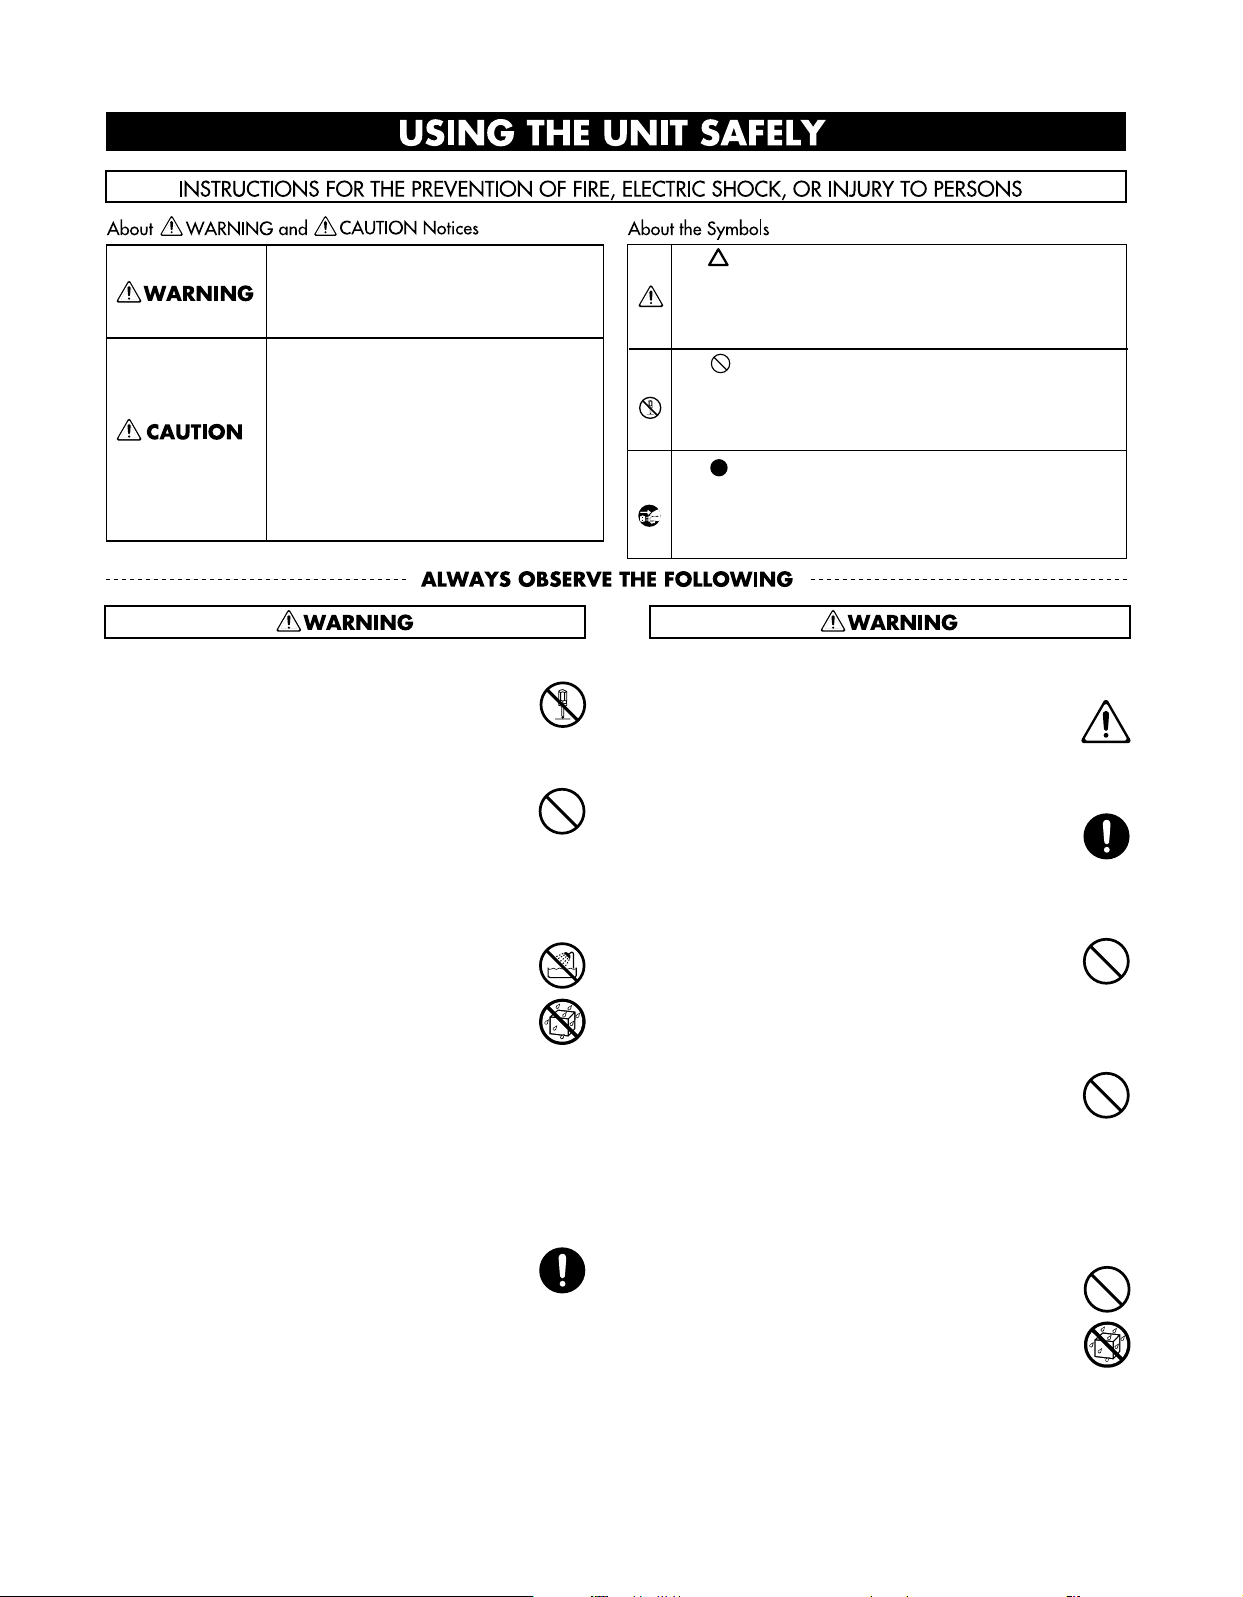
USING THE UNIT SAFELY
Used for instructions intended to alert the
user to the risk of death or severe injury
should the unit be used improperly.
Used for instructions intended to alert the
user to the risk of injury or material
damage should the unit be used
improperly.
* Material damage refers to damage or
other adverse effects caused with
respect to the home and all its
furnishings, as well to domestic animals
or pets.
Do not disassemble or modify
002a
•
Do not open or perform any internal modifications on the
unit.
................................................................................................................................................
Do not repair or replace parts
003
Do not attempt to repair the unit, or replace parts within it
•
(except when this manual provides specific instructions
directing you to do so). Refer all servicing to your retailer,
the nearest Roland Service Center, or an authorized Roland
distributor, as listed on the “Information” page.
................................................................................................................................................
Never install the unit in any of the following locations
004
•
Never install the unit in any of the following locations.
• Subject to temperature extremes (e.g., direct sunlight in
an enclosed vehicle, near a heating duct, on top of heatgenerating equipment); or are
• Damp (e.g., baths, washrooms, on wet floors); or are
• Exposed to steam or smoke; or are
• Subject to salt exposure; or are
• Humid; or are
• Exposed to rain; or are
• Dusty or sandy; or are
• Subject to high levels of vibration and shakiness.
................................................................................................................................................
Do not place in an unstable location
007
Make sure you always have the unit placed so it is level and
•
sure to remain stable. Never place it on stands that could
wobble, or on inclined surfaces.
................................................................................................................................................
The symbol alerts the user to important instructions or
warnings.The specific meaning of the symbol is
determined by the design contained within the triangle. In
the case of the symbol at left, it is used for general
cautions, warnings, or alerts to danger.
The symbol alerts the user to items that must never be
carried out (are forbidden). The specific thing that must
not be done is indicated by the design contained within
the circle. In the case of the symbol at left, it means that
the unit must never be disassembled.
The symbol alerts the user to things that must be
carried out. The specific thing that must be done is
indicated by the design contained within the circle. In the
case of the symbol at left, it means that the power-cord
plug must be unplugged from the outlet.
Connect the power cord to an outlet of the correct
voltage
008a
•
The unit should be connected to a power supply only of the
type described in the operating instructions, or as marked
on the rear side of unit.
................................................................................................................................................
Use only the included power cord
008e
•
Use only the attached power-supply cord. Also, the supplied
power cord must not be used with any other device.
................................................................................................................................................
Do not bend the power cord or place heavy objects on
it
009
Do not excessively twist or bend the power cord, nor place
•
heavy objects on it. Doing so can damage the cord,
producing severed elements and short circuits. Damaged
cords are fire and shock hazards!
................................................................................................................................................
Avoid extended use at high volume
010
•
This unit, either alone or in combination with an amplifier
and headphones or speakers, may be capable of producing
sound levels that could cause permanent hearing loss. Do
not operate for a long period of time at a high volume level,
or at a level that is uncomfortable. If you experience any
hearing loss or ringing in the ears, you should immediately
stop using the unit, and consult an audiologist.
................................................................................................................................................
Do not insert foreign objects
011
Do not allow any objects (e.g., flammable material, coins,
•
pins); or liquids of any kind (water, soft drinks, etc.) to
penetrate the unit.
................................................................................................................................................
6
Page 6
Turn off the power if an abnormality or malfunction
occurs
012a
•
Immediately turn the power off, remove the power cord
from the outlet, and request servicing by your retailer, the
nearest Roland Service Center, or an authorized Roland
distributor, as listed on the “Information” page when:
• The power-supply cord or the plug has been damaged;
or
• If smoke or unusual odor occurs
• Objects have fallen into, or liquid has been spilled onto
the unit; or
• The unit has been exposed to rain (or otherwise has
become wet); or
• The unit does not appear to operate normally or exhibits
a marked change in performance.
................................................................................................................................................
Do not allow children to use without supervision
013
• In households with small children, an adult should provide
supervision until the child is capable of following all the
rules essential for the safe operation of the unit.
................................................................................................................................................
Do not drop or subject to strong impact
014
• Protect the unit from strong impact.
(Do not drop it!)
................................................................................................................................................
Do not share an outlet with an unreasonable number
of other devices
015
• Do not force the unit’s power-supply cord to share an outlet
with an unreasonable number of other devices. Be
especially careful when using extension cords—the total
power used by all devices you have connected to the
extension cord’s outlet must never exceed the power rating
(watts/amperes) for the extension cord. Excessive loads can
cause the insulation on the cord to heat up and eventually
melt through.
................................................................................................................................................
Do not use overseas
016
• Before using the unit in a foreign country, consult with your
retailer, the nearest Roland Service Center, or an authorized
Roland distributor, as listed on the “Information” page.
................................................................................................................................................
Do not recharge, heat, or disassemble the batteries
Do not incinerate or submerge in water
019
• Batteries must never be recharged, heated, taken apart, or
thrown into fire or water.
................................................................................................................................................
Do not use a CD-ROM in an audio CD player or DVD
player
023
DO NOT play a CD-ROM disc on a conventional audio CD
•
player or DVD player. The resulting sound may be of a level
that could cause permanent hearing loss. Damage to
speakers or other system components may result.
................................................................................................................................................
Do not place containers of water on the device
026
•
Do not put anything that contains water (e.g., flower vases)
on this unit. Also, avoid the use of insecticides, perfumes,
alcohol, nail polish, spray cans, etc., near the unit. Swiftly
wipe away any liquid that spills on the unit using a dry, soft
cloth.
................................................................................................................................................
Never expose battery to excessive heat
027
• Never expose Battery to excessive heat such as sunshine,
fire or the like.
................................................................................................................................................
Place in a well ventilated location
101a
The unit should be located so that its location or position
•
does not interfere with its proper ventilation.
................................................................................................................................................
Grasp the plug when connecting or disconnecting the
power cord
102b
Always grasp only the plug on the power-supply cord when
•
plugging into, or unplugging from, an outlet or this unit.
................................................................................................................................................
Periodically wipe the dust off the power cord plug
103a
At regular intervals, you should unplug the power plug and
•
clean it by using a dry cloth to wipe all dust and other
accumulations away from its prongs. Also, disconnect the
power plug from the power outlet whenever the unit is to
remain unused for an extended period of time. Any
accumulation of dust between the power plug and the
power outlet can result in poor insulation and lead to fire.
................................................................................................................................................
Manage cables for safety
104
• Try to prevent cords and cables from becoming entangled.
Also, all cords and cables should be placed so they are out
of the reach of children.
................................................................................................................................................
Do not stand or place heavy objects on this device
106
• Never climb on top of, nor place heavy objects on the unit.
................................................................................................................................................
Do not connect or disconnect the power cord with wet
hands
107b
Never handle the power cord or its plugs with wet hands
•
when plugging into, or unplugging from, an outlet or this
unit.
................................................................................................................................................
7
Page 7

Cautions when moving this unit
108d: Selection
•
If you need to move the instrument, take note of the
precautions listed below. At least two persons are required
to safely lift and move the unit. It should be handled
carefully, all the while keeping it level. Make sure to have a
firm grip, to protect yourself from injury and the instrument
from damage.
1
• Check to make sure the knob bolts securing the unit to
the stand have not become loose. Fasten them again
securely whenever you notice any loosening.
2
• Disconnect the power cord.
3
• Disconnect all cords coming from external devices.
4
• Raise the adjusters on the stand (p. 22).
5
• Close the lid.
7
• Fold down the music stand.
................................................................................................................................................
Unplug the power cord from the AC outlet before
cleaning
109a
• Before cleaning the unit, turn off the power and unplug the
power cord from the outlet (p. 19).
................................................................................................................................................
If there is a possibility of lightning strike, disconnect
the power cord from the AC outlet
110a
• Whenever you suspect the possibility of lightning in your
area, pull the plug on the power cord out of the outlet.
................................................................................................................................................
Cautions when using batteries
111: Selection
• If used improperly, batteries may explode or leak and cause
damage or injury. In the interest of safety, please read and
observe the following precautions (p. 20).
1
• Carefully follow the installation instructions for batteries,
and make sure you observe the correct polarity.
2
• Avoid using new batteries together with used ones. In
addition, avoid mixing different types of batteries.
3
• Remove the batteries whenever the unit is to remain
unused for an extended period of time.
5
• If a battery has leaked, use a soft piece of cloth or paper
towel to wipe all remnants of the discharge from the
battery compartment. Then install new batteries. To
avoid inflammation of the skin, make sure that none of
the battery discharge gets onto your hands or skin.
Exercise the utmost caution so that none of the
discharge gets near your eyes. Immediately rinse the
affected area with running water if any of the discharge
has entered the eyes.
6
• Never keep batteries together with metallic objects such
as ballpoint pens, necklaces, hairpins, etc.
................................................................................................................................................
Cautions when dispose batteries
112
•
Used batteries must be disposed of in compliance with
whatever regulations for their safe disposal that may be
observed in the region in which you live.
................................................................................................................................................
Caution when opening/closing the lid
116
•
Be careful when opening/closing the lid so you do not get
your fingers pinched (p. 20). Adult supervision is recommended whenever small children use the unit.
................................................................................................................................................
Cautions when using the bench
117
• When using the bench, please observe the following points:
1
• Do not use the bench as a toy, or as a stepping stool.
2
• Do not allow two or more persons to sit on the bench.
4
• Do not sit on the bench if the bolts holding the bench
legs are loose. (If the bolts are loose, immediately retighten them using the supplied tool.)
5
• When opening or closing the seat lid, be careful not to
pinch your fingers. In particular, be careful not to pinch
your fingers in the folding metal supports.
................................................................................................................................................
Keep small items out of the reach of children
118c
• Always keep the following parts including with the RM-700
and small components that may be removed out of the
reach of small children to avoid accidental ingestion of
these parts.
• Included Parts
• External memory anti-theft lock securing screw
• Removable parts
• Screws fastening the stand
• Screws fastening music rest
• the thumbscrew fastening the headphone hook
................................................................................................................................................
8
Page 8

Important Notes
Power Supply
301
• Do not connect this unit to same electrical outlet that is being used by
an electrical appliance that is controlled by an inverter (such as a
refrigerator, washing machine, microwave oven, or air conditioner), or
that contains a motor. Depending on the way in which the electrical
appliance is used, power supply noise may cause this unit to
malfunction or may produce audible noise. If it is not practical to use a
separate electrical outlet, connect a power supply noise filter
between this unit and the electrical outlet.
304b
• To prevent malfunction, switch off the piano’s power before you
install or replace the batteries in the included remote control unit.
306b
• Batteries are supplied with the Remote Control. The life of these
batteries may be limited, however, since their primary purpose was to
enable testing.
307
• Before connecting this unit to other devices, turn off the power to all
units. This will help prevent malfunctions and/or damage to speakers
or other devices.
308
• Although the LCD and LEDs are switched off when the POWER switch
is switched off, this does not mean that the unit has been completely
disconnected from the source of power. If you need to turn off the
power completely, first turn off the POWER switch, then unplug the
power cord from the power outlet. For this reason, the outlet into
which you choose to connect the power cord’s plug should be one
that is within easy reach and readily accessible.
358
• Do not allow objects to remain on top of the keyboard. This can be
the cause of malfunction, such as keys ceasing to produce sound.
359
• Do not paste stickers, decals, or the like to this instrument. Peeling
such matter off the instrument may damage the exterior finish.
Maintenance
401b
• To clean the unit, use a dry, soft cloth; or one that is slightly
dampened. Try to wipe the entire surface using an equal amount of
strength, moving the cloth along with the grain of the wood. Rubbing
too hard in the same area can damage the finish.
402
• Never use benzine, thinners, alcohol or solvents of any kind, to avoid
the possibility of discoloration and/or deformation.
Repairs and Data
452
• Please be aware that all data contained in the unit’s memory may be
lost when the unit is sent for repairs. Important data should always be
backed up on an external memory, or written down on paper (when
possible). During repairs, due care is taken to avoid the loss of data.
However, in certain cases (such as when circuitry related to memory
itself is out of order), we regret that it may not be possible to restore
the data, and Roland assumes no liability concerning such loss of
data.
Placement
351
• Using the unit near power amplifiers (or other equipment containing
large power transformers) may induce hum. To alleviate the problem,
change the orientation of this unit; or move it farther away from the
source of interference.
352a
• This device may interfere with radio and television reception. Do not
use this device in the vicinity of such receivers.
352b
• Noise may be produced if wireless communications devices, such as
cell phones, are operated in the vicinity of this unit. Such noise could
occur when receiving or initiating a call, or while conversing. Should
you experience such problems, you should relocate such wireless
devices so they are at a greater distance from this unit, or switch them
off.
354b
• Do not expose the unit to direct sunlight, place it near devices that
radiate heat, leave it inside an enclosed vehicle, or otherwise subject it
to temperature extremes. Also, do not allow lighting devices that
normally are used while their light source is very close to the unit
(such as a piano light), or powerful spotlights to shine upon the same
area of the unit for extended periods of time. Excessive heat can
deform or discolor the unit.
355b
• When moved from one location to another where the temperature
and/or humidity is very different, water droplets (condensation) may
form inside the unit. Damage or malfunction may result if you
attempt to use the unit in this condition. Therefore, before using the
unit, you must allow it to stand for several hours, until the condensation has completely evaporated.
356
• Do not allow rubber, vinyl, or similar materials to remain on the unit
for long periods of time. Such objects can discolor or otherwise
harmfully affect the finish.
Additional Precautions
551
• Please be aware that the contents of memory can be irretrievably lost
as a result of a malfunction, or the improper operation of the unit. To
protect yourself against the risk of loosing important data, we
recommend that you periodically save a backup copy of important
data you have stored in the unit’s memory on an external memory.
552
• Unfortunately, it may be impossible to restore the contents of data
that was stored in the unit’s memory or on an external memory once
it has been lost. Roland Corporation assumes no liability concerning
such loss of data.
553
• Use a reasonable amount of care when using the unit’s buttons,
sliders, or other controls; and when using its jacks and connectors.
Rough handling can lead to malfunctions.
554
• Never strike or apply strong pressure to the display.
556
• When connecting / disconnecting all cables, grasp the connector
itself—never pull on the cable. This way you will avoid causing shorts,
or damage to the cable’s internal elements.
557
• A small amount of heat will radiate from the unit during normal
operation.
558a
• To avoid disturbing your neighbors, try to keep the unit’s volume at
reasonable levels. You may prefer to use headphones, so you do not
need to be concerned about those around you (especially when it is
late at night).
559b
• When you need to transport the unit, pack it in shock-absorbent
material. Transporting the unit without doing so can cause it to
become scratched or damaged, and could lead to malfunction.
560
• Do not apply undue force to the music stand while it is in use.
9
Page 9
Important Notes
561
• Use only the specified expression pedal (EV-5/7; sold separately). By
connecting any other expression pedals, you risk causing malfunction
and/or damage to the unit.
562
• Some connection cables contain resistors. Do not use cables that
incorporate resistors for connecting to this unit. The use of such
cables can cause the sound level to be extremely low, or impossible to
hear. For information on cable specifications, contact the manufacturer of the cable.
565
• Before opening or closing the keyboard lid, always make sure that no
pets or other small animals are located on top of the instrument (in
particular, they should be kept away from the keyboard and its lid).
Otherwise, due to the structural design of this instrument, small pets
or other animals could end up getting trapped inside it. If such a
situation is encountered, you must immediately switch off the power
and disconnect the power cord from the outlet. You should then
consult with the retailer from whom the instrument was purchased, or
contact the nearest Roland Service Center.
Floppy Disk Handling
(Using Optional Floppy Disk Drive)
651
• Floppy disks contain a plastic disk with a thin coating of magnetic
storage medium. Microscopic precision is required to enable storage
of large amounts of data on such a small surface area. To preserve
their integrity, please observe the following when handling floppy
disks:
• Never touch the magnetic medium inside the disk.
• Do not use or store floppy disks in dirty or dusty areas.
• Do not subject floppy disks to temperature extremes (e.g., direct
sunlight in an enclosed vehicle). Recommended temperature
range: 10 to 50˚C (50 to 122˚F).
• Do not expose floppy disks to strong magnetic fields, such as
those generated by loudspeakers.
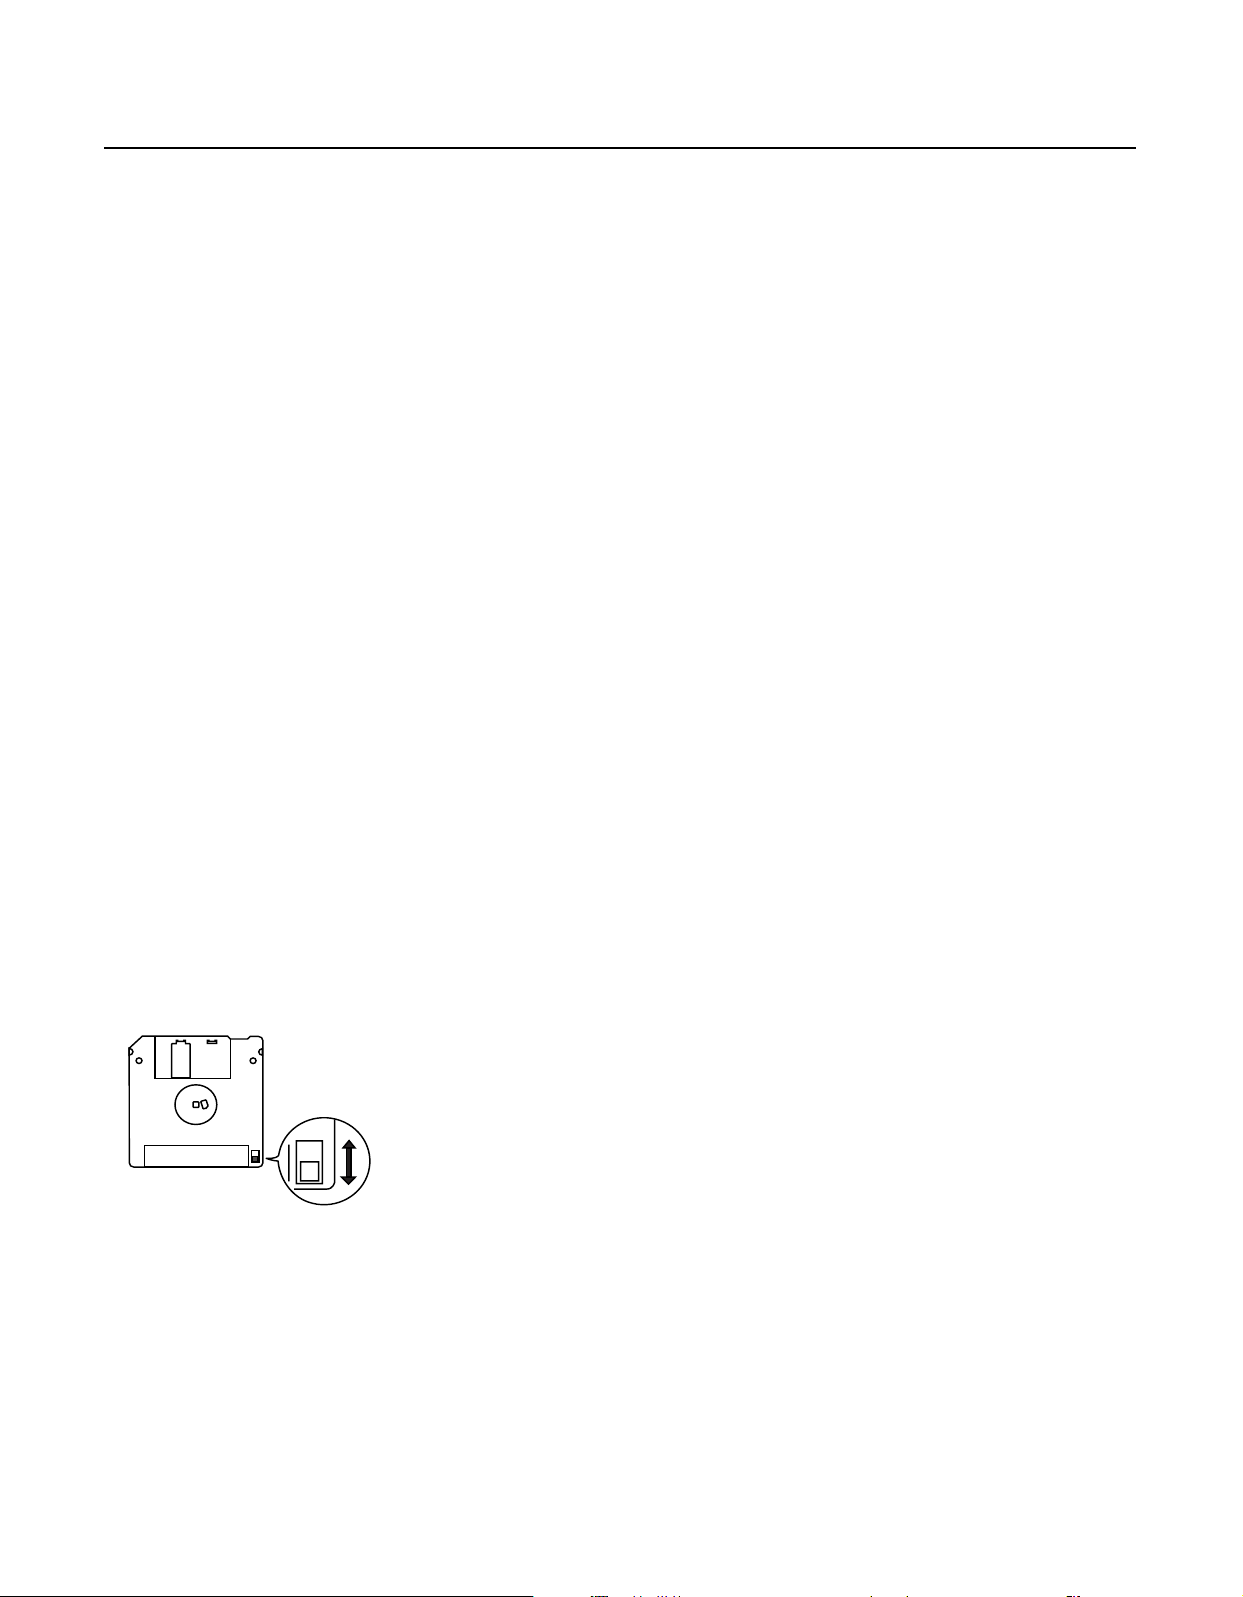
652
• Floppy disks have a “write protect” tab which can protect the disk
from accidental erasure. It is recommended that the tab be kept in the
PROTECT position, and moved to the WRITE position only when you
wish to write new data onto the disk.
fig.DiskProtect.e.eps
Rear side of the disk
USB Memory Handling
704
• When connecting USB memory, firmly insert it all the way in.
705
• Do not touch the pins of the USB memory connector, or allow them to
become dirty.
708
• USB memory is made using high-precision electronic components, so
please observe the following points when handling it.
• To prevent damage from static electrical charges, discharge any
static electricity that might be present in your body before
handling USB memory.
• Do not touch the terminals with your fingers or any metal object.
• Do not bend or drop USB memory, or subject it to strong impact.
• Do not leave USB memory in direct sunlight or in locations such as
a closed-up automobile. (Storage temperature: 0–50 degrees C).
• Do not allow USB memory to become wet.
• Do not disassemble or modify USB memory.
Add
• When connecting USB memory, position it horizontally with the
external memory connector and insert it without using excessive
force. The external memory connector may be damaged if you use
excessive force when inserting USB memory.
Add
• Do not insert anything other than USB memory (e.g., wire, coins, other
types of device) into the external memory connector. Doing so will
damage the external memory connector.
Add
• Do not apply excessive force to the connected USB memory.
Add
• If you will not be using USB memory for an extended period of time,
close the USB memory cover.
Write
(can write new data onto disk)
Write Protect Tab
Protect
(prevents writing to disk)
653
• The identification label should be firmly affixed to the disk. Should the
label come loose while the disk is in the drive, it may be difficult to
remove the disk.
654
• Store all disks in a safe place to avoid damaging them, and to protect
them from dust, dirt, and other hazards. By using a dirty or dustridden disk, you risk damaging the disk, as well as causing the disk
drive to malfunction.
10
Page 10
Important Notes
203
* GS ( ) is a registered trademark of Roland Corporation.
Add
* XG lite ( ) is a registered trademark of Yamaha Corporation.
204
* Microsoft and Windows are registered trademarks of Microsoft
Corporation.
206e
* The screen shots in this document are used in compliance with
the guidelines of the Microsoft Corporation.
Handling the CDs (CD-ROMs)
• When handling the discs, please observe the following.
• Do not touch the recording surface of the disc.
• Do not use in dusty areas.
• Do not leave the disc in direct sunlight or an enclosed vehicle.
801
• Avoid touching or scratching the shiny underside (encoded surface)
of the disc. Damaged or dirty CD-ROM discs may not be read properly.
Keep your discs clean using a commercially available CD cleaner.
• Keep the disc in the case.
• Do not keep the disc in the CD drive for a long time.
• Do not put a sticker on the label of the disc.
• Wipe the disc with a soft and dry cloth radially from inside to outside.
Do not wipe along circumference.
• Do not use benzine, record cleaner spray or solvents of any kind.
• Do not bend the disc. Bending discs may prevent proper reading and
writing of data, and may further result in malfunction.
Cautions when Using a CD
• CDs that contain both music tracks and data will not play correctly.
• For playback of commercially available CDs, this device supports
playback only for discs bearing the “COMPACT disc DIGITAL AUDIO”
logo, which indicates the official CD standard. We cannot guarantee
that this device will correctly play discs that do not comply with the
CD standard, such as music discs that use copy-protection
technology.
• The RM-700 is unable to play back music discs that use copyprotection technology.
Copyright
851
• Recording, duplication, distribution, sale, lease, performance, or
broadcast of copyrighted material (musical works, visual works,
broadcasts, live performances, etc.) belonging to a third party in part
or in whole without the permission of the copyright owner is
forbidden by law.
852a
• This product can be used to record or duplicate audio or visual
material without being limited by certain technological copyprotection measures. This is due to the fact that this product is
intended to be used for the purpose of producing original music or
video material, and is therefore designed so that material that does
not infringe copyrights belonging to others (for example, your own
original works) can be recorded or duplicated freely.
853
• Do not use this unit for purposes that could infringe on a copyright
held by a third party. We assume no responsibility whatsoever with
regard to any infringements of third-party copyrights arising through
your use of this unit.
• For details on music discs that use copy-protection technology,
please contact the distributor of the disc.
• You cannot save songs on a CD or delete a song from a CD, nor can
you format a CD.
206j
* Windows® is known officially as: “Microsoft® Windows® operating
system.”
207
* Apple and Macintosh are registered trademarks of Apple Inc.
209
* Mac OS is a trademark of Apple Inc.
* This product uses certain software of the “Independent JPEG
Group.”
220
* All product names mentioned in this document are trademarks
or registered trademarks of their respective owners.
238
* MPEG Layer-3 audio compression technology is licensed from
Fraunhofer IIS Corporation and THOMSON Multimedia Corporation.
* MMP (Moore Microprocessor Portfolio) refers to a patent
portfolio concerned with microprocessor architecture, which
was developed by Technology Properties Limited (TPL). Roland
has licensed this technology from the TPL Group.
11
Page 11
Contents
IMPORTANT SAFETY INSTRUCTIONS 3
Look at All You Can Do with the RM-700! 4
USING THE UNIT SAFELY 6
Important Notes 9
Panel Descriptions 16
Front Panel............................................................................................. 16
Bottom Panel (Rear)............................................................................ 18
Bottom Panel (Front Left/Right)..................................................... 18
Before You Start Playing 19
Connect the Pedal Cable................................................................... 19
Connect the Speaker Cable.............................................................. 19
Connect the Power Cord................................................................... 19
Setting Up the Music Rest ................................................................19
Folding Down the Music Rest................................................................ 19
Using the Music Holders.......................................................................... 19
Removing the Music Rest........................................................................ 20
Opening/Closing the Lid................................................................... 20
Installing Batteries in the Remote........................................................ 20
Turning the Power On/Off................................................................ 21
About the Pedals .................................................................................21
Adjusting the Volume........................................................................ 22
Connecting Headphones.................................................................. 22
Attaching the Headphone Hook.......................................................... 23
Connecting USB Memory .................................................................23
Formatting the USB Memory................................................................. 24
Locking the External Memory Connector Cover ............................24
Connecting a Microphone ...............................................................25
Connecting a CD Drive ......................................................................25
Attaching a CD Drive ................................................................................25
Experiencing the RM-700 Demo.................................................... 26
Main Screens .........................................................................................27
Piano Screen ................................................................................................27
Basic Screen .................................................................................................27
Performance 28
Playing the Keyboard Like a Piano (One-Touch Piano) .........28
Creating Your Own Piano Sound (Piano Designer)................. 29
Adjusting the Keyboard Touch (Key Touch) ....................................30
Making Fine Adjustments to the Key Touch
(Key Touch Offset) ..................................................................................... 30
Changing the Timing of Sounds According to the Force
Used to Press the Keys (Hammer Response).................................... 30
Adjusting the Sound of Hammers Striking Strings
(Hammer Noise).......................................................................................... 30
Adjusting Resonance when the Damper Pedal is Depressed
(Damper Resonance) ................................................................................31
Adjusting the Sound Heard at String Release When the
Damper Pedal is Depressed (Damper Noise) .................................. 31
Adjusting the Sympathetic Vibrations of an Acoustic Piano’s
Duplex Scale (Duplex Scale) .................................................................. 31
Producing the Resonance of the Strings when the Keys Are
Played (String Resonance)...................................................................... 31
Playing Sounds When the Keys Are Released
(Key Off Resonance).................................................................................. 32
Opening or Closing the Lid to Change the Resonance (Lid)...... 32
Tuning to Other Instruments’ Pitches (Master Tuning) ...............32
Changing the Tuning (Temperament)............................................... 32
Setting the Temperament Key.............................................................. 33
Setting the Tuning Curve (Stretch Tuning)...................................... 33
Performing with a Variety of Tones (Tone Buttons) ................34
Using Keywords to Search for Tones (Tone Search) ..................... 35
Using Super Tones...............................................................................36
Using Jazz Organ ....................................................................................... 37
Performing with Multiple Sounds Layered Together
(Layer).......................................................................................................38
Playing Different Tones with the Left and Right Hands
(Split).........................................................................................................39
Turning On Layer and Split Performance Simultaneously ......... 40
Shifting the Keyboard Pitch in Octave Steps
(Octave Shift) .........................................................................................41
Adding Reverberation to the Sound (Reverb)...........................42
Giving the Sound More Spatial Depth (3D)................................44
Changing the Brightness of the Sound (Brilliance)..................45
Adding Liveliness to the Sound (Dynamics) ..............................46
Applying Effects to the Sound (Effects)........................................47
Selecting the Part to Which the Effect is Added (EffectsPart) ... 48
Using the Metronome ........................................................................49
Using the Metronome.............................................................................. 49
Changing the Metronome Settings.................................................... 49
Automatic Accompaniment 52
Performing a song with the Ideal Automatic
Accompaniment and Sounds (One Touch Song).....................52
Searching for a Song by Keyword ....................................................... 53
Performing Using Automatic Accompaniment
(One Touch Rhythm)...........................................................................54
Leading Bass Function .......................................................................55
Playing Chords with Simple Fingering
(Chord Intelligence).............................................................................56
Viewing Chord Fingerings...................................................................... 58
Selecting Music Styles (Music Style Buttons) .............................59
Using Keywords to Search for Music Styles (Style Search) ......... 60
Selecting an Music Style from USB Memory.................................... 61
Playing Only the Rhythm of the Music Style..............................62
Changing the Tempo of the Automatic Accompaniment....62
Starting and Stopping the Accompaniment..............................63
Having the Accompaniment Start Simultaneously When You
Play the Keyboard (Sync Start).............................................................. 63
Stopping Automatic Accompaniment .............................................. 64
Having a Count Sound Play at the End of the Intro
(Countdown) ............................................................................................... 65
12
Page 12

Contents
Adding Variety to the Accompaniment ......................................66
Changing the Arrangement of the Rhythm and
Accompaniment (Variation)................................................................... 66
Changing the Accompaniment Pattern (Auto Fill In/Break) ......66
Adding Harmony to the Right-Hand Part
(Harmony Intelligence)...................................................................... 67
Playing Sounds in the Left Hand During a Performance
(Lower Tone).......................................................................................... 68
Playing the Piano with Accompaniment Added
(Piano Style Arranger)........................................................................ 69
Adjusting the Volume Balance for Each Part (Balance) .........70
Changing the Volume Balance Between the Accompaniment
and the Keyboard (Balance Knob) .......................................................70
Adjusting the Volume Balance for Each Performance Part
(Part Balance)............................................................................................... 70
Copying a Music Style........................................................................ 72
Copying a Music Style from USB Memory to User Memory .......72
Copying Music Styles from User Memory to USB Memory......... 73
Deleting Saved Music Style.............................................................. 74
Song Playback 75
Playing a Song ......................................................................................75
Viewing the Playing Hint......................................................................... 78
Viewing Information About the Song ................................................78
Saving a Song in “Favorites”............................................................ 79
Saving an Internal Song to “Favorites”............................................... 79
Copying a Song from USB Memory to “Favorites”......................... 81
Changing the Tempo (Playback Speed) of a Song.................. 82
Using the Remote Control................................................................ 83
How to Use the Remote Control........................................................... 83
Button Functions........................................................................................ 84
Minimizing the Melody of a Music CD or Audio/MP3
Format Song (Center Cancel).......................................................... 85
Adding Effects to Microphone Vocals (Vocal Effect)............... 86
Adding Harmony to Match the Song .................................................86
Modifying Your Voice (Transformer)................................................... 87
Adding Echo to Vocals (Echo)................................................................ 88
Enjoying Music and Video 90
Playing Photos Automatically (Slide Show)............................... 90
Enjoying a Slide Show Along with Internal Songs or
VIMA TUNES................................................................................................. 90
Selecting the Type of Image Used for the Slide Show
(Picture Category)...................................................................................... 91
Watching a Slide Show with Digital Camera Photos..................... 92
Watching a Slide Show with Photos Saved on USB Memory..... 93
Having the Image Change According to Your Performance
(Anime).................................................................................................... 94
Changing the Anime type ......................................................................95
Watching the Notes while a Song Plays (Piano Roll) ..............96
Using the Practice Functions 98
Playing in a Wonderland of Sound ................................................98
Playing Songs Using the Lesson Functions (Visual Lesson)
Practicing with Internal Songs and Songs on USB Memory ....103
....99
Splitting the Keyboard Into Two Sections for Four-Hand
Performances (Twin Piano)............................................................ 104
Changing the Way in Which the Sound is Heard
(Twin Piano Mode) ..................................................................................105
Enjoying Twin Piano Games ................................................................105
Displaying the Notation (DigiScore) ..........................................106
Touching Notes to Confirm the Sounds (Touch the Notes)..... 107
Scrolling the Notation Along with the Performances
(Auto Sync DigiScore) ............................................................................108
Detailed Settings for DigiScore ..........................................................109
Saving Notations as Image Data ........................................................111
Saving Your Visual Lesson Performance Results.......................... 112
Adjusting the Tempo....................................................................... 113
Using the Pedal to Set the Tempo (Tap Tempo) ..........................113
Playing Back at a Fixed Tempo (Tempo Mute)..............................114
Match the Tempo Before You Begin Playing (Count In) .....115
Muting Some Parts Before Playing (Track Buttons).............. 116
Using the Sound of a Specific Part as a “Guide”
(Mute Volume)..........................................................................................117
Setting Markers for Repeated Practice (Marker).................... 118
Placing a Marker within a Song ..........................................................118
Playback from a Marker Location ......................................................119
Erasing a Marker....................................................................................... 119
Moving a Marker...................................................................................... 119
Playing Back the Same Passage Over and Over ...........................120
Placing a Marker in the Middle of a Measure ................................121
Transposing Keyboard Sounds and Songs Played Back
(Transpose).......................................................................................... 122
Recording and Saving the Performance 124
SMF Recording ................................................................................... 125
Recording a New Song (New Song).................................................. 125
Recording With Accompaniment...................................................... 127
Recording Along With a Song............................................................. 129
Recording While Selecting the Track Buttons
(Redoing Recordings)............................................................................. 131
Deleting Recorded Performances......................................................132
Changing How Recording Stops........................................................ 132
Recording Songs Starting with Pickups ..........................................133
Saving Songs.............................................................................................134
Audio Recording................................................................................ 136
Recording a New Song (New Song).................................................. 136
Recording With Accompaniment...................................................... 138
Recording Along With a Song............................................................. 140
Deleting Saved Songs...................................................................... 142
Copying Songs from USB Memory to “Favorites” .................143
Copying Songs from “Favorites” to USB Memory........................ 144
13
Page 13

Contents
Creating a Music CD 145
Preparing a CD-R Disc for Playback on Another CD Player
(Finalize)................................................................................................148
Saving Your Performance Settings
(User Program) 149
Storing a “User Program”................................................................150
Calling Up Saved User Programs .................................................151
Saving the User Program Sets.......................................................151
Loading Saved User Program Sets ..............................................152
Deleting Saved User Program Sets..............................................153
Copying Sets of User Programs on USB Memory to the
User Memory.......................................................................................153
Coping Sets of User Programs Stored in the User Memory to
USB Memory ..............................................................................................154
User Program Settings.....................................................................154
Using the Pedal to Switch User Programs (Pedal Shift) .............154
Sequential Loading of User Program Sets Stored
(Load Next).................................................................................................155
Changing the Timing at Which Arranger Settings are
Recalled (Arranger Update)..................................................................155
Simultaneously Switching User Program and Transmitting
PC Numbers ...............................................................................................155
Creating and Editing Songs 156
Multitrack Recording with 16 Parts (16-Track Sequencer) .156
The 16-Track Sequencer Screen .........................................................156
Modifying the Settings of Each Part..................................................157
Recording a Performance .....................................................................158
Changing the Recording Method (Rec Mode)........................159
Recording While Erasing the Previous Recording
(Replace Recording)................................................................................159
Layering a Recording Over Previously Recorded Sounds
(Mix Recording).........................................................................................160
Repeated Recording at the Same Location
(Loop Recording) .....................................................................................160
Re-Recording Part of Your Performance
(Punch-in Recording)..............................................................................161
Composing an Accompaniment By Entering Chords
(Chord Sequencer) ............................................................................162
Inputting Chords without Playing the Keyboard.........................163
Editing Songs ......................................................................................163
Basic Operation of the Editing Functions........................................163
Undoing Edits (Undo).............................................................................164
Copying Measures (Copy).....................................................................164
Correcting Timing Discrepancies (Quantize).................................165
Deleting Measures (Delete)..................................................................165
Inserting Blank Measures (Insert).......................................................166
Transposing Individual Parts (Transpose).......................................166
Making Measures Blank (Erase)...........................................................167
Exchanging Parts (Part Exchange).....................................................167
Correcting Notes One by One (Note Edit).......................................168
Modifying the Tone Changes in a Song (PC Edit).........................168
Changing the Beat in the Middle of a Song (Beat Map) ......169
Changing the Tempo of Recorded Songs ................................169
Changing the Tempo Within the Song .....................................169
Adjusting the Tempo While Listening to a Song .........................169
Adjusting the Tempo at a Particular Measure............................... 170
Various Settings 171
Changing the Settings for the Count......................................... 171
Formatting the User Memory....................................................... 172
Slide Show Settings.......................................................................... 173
Selecting the Type of Slide Show (Type)......................................... 173
Selecting the Interval at which Images will Change
(Interval)......................................................................................................173
Synchronizing the Slide Show and Song (Sync)........................... 173
Piano Roll Screen Settings .............................................................174
Specifying the Color of the Piano (Cabinet)...................................174
Specifying the State of the Door of the Player Piano (Door) ...174
Displaying Bar Lines and Measure Numbers
(Measure Display) ....................................................................................174
Specifying the Direction in which the Piano Roll Screen Moves
(Viewpoint).................................................................................................174
Selecting the Background Image (Background) ..........................174
Selecting the Foreground Image (Frame) ......................................174
Vocal Effect Settings......................................................................... 175
Adding a Backing Chorus to the Harmony (Backing Choir)..... 175
Adjusting the Volume of the Backing Choir
(Backing Choir Level).............................................................................. 175
Changing the Equalizer Settings................................................. 175
Tuning Settings.................................................................................. 176
Tuning to Other Instruments’ Pitches (Master Tuning) .............176
Changing the Tuning (Temperament)............................................. 177
Setting the Temperament Key............................................................ 177
Setting the Tuning Curve (Stretch Tuning).................................... 177
Adjusting the Keyboard Touch (Key Touch)............................ 178
Changing the Keyboard’s Split Point (Split Point)................. 178
Assigning the Function of the Pedals
(Left Pedal/Center Pedal/Expression Pedal)............................179
Using the Pedal to Apply the Bender Effect (Bend Range)....... 180
Changing Music Styles Without Changing the Tone or
Tempo (Rhythm One Touch) ........................................................181
Selecting the Bass Tone/Chord Tone......................................... 181
Composer Settings ...........................................................................182
Hiding the Lyrics and Playing Hints ..................................................182
Using the [Accomp] Button to Switch the Part to be Muted
(Accomp Track)......................................................................................... 182
Changing the Parts Assigned to the Track Buttons During
SMF Playback (Track Assign)................................................................182
CD/Roland Audio Port Settings.................................................... 183
Setting the Type of CD to be Played Back (CD/Audio Type).... 183
Synchronizing the Timing of the Piano and Accompaniment
(CD/Audio Sync)....................................................................................... 183
Specifying the Type of Signal at the Roland Audio Port
(Audio Port Mode)...................................................................................183
Synchronizing the Timing of the Signals from the Piano
and the Roland Audio Port (Audio Port Sync)............................... 183
Switching the Remote Sensor On and Off (Ir Function)...... 184
14
Page 14

Contents
Remote Control Settings.................................................................184
Changing the [Play/Stop] Button Functions (Play Mode) .........184
Changing the [FUNC1] [FUNC2] Button Functions......................185
Changing the [TEMPO] Button and the [TRANSPOSE] Button
Functions (TEMPO/TRANSPOSE) ........................................................185
USB Settings ........................................................................................186
Changing the USB Driver Settings (USB Driver)............................186
Changing the Communication Settings for USB Memory
(Ext. Memory Mode)................................................................................186
Changing the Communication Settings for External Drive
(Ext. Drive Mode)......................................................................................186
Disabling the Background Music in the Evaluation Screen
(Instruction Mode).............................................................................187
Demo Settings ....................................................................................187
Automatically Starting the Demo (Auto Start)..............................187
Adding Background Music to the Auto Demo (BGM) ................187
Volume Settings.................................................................................188
Adjusting the Volume (Master Gain).................................................188
Adjusting the Audio Recording Level
(Audio Rec Gain).......................................................................................188
Calibrating the Touch Screen (Touch Screen).........................188
Changing the Language (Language) .........................................189
Remembering the Settings Even When the Power is
Turned Off (Memory Backup)........................................................189
Restoring the Factory Settings (Factory Reset).......................190
Disabling the Buttons (Panel Lock) .............................................191
Appendices 201
Troubleshooting................................................................................ 201
Error Messages ................................................................................... 206
Tone List ...............................................................................................207
Drum Set List....................................................................................... 211
Effects List ............................................................................................217
Music Style List................................................................................... 218
Chord List............................................................................................. 220
Internal Song List .............................................................................222
Parameters Stored to Internal Memory..................................... 225
Music Files That the RM-700 Can Use ........................................226
MIDI implementation Chart ..........................................................227
Main Specifications........................................................................... 228
Index ......................................................................................................230
Connecting External Devices 192
Connecting an External Display or Television.........................192
Connecting an External Display..........................................................192
Connecting a Television ........................................................................193
Switching Off Your External Display or Television.......................193
Video Settings.....................................................................................194
Specifying the Television Format (Video Type) ............................194
Selecting the Aspect Ratio of the Video Output
(Video Output Aspect Ratio)................................................................194
Selecting the Video Output Destination (Output Select)..........195
Selecting the Screen that is Shown when Slide Show,
DigiScore, or Piano Roll are off (Video Out Mode).......................195
Connecting a Portable Audio Player ..........................................195
Connecting Video Equipment (V-LINK) .....................................196
Connecting MIDI Equipment.........................................................196
Using a MIDI Sequencer to Play the RM-700..................................196
Playing a MIDI Sound Module from the RM-700 ..........................197
MIDI Settings.......................................................................................197
Changing the MIDI Transmit Channel (Tx Channel)....................197
Disconnecting the Internal Sound Generator and Keyboard
(Local Control)...........................................................................................198
Sending Recorded Performance Data to a MIDI Device
(Composer MIDI Out)..............................................................................198
Sending Tone Change Messages
(Bank Select MSB/Bank Select LSB/Program Change)................198
Connecting Audio Equipment......................................................199
Playing the RM-700 through Connected Speakers .....................199
Playing the Sound of an Audio Device through the RM-700...199
Connecting Your Computer ..........................................................200
Conventions Used in This Manual
This manual uses the following conventions in the interest of
simpler, more concise instructions.
●
Button names are enclosed in square brackets “[ ],” as in
One Touch Program [Piano] button.
●
On screen text is enclosed in angled brackets “< >,” as in
<Execute>.
●
The act of lightly contacting the Touch Screen with your finger
is called “touching.”
●
An asterisk (*) or a at the beginning of a paragraph
indicates a note or precaution. These should not be ignored.
(p. **) refers to pages within the manual.
●
15
Page 15
Panel Descriptions
1 2 3
45
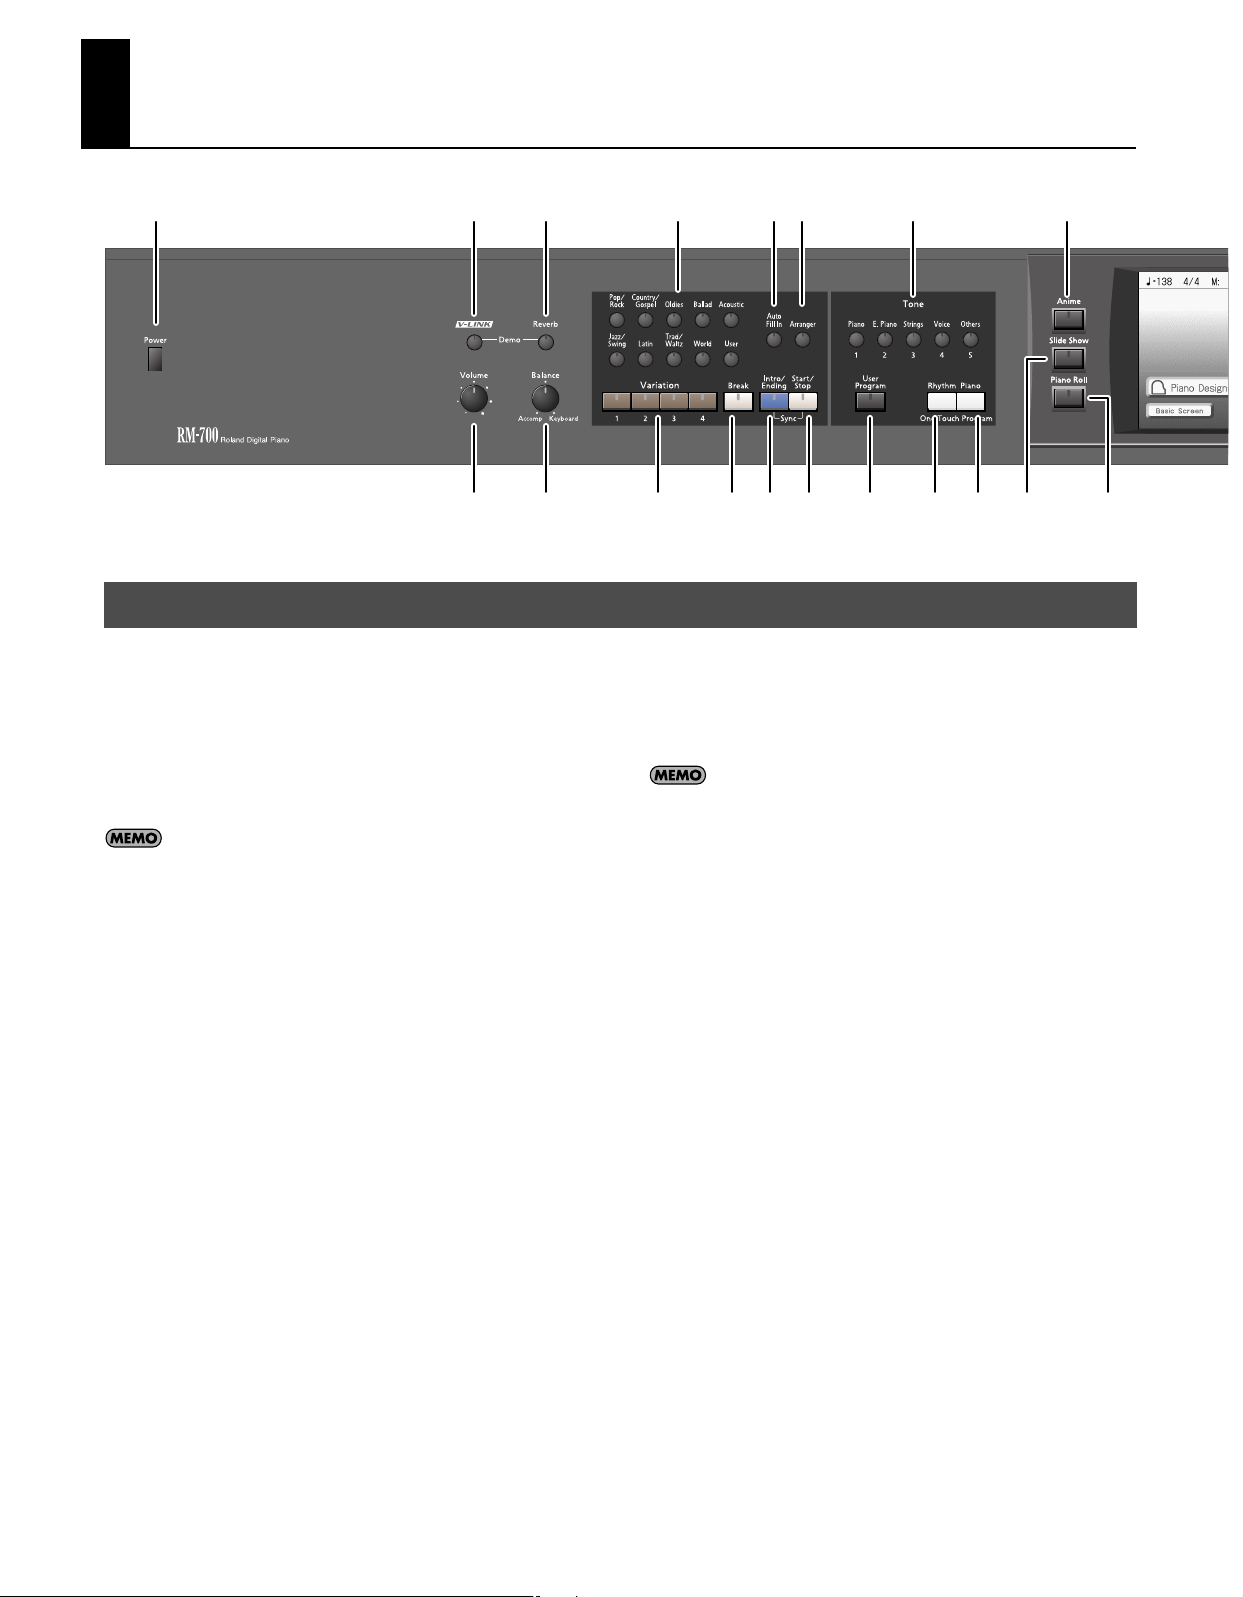
Front Panel
[Power] switch
1.
Pressed to switch the power on and off (p. 21).
[V-LINK] button
2.
This button turns the V-LINK function on/off (p. 196).
[Reverb] button
3.
Adds reverberation to the sound (p. 42).
By holding down the [V-LINK] button and pressing the [Reverb]
button you can access the Demo screen (p. 26).
[Volume] knob
4.
Adjusts the overall volume (p. 22).
[Balance] knob
5.
Changes the volume balance for sounds played with the keyboard
and for songs and accompaniments (p. 70).
6.
Rhythm buttons
Selects a Music Style for automatic accompaniment (p. 59).
Pressing the [User] button selects a User Style that you’ve made
yourself or a Music Style on external memory (p. 61).
7.
[Auto Fill In] button
A fill-in will automatically be added when you press a [Variation]
button to change the accompaniment or Rhythm arrangement (p.
66).
[Arranger] button
8.
This button turns the Arranger function on/off (p. 62).
Variation [1]–[4] buttons
9.
Pressed to switch the arrangement of the accompaniment (p. 66).
[Break] button
10.
Stop the Rhythm at the end of that measure (Break; p. 66).
6 7 8 13 17
9 10 11 12 14 15 16 18 19
[Intro/Ending] button
11.
Play an intro or ending during automatic accompaniment (p. 54).
[Start/Stop] button
12.
Starts and stops automatic accompaniment (p. 63).
By holding down the [Intro/Ending] button and pressing the
[Start/Stop] button you can enable the Synchro Start setting (p.
63).
13.
[Tone] buttons
Select the Tones that will be played from the keyboard (p. 34).
14.
[User Program] button
Used to call up or register a user program (p. 149).
15.
One Touch Program [Rhythm] button
Makes the optimal settings for playing with automatic
accompaniment (p. 54).
16.
One Touch Program [Piano] button
Makes the optimal settings for a piano performance (p. 28).
17.
[Anime] button
This button lets you change the image in time with your
performance (p. 94).
18.
[Slide Show] button
This button switches to the slide show screen (p. 90).
19.
[Piano Roll] button
This button switches to the piano roll screen (p. 96).
20.
Touch Screen
This lets you perform a variety of operations just by touching the
screen.
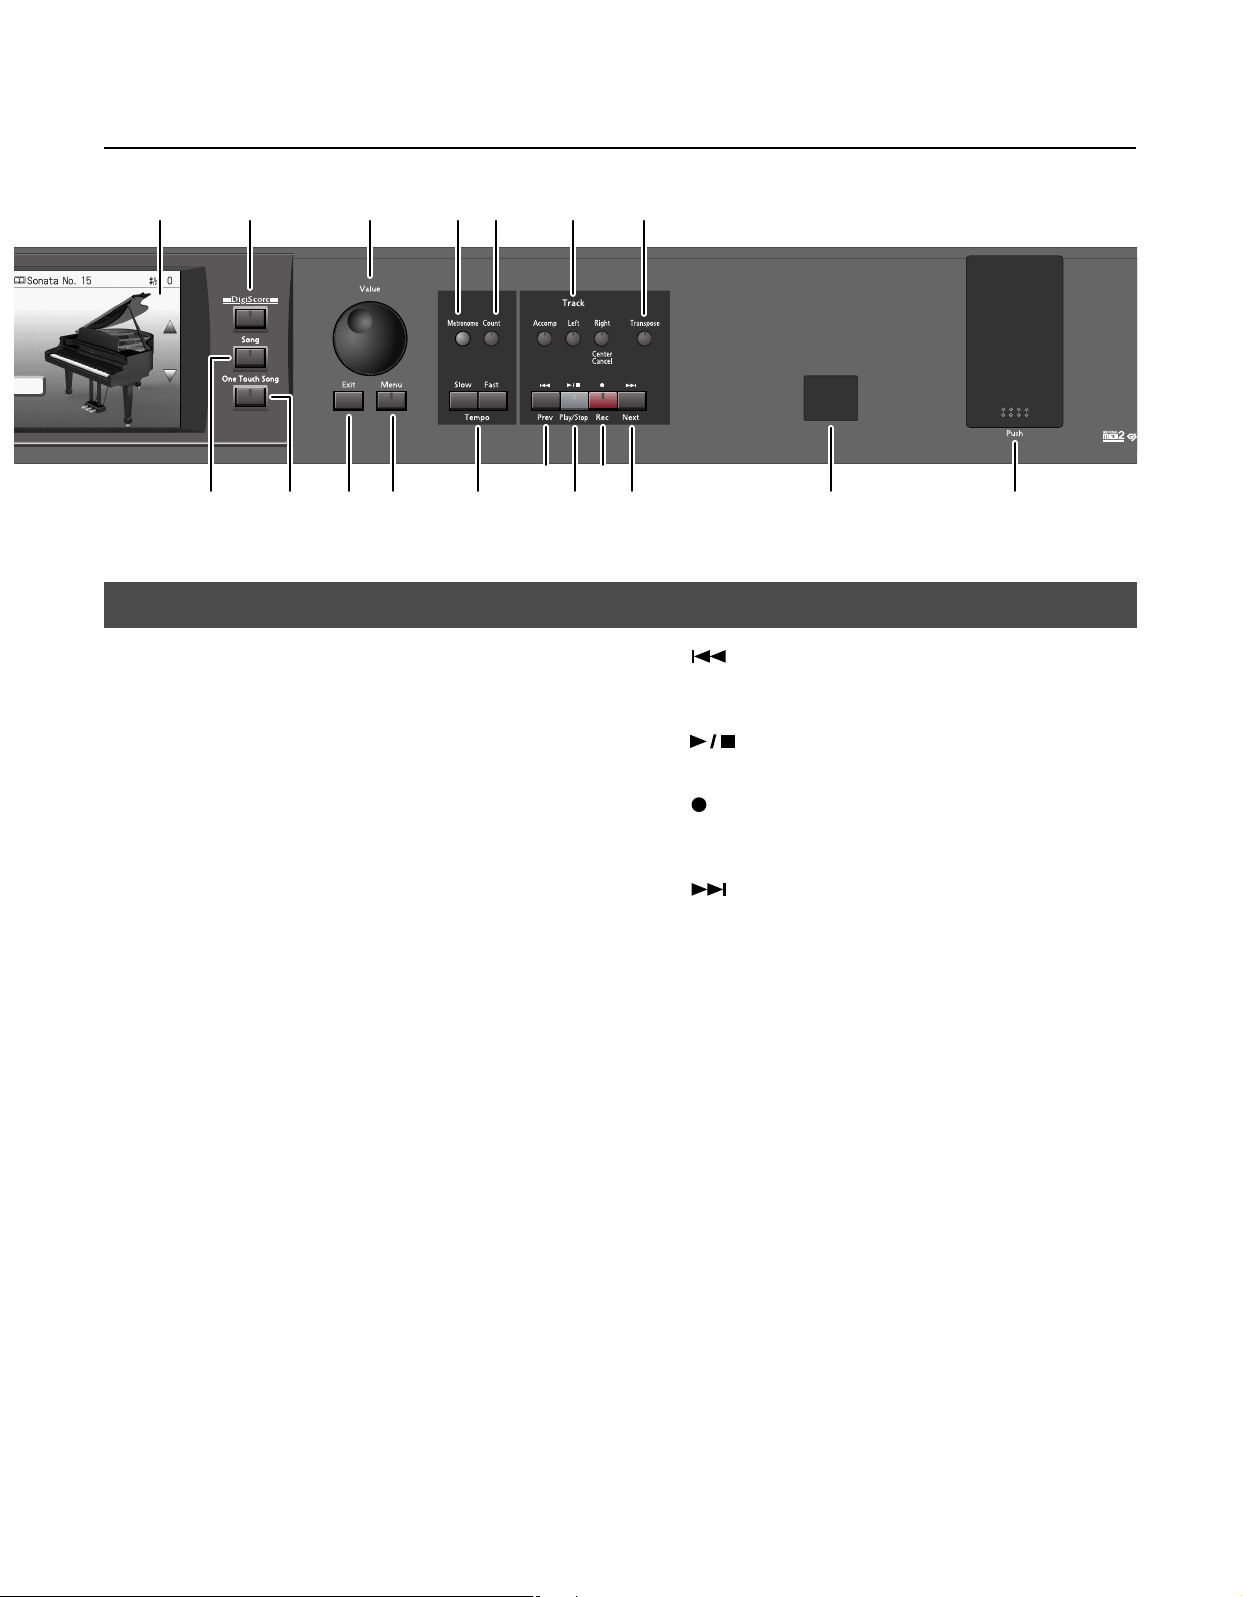
[DigiScore] button
21.
This button switches to the musical score display (p. 106).
16
Page 16
21 24 27 28 30 3120
22 23
Panel Descriptions
32 34
25 26 29 33 35 36 37
[Song] button
22.
This button switches to the song select screen. You can select a
song by touching in the screen (p. 75).
[One Touch Song] button
23.
This button turns the One Touch Song function on/off (p. 52).
24.
[Value] dial
Use this to change on-screen values.
25.
[Exit] button
Pressed to exit the currently displayed screen.
26.
[Menu] button
This button switches to the Menu screen.
27.
[Metronome] button
Activates the built-in metronome (p. 49).
28.
[Count] button
You can change the count settings (p. 115).
29.
Tempo [Slow] [Fast] buttons
Adjusts the tempo (p. 113).
Press the [Slow] and [Fast] buttons at the same time to return to the
original tempo.
30.
[Track] buttons
Used to play back or record each track of a song (p. 77, p. 116, p.
131).
If a music CD or audio/MP3 format song is selected, you can use the
[Right] button to turn the Center Cancel function on/off (p. 85).
[
32.
33.
34.
35.
36.
37.
* Be sure to close the cover of the External Memory connector after
* Use external memory available from Roland. Proper functioning
(Prev)] button
Returns the song playback start location to the beginning of the
song, or rewinds the song (p. 76).
[
(Play/Stop)] button
Starts and stops playback or recording a song (p. 76).
(Rec)] button
[
When pressed, this button places the instrument in recording
standby (p. 125, p. 136).
(Next)] button
[
Selects the next song, or fast-forwards the playback (p. 76).
Infrared Receiver
Point the remote control at this sensor when using the remote
control to operate the RM-700 (p. 83).
External Memory connector
Connects an USB memory to play (p. 75) and save songs (p. 134).
connecting USB memory to the External Memory connector.
cannot be guaranteed if other external memory products are used.
[Transpose] button
31.
Transposes the pitch of the keyboard or the song being played (p.
122).
17
Page 17
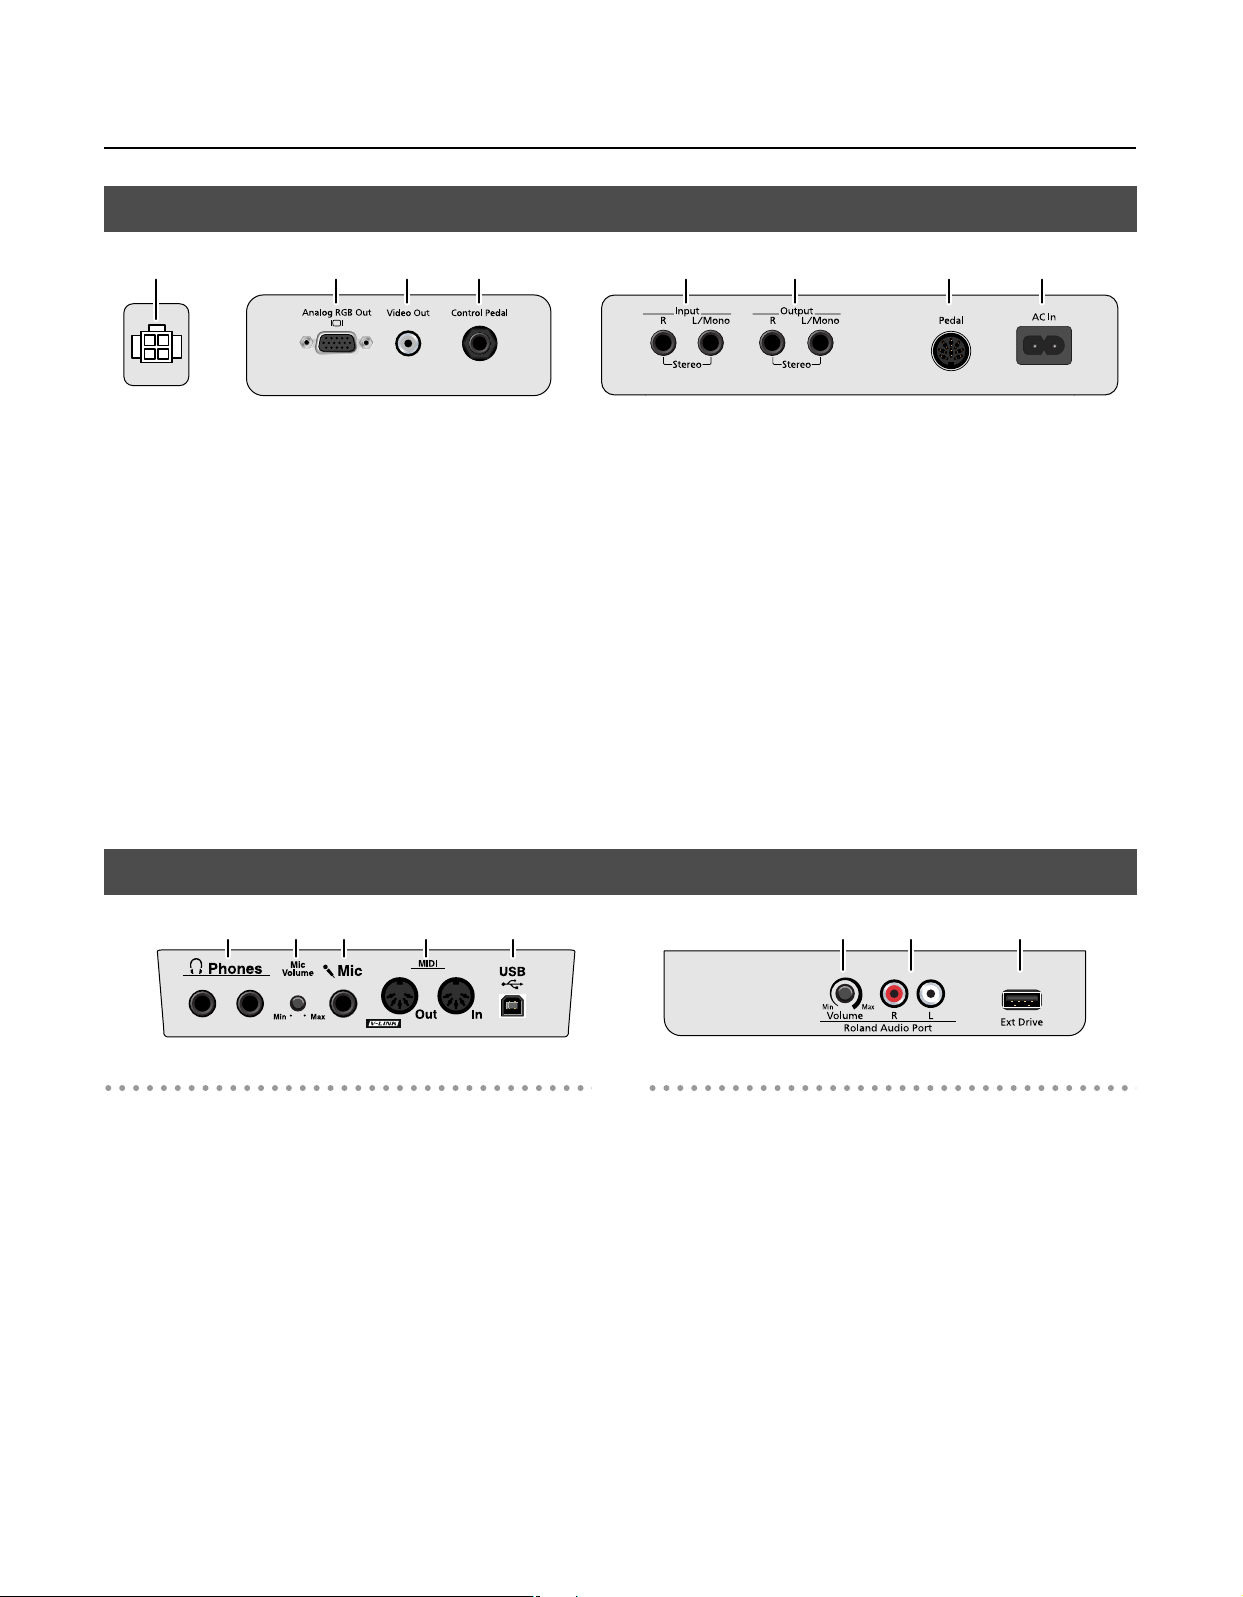
Panel Descriptions
Bottom Panel (Rear)
1 2 3 4 5 6 7 8
1.
Speaker connector
Connect the speaker cable of the stand (p. 19).
2.
Analog RGB Out connector
Connect an external display (p. 192).
* This cannot be used simultaneously with the Video Out jack.
Video Out jack
3.
Connect a television here (p. 193).
* This cannot be used simultaneously with the Analog RGB Out
connector.
Control Pedal jack
4.
You can connect the expression pedal here and use it as a volume
pedal, or you can assign a variety of other functions for the pedal to
control (p. 192).
Bottom Panel (Front Left/Right)
1 2 3 4 5 6 7 8
* Use only the specified expression pedal (EV-5/7; sold separately). By
connecting any other expression pedals, you risk causing
malfunction and/or damage to the unit.
Input jacks R, L /Mono
5.
These jacks can be connected to another sound generating device
or an audio device, so that the sound of that device will be output
from the RM-700’s speakers (p. 199).
6.
Output jacks R, L/Mono
These jacks can be connected to your audio system to enjoy more
powerful sound. Or, you can connect recording equipment and
record your performances (p. 199).
Pedal connector
7.
Connect the pedal cable of the stand to this connector (p. 19).
AC In
8.
Connect the included power cord here (p. 19).
Front Left
Phones jacks
1.
Connect headphones to these jacks. The RM-700 allows you to use
two headphones simultaneously (p. 22).
2.
Mic Volume knob
Adjusts the volume level for the microphone (p. 25).
3.
Mic jack
Used for connecting microphones (p. 25).
4.
MIDI Out/In connectors
These can be connected to an external MIDI device to exchange
performance data (p. 196).
5.
USB connector
You can connect a computer and exchange performance data
between the instrument and the computer (p. 200).
18
Front Right
Roland Audio Port Volume knob
6.
This knob adjusts the volume of the input from the Roland Audio
Port (p. 195).
7.
Roland Audio Port
Here you can connect a portable audio player or similar device (p.
195).
8.
Ext Drive connector
Connect a USB CD drive here (p. 25).
* Use the separately sold CD-01A.
* A floppy disk drive (FD-01; sold separately) can also be connected
here.
Page 18
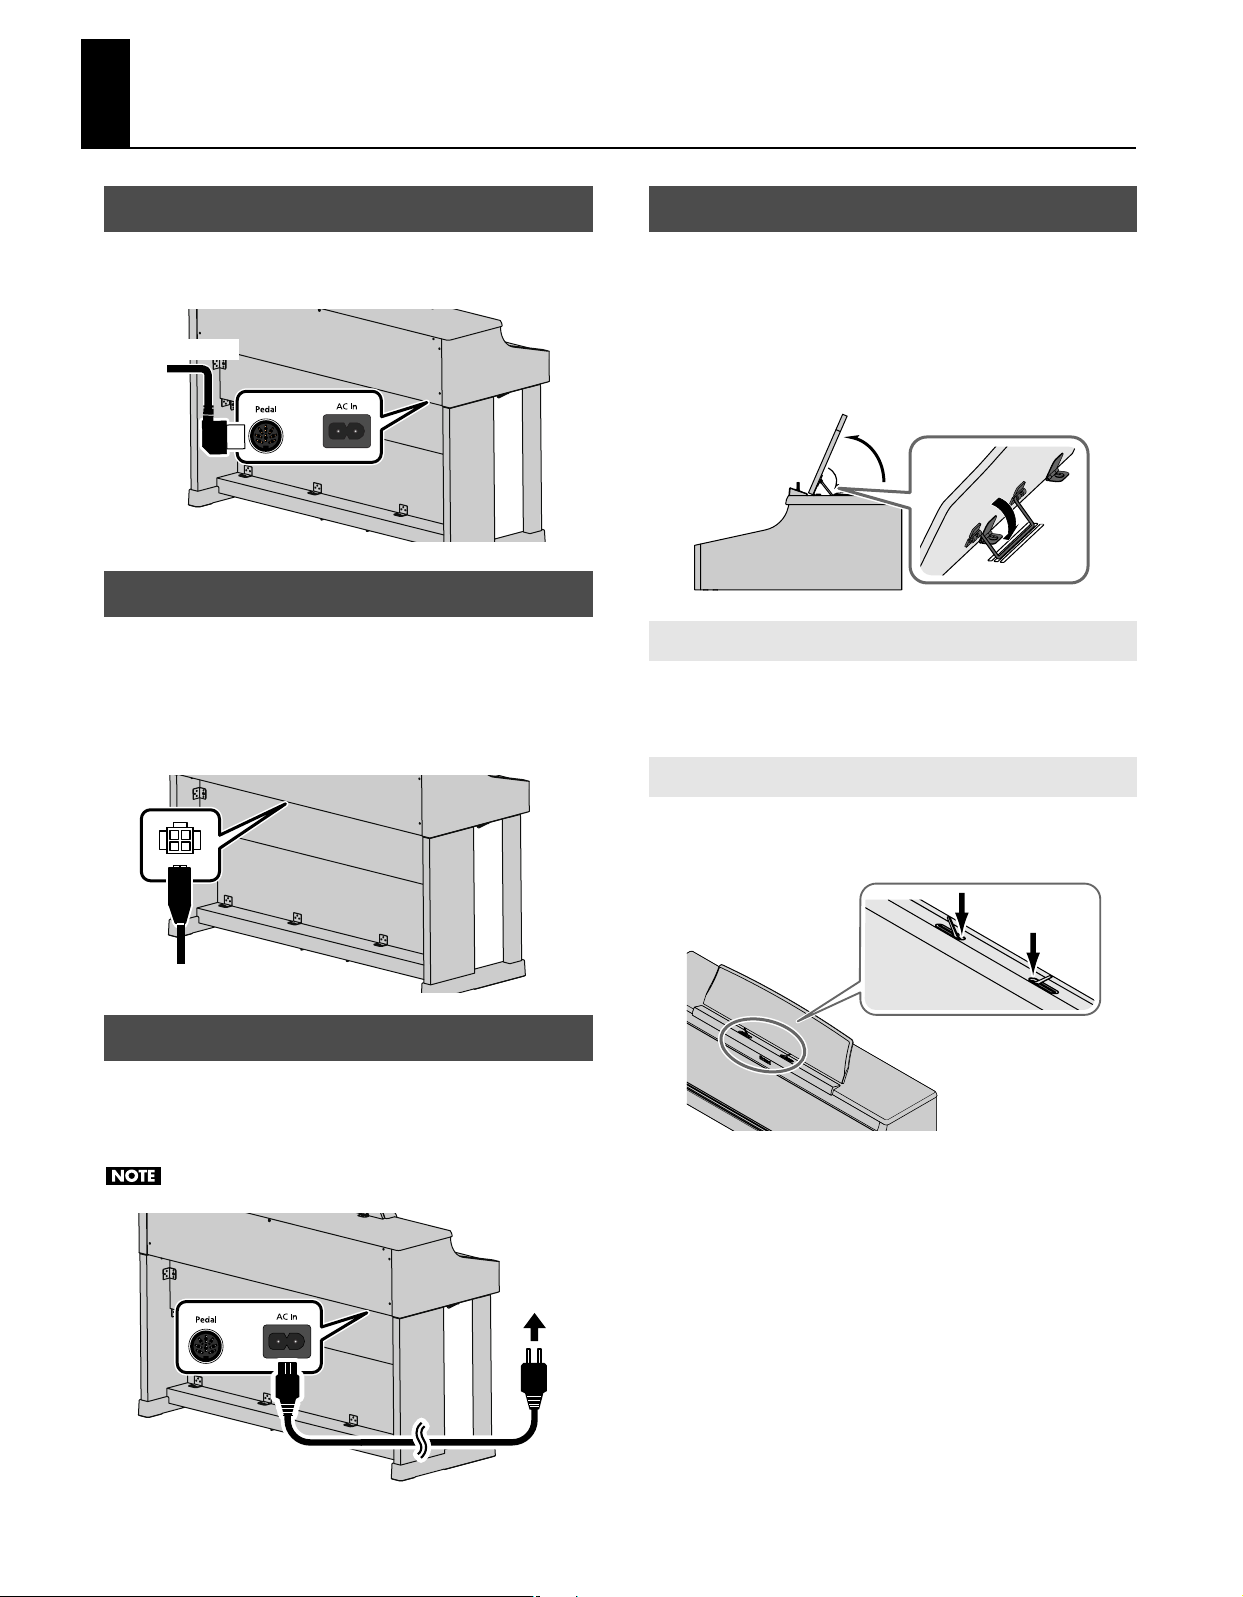
Before You Start Playing
Speaker cable
Push
Connect the Pedal Cable
1.
Insert the pedal cable into the Pedal connector on the
rear bottom panel of the RM-700.
Pedal cable
Connect the Speaker Cable
1.
As shown in the diagram, connect the speaker cable
leading from the speaker box of the stand to the speaker
connector located on the rear bottom panel of the RM-
700.
Push the speaker cable in until it clicks into position.
Setting Up the Music Rest
1.
Grasping the music rest with both hands, lift it toward
you until its in the upright position.
2.
Use the support on the back of the music rest to keep the
stand in place.
The angle of the music rest can be set to any of three positions.
1
2
Folding Down the Music Rest
1.
Raise the support located on the back of the music rest,
then gently fold down the music rest.
Using the Music Holders
Connect the Power Cord
1.
Insert the included power cord into the AC inlet on the
rear bottom panel of the RM-700, and then plug it into an
electrical outlet.
Be sure to use the supplied power cord.
AC outlet
You can use the holders to hold pages in place.
When not using the holders, leave them folded down.
Push
To
Power cord
19
Page 19
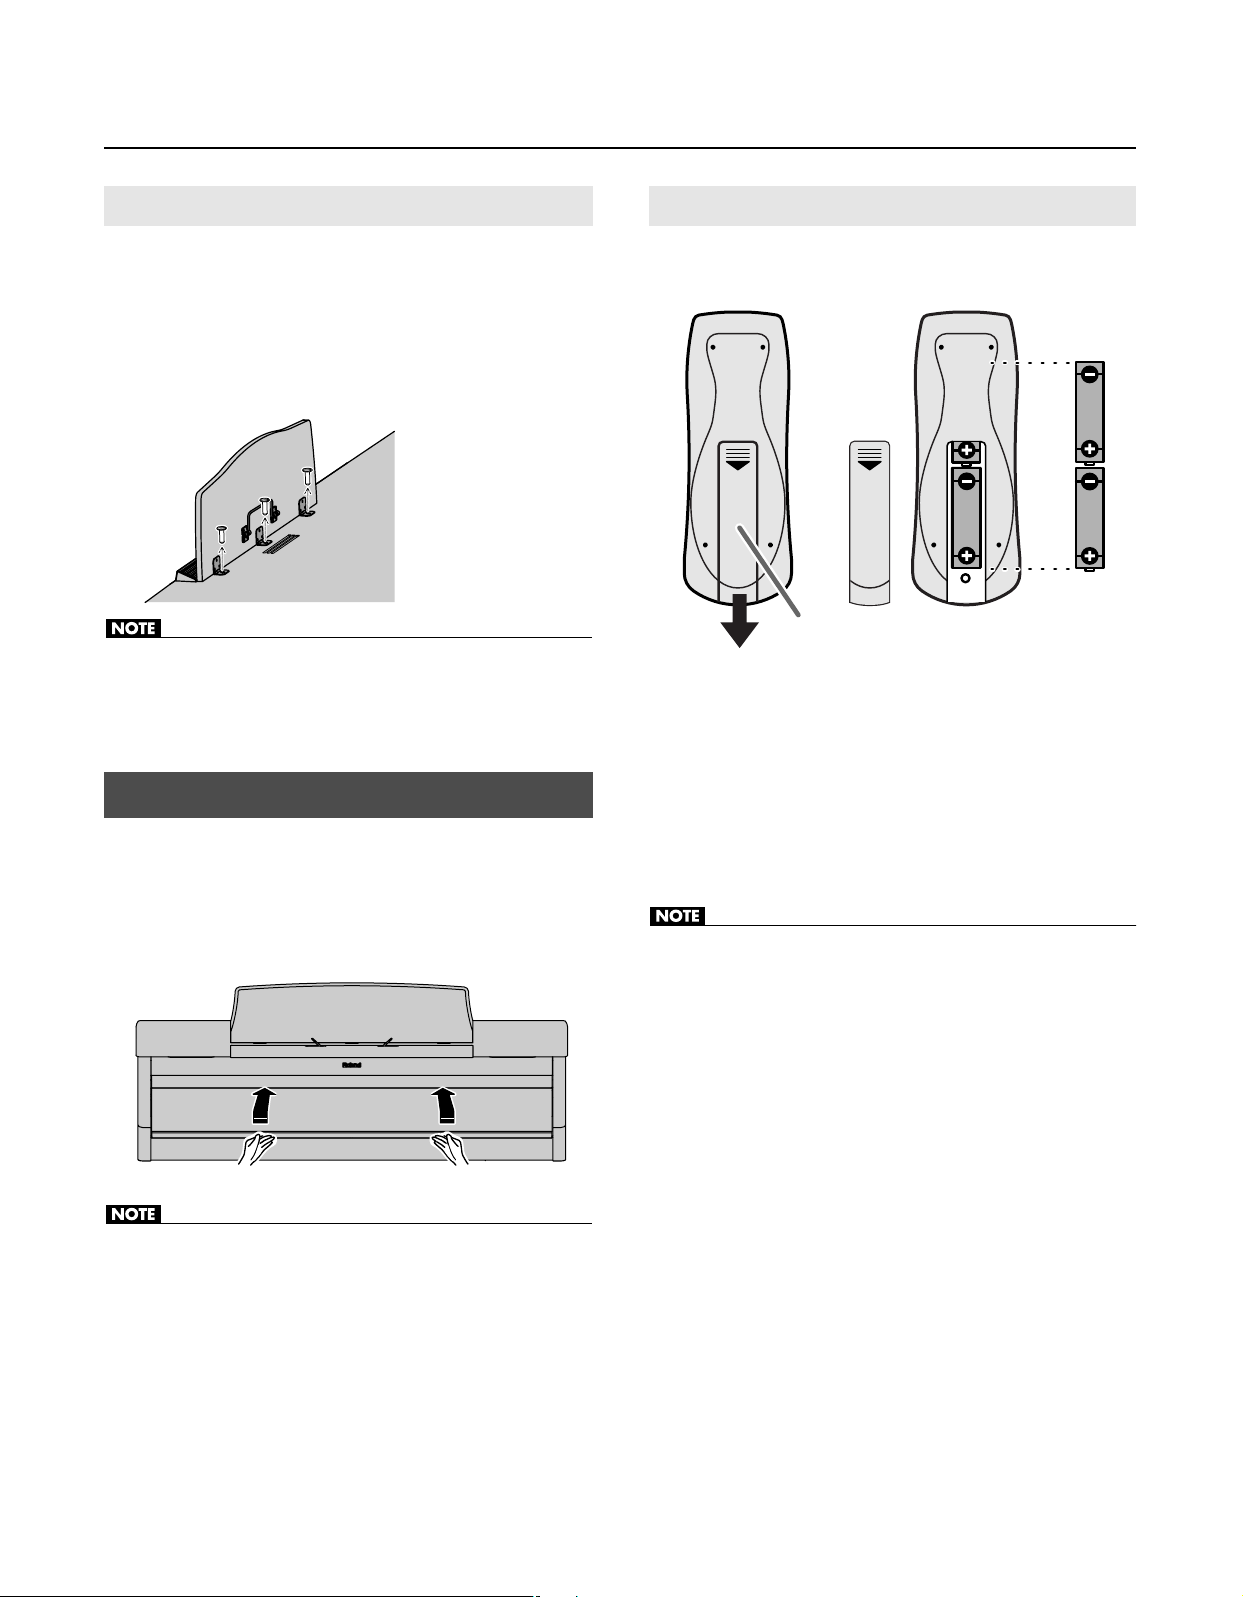
Before You Start Playing
Removing the Music Rest
You can remove the music rest from the piano.
This allows you to place a notebook computer or an external display
on the piano.
Position the music rest so it’s upright, then remove the
1.
three screws, as shown.
You can remove the screws using a coin.
• Be careful not to lose the screws that you removed from the music
rest, or put them where they might be swallowed by small children.
Opening/Closing the Lid
1.
To open the lid, use both hands to lift it lightly, and slide
it away from yourself.
Installing Batteries in the Remote
Install the included batteries (two) into the remote control unit.
Remote (rear)
Battery cover
Slide the cover located on the rear of the remote to open
1.
it.
2.
Insert the two LR6 (AA) type batteries in the orientation
shown on the remote.
* Be sure to observe the correct polarity (+, -) for each battery.
3.
Slide the cover closed.
2.
To close the lid, pull it gently toward yourself, and lower
it softly after it has been fully extended.
• When opening and closing the lid, be careful not to let your fingers
get caught. If small children will be using the RM-700, adult
supervision should be provided.
• If you need to move the piano, make sure the lid is closed first to
prevent accidents.
• If used improperly, batteries may explode or leak and cause damage
or injury. In the interest of safety, please read and observe the
following precautions.
• Avoid using new batteries together with used ones. In addition,
avoid mixing different types of batteries.
• Remove the batteries whenever the unit is to remain unused for
an extended period of time.
• If a battery has leaked, use a soft piece of cloth or paper towel to
wipe all remnants of the discharge from the battery
compartment. Then install new batteries. To avoid inflammation
of the skin, make sure that none of the battery discharge gets
onto your hands or skin. Exercise the utmost caution so that none
of the discharge gets near your eyes. Immediately rinse the
affected area with running water if any of the discharge has
entered the eyes.
• Never keep batteries together with metallic objects such as
ballpoint pens, necklaces, hairpins, etc.
20
Page 20
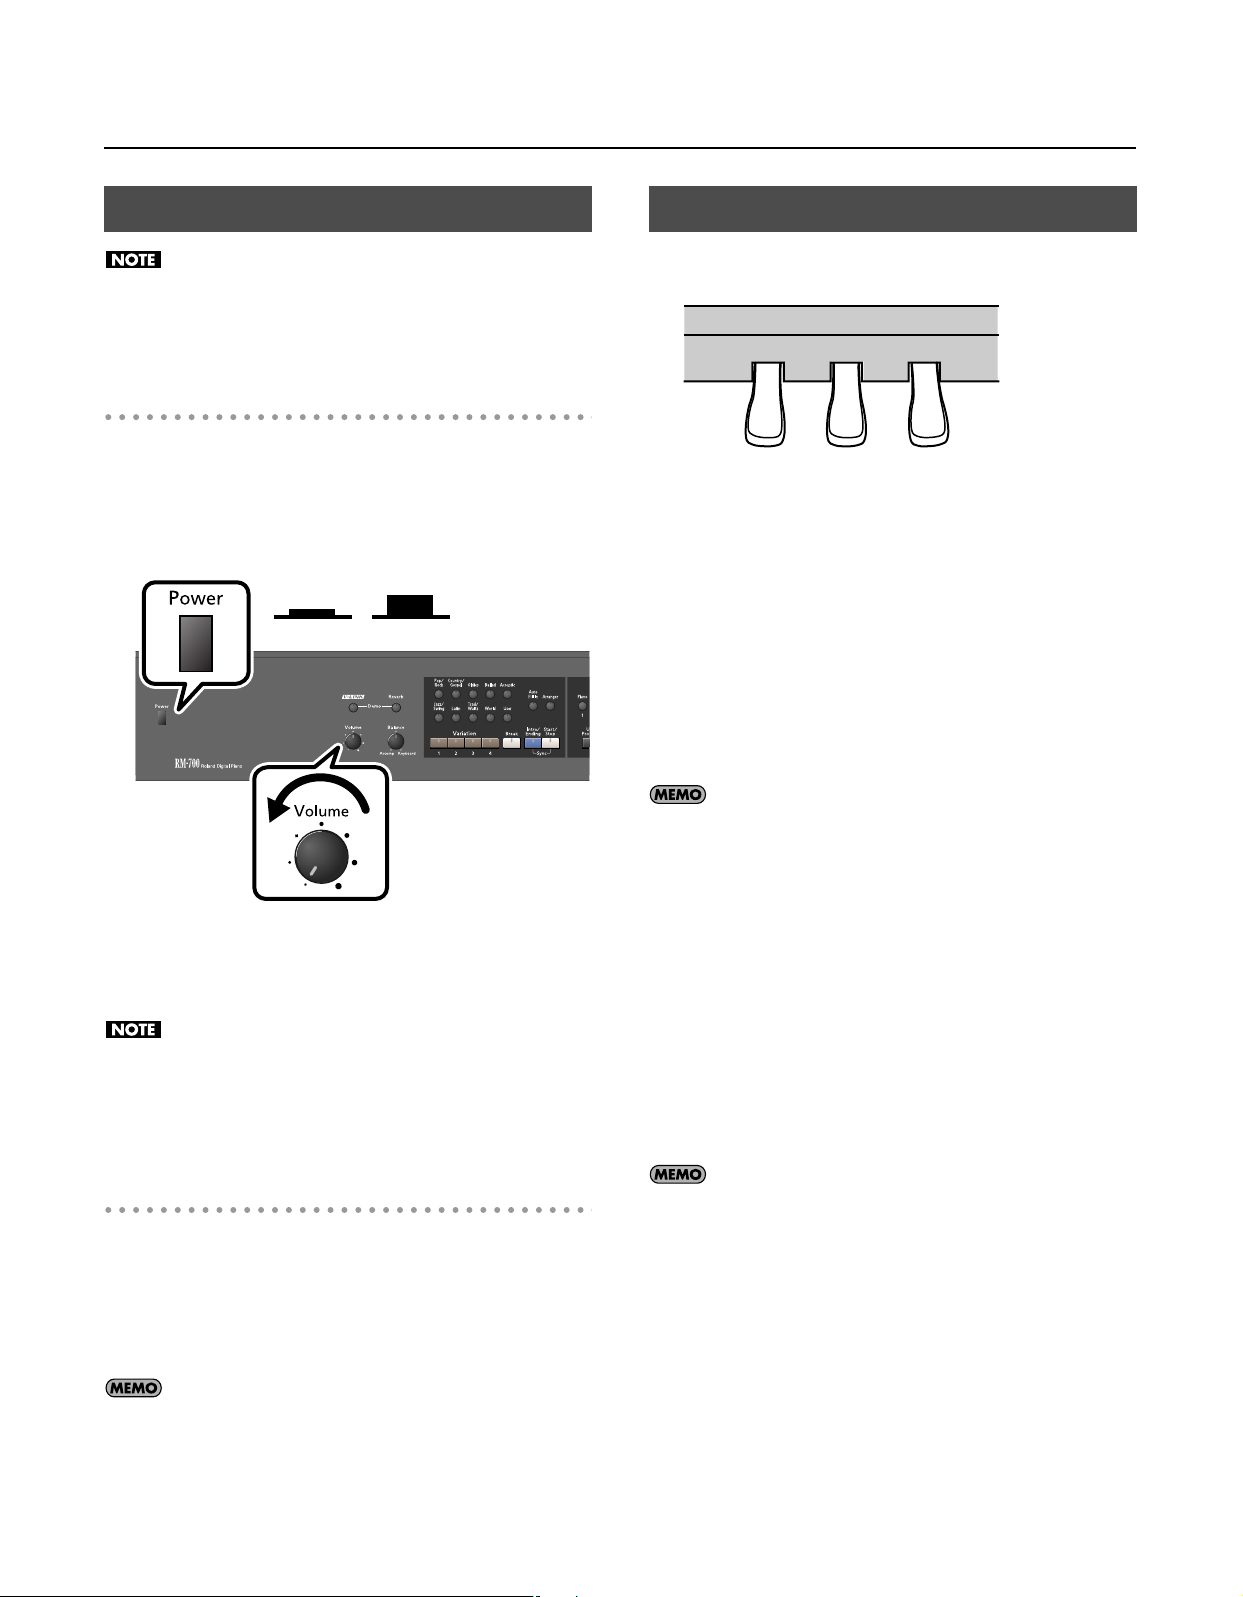
Before You Start Playing
Upward
position
ON OFF
Lower
position
Turning the Power On/Off
Once the connections have been completed, turn on power to
your various devices in the order specified. By turning on
devices in the wrong order, you risk causing malfunction and/
or damage to speakers and other devices.
Turning the Power On
Turn the [Volume] knob all the way to the left to
1.
minimize the volume.
Press the [Power] switch.
2.
About the Pedals
The pedals have the following functions, and are used mainly for
piano performance.
Soft Pedal
Sostenuto Pedal
Damper pedal (right pedal)
While this pedal is pressed, notes will be sustained even after you
take your fingers off the keys.
The length of the sustain changes subtly according to the extent to
which the pedal is depressed.
On an acoustic piano, holding down the damper pedal will allow the
remaining strings to resonate in sympathy with the sounds that you
played from the keyboard, adding a rich resonance.
The RM-700 simulates this damper resonance.
Damper Pedal
The power will turn on, several images will appear in the RM-700’s
screen, and then the Piano screen (p. 27) will appear.
After a brief interval, the RM-700 will be ready to produce sound
when you play the keyboard.
This unit is equipped with a protection circuit. A brief interval
(a few seconds) after power up is required before the unit will
operate normally.
Use the [Volume] knob to adjust the volume (p. 22).
3.
Turning the Power Off
1.
2.
Turn the [Volume] knob all the way to the left to
minimize the volume.
Press the [Power] switch.
The screen will disappear, and the power will turn off.
You can modify the sound of the damper releasing the string
and the sound of the sympathetic vibration. Refer to the Piano
Designer function (p. 29) settings “Damper Noise” and
“Damper Resonance.”
Sostenuto pedal (center pedal)
This pedal sustains only the sounds of the keys that were already
played when you pressed the pedal.
Soft pedal (left pedal)
When you hold down this pedal and play the keyboard, the sound
will have a softer tone.
The softness of the sound changes subtly depending on the extent
to which the pedal is depressed.
You can switch the function of the sostenuto pedal. Refer to
“Assigning the Function of the Pedals (Left Pedal/Center Pedal/
Expression Pedal)” (p. 179)
If you need to turn off the power completely, first turn off the
[Power] switch, then unplug the power cord from the power
outlet. Refer to
“Power Supply”
(p. 9).
21
Page 21
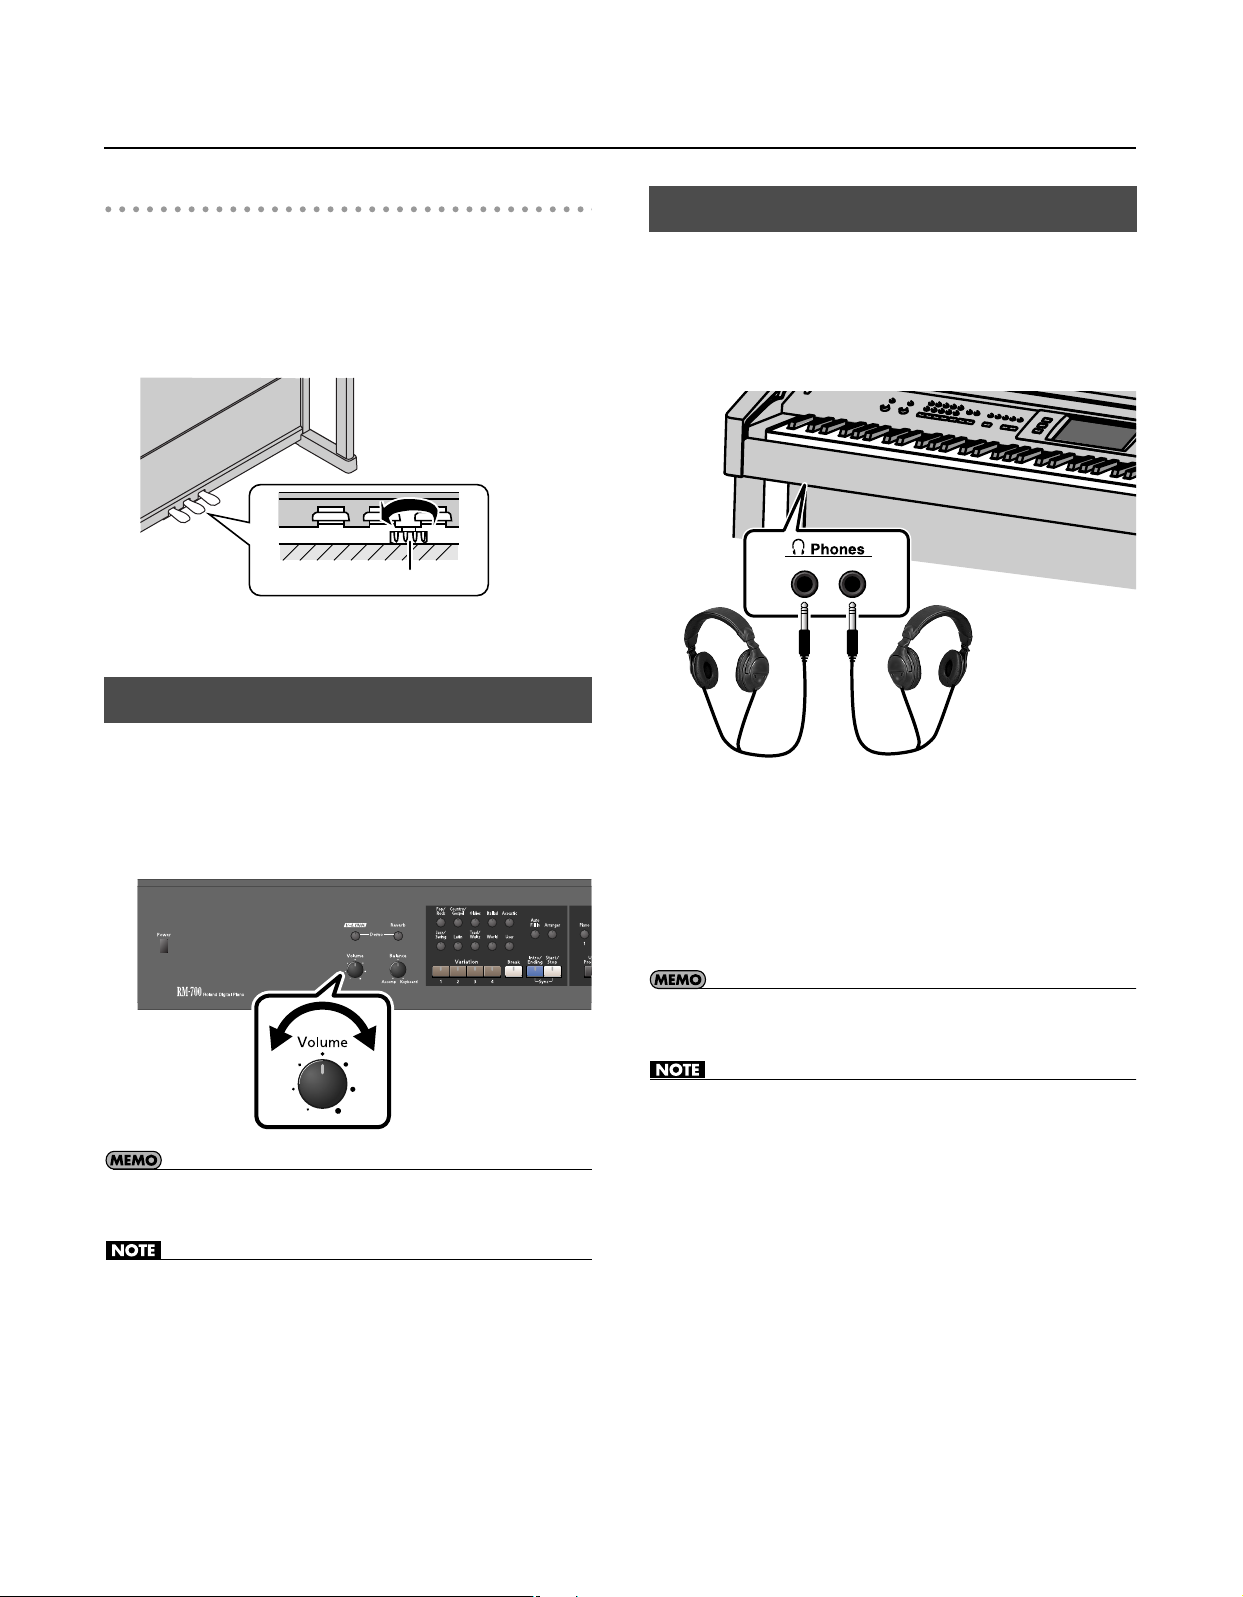
Before You Start Playing
Adjuster
About the Adjuster
When you move the RM-700 or if you feel that the pedals are
unstable, adjust the adjuster located below the pedals as follows.
• Rotate the adjuster to lower it so that it is in firm contact with the
floor. If there is a gap between the pedals and the floor, the pedals
may be damaged. In particular when placing the instrument on
carpet, adjust this so that the pedals firmly contact the floor.
Connecting Headphones
You can use headphones to enjoy the RM-700 without disturbing
those around you, such as at night. Since the RM-700 has two
headphone jacks, two people can also use headphones
simultaneously.
If you’re using only one set of headphones, you may connect them
to either of the two headphone jacks.
Adjusting the Volume
Here’s how to adjust the overall volume
If headphones are connected, use the [Volume] knob to adjust the
headphone volume.
Turn the [Volume] knob to adjust the overall volume.
1.
• You can also use the remote control to adjust the volume. Refer to
“Button Functions” (p. 84).
• Even if the [Volume] knob is raised, you won’t hear any sound if the
volume has been set to “0” using the remote’s VOLUME [-] [+]
buttons or if the [MUTE] button was pressed.
Plug the headphones into the Phones jack located at the
1.
bottom left of the piano.
If headphones are connected, no sound will be output from the RM700’s speakers.
2.
Use the RM-700’s [Volume] knob to adjust the
headphone volume.
• If the Twin Piano mode is set to “Individual,” separate sounds will be
heard from each Phones jack (p. 105).
• Use Stereo headphones.
• To prevent damage to the cord’s internal conductors, avoid rough
handling. When using headphones, mainly try to handle either the
plug or the headset.
• Your headphones may be damaged if the volume of a device is
already turned up when you plug them in. Minimize the volume
before you plug in the headphones.
• Excessive input will not only damage your hearing, but may also
strain the headphones. Please enjoy music at an appropriate
volume.
22
Page 22
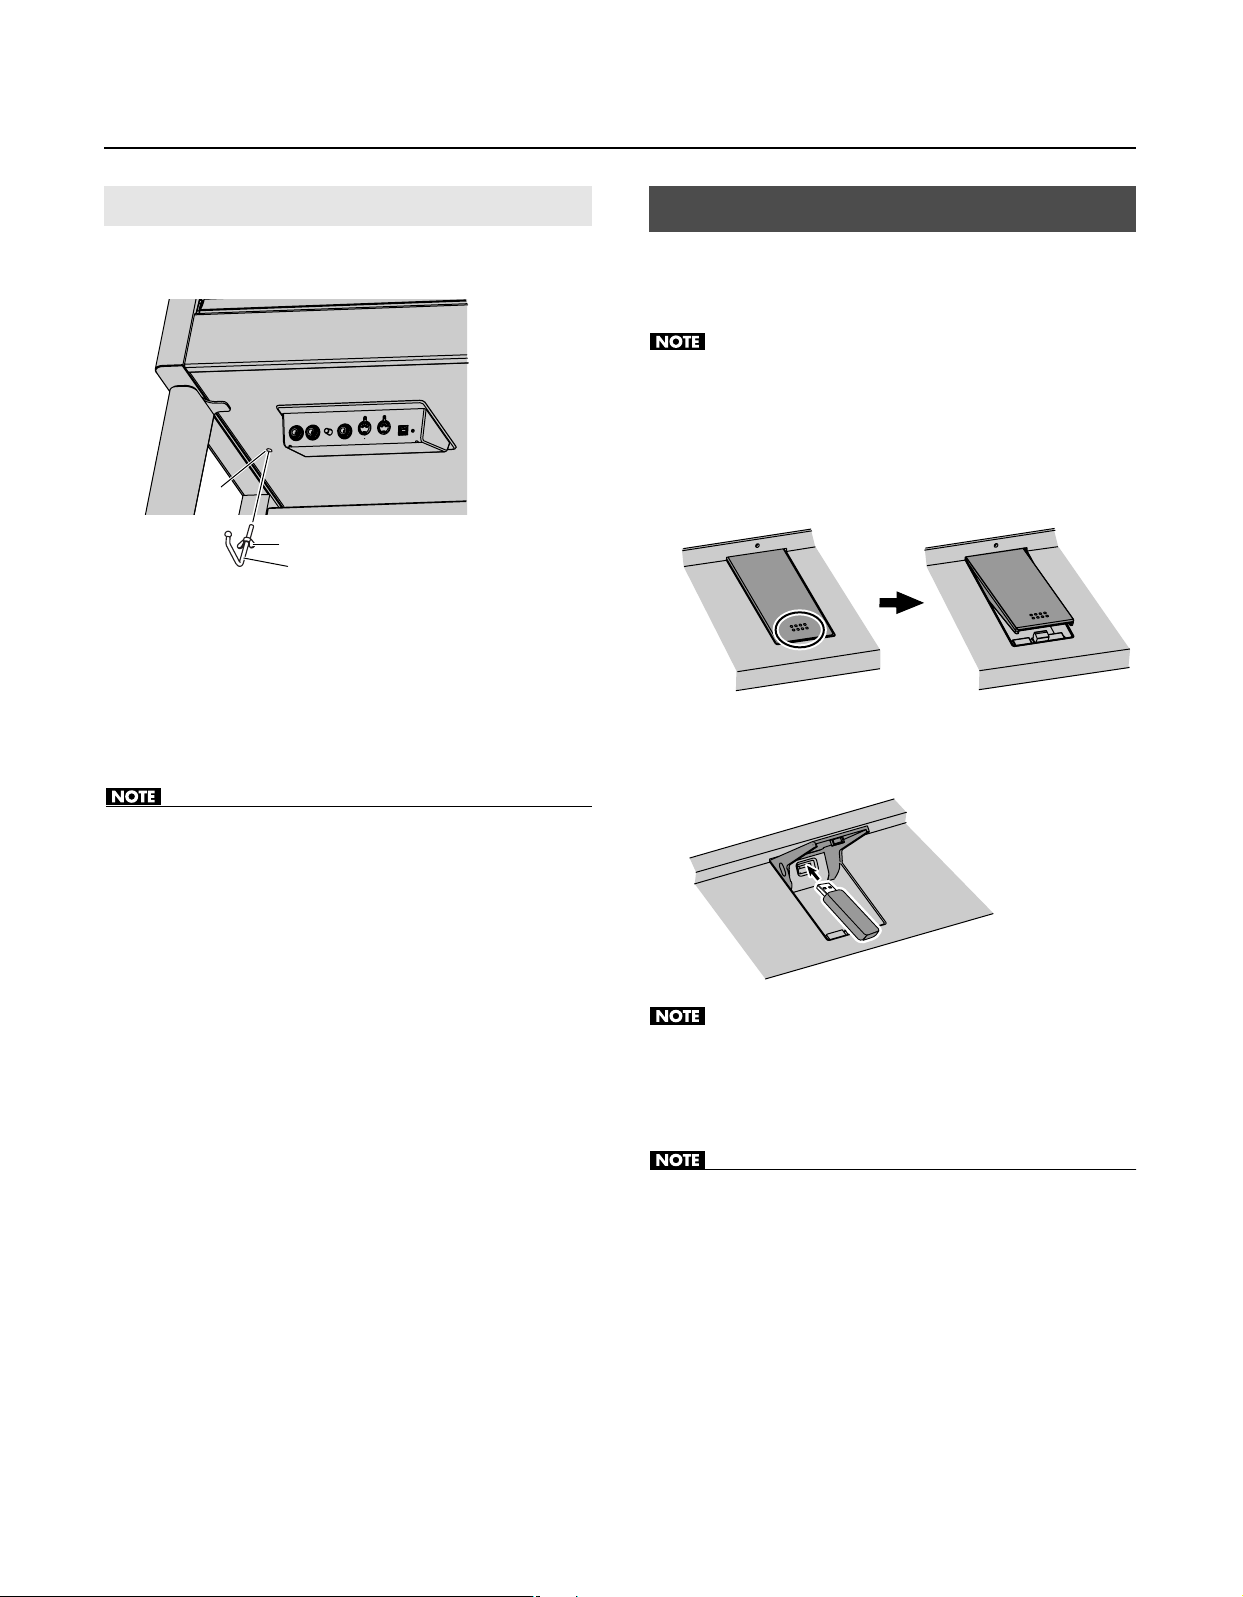
Before You Start Playing
Attaching the Headphone Hook
Whenever you are not using the headphones, you can hang them
on the headphone hook of the RM-700.
Hole
Wing nut
Headphone hook
1.
Press and twist the headphone hook included with the
RM-700 into the hole in the bottom left of the RM-700
(refer to the figure above).
2.
Turn the headphone hook wing nut to secure the
headphone hook.
Connecting USB Memory
You can connect USB memory to the External Memory connector,
and play back songs that were saved on the USB memory. Songs
you’ve recorded on the RM-700 can also be saved to USB memory.
Use USB memory sold by Roland. We cannot guarantee
operation if any other USB memory is used.
Press the External Memory connector cover and open the
1.
cover.
Press the cover in; the cover will open.
2.
Connect the USB memory to the External Memory
connector.
• Do not hang anything other than headphones on the headphone
hook. Doing so may damage the instrument or the hook.
Make sure that the memory is plugged in all the way. Do not
use excessive force.
3.
Press the cover in again to close the cover.
• Always keep the External Memory connector cover closed except
when connecting and disconnecting external memory.
23
Page 23
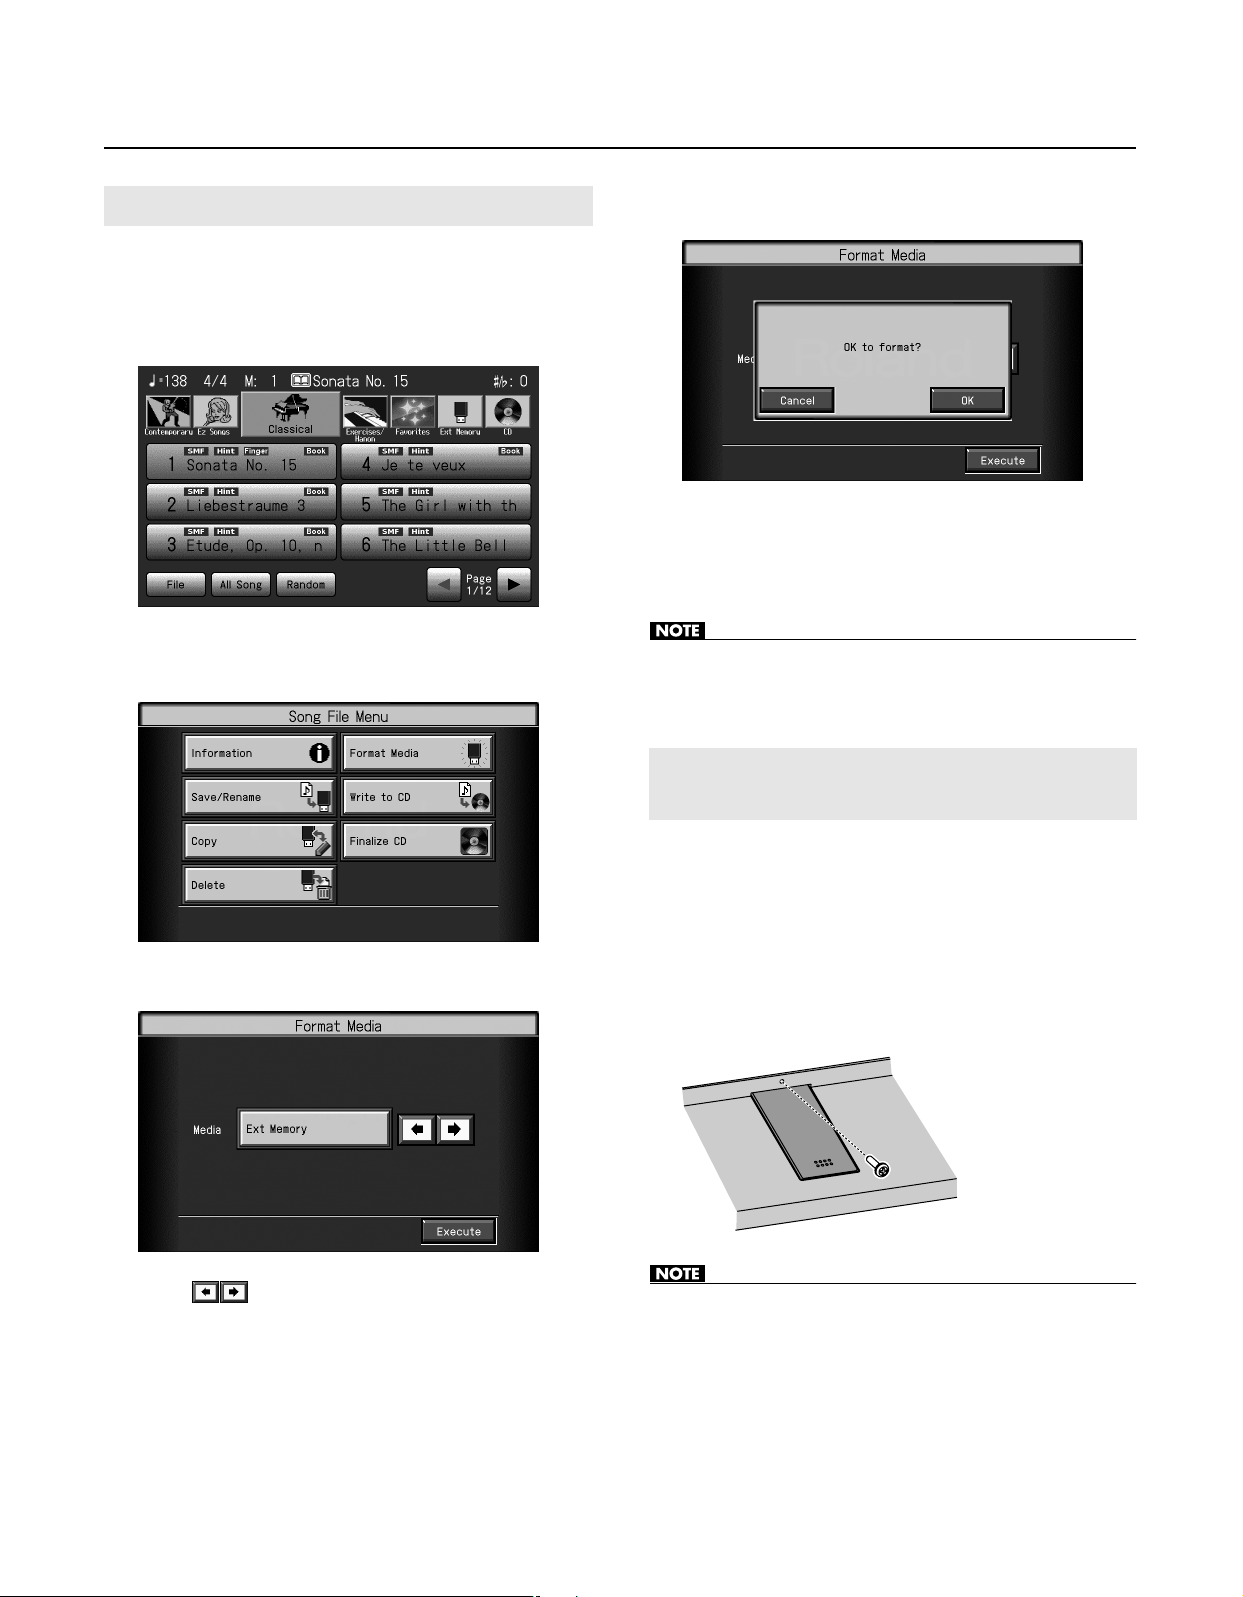
Before You Start Playing
Formatting the USB Memory
Before using newly purchased USB memory, you’ll need to format
(initialize) it on the RM-700.
1.
Press the [Song] button, getting indicator to light.
The Song selection screen appears.
2.
Touch < File >.
The “Song File Menu” screen appears.
5.
Touch < Execute >.
A confirmation message appears.
* If you want to quit the initialization, touch < Cancel >.
Touch < OK >.
6.
Initialization of the USB memory begins.
• Never disconnect the USB memory or turn off the power while the
“Formatting...” indication is shown.
3.
Touch < Format Media >.
Touch
4.
to select “Ext Memory.”
Locking the External Memory Connector Cover
To prevent theft or loss of the USB memory connected to the
External Memory connector, you can lock the External Memory
connector cover.
Press the External Memory connector cover to close the
1.
cover.
Secure the lock using the anti-theft lock screws included
2.
with the instrument.
• Take care not to lose the anti-theft lock screws. Also be sure to use
only the included screws to secure the anti-theft lock.
24
Page 24
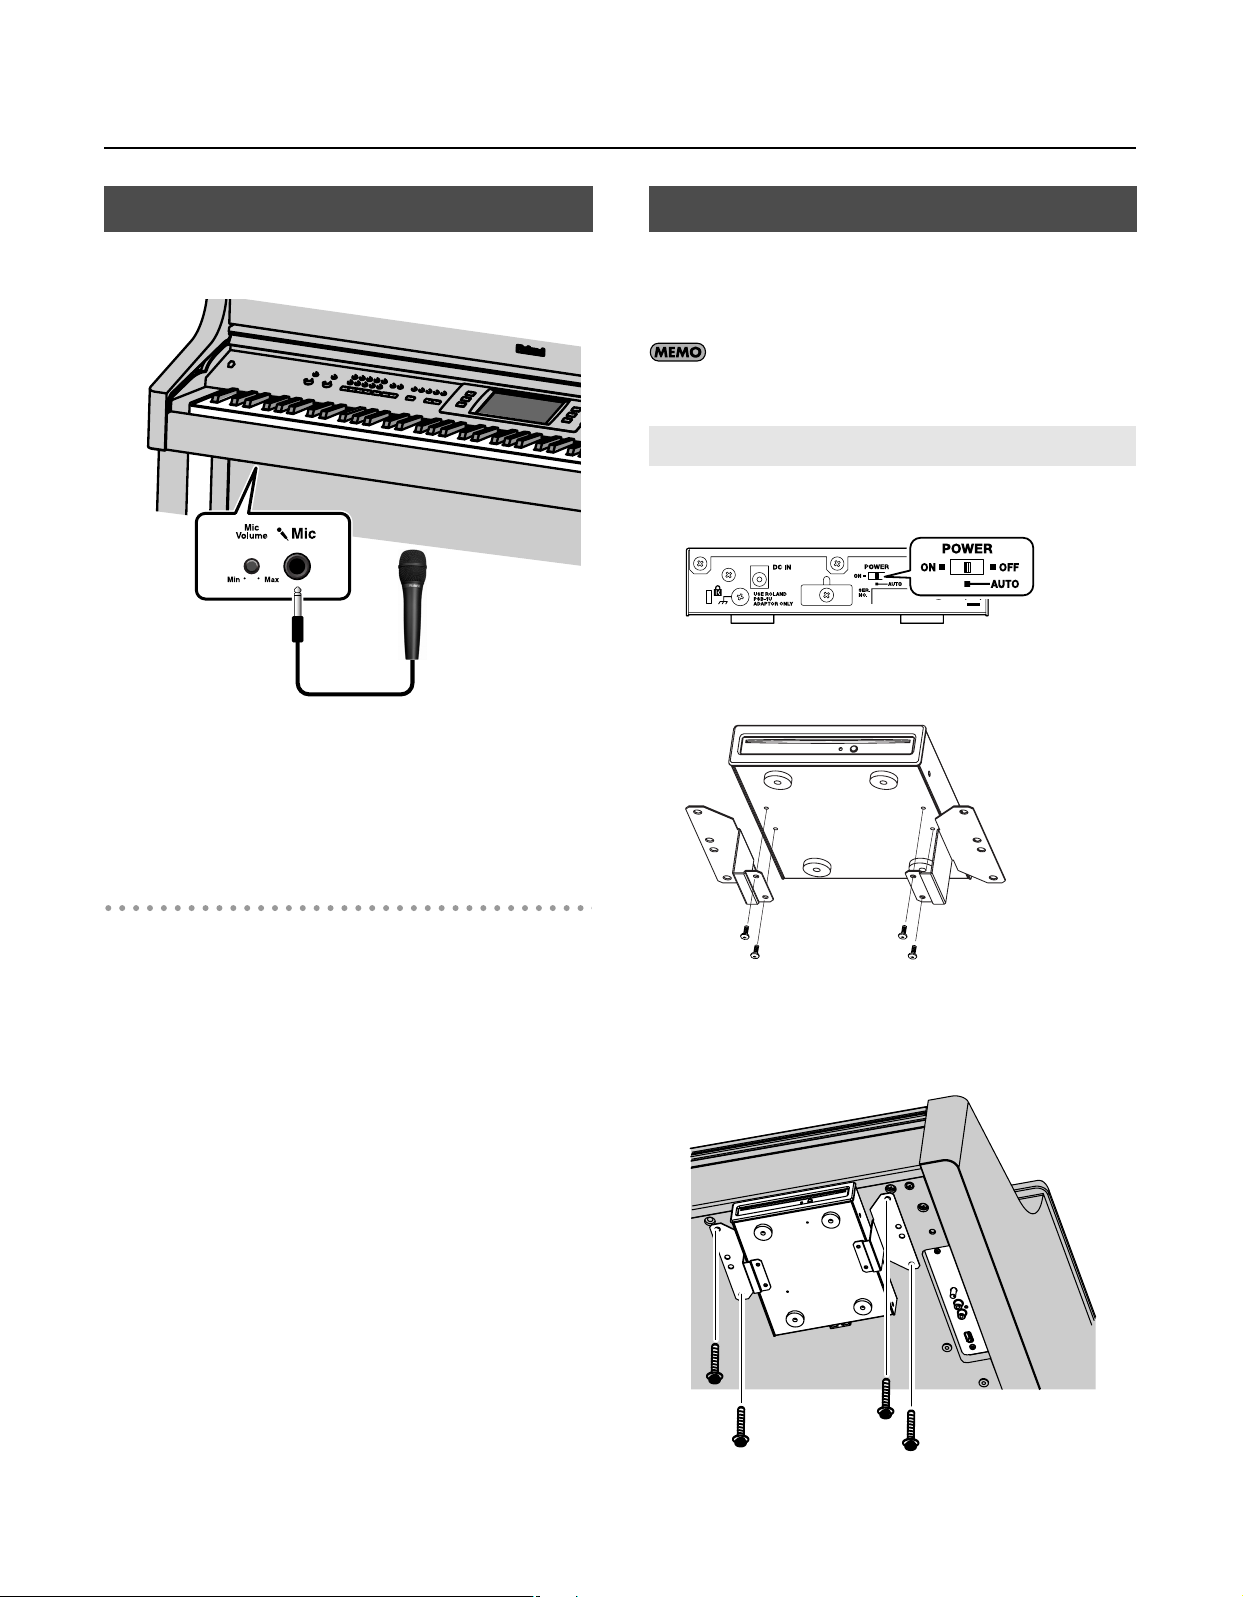
Before You Start Playing
Screws (3 x 8 mm)
Connecting a Microphone
You can connect a microphone to the Mic jack, and enjoy singalongs or tell a story while you play.
1.
Connect a microphone (sold separately) to the Mic jack
on the lower-left area of the instrument.
Connecting a CD Drive
You can connect a separately available CD drive (CD-01A) and play
back music CDs or CD-ROMs containing SMF music data. You can
also write songs for which the audio has been recorded to a CD to
create a music CD.
You can also play songs on VIMA TUNES (VIMA CD-ROMs) sold
by Roland.
Attaching a CD Drive
Turn the CD drive’s power “AUTO.”
1.
Use the screws (3 x 8 mm) to attach the holders to the CD
2.
drive.
2.
Rotate the [Mic Volume] knob on left side of the Mic jack
to adjust the volume level for the microphone.
Some Notes on Using a Microphone
• Be careful of high volume levels when using microphone late at
night or early in the morning.
• When connecting a microphone to the RM-700, be sure to lower the
volume. If the volume control is too high when the microphone is
plugged in, noise may be produced by the speakers.
• Howling could be produced depending on the location of
microphones relative to speakers. This can be remedied by:
• Changing the orientation of the microphone.
• Relocating microphone(s) at a greater distance from speakers.
• Lowering volume levels.
3.
As shown in the illustration, fasten the CD drive using the
screws (4 x 16 mm) and the screw holes located on the
bottom of the RM-700.
Screws (4 x 16 mm)
25
Page 25
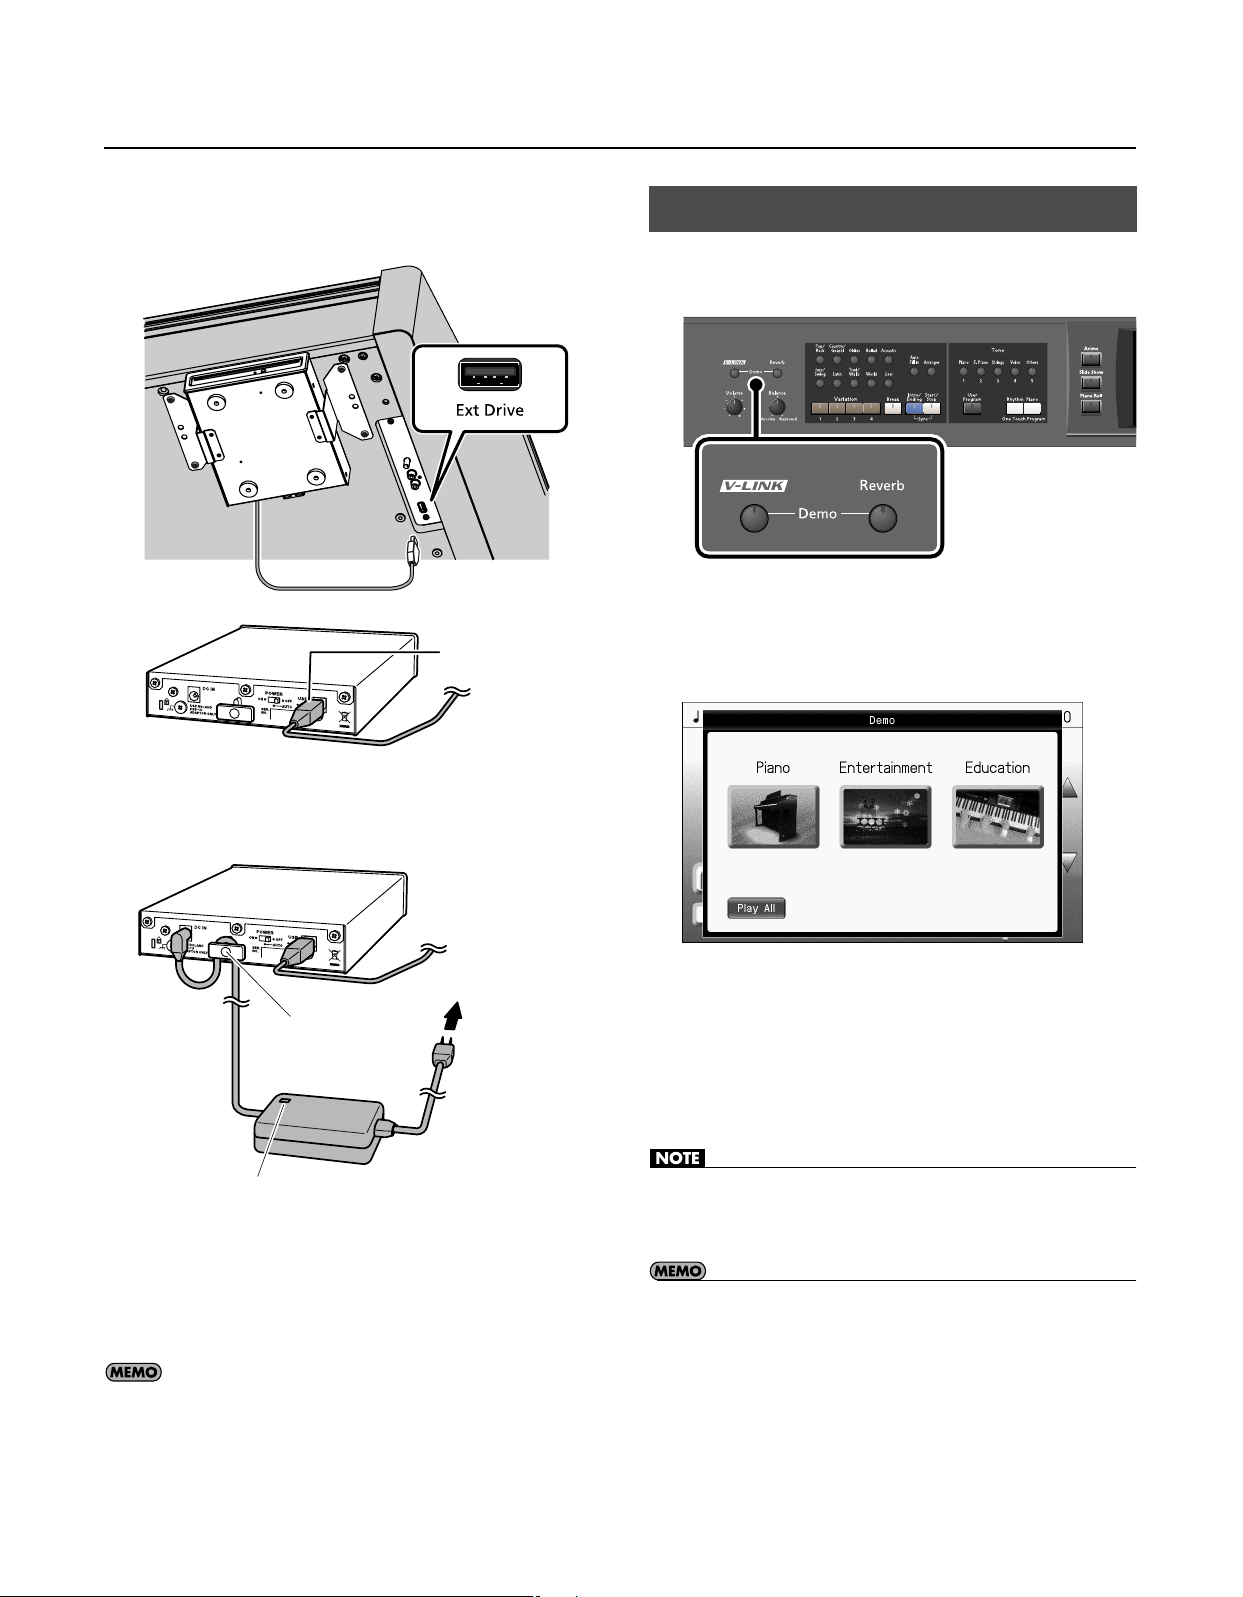
Before You Start Playing
4.
Use a USB cable to connect the CD drive’s USB connector
to the Ext Drive connector on the RM-700’s front bottom
panel.
USB cable
Experiencing the RM-700 Demo
You can experience three different demos that introduce the most
important functions.
While holding down the [V-LINK] button, press the
1.
[Reverb] button.
The demo menu screen appears.
5.
Connect the AC adaptor included with the CD drive to the
CD drive’s DC IN jack.
To AC outlet
Cord hook
AC adaptor
Power cord
Place the AC adaptor so the side with the indicator (see illustration)
faces upwards and the side with textual information faces
downwards.
The indicator will light when you plug the AC adaptor into an AC
outlet.
6.
Connect the AC adaptor to an AC outlet.
To prevent the inadvertent disruption of power to your unit
(should the plug be pulled out accidentally), and to avoid
applying undue stress to the AC adaptor jack, anchor the
power cord using the cord hook, as shown in the illustration.
Touch the demo that you want to experience.
2.
The demo image will appear in the RM-700’s display.
* If you touch
consecutively until you press the [Exit] button.
3.
To end the demo, press the [Exit] button.
• All rights reserved. Unauthorized use of this material for purposes
other than private, personal enjoyment is a violation of applicable
laws.
• You can set things so the Demo starts playing automatically. For
details, see “Automatically Starting the Demo (Auto Start)” (p. 187).
< Play All >
, the three demos will continue playing
26
Page 26
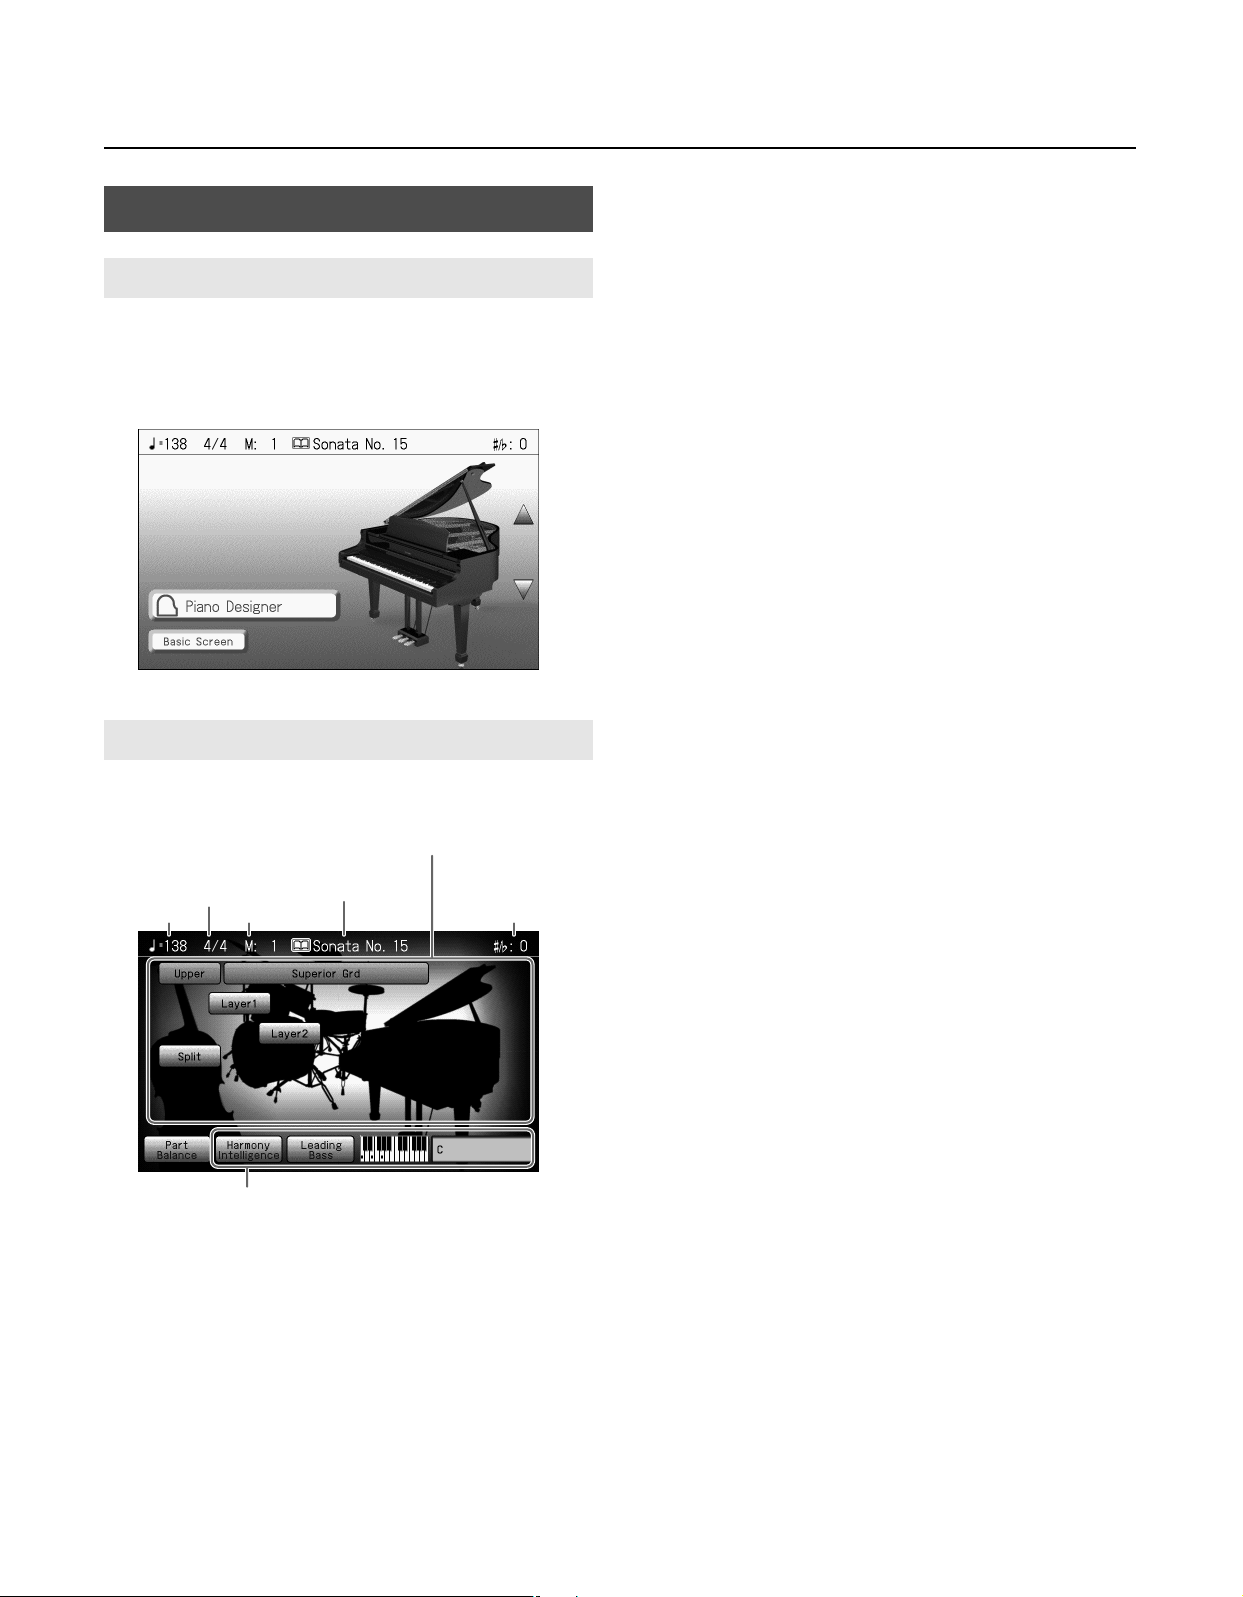
Main Screens
Piano Screen
Immediately after the power is turned on, the Piano screen is
displayed.
The Piano screen will also appear when you press the One Touch
Program [Piano] button.
Before You Start Playing
Basic Screen
From the Piano screen, you can touch <Basic Screen> to access the
Basic screen.
The Tone names are selected appear
The last-selected
Beat
Tempo Measure Transpostion value
Functions for automatic accompaniment
Follow either of the procedures described below to display it.
•
From the Piano screen, press the [Tone] button and then press
the [Exit] button.
song or Music Style
•
Press the One Touch Program [Rhythm] button.
The Basic screen appears and the settings are made for automatic
accompaniment.
27
Page 27
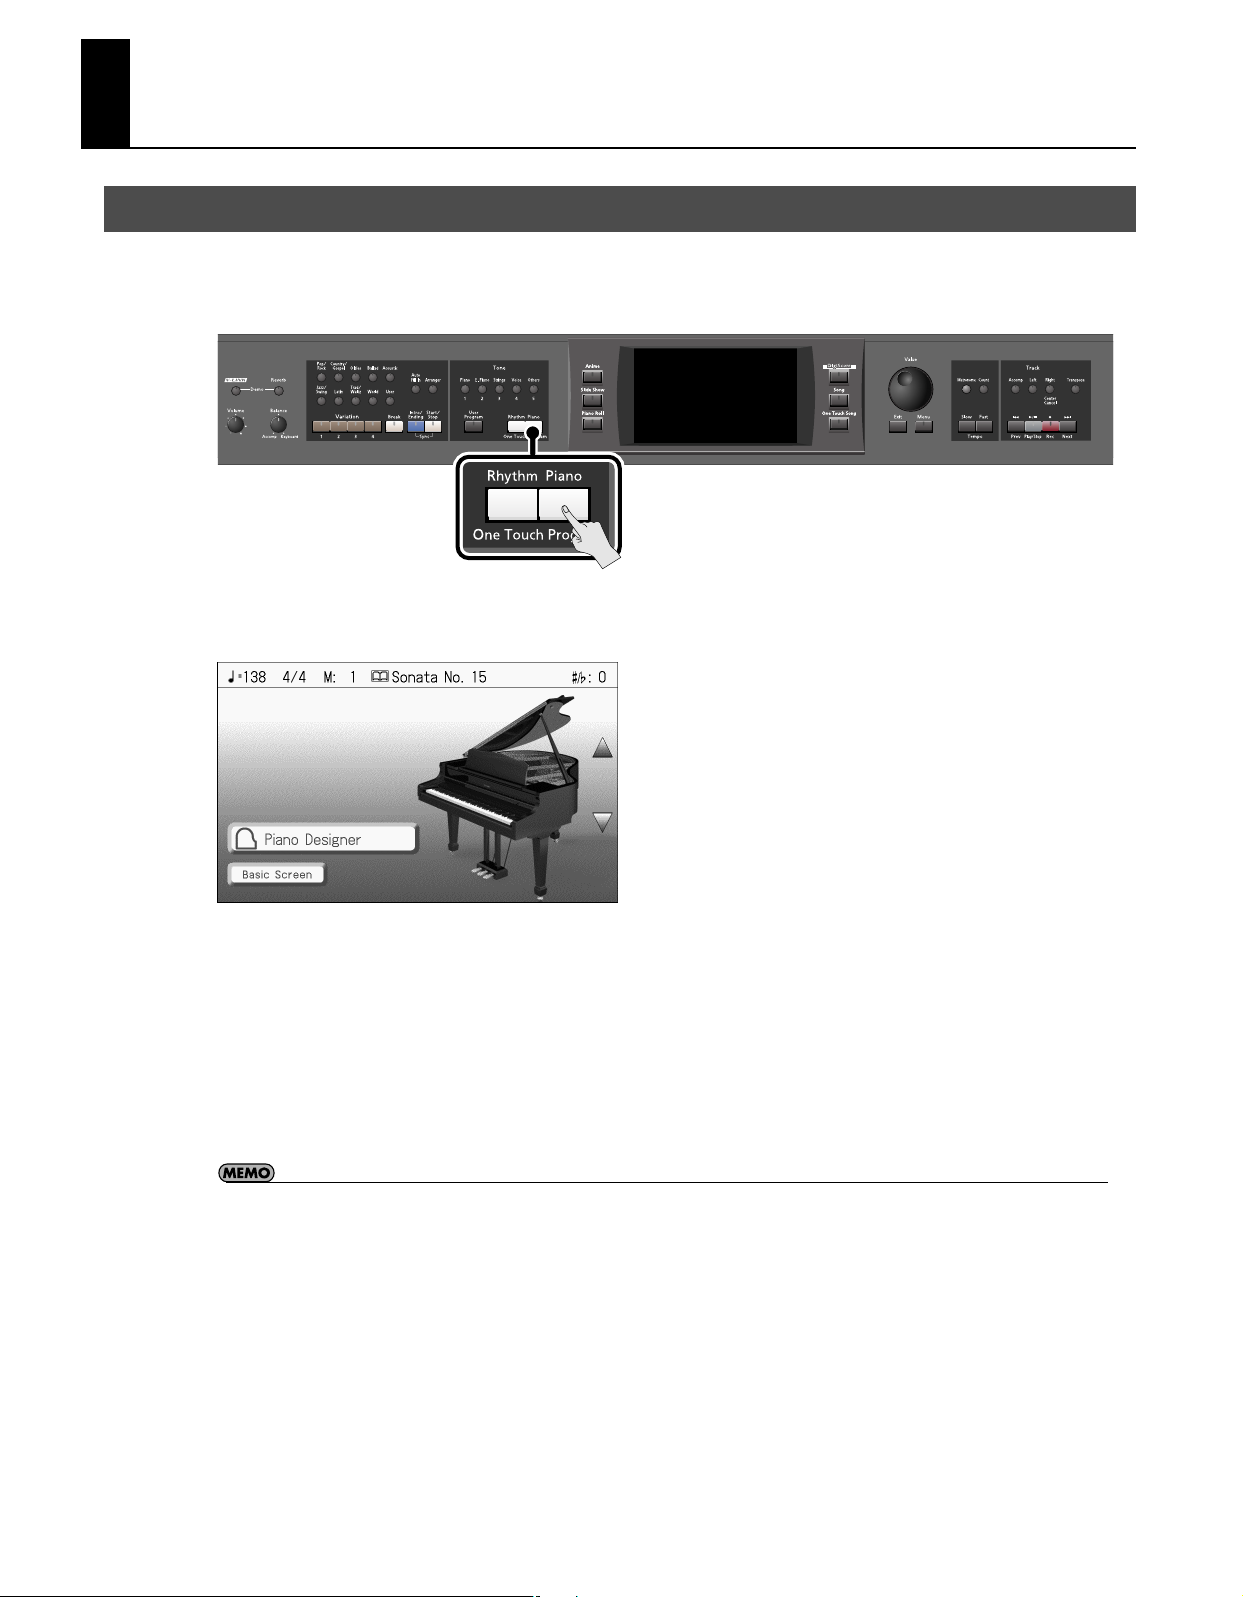
Performance
Playing the Keyboard Like a Piano (One-Touch Piano)
You can create the optimal settings for a piano performance with the press of a single button.
Thanks to the superb playing feel of its ivory feel keyboard, and its high-quality, grand piano sounds, the RM-700 allows you to
experience piano performance as it truly should be.
Press the One Touch Program [Piano] button.
1.
The Piano screen appears.
When you press the One Touch Program [Piano] button, the RM-700 will switch to the following settings, regardless of the current
panel settings.
• The piano sound “Superior Grd” will be selected.
• If the keyboard has been split into upper and lower sections (p. 39), the keyboard returns to a single section.
• The pedals return to their usual functions (p. 21).
• The effect is automatically set to “Damper Resonance” (p. 31).
• Since this instrument faithfully reproduces real acoustic piano action and response, keys played in the top one-and-one-half-octave
range continue to resonate, regardless of the damper pedal action, and the tone in this range is audibly different. The Transpose
setting (p. 122) can also be used to change the range that is unaffected by the damper pedal.
28
Page 28
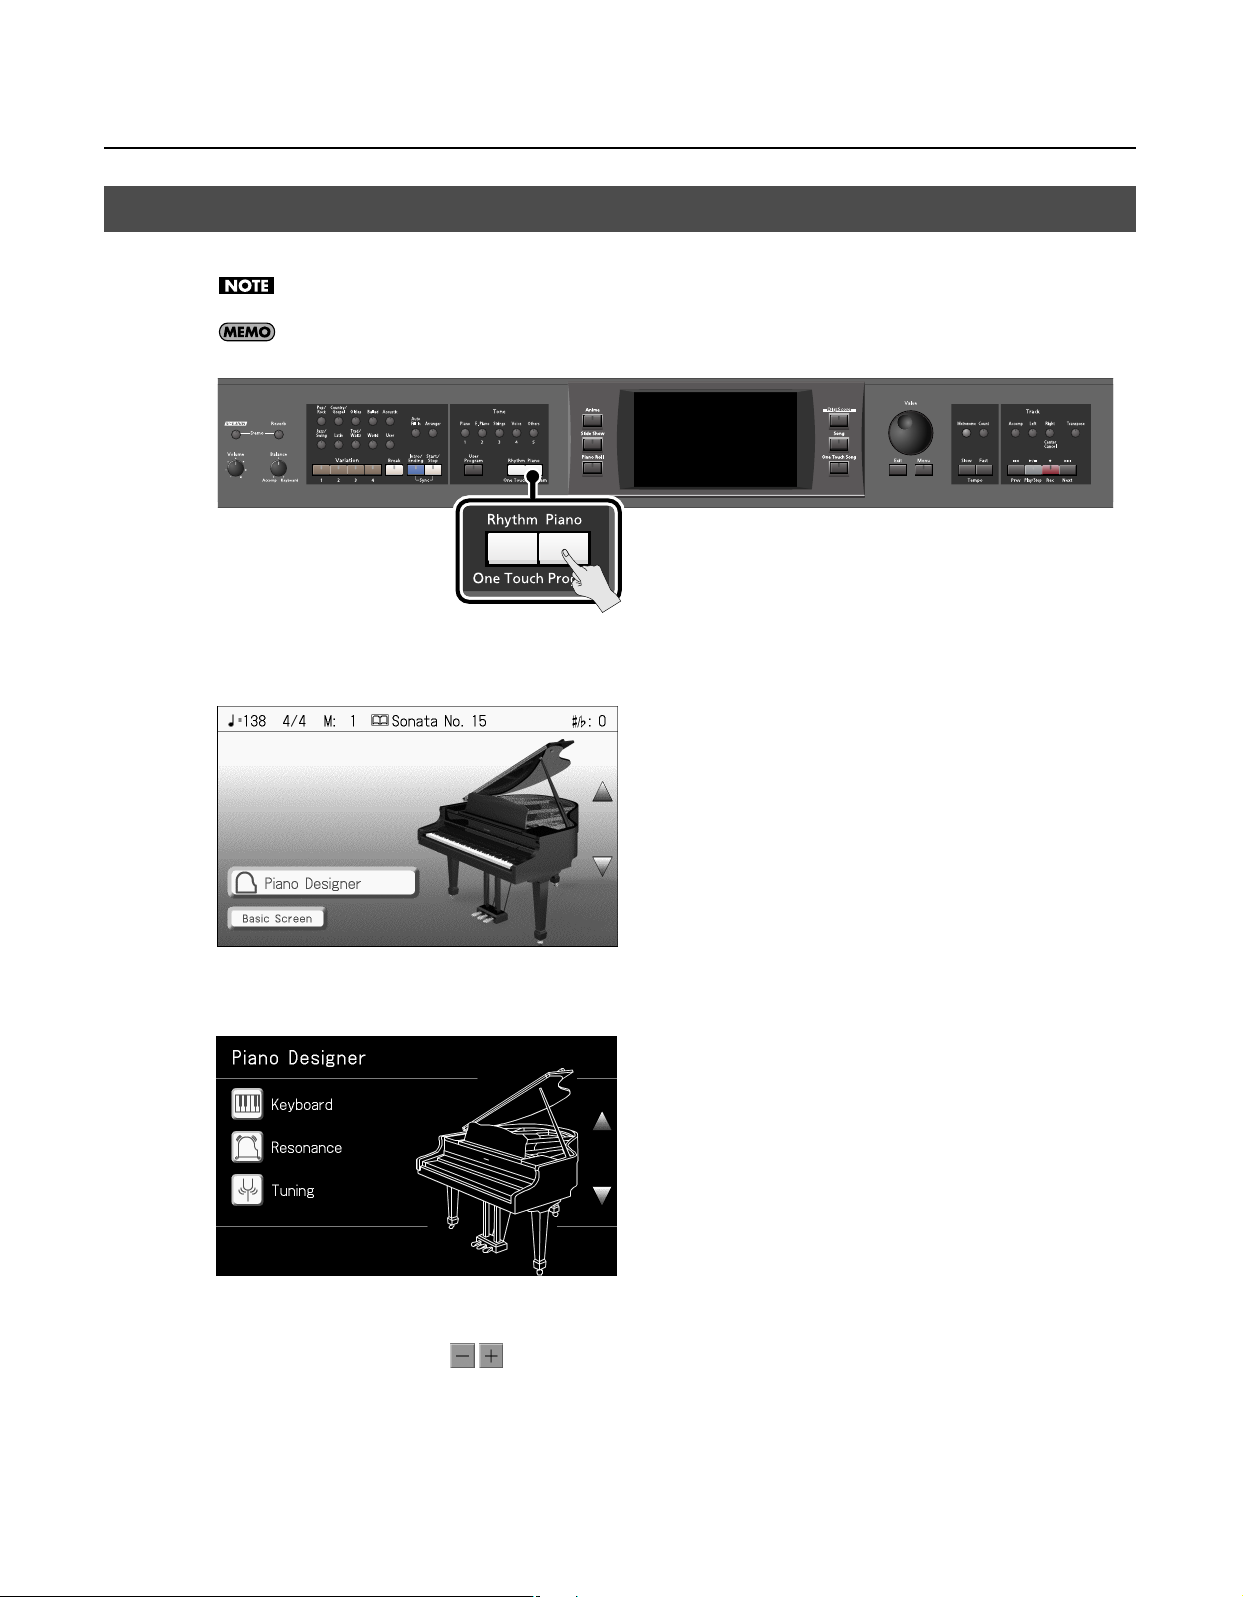
Creating Your Own Piano Sound (Piano Designer)
The RM-700 lets you make detailed adjustments to the piano sound as desired. This function is called “Piano Designer.”
Some of the “Piano Designer” functions apply only to specific sounds.
You can use the Memory Backup operation (p. 189) to store the “Piano Designer” settings in internal memory.
1.
Press the One Touch Program [Piano] button.
The Piano screen appears.
Performance
2.
Touch <Piano Designer>.
The “Piano Designer” screen appears.
Touch <Keyboard>–<Tuning>.
3.
4.
To change the setting, touch
5.
Press the [Exit] button when you’ve finished making settings.
for the item you want to specify.
29
Page 29
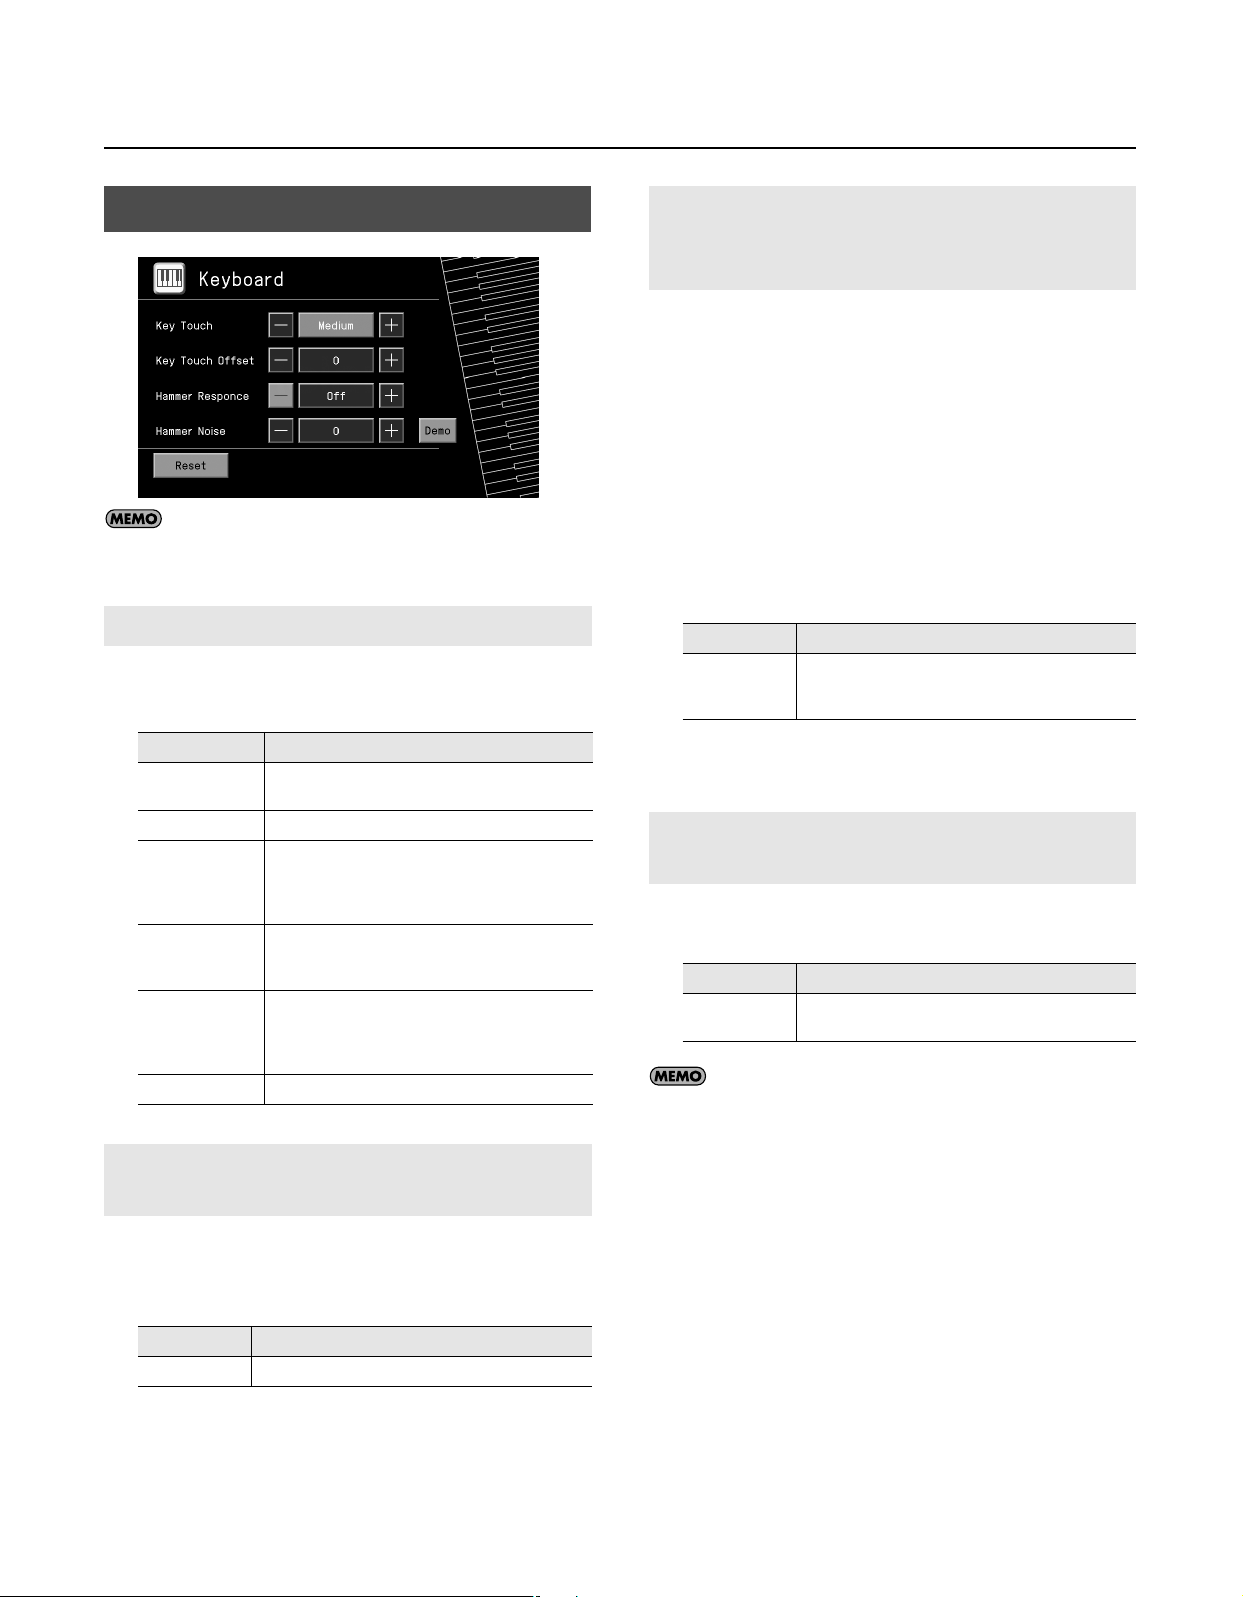
Performance
Keyboard
If you touch <Reset>, the currently selected setting
(parameter) will return to its factory setting.
Adjusting the Keyboard Touch (Key Touch)
You can adjust the touch (playing feel) of the keyboard.
* This setting applies to all tones.
Setting
Fixed
Super Light
Light
Medium
Heavy
Super Heavy
Making Fine Adjustments to the Key Touch (Key Touch Offset)
Explanation
The sound plays at one set volume, regardless of the
force used to play the keys.
This setting produces the lightest keyboard touch.
You can achieve fortissimo (ff) play with a less
forceful touch than usual, so the keyboard feels
lighter. This setting makes it easy to play, even for
children.
This sets the standard keyboard touch. You can play
with the most natural touch. This is the closest to the
touch of an acoustic piano.
You have to finger the keyboard more forcefully than
usual in order to play fortissimo (ff), so the keyboard
touch feels heavier. Dynamic fingering adds even
more feeling to what you play.
This setting produces the heaviest keyboard touch.
Changing the Timing of Sounds According to the Force Used to Press the Keys (Hammer Response)
This adjusts how your playing strength will affect the timing at
which the note sounds. This is called the “Hammer Response”
function.
On an acoustic piano, pressing a key moves a hammer, which strikes
a string to produce sound. If you press the key softly, the hammer
will move slowly, meaning that it will take slightly longer (in
comparison to a strongly-played note) from the moment you press
the key until the sound is produced.
If the Hammer Response function is turned on, the time between
the moment you press a key until the sound is heard will change
depending on the strength with which you play. As you play more
softly, this time will become longer.
* This setting applies to all tones.
Setting Explanation
Higher settings will produce slower response. The
Off, 1–10
Hammer Response function is not active when the
value is set to “Off.”
Adjusting the Sound of Hammers Striking Strings (Hammer Noise)
You can adjust the sound produced when the hammer of an
acoustic piano strikes the string.
Setting
-2–0–2
You can touch <Demo> to access the demo screen.
By touching the screen you can hear the change in the sound
produced by the different settings.
Press the [Exit] button to return to the previous screen.
Explanation
Higher settings will produce a louder sound of the
hammer striking the string.
This lets you make further detailed adjustments to the keyboard
sensitivity as appropriate for the strength of your fingers.
* This setting applies to all tones.
Setting
-10–0–9
Explanation
Higher settings will produce a heavier playing feel.
30
Page 30
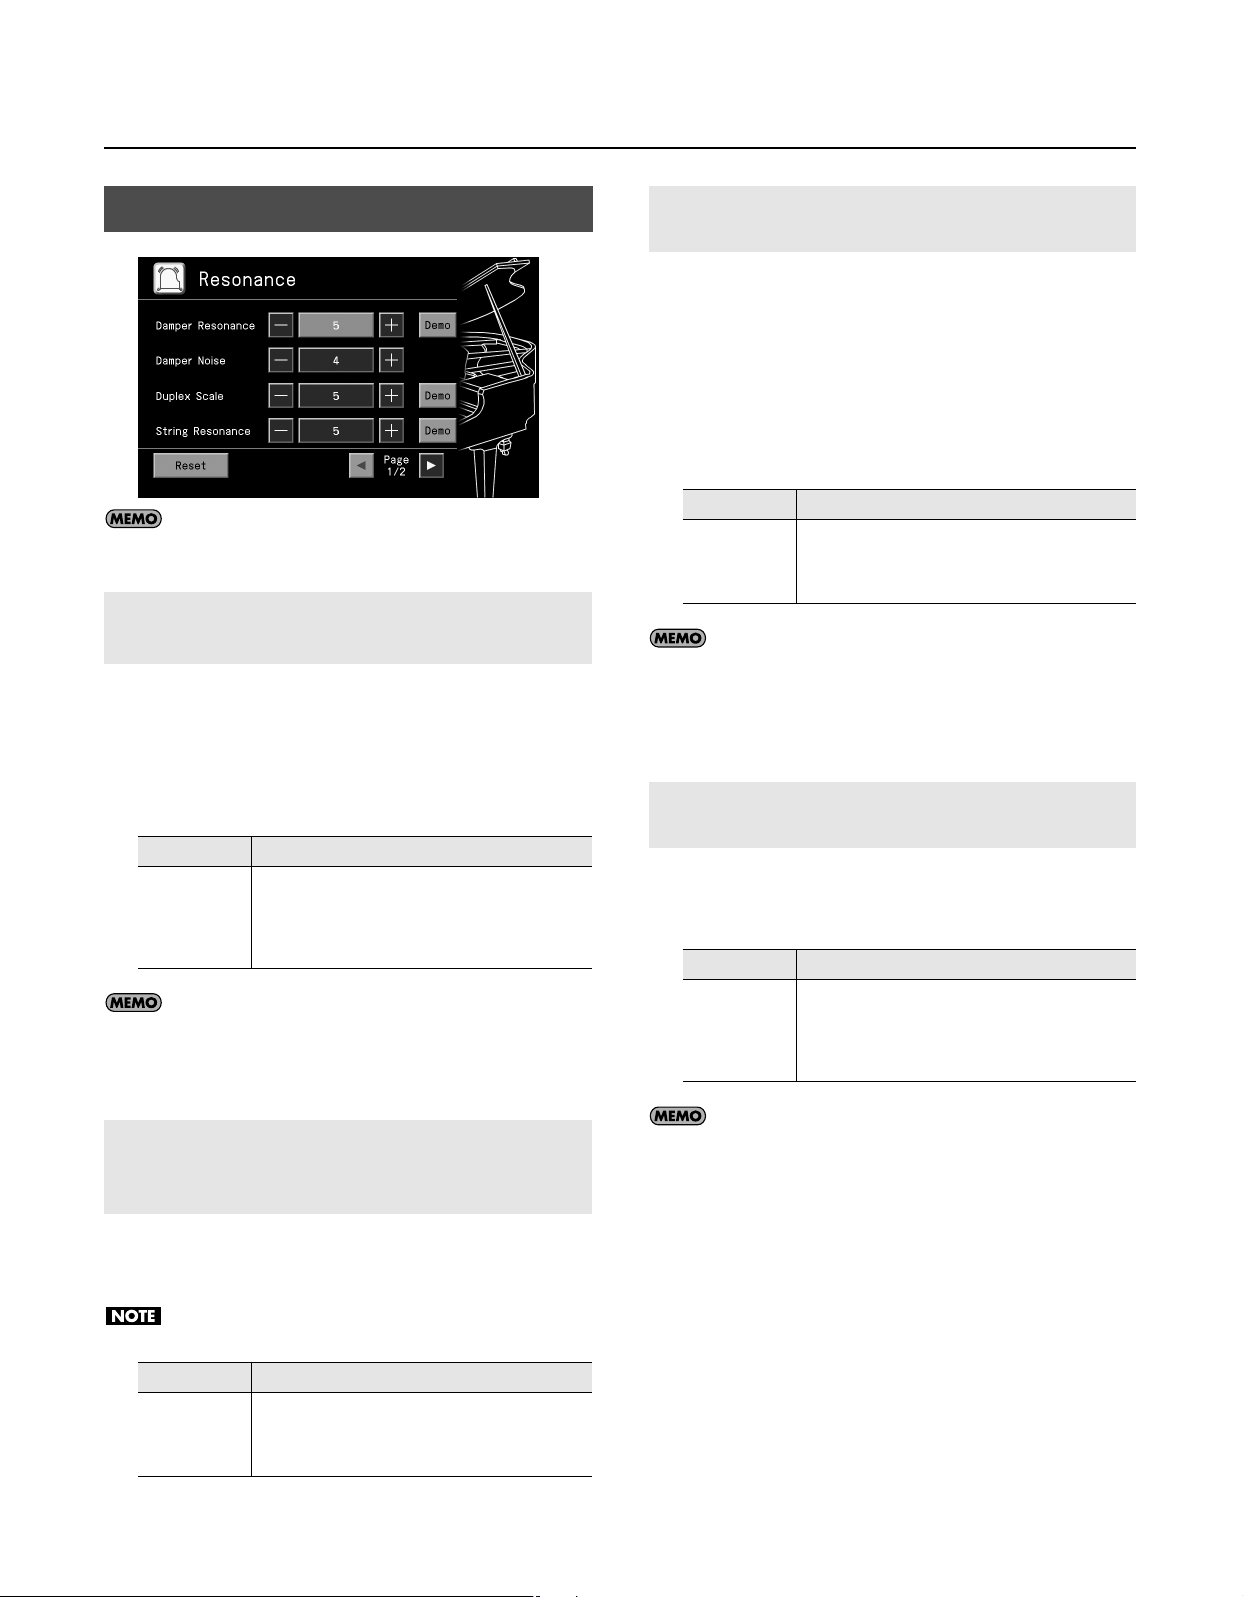
Performance
Resonance
If you touch <Reset>, the currently selected setting
(parameter) will return to its factory setting.
Adjusting Resonance when the Damper Pedal is Depressed (Damper Resonance)
You can change the volume of the damper pedal resonance.
On an acoustic piano, depressing the damper pedal makes the
notes you play resonate with other strings, adding rich
reverberations and fatness to the sound. The damper pedal on the
RM-700 recreates this resonance (Damper Resonance) when
depressed.
Setting
Off, 1–10
You can touch <Demo> to access the demo screen.
By touching the screen you can hear the change in the sound
produced by the different settings.
Press the [Exit] button to return to the previous screen.
Explanation
The resonance volume decreases as the value is
lowered, while raising the value increases the volume
of the Damper Resonance.
The Damper Resonance function is not active when the
value is set to “Off.”
Adjusting the Sympathetic Vibrations of an Acoustic Piano’s Duplex Scale (Duplex Scale)
“
Duplex Scale
vibrations in the sections of the string toward the front and toward
the back.
It can produce sound that is richer and brighter by adding the
string’s higher harmonics.
Because no damper (sound-stopping mechanism) is applied to the
front or back sections of the string, the resonating sounds linger
even after the sound of the string stops when you release the
played key.
Setting
Off, 1–10
You can touch <Demo> to access the demo screen.
By touching the screen you can hear the change in the sound
produced by the different settings.
Press the [Exit] button to return to the previous screen.
” refers to a system that causes sympathetic
Explanation
Higher settings will make the sympathetic vibration
louder.
The Duplex Scale function is not active when the value
is set to “Off.”
Producing the Resonance of the Strings when the Keys Are Played (String Resonance)
When you play the keys on an acoustic piano, the strings that are
already playing resonate as well. The function that reproduces this
effect is called “String Resonance.”
Setting
Off, 1–10
Explanation
The resonance level decreases as the value is
decreased, while increasing the value increases the
amount of resonance.
The String Resonance function is not active when the
value is set to “Off.”
Adjusting the Sound Heard at String Release When the Damper Pedal is Depressed (Damper Noise)
You can adjust the damper noise of the acoustic piano sound (the
sound of the damper releasing the strings when you press the
damper pedal).
This setting is ignored when Damper Resonance is set to “Off.”
Setting
Off, 1–10
Explanation
Larger values produce correspondingly greater
damper noise.
The Damper Noise function is not active when the
value is set to “Off.”
You can touch <Demo> to access the demo screen.
By touching the screen you can hear the change in the sound
produced by the different settings.
Press the [Exit] button to return to the previous screen.
31
Page 31

Performance
Playing Sounds When the Keys Are Released (Key Off Resonance)
You can play the “key off” sound (the subtle sound produced when
the keys are released) obtained when playing an acoustic piano.
Setting
Off, 1–10
You can touch <Demo> to access the demo screen.
By touching the screen you can hear the change in the sound
produced by the different settings.
Press the [Exit] button to return to the previous screen.
Explanation
The volume of the Key Off sound decreases as the value
is lowered, while raising the value increases the volume
of the Key Off sound.
The Key Off Resonance function is not active when the
value is set to “Off.”
Opening or Closing the Lid to Change the Resonance (Lid)
Adjusts the extent to which the lid of the grand piano is open.
Setting
0–6
Explanation
As the value decreases, the lid seems to close more,
producing a softer sound. increasing the value opens
the lid more, producing a brighter sound.
Tuning
If you touch <Reset>, the currently selected setting
(parameter) will return to its factory setting.
Tuning to Other Instruments’ Pitches (Master Tuning)
In situations such as when playing ensemble with other
instruments, you can tune the RM-700’s standard pitch to the pitch
of another instrument.
The standard pitch generally refers to the pitch of the note that’s
played when you finger the middle A key.
This tuning of all the instruments to a standard pitch is called
“Master Tuning.”
* This setting applies to all tones.
You can also adjust the openness of the lid by touching
in the Piano screen or the Piano Designer screen. Doing so will
also change the Lid setting.
Setting
415.3 Hz–440.0 Hz–466.2 Hz
Changing the Tuning (Temperament)
You can play classical styles such as Baroque using historic
temperaments (tuning methods).
Most modern songs are composed for and played in equal
temperament, the most common tuning in use today. But at one
time, there were a wide variety of other tuning systems in existence.
By playing in the temperament that was in use when a composition
was created, you can experience the sonorities of chords originally
intended for that song.
* This setting applies to all tones.
Setting
Equal
Just Major
Explanation
This temperament divides the octave into 12
equal parts. All intervals will be slightly out of tune
by the same amount.
This temperament makes the 5th and 3rd intervals
pure. It is unsuitable for playing melodies and
modulation is not possible, but it produces
beautifully harmonious chords.
32
Page 32

Performance
Setting Explanation
Just Minor
Arabic
Kirnberger
Meantone
Pythagorean
Werckmeister
Just intonation differs between major and minor
keys. The same results as major can be obtained in
a minor key.
This tuning is suitable for the music of Arabia.
This temperament is a modification of meantone
temperament and just intonation, allowing more
freedom of modulation. It allows you to play in all
keys (third method).
This temperament is a partial compromise of just
intonation in order to allow modulation.
This temperament is based on the theories of the
Greek philosopher Pythagoras, and has pure
fourths and fifths. Chords containing a third will
sound impure, but melodies will sound good.
This temperament is a combination of meantone
and Pythagorean temperaments. It allows you to
play in all keys. (First method, number three.)
Setting the Temperament Key
When playing with tuning other than equal temperament, you need
to specify the tonic note for tuning the song to be performed (that
is, the note that corresponds to C for a major key or to A for a minor
key).
If you choose an equal temperament, there’s no need to select a
tonic note.
* This setting applies to all tones.
Setting
C, C#, D, Eb, E, F, F#, G, Ab, A, Bb, B
* When performing in ensemble with other instruments, be aware
that depending on the key, there may be some shifting of the pitch.
Tune the RM-700 to the fundamental pitch of the other instruments.
Setting the Tuning Curve (Stretch Tuning)
Touch <Stretch Tuning> to access the Stretch Tuning screen.
Pianos are generally tuned so that the low range is flatter and the
high range is sharper than equal tempered pitches. This method of
tuning is unique to the piano, and is known as “stretched tuning.”
A graph that shows the changes in pitch of actual tuning compared
with the changes in equal temperament pitch is called a tuning
curve.
Changing the tuning curve produces subtle variations in the
reverberations of the chords you play.
Stretch Tuning
Setting
On, Off
Type
Setting
Preset
User
Type1–14
Explanation
Specifies whether Stretch Tuning will be used (On) or
not used (Off).
Explanation
This is the tuning curve pre-specified for the RM-700.
This is the tuning curve modified by the user.
You can choose from fourteen different tuning curves.
Tuning
Setting
-50–+50
Edit Key
Setting
A0–C8
Explanation
Adjusts the pitch of the specified key.
Explanation
To specify the key whose pitch you want to adjust, play
it on the keyboard.
If you touch <Fix> so it’s lit, this will be fixed at the
currently selected key.
This lets you tune while listening to the sound.
33
Page 33

Performance
Tone
gruop
Performing with a Variety of Tones (Tone Buttons)
The RM-700 comes with a many built-in instrument sounds and effects. This lets you enjoy perform in a wide range of musical styles.
The built-in sounds are called “Tones.” The sounds are organized into five tone groups, which are assigned to the Tone buttons.
For more about the names of Tones, take a look at the “Tone List” (p. 207).
1.
Press any one of the Tone buttons to select a tone group.
You’ll see that button’s indicator light up. The screen displays the tone names included in the tone group you’ve selected.
* If you press the [Others] button, additional tone groups will be displayed. Touch an icon to select the desired tone group.
This screen is called the “Tone selection screen.”
2.
Touch a tone name to select the tone.
• Tones indicated by
• Tones indicated by is 88 keys stereo multi-sampling piano tones.
• Tones indicated by red or mark produce the “Key Off Sound.” What “Key Off Sound” does is recreate the tonal changes
produced when the fingers are released from the keys.
• Touch the page icons to change pages.
• If you touch <Alphabetical>, the sounds will be shown in alphabetical order. However, even when sorted in alphabetical order, the
piano sound “Superior Grd” will be shown in first place.
• You can touch <Demo> for an audio demonstration of a particular tone.
• You can touch <Effects> to make settings for the effects applied to each sound (p. 47).
• You can do searches for tones according to search parameters or by name by touching <Search> (p. 35).
• If a VIMA TUNES song is selected (p. 75), you'll be able to select <VIMA TUNES> as the tone group.
If you select <VIMA TUNES> as the tone group, you’ll be able to select recommended tones.
is called an “EX voice.” These voices are especially recommended.
34
Page 34

Using Keywords to Search for Tones (Tone Search)
You can search for tones that match the conditions you set for instrument or musical style. You can also search the tones using the first
character of the tone name.
1.
Press any Tone button.
The tone selection screen appears.
2.
Touch <Search>.
The “Tone Search” screen appears.
Performance
Searching by Conditions
Touch <Category> or <Genre>, then use the [Value] dial to select the search conditions.
3.
In condition search, tones satisfying all of the selected search criteria are sought.
4.
Touch <Search>.
The search results appear in the display. Touch the tone name to select the tone.
Searching by Tone Name
3.
Touch <By Name>.
Touch <By Key> to go to the condition search screen.
4.
Decide which character is to be used for the search.
The selected character appears in the middle of the screen.
Enter the character you’re searching for. For example, touching <ABC> in succession cycles you through the available choices in that
character group (“A”→”B”→”C”...).
Touch <A-0> to toggle between alphabets and numerals.
5.
Touch <Search>.
The search results appear in the display. Touch the tone name to select the Tone.
35
Page 35

Performance
Using Super Tones
Here’s how to select particularly recommended sounds in addition to the sounds you select by pressing a button.
1.
Press the [Menu] button so its indicator is lit.
Touch <Play>.
2.
3.
Touch <Super Tones>.
A screen like the following will appear.
• Touch to select the musical genre.
• Touch to select other sounds in the same genre.
• Touch Rotary <SLOW> <FAST> to change the speed of the rotary effect (p. 37).
The sounds are organized into the following genres.
Organ
Select these to play with organ
Tones.
Pedal EX Tone
These Tones change when the
left pedal is pressed.
EX Tone
These are truly realistic sounds
which can reproduce even the
finest nuances of a particular
instrument’s expressive
capabilities.
Split Set
These let you play with
different Tones on the right
and left sides of the keyboard.
Drum
Select these to play with
percussion instrument sounds.
A different percussion
instrument plays with each key
you press.
SOUND EFFECT
These produce special effects.
A different sound effect is
produced with each key you
press.
36
Page 36

Using Jazz Organ
1.
Select Jazz Organ, and touch <Footage>.
The following screen appears.
Switches the presets
Performance
Selects the User tones
Saves the data to User memory
This changes the speed of the rotary effect
Plays the
percussion sounds
PRESET
USER
PERCUSSION
ROTARY
PART
Footage
Switches the parts
Footage
Touch here and drag up or down to alter the tone of a footage,
you can create the organ Tone you want with the footage
You can choose from four different pre-specified footage settings.
You can recall footage settings that you’ve created.
When you touch <WRITE>, the footage settings at that time will be written.
You can use PERCUSSION <4> or <2 2/3> to change the tone when it is played.
Touching PERCUSSION <FAST DECAY> makes the accent time shorter.
This adds a sort of spinning effect to the organ sound, similar to the sound when a rotary speaker is used.
Changing the speed increases or decreases the speed of this spinning effect.
Selects the part to which the footage settings will be added.
A device for combining different frequencies to create a desired sound is called “Footage.”
The numbers displayed originally referred to the lengths of the pipes on a pipe organ. The length of pipe used
to produce the reference pitch (the fundamental) for the keyboard is eight feet.
Reducing the pipe to half its length produces a pitch one octave higher; conversely, doubling the pipe length
creates a pitch one octave lower. Therefore, a pipe producing a pitch one octave below that of the reference of
8’ (eight feet) would be 16’; for one octave above the reference, the pipe would be 4’, and to take the pitch up
yet another octave it would be shortened to 2’.
Try experimenting by touching different icons to change the tone, and find one you like.
* When all bars are pushed in all the way (0), there will be no sound when you play the keyboard.
If PERCUSSION is on, the “1’” footage will not be heard.
37
Page 37

Performance
Performing with Multiple Sounds Layered Together (Layer)
By using the “Layer” feature, you can play two or more tones at the same time.
For instance, it’s possible to play the Tones for both Piano and Strings simultaneously.
Superior Grd
Decay Str3
Ballad Bells
1.
In the Basic screen, touch <Layer 1>.
The tone that was sounding before you switched to layer performance, plus the tone indicated in the lower part of the display, are
now played together.
Here, the tone appearing in the upper part of the display is called the “upper tone,” and the tone appearing in the lower part of the
display is called the “layer tone.”
In the same manner, you can touch <Layer 2> to layer further sounds.
Changing the Tones
Touch the name of the tone to be changed.
2.
Touch here to highlight the tone name.
Press a Tone button to select the new tone (p. 34).
3.
When you have selected the tone, press the [Exit] button.
4.
The display returns to the Basic screen.
Cancelling the Layer
Touch <Layer 1>.
5.
Touch <Layer 2> to have <Layer 2> play as well.
The <Layer 1> and <Layer 2> icons are dimmed, and the Layer performance is cancelled.
Now when you play the keys, only the tone indicated on the screen is sounded.
38
• You can change the balance of the upper tone and layer tone volume. For instructions, refer to “Adjusting the Volume Balance for
Each Performance Part (Part Balance)” (p. 70).
Page 38

Playing Different Tones with the Left and Right Hands (Split)
Dividing the keyboard into right-hand and left-hand areas, then playing different sounds in each section is called “split performance.”
The boundary key is called the “split point.”
The split point key is included in the left-hand keyboard area. Each time power to the keyboard is turned on, the split point is reset to
“F#3.”
Split Point
Performance
In the Basic screen, touch <Split>.
1.
The tone sounding prior to the split performance is played in the right-hand section of the keyboard, and the tone indicated at the left
of the screen is played in the left-hand section of the keyboard.
Here, the tone appearing at the upper of the display is called the “upper tone,” and the tone appearing at the lower of the display is
called the “lower tone.”
You can turn the tones on and off by touching <Lower 1> or <Lower 2>.
Changing the Tones
Wild Ac.Bs
You can change the split point; refer to “Changing the Keyboard’s Split Point (Split Point)” (p. 178).
Superior Grd
2.
Touch the name of the tone to be changed.
3.
Press a Tone button to select the tone (p. 34).
When you have selected the tone, press the [Exit] button.
4.
The display returns to the Basic screen.
39
Page 39

Performance
Cancelling the Split
5.
Touch <Split>.
The <Split> icons are dimmed, and the Split performance is cancelled.
When you play the keys, only the tone indicated on the screen is sounded.
• You can change the volume balance between the upper and lower parts of the keyboard; refer to “Adjusting the Volume Balance
for Each Performance Part (Part Balance)” (p. 70).
• When the keyboard has been divided into upper and lower sections, the damper pedal is applied to only the upper section. If you
want to add lingering reverberations to the notes of the lower section, refer to “Assigning the Function of the Pedals (Left Pedal/
Center Pedal/Expression Pedal)” (p. 179).
Turning On Layer and Split Performance Simultaneously
Turning on either Layer Performance or Split Performance allows you to divide the keyboard into a upper and a lower part and play
with two Tones layered in the lower part, and three Tones layered in the upper part.
40
Page 40

Shifting the Keyboard Pitch in Octave Steps (Octave Shift)
When using layer performance (p. 38*) or split performance (p. 39), you can change the pitch of the keyboard’s sound in octave units.
This function is called “Octave Shift.”
For example, when playing a Layer performance, if you change the pitch of one of the tones and then layer it, it changes the
impression created with the tone.
You can’t change the Octave Shift setting for Upper unless you’re using Split performance.
In the Basic screen, touch <Layer1> or <Split>.
1.
The RM-700 switches to layer performance or split performance.
2.
To apply Octave Shift, touch the name of the tone you’ve selected.
Press the Tone button to display the Tone selection screen.
3.
Performance
4.
In the lower left of the screen, touch <Octave>.
The “Octave Shift” screen appears.
5.
Touch
The sound can be changed from two octaves lower than the original sound (-2) to two octaves above the original (+2).
* If you touch <Reset>, the setting will return to its factory-set value.
6.
When you’ve specified the desired value, touch <OK>.
to adjust the pitch of the sound.
41
Page 41

Performance
Adding Reverberation to the Sound (Reverb)
Apply a reverb effect to the notes you play with the RM-700.
Reverb makes it sound as if you are playing in a concert hall.
1.
Press the [Reverb] button so its indicator is lit.
The “Reverb” screen appears.
2.
Touch an icon to select the performance space.
;
* Touch
Display
Hall1
Hall2
Room1
Cathedral
Ground
Room2
Lounge
Studio
Gymnasium
Hall3
Dome
Cave
GS Room1
GS Room2
GS Room3
GS Hall1
GS Hall2
GS Plate
GS Delay
GS Pan Delay
to switch between screens.
Explanation
Hall with bright reverberation
Hall with warm reverberation
Room reverberation
High-ceilinged cathedral
Wide open space with no reverberations
Small room
Larger room
A recording studio
In a gymnasium
Large concert hall reverberation
A domed ballpark
Adds the extended reverberations found inside a cave
Reproduces an indoor-type reverb.
Provides a clear, expansive reverberation.
Reproduces the reverberation found in a hall. Gives reverberation with a greater sense of depth than GS Room.
Reproduces a plate echo (reverberation created using the vibrations of a metal plate).
A delayed sound that is added to the original, similar to the reflected sounds of mountain echoes.
The reflected sounds are panned (shifted) laterally.
42
Page 42

3.
Touch the slider beneath the icons to adjust the effect selected.
Touch and slide the knob on the screen to the right for a deeper reverb, and to the left for less.
You can also move the slider with the [Value] dial.
When you press the [Exit] button, the reverb effect is activated, and you return to the previous screen.
No effect is applied when the slider is moved all the way to the left. In this case, the button’s indicator won’t light up when
you press the [Reverb] button.
Cancelling the Effect
4.
Press the [Reverb] button so its indicator is light go out.
The reverb effect is eliminated.
Performance
43
Page 43

Performance
Giving the Sound More Spatial Depth (3D)
The RM-700 provides a “3D” function, which creates the sense of spatial depth that you experience when playing a grand piano.
This function adds the natural resonance and spaciousness that are characteristic of an acoustic piano.
If you turn 3D on, “Vocal Effect” will turn off (p. 86).
1.
Press the [Menu] button so its indicator is lit.
2.
Touch <Settings>.
* The Menu screen for Settings contains five screen pages. Touch
3.
Touch <3D>.
The “3D” screen appears.
Touch <3D>
4.
5.
Touch <Depth>
Setting
1–4
Touch <Mode>
6.
Setting Explanation
Auto
Speaker
Headphones
to turn it “On.”
to adjust the depth.
Explanation
Increasing the value will increase the spatial depth of the sound.
to switch the mode.
This selects settings that are adjusted for use with headphones when headphones are connected. When no headphones are
connected, settings adjusted for speakers are selected.
Settings adjusted for listening to sounds through speakers are selected.
Settings adjusted for listening to sounds through headphones are selected.
to switch between the pages.
44
If you touch <Reset>, the currently selected setting (parameter) will return to its factory setting.
Press the [Exit] button when you’ve finished making settings.
7.
Page 44

Changing the Brightness of the Sound (Brilliance)
You can adjust the brightness of the sound heard.
The Brilliance setting has no effect during audio recording (p. 136).
Press the [Menu] button so its indicator is lit.
1.
2.
Touch <Settings>.
Performance
* The Menu screen for Settings contains five screen pages. Touch
3.
Touch <Tone Control>.
The “Tone Control” screen appears.
Touch <Brilliance>
4.
Setting
-10–0–10
If you touch <Reset>, the currently selected setting (parameter) will return to its factory setting.
Press the [Exit] button when you’ve finished making settings.
5.
to adjust the setting.
Explanation
“0” is the standard brightness.
Values below 0 will produce a more mellow sound. Values above 0 will make the sound brighter.
to switch between the pages.
45
Page 45

Performance
Adding Liveliness to the Sound (Dynamics)
You can add liveliness to the sound to give it superb clarity and distinctness.
1.
Press the [Menu] button so its indicator is lit.
Touch <Settings>.
2.
* The Menu screen for Settings contains five screen pages. Touch to switch between the pages.
Touch <Tone Control>.
3.
The “Tone Control” screen appears.
46
4.
Touch <Dynamics>
Setting
Off
Standard
Sharp
Clear
Power
Touch <Dynamics Mode>
5.
Setting
All
Except Audio
If you touch <Reset>, the currently selected setting (parameter) will return to its factory setting.
Press the [Exit] button when you’ve finished making settings.
6.
to adjust the setting.
Explanation
Dynamics sound control is turned off.
The typical dynamics will be applied.
Creates a sound with boosted bass and treble.
Produces a sound with chords in the low registers that are clear and distinct.
Creates a sound with boosted bass.
to adjust the setting.
Explanation
Dynamics will be applied to all sounds.
Dynamics will be applied to sounds other than audio.
Page 46

Applying Effects to the Sound (Effects)
You can apply a wide range of different effects to the notes you play on the keyboard.
For more on the effect types, refer to the “Effects List” (p. 217).
Press the Tone button to select a Tone (p. 34).
1.
The Tone selection screen appears.
Touch <Effects>.
2.
The “Effects” screen appears.
Performance
Applying Effects to the Sound
Touch <ON>.
3.
The effect selected with <Type> will be applied.
Selecting the Type of Effect
Touch <Type>
4.
Setting the Effect
The parameters that can be set change according to the type selected in Step 4.
5.
Touch
You can also move the slider with the [Value] dial.
Press the [Exit] button to return to the Tone selection screen.
for the parameter being set to select the value.
Cancelling the Effect
In the Effects screen, touch <OFF>.
6.
to select the type of effect.
47
Page 47

Performance
Selecting the Part to Which the Effect is Added (EffectsPart)
You may find effects not being applied to certain parts when different effects are applied to the upper tone, layer tone, and lower
tone. In such instances, you can select which effect is to have priority.
1.
Press the Tone button to select a Tone (p. 34).
The Tone selection screen appears.
2.
Touch <Effects>.
The “Effects” screen appears.
3.
Touch <Part>.
The “EffectsPart” screen appears.
Touch
4.
Setting
Upper,
Layer1, Layer2,
Lower1, Lower2
5.
Press the [Exit] button when you’ve finished making settings.
to select the part to which the effect is added.
Explanation
The effect will be applied to the selected part and other parts to which the same effect has been applied.
48
Page 48

Using the Metronome
The RM-700 features a built-in metronome.
During playback of the song and accompaniment, the metronome plays at that tempo and beat.
Using the Metronome
Press the [Metronome] button so its indicator is lit.
1.
You will hear the metronome. The following screen appears.
Performance
* You can press the [Exit] button to have the metronome continue to play while you return to the previous screen.
Stopping the Metronome
2.
Press the [Metronome] button once more, and the indicator light goes out.
Changing the Metronome Settings
Adjusting the Tempo
You can adjust the tempo of the metronome. The tempo and beat of the metronome changes automatically if you use an Automatic
Accompaniment or play back a song.
1.
Press the Tempo [Slow] or [Fast] buttons to adjust a tempo.
Setting
=10–500
Explanation
Pressing the Tempo [Slow] and [Fast] buttons simultaneously returns the selected song accompaniment to the basic
tempo.
49
Page 49

Performance
Changing the Volume
The volume of the metronome can be adjusted to ten different levels.
In the Metronome screen, touch <Volume>.
1.
2.
Adjust the volume with the [Value] dial.
Turning the [Value] dial clockwise will increase the volume. Choose “OFF” to silence the metronome sound.
Changing the Beat of the Metronome
1.
In the Metronome screen, touch <Beat>.
Select the beat with the [Value] dial.
2.
Setting
2/2, 0/4, 2/4–7/4, 3/8, 6/8, 9/8, 12/8
Changing the Type of Sound
You can change the sound the metronome makes.
1.
In the Metronome screen, touch <Sound>.
Select the sound with the [Value] dial.
2.
Displayed Explanation Displayed Explanation
Normal metronome sound
“1, 2, 3” in Japanese “1, 2, 3” in English
Dog and cat sounds Wood block
Triangle and castanet Hand clap
Explanation
When “0/4” is selected, only the upbeat will sound.
Electronic metronome sound
50
Page 50

Changing How the Metronome Beat (Pattern) Sounds
You can set the Metronome to play at even smaller intervals.
In the Metronome screen, <Pattern>.
1.
2.
Select the pattern with the [Value] dial.
Displayed Explanation Displayed Explanation
Performance
Usual sound
Half-note intervals Dotted quarter-note intervals
Quarter-note intervals Dotted eighth-note intervals
Eighth-note intervals Sixteenth-note intervals
Single back beat added Triplet rhythm added
Shuffle rhythm added
Turning Off the Beat Light (Beat Indicator)
The beat light flashes in time with the metronome, Music Styles, and song tempos, but you can set it so that it stays off at all times.
In the Metronome screen, <Beat LED>.
1.
2.
Use the [Value] dial to choose “Off.”
Dotted half-note intervals
51
Page 51

Automatic Accompaniment
The title of the selected song
is displayed here
Touch the screen
to switch performance patterns.
“Automatic accompaniment” is a function that adds an accompaniment consisting of various instruments such as drums, guitar, and
bass—all you need to do is specify chords from the keyboard.
Performing a song with the Ideal Automatic Accompaniment and Sounds (One Touch Song)
The “One Touch Song” function makes it easy to choose the ideal automatic accompaniment and sounds for the song you’ve selected.
1.
Press the [One Touch Song] button.
The following screen appears.
52
For more about <Harmony Intelligence>, refer to p. 67.
Touch to choose a song.
2.
* You can also use the [Value] dial to choose a song.
You can touch <List> to access a list screen. Touch the name of the desired song to select it.
* Touch to switch pages.
3.
Play the left-hand region of the keyboard.
The automatic accompaniment will start.
Page 52

Automatic Accompaniment
4.
As the song progresses, touch <Intro>–<Ending> to switch the automatic accompaniment pattern.
The currently selected performance pattern will continue repeating until you select a different pattern.
* If you use Synchro Start (p. 63) at the <Intro>, the next performance pattern will automatically be selected when the performance
ends.
Intro
Verse
Chorus
Bridge
Ending
The performance pattern that plays an introduction.
The main performance pattern.
The climatic part of the song.
The transition between verse and chorus of the song.
The performance pattern that plays the ending of the song.
Searching for a Song by Keyword
When the list screen is displayed, you can search for songs by tempo or musical style.
You can also search for songs by the letter of their name.
In the list screen, touch <Search>.
1.
The “One Touch Song Search” screen appears.
Searching by Conditions
Touch the parameter you want to set, then use the [Value] dial to select the search conditions.
2.
In a condition search, the RM-700 looks for songs satisfying all of the selected search criteria.
3.
Touch <Search>.
The search results appear in the display. Touch the song name to select the song.
Searching by Song Name
Touch <By Name>.
2.
Touch <By Key> to return to the Condition Search screen.
Decide which character you’ll use for the search.
3.
The selected character appears in the middle of the screen.
Enter the character you are searching for. For example, touching <ABC> in succession cycles you through the available choices in that
character group (“A”→”B”→”C”...).
Touch <A-0> to toggle between alphabets and numerals.
4.
Touch <Search>.
The search results appear in the display. Touch the song name to select the song.
53
Page 53

Automatic Accompaniment
Performing Using Automatic Accompaniment (One Touch Rhythm)
“Automatic Accompaniment” is a function that automatically adds an accompaniment in a variety of musical genres—all you need to
do is use your left hand to specify a chord.
The RM-700’s “One Touch Rhythm” function lets you make the ideal settings for automatic accompaniment simply by pressing the
One Touch Program [Rhythm] button.
Press the One Touch Program [Rhythm] button.
1.
The Basic screen like the one shown below appears.
Observe the settings:
• The keyboard is split into left- and right-hand parts, with accompaniment chords specified for the left-hand side of the keyboard.
• A tone appropriate for the selected Music Style is chosen.
• The tempo and beat for the selected Music Style is set.
For instructions on selecting Music Styles, refer to “Selecting Music Styles (Music Style Buttons)” (p. 59).
Play a chord on the Lower-part of keyboard.
2.
The accompaniment begins, starting from the intro.
Play chords with the left hand, and the melody with the right.
Split Point (F#3)
The range specified a chord
The lower right of the screen shows the keys you pressed to specify the chord, and the name of the chord.
The chord you specified
Chord name
54
Page 54

When you change chords in the left hand, the accompaniment also changes.
For instructions on starting and stopping the accompaniment, refer to “Starting and Stopping the Accompaniment” (p. 63).
3.
Press the [Intro/Ending] button.
After the ending plays, the accompaniment stops.
• Normally, when you change a Music Style, the tempo and tone change to selections that go well with the selected Music Style. If
you do not want to change the tempo and tone, refer to “Changing Music Styles Without Changing the Tone or Tempo (Rhythm
One Touch)” (p. 181).
• You can change the range in which chords are played. Please refer to “Changing the Keyboard’s Split Point (Split Point)” (p. 178).
Leading Bass Function
When you use automatic accompaniment, the root of the chord you hold down will normally be sounded as the bass tone.
If you use the “Leading Bass” function, the lowest note of the chord you hold down will be played as the bass tone.
This means that if you hold down an inverted chord form, the bass tone that sounds will be different than usual.
Automatic Accompaniment
1.
In the Basic screen, touch <Leading Bass>.
The Leading Bass function is on if <Leading Bass> is lit; the function is off if this indicator is not lit.
If the Leading Bass function is on, the note name of the bass tone is shown at the right of the chord name when you specify a chord in
the left-hand side of the keyboard.
Chord name Bass tone note name
• The task of switching on/off the Leading Bass function can be assigned to a pedal. For details, refer to “Assigning the Function of the
Pedals (Left Pedal/Center Pedal/Expression Pedal)” (p. 179).
55
Page 55

Automatic Accompaniment
About Chords
A chord is produced when several notes are played simultaneously. Chords are indicated by the pitch of the fundamental note
of the chord (the root) and the chord type, which is determined by the other notes of the chord.
For example, the C m chord is expressed in terms of the root note “C” and the chord type “m” (minor). C m is made up of the
three notes “C,” “E ” and “G.” “C m” is indicated as the chord name on the Basic screen.
All chord roots are indicated as a letter, sometimes with or added, and correspond to the notes shown below.
Playing Chords with Simple Fingering (Chord Intelligence)
The “Chord Intelligence” feature allows you to have chords be recognized even though you’ve pressed only one or two keys when
using automatic accompaniment.
To play a “C” chord, for example, you normally have to play the three keys C, E, and G. But with Chord Intelligence, you only have to
press the C key to start a “C” chord accompaniment.
C
m
Chord Type
Root Note
Root Note
E
CG
For more information about chord fingering, refer to “Chord List” (p. 220).
1.
Press the [Menu] button so its indicator is lit.
Touch <Settings>.
2.
* The Menu screen for Settings contains five screen pages. Touch
to switch between the pages.
56
Page 56

3.
Major
Seventh
Major
Seventh
Minor
Minor
Seventh
Diminished
C
Ex:
Play the chord root.
C 7
Ex:
Play the root and
the second key below it.
C m
Ex:
Play the root and
the third key above it.
C dim
Ex:
Play the root and
the sixth key above it.
C m7
Ex:
Play the root,
the third key above it, and
the second key below it.
C maj 7
Ex:
Play the root and
the first key below it.
C
C 7
C m
C m7
Ex:
Ex:
Ex:
Ex:
Play the root of the chord.
Play the root of the chord
and the white key to the
left of the root.
Play the root of the chord
and the black key to the
left of the root.
Play the root of the chord
and the black and white key
to the left of the root.
Intelligence 1 Intelligence 2
Touch <Rhythm Configuration>.
Automatic Accompaniment
4.
Touch <Chord Recognition Mode>
Setting
Intelligence1, 2
Manual
Press the [Exit] button when you’ve finished making settings.
5.
Explanation
Chord Intelligence will be on.
Intelligence 1 and 2 differ in the keys that you press to specify the chords.
Chord Intelligence will be off. You’ll need to press all of the notes in order to specify a chord.
to select the either “Intelligence1” or “Intelligence2.”
How to play chords in the Chord Intelligence mode:
57
Page 57

Automatic Accompaniment
Viewing Chord Fingerings
Whenever you are not sure how a certain chord is fingered, you can display the notes of the chord on the screen.
1.
In the Basic screen, touch the <chord name indication>.
2.
Touch the root of the chord you want to learn about.
For example, if you wanted to see the fingering for a C# chord, you would touch <C>, then touch <#>.
3.
Press the [Exit] button to return to the Basic screen.
58
Page 58

Selecting Music Styles (Music Style Buttons)
You can select a variety of Music Styles by pressing a Music Style button.
The ten buttons shown below are referred to as the “Music Style buttons”; they allow you to select a Music Styles organized into
groups by musical genre.
For more on the Music Style names, refer to the “Music Style List” (p. 218).
1.
Press the One Touch Program [Rhythm] button.
Automatic Accompaniment
Press one of the Music Style buttons to select the Music Style group.
2.
The Music style button’s indicator will light, and a Music style screen like the following will appear.
The display will show the Music styles in the Music Style group you selected.
3.
Touch a Music Style name to select the Music Style.
* Touch
4.
When you’ve selected a Music Style, press the [Exit] button.
The display returns to the Basic screen.
Next, all you have to do is press a chord in the left side of the keyboard, and the selected accompaniment style will start playing.
to switch pages.
You can touch <Search> to find Music Styles that match the selected criteria (p. 60).
59
Page 59

Automatic Accompaniment
Using Keywords to Search for Music Styles (Style Search)
You can search for Music Styles that match the tempo of the song, musical genre, or other criteria you set.
You can also search Music Styles using the first character of the Music Style names.
You can search for Music Styles except for those at the [User] button.
Press one of the Music Style buttons.
1.
The Music Style selection screen appears.
Touch <Search>.
2.
The “Style Search” screen appears.
Searching by Conditions
Touch the parameter you want to set, then use the [Value] dial to select the search conditions.
3.
In a condition search, the RM-700 looks for Music Styles satisfying all of the selected search criteria.
4.
Touch <Search>.
The search results appear in the display. Touch a Music Style name to select a Music Style.
Searching by Music Style Name
3.
Touch <By Name>.
Touch <By Key> to return to the Condition Search screen.
Decide which character you’ll use for the search.
4.
The selected character appears in the middle of the screen.
Enter the character you are searching for. For example, touching <ABC> in succession cycles you through the available choices in that
character group (“A”→”B”→”C”...).
Touch <A-0> to toggle between alphabets and numerals.
5.
Touch <Search>.
The search results appear in the display. Touch a Music Style name to select a Music Style.
60
Page 60

Selecting an Music Style from USB Memory
The RM-700 contains a wide variety of built-in Music Styles, but you can also use Music Styles from USB memory or floppy disk.
1.
Connect the USB memory containing the Music Styles to the External Memory connector.
If you want to use Music Styles from a floppy disk, connect your floppy disk drive to the Ext Drive connector.
Press the [User] button.
2.
The Music Style selection screen appears.
Touch <Ext Memory>.
3.
The screen for selecting USB memory Styles appears.
Automatic Accompaniment
Touch the name of a Music Style to select it.
4.
* Touch
5.
When you’ve selected a Music Style, press the [Exit] button.
Press the [Start/Stop] button.
6.
You can now perform in the selected Music Style.
Music Styles selected from USB memories are stored until the power is turned off. Even after ejecting the USB memory, by pressing the
Music Style [User] button, you can perform using the most recently selected Music Style.
• If you copy Music Styles from USB memory or floppy disk into user memory, you’ll be able to access those Music Styles simply by
pressing the [User] button (p. 73).
to switch pages.
61
Page 61

Automatic Accompaniment
Playing Only the Rhythm of the Music Style
You can also play only the rhythm patterns of Music Styles.
1.
Select a Music Style (p. 59).
Press the [Arranger] button so its indicator is turned off.
2.
The performance is set so that only the rhythm patterns are played.
Press the [Intro/Ending] button.
3.
The Rhythm part of accompaniment begins, starting from the Intro.
Just as with regular Automatic Accompaniment, you can add intros and endings by pressing the [Intro/Ending] button, and make
changes to the rhythm patterns with the [Auto Fill In] button (p. 66).
• Some Music Styles do not include rhythm patterns. When you select these Style patterns, no rhythm patterns are played.
Changing the Tempo of the Automatic Accompaniment
You can adjust the tempo of the automatic accompaniment.
1.
Press the Tempo [Slow] and [Fast] buttons to change the tempo (speed) of the Automatic Accompaniment.
By pressing the Tempo [Slow] and [Fast] buttons simultaneously, the tempo is returned to the standard (preset) tempo for the
selected Music Style.
The value of the tempo currently set (10–500 beats per minute) can be checked in the screen.
62
• You switch the Music Style while the Automatic Accompaniment is stopped, the tempo will automatically be set appropriately for
that Music Style.
Page 62

Automatic Accompaniment
Starting and Stopping the Accompaniment
Pressing the One Touch Program [Rhythm] button activates Sync Start for the accompaniment (which starts the accompaniment
simultaneously when you play on the lower section of the keyboard), and automatically sets an appropriate intro for the
accompaniment. You can also change the way the accompaniment starts and stops.
Having the Accompaniment Start Simultaneously When You Play the Keyboard (Sync Start)
1.
Press the [Intro/Ending] button and [Start/Stop] button simultaneously, causing the indicators of both buttons
to flash.
The Sync Start settings go into effect.
2.
Play a chord on the lower-part of keyboard.
The Intro will start playing as soon as you play something on the keyboard; then, after that, the accompaniment will start playing.
Starting without an Intro
Press the [Intro/Ending] button and [Start/Stop] button simultaneously, causing the indicators of both buttons
1.
to flash.
2.
Press the [Intro/Ending] button so its indicator is turned off.
3.
Play a chord on the lower-part of keyboard.
The accompaniment starts without the intro.
Starting at the Press of a Button
Press the [Intro/Ending] button and [Start/Stop] button simultaneously, and the indicators lights go out.
1.
Play a chord on the lower-part of keyboard.
2.
Choose the chord to be played when the accompaniment begins playing.
Press the [Intro/Ending] button or the [Start/Stop] button.
3.
When you press the [Intro/Ending] button, the intro plays, and the accompaniment starts.
When you press the [Start/Stop] button, the accompaniment starts without the intro.
63
Page 63

Automatic Accompaniment
Chord Tones and Bass Tones
When you play the keys in the left-hand side of the keyboard while the [Start/Stop] button’s indicator is not lit, chords play.
This note is called the “Chord Tone,” and the root of the chord being played at the same time is called the “Bass Tone.”
* You can change the sound of the chord tone and bass tone. Refer to “Selecting the Bass Tone/Chord Tone” (p. 181).
Stopping Automatic Accompaniment
Stopping with an Added Ending
Press the [Intro/Ending] button.
1.
An ending plays and the Automatic Accompaniment stops.
Stopping at the Same Time the Button is Pressed
Press the [Start/Stop] button.
1.
The Automatic Accompaniment stops as soon as you press the button.
64
Page 64

Having a Count Sound Play at the End of the Intro (Countdown)
If an intro plays before your performance, you can have a count-in sound played to the end of the intro, helping you hear when to start
playing.
1.
Press the [Count] button so its indicator is lit.
The “Count” screen appears.
Automatic Accompaniment
* Touch to switch pages.
2.
Touch <Count Mode> to set this to “Count In” or “Count In/down.”
Press the One Touch Program [Rhythm] button.
3.
4.
Press the [Start/Stop] button.
The intro plays, and a countdown plays to the end of the intro.
If you’ve specified Count In/down, a count will also be heard before the intro.
To stop the countdown, press the [Count] button so its indicator is turned off.
5.
By pressing the [Exit] button instead of the [Count] button, you can exit the “Count” screen without cancelling the count.
• When set to “Count In/down,” a count sound is added before playback of the song begins.
• For more about settings on the “Count” screen, refer to “Changing the Settings for the Count” (p. 171).
• You can touch <Marker> to move to the Marker screen (p. 118).
65
Page 65

Automatic Accompaniment
Adding Variety to the Accompaniment
Changing the Arrangement of the Rhythm and Accompaniment (Variation)
You can change the arrangement of the accompaniment. For each Music Style, there are four types of arrangement for the
accompaniment.
1.
Press the [Variation] buttons to change the arrangement of the accompaniment.
The indicator of the button you pressed will light.
The Variation [1] button produces the simplest arrangement, and the Variation [4] button produces the most florid.
For an intro or ending, Variation [1] button is the shortest and simplest.
Changing the Accompaniment Pattern (Auto Fill In/Break)
You can add variety to the automatic accompaniment by inserting a fill-in to change the pattern, or by inserting a break (i.e., stopping
the accompaniment for one measure).
Button
[Auto Fill In]
[Break]
What’s a “Fill In”?
A Fill In is a short phrase that is inserted at a break in the melody or at a point where the character of the song changes
(between Chorus’s or Verses).
Function
A fill-in will automatically be added when you press a [Variation] button to change the accompaniment or rhythm arrangement.
Stop the Rhythm at the end of that measure (Break).
66
Page 66

Automatic Accompaniment
Adding Harmony to the Right-Hand Part (Harmony Intelligence)
You can add harmony to the notes you play on the keyboard.
While an Automatic Accompaniment is playing, the matching harmony is automatically added to the notes you are playing with the
right hand. This function is called “Harmony Intelligence.”
In the Basic screen, touch <Harmony Intelligence>.
1.
The “Harmony Intelligence” screen appears.
Touch the screen to select the desired type of harmony.
2.
* Touch
Then when you play a melody on the keyboard, a harmony style is automatically added.
Press the [Exit] button to return to the Basic screen.
3.
To cancel the Harmony Intelligence, touch <Harmony Intelligence> and the icon returns to the original color.
4.
to switch the screens.
With some harmonies, Tones may change automatically. The tones will not change automatically for harmonies whose
name has an “*” symbol. Also, when you play several keys at the same time, in some cases harmony may be added to one
note.
67
Page 67

Automatic Accompaniment
Playing Sounds in the Left Hand During a Performance (Lower Tone)
Normally, when using Automatic Accompaniment in a performance, sounds are not produced by playing the left-hand part of the
keyboard. When you touch the <Lower 1> or <Lower 2> icon, you can have Tones from the left side of the keyboard play
simultaneously with the Automatic Accompaniment.
1.
Press the One Touch Program [Rhythm] button.
The Basic screen appears.
2.
Touch <Lower 1>.
Now when you play a chord in the left-hand keyboard area, the notes you play will sound, and the accompaniment chord changes.
In the same manner, you can play the lower tone by touching <Lower 2>.
By touching both <Lower 1> and <Lower 2>, you can get a Layer performance for the left-hand.
Stopping the Sound in the Left-hand
Touch <Lower 1>.
3.
The <Lower 1> icon returns to the original color.
To have <Lower 2> play as well, also touch <Lower 2>.
The lower Tones stop playing.
68
Page 68

Automatic Accompaniment
Playing the Piano with Accompaniment Added (Piano Style Arranger)
Usually with Automatic Accompaniment, you play chords on the left-hand side of the keyboard and the melody on the right-hand
side. Chords can also be recognized over the entire keyboard, allowing you to perform using Automatic Accompaniment without
splitting the keyboard. This function is called “Piano Style Arranger.”
This makes it possible to add an accompaniment automatically as you play a song by playing chords in the ordinary way, without
giving any thought to the location of a keyboard split.
1.
Press the One Touch Program [Rhythm] button.
The Basic screen appears.
2.
Touch <Split> to turn the Split function off.
3.
Select a Music Style (p. 59).
4.
Play the keyboard.
The accompaniment starts when you play a chord anywhere on the keyboard.
69
Page 69

Automatic Accompaniment
Adjusting the Volume Balance for Each Part (Balance)
You can adjust the volume balance between the accompaniment and the keyboard, and the volume balance for each of the parts in a
Music Style.
Changing the Volume Balance Between the Accompaniment and the Keyboard (Balance Knob)
You can change the volume balance between a song and accompaniment and the notes you play on the keyboard.
1.
Adjust the volume balance with the [Balance] knob.
When this knob is turned completely to the Accompaniment side, no sounds from the keyboard are audible, even when the
keys are pressed. You can usually leave the knob at the center position.
Adjusting the Volume Balance for Each Performance Part (Part Balance)
You can adjust the volume of each performance part in a Music Style, and the balance between parts when playing multiple Tones on
the keyboard.
1.
In the Basic screen, touch <Part Balance>.
The “Part Balance” screen appears.
* If <Accomp> is shown in the lower left of the screen, touch <Accomp>.
70
Page 70

Automatic Accompaniment
2.
Touch
* Touch
for each part to adjust its volume.
to switch the screens.
The volume balance between the performance parts in the Music Style is indicated.
Display
Rhythm
Bass
Accomp1–6
Chord Tone
Bass Tone
Audio
Performance part
Music Style Rhythm Part
Music Style Bass Part
Accompaniment 1–6
Chord Tone (p. 64)
Bass Tone (p. 64)
Audio (music CD, audio file)
When you touch <Keyboard>, a screen like the following appears.
This shows the volume balance between the keyboard’s Tones when either layer performance (p. 38) or split performance (p. 39) are
used, or the volume balance when using the keyboard to play percussion instruments or sound effects (p. 36).
Display
Drum/SFX
Upper
Layer 1
Layer 2
Lower 1
Lower 2
Tone part
Percussion instruments or sound effects played with the keys
Upper Tone
Layer Tone 1
Layer Tone 2
Lower Tone 1
Lower Tone 2
When you touch <Accomp>, you return to the screen for setting the Music Style volume balance.
71
Page 71

Automatic Accompaniment
Copying a Music Style
Music Styles saved in external memory can be copied to user memory.
Conversely, Music Styles in user memory can be copied to external memory.
Copying a Music Style from USB Memory to User Memory
1.
Connect the USB memory containing the Music Style to the External Memory connector.
If you want to use Music Styles from a floppy disk, connect your floppy disk drive to the Ext Drive connector.
2.
Press the [User] button.
The Music Style selection screen appears.
Touch <File>.
3.
The “Style File Menu” screen appears.
Touch <Copy>.
4.
The “Copy Style” screen appears.
72
Page 72

5.
Touch the large arrow icon in the center of the screen to make it point downward.
Automatic Accompaniment
Touch <Media>
6.
Choose “Ext Memory” if you want to copy a Music Style from USB memory.
Choose “Disk” if you want to copy a Music Style from floppy disk.
Touch <File>
7.
If you choose <All>, all accompaniment styles on the USB memory or floppy disk will be copied in a single operation.
Touch <User>
8.
If a Music Style name is shown for a number, that number already contains a Music Style.
9.
Touch <Execute>.
The Music style will be copied.
• Never disconnect the USB memory or turn off the power while the “Executing...” indication is shown.
to select the media containing the Music Style that you want to copy.
to select the Music Style that you want to copy.
to select the copy-destination number.
Copying Music Styles from User Memory to USB Memory
You can copy Music Styles from user memory to USB memory.
In this case, touch the arrow icon located in the center of the “Copy Style” screen in step 5 of the above procedure, so the arrow points
upwards.
In this state, you’ll be copying Music Styles from user memory to USB memory.
The rest of the procedure is the same as when copying Music Styles from USB memory to user memory.
73
Page 73

Automatic Accompaniment
Deleting Saved Music Style
You can delete Music Styles stored in User memory or USB memory.
If you want to delete an accompaniment style from USB memory, connect the USB memory to the External Memory
connector before you continue.
Press the [User] button.
1.
The Music Style selection screen appears.
Touch <File>.
2.
The “Style File Menu” screen appears.
3.
Touch <Delete>.
The “Delete Style” screen appears.
4.
Touch <Media>
Choose “User” if you want to delete the Music Style saved in user memory, or choose “Ext Memory” if you want to delete the Music
Style saved in USB memory.
5.
Touch <File>
6.
Touch <Execute>.
The Music Style will be deleted.
• Never disconnect the USB memory or turn off the power while the “Executing...” indication is shown.
to select the media containing the Music Style that you want to delete.
to select the number of the Music Style that you want to delete.
74
Page 74

Song Playback
The RM-700 lets you play back internal songs, songs that you yourself recorded, songs that are saved on USB memory (sold separately),
songs from a music CD, or songs in audio/MP3 format.
You can also play back separately available VIMA TUNES songs (CD-ROMs produced for VIMA).
Playing a Song
Selecting the Song
• If you want to playing a song from USB memory, connect the USB memory to the External Memory connector.
• If you want to playing a song from a CD-ROM, insert the CD-ROM into the CD drive.
1.
Press the [Song] button so its indicator is lit.
The Song selection screen appears.
2.
Touch the genre icon to select the desired song genre.
If you press the [Others] button when a VIMA TUNES song is selected, <VIMA TUNES> will appear in the sound selection
screen. If you touch this <VIMA TUNES> indication, the recommended tones will be displayed.
Genre
75
Page 75

Song Playback
When selecting songs in folders
1. Touch the folder name.
2. Touch the folder name once again.
After a moment, a list of songs in the folder is displayed.
* You can also open a folder by touching the folder and then pressing the [ (Play/Stop)] button.
* Alternatively, you can open a folder by using the [ (Prev)] [ (Next)] buttons, the remote’s [ ] [ ]
buttons, or the [Value] dial to select a folder, and then pressing the [ (Play/Stop)] button.
3.
Touch the name of the song to be played back.
You can also select a song by using the [
* Touch to switch pages.
(Prev)] [ (Next)] buttons or the [Value] dial.
“New Song” (p. 77) will be selected if you press the [
genres.
Song in SMF format
Song contains lyrics Notation available in the included “Roland 60 Classical Piano Masterpieces”
DigiScore screen contains chord indications Music CD or song in audio format
DigiScore screen contains fingering indications Song in MP3 format
(Prev)] button after you've selected the first song in any of the
Playing Hints (p. 78) are shown
To exit the folder
1. Touch “Up” shown at the beginning of the list.
2. Touch “Up” once again.
• When you touch <All Song>, all of the songs in the genre you have selected are played in order, starting from the selected song.
When the last song is finished, playback resumes from the first song in the genre.
• When you touch <Random>, songs selected from all of the internal songs are played in random order. When “Favorites” is selected
as the genre, songs registered in “Favorites” are played back in random order.
When “Ext Memory” or “CD” is selected as the genre, the songs in the folder appearing on the screen are played back in random
order.
Playing back
3.
Press the [
The button indicator lights up, and playback of the song begins.
Button
[ (Prev)]
[
(Next)]
(Play/Stop)] button.
Function
Moves to the beginning of the currently selected song.
If you’re at the beginning of the song, you’ll move to the
beginning of the previous song.
Pressing this while the song is playing will rewind the song.
Moves to the beginning of the next song.
Pressing this while the song is playing will fast-forward the
song.
Pressing this while the [Menu] button’s indicator is lit will
move to the previous measure each time you press the
button.
Pressing this while the [Menu] button’s indicator is lit will
move to the next measure each time you press the button.
76
Page 76

Stopping the Song
If the following screen appears
If you attempt to select a different song when a song has already been recorded, a screen like the following will appear.
If it is ok to delete the song you recorded, touch <OK>. If you don’t want to delete the song, touch <Cancel> to cancel the song
selection, and save the song you recorded (p. 134).
Song Playback
4.
Press the [
The button indicator light goes out, and the song stops.
When the song is finished, playback stops automatically.
Press the [ (Prev)] button to return to the beginning of the song.
(Play/Stop)] button.
Track Buttons (Accomp, Left, Right)
Each performance part of the song being played back is assigned to a track button. Use these buttons to select the
performance parts that are muted or played. For more detailed information, refer to p. 116.
What is “New Song”?
“New Song” refers to a state in which no particular song is selected.
For example, when you’re going to create a new song using the 16-track sequencer(p. 156), this is the state you need to start
from.
In order to enter the “New Song” state, you can use one of the following methods.
• In the song selection screen, press the [ (Prev)] button after you’ve selected the first song in any of the genres.
• While holding down the [Song] button, press the [ (Rec)] button.
77
Page 77

Song Playback
Viewing the Playing Hint
When you select a song that indicates
information about that song and a profile of the composer. In addition, advice on how to play the song will be shown at the bottom of
the screen.
This function is called “Playing Hint.”
When you press the [Play/Stop] button to play the song, this advice will be shown at various points during the song.
Viewing Information About the Song
You can view information about the song, such as the file name and the data format.
In the Song selection screen, touch <File>.
1.
The “Song File Menu” screen appears.
and press the [Slide Show] button so the button’s indicator is lit, the screen will show
78
Touch <Information>.
2.
The song information will be displayed.
3.
Press the [Exit] button a number of times to return to the previous screen.
Page 78

Saving a Song in “Favorites”
What are the “Favorites”?
“Favorites” refers to an area of memory in which you can store performances you’ve recorded on the RM-700 or have copied
from a connected USB memory or CD-ROM.
Songs you’ve copied to “Favorites” will be retained even after you turn off the power, so if you collect your favorite songs in
“Favorites,” you’ll be able to easily select them when you want.
Saving an Internal Song to “Favorites”
From the internal songs, select the song that you want to save to “Favorites” (p. 75).
1.
Touch <File>.
2.
The “Song File Menu” screen appears.
Song Playback
3.
Touch <Save/Rename>.
The “Save Song” screen appears.
79
Page 79

Song Playback
Determining the Name of the Song to be Saved
* If you don’t need to rename the song, proceed to step 8.
4.
Touch <Rename>.
The “Rename” screen appears.
Touch
5.
6.
Enter the desired characters.
Icon
< ABC >–< YZ >
< A–a–0–! >
< Ins >
< Del >
7.
When you’ve specified the desired name, press the [Exit] button.
to move the cursor.
Explanation
Enters a character at the cursor location.
For example, each time you touch the <ABC> icon, the character to be entered will cycle in the order of A → B → C → A...
Cycles you through the available selections for the character type, in this order: “Uppercase letters,” “Lowercase letters,”
“Numerals,” “Symbols.”
Insert a space at the cursor position.
Delete the character at the cursor position.
Determining the Save Destination
Touch <Media>
8.
Touch <File>
9.
If a song name is displayed with a number a song is already saved to that number.
If you select a number with a previously saved song and then proceed to save a new song, the previously saved song will be erased.
If you do not want to lose a saved song, select a number with no song name indicated in the save-destination column.
to select the “Favorites.”
to select the save-destination song number.
Save
80
10.
Touch <Execute>.
The song will be saved.
• Never turn off the power until saving has been completed.
Page 80

Copying a Song from USB Memory to “Favorites”
* Before you continue, connect the USB memory containing the song to the External Memory connector.
1.
In the Song selection screen, touch <File>.
The “Song File Menu” screen appears.
Touch <Copy>.
2.
The “Copy Song” screen appears.
Song Playback
3.
Touch the <File>
When “All” is selected, all of the songs on the USB memory are copied to “Favorites.”
Touch the large arrow icon in the center of the screen to make it point downward.
4.
5.
Touch Favorites <File>
If a song name is displayed with a number, a song is already saved to that number.
If you select a number with previously saved song data and proceed to copy to that location, the previously saved song will be erased.
If you don’t want to erase a previously saved song, choose a number with no song name appears in the destination column.
Touch <Execute>.
6.
The song(s) will be copied.
• Never disconnect the USB memory or turn off the power while the “Executing...” indication is shown.
to select the song you want to copy.
to select the copy destination for the song.
81
Page 81

Song Playback
Changing the Tempo (Playback Speed) of a Song
Here’s how to change the tempo of a song.
If a song is too fast for you to play or sing along comfortably, you can slow it down to a more comfortable tempo.
Changing the tempo (playback speed) will not affect the pitch. You can also change the tempo even while the song is playing.
In the case of a music CD or audio/MP3 format song, the playback speed will change.
1.
Press the Tempo [Slow] [Fast] buttons to adjust the tempo (playback speed).
Pressing the Tempo [Slow] button will make the tempo slower, and pressing the Tempo [Fast] button will make the tempo faster.
• For an SMF format song, the tempo can be adjusted in a range of =10–500.
• For a music CD song or an audio/MP3 format song, you can adjust the playback speed in a range of 75%–125% relative to an
original playback speed of 100%.
2.
To return to the normal tempo (playback speed) of the song, press the Tempo [Slow] and [Fast] buttons
simultaneously.
The “normal tempo (playback speed)” is the appropriate tempo that is pre-specified for each song.
82
Page 82

Using the Remote Control
Infrared receiverInfrared receiver
Remote Control
Range of operation
Distance:
4 m (approximately 13 feet)
Angle:
40 degrees to the left and right
of the receiver.
You can use the included remote control to easily start and stop performances and switch songs.
How to Use the Remote Control
When using the remote control, aim the remote control at the infrared receiver, keeping in mind the range of operation (below).
Song Playback
Precautions Concerning Use of the Remote Control
• The remote control is able to transmit only one operation at a time.
• Even though you’re using it within the normal recommended range, you may not obtain satisfactory results with the remote control
if there are objects blocking its path, or if you're using it at an odd angle.
• It's possible that it won’t work correctly if you’re using it in the vicinity of equipment that emits infrared light, or if you’re using other
remote controls that make use of infrared light.
• The life of the battery depends on the amount and conditions of use. If the operational range of the remote control decreases,
change the batteries.
• If you will not be using the remote control for a long period of time, remove the batteries.
• The remote’s response may suffer if the remote’s sensor is situated under spotlights or exposed to other such strong lighting
83
Page 83

Song Playback
Infrared Emitter
Button Functions
Button
1
2
3
4
5
6
7
8
9
DISPLAY
TONE
CANCEL
INTERNAL
FAVORITES
EXTERNAL
MUTE
VOL -, +
FUNC1, FUNC2
TEMPO -, +
Explanation
Pressing this button cycles you through the available screens,
like this: slide show → piano roll (classic) → piano roll
(modern) → DigiScore → DigiScore + keyboard → the screen
you specified in Video Out Mode (p. 195) → slide show →...
Each time you press this button, the sounds of the left-hand
track and right-hand track will change.
The left-hand track and right-hand track will be the piano
sound.
This switches the genres of the internal songs.
Selects songs in the “Favorites.”
If USB memory, CD drive, or floppy disk drive is connected,
pressing this button will select the connected media.
Pressing the [
selects the previous song.
Pressing the [ ] button at a point other than the
beginning of the song returns you to the beginning of the
song.
This starts and stops playback of the song.
Playback alternately starts and stops each time you press the
[
] button.
You can also assign functions to the button p. 184.
When you press the [ ] button, the next song is selected.
This mutes all of the sounds.
You can adjust the volume.
You can use the function assigned to these buttons.
You can also change the function assigned to the button (p.
185).
This adjusts the tempo.
You can also assign functions to the button (p. 185).
] button at the beginning of the song
84
10
TRANSPOSE -, +
This transpose the sounds from the keyboard and songs
being played back.
You can also assign functions to the button (p. 185).
Page 84

Minimizing the Melody of a Music CD or Audio/MP3 Format Song (Center Cancel)
This function reduces the volume of the melodic portion when you play back an audio/ MP3 format song or a song from a music CD.
This is convenient when you want to practice playing the melody or singing the vocal yourself.
The Center Cancel function can also be applied to the sound from a portable audio player connected to the Roland Audio
Port (p. 195).
• If you want to play back a song from USB memory, connect your USB memory to the External Memory connector.
• If you want to play back a song from a CD-ROM or music CD, insert the CD into the CD drive.
Song Playback
1.
Select a song (p. 75).
2.
Press the [Center Cancel] button so its indicator is lit.
The Center Cancel function is turned on.
3.
Press the [
The song will begin playing. The sound of the melody will be temporarily reduced.
To cancel the Center Cancel function, press the [Center Cancel] button so its indicator is turned off.
4.
The Center Cancel function is turned off.
• Depending on the song, the melody may not disappear entirely.
(Play/Stop)] button so its indicator is lit.
85
Page 85

Song Playback
Adding Effects to Microphone Vocals (Vocal Effect)
With a microphone connected, you can add effects to the microphone vocals.
Adding effects to the vocals is referred to as “Vocal Effect.”
If you turn Vocal Effect on, “3D” (p. 44) will turn off.
Adding Harmony to Match the Song
When you sing along with a song that has the “ ” indication by its title, such as the internal songs or VIMA TUNES (CD-ROMs
produced for VIMA), you can use the “Vocal Harmony” function, which uses the chord data included in the song to automatically
generate harmony that is suitable for the song.
Unless you’re playing back a song for which
performance to detect the chords you play, and automatically generates the most suitable harmony for those chords.
You can add a backing chorus in addition to the harmony effect. Refer to “Adding a Backing Chorus to the Harmony
(Backing Choir)” (p. 175).
1.
Press the [Menu] button so its indicator is lit.
Touch <Settings>.
2.
* The Menu screen for Settings contains five screen pages. Touch to switch between the pages.
Touch <Vocal Effect (Mic)>.
3.
The “Vocal Effect” screen appears.
appears next to its name, this function analyzes your keyboard
86
Touch <Effect>
4.
to turn it “On.”
The task of switching on/off the Effect can be assigned to a pedal (p. 179).
Page 86

Song Playback
5.
Touch <Effect Type>
Setting
Duet
Trio
Quartet
The task of switching the harmony type can be assigned to a pedal (p. 179).
6.
Touch <Harmony Level>
Setting
0–127
If you touch <Reset>, the currently selected setting (parameter) will return to its factory setting.
7.
Press the [Exit] button when you’ve finished making settings.
Select a song that has the
8.
9.
Press the [
Sing into the microphone.
10.
Harmony appropriate for the song will be added to your voice.
(Play/Stop)] button to play the song.
to choose one of the following settings.
Explanation
One voice of harmony will be added to your vocal.
Two voices of harmony will be added to your vocal.
Three voices of harmony will be added to your vocal.
to specify the volume of the harmony.
indication.
Modifying Your Voice (Transformer)
Here’s how you can transform a female voice into a male voice, or give your voice a robot-like character.
Perform steps 1–4 of “Adding Harmony to Match the Song.”
1.
5.
Touch <Effect Type>
Setting
Kids
Bear
Robot
Duck
Alien
Computer
Female
Male
Pitch Correct
If you touch <Reset>, the currently selected setting (parameter) will return to its factory setting.
6.
Press the [Exit] button when you’ve finished making settings.
Explanation
Your voice will be given a child-like character.
Your voice will be given a character suggestive of a large animal.
Your voice will be given a robot-like character.
Your voice will be given a duck-like character.
Your voice will be given a character suggestive of a space alien.
Your voice will be given a computer-like character.
A male voice will be given the character of a female voice.
A female voice will be given the character of a male voice.
The pitch of your voice will be corrected to match the melody of the song.
* If you select this setting, you won’t hear the vocal from the microphone unless the song is playing.
to choose one of the following settings.
Sing into the microphone.
7.
The effect will be applied to the sound from the microphone.
87
Page 87

Song Playback
Adding Echo to Vocals (Echo)
You can add echo to vocals arriving via the microphone. This will make singing more enjoyable.
1.
Press the [Menu] button so its indicator is lit.
Touch <Settings>.
2.
* The Menu screen for Settings contains five screen pages. Touch to switch between the pages.
3.
Touch <Vocal Effect (Mic)>.
The “Vocal Effect” screen appears.
88
Touch
4.
Touch <Effect Sw>
5.
to change pages.
to turn it “On.”
Page 88

Song Playback
6.
Touch <Echo Type>
Setting
1
2
Touch <Echo Level> to adjust the depth of the echo.
7.
Setting
1–10
Press the [Exit] button when you’ve finished making settings.
8.
Sing into the microphone.
9.
The specified echo will be applied to the sound from the microphone.
to choose one of the following settings.
Explanation
A beautiful reverberation will be added.
A karaoke-type echo will be added.
Explanation
Higher values produce a greater amount of echo.
89
Page 89

Enjoying Music and Video
Playing Photos Automatically (Slide Show)
“Slide Show” is a function that switches between images at a specified interval of time. By displaying images while a song plays, you
can enjoy music and images simultaneously.
The slide show can also be viewed on an external display or television connected to the RM-700.
While a Slide Show is being displayed, pressing the [Exit] button will return the RM-700’s own display to its previous screen
while leaving the Slide Show visible on an external display.
You can specify how the transition will occur between images (photos) in the slide show. For details, refer to “Selecting the
Type of Slide Show (Type)” (p. 173).
Enjoying a Slide Show Along with Internal Songs or VIMA TUNES
You can watch a slide show while listening to one of the RM-700’s internal songs or VIMA TUNES (CD-ROMs produced for VIMA).
The RM-700’s internal songs provide slide show images that are appropriate for each song.
This means that when you play back an internal song, a slide show suitable for that song can be automatically shown on the display.
Songs on VIMA TUNES (CD-ROMs produced for VIMA) also provide slide show images suitable for each song, making it easy for you to
enjoy a slide show without having to provide your own images.
90
Select an internal song or a VIMA TUNES song (p. 75).
1.
2.
Press the [Slide Show] button so its indicator is lit.
3.
Press the [
A slide show suitable for the character of the song will be shown on the display.
To stop slide show, press the [Slide Show] button to turn off its indicator.
4.
5.
Press the [
• If you play back a song that does not have slide show images (such as a song you recorded), the default slide show will appear.
(Play/Stop)] button to play back the song.
(Play/Stop)] button to stop the song.
Page 90

Selecting the Type of Image Used for the Slide Show (Picture Category)
The slide show images built into the RM-700 are organized into several “categories” according to the depicted object or the
atmosphere of the image.
The internal songs and VIMA TUNES (CD-ROMs produced for VIMA) songs specify slide show images that are suitable for the mood of
that song, but you can also switch categories to enjoy slide shows that are different than usual.
1.
Press the [Menu] button so its indicator is lit.
2.
Touch <Slide Show>.
The “Slide Show” screen appears.
Press the [Slide Show] button so its indicator is lit, and then press the [Menu] button so its indicator is lit; the “Slide Show”
screen will appear.
Enjoying Music and Video
3.
Touch <Picture Category>
Category Explanation
Auto
1: Kids, 2: Animal, 3: Goods, 4: Love, 5: Dream, 6: Abstract, 7: Urban, 8: Sea, 9: Summer, 10: Sunset, 11: Star, 12: Sky, 13: Nature,
14: Sad, 15: Heal, 16: Japan, 17: Enka, 18: Mountain, 19: River, 20: Tree, 21: Flower, 22: Bar, 23: Morning, 24: Rain, 25: Rock,
26: Holiday, 27: Winter, 28: Europe
If you touch <Reset>, the currently selected setting (parameter) will return to its factory setting.
Press the [Exit] button when you’ve finished making settings.
4.
• For information on the other parameters that can be set in the “Slide Show” screen, refer to “Slide Show Settings” (p. 173).
to switch the category.
The slide show images specified for each song will be used.
91
Page 91

Enjoying Music and Video
Watching a Slide Show with Digital Camera Photos
Photos of your vacation or family pet can be shown in the display as a slide show. They can also be shown on the larger screen of a
television or display connected to the RM-700.
Simply use a USB cable included with your digital camera to connect your digital camera to the RM-700.
You can perform while displaying the slide show, or play back a song to add background music.
Image data that can be displayed
Recommended: 640 x 480 pixels or smaller and 200 kilobytes or less
(Images of 1280 x 960 pixels or smaller and 400 kilobytes or less are supported)
* If you are taking photographs for the purpose of displaying them on the RM-700, we recommend that you set your
Size
Format
You can only connect a digital camera that supports USB mass storage class or PTP format. For details, refer to the owner’s
manual of your digital camera.
1.
Make sure that your digital camera contains the photos you want to view as a slide show.
camera to an image size of 640 x 480 pixels beforehand.
* Taking a photograph at a resolution that is larger than recommended will not improve the quality of the image
shown in the screen. In addition, a resolution that is higher than the screen size will mean that the amount of data is
unnecessarily greater, lengthening the time required to switch to the specified image.
JPEG format (.JPG)
Select the song that you want to play (p. 75).
2.
3.
Use a USB cable to connect your digital camera to the RM-700’s External Memory connector.
USB cable included
with your digital camera
Press the [Slide Show] button so its indicator is lit.
4.
Press the [
5.
The photos in your digital camera will be displayed as a slide show.
When all of the photos have been displayed, the slide show will begin again from the first photo.
• You can’t operate the digital camera from the RM-700.
(Play/Stop)] button so its indicator is lit.
92
Page 92

Watching a Slide Show with Photos Saved on USB Memory
Photos (images) saved on USB memory can be displayed as a slide show.
1.
On your computer, prepare the images that you want to display.
Image data that can be displayed
800 x 480 pixels (recommended)
Size
Format
Connect the USB memory to your computer, and create a folder named “_PICTURE” on the USB memory.
2.
Place the images you want to display in the “_PICTURE” folder.
3.
4.
Connect the USB memory containing the images you want to display to the RM-700’s External Memory
connector.
(Images of 1280 x 960 pixels or smaller and 400 kilobytes or less are supported)
* If you use images that are larger than the recommended size, it may take longer to switch images.
JPEG format (.JPG)
Enjoying Music and Video
5.
Select the song that you want to play, and play back the song.
6.
Press the [Slide Show] button so it’s lit.
The images in the USB memory will be displayed as a slide show on the display.
• Some images may not be displayed in the slide show if 500 or more images are contained in a single folder.
93
Page 93

Enjoying Music and Video
Having the Image Change According to Your Performance (Anime)
“Anime” is a special effect that displays graphics or text on the screen in synchronization with your keyboard performance or the
sounds of the song that is playing, and moves the graphics or text while they gradually disappear.
The Anime effect can also be used together with the Slide Show.
When you’re performing along with a song, you can create even greater visual impact by adding animation to the successively
changing images.
Press the [Anime] button so its indicator is lit.
1.
Anime effect will turn on.
Play the keyboard or play back a song (p. 75).
2.
Each time you play a key, graphics or text will appear, and will move around the screen as they gradually disappear.
94
To stop using Anime effect, press the [Anime] button to turn off its indicator.
3.
• Even if you switch the slide show type (p. 173) while the Anime effect is operating, the change will not be reflected.
• You can assign the pedal to control the Anime effect. For details, refer to “Assigning the Function of the Pedals (Left Pedal/Center
Pedal/Expression Pedal)” (p. 179).
Page 94

Changing the Anime type
You can change the graphics or text and the color and type of the characters that are shown in the display by the Anime effect.
1.
Press the [Anime] button so its indicator is lit.
Touch <Anime>.
2.
The “Anime” screen appears.
Press the [Anime] button so its indicator is lit, and then press the [Menu] button so its indicator is lit; the “Anime” screen will
appear.
Typ e
Enjoying Music and Video
Color
3.
Touch the screen to choose the Type and Color.
* You can switch the variation type by touching <Variation> so the button is lit. For each type, “variation types” with differing types of
change are provided.
* Each time you touch <Length>, the button color will change in the order of Orange → Red → Gray (normal) → Orange...
When the button is Orange or red, the Anime effect will operate as follows.
Orange
Red
Press the [Exit] button to return to the previous screen.
4.
5.
Play the keyboard or play back a song.
The “Anime” effect will operate with the type and color you specified.
The graphics or text in the screen will move faster, and the time until they fade and disappear will also be shorter.
The graphics or text in the screen will retain their original clarity until they disappear abruptly.
95
Page 95

Enjoying Music and Video
Watching the Notes while a Song Plays (Piano Roll)
The RM-700 provides an on-screen simulation of a player piano.
When you play back a song while viewing the classic-type piano roll screen, the on-screen keyboard will move automatically and the
notes will be shown in the screen. This provides a visual indication of the pitch and duration of each note. For even more enjoyment,
the RM-700 also provides Roland’s own modern-type piano roll screen which lets you change the background image (wallpaper) and
specify how the notes will appear.
The piano roll screen can be shown not just in the RM-700’s built-in display but also on a large external display or television so that
everyone can enjoy it.
You can’t display the piano roll screen for a song from a music CD and an audio/MP3 format.
1.
Press the [Piano Roll] button so its indicator is lit.
The Piano Roll screen appears.
Press the [Piano Roll] button to switch the type of piano roll screen.
2.
Pressing the [Piano Roll] button repeatedly cycles you through the available choices for the piano roll screen, in this order: piano roll
screen (classic type) → piano roll screen (modern type) → piano roll screen off → piano roll screen (classic type),... etc.
Classic type Modern type
96
Off
Page 96

Enjoying Music and Video
3.
Press the [
The song will play, and the notes will be shown in the screen.
Even while the song is playing, you can press the [Piano Roll] button to switch the type of piano roll screen.
4.
Press the [
• If Drums or SFX are selected as the sound, the on-screen keys will not move when you play the keyboard.
• You can change the color of the piano for the classic type piano roll screen, and switch the background image or display method for
the modern type piano roll screen.
→ “Piano Roll Screen Settings” (p. 174)
(Play/Stop)] button to play back the song.
(Play/Stop)] button to stop the song.
97
Page 97

Using the Practice Functions
Playing in a Wonderland of Sound
“Wonderland” allows children to experience a variety of sounds and internal songs with easy operation and enjoyable animation.
1.
Press the [Menu] button so its indicator is lit.
2.
Touch <Play>.
Touch <Wonderland>.
3.
The Wonderland Menu screen appears.
98
Touch the screen to select an item.
4.
Item
Piano
Flash Card
Songs
Tones
Drums
Alphabet
SFX
Game
5.
Try playing as you view the screen.
To exit Wonderland, press the [Exit] button a number of times.
6.
How it is used
Learn how the piano is constructed.
In this game, you play the notes shown on the cards.
Listen to the internal songs.
Select a picture of an instrument to hear the sound of that instrument.
Play the keyboard to play the selected instrument.
Select a picture of a percussion instrument to hear the sound of that instrument.
Play the keyboard to play the selected percussion instrument.
Use the keyboard to become familiar with the alphabet.
Listen to a wide variety of sound effects.
In this game, you try to the tone name, chords, and rhythms that you hear.
Page 98

Playing Songs Using the Lesson Functions (Visual Lesson)
You can enjoy your practices with the RM-700’s Lesson function (Visual Lesson).
Play along with the accompaniment, and your score appears in the display showing how well you played. In addition, in the Check
screen you can see the results shown as notation, allowing you to confirm just what you played.
You can select the course and practice songs to match your current abilities. You can also supplement your stock of practice songs
with additional music files.
1.
Press the [Menu] button so its indicator is lit.
Touch <Play>.
2.
Using the Practice Functions
Touch <Visual Lesson>.
3.
The “Visual Lesson” screen appears.
Selecting the Course
4.
Touch the screen to select the course that you want to practice.
99
Page 99

Using the Practice Functions
Selecting the Song
5.
Touch the screen to select the song that you want to practice.
• You can audition the sound by pressing the [
• You can adjust the tempo by pressing the Tempo [Slow] [Fast] buttons.
• You can also play the metronome sound by pressing the [Metronome] button.
6.
When you’ve selected a song, touch
* If you selected <Beginner> or <Challenge>, proceed to step 8.
If you selected <Repertoire>, a screen like the following appears.
7.
Touch the item to be specified, and set the value with the [Value] dial.
Item
Part
Tempo
Start Measure
End Measure
Value Explanation
Both Hands, Right Hand, Left Hand This selects the part to be practiced.
Much Slower, Slower, A Little Slower, Original Tempo
(song top) –
– (song end)
(Play/Stop)] button.
in the lower right of the screen.
This sets the tempo for your practice.
This sets the starting measure.
This sets the ending measure.
100
8.
After you’ve specified the various items, touch
The following screen appears.
in the center of the screen.
Page 100

Using the Practice Functions
9.
After reading the message in the screen, touch <OK>.
The notation will appear and the accompaniment will start.
<Beginner> <Challenge> / <Repertoire>
10.
Play along with the accompaniment.
* If you stop playing before the end of the song, the song playback stops, and the screen showing the graded result appears.
When you finish playing, your performance will be scored.
Touch
11.
• If you touch either “Ref.(reference)” or “You” and then press the [
will be played back.
• If you touch either “Ref.” or “You” and then turn the [Value] dial, you’ll be able to hear the notes of the selected part while checking
your results.
• You can touch a note to hear that note play.
• You can drag over the notation to play back the part for the region over which you dragged.
• You can play the keyboard to verify the key for a note. (Beginner course only)
• Press the [ (Prev)] button, the notation is switched, and going back one measure in the notation each time the button is
pressed.
• Press the [ (Next)] button, the notation is switched, and advancing one measure in the notation each time the button is
pressed.
at the bottom of the screen to see how well you did.
Grayed Out
1
The proper note was not played.
Pitch (Red)
2
The pitch was incorrect.
Rhythm (Blue)
3
The timing of the accent was off.
1
2 3
4
? (Green)
4
A note not in the notation was played.
(Play/Stop)] button, the performance of the selected part
101
 Loading...