

Page 1

Owner’s Manual
Bedienungsanleitung
Mode d’emploi
Manuale d’uso
Manual del usuario
Before using this unit, carefully read the sections entitled:
“USING THE UNIT SAFELY” and “IMPORTANT NOTES” (p. 2;
p. 5). These sections provide important information concerning
the proper operation of the unit. Additionally, in order to feel
assured that you have gained a good grasp of every feature
provided by your new unit, Owner’s Manual should be read in
its entirety. The manual should be saved and kept on hand as a
convenient reference.
Copyright © 2004 ROLAND CORPORATION
All rights reserved. No part of this publication may be reproduced in
any form without the written permission of ROLAND CORPORATION.
Page 2
Used for instructions intended to alert
the user to the risk of death or severe
injury should the unit be used
improperly.
Used for instructions intended to alert
the user to the risk of injury or material
damage should the unit be used
improperly.
* Material damage refers to damage or
other adverse effects caused with
respect to the home and all its
furnishings, as well to domestic
animals or pets.
The symbol alerts the user to important instructions
or warnings.The specific meaning of the symbol is
determined by the design contained within the
triangle. In the case of the symbol at left, it is used for
general cautions, warnings, or alerts to danger.
The symbol alerts the user to items that must never
be carried out (are forbidden). The specific thing that
must not be done is indicated by the design contained
within the circle. In the case of the symbol at left, it
means that the unit must never be disassembled.
The ● symbol alerts the user to things that must be
carried out. The specific thing that must be done is
indicated by the design contained within the circle. In
the case of the symbol at left, it means that the powercord plug must be unplugged from the outlet.
001
• Before using this unit, make sure to
read the instructions below, and the
Owner’s Manual.
..................................................................................................
002c
• Do not open (or modify in any way)
the unit or its AC adaptor.
..................................................................................................
003
• Do not attempt to repair the unit, or
replace parts within it (except when
this manual provides specific instructions directing you to do so). Refer all
servicing to your retailer, the nearest Roland
Service Center, or an authorized Roland
distributor, as listed on the “Information”
page.
..................................................................................................
004
• Never use or store the unit in places
that are:
• Subject to temperature extremes
(e.g., direct sunlight in an enclosed
vehicle, near a heating duct, on top
of heat-generating equipment); or are
• Damp (e.g., baths, washrooms, on wet
floors); or are
• Humid; or are
• Exposed to rain; or are
• Dusty; or are
• Subject to high levels of vibration.
..................................................................................................
007
• Make sure you always have the unit
placed so it is level and sure to remain
stable. Never place it on stands that
could wobble, or on inclined surfaces.
..................................................................................................
008c
• Be sure to use only the AC adaptor
supplied with the unit. Also, make
sure the line voltage at the installation
matches the input voltage specified on the AC
adaptor’s body. Other AC adaptors may use a
different polarity, or be designed for a
different voltage, so their use could result in
damage, malfunction, or electric shock.
..................................................................................................
008e
• Use only the attached power-supply
cord. Also, the supplied power cord
must not be used with any other
device.
..................................................................................................
009
• Do not excessively twist or bend the
power cord, nor place heavy objects
on it. Doing so can damage the cord,
producing severed elements and short
circuits. Damaged cords are fire and shock
hazards!
..................................................................................................
2
Page 3
010
• This unit, either alone or in combination with an amplifier and
headphones or speakers, may be
capable of producing sound levels that could
cause permanent hearing loss. Do not operate
for a long period of time at a high volume
level, or at a level that is uncomfortable. If
you experience any hearing loss or ringing in
the ears, you should immediately stop using
the unit, and consult an audiologist.
..................................................................................................
011
• Do not allow any objects (e.g.,
flammable material, coins, pins); or
liquids of any kind (water, soft drinks,
etc.) to penetrate the unit.
..................................................................................................
012b
• Immediately turn the power off,
remove the AC adaptor from the
outlet, and request servicing by your retailer,
the nearest Roland Service Center, or an
authorized Edirol/Roland distributor, as
listed on the “Information” page when:
• The AC adaptor, the power-supply cord,
or the plug has been damaged; or
• If smoke or unusual odor occurs
• Objects have fallen into, or liquid has been
spilled onto the unit; or
• The unit has been exposed to rain (or
otherwise has become wet); or
• The unit does not appear to operate
normally or exhibits a marked change in
performance.
..................................................................................................
013
• In households with small children, an
adult should provide supervision
until the child is capable of following all the
rules essential for the safe operation of the
unit.
015
• Do not force the unit’s power-supply
cord to share an outlet with an unreasonable number of other devices. Be
especially careful when using extension
cords—the total power used by all devices
you have connected to the extension cord’s
outlet must never exceed the power rating
(watts/amperes) for the extension cord.
Excessive loads can cause the insulation on
the cord to heat up and eventually melt
through.
..................................................................................................
016
• Before using the unit in a foreign
country, consult with your retailer, the
nearest Roland Service Center, or an authorized Edirol/Roland distributor, as listed on
the “Information” page.
..................................................................................................
019
• Batteries must never be recharged,
heated, taken apart, or thrown into fire
or water.
..................................................................................................
..................................................................................................
014
• Protect the unit from strong impact.
(Do not drop it!)
..................................................................................................
3
Page 4
101b
• The unit and the AC adaptor should
be located so their location or position
does not interfere with their proper ventilation.
..................................................................................................
102c
• Always grasp only the plug on the AC
adaptor cord when plugging into, or
unplugging from, an outlet or this
unit.
..................................................................................................
103b
• At regular intervals, you should
unplug the AC adaptor and clean it by
using a dry cloth to wipe all dust and
other accumulations away from its prongs.
Also, disconnect the power plug from the
power outlet whenever the unit is to remain
unused for an extended period of time. Any
accumulation of dust between the power plug
and the power outlet can result in poor
insulation and lead to fire.
..................................................................................................
104
• Try to prevent cords and cables from
becoming entangled. Also, all cords
and cables should be placed so they are out of
the reach of children.
..................................................................................................
106
• Never climb on top of, nor place heavy
objects on the unit.
..................................................................................................
107c
• Never handle the AC adaptor or its
plugs with wet hands when plugging
into, or unplugging from, an outlet or
this unit.
..................................................................................................
108b
• Before moving the unit, disconnect the
AC adaptor and all cords coming from
external devices.
110b
• Whenever you suspect the possibility
of lightning in your area, disconnect
the AC adaptor from the outlet.
..................................................................................................
111: Selection
• If used improperly, batteries may
explode or leak and cause damage or
injury. In the interest of safety, please
read and observe the following
precautions (P. 20).
1
• Carefully follow the installation
instructions for batteries, and make sure
you observe the correct polarity.
2
• Avoid using new batteries together with
used ones. In addition, avoid mixing
different types of batteries.
3
• Remove the batteries whenever the unit is
to remain unused for an extended period
of time.
5
• If a battery has leaked, use a soft piece of
cloth or paper towel to wipe all remnants
of the discharge from the battery
compartment. Then install new batteries.
To avoid inflammation of the skin, make
sure that none of the battery discharge gets
onto your hands or skin. Exercise the
utmost caution so that none of the
discharge gets near your eyes. Immediately rinse the affected area with running
water if any of the discharge has entered
the eyes.
6
• Never keep batteries together with metallic
objects such as ballpoint pens, necklaces,
hairpins, etc.
..................................................................................................
112
• Used batteries must be disposed of in
compliance with whatever regulations for their safe disposal that may
be observed in the region in which you live.
..................................................................................................
..................................................................................................
109b
• Before cleaning the unit, turn off the
power and unplug the AC adaptor
from the outlet (P. 19).
..................................................................................................
4
Page 5

IMPORTANTS NOTES
291a
In addition to the items listed under “USING THE UNIT SAFELY” on page 5, please read and
observe the following:
Power Supply
301
• Do not connect this unit to same electrical
outlet that is being used by an electrical
appliance that is controlled by an inverter
(such as a refrigerator, washing machine,
microwave oven, or air conditioner), or that
contains a motor. Depending on the way in
which the electrical appliance is used, power
supply noise may cause this unit to
malfunction or may produce audible noise. If
it is not practical to use a separate electrical
outlet, connect a power supply noise filter
between this unit and the electrical outlet.
302
• The AC adaptor will begin to generate heat
after long hours of consecutive use. This is
normal, and is not a cause for concern.
303a
• Since this device draws a relatively large
amount of electrical current, we recommend
that you use it with the AC adaptor unless AC
power is unavailable. Should you prefer to
use batteries, please use the alkaline type.
304a
• When installing or replacing batteries, always
turn off the power on this unit and disconnect
any other devices you may have connected.
This way, you can prevent malfunction and/
or damage to speakers or other devices.
307
• Before connecting this unit to other devices,
turn off the power to all units. This will help
prevent malfunctions and/or damage to
speakers or other devices.
Placement
351
• Using the unit near power amplifiers (or other
equipment containing large power transformers) may induce hum. To alleviate the
problem, change the orientation of this unit;
or move it farther away from the source of
interference.
352a
• This device may interfere with radio and
television reception. Do not use this device in
the vicinity of such receivers.
352b
• Noise may be produced if wireless communications devices, such as cell phones, are
operated in the vicinity of this unit. Such noise
could occur when receiving or initiating a call,
or while conversing. Should you experience
such problems, you should relocate such
wireless devices so they are at a greater
distance from this unit, or switch them off.
354a
• Do not expose the unit to direct sunlight,
place it near devices that radiate heat, leave it
inside an enclosed vehicle, or otherwise
subject it to temperature extremes. Excessive
heat can deform or discolor the unit.
355b
• When moved from one location to another
where the temperature and/or humidity is
very different, water droplets (condensation)
may form inside the unit. Damage or
malfunction may result if you attempt to use
the unit in this condition. Therefore, before
using the unit, you must allow it to stand for
several hours, until the condensation has
completely evaporated.
Maintenance
401a
• For everyday cleaning wipe the unit with a
soft, dry cloth or one that has been slightly
dampened with water. To remove stubborn
dirt, use a cloth impregnated with a mild,
non-abrasive detergent. Afterwards, be sure
to wipe the unit thoroughly with a soft, dry
cloth.
402
• Never use benzine, thinners, alcohol or
solvents of any kind, to avoid the possibility
of discoloration and/or deformation.
Repairs and Data
452
• Please be aware that all data contained in the
unit’s memory may be lost when the unit is
sent for repairs. Important data should always
be written down on paper (when possible).
During repairs, due care is taken to avoid the
loss of data. However, in certain cases (such as
when circuitry related to memory itself is out
of order), we regret that it may not be possible
to restore the data, and Roland assumes no
liability concerning such loss of data.
5
Page 6
IMPORTANTS NOTES
Additional Precautions
551
• Please be aware that the contents of memory
can be irretrievably lost as a result of a
malfunction, or the improper operation of the
unit. To protect yourself against the risk of
loosing important data, we recommend that
you periodically save a backup copy of
important data you have stored in the unit’s
memory on a hard disk.
552
• Unfortunately, it may be impossible to restore
the contents of data that was stored on a
memory card once it has been lost. Roland
Corporation assumes no liability concerning
such loss of data.
553
• Use a reasonable amount of care when using
the unit’s buttons, sliders, or other controls;
and when using its jacks and connectors.
Rough handling can lead to malfunctions.
554
• Never strike or apply strong pressure to the
display.
555
• A small amount of noise may be heard from
the display during normal operation.
556
• When connecting / disconnecting all cables,
grasp the connector itself—never pull on the
cable. This way you will avoid causing shorts,
or damage to the cable’s internal elements.
558a
• To avoid disturbing your neighbors, try to
keep the unit’s volume at reasonable levels.
You may prefer to use headphones, so you do
not need to be concerned about those around
you (especially when it is late at night).
559a
• When you need to transport the unit, package
it in the box (including padding) that it came
in, if possible. Otherwise, you will need to use
equivalent packaging materials.
562
• Use a cable from Roland to make the
connection. If using some other make of
connection cable, please note the following
precautions.
• Some connection cables contain resistors. Do not
use cables that incorporate resistors for connecting
to this unit. The use of such cables can cause the
sound level to be extremely low, or impossible to
hear. For information on cable specifications,
contact the manufacturer of the cable.
• Depending on the conditions in which you
use the R-1, you may notice a slight sensation
of discomfort or roughness when touching the
R-1 itself or a metal part of a connected mic.
This is due to an extremely small electrical
charge which poses absolutely no danger to
the human body. If this bothers you, you can
use the R-1 on battery power as desired.
Before Using Cards
Using DATA Cards
704
• Carefully insert the DATA card all the way
in—until it is firmly in place.
fig.M512-Insert
CompactFlash™
Reverse Side
705
• Never touch the terminals of the DATA card.
Also, avoid getting the terminals dirty.
707
• This unit’s memory card slot accepts
CompactFlash memory cards. Microdrive
storage media are not compatible.
708
• CompactFlash cards are constructed using
precision components; handle the cards
carefully, paying particular note to the
following.
• To prevent damage to the cards from static
electricity, be sure to discharge any static
electricity from your own body before
handling the cards.
• Do not touch or allow metal to come into
contact with the contact portion of the
cards.
• Do not bend, drop, or subject cards to
strong shock or vibration.
• Do not keep cards in direct sunlight, in
closed vehicles, or other such locations
(storage temperature: -25 to 85˚ C).
• Do not allow cards to become wet.
• Do not disassemble or modify the cards.
6
Page 7
Copyright
851
• Unauthorized recording, distribution, sale,
lending, public performance, broadcasting, or
the like, in whole or in part, of a work
(musical composition, video, broadcast, public
performance, or the like) whose copyright is
held by a third party is prohibited by law.
852b
• When transmitting audio signals to an
external device via a digital connection, this
device is able to transmit data without being
subjected to certain restrictions of the Serial
Copy Management System (SCMS). This is
because the unit is intended solely for musical
production, and is designed not to be subject
to restrictions as long as it is used to record
works (such as your own compositions) that
do not infringe on the copyrights of others.
(SCMS is a feature that prohibits secondgeneration and later copying through a digital
connection. It is built into MD recorders and
other consumer digital-audio equipment as a
copyright-protection feature.)
853
• Do not use this unit for purposes that could
infringe on a copyright held by a third party.
We assume no responsibility whatsoever with
regard to any infringements of third-party
copyrights arising through your use of this
unit.
IMPORTANTS NOTES
204
* Microsoft and Windows are registered trademarks of Microsoft Corporation.
206j
* Windows® is known officially as: “Microsoft® Windows® operating system.”
209
* Mac OS is a trademark of Apple Computer, Inc.
234
* CompactFlash and are trademarks of SanDisk Corporation and licensed by Compact-
Flash association.
235
* Roland Corporation is an authorized licensee of the CompactFlash™ and CF logo ( )
trademarks.
add
* PortalPlayer and the PortalPlayer logo are trademarks owned by PortalPlay-
er, Inc.
add
* MPEG Layer-3 audio coding technology licensed from Fraunhofer IIS
and Thomson multimedia.
7
Page 8
Checking the included items
The R-1 comes with the following items. Immediately after opening the package, please
check that you have all of these items. If any items are missing, please contact the dealer
where you purchased the R-1.
■
R-1
fig.r-1
■
AC adaptor
This AC adaptor is designed specifically for
the R-1. Do not attempt to use any other
adaptor with the R-1.
“Connecting the AC adaptor and
■
USB cable
turning on the power”
(p. 19)
(mini B type: 1 meter)
You can use this cable to connect the R-1 to
the USB connector of your computer.
“Connecting the R-1 to your
computer”
* If the AC adaptor or USB cable becomes
damaged or if you need a replacement for any
reason, please contact one of the Service Centers
listed in the “Information” section at the end of
this manual.
(p. 44)
■
CompactFlash card (64 MB)
You can use this memory card to carry out
recording and playback on the R-1.
“Memory card handling”
■
Carrying case
You can use this case to protect the R-1
while it is being transported or stored.
■
Owner’s manual
This is the document you’re reading. Keep
it at hand for easy reference.
(p. 25)
8
Page 9

Contents
Checking the included items 8
The R-1’s controls and connectors 12
Getting ready to use the R-1 18
Basic connections ...................................................................................................... 18
Connecting the AC adaptor and turning on the power............................... 19
Installing the batteries and turning on the power ........................................ 20
Connecting headphones ................................................................................... 22
Connecting digital speakers (digital devices)................................................ 23
Connecting analog speakers (analog devices)............................................... 24
Memory card handling ............................................................................................ 25
Types of files that the R-1 can handle.................................................................... 28
Basic recording methods 29
Recording with the internal microphone .............................................................. 29
Recording with an external microphone............................................................... 32
Recording from a cassette tape or CD ................................................................... 35
Playback methods 38
Normal playback ...................................................................................................... 38
REPEAT A-B (Repeat playback)............................................................................. 40
1/2 PLAY (Half-speed playback)........................................................................... 42
PLAY MODE (Playback mode) .............................................................................. 43
Using the R-1 with your computer 44
Connecting the R-1 to your computer ................................................................... 44
Disconnecting the R-1 from your computer ......................................................... 45
Using effects 46
Effect list.....................................................................................................................47
Applying an effect .................................................................................................... 52
Various settings 54
System settings (Setup mode)................................................................................. 54
Restoring the factory settings.................................................................................. 65
List of messages 66
Troubleshooting 67
Problems with recording ......................................................................................... 67
Problems with playback .......................................................................................... 69
Other problems ......................................................................................................... 70
9
Page 10

Contents
Deutsch
Bedienung und Anschlüsse des R-1 72
Vorbereitungen zum Einsatz des R-1 78
Einfache Aufnahmemethoden 79
Wiedergabemethoden 85
Einsatz von Effekten 89
Verschiedene Einstellungen 90
Français
Commandes et connecteurs 92
Formatieren einer CompactFlash-Karte ......................................................... 78
Aufnahmen mit dem Einbaumikrofon.................................................................. 79
Aufnehmen mit externem Mikrofon...................................................................... 82
Normale Wiedergabe ............................................................................................... 85
REPEAT A-B (Wiedergabewiederholung)............................................................ 86
1/2 PLAY (halbierte Wiedergabegeschwindigkeit) ............................................ 87
PLAY MODE (Wiedergabemodus)........................................................................ 88
Anwenden eines Effekts .......................................................................................... 89
Systemeinstellungen (Konfigurationsmodus)...................................................... 90
10
Préparatifs avant utilisation du R-1 98
Formatage d’une carte CompactFlash............................................................ 98
Méthodes d’enregistrement 99
Enregistrement à l’aide du micro intégré.............................................................. 99
Enregistrement avec microphone externe........................................................... 102
Modes de lecture 105
Lecture normale ...................................................................................................... 105
REPEAT A-B (lecture en boucle) .......................................................................... 106
1/2 PLAY (lecture en mode demi-vitesse).......................................................... 107
PLAY MODE (modes de lecture) ......................................................................... 108
Utilisation des effets 109
Application d’un effet ............................................................................................ 109
Paramétrages divers 110
Paramétrage système (mode Setup)..................................................................... 110
Page 11

Italiano
Controlli e connettori dell’R-1 112
Preparazione all’utilizzo dell’R-1 118
Formattazione di una scheda CompactFlash............................................... 118
Metodi di registrazione di base 119
Registrazione mediante il microfono interno ..................................................... 119
Registrazione mediante un microfono esterno................................................... 122
Metodi di riproduzione 125
Riproduzione normale ........................................................................................... 125
REPEAT A-B (Riproduzione ripetuta)................................................................. 126
1/2 PLAY (Riproduzione a velocità dimezzata)................................................ 127
PLAY MODE (Modalità riproduzione) ............................................................... 128
Utilizzo degli effetti 129
Applicazione di un effetto..................................................................................... 129
Impostazioni 130
Impostazioni del sistema (Setup mode) .............................................................. 130
Español
Controles y conectores de la unidad R-1 132
Contents
Preparación para el uso de la unidad R-1 138
Formateado de una tarjeta CompactFlash ................................................... 138
Métodos básicos de grabación 139
Grabación con el micrófono interno..................................................................... 139
Grabación con un micrófono externo .................................................................. 142
Métodos de reproducción 145
Reproducción normal............................................................................................. 145
REPETICIÓN A-B (repetición de la reproducción) ........................................... 146
REPRODUCCIÓN 1/2 (reproducción a la mitad de velocidad) ..................... 147
PLAY MODE (Modo de reproducción)............................................................... 148
Utilización de los efectos 149
Aplicación de un efecto.......................................................................................... 149
Algunos parámetros 150
Configuración del sistema (modo Setup (Configuración))............................... 150
Main specifications 152
Index 154
11
Page 12
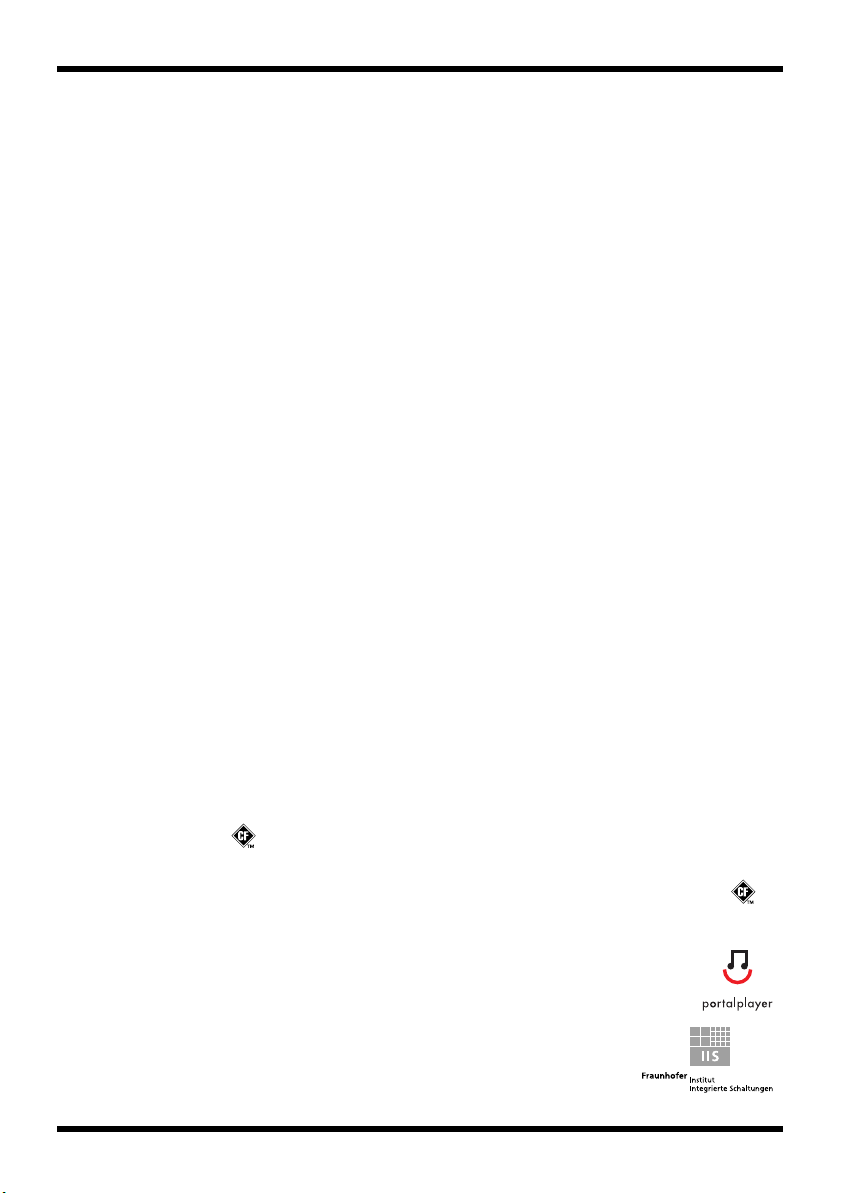
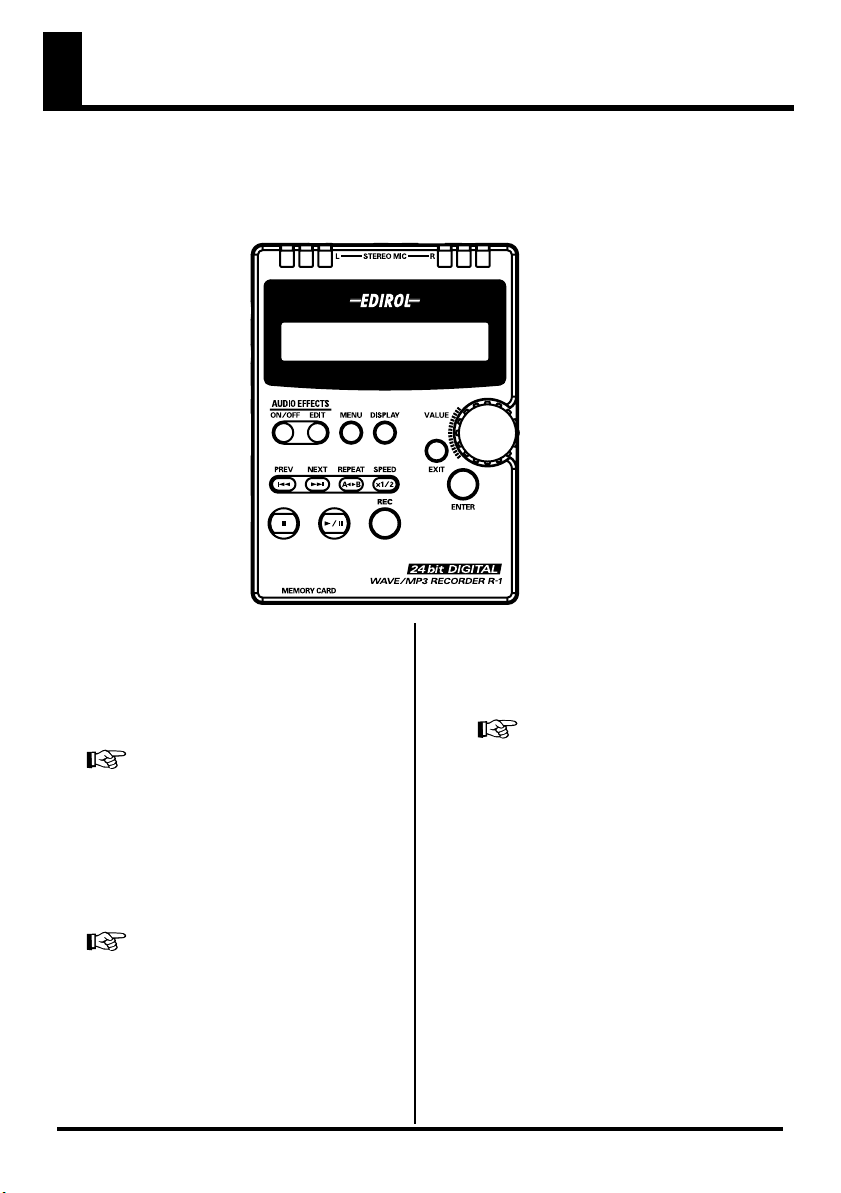
The R-1’s controls and connectors
fig.panel-1
1
Internal mic
11
12
1
2
3
4
7
8
5 6
9
10
13
14
15
16
This is a stereo microphone that’s built into the R-1.
You can’t use the internal microphone if a microphone or other device is connected to
the
mic jacks
18
or
line input jacks
19
. If you want to use the internal microphone,
don’t connect anything to the other input jacks.
When recording via the internal microphone, set the mic type select switch to DYN.
2
Display
Various information about the R-1’s operating state is shown here.
3
EFFECT button
Press the
EFFECT button
to switch the effect on/off.
This button will light red when the effect is on.
If you turn this on before or during playback, the effect will be applied to the sound that
is being played back. If you turn this on before or during recording, the effect will be
applied to the sound that is being input; i.e., the sound that has been processed by the
effect will be recorded.
The R-1 provides various effects that let you modify the sound being played back or
recorded, giving the sound more impact or allowing more comfortable listening. You
can also transform the sound to give it a totally new character.
4
EDIT button
Use this button to make effect settings.
For details on the effects, refer to
regardless of whether the
“Using effects”
EFFECT button
(p. 46). You can make effect settings
is on or off.
12
Page 13

The R-1’s controls and connectors
A
Song
AB
Song
AB
Song
5
MENU button
This button selects Setup mode, where you can make various settings for the R-1. Here
you can adjust the LCD contrast, specify the recording quality, and make various other
overall settings for the R-1. For details, refer to
6
DISPLAY button
This switches the contents of the R-1’s display.
In PLAY mode, this button will cycle through the playback time, the remaining
playback time in the current song (file), the type of song (file), and the bit rate.
Press the
7
PREV button
DISPLAY button
to switch the contents of the display.
Use this button to move to the beginning of the song or to select the preceding song.
Pressing this button in the middle of a song will move to the beginning of that song. If
you are already at the beginning (00:00) of the song, pressing this button will take you
to the preceding song. You can press and hold down this button to rewind.
These operations are available while playing or stopped.
8
NEXT button
Use this button to select the next song. You can press and hold down this button to fastforward.
These operations are available while playing or stopped.
9
REPEAT button
This button lets you play repeatedly between two points (A - B) you specify in the song.
Press this button once to mark point “A” and press it again to mark point “B.”
To cancel repeat playback, press the
REPEAT button
repeat playback, points A and B will both be cancelled.
fig.repeat-a
1.
During playback, press the
REPEAT button
That point will be the beginning (point A) of the
repeated playback.
“Various settings”
(p. 54)
once again. When you cancel
once.
EnglishDeutschFrançaisItalianoEspañol
fig.repeat-b
2.
Press the
REPEAT button
once again. That point
will be the end (point B) of the repeated playback.
fig.repeat-ab
Playback will occur repeatedly over the range you
specified in steps 1 and 2. To cancel repeat playback,
press the
10
SPEED button
REPEAT button
once again.
This button slows the playback to half-speed. Press it once again to return to normal
speed. This is useful when you are playing along with music at an uncomfortably fast
tempo, or when listening to rapid speech.
13
Page 14
The R-1’s controls and connectors
fig.panel-2
1
17
18
2
19
3
11
STOP button
20
21
11
12
4
7
8
5 6
9
10
13
This button stops playback or recording.
12
PLAY/PAUSE button
This button starts playback. It also pauses recording or playback.
If you press this button while playing, playback will pause, and the R-1’s display will
indicate
PLAY-PAUSE
. Press the
PLAY/PAUSE button
once again to resume
playback.
Similarly, if you press this button while recording, recording will pause. The R-1’s
display will indicate
To resume recording from the Rec Standby condition, press the
(or press the
13
REC button
PLAY/PAUSE button
When stopped, pressing the
The R-1's display will indicate
To begin recording from recording-standby mode, press the
press the
14
VALUE dial
PLAY/PAUSE button
REC-PAUSE
REC button
REC STANDBY
, and the
). The
REC button
REC button
will put the R-1 in recording-standby mode.
, and the
). During recording, the
will blink red.
REC button
once again
lights red during recording.
REC button
REC button
REC button
will blink red.
once again (or
will light red.
Use this dial to select songs, to specify effect types and values, and to select setup mode
items.
15
EXIT button
Use this button to return to the previous item in Effect Edit or Setup mode. In Setup
mode, your value changes will be cancelled if you press the
pressing the
16
ENTER button
ENTER button
.
EXIT button
before
Use this button to select an item or finalize a change in Effect Edit or Setup mode.
14
15
16
14
Page 15
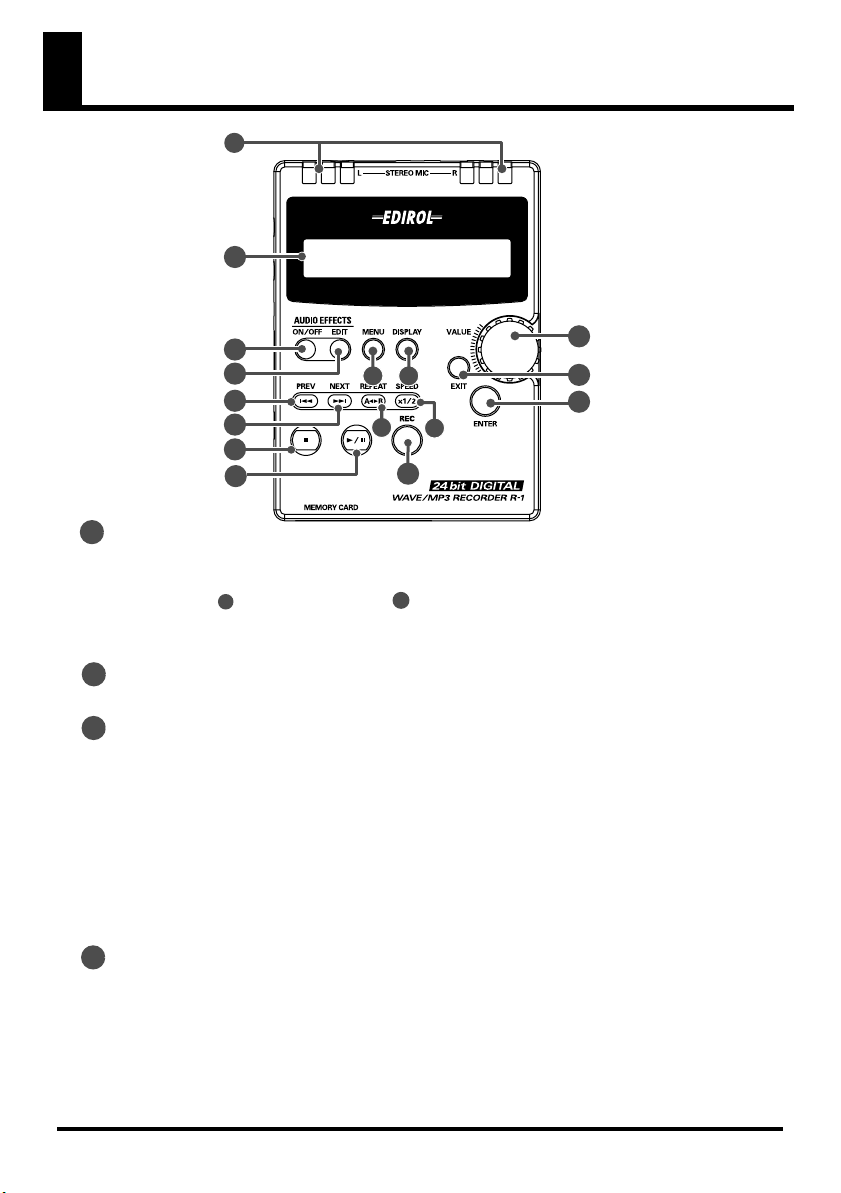
17
Mic input jack
Accepts connection of a microphone.
If a cable is plugged into the line input jack, audio will not be input through
the mic input jack.
The R-1’s controls and connectors
Set the
mic type select switch
19
to the appropriate position depending on whether
the connected microphone is a dynamic microphone or a plugin-powered miniature
condenser microphone.
Stereo microphones are supported; use a stereo mini-type cable to make connections. If
you use a monaural microphone, set the Setup mode
MONO
. For details on this setting, refer to
18
Line input jack
“System settings (Setup mode)”
“10 Input Select”
setting to
If you want to input an audio signal from an audio device or electronic musical
instrument into the R-1, use a stereo mini-plug cable to connect it to this jack.
19
Mic type select switch
Set this switch to the appropriate position according to the type of microphone you’ve
connected to the
DYN
CND
Input volume
20
mic input jack
Use this setting if you’ve connected a dynamic microphone.
If you’re using the internal microphone, set this to DYN.
Use this setting if you’ve connected a miniature condenser microphone that requires a power supply. You must use a “plug-in powered” microphone. This jack
supplies a voltage of 2 V.
* If this switch is set to CND, do not connect any microphone or device other than
a “plug-in powered” microphone. Any other type of microphone or device may
be damaged.
This adjusts the input volume of the sound from the built-in mics ,
17
, or
line input jack
18
.
Use the procedure described in
17
.
“Adjusting the input level”
1
mic input jack
(p. 30) to adjust this while
watching the input level.
21
USB connector
You can use the included USB cable to connect this connector to your computer.
If the R-1 is connected to your computer, the song files you record can be transferred or
copied to your computer. You can also transfer or copy MP3 or WAV files from your
computer to the R-1 so that these files can be played on the R-1.
This connector supports USB 2.0 (hi-speed USB), allowing files to be transferred
rapidly.
If you want to connect the R-1 to your computer, please refer to
to your computer”
(p. 44).
“Connecting the R-1
When your computer has correctly recognized the R-1, the R-1’s display will indicate
Connected via USB
.
EnglishDeutschFrançaisItalianoEspañol
(p. 54).
While the R-1 is connected to a computer, all functionality of the R-1 (other
than its power switch) is disabled; operating the buttons or switches will not
do anything.
15
Page 16
The R-1’s controls and connectors
28
fig.panel-3
1
22
22
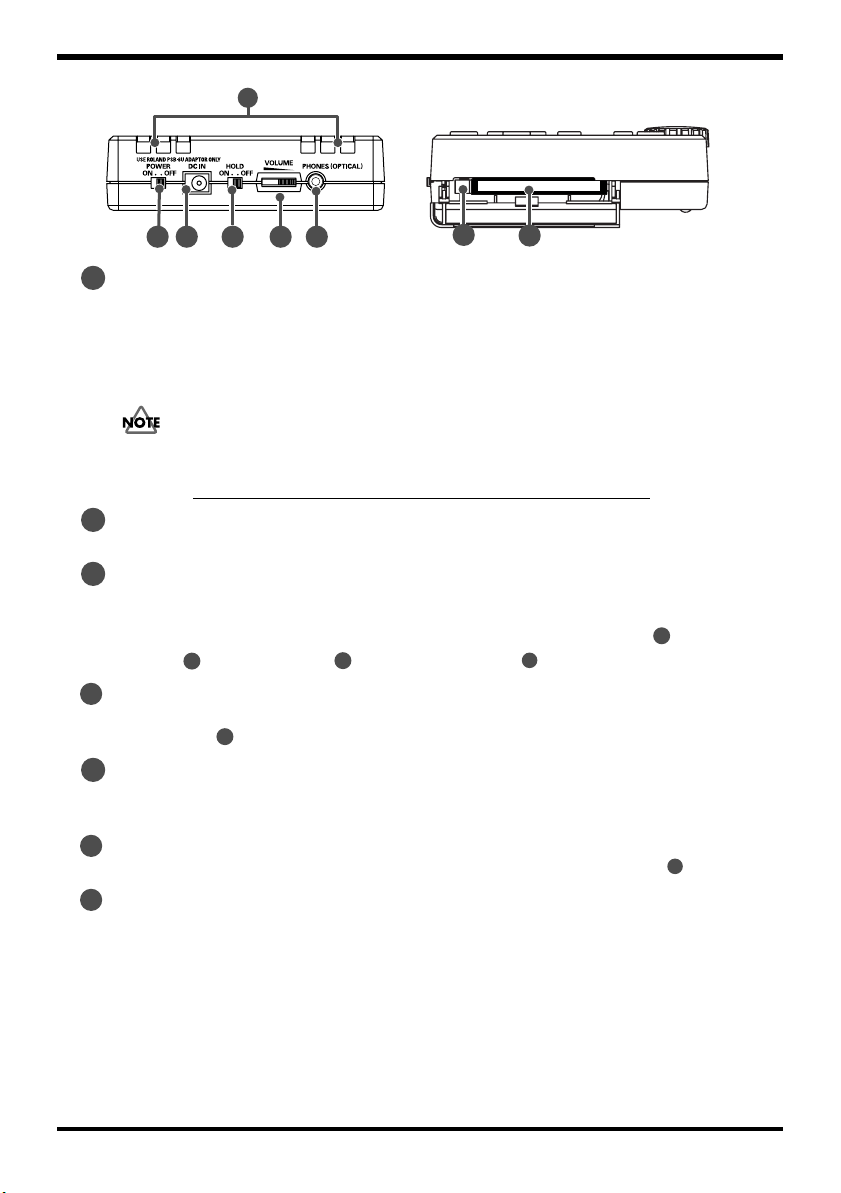
Power switch
24 25 2623
27
28
This turns the power on/off.
Do not turn off the power during playback or recording. You must make sure that
playback or recording is stopped before you turn off the power.
• If you accidentally turn off the power during recording, the data being recorded will
not be saved to the CompactFlash card.
• The CompactFlash card may be damaged if you turn off the R-1’s power while data is
being read or written, such as during playback or recording.
• If you turn off the R-1’s power while the “Now working...” indication is shown during
effect editing or while saving a setting you’ve changed, the R-1 will become unstable,
and may become unable to start up.
Be very careful to never turn off the power when the unit is in such states.
23
AC adaptor jack
Connect the included AC adaptor to this jack.
24
HOLD switch
If you set the
HOLD switch
to the ON position, button presses on the R-1 will be
disabled; this is a convenient way to prevent the R-1 from being operated accidentally.
However, even when the
volume
25
Output volume
20
,
power switch
This adjusts the volume that is sent from the
output jack
26
Headphone/line output/digital output jack
26
. However, the volume of the digital output is not adjustable.
HOLD switch
22
, and
is ON, the
output volume
mic type select switch
25
will still be operable.
headphone/line output/digital
This jack outputs audio from the R-1 to headphones or external speakers. If you want to
output a digital signal, use a round optical mini-type digital cable.
27
Eject button
Press this to eject the CompactFlash card inserted in the
28
Memory card slot
memory card slot
Insert a CompactFlash card into this slot.
CompactFlash is the only type of memory card that the R-1 can use.
19
,
input
.
16
Page 17
The R-1’s controls and connectors
28
fig.panel-4
29
30
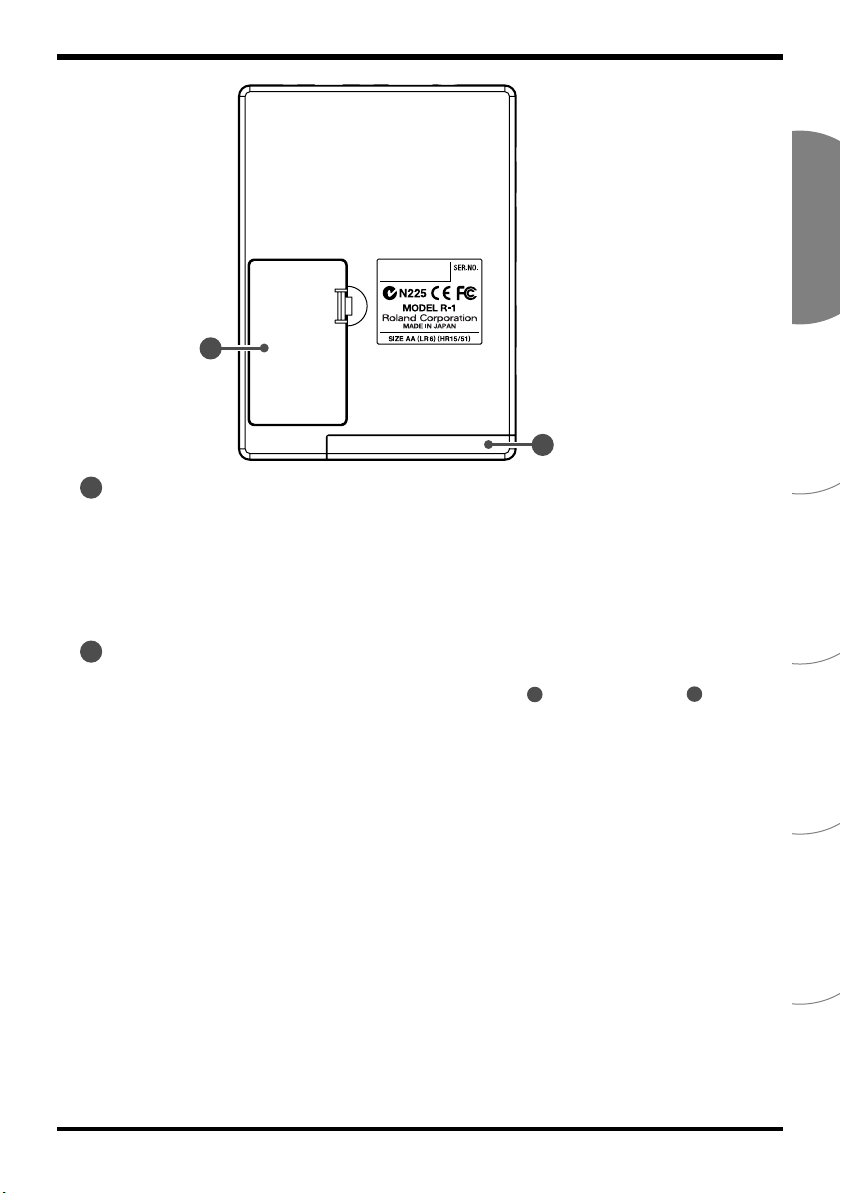
29
Battery compartment
If you want to operate the R-1 on batteries, install the batteries here. If you are operating
the R-1 with its AC adaptor, you don’t need to install batteries.
You must switch off the R-1’s power before changing from AC adaptor operation to
battery operation, or from battery operation to AC adaptor operation.
Please read
the R-1.
30
Memory card slot cover
This cover prevents the CompactFlash card from being removed accidentally. When
you open the cover, you will see the
“Installing the batteries and turning on the power”
memory card slot
and
(p. 20) before you use
eject button
27
.
EnglishDeutschFrançaisItalianoEspañol
17
Page 18
Getting ready to use the R-1
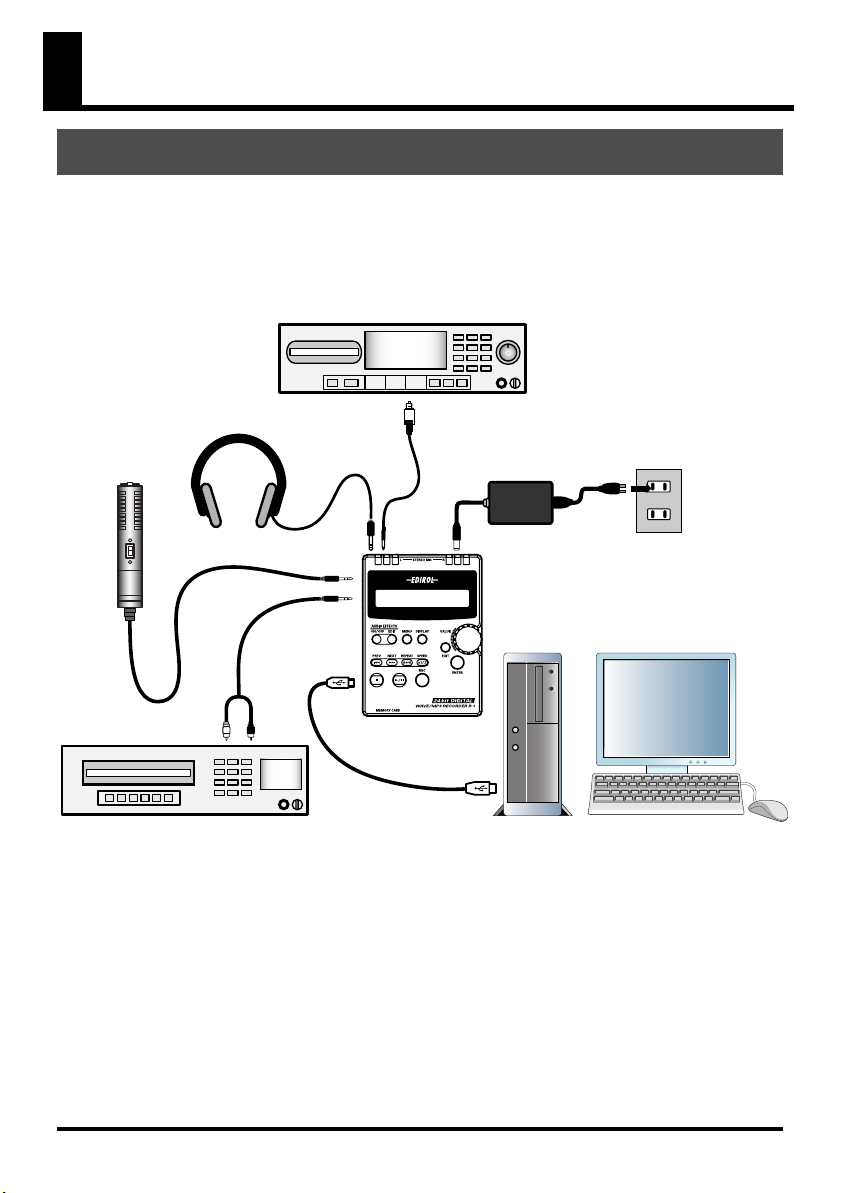
Basic connections
* Before making connections with other equipment, you must minimize the volume and turn
off the power of all of your equipment in order to prevent malfunction and/or speaker
damage.
* If you use a cable with a built-in resistor, the volume of the device connected to the line input
jack (LINE IN) may be too low. If so, you should use a connection cable that does not contain
a resistor.
fig.basic_50
MD player or similar for recording
Headphones
DIGITAL IN
Stereo mic
LINE OUT
CD/MD player for playback
LINE IN
USB
MIC
PHONES
(OPTICAL)
AC adaptor
DC IN
USB
Computer
The R-1 does not have built-in speakers. In order to hear the playback, you will need to
provide headphones or speakers.
You can use the R-1’s headphone jack as a digital output (optical out) for connection to
a digital device, or as a line output for connection to an analog device. Use the
appropriate cable for your device.
For details, refer to
(digital devices)”
“Connecting headphones”
(p. 23), or
“Connecting analog speakers (analog devices)”
(p. 22),
“Connecting digital speakers
(p. 24).
* Howling could be produced depending on the location of microphones relative to speakers.
This can be remedied by:
1. Changing the orientation of the microphone(s).
2. Relocating microphone(s) at a greater distance from speakers.
3. Lowering volume levels.
18
Page 19
Getting ready to use the R-1
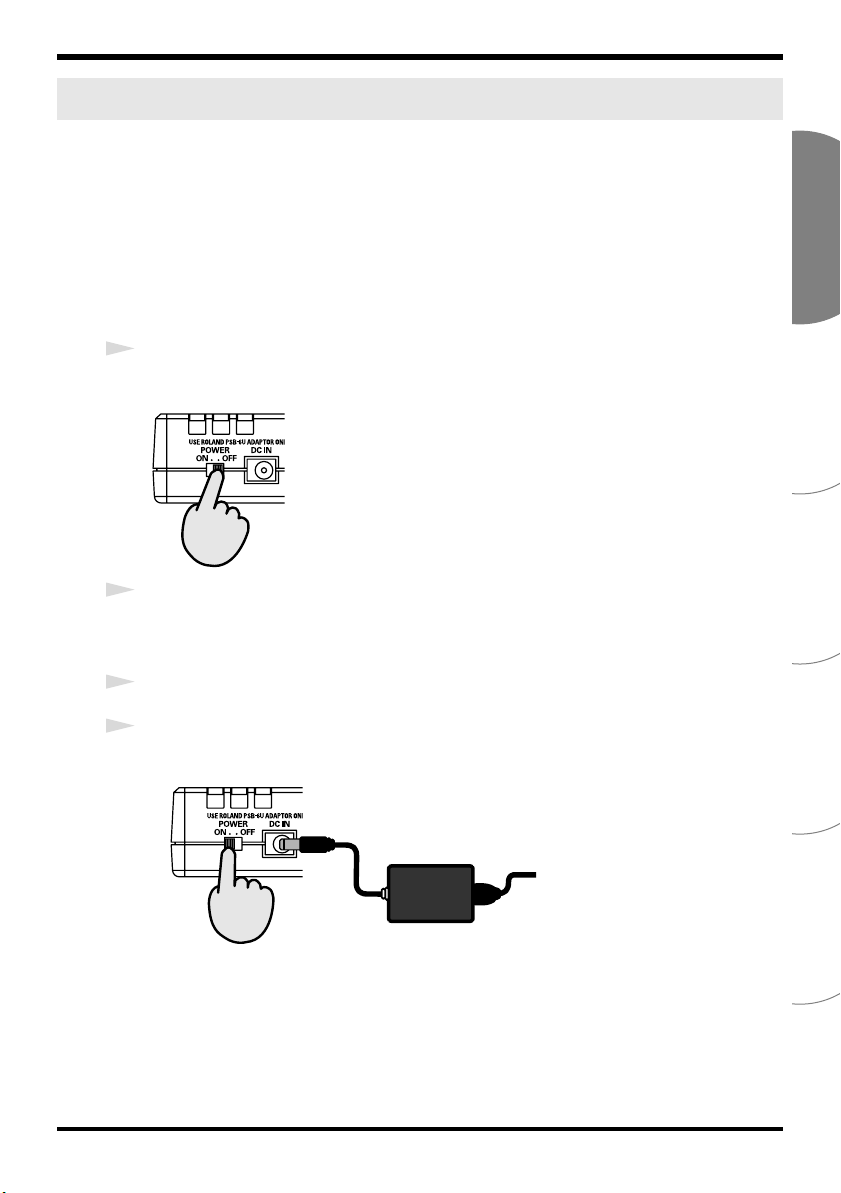
Connecting the AC adaptor and turning on the power
941
* Once the connections have been completed (p. 18), turn on power to your various devices in
the order specified. By turning on devices in the wrong order, you risk causing malfunction
and/or damage to speakers and other devices.
942
* This unit is equipped with a protection circuit. A brief interval (a few seconds) after power
up is required before the unit will operate normally.
* If batteries are installed and the AC adaptor is also connected, the power will be supplied
from the AC adaptor.
1
Turn off the R-1’s
fig.off
OFF
2
Connect the DC plug of the AC adaptor to the DC IN jack on the rear panel of the
R-1.
* Use only the AC adaptor supplied with the R-1.
3
Plug the AC adaptor into an AC outlet.
4
Turn on the R-1’s
fig.on-off
power switch
power switch
.
.
EnglishDeutschFrançaisItalianoEspañol
ON
* If batteries are installed and the AC adaptor is also connected, the power will be supplied
from the AC adaptor.
19
Page 20
Getting ready to use the R-1
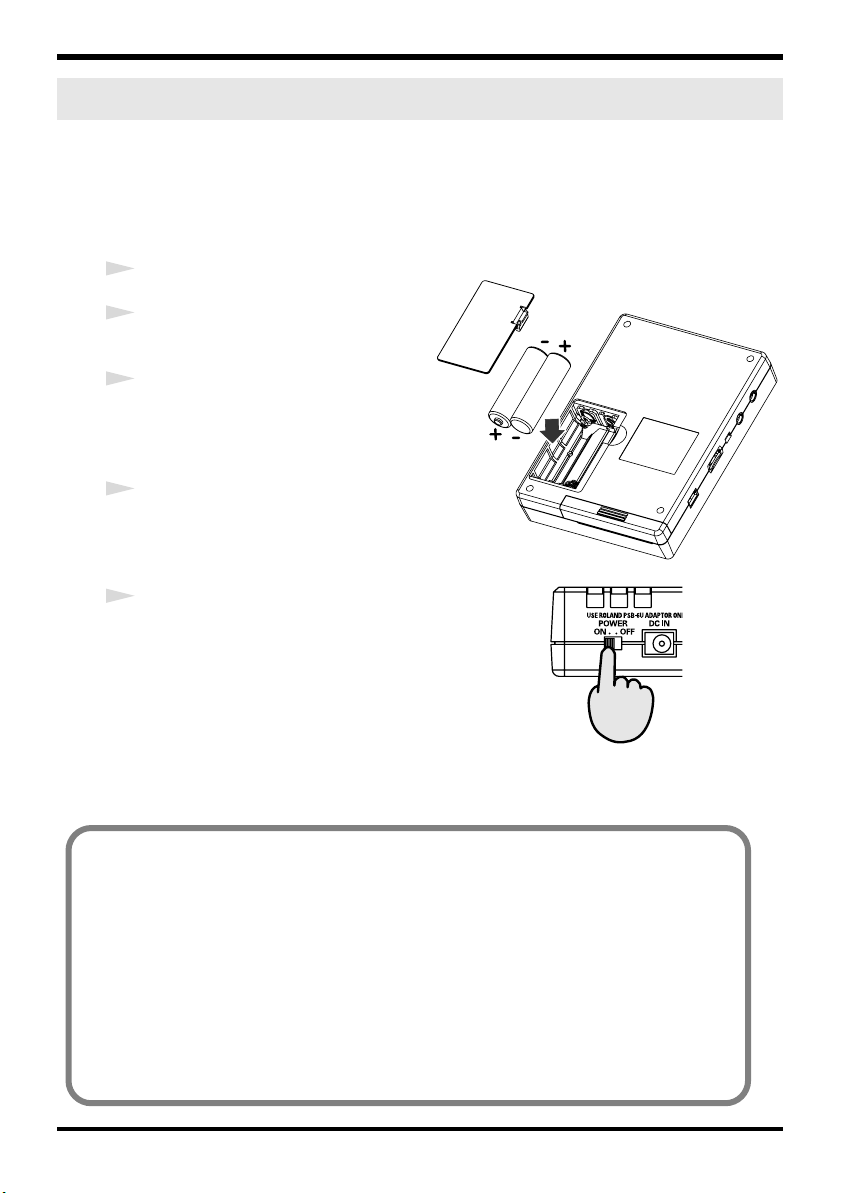
Installing the batteries and turning on the power
Types of batteries you can use:
• AA alkaline batteries (LR6)
• AA nickel metal hydride batteries (HR15/51)
* The R-1 itself is not able to charge nickel metal hydride batteries; you will need to use a
separate battery charger.
fig.battery
1
Turn off the R-1’s
2
Detach the battery compartment cover
located on the bottom panel of the R-1.
3
Insert two AA batteries into the
battery compartment, making sure to
observe the correct polarity (+ and indications).
4
Close the battery compartment cover.
fig.on-2
5
Turn on the R-1’s
power switch
power switch
.
.
Note when using the R-1 on batteries
• We recommend using alkaline batteries which have a longer life.
• Don’t mix new batteries with used batteries or batteries of different types.
• If you won’t be using the R-1 for an extended period of time, you should remove
the batteries to prevent them from leaking and damaging the unit.
• If the R-1 is running on batteries, the display may turn off (the Sleep function) or
the LCD backlight may turn off to save power. If you want to change these
settings, proceed as described in “System settings (Setup mode)” (p. 54).
If you’re using the AC adaptor, these settings are not used.
• When connecting the R-1 to your computer via a USB cable, you must use the AC
adaptor to prevent the batteries from running down while connected.
20
ON
Page 21
Getting ready to use the R-1
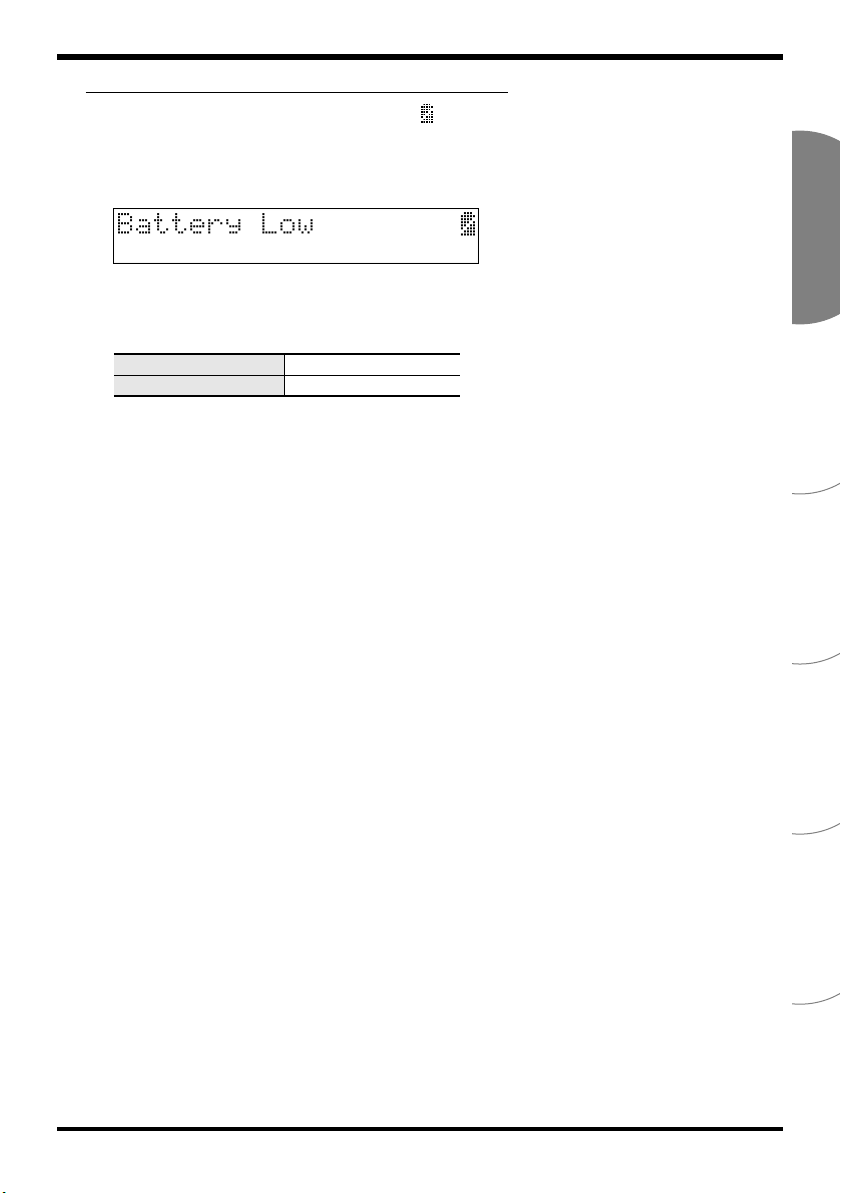
About the remaining battery capacity
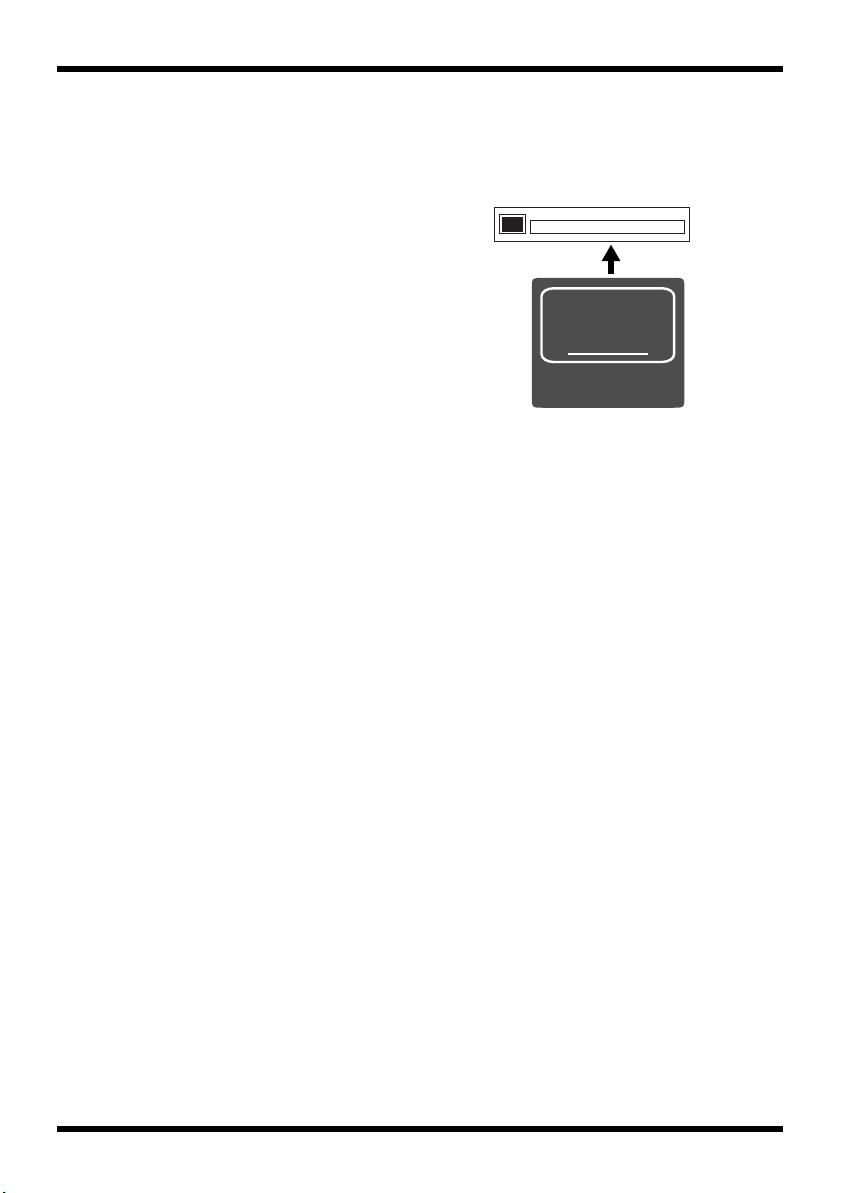
When the batteries run low, a battery icon ( ) is displayed blinking in the upper right
of the display. When this message appears, replace the batteries as soon as possible.
If you continue using the unit when the batteries have run low, the following screen will
appear, and all of the R-1’s functionality will stop.
fig.battery.eps
Turn off the power switch and replace the batteries with fresh ones.
Battery life
(When using alkaline batteries, MP3 192 kbps, and a 256 MB CompactFlash card)
Continuous playback
Continuous recording
* The battery life indicated above is approximate. Battery life will vary depending on the
environment in which you are using the R-1 and your method of use.
* The battery life will be shorter if you allow display backlighting to remain on or if you use
numerous effects.
approximately 5.5 hours
approximately 2 hours
EnglishDeutschFrançaisItalianoEspañol
21
Page 22
Getting ready to use the R-1
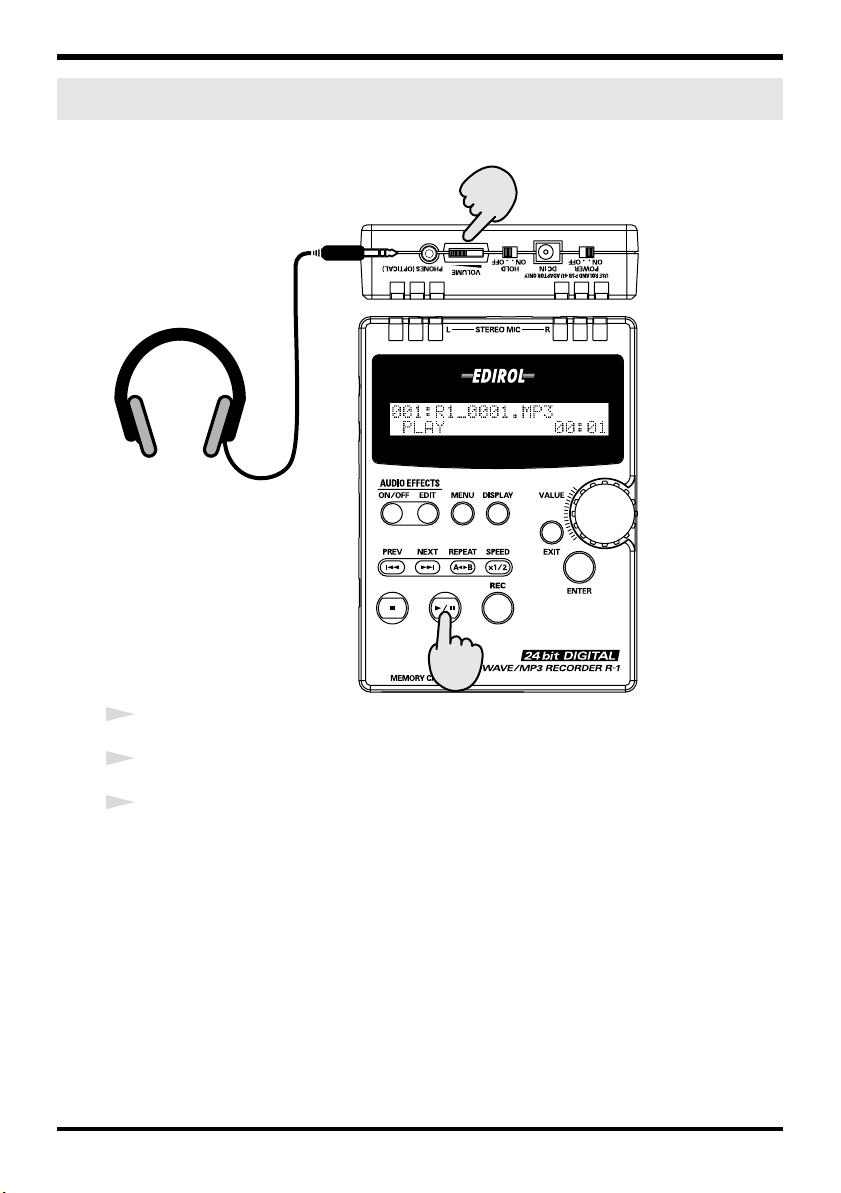
Connecting headphones
Here’s how to connect headphones.
fig.phones
Headphone jack
Headphones
1
Turn off the power of the R-1.
2
Turn the
3
Connect your headphones to the
output volume
Output volume
all the way toward the left to minimize the volume.
headphone jack
.
Now you can use the R-1 to record or play back as described in
methods”
Even if the song (file) was recorded at an appropriate recording level, you may hear
distortion or crackling during loud passages of the song if the output volume is too
high.
(p. 29) or
“Playback methods”
(p. 38).
“Basic recording
22
Page 23
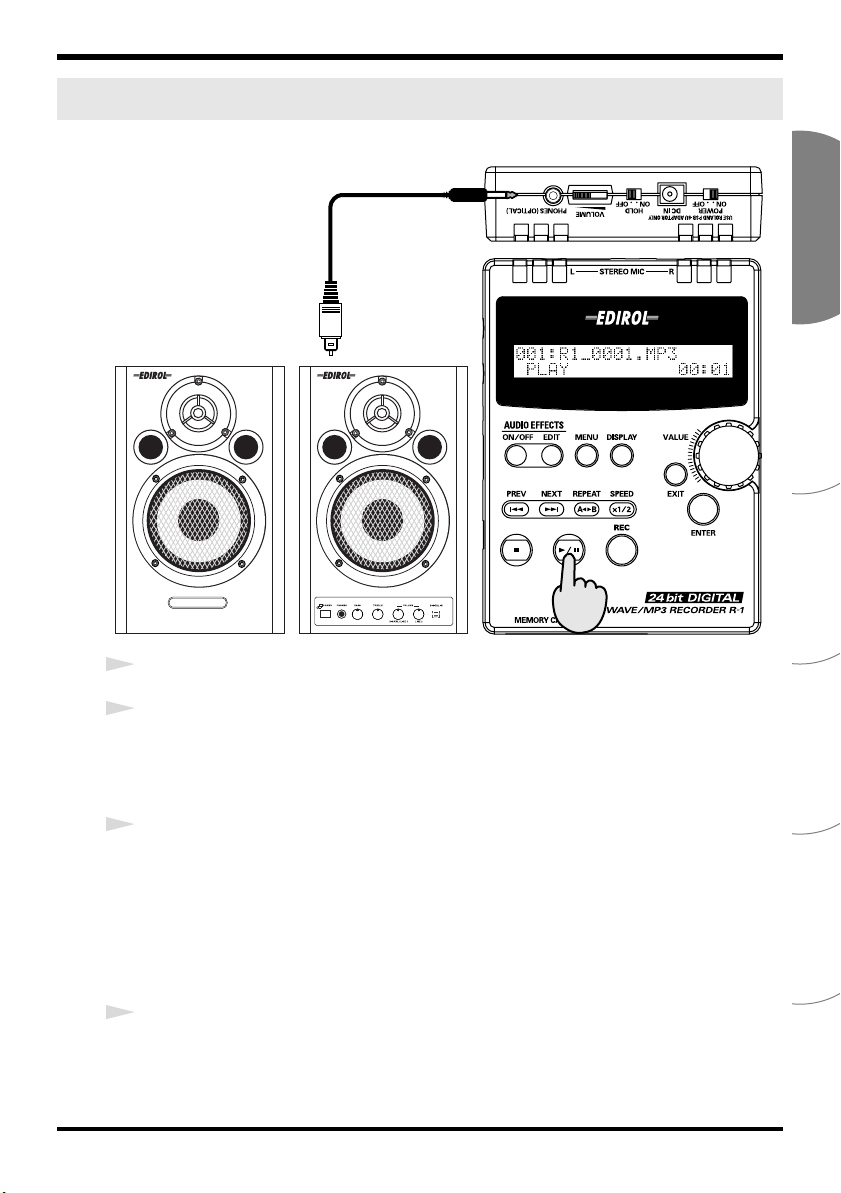
Getting ready to use the R-1
Connecting digital speakers (digital devices)
Here’s how to connect amplified speakers that have digital input jacks.
fig.speaker
Digital output jack
Optical cable
Rectangular optical plug
Amplified speakers
1
Turn off the power of the R-1.
2
Set the volume of the speakers to the minimum setting.
* If you’re using a digital connection, the R-1’s
volume.
* The digital output has a sampling frequency of 44.1 kHz.
3
Connect the
Use a cable with a round optical mini-plug to connect to the R-1’s digital output
jack.
Cables are not included; you will need to provide them separately.
digital output jack
Round optical mini-plug
DIGITAL IN
(OPTICAL)
output volume
to your digital-compatible amplified speakers.
control will not affect the
EnglishDeutschFrançaisItalianoEspañol
Now you can use the R-1 to record or play back as described in
methods”
4
(p. 29) or
Gradually raise the speaker volume to an appropriate listening level.
If you’re using a digital connection, the R-1’s
the volume.
“Playback methods”
(p. 38).
output volume
“Basic recording
control will not affect
23
Page 24
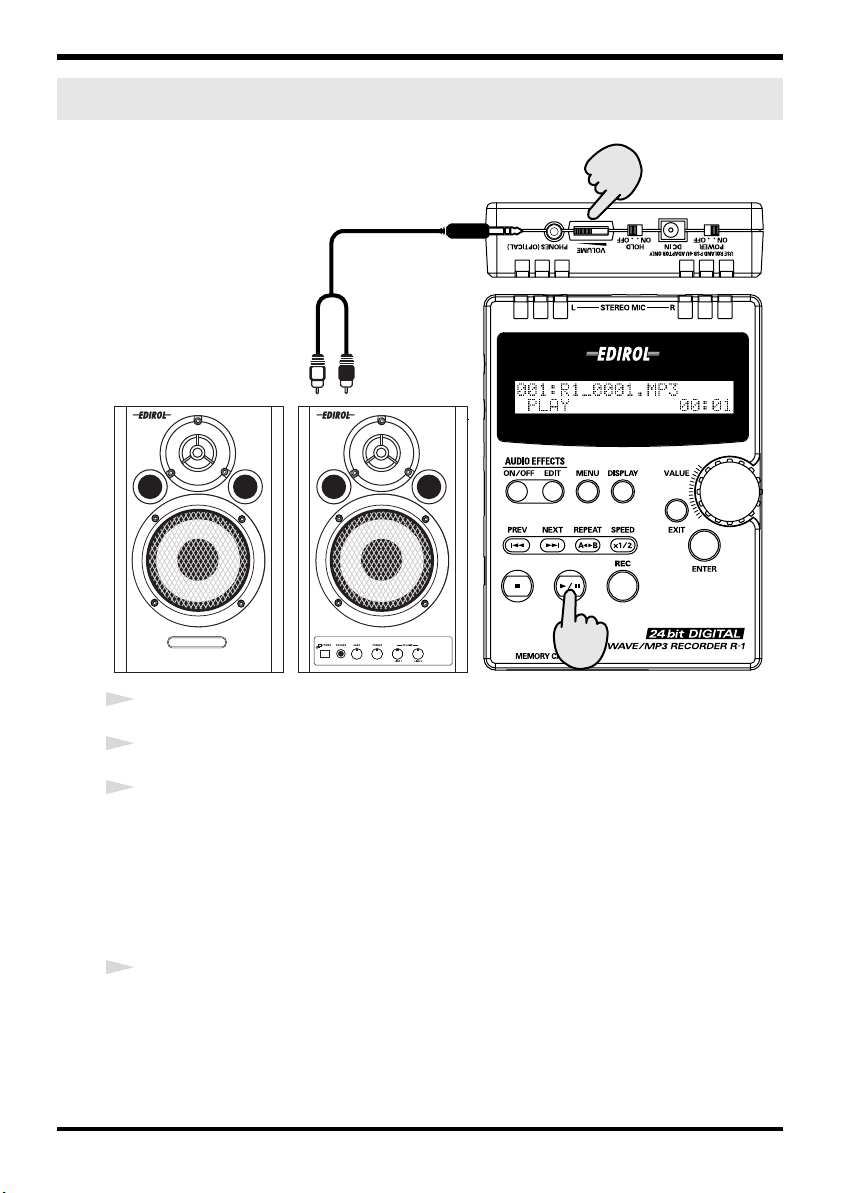
Getting ready to use the R-1
Connecting analog speakers (analog devices)
fig.analog
Output volume
Line output jack
Audio cable
Amplified speakers
1
Turn off the power of the R-1.
2
Turn the output volume all the way toward the left to minimize the volume.
3
Connect the R-1’s
You will need an audio cable for connection to the R-1's line output jack.
Cables are not included; you will need to provide them separately.
Now you can use the R-1 for recording or playback as described in
methods”
(p. 29) or
line output jack
“Playback methods”
LINE IN
to your amplified speakers.
“Basic recording
(p. 38).
24
4
Gradually turn the
You can also adjust the volume of your speakers.
output volume
toward the right to increase the volume.
Page 25
Getting ready to use the R-1
Memory card handling
The R-1 uses CompactFlash memory cards.
Types of CompactFlash that you can use
• CompactFlash cards of up to 4 GB (Gigabytes) in size can be used.
Even when using a high-capacity CompactFlash card, recording will stop when
the file being recorded reaches 2 GB in size. The file will automatically be saved,
and recording will end.
• Depending on the manufacturer or model, some CompactFlash cards may not be
capable of successful recording or playback on the R-1.
• Micro Drives cannot be used. If you inadvertently use a Micro Drive, we can take
no responsibility for any damage or malfunctions that may occur to the Micro
Drive or to the R-1.
930
* Never insert or remove a CompactFlash card while this unit’s power is on. Doing so may
corrupt the unit’s data or the data on the CompactFlash card.
931
* Carefully insert the CompactFlash card all the way in-until it is firmly in place.
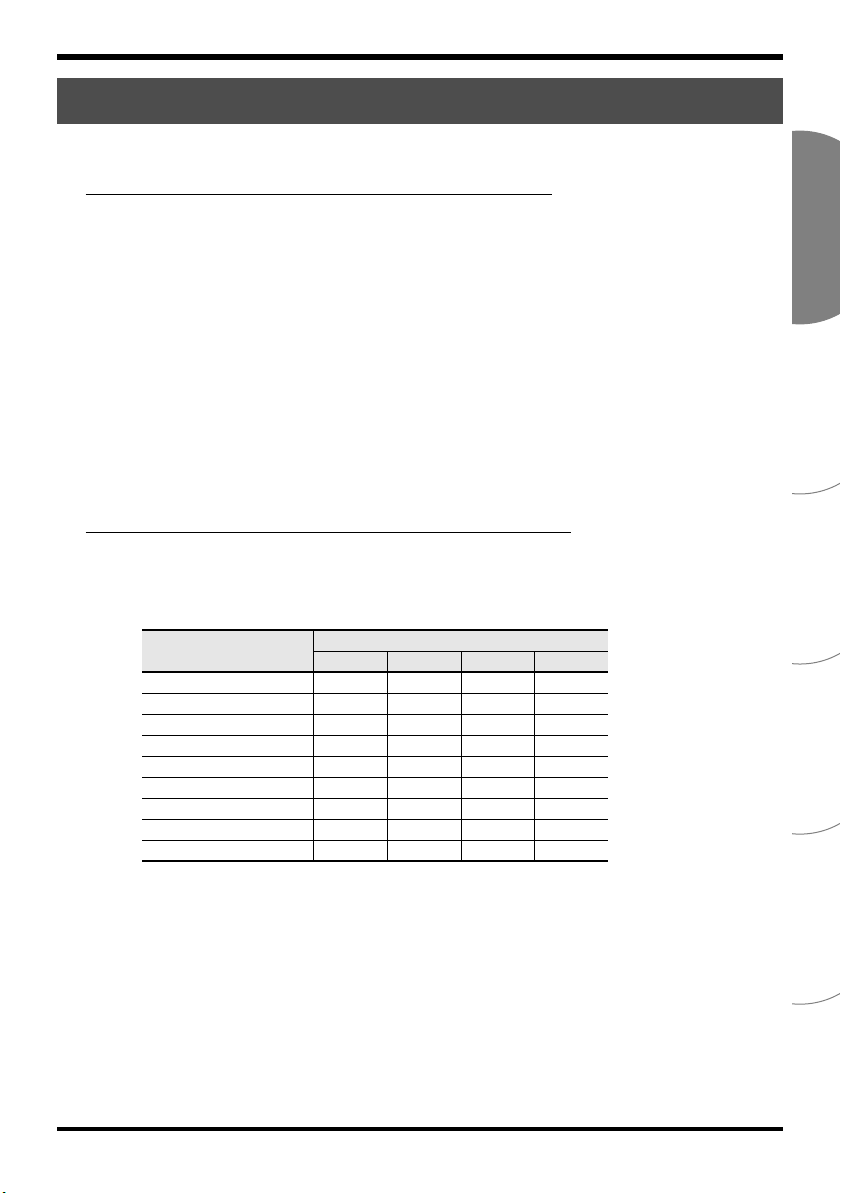
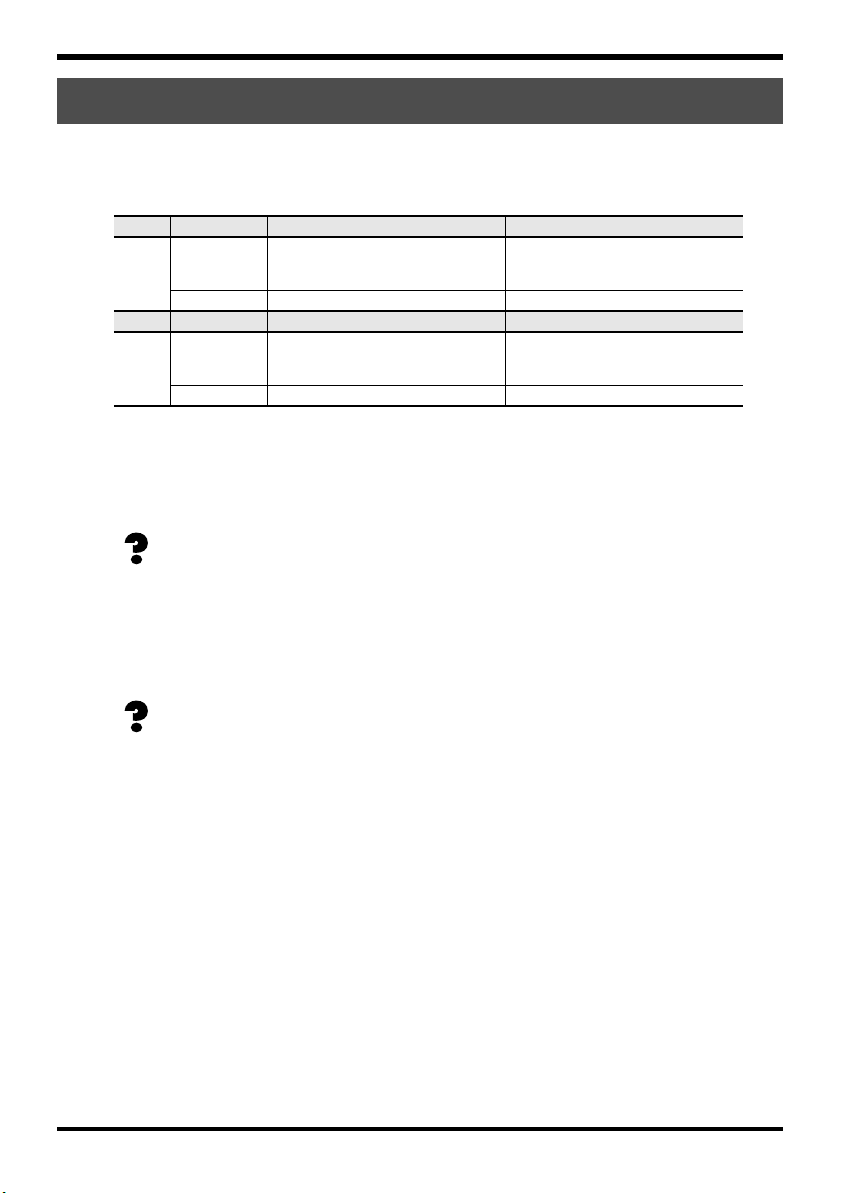
Recordable times on a CompactFlash card
The following table shows the approximate lengths of time you can record using
CompactFlash cards.
EnglishDeutschFrançaisItalianoEspañol
Recordable times (approximate)
CompactFlash size
File type 64 MB 256 MB 512 MB 2 GB
WAV, 24 bit/44.1 kHz
WAV, 16 bit/44.1 kHz
MP3, 16 bit/320 kbps
MP3, 16 bit/256 kbps
MP3, 16 bit/192 kbps
MP3, 16 bit/160 kbps
MP3, 16 bit/128 kbps
MP3, 16 bit/ 96 kbps
MP3, 16 bit/ 64 kbps
3
5
26
32
43
52
65
86
130
Units: minutes
15 31 125
23 47 188
102 208 831
128 260 1,039
170 346 1,386
205 416 1,663
256 520 2,079
341 693 2,772
512 1,040 4,158
* The recording times listed above are approximate. The actual length of time you are able to
record may be slightly different than shown here, so please allow some leeway in your
recording plans.
* Use the R-1 itself to format the CompactFlash card.
* Use the included AC adaptor when recording continuously for an extended time.
* If there are multiple files, the total time that can actually be recorded will be less than the
time shown above.
* The R-1 can handle up to 255 files. Once the number of files in the CompactFlash card
reaches 255, you won’t be able to make any more recordings.
25
Page 26
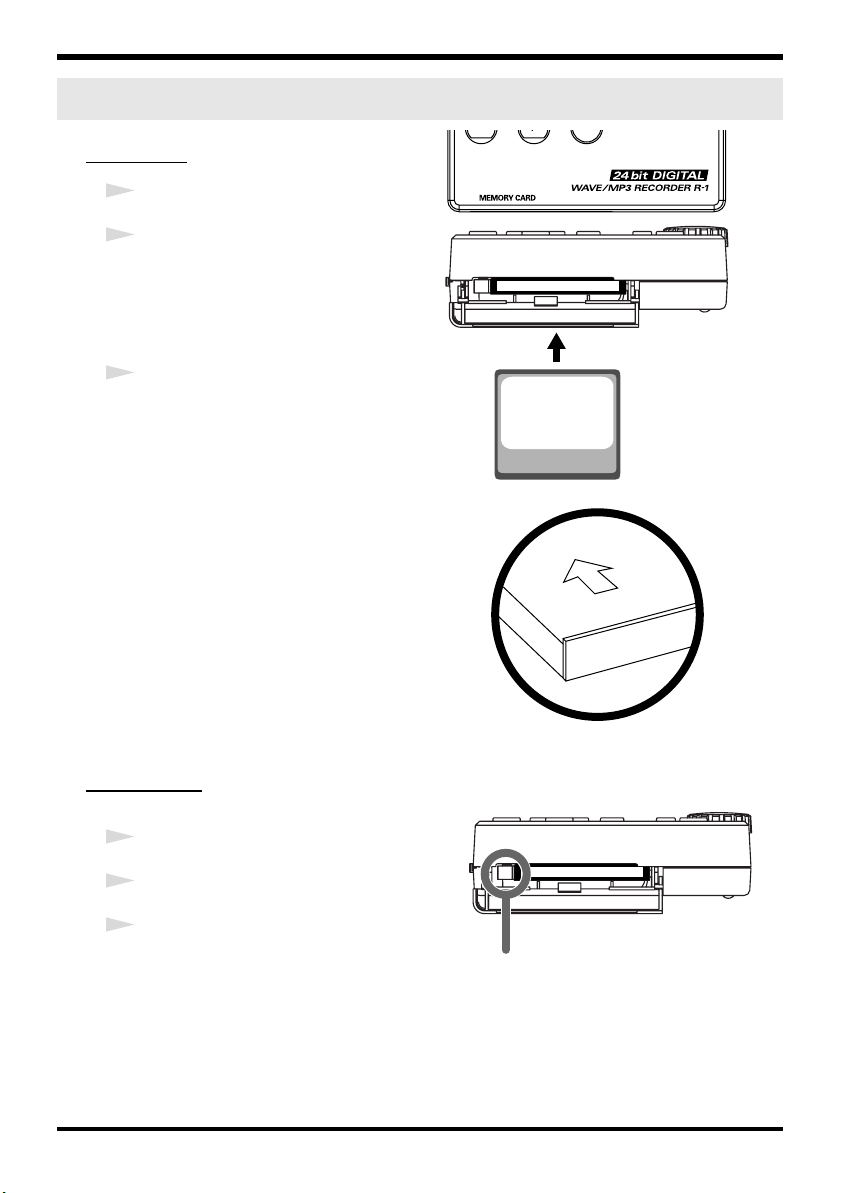
Getting ready to use the R-1
Inserting and removing a card
fig.CFslot
Inserting
1
Turn off the power of the R-1.
2
Open the
and insert the CompactFlash card with
its back side facing upward.
Push the CompactFlash card all the way
into the slot.
3
Close the
* With a CompactFlash card, the reverse side
is the side that has a raised lip when you’re
looking at the edge not containing the
terminals.
To insert a CompactFlash card, position it
so its reverse side faces upwards, and gently
push the card into the slot. If you attempt to
forcibly insert the card in the wrong
direction, you may damage the R-1 or the
CompactFlash card. Please use caution.
memory card slot cover
memory card slot cover
,
.
With the back of the
CompactFlash card
facing upward, push
it all the way into the
slot
Insert this way
Removing
fig.CFslot2
1
2
3
26
Turn off the power of the R-1.
Open the
Push the
CompactFlash card.
memory card slot cover
eject button
and remove the
.
Push the eject button
Page 27
Getting ready to use the R-1
Formatting a CompactFlash card
You must format a CompactFlash card before you can use it with the R-1.
You must use the R-1 itself to format the CompactFlash card. Follow the procedure
explained on page 60 of “System settings (Setup mode).”
CompactFlash cards formatted by a device other than the R-1 may not work correctly
with the R-1.
1
Turn off the power of the R-1.
2
Insert the CompactFlash card into the R-1’s
fig.startup.epsfig.no-song.eps
3
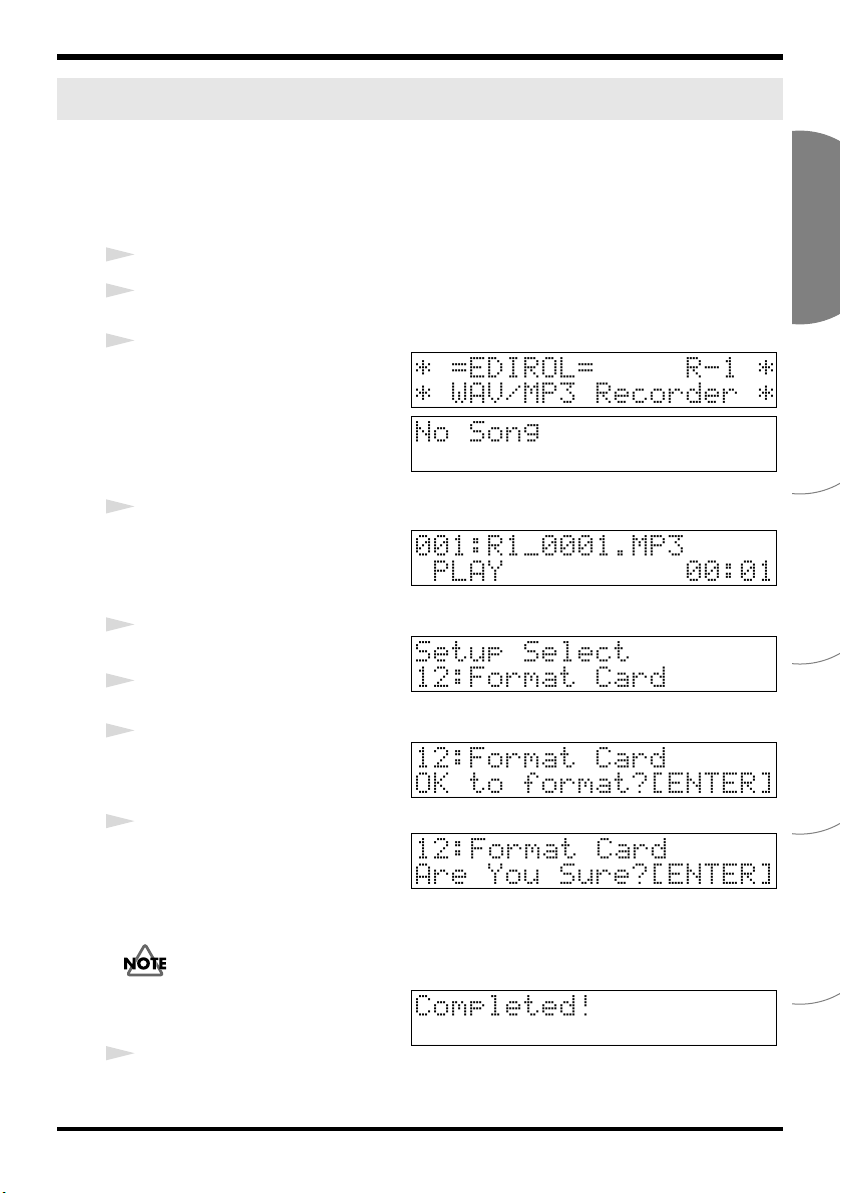
Turn on the power of the R-1.
If the CompactFlash card contains
no songs (files) that the R-1 is able
to play, the display will indicate No
Song. If the card contains songs
(files), the play mode screen will
appear.
4
Press the
* If you decide to cancel the procedure,
press the
return to the previous screen.
fig.format-disp.eps
5
Turn the
Format Card
6
Press the
fig.format.eps
7
When the display shown here
appears, press the
MENU button
EXIT button
VALUE dial
.
ENTER button
ENTER button
.
. You will
to select
.
12
.
memory card slot
.
EnglishDeutschFrançaisItalianoEspañol
fig.sure.eps
8
The screen will ask you to confirm
that you really want to format the
card. To format the card, press the
ENTER button
* If you decide not to format the card, press the
Never remove the CompactFlash card while formatting is in progress. Doing
so may damage the CompactFlash card.
fig.complete.eps
Formatting is completed when the
display indicates
9
Press the
You will return to the main screen (play mode).
.
Completed!
MENU button
.
EXIT button
. You will return to step 5.
27
Page 28
Getting ready to use the R-1
Types of files that the R-1 can handle
The R-1 can handle the following types of files.
Choose the type of file that is appropriate for your needs, depending on whether audio
quality or recording time is more important for your situation.
Bit rate (kbps)
8, 16, 24, 32, 40, 48, 56, 64, 80, 96,
112, 128, 144, 160, 192, 224, 256,
320, VBR
64, 96, 128, 160, 192, 256, 320
bit depth (bits)
8, 16, 24
16, 24
MP3
WAV
Playback
Recording
Playback
Recording
Sampling frequency (kHz)
8, 11.025, 16, 22.050, 24, 32, 44.1, 48
* All converted to 44.1 kHz for
playback
44.1
Sampling frequency (kHz)
8, 11.025, 16, 22.050, 24, 32, 44.1, 48
* All converted to 44.1 kHz for
playback
44.1
* Recording is always in stereo.
WAV files are not compressed; they capture all of the information in the recorded
sound. This means that they will have better audio quality than MP3 files. However,
WAV files are also much larger than MP3 files.
What is Bit Rate?
Bit Rate indicates the speed at which data is transferred. This is given in units
of “bps” (bits per second). Higher bit rates will deliver better audio quality. A
higher bit rate conveys more information, meaning that the sound will be
represented more accurately; but this also means that the file size will increase.
With a lower bit rate, the audio quality will be lower but the file size will also
be smaller.
What is VBR?
VBR stands for Variable Bit Rate. This means that the bit rate is varied according
to the type of sound at each moment in the recording. A higher bit rate is used
when there is a larger amount of sonic information to be captured, and a lower
bit rate is used when there is a lesser amount.
28
Page 29
Basic recording methods
The following table shows the approximate lengths of time you can record using
CompactFlash cards.
Recordable times on a CompactFlash card
Recordable times (approximate)
CompactFlash size
File type 64 MB 256 MB 512 MB 2 GB
WAV, 24 bit/44.1 kHz
WAV, 16 bit/44.1 kHz
MP3, 16 bit/320 kbps
MP3, 16 bit/256 kbps
MP3, 16 bit/192 kbps
MP3, 16 bit/160 kbps
MP3, 16 bit/128 kbps
MP3, 16 bit/ 96 kbps
MP3, 16 bit/ 64 kbps
* The recording times listed above are approximate. The actual length of time you are able to record
may be slightly different than shown here, so please allow some leeway in your recording plans.
* Use the R-1 itself to format the CompactFlash card.
* Use the included AC adaptor when recording continuously for an extended time.
* If there are multiple files, the total time that can actually be recorded will be less than the time
shown above.
3
5
26
32
43
52
65
86
130
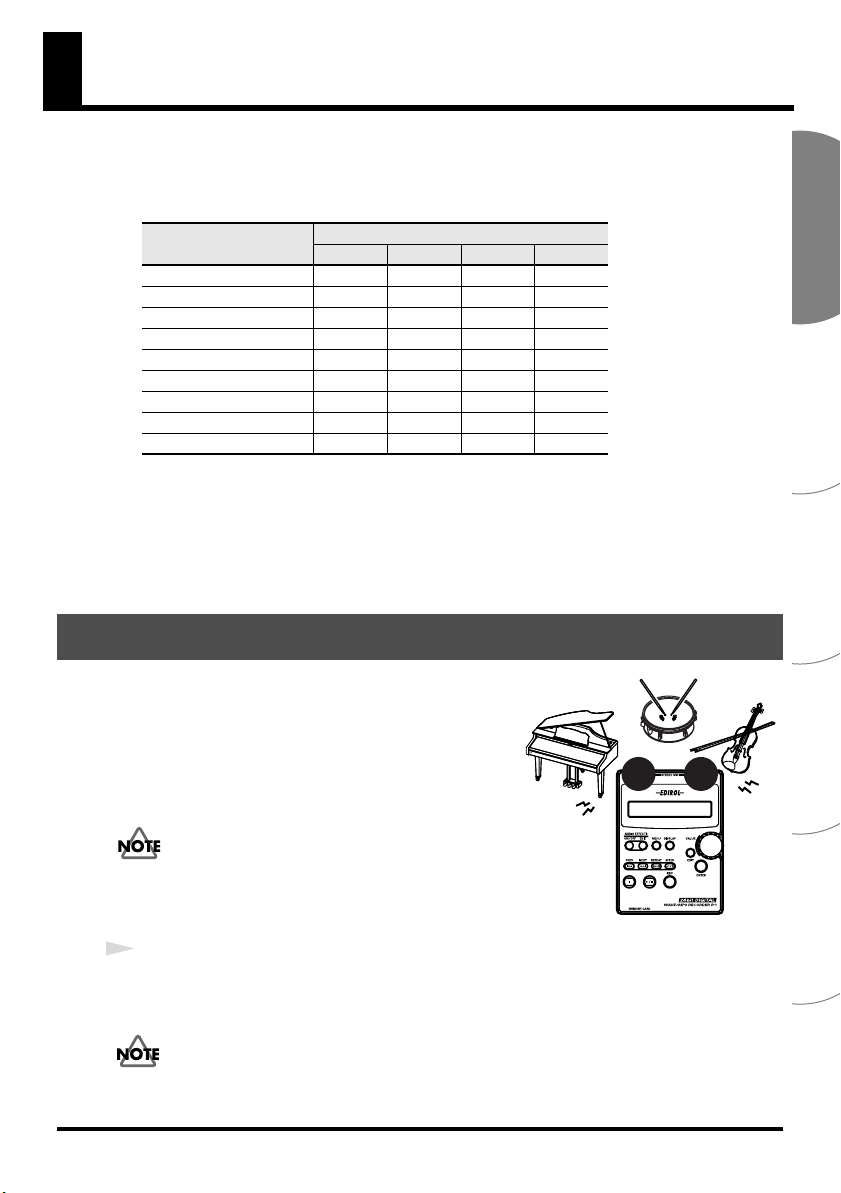
Recording with the internal microphone
fig.mic-LR.eps
The R-1’s internal microphone is stereo. Audio entering
the microphone at the right side of the R-1 is recorded
on the right (R) channel, while the audio picked up by
the left microphone is recorded on the left (L) channel.
If you want to use the internal microphone,
don’t connect anything to the mic input jack or
line input jack.
If a microphone or cable is connected to the mic
input jack or line input jack, these inputs will
take priority, and the internal microphone will
not be used.
1
Make sure that the R-1’s power is turned off. Also set the
minimum position.
If you want to hear (monitor) the sound while recording from the internal
microphone, connect a set of headphones to the phones jack and use them for
monitoring. If you connect external speakers and attempt to use them for
monitoring, acoustic feedback will occur, so don’t attempt to monitor through
speakers.
Units: minutes
15 31 125
23 47 188
102 208 831
128 260 1,039
170 346 1,386
205 416 1,663
256 520 2,079
341 693 2,772
512 1,040 4,158
input volume
L R
to the
EnglishDeutschFrançaisItalianoEspañol
29
Page 30
Basic recording methods
2
Turn on the R-1’s power as described in
turning on the power”
3
If you're recording via the internal microphone, set the mic type select switch to
4
Refer to
“Types of files that the R-1 can handle”
file that you want to record. To make your selection or to check the current
selection, use Setup mode
5
Adjust the input level as follows.
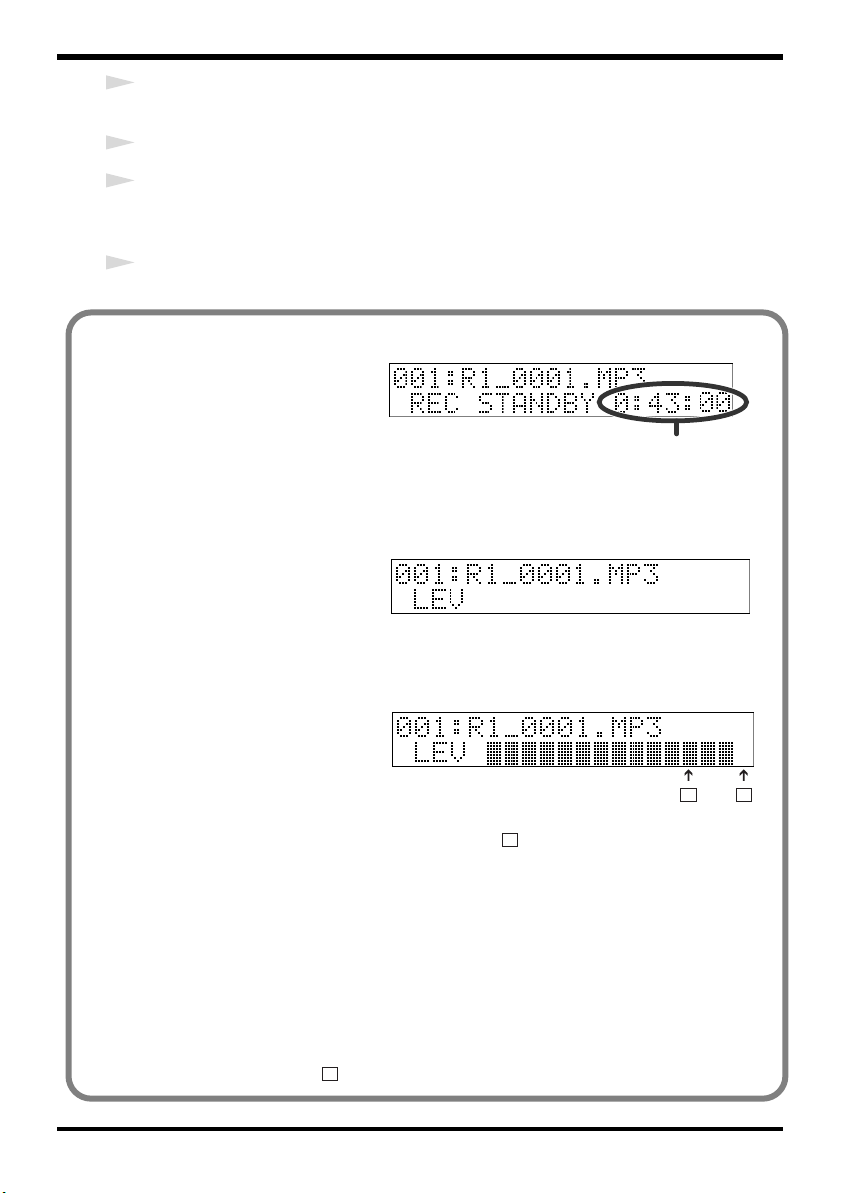
Adjusting the input level
fig.rec-1.eps
1. Press the REC button.
The R-1 enters recordingstandby mode. The display
indicates the remaining amount
of time that the R-1 can record for
the type of file (recording quality) you’ve selected.
* The song name shown in Record Standby mode is the name of the file that will be newly
created when recording is finished.
fig.rec-2.eps
2. Press the DISPLAY button.
3. Play (or perform) the sounds
that you actually intend to
record, and position the R-1’s internal microphone where it can pick up the sound.
* If you want to apply an effect to the sound while you record it, adjust the input level while
the effect is turned on (i.e., applied).
fig.rec-3.eps
4. While the sound plays,
gradually increase the input
volume.
Adjust the level so that the ■
input level indicators shown in
the display do not reach the righmost ■. (Position in the above illustration)
If the recording level is too low, you won’t be able to record very soft sounds. If the
recording level is too high, loud sounds will be distorted, causing crackles in the
recorded sound.
* If the material you are recording occasionally contains sudden loud sounds, such as the
attack of a drum in a band performance or sudden laughter during a quiet conversation, we
recommend that you use the Limiter (06 Limiter, p. 54). When doing so, adjust the input
level appropriately for the principal type of sound you are recording—not for the sudden
loud sounds that sometimes occur.
When you use the Limiter, the input level is automatically adjusted so that the audio input
level doesn’t get excessively high. When using the Limiter, you should adjust the input level
so that the ■ symbol at the position in the illustration appears only occasionally.
(p. 19).
07 Record Mode
B
“Connecting the AC adaptor and
(p. 28), and specify the type of
(p. 54).
Remaining recording time
A
DYN
.
B
A
30
Page 31

fig.rec-time.eps
6
Press the
Recording will begin.
* You can also start recording by pressing
the
REC button
PLAY/PAUSE button
.
Basic recording methods
.
Elapsed time from
start of recording
If you move the
recording, the input level will change. Be careful that you don’t operate the
input volume
input volume
7
When you’re finished recording, press the
If you want to pause recording, press the
and resume recording, press the
The recorded data will be saved as a file on the CompactFlash card. The display will
indicate the file name of the recorded data, and that file will be selected.
* The file name is created automatically, using this format:
will be the number that follows the highest-numbered file existing on the CompactFlash
card.
* The file is created at the root level of the CompactFlash card. Folders (directories) are not
created.
* Since the R-1 does not contain an internal clock, all files will have a creation date of January
1, 2002.
8
To listen to the data you just recorded, press the
playback methods, refer to
input volume control
control inadvertently. Even if the
is not affected by the HOLD function.
PLAY/PAUSE button
“Playback methods”
in Record Standby mode or during
HOLD switch
STOP button
PLAY/PAUSE button
again.
R1_0001.MP3
PLAY/PAUSE button
(p. 38).
.
is ON, the
. To defeat pause
. The
0001
portion
. For other
How the input level meter indicates the signal level
Number of ■’s dB Number of ■’s dB
None ∞ –– -50.0 8 -21.0 –– -18.0
1 -50.0 –– -40.0 9 -18.0 –– -15.0
2 -40.0 –– -36.0 10 -15.0 –– -12.0
3 -36.0 –– -33.0 11 -12.0 –– -9.0
4 -33.0 –– -30.0 12 -9.0 –– -6.0
5 -30.0 –– -27.0 13 -6.0 –– -3.0
6 -27.0 –– -24.0 14 -3.0 –– 0.0
7 -24.0 –– -21.0 15 0.0 –– (Clip)
EnglishDeutschFrançaisItalianoEspañol
31
Page 32

Basic recording methods
Recording with an external microphone
The R-1 can use dynamic microphones and the miniature plug-in powered condenser
microphones that are designed to be connected to the recording jack of an MD (Mini
Disc) recorder or the microphone jack of a computer.
If you use a condenser microphone, you must use one that is designed for
plug-in power. If you connect the wrong type of microphone or a conventional
stereo mini-plug microphone, your equipment may be damaged.
fig.conmic-LR.eps
L
Stereo mic
1
Make sure that the R-1’s power is turned off. Set the
minimum position.
If anything is connected to the
jack
will be ignored. If you want to record via the mic
connect anything to the line input jack.
2
Turn on the R-1’s power as described in
turning on the power”
3
Specify the type of file you want to record, as described in
R-1 can handle”
specify the desired setting or to check the current setting.
4
Set the
mic type select switch
connected to the
(p. 19).
(p. 28). You can use Setup mode
appropriately for the type of microphone you’ve
mic input jack
. ->
R
line input jack
“Connecting the AC adaptor and
“Mic type select switch”
MIC
MIC TYPE
INPUT LEVEL
input volume
, the input from the
input jack
“Types of files that the
07 Record Mode
(p. 15)
to the
mic input
, don’t
(p. 54) to
32
Page 33

Basic recording methods
5
Connect your external microphone to the
mic input jack
.
If you want to hear (monitor) the sound while recording, connect a set of
headphones to the phones jack and use them for monitoring. If you connect
external speakers and attempt to use them for monitoring, acoustic feedback
will occur, so don’t attempt to monitor through speakers.
6
Adjust the input level as follows.
Adjusting the input level
fig.rec-1.eps
1. Press the REC button.
The R-1 enters recordingstandby mode. The display
indicates the remaining amount
of time that the R-1 can record for
Remaining recording time
the type of file (recording quality) you’ve selected.
* The song name shown in Record Standby mode is the name of the file that will be newly
created when recording is finished.
fig.rec-2.eps
2. Press the DISPLAY button.
3. Play (or perform) the sounds
that you actually intend to
record, and position your external microphone where it can pick up the sound.
* If you want to apply an effect to the sound while you record it, adjust the input level while
the effect is turned on (i.e., applied).
fig.rec-3.eps
4. Gradually increase the input
volume.
Adjust the level so that the ■
input level indicators shown in
the display do not reach the
rightmost ■. (Position in the above illustration)
If the recording level is too low, you won’t be able to record very soft sounds. If the
recording level is too high, loud sounds will be distorted, causing crackles in the
recorded sound.
* If the material you are recording occasionally contains sudden loud sounds, such as the
attack of a drum in a band performance or sudden laughter during a quiet conversation, we
recommend that you use the Limiter (06 Limiter, p. 54).When doing so, adjust the input
level appropriately for the principal type of sound you are recording—not for the sudden
loud sounds that sometimes occur.
When you use the Limiter, the input level is automatically adjusted so that the audio input
level doesn’t get excessively high. When using the Limiter, you should adjust the input level
so that the ■ symbol at the position in the illustration appears only occasionally.
A
B
EnglishDeutschFrançaisItalianoEspañol
B
A
33
Page 34

Basic recording methods
fig.rec-time.eps
7
Press the
Recording will begin.
* You can also start recording by pressing
the
REC button
PLAY/PAUSE button
.
.
Elapsed time from
start of recording
If you move the
recording, the input level will change. Be careful that you don’t operate the
input volume
input volume
8
When you’re finished recording, press the
If you want to pause recording, press the
and resume recording, press the
The recorded data will be saved as a file on the CompactFlash card. The display will
indicate the file name of the recorded data, and that file will be selected.
* The file name is created automatically, using this format:
will be the number that follows the highest-numbered file existing on the CompactFlash
card.
* The file is created at the root level of the CompactFlash card. Folders (directories) are not
created.
9
To listen to the data you just recorded, press the
playback methods, refer to
input volume control
control inadvertently. Even if the
is not affected by the HOLD function.
PLAY/PAUSE button
“Playback methods”
in Record Standby mode or during
HOLD switch
STOP button
PLAY/PAUSE button
again.
R1_0001.MP3
PLAY/PAUSE button
(p. 38).
.
is ON, the
. To defeat pause
. The
0001
. For other
How the input level meter indicates the signal level
Number of ■’s dB Number of ■’s dB
None ∞ –– -50.0 8 -21.0 –– -18.0
1 -50.0 –– -40.0 9 -18.0 –– -15.0
2 -40.0 –– -36.0 10 -15.0 –– -12.0
3 -36.0 –– -33.0 11 -12.0 –– -9.0
4 -33.0 –– -30.0 12 -9.0 –– -6.0
5 -30.0 –– -27.0 13 -6.0 –– -3.0
6 -27.0 –– -24.0 14 -3.0 –– 0.0
7 -24.0 –– -21.0 15 0.0 –– (Clip)
portion
34
Page 35

Basic recording methods
Recording from a cassette tape or CD
This section explain how to record audio from an external device via the line input jack.
* The R-1 does not have a digital input jack.
As an example, here’s how to record from a CD player into the R-1.
fig.cd
LINE IN
LINE OUT
CD/MD player, cassette deck, etc.
The microphone input is disabled if you connect a device or cable to the line
input jack. This means that you cannot record the microphone input and line
input mixed together. If something is connected to both the line input jack and
the mic input jack, only the sound entering the line input jack will be recorded.
1
Make sure that the R-1’s power is turned off. Set the
minimum position.
2
Turn on the R-1’s power as described in
turning on the power”
3
Specify the type of file you want to record, as described in
R-1 can handle”
specify the desired setting or to check the current setting.
4
Use an audio cable to connect the output jacks of your CD player to the R-1’s
input jack
5
On your CD player, play back the song that you want to record and adjust the
input level as described below. ->
.
(p. 19).
(p. 28). You can use Setup mode
“Connecting the AC adaptor and
“Adjusting the input level”
input volume
“Types of files that the
07 Record Mode
(p. 36)
EnglishDeutschFrançaisItalianoEspañol
to the
(p. 54) to
line
35
Page 36

Basic recording methods
Adjusting the input level
fig.rec-1.eps
1. Press the REC button.
The R-1 enters recordingstandby mode. The display
indicates the remaining amount
of time that the R-1 can record for
Remaining recording time
the type of file (recording quality) you’ve selected.
* The song name shown in Record Standby mode is the name of the file that will be newly
created when recording is finished.
fig.rec-2.eps
2. Press the DISPLAY button.
3. On the device that’s connected to the line input jack, play back the sounds that
you want to record. In this example, play back a CD on your CD player.
* If you want to apply an effect to the sound while you record it, adjust the input level while
the effect is turned on (i.e., applied).
fig.rec-3.eps
4. Gradually increase the input
volume.
Adjust the level so that the ■
input level indicators shown in
the display do not reach the
rightmost ■. (Position in the above illustration)
If the recording level is too low, you won’t be able to record very soft sounds. If the
recording level is too high, loud sounds will be distorted, causing crackles in the
recorded sound.
If the sound still distorts or is too soft even after you’ve used the R-1’s
input volume control to adjust the input level, try adjusting the volume
of your CD player or other playback device.
* If the material you are recording occasionally contains sudden loud sounds, we recommend
that you use the Limiter (06 Limiter, p. 54). When doing so, adjust the input level
appropriately for the principal type of sound you are recording—not for the sudden loud
sounds that sometimes occur.
When you use the Limiter, the input level is automatically adjusted so that the audio input
level doesn’t get excessively high. When using the Limiter, you should adjust the input level
so that the ■ symbol at the position in the illustration appears only occasionally.
A
B
B
A
36
Page 37

fig.rec-time.eps
6
Press the
Recording will begin.
* You can also start recording by pressing
the
REC button
PLAY/PAUSE button
.
Basic recording methods
.
Elapsed time from
start of recording
If you move the
recording, the input level will change. Be careful that you don’t operate the
input volume
input volume
7
Press the Play button of your CD player.
8
When you’re finished recording, press the R-1’s
If you want to pause recording, press the
and resume recording, press the
The recorded data will be saved as a file on the CompactFlash card. The display will
indicate the file name of the recorded data, and that file will be selected.
* The file name is created automatically, using this format:
will be the number that follows the highest-numbered file existing on the CompactFlash
card.
* The file is created at the root level of the CompactFlash card. Folders (directories) are not
created.
9
Press the Stop button of your CD player.
10
To listen to the data you just recorded, press the
playback methods, refer to
input volume control
control inadvertently. Even if the
is not affected by the HOLD function.
PLAY/PAUSE button
“Playback methods”
in Record Standby mode or during
HOLD switch
STOP button
PLAY/PAUSE button
again.
R1_0001.MP3
PLAY/PAUSE button
(p. 38).
is ON, the
.
. To defeat pause
. The
0001
. For other
How the input level meter indicates the signal level
EnglishDeutschFrançaisItalianoEspañol
portion
Number of ■’s dB Number of ■’s dB
None ∞ –– -50.0 8 -21.0 –– -18.0
1 -50.0 –– -40.0 9 -18.0 –– -15.0
2 -40.0 –– -36.0 10 -15.0 –– -12.0
3 -36.0 –– -33.0 11 -12.0 –– -9.0
4 -33.0 –– -30.0 12 -9.0 –– -6.0
5 -30.0 –– -27.0 13 -6.0 –– -3.0
6 -27.0 –– -24.0 14 -3.0 –– 0.0
7 -24.0 –– -21.0 15 0.0 –– (Clip)
37
Page 38

Playback methods
Normal playback
fig.play-1_50
File name
1
2
The R-1 does not have internal speakers. In order to hear the playback, you’ll need to
provide a set of headphones or speakers.
You can use the R-1’s phones jack as a digital output (optical out) for connection to your
digital audio device, or as a line output for connection to your analog audio device.
Before you continue, make connections using the type of cable appropriate for your
device. Refer to
(digital devices)”
1
With the display showing an indication like the one in the illustration, turn the
VALUE dial
Press the
to move to the next song (file).
* If the display indicates No Song, the CompactFlash card contains no files that the R-1 is able
to play.
2
Press the R-1’s
begin playing.
3
Gradually turn the
to a comfortable listening level.
“Connecting headphones”
(p. 23), or
to select a song (file).
PREV button
PLAY button
“Connecting analog speakers (analog devices)”
to move to the previous song (file), or the
( ); the song (file) shown in the display will
output volume
(p. 22),
“Connecting digital speakers
NEXT button
control toward the right to adjust the volume
(p. 24).
38
Page 39
Playback methods
4
During playback, you can hold down the
the
NEXT button
button.
* The song name shown in the display is the name of the file. It does not correspond to the ID3
tag within the MP3 file.
* Song names are displayed in alphabetical order according to the following list of characters;
they are not displayed in the order in which they were recorded.
(space) ! # $ % & ‘ ( ) + , - . 0 1 2 3 4 5 6 7 8 9 ; = @
A B C D E F G H I J K L M N O P Q R S T U V W X Y Z
a b c d e f g h i j k l m n o p q r s t u v w x y z
* If the CompactFlash card contains sub-directories (folders), all files at the root level will be
displayed first, followed by the files in the sub-directories (folders).
* Filenames beginning with “.” are ignored and will not be displayed.
* Files with extensions other than .mp3 and .wav are ignored and will not be displayed.
For more about the files that the R-1 is able to record and play back, refer to
“Types of files that the R-1 can handle”
to fast-forward. Playback will resume when you release the
PREV button
(p. 28).
to rewind, or hold down
Rewinding or fast-forwarding during playback
This is a note of caution regarding operations while playing 16-bit/24-bit WAV files.
With some types of CompactFlash cards, performing fast-forward or rewind operations
while playing back these files will exceed the maximum speed at which data can be
read, causing the fast-forward or rewind operation to halt.
If this occurs, press the Stop button to stop playback. Then, start playback again.
EnglishDeutschFrançaisItalianoEspañol
39
Page 40

Playback methods
REPEAT A-B (Repeat playback)
This function lets you specify a region of the song during playback, causing it to play repeatedly.
fig.repeat-disp_50
Procedure
1
During playback, press the
button
( ) once.
That location will be assigned as the
beginning of the repetition (point A).
REPEAT
Song
A
40
2
Press the
again. That location will be assigned
as the end of the repetition (point B).
fig.repeat-a
The region you specified in steps 1
and 2 (the region between points A
and B) will play back repeatedly.
To cancel repeat play, press the
REPEAT button
REPEAT button
once again.
once
AB
Song
AB
Song
Page 41

Playback methods
Notes
* If after specifying point A, you press the STOP button before specifying point B, the point
A setting will be cancelled.
* If after specifying point A you allow playback to continue all the way to the end of the song,
playback will repeat between point A and the end of the song.
* If you press the STOP button during repeat play, playback will stop and the repeat region
(A-B) settings will be cancelled.
To cancel this function
• With points A and B specified, pressing the
settings for points A and B.
• If after specifying point A, you press the
the point A setting will be cancelled.
• If you want to stop playback as well as cancel the repeat settings, press the
button
. Playback will stop, and the repeat playback settings (points A and B) will
also be cancelled.
REPEAT button
STOP button
( ) will cancel the
before specifying point B,
EnglishDeutschFrançaisItalianoEspañol
STOP
41
Page 42

Playback methods
1/2 PLAY (Half-speed playback)
Here’s how you can play back at half the normal speed.
fig.half-disp_50
Procedure
1
While stopped or playing, press the
SPEED button
The lower line of the display will
indicate
If the R-1 is currently playing, the playback will slow down.
If the R-1 is currently stopped, half-speed playback will begin when you press the
PLAY button
* This function adjusts the pitch of the half-speed playback so that it remains the same as the
normal pitch. This may produce a wavering effect in the playback; this is not a malfunction.
.
1/2
, and playback will occur at
.
To cancel this function
If
half-speed playback
If you don’t cancel half-speed playback, the next song will also play back at
half-speed.
42
is active, press the
half-speed
SPEED button
.
to cancel it.
Page 43

PLAY MODE (Playback mode)
Here you can specify the order and method of playback.
fig.disp-play_50
2, 4
1, 6
3, 5
1
Press the
You can’t change the play mode while the R-1 is playing.
You must first press the
2
Use the VALUE dial to select
3
Press the
4
Use the
MENU button
ENTER button
VALUE dial
.
STOP button
05 Play Mode
.
to select the play mode you want.
to stop playback.
.
Playback methods
EnglishDeutschFrançaisItalianoEspañol
Sequential
Single
Shuffle
fig.sequential.eps
5
After you’ve selected the play mode
you want, press the
6
Press the
You will return to play mode.
Songs will play back in the order of 001, 002, 003...009
* Use the PREV and NEXT buttons or the VALUE dial to select a file (song).
Only the selected file (song) will be played repeatedly.
The song playback order will change automatically.
* A previously played song will not be played.
* If you use the PREV / NEXT buttons or the VALUE dial to select a file (song),
the file (song) names will appear in the same order as when
mode is selected.
MENU button
ENTER button
.
Sequential
.
play
43
Page 44

Using the R-1 with your computer
The R-1 can handle the following types of files.
Sampling frequency (kHz)
8, 11.025, 16, 22.050, 24, 32, 44.1, 48
* All converted to 44.1 kHz for
playback
44.1
Sampling frequency (kHz)
8, 11.025, 16, 22.050, 24, 32, 44.1, 48
* All converted to 44.1 kHz for
playback
44.1 16, 24
MP3
WAV
Playback
Recording
Playback
Recording
Connecting the R-1 to your computer
Use the AC adaptor when connecting the R-1 to your computer.
* When connecting the R-1 to your computer via a USB cable, you must use the AC adaptor
to prevent the batteries from running down while connected.
1
Insert a CompactFlash card into the R-1.
2
If the R-1’s
3
Use a USB cable to connect the R-1 to your computer.
The R-1 will be detected by your computer.
power switch
If no CompactFlash card is inserted in the R-1 when you connect it to your
computer, the R-1’s display will indicate
not be detected by your computer. Your computer will also fail to detect the
R-1 if the R-1 is in Setup mode. Unplug the USB cable that connects the R-1
to your computer, return to step 1 of this procedure, and insert the
CompactFlash card.
is off, turn it on.
Bit rate (kbps)
8, 16, 24, 32, 40, 48, 56, 64, 80, 96,
112, 128, 144, 160, 192, 224, 256, 320,
VBR
64, 96, 128, 160, 192, 256, 320
bit depth (bits)
8, 16, 24
No Card
. In this case, the R-1 will
The R-1’s CompactFlash card will be recognized by your computer as follows.
Windows
Mac OS X
Mac OS 9
* If you change the above name after the card has been recognized by your computer, it will
subsequently appear with the name you specified.
* If you're using Mac OS 9, format the CompactFlash card on your Macintosh, and then re-
format it on the R-1.
4
Now you can copy the desired files from the R-1’s CompactFlash card to your
computer, or from your computer to the R-1’s CompactFlash card.
You can copy files by dragging and dropping them.
When the card is recognized by My Computer or Explorer, it will appear with
the name
Removable Disk
The card will appear on the desktop with a name of
The card will appear on the desktop with a name of
.
44
NO NAME
Untitled
.
.
Page 45

Using the R-1 with your computer
Disconnecting the R-1 from your computer
Here’s how to disconnect the R-1 from your computer. You must use the following
procedure to cancel the connection, and then disconnect the USB cable.
Do not switch off power to the R-1, disconnect the USB cable, or remove the
CompactFlash card while the R-1 is still connected to your computer.
Windows
1
In the Windows task tray, double-click the
The
Safely Remove Hardware
2
In the displayed list of
CompactFlash card.
Item indicating the R-1’s CompactFlash card
Windows XP, 2000
Windows Me
3
In the dialog box, click
4
When the
the R-1’s CompactFlash card, and click
5
When your computer indicates
removed safely,”
computer. Alternatively, you can switch off power to the R-1.
Stop Hardware Device
[Stop]
you can disconnect the USB cable between the R-1 and your
dialog box will appear.
hardware devices
USB Mass Storage Device
Removable Disk
.
dialog box appears, select the item that indicates
“The USB Mass Storage Device can be
Safely Remove Hardware
, select the item that indicates the R-1’s
[OK]
.
icon ( ).
EnglishDeutschFrançaisItalianoEspañol
Macintosh
1
Cancel the connection with the R-1 displayed on the desktop.
In
Mac OS X
dock.
Normally, when you drag to the trash can located at the right edge of the dock, the
indication will change from the trash can to , allowing you to cancel the
connection.
In
Mac OS 9
2
When the icon has disappeared from the desktop, you can disconnect the USB
cable between the R-1 and your computer. Alternatively, you can switch off power
to the R-1.
, drag the R-1’s CompactFlash icon (NO NAME) to the of the
, drag the R-1’s CompactFlash icon (untitled) to the trash.
45
Page 46

Using effects
What are effects?
In the context of a digital audio device such as the R-1,
techniques that can be applied to a sound to modify it; for example, by making it
brighter or giving it more impact. You can also make speech more intelligible, or reduce
unwanted noise.
The R-1 provides various effects, which are listed on the pages that follow. You can
apply an effect to the input sound and record the processed sound, or apply an effect to
the sound that is being played back by the R-1.
If you apply effects while recording, the volume and tonal character of the recorded
sound will differ from the original sound. Particularly if you are applying an
“aggressive” effect, you should use headphones to monitor the sound while still in the
recording-standby mode to make sure that the sound is not clipping or distorting. We
also recommend that you make a test recording beforehand.
“effects”
are digital processing
Clipping
Clipping occurs when an effect or amplification causes the audio level
(volume) to exceed the maximum level that a device can handle. This will
cause distortion or a “buzzy” sound during loud passages.
For details on how to make effect settings, refer to
I
be switched on or off. To prevent the effect from being switched on or off
unintentionally, we recommend that you turn the HOLD switch on.
f you press the EFFECT button during recording or playback, the effect will
“Applying an effect”
(p. 52).
46
Page 47

Effect list
01
Easy EQ
For Speech
02
Voice Perform
03
04
Editable EQ
Noise Reduc-
05
er
Hum Noise
06
Cut
07 Reverb
08
Int-Mic Rec.
09 Ext-Mic Rec.
Using effects
Eleven settings are provided for use with styles such as rock, pop, or
dance. Each setting modifies the tonal character (frequency response)
appropriately for the selected style of music. For example, the Rock
setting boosts the low and high frequency ranges to give the sound
greater impact. The Pop setting makes it easier to hear the range in
which the melody is usually played. The Vocal setting makes the lyrics
more audible. The Flat setting simply outputs the sound without any
change in tonal character.
Internally, this effect uses a ten-band graphic equalizer.
This effect is appropriate for material that is mainly a speaking voice,
such as conversation or dialog. It clarifies the voice, and also reduces
the sibilance (unpleasant exaggeration of sounds beginning with “s”)
that can occur when recording with a microphone.
Internally, this effect combines a de-esser and an enhancer.
This effect can completely transform the character of a voice by modifying the pitch of the sound. You can use the provided settings to create comical voices, low monster-like voices, or voices that have a
“springy” character.
Internally, this combines a pitch shifter and a delay.
This is a ten-band graphic equalizer with adjustable gain. For each
band, you can adjust the gain in a range of -12 dB– +12 dB to modify
the tonal character of the sound.
This effect reduces the “hissing” or “rushing” background noise that
may be heard during silent portions of a recording, or the hiss that is
often heard on an analog record or cassette tape.
Internally, this combines a noise gate and a notch filter.
This effect reduces the low-pitched “hum” that can occur when recording from a microphone or when a motorized device is located
nearby.
Internally, this is a notch filter.
When you listen to sound, you are hearing not only the sound that
comes directly from the source to your ears, but also the sound that reflects off the floor and walls. These reflections are called “reverberation” (reverb), and their character will vary depending on the size of
the room and the material of which the walls are constructed.
This effect adds simulated reverberation to the original sound, producing a natural-sounding impression of spaciousness.
This effect modifies the character of the sound recorded from the internal mic or a miniature condenser mic connected to the mic input
jack, giving it the character of sound recorded from a larger mic. It can
simulate the characteristics of famous mics used in recording studios,
giving your sound a professional touch.
This effect is particularly useful when applied during recording.
This effect modifies the character of the sound recorded from a typical
small dynamic mic connected to the mic input jack, giving it the character of sound recorded from a larger mic. It can simulate the characteristics of famous mics used in recording studios, giving your sound
a professional touch.
This effect is particularly useful when applied during recording.
p. 49
EnglishDeutschFrançaisItalianoEspañol
p. 49
p. 49
p. 49
p. 49
p. 50
p. 50
p. 50
p. 50
47
Page 48

Using effects
10
Mastering
Center Cancel
11
12
Tuner
13 Metronome
You may sometimes feel that the material you record is lacking in definition or clarity. Also in some cases, there may be excessive volume
differences between loud and soft passages, or it may be difficult to
hear soft sounds that occur simultaneously with loud sounds. For example when recording your band performance, there might be an excessive difference in volume between the intro and the break. Or when
recording conversation, there will be a difference in volume between
someone near the mic and someone farther from the mic.
The Mastering effect processes such sounds to give them better definition and a more consistent volume.
You can also use this to enhance the playback of material you’ve already recorded on the R-1, or to enhance material as you’re recording
it into the R-1 from media such as cassette tape.
Internally, this combines an enhancer and a two-band (low and high)
compressor.
This effect cancels the sounds that are located at the center of a stereorecorded song. You can use this to remove the vocal from a song, leaving only the accompaniment. However this will not be as effective if
special effects have been used to create a broader stereo field or if the
recording contains a large amount of reverberation.
The tuner is a useful tool for use with a musical instrument; it is not an
“effect” that modifies the original sound. This produces a sine wave of
a fixed pitch at the notes C, D, E, ... relative to A=440 Hz. You can use
this reference pitch when tuning your musical instrument.
Internally, this is a fixed-pitch oscillator. Even if you record while the
tuner is sounding, the sound of the tuner will not be recorded.
The metronome is a useful tool for use with a musical instrument; it is
not an “effect” that modifies the original sound. You can specify the
time signature and the tempo of the metronome.
Even if you record while the metronome is sounding, the sound of the
metronome will not be recorded.
p. 50
p. 51
p. 51
p. 51
48
Page 49

01: Easy EQ
Parameter name
Type
Level 0–80–100 Adjusts the output volume.
Range of values Explanation
Flat, Rock,
Dance, HipHop,
Techno, Jazz, Blues,
Classic, Speech, Vocal
Pop
,
Selects an EQ preset.
02: For Speech
Parameter name
De-eser Sw.
Clarity 1–50–100
Low Gain -12dB–
High Gain -12dB–
Level 0–80–100 Adjusts the output volume.
Range of values Explanation
OFF,
ON
0dB
–+12dB Adjusts the low-range gain.
0dB
–+12dB Adjusts the high-range gain.
Switches the de-eser (sibilant reduction) on/off.
Adjusts the amount of clarification applied to the
sound.
03: Voice Perform
Parameter name Range of values Explanation
Type
Low Gain -12dB–
High Gain -12dB–
Pan L50–
Level 0–80–100 Adjusts the output volume.
High Tone
Tone, Spring, Spacy
, Low
0dB
–+12dB Adjusts the low-range gain.
0dB
–+12dB Adjusts the high-range gain.
CENTER
–R50 Adjusts the panning of the output sound.
Selects the type of transformation applied to the
sound.
Using effects
EnglishDeutschFrançaisItalianoEspañol
04: Editable EQ
Parameter name
32Hz
64Hz -12dB–
125Hz -12dB–
250Hz -12dB–
500Hz -12dB–
1kHz -12dB–
2kHz -12dB–
4kHz -12dB–
8kHz -12dB–
16kHz -12dB–
Range of values Explanation
-12dB–
0dB
–+12dB Adjusts the gain at 32 Hz.
0dB
–+12dB Adjusts the gain at 64 Hz.
0dB
–+12dB Adjusts the gain at 125 Hz.
0dB
–+12dB Adjusts the gain at 250 Hz.
0dB
–+12dB Adjusts the gain at 500 Hz.
0dB
–+12dB Adjusts the gain at 1 kHz.
0dB
–+12dB Adjusts the gain at 2 kHz.
0dB
–+12dB Adjusts the gain at 4 kHz.
0dB
–+12dB Adjusts the gain at 8 kHz.
0dB
–+12dB Adjusts the gain at 16 kHz.
05: Noise Reducer
Parameter name
Noise Gate 0–20–100
Hiss Cut 0–80–100 Adjusts the amount by which hiss will be cut.
Low Gain -12dB–
High Gain -12dB–
Level 0–80–100 Adjusts the output volume.
Range of values Explanation
Specifies the threshold level; the sound will be cut
when the volume falls below this level.
0dB
–+12dB Adjusts the low-range gain.
0dB
–+12dB Adjusts the high-range gain.
49
Page 50

Using effects
06: Hum Noise Cut
Parameter name
Frequency
Depth 0–80–100 Adjusts the amount by which hum will be cut.
Low Gain -12dB–
High Gain -12dB–
Level 0–80–100 Adjusts the output volume.
Range of values Explanation
50Hz
, 60Hz
0dB
–+12dB Adjusts the low-range gain.
0dB
–+12dB Adjusts the high-range gain.
Specifies the frequency at which hum will be cut.
07: Reverb
Parameter name
Type
Time 1–50–100 Adjusts the length of reverberation.
Balance
Low Gain -12dB–
High Gain -12dB–
Level
Range of values Explanation
Hall
, Room, Plate
D100:0W–
D0:100W
0
D50:50W
0dB
–+12dB Adjusts the low-range gain.
0dB
–+12dB Adjusts the high-range gain.
–100 Adjusts the output volume.
Selects the type of reverb.
–
Adjusts the proportion between the original sound
and the reverberation.
08: Int-Mic Rec.
Parameter name
Type
Low Gain -12dB–0dB
High Gain -12dB–
Level 0–80–100 Adjusts the output volume.
Range of values Explanation
1
–5
–+12dB Adjusts the low-range gain.
0dB
–+12dB Adjusts the high-range gain.
Selects the type of transformation.
09: Ext-Mic Rec.
Parameter name
Type
Low Gain -12dB–
High Gain -12dB–
Level 0–80–100 Adjusts the output volume.
Range of values Explanation
1
–5
0dB
–+12dB Adjusts the low-range gain.
0dB
–+12dB Adjusts the high-range gain.
Selects the type of transformation.
10: Mastering
Parameter name
Clarity
Crossover
Low Compress 0–50–100
High Compress 0–50–100
Low Gain -12dB–
High Gain -12dB–
Level 0–80–100 Adjusts the output volume.
Range of values Explanation
1–50–100
200Hz, 250Hz, 315Hz,
400Hz, 500Hz, 630Hz,
800Hz
, 1kHz, 1.25Hz,
1.6kHz, 2kHz
0dB
–+12dB Adjusts the low-range gain.
0dB
–+12dB Adjusts the high-range gain.
Adjusts the amount of clarification applied to the
sound.
Specifies the frequency at which the low- and highrange compressors are divided.
Adjusts the amount of compression for frequencies
below the Crossover point you specified.
Adjusts the amount of compression for frequencies
above the Crossover point you specified.
50
Page 51

11: Center Cancel
Parameter name
Depth
Point L50–
Ambience 0–20–100
Low Gain -12dB–
High Gain -12dB–
Level 0–80–100 Adjusts the output volume.
Range of values Explanation
0–80–100
CENTER
–R50
0dB
–+12dB Adjusts the low-range gain.
0dB
–+12dB Adjusts the high-range gain.
Adjusts the amount by which the center sound will
be cut.
Makes a fine adjustment to the stereo position at
which the sound will be cut.
Adjusts the amount of reverberation that will be
added.
12: Tuner
Parameter name
Tone (A=440)
Level 0–80–100 Adjusts the volume of the tuner.
Range of values Explanation
F, F#, G, G#, A, A#, B,
C, C#, D, D#, E
Specifies the pitch of the tuner.
13: Metronome
Parameter name Range of values Explanation
Beat
Tempo 30–
Level 0–80–100 Adjusts the volume of the metronome.
4/4
, 6/8, 1/4, 2/4, 3/4
120
–280
Specifies the time signature of the metronome.
Specifies the tempo of the metronome.
* The value will change in steps of 2.
Using effects
EnglishDeutschFrançaisItalianoEspañol
51
Page 52

Using effects
Applying an effect
This section explains how to apply an effect during playback or during recordingstandby mode. You can also make effect settings before you begin playback, or try out
various effect settings while making a trial recording.
fig.effect.eps
While playing
In recording-standby
Effect mode ON
3
1
2
EDIT
ENTEREXIT
EDIT
EXITEXIT
EXITEXIT
Edit mode
ENTERENTER
Choose an effect
01:Eazy EQ
-> 02:For Speech...
Select a parameter
Type -> Level1
52
ENTERENTER
EXITEXIT
Exit from
effect edit mode
Begin
playback/recording
Edit the parameter
Pop -> Dance
-> HipHop...
Page 53

Using effects
While in playback or in recording-standby mode, press the R-1’s
1.
2.
3.
turn it
on
Press the
Use the
button
.
(lit).
EDIT button
VALUE dial
. You will enter Edit mode.
to select the desired type of effect, and then press the
EFFECT button
Each effect has various “parameters” (settings) that adjust the effect. When you
select an effect type, its parameters will have the default settings.
When you change the effect type, the currently set parameter values are cleared.
* If you decide not to change the effect type, press the
EXIT button
or the
EDIT button
Effect mode.
Now you can select a parameter. Use the
4.
then press the
ENTER button
.
* If you decide not to select a parameter, press the
* If you want to return to the effect selection, press the
Now you can edit the parameter. Use the
5.
for the parameter, and then press the
6.
Press the
EDIT button
to leave Effect mode.
If you want to return to the parameter selection, press the
VALUE dial
EDIT button
VALUE dial
EXIT button
to select a parameter, and
to leave Effect mode.
EXIT button
.
to specify the desired value
.
EXIT button
The effect parameter settings you make are remembered until you change
them.
to
ENTER
EnglishDeutschFrançaisItalianoEspañol
to leave
.
53
Page 54

Various settings
System settings (Setup mode)
For details on how to make these settings, see
“Procedures”
(p. 56).
* During playback, recording, or recording-standby, you can’t enter Setup mode by pressing
the
MENU button
Menu/Effect
LCD Contrast
01
Adjusts the contrast of the display.
LCD Backlight
Specifies the time after which the display back-
02
light will turn off when running on batteries.
Delete File
03
Deletes a file.
Rename File
04
Changes the name of a file.
Play Mode
05
Specifies the order in which songs will play.
Limiter
Turns the input level limiter on/off.
* The limiter reduces the input level appropriately
when the input level is excessive.
06
The threshold level is -9 dBFS.
Record Mode
Specifies the type of file created when you record.
07
This will determine the audio quality of the recorded file.
Track Splitting
Turns the track splitting function on/off.
* When the signal level falls below -36 dBFS dur-
08
09
ing recording, the file will automatically be split
at that point. Recording will resume when the
signal level increases again, and the recording
time indication will be reset to “0:00:00.”
Input Monitor
Turn this on if you’re monitoring the input signal
through headphones. Turn this off if you’re not
monitoring the signal.
* During recording, the sound will be heard re-
gardless of whether this is on or off.
.
Value (default
value: boldface)
1–5–10 A (p. 56)
OFF, ON,
10sec, 20sec
–– B (p. 58)
–– C (p. 60)
Sequential
Single, Shuffle
OFF
MP3 64kbps,
MP3 96kbps,
MP3 128kbps,
MP3 160kbps,
MP3 192kbps
MP3 256kbps,
MP3 320kbps,
WAV 16bit,
WAV 24bit
OFF
OFF
5sec
,
, ON
, ON
, ON
,
,
Procedure
A (p. 56)
A (p. 56)
A (p. 56)
A (p. 56)
A (p. 56)
A (p. 56)
54
Page 55

Various settings
Menu/Effect
Input Select
Set this to STEREO if you’ve connected a stereo
microphone. Set this to MONO if you’ve connected a monaural microphone. If you use the STEREO setting with a monaural signal, only the L
10
(left) channel will be recorded. If this is set to
MONO, sound will be recorded on both the L and
R channels.
* The recorded file will be stereo even if this is set
to MONO.
Sleep Timer
Specifies the time after which the R-1 will enter
11
Sleep mode when running on batteries.
* This setting does nothing if you’re using the AC
adaptor.
Format Card
12
Formats a CompactFlash card.
Firmware Ver1.00
13
Lets you check the program version of the R-1.
About the R-1
14
Displays information about the R-1.
Value (default
value: boldface)
STEREO
, MONO
OFF, 1min, 2min,
3min
, 5min,
10min, 15min,
30min, 45min,
60min
– D (p. 62)
– E (p. 64)
– A (p. 56)
Procedure
A (p. 56)
A (p. 56)
EnglishDeutschFrançaisItalianoEspañol
55
Page 56
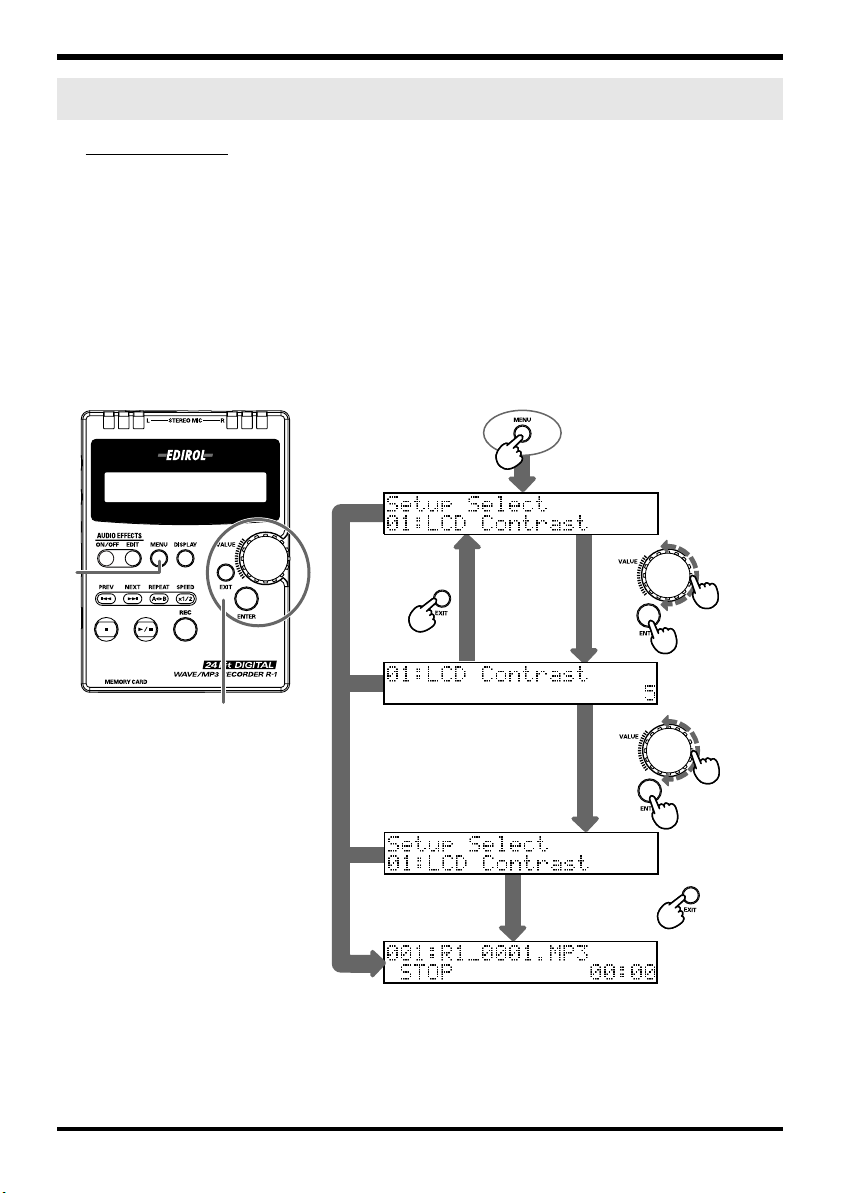
Various settings
Procedures
Procedure A
01 LCD Contrast
02 LCD Backlight
05 Play Mode
06 Limiter
07 Record Mode
08 Track Splitting
09 Input Monitor
10 Input Select
11 Sleep Timer
14 About the R-1
fig.system.eps
1
MENU
ENTEREXIT
EXITEXIT
Setup mode
Select an item
from the setup
menu
56
ENTERENTER
Specify
the value
5 ->6 -> 7...
2
MENU
ENTERENTER
MENU
EXITEXIT
Exit setup mode
Page 57

Various settings
While the R-1 is stopped, press the
1.
Turn the
2.
ENTER button
* If you decide not to continue, you can press the EXIT button or MENU button to leave
Setup mode.
3.
Now you can specify the value. Turn the
and then press the
* If you press the
press the
If you press either of these buttons, the value you specified in step 3 will be ignored.
4.
The opening screen of Setup mode is displayed. If you want to choose another
setup menu item, use the
step 2).
If you’re finished with Setup mode, press the
5.
If you want to continue making changes in Setup mode, press the
You will return to step 3.
If you want to choose another menu item, turn the
of pressing the ENTER button). Make the desired settings for each menu item as
described in
VALUE dial
MENU button
“System settings (Setup mode)”
to select an item from the setup menu, and then press the
.
ENTER button
EXIT button
, you will exit Setup mode.
VALUE dial
MENU button
VALUE dial
.
, you will return to the setup item selection in step 2. If you
to select an item from the menu (return to
. You will enter Setup mode.
to specify the desired value,
EXIT button
VALUE dial
(p. 54).
or
MENU button
ENTER button
to select it (instead
EnglishDeutschFrançaisItalianoEspañol
.
.
57
Page 58

Various settings
Procedure B
03 Delete File
fig.system-b.eps
1
Setup mode
Select an item
from the setup
menu
MENU
ENTEREXIT
2
MENU
EXITEXIT
EXITEXIT
ENTERENTER
ENTERENTER
Select the file
that you want to delete
001:R1_0001.MP3...
58
MENU
ENTERENTER
Exit setup mode
MENU
EXITEXIT
Return to Play mode
Page 59
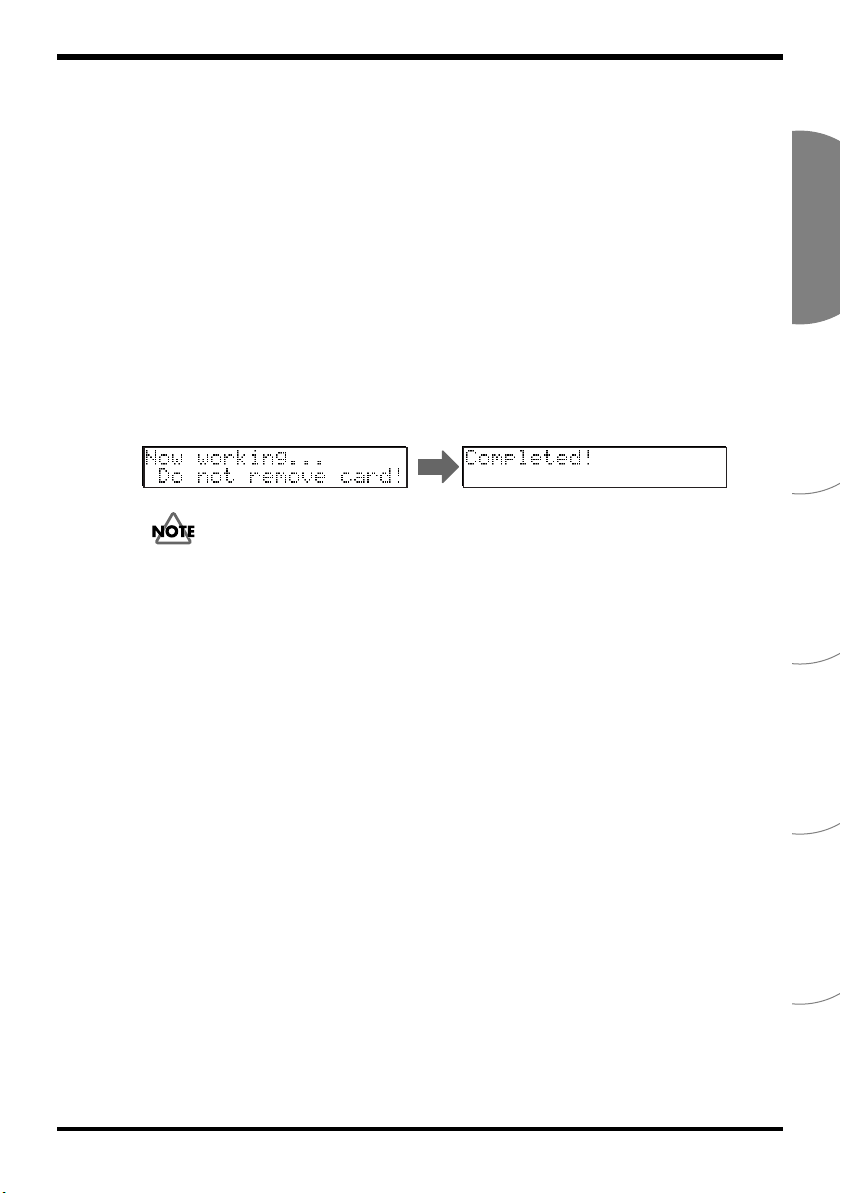
Various settings
In play-standby mode, press the
1.
Turn the
2.
Select
* If you decide not to continue, you can press the
Setup mode.
3.
Now you can choose the file that you want to delete. Turn the VALUE dial to select
the file that you want to delete, and then press the ENTER button.
* If you press the
* If there is no file to delete, the display will indicate
4.
The display will ask
If you’re sure you want to delete the file you selected in step 3, press the
button
The display will indicate
indicate
fig.working-complete
Then you will automatically return to the Setup mode screen.
If you’re finished, press the
5.
If you want to delete another file, press the
3.
If you want to choose another menu item, turn the
of pressing the
the appropriate procedure as listed in
VALUE dial
03: Delete File
.
“Completed!”
Don’t remove the CompactFlash card while a file is being deleted.
to select the desired item from the setup menu.
and then press the
EXIT button
“OK to delete? [ENTER]”
ENTER button
MENU button
or
MENU button
“Now working...Do not remove card!”
EXIT button
). To make settings for the menu item you select, use
“System settings (Setup mode)”
. You will enter Setup mode.
ENTER button
EXIT button
, you will exit Setup mode.
No Song
or the
MENU button
ENTER button
.
or
MENU button
.
. You will return to step
VALUE dial
.
to select it (instead
to leave
EnglishDeutschFrançaisItalianoEspañol
ENTER
and then will
(p. 54).
59
Page 60

Various settings
Procedure C
04 Rename File
fig.system-c.eps
1
Setup mode
Select an item
from the setup
menu
MENU
ENTEREXIT
23
MENU
MENU
MENU
EXITEXIT
EXITEXIT
PLAYPLAY (insert)
STOPSTOP (delete)
ENTERENTER
ENTERENTER
PREV
PREV
NEXT
NEXT
VALUEVALUE
Select the file
that you want to
rename
001:R1_0001.MP3...
The filename
extension
is not displayed
Move the cursor
to the character
you want to
change
60
PREV
PREV
NEXT
NEXT
Move the cursor to the character
you want to change
MENU
EXITEXIT
ENTERENTER
R1_0001.MP3
-> R5_0001.MP3
Exit setup mode
Return to Play mode
Page 61

Various settings
With the R-1 stopped, press the
1.
Turn the
2.
Rename File
* If you decide not to continue, you can press the
Setup mode.
3.
Now you can choose the file that you want to rename. Turn the
select the file that you want to rename, and then press the
* You will exit Setup mode if you press the
Use the
4.
change.
* If you press the
When you’ve moved the cursor to the location of the character you want to change,
5.
use the
■
VALUE dial
and then press the
PREV
Button
PREV button
NEXT button
VALUE dial
Characters that you can use in a file name
(space) ! # $ % & ‘ ( ) + , - . 0 1 2 3 4 5 6 7 8 9 ; = @
A B C D E F G H I J K L M N O P Q R S T U V W X Y Z
a b c d e f g h i j k l m n o p q r s t u v w x y z
to select the desired item from the setup menu. Select
and
NEXT buttons
Result Button Result
Moves the cursor left
Moves the cursor right
MENU button
to select the desired character for that location.
MENU button
ENTER button
MENU button
to move the cursor to a character you want to
, you will leave Setup mode.
. You will enter Setup mode.
.
EXIT button
PLAY button
STOP button
or
MENU button
ENTER button
.
VALUE dial
Inserts a character
Deletes a character
04:
to leave
to
.
EnglishDeutschFrançaisItalianoEspañol
File names beginning with “.” are ignored by the R-1.
* You will exit Setup mode if you press the
Move the cursor to the next location at which you want to change the character.
6.
When you’ve finished making changes to the file name, press the
7.
The display will indicate
Setup mode screen.
* When you change the name of a file, the playback order will also be affected.
fig.exists.eps_50
If an identically named file already exists, the
screen shown here will appear. You will need
to specify a different name for the file.
8.
If you’re finished, press the
If you want to rename another file, press the
3. If you want to choose another menu item, turn the
(instead of pressing the
select, use the appropriate procedure as listed in
(p. 54).
Completed!
EXIT button
ENTER button
MENU button
, and then you will automatically return to the
or the
). To make settings for the menu item you
.
MENU button
ENTER button
“System settings (Setup mode)”
. You will return to step
VALUE dial
ENTER button
.
to select it
.
61
Page 62
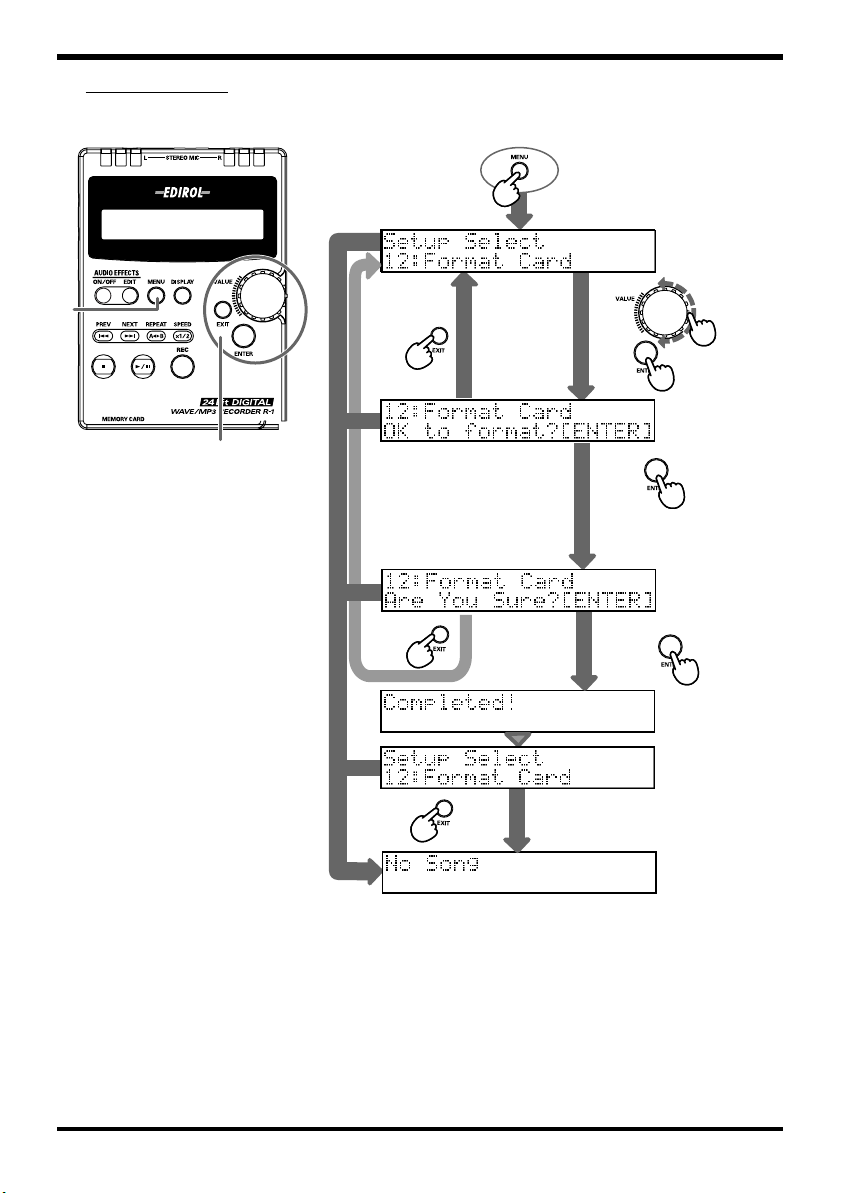
Various settings
Procedure D
12 Format Card
fig.system-d.eps
MENU
EXIT
Setup mode
Select an item
from the setup
menu
1
MENU
EXITEXIT
ENTERENTER
2
ENTERENTER
MENU
EXITEXIT
ENTERENTER
Exit setup mode
MENU
EXITEXIT
Return to Play mode
62
Page 63

Various settings
With the R-1 stopped, press the
1.
You will enter Setup mode.
Turn the
2.
Select
* If you decide not to continue, you can press the
Setup mode.
The display will ask
3.
* If you press the
Then the display will ask
4.
If you’re sure you want to format the card, press the ENTER button.
The display will indicate
indicate
fig.working-complete
Then you will automatically return to the Setup mode screen.
5.
If you’re finished, press the
Since formatting the card will delete all of the files, the display will indicate
Song
If you want to choose another menu item, turn the
of pressing the
the appropriate procedure as listed in
VALUE dial
12: Format Card
“OK to format? [ENTER].”
MENU button
“Completed!”
.
ENTER button
to select the desired item from the setup menu.
MENU button
and then press the
, you will exit Setup mode.
“Are You Sure? [ENTER]”
“Now working...Do not remove card!”
EXIT button
). To make settings for the menu item you select, use
“System settings (Setup mode)”
.
ENTER button
EXIT button
Press the
or the
MENU button
VALUE dial
or
.
MENU button
ENTER button
and then will
.
to select it (instead
to leave
.
EnglishDeutschFrançaisItalianoEspañol
No
(p. 54).
63
Page 64

Various settings
Procedure E
13 Firmware Ver1.00
fig.system-e.eps
1
Setup mode
Select an item
from the setup
menu
MENU
ENTEREXIT
Exit setup mode
2
With the R-1 stopped, press the
1.
MENU button
.
You will enter Setup mode.
2.
Turn the
Select
VALUE dial
to select the desired item from the setup menu.
13: Firmware Ver1.00.
* The program version of your R-1 will appear in the “1.00” area.
Press the
3.
If you want to choose another menu item, turn the
of pressing the
EXIT button
EXIT button
or
MENU button
or
MENU button
to leave Setup mode.
VALUE dial
. To make settings for the menu item
you select, use the appropriate procedure as listed in
mode)”
(p. 54).
to select it instead
“System settings (Setup
64
Page 65

Restoring the factory settings
Here’s how you can restore all effect values and setup mode items of the R-1 to their
factory-set state.
1
Turn off the power of the R-1.
2
While holding down the
The display will show the same content as when starting up normally, but the
settings will have been reset to their factory-set condition.
ENTER button
, switch on the R-1’s power.
Various settings
EnglishDeutschFrançaisItalianoEspañol
65
Page 66

List of messages
This section lists the most important messages that appear in the display.
Display
The batteries have run low. Please replace them with
fresh batteries.
The HOLD switch is turned on.
The R-1 is connected via USB to your computer.
No memory card (CompactFlash) is inserted.
There are no MP3 or WAV files on the memory card.
The time shown is the elapsed time.
STOP: stopped
PLAY: playing
Recording-standby mode
The screen shows the name of the file created by this recording.
Press the REC button or PLAY button to start recording.
Status while recording
The screen shows the name of the file created by this recording, and the remaining time that can be recorded.
The recordable time will depend on the capacity of the
memory card.
* remain: remaining time for recording
Name and type of file being recorded
This screen will appear if you press the DISPLAY button
during recording.
Name and type of file that has been recorded
This screen will appear if you press the DISPLAY button
while playing or stopped.
Playback status
The time shown is the remaining playback time for this
song.
* remain: remaining playback time
Playing repeatedly between points A-B
The screen shows the name of the currently playing file
and the elapsed time.
Playing at half-speed
The screen shows the name of the currently playing file
and the elapsed time.
The R-1 is executing a command. Do not remove the
card.
Explanation
66
Page 67

Troubleshooting
If you experience difficulties, read this section first. It contains tips on how to resolve
various problems.
Problems with recording
Sound recorded from the mic is heard only from the L (left)
channel
Some mics are stereo, while others are monaural. If you are using a monaural mic, the
sound will be recorded on the L (left) channel.
In this case, you can use
select MONO as the mic type. This setting is remembered even when the power is
turned off.
Refer to: “System settings (Setup mode)”
“System settings (Setup mode)”
(p. 54)
(p. 54) 10 Input Select to
Can’t start recording from recording-standby mode
Check the remaining space on your CompactFlash memory card. Recording is not
possible if there is little time remaining on the card. In this case, the R-1 will enter
recording-standby mode, but you will return to the play mode screen if you attempt to
start recording by pressing the record button or play button.
In recording-standby mode, the screen shows the amount of remaining recordable time.
An indication of 0:00:00 means that there is no time left. Please check the display.
Refer to: “Recordable times on a CompactFlash card”
(p. 29)
Can’t use the internal mic (Can’t use an external mic)
The internal mic cannot be used if a mic, cable, or device is connected to the
jack
or
line input jack
the other input jacks.
Refer to: “Mic input jack”
“Recording with the internal microphone”
. If you want to use the internal mic, don’t connect anything to
(p. 15),
“Line input jack”
(p. 15),
(p. 29)
mic input
Recorded sound is distorted
The sound will distort if the
appropriately as described in
In some cases, the sound will distort if you apply an effect while recording. Adjust the
input level while the effect is applied. You can also try adjusting the effect parameters
so that distortion does not occur.
Refer to: “Adjusting the input level”
“Applying an effect”
input volume
“Adjusting the input level”
(p. 52)
is too high. Adjust the input level
(p. 30), (p. 33), (p. 36)
(p. 30), (p. 33), (p. 36).
EnglishDeutschFrançaisItalianoEspañol
67
Page 68

Troubleshooting
Can’t record
Check the remaining space on your CompactFlash memory card. Recording is not
possible if there is little time remaining on the card. In recording-standby mode, the
screen shows the amount of remaining recordable time. An indication of
that there is no time left. Please check the display.
The R-1 can handle up to 255 files. Once the number of files in the CompactFlash card
reaches 255, you won’t be able to make any more recordings.
In this case, the R-1 will enter recording-standby mode, but you will return to the play
mode screen if you attempt to start recording by pressing the record button or play
button.
Refer to: “Recordable times on a CompactFlash card”
Recording is not possible if the CompactFlash memory card is not inserted correctly. If
the display indicates
Turn off the power, and re-insert the CompactFlash memory card.
Refer to: “Memory card handling”
Recording will not occur correctly if the input level specified by the
control
is too low. Please set the input level correctly.
Refer to: “Adjusting the input level”
If you want to record via a connected mic, connect it correctly to the
You should also check the setting of the
Refer to: “Mic input jack”
“Recording with the internal microphone”
A CompactFlash memory card will not work correctly unless it has been formatted on
the R-1. If you used your computer to format the CompactFlash card, it may not be
formatted correctly for the R-1. In this case, recording will stop immediately after you
begin recording, an indication of
possible.
Refer to: “Formatting a CompactFlash card”
No Card
, the R-1 has not detected a CompactFlash memory card.
(p. 25)
(p. 30), (p. 33), (p. 36)
mic type select switch
(p. 15),
“Line input jack”
No Song
will appear, and recording will not be
(p. 27)
(p. 29)
input volume
mic input jack
.
(p. 15),
(p. 29)
0:00:00
means
.
I used a monaural mic to record, but a stereo file was created
The R-1 normally records in stereo. Even if you connect a monaural mic and set the
Setup mode item Input Select to MONO, a stereo file will be created with the same
sound recorded on the left and right (L, R) tracks.
Even if I adjust the recording level, the sound is distorted
if I turn on the effect
Since some effects work by boosting a portion of the sound, they may cause the overall
volume of the song to increase. This may cause the sound to clip, producing distortion.
If this occurs, take either of the following actions.
• Lower the LEVEL value in the parameters of the effect
This will lower the overall volume, but the character of the effect will be
preserved.
• Lower the input volume to decrease the volume before the effect is applied
This is an easy adjustment to make, but may affect the character of the effect.
68
Page 69

Troubleshooting
Problems with playback
No sound
The
output volume
Refer to: “Output volume”
Make sure that your headphones or speakers are connected correctly.
Refer to: “Headphone/line output/digital output jack”
“Getting ready to use the R-1”
The CompactFlash memory card contains a song, but the R-1
won’t play it
Make sure that the file name is appropriate. The R-1 can’t use files with a name
beginning with “.” (period).
The R-1 can only play back files with a filename extension of .mp3 (MP3) or .wav
(WAV).
Refer to: “Types of files that the R-1 can handle”
Can’t play back
Make sure that the file name is appropriate. The R-1 can’t use files with a name
beginning with “.” (period).
The R-1 can only play back files with a filename extension of .mp3 (MP3) or .wav
(WAV).
Also, playback is not possible if the file has been corrupted.
Refer to: “Types of files that the R-1 can handle”
may be too low. Try gradually increasing the
(p. 16)
(p. 16)
(p. 18)
(p. 28)
(p. 28)
output volume
.
EnglishDeutschFrançaisItalianoEspañol
A song I didn’t want is played back
Could the PLAY MODE be set to Shuffle? If so, the R-1 will randomly select the song to
be played next. This will cause unexpected songs to be played.
Refer to: “PLAY MODE (Playback mode)”
(p. 43)
69
Page 70

Troubleshooting
Other problems
Power won’t turn on
Make sure that the AC adaptor is connected correctly.
If you’re using batteries, check the polarity of the batteries, and make sure that each
battery is firmly seated in the holder. It is also possible that the batteries have run down;
try a fresh set of batteries.
Refer to: “Connecting the AC adaptor and turning on the power”
“Installing the batteries and turning on the power”
If the R-1 will not turn on even though there is no problem with the AC adaptor or
batteries, it is possible that the R-1 has malfunctioned.
Please contact “Service Information” listed at the end of this manual.
My computer doesn’t detect the R-1 when I connect it
Your computer will not correctly detect the R-1 if no CompactFlash memory card is
inserted. If the R-1 does not appear on your computer desktop, check that a
CompactFlash memory card is correctly inserted.
Refer to: “Memory card handling”
(p. 25)
Pressing the MENU button doesn’t take me to Setup mode
You can’t enter Setup mode during playback or recording. Stop playback or recording,
and then press the
If the R-1 is playing, recording, or in recording-standby mode, pressing the
button
won’t put you in Setup mode.
Refer to: “System settings (Setup mode)”
MENU button
to enter Setup mode.
(p. 54)
(p. 19)
(p. 20)
MENU
Backlight turns off
If you’re using the R-1 on batteries, the backlight may turn off when the R-1 has not been
operated for a certain length of time, depending on the LCD Backlight setting.
Refer to: “System settings (Setup mode)”
(p. 54)
The R-1 goes to sleep
If you’re using the R-1 on batteries, it may go to sleep if no operation has been
performed for a certain length of time, depending on the Sleep Timer setting. You can
use Setup mode 11 Sleep Timer to change this setting.
Refer to: “System settings (Setup mode)”
(p. 54)
The settings I made have disappeared
If all of the effects and Setup mode settings you made have returned to their original
state, it is possible that you inadvertently restored the R-1 to its factory-set state.
Refer to: “Restoring the factory settings”
(p. 65)
70
Page 71

Troubleshooting
I used a USB cable to connect the R-1 to my computer, but it
was not detected
If the R-1 is in Setup mode, it will not be detected by your computer. Unplug the USB
cable that connects the R-1 to your computer, exit Setup mode, and make the connection
again.
Refer to: “Connecting the R-1 to your computer”
(p. 44)
The effect parameters I edited have been initialized
The effect parameter settings you edit are preserved as long as you don’t change the
effect type; if you change the effect type, the settings will revert to the initial values. If
you make detailed changes to an effect such as “Editable EQ,” we suggest that you write
down the settings on paper.
Refer to: “Applying an effect”
(p. 52)
When selecting a song, the song names are slow to appear
If a file is damaged or invalid, if an MP3 file is in a format that the R-1 does not support,
or if the file is very large, the R-1 may take some time to determine whether it is able to
play the file even if the file has an extension of .MP3 or .WAV.
This may cause the display to be slow when selecting files.
Refer to: “Types of files that the R-1 can handle”
“Normal playback”
(p. 38)
(p. 28)
Acoustic feedback occurs when monitoring through
headphones
If you’re using open-air type headphones to monitor the sound while recording,
moving close to the R-1 may allow sound from the headphones to be picked up by the
microphones, causing acoustic feedback. The R-1’s built-in microphones will pick up
even faint sounds, so be careful not to get too close.
Refer to: “Basic connections”
(p. 18)
EnglishDeutschFrançaisItalianoEspañol
71
Page 72

Bedienung und Anschlüsse des R-1
fig.panel-1
1
Internes Mikrofon
11
12
1
2
3
4
7
8
5 6
9
10
13
14
15
16
Dies ist ein ins R-1 eingebautes Stereomikrofon.
Sie können das interne Mikrofon nicht benutzen, wenn ein Mikrofon oder ein anderes Gerät mit
einer der Buchsen für den
Mikrofoneingang
18
oder den
Standardeingang
19
verbunden
ist. Schließen Sie nichts an die anderen Eingangsbuchsen an, wenn Sie das interne Mikrofon
einsetzen wollen. Bei Aufnahme mit dem eingebauten Mikrofon stellen Sie den MikrofontypWahlschalter auf DYN.
2
Anzeige
Hier werden verschiedene Informationen über den Betriebszustand des R-1 angezeigt.
3
EFFECT-Taste
Drücken Sie die
EFFECT-Taste
zum Ein- und Ausschalten eines Effekts.
Bei eingeschaltetem Effekt leuchtet die Taste rot.
Wenn Sie diese Taste vor oder während des Abspielens drücken, wird der Effekt auf den
wiedergegebenen Sound angewandt. Wenn Sie diese Taste vor oder während einer Aufnahme
drücken, wird der Effekt auf den eingespielten Sound angewandt, der mit dem Effekt
bearbeitete Sound wird also aufgenommen.
Das R-1 bietet verschiedene Effekte zur Veränderung des ausgegebenen oder aufgenommenen
Sounds an und gibt ihm so eine bessere Wirkung oder erlaubt komfortableres Hören. Sie
können den Sound auch zu einem völlig anderem Charakter transformieren.
4
EDIT-Taste
Benutzen Sie diese Taste für die Effekteinstellungen.
Detaillierte Hinweise zu Effekten finden Sie unter
können Sie unabhängig von der Stellung der
5
MENU-Taste
“Using effects”
Taste EFFECT
(S. 46). Effekteinstellungen
vornehmen.
Diese Taste wechselt in den Konfigurationsmodus, in dem Sie verschiedene Einstellungen des
R-1 vornehmen können. Hier können Sie den Kontrast der LCD-Anzeige einstellen, die
Aufnahmequalität bestimmen und verschiedene andere Grundeinstellungen des R-1
vornehmen. Details finden Sie unter
“Verschiedene Einstellungen”
(S. 90).
72
Page 73

Bedienung und Anschlüsse des R-1
A
Song
AB
Song
AB
Song
6
DISPLAY-Taste
Mit dieser Taste wird der Anzeigeinhalt des R-1 gewechselt.
Im PLAY-Modus wechselt die Taste nacheinander zur Anzeige der erfolgten
Abspielzeit, der verbleibenden Abspielzeit der aktuellen Songdatei, deren Dateityp und
der Bitrate.
Drücken Sie die
7
PREV-Taste
Mit dieser Taste gehen Sie zum Anfang des Songs oder Sie wählen den vorhergehenden
Song aus.
Ein Druck auf diese Taste während eines Songs geht zum Anfang dieses Songs. Wenn
Sie bereits am Anfang (00:00) des Songs sind, führt Sie diese Taste zum vorhergehenden
Song. Mit kontinuierlichem Druck auf diese Taste können Sie zurückspulen.
Diese Operationen funktionieren während des Abspielens oder bei STOP.
8
NEXT-Taste
Mit dieser Taste wählen Sie den nächsten Song aus. Mit kontinuierlichem Druck auf
diese Taste können Sie vorspulen.
Diese Operationen funktionieren während der Wiedergabe oder bei STOP.
9
REPEAT-Taste
Mit dieser Taste können Sie den Bereich zwischen zwei im Song angegebenen Punkten
A und B wiederholt abspielen. Drücken Sie die Taste einmal zur Markierung des
Punktes „A“ und ein zweites Mal für Punkt „B“.
Zum Stornieren der Abspielwiederholung drücken Sie nochmals die
Mit der Stornierung der Abspielwiederholung löschen Sie beide Punkte A und B.
fig.repeat-a
Drücken Sie während des Abspielens einmal auf
1.
die
REPEAT-Taste
Dieser Punkt wird der Startpunkt
Abspielwiederholung.
fig.repeat-b
Drücken Sie nochmals auf die
2.
Dieser Punkt wird der Endpunkt
Abspielwiederholung.
DISPLAY-Taste
.
zum Wechseln des Anzeigeinhalts.
A
der
REPEAT-Taste
B
der
.
REPEAT-Taste
EnglishDeutschFrançaisItalianoEspañol
.
fig.repeat-ab
Der Bereich zwischen den in Schritt 1 und 2 von
Ihnen angegebenen Punkten wird wiederholt
abgespielt. Zum Abbruch der Abspielwiederholung
drücken Sie erneut auf die
10
SPEED-Taste
REPEAT-Taste
.
Diese Taste halbiert die Abspielgeschwindigkeit. Drücken Sie die Taste nochmals zur
Rückkehr zur normalen Abspielgeschwindigkeit. Dies ist hilfreich, wenn Sie mit Musik
in ungewöhnlich schnellem Tempo arbeiten oder sehr schnelle Sprache abhören.
73
Page 74

Bedienung und Anschlüsse des R-1
fig.panel-2
1
17
18
2
11
STOP-Taste
19
20
21
11
12
3
4
7
8
5 6
9
10
13
14
15
16
Diese Taste stoppt Wiedergabe oder Aufnahme.
12
PLAY/PAUSE-Taste
Die Taste startet die Wiedergabe. Zusätzlich unterbricht sie Aufnahme und Wiedergabe.
Wenn Sie diese Taste während des Abspielens drücken, wird die Wiedergabe des R-1
unterbrochen und in der Anzeige
Taste
nochmals, um die Wiedergabe fortzusetzen.
PLAY-PAUSE
angezeigt. Drücken Sie die
PLAY/PAUSE-
Genauso können Sie mit dieser Taste Aufnahmen unterbrechen. In der Anzeige des R-1wird
dann
REC-PAUSE
stehen, gleichzeitig wird die
REC-Taste
rot blinken.
Zur Fortsetzung der Aufnahme aus der Aufnahmebereitschaft drücken Sie nochmals die
Taste
oder alternativ die
PLAY/PAUSE-Taste
. Die
REC-Taste
leuchtet bei der Aufnahme
rot.
13
REC-Taste
Bei gestopptem Gerät bringt die
des R-1wird dann
REC STANDBY
REC-Taste
das R-1 in Aufnahmebereitschaft. In der Anzeige
stehen, gleichzeitig wird die
REC-Taste
rot blinken.
Zum Beginn der Aufnahme aus der Aufnahmebereitschaft drücken Sie nochmals die
Taste
oder alternativ die
PLAY/PAUSE-Taste
. Die
REC-Taste
leuchtet bei der Aufnahme
rot.
14
VALUE-Regler
Benutzen Sie diesen Regler zur Auswahl der Songs, zur Bestimmung von Typen und Werten
von Effekten und zur Bedienung im Konfigurationsmodus.
15
EXIT-Taste
Mit dieser Taste kehren Sie im Konfigurationsmodus und im Effekteinstellungsmodus zum
vorherigen Punkt zurück. Im Konfigurationsmodus werden Ihre Eingaben gelöscht, wenn Sie
die
EXIT-Taste
16
ENTER-Taste
vor der
ENTER-Taste
drücken.
Mit dieser Taste wählen Sie im Effekteinstellungs- oder im Konfigurationsmodus Eingaben aus
oder schließen Änderungen ab.
REC-
REC-
74
Page 75

17
Mikrofoneingang
Anschlussbuchse für ein Mikrofon.
Falls ein Kabel mit dem Standardeingang verbunden ist, wird kein
Audiosignal durch den Mikrofoneingang entgegengenommen.
Bedienung und Anschlüsse des R-1
Schalten Sie den
Mikrofonauswahlschalter
19
auf die passende Stellung, je
nachdem ob ein dynamisches Mikrofon oder ein über den Anschluss versorgtes
Kondensatormikrofon mit Ministecker angeschlossen ist.
Stereomikrofone werden unterstützt, nutzen Sie für die Verbindung ein Kabel mit
Stereo-Ministecker. Falls Sie ein Mono-Mikrofon einsetzen, setzen Sie im
Konfigurationsmodus die Einstellung
Hinweise zu dieser Einstellung finden Sie unter
(Konfigurationsmodus)”
18
Standardeingang
(S. 90).
“10 Input Select”
“Systemeinstellungen
auf
MONO
. Detaillierte
Wenn Sie Audiosignale von Audiogeräten oder Musikinstrumenten ins R-1 eingeben
wollen, benutzen Sie Stereo-Ministecker zu deren Anschluss an diese Buchse.
19
Mikrofonauswahlschalter
Schalten Sie diesen Schalter in die passende Stellung, je nach dem Typ des am
Mikrofoneingang
DYN
CND
Eingangsregler
20
Wählen Sie beim Anschluss eines dynamischen Mikrofons diese Einstellung.
Wenn Sie das eingebaute Mikrofon verwenden, stellen Sie diesen Schalter auf
DYN.
Diese Einstellung ist für den Anschluss eines kleinen Kondensatormikrofons, das
eine Stromversorgung benötigt. Sie müssen ein „steckerbetriebenes“ Mikrofon benutzen. Diese Buchse liefert eine Versorgungsspannung von 2 V.
* Schließen Sie keine anderen Mikrofone oder Geräte außer „steckerbetriebenen“
Mikrofonen an, wenn dieser Schalter auf „CND“ steht. Andere Mikrofontypen
oder Geräte könnten beschädigt werden.
Hier wird die Eingangslautstärke des Sounds der eingebauten Mikrofone , des
Mikrofoneingangs
Nehmen Sie die Einstellung mit dem in
17
angeschlossenen Mikrofons.
17
oder der
Standardeingänge
“Einstellung des Eingangsreglers”
18
geregelt.
1
beschriebenen Verfahren unter Beobachtung der Eingangsempfindlichkeit vor.
21
USB-Anschluss
Sie können das im Lieferumfang enthaltene USB-Kabel an Ihren Computer anschließen.
Wenn das R-1 an Ihren Computer angeschlossen ist, können Songdateien übertragen
oder auf ihren Computer kopiert werden. Sie können auch MP3- oder WAV-Dateien
vom Rechner zum R-1 transferieren oder kopieren, so dass sie dort abgespielt werden
können.
Der Anschluss unterstützt „Hi-Speed“-USB 2.0 und erlaubt so einen schnellen
Dateitransfer.
Wenn Sie das R-1 mit Ihrem Computer verbinden wollen, berücksichtigen Sie bitte auch
“Connecting the R-1 to your computer”
Wenn Ihr Rechner das R-1 korrekt erkannt hat, steht in der Anzeige des R-1
via USB
.
(S. 44).
Connected
EnglishDeutschFrançaisItalianoEspañol
(S. 80)
75
Page 76

Bedienung und Anschlüsse des R-1
Bei bestehender Verbindung zwischen einem Computer und dem R-1 sind
alle Funktionalitäten des R-1 außer dem Netzschalter unwirksam; die
Bedienung von Tasten und Reglern bleibt wirkungslos.
fig.panel-3
1
22
22
Netzschalter
24 25 2623
27
28
Schaltet das Gerät an und aus.
Schalten Sie das Gerät bei laufender Aufnahme oder Wiedergabe nicht aus.
Vergewissern Sie sich vor dem Ausschalten, dass Wiedergabe oder Aufnahme gestoppt
sind.
• Falls Sie das Gerät während einer Aufnahme versehentlich ausschalten, werden die
aufgenommenen Daten nicht in der CompactFlash-Karte gespeichert.
• Die CompactFlash-Karte kann beschädigt werden, wenn das R-1 bei Lese- oder
Schreiboperationen wie Wiedergabe oder Aufnahme ausgeschaltet wird.
• Wird das R-1 während einer Anzeige „Now working...“ (In Arbeit...) im
Effekteinstellungsmodus oder beim Speichern einer Einstellung im
Konfigurationsmodus ausgeschaltet, wird das Gerät unstabil und kann womöglich
nicht mehr starten.
Achten Sie daher genau darauf, das Gerät in diesen Zuständen nicht abzuschalten.
23
Netzanschluss
Schließen Sie hier das Netzteil an.
24
HOLD-Schalter
Wenn Sie den
HOLD-Schalter
auf ON stellen, werden Tastenbetätigungen auf dem R1 wirkungslos; damit kann das Gerät bequem vor versehentlicher Bedienung geschützt
werden.
Allerdings sind mit der Stellung des
Mikrofonauswahlschalter
Lautstärkeregler
25
Lautstärkeregler
25
weiter bedienbar.
Hier wird die Lautstärke der Buchse für
Digitalausgang
26
eingestellt. Allerdings ist die digital ausgegebene Lautstärke
HOLD-Schalters
19
,
Eingangsregler
Kopfhörer, Standardausgang und
auf ON
20
,
Netzschalter
damit nicht regelbar.
26
Buchse für Kopfhörer, Standardausgang und Digitalausgang
Dieser Ausgang gibt Audiosignale vom R-1 zu Kopfhörer oder externen Lautsprechern.
Wenn Sie ein Digitalsignal ausgeben wollen, müssen Sie ein rundes Digitalkabel mit
Ministecker benutzen.
27
Auswurftaste
Drücken Sie hier, um die CompactFlash-Karte aus der
28
zu entfernen.
Speicherkartenaufnahme
22
und
76
Page 77

Bedienung und Anschlüsse des R-1
28
Speicherkartenaufnahme
Setzen Sie hier eine CompactFlash-Karte ein.
Das R-1 kann als Speicherkarten ausschließlich den Typ CompactFlash verwenden.
fig.panel-4
29
30
29
Batteriefach
Wenn Sie das R-1 netzunabhängig betreiben wollen, können Sie hier Batterien einlegen.
Beim Betrieb des R-1mit Netzteil brauchen Sie keine Batterien.
Vor einem Wechsel der Stromversorgung vom Netzteil zur Batterieversorgung und
umgekehrt müssen Sie das R-1 ausschalten.
Bitte lesen Sie vor der Benutzung des R-1
power”
(S. 20).
30
Speicherkartenabdeckung
Diese Abdeckung bietet einen Schutz vor versehentlichem Entfernen der
CompactFlash-Karte. Wenn Sie die Klappe öffnen, sehen Sie die
Speicherkartenaufnahme
28
und die
“Installing the batteries and turning on the
Auswurftaste
27
.
EnglishDeutschFrançaisItalianoEspañol
77
Page 78

Vorbereitungen zum Einsatz des R-1
Formatieren einer CompactFlash-Karte
Sie müssen eine CompactFlash-Karte vor ihrem Einsatz im R-1formatieren.
Sie müssen die CompactFlash-Karte mit dem R-1 selbst formatieren. Wenden Sie dazu das auf
S. 90 bei “Systemeinstellungen (Konfigurationsmodus)“ beschriebene Verfahren an.
Mit anderen Geräten als dem R-1 formatierte CompactFlash-Karten funktionieren im R-1
möglicherweise nicht richtig.
1
Schalten Sie das R-1 aus.
2
Setzen Sie die CompactFlash-Karte in die
fig.startup.epsfig.no-song.eps
3
Schalten Sie das R-1 ein.
Falls die CompactFlash-Karte keine auf
dem R-1 abspielbaren Songdateien
enthält, wird in der Anzeige „NoSong“
angezeigt. Wenn die Karte Songdateien
enthält, erscheint die Anzeige für den
PLAY-Modus.
4
Drücken Sie die
* Zum Abbruch des Vorgangs drücken
Sie die
EXIT-Taste
vorherigen Anzeige zurückkehren.
fig.format-disp.eps
5
Stellen Sie den
auf die Auswahl
6
Drücken Sie die
fig.format.eps
7
Wenn die hier gezeigte Anzeige
erscheint, drücken Sie die
Taste
.
fig.sure.eps
8
Die Anzeige fragt nach einer
Bestätigung, ob Sie die Karte
wirklich formatieren wollen.
Drücken Sie die
um die Karte zu formatieren.
* Zum Abbruch der Kartenformatierung drücken Sie die
Entfernen Sie niemals die CompactFlash-Karte während der Formatierung.
Das kann eine Beschädigung der Karte verursachen.
fig.complete.eps
Die Formatierung ist
abgeschlossen, wenn in der
Anzeige
9
Drücken Sie die
Sie werden zum Hauptanzeige des PLAY-Modus zurückkehren.
MENU-Taste
. Sie werden zur
VALUE-Regler
12 Format Card
ENTER-Taste
ENTER –Taste
Completed!
MENU-Taste
.
.
ENTER-
,
erscheint.
.
Kartenaufnahme
.
EXIT-Taste
des R-1 ein.
. Sie werden zu Schritt 5 zurückkehren.
78
Page 79

Einfache Aufnahmemethoden
Die folgende Tabelle zeigt die ungefähren Aufnahmezeiten, die Sie mit CompactFlashKarten aufnehmen können.
Aufnahmezeiten auf CompactFlash-Karten
ungefähre Aufnahmezeit
CompactFlash Größe
Dateityp 64 MB 256 MB 512 MB 2 GB
WAV, 24 bit/44,1 kHz
WAV, 16 bit/44,1 kHz
MP3, 16 bit/320 kbps
MP3, 16 bit/256 kbps
MP3, 16 bit/192 kbps
MP3, 16 bit/160 kbps
MP3, 16 bit/128 kbps
MP3, 16 bit/ 96 kbps
MP3, 16 bit/ 64 kbps
* Die oben angegebenen Zeiten sind Näherungswerte. Die tatsächlich möglichen
Aufnahmezeiten können von diesen Angaben geringfügig abweichen. Lassen Sie bitte bei
Ihren Aufnahmevorhaben eine Reserve zu.
* Formatieren Sie die CompactFlash-Karte mit dem R-1 selber.
* Benutzen Sie bei langen zusammenhängenden Aufnahmen das mitgelieferte Netzteil.
* Falls es sich um mehrere Dateien handelt, wird die tatsächliche Gesamtaufnahmezeit
geringer als die hier angezeigten Werte sein.
3
5
26
32
43
52
65
86
130
Aufnahmen mit dem Einbaumikrofon
fig.mic-LR.eps
Das interne Mikrofon des R-1 arbeitet stereophon. Die
von der rechten Seite des R-1 empfangenen
Audiosignale werden auf dem rechten Kanal (R)
aufgenommen, die von der linken Seite auf dem linken
Kanal (L).
Schließen Sie keine Kabel an die anderen
Eingangsbuchsen an, wenn Sie das interne
Mikrofon einsetzen wollen.
Wenn ein Mikrofon oder Mikrofonkabel am
Mikrofoneingang oder am Standardeingang
angeschlossen ist, werden diesen Eingängen
Priorität eingeräumt, so dass das interne
Mikrofon nicht benutzt wird.
1
Das Gerät muss ausgeschaltet sein. Stellen Sie auch den
Minimumposition.
Wenn Sie den Sound während der Aufnahme mit dem Einbaumikrofon hören wollen,
schließen Sie dazu einen Kopfhörer als Monitor an den entsprechenden Anschluss an. Falls
Sie externe Lautsprecher anschließen und als Monitor zu nutzen versuchen, kommt es zu
akustischen Rückkopplungen. Versuchen Sie nicht, Lautsprecher als Monitor einzusetzen.
Einheit: Minuten
15 31 125
23 47 188
102 208 831
128 260 1.039
170 346 1.386
205 416 1.663
256 520 2.079
341 693 2.772
512 1.040 4.158
Eingangsregler
L R
auf die
EnglishDeutschFrançaisItalianoEspañol
79
Page 80

Einfache Aufnahmemethoden
2
Schalten Sie das R-1 ein, so wie in
the power”
3
Bei Aufnahme mit dem eingebauten Mikrofon stellen Sie den MikrofontypWahlschalter auf
4
Berücksichtigen Sie
Sie den Dateityp der gewünschten Aufnahme an. Nutzen Sie für die Änderung
oder Überprüfung der gegenwärtigen Einstellung im Konfigurationsmodus
Record Mode
5
Stellen Sie den Eingangsregler wie folgt ein.
Einstellung des Eingangsreglers
fig.rec-1.eps
(S. 19) beschrieben.
DYN
.
“Types of files that the R-1 can handle”
(S. 90).
1. Drücken Sie die REC-Taste.
2.
Das R-1 geht in
Aufnahmebereitschaft. Die
Anzeige zeigt die für den
gewählten Dateityp bzw. die für
dessen Aufnahmequalität verbleibende Zeit an.
* Der während der Aufnahmebereitschaft angezeigte Songname ist der Name der Datei, die
bei Abschluss der neuen Aufnahme erzeugt werden wird.
fig.rec-2.eps
3.
Drücken Sie die DISPLAY-Taste.
4.
Spielen Sie den Sound, den Sie
tatsächlich aufnehmen wollen,
und positionieren Sie das interne Mikrofon des R-1 so, dass es den Sound empfangen kann.
* Wenn Sie während der Aufnahme einen Effekt auf den Sound anwenden wollen, regeln Sie den
Eingangspegel bei eingeschaltetem Effekt ein.
fig.rec-3.eps
5.
Steigern Sie langsam die
Eingangslautstärke
der Sound spielt.
6.
Stellen Sie das Niveau so ein, dass
das
■
in der Anzeige des
Eingangsniveaus das ganz rechts
außen stehende
Bei zu niedrigem Aufnahmeniveau können Sie keine sehr leisen Sounds aufnehmen. Bei zu
hohem Aufnahmepegel sind laute Sounds gestört und verursachen Knarzgeräusche in der
Aufnahme.
* Falls das Aufnahmematerial gelegentliche laute Soundspitzen wie z. B. Schlagzeugeinsätze in
Bandvorführungen oder plötzliches Lachen in einem sonst ruhigen Gespräch aufweist,
empfehlen wir den Einsatz des Begrenzers (06 Limiter, S. 90). Falls dieser eingesetzt werden soll,
regeln Sie den Eingangspegel auf das allgemeine Niveau des Aufnahmematerials ein, nicht auf
die gelegentlichen lauten Soundspitzen. Wenn Sie den Begrenzer verwenden, wird der
Eingangspegel automatisch so eingestellt, dass der Toneingangspegel nicht zu hoch wird. Bei
Verwendung des Begrenzsers sollten Sie den Eingangspegel so einstellen, dass das Symbol ■ in
Stellung in der Abbildung nur gelegentlich erscheint.
B
während
■
nicht erreicht. (Stellung in der obigen Abbildung)
“Connecting the AC adaptor and turning on
(S. 28) und geben
07
Verbleibende Aufnahmezeit
B
A
A
80
Page 81

fig.rec-time.eps
6
Drücken Sie die
Die Aufnahme beginnt.
* Sie können die Aufnahme auch mit der
PLAY/PAUSE-Taste
REC-Taste
starten.
Einfache Aufnahmemethoden
.
Vergangene Zeit seit
Aufnahmebeginn
Wenn Sie den
während der Aufnahme verstellen, wird sich der Eingangspegel ändern.
Achten Sie darauf, den
Auch bei auf ON geschaltetem
nicht von der sperrenden HOLD-Funktion betroffen.
7
Nach Abschluss der Aufnahme drücken Sie die
Wenn Sie die Aufnahme unterbrechen wollen, drücken Sie die
Taste
. Zur Beendigung der Pause und zur Fortsetzung der Aufnahme drücken Sie
die
PLAY/PAUSE-Taste
Die Aufnahmedaten werden in einer Datei auf der CompactFlash-Karte
gespeichert. Die Anzeige zeigt den Dateinamen der Aufnahme an, und diese Datei
wird selektiert.
* Der Dateiname wird automatisch nach folgendem Schema gebildet:
0001
ist die Zahl, die auf die Datei mit der höchsten Zahl auf der CompactFlash-Karte folgt.
* Die Datei wird auf der Rootebene der CompactFlash-Karte erzeugt. Verzeichnisse bzw.
Ordner werden nicht erzeugt.
* Da das R-1 über keine interne Uhr verfügt, haben alle Dateien ein Erzeugungsdatum vom
1.1.2002.
8
Um die gerade aufgenommene Datei anzuhören, drücken Sie die
Taste
. Informationen zu anderen Wiedergabemethoden finden Sie unter
“Wiedergabemethoden”
Eingangsregler
Eingangsregler
erneut.
(S. 85).
während der Aufnahmebereitschaft oder
nicht unabsichtlich zu verstellen.
HOLD-Schalter
ist der
STOP-Taste
Eingangsregler
.
PLAY/PAUSE-
R1_0001.MP3
PLAY/PAUSE-
Wie der Eingangepegelmesser den Signalpegel anzeigt
EnglishDeutschFrançaisItalianoEspañol
. Die
Anzahl von
erscheinenden ■
Keine ∞ –– -50,0 8 -21,0 –– -18,0
1 -50,0 –– -40,0 9 -18,0 –– -15,0
2 -40,0 –– -36,0 10 -15,0 –– -12,0
3 -36,0 –– -33,0 11 -12,0 –– -9,0
4 -33,0 –– -30,0 12 -9,0 –– -6,0
5 -30,0 –– -27,0 13 -6,0 –– -3,0
6 -27,0 –– -24,0 14 -3,0 –– 0,0
7 -24,0 –– -21,0 15 0,0 –– (Clip)
dB
Anzahl von
erscheinenden ■
dB
81
Page 82

Einfache Aufnahmemethoden
Aufnehmen mit externem Mikrofon
Das R-1 kann dynamische Mikrofone und diejenigen anschlussbetriebenen
Kondensatormikrofone mit Ministecker benutzen, die für die Aufnahmebuchse eines
Mini Disk-Recorders oder der Mikrofonbuchse eines Computers vorgesehen sind.
Wenn Sie ein Kondensatormikrofon einsetzen, muss dies für den
Anschlussbetrieb geeignet sein. Wenn Sie ein falsches Mikrofon oder ein
herkömmliches Stereomikrofon mit Ministecker anschließen, kann Ihr Gerät
beschädigt werden.
fig.conmic-LR.eps
L
Stereomikrofon
1
Das Gerät muss ausgeschaltet sein. Stellen Sie den
Minimumposition.
Wenn ein Gerät am
das Eingangssignal vom
Mikrofoneingang
angeschlossen sein.
2
Schalten Sie das R-1 ein, so wie in
the power”
3
Geben Sie den Dateityp ihrer beabsichtigten Aufnahme an, so wie in
files that the R-1 can handle”
Konfigurationsmodus mit
vornehmen oder die aktuelle Einstellung prüfen.
4
Schalten Sie den
Mikrofoneingang
(S. 19) beschrieben.
Mikrofonauswahlschalter
Standardeingang
Mikrofoneingang
aufnehmen wollen, darf am Standardeingang kein Kabel
“Connecting the AC adaptor and turning on
(S. 28) beschrieben. Sie können im
07 Record Mode
vorgesehenen Mikrofons. ->
R
MIRCRO TYP
EINGANGSPEGEL
Eingangsregler
(Line input) angeschlossen ist, wird
ignoriert. Wenn Sie über den
(S. 90) die gewünschte Einstellung
auf den Typ des für den
“Mikrofonauswahlschalter”
MIRCRO
auf die
“Types of
(S. 75)
82
Page 83

Einfache Aufnahmemethoden
5
Schließen Sie Ihr externes Mikrofon am
Mikrofoneingang
an.
Wenn Sie den Sound während der Aufnahme hören wollen, schließen Sie dazu einen
Kopfhörer als Monitor an den entsprechenden Anschluss an. Falls Sie externe Lautsprecher
anschließen und als Monitor zu nutzen versuchen, kommt es zu akustischen
Rückkopplungen. Versuchen Sie nicht, Lautsprecher als Monitor einzusetzen.
6
Stellen Sie den Eingangsregler wie folgt ein.
Eingangsniveau anpassen
fig.rec-1.eps
1. Drücken Sie die REC-Taste.
Das R-1 geht in
Aufnahmebereitschaft. Die
Anzeige zeigt die für den
Verbleibende Aufnahmezeit
gewählten Dateityp bzw. die für
dessen Aufnahmequalität verbleibende Zeit an.
* Der während der Aufnahmebereitschaft angezeigte Songname ist der Name der Datei, die
bei Abschluss der neuen Aufnahme erzeugt werden wird.
fig.rec-2.eps
2.
Drücken Sie die DISPLAY-Taste.
3. Spielen Sie den Sound, den Sie
tatsächlich aufnehmen wollen,
und positionieren Sie das externe Mikrofon so, dass es den Sound empfangen kann.
* Wenn Sie während der Aufnahme einen Effekt auf den Sound anwenden wollen, regeln Sie den
Eingangspegel bei eingeschaltetem Effekt ein.
fig.rec-3.eps
4. Erhöhen Sie langsam die
Aufnahmelautstärke.
Stellen Sie den Pegel so ein, dass
das ■ in der Anzeige des
Eingangsniveaus das am
meisten rechts stehende ■ nicht erreicht.
Bei zu niedrigem Aufnahmeniveau können Sie keine sehr leisen Sounds aufnehmen.
Bei zu hohem Aufnahmepegel sind laute Sound gestört und verursachen
Knarzgeräusche in der Aufnahme.
* Falls Ihr Aufnahmematerial gelegentliche laute Soundspitzen enthält, wie z. B.
Schlagzeugeinsätze einer Bandvorführung oder plötzliches lautes Lachen in einem sonst ruhigen
Gespräch, empfehlen wir den Einsatz des Begrenzers (06 Limiter, S. 90). Falls dieser eingesetzt
werden soll, regeln Sie den Eingangspegel passend für das allgemeine Soundniveau ein, und
nicht auf die gelegentlichen Soundspitzen. Wenn Sie den Begrenzer verwenden, wird der
Eingangspegel automatisch so eingestellt, dass der Toneingangspegel nicht zu hoch wird. Bei
Verwendung des Begrenzsers sollten Sie den Eingangspegel so einstellen, dass das Symbol ■ in
Stellung in der Abbildung nur gelegentlich erscheint.
B
(Stellung in der obigen Abbildung)
A
EnglishDeutschFrançaisItalianoEspañol
B
A
83
Page 84

Einfache Aufnahmemethoden
fig.rec-time.eps
7
Drücken Sie die
Die Aufnahme beginnt.
* Sie können die Aufnahme auch mit der
PLAY/PAUSE-Taste
REC-Taste
starten.
.
Vergangene Zeit seit
Aufnahmebeginn
Wenn Sie den
Eingangsregler
während der Aufnahmebereitschaft oder
während der Aufnahme verstellen, wird sich der Eingangspegel ändern.
Achten Sie darauf, den
Auch bei auf ON geschaltetem
Eingangsregler
HOLD-Schalter
nicht unabsichtlich zu verstellen.
ist der
Eingangsregler
nicht von der sperrenden HOLD-Funktion betroffen.
8
Nach Abschluss der Aufnahme drücken Sie die
Wenn Sie die Aufnahme unterbrechen wollen, drücken Sie die
Taste
. Zur Beendigung der Pause und zur Fortsetzung der Aufnahme drücken Sie
die
PLAY/PAUSE-Taste
erneut.
STOP-Taste
.
PLAY/PAUSE-
Die Aufnahmedaten werden in einer Datei auf der CompactFlash-Karte
gespeichert. Die Anzeige zeigt den Dateinamen der Aufnahme an, und diese Datei
wird selektiert.
* Der Dateiname wird automatisch nach folgendem Schema gebildet:
0001
ist die nächsthöhere Nummer der höchstnummerierten Datei auf der CompactFlash-
R1_0001.MP3
Karte.
* Die Datei wird auf der Rootebene der CompactFlash-Karte erzeugt. Verzeichnisse bzw.
Ordner werden nicht erzeugt.
9
Um die gerade aufgenommene Datei anzuhören, drücken Sie die
Taste
. Informationen zu anderen Wiedergabemethoden finden Sie unter
“Wiedergabemethoden”
(S. 85).
PLAY/PAUSE-
Wie der Eingangepegelmesser den Signalpegel anzeigt
. Die
84
Anzahl von
erscheinenden ■
Keine ∞ –– -50,0 8 -21,0 –– -18,0
1 -50,0 –– -40,0 9 -18,0 –– -15,0
2 -40,0 –– -36,0 10 -15,0 –– -12,0
3 -36,0 –– -33,0 11 -12,0 –– -9,0
4 -33,0 –– -30,0 12 -9,0 –– -6,0
5 -30,0 –– -27,0 13 -6,0 –– -3,0
6 -27,0 –– -24,0 14 -3,0 –– 0,0
7 -24,0 –– -21,0 15 0,0 –– (Clip)
dB
Anzahl von
erscheinenden ■
dB
Page 85

Wiedergabemethoden
Normale Wiedergabe
Das R-1 hat keine internen Lautsprecher. Darum müssen Sie für das Hören der
Wiedergabe Kopfhörer oder Lautsprecher bereithalten.
Sie können den Kopfhöreranschluss des R-1 als optischen Digitalausgang (optical out)
zur Verbindung mit einem digitalen Audiogerät oder als Standardausgang (line
output) zur Verbindung mit Ihrem analogen Audiogerät nutzen.
Bevor Sie fortfahren, stellen Sie die Verbindungen mit den für Ihr Gerät passenden
Kabeln her. Berücksichtigen Sie
digital speakers (digital devices)”
(analog devices)”
1
Wenn die Anzeige ein Bild wie in der Illustration zeigt, wählen Sie mit dem
VALUE-Regler
Drücken Sie die
NEXT-Taste
* Falls die CompactFlash-Karte keine auf dem R-1 abspielbaren Song-Dateien enthält, wird in
der Anzeige „NoSong“ angezeigt.
2
Drücken Sie die
abgespielt.
3
Stellen Sie den
Hörniveau..
* Der angezeigte Songname ist der Name der Datei. Er korrespondiert nicht mit dem Tag (der
Markierung) ID3 in der MP3-Datei.
* Songnamen werden in alphabetischer Reihenfolge nach folgender Buchstabenordnung und
nicht in der Reihenfolge ihrer Aufzeichnung angezeigt.
(Leerraum) ! # $ % & ‘ ( ) + , - . 0 1 2 3 4 5 6 7 8 9 ; = @
A B C D E F G H I J K L M N O P Q R S T U V W X Y Z
a b c d e f g h i j k l m n o p q r s t u v w x y z
* Falls die CompactFlash-Karte Ordner bzw. Unterverzeichnisse enthält, werden die Dateien
auf Rootebene zuerst angezeigt, gefolgt von den Dateien aus den Ordnern
(Unterverzeichnissen).
* Dateinamen, die mit einem „.“ beginnen, werden ignoriert und nicht angezeigt.
* Dateinamen mit anderen Endungen als .mp3 und .wav werden ignoriert und nicht
angezeigt.
(S. 24).
eine Songdatei.
PREV-Taste
, um zur nächsten Songdatei zu kommen.
PLAY-Taste
Lautstärkeregler
“Connecting headphones”
(S. 23) oder
, um zur vorherigen Songdatei zu gelangen, oder die
( ) des R-1; die angezeigte Songdatei wird
“Connecting analog speakers
langsam nach rechts bis auf ein angenehmes
(S. 22),
“Connecting
EnglishDeutschFrançaisItalianoEspañol
Mehr Informationen über Dateien, die das R-1 aufnehmen und abspielen
kann, finden Sie unter
“Types of files that the R-1 can handle”
(S. 28).
85
Page 86

Wiedergabemethoden
REPEAT A-B (Wiedergabewiederholung)
Mit dieser Funktion können Sie einen Songabschnitt bei der Wiedergabe markieren und ihn
wiederholt abspielen.
Verfahren
1
Drücken Sie während des Abspielens
einmal auf die
REPEAT-Taste
().
Dieser Ort wird dem Beginn der
Wiederholung zugewiesen (Punkt
A
).
2
Drücken Sie nochmals auf die
REPEAT-Taste
dem Ende der Wiederholung
zugewiesen (Punkt B).
fig.repeat-a
Der von Ihnen in den Schritten 1 und 2
angegebene Abschnitt zwischen den
Punkten A und B wird wiederholt
abgespielt. Zur Rückname der
Abspielwiederholung drücken Sie die
REPEAT-Taste
. Dieser Ort wird
erneut.
Song
Song
Song
A
AB
AB
Hinweise
* Wenn Sie nach der Angabe des Punktes A die STOP-Taste drücken, also bevor Sie einen
Punkt B angegeben haben, wird der Punkt A gelöscht.
* Wenn Sie nach der Angabe des Punktes A die Wiedergabe bis zum Ende des Songs laufen lassen,
liegt die Wiederholung zwischen Punkt A und dem Ende des Songs.
* Wenn Sie die STOP-Taste während der Wiederholung drücken, stoppt die Wiederholung und
die Einstellung für den Abschnitt (A-B) wird gelöscht.
Zum Löschen dieser Funktion
• Bei angegebenen Punkten
Einstellungen für die Punkte
• Wenn Sie nach der Angabe des Punktes
einen Punkt
• Wenn Sie sowohl die Wiedergabe stoppen als auch die Wiederholungseinstellungen löschen
wollen, drücken Sie die
Wiederholungseinstellungen der Punkte
B
angegeben haben, wird der Punkt
A
und
A
und
STOP-Taste
B
löscht das Drücken der
B
.
A
die
STOP-Taste
A
. Die Wiedergabe stoppt und die
A
und
B
werden gelöscht.
REPEAT-Taste
drücken, also bevor Sie
gelöscht.
86
( ) die
Page 87

Wiedergabemethoden
1/2 PLAY (halbierte Wiedergabegeschwindigkeit)
Hier wird erklärt, wie Sie mit halber Geschwindigkeit abspielen können.
Verfahren
1
Drücken Sie während des
Abspielens oder bei STOP die
SPEED-Taste
Die untere Zeile der Anzeige zeigt
Geschwindigkeit
Wenn das R-1 gerade abspielt, wird die Wiedergabe verlangsamt.
Wenn das R-1 gerade gestoppt ist, wird die Wiedergabe mit halber
Geschwindigkeit beginnen, wenn Sie die
* Die Funktion verstellt die Tonhöhe der verlangsamten Wiedergabe so, dass sie der bei
normaler Wiedergabe entspricht. Dies kann einen Schwebungseffekt bei der Wiedergabe
erzeugen, der jedoch keine Fehlfunktion bedeutet.
.
.
1/2
und die Wiedergabe erfolgt mit
PLAY-Taste
drücken.
To cancel this function
Wenn die
SPEED-Taste
Wiedergabe in halber Geschwindigkeit
zu deren Abbruch.
Wenn Sie die verlangsamte Wiedergabe nicht abbrechen, wird auch der
nächste Song verlangsamt abgespielt.
aktiviert ist, drücken Sie die
EnglishDeutschFrançaisItalianoEspañol
halber
87
Page 88

Wiedergabemethoden
PLAY MODE (Wiedergabemodus)
Hier können Sie die Reihenfolge und die Methode der Wiedergabe angeben.
1
Drücken Sie die
Sie können den PLAY-Modus während des Spielens des R-1 nicht ändern.
Sie müssen erst die
2
Stellen Sie am VALUE-Regler
3
Drücken Sie die
4
Stellen Sie mit dem
Sequential
Single
Shuffle
fig.sequential.eps
5
Drücken Sie nach der Auswahl des
gewünschten PLAY-Modus die
ENTER-Taste
6
Drücken Sie die
Sie werden zum PLAY-Modus zurückkehren.
MENU-Taste
STOP-Taste
ENTER-Taste
VALUE-Regler
Die Songs werden nacheinander in der Reihenfolge 001, 002, 002...009 abgespielt.
* Benutzen Sie die Tasten PREV und NEXT oder den VALUE-Regler zur
Auswahl einer Songdatei.
Die einzelne selektierte Songdatei wird wiederholt abgespielt.
Die Reihenfolge der Songs ändert sich automatisch.
* Ein unmittelbar vorher abgespielter Song wird nicht gespielt.
* Wenn Sie die Tasten PREV und NEXT oder den VALUE-Regler zur Auswahl
eines Songs benutzen, werden die Songs in der gleichen Reihenfolge angeboten, wie sie auch PLAY-Modus
.
MENU-Taste
.
zum Anhalten der Wiedergabe drücken.
05 Play Mode
.
den gewünschten PLAY-Modus ein.
.
ein.
Sequential
erscheinen.
88
Page 89

Einsatz von Effekten
Anwenden eines Effekts
Dieser Abschnitt erklärt die Anwendung eines Effekts während der Wiedergabe oder
bei Aufnahmebereitschaft. Sie können Effekteinstellungen auch vor der Wiedergabe
vornehmen oder verschiedene Einstellungen bei einer Probeaufnahme ausprobieren.
fig.effect.eps
Beim Abspielen in
Aufnahmebereitschaft
Effektmodus an
3
1
Änderungsmodus
EDIT
ENTEREXIT
EDIT
EXITEXIT
ENTERENTER
EXITEXIT
Wählen Sie einen Effekt
01:Eazy EQ
-> 02:For Speech...
Wählen Sie einen Parameter
Typ -> Level 1
EnglishDeutschFrançaisItalianoEspañol
ENTERENTER
Editieren eines Parameters
Pop -> Dance
-> HipHop...
EXITEXIT
Den Editiermodus für
Effekte verlassen
Wiedergabe
/Aufnahme starten
Die Parametereinstellungen für Effekte werden bis zu Ihrer nächsten
Änderung gespeichert.
89
Page 90

Verschiedene Einstellungen
Systemeinstellungen (Konfigurationsmodus)
Details zu diesen Einstellungen finden Sie in
“Procedures”
(S. 56).
* Sie können aus laufender Aufnahme oder Wiedergabe und aus der Aufnahmebereitschaft
mit der
MENU-Taste
Menü/Effekt
LCD Contrast
01
Stellt den Kontrast der Anzeige ein.
LCD Backlight
Gibt die Zeitspanne vor, nach der die Anzeigen-
02
beleuchtung bei Batteriebetrieb abgeschaltet
wird.
Delete File
03
Löscht eine Datei.
Rename File
04
Ändert einen Dateinamen.
Play Mode
05
Gibt die Reihenfolge vor, nach der Songs ab-
gespielt werden.
Limiter
Schaltet den Begrenzer für den Eingangspegel an
und aus.
* Der Begrenzer reduziert den Eingangspegel bei
zu starkem Niveau auf ein passendes Maß.
06
07
08
Schnitt-Niveau
Schwellwert-Niveau
AD-N iveau
Der Schwellwert ist –9 dBFS.
Record Mode
Gibt den Dateityp der bei einer Aufnahme erzeugten Datei vor. Dies bestimmt die Audioqualität der aufgenommenen Datei.
Track Splitting
Schaltet die Tracktrennungsfunktion an und aus.
* Diese Funktion spaltet die Datei automatisch
auf, wenn während der Aufnahme ein mindestens drei Sekunden langes Ruheintervall auftritt.
nicht in den Konfigurationsmodus gelangen.
Schnittgeräusche
reduzieren und an
AD-Konverter weiterleiten
Niveau des Eingangsignals
Wert
(Voreinstellung
ist fett gedruckt)
1–5–10 A (S. 56)
OFF, ON,
10sec, 20sec
–– B (S. 58)
–– C (S. 60)
Sequential
Single, Shuffle
OFF
MP3 64kbps,
MP3 96kbps,
MP3 128kbps,
MP3 160kbps,
MP3 192kbps
MP3 256kbps,
MP3 320kbps,
WAV 16bit,
WAV 24bit
OFF
5sec
,
, ON
, ON
Verfahren
,
A (S. 56)
A (S. 56)
A (S. 56)
A (S. 56)
,
A (S. 56)
90
Page 91

Verschiedene Einstellungen
Menü/Effekt
Input Monitor
Schalten Sie diese Funktion ein, wenn Sie das
Eingangssignal über Kopfhörer überwachen.
09
Schalten Sie aus, wenn das Signal nicht überwacht wird.
* Während der Aufnahme kann der Sound unab-
hängig von dieser Einstellung gehört werden.
Input Select
Setzen Sie diese Einstellung beim Anschluss eines
Stereomikrofons auf STEREO. Setzen Sie diese
Einstellung beim Anschluss eines Mono-Mikrofons auf MONO. Wenn Sie die STEREO-
10
Einstellung mit einem MONO-Signal nutzen,
wird nur der linke Kanal aufgenommen. Bei
MONO-Einstellung wird der Sound auf dem
rechten und linken Kanal aufgenommen.
* Die aufgenommene Datei hat auch bei MONO-
Einstellung ein STEREO-Format.
Sleep Timer
Gibt die Zeitspanne vor, nach der das R-1 bei Bat-
11
teriebetrieb in den Schlafmodus geht.
* Diese Einstellung bewirkt bei Netzbetrieb
nichts.
Format Card
12
Formatiert eine CompactFlash-Karte
Firmware Ver1.00
Erlaubt die Versionsprüfung der Firmware des R-
13
1.
About the R-1
14
Zeigt Informationen über das R-1 an.
Wert
(Voreinstellung
ist fett gedruckt)
OFF
, ON A (S. 56)
STEREO
, MONO
OFF, 1min, 2min,
3min
, 5min,
10min, 15min,
30min, 45min,
60min
– D (S. 62)
– E (S. 64)
– A (S. 56)
Verfahren
A (S. 56)
A (S. 56)
EnglishDeutschFrançaisItalianoEspañol
91
Page 92

Commandes et connecteurs
19
Figure panneau 1
1
Microphone interne
11
12
1
2
3
4
7
8
5 6
9
10
13
14
15
16
Microphone stéréo intégré
Ce microphone interne est désactivé lorsqu’un microphone ou autre appareil est
branché sur les
entrées micro
18
ou
les entrées ligne
. Il convient donc de ne
rien raccorder aux connecteurs d’entrée si l’on veut utiliser le microphone interne. Pour
enregistrer à l'aide du microphone interne, placer le bouton de sélection de type de microphone à DYN.
2
Afficheur
Tient l’utilisateur informé de l’état d’exécution du R-1.
3
Touche EFFECT
Appuyer sur la
touche EFFECT
pour activer/désactiver un effet.
Cette touche s’allume lorsque l’effet est activé.
Si l’effet est activé avant lecture ou en cours de lecture, il est appliqué à l’enregistrement
lors de la lecture. S’il est activé avant enregistrement ou en cours d’enregistrement, il
est appliqué au son enregistré, c’est-à-dire que l’enregistrement intègre le traitement résultant de l’effet.
Le R-1 est doté de divers effets permettant de modifier le son en lecture ou en enregistrement afin de lui donner plus de présence ou d’en rendre l’écoute plus agréable. Ces
effets permettent par ailleurs de transformer complètement le son.
4
Touche EDIT
Cette touche donne accès au paramétrage des effets.
Pour plus d’information sur les effets, se reporter à
paramétrage des effets est possible que la
5
Touche MENU
touche EFFECT
“Using effects”
soit activée ou non.
(p. 46). Le
Cette touche permet de sélectionner le mode de paramétrage de l’appareil (« Setup ») :
contraste de l’afficheur à cristaux liquides (LCD), sélection de la qualité d’enregistrement et divers autres réglages globaux (cf.
“Paramétrages divers”
(p. 110)).
92
Page 93

Commandes et connecteurs
A
Song
AB
Song
AB
Song
6
Touche DISPLAY
Cette touche commute les différents écrans de l’afficheur du R-1.
En mode PLAY (lecture), cette touche fait défiler les paramètres suivants : temps de lecture écoulé, temps de lecture restant pour le fichier en cours, type de fichier et débit.
Appuyer sur la
7
Touche PREV
Cette touche permet de revenir au début du fichier en cours ou de sélectionner le précédent.
En cours de lecture d’un fichier, elle permet de revenir au début de celui-ci. Si le lecteur
est déjà calé sur le début du fichier (00:00), cette touche sélectionne le fichier précédent.
Il suffit d’appuyer longuement sur cette touche pour revenir au premier des fichiers en
mémoire.
Ces opérations sont possibles en cours de lecture ou non.
8
Touche NEXT
Cette touche permet de sélectionner le fichier suivant. Il suffit d’appuyer longuement
sur cette touche pour faire défiler les fichiers vers l’avant.
Ces opérations sont possibles en cours de lecture ou non.
9
Touche REPEAT
Permet la lecture en boucle d’une partie d’un fichier située entre deux points (A - B)
définis par l’utilisateur. Appuyer une fois sur cette touche pour définir le point “A”, et
une nouvelle fois pour définir le point “B”.
Une troisième pression sur cette touche annule la lecture en boucle et efface les points
A et B.
Figure Repeat-a
En cours de lecture, appuyer sur la
1.
REPEAT
de manière à définir le point de départ (point A) de
la boucle.
Figure Repeat-b
Appuyer une nouvelle fois sur la
2.
pour définir le point d’arrivée (point B).
touche DISPLAY
pour faire défiler les différents paramètres.
touche
touche REPEAT
EnglishDeutschFrançaisItalianoEspañol
Figure Repeat-ab
L’appareil lit en boucle la partie du fichier située entre les deux points ainsi définis aux étapes 1 et 2.
Pour annuler la lecture en boucle, appuyer une nouvelle fois sur la
10
Touche SPEED
touche REPEAT
.
Cette touche met la lecture en mode demi-vitesse. Appuyer une nouvelle fois pour repasser en vitesse normale. Cette fonction permet de jouer sur un morceau de musique
au tempo trop rapide ou d’écouter dans un plus grand confort un enregistrement d’une
personne parlant très vite.
93
Page 94

Commandes et connecteurs
Figure panneau 2
17
18
1
2
19
3
11
Touche STOP
20
21
11
12
4
7
8
5 6
9
10
13
Interrompt lecture ou enregistrement.
12
Touche PLAY/PAUSE
Cette touche permet de lancer la lecture, mais également de mettre en mode « pause »
enregistrement ou lecture.
En cours de lecture, cette touche met l’appareil en pause, l’afficheur indiquant
PAUSE
. Il suffit d’appuyer une nouvelle fois sur la touche pour relancer la lecture.
De même, en cours d’enregistrement, cette touche permet d’interrompre brièvement ce
dernier. L’afficheur indique alors
REC-PAUSE
, et la
touche REC (enregistrement)
émet une lumière rouge clignotante.
Pour relancer l’enregistrement, appuyer de nouveau sur la
sur la
touche PLAY/PAUSE
). La
touche REC
émet une lumière rouge clignotante
touche REC
(ou appuyer
durant l’enregistrement.
13
Touche REC
L’appareil étant à l’arrêt, la
cording-standby »). L’afficheur indique alors
registrement)
émet une lumière rouge clignotante.
touche REC
le met en mode pause enregistrement (« re-
REC STANDBY
, et la
touche REC (en-
Pour lancer l’enregistrement à partir du mode pause enregistrement, appuyer de nouveau sur la
istrement, la
14
Molette VALUE
touche REC
touche REC
(ou appuyer sur la
touche PLAY/PAUSE
émet une lumière rouge.
). En cours d’enreg-
Cette molette sert à la sélection des fichiers, au choix des effets et à leur réglage, ainsi
qu’à la sélection des options du mode de paramétrage de l’appareil.
15
Touche EXIT
Cette touche permet de revenir au paramètre précédent en mode Effect Edit (réglage effets) ou Setup (paramétrage). En mode Setup, toute modification des paramètres est annulée si l’on appuie sur la
16
Touche ENTER
touche EXIT
avant d’avoir appuyé sur la
touche ENTER
Permet de sélectionner un paramètre ou de finaliser une modification effectuée en mode
Effect Edit ou Setup.
14
15
16
PLAY-
.
94
Page 95

Commandes et connecteurs
17
Connecteur d’entrée microphone
Réservé au branchement d’un microphone
Si un câble est branché sur la prise d’entrée ligne, aucun signal audio ne passe
par cette prise microphone.
Mettre le sélecteur de
type de micro (“mic type”)
au type de microphone branché (microphone électro-dynamique ou mini-micro électrostatique à alimentation fantôme).
Le connecteur prend en charge les micros stéréo ; utiliser un adaptateur stéréo de type
mini-jack. Si le microphone est de type monophonique, mettre le paramètre
Select
(mode Setup) sur
à
“Paramétrage système (mode Setup)”
18
Entrée ligne
MONO
. Pour plus d’information sur ce réglage, se reporter
(p. 110).
Le branchement des sorties audio d’un appareil audio ou d’un instrument de musique
sur le R-1 doit se faire sur cette prise par l’intermédiaire d’un câble stéréo de type minijack.
19
Sélecteur de type de microphone (“mic type”)
Mettre ce sélecteur sur la position correspondant au type de microphone branché sur
l’entrée
DYN
CND
mic input
17
.
Utiliser ce paramètre si le microphone est de type électro-dynamique.
Si le microphone interne est utilisé, régler à DYN.
Utiliser ce paramètre si le micro est de type électrostatique à alimentation fantôme.
Le microphone doit impérativement nécessiter une alimentation fantôme : En effet, cette prise fournit une tension d’alimentation de 2 V.
* Si le sélecteur est sur la position CND, ne brancher aucun microphone ni aucun
autre appareil n’acceptant pas un telle alimentation fantôme, qui risquerait de les
endommager.
19
sur la position correspondant
10 Input
EnglishDeutschFrançaisItalianoEspañol
Volume d’entrée
20
Règle le volume d’entrée du microphone intégré ,
trée ligne
18
.
Régler ce niveau selon la méthode décrite à la rubrique
1
de l’entrée micro
ou
“Réglage du niveau d’entrée”
17
(p. 100) tout en surveillant le niveau d’entrée.
21
Connecteur USB
Ce connecteur permet de brancher l’appareil sur un ordinateur par le biais du câble USB
fourni.
Une fois le R-1 branché sur l’ordinateur, il est possible de transférer ou copier sur ce
dernier les fichiers sons enregistrés à l’aide de l’appareil. Inversement, il est possible de
transférer ou de copier des fichiers .mp3 ou .wav présents sur l’ordinateur de manière
à les faire lire par le R-1.
Ce connecteur prend en charge la norme USB 2.0 (USB haut débit), assurant un chargement rapide.
La marche à suivre pour brancher le R-1 sur un ordinateur figure à la rubrique
necting the R-1 to your computer”
Une fois le R-1 “reconnu” par l’ordinateur, l’afficheur du R-1 indique
USB
.
(p. 44).
Connected via
Pour la durée de la connexion avec l’ordinateur, toutes les fonction du R-1 (interrupteur de marche/arrêt excepté) sont désactivées (ses divers commutateurs et touches ne fonctionnent pas).
de l’en-
“Con-
95
Page 96

Commandes et connecteurs
Figure panneau 3
1
22
22
Interrupteur principal
24 25 2623
27
28
Met l’appareil sous tension et hors tension.
Ne pas mettre l’appareil hors tension en cours de lecture ou d’enregistrement. Il faut impérativement s’assurer que lecture et enregistrement sont coupés avant toute mise hors
tension.
• En cas de mise hors tension accidentelle en cours d’enregistrement, les données enregistrées ne sont pas mémorisées sur la carte CompactFlash.
• Celle-ci peut se trouver endommagée en cas de mise hors tension de l’appareil alors
qu’elle subit une opération de lecture ou d’écriture de données, c’est-à-dire pendant la
lecture ou l’enregistrement audio.
• En cas de mise hors tension du R-1 alors que l’indication Now working... est affichée
(modification du paramétrage d’un effet ou sauvegarde d’un paramètre modifié), le
R-1 cesse de fonctionner correctement et peut même ne plus redémarrer.
Il convient donc de faire en sorte de ne JAMAIS le mettre hors tension dans de telles
conditions.
23
Prise adaptateur secteur
Connecter l’adaptateur secteur sur cette prise.
24
Commutateur HOLD
Le
commutateur HOLD
étant sur la position ON, les autres touches de l’appareil sont
désactivées, ce qui évite toute fausse manœuvre.
Exceptions : lorsque le
19
type
, le bouton
ton
Output volume
25
Niveau de sortie (Output volume)
commutateur HOLD
Input volume
25
restent opérationnels.
20
, l’
interrupteur marche/arrêt
est sur la position ON, le
sélecteur Mic
22
et le bou-
Ce bouton permet de régler le volume sonore du signal en sortie de la prise
sortie ligne/sortie numérique
26
(le niveau de la sortie numérique n’est toutefois
pas réglable).
26
Prise casque/sortie ligne/sortie numérique (Headphone/line
output/digital output)
Prise pour casque ou enceintes externes Pour exploiter le signal numérique, brancher un
câble optique avec prise mini.
27
Touche EJECT
Assure l’éjection de la carte CompactFlash introduite dans l’
carte mémoire
28
Emplacement pour carte mémoire
28
.
Introduire une carte mémoire CompactFlash dans la fente.
Le R-1 prend uniquement en charge les cartes mémoire de type CompactFlash.
emplacement pour
casque/
96
Page 97

Commandes et connecteurs
27
Figure panneau 4
29
30
29
Logement des piles
Installer les piles dans leur logement si le R-1 doit fonctionner sur piles. Si l’on entend
alimenter l’appareil à l’aide de son adaptateur secteur, il est inutile d’installer les piles.
Mettre impérativement le R-1 hors tension avant de passer d’un type d’alimentation
électrique à l’autre (adapteur secteur / piles et vice-versa).
Lire la rubrique
toute utilisation du R-1.
30
Couvercle de l’emplacement pour carte mémoire
Ce couvercle évite toute éjection intempestive de la carte CompactFlash. Ce couvercle
dissimule l’
“Installing the batteries and turning on the power”
emplacement de la carte
28
ainsi que la
touche d’éjection
(p. 20) avant
EnglishDeutschFrançaisItalianoEspañol
.
97
Page 98

Préparatifs avant utilisation du R-1
Formatage d’une carte CompactFlash
Avant utilisation dans le R-1, la carte CompactFlash doit être formatée.
Cette opération doit être effectuée à l’aide du R-1, selon la marche à suivre indiquée à la page 60
(Paramètres système - mode Setup).
Les cartes CompactFlash formatées sur un autre appareil que le R-1 risquent de ne pas fonctionner correctement avec ce dernier.
1
Mettre le R-1 hors tension.
2
Introduire la carte CompactFlash dans
Figure startup.epsFigure no-song.eps
3
Mettre le R-1 sous tension.
Si la carte CompactFlash ne comporte
aucun fichier pouvant être lu par le R1, l’indication No Song s’affiche. Dans
le cas contraire, l’écran de lecture
(“play mode”) s’affiche.
4
Appuyer sur la
* Si l’on désire annuler l’opération, il suf-
fit d’appuyer sur la
L’écran précédent s’affiche à nouveau.
Figure format-disp.eps
5
Tourner la
manière à sélectionner l’option
Format Card
6
Appuyer sur la
Figure format.eps
7
Lorsque l’écran ci-contre s’affiche,
appuyer sur la
touche MENU
touche EXIT
molette VALUE
.
touche ENTER
touche ENTER
de
l’emplacement prévu à cet effet
.
.
12
.
.
.
98
Figure sure.eps
8
Un écran de confirmation s’affiche.
Pour lancer le formatage de la
carte, appuyer sur la
ENTER
.
* Pour annuler l’opération (pas de formatage de la carte), appuyer sur la
pareil revient à l’écran illustré au point 5.
Ne jamais éjecter la carte CompactFlash en cours de formatage. Cela pourrait endommager la carte.
Figure complete.eps
Le formatage est terminé lorsque le
message
9
Appuyer sur la
L’écran principal (mode Play) s’affiche à nouveau.
Completed!
touche
s’affiche.
touche MENU
.
touche EXIT
. L’ap-
Page 99

Méthodes d’enregistrement
Le tableau ci-dessous indique les durées d’enregistrement approximatives permises par
les différentes cartes CompactFlash.
Durées d’enregistrement sur carte CompactFlash
Durée d’enregistrement (approximative)
Capacité de la carte
Type de fichier 64 Mo 256 Mo 512 Mo 2 Go
130
3
5
26
32
43
52
65
86
15 31 125
23 47 188
102 208 831
128 260 1,039
170 346 1,386
205 416 1,663
256 520 2,079
341 693 2,772
512 1,040 4,158
.wav, 24 bits/44,1 kHz
.wav, 16 bits/44,1 kHz
.mp3, 16 bits/320 kb/s
.mp3, 16 bits/256 kb/s
.mp3, 16 bits/192 kb/s
.mp3, 16 bits/160 kb/s
.mp3, 16 bits/128 kb/s
.mp3, 16 bits/96 kb/s
.mp3, 16 bits/64 kb/s
* Les durées d’enregistrement ci-dessus sont approximatives. La durée d’enregistrement effective
peut varier légèrement ; il convient donc d’en tenir compte au moment des préparatifs d’enreg-
istrement.
* Le formatage de la carte CompactFlash doit être fait à l’aide du R-1.
* Pour un enregistrement continu et de longue durée, utiliser l’adaptateur secteur fourni.
* Si l’enregistrement est fait en plusieurs fichiers, la durée d’enregistrement totale sera inférieure
à celle indiquée ci-dessus.
Enregistrement à l’aide du micro intégré
Figure mic-LR.eps
Le R-1 est doté d’un microphone stéréo intégré. Les sons
captés sur le côté droit du R-1 sont enregistrés sur le canal de droite (R), et les sons captés sur le côté gauche
sont enregistrés sur le canal de gauche (G).
Ne rien raccorder aux connecteurs d’entrée (micro et ligne) si l’on veut utiliser le microphone
interne.
En cas de branchement d’un microphone ou
d’un câble sur la prise microphone ou sur l’entrée ligne, la prise ainsi utilisée devient prioritaire, le microphone intégré étant alors mis
hors circuit.
1
S’assurer que le R-1 est hors tension (interrupteur sur OFF). Régler le
d’entrée
à zéro.
Pour entendre l’enregistrement au fur et à mesure, brancher un casque sur la
prise prévue à cet effet (Phones). Ne pas tenter de contrôler l’enregistrement
par le biais d’enceintes raccordées à l’appareil sous peine de déclencher une
réaction acoustique (“effet Larsen”).
Unité : minute
L R
volume
EnglishDeutschFrançaisItalianoEspañol
99
Page 100

Méthodes d’enregistrement
2
Mettre le R-1 sous tension comme indiqué à la rubrique
adaptor and turning on the power”
3
Pour enregistrer à l'aide du microphone interne, placer le bouton de sélection de
type de microphone à
4
Sélectionner le type de fichier à enregistrer (cf.
handle”
tionné, utiliser l’option
5
Régler le niveau d’entrée comme indiqué ci-après.
Réglage du niveau d’entrée
Figure rec-1.eps
(p. 28)). Pour effectuer la sélection ou contrôler le type actuellement sélec-
DYN
1. Appuyer sur la touche REC.
L’appareil passe en mode pause
enregistrement (« REC STAND-
BY »). L’afficheur indique la
durée d’enregistrement possible
pour la qualité sélectionnée.
* Le nom de fichier affiché en mode pause enregistrement est celui du fichier qui sera créé en
fin d’enregistrement.
Figure rec-2.eps
2.
Appuyer sur la touche DISPLAY.
3.
Jouer/produire les sons à enregis-
trer et positionner le R-1 de
manière à ce que son micro intégré
puisse les capter correctement.
* Pour traiter le son à l’aide d’un effet pendant l’enregistrement, régler le niveau d’entrée après
activation de l’effet.
Figure rec-3.eps
4.
Lancer le son à enregistrer et
accroître progressivement le
ume d’entrée
Continuer d’accroître le niveau
d’entrée, de manière à ne pas af-
ficher le dernier segment de l’in-
dicateur à barres. (Position dans l'illustration ci-dessus.)
Si le niveau d’enregistrement est trop bas, l’appareil n’enregistrera pas les sons de très
faible volume. Si le volume d’enregistrement est trop élevé, les sons les plus forts
(crêtes) sont distordus, ce qui se traduit par des craquements tout au long des pistes en-
registrées.
* Si le son à enregistrer comporte des crêtes importantes (coups de grosse caisse dans le cas d’un or-
chestre, rire soudain dans le cas d’une conversation), il est recommandé d’utiliser le limiteur (06
Limiter,p. 110). Il est ainsi possible de régler le niveau d’entrée en fonction du niveau général du
son à enregistrer, sans tenir compte du niveau des crètes. Lorsque le limiteur est utilisé, le niveau
d'entrée audio est automatiquement ajusté pour ne pas atteindre un niveau trop élevé. Lorsque le
limiteur est utilisé, il est préférable d'ajuster le niveau d'entrée pour que le symbole
qu'occasionnellement en position .
.
(p. 19).
.
07 Record Mode
vol-
A
B
“Connecting the AC
“Types of files that the R-1 can
(p. 110) du mode Setup.
Durée d’enregistrement restante
B
■
n'apparaisse
A
100
 Loading...