

Page 1
Reference Guide
Page 2

Contents
Panel Descriptions . . . . . . . . . . . . . . . . . . . . . . . . . . . . . . . . . . . . . . . 3
Main Screen . . . . . . . . . . . . . . . . . . . . . . . . . . . . . . . . . . . . . . . . . . . 5
Getting Ready . . . . . . . . . . . . . . . . . . . . . . . . . . . . . . . . . . . . . . . . . . . 6
Installing the Batteries . . . . . . . . . . . . . . . . . . . . . . . . . . . . . . . . . 6
Supplying Power from the USB Port . . . . . . . . . . . . . . . . . . . . . 6
Turning the Power On/O . . . . . . . . . . . . . . . . . . . . . . . . . . . . . . 6
Specifying the Battery Type . . . . . . . . . . . . . . . . . . . . . . . . . . . . 7
Setting the Date and Time . . . . . . . . . . . . . . . . . . . . . . . . . . . . . 7
Preparing a microSD Card . . . . . . . . . . . . . . . . . . . . . . . . . . . . . . 8
Inserting a microSD Card . . . . . . . . . . . . . . . . . . . . . . . . . 8
Formatting a microSD Card . . . . . . . . . . . . . . . . . . . . . . . 9
Using Headphones or Speakers . . . . . . . . . . . . . . . . . . . . . . . . . 10
Connecting External Speakers . . . . . . . . . . . . . . . . . . . . 10
Connecting Bluetooth® Speakers or Headphones . . . 10
Recording . . . . . . . . . . . . . . . . . . . . . . . . . . . . . . . . . . . . . . . . . . . . . . . 12
Basic Recording Operation . . . . . . . . . . . . . . . . . . . . . . . . . . . . . 12
Recalling Settings for Specic Purposes . . . . . . . . . . . . . . . . . 13
Saving an Edited Scene . . . . . . . . . . . . . . . . . . . . . . . . . . . . . . . . 13
Initializing an Edited Scene . . . . . . . . . . . . . . . . . . . . . . . . . . . . . 13
Specifying the Recording Quality . . . . . . . . . . . . . . . . . . . . . . . 14
Sample Rate . . . . . . . . . . . . . . . . . . . . . . . . . . . . . . . . . . . . . 14
Rec Mode . . . . . . . . . . . . . . . . . . . . . . . . . . . . . . . . . . . . . . . . 14
Setting the Sample Rate and Rec Mode . . . . . . . . . . . . 14
Approximate Recording Times . . . . . . . . . . . . . . . . . . . . 15
Using Limiter or AGC. . . . . . . . . . . . . . . . . . . . . . . . . . . . . . . . . . . 16
Cutting the Low-Frequency Range . . . . . . . . . . . . . . . . . . . . . . 16
Adjusting the Input Level . . . . . . . . . . . . . . . . . . . . . . . . . . . . . . 17
Manually Adjusting the Input Level . . . . . . . . . . . . . . . . 17
Using the Rehearsal Function . . . . . . . . . . . . . . . . . . . . . 18
Using the Pre-Rec Function. . . . . . . . . . . . . . . . . . . . . . . . . . . . . 18
Using the Auto Rec Start Function . . . . . . . . . . . . . . . . . . . . . . 18
Recording Instruments or Vocals . . . . . . . . . . . . . . . . . . . . . . . . 19
Using the Built-in Mics . . . . . . . . . . . . . . . . . . . . . . . . . . . . 19
Using an External Mic . . . . . . . . . . . . . . . . . . . . . . . . . . . . 19
Recording from a Cassette or CD. . . . . . . . . . . . . . . . . . . . . . . . 20
Assigning a Marker During Recording . . . . . . . . . . . . . . . . . . . 21
Manual Marking . . . . . . . . . . . . . . . . . . . . . . . . . . . . . . . . . 21
Splitting the File During Recording . . . . . . . . . . . . . . . . . . . . . 21
Splitting Manually . . . . . . . . . . . . . . . . . . . . . . . . . . . . . . . . 21
Splitting Automatically . . . . . . . . . . . . . . . . . . . . . . . . . . . 21
Playback . . . . . . . . . . . . . . . . . . . . . . . . . . . . . . . . . . . . . . . . . . . . . . . . . 22
Basic Playback Operation . . . . . . . . . . . . . . . . . . . . . . . . . . . . . . 22
Play Mode and Repeat Settings . . . . . . . . . . . . . . . . . . . . . . . . . 22
Assigning Markers in a File . . . . . . . . . . . . . . . . . . . . . . . . . . . . . 23
Repeatedly Playing a Portion of a File . . . . . . . . . . . . . . . . . . . 23
Changing the Playback Speed . . . . . . . . . . . . . . . . . . . . . . . . . . 24
Using the INPUT [+][–] Buttons to Change the
Playback Speed . . . . . . . . . . . . . . . . . . . . . . . . . . . . . . . . . . 24
Applying Reverb to the Playback . . . . . . . . . . . . . . . . . . . . . . . 24
Applying Reverb . . . . . . . . . . . . . . . . . . . . . . . . . . . . . . . . . 24
Changing the Reverb Depth . . . . . . . . . . . . . . . . . . . . . . 25
Types of Files that Can be Played . . . . . . . . . . . . . . . . . . . . . . . 25
Controlling the R-07 from a Mobile Device . . . . . . . . . . . . . . 26
Installing the App “R-07 Remote” . . . . . . . . . . . . . . . . . . . . . . . 26
Making Settings on the R-07 . . . . . . . . . . . . . . . . . . . . . . . . . . . 26
Making Settings on the Mobile Device . . . . . . . . . . . . . . . . . . 26
Starting the R-07 Remote . . . . . . . . . . . . . . . . . . . . . . . . . . . . . . 26
Using the Metronome . . . . . . . . . . . . . . . . . . . . . . . . . . . . . . . . . . . 28
Using the Metronome by Itself . . . . . . . . . . . . . . . . . . . . . . . . . 28
Sounding the Metronome During Recording . . . . . . . . . . . . 28
Using the Tuner . . . . . . . . . . . . . . . . . . . . . . . . . . . . . . . . . . . . . . . . . . 29
Basic Operation for the Tuner or Graphic Tuner . . . . . . . . . . 29
Tuner . . . . . . . . . . . . . . . . . . . . . . . . . . . . . . . . . . . . . . . . . . . . . . . . . 29
Graphic Tuner . . . . . . . . . . . . . . . . . . . . . . . . . . . . . . . . . . . . . . . . . 30
Connecting to Your Computer . . . . . . . . . . . . . . . . . . . . . . . . . . . 31
Transferring Files with a Computer (Mass Storage) . . . . . . . 31
Connecting the R-07 to Your Computer . . . . . . . . . . . . 31
Disconnecting from Your Computer . . . . . . . . . . . . . . . 31
Handling Files and Folders. . . . . . . . . . . . . . . . . . . . . . . . . . . . . . . 32
Basic Operation . . . . . . . . . . . . . . . . . . . . . . . . . . . . . . . . . . . . . . . 32
Opening a File or Folder . . . . . . . . . . . . . . . . . . . . . . . . . . . . . . . . 33
Viewing Information . . . . . . . . . . . . . . . . . . . . . . . . . . . . . . . . . . . 33
Deleting a File or Folder . . . . . . . . . . . . . . . . . . . . . . . . . . . . . . . . 34
Renaming a File or Folder . . . . . . . . . . . . . . . . . . . . . . . . . . . . . . 34
Moving a File . . . . . . . . . . . . . . . . . . . . . . . . . . . . . . . . . . . . . . . . . . 34
Copying a File . . . . . . . . . . . . . . . . . . . . . . . . . . . . . . . . . . . . . . . . . 34
Dividing a File . . . . . . . . . . . . . . . . . . . . . . . . . . . . . . . . . . . . . . . . . 35
Combining Files . . . . . . . . . . . . . . . . . . . . . . . . . . . . . . . . . . . . . . . 35
Deleting Unwanted Portions of a File (Trim) . . . . . . . . . . . . . 36
Creating an MP3 File . . . . . . . . . . . . . . . . . . . . . . . . . . . . . . . . . . . 36
Repairing a File . . . . . . . . . . . . . . . . . . . . . . . . . . . . . . . . . . . . . . . . 37
Creating a Folder . . . . . . . . . . . . . . . . . . . . . . . . . . . . . . . . . . . . . . 37
Settings for the R-07 . . . . . . . . . . . . . . . . . . . . . . . . . . . . . . . . . . . . . 38
Basic Procedure . . . . . . . . . . . . . . . . . . . . . . . . . . . . . . . . . . . . . . . 38
Error Messages . . . . . . . . . . . . . . . . . . . . . . . . . . . . . . . . . . . . . . . . . . 41
Troubleshooting . . . . . . . . . . . . . . . . . . . . . . . . . . . . . . . . . . . . . . . . . 42
Problems with Recording . . . . . . . . . . . . . . . . . . . . . . . . . . . . . . 42
Problems with Playback . . . . . . . . . . . . . . . . . . . . . . . . . . . . . . . . 42
Problems with Bluetooth Functionality . . . . . . . . . . . . . . . . . . 43
Other Problems . . . . . . . . . . . . . . . . . . . . . . . . . . . . . . . . . . . . . . . 43
Main Specications . . . . . . . . . . . . . . . . . . . . . . . . . . . . . . . . . . . . . . 45
Copyright © 2018 ROLAND CORPORATION
* This document explains the specications of the product at the time that the document was issued. For the latest information, refer to the
Roland website.
2
Page 3
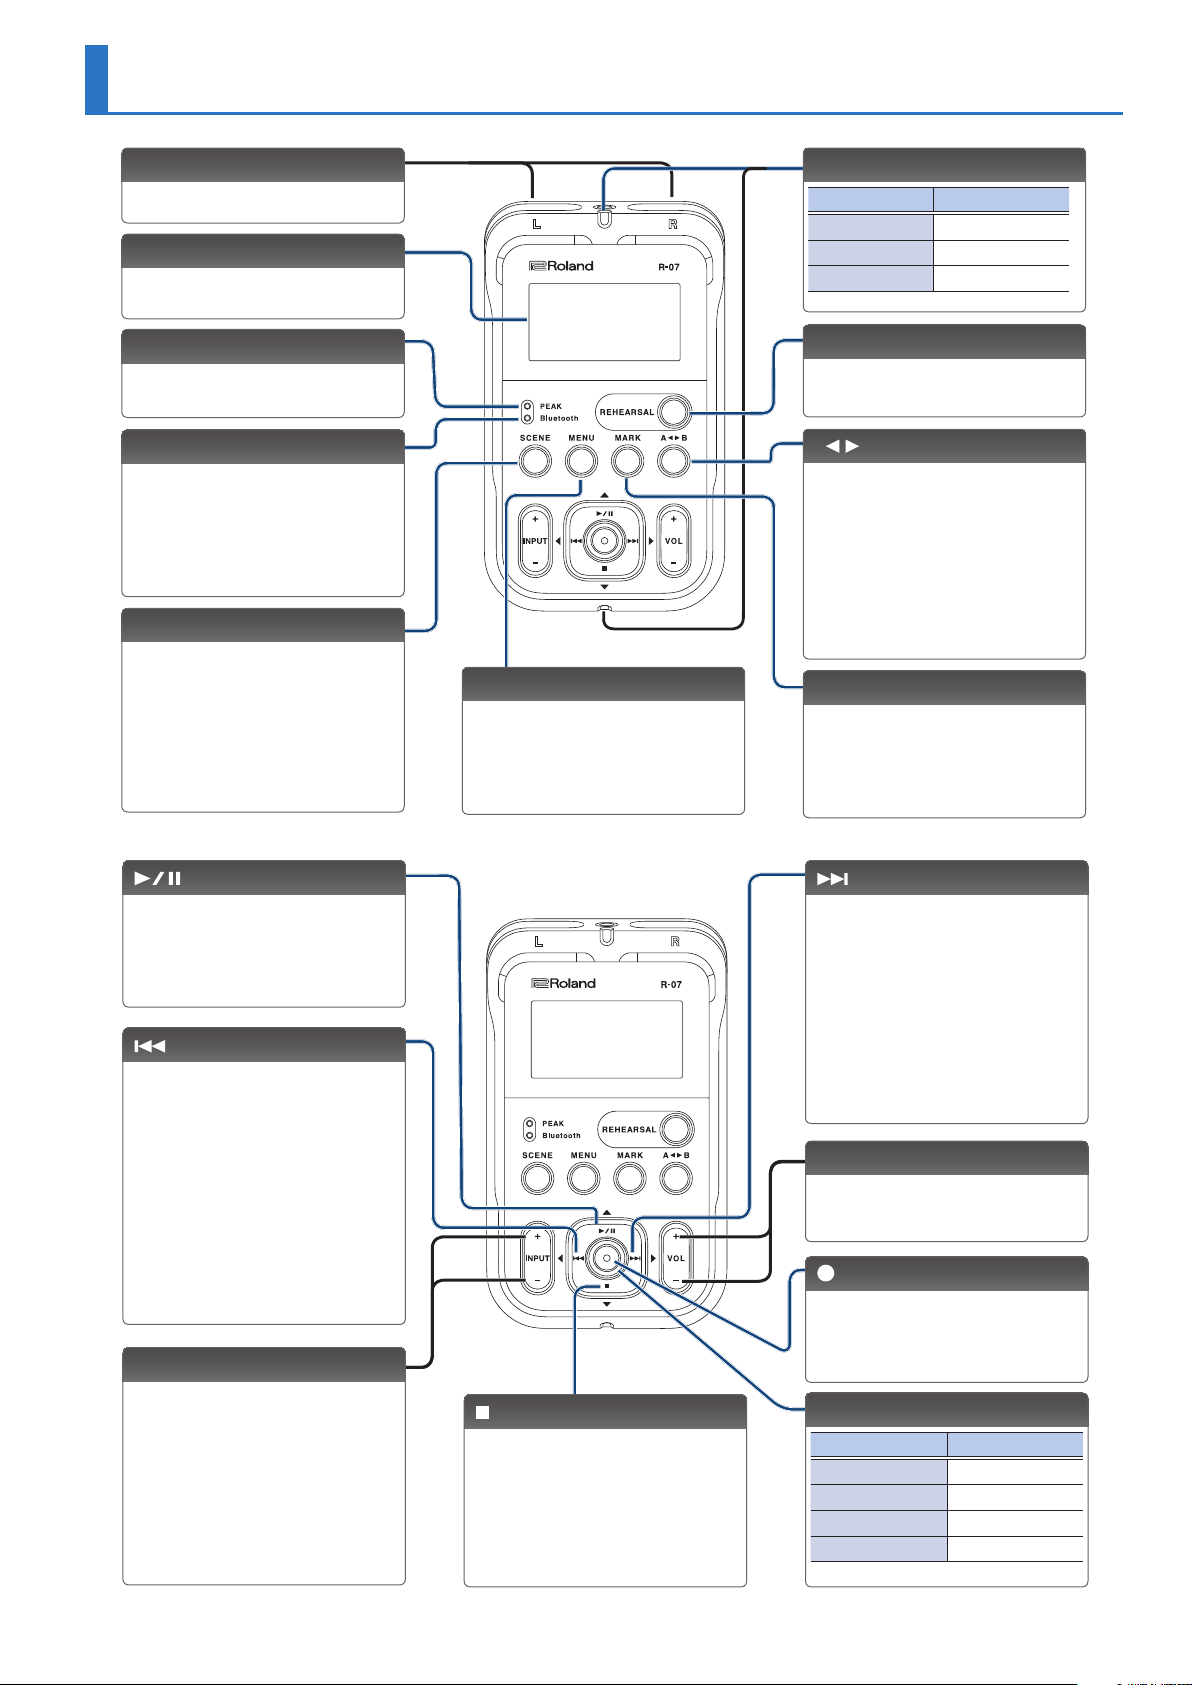
Panel Descriptions
Built-in mics
This is a stereo mic built into the unit.
Display
This shows various types of
information for the R-07.
PEAK indicator
This will light when the input volume
is excessive.
Bluetooth indicator
This blinks when pairing with a
Bluetooth speaker or headphones
(p. 10). It is lit if the R-07 is
connected to a Bluetooth speaker
or headphones, or when the remote
control is on (p. 26).
[SCENE] button
This button lets you switch scenes
(p. 13) that recall settings suitable for a
specic recording situation.
Long-press this button to ip the
display vertically.
[MENU] button
This button lets you make various
settings for the R-07, such as
recording/playback settings and
specifying the date and time.
Remote indicator
Operation Status
Lit Recording
Blinking (slow) Record-standby
Blinking (fast) Input overload
[REHEARSAL] button
This button automatically sets the
appropriate recording level (p. 18).
[A B] button
This button lets you repeatedly play
between two points (the A–B region)
of a le (p. 23). When you assign an
“A” marker and “B” marker in the le,
playback will repeat between the “A”
and “B” markers. Pressing the button
the rst time assigns the “A” marker,
and pressing it a second time assigns
the “B” marker.
[MARK] button
For a WAV le, you can press this
button to add a mark at a desired
location (p. 23). If you press this
button at a marked location, the mark
is removed.
[ ] button
Press this button to start playback, or
to pause playback or recording.
This button also moves the cursor
upward in the screen, or changes the
value of the selected item.
[ ] button
Press this button to move to the
beginning of the le, or to select
the previous le. For a WAV le that
contains marks, this button returns to
the previous mark. By holding down
this button, you can rewind through
the le.
You can do this during playback or
while stopped.
This button also moves the cursor to
the left in the screen, or changes the
value of the selected item.
INPUT [+] [–] buttons
These buttons adjust the level of the
audio that’s being input via the builtin mics or the MIC/AUX IN jack.
Pressing [+] will increase the input
level. Pressing [–] will decrease the
input level.
You can change the playback speed
by pressing these buttons during
playback (p. 24).
[ ] button
This button stops playback or
recording.
This button also moves the cursor
downward in the screen, or changes
the value of the selected item.
[ ] button
Press this button to select the next le.
For a WAV le that contains marks, this
button advances to the next mark. By
holding down this button, you can
fast-forward through the le.
You can do this during playback or
while stopped.
This button also moves the cursor to
the right in the screen, or changes the
value of the selected item.
VOL [+] [–] buttons
These buttons adjust the volume that
is output from the built-in speaker, the
PHONES jack or the Bluetooth device.
[ ] button
Press this button to enter recordingstandby mode or to begin recording.
You’ll also use this button to conrm
a selection.
REC/PLAY indicator
Operation Status
Lit red Recording
Blinking red Record-standby
Lit green Playing
Blinking green Play-standby
3
Page 4
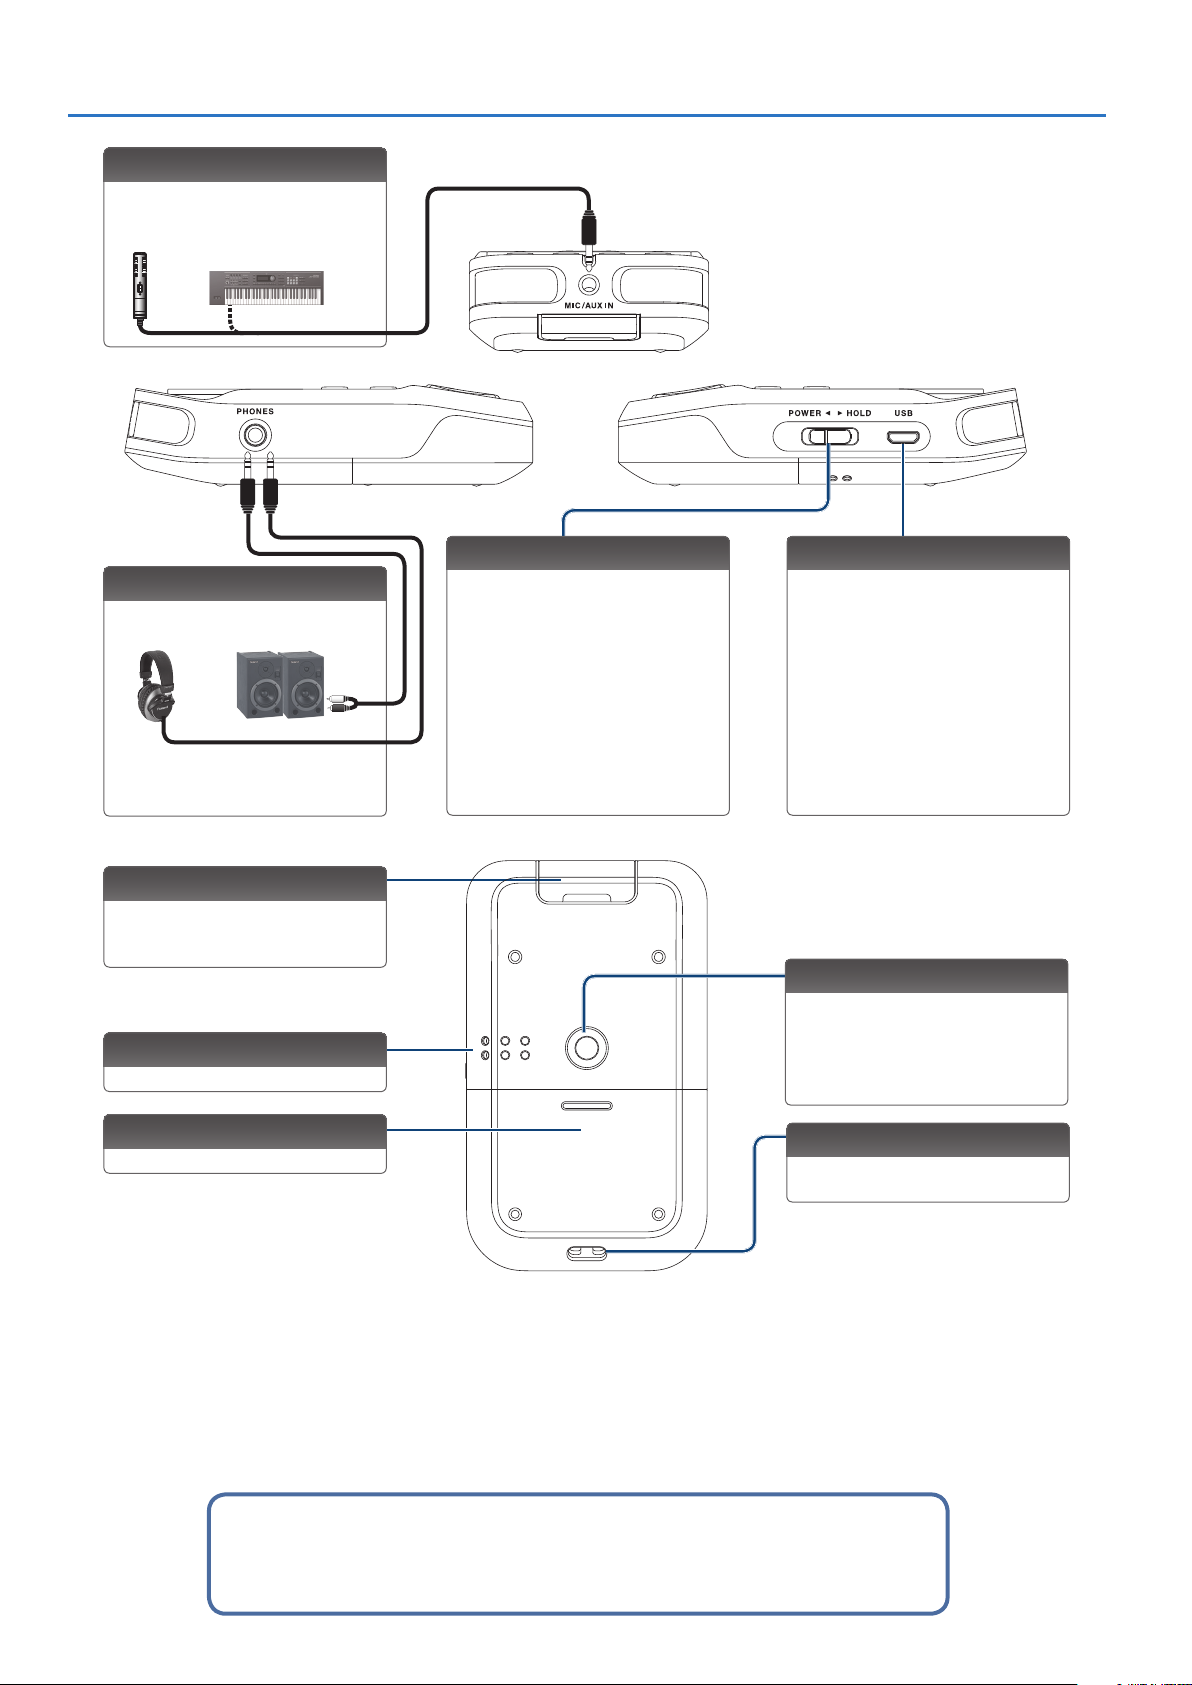
Panel Descriptions
MIC/AUX IN jack
Use this if you want to connect
an external mic, audio device or
electronic musical instrument.
PHONES jack
You can connect headphones here
(p. 10).
microSD card slot
Insert the microSD card into this slot.
When the R-07 is shipped from the
factory, a microSD card is inserted.
Built-in speaker
This is the R-07’s internal speaker.
Battery compartment
Install batteries here (p. 6).
[POWER] switch
Slide this switch toward POWER to
turn the power on/o (p. 6). With the
power turned on, you can set this
switch to the right to enable the HOLD
function.
If you leave HOLD on, operation is
disabled for all buttons, preventing
unintended operation. Even if HOLD is
on, you can still operate the R-07 from
a mobile device (p. 26).
USB port
Use a commercially available
USB cable to connect this to your
computer. This allows les recorded
on the R-07 to be transferred to your
computer, or WAV and MP3 les from
your computer to be copied to the R-07
for playback.
* Do not use a micro USB cable that is
designed only for charging a device.
Charge-only cables cannot transmit
data.
Tripod mounting socket
This socket lets you attach the R-07 to
a commercially available camera
tripod.
(The socket is threaded for a 1/4”
screw.)
Strap hole
The strap can be passed through this
hole.
About microSD cards
* Some memory card types or memory cards from some manufacturers may not record or play
back properly on the unit.
4
Page 5
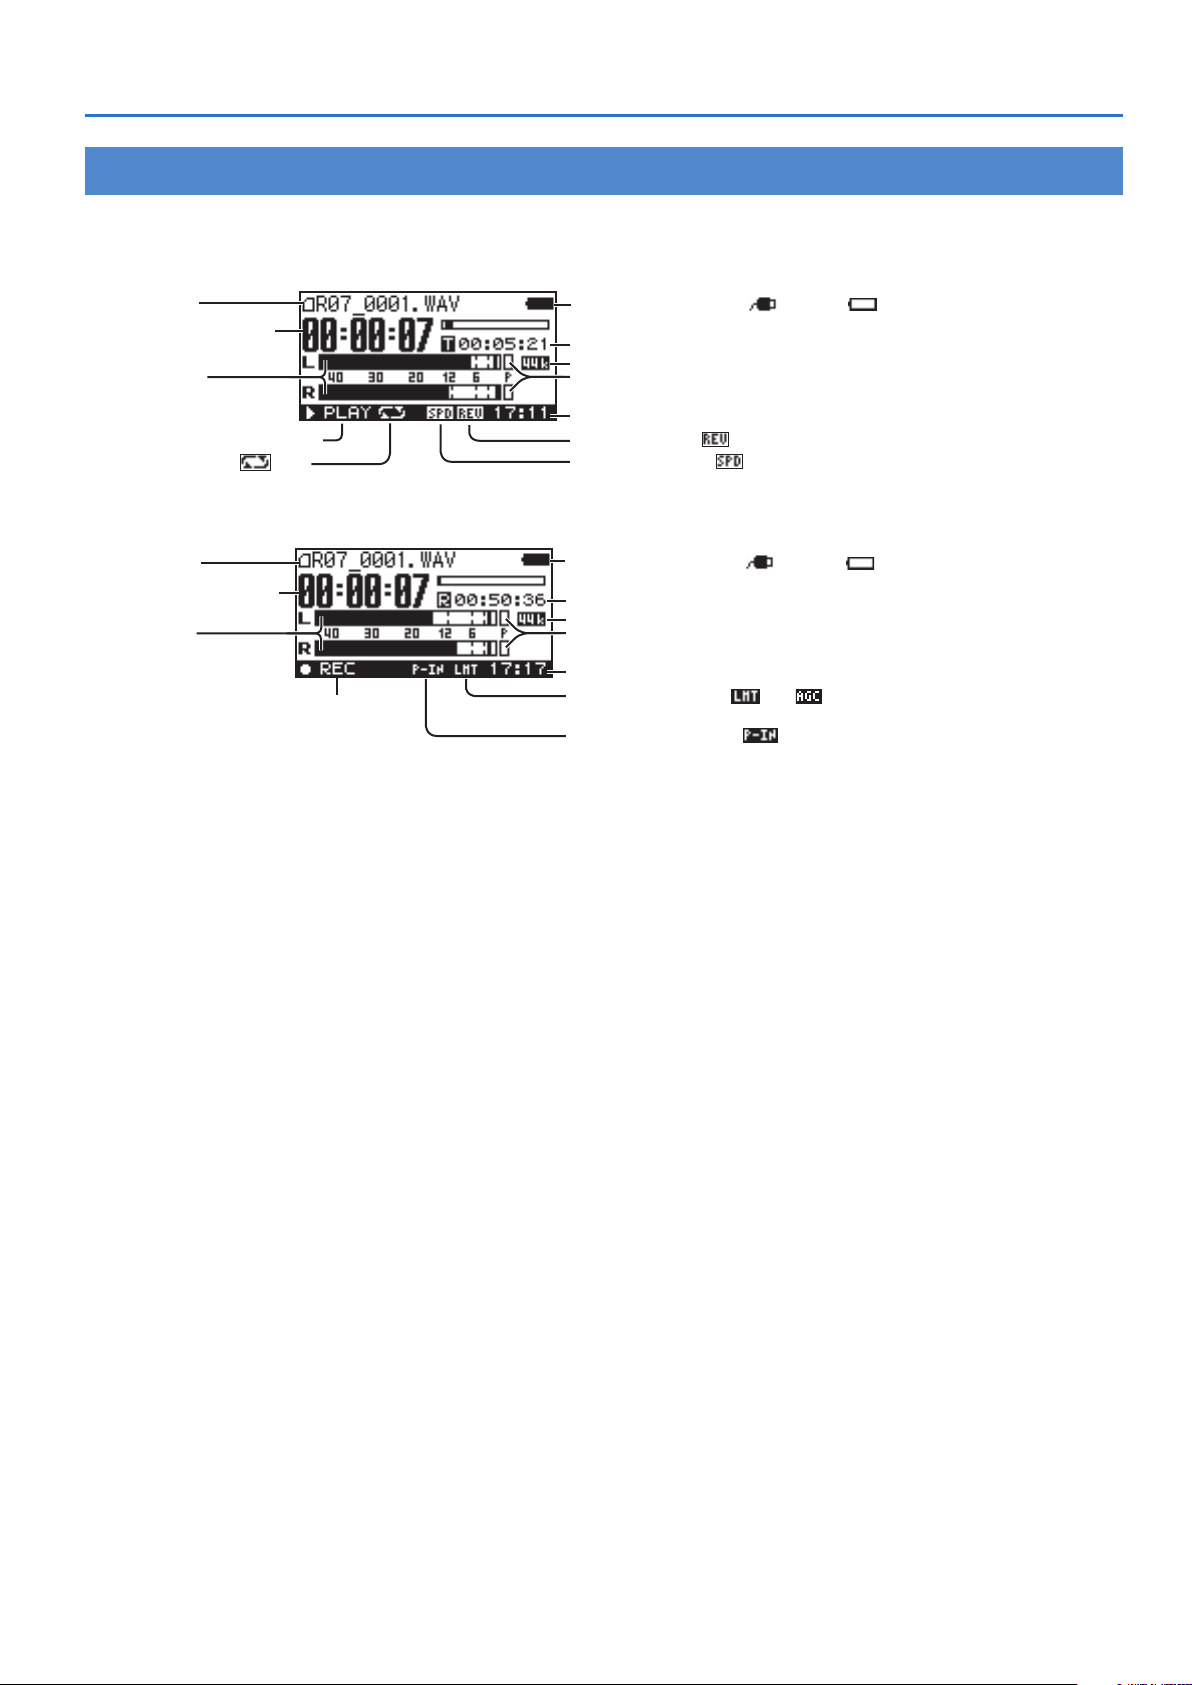
Main Screen
Here we’ll explain the principal icons and information shown in the main screen.
Playing / Stopped
Panel Descriptions
Song name
Elapsed playback time
Output level
Play/stop status (PLAY/STOP)
Repeat status (ON
/OFF)
Recording
Song name
Elapsed recording time
Input level
Record/recording-standby status
(REC/STANDBY)
Power supply status (USB
Song length
Sampling rate of the song being played
Peak
Current time
Reverb status (ON
Playback speed (ON
Power supply status (USB
Remaining recordable time on the memory card
Sampling rate during recording
Peak
Current time
Limiter/AGC status (ON
Plug-in power status (ON
when external mic has been connected.)
/batteries )
/OFF)
/ OFF)
/batteries )
/AGC /OFF)
/OFF) (Appears only
5
Page 6

Getting Ready
Installing the Batteries
Types of batteries that can be used
5 Alkaline battery (AA, LR6)
5 Rechargeable Ni-MH battery (AA, HR6)
NOTE
The R-07 itself is not able to recharge rechargeable
Ni-MH batteries. You’ll need to use a battery charger
designed for rechargeable Ni-MH batteries.
1. Make sure that the power is o.
If the power is on, turn it o. Slide the R-07’s [POWER] switch
toward POWER to turn the power on/o.
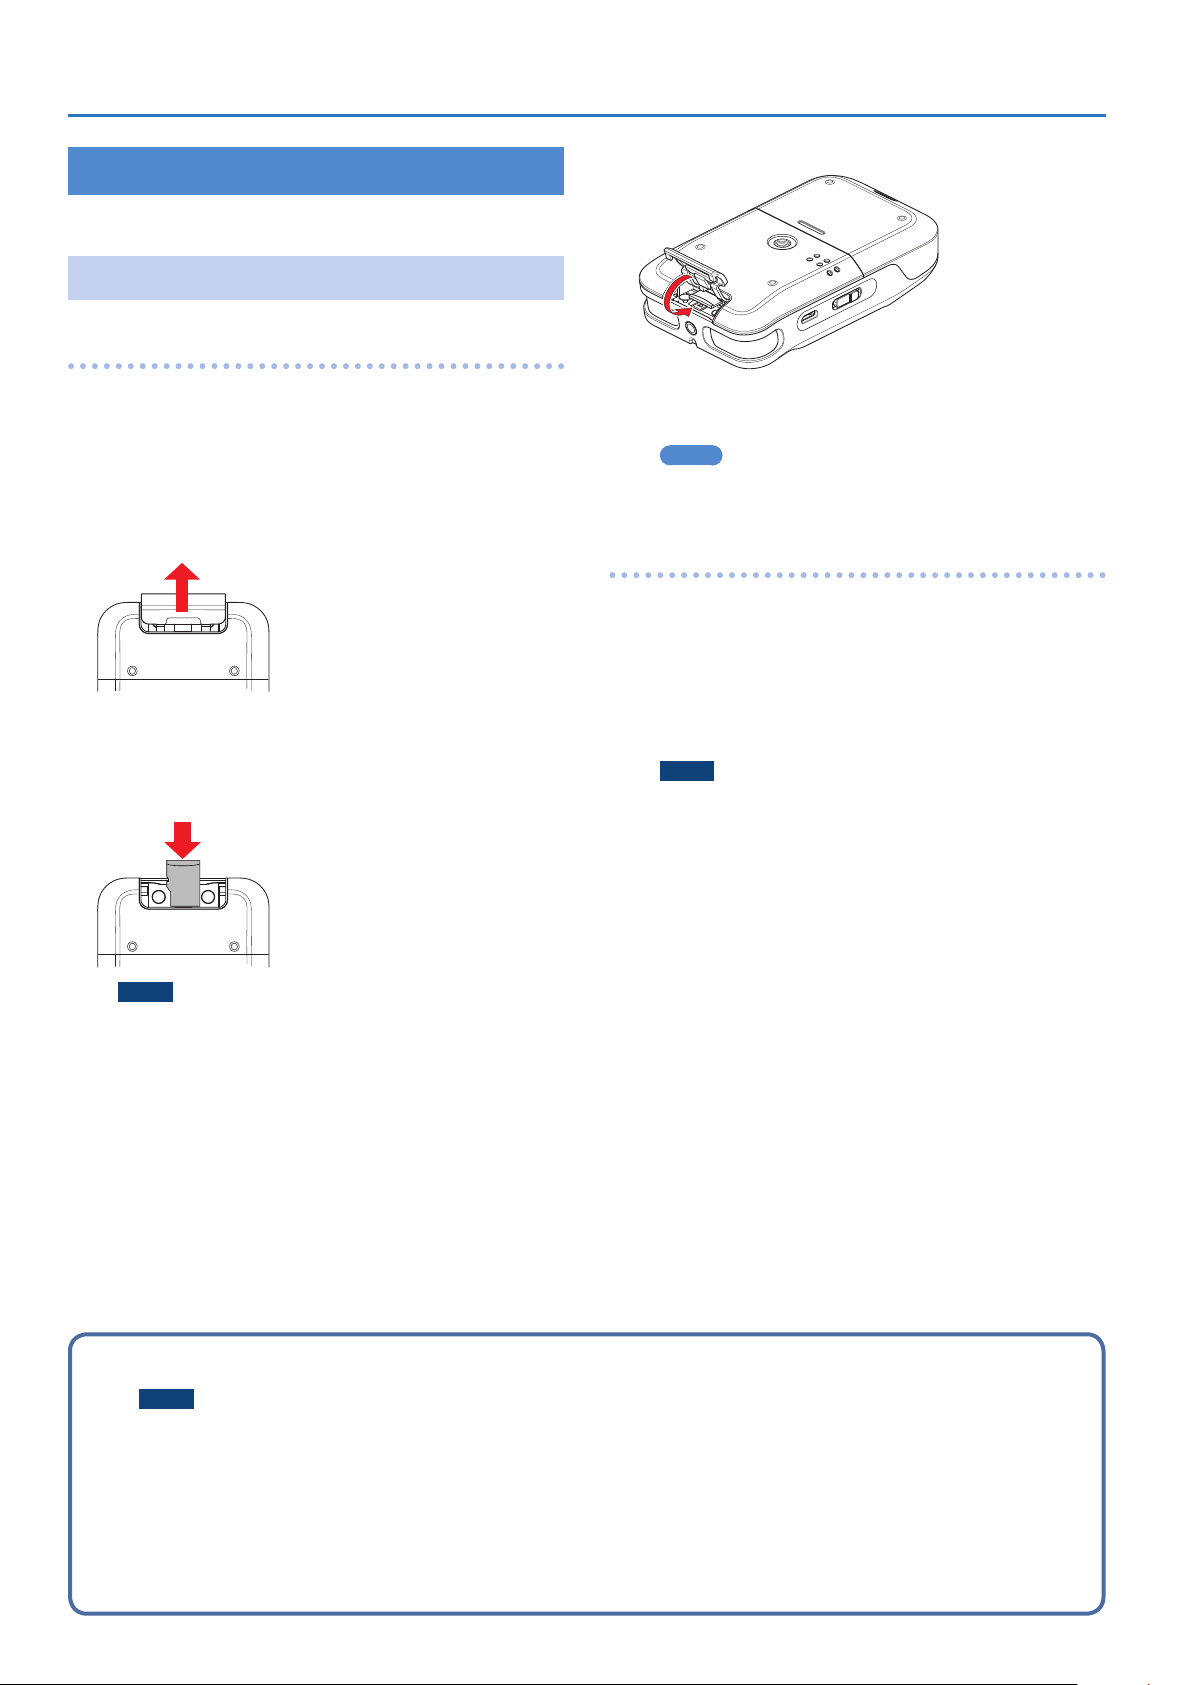
2. Open the cover of the battery compartment
located on the bottom of the unit.
Turn the R-07 over, then slide the cover downward while pressing
the area circled in the illustration.
Turning the Power On/O
1. Slide the [POWER] switch toward POWER for several
seconds; the power will turn on.
2. If the Select USB Mode screen appears, use
[ ]/[ ] to select “Power Supply,” and press [ ].
A screen like the following will appear in the display. We’ll call this
the “main screen.”
* When turning the unit over, be careful so as to protect the
buttons and knobs from damage. Also, handle the unit
carefully; do not drop it.
3. Install the batteries.
Install two AA batteries in the compartment, making sure that the
polarity (+/– orientation) is correct.
+
–
–
+
4. Close the cover of the battery compartment.
Supplying Power from the USB Port
1. Connect a commercially-available USB AC adaptor
and commercially-available USB cable to the R-07.
USB micro-B type
To outlet
If batteries are installed, the power supplied from the USB port is
used, and the batteries are not depleted.
3. To turn the power o, slide the [POWER] switch
once again toward POWER for several seconds.
Note when using the R-07 on batteries
5 If you handle batteries improperly, you risk explosion and uid
leakage. Make sure that you carefully observe all of the items
related to batteries that are listed in “USING THE UNIT SAFELY”
and “IMPORTANT NOTES” (leaet “USING THE UNIT SAFELY).
5 Do not mix fresh batteries with used batteries, and do not mix
batteries of dierent types.
5 If you won’t be using the R-07 for an extended period of time,
we recommend that you remove the batteries to prevent them
from leaking electrolyte.
5 If electrolyte should leak from the batteries, use a soft cloth
to wipe the battery compartment clean, and then install new
batteries. Electrolyte that contacts your skin might cause
irritation. Electrolyte that enters your eyes is dangerous; if this
occurs, immediately ush your eyes thoroughly with water.
5 Do not carry or store batteries together with metallic objects
such as pens, necklaces, or hairpins.
Power conservation function
The power to this unit will be turned o automatically after a
predetermined amount of time has passed since it was last used
for playing music, or its buttons or controls were operated (Auto
O function).
If you do not want the power to be turned o automatically,
disengage the Auto O function. For details, refer to the “Auto O ”
(p. 40).
5 To restore power, turn the power on again.
6
Page 7

Getting Ready
Remaining battery indication
5 When the remaining battery power runs low, a battery low
icon appears in the upper right of the display. When
this appears, install fresh batteries as soon as possible. If you
continue to use the unit in this state, the display will indicate
“Battery Low,” and nally the R-07 will stop functioning entirely.
Battery life (when using alkaline batteries)
Continuous playback approximately 15 hours
Continuous recording approximately 15 hours
* The above battery lifespans are approximate. Battery life will
vary depending on environmental conditions and the method
of use.
Specifying the Battery Type
1. Press [MENU] to access the “Menu” screen, use
[ ]/[ ] to select “Power Manage,” and then press
].
[
2. Use [ ]/[ ] to move the cursor to the Battery
setting, and use [
battery that you’re using.
]/[ ] to specify the type of
Setting the Date and Time
After you turn on the power for the rst time, you’ll need to set
the internal clock as follows. The date and time you specify are
used as the time stamp for the les that are recorded.
1. Press [MENU] to access the “Menu” screen, use
]/[ ] to select “Date & Time,” and then press
[
[
].
NOTE
5 The internal clock is powered by batteries. If the R-07 is left
for several minutes with batteries removed, the internal
clock will return to its default state. When you turn on the
power in this state, the message “Clock Initialized” will
appear.
5 If the screen indicates “Clock Initialized,” you’ll need to reset
the date and time.
2. Set the date and time.
Use [ ]/[ ] to move the cursor left/right.
(Default in bold)
Battery
ALKALINE
Ni-MH
3. Press [MENU] twice to return to the main screen.
When the cursor is at the position of the character you want to
change, use [ ]/[ ] to change the date and time, and then
press [ ] to conrm the setting.
3. Press [MENU] to return to the main screen.
7
Page 8
Getting Ready
Preparing a microSD Card
Inserting a microSD Card
Inserting
4. Close the microSD cover.
1. Make sure that the power is o.
If the power is on, turn it o.
2. Open the microSD cover located at the top of the
unit.
Insert your ngernail into the notch in the microSD cover, and pull
it upward.
The cover may break if you use excessive force.
3. Insert the microSD card.
Insert the microSD card in the same orientation as shown in the
illustration.
5. Slide the [POWER] switch toward POWER for several
seconds to turn on the power.
MEMO
If an unformatted microSD card is inserted in the R-07, the
screen will indicate “SD Unformatted.”
Removing an microSD card
1. Switch o the R-07’s power.
2. Open the microSD cover.
3. Gently press the microSD card inward, and then
release your nger.
When the microSD card pops out, remove it.
NOTE
Do not insert or remove a microSD card while the power is
on. The data on the microSD card may be lost if you do so.
NOTE
5 Forcibly inserting the microSD card in the wrong orientation
may damage the R-07 or the microSD card. Please use
caution.
5 Press the microSD card rmly all the way in.
5 Since a microSD card is small, take care not to lose it when it
is ejected.
About microSD cards
NOTE
5 The R-07 supports microSD/microSDHC cards.
5 Some microSD card types or memory cards from some manufacturers may not record or play back properly on the R-07.
5 Never insert or remove an microSD card while this unit’s power is on. Doing so may corrupt the unit’s data or the data on the microSD
card.
5 Carefully insert the microSD card all the way in—until it is rmly in place.
8
Page 9
Formatting a microSD Card
“Formatting” is the process of preparing the microSD card for use.
If you’re using a microSD card other than the included one, you
must rst format the microSD card before it can be used with the
R-07.
NOTE
5 You must format the microSD card on the R-07 itself. A microSD
card formatted on a device other than the R-07 might not
work correctly in the R-07.
5 When you format a microSD card, all data on the card will be
erased.
1. Make sure that the microSD card you want to
format is inserted in the microSD card slot.
For details, refer to “Inserting a microSD Card” (p. 8).
2. Press [Menu] to access the “Menu” screen, use
[ ]/[ ] to select “SD Card,” and then press [ ].
MEMO
If you decide to cancel without formatting, press [MENU].
You will return to the previous screen.
Getting Ready
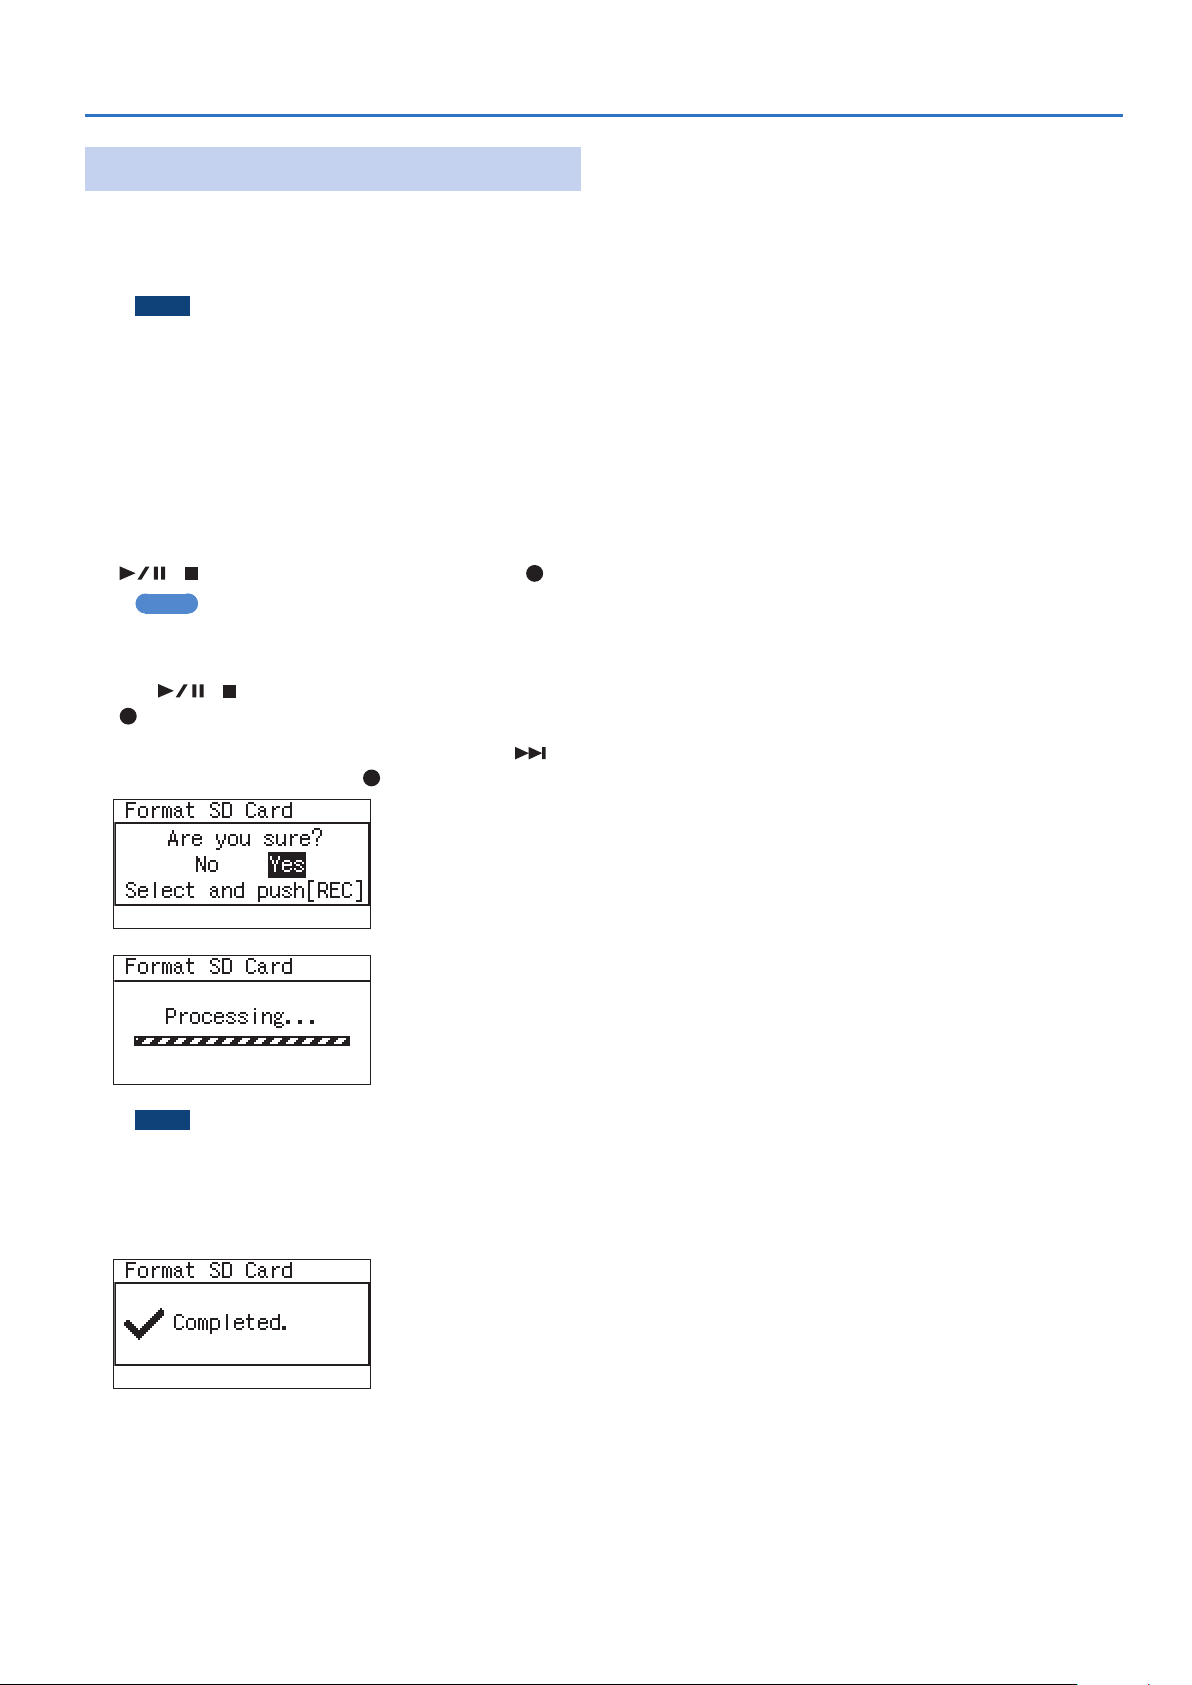
3. Use [ ]/[ ] to select “Format,” and then press
[ ].
4. When the conrmation screen appears, use [ ] to
select “Yes” and then press [ ].
NOTE
Never remove the microSD card while the screen indicates
“Processing.” Doing so may destroy the memory area in the
microSD card.
When the screen indicates “Completed!” the formatting process is
nished.
5. Press [MENU] twice to return to the main screen.
9
Page 10
Getting Ready
Using Headphones or Speakers
The R-07 has a built-in speaker. You can listen to the playback
through this speaker, or you can connect headphones or speakers
for listening. You can also connect Bluetooth headphones or
speakers to the R-07 and listen wirelessly to the playback.
* To prevent malfunction and equipment failure, always turn
down the volume, and turn o all the units before making any
connections.
Connecting External Speakers
* Turn on power to your various devices in the order specied.
By turning on devices in the wrong order, you risk causing
malfunction and/or damage to external speakers and other
devices.
1. Switch o the R-07’s power.
2. Minimize the volume of the external speakers you’ll
be connecting, and turn o their power.
3. Connect the external speakers.
You’ll need to use speakers that have a built-in amplier.
Use an audio cable to connect the R-07’s PHONES jack to the line
input jacks of your speaker system.
4. Switch on the R-07’s power.
4. Use [ ]/[ ] to choose “Yes,” and then press [ ].
The display indicates “Pairing...,” and this unit waits for a response
from the Bluetooth device. You can press [ ] to cancel the
operation.
When pairing succeeds, the display indicates “Completed.” and
sound can be output from the Bluetooth device.
Connecting an already-paired Bluetooth device
MEMO
If you initialize the settings (p. 40), the existing pairing
information is erased. You’ll need to pair your device again.
1. Press [MENU] to access the “Menu” screen, use
[ ]/[ ] to select “Bluetooth,” and then press [ ].
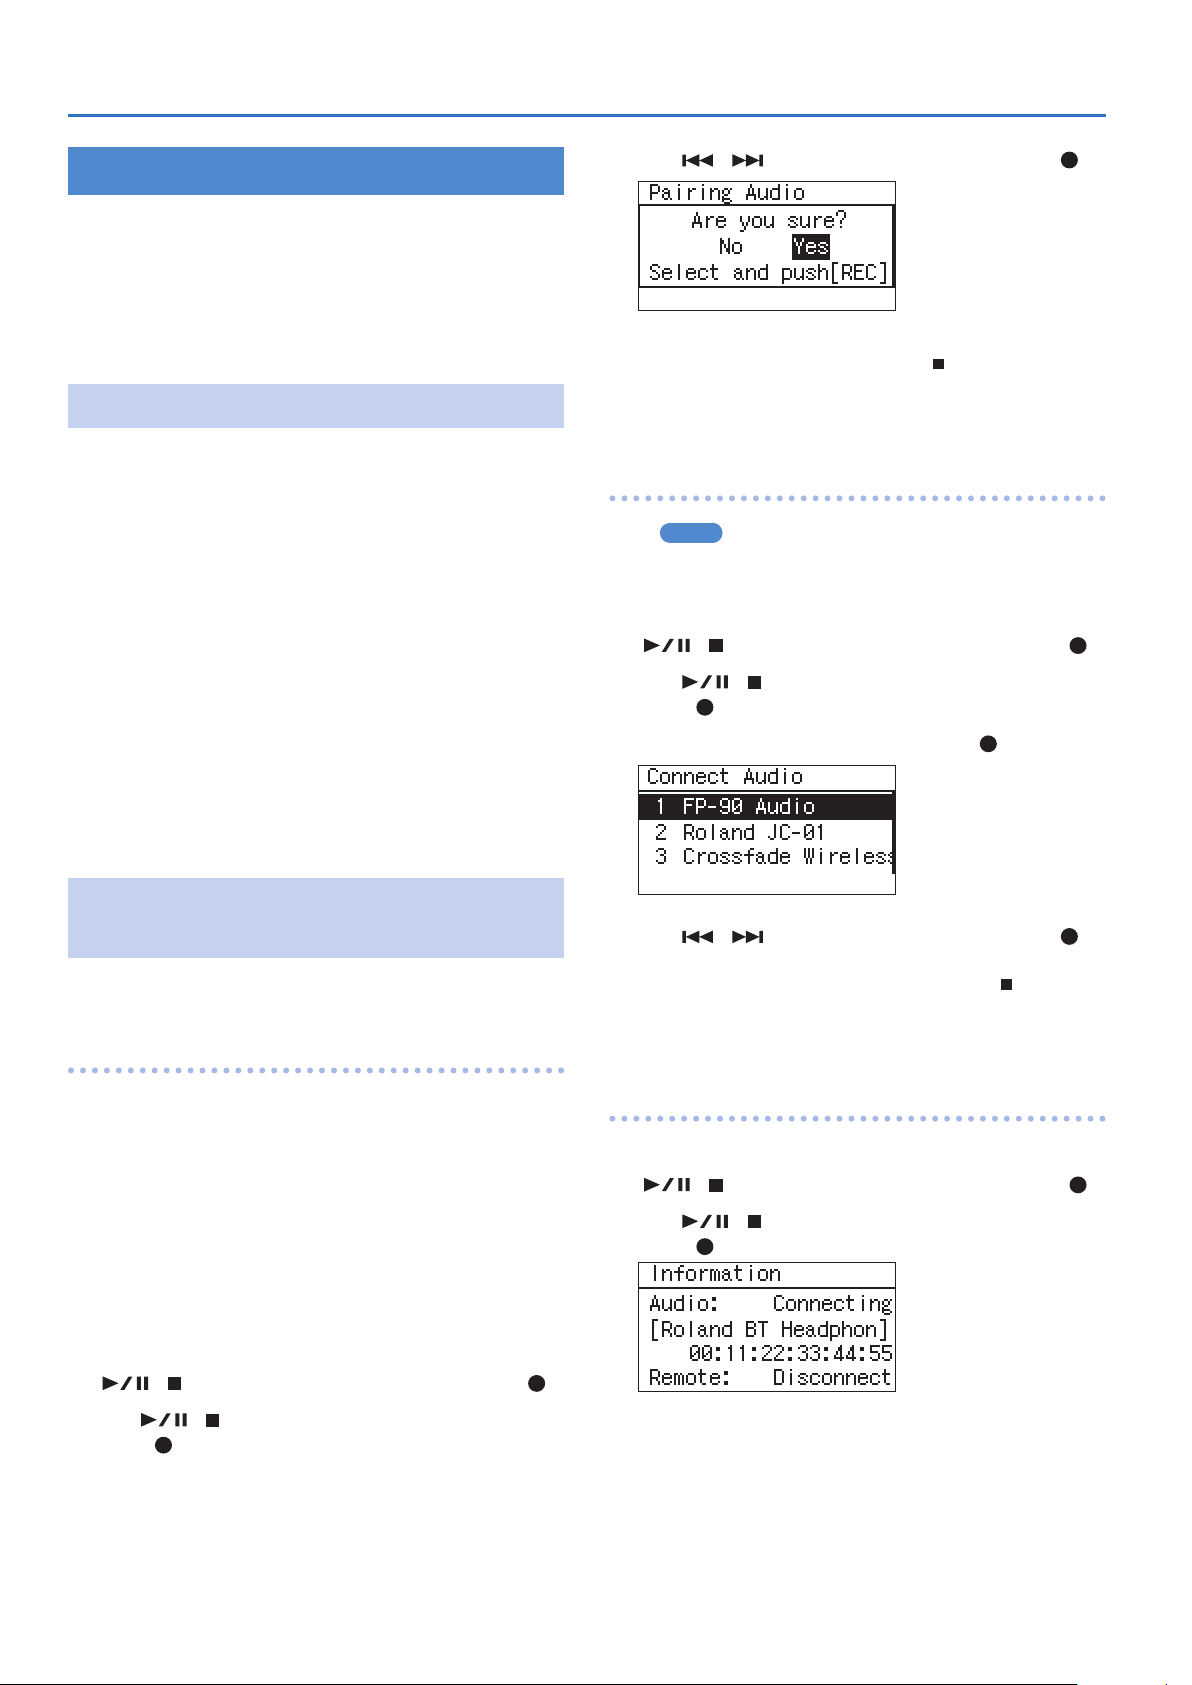
2. Use [ ]/[ ] to select “Connect Audio” and then
press [ ].
3. Select the playback device and press [ ].
5. Switch on power to the external speakers, and
gradually increase the volume to an appropriate
level.
Connecting Bluetooth® Speakers or Headphones
Supported codecs: SBC, Qualcomm®aptX™ audio,
Qualcomm®aptX™ Low Latency audio
Registering a Bluetooth device (Pairing)
“Pairing” is the procedure by which the mobile device that you
want to use is registered on this unit (the two devices recognize
each other).
Once a mobile device has been paired with this unit, there is no
need to perform pairing again. After the R-07 starts, it searches for
the previously-connected device, and connects automatically.
1. Place the Bluetooth device that you want to
connect near the R-07, power-on the device, and
put it in pairing mode.
For details, refer to the owner’s manual of your Bluetooth device.
2. Press [MENU] to access the “Menu” screen, use
[ ]/[ ] to select “Bluetooth,” and then press [ ].
4. Use [ ]/[ ] to choose “Yes,” and then press [ ].
The display indicates “Connecting...,” and this unit waits for a
response from the Bluetooth device. You can press [ ] to cancel
the operation.
When pairing succeeds, the display indicates “Completed.” and
sound can be output from the Bluetooth device.
Checking which Bluetooth device you’re connected to
1. Press [MENU] to access the “Menu” screen, use
[ ]/[ ] to select “Bluetooth,” and then press [ ].
2. Use [ ]/[ ] to select “Information” and then
press [ ].
3. Use [ ]/[ ] to select “Pairing Audio” and then
press [ ].
10
3. Press [MENU] three times to return to the main
screen.
Page 11
Disconnecting a Bluetooth device
Use this procedure when you want to switch to a dierent
Bluetooth device.
1. Press [MENU] to access the “Menu” screen, use
[ ]/[ ] to select “Bluetooth,” and then press [ ].
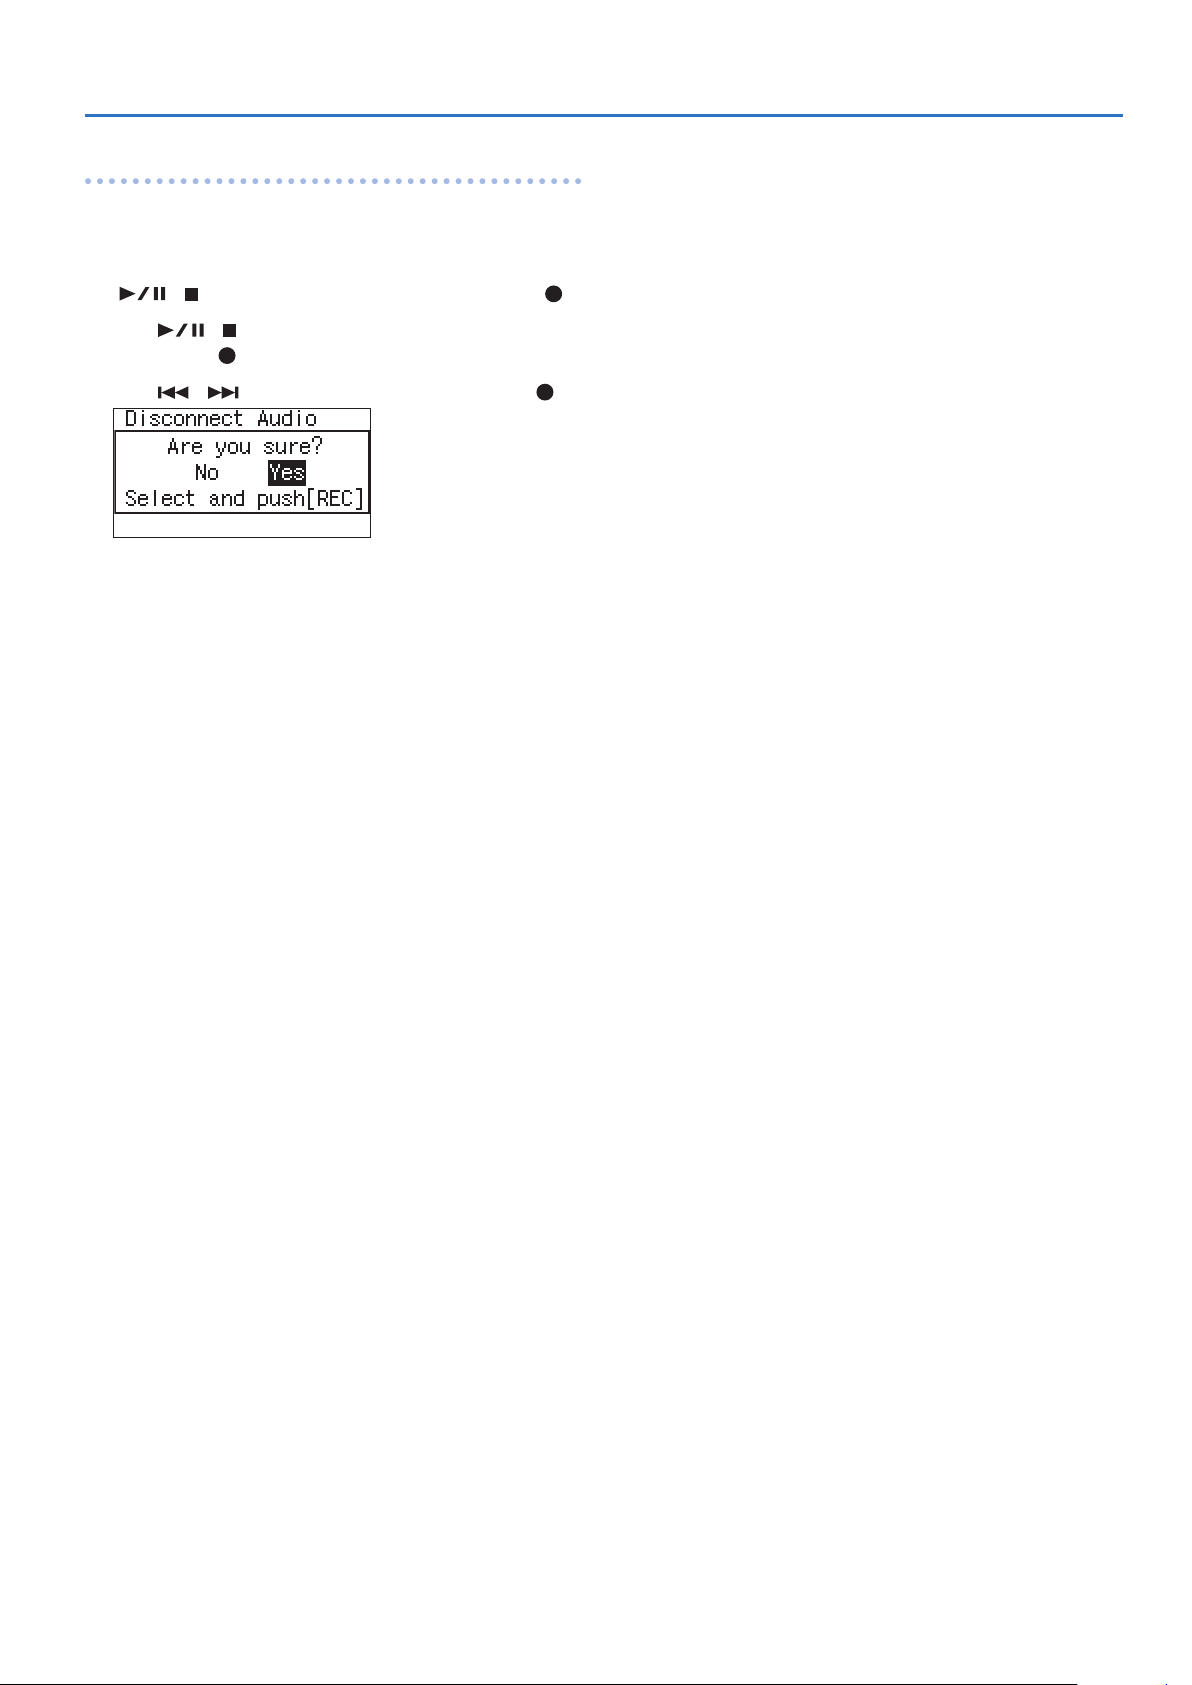
2. Use [ ]/[ ] to select “Disconnect Audio” and
then press [ ].
3. Use [ ]/[ ] to choose “Yes,” and then press [ ].
When disconnection succeeds, the display indicates “Completed.”
Getting Ready
11
Page 12
Recording
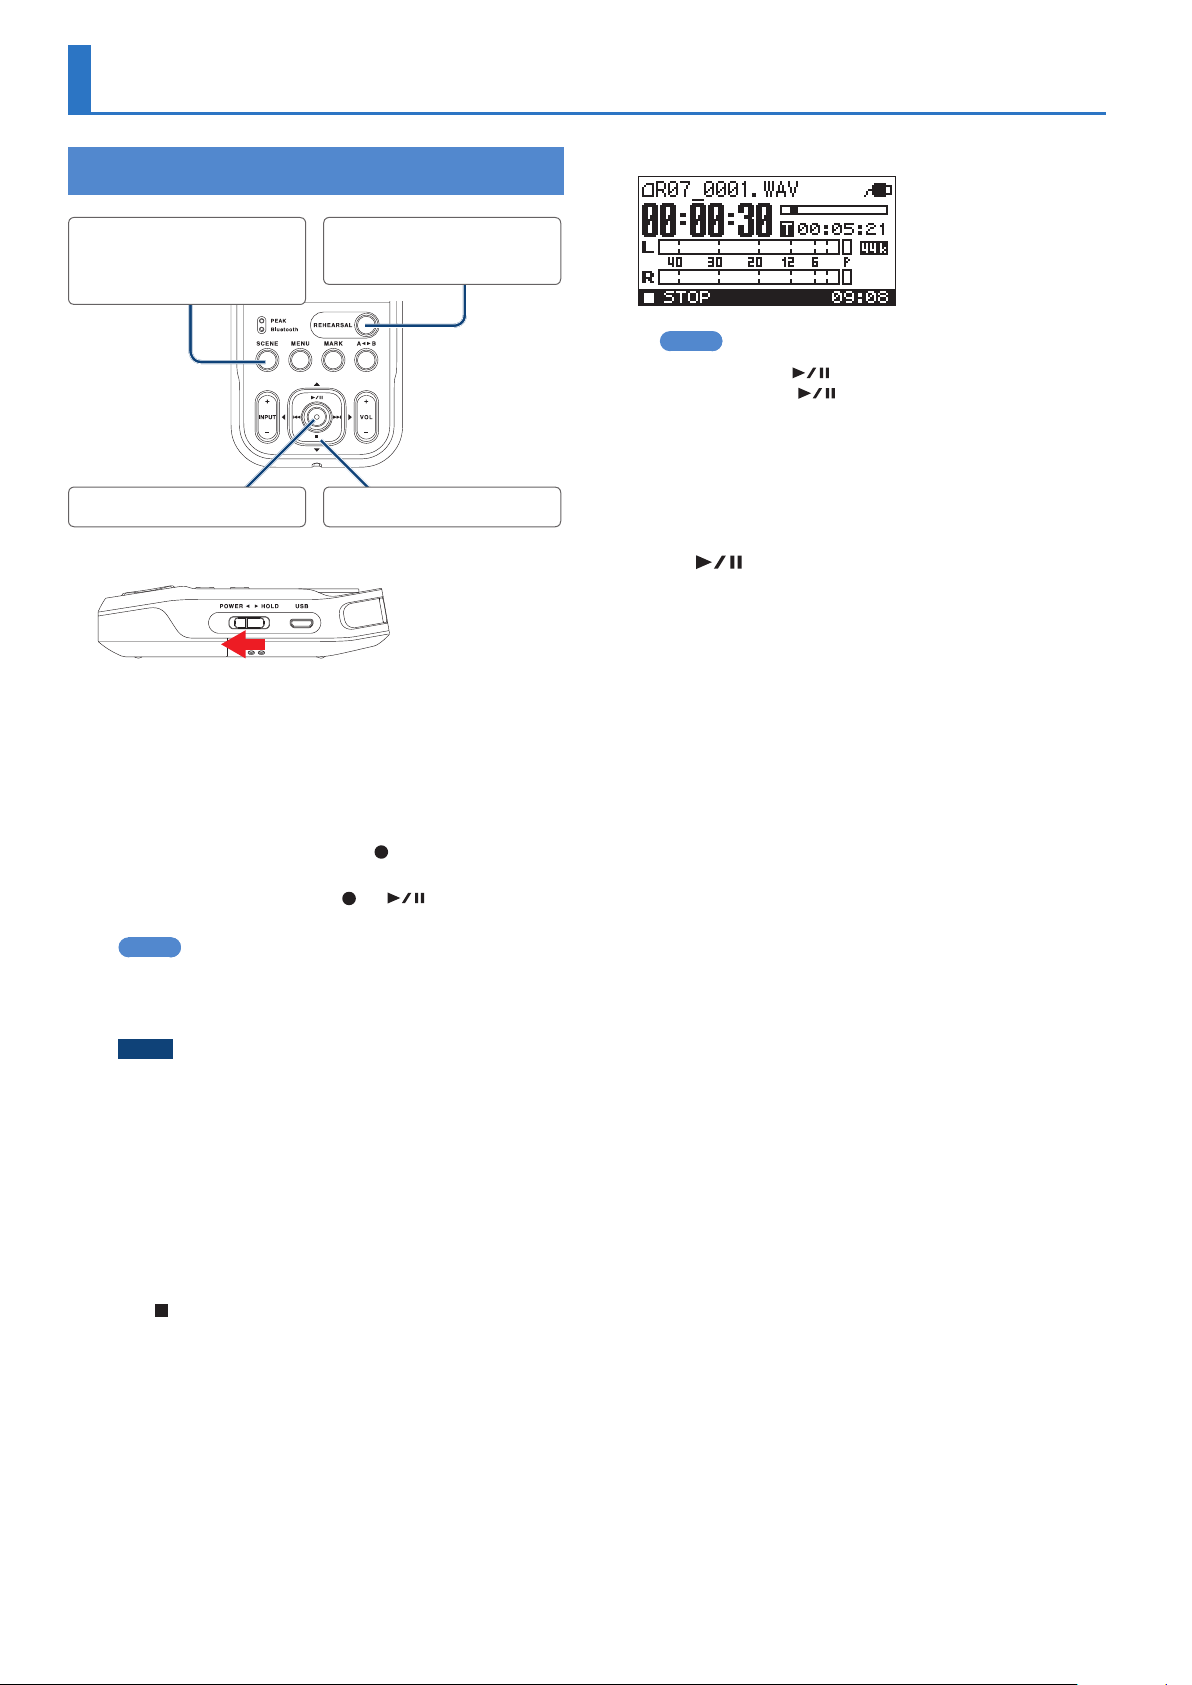
Basic Recording Operation
The display will show the le that was recorded (p. 5).
Recall settings for specic
purposes
Specify the recording quality
Adjusting the Input Level
StopRecord
1. Switch on the R-07’s power (p. 6).
2. Recall the settings that are most appropriate for
your specic recording situation (p. 13).
3. Specify the audio quality of the recording (p. 14).
4. Adjust the recording level (p. 17).
MEMO
5 To pause, press [
recording, press [ ] once again.
5 A le name such as R07_0001.WAV will be created
automatically. The 0001 portion is assigned as a number that
is one greater than the largest number of the existing les.
5 If the Recorder parameter File Name is set to “Date,” the date
and time of recording will be the le name. For details, refer
to “File Name” (p. 39).
]. To disengage pause and resume
7. Press [ ] to play back the recorded le.
For details, refer to “Basic Playback Operation” (p. 22).
5. Start recording.
If the REC/PLAY indicator is unlit, press [ ] to make it blink red,
putting the unit in recording-standby mode.
In recording-standby mode, press [
indicator is lit red, and recording starts.
MEMO
After recording starts, you can set the [POWER] switch to the
HOLD position so that accidental button presses do not stop
the recording or change the input level.
NOTE
5 The built-in mics cannot be used if a mic or other device is
connected to the MIC/AUX IN jack. If you want to use the
built-in mics, do not connect anything to the MIC/AUX IN
jack.
5 The recording level will change if you operate the INPUT [+]
[–] buttons in recording-standby mode or during recording.
Take care that you don’t inadvertently operate the INPUT [+]
[–] buttons.
5 You can’t turn o the power during recording. You must stop
recording before you can turn o the power.
] or [ ]; the REC/PLAY
6. Press [ ] to stop recording.
The REC/PLAY indicator will go out.
12
Page 13
Recalling Settings for Specic Purposes
The R-07 provides settings that are suitable for various recording situations. These settings are called “scenes.”
1. Press [SCENE] to access the “Scene” screen, and use [ ]/[ ] to change the Scene setting.
Scene Explanation Sample Rate Rec Mode Limiter Low Cut Input Level
OFF Choose this if you want to make settings manually.
Settings appropriate for high-quality recording of
Music HiRes
Music CD Settings for CD-quality recording. 44.1 kHz WAV-16 bit ON OFF 60
Music Long Settings for extended-duration recording. 44.1 kHz MP3-192 kbps ON OFF 60
Loud Live
Loud Practice
Instrument
Vocal Settings appropriate for recording a nearby vocal. 44.1 kHz WAV-24 bit ON 100 Hz 60
Voice Memo
Field
a band performance that’s not high-volume, or of
an acoustic instrumental performance.
Settings appropriate for high-volume
performances such as in a club.
Settings appropriate for extended-duration
recording at high volume, such as in a practice
studio.
Settings appropriate for recording a nearby
instrument.
Settings appropriate for non-musical recording,
such as a conference, lecture, or speech.
Settings appropriate for recording the sounds of
nature, such as birdcalls or the murmuring sound
of a river.
96 kHz WAV-24 bit ON OFF 60
44.1 kHz WAV-24 bit OFF OFF 25
44.1 kHz MP3-192 kbps OFF OFF 25
44.1 kHz WAV-24 bit ON OFF 60
44.1 kHz MP3-128 kbps AGC 200 Hz AUTO
96 kHz WAV-24 bit ON 100 Hz 80
Recording
Even after selecting a scene, you can edit the Sample Rate (p. 14), Rec Mode (p. 14), Limiter (p. 16), Low Cut (p. 16), and Input Level (p. 17)
values.
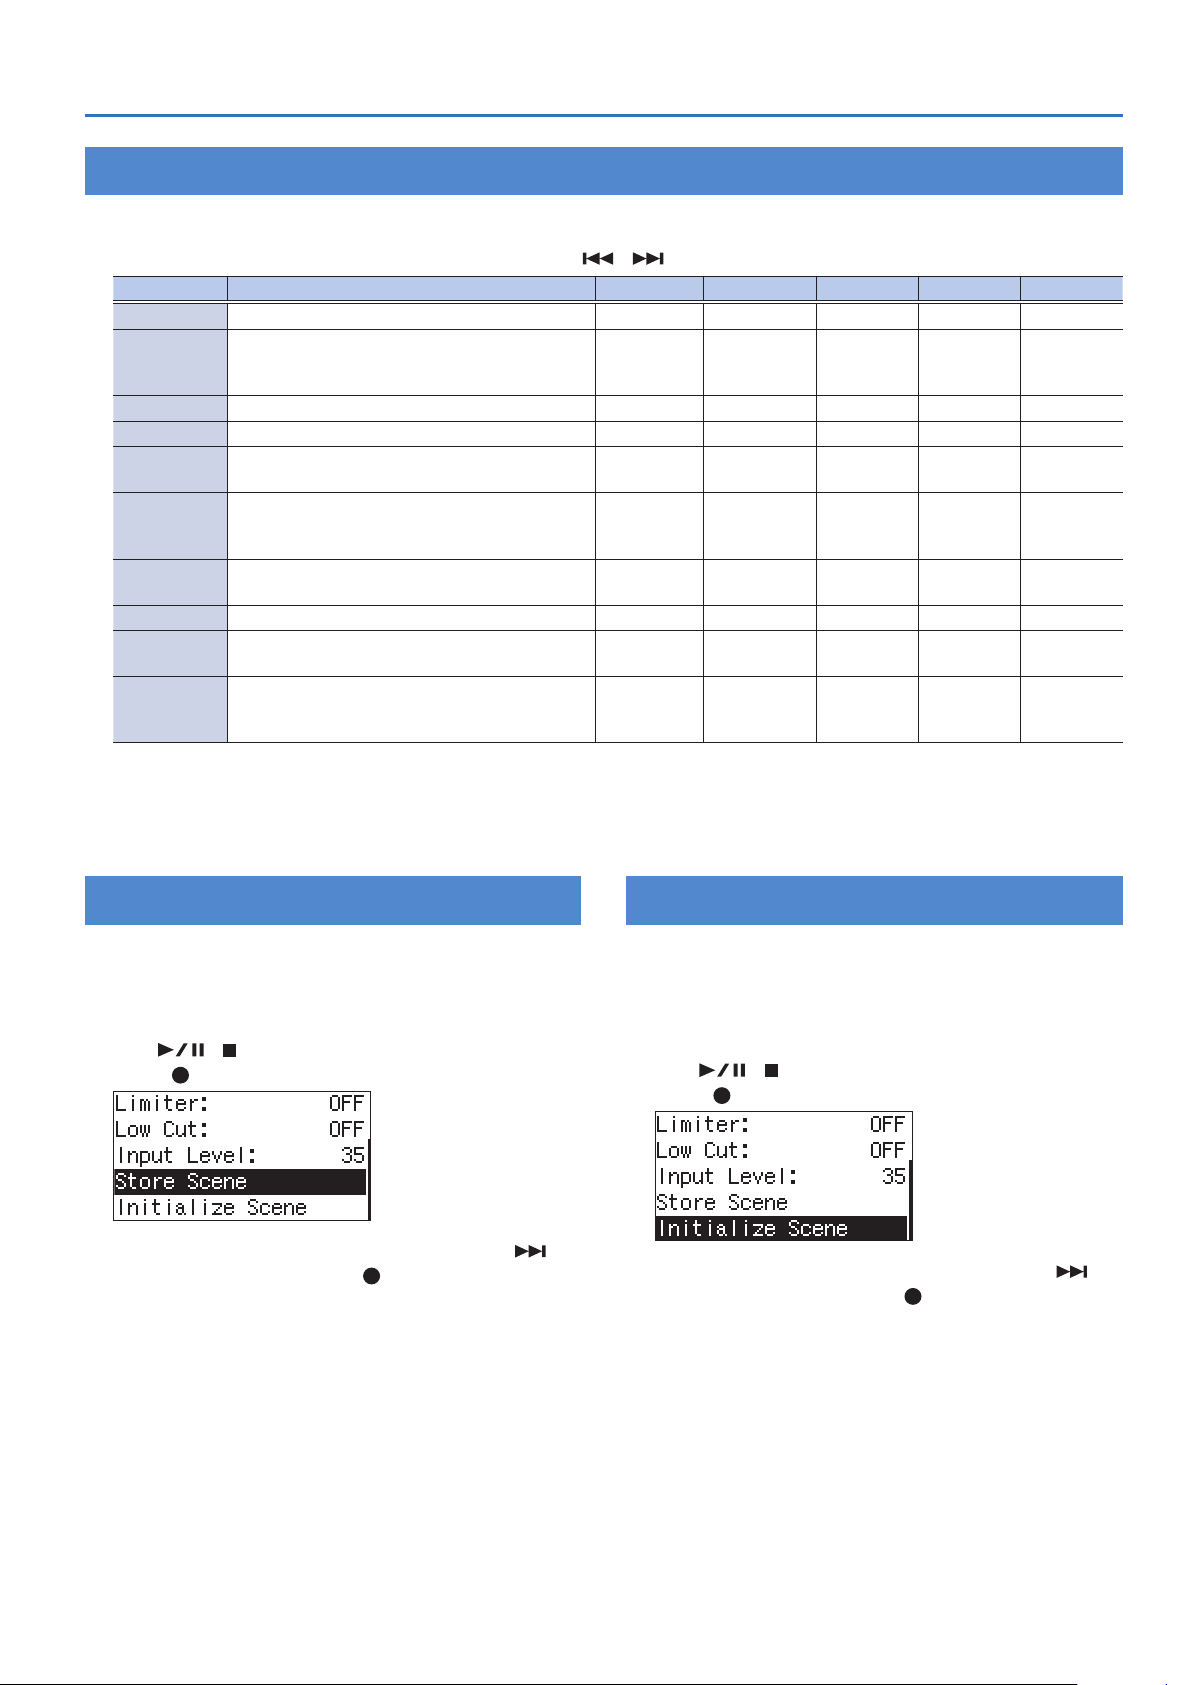
Saving an Edited Scene
Here’s how to save a scene that you’ve edited.
Scenes other than “OFF” can be saved.
Initializing an Edited Scene
After you’ve edited a scene, here’s how to initialize it to the
original settings.
Scenes other than “OFF” can be initialized.
1. Press [SCENE] to access the “Scene” screen.
1. Press [SCENE] to access the “Scene” screen.
2. Use [ ]/[ ] to select “Store Scene” and then
press [ ].
2. Use [ ]/[ ] to select “Initialize Scene” and then
press [ ].
3. When the conrmation screen appears, use [ ] to
select “Yes” and then press [ ].
3. When the conrmation screen appears, use [ ] to
select “Yes” and then press [ ].
13
Page 14
Recording
Specifying the Recording Quality
You can specify the audio quality with which the recording will be
made.
The audio quality setting is a combination of the Sample Rate
(sampling rate) and the Rec Mode. The audio quality will aect the
size of the le, and will also aect the length of time over which
recording can take place with an microSD card.
Consider whether audio quality or length of recording are more
important for your situation, and choose the quality that’s
appropriate for you.
Sample Rate
(Default in bold)
44.1 kHz
Sample Rate
Higher sampling rates will provide higher audio quality. You’ll
need to use a high sampling rate if you want to accurately
reproduce the high-frequency range.
MEMO
5 Higher sampling rate settings will increase the size of the
le, and will shorten the available recording time.
5 If you are recording audio material that you’ll be editing into
a video production, we recommend that you use the 48.0
kHz sampling rate.
5 The R-07 is not able to convert the sampling rate of a
recorded le.
NOTE
5 If this setting is 88.2 kHz or 96.0 kHz, the only choices for Rec
Mode are WAV-16 bit and WAV-24 bit.
48.0 kHz
88.2 kHz
96.0 kHz
NOTE
5 2xWAV-16 bit, 2xWAV-24 bit, MP3 and WAV+MP3 can be
selected only if the Sample Rate is 44.1 kHz or 48.0 kHz.
5 If you select WAV+MP3, the setting is xed at WAV-16 bit and
MP3-128 kbps.
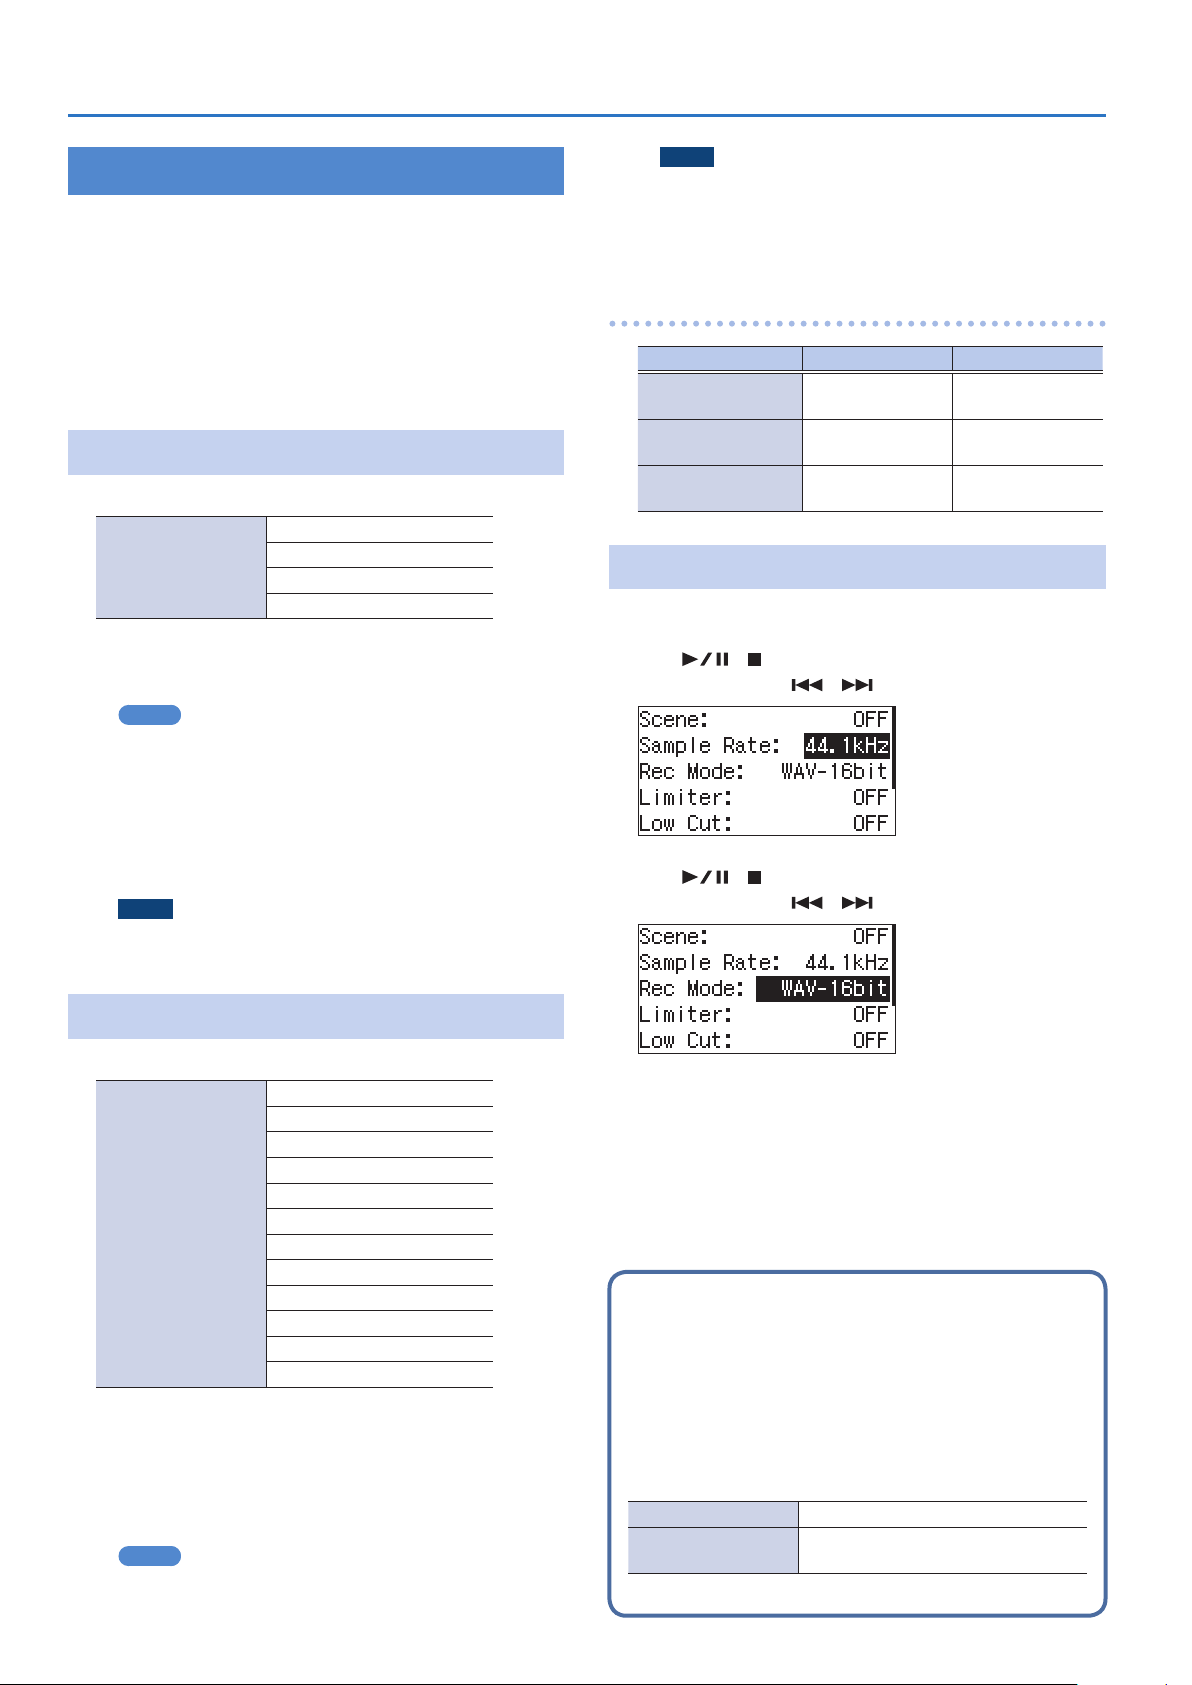
Examples of formats used for music
Purpose Rec Mode Approximate size
Professional quality WAV 24 bit/48 kHz
Creating a music CD
on your computer
Distributing music
on the Internet
WAV 16 bit/44.1
kHz
MP3 128 kbps/44.1
kHz
approx. 20 MB per
minute
approx. 10 MB per
minute
approx. 1 MB per
minute
Setting the Sample Rate and Rec Mode
1. Press [SCENE] to access the “Scene” screen.
2. Use [ ]/[ ] to move the cursor to Sample Rate
setting, and use [ ]/[ ] to change the setting.
3. Use [ ]/[ ] to move the cursor to Rec Mode
setting, and use [ ]/[ ] to change the setting.
Rec Mode
(Default in bold)
2xWAV-16bit
2xWAV-24bit
WAV+MP3
MP3-64kbps
MP3-96kbps
Rec Mode
WAV les allow higher-quality recording than MP3 les.
If you choose MP3, the le size will be smaller than WAV, allowing
you to record for a longer length of time. Higher settings for
“bit” or “bps” will increase the le size, shortening the available
recording time.
WAV+MP3 simultaneously creates both a WAV le and an MP3 le.
MEMO
5 Some software such as Windows Media Player cannot play
back 24-bit WAVE les.
14
MP3-128kbps
MP3-160kbps
MP3-192kbps
MP3-224kbps
MP3-320kbps
WAV-16bit
WAV-24bit
4. Press [SCENE] to return to the main screen.
2xWAV (Dual level recording)
By choosing 2xWAV- as the Rec Mode, you can simultaneously
record at the specied input level (p. 17) and at an input level
approximately 20 dB lower than that input level. This setting is
recommended if there is a possibility that the recorded sound
might distort when the volume during actual recording is louder
than you expected.
When you record, two les are created. The examples below are
for when the le name is R07_0010.WAV.
R07_0010.WAV Recorded at the specied input level
R07_0010L.WAV
Recorded at an input level 12 dB lower
than the specied level
Page 15

Approximate Recording Times
The following table shows the approximate recording times that a microSD card will allow.
Recordable time (approximate) Units: minutes
Rec Mode
WAV
MP3
WAV+MP3
WAVE x2
(2xWAV)
2 GB 4 GB 8 GB 16 GB 32 GB
WAV (24 bit/96 kHz) 55 110 220 450 900
WAV (24 bit/88.2 kHz) 60 120 240 490 980
WAV (24 bit/48 kHz) 110 220 440 900 1800
WAV (24 bit/44.1 kHz) 120 240 480 980 1950
WAV (16 bit/96 kHz) 80 160 320 670 1350
WAV (16 bit/88.2 kHz) 88 176 352 735 1470
WAV (16 bit/48 kHz) 166 332 664 1350 2700
WAV (16 bit/44.1 kHz) 180 360 720 1470 2950
MP3 (320 kbps) 797 1540 3080 6450 12950
MP3 (128 kbps) 1993 3990 7980 16180 32350
WAV (16 bit/48 kHz)+MP3 (128 kbps/48 kHz) 152 305 610 1240 2490
WAV (16 bit/44.1 kHz)+MP3 (128 kbps/44.1 kHz) 165 330 660 1345 2690
WAV (24 bit/48 kHz) 55 110 220 450 900
WAV (24 bit/44.1 kHz) 60 120 240 490 975
WAV (16 bit/48 kHz) 83 166 332 675 1350
WAV (16 bit/44.1 kHz) 90 180 360 735 1475
microSD card capacity
Recording
NOTE
5 The recording times listed above are approximate. They may dier depending on the specications of the card. If multiple les are
recorded, the total recording time may be less than these listed times.
5 The maximum recordable size of a single le is 2 GB.
15
Page 16

Recording
Using Limiter or AGC
The limiter setting gives you three choices: “ON” to use the limiter,
“AGC” to use Auto Gain Control, or “OFF” to use neither. Normally
you’ll choose “OFF.”
The Limiter is a function that compresses the recording level when
the input sound becomes too loud, thus preventing distortion.
AGC increases the recording level if the input is low, and decreases
the level if the input is too high, thus recording at a consistent
level. This allows recording at a consistent volume during a
meeting that might include people who are distant or nearby, and
both loud voices and soft voices.
If you record music or an instrumental performance with
the limiter set to “ON” or “AGC,” the varying dynamics of the
performance will be recorded at a consistent level, impairing
the musical expressiveness. If you want to record the sound
with its natural dynamics intact, leave the Limiter turned “OFF.”
NOTE
5 You can’t adjust the input level if Limiter is “AGC.”
5 You can’t use the rehearsal function if Limiter is “AGC.”
Setting the Limiter
Cutting the Low-Frequency Range
If low cut is set to anything other than “OFF,” the low-frequency
range below the specied frequency is cut. Normally you’ll choose
“OFF.”
If you have problems with low-frequency noise, such as the wind
noise that is often present in outdoor recordings, the rumble from
automobiles or machines, or vibration, you may be able to reduce
this noise by cutting the low-frequency range.
If you have problems with the breath noise or mued tone that
can occur when recording a vocal, cutting the low-frequency
range will give you a more crisp recording.
Setting the frequency at which to cut
1. Press [SCENE] to access the “Scene” screen.
2. Use [ ]/[ ] to move the cursor to Low Cut
setting, and use [ ]/[ ] to change the setting.
1. Press [SCENE] to access the “Scene” screen.
2. Use [ ]/[ ] to move the cursor to Limiter
setting, and use [ ]/[ ] to change the setting.
(Default in bold)
OFF
Limiter
ON
AGC
3. Press [SCENE] to return to the main screen.
NOTE
If Limiter is “AGC,” INPUT [+] [–] is disabled, and you won’t be
able to adjust the recording level manually.
(Default in bold)
OFF
Low Cut
100 Hz
200 Hz
400 Hz
3. Press [SCENE] to return to the main screen.
16
Page 17

Adjusting the Input Level
The R-07 is designed to let you record a wide range of sounds. By
adjusting the input level (volume) appropriately for the source
you’re recording, you’ll be able to record with optimal quality.
The basic principle when adjusting the level is to get the level
as high as possible without allowing distortion to occur. This
principle applies whether you’re using the built-in mics, an
external mic, or AUX IN.
Manually Adjusting the Input Level
NOTE
You can’t adjust the recording level if Limiter (p. 16) is “AGC.”
1. Point the R-07’s mics toward the source you’ll be
recording.
2. In the main screen, press [ ] so the REC/PLAY
indicator is blinking red.
The R-07 is in recording-standby mode.
Recording
4. While the sound plays, use INPUT [+] [–] to adjust
the recording level a little at a time.
MEMO
If the recording mode is set to 2xWAV- (dual-level recording),
the input level cannot be set to a value of 1–41.
The higher the level at which the sound is being captured, the
farther toward the right the level meter will move. Use INPUT [+]
[–] to adjust the level so that the sound is captured at as high a
level as possible.
However, don’t allow the PEAK indicator to light; this indicates
that the input volume is excessive.
If the PEAK indicator lights, this means that the input has
exceeded the maximum volume that can be recorded by the R-07;
i.e., the input is “clipping.” Sound that’s recorded in this condition
will be distorted.
Clipping level exceeded
PEAK indicator
lit
Level range
recordable by the R-07
Clipping
Waveform is clipped,
distorting the sound
3. On the audio source you’ll be recording, play the
sounds that you actually intend to record.
The level meter will move according to the loudness of the sound
being input to the R-07.
If you’re going to record a musical performance such as an
instrument or vocal, you should play the loudest passage of the
song.
Input audio waveform Recorded waveform
Use INPUT [+] [–] to adjust the level so that even the loudest
passages do not cause the PEAK indicator to light; i.e., so that
clipping does not occur. If you’re recording a song, make sure that
clipping does not occur during the climax of a vocal or during a
fortissimo passage of an instrumental performance.
5. When you’ve nished adjusting the level, press [ ]
to start recording.
MEMO
5 To stop recording, press [
The level setting will be preserved, so you can press [ ] once
again to start recording at the same recording level.
5 When using the INPUT [+] [–] buttons, you might hear a
slight noise when the input level changes; this does not
indicate a malfunction.
]; you’ll return to the main screen.
17
Page 18

Recording
Using the Rehearsal Function
You can use the rehearsal function to automatically set the
appropriate recording level based on the audio that is input
during the specied length of time.
NOTE
You can’t use the rehearsal function if Limiter (p. 16) is “AGC.”
1. Press [MENU] to access the “Menu” screen, use
[ ]/[ ] to select “Input,” and then press [ ].
2. Use [ ]/[ ] to move the cursor to Rehearsal Time
setting, and use [ ]/[ ] to change the setting.
(Default in bold)
Manual
30 sec
Rehearsal Time
3. Press [MENU] twice to return to the main screen.
4. Point the mic toward the source you want to record,
and press [REHEARSAL].
1 min
3 min
5 min
Using the Pre-Rec Function
The R-07 provides a Pre-Rec function that lets you capture the
two seconds of sound that preceded the moment you press [ ].
Even for situations in which you’re not sure when the desired
sound will begin, such as when recording outdoors, this function
ensures that you can record without missing the rst moments of
the sound.
1. Press [MENU] to access the “Menu” screen, use
[
]/[ ] to select “Recorder,” and then press [ ].
2. Use [ ]/[ ] to move the cursor to Pre-Rec
setting, and use [
“ON.”
]/[ ] to change the setting to
3. Press [MENU] twice to return to the main screen.
Using the Auto Rec Start Function
By using the Auto Rec Start function, you can have recording start
automatically when a specied time has elapsed, or when the
input level exceeds a specied value.
1. Press [MENU] to access the “Menu” screen, use
[ ]/[ ] to select “Recorder,” and then press [ ].
The input level will automatically be set according to the loudest
volume that occurs during the specied Rehearsal Time. At the
same time, the unit will also perform a test to determine the
appropriate sensitivity for the mic. When the setting is completed,
the R-07 will return to the main screen.
If the Rehearsal Time is set to “Manual,” press [
rehearsal.
If you’re going to record a musical performance such as an
instrument or vocal, you should play the loudest passage of the
song.
] to nish the
2. Use [ ]/[ ] to move the cursor to Auto Rec Start
setting, and use [ ]/[ ] to specify the time after
which recording will start or the level at which
recording will start.
(Default in bold)
Auto Rec Start
Auto Rec Start is not
used
Time until recording
starts
Level at which recording
starts
OFF
2 sec
5 sec
10 sec
Level1 (-60 dB)
Level2 (-30 dB)
Level3 (-20 dB)
3. Press [MENU] twice to return to the main screen.
4. From the main screen, press [ ] so the REC/PLAY
indicator is blinking red.
The R-07 will enter recording-standby mode.
18
5. Press [ ] once again.
Recording will begin automatically when the specied time has
elapsed or when the specied input level is detected.
Page 19

Recording
Recording Instruments or Vocals
Using the Built-in Mics
L R
The built-in mics are stereo.
The mic on the right side of the R-07 will record the right (R)
channel, and the mic on the left side will record the left (L)
channel.
NOTE
5 To avoid acoustic feedback (a whine or howling sound), do
not connect external speakers when you’re recording via a
mic.
5 The built-in mics cannot be used if a mic or device is
connected to the MIC/AUX IN jack. If you want to use the
built-in mics, don’t connect anything to the MIC/AUX IN jack.
MEMO
If you’re using headphones to monitor (listen to) the sound
while it’s being recorded, turn the Rec Monitor SW “ON.”
Using an External Mic
Stereo mic
A dynamic mic or a condenser mic of the type designed for
connection to a computer’s mic jack can be used with the R-07.
NOTE
5 To avoid acoustic feedback (a whine or howling sound), do
not connect external speakers when you’re recording via a
mic.
5 To prevent malfunction and/or damage to speakers or other
devices, always turn down the volume, and turn o the
power on all devices before making any connections.
Settings for the type of mic you’re using
External mic type setting
Here’s how to switch the mono/stereo setting as appropriate for
the mic that’s connected to the MIC/AUX IN jack.
MEMO
If you’re using a mono mic, and record with the external mic
type set to “STEREO,” only the L channel will be recorded.
If you use the “MONO” setting, the same sound will be
recorded on the L and R channels.
For details, refer to “Settings for the R-07” (p. 38).
1. Press [MENU] to access the “Menu” screen, use
[ ]/[ ] to select “Input,” and then press [ ].
2. Use [ ]/[ ] to move the cursor to the EXT Mic
Type setting, and use [ ]/[ ] to choose “MONO”
or “STEREO.”
(Default in bold)
EXT Mic Type
STEREO If the external mic is stereo
MONO If the external mic is mono
3. Press [MENU] twice to return to the main screen.
19
Page 20

Recording
Plug In Power setting
Turn this setting “ON” if you’re using a plug-in powered mic; turn it
“OFF” if you’re using a mic that uses a battery or does not require a
plug-in power supply.
1. Press [MENU] to access the “Menu” screen, use
[ ]/[ ] to select “Input,” and then press [ ].
2. Use [ ]/[ ] to move the cursor to the Plug In
Power setting, and use [ ]/[ ] to choose “ON” or
“OFF.”
(Default in bold)
Plug In Power
NOTE
If you’ve connected a dynamic mic or a mic that has an
internal battery, you must turn Plug In Power “OFF.” Using
the wrong setting may damage your equipment.
OFF
ON ON Plug-in powered condenser mic
Dynamic mic, or condenser mic
with an internal battery
3. Press [MENU] twice to return to the main screen.
About dynamic mics
This type of mic is rugged, and is suitable for recording
vocals and instruments. It does not require a power supply.
Recording from a Cassette or CD
In addition to recording instrumental performances or voice
memos via a mic, the R-07 lets you use the MIC/AUX IN jack to
record sound from a cassette or CD.
NOTE
5 When connection cables with resistors are used, the volume
level of equipment connected to the inputs (MIC/AUX IN)
may be low. If this happens, use connection cables that do
not contain resistors.
5 If you want to record from a connected record player, you’ll
need to obtain a phono equalizer separately.
In this example, we’ll explain how the sound from an CD player
can be recorded into the R-07.
Line output jacks
1. Connect your CD player.
Use an audio cable to connect your CD player’s line output jacks
to the R-07’s MIC/AUX IN jack.
2. Adjust the input level.
Adjust the input level while playing back the desired song on your
CD player.
When you’ve nished adjusting the input level, set your player
back to the beginning of the song you’ll be recording.
About condenser mics
This type of mic features high sensitivity, and is suitable for
recording lower-level sounds such as acoustic instruments
and conferences. It requires power to be supplied from a
battery or via plug-in power.
20
Page 21

Assigning a Marker During Recording
You can assign markers in the WAV le during recording.
Once you’ve assigned markers, you’ll be able to jump to the
marked locations by touching [
playback.
* Markers cannot be assigned to an MP3 le.
] [ ] in the MARK tab during
Manual Marking
1. Start recording.
2. At the moment you want to assign a marker, press
[MARK].
3. Press [ ] to stop recording.
To delete an assigned marker, press [MARK] at the location of the
marker.
Splitting the File During Recording
If you’ve split the le, it will be easy to start playback from a
division point.
When you’re making a continuous recording for an extended
period of time, you may nd it desirable to split the project at
points that will be convenient for searching.
Recording
(Default in bold)
64 MB
128 MB
Size at which le will be
automatically split
Split Type
Recording level at which le will
be automatically split
3. Press [MENU] twice to return to the main screen.
NOTE
5 With some microSD cards, there are rare cases in which the
recording is interrupted.
5 When carrying out playback on the R-07, it is not possible to
play back without an interruption between the preceding
and following les; i.e., gapless playback is not supported.
5 File splitting is possible if at least two seconds have been
recorded in a le. You cannot split les at intervals less than
two seconds.
256 MB
512 MB
1 GB
2 GB
Level 1
(-60 dB)
Level 2
(-30 dB)
Level 3
(-20 dB)
Splitting Manually
MEMO
With the default settings, you can split the le by pressing
] button. If you change the“Manual Split” (p. 39)
the [
settings, you can also split the le by pressing the [A B]
button.
1. Start recording.
2. At the moment you want to split the le, press [ ].
The le will be split at the point you press the button.
3. Press [ ] to stop recording.
Splitting Automatically
The R-07 can automatically split the le when the currently
recorded le reaches a specied size, or when the recording level
falls below a specied value.
By default, this is set to automatically split the le when the le
size reaches 2 GB.
1. Press [MENU] to access the “Menu” screen, use
[ ]/[ ] to select “Recorder,” and press [ ].
2. Use [ ]/[ ] to move the cursor to the Split Type
setting, and use [
or the recording level at which the le is to be
automatically split.
]/[ ] to choose the le size
21
Page 22

Playback
Basic Playback Operation
Play / Pause
Rewind / Move to
previous song or
beginning of song
Stop
1. Access the main screen.
2. Use [ ]/[ ] to select the le that you want to
play.
MEMO
If the display indicates “No Song,” the current folder contains
no les that the R-07 can play back.
If the display indicates “No Card,” no microSD card has been
inserted.
3. Press [ ] to play the le.
The REC/PLAY indicator will light green.
During playback, you can hold down [
fast-forward. Normal playback will resume when you release the
button.
NOTE
For some types of microSD card, the data reading speed
may not keep up when rewinding or fast-forwarding during
playback, causing the rewind or fast-forward operation to
stop.
If this occurs, press [
again.
] to stop playback. Then play back once
4. Use VOL [+] [–] to adjust the volume.
5. Press [ ] to stop playback.
Fast-forward /
Move to next
song
] to rewind, or [ ] to
Play Mode and Repeat Settings
You can specify how the les will be played. In addition to
playing les consecutively from the rst le, you can play just the
selected le, or play les in an automatically determined order
(shue play).
1. Press [MENU] to access the “Menu” screen, use
[ ]/[ ] to select “Player,” and then press [ ].
2. Use [ ]/[ ] to move the cursor to Play Mode
setting, and use [ ]/[ ] to change the setting.
(Default in bold)
SINGLE (play one le)
Play Mode
3. Use [ ]/[ ] to move the cursor to Repeat setting,
and use [ ]/[ ] to turn Repeat ON/OFF.
(Default in bold)
Repeat
MEMO
5 The following table shows the possible combinations of
these settings.
(Default in bold)
Play Mode Repeat Explanation
SINGLE
SEQUENTIAL
SHUFFLE
SEQUENTIAL (play in order)
SHUFFLE (shue play)
OFF (don’t play repeatedly)
ON (play repeatedly)
OFF Play only one le and then stop
ON Play one le repeatedly
OFF Play sequentially and then stop
ON Play sequentially repeatedly
OFF Shue play and then stop
ON Shue play repeatedly
22
5 If you use “SHUFFLE” with Repeat turned “ON,” the les will
play in shued order, and then played again in the same
shued order. If you want to re-shue the order, press [
and then press [ ] once again.
5 File names starting with “.” are not shown.
5 Files having a le name extension of anything other than
.WAV or .MP3 are not shown.
5 The le names shown in the display do not correspond to
the ID3 tags of the MP3 les.
]
Page 23

Playback
Assigning Markers in a File
You can assign markers to the desired locations in a WAV le, and
then jump easily to those locations.
* Markers cannot be assigned to an MP3 le.
1. Access the main screen.
2. Use the [ ], [ ], [ ], and [ ] to play, fast-
forward, or fast-reverse to nd the location at
which you want to assign a marker.
3. When you’ve found the location at which you want
to assign a marker, press [MARK].
The number of markers will be shown. Markers are numbered
sequentially starting at the beginning of the project.
A maximum of 99 markers can be assigned. Repeat steps 2 and 3
to assign markers at the desired locations.
Moving to a marker
Press [ ] to move to the marker that precedes the current
location.
Press [
Deleting a marker
Press [MARK] at a location where a marker is assigned.
] to move to the marker that follows the current location.
Repeatedly Playing a Portion of a File
The AB Repeat function lets you repeatedly play a specied
portion of a le. You can use this to repeatedly hear a section of
interest.
1. Press [ ] to play the le.
2. Specify the beginning of the repeat (point A).
During playback, press [A B]. That point will be the beginning
(point A) of the repeated portion.
A
Song
Set point A
3. Specify the end of the repeat (point B).
Press [A B] once again. That point will be the end (point B) of
the repeated portion.
A
Song
B
Set point B
A
Song
B
Cancelling the setting
5 If point A and point B are already specied, pressing [A B]
will clear the point A and B settings.
5 To stop playback, press [
(points A and B) will be retained, but playback will stop.
MEMO
5 If you’ve set point A and do not set point B before playback
reaches the end of the le, playback will repeat between
point A and the end of the le.
5 The repeat settings will be cancelled if you use [
select another le.
]. The repeat playback settings
]/[ ] to
23
Page 24

Playback
Changing the Playback Speed
Not available for 88.2 kHz or 96.0 kHz sample rates
You can make the playback faster or slower without changing the
pitch.
1. Press [MENU] to access the “Menu” screen, use
]/[ ] to select “Player,” and then press [ ].
[
2. Use [ ]/[ ] to move the cursor to Speed setting,
and use [
(Default in bold)
Speed
3. Press [MENU] twice to return to the main screen.
If Speed is other than “100%,” the indication “SPD” is highlighted at
the bottom of the screen, and the playback speed changes.
When you set Speed to “100%,” playback returns to the original
speed.
NOTE
5 If the playback speed is other than “100%,” the reverb eect
(p. 24) is not applied.
5 Changing the playback speed by a large amount will aect
the tonal character.
5 When you select another le, the playback speed returns to
“100%.”
]/[ ] to change the setting.
50%
60%
70%
80%
90%
100%
110%
120%
130%
140%
150%
Applying Reverb to the Playback
Not available for 88.2 kHz or 96.0 kHz sample rates
You can apply reverb when playing back a le on the R-07. The
reverb eect simulates the reverberation that is characteristic of a
performance in a large hall or other space.
NOTE
5 You can’t record the sound with reverb applied. Nor can you
apply reverb to the monitored sound during recording.
5 When you apply the reverb eect, the playback speed (p. 24)
is set to “100%.”
Applying Reverb
1. Press [MENU] to access the “Menu” screen, use
[ ]/[ ] to select “Player,” and then press [ ].
2. Use [ ]/[ ] to move the cursor to Rev Type
setting, and use [ ]/[ ] to change the setting.
(Default in bold)
OFF Reverberation is not applied.
Simulates the reverberation of a
HALL1
Rev Type
ROOM
PLATE
3. Press [MENU] twice to return to the main screen.
If the reverb type is other than “OFF,” the indication “REV” is
highlighted at the bottom of the screen, and the reverb eect is
applied.
concert hall. This produces mild,
spacious, and long reverberation.
Hall 2 produces a shorter
reverberation than Hall 1.HALL2
Simulates the reverberation of a
room. This produces a bright, short
reverberation that is typical of a
club or studio.
Simulates the reverberation
produced by a plate reverb unit
(a reverb device that uses the
vibration of a metal plate). This
produces a metallic reverberation
with an extended high-frequency
range.
Using the INPUT [+][–] Buttons to Change the Playback Speed
During playback, you can use the INPUT [+][–] buttons to change
the playback speed; the playback speed value is shown.
24
When you set the reverb type to “OFF,” the reverb eect is turned
o.
Page 25

Playback
Changing the Reverb Depth
Species the depth of reverb.
1. Press [MENU] to access the “Menu” screen, use
[ ]/[ ] to select “Player,” and then press [ ].
2. Use [ ]/[ ] to move the cursor to Rev Depth
setting, and use [ ]/[ ] to change the setting.
Rev Depth 1–10
3. Press [MENU] twice to return to the main screen.
Types of Files that Can be Played
The R-07 can play back the following types of les.
Sampling rate (kHz) Sample size (bits)
WAV 32.0, 44.1, 48.0, 88.2, 96.0 16, 24
Sampling rate (kHz) Bit rate
MP3 32.0, 44.1, 48.0 32–320 kbps, VBR
What is VBR?
VBR stands for Variable Bit Rate, which uses a lower bit rate
when the sound is less dense and a higher bit rate when the
sound is more dense.
25
Page 26

Controlling the R-07 from a Mobile Device
Using Bluetooth® functionality lets you remotely control the R-07
from a mobile device such as a smartphone or tablet.
* The app supports iOS and Android.
Here we explain how to install the app and make initial settings.
Installing the App “R-07 Remote”
1. From the web browser of your mobile device,
access the following URL.
http://roland.cm/r-07
From the page that appears, install the app that’s appropriate for
your mobile device.
Starting the R-07 Remote
1. Place the mobile device that you want to connect
nearby this unit.
MEMO
If you have more than one unit of this model, power-on only
the unit that you want to pair (power-o the other units).
2. Start the R-07 Remote.
If you are starting the R-07 Remote for the rst time, or if you have
initialized the R-07’s settings, tap the R-07 that appears.
When the connection is completed, the Bluetooth indicator is lit.
Making Settings on the R-07
1. Press [MENU] to access the “Menu” screen, use
[ ]/[ ] to select “Bluetooth,” and then press [ ].
2. Use [ ]/[ ] to select “Remote Control,” and then
press [ ].
3. Use [ ]/[ ] to move the cursor to Remote
setting, and use [ ]/[ ] to turn “ON.”
The Bluetooth indicator will light.
4. Press [MENU] three times to return to the main
screen.
Making Settings on the Mobile Device
1. Turn on the Bluetooth function of the mobile
device.
If you have multiple R-07 units
Specify the Bluetooth ID separately.
(Default in bold)
Bluetooth ID 0–99
If you change the Bluetooth ID, you need to restart the R-07.
The setting is applied when the unit is restarted.
Install R-07 Remote on each of your mobile devices, and
start R-07 Remote.
Example:
Bluetooth ID: 0 Bluetooth ID: 1
MEMO
The explanation here uses the iPhone as an example. For
details, refer to the owner’s manual of your mobile device.
* Do not tap the “R-07” that is shown in the Bluetooth settings of
the mobile device.
26
Start the R-07 Remote
Tap Roland R-07 MIDI
Start the R-07 Remote
Tap Roland R-07 MIDI-01
Page 27

Synchronizing the time with the mobile device
When the “R-07 Remote” app is connected to the R-07, you
can automatically synchronize the R-07’s time with the
mobile device’s time.
OFF Don’t synchronize the time
Date & Time Adj.
Automatically synchronize
ON
the time
Controlling the R-07 from a Mobile Device
27
Page 28

Using the Metronome
Using the Metronome by Itself
You can listen to the metronome via the preview monitor or
through headphones while you practice your instrument.
1. Press [MENU] to access the “Menu” screen, use
]/[ ] to select “Metronome,” and then
[
press [
2. Use [ ]/[ ] to adjust the BPM (tempo), and use
[
in each measure).
(Default in bold)
BEAT 0–4–8
BPM 30–120–250
3. Press [ ] to sound the metronome.
Press it again to stop.
If headphones are connected, no sound will be output from the
built-in speaker.
].
]/[ ] to specify the BEAT (the number of beats
Sounding the Metronome During Recording
You can listen to the metronome through headphones when in
recording-standby mode and during recording.
The metronome will not be sounded from the built-in speaker
during recording.
1. Press [MENU] to access the “Menu” screen, use
[ ]/[ ] to select “Recorder,” and then press [ ].
2. Use [ ]/[ ] to move the cursor to Metronome
Lev setting, and use [ ]/[ ] to change the
setting.
(Default in bold)
Metronome Lev OFF, 1–10
Specify “OFF” if you don’t want to use the metronome.
4. Use VOL [+] [–] to adjust the metronome’s volume.
28
Page 29

Using the Tuner
Two types of tuners, each having a dierent type of display, are
provided: a tuner that’s convenient for tuning an instrument, and
a graphic tuner that’s useful for vocal or brass instrument practice.
Both tuners let you choose either Auto, which automatically
displays the note name, or Manual, which lets you specify the note
name beforehand.
The reference pitch can be adjusted in the range of A = 435–445
Hz. You can use either the built-in mic or the MIC/AUX IN input.
Basic Operation for the Tuner or Graphic Tuner
Switch the type/note
AUTO, C–B (semitones up)
Adjust
reference pitch
(–)
Switch the type/note
AUTO, B–C (semitones down)
Adjust
reference pitch
(+)
Sound/mute
reference tone
Tuner
This tuner provides a convenient way to tune your instrument.
1. Press [MENU] to access the “Menu” screen, use
[
]/[ ] to select “Tuner,” and then press [ ].
2. Use [ ]/[ ] to specify the type/note of the tuner,
and use [
(Default in bold)
Type/Note AUTO/C, C#, D, D#, E, F, F#, G, G#, A, A#, B
Reference pitch 435 Hz–440 Hz–445 Hz
3. Facing the microphone, play the note that you want
to tune.
Tune your instrument so that the center indicator is illuminated in
the lower part of the display.
When the pitch is correct, the dashed line at the bottom will stop
moving.
]/[ ] to specify the reference pitch.
Use [ ]/[ ] to specify the desired note name, or AUTO. With
the factory settings, this is set to AUTO.
Use [
]/[ ] to specify the reference pitch that you want to use
for tuning. With the factory settings, this is set to A = 440 Hz.
If you press [
sounded from the built-in speaker or in your headphones.
If you’ve selected AUTO, the “A” note will sound. Press the [ ] once
again to mute the reference tone.
], a reference tone of the pitch you specied will be
If the pitch is below the specied note, the left side will light and
the dashed line will ow from right to left.
If the pitch is above the specied note, the right side will light and
the dashed line will ow from left to right.
MEMO
When using the tuner or graphic tuner, the input level is
xed for the internal microphone and MIC/AUX IN input, and
cannot be adjusted.
29
Page 30

Using the Tuner
Graphic Tuner
This tuner graphically shows the pitch change in real time.
It is a convenient way for you to practice singing or playing a wind
instrument with a stable pitch.
1. Press [MENU] to access the “Menu” screen, use
[ ]/[ ] to select “Graphic Tuner,” and then press
[ ].
2. Use [ ]/[ ] to specify the type/note of the tuner,
and use [ ]/[ ] to specify the reference pitch.
(Default in bold)
Type/Note AUTO/C, C#, D, D#, E, F, F#, G, G#, A, A#, B
Reference pitch 435 Hz–440 Hz–445 Hz
3. Facing the microphone, play the note that you want
to tune.
Adjust the pitch so that the graph value comes to the center (±0)
of the vertical axis. When the pitch is correct, the dashed line at
the bottom will stop moving.
If the pitch is below the specied note, a position below the
center line will light, and the dashed line will ow from right to
left.
If the pitch is above the specied note, a position above the center
line will light, and the dashed line will ow from left to right.
30
MEMO
When using the tuner or graphic tuner, the input level is
xed for the internal microphone and MIC/AUX IN input, and
cannot be adjusted.
Page 31

Connecting to Your Computer
By using a USB cable to connect the R-07 to your computer, you
can transfer les from the R-07’s microSD card into your computer
and use them in your music software. You can also transfer les
from your computer to the R-07 and play them back on the R-07.
For details, refer to “Types of Files that Can be Played” (p. 25).
Transferring Files with a Computer (Mass Storage)
Connecting the R-07 to Your Computer
1. Start up your computer.
2. Make sure that a microSD card is inserted in the
R-07’s microSD card slot.
For details, refer to “Inserting a microSD Card” (p. 8).
3. Switch on the R-07’s power (p. 6).
4. Access the main screen.
5. Use the commercially available USB cable to
connect the R-07 to your computer.
display will show the “Now connecting” screen.
Your computer will recognize the R-07’s microSD card in the
following way.
Windows
OS X/macOS
To copy les, use your computer to drag and drop them.
Appears in Computer or Explorer under a name
such as removable disk.
Appears on the desktop with a name such as NO
NAME.
Disconnecting from Your Computer
Here’s how to disconnect the R-07 from your computer. You must
use the following procedure to end the connection before you
disconnect the USB cable.
NOTE
Do not switch o the R-07’s power, disconnect the USB
cable, or remove the microSD card while the R-07 is
connected to your computer.
USB micro-B type
NOTE
5 When connecting the USB cable to your computer, grasp
the base of the connector, and avoid touching the metallic
portion of the plug.
5 If you connect the R-07 to your computer with no microSD
card inserted, the R-07’s display will indicate “No Card.”
5 The R-07 will not be recognized if you connect it to your
computer when the “Menu” screen is shown, or during
playback or recording. Disconnect the USB cable that’s
between the R-07 and your computer, and perform the
procedure again from step 3.
5 The R-07’s various functions are unavailable in the “Now
connecting” screen when connected to a computer.
Operations of the buttons or switches will be ignored.
5 If your computer displays the message “Insert a disk with
this type of le ...,” click [Cancel].
6. Use [ ]/[ ] to select “Storage,” and press [ ].
After a while, the computer will detect the R-07, and the R-07’s
Windows 7/8/10
1. In the Windows task tray, click icon, and then
icon.
2. Click on the message “Eject WAV/MP3 recorder
R-07” appears above the task tray.
3. When you see the message “Safe to Remove the
Hardware,” you can disconnect the USB cable that’s
between the R-07 and your computer.
OS X/macOS
1. Drag “NO NAME” into the trash in the dock.
* This screen shot was taken from macOS Sierra.
* The display might be dierent depending on your system.
When you drag to the location of the trash at the right edge of
the dock, the trash can will change to
connection.
2. Stop the connection.
When the “NO NAME” or “Unnamed” icon disappears from the
desktop, you can disconnect the USB cable that’s between the R-07
and your computer. Alternatively, you can switch o the R-07’s
power.
, allowing you to stop the
31
Page 32

Handling Files and Folders
The R-07 stores audio les on the microSD card.
The “Finder” screen provides various functions for listing, deleting,
or copying these les. You can also create folders and move les
between folders to manage your data.
File structure on the R-07’s microSD card
/ Root
R07_0001.WAV
R07_0002.WAV
R07_0003.WAV
R07_0004.WAV
Folder1
R07_0001.WAV
R07_0002.WAV
R07_0003.WAV
Folder2
R07_0001.WAV
R07_0002.WAV
/ Root Top level of the R-07
File
Folder
Use [
Press [
Press [
]/[ ] to change the selected le
] to enter a folder
] to leave a folder
Basic Operation
Move the
cursor up
Change the
value (–)
Move the cursor
to the left
Move the
cursor down
1. Press [MENU] to access the “Menu” screen, use
[ ]/[ ] to select “Finder,” and then press [ ].
2. Use [ ]/[ ] to select a le or folder, and then
press [ ].
Change the
value (+)
Move the cursor
to the right
Conrm
MEMO
5 You can rename a le or folder (p. 34).
5 You can create a folder in a desired location (p. 37).
MEMO
To make a selection from inside a folder (a lower folder),
select that folder and press [
press [ ].
]. To select a higher folder,
3. Use [ ]/[ ] to select a function, and press [ ].
NOTE
Do not turn o the power or remove the microSD card while
the following screen is shown.
32
Page 33

Handling Files and Folders
Operations in the “Finder” screen
Selection Function Result Procedure
Select Selects the le and moves to the main screen. p. 33
Information Shows information about the le. Alternatively, protects the le name. p. 33
Delete Deletes the le. p. 34
Rename Renames the le. p. 34
Move Moves the le. p. 34
File
Folder
Copy Copies the le. p. 34
Divide Splits the le. p. 35
Combine Joins the le. p. 35
Trim Deletes the beginning and end of the le. p. 36
MP3 Convert Converts a WAV le into MP3. p. 36
Repair
Select Selects the folder and moves to the main screen. p. 33
Information Shows information about the folder. p. 33
Delete Deletes the folder. p. 34
Rename Renames the folder. p. 34
Make Folder Creates a new folder. p. 37
Repairs the le.
* This menu item is shown only if the R-07 has detected a damaged le.
p. 37
Opening a File or Folder
Here’s how to select and play a le from the list of recorded les.
When you select a folder, the current location will change to
the selected folder, and you can use the main screen to choose
les from within the selected folder. You can also record into the
selected folder.
1. In the “Finder” screen, select a le or folder.
2. Choose “Select.”
You will return to the main screen with that le or folder selected.
Viewing Information
1. In the “Finder” screen, select a le or folder.
2. Select “Information.”
The information will be displayed.
Protect a le
You can protect a le so that it cannot be erased or
renamed accidentally.
Use [
]/[ ] to turn the Protect setting on/o.
When you turn the Write Protect setting “ON,” the icon
shown in the nder changes shape.
Write Protect
ON
OFF
3. Press [MENU] three times to return to the main
screen.
Displayed information
File or folder name
Date (date of creation)
Size
Write protect setting (on/o)
Type (Rec Mode)
Sampling Rate
33
Page 34

Handling Files and Folders
Deleting a File or Folder
1. In the “Finder” screen, select a le or folder.
2. Choose “Delete.”
3. When the conrmation screen appears, press [ ] to
conrm the operation.
MEMO
If you decide to cancel, press [MENU] before you press [
].
4. Press [MENU] twice to return to the main screen.
Renaming a File or Folder
1. In the “Finder” screen, select a le or folder.
2. Choose “Rename.”
3. Use [ ]/[ ] to move the cursor to the position of
the character that you want to change.
Moving a File
1. In the “Finder” screen, select a le.
2. Choose “Move.”
3. Use [ ]/[ ] to select the move destination, and
then press [ ].
MEMO
5 If you select “Root,” the le will be moved to the top level
(the root folder) of the R-07’s card. If you select a folder, the
le will be moved into that folder. For details, refer to “File
structure on the R-07’s microSD card” (p. 32)
5 If you want to select a folder that’s inside a folder (i.e., a
lower-level folder), select that folder and then press [
select a higher-level folder, press [ ].
5 If you decide to cancel, press [MENU] before pressing [
NOTE
You can’t perform the Move operation if there’s insucient
free space on the microSD card.
4. Press [MENU] twice to return to the main screen.
]. To
].
4. Use [ ]/[ ] to change the character, and press
[
] to conrm your choice.
MEMO
5 On the R-07, you can only rename le names that consist
of ASCII characters (single-byte alphanumeric characters).
You cannot rename a le name that contains double-byte
characters such as Japanese.
5 Press [A
a character.
5 If you decide to cancel, press [MENU] before pressing [
5 If an identical name already exists, the display will indicate
“Already Exists.” Please specify a dierent name.
B] to insert a space, and press [MARK] to delete
5. Press [MENU] twice to return to the main screen.
Copying a File
1. In the “Finder” screen, select a le.
2. Choose “Copy.”
3. Use [ ]/[ ] to select the copy destination, and
press [ ].
].
MEMO
5 If you select “Root,” the le will be copied to the top level
(the root folder) of the R-07’s card. If you select a folder, the
le will be copied to that folder. For details, refer to “File
structure on the R-07’s microSD card” (p. 32).
5 If you want to select a folder that’s inside a folder (i.e., a
lower-level folder), select that folder and then press [
select a higher-level folder, press [ ].
5 If you decide to cancel, press [MENU] before pressing [
4. Press [MENU] twice to return to the main screen.
NOTE
If you copy a le within the same folder, “-1” will be
appended to the name of the copied le.
]. To
].
34
Page 35

Handling Files and Folders
Dividing a File
1. In the “Finder” screen, select a le.
2. Choose “Divide.”
3. Use [ ]/[ ] and [ ]/[ ] to play, fast-forward,
and rewind through the le to nd the point at
which you want to divide it. When you’ve specied
the point at which to divide the le, press [ ].
4. When the conrmation message appears, press [ ]
to conrm the operation.
MEMO
If the Save Original File setting (p. 40) is turned on, each
divided le will be saved as a new le. In this case, the new
les will have “-1” and “-2” automatically appended to their
name. The original le will remain unchanged. If the original
le is named R07_001.WAV, new les named R07_001-1.WAV
and R07_001-2.WAV will be created.
NOTE
If the microSD card contains insucient free space, the
message “SD Card Full” will appear, and the Divide operation
cannot be executed.
Combining Files
1. In the “Finder” screen, select a le.
2. Choose “Combine.”
3. Select the le that will be combined with the
currently selected le.
Use [ ]/[ ] to select the le that you want to join to the end of
the le selected in step 1, and then press [
MEMO
5 If the Save Original File setting (p. 40) is turned on, the
combined le will be saved as a new le. In this case, the
new le will have “-1” automatically appended to its name.
The original le will remain unchanged. If the original le
is named R07_0001.WAV, the combined le will be created
with the name R07_0001-1.WAV.
5 You can’t combine les that have a dierent Sample Rate or
Rec Mode.
NOTE
5 If the microSD card does not have enough free space,
the message “SD Card Full” will appear, and the Combine
operation cannot be executed.
5 You can’t combine les if the result would exceed a le size
of 2 GB.
4. Press [MENU] twice to return to the main screen.
].
5. Press [MENU] twice to return to the main screen.
35
Page 36

Handling Files and Folders
Deleting Unwanted Portions of a File (Trim)
1. In the “Finder” screen, select a le.
2. Choose “Trim.”
3. Use [ ]/[ ] and [ ]/[ ] to nd the Start Point
of the region that you want to keep. When you’ve
found the desired Start Point, press [ ].
4. Use [ ]/[ ] and [ ]/[ ] to nd the End Point
of the region that you want to keep. When you’ve
found the desired End Point, press [
].
Creating an MP3 File
Not available for 88.2 kHz or 96.0 kHz sample rates
1. In the “Finder” screen, select the WAV le that you
want to convert to MP3.
2. Choose “MP3 Convert.”
3. Use [ ]/[ ] to select the desired MP3 Convert
Mode setting, and press [ ].
(Default in bold)
64 kbps
96 kbps
128 kbps
MP3 Convert Mode
160 kbps
192 kbps
224 kbps
320 kbps
5. When the conrmation message appears, press [ ]
to conrm the operation.
MEMO
If the Save Original File setting (p. 40) is turned on, the
trimmed le will be saved as a new le. In this case, the
new le will have “-1” automatically appended to its name.
The original le will remain unchanged. If the original le is
named R07_001.WAV, the trimmed le will be created with
the name R07_001-1.WAV.
6. Press [MENU] twice to return to the main screen.
MEMO
Creating an MP3 le will not delete the original WAV le.
4. Press [MENU] twice to return to the main screen.
36
Page 37

Handling Files and Folders
Repairing a File
If, during recording, the power is interrupted by disconnecting
the USB cable, or the microSD card is removed, the le will be
damaged and unplayable. In some cases you may be able to use
the Repair function to make the le playable.
1. In the “Finder” screen, select a le.
2. Choose “Repair.”
This menu item is shown only if the R-07 detects a damaged le.
3. When the conrmation message appears, press [ ].
If you decide to cancel, press [MENU] before you press [ ].
4. Press [MENU] twice to return to the main screen.
Creating a Folder
1. In the “Finder” screen, select the location at which
you want to create a folder.
To create a folder at the Root level
Use [
To create a folder within a folder
Use [
created.
Press [ ] to enter the folder.
Use [
press [
]/[ ] to select Root, and press [ ].
]/[ ] to select the folder in which the new folder is to be
]/[ ] to select the folder name shown at the top, and
].
2. Use [ ]/[ ] to choose “Make Folder,” and press
[ ].
The conrmation screen appears.
3. Press [ ] to conrm the operation.
A “New Folder” will be created.
If you decide to cancel, press [MENU] before you press [
].
4. Press [MENU] twice to return to the main screen.
37
Page 38

Settings for the R-07
In the “Menu” screen you can make various settings for the R-07
itself, such as settings for recording and playback, and the date
and time.
Basic Procedure
Access the Menu screen
If the menu screen is shown,
cancels the operation or returns to
the previous screen
Move the
cursor up
Change the
value (–)
Move the cursor
to the left
Move the
cursor down
Change the
value (+)
Move the cursor
to the right
Conrm
1. Press [MENU] to access the “Menu” screen, use
[ ]/[ ] to choose the desired settings category,
and then press [ ].
NOTE
You can’t move to a dierent screen while a le is playing
or recording. You must stop playback or recording before
moving to a dierent screen.
2. Use [ ]/[ ] to move the cursor to the menu
setting that you want to change, and use [ ]/[ ]
to change the value.
List of settings
Category: Finder
Here you can copy or delete audio les that are on a microSD card inserted in the microSD card slot (p. 32).
Category: Input
Menu item Eect Value (default value: bold)
Limiter Species whether to use the limiter or auto gain control (p. 16). OFF, ON, AGC
Low Cut Freq. Cuts the low-frequency region (p. 16). OFF, 100 Hz, 200 Hz, 400 Hz
Rehearsal Time
Rec Monitor Sw
EXT Mic Type
Plug In Power
Species the length of time that will be used to automatically set
the recording level (p. 18).
Species whether the audio input will be monitored via
headphones during recording.
Species the type of mic that is connected to the MIC/AUX IN jack
(p. 19).
Turn this ON if you’ve connected a plug-in powered mic (a small
condenser mic that requires power to be supplied, such as used
with a computer). A voltage of 2.5 V will be supplied (p. 20).
Manual, 30 sec, 1 min, 3 min, 5 min
OFF, ON
Mono, Stereo
OFF, ON
38
Page 39

Settings for the R-07
Category: Recorder
Menu item Eect Value (default value: bold)
Species the sampling rate for recording (p. 14).
Sampling Rate
Rec Mode
Pre-Rec
File Name Species how the le name is to be assigned. Date, Name
Auto Rec Start Species the Auto Rec Start setting (p. 18). OFF, 2 sec, 5 sec, 10 sec, Level 1, Level 2, Level 3
Split Type Species the Split Type (p. 21).
Manual Split Species the button that splits the le during recording (p. 21) OFF, AB, REC
Metronome Lev Sets the volume of the metronome sounded during recording. OFF, 1–10
* If this setting is 88.2 kHz or 96.0 kHz, the only choices for REC
Mode are WAV-16 bit and WAV-24 bit.
Species the type of le for recording (p. 14).
* 2xWAV-16 bit, 2xWAV-24 bit, MP3 and WAV+MP3 can be selected
only if the Sample Rate is 44.1 kHz or 48.0 kHz.
Species whether recording starts two seconds before you press [
(p. 18).
44.1 kHz, 48.0 kHz, 88.2 kHz, 96.0 kHz
2xWAV-16 bit, 2xWAV-24 bit, WAV+MP3, MP364 kbps, MP3-96 kbps, MP3-128 kbps, MP3-160
kbps, MP3-192 kbps, MP3-224 kbps, MP3-320
kbps, WAV-16 bit, WAV-24 bit
]
OFF, ON
64 MB, 128 MB, 256 MB, 512 MB, 1 GB, 2 GB,
Level 1, Level 2, Level 3
Category: Player
Menu item Eect Value (default value: bold)
Play Mode Species the order in which les will play (p. 22). SINGLE, SEQUENTIAL, SHUFFLE
Repeat Species whether Repeat will be enabled (p. 22). OFF, ON
Speed Species the playback speed (p. 24).
Rev Type Species the type of reverb (p. 24). OFF, HALL1, HALL2, ROOM, PLATE
Rev Depth Species the depth of reverb (p. 25). 1–10
Speaker Species whether sound is output from the built-in speaker. OFF, ON
50%, 60%, 70%, 80%, 90%, 100%, 110%, 120%,
130%, 140%, 150%
Category: Bluetooth
Menu item Eect Value (default value: bold)
Information
Pairing Audio Pairs Bluetooth headphones or speakers with the R-07 (p. 10). –
Connect Audio
Disconnect Audio Disconnects connected Bluetooth headphones or speakers. –
Remote Control
Shows information about connected Bluetooth headphones or
speakers.
Connects paired Bluetooth headphones or speakers with the R-07
(p. 10).
Makes preparations for using the “R-07 Remote” app to control the
R-07 (p. 26).
–
–
–
Category: Display
Menu item Eect Value (default value: bold)
Contrast Adjusts the contrast of the characters in the display. 1–5–10
Backlight Adjusts the brightness of the display backlight. OFF, 1, 2
Display Timer
Indicator
Rotate Display Species whether the display is ipped vertically. OFF, ON
Species the time after which the display backlight will be darkened
if no operation has been performed. (Units: seconds)
Species whether the PEAK indicator and Bluetooth indicator will
also go dark in conjunction with the Display Timer.
OFF, 2 sec, 5 sec, 10 sec, 20 sec
Normal, Power Save
Category: Language
Menu item Eect Value (default value: bold)
– Selects the language shown in the display.
English,
(Japanese)
39
Page 40

Settings for the R-07
Category: Power Manage
Menu item Eect Value (default value: bold)
Auto O
Battery Species the type of battery that is installed. ALKALINE, Ni-MH
Species the time after which the power will turn o if no operation
has been performed.
OFF, 3 min, 5 min, 10 min, 15 min, 30 min, 45
min, 60 min
Category: File Edit
Menu item Eect Value (default value: bold)
Save Original File
Switches whether the original unedited le will be retained when
executing a le editing operation (Divide, Combine, or Trim).
OFF, ON
Category: Date & Time
Species the date and time (p. 7).
Category: SD Card
Menu item Eect Value (default value: bold)
Information Displays information about the microSD card. –
Format Formats the microSD card (p. 9) –
Category: Metronome
Sets the tempo or beat of the metronome (p. 28)
Category: Tuner
Use this to tune an instrument (p. 29).
Category: Graphic Tuner
Use this to check pitch changes during vocal or brass instrument practice (p. 30).
Category: Factory Reset
Resets the R-07 to the factory-set condition.
The state of connection with a Bluetooth device or mobile device is also reset. You’ll need to make the connection again.
Category: Information
Shows wireless certication information for the R-07.
40
Page 41

Error Messages
This section explains the main error messages that may appear in the display.
Message Problem
Clock Initialized
Battery Low
Improper Song
Already Exists
Song Protected
Name Too Long
File System Err
SD Unformatted
SD Card Full
Cannot Change
Over 2GB
SD Card Slow
SD Card Error
No Card
SD Unsupported
HOLD is ON
Now Recording
Now Playing
AGC is ON
Power for the internal clock was lost, so the internal clock has been initialized. Please specify the
date and time.
The internal batteries have run low.
Replace the batteries. Alternatively, supply power via the USB port.
This le is of a format that the R-07 cannot use.
An identically named le or folder exists. Please use a dierent name to create the le or folder.
The le is protected. Turn Write Protect “OFF” before you execute the operation.
The name is too long.
There is a problem with the microSD card. Format the microSD card on the R-07.
The microSD card has not been formatted. Format the microSD card on the R-07.
The microSD card has insucient free space. Copy les to your computer, and free up space on
the microSD card.
The le cannot be renamed because the le name contains double-byte characters.
The le contains too much data.
Writing to the microSD card could not be performed fast enough. Please use a microSD card that
is known to work with the R-07. In some cases, repeated writing and deleting of les may cause
the les to become fragmented on the microSD card, impairing the processing capability. If so,
please reformat the microSD card.
A problem occurred while accessing the microSD card. The microSD card might be damaged.
No microSD card is inserted. Insert an microSD card into the R-07.
The R-07 cannot use this microSD card.
Operation is not possible because the [POWER] switch is set to the HOLD position. Turn the HOLD
o if you want to perform an operation.
Currently recording. Stop recording if you want to perform an operation.
Currently playing. Stop playback if you want to perform an operation.
Since Limiter is “AGC,” you cannot operate the input level buttons or the rehearsal function.
To operate these things, set the limiter to a setting other than “AGC.”
41
Page 42

Troubleshooting
If you experience problems, refer to the information provided here.
If this information does not help you solve the problem, please contact a customer service location listed on the leaet “Read Me First.”
Problems with Recording
Problem Cause Page
If you’re using a mono mic, only the L (left) channel will be recorded.
Sound recorded from the mic is heard only
from the L (left) channel
Can’t start recording
Recording begins at a dierent point than
when you started
Can’t use the mic
Recorded sound is distorted
Can’t play back the recorded le
Can’t record
Recording with a mono mic creates a stereo
le
Volume of the device connected to the MIC/
AUX IN jack is too low
File was divided unexpectedly
If you use an external mic, check whether the mic is stereo or mono. In order to
record onto both channels using a mono mic, use the “Menu” screen to set the
external mic type to “MONO.”
Recording will not be possible if the microSD card has less than 16 kilobytes of free
space. Nor can you enter recording-standby mode.
If Pre-Rec is on, the sound will be recorded starting two seconds before you press
the [
].
The internal mics cannot be used if a mic, cable, or device is connected to the MIC/
AUX IN jack. If you want to use the internal mics, do not connect anything to the
MIC/AUX IN jack.
If you’re using a plug-in powered mic, you’ll need to turn Plug In Power on. p. 20
The R-07 does not support phantom-powered mics. –
The sound will be distorted if the input level is too high. Adjust the recording level
appropriately.
If, during recording, the power is interrupted by disconnecting the USB cable, or the
microSD card is removed, the le will be damaged and unplayable.
In some cases you may be able to use the le Repair function to recover it.
Recording is not possible if the microSD card is not inserted correctly. Turn o the
power, and re-insert the microSD card.
If the microSD card has not been formatted, it will not be recognized, and the
display will indicate “SD Unformatted.” Please format the microSD card.
The microSD card will not work properly unless it was formatted on the R-07. If the
card was formatted using a computer, it might have the wrong format. In this case,
it might stop immediately after recording is started, or recording might not occur
correctly.
Recording will not occur correctly if the recording level specied by INPUT [+] [–] is
too low. Set the recording level appropriately.
The R-07 records in stereo. If you connect a mono mic, a stereo le with the same
sound on left and right (L, R) tracks will be created even if EXT Mic Type is set to
“MONO.”
Could you be using a connection cable that contains a built-in resistor? Please use a
connection cable that does not contain a resistor.
The R-07 will automatically divide the le if the le currently being recorded exceeds
a specied size, or if the recording level falls below a specied level. Set the Split
Type setting to specify the le size or recording level at which the le is to be
automatically divided.
p. 19
p. 40
p. 18
p. 19
p. 17
p. 37
p. 8
p. 9
p. 9
p. 17
p. 19
p. 20
p. 21
Problems with Playback
Problem Cause Page
You might not hear the sound if the output volume is too low. Try gradually pushing
No sound
Can’t play back
Unintended les are played
42
the VOL [+].
Make sure that your headphones or speakers are correctly connected. p. 10
Make sure that the le name is assigned correctly. The R-07 cannot use les that
have a name that begins with a “.” (period).
The R-07 can only play les with a le name extension of .MP3 or WAV. p. 25
A damaged le cannot be played. You might be able to recover the le by using the
Repair function.
The le Play Mode might be set to”SHUFFLE.” If so, the R-07 will randomly select and
play the next le. Change the setting back to “SEQUENTIAL.”
p. 22
p. 22
p. 37
p. 22
Page 43

Troubleshooting
Problems with Bluetooth Functionality
Problem Cause Page
Check whether the Bluetooth device is able to connect.
Can’t connect with Bluetooth headphones or
speakers
No sound from the Bluetooth headphones
or speakers
Noise is heard from the Bluetooth
headphones or speakers
The R-07’s Bluetooth indicator remains
blinking
Can’t connect to the R-07 from an app
If the Bluetooth device is too far away from the R-07, it might be unable to connect.
Place the Bluetooth device near the R-07.
Check the R-07’s “Pairing Audio” to see whether pairing data might be lost.
If the data is lost, perform the pairing operation once again.
No sound is output if the R-07’s volume is set to “0.” Raise the R-07’s volume.
No sound is heard if you’ve lowered the volume of the Bluetooth headphones or
speakers. Raise the volume of the Bluetooth headphones or speakers.
Noise might be heard if there is a nearby device that uses the same frequency range
(2.4 GHz) as the R-07. Move the R-07’ away from other devices that use the same
frequency range (2.4 GHz).
Noise might be heard if there is an obstruction such as a wall or person between the
R-07 and the Bluetooth device.
Use the R-07 in an unobstructed location with a clear line of sight. The distance at
which communication is possible might be shorter for some Bluetooth devices. Use
the Bluetooth device as near as possible to the R-07.
Depending on conditions, a Bluetooth device connected to the R-07 might be
disconnected. Power-on the Bluetooth device and reconnect it. If it does not
reconnect, use the R-07’s “Disconnecting a Bluetooth device” function to end the
connection, and then reconnect.
Delete the “Roland R-07 MIDI” that is registered on your mobile device; then reregister and connect.
Other Problems
Problem Cause Page
Check whether the USB AC adaptor or USB cable might have been disconnected,
causing the power to turn o.
If you’re using batteries, make sure that they are oriented correctly, and not loose in
Power won’t turn on
R-07 is not recognized when connected to
computer
“Menu” screen does not appear when you
press [MENU]
Display becomes dim
Power turns o unexpectedly
Your settings return to their original value
R-07 not recognized when connected to your
computer via USB
the compartment. If the batteries have run low, install fresh batteries.
If the R-07 will not power-on even though there are not problems with the USB
AC adaptor or USB cable, or if the batteries are OK, then the unit might have
malfunctioned. Please contact a customer service location listed on the leaet “Read
Me First.”
If no microSD card is inserted in the R-07, it won’t be correctly recognized by the
computer.
If no icon appears on your computer’s desktop, make sure that the microSD card is
inserted correctly.
During playback, recording, or recording-standby mode, pressing [MENU] will not
display the “Menu” screen. Stop playback or recording before you press [MENU].
If you’re using batteries, the display will be dimmed if no operation is performed
during the specied Display Timer interval.
Depending on the Auto O setting, power will turn o automatically if no operation
is performed for a specied length of time.
If you’re using batteries, power will turn o when the batteries run low. Please install
fresh batteries.
When you initialize the settings, all settings that you made in the “Menu” screen etc.
return to their original state. Please make the desired settings again.
Changes that you make to settings will return to their original state if the power was
turned o without using the [POWER] switch, for example if the batteries ran low or
if the USB AC adaptor or USB cable was disconnected.
Please make the desired settings again.
The R-07 will not be recognized by your computer if you connect it when the “Menu”
screen is displayed, or during playback or recording. Please disconnect the USB
cable, and try again.
p. 6
–
p. 8
–
p. 39
p. 40
p. 6
p. 38
p. 38
p. 31
43
Page 44

Troubleshooting
Problem Cause Page
Even if the le name extension is .MP3 or .WAV, the display when selecting a le will
File name display is slow when selecting a
le
Feedback occurs when monitoring through
headphones
Internal clock is reset
Can’t divide or join les
be slower if the le is damaged, if the le is an invalid le or an unsupported type of
MP3, or if the le is of a large size. This occurs because the R-07 needs to determine
whether it is able to play the le.
If you’re monitoring the recording through open-air type headphones, acoustic
feedback might occur if the R-07’s mics pick up the sound from your headphones.
The R-07’s built-in mics are able to detect even faint sound, so keep your
headphones away from the built-in mics.
When a USB AC adaptor and USB cable are connected, or when batteries are
installed, the internal clock is supplied with power and begins operating. If several
minutes pass with the batteries removed, the internal clock will return to its default
setting. When you turn on the power in this state, the message “Clock Initialized” will
appear. If this message appears, please reset the date and time.
The microSD card must have twice as much free space as occupied by the
corresponding le(s). It is not possible to join les that would exceed 2 GB in size.
p. 25
p. 19
p. 7
p. 40
44
Page 45

Main Specications
High Resolution Audio Recorder: R-07
Recorder Part
Tracks
2 (stereo)
4 (stereo x2) * WAVx2 recording mode only
Signal Processing
AD/DA conversion: 24 bits, 44.1/48/88.2/96 kHz
Data Type
[For Recording] * Stereo only
WAVE:
Sampling Rate 44.1/48/88.2/96 kHz
Bit Depth 16/24 bits
MP3 (MPEG-1 Audio Layer 3):
Sampling Rate 44.1/48 kHz
Bit Rates 64/96/128/160/192/224/320 kbps
WAV+MP3:
Sampling Rate 44.1/48 kHz
Bit Depth 16 bits
Bit Rates 128 kbps
WAVE x 2:
Sampling Rate 44.1/48 kHz
Bit Depth 16/24 bits
[For Playback]
WAVE:
Sampling Rate 32/44.1/48/88.2/96 kHz
Bit Depth 16/24 bits
MP3 (MPEG-1 Audio Layer 3):
Sampling Rate 32/44.1/48 kHz
Bit Rates 32–320 kbps or VBR (Variable Bit Rate)
Memory Card
microSD Card
SDHC format compatible
Recordable time (approximate) Units: minutes
Rec Mode
WAV (24 bit/96 kHz) 55 110 220 450 900
WAV (24 bit/88.2 kHz) 60 120 240 490 980
WAV (24 bit/48 kHz) 110 220 440 900 1800
WAV
MP3
WAV+MP3
WAVE x2
(2xWAV)
* Each recording time is approximate. The times may change depending on the card specications.
* In case that there are plural les, the sum of recording time would be shorter than above.
WAV (24 bit/44.1 kHz) 120 240 480 980 1950
WAV (16 bit/96 kHz) 80 160 320 670 1350
WAV (16 bit/88.2 kHz) 88 176 352 735 1470
WAV (16 bit/48 kHz) 166 332 664 1350 2700
WAV (16 bit/44.1 kHz) 180 360 720 1470 2950
MP3 (320 kbps) 797 1540 3080 6450 12950
MP3 (128 kbps) 1993 3990 7980 16180 32350
WAV (16 bit/48 kHz)+MP3 (128 kbps/48 kHz) 152 305 610 1240 2490
WAV (16 bit/44.1 kHz)+MP3 (128 kbps/44.1 kHz) 165 330 660 1345 2690
WAV (24 bit/48 kHz) 55 110 220 450 900
WAV (24 bit/44.1 kHz) 60 120 240 490 975
WAV (16 bit/48 kHz) 83 166 332 675 1350
WAV (16 bit/44.1 kHz) 90 180 360 735 1475
2 GB 4 GB 8 GB 16 GB 32 GB
microSD card capacity
45
Page 46

Main Specications
Input/Output
Audio Inputs
Internal Stereo Microphone
MIC/AUX IN jack (Stereo miniature phone type, plug-in powered
mic)
* The Internal Mic and the MIC/AUX IN can’t be used at the same
time; only the MIC/AUX IN jack is eective.
Audio Output
PHONES jacks (Stereo miniature phone type)
Internal Speaker for playback (mono)
* The Internal Speaker and the PHONES jack can’t be used at the
same time; only the PHONES jack is eective.
Nominal Input Level (Variable)
MIC/AUX IN jack: -31 dBu (Default input level)
* 0 dBu=0.775 Vrms
Input Impedance
MIC/AUX IN: 4.5 k ohms
Output Level
3 mW + 3 mW (In case 16 ohms load)
Recommended Load Impedance
16 ohms or greater
Frequency Response
20 Hz–40 kHz (+-3 dB)
USB Interface
USB port: USB Micro-B type
Support USB 2.0/1.1 mass storage device class
Bluetooth
R-07 Remote: Bluetooth technology: Bluetooth Ver 4.0
Audio transmission: Bluetooth technology: Bluetooth Ver 3.0
Transmitting Power: Specication Power Class 2 (Line of sight
range 10 m (30 ft))
Prole Support: A2DP, AVRCP
CODEC Support: SBC, Qualcomm aptX Qualcomm aptX low
latency
Other
Display
Graphic LCD 128 x 64 dots (white backlit)
Power Supply
Alkaline battery (AA, LR6) x 2,
or Rechargeable Ni-MH battery (AA, HR6) x 2,
or Supplied from the computer via USB
Current Draw
350 mA (MAX)
Duration of continuous use with Alkaline battery operation
Playback: Approximately 15 hours
Recording: Approximately 15 hours
* This can vary depending on the specications of the batteries,
capacity of the batteries, and the conditions of use.
Dimensions
61 (W) x 103 (D) x 26 (H) mm
2-7/16 (W) x 4-1/16 (D) x 1-1/16 (H) inches
Weight
150 g/6 oz (including batteries)
Accessories
Leaet “Read Me First”
Owner’s manual
microSD card (inserted in the R-07)
Batteries (two AA)
Options
Microphone Stand Adaptor: OP-MSA1
Binaural Microphones / Earphones: CS-10EM
Stereo Microphone: CS-15S
* This document explains the specications of the product at the
time that the document was issued. For the latest information,
refer to the Roland website.
Eects
* Playback only. Excludes playback in 88.2 kHz or 96 kHz.
* Reverb and Speed Change can’t be used at the same time.
Reverb
4 types (HALL1, HALL2, ROOM, PLATE)
Speed Change
50–150% of playback speed
46
01
 Loading...