

Page 1

Version 2 Supplementary Manual
This document explains the functions that have been added in version 2.0.
Please read this along with the Prelude Owner’s Manual.
Copyright © 2009 ROLAND EUROPE
All rights reserved. No part of this publication may be reproduced
in any form without the written permission of ROLAND EUROPE.
Page 2
Contents
New functions in Prelude Version 2.0 .3
Playing back songs with Lyrics data........................3
Creating a User Style .............................................3
Recording or editing a song ...................................3
Other added functions............................................3
Playing back songs with Lyrics data ...4
Importing songs with Lyrics data ............................4
Formatting a USB memory .......................................4
Copying songs to the USB memory...........................4
Playing back songs while following the lyrics..........4
Before you compose a Style ...............5
How a Style is constructed......................................5
Divisions................................................................5
Checking the settings for each part of a Division ........5
Creating a User Style .............................................6
Editing an existing Style.....................7
Changing the Style’s sounds (STYLE MAKEUP) .........7
Changing the Style’s MFX settings (STYLE MFX) .......7
Saving a Style........................................................8
Creating a new Style..........................9
Initializing the style (STYLE INITIALIZE).....................9
Recording a Style...................................................9
Realtime recording..................................................9
Step recording .....................................................10
Saving the Style you recorded ..............................12
Editing a Style......................................................13
Correcting the note timing (Quantize) .....................14
Erasing unwanted data (Erase)............................... 14
Deleting an unwanted region (Delete) .....................15
Copying performance data (Copy) ......................... 15
Inserting blank space (Insert)..................................17
Shifting the pitch (Transpose) .................................17
Modifying the note dynamics (Change Velocity).......18
Modifying the note durations (Change Gate Time).... 18
Replacing performance data (Global Change).........19
Making fine adjustments to the timing (Shift Clock)....20
Changing the length of each part (Style Part Length) . 20
Specifying the time signature (Time Signature)..........21
Editing a Style in more detail (STYLE MICROSCOPE) 21
Automatically generating Style data (EZ CONVERT)23
Editing an existing song...................26
Changing the song’s sounds (SONG MAKEUP)......26
Changing the song’s MFX settings (SONG MFX)....26
Saving a song .....................................................27
Creating a new song .......................28
Initializing the song (SONG INITIALIZE).................28
Recording a song.................................................28
Realtime recording ............................................... 28
Step recording..................................................... 29
Saving the song you recorded..............................31
Editing a song (SONG EDIT) .................................32
Correcting the note timing (Quantize)..................... 33
Erasing unwanted data (Erase) .............................. 33
Deleting an unwanted region (Delete)..................... 34
Copying performance data (Copy)......................... 34
Inserting blank space (Insert).................................. 35
Shifting the pitch (Transpose)................................. 36
Modifying the note dynamics (Change Velocity)....... 36
Modifying the note durations (Change Gate Time) ... 37
Replacing performance data (Global Change)......... 37
Making fine adjustments to the timing (Shift Clock)... 38
Combining performance data (Merge).................... 38
Exchanging data with another part (Exchange)........ 39
Editing a song in more detail
(SONG MICROSCOPE)........................................ 39
Editing data that applies to the entire song
(SONG MASTER TRACK)...................................... 41
Other added functions ..................... 43
STYLE FINDER ...................................................... 43
SYSTEM PEDAL ....................................................43
SYSTEM STYLE MIDI (NTA)....................................44
Chord Zone.........................................................45
Error messages related to creating
Styles and Songs ............................. 46
Index .............................................. 47
Creating a song...............................24
Recording your performance as you play..............24
Ways to create a song .........................................25
2
Page 3
New functions in Prelude Version 2.0
Playing back songs with Lyrics data
• You can now play back songs stored in the Prelude’s internal memory and follow their lyrics in the display in true
karaoke fashion.
• For your convenience, the Prelude allows you to specify whether you want to see 4 or 6 lines of lyrics at once.
Creatingd and editing a User Style
• You can easily edit a new Style by accessing the STYLE MAKEUP screen for an existing style, then changing the
sounds or modifying the way the sounds are produced.
• Dedicated MFX (Multi Effects) for Styles are now provided, allowing you to apply MFX to the sound of a style
independently from the keyboard performance.
• You can use realtime recording or step recording to create a new Style by recording a performance for individual
parts.
• You can now specify two or more Style parts as drum parts.
• You can use editing functions such as quantize and copy to create Styles efficiently.
• The STYLE MICROSCOPE screen lets you edit the individual notes of a Style in detail.
• You can use the EZ Convert function to create Styles easily.
Recording or editing a song
• You can access the SONG MAKEUP screen and easily change the sounds in a song or adjust how the sounds are
produced.
• Dedicated MFX (Multi Effects) for Songs are now provided, allowing you to apply MFX to the sound of a Song
independently from the keyboard performance.
•In addition to “realtime recording,” which records your performance just as you play it, version 2.0 provides “step
recording,” which lets you enter notes and rests one at a time. You can select the recording method that’s most
appropriate for the part you want to record.
• You can use editing functions such as quantize and copy to create songs efficiently.
• You can use the SONG MICROSCOPE screen or SONG MASTER TRACK screen to edit a song’s individual notes or
tempo data in detail.
The section “Recording and Editing a Song” in this document includes the content of the section titled “Song” in the
Owner’s Manual (p. 26~30).
Other added functions
• The “STYLE FINDER” screen has been added, allowing you to select a Style from a list sorted by number, name, or
tempo.
• The system pedal setting now allows you to assign BEND MODE to the pedal.
•A place for making MIDI settings related to the performance of Styles has been added to the system settings; it’s
named “SYSTEM STYLE MIDI (NTA).”
• The performance settings now provide a “Chord Zone” parameter, which lets you specify the key range for chord
detection.
• The Style player’s feel and its response to chord changes have been refined to provide an even more satisfying
musical experience.
Copyright © 2003 by Bitstream, Inc. All rights reserved. Bitstream Vera is a trademark of Bitstream, Inc.
3
Page 4
Playing back songs with Lyrics data
The Prelude allows you to follow the lyrics of the songs you
play back in its display (provided the songs you select contain
lyrics data).
This function is available for songs that reside in the Prelude’s
internal memory. You may therefore have to import songs from
a USB storage device to take advantage of this new function.
The Prelude can only display the lyrics of songs in its internal
memory. Please import all songs whose lyrics you want to
follow before using this new function. See below for details.
Importing songs with Lyrics data
To import songs with Lyrics data into the Prelude’s internal
memory, you need to prepare a USB memory by formatting it
on the Prelude itself. To do so, follow the procedure below
from step (1). If your USB memory already uses the correct
format, start from step (4) below.
Formatting a USB memory will erase all data it contains.
Always make sure your USB memory contains no data you
want to keep before formatting it.
8. Follow the procedure described under “Loading User Data
Saved on USB Memory (Import)” on page 48 in the
owner’s manual to import the desired songs.
Now you are ready to enjoy karaoke performances with
your Prelude.
If a “Write Error!” message is displayed while the data are
being imported, the operation is aborted. This is usually due to
unsupported characters in the file name. Only the following
characters are supported:
(space)
!#$%&'()
+, . 012345
67 89 ; = @
AB CD E F G H I J K
LM NO PQR S T UV
WX Y Z [ ] ^ _ `
ab cdefgh i j k
lmnopq r s t uv
wx y z { }
Any file whose name consists of 17 or more characters
(excluding the file name extension) cannot be loaded into the
Prelude.
Playing back songs while following the lyrics
Formatting a USB memory
1. Insert a USB memory into the USB MEMORY port on the
Prelude’s rear panel.
2. Follow the procedure described under “Initializing USB
Memory (USB Memory Format)” on page 48 in the
owner’s manual.
3. Wait until the operation is completed, then remove the USB
memory.
Copying songs to the USB memory
4. Connect the USB memory to a free USB port on your
computer.
5. Copy all songs with Lyrics data you wish to import to the
“\ROLAND\SONG” folder on your USB memory.
6. Eject the USB memory with your OS’s standard procedure,
then remove it from your computer’s USB port.
7. Insert the USB memory into the USB MEMORY port on the
Prelude’s rear panel.
1. Press the [SONG] button (it lights).
2. Use the VALUE dial to select a song with Lyrics data.
While the cursor is at a song number, you can also select
a song from the song list: press [ENTER] to open the song
list, use [ ] [ ] to select the desired song (the [INTRO]
button flashes to indicate songs that contain lyrics), then
confirm by pressing [ENTER] again.
Songs can also be selected using [NUMERIC]: see “Changing
a value” on page 16 in the owner’s manual.
3. Press [ ] to play back the song.
4. Press the [INTRO] button in the STYLE CONTROL section.
The Prelude now displays the song’s lyrics.
5. Press [INTRO] again to select 3 or 5 lines of lyrics data
(depending on which is more convenient for you).
6. Press the [EXIT] or [SONG] button to return to the main
song page.
You can return to the lyrics page any time by pressing
[INTRO] yet again.
7. Press [ ] to stop song playback.
4
Not all character sets are recognized.
Page 5
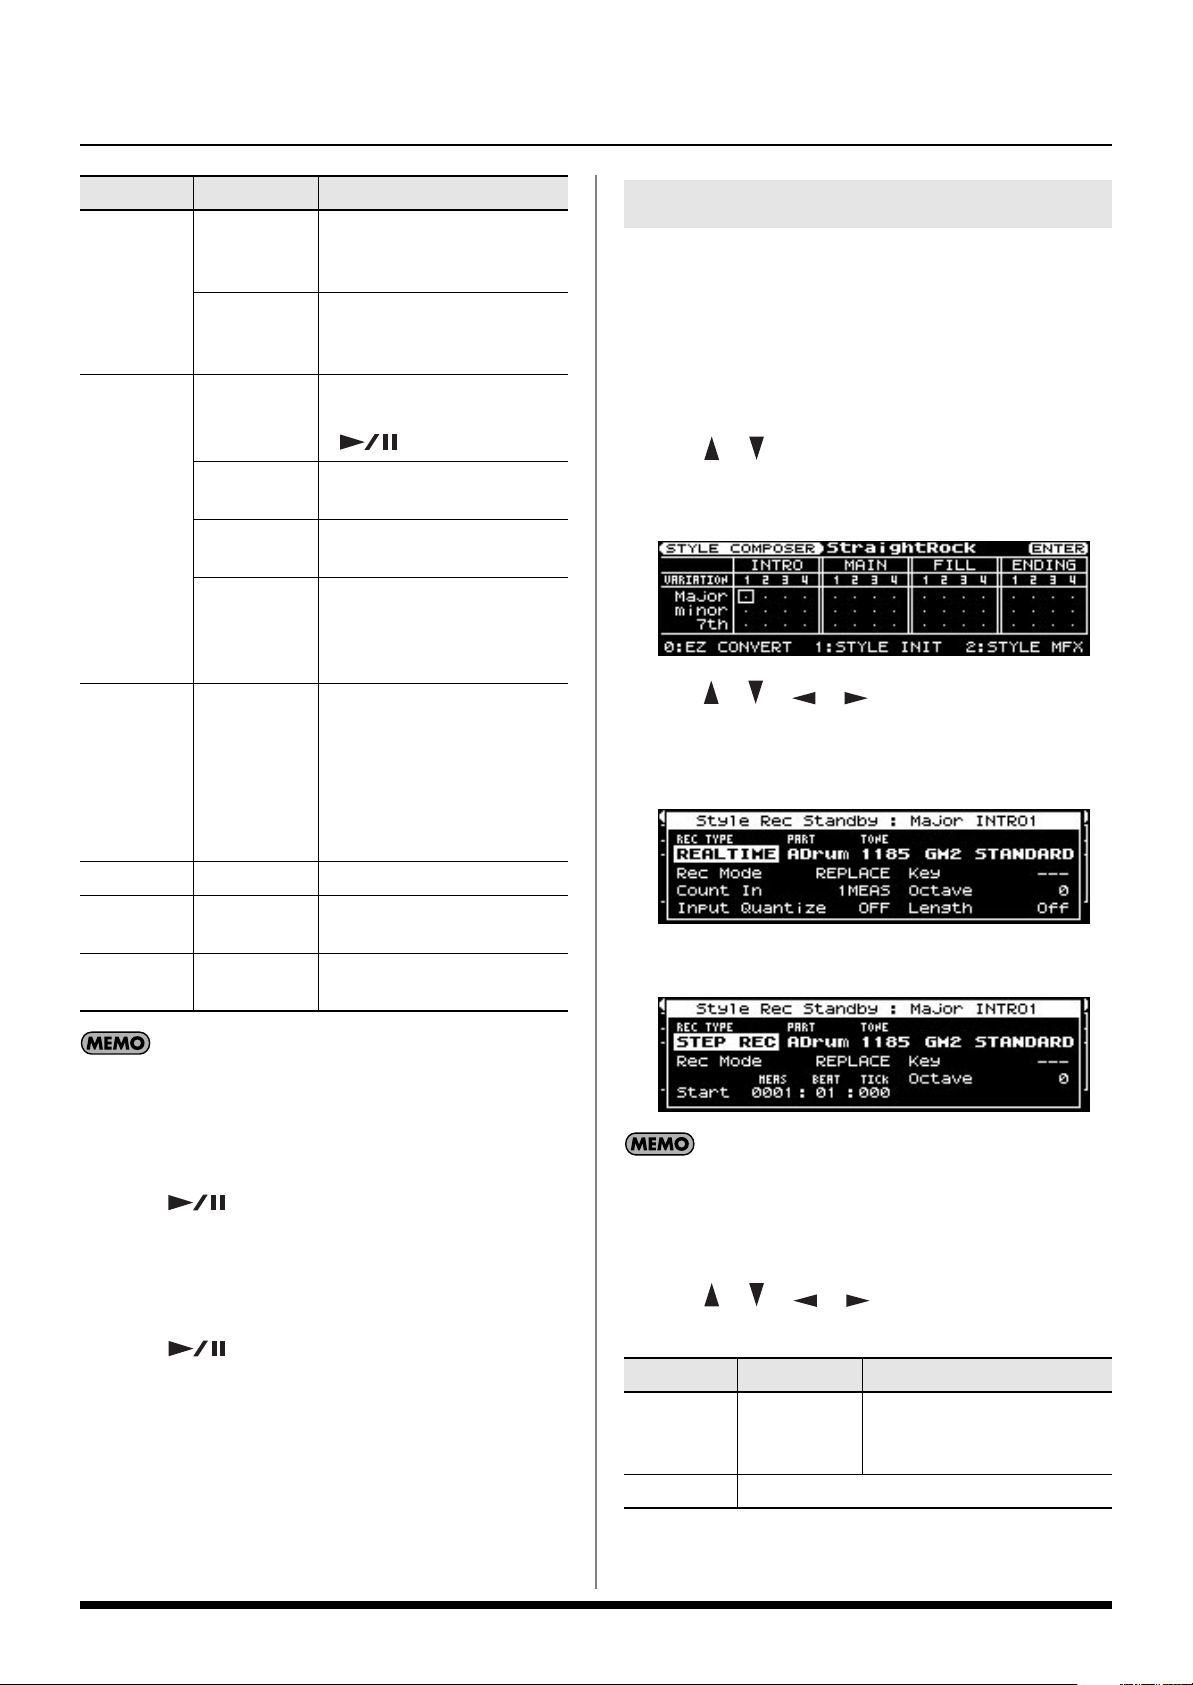
Before you compose a Style
How a Style is constructed
For each of the three principal chords (Major, minor, and 7th),
each Style contains four variations each for intro, main, fill-in,
and ending, giving a total of 48 accompaniment patterns.
Each accompaniment pattern is called a “division.”
In the STYLE COMPOSER screen you can check whether or not
a division exists.
1. Select a Style (p. 25 in the owner’s manual).
2. Press [MENU] so the button is lit.
3. Use [ ] [ ] to select “Style Composer,” and press
[ENTER].
The STYLE COMPOSER screen will appear.
In this screen you can select the division that you want to
edit or record.
You can also access the STYLE COMPOSER screen from the
Main screen by holding down [STYLE].
3
1 2
1.
Chord
2.
Division:
(■) Performance data exists
(•) No performance data
3.
Variation
Divisions
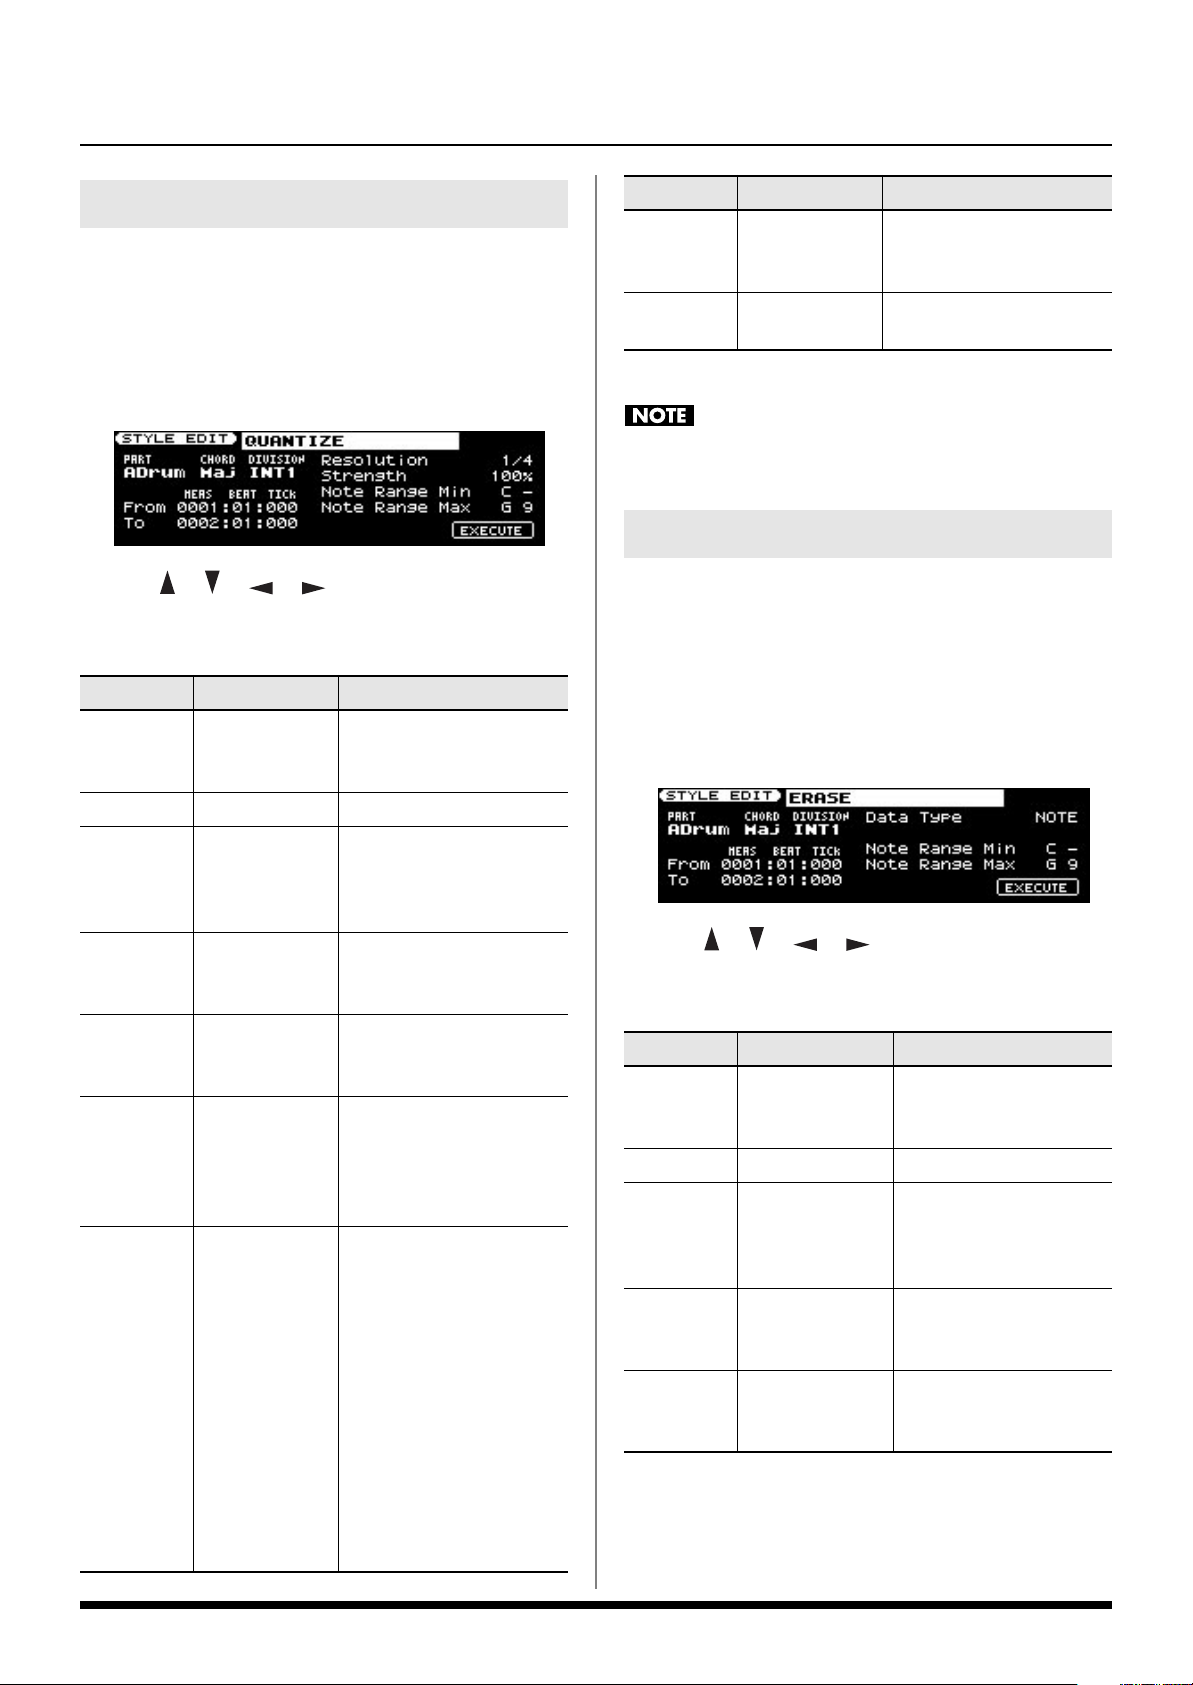
Each division consists of eight performance parts: “drums,”
“bass,” and “accompaniment 1–6.”
These eight parts are called Style parts.
You can select a desired part and edit its settings, or newly
record it.
Checking the settings for each part of a Division
In the STYLE COMPOSER screen, press [ENTER] to access the
STYLE COMPOSER ZOOM screen.
In the STYLE COMPOSER ZOOM screen you can view the
tone used by each part of the selected division.
1
2 3
1.
Tone:
This indicates the Tone assigned to the selected style
part.
2.
Style part:
The name will be highlighted for parts that contain
performance data.
You can assign the following Tones to each style part.
Drums (ADR): rhythm sets
Bass (ABS): tones other than rhythm sets
Accompaniment (AC 1–6): any tone
3.
Move the cursor and press [ENTER] to move to other
screens.
EDIT: STYLE EDIT screen (p. 13)
MICRO: STYLE MICROSCOPE screen (p. 21)
Parameter
PART
CHORD
DIVISION
MUTE
Value Explanation
Selects the style part.
ADR, ABS,
AC1–6
Major,
minor, 7th
INTRO1–4,
MAIN1–4,
FILL1–4,
ENDING1–4
OFF, ON
ADR: Accomp Drum
ABS: Accomp Bass
AC: Accompaniment
Selects the chord.
Selects the division.
Specifies whether the sound
will be muted (ON) or heard
(OFF).
SOLO
OFF, ON
Specifies whether this part
alone will be heard by itself
(ON) or not (OFF).
5
Page 6
Before you compose a Style
Creating a User Style
Broadly speaking, you can create a user style in either of the
following two ways.
Editing an existing style
You can create a new User Style by changing the Tones used
in a previously saved Style, adjusting the volume balance
between parts, or adjusting the settings of dedicated Style
effects.
Creating a new style
You can initialize a new Style and then use realtime or step
recording to create the performance data for each division.
The performance data you create can be edited using the
various editing functions or the Microscope function.
You can create performance data for all divisions of a single
chord, and then use the EZ Convert function to easily create
division data for the remaining chords.
6
Page 7
Editing an existing Style
Changing the Style’s sounds
(STYLE MAKEUP)
You can change the Tone used by each part of a Style, and
adjust the volume and effect balance between parts.
The STYLE MAKEUP settings are applied to all divisions of a
Part for which the same Tone is assigned.
1. Select a Style (p. 25 in the owner’s manual).
2. Press [PART VIEW] a number of times to access the STYLE
MAKEUP screen.
You can’t access the STYLE MAKEUP screen during recording
or in recording-standby mode.
3. Use [ ] [ ] [ ] [ ] to select a parameter.
4. Turn the VALUE dial to edit the value.
Changing the Style’s MFX settings (STYLE MFX)
Here’s how to change the effect settings or the amount of
chorus or reverb applied to the Style.
1. Select a Style (p. 25 in the owner’s manual).
2. Press [MENU] so the button is lit.
3. Use [ ] [ ] to select “Style Composer,” and press
[ENTER].
The STYLE COMPOSER screen will appear.
4. Press [2] (STYLE MFX).
The STYLE MFX screen will appear.
Parameter
PART
TONE
EXPRESS
PANPOT
REVERB
CHORUS
MUTE
Value Explanation
Switches between Makeup settings for the
Tones of each part. For example, if Accomp1
is using three Tones, here you can switch
among AC1 1, AC1 2, and AC1 3.
The Tone used by that part. The top line of the
screen shows the Tone number and Tone
name.
Offset value for the
-127–+127
-127–+127
-127–+127
-127–+127
OFF, ON
Expression assigned to the
Style
Offset value for the Panpot
assigned to the Style
Offset value for the Reverb
assigned to the Style
Offset value for the Chorus
assigned to the Style
Specifies whether the sound
will be muted (ON) or heard
(OFF).
You can also access the STYLE MFX screen from the STYLE
COMPOSER screen by pressing [REVERB].
5. Use [ ] [ ] to select a page, and use [ ] [ ] to
select the parameter that you want to edit.
6. Turn VALUE to edit the value.
STYLE MFX screen
To access this screen, press [2] from the STYLE COMPOSER
screen or press [ ] from the STYLE MFX SETTING screen.
Parameter
MFX Type
Refer to “Multi-Effects Parameters” (p. 56 in Owner’s
Manual).
Value Explanation
00–78
Select the MFX to use, and
edit the parameter values.
SOLO
OFF, ON
Specifies whether this part
alone will be heard by itself
(ON) or not (OFF).
Press [ ] [ ] to turn
this ON for the part at which
the cursor is located.
7
Page 8
Editing an existing Style
STYLE MFX SETTING screen
From the STYLE MFX screen, press [ ] to access this screen.
Button Explanation
Selects the type of character. Each time you
[0] (TYPE)
press this, you will alternately select the first
character of a character set: uppercase (A),
lowercase (a), or numerals and symbols (0).
Parameter
Style MFX
Chorus
Send
Style MFX
Reverb
Send
MFX Sw
Value Explanation
Specifies how much chorus is
0–127
0–127
OFF, ON
to be applied to the sound
that has passed through
MFX.
Specifies how much reverb is
to be applied to the sound
that has passed through
MFX.
Specifies whether MFX will
be used (ON), or not be used
(OFF) for each part of the
Style.
Saving a Style
Here’s how a Style you’ve edited can be saved as a User
Style.
1. Press [WRITE].
The WRITE MENU screen or the STYLE NAME screen will
appear.
2. If the WRITE MENU screen appears, use [ ] [ ] to
select “Style” and press [ENTER].
The STYLE NAME screen will appear.
Naming the Style
3. Use [ ] [ ] to move the cursor, and use the VALUE
dial to change the character.
Enter a Style name of up to 16 characters.
The following characters are available.
A–Z a–z 0–9 ! # $ % & ‘ ( ) - @ ^ ` { } _
[1] (DELETE)
[2] (INSERT)
From a naming screen you can press [MENU] and select
“1. Undo” to return the name to what it was before you
changed it.
From [MENU] you can select “2. To Upper” or press [ ] to
change the character at the cursor to uppercase.
From [MENU] you can select “3. To Lower” or press [ ] to
change the character at the cursor to lowercase.
From [MENU] you can select “4. Delete All” to clear all the
characters you were inputting.
The Prelude is able to display both uppercase and lowercase
letters, but these are not distinguished internally.
For example, suppose that a Style named “ROCK” has been
saved. If you then record a different Style, assign it the name
“rock” and then attempt to save it, “ROCK” and “rock” will be
considered identically named styles, so a screen will ask you
to confirm the overwrite operation.
If you continue with the save operation, the new Style will be
overwritten onto “ROCK.” The new Style data will be saved
with the name “ROCK,” and the Style data that was previously
in “ROCK” will be lost.
With the cursor located at the beginning of the name, pressing
[] will move the cursor to “ONE TOUCH.” Now, if you
turn the VALUE dial to add a check mark to this item, the
Upper/Lower Tone setting and Keyboard Mode setting used in
the Main screen will be saved as One Touch settings at the
same time that the User Style is saved.
If you select this User Style and press [ONE TOUCH], the
specified Upper/Lower Tone and Keyboard Mode will be
recalled.
4. Press [ENTER].
A confirmation screen will appear.
5. Press [ENTER] to save the User Style.
To return to the previous screen without saving the User
Style, press [EXIT]
Deletes the character at the cursor location.
Inserts a space at the cursor location.
8
Page 9
Creating a new Style
Initializing the style
(STYLE INITIALIZE)
Here’s how to delete the performance data from the Style, and
initialize it to the specified values.
1. Press [MENU] so the button is lit.
2. Use [ ] [ ] to select “Style Composer,” and press
[ENTER].
The STYLE COMPOSER screen will appear.
3. Press [1] (STYLE INIT).
The Style Initialize window will appear.
Recording a Style
You can use either of two recording methods: realtime
recording or step recording. Select the method that’s suitable
for your situation.
Realtime recording
1. If you want to create a new Style from scratch, initialize
(p. 9) the Style and then proceed to step 4.
If you want to record using an existing Style, select the
desired Style (p. 25 in the owner’s manual).
2. Press [MENU] so the button is lit.
3. Use [ ] [ ] to select “Style Composer,” and press
[ENTER].
The STYLE COMPOSER screen will appear.
4. Use [ ] [ ] to select the parameter whose setting you
want to change, and use the VALUE dial to change the
value.
Parameter
Initialize
Tempo
Time
Signature
5. Use [ ] [ ] to Move the cursor to “INIT” and press
[ENTER].
A confirmation screen will appear.
6. Press [ENTER] to execute the initialization.
To return to the previous screen without initializing
anything, press [EXIT]
When the initialization is complete, the STYLE
COMPOSER screen will appear, and all of the division
indications will change to “•.”
Value Explanation
20–250
1–32/2,
4, 8, 16
Specifies the initialized tempo.
Specifies the initialized time
signature.
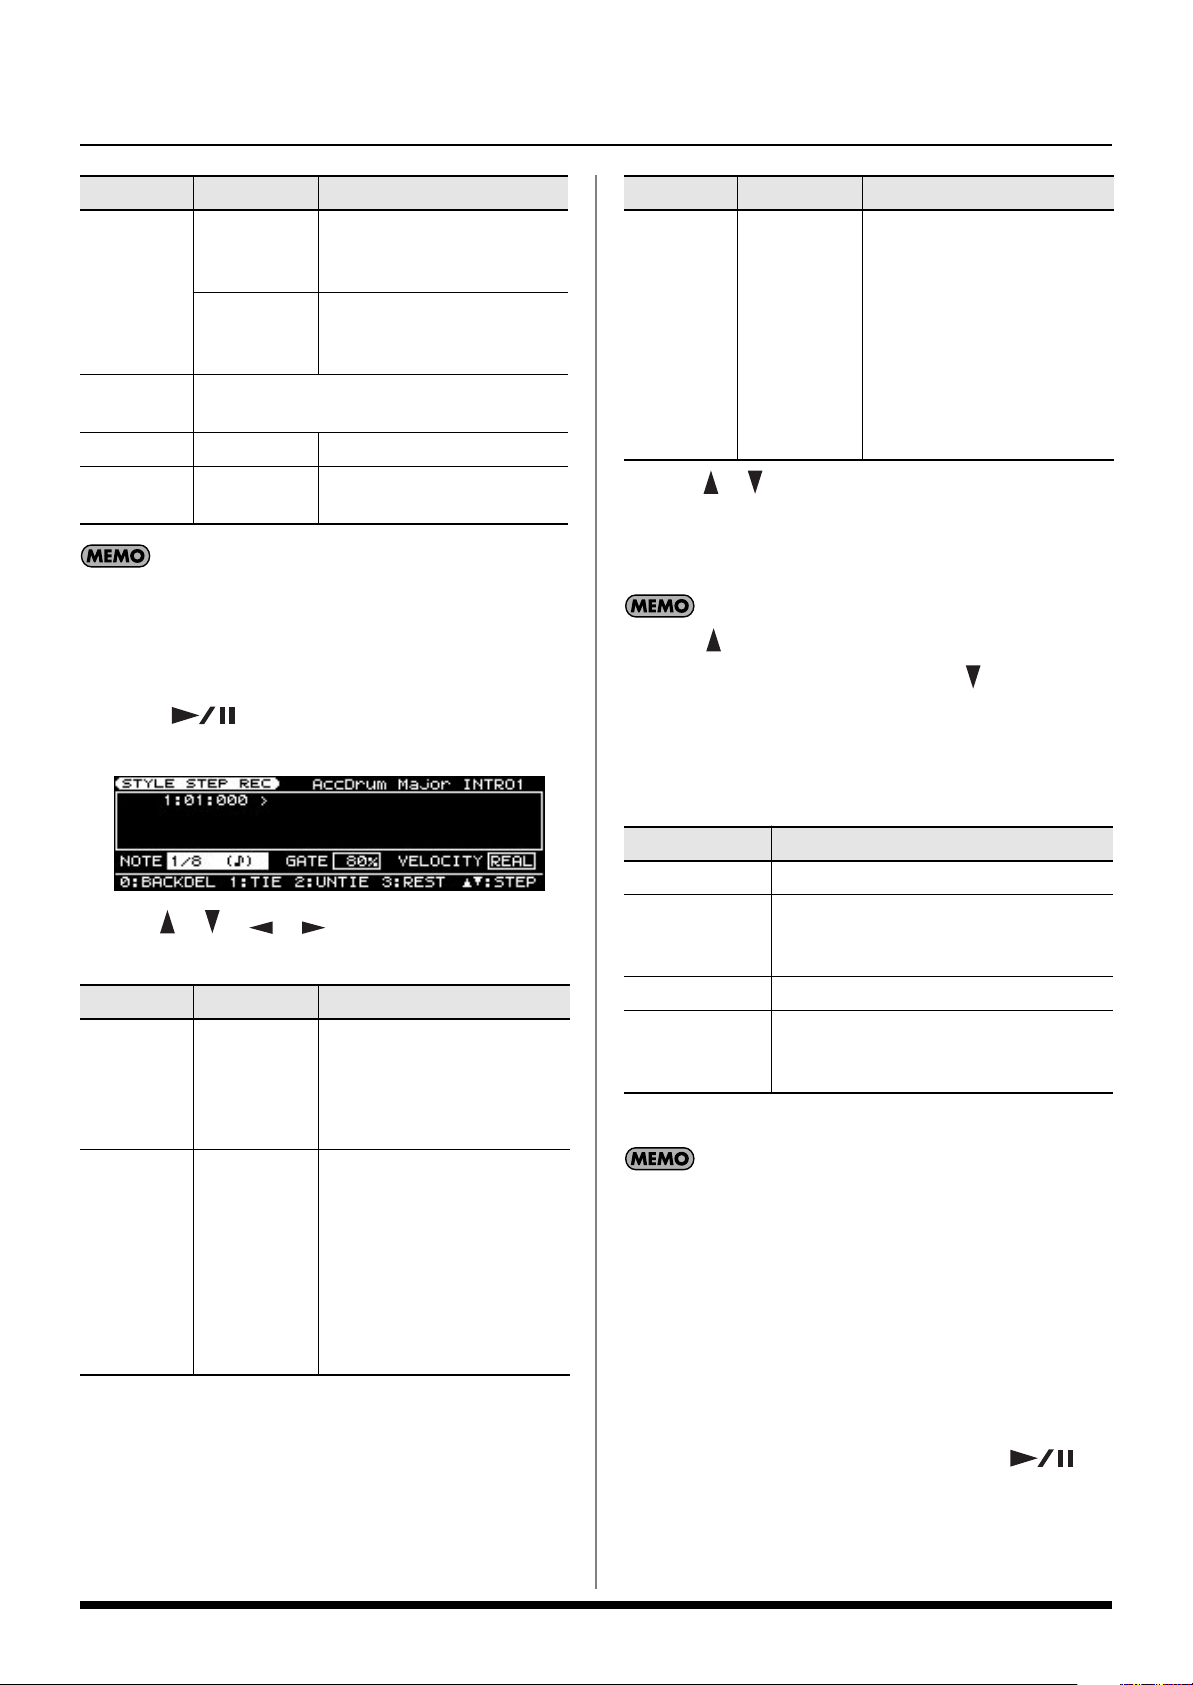
4. Use [ ] [ ] [ ] [ ] to select the division that you
want to record, and press [SONG REC].
The Style Rec Standby screen will appear, and
[SONG REC] will blink.
By pressing [SONG REC] you can switch between REALTIME
and STEP REC.
You can also switch between REALTIME and STEP REC by
moving the cursor to REC TYPE and turning the VALUE dial.
5. Use [ ] [ ] [ ] [ ] to select a parameter, and
turn the VALUE dial to change the value.
Parameter
PART
Value Explanation
ADrum,
ABass,
Acc1–6
Selects the part to record.
TONE
Selects the tone.
9
Page 10
Creating a new Style
Parameter Value Explanation
New material is recorded as
previously recorded material
is erased.
New notes are recorded on
top of notes previously
recorded.
No count-in. Recording starts
as soon as you press
[].
Recording starts after a 1-bar
count-in.
Recording starts after a 2-bar
count-in.
Recording starts as soon as
you play a note on the
keyboard. (There will be no
count-in.)
Quantize corrects the timing
of your notes by shifting them
to the nearest grid mark. This
specifies the number of steps
per measure (i.e., the
resolution).
Rec Mode
Count In
Input
Quantize
REPLACE
MIX
OFF
1MEAS
2MEAS
WAIT NOTE
OFF, 1/4,
1/8, 1/8T,
1/16,
1/16T,
1/32,
1/32T,
1/64
Step recording
1. If you want to create a new Style from scratch, initialize
(p. 9) the Style and then proceed to step 4.
If you want to record using an existing Style, select the
desired Style (p. 25 in the owner’s manual).
2. Press [MENU] so the button is lit.
3. Use [ ] [ ] to select “Style Composer,” and press
[ENTER].
The STYLE COMPOSER screen will appear.
4. Use [ ] [ ] [ ] [ ] to select the division that you
want to record, and press [SONG REC].
The Style Rec Standby screen will appear, and [SONG
REC] will blink.
Key C–B Specifies the key to record.
Octave -4–+4
Length Off, 0001–
You can assign the following Tones to each style part.
Drums (ADrum): rhythm sets
Bass (ABass): tones other than rhythm sets
Accompaniment (Acc 1–6): any tone
6. Press [ ] to start recording.
If the Count In setting is WAIT NOTE, recording will start
the moment you play a key.
7. Play the keyboard.
8. Press [ ] to stop recording.
If you want to keep the recorded style, save it as
described in “Saving the Style you recorded” (p. 12).
Adjusts the notes during
recording, in octave steps.
Specifies the number of
measures to record.
5. Press [SONG REC] to change REC TYPE to “STEP REC.”
By pressing [SONG REC] you can switch between REALTIME
and STEP REC.
You can also switch between REALTIME and STEP REC by
moving the cursor to REC TYPE and turning the VALUE dial.
6. Use [ ] [ ] [ ] [ ] to select a parameter, and
turn the VALUE dial to change the value.
Parameter Value Explanation
ADrum,
PART
ABass,
Acc1–6
Selects the part to record.
10
TONE Selects the tone.
Page 11
Creating a new Style
Parameter Value Explanation
New material is recorded as
REPLACE
Rec Mode
MIX
Start
Key C–B Specifies the key to record.
Octave -4–+4
You can assign the following Tones to each style part.
Drums (ADrum): rhythm sets
Bass (ABass): tones other than rhythm sets
Accompaniment (Acc 1–6): any tone
7. Press [ ] to start recording.
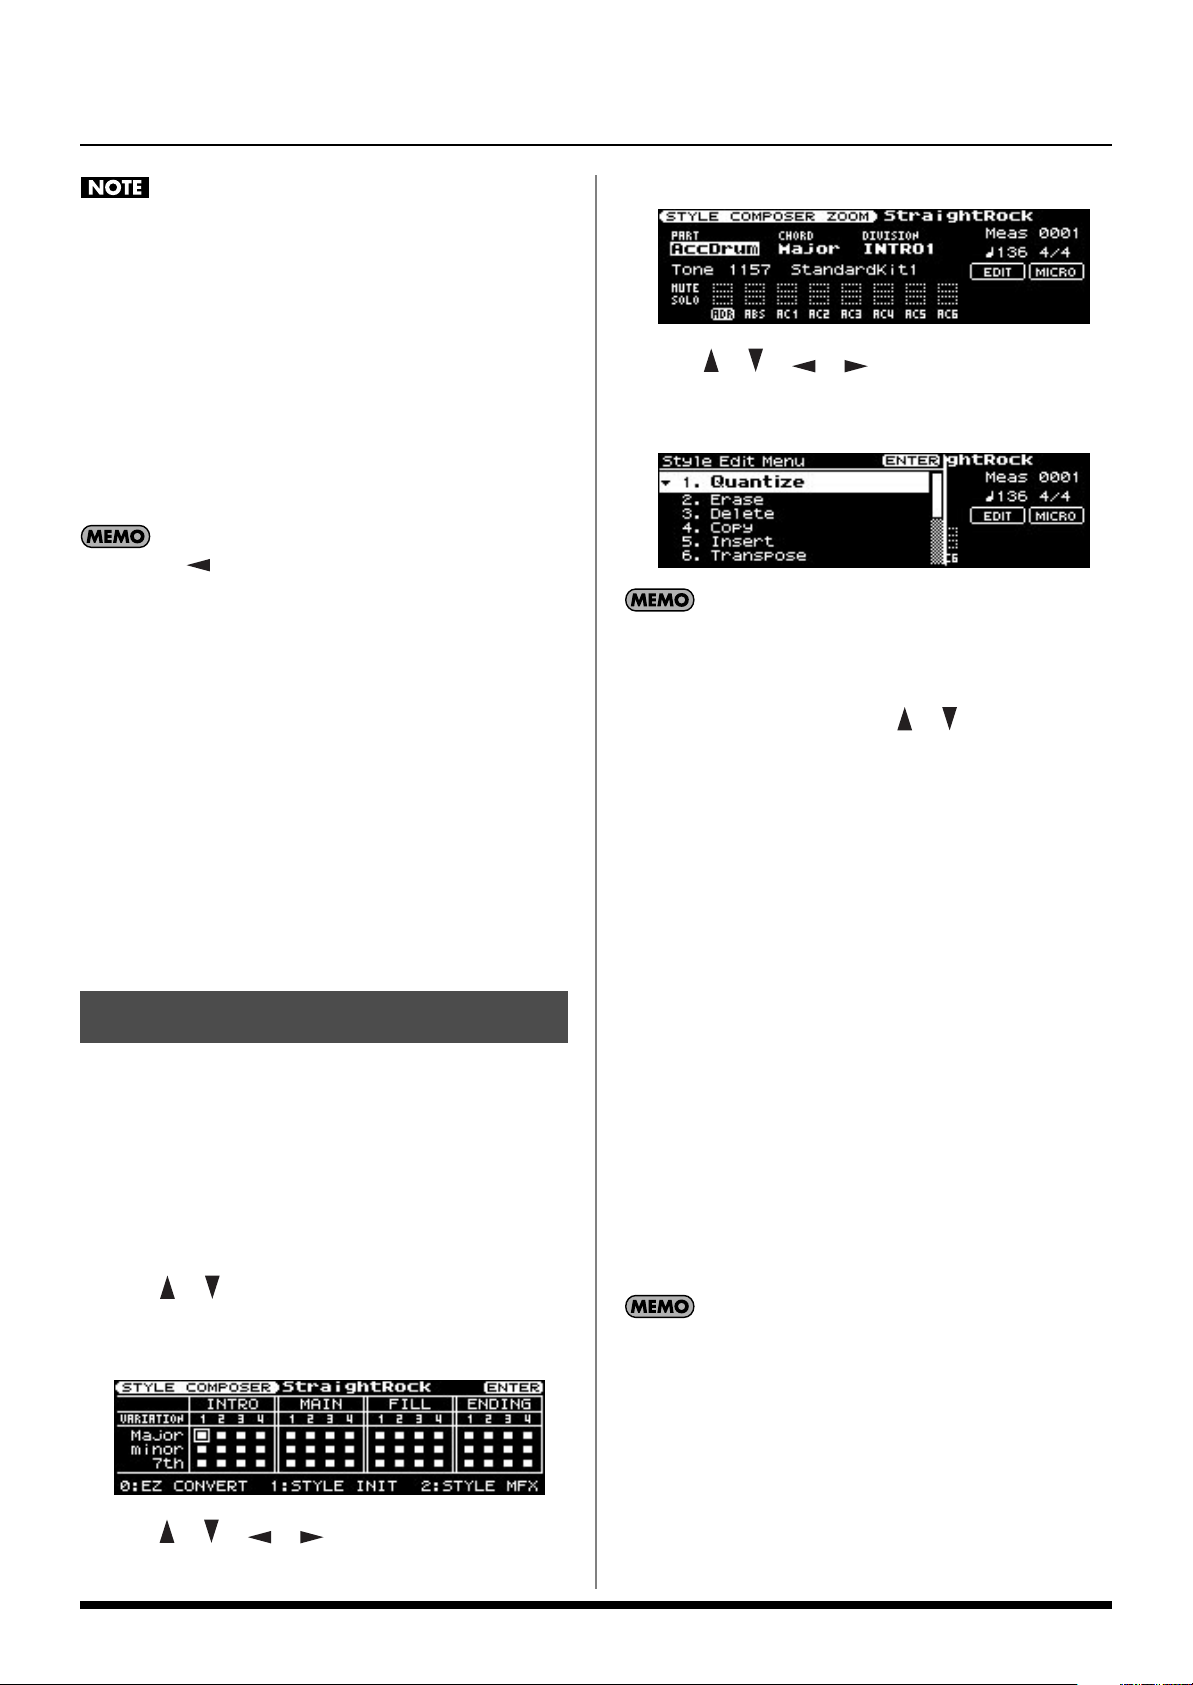
The STYLE STEP REC screen will appear.
Specifies the location at which recording will
start (MEAS: BEAT: TICK).
previously recorded material
is erased.
New notes are recorded on
top of notes previously
recorded.
Adjusts the notes during
recording, in octave steps.
Parameter Value Explanation
Specifies the volume of the
note to be input.
Select “REAL” if you want the
velocity to reflect the force
VELOCITY
9. Use [ ] [ ] to move the input location (step), and press
a key.
When you press a key, the input location will advance by
the length of the NOTE setting.
Pressing [ ] will move the input location back by the length
of the current NOTE setting, and pressing [ ] will move the
input location forward by the length of the current NOTE
setting.
You can use the [0]–[3] buttons to perform the following
operations.
REAL,
1–127
with which you play the key.
Otherwise, select the desired
value: approximately 60 for
“p” (piano), 90 for “mf”
(mezzoforte), or 120 for “f”
(forte).
8. Use [ ] [ ] [ ] [ ] to select a parameter, and
specify the note value that you want to input.
Parameter Value Explanation
Specifies the length of the
note to be input.
NOTE 1/32–2/1
GATE 1–100%
The note value is indicated as
the length from one note-on to
the next note-on.
Specifies the duration from
note-on to note-off, as a
percentage of the note value.
Specify a shorter value if you
want staccato, or a larger
value if you want to create a
tenuto or slur.
Normally, this should be set
to about “80%”.
Button Explanation
[0] (BACK DEL) Cancels the last-entered note.
Enters a tie by extending the duration of
[1] (TIE)
[2] (UNTIE) Cancels the last-entered tie.
[3] (REST)
10. Repeat steps 7–9 to enter the desired notes.
Each parameter will retain the value you entered most
recently, so if you want the same settings for the next note you
input, there’s no need to change them. Once you’ve specified
GATE and VELOCITY, there is usually no need to change these
parameters until the end; simply specify the NOTE and the
pitch (key).
the last-entered note by the current length
setting.
Enters a rest. Set NOTE to the length of
the rest that you want to enter, and then
press [3] (REST).
Entering chords
Play the chord. The input location will advance to the next step
when you release all of the keys.
11. When you’re finished step-recording, press [ ].
If you want to keep the Style you just recorded, proceed
as described in “Saving the Style you recorded” (p. 12).
11
Page 12

Creating a new Style
I
The Relation between Note Value Length
and Gate Time
The relation between the length of the note value and the
gate time is shown below. Since the Prelude’s song
recorder uses a TPQN (Ticks Per Quarter Note; i.e.,
resolution) of 120, a quarter note gate time is 120 ticks.
Note Gate time
1/32
1/16T 20
1/16
1/8T
1/16. 45
1/8
1/4T
1/8.
1/4
1/2T
1/4.
1/2
1/1 480
2/1 960
15
30
40
60
80
90
120
160
180
240
Saving the Style you recorded
A Style you’ve recorded can be saved as a User Style.
The following content is saved.
• Recording data for each Division
•Style MFX settings (MFX Type, MFX Chorus/Reverb Send,
MFX Sw)
• STYLE MAKEUP settings
• One Touch settings (you can select whether these will be
saved)
1. Press [WRITE].
The STYLE NAME screen will appear.
Assigning a name to the Style
2. Use [ ] [ ] to move the cursor, and use the VALUE
dial to change the character.
Enter a Style name of up to 16 characters.
The following characters are available.
A–Z a–z 0–9 ! # $ % & ‘ ( ) - @ ^ ` { } _
The gate time that is recorded in step recording will be
the original gate time value multiplied by the value of the
Gate Time parameter. For example, if the Gate Time
parameter is set to “80%,” inputting a quarter note will
mean that the gate time is 120 x 0.8= 96.
Button Explanation
Selects the type of character. Each time you
[0] (TYPE)
[1] (DELETE) Deletes the character at the cursor location.
[2] (INSERT) Inserts a space at the cursor location.
From a naming screen you can press [MENU] and select
“1. Undo” to return the name to what it was before you
changed it.
From [MENU] you can select “2. To Upper” or press [ ] to
change the character at the cursor to uppercase.
From [MENU] you can select “3. To Lower” or press [ ] to
change the character at the cursor to lowercase.
From [MENU] you can select “4. Delete All” to clear all the
characters you were inputting.
press this, you will alternately select the first
character of a character set: uppercase (A),
lowercase (a), or numerals and symbols (0).
12
Page 13
The Prelude is able to display both uppercase and lowercase
letters, but these are not distinguished internally.
For example, suppose that a Style named “ROCK” has been
saved. If you then record a different Style, assign it the name
“rock” and then attempt to save it, “ROCK” and “rock” will be
considered identically named styles, so a screen will ask you
to confirm the overwrite operation.
If you continue with the save operation, the new Style will be
overwritten onto “ROCK.” The new Style data will be saved
with the name “ROCK,” and the Style data that was previously
in “ROCK” will be lost.
If you press [ ] when the cursor is at the beginning of the
name, the cursor will move to “ONE TOUCH.” Now if you
turn the VALUE dial to add a check mark to this item, the
Upper/Lower Tone and Keyboard Mode settings used in the
Main screen will be saved as One Touch data at the same
time that the User Style is saved.
When you select this User Style and press [ONE TOUCH], the
specified Upper/Lower Tone and Keyboard Mode will be
recalled.
3. Press [ENTER].
A confirmation screen will appear.
4. Press [ENTER] to save the User Style.
If you press [EXIT], you’ll return to the previous screen
without saving the User Style.
Creating a new Style
The STYLE COMPOSER ZOOM screen will appear.
5. Use [ ] [ ] [ ] [ ] to move the cursor to “EDIT,”
and press [ENTER].
The Style Edit Menu window will appear.
You can also access the Style Edit Menu by pressing [MENU]
from the “STYLE COMPOSER” or “STYLE COMPOSER
ZOOM” screen.
6. In the “Style Edit Menu,” use [ ] [ ] to move the
cursor to the editing function you want to execute, and
press [ENTER].
The screen for the selected editing function will appear.
The following editing functions are provided.
• Quantize (Correcting the note timing)
• Erase (Erasing unwanted data)
• Delete (Deleting an unwanted region)
• Copy (Copying performance data)
Editing a Style
You can use the Style Edit functions to edit the performance
data recorded in each division.
1. Select the Style that you want to edit (p. 25 in the owner’s
manual).
2. Press [MENU] so the button is lit.
3. Use [ ] [ ] to select “Style Composer,” and press
[ENTER].
The STYLE COMPOSER screen will appear.
4. Use [ ] [ ] [ ] [ ] to select the division that you
want to edit, and press [ENTER].
•Insert (Inserting blank space)
• Transpose (Shifting the pitch)
• Change Velocity (Modifying the note dynamics)
• Change Gate Time (Modifying the note durations)
•Global Change (Replacing performance data)
• Shift Clock (Making fine adjustments to the timing)
•Style Part Length (Changing the length of each part)
• Time Signature (Specifying the time signature)
To switch to a different editing function, move the cursor to the
function name shown at the top of the screen, and turn the
VALUE dial.
13
Page 14
Creating a new Style
Correcting the note timing (Quantize)
This function corrects the timing of the performance data in the
specified region.
1. In the “Style Edit Menu,” select “1. Quantize” and press
[ENTER].
The STYLE EDIT QUANTIZE screen will appear.
2. Use [ ] [ ] [ ] [ ] to move the cursor to the
parameter you want to change, and use the VALUE dial to
make the desired setting.
Parameter Value Explanation
Selects the Style part to
which the Quantize
operation is to be applied.
PART
ADrum, ABass,
Acc1–6, ALL
Parameter Value Explanation
Note
Range Min
Note
Range Max
3. Select “EXECUTE” and then press [ENTER].
It is not possible to restore the data to its original state after
executing this operation.
C– (Note
Range Max
value)
(Note Range
Min value)–G9
Specifies the lowest pitch
to be quantized.
Specifies the highest pitch
to be quantized.
Erasing unwanted data (Erase)
This function erases performance data from the specified
region. The erased data will be converted to rests; the
measures themselves will remain.
1. In the “Style Edit Menu,” select “2. Erase” and press
[ENTER].
The STYLE EDIT ERASE screen will appear.
CHORD Maj, min, 7th Selects the chord.
INT1–4,
DIVISION
From
(MEAS:
BEAT: TICK)
To (MEAS:
BEAT: TICK)
Resolution
Strength 0–100%
MAIN1–4,
FILL1–4,
END1–4
0001: 01:
000–
0001: 01:
000–
1/4, 1/8, 1/
8T, 1/16, 1/
16T,
1/32, 1/32T,
1/64
Selects the division.
Specifies the beginning of
the region to which
Quantize is to be applied.
Specifies the end of the
region to which Quantize
is to be applied.
Specifies the timing
interval for quantization.
Select the shortest note
value used in the region to
be quantized.
Specifies the amount of
timing correction applied
relative to the Resolution
timing interval.
If you select “100%,”
notes will be corrected all
the way to precise
intervals of the specified
Resolution.
With lower values, the
correction will not be as
tight, and with a setting of
0% there will be no
correction at all.
2. Use [ ] [ ] [ ] [ ] to move the cursor to the
parameter you want to change, and use the VALUE dial to
make the desired setting.
Parameter Value Explanation
PART
CHORD Maj, min, 7th Selects the chord.
DIVISION
From
(MEAS:
BEAT: TICK)
To (MEAS:
BEAT: TICK)
ADrum, ABass,
Acc1–6, ALL
INT1–4,
MAIN1–4,
FILL1–4,
END1–4
0001: 01: 000–
0001: 01: 000–
Selects the Style part
from which data is to be
erased.
Selects the division.
Specifies the beginning
of the region from which
data is to be erased.
Specifies the end of the
region from which data
is to be erased.
14
Page 15
Creating a new Style
Parameter Value Explanation
ALL, NOTE,
MODULATION,
PANPOT,
Data Type
Note
Range Min
Note
Range Max
3. Select “EXECUTE” and then press [ENTER].
It is not possible to restore the data to its original state after
executing this operation.
EXPRESSION,
REVERB,
CHORUS, PC,
PITCH BEND
C– (Note Range
Max value)
(Note Range
Min value) –G9
Specifies the type of data
to be erased.
Specifies the lowest pitch
to be erased. This is
available only if Data
Type is set to NOTE.
Specifies the highest
pitch to be erased. This is
available only if Data
Type is set to NOTE.
Deleting an unwanted region (Delete)
Parameter Value Explanation
From
(MEAS:
BEAT: TICK)
To (MEAS:
BEAT: TICK)
3. Select “EXECUTE” and then press [ENTER].
It is not possible to restore the data to its original state after
executing this operation.
0001: 01: 000–
0001: 01: 000–
Specifies the beginning of
the region to be deleted.
Specifies the end of the
region to be deleted.
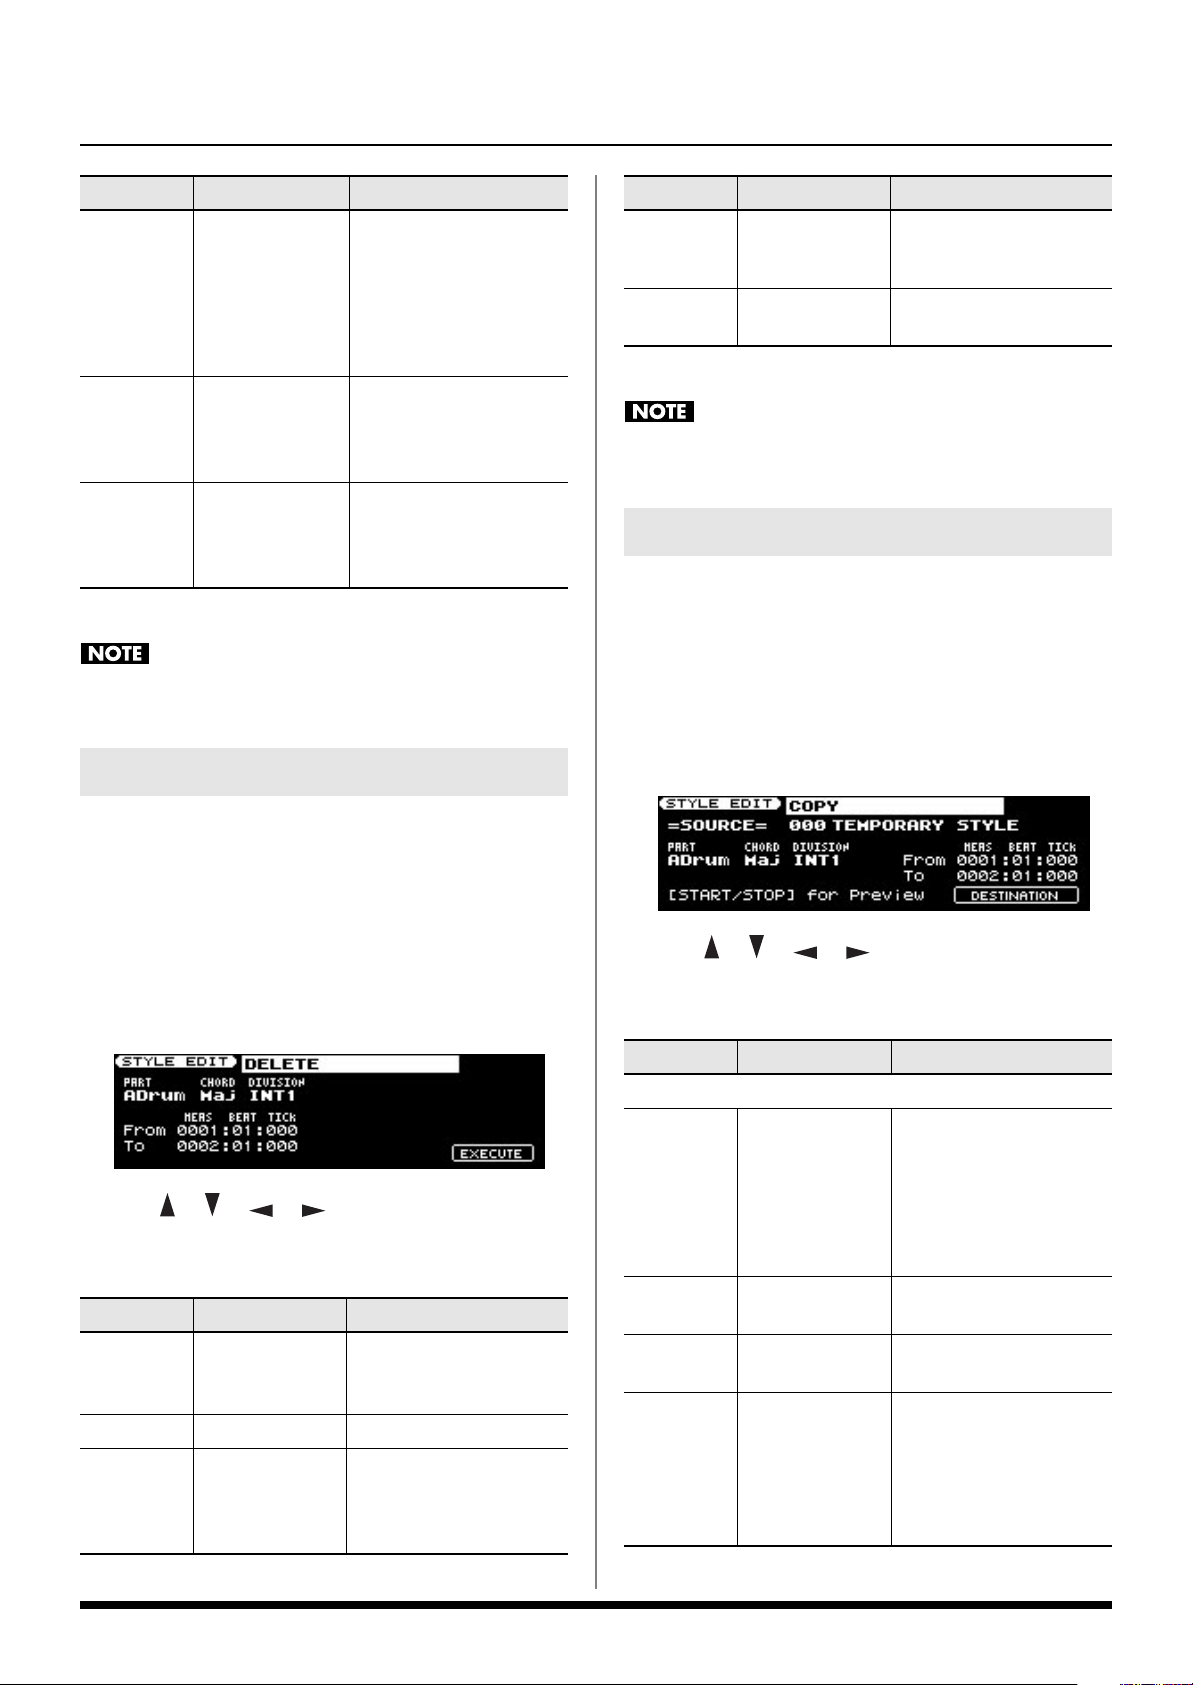
Copying performance data (Copy)
This function copies the performance data of the specified
region. This is convenient when you want to re-use an existing
Style.
1. In the “Style Edit Menu,” select “4. Copy” and press
[ENTER].
The STYLE EDIT COPY =SOURCE= screen will appear.
This function deletes the performance data of the specified
region. Performance data that follows the deleted region will
be moved forward to fill the gap. The performance data will
be shortened by the amount that was deleted.
1. In the “Style Edit Menu,” select “3. Delete” and press
[ENTER].
The STYLE EDIT DELETE screen will appear.
2. Use [ ] [ ] [ ] [ ] to move the cursor to the
parameter you want to change, and use the VALUE dial to
make the desired setting.
Parameter Value Explanation
PART
CHORD Maj, min, 7th Selects the chord.
DIVISION
ADrum, ABass,
Acc1–6, ALL
INT1–4,
MAIN1–4,
FILL1–4,
END1–4
Selects the Style part from
which data is to be
deleted.
Selects the division.
2. Use [ ] [ ] [ ] [ ] to move to the parameter
you want to change, and use the VALUE dial to make the
desired setting.
Parameter Value Explanation
SOURCE settings
Selects the copy-source
Style.
* 000 TEMPORARY
STYLE indicates the
Style you’re currently
editing.
Selects the copy-source
Style part.
Selects the chord.
Selects the division.
SOURCE
STYLE
PART
CHORD
DIVISION
000
TEMPORARY
STYLE, 001–
ADrum, ABass,
Acc1–6, ALL
Maj, min, 7th,
ALL
INT1–4, INTALL,
MAIN1–4,
MAINALL, FILL1–
4, FILLALL,
END1–4,
ENDALL
15
Page 16

Creating a new Style
Parameter Value Explanation
Specifies the beginning
of the region to be
From
(MEAS:
BEAT: TICK)
To (MEAS:
BEAT: TICK)
3. In the STYLE EDIT COPY =SOURCE= screen, select
“DESTINATION” and press [ENTER].
The STYLE EDIT COPY =DESTINATION= screen will
appear.
4. Use [ ] [ ] [ ] [ ] to move the cursor to the
parameter you want to change, and use the VALUE dial to
make the desired setting.
Parameter Value Explanation
DESTINATION settings
PART
CHORD Maj, min, 7th
0001: 01: 000–
0001: 01: 000–
ADrum,
ABass,
Acc1–6
copied.
If you’ve selected ALL as
the SOURCE part setting,
this is shown as “- - -” and
cannot be changed.
Specifies the end of the
region to be copied.
If you’ve selected ALL as
the SOURCE part setting,
this is shown as “- - -” and
cannot be changed.
Selects the copydestination Style part.
If you select “ALL” in the
SOURCE settings, this
setting will be fixed at
“ALL” and cannot be
changed.
If you change the copysource Style, this will
change in tandem.
Selects the chord. If you
change the copy-source
Style, this will change in
tandem.
If you select “ALL” in the
SOURCE settings, this
setting will be fixed at
“ALL” and cannot be
changed.
Parameter Value Explanation
Selects the division.
If the SOURCE setting
INT1–4,
DIVISION
Into (MEAS:
BEAT: TICK)
Copy Mode REPLACE, MIX
Copy Times 1–99
5. Select “EXECUTE” and then press [ENTER].
If you select “EXECUTE” and press [ENTER] when the Copy
Mode or Copy Times value is “- - -,” the copy will be executed
with the following settings:
Into = 0001:01:000
Copy Mode = REPLACE
Copy Times = 1
It is not possible to restore the data to its original state after
executing this operation.
MAIN1–4,
FILL1–4,
END1–4
0001: 01: 000–
DIVISION is set to
“xxxALL,” this setting will
be fixed at “xxxALL” and
cannot be changed.
If you change the copysource Style, this will
change in tandem.
Specifies the beginning of
the region at which the
copied data is to be
pasted.
If you’ve selected ALL as
the SOURCE part or
SOURCE chord setting,
this is shown as “- - -” and
cannot be changed.
Specifies the copy
method.
If you’ve selected ALL as
the SOURCE part or
SOURCE chord setting,
this is shown as “- - -” and
cannot be changed.
Specifies the number of
times to copy the data.
If you’ve selected ALL as
the SOURCE part or
SOURCE chord setting,
this is shown as “- - -” and
cannot be changed.
16
Page 17

Creating a new Style
Inserting blank space (Insert)
This function inserts blank space at the specified location.
Performance data that follows this location will be moved back
to make room for the inserted blank space. The performance
data will be lengthened by the inserted amount.
1. In the “Style Edit Menu,” select “5. Insert” and press
[ENTER].
The STYLE EDIT INSERT screen will appear.
2. Use [ ] [ ] [ ] [ ] to move the cursor to the
parameter you want to change, and use the VALUE dial to
make the desired setting.
Parameter Value Explanation
PART
CHORD Maj, min, 7th Selects the chord.
DIVISION
From
(MEAS:
BEAT: TICK)
For (MEAS:
BEAT: TICK)
3. Select “EXECUTE” and then press [ENTER].
It is not possible to restore the data to its original state after
executing this operation.
ADrum, ABass,
Acc1–6, ALL
INT1–4,
MAIN–4,
FILL1–4,
END1–4
0001: 01: 000–
0000: 00: 000–
Selects the Style part into
which blank space is to
be inserted.
Selects the division.
Specifies the location at
which the blank space is
to be inserted.
Specifies the length of
the blank space that is to
be inserted.
Shifting the pitch (Transpose)
This function transposes the pitches of the specified region.
1. In the “Style Edit Menu,” select “6. Transpose” and press
[ENTER].
The STYLE EDIT TRANSPOSE screen will appear.
2. Use [ ] [ ] [ ] [ ] to move the cursor to the
parameter you want to change, and use the VALUE dial to
make the desired setting.
Parameter Value Explanation
PART
CHORD Maj, min, 7th Selects the chord.
DIVISION
From
(MEAS:
BEAT: TICK)
To (MEAS:
BEAT: TICK)
Value -127–127
Note
Range Min
Note
Range Max
3. Select “EXECUTE” and then press [ENTER].
ADrum, ABass,
Acc1–6, ALL
INT1–4,
MAIN1–4,
FILL1–4,
END1–4
0001: 01: 000–
0001: 01: 000–
C–(Note Range
Max value)
(Note Range Min
value)–G9
Selects the Style part that
is to be transposed.
Selects the division.
Specifies the beginning
of the region to be
transposed.
Specifies the end of the
region to be transposed.
Specifies the number of
semitones by which the
pitches are to be
transposed.
Specifies the lowest pitch
to be transposed.
Specifies the highest
pitch to be transposed.
It is not possible to restore the data to its original state after
executing this operation.
17
Page 18

Creating a new Style
Modifying the note dynamics
(Change Velocity)
This function modifies the dynamics of the specified region.
1. In the “Style Edit Menu,” select “7. Change Velocity” and
press [ENTER].
The STYLE EDIT CHANGE VELOCITY screen will appear.
2. Use [ ] [ ] [ ] [ ] to move the cursor to the
parameter you want to change, and use the VALUE dial to
make the desired setting.
Parameter Value Explanation
ADrum,
PART
ABass,
Acc1–6,
ALL
Selects the Style part whose
velocity is to be modified.
Parameter Value Explanation
Note
Range Min
Note
Range Max
3. Select “EXECUTE” and then press [ENTER].
It is not possible to restore the data to its original state after
executing this operation.
C–(Note
Range
Max value)
(Note
Range Min
value)–G9
Specifies the lowest pitch whose
velocity is to be modified.
Specifies the highest pitch
whose velocity is to be modified.
Modifying the note durations
(Change Gate Time)
This function modifies the durations of the notes in the
specified region.
1. In the “Style Edit Menu,” select “8. Change Gate Time”
and press [ENTER].
The STYLE EDIT CHANGE GATE TIME screen will appear.
CHORD
DIVISION
From
(MEAS:
BEAT: TICK)
To (MEAS:
BEAT: TICK)
Bias -99–99
Magnify 0–200%
Maj, min,
7th
INT1–4,
MAIN1–4,
FILL1–4,
END1–4
0001: 01:
000–
0001: 01:
000–
Selects the chord.
Selects the division.
Specifies the beginning of the
region whose velocity is to be
modified.
Specifies the end of the region
whose velocity is to be modified.
Specifies the amount by which
the velocity is to be modified.
Allows you to make the velocity
more uniform, or to decrease or
increase the dynamics.
If Magnify is set near 0%, the
velocity will be adjusted toward
64, and the Bias value will be
added to each velocity value.
This allows you to make the
velocity more consistent while
adjusting it as desired.
If Magnify is set to 101% or
higher, velocities greater than
64 will be increased while
velocities below 64 will be
decreased, increasing the
dynamics.
If Magnify is set to 100%, the
velocity will not change.
2. Use [ ] [ ] [ ] [ ] to move the cursor to the
parameter you want to change, and use the VALUE dial to
make the desired setting.
Parameter Value Explanation
PART
CHORD Maj, min, 7th Selects the chord.
DIVISION
From
(MEAS:
BEAT: TICK)
To (MEAS:
BEAT: TICK)
ADrum, ABass,
Acc1–6, ALL
INT1–4,
MAIN1–4,
FILL1–4,
END1–4
0001: 01: 000–
0001: 01: 000–
Selects the Style part
whose gate times are to
be modified.
Selects the division.
Specifies the beginning
of the region whose gate
times are to be modified.
Specifies the end of the
region whose gate times
are to be modified.
18
Page 19

Creating a new Style
Parameter Value Explanation
Specifies the amount by
Bias (TICK)
Magnify 0–200%
Note
Range Min
Note
Range Max
3. Select “EXECUTE” and then press [ENTER].
It is not possible to restore the data to its original state after
executing this operation.
-1920–1920
(TICK)
C–(Note Range
Max value)
(Note Range
Min value)–G9
which the gate times are
to be modified, in units of
a tick.
Specifies the ratio by
which the gate times will
be modified.
Specifies the lowest pitch
whose gate times are to
be modified.
Specifies the highest
pitch whose gate times
are to be modified.
Replacing performance data
(Global Change)
This function replaces the specified MSB, LSB, and PC values
with different MSB, LSB, and PC values. You can also apply a
relative adjustment to the control values (Expression, Panpot,
Reverb, Chorus) within the Style.
Parameter Value Explanation
Specifies the MSB value that
MSB
(FROM)
MSB (TO) OFF, 0–127
LSB (FROM)
LSB (TO) OFF, 0–127 Specifies the new LSB value.
PC (FROM)
PC (TO) OFF, 1–128 Specifies the new PC value.
EXPRESS -127–127
PANPOT -127–127 Adjusts the Panpot values.
REVERB -127–127 Adjusts the Reverb values.
CHORUS -127–127 Adjusts the Chorus values.
3. Select “EXECUTE” and then press [ENTER].
OFF, 0–127,
ALL
OFF, 0–127,
ALL
OFF, 1–128,
ALL
is to be changed.
By choosing ALL, you can set
more than one Style part to
the same value.
Specifies the new MSB
value.
Specifies the LSB value that is
to be changed.
By choosing ALL, you can set
more than one Style part to
the same value.
Specifies the PC value that is
to be changed.
By choosing ALL, you can set
more than one Style part to
the same value.
Adjusts the Expression
values.
1. In the “Style Edit Menu,” select “9. Global Change” and
press [ENTER].
The STYLE EDIT GLOBAL CHANGE screen will appear.
2. Use [ ] [ ] [ ] [ ] to move the cursor to the
parameter you want to change, and use the VALUE dial to
make the desired setting.
Parameter Value Explanation
ADrum,
PART
CHORD Maj, min, 7th Selects the chord.
DIVISION
ABass,
Acc1–6, ALL
INT1–4,
MAIN1–4,
FILL1–4,
END1–4
Selects the Style part whose
data values you want to
modify.
Selects the division.
It is not possible to restore the data to its original state after
executing this operation.
19
Page 20

Creating a new Style
Making fine adjustments to the timing
(Shift Clock)
By using this function, events of the specified data type in the
specified region and specified range of pitches can be shifted
forward or backward.
1. In the “Style Edit Menu,” select “10. Shift Clock” and press
[ENTER].
The STYLE EDIT SHIFT CLOCK screen will appear.
2. Use [ ] [ ] [ ] [ ] to move the cursor to the
parameter you want to change, and use the VALUE dial to
make the desired setting.
Parameter Value Explanation
PART
CHORD Maj, min, 7th Selects the chord.
DIVISION
From
(MEAS:
BEAT: TICK)
To (MEAS:
BEAT: TICK)
Data Type
Value
(TICK)
ADrum, ABass,
Acc1–6, ALL
INT1–4,
MAIN1–4,
FILL1–4,
END1–4
0001: 01: 000–
0001: 01: 000–
ALL, NOTE,
MODULATION,
PANPOT,
EXPRESSION,
REVERB,
CHORUS, PC,
PITCH BEND
-4800–4800
(TICK)
Selects the Style part
whose timing is to be
shifted.
Selects the division.
Specifies the beginning
of the region to be
shifted.
Specifies the end of the
region to be shifted.
Specifies the type of data
to be shifted.
Specifies the amount of
shift in units of a tick.
It is not possible to restore the data to its original state after
executing this operation.
Changing the length of each part
(Style Part Length)
This function changes the length of a Style part.
1. In the “Style Edit Menu,” select “11. Style Part Length” and
press [ENTER].
The STYLE EDIT STYLE PART LENGTH screen will appear.
2. Use [ ] [ ] [ ] [ ] to move the cursor to the
parameter you want to change, and use the VALUE dial to
make the desired setting.
Parameter Value Explanation
PART
DIVISION
CHORD SW
(Major,
minor, 7th)
Length
(MEAS:
BEAT: TICK)
3. Select “EXECUTE” and then press [ENTER].
It is not possible to restore the data to its original state after
executing this operation.
ADrum, ABass,
Acc1–6, ALL
INT1–4,
MAIN1–4,
FILL1–4,
END1–4
OFF, ON
0000: 00: 000–
Selects the Style part
whose length you want
to change.
Selects the division.
You may select more
than one chord.
* You can’t execute the
function if nothing is
selected here.
Specifies the length of
the Style.
Note
Range Min
Note
Range Max
3. Select “EXECUTE” and then press [ENTER].
C–(Note Range
Max value)
(Note Range
Min value)–G9
Specifies the lowest pitch
whose position is to be
shifted.
Specifies the highest
pitch whose position is to
be shifted.
20
Page 21

Creating a new Style
Specifying the time signature
(Time Signature)
This function specifies the time signature of the Style.
1. In the “Style Edit Menu,” select “12. Time Signature” and
press [ENTER].
The STYLE EDIT TIME SIGNATURE screen will appear.
2. Use [ ] [ ] [ ] [ ] to move the cursor to the
parameter you want to change, and use the VALUE dial to
make the desired setting.
Parameter Value Explanation
INTRO,
MAIN,
DIVISION
FILL,
ENDING,
ALL
Selects the division.
Editing a Style in more detail
(STYLE MICROSCOPE)
MICROSCOPE lets you edit individual items of the
performance data recorded in the Style, such as notes or
velocities.
You can individually edit the following items.
• An event’s position • Controller number
• Note number • Controller value
• Note gate time • Program change number
• Note-on velocity • Pitch bend value
1. Select a Style (p. 25 in the owner’s manual).
2. Press [MENU] so the button is lit.
3. Use [ ] [ ] to select “Style Composer,” and press
[ENTER].
The STYLE COMPOSER screen will appear.
Selects the division number.
You may select more than
one.
VARIATION
SW (1–4)
Time Signature
3. Select “EXECUTE” and then press [ENTER].
It is not possible to restore the data to its original state after
executing this operation.
OFF, ON
1–32/2,
4, 8, 16
If DIVISION is set to ALL, this
will be ON for all switches
1–4.
* You can’t execute the
function if nothing is
selected here.
Specifies the time signature.
4. Use [ ] [ ] [ ] [ ] to select the division that you
want to edit, and press [ENTER].
The STYLE COMPOSER ZOOM screen will appear.
5. Use [ ] [ ] [ ] [ ] to move the cursor to
“MICRO,” and press [ENTER].
The STYLE MICROSCOPE screen will appear.
1
1 3
2
54
21
Page 22

Creating a new Style
1. Measure: Beat: Tick
2. Bank select MSB/value
Bank select LSB/value
Program change number/value
3. Controller number/value
4. Pitch bend/value
5. Note: Note number/Velocity/Gate time (Beat: Tick)
6. Use the VALUE dial or [ ] [ ] to select the event that
you want to edit.
7. Use [ ] [ ] to select the data that you want to
change, and use the VALUE dial to change the value.
You can use the [0]–[3] buttons to perform the following
operations.
Button Explanation
Inserts a new event at the desired location.
When you press [0] (CREATE), the Create
Event window will open.
Type: Select the data that you want to
[0] (CREATE)
To: Specify the location at which you
Move the cursor to “EXECUTE” and press
[ENTER] to insert the event.
[1] (ERASE) Erases the event at the cursor location.
Moves the event at the cursor location to
the specified location.
When you press [2] (MOVE), the Move
Event window will open.
[2] (MOVE)
To: Specify the destination of the
Move the cursor to “EXECUTE” and press
[ENTER] to move the event to the specified
location.
insert: Note, Program Change,
Control Change, or Pitch Bend.
want to insert the event.
move.
Viewing only the performance data you want
to see
Because many events are shown in the STYLE
MICROSCOPE screen, it can be difficult to find what
you’re looking for.
By specifying that only certain types of performance data
will be displayed, you can make it easier to view the
data.
It’s convenient to use this function when you want to view
or edit only a specific type of performance data.
1. Press [MENU] to open the View Select window.
2. Move the cursor to Note, Program Change, Control
Change, and Pitch Bend, and use the VALUE dial to
add a check mark for types of performance data you
want to see, and clear the check mark for types you
don’t want to see.
3. Press [EXIT] to close the View Select window.
Only the events for the performance data types that
have a check mark will be shown.
8. If you want to keep the changes you’ve made to the Style,
proceed as described in “Saving the Style you recorded”
(p. 12).
[3] (COPY)
[4] (PLACE)
22
Copies the event that’s at the cursor
location.
Inserts the copied event at the specified
location.
When you press [4] (PLACE), the Place
Event window will open.
To: Specify the location at which you
want to insert the copied event.
Move the cursor to “EXECUTE” and press
[ENTER] to insert the event.
Page 23

Automatically generating
Style data (EZ CONVERT)
Using the Style data of a chord, you can automatically
generate Style data for a different chord. This is called the “EZ
Convert” function.
For example, you could create performance data for each of
the Major divisions, and then use the EZ Convert function to
automatically generate data for the minor and 7th divisions.
Creating a new Style
6. Use [ ] [ ] [ ] [ ] to move the cursor to
“EXECUTE” and press [ENTER].
EZ Convert will be executed, and Style data will be
generated for the divisions of the specified chord.
The Style data in the divisions of the specified
DESTINATION chord will be overwritten.
1. Select a Style (p. 25 in the owner’s manual).
2. Press [MENU] so the button is lit.
3. Use [ ] [ ] to select “Style Composer,” and press
[ENTER].
The STYLE COMPOSER screen will appear.
4. Press [0] (EZ CONVERT).
The Style EZ Convert window will open.
5. Turn the VALUE dial to edit the “SOURCE” or
“DESTINATION” value.
If the selected SOURCE chord has divisions that don’t contain
performance data, the corresponding divisions in the
DESTINATION will be overwritten as a division that contains
no performance data.
Parameter Value Explanation
Select the chord that will be used
as the basis for EZ Convert.
If you select “Auto,” this function
will search for performance data
in the divisions of each chord, in
the order of 7th→ Major→
minor, and if performance data
is found, will use that chord as
the Source to automatically
generate Style data for the other
chords.
Selects the chord for which Style
data will automatically be
generated.
If SOURCE is Auto, the
DESTINATION will also be set to
Auto.
SOURCE
DESTINATION
Major,
minor,
7th,
Auto
Major,
minor,
7th
23
Page 24

Creating a song
You can use the Prelude’s 16-track recorder to create songs.
Recording your performance as you play
You can record your keyboard performance while listening to
an accompaniment, and then listen to the playback of your
recorded performance.
If you want to record the Style playback as well, turn [STYLE]
on.
Recording will start/stop simultaneously when you start/stop
the Style.
If you want to record only your keyboard performance without
playing a Style, turn [SONG] on.
If [STYLE] and [SONG] are both turned off, the rhythm pattern
of the Style selected by the STYLE SELECT buttons will be
recorded together with the keyboard performance.
Recorded performances are discarded when another Song is
selected, or when the power is turned off. If you don’t want to
lose the Song, you must save it (p. 27).
Song settings (e.g., tempo and time signature) are determined
by the settings of the Style that’s saved in the selected
Performance. You’ll probably find it convenient to first select
the Style and Tones that you want to use (p. 38 in owner’s
manual). If you are performing without using a Style, you can
specify the tempo and time signature of the Song in the SONG
TRACK screen (see below).
1. Select the Performance that you want to use (p. 36 in the
owner’s manual).
2. Press [SONG REC].
[SONG REC] will blink.
3. Press [ ] to start recording.
1
2
3
5
6
1. Song Name
2. Part: Part to record
3. The Tone number for each Part
4. Move the cursor here and press [ENTER] to move to a
different screen.
MFX: SONG MFX screen (p. 26)
EDIT: SONG EDIT screen (p. 32)
MICRO: SONG MICROSCOPE screen (p. 39)
MASTER: SONG MASTER TRACK screen (p. 41)
INIT: SONG INITIALIZE screen (p. 28)
5. MUTE:
Mute On (no sound) or Off (sound) setting for each Part
6. SOLO:
Solo On (hear only this part) or Off setting for each Part
7. Recording parts
A performance you record using a Style is recorded to
parts 1–16 as follows.
Track Part Name Track Part Name
1 Accomp 1 9 Accomp 6
2 Accomp bass 10 Accomp drums
3 Accomp 2 11 Lower Part
4 Upper Part 12
5 Accomp 3 13
6 14
7 Accomp 4 15 Melody Intelligence
8 Accomp 5 16
4
7
4. Perform.
5. Press [ ] to stop recording.
When you stop recording, the SONG TRACK screen will
appear.
24
When you record a performance, part 4 and part 11 are
recorded as the manually played Upper part and
manually played Lower part, respectively.
In this case, the part number indication at the bottom of
the SONG TRACK screen will indicate “UPR” and “LWR”
for Part 4 and Part 11, respectively.
6. Press [EXIT] to return to the Main screen.
Page 25

Upper/Lower MFX (p. 40 in the owner’s manual) will apply
only to the realtime performance of the Part (Upper Part or
Lower Part) you play by hand.
Be aware that Upper/Lower MFX will not apply to the
recorded Song data.
You can specify whether the metronome will sound during
recording. See “Using the Metronome” (Owner’s Manual p.
23).
Ways to create a song
Broadly speaking, there are two ways to create a song.
Editing an existing song
You can create a new song by changing an existing song’s
Tones, adjusting the volume balance between parts, or
changing the effect settings.
Creating a song
Creating a new song
You can initialize a song, and use realtime or step recording
to create performance data for each part.
After you’ve created the performance data, you can use the
SONG MICROSCOPE function or SONG MASTER TRACK
screen to edit it.
25
Page 26
Editing an existing song
Changing the song’s sounds
(SONG MAKEUP)
You can change the Tone used by each part of the song, and
adjust the volume or effect balance of the parts.
The settings in SONG MAKEUP are not applied to the data
recorded in the song; rather, they are applied when the song
is played back.
1. Select a song (p. 29 in the owner’s manual).
2. Press [PART VIEW] a number of times until the SONG
MAKEUP screen appears.
You can’t access the SONG MAKEUP screen during recording
or in recording-standby mode.
3. Use [ ] [ ] [ ] [ ] to select a parameter.
4. Turn the VALUE dial to set the value.
Parameter Value Explanation
Specifies whether this part
alone will be heard by itself
SOLO OFF, ON
If the selected song contains a recorded performance, Part 4
and Part 11 will respectively be the manually played parts,
and will be shown as “UPR” and “LWR.” Manually played
parts cannot be edited in the SONG MAKEUP screen.
The SONG MAKEUP settings are not reflected in the Song
Track screen.
(ON) or not (OFF).
Use [ ] [ ] to turn on
the part at which the cursor is
located.
Changing the song’s MFX settings (SONG MFX)
You can adjust the song’s effect settings or the amount of
chorus and reverb that are applied.
Parameter Value Explanation
Switches between Makeup settings for the
Tones of each part.
PART
TONE
EXPRESS -127–+127
PANPOT -127–+127
REVERB -127–+127
CHORUS -127–+127
For example, if three Tones are used in Part 1,
you can switch between P1 1, P1 2, and P1
3.
The Tone used by that part. The top line of the
screen shows the Tone number and Tone
name.
Offset value for the
Expression setting of the song
Offset value for the Panpot
setting of the song
Offset value for the Reverb
setting of the song
Offset value for the Chorus
setting of the song
1. Select a song (p. 29 in the owner’s manual).
2. Press [PART VIEW] a number of times until the SONG
TRACK screen appears.
3. Use [ ] [ ] [ ] [ ] to move the cursor to “MFX”
and press [ENTER].
The SONG MFX screen will appear.
4. Use [ ] [ ] to select a page, and use [ ] [ ] to
select the parameter that you want to edit.
You can also access the SONG MFX screen from the SONG
TRACK screen by pressing [REVERB].
5. Turn the VALUE dial to edit the value.
MUTE OFF, ON
26
Specifies whether the sound
will be muted (ON) or heard
(OFF).
Page 27

Editing an existing song
SONG MFX screen
You can access this screen from the SONG TRACK screen by
moving the cursor to “MFX” and pressing [ENTER], or from the
SONG MFX SETTING screen by pressing [ ].
Parameter Value Explanation
Selects the MFX to use. You
MFX Type 00–78
Refer to “Multi-Effects Parameter” (p. 56 in Owner’s
Manual).
can then edit the parameter
values.
SONG MFX SETTING screen
You can access this screen from the SONG MFX screen by
pressing [ ].
2. If the WRITE MENU screen appeared, use [ ] [ ] to
select “Song” and then press [ENTER].
The SONG NAME screen will appear.
Naming the Song
3. Use [ ] [ ] to move the cursor, and use the VALUE
dial to change the character.
Enter a Song name of up to 16 characters.
The following characters are available.
A–Z a–z 0–9 ! # $ % & ‘ ( ) - @ ^ ` { } _
Button Explanation
Selects the type of character. Each time you
[0] (TYPE)
[1] (DELETE) Deletes the character at the cursor location.
[2] (INSERT) Inserts a space at the cursor location.
press this, you will alternately select the first
character of a character set: uppercase (A),
lowercase (a), or numerals and symbols (0).
Parameter Value Explanation
Song MFX
Chorus
Send
Song MFX
Reverb
Send
MFX Sw OFF, ON
If part 4 and part 11 were recorded as manually played parts
(i.e., if the part indication is “UPR” or “LWR”), the Song MFX
effect will not apply to these parts.
0–127
0–127
Specifies how much chorus is
to be applied to the sound that
has passed through MFX.
Specifies how much reverb is to
be applied to the sound that
has passed through MFX.
Specifies whether MFX will be
used (ON), or not be used
(OFF) for each part of the
Song.
Saving a song
Here’s how to save the song you’ve edited.
From a naming screen you can press [MENU] and select
“1. Undo” to return the name to what it was before you
changed it.
From [MENU] you can select “2. To Upper” or press [ ] to
change the character at the cursor to uppercase.
From [MENU] you can select “3. To Lower” or press [ ] to
change the character at the cursor to lowercase.
From [MENU] you can select “4. Delete All” to clear all the
characters you were inputting.
The Prelude is able to display both uppercase and lowercase
letters, but these are not distinguished internally.
For example, suppose that a song named “SONG1” has been
saved. If you now record a different song, assign it the name
“song1” and then attempt to save it, “SONG1” and “song1”
will be considered identically named songs, so a screen will
ask you to confirm the overwrite operation.
If you continue with the save operation, the new performance
data will be saved as “SONG1.” This means that the
performance data that was previously saved in “SONG1” will
be lost.
4. Press [ENTER].
A confirmation screen will appear.
1. Press [WRITE].
The WRITE MENU screen or the SONG NAME screen will
appear.
5. Press [ENTER] to save the song.
If you press [EXIT], you’ll return to the previous screen
without saving the song.
27
Page 28

Creating a new song
Initializing the song
(SONG INITIALIZE)
Here’s how to erase the performance data from a song, and
initialize it to the specified values.
1. Press [SONG].
2. Press [PART VIEW] a number of times until the SONG
TRACK screen appears.
3. Use [ ] [ ] [ ] [ ] to move the cursor to “INIT”
and press [ENTER].
The Song Initialize window will appear.
Recording a song
There are two methods of recording: realtime recording and
step recording. Use the method that’s appropriate for your
situation.
When you edit the song data, the SONG MAKEUP settings
will be lost.
Realtime recording
1. If you want to create a new song, initialize the song (p.27)
and then proceed to step 3.
If you want to record using an existing song, select the
desired song (p. 29 in the owner’s manual).
2. Press [PART VIEW] so the button is lit.
The SONG TRACK screen will appear.
4. Use [ ] [ ] to select the parameter you want to edit,
and use the VALUE dial to edit the value.
Parameter Value Explanation
Initialize
Tempo
Time Signature
5. Use [ ] [ ] to move the cursor to “INIT” and press
[ENTER].
A confirmation screen will appear.
6. Press [ENTER] to execute initialization.
If you press [EXIT], you’ll return to the previous screen
without initializing.
When the initialization is completed, the song name will
change to “New Song.”
20–250
1–32/2, 4,
8, 16
Specifies the initialized
tempo.
Specifies the initialized time
signature.
The SONG TRACK screen has the following limitations.
• Transpose will not apply
• Key Scale will not apply
• DUAL/SPLIT will not apply
•Piano Mode is not available
3. Press [SONG REC].
The Song Rec Standby screen will appear, and [SONG
REC] will blink.
By pressing [SONG REC] you can switch between REALTIME
and STEP REC.
You can also switch between REALTIME and STEP REC by
moving the cursor to REC TYPE and turning the VALUE dial.
28
[SONG REC] will blink while you’re in recording-standby
mode.
Page 29

4. Use [ ] [ ] [ ] [ ] to select a parameter, and
turn the VALUE dial to edit the value.
Parameter Value Explanation
PART 1–16 Selects the part to record.
TONE Selects a tone.
New material is recorded as
REPLACE
Rec Mode
MIX
OFF
1MEAS
Count In
Input
Quantize
Punch Sw ON, OFF
Punch In 0001–9998
Punch Out 0002–9999
2MEAS
WAIT NOTE
OFF, 1/4,
1/8, 1/8T,
1/16, 1/16T,
1/32, 1/32T,
1/64
previously recorded material
is erased.
New notes are recorded on
top of notes previously
recorded.
No count-in. Recording starts
as soon as you press
[].
Recording starts after a 1-
bar count-in.
Recording starts after a 2-
bar count-in.
Recording starts as soon as
you play a note on the
keyboard. (There will be no
count-in.)
Quantize corrects the timing
of your notes by shifting
them to the nearest grid
mark.
This specifies the number of
steps per measure (i.e., the
resolution).
Specifies whether to use
Auto Punch-In/Out.
Specifies the Auto Punch-In
measure.
Specifies the Auto Punch-Out
measure.
Creating a new song
• If you want to record while hearing the
accompaniment provided by the Arranger, set
Backing= STYLE (p. 23 in the owner’s manual)
before you start recording.
• If you want to record while hearing the Style’s
rhythm, set Backing= OFF (p. 23 in the owner’s
manual) before you start recording.
• If you want to record only the keyboard, set
Backing= SONG (p. 23 in the owner’s manual)
before you start recording.
5. Press [ ] to start recording.
If Count In is set to WAIT NOTE, recording will start the
moment you play the keyboard.
[SONG REC] will be lit during recording.
6. Play the keyboard.
7. Press [ ] to stop recording.
If you want to keep the song you recorded, proceed as
described in “Saving the song you recorded” (p. 31).
Step recording
1. If you want to create a new song, initialize the song (p. 28)
and then proceed to step 3.
If you want to record using an existing song, select the
desired song (p. 29 in the owner’s manual).
2. Press [PART VIEW] so the button is lit.
The SONG TRACK screen will appear.
You can use [OCTAVE] to change the octave setting during
recording.
If “PUNCH IN/OUT” is set for Pedal Assign (p. 45 in the
owner’s manual).
• Set Punch Sw to “OFF.” If this is “ON,” you won’t be able
to use the pedal to perform Punch In/Out recording.
• Recording will be possible only by using the pedal to
perform Punch In/Out recording.
3. Press [SONG REC].
The Song Rec Standby screen will appear, and [SONG
REC] will blink.
29
Page 30

Creating a new song
4. Press [SONG REC] to change REC TYPE to “STEP REC.”
Pressing [SONG REC] will switch between REALTIME and
STEP REC.
You can also switch between REALTIME and STEP REC by
moving the cursor to REC TYPE and turning the VALUE dial.
5. Use [ ] [ ] [ ] [ ] to select a parameter, and
turn the VALUE dial to edit the value.
Parameter Value Explanation
PART 1–16 Selects the part to record.
TONE Selects a tone.
New material is recorded as
REPLACE
Rec Mode
MIX
Start
Octave -4–+4
6. Press [ ] to start recording.
The SONG STEP REC screen will appear.
Specifies the location (MEAS: BEAT: TICK) at
which recording will start.
previously recorded material is
erased.
New notes are recorded on top of
notes previously recorded.
Shifts the notes during recording
in units of an octave.
Parameter Value Explanation
Specifies the velocity of the notes
that will be entered. Select “REAL”
if you want the notes to reflect the
VELOCITY
8. Use [ ] [ ] to move the input position (step), and then
press a key.
When you press a key, the input position will advance by
the length of the NOTE setting.
Pressing [ ] will move the input position backward by the
current NOTE setting. Pressing [ ] will move the input
position forward by the current NOTE setting.
You can use the [0]–[3] buttons to perform the following
operations.
Button Explanation
[0] (BACK DEL) Cancels the last-entered note.
[1] (TIE)
[2] (UNTIE) Cancels the last-entered tie.
[3] (REST)
REAL,
1–127
actual force with which you strike
the key. Otherwise, “p” (piano)
corresponds to a value of about
60, “mf” (mezzoforte) to about
90, and “f” (forte) to about 120.
Enters a tie by extending the duration of
the last-entered note by the current length
setting.
Enters a rest. Set NOTE to the length of
the rest that you want to enter, and then
press [3] (REST).
7. Use [ ] [ ] [ ] [ ] to select a parameter, and
make settings for the notes that you’ll be entering.
Parameter Value Explanation
Specifies the timing value of the
NOTE
GATE 1–100%
1/32–
2/1
notes that will be entered.
The note value indicates the length
from a note-on to the next note-on.
Specifies the duration between the
note-on and note-off, as a
percentage of the note value.
Select a smaller value to create a
staccato feel, or a larger value to
create a tenuto or slur.
Normally, you should set this to
about 80%.
9. Repeat steps 7 through 9 to enter notes.
Each parameter will retain the value you specified, so there’s
no need to change the settings if you want to use the same
values for the next note. Once you’ve specified the GATE and
VELOCITY, there’s usually no need to change these values;
simply specify the NOTE value and the pitch (by playing the
keyboard).
Entering a chord
Play the chord. The input position will advance to the next step
when you’ve released all of the keys.
10. When you’re finished recording, press [ ].
If you want to keep the song you’ve recorded, proceed as
described in “Saving the song you recorded” (p. 31).
30
Page 31

Creating a new song
The Relation between Note Value Length
and Gate Time
The relation between the length of the note value and the
gate time is shown below. Since the Prelude’s song
recorder uses a TPQN (Ticks Per Quarter Note; i.e.,
resolution) of 120, a quarter note gate time is 120 ticks.
Note Gate time
1/32
1/16T 20
1/16
1/8T
1/16. 45
1/8
1/4T
1/8.
1/4
1/2T
1/4.
1/2
1/1 480
2/1 960
The gate time that is recorded in step recording will be
the original gate time value multiplied by the value of the
Gate Time parameter. For example, if the Gate Time
parameter is set to “80%,” inputting a quarter note will
mean that the gate time is 120 x 0.8= 96.
15
30
40
60
80
90
120
160
180
240
Saving the song you recorded
Here’s how to save a song you’ve recorded.
The following content will be saved.
• The song’s performance data
• Song MFX settings (MFX Type, MFX Chorus/Reverb Send,
MFX Sw)
• Song Makeup settings
1. Press [WRITE].
The SONG NAME screen will appear.
Naming the Song
2. Use [ ] [ ] to move the cursor, and use the VALUE
dial to change the character.
Enter a Song name of up to 16 characters.
The following characters are available.
A–Z a–z 0–9 ! # $ % & ‘ ( ) - @ ^ ` { } _
Button Explanation
Selects the type of character. Each time you
[0] (TYPE)
[1] (DELETE) Deletes the character at the cursor location.
[2] (INSERT) Inserts a space at the cursor location.
press this, you will alternately select the first
character of a character set: uppercase (A),
lowercase (a), or numerals and symbols (0).
From a naming screen you can press [MENU] and select
“1. Undo” to return the name to what it was before you
changed it.
From [MENU] you can select “2. To Upper” or press [ ] to
change the character at the cursor to uppercase.
From [MENU] you can select “3. To Lower” or press [ ] to
change the character at the cursor to lowercase.
From [MENU] you can select “4. Delete All” to clear all the
characters you were inputting.
3. Press [ENTER].
A confirmation screen will appear.
4. Press [ENTER] to save the song.
If you press [EXIT], you’ll return to the previous screen
without saving the song.
31
Page 32

Creating a new song
If you’ve assigned the same name as an existing song, a
screen will ask you to confirm that you want to overwrite the
existing song.
The Prelude is able to display both uppercase and lowercase
letters, but these are not distinguished internally.
For example, suppose that a song named “SONG1” has been
saved. If you now record a different song, assign it the name
“song1” and then attempt to save it, “SONG1” and “song1”
will be considered identically named songs, so a screen will
ask you to confirm the overwrite operation.
If you continue with the save operation, the new performance
data will be saved as “SONG1.” This means that the
performance data that was previously saved in “SONG1” will
be lost.
The setting screen for the selected editing function will
appear.
The following editing functions are available.
• Quantize (Correcting the note timing)
• Erase (Erasing unwanted data)
• Delete (Deleting an unwanted region)
• Copy (Copying performance data)
•Insert (Inserting blank space)
• Transpose (Shifting the pitch)
• Change Velocity (Modifying the note dynamics)
• Change Gate Time (Modifying the note durations)
•Global Change (Replacing performance data)
• Shift Clock (Making fine adjustments to the timing)
Editing a song (SONG EDIT)
You can use Song Edit functions to edit the song data you’ve
recorded. If you want to keep the edited song data, proceed
as described in “Saving the song you recorded” (p. 31).
When you edit the song data, the SONG MAKEUP settings
will be lost.
1. Select the song that you want to edit (p. 29 in the owner’s
manual).
2. Press [PART VIEW] so the button is lit.
The SONG TRACK screen will appear.
3. In the SONG TRACK screen, select “EDIT” and press
[ENTER].
The Song Edit Menu window will appear.
• Merge (Combining performance data)
• Exchange (Exchanging data with another part)
To switch to a different editing function, move the cursor to the
function name shown at the top of the screen, and turn the
VALUE dial.
You can also access the Song Edit Menu window from the
“SONG TRACK” screen by pressing [MENU].
4. In the “Song Edit Menu,” Use [ ] [ ] to move the
cursor to the editing function you want to use, and press
[ENTER].
32
Page 33

Creating a new song
Correcting the note timing (Quantize)
This function corrects the timing of performance data in the
specified region.
1. In the “Song Edit Menu,” select “1. Quantize” and
[ENTER].
The SONG EDIT QUANTIZE screen will appear.
2. Use [ ] [ ] [ ] [ ] to move the cursor to the
parameter that you want to change, and use the VALUE
dial to make the desired settings.
Parameter Value Explanation
Selects the Song part to
Part ALL, 1–16
From
(MEAS:
BEAT: TICK)
To (MEAS:
BEAT: TICK)
Resolution
Strength 0–100%
Note
Range Min
Note
Range Max
3. Select “EXECUTE” and then press [ENTER].
0001: 01: 000–
0001: 01: 000–
1/4, 1/8,
1/8T, 1/16,
1/16T, 1/32,
1/32T, 1/64
C–(Note Range
Max value)
(Note Range
Min value)–G9
which the Quantize
operation is to be applied.
Specifies the beginning of
the region to which
Quantize is to be applied.
Specifies the end of the
region to which Quantize
is to be applied.
Specifies the timing
interval for quantization.
Specifies the amount of
timing correction applied
relative to the Resolution
timing interval.
If you select “100%,”
notes will be corrected all
the way to precise
intervals of the specified
Resolution.
With lower values, the
correction will not be as
tight, and with a setting of
0% there will be no
correction at all.
Specifies the lowest pitch
to be quantized.
Specifies the highest pitch
to be quantized.
It is not possible to restore the data to its original state after
executing this operation.
Erasing unwanted data (Erase)
This function erases performance data from the specified
region. The erased data will be converted to rests; the
measures themselves will remain.
1. In the “Song Edit Menu,” select “2. Erase” and press
[ENTER].
The SONG EDIT ERASE screen will appear.
2. Use [ ] [ ] [ ] [ ] to move the cursor to the
parameter that you want to change, and use the VALUE
dial to make the desired settings.
Parameter Value Explanation
Selects the Song
Part ALL, 1–16
From
(MEAS:
BEAT: TICK)
To (MEAS:
BEAT: TICK)
Data Type
Range Min
Range Max
0001: 01: 000–
0001: 01: 000–
ALL, NOTE, PITCH
BEND, CC, PC
(Only when Data Type= NOTE or CC)
If Data Type= NOTE:
C–(Range Max value)
If Data Type= CC:
0–(Range Max value)
(Only when Data Type= NOTE or CC)
If Data Type= NOTE:
(Range Min Value)–
G9
If Data Type= CC:
(Range Min value)–
127
part from which
data is to be erased.
Specifies the
beginning of the
region from which
data is to be erased.
Specifies the end of
the region from
which data is to be
erased.
Specifies the type of
data to be erased.
Specifies the lowest
note (Note) or
lowest value (CC) of
the data that is to be
erased.
Specifies the highest
note (Note) or
highest value (CC)
of the data that is to
be erased.
33
Page 34

Creating a new song
3. Select “EXECUTE” and then press [ENTER].
Copying performance data (Copy)
It is not possible to restore the data to its original state after
executing this operation.
Deleting an unwanted region (Delete)
This function deletes the performance data of the specified
region. Performance data that follows the deleted region will
be moved forward to fill the gap. The performance data will
be shortened by the amount that was deleted.
1. In the “Song Edit Menu,” select “3. Delete” and press
[ENTER].
The SONG EDIT DELETE screen will appear.
2. Use [ ] [ ] [ ] [ ] to move the cursor to the
parameter that you want to change, and use the VALUE
dial to make the desired settings.
Parameter Value Explanation
Part ALL, 1–16
From
(MEAS:
BEAT: TICK)
To (MEAS:
BEAT: TICK)
3. Select “EXECUTE” and then press [ENTER].
It is not possible to restore the data to its original state after
executing this operation.
0001: 01:
000–
0001: 01:
000–
Selects the Song part from
which data is to be deleted.
Specifies the beginning of the
region to be deleted.
Specifies the end of the
region to be deleted.
This function copies the performance data of the specified
region. This is convenient when you want to re-use existing
performance data.
1. In the “Song Edit Menu,” select “4. Copy” and press
[ENTER].
The SONG EDIT COPY =SOURCE= screen will appear.
2. Use [ ] [ ] [ ] [ ] to move the cursor to the
parameter that you want to change, and use the VALUE
dial to make the desired settings.
Parameter Value Explanation
SOURCE settings
Part ALL, 1–16
From
(MEAS:
BEAT: TICK)
To (MEAS:
BEAT: TICK)
Data Type
Range Min
Range Max
0001: 01: 000–
0001: 01: 000–
ALL, NOTE, PITCH
BEND, CC, PC
(Only when Data Type= NOTE or CC)
If Data Type= NOTE:
C–(Range Max
value)
If Data Type= CC:
0–(Range Max value)
(Only when Data Type= NOTE or CC)
If Data Type= NOTE:
(Range Min Value)–
G9
If Data Type= CC:
(Range Min value)–
127
Selects the copysource Song part.
Specifies the
beginning of the
region to be copied.
Specifies the end of
the region to be
copied.
Specifies the type of
data to be copied.
Specifies the lowest
note (Note) or lowest
value (CC) of the
data that is to be
copied.
Specifies the highest
note (Note) or
highest value (CC) of
the data that is to be
copied.
34
Page 35

3. In the SONG EDIT COPY =SOURCE= screen, select
“DESTINATION” and press [ENTER].
The SONG EDIT COPY =DESTINATION= screen will
appear.
4. Use [ ] [ ] [ ] [ ] to move the cursor to the
parameter that you want to change, and use the VALUE
dial to make the desired settings.
Parameter Value Explanation
DESTINATION settings
Selects the copydestination Song part.
If you select “ALL” in the
Part 1–16
Into (MEAS:
BEAT: TICK)
Copy Mode REPLACE, MIX
Copy Times 1–99
5. Select “EXECUTE” and then press [ENTER].
0001: 01: 000–
SOURCE setting, this
setting will be fixed at
“ALL” and cannot be
changed.
Specifies the beginning
of the region at which the
copied data is to be
pasted.
Specifies the copy
method.
Specifies the number of
times to copy the data.
Creating a new song
Inserting blank space (Insert)
This function inserts blank space at the specified location.
Performance data that follows this location will be moved back
to make room for the inserted blank space. The performance
data will be lengthened by the inserted amount.
1. In the “Song Edit Menu,” select “5. Insert” and press
[ENTER].
The SONG EDIT INSERT screen will appear.
2. Use [ ] [ ] [ ] [ ] to move the cursor to the
parameter that you want to change, and use the VALUE
dial to make the desired settings.
Parameter Value Explanation
Selects the Song part
Part ALL, 1–16
From (MEAS:
BEAT: TICK)
For (MEAS:
BEAT: TICK)
0001: 01: 000–
0000: 00: 000–
into which blank
space is to be
inserted.
Specifies the location
at which the blank
space is to be
inserted.
Specifies the length of
the blank space to be
inserted.
It is not possible to restore the data to its original state after
executing this operation.
Specifies the time
Time Signature
3. Select “EXECUTE” and then press [ENTER].
It is not possible to restore the data to its original state after
executing this operation.
1–32/2, 4, 8,
16
signature.
* This is shown only
if the Part setting is
ALL.
35
Page 36

Creating a new song
Shifting the pitch (Transpose)
This function transposes the pitches of the specified region.
1. In the “Song Edit Menu,” select “6. Transpose” and press
[ENTER].
The SONG EDIT TRANSPOSE screen will appear.
2. Use [ ] [ ] [ ] [ ] to move the cursor to the
parameter that you want to change, and use the VALUE
dial to make the desired settings.
Parameter Value Explanation
Part ALL, 1–16
From
(MEAS:
BEAT: TICK)
To (MEAS:
BEAT: TICK)
Value -127–127
Note
Range Min
Note
Range Max
3. Select “EXECUTE” and then press [ENTER].
It is not possible to restore the data to its original state after
executing this operation.
0001: 01: 000–
0001: 01: 000–
C–(Note Range
Max value)
(Note Range
Min value)–G9
Selects the Song part to
be transposed.
Specifies the beginning of
the region to be
transposed.
Specifies the end of the
region to be transposed.
Specifies the number of
semitones by which the
pitches are to be
transposed.
Specifies the lowest pitch
to be transposed.
Specifies the highest pitch
to be transposed.
Modifying the note dynamics
(Change Velocity)
This function modifies the dynamics of the specified region.
1. In the “Song Edit Menu,” select “7. Change Velocity” and
press [ENTER].
The SONG EDIT CHANGE VELOCITY screen will appear.
2. Use [ ] [ ] [ ] [ ] to move the cursor to the
parameter that you want to edit, and use the VALUE dial to
set the value.
Parameter Value Explanation
Part ALL, 1–16
From
(MEAS:
BEAT: TICK)
To (MEAS:
BEAT: TICK)
Bias -99–99
Magnify 0 –200%
Note
Range Min
Note
Range Max
0001: 01:
000–
0001: 01:
000–
C–(Note
Range Max
value)
(Note Range
Min value)–
G9
Selects the Song part whose
velocity is to be modified.
Specifies the beginning of the
region whose velocity is to be
modified.
Specifies the end of the region
whose velocity is to be
modified.
Specifies the amount by which
the velocity is to be modified.
Allows you to make the
velocity more uniform, or to
decrease or increase the
dynamics.
If Magnify is set near 0%, the
velocity will be adjusted
toward 64, and the Bias value
will be added to each velocity
value. This allows you to make
the velocity more consistent
while adjusting it as desired.
If Magnify is set to 101% or
higher, velocities greater than
64 will be increased while
velocities below 64 will be
decreased, increasing the
dynamics.
If Magnify is set to 100%, the
velocity will not change.
Specifies the lowest pitch
whose velocity is to be
modified.
Specifies the highest pitch
whose velocity is to be
modified.
36
3. Select “EXECUTE” and then press [ENTER].
Page 37

Creating a new song
It is not possible to restore the data to its original state after
executing this operation.
Modifying the note durations
(Change Gate Time)
This function modifies the durations of the notes in the
specified region.
1. In the “Song Edit Menu,” select “8. Change Gate Time”
and press [ENTER].
The SONG EDIT CHANGE GATE TIME screen will
appear.
2. Use [ ] [ ] [ ] [ ] to move the cursor to the
parameter that you want to change, and use the VALUE
dial to make the desired settings.
Parameter Value Explanation
Part ALL, 1–16
From (MEAS:
BEAT: TICK)
To (MEAS:
BEAT: TICK)
Bias (TICK)
Magnify 0–200%
Note Range
Min
Note Range
Max
3. Select “EXECUTE” and then press [ENTER].
0001: 01:
000–
0001: 01:
000–
-4800–
4800 (TICK)
C–(Note
Range Max
value)
(Note Range
Min value)–
G9
Selects the Song part whose
gate times are to modified.
Specifies the beginning of
the region whose gate times
are to be modified.
Specifies the end of the
region whose gate times
are to be modified.
Specifies the amount by
which the gate times are to
be modified, in units of a
tick.
Specifies the ratio by which
the gate times will be
modified.
Specifies the lowest pitch
whose gate times are to be
modified.
Specifies the highest pitch
whose gate times are to be
modified.
Replacing performance data
(Global Change)
This function replaces the specified MSB, LSB, and PC values
with different MSB, LSB, and PC values. You can also apply a
relative adjustment to the control values (Expression, Panpot,
Reverb, Chorus) within the Song.
1. In the “Song Edit Menu,” select “9. Global Change” and
press [ENTER].
The SONG EDIT GLOBAL CHANGE screen will appear.
2. Use [ ] [ ] [ ] [ ] to move the cursor to the
parameter that you want to change, and use the VALUE
dial to make the desired settings.
Parameter Value Explanation
Selects the Song part whose
Part ALL, 1–16
MSB
(FROM)
MSB (TO) OFF, 0–127 Specifies the new MSB value.
LSB (FROM)
LSB (TO) OFF, 0–127 Specifies the new LSB value.
PC (FROM)
PC (TO) OFF, 1–128 Specifies the new PC value.
VOLUME -127–127 Adjusts the Volume values.
EXPRESS -127–127
PANPOT -127–127 Adjusts the Panpot values.
OFF,
0–127, ALL
OFF,
0–127, ALL
OFF,
1–128, ALL
data values you want to
modify.
Specifies the MSB value that
will be changed.
By choosing ALL, you can set
more than one Song part to
the same value.
Specifies the LSB value that is
to be changed.
By choosing ALL, you can set
more than one Song part to
the same value.
Specifies the PC value that is
to be changed.
By choosing ALL, you can set
more than one Song part to
the same value.
Adjusts the Expression
values.
It is not possible to restore the data to its original state after
executing this operation.
REVERB -127–127 Adjusts the Reverb values.
CHORUS -127–127 Adjusts the Chorus values.
37
Page 38

Creating a new song
3. Select “EXECUTE” and then press [ENTER].
It is not possible to restore the data to its original state after
executing this operation.
Making fine adjustments to the timing
(Shift Clock)
By using this function, events of the specified data type in the
specified region and specified range of pitches can be shifted
forward or backward.
1. In the “Song Edit Menu,” select “10. Shift Clock” and press
[ENTER].
The SONG EDIT SHIFT CLOCK screen will appear.
2. Use [ ] [ ] [ ] [ ] to move the cursor to the
parameter that you want to change, and use the VALUE
dial to make the desired settings.
Parameter Value Explanation
(Only when Data Type= NOTE or CC)
If Data Type= NOTE:
(Range Min Value)–
Range Max
3. Select “EXECUTE” and then press [ENTER].
It is not possible to restore the data to its original state after
executing this operation.
G9
If Data Type= CC:
(Range Min value)–
127
Specifies the
highest note (Note)
or highest value
(CC) of the data
that is to be shifted.
Combining performance data (Merge)
This function combines (merges) the performance data of the
specified Song part with a different part of the same Song.
1. In the “Song Edit Menu,” select “11. Merge” and press
[ENTER].
The SONG EDIT MERGE screen will appear.
Parameter Value Explanation
Selects the Song
Part ALL, 1–16
From (MEAS:
BEAT: TICK)
To (MEAS:
BEAT: TICK)
Data Type
Value (TICK) -4800–4800 (TICK)
Range Min
0001: 01: 000–
0001: 01: 000–
ALL, NOTE,
PITCH BEND, CC, PC
(Only when Data Type= NOTE or CC)
If Data Type= NOTE:
C–(Range Max value)
If Data Type= CC:
0–(Range Max value)
part whose timing
is to be shifted.
Specifies the
beginning of the
region to be
shifted.
Specifies the end
of the region to be
shifted.
Specifies the type
of data to be
shifted.
Specifies the
amount of shift in
units of one tick.
Specifies the
lowest note (Note)
or lowest value
(CC) of the data
that is to be shifted.
2. Use [ ] [ ] [ ] [ ] to move the cursor to the
parameter that you want to change, and use the VALUE
dial to make the desired settings.
Parameter Value Explanation
Selects the Song part containing
SOURCE PART 1–16
DESTINATION
PART
1–16
the data that you want to merge.
You can’t select the same part as
the Destination.
Selects the merge-destination
Song part.
You can’t select the same part as
the Source.
38
Page 39

Creating a new song
The performance data of the selected Source part will be lost.
Data such as Program Changes will also be merged, so if the
Source Part and Destination Part are using different Tones, the
data resulting from the merge might not be played by the Tone
you intend.
3. Select “EXECUTE” and then press [ENTER].
It is not possible to restore the data to its original state after
executing this operation.
Exchanging data with another part (Exchange)
This function exchanges the performance data between two
specified parts of the same Song.
1. In the “Song Edit Menu,” select “12. Exchange” and press
[ENTER].
The SONG EDIT EXCHANGE screen will appear.
Editing a song in more detail
(SONG MICROSCOPE)
This lets you edit individual MIDI events of the Song data.
You can individually edit the following items.
• An event’s position • Controller number
• Note number • Controller value
• Note gate time • Program change number
• Note-on velocity • Pitch bend value
1. Select the Song that you want to edit (p. 29 in the owner’s
manual).
2. Press [PART VIEW] so the button is lit.
The SONG TRACK screen will appear.
3. Use [ ] [ ] [ ] [ ] to move the cursor to
“MICRO” and press [ENTER].
The SONG MICROSCOPE screen will appear.
2. Use [ ] [ ] [ ] [ ] to move the cursor to the
parameter that you want to change, and use the VALUE
dial to make the desired settings.
Parameter Value Explanation
Selects one of the Song parts to
PART A 1–16
PART B 1–16
3. Select “EXECUTE” and then press [ENTER].
It is not possible to restore the data to its original state after
executing this operation.
exchange.
You can’t select the same part
as PART B.
Selects the other Song part to
exchange.
You can’t select the same part
as PART A.
1
1 4
1. Measure: Beat: Tick
2. Bank select MSB/value
Bank select LSB/value
Program change number/value
3. Controller number/value
4. Pitch bend
5. Note: Note number/Velocity/Gate time (Beat: Tick)
2
3
5
4. Use the VALUE dial or [ ] [ ] to select the event that
you want to edit.
39
Page 40

Creating a new song
5. Use [ ] [ ] to select the data that you want to edit,
and use the VALUE dial to edit the value.
You can use the [0]–[4] buttons to perform the following
operations.
Button Explanation
Inserts a new event at the desired location.
When you press [0] (CREATE), the Create
Event window will open.
Type: Select either Note, Program
Change, Control Change, or Pitch
[0] (CREATE)
To: Specify the location at which you
Move the cursor to “EXECUTE” and press
[ENTER] to insert the event.
[1] (ERASE) Erases the event at the cursor location.
Moves the event at the cursor location to the
specified location.
When you press [2] (MOVE), the Move
Event window will open.
[2] (MOVE)
To: Specify the move-destination
Move the cursor to “EXECUTE” and press
[ENTER] to move the event to the specified
location.
Bend to specify the data to be
inserted.
want to insert the event.
location.
2. Move the cursor to Note, Program Change, Control
Change, and Pitch Bend, and use the VALUE dial to
add a check mark for types of performance data you
want to see, and clear the check mark for types you
don’t want to see.
3. Press [EXIT] to close the View Select window.
Only the events for the performance data types that
have a check mark will be shown.
6. If you want to keep the Song you’ve edited, proceed as
described in “Saving the song you recorded” (p. 31).
[3] (COPY)
[4] (PLACE)
Copies the event that’s at the cursor
location.
Inserts the copied event at the specified
location.
When you press [4] (PLACE), the Place
Event window will open.
To: Specify the location at which you
want to insert the copied event.
Move the cursor to “EXECUTE” and press
[ENTER] to insert the event.
Viewing only the performance data you want
to see
Because many events are shown in the SONG
MICROSCOPE screen, it can be difficult to find what
you’re looking for. By specifying that only certain types of
performance data will be displayed, you can make it
easier to view the data.
It’s convenient to use this function when you want to view
or edit only a specific type of performance data.
1. Press [MENU] to open the View Select window.
40
Page 41

Creating a new song
Editing data that applies to the entire
song (SONG MASTER TRACK)
You can edit individual MIDI events of the data that applies to
the entire song (i.e., System Exclusive, Tempo, and Beat data).
1. Select the Song that you want to edit (p. 29 in the owner’s
manual).
2. Press [SONG].
3. Press [PART VIEW].
The SONG TRACK screen will appear.
4. Use [ ] [ ] [ ] [ ] to move the cursor to
“MASTER” and press [ENTER].
The SONG MASTER TRACK screen will appear.
Immediately after you’ve entered the MASTER TRACK
screen, Tempo/Beat events will be shown.
Press [MENU] to view System Exclusive events.
Button Explanation
Pressing [0] (CREATE) will open the Create
Event window.
Type: If the Tempo/Beat view is shown,
select either Tempo Change or Beat
[0] (CREATE)
Move the cursor to “EXECUTE” and press
[ENTER] to insert the event.
[1] (ERASE) Erases the event at the cursor location.
Moves the event at the cursor location to the
specified location.
When you press [2] (MOVE), the Move Event
window will open.
[2] (MOVE)
[3] (COPY) Copies the event that’s at the cursor location.
[4] (PLACE)
To: Specify the destination of the move.
Move the cursor to “EXECUTE” and press
[ENTER] to move the event to the specified
location.
Inserts the copied event at the specified
location.
When you press [4] (PLACE), the Place Event
window will open.
To: Specify the location at which the
Move the cursor to “EXECUTE” and press
[ENTER] to insert the event.
Change as the data to be inserted.
If the System Exclusive view is
shown, only Sys Exclusive can be
selected.
copied event is to be inserted.
Each time you press [MENU], you’ll alternate between
viewing Tempo/Beat events and System Exclusive events.
5. Use [ ] [ ] to select the event that you want to edit.
6. Use [ ] to move the cursor to the value that you want to
edit, and use the VALUE dial to edit the value.
You can use the [0]–[4] buttons to perform the following
operations.
If System Exclusive events are selected, pressing [ ]
will open the System Exclusive Edit window, allowing you
to edit System Exclusive events.
If you want to save the result of your editing, press
[ENTER].
If you press [EXIT], your edits will be discarded and you’ll
return to the previous screen.
In the System Exclusive Edit window you can use the [0]–
[2] buttons to perform the following operations.
Button Explanation
[0] (INSERT) Inserts “00” at the cursor location.
[1] (ERASE) Deletes the event at the cursor location.
[2] (TEST)
Transmits the System Exclusive message
currently being edited from MIDI OUT.
41
Page 42

Creating a new song
System Exclusive messages, which serve in storing MFX and
other settings for the Prelude, will be recorded at the
beginning of the song.
For this reason, please do not edit any System Exclusive
messages other than those listed in the MIDI Implementation.
The Prelude’s MIDI Implementation can be downloaded from
the Roland website.
7. If you want to keep the edited Song, proceed as described
in “Saving the song you recorded” (p. 31).
42
Page 43

Other added functions
STYLE FINDER
The “STYLE FINDER” screen lets you sort the listed Styles in
order of number, name, or tempo.
This lets you quickly find the desired one of a large number of
Styles.
1. Press [STYLE].
Start playback and press [STYLE] so it’s lit if you want to
hear the chordal accompaniment, or turn it off (unlit) if you
want only the rhythm to be heard. The button will alternate
between lit and extinguished each time you press [STYLE].
2. Use [ ] [ ] [ ] [ ] to move the cursor to the
Style number in the screen, and press [ENTER].
The STYLE LIST screen will appear.
3. Press [MENU].
The STYLE FINDER screen will appear.
You can use the [0]–[2] buttons to sort the list in the
following ways.
Function Explanation
[0] (NUMBER) Numerical order Press the button
[1] (NAME) Alphabetical order
[2] (TEMPO) Tempo order
An “→” is shown beside the current sorting order, with
to indicate ascending order or to indicate descending
order.
4. Press [ENTER] to confirm your choice of Style.
You will return to the Main screen.
If you press [EXIT], you’ll return to the STYLE LIST screen
without changing the Style.
again to alternate
between ascending
and descending
order.
SYSTEM PEDAL
(Owner’s Manual p. 45)
In the System Pedal setting, you can now assign BEND MODE
to the pedal.
1. Press [MENU].
2. Press [ENTER].
3. Use [ ] [ ] to select the SYSTEM PEDAL screen, and
use [ ] [ ] to select the parameter that you want to
edit.
4. Turn the VALUE dial to edit the value.
When you’re finished making system settings, press [EXIT].
Parameter Value Explanation
EXPRESSION
CHORD OFF
CHORD TOGGLE
Pedal
Assign
SOSTENUTO
SOFT
ROTARY SLOW/
FAST
START/STOP
BASS INVERSION
PUNCH IN/OUT
FILL UP
FILL DOWN
PERFORM UP
PERFORM
DOWN
BEND MODE
Refer to the owner’s manual
p. 45
* The function of using the
pedal to Punch In/Out is
available only when
you’re realtime recording
with the Song Track
screen displayed.
The BEND MODE
(NORMAL, CATCH+LAST)
will change each time you
press the pedal.
NORMAL: The pitch bend lever will
operate in the conventional way.
CATCH+LAST: If you play a note
after moving the pitch bend lever to
one side, the new note’s pitch
corresponds to the key you press.
When the lever passes through the
center position, it will once again
begin affecting the pitch. This
applies only to the most recently
played note. You could use this to
simulate the double-bending
technique of an electric guitarist.
43
Page 44

Other added functions
SYSTEM STYLE MIDI (NTA)
How program changes correspond to a Style’s
divisions
You can receive program change messages to switch divisions
of the Style, or cause program change messages to be
transmitted when you switch divisions of the Style.
You can also receive chord input from an external MIDI
keyboard.
1. Press [MENU].
2. Press [ENTER].
3. Use [ ] [ ] to select the SYSTEM STYLE MIDI screen,
and use [ ] [ ] to select the parameter that you want
to edit.
4. Turn the VALUE dial to edit the value.
5. When you’re finished making system settings, press [EXIT].
Parameter Value Explanation
TX Style PC
Specifies the transmit channel
Tx Style PC
Channel
Tx Style PC
Switch
Rx Style PC
Rx Style PC
Channel
Rx Style PC
Switch
NTA (see below)
Rx NTA
Channel
RX NTA
Switch
1–16
OFF, ON
1–16
OFF, ON
1–16
OFF, ON
for the program changes
transmitted when you switch
between divisions of the Style.
Specifies whether program
changes will be transmitted
when you switch between
divisions of the Style.
Specifies the receive channel for
program changes from an
external device that will switch
between divisions of the Style.
Specifies whether program
changes will be received to
switch between divisions of the
Style.
Specifies the NTA receive
channel.
Specifies whether NTA will be
received.
Division Program change
1 67
2 68
INTRO
3 65
4 66
1 1
2 2
MAIN
3 9
4 10
1 97
2 89
FILL
3 90
4 98
1 75
2 76
ENDING
3 73
4 74
Immediately after using Style PC to specify a FILL, you should
then specify the division that you want to play following the fillin.
What is NTA?
This stands for “Notes To Arranger.” The notes you play
on the keyboard of the Prelude are sent together with
chord information to the arranger. These notes can also
be received via MIDI from an external MIDI keyboard
controller or other device. If you want to use the arranger
without playing the Prelude’s keyboard, turn this setting
“ON,” and transmit the note messages from your
computer or an external MIDI device to the Prelude.
44
Page 45
Chord Zone
(Owner’s manual p. 37)
A new “Chord Zone” parameter has been added to the
performance settings, allowing you to specify the key range
for chord detection.
1. Press [MENU].
2. Use [ ] [ ] to select “Perform Edit” then press [ENTER].
3. Use [ ] [ ] to select the PERFORM GENERAL screen
(if it is not already selected), and use [ ] [ ] to select
“Chord Zone.”
4. Turn the VALUE dial to edit the value.
5. When you’re finished making system settings, press [EXIT].
Other added functions
Parameter Value Explanation
OFF
LEFT
Chord
Zone
RIGHT
WHOLE
The Chord Zone setting applies only to the keyboard of the
Prelude itself. If NTA is turned on, chords will be detected
using the entire range of notes from an external MIDI device.
Chord detection will not be
performed.
Chords played to the left of
the split point will be
detected.
Chords played to the right of
the split point will be
detected.
Chords will be detected in
the entire key range.
45
Page 46

Error messages related to creating Styles and Songs
Message Meaning Action
Edit Error! Failed to edit the Style/Song data. Make sure that the edit-related settings are correct.
Make sure that division data exists for the chord
EZ Convert Error! EZ Convert failed.
you’ve specified as the source.
Make sure that you haven’t specified the same
chord as the Source and Destination.
Style Full!
Style Full! Recording failed!
Recording is not possible because you have
exceeded the maximum number of events that
can be stored in a Style.
Recording failed because you have exceeded
the maximum number of events that can be
stored in a Style.
Use track edit operations such as Delete or Erase to
remove unneeded data from the Style you’re
recording.
Use track edit operations such as Delete or Erase to
remove unneeded data from the Style you’re
recording, and then record again.
46
Page 47
Index
B
BEND MODE ............................................................. 43
Bias .............................................................. 18, 36–37
C
Change Gate Time ............................................... 18, 37
Change Velocity ................................................... 18, 36
Chord Zone ............................................................... 45
Copy ................................................................... 15, 34
D
Delete ................................................................. 15, 34
Division ....................................................................... 5
E
Editing
Song .................................................................... 32
Style .................................................................... 13
Erase .................................................................. 14, 33
Exchange .................................................................. 39
EZ CONVERT ............................................................. 23
F
Format ......................................................................... 4
G
Gate Time ............................................................ 12, 31
Global Change .................................................... 19, 37
I
Initializing
Song .................................................................... 28
Style ...................................................................... 9
Insert ................................................................... 17, 35
L
Lyrics ........................................................................... 4
Q
Quantize ............................................................. 14, 33
R
Realtime Recording
Song ................................................................... 28
Style ...................................................................... 9
Rec Mode ................................................ 10–11, 29–30
Rx NTA Channel ........................................................ 44
RX NTA Switch .......................................................... 44
S
Saving
Song ............................................................. 27, 31
Style ................................................................ 8, 12
Shift Clock ........................................................... 20, 38
SOLO ......................................................... 5, 7, 24, 26
SONG MASTER TRACK .............................................. 41
SONG MFX Screen .................................................... 27
SONG MFX SETTING Screen ...................................... 27
SONG MICROSCOPE ................................................ 39
Song Name ......................................................... 27, 31
Step Recording
Song ................................................................... 29
Style .................................................................... 10
STYLE FINDER ............................................................ 43
STYLE MAKEUP ............................................................ 7
STYLE MFX Screen ........................................................ 7
STYLE MFX SETTING Screen .......................................... 8
STYLE MICROSCOPE .................................................. 21
Style Name ........................................................... 8, 12
Style Part Length ......................................................... 20
T
Time Signature ........................................................... 21
Transpose ............................................................ 17, 36
M
Magnify ........................................................ 18, 36–37
Merge ....................................................................... 38
MICROSCOPE ..................................................... 21, 39
MUTE .......................................................... 5, 7, 24, 26
N
NTA .......................................................................... 44
P
Punch In .................................................................... 29
Punch Out .................................................................. 29
Punch Sw ................................................................... 29
47
Page 48

R®
602.00.0388 RES 735-09 Owner’s Manual V2 (E) Prelude
 Loading...