

Page 1
Ver. 1.2
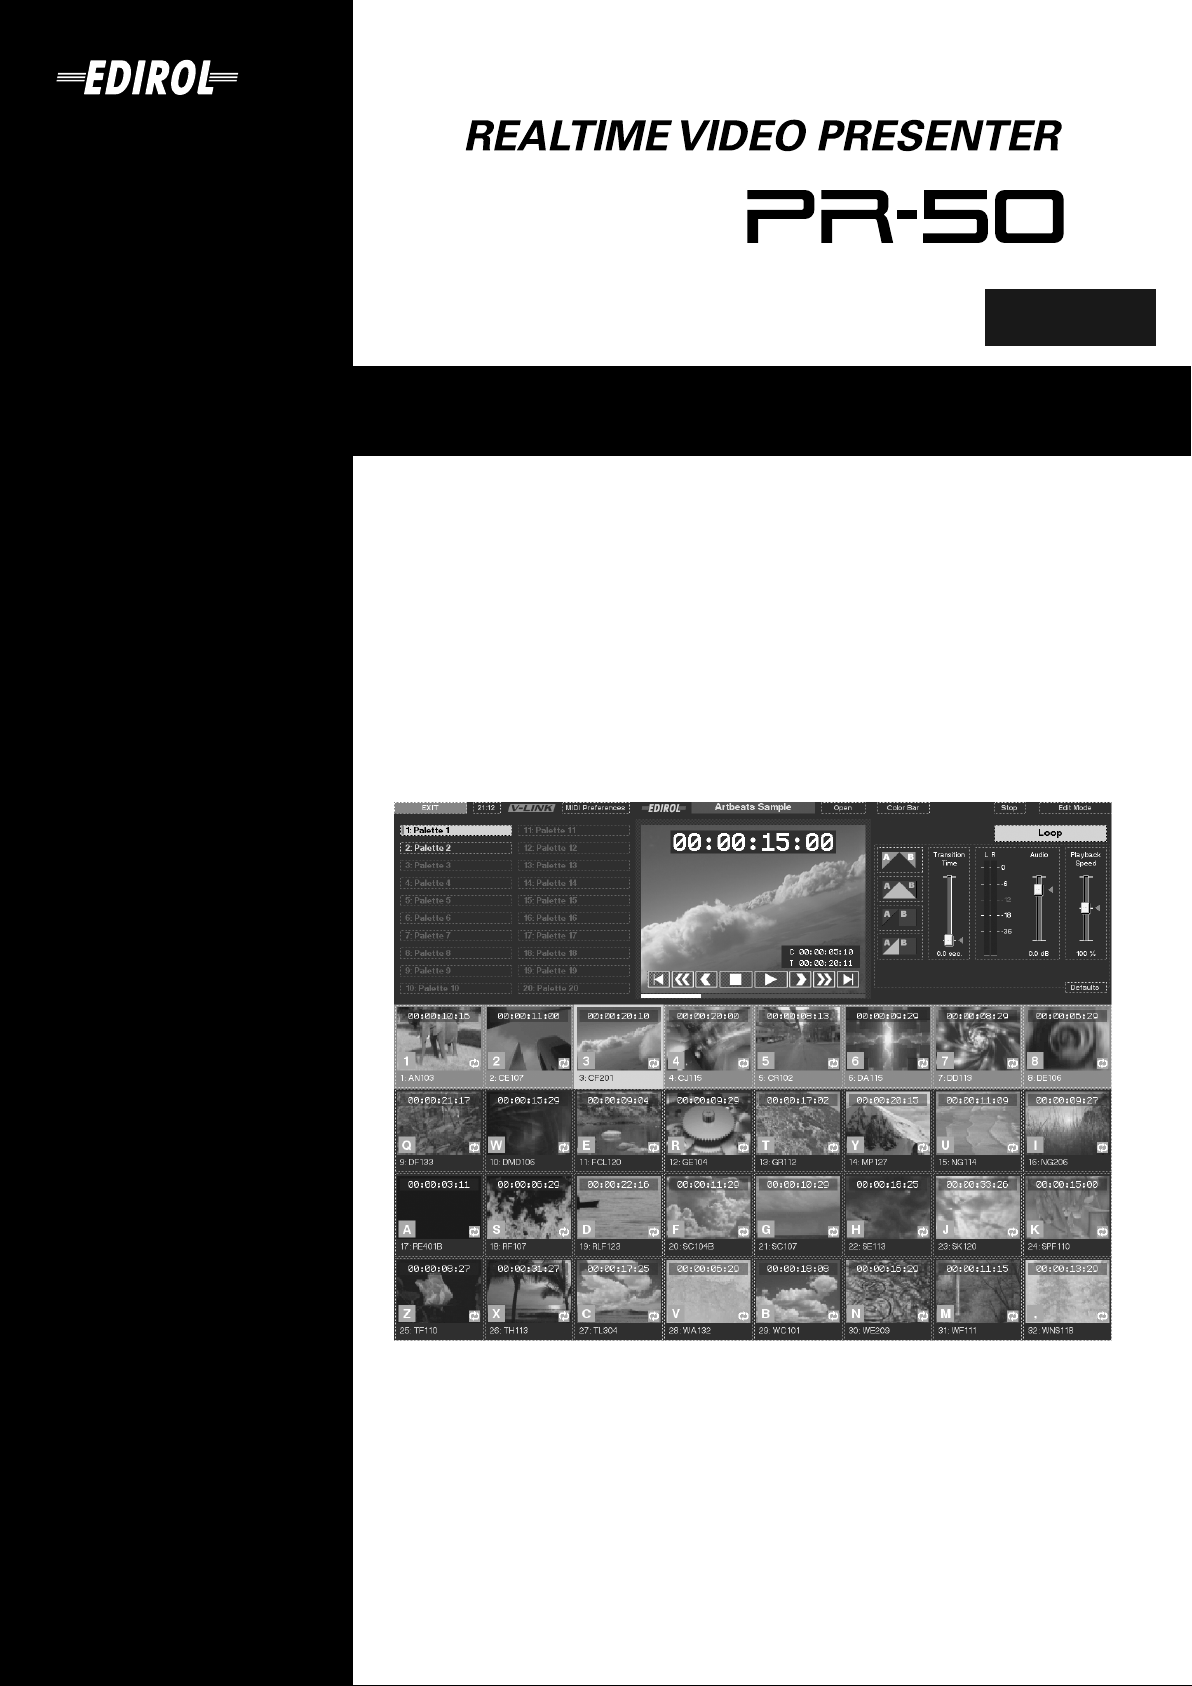
Owner’s Manual
Thank you for your purchase of the PR-50 Realtime Video Presenter.
201b
Before using this unit, carefully read the sections entitled: “IMPORTANT SAFETY
INSTRUCTIONS” (p. 2), “USING THE UNIT SAFELY” (p. 3–4), and “IMPORTANT
NOTES” (p. 5–6). These sections provide important information concerning the
proper operation of the unit. Additionally, in order to feel assured that you have
gained a good grasp of every feature provided by your new unit, Owner’s manual
should be read in its entirety. The manual should be saved and kept on hand as a
convenient reference.
202
Copyright © 2004 ROLAND CORPORATION
All rights reserved. No part of this publication may be reproduced in any form
without the written permission of ROLAND CORPORATION.
Page 2
CAUTION
RISK OF ELECTRIC SHOCK
DO NOT OPEN
ATTENTION: RISQUE DE CHOC ELECTRIQUE NE PAS OUVRIR
CAUTION: TO REDUCE THE RISK OF ELECTRIC SHOCK,
DO NOT REMOVE COVER (OR BACK).
NO USER-SERVICEABLE PARTS INSIDE.
REFER SERVICING TO QUALIFIED SERVICE PERSONNEL.
The lightning flash with arrowhead symbol, within an
equilateral triangle, is intended to alert the user to the
presence of uninsulated “dangerous voltage” within the
product’s enclosure that may be of sufficient magnitude to
constitute a risk of electric shock to persons.
The exclamation point within an equilateral triangle is
intended to alert the user to the presence of important
operating and maintenance (servicing) instructions in the
literature accompanying the product.
INSTRUCTIONS PERTAINING TO A RISK OF FIRE, ELECTRIC SHOCK, OR INJURY TO PERSONS.
IMPORTANT SAFETY INSTRUCTIONS
SAVE THESE INSTRUCTIONS
WARNING - When using electric products, basic precautions should always be followed, including the following:
1. Read these instructions.
2. Keep these instructions.
3. Heed all warnings.
4. Follow all instructions.
5. Do not use this apparatus near water.
6. Clean only with a dry cloth.
7. Do not block any of the ventilation openings. Install in
accordance with the manufacturers instructions.
8. Do not install near any heat sources such as radiators,
heat registers, stoves, or other apparatus (including
amplifiers) that produce heat.
9. Do not defeat the safety purpose of the polarized or
grounding-type plug. A polarized plug has two blades with
one wider than the other. A grounding type plug has two
blades and a third grounding prong. The wide blade or the
third prong are provided for your safety. When the provided
plug does not fit into your outlet, consult an electrician for
replacement of the obsolete outlet.
WARNING:
IMPORTANT:
As the colours of the wires in the mains lead of this apparatus may not correspond with the coloured markings identifying
the terminals in your plug, proceed as follows:
The wire which is coloured GREEN-AND-YELLOW must be connected to the terminal in the plug which is marked by the
letter E or by the safety earth symbol or coloured GREEN or GREEN-AND-YELLOW.
The wire which is coloured BLUE must be connected to the terminal which is marked with the letter N or coloured BLACK.
The wire which is coloured BROWN must be connected to the terminal which is marked with the letter L or coloured RED.
THIS APPARATUS MUST BE EARTHED
THE WIRES IN THIS MAINS LEAD ARE COLOURED IN ACCORDANCE WITH THE FOLLOWING CODE.
GREEN-AND-YELLOW: EARTH, BLUE: NEUTRAL, BROWN: LIVE
For the U.K.
10. Protect the power cord from being walked on or pinched
particularly at plugs, convenience receptacles, and the
point where they exit from the apparatus.
11. Only use attachments/accessories specified by the
manufacturer.
12. Never use with a cart, stand, tripod, bracket,
or table except as specified by the
manufacturer, or sold with the apparatus.
When a cart is used, use caution when
moving the cart/apparatus combination to
avoid injury from tip-over.
13. Unplug this apparatus during lightning storms or when
unused for long periods of time.
14. Refer all servicing to qualified service personnel. Servicing
is required when the apparatus has been damaged in any
way, such as power-supply cord or plug is damaged, liquid
has been spilled or objects have fallen into the apparatus,
the apparatus has been exposed to rain or moisture, does
not operate normally, or has been dropped.
For the USA
DECLARATION OF CONFORMITY
Compliance Information Statement
Model Name :
Type of Equipment :
Responsible Party :
Address :
Telephone :
PR-50
Realtaim Video Presemter
Roland Systems Group U.S.
425 Sequoia Drive, Suite 114, Bellingham, Washington 98226
(360) 594-4282
This product complies with the requirements of EMC Directive 2004/108/EC.
For EU Countries
For EU Countries
Apparatus containing
Lithium batteries
ADVARSEL!
Lithiumbatteri - Eksplosionsfare ved
fejlagtig håndtering.
Udskiftning må kun ske med batteri af
samme fabrikat og type.
Levér det brugte batteri tilbage til
leverandøren.
VARNING
Explosionsfara vid felaktigt batteribyte.
Använd samma batterityp eller en
ekvivalent typ som rekommenderas av
apparattillverkaren.
Kassera använt batteri enligt
fabrikantens instruktion.
CAUTION
Danger of explosion if battery is
incorrectly replaced.
Replace only with the same or
equivalent type recommended by the
manufacturer.
Discard used batteries according to the
manufacturer’s instructions.
ADVARSEL
Eksplosjonsfare ved feilaktig skifte av
batteri.
Benytt samme batteritype eller en
tilsvarende type anbefalt av
apparatfabrikanten.
Brukte batterier kasseres i henhold til
fabrikantens instruks joner.
VAROITUS
Paristo voi räjähtää, jos se on
virheellisesti asennettu.
Vaihda paristo ainoastaan
laitevalmistajan suosittelemaan
tyyppiin. Hävitä käytetty paristo
valmistajan ohjeiden mukaisesti.
For Canada
This Class B digital apparatus meets all requirements of the Canadian Interference-Causing Equipment Regulations.
Cet appareil numérique de la classe B respecte toutes les exigences du Règlement sur le matériel brouilleur du Canada.
NOTICE
AVIS
For the USA
FEDERAL COMMUNICATIONS COMMISSION
RADIO FREQUENCY INTERFERENCE STATEMENT
This equipment has been tested and found to comply with the limits for a Class B digital device, pursuant to Part 15 of the
FCC Rules. These limits are designed to provide reasonable protection against harmful interference in a residential
installation. This equipment generates, uses, and can radiate radio frequency energy and, if not installed and used in
accordance with the instructions, may cause harmful interference to radio communications. However, there is no guarantee
that interference will not occur in a particular installation. If this equipment does cause harmful interference to radio or
television reception, which can be determined by turning the equipment off and on, the user is encouraged to try to correct the
interference by one or more of the following measures:
– Reorient or relocate the receiving antenna.
– Increase the separation between the equipment and receiver.
– Connect the equipment into an outlet on a circuit different from that to which the receiver is connected.
– Consult the dealer or an experienced radio/TV technician for help.
This device complies with Part 15 of the FCC Rules. Operation is subject to the following two conditions:
(1) this device may not cause harmful interference, and
(2) this device must accept any interference received, including interference that may cause undesired operation.
Unauthorized changes or modification to this system can void the users authority to operate this equipment.
This equipment requires shielded interface cables in order to meet FCC class B Limit.
WARNING
This product contains chemicals known to cause cancer, birth defects and other reproductive harm, including lead.
For C.A. US (Proposition 65
)
2
Page 3
USING THE UNIT SAFELY
Used for instructions intended to alert
the user to the risk of death or severe
injury should the unit be used
improperly.
Used for instructions intended to alert
the user to the risk of injury or material
damage should the unit be used
improperly.
* Material damage refers to damage or
other adverse effects caused with
respect to the home and all its
furnishings, as well to domestic
animals or pets.
001
• Before using this unit, make sure to read the
instructions below, and the Owner’s Manual.
..........................................................................................................
002a
• Do not open or perform any internal modifications on the unit.
..........................................................................................................
003
• Do not attempt to repair the unit, or replace parts
within it (except when this manual provides
specific instructions directing you to do so). Refer
all servicing to your retailer, the nearest Roland
Service Center, or an authorized Roland
distributor, as listed on the “Information” page.
..........................................................................................................
004
• Never use or store the unit in places that are:
• Subject to temperature extremes (e.g., direct
sunlight in an enclosed vehicle, near a heating
duct, on top of heat-generating equipment); or
are
• Damp (e.g., baths, washrooms, on wet floors);
or are
• Humid; or are
• Exposed to rain; or are
• Dusty; or are
• Subject to high levels of vibration.
..........................................................................................................
007
• Make sure you always have the unit placed so it is
level and sure to remain stable. Never place it on
stands that could wobble, or on inclined surfaces.
..........................................................................................................
008a
• The unit should be connected to a power supply
only of the type described in the operating instructions, or as marked on the rear side of unit.
..........................................................................................................
008e
• Use only the attached power-supply cord. Also,
the supplied power cord must not be used with
any other device.
..........................................................................................................
The symbol alerts the user to important instructions
or warnings.The specific meaning of the symbol is
determined by the design contained within the
triangle. In the case of the symbol at left, it is used for
general cautions, warnings, or alerts to danger.
The symbol alerts the user to items that must never
be carried out (are forbidden). The specific thing that
must not be done is indicated by the design contained
within the circle. In the case of the symbol at left, it
means that the unit must never be disassembled.
The ● symbol alerts the user to things that must be
carried out. The specific thing that must be done is
indicated by the design contained within the circle. In
the case of the symbol at left, it means that the powercord plug must be unplugged from the outlet.
009
• Do not excessively twist or bend the power cord,
nor place heavy objects on it. Doing so can
damage the cord, producing severed elements and
short circuits. Damaged cords are fire and shock
hazards!
..........................................................................................................
010
• This unit, either alone or in combination with an
amplifier and headphones or speakers, may be
capable of producing sound levels that could
cause permanent hearing loss. Do not operate for
a long period of time at a high volume level, or at
a level that is uncomfortable. If you experience
any hearing loss or ringing in the ears, you should
immediately stop using the unit, and consult an
audiologist.
..........................................................................................................
011
• Do not allow any objects (e.g., flammable material,
coins, pins); or liquids of any kind (water, soft
drinks, etc.) to penetrate the unit.
..........................................................................................................
012a:
• Immediately turn the power off, remove the
power cord from the outlet, and request servicing
by your retailer, the nearest Roland Service
Center, or an authorized Roland distributor, as
listed on the “Information” page when:
• The power-supply cord, or the plug has been
damaged; or
• If smoke or unusual odor occurs
• Objects have fallen into, or liquid has been
spilled onto the unit; or
• The unit has been exposed to rain (or otherwise
has become wet); or
• The unit does not appear to operate normally or
exhibits a marked change in performance.
..........................................................................................................
3
Page 4
013
• In households with small children, an adult
should provide supervision until the child is
capable of following all the rules essential for the
safe operation of the unit.
..........................................................................................................
014
• Protect the unit from strong impact.
(Do not drop it!)
..........................................................................................................
015
• Do not force the unit’s power-supply cord to share
an outlet with an unreasonable number of other
devices. Be especially careful when using
extension cords—the total power used by all
devices you have connected to the extension
cord’s outlet must never exceed the power rating
(watts/amperes) for the extension cord. Excessive
loads can cause the insulation on the cord to heat
up and eventually melt through.
..........................................................................................................
016
• Before using the unit in a foreign country, consult
with your retailer, the nearest Roland Service
Center, or an authorized Roland distributor, as
listed on the “Information” page.
..........................................................................................................
023
• DO NOT play a CD-ROM disc on a conventional
audio CD player. The resulting sound may be of a
level that could cause permanent hearing loss.
Damage to speakers or other system components
may result.
..........................................................................................................
026
• Do not put anything that contains water (e.g.,
flower vases) on this unit. Also, avoid the use of
insecticides, perfumes, alcohol, nail polish, spray
cans, etc., near the unit. Swiftly wipe away any
liquid that spills on the unit using a dry, soft cloth.
..........................................................................................................
101a
• The unit should be located so that its location or
position does not interfere with its proper ventilation.
..........................................................................................................
102b
• Always grasp only the plug on the power-supply
cord when plugging into, or unplugging from, an
outlet or this unit.
..........................................................................................................
103a:
• At regular intervals, you should unplug the power
plug and clean it by using a dry cloth to wipe all
dust and other accumulations away from its
prongs. Also, disconnect the power plug from the
power outlet whenever the unit is to remain
unused for an extended period of time. Any
accumulation of dust between the power plug and
the power outlet can result in poor insulation and
lead to fire.
..........................................................................................................
104
• Try to prevent cords and cables from becoming
entangled. Also, all cords and cables should be
placed so they are out of the reach of children.
..........................................................................................................
106
• Never climb on top of, nor place heavy objects on
the unit.
..........................................................................................................
107b
• Never handle the power cord or its plugs with wet
hands when plugging into, or unplugging from,
an outlet or this unit.
..........................................................................................................
108a
• Before moving the unit, disconnect the power
plug from the outlet, and pull out all cords from
external devices.
..........................................................................................................
109a
• Before cleaning the unit, turn off the power and
unplug the power cord from the outlet (p. 47).
..........................................................................................................
110a
• Whenever you suspect the possibility of lightning
in your area, pull the plug on the power cord out
of the outlet.
..........................................................................................................
4
Page 5

IMPORTANT NOTES
Power Supply
301
• Do not connect this unit to same electrical outlet that is being
used by an electrical appliance that is controlled by an inverter
(such as a refrigerator, washing machine, microwave oven, or air
conditioner), or that contains a motor. Depending on the way in
which the electrical appliance is used, power supply noise may
cause this unit to malfunction or may produce audible noise. If it
is not practical to use a separate electrical outlet, connect a power
supply noise filter between this unit and the electrical outlet.
307
• Before connecting this unit to other devices, turn off the power to
all units. This will help prevent malfunctions and/or damage to
speakers or other devices.
308
• Although the LEDs are switched off when the POWER switch is
switched off, this does not mean that the unit has been
completely disconnected from the source of power. If you need to
turn off the power completely, first turn off the POWER switch,
then unplug the power cord from the power outlet. For this
reason, the outlet into which you choose to connect the power
cord’s plug should be one that is within easy reach.
Placement
351
• Using the unit near power amplifiers (or other equipment
containing large power transformers) may induce hum. To
alleviate the problem, change the orientation of this unit; or move
it farther away from the source of interference.
352a
• This device may interfere with radio and television reception. Do
not use this device in the vicinity of such receivers.
352b
• Noise may be produced if wireless communications devices, such
as cell phones, are operated in the vicinity of this unit. Such noise
could occur when receiving or initiating a call, or while
conversing. Should you experience such problems, you should
relocate such wireless devices so they are at a greater distance
from this unit, or switch them off.
354a
• Do not expose the unit to direct sunlight, place it near devices
that radiate heat, leave it inside an enclosed vehicle, or otherwise
subject it to temperature extremes. Excessive heat can deform or
discolor the unit.
355b
• When moved from one location to another where the temperature and/or humidity is very different, water droplets (condensation) may form inside the unit. Damage or malfunction may
result if you attempt to use the unit in this condition. Therefore,
before using the unit, you must allow it to stand for several
hours, until the condensation has completely evaporated.
Maintenance
401a
• For everyday cleaning wipe the unit with a soft, dry cloth or one
that has been slightly dampened with water. To remove stubborn
dirt, use a cloth impregnated with a mild, non-abrasive detergent.
Afterwards, be sure to wipe the unit thoroughly with a soft, dry
cloth.
402
• Never use benzine, thinners, alcohol or solvents of any kind, to
avoid the possibility of discoloration and/or deformation.
Repairs and Data
452
• Please be aware that all data contained in the unit’s memory may
be lost when the unit is sent for repairs. To avoid complete loss of
your data should it be deleted, be sure to copy important
recordings to an optional removable hard disk (DV-HD Series) as
a backup. During repairs, due care is taken to avoid the loss of
data. However, in certain cases (such as when circuitry related to
memory itself is out of order), we regret that it may not be
possible to restore the data, and Roland assumes no liability
concerning such loss of data.
Additional Precautions
551
• Please be aware that the contents of memory can be irretrievably
lost as a result of a malfunction, or the improper operation of the
unit. Copy important recordings to an optional removable hard
disk (DV-HD Series).
552
• Unfortunately, it may be impossible to restore the contents of
data that was stored on a hard disk once it has been lost. Roland
Corporation assumes no liability concerning such loss of data.
553
• Use a reasonable amount of care when using the unit’s buttons,
sliders, or other controls; and when using its jacks and
connectors. Rough handling can lead to malfunctions.
556
• When connecting / disconnecting all cables, grasp the connector
itself—never pull on the cable. This way you will avoid causing
shorts, or damage to the cable’s internal elements.
557
• A small amount of heat will radiate from the unit during normal
operation.
558a
• To avoid disturbing your neighbors, try to keep the unit’s volume
at reasonable levels. You may prefer to use headphones, so you
do not need to be concerned about those around you (especially
when it is late at night).
559a
• When you need to transport the unit, package it in the box
(including padding) that it came in, if possible. Otherwise, you
will need to use equivalent packaging materials.
562
• Use a cable from Roland to make the connection. If using some
other make of connection cable, please note the following precautions.
• Some connection cables contain resistors. Do not use cables
that incorporate resistors for connecting to this unit. The use
of such cables can cause the sound level to be extremely low,
or impossible to hear. For information on cable specifications,
contact the manufacturer of the cable.
565
• Due to the structural design of this instrument, small pets or
other animals could end up getting trapped inside it. If such a
situation is encountered, you must immediately switch off the
power and disconnect the power cord from the outlet. You
should then consult with the retailer from whom the instrument
was purchased, or contact the nearest Roland Service Center.
Handling CD-ROMs
801
• Avoid touching or scratching the shiny underside (encoded
surface) of the disc. Damaged or dirty CD-ROM discs may not be
read properly. Keep your discs clean using a commercially
available CD cleaner.
5
Page 6

IMPORTANT NOTES
Handling Hard Disks
Important Performance and Image Data
811
• Once a hard disk fails to function normally, all data that has been
stored on it could be destroyed.
All hard disks eventually wear out.
consider the hard disk not as a permanent storage site, but as a
place to store data temporarily. We also recommend that you
back up important performance and image data that cannot be
recorded again onto the external media that is supported by your
device. For instructions on how to make such backups, refer to
the owner’s manual for your device.
Note that Roland assumes no liability whatsoever, including
monetary compensation, for the loss of any recorded content in
the event of the malfunction of, or physical damage to the hard
disk, or for any direct or incidental damages resulting from the
loss of such data.
Precautions Regarding Setup and Use
812
• Certain hard disk setup procedures and usage conditions may
result in the corruption of recorded data, malfunctioning, or
physical damage to the disk, so be sure to observe the following
precautions.
• Do not subject the hard disk to vibration or shock, especially
while the unit is in operation.
• Do not set up the unit in any location where it may be affected
by vibration from external sources, or on any surface that is
not stable and level.
• If the device includes a cooling fan, ensure that the fan and
the side panel air vents remain unobstructed.
• Do not leave the unit in any environment subject to temperature extremes; for example, in a closed automobile in
summer or outdoors during winter.
• Do not use the unit in conditions of high temperature and
humidity or in any location subject to rapid temperature
changes.
• Do not unplug the power cord or switch off any circuit
breakers in the circuit to which the unit is connected while the
power is turned on.
• Do not move the unit while the power is turned on or
immediately after turning off the power. When transporting
the unit, first turn off the power and confirm that the display
screen has gone off, disconnect the power plug, then wait at
least two minutes before moving the device.
Emergency Procedures
813
* The following procedures are to be used as emergency measures
only, and are not recommended for normal operation.
• If the device fails to respond to operational commands or does
not complete operations, turn off the power. If the power does
not shut off following normal shutdown procedures, disconnect
the power plug.
If the unit does not operate normally when the power is turned
on again, it may mean that the hard disk has been damaged. In
such instances, consult your dealer or the nearest Roland Service
Center. Note, however, that it may not be possible to recover any
data from the hard disk once it has been lost.
If your device features drive check capabilities, use the drive
check function to regularly confirm that there are no problems,
even when the device is operating normally.
For more detailed information on the shutdown and drive check
procedures, refer to the Owner’s Manual.
We recommend that you
Copyright
851
• Unauthorized recording, distribution, sale, lending, public
performance, broadcasting, or the like, in whole or in part, of a
work (musical composition, video, broadcast, public performance, or the like) whose copyright is held by a third party is
prohibited by law.
853
• Do not use this unit for purposes that could infringe on a
copyright held by a third party. We assume no responsibility
whatsoever with regard to any infringements of third-party
copyrights arising through your use of this unit.
852a revised
• When exchanging video signals between the PR-50 and external
devices via a digital connection, you can record without the
limitations imposed by CGMS (Copy Generation Management
System). This is because the PR-50 is designed wholly for the
purpose of creating video images, with no restrictions on creating
and working with material (such as videos you create yourself) in
a manner that does not infringe on another’s copyright (CGMS is
a function that limits copying through digital connections).
854 revised
• Even if the intended purpose is solely private, personal
enjoyment (personal use), the unauthorized reproduction of any
third-party copyrighted works, which circumvents CGMS or
other technologies, is a violation of copyright and is prohibited by
law.
855 revised
• Reproductions of works not protected by technological means, or
reproductions made in conformance with CGMS are permitted,
as long as the intended use is private, personal enjoyment.
Copyrights on material data
981a
• The copyrights for the material data supplied with the PR-50 are
held by the creators of the materials. For more details, refer to the
separate sheet “ARTBEATS END USER LICENSE
AGREEMENT.”
985
• The explanations in this manual include illustrations that depict
what should typically be shown by the display. Note, however,
that your unit may incorporate a newer, enhanced version of the
system (material names, etc.), so what you actually see in the
display may not always match what appears in the manual.
About the GPL/LGPL software used in
this product
This product is using the GNU General Public License (GPL) /
GNU Lesser General Public License (LGPL) software. You have
the right to acquire, modify and distribute the source code for this
GPL/LGPL software.
You can obtain the GPL/LGPL source code used in this product
by downloading it from the following website:
http://www.roland.com/support/gpl/
* Microsoft and Windows are registered trademarks of Microsoft
Corporation.
* Apple and Macintosh are registered trademarks of Apple
Computer, Inc.
* Mac OS is a trademark of Apple Computer, Inc.
* All product names mentioned in this document are trademarks or
registered trademarks of their respective owners.
* MMP (Moore Microprocessor Portfolio) refers to a patent
portfolio concerned with microprocessor architecture, which was
developed by Technology Properties Limited (TPL). Roland has
licensed this technology from the TPL Group.
6
Page 7

Contents
USING THE UNIT SAFELY......................................................................3
IMPORTANT NOTES ...............................................................................5
Before Using the PR-50 ..........................................................................9
Main Features.............................................................................................................................................. 9
About This Manual .................................................................................................................................. 10
When First Operating the PR-50 ................................................................................................. 10
Other Notes ...............................................................................................................................................11
About the Hard Disk ....................................................................................................................11
About the Shortcut Keys .............................................................................................................. 11
About the DV-7DLC Templates.................................................................................................. 11
Names of Things and What They Do .................................................................................................... 12
Front Panel ..................................................................................................................................... 12
Rear Panel....................................................................................................................................... 13
Setting Up and Connecting Equipment ................................................................................................ 14
Instructions for Connecting Digital Video Devices Equipped with DV Connectors.......... 15
Connecting to a Computer Over a Network............................................................................. 16
Examples of Using and Connecting the PR-50..................................................................................... 17
Usage Examples ............................................................................................................................ 17
Connection Examples ................................................................................................................... 19
Working with the Keyboard and Mouse ..............................................................................................26
About the Keyboard and Included Mouse................................................................................ 26
About Operations with the Mouse ............................................................................................. 26
Introduction to Use of the PR-50 .........................................................27
How the PR-50 is Organized .................................................................................................................. 27
Selector............................................................................................................................................ 27
Presenter......................................................................................................................................... 27
Basic Workflow......................................................................................................................................... 28
What is V-LINK? ...................................................................................................................................... 35
Names of Things in Screens/What They Do........................................................................................ 36
Selector............................................................................................................................................ 36
Play Mode ...................................................................................................................................... 37
Edit Mode....................................................................................................................................... 40
Utility .............................................................................................................................................. 43
System Preferences ....................................................................................................................... 44
Turning the Power On and Off .............................................................................................................. 46
Turning On the Power.................................................................................................................. 46
Turning Off the Power .................................................................................................................47
Creating and Opening Projects............................................................................................................... 48
What is a Project? ..........................................................................................................................48
The Relationship Between Materials, Clips, and Palettes ....................................................... 48
Creating Projects ........................................................................................................................... 49
Opening Projects ...........................................................................................................................50
To Copy or Delete a Project ......................................................................................................... 50
Playing Back Clips.................................................................................................................................... 51
Using the Mouse to Play Back Clips........................................................................................... 51
About the Video Output Monitor Display ................................................................................ 52
Switching the Palette ....................................................................................................................54
Transition Effects........................................................................................................................... 54
Turning Loop Playback On and Off........................................................................................... 55
Assigning Materials to Palettes .............................................................................................................. 56
Saving Projects .......................................................................................................................................... 58
Using V-LINK ........................................................................................................................................... 59
7
Page 8

Contents
Practical Use of the PR-50 ...................................................................61
Making the Settings for the Project........................................................................................................ 61
Editing Palettes.............................................................................................................................. 62
Making the Palette Settings .........................................................................................................63
Editing Clips ..................................................................................................................................64
Making the Clip Settings.............................................................................................................. 66
Changing Material Settings .........................................................................................................73
Setting Automatic Playback ........................................................................................................ 74
Importing Materials .................................................................................................................................75
Importing Materials from Another Project ............................................................................... 75
Capturing Video from a Video Deck or Other Device ............................................................ 76
Importing Materials Created with a Computer........................................................................ 77
Organizing Projects.................................................................................................................................. 79
Copying Projects ........................................................................................................................... 79
Deleting Projects............................................................................................................................ 80
Using Scheduler to Control Presenter ................................................................................................... 81
Adding Schedules ......................................................................................................................... 81
Deleting Schedules........................................................................................................................ 81
Setting the Schedule...................................................................................................................... 81
Activating Scheduler ....................................................................................................................82
Controlling Presenter with MIDI ........................................................................................................... 83
Using MIDI Devices...................................................................................................................... 83
Controlling Other Devices with the PR-50 ...........................................................................................92
Controlling Another Presenter.................................................................................................... 92
Controlling an Edirol Video Mixer............................................................................................. 93
Controlling AR Series Devices .................................................................................................... 96
Using Other Devices to Control Presenter............................................................................................ 97
Using a DV-7DLC ......................................................................................................................... 97
Using the RS-232C Connector ................................................................................................... 101
Using a Touch Panel Display ....................................................................................................101
Making the System Settings.................................................................................................................. 102
Eliminating Flicker in the Operational Display...................................................................... 102
Automatically Starting Up Presenter ....................................................................................... 103
Using an External Power Switch to Turn the Power On and Off ........................................103
Making the Network Settings ................................................................................................... 104
Making the Touch Panel Display Settings............................................................................... 106
Other System Settings................................................................................................................. 106
Specifications......................................................................................107
Keyboard shortcut keys......................................................................................................................... 107
When using the Play Mode of Presenter ................................................................................. 107
When using the Edit Mode of Presenter.................................................................................. 107
MIDI implementation (Presenter)........................................................................................................ 108
RS-232C command reference (Presenter)............................................................................................ 120
Command overview ................................................................................................................... 120
About the protocol ...................................................................................................................... 120
Commands sent from an external device to Presenter.......................................................... 121
Commands sent from Presenter to external device ...............................................................122
Main specifications................................................................................................................................. 123
About the Removable Hard Disk......................................................................................................... 124
Precautions to Note When Using Disks................................................................................... 124
Instructions for Installing the Hard Disk................................................................................. 125
Index.....................................................................................................126
8
Page 9

Before Using the PR-50
Main Features
Play Back High-Quality Video in Real Time
You can play back and switch high-quality DV-format video images in real time.
A Variety of Realtime Effects
Use a variety of video effects in real time, including switching effects for smooth transitions between
video images, control of playback speed, resetting of retrigger points, and more.
A variety of External Control Functions
Not only can you use the keyboard and mouse, you can select from a number of different ways to
control the PR-50. You can use the RS-232C port, optional touch screen, or use the optional DV-7DLC
controller, a UM-1 or other UM Series USB MIDI interface, or the PCR-50 MIDI keyboard.
A Variety of Ways to Connect
You can use the V-LINK function to exhibit video during musical performances, create virtual clips
of live video sources with the V-4 (video mixer) control, use the Presenter Control for simple and easy
coordination of multiple PR-50s and DV-7PRs, work with multichannel audio sources with the AR
(Roland AR Series control), and more.
Can Be Used with a Removable Hard Disk
You can use an optional removable hard disk (DV-HD Series) for transport and backup of your video
data. This data is also mutually compatible with data from DV-7 Series devices.
Import Video Material Created on Computers
Using the CD-ROM or network functions and a digital video connection, you can import video
material created on computers.
Simple Sequencer Function
You can play multiple clips in a specified sequence, or have a specified clip play automatically upon
startup.
Automatic Operations with the Scheduler
You can use the Scheduler to have the PR-50 automatically perform a variety of functions, such as
playing back data, stopping, synchronizing times over a network, or starting up at a predetermined
time.
9
Page 10

Before Using the PR-50
About This Manual
This Owner’s Manual contains the following sections.
Before Using the PR-50
This section includes cautionary notes regarding use of this device, descriptions of the front and rear
panels, and examples showing different ways to set up and connect the device.
Introduction to Use of the PR-50
This section goes over the procedural sequences used in operating the PR-50, provides descriptions
of the different screens, and explains how to use the PR-50 to play back video images.
Practical Use of the PR-50
This section explains how to control the PR-50 with external devices and provides detailed
instructions for using the PR-50’s functions, allowing you to gain full control of the device.
Reference
This section contains the MIDI Implementation, device specifications, and other data for the PR-50.
When First Operating the PR-50
• If operating the PR-50 for the first time, please read “Basic Workflow” (p. 28). This section
provides a general overview of operations using the PR-50, from turning on the power to playing
back and loading prepared data, in a manner that allows an easy grasp of how the PR-50 works.
• Most of the procedures involve using the mouse or keyboard while viewing the PR-50’s screens.
If you find you do not understand something during an operation, you can check the buttons
and features by referring to the descriptions of the various screens in “Names of Things and
What They Do” (p. 12).
10
Page 11

Other Notes
About the Hard Disk
The PR-50 uses a hard disk for saving video and storing the system. Hard disks do have a limited
lifetime, and thus are considered a consumable item. Depending on how the unit is handled, the hard
disk may reach the end of its service life sooner than expected. Please be sure to observe the following
points to prevent loss of your important creations.
• Back up your projects by using a removable hard disk (DV-HD Series).
• As much as possible, stop playback and keep access to the hard disk to a minimum whenever
playback of video images is not required.
• If the unit is moved frequently, save projects to an optional removable hard disk (DV-HD Series),
and transport the hard disk separately from the PR-50, in the box that it came in when
purchased.
For more information regarding the removable hard disk (DV-HD Series), read “About the
Removable Hard Disk” (p. 124).
About the Shortcut Keys
You can reconfigure the shortcut keys used for the PR-50’s keyboard shortcuts. Although this manual
explains the keyboard shortcuts that use the Ctrl key, if the shortcut keys have been changed by
means of the system environment settings (p. 44), you’ll need to substitute the names of the shortcut
keys you have set while reading these explanations.
Before Using the PR-50
About the DV-7DLC Templates
The DV-7DLC template included with this unit makes it easier to understand the functions assigned
to the buttons when the optional DV-7DLC is used with the PR-50. Remove the detachable sheet on
the back of the template and apply the template to the DV-7DLC control panel, then remove the
protective sheet from the template’s front surface.
11
Page 12

Before Using the PR-50
Names of Things and What They Do
Front Panel
fig.frontpanel.eps
a
de
a. CD-ROM Drive and Eject Button
Used for loading data from CD-R/CD-RW disks
containing material created using computers and from
future upgrade CD-ROMs. Press the eject button to
open the disk tray.
b. Hard Disk Bay
The optional removable hard disk (DV-HD Series) is
inserted here. In addition to the internal hard disk, use
of the removable hard disk allows you to store projects
on dedicated disks, back up data, and manage your
data in the most suitable manner.
* You cannot make use of the internal hard disk and the
removable hard disk simultaneously on the same project.
* Always turn off the power to the PR-50 before inserting
or removing the removable hard disk.
* For a detailed explanation of how the removable hard disk
is installed, refer to “About the Removable Hard Disk”
(p. 124).
c. Mic Jack [MIC IN] and Level Knob
[LEVEL]
Not used with the PR-50.
b c
ihgf
d. DV2 Connector
Digital video input/output. Connect DV devices here.
* The transition effects and output fader are not applied to
the digital video output.
e. USB Connector
Connect an optional remote controller (DV-7DLC),
MIDI interface (UM-1/UM-1S/UM-2/UM-4/UM550/UM-880), or a MIDI keyboard (PC-300/PCR-30/
PCR-50).
Connect devices here only when the PR-50’s power is
turned off. You can connect to either of the two
connectors. However, you cannot connect two remote
controllers simultaneously.
f. Headphone Jack [PHONES] and
Volume Knob [LEVEL]
Jack for connecting headphones and knob for
adjusting the headphone volume level.
g. Hard Disk Indicator
Lights when the hard disk is being accessed.
h. POWER Indicator
12
Lights when the PR-50’s power is on.
i. [POWER] Button
Button for turning on the power to the PR-50.
Page 13
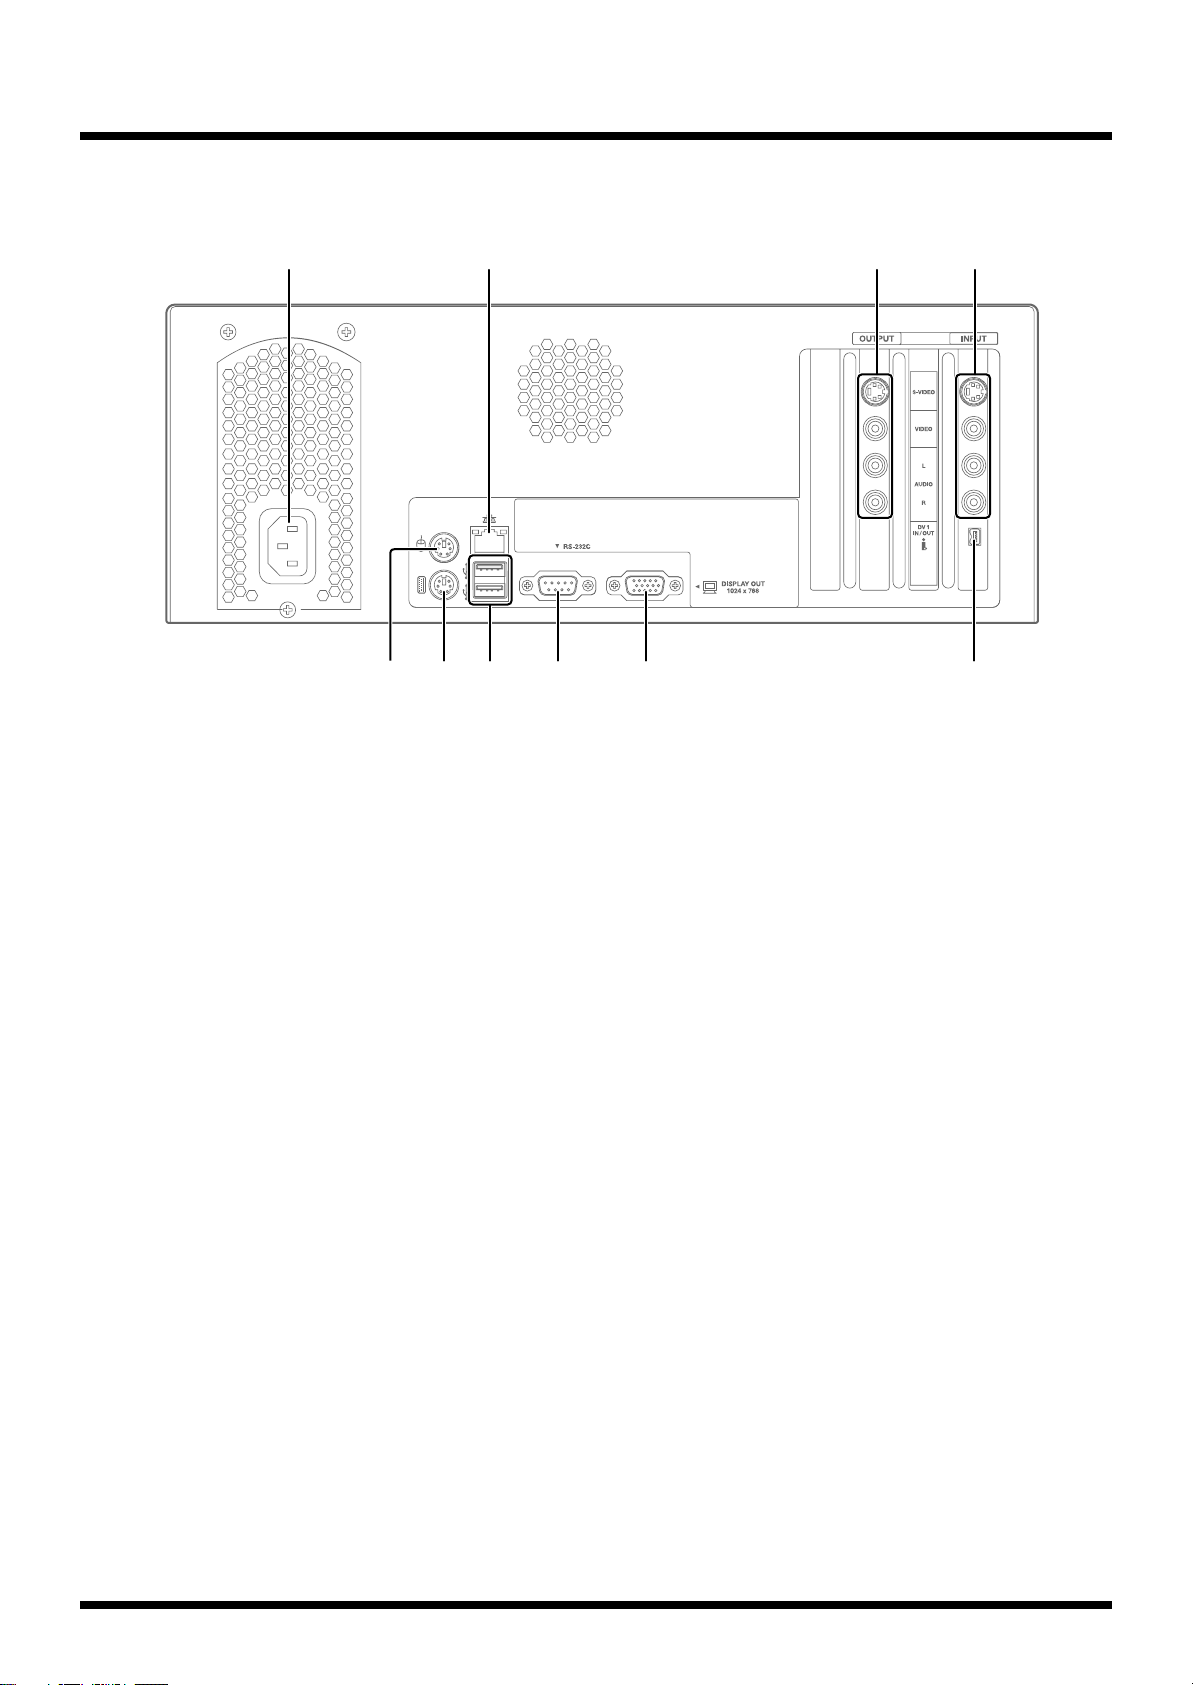
Rear Panel
fig.rearpanel.eps
Before Using the PR-50
aa b c d
gf h ie j
a. AC Socket
Connect the included power cord here.
b. LAN Connector
Connect a networking cable here. For more detailed
information, refer to “Making the Network Settings”
(p. 104).
c. Output Connectors [OUTPUT]
Connectors for output of video and audio signals. Use
for connecting monitor television sets, video
projectors, power amps, or other equipment.
d. Input Connectors [INPUT: S-VIDEO,
VIDEO, AUDIO]
Connectors for input of video and audio signals. Use
for connecting video devices and other such
equipment.
e. Mouse Connector [MOUSE]
Use for connecting the included mouse. Make sure the
power to the PR-50 is turned off before connecting.
g. USB Connector
Connect an optional remote controller (DV-7DLC),
MIDI interface (SMPU-64/UM-1/UM-1S/UM-1X/
UM-1SX/UM-2/UM-2E/UM-2C/UM-4/UM-550/
UM-880), or a MIDI keyboard (PCR-30/PCR-50/PCR80/PC-300) here.
Connect devices here only when the PR-50’s power is
turned off. You can connect to either of the two
connectors. However, you cannot connect two remote
controllers simultaneously.
h. RS-232C Connector [RS-232C]
Use this connector to connect the PR-50 and a
computer and use the connection to exchange signals
between the two devices. For more detailed
information, refer to “Using the RS-232C Connector”
(p. 101).
* You can also use this to connect a touch panel display. In
this case, RS-232C commands cannot be used for control
functions. For more details, refer to “Using a Touch
Panel Display” (p. 101). For more on the touch panel
displays that can be used, contact your dealer.
f. Keyboard Connector [KEYBOARD]
Use for connecting the keyboard. Make sure the power
to the PR-50 is turned off before connecting.
i. Display Connector [DISPLAY OUT]
Connect the display here. Use an XGA-compatible
display (1024 x 768) equipped with a D-sub 15-pin
connector.
j. DV1 Connector [DV 1]
Digital video input and output connector. Connect
digital video devices here.
* The transition effects and output fader are not applied to
the digital video output.
13
Page 14

Before Using the PR-50
Mouse
Keyboard
AC power outlet
Display for monitor/output
Video
Audio
S-Video connectorRCA pin connector
Display for operation
VGA cable
Setting Up and Connecting Equipment
Start by connecting the devices you will be using, such as video and audio devices used for output
and monitoring and the displays used for your operations. Whenever connecting devices, always be
sure to have the power turned off first. Connecting equipment with the power turned on may cause
malfunctioning and other problems.
The PR-50 comes with a DV (digital video) cable for use in connecting video devices equipped with
DV connectors to the PR-50’s DV connector. Use the included DV cable when connecting to the DV
connector. When connecting video tape recorders to the S-Video or video (composite) connectors, use
a commercially available video cable.
We recommend connecting to the S-Video connector if a VCR equipped with an S-Video connector
is to be connected to an analog connector. This provides higher quality video than that available with
the normal (composite) video connector.
fig.connection.eps
921
• To prevent malfunction and/or damage to speakers or other devices, always turn down the
volume, and turn off the power on all devices before making any connections.
14
Page 15
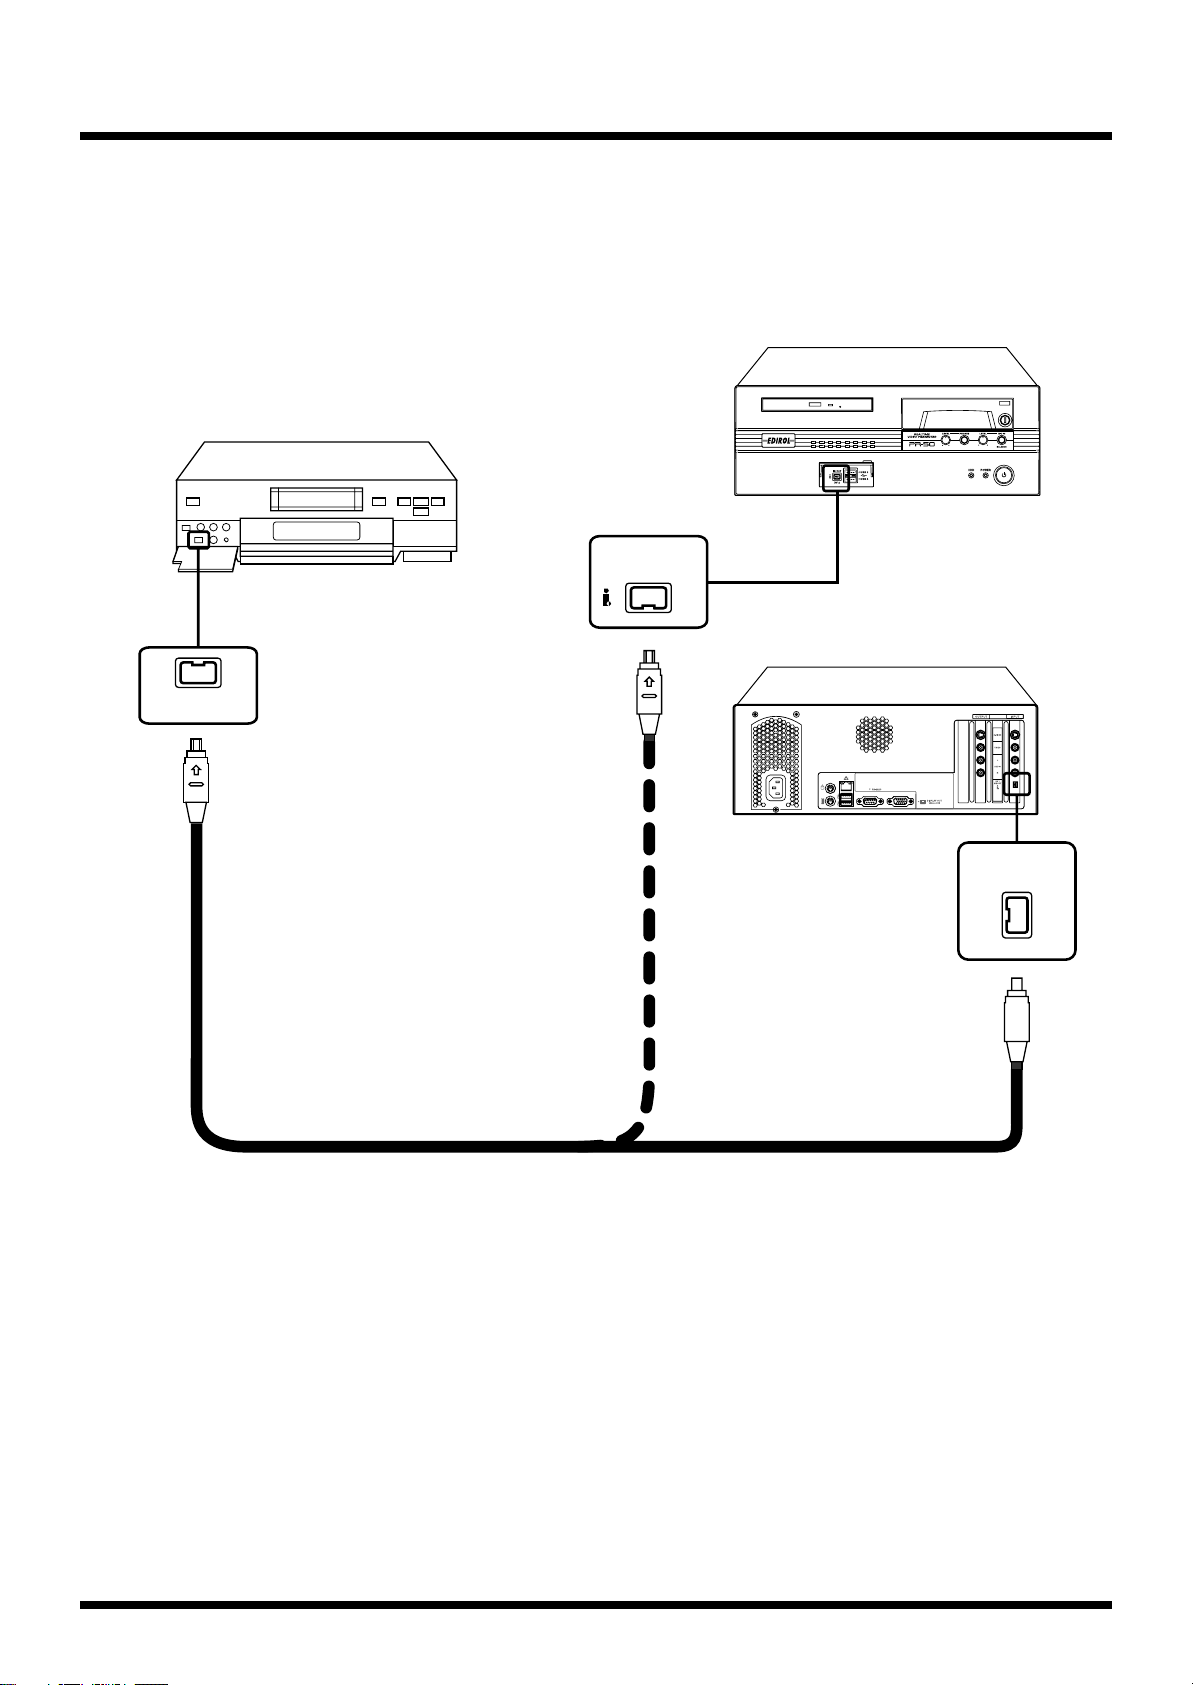
Before Using the PR-50
Other device
(such as a video deck)
Front Panel
Rear panel
DV Input/Output
Connector
DV Input/Output
Connector
DV Input/Output
Connector
the included DV cable
Instructions for Connecting Digital Video Devices Equipped with DV Connectors
When connecting digital video devices equipped with DV connectors, use the included DV cable and
connect as shown in the following figure.
fig.connection.DV.eps
• Electromagnetic interference produced by using the PR-50 near a television or radio may cause
unevenness in the TV screen picture color or produce noise in the radio.
• If connecting to a computer’s IEEE1394 connector (also called i.LINK or FireWire), be sure to use
a DV cable that is compatible with your computer.
15
Page 16
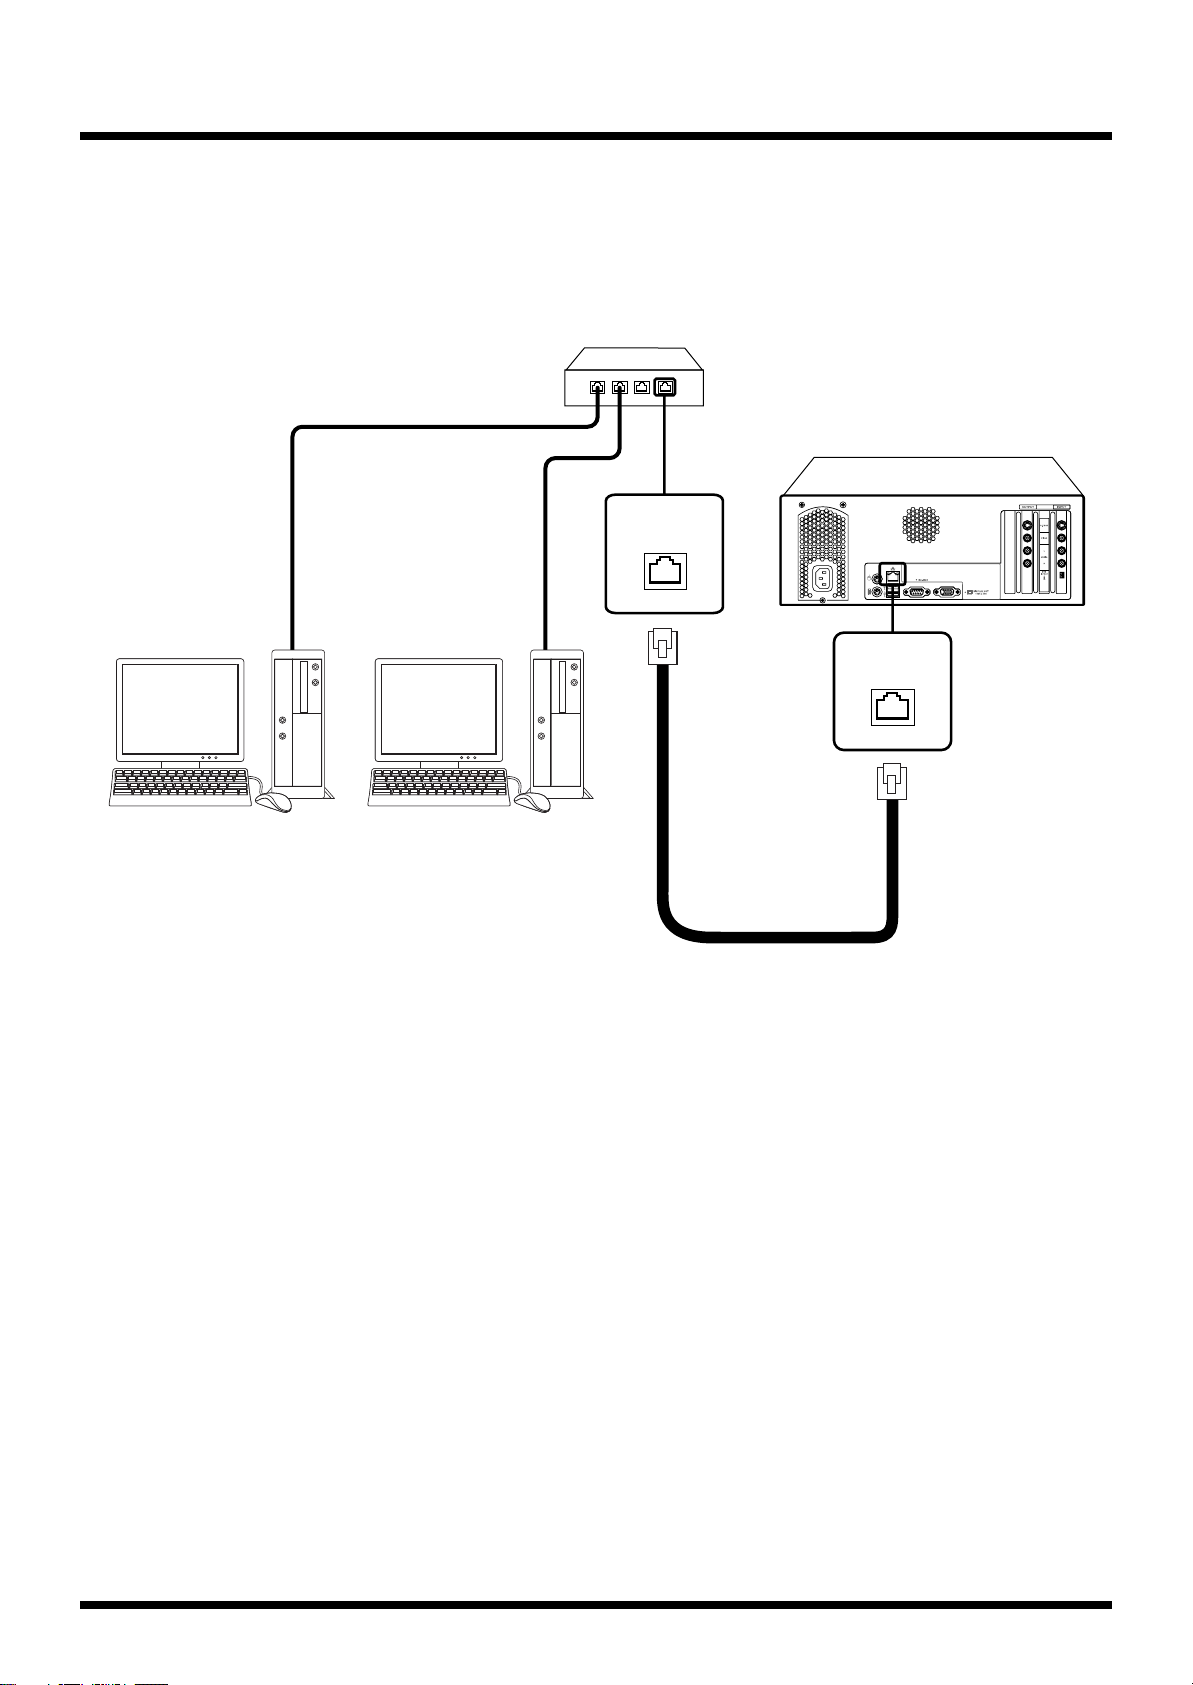
Before Using the PR-50
Rear panel
Router, hub, etc.
LAN cable
LAN Connector
ComputerComputer
LAN Connector
Connecting to a Computer Over a Network
Connect using a LAN cable. Connecting to the computer over a network allows you to copy data from
the computer to the PR-50 and access a network time server to adjust the PR-50’s timing.
Whenever making these connections, always make sure that the power for all devices is turned off.
Connecting equipment with the power turned on may cause malfunctioning and other problems
fig.connection.LAN.eps
16
Page 17

Before Using the PR-50
Examples of Using and Connecting the PR-50
Usage Examples
Presenting Video Performances on Stage
You can utilize the PR-50’s high-quality video and superb responsiveness to add the effects of video
to concerts and other stage events.
fig.stage.eps
PR-50
V-4
Projector
Video camera, etc.
Exhibits and Other Presentations
fig.presentation.eps
DV-7DLC
V-Synth
You can insert still images, video, narration, and other material as clips, with no need to make
changes to the material and with full freedom to play the clips at whatever point desired.
PR-50
Power amplifier
Projector
Speakers
17
Page 18
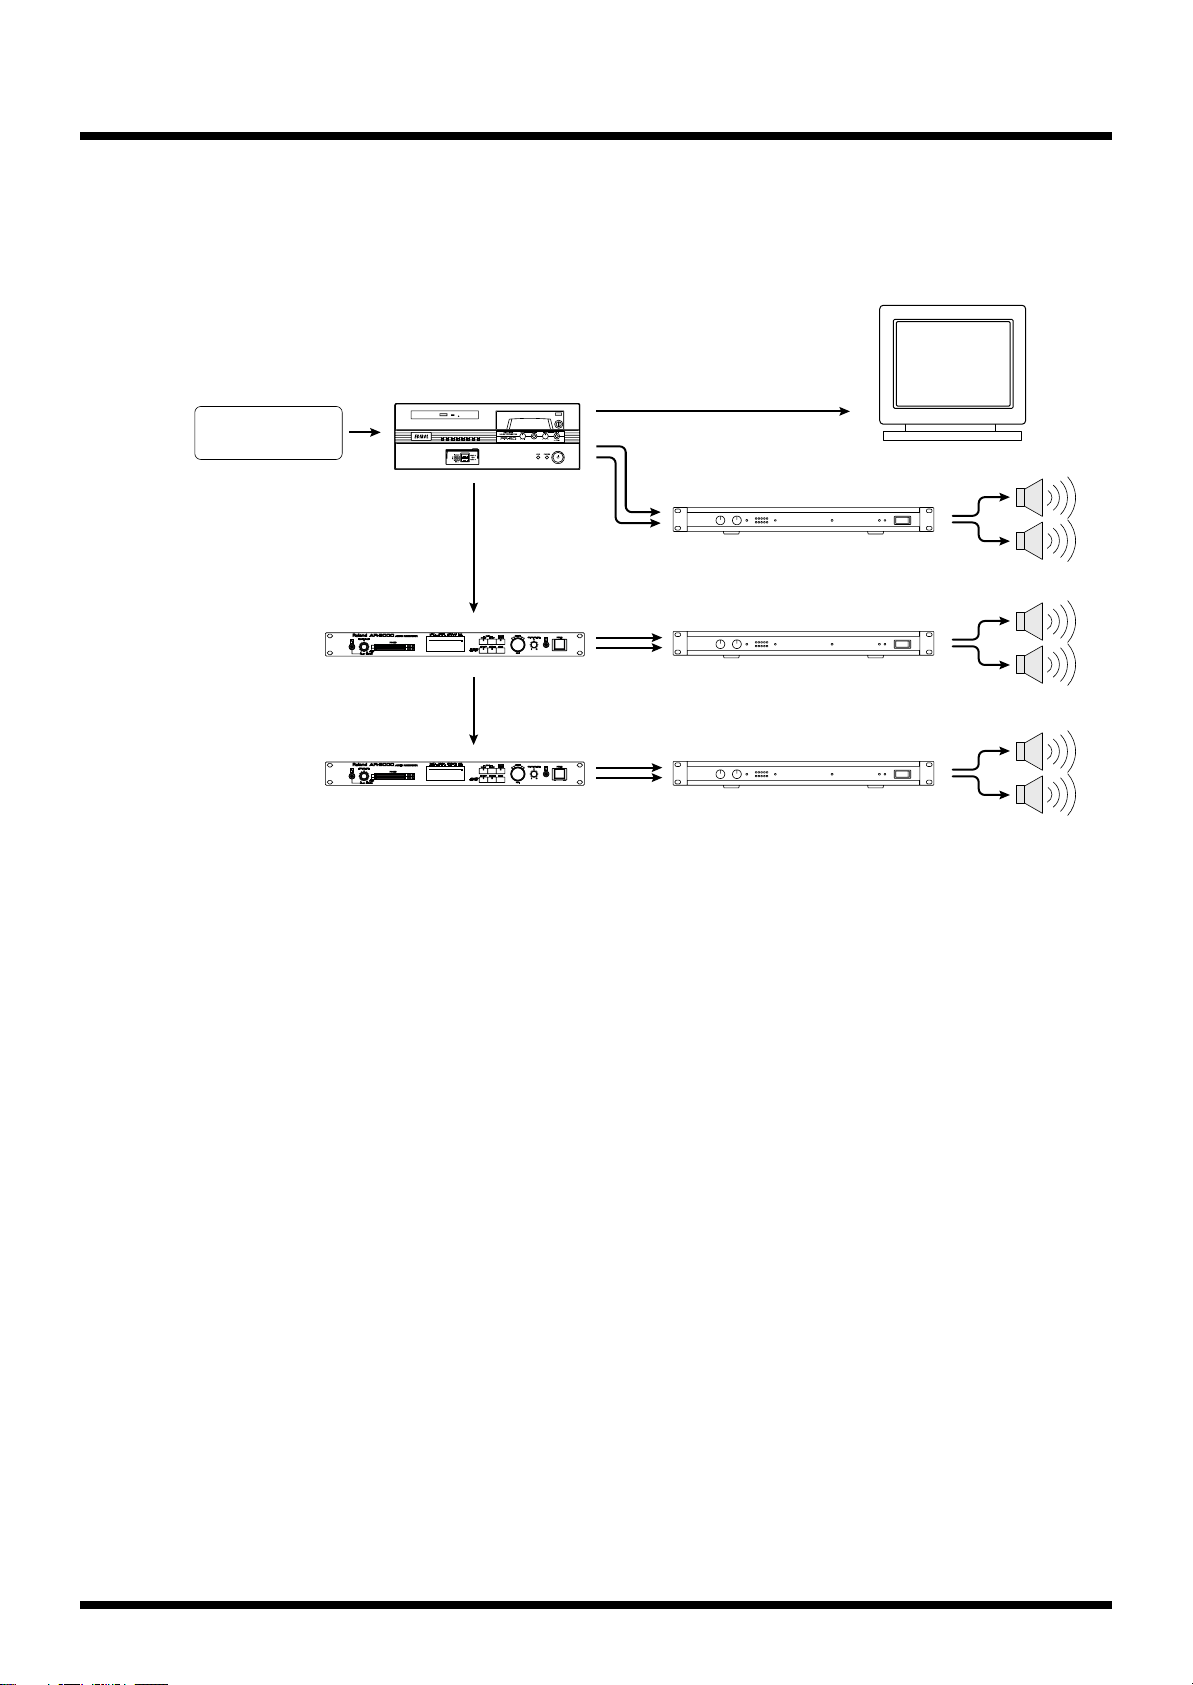
Before Using the PR-50
Display
PR-50
Power amplifier
Speakers
Power amplifier
Speakers
Power amplifier
Speakers
Touch panel
display
AR-3000
AR-3000
Video at Facilities
It’s a breeze to set up a system that allows visitors to museums or individual booths at conventions
and the like to see and hear video and audio descriptions when they want. You can also use the
Scheduler to have video play automatically.
fig.equipment.eps
18
Page 19
Connection Examples
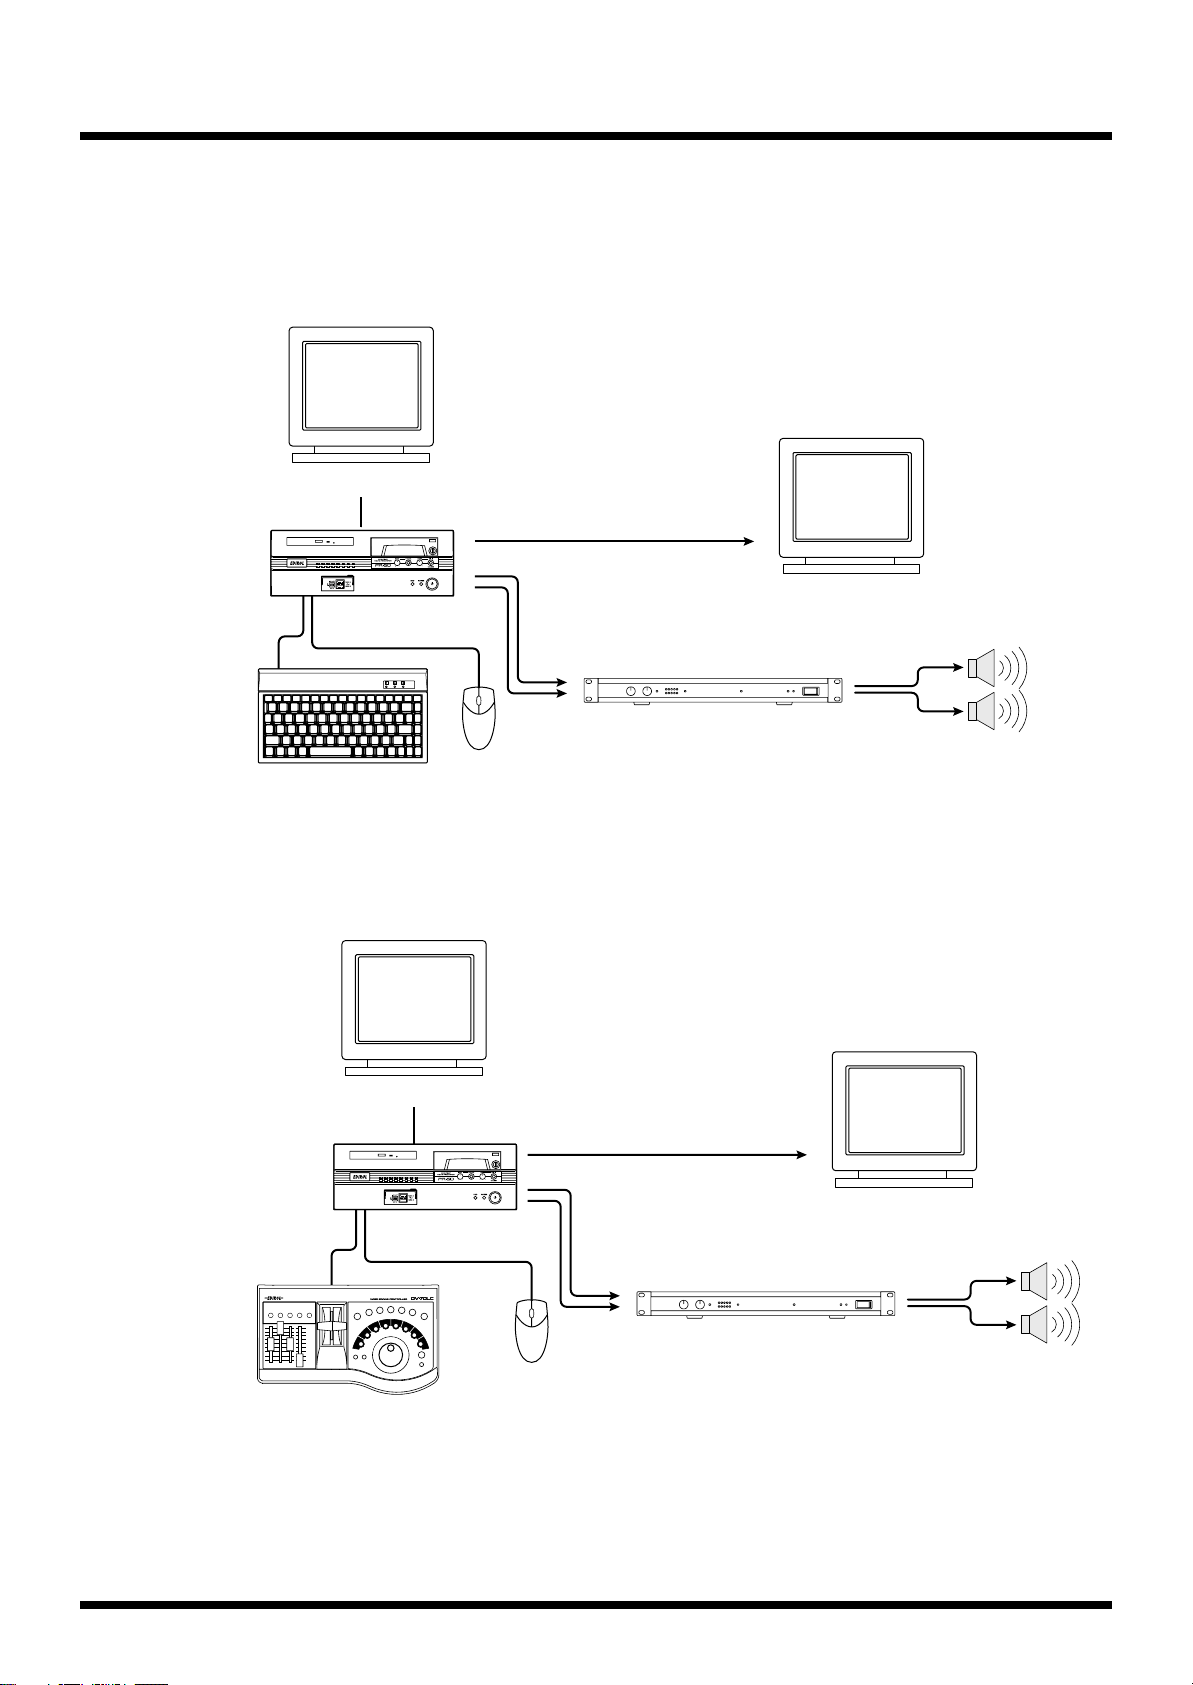
Standalone Use
The PR-50 is controlled with the keyboard and mouse. For more detailed information, refer to
“Playing Back Clips” (p. 51).
fig.standalone.eps
Display for operation
PR-50
Before Using the PR-50
Display
fig.with.dv7c.eps
Power amplifier
Keyboard
Mouse
Using the PR-50 with the Optional DV-7DLC
Using the DV-7DLC provides the kind of operability you can get only with a dedicated controller.
For more detailed information, refer to “Using a DV-7DLC” (p. 97).
Display for operation
Display
PR-50
Speakers
DV-7DLC
Mouse
Power amplifier
Speakers
19
Page 20

Before Using the PR-50
PR-50
UM-880
MIDI
MIDI
USB
MIDI
PR-50
PR-50
UM-1
UM-1
V-Synth
Display
Display
Display
Mouse
Mouse
Mouse
Using the PR-50 with MIDI
Using the optional UM-1 or other USB compatible (UM Series) MIDI interface enables you to control
MIDI devices with MIDI signals. Additionally, you can connect a V-LINK compatible device and use
the V-LINK feature to enjoy a variety of video effects that bring visual element of expression to your
performances.
For more detailed information, refer to “Using V-LINK” (p. 59) and “Using MIDI Devices” (p. 83).
fig.with.um1.eps
20
Page 21
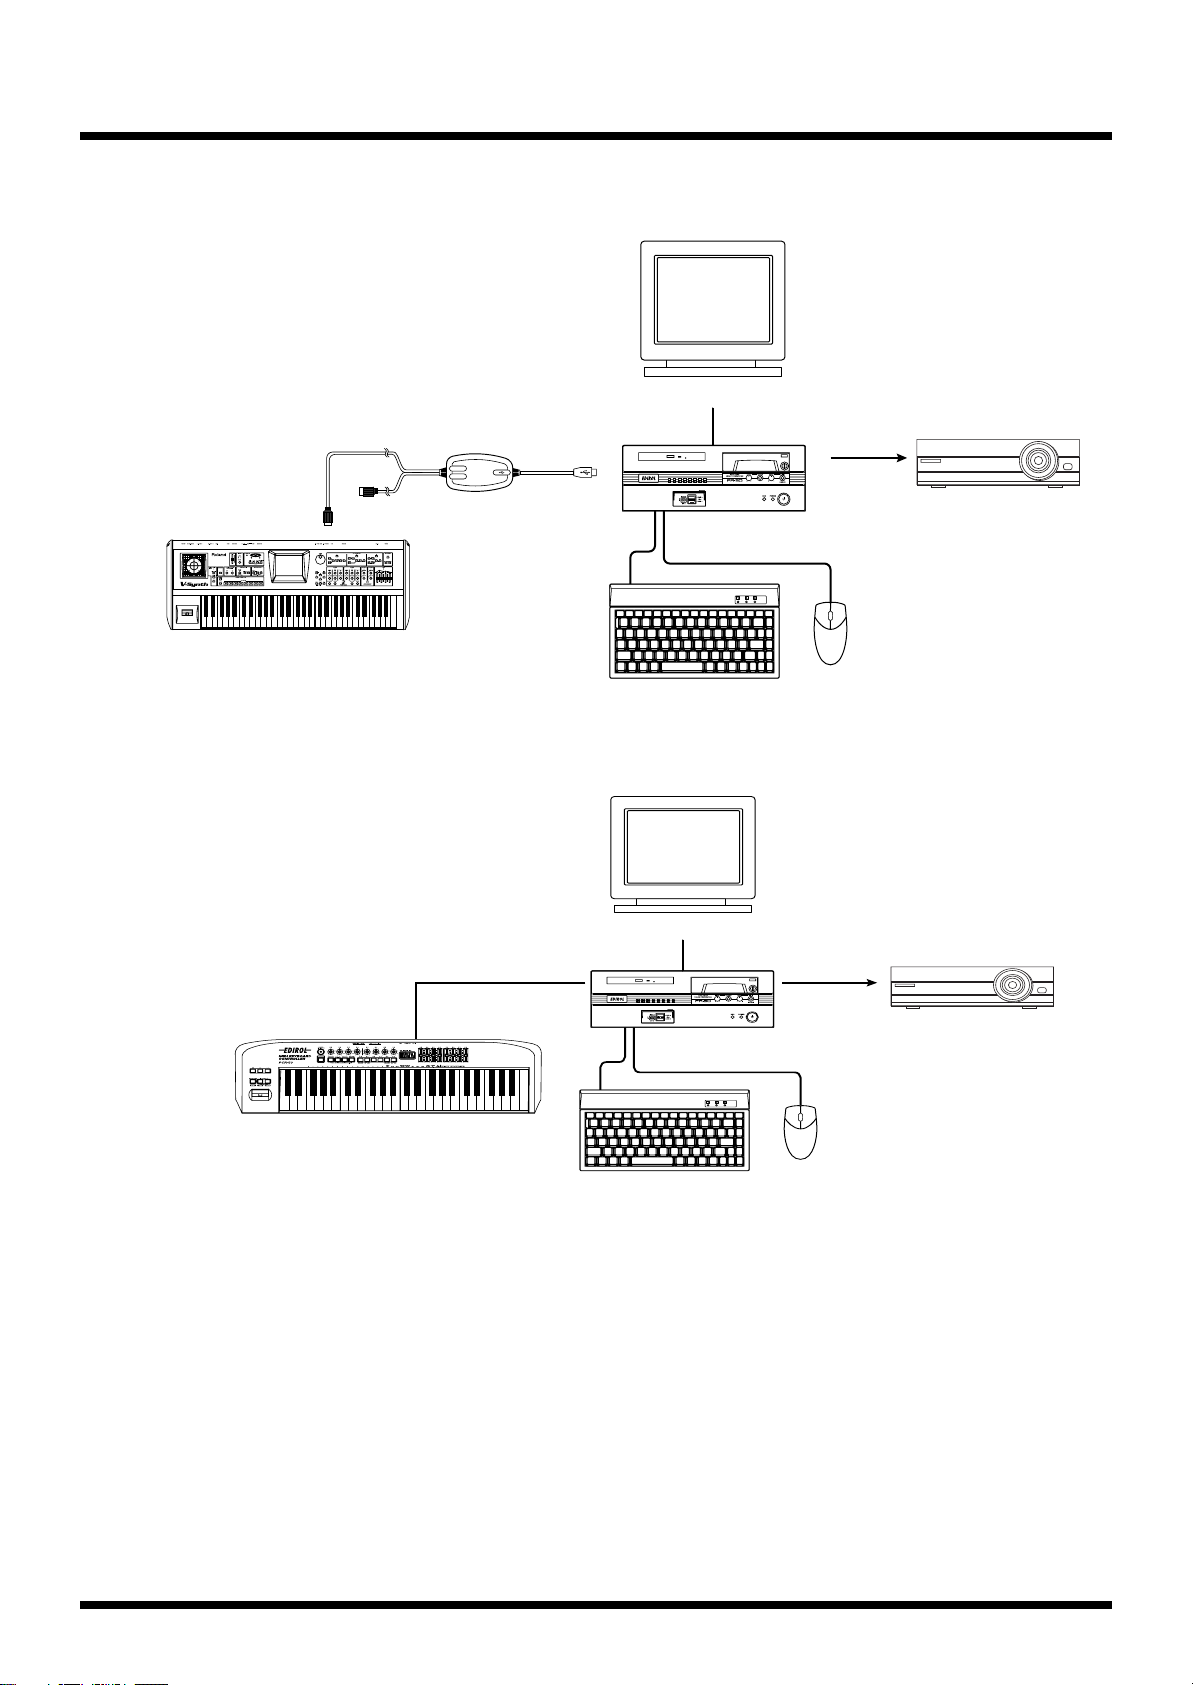
fig.with.midikey.eps
PR-50
Display for operation
PCR-50
USB
Projector
Keyboard
Mouse
Before Using the PR-50
You can use a MIDI keyboard to control the switching of effects with retrigger playback and velocity,
control the playback speed, and produce other advanced playback effects intuitively.
Display for operation
fig.with.pc300.eps
UM-1
V-Synth
PR-50
Keyboard
Mouse
Projector
You can also use an optional PCR-50 or other USB keyboard (PCR Series or PC-300), connecting the
keyboard directly to the PR-50 with no MIDI interface necessary.
21
Page 22
Before Using the PR-50
PR-50
RS-232C
VGA
Speakers
Power amplifier
Touch panel
display
Display
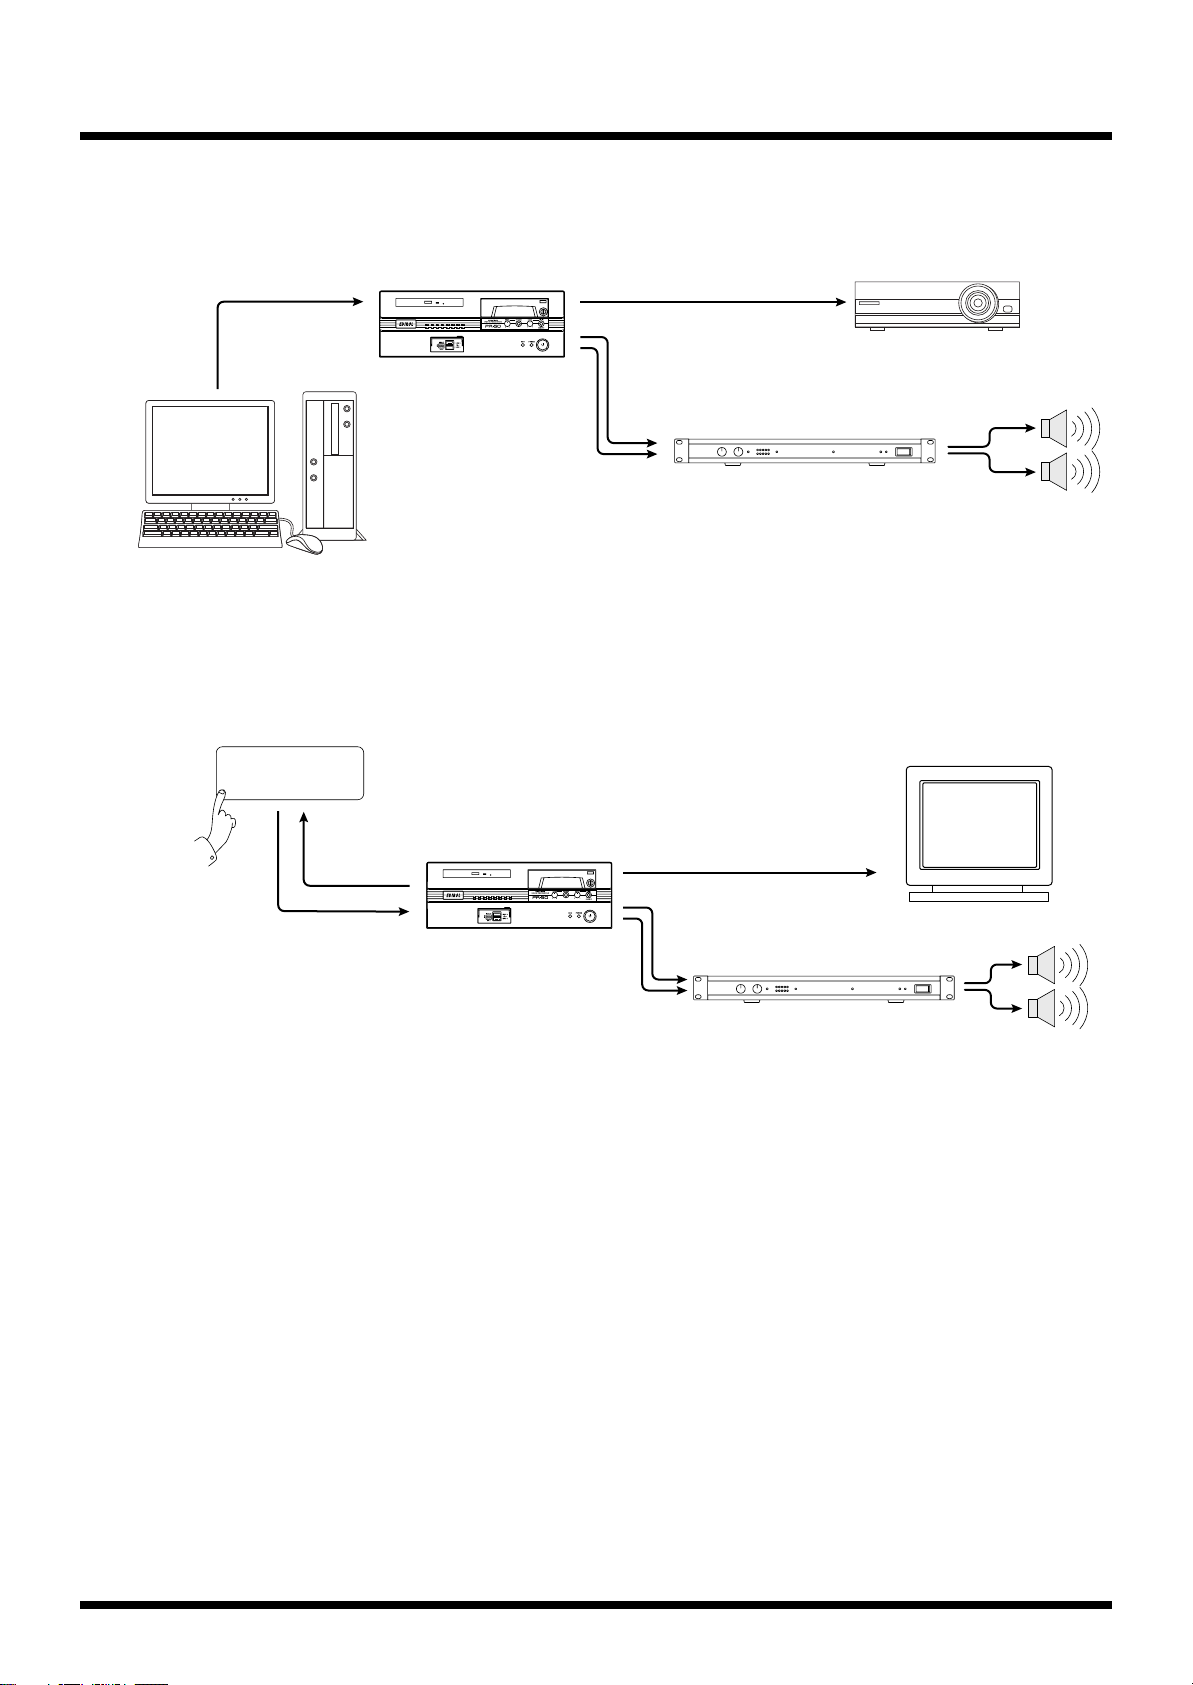
Using the RS-232C Connector
Connecting with the RS-232C cable allows you to control the PR-50 with a computer or other external
control device. For more detailed information, refer to “Using the RS-232C Connector” (p. 101).
fig.with.pc.eps
PC
Using a Touch Panel Display
You can connect a touch panel display using an RS-232C cable and VGA cable and then control the
PR-50 by directly touching the touch panel display screen. For more detailed information about
setting up touch panel displays, refer to “Using a Touch Panel Display” (p. 101).
fig.with.panel.eps
Projector
PR-50
Power amplifier
Speakers
22
Page 23

fig.with.AR.eps
Power amplifier
Speakers
Power amplifier
Speakers
Power amplifier
Speakers
PR-50
UM-880
USB
MIDI
MIDI
MIDI
AR-3000
AR-3000
AR-3000
Projector
Display for operation
Keyboard
Mouse
Before Using the PR-50
Controlling AR Series Devices
You can use the PR-50 for MIDI control of the AR-3000 and other models in Roland’s AR (Audio
Recorder) Series. This allows you to switch playback of AR Series phrases by switching clips with the
PR-50.
For more details about setting up the PR-50 to control AR Series devices, refer to “Controlling AR
Series Devices” (p. 96).
23
Page 24
Before Using the PR-50
PR-50
Display for operation
UM-880
USB
MIDI
MIDI
PR-50
DV-7PR
UM-1
UM-1
Projector
Projector
Projector
Keyboard
Mouse
Mouse
Mouse
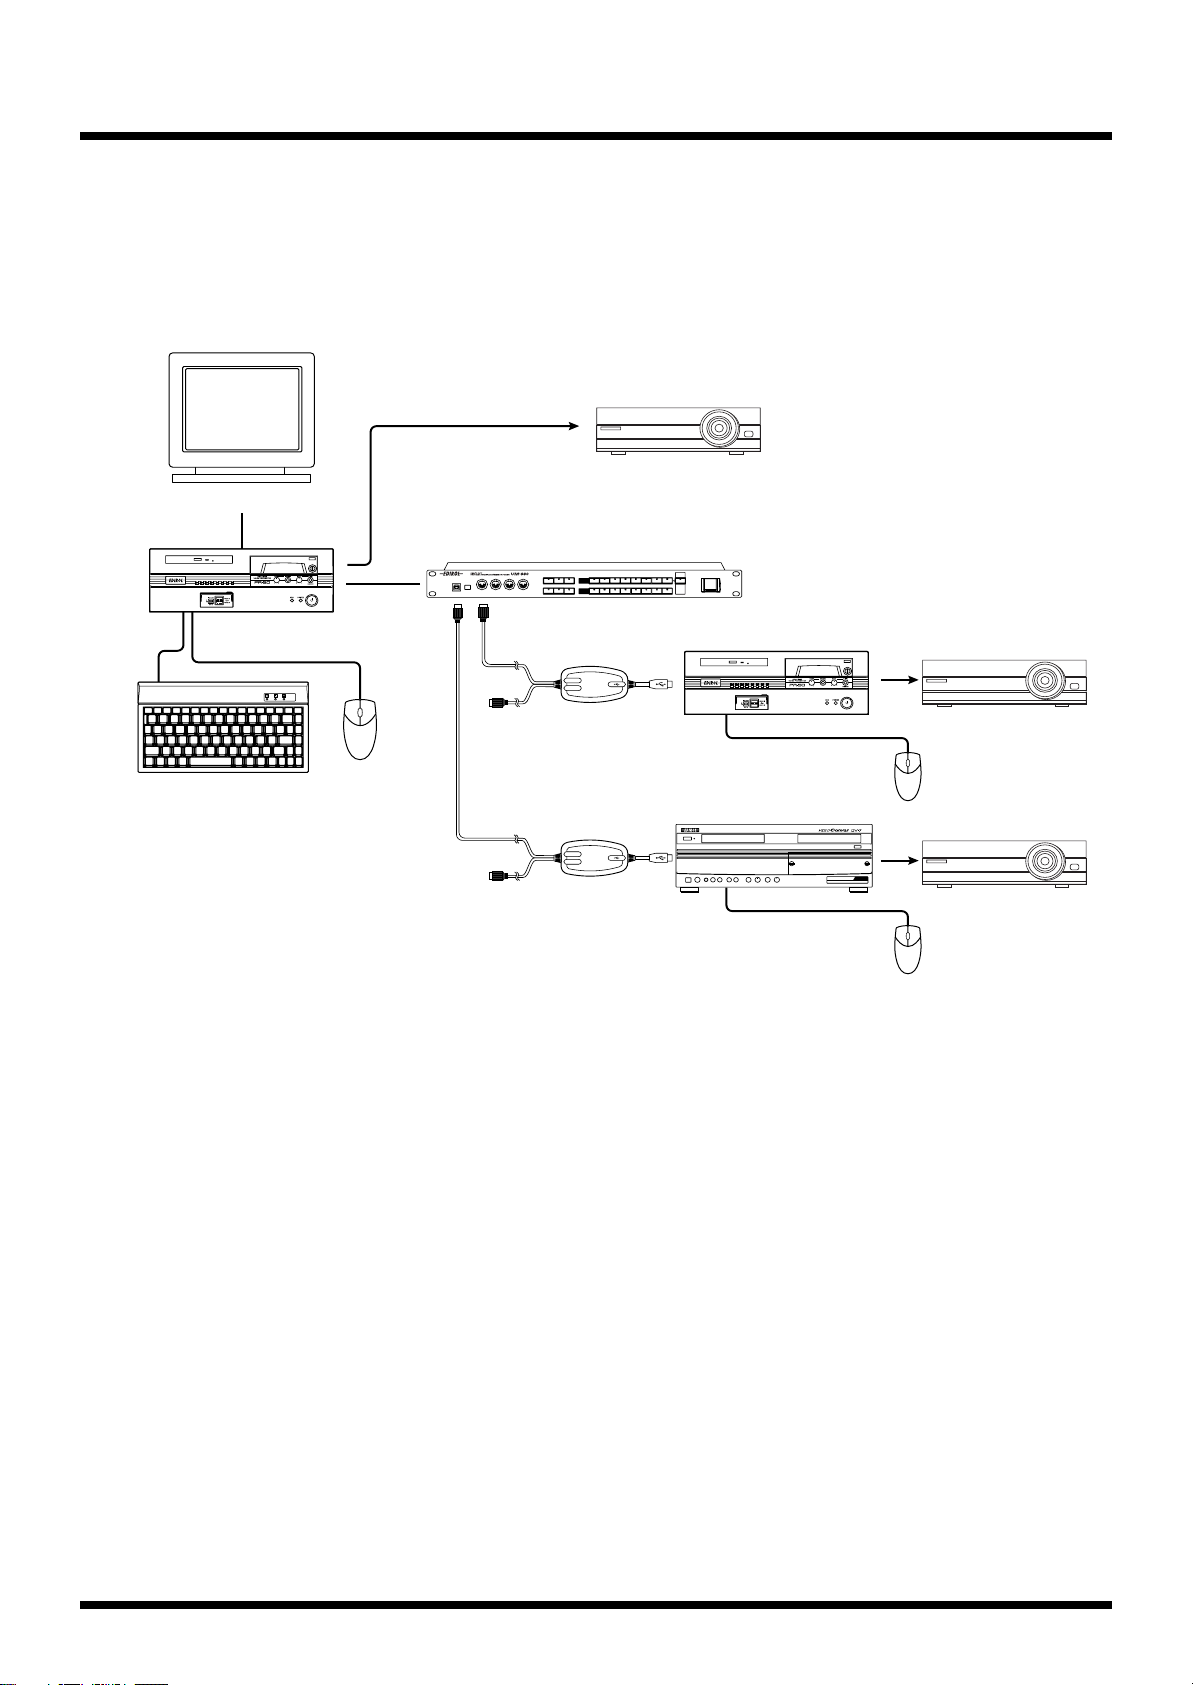
Controlling Multiple Presenters
You can control multiple other Presenters (such as other PR-50s or DV-7PRs) with the PR-50. You can
make settings for starting and stopping playback of clips, selecting palettes and clips, and setting
switch effect times.
For more details about setting the PR-50 to control other Presenters, refer to “Controlling Another
Presenter” (p. 92).
fig.with.DV-7PR.eps
24
Page 25
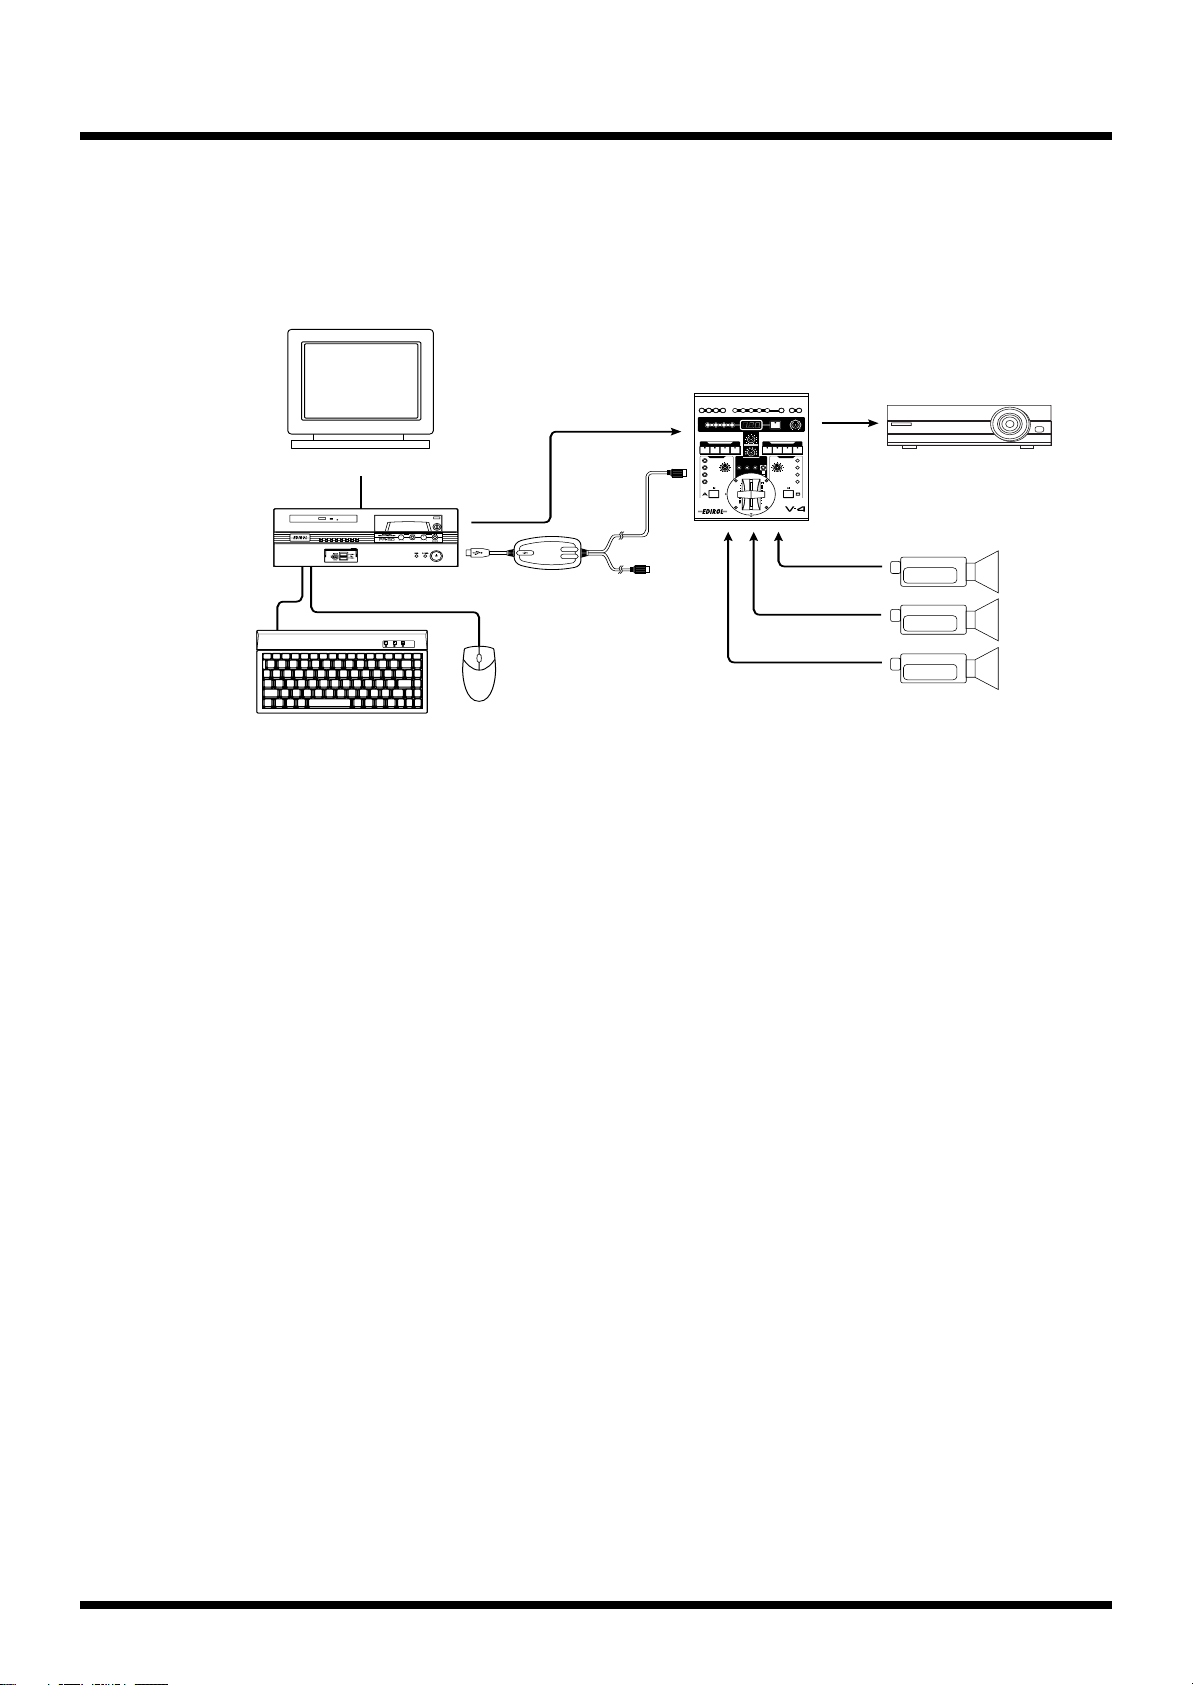
fig.with.V4.eps
Before Using the PR-50
Controlling a Video Mixer
Using a video mixer, you can work with video input from an external device connected to the video
mixer as PR-80 clips. Additionally, you can use an external MIDI device to control the video mixer’s
effect settings and fade the final video output. For more details about video-mixer control settings,
refer to “Controlling an Edirol Video Mixer” (p. 93).
V-4
Display for operation
PR-50
Keyboard
Projector
MIDI
Video camera, etc.
UM-1
Mouse
25
Page 26

Before Using the PR-50
Working with the Keyboard and Mouse
About the Keyboard and Included Mouse
After reviewing the material in “Setting Up and Connecting Equipment” (p. 14), be sure to connect
the keyboard and included mouse. Operations with the PR-50 are primarily performed with the
mouse. For more on how to use the mouse, refer to“About Operations with the Mouse” (p. 26).
The keyboard is used for entering titles and changing the names of data materials and projects.
Notes to Observe When Using the Keyboard
• Do not place objects on top of the keyboard.
• Do not turn on the power to the PR-50 while pressing and holding down any of the keys.
• After turning on the power to the PR-50, do not press any of the keys on the keyboard until the
Selector screen appears. Pressing certain keys at this time may call up a system maintenance
screen that is not required for normal operation of the unit.
• If an unfamiliar screen showing alphabetic characters appears, press the [POWER] button on the
PR-50’s front panel and hold the button down more than 5 seconds to turn off the power. After
checking to make sure none of the keyboard’s keys is pressed down, press the [POWER] button
again to turn on the power.
About Operations with the Mouse
PR-50’s operational screens appear on a monitor similar to those used in personal computers. The
mouse also performs operations similar to those of a personal computer mouse.
The following describes the four common options performed by the mouse.
Mouse Pointer
The mouse cursor on the screen moves in sync with the mouse movement in your hand. Move the
pointer to the desired position on the screen, click the left or right mouse button to select a menu, then
click to perform the function.
Single Click
The mouse is equipped with two buttons. The left button is the main button used in most operations.
Move the pointer to the desired point on the screen, then press the left button once. You can use this
when pressing buttons such as [OK] and [Cancel], selecting menus, and for other such tasks.
Drag and Drop
This refers to “dragging” an item on the screen and “dropping” (releasing) it at the targeted point.
This operation is used for transferring, arranging, and copying materials. Move the mouse pointer to
the location where the desired icon is, then press the left button to select it. Now continue to hold
down the mouse button as you move the mouse to a different point. The selected object moves along
with the pointer. When the icon reaches the intended point, release the left mouse button.
Right Click
Press, or “click” the right mouse button one time only. This enables you to call up various editing
functions.
26
* Use an attached mouse pad when using the mouse.
Page 27
Introduction to Use of the PR-50
How the PR-50 is Organized
The PR-50 consists of the two main sections below.
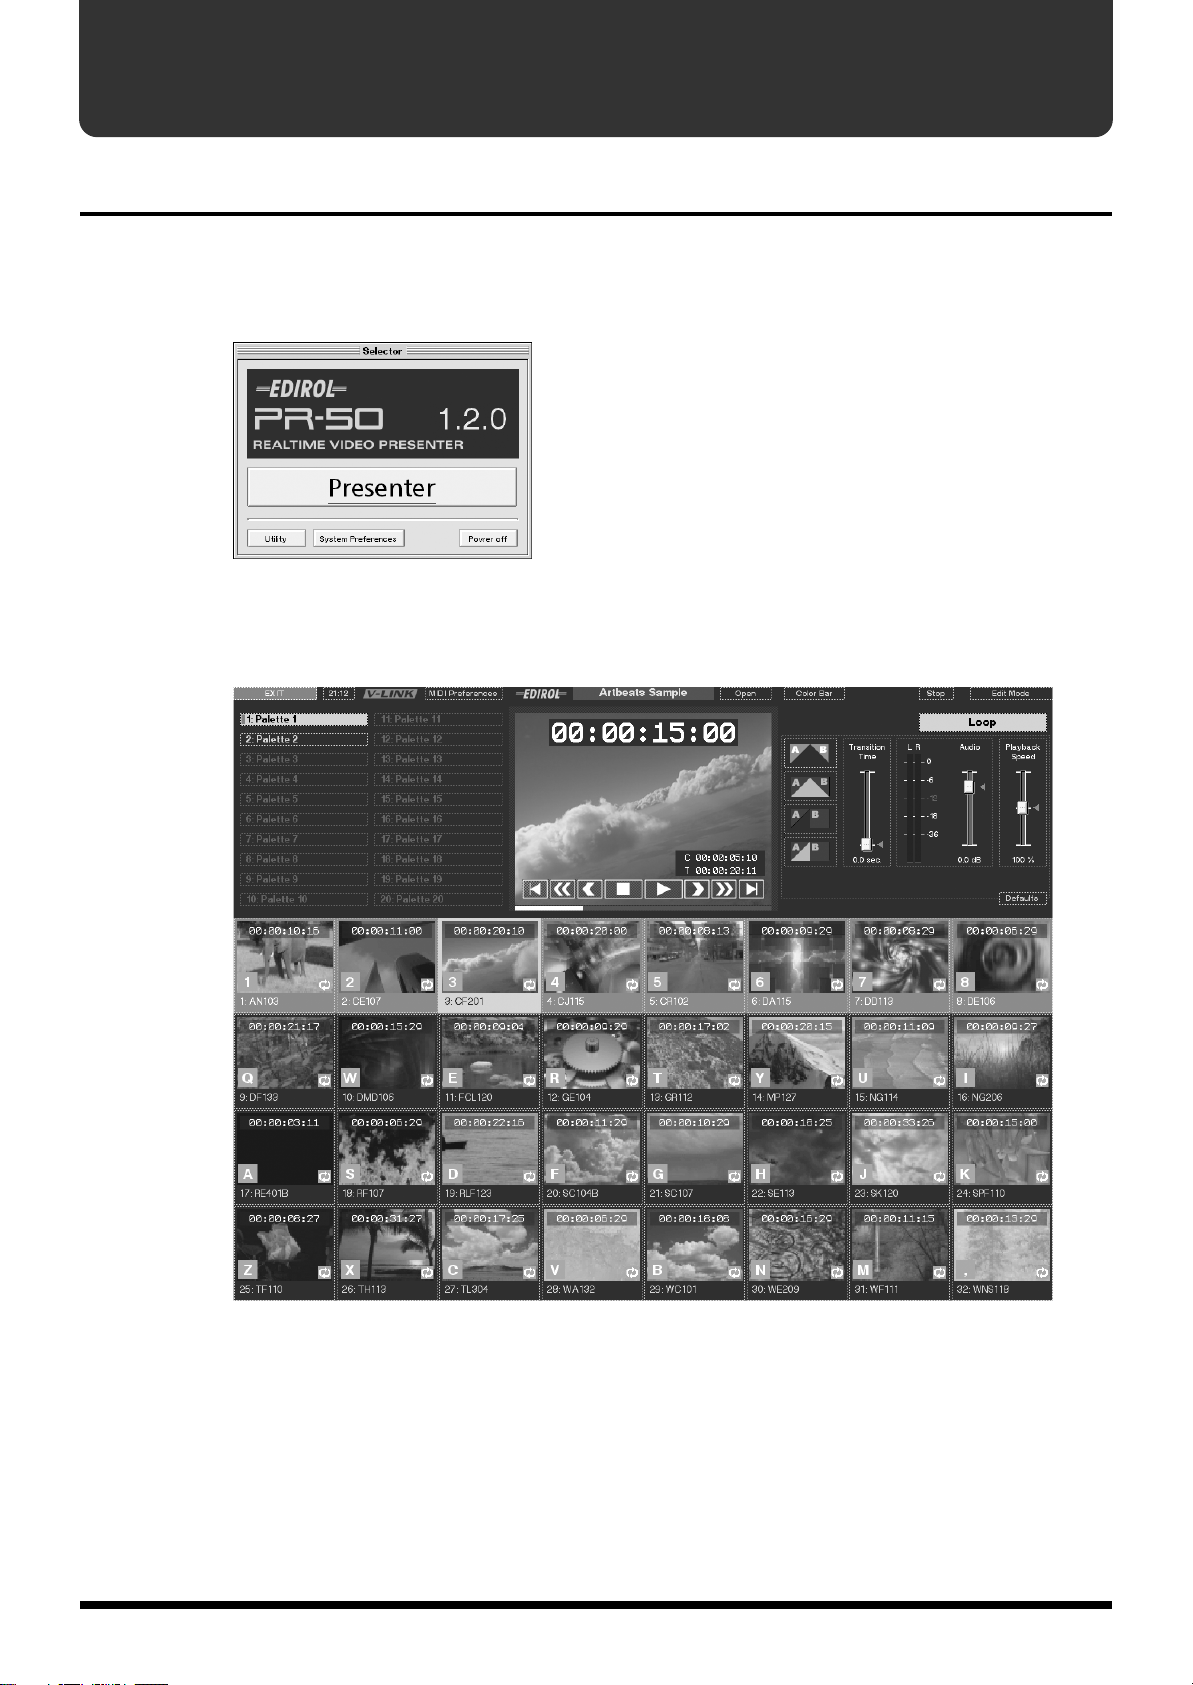
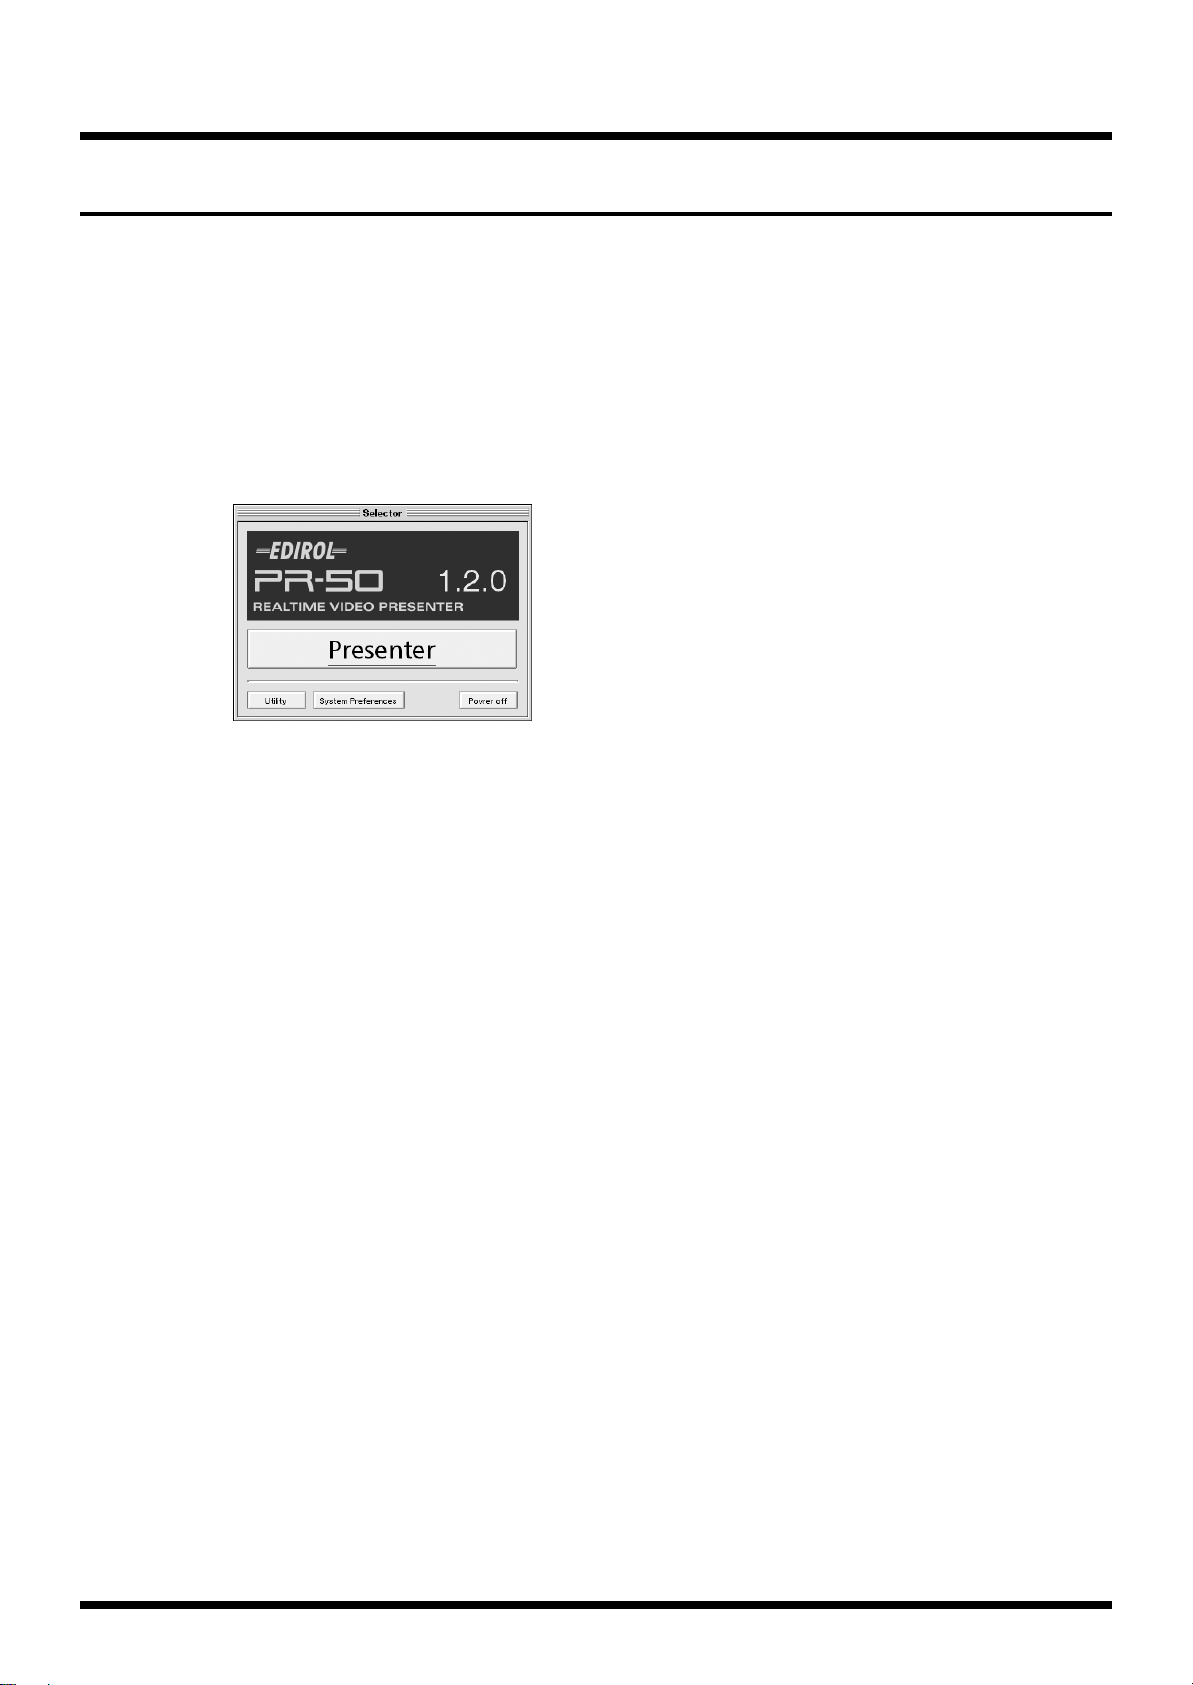
Selector
fig.selector.eps
This is what first appears when the PR-50 is turned on. Various different functions use this as their
starting point.
Presenter
fig.playmode.eps
Included here are functions used in playing back and switching video materials.
27
Page 28
Introduction to Use of the PR-50
Basic Workflow
Most of the PR-50’s operations are performed using the mouse and keyboard as you look at the
screens.
The following guides you through the basic workflow, while making use of samples that were
supplied with the PR-50.
For details of individual operations, see the cited reference pages.
fig.selector.eps
1.
Turning the Power On (Off)
→
“Turning On the Power” (p. 46)
Selector appears.
[Presenter]
Presenter starts up.
Presenter features two screens, one for “Play mode” and another for “Edit mode.”
Play Mode → “Play Mode” (p. 37)
In this mode, you arrange and switch materials during playback. You can also add a variety of
different effects.
Edit Mode → “Edit Mode” (p. 40)
In this mode, you load data and arrange the materials in palettes (p. 56).
[Utility] → “Utility” (p. 43)
Use this to copy and delete projects (p. 48).
[System Preferences] → “System Preferences” (p. 44)
This is where screen, time, mouse, keyboard, and other system-related settings are made.
28
Page 29
Introduction to Use of the PR-50
2.
fig.playmode01.eps
Starting Up Presenter
Click [Presenter] in Selector. The Presenter Play mode screen appears, after a few seconds.
• Play Mode Screen → (p. 37)
29
Page 30
Introduction to Use of the PR-50
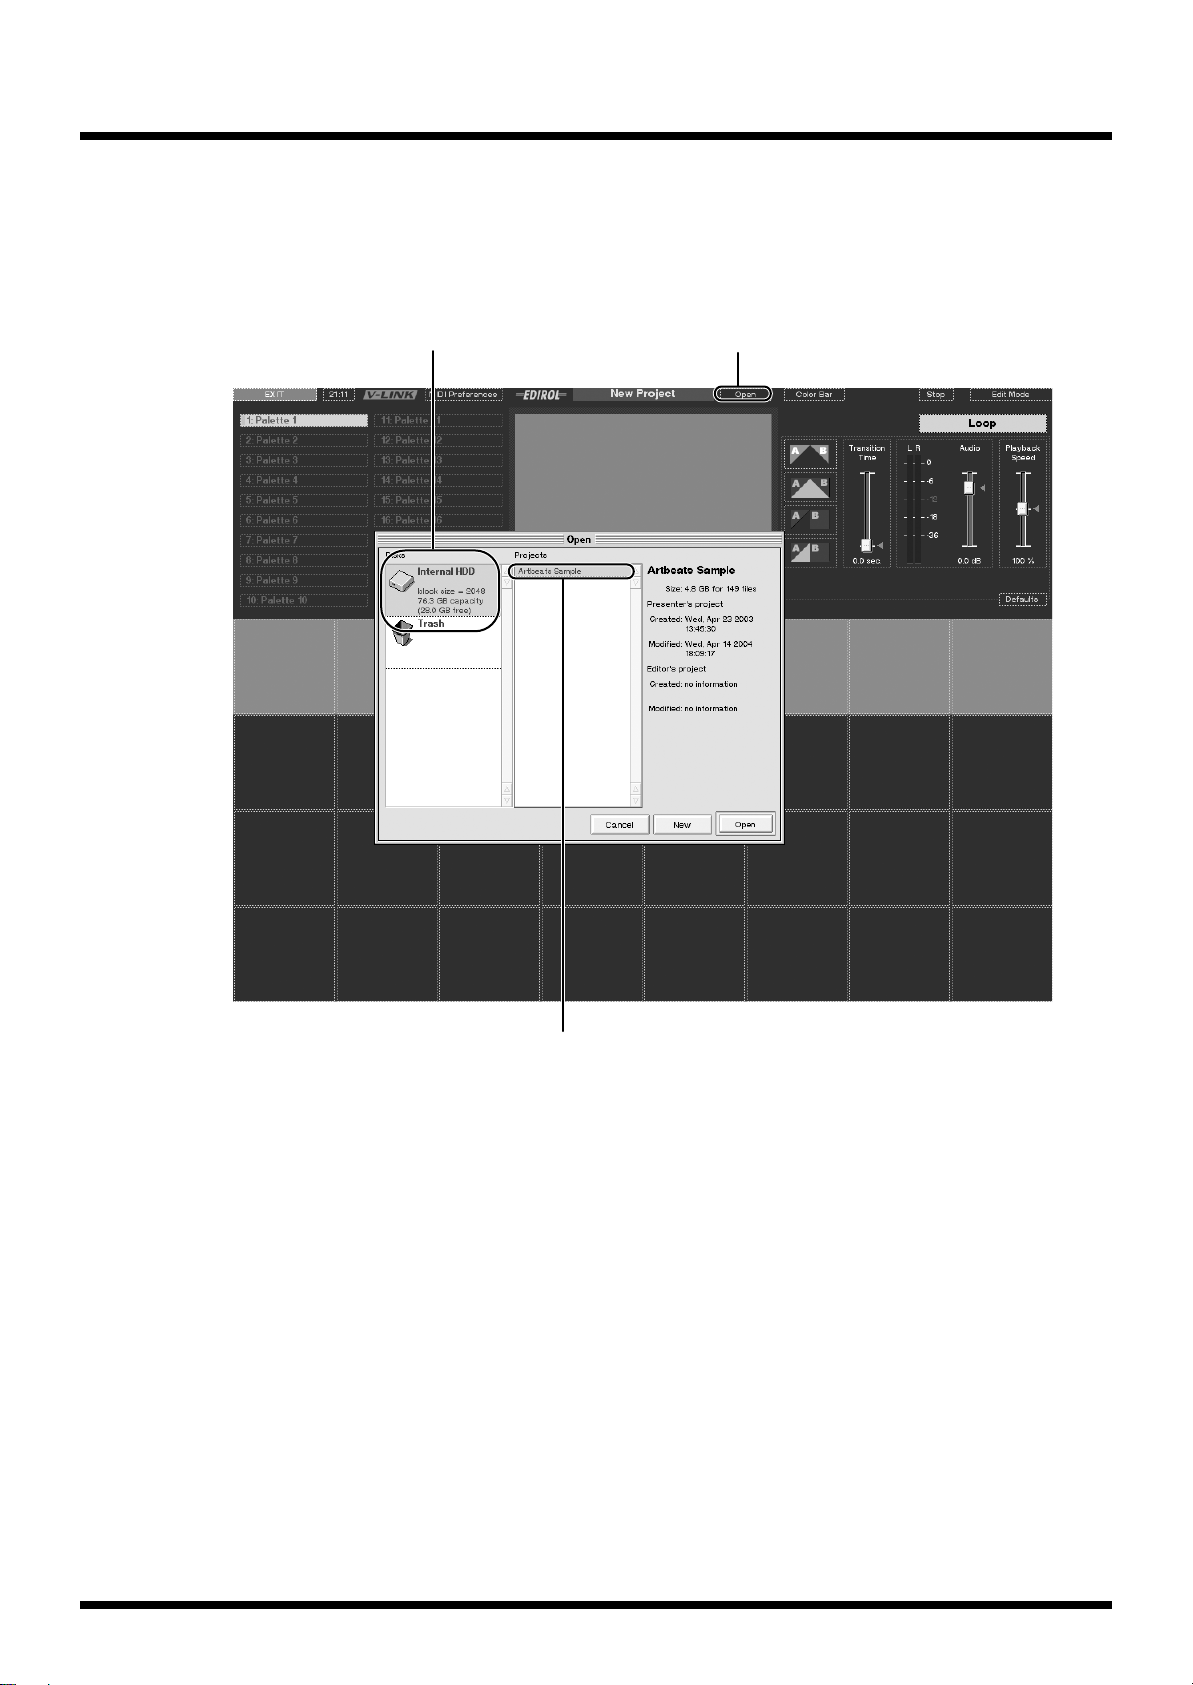
Select a disk Click [Open]
Select a project
3.
fig.play.project01.eps
Opening a Project
Click [Open] on the screen, and the following dialog appears.
Click “Internal HDD,” then click “Artbeats Sample” and “Open” (the project “Artbeats Sample” is
used as the example procedure in “Basic Workflow”).
This calls up the project entitled “Artbeats Sample.”
Projects are the most basic unit managed with the PR-50. Clips are played back and materials are
saved in project units.
• What is a Project? → (p. 48)
• Creating Projects → (p. 49)
• Opening Projects → (p. 50)
30
Page 31

Introduction to Use of the PR-50
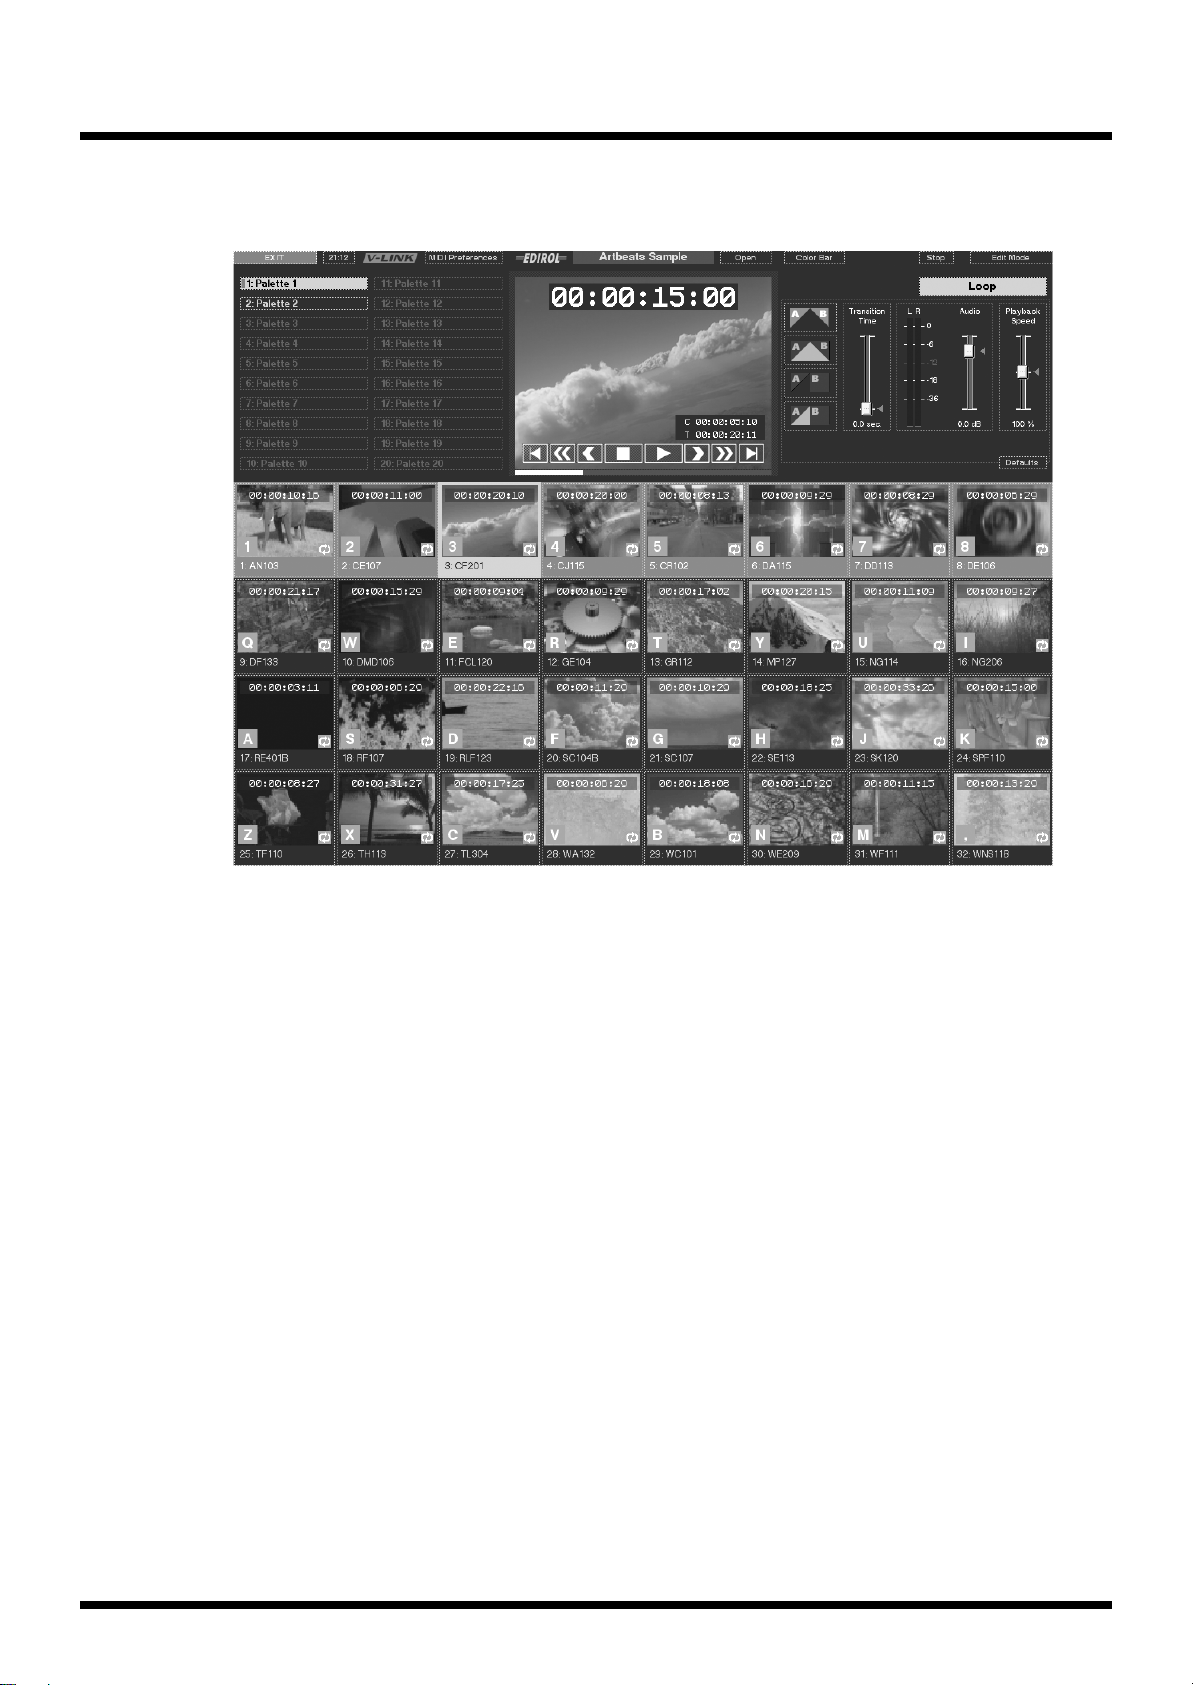
Select a palette Program output monitor Image effects
Palette (select a clip) Transport control
4.
fig.playmode02.eps
Playing Back the Clip
The area in the Play Mode screen where the thumbnail video images are shown is called the palette,
and each of the video images is called a clip. You select the clip to be played back from the palette.
You can also switch and play video from other palettes.
Click on a clip with the mouse to start playing the clip. Clicking on the transport control allows you
to start and stop playback, and to play back clips one frame at a time.
You can check the images being played back with the video output monitor.
Clicking on the palette list with the mouse switches the palette.
You can work with the controls in the upper right of the screen to select from a number of different
playback methods and add effects.
• Play Mode Screen → (p. 37)
• Using the Mouse to Play Back Clips → (p. 51)
• Using the Keyboard to Play Back Clips → (p. 53)
• Viewing the Video Output Monitor → (p. 52)
• Switching the Palette → (p. 54)
• Setting the Switching Effects → (p. 54)
• Turning Loop Playback On and Off → (p. 55)
• Setting the Palette’s Loop Mode → (p. 63)
• Making Clip Loop Mode Settings → (p. 71)
• Setting Projects to Play Automatically When Loaded → (p. 74)
• Setting the Scheduler → (p. 81)
31
Page 32

Introduction to Use of the PR-50
Clips list Program output monitor
Palettes list (select a palette)
Materials list (select materials)
5.
fig.editmode01.eps
Editing the Palette
This is done in the Edit Mode screen.
You can display the Edit Mode screen by clicking the [Edit Mode] button in the upper right of the
Play Mode screen.
Here you can change clip sequences and names and assign new materials to the palette as clips. You
can easily assign materials to the palette just by dragging them with the mouse. The materials list
shows the materials that are saved to projects.
The content edited in this screen is carried over in Play mode, with no further changes necessary. Just
click “Play Mode” at the upper right to immediately play back the edited data.
• Edit Mode Screen → (p. 40)
• Assigning Materials to Palettes → (p. 56)
• Making the Palette Settings → (p. 63)
• Editing Palettes → (p. 62)
• Making Clip Settings → (p. 66)
• Editing Clips → (p. 64)
• Changing the Material Settings → (p. 73)
• Setting the Scheduler → (p. 81)
32
Page 33

Introduction to Use of the PR-50
Select a disk Select materials
Material preview monitor
Select a project Import button
6.
fig.edit.import01.eps
Importing Materials
This is done in the Edit Mode screen.
You can import new materials. When you click the [Import] button at the lower right of the screen,
the following dialog appears; you can then import materials from another project, disk, or other
source.
• Importing Materials from Another Project → (p. 75)
• Importing Materials Created with a Computer → (p. 77)
33
Page 34

Introduction to Use of the PR-50
Start button Capture button
Select an input source
Preview monitor Stop button
7.
fig.edit.capture01.eps
Capturing Video from a Video Deck or Other Device
You can capture video from a video deck or a similar device connected to the PR-50. When you click
the [Capture] button at the lower right of the screen, a “Capture” screen for capturing video appears.
In the Preview monitor you can see the video from a video deck. Click the [Start] button to captures
the video. You can capture each video frame separately, and separate a video into materials at any
desired point using [Frame] button and [Auto-cut] button.
Click [Close] button in the “Capture” screen to return to Edit mode.
• Capturing Video form a Video Deck or Other Device → (p. 76)
34
Page 35

What is V-LINK?
V-LINK ( ) is a function that allows music and images to be performed together. By using
MIDI to connect two or more V-LINK compatible devices, you can easily enjoy performing a wide
range of visual effects that are linked to the expressive elements of a music performance.
With V-LINK, you can easily control the PR-50 with a V-LINK compatible MIDI device.
fig.connection.Vlink01.eps
Introduction to Use of the PR-50
Remote control (V-LINK)
Image export
V-Synth
Remote control (V-LINK)
MC-909
For more detailed information on how to use the V-LINK function, refer to “Using V-LINK” (p. 59).
UM-1
UM-1
PR-50
Image export
PR-50
Projector
Projector
35
Page 36

Introduction to Use of the PR-50
Names of Things in Screens/What They Do
Selector
This is what first appears when you turn on the power to the PR-50.
The Presenter starts up from here. Also shown here are screens for managing projects on hard disks
fig.selector01.eps
and for setting the PR-50 system preferences.
a
bc d
a. [Presenter] Button
This starts up the Presenter. The Presenter features two modes, Play mode (p. 37) and Edit mode (p.
40).
b. [Utility] Button
This calls up the Utility screen (p. 43). This is used for organizing the projects on the hard disk.
c. [System Preferences] Button
This calls up the System Preferences screen (p. 44). These settings affect the PR-50’s overall system
environment.
d. [Power off] Button
This shuts off the power to the PR-50 (p. 47).
36
Page 37

Play Mode
adcefgh j
l
m
n
q
s
r
ib
k
t
p
o
fig.playmode03.eps
Introduction to Use of the PR-50
This is displayed when you select [Presenter] in the Selector screen (p. 36), or when you click the [Play
Mode] button at the upper right of the Edit Mode screen (p. 40).
a. [EXIT] Button
This quits Presenter.
b. Clock
This indicates the current time. You can click the mouse to open the Schedule Editor. This is also lit
when the Scheduler is operational.
c. [V-LINK] Indicator
This lights up when a V-LINK device is connected (p. 59). You can turn V-LINK off by clicking this
while it is lit.
d. [MIDI Preferences] Button
This is used for setting the MIDI preferences. For more detailed information, refer to “Using MIDI
Devices” (p. 83).
e. EDIROL Logo
Click this logo to display the version number and other information about Presenter. Clicking on the
displayed information clears it from the screen.
f. Project Name
This indicates the name of the current project.
37
Page 38

Introduction to Use of the PR-50
g. [Open] Button
The “Open” dialog is displayed, and the project to be used opens.
For more details about working with this, refer to “Opening Projects” (p. 50).
You can also perform the same tasks, like copying and deleting projects, as you do in the Utility
screen (p. 43).
h. [Color Bar] Button
Click this button to show and hide the color bar.
i. [Stop] Button
This stops playback.
j. [Edit Mode] Button
This switches the PR-50 to Edit mode (p. 40).
k. Palette List
This displays 20 palettes. You can switch palettes by clicking here.
For more details about working with this feature, refer to “Switching the Palette” (p. 54).
l. Video Output Monitor
This is used for monitoring the video output. The monitor’s perimeter lights in red when effects are
switched (p. 54) or at other times when the system is busy. You can also have information such as
playback status and remaining clip time be displayed here.
For more details about viewing the monitor, refer to “About the Video Output Monitor Display” (p.
52).
m. [Loop] Button
This turns loop playback of clips on and off. Click here to switch the function on or off.
When this is turned on, each clip plays in accordance with its own Loop Mode setting. You can have
the same clip play repeatedly (loop), play the subsequent clip, or play back another specified clip.
When this is turned off, the clip stops playing at the last frame or at the out point.
For more details about turning clips’ loop playback on and off, refer to “Turning Loop Playback On
and Off” (p. 55).
For more details about clip Loop Mode settings, refer to “Making the Palette Settings” (p. 63).
n. [Transition Time] Slider
This adjusts the time used for the transition effect. You can set this to any value from 0 to 4 seconds.
You can reset to standard values by clicking the triangle at the position corresponding to the standard
value.
For more details about adjusting transition times, refer to “Transition Effects” (p. 54).
o. Volume Level Meter
This indicates the volume level.
p. [Audio] Slider
38
This adjusts the volume during audio playback.
You can reset to standard values by clicking the triangle at the position corresponding to the standard
value.
You can adjust the volume for each clip independently (p. 71).
Page 39

Introduction to Use of the PR-50
t-2
t-1
t-3
q. [Playback Speed] Slider
You can alter the playback speed. You can also change the range of speeds permitted in the MIDI
preferences (p. 83).
You can reset to standard values by clicking the triangle at the position corresponding to the standard
value.
r. Transition Effect Type
This selects the type of transition effect used.
For more details about selecting transition types, refer to “Transition Effects” (p. 54).
s. [Defaults] Button
Restores the three sliders to the standard values. The standard settings are shown below.
• [Transition Effect Time] Slider: 0.0 sec.
• [Audio] Slider: 0 dB
• [Playback Speed] Slider: 100%
You can reset the sliders to standard values by clicking the triangle at the position corresponding to
the standard value.
fig.play.clip01.eps
t. Palette Area
Displayed here are thumbnails of the clips contained in the palette and their settings. Clicking on a
thumbnail starts playback of the clip, and the video images are displayed in the monitor.
Also displayed are the clips’ Loop playback settings.
t-1. Keyboard identifier used when a clip is played back with the keyboard (p. 53).
t-2. Loop Mode setting, set separately for each individual clip (p. 71).
• : Playback stops at the final frame or the out point.
• : Clip plays repeatedly.
• : The next clip is played back.
• : The next clip is selected.
• : The specified clip is played back.
t-3. Length of clip from the In point to the Out point.
39
Page 40

Introduction to Use of the PR-50
a c
jik
defg h
n
l m
p
q
r
o-1
o
o-2
o-3
b
Edit Mode
fig.editmode02.eps
This appears when you click the [Edit Mode] button in the upper right of the Play Mode screen.
a. [EXIT] Button
This quits Presenter.
b. Clock
This indicates the current time. You can click the mouse to open the Schedule Editor. This also lights
up when the Scheduler is operational.
c. [V-LINK] Indicator
This lights up when a V-LINK device is connected (p. 59). You can switch V-LINK off by clicking this
while it is lit.
d. [MIDI Preferences] Button
This is used for setting the MIDI preferences. For more detailed information, refer to “Using MIDI
Devices” (p. 83).
e. Project Name
This indicates the name of the current project.
f. [Open] Button
The “Open” dialog appears, just as in Play mode.
For more details about working with this, refer to “Opening Projects” (p. 50).
You can also perform the same tasks, like copying and deleting projects, as you do in the Utility
screen (p. 43).
40
Page 41

Introduction to Use of the PR-50
g. [Save] Button
This overwrites and saves the current project. For more details about working with this, refer to
“Saving Projects” (p. 58).
You cannot change a project’s name and then save the project under the different name. For more on
backing up projects, refer to “Copying Projects” (p. 79) and “Changing Project Names” (p. 79).
h. [Play Mode] Button
This switches the PR-50 to Play mode (p. 37).
i. [Project] Area
Here is where you can set up the automatic playback that is to take place when Presenter starts up.
For more details about working with this, refer to “Setting Automatic Playback” (p. 74).
j. “Palettes” list
This shows the names of palettes and thumbnails of the first eight clips. Left-click to select the
palettes. The clips included in the palette appear in the [Clip] list below.
You can change palette names, change the sequence of clips in palettes, and perform various other
editing functions. For more on palette editing procedures, refer to “Editing Palettes” (p. 62).
You can also make the Loop Mode settings for each palette individually. For more details about
making Loop Mode settings, refer to “Making the Palette Settings” (p. 63).
k. “Clips” list
This displays the clips contained in the palette currently selected in the “Palettes” list. You can left
click to select a clip and play it back in Clip Preview. You can further edit the clips in various ways,
such as changing clip names, rearranging clip sequences, and importing data for additional clips.
For more details about procedures used in editing clips, refer to “Editing Clips” (p. 64).
You can also make the Loop Mode settings and adjust volume levels for each clip individually. For
more details about making clip settings, refer to “Making the Clip Settings” (p. 66).
l. “Parameters” Area
This is where the parameters and settings are made for clips selected in the “Clips” list.
Here you can set each clip’s In point and Out point, Loop Mode settings, volume levels, and more.
For more details about making the clip settings, refer to “Making the Clip Settings” (p. 66).
m. “Materials” List
This displays the materials included in the project. You can import materials from other projects as
well as from video tape decks and other devices. You can also edit this material in various ways, such
as changing material names and changing their sequence.
For more details about these procedures, refer to “Changing Material Settings” (p. 73).
n. “Search”
You can use this to search for material in the “Materials” list by material name. The “Materials” list
is searched for materials with matching names, starting from the beginning of the material names.
41
Page 42

Introduction to Use of the PR-50
o. “Information” Area
Displayed here is information about materials selected in the “Materials” list.
o-1. Thumbnail
Shows a thumbnail of the material.
o-2. Thumbnail Slider
Sets material thumbnails.
o-3. Material Information
Displays the following information about the materials.
• Material Name
• “Time”
This is the material length.
• “Date Created”
This indicates the date the material was imported into the PR-50.
• “Date Modified”
This indicates the date the material was last edited.
• “Date Shot”
For materials shot with digital video cameras, this shows the date recorded by the camera.
• “Video”
This indicates the material’s video format.
• “Audio”
This indicates the material’s audio format.
• “Memo”
This shows notes entered in Editor of the DV-7 series.
• “Lock”
“Locked in Editor” appears here if the data has been positioned on the timeline in Editor of the
DV-7 series.
p. “Capture” Button
This displays the “Capture” screen.
Here you can import data from video decks and other devices.
For more details about these procedures, refer to “Capturing Video from a Video Deck or Other
Device” (p. 76).
q. “Import” Button
This displays the “Import material” dialog.
Here, materials are imported from other projects, hard disks, or other such sources.
For more details about these procedures, refer to “Importing Materials from Another Project” (p. 75)
and “Importing Materials Created with a Computer” (p. 77).
r. [Share Disk] Button
This starts network sharing for shared folders. This lets you exchange moving-image material and
mask data over a local area network (LAN).
For more details about working with this, refer to “Making the Network Settings” (p. 104).
42
Page 43

Utility
fig.utility01.eps
Introduction to Use of the PR-50
This is displayed when “Utility” is selected in the Selector screen (p. 27).
This function is used for organizing the projects (p. 48) on the hard disk. For more details, refer to
“Organizing Projects” (p. 79).
You can perform the same operation in the dialog displayed by clicking “Open” in the Play Mode or
Edit Mode screens.
ab c
d
a. “Disks” List
Select the hard disk you want to work with here. Information including the remaining free disk space
is also indicated.
b. “Projects” List
Select the project you want to work on here. You can also drag and drop projects to other disks in the
“Disks” list and copy projects from other disks.
You can carry out the following operations by right-clicking.
[Duplicate]
This creates copies of projects on the same hard disk.
[Change Name]
This changes the name of the project.
[Move to Trash]
This transfers the project to the trash. To completely delete projects in the trash, right-click on “Trash”
in the “Disks” list and select “Empty Trash.”
You can also transfer projects to the Trash with drag and drop.
c. Project Information
This displays information about the selected project.
d. [Done] Button
This quits Utility and returns you to the Selector screen (p. 27).
43
Page 44

Introduction to Use of the PR-50
i
a
b
c
d
e
f
g
h
j
k
l
m
System Preferences
This is displayed when “System Preferences” is selected in the Selector screen (p. 36).
fig.system01.eps
These settings affect the PR-50’s overall system environment.
a. “Language”
This sets the language used for the display.
b. “Screen refresh rate”
This sets the screen refresh rate. For more detailed information, refer to “Eliminating Flicker in the
Operational Display” (p. 102).
c. “Shortcut Key”
This sets the keys used for keyboard shortcuts.
For more details about performing tasks with keyboard shortcuts, refer to “Keyboard shortcut keys”
(p. 107).
d. “Time and date”
This sets the time and date. To make these settings, click the check box to check it, click the arrows
above or below the numbers to change them to the values you want, then click the [Set] button.
You can also use a time server to adjust the time and date automatically.
For more details about time servers, refer to “Making the Network Settings” (p. 104).
e. “Bootup Method”
This sets the method used by the PR-50 to start up when the power is turned on. When automatic
startup is selected, Presenter automatically starts up. For more details, refer to “Automatically
Starting Up Presenter” (p. 103).
f. “Power On/Off”
This sets the method used to turn on and shut off the PR-50’s power.
For more details about using this function, refer to “Using an External Power Switch to Turn the
Power On and Off” (p. 103).
44
Page 45

Introduction to Use of the PR-50
g. “Network”
This setting is used when the PR-50 is connected to a computer network. Included here are settings
for time servers used in adjusting the PR-50’s time and for copying material materials from
computers to the PR-50 when the PR-50 is connected to a network.
For more details about working with this, refer to “Making the Network Settings” (p. 104).
h. “Keyboard”
This is used for making the keyboard settings. Clicking the [Default] button restores the factory
settings.
i. “Mouse”
This is used for making the mouse settings. Clicking the [Default] button restores the factory settings.
j. “Touch Panel Display”
This includes the settings utilized when a touch panel display is used.
For more details about working with this, refer to “Using a Touch Panel Display” (p. 101).
k. “Automatic Disk Checking”
This determines whether or not the PR-50 will perform an automatic disk check at startup.
When “Automatic Disk Checking” is checked, the hard disk is automatically diagnosed and repaired
when the power is turned on, before Selector starts up. This function helps minimize hard disk
failures resulting from improper system shutdowns and other problems.
Depending on the number of files and the extent of any damage, if any, this function may increase
the time needed to start up the system.
l. [Done] Button
This quits the System Preferences and returns you to the Selector screen.
m. [Latency] Slider
This sets the playback latency of Presenter. Playback timing will be delayed by the frames indicated
(value is approximate and not exact). This is useful to adjust playback timing with slow-response
video equipment.
45
Page 46

Introduction to Use of the PR-50
POWER
Turning the Power On and Off
941
• Once the connections have been completed (p. 14), turn on power to your various devices in the
order specified. By turning on devices in the wrong order, you risk causing malfunction and/or
damage to speakers and other devices.
Turning On the Power
1.
2.
3.
4.
fig.front.power.eps
Refer to “Setting Up and Connecting Equipment” to confirm the
connections.
Turn on the power to all of the peripheral devices connected to the
PR-50.
Lower the volume on all audio equipment (amps, mixers, etc.) to their
minimum level.
Press the PR-50’s [POWER] button.
942
fig.selector.eps
5.
* This unit is equipped with a protection circuit. A brief interval (a few seconds) after power up is required before the unit
will operate normally.
Do not hold down the [POWER] button for four seconds or longer.
Selector is displayed. Select [Presenter].
The PR-50 can also be turned on by means of an external power switch. To turn on the PR-50 without
pressing the PR-50’s [POWER] button, refer to “Using an External Power Switch to Turn the Power
On and Off” (p. 103).
46
Page 47

Turning Off the Power
Introduction to Use of the PR-50
fig.playmode04.eps
1.
Turn the volume levels down completely on any audio equipment
(amps, mixers, etc.) connected to the PR-50.
2.
Turn off the power to the PR-50.
When Using Selector:
Click the [Power off] button.
When Using Presenter:
2-1. Click the [EXIT] button at the upper left of the screen.
[EXIT] button
fig.front.power.eps
fig.poweroff.eps
2-2.
The message “Do you want to shut down?” appears; click the [Power off] button.
When Using [POWER] button:
2-1. Press the PR-50’s [POWER] button.
POWER
2-2. The message “Are you sure you want to shut down?” appears; click the [OK] button.
• If a project has not been saved, the message “Would you like to save the current project?”
appears. If you want to save the project, click the [Save] button.
• Do not hold down the [POWER] button for four seconds or longer.
3.
Turn off the power to all of the peripheral devices connected to the PR-50.
47
Page 48

Introduction to Use of the PR-50
Project
Material
Palette
Clip
Clip
Clip
Clip
Clip
Clip
Clip
Video Video Video
...
...
Creating and Opening Projects
The PR-50 manages materials in what are called “projects.”
What is a Project?
Projects are the most basic unit managed with the PR-50. Materials are imported into projects, and
the projects are played back in real time in Presenter using the imported materials. Furthermore,
settings for realtime playback and the data for editing operations are also saved in projects.
The Relationship Between Materials, Clips, and Palettes
Each project contains the materials used in the project, palettes for arranging the sequence of the
fig.aboutproject.eps
materials, and clips above the palettes to be played back in real time.
Materials are imported from external video decks or other devices using the capture function.
Materials created on computers or other such data can be imported by writing them to digital video
tape or by burning them to CD-Rs as digital video stream files. Using the network function, you can
also copy materials to the PR-50 from computers.
A single project contains twenty palettes. You can arrange up to 32 materials in one palette using the
imported materials within a project.
The materials arranged in a palette are called clips. You can play back video images in real time by
selecting the clips. You can also make settings for individual clips that determine the segment to play
back (In point and End point) as well as loop playback, mode, and other settings.
Projects can be transferred back and forth between the PR-50 and DV-7 Series devices.
48
Page 49

Creating Projects
This procedure creates a new project.
Introduction to Use of the PR-50
fig.open01.eps
1.
2.
Click the “Open” button in the upper part of the Play Mode screen (p.
37) or Edit Mode screen (p. 40).
The “Open” dialog appears.
Disks list Projects list
New Open
Select the disk to which you want to save the project from the “Disks”
list.
3.
4.
5.
6.
Click the [New] button.
“New Project” appears highlighted in the “Projects” list. Use the
keyboard to enter the project name.
After entering the name, confirm it by pressing the [Enter] key on the
keyboard.
Click the [Open] button.
The created project opens.
49
Page 50

Introduction to Use of the PR-50
Opening Projects
This opens projects already saved to the PR-50.
fig.open02.eps
1.
2.
Click the “Open” button in the upper part of the Play Mode screen (p.
37) or Edit Mode screen (p. 40).
The “Open” dialog appears.
Disks list Project information
OpenProjects list
Select the disk containing the project from the “Disks” list.
3.
4.
Select the desired project from the “Projects” list.
The information for the selected project appears at the right.
Click the [Open] button.
The selected project opens.
If you select [Cancel], the selection is no longer highlighted, and the original screen returns to the
display.
To Copy or Delete a Project
When you right-click to select a project in the screen above, a context menu appears, allowing you to
copy or delete the project or change the project’s name. These operations are performed the same way
as in the Utility screen. For more details about these operations, refer to “Organizing Projects” (p. 79).
You cannot delete or change the name of a project that is currently open.
50
Page 51

Playing Back Clips
When you turn on the power to the PR-50 and click the [Presenter] button in the Selector screen,
Presenter’s Play Mode screen appears, and the most recently opened project opens.
Using the Mouse to Play Back Clips
Click on a clip thumbnail in the palette area to start playback of the clip. The clip that is currently
playing is singled out in green.
fig.playmode05.eps
Introduction to Use of the PR-50
[Stop] button
Transport control
Palette area (select the clip)
Stopping Playback
Click the [Stop] button or press the “Esc” key on the keyboard.
When playback stops, the video output screen goes black.
If the transition effect time settings have been set, the video then fades in accordance with the settings
(p. 55).
Pausing Playback
Right-click on the clip being played back or click in the transport control. Playback resumes when you
left-click on the paused clip or click in the transport control.
Selecting a Paused Clip
Use the right mouse button to select the clip. The first frame of the clip is displayed.
Moving by One Frame
Click in the transport control to move to previous frames one by one; click to advance to
later frames one at a time.
Moving by Ten Frames
Click in the transport control to move back ten frames at a time; click to advance ten frames
at a time.
51
Page 52

Introduction to Use of the PR-50
Transport control
Progress bar
Clip current time and length
Clip remaining time
Shifting a Clip’s In Point and Out Point
The point at which a clip starts playback is called the In point, and the point where it stops playing is
called the Out point. Click in the transport controls to shift to the In point, and click to shift
to the Out point. When you click this while the clip is playing, playback continues after the shift; if
you click this while the clip is paused, the clip remains paused in the shifted position.
You can set the In point and Out point individually for each clip (p. 66).
You can display the clip’s current and remaining time in the video output monitor. You can also turn
display of the transport controls on and off. For more detailed information about the video output
monitor display, refer to “About the Video Output Monitor Display.”
You cannot click blank portions of clips.
About the Video Output Monitor Display
In the video output monitor you can display the clip as it is played back as well as the clip’s current
fig.monitor01.eps
time and remaining time, the clip length, and a progress bar.
fig.monitor.menu01.eps
Using the Progress Bar
You can use this to confirm the clip’s In and Out points and the current playback position. You can
also move playback to any desired point by clicking on the point with the mouse or dragging in the
bar, regardless of whether playback is paused or not.
Reducing Flicker in the Screen During Pause
You can make settings for playback mode during pause to reduce the amount of flickering in the
screen while playback is paused.
The settings menu is displayed when you right-click on the video output monitor.
When “Pause at fields” is checked, only one of the fields is displayed. Although this allows pausing
with nothing being played during rapid interlaced recording, it results in only half the vertical
resolution. Check this item only when it is required (both odd and even fields are displayed when
this is not checked).
You can also cut flickering from interlacing of still images when importing materials (p. 78).
52
Page 53

fig.monitor.menu02.eps
fig.monitor.menu03.eps
Introduction to Use of the PR-50
Turning Displays On and Off
You can turn the video output monitor display on and off.
The settings menu is displayed when you right-click on the video output monitor.
Checked options are displayed in the video output monitor display. Unchecking an item removes it
from the display.
Turning Automatic Palette Switching On and Off
This determines whether the palette display remains as is or switches in accordance with the clip
being played when an external control device or automatic clip playback is used to trigger clips in
palettes other than the palette currently displayed.
The settings menu is displayed when you right-click on the video output monitor.
fig.playmode06.eps
Checking “Change palette view automatically” turns automatic palette switching on.
Using the Keyboard to Play Back Clips
You can also play back clips using the keyboard. The number row on the keyboard (1, 2, 3, 4, ...)
corresponds to the first row in the Palette Area, the next row (Q, W, E, R, ...) to the Palette Area’s
second row, the next row (A, S, D, F, ...) to the Palette Area’s third row, and the next row (Z, X, C, V,
...) to the Palette Area’s fourth row, and each clip is played back when the corresponding key is
pressed.
The corresponding keys are displayed
Corresponds the row of keys [1, 2, 3, ...]
Corresponds the row of keys [Q, W, E, ...]
Corresponds the row of keys [A, S, D, ...]
Corresponds the row of keys [Z, X, C, ...]
The key corresponding to each key appears in the clip’s lower left corner.
You can also select clips with the cursor key (the clip shown in white is selected) and start playback
with the space key. In addition, you can play clips in sequence with the [+] and [-] keys in the
numerical keypad.
[+] Key:
[-] Key:
Plays the clip following the clip selected but not currently playing (shown in white),
or the clip currently being played back (shown in green).
Plays the clip before the clip selected but not currently playing (shown in white), or
the clip currently being played back (shown in green).
You can disable direct playback control with the keyboard by pressing the [Caps Lock] key.
53
Page 54

Introduction to Use of the PR-50
Switching the Palette
Clicking on a palette in the palette list switches the palette.
fig.playmode07.eps
You can change the sequence of palettes, change palette names, and perform various other editing
functions in Edit mode (p. 40). For more on palette editing procedures, refer to “Editing Palettes” (p.
62) and “Making the Palette Settings” (p. 63).
For instructions on how to assign materials to palettes, refer to “Assigning Materials to Palettes” (p.
56).
Palettes list
Switching Palettes with the Keyboard
You can also switch palettes using the keyboard. You can select palettes 1–12 by pressing the
corresponding function keys on the keyboard (F1, F2, F3, ...) and palettes 11–20 by holding down the
Shift key while pressing the relevant function keys (nothing is selected when the “F11” and “F12”
keys are pressed while the Shift key is held down).
Transition Effects
This setting determines the time used to switch from a currently playing clip to playback of the next
clip. You can also select the type of transition effect to be used.
fig.playmode08.eps
[Transition Time] slider
Transition effect time
Transition effect type
54
1.
Move the [Transition Effect Time] slider to adjust the transition effect
time.
You can set this to any value from 0 to 4 seconds.
You can also increase or decrease the transition effect time with the keyboard’s [Page Up] and [Page
Down] keys.
Page 55

Introduction to Use of the PR-50
[Loop] button
2.
3.
4.
Select the type of transition effect to be used.
Selects the transition effect type you prefer.
• : The current clip fades to black, then the next clip fades in from black.
• : The current clip fades to white, then the next clip fades in from white.
• : The current clip fades to black, then the next clip starts playing back immediately.
• : The current clip fades to white, then the next clip starts playing back immediately.
Click one clip in the palette area to start playback.
When you click the clip again, the transition effect begins.
Turning Loop Playback On and Off
You can turn the Loop Mode settings on and off to have the same clip play repeatedly, play clips in
sequence, or play back another specified clip.
fig.playmode09.eps
Click the [Loop] button to switch the setting.
When the [Loop] button is lit, the clip plays according to its loop mode setting and the automatic
playback settings. When setting the loop mode, you can either assign the same setting to clips of the
entire palette, or to each video clip individually.
To assign the same setting to clips of an entire palette, refer to “Making the Palette Settings” (p. 63).
To set each clip, refer to “Setting Loop Mode for Each Clip” (p. 71). To set the automatic playback,
refer to “Setting Automatic Playback” (p. 74). When the [Loop] button is not lit, playback will stop at
the last frame or the out point of the clip (automatic playback will not be available).
55
Page 56

Introduction to Use of the PR-50
Assigning Materials to Palettes
Clips in the palette can be arranged in any order you like. You can assign materials to the clips. Select
materials from the Materials list.
fig.editmode03.eps
This procedure is carried out in the Edit Mode screen (p. 40).
Palletes list Materials list inside project
1.
2.
3.
fig.editmode04.eps
Clips list
Switch to Edit mode.
The Edit Mode screen is displayed when you click the [Edit Mode] button in the upper right of the
Play Mode screen.
Click one palette from the “Palettes” list to select the palette.
The “Clips” list for the selected palette appears.
Assign materials to the palettes as clips.
Select and drag one material from the “Materials” list and drop it in the position in the “Clips” list to
which you want the material assigned.
You can confirm the clip in the video output monitor and the material in the thumbnails.
Clip preview monitor
Thumbnail
56
When you drop a material in a position where a clip is already assigned, the earlier material is
replaced by the one you drop there.
When you select multiple materials (select materials while holding down the Shift key) and drop
them into the “Clips” list, the materials are assigned in order of the material list, starting from the
position where they are dropped.
Page 57

Introduction to Use of the PR-50
Importing Materials from Another Project
Not only can you use materials within a project, you can also import materials from other projects.
For more details about these procedures, refer to “Importing Materials from Another Project” (p. 57).
Using video sources connected to the V-4 as clips
By connecting the V-4 (Video mixer), you can also use signals via external devices connected to the
V-4 such as video decks as materials. These data will appear in the Materials list with names like “V4
INPUT2” (only when the V-4 control function (p. 93) is on). You can assign these materials as video
clips to a palette, so that you can play the signals from external videos like any other clips in Play
Mode. For more information regarding the V-4 operation, refer to “Controlling an Edirol Video
Mixer” (p. 93).
Importing Materials from External Media
You can import materials from videos, CD-Rs, and other sources. For more details about these
procedures, refer to “Capturing Video from a Video Deck or Other Device” (p. 76) and “Importing
Materials Created with a Computer” (p. 77).
Editing Palettes and Clips
You can change palette and clip names, change their sequence, and perform various other editing
functions. For more on palette and clip editing procedures, refer to “Editing Palettes” (p. 62) and
“Editing Clips” (p. 64).
57
Page 58

Introduction to Use of the PR-50
Saving Projects
fig.editmode05.eps
Click the [Save] button in the upper part of the screen. The project is updated and saved.
[Save] button
You cannot change a project’s name and then save the project under the different name. For more on
backing up projects, refer to “Copying Projects” (p. 79) and “Changing Project Names” (p. 79).
When You Want to Remake the Project Settings
If you want to revert the settings for a project (restoring the settings as they were when last saved),
click the [Open] button to open the project again. At this point a message asking whether or not you
want to save the project appears. Select “Discard.”
58
Page 59

Using V-LINK
V-LINK ( ) is a function that makes it easy to exhibit video material during musical
performances. Connecting a V-LINK compatible MIDI device to the PR-50 and pressing the V-LINK
button on the MIDI device provides you with easy control of Presenter.
fig.connection.Vlink02.eps
Connection example
Introduction to Use of the PR-50
Remote control (V-LINK)
Image output
V-Synth
Connect using an optional UM-1 or other USB-compatible MIDI interface.
Connect the USB interface to the [USB] connector on the PR-50 using a USB cable.
The USB MIDI interfaces that can be used for this function are shown below.
S-MPU64, UM-1, UM-1S, UM-1X, UM-1SX, UM-1EX, UM-2, UM-2E, UM-2C, UM-4, UM-550,
UM-880, PCR-30, PCR-50, PCR-80, PCR-M30, PCR-M50, PCR-M80, PCR-M1, PC-300
The driver software included with these units is not used by the PR-50. In addition, when connecting
multiple interfaces and using interfaces with multiple ports, set all inputs to merge (mix) and all
outputs to parallel (whereby the same signals are output).
Make these connections only with the power to all devices turned off.
Presenter must be started up before the MIDI device’s V-LINK button is pressed.
When V-LINK is turned on, you can have the set up be made in accordance with the MIDI device
rather than the PR-50’s MIDI preferences, and functions appropriate for the MIDI device can be
assigned.
UM-1
PR-50
Mouse
Projector
You cannot save changes to the PR-50’s MIDI settings made when V-LINK is active.
The main Presenter functions that can be controlled with MIDI are shown below.
• Selecting palettes
• Starting and stopping playback of clips
• Changing the retrigger point
• Changing the playback speed
• Changing the transition effect time
• Changing audio levels
• Controlling Time Trip
• Controlling output fades
59
Page 60

Introduction to Use of the PR-50
The functions that can be controlled may vary with the V-LINK compatible MIDI device.
Refer to the owner’s manual for each MIDI device for more information on the device’s compatibility.
In addition, for details on controlling with MIDI without using the V-LINK function, refer to
“Controlling Presenter with MIDI.”
When Presenter receives a MIDI System Exclusive V-LINK ON message, the V-LINK function
switches on, allowing you to set up and control Presenter using V-LINK messages. For more detailed
information on these messages, refer to the MIDI Implementation and the V-LINK Message List.
V-LINK compatible MIDI devices set up both Presenter and the MIDI device, without necessitating
any user awareness of V-LINK messages, providing easy control of Presenter during musical
performances.
The same MIDI messages are received whether the V-LINK function is on or not.
60
Page 61

Practical Use of the PR-50
Making the Settings for the Project
You can make more detailed settings for projects in Presenter’s Edit mode.
In this case, you can make the following settings.
1.
Editing Palettes → “Editing Palettes” (p. 62)
You can alter names, rearrange palette sequences, delete clips in palettes, and perform other
editing functions.
Making the Palette Settings → “Making the Palette Settings” (p. 63)
2.
You can make the Loop mode settings for all of the clips in a palette simultaneously.
Editing Clips → “Editing Clips” (p. 64)
3.
You can edit clip names, rearrange the sequence of clips, and copy and delete clips.
4.
Making the Clip Settings → “Making the Clip Settings” (p. 66)
Here you can set each clip’s Loop Mode settings, In point and Out point, volume levels, and more.
Changing the Material Settings → “Changing Material Settings” (p. 73)
5.
You can edit material names as well as copy and delete materials.
Setting Automatic Playback → “Setting Automatic Playback” (p. 74)
6.
You can have specified clips play back automatically when projects are loaded.
61
Page 62

Practical Use of the PR-50
Editing Palettes
Here you can change palette names, rearrange palette sequences, delete clips in palettes, and perform
other editing functions.
To edit a palette, right-click on the palette and work from the context menu that is displayed.
fig.edit.palette01.eps
Context menu
Clips list
Changing Palette Names
1.
Right-click on the name of the palette whose name you want to change in the “Palettes” list.
A context menu appears.
2.
Select [Rename] to highlight the palette name.
Enter the new name using the keyboard.
When you have finished typing the name, press the [Enter] key to confirm it.
3.
Rearranging Palette Sequences
Drag and drop the palettes you want to reorder right inside the “Palettes” list. The palettes are
inserted where dropped.
You can also do this with the following procedure.
Right-click on a palette whose position you want to change in the “Palettes” list.
1.
A context menu appears.
2.
Select [Swap with previous] or [Swap with next].
The palette switches positions with the one before or after it.
Deleting Content from the Palette
62
Right-click on the name of the palette whose content you want to delete in the “Palettes” list.
1.
A context menu appears.
Select [Clear palette].
2.
The palette’s content is deleted.
Displaying the Palette Window
You can edit clips and perform other operations in the Palette window. For more details about the
procedures, refer to “Editing Clips in the Palette Window” (p. 65).
Page 63

Making the Palette Settings
You can make the Loop mode settings for all of the clips in a palette simultaneously.
You can have the same clip play repeatedly, play the subsequent clip after the current clip is finished,
or specify another clip to play back.
This function is convenient in situations such as when you need the clips in a palette played back
automatically one after another.
fig.edit.palette01.eps
Context menu
Practical Use of the PR-50
1.
2.
fig.edit.palette02.eps
3.
Clips list
Right-click on the palette whose Loop Mode settings you want to set in the “Palettes” list.
A context menu appears.
Select [Set loop mode of all clips to].
A submenu appears.
submenu
Make the Loop mode settings.
• One shot
Playback stops at the final frame in the clip or at the Out point set in the clip settings (p. 66).
• Loop
The clips are played back continuously.
• Play Next Clip
The current clip is played back to the end, and the next clip is played.
• Select Next Clip
The current clip is played to the end, and then playback pauses at the first frame of the next clip.
• Play Target Clip
When playback of the current clip is finished, the clip specified in the loop mode settings (p. 71) is
played back.
63
Page 64

Practical Use of the PR-50
Editing Clips
You can change clip names, rearrange clip sequences, copy and delete clips, and perform other
editing functions.
To edit a clip, right-click on the clip and work from the context menu that is displayed.
context menu
"Clip" list.
Changing Clip Names
You can change the clip names independently of the materials.
Right-click on the name of the clip whose name you want to change in the “Clips” list.
1.
A context menu appears.
Select [Rename] to highlight the clip name.
2.
Enter the new name using the keyboard.
3.
When you have finished typing the name, press the [Enter] key to confirm it.
Rearranging Clip Sequences
Drag and drop the clips in the “Clips” list to rearrange the clip sequence.
Searching Clip Materials
This searches for materials assigned to the clips.
Right-click on the name of the clip containing the material you want to find in the “Clips” list.
1.
A context menu appears.
2.
Select [Find material].
The materials assigned to the clip are selected in the “Materials” list.
Copying Clips to Other Locations and Palettes
64
Right-click on the name of the clip you want to copy in the “Clips” list.
1.
A context menu appears.
2.
Select [Copy].
Right-click on the location (even in another palette) where you want to paste the clip copied
3.
in the “Clips” list.
A context menu appears.
4.
Select [Paste].
The copy of the clip is assigned to that location.
Page 65

Practical Use of the PR-50
Cutting and Moving Clips to Other Locations and Palettes
1.
Right-click on the name of the clip you want to cut in the “Clips” list.
A context menu appears.
Select [Cut].
2.
3.
Right-click on the location (even in another palette) where you want to paste the cut clip in
the “Clips” list.
A context menu appears.
4.
Select [Paste].
The cut clip is assigned that location.
Removing Clips
Right-click on the name of the clip in the “Clips” list you want to remove.
1.
A context menu appears.
Select [Clear].
2.
The clip is removed.
* Materials are not deleted when clips are removed.
Changing the Size of the Thumbnails in the “Clips” list
Right-click on the “Clips” list.
1.
A context menu appears.
Select [Appearance].
2.
A submenu appears.
Select the display size.
3.
Select “Large” to display larger thumbnails, “Medium” for normal size, or “Small” for smaller-size
thumbnails.
Editing Clips in the Palette Window
You can edit clips in the Palette window.
Right-click on the “Palettes” list.
1.
A context menu appears.
Select [Open palette window].
2.
The Palette window opens.
Context menu
* You can also open the Palette window by double-clicking in the “Palettes” list.
Select and right-click on the clip you want to edit.
3.
Select the parameter you want to edit.
You can rearrange clip sequences and load materials in the Palette window.
You can rearrange the sequence of clips by dragging and dropping them in the Palette window. You
can also easily arrange materials in the Palette window by dragging and dropping from the “Clips”
list or “Materials” list.
65
Page 66

Practical Use of the PR-50
Making the Clip Settings
Here you can set each clip’s Loop Mode settings, In point and Out point, volume levels, and more.
Clip settings are made in the Parameter Area.
Parameters area
Setting the Clip Playback Segment
This sets the clip’s In point and Out point.
1.
Click on the clip whose playback segment you want to change in the “Clips” list.
Use the time slider in the “Parameters” Area to move the preview cursor to the frames you
2.
want to set as the In point and Out point.
Preview cursor
Current time
The current time is indicated beneath the preview cursor.
66
Page 67

You can move the cursor in the following ways.
Transport control
3.
Dragging the Preview Cursor with the Mouse
You can play back scrubs by dragging the preview cursor with the mouse (p. 70).
Right-click the Time Slider with the Mouse
Time slider Context menu
A context menu appears, allowing you to shift to the following points.
• [Jump to top frame]
• [Jump to end frame]
• [Jump to in point]
• [Jump to out point]
Practical Use of the PR-50
fig.clip03.eps
fig.clip04.eps
Using the Transport Control
• : Return to first frame • : Advance to last frame
• : Go back 1 frame • : Advance 1 frame
• : Go back 10 frames • : Advance 10 frames
• : Start playback • : Stop playback
Using the In Point and Out Point Settings Icons
Jump to out point
Jump to in point
• : Jump to In point
• : Jump to Out point
67
Page 68

Practical Use of the PR-50
Time slider Context menu
Using the Keyboard Shortcuts
• Shortcut key + [Shift] + [←]: Go back 10 frames
• Shortcut key + [Shift] + [
• Shortcut key + [←]: Go back 1 frame
• Shortcut key + [
Shortcut key is set in the [Preferences] in Selector. This is set to the [Ctrl] key at the factory. For more
detailed information, refer to “System Preferences” (p. 44).
Using the Optional DV-7DLC
• JOG/Shuttle Dial
• : Return to first frame
• : Go back 10 frames
• : Advance 10 frames
• : Pause
]: Advance 10 frames
→
]: Advance 1 frame
→
•
•
•
: Go back 1 frame
: Advance 1 frame
: Advance to last frame
fig.clip02.eps
fig.clip05.eps
• : Playback
4.
After deciding on the frame, set the In point or Out point as shown below.
• Right-click the time slider
A context menu appears, and you can then make the following settings.
• [Set in point]
• [Set out point]
• : Play from In point to Out point
Using the In Point and Out Point Settings Icons
Out point
68
In point
• Sets the In point
• : Sets the Out point
• : Plays back from the In point to the Out point
Page 69

fig.clip02.eps
Deletes in point
Deletes out point
Practical Use of the PR-50
Using the Optional DV-7DLC
• : Sets the In point
• : Sets the Out point
• : Plays back from the In point to the Out point
When you set the In point, the In point is then automatically assigned to each of the clip thumbnails.
You can also right-click the time slider with the mouse and select [Set thumbnail frame] to assign the
frame that appears at the preview cursor position to each of the clip thumbnails.
5.
You can delete the In point and Out point in the following ways.
Right-click the Time Slider with the Mouse
fig.clip06.eps
Time slider Context menu
• [Delete in/out point]
Using the In Point and Out Point Settings Icons
• : Deletes the In point
• : Deletes the Out point
69
Page 70

Practical Use of the PR-50
Setting the In Point and Out Point While Playing the Audio
You can set the In point and Out point as the audio is being played.
Select a clip in Edit mode.
1.
Press in the upper left of the clip parameter Preview Area to switch on scrub playback
2.
with audio.
The button changes to .
fig.clip07.eps
When On
When Off
fig.clip02.eps
3.
Drag the time slider.
The audio track plays back in accordance with the time slider.
When playback is paused, playback of the audio for that frame is looped.
Set the desired In point and Out point.
4.
5.
Press to switch off scrub playback with audio.
The button switches to .
Specifying Clip Thumbnails
You can specify the thumbnails for clips shown in the palette.
1.
Drag the time slider with the mouse to the point where the image you want to specify as the
thumbnail appears, then right-click.
Time slider Context menu
When you select “Set thumbnail frame,” the thumbnail switches to the currently displayed image.
70
Page 71

fig.loop.eps
Practical Use of the PR-50
Setting Loop Mode for Each Clip
You can make separate Loop mode settings for each clip.
When this is turned on, each clip plays in accordance with its own Loop Mode setting. You can have
the same clip play continuously or play the next clip when the current one is finished. You can also
have another specified clip play after the current clip is played back. These functions allow you to
program the playback sequence of the clips.
The Loop mode settings are enabled when Loop playback is on (p. 55).
Select the clip whose Loop mode settings you want to set in the “Clips” list.
1.
Select the “Loop mode” setting.
2.
• One shot
Playback stops at the final clip in the frame or at the Out point set in the clip settings (p. 66).
fig.clip.audio.eps
• Loop
The clips are played back continuously.
• Play Next Clip
The current clip is played back to the end, and the next clip is played.
• Select Next Clip
Playback stops at the final frame in the clip or at the Out point set in the clip settings (p. 66).
• Play Target Clip
When the current clip is finished playing, the specified clip is then played back. Specify clips by
selecting the palette number and clip number.
Each clip’s Loop mode appears in the clip’s image in the palette in Play mode.
Setting the Volume for Each Clip
You can adjust the volume level of each clip independently of the others. Adjust clip volume levels
individually when, for example, there are discrepancies in the levels from one clip to another.
Select the clip whose volume setting you want to set in the “Clips” list.
1.
2.
Move the slider to adjust the volume level.
You can return the parameters to their standard settings by right-clicking the slider and then selecting
“Defaults.”
The setting items described below have been added to the Presenter’s Edit mode.
71
Page 72

Practical Use of the PR-50
Setting the Playback Speed for Each Clip
You can set the playback speed independently for each individual clip.
Click the Extended Parameters tab.
1.
Move the Playback Speed slider to adjust the playback speed.
2.
The number above the slider indicates the playback speed. You can make the setting for reverse
playback by making this number negative.
Setting the Playback Start Point for Each Clip
You can set the point where playback starts independently for each individual clip.
Click the Extended Parameters tab.
1.
Click to select either “Start Playback from In Point” or “Start Playback from Thumbnail” as the
point to start playback.
72
Page 73

Changing Material Settings
You can change material names, copy and delete materials, and perform other tasks.
To change a material’s settings, right-click on the material whose setting you want to change and
work from the context menu that is displayed.
fig.edit.material.menu01.eps
Practical Use of the PR-50
Context menu
Materials list
Changing Material Names
1.
Right-click on the material whose name you want to change in the “Materials” list.
A context menu appears.
Select [Rename] to highlight the material name.
2.
Enter the new name using the keyboard.
When you have finished typing the name, press the [Enter] key to confirm it.
3.
Copying Materials to the “Clips” list
Right-click on the material you want to copy in the “Materials” list.
1.
A context menu appears.
Select [Copy].
2.
Right-click on the location in the “Clips” list where you want to paste the clip copied in the
3.
“Materials” list.
A context menu appears.
Select [Paste].
4.
The copy of the material is assigned to that location.
Deleting Materials
1.
Right-click on the material you want to delete in the “Materials” list.
A context menu appears.
Select [Delete].
2.
The material is completely deleted from the hard disk.
This procedure completely removes the material from the hard disk; always confirm that you indeed
want to delete the material before you delete it.
73
Page 74

Practical Use of the PR-50
Project
Changing Material Thumbnail Images
1.
Click on the material whose thumbnail image you want to change in the “Materials” list.
Move the thumbnail slider in the “Information” Area.
2.
fig.editmode07.eps
Preview
Thumbnail slider
The thumbnail switches to the frame shown at the current slider position.
3.
Setting Automatic Playback
You can have clips play back automatically when projects are loaded.
These settings are made in Edit mode.
fig.editmode08.eps
1.
Put a check in the check box in the “Project” Area.
fig.project.eps
74
Select the palette number and clip number.
2.
The selected clip plays back automatically when the project is loaded.
If you check “Keep this clip running,” the screen does not go black when a clip is finished playing
(this includes stopping playback with the “Stop” button or “Esc” key on the keyboard), but the
specified clip is played instead.
Clips do not play back automatically when Loop playback is off in Play mode (p. 55).
Page 75

Importing Materials
Select disk Select material
Select project
Import button
Cancel button
Importing Materials from Another Project
You can import materials from other projects.
Click the [Import] button at the lower right of the Edit Mode screen.
1.
The “Import material” dialog is displayed.
fig.import01.eps
Practical Use of the PR-50
Select the import source disk in the “Disks” list and the import source project in the “Projects”
2.
list.
Select the material you want to import, then click the [Import] button.
3.
You can confirm the material in the Project Area to the right.
To select multiple materials, hold down the [Shift] key as you select.
When you have finished importing, press [Cancel] to close the dialog.
4.
When you use the above procedure in “Import material here,” which appears after you select a clip
in the “Clips” list or Palette window, and then right-click, you can import and use the material as a
clip at that position.
75
Page 76

Practical Use of the PR-50
Capturing Video from a Video Deck or Other Device
This procedure captures video from a video deck or other device.
Click the [Capture] button at the lower right of the Edit Mode screen.
1.
The “Capture” screen appears.
fig.capture01.eps
Select input Stop button
Monitor
2.
Use the keyboard to enter the name of the material to be newly captured.
Select the connector to which the video deck or other device is connected.
3.
Start playback of the external device.
4.
You can see the playback in the monitor.
When you connect a deck to the PR-50 with a DV cable and select “DV” input, you can operate the
deck with transport buttons in the screen.
5.
Click the [Start] button to begin capturing.
Click the [Frame] button to capture a single frame.
If instead of the [Frame] button you press the [Auto-cut] button, the material is automatically
segmented at the points where the scenes change and then saved. In this case, the materials are
automatically given names such as “Title-0001” and “Title-0002.”
Click the [Stop] button to stop capturing.
6.
It makes the captured video into a single material.
If you click the [Cut] button, it segments the captured video at your click timing. In this case, the
materials are automatically given names such as “Title-0001” and “Title-0002.”
Start recording button [CLOSE] button
76
7.
Click the [Close] button to close the “Capture” screen.
The captured material appears in the material list in Edit mode.
8.
The imported material is indicated by a name such as “Title-0001.”
Page 77

Importing Materials Created with a Computer
You can use CD-ROMs, CD-Rs, and CD-RWs to import video materials created on computers into
projects. You can also import data in the same manner from memory cards using an optional card
reader.
This feature is compatible only with systems meeting the following specifications.
• CD-ROM/CD-R/CD-RW Format
ISO9660 Level 2, HFS, or Microsoft Joliet Mode 1 format (not compatible with other operating
systems’ extended formats)
• Memory Card Format
FAT16 or FAT32 format
• File Format
Animation: DV stream files
Still: JPEG files
• Data Format (CODEC)
Animation: DV, NTSC/PAL (differing according to regional specification), 48 kHz,
16-bit PCM Audio
Still: JPEG (4:3 [Horizontal:Vertical] Aspect Ratio)
Use single-session, write-at-once for creating CD-Rs, CD-RWs, or CD-ROMs. This feature is not
compatible with packet-write and multi-session methods.
Practical Use of the PR-50
For more detailed information, refer to the owner’s manuals for your computer and video editing
software.
You can import materials using video editing software on a computer with the capture function (p.
76). You can also use the network function (p. 104) to copy materials to the PR-50 from a computer.
1.
Press the Eject button on the PR-50’s front panel to open the CD-ROM drive’s disk tray.
If using a memory card, insert the card into the card reader, then press [Import] at the lower right of
the Edit Mode screen, and proceed to Step 4.
Place the disk containing the material or materials in the tray, then press the Eject button to
2.
close the tray.
77
Page 78

Practical Use of the PR-50
After the sound of the drive spinning abates, click the [Import] button at the lower right of the
3.
Edit Mode screen.
The “Import material” dialog is displayed.
fig.import02.eps
Select a disk
Select materials
Select a directory
If the disk does not appear in the screen, click the “Rescan” button in the dialog.
4.
Select the disk you want to import from the “Disks” list.
Select the material you want to import in the “Materials” list, then click the [Import] button.
5.
To select multiple materials, hold down the [Shift] key as you select.
You can cut down on interlacing problems when selecting still images by importing with “Apply
field smooth to still images” checked at the bottom center of the dialog.
6.
Select the disk in the “Disks” list and click the [Eject] button.
If you select a CD, the disk tray opens; remove the disk from the tray.
Remove the card from the card reader.
If you want to continue importing from other disks, insert a disk as described in Step 1.2
7.
above, and after the sound from the drive’s spinning abates, click the [Rescan] button.
8.
When you have finished importing, eject the disk as described in Step 6 above, then press
[Cancel] to close the dialog.
78
• When you use the above procedure in “Import material here,” which appears after you select a
clip in the “Clips” list or Palette window and then right-click, you can import and use the
material as a clip at that position.
• Materials copied from computers connected to a network (p. 104) are copied to the “IMPORT”
folder in the “Disks” list. Load these materials from the “IMPORT” folder.
Page 79

Organizing Projects
You can create copies of projects on the hard disk and change their names.
These operations are carried out in the Utility screen (p. 43).
fig.utility02.eps
Disks list Project information
Practical Use of the PR-50
Copying Projects
Duplicating Projects on the Same Hard Disk
Click Selector’s [Utility] button.
1.
The Utility screen appears.
Select the disk you want to work with from the “Disks” list.
2.
3.
Right-click on the project you want to duplicate in the “Projects” list.
A context menu appears.
Select [Duplicate]. The project “~Project Name~copy” is created on the same hard disk.
4.
Copying Projects From One Hard Disk to Another
Click Selector’s [Utility] button.
1.
The Utility screen appears.
Select the copy source disk in the “Disks” list.
2.
Drag the project you want to copy from the “Projects” list.
3.
4.
Drop the project in the copy-destination disk in the “Disks” list.
Changing Project Names
Projects list Done
Click Selector’s [Utility] button.
1.
The Utility screen appears.
2.
Select the disk you want to work with from the “Disks” list.
Right-click on the project whose name you want to change in the “Projects” list.
3.
A context menu appears.
4.
Select [Rename] to highlight the project name. Enter the name with the keyboard.
When you have finished typing the name, press the [Enter] key to confirm it.
5.
79
Page 80

Practical Use of the PR-50
Deleting Projects
Moving Projects to the Trash
Click Selector’s [Utility] button.
1.
The Utility screen appears.
2.
Select the disk you want to work with from the “Disks” List.
Right-click on the project you want to delete in the “Projects” List.
3.
A context menu appears.
4.
Select “Move to Trash.”
You can also delete projects by dragging the projects and dropping them in the “Trash” in the “Disks”
list.
You cannot remove a currently selected project.
Completely Deleting Projects from the Trash
Click Selector’s [Utility] button.
1.
The Utility screen appears.
2.
Right-click on “Trash” in the “Disks” list.
A context menu appears.
Select [Empty Trash].
3.
4.
When the message “Do you want to empty trash?” appears, click [OK].
Emptying the Trash with this procedure completely removes the project from the hard disk; always
confirm that you indeed want to delete the project before you delete it.
Initializing a Removable Disk
Click Selector’s [Utility] button.
1.
The Utility screen appears.
2.
Right-click on a removable hard disk in the “Disks” list.
A context menu appears.
3.
Select [Initialize].
4.
A screen appears requesting you to confirm that you want to initialize the disk; follow the
instructions to proceed.
80
Initializing the disk with this procedure completely removes the project from the hard disk; always
confirm that you indeed want to delete the project before you delete it.
Page 81

Using Scheduler to Control Presenter
You can use the Scheduler function to play the clips you want at any time you like. You can also
program it to stop playback and shut down the PR-50 at the desired time as well.
Use of Scheduler requires that the PR-50’s time be set. You can set the time in the “System
Preferences” (p. 44).
You can also synchronize the PR-50 with the time data from a network time server and have the time
adjusted automatically (p. 104).
You can click the [Clock] button to open the “Schedule Editor” screen and make settings for the
schedule.
Adding Schedules
Click the [Add] button at the lower left of the “Schedule Editor” screen to create a new schedule.
Deleting Schedules
In the “Schedule Editor” screen, select the schedule you want to delete, then click the [Delete] button
at the lower left of the “Schedule Editor” screen.
Practical Use of the PR-50
Setting the Schedule
1.
Click the [Clock] button at the upper left of the Presenter screen.
fig.scheduler01.eps
The “Schedule Editor” screen appears.
Selects the month, Day, Week, Hour and minute
Selects the palette and clip
Selects the operation
[Scheduler] button
Click below “Month” and select the month.
2.
If the month is not to be specified, select “*” (for example if you only want to specify the day of the week).
3.
Select the “Day,” “Week,” “Hour,” and “Minute” in the same manner.
If this information is not to be specified, select “*” (“*” cannot be selected for “Minute”).
81
Page 82

Practical Use of the PR-50
Select the operation you want performed at the specified time.
4.
• “Play”: Begins playback at the specified time.
• “Stop”: Stops playback at the specified time.
• “Shutdown”: Shuts down the PR-50 at the specified time.
• “Reboot”: Restarts the PR-50 at the specified time.
• “Time Adj”: Accesses the time server over the network at the specified time and
If “Play” is selected, also select the clip to be played back.
5.
Select a palette, then select the clip.
You can set the clips’ Loop mode settings (p. 71) and program the clip sequence to have clips play
back at any time you like.
Click [Save] to save the settings.
6.
If you click [Close] here, the screen is closed without the settings being saved.
Activating Scheduler
corrects the time.
1.
Click the [Scheduler] button at the bottom of the “Schedule Editor” screen to highlight it in
orange.
The Scheduler function is switched on. The selected operation is then carried out at the time specified
in the settings.
The Scheduler’s operational mode is indicated by the manner in which the “Clock” button lights.
Schedules set in Scheduler and Scheduler On/Off settings can be saved individually to different
projects. Scheduler is stopped when the Selector screen is active (with no project being opened). You
cannot play back and stop clips with Scheduler when Presenter is in Edit mode.
82
Page 83

Controlling Presenter with MIDI
In addition to the keyboard and mouse, you can also control Presenter in various ways using any of
a number of different external control devices.
Switch Presenter to Play mode (p. 37) when controlling it with an external device.
Using MIDI Devices
Using an optional USB MIDI interface, you can control the PR-50 in a variety of ways from a MIDI
device.
Connect the USB interface to the [USB] connector on the PR-50 with a USB cable.
The USB MIDI interfaces that can be used for this function are shown below.
S-MPU64, UM-1, UM-1S, UM-1X, UM-1SX, UM-1EX, UM-2, UM-2E, UM-2C, UM-4, UM-550,
UM-880, PCR-30, PCR-50, PCR-80, PCR-M30, PCR-M50, PCR-M80, PCR-M1, PC-300
The driver software included with these units is not used by the PR-50. In addition, when connecting
multiple interfaces and using interfaces with multiple ports, set all inputs to merge (mix) and all
outputs to parallel (whereby the same signals are output).
Practical Use of the PR-50
Playing Clips
Set the MIDI preferences.
These settings are saved without regard to the project.
With these settings made, you can use a MIDI device for the following operations.
Selecting Palettes
Palettes are selected with the Bank Select MSB. Values range from 0 to 19.
Playing Clips
Clips are selected and played back with Program Changes. Values range from 0 to 31.
Controlling the Playback Speed
This is set in Step 3.
Setting the Transition Effect Time
This is set in Step 4.
Adjusting the Volume
You can adjust the volume level. This is set in Step 5.
Setting the Time Trip Pad
You can make the settings for the Time Trip pad, featured on V-Synths and other instruments. This
is set in Step 6.
Stopping Playback of Clips
Playback of the clips stops when an All Note Off message is received (followed by a black screen).
Resetting the Playback Speed Changes and Transition Effect Time
Reset All Controllers sets the playback speed to the standard default speed and the transition effect
time to 0 seconds.
83
Page 84

Practical Use of the PR-50
Select a MIDI message
Click the [MIDI Preferences] button in Play mode or Edit mode.
1.
2.
Set the MIDI channel to be used for playback of the clip in “Rx Channel” in “Clip Control.”
fig.midi01.eps
3.
If controlling the playback speed via MIDI, set the MIDI message to be used in “Speed
Control” (controls are not accepted via MIDI when this is set to [OFF]).
The playback speed is controlled with the selected MIDI message.
fig.midi02.eps
Select the RX channel
fig.midi03.eps
When controlling the playback speed, set the “Speed Control Range” (the value is set in terms of a
range of multipliers that can be applied to the standard speed).
Speed Control Range
Numerals in the “Speed Control Range” indicate, from left to right, the minimum MIDI value (0),
center value (64), and maximum value (127). When selecting a range starting from 0 in the “Speed
Control Range,” playback is paused when the value is set at 0.
84
Page 85

fig.midi04.eps
Practical Use of the PR-50
If the transition effect time is controlled via MIDI, set the MIDI message to be used in
4.
“Trans. Time Control” (controls are not accepted via MIDI when this is set to [OFF]).
The transition effect time setting is controlled with the selected MIDI message.
Select a MIDI message
fig.midi04a.eps
The transition effect time (0.0–4.0 seconds) corresponds to the MIDI value (0–127).
For more details about selecting the transition effect time, refer to “Transition Effects” (p. 54).
5.
If you wish to control the volume from the MIDI device, set the MIDI message at the “Audio
Level Control” pull-down menu (if “OFF” selected, it cannot be controlled using the MIDI
device).
Control the volume with the selected MIDI message.
Select a MIDI message
85
Page 86

Practical Use of the PR-50
Select a MIDI message
Mark the checkbox
Set the MIDI messages for use with the Time Trip Pad featured on V-Synths and other
6.
instruments (MIDI controls cannot be received if the check box is not checked).
The selected MIDI message is controlled with the Time Trip Pad.
You can use the Time Trip Pad to play back clips. Simply press the pad to stop playback, rotate to the
right to have the clip play back according to the speed with which you rotate the pad, rotate to the
left to play back in reverse, and release the pad to resume ordinary playback.
Set the Time Trip Pad’s horizontal axis.
fig.midi05.eps
Select a MIDI message
Mark the checkbox
fig.midi06.eps
Set the Time Trip Pad’s vertical axis.
7.
Click the [Done] button
86
Page 87

fig.midi07.eps
Practical Use of the PR-50
Controlling Fades
Set the MIDI preferences.
These settings are saved without regard to the project.
With these settings made, you can use a MIDI device for the following operations.
Controlling Fades
This controls fading applied to the final output video (output fade). This is set in Step 7.
1.
Click the [MIDI Preferences] button in Play mode or Edit mode.
Set the MIDI channel to be used for the fade control with the “Rx Channel” setting in “Color/
2.
Brightness Control.”
Select the Rx Channel
fig.midi08.eps
The MIDI message that sets the fade applied to the final video output is set by means of
3.
“Output Fade” in “Color/Brightness Control” (controls are not accepted via MIDI when this is
set to [OFF]).
The fade applied to the final video output is set with the selected MIDI message.
Select a MIDI message
The range of MIDI values, 0–64–127, corresponds to the minimum to maximum values for the
parameter.
You can select the polarity of the control with the box on the right side. Select “+” to set the
parameters targeted for MIDI control to [0: normal playback–64: 50% white fade–127: 100% white
fade], “-” for [-127: 100% black fade—64: 50% black fade–0: normal playback], and “+/-” for [-127:
100% black fade–0: normal playback–127: 100% white fade].
Presenter’s output fade cannot be controlled with MIDI while the V-4 control function (p. 93) is on.
Click the [Done] button
4.
87
Page 88

Practical Use of the PR-50
Using a MIDI Keyboard to Play Back Clips
You can use a MIDI keyboard as an intuitive user interface to directly select and play back clips. This
is perfect for use in video performances.
Not only can you connect a MIDI keyboard to the UM-1 or other USB MIDI interface using a MIDI
cable, you can also connect an optional PC-300, PCR-30, PCR-50, or PCR-80 USB keyboard directly to
the PR-50. Connect the PC-300, PCR-30, PCR-50, or PCR-80 with a USB cable to the [USB] connector
on the PR-50.
Connect these keyboards only while the power is turned off. Set the POWER switch on the PC-300,
PCR-30, PCR-50, or PCR-80 to [USB] (no AC adaptor is needed).
Set the MIDI preferences.
These settings are saved without regard to the project.
With these settings made, you can use a 49-key MIDI keyboard for the following operations.
Selecting Palettes
You can use the black keys to switch palettes. Palettes are switched when a black key is held down
for at least 0.5 seconds. Palettes 1–20 are assigned to the black keys, in order from left to right, starting
from the far left.
fig.midi09.eps
Playing Clips
You can play back clips with the white keys. Playback is started by Note On messages, so it is not
necessary to hold down the keys. Clips 1 to 28 are assigned to the white keys, in order from left to
right, starting from the white key at the far left (Note Number: 24H).
Controlling the Transition Effect Time
You can control the transition effect time with the force used to play the keys. Transition effects take
effect quickly when the keys are pressed firmly, and they take effect slowly when the keys are pressed
slowly (when the transition effect times is set in Play mode). This is set in Step 4.
Setting the Clip Retrigger Point
When the same white key is held down, the same clip is repeatedly played (retriggered) from the
beginning of the clip (or the In point). You can preset the starting point at which the repeated
playback begins (the retrigger point).
For more details about making this setting, refer to “Setting the Clip Retrigger Point” (p. 90).
Click the [MIDI Preferences] button in Play mode or Edit Mode.
1.
Settings determining the MIDI channels, control of the playback speed and transition effect
2.
time, switching Insert Playback on and off, and other such settings reflect the settings from
“Playing Clips” (p. 83) in “Using MIDI Devices.”
3.
Check the “Note Mode” check box in “Clip Control” and then check “49-Key MIDI Keyboard.”
This switches on 49-Key MIDI Keyboard mode.
88
Mark the checkbox
Page 89

fig.midi10.eps
Practical Use of the PR-50
In 49-Key MIDI Keyboard mode, the clips are assigned to the white keys of the 49-key keyboard. The
4 x 8 display in the Play mode Palette Area and the Edit mode Palette window changes to 4 x 7, thus
showing one octave per row.
The corresponding note names are displayed in the clip thumbnails in Play mode.
fig.midi11.eps
You can assign clips to all of the MIDI keyboard’s keys (p. 90).
Clips 29 through 32 cannot be played back in 49-Key MIDI Keyboard mode.
You can use the force with which the keys are played (velocity) to control the set transition
4.
effect time. When the keys are played with maximum force (velocity = 127), the transition
effect time is the product of the setting’s value multiplied by zero, and when the keys are
played with minimum force (velocity = 1), it is the product of the setting’s value multiplied by
one. This magnification curve is set with the “Velocity Curve Type” setting in “49-Key MIDI
Keyboard mode.”
Select the Velocity Curve Type
5.
Click the [Done] button.
89
Page 90

Practical Use of the PR-50
To Assign Clips to All of the MIDI Keyboard Keys
1.
Check the “Note Mode” check box in “Clip Control” from Step 3 above, then check “Set Key
Range.”
fig.midi12.eps
Click “Set from MIDI” to highlight it.
2.
3.
Specify the range of notes with the MIDI keyboard connected to the PR-50.
Hold down the key for the lowest pitch and press the key for the highest pitch; the specified range
is shown in the display.
The clips corresponding to the notes within this range are assigned to the keys.
Mark the checkbox
[Set from MIDI] button
Range of notes
Setting the Clip Retrigger Point
When the same white key is held down, the same clip is repeatedly played (retriggered) from the
beginning of the clip (or the In point). You can preset the starting point at which the repeated
playback begins (the retrigger point).
1.
Hold down a white key for at least one second.
View the clip as it is played back, then release the key when the clip reaches the point that
2.
you want to set as the retrigger point.
The clip is played again either when playback reaches the end of the clip or when you
3.
press the same key before switching to another clip.
The retrigger point is cleared when playback reaches the end of the clip or when you switch to
another clip.
After setting a retrigger point, you can set it again by holding down the same key for at least one
second.
Retriggering with the transition effect time setting enabled may result in fading out of the functions,
making the effect unclear.
90
Page 91

fig.midi13.eps
Practical Use of the PR-50
About System Exclusive Messages
Presenter is capable of receiving System Exclusive messages from other MIDI devices. Using this
function enables you to set the Device ID required for receiving these messages. In addition, when
using the PR-50 to control another Presenter (such as another PR-50 or the DV-7PR), or when setting
the PR-50 as the controlled device, make sure that the “Presenter Control” Device ID set in the MIDI
preferences for the controlling device matches the PR-50’s Device ID.
Set the MIDI preferences.
These settings are saved without regard to the project.
Click the [MIDI Preferences] button in Play mode or Edit mode.
1.
2.
Set the PR-50’s Device ID to enable reception of System Exclusive messages.
Select a Device ID
3.
Click the [Done] button.
For more details about this function and how to make the settings, refer to the “MIDI
implementation (Presenter)” (p. 108).
Messages carrying Device ID 7FH are received regardless of the settings (Broadcast messages).
91
Page 92

Practical Use of the PR-50
Select a Device ID
Controlling Other Devices with the PR-50
Controlling Another Presenter
You can control a number of other Presenters (such as other PR-50s or the DV-7PR) from the PR-50.
With the PR-50’s control function enabled, you can make settings for transition effect times and for
selecting palettes and clips.
Set the PR-50 as the master, and the other Presenter as the slave. Connect the PR-50 and the Presenter
functioning as the slave to a UM-1 or other USB MIDI interface, and use a MIDI cable to connect the
MIDI OUT of the MIDI interface for the master PR-50 to the MIDI IN of the slave Presenter.
When controlling other Presenters, start up the slave Presenter first and set the Device ID in “System
Exclusive Messages” in the “MIDI Preferences” (p. 91). Then make the settings for the master
Presenter as described below.
Set the Device ID for the slave Presenter.
1.
For instructions on how to set the Device ID, refer to “About System Exclusive Messages” (p. 91).
Click the [MIDI Preferences] button in Play mode or Edit mode on the master Presenter.
2.
fig.midi14.eps
fig.midi15.eps
Set the Device ID used for Presenter Control.
3.
Match this to the slave’s Device ID.
When set to Broadcast, control messages can be transmitted, regardless of the slave device’s settings.
4.
Check the “Presenter Control” check box.
The Presenter Control function is enabled, and the PR-50 is set as the master.
Mark the Checkbox
92
5.
Click the [Done] button.
If you find the controls are not working well, try turning off the control function (uncheck the check
box) and turn it on again (check the box again).
Response rates for DV-7PR and PR-50 Presenters differ.
Page 93

Controlling an Edirol Video Mixer
Using a video mixer from Edirol (such as the V-4 or V-440HD) in combination with the PR-50 lets you
control the video mixer using the PR-50. When you do this, you can take the video input to the video
mixer from the external source and work with it as clips using the PR-50. Additionally, you can use
an external MIDI device to control the video mixer’s effect settings and fade the final video output.
Using MIDI cables, connect a USB MIDI interface to the PR-50 and connect the MIDI
1.
interface’s MIDI OUT to the video mixer’s MIDI IN.
For more information about USB MIDI interfaces, refer to p. 83.
Input the video output from the PR-50 to the video mixer.
2.
Turn on the power to the PR-50 and the video mixer.
3.
When you’re making the connection, first turn on the power to the video mixer, then turn on the
PR-50.
Set the Device ID for the video mixer.
4.
For instructions on how to set the Device ID, refer to the owner’s manual that came with the video
mixer.
5.
If you’re in the Play mode, click the [Preferences] button and then the [MIDI Preferences]
button. If you’re in the Edit mode, click the [Preferences] button.
Practical Use of the PR-50
Use “Device ID” to set the Device ID for “Video Mixer Control.”
6.
Select the same Device ID as the one you set for the video mixer in Step 4.
When set to Broadcast, control messages can be transmitted regardless of the setting for the video
mixer.
Select a Device ID
Use “Presenter Connection Input” to set the input channel on the video mixer used to input
7.
PR-50 video in Step 2.
93
Page 94

Practical Use of the PR-50
Set "Presenter => External Latency"
Set "External => Presenter Latency"
Go to “Video Mixer Control” and use “VFX1 Control” to set the MIDI message that controls the
8.
video mixer’s effects.
(Controls are not accepted via MIDI when this is set to [OFF].)
The effects are controlled with the selected MIDI message.
A MIDI value of 0 corresponds to “OFF,” and values 1 through 127 correspond to “ON” (or to
changes in the parameter if the effect has variable parameters). Set “VFX2 Control” through “VFX4
Control” in the same way.
Some video mixers may not support this feature.
Go to “Color/Brightness Control” and use “Output Fade” to select the MIDI message that
9.
controls the fade applied to the video mixer’s final video output.
(Controls are not accepted via MIDI when this is set to [OFF].)
Select a MIDI message
The fade applied to the video mixer’s final video output is controlled by the selected MIDI message.
The range of MIDI values, 0–64–127, corresponds to the range of the minimum to maximum values
for the parameter.
You can use the box on the right side to select the polarity of the control. Select “+” to set the
parameter targeted for MIDI control to [0: normal playback – 64: 50% white fade – 127: 100% white
fade], “-” for [127: 100% black fade – 64: 50% black fade – 0: normal playback], and “+/-” for [-127:
100% black fade – 0: normal playback – 127: 100% white fade].
With the V-1/LVS-400/V-4/V-8, select “+/-.” With the V-440HD/V-44SW, select “-.”
When you use the PR-50 as a slave of the presenter control, please set the polarity of the output fade
control in the master presenter.
This setting is shared with “Controlling Fades” (p. 87).
10.
To set the latency between the PR-50 and the video mixer, use the “Presenter => External
Latency” and “External => Presenter Latency” settings.
The latency (delay) for operations made from the PR-50 may differ from one video mixer to another.
If video transitions under control from the PR-50 are corrupt, or if unexpected video is seen during
such transitions, then adjust these two values to make video transitions smooth. Delay can also be
applied to input switching on the video mixer, so adjusting this may also be a good idea.
Ordinarily, both can be left at their initial values (i.e., “0”).
94
Page 95

Practical Use of the PR-50
Select the “Video Mixer Control” check box.
11.
This enables the Video Mixer Control feature.
Mark the checkbox
Click the [Done] button.
12.
For more details about operating the video mixer, refer to the owner’s manual that came with the
video mixer.
Presenter’s output-fade cannot be controlled with MIDI while the Video Mixer Control feature is on.
If you find the controls are not working well, try turning off the control feature (clearing the check
box) and turning it on again (selecting the check box once more).
13.
Input from the video mixer appears on the “Material” list with a name like “MIXER INPUT 1.”
You can assign input from the video mixer to a clip by dragging material having such names
to the “Clips” list.
“MIXER INPUT” data items from 1 through 8 are displayed. The video-mixer input you set in Step
10 is not displayed.
When you are connecting to the PR-50 a video mixer that has fewer than eight inputs, such as the
V-4, never drag to the “Clips” list a “MIXER INPUT” item whose number exceeds the number of
input channels on the video mixer.
When a clip has been created by dragging a “MIXER INPUT” item whose number exceeds the
number of input channels on the video mixer to the “Clips” list, selecting the clip while in the Play
mode may cause the words “MIXER INPUT” to appear in the output video or result in a failure to
switch the input channel.
In the Play mode, never rapidly switch clips created by dragging “MIXER INPUT” to the “Clips” list.
When you’re using Video Mixer Control, never try to operate the video mixer directly.
95
Page 96

Practical Use of the PR-50
Select the MIDI channel
Controlling AR Series Devices
You can control the AR-3000 and other models in Roland’s AR (Audio Recorder) Series via MIDI.
When clips are played on the PR-50, Program Change and Note On messages are transmitted from
the MIDI interface’s OUT in accordance with the clips as they play.
You can have playback of the AR Series phrases switch by switching clips with the PR-50.
Connect a USB MIDI interface to the PR-50, and connect the MIDI interface’s MIDI OUT to the MIDI
IN of the AR Series device with a MIDI cable.
Click the [MIDI Preferences] button in Play mode or Edit Mode.
1.
2.
Check the “AR Control” check box.
fig.midi20.eps
The AR Control function is enabled.
Mark the checkbox
fig.midi21.eps
3.
Set the MIDI channel to be used in controlling the AR in “Tx Channel” in “AR Control.”
The AR Series phrases correspond to the PR-50’s clips as described below.
Clip
Palette 1, Clip 1
↓
Palette 1, Clip 32
Palette 2, Clip 1 A0033
↓
Palette 20, Clip 32
4.
Click the [Done] button
For more detailed information on operating the AR Series, refer to the Owner’s Manual included with
the AR Series device.
Phrase
A0001
↓
A0032
↓
A0640
96
When controlling an AR, set the Note Trigger setting of the AR Series device to “Trigger.”
Page 97

Practical Use of the PR-50
Using Other Devices to Control Presenter
When controlling the PR-50 from an external device, set the PR-50 to Play mode (p. 37). In Edit mode,
only the DV-7DLC transport control, In and Out point settings, and mouse and keyboard functions
are enabled. No other controls can be controlled from an external device.
Using a DV-7DLC
You can use an optional DV-7DLC to control clips with the kind of intuitive operation that only a
dedicated controller can provide. Use the cable included with the PR-50 to connect the DV-7DLC to
the PR-50’s front panel or the [REMOTE] connector on the rear panel.
Connect devices only with the power turned off.
Do not connect more than one DV-7DLC.
Displaying the Color Bar, Switching Play Mode and Edit Mode,
and Turning Off the Power
The following operations are common to each of Presenter’s modes.
Displaying the Color Bar
Hold down the [SHIFT] button at the lower right and press the [COLOR BAR] button.
To stop display of the color bar, perform the same operation again.
Switching Play and Edit Modes
Hold down the [SHIFT] button at the lower right and press the [MODE] button.
Turning Off the Power
Hold down the [SHIFT] button at the lower right and press the [OFF] button near the center.
You cannot perform this procedure twice in rapid succession while holding down the [SHIFT] button
at the lower right.
Making the Clip Settings
You can set the In and Out points in Edit mode. For more detailed information, refer to “Setting the
Clip Playback Segment” (p. 66).
97
Page 98

Practical Use of the PR-50
Playing Clips
You can select palettes and play back clips intuitively in Play mode.
fig.dv7c.play.eps
ab c d
e hfg ij
Selecting Palettes and Playing Back Clips
e.
This plays the clip right before or after a clip that is selected but not playing (highlighted in white),
or the clip that is currently being played back (highlighted in green).
h.
This provides direct playback of the clips in the selected row (highlighted in gray) in the Palette
Area.
i.
This plays the clip that is selected but not playing (highlighted in white). Retrigger Playback is
enabled only when the selected clip is the one being played back.
j.
This stops playback of the clip. This is followed by a black screen.
f.
Rotate the ring to select the palettes. Palettes are switched each time the ring is turned one full
circle.
g.
Rotate the dial to select a clip (highlighted in white). Use (e) or (i) to start playback.
Controlling the Transition Effects and Volume
a.
When the button is switched on, you can then use this slider to control the [Transition Time] slider.
b.
When the button is switched on, you can then control the [Audio] slider with this slider. When the
button is switched off, the standard default value (100) is restored.
c.
This controls the output fade to black. When the lever is tilted towards you, the video output is
100%, while tilting the lever completely away from you switches the output to 100% black.
d.
This corresponds to the [Defaults] button.
98
For more on assigning in Edit mode, refer to “Making the Clip Settings” (p. 66)).
Page 99

Practical Use of the PR-50
cab
Using the DV-7DLC Like a Deck Controller
You can change the control assignments to make the unit function like a video-deck controller in the
Play mode.
Click [Show Preferences].
1.
A dialog box appears, asking you which preferences panel you want to display.
2.
Click [DV-7DLC Preferences].
The DV-7DLC Preferences dialog box appears.
For “Control Type,” select “Deck Type.”
3.
Select Type 2
fig.dv7c.play2.eps
The following buttons are assigned to function like a video deck’s controls.
a.
You can use this as a shuttle ring for fast forwarding and rewinding.
b.
You can use this as a jog dial for single frame advance and other functions.
c.
You can use these buttons for the following functions.
• : Return to first frame • : Go back 10 frames
• : Advance 10 frames • : Stop
• : Play • : Go back 1 frame
• : Advance 1 frame • : Advance to last frame
Buttons other than those listed above retain their normal functions.
For more on assignments in Edit mode, refer to “Making the Clip Settings” (p. 66).
99
Page 100

Practical Use of the PR-50
Changing the Functions Assigned to Sliders and Button
You can use the procedure described below to assign different features to sliders 1 through 4 and
buttons 1 through 5 on the DV-7DLC.
Click [Show Preferences].
1.
A dialog box appears, asking you which preferences you want to display.
2.
Click [DV-7DLC Preferences].
The DV-7DLC Preferences dialog box appears.
Use “Sliders” or “Buttons 1–5” to make the setting for the feature you want to assign.
3.
The features you can assign are as follows.
Slider Button
Value name Effect Value name Effect Setting item
None (None)
VFX1 Effect 1
VFX2 Effect 2
VFX3 Effect 3
VFX4 Effect 4
Color Hue Hue adjustment
Color Saturation
Brightness
Lum Key Level Key-level adjustment
Output Fade Output fade
Volume Volume adjustment
Transition Time Transition Time
Playback Speed Playback Speed
Saturation adjustment
Brightness adjustment
None (None) VFX 1 Effect 1 Toggle, momentary,
VFX 2 Effect 2
VFX 3 Effect 3
VFX 4 Effect 4
VFX Enable/Disable
Mask Toggle, momentary,
Transformer MAIN
Transformer INSERT
Play Reverse Reverse playback Toggle, momentary
Playback Speed Playback speed Toggle, momentary,
Output Fade Output fade Toggle, momentary,
White Lum Key White luminance key
Black Lum Key Black luminance key
Corresponds to [Main] button
Switch to MAIN Toggle, momentary
Switch to INSERT Toggle, momentary
Value (depth of effects)
Toggle, momentary
(Mask type; 1--8 only)
Value
(64 - equivalent to
Value
centered Playback Speed
slider in Play mode)
Value
(0 - black, 64 -
100% output, 127 - white)
Value (Lum Key Level)
Value (Lum Key Level)
100
Transition * Transition mode (None)
When you assign a feature to a button, you can specify how the button behaves when it is pressed.
Toggle: Pressing the button switches the feature on or off.
Momentary: Pressing the button activates the feature, which stays on until the button is released.
Value: The value passed to the feature when the button is pressed.
* The behavior settings you can make differ depending on the effect.
Setting any of buttons 1 through 5 to [Transition] makes the remaining buttons be set to [Transition]
as well.
 Loading...