

Page 1
Owner’s Manual
Bedienungsanleitung
Guide d’utilisation
Manuale dell'utente
Manual del usuario
Manual do proprietário
Gebruikershandleiding
Thank you, and congratulations on your choice of the Roland MICRO CUBE RX Amplifier.
Before using this unit, carefully read the sections entitled: “USING THE UNIT SAFELY” and “IMPORTANT NOTES” (p. 2; p. 4).
These sections provide important information concerning the proper operation of the unit. Additionally, in order to feel assured that you have gained
a good grasp of every feature provided by your new unit, Owner’s manual should be read in its entirety. The manual should be saved and kept on hand
as a convenient reference.
Main Features
A compact, high-performance guitar amplifier ideal for practicing at home
Equipped with four newly developed 10-cm (4-inch) speakers, this compact 5-watt stereo power amp (2.5 watt + 2.5 watt) delivers a powerful guitar
sound.
Dual power operation with alkaline batteries (6 x AA) or AC adaptor (p. 5)
Dual power operation allows the amplifier to be used anywhere.
An 8-type COSM amp modeling function that reproduces sounds such as the Roland JC-120 (p. 6)
The amp is equipped with modeling for six types of popular guitar amps, including the JC-120, in addtion to an original amp, ACOUSTIC.
Combined with the three-band equalizer, enables finely textured sound creation. Can also be used as a simple PA system using the MIC.
COSM (Composite Object Sound Modeling) is proprietary Roland modeling technology, which analyzes the way in which sound is affected by
elements such as electronic circuitry, structure, and materials, and combines these elements to reconstruct the desired sound.
Equipped with the same spacially synthesized chorus as the JC-120 (p. 7)
The amp is equipped with an EFX function that allows you to use four types of effects. In addition to a spacially synthesized chorus that reproduces the
soothing breadth of the JC-120's chorus, EFX also delivers FLANGER, PHASER and TREMOLO effects. The amp is also equipped with
separate basic DELAY/REVERB effects.
RHYTHM GUIDE function makes practical rhythm training easy (p. 9)
Contains preset rhythms from 11 genres (33 patterns) such as ROCK, JAZZ, LATIN and METRONOME. The optional footswitch allows you to operate
the START/STOP and TAP TEMPO controls with your feet while playing.
Tuner function that also supports flat tuning (p. 9)
The amp is equipped with a tuner function that also makes flat tuning possible.
AUX IN allows stereo playback (p. 8)
You can connect a CD/MP3 player to the AUX IN jack and play the music in stereo.
Stereo headphone output supported (p. 8)
The amplifier has a stereo PHONES jack that can also be used as a REC OUT jack.
Español Italiano Français Deutsch EnglishPortuguêsNederlands
Copyright © 2008 ROLAND CORPORATION All rights reserved.
No part of this publication may be reproduced in any form without the written permission of ROLAND CORPORATION.
Page 2
USING THE UNIT SAFELY
Used for instructions intended to alert
the user to the risk of death or severe
injury should the unit be used
improperly.
Used for instructions intended to alert
the user to the risk of injury or material
damage should the unit be used
improperly.
* Material damage refers to damage or
other adverse effects caused with
respect to the home and all its
furnishings, as well to domestic
animals or pets.
• Do not attempt to repair the
unit, or replace parts within
it (except when this manual
provides specific instructions
directing you to do so). Refer all
servicing to your retailer, the nearest
Roland Service Center, or an authorized Roland distributor, as listed on
the “Information” page.
........................................................................
• Never use or store the unit
in places that are:
• Subject to temperature
extremes (e.g., direct
sunlight in an enclosed
vehicle, near a heating duct, on top
of heat-generating equipment);
or are
• Damp (e.g., baths, washrooms,
on wet floors); or are
• Humid; or are
• Exposed to rain; or are
• Dusty; or are
• Subject to high levels of vibration.
........................................................................
• Make sure you always have
the unit placed so it is level
and sure to remain stable.
Never place it on stands that could
wobble, or on inclined surfaces.
........................................................................
The symbol alerts the user to important instructions
or warnings.The specific meaning of the symbol is
determined by the design contained within the
triangle. In the case of the symbol at left, it is used for
general cautions, warnings, or alerts to danger.
The symbol alerts the user to items that must never
be carried out (are forbidden). The specific thing that
must not be done is indicated by the design contained
within the circle. In the case of the symbol at left, it
means that the unit must never be disassembled.
The ● symbol alerts the user to things that must be
carried out. The specific thing that must be done is
indicated by the design contained within the circle. In
the case of the symbol at left, it means that the powercord plug must be unplugged from the outlet.
• Be sure to use only the AC
adaptor supplied with the
unit. Also, make sure the line
voltage at the installation matches the
input voltage specified on the AC
adaptor’s body. Other AC adaptors
may use a different polarity, or be
designed for a different voltage,
so their use could result in damage,
malfunction, or electric shock.
........................................................................
• Use only the attached powersupply cord. Also, the
supplied power cord must not
be used with any other device.
........................................................................
• Do not excessively twist or
bend the power cord, nor
place heavy objects on it.
Doing so can damage the cord,
producing severed elements and short
circuits. Damaged cords are fire and
shock hazards!
........................................................................
• This unit, either alone or in
combination with an amplifier
and headphones or speakers,
may be capable of producing sound
levels that could cause permanent
hearing loss. Do not operate for a long
period of time at a high volume level,
or at a level that is uncomfortable.
If you experience any hearing loss
or ringing in the ears, you should
immediately stop using the unit,
and consult an audiologist.
........................................................................
• Do not allow any objects
(e.g., flammable material,
coins, pins); or liquids of any
kind (water, soft drinks, etc.)
to penetrate the unit.
........................................................................
• Immediately turn the power
off, remove the AC adaptor
from the outlet, and request
servicing by your retailer, the nearest
Roland Service Center, or an authorized Roland distributor, as listed on
the “Information” page when:
• The AC adaptor, the power-supply
cord, or the plug has been
damaged; or
• If smoke or unusual odor occurs
• Objects have fallen into, or liquid
has been spilled onto the unit; or
• The unit has been exposed to rain
(or otherwise has become wet); or
• The unit does not appear to operate
normally or exhibits a marked
change in performance.
........................................................................
• In households with small
children, an adult should
provide supervision until the
child is capable of following all the
rules essential for the safe operation
of the unit.
........................................................................
• Protect the unit from
strong impact.
(Do not drop it!)
........................................................................
2
Page 3
• Do not force the unit’s powersupply cord to share an outlet
with an unreasonable number
of other devices. Be especially careful
when using extension cords—the total
power used by all devices you have
connected to the extension cord’s
outlet must never exceed the power
rating (watts/amperes) for the
extension cord. Excessive loads can
cause the insulation on the cord to
heat up and eventually melt through.
........................................................................
• Before using the unit in
a foreign country, consult
with your retailer, the nearest
Roland Service Center, or an authorized Roland distributor, as listed on
the “Information” page.
........................................................................
• Batteries must never be
recharged, heated, taken apart,
or thrown into fire or water.
........................................................................
• Never expose batteries to
excessive heat such as
sunshine, fire or the like.
........................................................................
• The unit and the AC adaptor
should be located so their
location or position does not
interfere with their proper ventilation.
........................................................................
• Always grasp only the plug on
the AC adaptor cord when
plugging into, or unplugging
from, an outlet or this unit.
........................................................................
• At regular intervals, you
should unplug the AC adaptor
and clean it by using a dry
cloth to wipe all dust and other
accumulations away from its prongs.
Also, disconnect the power plug from
the power outlet whenever the unit is
to remain unused for an extended
period of time. Any accumulation of
dust between the power plug and the
power outlet can result in poor
insulation and lead to fire.
........................................................................
• Try to prevent cords and
cables from becoming
entangled. Also, all cords and
cables should be placed so they are
out of the reach of children.
........................................................................
• Never climb on top of, nor
place heavy objects on the
unit.
........................................................................
• Never handle the AC adaptor
or its plugs with wet hands
when plugging into, or
unplugging from, an outlet
or this unit.
........................................................................
• Before moving the unit,
disconnect the AC adaptor
and all cords coming from
external devices.
........................................................................
• Before cleaning the unit, turn
off the power and unplug the
AC adaptor from the outlet
(p. 5).
........................................................................
• Whenever you suspect the
possibility of lightning in your
area, disconnect the AC
adaptor from the outlet.
• If used improperly, batteries
may explode or leak and
cause damage or injury. In the
interest of safety, please read
and observe the following
precautions (p. 5).
• Carefully follow the instal-
lation instructions for batteries, and
make sure you observe the correct
polarity.
• Avoid using new batteries together
with used ones. In addition, avoid
mixing different types of batteries.
• Remove the batteries whenever the
unit is to remain unused for an
extended period of time.
• If a battery has leaked, use a soft
piece of cloth or paper towel to
wipe all remnants of the discharge
from the battery compartment.
Then install new batteries. To avoid
inflammation of the skin, make
sure that none of the battery
discharge gets onto your hands or
skin. Exercise the utmost caution so
that none of the discharge gets near
your eyes. Immediately rinse the
affected area with running water
if any of the discharge has entered
the eyes.
• Never keep batteries together with
metallic objects such as ballpoint
pens, necklaces, hairpins, etc.
........................................................................
• Used batteries must be
disposed of in compliance
with whatever regulations for
their safe disposal that may be
observed in the region in which
you live.
........................................................................
• Should you remove the
grounding terminal screw,
keep it in a safe place out of
children’s reach, so there is no chance
of it being swallowed accidentally.
........................................................................
• Do not remove the speaker
grille and speaker by any
means. Speaker not user
replaceable. Shock hazardous
voltages and currents are present
inside the enclosure.
........................................................................
3
Page 4

IMPORTANT NOTES
Power Supply: Use of Batteries
• Do not connect this unit to same electrical outlet that is
being used by an electrical appliance that is controlled
by an inverter (such as a refrigerator, washing machine,
microwave oven, or air conditioner), or that contains
a motor. Depending on the way in which the electrical
appliance is used, power supply noise may cause this unit
to malfunction or may produce audible noise. If it is not
practical to use a separate electrical outlet, connect
a power supply noise filter between this unit and the
electrical outlet.
• The AC adaptor will begin to generate heat after long
hours of consecutive use. This is normal, and is not
a cause for concern.
• The use of an AC adaptor is recommended as the unit’s
power consumption is relatively high. Should you prefer
to use batteries, please use the alkaline type.
• When installing or replacing batteries, always turn off the
power on this unit and disconnect any other devices you
may have connected. This way, you can prevent
malfunction and/or damage to speakers or other devices.
• Before connecting this unit to other devices, turn off the
power to all units. This will help prevent malfunctions
and/or damage to speakers or other devices.
Placement
• Using the unit near power amplifiers (or other equipment
containing large power transformers) may induce hum.
To alleviate the problem, change the orientation of this
unit; or move it farther away from the source of interference.
• When moved from one location to another where the
temperature and/or humidity is very different, water
droplets (condensation) may form inside the unit. Damage
or malfunction may result if you attempt to use the unit in
this condition. Therefore, before using the unit, you must
allow it to stand for several hours, until the condensation
has completely evaporated.
• Do not allow rubber, vinyl, or similar materials to remain
on the unit for long periods of time. Such objects can
discolor or otherwise harmfully affect the finish.
• Do not paste stickers, decals, or the like to this instrument.
Peeling such matter off the instrument may damage the
exterior finish.
• Depending on the material and temperature of the surface
on which you place the unit, its rubber feet may discolor
or mar the surface.
You can place a piece of felt or cloth under the rubber feet
to prevent this from happening. If you do so, please make
sure that the unit will not slip or move accidentally.
Maintenance
• For everyday cleaning wipe the unit with a soft, dry cloth
or one that has been slightly dampened with water.
To remove stubborn dirt, use a cloth impregnated with
a mild, non-abrasive detergent. Afterwards, be sure
to wipe the unit thoroughly with a soft, dry cloth.
• Never use benzine, thinners, alcohol or solvents of any
kind, to avoid the possibility of discoloration and/or
deformation.
Additional Precautions
• This device may interfere with radio and television
reception. Do not use this device in the vicinity of such
receivers.
• Noise may be produced if wireless communications
devices, such as cell phones, are operated in the vicinity of
this unit. Such noise could occur when receiving or initiating a call, or while conversing. Should you experience
such problems, you should relocate such wireless devices
so they are at a greater distance from this unit, or switch
them off.
• Do not expose the unit to direct sunlight, place it near
devices that radiate heat, leave it inside an enclosed
vehicle, or otherwise subject it to temperature extremes.
Also, do not allow lighting devices that normally are used
while their light source is very close to the unit (such as
a piano light), or powerful spotlights to shine upon the
same area of the unit for extended periods of time.
Excessive heat can deform or discolor the unit.
4
• Use a reasonable amount of care when using the unit’s
buttons, sliders, or other controls; and when using its jacks
and connectors. Rough handling can lead to malfunctions.
• When connecting/disconnecting all cables, grasp the
connector itself—never pull on the cable. This way you
will avoid causing shorts, or damage to the cable’s internal
elements.
• To avoid disturbing your neighbors, try to keep the unit’s
volume at reasonable levels. You may prefer to use
headphones, so you do not need to be concerned about
those around you (especially when it is late at night).
• When you need to transport the unit, package it in the box
(including padding) that it came in, if possible. Otherwise,
you will need to use equivalent packaging materials.
• Some connection cables contain resistors. Do not use
cables that incorporate resistors for connecting to this unit.
The use of such cables can cause the sound level to be
extremely low, or impossible to hear. For information on
cable specifications, contact the manufacturer of the cable.
Page 5
Power Supply
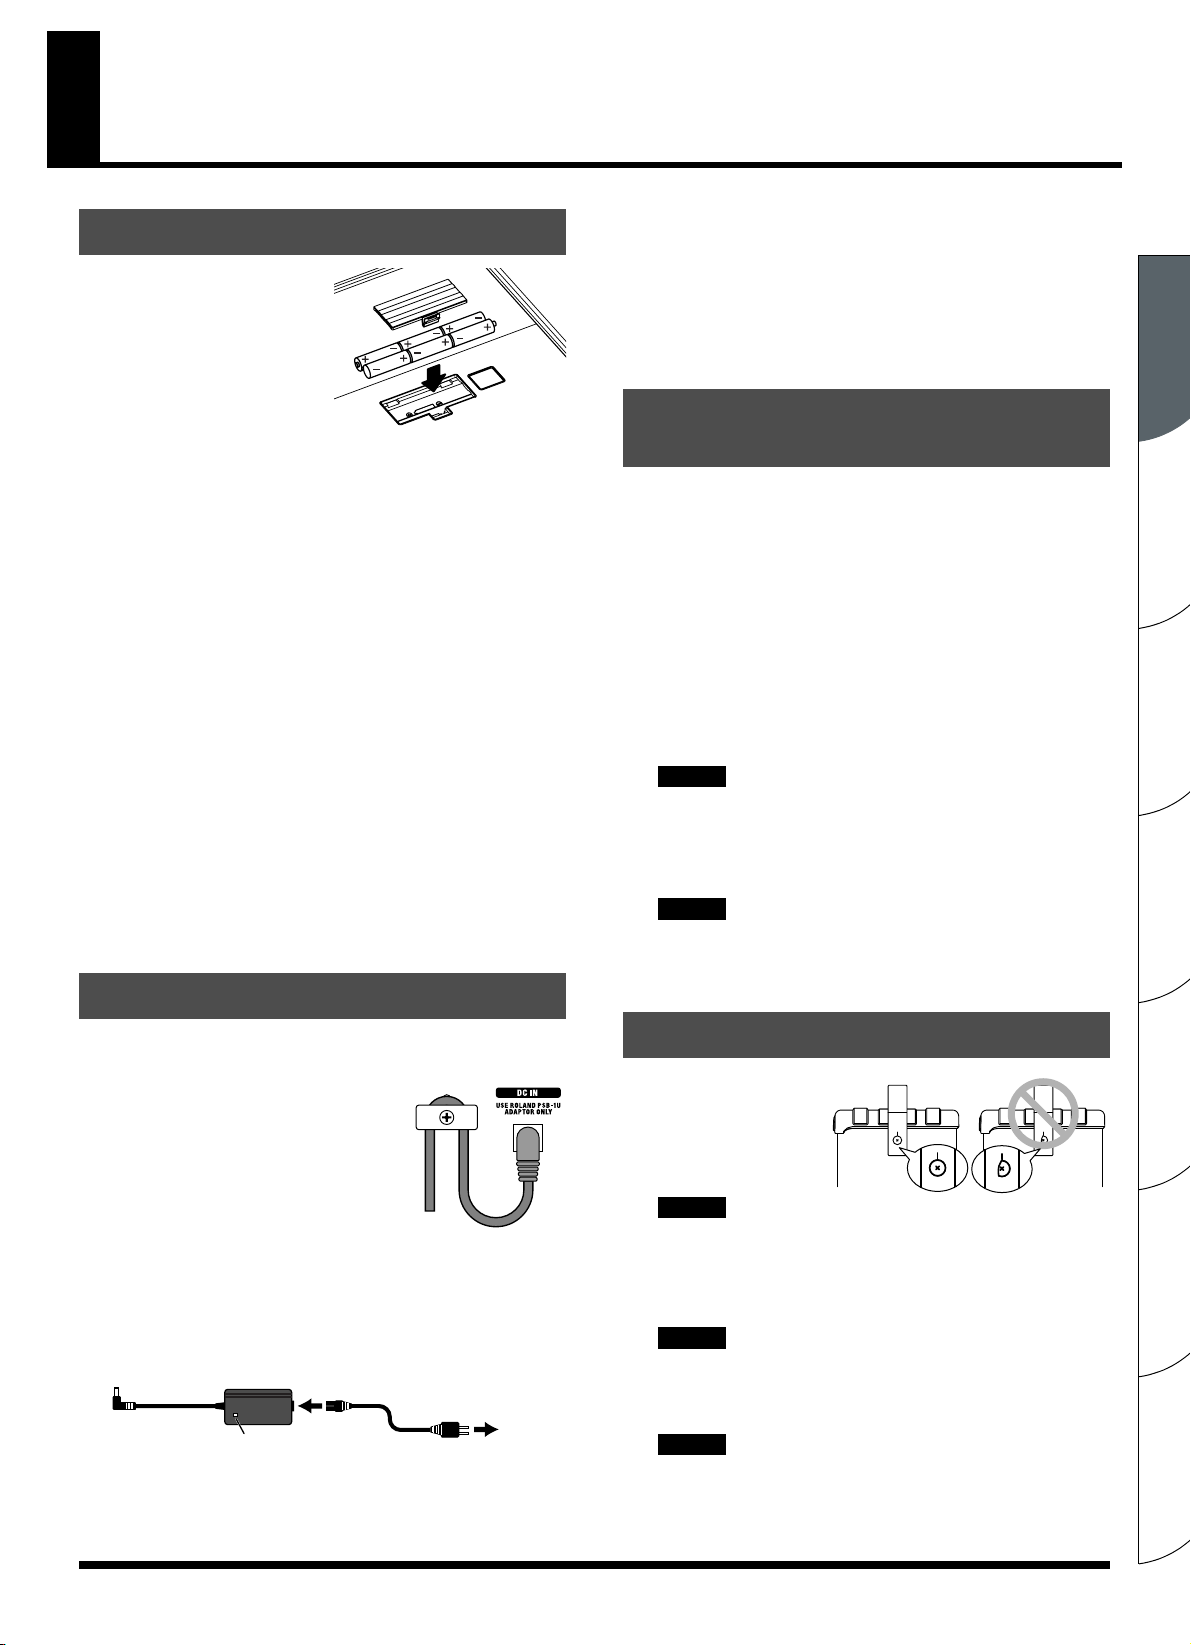
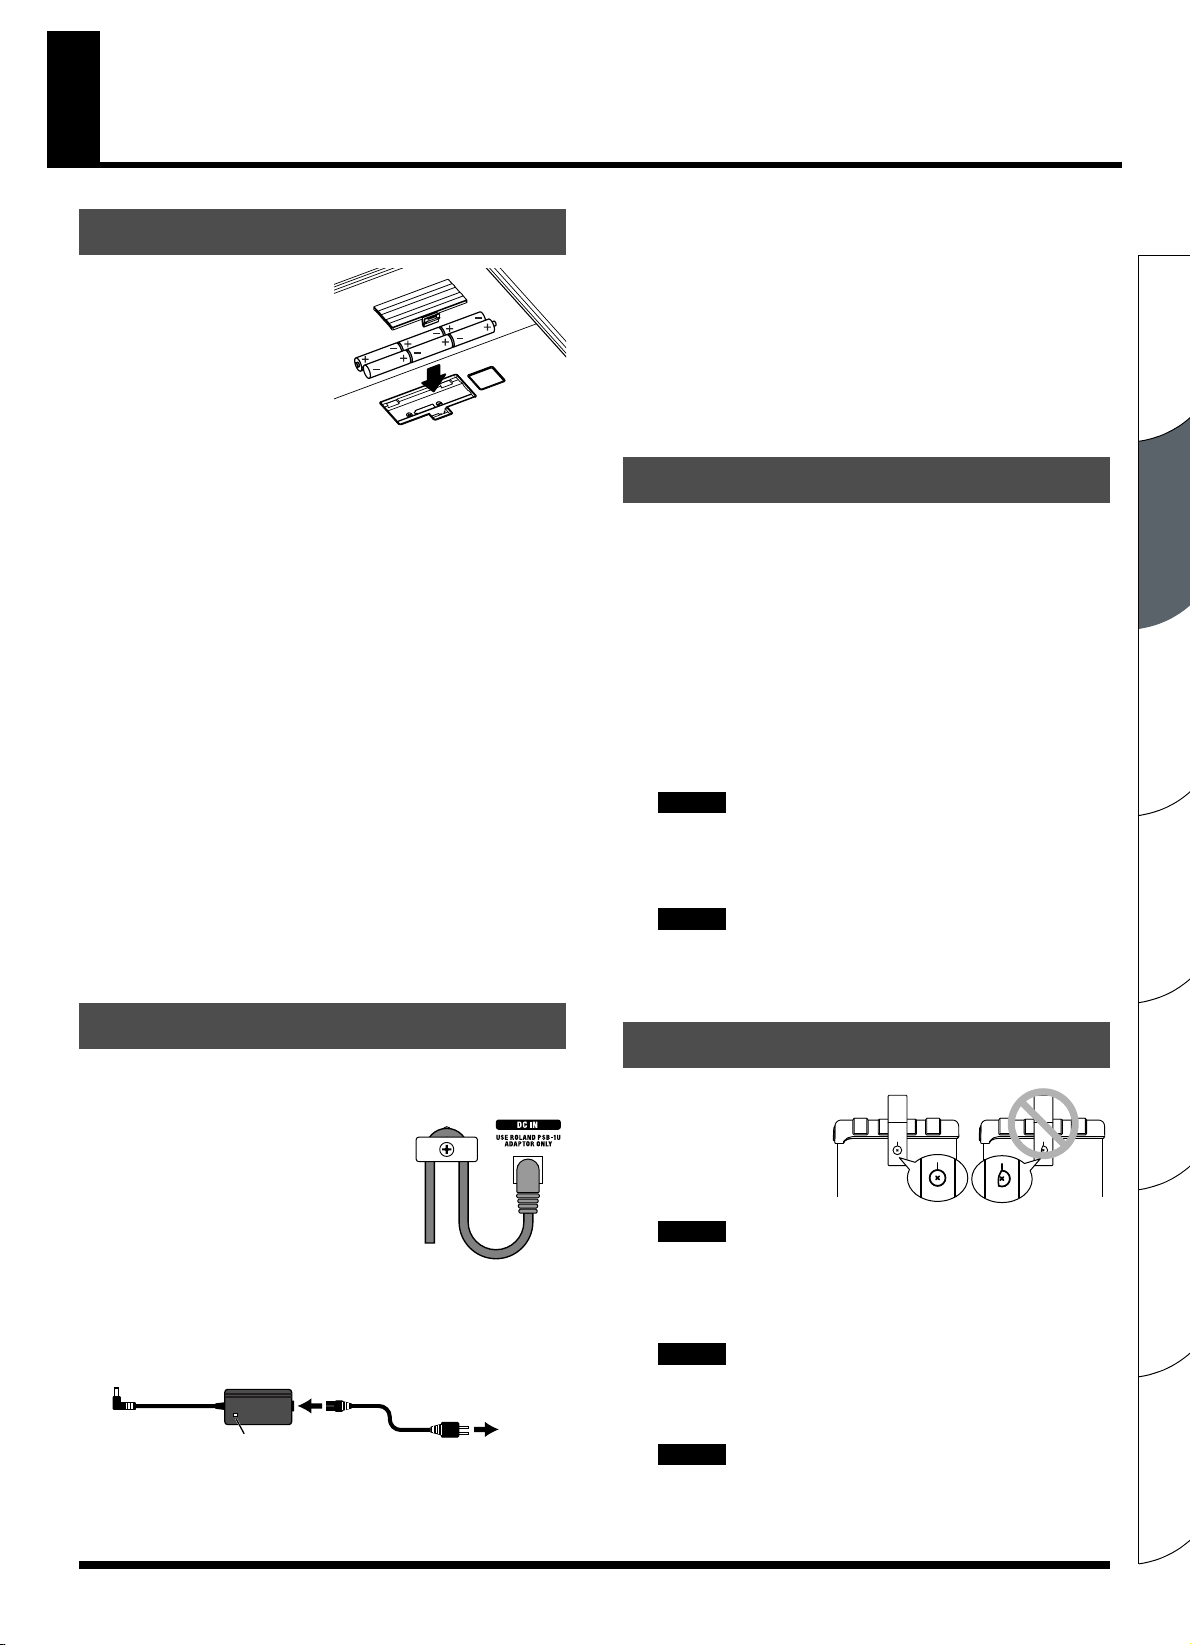
Inserting Batteries
Remove the lid of the battery
compartment and insert 6 AA
batteries, making sure that they are
correctly oriented.
* To avoid malfunction and/or
damage to speakers or other
devices, always turn off the
power on this unit and
disconnect any other devices when installing or replacing batteries.
* When closing the lid of the battery compartment, first insert the
catches on the lid into the matching cavities, then push the lid down
firmly until you hear a click.
Using Batteries
Please note the following points.
• If there are batteries in the unit while an AC adaptor is being used,
normal operation will continue should the supply of current
be interrupted (power outage or power cord disconnection).
Use only alkaline batteries (LR6). You cannot use any other type of battery.
•
• Battery Life
Used continuously at maximum power: approx. 13 hours
(These figures will vary depending on the actual conditions of use)
When operating on battery power only, the unit's power indicator (p. 6)
•
will become dim when battery power gets too low. Replace the batteries
as soon as possible.
• Sounds may distort easily or may cut off when played at high
volume as the battery power begins to fade, but this is normal
and does not indicate a malfunction. Either replace the batteries
or use the AC adaptor included with the unit.
Connecting the AC Adaptor
Using the Unit With the AC Adaptor
Please note the following points.
• Although the unit can operate on batteries alone, connecting the AC
adaptor to the unit while it has batteries inserted ensures that power
is supplied from the AC adaptor, reducing battery consumption.
Use only the AC adaptor included with the MICRO CUBE RX.
•
Use of other AC adaptors may damage the amp or result in other problems.
Switching the Power On and Off
Once the connections have been completed, turn on power to your various
devices in the order specified. By turning on devices in the wrong order, you
risk causing malfunction and/or damage to speakers and other devices.
1. Make sure that all volume controls on the MICRO CUBE RX
and connected devices are set to 0.
2. Turn on all the devices connected to the MICRO CUBE RX's INPUT
jack and AUX IN jack.
3. Turn on the MICRO CUBE RX.
4. Adjust the volume levels for the devices.
5. Before switching off the power, lower the volume on each
of the devices in your system, and then turn off the devices
in the reverse of the order followed when switching them on.
NOTE
Due to a circuitry protection feature, this unit requires a few moments
after power up before it is ready for normal operation. To avoid
sudden, high-volume sound, always make sure to have the volume
level turned down before switching on power.
NOTE
Even with the volume all the way down, you may still hear some
sound when the power is switched on and off, but this is normal,
and does not indicate a malfunction.
1. Insert the DC plug of the supplied AC adaptor into the unit's AC
adaptor jack.
By anchoring the AC adaptor cord using the
cord hook, as shown in the illustration, you
can prevent situations such as the adaptor
becoming unplugged or unreasonable
pressure being exerted on the AC adaptor
jack.
* To avoid faulty operation or damage to the
speakers, you should disconnect the unit from other devices and
switch off its power when connecting the AC adaptor.
2. Connect the supplied power cord to the AC adaptor, and plug
it into an AC outlet.
AC Adaptor
Indicator
Place the AC adaptor so the side with the indicator (see illustration)
faces upwards.
* The indicator will light when you plug the AC adaptor into an AC outlet.
Power Cord
AC Outlet
Attaching the Strap
Attach the supplied strap to
the strap pin as shown in the
illustration.
NOTE
Attach the strap securely so that it does not easily become
detached. If the strap is loose, and you use it that way when
carrying the MICRO CUBE RX, the amp could be dropped,
possibly resulting in damage or injury.
NOTE
Use only the provided strap. The included strap is meant for
exclusive use with the MICRO CUBE RX. Do not use this strap
for other products.
NOTE
Do not spin or swing the MICRO CUBE RX while holding it by
the strap. This is extremely dangerous, as it may cause the strap
to become detached; or, if the motion is repeated enough, may
even break the strap.
Español Italiano Français Deutsch EnglishPortuguêsNederlands
5
Page 6

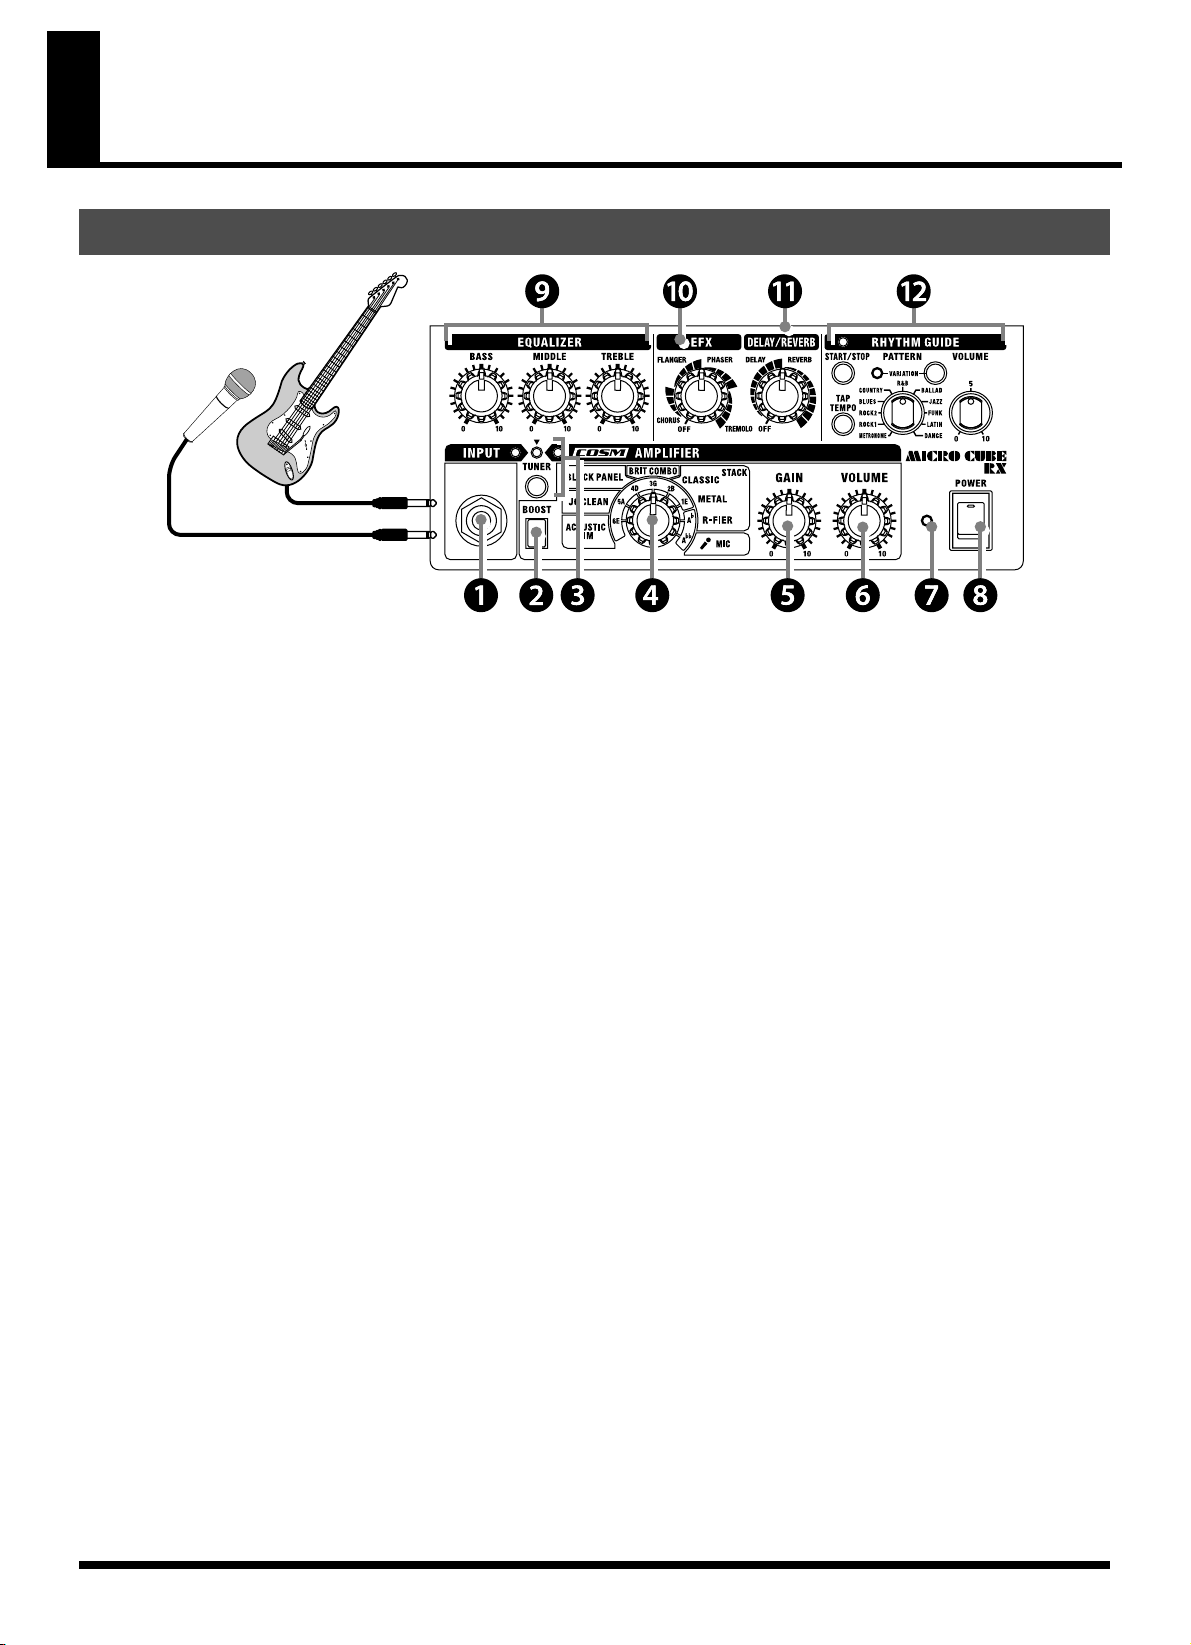
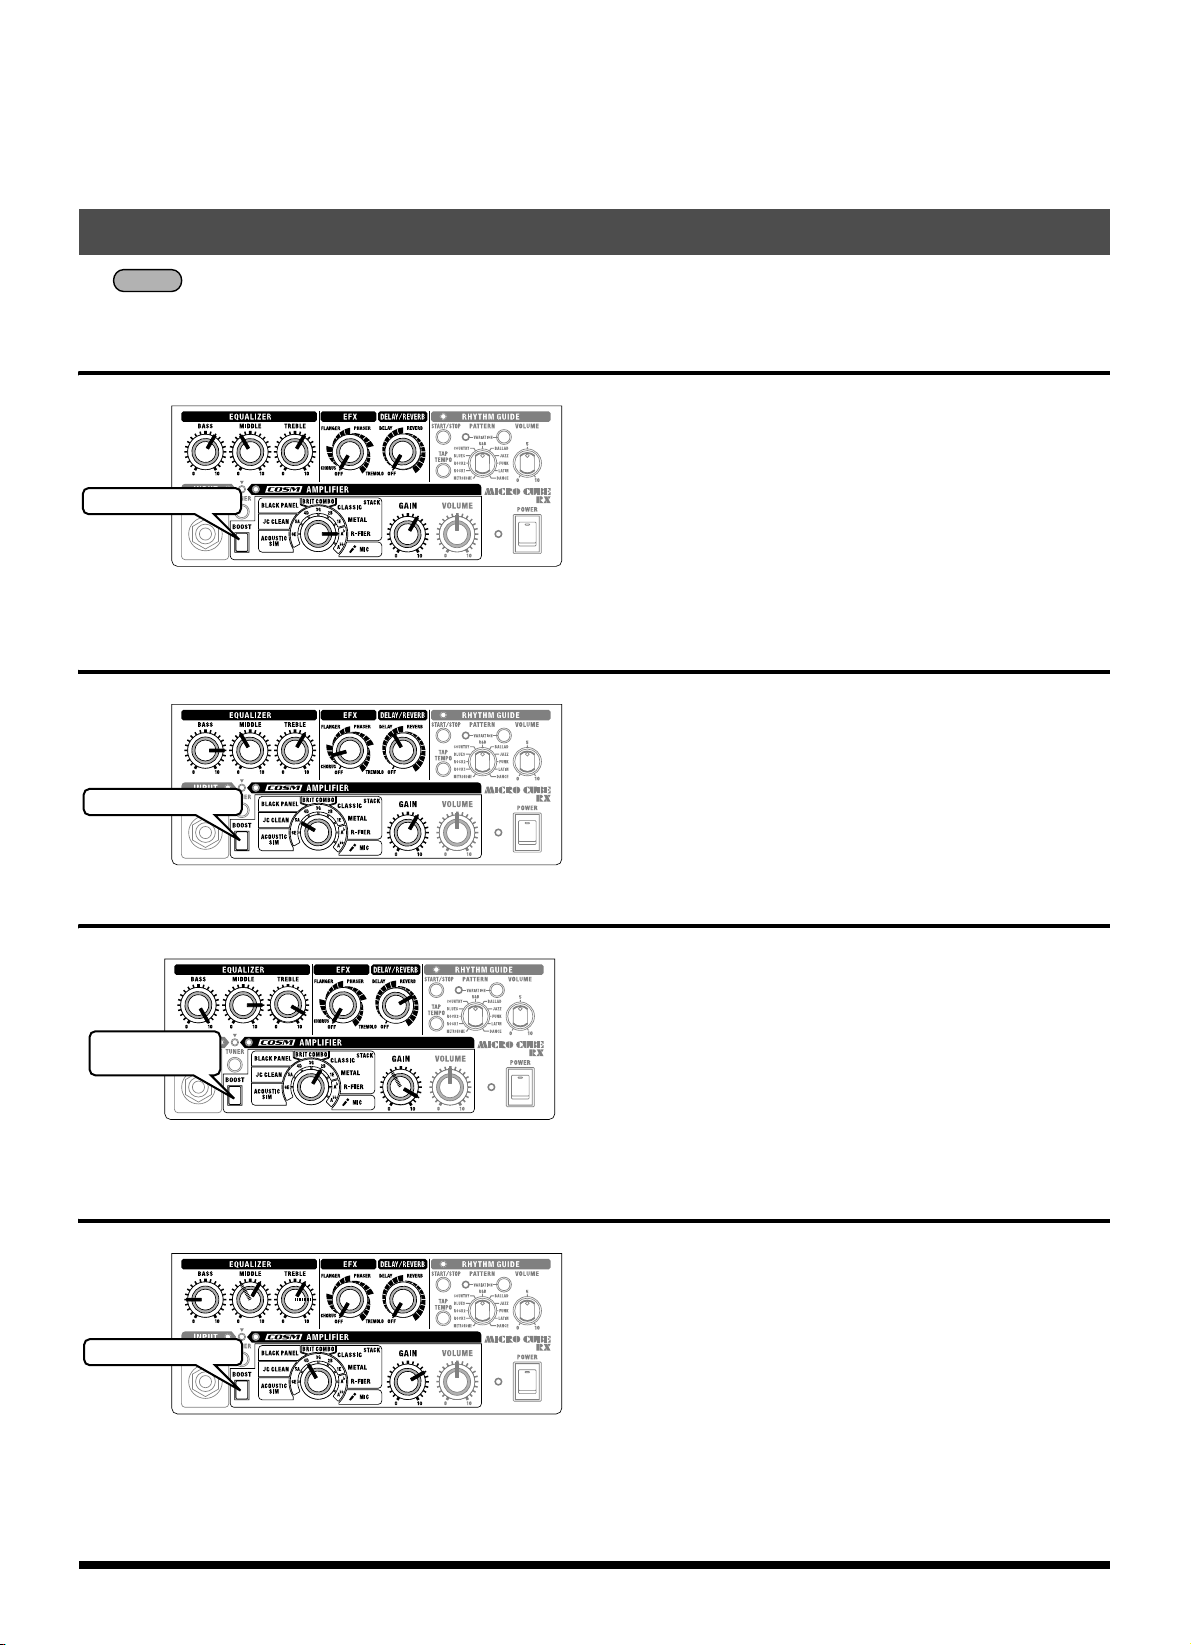
Panel Descriptions
Control Panel
fig.01-01
Guitar
Dynamic Mic
Standard
Mono Cable
1. INPUT Jack
Connect your guitar or microphone here.
2. BOOST Button
Press the BOOST button to change the amp tone. The effects
that you can create vary according to the amp type.
3. TUNER
In addition to manual tuning, in which strings are specified,
you can also use it as a chromatic tuner.
It also supports flat tuning.
→ Using the Tuner Function (p. 9)
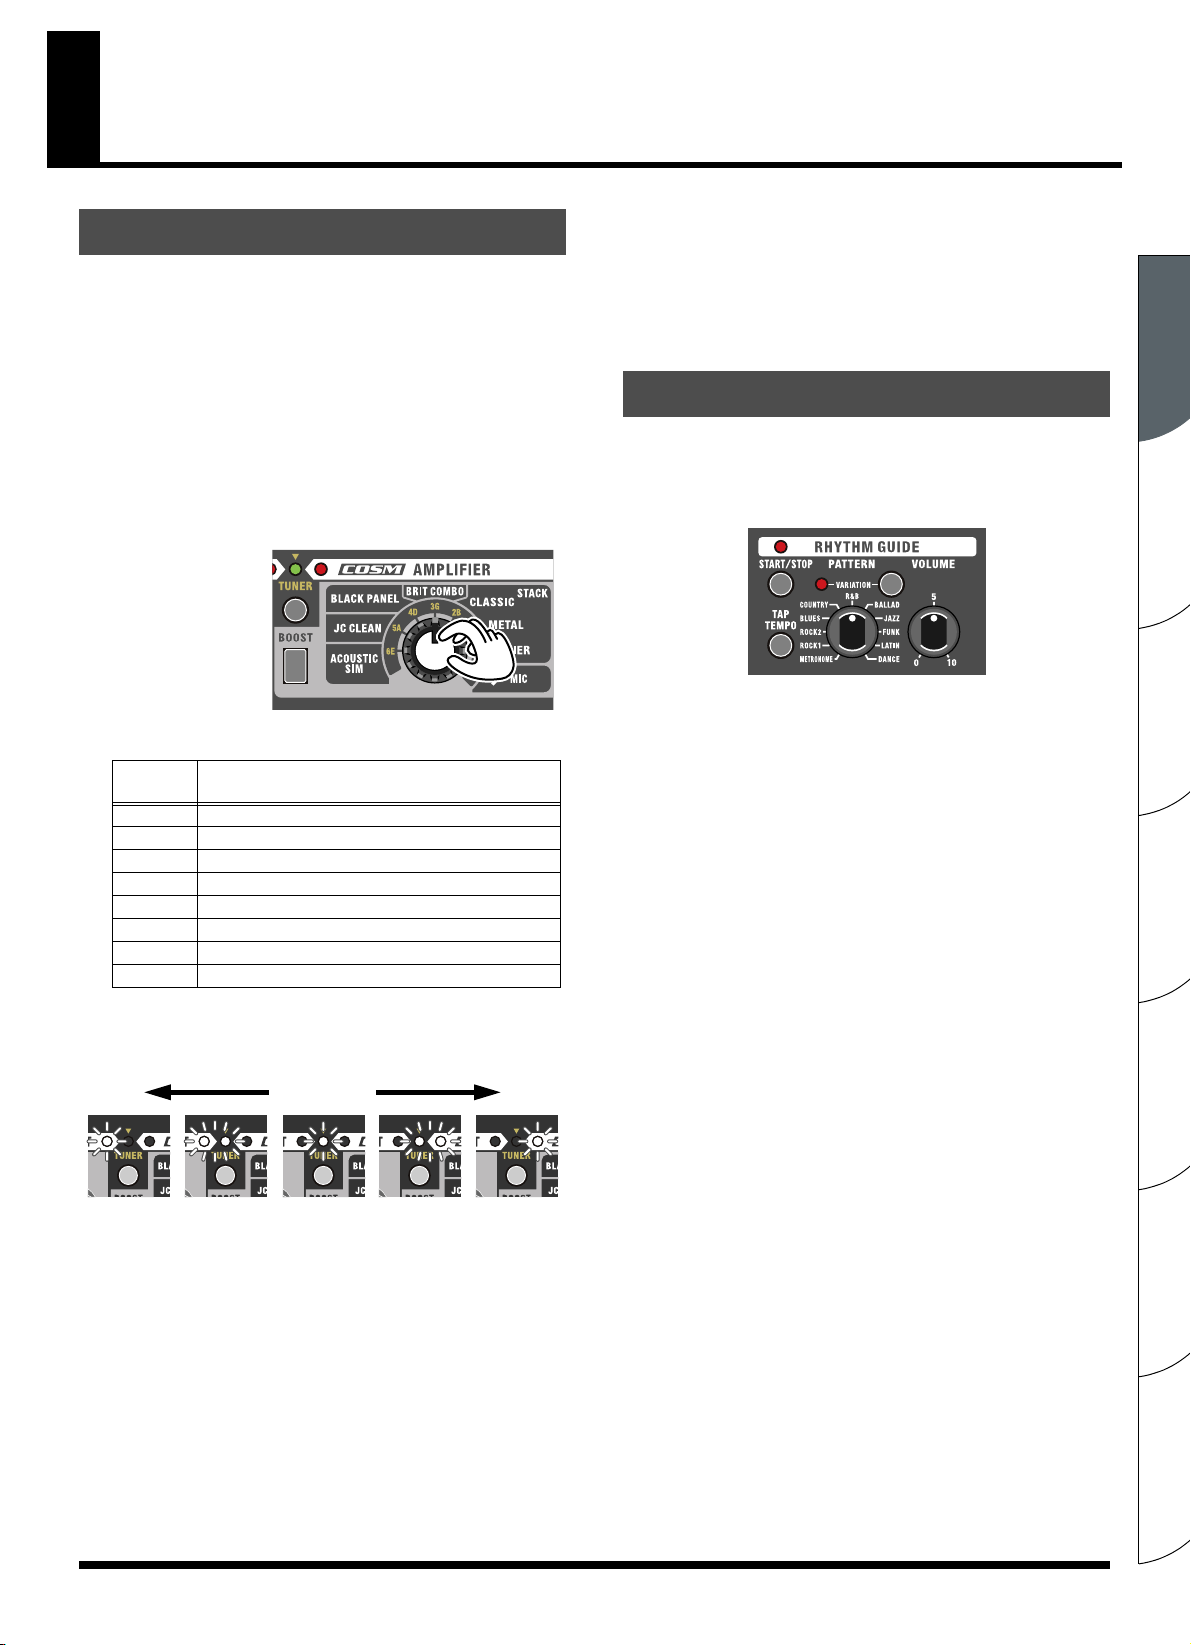
4. AMP TYPE Knob
You can select from eight COSM amp types. When the TUNER
function is on, you can specify a string (note name).
* The product names mentioned in this document are trademarks
or registered trademarks of their respective owners, and are not
related to Roland Corporation. In this manual, these names are
used because it is the most practical way of describing the sounds
that are simulated using COSM technology.
ACOUSTIC SIM
This is an original amp type that includes an acoustic simulator.
Turns the sounds from your electric guitar into a clear, refined
acoustic guitar sound.
Using this type together with a single coil pickup provides optimum
sound quality. Slightly turning down the equalizer's BASS and
MIDDLE settings is effective if you are using a humbucking pickup.
JC CLEAN
This is a model of Roland's famous JC-120 Jazz Chorus guitar amplifier.
The ultra-clean, ultra-flat sound offers a smooth feel. This becomes more
effective when used in combination with an effects device.
BLACK PANEL
This is modeled on the classic Fender Twin Reverb amplifier. It can
be used in a wide variety of musical styles, from country to blues,
jazz, and rock. It exhibits rich lows and a bright high end.
BRIT COMBO
This is modeled on the VOX AC-30TB. This is the rock amplifier that
created the Liverpool sound of the '60s. It can produce a broad
range of sounds, from clean to overdrive.
CLASSIC STACK
This is modeled on the sound and response of a Marshall JMP1987.
Used extensively in hard rock during the 1970s, this is truly the
perfect amp for the "top rock" guitar sound.
METAL STACK
This is modeled on the PEAVEY EVH5150. This is a high-gain amp
type, so even at low volumes, you can still get heavy distortion and
sustain.
R-FIER STACK
This is modeled on the MESA/Boogie Rectifier. This super-high-gain
amp is capable of producing slash metal, grunge, and a wide range
of other lead sounds.
MIC
Select this when a microphone is connected.
* Please note the following points when using a microphone.
• Feedback could be produced depending on the location of
microphones relative to the unit. This can be remedied by:
1. Changing the orientation of the microphone(s).
2. Relocating microphone(s) at a greater distance
from the unit.
3. Lowering volume levels.
• The sound will be distorted if you turn the GAIN knob up
too high. Set the GAIN knob to as high a value as possible
before the sound distorts to get the best signal-to-noise ratio.
• Use a dynamic microphone. You cannot use a condenser
microphone or a plug-in powered microphone that requires
a power supply.
6
Page 7
Panel Descriptions
5. GAIN Knob
Adjusts the input level. Adjust the input level to suit the signal level of
musical instruments connected to the INPUT jack.
TIP
Using a high GAIN setting allows you to get an overdrive sound.
TIP
Set the GAIN knob to as high a value as possible before the sound
distorts to get the clearest sound.
6. VOLUME Knob
Adjusts the volume of the guitar (microphone).
7. Power Indicator
This indicator lights when the unit is turned on.
* When operating on battery power only, the unit's indicator will
become dim during play when battery power gets too low.
Replace the batteries as soon as possible.
8. POWER Switch
Turns the power on and off.
→ Switching the Power On and Off (p. 5)
9. EQUALIZER
This is a three-band equalizer. It allow you to adjust the tone of the guitar.
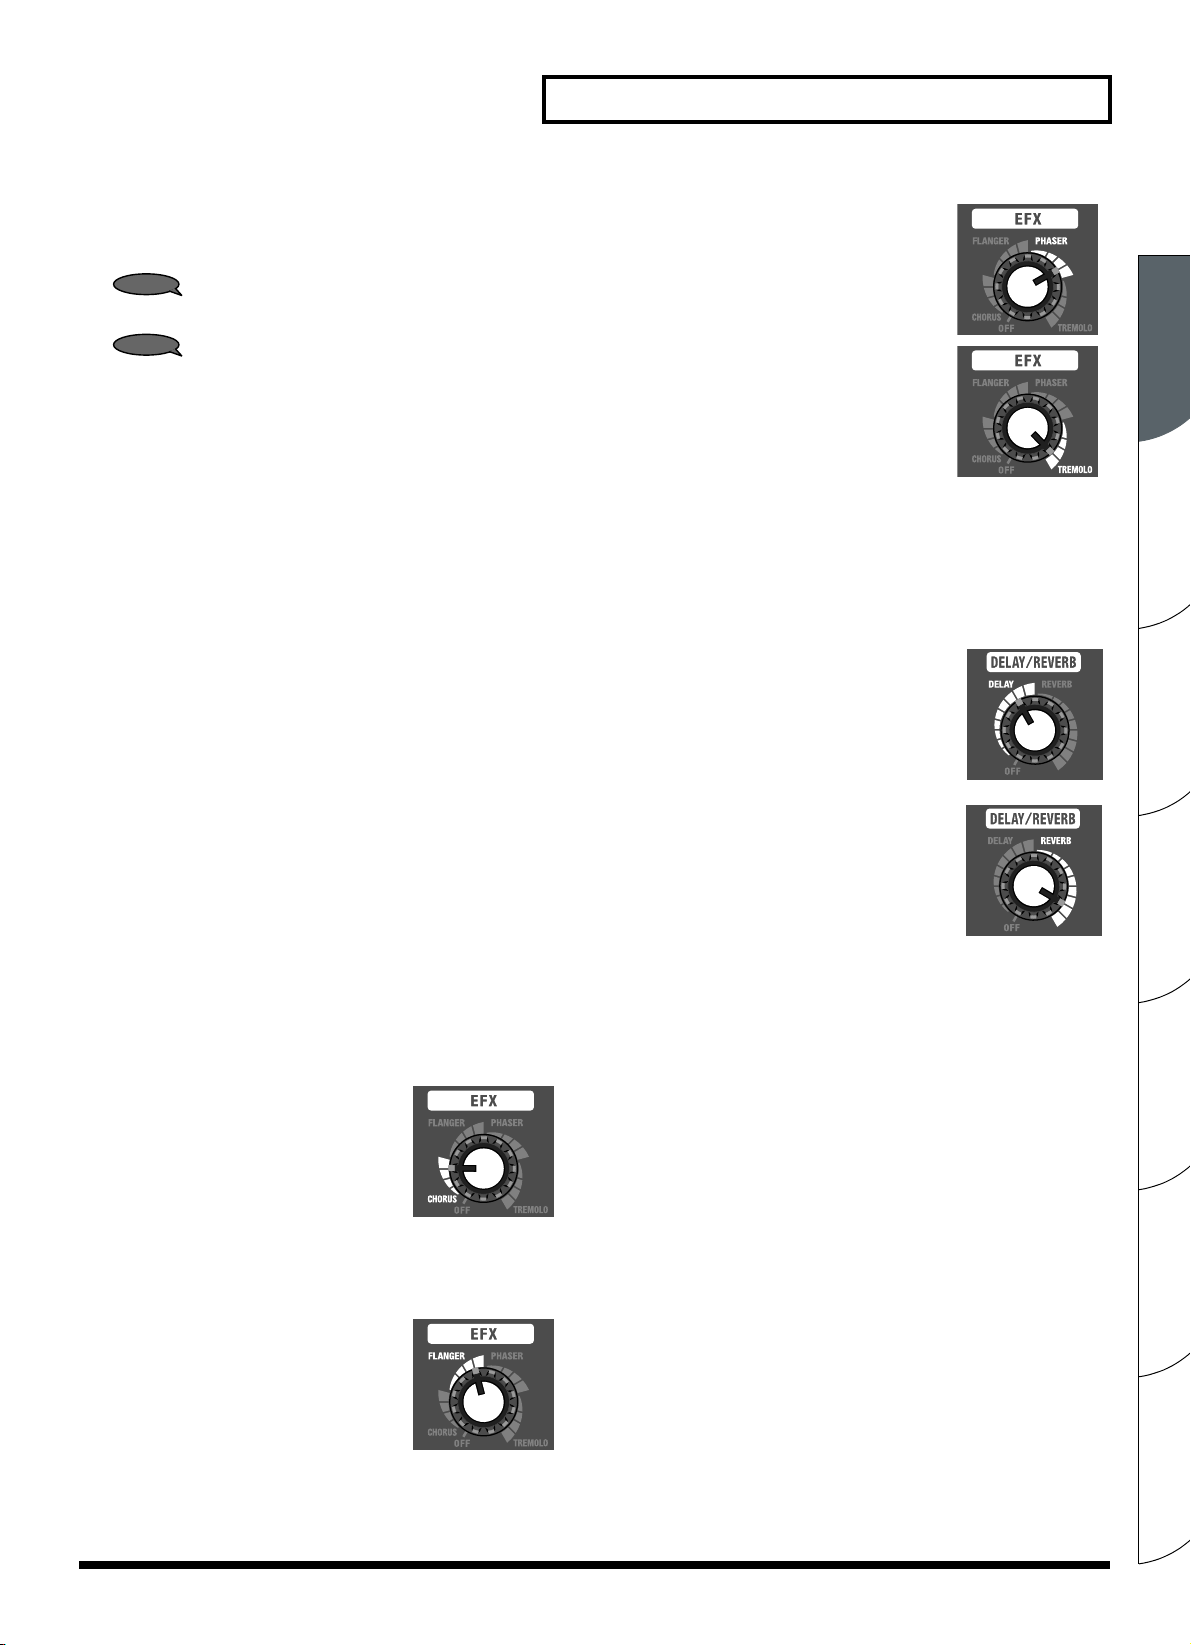
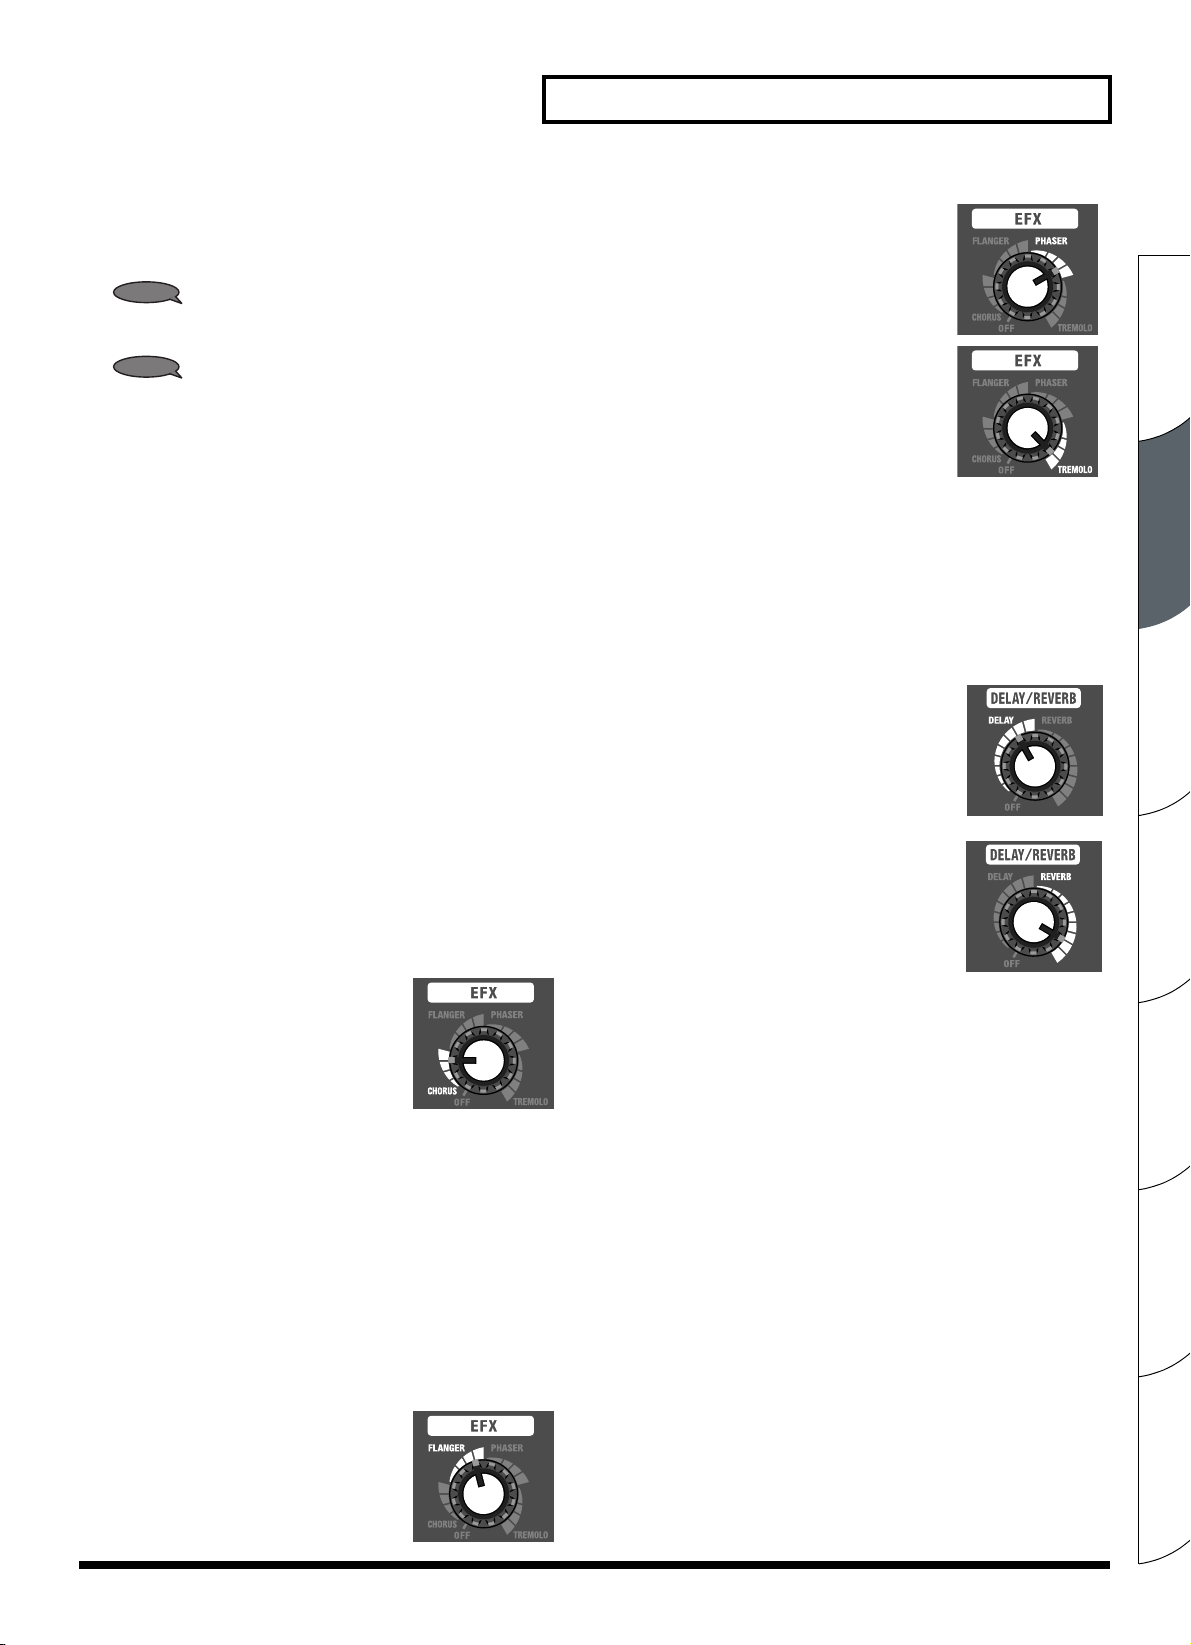
PHASER
This effect adds a variable phase-shifted
signal to the direct sound, giving
the sound a swirling character.
TREMOLO
Tremolo is an effect that creates a cyclic
change in volume.
* Graduations for CHORUS, FLANGER,
PHASER and TREMOLO on the panel
are for reference. Be sure to check the sound as you adjust the effects.
11. DELAY/REVERB Knob
Turn this knob to DELAY or REVERB to switch to that effect.
You can also adjust the amount of effect applied by turning
the knob to the desired position.
DELAY
Turn the knob to adjust the delay effect.
BASS Knob
Adjusts the tone quality of the lower range.
MIDDLE Knob
Adjusts the tone quality of the midrange.
TREBLE Knob
Adjusts the tone quality of the upper range.
10. EFX (Effects) Knob
Turn this knob to CHORUS, FLANGER, PHASER, or TREMOLO
to select the corresponding effect. Turn the knob to adjust the
amount of effect applied.
CHORUS (spacially synthesized chorus)
This uses the same spacially synthesized
chorus as the JC-120 to deliver a broad
sound.
* The chorus effects are designed so
they exhibit the greatest effectiveness when you use the unit's
built-in speakers. Effectiveness may differ when REC OUT/
PHONE are used instead of the built-in speakers.
FLANGER
This creates a flanging effect that creates
a sort of spinning sensation with the sound.
REVERB
Turn the knob to adjust the reverb effect.
* Graduations for DELAY and REVERB
on the panel are for reference. Be sure to
check the sound as you adjust the effects.
12. RHYTHM GUIDE
The unit is equipped with drum/percussion-based rhythm patterns
that are useful for solo practicing. In addition to practicing with your
desired beat, you can also use it as a metronome.
→ Using the RHYTHM GUIDE (p. 9)
PATTERN Knob
Selects the genre of rhythm pattern.
START/STOP Button
Starts/stops the RHYTHM GUIDE. When you start the RHYTHM
GUIDE, its indicator flashes in tempo with the music.
TAP TEMPO Button
Sets the tempo of the RHYTHM GUIDE. Tap this button two or more times
at the desired tempo and the RHYTHM GUIDE will play at that tempo.
VARIATION Button
Selects the variation of the rhythm pattern. Each genre contains three
types of rhythm variations. Pressing the VARIATION button cycles you
through the available variations; the VARIATION indicator will be unlit,
will light green, or will light red to indicate the change in variation.
VOLUME Knob
Adjusts the volume of the RHYTHM GUIDE.
Español Italiano Français Deutsch EnglishPortuguêsNederlands
7
Page 8
Panel Descriptions
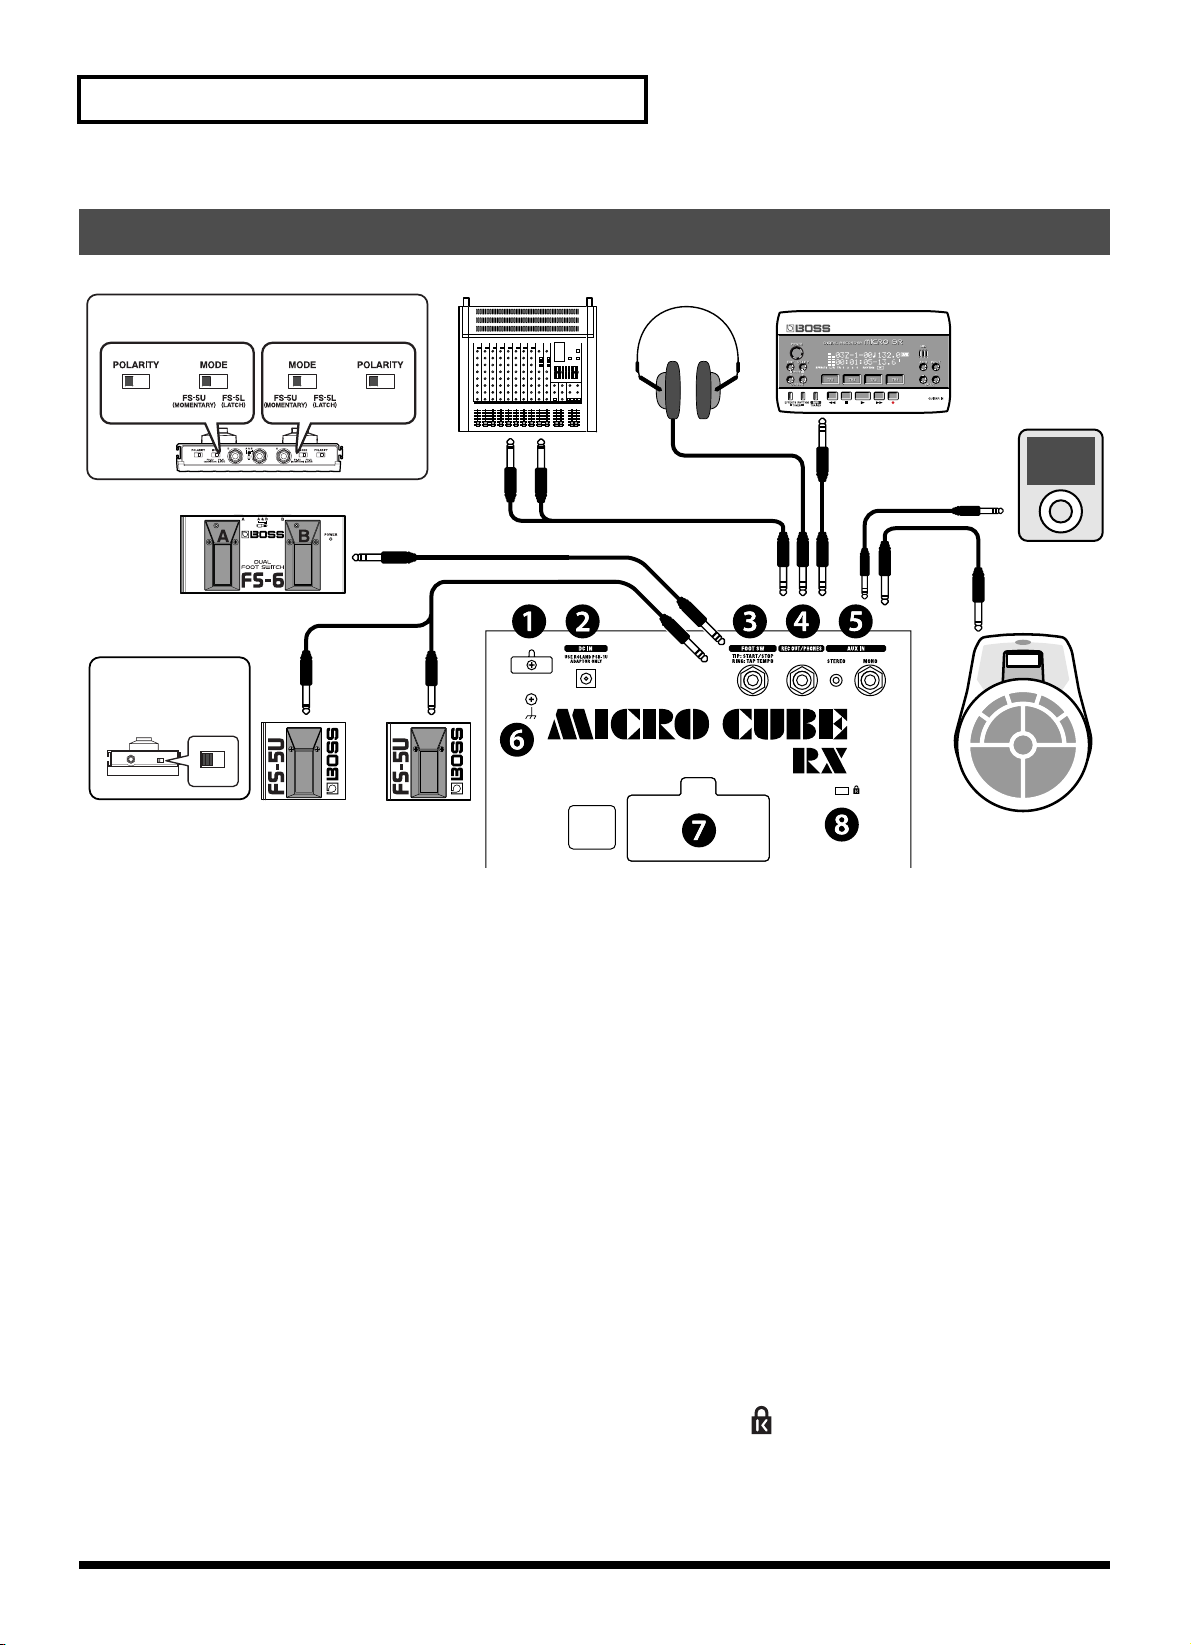
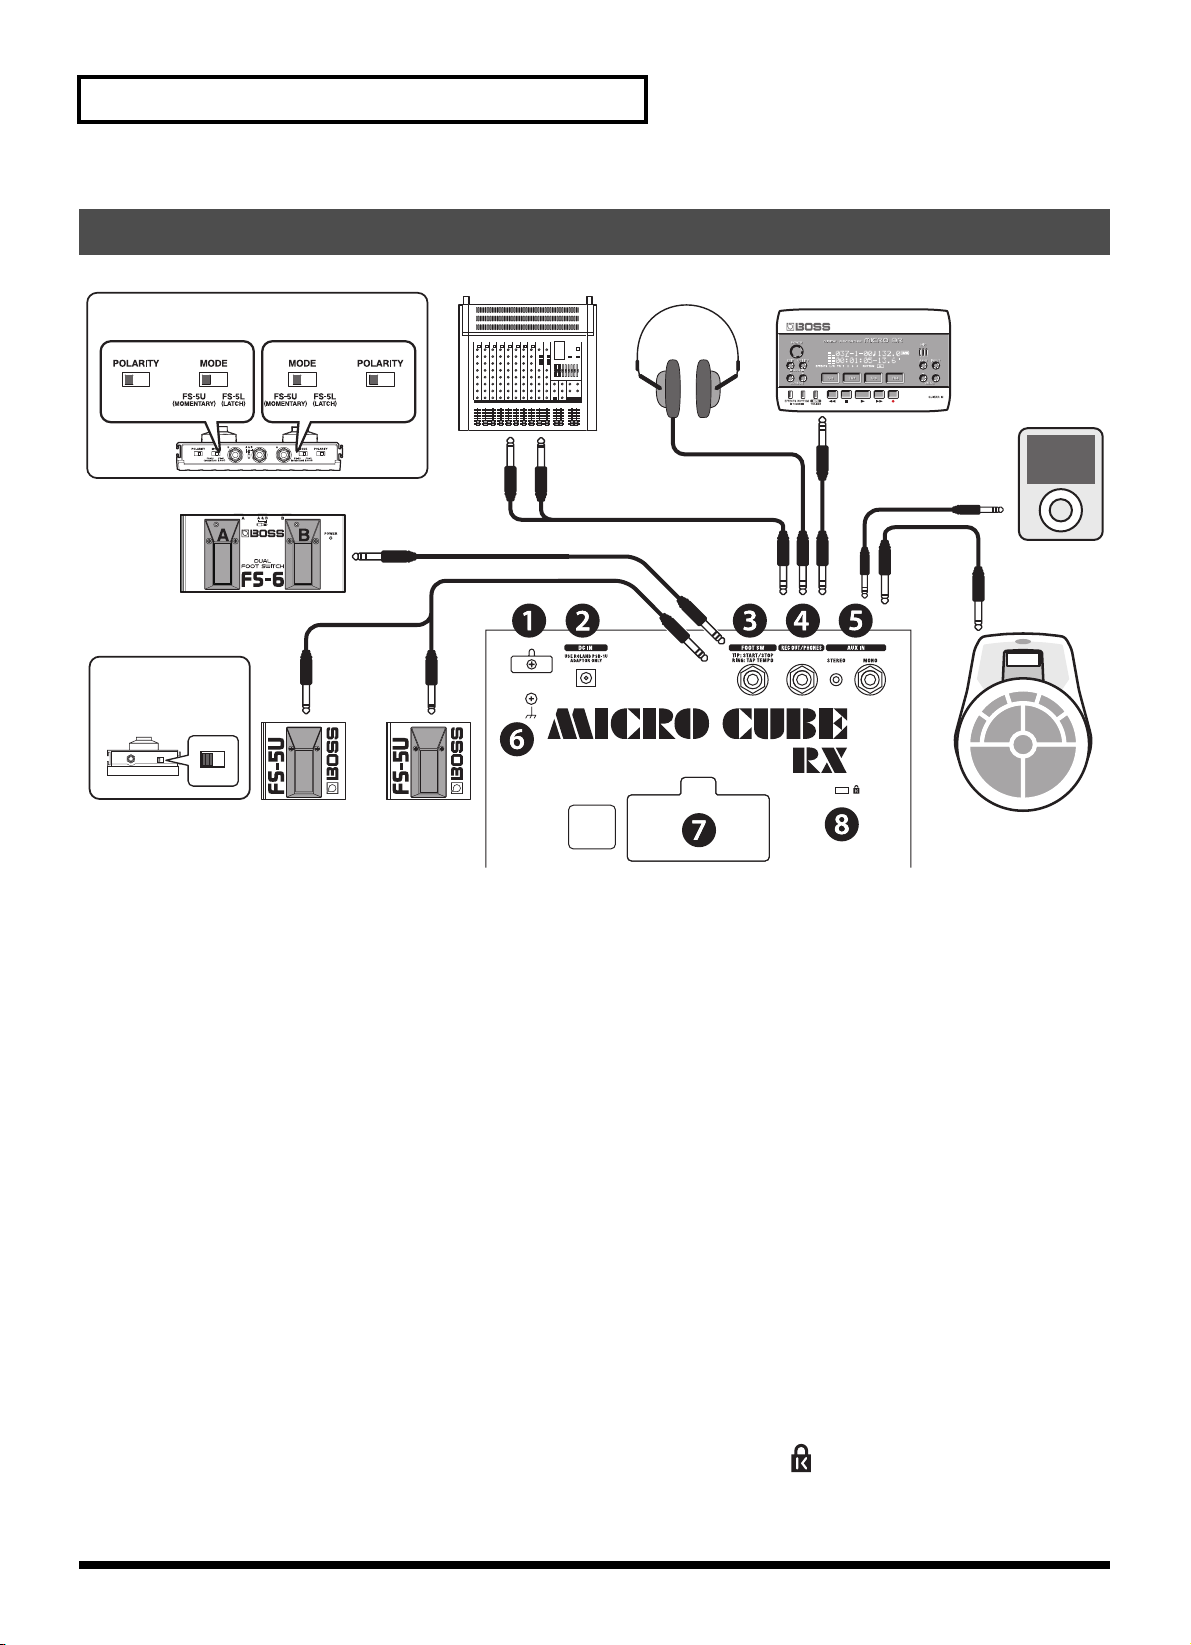
Rear Panel
Set the switches as shown below.
Start/Stop
BOSS FS-6
Set the polarity
switch as shown below.
AB
Tap Tempo
PCS-31
White Red
BOSS FS-5U
Start/Stop
White (L ch) Red (R ch)
Tap Tempo
RecorderStereo HeadphonesMixer
Digital
Audio
Player
Stereo Cable
Stereo Mini Cable
PCS-31
Standard
Mono Cable
Electronic Musical
Instruments, etc.
1. Cord Hook
Hook the AC adaptor cord here.
→ Connecting the AC Adaptor (p. 5)
2. AC Adaptor Jack
Connect the included AC adaptor to this jack.
Use only the AC adaptor included with the MICRO CUBE RX. Use of
other AC adaptors may damage the amp or result in other problems.
→ Connecting the AC Adaptor (p. 5)
3. FOOT SW (Footswitch) Jack
If you connect a footswitch (the optional BOSS FS-5U or FS-6), you can
operate the RHYTHM GUIDE function (START/STOP and TAP TEMPO).
4. REC OUT/PHONES Jack
Connect stereo headphones or a recording device to this jack.
It supports stereo output.
* No sound is played through the unit's speaker while the REC
OUT/PHONES jack is in use.
5. AUX IN Jack
You can connect devices such as a CD player, digital audio player or
electronic musical instrument, and have it play along with your guitar.
Offers two types of jacks for external input; a mono 1/4" phone jack
and a stereo-mini jack. Use the appropriate cable (optional) for
the device that you are connecting.
* Determine the volume level by adjusting the volume control
of the connected device.
6. Ground Terminal
Depending on the circumstances of a particular setup, you may
experience a discomforting sensation, or perceive that the surface feels
gritty to the touch when you touch this device, microphones connected
to it, or the metal portions of other objects, such as guitars. This is due to
an infinitesimal electrical charge, which is absolutely harmless. However,
if you are concerned about this, connect the ground terminal with an
external ground. When the unit is grounded, a slight hum may occur,
depending on the particulars of your installation. If you are unsure of
the connection method, contact the nearest Roland Service Center, or
an authorized Roland distributor, as listed on the "Information" page.
Unsuitable places for connection
• Water pipes (may result in electrical shock)
• Gas pipes (may result in fire or explosion)
• Telephone-line ground or lightning rod (may be dangerous
in the event of lightning)
7. Battery Compartment
Insert 6 AA batteries. Use only alkaline batteries (LR6).
You cannot use any other type of battery.
→ Inserting Batteries (p. 5)
8. Security Slot ( )
You can connect commercially available anti-theft security cables
and other security devices to the unit.
http://www.kensington.com/
8
Page 9
Useful Functions
Using the Tuner Function
The MICRO CUBE RX is equipped with a tuner function. In addition
to manual tuning, you can also use it as a chromatic tuner.
* Use manual tuning when the strings are substantially out of tune
(such as after changing strings).
Chromatic Tuning
If you press the TUNER button for one second or more, you can also use
the unit as a "chromatic tuner", which automatically determines the closest
note name to the one played.
As with manual tuning, chromatic tuning allows you to play a single note on
the string that you want to tune. Tune the string until the green indicator lights.
Manual Tuning
1. Press the TUNER button.
The unit enters Tuner mode, and the TUNER button lights. When the
unit is in Tuner mode, no sound is played through the speakers
or the REC OUT/PHONES jack.
2. Use the AMP TYPE
knob to select the
string that you
want to tune.
Knob
Position
6E Open sixth string (E)
5A Open fifth string (A)
4D Open fourth string
3G Open third string
2B Open second string
1E Open first string (E)
b
A
bb
A
3. Play a single note on the open string that you want to tune.
Tune the string until the green indicator lights.
Flat Sharp
String (Note Name)
(D)
(G)
(B)
Open fifth string (semitone down)
Open fifth string (whole tone down)
Pitch
is correct
(Ab)
(G)
Using the RHYTHM GUIDE
The MICRO CUBE RX is equipped with drum/percussion-based rhythm
patterns that are useful for solo practicing. In addition to practicing with
your desired beat, you can also use it as a metronome.
1. Select the rhythm genre using the PATTERN knob.
METRONOME ROCK1 ROCK2 BLUES
COUNTRY R&B BALLAD JAZZ
FUNK LATIN DANCE
2. Press the START/STOP button to start the RHYTHM GUIDE.
When the RHYTHM GUIDE is started, the RHYTHM GUIDE indicator
lights.
3. Adjust the RHYTHM GUIDE volume using the RHYTHM GUIDE
VOLUME knob.
4. Select a rhythm variation by pressing the VARIATION button.
Each genre contains three types of rhythm variations. Pressing
the VARIATION button cycles you through the available variations;
the VARIATION indicator will be unlit, will light green, or will light
red to indicate the change in variation.
5. Adjust the variation to the tempo that you want to play to.
Press the TAP TEMPO button two or more times at the desired tempo
to get the RHYTHM GUIDE to play at that tempo.
Español Italiano Français Deutsch EnglishPortuguêsNederlands
Lights greenLights red Lights red
* The red indicator flashes if the pitch is substantially out of tune.
4. When you have finished tuning, press the TUNER button once
again.
* The reference pitch is A=440 Hz. This cannot be changed.
9
Page 10
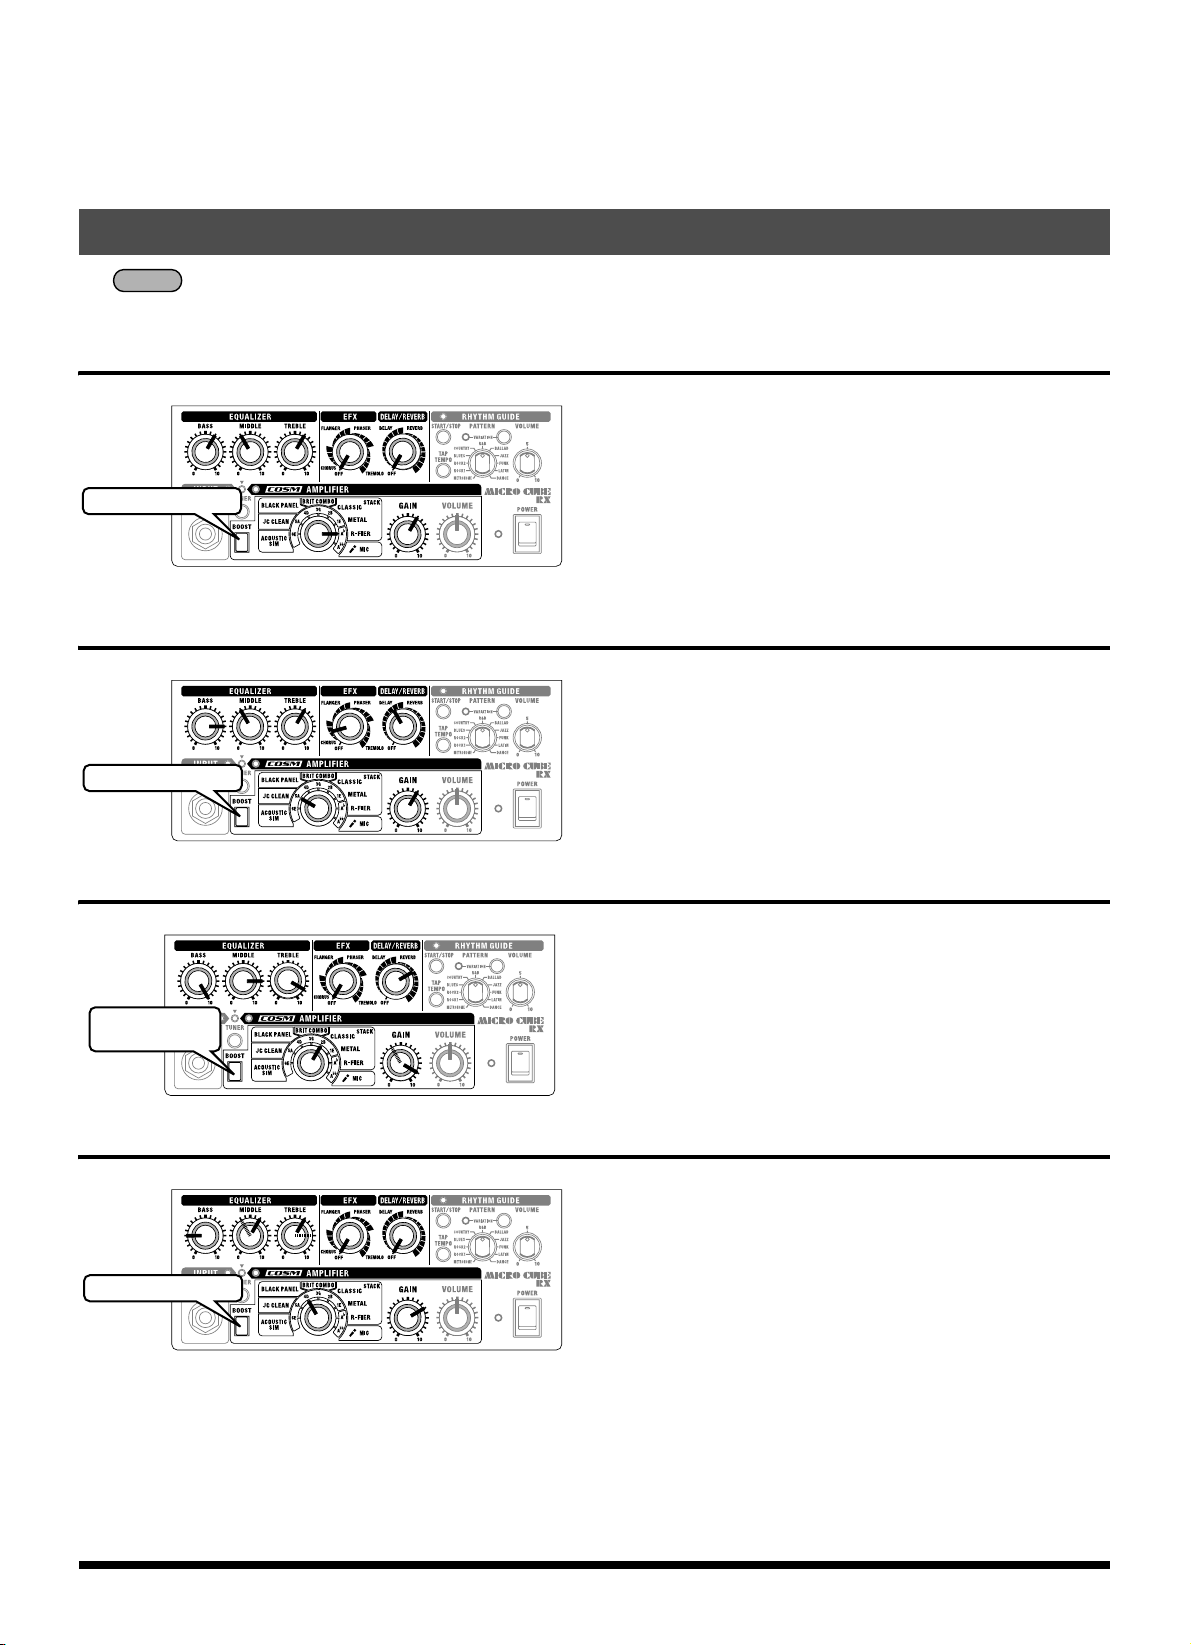
Sample Settings
MEMO
Adjust the VOLUME knob to an appropriate volume level.
Alternative Metal
BOOST Switch: OFF
Space Clean
BOOST Switch: OFF
The perfect sound for heavy, sharp riffs.
Select the high-gain R-FIER amp, then use the equalizer to boost the low
and high ends.
Used with a humbucking pickup in the rear position, it results in an
extreme distortion effect.
Plus, you can add a long delay to use this as a lead sound with great sustain.
Adding a short delay produces a doubling sound like that from two
performers playing the same phrases simultaneously.
This is a transparent sound using spacial effects.
Select the JC CLEAN amp, modeled on the Roland JC-120, then add
chorus and long delay.
Using this setting with a guitar equipped with single coil pickups makes
beautiful sounding arpeggios and chord strumming.
Depending on the phrase being played, it can be effective to set the delay
sound's delay time slightly slower than the phrase's tempo.
Classic Rock
BOOST Switch:
OFF
Tube Crunch
BOOST Switch: OFF
This is a 70s-style rock sound.
Turning up the gain produces a powerful rock sound in all riffs and solos.
A powerful low end is a characteristic of the sound emitted by the surfaces
of the cabinet, so you can turn up the equalizer knobs, especially the
BASS knob, to produce a sound with great punch.
Turning down the GAIN knob is also a perfect way to get a sharp crunch sound.
This is a sound that complements blues music.
Turn down the BASS knob a little and turn up the GAIN knob to obtain
a smooth crunch sound.
This is due to sound boosted by the equalizer being distorted by the GAIN knob.
You can also obtain a sharp crunch sound by further boosting the high
end or lowering the midrange.
10
Page 11
Stromversorgung
Einlegen der Batterien
Nehmen Sie den Deckel des
Batteriefachs ab und setzen Sie 6 AABatterien ein. Achten Sie dabei auf die
richtige Polung.
* Um Fehlfunktionen und/oder
Schäden an Lautsprechern
oder anderen Geräten zu
vermeiden, schalten Sie immer
dieses Gerät aus und trennen Sie die Verbindung zu anderen
Geräten, bevor Sie Batterien einlegen oder ersetzen.
* Führen Sie, wenn Sie den Batteriefachdeckel schließen, als erstes
die Zapfen am Deckel in die entsprechenden Aussparungen ein,
und drücken Sie dann den Deckel fest zu, bis sie ihn einrasten hören.
Batteriebetrieb
Beachten Sie bitte die folgenden Punkte:
• Wenn der Netzadapter verwendet wird, sich aber Batterien
im Gerät befinden, wird im Fall einer Unterbrechung der
Stromversorgung (durch Stromausfall oder Abziehen des
Netzkabels) der normale Betrieb fortgesetzt.
• Verwenden Sie ausschließlich Alkali-Batterien (LR6).
Andere Batterietypen können nicht verwendet werden.
• Lebensdauer der Batterien
Bei Dauerbetrieb mit maximaler Leistung: etwa 13 Stunden
(Diese Werte variieren je nach den tatsächlichen
Betriebsbedingungen.)
• Bei ausschließlichem Batteriebetrieb wird die Spannungsanzeige
(S. 12) des Geräts während des Spielens zunehmend dunkler,
sobald die Batteriespannung zu sehr absinkt. Ersetzen Sie
die Batterien so bald wie möglich.
•
Die Sounds verzerren früher oder werden abgeschnitten, wenn Sie bei
abnehmender Batteriespannung mit hoher Lautstärke spielen. Dies ist
jedoch normal und nicht als Fehlfunktion zu werten. Ersetzen Sie entweder
die Batterien oder verwenden Sie den mitgelieferten Netzadapter.
Verwendung des Geräts mit
dem Netzadapter
Beachten Sie bitte die folgenden Punkte:
• Das Gerät kann zwar allein mit Batterien betrieben werden, doch
durch Anschließen des Netzadapters bei eingelegten Batterien wird
sichergestellt, dass das Gerät über den Netzadapter mit Spannung
versorgt wird, was den Batterieverbrauch verringert.
• Verwenden Sie ausschließlich den mit dem MICRO CUBE RX
mitgelieferten Netzadapter.
Die Verwendung anderer Netzadapter kann den Verstärker
beschädigen oder andere Probleme verursachen.
Ein- und Ausschalten
Sobald Sie alle Anschlüsse vorgenommen haben, schalten Sie alle
beteiligten Geräte in der angegebenen Reihenfolge ein. Wenn Sie die
Geräte in der falschen Reihenfolge einschalten, kann es zu Fehlfunktionen
und/oder Schäden an Lautsprechern oder anderen Geräten kommen.
1. Achten Sie darauf, dass alle Lautstärkeregler am MICRO CUBE RX
und an angeschlossenen Geräten auf 0 eingestellt sind.
2. Schalten Sie alle Geräte ein, die an der INPUT- und der
AUXI-IN-Buchse des MICRO CUBE RX angeschlossen sind.
3. Schalten Sie den MICRO CUBE RX ein.
4. Stellen Sie die Lautstärken der Geräte ein.
5. Regeln Sie vor dem Ausschalten die Lautstärken aller Geräte
in Ihrem System herunter, und schalten Sie dann die
Geräte in umgekehrter Reihenfolge aus.
HINWEIS
Aufgrund einer Schaltungsschutzfunktion dauert es nach dem Einschalten
einen Moment, bis dieses Gerät für den normalen Betrieb bereit ist.
Um plötzliche, laute Impulse zu vermeiden, achten Sie immer darauf,
die Lautstärke herunterzuregeln, bevor Sie das Gerät einschalten.
HINWEIS
Auch bei vollständig heruntergeregelter Lautstärke hören Sie beim
Ein- und Ausschalten möglicherweise ein Geräusch, aber das ist
normal und stellt keine Fehlfunktion dar.
Anschließen des Netzadapters
1. Stecken Sie den Stecker des mitgelieferten Netzadapters
in die Netzadapterbuchse des Geräts.
Indem Sie den Netzadapter wie in der
Abbildung gezeigt mit Hilfe der
Kabelklemme festhaken, können Sie
vermeiden, dass sich der Adapterstecker
aus der Buchse löst oder übermäßiger Druck
auf die Adapterbuchse ausgeübt wird.
* Um Betriebsfehler oder Schäden an den
Lautsprechern zu vermeiden, sollten Sie
das Gerät von anderen Geräten trennen
und es ausschalten, wenn Sie den Netzadapter anschließen.
2. Schließen Sie das mitgelieferte Stromkabel an den Netzadapter
an, und stecken Sie dessen Stecker in eine Netzsteckdose.
Netzadapter
Anzeige
Platzieren Sie den Netzadapter so, dass die Seite mit der Anzeige
(siehe Abbildung) nach oben weist.
* Die Anzeige leuchtet, sobald Sie den Netzadapter in eine
funktionierende Netzsteckdose einstecken.
Stromkabel
Netzsteckdose
Anbringen des Tragegurts
Befestigen Sie den
mitgelieferten Tragegurt wie
in der Abbildung gezeigt am
Gurtstift.
HINWEIS
Befestigen Sie den Gurt so, dass er sich nicht versehentlich lösen
kann. Falls der Gurt locker ist, während Sie den MICRO CUBE RX
am Gurt tragen, könnte der Verstärker zu Boden fallen,
was Schäden oder Verletzungen verursachen kann.
HINWEIS
Verwenden Sie nur den mitgelieferten Gurt. Der mitgelieferte
Gurt ist ausschließlich zur Verwendung mit dem MICRO CUBE RX
vorgesehen. Verwenden Sie diesen Gurt nicht für andere Produkte.
HINWEIS
Machen Sie keine Dreh- oder Schwingbewegungen mit dem
MICRO CUBE RX, während Sie ihn am Gurt halten. Dies ist äußerst
gefährlich, da sich dadurch der Gurt lösen oder, wenn die
Bewegung zu oft wiederholt wird, sogar reißen kann.
Español Italiano Français Deutsch EnglishPortuguêsNederlands
11
Page 12
Beschreibungen zum Bedienfeld
Bedienfeld
Abb. 01-01
Gitarre
Dynamisches Mikrofon
StandardMono-Kabel
1. Buchse INPUT (Eingang)
Schließen Sie hier Ihre Gitarre oder Ihr Mikrofon an.
2. Taste BOOST (Frequenzverstärkung)
Drücken Sie die BOOST-Taste, um den Klang des Verstärkers zu ändern.
Welche Effekte Sie erzeugen können, hängt vom Verstärkertyp ab.
3. TUNER (Stimmfunktion)
Zusätzlich zum manuellen Stimmen, wo die Tonhöhe der Saiten
angegeben wird, können Sie diese Funktion auch als chromatisches
Stimmgerät nutzen.
Sie unterstützt auch Flat Tuning (alle Saiten einen Halbton tiefer).
→ Verwendung der Tuner-Funktion (S. 15)
4. Typ-Regler
Sie können aus acht COSM-Verstärkertypen auswählen.
Bei eingeschalteter TUNER-Funktion können Sie eine Saite
(einen Notennamen) angeben.
* Die in diesem Dokument erwähnten Produktbezeichnungen sind
Warenzeichen oder eingetragene Warenzeichen der jeweiligen
Eigentümer und haben nichts mit der Roland Corporation zu tun.
In dieser Anleitung werden diese Bezeichnungen in einer Weise
verwendet, die geeignet ist, die mit der COSM-Technologie
simulierten Sounds zu beschreiben.
ACOUSTIC SIM
Dies ist ein spezieller Verstärkertyp mit Akustiksimulator.
Wandelt die Sounds Ihrer E-Gitarre in den verfeinerten,
klaren Klang einer akustischen Gitarre um.
In Kombination mit einem Single-Coil-Tonabnehmer sorgt dieser
Verstärkertyp für optimale Klangqualität. Bei Verwendung eines
Humbucker-Tonabnehmers ist es sinnvoll, den unteren (BASS) und
den mittleren Frequenzbereich (MIDDLE) herunterzuregeln.
JC CLEAN
Dies ist ein Modell des berühmten Gitarrenverstärkers Jazz Chorus
JC-120 von Roland. Der ultra-cleane, ebenmäßige Sound bietet einen
weichen Klang. Dies wird um so deutlicher, wenn er in Kombination
mit der Effekt-Sektion dieses Cube Amps eingesetzt wird.
BLACK PANEL
Dies ist ein Modell des klassischen Verstärkers Fender Twin Reverb. Er wird
in vielen verschiedenen Musikstilrichtungen verwendet, von Country und
Blues bis Jazz und Rock. Er bietet voll klingende Bässe und klare Höhen.
BRIT COMBO
Dies ist ein Modell eines VOX AC-30TB. Dies ist der RockmusikAmp, der den Liverpool-Sound der 60er mitgestaltet hat. Er kann
viele verschiedene Sounds hervorbringen, von Clean bis Overdrive.
CLASSIC STACK
Dies ist ein Modell auf Grundlage des Sounds und des Verhaltens
eines Marshall JMP1987. Dieser im Hardrock der 1970er viel
genutzte Verstärker liefert einen perfekten „Top Rock“-Gitarrensound.
METAL STACK
Dies ist ein Modell des PEAVEY EVH5150. Dies ist ein Verstärkertyp
mit hohem Gain, so dass Sie selbst bei niedriger Lautstärke eine
starke Verzerrung und lange Ausklingzeit erhalten können.
R-FIER STACK
Dies ist ein Modell des MESA/Boogie Rectifier. Dieser Amp mit
äußerst hohem Gain kann Slash-Metal-, Grunge- und viele andere
Lead-Sounds erzeugen.
MIC
Wählen Sie diesen Typ, wenn ein Mikrofon angeschlossen ist.
* Bitte beachten Sie, wenn Sie ein Mikrofon verwenden, die
folgenden Punkte.
• Je nach dem Aufstellort von Mikrofonen im Verhältnis zum
Gerät könnten Rückkopplungen erzeugt werden. Dies lässt
sich lösen durch:
1. Ändern der Ausrichtung des Mikrofons bzw. der Mikrofone.
2. Aufstellung des Mikrofons bzw. der Mikrofone
in größerem Abstand vom Gerät.
3. Verringern der Lautstärke(n).
• Wenn Sie den GAIN-Regler zu hoch einstellen, wird der
Klang verzerrt. Stellen Sie den GAIN-Regler auf einen so
hohen Wert wie möglich ein, bevor eine Verzerrung eintritt,
um das beste Signal-Rausch-Verhältnis zu erhalten.
• Verwenden Sie ein dynamisches Mikrofon. Sie können kein
Kondensatormikrofon oder ein aktives Mikrofon verwenden,
das eine Stromversorgung benötigt.
12
Page 13
Beschreibungen zum Bedienfeld
5. Regler GAIN (Verstärkung)
Stellt den Eingangspegel ein. Stellen Sie den Eingangspegel passend
zum Signalpegel der an der INPUT-Buchse angeschlossenen
Musikinstrumente an.
TIPP
Mit einer hohen GAIN-Einstellung können Sie einen übersteuerten
Sound erzielen.
TIPP
Stellen Sie den GAIN-Regler auf einen so hohen Wert wie möglich
ein, bevor die Soundverzerrung einsetzt, um einen möglichst klaren
Sound zu erhalten.
6. Regler VOLUME (Lautstärke)
Reguliert die Lautstärke der Gitarre (des Mikrofons).
7. Netzanzeige
Diese Anzeige leuchtet, wenn das Gerät eingeschaltet ist.
* Bei ausschließlichem Batteriebetrieb wird die Anzeige
zunehmend dunkler, sobald die Batteriespannung zu sehr
absinkt. Ersetzen Sie die Batterien so bald wie möglich.
8. Netzschalter POWER
Schaltet das Gerät ein und aus.
→ Ein- und Ausschalten (S. 11)
9. EQUALIZER (Klangregelung)
Dies ist ein 3-Band-Equalizer. Sie können die Klangfarbe der Gitarre mit
drei Reglern einstellen.
Regler BASS (Bässe)
Regelt den Pegel des unteren Frequenzbereichs.
Regler MIDDLE (Mitten)
Regelt den Pegel des mittleren Frequenzbereichs.
Regler TREBLE (Höhen)
Regelt den Pegel des oberen Frequenzbereichs.
10. Regler EFX (Effekte)
Drehen Sie diesen Regler auf Chorus, Flanger, Phaser oder Tremolo,
um den entsprechenden Effekt auszuwählen. Drehen Sie den Regler,
um den Effektanteil einzustellen.
CHORUS (räumlich erzeugter
Chorus-Effekt)
Hier wird der gleiche räumliche ChorusEffekt verwendet wie beim JC-120, um
einen breiten Sound zu erzeugen.Beim
räumlich erzeugten Chorus, einer nur in
Stereo verfügbaren Methode, wird der
Effekt erzeugt, indem der Klang vom
rechten Lautsprecher (von dem der Effektklang ausgegeben wird)
und der Klang vom linken Lautsprecher (der den direkten Klang
ausgibt) genommen und dann im Raum selbst gemischt werden.
Dadurch entsteht eine größere seitliche Streuung, als wenn die
Klänge elektronisch gemischt werden, was einen natürlicheren
Eindruck von Breite hervorruft.
* Die Chorus-Effekte sind so konzipiert, dass sie die größte Wirkung
zeigen, wenn Sie die eingebauten Lautsprecher des Geräts
verwenden. Die Wirkung kann abweichen, wenn REC OUT/PHONE
anstelle der eingebauten Lautsprecher verwendet werden.
FLANGER
Dies erzeugt den Flanging-Effekt, der
den Eindruck eines sich drehenden Klangs
bewirkt.
PHASER
Dieser Effekt fügt dem direkten Klang ein
variabel phasenverschobenes Signal
hinzu, wodurch der Sound einen
wirbelnden Charakter erhält.
TREMOLO
Tremolo ist ein Effekt, der eine zyklische
Lautstärkeänderung erzeugt.
* AblesenDie Markierung für die
Effektstärke ist ein Näherungswert.
Richten Sie sich beim Einstellen des Effektes nach dem von Ihnen
gewünschten Klangergebnis.
11. Regler DELAY/REVERB (Hall/Echo)
Stellen Sie diesen Regler auf DELAY oder REVERB, um auf den
betreffenden Effekt zu schalten. Außerdem können Sie die Intensität
des angewendeten Effekts einstellen, indem Sie den Regler in die
gewünschte Stellung bringen.
DELAY
Drehen Sie den Regler, um den
Verzögerungseffekt einzustellen.
REVERB
Drehen Sie den Regler, um den Halleffekt
einzustellen.
* Die Einteilungen auf dem Bedienfeld für
DELAY und REVERB dienen zum Ablesen.
Hören Sie beim Einstellen der Effekte vor
allem auf den Klang.
12. RHYTHM GUIDE
Das Gerät ist mit Rhythmus-Patterns auf Drum/Percussion-Basis
ausgestattet, die nützlich sind, wenn man allein üben möchte.
Zusätzlich zum Üben mit Ihrem gewünschten Groove können Sie
ihn auch als Metronom nutzen.
→ Verwendung des RHYTHM GUIDE (S. 15)
Regler PATTERN
Wählt das Genre des Rhythmus-Patterns aus.
Taste START/STOP
Startet/stoppt den RHYTHM GUIDE. Wenn Sie den RHYTHM GUIDE
starten, blinkt seine Anzeige synchron zur Musik.
Taste TAP TEMPO
Stellt das Tempo für den RHYTHM GUIDE ein. Tippen Sie zwei oder
mehrere Male im gewünschten Tempo auf diese Taste, und der
RHYTHM GUIDE spielt im entsprechenden Tempo.
Taste VARIATION
Wählt die Variation des Rhythmus-Patterns aus. Jedes Genre enthält
drei Typen von Rhythmusvariationen. Wenn Sie die VARIATION-Taste
drücken, durchläuft das Gerät die verfügbaren Variationen; die
VARIATION-Anzeige ist entweder unbeleuchtet, grün oder rot, um den
Wechsel der Variationen anzuzeigen.
Regler VOLUME (Lautstärke)
Reguliert die Lautstärke des RHYTHM GUIDE.
Español Italiano Français Deutsch EnglishPortuguêsNederlands
13
Page 14
Beschreibungen zum Bedienfeld
Rückseite
Stellen Sie die Schalter wie nachstehend gezeigt ein.
AB
START/STOP
BOSS FS-6
Stellen Sie den
Polaritätsschalter wie
nachstehend gezeigt ein.
TAP TEMPO
PCS-31
Weiß Rot
BOSS FS-5U
START/STOP
(linker Kanal)
TAP TEMPO
Weiß
Rot (rechter Kanal)
Aufnahmeeinheit (Rekorder)StereokopfhörerMischpult
Digitaler
Audioplayer
Stereo-Kabel
Stereo-Mini-Kabel
PCS-31
StandardMono-Kabel
Elektronische
Musikinstrumente usw.
1. Kabelklemme
Haken Sie hier das Netzkabel ein.
→ Anschließen des Netzadapters (S. 11)
2. Netzadapterbuchse
Schließen Sie hier den mitgelieferten Netzadapter an.
Verwenden Sie ausschließlich den mit dem MICRO CUBE RX
gelieferten Netzadapter. Die Verwendung anderer Netzadapter kann
den Verstärker beschädigen oder andere Probleme verursachen.
→ Anschließen des Netzadapters (S. 11)
3. Buchse FOOT SW (Fußtaster)
Wenn Sie einen Fußtaster anschließen (den als Zubehör erhältlichen
BOSS FS-5U oder FS-6), können Sie mit ihm die RHYTHM-GUIDEFunktion steuern (START/STOP und TAP TEMPO).
4. Buchse REC OUT/PHONES (Aufnahme/Kopfhörer)
Schließen Sie an dieser Buchse einen Stereokopfhörer oder ein
Aufnahmegerät an. Sie unterstützt die Stereoausgabe.
* Es erfolgt keine Tonausgabe aus dem Lautsprecher des Geräts,
so lange die Buchse REC OUT/PHONES belegt ist.
5. Buchse AUX IN
Sie können Geräte wie einen CD-Player, ein digitales Wiedergabegerät
oder ein elektronisches Musikinstrument anschließen und mit Ihrer
Gitarre dazu spielen.
Hier können zwei Arten von Steckern angeschlossen werden:
ein 6,3-mm-Mono-Klinkenstecker und ein Miniklinken-Stecker.
Verwenden Sie ein für das anzuschließende Gerät geeignetes
Kabel (als Zubehör erhältlich).
* Stellen Sie die Lautstärke am Lautstärkeregler des
angeschlossenen Audiogerätes ein.
6. Erdungsanschluss
Je nach den Umständen von Aufstellung und Anschluss kann es
vorkommen, dass Sie beim Berühren von Metalloberflächen dieses Geräts
oder angeschlossener Mikrofone oder Gitarren ein etwas unangenehmes
„Stromgefühl“ wahrnehmen. Dies entsteht durch eine minimale
elektrische Ladung, die vollkommen harmlos ist. Falls es Sie trotzdem
beunruhigt, verbinden Sie den Erdungsanschluss mit einer externen
Masse. Wenn das Gerät geerdet ist, kann je nach den Umständen von
Aufstellung und Anschluss ein leichtes Brummen auftreten. Wenn Sie sich
bezüglich der Anschlussmethode nicht sicher sind, wenden Sie sich an ein
Roland Service Center in Ihrer Nähe oder an einen der autorisierten
Roland-Vertriebspartner, die auf der Seite „Information“ aufgelistet sind.
Nicht für den Anschluss geeignete Stellen
Wasserleitungen (kann einen elektrischen Schlag zur Folge haben)
•
•
Gasleitungen (kann zu einem Brand oder einer Explosion führen)
• Masseleiter von Telefonleitungen oder Blitzableiter
(kann bei Blitzschlag eine Gefahr darstellen)
7. Batteriefach
Setzen Sie 6 AA-Batterien ein. Verwenden Sie ausschließlich AlkaliBatterien (LR6). Andere Batterietypen können nicht verwendet werden.
→ Einlegen der Batterien (S. 11)
8. Sicherheitsschacht ( )
Sie können im Handel erhältliche Diebstahlsicherungskabel
sowie andere Sicherheitsvorrichtungen an das Gerät anschließen.
http://www.kensington.com/
14
Page 15

Nützliche Funktionen
Verwendung der TunerFunktion
Der MICRO CUBE RX ist mit einer Tuner-Funktion ausgestattet. Zusätzlich
zum manuellen Stimmen können Sie sie auch als chromatisches
Stimmgerät nutzen.
* Stimmen Sie das Instrument manuell, wenn die Saiten stark
verstimmt sind (zum Beispiel nach dem Aufziehen neuer Saiten).
Chromatisches Stimmen
Wenn Sie die TUNER-Taste eine Sekunde lang oder länger drücken,
können Sie das Gerät auch als ein „chromatisches Stimmgerät“
verwenden, das automatisch die Note bestimmt, die der gespielten am
nächsten ist.
Wie beim manuellen Stimmen können Sie beim chromatischen Stimmen auf
der zu stimmenden Saite eine einzelne Note spielen. Stimmen Sie die Saite,
bis die grüne Anzeige aufleuchtet.
Manuelles Stimmen
1. Drücken Sie die TUNER-Taste.
Das Gerät wechselt in den Tuner-Modus, und die TUNER-Taste
leuchtet. Wenn das Gerät im Tuner-Modus ist, erfolgt keine
Tonausgabe aus den Lautsprechern oder der Buchse REC OUT/
PHONES.
2. Wählen Sie mit dem
Typ-Regler die zu
stimmende Saite
aus.
Reglerstellung
6E Offene sechste Saite (E)
5A Offene fünfte Saite (A)
4D Offene vierte Saite
3G Offene dritte Saite
2B Offene zweite Saite
1E Offene erste Saite (E)
b
A
bb
A
3. Spielen Sie eine einzelne Note auf der offenen Saite, die Sie
stimmen möchten.
Stimmen Sie die Saite, bis die grüne Anzeige aufleuchtet.
Zu tief Zu hoch
Saite (Notenname)
(D)
(G)
(deutsche Tonbezeichnung: H)
Offene fünfte Saite (ein Halbton tiefer)
Offene fünfte Saite (ein Ganzton tiefer)
Richtige
Tonhöhe
(Ab)
(G)
Verwendung des RHYTHM GUIDE
Der MICRO CUBE RX ist mit Rhythmus-Patterns mit Schlagzeug/
Percussion ausgestattet, die nützlich sind, wenn man allein üben möchte.
Zusätzlich zum Üben mit Ihrem gewünschten Groove können Sie ihn auch
als Metronom nutzen.
1. Wählen Sie mit dem PATTERN-Regler das Rhythmus-Genre aus.
METRONOME ROCK1 ROCK2 BLUES
COUNTRY R&B BALLAD JAZZ
FUNK LATIN DANCE
2. Drücken Sie die START/STOP-Taste, um den RHYTHM GUIDE zu
starten.
Wenn der RHYTHM GUIDE gestartet wurde, leuchtet die RHYTHMGUIDE-Anzeige.
3. Stellen Sie mit dem Regler RHYTHM GUIDE VOLUME die
Lautstärke für den RHYTHM GUIDE ein.
4. Wählen Sie mit der VARIATION-Taste eine Rhythmusvariation aus.
Jedes Genre enthält drei Typen von Rhythmusvariationen. Wenn Sie
die VARIATION-Taste drücken, durchläuft das Gerät die verfügbaren
Variationen; die VARIATION-Anzeige ist entweder unbeleuchtet, grün
oder rot, um den Wechsel der Variationen anzuzeigen.
Español Italiano Français Deutsch EnglishPortuguêsNederlands
Leuchtet grünLeuchtet rot Leuchtet rot
* Die rote Anzeige leuchtet, wenn die Saite stark verstimmt ist.
4. Wenn Sie mit dem Stimmen fertig sind, drücken Sie noch einmal
die TUNER-Taste.
* Die Bezugstonhöhe ist A = 440 Hz. Dies kann nicht geändert
werden.
5. Stellen Sie die Variation auf das Tempo ein, zu dem Sie spielen
möchten.
Drücken Sie zwei oder mehrere Male im gewünschten Tempo die
TAP-TEMPO-Taste, damit der RHYTHM GUIDE in dem betreffenden
Tempo spielt.
15
Page 16
Mustereinstellungen
NOTIZ
Stellen Sie den VOLUME-Regler auf einen geeigneten Lautstärkepegel ein.
Alternative Metal
BOOST-Schalter: OFF
Space Clean
BOOST-Schalter: OFF
Der perfekte Sound für metallische Heavy-Riffs.
Wählen Sie den Verstärker R-FIER mit seinem hohen Gain, und erhöhen
Sie dann mit dem Equalizer die tiefen und die hohen Frequenzen.
Bei gleichzeitiger Verwendung eines Humbucker in hinterer Position
ergibt dies einen extremen Verzerrungseffekt.
Außerdem können Sie ein langes Delay hinzufügen, um diesen Klang als
Lead-Sound mit hervorragendem Sustain zu verwenden.
Mit einem kurzen Delay erzeugen Sie einen gedoppelten Sound, so als
würden zwei Gitarristen gleichzeitig die gleiche Phrase spielen.
Dies ist ein transparenter Sound mit räumlichen Effekten.
Wählen Sie den Verstärker JC CLEAN, ein Modell des Roland JC-120,
und fügen Sie dann Chorus und ein langes Delay hinzu.
Diese Einstellung zusammen mit einer Gitarre mit Single Coils ergibt
schön klingende Arpeggien und Akkordschläge.
Je nach der gespielten Phrase kann es effektiv sein, die Verzögerungszeit
des Delay-Sounds etwas langsamer einzustellen als das Tempo der Phrase.
Classic Rock
BOOST-Schalter:
OFF
Tube Crunch
BOOST-Schalter: OFF
Dies ist ein Rock-Sound im Stil der 70er Jahre.
Mit hoch eingestelltem Gain sorgt er bei allen Riffs und Soli für einen
kraftvollen Rock-Sound.
Ein kraftvoller unterer Frequenzbereich zeichnet beim Original-Verstärker
den von den Gehäuseoberflächen abgegebenen Sound aus. Sie können
also die Equalizer-Regler hochdrehen, vor allem den BASS-Regler, um
einen Sound mit sattem Punch zu erzeugen.
Mit heruntergeregeltem GAIN kann man außerdem hervorragend einen
scharfen Crunch-Sound erzeugen.
Dieser Sound bietet eine gute Unterstützung für Blues.
Drehen Sie den BASS-Regler ein wenig herunter und den GAIN-Regler
hoch, um einen geschmeidigen Crunch-Sound zu erzielen.
Dieser entsteht dadurch, dass der vom Equalizer selektiv verstärkte Sound
durch den GAIN-Regler verzerrt wird.
Außerdem können Sie einen scharfen Crunch-Sound erzielen, indem
Sie die hohen Frequenzen anheben oder die mittleren absenken.
16
Page 17

Alimentation
Insertion des piles
Retirez le couvercle du compartiment
à piles et insérez six piles LR-06 (AA)
en respectant leur polarité.
* Pour éviter tout
dysfonctionnement et / ou
dommages au niveau des hautparleurs ou d’autres appareils,
commencez toujours par réduire
le volume au minimum, puis
mettez hors tension tous les autres appareils avant d’installer ou
de remplacer les piles.
* Avant de refermer le couvercle du compartiment à piles, commencez
par insérer ses tenons dans les encoches du boîtier, puis poussez-le
fermement vers le bas jusqu’à ce qu’un déclic se produise.
Utilisation des piles
Notez les points suivants.
• En utilisation sur secteur, la présence de piles dans l’appareil lui
permet de continuer à fonctionner en cas de coupure de courant
(panne électrique ou déconnexion du cordon d’alimentation).
•
N’utilisez que des piles alcalines (LR6). N’utilisez pas d’autre type de piles.
•
Durée de vie
Utilisation continue à puissance maximale : 13 heures environ
(Ces chiffres varient en fonction des conditions réelles d’utilisation)
•
Lorsque l’amplificateur fonctionne sur piles, l’intensité lumineuse
du voyant diminue lorsque leur niveau de charge devient insuffisant.
Remplacez-les dès que possible.
• Les sons peuvent facilement être déformés ou coupés
à volume élevé lorsque le niveau de charge des piles diminue.
Ce phénomène est normal et n’indique pas de dysfonctionnement
particulier. Remplacez les piles ou utilisez l’adaptateur secteur
fourni avec l’amplificateur.
Connexion de l’adaptateur secteur
Utilisation de l’appareil avec
l’adaptateur secteur
Notez les points suivants.
• En utilisation sur piles, si vous branchez l’adaptateur secteur,
l’alimentation électrique sera fournie par l’adaptateur secteur
et réduira l’utilisation des piles.
Utilisez uniquement l’adaptateur secteur fourni avec le MICRO CUBE RX.
•
L’utilisation d’autres adaptateurs secteur risque d’endommager
l’amplificateur ou de générer d’autres problèmes.
Mise sous / hors tension
Une fois les connexions établies, mettez les divers appareils sous tension en
suivant l’ordre indiqué. Si vous ne respectez pas l’ordre de mise sous tension
des appareils, vous risquez de provoquer un dysfonctionnement et / ou
d’endommager les haut-parleurs ou d’autres dispositifs.
1. Assurez-vous que les boutons de commande
du volume du MICRO CUBE RX et des appareils qui
y sont reliés sont sur la position 0.
2. Mettez sous tension tous les appareils connectés aux
prises INPUT et AUX IN du MICRO CUBE RX.
3. Mettez sous tension le MICRO CUBE RX.
4. Réglez le volume des appareils.
5. Avant de couper l’alimentation, baissez le volume de
tous vos appareils , puis mettez-les hors tension en
procédant dans l’ordre inverse de la mise sous tension.
REMARQUE
Cet appareil est équipé d'un circuit de protection. Une temporisation
de quelques secondes est donc nécessaire à la mise sous tension avant
qu'il ne puisse fonctionner normalement. Pour éviter une apparition
brutale du son, veillez à réduire le volume au minimum avant de mettre
l'appareil sous tension.
REMARQUE
Même si le volume est réglé au minimum, il est possible que vous
entendiez un son lors de la mise sous / hors tension de l’appareil.
Cela est normal et n'indique pas de dysfonctionnement.
1. Insérez la fiche DC de l’adaptateur secteur fourni dans
le connecteur DC IN de l’appareil.
Fixez le cordon de l’adaptateur secteur
à l’aide du crochet, comme l’indique
l’illustration, pour empêcher que
l’adaptateur ne se débranche ou pour le
protéger contre toute tension excessive.
* Pour éviter tout dysfonctionnement ou
dommages au niveau des haut-parleurs,
déconnectez l’appareil des autres appareils et mettez-le hors
tension avant de connecter l’adaptateur secteur.
2. Reliez le cordon d’alimentation fourni à l’adaptateur
secteur et branchez-le à une prise de courant.
Adaptateur
secteur
Voya nt
Placez l’adaptateur secteur de sorte que le voyant (voir illustration)
soit dirigé vers le haut.
* Le voyant s’allume lorsque vous branchez l’appareil sur secteur.
Cordon
d'alimentation
Prise secteur
Fixation de la sangle
Fixez la sangle fournie à son
bouton comme indiqué dans
l’illustration.
REMARQUE
Attachez la sangle correctement pour éviter qu’elle ne se détache facilement. Le
transport de l’amplificateur MICRO CUBE RX avec une sangle mal fixée risque
de le faire tomber et de provoquer des dégâts ou des blessures.
REMARQUE
Utilisez uniquement la sangle fournie. Cette sangle est réservée
exclusivement à l’amplificateur MICRO CUBE RX. Ne l’utilisez pas
avec d’autres produits.
REMARQUE
Évitez de faire tourner le MICRO CUBE RX en le tenant par la sangle ou de le
balancer. Ce type de manipulation, répété avec insistance, est extrêmement
dangereux car la sangle peut se détacher ou même se casser.
Español Italiano Français Deutsch EnglishPortuguêsNederlands
17
Page 18

Description de l'appareil
Face supérieure
fig.01-01
Guitare
Micro dynamique
Câble mono
standard
1. Entrée INPUT
Branchez votre guitare ou votre micro.
2. Bouton BOOST
Appuyez sur le bouton BOOST pour modifier le son
de l’amplificateur. Les effets que vous pouvez créer varient
en fonction du type d’amplificateur.
3. TUNER
Vous pouvez l’utiliser comme accordeur manuel en sélectionnant
chaque corde ou comme accordeur chromatique.
Il permet des accords altérés ou de type « open tuning ».
→ Utilisation de la fonction Tuner (p. 21)
4. Sélecteur AMP TYPE
Vous avez le choix entre huit types d’amplificateur COSM.
Lorsque la fonction TUNER est activée, ce même sélecteur permet
d'indiquer une corde (le nom d’une note).
* Les noms de produit mentionnés dans ce document sont
des marques ou des marques déposées de leurs propriétaires
respectifs et ne sont pas liés à Roland Corporation. Dans
ce manuel, ces noms permettent de décrire le plus efficacement
possible les sons simulés à l’aide de la technologie COSM.
ACOUSTIC SIM
Il s’agit d’un type d’amplificateur original comportant un simulateur
acoustique. Transforme les sons de votre guitare électrique en un son
de guitare acoustique clair et raffiné.
Les meilleurs résultats seront obtenus avec des micros à simple bobinage.
Il y a lieu de réduire les paramètres BASS et MIDDLE de l’égaliseur
uniquement si vous utilisez des micros à double bobinage.
JC CLEAN
Il s’agit d’un modèle du célèbre amplificateur de guitare JC-120 Jazz
Chorus de Roland. Il offre un son ultra-clair et ultra-lisse. Le résultat est
amélioré par l’utilisation conjointe d’un dispositif d’effets.
BLACK PANEL
Conçu sur le modèle du Fender Twin Reverb classique. Il est utilisé
dans de nombreux styles musicaux (country, blues, jazz, rock).
Il offre une richesse de graves et une clarté des aigus.
BRIT COMBO
Conçu sur le modèle du VOX AC-30TB. Il s’agit de l’amplificateur
rock qui est à l’origine du son de Liverpool des années 60. Il produit
une large gamme de sons clairs à saturés.
CLASSIC STACK
Cet amplificateur est conçu en fonction du son et de la réponse d’un
ampli Marshall double-corps type JMP1987. Largement utilisé dans
le hard rock des années 1970, c’est l’amplificateur idéal pour le son
des guitares « top rock ».
METAL STACK
Cet amplificateur est conçu sur le modèle du PEAVEY EVH5150.
Il s’agit d’un type d’amplificateur à très haut gain, même à faible
volume. Il peut générer une forte distorsion et la conserver.
R-FIER STACK
Conçu sur le modèle du MESA / Boogie Rectifier. Cet amplificateur
à très haut gain est capable de produire une multitude de sons
(slash metal, grunge, lead, etc.).
MIC
Sélectionnez cette option lorsqu’un micro est connecté.
* Pour utiliser un micro, notez les points suivants.
• Un mauvais positionnement du micro par rapport au hautparleur peut créer un effet Larsen. Il est possible de remédier
à cela en :
1. Changeant l’orientation du micro.
2. Éloignant le micro de l’appareil.
3. Diminuant le volume.
• De la distorsion apparaît si vous montez le bouton de GAIN
trop haut. Réglez le bouton GAIN aussi haut que possible
avant que le son ne se déforme afin d’obtenir le meilleur
rapport signal-bruit.
• Utilisez un microphone dynamique. Vous ne pouvez pas
utiliser de micro à condensateur ou de micro alimenté
nécessitant une alimentation externe.
18
Page 19

Description de l'appareil
5. Bouton GAIN
Permet de régler le niveau d’entrée. Réglez le niveau d’entrée pour
l’adapter au niveau de signal des instruments musicaux branchés
àla prise INPUT.
ASTUCE
Une valeur de GAIN élevée génère un son saturé.
ASTUCE
Pour obtenir le son le plus clair, réglez le bouton GAIN à la valeur
aussi élevée que possible mais avant la distorsion du son.
6. Bouton VOLUME
Permet de régler le volume de la guitare (micro).
7. Voyant d’alimentation
Le voyant d’alimentation s’allume lorsque l’amplificateur est sous tension.
* Lorsque l’amplificateur fonctionne sur piles uniquement,
l’intensité lumineuse du voyant diminue lorsque le niveau
de charge des piles devient insuffisant. Remplacez les piles dès
que possible.
8. Interrupteur POWER
Met sous tension ou hors tension.
→ Mise sous / hors tension (p. 17)
9. EQUALIZER
Il s’agit d’un égaliseur trois bandes. Il vous permet de régler le son de la
guitare.
Bouton BASS
Permet de régler la qualité sonore de la bande de basses fréquences.
PHASER
Effet ajoutant au son direct un signal
déphasé variable, produisant une
modulation cyclique par décalage
de phase.
TREMOLO
Effet qui crée un mouvement cyclique
dans le volume.
* Les repères des effets CHORUS, FLANGER,
PHASER et TREMOLO apparaissent pour
référence visuelle. Contrôlez la nature de l’effet à l’oreille.
11. Bouton DELAY / REVERB
Tournez ce bouton sur DELAY ou REVERB pour obtenir l’effet voulu.
Vous pouvez aussi moduler l’effet produit en tournant le bouton sur
la position voulue.
DELAY
Tournez le bouton pour régler l’effet
de retard.
REVERB
Tournez le bouton pour régler l’effet
de réverbération.
Bouton MIDDLE
Permet de régler la qualité sonore de la bande de moyennes fréquences.
Bouton TREBLE
Permet de régler la qualité sonore de la bande de hautes fréquences.
10. Bouton EFX (Effets)
Tournez ce bouton sur la position CHORUS, FLANGER, PHASER ou
TREMOLO pour sélectionner l’effet correspondant. Tournez
le bouton pour régler la quantité d’effet souhaitée.
CHORUS « Spacially Synthesized
chorus »
CHORUS utilise le même chorus spatial
synthétisé dans l’espace que le JC-120
pour produire un son large.
* Les effets de chorus sont conçus de manière optimale pour
l’utilisation des haut-parleurs intégrés. Leur efficacité peut varier
si la sortie REC OUT / PHONE est utilisée à la place des hautparleurs intégrés.
FLANGER
Produit un effet qui génère une modulation
cyclique.
* Les repères des effets DELAY et REVERB
sont approximatifs. Contrôlez la nature de l’effet à l’oreille.
12. RHYTHM GUIDE
L’appareil est doté de modèles de rythme de type batterie /
percussion, pratiques pour les exercices en solo. Vous pouvez utiliser
le RHYTHM GUIDE pour vous exercer au rythme que vous souhaitez,
ou bien comme métronome.
→ Utilisation de la fonction RHYTHM GUIDE (p. 21)
Bouton PATTERN
Permet de sélectionner le genre du modèle de rythme.
Bouton START / STOP
Démarre / arrête le RHYTHM GUIDE. Lorsque vous démarrez
le RHYTHM GUIDE, son voyant clignote en mesure.
Bouton TAP TEMPO
Définit le tempo du RHYTHM GUIDE. Appuyez sur ce bouton deux fois
ou plus au tempo voulu et le RHYTHM GUIDE jouera à ce tempo.
Bouton VARIATION
Permet de sélectionner la variation du modèle de rythme. Chaque genre
contient trois types de variations de rythme. Lorsque vous appuyez sur
le bouton VARIATION, les variations disponibles s’affichent tour à tour.
Le voyant VARIATION s’éteint, s’allume en vert ou s’allume en rouge
pour indiquer le changement de variation.
Bouton VOLUME
Permet de régler le volume du RHYTHM GUIDE.
Español Italiano Français Deutsch EnglishPortuguêsNederlands
19
Page 20

Description de l'appareil
Panneau arrière
Réglez les interrupteurs comme indiqué ci-dessous.
AB
Start/Stop
BOSS FS-6
Réglez la polarité comme
indiqué ci-dessous.
Tap Tempo
PCS-31
Blanc Rouge
BOSS FS-5U
Start/Stop
Console de mixage
Blanc (G ch) Rouge (D ch)
Tap Tempo
EnregistreurCasque stéréo
Lecteur
audio
numérique
Câble stéréo
Câble mini stéréo
PCS-31
Câble
mono standard
Instruments musicaux
électroniques, etc.
1. Passe-câble
Accrochez le cordon de l’adaptateur secteur ici.
→ Connexion de l’adaptateur secteur (p. 17)
2. Connecteur de l’adaptateur secteur
Branchez ici l’adaptateur secteur fourni.
Utilisez exclusivement l’adaptateur secteur fourni avec l’amplificateur
MICRO CUBE RX. L’utilisation d’un autre adaptateur secteur risque
d’endommager l’amplificateur ou de générer d’autres problèmes.
→ Connexion de l’adaptateur secteur (p. 17)
3. Connecteur FOOT SW (pédale)
Pour utiliser la fonction RHYTHM GUIDE (START / STOP et TAP TEMPO),
connectez une pédale (la BOSS FS-5U ou FS-6 en option).
4. Connecteur REC OUT / PHONES
Connectez un casque stéréo ou un enregistreur à cette prise.
La sortie est stéréo.
* Aucun son n’est émis via le haut-parleur de l’amplificateur
lorsque la prise REC OUT / PHONES est utilisée.
5. Connecteur AUX IN
Vous pouvez y connecter des appareils (lecteur CD, lecteur audio
numérique ou instrument musical électronique) et les utiliser
conjointement à votre guitare.
Comporte deux types de connecteur d’entrée : jack 6,35 mono
et mini-jack stéréo. Pour connecter l’appareil, utilisez le câble
approprié (en option).
* Le volume de cette entrée se règle à partir de l’appareil source.
6. Prise de terre
En fonction de votre installation, il est possible que vous éprouviez
un certain inconfort ou que vous perceviez une rugosité en touchant
la surface de l’amplificateur, des microphones connectés ou des parties
métalliques d’autres objets, tels que les guitares, par exemple.
Ce phénomène est dû à des courants infinitésimaux, absolument sans
danger. Toutefois, si cela vous préoccupe, vous pouvez relier la prise de
terre à une prise de terre extérieure. Lorsque l’appareil est ainsi connecté,
un léger bourdonnement peut se faire entendre, en fonction de
l’installation. Si vous n’êtes pas certain du mode de connexion à établir,
prenez contact avec le centre de maintenance Roland le plus proche, ou
avec un distributeur Roland agréé (voir la page Information).
Endroits non adaptés pour une connexion
• Canalisations d’eau (risque de choc ou d’électrocution)
• Conduites de gaz (risque d’incendie ou d’explosion)
• Masse de ligne téléphonique ou paratonnerre (risque en cas
de foudre)
7. Compartiment de piles
Insérez des piles six piles LR-06. N’utilisez que des piles alcalines
(LR6). Vous ne pouvez pas utiliser un autre type de pile.
→ Insertion des piles (p. 17)
8. Emplacement sécurité ( )
Vous pouvez connecter à l’appareil des câbles de sécurité antivol
disponibles dans le commerce et d’autres dispositifs de sécurité.
http://www.kensington.com/
20
Page 21

Fonctions pratiques
Utilisation de la fonction Tuner
Le MICRO CUBE RX est doté d’une fonction d'accordeur. Vous pouvez
l’utiliser comme accordeur manuel en sélectionnant chaque corde,
qui s'effectuent en indiquant les cordes, ou bien comme accordeur
chromatique.
* Pour des cordes franchement désaccordées (par exemple après leur
changement), procédez à un accord « manuel ».
Accord manuel
1. Appuyez sur le bouton TUNER.
L’appareil passe en mode Tuner et le bouton TUNER s’allume.
Lorsque l’appareil est en mode Tuner, aucun son n’est émis via
les haut-parleurs ou la prise REC OUT / PHONES.
2. Utilisez le bouton
AMP TYPE pour
choisir la corde
à accorder.
Accord chromatique
Si vous appuyez sur le bouton TUNER pendant une seconde ou plus, vous
pouvez utiliser l’appareil comme « tuner chromatique » pour déterminer
automatiquement le nom de la note la plus proche de celle qui est jouée.
Le réglage chromatique vous permet, comme le réglage manuel, de jouer une
note sur la corde à régler. Réglez la corde jusqu’à ce que le voyant vert
s’allume.
Utilisation de la fonction RHYTHM GUIDE
L’amplificateur MICRO CUBE RX est doté de motifs rythmiques de type
batterie / percussion, pratiques pour les exercices en solo. Vous pouvez
utiliser le RHYTHM GUIDE pour vous exercer au rythme que vous
souhaitez, ou bien comme métronome.
Bouton
Position
6E Sixième corde à vide (E / mi)
5A Cinquième corde à vide (A / la)
4D Quatrième corde à vide
3G Troisième corde à vide
2B Deuxième corde à vide
1E Première corde à vide (E / mi)
b
A
bb
A
3. Jouez une note sur la corde à vide que vous souhaitez accorder.
Réglez la corde jusqu’à ce que le voyant vert s’allume.
Bas Haut
S'allume
en rouge
* Le voyant rouge clignote tant que la note n’est pas juste.
4. Lorsque le réglage est terminé, appuyez à nouveau sur le bouton
TUNER.
* Le diapason de référence est A = 440 Hz. Il n’est pas modifiable.
Corde (nom de la note)
(D / ré)
(G / sol)
(B / si)
Cinquième corde à vide (un demi-ton plus bas)
Cinquième corde à vide (un ton plus bas)
La note est
accordée
S'allume
en vert
(G / sol)
S'allume
en rouge
(Ab)
1. Utilisez le bouton PATTERN pour choisir le genre de rythme.
METRONOME ROCK1 ROCK2 BLUES
COUNTRY R&B BALLAD JAZZ
FUNK LATIN DANCE
2. Appuyez sur le bouton START / STOP pour démarrer la fonction
RHYTHM GUIDE.
Lorsque cette fonction a démarré, le voyant RHYTHM GUIDE
s’allume.
3. Réglez le volume du RHYTHM GUIDE à l’aide du bouton RHYTHM
GUIDE VOLUME.
4. Choisissez une variation du motif rythmique sélectionné en
appuyant sur le bouton VARIATION.
Chaque type de motif contient trois variations. Lorsque vous appuyez sur
le bouton VARIATION, les variations disponibles s’affichent tour à tour.
Le voyant VARIATION s’éteint, s’allume en vert ou s’allume en rouge
pour indiquer le changement de variation.
5. Adaptez la variation au tempo auquel vous souhaitez jouer.
Appuyez sur le bouton TAP TEMPO deux fois ou plus au tempo voulu
et le RHYTHM GUIDE jouera à ce tempo.
Español Italiano Français Deutsch EnglishPortuguêsNederlands
21
Page 22

Exemples de réglage
MÉMO
Réglez le bouton VOLUME au niveau de volume approprié.
Alternative Metal
Interrupteur BOOST sur OFF
Space Clean
Interrupteur BOOST sur OFF
C’est le son idéal pour des riffs lourds et aigus.
Sélectionnez l’amplificateur R-FIER à très haut gain, puis utilisez
l’égaliseur pour pousser les sons graves et les sons aigus.
Utilisé avec un micro « humbucking » central, il produit un effet
de distorsion extrême.
De plus, vous pouvez ajouter un long retard de Delay pour produire
un son lead magnifiquement tenu.
L’ajout d’un retard court génère un son double tel que celui que
produisent deux musiciens jouant les mêmes phrases ensemble.
Son transparent qui utilise des effets spatiaux.
Sélectionnez l’amplificateur JC CLEAN, conçu sur le modèle Roland JC-
120, puis ajoutez les effets de chorus et de long retard.
L’utilisation de ce paramètre avec une guitare équipée d'un micro
à simple bobinage produit des arpèges et des accords plaqués d’un
son harmonieux.
Selon la phrase jouée, il peut être opportun de de régler le retard
du Delay légèrement en dessous du tempo de la phrase.
Classic Rock
Interrupteur BOOST
OFF
Tube Crunch
Interrupteur BOOST sur OFF
C’est un son rock du style années 70.
Pour obtenir un son rock puissant dans tous les riffs et solos, il suffit
de tourner le bouton GAIN vers le haut.
Les surfaces de l’enceinte émettent un son grave puissant. Vous pouvez
donc tourner les boutons de l’égaliseur vers le haut, notamment le bouton
BASS, pour produire un son très puissant.
Pour obtenir un son aigu agressif, il suffit de tourner le bouton GAIN vers le bas.
C’est un son qui vient compléter la musique blues.
To urnez légère ment l e bouto n BASS v ers le bas et tourn ez le bo uton G AIN
vers le haut pour obtenir un son « Crunch » lisse.
En effet, le son est augmenté par la distorsion exercée par le bouton GAIN
sur l’égaliseur.
Vous pouvez également obtenir un son « Crunch » aigu en continuant
de pousser les sons aigus ou de baisser les fréquences basses.
22
Page 23

Alimentazione
Inserimento delle batterie
Rimuovere il coperchio del comparto
delle batterie e inserire 6 batterie
AA, assicurandosi che siano
orientate correttamente.
* Per evitare il
malfunzionamento e/o danni
alle casse o ad altri dispositivi,
al momento dell'installazione
o della sostituzione delle
batterie spegnere sempre l'unità e scollegare e scollegare tutti
i dispositivi eventualmente collegati.
* Quando si chiude il coperchio del comparto della batteria, inserire
prima i fermi sul coperchio nelle cavità corrispondenti, quindi premere
saldamente il coperchio verso il basso finché non si avverte uno scatto.
Utilizzo delle batterie
Prestare attenzione ai punti seguenti.
• Se mentre si utilizza l'adattatore CA nell'unità sono presenti
le batterie, l'unità continuerà a funzionare normalmente nel caso
in cui l'emissione di corrente venga interrotta (interruzione di
corrente o distacco del cavo di alimentazione).
• Utilizzare solo batterie alcaline (LR6). Non è possibile utilizzare
altri tipi di batterie.
• Durata delle batterie
Utilizzo continuo alla massima potenza: circa 13 ore
(La durata varia a seconda delle condizioni effettive di utilizzo).
• Quando l'unità funziona esclusivamente con le batterie e il livello
di carica di queste si riduce eccessivamente, l'intensità luminosa
dell'indicatore di alimentazione dell'unità (p. 24) diminuisce.
Sostituire le batterie prima possibile.
• Se si suona utilizzando un volume elevato mentre il livello delle
batterie comincia a diminuire, è possibile che i suoni vengano
distorti o tagliati. Si tratta di una conseguenza normale che non
indica un malfunzionamento. Sostituire le batterie o utilizzare
l'adattatore CA fornito con l'unità.
Posizionare l'adattatore CA in modo che il lato con l'indicatore
(vedere la figura) sia rivolto verso l'alto.
* Collegando l'adattatore CA alla relativa presa, l'indicatore si illumina.
Utilizzo dell'unità con l'adattatore CA
Prestare attenzione ai punti seguenti.
• Anche se l'unità può funzionare con le sole batterie, il
collegamento dell'adattatore CA all'unità con le batterie inserite
assicura che l'alimentazione venga fornita dall'adattatore CA,
riducendo il consumo delle batterie.
•
Utilizzare solo l'adattatore CA incluso con l'amplificatore MICRO CUBE RX.
L'utilizzo di altri adattatori CA potrebbe danneggiare
l'amplificatore o causare problemi.
Accensione e spegnimento
Una volta completate le connessioni, accendere i vari dispositivi nell'ordine
specificato. Se i dispositivi vengono accesi nell'ordine errato, è possibile che
si verifichi un malfunzionamento e/o danni alle casse e agli altri dispositivi.
1. Assicurarsi che tutti i controlli volume dell'amplificatore MICRO
CUBE RX e dei dispositivi collegati siano regolati su 0.
2. Accendere tutti i dispositivi collegati ai jack INPUT e AUX IN
dell'amplificatore MICRO CUBE RX.
3. Accendere l'amplificatore MICRO CUBE RX.
4. Regolare i livelli di volume dei dispositivi.
5. Prima di spegnere, abbassare il volume di ciascuno dei dispositivi
del sistema, quindi spegnere i dispositivi nell'ordine inverso
a quello di accensione.
NOTA
A causa di una funzione di protezione del circuito, l'unità è pronta
per il normale funzionamento dopo alcuni secondi dall'accensione.
Per evitare suoni ad alto volume improvvisi, assicurarsi sempre che
il livello del volume sia abbassato prima di accendere l'unità.
NOTA
Anche con il volume al minimo è possibile che al momento
dell'accensione e dello spegnimento si sentano dei suoni; si tratta
di una situazione normale, che non indica un malfunzionamento.
Collegamento dell'adattatore CA
1. Inserire la spina DC dell'adattatore CA fornito nel jack
dell'adattatore CA dell'unità.
Se si fissa il cavo di alimentazione
utilizzando l'apposito gancio, come
mostrato nella figura, è possibile evitare
situazioni dannose, ad esempio che si
scolleghi l'adattatore o che venga esercitata
una pressione eccessiva sul jack
dell'adattatore CA.
* Per evitare il malfunzionamento o il
danneggiamento degli altoparlanti, è necessario scollegare l'unità
da altri dispositivi e spegnerla quando si collega l'adattatore CA.
2. Collegare il cavo di alimentazione fornito all'adattatore CA
e a una presa di corrente.
Adattatore CA
Indicatore
Cavo di alimentazione
Presa CA
Collegamento della cinghia
Collegare la cinghia fornita
al perno della cinghia come
illustrato nella figura.
NOTA
Collegare la cinghia saldamente in modo che non si stacchi
facilmente. Se la cinghia è lenta e la si utilizza per trasportare
l'amplificatore MICRO CUBE RX, l'amplificatore potrebbe
cadere provocando danni o lesioni.
NOTA
Utilizzare solo la cinghia fornita. La cinghia fornita è indicata
esclusivamente per l'utilizzo con l'amplificatore MICRO CUBE RX.
Non utilizzare questa cinghia per altri prodotti.
NOTA
Non far ruotare né oscillare l'amplificatore MICRO CUBE RX
mentre viene tenuto per la cinghia. Questo è estremamente
pericoloso perché potrebbe causare il distacco della cinghia o,
se il movimento è ripetuto, perfino la sua rottura.
Español Italiano Français Deutsch EnglishPortuguêsNederlands
23
Page 24

Descrizioni del pannello
Pannello di controllo
fig.01-01
Chitarra
Microfono dinamico
Cavo mono
standard
1. Jack INPUT
Collegare qui la chitarra o il microfono.
2. Pulsante BOOST
Premere il pulsante BOOST per modificare il tono dell'amplificatore.
Gli effetti che è possibile creare variano in base al tipo di amplificatore.
3. TUNER
In aggiunta all'accordatura manuale, in cui vengono specificate le
corde, è inoltre possibile utilizzarlo per l'accordatura cromatica.
Supporta inoltre l'accordatura bassa.
→ Utilizzo della funzione Tuner (p. 27)
4. Manopola AMP TYPE
È possibile scegliere tra otto tipi di amplificatori COSM. Quando
la funzione TUNER è attivata, è possibile specificare una corda
(nome della nota).
* I nomi di prodotto citati nel presente documento sono marchi
o marchi registrati dei rispettivi proprietari e non si riferiscono
a Roland Corporation. Nel presente manuale, questi nomi sono
utilizzati perché è il metodo più pratico di descrivere i suoni
simulati utilizzando la tecnologia COSM.
ACOUSTIC SIM
È un tipo di amplificatore originale che include un simulatore
acustico. Trasforma il suono proveniente dalla chitarra elettrica
in un suono di chitarra acustica limpido e raffinato.
L'utilizzo di questo tipo con un trasduttore a bobina singola
garantisce una qualità del suono eccellente. Se si utilizza
un trasduttore humbucking, è opportuno abbassare leggermente
le impostazioni BASS e MIDDLE.
JC CLEAN
Si tratta di una riproduzione del famoso amplificatore per chitarra
Roland JC-120 Jazz Chorus. Le notevoli caratteristiche di pulizia
e uniformità del suono offrono un effetto morbido che diventa ancora
più efficace se utilizzato in combinazione con un processore di effetti
esterno.
BLACK PANEL
Basato sul modello di amplificatore Fender Twin Reverb classico,
utilizzato in un'ampia varietà di stili musicali, dal country al blues, al
jazz e al rock. Offre una grande varietà di bassi e un high end intenso.
BRIT COMBO
Basato sul modello VOX AC-30TB, l'amplificatore rock che creò il
"Liverpool sound" degli anni '60. È in grado di produrre un'ampia
gamma di sonorità, dal clean all'overdrive.
CLASSIC STACK
Modellato sulla sonorità e sulla risposta di un amplificatore Marshall
JMP1987. Utilizzato frequentemente nella musica hard rock negli
anni '70, è l'amplificatore perfetto per il suono della chitarra "top rock".
METAL STACK
Basato sul modello PEAVEY EVH5150. È un tipo di amplificatore
ad alto guadagno, quindi anche a volumi bassi è possibile ottenere
effetti di distorsione e sustain intensi.
R-FIER STACK
Modellato sull'amplificatore a valvole MESA/Boogie. Questo
amplificatore dal guadagno estremamente elevato è in grado di produrre
suoni metallici, grunge e un'ampia varietà di altri suoni lead.
MIC
Scegliere questa posizione quando è collegato un microfono.
* Quando si utilizza un microfono, prestare attenzione ai punti seguenti.
• È possibile che venga generato feedback a seconda della
posizione dei microfoni rispetto all'unità. Per porre rimedio
a questa eventualità, effettuare una delle seguenti operazioni:
1. Cambiare l'orientamento dei microfoni.
2. Riposizionare il microfono a una distanza maggiore
dall'unità.
3. Ridurre i livelli di volume.
• Se si posiziona la manopola GAIN troppo in alto, il suono
risulterà distorto. Per ottenere un rapporto segnale-rumore
ottimale, regolare la manopola GAIN su un valore più alto
possibile prima che si verifichi la distorsione del suono.
• Utilizzare un microfono dinamico. Non è possibile utilizzare
un microfono a condensatore o un microfono plug-in
alimentato che richiede un'alimentazione.
24
Page 25

Descrizioni del pannello
5. Manopola GAIN
Regola il livello di ingresso. Regolare il livello di ingresso adatto al
livello del segnale degli strumenti musicali collegati al jack INPUT.
SUGGERIMENTO
L'utilizzo di un'impostazione GAIN elevata consente di ottenere un
suono overdrive.
SUGGERIMENTO
Per ottenere il suono più chiaro, regolare la manopola GAIN su un
valore più alto possibile prima che si verifichi la distorsione del
suono.
6. Manopola VOLUME
Regola il volume della chitarra (microfono).
7. Indicatore di alimentazione
Questo indicatore si illumina quando l'unità è accesa.
* Quando l'unità funziona esclusivamente con le batterie e il
livello di carica di queste si riduce eccessivamente, l'intensità
luminosa dell'indicatore diminuisce durante l'esecuzione.
Sostituire le batterie prima possibile.
8. Interruttore POWER
Interruttore di accensione e spegnimento.
→ Accensione e spegnimento (p. 23)
PHASER
Questo effetto aggiunge un segnale
variabile con cambio di fase al suono
diretto e fornisce al suono un carattere
vorticoso.
TREMOLO
L'effetto Tremolo genera un cambiamento
ciclico del volume.
* Le indicazioni di intensità degli effetti
CHORUS, FLANGER, PHASER
e TREMOLO sul pannello servono da riferimento. Assicurarsi
di controllare il suono durante la regolazione degli effetti.
11. Manopola DELAY/REVERB
Ruotare la manopola DELAY o REVERB per passare all'effetto
desiderato. È inoltre possibile regolare la quantità di effetto
applicato ruotando la manopola nella posizione desiderata.
DELAY
Ruotare la manopola per regolare il livello
dell'effetto delay.
9. EQUALIZER
È un equalizzatore a tre bande. Consente di regolare il tono della chitarra.
Manopola BASS
Consente di regolare la quantità di tono dell'intervallo di bassa frequenza.
Manopola MIDDLE
Consente di regolare la quantità di tono dell'intervallo di media frequenza.
Manopola TREBLE
Consente di regolare la quantità di tono dell'intervallo di alta frequenza.
10. Manopola EFX (effetti)
Ruotare questa manopola su CHORUS, FLANGER, PHASER
o TREMOLO per selezionare l'effetto corrispondente, quindi
regolare la quantità di effetto applicato.
CHORUS (effetto coro sintetizzato
a livello spaziale)
Utilizza lo stesso coro sintetizzato a livello
spaziale del modello JC-120 per la
produzione di un suono ampio.
* Gli effetti coro sono progettati in
modo da produrre la maggiore efficacia quando si utilizzano le
casse incorporate dell'unità. L'efficacia può variare quando si
utilizza l'uscita REC OUT/PHONE anziché le casse incorporate.
FLANGER
Crea un effetto flanger che genera
una sorta di sensazione di rotazione
del suono.
REVERB
Ruotare la manopola per regolare il livello
dell'effetto reverb.
* Le indicazioni di intensità per le funzioni
DELAY e REVERB sul pannello servono da
riferimento. Assicurarsi di controllare il
suono durante la regolazione degli effetti.
12. RHYTHM GUIDE
L'unità è dotata di modelli di ritmo basati su batteria/percussioni utili per
esercitarsi in assolo. Oltre a consentire di esercitarsi con il ritmo desiderato,
questa funzione può essere utilizzata anche come metronomo.
→ Utilizzo di RHYTHM GUIDE (p. 27)
Manopola PATTERN
Consente di selezionare il genere del modello di ritmo.
Pulsante START/STOP
Consente di avviare o interrompere RHYTHM GUIDE. Quando si avvia
RHYTHM GUIDE, il relativo indicatore lampeggia a tempo con la musica.
Pulsante TAP TEMPO
Consente di impostare il tempo di RHYTHM GUIDE. Toccare questo
pulsante due o più volte al tempo desiderato e RHYTHM GUIDE
riprodurrà quel tempo.
Pulsante VARIATION
Consente di selezionare la variazione del modello di ritmo. Ciascun
genere contiene tre tipi di variazioni di ritmo. La pressione del pulsante
VARIATION consente di impostare le variazioni disponibili; l'indicatore
VARIATION sarà spento, illuminato in verde o in rosso per indicare la
modifica della variazione.
Manopola VOLUME
Consente di regolare il volume di RHYTHM GUIDE.
Español Italiano Français Deutsch EnglishPortuguêsNederlands
25
Page 26

Descrizioni del pannello
Pannello posteriore
Impostare gli interruttori come illustrato di seguito.
AB
Start/Stop
BOSS FS-6
Impostare l'interruttore
della polarità come
illustrato di seguito.
Tap Tempo
PCS-31
Bianco Rosso
BOSS FS-5U
Start/Stop
Bianco (can. S) Rosso (can. D)
Tap Tempo
RegistratoreCuffie stereoMixer
Lettore
audio
digitale
Cavo stereo
Cavo mini stereo
PCS-31
Cavo mono
standard
Strumenti musicali
elettronici, ecc.
1. Gancio per cavo
Agganciare il cavo dell'adattatore CA in questo punto.
→ Collegamento dell'adattatore CA (p. 23)
2. Jack adattatore CA
Collegare a questo jack l'adattatore CA fornito.
Utilizzare esclusivamente l'adattatore CA incluso con l'amplificatore
MICRO CUBE RX. L'utilizzo di altri adattatori CA potrebbe
danneggiare l'amplificatore o causare altri problemi.
→ Collegamento dell'adattatore CA (p. 23)
3. Jack FOOT SW (interruttore a pedale)
Se si collega un interruttore a pedale (BOSS FS-5U o FS-6
opzionali), è possibile attivare la funzione RHYTHM GUIDE
(START/STOP e TAP TEMPO).
4. Jack REC OUT/PHONES
Collegare a questo jack cuffie stereo o un dispositivo di
registrazione. Supporta l'uscita stereo.
* Se il jack REC OUT/PHONES è in uso, la cassa dell'unità non
riproduce alcun suono.
5. Jack AUX IN
È possibile collegare un dispositivo, ad esempio un lettore CD, un lettore
audio digitale o uno strumento musicale elettrico e farlo funzionare
insieme alla chitarra.
Offre due tipi di jack di ingresso esterni: un jack phone 1/4" mono
e un jack stereo-mini. Utilizzare il cavo appropriato (opzionale) per
il dispositivo da collegare.
* Stabilire il livello del volume regolando il controllo volume
del dispositivo collegato.
6. Morsetto di terra
In caso di configurazioni particolari, è possibile che toccando la
superficie del dispositivo, i microfoni ad esso collegati o le parti
metalliche di altri oggetti, ad esempio le chitarre, si avverta una
sensazione sgradevole. Ciò è dovuto a una piccolissima carica
elettrica, assolutamente innocua. Se tuttavia tale carica dovesse
generare preoccupazione, collegare il morsetto di terra a una messa
a terra esterna. Quando l'unità è collegata a massa, è possibile che
venga generato un leggero ronzio, a seconda dell'installazione.
Se non si è sicuri del metodo di collegamento, contattare il Centro
di assistenza Roland più vicino oppure un distributore Roland
autorizzato, come indicato nella pagina delle informazioni.
Punti non indicati per il collegamento
• Tubi dell'acqua (potrebbero causare scosse elettriche)
• Tubi del gas (potrebbero causare incendi o esplosioni)
• Massa della linea telefonica o parafulmine (potrebbe essere
pericoloso in caso di fulmini)
7. Comparto delle batterie
Inserire 6 batterie AA. Utilizzare solo batterie alcaline (LR6).
Non è possibile utilizzare altri tipi di batterie.
→ Inserimento delle batterie (p. 23)
8. Slot di sicurezza ( )
È possibile collegare cavi di protezione antifurto disponibili
in commercio e altri dispositivi di protezione all'unità.
http://www.kensington.com/
26
Page 27

Funzioni utili
Utilizzo della funzione Tuner
L'amplificatore MICRO CUBE RX è fornito di una funzione tuner.
In aggiunta all'accordatura manuale, è inoltre possibile utilizzarlo
per effettuare l'accordatura cromatica.
* Utilizzare l'accordatura manuale quando le corde sono
notevolmente scordate, ad esempio dopo averle cambiate.
Accordatura cromatica
Se si preme il pulsante TUNER per uno o più secondi, è inoltre possibile
utilizzare l'unità come "accordatura cromatica" che determina in modo
automatico il nome della nota più vicina a quella suonata.
Come per l'accordatura manuale, quella cromatica consente di suonare una
singola nota sulla corda che si desidera accordare. Accordare la corda fino
a quando non si accende l'indicatore verde.
Accordatura manuale
1. Premere il pulsante TUNER.
L'unità passa alla modalità Tuner e il pulsante TUNER si illumina.
Quando l'unità è in modalità Tuner, le casse o il jack REC OUT/
PHONES non emettono alcun suono.
2. Utilizzare la
manopola AMP
TYPE per
selezionare
la corda che
si desidera
accordare.
Posizione
della
manopola
6E Accordare la sesta corda (E)
5A Accordare la quinta corda (A)
4D Accordare la quarta corda
3G Accordare la terza corda
2B Accordare la seconda corda
1E Accordare la prima corda (E)
b
A
bb
A
3. Suonare una sola nota sulla corda da accordare.
Accordare la corda fino a quando non si accende l'indicatore verde.
Basso Alto
Corda (nome della nota)
(D)
(G)
(B)
Accordare la quinta corda
(semitono verso il basso)
Accordare la quinta corda
(tonalità intera verso il basso) (G)
Il tono
è corretto
(Ab)
Utilizzo di RHYTHM GUIDE
L'amplificatore MICRO CUBE RX è fornito di modelli di ritmo basati su
batteria/percussioni utili per esercitarsi in assolo. Oltre a consentire di
esercitarsi con il ritmo desiderato, questa funzione può essere utilizzata
anche come metronomo.
1. Selezionare il genere di ritmo utilizzando la manopola PATTERN.
METRONOME ROCK1 ROCK2 BLUES
COUNTRY R&B BALLAD JAZZ
FUNK LATIN DANCE
2. Per avviare RHYTHM GUIDE, premere il pulsante START/STOP.
Quando si avvia RHYTHM GUIDE, l'indicatore RHYTHM GUIDE
si illumina.
3. Regolare il volume di RHYTHM GUIDE utilizzando la manopola
del volume di RHYTHM GUIDE.
4. Selezionare una variazione di ritmo premendo il pulsante
VARIATION.
Ciascun genere contiene tre tipi di variazioni di ritmo. La pressione
del pulsante VARIATION consente di impostare le variazioni
disponibili; l'indicatore VARIATION sarà spento, illuminato in verde
o in rosso per indicare la modifica della variazione.
5. Regolare la variazione in base al tempo che si desidera seguire.
Toccare il pulsante TAP TEMPO due o più volte al tempo desiderato
per fare in modo che RHYTHM GUIDE riproduca quel tempo.
Español Italiano Français Deutsch EnglishPortuguêsNederlands
Luce verdeLuce rossa Luce rossa
* Se il tono è notevolmente scordato, l'indicatore rosso lampeggia.
4. Al termine dell'operazione di accordatura, premere nuovamente
il pulsante TUNER.
* Il tono di riferimento è A=440Hz e non è possibile modificarlo.
27
Page 28

Impostazioni di esempio
PROMEMORIA
Regolare la manopola VOLUME a un livello di volume appropriato.
Alternative Metal
Interruttore BOOST: OFF
Space Clean
Interruttore BOOST: OFF
Il suono perfetto per riff alti e intensi.
Selezionare l'amplificatore R-FIER ad alto guadagno, quindi utilizzare
l'equalizzatore per aumentare low end e high end.
Utilizzato con un trasduttore humbucking nella posizione posteriore,
produce un elevato effetto distorsione.
Inoltre, è possibile aggiungere un delay lungo per utilizzarlo come suono di
base con sustain elevato.
L'aggiunta di un delay breve produce un suono duplicato come quello
emesso da due esecutori che suonano le stesse frasi
contemporaneamente.
Si tratta di un suono trasparente prodotto tramite effetti spaziali.
Selezionare l'amplificatore JC CLEAN, basato sul modello Roland
JC-120, quindi aggiungere gli effetti chorus e delay lungo.
L'utilizzo di questa impostazione con una chitarra fornita di trasduttori
a bobina singola produce suoni di arpeggi e corde strumming eccellenti.
In base alla frase suonata, può essere efficace rallentare leggermente
il tempo di delay dell'effetto delay rispetto al tempo della frase.
Classic Rock
Interruttore BOOST:
OFF
Tube Crunch
Interruttore BOOST: OFF
Si tratta di un suono rock stile anni '70.
L'aumento del livello del guadagno produce un suono rock potente in tutti
i riff e gli assolo.
Un low end potente è una caratteristica del suono emesso dalle superfici della
scatola, quindi è possibile ruotare verso l'alto le manopole dell'equalizzatore,
soprattutto la manopola BASS, per produrre un suono di notevole incisività.
Un modo ottimale per ottenere un suono deciso e acuto consiste nel ruotare verso
il basso la manopola GAIN.
Si tratta di un suono particolarmente adatto alla musica blues.
Per ottenere un suono deciso e morbido, ruotare leggermente verso
il basso la manopola BASS e ruotare verso l'alto la manopola GAIN.
Questo effetto è dovuto all'enfasi dell'equalizzatore distorto dall'azione del gain.
È inoltre possibile ottenere un suono deciso acuto aumentando
ulteriormente l'high end o abbassando l'intervallo di media frequenza.
28
Page 29

Fuente de alimentación
Insertar las pilas
Abra la tapa del compartimento de
las pilas e introduzca 6 pilas de tipo
AA; asegúrese de que
están orientadas correctamente.
* Para evitar que los altavoces
u otros dispositivos funcionen
de manera deficiente o se dañen,
cuando instale o sustituya las pilas
desenchufe el aparato de la corriente y desconecte el resto de dispositivos.
* Al cerrar la tapa del compartimento de las pilas, inserte primero
las lengüetas de la tapa en las ranuras correspondientes y, a continuación,
empuje firmemente la tapa hacia abajo hasta escuchar un clic.
Utilización de las pilas
Tenga en cuenta los siguientes aspectos.
• Si las pilas están puestas mientras se utiliza el adaptador de CA,
el aparato seguirá funcionando aunque se interrumpa la corriente de
alimentación (debido a un apagón o a un desenchufado accidental).
• Utilice únicamente pilas alcalinas (LR6). No se puede usar ningún
otro tipo de pilas.
• Duración de las pilas
Uso continuo a la máxima potencia: aprox. 13 horas
(Estas cifras variarán en función de las condiciones reales de uso)
Cuando la unidad funciona sólo con pilas, la luz del indicador de
•
alimentación (p. 30) se atenúa en el momento en que la carga de las
pilas empieza a ser demasiado baja. Sustituya las pilas lo antes posible.
• Cuando la carga de las pilas empieza a ser demasiado baja, el
sonido puede distorsionarse o incluso cesar cuando se emite a alto
volumen, pero esto es normal y no indica ninguna deficiencia de
funcionamiento. Sustituya las pilas o utilice el adaptador de CA
que se incluye con la unidad.
Conectar el adaptador de CA
* El indicador se iluminará cuando se conecte el adaptador a un
enchufe de CA.
Utilizar la unidad con un adaptador
de CA
Tenga en cuenta los siguientes aspectos.
• Aunque la unidad puede funcionar sólo con pilas, la conexión
del adaptador de CA a la unidad cuando ésta tiene pilas permite
asegurar el suministro de alimentación desde el adaptador de CA
y reducir de este modo el consumo de pilas.
•
Utilice únicamente el adaptador de CA incluido en el MICRO CUBE RX.
El uso de otros adaptadores de CA puede causar daños en el amplificador
u otros problemas.
Apagado y encendido
Una vez realizadas las conexiones, ponga en marcha los diferentes
dispositivos en el orden indicado. Si se ponen en marcha los dispositivos en un
orden equivocado, puede producirse un funcionamiento deficiente y/o dañar
los altavoces y otros dispositivos.
1. Compruebe que todos los mandos de volumen del MICRO CUBE
RX y los dispositivos conectados están en la posición 0.
2. Encienda todos los dispositivos conectados a los conectores INPUT
y AUX IN del MICRO CUBE RX.
3. Ponga en marcha el MICRO CUBE RX.
4. Ajuste el nivel de volumen de los dispositivos.
5. Antes de apagar, baje el volumen de cada uno de los dispositivos
del sistema y luego apague los dispositivos en el orden inverso al
orden en que los puso en marcha.
NOTA
Debido a la función de protección de circuitos, esta unidad tarda unos
instantes desde que se enciende hasta que está preparada para el
funcionamiento normal. Para evitar que se produzcan sonidos de
volumen excesivo, asegúrese siempre de bajar el nivel del volumen
antes de encender el equipo.
NOTA
Incluso con el volumen totalmente bajado oirá algún sonido al
encender y apagar el equipo, aunque se trata de algo normal
y no de una deficiencia de funcionamiento.
1. Conecte el cable de CC del adaptador de CA que se incluye con la
unidad en el enchufe del adaptador de CA.
Sujete el cable del adaptador de CA en el
anclaje para el cable, tal como se muestra en
la ilustración, para evitar que se produzcan
situaciones como que se desenchufe el cable
del adaptador de CA o que se aplique una
presión inadecuada sobre el conector.
* Cuando conecte el adaptador de CA,
desconecte la unidad de otros dispositivos y apague el aparato para
evitar que los altavoces funcionen de manera deficiente o se dañen.
2. Conecte el cable de toma de corriente incluido con la unidad al
adaptador de CA y conéctelo en un enchufe de CA.
Adaptador de AC
Indicador
Coloque el adaptador de CA de manera que el lado del indicador
(ver ilustración) esté orientado hacia arriba.
Cable de corriente
Salida de AC
Sujetar la correa
Sujete la correa incluida en
el pasador, tal como se
muestra en la ilustración.
NOTA
Asegúrese de que la correa queda bien sujeta para que no se suelte
con facilidad. Si la correa se suelta y la utiliza para transportar el
MICRO CUBE RX, el amplificador podría caerse y sufrir daños.
NOTA
Utilice únicamente la correa que se incluye. Dicha correa está
pensada para su uso exclusivo con el MICRO CUBE RX. No la
utilice para otros productos.
NOTA
No dé vueltas ni balancee el MICRO CUBE RX cuando lo esté
sujetando por la correa. Esto es muy peligroso porque puede dar
lugar a que se suelte la correa o incluso, si el movimiento es muy
repetido, a que ésta se rompa.
Español Italiano Français Deutsch EnglishPortuguêsNederlands
29
Page 30

Descripciones de los paneles
Panel de control
fig.01-01
Guitarra
Micrófono dinámico
Cable
monofónico
estándar
1. Conector INPUT
Conecte aquí la guitarra o el micrófono.
2. Botón BOOST
Pulse el botón BOOST para cambiar el tono del amplificador. Los
efectos que puede crear varían en función del tipo de amplificador.
3. TUNER
Además de la afinación manual, en la que las cuerdas están
especificadas, también puede utilizar una afinación cromática.
También admite afinación bemol.
→ Utilizar la función de afinación (p. 33)
4. Mando AMP TYPE
Puede escoger entre ocho tipos de amplificador COSM. Cuando
la función TUNER está activada, puede especificar una cuerda
(nombre de nota).
* Todos los nombres de productos mencionados en este documento
son marcas comerciales o marcas registradas de sus respectivos
propietarios, y no pertenecen a Roland Corporation. En el presente
manual, estos nombres se utilizan a fin de describir de la manera más
práctica los sonidos que se emulan por medio de la tecnología COSM.
ACOUSTIC SIM
Este original tipo de amplificador incluye un simulador acústico.
Convierte el sonido de su guitarra eléctrica en un sonido de guitarra
acústica claro y elegante.
El uso de este tipo de amplificador junto a una pastilla de bonina
única consigue una calidad de sonido óptima. Bajar ligeramente los
ajustes BASS y MIDDLE del ecualizador resulta eficaz si se usa una
pastilla canceladora de zumbido.
JC CLEAN
Se basa en el famoso amplificador de guitarra JC-120 Jazz Chorus
de Roland. Consigue una gran suavidad de tono gracias a su sonido
ultralimpio y ultraplano. El resultado es aún mejor si se usa en
combinación con un dispositivo de efectos.
BLACK PANEL
Está basado en el clásico amplificador Fender Twin Reverb.
Se puede utilizar en una gran variedad de estilos musicales,
como el country, el blues, el jazz y el rock. Ofrece una gran riqueza
de gamas bajas y unas excelentes frecuencias altas.
BRIT COMBO
Está basado en el VOX AC-30TB. Este es el amplificador que creó el
sonido de Liverpool de los años 1960. Puede producir una amplia
gama de sonidos, desde un sonido limpio a otro saturado.
CLASSIC STACK
Está basado en el sonido y la respuesta de un amplificador Marshall
JMP1987. Muy utilizado en el rock duro de los años 1970, este es
realmente el amplificador ideal para lograr un sonido de guitarra
muy rock.
METAL STACK
Está basado en el PEAVEY EVH5150. Es un amplificador de alta
ganancia por lo que, incluso en volúmenes bajos, podrá obtener
distorsión pesada y sustain.
R-FIER STACK
Está basado en el MESA/Boogie Rectifier. Este amplificador de muy
alta ganancia permite generar los sonidos típicos del slash metal,
el grunge y otros muchos sonidos de base.
MIC
Seleccione esta posición si ha conectado un micrófono.
* Tenga en cuenta los siguientes aspectos a la hora de utilizar
un micrófono.
• Pueden producirse acoples en función de la ubicación de los
micrófonos con respecto a la unidad. Posibles soluciones:
1. Cambiar la orientación de los micrófonos.
2. Colocar los micrófonos a mayor distancia de la unidad.
3. Bajar los niveles de volumen.
• Se producirán distorsiones de sonido si sube demasiado el
mando GAIN . Sitúe el mando GAIN en su valor más
elevado antes de que se produzca distorsión de sonido para
obtener la mejor relación señal-ruido.
• Utilice un micrófono dinámico. No puede utilizar un
micrófono de condensador ni un micrófono energizado
enchufable que requiera una fuente de alimentación.
30
Page 31

Descripciones de los paneles
5. Mando GAIN
Ajusta el nivel de entrada. Ajuste el nivel de entrada para adecuarlo
al nivel de señal de los instrumentos musicales conectados al
conector INPUT.
CONSEJO
El uso de un valor alto de GAIN permite obtener un sonido
saturado.
CONSEJO
Sitúe el mando GAIN en su valor más elevado antes de que
se produzca distorsión para obtener el sonido más claro.
6. Mando VOLUME
Ajusta el volumen de la guitarra (micrófono).
7. Indicador de alimentación
Este indicador se enciende cuando la unidad está en funcionamiento.
* Cuando la unidad funciona sólo con pilas, la luz del indicador
se atenúa durante la reproducción en el momento en que la
carga de las pilas empieza a ser demasiado baja. Sustituya las
pilas lo antes posible.
8. Interruptor POWER
Apaga y enciende la unidad.
→ Apagado y encendido (p. 29)
9. EQUALIZER
Este es un ecualizador de tres bandas. Permite ajustar el tono de
la guitarra.
Mando BASS
Ajusta la calidad de tono de la gama baja.
PHASER
Este efecto añade una señal desfasada
variable, lo que imprime al sonido un
carácter de remolino.
TREMOLO
El trémolo es un efecto que crea un
cambio cíclico del volumen.
* Las graduaciones de CHORUS,
FLANGER, PHASER y TREMOLO en
el panel son aproximativas. Al ajustar los efectos, recuerde
graduar también el volumen.
11. Mando DELAY/REVERB
Sitúe el mando en la posición DELAY o REVERB para cambiar
a dicho efecto. También puede ajustar la cantidad de efecto que
desea aplicar girando el mando hasta la posición deseada.
DELAY
Gire el mando para ajustar el efecto de
retardo.
REVERB
Gire el mando para ajustar el efecto de
reverberación.
Mando MIDDLE
Ajusta la calidad de tono de la gama media.
Mando TREBLE
Ajusta la calidad de tono de la gama alta.
10. Mando EFX (efectos)
Gire este mando a CHORUS, FLANGER, PHASER o TREMOLO
para seleccionar el efecto correspondiente. Gire el mando para
ajustar la magnitud del efecto que se aplicará.
CHORUS (efecto coral espacialmente
sintetizado)
Utiliza el mismo efecto coral
espacialmente sintetizado que el JC-120
para proporcionar un sonido amplio.
* Los efectos corales están diseñados
para alcanzar su máxima eficacia cuando se utilizan los altavoces
integrados en la unidad. La efectividad puede ser diferente si se
utiliza REC OUT/PHONE en lugar de los altavoces integrados.
FLANGER
Crea un efecto de pestañeo que produce
una percepción de sonido giratorio.
* Las graduaciones de DELAY y REVERB en
el panel son aproximativas. Al ajustar los
efectos, recuerde graduar también el volumen.
12. RHYTHM GUIDE
La unidad está equipada con patrones de ritmo de tambor/
percusión que son muy útiles para practicar en solitario. Además
de para practicar con el compás deseado, se puede utilizar también
como metrónomo
→ Utilizar RHYTHM GUIDE (p. 33)
PATTERN Knob
Selecciona el tipo de patrón de ritmo.
Botón START/STOP
Inicia o detiene el RHYTHM GUIDE. Cuando se inicia RHYTHM
GUIDE, su indicador parpadea en tempo con la música.
Botón TAP TEMPO
Establece el tempo de RHYTHM GUIDE. Pulse dos veces o más este
botón en el tempo deseado y RHYTHM GUIDE iniciará la reproducción
en dicho tempo.
Botón VARIATION
Selecciona la variación del patrón de ritmo. Cada uno consta de tres
tipos de variaciones de ritmo. Si pulsa el botón VARIATION podrá
recorrer las variaciones disponibles; el indicador de VARIATION estará
apagado, encendido en rojo o encendido en verde para indicar el
cambio de variación.
Mando VOLUME
Ajusta el volumen de RHYTHM GUIDE.
Español Italiano Français Deutsch EnglishPortuguêsNederlands
31
Page 32

Descripciones de los paneles
Panel trasero
Ajuste los conectores como se muestra a continuación.
AB
Start/Stop
BOSS FS-6
Ajuste el conector
de polaridad como
se muestra a continuación.
Tap Tempo
PCS-31
Blanco Rojo
BOSS FS-5U
Start/Stop
Blanco (I ch) Rojo (D ch)
Tap Tempo
GrabadorAuriculares estereofónicosMezclador
Reproductor
de audio
digital
Cable estereofónico
Minicable estereofónico
PCS-31
Cable monofónico
estándar
Instrumentos musicales
electrónicos, etc.
1. Anclaje para el cable
Úselo para sujetar el cable del adaptador de CA.
→ Conectar el adaptador de CA (p. 29)
2. Conector del adaptador de CA
Conecte aquí el adaptador de CA que se incluye con la unidad.
Utilice únicamente el adaptador de CA incluido en el MICRO CUBE
RX. El uso de otros adaptadores de CA puede causar daños en el
amplificador u otros problemas.
→ Conectar el adaptador de CA (p. 29)
3. Conector FOOT SW (pedal)
Si conecta un pedal (los BOSS FS-5U o FS-6 opcionales), puede utilizar
la función RHYTHM GUIDE (START/STOP y TAP TEMPO).
4. Conector REC OUT/PHONES
Conecte auriculares estereofónicos o un dispositivo de grabación
a este conector. Admite salida estéreo.
* Mientras el conector REC OUT/PHONES está en uso, no
se emite ningún sonido a través del altavoz de la unidad.
5. Conector AUX IN
Puede conectar dispositivos como un reproductor de CD, un
reproductor de audio digital o un instrumento musical electrónico,
y hacer que reproduzcan sonido junto al de su guitarra.
Ofrece dos tipos de conectores para entrada externa; un conector
monoaural de 1/4" y una miniclavija estéreo. Utilice el cable
adecuado (opcional) para el dispositivo que esté conectando.
* Para establecer el nivel de volumen, ajuste el control de volumen
del dispositivo conectado.
6. Terminal de toma de tierra
En algunas circunstancias, es posible que al tocar este dispositivo se
experimente una sensación desagradable o se perciba una sensación
rasposa al rozar la superficie del aparato, de los micrófonos conectados
a él o de las partes metálicas de otros objetos, como por ejemplo las
guitarras. Esto se debe a una carga eléctrica infinitesimal completamente
inofensiva. Sin embargo, si se prefiere evitar este fenómeno basta con
conectar la terminal de toma de tierra a una toma de tierra externa.
Una vez puesta a tierra la unidad, puede producirse un leve zumbido,
dependiendo de las peculiaridades de la instalación. Si tiene dudas
respecto al método de conexión, póngase en contacto con el centro de
servicio Roland más cercano o con un distribuidor autorizado de Roland
de los que se indican en la página de información.
Lugares inadecuados para la conexión
• Cañerías de agua (riesgo de descarga eléctrica o electrocución).
• Tuberías de gas (riesgo de incendio o explosión).
• Toma de tierra de línea telefónica o pararrayos
(riesgo en caso de tormenta eléctrica).
7. Compartimento de las pilas
Introduzca 6 pilas de tipo AA. Utilice únicamente pilas alcalinas (LR6).
No se puede usar ningún otro tipo de pilas.
→ Insertar las pilas (p. 29)
8. Ranura de seguridad ( )
Puede conectar cables de seguridad antirrobo disponibles
comercialmente y otros dispositivos de seguridad.
http://www.kensington.com/
32
Page 33

Funciones útiles
R
o
Utilizar la función de afinación
El MICRO CUBE RX está provisto de una función de afinación. Además
de la afinación manual, también puede utilizar una afinación cromática.
* Utilice la afinación manual cuando las cuerdas estén muy
desafinadas (como, por ejemplo, después de haberlas cambiado).
Afinación cromática
Al presionar el botón TUNER durante un segundo o más, también puede
utilizar la unidad como un afinador cromático, el cual determina de
manera automática el nombre de nota más próxima a la emitida.
Al igual que en la afinación manual, la afinación cromática permite tocar
una única nota en la cuerda que desea afinar. Afine la cuerda hasta que
se encienda el indicador verde.
Afinación manual
1. Pulse el botón TUNER.
La unidad se pone en modo de afinación y se enciende la luz de
TUNER. Cuando la unidad está en modo de afinación, no se emite
ningún sonido a través del altavoz o del conector REC OUT/
PHONES.
2. Utilice el mando
AMP TYPE para
seleccionar la
cuerda que desea
afinar.
Posición
del
mando
6E Cuerda sexta suelta (E)
5A Cuerda quinta suelta (A)
4D Cuerda cuarta suelta
3G Cuerda tercera suelta
2B Cuerda segunda suelta
1E Cuerda primera suelta (E)
b
A
bb
A
3. Pulse una sola nota en la cuerda al aire que desee afinar.
Afine la cuerda hasta que se encienda el indicador verde.
Bajo Alto
Cuerda (nombre de nota)
(D)
(G)
(B)
Cuerda quinta suelta (semitono bajo)
Cuerda quinta suelta (tono entero abajo)
Afinación
correcta
(Ab)
(G)
Utilizar RHYTHM GUIDE
El MICRO CUBE RX está equipado con patrones de ritmo de tambor/
percusión que son muy útiles para practicar en solitario. Además de para
practicar con el compás deseado, se puede utilizar como metrónomo.
1. Seleccione el tipo de ritmo mediante el mando PATTERN.
METRONOME ROCK1 ROCK2 BLUES
COUNTRY R&B BALLAD JAZZ
FUNK LATIN DANCE
2. Pulse el botón START/STOP para activar RHYTHM GUIDE.
Al activar RHYTHM GUIDE, el indicador de RHYTHM GUIDE
se ilumina.
3. Ajuste el volumen de RHYTHM GUIDE mediante el mando
VOLUME de RHYTHM GUIDE.
4. Seleccione la variación del ritmo presionando el botón
VARIATION.
Cada uno consta de tres tipos de variaciones de ritmo. Si pulsa el botón
VARIATION podrá recorrer las variaciones disponibles; el indicador de
VARIATION estará apagado, encendido en rojo o encendido en verde
para indicar el cambio de variación.
5. Ajuste la variación al tempo con el que desea tocar.
Pulse dos veces o más este botón TAP TEMPO en el tempo deseado
y RHYTHM GUIDE iniciará la reproducción en dicho tempo.
Español Italiano Français Deutsch EnglishPortuguêsNederlands
ojo encendido Rojo encendid
* El indicador rojo parpadea si el tono está sustancialmente
desafinado.
4. Cuando haya terminado la afinación, pulse de nuevo el botón
TUNER.
* El tono de referencia es A=440 Hz. No se puede modificar.
Verde encendido
33
Page 34

Ejemplos de ajustes
APUNTE
Ajuste el mando VOLUME a un nivel de volumen adecuado.
Metal alternativo
Interruptor BOOST: OFF
Espacio limpio
Interruptor BOOST: OFF
El sonido perfecto para riffs agudos y pesados.
Seleccione el amplificador R-FIER de alta ganancia y, a continuación,
el ecualizador para reforzar las frecuencias bajas y altas.
Si se utiliza con una pastilla canceladora de zumbido en posición
posterior, se obtiene un efecto de distorsión extrema.
Además, puede agregar un retardo prolongado para utilizarlo como
sonido base con buen sustain.
Si se agrega un retardo corto se produce un sonido de duplicación como
el de dos intérpretes tocando las mismas frases de manera simultánea.
Es un sonido transparente que utiliza efectos espaciales.
Seleccione el amplificador JC CLEAN, basado en el Roland JC-120
y luego añada efecto coral y retardo largo.
El uso de este ajuste con una guitarra equipada con pastillas de bobina
única genera unos bonitos de arpegios y acordes de rasgueado.
Dependiendo de la frase que se interprete, puede resultar eficaz
establecer el tiempo de retardo del sonido de retardo ligeramente
por debajo del tempo de la frase.
Rock clásico
Interruptor BOOST:
OFF
Crunch de tubo
Interruptor BOOST: OFF
Este es un sonido de rock de los años 1970.
Si se aumenta la ganancia, se crea un potente sonido de rock en todos
los riffs y solos.
La potente frecuencia de bajos es característica del sonido que emiten las
superficies de la caja, por lo que puede subir los mandos del ecualizador,
especialmente el mando BASS, para conseguir un sonido con fuerza.
Bajar el mando GAIN es también una buena manera de obtener sonido
crunch alto.
Este es un sonido que complementa la música blues.
Baje un poco el mando BASS y suba el mando GAIN para conseguir
un suave sonido crunch.
Esto se debe al refuerzo del sonido por parte del ecualizador
distorsionado mediante el mando GAIN.
También puede obtener un sonido crunch alto subiendo aún más la gama
alta o bajando la gama media.
34
Page 35

Fonte de alimentação
Colocando as pilhas
Remova a tampa do compartimento
de pilhas e coloque seis pilhas AA,
tomando cuidado para que estejam
no sentido correto.
* Para evitar danos nos alto-
falantes ou em outros aparelhos
e/ou mau funcionamento,
sempre desligue a energia na
unidade e desconecte qualquer
outro aparelho ao instalar ou trocar as pilhas.
* Antes de fechar a tampa do compartimento de pilhas, primeiramente
encaixe as lingüetas da tampa nos orifícios de encaixe e, em seguida,
pressione com firmeza a tampa para baixo até ouvir um clique.
Usando as pilhas
Observe os pontos a seguir.
• Se estiver usando um adaptador CA e houver pilhas na unidade,
o aparelho continuará a funcionar mesmo em caso de interrupção
do fornecimento de corrente (falta de energia ou desconexão do
cabo de força).
• Use apenas pilhas alcalinas (LR6). Você não pode usar nenhum
outro tipo de pilha.
• Vida útil das pilhas
Usada continuamente na capacidade máxima: 13 horas aprox.
(Esses cálculos variarão de acordo com as condições de uso reais.)
•
Quando estiver usando apenas a energia das pilhas e a luz do
indicador (p. 36) de energia da unidade ficar fraca, isso significa que
as pilhas estão chegando ao fim. Troque as pilhas assim que possível.
• Se a energia das pilhas estiver começando a acabar, os sons
naturalmente sofrerão distorções ou sumirão se reproduzidos com
o volume alto, mas isso é normal e não indica mau funcionamento.
Troque as pilhas ou use o adaptador CA que acompanha a unidade.
Conectando o adaptador CA
1. Insira o conector CD do adaptador CA fornecido no plugue
correspondente na unidade.
Se você prender o cabo do adaptador CA
com um gancho, como mostra a ilustração,
poderá evitar desconexões acidentais ou
ter de pressionar o plugue desse adaptador
com muita freqüência.
* Para evitar danos nos alto-falantes ou
mau funcionamento, você deve
desconectar a unidade de outros aparelhos e desligar a respectiva
alimentação de energia ao conectar o adaptador CA.
2. Conecte o cabo de energia fornecido ao adaptador CA e este
à tomada CA.
Adaptador CA
Indicador
Coloque o adaptador CA de forma que o lado com o indicador
(veja a ilustração) fique voltado para cima.
* O indicador se acenderá quando você conectar o adaptador à tomada CA.
Cabo de força
Tomada CA
Usando a unidade com o adaptador CA
Observe os pontos a seguir.
• Embora a unidade funcione apenas com pilhas, se você conectar
o adaptador CA à unidade e ela contiver pilhas, a energia será
fornecida pelo adaptador CA, reduzindo o consumo das pilhas.
Use apenas o adaptador CA que acompanha o MICRO CUBE RX.
•
O uso de outros adaptadores CA pode danificar o amplificador ou
provocar outros problemas.
Ligando e desligando aenergia
Assim que as conexões forem feitas, ligue a energia dos vários aparelhos na
ordem especificada. Ao ligá-los na ordem errada, você corre o risco de mau
funcionamento e/ou danos em alto-falantes e em outros aparelhos.
1. Verifique se todos os controles de volume no MICRO CUBE RX
e nos aparelhos conectados estão ajustados em 0.
2. Ligue todos os aparelhos conectados aos plugues INPUT e AUX IN
do MICRO CUBE RX.
3. Ligue o MICRO CUBE RX.
4. Ajuste os níveis de volume dos aparelhos.
5. Antes de desligar a energia, diminua o volume de
todos os aparelhos no sistema e, em seguida, desligue os
aparelhos na ordem inversa àquela em que foram ligados.
OBSERVAÇÃO
Visto que essa unidade dispõe de um dispositivo para proteção dos
circuitos, ela precisa de algum tempo para começar a funcionar
normalmente logo depois de ligada. Para evitar ruídos repentinos
muito altos, sempre verifique se o nível de volume está baixo antes
de ligar a energia.
OBSERVAÇÃO
Mesmo quando o volume for totalmente diminuído, você poderá
ouvir ainda algum som ao ligar e desligar a força, porém isso
é normal e não indica mau funcionamento.
Encaixando a alça
Encaixe a alça fornecida ao
conector correspondente,
como mostra a ilustração.
OBSERVAÇÃO
Encaixe-a com firmeza para que não se solte facilmente. Se você
deixá-la frouxa e usá-la dessa forma ao transportar o MICRO
CUBE RX, correrá o risco de derrubar o amplificador
e possivelmente danificar o equipamento ou se ferir.
OBSERVAÇÃO
Use apenas a alça que acompanha o produto. Essa alça
foi projetada para uso exclusivo com o MICRO CUBE RX.
Não a use em outros produtos.
OBSERVAÇÃO
Não gire ou balance o MICRO CUBE RX, se estiver transportando-o
pela alça. Isso é extremamente perigoso, porque a alça pode se soltar;
ou, se o movimento for muito repetitivo, poderá até se quebrar.
Español Italiano Français Deutsch EnglishPortuguêsNederlands
35
Page 36

Descrições do painel
Painel de controle
fig.01-01
Guitar
Microfone dinâmico
Cabo mono
padrão
1. Plugue INPUT
Conecte a guitarra ou o microfone aqui.
2. Botão BOOST
Pressione o botão BOOST para alterar a tonalidade do
amplificador. Os efeitos que você pode criar variam de acordo com
o tipo de amplificador.
3. TUNER
Além da afinação manual, na qual as cordas são especificadas,
você também pode usá-lo como afinador cromático.
Também suporta afinação em bemol.
→ Usando a função de afinação (p. 39)
4. Botão AMP TYPE
Você pode selecionar entre oito tipos de amplificadores COSM.
Quando a função TUNER está ligada, é possível especificar uma
corda (nome da nota).
* Os nomes de produto mencionados neste documento são marcas
comerciais ou marcas registradas de seus respectivos proprietários
e não estão relacionados à Roland Corporation. Neste manual,
esses nomes são usados porque é a maneira mais prática de
descrever os sons simulados por meio da tecnologia COSM.
ACOUSTIC SIM
Este é um tipo de amplificador original que inclui um simulador
acústico. E transforma o som da sua guitarra em um som de violão
acústico, limpo e refinado.
O uso deste simulador junto com um captador de bobina fornece
uma ótima qualidade de som. Se você está usando um captador
duplo, diminua um pouco os ajustes BASS e MIDDLE.
JC CLEAN
Trata-se de um modelo do famoso amplificador para guitarras JC-120
Jazz Chorus da Roland. É produzido um som extremamente limpo,
nítido e agradável. E isso fica mais evidente quando usado com um
aparelho gerador de efeitos.
BLACK PANEL
Trata-se de um modelo elaborado a partir do amplificador clássico
Fender Twin Reverb, que pode ser usado em vários estilos musicais,
do country passando pelo blues, jazz e rock. E produz graves muito
bonitos e agudos excelentes.
BRIT COMBO
Trata-se do modelo elaborado a partir do VOX AC-30TB.
É o amplificador de rock criado para o som de Liverpool dos anos
60 e produz uma ampla faixa de sons, do limpo até o overdrive.
CLASSIC STACK
Trata-se de um modelo elaborado no som e na resposta de um
Marshall JMP1987. Foi muito usado no hard rock dos anos 70,
e é o amplificador perfeito para um som de guitarra "top rock".
METAL STACK
Trata-se de um modelo elaborado a partir do PEAVEY EVH5150.
É um tipo de amplificador de alta potência, portanto mesmo em
volumes baixos, é possível obter uma distorção e sustentação
intensas.
R-FIER STACK
Trata-se do modelo elaborado a partir do MESA/Boogie Rectifier.
Esse superamplificador de alta potência é capaz de produzir sons
de slash metal, grunge e muitos outros sons iniciais.
MIC
Selecione-o quando houver um microfone conectado.
* Observe os pontos a seguir ao usar um microfone.
Dependendo de sua posição em relação à unidade, os microfones
•
podem produzir feedback. Isso pode ser resolvido com:
1. A mudança de sentido do(s) microfone(s).
2. Uma nova disposição do(s) microfone(s) a uma distância maior
da unidade.
3. A redução dos níveis de volume.
• O som sairá distorcido se você girar o botão GAIN para
uma posição muito alta. Gire o botão GAIN para um valor
o mais alto possível que não distorça o som para obter
a melhor relação de sinal/ruído.
• Use um microfone dinâmico. Você não pode usar
um microfone condensador ou um microfone alimentado
por plug-in que exige uma fonte de alimentação.
36
Page 37

Descrições do painel
5. Botão GAIN
Ajusta o nível de entrada. Regule o nível de entrada para ajustar o nível
de sinal dos instrumentos musicais conectados ao plugue INPUT.
DICA
Se ajustar GAIN em um valor alto, obterá um timbre de overdrive.
DICA
Gire o botão GAIN para um valor o mais alto possível que não
provoque distorção para obter o som mais nítido.
6. Botão VOLUME
Ajusta o volume da guitarra (microfone).
7. Indicador de energia
Esse indicador acende quando a unidade está ligada.
* Quando estiver funcionando apenas com a energia das pilhas,
o indicador da unidade permanecerá apagado enquanto você
toca para sinalizar que as pilhas estão fracas. Troque as pilhas
assim que possível.
8. Chave POWER
Liga e desliga a energia.
→ Ligando e desligando a energia (p. 35)
9. EQUALIZER
Esse equalizador é de três bandas. E permite que você ajuste
a tonalidade da guitarra.
Botão BASS
Ajusta os graves do som.
Botão MIDDLE
Ajusta os médios do som.
Botão TREBLE
Ajusta os agudos do som.
10. Botão EFX (Efeitos)
Ajuste este botão para CHORUS, FLANGER, PHASER ou TREMOLO
para selecionar o efeito correspondente. Gire o botão para ajustar
a intensidade do efeito aplicado.
CHORUS (chorus com sintetização
espacial)
Usa o mesmo chorus com sintetização
espacial que o JC-120 para reproduzir
uma ampla faixa de sons.
* Os efeitos de chorus foram criados para
projetar o máximo de eficiência quando são usados os alto-falantes
integrados da unidade. Essa eficiência pode variar quando o REC
OUT/PHONE é usado no lugar dos alto-falantes integrados.
FLANGER
Essa graduação gera o efeito flanging, que
dá uma espécie de sensação giratória
(vertigem).
PHASER
Esse efeito agrega um sinal de mudança
de fase ao som direto, incorporando
ao som um aspecto em espiral.
TREMOLO
Tremolo é um efeito que cria uma
mudança cíclica no volume.
* As graduações de CHORUS, FLANGER,
PHASER e TREMOLO no painel servem
de referência. Não se esqueça de passar o som ao ajustar os efeitos.
11. Botão DELAY/REVERB
Gire esse botão para DELAY ou REVERB para mudar para um
desses efeitos. Você pode ajustar também a intensidade de efeito
aplicada girando o botão para a posição desejada.
DELAY
Gire o botão para ajustar o efeito de delay.
REVERB
Gire o botão para ajustar o efeito de reverb.
* As graduações de DELAY e REVERB
no painel servem de referência.
Não se esqueça de passar o som
ao ajustar os efeitos.
12. RHYTHM GUIDE
A unidade possui padroes rítmicos com sons de bateria e percussão
e são ótimos para você treinar sozinho. Além de treinar com a batida
desejada, você poderá usar esse recurso como metrônomo.
→ Usando o RHYTHM GUIDE (p. 39)
Botão PATTERN
Seleciona o gênero do padrão rítmico.
Botão START/STOP
Inicia/pára o RHYTHM GUIDE. Quando você inicia o RHYTHM
GUIDE, o indicador correspondente pisca de acordo com o ritmo
(tempo) da música.
Botão TAP TEMPO
Ajusta o ritmo do RHYTHM GUIDE. Aperte esse botão duas ou mais
vezes de acordo com o ritmo desejado para que o RHYTHM GUIDE
reproduza esse ritmo.
Botão VARIATION
Seleciona a variação do padrão rítmico. Cada gênero contém três tipos
de variação rítmica. Se pressionar o botão VARIATION, poderá percorrer
todas as variações disponíveis; o indicador de VARIATION ficará
apagado, verde ou então vermelho para indicar que a variação mudou.
Botão VOLUME
Ajusta o volume do RHYTHM GUIDE.
Español Italiano Français Deutsch EnglishPortuguêsNederlands
37
Page 38

Descrições do painel
Painel traseiro
Ajuste as chaves conforme demonstrado a seguir.
AB
Iniciar/Parar
BOSS FS-6
Ajuste a chave de
polaridade conforme
demonstrado a seguir.
Tap tempo
PCS-31
Branco Vermelho
BOSS FS-5U
Iniciar/Parar
Branco (canal E) Vermelho (canal D)
Tap tempo
GravadorFones de ouvido estéreosMixer
Reprodutor
de áudio
digital
Cabo estéreo
Cabo estéreo padrão
PCS-31
Cabo mono
padrão
Instrumentos musicais
eletrônicos etc.
1. Gancho do cabo
Enganche o cabo do adaptador CA aqui.
→ Colocando as pilhas (p. 35)
2. Plugue do adaptador CA
Conecte o adaptador CA que acompanha a unidade ao plugue.
Use apenas o adaptador CA fornecido com o MICRO CUBE RX.
O uso de outros adaptadores CA pode danificar o amplificador
ou acarretar outros problemas.
→ Colocando as pilhas (p. 35)
3. Plugue FOOT SW (Pedal)
Se você conectar um pedal (o opcional BOSS FS-5U ou FS-6),
poderá usar a função RHYTHM GUIDE (START/STOP e TAP TEMPO).
4. Plugue REC OUT/PHONES
Conecte fones de ouvido estéreos ou um equipamento de gravação
a esse plugue. Ele oferece saída estéreo.
* Nenhum som é reproduzido nos alto-falantes da unidade
quando o plugue RECOUT/PHONES está sendo usado.
5. Plugue AUX IN
Você pode conectar CD player, reprodutor de áudio digital ou instrumentos
musicais eletrônicos para acompanhá-lo enquanto toca a guitarra.
A unidade dispõe de dois tipos de plugue para entrada externa:
um plugue mono de 1/4" e um miniplugue estéreo. Use o cabo
apropriado (opcional) ao aparelho quando for conectar.
* Determine o nível do volume, ajustando o controle de volume
do aparelho conectado.
6. Terminal de aterramento
Dependendo das circunstâncias de um ajuste em particular, você talvez
sinta uma sensação desconfortável ou perceba que a superfície fica áspera
ao tocar o aparelho, os microfones conectados a ele ou a parte metálica
dos demais objetos (por exemplo, guitarras ou violões). Isso acontece
por causa de uma carga elétrica muito pequena, absolutamente
inofensiva. No entanto, se ficar preocupado com isso, conecte o terminal
de aterramento usando um fio terra externo. Quando a unidade está
aterrada, pode haver um zumbido mínimo, dependendo dos detalhes
da instalação. Se estiver inseguro sobre o método de conexão, entre
em contato com o Centro de Serviço da Roland ou com um distribuidor
autorizado pela Roland, conforme indicado na página “Information”.
Locais inadequados para conexão
• Tubulações de água (podem provocar choques elétricos)
Tubulações de gás (podem resultar em incêndio ou em explosão)
•
• Aterramento de linha telefônica ou haste de pára-raios
(pode ser perigoso em caso de raios)
7. Compartimento das pilhas
Coloque seis pilhas AA. Use apenas pilhas alcalinas (LR6).
Você não pode usar nenhum outro tipo de pilha.
→ Colocando as pilhas (p. 35)
8. Slot de Segurança ( )
Você pode conectar à unidade qualquer cabo de segurança contra
roubo oferecido no mercado e também outros dispositivos de segurança.
http://www.kensington.com/
38
Page 39

Funções úteis
A
Usando a função de afinação
O MICRO CUBE RX está equipado com uma função de afinação. Além
da afinação manual, você pode usá-lo como um afinador cromático.
* Use a afinação manual quando as cordas estiverem
significativamente desafinadas (por exemplo, depois de trocá-las).
Afinação manual
1. Pressione o botão TUNER.
A unidade entrará no modo de afinação e o botão TUNER acenderá.
Quando a unidade estiver no modo de afinação, nenhum som será
reproduzido nos alto-falantes ou no plugue REC OUT/PHONES.
2. Use o botão AMP
TYPE para
selecionar a corda
que deseja afinar.
Afinação cromática
Se pressionar o botão TUNER por um segundo ou mais, poderá usar
a unidade também como um "afinador cromático", o qual determina
automaticamente o nome da nota mais próxima da que foi tocada.
Do mesmo modo que a afinação manual, a afinação cromática permite que
você toque uma única nota na corda que deseja afinar. Afine a corda até
que o indicador verde se acenda.
Usando o RHYTHM GUIDE
O MICRO CUBE RX dispõe de padrões rítmicos que usam basicamente
tambor/percussão e são ótimos para você treinar sozinho. Além de
praticar com a batida desejada, poderá usar esse recurso como
metrônomo.
Posição
do botão
6E Sexta corda solta (E)
5A Quinta corda solta (A)
4D Quarta corda solta
3G Terceira corda solta
2B Segunda corda solta
1E Primeira corda solta (E)
b
A
bb
A
3. Toque uma única nota na corda solta que você deseja afinar.
Afine a corda até que o indicador verde se acenda.
Bemol Sustenido
cende em vermelho Acende em vermelho
* O indicador vermelho piscará se a altura estiver significativamente
fora de sintonia.
4.
Assim que terminar a afinação, pressione o botão TUNER novamente.
* A altura da referência é A=440 Hz. Isso não pode ser mudado.
Corda (nome da corda)
(D)
(G)
(B)
Quinta corda solta (semitom abaixo)
Quinta corda solta (um tom inteiro abaixo)
A altura
está correta
Acende em verde
(Ab)
(G)
1. Selecione o gênero rítmico usando o botão PATTERN.
METRONOME ROCK1 ROCK2 BLUES
COUNTRY R&B BALLAD JAZZ
FUNK LATIN DANCE
2. Pressione o botão START/STOP para iniciar o RHYTHM GUIDE.
Quando você inicia o RHYTHM GUIDE, o indicador correspondente
se acende.
3. Ajuste o volume do RHYTHM GUIDE usando o botão VOLUME
correspondente.
4. Selecione uma variação rítmica pressionando o botão VARIATION.
Cada gênero contém três tipos de variação rítmica. Se você pressionar
o botão VARIATION, poderá percorrer todas as variações disponíveis;
o indicador VARIATION ficará apagado, verde ou vermelho para
indicar que a variação mudou.
5. Ajuste a variação ao ritmo de acordo com o qual deseja tocar.
Pressione o botão TAP TEMPO duas ou mais vezes de acordo com
o ritmo desejado para que o RHYTHM GUIDE reproduza esse ritmo.
Español Italiano Français Deutsch EnglishPortuguêsNederlands
39
Page 40

Ajustes de exemplo
MEMO
Ajuste o botão VOLUME em um nível apropriado.
Alternative Metal
Chave BOOST: OFF
Space Clean
Chave BOOST: OFF
O som perfeito para riffs agudos e intensos.
Selecione o amplificador de alta potência R-FIER e use o equalizador
para reforçar os graves e agudos.
É usado com o captador duplo na posição traseira, o que resulta em um
efeito de distorção radical.
E tem mais, você pode adicionar um delay longo como o som inicial com
uma incrível sustentação.
Além disso, o delay breve produz um som duplicado como se dois
guitarristas estivessem tocando as mesmas frases musicais
simultaneamente.
É um som limpo usado em efeitos espaciais.
Selecione o amplificador JC CLEAN, elaborado a partir do Roland
JC-120, e adicione chorus e delay breve.
O uso deste ajuste com uma guitarra equipada com captadores de
bobina permite a emissão de belos arpejos e acordes dedilhados.
Dependendo da frase musical que está sendo tocada, pode ser mais
eficaz ajustar a duração do delay para um ritmo um pouco mais lento
do que o ritmo da frase.
Classic Rock
Chave BOOST:
OFF
Tube Crunch
Chave BOOST: OFF
É o som de rock no estilo dos anos 70.
O aumento da potência produz um poderoso som de rock como todos
os riffs e solos.
O poderoso grave é a principal característica do som emitido pelas
superfícies do gabinete. Por isso, você pode aumentar os botões do
equalizador, especialmente o botão BASS, para produzir um som
radicalmente vigoroso.
Diminuir o botão GAIN também é uma excelente maneira de obter um som com
efeito crunch agudo.
É o som que complementa o blues.
Reduza um pouco o volume do botão BASS e aumente o botão GAIN
para obter um som com efeito crunch suave.
Isso ocorre por causa do som reforçado do equalizador que está sendo
distorcido pelo botão GAIN.
Você também pode obter um som com efeito crunch agudo pelo aumento
dos agudos ou redução dos médios.
40
Page 41

Stroomtoevoer
Batterijen plaatsen
Verwijder het klepje van het
batterijvak en plaats 6 AA-batterijen
in de juiste richting.
* Om defecten en/of schade
aan de luidsprekers of andere
apparaten te voorkomen
schakelt u het toestel uit en
koppelt u eventuele andere
apparaten los als u batterijen
plaatst of vervangt.
* Steek bij het sluiten van het klepje van het batterijvak eerst
de sluithaken in de overeenstemmende holtes en druk vervolgens
het klepje naar beneden tot het vastklikt.
Batterijen gebruiken
Denk aan de volgende opmerkingen.
• Als er batterijen in het toestel zijn geplaatst terwijl de
netstroomadapter wordt gebruikt, kan het toestel verder worden
gebruikt als de stroomtoevoer onderbroken wordt (stroompanne
of loskoppeling van netsnoer).
• Gebruik alleen alkalinebatterijen (LR6). U kunt geen ander
type batterij gebruiken.
• Batterijduur
Bij voortdurend gebruik aan maximum vermogen: ongeveer 13 uur
(Deze waarden hangen af van de effectieve gebruiksomstandigheden)
•
Als de stroomvoorziening alleen met behulp van batterijen gebeurt,
zwakt het stroomlampje (p.42) af als de batterij leeg raakt. Vervang
de batterijen zo snel mogelijk.
• Geluiden worden gemakkelijk verstoord of onderbroken als er aan
hoog volume wordt gespeeld terwijl de batterij leeg begint te lopen.
Dit is normaal en duidt niet op een defect. Vervang de batterijen
of gebruik de netstroomadapter die bij het apparaat werd geleverd.
De netstroomadapter aansluiten
* Het lampje licht op als u de netstroomadapter in een stopcontact steekt.
Het toestel met de adapter gebruiken
Denk aan de volgende opmerkingen.
• Hoewel het toestel ook alleen op batterijen kan werken, gebeurt de
stroomvoorziening via de netstroomadapter als u die op het toestel
aansluit terwijl er batterijen zijn geplaatst, waardoor batterijverbruik
wordt verminderd.
•
Gebruik alleen de bijgeleverde netstroomadapter met de MICRO CUBE RX.
Een andere netstroomadapter kan de versterker beschadigen of andere
problemen veroorzaken.
De voeding inen uitschakelen
Schakel de voeding naar uw verschillende apparaten in de aangegeven
volgorde in zodra de aansluitingen voltooid zijn. Als u de apparaten
in de verkeerde volgorde inschakelt, kunnen er defecten optreden en/of
kan er schade aan de luidsprekers en andere apparaten ontstaan.
1. Zorg ervoor dat alle volumeregelaars op de MICRO CUBE RX
en de aangesloten apparaten op 0 zijn ingesteld.
2. Schakel alle apparaten in die op de INPUT-aansluiting en de AUX
IN-aansluiting van de MICRO CUBE RX zijn aangesloten.
3. Schakel de MICRO CUBE RX in.
4. Wijzig het volume van de apparaten.
5.
Verlaag, voordat u het toestel uitschakelt, het volume van alle
apparaten in uw systeem en schakel de apparaten in de omgekeerde
volgorde uit dan de volgorde waarin u ze hebt ingeschakeld.
NOOT
Om het stroomcircuit te beschermen, duurt het even voordat u het
toestel normaal kunt gebruiken nadat u het hebt ingeschakeld.
Zorg er altijd voor dat het volume lager is gezet voordat u het
toestel inschakelt, als bescherming tegen een plots luid volume.
NOOT
Zelfs als het volume volledig op nul staat, kunt u nog geluid horen wanneer
u het toestel in- en uitschakelt. Dit is normaal en wijst niet op een defect.
1. Steek de stekker van de bijgeleverde netstroomadapter in de
aansluiting voor de netstroomadapter van het apparaat.
Haak het netsnoer zoals in de afbeelding
vast met de snoerhaak. Zo voorkomt u dat
de adapter in bepaalde omstandigheden
wordt uitgetrokken of dat er overmatige
druk op de aansluiting voor de
netstroomadapter wordt uitgeoefend.
* Om fouten of schade aan de luidsprekers
te voorkomen, moet u het toestel
loskoppelen van andere apparaten en het uitschakelen als u de
netstroomadapter aansluit.
2. Sluit het bijgeleverde netsnoer aan op de netstroomadapter en
steek het in een stopcontact.
Netstroomadapter
Lampje
Plaats de netstroomadapter met de zijde met het lampje
(zie afbeelding) naar boven.
Netsnoer
Stopcontact
De riem bevestigen
Bevestig de bijgeleverde
riem op de riempen zoals
getoond in de afbeelding.
NOOT
Maak de riem stevig vast zodat hij niet gemakkelijk los kan raken.
Als u de MICRO CUBE RX met de riem draagt terwijl die los is, kan
de versterker vallen, met mogelijk schade of letsel tot gevolg.
NOOT
Gebruik alleen de bijgeleverde riem. De bijgeleverde riem is
bedoeld voor exclusief gebruik met de MICRO CUBE RX. Gebruik
de riem niet voor andere producten.
NOOT
Draai of zwaai niet met de MICRO CUBE RX terwijl u hem aan de
riem vasthoudt. Dit is erg gevaarlijk aangezien hierdoor de riem
kan losraken, of, als de beweging genoeg wordt herhaald, zelfs breken.
Español Italiano Français Deutsch EnglishPortuguêsNederlands
41
Page 42

Paneelbeschrijvingen
Voorpaneel
afb. 01-01
Gitaar
Dynamische
microfoon
Standaard
monokabel
1. INPUT-aansluiting
Sluit uw gitaar of microfoon hier aan.
2. BOOST-knop
Druk op de BOOST-knop om de toon van de versterker te wijzigen.
De effecten die u kunt creëren hangen af van het versterkertype.
3. TUNER
Naast handmatige stemming, waarbij snaren worden
aangegeven, kunt u ook de chromatische stemfunctie gebruiken.
“flat tuning” wordt ook ondersteund.
→ De stemfunctie gebruiken (p. 45)
4. AMP TYPE-regelaar
U kunt uit acht COSM-versterkertypes kiezen. Als de TUNER-functie
aan is, kunt u een snaar kiezen (nootnaam).
* De productnamen die in dit document worden genoemd, zijn
handelsmerken of gedeponeerde handelsmerken van hun
respectieve eigenaars en hebben geen verband met Roland
Corporation. In deze handleiding worden deze namen gebruikt
omdat het de meest praktische manier is om de geluiden te
beschrijven die gesimuleerd worden met COSM-technologie.
ACOUSTIC SIM
Dit is een origineel versterkertype dat een akoestische simulator
bevat. Zet de geluiden van uw elektrische gitaar om in een helder,
verfijnd akoestisch gitaargeluid.
De geluidskwaliteit met dit type is optimaal In combinatie met een
enkelspoelement. Als u een dubbelspoelelement gebruikt stelt u BASS
en MIDDLE van de equalizer best iets lager in.
JC CLEAN
Dit model is gebaseerd op de beroemde Roland JC-120 Jazz Chorus
gitaarversterker. De uiterst gepolijste, uiterst vlakke sound geeft een
zacht geluid. Dit krijgt nog meer effect in combinatie met een extern
effectenapparaat.
BLACK PANEL
Dit model is gebaseerd op de klassieke Fender Twin Reverb-versterker.
Dit model is geschikt voor verschillende muziekstijlen, van country tot
blues, jazz en rock. Het geeft rijke lage en heldere hoge tonen weer.
BRIT COMBO
Dit model is gebaseerd op de VOX AC-30TB. Dit is de rockversterker
die de Liverpool-sound van de jaren ’60 bepaalde. Het kan een
meerdere geluiden weergeven, van clean tot overdrive.
CLASSIC STACK
Dit model is gebaseerd op de sound en respons van een Marshall
JMP1987. Deze versterker werd erg veel gebruikt in de jaren '70 en
is de perfecte versterker voor het “top rock”-gitaargeluid.
METAL STACK
Dit model is gebaseerd op de PEAVEY EVH5150. Dit is een 'highgain'-versterkertype waarmee u zelfs aan lage volumes zware
distortion en sustain kunt creëren.
R-FIER STACK
Dit model is gebaseerd op de MESA/Boogie Rectifier. Deze 'superhigh-gain'-versterker kan slash metal, grunge en allerlei andere
lead-klanken produceren.
MIC
Kies dit als er een microfoon is aangesloten.
* Let op de volgende punten als een microfoon wordt gebruikt.
• Er kan feedback optreden, afhankelijk van de plaats van
de microfoons ten opzichte van het toestel. Dit kan worden
opgelost door:
1. De richting van de microfoon(s) te wijzigen.
2. De microfoon(s) op een grotere afstand
van het toestel te plaatsen.
3. De volumeniveaus te verlagen.
• Het geluid wordt overstuud als u de GAIN-regelaar te
hoog instelt. Stel de GAIN-regelaar op de hoogst mogelijke
waarde voordat het geluid verstoord wordt om de beste
signaal-ruisverhouding te verkrijgen.
• Gebruik een dynamische microfoon. U kunt geen
condensatormicrofoon gebruiken of een microfoon
die een stroomvoorziening vereist.
42
Page 43

Paneelbeschrijvingen
5. GAIN-regelaar
Wijzigt het ingangsniveau. Pas het ingangsniveau aan zodat het
geschikt is voor het signaalniveau van muziekinstrumenten die met
de INPUT-aansluiting zijn verbonden.
TIP
Een hoge GAIN-instelling zorgt voor een overstuurd geluid.
TIP
Stel de GAIN-regelaar in op de hoogst mogelijke waarde voordat
het geluid wordt verstoord om het meest heldere geluid te
verkrijgen.
6. VOLUME-regelaar
Wijzigt het volume van de gitaar (microfoon).
7. Stroomlampje
Dit lampje licht op wanneer het toestel is ingeschakeld.
* Als de stroomvoorziening alleen met behulp van batterijen
gebeurt, zwakt het lampje tijdens het spelen af als de batterij
leeg raakt. Vervang de batterijen zo snel mogelijk.
8. POWER-schakelaar
Deze schakelt de voeding in en uit.
→ De voeding in- en uitschakelen (p. 41)
9. EQUALIZER
Dit is een driebands equalizer. Hiermee kunt u de toon van de gitaar
regelen.
BASS-regelaar
Wijzigt de tooneigenschappen van de lagere frequenties.
PHASER
Dit effect voegt een variabel gefaseerd
signaal aan het directe geluid toe, wat
het geluid een ronddraaiend karakter
geeft.
TREMOLO
Tremolo is een effect dat een cyclische
volumewijziging creëert.
* De maatstrepen voor CHORUS,
FLANGER, PHASER en TREMOLO op
het paneel zijn indicatief. Denk eraan uw geluid te controleren
bij het wijzigen van de effecten.
11. DELAY/REVERB-regelaar
Draai deze regelaar naar DELAY of REVERB om naar dat effect over
te schakelen. U kunt ook de hoeveelheid van het toegepaste effect
bepalen door de regelaar in de gewenste stand te zetten.
DELAY
Draai met de regelaar om het delayeffect
te wijzigen.
REVERB
Draai met de regelaar om het reverbeffect
te wijzigen.
MIDDLE-regelaar
Wijzigt de tooneigenschappen van de middenfrequenties.
TREBLE-regelaar
Wijzigt de tooneigenschappen van de hogere frequenties.
10. EFX-regelaar (effecten)
Zet deze regelaar op CHORUS, FLANGER, PHASER of TREMOLO
om het overeenkomstige effect te selecteren. Draai aan de regelaar
om de sterkte van het effect te regelen.
CHORUS (ruimtelijk samengestelde chorus)
Dit gebruikt dezelfde ruimtelijk
samengestelde chorus als de JC-120 om
een breed geluid te leveren.
* De choruseffecten zijn zo ontworpen
dat ze zo doeltreffend mogelijk zijn wanneer u de ingebouwde
luidsprekers van het toestel gebruikt. De doeltreffendheid kan
verschillen wanneer u REC OUT/PHONE gebruikt in plaats van
de ingebouwde luidsprekers.
FLANGER
Dit flanger-effect geef een soort van
wervelend gevoel aan het geluid.
* De maatstrepen voor DELAY en REVERB
op het paneel zijn indicatief. Denk eraan
uw geluid te controleren bij het wijzigen van de effecten.
12. RHYTHM GUIDE
Dit toestel is uitgerust met ritmepatronen op basis van drum/
percussie, die handig zijn als u alleen oefent. Naast oefenen met uw
gekozen beat, kunt u deze functie ook als metronoom gebruiken.
→ De RHYTHM GUIDE gebruiken (p. 45)
PATTERN-regelaar
Kiest het genre van het ritmepatroon.
START/STOP-knop
Start/stopt de RHYTHM GUIDE. Als u de RYTHM GUIDE start,
knippert het lampje in het tempo van de muziek.
TAP TEMPO-knop
Bepaalt het tempo van de RHYTHM GUIDE. Tik twee of drie keer op
deze knop in het gewenste tempo en de RYTHM GUIDE zal aan dat
tempo spelen.
VARIATION-knop
Kiest de variatie van het ritmepatroon. Elk genre bevat drie soorten
ritmevariaties. Door op de VARIATION-regelaar te drukken doorloopt
u de beschikbare variaties; het VARIATION-lampje zal uit zijn of groen
of rood branden om de variatiewijziging aan te geven.
VOLUME-regelaar
Wijzigt het volume van de RHYTHM GUIDE.
Español Italiano Français Deutsch EnglishPortuguêsNederlands
43
Page 44

Paneelbeschrijvingen
Achterpaneel
Stel de schakelaars in zoals hieronder afgebeeld.
AB
Start/Stop
BOSS FS-6
Stel de polariteitsschakelaar
in zoals hieronder
afgebeeld.
Tap Tempo
Wit Rood
BOSS FS-5U
Start/Stop
PCS-31
Wit (L-kan.) Rood (R-kan.)
Tap Tempo
PCS-31
OpnameapparaatStereohoofdtelefoonMixer
Digitale
audiospeler
Stereokabel
Stereo-minikabel
Standaard
monokabel
Elektronische
muziekinstrumenten enz.
1. Snoerhaak
Haak het netsnoer hier vast.
→ De netstroomadapter aansluiten (p. 41)
2. Aansluiting voor netstroomadapter
Sluit de bijgeleverde netstroomadapter aan op deze aansluiting.
Gebruik alleen de netstroomadapter die bij de MICRO CUBE RX werd
geleverd. Als u andere netstroomadapters gebruikt, kunt u de
versterker beschadigen of andere problemen veroorzaken.
→ De netstroomadapter aansluiten (p. 41)
3. FOOT SW-aansluiting (Voetschakelaar)
Als u een voetschakelaar (de optionele BOSS FS-5U of FS-6) aansluit, kunt
u de functie RYTHM GUIDE bedienen (START/STOP en TAP TEMPO).
4. REC OUT/PHONES-aansluiting
Sluit een stereohoofdtelefoon of een opnameapparaat aan op deze
aansluiting. Het ondersteunt stereo-uitvoer.
* Er wordt geen geluid door de luidspreker van het toestel weergegeven
zolang de aansluiting REC OUT/PHONES in gebruik is.
5. AUX IN-aansluiting
U kunt apparaten aansluiten zoals een cd-speler, digitale audiospeler
of elektronisch muziekinstrument en ze met uw gitaar laten meespelen.
Biedt twee soorten aansluitingen voor externe invoer: een mono
1/4"-aansluiting en een stereo-mini-aansluiting. Gebruik de juiste
kabel (optioneel) voor het apparaat dat u aansluit.
* Bepaal het volumeniveau met behulp van de volumeregeling
op het aangesloten apparaat.
6. Aardingsaansklem
Afhankelijk van de omstandigheden van een bepaalde opstelling ervaart
u mogelijk een ongemakkelijk gevoel of lijkt het oppervlak korrelig als
u het apparaat, microfoons die erop aangesloten zijn of metalen delen
van andere objecten, zoals gitaren, aanraakt. Dit is te wijten aan een heel
erg kleine elektrische lading, die volledig ongevaarlijk is. Als u zich hier
echter zorgen over maakt, verbindt u best de aardingsklem met een
externe aarding. Als het apparaat geaard is, kan er mogelijk een licht
gebrom voorkomen, afhankelijk van uw specifieke opstelling. Neem
contact op met het dichtstbijzijnde Roland Service Center of een erkende
Roland-verdeler, zoals vermeld op de pagina "Informatie".
Ongeschikte plaatsen voor een aansluiting
• Waterleidingen (kan een elektrische schok veroorzaken)
• Gasleidingen (kan brand of een ontploffing veroorzaken)
• De aarding van een telefoonlijn of bliksemafleider (kan
gevaarlijk zijn in geval van bliksem)
7. Batterijvak
Plaats 6 AA-batterijen. Gebruik alleen alkalinebatterijen (LR6).
U kunt geen ander type batterij gebruiken.
→ Batterijen plaatsen (p. 41)
8. Veiligheidssleuf ( )
U kunt in de handel verkrijgbare anti-diefstal-beveiligingskabels
en andere beveiligingsapparaten op het apparaat aansluiten.
http://www.kensington.com/
44
Page 45

Handige functies
g
De stemfunctie gebruiken
De MICRO CUBE RX is uitgerust met een stemfunctie. Naast handmatisch
stemmen kunt u ook chromatisch stemmen.
* Gebruik handmatige stemming als de snaren erg ontstemd zijn
(zoals na het vervangen van snaren).
Handmatig stemmen
1. Druk op de TUNER-knop.
Het toestel gaat in de stemmodus en de TUNER-knop licht op. Als het
toestel zich in de stemmodus bevindt wordt er geen geluid via de
luidsprekers of de REC OUT/PHONES-aansluiting weergegeven.
2. Gebruik de
regelaar AMP TYPE
om de snaar de
selecteren die u wilt
stemmen.
Chromatisch stemmen
Als u de TUNER-knop een seconde of langer inhoudt, kunt u het toestel
ook als chromatisch stemapparaat gebruiken, waarbij automatisch de
noot wordt bepaald die het dichtst ligt bij de noot die u speelde.
Zoals bij handmatig stemmen kunt u bij chromatisch stemmen één enkele noot
op de snaar spelen die u wilt stemmen. Stem de snaar totdat het groene
lampje brandt.
De RHYTHM GUIDE gebruiken
De MICRO CUBE RX is uitgerust met ritmepatronen op basis van drum/
percussie, die handig zijn als u alleen oefent. Naast oefenen met uw
gekozen beat, kunt u deze functie ook als metronoom gebruiken.
Regelaar
stand
6E Open zesde snaar (E)
5A Open vijfde snaar (A)
4D Open vierde snaar
3G Open derde snaar
2B Open tweede snaar
1E Open eerste snaar (E)
b
A
bb
A
3. Speel een enkele noot op de open snaar die u wilt stemmen.
Stem de snaar totdat het groene lampje brandt.
Vlak Te hoog
* Het rode lampje knippert als de toonhoogte helemaal niet klopt.
4.
Als u gedaan hebt met stemmen drukt u opnieuw op de TUNER-knop.
* De referentietoonhoogte is A=440 Hz. Dit kan niet worden
gewijzigd.
Snaar (nootnaam)
(D)
(G)
(B)
Open vijfde snaar (halve toon lager)
Open vijfde snaar (hele toon lager)
Juiste
toonhoogte
Licht
roen opLicht rood op Licht rood op
(Ab)
(G)
1. Selecteer het ritmegenre met de PATTERN-regelaar.
METRONOME ROCK1 ROCK2 BLUES
COUNTRY R&B BALLAD JAZZ
FUNK LATIN DANCE
2. Druk op de START/STOP-knop om de RYTHM GUIDE te starten.
Als de RYTHM GUIDE wordt gestart, brandt het lampje voor de
RYTHM GUIDE.
3. Wijzig het volume van de RYTHM GUIDE met de regelaar RYTHM
GUIDE VOLUME.
4. Kies een ritmevariatie door op de VARIATION-knop te drukken.
Elk genre bevat drie soorten ritmevariaties. Door op de VARIATIONknop te drukken doorloopt u de beschikbare variaties; het VARIATIONlampje zal uit zijn of groen of rood branden om de variatiewijziging aan
te geven.
5. Breng de variatie op het tempo waarin u wilt spelen.
Druk twee of drie keer op deze knop TAP TEMPO in het gewenste
tempo en de RYTHM GUIDE zal aan dat tempo spelen.
Español Italiano Français Deutsch EnglishPortuguêsNederlands
45
Page 46

Voorbeeldinstellingen
MEMO
Stel de VOLUME-regelaar in op een geschikt niveau.
Alternatieve metal
BOOST-schakelaar: UIT
Space Clean
BOOST-schakelaar: UIT
Het perfecte geluid voor zware, scherpe riffs.
Kies de 'high-gain'-R-FIER-versterker en gebruik vervolgens de equalizer
om de lage en hoge tonen te versterken.
In combinatie met een dubbelspoelelement in de achterste positie creëert
dit een extreem distortion-effect.
Bovendien kunt u een lange delay hieraan toevoegen om een lead-geluid
met een geweldige sustain te verkrijgen.
Een korte delay creëert een dubbel geluid waarbij het lijkt alsof twee
spelers dezelfde partijen tegelijk spelen.
Dit is een transparant geluid dat gebruik maakt van ruimtelijke effecten.
Kies de JC CLEAN-versterker, gebaseerd op de Roland JC-120, en voeg
chorus en een lange delay toe.
Deze instelling in combinatie met een gitaar met enkelspoelelementen
zorgt voor prachtig klinkende arpeggio’s en akkoorden.
Afhankelijk van de frase die wordt gespeeld kan het nuttig zijn om
de delay-tijd iets trager in te stellen dan het tempo van de frase.
Classic Rock
BOOST-schakelaar:
UIT
Tube Crunch
BOOST-schakelaar: UIT
Dit is een rockgeluid van de jaren ’70.
Door de gain te verhogen wordt een krachtig rockgeluid gecreëerd in alle
riffs en solo's.
Krachtige lage tonen zijn een eigenschap van het geluid dat door
de vlakken van de luidsprekerkast wordt geproduceerd. U kunt dus
de equalizer-regelaars, en dan vooral de BASS-regelaar, hoger
draaien om een geluid met een stevige punch te creëren.
De GAIN-regelaar lager draaien zorgt voor een scherp crunch-geluid.
Dit is een geluid dat geschikt is voor blues-muziek.
Draai de BASS-regelaar iets lager en draai de GAIN-regelaar hoger om
een vloeiend crunch-geluid te creëren.
Dit geluid is het gevolg van verstoring door de GAIN-regelaar van het geluid dat
door de equalizer extra wordt versterkt.
U kunt ook een scherp crunch-geluid creëren door de hoge tonen extra
hoog te draaien of door de middentonen te verminderen.
46
Page 47

Specifications
A
MICRO CUBE RX: GUITAR AMPLIFIER
Rated Power Output
2.5 W + 2.5 W
Nominal Input Level (1 kHz)
INPUT: -10 dBu
STEREO AUX IN: -10 dBu
MONO AUX IN: -10 dBu
Speakers
10 cm (4 inches) x 4
Controls
POWER Switch
TUNER Switch
COSM AMPLIFIER:
BOOST Switch
TYPE Switch (ACOUSTIC SIM/JC CLEAN/BLACK PANEL/BRIT COMBO/
CLASSIC/METAL/R-FIER/MIC)
GAIN Knob
VOLUME Knob
EQUALIZER:
BASS Knob/MIDDLE Knob/TREBLE Knob
EFX Knob (CHORUS/FLANGER/PHASER/TREMOLO)
DELAY/REVERB Knob
RHYTHM GUIDE:
START/STOP Switch
TAP TEMPO Switch
PATTERN Knob (METRONOME/ROCK1/ROCK2/BLUES/COUNTRY/
R&B/BALLAD/JAZZ/FUNK/LATIN/DANCE)
VARIATION Switch
VOLUME Knob
Indicators
POWER/TUNER/RHYTHM GUIDE/VARIATION (RHYTHM GUIDE)
Connectors
Input Jack (1/4" phone type)
Foot Switch Jack (1/4" TRS phone type)
STEREO AUX IN Jack (Stereo miniature phone type)
MONO AUX IN Jack (1/4" phone type)
REC OUT/PHONES Jack (Stereo 1/4" phone type)
AC Adaptor Jack
Grounding Terminal
Power Supply
DC 9 V: AC Adaptor(Accessory) or
Dry battery LR6 (AA) type (alkaline)(optional) x 6
Current Draw
186 mA
Dimensions
296(W) x 207(D) x 294(H) mm
11-11/16(W) x 8-3/16(D) x 11-5/8(H) inches
Weight
6.4 kg/14 lbs 2 oz(including Batteries)
Accessories
Strap/Power Cord/AC Adaptor/Owner's Manual
Options
Foot Switch (BOSS FS-5U, FS-6)/Connection Cable (PCS-31)/
* 0 dBu = 0.775 Vrms
* In the interest of product improvement, the specifications and/or appearance
of this unit are subject to change without prior notice.
Block Diagram
MONO
UX IN
STEREO
AMPLIFIER
INPUT
TUNER
GAIN EQ
JC CLEAN
ACOUSTIC SIM
BLACK PANEL
BRIT COMBO
CLASSIC STACK
METAL STACK
R-FIRE STACK
MIC
BOOST
EFX
DELAY/REVERB
RHYTHM GUIDE
VOLUME
VOLUME
* No sound is played through the unit’s
speaker while the PHONES jack is in use.
POWER AMP
MUTE
CABINET &
SPEAKER
SIMULATOR
REC OUT/PHONES
SPEAKER
47
Page 48

For the U.K.
IMPORTANT: THE WIRES IN THIS MAINS LEAD ARE COLOURED IN ACCORDANCE WITH THE FOLLOWING CODE.
48
BLUE:
BROWN:
As the colours of the wires in the mains lead of this apparatus may not correspond with the coloured markings identifying
the terminals in your plug, proceed as follows:
The wire which is coloured BLUE must be connected to the terminal which is marked with the letter N or coloured BLACK.
The wire which is coloured BROWN must be connected to the terminal which is marked with the letter L or coloured RED.
Under no circumstances must either of the above wires be connected to the earth terminal of a three pin plug.
NEUTRAL
LIVE
Page 49

For EU Countries
This product complies with the requirements of EMC Directive 2004/108/EC.
For the USA
FEDERAL COMMUNICATIONS COMMISSION
RADIO FREQUENCY INTERFERENCE STATEMENT
This equipment has been tested and found to comply with the limits for a Class B digital device, pursuant to Part 15 of the
FCC Rules. These limits are designed to provide reasonable protection against harmful interference in a residential
installation. This equipment generates, uses, and can radiate radio frequency energy and, if not installed and used in
accordance with the instructions, may cause harmful interference to radio communications. However, there is no guarantee
that interference will not occur in a particular installation. If this equipment does cause harmful interference to radio or
television reception, which can be determined by turning the equipment off and on, the user is encouraged to try to correct the
interference by one or more of the following measures:
– Reorient or relocate the receiving antenna.
– Increase the separation between the equipment and receiver.
– Connect the equipment into an outlet on a circuit different from that to which the receiver is connected.
– Consult the dealer or an experienced radio/TV technician for help.
This device complies with Part 15 of the FCC Rules. Operation is subject to the following two conditions:
(1) this device may not cause harmful interference, and
(2) this device must accept any interference received, including interference that may cause undesired operation.
Unauthorized changes or modification to this system can void the users authority to operate this equipment.
This equipment requires shielded interface cables in order to meet FCC class B Limit.
For Canada
NOTICE
This Class B digital apparatus meets all requirements of the Canadian Interference-Causing Equipment Regulations.
AVIS
Cet appareil numérique de la classe B respecte toutes les exigences du Règlement sur le matériel brouilleur du Canada.
For EU Countries
49
Page 50

For China
50
Page 51

Information
When you need repair service, call your nearest Roland Service Center or authorized Roland
distributor in your country as shown below.
AFRICA
EGYPT
Al Fanny Trading Office
9, EBN Hagar Al Askalany
Street,
ARD E1 Golf, Heliopolis,
Cairo 11341, EGYPT
TEL: (022)-418-5531
REUNION
Maison FO - YAM Marcel
25 Rue Jules Hermann,
Chaudron - BP79 97 491
Ste Clotilde Cedex,
REUNION ISLAND
TEL: (0262) 218-429
SOUTH AFRICA
T.O.M.S. Sound & Music
(Pty)Ltd.
2 ASTRON ROAD DENVER
JOHANNESBURG ZA 2195,
SOUTH AFRICA
TEL: (011)417 3400
Paul Bothner(PTY)Ltd.
Royal Cape Park, Unit 24
Londonderry Road, Ottery 7800
Cape Town, SOUTH AFRICA
TEL: (021) 799 4900
ASIA
CHINA
Roland Shanghai Electronics
Co.,Ltd.
5F. No.1500 Pingliang Road
Shanghai 200090, CHINA
TEL: (021) 5580-0800
Roland Shanghai Electronics
Co.,Ltd.
(BEIJING OFFICE)
10F. No.18 3 Section Anhuaxili
Chaoyang District Beijing
100011 CHINA
TEL: (010) 6426-5050
HONG KONG
Tom Lee Music Co., Ltd.
Service Division
22-32 Pun Shan Street, Tsuen
Wan, New Territories,
HONG KONG
TEL: 2415 0911
Parsons Music Ltd.
8th Floor, Railway Plaza, 39
Chatham Road South, T.S.T,
Kowloon, HONG KONG
TEL: 2333 1863
INDIA
Rivera Digitec (India) Pvt. Ltd.
411, Nirman Kendra
Mahalaxmi Flats Compound
Off. Dr. Edwin Moses Road,
Mumbai-400011, INDIA
TEL: (022) 2493 9051
INDONESIA
PT Citra IntiRama
Jl. Cideng Timur No. 15J-15O
Jakarta Pusat
INDONESIA
TEL: (021) 6324170
KOREA
Cosmos Corporation
1461-9, Seocho-Dong,
Seocho Ku, Seoul, KOREA
TEL: (02) 3486-8855
MALAYSIA
Roland Asia Pacific Sdn. Bhd.
45-1, Block C2, Jalan PJU 1/39,
Dataran Prima, 47301 Petaling
Jaya, Selangor, MALAYSIA
TEL: (03) 7805-3263
VIET NAM
Suoi Nhac Company, Ltd
370 Cach Mang Thang Tam St.
Dist.3, Ho Chi Minh City,
VIET NAM
TEL: 9316540
PHILIPPINES
G.A. Yupangco & Co. Inc.
339 Gil J. Puyat Avenue
Makati, Metro Manila 1200,
PHILIPPINES
TEL: (02) 899 9801
SINGAPORE
SWEE LEE MUSIC
COMPANY PTE. LTD.
150 Sims Drive,
SINGAPORE 387381
TEL: 6846-3676
TAIWAN
ROLAND TAIWAN
ENTERPRISE CO., LTD.
Room 5, 9fl. No. 112 Chung
Shan N.Road Sec.2, Taipei,
TAIWAN, R.O.C.
TEL: (02) 2561 3339
THAILAND
Theera Music Co. , Ltd.
100-108 Soi Verng
Nakornkasem, New
Road,Sumpantawongse,
Bangkok 10100 THAILAND
TEL: (02) 224-8821
AUSTRALIA/
NEW ZEALAND
AUSTRALIA/
NEW ZEALAND
Roland Corporation
Australia Pty.,Ltd.
38 Campbell Avenue
Dee Why West. NSW 2099
AUSTRALIA
For Australia
Tel: (02) 9982 8266
For New Zealand
Tel: (09) 3098 715
CENTRAL/LATIN
AMERICA
ARGENTINA
Instrumentos Musicales S.A.
Av.Santa Fe 2055
(1123) Buenos Aires
ARGENTINA
TEL: (011) 4508-2700
BARBADOS
A&B Music Supplies LTD
12 Webster Industrial Park
Wildey, St.Michael, Barbados
TEL: (246)430-1100
BRAZIL
Roland Brasil Ltda.
Rua San Jose, 780 Sala B
Parque Industrial San Jose
Cotia - Sao Paulo - SP, BRAZIL
TEL: (011) 4615 5666
CHILE
Comercial Fancy II S.A.
Rut.: 96.919.420-1
Nataniel Cox #739, 4th Floor
Santiago - Centro, CHILE
TEL: (02) 688-9540
COLOMBIA
Centro Musical Ltda.
Cra 43 B No 25 A 41 Bododega 9
Medellin, Colombia
TEL: (574)3812529
COSTA RICA
JUAN Bansbach Instrumentos
Musicales
Ave.1. Calle 11, Apartado
10237,
San Jose, COSTA RICA
TEL: 258-0211
CURACAO
Zeelandia Music Center Inc.
Orionweg 30
Curacao, Netherland Antilles
TEL:(305)5926866
DOMINICAN REPUBLIC
Instrumentos Fernando Giraldez
Calle Proyecto Central No.3
Ens.La Esperilla
Santo Domingo,
Dominican Republic
TEL:(809) 683 0305
ECUADOR
Mas Musika
Rumichaca 822 y Zaruma
Guayaquil - Ecuador
TEL:(593-4)2302364
EL SALVADOR
OMNI MUSIC
75 Avenida Norte y Final
Alameda Juan Pablo II,
Edificio No.4010 San Salvador,
EL SALVADOR
TEL: 262-0788
GUATEMALA
Casa Instrumental
Calzada Roosevelt 34-01,zona 11
Ciudad de Guatemala
Guatemala
TEL:(502) 599-2888
HONDURAS
Almacen Pajaro Azul S.A. de C.V.
BO.Paz Barahona
3 Ave.11 Calle S.O
San Pedro Sula, Honduras
TEL: (504) 553-2029
MARTINIQUE
Musique & Son
Z.I.Les Mangle
97232 Le Lamantin
Martinique F.W.I.
TEL: 596 596 426860
Gigamusic SARL
10 Rte De La Folie
97200 Fort De France
Martinique F.W.I.
TEL: 596 596 715222
MEXICO
Casa Veerkamp, s.a. de c.v.
Av. Toluca No. 323, Col. Olivar
de los Padres 01780 Mexico
D.F. MEXICO
TEL: (55) 5668-6699
NICARAGUA
Bansbach Instrumentos
Musicales Nicaragua
Altamira D'Este Calle Principal
de la Farmacia 5ta.Avenida
1 Cuadra al Lago.#503
Managua, Nicaragua
TEL: (505)277-2557
PANAMA
SUPRO MUNDIAL, S.A.
Boulevard Andrews, Albrook,
Panama City, REP. DE
PANAMA
TEL: 315-0101
PARAGUAY
Distribuidora De
Instrumentos Musicales
J.E. Olear y ESQ. Manduvira
Asuncion PARAGUAY
TEL: (595) 21 492147
PERU
Audionet
Distribuciones Musicales SAC
Juan Fanning 530
Miraflores
Lima - Peru
TEL: (511) 4461388
TRINIDAD
AMR Ltd
Ground Floor
Maritime Plaza
Barataria Trinidad W.I.
TEL: (868) 638 6385
URUGUAY
Todo Musica S.A.
Francisco Acuna de Figueroa
1771
C.P.: 11.800
Montevideo, URUGUAY
TEL: (02) 924-2335
VENEZUELA
Instrumentos Musicales
Allegro,C.A.
Av.las industrias edf.Guitar
import
#7 zona Industrial de Turumo
Caracas, Venezuela
TEL: (212) 244-1122
EUROPE
AUSTRIA
Roland Elektronische
Musikinstrumente HmbH.
Austrian Office
Eduard-Bodem-Gasse 8,
A-6020 Innsbruck, AUSTRIA
TEL: (0512) 26 44 260
BELGIUM/FRANCE/
HOLLAND/
LUXEMBOURG
Roland Central Europe N.V.
Houtstraat 3, B-2260, Oevel
(Westerlo) BELGIUM
TEL: (014) 575811
CROATIA
ART-CENTAR
Degenova 3.
HR - 10000 Zagreb
TEL: (1) 466 8493
CZECH REP.
CZECH REPUBLIC
DISTRIBUTOR s.r.o
Voctárova 247/16
CZ - 180 00 PRAHA 8,
CZECH REP.
TEL: (2) 830 20270
DENMARK
Roland Scandinavia A/S
Nordhavnsvej 7, Postbox 880,
DK-2100 Copenhagen
DENMARK
TEL: 3916 6200
FINLAND
Roland Scandinavia As, Filial
Finland
Elannontie 5
FIN-01510 Vantaa, FINLAND
TEL: (0)9 68 24 020
GERMANY
Roland Elektronische
Musikinstrumente HmbH.
Oststrasse 96, 22844
Norderstedt, GERMANY
TEL: (040) 52 60090
GREECE/CYPRUS
STOLLAS S.A.
Music Sound Light
155, New National Road
Patras 26442, GREECE
TEL: 2610 435400
HUNGARY
Roland East Europe Ltd.
Warehouse Area ‘DEPO’ Pf.83
H-2046 Torokbalint,
HUNGARY
TEL: (23) 511011
IRELAND
Roland Ireland
G2 Calmount Park, Calmount
Avenue, Dublin 12
Republic of IRELAND
TEL: (01) 4294444
ITALY
Roland Italy S. p. A.
Viale delle Industrie 8,
20020 Arese, Milano, ITALY
TEL: (02) 937-78300
NORWAY
Roland Scandinavia Avd.
Kontor Norge
Lilleakerveien 2 Postboks 95
Lilleaker N-0216 Oslo
NORWAY
TEL: 2273 0074
POLAND
ROLAND POLSKA SP. Z O.O.
UL. Gibraltarska 4.
PL-03 664 Warszawa
POLAND
TEL: (022) 679 4419
PORTUGAL
Roland Iberia, S.L.
Portugal Office
Cais das Pedras, 8/9-1 Dto
4050-465, Porto, PORTUGAL
TEL: 22 608 00 60
ROMANIA
FBS LINES
Piata Libertatii 1,
535500 Gheorgheni,
ROMANIA
TEL: (266) 364 609
RUSSIA
MuTek
Dorozhnaya ul.3,korp.6
117 545 Moscow, RUSSIA
TEL: (095) 981-4967
SLOVAKIA
DAN Acoustic s.r.o.
Povazská 18.
SK - 940 01 Nové Zámky
TEL: (035) 6424 330
SPAIN
Roland Iberia, S.L.
Paseo García Faria, 33-35
08005 Barcelona SPAIN
TEL: 93 493 91 00
SWEDEN
Roland Scandinavia A/S
SWEDISH SALES OFFICE
Danvik Center 28, 2 tr.
S-131 30 Nacka SWEDEN
TEL: (0)8 702 00 20
SWITZERLAND
Roland (Switzerland) AG
Landstrasse 5, Postfach,
CH-4452 Itingen,
SWITZERLAND
TEL: (061) 927-8383
UKRAINE
EURHYTHMICS Ltd.
P.O.Box: 37-a.
Nedecey Str. 30
UA - 89600 Mukachevo,
UKRAINE
TEL: (03131) 414-40
UNITED KINGDOM
Roland (U.K.) Ltd.
Atlantic Close, Swansea
Enterprise Park, SWANSEA
SA7 9FJ,
UNITED KINGDOM
TEL: (01792) 702701
MIDDLE EAST
BAHRAIN
Moon Stores
No.1231&1249 Rumaytha
Building Road 3931, Manama
339 BAHRAIN
TEL: 17 813 942
IRAN
MOCO INC.
No.41 Nike St., Dr.Shariyati Ave.,
Roberoye Cerahe Mirdamad
Tehran, IRAN
TEL: (021)-2285-4169
ISRAEL
Halilit P. Greenspoon & Sons
Ltd.
8 Retzif Ha'alia Hashnia St.
Tel-Aviv-Yafo ISRAEL
TEL: (03) 6823666
JORDAN
MUSIC HOUSE CO. LTD.
FREDDY FOR MUSIC
P. O. Box 922846
Amman 11192 JORDAN
TEL: (06) 5692696
KUWAIT
EASA HUSAIN AL-YOUSIFI
& SONS CO.
Al-Yousifi Service Center
P.O.Box 126 (Safat) 13002
KUWAIT
TEL: 00 965 802929
LEBANON
Chahine S.A.L.
George Zeidan St., Chahine
Bldg., Achrafieh, P.O.Box: 165857
Beirut, LEBANON
TEL: (01) 20-1441
OMAN
TALENTZ CENTRE L.L.C.
Malatan House No.1
Al Noor Street, Ruwi
SULTANATE OF OMAN
TEL: 2478 3443
QATAR
Al Emadi Co. (Badie Studio &
Stores)
P.O. Box 62, Doha, QATAR
TEL: 4423-554
SAUDI ARABIA
aDawliah Universal
Electronics APL
Behind Pizza Inn
Prince Turkey Street
aDawliah Building,
PO BOX 2154,
Alkhobar 31952
SAUDI ARABIA
TEL: (03) 8643601
SYRIA
Technical Light & Sound
Center
Rawda, Abdul Qader Jazairi St.
Bldg. No. 21, P.O.BOX 13520,
Damascus, SYRIA
TEL: (011) 223-5384
TURKEY
ZUHAL DIS TICARET A.S.
Galip Dede Cad. No.37
Beyoglu - Istanbul / TURKEY
TEL: (0212) 249 85 10
U.A.E.
Zak Electronics & Musical
Instruments Co. L.L.C.
Zabeel Road, Al Sherooq Bldg.,
No. 14, Ground Floor, Dubai,
U.A.E.
TEL: (04) 3360715
NORTH AMERICA
CANADA
Roland Canada Ltd.
(Head Office)
5480 Parkwood Way
Richmond B. C., V6V 2M4
CANADA
TEL: (604) 270 6626
Roland Canada Ltd.
(Toronto Office)
170 Admiral Boulevard
Mississauga On L5T 2N6
CANADA
TEL: (905) 362 9707
U. S. A.
Roland Corporation U.S.
5100 S. Eastern Avenue
Los Angeles, CA 90040-2938,
U. S. A.
TEL: (323) 890 3700
As of Oct. 1, 2007 (ROLAND)
51
Page 52

*SD001079- 01*
SD001079 1DH
 Loading...