

KD-120 とオリジナル TD-10*をお使いのお客様へ
*TDW-1 によりバージョン・アップされていない TD-10
KD-120 をお使いになる前に、次の手順にしたがって TD-10 の設定を行ってください。
TDW-1 でバージョン・アップされた TD-10 をお使いの場合は、この設定は不要です。
この設定を行わずにご使用になりますと、以下の症状が出ます。
•
キックの演奏時に、音が出ないことがある(音にムラがある)。
•
キックの音が小さい(感度が不足する)。
操作手順
※ 手順の途中で、KD-120 以外のパッドをたたくと正しく設定できませんのでご注意ください。
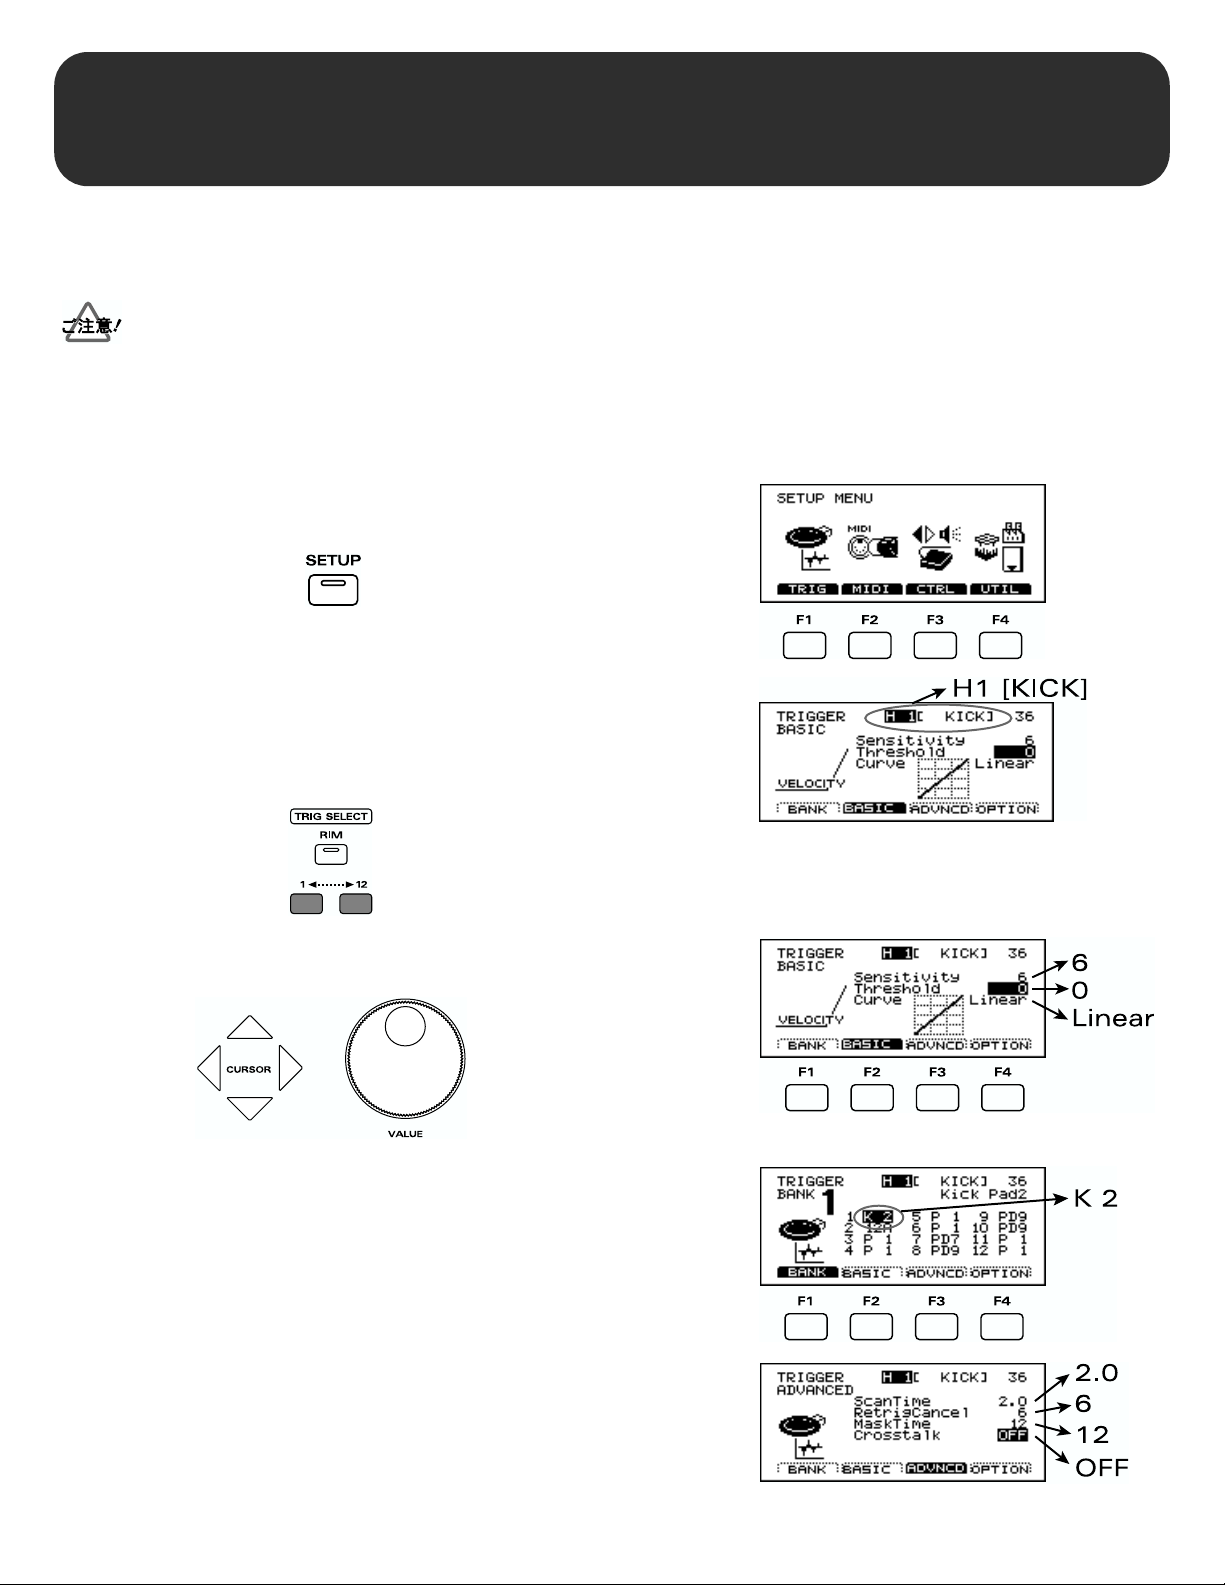
1.
[SETUP]ボタンを押します。
「SETUP MENU」画面になります。
2.
[F1(TRIG)]ボタンを押します。
「TRIGGER BASIC」画面になります。
[TRIG SELECT]ボタンで、キック用のパッドを選びます。
3.
画面右上に「H1[KICK]」と表示されます。
4.
[CURSOR]ボタンと、[VALUE]ダイヤルで、右の画面図と
同じ値に設定してください。
[F1(BANK)]ボタンを押します。
5.
「TRIGGER BANK」画面になります。
6.
[CURSOR]ボタンと、[VALUE]ダイヤルで、右の画面図と
同じ値(「K 2」)に設定してください。
[F3(ADVNCD)]ボタンを押します。
7.
「TRIGGER ADVANCED」画面になります。
8.
[CURSOR]ボタンと、[VALUE]ダイヤルで、右の画面図と
同じ値に設定してください。
以上で、TD-10 の設定が終了しました。
40343345 2*RAD
TD-10 の設定を行っても症状がなくならない場合は、次の説明にしたがって、ヘッドの張り具
合の調整や、キック・ペダルの取り付けを正しく行ってください。
ヘッドの張り具合の調整
ヘッドの張り具合が緩いと、症状がなくならないことがあります。次の操作手順に従ってヘッドを調整すると、最適な張り
具合になります。
操作手順
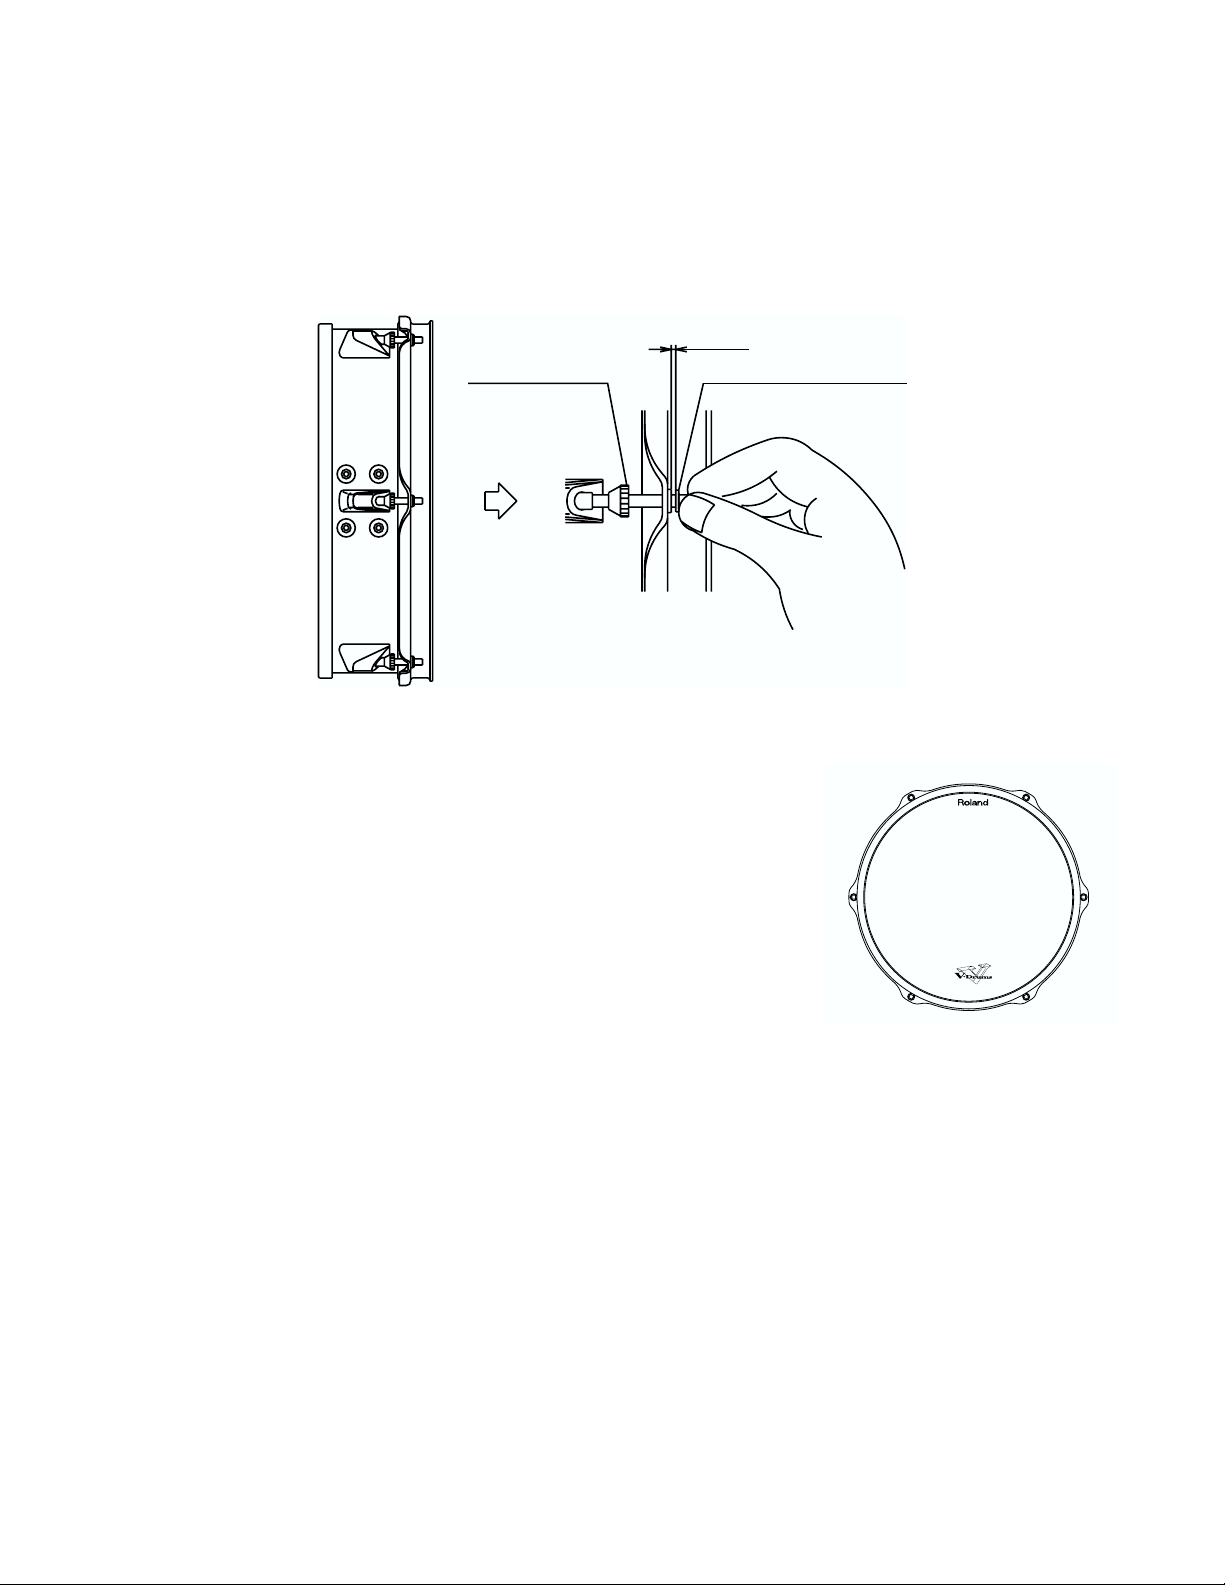
すき間
ロック・ナット
1.
ロック・ナットを、6 カ所すべてゆるめます。
チューニング・ボルトを、チューニング・キーで、6 カ所すべて、
2.
すき間があくまでゆるめます。
3.
チューニング・ボルトを、6 カ所すべて指の力で回らなくなるまで
締めます。
チューニング・ボルトを、チューニング・キーで、半回転から 1 回転
4.
締めます。
6カ所のチューニング・ボルトは、右の図の番号順に締めてください。
5.
チューニング・ボルトのゆるみを防止するために、ロック・ナット
を、6 カ所すべて締めます。
チューニング・ボルト
13
56
HEAD MADE BY REMO U.S.A.
42
以上で、KD-120 のヘッドの張り具合の調整が終了しました。
キック・ペダルを取り付けるときの注意
キック・ペダルを、KD-120 に確実に取り付けてください。
•
•
キック・ペダルを踏んだときに、機械ノイズ(がたつきなど)が出ないようにしてください。
•
KD-120 は、スタンドなどにふれないようにセッティングしてください。
ビーターが、ヘッドの中心よりやや上部に当たるようにすると、感度が少し上がります。
•

For KD-120 and
Non-Expanded TD-10 Owners
Before using the KD-120, you need to follow the steps below to make the appropriate settings
for the TD-10.
However, these settings won't be necessary if your TD-10 has been upgraded by means of the
TDW-1.
Should you neglect to make the appropriate settings for the TD-10, you could likely experience the following
problems:
• Sometimes the kick drum does not sound (uneven volume)
• The volume of kick drum is too small (reduced sensitivity)
Procedure
* Do not strike any pads or step on any pedals (except the KD-120) until the following settings are complete.
1.
Press the [SETUP] button.
The “SETUP MENU” screen appears.
2.
Press the [F1 (TRIG)] button.
The “TRIGGER BASIC” screen appears.
3.
Use the [TRIG SELECT] buttons to select the pad being used for the kick.
The upper right of the display will show “H1 [KICK]”.
4.
Use the [CURSOR] buttons and [VALUE] dial to modify the values of
the settings so they match those in the screen depicted at right.
5.
Press the [F1 (BANK)] button.
The “TRIGGER BANK” screen appears.
6.
Using the [CURSOR] buttons and [VALUE] dial, change the setting so
it matches that shown at right (K 2).
7.
Press the [F3 (ADVNCD)] button.
The “TRIGGER ADVANCED” screen appears.
8.
Use the [CURSOR] buttons and [VALUE] dial to modify the values of the
settings so they match those shown at right.
This completes the settings you need to make for the TD-10.
40343345 2*RAD

1.
2.
3.
4.
5.
If you experience any of the above-mentioned problems even after you’ve made the
correct settings, try adjusting the head tension and mounting the kick pedal, as
described in the following.
Adjusting the head tension
Head tension that is too loose may cause problems. Adjust the head tension according to the following procedure.
Procedure
Slight gap
Lock nut
Tuning bolt
Loosen all six lock nuts.
Using a tuning key, loosen the tuning bolts until a slight gap is produced.
Tighten all tuning bolts by hand, as tightly as you can.
Using the tuning key, turn the tuning bolts a half to a full revolution each, thus
tightening them.
Tighten each tuning bolt one by one, observing the numerical order shown at right.
Tighten all lock nuts to prevent loosening of the tuning bolts.
13
HEAD MADE BY REMO U.S.A.
42
This completes the head tension adjustment.
Notes concerning installation of the kick pedal on the KD-120.
• Install the kick pedal securely.
• Set the KD-120 so no mechanical noise is heard when you step on pedal.
• Make sure that KD-120 does not touch the stand or the other pads.
• Moving the beater’s striking point upwards from the center of the head increases the sensitivity a little.
56
 Loading...