

Page 1
Startup Guide
Before using this unit, carefully read “USING THE UNIT SAFELY” and “IMPORTANT NOTES” (leaet “USING
THE UNIT SAFELY” and Startup Guide (p. 12)). After reading, keep the document(s) where it will be
available for immediate reference.
© 2019 Roland Corporation
Page 2
Contents
Introduction . . . . . . . . . . . . . . . . . . . . . . . . . . . . . . . . . . . . . . . . . . . . . 2
About This Document. . . . . . . . . . . . . . . . . . . . . . . . . . . . . . . . . . . . . . . . 2
Check the Included Items. . . . . . . . . . . . . . . . . . . . . . . . . . . . . . . . . . . . . 2
Downloading the Owner’s Manual . . . . . . . . . . . . . . . . . . . . . . . . . . . . . 2
Installing the Software . . . . . . . . . . . . . . . . . . . . . . . . . . . . . . . . . . 3
System Requirements. . . . . . . . . . . . . . . . . . . . . . . . . . . . . . . . . . . . . . . . 3
Downloading the Software . . . . . . . . . . . . . . . . . . . . . . . . . . . . . . . . . . . 3
Downloading the DJ-707M USB Driver . . . . . . . . . . . . . . . . . . . . . . . . . 3
Downloading the Serato DJ Pro Software. . . . . . . . . . . . . . . . . . . . . . . 3
Installing the Software . . . . . . . . . . . . . . . . . . . . . . . . . . . . . . . . . . . . . . . 3
Mac OS Users. . . . . . . . . . . . . . . . . . . . . . . . . . . . . . . . . . . . . . . . . . . . . . 3
Windows Users . . . . . . . . . . . . . . . . . . . . . . . . . . . . . . . . . . . . . . . . . . . . 3
Panel Descriptions . . . . . . . . . . . . . . . . . . . . . . . . . . . . . . . . . . . . . . 4
Deck Section . . . . . . . . . . . . . . . . . . . . . . . . . . . . . . . . . . . . . . . . . . . . . . . 4
Mixer Section. . . . . . . . . . . . . . . . . . . . . . . . . . . . . . . . . . . . . . . . . . . . . . . 6
Eect Section. . . . . . . . . . . . . . . . . . . . . . . . . . . . . . . . . . . . . . . . . . . . . . . 7
Mic Section. . . . . . . . . . . . . . . . . . . . . . . . . . . . . . . . . . . . . . . . . . . . . . . . . 7
Front Panel. . . . . . . . . . . . . . . . . . . . . . . . . . . . . . . . . . . . . . . . . . . . . . . . . 8
Rear Panel (Connecting Your Equipment) . . . . . . . . . . . . . . . . . . . . . . . 8
Using Serato DJ Pro. . . . . . . . . . . . . . . . . . . . . . . . . . . . . . . . . . . . . . 10
Starting Serato DJ Pro . . . . . . . . . . . . . . . . . . . . . . . . . . . . . . . . . . . . . . . 10
Basic Operations in Serato DJ Pro. . . . . . . . . . . . . . . . . . . . . . . . . . . . . . 10
Importing a Song . . . . . . . . . . . . . . . . . . . . . . . . . . . . . . . . . . . . . . . . . . 10
Loading a Song . . . . . . . . . . . . . . . . . . . . . . . . . . . . . . . . . . . . . . . . . . . . 10
Playing a Song. . . . . . . . . . . . . . . . . . . . . . . . . . . . . . . . . . . . . . . . . . . . . 11
Monitoring Through Headphones . . . . . . . . . . . . . . . . . . . . . . . . . . . . . 11
Closing Serato DJ Pro . . . . . . . . . . . . . . . . . . . . . . . . . . . . . . . . . . . . . . . . 11
USING THE UNIT SAFELY. . . . . . . . . . . . . . . . . . . . . . . . . . . . . . . . . 12
IMPORTANT NOTES . . . . . . . . . . . . . . . . . . . . . . . . . . . . . . . . . . . . . . 12
Main Specications. . . . . . . . . . . . . . . . . . . . . . . . . . . . . . . . . . . . . . 12
Introduction
About This Document
The Startup Guide (which we’ll subsequently refer to as “this document”)
explains how to obtain the software that you’ll need in order to use the
DJ-707M, how to make settings, and the names and functions of the
parts.
Before you use the DJ-707M, please read this document together with the
owner’s manual (PDF).
For details on how to obtain the owner’s manual, refer to “Downloading
the Owner’s Manual” (p. 2).
Check the Included Items
The DJ-707M includes the following items. Please take a moment to
conrm that all of these items have been included with the DJ-707M.
If you nd that any item is missing, contact the nearest authorized Roland
distributor in your country.
5 Startup Guide (this document)
5 Leaet “USING THE UNIT SAFELY”
5 AC adaptor
5 Power cord
5 USB cable
Downloading the Owner’s Manual
The owner’s manual is in PDF format. In order to read the owner’s manual,
you’ll need a PDF reader installed on your computer.
Downloading the DJ-707M Owner’s Manual
1. Start a browser and access the following Roland support
webpage.
https://www.roland.com/support/
2. Search for “DJ-707M.”
3. From the owner’s manuals, nd “DJ-707M Owner’s Manual”
and click it.
4. Download the manual as directed by the screen.
Downloading the Serato DJ Pro User Manual
1. Start a browser and access the following Serato DJ Pro
webpage.
https://serato.com/dj/pro/downloads
2. Click “Manuals and Downloads.”
3. From “Manuals and Downloads,” download the Serato DJ Pro
User Manual.
2
Page 3
Installing the Software
System Requirements
Verify that your computer meets the system requirements before you
proceed with installing the software.
Mac OS Windows
Operating System
CPU/Clock
Screen Resolution 1280 x 720
Memory 4 GB
Free HDD Space 5 GB
USB Available USB 2.0 port
* 64-bit only (32-bit operating systems not supported).
* For the latest system requirements, refer to the Serato DJ Pro webpage.
macOS 10.14
macOS 10.13
macOS 10.12
Intel® Core™ i9/1.07 GHz
Intel® Core™ i7/1.07 GHz
Intel® Core™ i5/1.07 GHz
Intel® Core™ i3/1.07 GHz
Windows 10
Windows 8.1
Windows 7 SP1
Downloading the Software
The DJ-707M USB driver and Serato DJ Pro are not included in the
package. Download them from the Roland or Serato website.
Downloading the DJ-707M USB Driver
The DJ-707M USB driver is software that outputs audio from your
computer to the DJ-707M.
Mac OS users
1. Start a browser and access the following Roland support
webpage.
https://www.roland.com/support/
2. Search for “DJ-707M.”
3. In downloads, nd “DJ-707M Driver for macOS” and click it.
4. Download the driver as directed by the screen.
Windows 10 users
1. Connect your internet-connected computer to the DJ-707M’s
USB port.
2. Power-on the DJ-707M.
3. Download the driver as directed by the screen.
Users of other than Windows 10
1. Start a browser and access the following Roland support
webpage.
https://www.roland.com/support/
2. Search for “DJ-707M.”
3. In downloads, nd “DJ-707M Driver for Windows **” and click
it.
4. Download the driver as directed by the screen.
Downloading the Serato DJ Pro Software
1. Start a browser and access the following Serato DJ Pro
webpage.
https://serato.com/dj/pro/downloads
2. Click “DOWNLOAD V**.”
3. Enter your email address, and click “CONTINUE.”
4. Enter your password and country, and click “CONTINUE.”
An email is sent to the address you specied.
5. Click “DOWNLOAD V**” as directed by the email.
6. Follow the instructions as directed by the screen, then
download the Serato DJ Pro.
Installing the Software
Install the software as follows.
Mac OS Users
1. Decompress the DJ-707M USB driver le that you
downloaded.
2. Open the decompressed le, and double-click “DJ707M_
USBDriver.pkg.”
The installer starts.
3. Install the software as directed by the screen.
4. Double-click the Serato DJ Pro software le that you
downloaded.
The installer starts.
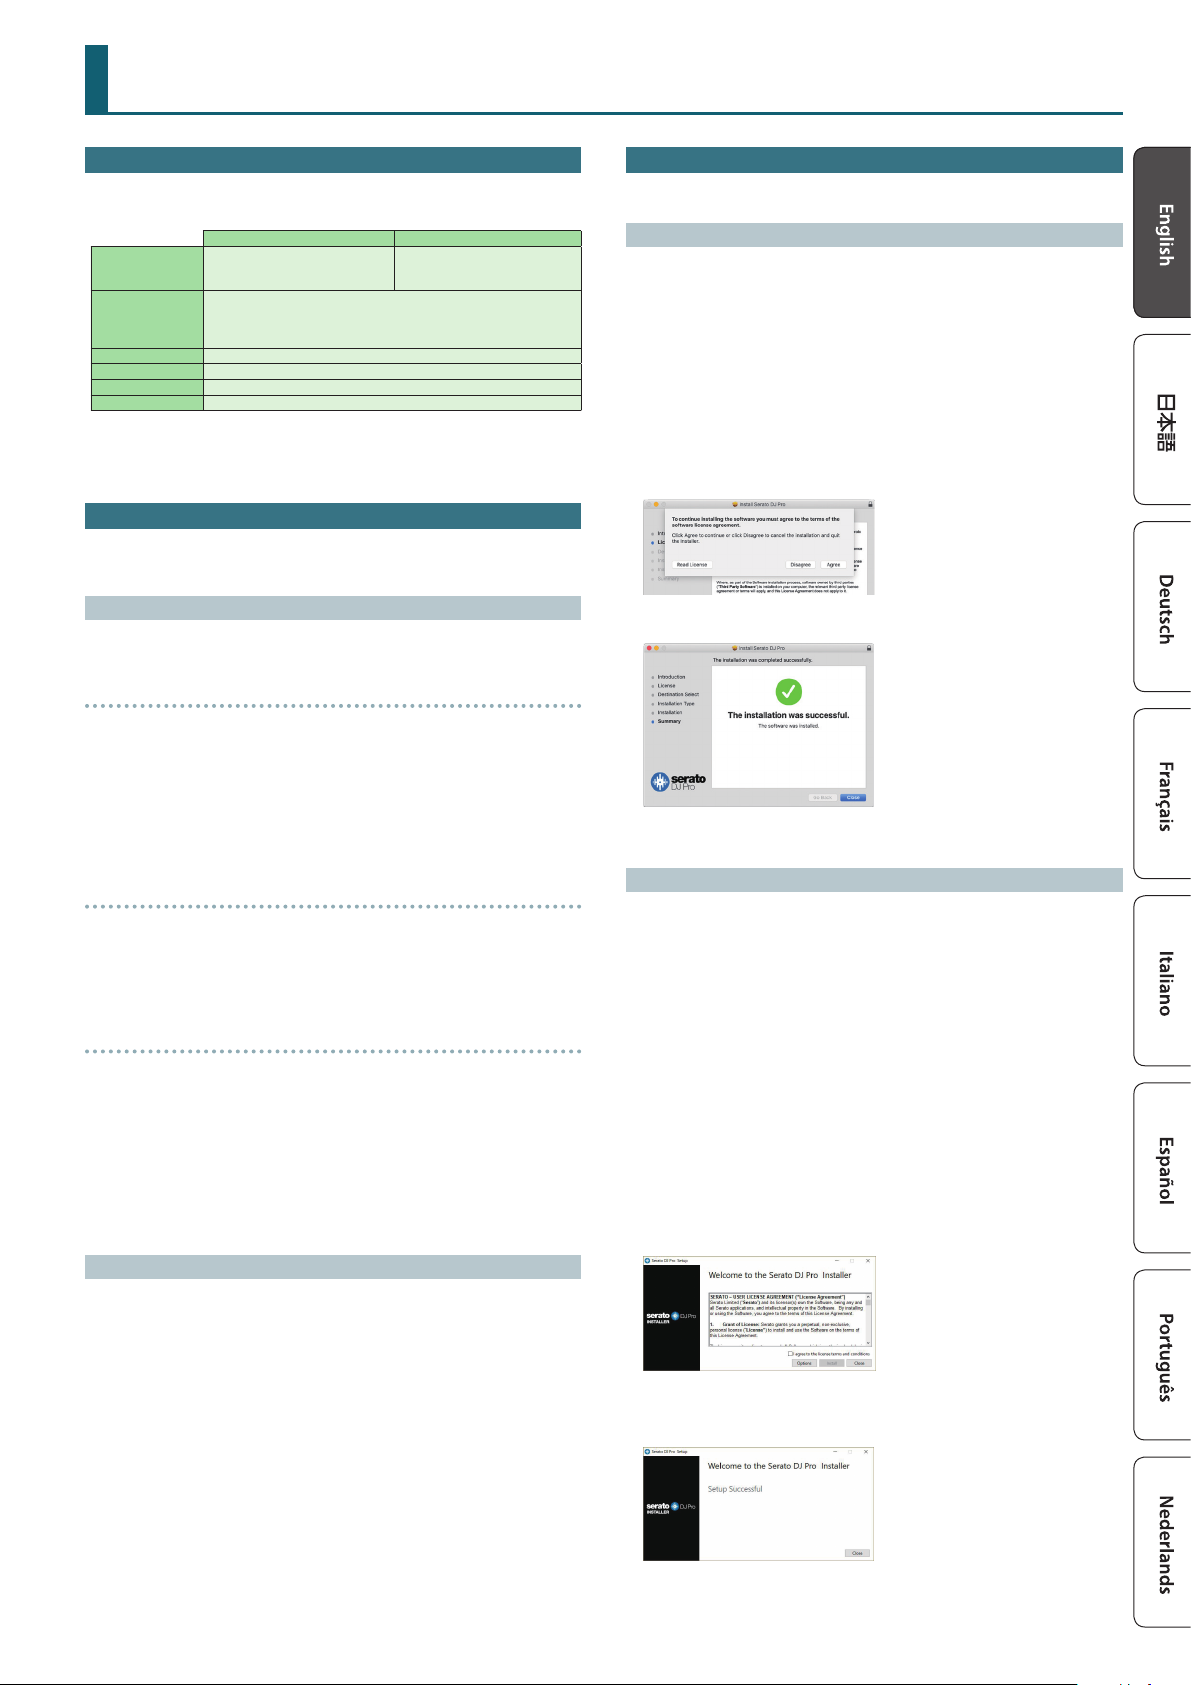
5. Read the license agreement, and if you accept the conditions,
click [Agree].
6. When the following screen appears, click [Close].
This completes the installation.
Windows Users
* If you’re using Windows 10, start from step 4. (The USB driver is
installed automatically.)
1. Right-click the DJ-707M USB driver folder that you
downloaded, and choose “Extract all.”
The folder is decompressed.
2. Open the decompressed folder, and double-click “Setup.exe.”
The installer starts.
3. Install the software as directed by the screen.
4. Right-click the Serato DJ Pro software folder that you
downloaded, and choose “Extract all.”
The folder is decompressed.
5. Double-click the decompressed le.
The installer starts.
6. Read the license agreement, and if you accept the conditions,
choose [I agree to the license terms and conditions] and click
[Install].
Installation begins.
7. When the following screen appears, click [Close].
This completes the installation.
3
Page 4
Panel Descriptions
The top panel of the DJ-707M is divided into four sections by function:
deck, mixer, eects, and mic.
Headphone jacks, AUX IN jacks, and cross fader assign switches are
located on the front panel. Various input/output jacks are located on the
rear panel.
For details about each part, refer to the DJ-707M owner’s manual and the
Serato DJ Pro manual.
4
1
1
Deck section
2
Mixer section
3
2
3
4
Eect section
Mic section
3
1
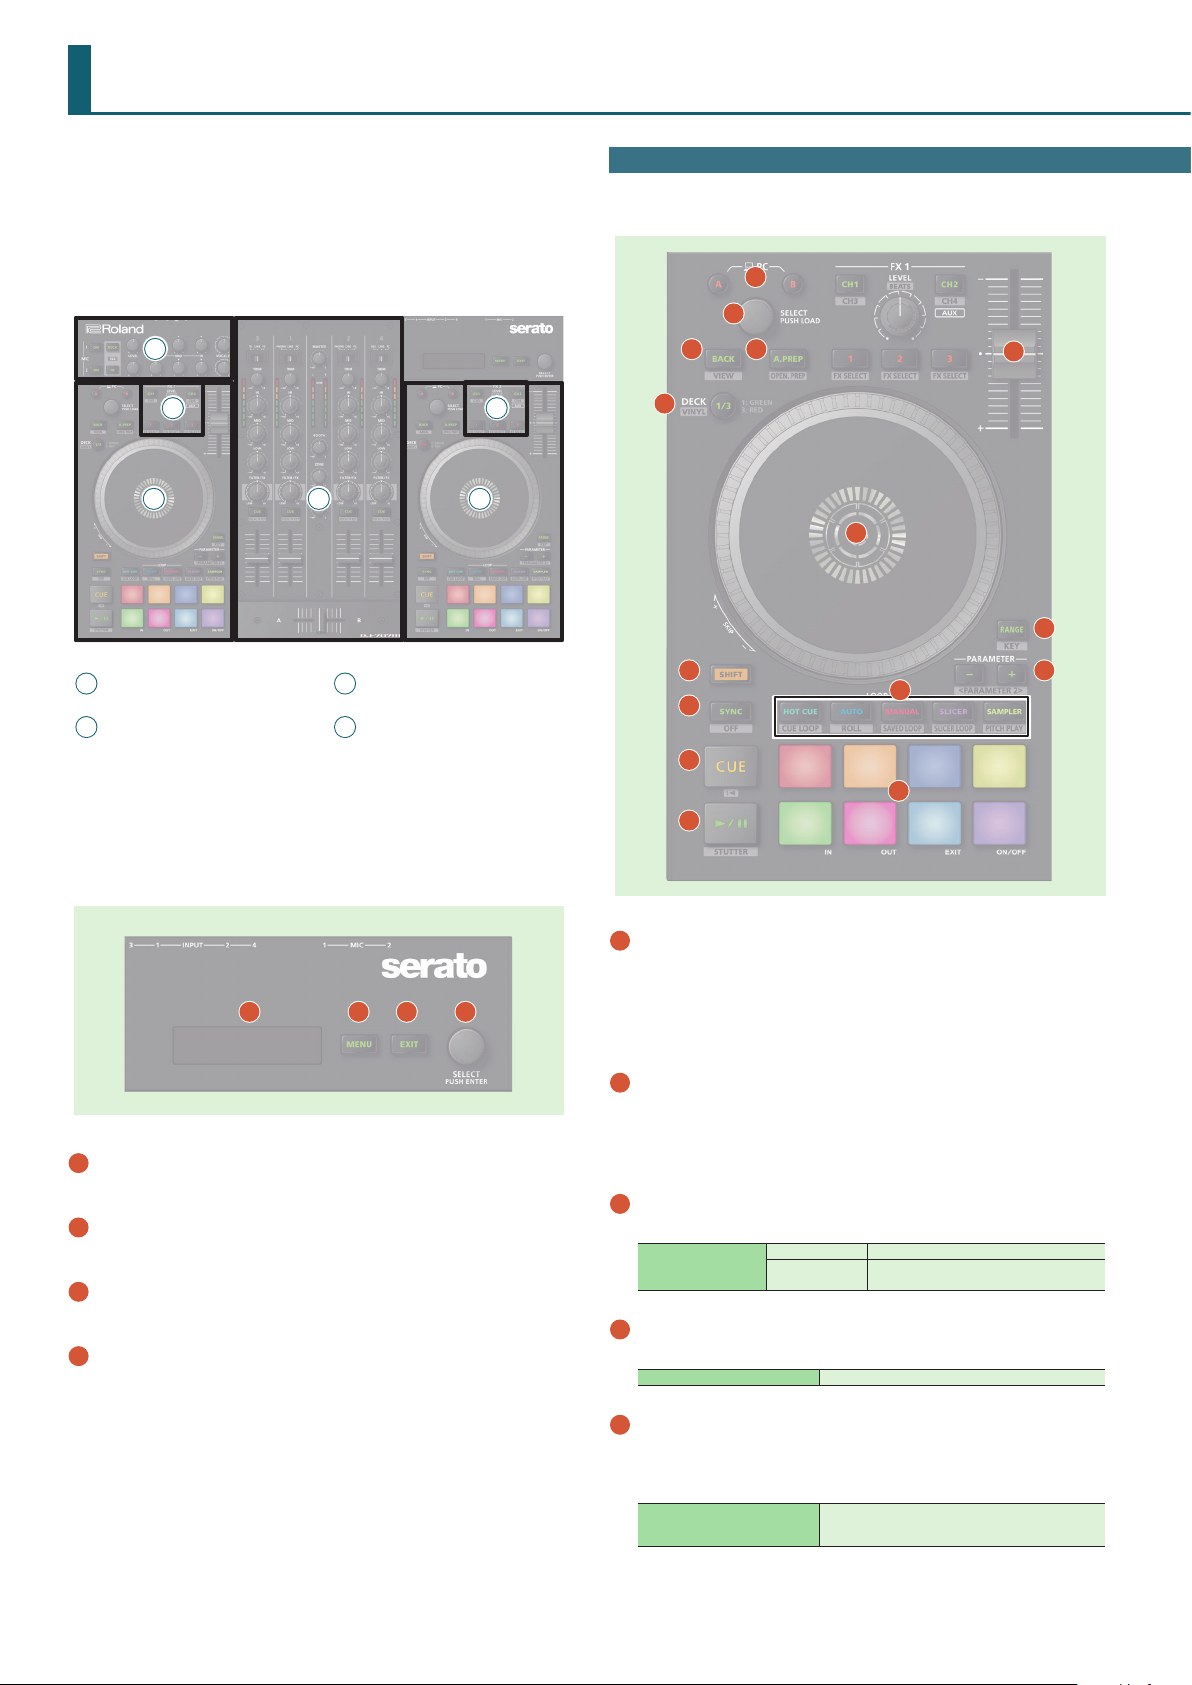
Deck Section
The deck sections located at the left and right control four decks (left:
decks 1 and 3, right: decks 2 and 4).
1
2
3
5
4
7
6
9
11
13
14
8
12
15
10
1
1
Display
Shows various information depending on operation.
2
[MENU] button
Shows the menu in the display.
3
[EXIT] button
Moves to a higher level of the menu, or exits the menu.
4
[SELECT] knob
Selects a parameter or edits a value.
Press this knob to conrm an operation.
2 3
1
PC [A], [B] button
Select the computer (one or the other computer connected to the rear
panel PC A or B ports) that you want to control from the DJ-707M.
4
The DJ-707M controls the computer whose button is lit.
For each of the left and right decks, you can choose the computer that
will be controlled.
2
[SELECT] knob
Turning this knob moves the cursor up/down, letting you select a
song or folder.
Pressing this knob loads the selected song into the currently selected
deck.
3
[BACK] button
Moves the cursor to a higher level.
[SHIFT] + [BACK]
4
[A.PREP] button
Adds a song to the “PREPARE” panel.
[SHIFT] + [A.PREP] Switches the display of the “PREPARE” panel.
5
DECK [1/3], DECK [2/4] button
Switch the deck (left: decks 1 and 3, right: decks 2 and 4) to be
operated.
This is lit green for deck 1 (2) and lit red for deck 3 (4).
[SHIFT] + DECK [1/3] ([2/4])
left deck: VIEW Switches the layout of Serato DJ Pro.
right deck: AREA
The panel display is switched each time you
press the button.
Turns VINYL mode on/o.
If this is on, the button is lit while you hold down the
[SHIFT] button.
4
Page 5

Panel Descriptions
6
Tempo slider
Adjusts the playback speed of the song.
7
Jog dial
Controls scratch and pitch bend (playback speed adjustment).
Top surface
Outer edge
Rotate the top surface
Rotate the outer edge Performs pitch bend.
[SHIFT] + rotate the top surface Skip the playback location.
[SHIFT] + rotate the outer edge Moves the playback location (search).
8
[SHIFT] button
Performs scratch if the VINYL mode is on, or performs
pitch bend if the button is o.
You can recall other functions by holding down this button and
pressing another button.
9
[RANGE] button
Species the variable range of the Tempo slider.
[SHIFT] + [RANGE] Turns the key lock function on/o.
[SLICER] button
Button illumination: Red
Selects slicer mode.
[SHIFT] + [SLICER]
Button illumination: Blue
Selects slicer loop mode.
[SAMPLER] button
Button illumination: Magenta
Selects sampler mode.
Button illumination: Turquoise
[SHIFT] + [SAMPLER]
Press [SAMPLER] twice
13
[CUE] button
Selects pitch play mode.
* In order to use pitch play mode, you must purchase
a separate license.
Button illumination: Purple
Selects velocity sampler mode.
Species, plays, or recalls a temporary cue point.
The rst time that you press the [CUE] button after switching the
playback song, the cue point is set.
After the cue point has been set, pressing the [CUE] button moves the
cue point to the location at which you pressed the button.
If playback is in progress, pressing this button moves to the temporary
cue point and stops playback.
If you press the buttons during the song, the location
[SHIFT] + [CUE]
returns to the beginning of the song.
If you press the buttons at the beginning of the song,
the previous song in the song list is loaded.
10
PARAMETER [–] [+] buttons
Here you can specify the value of the parameter that’s operated by the
performance pads.
11
[SYNC] button
Automatically matches the tempo (pitch) or beat grid of multiple
songs. When you press this button, the tempo (BPM) changes to
match the tempo of the song on a deck other than the deck whose
button was pressed.
[SHIFT] + [SYNC] Cancels SYNC.
12
Pad Mode select
Here you can select the control mode of the performance pads.
[HOT CUE] button
Button illumination: White
Selects hot cue mode.
[SHIFT] + [HOT CUE]
Press [HOT CUE] twice
Button illumination: Blue
Selects cue loop mode.
Button illumination: Orange
Selects saved ip mode.
* In order to use saved ip mode, you must purchase
a separate license.
[AUTO] button
Button illumination: Blue
Selects auto loop mode.
[SHIFT] + [AUTO]
Button illumination: Light blue
Selects loop roll mode.
14
[r] button
Plays or pauses the song.
[SHIFT] + [r]
15
Performance pads
Returns to the temporary cue point, and plays.
Use these pads to perform in the pad mode that you’ve selected.
[MANUAL] button
Button illumination: Yellow green
Selects manual loop mode.
[SHIFT] + [MANUAL]
Button illumination: Yellow green
Selects saved loop mode.
5
Page 6

Panel Descriptions
Mixer Section
This is a four-channel mixer. Here you can adjust the sound, connect sounds, and turn headphone cue on/o.
1
Input select switches
Select the input source for each channel.
CH 1, 2
PHONO The phono level (MM type cartridge) input is the source.
1
2
4
3
5
6
10
11
12
13
9
LINE The line level input is the source.
PC
The sound loaded into the Serato DJ Pro deck is the source.
Select this if you’re using DVS.
CH 3, 4
TR (CH 3)
OSC (CH 4)
LINE The line level input is the source.
PC The sound loaded into the Serato DJ Pro deck is the source.
2
[TRIM] knobs
The internal TR sound generator is the source.
You can use deck 3 to operate the TR.
The internal OSC sound generator is the source.
You can use deck 4 to operate the OSC.
Adjust the volume.
3
[HI], [MID], [LOW] knobs
Boost/cut the volume of the high-frequency, mid-frequency, and lowfrequency regions.
4
Channel level indicators
Indicate the level of each channel before the sound passes through
the channel fader.
5
[FILTER/FX] knobs
Apply a lter to each channel, or adjust the FX eect that’s assigned by
7
8
the menu settings.
If you turn the knob toward the right, only the high-frequency range is
FILTER
6
Channel [CUE] buttons
heard.
If you turn the knob toward the left, only the low-frequency range is
heard.
Turn cue on/o for each channel. The sound of channels whose [CUE]
button is lit is output from the headphones.
[SHIFT] + [CUE]
7
Channel faders
You can make the mic section’s eect follow the key information
of the song that’s loaded into the deck.
Adjust the output level of each channel.
8
Cross fader
Outputs the sounds that are assigned by the front panel [CROSS FADER]
assign switches.
9
[MASTER] knob
Adjusts the master output level.
10
Master level indicator
Indicates the master output level.
11
[BOOTH] knob
Adjusts the output level of the BOOTH OUT jacks.
12
[ZONE] knob
Adjusts the output level of the ZONE OUT jacks.
13
[SAMPLER] knob
Adjusts the output level of the sampler.
6
Page 7

Eect Section
Here you can adjust the eects using two independent eect sections (FX 1, FX 2).
Panel Descriptions
1
3
4
1
[CH1] button
Turns FX 1 (FX 2) on/o for deck 1.
[SHIFT] + [CH1] Turns FX 1 (FX 2) on/o for deck 3.
2
[CH2] button
Turns FX 1 (FX 2) on/o for deck 2.
[SHIFT] + [CH2] Turns FX 1 (FX 2) on/o for deck 4.
Long press [CH2] Turns FX 1 (FX 2) on/o for sampler.
2
Mic Section
Here you can apply a vocal eect to the mic input.
1
3
4
2
3
[LEVEL] knob
Adjusts the depth of the eect.
[SHIFT] + [LEVEL] Adjusts the time for which the eect is applied.
4
Eect button [1]–[3]
Turn the eect on/o.
[SHIFT] + Eect button Changes the eect type.
2
1
3
4
1
MIC 1, 2 [ON] buttons
Turns the mic input on/o.
2
[DUCK] button
Turns on/o ducking (an eect that lowers the output volume of
sounds other than the mic when mic input is present) for mic 1 and 2.
3
[FX] button
Turns on/o the vocal eect for mic 1 and 2.
4
[LEVEL] knob
Adjusts the output volume of the mic.
5
6
5
[HI], [MID], [LOW] knobs
Boost/cut the volume of the high-frequency, mid-frequency, and lowfrequency regions.
6
[VOCAL FX] knob
Adjusts the depth of the vocal eect.
7
Page 8

Panel Descriptions
Front Panel
Microphone
Audio player
Headphones
1
PHONES jacks
1 2 3 4
Connect headphones here.
Stereo 1/4” and stereo miniature plugs are supported.
2
PHONES [LEVEL] knob
Adjusts the volume of the headphones.
3
PHONES [MIXING] knob
Adjusts the monitor volume balance of the channel whose Channel
[CUE] button is lit and the master output.
4
[SPLIT/STEREO] switch
Selects whether the sound of channels whose channel [CUE] button
is lit are mixed in stereo with the master output, or are played back
individually from left and right in mono.
SPLIT
STEREO
The sound of the channel whose Channel [CUE] button is lit is heard from
the L-side, and the master output monitor is heard from the R-side.
The sound of the channel whose channel [CUE] button is lit is mixed with
the master output, and output in stereo.
5
6
7 8
5
CROSS FADER [CH 1]–[CH 4] switch
9
Keyboard
Specify the output destination of the channels.
A Output to cross fader A.
THRU Output directly without passing through the cross fader.
B Output to cross fader B.
6
CROSS FADER [CURVE] knob
Adjusts the response curve of the cross fader.
7
AUX IN select switch
Set this according to the input source that’s connected to the AUX IN
jacks.
MIC If a mic is connected
MONO If you want to input sound in mono
STEREO If you want to input sound in stereo
8
AUX IN [LEVEL] knob
Adjusts the level of the sound that's input to the AUX IN jacks.
9
AUX IN jacks (L, R, STEREO)
Connect these to a mic or audio device.
Rear Panel (Connecting Your Equipment)
Turntable
(analog)
1
Microphone
DJ player
Turntable
(analog)
2
3
4
5 6
7 8 9
MIDI device
10
Computer
Computer
Audio player
Powered speakerPowered speaker, amp
Speaker, recorder
8
Page 9

Rear Panel (Connecting Your Equipment)
To prevent malfunction and equipment failure, always turn down the volume, and turn o all the units before making any connections.
Panel Descriptions
1
MIC IN 1, 2 connector
Connect your microphone here.
* Pin assignment of MIC IN connectors
2
INPUT (CH 1–CH 4) jacks
These jacks input sound to channels 1–4. The CH 1 and C H2 INPUT
jacks support phono input from MM-type cartridges.
Set the input select switch of the mixer section appropriately for the
device you’re connecting.
3
PHONO GROUND terminal
If a turntable (analog) is connected to the CH 1 or CH 2 INPUT jacks,
connect the turntable’s ground terminal here. This suppresses noise
from the turntable.
* Unsuitable places for connection
5 Water pipes (may result in shock or electrocution)
5 Gas pipes (may result in re or explosion)
5 Telephone-line ground or lightning rod (may be dangerous in the
event of lightning)
4
MASTER OUT (L, R) connectors
Connect your powered speakers or power amp here.
Both XLR type and RCA phono type plugs are supported.
* Pin assignment of MASTER OUT connector (XLR type)
8
PC A, B port
Use the included USB cable to connect this port to your computer.
To connect this to your computer, you must install the USB driver.
&“Installing the Software” (p. 3)
9
[POWER] switch
This turns the power on/o.
NOTE
When turning o the power, follow the directions that appear in the
display.
* The power to this unit will be turned o automatically after a
predetermined amount of time has passed since it was last used for
playing music, or its buttons or controls were operated (Auto O
function).
If you do not want the power to be turned o automatically,
disengage the Auto O function.
For details on how to disable this function, refer to the owner’s manual
(PDF).
NOTE
5 Any settings that you are in the process of editing will be lost when
the power is turned o. If you have any settings that you want to keep,
you should save them beforehand.
5 To restore power, turn the power on again.
10
DC IN jack
Connect the included AC adaptor here.
* Use the cord hook to secure the cord of the AC adaptor as shown in
the illustration.
5
BOOTH OUT (L, R) jacks
These are the output jacks for booth monitoring.
* Pin assignment of BOOTH OUT jacks
6
ZONE OUT (L, R) jacks
Use these output jacks when you want to send signals to another
location independently from MASTER OUT or BOOTH OUT.
Connect them to your speakers or recorder.
7
MIDI OUT connector
This outputs MIDI messages such as MIDI clock.
Power cord
Indicator
AC Outlet
9
Page 10

Using Serato DJ Pro
This document explains basic use of Serato DJ Pro. For details on the functions and use of the software, refer to the Serato DJ Pro user manual (PDF).
Here we explain operation for when a computer is connected to the PC A port.
Starting Serato DJ Pro
* Before turning the unit on/o, always be sure to turn the volume down. Even with the volume turned down, you might hear some sound when
switching the unit on/o. However, this is normal and does not indicate a malfunction.
1. Connect your computer to the rear panel PC A port.
2. Press the [POWER] switch to power-on the DJ-707M.
3. Turn on the power of the equipment that’s connected to the
Windows 7
In the [Start] menu, click [All Programs] & [Serato]
[Serato DJ Pro] & [Serato DJ Pro] icon.
DJ-707M.
4. Start Serato DJ Pro.
Mac OS
In the Finder, open the [Applications] folder and click the
[Serato DJ Pro] icon.
Windows 8.1
In the [App View], click the [Serato DJ Pro] icon.
Windows 10
In the [Start] screen or [App View], click the [Serato DJ Pro] icon.
Basic Operations in Serato DJ Pro
Songs shown in the browser view can be imported into a deck area, and controlled from the DJ-707M.
1
2
1
1
Deck section
2
Waveform panel
3
crate panel
4
Library
&
3
4
Importing a Song
Here we’ll explain typical operations for importing a song.
* Serato DJ Pro provides a variety of ways to import songs. For details,
refer to the Serato DJ Pro user manual.
* If you’re using Serato Corporation’s DJ software (Scratch Live, ITCH,
Serato DJ Pro Intro) and you have already created a song library, the
library you created can be used as-is.
* If you’re using Serato DJ Pro Intro and you’ve already created a song
library, there might be cases in which songs need to be re-analyzed.
1. In Serato DJ Pro, click the [Files] key.
The [Files] panel opens, and the les on your computer and on the
peripheral devices connected to your computer are displayed.
2. In the [Files] panel, click the folder that contains the songs
you want to add to the library.
3. Drag and drop the selected folder onto the create panel.
A crate is created, and the songs are added to the library.
Loading a Song
Here’s how to load a song so that it can be output.
1. On the DJ-707M, press the [BACK] button to move the cursor
to the create panel.
2. Turn the DJ-707M’s rotary selector to move to the folder
containing the song that you want to load; then press the
rotary selector.
The cursor moves to the library.
3. Turn the rotary selector to move to the song that you want to
load.
4. On the DJ-707M, press the [LOAD] button of the deck into
which you want to load the song.
10
Page 11

Using Serato DJ Pro
Playing a Song
1. Set the DJ-707M’s knobs and switches as follows.
Input select switches “PC” position
[MASTER] knob
[TRIM] knob
[BOOTH] knob
[ZONE] knob
[HI], [MID], [LOW] knobs
[FILTER/FX] knob
Channel faders Lowest position
Cross fader Center
CROSS FADER [CH 1]–[CH 4] knobs “THRU” position
2. Press the [
r
] button to play back the loaded song.
Turned all the way to the left
Center
3. Move the channel fader upward and turn the [TRIM] knob
toward the right to adjust the volume.
Adjust the volume so that the channel level in the level indicator is lit in
the orange-colored area.
4. Turn the [MASTER] knob toward the right to adjust the level of
the speakers.
Closing Serato DJ Pro
1. Close the Serato DJ Pro screen.
Mac OS
In the upper left of the Serato DJ Pro screen, click the [6] (red: close)
button.
Monitoring Through Headphones
1. Set the DJ-707M’s knobs as follows.
PHONES [MIXING] knob
PHONES [LEVEL] knob
Turned all the way to the left
2. Press the channel [CUE] button of the channel that you want to
monitor.
3. Turn the [VOLUME] knob toward the right to adjust the
headphone level.
Windows
In the upper right of the Serato DJ Pro screen, click the [X] button.
A conrmation screen appears.
2. Click [Yes] to close Serato DJ Pro.
3. Turn o the power of the equipment that’s connected to the
DJ-707M.
4. Press the [POWER] switch.
The display indicates “Are you sure to Power o.”
Are you sure to
Power off [YES]
5. Press the [SELECT] (ENTER) knob to power-o the DJ-707M.
11
Page 12

USING THE UNIT SAFELY
WARNING
Concerning the Auto O function
The power to this unit will be turned o automatically
after a predetermined amount of time has passed since
it was last used for playing music, or its buttons or controls were
operated (Auto O function). If you do not want the power to
be turned o automatically, disengage the Auto O function.
For details on how to disable this function, refer to the owner’s
manual (PDF).
Use only the supplied AC adaptor and the
correct voltage
Be sure to use only the AC adaptor supplied with the
unit. Also, make sure the line voltage at the installation
matches the input voltage specied on the AC adaptor’s
body. Other AC adaptors may use a dierent polarity, or be
designed for a dierent voltage, so their use could result in
damage, malfunction, or electric shock.
IMPORTANT NOTES
Power Supply
5Place the AC adaptor so the side with the indicator faces
upwards. The indicator will light when you plug the AC
adaptor into an AC outlet.
Placement
5Depending on the material and temperature of the surface
on which you place the unit, its rubber feet may discolor or
mar the surface.
Repairs and Data
5Before sending the unit away for repairs, be sure to make
a backup of the data stored within it; or you may prefer to
write down the needed information. Although we will do our
utmost to preserve the data stored in your unit when we carry
out repairs, in some cases, such as when the memory section
is physically damaged, restoration of the stored content may
be impossible. Roland assumes no liability concerning the
restoration of any stored content that has been lost.
WARNING
Use only the supplied power cord
Use only the attached power cord. Also, the supplied
power cord must not be used with any other device.
Additional Precautions
5Any data stored within the unit can be lost as the result
of equipment failure, incorrect operation, etc. To protect
yourself against the irretrievable loss of data, try to make a
habit of creating regular backups of the data you’ve stored in
the unit.
5Roland assumes no liability concerning the restoration of any
stored content that has been lost.
5Never strike or apply strong pressure to the display.
5Continuous playing may cause dis-coloration of the pad, but
this will not aect the pad’s function.
5Do not use connection cables that contain a built-in resistor.
CAUTION
Handle the PHONO GROUND terminal
carefully
If you remove the screw from the ground terminal, be
sure to replace it; don’t leave it lying around where it
could accidentally be swallowed by small children. When
refastening the screw, make that it is rmly fastened, so it won’t
come loose.
Intellectual Property Right
5It is forbidden by law to make an audio recording, video
recording, copy or revision of a third party’s copyrighted work
(musical work, video work, broadcast, live performance, or
other work), whether in whole or in part, and distribute, sell,
lease, perform, or broadcast it without the permission of the
copyright owner.
5Do not use this product for purposes that could infringe on a
copyright held by a third party. We assume no responsibility
whatsoever with regard to any infringements of third-party
copyrights arising through your use of this product.
5The copyright of content in this product (the sound waveform
data, style data, accompaniment patterns, phrase data, audio
loops and image data) is reserved by Roland Corporation.
5Purchasers of this product are permitted to utilize said
content (except song data such as Demo Songs) for the
creating, performing, recording and distributing original
musical works.
5Purchasers of this product are NOT permitted to extract
said content in original or modied form, for the purpose
of distributing recorded medium of said content or making
them available on a computer network.
5ASIO is a trademark and software of Steinberg Media
Technologies GmbH.
5This product contains eParts integrated software platform of
eSOL Co.,Ltd. eParts is a trademark of eSOL Co., Ltd. in Japan.
5Roland is either a registered trademark or a trademark
of Roland Corporation in the United States and/or other
countries.
5Company names and product names appearing in this
document are registered trademarks or trademarks of their
respective owners.
Main Specications
Roland DJ-707M: DJ Controller
Power Supply AC adaptor
Current draw 2,000 mA
Dimensions
Weight 3.5 kg / 7 lbs 12 oz (excluding AC adaptor)
Accessories
12
474 (W) x 331 (D) x 73 (H) mm
18-11/16 (W) x 13-1/16 (D) x 2-7/8 (H) inches
Startup Guide
Leaet “USING THE UNIT SAFELY”
AC adaptor
Power cord
USB cable
* This document explains the specications of the product at the time
that the document was issued. For the latest information, refer to the
Roland website.
 Loading...