

Roland DJ-505 User Manual
Owner’s Manual
Before using this unit, carefully read “USING THE UNIT SAFELY” and “IMPORTANT NOTES” (leaet “USING
THE UNIT SAFELY” and Startup Guide). After reading, keep the document(s) where it will be available for
immediate reference.
Copyright © 2017 ROLAND CORPORATION
02
Contents
Installing the Software . . . . . . . . . . . . . . . . . . . . . . . . . . . . . . . . . . . 3
System Requirements . . . . . . . . . . . . . . . . . . . . . . . . . . . . . . . . . . . . 3
Downloading the Software . . . . . . . . . . . . . . . . . . . . . . . . . . . . . . . . 3
Downloading the DJ-505 USB Driver . . . . . . . . . . . . . . . . . . . 3
Downloading the Serato DJ Software . . . . . . . . . . . . . . . . . . 3
Installing the Software . . . . . . . . . . . . . . . . . . . . . . . . . . . . . . . . . . . . 3
Mac OS Users . . . . . . . . . . . . . . . . . . . . . . . . . . . . . . . . . . . . . . 3
Windows Users. . . . . . . . . . . . . . . . . . . . . . . . . . . . . . . . . . . . . 3
Panel Descriptions . . . . . . . . . . . . . . . . . . . . . . . . . . . . . . . . . . . . . . . 4
Browser Section . . . . . . . . . . . . . . . . . . . . . . . . . . . . . . . . . . . . . . . . . 4
Deck Section . . . . . . . . . . . . . . . . . . . . . . . . . . . . . . . . . . . . . . . . . . . . 5
Mixer Section . . . . . . . . . . . . . . . . . . . . . . . . . . . . . . . . . . . . . . . . . . . 7
Eect Section . . . . . . . . . . . . . . . . . . . . . . . . . . . . . . . . . . . . . . . . . . . 7
TR-S Section . . . . . . . . . . . . . . . . . . . . . . . . . . . . . . . . . . . . . . . . . . . . 8
Front Panel . . . . . . . . . . . . . . . . . . . . . . . . . . . . . . . . . . . . . . . . . . . . . 8
Rear Panel (Connecting Your Equipment). . . . . . . . . . . . . . . . . . . . . 9
Using Serato DJ . . . . . . . . . . . . . . . . . . . . . . . . . . . . . . . . . . . . . . . . . . 11
Starting Serato DJ. . . . . . . . . . . . . . . . . . . . . . . . . . . . . . . . . . . . . . . . 11
Basic Operations in Serato DJ . . . . . . . . . . . . . . . . . . . . . . . . . . . . . . 11
Importing a Song. . . . . . . . . . . . . . . . . . . . . . . . . . . . . . . . . . . 11
Loading a Song . . . . . . . . . . . . . . . . . . . . . . . . . . . . . . . . . . . . 11
Playing a Song . . . . . . . . . . . . . . . . . . . . . . . . . . . . . . . . . . . . . 12
Monitoring Through Headphones . . . . . . . . . . . . . . . . . . . . . 12
Closing Serato DJ . . . . . . . . . . . . . . . . . . . . . . . . . . . . . . . . . . . . . . . . 12
Operating the DJ-505 . . . . . . . . . . . . . . . . . . . . . . . . . . . . . . . . . . . . 13
Performance Pad Operations. . . . . . . . . . . . . . . . . . . . . . . . . . . . . . . 13
Hot Cue Operations (HOT CUE). . . . . . . . . . . . . . . . . . . . . . . . 13
Cue Loop Operations (CUE LOOP) . . . . . . . . . . . . . . . . . . . . . 13
Roll Operations (ROLL) . . . . . . . . . . . . . . . . . . . . . . . . . . . . . . 13
Slicer Operations (SLICER) . . . . . . . . . . . . . . . . . . . . . . . . . . . . 14
Saved Loop Operations. . . . . . . . . . . . . . . . . . . . . . . . . . . . . . 14
TR Operations (TR) . . . . . . . . . . . . . . . . . . . . . . . . . . . . . . . . . . 14
Pattern Operations (PATTERN) . . . . . . . . . . . . . . . . . . . . . . . . 15
TR Velocity Operations . . . . . . . . . . . . . . . . . . . . . . . . . . . . . . 15
Serato Sampler Operations (SAMPLER) . . . . . . . . . . . . . . . . . 15
Pitch Play Operations (PITCH PLAY) . . . . . . . . . . . . . . . . . . . . 15
Velocity Sampler Operations. . . . . . . . . . . . . . . . . . . . . . . . . . 15
Slip Operations . . . . . . . . . . . . . . . . . . . . . . . . . . . . . . . . . . . . . . . . . . 15
Song Analysis . . . . . . . . . . . . . . . . . . . . . . . . . . . . . . . . . . . . . . . . . . . 15
Eect Operations . . . . . . . . . . . . . . . . . . . . . . . . . . . . . . . . . . . . . . . . 16
Multi FX Mode Operations . . . . . . . . . . . . . . . . . . . . . . . . . . . 16
Single FX Mode Operations . . . . . . . . . . . . . . . . . . . . . . . . . . 16
Changing the Eect Tempo. . . . . . . . . . . . . . . . . . . . . . . . . . . 17
Recording . . . . . . . . . . . . . . . . . . . . . . . . . . . . . . . . . . . . . . . . . . . . . . 17
Inputting Sound from an External Device . . . . . . . . . . . . . . . . . . . . 17
Inputting Sound from a DJ Player. . . . . . . . . . . . . . . . . . . . . . 17
Inputting Sound from a Turntable . . . . . . . . . . . . . . . . . . . . . 17
Inputting Sound from a Mic . . . . . . . . . . . . . . . . . . . . . . . . . . 17
TR-S Operations . . . . . . . . . . . . . . . . . . . . . . . . . . . . . . . . . . . . . . . . . 18
Playing, Copying, or Deleting Patterns. . . . . . . . . . . . . . . . . . 18
Changing Instruments/Kits . . . . . . . . . . . . . . . . . . . . . . . . . . . 19
TR-REC (Step Recording) . . . . . . . . . . . . . . . . . . . . . . . . . . . . . 20
INST-REC (Realtime Recording). . . . . . . . . . . . . . . . . . . . . . . . 20
Synchronizing the TR-S Tempo with the Serato DJ Tempo . . 21
Backing Up or Restoring TR-S Data. . . . . . . . . . . . . . . . . . . . . 21
Using the DJ-505 in Stand-Alone Mode . . . . . . . . . . . . . . . . . . . . . . 21
System Settings . . . . . . . . . . . . . . . . . . . . . . . . . . . . . . . . . . . . . . . . . . 22
Returning to the Factory Settings (Factory Reset) . . . . . . . . . . . . . . 23
Using Serato Flip . . . . . . . . . . . . . . . . . . . . . . . . . . . . . . . . . . . . . . . . . 24
Purchasing Serato Flip Expansion Pack. . . . . . . . . . . . . . . . . . . . . . . 24
Activating the Serato Flip Expansion Pack . . . . . . . . . . . . . . . . . . . . 24
Flip Display in the Serato DJ Screen . . . . . . . . . . . . . . . . . . . . . . . . . 25
Flip Operations . . . . . . . . . . . . . . . . . . . . . . . . . . . . . . . . . . . . . . . . . . 26
Specifying Hot Cue . . . . . . . . . . . . . . . . . . . . . . . . . . . . . . . . . 26
Creating a Flip . . . . . . . . . . . . . . . . . . . . . . . . . . . . . . . . . . . . . 26
Saving the Flip . . . . . . . . . . . . . . . . . . . . . . . . . . . . . . . . . . . . . 26
Recalling and Playing a Flip. . . . . . . . . . . . . . . . . . . . . . . . . . . 26
Saved Flip Operations . . . . . . . . . . . . . . . . . . . . . . . . . . . . . . . . . . . . 26
Using Serato DVS . . . . . . . . . . . . . . . . . . . . . . . . . . . . . . . . . . . . . . . . 27
Purchasing Serato DVS Expansion Pack . . . . . . . . . . . . . . . . . . . . . . 27
Activating the Serato DVS Expansion Pack. . . . . . . . . . . . . . . . . . . . 27
About the Virtual Deck Screen. . . . . . . . . . . . . . . . . . . . . . . . . . . . . . 29
Settings for Using DVS . . . . . . . . . . . . . . . . . . . . . . . . . . . . . . . . . . . . 29
Turntable/DJ Player Connections. . . . . . . . . . . . . . . . . . . . . . 29
Serato DJ Settings . . . . . . . . . . . . . . . . . . . . . . . . . . . . . . . . . . 29
Adjusting the Control Signal. . . . . . . . . . . . . . . . . . . . . . . . . . 29
Playing a Song with DVS . . . . . . . . . . . . . . . . . . . . . . . . . . . . . . . . . . 30
Functions Available When Using DVS . . . . . . . . . . . . . . . . . . . . . . . . 30
Appendix . . . . . . . . . . . . . . . . . . . . . . . . . . . . . . . . . . . . . . . . . . . . . . . . 31
Troubleshooting. . . . . . . . . . . . . . . . . . . . . . . . . . . . . . . . . . . . . . . . . 31
Block Diagram. . . . . . . . . . . . . . . . . . . . . . . . . . . . . . . . . . . . . . . . . . . 31
Main Specications . . . . . . . . . . . . . . . . . . . . . . . . . . . . . . . . . . . . . . 32
About this owner’s manual
This manual explains basic operation of the DJ-505.
Read it in conjunction with the startup guide.
2
Downloading the Serato DJ owner’s manual
1. Start a browser and access the following Serato DJ webpage.
https://serato.com/dj/downloads
2. Click “Manuals and Downloads.”
3. From “Manuals and Downloads,” download the Serato DJ
owner’s manual.

Installing the Software
System Requirements
Verify that your computer meets the system requirements before you
proceed with installing the software.
Mac OS Windows
Operating System
CPU/Clock
Screen Resolution 1280 x 720
Memory 4 GB
Free HDD Space 5 GB
USB Available USB 2.0 port
* For the latest system requirements, refer to the Serato DJ webpage.
macOS 10.12
OS X 10.11
OS X 10.10
Intel® Core™ i7/1.07 GHz
Intel® Core™ i5/1.07 GHz
Intel® Core™ i3/1.07 GHz
Windows 10
Windows 8.1
Windows 7 SP1
Downloading the Software
The DJ-505 USB driver and Serato DJ are not included in the package.
Download them from the Roland or Serato website.
Downloading the DJ-505 USB Driver
The DJ-505 USB driver is software that outputs audio from your computer
to the DJ-505.
Mac OS users
1. Start a browser and access the following Roland support
webpage.
http://www.roland.com/support/
2. S earch for “DJ-505.”
3. In downloads, nd “DJ-505 Driver for macOS / OS X” and click it.
4. Download the driver as directed by the screen.
Windows 10 users
1. Connect your internet-connected computer to the DJ-505’s
USB port.
2. Power-on the DJ-505.
3. Download the driver as directed by the screen.
Users of other than Windows 10
1. Start a browser and access the following Roland support
webpage.
http://www.roland.com/support/
2. S earch for “DJ-505.”
3. In downloads, nd “DJ-505 Driver for Windows **” and click it.
4. Download the driver as directed by the screen.
Installing the Software
Install the software as follows.
Mac OS Users
1. Decompress the DJ-505 USB driver le that you downloaded.
2. Open the decompressed le, and double-click “DJ505_USBDriver.
p k g.”
The installer starts.
3. Install the software as directed by the screen.
4. Decompress the Serato DJ software le that you downloaded.
5. Double-click the decompressed le.
The installer starts.
6. Read the license agreement, and if you accept the conditions,
click [Agree].
7. When the following screen appears, drag and drop the
[Serato DJ] icon into the Applications folder.
This completes the installation.
Windows Users
1. Right-click the DJ-505 USB driver folder that you downloaded,
and choose “Extract all.”
The folder is decompressed.
2. Open the decompressed folder, and double-click “Setup.exe.”
The installer starts.
3. Install the software as directed by the screen.
4. Right-click the Serato DJ software folder that you downloaded,
and choose “Extract all.”
The folder is decompressed.
5. Double-click the decompressed le.
The installer starts.
6. Read the license agreement, and if you accept the conditions,
choose [I agree to the license terms and conditions] and click
[Install].
Installation begins.
7. When the following screen appears, click [Close].
Downloading the Serato DJ Software
1. Start a browser and access the following Serato DJ webpage.
https://serato.com/dj/downloads
2. Click “DOWNLOAD Serato DJ.”
3. Enter your email address, and click “CONTINUE.”
4. Enter your password and country, and click “CONTINUE.”
An email is sent to the address you specied.
5. Click “Download Serato DJ” as directed by the email.
6. Follow the instructions as directed by the screen, then
download the Serato DJ.
This completes the installation.
3
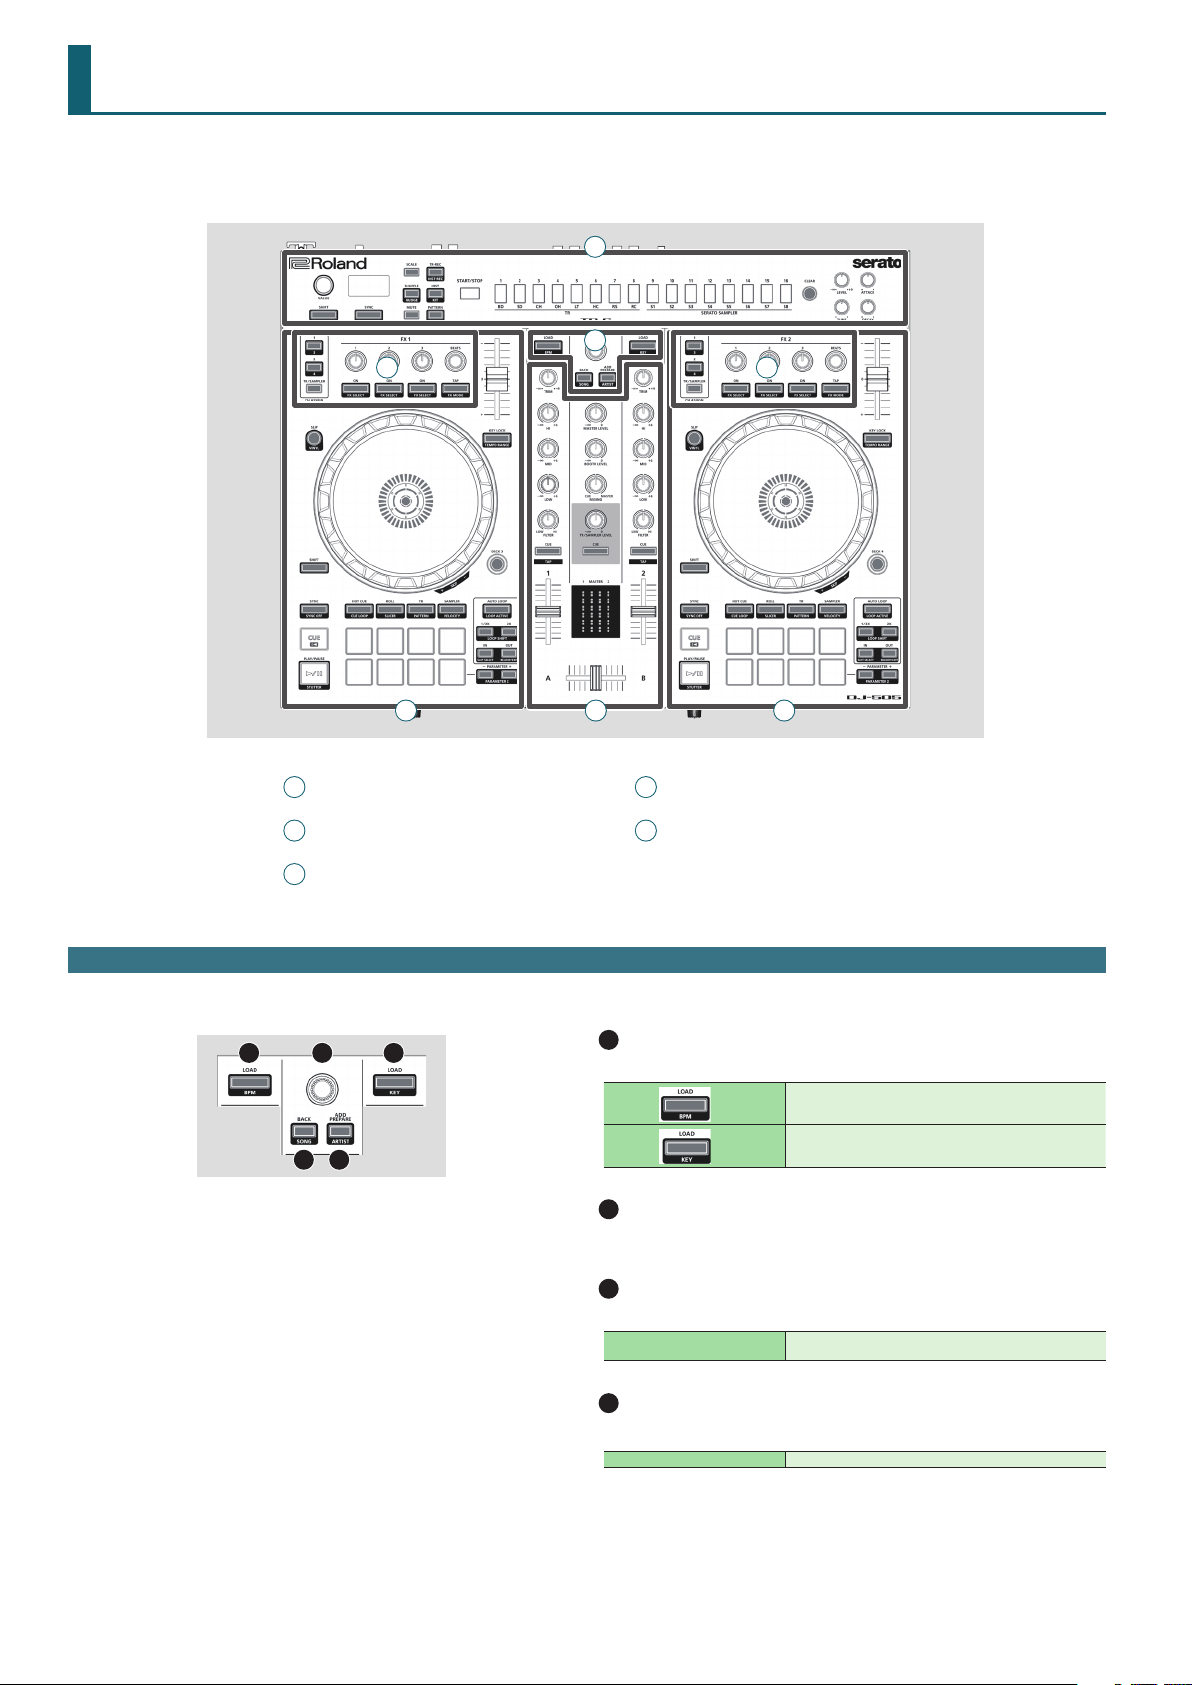
Panel Descriptions
The top panel of the DJ-505 is divided into ve sections by function: browser, deck, mixer, eects, and TR-S.
Phones jacks and input source select switches are located on the front side, and input/output jacks are located on the rear side.
5
1
4
4
2
1
Browser section
2
Deck section
3
Mixer section
Browser Section
Use these controls to operate Serato DJ and load songs.
1
2
3 4
1
3
4
Eect section
5
TR-S section
1
[LOAD] buttons
Load a song selected on Serato DJ into a deck.
[SHIFT] +
[SHIFT] +
2
Rotary selector
Turn this knob to move the cursor up/down. Press this knob to move the
cursor to a lower level.
3
[BACK] button
Moves the cursor to a higher level.
[SHIFT] + [BACK]
2
Sorts the song library by BPM.
Sorts the song library by KEY.
Library songs are sorted in alphabetic order of their song
name.
4
[ADD PREPARE] button
Adds a song to the “PREPARE” panel.
[SHIFT] + [ADD PREPARE] Library songs are sorted in order of their artist name.
4
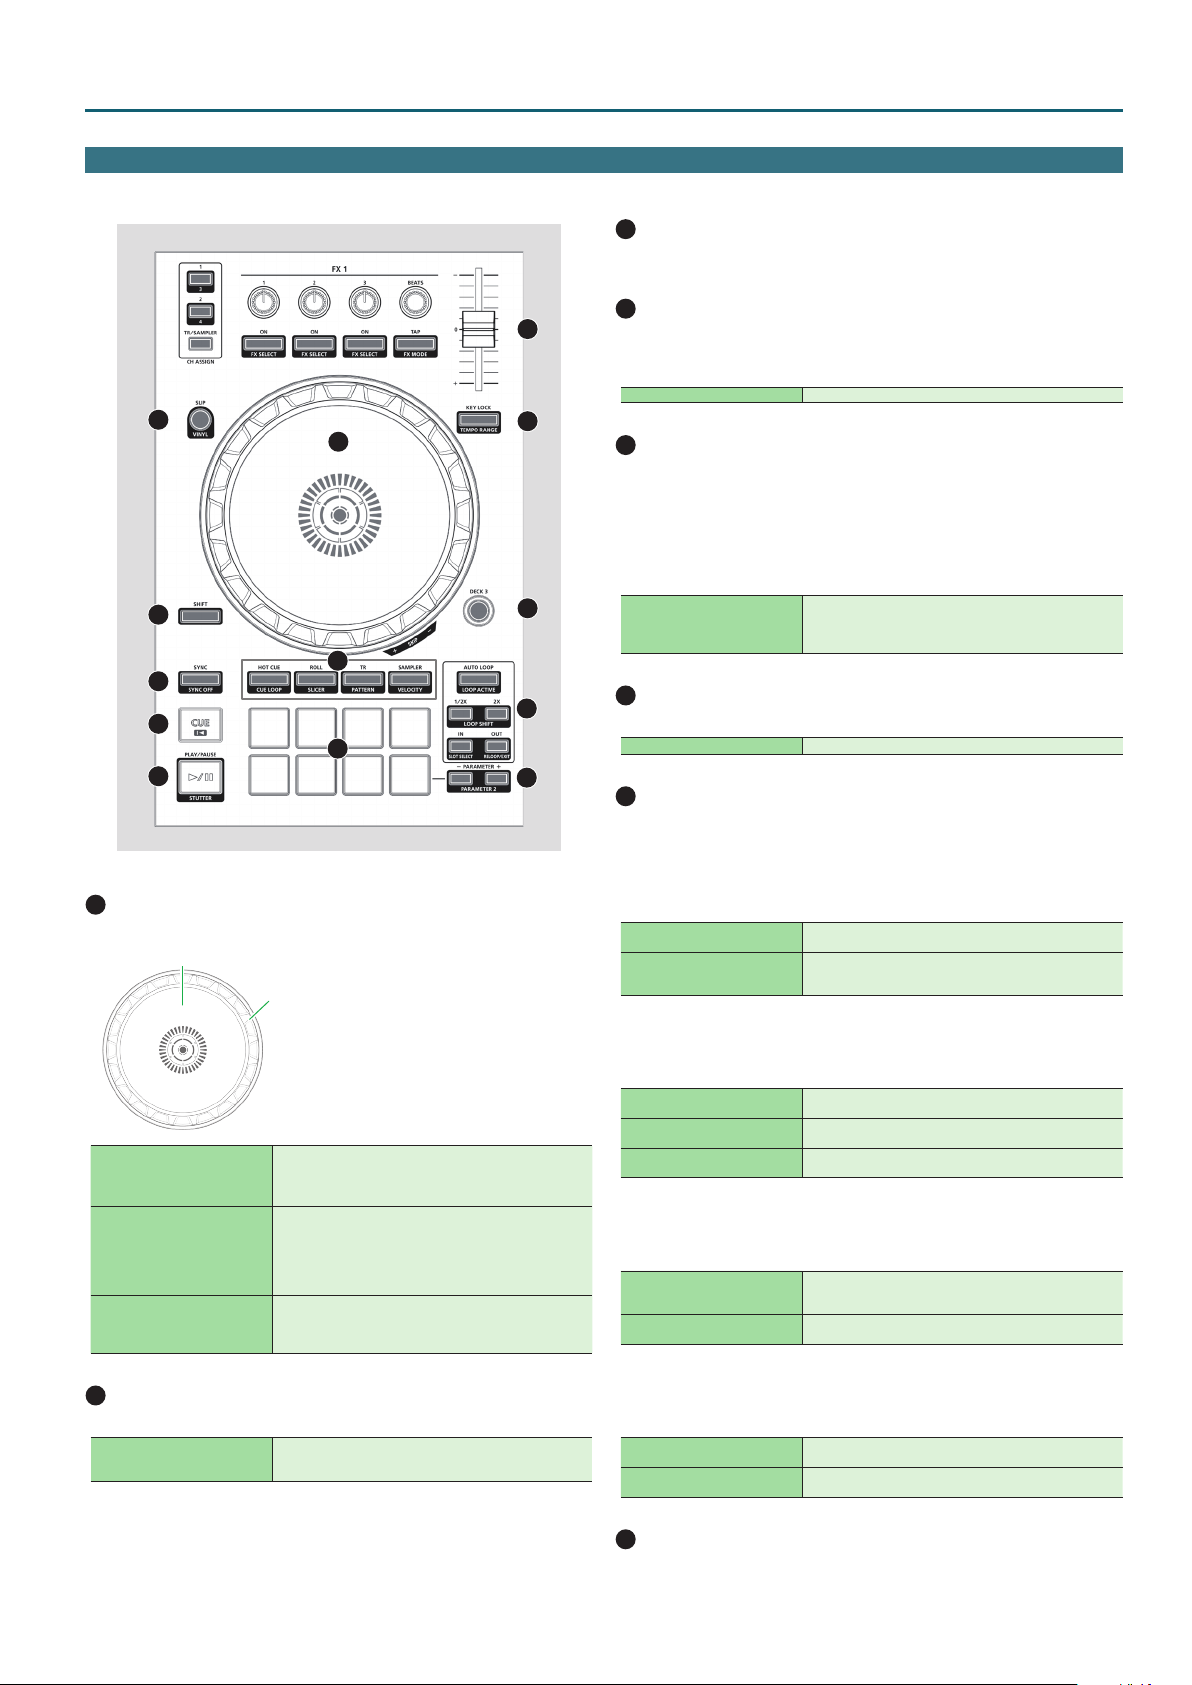
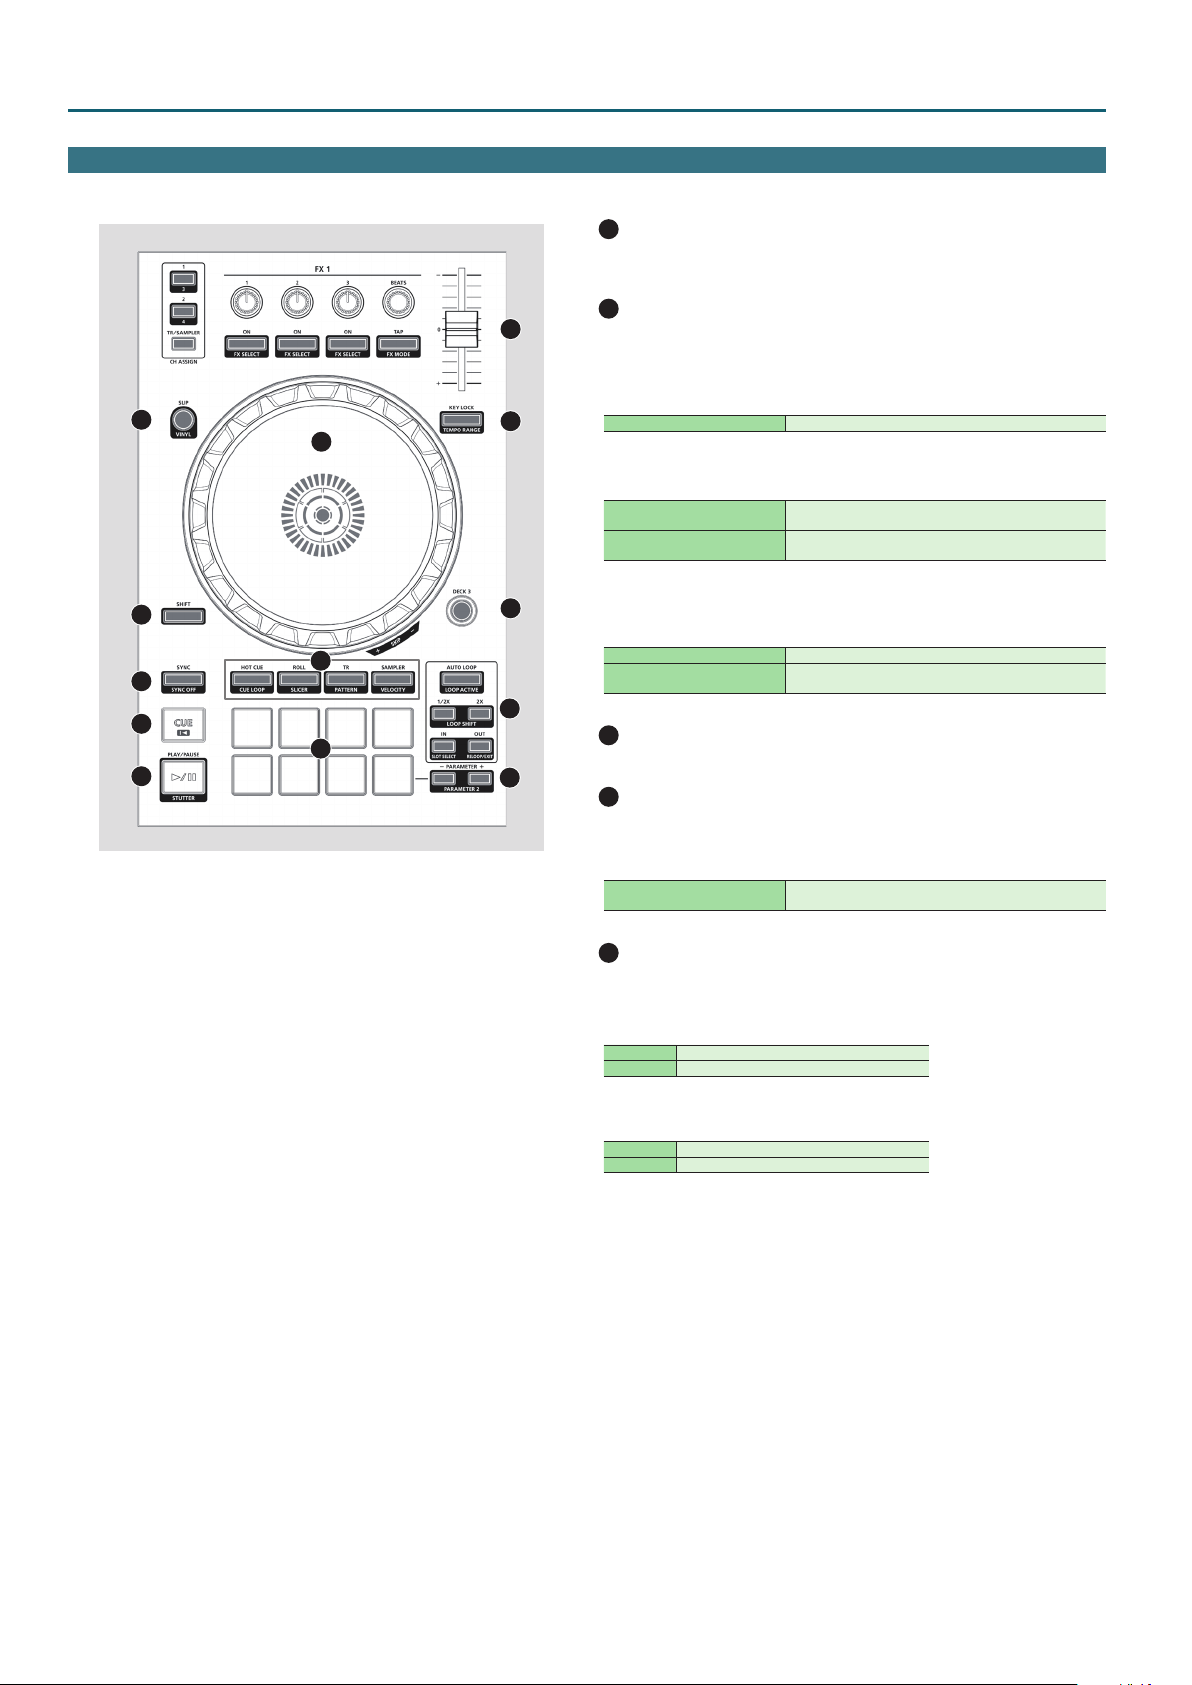
Deck Section
The deck sections located at the left and right control four decks (left: decks 1 and 3, right: decks 2 and 4).
3
[SHIFT] button
You can recall other functions by holding down this button and pressing
another button.
4
13
2
1
3
7
4
5
6
8
12
11
10
9
[SYNC] button
Automatically matches the tempo (pitch) or beat grid of multiple songs.
When you press this button, the tempo (BPM) changes to match the tempo
of the song on a deck other than the deck whose button was pressed.
[SHIFT] + [SYNC] Cancels SYNC.
5
[CUE u] button
Species, plays, or recalls a temporary cue point.
The rst time that you press the [CUE u] button after switching the
playback song, the cue point is set.
After the cue point has been set, pressing the [CUE u] button moves the
cue point to the location at which you pressed the button.
If playback is in progress, pressing this button moves to the temporary cue
point and stops playback.
[SHIFT] + [CUE u]
6
[r] button
Plays or pauses the song.
[SHIFT] + [r]
7
Pad Mode select
Here you can select the control mode of the performance pads.
Panel Descriptions
If you press the buttons during the song, the location returns
to the beginning of the song.
If you press the buttons at the beginning of the song, the
previous song in the song list is loaded.
Returns to the temporary cue point, and plays.
1
Jog dial
Controls scratch and pitch bend (playback speed adjustment).
Top surface
Outer edge
If VINYL MODE is on:
Rotate the top surface
Rotate the outer edge
[SHIFT] + rotate the top surface
2
[SLIP] button
Performs scratch operations.
If VINYL MODE is o:
Performs pitch bend (playback speed) operations.
If the key lock function is on:
Rotating to the right raises the playback speed; rotating to the
left lowers the playback speed.
If the key lock function is o:
Rotating to the right raises the playback speed and pitch;
rotating to the left lowers the playback speed and pitch.
Rapidly moves the playback location (fast search).
Rotating to the left moves the playback location forward;
rotating to the right moves it backward.
* Search is possible if a grid is specied.
Turns slip mode on/o. If this is on, the button is lit.
[SHIFT] + [SLIP]
Turns VINYL mode on/o.
If this is on, the button is lit while you hold down the [SHIFT]
button.
[HOT CUE] button
Button illumination: White
Selects hot cue mode (p. 13).
[SHIFT] + [HOT CUE]
Press [HOT CUE] twice
Button illumination: Blue
Selects cue loop mode (p. 13).
Button illumination: Orange
Selects saved ip mode (p. 26).
* Serato Flip must be purchased separately.
[ROLL] button
Button illumination: Light blue
Selects roll mode (p. 13).
[SHIFT] + [ROLL]
Press [ROLL] twice
Press [SHIFT] + [ROLL] twice
Button illumination: Red
Selects slicer mode (p. 14).
Button illumination: Green
Selects saved loop mode (p. 14).
Button illumination: Blue
Selects slicer loop mode (p. 14).
[TR] button
Button illumination: Red
Selects TR mode (p. 14).
[SHIFT] + [TR]
Press [TR] twice
Button illumination: Green
Selects pattern mode (p. 15).
Switches the TR-S pattern.
Button illumination: Orange
Selects TR velocity mode (p. 15).
[SAMPLER] button
Button illumination: Magenta
Selects sampler mode (p. 15).
[SHIFT] + [SAMPLER]
Press [SAMPLER] twice
Button illumination: Purple
Selects velocity sampler mode (p. 15).
Button illumination: Green
Selects pitch play mode (p. 15).
8
Performance pads
Use these pads to perform in the pad mode that you’ve selected.
5
Panel Descriptions
Deck Section
2
9
PARAMETER area
Here you can specify the value of the parameter that’s operated by the
performance pads.
10
13
LOOP area
[AUTO LOOP] button
Turns auto loop on/o.
When you use the [IN]/[OUT] buttons to set the loop point, the button
automatically lights.
12
1
[SHIFT] + [AUTO LOOP] Switches the loop between active/inactive (Loop Active).
[1/2X], [2X] button
Set the loop playback length to half/double.
[SHIFT] + [1/2X]
[SHIFT] + [2X]
During loop playback, moves the loop by its length toward
the left (Loop Shift).
During loop playback, moves the loop by its length toward
the right (Loop Shift).
11
10
9
3
7
4
5
6
8
[IN], [OUT] button
Specify the loop-in point and loop-out point. When the loop-out point is
specied, loop playback starts.
[SHIFT] + [IN] Switches the loop slot.
[SHIFT] + [OUT]
11
[DECK 3], [DECK 4] buttons
Cancels loop playback, returns to the previously-specied
loop-in point and resumes loop playback.
Switch the deck (left: decks 1 and 3, right: decks 2 and 4) to be operated.
12
[KEY LOCK] button
Turns the key lock function on/o.
* If the key lock function is on, the pitch does not change even if you use
the tempo slider to change the playback speed.
[SHIFT] + [KEY LOCK]
13
Tempo slider
Species the variable range of the Tempo slider.
The setting changes in the order of ±8% 0 16% 0 50%.
Adjusts the playback speed of the song.
If the key lock function is on:
Changes the playback speed.
“–” side Lowers the playback speed.
“+” side Raises the playback speed.
If the key lock function is o:
Changes the playback speed and pitch.
“–” side Lowers the playback speed and pitch.
“+” side Raises the playback speed and pitch.
6
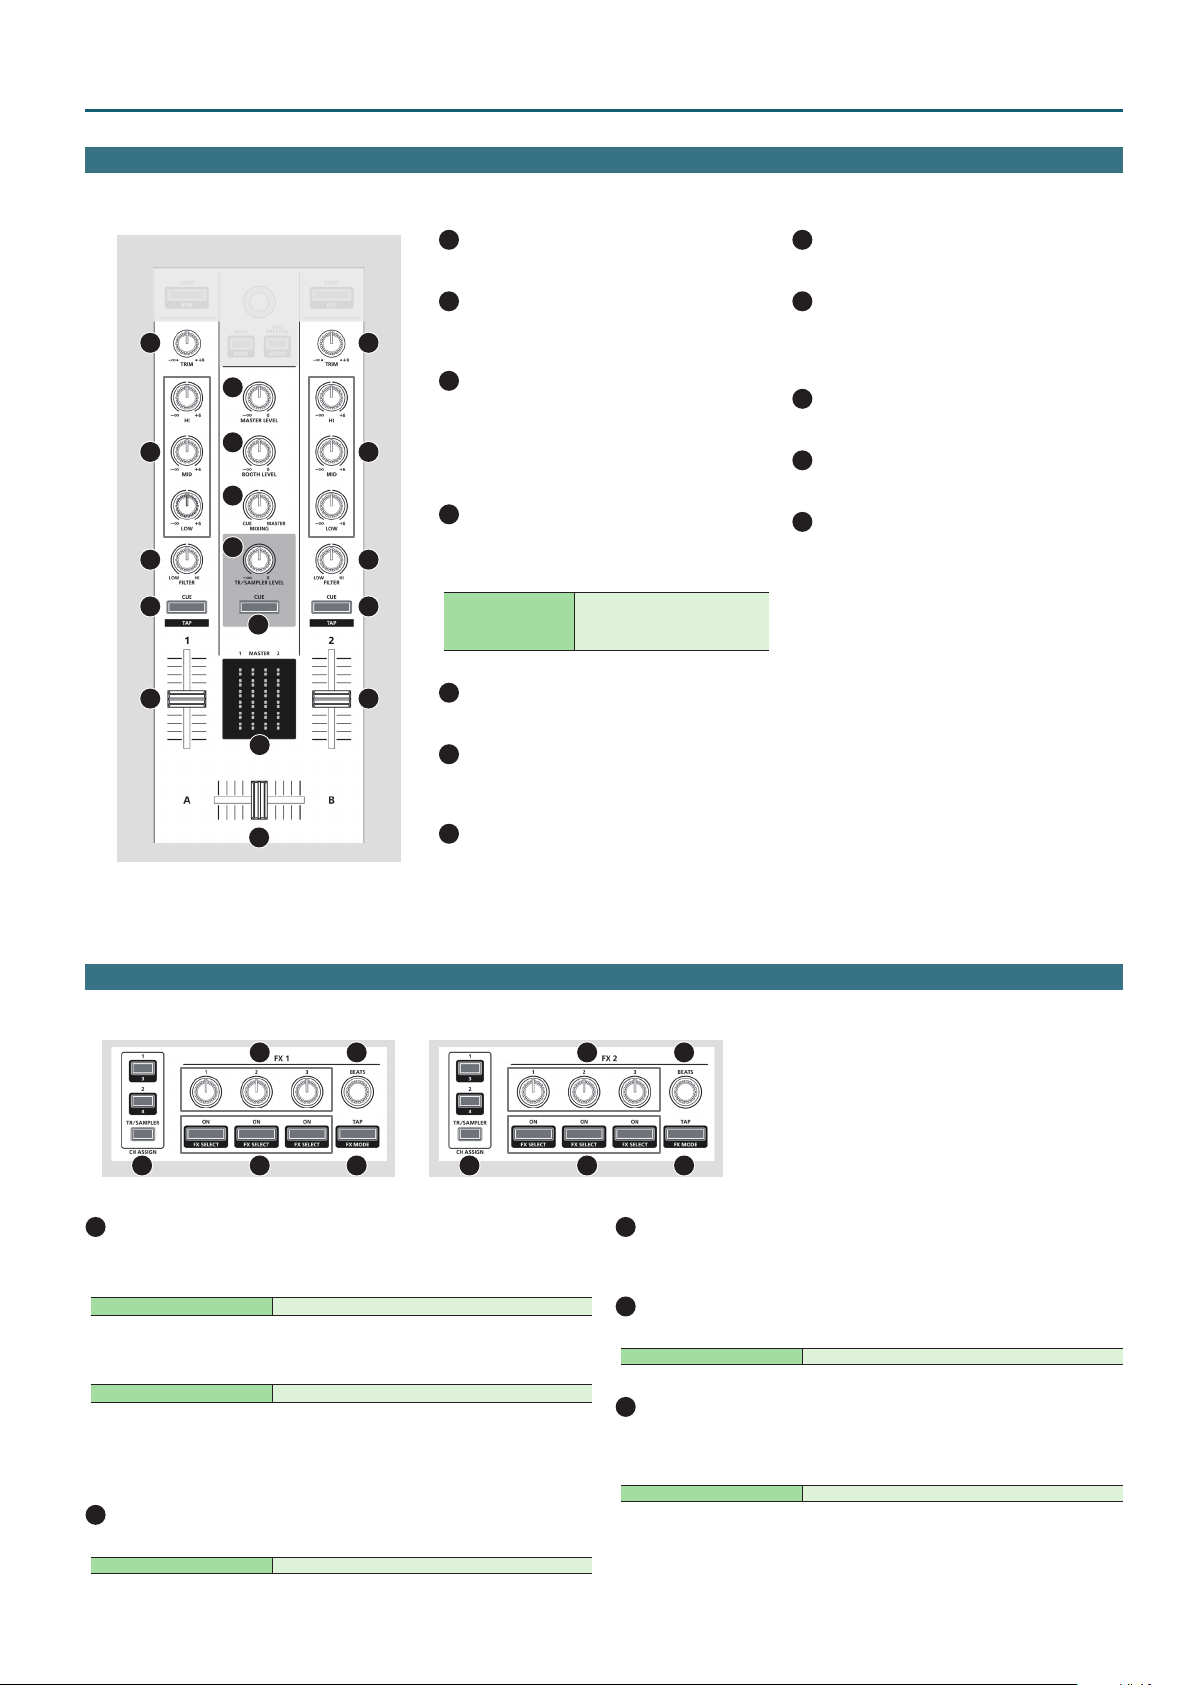
Mixer Section
This is a two-channel mixer. Here you can adjust the sound, connect sounds, and turn headphone cue on/o.
Panel Descriptions
1
[TRIM] knobs
Adjust the volume.
2
[HI], [MID], [LOW] knobs
1
7
8
10
9
11
12
2
3
4
5
1
2
3
4
5
Boost/cut the volume of the high-frequency,
mid-frequency, and low-frequency regions.
3
[FILTER] knobs
Applies a lter to each channel.
If you turn the [FILTER] knob toward the right,
only the high-frequency range is heard.
If you turn the knob toward the left, only the
low-frequency range is heard.
4
Channel [CUE] buttons
Turn cue on/o for each channel. The sound of
channels whose [CUE] button is lit is output from
the headphones.
[SHIFT] + [CUE]
5
Channel faders
Adjust the output level of each channel.
6
Cross fader
Switches between the audio output of the left
and right decks.
You can specify the tempo of the
track by the interval at which you
repeatedly press the [CUE] button
(Tap Tempo function).
8
[BOOTH LEVEL] knob
Adjusts the output level of the BOOTH OUT jacks.
9
[MIXING] knob
Adjusts the volume balance of the channel
whose Channel [CUE] button is lit and the master
output for phones output.
10
[TR/SAMPLER LEVEL] knob
Adjusts TR-S/SAMPLER output level.
11
TR/SAMPLER [CUE] button
Turns TR-S/SAMPLER output cue on/o.
12
Level indicator
Indicate the output level of each channel and
master.
7
6
[MASTER LEVEL] knob
Adjusts the master output level.
Eect Section
Here you can adjust the eects using two independent eect sections (FX1, FX2).
1
1
CH ASSIGN area
2
4
3
5
1
2
4
[1] button
Turns FX 1 (FX 2) on/o for deck 1.
[SHIFT] + [SLIP] Turns FX 1 (FX 2) on/o for deck 3.
[2] button
Turns FX 1 (FX 2) on/o for deck 2.
[SHIFT] + [SLIP] Turns FX 1 (FX 2) on/o for deck 4.
[TR/SAMPLER] button
Turns FX 1 (FX 2) on/o for TR-S/SAMPLER.
* In Serato DJ’s Sampler panel, set OUTPUT to “A.”
2
Eect parameter knobs
Adjust the character of the specied eect.
[SHIFT] + Eect parameter knob Changes the eect type.
3
5
3
[BEATS] knob
Adjusts the time for which the eect is applied.
If you press the knob, the setting is set to “1.”
4
Eect buttons
Turn the eect on/o.
[SHIFT] + Eect button Changes the eect type.
5
[TAP] button
The interval at which you press this button (tap tempo) species the
reference tempo of the eect.
If you long-press the button, the specied tempo is reset.
[SHIFT] + [TAP] Switches the eect mode (single FX/multi FX).
7
Panel Descriptions
11 12 13
14 15 16
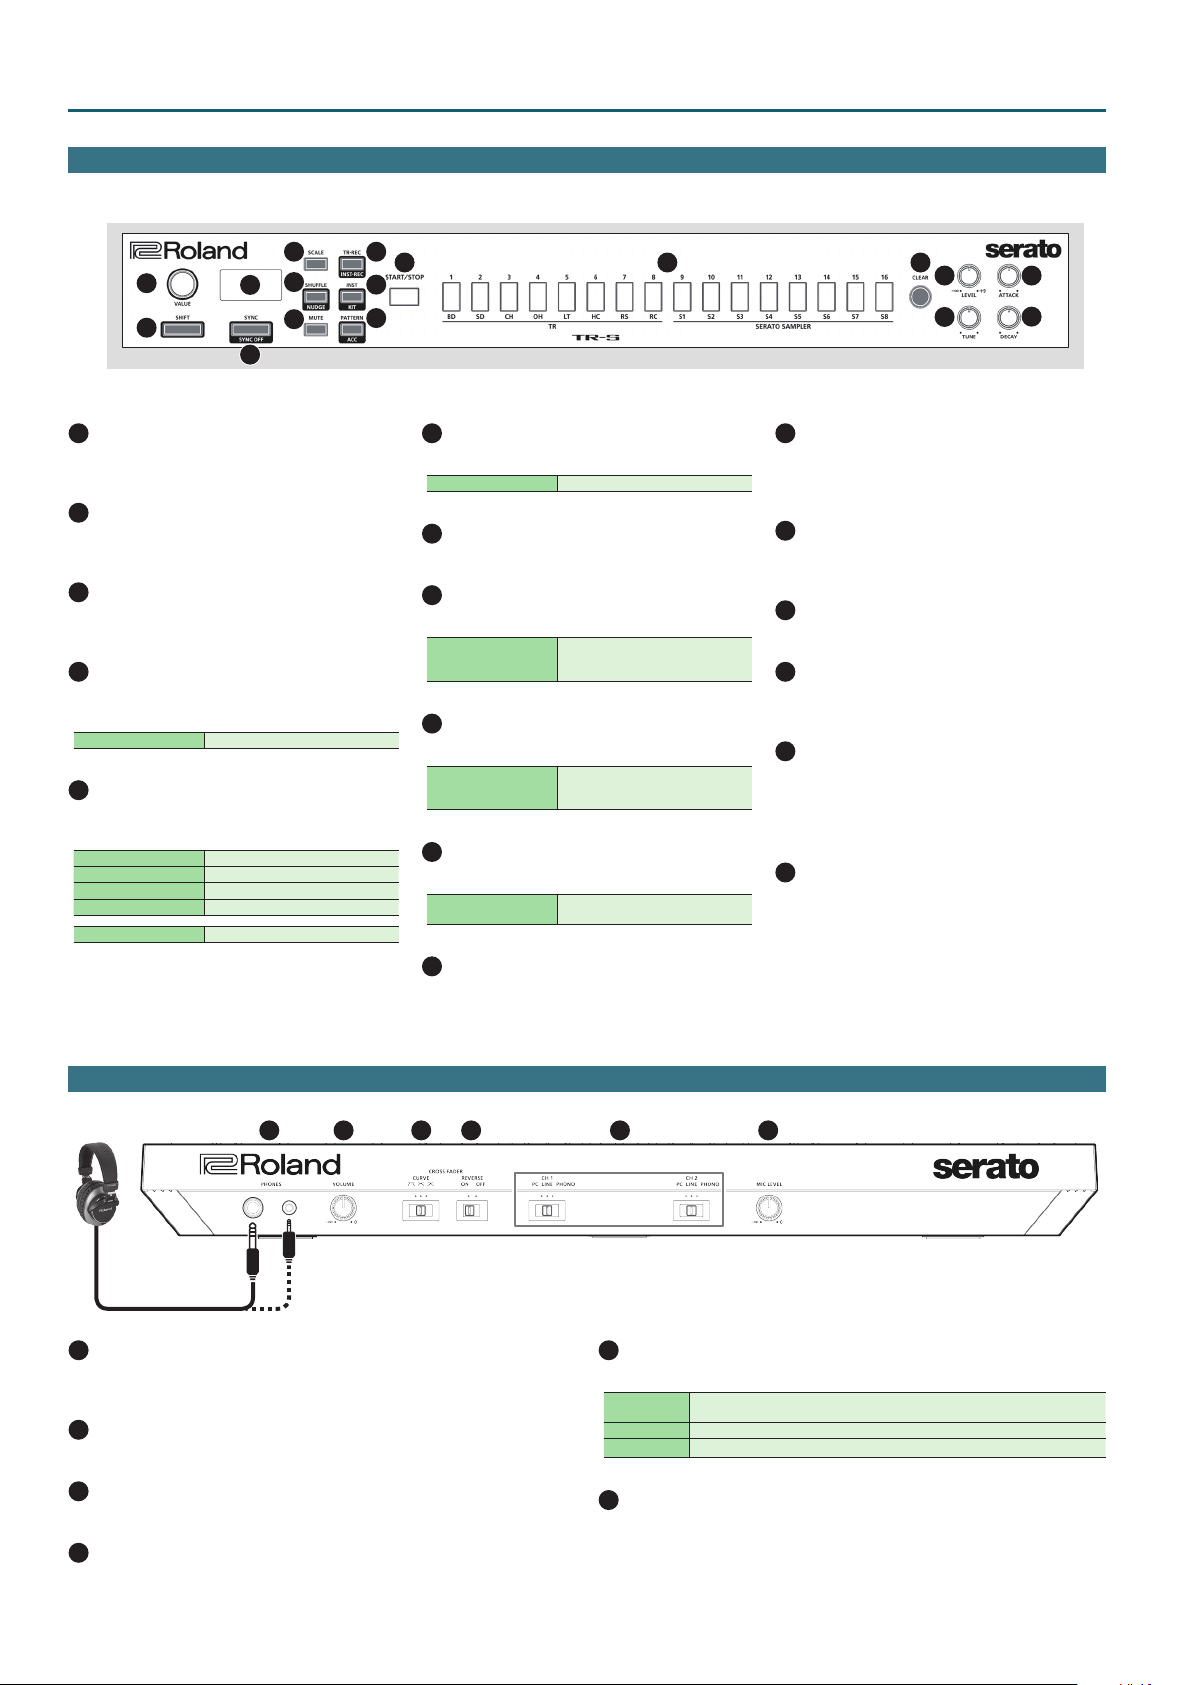
17
TR-S Section
This is a 16-step sequencer. You can create rhythm tracks using sounds of the Roland TR-808 rhythm machine etc. or samples in Serato DJ.
5
1
2
1
[VALUE] knob
Changes the value of settings such as tempo,
pattern scale, or shue.
2
[SHIFT] button
You can recall other functions by holding down
this button and pressing another button.
3
Display
This shows various information depending on
the operation.
4
[SYNC] button
Synchronizes the tempo of the rhythm to the
tempo of Serato DJ.
[SHIFT] + [SYNC] Disables tempo synchronization.
5
[SCALE] button
Selects one of the following choices as the time
value of one step.
8th note triplet (¯)
16th note triplet (´)
16th note (˜)
32nd note (`)
[SHIFT] + [SCALE] Species the last step.
Three steps will be one beat.
Six steps will be one beat.
Four steps will be one beat.
Eight steps will be one beat.
6
3
7
4
8
9
10
6
[SHUFFLE] button
Adjusts shue (rhythmic swing).
[SHIFT] + [SHUFFLE] Sets the nudge setting.
7
[MUTE] button
Mutes the selected instrument.
8
[TR-REC] button
Lets you step-record a pattern.
[SHIFT] + [TR-REC]
9
[INST] button
Select the instruments when using TR-REC.
[SHIFT] + [INST]
10
[PATTERN] button
Lets you select rhythm patterns 1–16.
[SHIFT] + [PATTERN]
11
[START/STOP] button
Plays/stops the pattern.
Lets you realtime-record a pattern
using the performance pads
(INST-REC).
Sets the kit for instruments, or
switches the sample bank in
Serato DJ.
Adds an accent to the step when
using TR-REC.
12
TR-S pads [1]–[16]
Use these buttons to turn steps on/o, to select
patterns/instruments, or to assign samples of Serato DJ
as instruments.
13
[CLEAR] button
Deletes the content recorded by TR-REC for a
specic instrument, or deletes the pattern.
14
[LEVEL] knob
Adjusts the volume of the selected instrument.
15
[TUNE] knob
Adjusts the tuning (pitch) of the selected
instrument.
16
[ATTACK] knob
Adjusts the strength of the attack for the
selected instrument.
* This has no eect for some instruments, or
when a sample is selected in Serato DJ.
17
[DECAY] knob
Adjusts the length of the decay for the selected
instrument.
* This has no eect when a sample is selected
in Serato DJ.
Front Panel
Headphones
1
[PHONES] jacks
Connect headphones here.
Stereo 1/4” (Ø 6.3 mm) and stereo 1/8” (Ø 3.5 mm) plugs are supported.
2
[VOLUME] knob
Adjusts the volume of the headphones.
3
[CROSS FADER] switch
Switches the response curve of the cross fader.
4
[REVERSE] switch
Reverses the left/right operation of the cross fader.
1
2
3 4
8
5
5
[CH 1], [CH 2] switches
Select the input source for each channel.
PC
LINE The line level input is the source.
PHONO The phono level (MM type cartridge) input is the source.
6
[MIC LEVEL] knob
Adjusts the output volume of the mic.
The sound loaded into the Serato DJ deck is the source.
Select this if you’re using DVS.
6
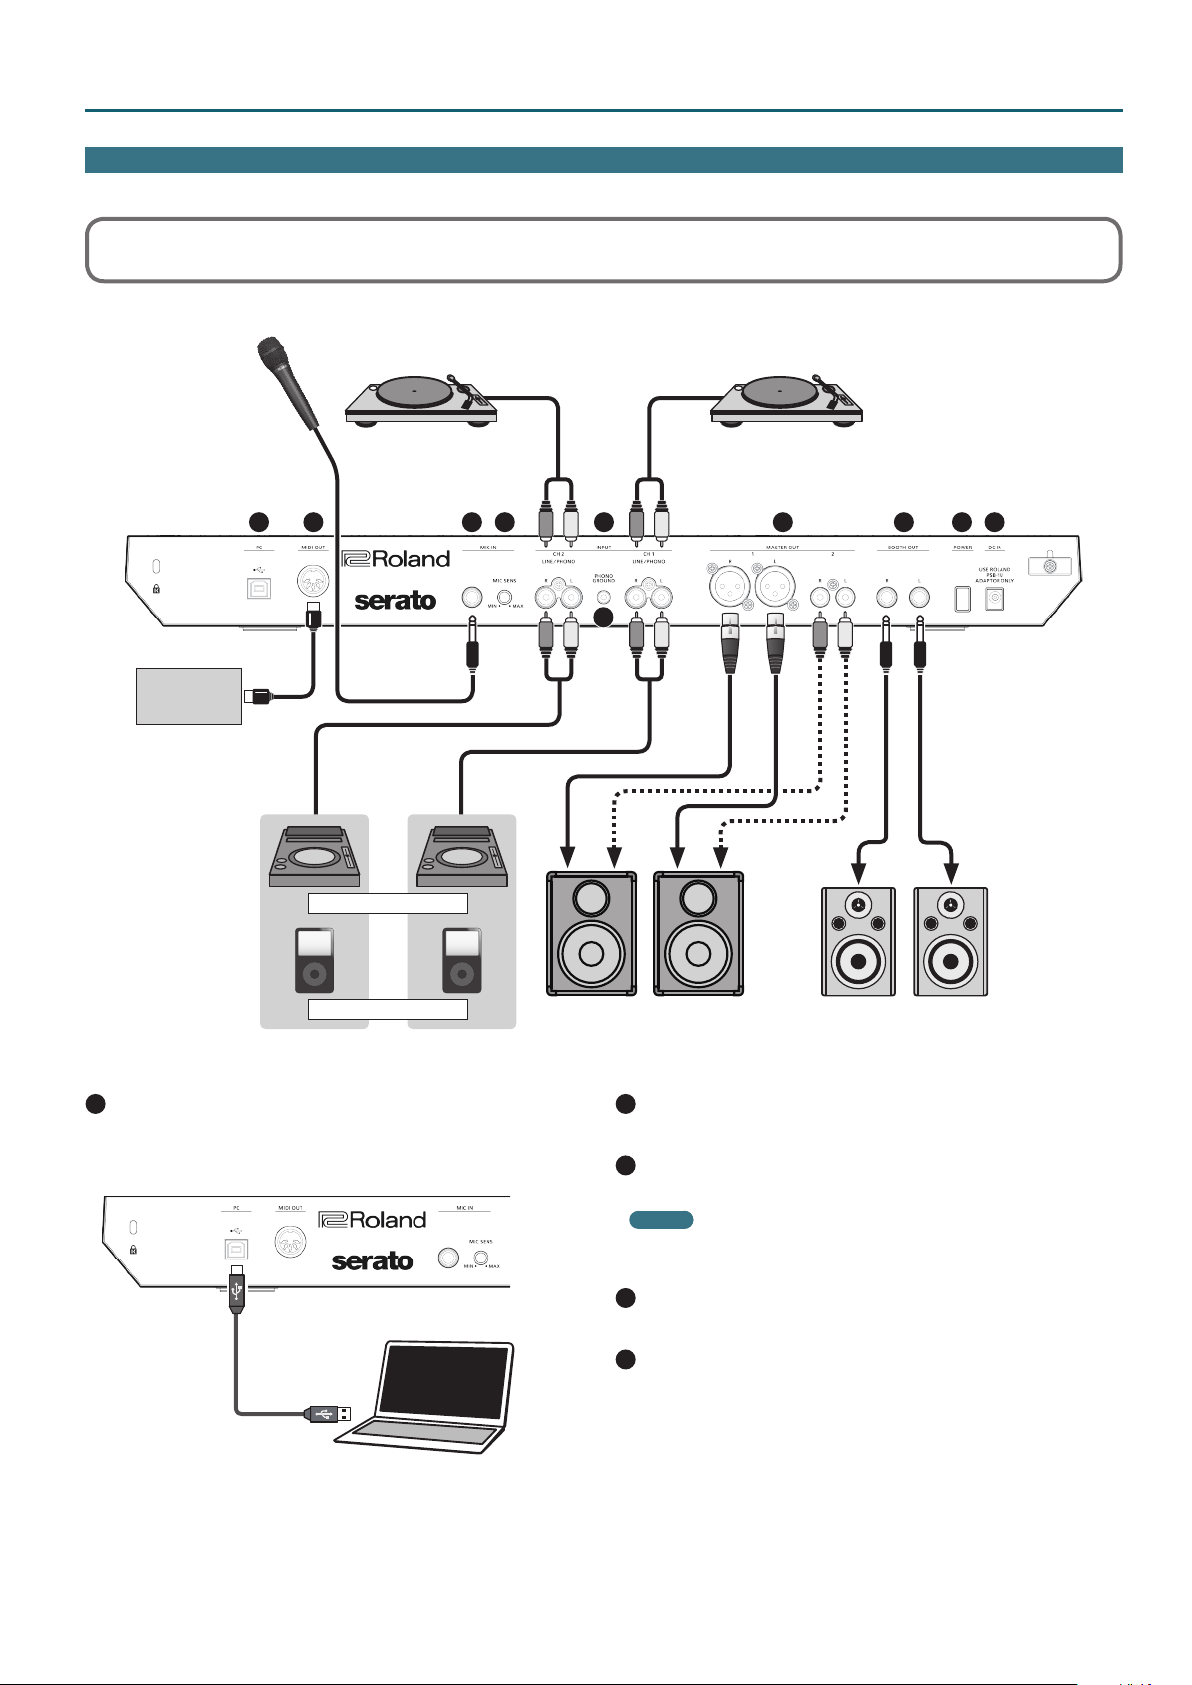
Rear Panel (Connecting Your Equipment)
To prevent malfunction and equipment failure, always turn down the volume, and turn o all the units before making any connections.
Microphone
Panel Descriptions
MIDI device
Turntable
(analog)
1
2
DJ player
Audio player
3 4
5
6
Turntable
(analog)
7
8
Powered speakerPowered speaker, amp
9 10
1
PC port
Use the included USB cable to connect this port to your computer.
To connect this to your computer, you must install the USB driver.
& “Installing the Software” (p. 3)
Computer
2
MIDI OUT connector
This outputs MIDI messages such as MIDI clock.
3
MIC IN jack
Connect your microphone here.
MEMO
In “System Settings” (p. 22), you can specify dedicated eects (reverb,
delay) for the mic input.
4
[MIC SENS] knob
Adjusts the mic input sensitivity.
5
INPUT (CH 1, CH 2) jacks
These jacks input sound to channels 1, 2. These jacks support phono input
from MM-type cartridges.
9
Panel Descriptions
6
PHONO GROUND terminal
If a turntable (analog) is connected to the CH 1 or CH 2 INPUT jacks,
connect the turntable’s ground terminal here. This suppresses noise from
the turntable.
* Depending on the circumstances of a particular setup, you may
experience a discomforting sensation, or perceive that the surface
feels gritty to the touch when you touch this device, or the metal
portions of other objects. This is due to an innitesimal electrical
charge, which is absolutely harmless. However, if you are concerned
about this, connect the PHONO GROUND terminal with an external
ground. When the unit is grounded, a slight hum may occur,
depending on the particulars of your installation. If you are unsure of
the connection method, contact the nearest Roland Service Center, or
an authorized Roland distributor, as listed on the “Information” page.
Unsuitable places for connection
5 Water pipes (may result in shock or electrocution)
5 Gas pipes (may result in re or explosion)
5 Telephone-line ground or lightning rod (may be dangerous in the
event of lightning)
7
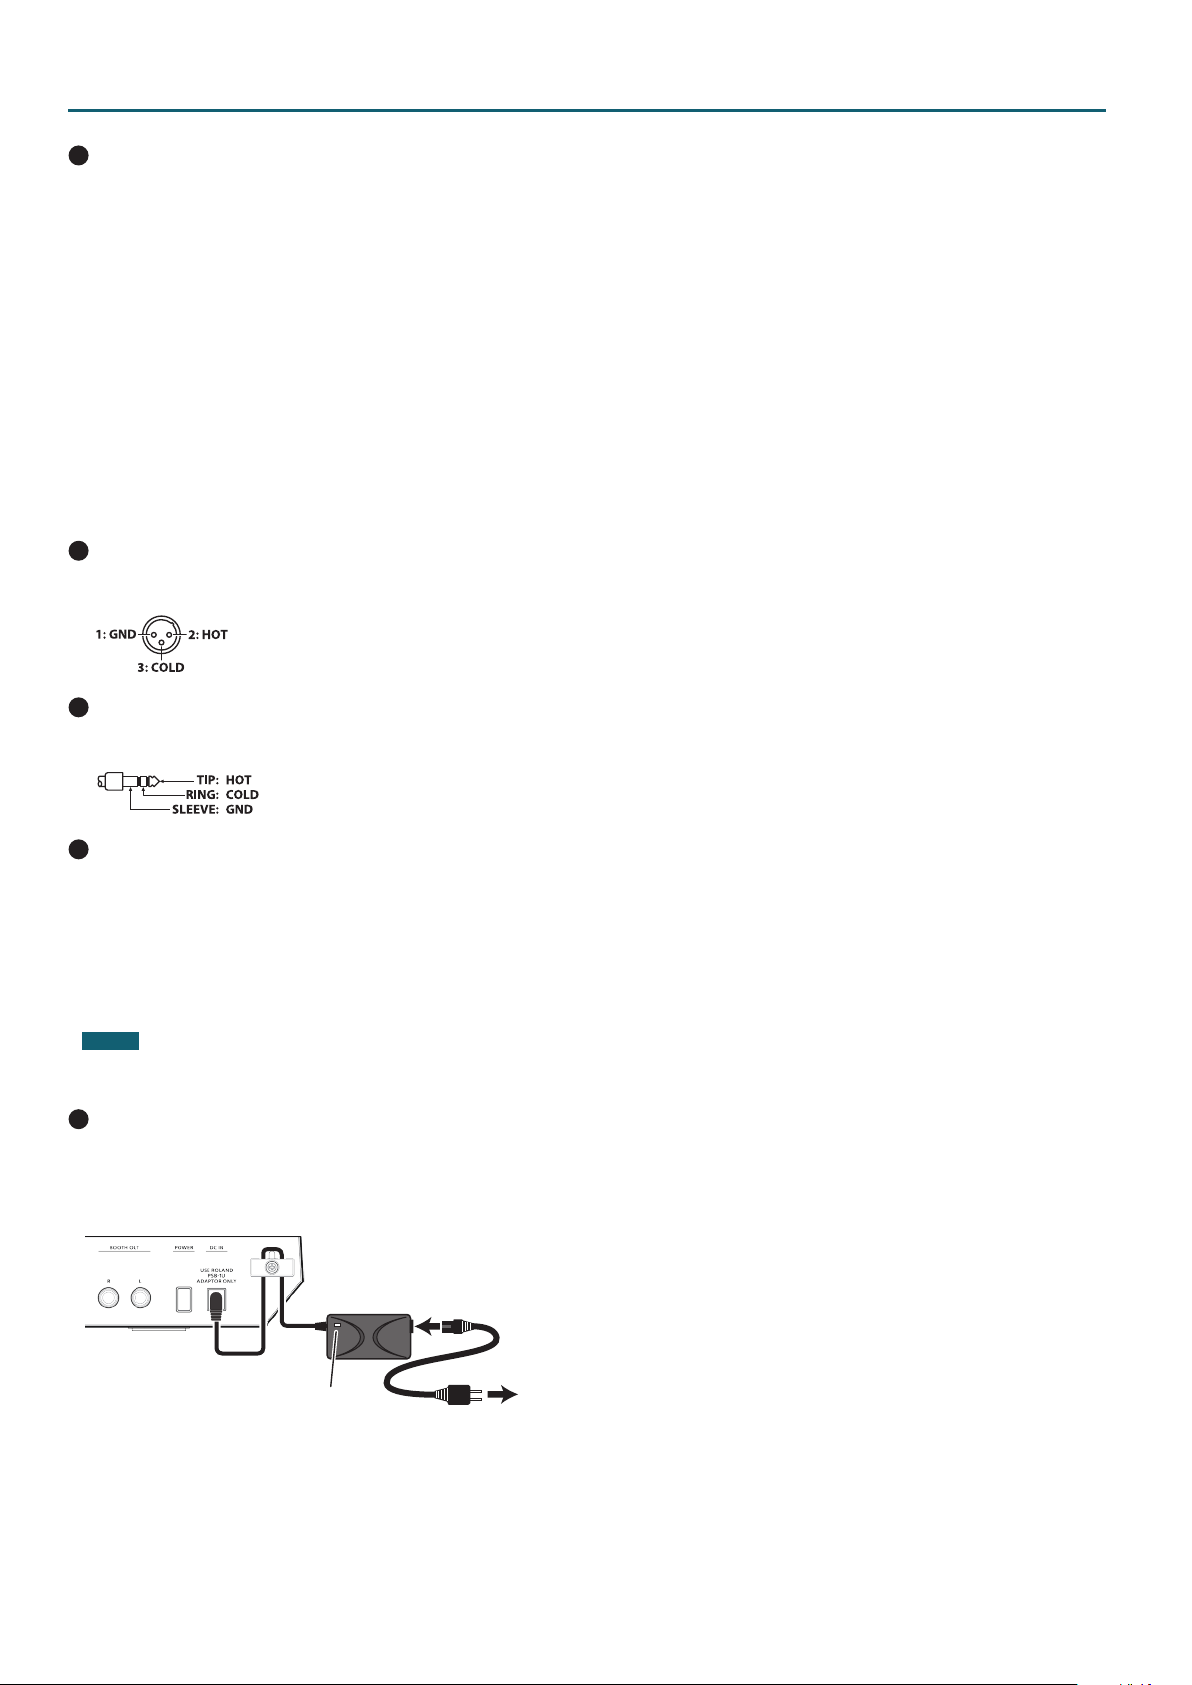
MASTER OUT 1 (L / R) connectors, 2 (L / R) jacks
Connect your powered speakers or power amp here.
* Pin assignment of MASTER OUT 1 connectors
8
BOOTH OUT (L / R) jacks
These are the output jacks for booth monitoring.
* Pin assignment of BOOTH OUT jacks
9
[POWER] switch
This turns the power on/o.
* The power to this unit will be turned o automatically after a
predetermined amount of time has passed since it was last used for
playing music, or its buttons or controls were operated (Auto O
function).
If you do not want the power to be turned o automatically,
disengage the Auto O function.
For details on how to disable this function, refer to p. 22.
NOTE
To restore power, turn the power on again.
10
DC IN jack
Connect the included AC adaptor here.
* Place the AC adaptor so the side with the indicator (see illustration)
faces upwards and the side with textual information faces downwards.
The indicator will light when you plug the AC adaptor into an AC
outlet.
Power cord
Indicator
AC Outlet
* To prevent the inadvertent disruption of power to your unit (should
the plug be pulled out accidentally), and to avoid applying undue
stress to the jack, anchor the power cord using the cord hook, as
shown in the illustration.
10
 Loading...