

Page 1

r
Owner’s Manual
Thank you for choosing a Roland DisCover 5M Realtime Orchestrator module, the perfect Standard MIDI File player
for performing musicians with a professional Vocal Harmonist function. The DisCover 5M allows you to play back
Standard MIDI Files on SmartMedia™ card or floppy disk, and to change their orchestration in realtime, while you
also have the flexibility to jump to four locations within every song, which allows you, for instance, to repeat any
part of a song time and again.
The DisCover 5M’s Vocal Harmonist is equally flexible: it can add harmonies to your singing based on the chords
used by the songs you are playing back. You can also use it for gender transformations of your voice, for correcting
not-so-perfect singing, and for a number of professional effects.
To get the most out of the DisCover 5M and to ensure many years of trouble-free service, we urge you to read
through this Owner’s Manual thoroughly.
To avoid confusion, let’s agree to use the word “button” for all keys on the front panel.
To save space (and time), let us agree to use the word “song” when referring to Standard MIDI Files.
Before using this module, carefully read the sections entitled “Important safety instructions” and “Important notes”.
They provide important information concerning the proper operation of the DisCover 5M. Be sure to keep this manual in a safe place for future reference.
Copyright © 2003 ROLAND EUROPE. All rights reserved. No part of this publication may be reproduced in any form without the written permission of Roland Europe s.p.a.
Page 2

Features
Features
The ease of Standard MIDI Files
The DisCover 5M is not just another Standard MIDI
File player: it’s a MIDI File wizard that allows you to
do all kinds of things to song material you purchase
or download from the Internet.
The DisCover 5M accepts 8MB, 16MB, 32MB, 64MB,
and 128MB SmartMedia™ cards. You should therefore be able to build yourself a vast repertoire in no
time.
Flexible song playback
Simply by selecting another “Cover” preset (of which
there are 72), you can change the orchestration of
the songs you are playing back, so as to transform,
say, the original country version into a Viennese ballroom rendition.
It is also possible to just change the character of the
drum or bass parts, if you think your songs will sound
better that way.
Of course, you can also program everything yourself
so as to add your hallmark to pre-recorded material.
The good news is that all changes can be carried out
on the DisCover 5M itself. You do not need to resort
to an external sequencer or software program.
Song Chain function and quick location of the songs
you need
Thanks to the DisCover 5M’s Chain function, you can
program play lists for your performances. The advantage of such song chains is that you won’t have to
look for the desired songs on stage.
But make no mistake: in the DisCover 5M’s case, not
having to look for the next song to be played back is
only designed to help you avoid choosing the wrong
song, which can happen quite easily, as you may
know. Realtime selection of Standard MIDI Files is
indeed lightning-fast (courtesy of the Song Finder)
and convenient (Play & Search function).
Furthermore, you can already prepare the next song
while the current one is still running (NEXT SONG
function).
And finally, you can also link one song to each User
Program, so that the desired song will be loaded simply by recalling that User Program.
Professional Vocal Harmonist
Another highlight of the DisCover 5M is its Vocal
Harmonist that adds automatic harmonies to your
singing, while there are also several modes for transforming your (or someone else’s) voice.
This implies, of course, that you can connect an
optional (Roland DR-10 or DR-20) microphone to the
DisCover 5M. Other signal sources (synthesizers, etc.)
can also be connected.
r
The signals generated by your singing and/or the
Vocal Harmonist can either be added to the signals of
the OUTPUT sockets, or transmitted directly to one or
two mixer channels (or additional amplifiers) via the
dedicated VOCAL HARMONIST OUTPUT sockets.
Dedicated effects sections
The DisCover 5M has dedicated (and completely separate) effects processors for the song and Realtime
parts, on the one hand, and the microphone and
Vocal Harmonist signals on the other.
These include: Reverb, Chorus, Delay, Compressor,
Gate, and 2-band parametric equalizer.
Three Realtime parts
You can control the DisCover 5M from an external
keyboard, MIDI accordion, sequencer, etc. To this end,
your Realtime Orchestrator contains an Upper,
Lower, and M.Drums part. They can be controlled via
separate (or the same) MIDI channel(s).
Intuitive user interface
The large touch screen keeps you posted about the
DisCover 5M’s status and allows you to set almost all
functions by touching the on-screen fields.
The DisCover 5M’s panel layout is just as intuitive and
very cooperative indeed: it works hand-in-hand with
the touch screen.
D-Beam controller
The DisCover 5M has the acclaimed D-Beam Controller* for intuitive song playback control and additional
DJ-like effects via movements over an invisible beam
of infrared light. And, of course, there are sockets for
an optional footswitch and expression pedal.
(* D Beam technology licensed from Interactive Light, Inc.)
Excellent sound source
The DisCover 5M comes with a 64-voice polyphonic
sound source with 1,422 instrument sounds and 44
Drum Sets that cover everything from incredibly
realistic acoustic instruments to cooking Techno
sounds. Never before has an electronic instrument
produced such true-to-life instrument and drum
sounds that include subtle tonal changes and all the
“noises” associated with acoustic instruments (scraping for guitar sounds, resonance for drum sounds,
etc.).
The DisCover 5M supports GS-, General MIDI2-, and
XG-format MIDI files.
128 User Programs
User Programs are memories where you can save
your own panel settings. These include the currently
selected song, Tones (sounds), tempo, as well as a lot
of other parameters. At the press of a maximum of
three buttons, you can thus completely reconfigure
your instrument.
2
Page 3

Owner’s Manual
For even more flexibility, User Program settings
stored on SmartMedia™ card can be loaded directly,
so that the number of “pre-sets” available on stage is
almost unlimited.
…and so much more
Listing all of the DisCover 5M’s advantages and functions would take another ten pages, while you must
be dying to put it through its paces. That is why we
would like to ask you to read this manual from cover
to cover. You’ll find that the DisCover 5M is quite
unlike any other instrument you know.
Have fun!
3
Page 4

Using the unit safely
Using the unit safely
Used for instructions intended to alert
the user to the risk of death or severe
injury should the unit be used
improperly.
Used for instructions intended to alert
the user to the risk of injury or material
damage should the unit be used
improperly.
* Material damage refers to damage or
other adverse effects caused with
respect to the home and all its
furnishings, as well to domestic
animals or pets.
• Before using this instrument, make sure to read the
instructions below, and the Owner’s Manual.
....................................................................................................................................
• Do not open or perform any internal modifications on
the unit.
....................................................................................................................................
• Do not attempt to repair the DisCover 5M, or replace
parts within it (except when this manual provides specific
instructions directing you to do so). Refer all servicing to
your retailer, the nearest Roland Service Center, or an
authorized Roland distributor, as listed on the “Information” page.
....................................................................................................................................
• Never use or store the DisCover 5M in places that are:
• Subject to temperature extremes (e.g., direct sunlight
in an enclosed vehicle, near a heating duct, on top of
heat-generating equipment); or are
• Damp (e.g., baths, washrooms, on wet floors); or are
• Humid; or are
• Exposed to rain; or are
• Dusty; or are
• Subject to high levels of vibration.
....................................................................................................................................
• This unit should be used only with a rack or stand that
is recommended by Roland.
....................................................................................................................................
007
• Make sure you always have the unit placed in such a way
that it is level and sure to remain stable. Never place it on
stands that could wobble, or on inclined surfaces.
....................................................................................................................................
• The instrument should only be connected to a power
supply of the type described in the operating instructions, or as marked on the DisCover 5M.
....................................................................................................................................
The symbol alerts the user to important instructions
or warnings.The specific meaning of the symbol is
determined by the design contained within the
triangle. In the case of the symbol at left, it is used for
general cautions, warnings, or alerts to danger.
The symbol alerts the user to items that must never
be carried out (are forbidden). The specific thing that
must not be done is indicated by the design contained
within the circle. In the case of the symbol at left, it
means that the unit must never be disassembled.
The ● symbol alerts the user to things that must be
carried out. The specific thing that must be done is
indicated by the design contained within the circle. In
the case of the symbol at left, it means that the powercord plug must be unplugged from the outlet.
• Do not excessively twist or bend the power cord, nor
place heavy objects on it. Doing so can damage the cord,
producing severed elements and short circuits. Damaged
cords are fire and shock hazards!
...................................................................................................................................
• This instrument, either alone or in combination with an
amplifier and headphones or speakers, may be capable of
producing sound levels that could cause permanent
hearing loss. Do not operate for a long period of time at a
high volume level, or at a level that is uncomfortable. If
you experience any hearing loss or ringing in the ears,
you should immediately stop using the unit, and consult
an audiologist.
...................................................................................................................................
• Do not allow any objects (e.g., flammable material, coins,
pins); or liquids of any kind (water, soft drinks, etc.) to
penetrate the unit.
...................................................................................................................................
• In households with small children, an adult should provide supervision until the child is capable of following all
rules essential for the safe operation of the DisCover 5M.
...................................................................................................................................
• Protect the unit from strong impact.
(Do not drop it!)
...................................................................................................................................
• Do not force the DisCover 5M’s power cord to share an
outlet with an unreasonable number of other devices. Be
especially careful when using extension cords—the total
power used by all devices you have connected to the
extension cord’s outlet must never exceed the power rating (watts/amperes) for the extension cord. Excessive
loads can cause the insulation on the cord to heat up and
eventually melt through.
...................................................................................................................................
r
4
Page 5
• Before using the DisCover 5M in a foreign country, consult with your retailer, the nearest Roland Service Center,
or an authorized Roland distributor, as listed on the
“Information” page.
....................................................................................................................................
• The DisCover 5M should be located so that its location or
position does not interfere with its proper ventilation.
....................................................................................................................................
• Always grasp only the plug on the power-supply cord
when plugging into, or unplugging from, an outlet or this
unit.
....................................................................................................................................
• Try to prevent cords and cables from becoming entangled. Also, all cords and cables should be placed out of
the reach of children.
....................................................................................................................................
• Never climb on top of, nor place heavy objects on the
unit.
Owner’s Manual
• Never handle the power cord or its plugs with wet hands
when plugging into, or unplugging from, an outlet or this
unit.
...................................................................................................................................
• If you need to move the instrument, take note of the precautions listed below. Make sure to have a firm grip, to
protect yourself from injury and the instrument from
damage.
• Disconnect the power cord.
• Disconnect all cords coming from external devices.
• Before cleaning the unit, turn off the power and unplug
the power cord from the outlet.
...................................................................................................................................
• Whenever you suspect the possibility of lightning in your
area, disconnect the power cord from the outlet.
...................................................................................................................................
• Should you remove screws, make sure to put them in a
safe place out of children’s reach, so there is no chance
of them being swallowed accidentally.
...................................................................................................................................
....................................................................................................................................
5
Page 6

Important notes
1. Important notes
In addition to the items listed under “Using the unit safely” (p. 4), please read and observe the following:
Power supply
• Do not use this instrument on the same power circuit with any
device that will generate line noise (such as an electric motor or
variable lighting system).
• Before connecting the DisCover 5M to other devices, turn off the
power to all units. This will help prevent malfunctions and/or damage to speakers or other devices.
Placement
• Using the DisCover 5M near power amplifiers (or other equipment
containing large power transformers) may induce hum. To alleviate the problem, change the orientation of this instrument or
move it further away from the source of interference.
• This instrument may interfere with radio and television reception.
Do not use it in the vicinity of such receivers.
• Observe the following when using the unit’s floppy disk drive. For
further details, refer to “Before using floppy disks (handling the
floppy disk drive)”.
• Do not place the unit near devices that produce a strong mag-
netic field (e.g., loudspeakers).
• Install the DisCover 5M on a solid, level surface.
• Do not move the unit or subject it to vibration while the drive is
operating.
• Do not expose the DisCover 5M to direct sunlight, place it near
devices that radiate heat, leave it inside an enclosed vehicle, or
otherwise subject it to temperature extremes. Excessive heat can
deform or discolor the instrument.
• To avoid possible breakdown, do not use the unit in a wet area,
such as an area exposed to rain or other moisture.
• Do not allow objects to remain on top of the DisCover 5M. This can
be the cause of malfunction.
Maintenance
• For everyday cleaning wipe the DisCover 5M with a soft, dry cloth
or one that has been slightly dampened with water. To remove
stubborn dirt, use a mild, non-abrasive detergent. Afterwards, be
sure to wipe the instrument thoroughly with a soft, dry cloth.
• Never use benzene, thinner, alcohol or solvents of any kind, to
avoid the possibility of discoloration and/or deformation.
Repairs and data
• Please be aware that all data contained in the instrument’s memory may be lost when it is sent for repairs. In certain cases (such as
when circuitry related to memory itself is out of order), we regret
that it may not be possible to restore the data. Roland assumes no
liability concerning such loss of data.
Additional precautions
• Please be aware that the memory contents can be irretrievably lost
as a result of a malfunction, or the improper operation of the
instrument.
• Use a reasonable amount of care when using the instrument’s buttons, other controls, and jacks/connectors. Rough handling can
lead to malfunctions.
• Never strike or apply strong pressure to the display.
• When connecting/disconnecting cables, grasp the connector
itself—never pull on the cable. This way you will avoid causing
shorts, or damage to the cable’s internal elements.
• A small amount of heat will radiate from the instrument during
normal operation. This is perfectly normal.
• To avoid disturbing your neighbors, try to keep the instrument’s
volume at reasonable levels. You may prefer to use headphones, so
you do not need to be concerned about those around you (especially late at night).
• When you need to transport the instrument, package it in the box
(including padding) that it came in. Otherwise, you will need to use
equivalent packaging materials, or a flightcase.
• Use only the specified expression pedal (EV-5, EV-7; sold separately). By connecting any other expression pedals, you risk causing malfunction and/or damage to the DisCover 5M.
About the touch screen
• Wipe off stains on the touch screen using ethanol, but do not
allow the ethanol to soak into the joint of the upper fume and the
bottom glass, for it may otherwise cause peeling or malfunction.
Do not use organic solvents or detergents other than ethyl alcohol
(ethanol).
Before using floppy disks (handling the floppy disk
drive)
• Install the unit on a solid, level surface in an area free from vibration. If the unit must be installed at an angle, be sure the installation does not exceed the permissible range: upward, 2°; downward, 18°.
• Avoid using the DisCover 5M immediately after it has been moved
to a location with a level of humidity that is greatly different than
its former location. Rapid changes in the environment can cause
condensation to form inside the drive, which will adversely affect
the operation of the drive and/or damage floppy disks. When the
unit has been moved, allow it to become accustomed to the new
environment (allow a few hours) before operating it.
• To insert a disk, push it gently but firmly into the drive—it will click
into place. To remove a disk, press the EJECT button firmly. Do not
use excessive force to remove a disk which is lodged in the drive.
• Never attempt to remove a floppy disk from the drive while the
drive is operating (the indicator is lit); damage could result to both
the disk and the drive.
• Remove any disk from the drive before powering up or down.
• To prevent damage to the disk drive’s heads, always try to hold the
floppy disk in a level position (not tilted in any direction) while
inserting it into the drive. Push it in firmly, but gently. Never use
excessive force.
• To avoid the risk of malfunction and/or damage, insert only floppy
disks into the disk drive. Never insert any other type of disk. Avoid
getting paper clips, coins, or any other foreign objects inside the
drive.
Handling floppy disks
• Floppy disks contain a plastic disk with a thin magnetic coating.
Microscopic precision is required to enable storage of large
amounts of data on such a small surface area. To preserve their
integrity, please observe the following when handling floppy disks:
• Never touch the magnetic medium inside the disk.
• Do not use or store floppy disks in dirty or dusty areas.
• Do not subject floppy disks to temperature extremes (e.g., direct
sunlight in an enclosed vehicle). Recommended temperature
range: 10°~50°C (50°~122°F).
• Do not expose floppy disks to strong magnetic fields, such as
those generated by loudspeakers.
r
6
Page 7
Owner’s Manual
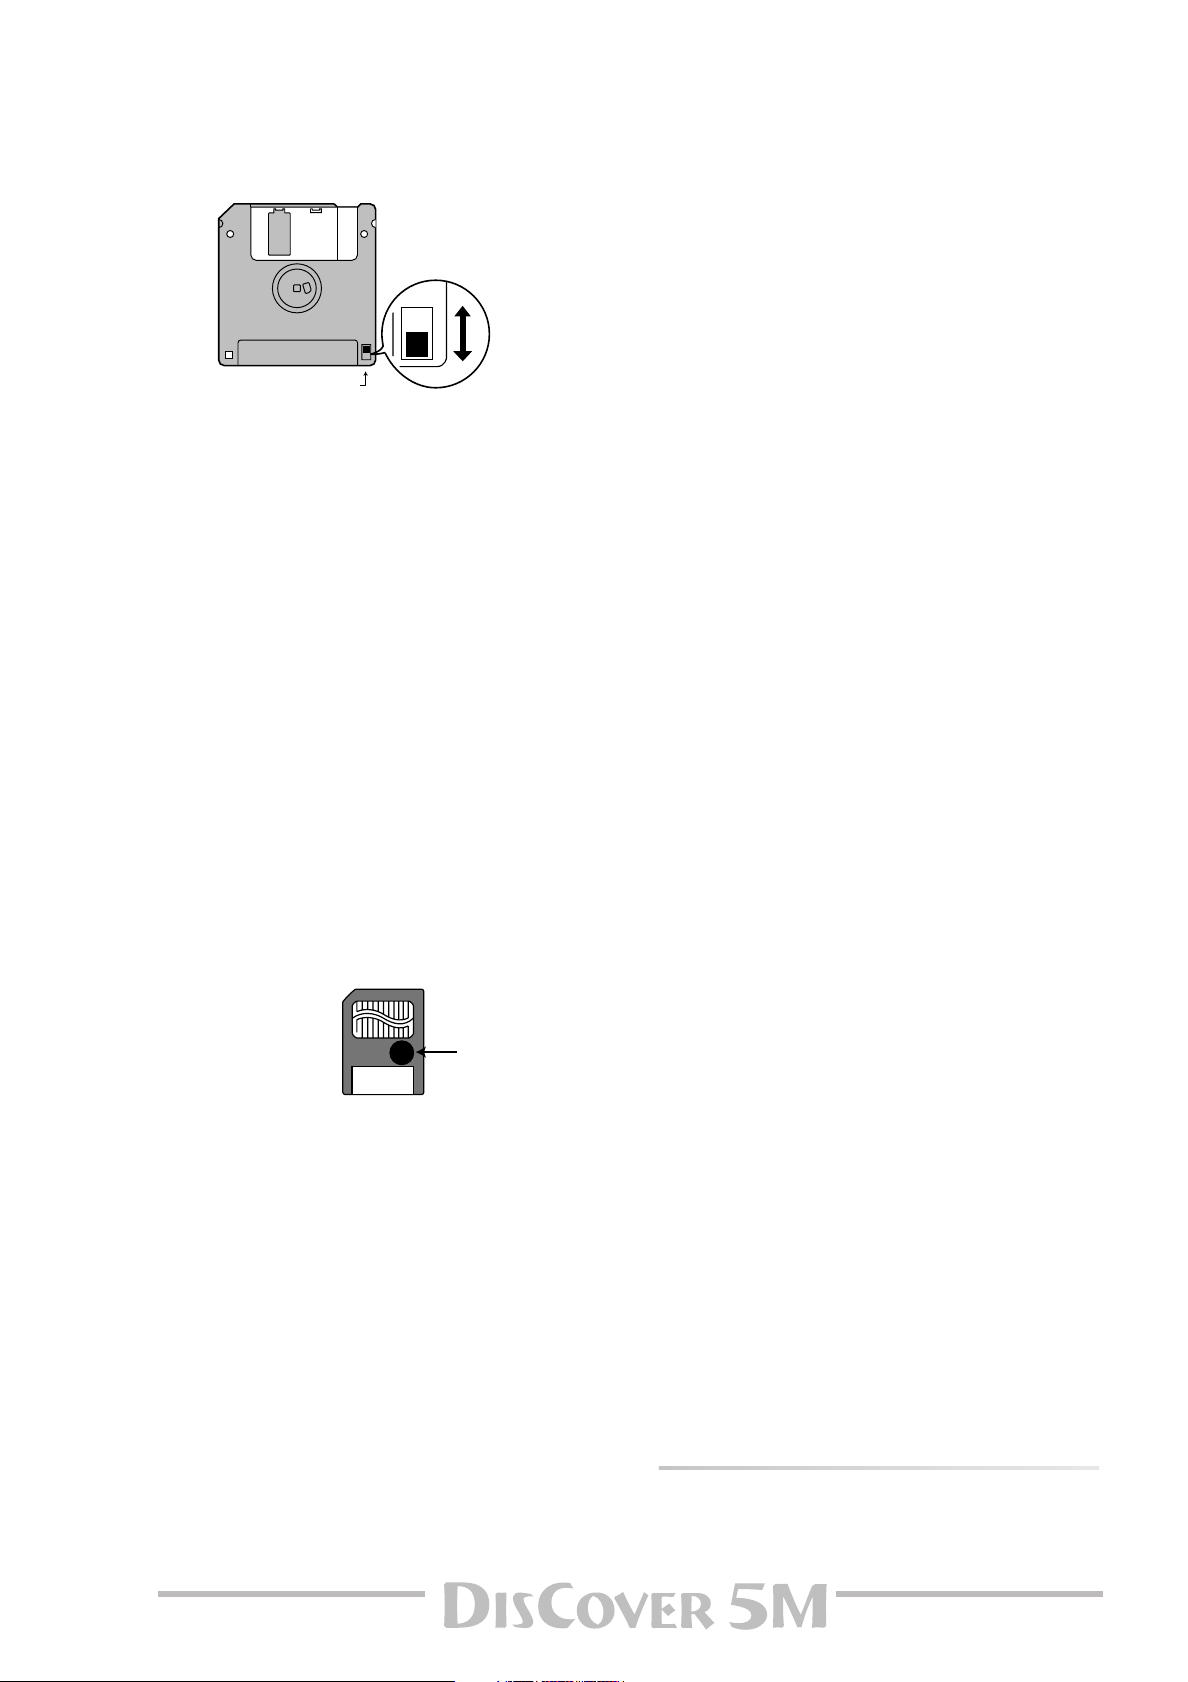
• Floppy disks have a “WRITE” tab which can protect the disk from
accidental erasure. It is recommended that the tab be kept in
the PROTECT position, and moved to the WRITE position only
when you wish to write new data onto the disk.
Rear side of the disk
WRITE
(you can save data to the disk)
Protect tab
• Disks containing important performance data for this instrument should always be locked (have their write protect tab slid
to the PROTECT position) before you insert them into the drive
of another instrument.
• The identification label should be firmly affixed to the disk. If
the label comes loose while the disk is in the drive, it may be
difficult to remove the disk.
• Put the disk back into its case for storage.
PROTECT
(you cannot save data)
Before using a SmartMedia™ card
• Only SmartMedia cards formatted on the DisCover 5M can be
used.
• Be sure to insert the memory card all the way into the slot.
• Do not touch the contacts of the memory card, or allow them to
become soiled.
• Never remove the memory card or turn off the power while an
operation –such as reading or writing data, or formatting– is being
performed on the memory card. Never remove or connect the card
while the DisCover 5M is on. Doing so can destroy the data on the
memory card and/or render the memory card itself unusable.
• If you affix the write-protect label to the write-protect area of the
memory card, you will not be able to format the card or write data
to it. If you wish to format the card or write data to it, do so without the label affixed. For details on the write-protect sticker, refer
to the owner’s manual for your memory card.
Liability and copyright
• Should data contained and stored on the SmartMedia card be lost,
it is unfortunately impossible to restore them. Roland Europe
S.p.A. assumes no liability concerning such loss of data.
• Unauthorized recording, distribution, sale, lending, public performance, broadcasting, or the like in whole or in part, of a work
(musical composition, video, broadcast, public performance, or the
like) whose copyright is held by a third party is prohibited by law.
• Do not use this unit for purposes that could infringe on a copyright held by a third party. Roland assumes no responsibility whatsoever with regard to any infringements of third-party copyrights
arising through your use of this unit.
• If you attempt to format a card or write data to it when the writeprotect label is affixed, an error message will appear. In that case,
either insert another card or remove the write-protect label.
• At power-on, do not remove/insert a SmartMedia card while the
DisCover 5M is updating its internal data (wait until the messages
“Song database checking…” and “User Program database
checking…” have disappeared).
• Make sure that the memory card is oriented correctly, and push it
all the way into the slot. The gold contacts must face downward.
• Never turn on the power when a memory card is inserted partway
into the slot. Doing so will damage the data in internal memory.
Memory cards usable with the DisCover 5M
• The DisCover 5M can use commercially available Smart Media
memory cards. You can purchase such cards at a computer shop or
digital camera dealer.
• Memory cards you purchase must meet the following conditions.
• Power supply voltage: 3.3 V
• Capacity: 4, 8, 16, 32, 64, 128MB
• The DisCover 5M cannot use SmartMedia of types other than the
above.
• SmartMedia is a trademark of Toshiba Corp.
• All product names mentioned in this document are trademarks or
registered trademarks of their respective owners.
• DisCover 5M IT. PAT. PEND.
7
Page 8

Contents
Features. . . . . . . . . . . . . . . . . . . . . . . . . . . . . . . . . . . . . . . 2
1. Important notes . . . . . . . . . . . . . . . . . . . . . . . . . . . . . 6
2. Panel descriptions . . . . . . . . . . . . . . . . . . . . . . . . . . . 9
3. Touring your DisCover 5M . . . . . . . . . . . . . . . . . . . 12
Connections. . . . . . . . . . . . . . . . . . . . . . . . . . . . . . . . . . . 12
Switching the DisCover 5M on/off . . . . . . . . . . . . . . . 13
Interactive demo of the DisCover 5M. . . . . . . . . . . . . 14
Overview . . . . . . . . . . . . . . . . . . . . . . . . . . . . . . . . . . . . . 15
Playing back songs . . . . . . . . . . . . . . . . . . . . . . . . . . . . . 15
Quick location of the song you need. . . . . . . . . . . . . . . . . 16
Starting playback . . . . . . . . . . . . . . . . . . . . . . . . . . . . . . . . . 16
Other practical playback functions . . . . . . . . . . . . . . . . . . 17
Modifying songs in realtime. . . . . . . . . . . . . . . . . . . . . 19
Using the Cover function . . . . . . . . . . . . . . . . . . . . . . . . . .19
Minus One . . . . . . . . . . . . . . . . . . . . . . . . . . . . . . . . . . . . . . . 19
Vocal Harmonist function. . . . . . . . . . . . . . . . . . . . . . . 20
Adding harmonies to your singing . . . . . . . . . . . . . . . . . .22
Who specifies the harmonies? . . . . . . . . . . . . . . . . . . . . . . 23
Not convinced so far? . . . . . . . . . . . . . . . . . . . . . . . . . . . . . 23
Voice-FX . . . . . . . . . . . . . . . . . . . . . . . . . . . . . . . . . . . . . . . . . 24
Auto Pitch Correct function . . . . . . . . . . . . . . . . . . . . . . . . 24
Vocoder. . . . . . . . . . . . . . . . . . . . . . . . . . . . . . . . . . . . . . . . . . 25
Talk . . . . . . . . . . . . . . . . . . . . . . . . . . . . . . . . . . . . . . . . . . . . . 26
Automatic transposition (Singer Key) . . . . . . . . . . . . . 27
Displaying Lyrics and chord information . . . . . . . . . . 29
Using the Realtime parts. . . . . . . . . . . . . . . . . . . . . . . . 30
Choosing other Tones (or Drum Sets) . . . . . . . . . . . . . . . . 31
Using the D Beam Controller . . . . . . . . . . . . . . . . . . . . 34
4. Using the performance functions . . . . . . . . . . . . . 35
Transposition. . . . . . . . . . . . . . . . . . . . . . . . . . . . . . . . . . 35
Setting the transposition interval via the display . . . . . .36
Master Tune. . . . . . . . . . . . . . . . . . . . . . . . . . . . . . . . . . . 36
D Beam functions. . . . . . . . . . . . . . . . . . . . . . . . . . . . . . 37
Using optional footswitches. . . . . . . . . . . . . . . . . . . . . 39
Expression (Foot Pedal) . . . . . . . . . . . . . . . . . . . . . . . . . . . . 40
Scale Tune . . . . . . . . . . . . . . . . . . . . . . . . . . . . . . . . . . . . 40
5. Before you start editing (Menu). . . . . . . . . . . . . . . 42
6. Working with the Mixer & using effects . . . . . . . . 44
Mixing Realtime parts . . . . . . . . . . . . . . . . . . . . . . . . . . 44
More refined Mixer settings . . . . . . . . . . . . . . . . . . . . . . . . 45
Editing the Realtime (and song) effects processors . . . . 45
Using the multi-effects processor (Multi-FX) . . . . . . 47
Selecting another Multi-FX type . . . . . . . . . . . . . . . . . . . . 47
Linking Multi-FX type selection to the Upper part
(Upper M-FX) . . . . . . . . . . . . . . . . . . . . . . . . . . . . . . . . . . . . 49
Voice and Vocal Harmonist part mixing . . . . . . . . . . . 49
Reverb, Delay, and Chorus effects . . . . . . . . . . . . . . . . . . . 50
7. Editing the Realtime & Vocal Harmonist parts . . . 54
Editing the Realtime parts (Sound Edit) . . . . . . . . . . . 54
Editing the Vocal Harmonist parts. . . . . . . . . . . . . . . . 56
Procedure for selecting these pages . . . . . . . . . . . . . . . . . 56
Singer settings. . . . . . . . . . . . . . . . . . . . . . . . . . . . . . . . . . . . 56
Voice-FX settings. . . . . . . . . . . . . . . . . . . . . . . . . . . . . . . . . . 57
Auto Pitch Correct function settings. . . . . . . . . . . . . . . . . 58
Vocoder settings . . . . . . . . . . . . . . . . . . . . . . . . . . . . . . . . . . 59
Small settings . . . . . . . . . . . . . . . . . . . . . . . . . . . . . . . . . . . . 60
Ensemble settings . . . . . . . . . . . . . . . . . . . . . . . . . . . . . . . . .62
r
8. More refined song functions . . . . . . . . . . . . . . . . . 63
Using the Fade-In/Out function . . . . . . . . . . . . . . . . . 63
Programming MARK JUMP locations . . . . . . . . . . . . . 64
Working with the Song Finder. . . . . . . . . . . . . . . . . . . 65
Locating files with the Song Finder . . . . . . . . . . . . . . . . . .66
Editing the Song Finder information . . . . . . . . . . . . . . . . . 67
Song Chain function . . . . . . . . . . . . . . . . . . . . . . . . . . . 71
Programming Song Chains . . . . . . . . . . . . . . . . . . . . . . . . . 71
Editing Chains . . . . . . . . . . . . . . . . . . . . . . . . . . . . . . . . . . . . 72
Using Song Chains . . . . . . . . . . . . . . . . . . . . . . . . . . . . . . . . 73
Managing Song Chains . . . . . . . . . . . . . . . . . . . . . . . . . . . . 74
9. Working with User Programs. . . . . . . . . . . . . . . . . 75
Writing your settings to a User Program. . . . . . . . . . 75
Selecting User Programs. . . . . . . . . . . . . . . . . . . . . . . . 76
User Program selection . . . . . . . . . . . . . . . . . . . . . . . . . . . . 76
Selecting User Programs with
Finder: selecting User Programs on SmartMedia card . . 77
Selectively loading User Program settings
(User Program Hold) . . . . . . . . . . . . . . . . . . . . . . . . . . . . . . 78
Automatic functions for User Programs . . . . . . . . . . 79
Linking a MIDI Set to a User Program . . . . . . . . . . . . . . . .80
Startup User Program. . . . . . . . . . . . . . . . . . . . . . . . . . . . . . 80
10. Song Makeup Tools. . . . . . . . . . . . . . . . . . . . . . . . . 81
Instrument: selecting different sounds . . . . . . . . . . . 81
Volume: part balance . . . . . . . . . . . . . . . . . . . . . . . . . . 82
Reverb and Chorus: effect balance . . . . . . . . . . . . . . . 83
Palette: in-depth song editing. . . . . . . . . . . . . . . . . . . 85
11. Editing Lyrics . . . . . . . . . . . . . . . . . . . . . . . . . . . . . . 91
Adding Lyrics to a song. . . . . . . . . . . . . . . . . . . . . . . . . 91
‘Utility’ functions for Edit Lyrics . . . . . . . . . . . . . . . . . 93
12. MIDI . . . . . . . . . . . . . . . . . . . . . . . . . . . . . . . . . . . . . 94
The how-to’s . . . . . . . . . . . . . . . . . . . . . . . . . . . . . . . . . . 94
Editing MIDI parameters. . . . . . . . . . . . . . . . . . . . . . . . 96
Editing the System parameters. . . . . . . . . . . . . . . . . . . . . . 98
MIDI Sets . . . . . . . . . . . . . . . . . . . . . . . . . . . . . . . . . . . . . 99
13. Disk/Media functions . . . . . . . . . . . . . . . . . . . . . . 101
The how-to’s . . . . . . . . . . . . . . . . . . . . . . . . . . . . . . . . . 101
Load (from disk or SmartMedia) . . . . . . . . . . . . . . . . 102
Save (to disk or SmartMedia). . . . . . . . . . . . . . . . . . . 102
Delete. . . . . . . . . . . . . . . . . . . . . . . . . . . . . . . . . . . . . . . 104
Disk/Media Utility functions. . . . . . . . . . . . . . . . . . . . 104
Format. . . . . . . . . . . . . . . . . . . . . . . . . . . . . . . . . . . . . . . . . .104
Copy functions. . . . . . . . . . . . . . . . . . . . . . . . . . . . . . . . . . .105
14. Specifications . . . . . . . . . . . . . . . . . . . . . . . . . . . . 110
MIDI Implementation Chart. . . . . . . . . . . . . . . . . . . . 111
Index. . . . . . . . . . . . . . . . . . . . . . . . . . . . . . . . . . . . . . . 112
[DOWN] [UP]
. . . . . . . . . . .77
8
Page 9

2. Panel descriptions
Owner’s Manual
E
A
C
D J
K
A
D Beam controller
This controller allows you to influence the timbre of
the notes you play, to control song playback, and to
create some unique effects. All you need to do is
move your hand up/down or left/right above the two
“eyes”.
The D BEAM CONTROLLER buttons allow you to
assign the desired function to the D Beam Controller.
See p. 34.
B
LCD CONTRAST knob
Use this knob to set the contrast when you are having problems reading what is written on the display.
The LCD may take some time to warm up. That is why
you may have to change the contrast several times
after powering on.
C
VOLUME section
[MASTER]
ume of your DisCover 5M.
[SONG]
of the song parts. Turn it towards the left (towards
“MIN”) if you think your solo is too soft.
[FADE¥OUT/IN]
playback with an automatic fade-in of the music. If
you press it during playback, the volume will gradually decrease (fade-out).
knob: Use this knob to set the global vol-
knob: This knob allows you to set the volume
B
F
G
H
I
ML N O
V W X
button: This button allows you to start
P
Q
R
S U
T
D
TRANSPOSE section
These buttons allow you to transpose the
DisCover 5M up ([¥®]) or down ([√¥ƒ]) in semitone
steps. You can also specify which parts are to be
transposed (page 35). If neither button lights, no
manual transposition is used.
E
[SONG/RHYTHM FINDER] button
Press this button to quickly locate the desired Standard MIDI File on the inserted SmartMedia™ card or
floppy disk. See page 65.
F
[LYRICS & CHORD] button
Press this button if you want the lyrics contained in
the songs to appear in the display. At the same time,
the chords of the notes played by the song parts will
also be displayed. This, however, is information that is
“extracted” (derived) in realtime by the DisCover 5M.
G
[SINGER KEY] button
This button provides access to a page where you can
set and/or select the range to which the tonality of
the songs should be adapted (page 27).
H
[DISK/MEDIA] button
Press this button if you wish to save/load data from a
floppy disk or SmartMedia™ card. You will also find
data management functions here, like deleting files,
formatting floppies or cards, etc. (page 101).
9
Page 10

Panel descriptions
I
SONG MAKEUP TOOLS buttons
These buttons allow you to modify the settings of the
current song. See page 81.
The [COVER] button is especially interesting, because
it provides access to pre-programmed templates that
allow you to quickly modify a song’s character. See
page 19.
J
PLAYER section
[CHAIN] button: Press this button to access the Chain
display where you can select a song chain to be
played back, edit existing chains, program new ones,
etc. When this button lights, [|√], [º], [‰], [®/ª] are
used to control playback of the current song. Press it
together with [NEXT¥SONG] to select the
DisCover 5M’s demo function (see p. 14).
[NEXT¥SONG] button: Press this button to select the
next song you want to use, while the current one is
still running. If the [CHAIN] button lights, this button
allows you to select the next song of the selected
chain.
[MINUS¥ONE] button: Press this button to switch off
the part you want to play (or sing) yourself. The part
to be muted is selectable (page 19).
[|√], [º], [‰], [®/ª]: These buttons allow you to return
to the beginning of the current song, “rewind” or
fast-foward in one-measure steps, and to start and
stop playback of the selected song.
BEAT indicator: this indicator flashes at the speed of
the currently-set tempo (the tempo value also
appears in the display).
K
[MULTI-FX] button
This button allows you to quickly switch the
DisCover 5M’s multi-effects processor on (button
lights) and off (button dark). By holding it slightly
longer, you jump to a display page where you can
change the multi-effects settings (see p. 47).
L
USER PROGRAM buttons
These buttons allow you to select the previous
([DOWN]) or next ([UP]) User Program. User Programs
are registration memories. By pressing these buttons
simultaneously, you revert to the settings that were
in effect before recalling the current User Program
(“Cancel”).
M
USER PROGRAM HOLD buttons
These buttons are used for ignoring the TONE and/or
VOCAL HARMONIST settings of subsequently loaded
User Programs. If a button lights, the DisCover 5M
will recall all User Program settings except the ones
filtered by the active button.
N
MARK JUMP buttons [1], [2], [3], [4]
These buttons allow you to jump to one of four
stored locations inside the currently selected song.
The 132 songs on the supplied SmartMedia™ card
already contain such locations for the verse ([1]), chorus ([2]), bridge ([3]) and ending ([4]). You can edit
these, and also program the desired locations for
songs that do not yet contain them.
O
DATA ENTRY section
[VALUE] dial: This dial can be used to set the tempo or
the value in the parameter field that is currently
highlighted.
The [PREV] and [NEXT] buttons are used to select the
previous or next value field on the current display
page (if available).
P
Display
This touch sensitive display not only keeps you
posted about the DisCover 5M’s current status, it also
allows you to select the parameters and settings you
see by pressing the corresponding fields.
Q
[TONE FINDER] button
Press this button to search for a suitable sound
(“Tone”) for your live playing using the Upper and/or
Lower Realtime parts.
R
[MIXER/EFFECT] button
This button provides access to the display pages
where you can set the volume balance and effects of
the DisCover 5M’s parts.
S
[MENU] button
Press this button to call up a menu that provides
access to more refined DisCover 5M functions you
may wish to set from time to time.
T
[EXIT] button
Press this button to return to the previously selected
display page, or the DisCover 5M’s main page.
U
VOCAL HARMONIST section
The buttons and knobs in this section are used to set
the Vocal Harmonist function, the microphone level
and the effects applied to the signals received via the
Vocal Harmonist MIC INPUT socket.
V
PHONES 1 & 2 sockets
This is where you can connect optional stereo headphones (e.g. of Roland’s RH series). Feel free to use
either or both jacks simultaneously.
W
SmartMedia™ slot
This is where you need to insert the supplied or other
SmartMedia cards. The DisCover 5M comes with a
64MB card packed with Standard MIDI Files and
other useful settings. You can, however, also use 4, 8,
16, 32, 64 and 128MB cards.
X
Disk drive
This is where you insert floppy disks with Standard
MIDI Files you may already own. The drive accepts
2DD (720k) and 2HD (1.44MB) floppy disks.
For your convenience, and to take advantage of the
DisCover 5M’s powerful FINDER functions, we recommend copying all Standard MIDI Files to SmartMedia card.
r
10
Page 11

A B C D E F G
A
OUTPUT R & L/MONO sockets
These sockets need to be connected to an external
amplifier, mixing consoles, etc. Depending on
whether you are also using the Vocal Harmonist OUTPUT sockets (see below), the present sockets either
transmit only the music generated by Song and Realtime parts, or both the tone generator’s and Vocal
Harmonist’s signals.
Note: If you can/want to use only one channel on your external amplifier, connect the L/MONO socket to its input. For
optimum sound quality, we recommend working in stereo,
though.
B
VIDEO OUTPUT socket
Connect this socket to the appropriate socket of your
TV or monitor. In that case, the lyrics of songs that
contain such information, and the note information
extracted in realtime (page 29) will be displayed on
screen even if the [LYRICS&CHORD] button does not
light (in which case the lyrics and chords no longer
appear in the DisCover 5M’s display).
Note: The signal format (PAL or NTSC) can be set via a MENU
function.
C
Vocal Harmonist OUTPUT R & L sockets
If connected to a mixing console, amplifier, etc.,
these sockets transmit the signal received via the MIC
INPUT socket and processed by the DisCover 5M’s
Vocal Harmonist. If no jacks are connected here, the
Vocal Harmonist signals will be transmitted via the
OUTPUT sockets (see above).
D
MIC INPUT socket
This is where you need to connect an optional microphone (like a Roland DR-10 or DR-20) or other external signal source you wish to process using the
DisCover 5M’s Vocal Harmonist facility. See also
“GAIN switch” above for setting the input sensitivity.
Note: The MIC INPUT socket is mono.
Owner’s Manual
H I J
E
GAIN switch
If you connect a microphone to the MIC INPUT
socket, set this switch to “MIC”. If you wish to try out
the Vocal Harmonist function for other signals (guitar, external synthesizers & modules, CDs, MDs, etc.),
set this switch to “LINE”.
Note: For the “LINE” setting to work with electric guitars or
basses, you need to connect such instruments to an effects
pedal or rack effect (in bypass mode), and connect the effect’s
output to the MIC INPUT socket.
F
FOOT SWITCH socket
An optional DP-2, DP-6, or BOSS FS-5U footswitch
connected to this socket can be used for various purposes: its function is programmable (page 39).
Note: The DisCover 5M has no Hold (or Damper) socket,
because those messages are received via MIDI. If you need to
sustain the notes you play, connect an appropriate pedal to
your external MIDI keyboard (Roland A-37, PC-300, etc.).
G
FOOT PEDAL socket
An optional EV-5 or EV-7 expression pedal connected
to this jack can be used for controlling the volume of
the DisCover 5M’s Realtime parts.
H
MIDI THRU/OUT/IN sockets
These sockets allow you to connect the DisCover 5M
to external MIDI devices for a variety of applications:
receiving song data in realtime from an external
sequencer, transmitting your playing (and the data of
the song you are playing back) to an external
sequencer.
Note: The MIDI functions can be accessed via the
DisCover 5M’s Menu (page 94). Frequently used MIDI settings
can be written and recalled as “MIDI Sets”.
I
[POWER ON] button
Press this button to switch the DisCover 5M on and
off.
J
AC socket
This is where you need to connect the supplied power
cord.
11
Page 12
Touring your DisCover 5M
3. Touring your DisCover 5M
You must be dying to try out your new DisCover 5M to see what it is capable of. We’ll get to that in a minute. But
first we need to connect it.
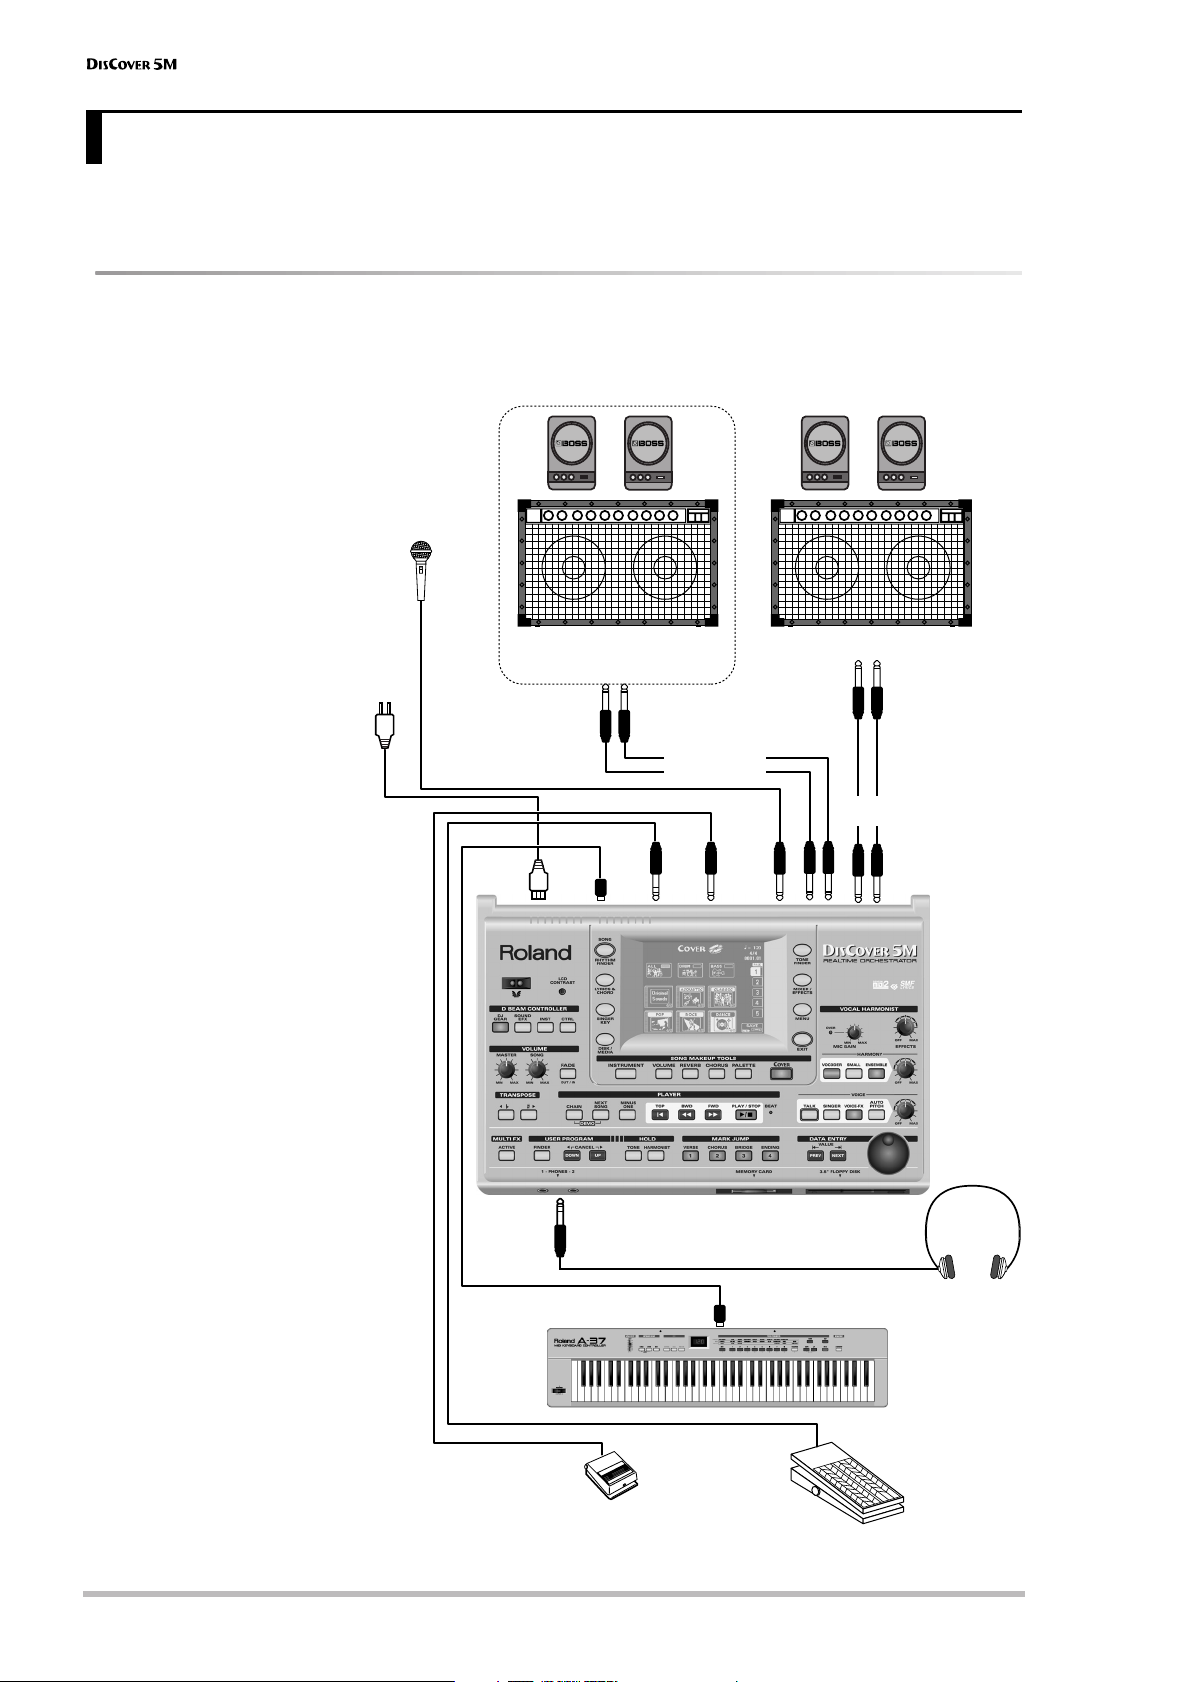
Connections
The DisCover 5M neither contains a keyboard, nor internal speakers. You therefore need to connect it to an external
keyboard (MIDI accordion, sequencer) and amplifier (Roland’s KC series, for example), or use optional headphones
(Roland RH-25 or RH-50, for example).
Be sure to switch off both
the DisCover 5M and the
external devices you want
to connect before making
or breaking audio and/or
MIDI connections. If you
do not have access to the
sound system of the venue
where you are performing, ask the local engineer
to set the volume to the
minimum level.
Note: Try to use dynamic
microphones whenever possible. You can also connect a
condenser microphone, however, provided you use a DI box
(with power supply). Connect
the microphone using an
unbalanced mono 1/4” jack.
Note: Except for the power
cable, all other items shown
above are optional. See your
Roland dealer for details.
Note: There is no absolute
need to connect the Vocal Harmonist OUTPUT sockets. If you
don’t, your singing and the
Harmonist effects will be transmitted via the main OUTPUT
sockets. (Only if you don’t connect anything to the Vocal
Harmonist OUTPUT sockets.) If
you use these connectors, the
Vocal Harmonist signals are no
longer transmitted to the
headphones.
Dynamic microphone
(select “MIC”)
Other signal source
(select “LINE”)
Connect to
wall outlet
[Microphone: DR-10 or DR-20]
*Connect the microphone using an
unbalanced mono 1/4” jack.
Keyboard amplifier, active speakers
—OPTIONAL—
Vocal Harmonist
OUTPUT R, L
MIDI
FOOT
AC
PEDAL
IN
FOOT
SWITCH
Keyboard amplifier, active speakers,
MIC
INPUT
etc.
OUTPUT R,
L/MONO
r
12
(DP-2, DP-6, or BOSS FS-5U)
Footswitch
MIDI OUT
Expression pedal
(EV-5, EV-7)
Roland
Stereo headphones
(RH-25 or RH-50)
MIDI controller (keyboard, accordion,
sequencer, etc.)
Page 13
Switching the DisCover 5M on/off
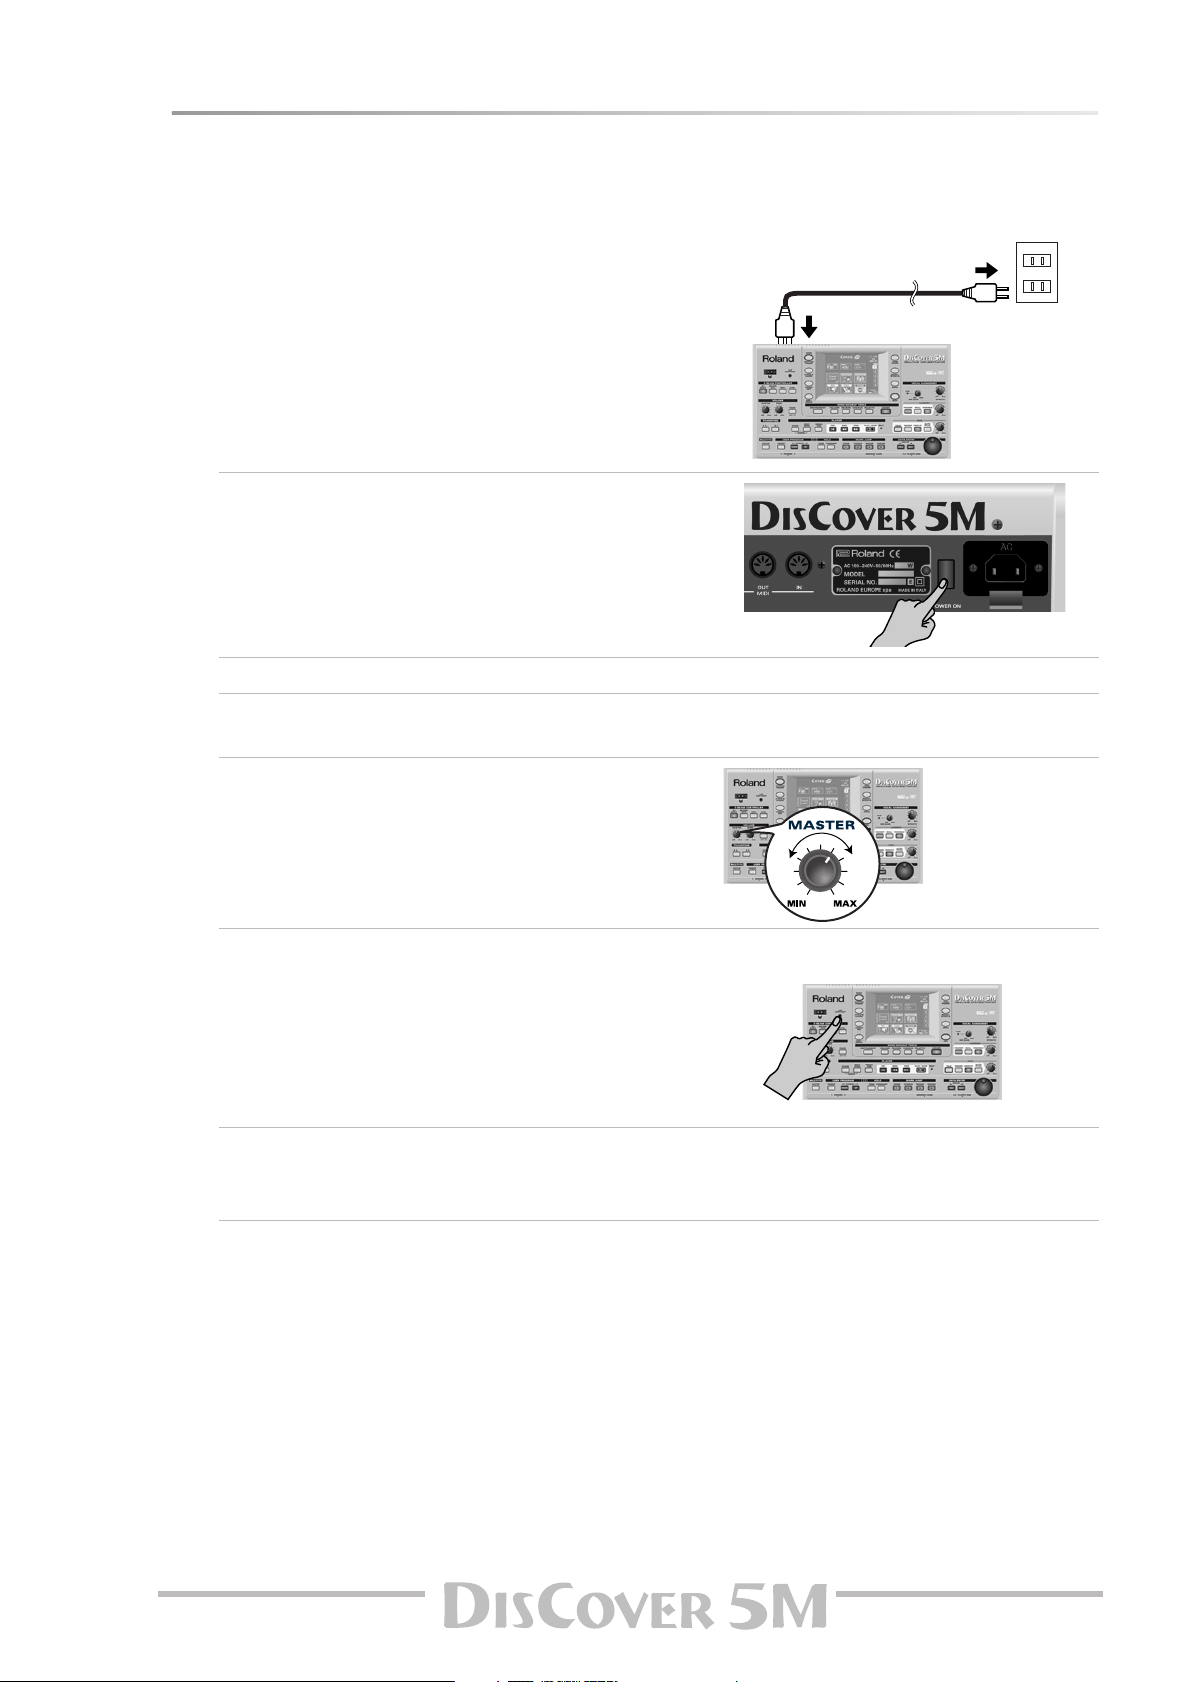
After connecting the DisCover 5M to the other devices, proceed as follows:
Switching on the DisCover 5M
(1) Insert the included power cable into the AC inlet
and then plug it into an electrical outlet.
(2) Press the DisCover 5M’s [POWER¥ON] button
located on the rear panel to switch it on.
Owner’s Manual
(3) If you connected the DisCover 5M to a mixing console, switch it on now.
(4) Switch on the amplifier, your active speakers, or the keyboard amplifier(s).
(5) Switch on your MIDI controller connected to the DisCover 5M’s MIDI IN socket.
(6) Use the [MASTER] knob to set the DisCover 5M’s
output volume.
Setting the display contrast
The information in the LCD display may be difficult to
view after turning on your DisCover 5M or after extended
use. Your viewing angle or the current lighting conditions
can also affect the appearance of the display.
In such cases, use the [LCD¥CONTRAST] knob located on
the rear panel to adjust the contrast of the display.
Switching off the DisCover 5M
(7) Switch off all external devices.
(8) Press the DisCover 5M’s [POWER¥ON] button to switch it off.
13
Page 14
Touring your DisCover 5M
LCD Mode
You can decide to have the information displayed
white-on-blue (Normal) or blue–on-white (Invert).
Choose whichever is more convenient for you:
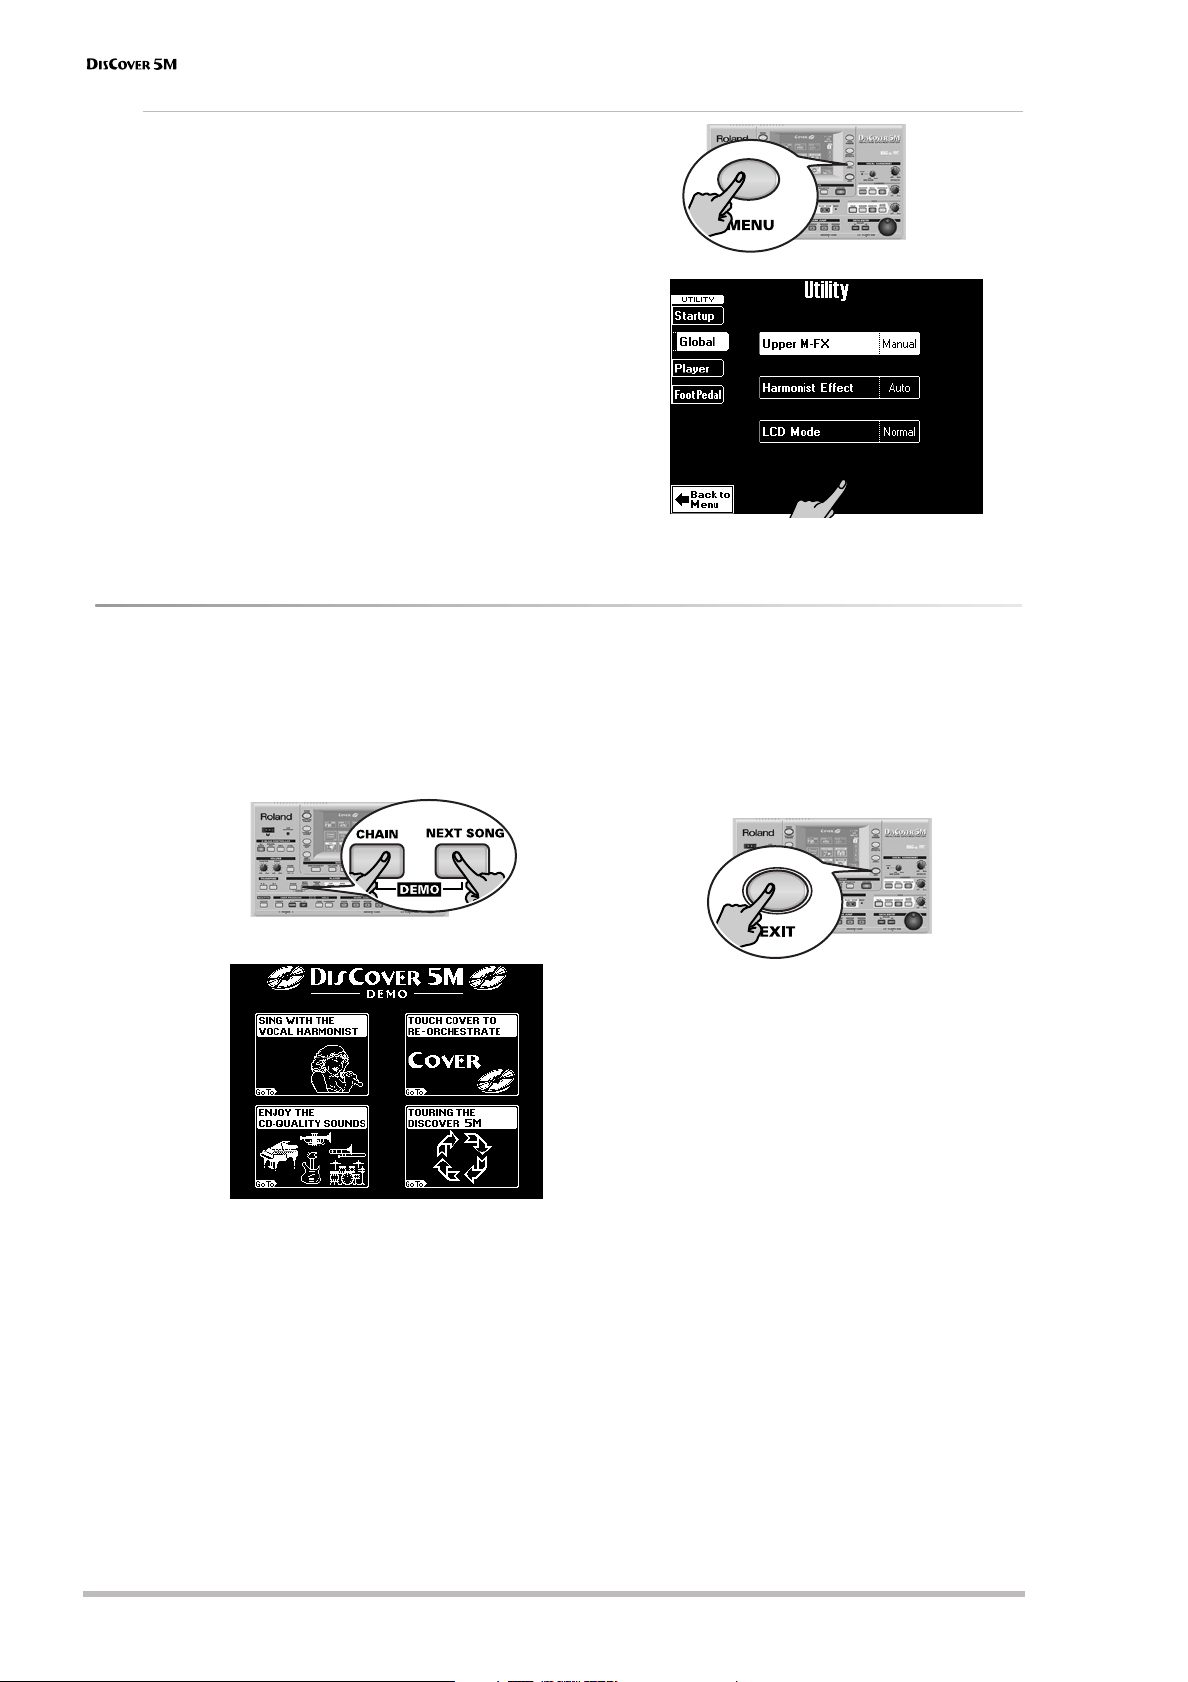
(1) Press the [MENU] button.
(2) On the display page that appears now, press the
[UTILITY] field.
(3) Press the [Global] field in the left corner.
(4) Press the [LCD¥Mode] field.
(5) Use the [VALUE] dial to select “Invert” (blue-on-
white) or “Normal” (white-on-blue).
(6) Press the [EXIT] button to return to the main page.
Interactive demo of the DisCover 5M
Your DisCover 5M contains an interactive demo that introduces all of its highlights. It might be a good idea to try it
out now. The demo is self-explanatory, so we’ll just show you how to start and stop it.
(1) Simultaneously press the [CHAIN] and
[NEXT¥SONG] buttons.
The display now looks as follows:
(2) Press the field that provides access to the
desired demo function.
There are 5 demo songs that are played back in
a loop. If necessary, you can jump to the preceding or following demo song by pressing the
[PREV] or [NEXT] button.
(3) To stop the demo and leave the
DisCover 5M’s Demo function, press the [EXIT]
button.
(4) If you can barely hear the music, set the
[MASTER] knob (far left, VOLUME section) to a
higher level.
r
14
Page 15
Overview
Your DisCover 5M is a very user-friendly instrument indeed, but it is also extremely powerful. As we have to start
somewhere (which may not be what you want to do first), here’s an overview of where to find what for your first
exploration of the DisCover 5M:
What do you want to do first?
• Playing back songs → p. 15
• Modifying songs in realtime → p. 19
• Vocal Harmonist function → p. 20
• Automatic transposition (Singer Key) → p. 27
• Displaying Lyrics and chord information → p. 29
• Using the Realtime parts → p. 30
• Using the D Beam Controller → p. 34
Other aspects will be covered elsewhere in this manual.
Playing back songs
Your DisCover 5M is a novel Standard MIDI File player with all kinds of functions for “customizing” the songs you
play back via easy-to-use routines. Let us first look at the playback functions proper.
(1) Connect the DisCover 5M to your sound sys-
tem.
If you prefer to use headphones, connect them
to the PHONES socket (left side).
(2) Insert the supplied SmartMedia™ card into
the card slot.
(3) Switch on the amp (if available) and the
DisCover 5M.
You can press [®÷ª] at this stage to start playback of the first song on the card. (If no card is
inserted, while a floppy disk is in the drive, the
DisCover 5M selects the first song on disk.) To
select the song yourself, proceed as follows:
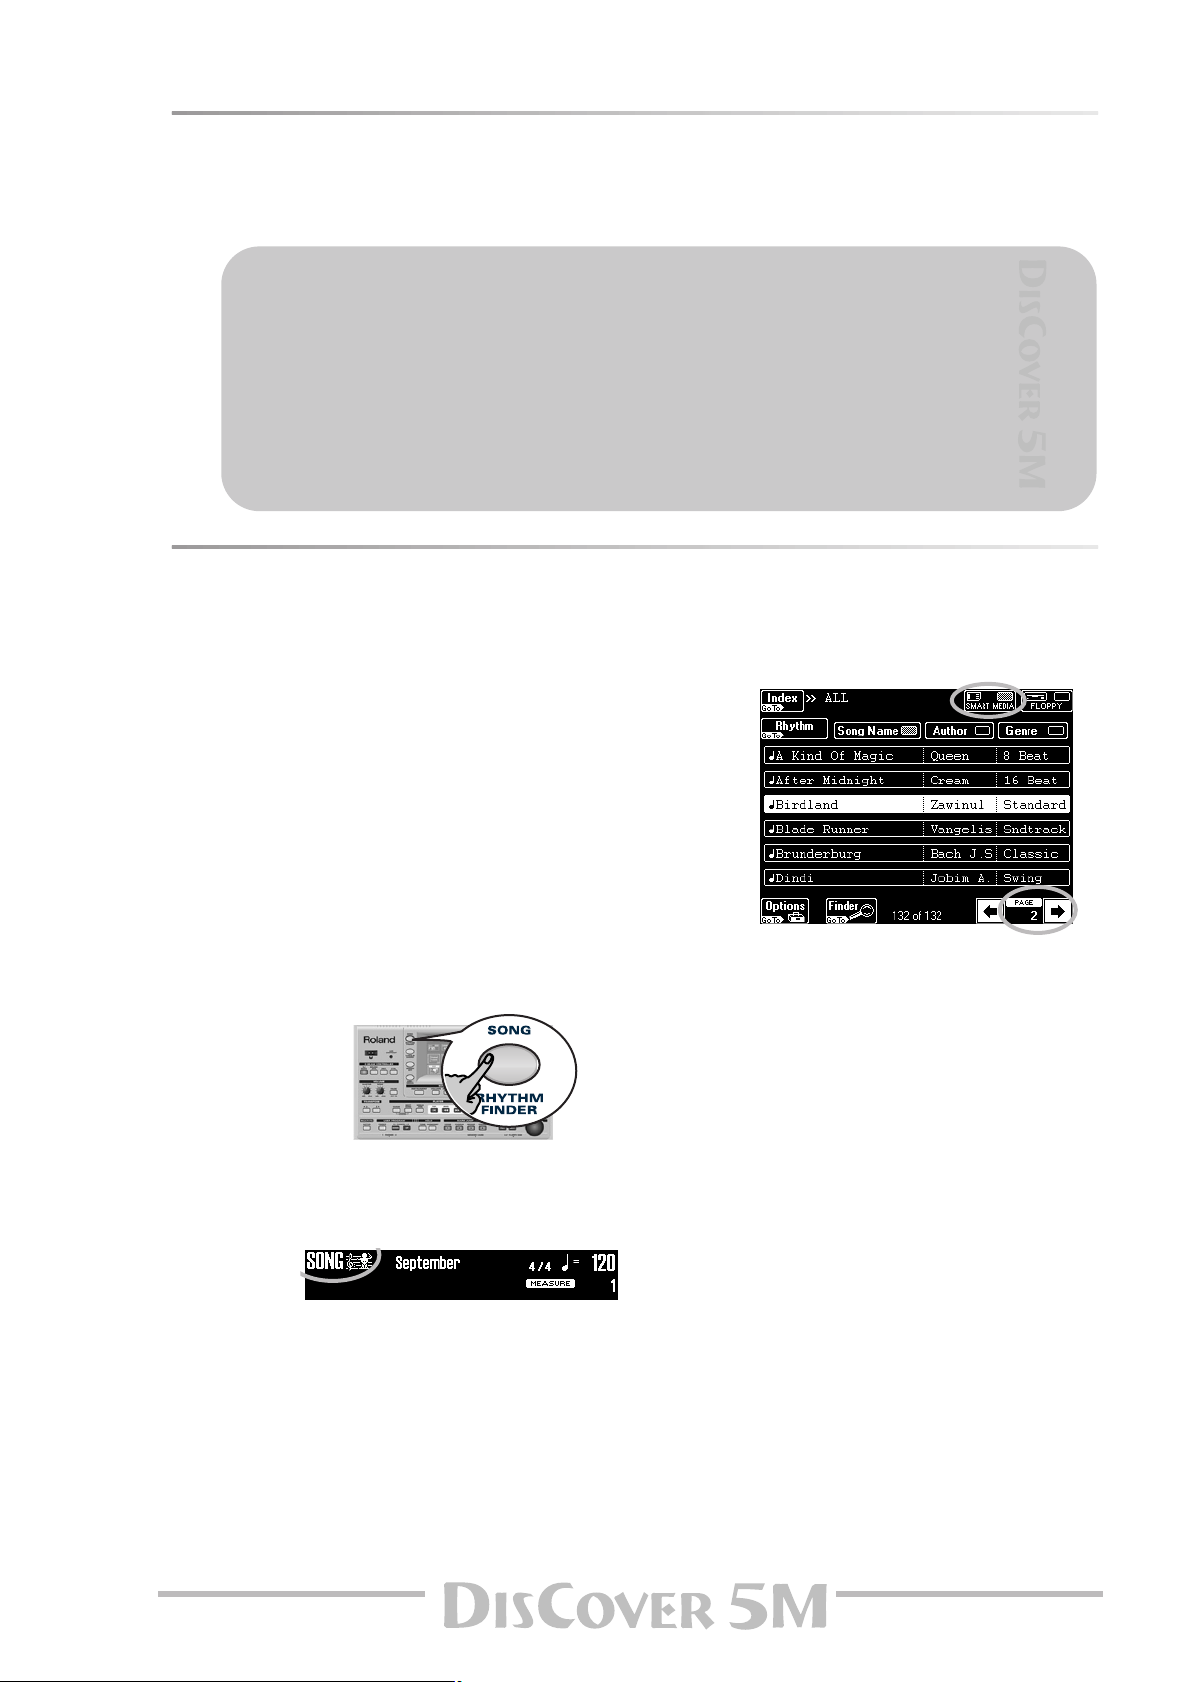
(4) Press the [SONG/RHYTHM¥FINDER] button.
You can also press the [SONG] field in the upper
left corner of the display (if available) to select
songs.
The display changes to:
(5) If it isn’t already highlighted, press the
[SMART¥MEDIA] field in the upper right corner.
The display shows a list of 6 songs (Standard
MIDI Files) on the SmartMedia card.
If you prefer to listen to one of your own songs
on floppy disk, insert it into the drive and press
the [FLOPPY] field.
(6) If the name of the song you want to listen to
is already displayed, press its line.
In our example, “Birdland” has been selected.
(7) To display the next 6 songs, press the [˚] field
in the lower right corner.
You can press this field as many times as necessary (or until it is no longer displayed).
To return to a previous group of 6 songs,
press [ø].
Owner’s Manual
15
Page 16
Touring your DisCover 5M
Quick location of the song you need
There are several ways to quickly locate the song you are after:
• Press the [Author] or [Genre] field under step (4)
to sort the song files according to artist names
(Author) or kind of music (Genre).
Continue with step (5) to select the song you
want to listen to.
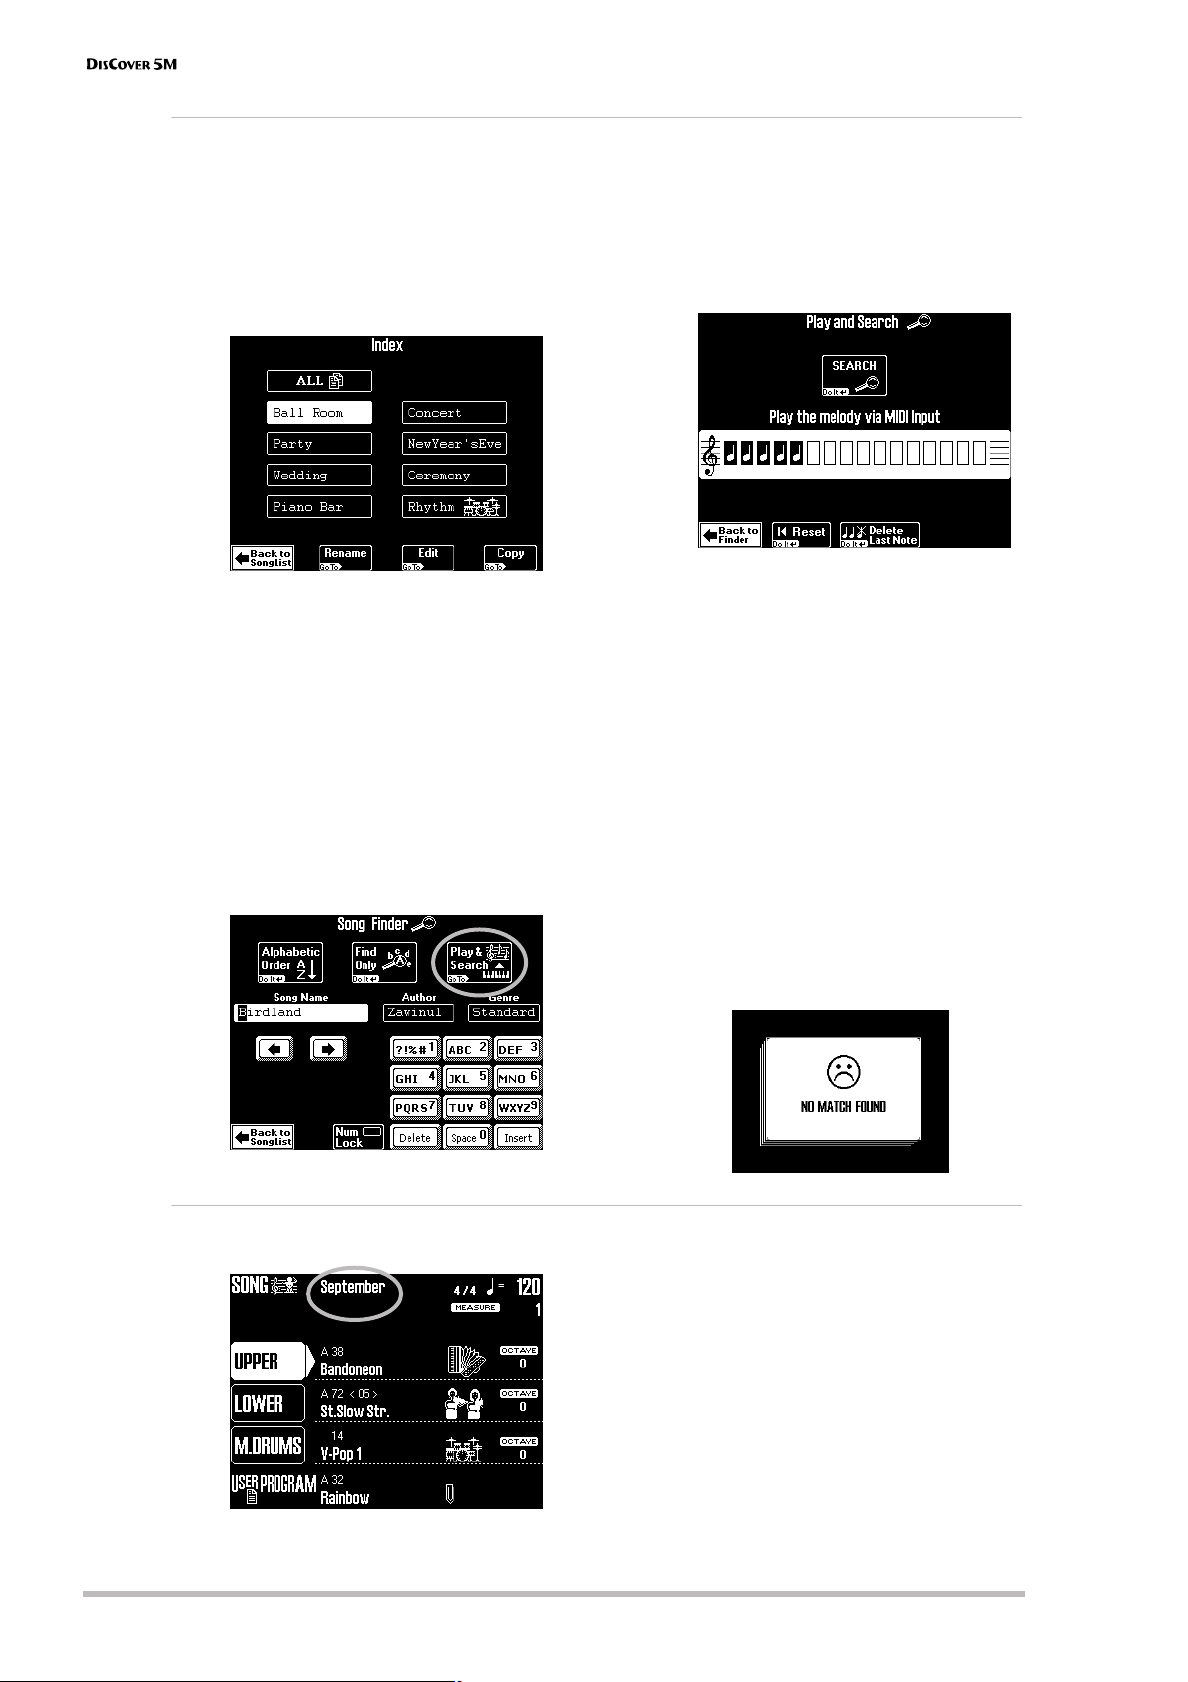
• Press the [Index] field in the upper left corner.
• Connect an external MIDI controller to the
DisCover 5M’s MIDI IN jack (the MIDI channel
on which it transmits is of little importance
here).
• Press the [Play&Search] field.
Press one of the displayed field names to narrow down your search to songs that belong to
the selected category (“Index”).
Note: Press the [ALL] field to display all songs on the
SmartMedia card.
The display now returns to the page shown
under step (4) above. This time, however, only
the songs belonging to the selected Index are
displayed.
Continue with step (5) to select the song you
want to listen to.
• If you only know the melody of the desired
song, press the [Finder] field under step (4).
• As indicated in the display, play the main theme
on the external keyboard. You can play in any
key, and the rhythm doesn’t have to be perfect
either (this function just looks for intervals).
• If you played a wrong note, press
[Delete¥LastNote].
• To enter the entire line again, press [∫¥Reset] to
erase the previously entered notes, then play
the phrase again.
• After entering the melody, press the [SEARCH]
field.
The display now returns to step (4) on page 15
and shows the names of the songs that contain
the melody you played.
• Press the field of the song you want to play
back.
Note: If no songs were found, the following message
appears, and all songs are once again displayed:
Starting playback
(8) To return to the main page, press [EXIT]. The “main page” is the DisCover 5M’s display
r
16
page that provides a maximum of relevant
information and allows you to select (and
change) items you may need during normal
operation.
It also displays the name of the selected song,
the tempo, and the current measure.
Note: The player can muster up to 76,000 events. If the
message “Too many events” is displayed, the selected
song contains more than that number and cannot be
played back.
Page 17

Owner’s Manual
Note: When playing back large SMFs at a very high
tempo, playback may suddenly stop and the message
“Song Scanning” may appear. This can be solved by
reducing the playback tempo so that the DisCover 5M
has enough time to process all MIDI data contained in
the song.
(9) Press the [®÷ª] button.
Playback of the selected song starts.
Other practical playback functions
●
MARK JUMP
Songs on the supplied SmartMedia card contain four locations (“markers”) you can jump to
right away. For songs that do not yet contain
them, you can program these markers yourself.
You can also edit the locations of existing
markers (page 64).
Use the MARK JUMP [1]~[4] buttons (below the
[®÷ª] button) to select the position you want to
jump to without stopping or delaying playback.
Such changes occur at the end of the current
measure, which makes more musical sense than
jumping when you’re halfway into a measure.
The labels (VERSE, CHORUS, BRIDGE, ENDING)
refer to the locations you jump to by pressing
the corresponding button. Obviously, these
labels may be meaningless for markers you programmed or edited yourself.
There are four such MARK memories.
The advantage of these markers is that you can
return to the chorus, for example, if you notice
that the audience wants the song to last a little
longer than originally planned. Markers also
allow you to change the song structure in realtime (by starting with the bridge, for example).
Note: These buttons may also come in handy for the
songs of the [Rhythm] index. See page 65.
(10) If necessary, use the [VALUE] dial to change
the tempo.
To reset the song tempo, press the tempo field
in the display.
(11) Use the [MASTER] knob to set the
DisCover 5M’s output volume.
You can also play to the music. If necessary, use
the [SONG] knob to set the desired balance.
●
Reset, rewind, fast-forward
You can also use the following buttons to jump
to different song locations.
[|√] TOP: Allows you to return to the beginning
of the current song.
[º] BWD: allows you to rewind one measure at
a time.
[‰] FWD: allows you to fast-forward one measure at a time.
These buttons are available both during playback and while playback is stopped.
●
Next Song
While the current song is still running, you can
already select the next one to be played back:
• Press the [NEXT¥SONG] button.
• Select the desired song using the Song Finder
(page 15).
• As soon as the current song finishes, the next
one starts. You can now select another song.
• Press the [NEXT¥SONG] button again to switch
off this function.
Note: Your DisCover 5M also provides a Chain function
for programming play lists of several songs (page 71).
17
Page 18

Touring your DisCover 5M
●
Player (GS Reset Send and Quick Start)
(1) Press the [MENU] button.
The display changes to:
(2) Press the [UTILITY] field. If the [Player] field in
the left corner is not displayed in white, press
it.
(3) Switch the [GS¥RESET¥SEND] field to specify
whether (on) or not (off) SysEx messages
contained in the song you play back are
updated while you fast-forward/rewind or
use the MARK JUMP buttons.
By switching this function on, you can rest
assured that your songs always sound as
expected.
(4) Use the [Quick¥Start] field to quickly jump to
the first note of the selected song.
This function temporarily sets the tempo to
= 250 – to race through empty measures at
the beginning of the song file (which may contain important settings), thus avoiding that the
newly selected song begins with two measures
of “nothing” (which can be terribly long when
you’re in front of an audience). As soon as the
DisCover 5M reaches the first note, the tempo
returns to the programmed value.
r
18
Page 19
Modifying songs in realtime
Let us now look at some functions for customizing the songs you play back.
Using the Cover function
The COVER function provides “masks” that change the instrumentation of the selected song. Simply by selecting
another preset, you can cause a Viennese waltz to be played back by a heavy metal band, etc. Even though the
arrangement (rhythm, riffs) does not change, the songs’ character can be modified beyond recognition.
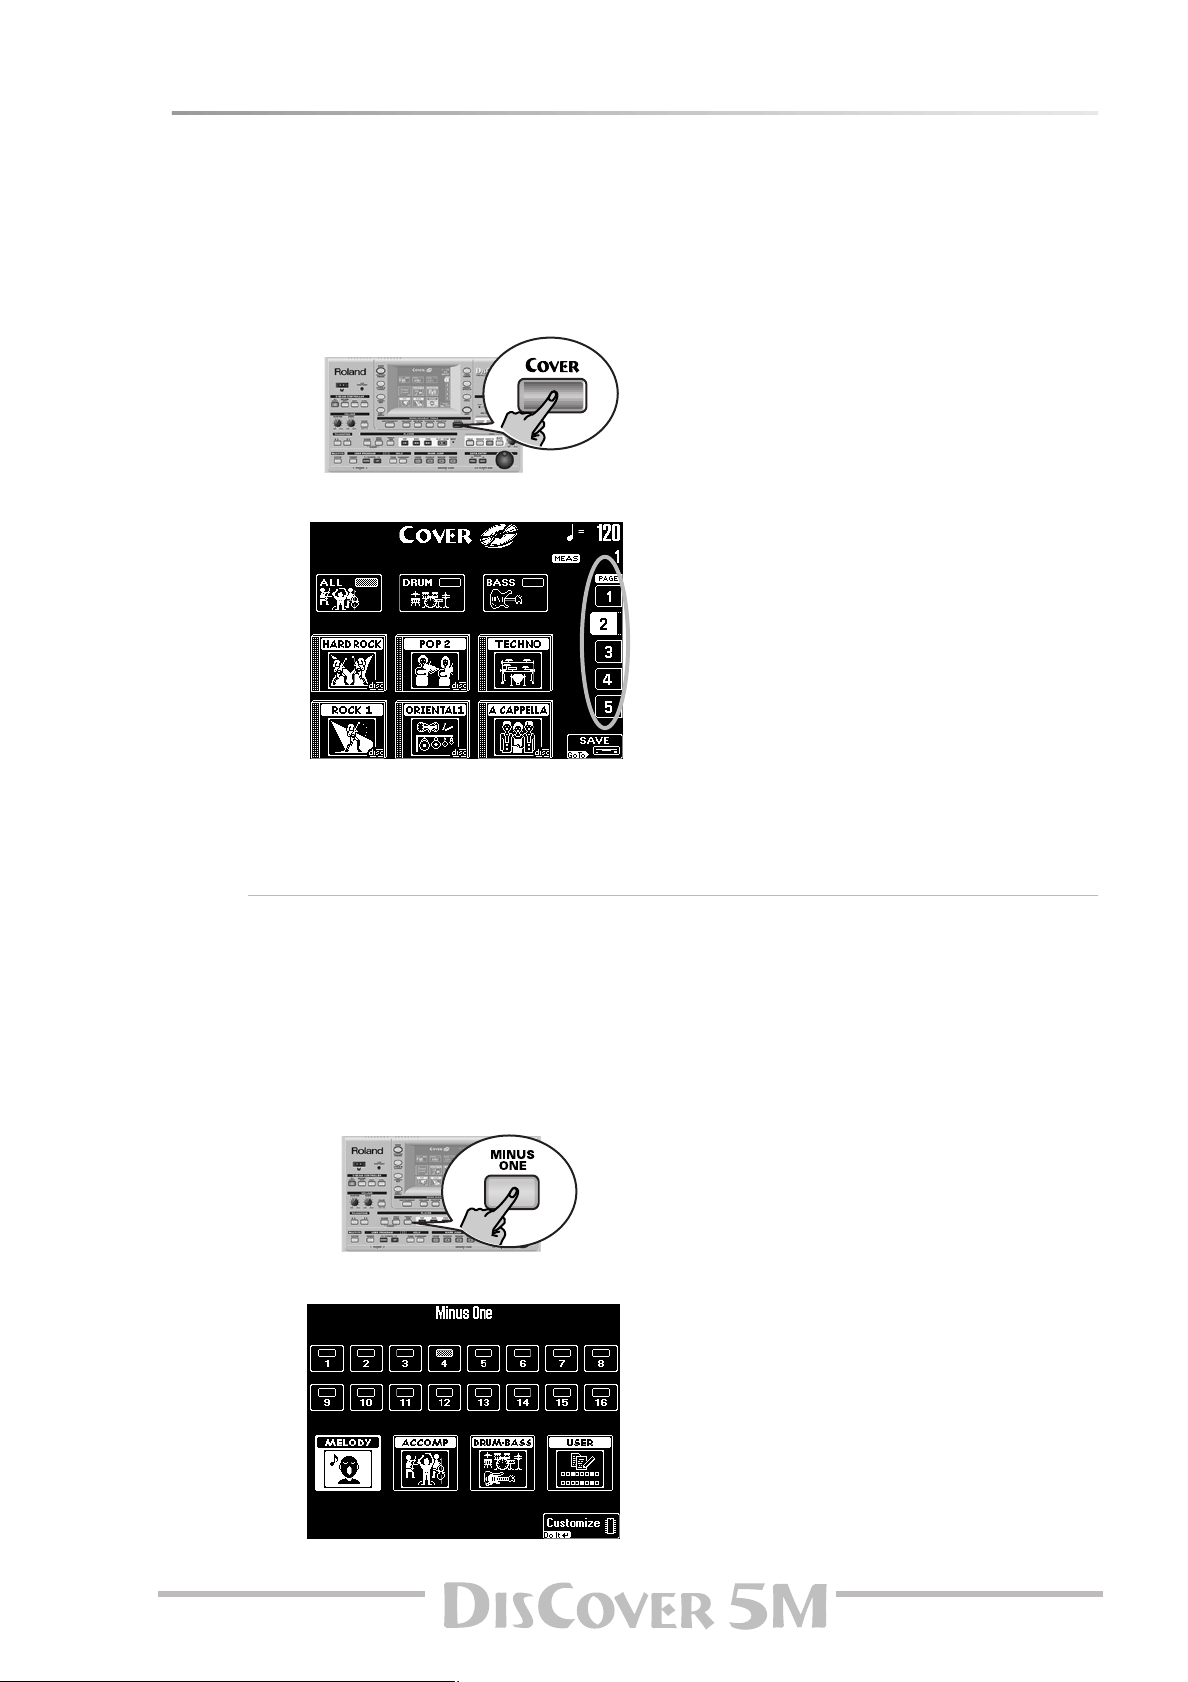
(1) Press the [COVER] button.
(3) Press one of the six fields in the lower half of
The display now looks more or less as follows:
(4) If none of the displayed presets appeal to
(5) Try out various presets to see how (fast) this
(6) If you like the new version better than the
(2) Select the parts whose instrumentation you
want to change:
Press the [ALL] field if all instruments should be
replaced.
Owner’s Manual
Press the [DRUM] field if only the drum and
percussion instruments should change.
Press the [BASS] field if you’re happy with
everything but the bass line’s sound.
the display to select another preset.
After selecting a preset, you can press
[Original¥Sounds] (page 1) to return to the original orchestration.
you, use the PAGE [1]~[5] fields at the right to
jump to another page with more presets.
concept works.
original one, you can press the [SAVE] field to
save the song to SmartMedia card or floppy
with this information (page 103).
Note: The COVER information is part of the data only
the DisCover 5M understands. You can still play back
the newly saved version of this song on another
sequencer or SMF player, but the COVER information
will be ignored.
Minus One
“Minus One” means that (at least) one part of a song is not played back.
There are at least two applications for this function:
• it allows you to play the muted parts yourself,
via the external keyboard;
• it allows you to sing without doubling by the
song (which may sound odd).
(1) Press and hold the [MINUS¥ONE] button.
The display changes to:
(2) Press one of the three “preset” fields to mute
the corresponding song parts:
Press [MELODY] to mute the melody (you will
notice that the [4] field also lights).
Press the [ACCOMP] field to mute everything
but the melody, bass, and drums.
Press the [DRUM&BASS] field to mute the bass
and drum parts.
Note: Even the “preset” fields can be used simultaneously. And the part fields [1]~[16] can be added, too.
(3) To mute other parts “ad lib” (i.e. without tak-
ing advantage of the presets):
• Press the [USER] field. This mutes all parts
except [4] (the melody).
• Switch on all parts you want to hear by pressing the [1]~[3] and [5]~[16] fields. Indicator icons
of parts you need must be white (the others
blue).
19
Page 20
Touring your DisCover 5M
• To save this customized “Minus” setting in the
DisCover 5M’s internal memory, press
[Customize]. The display now responds with:
(4) Press the [EXIT] button to return to the main
page.
Your last preset selection (MELODY~USER) will
be used until you select another preset or until
you switch off your DisCover 5M.
(5) Press [MINUS¥ONE] again to switch this func-
tion off.
Note: You can also switch the Minus One function on/
off using an optional footswitch (page 39).
Vocal Harmonist function
The Vocal Harmonist doesn’t just produce harmonies: it can also transform your voice in various ways. More importantly, its sound quality surpasses by far anything you may already have tried.
Setting up
Here’s what you need to do to take advantage of
the Vocal Harmonist function:
(1) Switch off your amp and the DisCover 5M (in
that order).
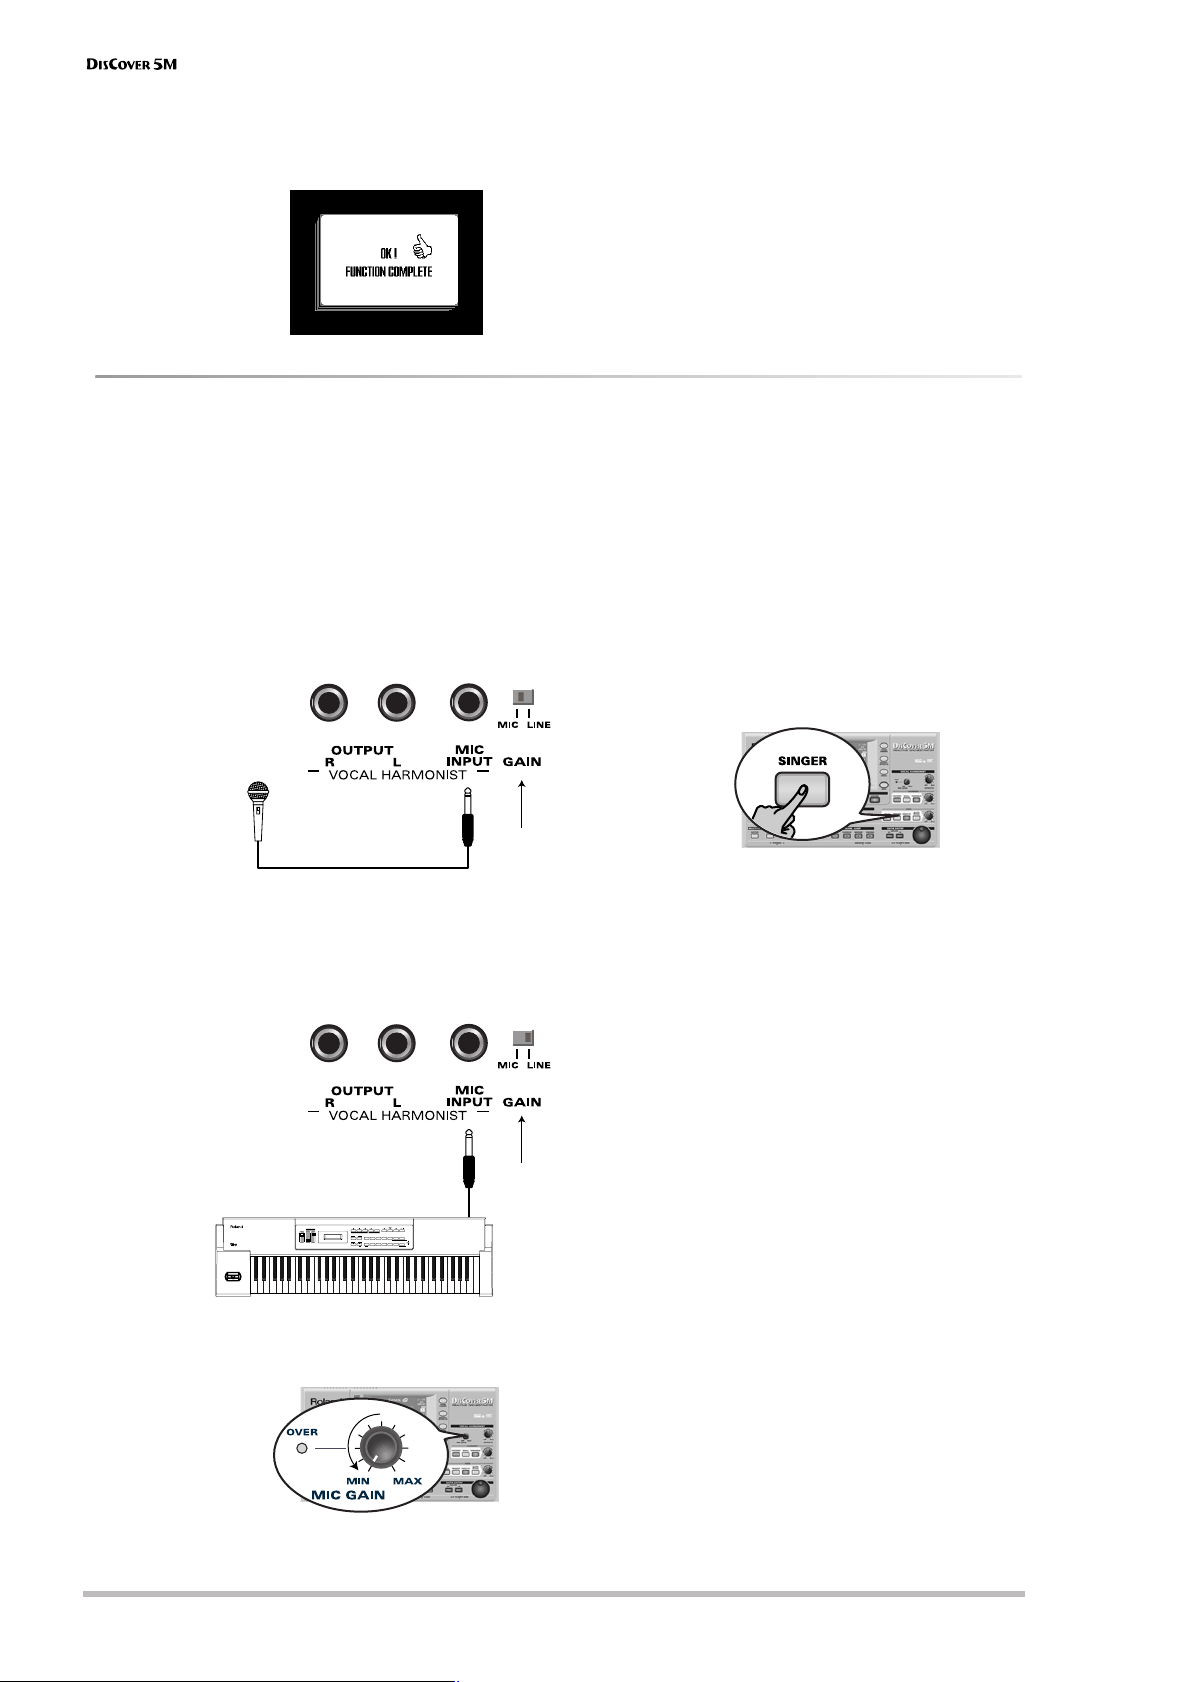
(2) Connect a dynamic microphone to the MIC
INPUT jack on the DisCover 5M’s rear panel.
Note: If you like, you can connect the Vocal Harmonist
OUTPUT sockets to another amp (or additional mixer
channels).
(5) Switch on the DisCover 5M and your amp (in
that order).
(6) Press the [SINGER] button (it must light) and
switch off the [VOCODER], [SMALL] or
[ENSEMBLE] button.
Set to “MIC”
Examples: Roland DR-10 or DR-20
(3) Set the [GAIN] switch to “MIC”.
You can also connect the (mono) output of
other instruments, a CD player, etc.
In that case, you need to set [GAIN] to “LINE”.
Set to “LINE”
KEYBOARD MODE ARPEGGIO
PART
UPPERLOWER
VALUE
/
CANCELEXIT
TONE
PERFORM
271
38495
VARIATION
/TONE
DRUMENVELOPEFILTERVIBRATO TONE
USER
EDIT
6
0
ENTER
/PRESET
PERFORM
ROM PLAY
CONTROLKEYBOARDMIDI/TUNELEVEL/PAN
ARPEGGIO
/SYSTEM
/EFFECT
COMBINATION
VOLUME
PALETTE
12
1>Piano 1
Preset:001
L/MONO
EDIT UTILITY
SEQ CTRL
TRANSPOSEX-DUALDUALSPLIT
PALETTE
ON/OFF
SELECT
Synthesizer, CD/MD player, etc.
(4) Set the [MIC¥GAIN] knob on the front panel to
“MIN”.
(7) Sing into the microphone and gradually
increase the [MIC¥GAIN] setting.
Set it to the highest possible value, taking care
to avoid that the OVER indicator lights. It would
be best to sing at the level you will be using
during your performances.
(8) If your singing is inaudible in the speakers
connected to the amp (or the headphones),
turn the [VOICE] knob towards the right
(towards “MAX”).
Note: If a howling sound (a.k.a. “feedback”) is produced,
your microphone may be pointed at a speaker. Try to
orient it differently, or slightly reduce the [VOICE] setting.
(9) Use the [EFFECTS] knob to set the balance
between your original singing and the effects
that are added to your voice.
Note: You can start song playback and sing to it. See
“Playing back songs” (p. 15) and “Minus One” (p. 19) for
details.
r
20
Page 21

Owner’s Manual
®
Compressor, Gate, and effects
Your DisCover 5M provides a Compressor effect
you might want to set up now. The Compressor
reduces volume peaks and thus “levels out” differences in the microphone signal.
The Gate effect, on the other hand can be used
to avoid that background noises cause the
Vocal Harmonist, etc., to start working when
you’re not singing.
These two effects are located immediately
behind the MIC INPUT socket and thus applied
to the microphone signal before it is processed
by the Vocal Harmonist section.
(10) Press the [MIXER/EFFECTS] button.
The display changes to:
Parameter fields can also be selected by pressing them.
It is very important that you keep singing
while setting the following parameters.
Sustain Level: Use this parameter to specify
how fast the compressor stops working once
the microphone level drops below the Compressor’s threshold. This should be set in such a
way as to avoid unpleasant level jumps
between notes. Set it in combination with the
following parameter to obtain the best possible
result.
Output Level: The Compressor reduces the
dynamics (level differences) of your singing.
This parameter serves two purposes: it allows
you to specify how strongly your voice should
be compressed, and –as you increase the value–
it raises the compressor’s output volume to
make up for the lower resulting level.
Note: The value “0” means that the Compressor is not
working.
Threshold: This parameter allows you to set the
level the microphone signal must have in order
to be audible. Softer signals will be muted (suppressed) by the Gate.
(15) Press the [Vocal¥HARMONIST] field to jump to
a page where you can select different presets,
etc. (see below).
(16) Press the [EXIT] button to return to the main
page.
(11) Press the [Vocal¥Effect] field.
Note: Since you pressed the [SINGER] button in step (6)
above, the left-most column is called “SINGER” here. It
may also be called “TALK”, “VOICE-FX”, or “AUTO PITCH”.
Though that is of little importance for what we are
about to do, it proves that your DisCover 5M is in fact a
very clever instrument that helps you save time.
(12) If you need the Compressor, press the
[Compressor] field, so that its indicator icon is
highlighted.
(13) If you also want to use the Gate, press the
[GATE] field (its indicator icon must be highlighted).
(14) Use the [PREV] and [NEXT] buttons to select
the parameter you wish to edit, and set the
desired value with the [VALUE] dial.
21
Page 22
Touring your DisCover 5M
Adding harmonies to your singing
Now that your microphone is up and running, let’s look at the Harmonist effect proper.
The DisCover 5M provides two harmony types:
“Small” (1 or 2 additional voices) and “Ensemble” (3
or 4 additional voices).
(1) Connect your microphone, press the [SINGER]
button, set the desired [VOICE] level, and…
(2) …press the [SMALL] button (it must light).
(3) Sing a few notes and listen to the harmonies
produced.
(4) If the harmonies are too soft, turn the
[HARMONY] knob (right) towards the right
(towards “MAX”).
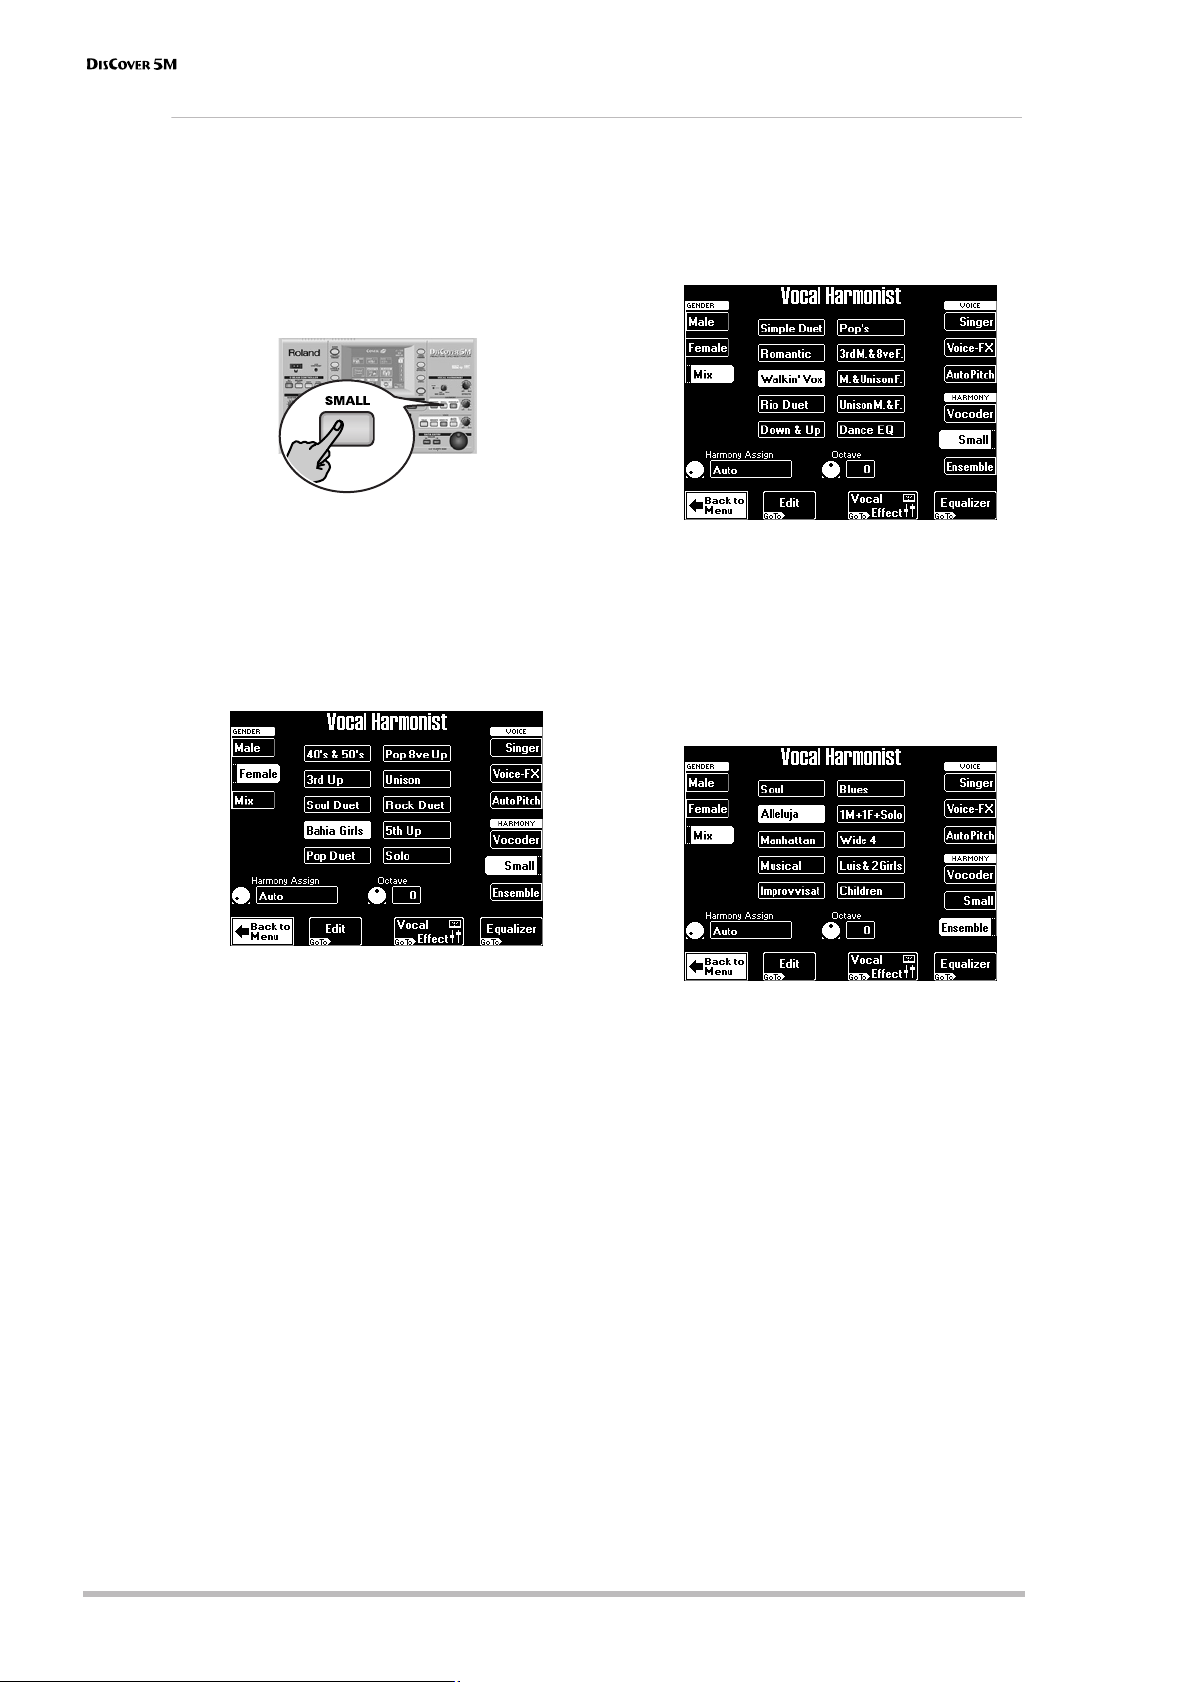
(5) To try out different harmonizations, press
and hold the [SMALL] button.
The display changes to:
This also changes the available preset options in
the center of the display. If, on the above page,
you press [Mix] for example, the display changes
to:
(7) Press one of the preset fields ([Walkin’Vox],
for example) to select a different harmony
type.
(8) Now press the [ENSEMBLE] button and sing
again.
This sounds more like a choir, don’t you agree?
(9) Press and hold the [ENSEMBLE] button.
The display changes to:
(6) Press the [Male], [Female] or [Mix] field to
change the “GENDER” (voice type) of the harmonies produced.
[Mix] adds both a male and a female voice.
You already know what the [Male], [Female], and
[Mix] fields are for. The 10 preset fields in the
middle allow you to select different “voicings”
and voice characters for your choir.
(10) To sing again without automatic harmonies,
press the [SMALL] or [ENSEMBLE] button again
(so that neither of them lights).
Note: Obviously, you do not have to use a song as backing: you can also play the accompaniment yourself. See
page 30 and below.
r
22
Page 23

Owner’s Manual
Who specifies the harmonies?
Now that you know what the Vocal Harmonist does, let us briefly look at how it does that.
You may have noticed the [Harmony¥Assign]
field in the lower left corner of the above display pages.
If you stop song playback and play chords on
the external keyboard, the note information
thus generated is used for the harmony pitches.
Use the [VALUE] dial to select another setting.
The possibilities are:
MIDI IN Only notes played on the external key-
Its current (default) setting is “Auto”. This
means that, during song playback, the note
information contained in the song data will be
used for specifying the pitches of the harmony
notes (“Auto Harmony”).
Note: If the song you are playing back contains a “Harmony track”, the harmonies will be based on those
notes. In all other cases, the harmonies are generated in
realtime.
MIDI IN
Left
MIDI IN
Right
Song The note information contained in the
board will be used for specifying harmony pitches.
Only MIDI notes played to the left of the
split point (page 31) will be used for
specifying harmony pitches.
Only MIDI notes played to the right of
the split point (page 31) will be used for
specifying harmony pitches.
song you are playing back is used.
Not convinced so far?
Just in case you are a little bit disappointed by the Vocal Harmonist function, here are some tips (and a bonus):
●
Use it with song backing
The Harmonist sounds most convincing when
used during song playback. It was fine-tuned to
blend in with Standard MIDI File playback, and
that’s when it sounds most “real”. Try it out, it
works!
●
Check the following (Gender Voice Input)
(1) Press and hold the [SINGER] button.
The display changes to:
(4) Press the [Edit] field.
(2) Press the [Male] field if you’re a man, or the
[Female] field if you’re a woman.
This is an important clue for the Vocal Harmonist. After selecting the correct setting, you may
find that the harmonies sound better.
And just in case, you wanted to sound like a
somewhat worn-out opera singer…
(3) Press the [Vibrato] field (indicator icon must
“light”).
Sing a few notes and note the vibrato. If the
effect is not strong enough…
(5) Use the [PREV] and [NEXT] buttons to select
the parameter you wish to edit, and set the
desired value with the [VALUE] dial.
Parameter fields can also be selected by pressing them.
The [Vibrato] indicator icon must be blue for the
effect to be noticeable.
Here’s what the parameters mean:
Rate: Sets the speed of the vibrato effect.
Depth: Allows you to set the vibrato intensity.
Vibrato is an effect that changes (“modulates”)
the pitch. The higher the Depth value, the more
outspoken these periodic pitch changes will be.
Rise Time: Allows you to set a swell for the
vibrato effect. This parameter specifies how
long it takes before the Depth value is reached
– once the Delay Time is up.
Delay Time: Allows you to set a delay between
the moment you start singing and the moment
the vibrato effect kicks in.
(6) Press [EXIT] to leave this page (or
[Back¥to¥Singer] to try out the other “Gender”
settings).
23
Page 24
Touring your DisCover 5M
Voice-FX
Ever wondered what your voice would sound like if you were a woman (for men), man (for women), robot or
something else…? You’re about to find out:
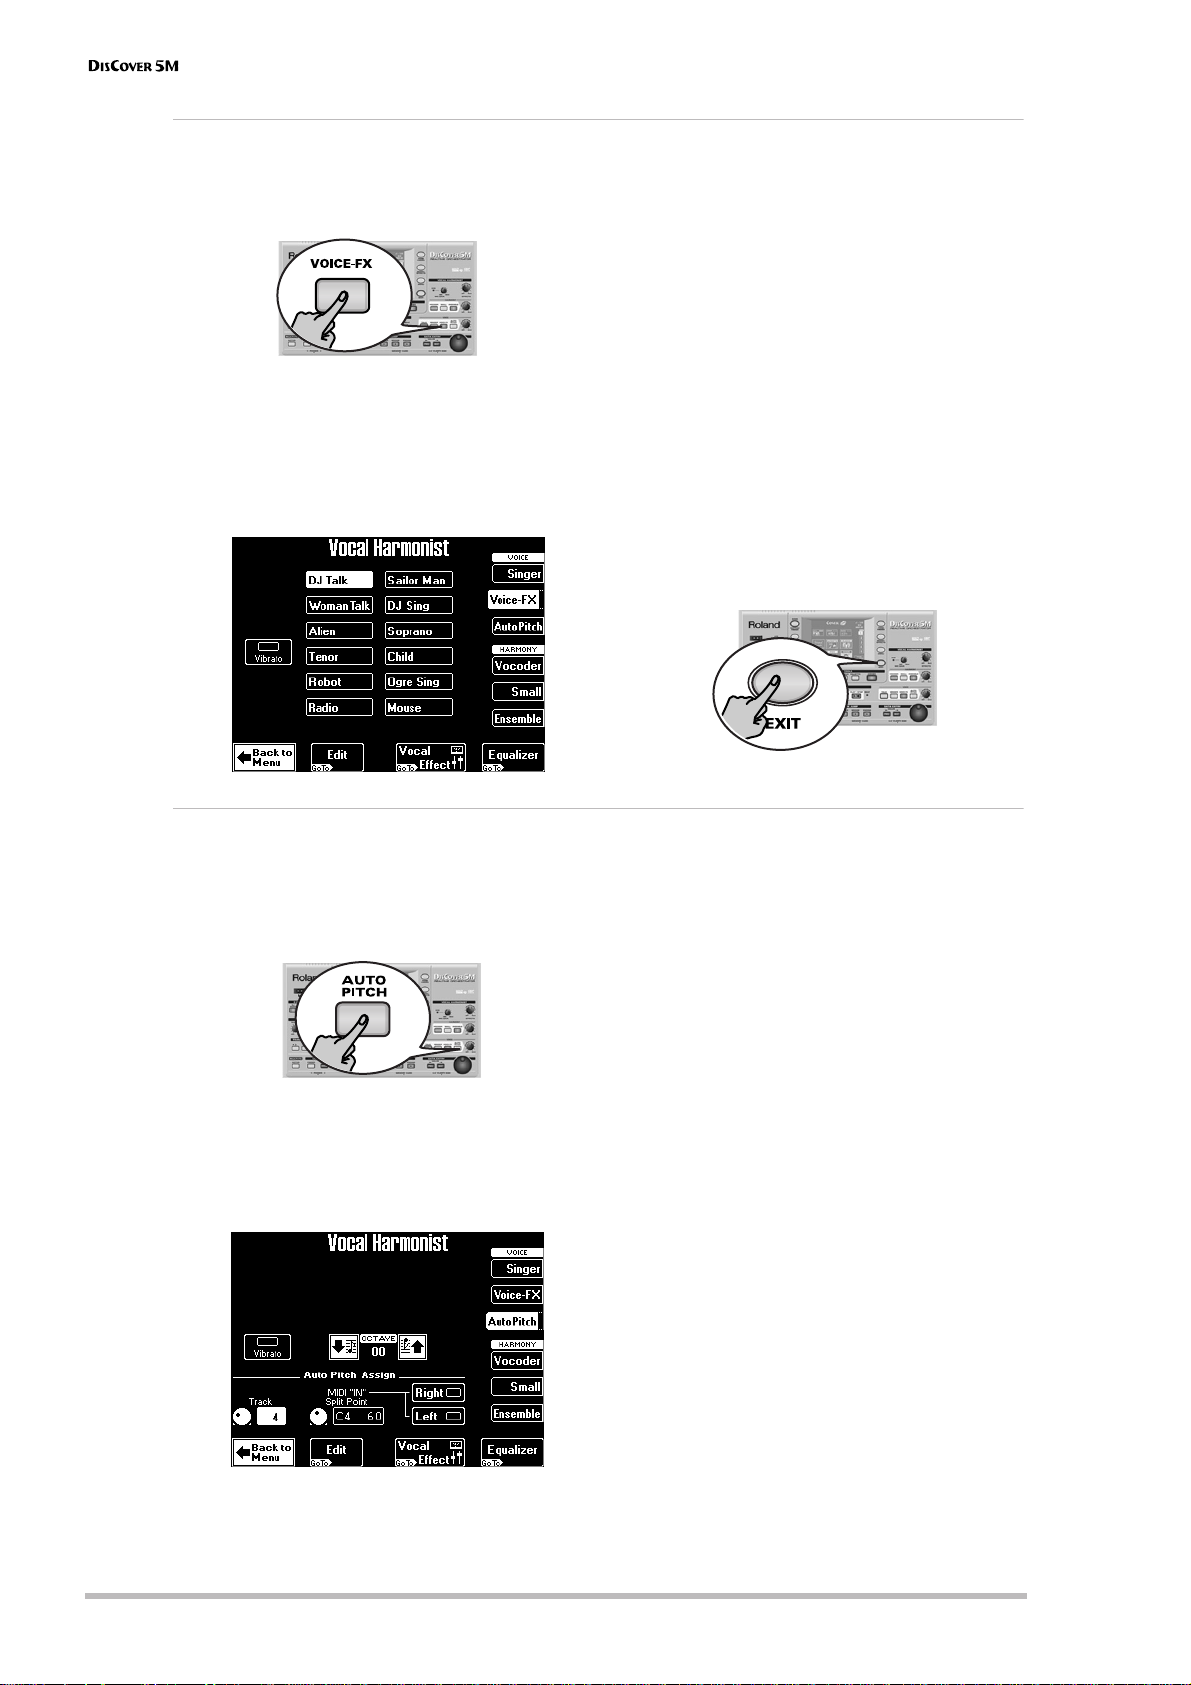
(1) Press the
(2) Sing into the microphone and listen to your-
self. (You may have to switch off the
or
this function works.)
(3) Press and hold the
play now looks as follows:
[VOICE-FX]
[ENSEMBLE]
button.
[SMALL]
button if it lights to hear how
[VOICE-FX]
button. The dis-
(4) Press one of the twelve preset fields in the
center of the display to try out other possibilities.
(5) For added “strangeness” (or realism), you can
press the
(6) If you feel the general idea is OK, but would
like to fine-tune the effect, press the
field at the bottom edge of the display.
See page 57 for the Edit and Equalizer parameters.
Note:
User Program.
Note:
nies to this effect.
(7) Press the
page.
[Vibrato]
To keep your settings, you must write them to a
You can add the
[EXIT]
field (left).
[Edit]
[SMALL]
or
[ENSEMBLE]
button to return to the main
harmo-
Auto Pitch Correct function
Here’s another interesting effect that can either be used as gimmick or to ensure that even the flattest of renditions suddenly sounds in tune. Of course, the voice will sound somewhat “artificial”, because the emphasis is on
tuning here. However, even if you just speak the words of a song, it will be sung just the same.
(1) Press the
(2) Start song playback and say something into
the microphone (don’t sing).
Sounds like an interesting effect, doesn’t it?
(3) Press and hold the
The display changes to:
[AUTO¥PITCH]
[AUTO¥PITCH]
button.
button.
Let us begin with the most important parameter: the notes that will be used by the Auto
Pitch function. That is what you specify via the
Auto Pitch Assign fields.
(4) Set the
The “4” setting usually corresponds to the melody part, and is thus the most likely candidate,
but feel free to select “1”~”3” or “5”~”16” to use
another part as melody.
If you want to play the melody yourself, press
the
desired notes on the external keyboard, while
you speak (or sing) into the microphone.
Note:
parameter to “Off”.
(5) If necessary, press
the MIDI IN
desired note with the
”C6 84”).
This value specifies where the
(or where the
The default MIDI channel for the Vocal Harmonist part is “4” (the same as for the Upper
part). Be sure to set that number as Transmit (or
TX) channel on your MIDI controller.
Track
value to select a song part.
[Left]
or
[Right]
field (or both) and play the
Selecting “Left” and/or “Right” will set the Track
[PREV]
or
[NEXT]
to select
Split Point
[Right]
parameter and set the
[VALUE]
section starts).
dial (“C3 48”~
[Left]
section ends
r
24
Page 25
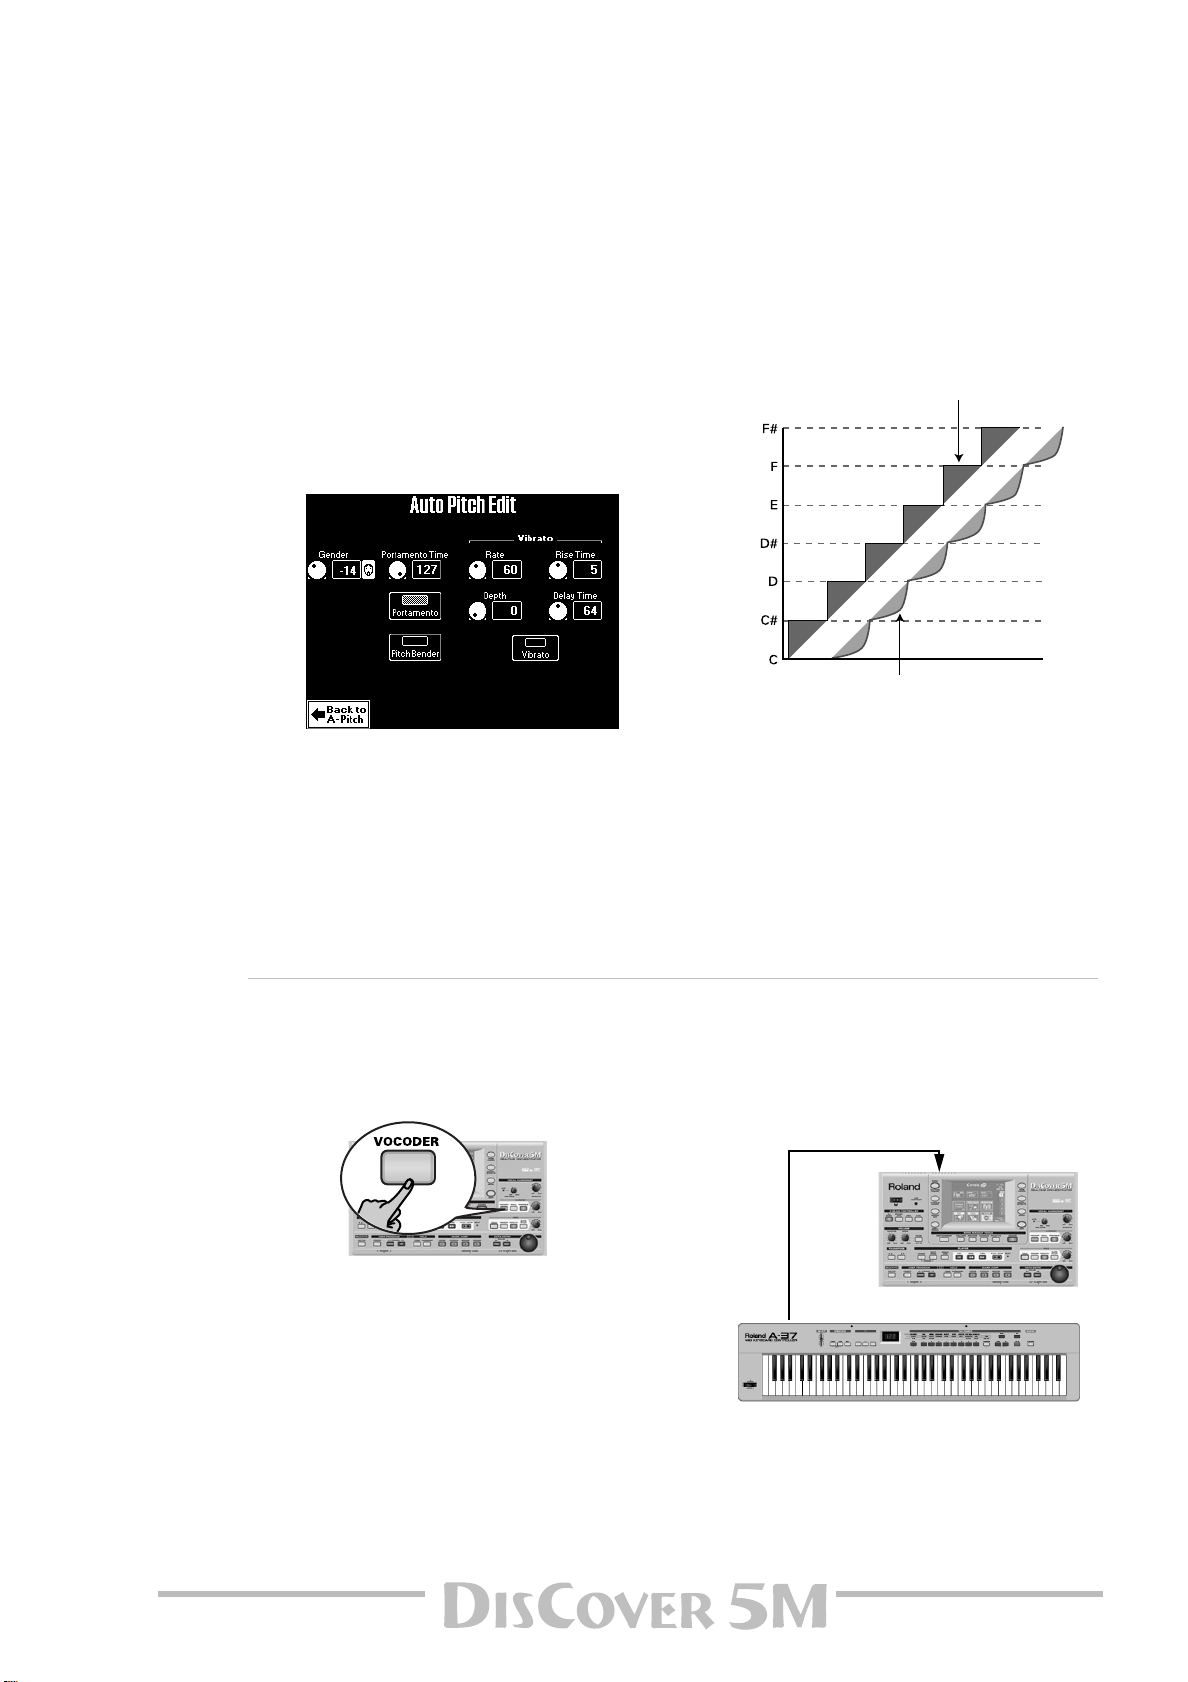
Owner’s Manual
[Portamento Time= 0] “Rough” pitch changes in semitone
steps (normal)
[Portamento Time= 1~127] Pitch glides from one
note to the next
By switching on only [Left] or [Right] and selecting the appropriate split point you can thus
restrict the range of note numbers used for
controlling the Vocal Harmonist.
Use the Octave parameter to shift the pitch of
the Auto Pitch notes up to 2 octaves up or
down.
(6) Press the [Vibrato] field to add some “wobble”
to the Auto Pitch sound.
This vibrato effect is not linked to the Voice-FX
vibrato, and can thus be set separately (see
below).
(7) For more refined control over the Auto Pitch
voice, press the [Edit] field:
(8) Use the [PREV] and [NEXT] buttons to select
the parameter you wish to edit, and set the
desired value with the [VALUE] dial.
Parameter fields can also be selected by pressing them.
(9) Press the [Portamento] field to switch on this
effect.
“Portamento” means that the pitch doesn’t
change in clearly defined steps: it produces
glides from one note to the next.
Though they are not linked to their namesakes
on the Voice-FX Edit page, most parameters on
this page will look familiar. Therefore, please
see above for the explanations of Gender and
Vibrato Rate, Depth, Rise Time, and Delay
Time.
Vocoder
A Vocoder is an effect that combines spoken words with sounds, thus creating the impression that the instrument that produces the sounds can talk. As this relies on complex filtering effects, the character of the sound
used as “carrier” can change dramatically.
(1) Press the [VOCODER] button (it must light).
This switches off the [SMALL] or [ENSEMBLE]
button if it was on, because the Vocoder cannot
be used simultaneously with the Harmonist
function proper.
(2) Stop song playback if it is running.
The Vocoder can also use a song part, but for
this demonstration, we’ll use the external keyboard, because doing so will make you understand how the Vocoder works.
Use the Portamento Time parameter to specify
the speed at which those glides are carried out
(0~127). The higher the value, the slower the
transitions.
Note: To keep your settings, you must write them to a
User Program.
(10) Press [EXIT] to leave this page (or
[Back¥to¥A-Pitch] to modify other Auto Pitch
settings).
(3) Connect the MIDI controller’s MIDI OUT
socket to the DisCover 5M’s MIDI IN socket.
MIDI IN
MIDI OUT
(4) Set the external keyboard’s MIDI transmit
(TX) channel to “4”.
(5) Play a chord on the external keyboard, hold
those notes, and talk into the microphone.
25
Page 26
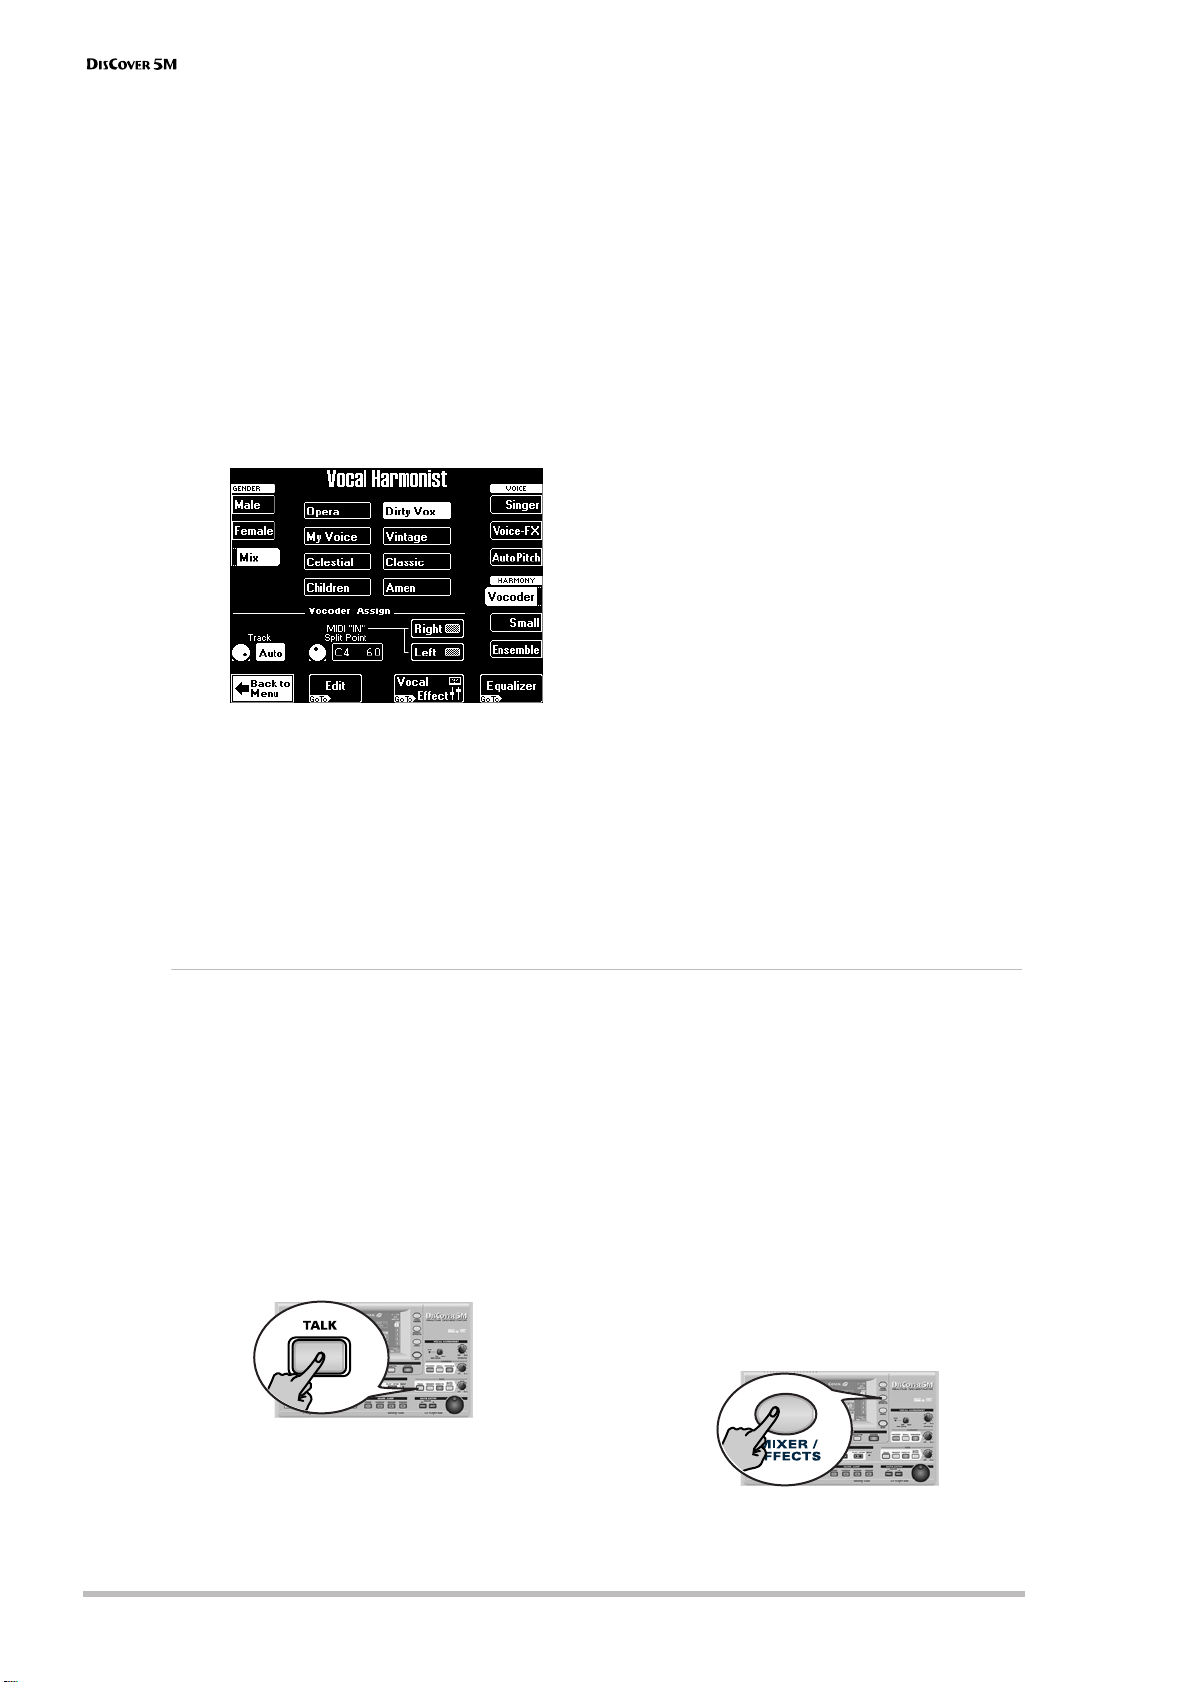
Touring your DisCover 5M
For obvious reasons, the Vocoder only works if
you (a) talk or sing, and (b) if there is a “musical
sound” that can be processed.
Play various chords and listen to how that
affects the signal generated by the Vocoder.
Note: The Vocoder can produce four voices at once.
Playing more than four notes simultaneously is thus
unnecessary.
Note: The Vocoder can be used alongside [SINGER],
[VOICE–FX] or [AUTO¥PITCH].
Again, there are several parameters for customizing the Vocoder’s behavior:
(6) Press and hold the [VOCODER] button.
The display changes to:
Gender: Allows you to change the timbre of
the effect so as to create a masculine, feminine,
or mixed character. The Gender choice determines which 8 preset settings are available.
There are thus 24 Vocoder presets (8 for “Male”,
8 for “Female”, and 8 for “Mix”).
The 8 fields in the middle (e.g. [Opera],
[My¥Voice], etc.) specify the voice character.
These presets are based on the parameters you
can change on the Edit Part 1~4 page (which
you don’t need if you are happy with one of the
presets).
(7) Set the desired “Track” value with the [VALUE]
dial.
The Vocoder Assign section’s current (default)
setting is “Auto”. This means that song files
indicated as “With MIDI Harmony for Your
Vocal Harmony Processor” (with harmony note
information on track 5) automatically switch on
the Vocoder. If you like, you can still add more
chord information by playing on the external
keyboard (use MIDI channel “4”). In Small or
Ensemble mode, the pitch of your singing also
influences the voicing of the harmony notes.
This is not the case when you use the Vocoder.
If you stop song playback and then play a chord
on the external keyboard, the note information
thus generated is used.
Set the Track value to select a song part (“1”~
”16”). As the melody is usually monophonic (1
note at a time), “4” may not be the best possible
setting. Try to select a track with several notes.
If you want to play the melody yourself, press
the [Left] or [Right] field (or both) and play the
desired notes, while you speak (or sing) into the
microphone. See page 24 for details about the
MIDI IN Split Point parameter.
Note: See page 59 for the [Edit] parameters.
Note: To keep your settings, you must write them to a
User Program.
(8) Press [EXIT] or [Back¥to¥Vocoder] to leave this
page.
Talk
The Talk function is meant for announcements between songs: it switches off any other Vocal Harmonist effect
(Voice-FX, Auto Pitch, Singer, Vocoder, Small/Ensemble) that may be on. Furthermore, it mutes the Vocal Harmonist’s effects processors (Reverb, Chorus, Delay, etc.) – or adds a pinch of Reverb and/or Delay if you like.
That way, your voice has its normal sound when you
wish or need to address your audience. And here
too, the professionalism of your DisCover 5M shows,
because the Talk function can be set in such a way
that the music (song) is turned softer, but not
muted altogether.
(1) Press the [TALK] button and speak into the
microphone.
All Vocal Harmonist transformations are now
muted. This includes the [VOCODER], [SMALL],
and [ENSEMBLE] buttons.
(2) After your announcement, press the [TALK]
button again (to return to the previous
“singer” settings) and sing to the next song.
Here’s what you need to do to change the level
of the background music, and the amount of
Reverb and/or Delay that is added to your
speaking voice.
Note: See page 49 for an in-depth discussion of the
effects settings.
(3) Press the [MIXER/EFFECTS] button.
r
26
Page 27

Owner’s Manual
The display changes to:
(4) Press the [Vocal¥Effect] field.
Note: Press the [Vocal¥Harmonist] field to jump to a
page where you can select different presets, etc. (see
p. 22).
(5) Use the [PREV] and [NEXT] buttons to select
the Music Mute field and set the desired
value with the [VALUE] dial.
The smaller the value, the softer the song’s and
Realtime parts’ volume will be. Select “0” if you
do not want the music to be any softer than it
already is.
The Reverb Send and Delay Send fields allow
you to add some Reverb and/or Delay to your
voice. While some Reverb (values between “10”
and “40”, for example) could be useful, Delay
should probably only be used as a “effect”,
because it tends to blur your announcements.
Automatic transposition (Singer Key)
Here’s yet another revolutionary function of your DisCover 5M: based on information you select or input, it can
change the key of all songs you play back in realtime, thus allowing you (or a guest singer) to sing all songs in a
comfortable range. This function is called “Singer Key”.
(1) For the sake of clarity, first select a song (see
p. 15) and press [®÷ª] to start playback.
Pay attention to the song’s key.
(2) Press [®÷ª] again to stop playback, and [|√] to
return to the beginning.
(3) Press the [SINGER¥KEY] button to switch on
this function.
The display changes to:
(4) Press the [MALE] or [FEMALE] field (depending
on whether you’re a man or a woman).
(5) Press the [®÷ª] button to start playback.
The song may now be playing in a different key.
If it is not, the melody falls within the “typical”
range you have just selected.
Note: This automatic transposition only works if track/
MIDI channel “4” of the songs you play back contains
the melody part.
(6) Press [®÷ª] again to stop playback, and [|√] to
return to the beginning.
That may still have been too high or too low for
comfort… So here comes the best part:
(7) Press one of the USER PRESET fields, and then
[Edit].
This page contains three presets: [ORIGINAL]
means that the songs are not transposed, while
[MALE] and [FEMALE] adapt the song’s key to
the “typical” range of a male or female voice.
27
Page 28
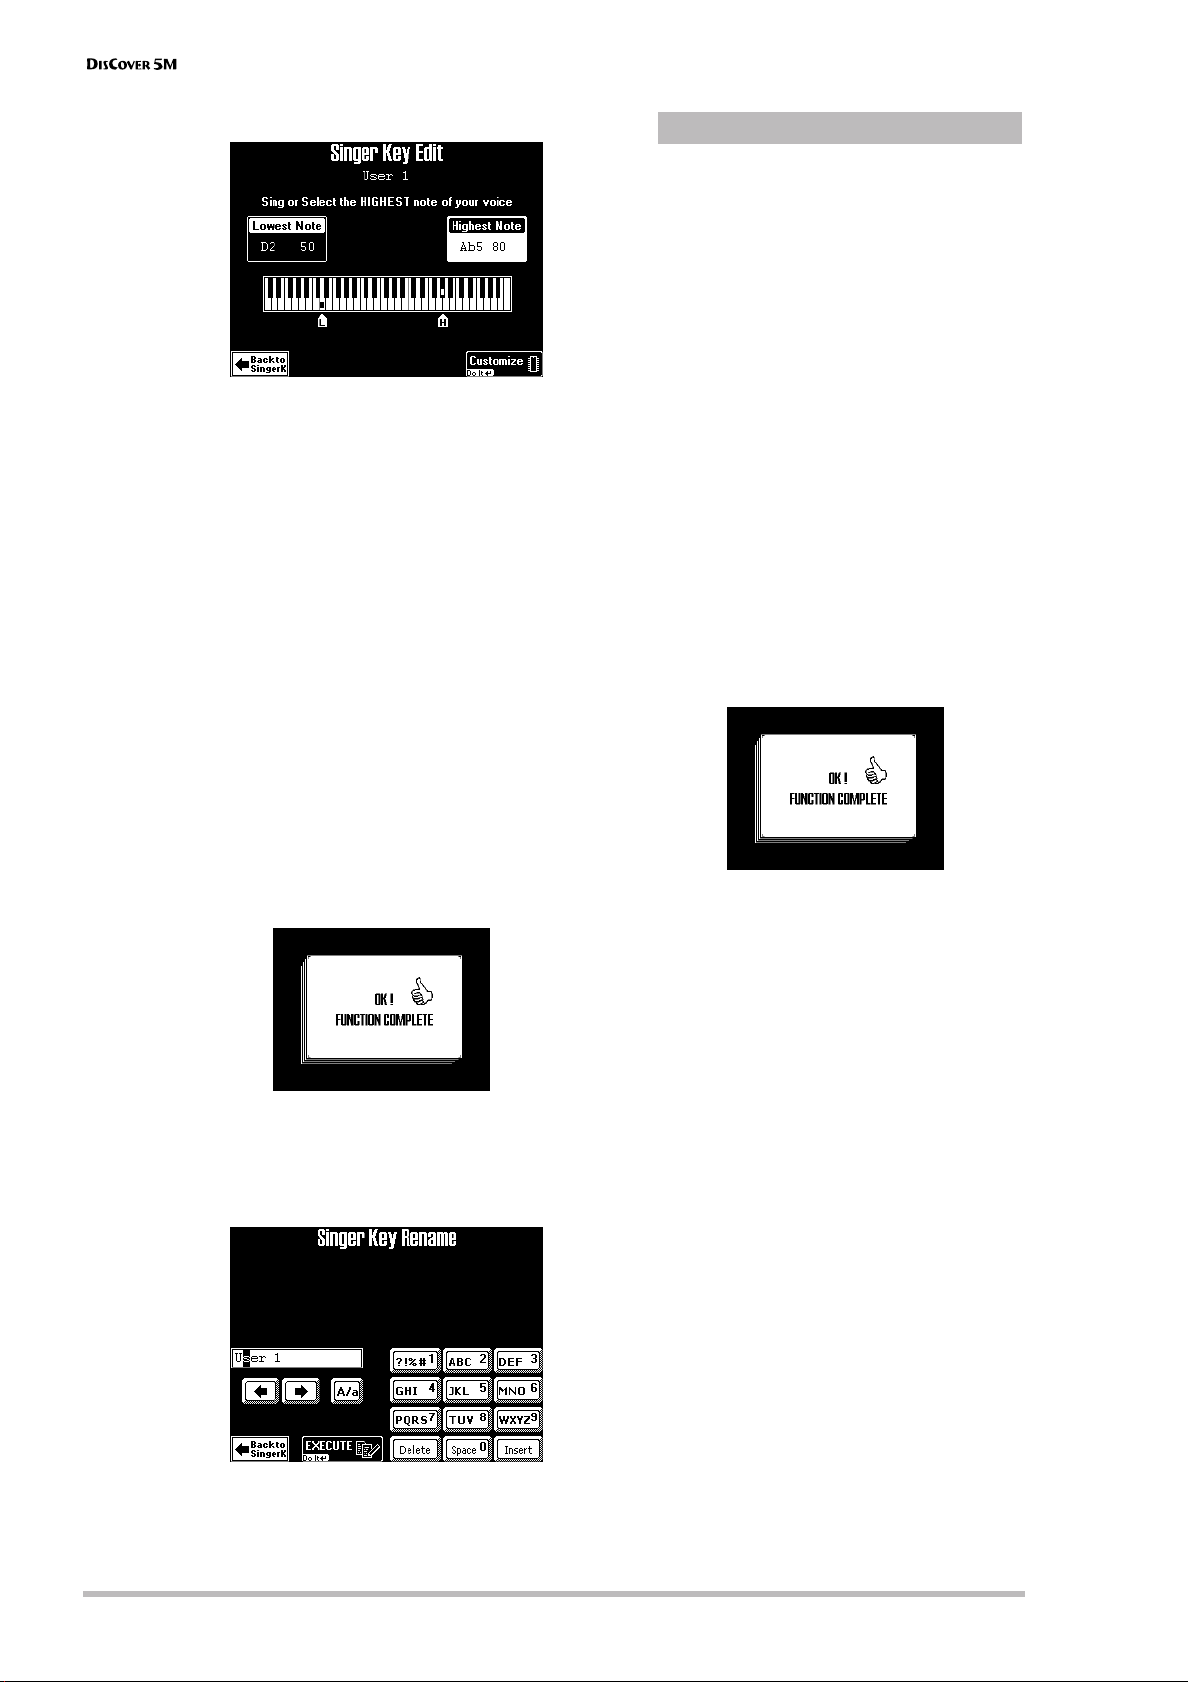
Touring your DisCover 5M
The display changes to:
Note: The [Edit] field only appears after pressing one of
the USER PRESET fields. The latter are four memories
where you can store your own range settings.
(8) Press the [Highest¥Note] field (if it is not
already selected).
(9) Sing the highest note you can muster effort-
lessly (you can sing it several times).
If you connected a microphone, a [CAPTURE]
field appears. Press this field to confirm the
note you want the DisCover 5M to recognize.
The DisCover 5M recognizes the pitch and displays the name of the corresponding note.
(If you have no microphone handy, you can also
use the [VALUE] dial to set the desired note.)
(10) Press the [Lowest¥Note] field and repeat step
(9), taking care to sing your lowest possible
note.
(11) Press [Customize] to store these settings if you
wish to use them at a later stage.
The display briefly confirms that your settings
have been stored:
(12) Press the [Back¥to¥SingerK] field to return to
the page of the same name.
(13) Press the [Rename] field to assign a name to
your settings.
®
Entering names
(14) Use the [ø] and [˚] fields to select the position
for which you wish to enter a new character.
(15) Use the alphanumeric keypad in the right
corner to enter the desired characters.
This keypad works exactly like the keypad of a
cellphone: you may have to press an alphanumeric field several times to select the desired
character or number.
• The [A/a] field allows you to switch between
uppercase and lowercase characters.
• The [Delete] field allows you to delete the
inverted character.
• Press [Space] to insert a blank (or the number
“0”).
• If you forgot to insert a character, use [ø] or [˚]
to select the position where the missing character should be inserted. Then press [Insert], followed by the character you wish to insert.
(16) If you’re happy with the name for your
Singer Key settings, press [EXECUTE].
The display briefly confirms that your name has
been stored:
(17) Press the [®÷ª] button to start playback.
The song may now be playing in a different key.
If it is not, the melody falls within the range
you set.
Note: At first, the Singer Key function only works with
the songs on the supplied SmartMedia card. Other
songs you copied to the SmartMedia card need to be
selected, played back for a few measures, and then
saved to card again (even without any changes). Only
then will the Highest and Lowest notes be recognized
the way they should. See page 103 for how to save
songs.
r
28
Page 29
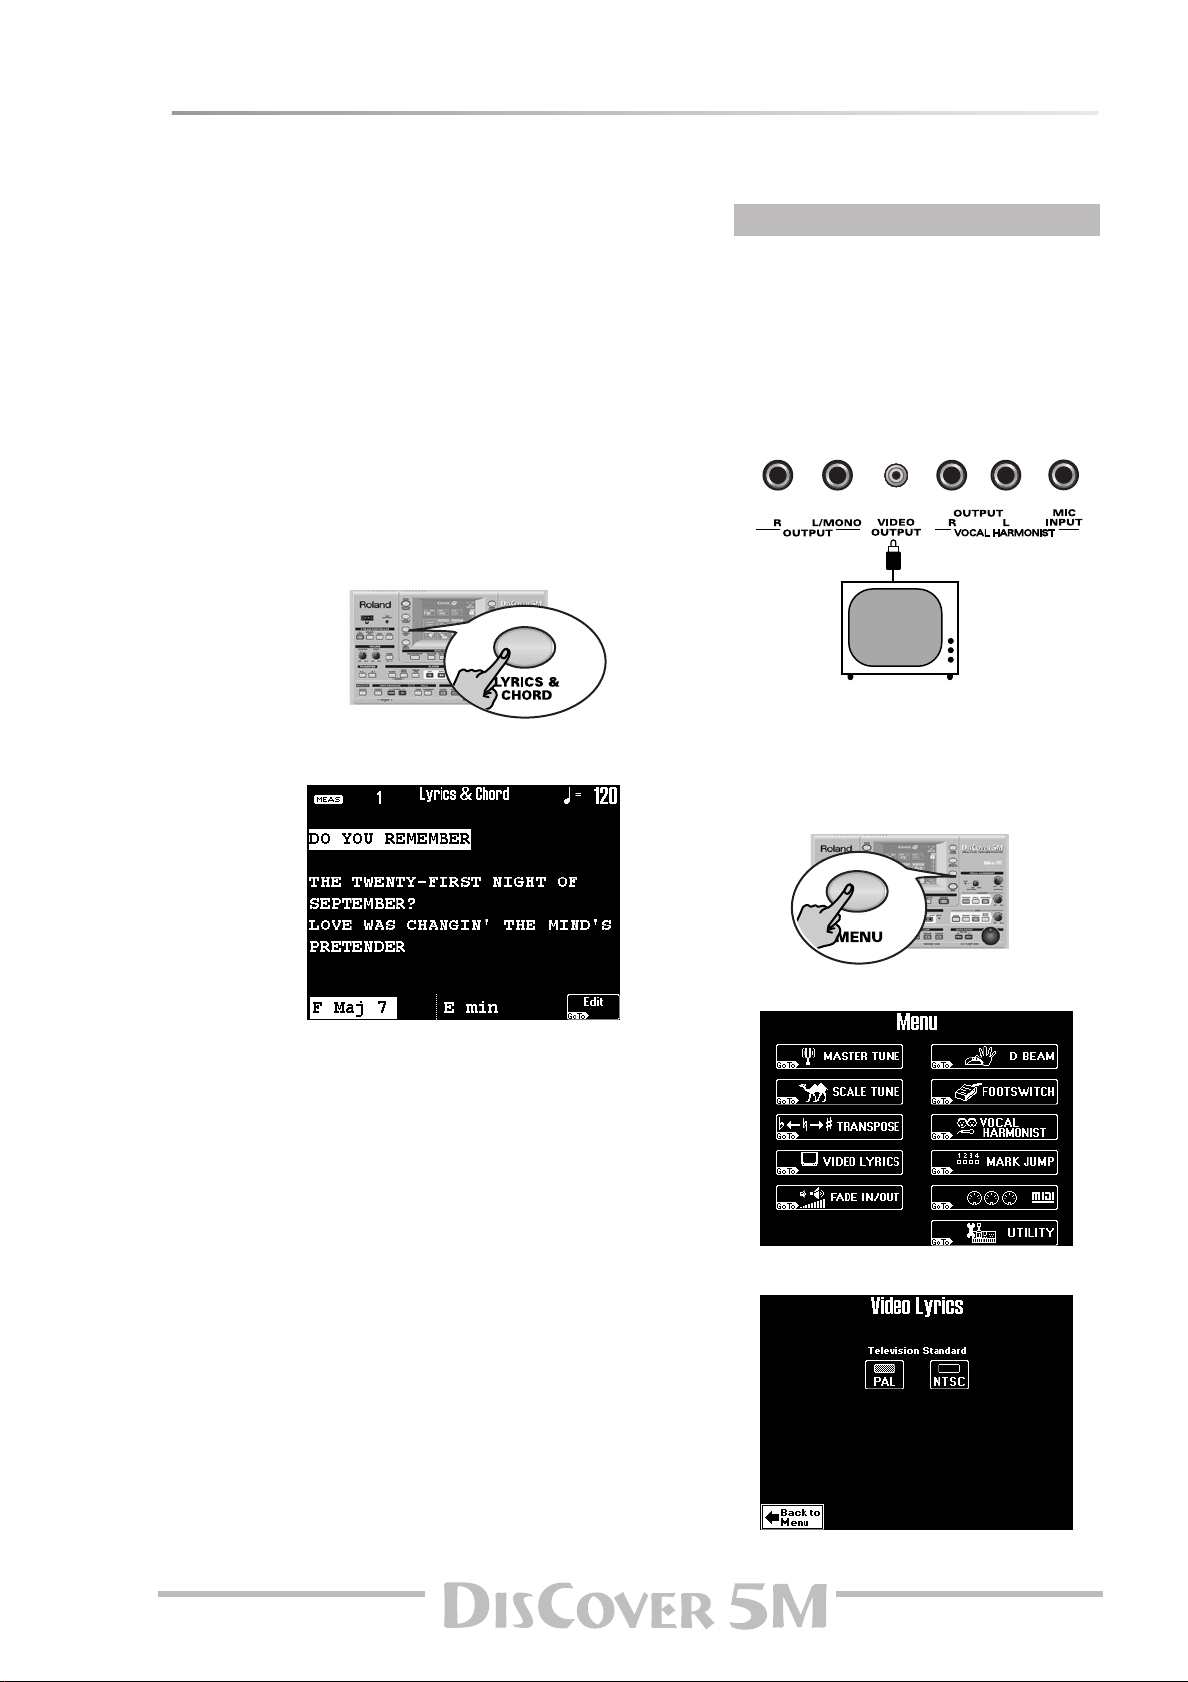
Displaying Lyrics and chord information
Your DisCover 5M also allows you to view the lyrics of the songs (if available) in the display.
Owner’s Manual
The Lyrics function was provided to allow you to
read the words of the songs being played back in a
karaoke fashion: the words to sing are highlighted
at the right time. Note that this function is only
available for Standard MIDI Files that contain Lyrics
data. Ask your dealer for details.
Apart from the Lyrics, the DisCover 5M also displays
the chords, which may come in handy for a guitarist
or bassist with whom you are playing.
The chord information is usually not contained in a
song as such, but that’s no problem: the
DisCover 5M can “calculate” it in realtime and even
display it a little ahead of the “changes”.
(1) Select a song (page 15).
(2) Press the [LYRICS&CHORD] button.
(3) Start song playback.
The display changes to:
®
Using an external monitor
Your DisCover 5M also provides a VIDEO
OUTPUT socket you can connect to the video
input of a TV screen or monitor.
That monitor (or screen) always displays the
Lyrics (if available) and chords, even if you –or
the DisCover 5M– select(s) other display pages.
(1) Connect the VIDEO OUTPUT socket to the
video input of the TV set or monitor.
(2) Switch on your TV set or monitor and start
playback of a song with Lyrics.
If the lyrics and chords do not appear correctly
on the external screen, proceed as follows:
(3) Press the [MENU] button.
The chord information appears at the bottom
of the screen.
Note: The chord information is calculated in real-time
and may not always be accurate. Also, with chords
where the third has been omitted, no information will
be displayed (because it is impossible to tell whether
those are minor or major chords).
Note: You can also add Lyrics data to songs that do not
yet contain them. See page 91 for details.
The display changes to:
(4) Press the [VIDEO¥LYRICS] field.
29
Page 30

Touring your DisCover 5M
(5) Press the [PAL] or [NTSC] field to select the
desired setting (or the one that works).
Note: If you work with a TV set, do not forget to select
the correct channel (“AV”, or something to that effect,
see the manual that came with your set).
(6) Press the [EXIT] button to return to the main
page.
Using the Realtime parts
Your DisCover 5M provides three “parts” that allow you to play different sounds from an external keyboard. These
are called “Realtime parts”. They are available during song playback and while playback is stopped.
Playing with the Upper and/or Lower part
The three Realtime parts need to be controlled via
MIDI. They behave exactly like the parts (or channels) of a multitimbral sound module. This means
that the DisCover 5M is in fact three units in one:
• a Vocal Harmonist
• a powerful Standard MIDI File player
• a multitimbral sound module
To take advantage of the DisCover 5M’s Realtime
parts, you need to ensure that your MIDI controller
(keyboard, MIDI accordion, sequencer, etc.) transmits on the correct MIDI channel.
The default MIDI channel assignments are as follows:
Upper part MIDI channel 4
Lower part MIDI channel 11
M.Drums part MIDI channel 16
Vocal Harmonist* MIDI channel 4
(*) The Vocal Harmonist’s reception range can be
restricted. You’ll find an example of this on page 24.
You can change these MIDI channel assignments. See
“Channel” (p. 96).
Note that the Vocal Harmonist part does not sound
directly: the note messages received by this “part”
are used for harmony voicings and controlling the
Auto Pitch, Vocoder and other related vocal effects.
These are discussed on the previous pages. Don’t
forget to sing while “feeding” the Vocal Harmonist
with MIDI notes.
(1) Connect the MIDI controller’s MIDI OUT
socket to the DisCover 5M’s MIDI IN socket.
MIDI IN
Working with a keyboard like the Roland A-37,
A-33 or RD-170 has the following advantages:
• you can transmit on two MIDI channels simultaneously, either in the same range (“Layer”) or
via separate zones (“Split”).
• these instruments have memories that allow
you to quickly change the MIDI channels (and
many other MIDI parameters) by simply selecting another memory.
Note: By using an optional MIDI merger (or MIDI
patcher with Merge function) you could control the
Realtime parts as follows: Upper and Lower from a
MIDI keyboard or accordion, while a drummer with
MIDI-compatible pads can control the M.Drums part. If
you work with a sequencer, all three Realtime parts can
be controlled simultaneously.
(2) Set the MIDI controller’s transmit (TX) chan-
nel to “4” (Upper part), “11” (Lower part) and/
or “16” (M.Drums part).
(3) Play a few notes on the external MIDI con-
troller.
Depending on the MIDI channel the controller
transmits on, you now hear the Upper, Lower
and/or M.Drums part.
You could also press the [MULTI-FX] button to
add an appropriate effect to the Upper part.
See page 47 for details.
Note: The Multi-FX is only available for the Upper part.
(4) Use the [MASTER] knob to set the
DisCover 5M’s output volume.
(5) If you are playing to a song, use the [SONG]
knob to set the song volume.
MIDI OUT
r
30
Turn it towards “MAX” if your playing is too
loud with respect to the other parts.
Note: See page 44 for how to set the balance between
the Realtime parts.
Page 31

Owner’s Manual
UpperLower
C2
C3
IPopKik36
IPopCStk37st
IPopSn38st
IPopGstS39st
IPopSn40st
IPopTomLFl41
IPopHat1_42
IPopTomL43
IPopHat2_44
IPopTomMFl45
IPopHat3_46
IPopTomM47
IPopTomHFl48
IPopCyml2_52
IPopTomH50
The Lower part can be used in the following
ways:
• as a quick way of alternating between two different Tones, whereby one is assigned to the
Upper part and the other to the Lower part.
• as additional sound for the Upper part, in which
case Upper and Lower sound together (this is
called a “Layer”).
• as separate sound for the left half of the keyboard (while the Upper part is assigned to the
right half). This is called “Split” (see below).
(6) Set the MIDI controller to the Lower part’s
MIDI channel and play a few notes on the
external keyboard.
(7) To create a layer (Upper + Lower), use a MIDI
controller (or sequencer) that can transmit on
two MIDI channels simultaneously.
Using splits
As stated above, you can also use splits and therefore play the Lower part via the left half, and the
Upper part via the right half. To this end, you need
to work in one of the following ways:
• Use a MIDI controller that can transmit on two
MIDI channels simultaneously and already provides MIDI zones (examples: Roland A-33, A-37,
AX-7, RD-170).
• Use a MIDI controller (or sequencer) that transmits on two MIDI channels simultaneously but
has no MIDI zones (i.e. both MIDI channels
transmit all note numbers).
Use Limit Low and High (see p. 96) to specify
the note ranges the Upper and Lower parts
should receive. Here’s an example:
Limit Low Limit High
Lower C– B2
Upper C3 G9
Here’s what a split could look like:
Note that this system also works with MIDI
controllers that only transmit on one MIDI
channel. In that case, you need to assign the
channel number in question to both the Lower
and Upper parts. See “Channel” (p. 96).
Drumming
The DisCover 5M also provides a Realtime part that
allows you to play drums and percussion. This is the
“M.Drums” part (MIDI channel 16).
This part behaves similarly to a rhythm machine,
except that the drum part needs to be played in
realtime. The DisCover 5M’s Drum Sets are so good/
realistic, that you might consider using the M.Drums
part as “stand-alone” rhythm module when working
with an external sequencer.
Every key is assigned to a different drum/percussion
sound. Press the C2 key to sound a bass drum
(“kick”), and the white key to its right (D2) to play a
snare sound. Then, try out the other keys.
Choosing other Tones (or Drum Sets)
The DisCover 5M contains 1,422 Tones (or sounds) that can be assigned to the Upper and Lower parts. There are
two methods for assigning Tones to the Upper and Lower parts, or Drum Sets to the M.Drums part.
®
TONE FINDER function
(1) If one of the buttons in the SONG MAKEUP
TOOLS section below the display lights, press
[EXIT] to switch it off.
(2) Press the [TONE¥FINDER] button.
The display changes to:
(3) Take a look at the part name below the mea-
sure indication (right side) that is displayed in
white. Press the field ([UPPER], [LOWER],
[M.DRUMS]) that corresponds to the part you
wish to assign a Tone to.
31
Page 32

Touring your DisCover 5M
(4) If the [Family] indicator icon is not high-
lighted, press it.
The eight big fields contain the names of the
first eight Tone families.
(5) Press the field that corresponds to the kind of
Tone you need if it is already displayed (in the
above example, [ACCORDION] has been
selected).
Use the [ø] or [˚] field (lower right) to select
another group of up to eight Tone family
names.
(There are 34 families in all that are divided
over five display pages.)
The display now lists eight Tones of the selected
family.
®
Selecting Tones via the bank/number system
The following is a more traditional approach,
which may nevertheless be practical for experienced users.
(1) On the main page, press the row of the part
you wish to assign a different Tone to.
The display changes to:
(6) Press the field of the Tone you are interested
in. If you don’t like it, press another field.
(7) If none of the Tones available on this page fit
the bill, use [ø] or [˚] to jump to another page.
The number of Tone pages depends on the family you select. If the [˚] field is not displayed in
the bottom right corner, you have reached the
last Tone page of the selected family.
(8) Use the two arrow fields to change the
OCTAVE (transposition) of the selected Tone.
This is only necessary if you feel the Tone is
right for what you want to play, but too high or
too low.
(9) Press the [EXIT] button to return to the main
page.
(2) If necessary, press the [Family] field in the
upper left corner to select the above page.
(3) Press the field that corresponds to the sound
bank you’re interested in (the DisCover 5M
calls these banks “families”).
There are two Groups with 8 banks each: “A”
(left) and “B” (right).
The display now responds with a list of Tones
available in that family:
(4) Press the field of the Tone you are interested
in. If you don’t like it, press another field.
Note: If you picked the wrong family, you can press the
[Family] field to return to the previous display page.
Note: To quickly assign a Tone to the Lower (or a Drum
Set to the M.Drums) part, press the [LOWER] (or
[M.DRUMS]) field.
r
32
Page 33

Owner’s Manual
●
Variations
If you think the Tone you selected is close, but
not entirely what you need, you can refine your
selection as follows:
(5) On the above display page, press the
[Variations] field.
(6) Press a field on this page to select a Tone
Variation.
This Variation system is used to provide access
to all Tones you can select. After all, 2 Groups ×
8 families × 8 memories add up to 128 possibilities, which is only a fraction of the Tones you
can select.
Hence the Variation system, which adds a “subcategory” to the Tone memories. The number of
Variations varies from Tone to Tone: it can be
anything between 1 and 50. See the included
“Tone & Drum Set Lists”.
(7) Press the field of the desired Variation.
(8) If you are still not happy with the Tone, use
the [1]~[5] fields (right side) to select the corresponding page and its 10 Variations (if
available).
If you now return to the Tone memory page, it
may look as follows:
(10) Press the [Customize] field to store your Varia-
tion assignment.
The display briefly responds with the following
message and then returns to the Tone memory
page.
(11) Press the [EXIT] button to return to the main
page.
Next time you select the ORGAN family page
(because you want to choose an organ Tone),
the display will look as follows:
(The first memory no longer recalls the “Organ
1” Tone, but the “Full Organ 6” variation.)
The symbol means that the selected Variation is being used (see also its “address” in the
upper right corner), but that your choice will
not be remembered. So next time you select
that Tone memory (“A31”), the DisCover 5M will
once again use the “Organ 1” Tone.
To ensure that the “Full Organ 6” Tone is
assigned to the “number position” (1 in this
case) –thus replacing the “Organ 1” Tone–, you
need to proceed as follows:
(9) Press the [Variations] field.
If you’re still on the Variation page (see step (5)
above), this step is unnecessary.
®
Selecting Drum Sets
As stated earlier, the M.Drums part doesn’t use
Tones but “Drum Sets”. Drum Sets are collections of up to 128 different drum and percussion sounds, each assigned to a different key.
The DisCover 5M contains 44 Drum Sets. Drum
Set selection is similar to Tone selection, and
you can use both the Tone Finder routine
(which is then called “Drum Set Finder”).
Here’s what the Drum Set Finder page looks
like:
33
Page 34

Touring your DisCover 5M
C2
C3
IPopKik36
IPopCStk37st
IPopSn38st
IPopGstS39st
IPopSn40st
IPopTomLFl41
IPopHat1_42
IPopTomL43
IPopHat2_44
IPopTomMFl45
IPopHat3_46
IPopTomM47
IPopTomHFl48
IPopCyml2_52
IPopTomH50
IPopSn38mn
IPopGstS39mn
IPopSn38mn
FingerSnaps2
707 Claps
808clap
Hand clap2
909 HandClap
IPopPHat32
GospelHClp1
IPopSRll30st
IPopKik35
IPopKik36
IPopCStk37st
IPopSn38st
C2
C3
OCTAVE= 0
OCTAVE= –1
The [Family] field should look familiar: it allows
you to specify what kind of Drum Set you need.
(There are no “Groups” on this page.)
After specifying the family by pressing one of
the eight big fields the display changes to:
Use the arrow fields to change the OCTAVE of
the selected Drum Set.
This is only necessary if you do not have access
to the desired drum/percussion sounds. Some
Drum Sets indeed provide up to 128 such
sounds, while your external keyboard (or controller) may have fewer keys.
OCTAVE therefore doesn’t change the pitch of
the sounds: it assigns other sounds to the keys.
Here’s an example:
Drum Set selection via the bank/number system
works exactly like Tone selection.
Using the D Beam Controller
The D Beam Controller allows you to control various aspects of your performance, or to add something to the
music, by moving your hand, head, etc., in the air. You only need to make sure that you do so over the two “eyes”
and within a 40cm (±16”) range. Your movements are translated into musical expression. Let’s first try out the DJ
GEAR functions.
(1) Press the [DJ¥GEAR] button to the left of the
display.
The button lights. (Press it again to switch the D
Beam function off again.)
The display changes to:
(2) Start playback of a song (page 15).
(3) Move your hand towards and away from the
D Beam’s “eyes”.
What you hear now is the “VinylRPM” effect.
Now let’s do some scratching…
(4) Press the [SCRATCH] field.
(5) Again move your hand towards and away
from the D Beam.
Now you should hear a scratch sound.
Try out some other effects by pressing the
[Sound¥EFX] and [Instruments] fields/buttons and
selecting one of the available options.
Note: See p. 37 for full details about the D Beam Controller.
(6) Press the [EXIT] button to return to the main
page.
r
34
Page 35

Owner’s Manual
4. Using the performance functions
Let us now have a look at the DisCover 5M’s performance functions. They allow you to add expression to your playing, which is a very important aspect for simulating glissando’s, bendings, and other changes that will make your
melodies even more convincing.
Pitch Bend and Modulation
The DisCover 5M does not have a BENDER/MODULATION lever and therefore needs to receive the appropriate MIDI
messages from the external MIDI controller. Pitch Bend and modulation can be applied simultaneously if you like.
Velocity sensitivity
See page 96.
Transposition
If you are used to playing a song in a particular key, the Transpose function will help you go on playing in that key
while sounding in another one. That way, you can accompany a singer or instrument without changing your fingering.
(1) Press the TRANSPOSE [√¥ƒ] button to trans-
pose the DisCover 5M down by up to 6 semitones.
The transposition interval is indicated on the
main page:
(2) Press the TRANSPOSE [¥®] button to trans-
pose the DisCover 5M up by up to 5 semitones.
Transposition never applies to M.Drums part (or
the drum part of a song).
To transpose from the key of C to E, press [¥®]
four times. To transpose from C to G, press [√¥ƒ]
five times.
Be sure to return to the original setting (no
transposition) by simultaneously pressing [√¥ƒ]
and [¥®].
As long as the interval is different from “0”, one
of these buttons lights to signal that the Transpose function is active.
The “C#” actually refers to a semitone increase
of the pitch, so that you hear a “C sharp” every
time you play a “C”. It also means that, rather
than the “A” you press, you will hear “A sharp”
(or “B flat/Bb”). The above setting corresponds
to pressing [¥®] once.
Note: Any interval you set here automatically resets
(and thus overrides) the Singer Key transposition (see
p. 27). In fact, the latter is reset to ORIGINAL, after
which the new transposition value is used.
35
Page 36

Using the performance functions
Setting the transposition interval via the display
If you prefer to set the transposition interval via the touch screen with a nice graphic, here is how to.
(1) Press and hold the TRANSPOSE [√¥ƒ] or [¥®]
button.
(2) In the display, press the key that corresponds
to the note you would like to hear every time
you play a C.
Note: Selecting “0” means that the transposition is off.
Your setting can, however, be written to a User Program
(page 75).
(3) Press the [MIDI¥RX] and/or [Song] field to
switch it on.
These fields allow you to specify which parts
should be affected by the Transpose setting:
[MIDI¥RX]: The Upper and/or Lower parts will be
transposed.
Note: The M.Drums part is never transposed.
[Song]: Only the song parts will be transposed.
Though it is perfectly possible to switch on both
options, at least one of them must be on. “MIDI
RX” could be useful for transposing only the
Realtime parts so that you can play to a song in
“your” key but sound in the song’s key.
(4) If necessary, set the GLOBAL TRANSPOSE
value using the [ø¥ƒ] [¥˚] fields.
This value is in fact a “master transpose control”
for all sections of the DisCover 5M. Its value is
added to the current transposition interval (and
the Singer Key as well as User Program transposition) until you reset it to “0”, or until you
switch off your DisCover 5M.
(5) Press the [EXIT] button to return to the main
page.
Master Tune
This is not really a performance function, but it allows you to tune your DisCover 5M to acoustic instruments that
cannot be tuned.
(1) Press the [MENU] button.
The display changes to:
(2) Press the [MASTER¥TUNE] field.
(3) Use the [VALUE] dial to set the desired tuning.
The default value is “440.0”. You can return to
this value by pressing the [440.0Hz] field.
(4) Press the [EXIT] button to return to the main
page.
r
36
Page 37

D Beam functions
We still owe you an explanation or two about how to assign the desired function to the D Beam controller and
what they mean. Let’s have a look at how to do that.
Owner’s Manual
The D Beam Controller has two sensors that detect
motion (such as your hand or body movements) in
front of it. These “sensed” positions are translated
into MIDI messages that can be assigned to a variety
of parameters.
(1) Press the [DJ¥GEAR], [SOUND¥EFX], [INST] or
[CTRL] button to switch on the D Beam and
select the function it should perform.
To assign another function to the D Beam Controller:
(2) Press the field that corresponds to the desired
function (see below).
(3) Use the [DJ¥Gear], [Sound¥EFX], [Instruments]
and [Controls] fields to select the remaining
groups and assign the desired functions as
well.
The assignments of all four groups (DJ GEAR,
SOUND FX, INSTRUMENT, CONTROLS) will be
written to a User Program (one per group), so
that you can also alternate between these
groups while playing – and still use your favorite settings.
®
DJ Gear
Vinyl RPM: allows you to simulate the sound you
hear when manually turning a vinyl record to locate
(cue) the position where you wish to start playback.
Cutting: this is a very powerful filter effect that
allows you to suppress the high frequencies in a
rhythmic way (like a DJ does sometimes).
TT Motor: simulates the effect you hear when you
suddenly stop a turntable: the playback speed
decreases, while the pitch drops and the sound
becomes muffled.
Scratch: the D Beam Controller can be used for adding scratch noises. You know what that is, don’t
you…?
Tape Rewind: allows you add the sound you hear
when you rewind a cassette tape without stopping
playback (the music plays backwards and at high
speed).
®
Sound EFX
Here, you can select various “noises” to be added to
your music simply by moving your hand over the D
Beam. We will not try to describe them: just try them
out!
If necessary, press the [˚] field to go to the second
page.
(Press [ø] to return to the previous page.)
®
Instruments/[INST]
In this case, the D Beam will play musical notes. The
pitch and chords of those patterns depend on the
notes you play on the external keyboard. Please try
out the options on offer. It’s the quickest way to find
out how they sound and work.
37
Page 38

Using the performance functions
®
Controls/[CTRL]
■ Play/Stop: Depending on the current condition of
song playback (running or stopped), one move inside
the D Beam’s range stops (or starts) it. A second
movement will start (or stop) it again.
■ Tempo Up/Down: Select one of these options if
you want to increase (Up) or decrease (Down) the
current song tempo. By moving your hand outside
the D Beam’s range, you return to the previous
tempo value.
■ Arpeggio Oct 1/2/3: By moving your hand over
the D Beam, you cause the Lower part to play arpeggios (broken chords) based on the notes extracted
from the current song. Depending on the setting you
select here, the notes will be arpeggiated over 1, 2, or
3 octaves.
Note: Do not forget to assign a suitable Tone to the
Lower part.
■ Chord Oct 1/2/3: By holding your hand inside the
D Beam’s range, you cause the Lower part to sound
the notes extracted from the current song. You could
use this function to add syncopated brass or guitar
“hits” to your melody. The velocity value used for
playing these notes is “100”. The number (1, 2, or 3)
bears on the octave of this “added chord”:
G4,
2
= Ab4~G5, and 3= Ab5~G6. Move your hand
outside the D Beam’s range to stop the Lower part
from sounding the chord.
■ Melody Mute: By holding your hand inside the D
Beam’s range, you switch off the melody part (track
4) of the song you are playing back. A second movement will switch the melody on again. This function
corresponds to one of the Minus-One options
(page 19).
■ Accomp Mute: By holding your hand inside the D
Beam’s range, you mute all parts of the song you are
playing back – except the melody, bass, and drums. A
second movement will switch the accompaniment
on again. This function corresponds to one of the
Minus-One options (page 19).
■ Drum&Bass Mute: By holding your hand inside
the D Beam’s range, you mute the bass and drums of
the song you are playing back. A second movement
will switch these parts on again. This function corresponds to one of the Minus-One options (page 19).
■ Rotary S/F: Allows you to select the slow or fast
speeds of the Rotary effect. This only works, if the
Rotary effect is currently assigned to the Multi-FX.
1
= Ab3~
r
38
Page 39

Using optional footswitches
Owner’s Manual
Foot Switch
An optional DP-2, DP-6, or BOSS FS-5U footswitch
connected to the FOOT SWITCH socket can be used
to perform various functions. If you do not change
the factory setting, this footswitch allows you to
start and stop song playback.
Here’s how to select another footswitch function:
(1) Press the [MENU] button.
The display changes to:
■ Harmony On/Off: The footswitch allows you to
switch the currently selected HARMONY function
([VOCODER], [SMALL] or [ENSEMBLE]) on and off.
Select this function if you want to be able to switch
the harmonies on for the choruses, and off for the
verses (for example) while playing on the external
keyboard.
■ Fade In/Out: The footswitch performs the same
function as the [FADE] button on the front panel. See
also page 63.
■ User Program Up: Selects the next User Program
(i.e. A12 if A11 is currently active).
■ Minus One: The footswitch allows you to switch
the Minus-One function on and off. See page 19 for
how to select the option that will be used when the
Minus-On function is on.
(4) Press the [EXIT] button to return to the main
page.
(2) Press the [FOOTSWITCH] field.
(3) Press the field that corresponds to the desired
footswitch function.
■ Play/Stop: Starts and stops song playback. Same
function as the [®÷ª] button.
■ Rotary S/F: Allows you to select the slow or fast
speeds of the Rotary effect. This only works, if the
Rotary effect is currently assigned to the Multi-FX.
■ Talk: The footswitch performs the same function
as the [TALK] button in the VOCAL HARMONIST section.
39
Page 40

Using the performance functions
Expression (Foot Pedal)
An optional EV-5, EV-7 or BOSS FV-300L expression pedal connected to the FOOT PEDAL socket allows you to
control the volume of the Realtime parts. You can also specify which Realtime part(s) should respond to and
how the pedal works:
(1) Press the [MENU] button.
The display changes to:
(2) Press the [UTILITY] field. If the [FootPedal] field
in the left corner is not displayed in white,
press it.
(3) Press the field of the Realtime part whose
expression assignment you want to change.
(4) Use the [VALUE] dial to select one of the fol-
lowing options:
■ ON: The expression pedal is assigned to the
selected Realtime part.
■ REV: The expression pedal is assigned to the
selected Realtime part, but works the other way
around: when the pedal is pressed (toe down), the
Realtime part is inaudible. When the pedal is up (heel
down), the Realtime part uses its maximum volume.
You can use this for blending effects between the
Upper (“ON”) and Lower (“REV”) parts, for example.
■ OFF: The expression pedal is not assigned to the
selected Realtime part.
Scale Tune
Another useful function is called Scale Tune. It allows you to use oriental, Asian, and other scales in much the same
way as on an oriental keyboard (EM-55 OR, etc.).
The DisCover 5M contains three memories where
you can store your favorite tunings. These are three
global memories that apply to all User Programs.
(1) Press the [MENU] button.
The display changes to:
(2) Press the [SCALE¥TUNE] field.
(3) Press a [Mem¥1]~[Mem¥3] field to select a
Scale Tune memory.
This will change the pitch of the following
notes (“–50” means that the note in question is
tuned a quarter tone down):
Mem 1 Mem 2 Mem 3
E (–50)
B (–50)
E (–50)
A (–50)
C# (–50)
F# (–50)
r
40
Page 41

Owner’s Manual
The pitch of the other notes is left unchanged.
The keys corresponding to the notes whose
pitch is changed are displayed in white for easy
identification.
You will notice that every note can be selected
only once. That is because the value you specify
applies to all notes of the same name. If you
change the tuning of the “C”, that value will be
added to or subtracted from all Cs (C1, C2, C3,
etc.). The on-screen keys are used as “on/off
switches”.
If you now returned to the main page, you
would notice that the DisCover 5M alerts you
to the fact that the Scale Tuning function has
been switched on:
any value between “–64” (slightly lower than a
quarter tone down) and “63” (slightly higher
than a quarter tone up).
(5) Use the [VALUE] dial to set the desired pitch.
If you selected a [Mem] field, an asterisk (*) is
displayed to indicate that the stored settings
have changed.
You can also select the desired value field with
the [PREV] and [NEXT] buttons.
(6) Repeat steps (4) and (5) for the other notes
whose pitch you want to change.
Note: This pitch is only used when the corresponding
on-screen key is displayed in white. Do not forget to
switch it on.
●
Storing your new scale
If you think you’ll need that scale in the future,
you should write – or “Memorize”– it:
(7) Program the scale you wish to save by
switching the desired notes on or off (see
above).
(8) Press the [Memorize] field in the lower right
corner of the display.
The display now looks as follows:
But let us not return to the main page just yet.
Changing the pitch of other notes
Changing the pitch of other notes than the
ones already highlighted is a matter of pressing
the desired on-screen keys in question. And
defeating the pitch change of a key displayed in
white is as easy as pressing that key again (it
will once again be displayed in white).
Press all white on-screen keys (or the [Mem]
field that is displayed in white) to switch the
Scale Tuning function off again.
●
Customizing the pitch changes
At first, pressing an on-screen key, so that it is
displayed in white, means that its pitch is lowered by 50 cents (1/4 tone, or “–50”). There may
be situations where you actually want to raise
the pitch of a note, or select a different tuning:
(4) Press the on-screen key of the note/key
whose pitch you want to change.
(9) Press a [Mem¥1]~[Mem¥3] field and [EXECUTE]
to save your settings in the corresponding
Scale Tuning memory.
The display now responds with the following
message and then returns to the Scale Tune
page.
(10) Press the [EXIT] button to return to the main
page.
That field is displayed in white. As stated earlier,
the pitch of all notes is at first set to “–50” (one
quarter tone down). You can however, select
41
Page 42

Before you start editing (Menu)
5. Before you start editing (Menu)
The DisCover 5M provides a number of “hidden” functions you may only need every so often. Certain functions,
though “on the menu”, can also be selected by pressing and holding the assigned button. The following is only provided for your orientation, as all functions on this menu are covered elsewhere (where it makes sense to mention
them). Yet other functions can be recalled via dedicated buttons and therefore do not appear on the Menu page.
Here’s what’s part of the Menu environment and
where to find details about those parameters.
Note: Except for the MASTER TUNE, MIDI, and UTILITY settings, all parameter values and assignments can be written to
a User Program (page 75).
(1) Press the [MENU] button.
The display changes to:
(2) Press the field that provides access to the
function you are interested in:
• [MASTER¥TUNE]: Allows you to tune the
DisCover 5M as a whole. . . . . . . . . . . . . . . . . p. 36
Use this parameter when you wish to accompany other instruments or play to a CD, cassette, etc.
• [TRANSPOSE]: Allows you to set the transposi-
tion interval via the display and to specify
which sections should be transposed.. . . . . p. 35
• [VIDEO¥LYRICS]: Allows you to make settings
related to an optional TV screen or monitor.
. . . . . . . . . . . . . . . . . . . . . . . . . . . . . . . . . . . . . . p. 29
• [FADE¥IN/OUT]: Allows you to specify how fast
fades triggered via the [FADE] button should be
carried out . . . . . . . . . . . . . . . . . . . . . . . . . . . . p. 63
• [SCALE¥TUNE]: Allows you to use and/or pro-
gram different tuning systems for oriental
music, and the like. . . . . . . . . . . . . . . . . . . . . .p. 40
r
42
• [D¥BEAM]: Allows you to assign the desired
function to the D Beam controller. . . . . . . . p. 37
Page 43

Owner’s Manual
• [FOOTSWITCH]: Allows you to assign the
desired function to an optional DP-2, DP-6, or
BOSS FS-5U footswitch.. . . . . . . . . . . . . . . . .p. 39
• [VOCAL¥HARMONIST]: Provides access to set-
tings with which you can fine-tune the Vocal
Harmonist’s behavior for your own voice, transformed voice signals, and harmonies. You can
also set the equalizer by pressing the [Equalizer]
field.
Use the fields at the right edge of the display to
select the part (mode) whose settings you wish
to change . . . . . . . . . . . . . . . . . . . . . . . . . . . . .p. 56
• [UTILITY]: Allows you to specify the following:
Which MIDI Set and/or User Program to load
when the DisCover 5M is switched on.
. . . . . . . . . . . . . . . . . . . . . . . . . . . . . . p. 80 and 100
Whether the Multi-FX should be linked to the
Tone selected for the Upper part . . . . . . . . . p. 49
Whether the pre-programmed effect settings
should be loaded each time you press a button
in the VOCAL HARMONIST section. . . . . . . . p. 50
• [MARK¥JUMP]: Allows you to program the
desired locations that can be recalled using the
MARK JUMP [1]~[4] buttons. . . . . . . . . . . . . .p. 64
• [MIDI]: Provides access to the DisCover 5M’s
MIDI parameters.. . . . . . . . . . . . . . . . . . . . . . .p. 94
To set playback-specific parameters (Player)
. . . . . . . . . . . . . . . . . . . . . . . . . . . . . . . . . . . . . . p. 18
To select the Realtime parts that should be
affected by an optional expression pedal – and
how this should be done (FootPedal) . . . . . p. 40
(3) Press the [EXIT] button to return to the main
page.
43
Page 44

Working with the Mixer & using effects
6. Working with the Mixer & using effects
The MIXER environment does what its name suggests: it allows you to balance the various Realtime parts of your
DisCover 5M. See page 82 and following for how to “mix” the song parts.
Your singing and the generated Vocal Harmonist parts can be “mixed” using the knobs in the [VOICE] and
[HARMONY] sections.
About the DisCover 5M’s effects
The DisCover 5M contains the following effects processors, not all of which are available for all sections. So please carefully study the following table:
Section Effects processors Remarks
Song Reverb, Chorus Same as Realtime parts
Realtime parts Reverb, Chorus Same as song section
Upper part Multi-FX + same as above Multi-FX only for Upper (and
VOICE Reverb, Delay, Compres-
sor, Gate
HARMONY Reverb, Delay, Chorus Vocoder, Small, Ensemble
then no Chorus)
Talk, Singer, Auto Pitch,
Voice FX
The reason why we are talking about “processors” is
that most of them can be used in various ways (by
selecting a “Type”). The Multi-FX is, of course the
most versatile processor, because it can use one of
47 types, while other processors provide 8 or 9 possibilities. Only the Compressor and Gate processors
are “dedicated” effects: they can “only” function as
Compressor or Gate.
Note: See page 57 for how to set the VOCAL HARMONIST
equalizers.
Mixing Realtime parts
Here’s how to set the balance and other “mix-related” parameters of the Realtime parts.
(1) Press the [MIXER/EFFECTS] button.
The display changes to:
(2) Move the on-screen sliders to set the desired
volume for the various Realtime parts.
The D BEAM part refers to the sounds that are
generated when you use the D Beam controller
after selecting the DJ GEAR, SOUND EFX or
INSTRUMENT mode (scratches, sound effects,
other “noises”). See page 37 for details.
Use these sliders as “sub mixer”, to establish the
correct balance between the Realtime parts.
(3) After setting these levels, you can use the
[SONG] knob to establish the correct balance
between the Realtime parts and the song.
(This only changes the song volume, however.)
r
44
Page 45

Owner’s Manual
More refined Mixer settings
“Mixing”, as you may know, entails a lot more than just getting the balances right. It also involves specifying the
stereo placement of sounds and the amount of effect that should be applied. So here we go…
(1) On the above display page, press the
[RealTime¥Effect] field.
The display changes to:
The “Chorus Send” parameter of the Upper part
is not available when the [MULTI-FX] button
lights. In that case, the page above looks as follows:
Note: There are no “Realtime Mixer” parameters for the
D Beam part. Moreover, this part is never processed by
any of the DisCover 5M’s effects.
(2) Use the [PREV] and [NEXT] buttons to select
the parameter you wish to edit, and set the
desired value with the [VALUE] dial.
Parameter fields can also be selected by pressing them.
■ Reverb Send & Chorus Send: Use these parame-
ters to set the Reverb or Chorus send level (how
much effect should be applied to the part in question). The effects themselves can be edited on the
Effect page (see below).
Note: The M.Drums parameters on this page apply to
the entire Drum Set and cannot be set for each drum/
percussion instrument individually (unlike the send
parameter of the song drum part).
■ PanPot: Use this parameter to set the stereo
placement of the selected part. “L63” corresponds to
hard left, “0” to dead center, and “R63” to hard right.
“Rnd” means that the stereo position of each note
changes.
■ Volume: Use this parameter to set the volume of
the selected part. This parameter duplicates the sliders on the Global page.
[Back¥to¥Global] Press this field to return to the
Global page (the one with the on-screen sliders).
[Sound¥Edit] See page 54.
[Effect¥Type] Press this field if you want to edit
the effects settings themselves.
Editing the Realtime (and song) effects processors
After setting the above parameters, you may find that even sensible Reverb/Chorus Send values for the Realtime
parts do not yield the expected result.
In that case, you should edit the Reverb and Chorus
settings, by pressing the [Effect¥Type] field.
If, after pressing the [MIXER/EFFECTS] button, the
page with the faders is displayed, press the left
[Effect¥Type] field (the one with the keyboard icon).
●
Reverb for Realtime parts
(1) Press the [Reverb] field in the upper left cor-
ner to gain access to the Reverb parameters.
The display changes to:
(2) Press the field of the effect type you wish to
use.
The options are:
[Room1], [Room2], [Room3] These types simulate
the Reverb characteristics of a room. The higher the
number (1, 2, or 3), the “bigger” the room becomes.
[Hall1], [Hall2] These types simulate the Reverb of a
small (1) or large (2) concert hall and thus sound
much “bigger” than the Room types above.
[Plate] Digital simulation of a metal plate that is
sometimes used for creating Reverb effects. Works
well for percussive sounds.
[Delay] A Delay effect (no Reverb). Works a lot like an
echo effect and thus repeats the sounds.
[Pan¥Delay] This is a stereo version of the above
Delay effect. It creates repetitions that alternate
between the left and right channels.
If necessary, you can correct the Send levels
after selecting a different Reverb type.
45
Page 46

Working with the Mixer & using effects
(3) Use the [PREV] and [NEXT] buttons to select
the parameter you wish to edit, and set the
desired value with the [VALUE] dial.
Parameter fields can also be selected by pressing them.
[Level] allows you to set the output level of the
Reverb processor. Setting this parameter to “0”
means that your no longer hear the effect in
question.
By contrast, setting [Reverb¥Send] on the Realtime Mixer page to “0” means that the selected
Realtime part is no longer processed by the
effect, while the remaining Realtime parts are.
(4) Press the [RealTime¥Effect] field to return to
the page of the same name. Press
[Back¥to¥Global] to return to the display page
with the sliders.
●
Chorus for Realtime parts
(1) Press the [Chorus] field in the upper left cor-
ner to gain access to the Chorus parameters.
The display changes to:
If necessary, you can correct the Send levels
after selecting a different Chorus type.
(3) Use the [PREV] and [NEXT] buttons to select
the parameter you wish to edit, and set the
desired value with the [VALUE] dial.
Note: UPPER Chorus Send is only available if the
[MULTI-FX] button does not light. If it lights, the Upper
part is not processed by the Chorus.
[Level] allows you to set the output level of the
Chorus processor. Setting this parameter to “0”
means that your no longer hear the effect in
question.
By contrast, setting [Chorus¥Send] on the Realtime Mixer page to “0” means that the selected
Realtime part is no longer processed by the
effect, while the remaining Realtime parts are.
You may have noticed the [MULTI-FX] field.
That’s up next. But first…
(4) Press the [EXIT] button to return to the main
page.
(2) Press the field of the effect type you wish to
use.
Chorus broadens the spatial image of the sound
and creates a stereo impression. You can
choose from 8 types of Chorus.
[Chorus1]~[Chorus4]
rus effects that add spaciousness and depth to the
sound.
[Fb¥Chorus] This type produces a Flanger-like effect
and has a soft sound.
[Flanger] This is an effect that sounds somewhat like
a jet airplane taking off and landing.
[Delay] This is a Delay (echo effect) with a short
Delay time.
[Pan¥Delay] This is a short Delay with many repeats
that alternate between the left and right channels.
These are conventional Cho-
r
46
Page 47

Owner’s Manual
Using the multi-effects processor (Multi-FX)
Your DisCover 5M contains a multi-effects processor that can be used for processing the Upper part. If you switch
it on, the Upper part is no longer processed by the Chorus effect.
(1) Select the “A32 Jazz Organ” Tone:
• On the main page, press the [UPPER] field.
• Press [Family], [ORGAN] (3rd field in the left column), and [2].
The [MULTI-FX] button lights. The Upper part is
now processed by the effect type currently
assigned to the Multi-FX processor (“Rotary”).
Selecting another Multi-FX type
The Rotary effect that is assigned to the Multi-FX by default is wonderful for organ and other sounds.
For a guitar sound, however, working with distortion can be more effective. In fact, the DisCover 5M
provides 47 different Multi-FX types, some of which
are combinations of two effects for added flexibility.
Here is how to select another Multi-FX type:
(1) Press and hold the [ACTIVE] button until the
display looks as follows:
You can also select this page by pressing the
[MIXER/EFFECTS] button→ [RealTime¥Effect]
field→ [Effect¥Type] field. But the above method
is a lot faster.
(2) Press one of the 12 fields in the upper part of
the display to select another Multi-FX type.
(3) If none of the types on this page appeal to
you, use the PAGE [1]~[4] fields at the right to
jump to another page with different types.
Note: Multi-FX type selection can be linked to Tone
selection for the Upper part. See page 49.
The available types are:
Enhancer: An Enhancer controls the overtone structure of the high frequencies, adding sparkle and
tightness to the sound.
Overdrv1~4: Overdrive creates a soft distortion similar to that produced by tube amplifiers. Several
types of overdrive are available: (1) Small combo
amp, (2) large combo amp, (3) Large double-stack
amp (2 cabinets), (4) Large double-stack amp (3 cabinets).
(2) Play a few notes on the external keyboard,
and switch the [ACTIVE] button on/off to hear
the difference.
Note: The slow/fast switching function can be assigned
to an optional footswitch (see p. 39) or the D Beam
Controller (see p. 37).
Distort1~4: This effect produces a more intense distortion than Overdrive. The numbers refer to different kinds of distortion.
Phaser: Adds a phase-shifted sound to the original
sound, producing a twisting modulation that creates
spaciousness and depth.
AutoWah: The Auto Wah cyclically controls a filter
to create cyclic change in timbre.
Rotary: Simulates the sound of a classic rotary
speaker. This effect is most suitable for electric organ.
StFlangr: This is a stereo Flanger. It produces a
metallic resonance that rises and falls like a jet airplane taking off or landing.
SpFlangr: A Step Flanger is a Flanger effect with
clearly noticeable steps rather than continuous pitch
changes.
Compress: A compressor reduces signal peaks and
boosts low levels, smoothing out unevenness in volume.
Limiter: A limiter prevents the volume from exceeding a certain level without boosting low levels.
HexaCho: Hexa Chorus uses six layers of chorused
sound to give richness and spatial spread to the
sound.
Trem Cho: Tremolo Chorus is a Chorus effect with
added Tremolo (cyclic modulation of the volume).
StChorus: This is a stereo Chorus.
Space-D: A multiple Chorus that gives no impression
of modulation, but produces a transparent Chorus
effect (the perfect “stereo maker”).
47
Page 48

Working with the Mixer & using effects
StDelay: Delay is an effect that allows you repeat the
input signal, thus creating echoes (repetition).
Mod Delay: This effect adds modulation to the
delayed sound, producing an effect similar to a
Flanger.
3Tap Dly: The Triple Tap Delay produces three delay
sounds: center, left and right.
4Tap Dly: Delay with four repetition lines.
TmCtrDly: This effect controls the delay time and
pitch in realtime. Lengthening the delay time will
lower the pitch, and shortening it will raise the pitch.
Reverb: A nice Reverb effect.
GteRevNr: Gate Reverb is a special type of Reverb in
which the reverberant sound is suddenly cut off (and
does not gradually decrease).
GteRevRv: A gated Reverb effect that sounds “backwards”.
GteRevS1: The reverberant sound moves from right
to left.
GteRevS2: The reverberant sound moves from left to
right.
2PtchShf: A Pitch Shifter changes the pitch of the
original sound. This 2-voice effect contains two pitch
shifters and adds two transposed copies to the original sound.
FbPtchShf: Pitch Shifter with several echoes.
OD®Chors: This effect connects an Overdrive and a
Chorus in series. (“Series” means that the output signal of the first effect is also processed by the second.)
OD®Flger: This effect connects an Overdrive and a
Flanger in series.
OD®Delay: This effect connects an Overdrive and a
Delay in series.
DS®Chors: This effect connects distortion and a
Chorus in series.
DS®Flger: This effect connects distortion and a
Flanger in series.
DS®Delay: This effect connects distortion and a
Delay in series.
EH®Chors: This effect connects an Enhancer and a
Chorus in series.
EH®Flger: This effect connects an Enhancer and a
Flanger in series.
EH®Delay: This effect connects an Enhancer and a
Delay in series.
Cho®Dly: This effect connects a Chorus and a Delay
in series.
FL®Delay: This effect connects a Flanger and a
Delay in series.
Cho®Flger: This effect connects a Chorus and a
Flanger in series.
Cho/Delay: This effect connects a Chorus and a
Delay in parallel. (“Parallel” means that the input signal is processed by two effects that do not interact.)
FL/Delay: This effect connects a Flanger and a Delay
in parallel.
Cho/Flger: This effect connects a Chorus and a
Flanger in parallel.
(4) If you want to change other Mixer parame-
ters of the Upper part, press the
[RealTime¥Effect] or [Back¥to¥Global] field.
If you don’t, press the [EXIT] button to return to
the main page.
r
48
Page 49

Owner’s Manual
AB
Linking Multi-FX type selection to the Upper part (Upper M-FX)
If you like, the DisCover 5M can automatically load the Multi-FX type that is suited for the Tone you assign to
the Upper part.
A good example of this is the selection of the
“Rotary” type for organ Tones. The status of the
Multi-FX (on or off) is also memorized and may thus
change. There may be times when you wish to
remain in control yourself. In that case, proceed as
follows:
(1) Press the [MENU] button.
The display changes to:
(2) Press the [UTILITY] field.
(3) Press the [Global] field in the upper left cor-
ner.
(4) Press the [Upper¥M-FX] field (or select it with
the [PREV] [NEXT] buttons).
(5) Use the [VALUE] dial to toggle between
“Auto” and “Manual”.
Select “Auto” if the DisCover 5M should choose
a suitable Multi-FX type for each Tone you
assign to the Upper part.
Select “Manual” if you do not want the
Multi-FX to change automatically.
(6) Press the [EXIT] button to return to the main
page.
Voice and Vocal Harmonist part mixing
Your DisCover 5M provides three knobs ([VOICE], [HARMONY], and [EFFECTS]) that you can use without even bothering about the MIXER environment. That is why there are fewer MIXER functions for this section, but a lot more
effects…
Note: For the following, it would be a good idea to set the
[EFFECTS] knob at least to “▼” to hear what you are doing.
(1) Press the [MIXER/EFFECTS] button.
The display changes to:
(2) Press the [Vocal¥Effect] field.
●
About the VOICE & HARMONY columns
For the VOICE & HARMONY columns (marked
A and B in the above illustration), you will
notice a striking analogy with the button layout
in the VOCAL HARMONIST section.
The part names that can appear in the VOICE
column are: TALK, SINGER, VOICE-FX, or AUTO
PITCH. → Processors: Reverb, Delay
49
Page 50

Working with the Mixer & using effects
Now look at the front panel:
Only one button in each row can be on at any
one time. It therefore makes sense to use one
set of effects processors for the lower row
(VOICE), and a second for the upper row (HARMONY).
The part names that can appear in the HAR-
MONY column are: VOCODER, SMALL, or
ENSEMBLE. → Processors: Reverb, Chorus,
Delay
The smaller names in the VOICE and HARMONY
columns reflect the current settings of the
VOCAL HARMONIST section.
On the display page, TALK appears below VOICE.
If you look at the button illustration (left),
[TALK] currently lights.
(3) Press the VOCAL HARMONIST button of the
part whose settings you wish to change.
(4) Use the [PREV] and [NEXT] buttons to select
the parameter you wish to edit, and set the
desired value with the [VALUE] dial.
Parameter fields can also be selected by pressing them.
●
VOICE column
■ Reverb Send: Allows you to specify how strongly
the currently selected VOICE part should be processed by Reverb [1] of the VOCAL HARMONIST section.
■ Music Mute (only for TALK): Allows you to set
the balance between the music and your announcements. The smaller the value, the softer the song’s
and Realtime parts’ volume will be. Select “0” if you
do not want the music to be any softer than it
already is.
■ Delay Send: Allows you to specify how strongly
the currently selected VOICE part should be processed by Delay [1] of the VOCAL HARMONIST section.
●
HARMONY column
■ Reverb Send: Allows you to specify how strongly
the currently selected HARMONY part should be processed by Reverb [2] of the VOCAL HARMONIST section.
■ Chorus Send: Allows you to specify how strongly
the currently selected HARMONY part should be processed by the Chorus effect of the VOCAL HARMONIST section. (The VOICE section doesn’t have a Chorus
effect.)
■ Delay Send: Allows you to specify how strongly
the currently selected HARMONY part should be processed by Delay [2] of the VOCAL HARMONIST section.
(5) Repeat the above for the remaining combi-
nations.
All settings for all VOCAL HARMONIST buttons
are written to a User Program (page 75).
(6) Set the MIC INPUT parameters as desired.
As explained under “Compressor, Gate, and
effects” (p. 21), the Compressor and Gate apply
to the MIC INPUT signal before it reaches the
VOCAL HARMONIST section.
(7) Press the [EXIT] button to return to the main
page, or continue with the next section to
program the effects processors.
Reverb, Delay, and Chorus effects
For the following, it is very important that you read (and understand) the explanations under “About the VOICE
& HARMONY columns” (p. 49).
Each Vocal Harmonist part can have its own effects
settings. These settings change automatically as you
press [TALK], [VOICE–FX], [AUTO¥PITCH], or [SINGER],
on the one hand, and [VOCODER], [SMALL], or
[ENSEMBLE] on the other.
[TALK] can therefore use a short Reverb (“Room”, for
example), while [SINGER] can be processed with the
“Church” algorithm, and so on. Thus, by pressing
[VOICE-FX], you not only select that part and its
voice transformations, but also the Reverb and
Delay settings you will (maybe) edit in a minute.
In fact, the Roland engineers already programmed
the effects parameters for you, so that you only
need to read on if you want to edit those presets
yourself.
r
50
®
Extremely important remark
Before you even consider spending some time
with the Vocal Harmonist effects, you need to
change the following parameter. If you don’t,
your changes will be lost as soon as you press
another VOCAL HARMONIST button.
Do not change this setting if you are happy
with the way the effects sound and therefore
have no intention to delve into this matter. The
following setting is remembered even after you
switch off your DisCover 5M.
Page 51

Owner’s Manual
(1) Press the [MENU] button.
(2) Press the [UTILITY] field.
If the above page is not displayed, press the
[Back¥to¥Global] field in the upper left corner.
(3) Press the [Harmonist¥Effect] field.
(4) Use the [VALUE] dial to toggle between
“Auto” and “Manual”.
Select “Auto” to use the most suitable effects
presets for each preset.
Select “Manual” to leave the last effect settings
you made intact (and change them, if necessary), then write them to a User Program
(page 75).
(3) Press the [Effect¥Type] field.
(4) Decide which effects processor you wish to
edit:
• To edit a VOICE effect, press the [Reverb] or
[Delay] field below “VOICE EFFECT”.
• To edit a HARMONY effect, press [Reverb],
[Chorus], or [Delay] below “HARMONY EFFECT”.
Only the HARMONY parts (Vocoder, Small,
Ensemble) have a Chorus processor. The parameters and presets for the Reverb and Delay processors differ between the VOICE EFFECTS and
HARMONY EFFECTS sections.
(5) Press the VOCAL HARMONIST button for
which you want to program the effect and
talk/sing into the microphone while setting
the following parameters.
®
And now… the Vocal Harmonist effects
(1) Press the [MIXER/EFFECTS] button.
The display changes to:
(2) Press the [Vocal¥Effect] field.
If necessary, you can use the [VOICE] or
[HARMONY] knob to temporarily set the vol-
ume of the part you don’t want to hear to “0”.
Reverb
Reverb for VOICE EFFECTS
• Press the field of the Reverb type you wish to
use.
Note: The choice of the preset also affects the settings
of the parameters below. Always start by selecting the
type and then set the programmable parameters.
51
Page 52

Working with the Mixer & using effects
The names of these types ([Studio]~[Church]) are
probably self-explanatory. You may notice that
the Reverb character changes as you select different types.
• Use the [PREV] and [NEXT] buttons to select the
parameter (knob icons) you wish to edit, and set
the desired value with the [VALUE] dial.
Parameter fields can also be selected by pressing them.
The three knob icons allow you to alter the
selected Reverb type.
■ Wall Type: Allows you to specify the surface of
the walls in the simulated location. This parameter
determines the “brightness” and “liveness” of the
effect. (
Carpet, Wood, Brick, Concrete, Marble)
■ Reverb Send: This parameter reflects the setting
on the Vocal Mixer page. It was provided so that you
do not need to switch pages while editing the Reverb
processor.
■ Reverb Time: Allows you to set the length (dura-
tion) of the Reverb effect if you do not agree with
the “pre-setting”.
Reverb for HARMONY EFFECTS
ferent types. Also note that some Delays are
stereo. [Bubble] and [Space] are “special” effects
you probably only need every so often.
• Use the [PREV] and [NEXT] buttons to select the
parameter (knob icons) you wish to edit, and set
the desired value with the [VALUE] dial.
Parameter fields can also be selected by pressing them.
The four knob icons allow you to alter the
selected Delay type.
■ Wall Type: This parameter determines the “bright-
ness” and “liveness” of the effect. (
Carpet, Wood,
Brick, Concrete, Marble)
■ Delay Send: This parameter reflects the setting on
the Vocal Mixer page. It was provided so that you do
not need to switch pages while editing the Delay
processor.
■ Delay Time: Allows you to set the “time lag”
between the original and the effect signal. Combined
with the “Dly Feedback” parameter, it sets the speed
of the repetitions (echoes).
■ Delay®Rev Send: This parameter sets the
amount of Delay sound that is sent to the Reverb.
Higher values mean that the Delay portion will be
more prominent in the Reverb signal. Be careful not
to overdo this effect, because it tends to blur the
sound image.
■ Dly Feedback: This parameter specifies the num-
ber of times the Delay will repeat. With a value of “0”,
the Delay will not repeat, while higher values
increase the number of repeats. With negative (–)
values, the Delay will be fed back with inverted
phase. Negative values are mainly effective with
short Delay times.
Except for the presets, this processor works
exactly like its VOICE namesake.
Delay
Delay for VOICE EFFECTS
• Press the field of the Delay type you wish to
use.
Note: The choice of the preset also affects the settings
of the parameters below. Always start by selecting the
type and then set the programmable parameters.
The names of these types ([Slow]~[Space]) are
probably self-explanatory. You may notice that
the Delay character changes as you select dif-
Delay for HARMONY EFFECTS
The presets on this page are different, while
there is also one more parameter you can set
(see above for the others):
■ Delay®Cho Send: Sets the amount of Delay
sound that is sent to the Chorus. Higher values mean
that the Delay portion will be more prominent in the
Chorus signal.
r
52
Page 53

Owner’s Manual
Chorus (HARMONY EFFECTS)
• Press the field of the Chorus type you wish to
use.
Note: The choice of the preset also affects the settings
of the parameters below. Always start by selecting the
type and then set the programmable parameters.
The names of these types ([Smooth]~[Celeste])
are probably self-explanatory. You may notice
that the Chorus character changes as you select
different types.
• Use the [PREV] and [NEXT] buttons to select the
parameter (knob icons) you wish to edit, and set
the desired value with the [VALUE] dial.
Parameter fields can also be selected by pressing them.
The three knob icons allow you to alter the
selected Chorus type.
■ Low Pass Filter: A low-pass filter can be applied
to the sound sent to the Chorus to cut the high frequency range. Higher values will cut more of the
high frequencies, resulting in a more mellow Chorus
sound.
■ Chorus Send: This parameter reflects the setting
on the Vocal Mixer page. It was provided so that you
do not need to switch pages while editing the Chorus
processor.
■ Cho® Rev Send: This parameter sets the amount
of Chorus sound that will be sent to the Reverb.
Higher values result in more Chorus sound being
sent. The value “90” effectively allows you to connect
the Chorus and Reverb effects in series (Chorus
before Reverb). If you do not wish the Chorus signal
to be processed by the Reverb effect, set this value to
“0”.
(6) Press the [EXIT] button to return to the main
page.
Note: The first thing to do now is probably to write
your settings to a User Program (page 75).
Note: For certain parts, there is also an equalizer. See
pages 57 and 60 for how to set them.
53
Page 54

Editing the Realtime & Vocal Harmonist parts
Level
Low pass filter characteristics
Cutoff frequency
Frequency
Level
Low-pass filter (LPF)
Frequency
Cutoff value
7. Editing the Realtime & Vocal Harmonist parts
Editing the Realtime parts (Sound Edit)
After selecting the desired Tones (or Drum Set) for the Realtime parts –and probably before setting the Mixer
parameters proper– you may want to change certain aspects so as to adapt them to your music. In fact, this adds
“producing” to the mere mixing discussed earlier…
(1) Press the [MIXER/EFFECTS] button.
The display changes to:
If it does not, you may have to press the
[RealTime¥Effect] (if available) and/or
[Back¥to¥Global] field at the bottom of the dis-
play.
(If a page with a [Sound¥Edit] field is displayed
right away, you can skip steps (2) and (3).)
(2) Press the [RealTime¥Effect] field.
(3) Press the [Sound¥Edit] field.
If you press [Upper] or [Lower], the display looks
like the page shown above. If you press
[M.Drums], the display looks slightly different.
See below.
(5) The [Reset] field allows you to select the
default value (usually “0”) for the currently
selected parameter.
(6) Use the [PREV] and [NEXT] buttons to select
the parameter you wish to edit, and set the
desired value with the [VALUE] dial.
Parameter fields can also be selected by pressing them.
■ Cutoff: This filter parameter allows you to make
the selected sound darker or brighter. Positive Cutoff
settings mean that more overtones are allowed to
pass, so that the sound becomes brighter. The further this value is set in the negative direction, the
fewer overtones will be allowed to pass, and the
sound will become softer (darker).
Note: For some sounds, positive (+) Cutoff settings may
cause no noticeable change, because the pre-programmed Cutoff parameter is already set to its maximum value.
■ Resonance: This is a parameter one invariably
associates with a synthesizer. When the Resonance
value is increased, the overtones in the area of the
cutoff frequency will be emphasized, creating a
sound with a strong character.
Note: For some sounds, negative (–) Resonance settings
may produce no noticeable change because the Resonance is already set to the minimum value.
(4) Press the field that corresponds to the Real-
time part you wish to edit ([Upper], [Lower],
[M.Drums], upper right).
r
54
The following parameters allow you to set the Tone’s
“envelope”. The volume of an instrument changes
with time, from the moment the note begins to
sound to when it disappears. The envelope shape is
unique to each instrument, and is an important element in how we distinguish the sounds we hear.
The envelopes of musical instrument sounds can
change depending on how the instrument is played.
For example if a trumpet is played sharply and
strongly, the attack will be quick and the sound will
be sharp. But if a trumpet is played lightly and softly,
the attack will be softer.
Page 55

Owner’s Manual
The envelope parameters affect both the volume (or
amplitude) and the filter.
Volume
Volume
Sound ends
Sound ends
Sustain
Time
Attack Decay Release
This is where
This is where a
you play a note
note is played.
(Note-on)
This is where you
This is where that
release the key
note is released.
(Note-off)
Time
■ Attack: This parameter adjusts the onset of the
sound. Negative values speed up the attack, so that
the sound becomes more aggressive.
■ Decay: This parameter adjusts the time over
which the sound will fall from the highest point of
the attack down to the sustain level.
Note: Percussive sounds usually have a Sustain level of
“0”. Piano and guitar sounds are in this category. Holding the notes for a long time will thus have little effect
on their duration.
■ Release: This parameter adjusts the time over
which the sound will decay after the note is released
until it is no longer heard. The cutoff frequency also
falls according to this setting.
Vibrato is an effect created by modulating the pitch.
It makes the sound more expressive. Use the following three parameters if you think the part in question
has too much (or could use a little more) vibrato.
Note: Some “V” Tones contain natural (sampled) vibrato
whose depth or speed cannot be changed.
■ Vibrato Rate: This parameter adjusts the speed of
the pitch modulation. Positive (+) settings make the
preset pitch modulation faster, and negative (–) settings make it slower.
■ Vibrato Depth: Sets the intensity of the pitch
modulation. Positive (+) settings mean that the
“wobble” becomes more prominent, while negative
(–) settings make it shallower.
■ Vibrato Delay: This parameter adjusts the time
required for the vibrato effect to begin. Positive (+)
settings increase the delay, and negative settings
shorten it.
(7) Press the [Back¥to¥Rtm¥Eff] field to return to
the Realtime Mixer page.
Note: It would be a good idea to save these settings to
a User Program (page 75).
®
If you press [M.Drums]…
…you can edit the Drum Set assigned to the
M.Drums part as a whole.
The [Reset] field allows you to select the default
value (usually “0”) for the currently selected
parameter.
■ Cutoff: Allows you to make the Drum Set (all
instruments) brighter (positive values) or darker
(negative values). The further this value is set in the
negative direction, the fewer overtones will be
allowed to pass, and the sound will become softer
(darker).
■ Resonance: This parameter allows you to add a
“synthetic” character to your Drum Sets (choose a
positive value), or to make it sound more natural.
Note: It would be a good idea to save these settings to
a User Program (page 75).
55
Page 56

Editing the Realtime & Vocal Harmonist parts
Editing the Vocal Harmonist parts
Apart from the effects settings discussed earlier, there are also other VOCAL HARMONIST settings that can be customized. There are additional parameters for all Vocal Harmonist Parts except the TALK option.
Procedure for selecting these pages
(1) Press the [MENU] button.
(2) On the MENU page that appears now, press
the [VOCAL¥HARMONIST] field.
Singer settings
When the [SINGER] button lights, your solo singing
is output.
(3) In the right column, press the field that cor-
responds to the VOCAL HARMONIST part you
wish to edit.
You could also press and hold the corresponding button on the front panel.
It might be a good idea to connect a microphone and to sing/talk while making the following settings.
●
If you press the
…the display looks as follows:
[Edit]
field…
(1) Press the [Male] or [Female] field.
This is an important indication for the HARMONY processor (Vocoder, Small or Ensemble).
It does not change the character of your live
singing, though.
Press the field that corresponds to your voice
type. That way, the added harmony voices will
sound even more convincing.
(2) Press the [Vibrato] field to add an automatic
Vibrato effect to your singing.
Note that this is probably only useful as gimmick: your natural vibrato no doubt sounds far
more… natural. The Vibrato parameters can be
set on the Edit page.
(3) When you are done, either press the [EXIT]
button to return to the main page, or one of
the other fields in the right column to set
those parameters as well.
Note: The [Vocal¥Effect] and [Equalizer] fields allow you
to jump to the effects or tone controls.
• Use the [PREV] and [NEXT] buttons to select the
parameter you wish to edit, and set the desired
value with the [VALUE] dial.
Parameter fields can also be selected by pressing them.
For the following, the [Vibrato] indicator icon
must be white for the effect to be noticeable.
■ Vibrato Rate: Sets the speed of the vibrato effect.
■ Vibrato Depth: Allows you to set the vibrato
intensity. Vibrato is an effect that changes (“modulates”) the pitch. The higher the Depth value, the
more outspoken these periodic pitch changes will be.
■ Rise Time: Allows you to set a swell for the vibrato
effect. This parameter specifies how long it takes
before the Depth value is reached – once the Delay
Time is up.
■ Delay Time: Allows you to set a delay between the
moment you start singing and the moment the
vibrato effect kicks in.
• Press [EXIT] (or [Back¥to¥Singer]) to leave this
page.
●
If you press the
…the Vocal Equalizer page appears. It contains
a simple equalizer for the Voice-FX, Auto Pitch
and Singer parts. See above.
[Equalizer]
field…
r
56
Page 57

Voice-FX settings
When the
voice will not be output by the Vocal Harmonist.
Instead, it will be changed (transformed) according
to the preset you select here.
(1) Press one of the 12 fields in the middle to
(2) Press the
(3) When you are done, either press the
●
[VOICE-FX]
button lights, your original
select the kind of transformation you want.
[Vibrato]
field to add an automatic
Vibrato effect to the transformed voice.
The Vibrato parameters can be set on the Edit
page.
[EXIT]
button to return to the main page, or one of
the other fields in the right column to set
those parameters as well.
Note:
The
[Vocal¥Effect]
to jump to the effects or tone controls.
If you press the
and
[Edit]
[Equalizer]
field…
fields allow you
…the display looks as follows:
Owner’s Manual
For the following, the
[Vibrato]
indicator icon
must be white for the effect to be noticeable.
■
Vibrato Rate:
■
Vibrato Depth:
intensity. Vibrato is an effect that changes (“modulates”) the pitch. The higher the Depth value, the
more outspoken these periodic pitch changes will be.
■
Rise Time:
effect. This parameter specifies how long it takes
before the Depth value is reached – once the Delay
Time is up.
■
Delay Time:
moment you start singing and the moment the
vibrato effect kicks in.
• Press
[EXIT]
Sets the speed of the vibrato effect.
Allows you to set the vibrato
Allows you to set a swell for the vibrato
Allows you to set a delay between the
to leave this page (or
[Back¥to¥V-FX]
if you want to select another preset).
Note:
If you select another preset, the Pitch and Vibrato
parameters on the Edit page are reset to their factory
values.
●
If you press the
[Equalizer]
field…
…the display looks as follows:
Note:
Be sure to select the desired preset before press-
[Edit]
ing the
ters.
• Use the
field and modifying the following parame-
[PREV]
and
[NEXT]
buttons to select the
parameter you wish to edit, and set the desired
value with the
[VALUE]
dial.
Parameter fields can also be selected by pressing them.
Here’s what the parameters mean:
■
Gender:
part. Negative values produce a “masculine” effect,
positive values add “feminine” qualities.
This parameter should be set in relation to the Coarse
parameter (if you want to achieve a realistic effect).
■
Pitch Coarse:
cessed voice signal in semitone steps. “12” corresponds to 1 octave, “24” to 2 octaves.
■
Pitch Fine:
the processed voice in very small (cent) steps.
Allows you to change the timbre of the
Allows you to transpose the pro-
Allows you to change the tuning of
This page contains a simple equalizer for the
Voice-FX, Auto Pitch and Singer parts.
• Use the
[PREV]
and
[NEXT]
buttons to select the
parameter you wish to edit, and set the desired
value with the
[VALUE]
dial.
Parameter fields can also be selected by pressing them.
[Equalizer]
the corresponding part on or off. The parameter settings of that column are only used if the
indicator icon lights.
The equalizer can be used for two things: (a) emphasizing a specific frequency range to create a special
effect or make the part more distinguishable; (b) to
reduce the level of frequencies that mask other
sounds or produce a “boomy” sound.
■
Frequency Hz:
frequency whose level you wish to change with the
Gain parameter. The smaller the value, the lower the
frequency that will be boosted or cut.
■
Gain:
frequency. “0” means that the frequency’s level does
not change (no difference between equalizer on and
off).
• Press
Press this field to switch the equalizer of
[Equalizer]
Use this parameter to select the
This parameter sets the level of the selected
[EXIT]
(or
[Back¥to¥VocalH]
) to leave this
page.
57
Page 58

Editing the Realtime & Vocal Harmonist parts
Auto Pitch Correct function settings
When the [AUTO¥PITCH] button lights, only the words you say will be used. The melody for these words is generated by the Vocal Harmonist. This is similar to the Vocoder part, except that Auto Pitch is monophonic (and
thus meant as “solo voice”).
Here’s what the parameters mean:
■ Gender: Allows you to change the timbre of the
part. Negative values produce a “masculine” effect,
positive values add “feminine” qualities.
■ Portamento Time & [Portamento]: See page 24.
■ Pitch Bender: Press this field (so that its indicator
icon is white) if you want to influence the pitch of
the voice effect using the external keyboard’s Pitch
Bend lever.
■ Vibrato Rate, Depth, Rise Time, Delay Time:
These are the same parameters as for the Voice-FX
(1) Press the [Vibrato] field to add an automatic
Vibrato effect to the generated voice.
The Vibrato parameters can be set on the Edit
page.
■ OCTAVE: If you are not happy with the register of
the generated voice, you can transpose it up or down
by up to 2 octaves.
(2) Set the desired “Track” value with the [VALUE]
dial.
■ Track: This is where you select the track that
should supply the note information for the melody
to be generated. In most instances “4” is a good
choice, because that track usually contains the melody.
Note: Use the Minus One function to mute the selected
track if it should not be played alongside the generated
vocal part. See page 19 for details.
Press the [Left] and/or [Right] field if you want to use
the melody you play on the external keyboard. The
“divide” between Left and Right can be set with MIDI
IN Split Point (see p. 24).
(3) When you are done, either press the [EXIT]
button to return to the main page, or one of
the other fields in the right column to set
those parameters as well.
Note: The [Vocal¥Effect] and [Equalizer] fields allow you
to jump to the effects or tone controls.
●
If you press the
[Edit]
field…
…the display looks as follows:
part. See therefore page 57. This time, however, they
apply to the Auto Pitch part.
Note: The [Vibrato] indicator icon must be white for the
Vibrato effect to be noticeable.
• Press [EXIT] (or [Back¥to¥A-Pitch]) to leave this
page.
●
If you press the
[Equalizer]
field…
…the Vocal Equalizer page appears. It contains
a simple equalizer for the Voice-FX, Auto Pitch
and Singer parts. See above.
• Use the [PREV] and [NEXT] buttons to select the
parameter you wish to edit, and set the desired
value with the [VALUE] dial.
Parameter fields can also be selected by pressing them.
r
58
Page 59

Owner’s Manual
Vocoder settings
The Vocoder page is the first page that is related to voices that are added to your (or the DisCover 5M’s) singing
(Voice-FX, Auto Pitch or Singer).
When the [VOCODER] button lights, “synthetic” harmonies are added to your singing, whereby the
words you say are used to change the timbre of the
sound used as “carrier”. Unlike the Auto Pitch function, the Vocoder is polyphonic and can generate up
to four harmony voices.
(1) In the GENDER column (left), press the field
that corresponds to the kind of “synthesizer
choir” you want to add to your singing.
Press [Male] for a darker character, or [Female] if
the Vocoder signals should be reminiscent of
female voices. Press [Mix] to create a mixed
choir.
The field you press here determines what presets are available. See also page 25.
Note: The [Vocal¥Effect] and [Equalizer] fields allow you
to jump to the effects or tone controls.
●
If you press the
[Edit]
field…
…the display looks as follows:
Parameter fields can also be selected by pressing them.
■ Gender: Allows you to change the timbre of the
part. Negative values produce a “masculine” effect,
positive values add “feminine” qualities.
■ PanPot: Allows you to set the placement of the
corresponding part in the stereo sound image. This is
only meaningful if you connect the DisCover 5M to a
stereo amplifier. “L63” corresponds to hard left, “0” to
dead center, and “R63” to hard right. “Rnd” means
that the stereo position of each note changes.
■ Volume: Allows you to set the level of the corre-
sponding part. Be aware that even the maximum
value produces no audible effect if the [HARMONY]
knob is set all the way to “MIN”.
●
Press the
[Common]
field to jump to the fol-
lowing page.
• Use the [PREV] and [NEXT] buttons to select the
parameter you wish to edit, and set the desired
value with the [VALUE] dial.
Parameter fields can also be selected by pressing them.
• Press the [Portamento] field to switch this effect
on. “Portamento” means that the pitch doesn’t
change in clearly defined steps: it produces
glides from one note to the next.
This page also appears when you press the
[Part¥1–4] field on the Common page (see
below).
The note icons next to the Part 1~4 entries
indicate the Vocoder parts that are currently
playing. This may help you to decide which part
needs to be corrected.
As a rule, the Vocoder works as follows: the
lowest note played by the selected song part or
yourself is assigned to “Part 1”, while the highest is assigned to “Part 4”. So always start editing “from bottom to top”.
• Use the [PREV] and [NEXT] buttons to select the
parameter you wish to edit, and set the desired
value with the [VALUE] dial.
■ Portamento Time: Use this parameter to specify
the speed at which the glides are carried out. The
higher the value, the slower the transitions.
■ Random Tuning: This parameter allows you to
introduce subtle (or not-so-subtle) pitch inaccuracies
usually associated with analog synthesizers. Irrespective of the choice you make here (Low, Middle, High),
the effect will be noticeable, but never overly dramatic. Select “Off” if you do not need this effect.
This is not the same as a vibrato effect, because it
only affects the onset of the notes. There is thus no
periodic modulation of the pitch. And “Random”
means that the exact detuning is unpredictable and
therefore changes with every chord the Vocoder processes.
■ Note Wrap: Activate this field if the Vocoder
notes should remain within a “natural” range. If it is
off, some notes may sound too high or too low.
■ Octave: This parameter allows you to transpose
the Vocoder in octave steps.
59
Page 60

Editing the Realtime & Vocal Harmonist parts
■ Pitch Bender: Press this field (so that its indicator
icon is white) if you want to influence the pitch of
the voice effect using the external keyboard’s Pitch
Bend lever.
• Press [EXIT] or [Back¥to¥Vocoder] to leave this
page, or [Part¥1–4] for even more control over
the Vocoder effect.
●
If you press the
[Equalizer]
field…
…the display looks as follows:
This page contains a simple equalizer for each
separate Vocoder part, as well as an EQ band
that applies to all four voices simultaneously
for added flexibility. These are connected in
series.
• Use the [PREV] and [NEXT] buttons to select the
parameter you wish to edit, and set the desired
value with the [VALUE] dial.
Parameter fields can also be selected by pressing them.
[Equalizer]
this page on or off. The equalizer can be used for two
things: (a) emphasizing a specific frequency range to
create a special effect or make the part more distinguishable; (b) to reduce the level of frequencies that
mask other sounds or produce a “boomy” sound.
■ Frequency Hz: Use this parameter to select the
frequency whose level you wish to change with the
Gain parameter. The smaller the value, the lower the
frequency that will be boosted or cut.
■ Gain: This parameter sets the level of the selected
frequency. “0” means that the frequency’s level does
not change (no difference between equalizer on and
off).
Press this field to switch all equalizers on
• Press [EXIT] (or [Back¥to¥VocalH]) to leave this
page.
Note: When one of the Vocal Equalizers is on (page 57),
the Vocoder, Small and Ensemble parts lose one voice
(so that 3 voices are available for Vocoder and Ensemble, and 1 for Small).
Small settings
When the [SMALL] button lights, two-part harmonies are added to your singing. This page allows you
to specify what kinds of voices will be used for these
harmonies.
(1) In the GENDER column (left), press the field
that corresponds to the kind of choir you
want to add to your singing.
Press [Male] for a man’s choir, or [Female] for
female voices. Press [Mix] to create a mixed
choir. The field you press here determines what
presets are available. The choice of the preset
sets the number of voices (1 or 2) that will be
added.
Note: For an optimum effect, be sure to set the GENDER VOICE INPUT parameter to match your voice type.
See page 56.
(2) Use the [PREV] and [NEXT] buttons to select
the parameter you wish to edit, and set the
desired value with the [VALUE] dial.
Parameter fields can also be selected by pressing them.
■ Harmony Voice Assign: See “Who specifies the
harmonies?” (p. 23).
■ Octave (–1~1):
This parameter allows you to
transpose the harmony voices one octave up or
down. Use it if you think the arrangement
becomes a bit “cluttered”, or to achieve a special effect.
●
If you press the
[Edit]
field…
(You can also select this page by pressing the
[Part¥1-2]
field on the “Common” page, see
below.)
As a rule, the SMALL harmony system works as
follows: the lowest note played by the selected
song part or yourself is assigned to “Part 1”,
while the second is assigned to “Part 2”.
• Use the [PREV] and [NEXT] buttons to select the
parameter you wish to edit, and set the desired
value with the [VALUE] dial.
Parameter fields can also be selected by pressing them.
r
60
Page 61

Owner’s Manual
■ Gender: Allows you to change the timbre of the
part. Negative values produce a “masculine” effect,
positive values add “feminine” qualities.
■ PanPot: Allows you to set the placement of the
corresponding part in the stereo sound image. This is
only meaningful if you connect the DisCover 5M to a
stereo amplifier. “L63” corresponds to hard left, “0” to
dead center, and “R63” to hard right. “Rnd” means
that the stereo position of each note changes.
■ Volume: Allows you to set the level of the corre-
sponding part. Be aware that even the highest value
produces no audible effect if the [HARMONY] knob is
set all the way to “MIN”.
●
Press the
[Common]
field to jump to the fol-
lowing page.
• Use the [PREV] and [NEXT] buttons to select the
parameter you wish to edit, and set the desired
value with the [VALUE] dial.
Parameter fields can also be selected by pressing them.
• Press the [Portamento] field to switch this effect
on. “Portamento” means that the pitch doesn’t
change in clearly defined steps: it produces
glides from one note to the next.
■ Portamento Time: Use this parameter to specify
the speed at which the glides are carried out. The
higher the value, the slower the transitions.
■ Random Tuning: This parameter allows you to
introduce subtle (or not-so-subtle) pitch inaccuracies
usually associated with analog synthesizers. Irrespective of the choice you make here (Low, Middle, High),
the effect will be noticeable, but never overly dramatic. Select “Off” if you do not need this effect.
■ Chord Intell: The Vocal Harmonist usually orga-
nizes the added voices in a musically logical way
(making them suitable for jazz, ballads, etc.). Switch
this parameter on if you wish to obtain natural voicings for the harmony parts added to your voice.
■ Pitch Bender: Press this field (so that its indicator
icon is white) if you want to influence the pitch of
the voice effect using the external keyboard’s Pitch
Bend lever.
If you press the
●
[Equalizer]
field…
…the display looks as follows:
This page contains a simple equalizer for either
SMALL part, as well as an EQ band that applies
to both voices simultaneously for additional
flexibility.
• Use the [PREV] and [NEXT] buttons to select the
parameter you wish to edit, and set the desired
value with the [VALUE] dial.
Parameter fields can also be selected by pressing them.
[Equalizer]
this page on or off. The equalizer can be used for two
things: (a) emphasizing a specific frequency range to
create a special effect or make the part more distinguishable; (b) to reduce the level of frequencies that
mask other sounds or produce a “boomy” sound.
■ Frequency Hz: Use this parameter to select the
frequency whose level you wish to change with the
Gain parameter. The smaller the value, the lower the
frequency that will be boosted or cut.
■ Gain: This parameter sets the level of the selected
frequency. “0” means that the frequency’s level does
not change (no difference between equalizer on and
off).
Press this field to switch all equalizers on
• Press [EXIT] (or [Back¥to¥VocalH]) to leave this
page.
Note: When one of the Vocal Equalizers is on (page 57),
the Vocoder, Small and Ensemble parts lose one voice
(so that 3 voices are available for Vocoder and Ensemble, and 1 for Small).
• Press [EXIT] or [Back¥to¥Small] to leave this page,
or [Part¥1–2] for even more control over the
Small effect.
61
Page 62

Editing the Realtime & Vocal Harmonist parts
Ensemble settings
When the [ENSEMBLE] button lights, four-part harmonies are added to your singing. This page allows
you to specify what kinds of voices will be used for
these harmonies.
With the exception of the fact that up to four
voices are generated, the parameters and fields
on this page work exactly like for “Small”, so
please see above.
Note: The [Vocal¥Effect] and [Equalizer] fields allow you
to jump to the effects or tone controls.
●
If you press the
See page 59. This page can also be selected via
the [Part¥1–4] field on the Common page.
●
If you press the
…the display looks as follows:
[Edit]
field…
[Common]
field…
If you press the
●
…the display looks as follows:
This page contains a simple equalizer for the
four ENSEMBLE parts, as well as an EQ band
that applies to all four voices simultaneously
for added flexibility.
• Use the [PREV] and [NEXT] buttons to select the
parameter you wish to edit, and set the desired
value with the [VALUE] dial.
Parameter fields can also be selected by pressing them.
[Equalizer]
this page on or off. The equalizer can be used for two
things: (a) emphasizing a specific frequency range to
create a special effect or make the part more distinguishable; (b) to reduce the level of frequencies that
mask other sounds or produce a “boomy” sound.
■ Frequency Hz: Use this parameter to select the
frequency whose level you wish to change with the
Gain parameter. The smaller the value, the lower the
frequency that will be boosted or cut.
■ Gain: This parameter sets the level of the selected
frequency. “0” means that the frequency’s level does
not change (no difference between equalizer on and
off for that particular part, or the overall EQ band).
• Press [EXIT] (or [Back¥to¥VocalH]) to leave this
page.
Note: When one of the Vocal Equalizers is on (page 57),
the Vocoder, Small and Ensemble parts lose one voice
(so that 3 voices are available for Vocoder and Ensemble, and 1 for Small).
[Equalizer]
Press this field to switch all equalizers on
field…
See the explanations under “Small settings”.
• Press [EXIT] or [Back¥to¥Ensembl] to leave this
page, or [Part¥1-4] for even more control over
the Ensemble effect.
• Press the [Common] field to return to the previous page.
r
62
Page 63

8. More refined song functions
Let us now take a look at additional and more refined functions you can use for song playback.
Using the Fade-In/Out function
The [FADE] button can be used for two things,
depending on whether you press it before or during
song playback:
●
If pressed while playback is stopped
The [FADE] button flashes until you press the
[®÷ª] button, and the Fade-In starts.
Fading in means that the volume of both the
song and Realtime parts (but neither the Vocal
Harmonist signal, nor your voice) gradually
increases, giving the impression that you have
been playing for a long time before the music
becomes audible. The volume is automatically
set to zero and then gradually increased to the
value specified with the [MASTER] knob. When
the Fade In is completed, the [FADE] button
goes dark.
●
If pressed while playback is running
The [FADE] button flashes and the volume gradually decreases until it reaches zero (button
lights steadily). This is called a Fade-Out.
Fade Outs are extremely popular in pop music,
and the DisCover 5M allows you to end a song
just like the original.
If you think the Fade-In or Fade-Out takes too
much time, here’s how to change it:
(1) Press and hold the [FADE] button.
The display changes to:
(2) Press the field that provides access to the
parameter you wish to change.
Press [Time¥IN] to change the Fade-In time (0~
20 seconds).
Press [Time¥OUT] to change the Fade-Out time
(0~20 seconds).
Press [Time¥HOLD] to set how long it takes for
the volume to return to the [MASTER] setting
(0~10 seconds) after completing the fade-out.
Do not select too short a value, because that
might produce highly unprofessional level
jumps.
(3) Use the [VALUE] dial to set the desired value.
(4) Press the [EXIT] button to return to the main
page, or [Back¥to¥Menu] to return to the
menu.
Owner’s Manual
63
Page 64

More refined song functions
Programming MARK JUMP locations
All songs on the supplied SmartMedia card come with four locations already memorized that can be selected by
pressing MARK JUMP [1]~[4] (page 17).
Editing and programming MARK JUMP locations
can be carried out as follows:
(1) Press and hold a MARK JUMP button [1]~[4].
Press whichever button you like. The display
changes to:
(2) Press the field that corresponds to the MARK
JUMP button for which you wish to program
a different location (1~4).
The following can be done both during playback and while it is stopped.
(3) Do one of the following:
• Press the [Current¥MEASURE] field. This inserts
the number of the current measure in the white
field.
• Use the numeric keypad to enter the desired
measure number. Press [Delete] to dispose of
the last number you entered.
Example: if you wanted to enter “14” and then
notice that you pressed the [4] field twice
(“144”), press [Delete] to get rid of the second
“4”.
As soon as you enter a new value, an [EDIT]
message appears next to the memory number:
(4) Press the [MARK] field to confirm your set-
ting.
The [EDIT] message disappears.
r
Repeat steps (2)~(4) to program new locations
for the remaining MARK JUMP buttons.
(5) Press the [Remove] field to clear the measure
indication of the selected MARK JUMP button.
MARK JUMP buttons for which a location has
been programmed light.
Pressing a MARK JUMP button for which no
measure location has been entered (in which
case the indicator does not light) has no effect.
Want to save time? Here’s the quickest way to program MARK JUMP locations:
• Select the song you want to program MARK locations for.
• Select the Mark Jump Edit page (see above).
• Press [|√] to return to the beginning of the song,
then [®÷ª] to start playback.
• Press the [1] field to select it.
• Press the [MARK] field where you want the first
marker to be. This position is memorized.
• Press the [NEXT] button (below the [VALUE] dial)
to select memory [2].
• Press the [MARK] field where you want the second marker to be.
• Repeat the previous two steps for memories [3]
and [4].
• Continue with step (6).
(6) Press the [Save] field.
The MARK JUMP locations are additional information for song files that need to be saved to
floppy disk or SmartMedia card.
(7) If necessary, change the song’s name.
You only need to do this if you want to preserve
the original version. The MARK JUMP information can only be read by the DisCover 5M, and
so is of little use to other sequencers or SMF
players: they simply ignore it. So you might as
well save the song under its original name.
Besides, you can also save the song to a different card or disk.
See page 28 for how to enter a different name.
64
Page 65

Owner’s Manual
“xx”: found entries.
“yy”: total number of songs
on the card.
(8) Press the [SMART¥MEDIA] or [FLOPPY] field to
select the Save destination.
(9) Press the [EXECUTE] field.
If you selected the drive that contains the original version, the following message is displayed:
• Press the [REPLACE] field to overwrite the old
version.
Press the [EXIT] button on the DisCover 5M’s
front panel if you do not want to overwrite this
song and return to the previous page. Then
enter a different name (or select a different
media).
If the song doesn’t yet exist on the selected
SmartMedia card or floppy disk, the data are
saved, and the following message appears:
If you pressed the [FLOPPY] field, the message
reads “SAME NAME ON DISK”.
Working with the Song Finder
You already know the main aspects of the Song Finder, so let’s have a more detailed look at it.
The Song Finder is used for quickly locating the
songs you want to play back. You will see in a
minute that it is far more powerful when you work
with SmartMedia cards than when you work with
floppy disks.
(1) Press the [SONG/RHYTHM¥FINDER] button.
If you press [SMART¥MEDIA]…
…the display changes to:
You can also press the [SONG] field in the upper
left corner of the display (if available) to select
songs.
(2) Press the [SMART¥MEDIA] or [FLOPPY] field in
the upper right corner.
If you press [FLOPPY]…
… the display looks as follows:
The [Song¥Name] and [File¥Name] fields allow
you to select between a list of readily understandable song names and slightly more cryptic
file names (limited to 18 characters). Choose
whichever is more convenient.
Note: If no song list is displayed, please select “All” in
order to display all song file names.
The [Song¥Name], [Author], and [Genre] fields
allow you to sort songs on the SmartMedia card
in alphabetical order.
This alphabetical sorting is determined by the
selected category. In the above example,
[Song¥Name] is selected.
(3) Press the [Rhythm] field to select drum pat-
terns.
65
Page 66

More refined song functions
The “Rhythm” index provides access to 32
“drum songs”, which reside on the supplied
SmartMedia card. These SMF songs can be used
like a simple rhythm box.
They only contain a drum part, which may
come in handy when you wish to play the
accompaniment yourself or when you are playing with a bassist.
• Press the field of the rhythm accompaniment
you need.
• Use the MARK/JUMP buttons (see p. 64) for
stepping through the various “patterns” (intro,
verse, chorus, ending).
(4) After the above, press the [SONG] field to
return to all songs on the SmartMedia card.
(5) If available, press the field of the song you
need.
If the name is not displayed, use [ø] or [˚] to go
to a different page. In the case of a SmartMedia
card, you can also use the following…
Locating files with the Song Finder
Allow us to once again remind you that the following is only available for SmartMedia cards.
a) Choose a category (Index)
The highest hierarchical level of the Song Finder
database is called “Index”. All search operations
apply to the selected Index (and therefore not
necessarily to all files on card).
• Press the [Index] field in the top left corner.
• Either press the field that corresponds to the
desired song category, or –if you’re not sure
which category the song belongs to– press
[ALL]. (This may be a safer bet.)
• Now return to the previous page by pressing
[Back¥to¥SongList].
b) Select the Finder
The powerful part starts as soon as you press
the [Finder] field.
c) Decide what you want to look for
• Press the [Song¥Name] field if you want the
DisCover 5M to look for song names, then enter
the name (or part of it).
• Press the [Author] field if you want to look for
an artist’s name, then enter the name (or part
of it).
• Press the [Genre] field to locate a specific genre
(Rock’n’Roll, 16-Beat, etc.), then enter the
desired characters.
●
Entering characters
Enter only as many characters as you think are
necessary to find the song you are after. The
character string you enter can be used in two
ways (see below).
• Use the [ø] and [˚] fields to select the position
for which you wish to enter a new character.
• Use the alphanumeric keypad in the right corner to enter the desired characters. This keypad
works exactly like the keypad of a cellphone:
you may have to press an alphanumeric field
several times to select the desired character or
number.
Note: There is no [A/a] field here, because the Finder
makes no distinction between upper- and lower-case
letters.
• The [Delete] field allows you to delete the
inverted character.
• Press [Space] to insert a blank (or the number
“0”).
• If you forgot to insert a character, use [ø] or [˚]
to select the position where the missing character should be inserted. Then press [Insert], followed by the character you wish to insert.
• To enter numbers quickly (without cycling
through the characters first), press the
[Num¥Lock] field, so that its indicator icon
lights. After entering the numbers, switch it off
if you need to enter characters again.
r
66
Page 67

Owner’s Manual
d) Search the database
If the following message appears, the
DisCover 5M was unable to locate any files that
The next step is to decide how the Song Finder
match the search criteria:
should look for the files:
• Press the [Alphabetic¥Order] field to search for
all entries that start with the characters you
entered (“BEA”, for example). Files that match
the specified criteria will be displayed at the top
of the list.
The order depends on whether you entered the
name in the [Song¥Name], [Author], or [Genre]
field.
• Press the [Find¥Only] field to have the
DisCover 5M search the selected column for
files that contain the supplied information.
(This would allow you to also locate a file called
“Raggabeat” if you entered “BEA”.)
Note: See p. 16 for how to use the Play & Search function.
In that case all song names are listed (the “xx of
yy” entry lists twice the same number of files).
If the DisCover 5M did find one or several
matches, the “xx” number will be smaller than
the “yy” number.
• Press the field of the song you need and do
your thing.
Editing the Song Finder information
The Finder information is based on search criteria that are added to plain and simple Standard MIDI Files. The
information is therefore not contained in the files themselves and needs to be added for new files you copy to
your SmartMedia card. That is a process we call “editing”.
The database (which is a separate file) must be
managed and maintained on the DisCover 5M.
You can copy files to a SmartMedia card on
your PC (provided you have the appropriate
device for that), but if you then insert the card
into the DisCover 5M’s slot, the following message appears:
Song Options
As you know, after pressing the [SONG] button
next to the display, followed by the
[SMART¥MEDIA] field, the display looks as follows:
It means that the DisCover 5M found files for
which no Song Finder information is available.
• Press [Update¥the¥DATABASE] to make the new
files “DisCover 5M savvy”. This only adds the
Song Name – the rest must be entered manually (see below).
Note: Depending on the number of songs you copied to
the SmartMedia card, this update may take some time.
But it’s worth it, so please be patient.
• Press the [Skip¥DATABASE¥Updating] field if you
do not wish to update the database now. In
that case, however, such new “PC songs” are
“invisible” to the Finder.
The field in the lower left corner provides
access to a display page where you can add
database information to “known” files (see
above). This also works for songs that already
contain entries you wish to modify.
(1) First select the song whose database infor-
mation you wish to change or edit by pressing its field.
(2) Press the [Options] field.
67
Page 68

More refined song functions
The name of the selected song as well as the
Author and Genre information (if available) are
displayed below the three options (Rename,
Delete, P&S Input).
(3) Now do one of the following:
●
Rename
This function allows you to change the Song
Name, Author, and/or Genre entry of the
selected song.
• Press the [Song¥Name], [Author], or [Genre] field
and enter the desired characters.
You can also rename all three of them.
• Press the [Rename] field. The display responds
with “Executing”.
●
Delete
This function allows you to delete the selected
song from the SmartMedia card.
• Check the name of the song. If you selected the
wrong song, press [Back¥toSongList] and correct
your selection.
• Press the [Delete] field. Deleting a song cannot
be undone, which is why the following question
is now displayed:
●
Lyrics Mark
The [Insert] and [Remove] fields allow you to add
an icon (Insert) to song files that contain Lyrics
data for easy identification, or to delete
(Remove) that icon again. Here is an example of
what the icon looks like:
●
P&S Input
You can also add a musical phrase to your
songs if you wish to take advantage of the Play
& Search facility. See page 16 for how to use
that facility in a real-life situation. Here’s how
to program the phrase:
(1) Press the [Options] field.
(2) Press the [P&S¥Input] field.
[YES] deletes the song file.
[NO] leaves the file intact and takes you back to
the initial Song Finder page with the song list.
[CANCEL] leaves the file intact and takes you
back to the Song Options page.
Note: If a song you delete here is assigned to a Chain
step, an error message (“File not found”) is displayed
during playback of that Chain, and playback stops at
that step. So be careful.
(3) Play the notes of the most characteristic
theme (the one you’ll be most likely to play
when using Play & Search for locating this
song) on your external MIDI controller.
The key and rhythm are of little importance.
(You must get the intervals right, though!) The
note boxes will display a quarter note for every
note you played. Five “note boxes” thus mean
that you played five notes.
Note: While this page is displayed, the DisCover 5M
receives on all MIDI channels. There is thus no need to
select a specific MIDI channel on your external controller.
(4) If you make a mistake, proceed as follows to
correct it:
Press the [Delete¥Last¥Note] field if you only
wish to correct the last note you entered.
Press [Reset] to erase all notes you have played
so far. Then play the notes again.
(5) Press the [EXECUTE] field to save this infor-
mation to SmartMedia card (“Executing”
appears).
r
68
Page 69

Owner’s Manual
Songs for which there is Play & Search information are flagged with a note symbol ( ) to
the left of their names.
Note: The Play & Search function is Database information that is not part of the songs themselves. It resides
in a different area on the SmartMedia card.
Editing an Index
All songs on the supplied SmartMedia card are
already assigned to one of the eight categories.
You can change those assignments and even
edit the Index names. Furthermore, you can
copy an Index entry (along with all its song
assignments) to a different entry.
(1) Press the [SONG/RHYTHM¥FINDER] button.
You can also press the [SONG] field in the upper
left corner of the display (if available) to select
songs.
(2) Press the [SMART¥MEDIA] field in the upper
right corner.
(3) Press the [Index] field in the top left corner.
If the [ALL] field is currently selected, the display looks as follows:
●
Rename
This function allows you to change the name of
the selected Index.
• Press the [Rename] field.
• Enter the new name (16 characters). See
“Entering characters” (p. 66).
• Press the [EXECUTE] field to confirm the new
name (“Executing” appears).
●
Edit
This function allows you to assign the desired
songs to the selected Index (or to remove existing song assignments).
• After performing step (4) above, press the [Edit]
field.
The Index Edit functions are only available for
“real” Index categories, so…
(4) Press the field of the Index category you wish
to edit.
(5) Select the edit function you need by pressing
its field:
• Use the [Finder], [Song¥Name], [Author], and
[Genre] fields to locate the desired file. See
page 66.
• Press the fields of all songs you wish to assign
to the selected Index category (“Ball Room” in
the above example).
Selected songs are displayed on a white background.
To remove a song from the selected category,
press its white field, so that it turns white.
• If necessary, use the [ø] [˚] fields to go to previous or subsequent list pages.
• Press [Back¥to¥Index] to confirm your changes
and return to the previous page. Press [EXIT] to
return to the master page and to cancel your
changes (which means that the assignments
you have just changed will be lost).
Note: After 50 modifications (established/defeated
assignments), the DisCover 5M performs an automatic
confirmation (like when you press the [Back¥to¥Index]
field).
69
Page 70

More refined song functions
●
Copy
This function allows you to copy one Index category (along with all the song assignments) to a
another category. You could take advantage of
this for merging two categories so as to free up
one category for new assignments.
Note: There are eight Index categories in all. You cannot create additional categories.
• After performing step (4) above, press the
[Copy] field.
• In the left column (SOURCE), press the field
whose assignments you wish to copy to
another Index category.
• In the right column (DESTINATIONS), press the
field of the index category you wish to copy the
assignments to.
Note: For safety reasons, the [Rhythm] category cannot
be edited here.
• Now select the method used for copying the
song assignments:
Press the [Replace] field if the assignments of
the DESTINATIONS Index should be erased and
replaced by the entries of the selected SOURCE
field.
Press [Merge] if the song assignments of the
SOURCE category should be added to the
assignments of the DESTINATIONS Index. This
means that the DESTINATIONS category will
contain more assignments than before.
Your command is briefly confirmed by the display (“Executing” appears).
Note: No song files are copied during this operation.
(6) Press the [Back¥to¥Index] field to return to the
Index page.
The message “Executing” appears.
Note: Press the [EXIT] button to return to the master
page and cancel your changes.
r
70
Page 71

Song Chain function
The Chain function allows you to prepare play lists of all the songs you want to use during a performance. The
advantage of working with song chains is that you do not need to select files between songs.
Programming Song Chains
(1) Insert the SmartMedia™ card that contains
the desired songs into the slot.
Note: The Chain function is only available for songs on
SmartMedia card – and only for one such card at a time.
You may therefore have to copy all desired songs to
that card before proceeding. See page 105 for details.
(2) Press the [CHAIN] button.
The display looks more or less as follows:
The long fields refer to the names of the Song
Chains already available on the inserted SmartMedia card.
(3) Press the [Make¥New¥Chain] field in the upper
right corner.
(4) Press the [Song¥List] field.
(5) Locate the song you wish to assign to step 01.
• If it is already displayed, continue with step (6)
below.
• If it is not yet displayed, use the [ø] [˚] fields in
the lower right of the display to change pages.
• You can also use the following fields for narrowing down your search if you are overwhelmed by the number of songs (and pages
you need to scroll): [Index], [Song¥Name],
[Author], [Genre], and [Finder]. See page 66.
(6) Select the song you wish to assign by press-
ing its field (so that it is displayed in white).
(7) Press the [ENTER] field.
This takes you back to the following page. The
song is assigned to step 01, and step 02
becomes the last one of your chain (*End*):
Owner’s Manual
You have just created a new Chain. Chains consist of “steps” (up to 99) to which you can
assign one song each.
To assign a song to the first step, which is
already selected:
The [*End*] field is selected automatically, so
you can assign a song to it right away.
(8) Repeat steps (4)~(7) above to assign a song to
this step.
After assigning a song to step 06, the *End*
message automatically jumps to the first field
on the next page (step 07).
(9) Continue assigning songs to new steps until
your chain is complete.
71
Page 72

More refined song functions
(10) After compiling your chain, press the [Save]
field.
(11) Enter a name (up to 12 characters).
See p. 28 for how to enter names.
(12) Press the [EXECUTE] field to save your chain
to SmartMedia card.
The display now shows a confirmation message
and then returns to the Song Chain page.
Editing Chains
If, while programming or using a chain, you notice that one song is missing from your play list, or if you decide
not to use a given song after all, you need to edit your Song Chain. Steps (1)~(3) below are only necessary if you
want to edit a different chain than the one you have just programmed.
(1) Press the [CHAIN] button until the Song Chain
page appears.
(2) Press the field of the chain you wish to edit.
Depending on the number of chains already
present on your SmartMedia card, you may
have to use the [ø] [˚] fields for changing pages.
●
Deleting steps
On the Song Chain Edit page (see left), select
the step you wish to delete and press the
[Remove] field.
All subsequent steps now move up one entry.
Example: if you delete step 04 of a chain that
contains 10 steps, step 05 becomes 04, step 06
becomes 05, etc.
(5) Press the [Save] field to save your edited
chain.
(3) Press the [Edit] field.
(4) Proceed as follows for editing your chain:
●
Inserting Chain steps
To add a step and assign a song to it, select the
step that should follow your new step, then
press the [Insert] field. (Example: to insert a step
before step 04, press the [04] field.)
This takes you to the following display page:
See steps (5) and (6) above for how to assign a
song to the newly inserted step.
r
Note: By pressing the [Back¥to¥Edit] field or the [EXIT]
button, you not only leave this page, but you also delete
any changes you have made up to that point.
●
Clear ALL Steps
The Song Chain Edit page has a
[Clear¥ALL¥Steps] field you can use to remove
all
steps of the currently selected Chain. In
effect, this means that only the name is preserved, while the Chain can/must be programmed again.
72
Page 73

Using Song Chains
Here’s how songs chains can be used for your performances:
(1) Insert the SmartMedia™ card that contains
the chain (and songs) you need into the slot.
(2) Press the [CHAIN] button.
You can release it as soon as the display looks
more or less as follows:
Owner’s Manual
At the end of the first song step, the next song
is selected automatically, if the [NEXT¥SONG]
button lights. (If you stop playback halfway into
the song, then start it again, the next step is
played back.)
If the [NEXT¥SONG] button does not light, playback stops at the end of the current step, the
next step is loaded, but playback needs to be
started using the [®÷ª] button. (If you stop playback halfway into the song, then start it again,
playback continues from the place where you
stopped it.)
The two fields that appear on the main page
during chain playback allow you to navigate
your chain. While the [CHAIN] button lights,
there are indeed two more fields:
(3) Press the field that corresponds to the chain
you want to use.
Use the [ø] [˚] fields to move to the previous or
next page of song chains (if available and necessary).
(4) Press the [EXIT] button to return to the main
page.
The [CHAIN] button now lights to indicate that
the Song Chain function is active.
(5) Press the [®÷ª] button to start playback of
your chain.
Use the [|√√] field to select the previous step,
and [®®|] to select the next step. If you do so
while playback is running, the previous or next
song will be played back as soon as the current
song is finished.
Note: The MARK JUMP buttons are also available during Song Chain playback, so feel free to use them (see
p. 17).
(6) Press [®÷ª] again to continue with the next
step.
(7) To switch off the Song Chain function, press
the [CHAIN] button and the [EXIT¥CHAIN] field
(upper left; the [CHAIN] button goes dark).
Selecting another (single) song via the Song
Finder will also deactivate the Chain function.
73
Page 74

More refined song functions
Managing Song Chains
Song Chains can be renamed and deleted.
(1) Insert the SmartMedia™ card that contains
the chain you wish to rename or delete into
the slot.
(2) Press the [CHAIN] button.
The display looks more or less as follows:
(3) Press the field that corresponds to the chain
you need.
Use the [ø] [˚] fields to move to the previous or
next page of song chains (if available and necessary).
●
Renaming a chain
To change the name of the selected chain, press
the [Rename] field.
●
Deleting a chain from SmartMedia card
See steps (1)~(3) above, then press the [Delete]
field. As this may ruin your work, you need to
confirm this command:
You have three options here. Be aware that a
deleted chain cannot be recalled.
[YES] deletes the chain file (but not the Standard MIDI Files it refers to).
[NO] leaves the chain intact and takes you back
to the main page.
[CANCEL] leaves the chain intact and takes you
back to the Song Chain page, where you could
select another chain to be deleted.
Note: Even if you delete the selected chain, this “only”
disposes of the play list. The Standard MIDI Files
assigned to the chain are not deleted and can thus be
used in isolation, or assigned to new/other chains.
Enter the desired characters (page 28) and
press the [Execute] field. After a brief confirmation, the display returns to the Song Chain
page.
Note: You do not need to save a chain after renaming
it: this change applies to the file on SmartMedia card.
r
74
Page 75

Owner’s Manual
9. Working with User Programs
The DisCover 5M is equipped with 128 User Program memories that allow you to store almost all settings (or registrations) you make on the front panel and the various display pages. Additional registrations can be loaded directly
from SmartMedia card and used right away.
Before taking a closer look at these User Programs,
there is one thing we have to point out: all settings
related to MIDI must be written to a MIDI Set
(page 99).
MIDI settings are not saved to a User Program. The
reason for this is simple: You probably need a lot
more memories for your songs than you do for your
MIDI gear. Writing the MIDI settings to a User Program would slow down the loading process. Besides,
you may not even need the MIDI settings (if you use
the DisCover 5M as stand-alone harmonist and
advanced SMF player).
Note: It is perfectly possible to link a MIDI Set to a User Program, so that the User Program in question also recalls the
linked MIDI Set (page 80).
Writing your settings to a User Program
It is a good idea to memorize your settings frequently even if you still need to do some touching up afterwards.
Those intermediary saves allow you to return to the
previous stage whenever you do not like your last
modifications. Try to use the User Programs as
“recall buffers” to be able to return to the previously
edited settings, discarding only the latest modifications.
Save your settings after...
• …editing the Vocal Harmonist parameters;
• …selecting Tones for the Realtime parts;
• …editing the Mixer settings (including the
effects);
• …defining the D Beam and Footswitch functions.
That way, subsequent modifications can be
undone by loading the “provisional” User Program settings you do not want to lose.
(1) Press the [USER¥PROGRAM] field on the main
page.
The display changes to:
(2) Press the [MEMORIZE] field.
The field (“Cancel”) next to the [A] and [B] fields
refers to the name of the last settings you
loaded.
(3) Use the [A]/[B] and the numeric fields to select
the Group, the bank and the memory number
where you wish to write your settings.
(4) Enter a name for your new User Program.
See page 28. You only have to do this the first
time you write (or “memorize”) new settings to
a User Program. You can also name your User
Program at a later stage and then write it again
under the same address.
This name is very important for taking advantage of the User Program Finder function
(page 77).
75
Page 76

Working with User Programs
Use a name that somehow summarizes the
memory’s contents. The name of the song you
will use these settings for is probably the most
explicit name you can think of.
It is perfectly possible to program several User
Programs for one song. Selecting a User Program is a lot faster than calling up one of the
DisCover 5M’s functions, modifying the settings, etc., while playing. You could program
Selecting User Programs
Cancel
For song playback, or whenever you want to start anew, you should select the “Cancel” User Program. This
allows you to leave the User Program mode (i.e. no longer work with the settings of the last User Program you
may have loaded).
These settings can be recalled any time, i.e. even
after selecting a “regular” User Program.
Simultaneously press User Program [DOWN] and
[UP].
one User Program for the first part of a song,
another one for the bridge, and a third one for
the closing section. Doing so allows you to
“play” with the effect settings of the Realtime
parts, for example.
(5) Press the [EXECUTE] field.
The display confirms that the settings have
been written to the selected memory and
returns to the page of step (1) above.
Note: The “Cancel” memory is read-only. You cannot
write data to it.
Note: Unless you specified a User Program for the Startup function (page 80), you can also load the original
Cancel settings by powering off your DisCover 5M and
turning it back on again.
User Program selection
Selecting User Programs works exactly like selecting Tones: you can work via the display.
(1) Press the [USER¥PROGRAM] field on the main
page.
The display changes to:
There are two Groups with 8 banks each: “A”
and “B”.
(2) Press the [A] or [B] field in the display.
(3) Press a [1]~[8] field to select a bank within this
Group.
(4) Press the field of the User Program you need.
You can select the group (A or B) and the bank
(1~8) a little ahead of the song part where you
want the new settings to take effect. Only when
you specify the User Program number will the
corresponding settings be loaded.
Sometimes, an asterisk (*) is displayed. This
happens when you change a parameter setting
after recalling a User Program to alert you to
the fact that the current settings no longer correspond to the ones you recalled. If you like
them better than the original settings, you
must write them again. See page 75.
r
76
Page 77

Owner’s Manual
Selecting User Programs with
[DOWN] [UP]
The following method is especially useful if you programmed two or more User Programs for a song or if the
User Program sequence corresponds exactly to the song sequence you are about to play (i.e. settings of the first
song or song part in memory A11, settings of the second song or song part in A12, etc.).
Pressing [DOWN] or [UP] immediately selects the
preceding or following User Program.
[UP] Selects the following User Program (for
example A13, if you selected A12 before pressing this button).
[DOWN] Selects the preceding User Program
(for example A11 if you selected A12 before
pressing this button).
Note: If you press [UP] after selecting A88, your
DisCover 5M will call up B11. Likewise, if you press
[DOWN] after selecting B11, your DisCover 5M will call
up A88, and so on.
Note: User Programs can also be selected using an
optional footswitch connected to the FOOT SWITCH
socket on the rear panel. See “User Program Up” (p. 39).
Finder: selecting User Programs on SmartMedia card
Your DisCover 5M also allows you to directly load any User Program from SmartMedia card, which is just as fast
as working with internal User Programs. The supplied card already contains 128 such User Programs.
The User Program Finder function is also available
for your own User Programs, but only after you
saved them to SmartMedia card. See page 102. By
doing that, you actually save a User Program “set”
that contains the settings of all 128 internal User
Program memories. You cannot save individual User
Programs to SmartMedia card (or floppy disk). But
you can load just one User Program from such a set
– provided that set resides on SmartMedia card.
Such a User Program then resides in the “Cancel”
memory (a buffer) and will be overwritten as soon
as you select another internal or external User Program. You could, however, decide to write it to an
internal memory. This function can also be used for
creating “best of” compilations from various User
Program sets.
(1) Insert the SmartMedia card with the settings
you need into the slot.
Note: This function is not available for floppy disks. You
may thus have to copy your User Program sets from
floppy to your SmartMedia card. See page 105 for
details.
Note: The DisCover 5M does not support User Programs
of the Roland VA, E, KR, or EM series.
(2) Press the [USER¥PROGRAM] field on the main
page.
The display changes to:
(3) Press the [User¥Program¥Finder] field.
As an alternative for steps (2) & (3), you can
also press the [FINDER] button.
(4) If available, press the field of the User Pro-
gram you need.
If the name is not displayed, use [ø] or [˚] to go
to a different page, then press the field of the
settings you are interested in.
This page lists the names of all individual User
Programs contained in the various sets on the
inserted SmartMedia card.
77
Page 78

Working with User Programs
To quickly locate the desired User Program…
(5) Press the [Finder] field.
(6) Enter only as many characters as you think
are necessary to locate the User Program you
are after.
The character string you enter can be used in
two ways (see below).
• Use the [ø] and [˚] fields to select the position
for which you wish to enter a new character.
• Use the alphanumeric keypad in the right corner to enter the desired characters. This keypad
works exactly like the keypad of a cellphone:
you may have to press an alphanumeric field
several times to select the desired character or
number.
Note: There’s is no [A/a] field here, because the Finder
makes no distinction between upper- and lower-case
letters.
• The [Delete] field allows you to delete the
inverted character.
• Press [Space] to insert a blank (or the number
“0”).
• If you forgot to insert a character, use [ø] or [˚]
to select the position where the missing character should be inserted. Then press [Insert], followed by the character you wish to insert.
(7) Decide how the Finder should look for the
files:
• Press the [Alphabetic¥Order] field to search for
all entries that start with the characters you
entered (“BEA”, for example). Names that match
the specified criteria will be displayed at the top
of the list.
• Press the [Find¥Only] field to have the
DisCover 5M search for names that contain the
supplied information. (This would allow you to
also locate a file called “Raggabeat” if you
entered “BEA”.)
If the following message appears, the
DisCover 5M was unable to locate User Programs that match the search criteria:
(8) Press the field of the User Program you need
and start playing.
If you want all files to be displayed again, press
the [List¥ALL] field.
Selectively loading User Program settings (User Program Hold)
Your DisCover 5M can keep certain settings of the previous User Program while selecting another User Program.
That way, you can go on playing with the last Tones you selected and/or Harmonist settings you made.
(1) Press the [USER¥PROGRAM] field in the dis-
play.
(2) If you need a different User Program (whose
settings should be used), select it, otherwise…
(3) Press the HOLD [TONE] or [HARMONIST] but-
ton, depending on which settings you do not
want to recall.
Press [TONE] to ignore Tone selection for the
Realtime parts when a different User Program
is recalled.
Press [HARMONIST] to ignore the various
VOICE-FX, AUTO PITCH, etc. settings you have
made. See “Editing the Vocal Harmonist parts”
(p. 56).
Note: You can also switch on (or off) both buttons, if
you like.
Pressing one of these buttons without selecting
a User Program afterwards has no effect. Only
when you select another User Program will the
selected filter (because that is what the User
Program Hold buttons are) start working.
To once again load all settings of the new User
Program, switch off the HOLD button that
lights.
r
78
Page 79

Automatic functions for User Programs
Song Link
This function means that, by recalling a User Program, you also prepare the song in question. Such
songs reside on SmartMedia card, which means that
it must be inserted, otherwise, this system won’t
work. All you need to do then, is hit the [®÷ª] button
to start playback of that song.
Your DisCover 5M only memorizes the song name.
If, at the time you recall such a User Program, that
song is not available, the display will respond with:
Remove the SmartMedia card, and insert the proper
card and select that User Program again. If you
don’t, the DisCover 5M will start playback of the
previously loaded song when you press [®÷ª] again.
(1) Press the [USER¥PROGRAM] field on the main
page.
The display changes to:
(2) On the display page that appears now, press
the [Song¥&¥MIDI¥Link] field.
The display changes to:
Owner’s Manual
(4) Press the [Song¥List] field to jump to the dis-
play page where you can select a song.
See “Locating files with the Song Finder” (p. 66).
Bear in mind that the song data are not loaded
into the User Program memory. You will have
to insert the SmartMedia in question into the
slot before recalling this User Program (otherwise, an error message is displayed and the
song is not loaded).
If you are planning to save your User Programs
to SmartMedia card and to use the User Program Finder function, the song must either
already reside on the correct SmartMedia card,
or you must copy it to that card at later stage.
Links of User Programs selected via the Finder
function will not work if the song is on one
SmartMedia card, while the User Program is on
another.
(5) Press the [Link] field to establish the link to
the song whose name appears on a white
background.
This takes you back to the “Song & MIDI Link”
page. The name of the song appears in the
“Song Name” field with a paper clip icon to its
left.
(6) Press the [Delete¥Song¥Link] field to break the
link if you no longer need it.
(7) Continue with the section below (MIDI Set
Link), or press [Back¥to¥User¥Prg] to return to
the page where you came from.
Note: Do not forget to write your User Program after
changing these settings (page 75).
(3) Insert the SmartMedia card with the song
you need into the slot.
79
Page 80

Working with User Programs
Linking a MIDI Set to a User Program
MIDI Sets are “User Programs for MIDI parameters”. There are eight such memories (page 99).
If you regularly use the DisCover 5M in different
MIDI environments (studio, live, band), preparing
three MIDI Sets and linking them to the User Programs you usually use in the studio, on stage, etc.,
can be a time saver. In other situations, such a link
could be dangerous, because it would reconfigure
the DisCover 5M’s MIDI parameters without you
actually knowing it.
(1) Press the [USER¥PROGRAM] field on the main
page.
If you are still on the “Song & MIDI Link” page,
skip to step (3) below.
(2) On the display page that appears now, press
the [Song¥&¥MIDI¥Link] field.
The display changes to:
(3) Press a MIDI Set [1]~[8] field to select the
desired MIDI Set.
To break the link to this MIDI Set, press its field
again (all indicator icons must be dark).
Note: Do not forget to write your User Program after
changing these settings (page 75).
(4) Press [Back¥to¥User¥Prg] to return to the User
Program selection page, or the [EXIT] button
to return to the main page.
Startup User Program
Whenever you switch on the DisCover 5M, it automatically selects the “Cancel” User Program (page 76). But
maybe you prefer to be operational right away. In that case, tell the DisCover 5M which User Program it should
recall whenever you switch it on:
(1) Press the [MENU] button.
The display changes to:
(2) Press the [UTILITY] field. If the [Startup] field in
the left corner is not displayed in white, press
it.
(3) Press the [Startup¥User¥Program] field so that
it is displayed in white.
(4) Use the [VALUE] dial to select the User Pro-
gram to be recalled.
If you don’t want any User Program to be
recalled, select “Off”.
Note: You can only select internal User Programs (A11~
B88) here.
(5) Press the [EXIT] button to return to the main
page.
r
80
Page 81

Owner’s Manual
10. Song Makeup Tools
You already know how the Cover function works (page 19). It relies on presets for the following, more detailed,
parameters with which you can customize playback of the currently selected song. Changes you perform here must
be saved to disk or SmartMedia card if you want them to be permanent.
Before you begin…
(1) Insert the SmartMedia card (or floppy disk)
with the desired song into the slot (or drive),
select the song, and press the [®÷ª] button.
This will load the first chunk of song data into
the DisCover 5M’s buffer. Only then will you be
able to edit the following settings.
Instrument: selecting different sounds
If you do not agree with the instrumentation of a Standard MIDI File, use the INSTRUMENT parameters allow to
select different sounds:
(1) Press the [INSTRUMENT] button.
(2) Press the [®÷ª] button again after a few mea-
sures.
Though you can also edit the following settings
while playback is running, selecting Tones/Drum
Sets may become a bit confusing.
(2) If the track you are interested in (9~16) is not
listed, press the [Trk9~16] field.
This page lists some sounds that are used by
tracks 1~8. “Tracks” are in fact MIDI channels,
and usually used to differentiate between the
various parts of a song (drums, bass, guitar line,
piano part, etc.).
Standard MIDI Files can contain data for up to
16 tracks (MIDI channels). Quite a few Standard
MIDI Files use fewer tracks, but the following
are almost always present (that is part of the
“standard”):
2 Bass line (uses a “Tone”)
4 Melody (uses a “Tone”)
10 Drums (uses a “Drum Set”)
Note: The MUTE messages within a Tone/Drum Set field
mean that the passage in question (using that Tone/
Drum Set) is not played. This needs to be set on one of
the other SONG MAKEUP TOOLS pages (see below).
The [ø] [˚] fields that may (but do not necessarily) appear allow you to jump to other instances
where a Tone/Drum Set change occurs.
Note that the Tone/Drum Set field graphics are
displayed in chronological order within a track,
but not in time. The “St. Slow Str.” change (track
3) may therefore be located way behind the
“Flugel Horn” (track 7) change, for example (see
the illustration of step (1)).
(3) To switch a track on or off, press its [ON÷OFF]
field.
(4) To select a different Tone (tracks 1~9, 11~16)
or Drum Set (track 10):
• Press the field of the Tone/Drum Set you wish
to replace. (In the example of step (1), the “St.
AcPiano 1” sound can be changed.)
• Use the display to select a different sound, or
press the [Tone¥Finder] field and use the Tone
Finder function (page 31).
81
Page 82

Song Makeup Tools
Note: Be sure to also read the part about the [SAVE]
field in the next or subsequent sections. To keep your
changes, you must indeed save them to SmartMedia
card or disk.
®
Tone Finder for song parts
After pressing the [Tone¥Finder] field, the display looks as follows:
The main routine of selecting Tones or Drum
Sets is identical to what you learned on
page 31: first select a family, and then specify a
Tone (or Drum Set) within that family.
Let’s have a look at the new elements on this
page.
Press the [Jump¥to¥1st¥note] field to jump to the
location where the Tone you are about to
change is used. Playback starts automatically
from that point. You can select another Tone
(or Drum Set) while the song is playing. To
return to that position, press [Jump¥to¥1st¥note]
again.
If you can barely hear the Tone/Drum Set, press
the [SOLO] field (indicator icon must be displayed in white), then use [Jump¥to¥1st¥note] to
jump to the first note of that instrument. Then
press [SOLO] again to switch this function off.
If you are happy with your new song instrumentation and wish to preserve it, press the
[SAVE] field. The display changes to:
See step (7) and following on page 64 for how
to save your song.
Note: If you also want to change the volume and other
song settings (see below), there is no need to save the
song just yet. The other SONG MAKEUP TOOLS pages
also provide [SAVE] fields.
Volume: part balance
From this point onward, there are no more tracks, just instruments. Here, you work on a Tone/Drum Set level (some
tracks may indeed use two or more sounds): if you think “the bass” is too loud, touch the corresponding field, and
turn it down… It doesn’t get any easier than that.
(1) Press the [VOLUME] button.
The display changes to:
(2) Press the field that corresponds to the Tone/
Drum Set whose volume you wish to change
(or use the [PREV] [NEXT] buttons to select it).
Parameter fields can also be selected by pressing them.
r
Note: If the name of the desired Tone/Drum Set is not
currently displayed, use the [ø] [˚] fields in the lower
right corner to change pages.
(3) Use the [VALUE] dial to set the volume.
The volume settings of all instruments are displayed by means of a value.
(4) Use the following fields to check your set-
tings:
Press the [Jump¥to¥1st¥note] field to jump to the
first note of that instrument. Playback starts
automatically from that point. You can also
change the volume while the song is playing. To
return to that position, press [Jump¥to¥1st¥note]
again.
If you can barely hear the instrument, press the
[SOLO] field (indicator icon must be displayed in
white), then use [Jump¥to¥1st¥note]. To listen to
all instruments again, press [SOLO] again to
switch this function off.
(5) Use the [MUTE] fields to switch off instru-
ments you do not want to hear, and switch
on those you do want to hear.
Please bear in mind that these [MUTE] fields
apply to the instruments (Tones/Drum Set) –
not to the entire track they belong to.
82
Page 83

Owner’s Manual
If the [MUTE] indicator “lights” ( ), that
sound is indicated as on the INSTRUMENT
page.
Note: Most tracks only use one Tone/Drum Set, so that
activating [MUTE] means that the track in question
never sounds.
(6) If you are happy with your changes and wish
to preserve them, press the [SAVE] field. The
display changes to:
See step (7) and following on page 64 for how
to save your song.
Note: If you also want to change other song settings,
there is no need to save the song just yet. The other
SONG MAKEUP TOOLS pages also provide [SAVE] but-
tons.
Reverb and Chorus: effect balance
On the following two pages, you can specify how strongly the instruments should be processed by the Reverb and/
or Chorus effects. The effects parameters (kind of Reverb and Chorus, etc.) can be set on the Common page (see
p. 89).
(1) Press the [REVERB] or [CHORUS] button.
The display changes to:
…or:
Press the field that corresponds to the effect
for which you wish to set the send level.
(2) Press the field that corresponds to the instru-
ment (Tone/Drum Set) whose send level you
wish to change (or use the [PREV] [NEXT] buttons to select it).
The “send level” refers to the amount of the signal transmitted to the Reverb or Chorus effect
– and hence to the strength (intensity) with
which the instrument is processed.
Note: If the name of the instrument (Tone/Drum Set)
name is not currently displayed, use the [ø] [˚] fields in
the lower right corner to change pages.
(3) Use the [VALUE] dial to set the send level.
The send level settings of all instruments are
displayed by means of a value.
(4) Use the following fields to check your set-
tings:
Press the [Jump¥to¥1st¥note] field to jump to the
first note of that instrument. Playback starts
automatically. You can also change the setting
while the song is playing. To return to that
position, press [Jump¥to¥1st¥note] again.
If you can barely hear the instrument, press the
[SOLO] field (indicator icon must be displayed in
white), then use [Jump¥to¥1st¥note]. To return to
all instruments, press [SOLO] again to switch
this function off.
(5) Use the [MUTE] fields to switch off instru-
ments you do not want to hear, and switch
on those you do want to hear.
Please bear in mind that these [MUTE] fields
apply to the instruments indicated by the Tone/
Drum Set names – not to the entire track they
belong to.
83
Page 84

Song Makeup Tools
If the [MUTE] indicator “lights” ( ), that passage is indicated as on the INSTRUMENT
page.
Note: Most tracks only use one Tone/Drum Set, so that
activating [MUTE] means that the track in question
never sounds.
(6) If you are happy with your changes and wish
to preserve them, press the [SAVE] field. The
display changes to:
(7) If necessary, change the song’s name.
You only need to do this if you want to preserve
the original version. The edits you have just
performed can only be read by the
DisCover 5M, and so are of little use to other
sequencers or SMF players: they simply ignore
it. So you might as well save the song under its
original name. Besides, you can also save the
song to a different card or disk.
See page 28 for how to enter a different name.
(8) Press the [SMART¥MEDIA] or [FLOPPY] field to
select the Save destination.
(9) Press the [EXECUTE] field.
If you selected the drive that contains the original version, the following message is displayed:
If you pressed the [FLOPPY] field, the message
reads “SAME NAME ON DISK”.
• Press the [REPLACE] field to overwrite the old
version.
Press the [EXIT] button on the DisCover 5M’s
front panel if you do not want to overwrite this
song and return to the previous page. Then
enter a different name (or select a different
media).
If the song doesn’t yet exist on the selected
SmartMedia card or floppy disk, the data are
saved, and the following message appears:
Note: If you also want to change other song settings,
there is no need to save the song just yet. The other
SONG MAKEUP TOOLS pages also provide [SAVE] but-
tons.
r
84
Page 85

Owner’s Manual
Palette: in-depth song editing
Now we are closing in on the “inner workings” of the instruments, with an overview of parameters also present on
the VOLUME, REVERB, and CHORUS pages, while new parameters are added. For even more control, you can actually really “edit” the selected Tones or Drum Set, specify how the Reverb and Chorus effects should sound, and
more…
As the Palette environment is a little bit more complex, let’s start with a general overview:
85
Page 86

Song Makeup Tools
(1) Press the [PALETTE] button.
The display changes to:
All modifications on this page and the related
pages are SysEx data that alter the actual song
data (without replacing them). Only the
DisCover 5M can read these data. To other SMF
players, the song will still be the original song,
i.e. they will ignore these newly added SysEx
data.
Most fields ([MUTE], [Volume], [Reverb],
[Chorus], [Jump¥to¥1st¥Note], [SOLO], [SAVE])
should look familiar. See the previous pages
for details.
Here’s what’s new on this page.
(2) Use the [ø] [˚] fields in the lower right corner
to select the instrument you wish to edit.
Each page indeed only displays the name of one
Tone/Drum Set. If you select a Drum Set, the
display changes to:
(5) Press [UNDO¥Changes] to reset the parameter
of the currently selected field to its saved
setting.
Example: If you change the Reverb parameter
(set to “40” within the Standard MIDI File) to
“94”, pressing [UNDO¥Changes] recalls the value
“40”.
Note: The “saved setting” referred to above can mean
two things: the original value contained in the Standard
MIDI File (if you haven’t yet used the [SAVE] field), or the
last setting you saved yourself (via the [SAVE] field).
Parameters:
[PanPot] Use this parameter to set the stereo
placement of the selected instrument. Negative
values shift the instrument towards the left, “0”
means “no change”. Positive values shift the
instrument towards the right.
Note: In the case of Drum Sets, this setting applies to
all drum/percussion instruments. There is also a parameter that can be set for certain drum instruments. See
page 88.
[Octave] (Only for Tones) Use this parameter to
transpose the selected instrument up or down
by up to 4 octaves if you think it is too high or
too low.
[Velocity] This parameter allows you to modify
the velocity range of the instrument in question. “0” means that the recorded values are left
untouched, negative values reduce all velocity
values by the same amount (leaving differences
between notes intact), while positive settings
shift all velocity values in a positive direction.
[Drum¥Instrument] (Only for Drums Sets) Calls
up the display page of the same name. This is a
field you need to press (it cannot be activated
or selected with the [PREV] [NEXT] buttons). See
page 88 for details.
Note: All fields in the DisCover 5M’s display labelled “Go
To”, “Do It”, and “Back to…” need to be pressed.
[Drum¥Instrument] is part of those fields.
Note: See page 89 for details about the [Common] field.
The [Octave] field is replaced by a
[Drum¥Instrument] field. See below for details.
(3) Press the big Tone/Drum Set field and use the
[Tone¥Finder] facility to select another Tone or
Drum Set.
You can also use the [PREV] [NEXT] buttons to
select this field.
(4) Use the [PREV] and [NEXT] buttons to select
the parameter you wish to edit, and set the
desired value with the [VALUE] dial.
r
86
Page 87

Owner’s Manual
®
[Sound¥Edit] for Tones
If the uppermost field to the right of the Tone/
Drum Set field reads [Tone¥Finder], you have
selected a Tone page.
In that case, pressing the [Sound¥Edit] field takes
you to the following page where you can make
more refined changes to the selected Tone:
(1) Use the [PREV] and [NEXT] buttons to select
the parameter you wish to edit, and set the
desired value with the [VALUE] dial.
Parameter fields can also be selected by pressing them.
■ Cutoff: This filter parameter allows you to make
the selected sound darker or brighter. Positive Cutoff
settings mean that more overtones are allowed to
pass, so that the sound becomes brighter. On
page 54 you will find a graphic.
Note: For some sounds, positive (+) Cutoff settings may
cause no noticeable change, because the pre-programmed Cutoff parameter is already set to its maximum value.
■ Resonance: This is a parameter one invariably
associates with a synthesizer. When the Resonance
value is increased, the overtones in the area of the
cutoff frequency will be emphasized, creating a
sound with a strong character.
Note: For some sounds, negative (–) Resonance settings
may produce no noticeable change because the Resonance is already set to the minimum value.
The following parameters allow you to set the Tone’s
“envelope”. See page 55 for details.
■ Attack: This parameter adjusts the onset of the
sound. Negative values speed up the attack, so that
the sound becomes more aggressive.
■ Decay: This parameter adjusts the time over
which the sound will fall from the highest point of
the attack down to the sustain level.
Note: Percussive sounds usually have a Sustain level of
“0”. Piano and guitar sounds are in this category. Holding the notes for a long time will thus have little effect
on their duration.
■ Release: This parameter adjusts the time over
which the sound will decay after the note is released
until it is no longer heard. The cutoff frequency also
falls according to this setting.
Use the following three parameters if you think the
part in question has too much (or could use a little
more) vibrato.
Note: Some “V” Tones contain natural (sampled) vibrato
whose depth or speed cannot be changed.
■ Vibrato Rate: This parameter adjusts the speed of
the pitch modulation. Positive (+) settings make the
preset pitch modulation faster, and negative (–) settings make it slower.
■ Vibrato Depth: Sets the intensity of the pitch
modulation. Positive (+) settings mean that the
“wobble” becomes more prominent, while negative
(–) settings make it shallower.
■ Vibrato Delay: This parameter adjusts the time
required for the vibrato effect to begin. Positive (+)
settings increase the delay, and negative settings
shorten it.
(2) Press the [Back¥to¥Palette] field to return to
the Palette page.
If necessary, press the [SAVE] field to save your
settings.
®
[Sound¥Edit] for Drum Sets
If the uppermost field to the right of the Tone/
Drum Set field reads [Drum¥Set¥Finder], you
have selected a Drum Set page.
In that case, pressing the [Sound¥Edit] field takes
you to the following page where you can edit
the Drum Set as a whole.
(1) Use the [PREV] and [NEXT] buttons to select
the parameter you wish to edit, and set the
desired value with the [VALUE] dial.
Parameter fields can also be selected by pressing them.
■ Cutoff: Allows you to make the Drum Set (all
instruments) brighter (positive values) or darker
(negative values). The further this value is set in the
negative direction, the fewer overtones will be
allowed to pass, and the sound will become softer
(darker).
■ Resonance: This parameter allows you to add a
“synthetic” character to your Drum Sets (choose a
positive value), or to make it sound more natural.
(2) Use the [Drum¥MUTE] field to suppress (or
add) the drum sounds.
87
Page 88

Song Makeup Tools
(3) Use the [Percussion¥MUTE] field to suppress
(or add) the percussion sounds.
(4) Press the [Back¥to¥Palette] field to return to
the Palette page.
If necessary, press the [SAVE] field to save your
settings.
®
If you press [Drum¥Instrument] on the Palette
page
If the uppermost field to the right of the Tone/
Drum Set field reads [Drum¥Set¥Finder], you
have selected a Drum Set page.
In that case, pressing the [Drum¥Instrument]
field takes you to the following page where you
can make more refined changes for certain
instruments of the selected Drum Set:
The eligible instruments and corresponding
note numbers are:
C#2/37 Side Stick D2/38 Snare 1,
E2/40 Snare 2 F2/41 Low Tom 2,
E3/52 Chinese Cymbal G#3/56 Cowbell,
A3/57 Crash Cymbal 2 F4/65 High Timbale.
Note: The names of the drum/percussion sounds
depend on the currently selected Drum Set. The sounds
are usually similar in nature, however.
(1) Use the [ø] [˚] fields to select the drum instru-
ment you want to edit.
(2) Press the [MUTE] field to switch the instru-
ment in question on/off.
(3) To select a different sound:
• Press the [Drum¥Instr¥Finder] field.
• Press the [Instrum] field, and use the [ø] [˚] and
big fields to make your selection.
Note: Please be aware that you can only select sounds
from the currently active Drum Set.
• Press [Back¥to¥DrumInst] to return to the Drum
Instrument page.
(4) Use the [PREV] and [NEXT] buttons to select
the remaining parameters, and set the
desired values with the [VALUE] dial.
Parameter fields can also be selected by pressing them.
■ Volume: Use this parameter to set the volume of
the selected drum instrument.
■ PanPot: Use this parameter to set the stereo
placement of the selected drum instrument. “0”
means “no change”, negative values shift the instrument towards the left, and positive values shift it
towards the right.
■ Pitch: Use this parameter to tune the selected
drum instrument higher or lower. The main reason
for doing so would be to create a “special effect” or
to make a snare sound, etc., slightly snappier. “0”
means that the pitch is left unchanged.
■ Reverb & Chorus: Use these parameters to set the
Reverb or Chorus send level. The effects themselves
can be edited via the Common page (see below).
■ Velocity: This parameter allows you to modify the
velocity range of the drum instrument in question.
“0” means that the recorded values are left
untouched, a negative setting reduces all velocity
values by the same amount (leaving variations
intact), while a positive setting shifts all velocity
values in a positive direction.
• Press [Family] and select an instrument family
(snare drums, cymbals, etc.).
r
88
(5) Press the [Back¥to¥Palette] field to return to
the Palette page.
If necessary, press the [SAVE] field to save your
settings.
Page 89

Owner’s Manual
®
If you press [Common] on the Palette page
After pressing the [Common] field on the Palette page, the display looks as follows. The
parameters on this page apply to the entire
song – and do therefore not depend on
whether you selected a Tone or Drum Set.
(1) Use the [PREV] and [NEXT] buttons to select
the parameter you wish to edit, and set the
desired value with the [VALUE] dial.
Parameter fields can also be selected by pressing them.
[Rev¥Type] This parameter allows you to specify
what kind of Reverb effect you need. The available Reverb types are:
Room1,
Room2,
Room3
Hall1,
Hall2
Plate Digital simulation of a metal plate that
Delay A Delay effect (no Reverb). Works a lot
Pan Delay This is a stereo version of the above
Note: Selecting one of the above also means that the
Realtime parts will use this new effect type (see p. 45).
These types simulate the Reverb characteristics of a room. The higher the number (1, 2, or 3), the “bigger” the room
becomes.
These types simulate the Reverb of a
small (1) or large (2) concert hall and
thus sound much “bigger” than the
Room types above.
is sometimes used for creating Reverb
effects. Works well for percussive
sounds.
like an echo effect and thus repeats the
sounds.
Delay effect. It creates repetitions that
alternate between the left and right
channels.
The Original setting means that the song uses
its own (programmed) Reverb settings.
You can also select User Prg, in which case the
display changes as follows:
Selecting “User Prg” means that you want the
song to use the effect settings contained in the
last User Program you recalled (page 76), in
which case, there is obviously no need to
change the level setting.
[Chr¥Type] Chorus broadens the spatial image of
the sound and creates a stereo impression. You
can choose from 8 types of Chorus.
Chorus
1~4
Fb Chorus This type produces a Flanger-like effect
Flanger This is an effect that sounds somewhat
Delay This is a Delay (echo effect) with a short
Pan Delay This is a short Delay with many repeats
Note: Selecting one of the above also means that the
Realtime parts will use this new effect type (see p. 45).
These are conventional Chorus effects
that add spaciousness and depth to the
sound.
and has a soft sound.
like a jet airplane taking off and landing.
Delay time.
that alternate between the left and
right channels.
Original means that the song uses its own
(programmed) Chorus settings.
You can also select User Prg, in which case the
display changes, because you chose to work
with the Chorus settings currently in effect for
the last User Program you selected.
[Transpose] This parameter allows you to transpose all song parts (except the drums) up to 12
semitones (1 octave) up or down. This value will
be written to the song data and used every time
you play back this song. Working with the
SINGER KEY facility (page 27) or the TRANSPOSER buttons (page 35) yields a similar result,
so choose whichever is more convenient.
[Rev¥Level]& [Chr¥Level] These parameters are
not available if [Rev¥Type] (or [Chr¥Type]) is set
to “User Prg”.
When they are available, they allow you to
modify the output level of the Reverb (or Chorus) processor.
[Tempo] Allows you to change the song’s tempo
( = 20~250) if you do not agree with the preset song tempo.
89
Page 90

Song Makeup Tools
(2) Press the [Back¥to¥Palette] field to return to
the Palette page.
If necessary, press the [SAVE] field to save your
settings. See page 84.
r
90
Page 91

Owner’s Manual
11. Editing Lyrics
Your DisCover 5M contains functions that allow you to add Lyrics to a Standard MIDI File that does not contain
them. It is also possible to edit the Lyrics data of Standard MIDI Files that conform to the Tune 1000 format (other
formats cannot be edited on the DisCover 5M).
This may come in handy when you keep forgetting the words of a song you wish to use for your performances and
want them to be included in the song file.
Note: The DisCover 5M only allows you to link (“synchronize”) Lyrics data to the note messages of the loaded Standard MIDI File. The text data proper must be entered on a
Windows-compatible PC (or a Mac and saved as .TXT data for
Windows). See right for the supported characters.
Adding Lyrics to a song
Here’s a step-by-step tour of how to add Lyrics data
to a Standard MIDI File:
(1) Prepare the text file with the lyrics you wish
to associate with a given song.
Use a word processor program on your computer, taking care to type a return after every
line or word you wish to synchronize separately. The synchronization function (see below)
always works with entire lines of text (i.e. until
the following return). In any case, no line
should contain more than 28 characters.
Export the file as .TXT file and save it to a
floppy.
(2) Load the song you wish to add Lyrics to.
See page 16.
(3) Press the [LYRICS&CHORD] button.
The display changes to:
This is only possible while song playback is
stopped. So be sure to stop playback before
pressing [Edit]. Otherwise a “CAN’T EXECUTE”
error message is displayed.
(5) Now, we’re going to import the text file you
created earlier:
(6) Insert the floppy disk that contains the text
file you wish to associate with the Standard
MIDI File in the DisCover 5M’s RAM memory.
(7) Press the [TXT¥Import] field.
If the song already contains Lyrics data that can
be edited, the first few lines are displayed.
(4) Press the [Edit] field.
(8) Press the field that contains the name of the
desired file.
If you don’t see the desired file name, use [ø] [˚]
to select another group of 14 files. (If you still
can’t find the desired file, it may not end in
“.TXT” or not be a text/ASCII file.)
(9) Press the [EXECUTE] field to load the desired
text file.
(10) Press [Back¥to¥Lyr¥Edit] to return to the Edit
Lyrics page (see above).
91
Page 92

Editing Lyrics
Now you’re all set for the synchronization
work:
(11) Press the [Lyrics¥Synchro] field.
This display page should contain the first line of
the text you imported. (This function can also
be used to correct the synchronization of Lyrics
data contained in a Tune 1000-format song
you loaded.)
Here’s what we’re going to do: every line of the
text we imported can be associated with a
given quarter note of the song. We’ll do this
while the song is playing back. Synchronizing
text lines is a matter of pressing the [NEXT] button on the beats where they should appear during normal playback of the Standard MIDI File.
Each press of the [NEXT] button will associate
the text line below the arrows (® √) with the
quarter note where the button was pressed. The
preceding line automatically scrolls above the
(® √) section, while the following line will
appear below the arrows.
(12) Press [|√] to return to the beginning of the
song or use [º] or [‰] to jump to a measure
that lies a little ahead of the place where the
first line should be displayed during normal
operation.
(13) Press [REC≈∏] (Lyrics Sync).
(15) On the beat where the first text line should
be displayed, press the [NEXT] button (front
panel).
(16) Repeat this at the quarter note where the
second line should be displayed.
(17) Keep pressing [NEXT] on all beats where the
subsequent text lines should appear.
(18) Press the [®÷ª] button when all Lyrics data
have been synchronized.
(19) If you made a mistake somewhere, you can
return to that measure using [º] and start
anew from that position.
In that case, you will have to keep synchronizing the remaining text until the end of the
song.
(20) Press the [Save] field and save your song with
the synchronized lyrics to disk or SmartMedia
card.
(14) Press the [®÷ª] button.
Playback (and Lyric synchronization recording)
starts.
r
92
• Enter the name (page 28).
• Press the [SMART¥MEDIA] or [FLOPPY] field to
select the destination.
• Press the [EXECUTE] field.
Page 93

Owner’s Manual
‘Utility’ functions for Edit Lyrics
There are three functions you may want to use for managing Lyrics files, or songs with associated lyrics. All of them
can be accessed via the Lyrics Edit menu (see page 91 for how to get there.)
Exporting the Lyrics data as text file
Here’s what you need to do to export the Lyrics data
contained in a Standard MIDI File as text data. This
may be useful for editing or printing the lyrics using
your computer.
Note: This only works if the Standard MIDI File in the
DisCover 5M’s RAM memory contains lyrics data.
(1) On the Lyrics Edit page, press the [TXT¥Export]
field.
(2) Name the text file.
This is only necessary if you do not agree with
the preset name (i.e. the one of the song in
question).
See page 28 for how to enter the desired name.
(3) Press the [EXECUTE] field to save the file to
disk.
Save without Lyrics
This function allows you to save the song in the
DisCover 5M’s RAM to disk without the Lyrics data.
(1) On the Lyrics Edit page, press the
[Save¥without¥Lyrics] field.
(2) Press the [YES] field to erase all Lyrics data
still present in the DisCover 5M’s RAM. This
takes you to the SAVE Song page where you
can save the MIDI data without lyrics.
Press [NO] to return to the Edit Lyrics page
without erasing the Lyrics.
93
Page 94

MIDI
12. MIDI
MIDI is short for
being a connector type that is used by musical instruments and other devices to exchange messages relating to the
act of making music.
The DisCover 5M’s Realtime parts must be controlled via MIDI, because the DisCover 5M doesn’t
have a keyboard. Conversely, when you start song
playback, the DisCover 5M transmits MIDI data to its
MIDI OUT socket. If you connect this socket to the
MIDI IN socket of another instrument, that instrument may play the same notes as one of the
DisCover 5M’s parts, select sounds, etc.
MIDI can simultaneously transmit and receive messages on 16 channels, so that up to 16 instruments
can be controlled. Nowadays, most instruments
–like your DisCover 5M– are multitimbral, which
means that they can play several musical parts with
different sounds.
Note: All DisCover 5M parts are set to receive MIDI messages. If they do not seem to respond to the messages you
send from the external controller, you should check the MIDI
connections and the channel settings on the DisCover 5M.
The receive channels of the Realtime parts are set as
follows:
Upper MIDI channel 4
Lower MIDI channel 11
M.Drums MIDI channel 16
Vocal Harmonist MIDI channel 4
Musical Instrument Digital Interface
Transmits “MIDI IN” data
DisCover 5MExternal MIDI instrument
. The word refers to many things, the most obvious
MIDI is a universal standard, which means that
musical data can be sent to and received by instruments of different types and manufacturers. Furthermore, MIDI allows you to connect your
DisCover 5M to a computer or hardware sequencer.
Connect your DisCover 5M as shown below.
The DisCover 5M receives data
The DisCover 5M transmits data
■ About the Realtime parts: One of the fundamental
rules of the MIDI standard is that the MIDI OUT socket
only transmits data generated by the instrument itself,
while the MIDI THRU socket only transmits MIDI data
received via the MIDI IN socket.
In the case of the DisCover 5M it is important to understand that the Realtime parts can indeed send data
(whenever you select another Tone, change the volume,
effects settings, etc., on the DisCover 5M itself). They
will, however, never transmit note messages, Pitch
Bend, modulation, volume messages (CC07) received via
MIDI. Those data are only transmitted via the
DisCover 5M’s MIDI THRU socket. When working with a
sequencer, you may therefore have to change the connections from time to time.
External MIDI instrument/
computer (*)
The how-to’s
Accessing the MIDI functions
Do the following to gain access to the MIDI functions:
(1) Press the [MENU] button.
The display changes to:
r
94
(2) Press the [MIDI] field.
(3) Do one of the following:
• Press a [1]~[8] field to select a MIDI Set.
Page 95

Owner’s Manual
Refers to the Realtime parts
Refers to the parts of the Song Player
Synchronization, general settings
MIDI data transmission
MIDI data reception
• Press one or several “Macro Settings” fields to
recall the corresponding presets (called “macros”).
• Press the [Edit] field to gain access to the MIDI
parameters.
(4) If you changed certain MIDI parameter set-
tings, press the [EXECUTE] field to write them
to a MIDI Set (page 99).
(5) Press the [EXIT] button to return to the main
page.
Working with Macros
The opening “MIDI” page contains three big
fields with preset settings. All you need to do is
press them to restore the default settings for
the sections or aspects in question.
[RealTime]: This field recalls the factory MIDI
settings for the Realtime parts (Upper, Lower,
M.Drums, Vocal Harmonist). The most important (and practical) use for this field is to set
the MIDI transmit/receive channels of the Realtime parts and to switch off MIDI transmission/
reception of the song parts.
Note: This field applies to both reception (RX) and
transmission (TX). The DisCover 5M indeed allows you to
set separate TX and RX channels for each part.
[Song]: This field restores the factory settings
for the DisCover 5M’s song parts. It also
switches off the MIDI transmission and reception of the Realtime parts. You may not have
noticed it so far, but these are separate parts.
Your DisCover 5M is indeed 20-part multitimbral.
[External¥Sequencer]: Prepares your
DisCover 5M for use (and synchronization) with
an external sequencer. The MIDI transmission of
the Realtime parts is switched on, while MIDI
reception of the song parts is also activated
(they do not transmit MIDI messages).
All Parts [Local¥On]/[Local¥Off]: These settings
allow you to establish or remove the connection between the DisCover 5M’s Song Player
and the internal tone generator.
When set to [Local¥On] (default), playing back a
song will cause the corresponding notes to
sound. If you select [Local¥Off], the corresponding MIDI messages are no longer sent to the
internal tone generator – but they are still
transmitted to the MIDI OUT port and hence to
external MIDI instruments.
Sound source Sound source
LOCAL ON
MIDI OUT
LOCAL OFF
MIDI OUT
SMF SMF
Note that this system also applies to the Realtime part settings you can change on the
DisCover 5M (volume, effects, etc.) as well as
the foot switch and expression messages of the
connected pedals. If you select [Local¥Off], these
messages no longer affect the DisCover 5M’s
sound source, but they could be used for controlling software sequencers via the on-screens
sliders, for example, which would turn the
DisCover 5M into a remote control.
As soon as you press one of these fields, the
number of the currently selected MIDI Set is
indicated with an asterisk (*) to signal that the
current settings no longer correspond to the
written settings. See p. 99 for details about the
MIDI Sets.
Editing procedure
After performing step (6) below, you will see a
display page that works as follows. In fact, it
uses the same system as the Vocal Harmonist
(Menu) and the Disk Media environment.
(6) Press the [Edit] field on the first “MIDI” page.
(7) On the page that appears now, select the sec-
tion whose parameters you wish to edit (left
side):
(8) Select what you want to edit (for RealTime
and Song):
95
Page 96

MIDI
If you press the [System] field (see step (7)), the
“MODE” options change:
Synchronization with other devices
Overall MIDI settings
(9) Use the [PREV] and [NEXT] buttons to select
the parameter you wish to edit, and set the
desired value with the [VALUE] dial.
Parameter fields can also be selected by pressing them.
Editing MIDI parameters
Editing Realtime, Vocal Harmonist and Song parameters
The Realtime and Song parts have the same and “Receive” and “Transmit” parameters, so we will discuss them
only once.
●
Receive parameters
❑
RX Monitor
These indicator icons (1~16) light whenever the
DisCover 5M receives MIDI data on the corresponding channel. This may help you decide which channel
you need to assign to a given part.
❑
Part
Use this parameter to select the part you want to
edit. If you press MIDI [RealTime], the options are:
Upper, Lower, M.Drums, and Vocal-H (the latter only
on the “Receive” page). If you select “Vocal-H”, the
display page changes as follows, because that part
only allows you to change the MIDI channel:
(10) Press the [EXIT] button to return to the main
page.
❑
Channel
(Off, 1~16, Off) Allows you to assign a MIDI receive
channel to the selected part. The default settings
usually work best, but you are most welcome to
change them. Select “Off” for a part that shouldn’t
receive MIDI data.
Note: Unless you have a very good reason to do otherwise, we suggest you always select the same Transmit
and Receive channel numbers for a part.
Note: Assigning the same channel to two or more parts
is usually not a very good idea.
Note: For Song (SMF) parts, this also affects playback of
the Standard MIDI Files.
Note: In most instances, assigning the same Receive
channel to the Upper and Vocal-H parts works best.
“Channel” is the only parameter you can set for the
Vocal-H part.
❑
Velocity
(1~127, On) Allows you to specify whether the Realtime parts should be velocity sensitive (“On”) or
whether they should play all received notes with the
velocity value you specify here (1~127). This is probably only useful if your MIDI controller (keyboard,
accordion, etc.) sends fixed velocity values that are
too low (or too high) to produce the “right” sound.
❑
Shift
(–48~48) This parameter allows you to transpose the
received note messages before sending them to the
DisCover 5M’s tone generator. You could change the
pitch of the received MIDI note messages if you are
used to playing a song (that is being received via
MIDI) in another key than the one the data were programmed in. The maximum possible transposition is
four octaves up (48) or down (–48). Each step represents a semitone.
The Vocal-H “part” specifies the MIDI channel whose
note messages are used for the harmony voicings,
Vocoder notes, etc. See pages 23, 24, 25.
If you press MIDI [Song], the options are Track 1~
Track 16. Always select the Part before changing the
remaining parameters on this page.
r
96
❑
Limit High/Limit Low
(C-~G9) “Limit High” and “Limit Low” allow you to
set the note range to be received. If not all note messages on the selected MIDI channel should be
received by the selected part, set the range to the
desired values. This may be necessary when controlling the DisCover 5M from a MIDI accordion that
sends the chord and bass notes on the same channel.
Note: The Low Limit cannot be set to a higher value
than the High Limit (and vice versa).
Page 97

Owner’s Manual
Note: Some instruments start at C–2 and end at G8
(instead of C–1 and G9). You may have to “add an
octave” to the value you see on the screen of your computer or external sequencer.
Note: A comparable effect can be achieved for the
Vocal-H part by working with the MIDI IN Split Point
and [Left]/[Right] parameters (see p. 24, for example).
❑
Data filters
The remaining three fields allow you to specify
whether the messages in question should be received
(ON) or not (OFF).
PC—Program Change and Bank Select (CC00, CC32)
messages. These messages are used to select Tones
and Drum Sets (as well as User Programs, see below).
“Bank Select” messages are in fact Control Change
messages, which were added when it became clear
that the maximum number of sounds selectable
using Program Change messages (128) was no longer
sufficient to access all sounds of a given instrument.
(The DisCover 5M boasts 1,422 sounds.)
Do not forget to send a Program Change message
after a Bank Select message because sending only
Bank Select messages does nothing whatsoever. The
correct order for sending these messages is (pay
attention to the CPT values):
1.1.0 Bank Select CC00 + value
1.1.1 Bank Select CC32 + value
1.1.2 Program Change
CC—These messages control parameters such as
modulation and pan. The function of a message is
determined by its control change (e.g. ID) number.
Here are some frequently used Control Changes that
can be filtered using this parameter: Modulation
(CC01), Volume (CC07), Expression (CC11), Pan(pot)
(CC10), Hold 1 (CC64), Reverb Send Level (CC91),
Chorus Send Level (CC93), RPN LSB, MSB (CC100/
101), Data Entry (CC06/38), NRPN LSB, MSB (CC98/
99).
Note: The DisCover 5M’s sound source also receives
Channel Aftertouch messages (but they cannot be filtered).
PB—Allows you to specify whether or not Pitch Bend
messages should be received.
●
Transmit parameters
Note: In the following, items indicated as “×” are not
available for the Realtime parts.
❑
TX Monitor
These indicator icons (1~16) light whenever the
DisCover 5M (Realtime, Song parts) transmits MIDI
data on the corresponding channel. See also the
remark on page 94.
❑
Part
Use this parameter to select the part you want to
edit. If you press MIDI [RealTime], the options are:
Upper, Lower, M.Drums. If you press MIDI [Song], the
options are Track 1~Track 16. Always select the Part
before changing the remaining parameters on this
page.
❑
Channel
(Off, 1~16, Off) Allows you to assign MIDI transmit
channel to the selected part. The default settings
usually work best, but you are most welcome to
change them. Select “Off” for a part that shouldn’t
transmit MIDI data.
Note: Unless you have a very good reason to do otherwise, we suggest you always select the same Transmit
and Receive channel numbers for a part.
For Realtime parts, this parameter does not “remap” the
messages received via MIDI IN (because they are only
transmitted via MIDI THRU and cannot be changed by
the DisCover 5M). The channel therefore only applies to
messages generated by changing the Realtime part
parameters or assigning different Tones to these parts.
Note: Assigning the same channel to two or more parts
is usually not a very good idea.
Note: The Vocal-H part has no transmit channel
(because it never generates MIDI data).
❑
Shift ×
(–48~48) This parameter allows you to transpose the
note messages before they are transmitted to an
external MIDI instrument or computer. The maximum possible transposition is four octaves up (48) or
down (–48). Each step represents a semitone.
97
Page 98

MIDI
❑
Data filters
The remaining three fields allow you to specify
whether the messages in question should be transmitted (ON) or not (OFF).
PC—Program Change and Bank Select (CC00, CC32)
messages. These messages are used to select Tones
and Drum Sets (as well as User Programs, see below).
See also the explanation for the “Receive” parameter
of the same name.
Editing the System parameters
The following parameters apply to the DisCover 5M as a whole.
●
Sync parameters
❑
Transmit
The Transmit Sync parameters allow you to specify
whether or not the DisCover 5M should send MIDI
realtime messages whenever you start the song playback. Sending MIDI realtime (start, stop, clock) messages has the advantage that you can synchronize
external instruments or computers with your
DisCover 5M.
Start/Stop/Cont—(On/Off) If you activate this
option, the DisCover 5M will only send start or stop
messages whenever you start (or stop) song playback. In this case, no Clock messages are sent.
Clock—(On/Off) This option means that the Song
Player sends Clock messages (usual synchronization
method).
Song Pos Pointer—(On/Off) If you select “ON”, the
Song player sends Song Position Pointer (SPP) messages. These messages are used to signal the current
playback position, so that the slaved (synchronized)
drum machine, sequencer, etc., automatically jumps
to the correct position.
Note: See your sequencer’s etc. manual to find out
whether it accepts Song Position Pointer messages.
❑
Receive: RX Sync
The RX Sync parameter allows you to specify
whether and how the Song player should be synchronized to external sequencers or drum machines.
The available options are:
Internal—The Song player will follow its own internal tempo.
Auto—This is a function for remote control of song
playback (using a PK-5 dynamic MIDI pedal board,
for example). If the DisCover 5M receives a MIDI
Start message (FA), it waits for Clock messages. If
those Clock messages are not received (a PK-5, for
instance, doesn’t send them), the DisCover 5M starts
playback using its internal tempo. If, however, Clock
messages (F8) follow after the Start message, the
DisCover 5M uses the external tempo. You can nev-
r
CC—These messages control parameters such as
modulation and pan. The function of a message is
determined by its control change (e.g. ID) number.
PB ×—Allows you to specify whether or not Pitch
Bend messages should be transmitted.
ertheless go on using the Song Player without MIDI
Start/Clock messages, which is not possible when you
select “MIDI”.
MIDI—Song playback can be started or stopped with
MIDI realtime messages (Start, Stop, Clock) coming
from an external clock source.
Remote—The Song player waits for a start message
to start playback at its own tempo. When it receives
a stop message, playback will stop.
●
Global parameters
❑
Transmit
Sys Exclusive—(On/Off) Use this parameter to spec-
ify whether (ON) or not (OFF) the DisCover 5M should
send SysEx messages. Such messages are not standardized, so that each manufacturer can use them ad
lib for temporary (or permanent) changes to the way
a part behaves. Changes to the effect processor settings, for instance, are only possible via SysEx messages.
Such messages may slow down playback on external
MIDI instruments, or yield no effect at all, which is
why you have the option to stop them from being
transmitted in the first place.
User Prg PC Channel—(1~16, OFF) This parameter
allows you to specify the MIDI channel (1~16) on
which the DisCover 5M should send Program Change
messages whenever you select a User Program. If you
select a channel (1~16), such messages will be transmitted on that channel. Select “OFF” if no Program
Changes should be transmitted.
Song Data Changes—(On/Off) This parameter
allows you to specify how the original program
changes of the songs you play back are transmitted
via MIDI. Why “original”? That’s because the
DisCover 5M changes sound addresses (usually CC00
and CC32 values) so as to play back all songs with
the best possible quality. If you set this parameter to
“On”, these realtime transformations are also trans-
98
Page 99

Owner’s Manual
mitted to the MIDI OUT socket, in which case the
receiving tone generator may drop certain parts (if it
does not support the requested sound bank).
If you select “Off” (default setting), the original
sound addresses are transmitted to the
DisCover 5M’s MIDI OUT socket. (But the internal
tone generator continues to “enhance” the songs you
play back – this parameter is only for MIDI transmission to external instruments.)
❑
Receive
Sys Exclusive—(On/Off) Use this parameter to spec-
ify whether (ON) or not (OFF) the DisCover 5M should
receive SysEx messages from other devices. See also
the explanation above.
User Prg PC Channel—(1~16, OFF) This parameter
allows you to specify the MIDI channel (1~16) whose
Program Change messages will be used for switching
User Programs on the DisCover 5M. If you do not
want to receive them, select “OFF”.
Transpose—(On/Off) Use this parameter to specify
whether note messages received via MIDI should be
transposed according to the Transpose interval that
is currently in effect (manual setting, Singer Key,
Global).
MIDI Sets
MIDI Sets are memories for the settings you make in MIDI mode. The DisCover 5M has eight MIDI Set memories that
you can use to change your MIDI configuration. You can link a MIDI Set to a User Program (page 80), and specify
which MIDI Set should be loaded each time you switch on the DisCover 5M (see below). If you need to reset some or
all MIDI parameters to their default values, loading the Macro Settings (page 95) may be a wiser choice than
selecting a MIDI Set.
Writing a MIDI Set
(1) If you are still on one of the “MIDI Edit”
pages, press the [Back¥to¥MIDI] field.
If not, press the [MENU] button and the [MIDI]
field on the “Menu” display page.
(2) Press the [Memorize] field.
Selecting a MIDI Set
(1) Press the [MENU] button.
The display changes to:
(3) Press the field that corresponds to the MIDI
Set where you wish to save your MIDI settings ([1]~[8]).
(4) Press the [EXECUTE] field.
The display confirms that the settings have
been written to the selected memory and
returns to the “MIDI” page.
(2) Press the [MIDI] field.
(3) Press the [1]~[8] field that corresponds to the
MIDI Set you need.
99
Page 100

MIDI
You can also select a Macro and work with
those settings, in which case all eight MIDI Set
indicator icons go dark.
(4) Press the [EXIT] button to return to the main
page.
The main page looks as follows when you work
with a MIDI Set:
MIDI Set selection at power-on
Whenever you switch on the DisCover 5M, it automatically selects the appropriate Macro settings. But maybe
you prefer to be “operational” right away. In that case, tell the DisCover 5M which MIDI Set it should recall
whenever you switch it on:
(1) Press the [MENU] button.
(2) Press the [UTILITY] field. If the [Startup] field in
the left corner is not displayed in white, press
it.
The display changes to:
(3) Press the [Startup¥MIDI¥Set] field so that it is
displayed in white.
(4) Use the [VALUE] dial to select the MIDI Set to
be recalled (1~8).
If you don’t want any MIDI Set to be recalled,
select “Off”.
(5) Press the [EXIT] button to return to the main
page.
r
100
 Loading...