

Page 1
Owner’s Manual
Contents
Panel Descriptions . . . . . . . . . . . . . . . . . . . . . . . . . . . . . . . . . . . . . . . 2
Connect the Included USB Cable . . . . . . . . . . . . . . . . . . . . . . . 3
Before You Play . . . . . . . . . . . . . . . . . . . . . . . . . . . . . . . . . . . . . . . . . . 4
Power Supply Settings . . . . . . . . . . . . . . . . . . . . . . . . . . . . . . . . . 4
Turning the Aerophone GO on . . . . . . . . . . . . . . . . . . . . . . . . . 4
Wrapping the Band . . . . . . . . . . . . . . . . . . . . . . . . . . . . . . . . . . . . 4
Attaching the Neck Strap . . . . . . . . . . . . . . . . . . . . . . . . . . . . . . 4
Selecting the Base Key . . . . . . . . . . . . . . . . . . . . . . . . . . . . . . . . . 5
Selecting a Tone . . . . . . . . . . . . . . . . . . . . . . . . . . . . . . . . . . . . . . . 5
Other Preparations . . . . . . . . . . . . . . . . . . . . . . . . . . . . . . . . . . . . 5
Connecting Your Headphones or External Speakers 5
Mode Settings . . . . . . . . . . . . . . . . . . . . . . . . . . . . . . . . . . . 5
Performing . . . . . . . . . . . . . . . . . . . . . . . . . . . . . . . . . . . . . . . . . . . . . . 6
Holding the Aerophone GO . . . . . . . . . . . . . . . . . . . . . . . . . . . . 6
Embouchure . . . . . . . . . . . . . . . . . . . . . . . . . . . . . . . . . . . . . . . . . . 6
Using the Thumb . . . . . . . . . . . . . . . . . . . . . . . . . . . . . . . . . . . . . . 6
Pressing the Performance Keys . . . . . . . . . . . . . . . . . . . . . . . . . 6
How to Make Sound . . . . . . . . . . . . . . . . . . . . . . . . . . . . . . . . . . . 6
Changing the Settings . . . . . . . . . . . . . . . . . . . . . . . . . . . . . . . . . . . 7
Returning to the Factory Settings (Factory Reset) . . . . . . . . 7
Using the Aerophone GO with the Smartphone . . . . . . . . . 8
Here’s What You Can Do . . . . . . . . . . . . . . . . . . . . . . . . . . . . . . . . 8
Making Settings . . . . . . . . . . . . . . . . . . . . . . . . . . . . . . . . . . . . . . . 8
Performing on the Aerophone GO Along with Music
Played from a Smartphone. . . . . . . . . . . . . . . . . . . . . . . . 8
Using a Smartphone to Edit Aerophone GO Settings
or Play the App’s Sound Engine . . . . . . . . . . . . . . . . . . . 8
If You Can’t Connect via Bluetooth . . . . . . . . . . . . . . . . . . . . . . 9
Appendix . . . . . . . . . . . . . . . . . . . . . . . . . . . . . . . . . . . . . . . . . . . . . . . . 9
Maintaining the Mouthpiece . . . . . . . . . . . . . . . . . . . . . . . . . . . 9
Main Specications . . . . . . . . . . . . . . . . . . . . . . . . . . . . . . . . . . . . 9
USING THE UNIT SAFELY . . . . . . . . . . . . . . . . . . . . . . . . . . . . . . . . . 10
IMPORTANT NOTES . . . . . . . . . . . . . . . . . . . . . . . . . . . . . . . . . . . . . . 11
Before using this unit, carefully read “USING THE UNIT SAFELY” (p. 10) and “IMPORTANT NOTES” (p. 11). After reading, keep the
document(s) where it will be available for immediate reference.
AE-05 © 2018 Roland Corporation
1
Page 2
Panel Descriptions
11
10
1
12
4
13
6
18
14
15
16
20
21
8
9
17
2
3
5
7
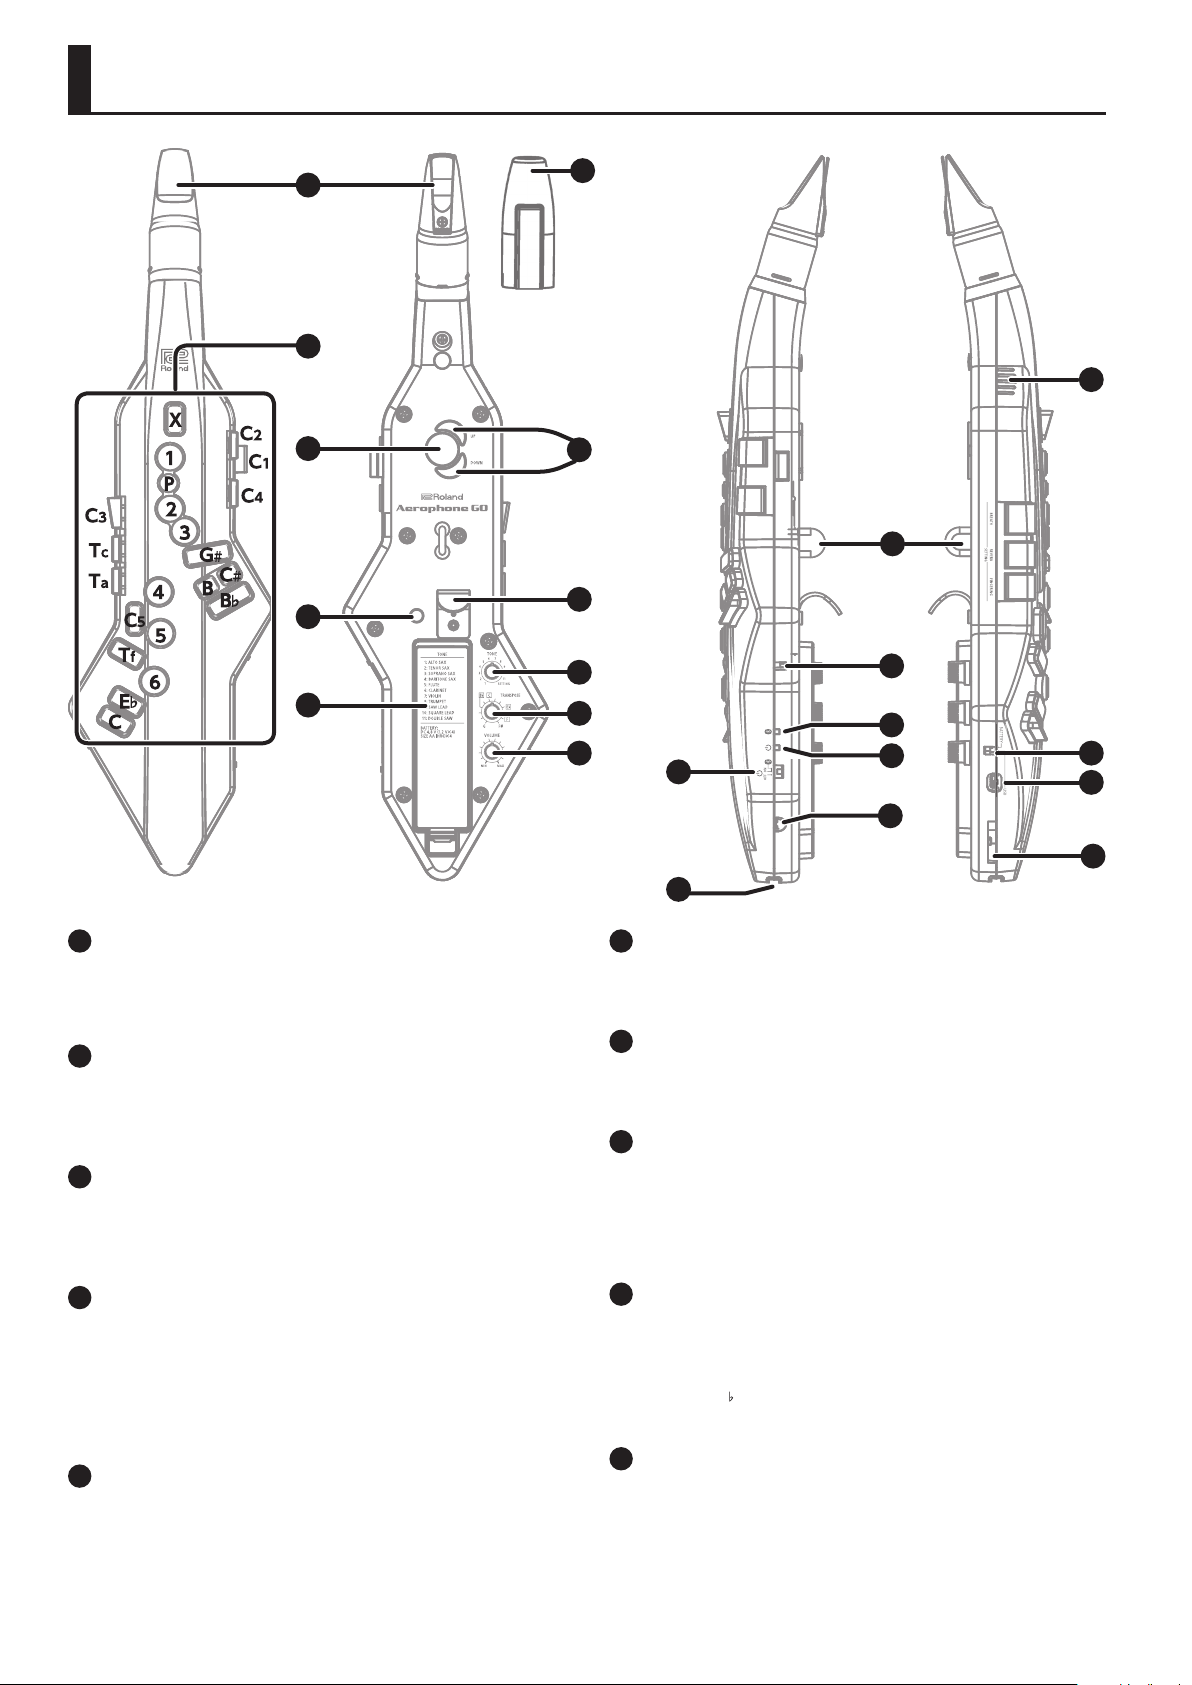
1
Mouthpiece Cap
Protects the mouthpiece. When you’re not playing, leave the
mouthpiece cap attached. Taking care that it does not touch the
reed, press it on until you hear it click into place.
2
Mouthpiece
A dedicated mouthpiece for the Aerophone GO that is
constructed as a single unit with the reed.
& Refer to “Embouchure” (p. 6).
3
Performance keys
These keys are used for performance. They allow performance
using the same ngering as a saxophone.
& Refer to “Pressing the Performance Keys” (p. 6).
4
Octave keys
Switch the octave. Operate them using the left-hand thumb.
You can use these to raise or lower the pitch by one octave.
You’ll also use these to select the value of various settings.
& Refer to “Using the Thumb” (p. 6).
& Refer to “Changing the Settings” (p. 7).
5
Thumb rest
Place your left thumb here.
& Refer to “Holding the Aerophone GO” (p. 6).
19
6
Thumb hook
Place your right thumb under the hook.
& Refer to “Holding the Aerophone GO” (p. 6).
7
Thumb button
Bends up (raises the pitch) or bends down (lowers the pitch).
& Refer to “Using the Thumb” (p. 6).
8
[TONE] knob
Selects a tone. Turn the knob to switch between sounds “1”–”11.”
If this is set to “SETTING,” you’ll be in settings mode.
& Refer to “Selecting a Tone” (p. 5).
& Refer to “Changing the Settings” (p. 7).
9
[TRANSPOSE] knob
Selects the base key (the note that is heard when you use the “C”
ngering).
If you want to perform using the same base key as an alto sax, set
this to the “E
& Refer to “Selecting the Base Key” (p. 5).
10
[VOLUME] knob
The volume is regulated by the strength of your breath as you
perform, but you can also use the [VOLUME] knob to adjust the
overall volume.
This aects the volume of the built-in speaker and the volume
from the device that’s connected to the PHONES/OUTPUT jack.
” position.
22
2
Page 3
Panel Descriptions
11
Battery case
If you are using the Aerophone GO on batteries, insert four
rechargeable Ni-MH batteries (AA).
& Refer to “Power Supply Settings” (p. 4).
12
Built-in speakers
13
Strap ring
Attach a neck strap here.
& Refer to “Attaching the Neck Strap” (p. 4).
14
Bite Control Switch
Switches bite control on/o.
If this is on, the force with which you bite the mouthpiece controls
the pitch. If this is o, natural vibrato is applied automatically.
15
Bluetooth LED (blue)
The LED indicates the Bluetooth connection status.
Lit Connected via Bluetooth
Blinking Waiting to connect via Bluetooth
Unlit Bluetooth o
16
Power LED (orange)
The LED indicates whether the power is on/o and the amount
remaining in the batteries.
Lit Power on
Blinking Batteries are low
Unlit Power o
22
Cord hook
When using a USB cable, use this cord hook to secure it.
& Refer to “Secure to cord hook” (p. 3).
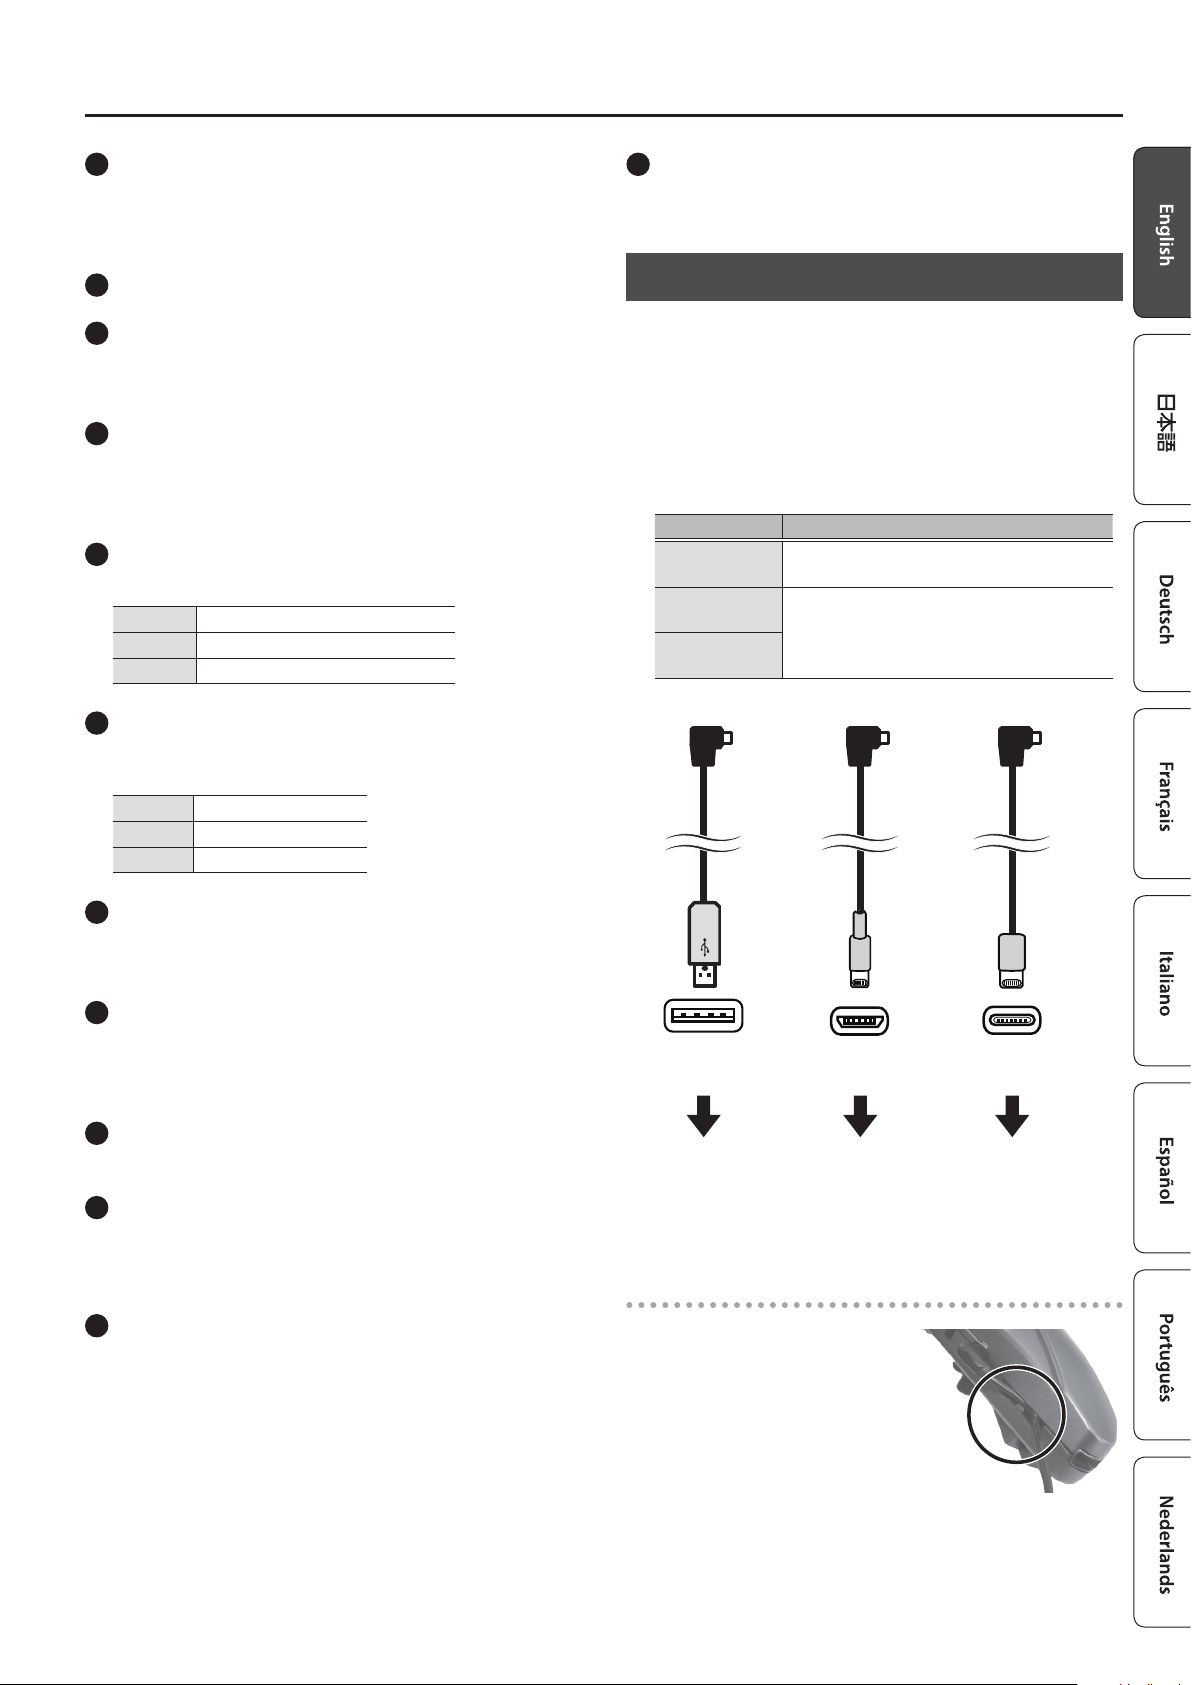
Connect the Included USB Cable
You can use one of these cables when supplying power to the
Aerophone GO from a USB AC adaptor, or when you want to
use a wired connection to connect the Aerophone Go with a
smartphone on which the dedicated app is installed.
* Handle USB cables with care. If saliva drips down the USB cable
and reaches the interior of the USB AC adaptor, malfunctions or
electrical shock might occur.
The types of included USB cable and the uses of each type are
shown below.
USB cable type Purpose
Type A
Micro B
Type C
Powers the Aerophone GO from a USB AC
adaptor connected to the USB port.
If you are using the dedicated app on an
Android smartphone, and feel that the
sound is delayed, make connections using a
USB cable.
To Aerophone GO
17
[L] switch
Turns the power on/o, and turns Bluetooth on.
& Refer to “Turning the Aerophone GO on” (p. 4).
18
PHONES/OUTPUT jack
Connect this jack to your headphones or external speakers.
& Refer to “Connecting Your Headphones or External
Speakers” (p. 5).
19
Water drain
Drops of water will exit here. Wipe them o with a soft cloth.
20
Power Select Switch
Selects whether the Aerophone GO will use batteries or will take
its power from a USB AC adaptor.
& Refer to “Power Supply Settings” (p. 4).
21
USB Port
If you are powering the Aerophone GO from a USB AC adaptor,
connect the included USB cable (type A).
If you are using the dedicated app on an Android smartphone,
and feel that the sound is delayed, make connections using the
included USB cable (micro B or type C).
* Do not use any cable other than the included USB cables.
& Refer to “Power Supply Settings” (p. 4).
& Refer to “Using the Aerophone GO with the Smartphone”
(p. 8)
Type A Micro B Type C
USB AC adaptor Smartphone
equipped with a
micro B port
or
Tablet
Secure to cord hook
If you use a USB cable, secure it
to the cord hook as shown in the
illustration.
This prevents the cable from being
inadvertently being unplugged if it is
pulled, and prevents the connector
from being stressed.
Smartphone
equipped with a
type C port
or
Tablet
3
Page 4
Before You Play
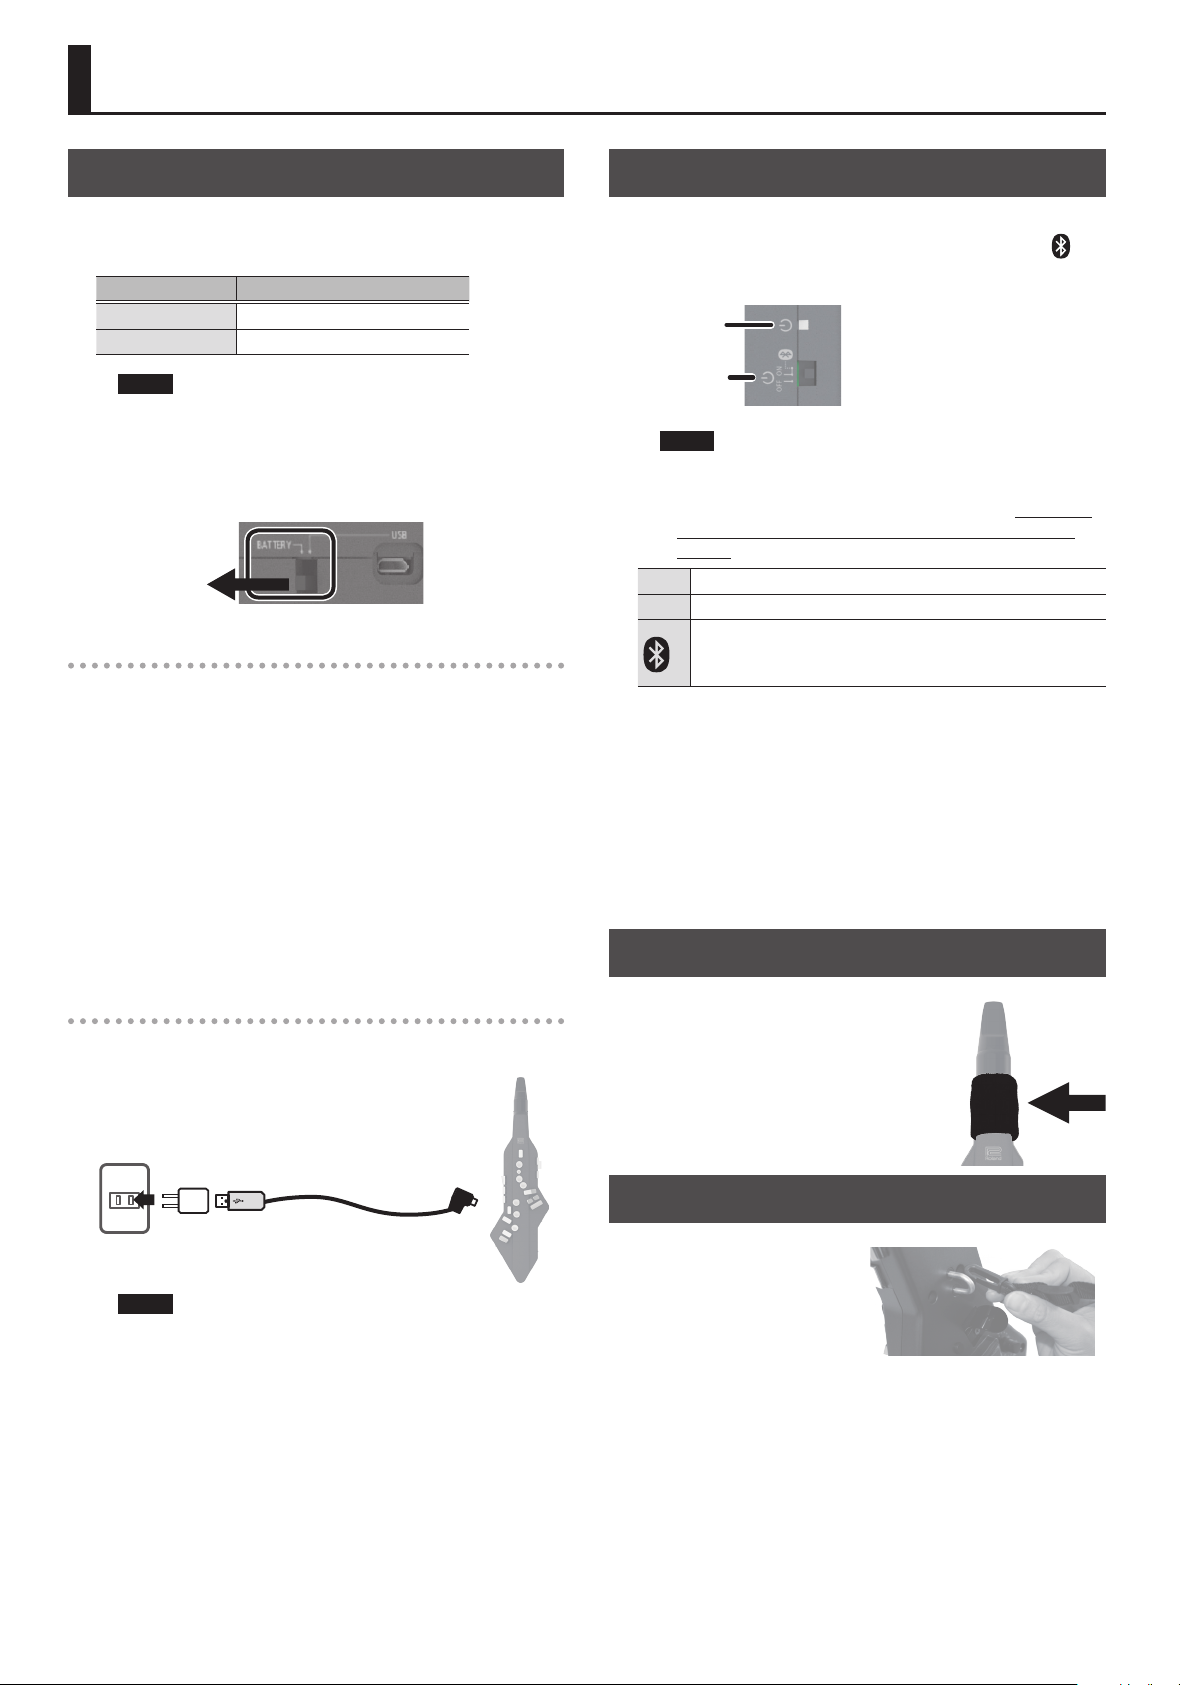
Power Supply Settings
The Aerophone GO can be powered by batteries or by a USB
AC adaptor. Set the power select switch according to the power
supply that you want to use.
Power Supply Power Select Switch
Battery Set to the “BATTERY” position
USB AC Adaptor Set to the “USB” position
NOTE
If you are using the app on an Android smartphone that’s
connected via a USB cable, set the power select switch to
“BATTERY” so that the unit is powered by batteries.
Using the “USB” position might cause problems, such as the
battery of your smartphone running down.
BATTERY
When using batteries
Insert four rechargeable Ni-MH (AA) batteries. This allows
approximately 10 hours of playing.
* When turning the unit over, be careful so as to protect the
buttons and knobs from damage. Also, handle the unit
carefully; do not drop it.
* Battery life can vary depending on the specications of the
batteries, capacity of the batteries, and the conditions of use.
* When the batteries run low, the power LED (orange) blinks.
* If you handle batteries improperly, you risk explosion uid
leakage. Make sure that you carefully observe all of the items
related to batteries that are listed in “USING THE UNIT SAFELY”
(p. 10) and “IMPORTANT NOTES” (p. 11).
Turning the Aerophone GO on
Set the [L] switch to “ON.” If you’re using the Aerophone GO with
an app that’s installed on your smartphone, set this to the “ “
position.
The power supply LED indicates whether power is on or o.
Power LED
[L] switch
NOTE
The sensitivity of the mouthpiece is automatically adjusted
when you turn on the power (this unit takes about seven
seconds for the system to start). For this reason, don’t bite
or touch the mouthpiece while turning on the power
switch.
OFF Power o
ON Power on
The Bluetooth functionality is on. Use this position when
using the Aerophone GO with an app that’s installed on
your smartphone.
* The power to this unit will be turned o automatically after
a predetermined amount of time has passed since it was last
used for playing music, or its buttons or controls were operated
(Auto O function). To prevent the power from turning o
automatically, make settings in the app to disable the Auto O
function. To turn the power on again, set the [L] switch to the
“OFF” position, and then move it back to the “ON” position.
* When you turn the power switch “OFF,” the power LED blinks
and the shutdown process occurs. Do not remove the batteries
or disconnect the USB AC adaptor until the LED goes dark.
Wrapping the Band
When supplying power from a USB AC adaptor
Connect the included power supply USB cable (type A) and USB
AC adaptor to the USB port of the Aerophone GO.
You can play without being concerned about how
much battery power you have left.
USB AC
adaptor
NOTE
Use only the included power supply USB cable (type A).
When connecting or disconnecting the cable, grasp the plug
itself; do not pull the cable.
Power supply USB cable
(Type A)
If you continue playing for an extended
time, saliva from your mouth might drip
down across the instrument and enter the
interior from around the [L] switch or any
keys.
When playing the instrument, wrap the
included band around it as shown in the
illustration.
Attaching the Neck Strap
Place the strap over your neck,
and attach the hook of the
strap to the strap ring of the
Aerophone GO.
4
Page 5
Before You Play
Selecting the Base Key
The sax is a transposing instrument. The note symbol written
in the musical score diers from the note pitch that is actually
sounded. In the case of an alto sax, the note written as “C” on the
musical score actually sounds the “E ” pitch.
1. Use the [TRANSPOSE] knob to specify the base key
(the pitch that is sounded by the “C” ngering).
For example, if you want to perform using the same ngering
as an alto sax or baritone sax, set this to “E ” (+3). If you want to
perform using the same ngering as a soprano sax or tenor sax,
set this to “B ” (-2).
Selecting a Tone
Use the [TONE] knob select a sound in the range of “1”–”11.”
Tone List
No. Tone Name
1 ALTO SAX
2 TENOR SAX
3 SOPRANO SAX
4 BARITONE SAX
5 FLUTE
6 CLARINET
7 VIOLIN
8 MUTE TRUMPET
9 SAW LEAD (*)
10 SQUARE LEAD (*)
PERCUSSION
&
11
For details on the ngering and the assignments of
sounds, refer to the “PERCUSSION” Assignment at the
end of this manual.
Other Preparations
Make the following preparations as necessary.
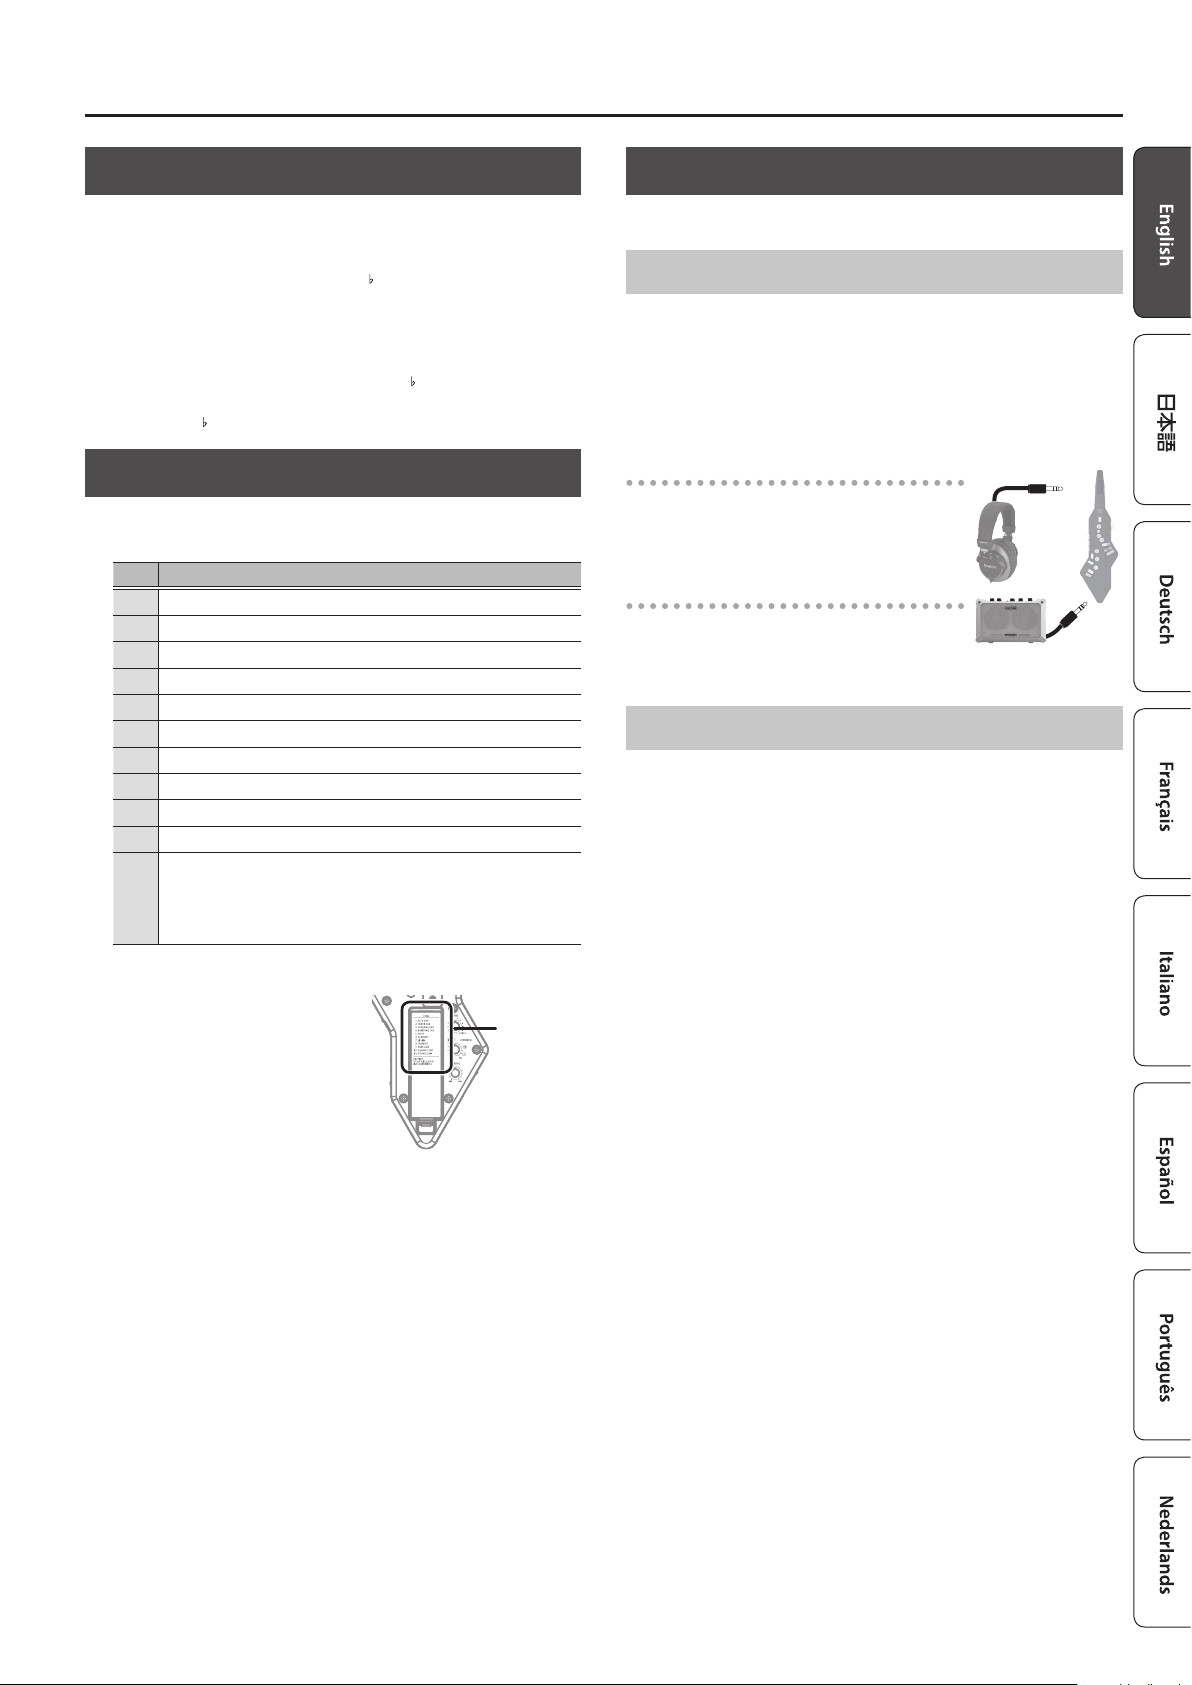
Connecting Your Headphones or External Speakers
Since the Aerophone GO is equipped with a built-in speaker, it can
produce sound by itself. If you want to connect headphones or an
external speaker, connect them to the PHONES/OUTPUT jack.
* To prevent malfunction and equipment failure, always turn
down the volume, and turn o all the units before making any
connections.
Headphones
Since sound is not produced by the builtin speaker of the Aerophone GO, this is
convenient for night-time practice.
External speakers
Since this allows high volume to be
produced, it is convenient when you’re
performing live for a large number of people.
Mode Settings
You can specify how the sound is aected by the force of your
breath, the depth of reverberation, and the type of ngering.
& For details on how to make these settings, refer to
“Changing the Settings” (p. 7).
or
(*) Synthesizer sounds
* The number indicated by the
[TONE] knob corresponds to the
names in the tone list. The tone
names are also listed on the
battery compartment cover.
Tone Names
5
Page 6

Performing
Holding the Aerophone GO
1. Attach the neck strap
to the strap ring of the
Aerophone GO, and hold it
as shown in the illustration.
2. Place your left thumb on the thumb rest, and place
your right thumb under the thumb hook.
Support the instrument at three points: your right thumb, your
upper teeth, and the strap.
Left thumb
Thumb rest
Thumb hook
Right thumb
Embouchure
Hold the mouthpiece lightly
between your upper teeth and
lower lip, and blow into it.
5 By using tonguing (using
your tongue to control your
breath) and legato you can
control the sound more
expressively.
5 You can control the pitch by
the strength with which you
bite the reed.
* If saliva runs down during performance, use a dry cloth to wipe
it o diligently.
upper teeth
tongue
lower lip
lower teeth
Using the Thumb
Octave keys
Switch the octave. You can raise or lower
the pitch by one octave. Operate them
using the left-hand thumb.
Thumb button
Bends up (raises the pitch) or bends down
(lowers the pitch).
* Whether the thumb button bends up
or bends down is specied for each
tone, and this cannot be changed.
+1
-1
thumb button
Pressing the Performance Keys
These are the performance keys. You can perform using the same
ngering as on a saxophone.
& For details on ngering, refer to “Fingering Chart” at the end
of this manual.
X
C2
1
C1
P
C4
2
Right index nger
* Use the inside of your hand to press the side keys (C1–C4, Tc, Ta).
C3
Tc
Ta
3
G#
C#
B
4
B
5
Tf
6
E
C
Left index nger
How to Make Sound
To begin, let’s try playing C D E F G A B C using sax ngering.
Take a deep breath, and blow as through you’re lling the entire instrument.
C D E F G A B C
Left index
nger
Right index
nger
& For details on ngering, refer to “Fingering Chart” at the end of this manual.
6
Page 7

Changing the Settings
You can specify how the sound is aected by the force of your breath (Breath Curve), the depth of reverberation (Reverb Level), and the type of
ngering (Fingering Type).
1. Set the [TONE] knob to the “SETTING”
position.
You’re in settings mode.
* When you play in settings mode, you hear the
tone that you were previously playing.
2. Press the side key that corresponds to the item that
you want to set.
A “beep” is heard for a number of times corresponding to the
current value of the setting.
3. Use the octave keys to specify the value of the
setting.
A “beep” is heard for a number of times corresponding to the
specied value.
* The value that you specify is saved automatically. Even if you
turn o the power, the setting is remembered the next time
that you turn on the power.
4. Turn the [TONE] knob to exit settings mode.
Setting
Breath Curve “C3”
Reverb Level “ Tc”
Fingering Type “Ta”
Side
keys
Value Explanation
1 L2
2 L1
3 M
4 H1
5 H2
1 OFF
2 1
3 2
4 3
5 4
1 Sax
2 Recorder
3 E-Wind
Species how the sound responds to the force of your breath.
L2, L1
M
H1, H2
Adjusts the depth of reverb (the reverberation that is characteristic of a performance in a concert hall).
Higher values produce deeper reverberation; lower values produce shallower reverberation.
Switches the ngering setting.
&
For details on ngering, refer to “Fingering Chart” at the end of this manual.
Sax Sax ngering
Recorder
E-Wind
We recommend these settings if you’re a beginning wind
instrument player, or if you’re not condent of your lung
capacity. Fortissimo () can be produced even by blowing
relatively softly.
This setting is the closest to the response of an actual wind
instrument.
We recommend these settings for sax players. Fortissimo ()
is produced only when you blow quite strongly.
Recorder ngering
This uses standard recorder ngering, with the pitch range expanded by the table key.
With this ngering, the side keys are disabled so that the note does not change even if
you inadvertently press the left or right side key.
Electronic wind instrument ngering
The same “C D E F G A B C” ngering as a standard sax or recorder, with key combinations
that raise/lower the pitch by a semitone.
1, 2, 3, 4, 5, 6, C The same “C D E F G A B C” ngering as a standard sax or recorder
Tc, G#, C# Raise by a semitone
Ta, Tf, Eb, B Lower by a semitone
Bb Lower by a whole tone
Volume
L2
L1
M
H1
H2
Breath force
&
Refer to “Pressing the Performance Keys” (p. 6).
MEMO
You can use the dedicated app to edit the settings of the Aerophone GO from your smartphone or tablet.
&
Refer to “Using the Aerophone GO with the Smartphone” (p. 8).
2. While holding down both of the octave keys “UP”
Returning to the Factory Settings (Factory Reset)
Here’s how to return the Aerophone GO to its factory-set state.
* Be aware that when you execute a factory reset, all previously
stored settings are lost.
1. With the [
[TONE] knob to the “SETTING” position.
L
] switch in the “OFF” position, turn the
and “DOWN,” turn the [L] switch “ON.”
A series of short “beeps” is heard, asking you to conrm the
operation.
3. Press the thumb button.
A long “beep” is heard, and the settings return to the factory-set
state.
4. Turn the power o, and then on again.
This completes the factory reset.
7
Page 8

Using the Aerophone GO with the Smartphone
6. Tap “AE-05 Audio” that is shown in the Bluetooth
Here’s What You Can Do
You can use the Aerophone GO along with a mobile device
such as a smartphone or tablet (subsequently referred to as a
“smartphone”).
7
Perform on the Aerophone GO along with music
played from a smartphone (Bluetooth audio
function)
7
Use the dedicated app to make Aerophone GO
settings or play the app’s sound engine
* The dedicated app supports iOS and Android products.
You can customize the Aerophone GO in various ways, for
example by adjusting its master tuning or specifying the basic
state for reed bite strength.
device screen of your smartphone.
Aerophone GO is paired with the smartphone. When the screen of
the smartphone shows as follows, pairing is complete.
iOS device
“MY DEVICES“ 0 “AE-05 Audio Connected“
Android device
“Paired devices“ 0 “AE-05 Audio“
* To disconnect, either set the Aerophone GO’s [L] switch
to other than the “
Bluetooth function o.
“ position or turn the smartphone’s
7. On your smartphone, use a music app to play back
a song.
The sound is heard from the speaker of the Aerophone GO.
* The playback volume cannot be adjusted from the Aerophone
GO itself. Use your smartphone to adjust the volume.
Pairing
To connect wirelessly via Bluetooth, you
must rst perform “ pairing” so that the Aerophone GO
is connected to your smartphone in a
one-to-one relationship.
“Pairing” is the procedure of registering
(mutually authenticating) your
smartphone with Aerophone GO.
Paring
Making Settings
Performing on the Aerophone GO Along with Music Played from a Smartphone
1. Place the smartphone near the Aerophone GO.
2. Set the Aerophone GO’s [
position.
The Bluetooth LED blinks.
4. Set the [TONE] knob to the “SETTING” position, and
long-press “C1“ key.
The Aerophone GO is now ready to begin pairing.
When pairing starts, you’ll hear a “beep” twice.
5. In your smartphone’s settings, turn Bluetooth on.
Example screen on an iOS device
L
] switch to the “ “
C1
Using a Smartphone to Edit Aerophone GO Settings or Play the App’s Sound Engine
1. Install the dedicated app on your smartphone.
Download the app from the App Store if you have an iOS device,
or from Google Play if you have an Android device.
2. Place the smartphone on which the app is installed
near the Aerophone GO.
3. Set the Aerophone GO’s [
position.
The Bluetooth LED blinks.
4. In your smartphone’s settings, turn Bluetooth on.
Example screen on an iOS device
NOTE
Even if the model name “AE-05“ is shown in the
“DEVICES” list (iOS) or “Available devices” list (Android),
don’t tap it.
5. Start the dedicated app, and perform pairing as
directed by the screen.
When the Bluetooth LED changes to steadily lit, connection is
complete.
* If you’re using the dedicated app, you can’t use Bluetooth
audio functionality. The connection of the dedicated app takes
priority. Audio connection is not possible while the dedicated
app is connected. If you connect the dedicated app while the
audio connection is in use, the audio connection is cancelled
and the dedicated app is connected.
6. Following the directions in the dedicated app’s
screen, make settings for the Aerophone GO or play
the app’s sound engine.
* If you want to play the dedicated app’s sound engine, set the
Aerophone GO’s [VOLUME] knob to the MIN position. If the
[VOLUME] knob is raised, you’ll hear the app’s sound engine
simultaneously with the sound of the Aerophone GO.
L
] switch to the “ “
8
Page 9

Appendix
If You Can’t Connect via Bluetooth
Items to check / Problem Action
Is the [L] switch set to the “
” position?
In the settings of your
smartphone, is the
Bluetooth functionality
turned “on”?
Editing the Aerophone GO from your smartphone
In step 4 of the procedure,
could you have tapped a
model name “AE-05“ shown
on the smartphone?
Android users
When you play the sounds of the Aerophone GO through your
smartphone, the sound might be delayed in some cases. If so,
connect the Aerophone GO with your smartphone using the
included USB cable (micro B or type C).
& Refer to “Connect the Included USB Cable” (p. 3).
Set the [L] switch to the “ ”
position.
In your smartphone’s settings, turn
Bluetooth on.
If it is “on” but you still can’t connect,
try turning it “o ” and then “on” again;
this might allow connection to occur.
In step 4 of the connection
procedure, do not tap “AE-05” even
if it is shown on your smartphone.
If you tapped it, temporarily cancel
pairing on your smartphone, turn
the Bluetooth functionality “o,” and
then “on” again. Try the connection
procedure again from step 1.
Maintaining the Mouthpiece
The maintenance needed for a
conventional saxophone is not necessary.
If the mouthpiece becomes soiled from
playing, remove the mouthpiece, wash it
with water, and use a soft cloth to dry o
any water droplets.
As shown in the illustration, insert the
mouthpiece all the way until the concave
and convex portions align.
NOTE
5 If the mouthpiece is not inserted all the way, you won’t be
able to control the tone by the strength with which you bite
the reed.
5 When removing or attaching the
mouthpiece, take care not to bend
the bite bar.
5 Take care not to hurt your hand
on the screw that’s inside the
mouthpiece.
5 When attaching the mouthpiece,
take care not to pinch your nger
between the movable part and the
body of the instrument. Applying
commercially available recorder
cream makes attachment and removal easier.
Bite bar
USB cable (Micro B or Type C)
1. Set the Aerophone GO’s [
L
] switch to the “ON“
position.
2. Start the dedicated app, and operate as directed by
the screen.
If you’ve checked the points listed above but are still unable to solve
the problem, refer to the support page of the Roland website or
contact your dealer.
http://www.roland.com/support/
Main Specications
Roland Aerophone GO (AE-05): Digital Wind Instrument
Bluetooth Ver 4.2
Prole Support: A2DP (Audio), GATT (MIDI over Bluetooth
Bluetooth
Power Supply
Current Draw
Battery life for
continuous use
Dimensions
Weight
(including batteries)
Accessories
Options
(sold separately)
* In the interest of product improvement, the specications and/or
appearance of this unit are subject to change without prior notice.
Low Energy)
Codec: SBC (Support to the content protection of the
SCMS-T method)
USB AC adaptor (sold separately)
Rechargeable Ni-MH battery (AA, HR6) (sold separately) x 4
400 mA
Rechargeable nickel metal hydride batteries:
approximately 10 hours (When using batteries having a
capacity of 1,900 mAh.)
* diers depending on the conditions of use
* Carbon-zinc or alkaline batteries cannot be used
128 (W) x 78 (D) x 454 (H) mm
5-1/16 (W) x 3-1/8 (D) x 17-7/8 (H) inches
695 g, 1 lb 9 oz
Owner’s manual, Mouthpiece cap, Neck strap,
Dedicated hand carry bag, Band, USB cable (Power Type
A, Data micro B, Data Type C)
Replacement Mouthpiece
9
Page 10

USING THE UNIT SAFELY
About WARNING and CAUTION Notices
Used for instructions intended to alert the
user to the risk of death or severe injury
should the unit be used improperly.
Used for instructions intended to alert the
user to the risk of injury or material
damage should the unit be used
improperly.
* Material damage refers to damage or
other adverse effects caused with
respect to the home and all its
furnishings, as well to domestic animals
or pets.
ALWAYS OBSERVE THE FOLLOWING
WARNING
When using the strap, take care
that it does not become wound
around your neck.
Concerning the Auto O function
The power to this unit will be turned
o automatically after a predetermined
amount of time has passed since it
was last used for playing music, or
its buttons or controls were operated (Auto O
function). To prevent the power from turning o
automatically, make settings in the app to disable
the Auto O function.
Do not disassemble or modify by yourself
Do not carry out anything unless you
are instructed to do so in the owner’s
manual. Otherwise, you risk causing
malfunction.
Do not repair or replace parts by yourself
Be sure to contact your retailer, a Roland
service center, or an authorized Roland
distributor. For a list of Roland service
centers and ocial Roland dealers, refer
to the Roland website.
http://roland.cm/service
Do not use or store in the following types of
locations
• Subject to temperature extremes
(e.g., direct sunlight in an enclosed
vehicle, near a heating duct, on top of
heat-generating equipment); or are
• Damp (e.g., baths, washrooms, on
wet oors); or are
• Exposed to steam or smoke; or are
• Subject to salt exposure; or are
• Exposed to rain; or are
• Dusty or sandy; or are
• Subject to high levels of vibration and shakiness;
or are
• Placed in a poorly ventilated location.
Do not place in an unstable location
Otherwise, you risk injury as the result
of the unit toppling over or dropping
down.
Avoid extended use at high volume
Use of the unit at high volume for
extended periods of time may cause
hearing loss. If you ever experience any
hearing loss or ringing in the ears, you
should immediately stop using the unit
and consult a specialized physician.
About the Symbols
The symbol alerts the user to important instructions or
warnings.The specific meaning of the symbol is
determined by the design contained within the triangle. In
the case of the symbol at left, it is used for general
cautions, warnings, or aler ts to danger.
The symbol alerts the user to items that must never be
carried out (are forbidden). The specific thing that must
not be done is indicated by the design contained within
the circle. In the case of the symbol at left, it means that
the unit must never be disassembled.
The symbol alerts the user to things that must be
carried out. The specific thing that must be done is
indicated by the design contained within the circle. In the
case of the symbol at left, it means that the power-cord
plug must be unplugged from the outlet.
WARNING
Do not allow foreign objects or liquids to
enter unit; never place containers with liquid
on unit
Never allow foreign objects (e.g.,
ammable objects, coins, wires) or
liquids (e.g., water or juice) to enter
this product. Doing so may cause short
circuits, faulty operation, or other
malfunctions.
Turn o the unit if an abnormality or
malfunction occurs
In the following cases, immediately
turn o the power and contact your
retailer, a Roland service center, or
an authorized Roland distrybutor for
service.
• If smoke or unusual odor occurs; or
• Objects have fallen into, or liquid has been
spilled onto the unit; or
• The unit has been exposed to rain (or otherwise
has become wet); or
• The unit does not appear to operate normally or
exhibits a marked change in performance.
For a list of Roland service centers and ocial
Roland dealers, refer to the Roland website.
http://roland.cm/service
Be cautious to protect children from injury
Always make sure that an adult is
on hand to provide supervision and
guidance when using the unit in places
where children are present, or when a
child will be using the unit.
Do not drop or subject to strong impact
Otherwise, you risk causing damage or
malfunction.
Handle batteries carefully
If used improperly, you risk the
dangers of uid leakage, overheating,
combustion, explosion, etc. Carefully
observe the following:
• Do not heat, disassemble, or toss
them into a re or water.
• Do not expose them to sunlight,
ame, or any other source of extreme
heat.
• When using a rechargeable battery
and a charger, make sure to use only
the combination of rechargeable
battery and charger that has been
specied by the battery manufacturer.
Also, be sure to read all of the
precautions that were supplied with
the rechargeable battery and charger,
and abide by them when using the
battery/charger.
CAUTION
Route all power cords and cables in such a
way as to prevent them from getting
entangled
Injury could result if someone were to
trip on a cable and cause the unit to fall
or topple.
Avoid climbing on top of the unit, or placing
heavy objects on it
Otherwise, you risk injury as the result
of the unit toppling over or dropping
down.
Disconnect all cords/cables before moving
the unit
Damage or malfunction may result if
you fail to disconnect all cables before
moving the unit.
Handle batteries carefully
If used improperly, batteries may
explode or leak and cause damage
or injury. In the interest of safety,
please read and observe the following
precautions.
• Carefully follow the installation
instructions for batteries, and make
sure you observe the correct polarity.
• Avoid using new batteries together
with used ones. In addition, avoid
mixing dierent types of batteries.
• Remove the batteries whenever the
unit is to remain unused for an extended period
of time.
• Never keep batteries together with metallic
objects such as ballpoint pens, necklaces,
hairpins, etc.
• Used batteries must be disposed of in
compliance with whatever regulations for their
safe disposal that may be observed in the region
in which you live.
Take care so as not to get ngers pinched
When handling the following moving
parts, take care so as not to get ngers,
toes, etc., pinched. Whenever a child
uses the unit, an adult should be on
hand to provide supervision and guidance.
• mouthpiece (p. 9)
Handle leaking batteries carefully
• Do not touch the liquid with your
bare hands.
• If any of the leaking uid gets into
your eyes, the loss of vision may
result. Do not rub your eyes; use
clean water to ush them thoroughly.
Then, promptly see a doctor.
• Burning of the skin or dermatitis
may result if uid has gotten onto your skin or
clothing. Use clean water to ush aected areas
thoroughly; then, promptly see a doctor.
• Using a soft cloth, carefully wipe any
remaining uid from the inside of the battery
compartment. Then, install new batteries.
10
Page 11

IMPORTANT NOTES
Power Supply: Use of Batteries
• Before installing/removing batteries, make sure
to turn o the power to this unit and disconnect
all connections to other devices.
• If the batteries run extremely low, the sound may
distort, but this does not indicate a malfunction.
If this occurs, please replace the batteries / use a
USB AC adaptor.
• If operating this unit on batteries, please use
rechargeable Ni-MH batteries.
Placement
• Using the unit near power ampliers (or other
equipment containing large power transformers)
may induce hum. To alleviate the problem,
change the orientation of this unit; or move it
farther away from the source of interference.
• This unit may interfere with radio and television
reception. Do not use this unit in the vicinity of
such receivers.
• Noise may be produced if wireless
communications devices, such as cell phones,
are operated in the vicinity of this unit. Such
noise could occur when receiving or initiating a
call, or while conversing. Should you experience
such problems, you should relocate such wireless
devices so they are at a greater distance from
this unit, or switch them o.
• When moved from one location to another
where the temperature and/or humidity is very
dierent, water droplets (condensation) may
form inside the unit. Damage or malfunction
may result if you attempt to use the unit in this
condition. Therefore, before using the unit, you
must allow it to stand for several hours, until the
condensation has completely evaporated.
• Whenever any liquid has been spilled on the
surface of this unit, be sure to promptly wipe it
away using a soft, dry cloth.
Maintenance
• Never use benzine, thinners, alcohol or
solvents of any kind, to avoid the possibility of
discoloration and/or deformation.
Repairs and Data
• Before sending the unit away for repairs, be
sure to make a backup of the data stored
within it; or you may prefer to write down the
needed information. Although we will do our
utmost to preserve the data stored in your
unit when we carry out repairs, in some cases,
such as when the memory section is physically
damaged, restoration of the stored content
may be impossible. Roland assumes no liability
concerning the restoration of any stored content
that has been lost.
Additional Precautions
• Any data stored within the unit can be lost as the
result of equipment failure, incorrect operation,
etc. To protect yourself against the irretrievable
loss of data, try to make a habit of creating
regular backups of the data you’ve stored in the
unit.
• Roland assumes no liability concerning the
restoration of any stored content that has been
lost.
• Use a reasonable amount of care when using
the unit’s buttons, sliders, or other controls; and
when using its jacks and connectors. Rough
handling can lead to malfunctions.
• When disconnecting all cables, grasp the
connector itself—never pull on the cable. This
way you will avoid causing shorts, or damage to
the cable’s internal elements.
• To avoid disturbing others nearby, try to keep
the unit’s volume at reasonable levels.
Caution Regarding Radio Frequency
Emissions
• The following actions may subject you to penalty
of law.
• Disassembling or modifying this device.
• Removing the certication label axed to the
back of this device.
• Keep this product at least 22 cm away from a
location where a cardiac pacemaker is installed.
There is a risk that it could aect the operation of
a pacemaker.
Intellectual Property Right
• Roland is either registered a trademark or a
trademark of Roland Corporation in the United
States and/or other countries.
• Company names and product names appearing
in this document are registered trademarks or
trademarks of their respective owners.
• The Bluetooth® word mark and logos are
registered trademarks owned by Bluetooth
SIG, Inc. and any use of such marks by Roland is
under license.
• The copyright of content in this product
(the sound waveform data, style data,
accompaniment patterns, phrase data, audio
loops and image data) is reserved by Roland
Corporation.
• Purchasers of this product are permitted to
utilize said content (except song data such
as Demo Songs) for the creating, performing,
recording and distributing original musical
works.
• Purchasers of this product are NOT permitted to
extract said content in original or modied form,
for the purpose of distributing recorded medium
of said content or making them available on a
computer network.
11
Page 12

12
Page 13

Fingering Chart / 運指表
SAX ngering/サックス運指
A#3/B²3 C#4/D²4 D#4/E²4
F#4/G²4 G#4/A²4 A#4/B²4
B3 C4 D4 E4
G4 A4 B4
F4
C5 D5 E5
F5
C#5/D²5 D#5/E²5
F#5/G²5
Page 14

Fingering Chart / 運指表
Recorder ngering / リコーダー運指
A#3/B²3
F#4/G²4
B3
C4 D4 F4
G4
C#4/D²4 D#4/E²4
A4
E4
A#4/B²4G#4/A²4
B4 D5
C5
C#5/D²5
Page 15

Electronic wind instrument ngering / 電子吹奏楽器運指
Fingering Chart / 運指表
A3 B3 C4
A#3/B²3 C#4/D²4
F#4/G²4
G#4/A²4
D4 E4
A4F4 G4
A#4/B²4
D#4/E²4
B4
C5
C#5/D²5 D#5/E²5
E5
F#5/G²5
G5D5 F5
Page 16

“PERCUSSION” Assignment /
When the [TONE] knob is set to select “11” PERCUSSION, you can use the ngering shown in the following table to play the corresponding sounds.
[TONE]つまみで「11」PERCUSSIONを選んだときは、下表の運指で対応する音色を鳴らすことができます。
Fingering / 運指 Tone name / 音色名
C3 Kick Drum
C¾3
D3 Low Tom
E²3
E3 High Tom
F3 Open Hi-hat
F¾3
G3 Closed Hi-hat
A²3
A3 Ride Cymbal
B²3
B3 Snare Drum
C4 Timpani C
C¾4 Timpani C
D4 Timpani D
E²4 Timpani D
E4 Timpani E
F4 Timpani F
F¾4 Timpani F
G4 Timpani G
A²4 Timpani A
A4 Timpani A
B²4 Timpani B
B4 Timpani B
C5 Timpani c
C¾5 Timpani c
D5 Timpani d
E²5 Timpani e
E5 Timpani e
F5 Timpani f
F¾5
G5 High Bongo
A²5
A5 Cowbell
B²5
B5 Maracas
C6 Wood Block
– –
– –
– –
Triangle
Tambourine
Low Bongo
Castanets
Cabasa
¾
¾
¾
²
²
¾
²
キック・ドラム
ハイハット・シンバル
ハイハット・シンバル
トライアングル
ライド・シンバル
タンバリン
スネア・ドラム
ティンパニ
カスタネット
カウベル
マラカス
ウッド・ブロック
タム
タム
ボンゴ
カバサ
「PERCUSSION」アサイン
 Loading...