

Roland AC-40 Owner’s Manual
ACOUSTIC GUITAR AMPLIFIER
Owner’s Manual
Bedienungsanleitung
Mode d’emploi
Manuale dell'utente
Manual del usuario
Deutsch Français Italiano Español Português NederlandsEnglish
Manual do proprietário
Gebruikershandleiding

For the U.K.
WARNING:
IMPORTANT:
As the colours of the wires in the mains lead of this apparatus may not correspond with the coloured markings identifying
the terminals in your plug, proceed as follows:
The wire which is coloured GREEN-AND-YELLOW must be connected to the terminal in the plug which is marked by the
letter E or by the safety earth symbol or coloured GREEN or GREEN-AND-YELLOW.
The wire which is coloured BLUE must be connected to the terminal which is marked with the letter N or coloured BLACK.
The wire which is coloured BROWN must be connected to the terminal which is marked with the letter L or coloured RED.
THIS APPARATUS MUST BE EARTHED
THE WIRES IN THIS MAINS LEAD ARE COLOURED IN ACCORDANCE WITH THE FOLLOWING CODE.
GREEN-AND-YELLOW: EARTH, BLUE: NEUTRAL, BROWN: LIVE
Owner’s Manual
ACOUSTIC GUITAR AMPLIFIER
A stereo acoustic guitar amp that faithfully reproduces the rich resonances of your instrument
• High-eciency 35 W (17.5 W + 17.5 W) stereo power amp.
• Two custom 6.5 inch (16 cm) speakers deliver ideal sound for acoustic instruments.
Two-channel design lets you use a guitar simultaneously with a microphone or line source (p. 4)
• Flexibility to cover a wide range of uses, including a guitar duo or a singer/instrumentalist (p. 8).
• Chorus and reverb are provided for both the Guitar channel and the Mic/Line channel. You can adjust the eect depth individually for each
channel.
Deutsch Français Italiano Español Português NederlandsEnglish
Equipped with the input/output jacks you need for just about any situation (p. 5)
• AUX IN jack lets you connect your CD or digital audio player.
• You can connect the LINE OUT jacks to an external PA system, and use the AC-40 as a monitor during your live performance.
• The headphone jack is convenient for night-time practice or during a sound check.
• You can connect separately sold footswitches (BOSS FS-5U, FS-6) to the FOOT SW jack and use them to switch eects on/o with your foot.
Anti-feedback function (p. 7)
• Simply switch this on to automatically suppress acoustic feedback.
Before using this unit, carefully read the sections entitled “USING THE UNIT SAFELY” and “IMPORTANT NOTES” (p. 2; p. 3). These sections provide
important information concerning the proper operation of the unit. Additionally, in order to feel assured that you have gained a good grasp of
every feature of your new unit, read Owner’s manual in its entirety. This manual should be saved and kept on hand as a convenient reference.
Copyright © 2013 ROLAND CORPORATION
All rights reserved. No part of this publication may be reproduced in any form without the written permission of ROLAND CORPORATION.
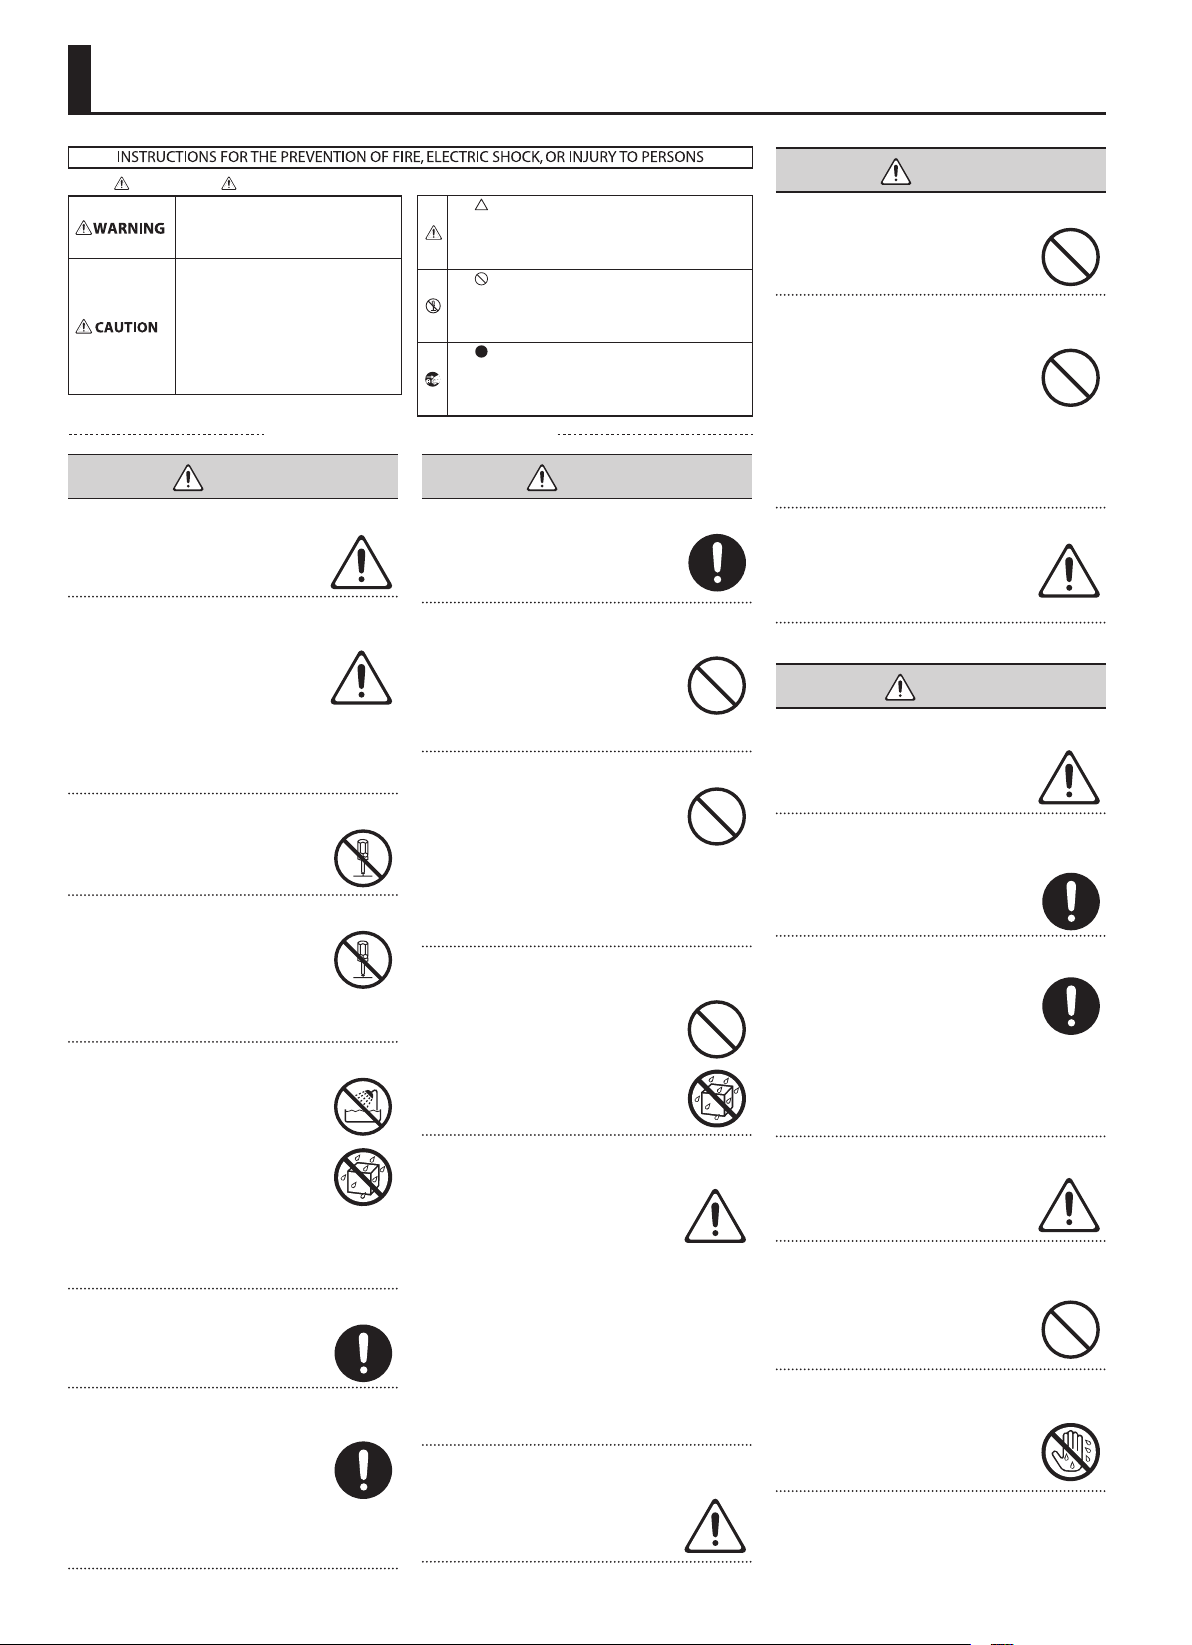
USING THE UNIT SAFELY
About WARNING and CAUTION Notices
Used for instructions intended to alert the
user to the risk of death or severe injury
should the unit be used improperly.
Used for instructions intended to alert the
user to the risk of injury or material
damage should the unit be used
improperly.
* Material damage refers to damage or
other adverse effects caused with
respect to the home and all its
furnishings, as well to domestic animals
or pets.
ALWAYS OBSERVE THE FOLLOWING
WARNING
Make sure that the power cord is grounded
Connect mains plug of this model to a
mains socket outlet with a protective
earthing connection.
To completely turn o power to the unit, pull out
the plug from the outlet
Even with the power switch turned o,
this unit is not completely separated
from its main source of power. When
the power needs to be completely
turned o, turn o the power switch
on the unit, then pull out the plug from
the outlet. For this reason, the outlet into which you
choose to connect the power cord’s plug should be
one that is within easy reach and readily accessible.
Do not disassemble or modify by yourself
Do not open (or modify in any way) the
unit or its AC adaptor.
Do not repair or replace parts by yourself
Do not attempt to repair the unit, or
replace parts within it (except when this
manual provides specic instructions
directing you to do so). Refer all servicing
to your retailer, the nearest Roland
Service Center, or an authorized Roland
distributor, as listed on the “Information” page.
Do not use or store in the following types of locations
• Subject to temperature extremes (e.g.,
direct sunlight in an enclosed vehicle,
near a heating duct, on top of heatgenerating equipment); or are
• Damp (e.g., baths, washrooms, on wet
oors); or are
• Exposed to steam or smoke; or are
• Subject to salt exposure; or are
• Humid; or are
• Exposed to rain; or are
• Dusty or sandy; or are
• Subject to high levels of vibration and shakiness.
Do not place in an unstable location
Make sure you always have the unit
placed so it is level and sure to remain
stable. Never place it on stands that
could wobble, or on inclined surfaces.
Use only the supplied AC adaptor and the correct
voltage
Be sure to use only the AC adaptor
supplied with the unit. Also, make
sure the line voltage at the installation
matches the input voltage specied
on the AC adaptor’s body. Other AC
adaptors may use a dierent polarity, or
be designed for a dierent voltage, so their use could
result in damage, malfunction, or electric shock.
About the Symbols
The symbol alerts the user to important instructions or
warnings.The specific meaning of the symbol is
determined by the design contained within the triangle. In
the case of the symbol at left, it is used for general
cautions, warnings, or aler ts to danger.
The symbol alerts the user to items that must never be
carried out (are forbidden). The specific thing that must
not be done is indicated by the design contained within
the circle. In the case of the symbol at left, it means that
the unit must never be disassembled.
The symbol alerts the user to things that must be
carried out. The specific thing that must be done is
indicated by the design contained within the circle. In the
case of the symbol at left, it means that the power-cord
plug must be unplugged from the outlet.
WARNING
Use only the supplied power cord
Use only the attached power-supply
cord. Also, the supplied power cord must
not be used with any other device.
Do not bend the power cord or place heavy objects
on it
Do not excessively twist or bend the
power cord, nor place heavy objects
on it. Doing so can damage the cord,
producing severed elements and short
circuits. Damaged cords are re and
shock hazards!
Avoid extended use at high volume
This unit, either alone or in combination
with an amplier and headphones or
speakers, may be capable of producing
sound levels that could cause permanent
hearing loss. Do not operate for a long
period of time at a high volume level,
or at a level that is uncomfortable. If you experience
any hearing loss or ringing in the ears, you should
immediately stop using the unit, and consult an
audiologist.
Don’t allow foreign objects or liquids to enter
unit; never place containers with liquid on unit
Do not place containers containing liquid
(e.g., ower vases) on this product. Never
allow foreign objects (e.g., ammable
objects, coins, wires) or liquids (e.g.,
water or juice) to enter this product.
Doing so may cause short circuits, faulty
operation, or other malfunctions.
Turn o the unit if an abnormality or malfunction
occurs
Immediately turn the unit o, remove
the AC adaptor from the outlet, and
request servicing by your retailer, the
nearest Roland Service Center, or an
authorized Roland distributor, as listed
on the “Information” page when:
• The AC adaptor, the power-supply cord, or the plug
has been damaged; or
• If smoke or unusual odor occurs; or
• Objects have fallen into, or liquid has been spilled
onto the unit; or
• The unit has been exposed to rain (or otherwise has
become wet); or
• The unit does not appear to operate normally or
exhibits a marked change in performance.
Adults must provide supervision in places where
children are present
Always make sure that an adult is
on hand to provide supervision and
guidance when using the unit in places
where children are present.
WARNING
Do not drop or subject to strong impact
Protect the unit from strong impact.
(Do not drop it!)
Do not share an outlet with an unreasonable
number of other devices
Do not force the unit’s power-supply
cord to share an outlet with an
unreasonable number of other devices.
Be especially careful when using
extension cords—the total power used
by all devices you have connected to
the extension cord’s outlet must never exceed the
power rating (watts/amperes) for the extension cord.
Excessive loads can cause the insulation on the cord
to heat up and eventually melt through.
Do not use overseas
Before using the unit in overseas,
consult with your retailer, the nearest
Roland Service Center, or an authorized
Roland distributor, as listed on the
“Information” page.
CAUTION
Place in a well ventilated location
The unit and the AC adaptor should
be located so their location or position
does not interfere with their proper
ventilation.
When disconnecting an AC adaptor, grasp it by the
plug
To prevent conductor damage, always
grasp the AC adaptor by its plug when
disconnecting it from this unit or from a
power outlet.
Periodically clean the AC adaptor’s plug
At regular intervals, you should unplug
the AC adaptor and clean it by using
a dry cloth to wipe all dust and other
accumulations away from its prongs.
Also, disconnect the power plug from
the power outlet whenever the unit is to
remain unused for an extended period of time. Any
accumulation of dust between the power plug and
the power outlet can result in poor insulation and
lead to re.
Manage cables for safety
Try to prevent cords and cables from
becoming entangled. Also, all cords and
cables should be placed so they are out
of the reach of children.
Avoid climbing on top of the unit, or placing heavy
objects on it
Never climb on top of, nor place heavy
objects on the unit.
Do not connect or disconnect the AC adaptor with
wet hands
Never handle the AC adaptor or its plugs
with wet hands when plugging into, or
unplugging from, an outlet or this unit.
2
IMPORTANT NOTES
CAUTION
Disconnect everything before moving the unit
Before moving the unit, disconnect the
AC adaptor and all cords coming from
external devices.
Unplug the AC adaptor from the outlet before
cleaning
Before cleaning the unit, turn it o and
unplug the AC adaptor from the outlet
(p. 5).
IMPORTANT NOTES
Power Supply
• Do not connect this unit to same electrical outlet
that is being used by an electrical appliance that
is controlled by an inverter or a motor (such as a
refrigerator, washing machine, microwave oven, or
air conditioner). Depending on the way in which
the electrical appliance is used, power supply noise
may cause this unit to malfunction or may produce
audible noise. If it is not practical to use a separate
electrical outlet, connect a power supply noise lter
between this unit and the electrical outlet.
• The AC adaptor will begin to generate heat after long
hours of consecutive use. This is normal, and is not a
cause for concern.
• To prevent malfunction and equipment failure,
always make sure to turn o the power on all your
equipment before you make any connections.
Placement
• Using the unit near power ampliers (or other
equipment containing large power transformers)
may induce hum. To alleviate the problem, change
the orientation of this unit; or move it farther away
from the source of interference.
• This device may interfere with radio and television
reception. Do not use this device in the vicinity of
such receivers.
• Noise may be produced if wireless communications
devices, such as cell phones, are operated in the
vicinity of this unit. Such noise could occur when
receiving or initiating a call, or while conversing.
Should you experience such problems, you should
relocate such wireless devices so they are at a greater
distance from this unit, or switch them o.
• Do not expose the unit to direct sunlight, place
it near devices that radiate heat, leave it inside
an enclosed vehicle, or otherwise subject it to
temperature extremes. Also, do not allow lighting
devices that normally are used while their light
source is very close to the unit (such as a piano light),
or powerful spotlights to shine upon the same area
of the unit for extended periods of time. Excessive
heat can deform or discolor the unit.
• When moved from one location to another where
the temperature and/or humidity is very dierent,
water droplets (condensation) may form inside
the unit. Damage or malfunction may result if you
attempt to use the unit in this condition. Therefore,
before using the unit, you must allow it to stand for
several hours, until the condensation has completely
evaporated.
CAUTION
If there is a possibility of lightning strike,
disconnect the AC adaptor from the outlet
Whenever you suspect the possibility of
lightning in your area, disconnect the AC
adaptor from the outlet.
• Do not allow rubber, vinyl, or similar materials to
remain on this unit for long periods of time. Such
objects can discolor or otherwise harmfully aect
the nish.
• Do not paste stickers, decals, or the like to this
instrument. Peeling such matter o the instrument
may damage the exterior nish.
• Depending on the material and temperature of the
surface on which you place the unit, its rubber feet
may discolor or mar the surface.
You can place a piece of felt or cloth under the
rubber feet to prevent this from happening. If you
do so, please make sure that the unit will not slip or
move accidentally.
• Do not place containers or anything else containing
liquid on top of this unit. Also, whenever any liquid
has been spilled on the surface of this unit, be sure to
promptly wipe it away using a soft, dry cloth.
Maintenance
• For everyday cleaning wipe the unit with a soft,
dry cloth or one that has been slightly dampened
with water. To remove stubborn dirt, use a cloth
impregnated with a mild, non-abrasive detergent.
Afterwards, be sure to wipe the unit thoroughly with
a soft, dry cloth.
• Never use benzine, thinners, alcohol or solvents of
any kind, to avoid the possibility of discoloration
and/or deformation.
Additional Precautions
• Use a reasonable amount of care when using the
unit’s buttons, sliders, or other controls; and when
using its jacks and connectors. Rough handling can
lead to malfunctions.
• When disconnecting all cables, grasp the connector
itself—never pull on the cable. This way you will
avoid causing shorts, or damage to the cable’s
internal elements.
• To avoid disturbing others nearby, try to keep the
unit’s volume at reasonable levels.
• When you need to transport the unit, package it
in the box (including padding) that it came in, if
possible. Otherwise, you will need to use equivalent
packaging materials.
CAUTION
Take care so as not to get ngers pinched
When handling the following moving
parts, take care so as not to get ngers,
toes, etc., pinched. Whenever a child uses
the unit, an adult should be on hand to
provide supervision and guidance.
• Arm stand (p. 7)
Deutsch Français Italiano Español Português NederlandsEnglish
• Some connection cables contain resistors. Do not use
cables that incorporate resistors for connecting to
this unit. The use of such cables can cause the sound
level to be extremely low, or impossible to hear. For
information on cable specications, contact the
manufacturer of the cable.
• When deploying or retracting the arm stand, be
careful so as not to get your ngers pinched between
the movable part and the unit itself. In places where
small children are present, make sure that an adult
provides supervision and guidance.
Licence/Trademarks
• MMP (Moore Microprocessor Portfolio) refers to a
patent portfolio concerned with microprocessor
architecture, which was developed by Technology
Properties Limited (TPL). Roland has licensed this
technology from the TPL Group.
• Roland and BOSS are either registered trademarks
or trademarks of Roland Corporation in the United
States and/or other countries.
• Company names and product names appearing
in this document are registered trademarks or
trademarks of their respective owners.
3
Panel Descriptions
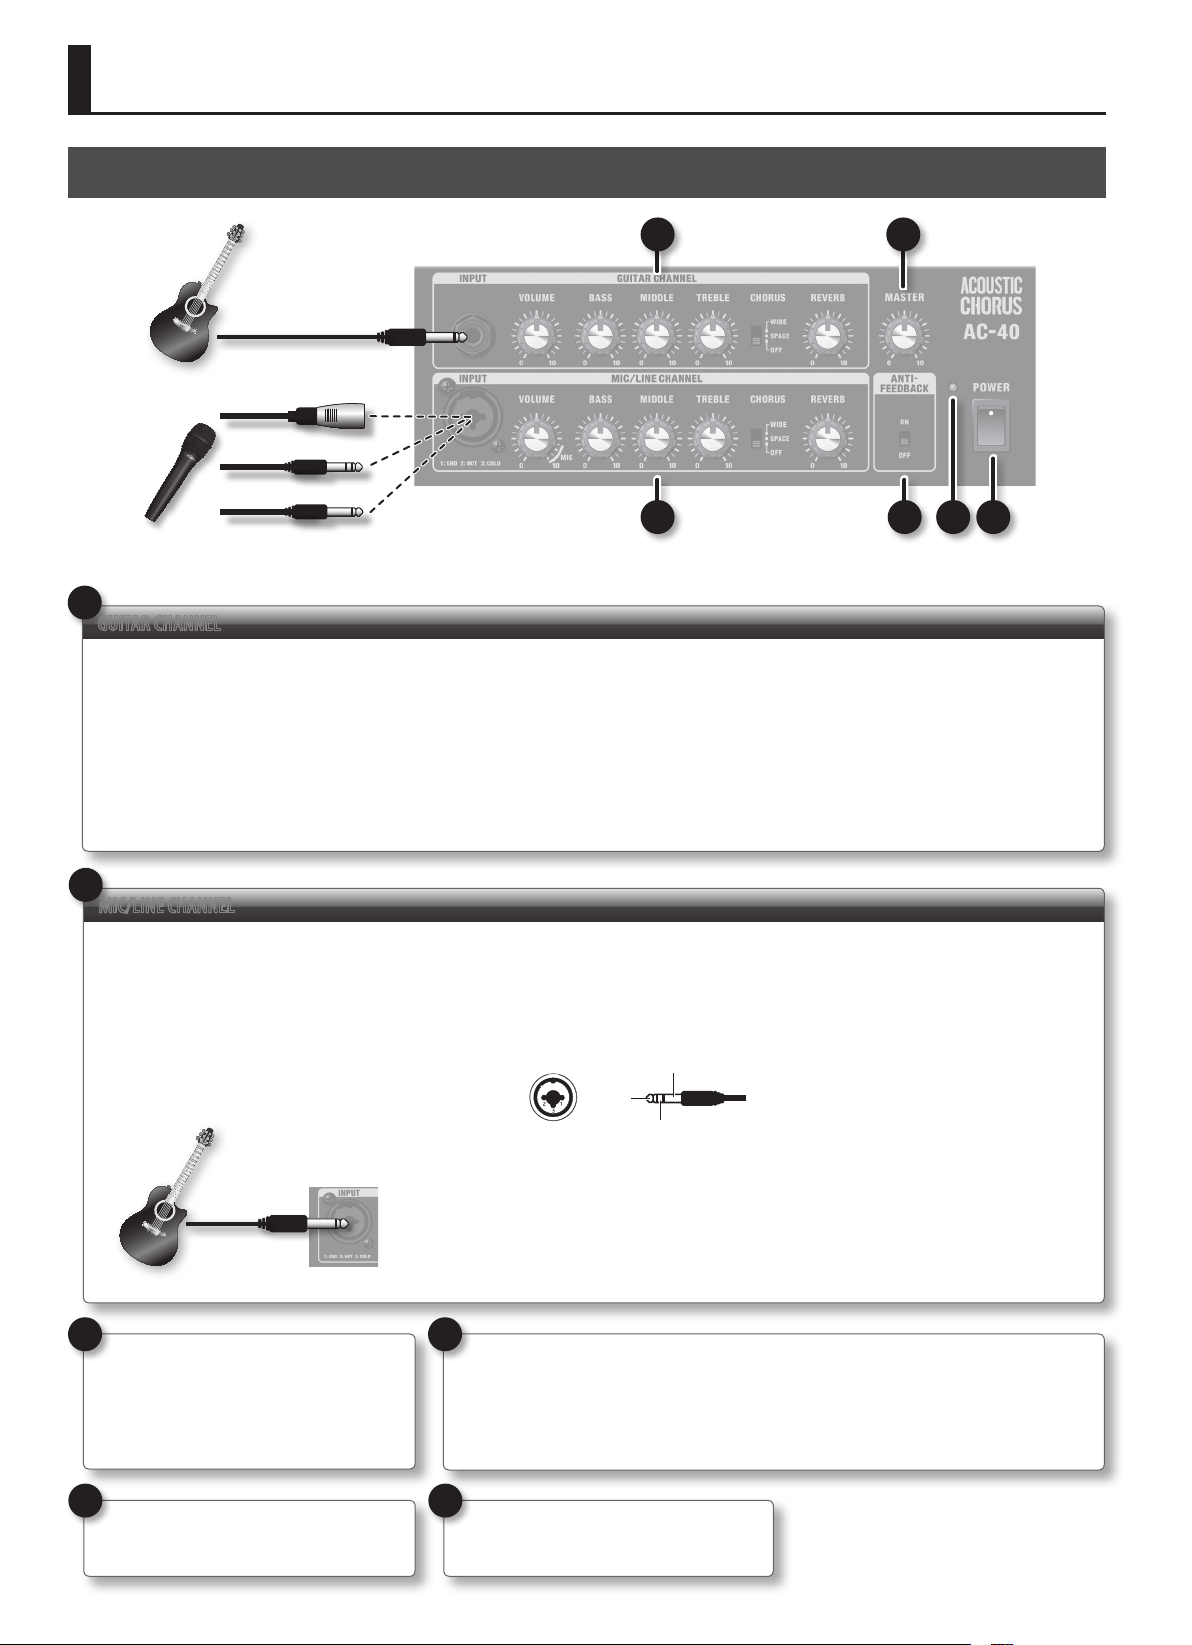
Control Panel (Connecting Your Guitar/Microphone)
1 3
XLR type
TRS type
Phone type
2 4 5 6
1
GUITAR CHANNEL
INPUT jack
Connect your guitar here.
[VOLUME] knob
This adjusts the volume of the guitar channel.
[BASS] knob
This adjusts the sound level of the lowfrequency range.
2
MIC/LINE CHANNEL
INPUT jack
Connect your microphone or line-level device
here.
You can use any one of three types of plugs
(XLR, TRS, phone).
* If your guitar has a pickup as well as a built-
in preamp, you can also connect it to the
MIC/LINE CHANNEL.
[MIDDLE] knob
This adjusts the sound level of the midfrequency range.
[TREBLE] knob
This adjusts the sound level of the highfrequency range.
* This instrument is equipped with balanced
(XLR/TRS) type jacks. Wiring diagrams
for these jacks are shown below. Make
connections after rst checking the wiring
diagrams of other equipment you intend
to connect.
1: GND
2: HOT
3: COLD
* Phantom power is not supplied.
GND (SLEEVE)
HOT
(TIP)
COLD (RING)
[VOLUME] knob
This adjusts the volume of the mic/line channel.
If you’re using a microphone, set this to the
MIC position.
[CHORUS] knob
This switches the type of chorus that is applied
(p. 6).
[REVERB] knob
This adjusts the amount of reverb (p. 6).
[BASS] knob
This adjusts the sound level of the lowfrequency range.
[MIDDLE] knob
This adjusts the sound level of the midfrequency range.
[TREBLE] knob
This adjusts the sound level of the highfrequency range.
[CHORUS] knob
This switches the type of chorus that is applied
(p. 6).
[REVERB] knob
This adjusts the amount of reverb (p. 6).
3
[MASTER] knob
This adjusts the overall volume.
* This knob does not aect LINE OUT.
5
POWER indicator
This will light if the power is on.
4
4
[ANTI-FEEDBACK] switch
You can prevent acoustic feedback by
turning this on (p. 7).
6
[POWER] switch
This turns the power on/o.
* When you turn this switch on, the feedback
point will be detected automatically.
* The next time you turn on the power, the
setting for the feedback point that was
automatically detected will be reset.

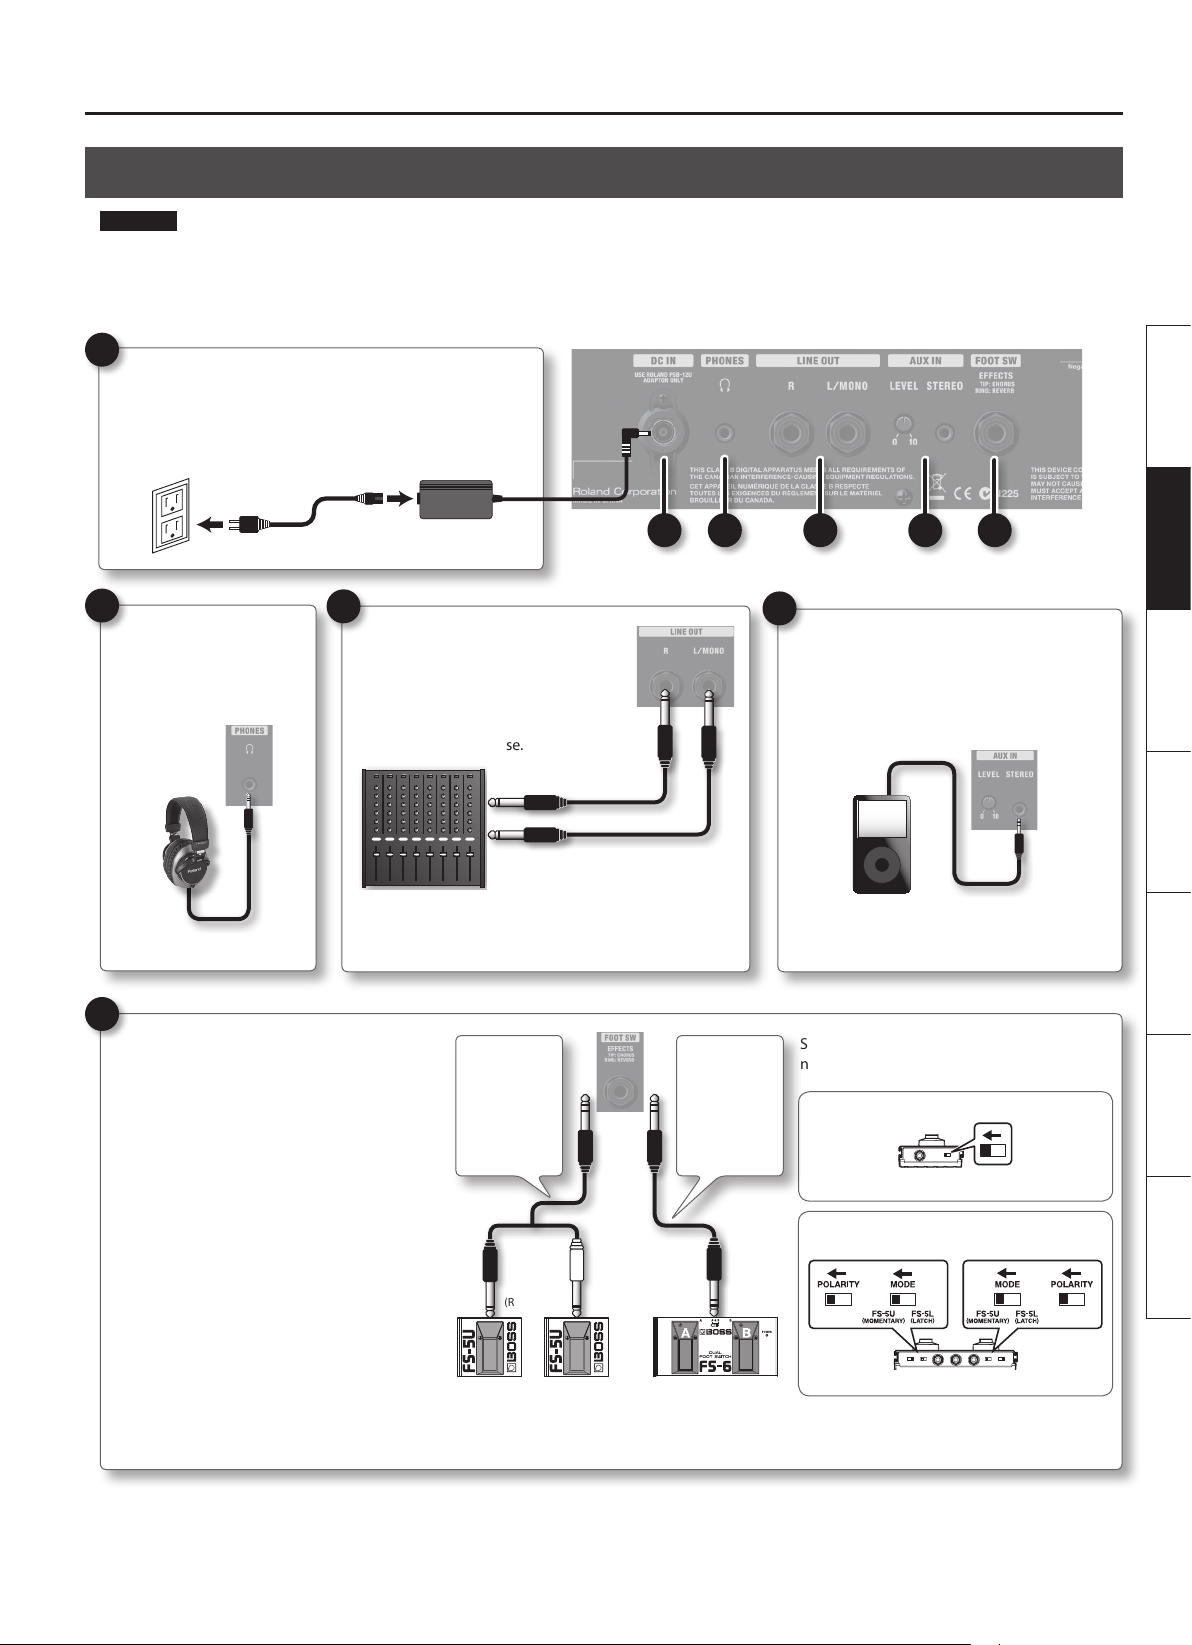
Panel Descriptions
Jack Panel (Connecting Your Equipment)
NOTE
• To prevent malfunction and equipment failure, always turn down the volume, and turn o all the units before making any connections.
• When connection cables with resistors are used, the volume level of equipment connected to the inputs (GUITAR CHANNEL, MIC/LINE CHANNEL,
AUX IN) may be low. If this happens, use connection cables that do not contain resistors.
7
DC IN jack
Connect the included AC adaptor here.
* You must use only the AC adaptor that is supplied with
the AC-40.
7 8 9 10 11
Deutsch Français Italiano Español Português NederlandsEnglish
8
9
PHONES jack
Connect headphones
equipped with a stereo
mini-plug.
11
FOOT SW jack
If footswitches are connected, you’ll be able to
control the turn eects on/o using your foot.
* You’ll need momentary-type footswitches
(BOSS FS-5U or FS-6; sold separately).
• Chorus on/o and Reverb on/o operations
apply in common to the GUITAR CHANNEL
and the MIC/LINE CHANNEL.
• If the [CHORUS] switch is “OFF” or if the
[REVERB] knob is at 0, you won’t be able to
turn chorus or reverb on/o by operating the
footswitch.
• If you use a phone plug (mono) cable to
connect only one footswitch, it will only turn
chorus on/o.
LINE OUT jacks
You can connect your mixer or
recorder here.
Connect to the L/MONO jack if you’re
outputting in mono.
* The [MASTER] knob does not aect the output from
the LINE OUT jacks.
Cable:
Stereo 1/4”
phone type
phone type
2
1/4” phone type
x 2
Red
(RING)
REVERB
on/o
BOSS FS-5U BOSS FS-6
White
(TIP)
CHORUS
on/o
or
phone type
REVERB
on/o
Cable:
Stereo 1/4”
2
Stereo 1/4”
CHORUS
on/o
10
AUX IN jack/[LEVEL] knob
Use the stereo mini-cable to connect your
CD player or digital audio player here.
Use the [LEVEL] knob to adjust the volume.
* The chorus/reverb is not applied to AUX
IN jack.
Set the polarity switch of the footswitches as
shown in the illustration.
POLARITY switch
BOSS FS-5U
MODE/POLARITY switches
B A
BOSS FS-6
5
Operation
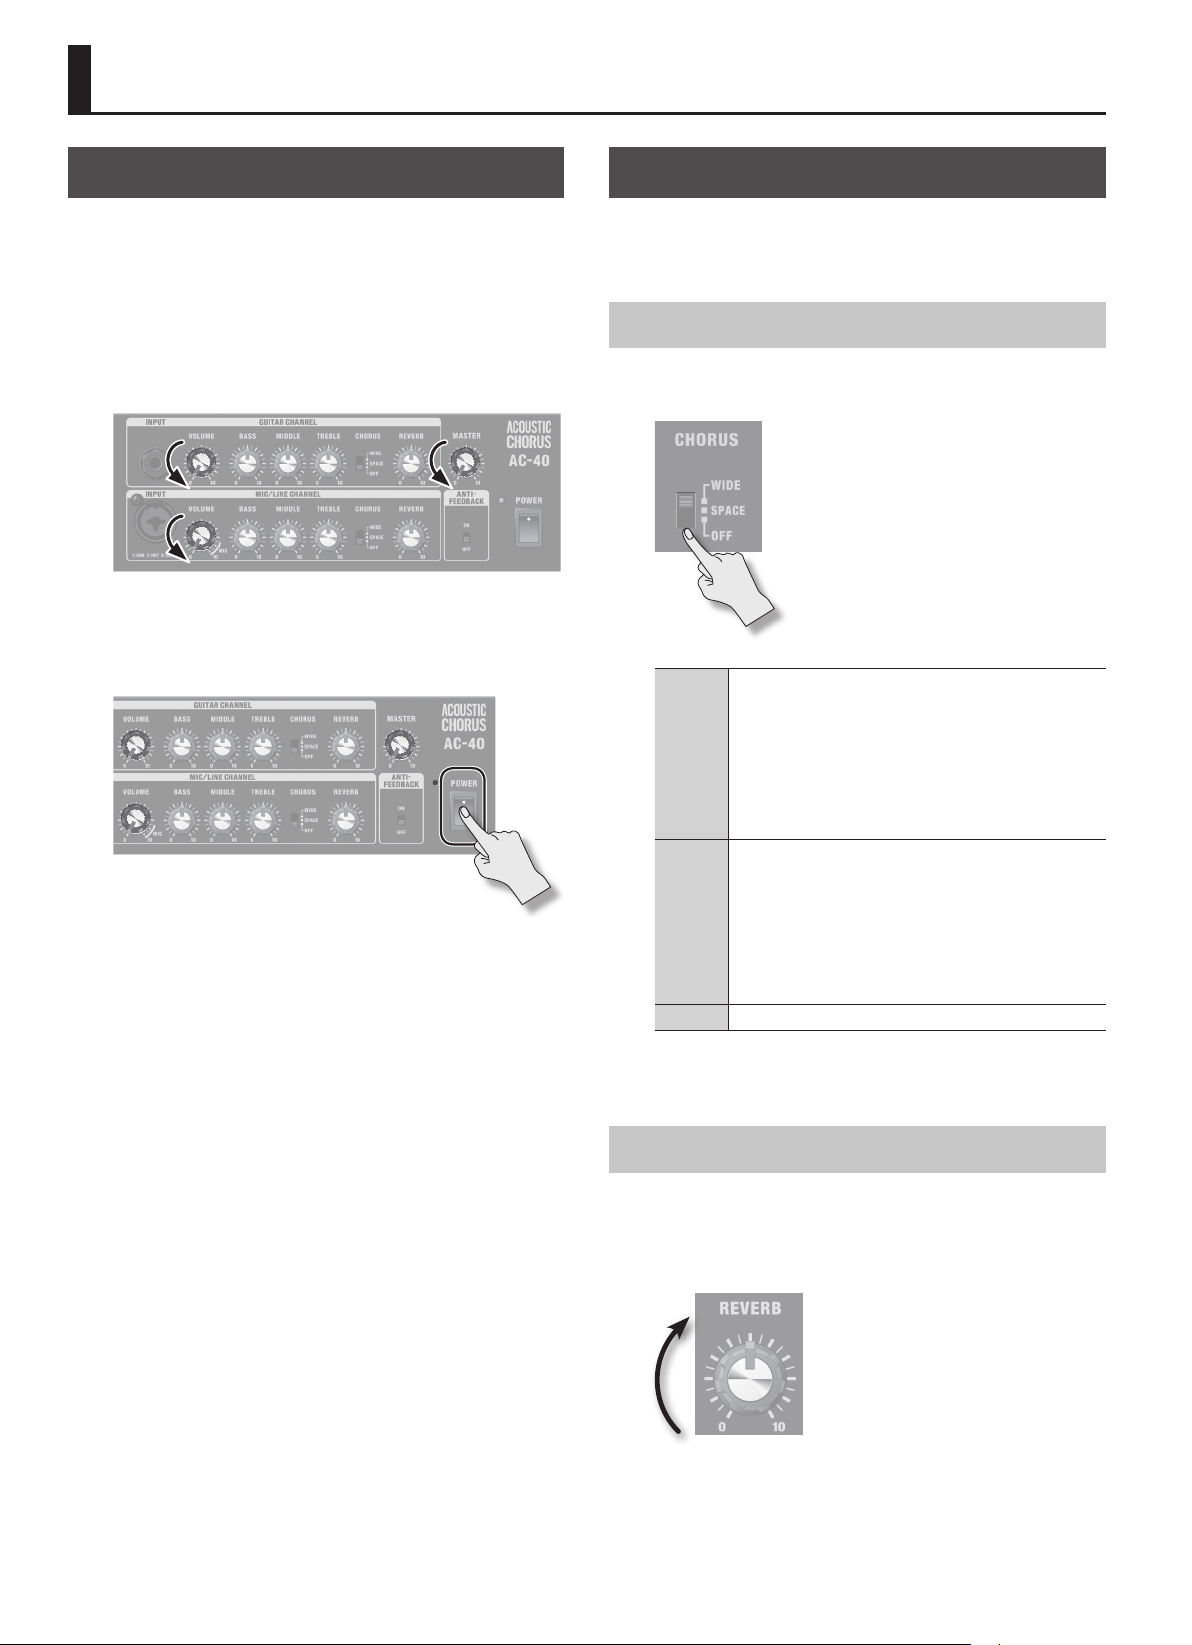
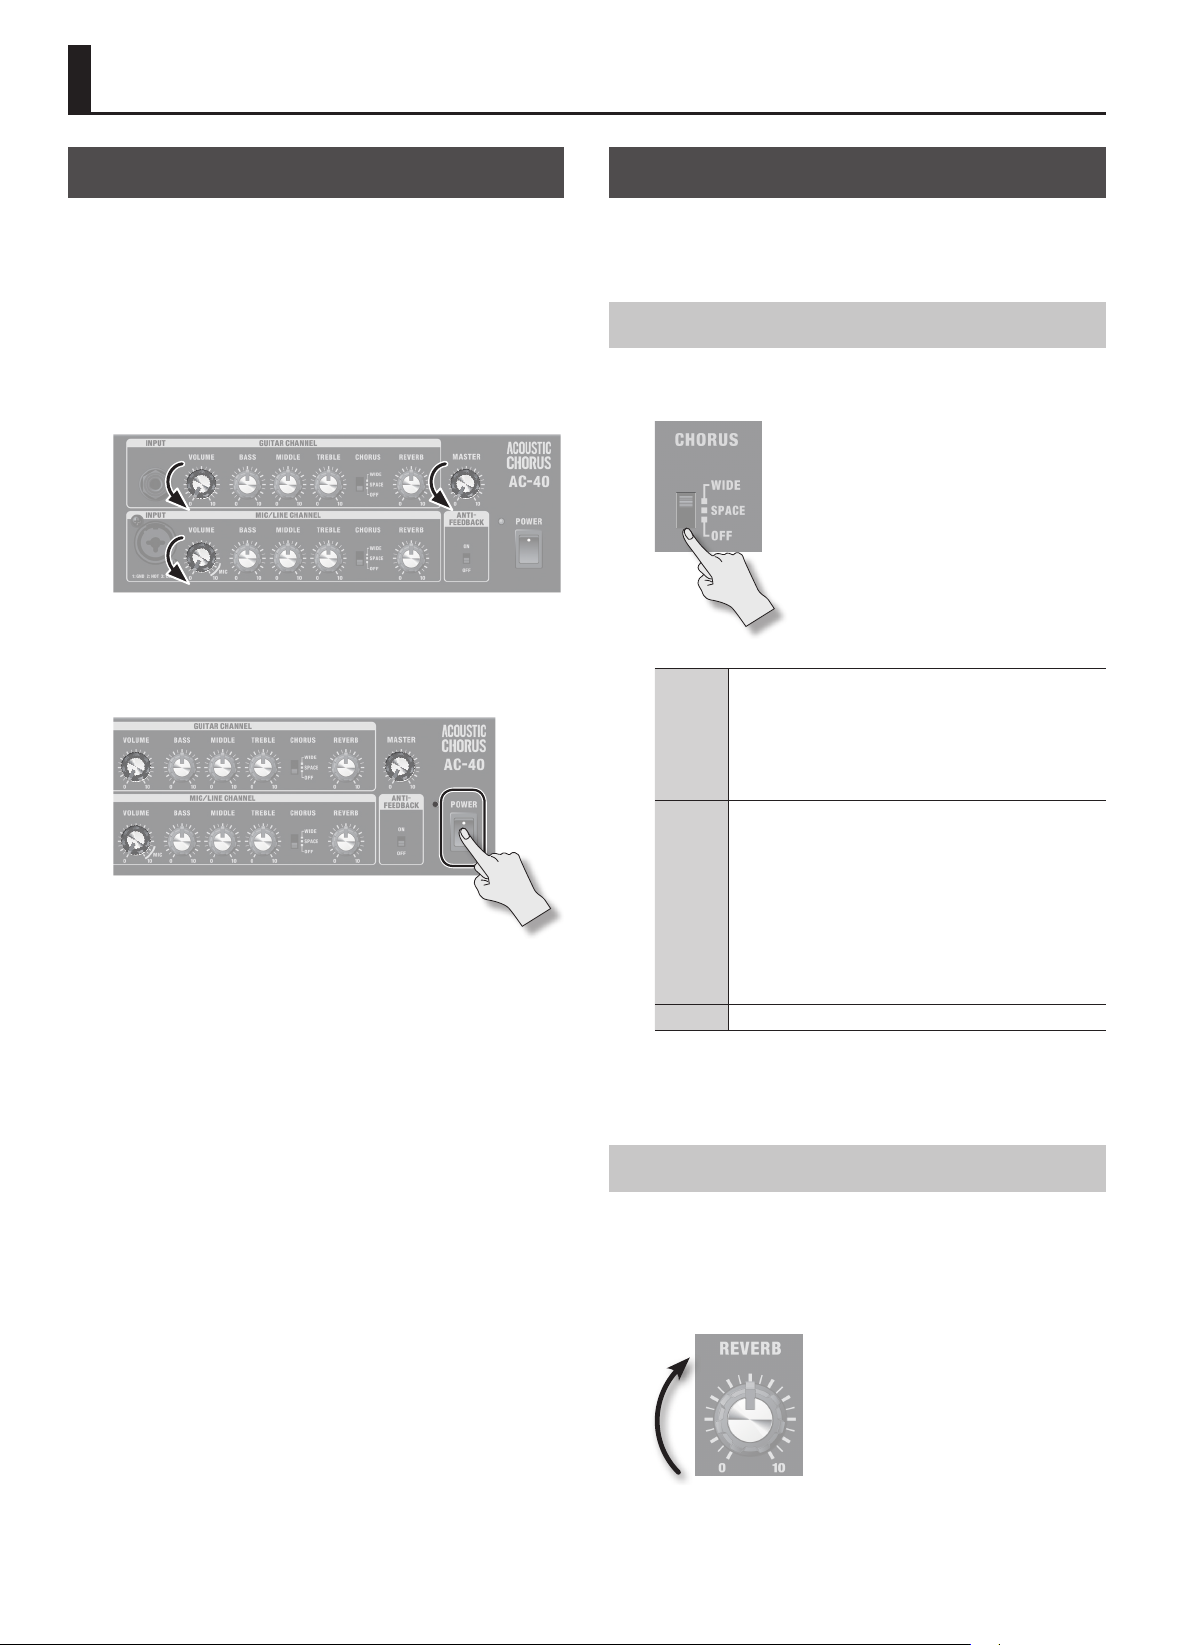
Turning the Power On/O
Once everything is properly connected (p. 4, p. 5), be sure to
follow the procedure below to turn on their power. If you turn on
equipment in the wrong order, you risk causing malfunction or
equipment failure.
1. Make sure that the power to all equipment is turned o.
2. Set each of the AC-40’s [VOLUME] knobs and the
[MASTER] knob to 0.
3. Switch on the power to any external equipment
connected to the AUX IN jack.
4. Switch on the AC-40’s power.
* This unit is equipped with a protection circuit. A brief interval (a
few seconds) after turning the unit on is required before it will
operate normally.
5. Switch on any equipment connected to the LINE OUT
jacks.
6. When you want to turn the power o, minimize the
volume on the AC-40 and all connected devices, and then
turn o their power in the opposite order of that followed
when turning them on.
* Before turning the unit on/o, always be sure to turn the volume
down. Even with the volume turned down, you might hear some
sound when switching the unit on/o. However, this is normal
and does not indicate a malfunction.
Using Eects
Chorus and reverb are provided for both the Guitar channel and the
Mic/Line channel.
You can adjust the eect depth individually for each channel.
Applying Chorus
1. Set each channel’s [CHORUS] switch to “WIDE” or “SPACE”
position.
This is a stereo chorus that processes the three bands
independently.
By applying band-appropriate chorusing to each of the low,
WIDE
SPACE
OFF No chorus eect will be applied.
* If the [CHORUS] switch is “OFF,” you won’t be able to turn chorus
Applying Reverb
This is a stereo reverb that was developed specically for acoustic
instruments and produces a spacious and natural sound.
1. Use the [REVERB] knob to adjust the depth.
mid, and high-frequency bands, this eect creates a deep and
spacious chorusing that is appropriate for the sound of an
acoustic guitar.
The low range remains rmly localized in the center, and the
sound will become more spacious as you go from the mid to
the high range.
This is a chorus that mixes the sounds in the air, a method that
is possible only with a stereo system. On the AC-40, the eect
sound is emitted by the right speaker (as you face the unit),
and the direct sound is emitted by the left speaker. The chorus
eect is produced as the sound from the left and right speakers
is mixed in the air.
Compared to an electrically mixed chorus eect, this eect
has a broader left/right spread and a more natural-sounding
spaciousness.
on/o by operating the footswitch.
* If the [REVERB] knob is at 0, you won’t be able to turn reverb on/
o by operating the footswitch.
6
6
Operation
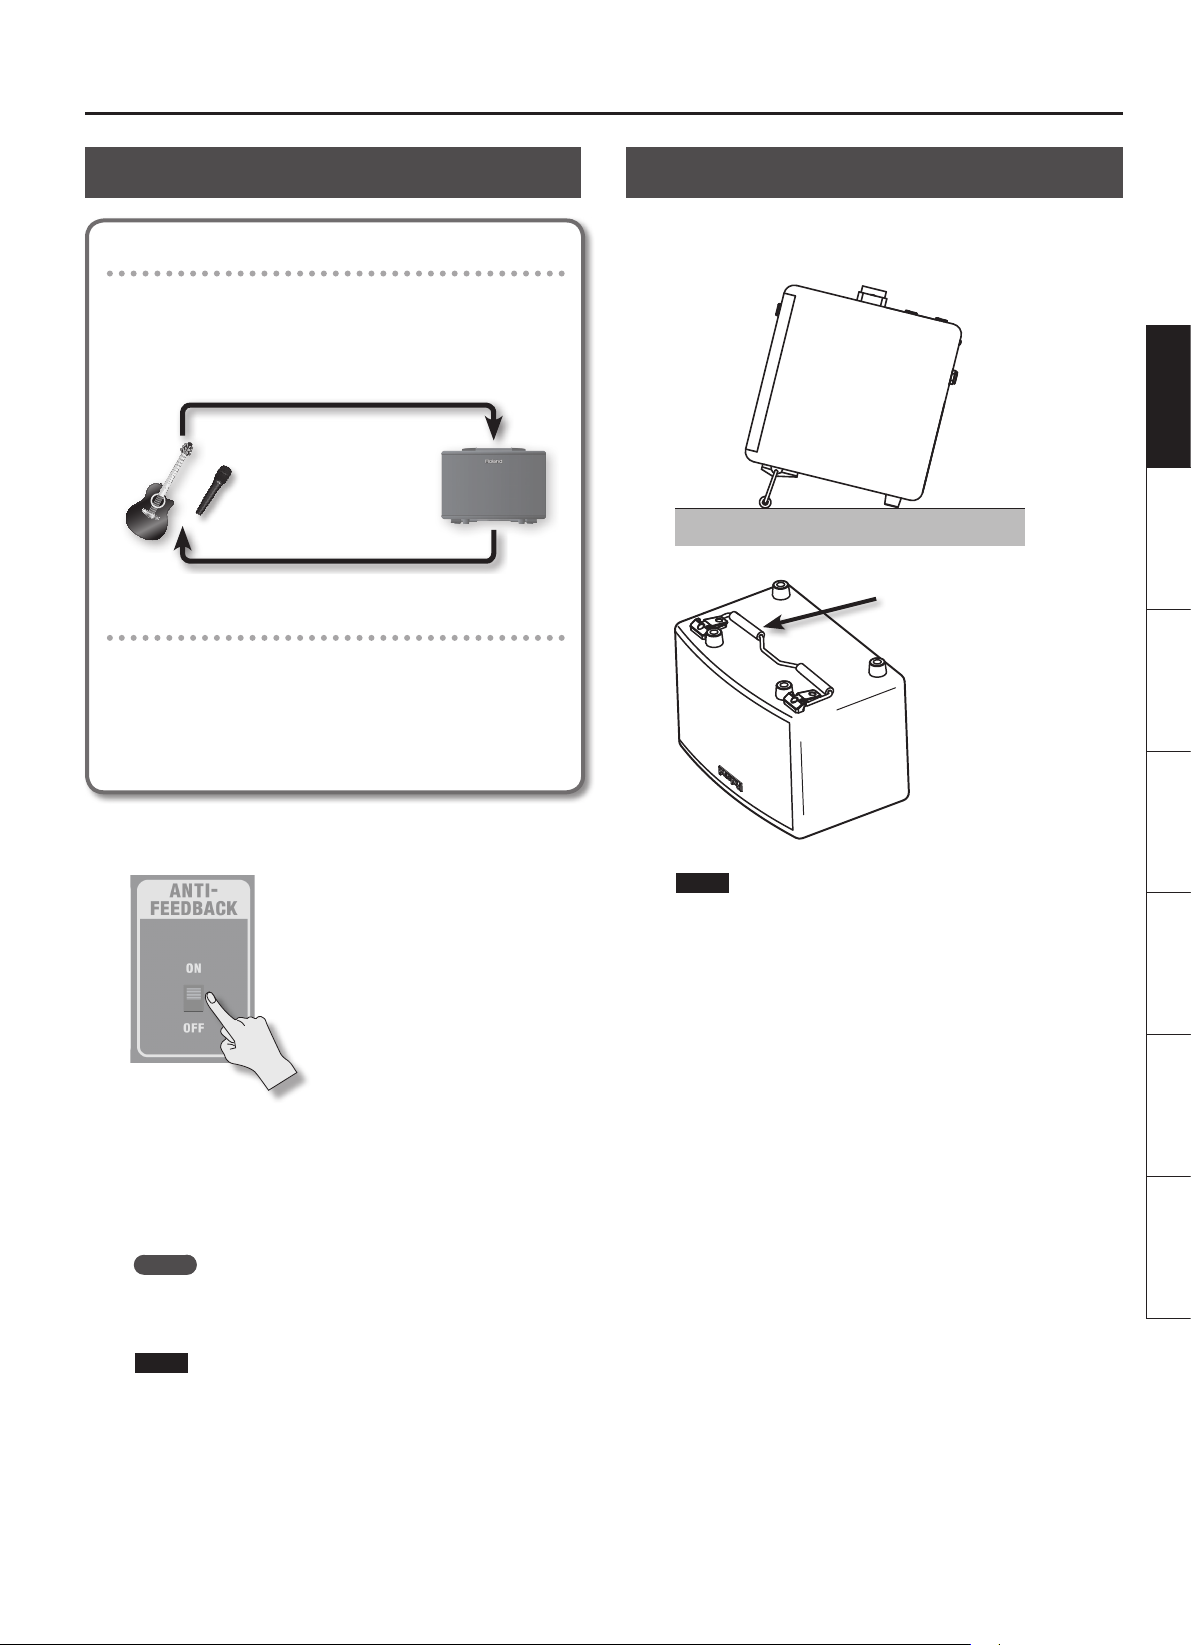
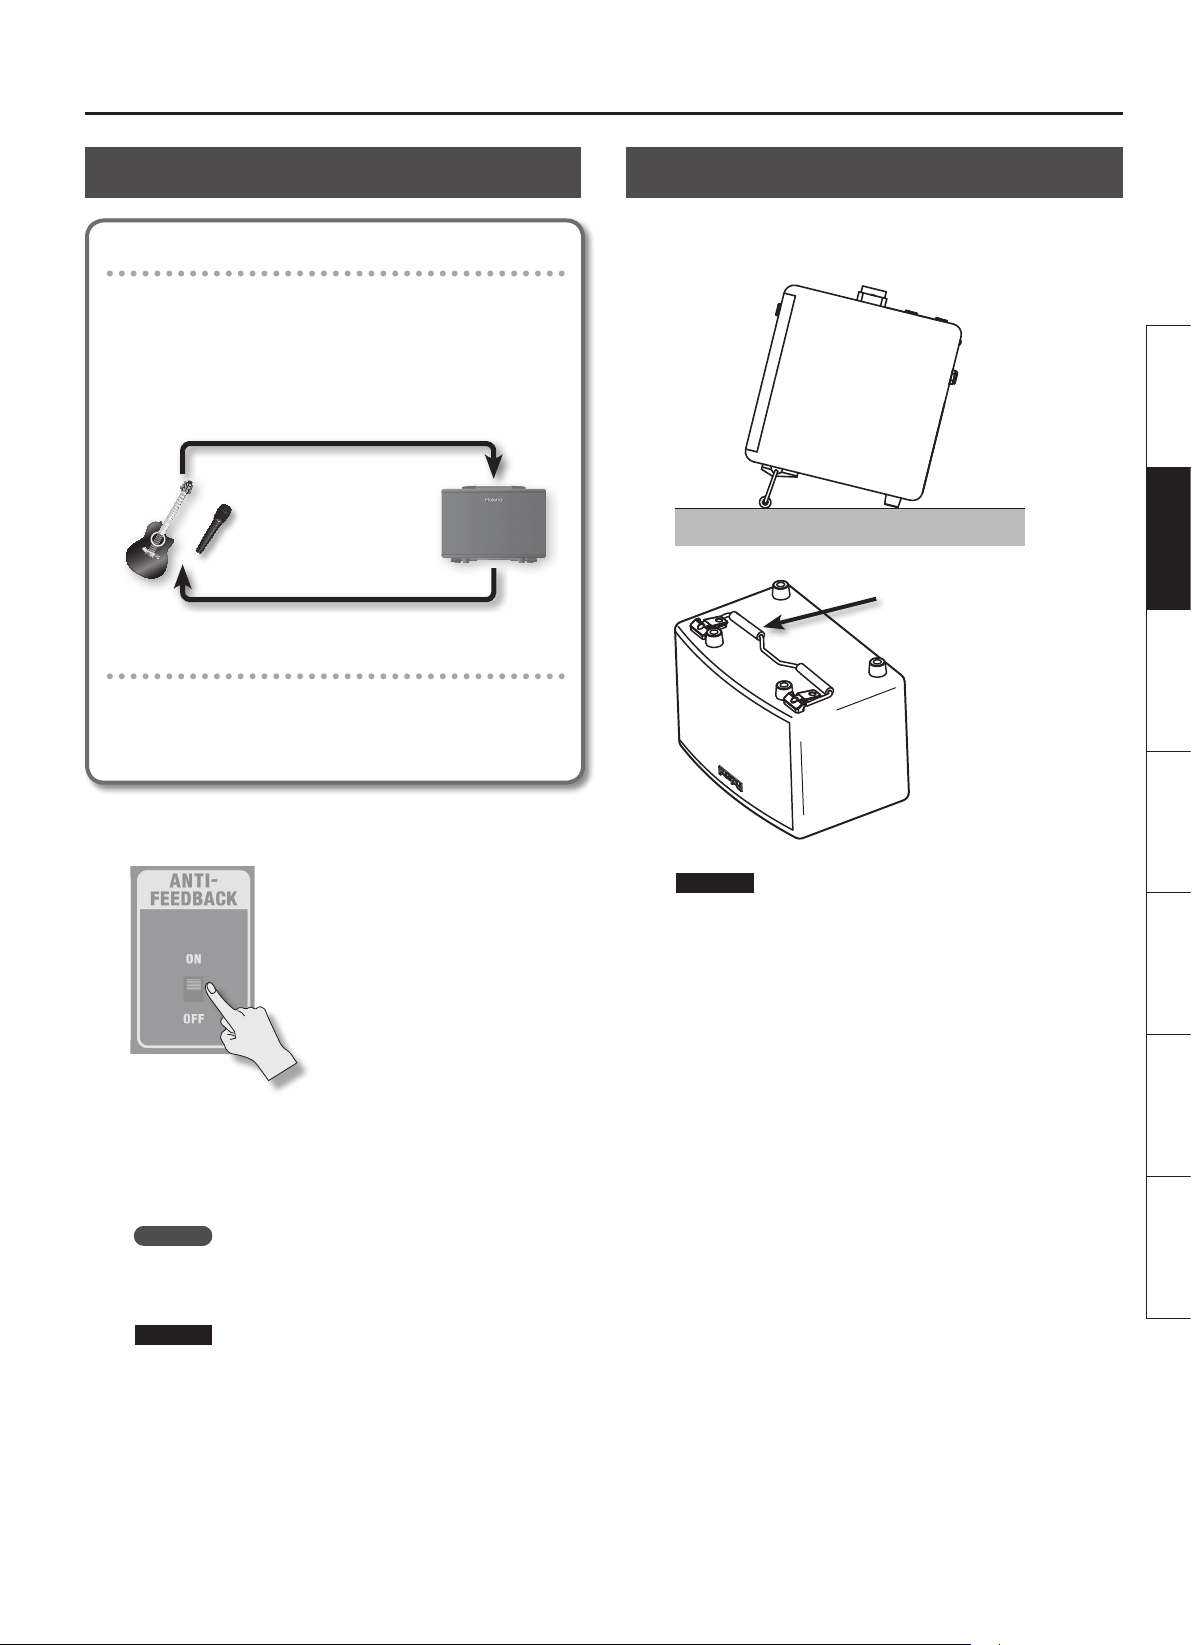
Using the Anti-Feedback Function
What is acoustic feedback?
This is an unpleasant oscillation (a whine, buzz, or howl) that occurs
when the output from a speaker is re-input to a microphone or
pickup, amplied, and output again from the speaker.
This is more likely to occur when you point the microphone at a
speaker or raise the volume to a high level.
Sound continues
cycling, causing
feedback
What is the anti-feedback function?
This function suppresses the acoustic feedback that can occur
between a guitar or microphone and the amp. It does this by
attenuating the sound in the frequency range at which feedback is
occurring.
Feedback will be suppressed automatically when you use the antifeedback function.
Using the Arm Stand
When using the AC-40 at a low position such as on the oor,
extending the arm stand will make the sound from the speakers
easier to hear.
Deutsch Français Italiano Español Português NederlandsEnglish
Arm stand
1. Turn the [ANTI-FEEDBACK] switch “ON.”
When you turn the switch “ON,” the feedback point (frequency) will
be detected automatically.
The anti-feedback function will be applied to the microphone or
guitar connected to the GUITAR CHANNEL and MIC/LINE CHANNEL
inputs.
MEMO
In order to prevent feedback from occurring during your
performance, we recommend that you turn the anti-feedback
function ON before you begin performing.
NOTE
* The next time you turn on the power, the setting for the
feedback point that was automatically detected will be reset.
* If the anti-feedback function is not enough to suppress
feedback, take the following steps.
• Change the direction of the guitar or microphone
• Move the guitar or microphone away from the speakers
• Lower the volume
NOTE
* When using the arm stand, please observe the following points.
• You must place the AC-40 on a horizontal surface.
• Do not place objects on the AC-40, or sit or stand on the
AC-40.
• Do not lift or carry the AC-40 by grasping its arm stand.
* Fold the arm stand if you’re not using it.
* When deploying or retracting the arm stand, be careful so as not
to get your ngers pinched between the movable part and the
unit itself. In places where small children are present, make sure
that an adult provides supervision and guidance.
7
7

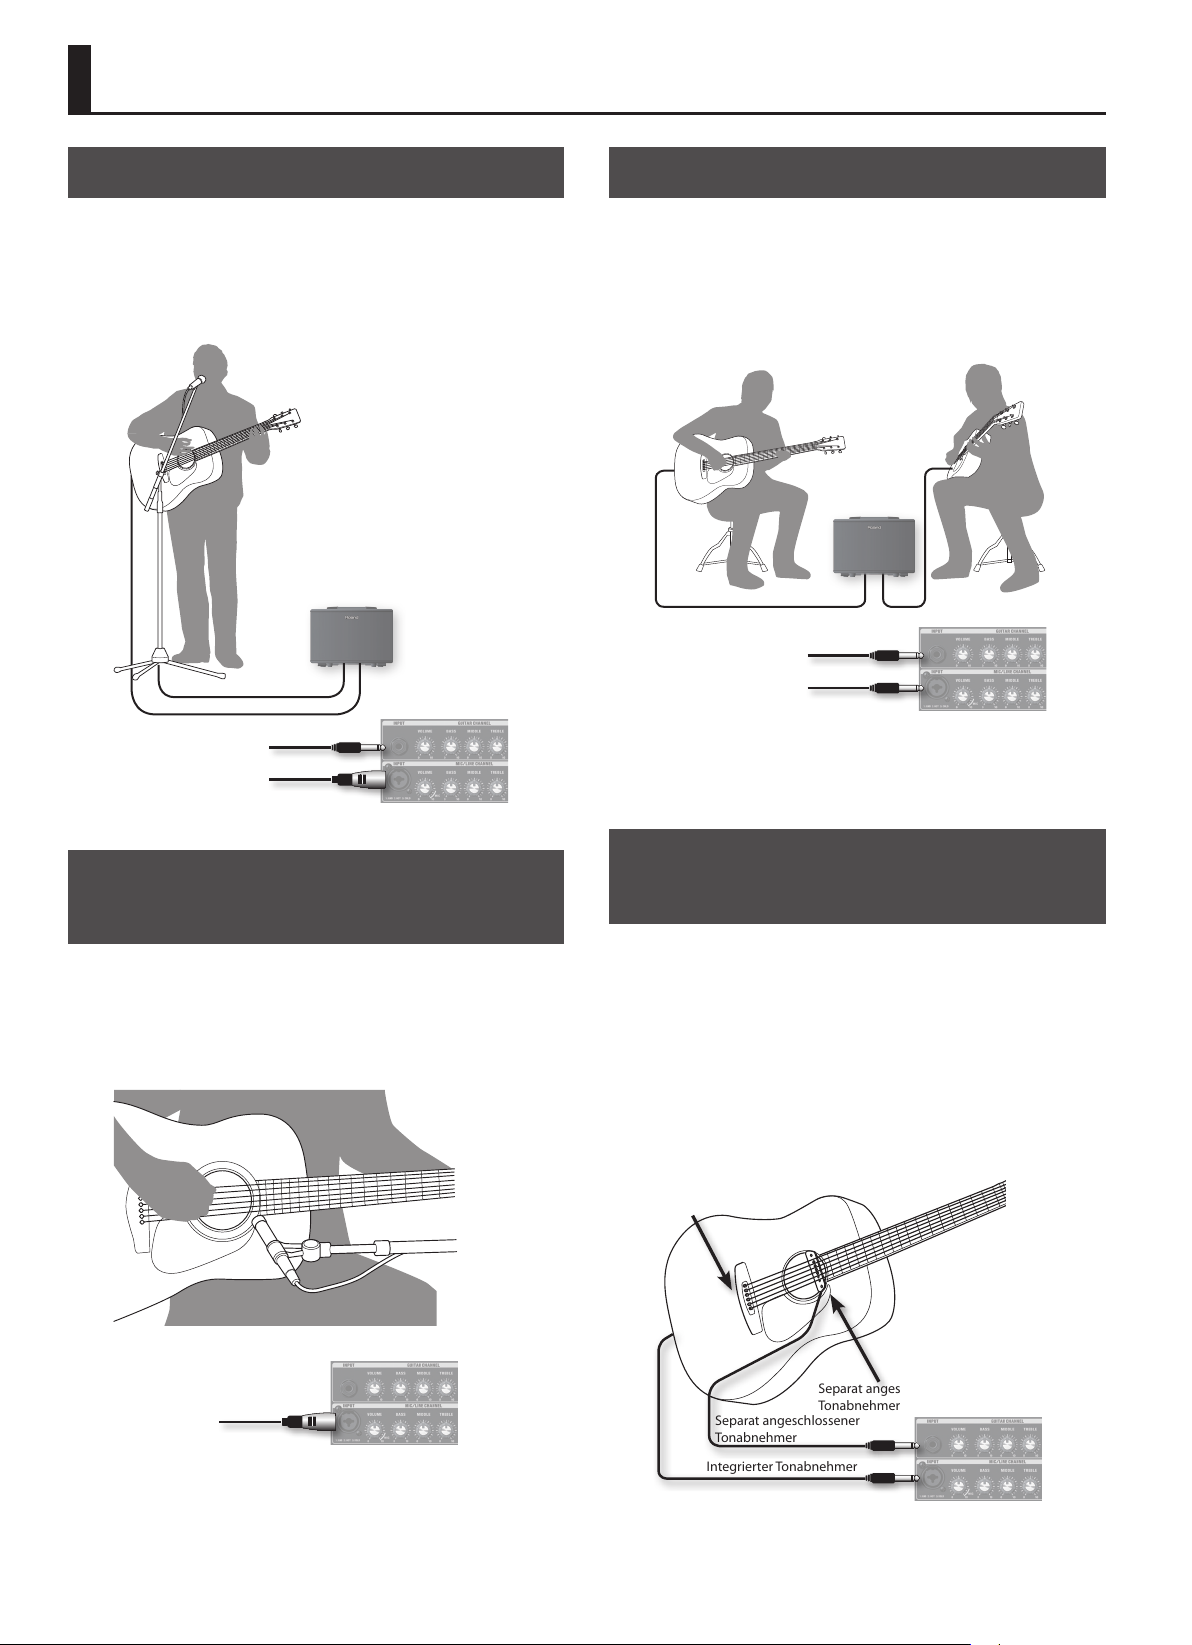
Various Ways to Use the AC-40
Singer/Performer
You can sing while playing your guitar.
• Connect your guitar to the GUITAR CHANNEL.
• Connect your microphone to the MIC/LINE CHANNEL.
Guitar
Microphone
Guitar Duo
Here’s how two guitarists can perform.
• Connect one guitar to the GUITAR CHANNEL.
• Connect the other guitar (with a built-in preamp) to the
MIC/LINE CHANNEL.
One Guitar
The Other Guitar
Miking Your Instrument
You can use a microphone to input sound from an instrument
that is not equipped with a pickup.
• Connect your microphone to the MIC/LINE CHANNEL.
• Point the microphone toward the instrument.
Microphone
* The AC-40 is not equipped to provide phantom power, so
condenser microphones that require phantom power cannot
be used.
Blending Sound from Two Types of Pickups
If your guitar has two types of pickups, you can use the AC-40
to mix their outputs.
• Connect the pickup attached to the sound hole of your guitar to
the GUITAR CHANNEL input.
• Connect the pickup (with internal preamp) built into your guitar
to the MIC/LINE CHANNEL input.
Built-in pickup
(with preamp)
Separately attached pickup
Separately attached
pickup
Built-in pickup
8
STEREO EFFECTS
Troubleshooting
If the system does not work as you expect, check the following points rst.
Problem Items to check Action Page
Power won’t turn on Is the specied AC adaptor connected correctly?
Are connections with other devices correct? Check the connections again.
Could headphones be connected?
No sound/
Insucient volume
Is the [MASTER] knob set appropriately?
Are the each channel’s [VOLUME] knob set appropriately?
Is the AUX IN [LEVEL] knob set appropriately? p. 5
Could you have connected a condenser microphone that
requires a phantom power supply?
Sound is distorted Could each channel’s [VOLUME] knob be raised excessively?
The volume level of the
device connected to INPUT
jacks or AUX IN jack is too
Could you be using a connection cable that contains a
resistor?
low
Could the [CHORUS] switch be turned o?
Chorus or Reverb not
applied
Isn’t the [REVERB] knob set to 0?
Could you have used a footswitch to turn o the chorus or
reverb?
The chorus and reverb cannot be applied to AUX IN. –
Check the connection once again. Never use any AC
adaptor other than the specied model.
If headphones are connected, no sound will be produced
from the unit’s speakers.
Adjust the volume appropriately.
The AC-40 is not equipped to provide phantom power,
so condenser microphones that require phantom power
cannot be used.
Turn each channel’s [VOLUME] knob toward the left to
adjust the volume appropriately.
Use a connection cable that does not contain a resistor. –
Set each channel’s [CHORUS] switch to “WIDE” or “SPACE”
position.
Turn each channel’s [REVERB] knob toward the right to
adjust the reverb level.
Operate the footswitch to turn chorus/reverb on. p. 5
p. 5
p. 4
–
p. 4
Deutsch Français Italiano Español Português NederlandsEnglish
p. 6
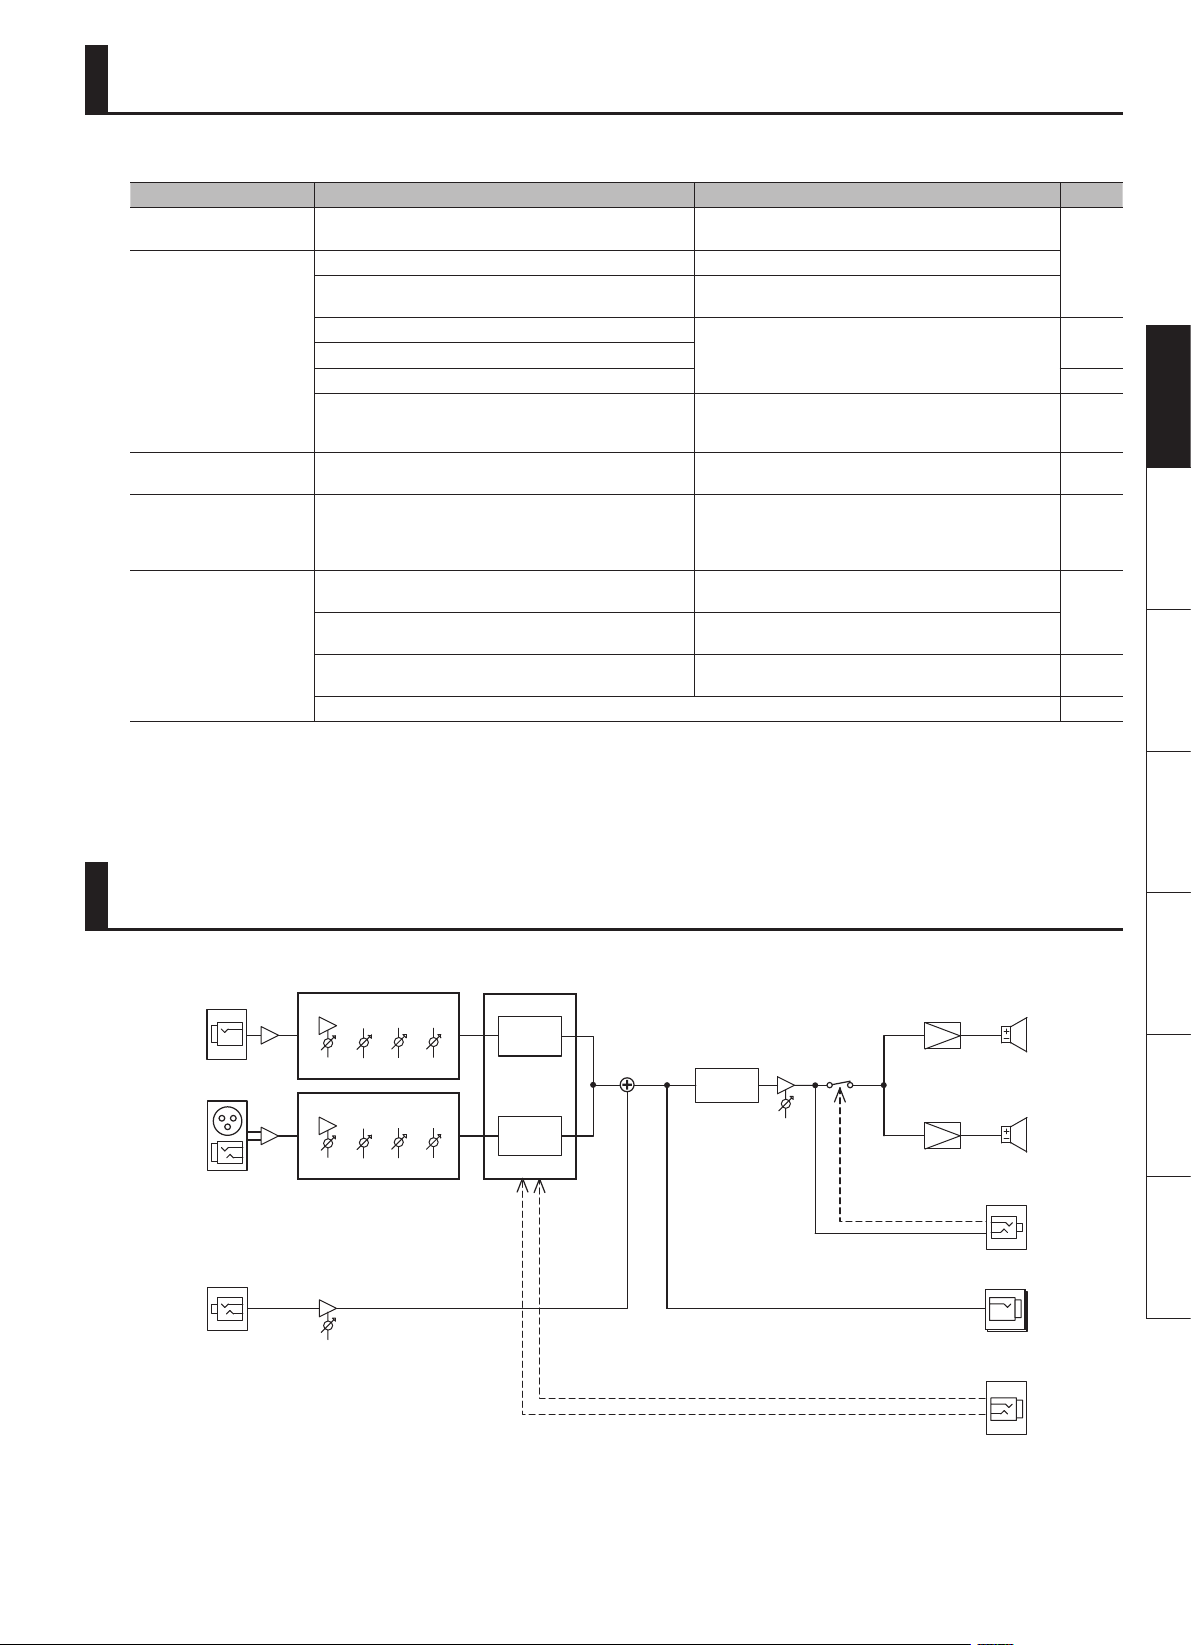
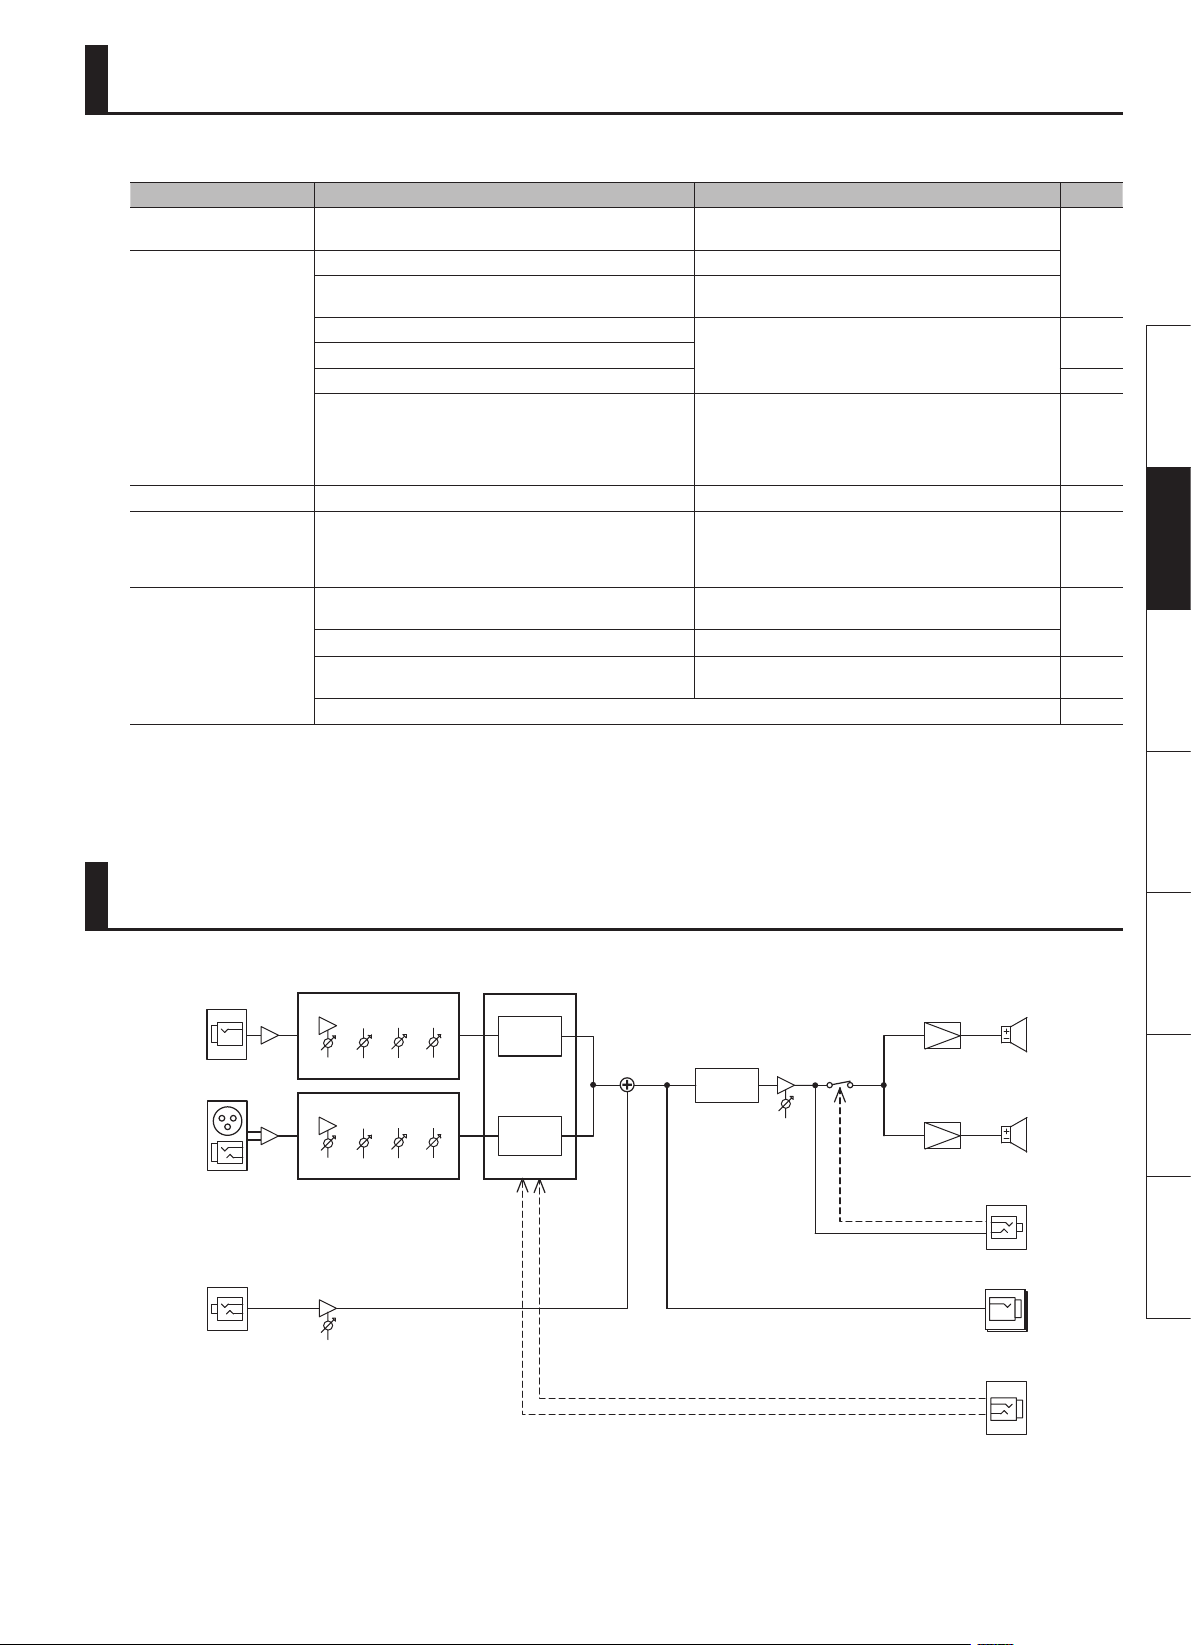
Block Diagram
GUITAR CHANNEL
GUITAR INPUT
MIC/LINE CHANNEL
MIC/LINE INPUT
AUX IN
(STEREO)
LEVEL
MUTE
L
R
POWER AMP
POWER AMP
SPEAKER L
SPEAKER R
PHONES
(STEREO)
LINE OUT
L/R
FOOT SW
EFFECTS
CHORUS
REVERB
TREBLEMIDDLEBASSVOLUME
CHORUS
REVERB
TREBLEMIDDLEBASSVOLUME
ANTI-
FEEDBACK
VOLUME
CHORUS ON/OFF
REVERB ON/OFF
9

Specications
Roland AC-40: ACOUSTIC GUITAR AMPLIFIER
Rated Power Output 35 W (17.5 W + 17.5 W)
GUITAR CHANNEL:
Nominal Input Level (1 kHz)
Nominal Output Level (1 kHz) LINE OUT: -10 dBu
Speakers 16 cm (6.5 inches) x 2
Controls
Indicator POWER
Connectors
Power Supply AC Adaptor
Current Draw 480 mA
Dimensions
Weight
Accessories Owner’s Manual, AC adaptor, Power Cord
Options (sold separately) Footswitch: BOSS FS-5U, FS-6
MIC/LINE CHANNEL:
AUX IN:
GUITAR CHANNEL:
MIC/LINE CHANNEL:
ANTI-FEEDBACK: ON/OFF switch
AUX IN: LEVEL knob
Others: MASTER knob, POWER switch
GUITAR CHANNEL INPUT jack: 1/4” phone type
MIC/LINE CHANNEL INPUT jack: XLR type, 1/4” TRS phone type
AUX IN jack: Stereo miniature phone type
LINE OUT (L/MONO, R) jacks: 1/4” phone type
PHONES jack: Stereo miniature phone type
FOOT SW jack: 1/4” TRS phone type
DC IN jack
362 (W) x 241 (D) x 265 (H) mm
14-1/4 (W) x 9-1/2 (D) x 10-7/16 (H) inches
5.3 kg
11 lbs 11 oz
-10 dBu
-50 dBu/-20 dBu
-10 dBu
VOLUME knob, BASS knob, MIDDLE knob, TREBLE knob, CHORUS switch (OFF, SPACE, WIDE),
REVERB knob
VOLUME knob, BASS knob, MIDDLE knob, TREBLE knob, CHORUS switch (OFF, SPACE, WIDE),
REVERB knob
* 0 dBu=0.775 Vrms
* In the interest of product improvement, the specications and/or appearance of this unit are subject to change without prior notice.
10
Bedienungsanleitung
AKUSTIKGITARREN-VERSTÄRKER
Akustikgitarren-Verstärker mit Stereosound in einem kompakten Gehäuse
• Hochleistungsfähiger 35 W (17.5 W + 17.5 W) Stereoverstärker.
• Zwei speziell entwickelte 6.5 inch (16 cm) Lautsprecher liefern einen idealen Sound für Akustikinstrumente.
Zwei Kanäle für die Verwendung von Gitarre zusammen mit einem Mikrofon oder einem anderen Gerät (S. 4)
• Ermöglicht eine Vielzahl von Einsatzzwecken, z. B. für ein Gitarrenduo oder einen Sänger, der sich selbst begleitet (S. 8).
• Chorus- und Reverb-Eekte sowohl für den Gitarren- als auch Mic/Line-Kanal mit einstellbarer Eektlautstärke pro Kanal.
Deutsch Français Italiano Español Português NederlandsEnglish
Anschlüsse für verschiedene Einsatzmöglichkeiten (S. 5)
• AUX IN-Buchse für den Anschluss eines Audio-Players (CD, mp3 usw.).
• LINE OUT-Buchsen für die Verbindung zu einem externem Lautsprechersystem mit dem AC-40 als eigener Audiomonitor.
• Kopfhöreranschluss für das Üben oder den Sound Check, ohne dass andere Personen mithören können.
• FOOT SW-Anschluss für einen Fußschalter (BOSS FS-5U, FS-6) zum Ein- und Ausschalten der Eekte.
Anti-Feedback-Funktion (S. 7)
• Zum schnellen Unterdrücken von Rückkopplungs-Eekten.
Lesen Sie vor der Verwendung dieses Gerätes die Abschnitte “SICHERHEITSHINWEISE” und “WICHTIGE HINWEISE” (S. 2; S. 3). Diese Abschnitte
liefern wichtige Hinweise zum sicheren Betrieb des Gerätes. Lesen Sie dann diese Anleitung ganz durch, um einen vollständigen Überblick über
alle Funktionen dieses Gerätes zu erhalten. Bewahren Sie die Anleitung auf und verwenden Sie diese als Referenz.
Copyright © 2013 ROLAND CORPORATION
Alle Rechte vorbehalten. Vervielfältigung, als Print oder Datei, als Ganzes oder in Teilen, bedarf einer schriftlichen Genehmigung der ROLAND CORPORATION.
SICHERHEITSHINWEISE
About WARNING and CAUTION Notices
Used for instructions intended to alert the
user to the risk of death or severe injury
should the unit be used improperly.
Used for instructions intended to alert the
user to the risk of injury or material
damage should the unit be used
improperly.
* Material damage refers to damage or
other adverse effects caused with
respect to the home and all its
furnishings, as well to domestic animals
or pets.
WARNUNG
Netzkabel mit einem geerdeten Anschluss verbinden
Schließen Sie den Netzstecker des
Gerätes an eine Netzsteckdose mit
Schutzleiterverbindung an.
Gerät vom Stromnetz trennen
Auch wenn das Gerät ausgeschaltet ist,
ist es immer noch mit dem Stromnetz
verbunden. Wenn Sie das Gerät vom
Stromnetz trennen möchten, ziehen Sie
den Netzstecker aus der Steckdose.
Das Gerät bzw. den Netzadapter nicht
auseinander bauen bzw. verändern
Önen Sie weder das Gerät noch den
Netzadapter, und nehmen Sie keine
Änderungen daran vor.
Gerät nicht selber reparieren
Versuchen Sie nicht, das Gerät zu
reparieren oder darin enthaltene
Teile zu ersetzen. Wenden Sie sich bei
allen Reparaturen an Ihren RolandVertragspartner, ein Roland-ServiceCenter in Ihrer Nähe oder an einen der
autorisierten Roland-Vertriebspartner, die auf der
Seite „Informationen“ aufgeführt sind.
Folgende Umgebungsbedingungen vermeiden
• Extreme Temperaturen (z. B. direktes
Sonnenlicht in einem geschlossenen
Fahrzeug, in der Nähe einer
Heizungsleitung, auf Wärmequellen)
• Feuchtigkeit (z. B. Bäder, Waschräume,
nasse Fußböden)
• Dampf oder Rauch
• Hoher Salzgehalt in der Luft
• Hohe Luftfeuchtigkeit
• Regen
• Staub oder Sand
• Starke Vibrationen oder Erschütterungen.
Auf einen stabilen Untergrund achten
Achten Sie darauf, dass das Gerät immer
waagerecht und stabil steht. Platzieren
Sie es nicht auf wackeligen Ständern
oder schiefen Flächen.
Nur den beigefügten Netzadapter verwenden und auf
eine korrekte Spannung achten
Verwenden Sie ausschließlich den im
Lieferumfang des Gerätes enthaltenen
Netzadapter. Achten Sie darauf,
dass die Netzspannung mit der auf
dem Netzadapter angegebenen
Eingangsspannung übereinstimmt.
Andere Netzadapter haben möglicherweise eine
andere Polarität oder sind auf eine andere Spannung
ausgelegt, daher kann deren Verwendung eine
Beschädigung, Fehlfunktion oder einen elektrischen
Schlag zur Folge haben.
About the Symbols
The symbol alerts the user to important instructions or
warnings.The specific meaning of the symbol is
determined by the design contained within the triangle. In
the case of the symbol at left, it is used for general
cautions, warnings, or aler ts to danger.
The symbol alerts the user to items that must never be
carried out (are forbidden). The specific thing that must
not be done is indicated by the design contained within
the circle. In the case of the symbol at left, it means that
the unit must never be disassembled.
The symbol alerts the user to things that must be
carried out. The specific thing that must be done is
indicated by the design contained within the circle. In the
case of the symbol at left, it means that the power-cord
Nur das beigefügte Netzkabel verwenden
Verwenden Sie ausschließlich das
mit dem Gerät gelieferte Netzkabel.
Verwenden Sie das mitgelieferte
Netzkabel nicht für ein anderes Gerät.
Das Netzkabel nicht belasten und keine
Gegenstände darauf abstellen
Verdrehen oder biegen Sie das Netzkabel
nicht zu stark, und stellen Sie keine
schweren Gegenstände auf das Kabel.
Dadurch kann das Kabel beschädigt
werden, was zu Unterbrechungen und
Kurzschlüssen führen kann. Schadhafte
Kabel können Brände und elektrische Schläge
verursachen!
Zu hohe Lautstärken vermeiden
Dieses Gerät kann einzeln oder in
Kombination mit einem Verstärker
und Kopfhörern oder Lautsprechern
Schallpegel erzeugen, die zu
dauerhaftem Gehörverlust führen
können. Betreiben Sie das Gerät nicht
über längere Zeit mit hoher oder unangenehmer
Lautstärke. Sobald Sie eine Beeinträchtigung Ihres
Gehörs oder ein Klingeln in den Ohren bemerken,
sollten Sie den Betrieb des Gerätes sofort einstellen
und sich an einen HNO-Arzt wenden.
Vorsicht bei kleinen Gegenständen und
Flüssigkeiten
Achten Sie darauf, dass weder
Gegenstände (z. B. leicht entzündliches
Material, Münzen, Nadeln) noch
Flüssigkeiten jeglicher Art (Wasser,
Getränke usw.) in das Gerät gelangen.
Bei unnormalem Verhalten sofort ausschalten
Wenn einer der folgenden Fälle eintritt,
ziehen Sie den Netzadapter aus der
Steckdose, und wenden Sie sich an
Ihren Fachhändler, ein Roland-ServiceCenter in Ihrer Nähe oder an einen der
autorisierten Roland-Vertriebspartner,
die auf der Seite „Informationen“ aufgeführt sind:
• Der Netzadapter, das Netzkabel oder der Stecker
wurde beschädigt
• Rauch oder ein ungewöhnlicher Geruch tritt auf
• Gegenstände oder Flüssigkeiten sind in das Gerät
gelangt
• Das Gerät war Regen (oder sonstiger Feuchtigkeit)
ausgesetzt
• Das Gerät scheint nicht normal zu funktionieren
oder seine Leistung weist eine deutliche Änderung
auf.
WARNUNG
WARNUNG
Aufsichtspicht von Erwachsenen
In Haushalten mit Kindern sollte ein
Erwachsener anwesend sein und den
Betrieb überwachen, bis das Kind alle
wesentlichen Regeln beachten kann,
die für den sicheren Betrieb des Gerätes
unerlässlich sind.
Gerät vor Erschütterungen schützen
Schützen Sie das Gerät vor starken
Stößen, und lassen Sie es nicht fallen.
Nicht zu viele Geräte an einer Netzsteckdose
anschließen
Betreiben Sie den Netzadapter
nicht zusammen mit einer zu
großen Anzahl von Geräten an
einer einzigen Netzsteckdose. Seien
Sie besonders vorsichtig beim
Einsatz von Verlängerungskabeln.
Die Gesamtleistung aller an der Verlängerung
betriebenen Geräte darf die für das
Verlängerungskabel angegebene zulässige
Leistung (Watt-/Ampère-Zahl) nicht überschreiten.
Übermäßige Last kann dazu führen, dass sich die
Isolierung erhitzt und ggf. schmilzt.
Betrieb des Gerätes im Ausland
Bevor Sie das Gerät in einem anderen
Land betreiben, wenden Sie sich an
Ihren Fachhändler, ein Roland-ServiceCenter in Ihrer Nähe oder an einen der
autorisierten Roland-Vertriebspartner,
die auf der Seite „Informationen“
aufgeführt sind.
VORSICHT
Für ausreichende Belüftung sorgen
Das Gerät und der Netzadapter sollten
so aufgestellt werden, dass deren
Aufstellort oder -position nicht die
erforderliche Belüftung beeinträchtigt.
Immer am Stecker anfassen, nicht am Kabel
ziehen
Fassen Sie das Netzkabel des
Netzadapters immer am Stecker an,
wenn Sie diesen in eine Steckdose oder
in das Gerät stecken oder herausziehen.
Staub regelmäßig entfernen
Sie sollten den Netzadapter in
regelmäßigen Abständen aus der
Steckdose herausziehen und die
Kontakte am Stecker mit einem
trockenen Tuch von Staub und anderen
Ablagerungen befreien. Ziehen Sie den
Netzstecker auch dann aus der Steckdose, wenn
das Gerät längere Zeit außer Betrieb ist. Jegliche
Staubansammlung zwischen Netzstecker und
Steckdose kann die Isolierung beeinträchtigen und
zu Bränden führen.
Kabel sicher verlegen
Sorgen Sie dafür, dass Kabel und
Leitungen nicht durcheinander geraten.
Achten Sie zudem darauf, dass sich alle
Kabel und Leitungen außerhalb der
Reichweite von Kindern benden.
2
WICHTIGE HINWEISE
VORSICHT
Nicht auf das Gerät stellen und keine anderen
Gegenstände darauf abstellen
Stellen Sie sich nicht auf das Gerät, und
stellen Sie keine schweren Gegenstände
darauf ab.
Den Netzadapter nicht mit nassen Händen
anfassen
Fassen Sie den Netzadapter niemals mit
nassen Händen an, wenn Sie ihn in eine
Steckdose oder das Gerät stecken oder
herausziehen.
Vor Bewegen des Gerätes die Kabel trennen
Bevor Sie das Gerät bewegen, trennen
Sie die Verbindung des Netzadapters mit
der Steckdose sowie aller weiteren Kabel
mit externen Geräten.
Vor Reinigen des Gerätes den Netzadapter
abziehen
Bevor Sie das Gerät reinigen, schalten Sie
es aus, und ziehen Sie den Netzadapter
aus der Steckdose (S. 5).
WICHTIGE HINWEISE
Stromversorgung
• Schließen Sie dieses Gerät nicht an die gleiche
Netzsteckdose wie andere elektrische Geräte an,
die durch einen Wechselrichter gesteuert (z. B.
Kühlschrank, Waschmaschine, Mikrowellenherd
oder Klimaanlage) oder durch einen Motor
betrieben werden. Die erzeugten Interferenzen
in der Netzversorgung können zu Fehlfunktionen
oder hörbaren Störgeräuschen führen. Wenn es
nicht möglich ist, eine gesonderte Steckdose zu
verwenden, schalten Sie einen Netzentstörlter
zwischen dieses Gerät und die Netzsteckdose.
• Der Netzadapter wird bei Dauerbetrieb warm. Dies
ist normal und kein Grund zur Beunruhigung.
• Schalten Sie alle beteiligten Geräte aus, bevor Sie
diese zusammen schließen. Auf diese Weise können
Sie Fehlfunktionen und/oder Schäden an den
Lautsprechern oder anderen Geräten vermeiden.
Aufstellung
• Der Einsatz des Gerätes in der Nähe von
Leistungsverstärkern (oder anderen Geräten mit
großen Transformatoren) kann ein Brummen
verursachen. Um dieses Problem zu umgehen,
ändern Sie die Position dieses Gerätes, oder stellen
Sie es in größerer Entfernung zur Störquelle auf.
• Dieses Gerät kann den Empfang von Radio- und
Fernsehsignalen stören. Verwenden Sie es deshalb
nicht in der Nähe solcher Empfangsgeräte.
• Wenn Geräte zur drahtlosen Kommunikation wie
Mobiltelefone in der Umgebung dieses Gerätes
verwendet werden, können Geräusche bei
abgehenden oder ankommenden Gesprächen
oder während der Verbindung entstehen. Sollten
Sie Probleme dieser Art haben, verwenden Sie die
Mobilfunkgeräte in größerer Entfernung zu diesem
Gerät, oder schalten Sie sie aus.
• Setzen Sie das Gerät keinem direkten Sonnenlicht
aus, stellen Sie es nicht neben Heizgeräten auf,
lassen Sie es nicht in einem geschlossenen Fahrzeug
liegen, und setzen Sie es auch sonst keinen extremen
Temperaturen aus. Achten Sie auch darauf, dass
Lichtquellen, deren Licht normalerweise auf kurze
Distanz verwendet wird (z. B. eine Klavierlampe),
oder kräftige Spots nicht für längere Zeit immer die
gleiche Stelle des Gerätes beleuchten. Übermäßige
Hitze kann zu Verformungen oder Verfärbungen des
Gerätes führen.
• Wenn das Gerät bei einem Transport aus kalter/
• Vermeiden Sie es, dass Gummi, Vinyl oder ähnliche
• Kleben Sie keine Sticker, Abziehbilder oder ähnliches
• Je nach Material und Temperatur der Oberäche, auf
• Stellen Sie keine Gefäße mit Flüssigkeiten auf das
Reinigung
• Für die normale Reinigung wischen Sie das
• Verwenden Sie kein Benzin oder Verdünnungsmittel,
Zusätzliche Hinweise
• Seien Sie hinreichend vorsichtig beim Betätigen der
• Wenn Sie Kabel anschließen oder abziehen, fassen
VORSICHT
trockener Umgebung in eine feucht-warme
Umgebung gelangt, können sich Wassertröpfchen
(Kondensation) im Geräteinneren bilden. Es können
Schäden oder Fehlfunktionen auftreten, falls Sie
versuchen, das Gerät unter diesen Bedingungen zu
betreiben. Bevor Sie das Gerät verwenden, lassen Sie
es so lange stehen, bis die Kondensation vollständig
verdampft ist.
Materialien über längere Zeiträume auf dem Gerät
liegen bleiben. Diese Gegenstände könnten die
Oberäche des Gerätes verfärben oder auf andere
Weise beeinträchtigen.
auf das Gerät. Beim Ablösen solcher Materialien vom
Gerät könnte die Oberäche beschädigt werden.
der Sie das Gerät aufstellen, können die Gummifüße
die Oberäche verfärben oder beschädigen. Um
dies zu vermeiden, legen Sie ein Stück Filz oder Sto
unter die Gummifüße. Achten Sie in diesem Fall
darauf, dass das Gerät nicht wegrutschen kann.
Gerät. Sollte sich Flüssigkeit auf der Oberäche
benden, wischen Sie diese mit einem weichen,
trockenen Tuch ab.
Gerät mit einem weichen, trockenen oder leicht
angefeuchteten Tuch ab. Um hartnäckigen Schmutz
zu entfernen, verwenden Sie ein mit einer milden,
nicht scheuernden Seifenlösung getränktes Tuch.
Wischen Sie sorgfältig mit einem weichen, trockenen
Tuch nach.
Alkohol oder sonstige Lösemittel, um Verfärbungen
und/oder Verformungen zu vermeiden.
Tasten, Regler und anderer Bedienelemente sowie
beim Anschließen von Kabeln an den Buchsen des
Gerätes. Eine unachtsame Handhabung kann zu
Fehlfunktionen führen.
Sie das Kabel immer am Stecker an – ziehen Sie
niemals am Kabel. Auf diese Weise vermeiden
Sie Kurzschlüsse oder Schäden an inneren
Kabelbestandteilen.
VORSICHT
Bei Gewitter den Netzadapter vom Stromnetz
trennen
Bei angekündigtem oder
heraufziehendem Gewitter sollten
Sie immer den Netzadapter aus der
Steckdose ziehen.
Take care so as not to get ngers pinched
When handling the following moving
parts, take care so as not to get ngers,
toes, etc., pinched. Whenever a child uses
the unit, an adult should be on hand to
provide supervision and guidance.
• Arm stand (S. 7)
Deutsch Français Italiano Español Português NederlandsEnglish
• Halten Sie die Lautstärke des Gerätes auf einem
vernünftigen Maß, auch wenn Sie einen Kopfhörer
verwenden.
• Wenn Sie das Gerät transportieren möchten,
verpacken Sie es möglichst im Originalkarton
(einschließlich des Verpackungsmaterials) oder in
einer anderen, stabilen Verpackung (z.B. Hardcase).
• Verwenden Sie für Anschlüsse an diesem Gerät keine
Kabel mit Widerständen. Die Verwendung solcher
Kabel kann dazu führen, dass der Signalpegel sehr
niedrig oder sogar unhörbar ist. Informationen zu
den technischen Daten von Kabeln erhalten Sie vom
jeweiligen Hersteller.
• Achten Sie darauf, sich bei Auf- bzw. Zuklappen
des Ständers an der Unterseite des Gerätes
nicht die Hände zu verletzen. Kinder sollten aus
Sicherheitsgründen den Ständer nicht auf- bzw.
zuklappen.
Lizenzen und Warenzeichen
• MMP (Moore Microprocessor Portfolio) ist ein Patent
für Mikro-Prozessoren, entwicket von der Technology
Properties Limited (TPL). Roland ist ein Lizenznehmer
der TPL-Gruppe.
• Roland und BOSS sind eingetragene Warenzeichen
bzw. Warenzeichen der Roland Corporation in den
USA und/oder anderen Ländern.
• Die in dieser Anleitung erwähnten Firmennamen
und Produktbezeichnungen sind Warenzeichen bzw.
eingetragene Warenzeichen des jeweiligen NamenInhabers.
3

Die Bedienoberäche und Anschlüsse
Anschlüsse und Regler für eine Gitarre bzw. ein Mikrofon
1 3
XLR
Klinke stereo
Klinke mono
2 4 5 6
1
GUITAR CHANNEL
INPUT-Buchse
Zum Anschluss der Gitarre.
[VOLUME]-Regler
Bestimmt die Lautstärke des Gitarren-Kanals.
[BASS]-Regler
Bestimmt die Lautstärke der tiefen
Frequenzen.
2
MIC/LINE CHANNEL
INPUT-Buchse
Zum Anschluss eines Mikrofons bzw. Gerätes
mit Line-Pegel.
Die Anschluss-Optionen sind; XLR, Klinke
stereo (TRS) oder Klinke mono.
* Gitarren mit Pickup und integriertem
Vorverstärker können an den MIC/LINE
CHANNEL angeschlossen werden.
[MIDDLE]-Regler
Bestimmt die Lautstärke der mittleren
Frequenzen.
[TREBLE]-Regler
Bestimmt die Lautstärke der hohen
Frequenzen.
* Der AC-40 besitzt einen symmetrischen
XLR/TRS-Anschluss mit folgender PinBelegung. Prüfen Sie die entsprechende
Pin-Belegung Ihres Gerätes, bevor Sie es
anschließen.
1: GND
2: HOT
3: COLD
* Phantomspeisung wird nicht unterstützt.
GND (SLEEVE)
HOT
(TIP)
COLD (RING)
[VOLUME]-Regler
Bestimmt die Lautstärke des MIC/LINE-Kanals.
Wenn Sie ein Mikrofon angeschlossen haben,
wählen Sie eine Position innerhalb des MICBereiches.
[CHORUS]-Regler
Schaltet den Chorus-Typ um (S. 6).
[REVERB]-Regler
Bestimmt die Hall-Lautstärke (S. 6).
[BASS]-Regler
Bestimmt die Lautstärke der tiefen
Frequenzen.
[MIDDLE]-Regler
Bestimmt die Lautstärke der mittleren
Frequenzen.
[TREBLE]-Regler
Bestimmt die Lautstärke der hohen
Frequenzen.
[CHORUS]-Regler
Schaltet den Chorus-Typ um (S. 6).
[REVERB]-Regler
Bestimmt die Hall-Lautstärke (S. 6).
3
[MASTER]-Regler
Bestimmt die Gesamt-Lautstärke.
* Dieser Regler wirkt sich nicht auf das LINE
OUT-Signal aus.
5
POWER-Anzeige
Leuchtet, wenn das Gerät eingeschaltet ist.
4
4
[ANTI-FEEDBACK]-Schalter
Aktiviert die Anti Feedback-Funktion (S. 7).
6
[POWER]-Schalter
Schaltet das Gerät ein bzw. aus.
* Die Rückkopplungs-Frequenz wird
automatisch erkannt.
* Die Anti-Feedback-Funktion wird immer
dann zurückgesetzt, wenn Sie das Gerät
ein- und ausschalten.
Die Bedienoberäche und Anschlüsse
Die Anschlüsse auf der Rückseite
WICHTIG
• Regeln Sie immer die Lautstärke auf Minimum und lassen Sie die Geräte ausgeschaltet, bevor Sie neue Kabelverbindungen vornehmen. Damit
beugen Sie eventuellen Fehlfunktionen bzw. Beschädigungen vor.
• Verwenden Sie für die Audioeingänge (GUITAR CHANNEL, MIC/LINE CHANNEL, AUX IN) keine Kabel mit integrierten Widerständen, da ansonsten
die Lautstärke deutlich reduziert wird.
7
DC IN-Buchse
Zum Anschluss des beigefügten Netzadapters.
* Verwenden Sie nur den dem AC-40 beigefügten
Netzadapter.
7 8 9 10 11
Deutsch Français Italiano Español Português NederlandsEnglish
8
PHONES-Buchse
Zum Anschluss eines
Kopfhörers mit Stereo
Miniklinken-Anschluss.
9
LINE OUT-Buchsen
Zum Anschluss an einen
externen Mixer oder ein externes
Lautsprechersystem.
Verbinden Sie für den Monobetrieb
nur die L/MONO-Buchse.
* Der [MASTER]-Regler beinusst nicht das über die
11
FOOT SW-Buchse
Wenn Fußtaster angeschlossen sind, können Sie
das Ein- und Ausschalten von Eekten mit dem
Fuß steuern.
* Verwenden Sie dafür den BOSS FS-5U oder
FS-6 (zusätzliches Zubehör).
• Chorus On/O und Reverb On/O wirken
gleichermaßen auf den GUITAR CHANNEL und
MIC/LINE CHANNEL.
• Wenn der [CHORUS]-Schalter auf “OFF”
bzw. der [REVERB]-Regler auf “0” gestellt ist,
können der Chorus und Reverb nicht mit dem
Fußschalter ein- bzw. ausgeschaltet werden.
• Wenn Sie nur einen Fußschalter über ein
Mono-Klinkenkabel anschließen, kann nur der
Chorus ein- bzw. ausgeschaltet werden.
LINE OUT-Buchsen ausgegebene Signal.
Kabel:
Stereoklinke
2
2x Monoklinke
rot
(RING)
REVERB
On/O
BOSS FS-5U BOSS FS-6
weiss
(SPITZE)
CHORUS
On/O
oder
REVERB
On/O
Kabel:
Stereoklinke
2
Stereoklinke
CHORUS
On/O
10
AUX IN-Buchse/[LEVEL]-Regler
Zum Anschluss eines externen Audio Players
(mp3, CD, usw.) über ein Stereo MiniklinkenKabel. Die Lautstärke wird mit dem [LEVEL]Regler eingestellt.
* Die Chorus/Reverb-Eekte stehen für
das Signal der AUX IN-Buchse nicht zur
Verfügung.
Stellen Sie die Polarität der Fußschalter wie
nachfolgend beschrieben ein.
POLARITY-Schalter
BOSS FS-5U
MODE/POLARITY-Schalter
B A
BOSS FS-6
5
Bedienung des Gerätes
Ein- und Ausschalten
Nachdem Sie die Verbindungen hergestellt haben (S. 4, S. 5), schalten
Sie die Geräte in der angegebenen Reihenfolge ein, um der Gefahr
von Fehlfunktionen und/oder Schäden an Lautsprechern und
anderen Geräten vorzubeugen.
1. Stellen Sie sicher, dass alle Geräte noch ausgeschaltet
sind.
2. Setzen Sie am AC-40 den [VOLUME]-Regler und [MASTER]-
Regler auf “0”.
3. Schalten Sie das externe Gerät ein, das an der AUX IN-
Buchse angeschlossen ist.
4. Schalten Sie den AC-40 ein.
* Dieses Gerät ist mit einer Schutzschaltung ausgestattet. Nach
dem Einschalten entsteht eine kurze Betriebspause von einigen
Sekunden, bis das Gerät normal arbeitet.
5. Schalten Sie das externe Gerät ein, das an den LINE OUT-
Buchsen angeschlossen ist.
6. Wenn Sie die Geräte ausschalten möchten, regeln Sie die
Lautstärken aller Geräte inkl. des AC-40 auf Minimum,
und schalten Sie diese in umgekehrter Reihenfolge (im
Vergleich zum Einschaltvorgang) aus.
* Achten Sie immer darauf, die Lautstärke herunterzuregeln,
bevor Sie das Gerät einschalten. Auch bei vollständig
heruntergeregelter Lautstärke hören Sie beim Einschalten
möglicherweise ein Geräusch, dieses ist aber normal und stellt
keine Fehlfunktion dar.
Anwendung der Eekte
Die Eekte Chorus und Reverb wirken sowohl auf den GUITAR
CHANNEL als auch auf den MIC/LINE CHANNEL.
Sie können die Eekt-Lautstärke pro Kanal individuell einstellen.
Der Chorus-Eekt
1. Setzen Sie den [CHORUS]-Schalter auf eine der Positionen
“WIDE” oder “SPACE”.
Ein Stereo-Chorus-Eekt, bei dem drei Frequenzbänder
unabhängig voneinander verarbeitet werden. Dadurch
entsteht ein Eindruck von besonderer Klangfülle, der perfekt zu
WIDE
SPACE
OFF Der Chorus-Eekt ist ausgeschaltet.
* Wenn der [CHORUS]-Schalter auf “OFF” gesetzt ist, kann der
Der Reverb-Eekt
Dieses ist ein Stereo Reverb, der speziell für akustische Instrumente
entwickelt wurde.
1. Stellen Sie die Hall-Lautstärke mit dem [REVERB]-Regler
ein.
einer akustischen Gitarre passt.
Die tiefen Frequenzen bleiben im Zentrum des Klangfeldes. Bei
Klängen im mittleren und hohen Frequenzbereich gewinnt der
Sound an Fülle und Breite.
Dieser Chorus-Eekt sorgt dafür, dass sich die Sounds im
Raum mischen. Diese Methode ist nur bei einem Stereosystem
möglich.
Beim AC-40 gibt der rechte Lautsprecher (Ansicht der
Vorderseite) den Soundeekt aus. Der linke Lautsprecher
erzeugt den direkten Sound. Der Chorus-Eekt entsteht, wenn
sich die Klänge des linken und rechten Lautsprechers im Raum
mischen.
Gegenüber einem elektrisch gemischten Chorus-Eekt hat
dieser Eekt eine größere Reichweite nach links und rechts und
eine natürlichere Klangfülle.
Chorus-Eekt nicht mit einem Fußtaster ein- bzw. ausgeschaltet
werden.
* Wenn der [REVERB]-Regler auf “0” gesetzt ist, kann der Reverb-
Eekt nicht mit einem Fußtaster ein- bzw. ausgeschaltet werden.
6
6
Bedienung des Gerätes
Die Anti-Feedback-Funktion
Was ist eine Rückkopplung?
Eine Rückkopplung ist eine unerwünschte Schwingung (Pfeifton),
die auftritt, wenn das Signal eines Lautsprechers durch ein Mikrofon
oder einen Tonabnehmer aufgenommen, verstärkt und dann erneut
über den Lautsprecher ausgegeben wird.
Die Wahrscheinlichkeit einer Rückkopplung ist hoch, wenn Sie das
Mikrofon in die Richtung eines Lautsprechers halten oder/und die
Lautstärke sehr hoch drehen.
Der Klang schaukelt
sich zu einem lauten
Pfeifton auf.
Was ist die Anti-Feedback-Funktion?
Diese Funktion unterdrückt automatisch die Rückkopplung, die
zwischen einer Gitarre oder einem Mikrofon und dem Verstärker
auftreten kann. Dazu wird der Frequenzbereich abgeschwächt, in
dem die Rückkopplung auftritt.
Verwendung des Klappständers
Wenn Sie den AC-40 auf den Boden stellen, können Sie den an der
Unterseite befestigten Ständer ausklappen und den Verstärker
schräg stellen, so dass der Sound schräg nach oben abstrahlt.
Deutsch Français Italiano Español Português NederlandsEnglish
Klappständer
1. Stellen Sie den [ANTI-FEEDBACK]-Schalter auf “ON”.
Die Rückkopplungs-Frequenz wird automatisch erkannt.
Die Anti-Feedback-Funktion wird auf das Mikrofon bzw. die Gitarre
angewendet, die an den Eingängen GUITAR CHANNEL und MIC/
LINE CHANNEL angeschlossen sind.
HINWEIS
Um eine Rückkopplung während des Spiels zu vermeiden,
empfehlen wir Ihnen, die Anti-Feedback-Funktion zu aktivieren,
bevor Sie zu spielen beginnen.
WICHTIG
* Die Anti-Feedback-Funktion wird immer dann zurückgesetzt,
wenn Sie das Gerät ein- und ausschalten.
* Wenn die Anti-Feedback-Funktion nicht ausreicht, um
Rückkopplungen zu unterdrücken, führen Sie folgende Schritte
aus:
• Ändern Sie die Ausrichtung der Gitarre oder des Mikrofons.
• Vergrößern Sie den Abstand zwischen Gitarre oder Mikrofon
und den Lautsprechern.
• Verringern Sie die Lautstärke.
WICHTIG
* Beachten Sie die folgenden Punkte:
• Der AC-40 muss auf einer geraden Oberäche stehen.
• Es dürfen sich keine Gegenstände auf dem AC-40 benden,
und Sie dürfen sich nicht auf den AC-40 setzen bzw. sich
darauf stellen.
• Der AC-40 darf nicht am Klappständer getragen werden.
* Wenn Sie den Ständer nicht benötigen, klappen Sie diesen
wieder ein.
* Achten Sie darauf, sich bei Auf- bzw. Zuklappen des
Ständers nicht die Hände zu verletzen. Kinder sollten aus
Sicherheitsgründen den Ständer nicht auf- bzw. zuklappen.
7
7
Praktische Anwendung des AC-40
Singen und Begleiten
Singen und gleichzeitig Gitarre spielen.
• Schließen Sie Ihre Gitarre an den GUITAR CHANNEL an.
• Schließen Sie das Mikrofon an den MIC/LINE CHANNEL an.
Gitarre
MIkrofon
Gitarrenduo
Zwei Gitarristen können gleichzeitig spielen.
• Schließen Sie eine Gitarre an den GUITAR CHANNEL an.
• Schließen Sie die andere Gitarre (mit integriertem Vorverstärker)
an den MIC/LINE CHANNEL an.
Erste Gitarre
Zweite Gitarre
Abnahme des Instrumentes mit einem Mikrofon
Richten Sie das Mikrofon auf das Instrument.
• Schließen Sie das Mikrofon an den MIC/LINE CHANNEL an.
• Richten Sie das Mikrofon in Richtung Schallloch der Gitarre.
Mikrofon
* Der AC-40 besitzt keine Phantomspeisung. Wenn Sie ein
Kondensator-Mikrofon einsetzen möchten, müssen Sie
dafür ein zum jeweiligen Mikrofon passendes, externes
Phantomspeisegerät verwenden oder auf ein dynamisches
Mikrofon wechseln.
Mischen von Sounds zweier Tonabnehmer
Wenn Ihre Gitarre mit zwei Arten von Tonabnehmern
ausgestattet ist, können Sie deren Signale mit dem AC-40
mischen.
• Schließen Sie den Tonabnehmer am Schallloch Ihrer Gitarre am
GUITAR CHANNEL-Eingang an.
• Schließen Sie den in die Gitarre integrierten Tonabnehmer (mit
internem Vorverstärker) an den MIC/LINE CHANNEL-Eingang an.
Integrierter Tonabnehmer
(mit Vorverstärker)
Separat angeschlossener
Separat angeschlossener
Tonabnehmer
Integrierter Tonabnehmer
Tonabnehmer
8
STEREO EFFECTS
Mögliche Fehlerursachen
Wenn das System nicht wie erwartet funktioniert, prüfen Sie zuerst folgende Punkte.
Problem Mögliche Ursache Abhilfe Seite
Das Gerät lässt sich nicht
einschalten
Ist der dem AC-40 beigefügte Netzadapter angeschlossen?
Sind die Kabelverbindungen zu den externen Geräten korrekt? Überprüfen Sie die Verbindungen erneut.
Ist ein Kopfhörer angeschlossen?
Ist der [MASTER]-Regler zu niedrig eingestellt?
Kein Sound/
Zu geringe Lautstärke
Sind die [VOLUME]-Regler der Kanäle zu niedrig eingestellt?
Ist der AUX IN [LEVEL]-Regler zu niedrig eingestellt? S. 5
Verwenden Sie ein Kondensator-Mikrofon, das eine Phantomspeisung benötigt?
Der Sound ist verzerrt Sind die [VOLUME]-Regler der Kanäle zu hoch eingestellt? Drehen Sie den/die [VOLUME]-Regler weiter nach links. S. 4
Die Lautstärke des an den
INPUT-Buchsen bzw. AUX
IN-Buchse angeschlos-
Verwenden Sie Kabel mit integriertem Widerstand? Benutzen Sie nur Kabel ohne eingebauten Widerstand. –
senen Gerätes ist zu niedrig
Ist der [CHORUS]-Eekt ausgeschaltet?
Der Chorus- bzw. ReverbEekt ist nicht hörbar
Ist der [REVERB]-Regler auf “0” gestellt? Drehen Sie den/die [REVERB]-Regler weiter nach rechts.
Wurde der Eekt mithilfe eines angeschlossenen Fußschalters
ausgeschaltet?
Die Eekte Chorus und Reverb wirken nicht auf das Signal der AUX IN-Buchse. –
Überprüfen Sie dieses. Verwenden Sie in keinem Fall einen
anderen Netzadapter.
Falls ja, sind die Lautsprecher des AC-40 automatisch
abgeschaltet.
Überprüfen Sie dieses.
Der AC-40 stellt keine Phantomspeisung zur Verfügung. Sie
müssen entweder ein dynamisches Mikrofon verwenden
oder für das Kondensator-Mikrofon ein entsprechend
passendes externes Phantomspeisegerät dazwischen
schalten.
Setzen Sie den [CHORUS]-Schalter auf eine der Positionen
“WIDE” oder “SPACE”.
Schalten Sie den Eekt durch Drücken des Fußschalters
wieder ein.
S. 5
S. 4
–
Deutsch Français Italiano Español Português NederlandsEnglish
S. 6
S. 5
Blockschaltbild
GUITAR CHANNEL
GUITAR INPUT
MIC/LINE CHANNEL
MIC/LINE INPUT
AUX IN
(STEREO)
LEVEL
MUTE
L
R
POWER AMP
POWER AMP
SPEAKER L
SPEAKER R
PHONES
(STEREO)
LINE OUT
L/R
FOOT SW
EFFECTS
CHORUS
REVERB
TREBLEMIDDLEBASSVOLUME
CHORUS
REVERB
TREBLEMIDDLEBASSVOLUME
ANTI-
FEEDBACK
VOLUME
CHORUS ON/OFF
REVERB ON/OFF
9

Technische Daten
Roland AC-40: ACOUSTIC GUITAR AMPLIFIER
Angegebene Ausgangsleistung 35 W (17.5 W + 17.5 W)
GUITAR CHANNEL:
Nomineller Eingangspegel (1 kHz)
Nomineller Ausgangspegel (1 kHz) LINE OUT: -10 dBu
Lautsprecher 16 cm (6.5 inches) x 2
Bedienelemente/Regler
Anzeige POWER
Anschlüsse
Stromversorgung AC-Adapter
Stromverbrauch 480 mA
Abmessungen 362 (W) x 241 (D) x 265 (H) mm
Gewicht ca. 5.3 kg
Beigefügtes Zubehör Bedienungsanleitung, AC-Adapter, Netzkabel
Zusätzliches Zubehör Fußschalter (BOSS FS-5U, FS-6)
MIC/LINE CHANNEL:
AUX IN:
GUITAR CHANNEL:
MIC/LINE CHANNEL:
ANTI-FEEDBACK: ON/OFF-Schalter
AUX IN: LEVEL-Regler
Andere: MASTER-Regler, POWER-Schalter
GUITAR CHANNEL INPUTBuchse:
MIC/LINE CHANNEL INPUTBuchse:
AUX IN-Buchse: Stereo-Miniklinke
LINE OUT (L/MONO, R)-Buchsen: Klinkenanschlüsse
PHONES-Buchse: Stereo-Miniklinke
FOOT SW-Buchse: Klinke stereo (TRS)
DC IN-Buchse
-10 dBu
-50 dBu/-20 dBu
-10 dBu
VOLUME-Regler, BASS-Regler, MIDDLE-Regler, TREBLE-Regler, CHORUS-Schalter (OFF, SPACE,
WIDE), REVERB-Regler
VOLUME-Regler, BASS-Regler, MIDDLE-Regler, TREBLE-Regler, CHORUS-Schalter (OFF, SPACE,
WIDE), REVERB-Regler
Klinkenanschluss
XLR, Klinke stereo (TRS)
* 0 dBu=0.775 Vrms
* Änderungen der technischen Daten und des Designs sind ohne vorherige Ankündigung möglich.
* Für Druckfehler wird keine Haftung übernommen.
10
Mode d’emploi
AMPLIFICATEUR POUR GUITARE ACOUSTIQUE
Un ampli stéréo pour guitare acoustique qui reproduit dèlement la richesse des résonances de votre
instrument
• Amplicateur de puissance stéréo de 35 W (17,5 W + 17,5 W) à haut rendement.
• Deux haut-parleurs spécialement conçus de 6,5pouces (16 cm) délivrant un son idéal pour les instruments acoustiques.
La conception en deux canaux permet d’utiliser simultanément une guitare avec un micro ou une source à
niveau ligne (p. 4)
• Flexibilité permettant de couvrir une large gamme d’utilisations, notamment un duo de guitares ou un chanteur/instrumentiste (p. 8).
• Le chorus et la réverbération sont fournis à la fois pour le canal GUITAR et le canal MIC/LINE. Vous pouvez ajuster la profondeur d’eet pour
chaque canal individuellement.
Deutsch Français Italiano Español Português NederlandsEnglish
Équipé des prises d’entrée/sortie dont vous avez besoin pour quasiment toutes les situations (p. 5)
• Entrée AUX IN vous permettant de brancher un lecteur CD ou un lecteur audio numérique.
• Vous pouvez brancher les sorties LINEOUT sur un système de sonorisation externe et utiliser l’AC-40 en tant qu’appareil de contrôle pendant
que vous jouez.
• La prise casque est utile pour jouer la nuit ou vérier le son.
• Vous pouvez brancher les commutateurs au pied vendus séparément (BOSS FS-5U, FS-6) à la prise FOOT SW et les utiliser pour
activer/désactiver les eets avec le pied.
Fonction anti-Larsen (p. 7)
• Il vous sut d’activer cette fonction pour supprimer automatiquement l’eet Larsen.
Avant d’utiliser l’appareil, veuillez lire attentivement les sections intitulées «UTILISATION DE L’APPAREIL EN TOUTE SÉCURITÉ» et
«NOTES IMPORTANTES» (p. 2; p. 3). Ces sections fournissent des informations importantes relatives au bon fonctionnement de l’appareil. En outre,
pour être sûr de bien maîtriser chacune des fonctionnalités de votre nouvel appareil, lisez le mode d’emploi dans son intégralité. Gardez-le en lieu sûr
an de pouvoir vous y référer en cas de besoin.
Copyright © 2013 ROLAND CORPORATION
Tous droits réservés. La reproduction intégrale ou partielle de cette publication est interdite sous quelque forme que ce soit sans l’autorisation écrite de ROLAND
CORPORATION.
 Loading...