

Page 1

Manual | 4071.5546.32 – 08
Radiomonitoring and Radiolocation
Manual
®
R&S
GX430
PC-based Signal Analysis and
Signal Processing
4071.5546.32-08.00
Page 2

© Rohde & Schwarz GmbH & Co KG
81671 München, Deutschland, 2008
Gedruckt in der Bundesrepublik Deutschland - Änderungen vorbehalten - Daten ohne spezifizierte Fehlergrenzen,
Messunsicherheitsgrenzen oder Messunsicherheiten stellen nur Größenordnungen dar.
®
R&S
ist ein registrierter Markenname der ROHDE & SCHWARZ GmbH & Co. KG.
Eigennamen sind Warenzeichen der jeweiligen Eigentümer.
© Rohde & Schwarz, GmbH & Co KG
81671 Munich, Germany, 2008
Printed in Germany - Subject to change - Data without tolerance limits is not binding
®
R&S
is a registered trademark of Rohde & Schwarz GmbH & Co. KG.
Trade names are trademarks of the owners.
Page 3

Contents R&S GX430
Contents
1 Characteristics................................................................................................................................... 1-1
1.1 R&S®GX430 Concept and Workflow.......................................................................................... 1-1
2 Preparations for Use ......................................................................................................................... 2-1
2.1 Software Installation.................................................................................................................... 2-1
2.2 License Management .................................................................................................................. 2-6
2.3 Firewall ........................................................................................................................................ 2-7
3 Operation............................................................................................................................................ 3-1
3.1 Introduction.................................................................................................................................. 3-1
3.1.1 Starting the Application ....................................................................................................... 3-1
3.2 The Main Window........................................................................................................................ 3-3
3.2.1 The File Menu ..................................................................................................................... 3-4
3.2.2 The Edit Menu ..................................................................................................................... 3-7
3.2.3 The View Menu ................................................................................................................... 3-7
3.2.4 The Visualizations Menu ..................................................................................................... 3-7
3.2.5 The Help Menu.................................................................................................................... 3-7
3.2.6 The View Toolbar ................................................................................................................ 3-8
3.2.7 The Visualizations Toolbar.................................................................................................. 3-8
3.2.8 The File Toolbar .................................................................................................................. 3-9
3.2.9 The Master/Slave Toolbar................................................................................................. 3-10
3.2.10 The Reporting Toolbar .................................................................................................... 3-11
3.2.11 The GX430IS Toolbar ..................................................................................................... 3-11
3.2.12 The Digital Demodulation Dock Window......................................................................... 3-12
3.2.13 The Tuner Dock Window................................................................................................. 3-13
3.2.14 The Automatic Search and Classification Dock Window ................................................ 3-14
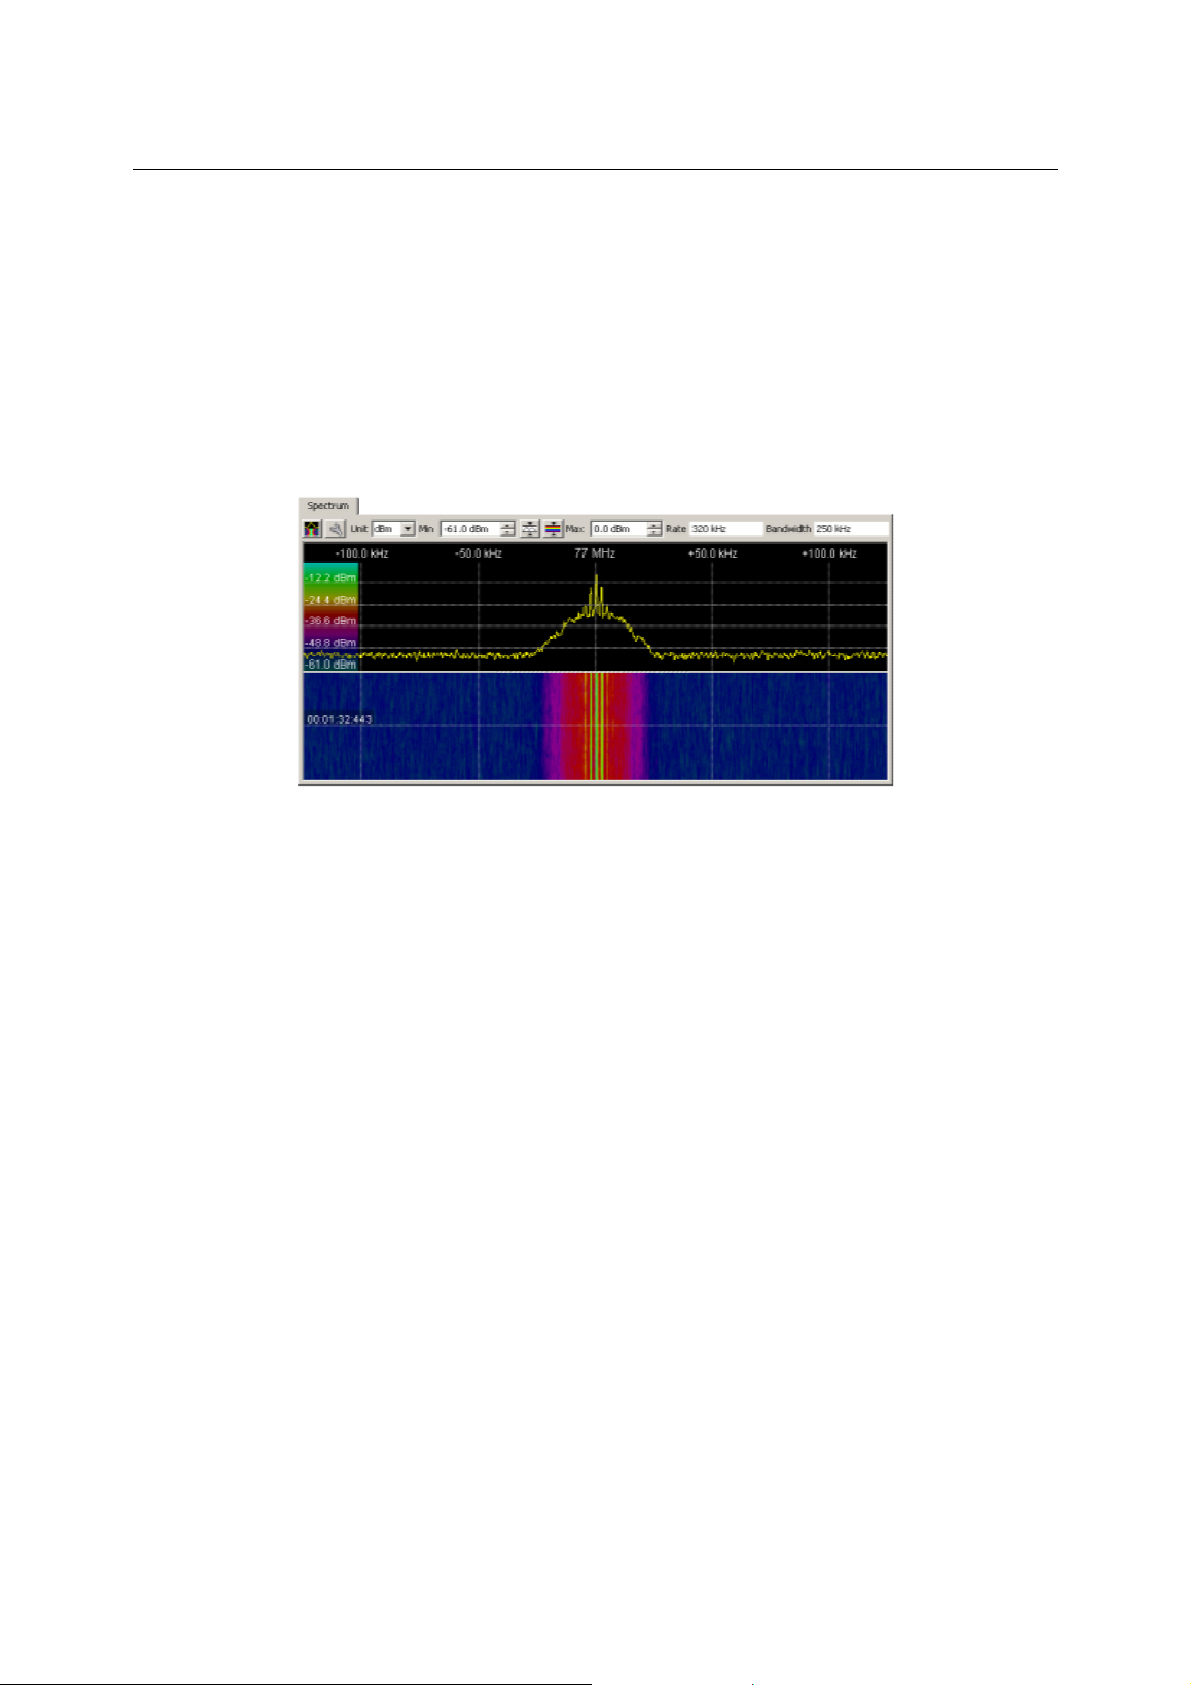
3.2.15 The Spectrum Dock Window........................................................................................... 3-17
3.2.16 The Audio Dock Window................................................................................................. 3-19
3.2.17 The Classifier Dock Window ........................................................................................... 3-19
3.2.18 The Spectrum Tab........................................................................................................... 3-21
3.2.19 The Digital Demodulation Tab......................................................................................... 3-31
3.2.20 The Decoding Tab........................................................................................................... 3-32
3.2.21 The Classifier Tab ........................................................................................................... 3-33
3.2.22 The Bitstream Classification Tab .................................................................................... 3-36
3.2.23 The Automatic Search and Classification Tab ................................................................ 3-37
3.2.24 The Time Analysis Tab ................................................................................................... 3-41
3.2.25 The Audio Tab................................................................................................................. 3-43
3.2.26 The Log Messages Window............................................................................................ 3-43
3.2.27 The Status Bar ................................................................................................................ 3-44
3.3 The Settings Dialog ................................................................................................................... 3-45
3.3.1 General – General............................................................................................................. 3-45
3.3.2 General – Paths ................................................................................................................ 3-46
3.3.3 Visualizations – Diagrams................................................................................................. 3-47
3.3.4 Visualizations – Decoded Text.......................................................................................... 3-48
3.3.5 Visualizations – Morse ...................................................................................................... 3-49
3.3.6 Visualizations – Image ...................................................................................................... 3-50
1 4071.5546.32-08.00
Page 4

R&S GX430 Contents
3.3.7 Subsystem – Tuners ......................................................................................................... 3-51
3.3.8 Subsystem – Demodulator / Decoder Mapping ................................................................ 3-52
3.3.9 RAMON – Master/Slave.................................................................................................... 3-53
3.3.10 RAMON – Report Edit..................................................................................................... 3-54
.3.11 Audio – General .............................................................................................................. 3-55
3
4 Demodulation..................................................................................................................................... 4-1
4.1 Digital Demodulator Parameters ................................................................................................. 4-1
4.1.1 Demodulator Selection........................................................................................................ 4-1
4.1.2 Adjusting and Applying Parameters .................................................................................... 4-1
4.1.3 Input Signal Parameters and Terms ................................................................................... 4-2
4.1.4 Common Parameters .......................................................................................................... 4-2
4.1.5 The ASK2 Demodulator ...................................................................................................... 4-3
4.1.6 The ATIS Demodulator ....................................................................................................... 4-4
4.1.7 The CLOVER Demodulator................................................................................................. 4-5
4.1.8 The DRM Demodulator ....................................................................................................... 4-5
4.1.9 The DTMF Demodulator ..................................................................................................... 4-6
4.1.10 The FMSBOS Demodulator .............................................................................................. 4-6
4.1.11 The FSK Demodulator ...................................................................................................... 4-7
4.1.12 The HELLSCHREIBER Demodulator ............................................................................... 4-8
4.1.13 The HF-FAX and PRESSFAX Demodulators ................................................................... 4-9
4.1.14 The METEOSAT-WEFAX Demodulator............................................................................ 4-9
4.1.15 The McFSK Demodulator................................................................................................ 4-10
4.1.16 The McPSK Demodulator ............................................................................................... 4-12
4.1.17 The MORSE Demodulator .............................................................................................. 4-13
4.1.18 The MPT1327 Demodulator............................................................................................ 4-14
4.1.19 The MTONE Demodulator .............................................................................................. 4-14
4.1.20 The Packet Radio Demodulator ...................................................................................... 4-15
4.1.21 The PACTOR Demodulator ............................................................................................ 4-16
4.1.22 The POCSAG Demodulator ............................................................................................ 4-16
4.1.23 The PSK Demodulator .................................................................................................... 4-17
4.1.24 The SELCAL_5T Demodulator ....................................................................................... 4-18
4.1.25 The SSTV Demodulator .................................................................................................. 4-18
4.1.26 The ZVEI-VDEW Demodulator ....................................................................................... 4-19
4.2 Analog Demodulator Parameters.............................................................................................. 4-20
4.2.1 Adjusting and Applying Parameters .................................................................................. 4-20
4.3 Visualizations............................................................................................................................. 4-22
4.3.1 Eye Diagram...................................................................................................................... 4-22
4.3.2 IQ Diagram ........................................................................................................................ 4-23
4.3.3 Demodulator Status........................................................................................................... 4-23
4.3.4 Audio Visualization ............................................................................................................ 4-24
5 Decoding ............................................................................................................................................ 5-1
5.1 Decoder Selection ....................................................................................................................... 5-1
5.2 System Visualizations ................................................................................................................. 5-2
5.2.1 Decoded Text ...................................................................................................................... 5-2
5.2.2 Image Data.......................................................................................................................... 5-4
5.2.3 Morse Data.......................................................................................................................... 5-7
5.2.4 ATIS .................................................................................................................................... 5-9
4071.5546.32-08.00 2
Page 5

Contents R&S GX430
5.2.5 FMSBOS ........................................................................................................................... 5-10
5.2.6 MPT1327........................................................................................................................... 5-11
5.2.7 PacketRadio ...................................................................................................................... 5-12
5.2.8 POCSAG ........................................................................................................................... 5-13
.2.9 DTMF & SELCAL .............................................................................................................. 5-14
5
5.2.10 ZVEI-VDEW .................................................................................................................... 5-15
5.2.11 ACARS ............................................................................................................................ 5-16
5.2.12 CLOVER.......................................................................................................................... 5-17
5.2.13 PACTOR II and III ........................................................................................................... 5-18
6 Maintenance and Troubleshooting .................................................................................................. 6-1
6.1 Application Log Files ................................................................................................................... 6-1
6.2 User Settings ............................................................................................................................... 6-1
6.3 The HSP SRM Dongle ................................................................................................................ 6-2
6.3.1 Configuring the Local License Manager.............................................................................. 6-2
6.3.2 Manual Installation of the HSP SRM Drivers ...................................................................... 6-2
6.3.3 Failure Caused by a Newer Driver Version......................................................................... 6-3
6.3.4 HASP Drivers for Windows Vista ........................................................................................ 6-4
7 Appendix A......................................................................................................................................... 7-1
7.1 Settings........................................................................................................................................ 7-1
7.1.1 General – General............................................................................................................... 7-1
7.1.2 General – Paths .................................................................................................................. 7-1
7.1.3 Visualizations – Diagrams................................................................................................... 7-1
7.1.4 Visualizations – Decoded Text............................................................................................ 7-2
7.1.5 Visualizations – Morse ........................................................................................................ 7-2
7.1.6 Visualizations – Image ........................................................................................................ 7-2
7.1.7 Subsystem – Tuners ........................................................................................................... 7-2
7.1.8 Subsystem – Demodulator / Decoder Mapping .................................................................. 7-3
7.1.9 RAMON – Master/Slave...................................................................................................... 7-3
7.1.10 RAMON – Report Edit....................................................................................................... 7-3
7.1.11 Audio – General ................................................................................................................ 7-4
7.2 Keyboard Shortcuts..................................................................................................................... 7-5
7.3 Third Party License Agreements ................................................................................................. 7-8
7.3.1 GLee.................................................................................................................................... 7-8
7.3.2 Dream DRM Receiver ......................................................................................................... 7-8
7.3.3 W inFFAD2Inst ..................................................................................................................... 7-9
7.3.4 FFTW .................................................................................................................................. 7-9
7.3.5 zlib ..................................................................................................................................... 7-10
7.3.6 OmniORB .......................................................................................................................... 7-10
7.3.7 Tcl...................................................................................................................................... 7-10
7.3.8 Tk....................................................................................................................................... 7-11
7.3.9 IncrTcl................................................................................................................................ 7-12
7.3.10 TclVFS............................................................................................................................. 7-13
7.3.11 Metakit............................................................................................................................. 7-14
7.3.12 Tile................................................................................................................................... 7-14
7.3.13 Tablelist ........................................................................................................................... 7-15
7.3.14 GNU General Public License .......................................................................................... 7-15
7.3.15 GNU Lesser General Public License .............................................................................. 7-25
3 4071.5546.32-08.00
Page 6

R&S GX430 Contents
8 Glossary ............................................................................................................................................. 8-1
4071.5546.32-08.00 4
Page 7

Contents R&S GX430
Figures
Figure 1: Online spectrum /waterfall....................................................................................................... 1-2
Figure 2: Classification / demodulation & decoding ............................................................................... 1-3
Figure 3: Demodulation & decoding of a Piccolo MK6 signal. ............................................................... 1-4
Figure 4: Decoding of Morse signal with Cyrillic or Arabic alphabet. ..................................................... 1-4
Figure 5: R&S GX430 Setup application................................................................................................ 2-1
Figure 6: R&S GX430 Setup application – Start Installation .................................................................. 2-2
Figure 7: Installation Welcome screen ................................................................................................... 2-3
Figure 8: Destination Folder selection.................................................................................................... 2-3
Figure 9: Select Installation Type page.................................................................................................. 2-4
Figure 10: Installation result ................................................................................................................... 2-5
Figure 11: Sample for documenting optional software functionality....................................................... 2-6
Figure 12: Firewall problems .................................................................................................................. 2-7
Figure 13: WAV File Options dialog ....................................................................................................... 3-4
Figure 14: Select Tuner dialog ............................................................................................................... 3-4
Figure 15: Select Audio Device dialog ................................................................................................... 3-5
Figure 16: File Export dialog................................................................................................................... 3-5
Figure 17: Select Job Components dialog for loading a job................................................................... 3-6
Figure 18: Select Job Components dialog for saving a job.................................................................... 3-6
Figure 19: About R&S GX430 ................................................................................................................ 3-8
Figure 20: The View toolbar ................................................................................................................... 3-8
Figure 21: The Visualizations toolbar ..................................................................................................... 3-8
Figure 22: The File toolbar ..................................................................................................................... 3-9
Figure 23: The File toolbar with open record/backlog menu .................................................................. 3-9
Figure 24: The Master/Slave toolbar.................................................................................................... 3-10
Figure 25: The Reporting toolbar.......................................................................................................... 3-11
Figure 26: Information on the RAMON report file................................................................................. 3-11
Figure 27: Information on the screenshot file ....................................................................................... 3-11
Figure 28: The GX430IS toolbar........................................................................................................... 3-11
Figure 29: The Digital Demodulation dock window .............................................................................. 3-12
Figure 30: The Tuner dock window ...................................................................................................... 3-13
Figure 31: The tuner Hardware/Software Reset tool button................................................................. 3-13
Figure 32: The Hardware Reset warning dialog................................................................................... 3-14
Figure 33: The Automatic Search and Classification dock window...................................................... 3-15
Figure 34: The Manage Paramer Sets dialog ...................................................................................... 3-16
Figure 35: The Spectrum dock window................................................................................................ 3-17
Figure 36: The Audio dock window ...................................................................................................... 3-19
Figure 37: The Classifier dock window................................................................................................. 3-20
Figure 38: The Spectrum tab – In full color range mode...................................................................... 3-21
Figure 39: Menus for display and tool selection................................................................................... 3-22
Figure 40: The Spectrum tab – In color range strip mode.................................................................... 3-22
Figure 41: The Spectrum tab – In simple color mode .......................................................................... 3-23
Figure 42: The Spectrum Background context menu........................................................................... 3-23
Figure 43: dBm / dBMV Selection ......................................................................................................... 3-23
Figure 44: The Zoom Operations toolbar ............................................................................................. 3-24
5 4071.5546.32-08.00
Page 8

R&S GX430 Contents
Figure 45: Measurement Tool .............................................................................................................. 3-25
Figure 46: Choices ............................................................................................................................... 3-25
Figure 47: Send selection to sub menu................................................................................................ 3-26
Figure 48: Show segments sub menu.................................................................................................. 3-26
igure 49: Set measurement tool to… sub menu................................................................................. 3-27
F
Figure 50: Waterfall Time Measuring Tool ........................................................................................... 3-27
Figure 51: Waterfall Time Measuring Tool ........................................................................................... 3-28
Figure 52: Zoom Tool ........................................................................................................................... 3-29
Figure 53: Color Adjust Tool................................................................................................................. 3-30
Figure 54: Color Adjust Tool Window................................................................................................... 3-30
Figure 55: Set Tuner Frequency from spectrum .................................................................................. 3-31
Figure 56: The Digital Demodulation tab with Eye diagram ................................................................. 3-32
Figure 57: The Decoding tab, showing Decoded Text ......................................................................... 3-33
Figure 58: The Classifier tab ................................................................................................................ 3-34
Figure 59: The pop-up menu within the Classifier tab.......................................................................... 3-35
Figure 60: The Bitstream Classification tab.......................................................................................... 3-37
Figure 61: The Automatic Search and Classification tab ..................................................................... 3-38
Figure 62: Menu for tool selection in the scan spectrum...................................................................... 3-38
Figure 63: The pop-up menu within the emission list........................................................................... 3-40
Figure 64: The Time Analysis tab......................................................................................................... 3-41
Figure 65: Tool selection of the Time Analysis tab............................................................................... 3-42
Figure 66: The Audio tab...................................................................................................................... 3-43
Figure 67: The All Messages tab of the Log Messages window .......................................................... 3-43
Figure 68: The Faults tab of the Log Messages window...................................................................... 3-44
Figure 69: The status bar ..................................................................................................................... 3-44
Figure 70: Settings dialog, General – General..................................................................................... 3-45
Figure 71: Settings dialog, General – Paths......................................................................................... 3-46
Figure 72: Settings dialog, Visualizations – Diagrams ......................................................................... 3-47
Figure 73: Settings dialog, Visualizations – Decoded Text .................................................................. 3-48
Figure 74: Settings dialog, Visualizations – Morse............................................................................... 3-49
Figure 75: Settings dialog, Visualizations – Image............................................................................... 3-50
Figure 76: Settings dialog, Subsystem – Tuners.................................................................................. 3-51
Figure 77: Settings dialog, Subsystem – Demodulator / Decoder Mapping ........................................ 3-52
Figure 78: Settings dialog, RAMON – Master/Slave ............................................................................ 3-53
Figure 79: Settings dialog, RAMON – Report Edit ............................................................................... 3-54
Figure 80: Settings dialog, Audio – General......................................................................................... 3-55
Figure 81: Demodulator selection........................................................................................................... 4-1
Figure 82: Parameter range visualization for parameter FFE order....................................................... 4-2
Figure 83: Parameters for the ASK2 demodulator ................................................................................. 4-3
Figure 84: Error in Log Messages after an incompatible Baud rate setting in ASK demodulator.......... 4-4
Figure 85: Parameters for the ATIS Demodulator.................................................................................. 4-4
Figure 86: Parameters for the CLOVER demodulator ........................................................................... 4-5
Figure 87: Parameters for the DRM demodulator .................................................................................. 4-5
Figure 88: Parameters for the DTMF demodulator ................................................................................ 4-6
Figure 89: Parameters for the FMSBOS demodulator ........................................................................... 4-6
Figure 90: Parameters for the FSK demodulator ................................................................................... 4-7
Figure 91: Parameters for the HELLSCHREIBER demodulator ............................................................ 4-8
4071.5546.32-08.00 6
Page 9

Contents R&S GX430
Figure 92: Parameters for the HF-FAX, PRESSFAX demodulator........................................................ 4-9
Figure 93: Parameters for the METEOSAT-WEFAX demodulator ........................................................ 4-9
Figure 94: Parameters for the McFSK demodulator............................................................................. 4-10
Figure 95: Parameters for the McPSK demodulator ............................................................................ 4-12
igure 96: Parameters for the MORSE demodulator ........................................................................... 4-13
F
Figure 97: Parameters for the MPT1327 demodulator......................................................................... 4-14
Figure 98: Parameters for the MTONE demodulator ........................................................................... 4-14
Figure 99: Parameters for the Packet Radio demodulator................................................................... 4-15
Figure 100: Parameters for the PACTOR demodulator ....................................................................... 4-16
Figure 101: Parameters for the POCSAG demodulator ....................................................................... 4-16
Figure 102: Parameters for the PSK demodulator ............................................................................... 4-17
Figure 103: Parameters for the SELCAL_5T demodulator .................................................................. 4-18
Figure 104: Parameters for the SSTV demodulator ............................................................................. 4-18
Figure 105: Parameters for the ZVEI-VDEW demodulator .................................................................. 4-19
Figure 106: Analog demodulator parameters....................................................................................... 4-20
Figure 107: Eye Diagram...................................................................................................................... 4-22
Figure 108: IQ Diagram ........................................................................................................................ 4-23
Figure 109: Demodulator Status .......................................................................................................... 4-24
Figure 110: Audio visualization............................................................................................................. 4-24
Figure 111: The pop-up menu within the Audio visualization............................................................... 4-25
Figure 112: Selecting a decoder ............................................................................................................ 5-1
Figure 113: Running without any decoder.............................................................................................. 5-1
Figure 114: Decoded Text visualization ................................................................................................. 5-2
Figure 115: The pop-up menu within the Decoded Text visualization ................................................... 5-3
Figure 116: Image Data visualization ..................................................................................................... 5-4
Figure 117: Image size selection for the history..................................................................................... 5-5
Figure 118: Buttons for rotating and mirroring images........................................................................... 5-5
Figure 119: Buttons for Drum & Phase .................................................................................................. 5-5
Figure 120: Image for Phase case ......................................................................................................... 5-6
Figure 121: Morse Data visualization ..................................................................................................... 5-7
Figure 122: Morse dictionary.................................................................................................................. 5-8
Figure 123: ATIS visualization................................................................................................................ 5-9
Figure 124: FMSBOS visualization....................................................................................................... 5-10
Figure 125: MPT1327 visualization...................................................................................................... 5-11
Figure 126: PacketRadio visualization ................................................................................................. 5-12
Figure 127: POCSAG visualization ...................................................................................................... 5-13
Figure 128: DTMF & SELCAL visualization ......................................................................................... 5-14
Figure 129: ZVEI-VDEW visualization.................................................................................................. 5-15
Figure 130: ACARS visualization ......................................................................................................... 5-16
Figure 131: The pop-up menu within the ACARS visualization ........................................................... 5-16
Figure 132: CLOVER visualization....................................................................................................... 5-17
Figure 133: The pop-up menu within the text part of the CLOVER visualization ................................. 5-18
Figure 134: The pop-up menu within the history part of the CLOVER visualization ............................ 5-18
Figure 135: PACTOR II and III visualization......................................................................................... 5-19
Figure 136: The pop-up menu within the text part of the PACTOR II and III visualization................... 5-19
Figure 137: The pop-up menu within the history part of the PACTOR II and III visualization.............. 5-19
Figure 138: The CRC editor of the PACTOR II and III visualization ................................................... 5-20
7 4071.5546.32-08.00
Page 10

R&S GX430 Contents
Figure 139: Configuring the license manager ........................................................................................ 6-2
Figure 140: Usage message displayed by haspdinst_v2_50.exe .......................................................... 6-3
Figure 141: Error message displayed by haspdinst_v2_50.exe ............................................................ 6-4
4071.5546.32-08.00 8
Page 11

Contents R&S GX430
Tables
Table 1: GX430 options .......................................................................................................................... 2-6
Table 2: Applications and ports of the GX430 subsystem ..................................................................... 2-7
Table 3: Dependency between spectrum Length and Lines per second ............................................. 3-18
Table 4: Parameter restrictions for the ASK2 demodulator.................................................................... 4-4
Table 5: Parameter restrictions for the FSK demodulator...................................................................... 4-8
Table 6: Parameter restrictions for the McFSK demodulator ............................................................... 4-11
Table 7: Parameter restrictions for the McPSK demodulator............................................................... 4-13
Table 8: Parameter restrictions for the MTONE demodulator.............................................................. 4-15
Table 9: Parameter restrictions for the PSK demodulator.................................................................... 4-18
Table 10: Settings, General – General................................................................................................... 7-1
Table 11: Settings, General – Paths ...................................................................................................... 7-1
Table 12: Settings, Visualizations – Decoded Text................................................................................ 7-2
Table 13: Settings, Visualizations – Morse ............................................................................................ 7-2
Table 14: Settings, Visualizations – Image ............................................................................................ 7-2
Table 15: Settings, Subsystem – Tuners ............................................................................................... 7-2
Table 16: Settings, RAMON – Master/Slave .......................................................................................... 7-3
Table 17: Settings, RAMON – Report Edit ............................................................................................. 7-3
Table 18: Settings, Audio – General ...................................................................................................... 7-4
Table 19: General Shortcuts................................................................................................................... 7-5
Table 20: Shortcuts – AS&C Tab ........................................................................................................... 7-5
Table 21: Shortcuts – Spectrum Tab - Tools.......................................................................................... 7-6
Table 22: Shortcuts – Spectrum Tab – Segment Processing - Demodulator ........................................ 7-6
Table 23: Shortcuts – Spectrum Tab – Segment Processing – Analysis............................................... 7-6
Table 24: Shortcuts – Spectrum Tab – Segment Processing – Classification Results.......................... 7-7
Table 25: Shortcuts – Time Analysis Tab............................................................................................... 7-7
Table 26: Special Shortcuts.................................................................................................................... 7-7
Table 27: Glossary ................................................................................................................................. 8-1
9 4071.5546.32-08.00
Page 12

Page 13

Characteristics R&S GX430
1 Characteristics
The R&S®GX430 provides a signal overview using a high-speed spectrum/waterfall display; it supports
the monitoring of known signals (demodulation and decoding to content level) and supports
surveillance/search operation by detecting signals of interest and performing a classification
(recognition of modulation type and transmission system/code) automatically.
For complex (very dense, weak, or disturbed) signal scenarios, the user can overrule the automatic
signal processing and set up the classifier or demodulator/decoder to the signal of interest manually. An
additional time domain analysis provides manual measurement of technical signal parameters.
The search and classify application provides a fully automatic mode to scan a frequency range, detect
all signals of interest, classify these signals and store the results for later processing.
Signal data (digital IF) can be recorded on the computer hard disk and replayed in offline mode for
processing.
®
The R&S
• Signal acquisition and receiver control
GX430 offers the following:
• Manual signal measurement
• Automatic modulation type and transmission system classification
• Comprehensive library of demodulators and decoders
• Automatic search and classification application
• Signal recording and replay on/from hard disk
®
The R&S
decoding of digital and analog IF signals. The software provides powerful signal analysis and signal
processing functions running on an MS Windows PC connected to modern Rohde & Schwarz receivers
via LAN or to any other receivers via soundcard audio input.
GX430 is a standalone software solution for analysis, classification, demodulation, and
1.1 R&S®GX430 Concept and Workflow
The R&S®GX430 processes digital IF signal data, covering the following:
• Online digital IF data (AMMOS IF format) provided by various Rohde & Schwarz receivers
(EM050, EM510, EM550, ESMB, EB200, ESMD)
• Online analog IF data digitized via soundcard
• Offline replay of digital IF data (AMMOS IF format); the signal sample can be an IF file recorded
with the R&S
for narrowband/wideband interception)
• Offline replay of WAV file
®
GX430 or an imported IF file (e.g. from the R&S®GX420 recording component
1-1 4071.5546.32-08.00
Page 14
R&S GX430 Characteristics
Processing of signal data and calculation of a spectrum/waterfall
The frequency range is presented using a real time waterfall up to 1000 lines/s. Signal attributes can be
measured by using time and frequency axis cursors.
Signal recording and replay on/from hard disk
By activating the IF recording, a signal sample is stored on the computer hard disk for later IF replay or
IF export (such as to the R&S
®
GX400 or the R&S®GX410 system).
By using an audio demodulator, (analog) emissions can be listened to and recorded to WAV files on the
computer hard disk.
Figure 1: Online spectrum /waterfall
Manual or automatic demodulation and decoding
Demodulators and decoders can be set manually by the operator or automatically by the R&S
modulation and transmission system classifier. For a list of demodulators and decoders included in the
®
GX430, please refer to the datasheet. This list will be continuously expanded.
R&S
®
GX430
Customer-specific decoders
Customer-specific decoders (developed with the R&S
customer-specific demodulators can be installed on the R&S
®
GX400ID decoder development equipment) and
®
GX430 to expand the
demodulation/decoding capability.
®
Powerful R&S
The R&S
®
AMMOS classification unit
GX430 contains the powerful R&S®AMMOS classification unit for the HF and VHF/UHF
frequency range and can recognize the modulation type and transmission system of a huge variety of
analog and digital signals.
The classification algorithm provides a segmentation and modulation analysis result. The segmentation
process determines the accurate center frequency and bandwidth of the signal. The modulation
analysis determines the modulation type as well as all relevant modulation parameters (symbol rate,
frequency shift, etc.).
Comprehensive library of demodulators and decoders
®
The classifier results are used to automatically parameterize a demodulator from the R&S
demodulation library. The resulting symbol/bit stream can be analyzed by using the transmission
system recognition and can be decoded by using the decoders of the R&S
®
AMMOS decoding library.
AMMOS
4071.5546.32-08.00 1-2
Page 15

Characteristics R&S GX430
Customer-specific decoders which are developed with the
®
R&S
GX400ID decoder development equipment and are installed on the R&S®GX430 are also used
in the classification process. Symbol/bit stream data can be exported for further bit stream analysis with
the R&S
Manual measurements of emission characteristics
®
GX410 system.
Figure 2: Classification / demodulation & decoding
Manual measurements of emission characteristics (bandwidth, duration, S/N ratio) can be performed
with measurement cursors in the zoomable spectrum. The filter bandwidth is automatically adapted to
filter out all disturbing out-of-band emissions and noise.
Emission analysis
®
Emissions are analyzed using the time domain analysis part of the R&S
GX430. Zoomable level,
envelope, frequency, phase, and spectrum plots make it possible to measure technical parameters
such as level range, frequency shift, and symbol rate.
Demodulation & decoding
®
Demodulators and decoders can be set manually by the operator or automatically by the R&S
GX430
modulation and transmission system classifier.
®
Customer specific decoders (developed with R&S
installed on R&S
®
GX430 to extend the decoding capability.
Customer specific demodulators can be installed on R&S
GX400ID decoder development equipment) can be
®
GX430 to extend the demodulation
capability.
1-3 4071.5546.32-08.00
Page 16

R&S GX430 Characteristics
Figure 3: Demodulation & decoding of a Piccolo MK6 signal.
Figure 4: Decoding of Morse signal with Cyrillic or Arabic alphabet.
Automatic signal search and classification
®
The R&S
signals are automatically processed with the R&S
classifier. If connected to a Rohde & Schwarz receiver, the search process makes use of the highperformance frequency scan mode.
GX430 can define a frequency range for automatic signal search and classification. Detected
®
GX430 modulation and transmission system
Detection and classification results
The detection and classification results are displayed in a list together with all measured parameters
(e.g. center frequency, bandwidth, modulation type, shift, baud rate, code). Using this list, the operator
can select signals for reclassification or demodulation/decoding based on the measured signal
parameters. The list can be exported from the R&S
The chapter Operation
in this manual will provide you with detailed information on the usage.
®
GX430.
4071.5546.32-08.00 1-4
Page 17

Preparations for Use R&S GX430
2 Preparations for Use
2.1 Software Installation
nsert the R&S GX430 Installation CD. If autorun is enabled on the CD drive, then the R&S GX430
I
Setup application will automatically be started. In the case that autorun is disabled or the R&S GX430
Setup application does not start, open the CD drive in Explorer® and double-click on
ApplicationStarter.exe to start the R&S GX430 Setup application.
Figure 5: R&S GX430 Setup application
From the R&S GX430 Setup application window you can start the R&S GX430 installation, open the
R&S GX430 Quick Start Guide and Manual, read the Release Notes for this version of R&S GX430 and
browse the provided additional documentation.
Simply click an entry with the left mouse button to activate the associated action. To start e.g. the R&S
GX430 installation click the Start Installation entry.
2-1 4071.5546.32-08.00
Page 18

R&S GX430 Preparations for Use
Figure 6: R&S GX430 Setup application – Start Installation
After clicking Start Installation the R&S GX430 installation is started. Carefully read the information
presented on each page of the installation wizard that will guide you through the installation. Press Next
to proceed to the next page. You can use the Back button to go back to the previous page and change
the settings you made there. Use Cancel to exit the installation wizard without installing R&S GX430.
4071.5546.32-08.00 2-2
Page 19

Preparations for Use R&S GX430
Figure 7: Installation Welcome screen
Click Next on the Welcome Screen to proceed to the Destination Folder selection.
Figure 8: Destination Folder selection
By default R&S GX430 is installed into the GX430 subfolder below the Rohde-Schwarz program group
of your <Program Files> folder. This is C:\Program Files\Rohde-Schwarz\GX430 on a typical system.
2-3 4071.5546.32-08.00
Page 20

R&S GX430 Preparations for Use
You can change the destination folder by clicking the Browse button and selecting another folder in the
subsequent dialog. It is recommended, however, that you keep the default destination folder. R&S
X430 requires about 150 MB hard disk space.
G
Click the Next button to proceed to the Select Installation Type page.
Figure 9: Select Installation Type page
On the Select Installation Type page you can select the type of the installation. It is recommended that
you use the Typical setup. Click Next to start copying the files to the previously selected destination
folder. When the installation is successfully finished the Installation Result page will appear.
4071.5546.32-08.00 2-4
Page 21

Preparations for Use R&S GX430
Figure 10: Installation result
Click Finish to exit the installer. Additionally to copying the required files, the installation will have
created an entry in the Start menu and a shortcut on the desktop.
2-5 4071.5546.32-08.00
Page 22

R&S GX430 Preparations for Use
2.2 License Management
The R&S GX430 product consists of a base package and several additional options:
Equipment
Type
Stock No. Designation of License/Option
GX430
Options
GX430RX
GX430MA
GX430SR
GX430SR-E
GX430DM
GX430DM-E
GX430DC
GX430DC-E
GX430MM
GX430SC
4071.5500.02 AMMOS PC based signal analysis & signal processing
4071.5700.02 Control for receivers (requires R&S receiver EM050, EM510,
EM550, ESMB, EB200)
4071.5717.02 Automatic modulation classification HF & VHF/UHF
4071.5723.02 Automatic transmission system / code classification HF & VHF/UHF
(requires R&S® GX430MA)
4071.5730.02 Extended classification capability for automatic transmission system
and code recognition HF & VHF/UHF extension (requires R&S®
GX430SR)
4071.5746.02 Demodulation HF & VHF/UHF
4071.5752.02 Extended capability for demodulation HF & VHF/UHF (requires
R&S® GX430DM)
4071. 5769.02 Decoding HF & VHF/UHF (requires R&S® GX430DM)
4071. 5775.02 Extended capability for decoding HF & VHF/UHF (requires R&S®
GX430DC)
4071.5781.02 Manual modulation analysis
4071.5798.02 Search & classify application (requires R&S® GX430MA and
optional R&S® GX430SR)
GX430IS
Some functionality described in this manual is only enabled in R&S GX430 if the required license has
been purchased. In this case the corresponding chapter or section will be headed by the following
figure.
For unlocking any additionally purchased license in the software you will receive an executable to
perform the update to your locking mechanism (the Aladdin HASP SRM dongle). Simply double-click
the executable and press Apply update. Make sure the Aladdin dongle is connected to your system
and GX430 is not running. The changes in the licensing will be transferred to the dongle and will be
available at the next start of R&S GX430. You will always have to apply all the updates that have been
sent to you in the correct order of creation. Every update is bound to a specific Aladdin HASP SRM
hardware dongle. Updates can only be applied once.
4071.5817.02 GX430 ITU SM1600 modulation analysis
Table 1: GX430 options
The functionality “XXX” will only be available if the corresponding option
key has been acquired. Please check with your vendor for purchasing this
option if required.
Figure 11: Sample for documenting optional software functionality
4071.5546.32-08.00 2-6
Page 23

Preparations for Use R&S GX430
2.3 Firewall
The R&S GX430 Subsystem needs for operation an IP address and a number of network ports.
Normally, the IP address is “local host” and the port range begins at 23376 (root port) and ends at
23411. In addition, the UDP port 23375 is used for broadcasting.
If you have installed a firewall on your computer, it may happen that the firewall blocks communication
on this IP address and the ports mentioned above.
Figure 12: Firewall problems
The following table shows the applications and ports of the GX430 subsystem. By using this information
you can parameterize your firewall with the exceptions to be made for proper operation of the
subsystem.
Executable Purpose IP address Port Protocol
rs_ComMan.exe General operationLocal host Root port TCP
rs_isd.exe Tuner data input Network adapter Root port + 10 UDP
rs_IPCCtrl.exe Tuner commands Network adapter - TCP
rs_FlexLinkDriver.exe Data streams Local host Complete port range TCP
Table 2: Applications and ports of the GX430 subsystem
2-7 4071.5546.32-08.00
Page 24

Page 25

Operation R&S GX430
3 Operation
3.1 Introduction
3.1.1 Starting the Application
The program first starts the processes making up the signal processing subsystem and establishes a
connection to it. Next, a connection to the Master/Slave server is established, provided that the GX430
application was configured to do that on startup (see the Settings
splash screen is shown on the display. After that the main window appears, whose components are
described in the next section.
The functionality “digital demodulation” will only be available if the
corresponding option key has been acquired. Please check with your
vendor for purchasing this option.
If you have no valid license for the functionality “digital demodulation” then the main window will be
displayed without the components related to demodulation of digital signals.
dialog for details). During this time, a
The functionality “decoding” will only be available if the corresponding
option key has been acquired. Please check with your vendor for
purchasing this option if required.
If you have no valid license for the functionality “decoding” then the main window will be displayed
without the decoding-related components. There is, however, an exception from this rule: The
Decoding tab, which is used for displaying system visualizations, will also appear if at least one of the
available demodulators provides data to be visualized in this tab.
The functionality “classification” will only be available if the
corresponding option key has been acquired. Please check with your
vendor for purchasing this option if required.
If you have no valid license for the functionality “classification” then the main window will be displayed
without the classification-related components.
The functionality “system recognition” will only be available if the
corresponding option key has been acquired. Please check with your
vendor for purchasing this option if required.
If you have no valid license for the functionality “system recognition” then the main window will be
displayed without the components related to system recognition (i.e., bitstream classification).
The functionality “tuner” will only be available if the corresponding
option key has been acquired. Please check with your vendor for
purchasing this option if required.
If you have no valid license for the functionality “tuner” then the main window will be displayed without
the tuner-related components.
3-1 4071.5546.32-08.00
Page 26

R&S GX430 Operation
The functionality “automatic search and classification” will only be
available if the corresponding option key has been acquired. Please
check with your vendor for purchasing this option if required.
If you have no valid license for the functionality “automatic search and classification” then the main
window will be displayed without the components related to automatic search and classification.
The functionality “manual modulation analysis” will only be available if
the corresponding option key has been acquired. Please check with your
vendor for purchasing this option if required.
If you have no valid license for the functionality “manual modulation analysis” then the main window will
be displayed without the components related to manual modulation analysis.
The functionality “GX430 ITU SM1600 modulation analysis” will only be
available if the corresponding option key has been acquired. Please
check with your vendor for purchasing this option if required.
If you have no valid license for the functionality “GX430 ITU SM1600 modulation analysis” then the
main window will be displayed without the components related to the R&S GX430IS application.
4071.5546.32-08.00 3-2
Page 27

Operation R&S GX430
3.2 The Main Window
The R&S GX430 main window consists of the following components:
• the menu bar, with the menus File, Edit, View, Visualizations, and Help;
• the View toolbar, containing buttons designed for toggling the visibility of some parts of the main
window;
• the Visualizations toolbar, with a button that clears the visualizations and another one that
opens the folder containing visualization results;
• the File toolbar, used for selecting and processing an input source (a file, tuner, or audio
device), as well as for recording the data being processed;
• the Master/Slave toolbar, enabling you to send a job or the current tuner frequency and
bandwidth to another Master/Slave client;
• the Reporting toolbar, containing a button that creates a report file for the RAMON system and
another one that produces a screenshot of the GX430 application;
• the GX430IS toolbar, containing a button that passes the current input file to the R&S GX430IS
application;
• the dock window Digital Demodulation, used for selecting a demodulator and setting its
parameters, as well as for choosing one of the available decoders;
• the dock window Tuner, used for setting the parameters of the currently selected tuner (if any);
• the doc window Automatic Search and Classification, used for setting the parameters related
to the functionality automatic search and classification;
• the dock window Spectrum, used for setting parameters related to the visualization of FFT
processor spectrum data;
• the dock window Audio, used for setting the parameters of the analog demodulator;
• the dock window Classifier, used for setting classifier-related parameters;
• the Spectrum tab, used for visualization of FFT processor spectrum data;
• the Digital Demodulation tab, used for various visualizations of data streams;
• the Decoding tab, used for displaying system visualizations;
• the Classifier tab, used for displaying the results provided by the classifier;
• the Bitstream Classification tab, used for starting/stopping the bitstream classification and
displaying its results;
• the Automatic Search and Classification tab, used for visualization of data generated by the
automatic search and classification;
• the Time Analysis tab, used for manual modulation analysis;
• the Audio tab, used for visualization of audio data;
• the dock window Log Messages, displaying error, warning, and info messages as well as
subsystem faults;
• the status bar, displaying status information and status tips.
The visibility of the View, Visualizations, and File toolbars as well as of the dock windows Digital
Demodulation, Tuner, Automatic Search and Classification, Spectrum, Audio, Classifier, and Log
Messages can be toggled by using the View menu. The above-mentioned dock windows can also be
hidden and shown with the aid of the buttons contained in the View toolbar.
The dock windows for separate modules mostly offer the possibility to switch the corresponding module
on or off by checking or unchecking the corresponding check box in the dock window. Some modules
produce more processor load than others. To prevent the processor load from getting too high and thus
the processing from slowing down, it is advisable to always disable the processing in unneeded
modules. Read the paragraphs about job files in the next section to learn how you can easily switch
between different enabled/disabled configurations for all available modules.
3-3 4071.5546.32-08.00
Page 28

R&S GX430 Operation
3.2.1 The File Menu
The File menu consists of the following entries:
• Open File: This menu item brings up a standard file selection dialog, used to open a file for
processing by the signal subsystem. In the case of a WAV-file, another dialog window is
pened, for setting the file options shown below.
o
Figure 13: WAV File Options dialog
• Select Tuner: This menu item is only available in the presence of a valid license for Rohde &
Schwarz tuner support. It opens the tuner selection dialog, used to select one of the currently
configured tuners as input source. The tuners can be configured with the aid of the Settings
dialog.
Figure 14: Select Tuner dialog
• Select Audio Device: This menu item opens the audio device selection dialog, used to select
one of the available audio devices as input source and set its parameters.
4071.5546.32-08.00 3-4
Page 29

Operation R&S GX430
Figure 15: Select Audio Device dialog
To get optimal results using an audio device, the following points should be paid attention to:
• Ensure that the audio device is not overdriven, otherwise you will get a comb spectrum
or flickering spectrum. Therefore the level of the audio output of the tuner and/or the
input level of the audio device should be adjusted.
• Ensure that no squelch is enabled at the audio output of the tuner or the squelch level
is set to minimum.
• Select the correct channel of the audio device. Normally, the tuner will output a mono
signal, so “mono” should be selected in the audio device selection dialog. The first or
second channel (left or right on the input plug) should be set. The setting “stereo” is for
complex audio signals, available only with accordingly equipped tuners. The correct
order (I/Q or Q/I) according to the input plug (left/right) should be set.
• Select the correct bandwidth for the audio output of the tuner and the correct
modulation type (normally CW or IF).
• To get the resulting audio output of the tuner in the middle of the resulting spectrum in
case of “mono”, the BFO must be a quarter of the sampling rate of the audio device.
• Common audio devices have a DC offset which results in a peak on the left side in
case of “mono” if the bandwidth is half of the sampling rate of the audio device or in the
middle in case of “stereo”. This is no malfunction of GX430.
• Export: This menu item displays a submenu, with the items Export as WAV-file… and Export
as AID-file…. The first submenu item is enabled if (and only if) the current input source is an IF-
file that is no WAV-file. Similarly, the second submenu item is enabled if (and only if) the current
input source is a WAV-file. Both submenu items bring up a standard file save dialog, used to
enter the name of the target file. The progress of the file conversion is displayed in a dialog like
the one shown below, which can also be used to cancel this operation.
Figure 16: File Export dialog
• Load Job: This menu item displays a submenu, with the items Entire Job… and Selected
Components…. Both submenu items bring up a standard file selection dialog, used to open a
3-5 4071.5546.32-08.00
Page 30

R&S GX430 Operation
job file. In case of the Selected Components… item, after choosing the desired job file, a
further dialog box appears, for selecting the job components to be loaded.
Figure 17: Select Job Components dialog for loading a job
The Use relative path name for input file checkbox in this dialog appears in disabled state. It
specifies whether the name of the input file as contained in the job file is relative to the latter or
not. This might prove useful when exchanging jobs along with input files between workstations.
• Save Job: This menu item displays a submenu, with the items Entire Job… and Selected
Components…. Both submenu items bring up a standard file dialog, used to select the target
job file. In case of the Selected Components… item, after choosing the target job file, a further
dialog box appears, for selecting the job components to be saved in that file.
Figure 18: Select Job Components dialog for saving a job
The Use relative path name for input file checkbox in this dialog appears in enabled state if
(and only if) it is possible to save the name of the input file relative to the job file. Whether it
appears in checked or unchecked state depends on the value of the corresponding user setting
(see the Settings
dialog for details). The same setting determines whether the menu item Entire
Job… should use a relative path name for the input file when possible (this is the default).
Relative input file names might prove useful when exchanging jobs along with input files
between workstations.
4071.5546.32-08.00 3-6
Page 31

Operation R&S GX430
• Recently Opened Files: This menu item displays a submenu, whose entries are the names of
the most recently opened input files. The number of entries in this submenu can be set with the
aid of the Settings dialog; its initial value is 8. By selecting one of these submenu entries, the
corresponding file will be opened for processing by the signal subsystem.
• Recently Opened Job Files: This menu item displays a submenu, whose entries are the
names of the most recently opened job files. The number of entries in this submenu can be set
with the aid of the Settings
entries, all the job components contained in the corresponding file will be loaded.
• Exit: This menu item terminates the R&S GX430 application, after shutting down the signal
processing subsystem.
dialog; its initial value is 8. By selecting one of these submenu
3.2.2 The Edit Menu
The single Settings… item of the Edit menu is used to open the Settings dialog.
3.2.3 The View Menu
The View menu consists of the following entries:
• Reset layout: This menu item restores the default order and positions of the tabs and dock
windows.
• Flip layout orientation: This menu item changes the tab rows to columns and vice-versa.
• View Toolbar, Visualizations Toolbar, File Toolbar, Master/Slave Toolbar, and Reporting
Toolbar: These menu items toggle the visibility of the respective toolbars.
• Hide/Show Parameter Dock Windows: This menu item toggles the visibility of all parameter
dock windows (Digital Demodulation, Tuner, Automatic Search and Classification,
Spectrum, Audio, and Classifier) at once.
• Digital Demodulation, Tuner, Automatic Search and Classification, Spectrum, Audio, and
Classifier: These menu items toggle the visibility of the respective dock windows.
• Log Messages: This menu item toggles the visibility of the Log Messages dock window.
3.2.4 The Visualizations Menu
The Visualizations menu consists of the following entries:
• Clear Visualizations: This menu item clears the output of the currently active visualizations.
• Open Results Folder: This menu item opens the folder containing visualization results (like
images, Morse text, WAV files, decoded text, and emission list files).
3.2.5 The Help Menu
The Help menu consists of the following items:
• Help Topics: This entry displays the main online help page.
• Context Help: Displays the online help information corresponding to the GUI component that
currently has the keyboard focus.
• Open Log Files Folder: This menu item opens the folder containing the log files.
• View Current Log File: This menu item displays the current log file in tabular form, with the aid
of the LogViewer application, which is part of the R&S GX430 software distribution.
• About R&S GX430: This menu item displays version and copyright information about the R&S
GX430 application. In the lower part of the dialog box, information about the installed options is
displayed. The Export… button retrieves various license-related data from the USB dongle and
saves them in a directory chosen interactively with the aid of a standard directory selection
dialog box.
3-7 4071.5546.32-08.00
Page 32

R&S GX430 Operation
Figure 19: About R&S GX430
3.2.6 The View Toolbar
The buttons contained in this toolbar offer the same functionality as the items Hide/Show Parameter
Dock Windows, Digital Demodulation, Tuner, Automatic Search and Classification, Spectrum,
Audio, Classifier, and Log Messages of the View menu
dock windows.
Figure 20: The View toolbar
: they are used to toggle the visibility of the
3.2.7 The Visualizations Toolbar
This toolbar contains two buttons, offering the same functionality as the two entries Clear
Visualizations and Open Results Folder of the Visualizations Menu
Figure 21: The Visualizations toolbar
.
4071.5546.32-08.00 3-8
Page 33

Operation R&S GX430
3.2.8 The File Toolbar
This toolbar is used for selecting and processing an input source.
Figure 22: The File toolbar
Figure 23: The File toolbar with open record/backlog menu
The File toolbar contains the following components:
• The Open File button, having the same functionality as the item of the same name of the File
menu: it brings up a standard file selection dialog, used to open a file for processing by the
signal subsystem.
• The Select Tuner button, having the same functionality as the item of the same name of the File
menu: it opens the tuner selection dialog, used to select one of the currently configured tuners
as input source. This button is only available in the presence of a valid license for Rohde &
Schwarz tuner support.
• The Select Audio Device button, having the same functionality as the item of the same name of
the File menu
audio devices as input source and set its parameters.
• The AS&C button, used to switch the operating mode from normal to AS&C (Automatic Search
& Classification).
• The Start button: Starts the signal processing for the current input source (file, tuner, or audio
device). If your keyboard is equipped with multimedia keys, then this command is also available
as a keyboard shortcut. You can then use the Play/Pause key on your keyboard to start and/or
pause the signal processing. Please note that not all multimedia keyboards offer all possible
multimedia keys.
• The Pause button: Toggles a break of the signal processing for the currently opened input file.
It also toggles a break of the AS&C processing. If your keyboard is equipped with multimedia
keys, then this command is also available as a keyboard shortcut. You can then use the
Play/Pause key on your keyboard to start and/or pause the signal or AS&C processing. Please
note that not all multimedia keyboards offer all possible multimedia keys. If the current input
source is a tuner or audio device then this button is disabled.
• The Stop button: Stops the signal processing for the current input source (file, tuner, or audio
device). It also stops the AS&C processing (if active), causing a return into the normal operating
mode. If your keyboard is equipped with multimedia keys, then this command is also available
as a keyboard shortcut. You can then use the Stop key on your keyboard to stop the signal
processing. Please note that not all multimedia keyboards offer all possible multimedia keys.
• The Record button: Starts/stops the recording of the data being processed. Depending on the
signal being processed, this button offers a drop-down menu that can be used to set a backlog
: it opens the audio device selection dialog, used to select one of the available
3-9 4071.5546.32-08.00
Page 34

R&S GX430 Operation
time that will be used the next time a recording is started. If your keyboard is equipped with
multimedia keys, then this command is also available as a keyboard shortcut. You can then use
he Record key on your keyboard to start and/or pause the signal processing using the backlog
t
time that was selected last. Please note that not all multimedia keyboards offer all possible
multimedia keys.
• The Loop button: Toggles the looping of the playback during signal processing. If the current
input source is a tuner (in normal operating mode) or audio device then this button is disabled. It
also toggles the looping of the AS&C parameter sets during AS&C processing.
• The Playback Speed input field: Here you can enter the speed of the playback during signal
processing. Again, if the current input source is a tuner or audio device then this field is
disabled.
• The Current Playback Speed display field: Shows the current speed of the playback, as
reported by the subsystem; this value can be different from the one entered by the user.
• The Fastest Speed button: Toggles the signal processing at the highest possible speed. If the
current input source is a tuner or audio device then this button is disabled.
• The Playback Position slider, used to control and visualize the position within the input file
during signal processing. Again, if the current input source is a tuner or audio device then this
field is disabled.
• The Current Playback Position display field: Shows the current position within the input
stream during signal processing.
3.2.9 The Master/Slave Toolbar
Figure 24: The Master/Slave toolbar
The Master/Slave toolbar enables you to send a job or the current tuner frequency and bandwidth to
another Master/Slave client.
The names of the clients that are currently connected to the Master/Slave server are displayed in the
Client combo box, which is used to select the destination client before sending a job or a tuner
frequency and bandwidth. Those clients that are able and willing to receive messages from this GX430
instance appear in dark green color, while the others in gray. The first item, displaying a dash, stands
for “no client selected”. If the GX430 application itself is not connected to the Master/Slave server (see
the Settings
select a client that is not able or willing to accept messages will be rejected by resetting the selection to
the item displaying a dash.
The Tuner for sent jobs combo box is used to specify the tuner name to be included in jobs sent to
other clients. The first item is named Unspecified and means that the destination client shall select the
tuner to be used as input source when receiving the job. Another entry with a special meaning is the
second one, displaying the text Current tuner; it will insert the name of the current tuner into the jobs
sent to other clients. The remaining items display the names and IP addresses of the currently
configured tuners.
The Send Job button will only be enabled after selecting a destination client from the Client combo
box. It will send the contents of a complete temporary job file (see the Save Job
for details) to the destination client.
dialog for details) then the combo box will not contain any other items. Any attempt to
item of the File menu
The Send Freq/Bw button is only enabled if a destination client from the Client combo box has been
selected and the current input source is a tuner. It sends the tuner frequency and bandwidth to the
specified Master/Slave client.
4071.5546.32-08.00 3-10
Page 35

Operation R&S GX430
3.2.10 The Reporting Toolbar
Figure 25: The Reporting toolbar
The Reporting toolbar consists of two buttons:
• The Create Report button creates a report file in XML format for the RAMON system. The file
will contain, among others, the current tuner, demodulator, decoder, and classifier parameters,
along with classifier results and some other data describing various result files created by the
GX430 application. The report file, whose name is formed from the current date and time, will
be placed in the folder specified in the Settings
referred to in the report will be copied into the folder specified as the Results directory. After
clicking the Create Report button, the complete report file name will be displayed in an
information dialog:
as the Reports directory. The result files
Figure 26: Information on the RAMON report file
Please note that the Report Edit functionality is still work in progress. Especially, writing
references to various result files and copying these files into the above-mentioned directory are
not yet implemented.
• The Screenshot button produces a screenshot of the GX430 application and saves it in PNG
format in a file whose name is formed from the current date and time and which is placed in the
subdirectory screenshots of the folder specified in the Settings
The complete screenshot file name will be displayed in an information dialog:
Figure 27: Information on the screenshot file
as the directory for Results.
3.2.11 The GX430IS Toolbar
This toolbar will only be available if the option key for the functionality
“GX430 ITU SM1600 modulation analysis” has been acquired. Please
check with your vendor for purchasing this option if required.
Figure 28: The GX430IS toolbar
3-11 4071.5546.32-08.00
Page 36

R&S GX430 Operation
The GX430IS toolbar consists of a single button used to pass the current input file to the R&S GX430IS
application, to be opened by the latter for modulation analysis. If GX430IS is not yet running then it is
started automatically. Please note that this button will only be enabled if the input source is a file whose
type is supported by GX430IS.
3.2.12 The Digital Demodulation Dock Window
This window will only be available if the option key for the functionality
“digital demodulation” has been acquired. Please check with your
vendor for purchasing this option if required.
The Decoder combo box within this window will only be available if the
option key for the functionality “decoding” has been acquired. Please
check with your vendor for purchasing this option if required.
The Digital Demodulation dock window is used for selecting a demodulator and setting its parameters,
as well as for choosing one of the available decoders, depending on the currently selected
demodulator.
Figure 29: The Digital Demodulation dock window
The red Record button toggles the recording of the symbol data or transmission system result data (for
demodulators providing this type of data). It is deactivated if the currently selected demodulator
provides neither of these data streams. For a detailed description of the other components of this
window see the sections Digital Demodulator Parameters and Decoder Selection.
Most demodulators use a Frequency offset parameter. This parameter can also be set graphically
using the measurement tool in the Spectrum tab
selection to sub menu of the context menu. If the demodulator also uses a Bandwidth parameter then
this parameter will be set simultaneously when setting the Frequency offset through the spectrum.
Please read the section on the Spectrum tab
process further by using keyboard shortcuts in the spectrum.
4071.5546.32-08.00 3-12
and selecting Digital Demodulator from the Send
for further information, especially on how to simplify this
Page 37

Operation R&S GX430
3.2.13 The Tuner Dock Window
This window will only be available if the option key for the functionality
“tuner” has been acquired. Please check with your vendor for purchasing
this option if required.
The Tuner dock window is used for setting the parameters of the currently selected tuner (if any). This
window will only appear if you have a valid license for Rohde & Schwarz tuner support, and it will only
be enabled by selecting one of the available tuners as input source for signal processing.
Figure 30: The Tuner dock window
For parameters that can be adjusted in spin boxes or in the special frequency edit field, the allowed
parameter ranges are displayed in a tool-tip. The tool-tip window appears when moving the mouse
cursor over the value field of the particular parameter.
The type of the currently selected tuner is shown in the display-only field Tuner type. It depends on the
tuner type whether all or only a subset of the parameters described below will be present in the window.
To the right of the field displaying the tuner type there is a tool button that enables you to reset the tuner
in case it doesn’t work as expected.
Figure 31: The tuner Hardware/Software Reset tool button
By pressing the Hardware Reset item (which is the default one), the warning dialog shown below will
be popped up, giving you a chance to cancel this operation, which causes the tuner to reboot. A
Software Reset will only set the tuner parameters to their default values, without rebooting the device.
3-13 4071.5546.32-08.00
Page 38

R&S GX430 Operation
Figure 32: The Hardware Reset warning dialog
The Frequency can be entered with the aid of the keyboard or mouse (including the mouse wheel).
The supported frequency range depends on the tuner type. Take a look at the section about the
Spectrum tab
The Bandwidth can be selected from a tuner type specific list of values between 100 and 1000000 Hz.
The Preselection mode can have one of the values Normal, Low noise, and Low distortion. It is
used to adapt the tuner to the different receiving conditions.
By keeping the Automatic attenuation deactivated, you can specify an Attenuation value between 0
and 25 or 40 dB, depending on the tuner type. You may want to activate it, in order to tie the
attenuation to the strength of the input signal; in this case, you can set the Attenuation hold time to a
value from a tuner type specific range (usually between 0 and 10 sec), to prevent the attenuation value
from dropping too early when the input level decreases. Instead of the numerical attenuation value;
some tuners (like the ESMB and EB200) support only the Attenuation state, which can be set to on or
off with the aid of a checkbox.
to learn how the tuner frequency can be set graphically via the spectrum visualization.
The Gain control mode can have one of the values AGC and MGC. By selecting AGC (Automatic
Gain Control), the gain control will be automatically generated; in this case you can set the Gain
control time to one of the values Default, Fast, and Slow. You may want to select MGC (Manual Gain
Control); in this case you can specify a Gain control value from a tuner type specific range (usually
between -30 and 130 dBMV).
When all parameters are set to the desired values, they have to be sent to the tuner with the Apply
button. If the Auto Apply checkbox is activated then the values are automatically applied after one
second following the last input.
3.2.14 The Automatic Search and Classification Dock Window
This window will only be available if the option key for the functionality
“automatic search and classification” has been acquired. Please check
with your vendor for purchasing this option if required.
The Automatic Search and Classification dock window is used for editing parameter sets for the
operating mode of the same name, abbreviated as “AS&C”. This window will only appear if you have a
valid license for the functionality “automatic search and classification”.
4071.5546.32-08.00 3-14
Page 39

Operation R&S GX430
Figure 33: The Automatic Search and Classification dock window
For parameters that can be adjusted in spin boxes or in the special frequency edit fields, the allowed
parameter ranges are displayed in a tool-tip. The tool-tip window appears when moving the mouse
cursor over the value field of the particular parameter.
The parameters for an AS&C session consist of an arbitrary sequence of parameter sets. Each set has
its own (not necessarily unique) tuner, which can be selected by pressing the Select Tuner… button.
This will open the tuner selection dialog already known from the description of the File menu
case, however, the dialog will only contain the list of the tuners that support either panorama scan or
DIGI-scan. Alternatively, if you select a tuner for normal processing (see the File menu
supports panorama scan or DIGI-scan, then the application will view it as if it had been selected for
AS&C, too.
The controls for the parameters Start frequency, Stop frequency, Min. bandwidth, Max bandwidth,
Automatic attenuation, and Attenuation value will only be displayed after selecting a tuner. The
default values for the two frequencies are determined by subtracting and adding 0.5 MHz from/to the
current frequency and adjusting the resulting values so they fit into the supported panorama scan
frequency range (which is tuner type specific). The parameters Min. bandwidth and Max. bandwidth
specify the range of signal bandwidths sought for by the AS&C processor. The first one will affect the
scan’s frequency resolution. For an HF tuner or a V/UHF one with HF support, the default values for
the two bandwidths are set to 100 Hz and 5000 Hz, respectively. For a V/UHF tuner without HF
support, the two default values are 8000 Hz and 50000 Hz. The two attenuation-related controls are
only displayed if the selected tuner supports the attenuation value parameter. Otherwise two other
controls, for the Gain control mode (AGC/MGC) and Gain control value are displayed.
. In this
) and that tuner
The Analysis depth can be Tuner scan, Detection, Classification, or Bitstream classification (the
last two are only available in the presence of the corresponding licenses). The depth Tuner scan will
only produce a scan spectrum for the specified frequency range. If you choose the depth Detection
then the AS&C processor will first execute a scan over the specified frequency range and then detect
the emissions that fit the given parameters. This will give rise to a scan spectrum together with a
3-15 4071.5546.32-08.00
Page 40

R&S GX430 Operation
detection threshold line and an emission list. If the analysis depth is set to Classification then the
AS&C processor will also produce classification results for the detected emissions; these results will
lso be displayed in the emission list. Finally, the depth Bitstream classification will also start the
a
system recognition for one classification result per emission list item whenever possible.
he next three parameters specify the detection level. The corresponding controls will only be enabled
T
f at least an analysis depth of Detection has been selected. If the Automatic threshold is active then
i
the detection threshold will automatically be computed from the scan spectrum data by estimating the
noise level and taking into account the value of the Signal to noise ratio (SNR). You can set the latter
to a value between 3 and 40 dB; the default is 10 dB. Otherwise the manual detection Threshold level
can be set to a value between -160 and 10 dBMV(Hz); the default is -120 dBMV(Hz).
The last three parameters specify the decision criterion. The corresponding controls will only be
enabled if at least an analysis depth of Classification has been selected. In the Max. classif. results
field you can specify an upper limit for the number of classification results per emission. The smaller
this value, the less time will the classifier need to produce the final result for each emission. On the
other hand, a higher value may improve the quality of the final results. The range is from 1 to 100; the
default is 10. The Decision rule can be one of Confidence threshold (which is the default), Majority
decision, and Heuristic decision. If the rule is set to Confidence threshold then the final result per
emission will be the one with the highest confidence or the first classification result above the specified
Confidence threshold value, which can be between 10 % and 100 % (the default is 60 %). The rule
Majority decision specifies that the final result for each emission shall be the one having the most
frequently encountered modulation. The Heuristic decision rule extends the Majority decision by
taking into account several further classification result data when determining the final result of an
emission.
The currently edited parameter set can be added to the current sequence of parameter sets with the aid
of the Add as New button. After that it can still be overridden by pressing the Update button. If the
sequence of parameter sets is still empty when starting the AS&C processor, then the currently edited
parameter set will be added to it automatically.
The Manage… button will open a dialog window that displays all AS&C parameter sets in tabular form.
Figure 34: The Manage Paramer Sets dialog
The buttons on the right side of this dialog can be used to change the order of the parameter sets,
delete one or all items, or activate/deactivate all parameter sets. Individual items can also be
activated/deactivated with the aid of the check boxes in the first column. When starting the AS&C
processing, only the parameter sets marked as active will be sent to the signal subsystem. A new
parameter set added to the current sequence of parameter sets is, per default, marked as active. By
4071.5546.32-08.00 3-16
Page 41

Operation R&S GX430
pressing the OK button, the parameter set displayed in the currently selected row will be loaded for
editing into the Automatic Search and Classification dock window.
3.2.15 The Spectrum Dock Window
This dockable window is used to configure the parameters required by the spectrum (FFT) processing
subsystem.
Figure 35: The Spectrum dock window
Spectrum processing may be enabled / disabled in the check box Spectrum processing enabled. The
remaining Spectrum window parameters can only be edited when spectrum processing is enabled.
For parameters that can be adjusted in spin boxes or in the special frequency edit fields, the allowed
parameter ranges are displayed in a tool-tip. The tool-tip window appears when moving the mouse
cursor over the value field of the particular parameter.
Length specifies the number of samples used when calculating the spectrum (FFT). The number of
samples directly influences the spectral frequency and time resolution; increasing the Length increases
the frequency resolution, and reduces the time resolution.
Windowing specifies the methodology applied when calculating the spectrum. These methodologies
influence the ‘leakage effect’ when the spectrum is being calculated. The methodologies available are
listed according to their ability to reduce the ‘leakage effect’; BLACKMAN offers the best ‘leakage
effect’ reduction; RECTANGULAR offers the worst. It must be noted that reducing the ‘leakage effect’
has an adverse effect on frequency selectivity.
Lines per second specifies the number of spectrum lines per second to be delivered by the FFT
processing subsystem when having normal (“1.0 x”) playback speed. The actual number of spectrum
lines is directly proportional to the playback speed.
3-17 4071.5546.32-08.00
Page 42

R&S GX430 Operation
Please note that the FFT processing subsystem won’t allow you to combine high Length values with
high values of the Lines per second parameter. In the table below, the first column and row contain the
upported values of Length and Lines per second, respectively.
s
20 50 100 200 500 1000
128
256
512
1024
2048
4096
8192
16384
32768
Table 3: Dependency between spectrum Length and Lines per second
Display mode offers alternatives for visualizing the spectrum. When the Display mode AVERAGING
is selected, then the value selected for Average time is applied. A higher Average time offers a more
composed display, but tends to disguise short emissions. A lower Average time shows up short
emissions more clearly.
When either the Display mode PEAKHOLD or MINHOLD is selected then the spectrum is displayed in
periods determined by the value selected for Measurement time. During the display period, depending
on the chosen mode (PEAKHOLD or MINHOLD), maximum / minimum values are displayed. After
each Measurement time period, the displayed spectrum is cleared, and the next display period
commences. The Display mode MINHOLD is best chosen when looking for weak emissions. The
Display mode PEAKHOLD is best chosen when looking for short emissions.
x x x x x X
x x x x x x
x x x x x x
x x x x x –
x x x x – –
x x x – – –
x x – – – –
x – – – – –
x – – – – –
Modulation Analysis
The Source parameter within this block specifies the input signal for the spectrum computation. If set to
Baseband then the spectrum of the base band signal will be computed. Envelope specifies that the
envelope of the base band signal is first to be generated and then used for the spectrum computation.
Baseband squared specifies that the complex square of the base band signal shall be generated and
then used for the spectrum computation. Finally, the value Instantaneous Frequency will first calculate
the instantaneous frequency signal of the base band signal and then use the former for the spectrum
computation.
The parameter Frequency offset (i.e., the offset of the emission of interest to the center frequency)
and Bandwidth can be used to define a sub-band within the input signal to be used for the modulation
analysis. These parameters can also be set graphically using the measurement tool in the Spectrum tab
and selecting Time Analysis Segment from the Send selection to sub menu of the context menu.
Please read the section on the Spectrum tab
process further by using keyboard shortcuts in the spectrum.
The Time signal type (with the values None, Frequency, and Envelope) specifies the type of
computation to be applied to the signal selected by the Source parameter. The result of the
computation will be visualized in the Time Analysis
The ‘Modulation Analysis’ section is only available if the option key for
the functionality ’manual modulation analysis’ has been acquired. This
optional functionality is available from your vendor.
for further information, especially on how to simplify this
tab.
4071.5546.32-08.00 3-18
Page 43

Operation R&S GX430
Spectral Resolution
The display-only fields Frequency and Time within this block show the current frequency and time
resolution of the computed spectrum.
Selecting Apply sends the parameters to the signal processing subsystem. If Auto Apply is selected,
then the parameters are sent to the subsystem within 3 seconds of one of the spectrum configuration
parameters being changed.
3.2.16 The Audio Dock Window
The Audio dock window is used for setting the parameters of the analog demodulator.
Figure 36: The Audio dock window
For a detailed description of the components of this window see the section Analog Demodulator
Parameters.
3.2.17 The Classifier Dock Window
This window is only available if the option key for the functionality
’classifier’ has been acquired. Please check with your vendor for
purchasing this option if required.
This dockable window is used to configure the parameters required by the classifier. It will only appear if
you have a valid license for the “classifier” functionality.
3-19 4071.5546.32-08.00
Page 44

R&S GX430 Operation
Figure 37: The Classifier dock window
The classifier may be enabled / disabled in the check box Classifier enabled. The remaining Classifier
window parameters can only be edited when Classifier enabled is selected.
For parameters that can be adjusted in spin boxes or in the special frequency edit fields, the allowed
parameter ranges are displayed in a tool-tip. The tool-tip window appears when moving the mouse
cursor over the value field of the particular parameter.
The signal segmentation values Segmentation freq. offset (the frequency offset relative to the center
frequency of the segment within the input IF signal that is to be used for classification purposes) and
Segmentation bandwidth (bandwidth of the segment within the input IF signal that is to be used for
classification purposes), may be entered. The Auto segmentation setting determines whether the
segment that is defined through the parameters above is further segmented by the classifier (Auto
segmentation On) or used in its entirety (Auto segmentation Off).
These parameters can also be set graphically using the measurement tool in the Spectrum tab
selecting Classification from the Send selection to sub menu of the context menu. Please read the
section on the Spectrum tab
using keyboard shortcuts in the spectrum.
The supplementary broadcast modulation method used by the transmitter may be determined
automatically by selecting the Primary modulation analysis value AUTO. Alternatively, one of the
values AM , FM, and DIRECT (no supplementary broadcast modulation method) may be selected.
Analog modulation methods and voice transmissions may be detected by selecting Analog
recognition. Similarly, automatic recognition of multi channel, simplex ARQ, and multi tone
transmission methods may be selected (Multi-channel recognition, ARQ recognition, Multi-tone
recognition).
for further information, especially on how to simplify this process further by
and
PSK modems may be detected by selecting PSK modem recognition.
The symbol stream is included in the classification process by selecting Symbol stream analysis. This
is used when looking for special transmission systems (e.g. packet radio).
Auto parameter mode specifies the way demodulation / decoding are to be configured using the
classifier results. Selecting the value Off inhibits the classification results from being applied to the
demodulation / decoding. With the value Surveillance, the demodulation / decoding are configured
4071.5546.32-08.00 3-20
Page 45

Operation R&S GX430
every time classification results become available, and the code system recognition is restarted. This
mode is only supported in the presence of valid digital demodulation and system recognition licenses.
ith the value Production, the demodulation / decoding are configured the first time classification
W
results become available; and the decoder indicating the highest confidence after decoding
classification remains in operation. This mode requires a valid digital demodulation license option.
electing Apply sends the parameters to the classifier. If Auto Apply is selected, then the parameters
S
are sent to the classifier within 3 seconds of one of the classifier configuration parameters being
changed.
3.2.18 The Spectrum Tab
The Spectrum tab is used to visualize the spectrum of the current signal. It consists of two parts. The
upper part shows the current spectrum line and the lower part shows the waterfall, which is a history of
the spectrum lines.
Figure 38: The Spectrum tab – In full color range mode
Above the line spectrum the sample rate and the bandwidth of the signal are shown. There are also
controls to manually or automatically adjust the display range
to the visible range , individually show or hide the line spectrum or the waterfall and to select the
tool to use inside the spectrum. Alternatively you can use the keyboard shortcuts (adjust display
range) and
(adjust color range).
3-21 4071.5546.32-08.00
, automatically adjust the color range
Page 46

R&S GX430 Operation
Figure 39: Menus for display and tool selection
There are several tools available for measuring tasks or to adjust the way the spectrum is displayed.
Tools can be switched using the menu on the tool selection button. It is also possible to switch tools
more quickly by using the specified keyboard shortcuts. The keyboard shortcuts for the individual tools
are displayed on the right side next to the tool entries in the tool selection menu.
Line spectrum background
GX430 offers several ways of how to display the line spectrum background. The introductory figure
shows the line spectrum with a fully colored background that makes it easy to see how the different
levels are translated to colors for the waterfall display. However for some users this full color display is
too distracting from the signal line itself. Alternatively GX430 offers the color strip mode which only
shows a colored strip beneath the level scale on the left side.
Figure 40: The Spectrum tab – In color range strip mode
4071.5546.32-08.00 3-22
Page 47

Operation R&S GX430
For those who prefer a simple one color background, or for cases when the waterfall display is switched
off, GX430 also offers a simple background color mode.
Figure 41: The Spectrum tab – In simple color mode
The background color modes can be switched easily by using the right-click context menu.
Figure 42: The Spectrum Background context menu
Unit
Normally the line spectrum values are displayed as dBm. Alternatively GX430 offers to convert these
values to dBMV.
Figure 43: dBm / dBKV Selection
Tools
All tools for the line spectrum and the waterfall share some common ways of using them. Boundary
cursors can be dragged using the mouse, by clicking and holding the left mouse button on them, then
moving them to the new position and releasing the mouse button. Selected/highlighted areas can be
grabbed entirely and the complete tool will be moved. Inside the tool area the mouse wheel can be
used to increase or decrease the tool area. Outside the tool the mouse wheel will only affect the nearest
boundary of the tool. Using the cursor keys on the keyboard will also affect the tool boundaries.
3-23 4071.5546.32-08.00
Page 48

R&S GX430 Operation
Combining the keys with the
affected (reverse direction, move entire tool or possibly open a completely new tool area). Additionally,
except the Zoom Tool is already selected, holding down the
clicking and dragging the mouse bypasses the currently selected tool and forwards your actions to the
oom Tool. That way zooming is possible even when e.g. a measuring tool is active. Some tools can
Z
quickly be accessed through keyboard shortcut keys. The valid shortcut keys are displayed on the right
side of the tool selection menu, next to the tool for which they are valid.
The following paragraphs describe each of the available tools in more detail.
or modifier keys will change the way the tool is
key on your keyboard while
No Tool selected
Even when no tool is selected, it is possible to interact with the spectrum. You can simply grab (click
and hold the left mouse button) the spectrum and, depending on the current zoom level, drag it around
to adjust the part that is displayed. By holding down the
the mouse to open a zoom rectangle and zoom further into the spectrum. To facilitate the zooming
functionality a small toolbar with the possible zoom operations will be shown.
Figure 44: The Zoom Operations toolbar
key on your keyboard you can also use
Measurement Tool
Selecting the Measurement Tool will display the Measurement Tool inside the line spectrum and inside
the waterfall. It consists of a highlighted area bounded by vertical and horizontal measuring cursors.
Additionally, the middle lines of the selected areas are also shown. The waterfall only displays the
vertical measuring cursors and the highlighted area. Above the line spectrum new display elements
show the current characteristics of the tool. The vertical measuring cursors are used to measure
frequencies and the bandwidth, while the horizontal measuring cursors are used to measure the level
and the level range. Again, holding down the
of the Zoom Tool. Holding down the
to open a completely new selection without need to use the individual cursors.
key on your keyboard allows for simultaneous use
key and then clicking and dragging the mouse allows
4071.5546.32-08.00 3-24
Page 49

Operation R&S GX430
Figure 45: Measurement Tool
The Bandwidth button lets you choose which characteristic of the displayed signal you want to
measure. There are different choices possible, depending on the Source you have selected in the
Spectrum dock widget. A tool tip will display all measured values. Values are applied after the tool has
been moved/modified. This has the advantage that you can simply switch between characteristics to
see the old value(s).
Figure 46: Choices
Controlling other components using the spectrum
The ‘Classification’ related functionality will only be available if the
option key for the functionality ’classifier’ has been acquired. This
optional functionality is available from your vendor.
The ‘Digital Demodulator’ related functionality will only be available if the
corresponding option key has been acquired. This optional functionality
is available from your vendor.
The ‘Time Analysis’ related functionality will only be available if the
option key for the functionality ’manual modulation analysis’ has been
acquired. This optional functionality is available from your vendor.
3-25 4071.5546.32-08.00
Page 50

R&S GX430 Operation
If the measurement tool is activated and a frequency and bandwidth are selected by the tool, then this
selection can be sent to a number of different other components. Simply right click into the spectrum
nd select one of the entries of the Send selection to sub menu of the context menu. The currently
a
selected Frequency Offset (to the signal’s center frequency) and Bandwidth (of the selection) will then
be sent to the corresponding component. If the target component is the Digital Demodulator then only
the frequency offset will be used. For clarification purposes the selected frequency offset and bandwidth
are also displayed (but not selectable) in the sub menu. There are also keyboard shortcuts to further
ease the process of sending the selection to the different components. The keyboard shortcuts are
displayed on the right side next to the sub menu entries.
Figure 47: Send selection to sub menu
There is also a context menu entry with a corresponding keyboard shortcut to reset the segment used
for classification to its default value. The above figure shows that its keyboard shortcut is composed of
the
classifier
. This rule also applies to the other components, even though there are no explicit reset
keys hold down together plus the key used for sending the selection to the
entries in the context menu.
The spectrum can also display the segments currently used by these components. Simply select the
component from the Show segments sub menu or use the corresponding keyboard shortcut (
plus component key)
Figure 48: Show segments sub menu
As a convenience it is also possible to set the measurement tool to a segment used by one of the
components. The measurement tool is automatically set as current tool in case it is not already
selected. Simply select the Set measurement tool to… sub menu or use the corresponding keyboard
shortcut (
plus component key)
4071.5546.32-08.00 3-26
Page 51

Operation R&S GX430
Figure 49: Set measurement tool to… sub menu
Channel Spacing Tool Tool
Selecting the Channel Spacing Tool will display the Channel Spacing Tool inside the line spectrum
and inside the waterfall. The tool can be used to determine the count and the spacing between several
channels in the displayed signal. Select the number of channels by adjusting the count and position the
left and right cursors on the leftmost and rightmost of the channels in the signal. The spacing will then
be displayed above the line spectrum. The tool also offers to draw additional lines using the same
spacing outside the actual tool. This is useful to find additional peaks. As usual, holding down the
key on your keyboard allows for simultaneous use of the Zoom Tool. Holding down the
key and then clicking and dragging the mouse allows to open a completely new selection
without need to use the individual cursors.
Figure 50: Waterfall Time Measuring Tool
3-27 4071.5546.32-08.00
Page 52

R&S GX430 Operation
Waterfall Time Measuring Tool
Selecting the Waterfall Time Measuring Tool will display the Time Measuring Tool inside the waterfall.
It consists of a highlighted area bounded by vertical and horizontal measuring cursors. These cursors
allow for simultaneous measuring of the times and time difference and frequencies and bandwidth. In
the information area new display elements show the current characteristics of the tool. Please note that
ey on your keyboard
he waterfall is held while this tool is activated. As usual, holding down the
t
k
allows for simultaneous use of the Zoom Tool. Holding down the
dragging the mouse allows to open a completely new selection without need to use the individual
cursors.
key and then clicking and
Figure 51: Waterfall Time Measuring Tool
Zoom Tool
Selecting the Zoom Tool will activate the Zoom Tool for the line spectrum and the waterfall. When the
Zoom Tool is activated you can use the mouse to open a zoom rectangle in the line spectrum or a zoom
area in the waterfall. Above the line spectrum new display elements show the current characteristics of
the zoom selection. As soon as you release the mouse button the selected zoom will instantly be
applied. If already zoomed in the Zoom Out button will return the display to the previous zoom level.
The Zoom Reset button will turn off any zoom and return the display to the initial bandwidth and level
range.
4071.5546.32-08.00 3-28
Page 53

Operation R&S GX430
Figure 52: Zoom Tool
Color Adjust Tool
Selecting the Color Adjust Tool will display the Color Adjust Tool inside the line spectrum. It consists
of adjustment cursors at the upper and lower end of the current color range. Additionally, the middle of
the color range is also shown and might be helpful in aligning the color levels. In case the color range
background in the line spectrum is switched off, it will activated temporarily for the time the Color
Adjust Tool is active.
3-29 4071.5546.32-08.00
Page 54

R&S GX430 Operation
Figure 53: Color Adjust Tool
When the Color Adjust Tool is activated, the Color Adjust Tool Window is also displayed. It contains
additional controls that allow fine-tuning of the upper and lower color range bounds. It is also possible to
save and load color range settings, reset them to the default values, switch to gray mode, swap upper
and lower colors, or invert them.
Figure 54: Color Adjust Tool Window
Clicking on one of the Color buttons next to the level spin boxes will open a tool window that allows
you to adjust the color for this boundary. Depending on the mode (color or gray), this will either be a
color triangle allowing the selection of a color from the HSV color space or a simple grey ramp to select
the luminosity.
Again, holding down the
key on your keyboard allows for simultaneous use of the Zoom Tool.
4071.5546.32-08.00 3-30
Page 55

Operation R&S GX430
Tuner Control Using the Spectrum
This functionality will only be available if the option key for the
functionality “tuner” has been acquired. Please check with your vendor
or purchasing this option if required.
f
If the currently selected signal input source is a tuner, then the spectrum tab allows for graphically
setting the tuner frequency by simply double clicking with the left mouse button into the spectrum.
Alternatively you can also right click and select the Set Tuner Frequency entry of the context menu.
The value in parentheses is the frequency that will be set on the tuner. Please note that this menu item
will only be enabled (and the double-click will only work) in normal operating mode or during a break in
the AS&C processing.
Figure 55: Set Tuner Frequency from spectrum
3.2.19 The Digital Demodulation Tab
This tab will only be displayed if the option key for the functionality
“demodulation” has been acquired. Please check with your vendor for
purchasing this option if required.
The Demodulator Status visualization within this window will only be
available if the option key for the functionality “demodulation
professional” has been acquired. Please check with your vendor for
purchasing this option if required.
The Digital Demodulation tab is used for various visualizations of data streams. It will only appear if
you have a valid license for digital demodulation.
3-31 4071.5546.32-08.00
Page 56

R&S GX430 Operation
Figure 56: The Digital Demodulation tab with Eye diagram
The visualizations displayed in this tab are the Eye Diagram, IQ Diagram, and Demodulator Status.
Depending on the currently selected demodulator, either an Eye or an IQ Diagram is placed in the left
half of the tab. The Demodulator Status visualization (in the presence of a demodulation professional
license only) fills the right half of the tab. You can control the widths of these two parts of the tab by
dragging the boundary between them.
3.2.20 The Decoding Tab
This tab will only be displayed if the option key for the functionality
“decoding” has been acquired or if at least one of the available
demodulators provides data to be visualized in this tab. Please check
with your vendor for purchasing the “decoding” option if required.
The Decoding tab is used for displaying system visualizations. It will only appear if you have a valid
license for decoding or if at least one of the available demodulators provides data to be visualized in
this tab.
4071.5546.32-08.00 3-32
Page 57

Operation R&S GX430
Figure 57: The Decoding tab, showing Decoded Text
The system visualizations displayed in this tab are Decoded Text, Image Data, Morse Data, ATIS,
FMSBOS
PACTOR
selected demodulator.
, MPT1327, PacketRadio, POCSAG, DTMF & SELCAL, ZVEI-VDEW, ACARS, CLOVER, and
. There is only one visualization at a time shown in this tab, corresponding to the currently
3.2.21 The Classifier Tab
This tab will only be displayed if the option key for the functionality
“classifier” has been acquired. Please check with your vendor for
purchasing this option if required.
The Classifier tab is used for displaying the results provided by the classifier. It will only appear if you
have a valid license for the classifier.
3-33 4071.5546.32-08.00
Page 58

R&S GX430 Operation
Figure 58: The Classifier tab
The lower part of the tab displays the classifier results in tabular form. Some of these are viewed as
final results; these will be displayed above all the others when sorting the items by the sequence
number. The first row will contain the most recent final result, and all the other items are displayed as
children of this row.
The columns are resizable, and their order can be changed by dragging the column headers with the
left mouse button. In addition, you can sort the list by any column, by clicking on the corresponding
header. The table contains the following columns:
• No.: The sequence number. For final results, it is preceded by an F and is displayed in bold
font.
• Time: The hour, minutes, and seconds corresponding to the time stamp from the input source.
• Confidence: The classification confidence in percent.
• Center Freq.: The center frequency of the classified signal.
• Bandwidth: The bandwidth of the classified signal.
• Modulation: The modulation type of the classifier result.
• Prim. Mod.: The primary modulation type of the classifier result.
• Dec. Mods: The names of decoder module candidates used by the classifier. To the left of this
list, one of the symbols
that row is in progress, is finished, or has been cancelled, respectively.
• Trans. Sys.: The transmission system. When a new result row is displayed, the corresponding
transmission system can still be unknown. In this case, if during the classification the
demodulation/decoding has been automatically configured using this result, then the classifier
will start the bitstream classification, and when the latter is finished, the name of the resulting
decoding system, together with its confidence, will be inserted into the Trans. Sys. column. The
bitstream classification can also be started manually, by clicking on a row with the right mouse
button and then selecting the Start Bitstream Classification pop-up menu item; the latter is
only enabled if the digital demodulator parameters associated with that row are valid, the
number of the decoder modules is non-zero, and a valid license for system recognition is
present.
• Symbol Rate: The symbol rate in Bd.
• Level: The signal level in dBMV.
, , or may appear, visualizing that the bitstream classification for
4071.5546.32-08.00 3-34
Page 59

Operation R&S GX430
• Block Length: The block duration in milliseconds (for simplex-ARQ signals).
• Block Cycle: The block periodicity in milliseconds (for simplex-ARQ signals).
• Valid: yes or no, indicating whether the digital or analog demodulator parameters associated
with the row are valid.
• Config.: yes or no, indicating whether the demodulation/decoding has been automatically
configured using this result.
• Tones: The number of detected tones (for multi-tone signals).
• Chans: The number of detected channels (for multi-channel signals).
• Shift: Up to three tone shift values (for multi-tone signals).
• Spacing: A list of channel spacing values, corresponding to the detected channels (for multi-
channel signals).
The Dec. Mods and Trans. Sys. columns will only appear if a valid license for system recognition has
been purchased.
If the demodulation/decoding has been automatically configured using the result just received from the
signal processing subsystem then the corresponding row is displayed with dark green background (and
white foreground). Otherwise, if the digital or analog demodulator parameters associated with the result
are valid then the row is displayed with normal green background. Otherwise, if the modulation type of
the result is different from both NOSIGNAL and UNKNOWN then the row is displayed with light green
background.
A right-click on a row will display the pop-up menu shown below.
Figure 59: The pop-up menu within the Classifier tab
• Clear Results: This menu item deletes all currently displayed rows.
• Clear Selection: Clears the selection in the list.
• Adjust Columns: Adapts the widths of the columns to their current contents.
• Reset Column Layout: Resets the order of the columns to the default order and adapts their
widths to their current contents (recall that the columns are movable and resizable).
• Log the Results: This is a checkable item; when checked then the classification results will be
written to a file (whose name is formed from the current date and time), in CSV-format (which is
supported by most spreadsheet applications). After unchecking the item or stopping the
processing, the path name of the file will be displayed in a standard information dialog.
• Set Dig. Demod. & Decod. Parameters: This menu item is only enabled if the digital
demodulator parameters associated with the currently selected row are valid and the option key
for the functionality “digital demodulation” has been acquired. It sets the digital demodulator
parameters according to the ones associated with the currently selected row. In addition, if the
result contains exactly one decoder module and a valid decoding license is present then this
menu item sets that module as the current decoder. Otherwise, if the bitstream classification
has been successfully performed for that row and a valid decoding license is present then this
menu item selects the module with the highest confidence as the current decoder..
3-35 4071.5546.32-08.00
Page 60

R&S GX430 Operation
• Set Analog Demodulator Parameters: This menu item is only enabled if the analog
demodulator parameters associated with the currently selected row are valid. It sets the analog
demodulator parameters according to the ones associated with the currently selected row.
• Start Bitstream Classification: This menu item is only enabled if the digital demodulator
parameters associated with the currently selected row are valid, the number of the decoder
modules is non-zero, and a valid license for system recognition is present. It starts the bitstream
classification, after setting the digital demodulator parameters according to the ones associated
with the currently selected row. When the bitstream classification is finished, the name of the
decoder module having the highest non-zero confidence will be inserted into the Trans. Sys.
column.
By double-clicking a row, the action associated with the Set Analog Demodulator Parameters menu
item will be performed (if enabled), followed by the one associated with Start Bitstream Classification
if this item is enabled and the result contains more than one decoder modules, or else by the action
associated with Set Dig. Demod. & Decod. Parameters (if enabled).
The upper part of the tab provides a detailed view of the currently selected row. The decoder modules
and the spacing values can be stepped through with the aid of the corresponding spin boxes.
The detailed view part of the tab can be hidden by dragging the splitter handle separating it from the
tabular view.
The classification process is optimized for sample rate to input signal bandwidth ratios between 4 and
100.
3.2.22 The Bitstream Classification Tab
This tab will only be displayed if the option key for the functionality
“system recognition” has been acquired. Please check with your vendor
for purchasing this option if required.
The Bitstream Classification tab is used for starting/stopping the bitstream classification and
displaying its results. It will only appear if you have a valid license for system recognition.
4071.5546.32-08.00 3-36
Page 61

Operation R&S GX430
Figure 60: The Bitstream Classification tab
The left list box in the upper part of the tab displays all the available decoder modules. You can use the
buttons to the right of this list box to add any available modules to the right one or remove any entries
from the latter. Both list boxes support multiple item selection with the aid of the
keys.
Whenever the current demodulator or one of its parameters changes, the symbols to the left of the
decoder module names in both lists are automatically updated as follows: Those modules that are
considered compatible with the current demodulator settings are marked with the “checked” symbol
and the others with the question mark
of the decoder modules to be sent to the system recognition; you can add both “checked” and
“unchecked” decoder module names to the list of the chosen modules.
The Start button activates the bitstream classification, using the interactively chosen modules. During
the classification, this button will display the text Restart and the status shown in the upper right corner
of the window changes from Idle to Running. The results of this system recognition are displayed in
the lower part of the tab. You can modify the list of the chosen modules and press this button again,
still before seeing the results; in this case, the previously started bitstream classification will be
cancelled and restarted, using the new module list. The system recognition can also be cancelled
explicitly, by pressing the Stop button.
. This is, however, just a hint, aiming to facilitate the selection
and
3.2.23 The Automatic Search and Classification Tab
This tab will only be displayed if the option key for the functionality
“automatic search and classification” has been acquired. Please check
with your vendor for purchasing this option if required.
,
The Automatic Search and Classification tab is used for visualizing the data generated by the
automatic search and classification (abbreviated as “AS&C”). It will only appear if you have a valid
license for this functionality.
3-37 4071.5546.32-08.00
Page 62

R&S GX430 Operation
Figure 61: The Automatic Search and Classification tab
The tab is divided into three parts, the first two of which are separated from each other with a splitter.
The upper part displays the scan spectrum. If the analysis depth was set to at least Detection then
another diagram, the threshold line will also be displayed together with the scan spectrum.
Above the spectrum line(s) the level range and the bandwidth of the tuner signal are shown. There is
also a menu button for selecting the tool to use inside the spectrum. The tools can also be selected by
utilizing the associated keyboard shortcut. See the section about the Spectrum tab
for a detailed
description of the three menu items No Tool, Measurement Tool, and Zoom Tool. Notice, however,
that the keyboard shortcuts for the tools in the AS&C tab differ from those used in the Spectrum tab.
Figure 62: Menu for tool selection in the scan spectrum
The middle part of the tab displays the emission list in tabular form, which will only appear if the
analysis depth was set to at least Detection. For each AS&C parameter set, the corresponding
emission rows are displayed as children of a row containing the name of the tuner belonging to that
parameter set. If the analysis depth was set to at least Classification then the emission list will also
display classification results, displayed as children of the corresponding emission items.
The columns are resizable, and their order can be changed by dragging the column headers with the
left mouse button. In addition, you can sort the list by any column, by clicking on the corresponding
header. The table contains the following columns:
4071.5546.32-08.00 3-38
Page 63

Operation R&S GX430
• ID: The tuner name or the ID of the emission item or classification result, starting with the word
Emission or Result, respectively.
• Time: The hour, minutes, and seconds corresponding to the time stamp from the input source.
• Confidence: The classification confidence in percent.
• Center Freq.: The center frequency of the signal.
• Bandwidth: The bandwidth of the signal.
• Modulation: The modulation type of the classification result.
• Prim. Mod.: The primary modulation type of the classification result.
• Dec. Mods: The names of decoder module candidates used by the classification. To the left of
this list, one of the symbols
for that row is in progress, is finished, or has been cancelled, respectively.
• Trans. Sys.: The transmission system. When a new result row is displayed, the corresponding
transmission system can still be unknown. In this case, if during the classification the
demodulation/decoding has been automatically configured using this result and the analysis
depth was set to Bitstream classification, then the AS&C processor will start the bitstream
classification (if possible), and when the latter is finished, the name of the resulting decoding
system, together with its confidence, will be inserted into the Trans. Sys. column of the emission
row corresponding to this result.
• Symbol Rate: The symbol rate in Bd.
• Level: The signal level in dBMV.
• Block Length: The block duration in milliseconds (for simplex-ARQ signals).
• Block Cycle: The block periodicity in milliseconds (for simplex-ARQ signals).
• Valid: yes or no, indicating whether the digital or analog demodulator parameters associated
with the result row are valid.
• Config.: yes or no, indicating whether the demodulation/decoding has been automatically
configured using this result.
• Tones: The number of detected tones (for multi-tone signals).
• Chans: The number of detected channels (for multi-channel signals).
• Shift: Up to three tone shift values (for multi-tone signals).
• Spacing: A list of channel spacing values, corresponding to the detected channels (for multi-
channel signals).
, , or may appear, visualizing that the bitstream classification
The Dec. Mods and Trans. Sys. columns will only appear if a valid license for system recognition has
been purchased. Similarly, the columns related to the classification will only appear if a valid license for
the classifier has been acquired. These columns are the following: Confidence, Modulation, Prim.
Mod., Dec. Mods, Trans. Sys., Symbol Rate, Level, Block Length, Block Cycle, Valid, Config.,
Tones, Chans, Shift, and Spacing.
If the demodulation/decoding has been automatically configured using the result just received from the
signal processing subsystem then the corresponding row is displayed with dark green background (and
white foreground). Otherwise, if the digital or analog demodulator parameters associated with the result
are valid then the row is displayed with normal green background. Otherwise, if the modulation type of
the result is different from both NOSIGNAL and UNKNOWN then the row is displayed with light green
background.
The last classification result belonging to an emission item is considered the final one; its values (except
the ID) are automatically copied into the corresponding emission row, and the latter’s old contents will
appear at the same level as the classification results, with an ID that starts with the word Detection.
A right-click on a row will display the pop-up menu shown below.
3-39 4071.5546.32-08.00
Page 64

R&S GX430 Operation
Figure 63: The pop-up menu within the emission list
• Clear Selection: Clears the selection in the list.
• Expand All: Expands all emission items, thus showing the corresponding result and detection
rows.
• Collapse All: Collapses all emission items, thus hiding the corresponding result and detection
rows.
• Adjust Columns: Adapts the widths of the columns to their current contents.
• Reset Column Layout: Resets the order of the columns to the default order and adapts their
widths to their current contents (recall that the columns are movable and resizable).
• Log the Emission List: This is a checkable item; when checked then the emission list
(together with the classification results) will be written to a file (whose name is formed from the
current date and time), in CSV-format (which is supported by most spreadsheet applications).
After unchecking the item or stopping the AS&C processing, the path name of the file will be
displayed in a standard information dialog.
• Set Tuner Frequency: This menu item is only enabled during a break in the AS&C processing,
or after leaving the AS&C operating mode if the current signal input source is identical to the
tuner to which the selected item belongs. It sets the tuner frequency to the center frequency
value displayed in the currently selected row.
• Set Dig. Demod. & Decod. Parameters: This menu item is only enabled for emission rows (not
for classification result rows) if the AS&C processor is in paused or stopped state, and only if the
digital demodulator parameters associated with the currently selected row are valid and the
option key for the functionality “digital demodulation” has been acquired. It sets the digital
demodulator parameters according to the ones associated with the currently selected row. In
addition, if the result contains exactly one decoder module and a valid decoding license is
present then this menu item sets that module as the current decoder. Otherwise, if the bitstream
classification has been successfully performed for that row (in case the analysis depth was set
to Bitstream classification) and a valid decoding license is present then this menu item selects
the module with the highest confidence as the current decoder. If the current signal input source
is identical to the tuner to which the selected item belongs then this menu item also sets the
tuner frequency to the center frequency value displayed in the currently selected row.
• Set Analog Demodulator Parameters: This menu item is only enabled for emission rows (not
for classification result rows) if the AS&C processor is in paused or stopped state, and only if the
analog demodulator parameters associated with the currently selected row are valid. It sets the
analog demodulator parameters according to the ones associated with the currently selected
row. If the current signal input source is identical to the tuner to which the selected item belongs
then this menu item also sets the tuner frequency to the center frequency value displayed in the
currently selected row.
• Start Bitstream Classification: This menu item is only enabled for emission rows (not for
classification result rows) if the AS&C processor is in paused or stopped state, and only if the
digital demodulator parameters associated with the currently selected row are valid, the number
4071.5546.32-08.00 3-40
Page 65

Operation R&S GX430
of the decoder modules is non-zero, and a valid license for system recognition is present. It
starts the bitstream classification, after setting the digital demodulator parameters according to
the ones associated with the currently selected row. If the current signal input source is identical
to the tuner to which the selected item belongs then this menu item also sets the tuner
frequency to the center frequency value displayed in the currently selected row before starting
the bitstream classification. When the bitstream classification is finished, the name of the
decoder module having the highest non-zero confidence will be inserted into the Trans. Sys.
column.
By double-clicking a row, the action associated with the Set Analog Demodulator Parameters menu
item will be performed (if enabled), followed by the one associated with Start Bitstream Classification
if this item is enabled and the result contains more than one decoder modules, or else by the action
associated with Set Dig. Demod. & Decod. Parameters (if enabled).
The lower part of the tab shows the current AS&C status, the progress of the operation just being
performed, and the name of the tuner currently used by the AS&C processor..
3.2.24 The Time Analysis Tab
This tab will only be displayed if the option key for the functionality
“manual modulation analysis” has been acquired. Please check with your
vendor for purchasing this option if required.
The Time Analysis tab displays instantaneous time domain data. Which data is generated is selected
with the Time signal type setting in the Spectrum dock window
the Time Analysis tab is periodically updated. The Freeze button stops new data from being
displayed in the Time Analysis tab. This makes it easier to use the tools described below.
. While processing is started the data in
Figure 64: The Time Analysis tab
The Time Analysis tab provides several tools for measuring the different characteristics for the
displayed data. Please note that not all tools are available for all types of displayed data and that some
types of data characteristics depend on each other and therefore must be measured in a specific order.
The tools can be selected by either using the drop down menu from the tool button or by utilizing the
keyboard shortcut associated with each tool.
3-41 4071.5546.32-08.00
Page 66

R&S GX430 Operation
Figure 65: Tool selection of the Time Analysis tab
Zoom Tool
The Zoom tool allows to zoom into the displayed data. Double-clicking the diagram resets the zoom.
Selecting the Zoom tool is actually equivalent to having no tool set on the Time Analysis diagram,
since zooming into the graph is always possible, regardless of which tool is actually selected.
Symbol Rate Tool
The Symbol rate tool allows to measure the symbol rate. You can adjust the tool’s appearance by
changing the number of grid lines and whether the grid extends beyond the measuring cursors or not.
To measure change the position of and distance between the tool’s cursors to fit into the displayed
signal. Change the number of gridlines to fit the signal’s symbol rate.
Modulation Index Tool
The Modulation Index tool allows to determine the modulation index. To use this tool you have to
determine the symbol rate first.
Shift Tool
The Shift tool allows to determine the shift.
Bandwidth Tool
The Bandwidth tool is used to determine the center frequency and the bandwidth of the displayed
signal.
4071.5546.32-08.00 3-42
Page 67

Operation R&S GX430
3.2.25 The Audio Tab
The Audio tab is used for visualization of audio data. See the section Audio Visualization for details.
Figure 66: The Audio tab
3.2.26 The Log Messages Window
This dock window is used for displaying error, warning, and info messages as well as subsystem faults.
Figure 67: The All Messages tab of the Log Messages window
The subsystem faults are received as asynchronous messages from the signal processing subsystem.
They are displayed in the Faults tab of the window. In addition, for each fault a corresponding error
message is output to the Errors & Warnings and All Messages tabs.
3-43 4071.5546.32-08.00
Page 68

R&S GX430 Operation
Figure 68: The Faults tab of the Log Messages window
The errors and warnings are partly asynchronous messages received from the subsystem, and partly
messages generated by various user actions. They are displayed in identical form in both the Errors &
Warnings and All Messages tabs of the window. The latter can also contain info messages, which are
mainly sent asynchronously by the signal processing subsystem.
3.2.27 The Status Bar
The status bar displays status information and status tips.
Figure 69: The status bar
The status information includes a text describing the processing status of the subsystem (like “IPC
active”, “IPC not active”, or “IPC faulty”) and up to six indicators (depending on the purchased license
options) that visualize the following states:
• the signal detection status of the digital demodulation/decoding (green background for signal
detected and red for no signal);
• the locked/unlocked status of the digital demodulator (green background for locked and red for
unlocked);
• the locked/unlocked status of the decoder (green background for locked and red for unlocked);
• the signal detection status of the analog demodulator (green background for signal detected and
red for no signal);
• the signal detection status of the classifier (green background for signal detected and red for no
signal);
• the enabled/disabled status of the spectrum processing (dark blue background for enabled and
“grayed-out“ blue for disabled);
If the signal processing subsystem reports an input data parameter incompatibility for the digital or
analog demodulator or for the classifier or spectrum processing then the background color of the
corresponding status indicator turns to yellow.
The status tips are short texts that are displayed while the mouse pointer is held over some
components of the user interface, like menu items or the six status indicators mentioned above.
4071.5546.32-08.00 3-44
Page 69

Operation R&S GX430
3.3 The Settings Dialog
To open the R&S GX430 Settings dialog, select the Settings… item of the Edit menu.
The tree on the left side of the window allows you to select one of the available settings pages,
displayed on the right side of the dialog: For detailed information on all supported settings please check
the section Settings
3.3.1 General – General
Here you can set the language, the maximum number of days after which the log files are to be
automatically deleted, as well as the number of recent file/job entries in the File menu. See the section
Settings, General – General
in Appendix A.
in Appendix A for details.
Figure 70: Settings dialog, General – General
3-45 4071.5546.32-08.00
Page 70

R&S GX430 Operation
3.3.2 General – Paths
This page enables you to select the directories containing the log files, the data streams, the
visualization results and the job files, respectively. See the section Settings, General – Paths
Appendix A for details.
in
Figure 71: Settings dialog, General – Paths
4071.5546.32-08.00 3-46
Page 71

Operation R&S GX430
3.3.3 Visualizations – Diagrams
This page enables you to adjust several settings that control the appearance of the diagrams in R&S
GX430. See the section Settings, Visualizations – Diagrams
in Appendix A for details.
Figure 72: Settings dialog, Visualizations – Diagrams
3-47 4071.5546.32-08.00
Page 72

R&S GX430 Operation
3.3.4 Visualizations – Decoded Text
This page enables you to adjust settings of the Decoded Text visualization. See the section Settings,
Visualizations – Decoded Text in Appendix A for details.
Figure 73: Settings dialog, Visualizations – Decoded Text
4071.5546.32-08.00 3-48
Page 73

Operation R&S GX430
3.3.5 Visualizations – Morse
This page enables you to adjust settings of the Morse Data visualization. See the section Settings,
Visualizations – Morse in Appendix A for details.
Figure 74: Settings dialog, Visualizations – Morse
3-49 4071.5546.32-08.00
Page 74

R&S GX430 Operation
3.3.6 Visualizations – Image
This page enables you to adjust settings of the Image Data visualization. See the section Settings,
Visualizations – Image in Appendix A for details.
Figure 75: Settings dialog, Visualizations – Image
4071.5546.32-08.00 3-50
Page 75

Operation R&S GX430
3.3.7 Subsystem – Tuners
This page enables you to modify the list of tuners available in the Select Tuner dialog. See the section
Settings, Subsystem – Tuners
in Appendix A for details.
Figure 76: Settings dialog, Subsystem – Tuners
3-51 4071.5546.32-08.00
Page 76

R&S GX430 Operation
3.3.8 Subsystem – Demodulator / Decoder Mapping
This page enables you to modify the demodulator / decoder / category mapping and with that the
demodulator selection appearance. See the section Settings, Subsystem – Demodulator / Decoder
Mapping in Appendix A for details.
Figure 77: Settings dialog, Subsystem – Demodulator / Decoder Mapping
4071.5546.32-08.00 3-52
Page 77

Operation R&S GX430
3.3.9 RAMON – Master/Slave
This page enables you to specify the data of the Master/Slave server to be used for data exchange with
other applications and to configure the own GX430 application instance as a Master/Slave client. See
the section Settings, RAMON – Master/Slave
in Appendix A for details.
Figure 78: Settings dialog, RAMON – Master/Slave
3-53 4071.5546.32-08.00
Page 78

R&S GX430 Operation
3.3.10 RAMON – Report Edit
This page enables you to select the directories containing the RAMON report and result files,
respectively, as well as to specify the user name to be included in the RAMON report files. See the
section Settings, RAMON – Report Edit
in Appendix A for details.
Figure 79: Settings dialog, RAMON – Report Edit
4071.5546.32-08.00 3-54
Page 79

Operation R&S GX430
3.3.11 Audio – General
This page enables you to adjust settings of the Audio processing and visualization. See the section
Settings, Audio – General
in Appendix A for details.
Figure 80: Settings dialog, Audio – General
3-55 4071.5546.32-08.00
Page 80

Page 81

Demodulation R&S GX430
4 Demodulation
4.1 Digital Demodulator Parameters
The features described in this section will only be available if the option
key for the functionality “digital demodulation” has been acquired.
Please check with your vendor for purchasing this option if required.
4.1.1 Demodulator Selection
All digital demodulators included in R&S GX430 are automatically displayed in the Demodulator
selection. After choosing a category, the demodulators within this category are displayed for selection.
The All category contains all demodulators grouped by their categories.
Figure 81: Demodulator selection
4.1.2 Adjusting and Applying Parameters
After the demodulator was selected, the demodulation parameters can be adjusted.
For parameters that can be adjusted in spin boxes or in the special frequency edit fields, the allowed
parameter ranges are displayed in a tool-tip. The tool-tip window appears when moving the mouse
cursor over the value field of the particular parameter. The following figure shows an example of the
tool-tip window for the parameter FFE Order of the PSK demodulator.
4-1 4071.5546.32-08.00
Page 82

R&S GX430 Demodulation
Figure 82: Parameter range visualization for parameter FFE order
When all parameters are set to the desired values, they have to be sent to the signal processing
subsystem with the Apply button. If the Auto Apply checkbox is activated then the adjusted values are
automatically applied to the demodulator after three seconds following the last input.
4.1.3 Input Signal Parameters and Terms
In order to set reasonable demodulator parameters the sample rate of the input signal must be known.
The sample rate of the input signal is visualized at the top of the Spectrum tab and is denoted by Rate.
In the following the term emission of interest denotes a digital signal that is contained in the input signal
which is provided to the demodulator. In general the emission of interest is of smaller bandwidth than
the input signal and it appears at a certain frequency offset with respect to the center of the spectrum of
the input signal.
4.1.4 Common Parameters
There are some basic parameters that are common to several demodulators. These parameters are
described here.
The Frequency offset is the frequency offset of the emission of interest to the tuner frequency. The
default value is 0 Hz, which means that the center frequency of the emission of interest is the same as
the tuner frequency. The FFT spectrum that is displayed in the Spectrum tab can be used in order to
identify the Frequency offset as the distance in Hz of the emission of interest to the center of the total
spectrum. The center of the total spectrum is equivalent to the tuner frequency. In order to achieve
reasonable demodulation results the emission of interest should not be positioned close to the borders
of the spectrum.
4071.5546.32-08.00 4-2
Page 83

Demodulation R&S GX430
The demodulators are able to compensate for changing center frequencies of the emission of interest
but also for inaccurate configuration of the Frequency offset. The value Frequency offset tracking
ange defines to what extent the demodulator will try to compensate a frequency deviation. In any case,
r
the maximum frequency deviation that can be compensated this way is about half of the bandwidth of
the emission of interest. The minimum value of 0 results in no frequency compensation at all. In this
case the demodulator assumes that the emission of interest resides at frequency “tuner frequency +
Frequency offset “at any moment in time. The higher the value of Frequency offset tracking range is
chosen, the higher the maximum frequency deviation that can be compensated. On the other hand,
igher values of Frequency offset tracking range will make the frequency offset compensation more
h
sensitive for signal distortions, which might result in an inaccurate frequency offset compensation. A
good trade-off is a value of 0.1 for Frequency offset tracking range.
The symbol rate of the emission of interest (expected to be a digital modulation method) is set in the
field Baud rate. It is to be specified in symbols per second, which is equivalent to the unit Bd (baud).
The demodulators are able to adapt to an inaccurately adjusted symbol rate (baud rate) of an emission
of interest (expected to be a digital modulation method). The compensation works in two phases. First,
the compensation uses the parameter Baud rate capture range. Second, when the demodulation
quality is sufficiently high, the demodulator automatically switches over to the parameter Baud rate
tracking range. The values in these fields are interpreted as the ratio of the allowed deviation to the
specified symbol rate (baud rate). Typically one should set Baud rate tracking range greater or equal
to Baud rate capture range. The higher the value of these fields is chosen, the higher the maximum
baud rate deviation that can be compensated. On the other hand, higher values of these fields will
make the baud rate offset compensation more sensitive for signal distortions, which might result in
inaccurate baud rate offset compensation. A good trade-off is a value of 0.1 for Baud rate capture
range and Baud rate tracking range.
4.1.5 The ASK2 Demodulator
The dialog for the ASK2 demodulator is displayed in the following figure. All parameters of this
demodulator are described in section Common Parameters
Figure 83: Parameters for the ASK2 demodulator
.
The maximum Baud rate that can be set in order to achieve reasonable demodulation results depends
on the sample rate of the input signal (Rate) provided to this demodulator.
4-3 4071.5546.32-08.00
Page 84

R&S GX430 Demodulation
The parameters Baud rate capture range, Baud rate tracking range, and
Frequency offset tracking range are only available if the option key for the
functionality “demodulation professional” has been acquired. Please
check with your vendor for purchasing this option if required.
Parameter restrictions
The following table describes restrictions of parameter settings that need to be respected in order to
create a parameter set that enables the demodulator to produce reasonable results. The table lists the
assumed settings for a subset of demodulation parameters and/or signal parameters in the left column.
The right column lists the corresponding restrictions on demodulator parameters that must be fulfilled.
Assumption Restriction
- 6.66 < Rate/Baud rate < 5333.33
Table 4: Parameter restrictions for the ASK2 demodulator
If the parameter Baud rate does not fulfill this relation the demodulator setting is considered
incompatible to the input signal. In this case the message
recvDDEM_Inputdata_Parameter_Compatibility with value FALSE appears in the Log Messages
window. Furthermore the demodulator does not produce any demodulation results. The example in the
following figure shows the Log Messages window containing an [Error] entry after an inaccurate baud
rate setting for the ASK demodulator with an input signal with Rate = 32000Hz and parameter Baud
rate = 22000Bd. The message recvDDEM_Inputdata_Parameter_Compatibility appears in the Log
Messages window.
Figure 84: Error in Log Messages after an incompatible Baud rate setting in ASK demodulator
4.1.6 The ATIS Demodulator
The dialog for the ATIS demodulator is displayed in the following figure. This demodulator only needs
the Frequency offset which is described in section Common Parameters
Figure 85: Parameters for the ATIS Demodulator
4071.5546.32-08.00 4-4
.
Page 85

Demodulation R&S GX430
4.1.7 The CLOVER Demodulator
The dialog for the CLOVER demodulator is displayed in the following figure.
Figure 86: Parameters for the CLOVER demodulator
You can select the type of the demodulator (CLOVER or CLOVER-2000) in the field Type.
CLOVER is a digital communications mode that conveys 8-bit digital data over narrow-band high-
frequency radio. It can also transfer ASCII text and executable computer files without using the
additional control characters required in other digital modes, which decrease throughput. It measures
signal conditions, and automatically changes modulation format and data throughput to match current
link quality.
CLOVER-2000 is a faster version of CLOVER (about four times faster) that uses eight tone pulses,
each of which is 250 Hz wide, spaced at 250-Hz centers, contained within a 2 kHz bandwidth between
500 and 2500 Hz.
The parameter Frequency offset is described in section Common Parameters
.
4.1.8 The DRM Demodulator
DRM (Digital Radio Mondiale) is the universal, openly standardized, digital radio system for short-wave,
medium-wave, and long-wave digital radio for the frequencies below 30MHz.
The dialog for the DRM demodulator is displayed in the following figure. Please note that this dialog is
an example of a custom parameter dialog. Due to this, its source code has been kept simple and it has
neither an Apply button, nor an Auto Apply checkbox. When changed by the user, the settings are
immediately sent to the signal processing subsystem.
Figure 87: Parameters for the DRM demodulator
The parameter Frequency offset is described in section Common Parameters.
4-5 4071.5546.32-08.00
Page 86

R&S GX430 Demodulation
IQ data type specifies the channel to be visualized. The supported channels are Fast access channel
(a QPSK), which is a synchronization channel, Service description channel (a QAM16), which
rovides additional information about the first one, and Main service channel, which contains both
p
audio and text information.
The supported Noise reduction values are None (meaning no filtering), 10 kHz filter, and 20 kHz filter.
4.1.9 The DTMF Demodulator
The dialog for the DTMF demodulator is displayed in the following figure. The demodulator only needs
the Frequency offset. This parameter is described in section Common Parameters
Figure 88: Parameters for the DTMF demodulator
.
4.1.10 The FMSBOS Demodulator
The dialog for the FMSBOS demodulator is displayed in the following figure. The demodulator only
needs the Frequency offset. This parameter is described in section Common Parameters
Figure 89: Parameters for the FMSBOS demodulator
.
4071.5546.32-08.00 4-6
Page 87

Demodulation R&S GX430
4.1.11 The FSK Demodulator
The dialog for the FSK demodulator is displayed in the following figure.
Figure 90: Parameters for the FSK demodulator
The parameters Baud rate capture range, Baud rate tracking range,
Frequency offset tracking range, Primary modulation, Sub carrier, and
Primary modulation bandwidth are only available if the option key for the
functionality “demodulation professional” has been acquired. Please
check with your vendor for purchasing this option if required.
In the field Demodulator the modulation type (FSK2, FSK4, or MSK) has to be selected.
The selection in the field Variant determines which variant is used for the symbol decision. If the variant
Discriminator is selected then the demodulator uses a discriminator. If Matched Filter is selected then
the demodulator uses a matched filter. If the variant is AUTO then the demodulator automatically
decides which variant is the best for demodulation of the input signal.
4-7 4071.5546.32-08.00
Page 88

R&S GX430 Demodulation
For MSK none of the Shift fields needs to be specified. For FSK2 the frequency shift needs to be
specified in the first of the three Shift fields. For FSK4 all the three frequency shifts between the four
ones have to be specified in the three Shift fields. The unit of these frequency shifts is Hz.
t
The Block cycle is the time between the starts of two successive bursts. The Block length is the
uration of one burst. Both values are specified in seconds.
d
In the field Sideband the options Upper and Lower can be selected. If the option Upper is selected the
signal is processed as it is. In case of the option Lower the imaginary part of the signal is inverted. I.e.
the spectrum of the signal is mirrored. Select this option if the signal was transmitted with a lower
sideband transmitter.
For directly modulated signals select DIRECT in the field Primary modulation. For doubled modulated
signals select AM or FM. In the case of doubled modulated signals the sub carrier frequency must be
specified in the field Sub carrier and the bandwidth of the primary modulation must be specified in the
field Primary modulation bandwidth.
The other parameters of the demodulator are described in section Common Parameters
Parameter restrictions
The following table describes restrictions of parameter settings that need to be respected in order to
create a parameter set that enables the demodulator to produce reasonable results. The table lists the
assumed settings for a subset of demodulation parameters and/or signal parameters in the left column.
The right column lists the corresponding restrictions on demodulator parameters that must be fulfilled.
Assumption Restriction
Rate is the sample rate of the input signal 6.6 < Rate/Baud rate < 1600
Demodulator = FSK2 0.5 ^ Shift/Baud rate ^ 25
Demodulator = FSK4 0.5 ^ Shift/Baud rate ^ 4 (for each Shift)
Block cycle > 0 and Block length > 0 0 < Block cycle ^ 3 sec
0 < Block length ^ 2 sec
Block cycle > Block length
Primary modulation = AM or FM Sub carrier ^ 3000 Hz
800 Bd ^ Baud rate ^ 2400 Bd
Table 5: Parameter restrictions for the FSK demodulator
.
4.1.12 The HELLSCHREIBER Demodulator
The dialog for the HELLSCHREIBER demodulator is displayed in the following figure.
Figure 91: Parameters for the HELLSCHREIBER demodulator
4071.5546.32-08.00 4-8
Page 89

Demodulation R&S GX430
Select the type of the HELLSCHREIBER (AM or FM) in the field Type.
The parameter Frequency offset is described in section Common Parameters
.
4.1.13 The HF-FAX and PRESSFAX Demodulators
The dialog for the HF-FAX and PRESSFAX demodulators is displayed in the following figure.
Figure 92: Parameters for the HF-FAX, PRESSFAX demodulator
The Drum speed determines how often there will be a line wrap in the picture. This parameter is
needed to adjust the picture output.
The Shift is the difference in frequency between white and black. It is specified in Hz. This parameter is
only needed for HFFAX_FM and PRESSFAX.
The IOC is the index of cooperation. Select IOC_352, IOC_576, or IOC_288.
The parameter Frequency offset is described in section Common Parameters
.
4.1.14 The METEOSAT-WEFAX Demodulator
The dialog for the METEOSAT-WEFAX demodulator is displayed in the following figure. The
demodulator only needs the Frequency offset. This parameter is described in section Common
Parameters.
Figure 93: Parameters for the METEOSAT-WEFAX demodulator
4-9 4071.5546.32-08.00
Page 90

R&S GX430 Demodulation
4.1.15 The McFSK Demodulator
The dialog for the multi channel FSK2 (McFSK) demodulator is displayed in the following figure.
Figure 94: Parameters for the McFSK demodulator
The parameters Baud rate capture range, Baud rate tracking range,
Frequency offset tracking range, and Visualization channel are only
available if the option key for the functionality “demodulation
professional” has been acquired. Please check with your vendor for
purchasing this option if required.
The selection in the field Variant determines which variant is used for the symbol decision. If the variant
Discriminator is selected then the demodulator uses a discriminator. If Matched Filter is selected then
the demodulator uses a matched filter. If the variant is AUTO then the demodulator automatically
decides which variant is the best for demodulation of the input signal.
The frequency shift is to be specified in the Shift field. Its unit is Hz.
4071.5546.32-08.00 4-10
Page 91

Demodulation R&S GX430
In the field Sideband the options Upper and Lower can be selected. If the option Upper is selected the
signal is processed as it is. In case of the option Lower the imaginary part of the signal is inverted. I.e.
the spectrum of the signal is mirrored. Select this option if the signal was transmitted with a lower
sideband transmitter.
The field Baud rate specifies the symbol rate of one channel. It is assumed that all channels have the
same symbol rate and follow the same clock.
In the field Visualization channel select the channel whose eye diagram will be displayed.
The number of FSK channels is selected in the field Channel count. The spacing between the
channels is specified in the field Channel spacing. It contains a list of the spacings between all
neighboring channels, i.e. if the signal has n channels, then the list in the field channel spacing must
contain n-1 entries. The unit of the channel spacing is Hz.
The other parameters of the demodulator are described in section Common Parameters
Parameter restrictions
The following table describes restrictions of parameter settings that need to be respected in order to
create a parameter set that enables the demodulator to produce reasonable results. The table lists the
assumed settings for a subset of demodulation parameters and/or signal parameters in the left column.
The right column lists the corresponding restrictions on demodulator parameters that must be fulfilled.
Assumption Restriction
Rate is the sample rate of the
input signal
- 4Bd ^ Baud rate ^ 1000Bd
- 2Hz ^ Shift ^ 1000Hz
- 2 ^ Channel count ^ 64
- for each Channel spacing entry
- 0.5 ^ Shift/Baud rate ^ 4
- Baud rate*Channel count ^ 200kBd
Sum of Channel spacing entries < Rate
Rate/Baud rate < 8112.4
Channel spacing ` 10Hz
Channel spacing ` (1.2 * Baud rate + Shift)
.
Sum of Channel spacing entries ^ 200kHz
Table 6: Parameter restrictions for the McFSK demodulator
4-11 4071.5546.32-08.00
Page 92

R&S GX430 Demodulation
4.1.16 The McPSK Demodulator
The dialog for the multi channel PSK (McPSK) demodulator is displayed in the following figure.
Figure 95: Parameters for the McPSK demodulator
The parameters Baud rate capture range, Baud rate tracking range, and
Frequency offset tracking range are only available if the option key for the
functionality “demodulation professional” has been acquired. Please
check with your vendor for purchasing this option if required.
In the field Demodulator the modulation type (MPSK2A, MPSK2B, MPSK4A, or MPSK4B) has to be
selected.
The field Baud rate specifies the symbol rate of one channel. It is assumed that all channels have the
same symbol rate and follow the same clock.
In the field Sideband the options Upper and Lower can be selected. If the option Upper is selected the
signal is processed as it is. In case of the option Lower the imaginary part of the signal is inverted. I.e.
4071.5546.32-08.00 4-12
Page 93

Demodulation R&S GX430
the spectrum of the signal is mirrored. Select this option if the signal was transmitted with a lower
sideband transmitter.
The number of PSK channels is selected in the field Channel count. The spacing between the
channels is specified in the field Channel spacing. It contains a list of the spacings between all
eighboring channels, i.e. if the signal has n channels, then the list in the field channel spacing must
n
contain n-1 channel spacings. The unit of the channel spacing is Hz.
The other parameters of the demodulator are described in section Common Parameters
Parameter restrictions
The following table describes restrictions of parameter settings that need to be respected in order to
create a parameter set that enables the demodulator to produce reasonable results. The table lists the
assumed settings for a subset of demodulation parameters and/or signal parameters in the left column.
The right column lists the corresponding restrictions on demodulator parameters that must be fulfilled.
Assumption Restriction
Rate is the sample rate of the
input signal
- 4Bd ^ Baud rate ^ 240Bd
- 2 ^ Channel count ^ 64
- for each Channel spacing:
- Baud rate*Channel count ^ 4800Bd
Table 7: Parameter restrictions for the McPSK demodulator
Sum of Channel spacing entries < Rate
Rate/Baud rate < 5726.4
1000Hz ` Channel spacing ` 10Hz
Channel spacing ` (1.2*Baud rate)
Sum of Channel spacing entries ^ 8200Hz
.
4.1.17 The MORSE Demodulator
The dialog for the MORSE demodulator is displayed in the following figure.
Figure 96: Parameters for the MORSE demodulator
The parameter Frequency offset is described in section Common Parameters. The field Speed
determines the speed of the transmission. It is specified in words per minute (WPM).
If the Automatic mode is selected, then the frequency offset and the speed are determined
automatically by the demodulator.
4-13 4071.5546.32-08.00
Page 94

R&S GX430 Demodulation
4.1.18 The MPT1327 Demodulator
The dialog for the MPT1327 demodulator is displayed in the following figure.
Figure 97: Parameters for the MPT1327 demodulator
In the field Type the channel spacing for the transmitting channels is selected. There are two options,
12.5 kHz and 25 kHz.
The index of the control channel is to be entered into the field Control channel.
The parameter Frequency offset is described in section Common Parameters
4.1.19 The MTONE Demodulator
The dialog for the MTONE demodulator is displayed in the following figure.
.
Figure 98: Parameters for the MTONE demodulator
4071.5546.32-08.00 4-14
Page 95

Demodulation R&S GX430
The parameters Tone duration capture range, Tone duration tracking
range, and Frequency offset tracking range are only available if the option
key for the functionality “demodulation professional” has been acquired.
Please check with your vendor for purchasing this option if required.
The tone duration has to be entered in ms into the field Tone duration.
The number of tones is set in the field Tone count. The spacing between neighboring tones is to be
specified in Hz in the field Tone spacing.
In the field Sideband the options Upper and Lower can be selected. If the option Upper is selected the
signal is processed as it is. In case of the option Lower the imaginary part of the signal is inverted. I.e.
the spectrum of the signal is mirrored. Select this option if the signal was transmitted with a lower
sideband transmitter.
Tone duration capture range, Tone duration tracking range, and Frequency offset tracking range
are described in section Common Parameters
rate tracking range, and Frequency offset tracking range, respectively.
Parameter restrictions
The following table describes restrictions of parameter settings that need to be respected in order to
create a parameter set that enables the demodulator to produce reasonable results. The table lists the
assumed settings for a subset of demodulation parameters and/or signal parameters in the left column.
The right column lists the corresponding restrictions on demodulator parameters that must be fulfilled.
Assumption Restriction
, but are denoted by Baud rate capture range, Baud
Rate is the sample rate of the
input signal
- 6 ^ Tone count ^ 64
- 2Hz ^ Tone spacing ^ 100Hz
Table 8: Parameter restrictions for the MTONE demodulator
Tone spacing * Tone count < Rate
Rate*(Tone duration/1000) < 2048
3ms ^ Tone duration ^ 200ms
4.1.20 The Packet Radio Demodulator
The dialog for the Packet Radio demodulator is displayed in the following figure.
Figure 99: Parameters for the Packet Radio demodulator
The type of the Packet Radio (PR_300, PR_1200, or PR_9600) is selected in the field Type.
The parameter Frequency offset is described in section Common Parameters
4-15 4071.5546.32-08.00
.
Page 96

R&S GX430 Demodulation
4.1.21 The PACTOR Demodulator
PACTOR (Packet Teleprinting Over Radio) is a modern radio teletype mode developed in Germany by
Ulrich Strate and Hans-Peter Helfert to improve on inefficient modes such as AMTOR/SITOR and
Packet-Radio (AX.25) in weak short wave conditions
The dialog for the PACTOR demodulator is displayed in the following figure.
Figure 100: Parameters for the PACTOR demodulator
You can select the type of the demodulator (PACTOR II or PACTOR III) in the field Type.
PACTOR-II consists of a synchronous half-duplex ARQ protocol and supports four different
speed steps for improved adaptability.
PACTOR-III is superior to PACTOR-II in both speed and robustness. On an average channel,
PACTOR-III is around 3.5 times faster than PACTOR-II. On good channels, the effective
throughput ratio between PACTOR-III and PACTOR-II can exceed 5. PACTOR-III achieves
slightly higher robustness at the low SNR edge compared to PACTOR-II.
The parameter Frequency offset is described in section Common Parameters.
4.1.22 The POCSAG Demodulator
The dialog for the POCSAG demodulator is displayed in the following figure.
Figure 101: Parameters for the POCSAG demodulator
The symbol rate of the POCSAG system (AUTO, 512 Bd, 1200 Bd, or 2400 Bd) is selected in the field
Symbol rate. If the option AUTO is selected, then the demodulator automatically determines the
correct symbol rate.
The parameter Frequency offset is described in section Common Parameters
4071.5546.32-08.00 4-16
.
Page 97

Demodulation R&S GX430
4.1.23 The PSK Demodulator
The dialog for the PSK demodulator is displayed in the following figure.
Figure 102: Parameters for the PSK demodulator
The parameters Baud rate capture range, Baud rate tracking range,
Frequency offset tracking range, FFE Order, and FFE Convergence Factor
are only available if the option key for the functionality “demodulation
professional” has been acquired. Please check with your vendor for
purchasing this option if required.
In the field Demodulator the modulation type (PSK2A, PSK2B, PSK4A, PSK4B, PSK8A, or PSK8B)
has to be selected.
In the field Sideband the options Upper and Lower can be selected. If the option Upper is selected the
signal is processed as it is. In case of the option Lower the imaginary part of the signal is inverted. I.e.
the spectrum of the signal is mirrored. Select this option if the signal was transmitted with a lower
sideband transmitter.
In the field Equalizer the equalizer is switched On or Off. A constant modulus algorithm (CMA)
equalizer is used for blind equalization. In the field FFE order the order of the feed forward equalizer
may be selected. The FFE convergence factor determines how fast the feed forward equalizer is
converging.
The other parameters of the demodulator are described in section Common Parameters
.
4-17 4071.5546.32-08.00
Page 98

R&S GX430 Demodulation
Parameter restrictions
The following table describes restrictions of parameter settings that need to be respected in order to
create a parameter set that enables the demodulator to produce reasonable results. The table lists the
assumed settings for a subset of demodulation parameters and/or signal parameters in the left column.
he right column lists the corresponding restrictions on demodulator parameters that must be fulfilled.
T
Assumption Restriction
Rate is the sample rate of the
input signal
Equalizer = On 1 ^ FFE order ^ 48
Table 9: Parameter restrictions for the PSK demodulator
4 ^ Rate/Baud rate ^ 2048
4.1.24 The SELCAL_5T Demodulator
The dialog for the SELCAL_5T demodulator is displayed in the following figure.
Figure 103: Parameters for the SELCAL_5T demodulator
In the field Type the type of the SELCAL system is selected. The following systems are available:
ZVEI1, ZVEI2, CCIR1, CCIR2, VDEW, CCITT, EEA, EIA, EURO, and NATEL.
The parameter Frequency offset is described in section Common Parameters
.
4.1.25 The SSTV Demodulator
The dialog for the SSTV demodulator is displayed in the following figure.
Figure 104: Parameters for the SSTV demodulator
In the field Mode the transmission mode of the SSTV system is selected. If the option AUTO was
selected, then the demodulator automatically determines the correct mode.
4071.5546.32-08.00 4-18
Page 99

Demodulation R&S GX430
The parameter Frequency offset is described in section Common Parameters
.
4.1.26 The ZVEI-VDEW Demodulator
The dialog for the ZVEI-VDEW demodulator is displayed in the following figure. The demodulator only
needs the Frequency offset. This parameter is described in section Common Parameters
Figure 105: Parameters for the ZVEI-VDEW demodulator
.
4-19 4071.5546.32-08.00
Page 100

R&S GX430 Demodulation
4.2 Analog Demodulator Parameters
4.2.1 Adjusting and Applying Parameters
Audio Source allows for switching between the audio data provided by the Analog demodulator and
the one provided by the currently active Digital demodulator (in case it provides audio data). It also
allows for disconnecting from any audio data stream by selecting None as source.
The analog demodulator can be enabled or disabled with the aid of the Analog demodulator enabled
checkbox. Disabling the analog demodulator will also inhibit the manipulation of its parameters.
Figure 106: Analog demodulator parameters
For parameters that can be adjusted in spin boxes, the allowed parameter ranges are displayed in a
tool-tip. The tool-tip window appears when moving the mouse cursor over the value field of the
particular parameter.
Modulation type defines the demodulator to be used. For non suppressed carrier amplitude modulated
signals use the AM demodulator, frequency modulated signals can be demodulated with the FM
demodulator. For single sideband emissions use USB for upper sideband signals and LSB for lower
sideband signals. Signals with independent sidebands can be demodulated using the ISB demodulator
– the upper and lower channels will be placed in the left and right channels within the audio stream.
Amplitude modulated signals with suppressed carrier can be demodulated by choosing one sideband
and using the corresponding USB or LSB demodulator. The CW demodulator is used to listen into
single sideband digital signals like FSK or Morse emissions – CW is also a USB demodulator.
Audio sample rate determines the sample rate for the resulting audio stream. A larger audio sample
rate leads to increased traffic caused by the audio data stream. By choosing LOW the output audio
sample rate should fit speech and the chosen bandwidth, MEDIUM is a compromise between traffic
and music quality and HIGH should be used for music or audio signals with higher bandwidth.
The Frequency offset is the frequency offset of the emission of interest to the tuner frequency. The
default value is 0 Hz, which means that the center frequency of the emission of interest is the same as
the tuner frequency. The FFT spectrum that is displayed in the Spectrum tab can be used in order to
identify the Frequency offset as the distance in Hz of the emission of interest to the center of the total
spectrum. The center of the total spectrum is equivalent to the tuner frequency. In order to achieve
reasonable demodulation results the emission of interest should not be positioned close to the borders
of the spectrum.
4071.5546.32-08.00 4-20
 Loading...