

RODE Microphones Stereo VideoMic X User Manual [en, de, es, fr, it]
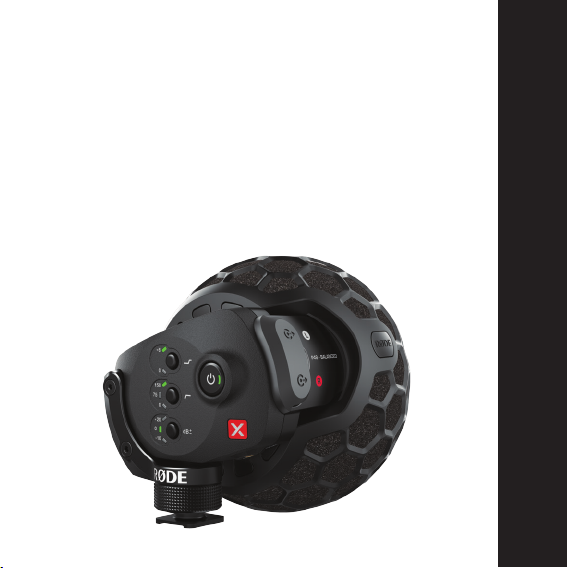
Stereo VideoMic X
Broadcast On-Camera
Stereo Microphone
www.rodemic.com/svmx
1
INSTRUCTION MANUAL ENGLISH

2 3
Features
Compact true condenser stereo microphone
• Heavy duty, lightweight aluminium alloy body
• Broadcast recording quality
• ½” externally biased true condenser capsules, acoustically
matched.
• Integrated shock mount provides isolation from handling and
mechanical noise
• Integrated professional Mini-XLR balanced stereo output for
professional camera use
• 3.5mm stereo minijack output
Detailed control
• Three step high-pass filter (0, 75H Hz, 150Hz)
• Three position level control (-10dB, 0dB, +20dB)
• High frequency boost (+6dB)
• LED power on/low battery indicator
• Integrated billeted metal camera shoe mount with 3/8” thread
for easy boompole mounting
• Integrated digital switching with power On/Off delay

4 5
Features cont.
Warranty
High quality performance
• 9V battery powered – over 30 hours use (alkaline)
• P48 phantom power via Mini XLR
• Flexible and lightweight removable 3.5mm stereo cable (to
minimise handling noise and ensure isolation)
• Premium pop shield and wind shield provided for protection in
all situations.
• Australian designed and manufactured
• 10 Year Warranty*
*Online registration required
Register your SVMX now and
validate your free 10 year warranty.
Scan the QR code with a smartphone, or visit
warranty.rodemic.com/stereovideomicx
The Stereo VideoMic X is covered by a limited warranty for one (1)
year from the date of purchase. This can be extended free of charge
to a full ten (10) year warranty by registering your microphone
online at warranty.rodemic.com/stereovideomicx

6 7
Specications
Acoustic Principle
Polar Pattern
Frequency Range
Frequency Range (High
Pass Filter)
Variable Level
Output Impedence
Signal to Noise Ratio
Equivalent Noise
Maximum SPL
Pressure Gradient
Cardioid
40Hz ~ 20kHz
0, 75, 150Hz
-10, 0, +20dB
200Ω
82 dBA SPL (as per IEC651)
12 dBA SPL (as per IEC651)
143dB SPL
Sensitivity
Dynamic Range
Power requirements
Output Connection
Battery Life
Weight (No Battery)
Dimension (W x L x H)
-32 dB re 1V/Pa (25mV @ 94dB SPL) ±
2dB @ 1kHz
131 dB SPL
9V alkaline battery
3.5 Stereo mini jack plug (dual mono),
Tip – left channel, Ring – right channel,
Dual Mini XLR output (P48 compatible)
30 hours
300g
102mm x 118mm x 100mm
8 9
0˚
90˚ 270˚
180˚
-2.0
-20.0
-10.0
0.0
-2.0
-4.0
-6.0
-8.0
-10.0
-12.0
-14.0
-16.0
-18.0
-20.0
-22.0
-24.0
-25.0
dB rel. 1V/Pa
+5.0
Frequency:
500 Hz:
1000 Hz:
4000 Hz:
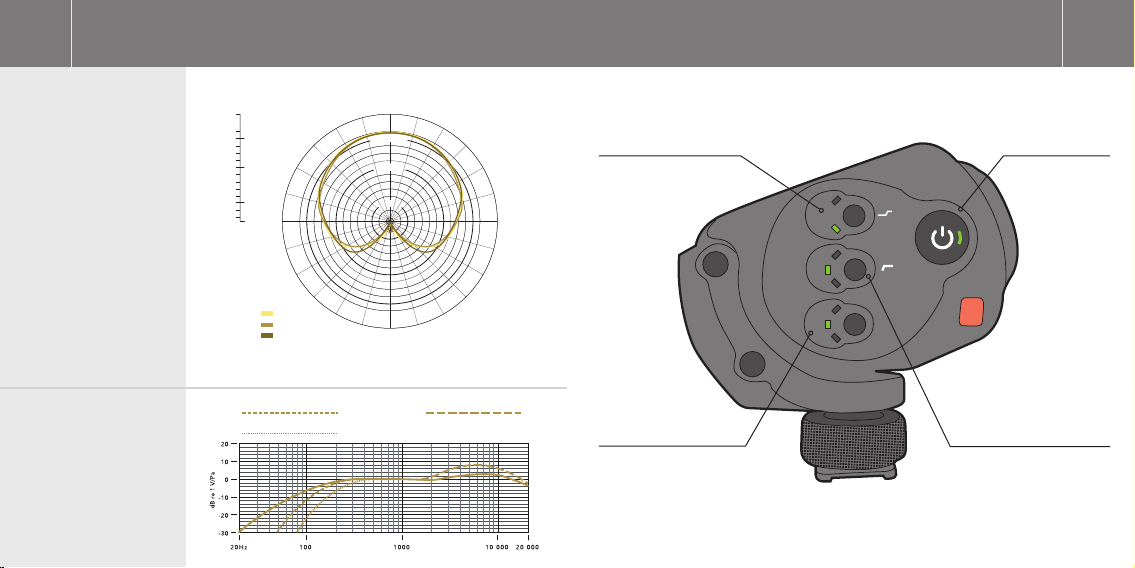
Specications
Control overview
Polar Response
Frequency
Response
75Hz HPF
150Hz HPF
High Boost
High frequency boost
control button
Level control button
On/off power
button
+6
0
150
75
0
+20
0
dB±
-10
High pass filter
switch control button
10 11
Powering the SVMX
Installing the battery
Before you can record with your Stereo VideoMic X, you will need to
install a standard 9V battery (ANS1:1604A or IEC:6LR61), or connect
the microphone via the Mini XLR connections with individual 48v
phantom power supplied for each channel.
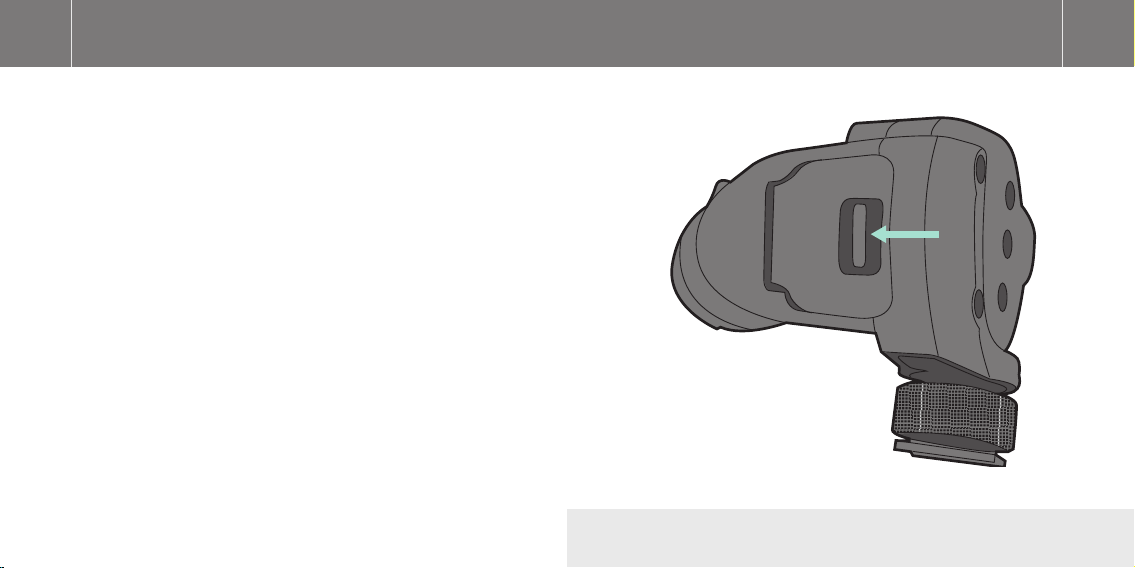
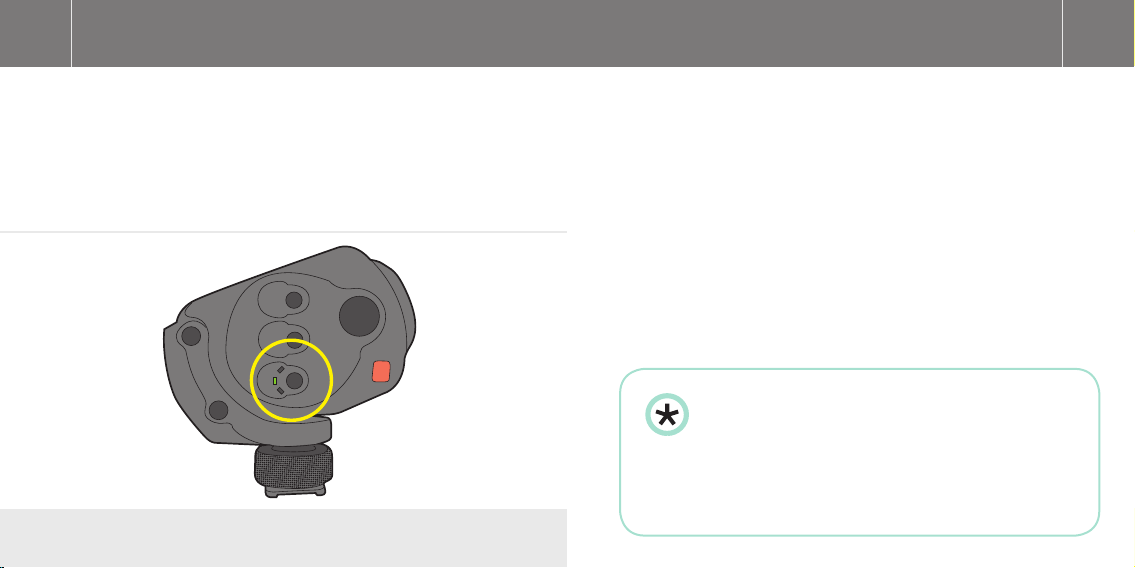
RØDE recommends using a high quality lithium or alkaline battery
to achieve the best possible battery life. To install the battery, open
the battery cover that is located on the left hand side of the Stereo
VideoMic X. To remove the cover, hold the microphone in one hand,
and push the indentation across with your index finger to un-latch
the battery door.
Diagram 1 - Push the indentation accross to un-latch battery door
STEREO VIDEOMIC X
MADE IN AUSTRALIA

12 13
Powering the SVMX
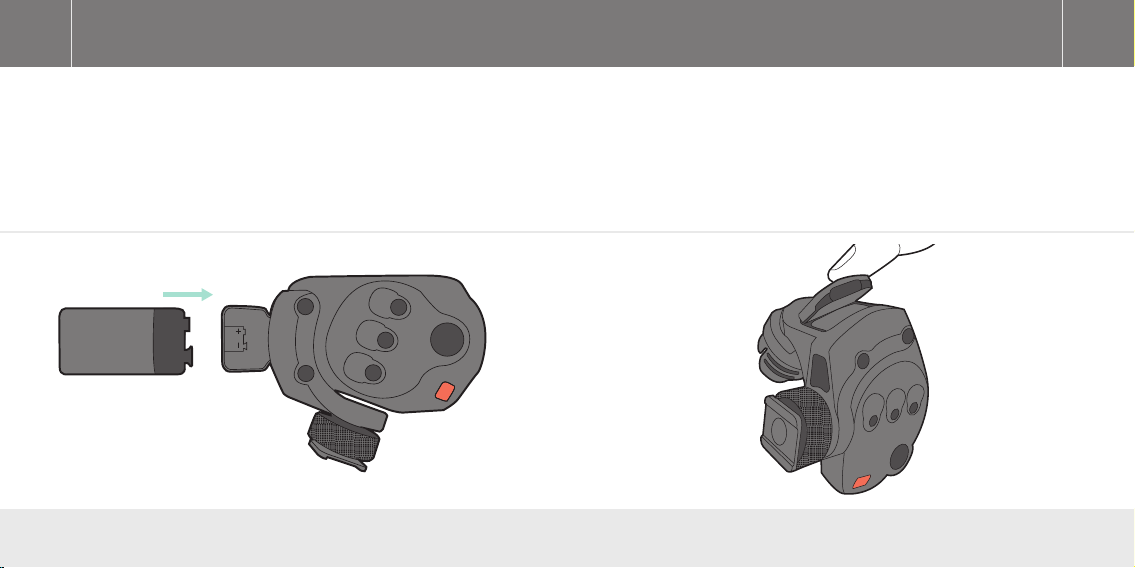
Insert the battery with the negative terminal (-) on the bottom as
shown in Diagram 2. The correct battery orientation is also shown
on the inside of the battery cover. If the battery orientation is not
correct you will be unable to close the battery door.
9V
Diagram 2 - Insert 9V battery
Replace the cover by simply pushing the door closed until it locks
into place. The cover will push the battery against its spring
terminal during installation.
Diagram 3 - Push the cover until it locks into place

14 15
Powering the SVMX
Mounting the SVMX
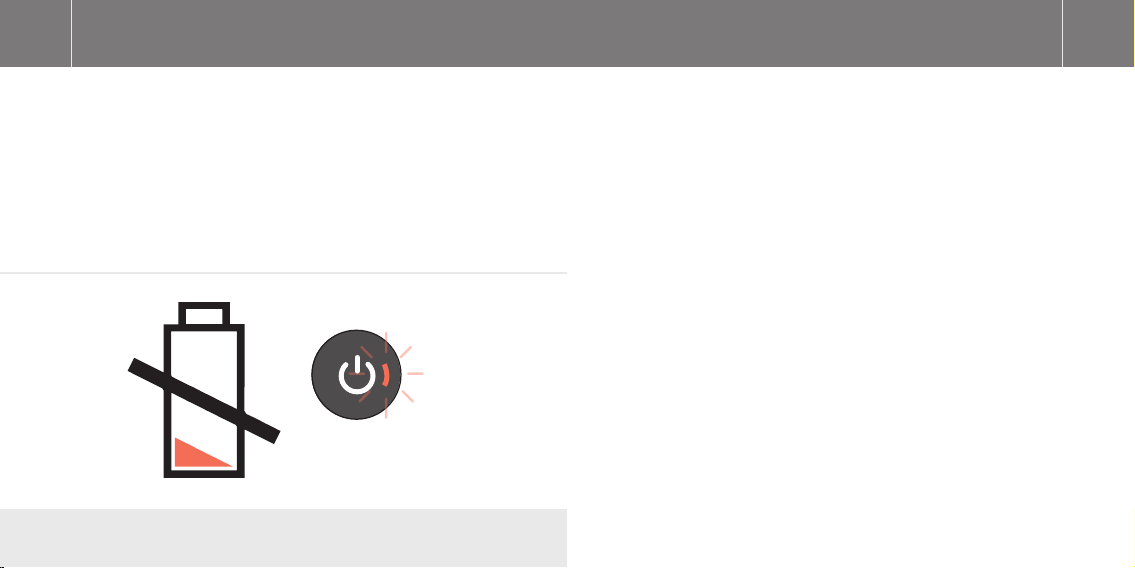
The Stereo VideoMic X will run continuously for over 30 hours with
a high quality alkaline or lithium battery. Battery performance may
vary depending on ambient temperature and battery shelf life, so it
is wise to always carry a spare battery. We suggest always installing
a fresh battery when the application is critical, with no opportunity
to re-shoot. Always remember to switch off the Stereo VideoMic X
when not in use, by holding the power button for approximately two
seconds.
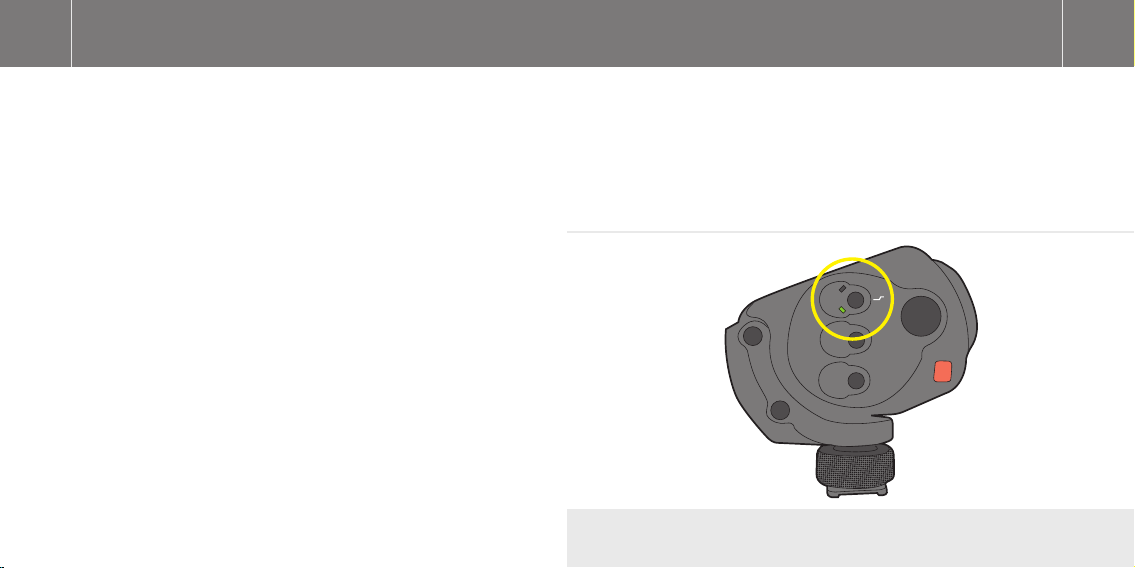
Diagram 4 - The power indicator LED will turn red to indicate a low battery level.
Mounting and connecting your Stereo VideoMic X
The Stereo VideoMic X incorporates a standard camera shoe mount
on the underside of microphone body. The camera shoe mount
has a 3/8” thread at the bottom to additionally allow mounting on
tripods and boompoles.
Some older model and low-cost cameras may produce a higher
level of mechanical noise, which can be picked up by the Stereo
VideoMic X. The integrated high-pass filter should be switched on to
reduce the resulting low frequency rumble.

16 17
Mounting the SVMX
Connecting the SVMX
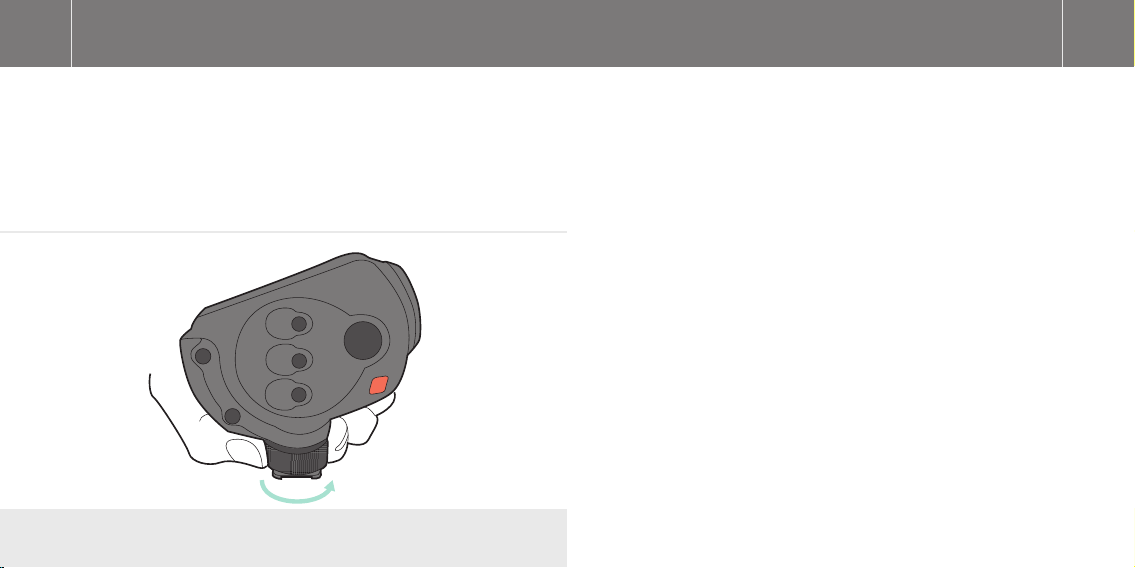
Before sliding the camera shoe into place, loosen the fastening ring
by turning anti-clockwise until it is loose enough to fit easily into
your camera’s shoe mount. Once the shoe is in place, gently tighten
by turning the fastening ring clockwise until the Stereo VideoMic X
is seated firmly in place.
Diagram 5 - Twist the fastening ring anti-clockwise to loosen
The Stereo VideoMic X delivers a mic-level signal to the video camera
via the stereo minijack audio port on the underside of the microphone
body, or via the Mini XLR output connections on the right hand side of the
Stereo VideoMic X body.
Connecting via Minijack: To connect to your camera via the 3.5mm
minijack connection, first connect the red cable supplied with your
microphone to the socket on the underside of the Stereo VideoMic X.
The minijack should be connected to the camera via the camera’s
“audio-in” socket – refer to your video camera user manual for the
location of the socket on your camera model. Now that you have the
Stereo VideoMic X securely fastened to your camera and the audio output
lead connected, you can switch the microphone on and start recording.
Connecting via Mini XLR: To connect the Stereo VideoMic X to a
professional recording device via the mini XLR connectors, lift the
protective cover on the side of the microphone to expose the mini XLR
jacks. Ensuring that the levels on your recording device are set to zero,
connect a mini XLR cable (available separately) to each of the two jacks
on the microphone, followed by the corresponding ends on your recording
device. Power on the microphone and then increase the recording levels
of your recording device as required.
18 19
General operation
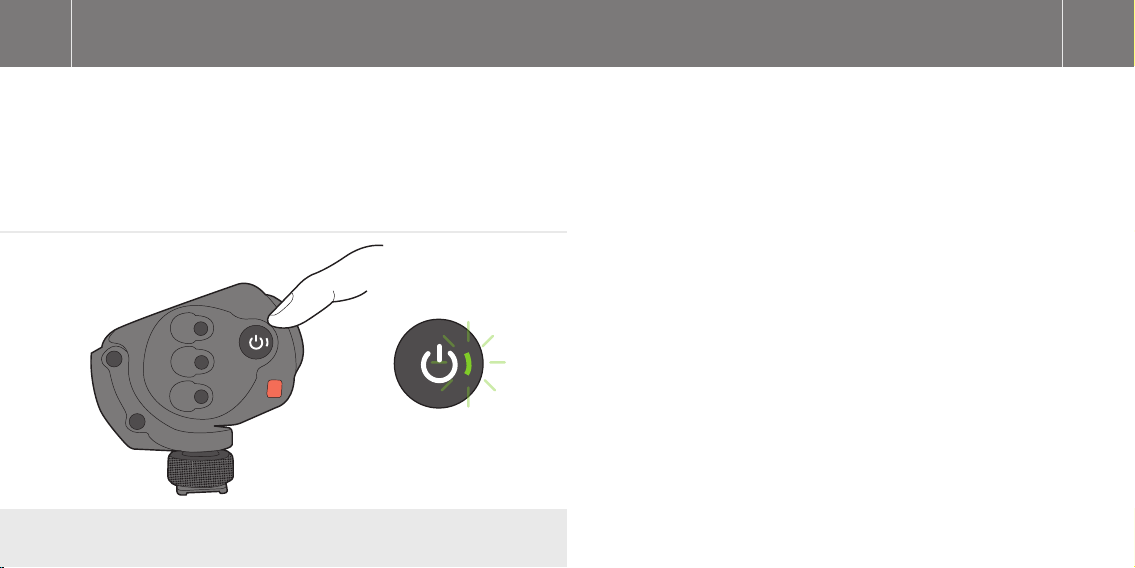
Powering the Stereo VideoMic X
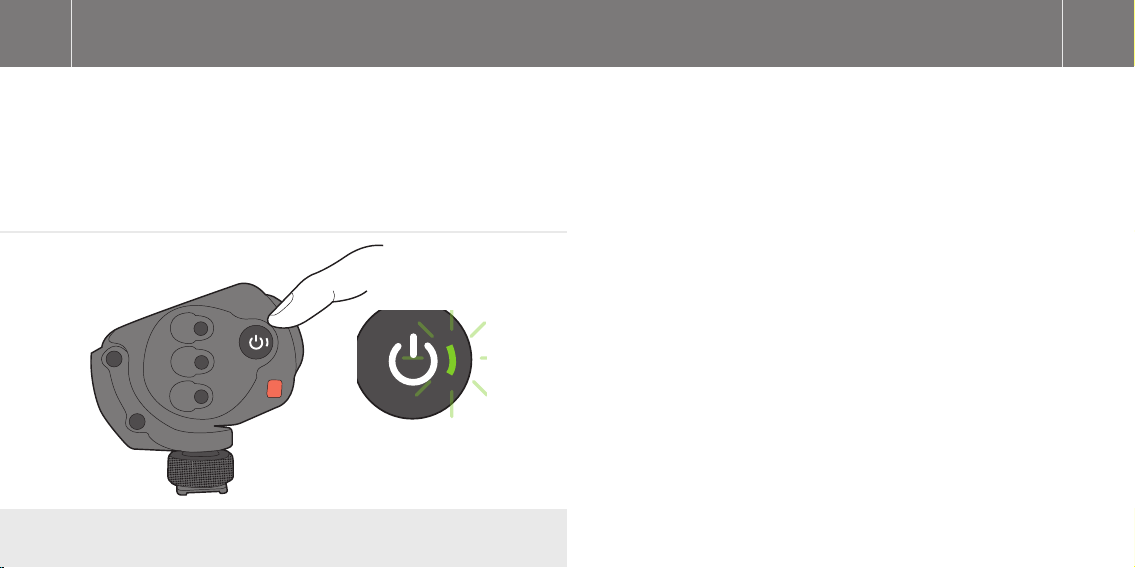
To turn the microphone on, first press and hold the power putton
until the power symbol lights up.
Diagram 6 - Press the power buttong until the power symbol lights
The power indicator LED is located within the power button. This
LED will display a green light indicating a healthy battery level.
When the battery runs low the LED will remain red and you should
replace the battery. The microphone will work for over two hours
once the red indicator is lit, however with reduced performance.
RØDE recommends changing the battery as soon as possible after
the LED has turned red.

20 21
General operation
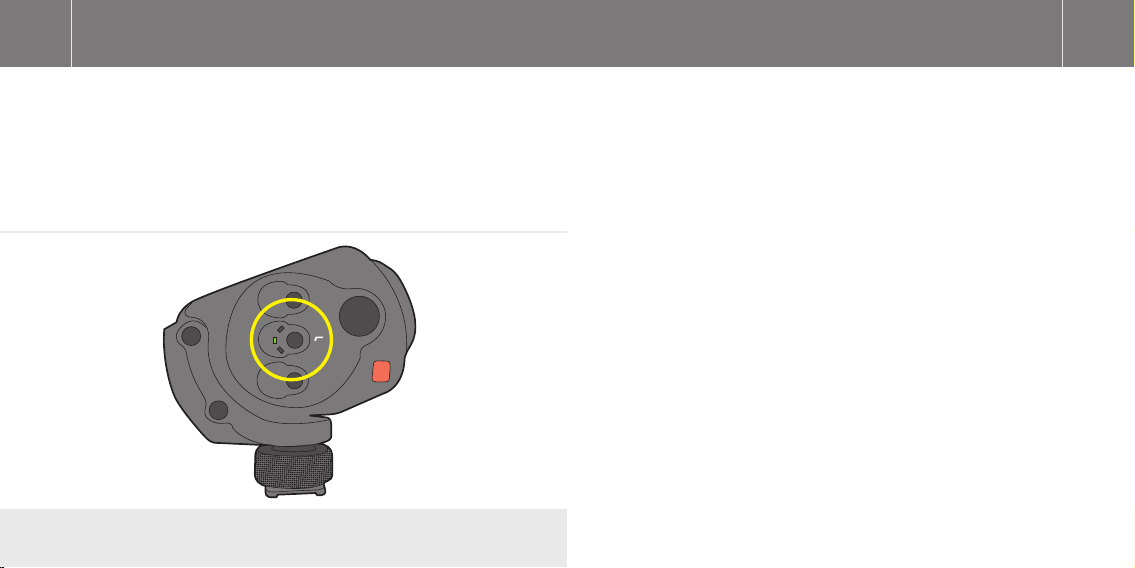
High-pass lter switch
The high-pass filter (HPF) is a low frequency cut-off setting, which
you can use to reduce rumble and other low frequency noise picked
up by the microphone while recording.
150
75
0
Diagram 7 - High pass filter switch control button
For instance, it may be helpful to engage the high-pass filter to cut
out the sound of air conditioning, handling noise while adjusting
focus settings and distant traffic audible in the background.
To engage the high-pass filter, press the center button on the back
of the microphone. The Stereo VideoMic X will cycle through each
setting as the button is pressed, and the green LED will indicate the
position that is currently selected.
22 23
General operation
Level control
The Stereo VideoMic X features three settings to control the signal
output level to your recording device. These are set via the lowest
selector button on the back of the microphone.
+20
dB±
0
-10
Diagram 8 - Level control button
The lowest setting (-10) will reduce or attenuate the signal by 10dB,
meaning that loud sound sources will be reduced and be less likely
to overload or ‘clip’ the input of the recording device. The middle
setting (0dB) is the nominal gain setting of the microphone for use
in ideal recording conditions. The highest setting (+20) will increase
the signal level by 20dB. This is useful for recording quiet sound
sources, or when your camera requires a higher input level for
better signal to noise ratio (as in many digital SLR cameras).
Please note that when setting the input level you should always be
mindful of your camera’s internal audio level setting. If you have
the +20dB level selected on the Stereo VideoMic X you may need to
reduce the input level on your camera.
For best results when recording to DSLR cameras, reduce
the camera’s input level as much as possible, selecting the
+20dB input level on the Stereo VideoMic X and working
downward until the appropriate input level is achieved. This will
result in a much lower noise floor and an overall clearer recording
when plugging the Stereo VideoMic X into the typically low quality
mic preamps found on most DSLR cameras.

24 25
General operation
The Stereo VideoMic X has been designed to work best with the
camera’s auto-gain control (AGC) switched off. (see your camera’s
user manual for instructions on setting the gain control to manual)
As always, it is recommended to test your audio first before
recording anything of importance.
The Stereo VideoMic X has been RF/EMI shielded for very high
rejection of radio frequency interference, but we suggest you keep
all transmitters, cell phones, pagers etc. at least two metres away
to reduce the possibility of interference affecting your recordings.
High frequency boost control
The Stereo VideoMic X features a unique high frequency boost,
which is designed to help pick out high frequency detail such as
voices in a recording environment. The boost will also combat any
high frequency loss experienced with the use of wind protection.
The high frequency boost function is engaged via the top button on
the back of the microphone body.
When engaged, the high frequency boost will apply a +6db shelf
from 3kHz upwards, adding overall clarity to the recorded signal.
+6
0
Diagram 9 - High frequency boost control button
26 27
Selecting & Fitting Wind Shields
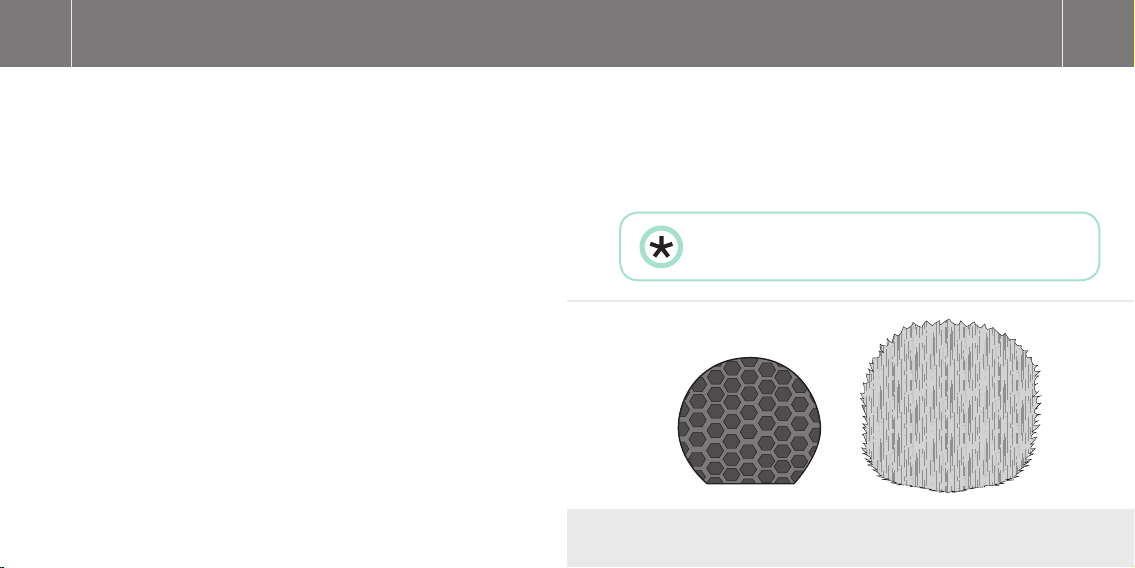
A premium pop shield and wind shield is provided with the Stereo
VideoMic X for the ultimate in wind protection for all situations.
Pop shield:
The pop shield is designed to protect the Stereo VideoMic X
capsules from very light air movement such as a gentle breeze,
and has been designed to be acoustically transparent, whilst
still providing wind protection. It is also useful for protecting the
microphone from the noise caused by fast camera movements, like
tracking or dolly shots.
To fit or remove the pop shield, simply squeeze it on the sides
(labelled with the RODE logo) to allow it to fit over the microphone
capsules.
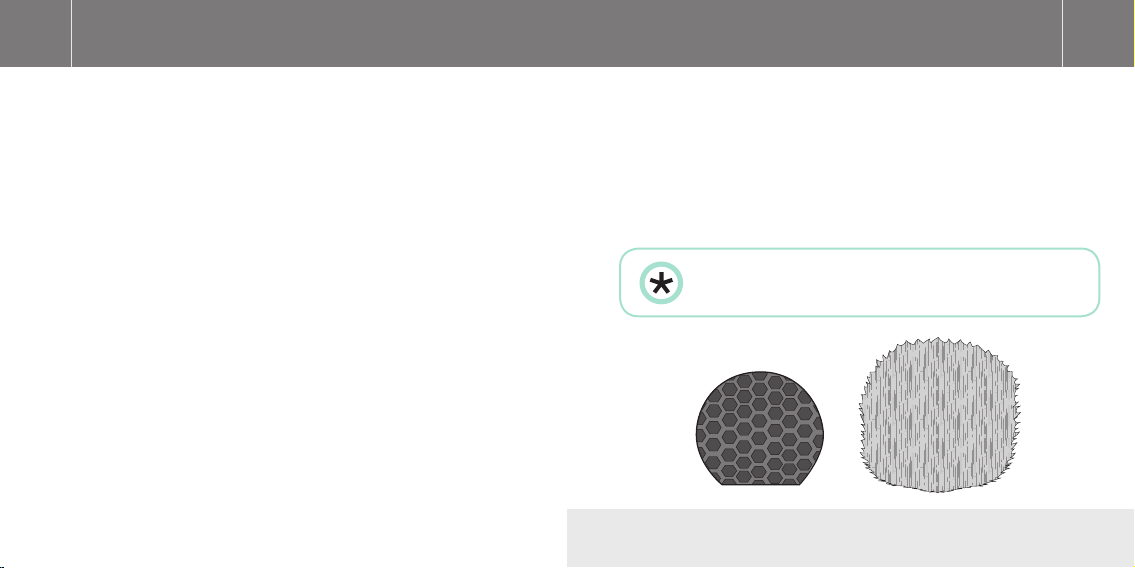
Wind shield:
The wind shield is designed to protect the Stereo VideoMic X
capsules from light breezes to heavy wind, and is recommended
for use in all outdoor shooting situations, where wind gusts can
often be unexpected and unpredictable. The wind shield is made
from a high quality synthetic fur mounted on a low-density foam,
with a rubber lip that provides a tight seal around the microphone
body. Although the wind shield is designed to be as acoustically
transparent as possible, we recommend engaging the high
frequency boost feature on the Stereo VideoMic X to combat the
slight loss of high frequency detail experienced when covering any
microphone capsule.
In very strong wind the combination of wind shield, high
boost and high-pass filter can be used to best effect.
Diagram 10 - Pop shield (left) and wind shield (right)

28 29
Additional tips and tricks
Safety & maintenance
For additional recording tips and tricks, please visit the RØDE
University – RØDE’s free online microphone training website ( www.
rodeuniversity.com ). Check out the Broadcast recording semester
for tutorials most relevant to the Stereo VideoMic X.
For more entertaining videos, you may also wish to visit RØDE TV (
www.rodemic.com/tv ) – featuring a wide range of demos, reviews,
interviews and behind-the-scenes clips for anyone interested in
music, audio and recording.
When not in use, always keep your Stereo VideoMic X in a cool, dry
place, preferably in a camera bag or equivalent to protect from dust
or damage. When not in use for long periods of time, remove the
battery before storage. Do not expose the Stereo VideoMic X to rain
or moisture.
It is recommended that the pop shield be left on at all times
possible to protect the microphone and sensitive capsules from
damage, dust and moisture.
In instances where the microphone has become exposed to the
elements and the foam has become moist or dirty, it may be
necessary to remove the foam gently and dry it separately to
the microphone body to prevent moisture from damaging the
microphone. Take care in this operation so as not to damage or tear
the foam during removal. The foam windshield can be hand washed
in cold water, then dried thoroughly in the sun before refitting.
Inside the Stereo VideoMic X box, you will find a sachet of moisture
absorbent crystals. Please retain these crystals and store with the
Stereo VideoMic X to keep the microphone in ideal condition.

30 31
Safety & maintenance
Support
Eventually this pack of crystals will need to be dried. This is
indicated by the crystals turning pink in colour. They can easily be
re-used by placing them in an oven at 100-150 degrees Celsius
for approximately ten minutes. The crystals will operate effectively
again once they have turned blue.
The Stereo VideoMic X has no internal user serviceable parts.
Should you encounter a problem, please refer all servicing to
qualified service personnel.
If you experience any problem, or have any questions regarding your
RØDE microphone, first contact the dealer who sold it to you. If the
microphone requires a factory authorised service, return will be
organised by that dealer.
We have an extensive distributor/dealer network, but if you have
difficulty getting the advice or assistance you require, please do not
hesitate to contact us directly.
Alternatively please visit www.rodemic.com/support for contact
details and a list of Frequently Asked Questions.
Importers & distributors
For a full list of international importers and distributors, visit our
website at www.rodemic.com/distributors.
32
32 33
33
Stereo VideoMic X
Stereomikrofon für die
Kameramontage
www.rodemic.com/svmx
BEDIENUNGSANLEITUNG DEUTSCH
BEDIENUNGSANLEITUNG DEUTSCH

34 35
Merkmale
Kompaktes, aber vollwertiges StereoKondensatormikrofon
• Robustes, leichtes Gehäuse aus Aluminiumlegierung.
• Absolute Broadcast-Qualität.
• Akustisch abgestimmte 1/2”-Kondensatorkapseln mit externer Vorspannung.
• Die elastische Aufhängung verhindert Handhabungs- und
mechanische Geräusche.
• Hochwertiger symmetrischer Mini-XLR-Ausgang (stereo) für
professionelle Anwendungen.
• 3,5mm Stereo-Miniklinkenausgang.
Umfassende Einstellungsmöglichkeiten
• Hochpassfilter mit drei Einstellungsmöglichkeiten (0, 75Hz,
150Hz).
• Pegel in 3 Stufen einstellbar (–10dB, 0dB, +20dB).
• Anhebung der hohen Frequenzen (+6dB).
• LED für die Status- und Ladungsanzeige.
• Blitzschuhmontage, 3/8”-Gewinde für Stativmontage.
• Interne digitale Schaltfunktion mit Ein-/Ausschaltverzögerung.

36 37
Merkmale (Fortsetzung)
Garantie
Hochwertige Signalqualität.
• Speisung per 9V-Batterie, Laufzeit von über 30 Stunden
(Alkali).
• P48-Phantomspeisung über Mini-XLR.
• Flexibel einsetzbares und federleichtes 3,5mm-Kabel (stereo)
für eine optimale Isolierung und minimale Handhabungsgeräusche.
• Hochwertiger Popp- und Windschutz für eine optimale Signalqualität.
• Entwickelt und hergestellt in Australien.
• 10 Jahre Garantie*
* Mittels Online-Registrierung.
Registrieren Sie Ihr SVMX jetzt, um
Ihre kostenlose 10-Jahres-Garantie
zu aktivieren.
Scannen Sie den QR-Code mit Ihrem Smartphone
oder surfen Sie zu warranty.rodemic.com/
stereovideomicx.
Für das Stereo VideoMic X gilt eine Garantiefrist von 2 Jahren ab
dem Erstkaufdatum. Diese kann jedoch kostenlos auf zehn (10)
Jahre verlängert werden, indem man das Mikrofon unter warranty.
rodemic.com/stereovideomicx registriert.

38 39
Technische Daten
Akustisches Prinzip
Richtcharakteristik
Übertragungsbereich
Grenzfrequenz
(Hochpassfilter)
Pegeleinstellung
Ausgangsimpedanz
Fremdspannungsabstand
Eigenrauschen
Grenzschalldruck
Druckgradient
Niere
40Hz~20kHz
0, 75, 150Hz
–10, 0, +20dB
200Ω
82dBA Schalldruck (gemäß IEC651)
12dBA Schalldruck (gemäß IEC651)
143dB
Empfindlichkeit
Dynamikbereich
Spannungsanforderungen
Ausgang
Batterielaufzeit
Gewicht (ohne Batterie)
Abmessungen (B x L x H)
–32dB re 1V/Pa (25mV bei Schalldruck
von 94dB) ±2dB @1kHz
131dB
9V-Alkalibatterie
Stereo-Miniklinkenstecker (3,5mm,
Doppelmono),
Spitze – linker Kanal, Ring – rechter
Kanal, Doppelter Mini-XLR-Ausgang
(P48-kompatibel)
30 Stunden
300g
102mm x 118mm x 100mm

40 41
0˚
90˚ 270˚
180˚
-2.0
-20.0
-10.0
0.0
-2.0
-4.0
-6.0
-8.0
-10.0
-12.0
-14.0
-16.0
-18.0
-20.0
-22.0
-24.0
-25.0
dB rel. 1V/Pa
+5.0
Frequency:
500 Hz:
1000 Hz:
4000 Hz:
Technische Daten
Bedienelemente
Taste für die Anhebung der
hohen Frequenzen
Betriebstaste
Richtcharakteristik
Übertragungsbereich
75Hz HPF
150Hz HPF
High Boost
Pegeltaste
+6
0
150
75
0
+20
0
dB±
-10
Bedientaste für das
Hochpassfilter

42 43
Speisung des SVMX
Einlegen der Batterie
Das Stereo VideoMic X erfordert eine Stromspeisung. Legen Sie
vor dem Einsatz eine herkömmliche 9V-Batterie (ANS1:1604A oder
IEC:6LR61) ein oder verbinden Sie die beiden Mini XLR-Buchsen
mit den entsprechenden Kamera-Eingängen, um deren 48V-Phantomspeisung zu nutzen.
Im Hinblick auf eine maximale Laufzeit empfiehlt RØDE die Verwendung einer hochwertigen Lithium- oder Alkalibatterie. Zum
Installieren der Batterie müssen Sie den Batteriefachdeckel an
der linken Seite des Stereo VideoMic X öffnen. Um den Deckel zu
öffnen, halten Sie das Mikrofon mit einer Hand, während Sie die
Kerbe mit dem Zeigefinger in die gezeigte Richtung schieben. Der
Deckel öffnet sich.
Abbildung 1 - Schieben Sie die Kerbe in Pfeilrichtung, um den Deckel
zu öffnen
STEREO VIDEOMIC X
MADE IN AUSTRALIA
44 45
Speisung des SVMX
Schieben Sie die Batterie mit dem Minuspol (–) unten in das Fach
(siehe Abbildung 2). Siehe auch die Zeichnung an der Innenseite der
Batteriefachblende. Wenn Sie die Batterie falsch herum eingelegt
haben, kann der Deckel nicht geschlossen werden.
9V
Abbildung 2 - Einlegen der 9V-Batterie
Schließen Sie den Deckel, indem Sie ihn so weit hinunterdrücken,
bis er einrastet. Die Blende drückt die Batterie dann auf den gefederten Anschluss.
Abbildung 3 - Drücken Sie auf den Deckel, bis er einrastet
46 47
Speisung des SVMX
Vorbereiten des SVMX
Bei Verwendung einer guten Alkalibatterie ist das Stereo VideoMic
X über 30 Stunden im Dauerbetrieb einsatzfähig. Bedenken Sie
jedoch, dass sich die Batterielaufzeit entscheidend nach der Umgebungstemperatur und dem Batteriealter richtet. Vor kritischen Anwendungen (wo man nur “einen Schuss” hat) sollten Sie unbedingt
eine frische Batterie einlegen. Schalten Sie das Stereo VideoMic X
prinzipiell aus, wenn Sie es nicht benötigen: Halten Sie hierfür die
Betriebstaste gedrückt.
Abbildung 4 - Wenn die LED rot leuchtet, ist die Batterie fast erschöpft.
Installieren und Anschließen des Stereo VideoMic X
Das Stereo VideoMic X ist an der Unterseite mit einer Blitzschuh-Halterung versehen. Dieser Blitzfuß bietet außerdem eine
3/8”-Rändelschraube für die Stativ- und Galgenarmmontage.
Besonders ältere und Einsteigerkameras können mechanische
Geräusche erzeugen, die das Stereo VideoMic X eventuell abgreift.
Wenn am Einsatzort außerdem tieffrequente Störquellen hörbar
sind, sollten Sie das Hochpassfilter aktivieren.
48 49
Vorbereiten des SVMX
Anschließen des SVMX
Lösen Sie die Rändelschraube der Blitzschuh-Halterung, bevor Sie
letztere in den Blitzschuh der Kamera schieben. Drehen Sie die
Schraube nach der Installation behutsam (im Uhrzeigersinn) fest,
um das Stereo VideoMic X zu arretieren.
Abbildung 5 - Drehen Sie die Rändelschraube nach links, um den
Blitzfuß zu lösen
Das Stereo VideoMic X überträgt ein Signal mit Mikrofonpegel zur Videokamera. Hierfür muss man wahlweise die Stereo-Miniklinke an der Gehäuseunterseite oder die Mini-XLR-Buchsen rechts auf dem Stereo VideoMic X mit der
Kamera verbinden.
Verwendung der Miniklinkenbuchse: Verbinden Sie das beiliegende rote
Kabel mit der 3,5mm-Buchse an der Unterseite des Stereo VideoMic X.
Schließen Sie den Stecker dieses Kabels an den Audio-Eingang der Videokamera an. Siehe auch deren Bedienungsanleitung. Nach der Installation des
Stereo VideoMic X und nach Anschließen des Kabels können Sie das Mikrofon
einschalten und zum Filmen verwenden.
Verwendung der Mini-XLR-Buchsen: Wenn Sie lieber die professionellen
Mini-XLR-Ausgänge des Stereo VideoMic X verwenden, müssen Sie die Blende
an der Seite des Mikrofons anheben. Stellen Sie den Pegel des Aufnahmegeräts (z.B. der Kamera) auf den Mindestwert, während Sie je ein Mini-XLR-Kabel (Sonderzubehör) mit den beiden Buchsen des Mikrofons verbinden.
Schließen Sie das andere Ende der Kabel an das Aufnahmegerät an. Schalten
Sie das Mikrofon ein und stellen Sie den Eingangspegel des Aufnahmegeräts
wunschgemäß ein.
50 51
Allgemeine Bedienung
Einschalten des Stereo VideoMic X
Um Ihr Mikrofon einzuschalten, müssen Sie die Betriebstaste so
lange drücken, bis ihre Diode leuchtet.
Abbildung 6 - Drücken Sie die Betriebstaste, bis ihre Diode leuchtet
Die Diode befindet sich in der Taste und beleuchtet das Betriebssymbol. Wenn die Diode grün leuchtet, ist die Spannung (der Batterie) in Ordnung. Wenn die Batterie nahezu erschöpft ist, leuchtet die
Diode rot. Wechseln Sie sie dann so schnell wie möglich aus. Wenn
die Diode rot zu leuchten beginnt, beträgt die Batterielaufzeit noch
ungefähr zwei Stunden. Allerdings könnte die Signalqualität dann
bereits nachlassen. Am besten wechseln Sie die Batterie aber aus,
sobald die Diode rot zu leuchten beginnt.
52 53
Allgemeine Bedienung
Verwendung des Hochpasslters
Das Hochpassfilter (HPF) ist ein Trittschallfilter, das tieffrequente
Störgeräusche unterdrückt, was in der Regel eine professionellere
Audioqualität zur Folge hat.
150
75
0
Abbildung 7 - Bedientaste für das Hochpassfilter
Das Filter eignet sich z.B. zum Unterdrücken des Brummens einer
Klimaanlage, der Handhabungsgeräusche, des Stadtverkehrs im
Hintergrund usw.
Um das Hochpassfilter zu aktivieren, müssen Sie die mittlere Taste
auf der Mikrofonrückseite drücken. Bei weiderholtem Drücken
wählt das Stereo VideoMic X die jeweils nächste Filtereinstellung.
Die aktuell gewählte Einstellung wird mit Hilfe einer grünen LED
angezeigt.

54 55
Allgemeine Bedienung
Pegelregler
Das Stereo VideoMic X bietet einen dreistufigen Ausgangspegelregler, der sich ganz unten an der Mikrofonrückseite befindet.
+20
dB±
0
-10
Abbildung 8 - Pegeltaste
Die untere Einstellung (–10) entspricht einer Pegelreduzierung
um 10dB. Wählen Sie diese in einem lauten Umfeld, wenn Sie
Übersteuerung befürchten. Die mittlere Einstellung (0dB) vertritt
den Nennausgangspegel des Mikrofons und sollte unter idealen
Aufnahmebedingungen gewählt werden. Die obere Einstellung
(+20) entspricht einer Pegelanhebung um 20dB. Sie eignet sich für
leise Schallquellen bzw. für die Erzielung eines besseren Fremdspannungsabstands (zumal bei digitalen Spiegelreflexkameras mit
Videofunktion).
Eventuell muss auch der Audio-Eingangspegel der Kamera
geändert werden. Wenn Sie auf dem Stereo VideoMic X z.B. die
“+20dB”-Einstellung wählen, müssen Sie vermutlich den Eingangspegel der Kamera reduzieren.
Das beste Ergebnis erzielt man oftmals, indem man den
Pegel des Stereo VideoMic X auf “+20dB” stellt und den
Eingangspegel der Kamera so weit verringert, bis keine
Übersteuerung mehr auftritt. Das bewirkt nämlich einen besseren
Fremdspanungsabstand und ein klareres Aufnahmesignal: Viele
Kameras (längst nicht nur Spiegelreflexmodelle mit Videofunktion)
bieten nämlich einen eher mäßigen Mikrofonvorverstärker.
56 57
Allgemeine Bedienung
Das Stereo VideoMic X sollte nach Möglichkeit ohne die automatische Pegelkorrektur (AGC) der Kamera bzw. des Aufnahmegeräts
verwendet werden (wie man sie ausschaltet, finden Sie in der
betreffenden Bedienungsanleitung). Probieren Sie alle Möglichkeiten aus, um gleich beim ersten “echten” Einsatz alles richtig zu
machen.
Das Stereo VideoMic X bietet zwar eine Schirmung gegen Funkund elektromagnetische Störungen, allerdings empfehlen wir,
Sender, Handys, Pager usw. mindestens 2 Meter von der Kamera
entfernt aufzubewahren, um Interferenzen zu vermeiden.
Taste für die Anhebung der hohen Frequenzen
Das Stereo VideoMic X erlaubt das Anheben der hohen Frequenzen,
was vor allem für Sprachaufnahmen von Vorteil sein kann. Damit
kompensiert man außerdem den für einen Windschutz typischen
Höhenverlust. Die Höhenanhebung kann mit der obersten Taste auf
der Mikrofonrückseite aktiviert werden.
Wenn man sie aktiviert, werden die Höhen ab 3kHz um +6dB angehoben (Kuhschwanzfilter) und erzeugen ein klareres Schallbild.
+6
0
Abbildung 9 - Taste für die Anhebung der hohen Frequenzen
58 59
Wahl und Anbringen des Windschutzes
Zum Lieferumfang des Stereo VideoMic X gehören ein hochwertiger
Popp- und Windschutz.
Poppschutz:
Der Poppschutz ist als Schutz der im Stereo VideoMic X verbauten Kapseln vor leichten Windstößen in einem Raum gedacht. Im
Prinzip ist er klangneutral und schwächt also nur Windgeräusche
ab, ändert aber nichts am Frequenzgang. Außerdem eignet er sich
zum Abschwächen von Windgeräuschen bei schnellen Kameraschwenks.
Um den Poppschutz anzubringen, brauchen Sie nur die Seiten (mit
dem RØDE-Logo) hineinzudrücken und ihn über die Mikrofonkapseln zu ziehen.
Windschutz:
Der Windschutz ist für Außenaufnahmen bei windigem Wetter
gedacht und verhindert das Rumpeln bei Windstößen. Er ist aus
hochwertigem Synthetikfell und Schaumstoff mit einer geringen
Dichte gefertigt. Dank einer Gummilippe umschließt er das Mikrofon jederzeit perfekt.
Da der Schutzfaktor weitaus höher liegt, raten wir zur Aktivierung
der Höhenanhebung, um zu verhindern, dass der Ton hinterher
eine Idee zu dumpf wirkt.
Bei Sturm sollten Sie zusätzlich das Hochpassfilter aktivieren.
Abbildung 10 - Poppschutz (links) und Windschutz (rechts)
 Loading...