

Roda X-Frizzy RU-B07A, X-Frizzy RS-B07A, X-Frizzy RU-B12A, X-Frizzy RS-B09A, X-Frizzy RU-B09A Service Manual
...Page 1
AIR CONDITIONER
SERVICE MANUAL
SPLIT TYPE
RS-B07A/RU-B07A
RS-B09A/RU-B09A
RS-B12A/RU-B12A
X-FRIZZY
Page 2

CONTENTS PAG E
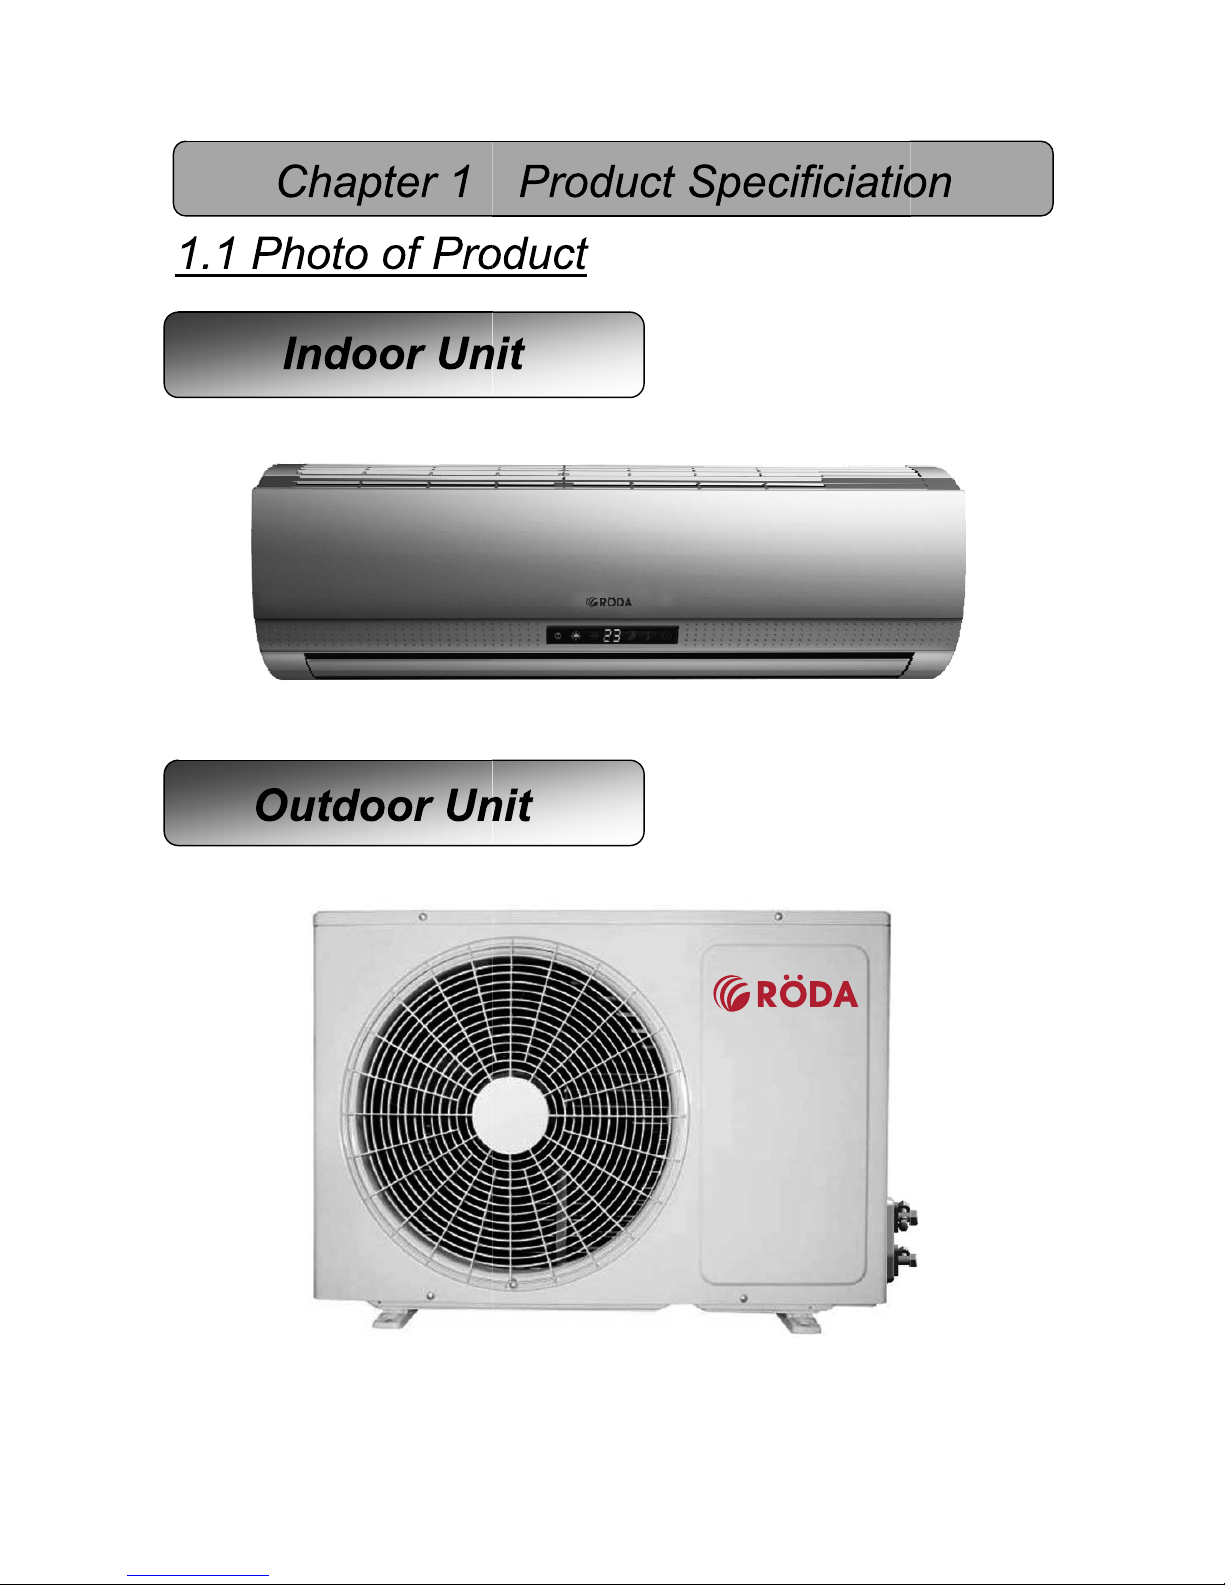
PRODUCT SPECIFICATIONS
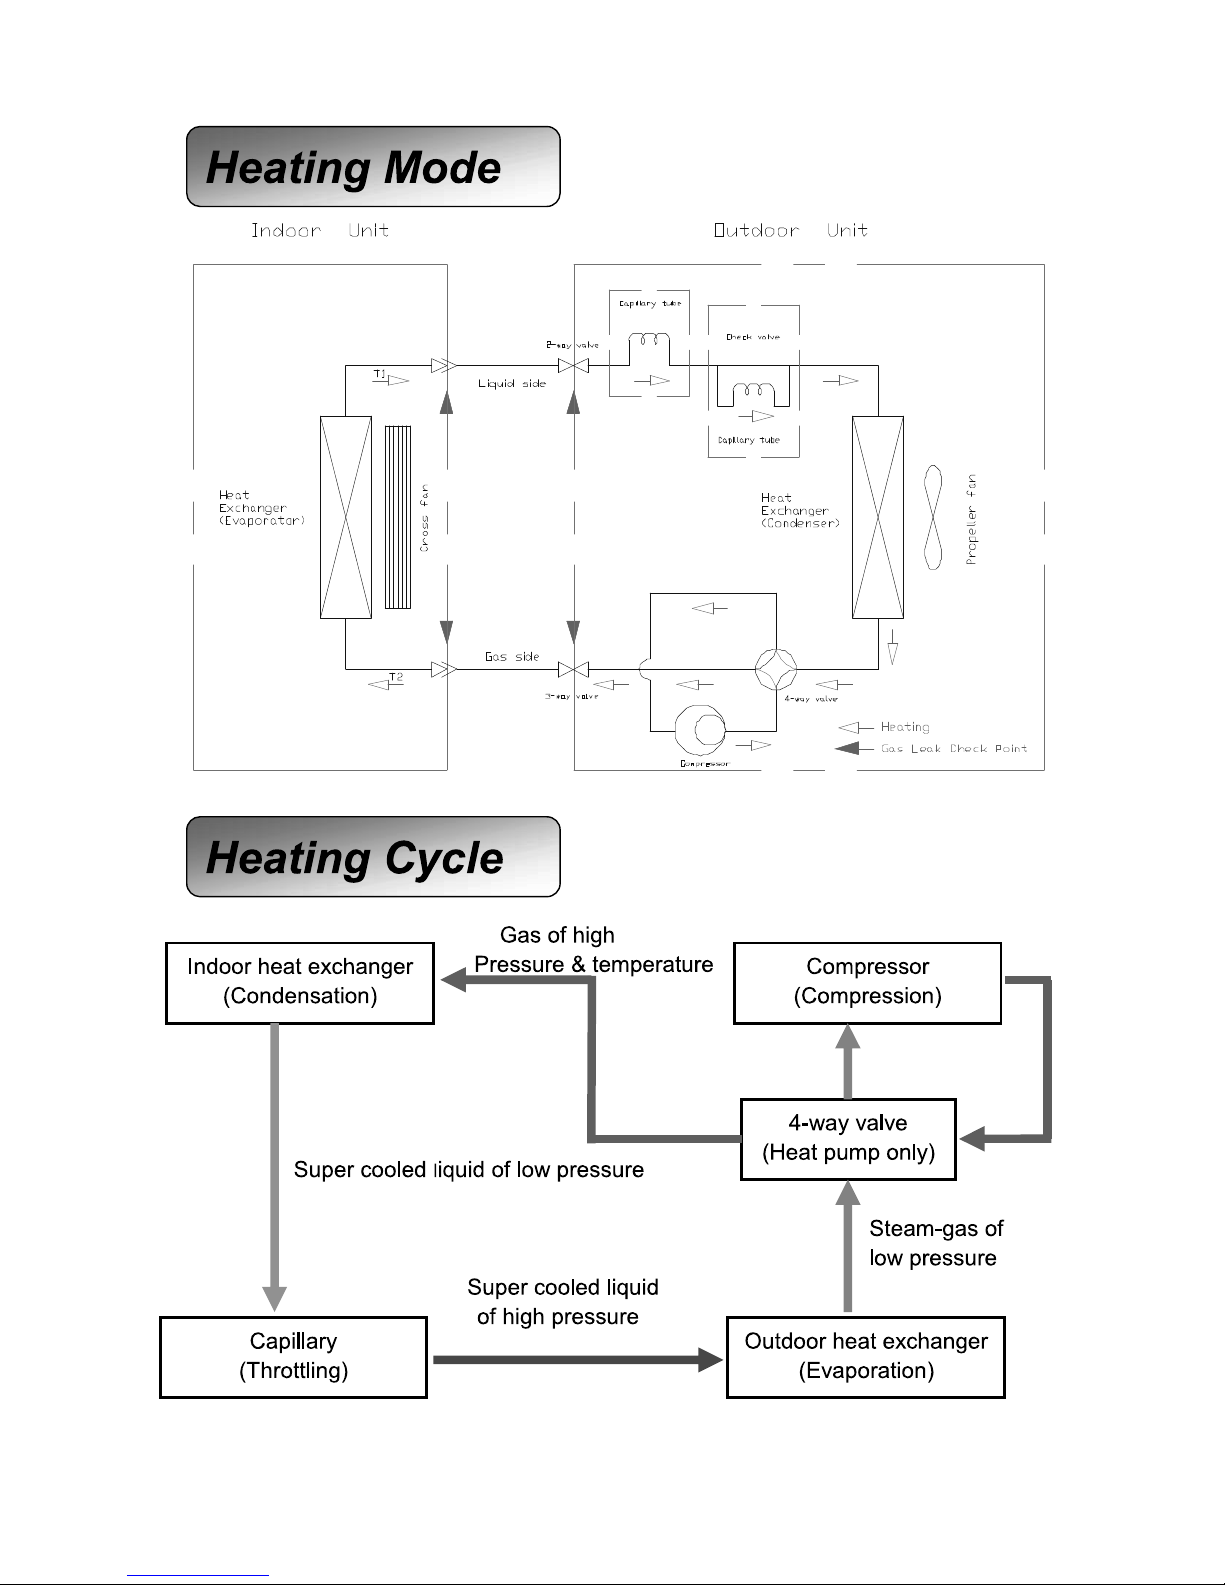
REFRIGERATION DIAGRAM
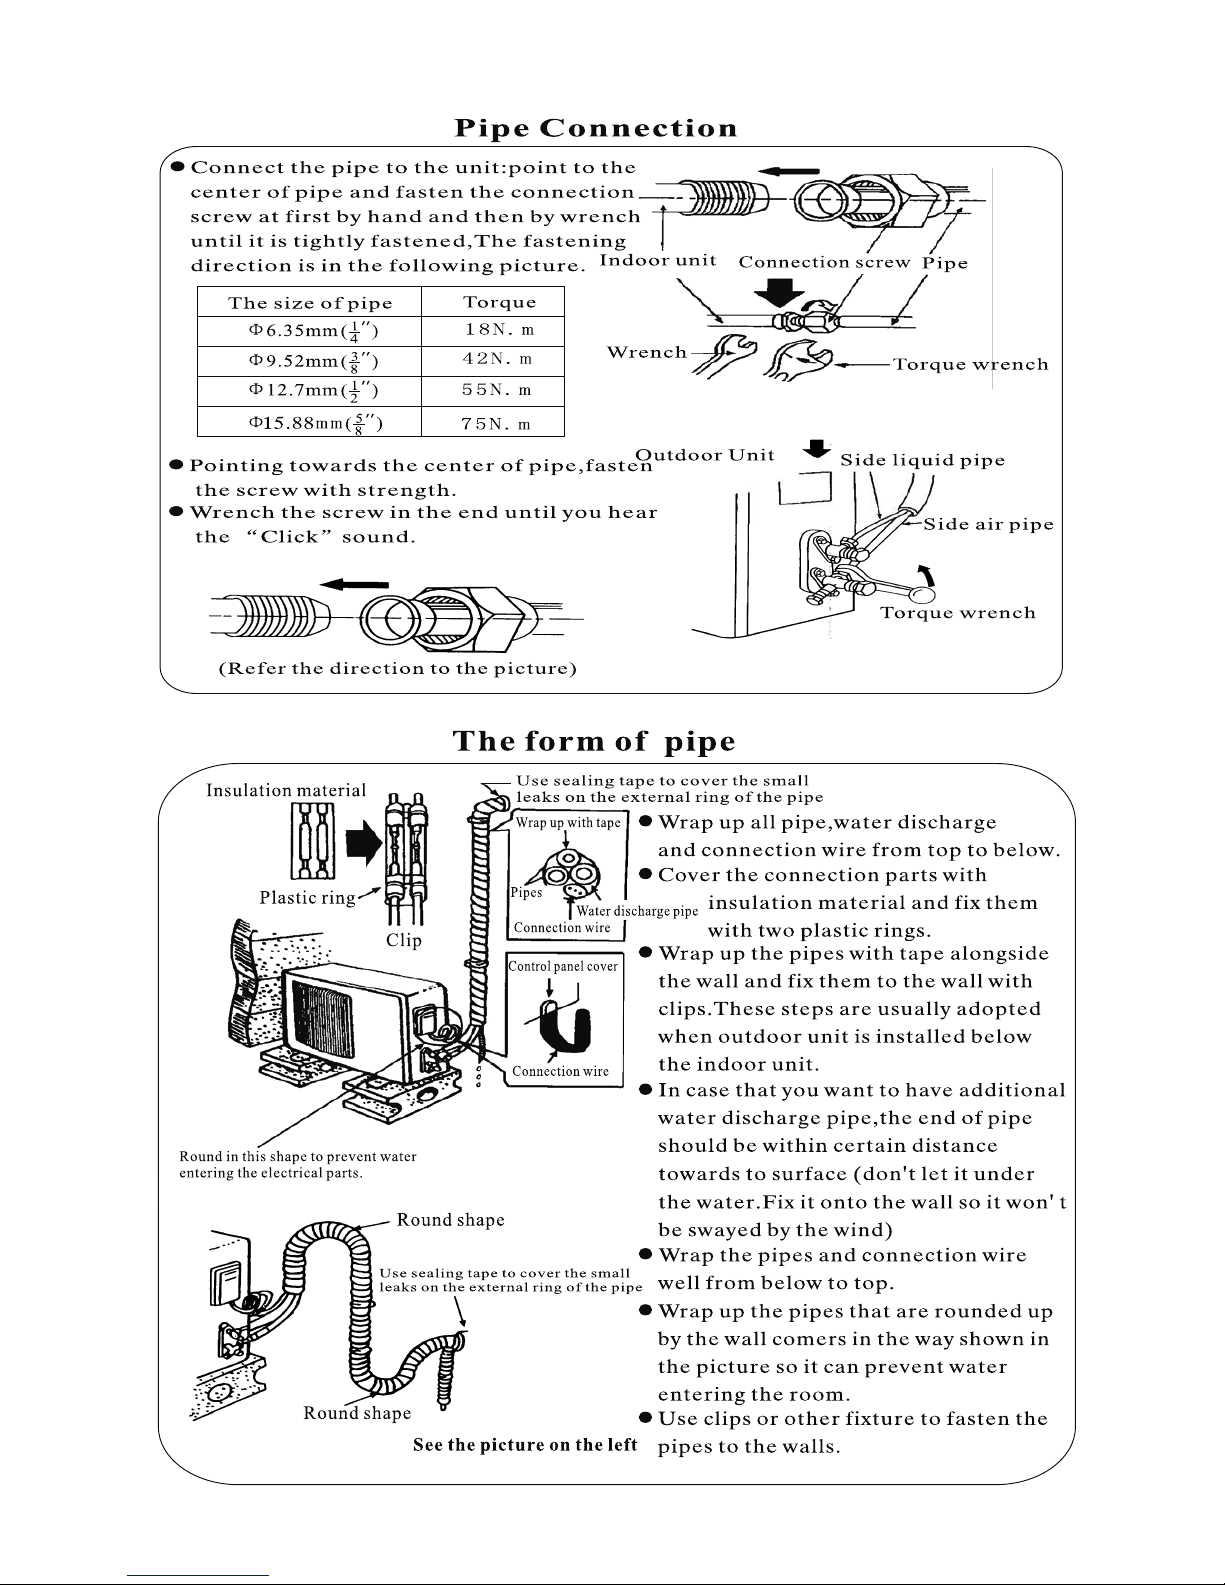
INTRODUCTIONS OF INSTALLATION
REMOTE CONTROLLER INTRODUCTIONS
BRIEF INTRODUCTION FOR USAGE
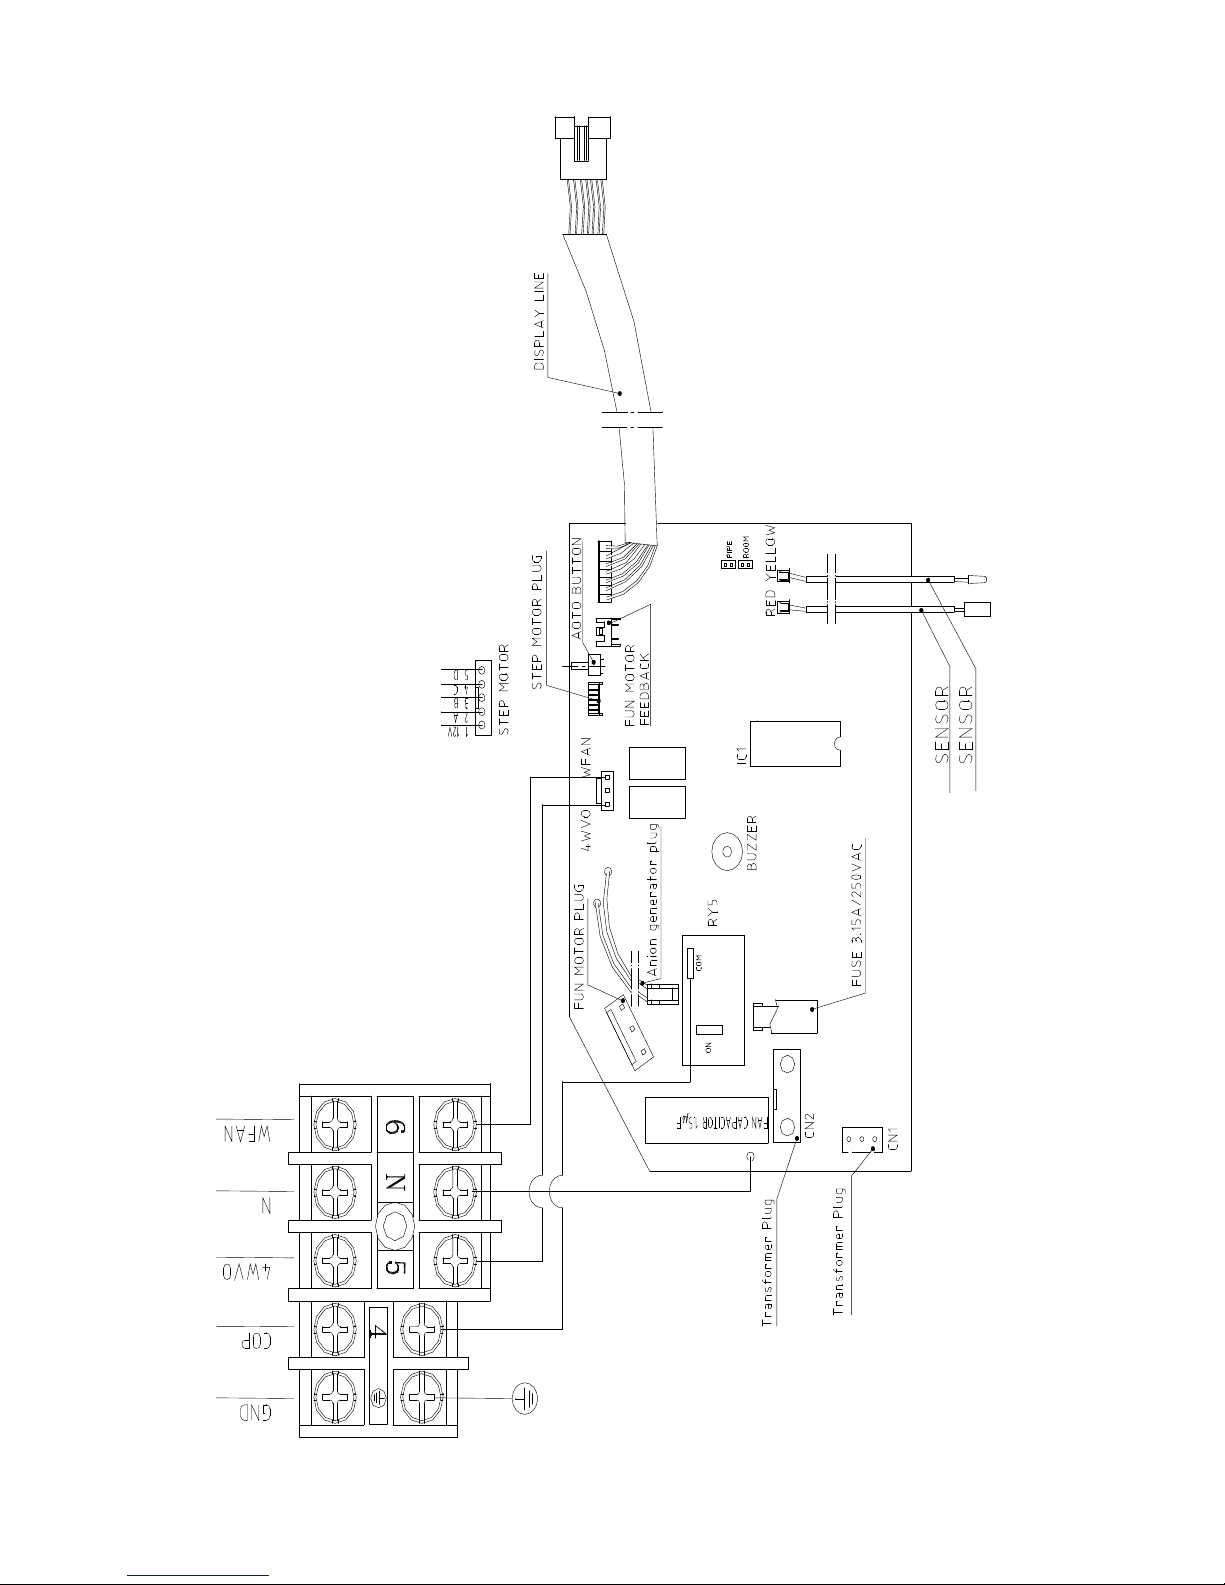
WIRING DIAGRAM
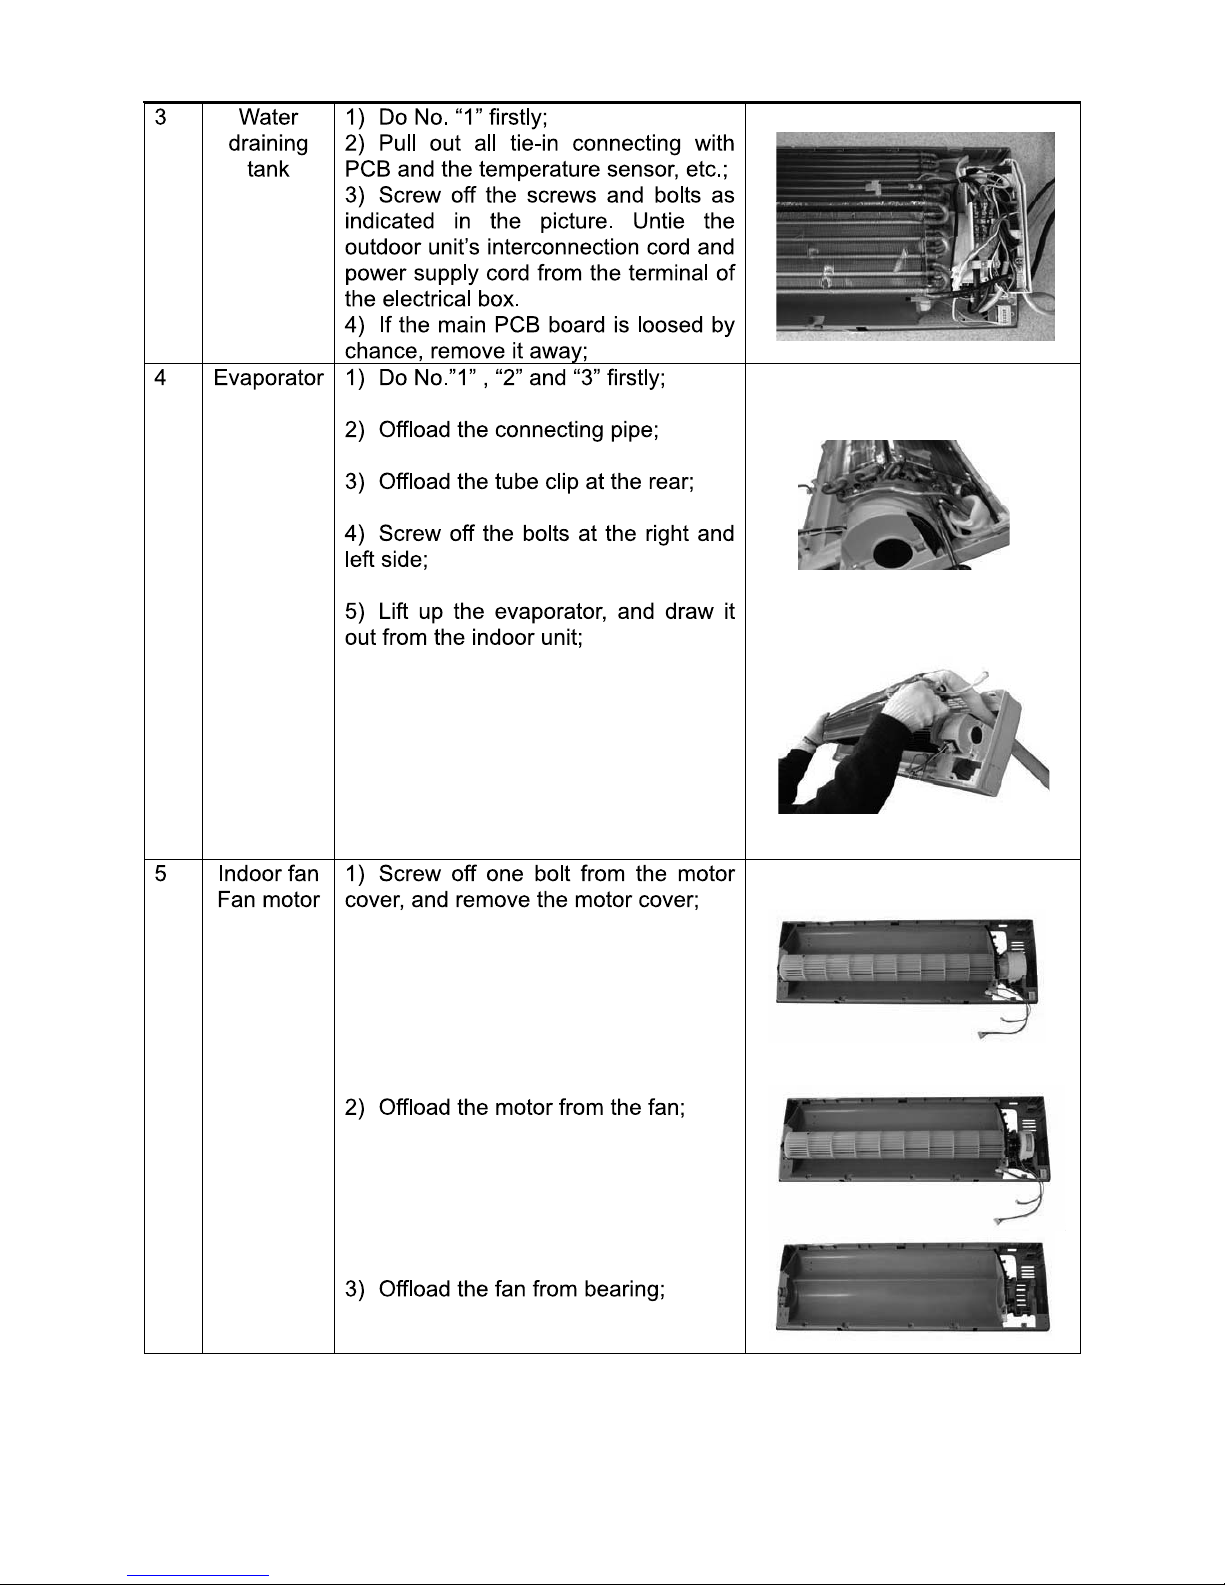
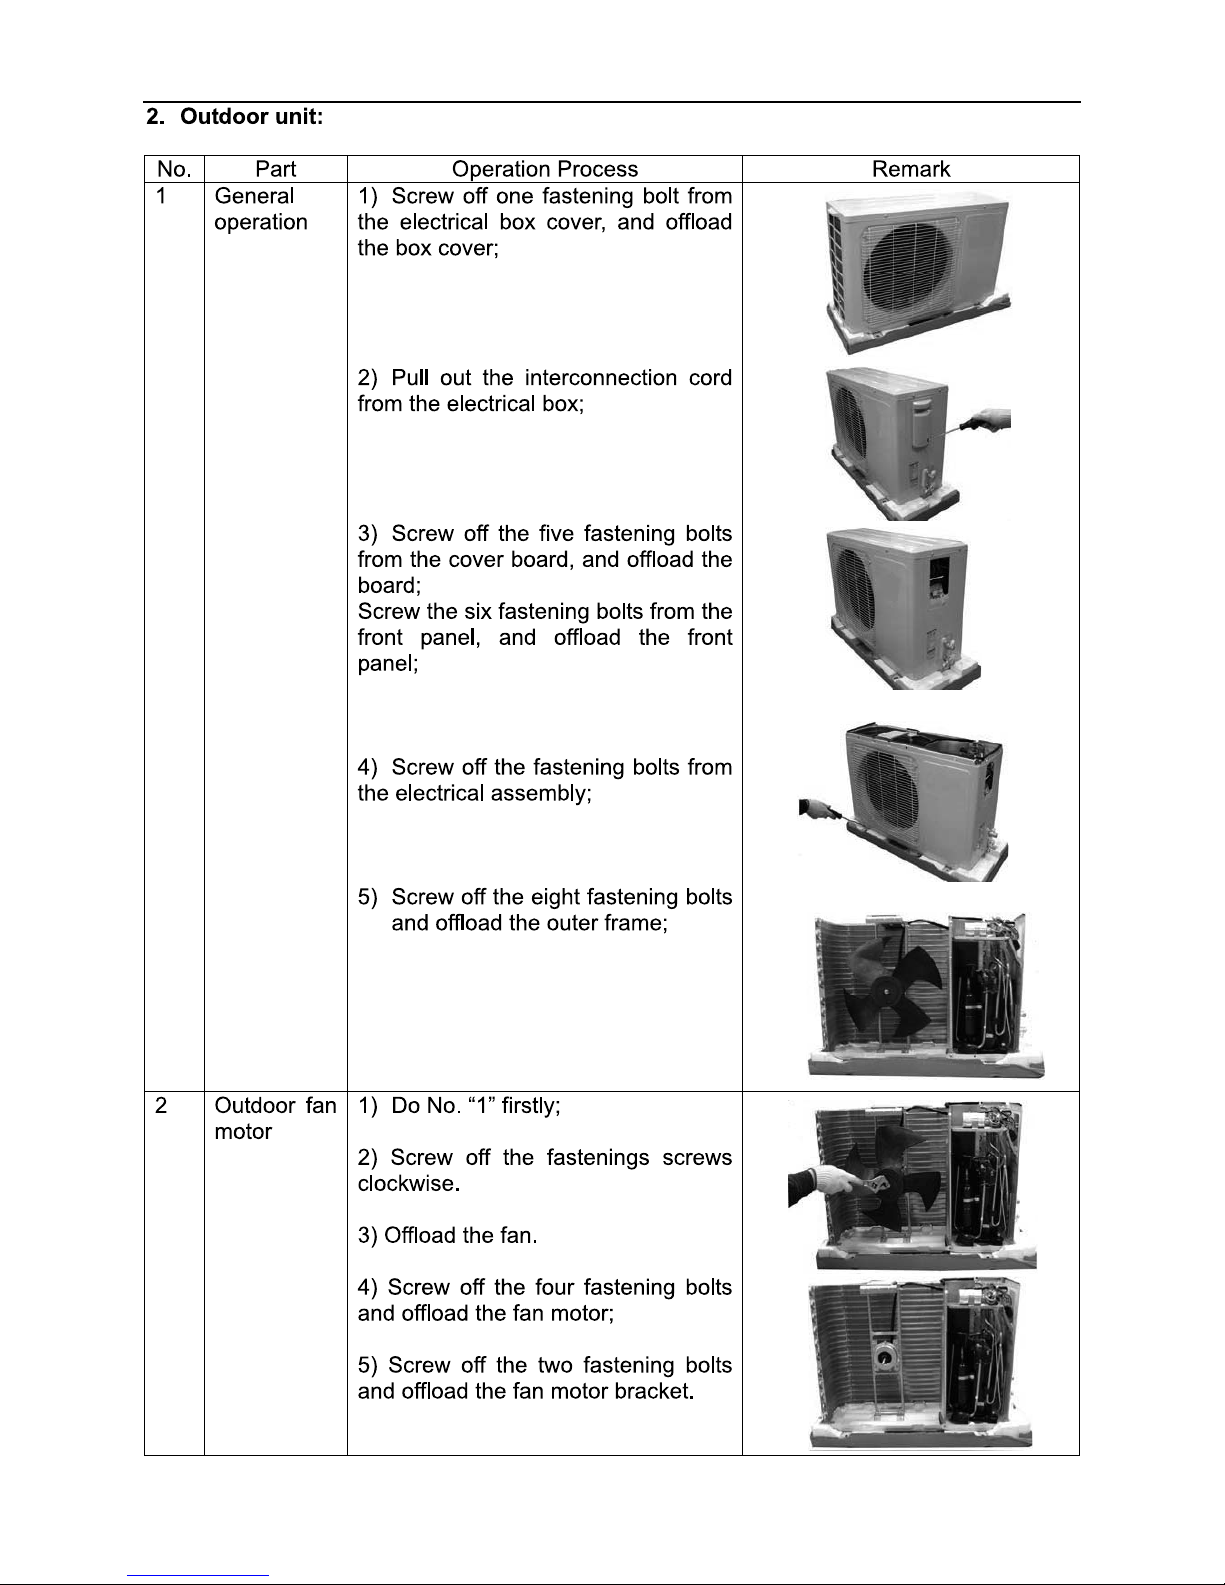
DISASSEMBLY & ASSEMBLY
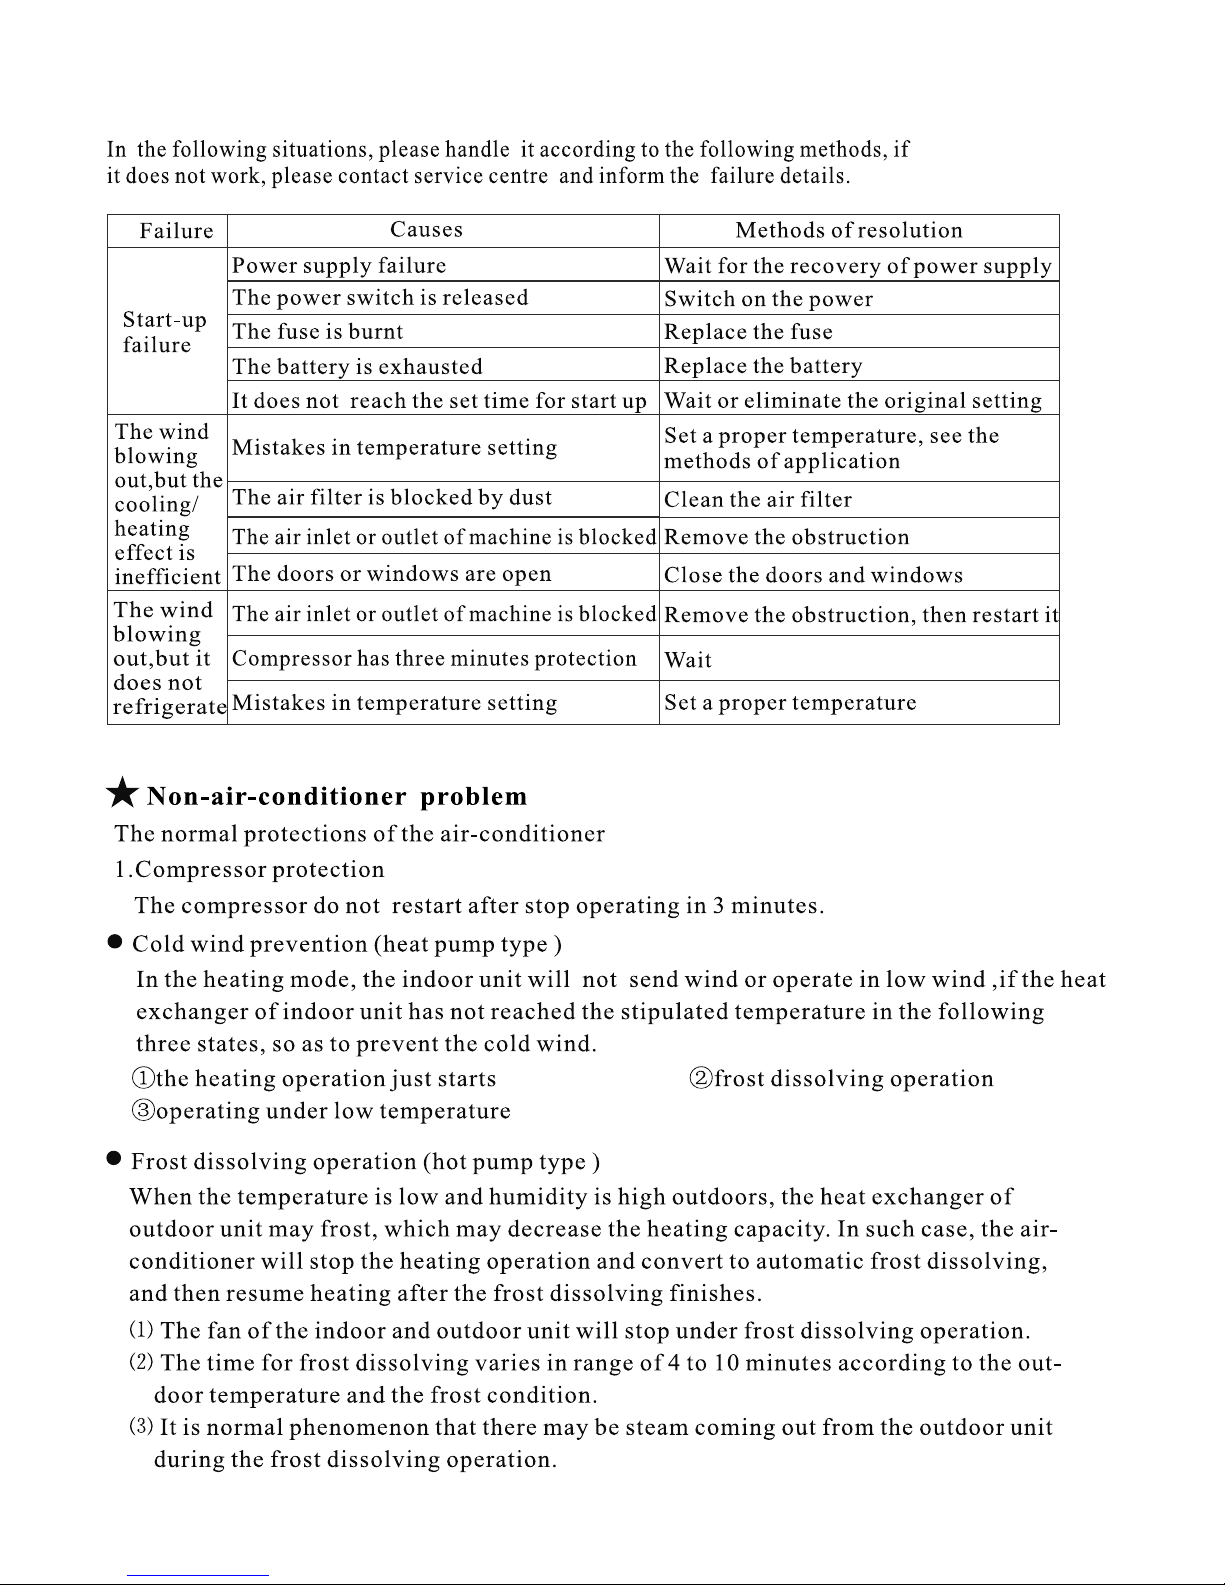
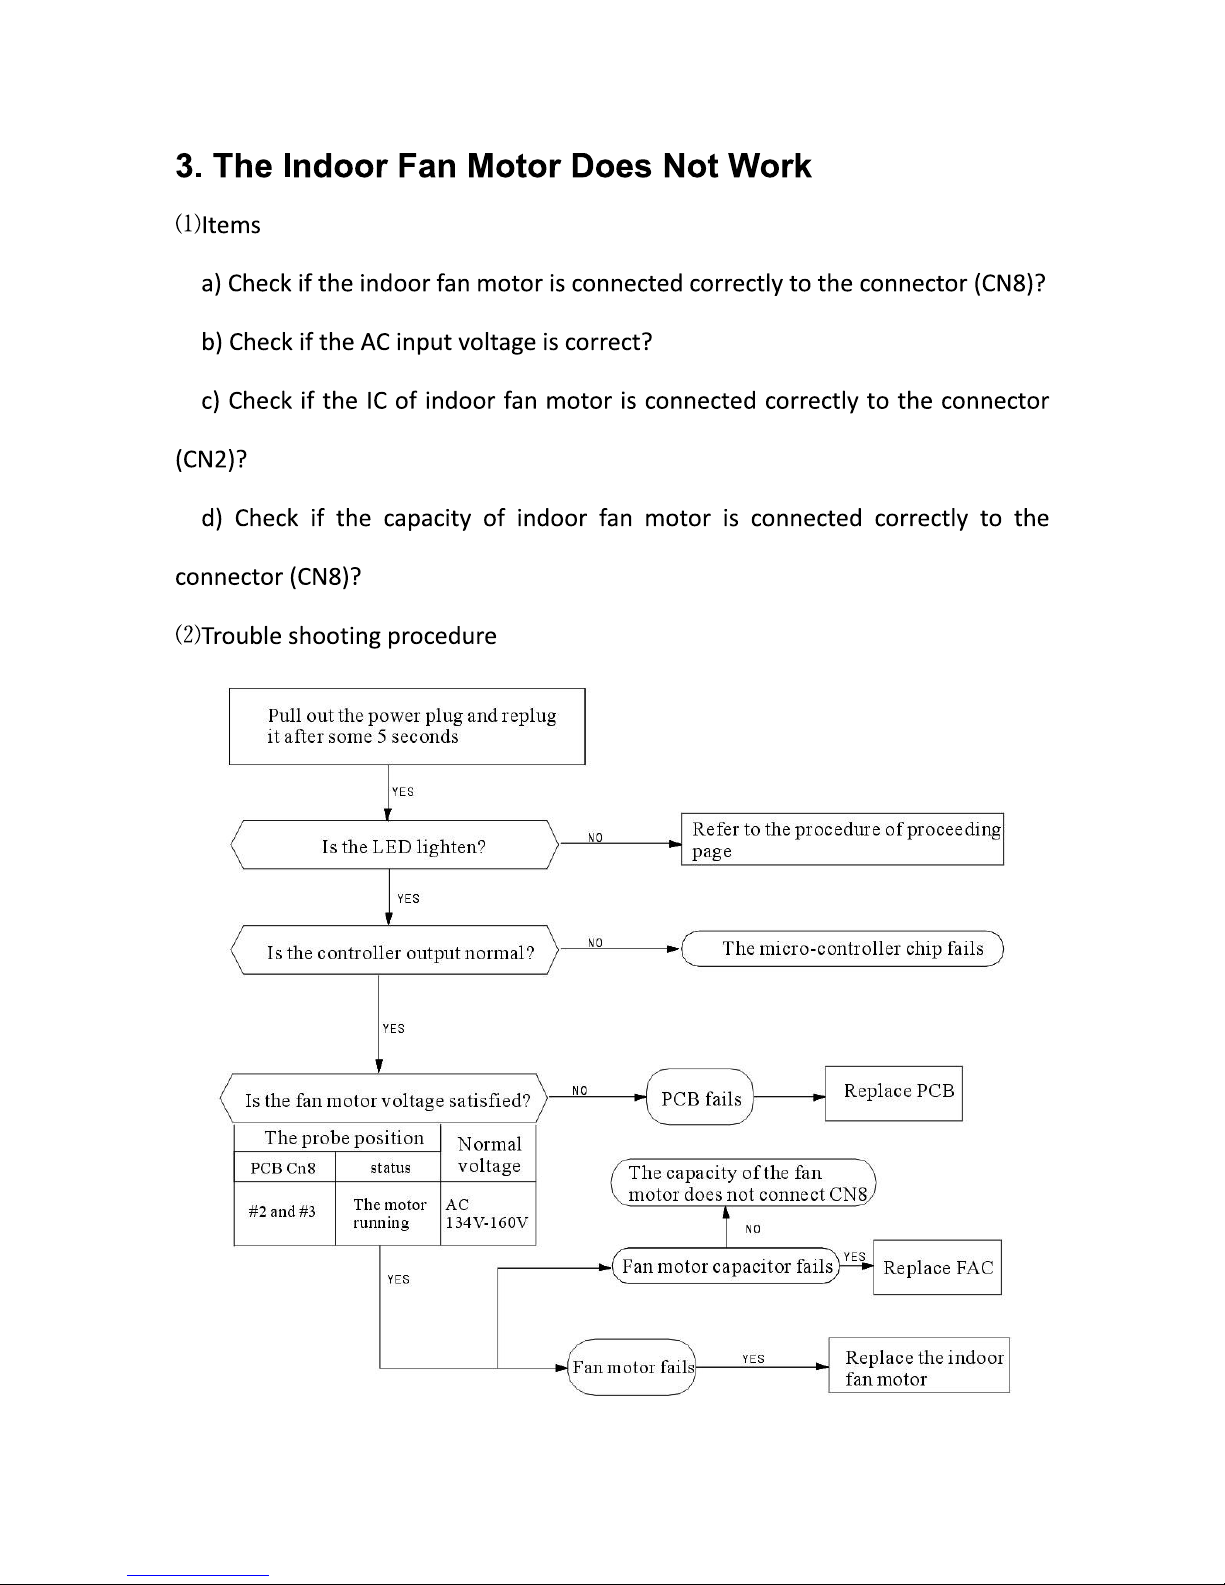
TROUBLESHOOTING GUIDE
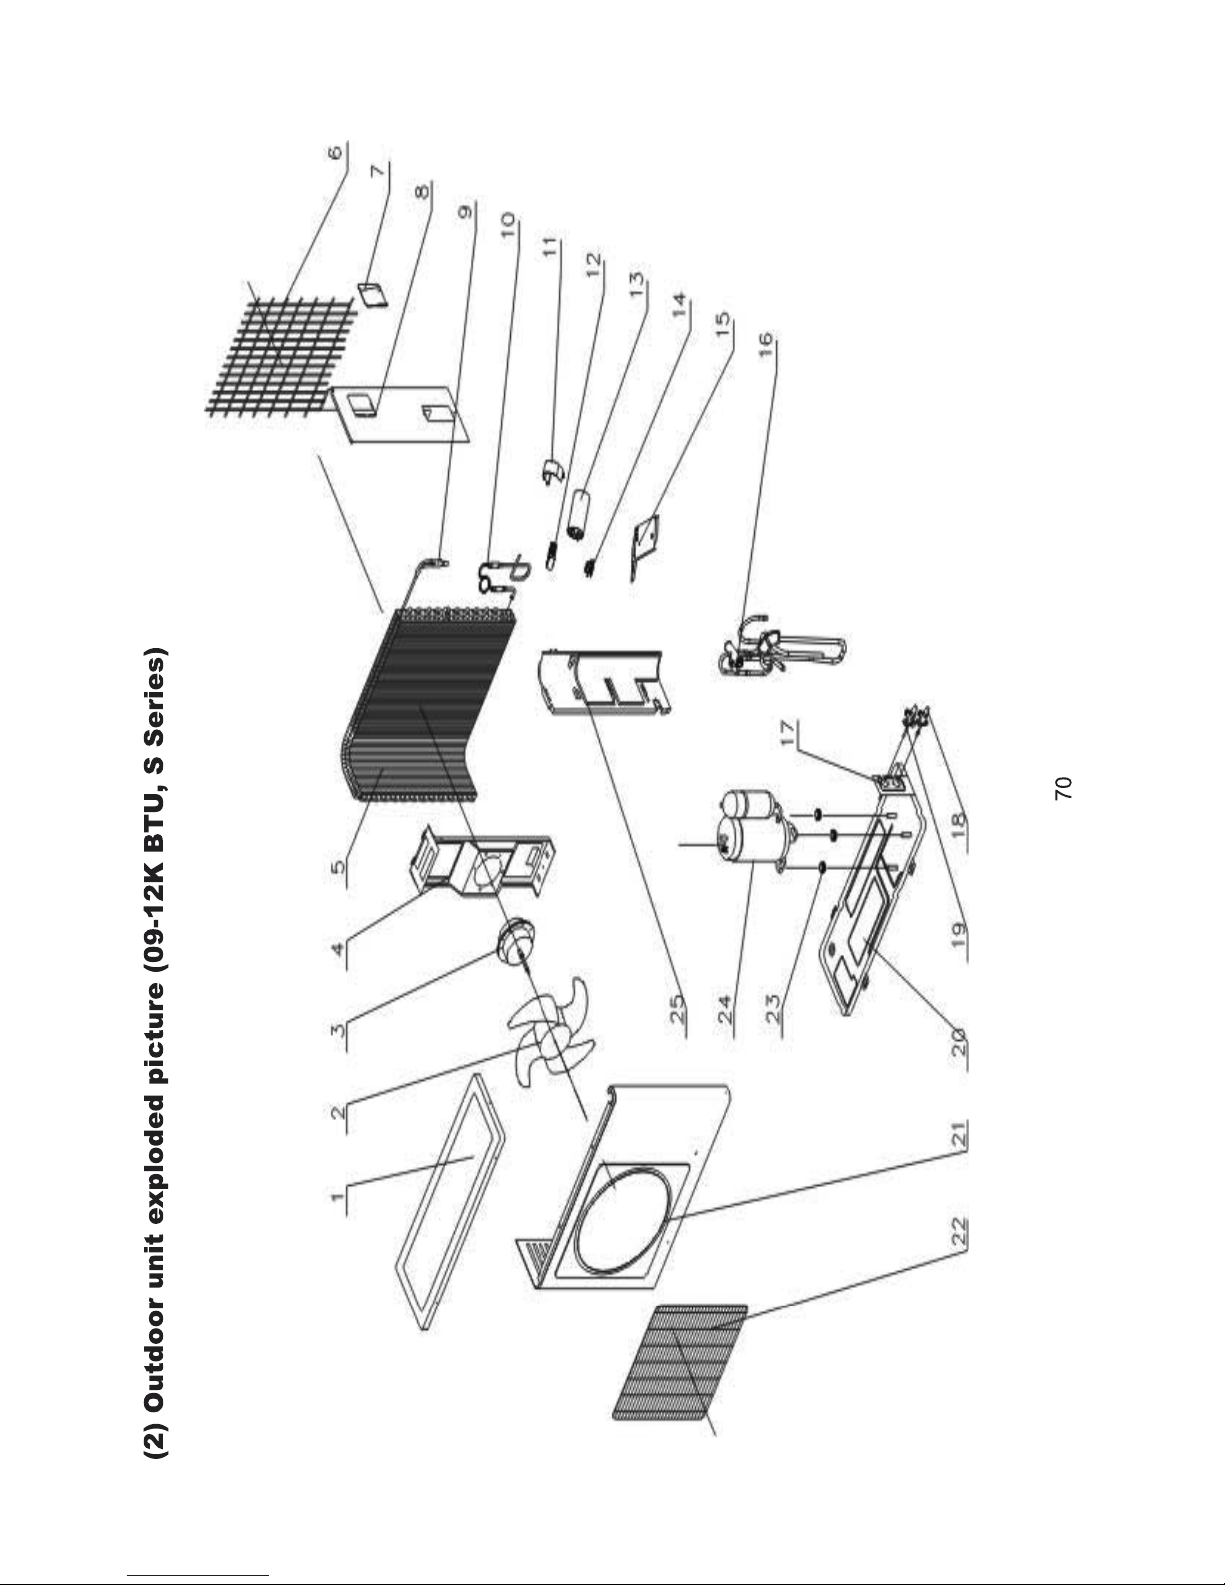
EXPLODED VIEWS & PARTS LIST
OPERATION DETAILS
CURRENT & WIRING DIAGRAM OF PCB
3
7
1
2
31
3
50
58
8
4
2
3
37
46
Page 3
.3.
Page 4
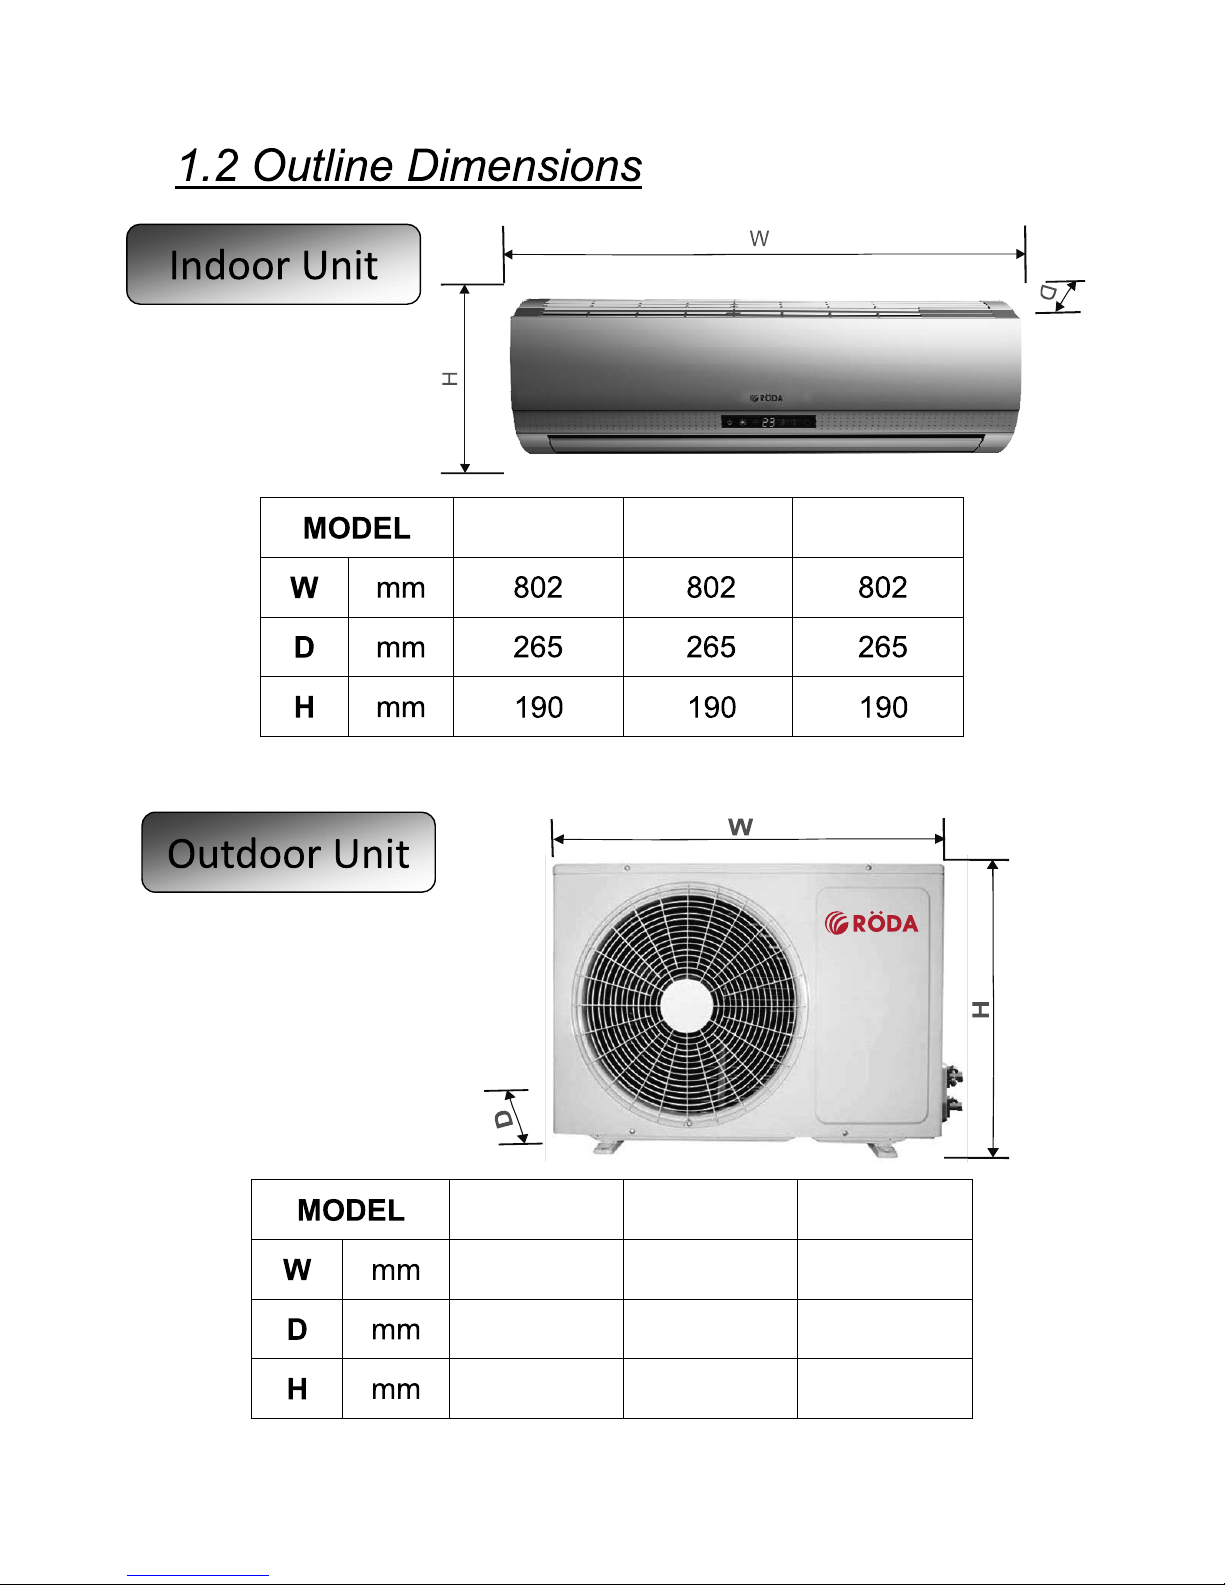
600
250
490
700 760
225 260
500 540
7000 BTU 9000 BTU 12000 BTU
7000 BTU 9000 BTU 12000 BTU
.4.
Page 5

.5.
Page 6

.6.
Page 7
.7.
Page 8

.8.
Page 9

.9.
Page 10

.10.
Page 11
.11.
Page 12

.12.
Page 13

.13.
Page 14

SET
MODE
ON/OFF
SPEED
TIMER
SWING SWING2
STRONG
FEELING
CLEAN
HEALTH
SLEEP
SCREEN
FUNGUSPROOF
AUTO
COOL DRY
HEAT
FAN
SPEED
STRONG
HIGH
MID
LOW
AUTO
TIMER
ONOFF
ROOM
SET
h
C F
SWING2
SWING
ON
OFF
SLEEP
CLEAN
HEALTH
FRESH
ELE.H
FUNGUSPROOF
SCREEN
LOCK
.14.
Page 15

Buttons description
1. buttonON/OFF
You can start or stop the air-conditioner by pressing this
button.
2.SPEED
button
You can select fan speed as the following:
High
Low
Auto
Med
3. buttonSWING2
Press this button, the vertical wind direction vanes can rotate
automatically, when you have the desired horizontal wind
direction, press it again, the vertical wind direction vanes will
be stopped at the situation of your choice.
SET
MODE
ON/OFF
SPEED
TIMER
SWING SWING2
STRONG
FEELING
CLEAN
HEALTH
SLEEP
SCREEN
FUNGUSPROOF
AUTO
COOL DRY
HEAT
FAN
SPEED
STRONG
HIGH
MID
LOW
AUTO
TIMER
ONOFF
ROOM
SET
h
C F
SWING2
SWING
ON
OFF
SLEEP
CLEAN
HEALTH
FRESH
ELE.H
FUNGUSPROOF
SCREEN
LOCK
8
1
10
6
3
12
2
4
9
13
11
7
14
RUNNING MODE DISPLAY
SPEED DISPLAY
SWING OR ON/OFF DISPLAY
5
Note: The picture is general remote controller, contains
almost all of the function buttons. They may be slightly
different from material abject(depend on model).
FEATURES DISPLAY
TEMPERATURE, TIME DISPLAY ETC
Note:
All the figures above are
the displays after being
initially electrified or
re-electrified after power
off. In actual operations,
the remote controller
screen displays related
items only.
.15.
Page 16

Press this button can be used to set the feeling function.
The LCD shows the actual room temperature when the
function set and it shows the setting temperature when the
function cancelled. This function is invalid when the
appliance at the Fan mode.
4. buttonFEELING
When it displays buttonFEELING :
5. buttonSTRONG
6. buttonTIMER
Only under the state of cooling or heating mode, press this
button, the fan speed is adjusted to strong auto-maticlly and
the LCD displays high fan, the strong function is
started to reach the highest cooling or heating.
Setting the ON timer time
a. When remote controller is at off state, press TIMER
button, the LCD displays TIMER ON and the timer
time, the range of setting time is 0.5h to 24h.
b. You can press the button to adjust the
timer time, each touch will be set time to increase or
reduce 0.5h before 10 hours ago, after ten hours will be
set time to increase or reduce 1h per pressing, to enables
your required timer.
c. Press TIMERbutton again, to set the timer on function.
d. You can set another function to insure the suitable state
after air conditioner turn on (including mode, temperature,
swing, fan speed and etc). The LCD will displays all your
setting and keep it, when the timer reach to the set time,
the air conditioner will be working according to your set
automatically.
Setting the OFF timer time
a. When remote controller is at on state, press TIMER
button, the LCD displays TIMER OFF and the timer
time, the range of setting time is 0.5h to 24h.
b. You can press button to adjust the
timer time, each touch will be set time to increase or
reduce 0.5h before 10 hours ago, after ten hours will be
set time to increase or reduce 1h per pressing, to enable
your required timer.
c. Press TIMER button again, to set the timer off function.
7. buttonSCREEN
You can let the LCD display working or not by pressing this
button.
.16.
Page 17

Press the
16 to 32,Display will change when you touch
the button.
SET SET -+or button,you can set the temperature
range from
8. or buttonDOWN-SET UP+
9. buttonCLEAN
a. When remote controller is at the off state, press CLEAN
button, the wind guiding bars turn to initial postions for
cooling, the A/C runs CLEAN function with max duration
35mins.The purpose of this function is to clean dust on
evaporator and dry the inside water of evaporator and
to prevent the evaporator going moldy due to water
deposition and boasting strange smell.
b. After setting CLEAN function, press CLEAN button
again to cancel CLEAN function or press ON/OFF
button to cancel CLEAN function and start A/C.
c. The clean function will be stop working after 35 minutes
running working without any operation.
Note: clean function can be set in parallel with
time start function; in this case , time start
function will be executed after clean function.
10. MODE
button
AUTO COOL DRY HEAT FAN AUTO-----
Remark: cold wind type has no heating function.
Which enables you to select different operation mode,
after each pressing, the operation mode will be changed. It
shows in the following display.
11. SLEEP
button
1.Press the SLEEP button, the sleeping indicator light of
indoor unit flashes on.
2.After the setting of sleeping mode, the cooling operation
enables the set temperature to increase 1 after 1hour
and another 1 automatically after 1 hour.
3.After the setting of sleeping mode, the heating operation
enables the set temperature to drop 2 after 1hour and
another 2 automatically after 1 hour.
4.The air-conditioner runs in sleeping mode for 7 hours and
stops automatically.
Remark: press the MODE or ON/OFF button, the remote
controller clears sleeping mode away.
.17.
Page 18

12.SWING button
Press this button, the horizontal wind direction vanes can
swing automatically, when you have the desired vertical
wind direction, press it again, the horizontal wind direction
vanes will be stopped at the situation of your choice.
13.HEALTH
button
Press this button, you can turn on or off the health function.
14.FUNGUSPROOF
button
This A/C has special dry and anti-mold function which
has yes two selections. This function is
controlled by the remote controller under cooling, dry and
auto (cooling and dry) modes, the horizontal wind guiding
bars are at the initial position for cooling. The A/C runs
under heating mode(the cooling only A/C only runs under
fan mode), the internal fan runs for three minutes with weak
wind before stop. The purpose of this function is to dry the
inside of the evaporator and to prevent the evaporator from
going mouldy due to water deposition and thus dispersing
strange smell.
or no
Note:
1.This function has not been set in the factory. You may
freely set and cancel this function. The setting method
is: under off status of the A/C and the remote
controller, point the remote controller toward the A/C
and continuously press pushbutton
for one time, the buzzer keep beeping five times again
after five times beep, indicating that this function is
ready. In case this function has been set, unless the
whole A/C is powered off or the function is manually
cancelled, the A/C then has this function as default;
2.To cancel the function: 1. Power off the whole A/C; 2.
Under off status of the A/C and the remote
controller, point the remote controller toward the A/C
and continuously press pushbutton
for one time, the buzzer keep beeping three times again
after five times beep, indicating that this function has
been cancelled;
3.When this function is on, it is suggested not to restart
the A/C before it is completely stop;
4.This function will not run in case of time stop or sleep
stop.
FUNGUSPROOF
FUNGUSPROOF
.18.
Page 19

Fix batteries
1.Slide open the cover according the direction indicated
by arrowhead.
2.Put into two brand new batteries (7#), position the
batteries to right electric poles (+ -).
3.Put back the cover.
Ј
Automatic operation mode
1.Press the ON/OFF button, the air-conditioner starts to
operate.
2.Press the MODE button, select the automatic operation
mode.
3.Press the SPEED button, you can select fan speed.
You can select fan speed from LOW, MID, HIGH, AUTO.
4.Press the button again, the air-conditioner stops.
Cooling/Heating operation mode
(cold wind type has no heating function)
1.Press the ON/OFF button, the air-conditioner starts to
operate.
2.Press the MODE button, select the Cooling or Heating
operation mode.
3.Press the or button, set the temperature,
temperature can be set at 1 difference range from
16-32.
4.Press the SPEED button, you can select fan speed.
You can select fan speed from LOW, MID, HIGH, AUTO.
5.Press the button again, the air-conditioner stops.
SET+ SET-
Usage
.19.
Page 20

Fan operation mode
Drying operation mode
1.Press the ON/OFF button, the air-conditioner starts to
operate.
2.Press the MODE button, select the Cooling or Heating
operation mode.
3.Press the SPEED button, you can select fan speed.
You can select fan speed from LOW, MID, HIGH.
4.Press the button again, the air-conditioner stops.
Remark: In the circulation operation mode, to set the
temperature is noneffective.
1.
Press the MODE button, select the Dry operation mode.
3.Press the or button, set the temperature,
temperature can be set at 1 difference range from
16-32.
4.Press the SPEED button, you can select fan speed.
You can select fan speed from LOW, MID, HIGH, AUTO.
5.Press the button again, the air-conditioner stops.
Press the ON/OFF button, the air-conditioner starts to
operate.
2.
SET + SET -
Note:
This manual introduces function for all of the remote
control, maybe you press one button without any
reaction, well, the air-conditioner you bought hasn't
this function.
.20.
Page 21

1.Aim the remote controller towards the receiver on the air-
conditioner.
2.The remote controller should be within 8 meters away
from the receiver.
3.No obstacles between the remote controller and receiver.
4.Do not drop or throw the remote controller.
5.Do not put the remote controller under the forceful
sunrays or heating facilities and other heating sources.
6.Use two 7# batteries, do not use the electric batteries.
7.Take the batteries out of remote controller before stop its
using for long.
8.When the noise of transmitting signal can t be heard
indoor unit or the transmission symbol on the display
screen doesn t flare, batteries need be replaced.
9.If reset phenomenon occurs on pressing the button of the
remote controller, the electric quantity is deficient and
new batteries need to be substituted.
10.The waste battery should be disposed properly.
Attention
.21.
Page 22

.22.
Page 23

.23.
Page 24

.24.
Page 25

.25.
Page 26

.26.
Page 27
.27.
Page 28

.28.
Page 29

.29.
Page 30

.30.
Page 31

.31.
Page 32

.32.
Page 33

.33.
Chapter 7 Disassembly & Assembly
Page 34
.34.
Page 35
.35.
Page 36

.36.
Page 37

.37.
Page 38

.38.
Page 39

.39.
Page 40
.40.
Page 41

.41.
Page 42

.42.
Page 43

.43.
Page 44

.44.
Page 45

.45.
Page 46

.46.
Chapter 9 Exploded Views & Part List
Page 47

.47.
Page 48
.48.
Page 49

.49.
Page 50

.50.
Chapter 10 Operation Details
Page 51

.51.
Page 52
.52.
Page 53

.53.
Page 54

.54.
Page 55

.55.
Page 56

.56.
Page 57

.57.
Page 58

.58.
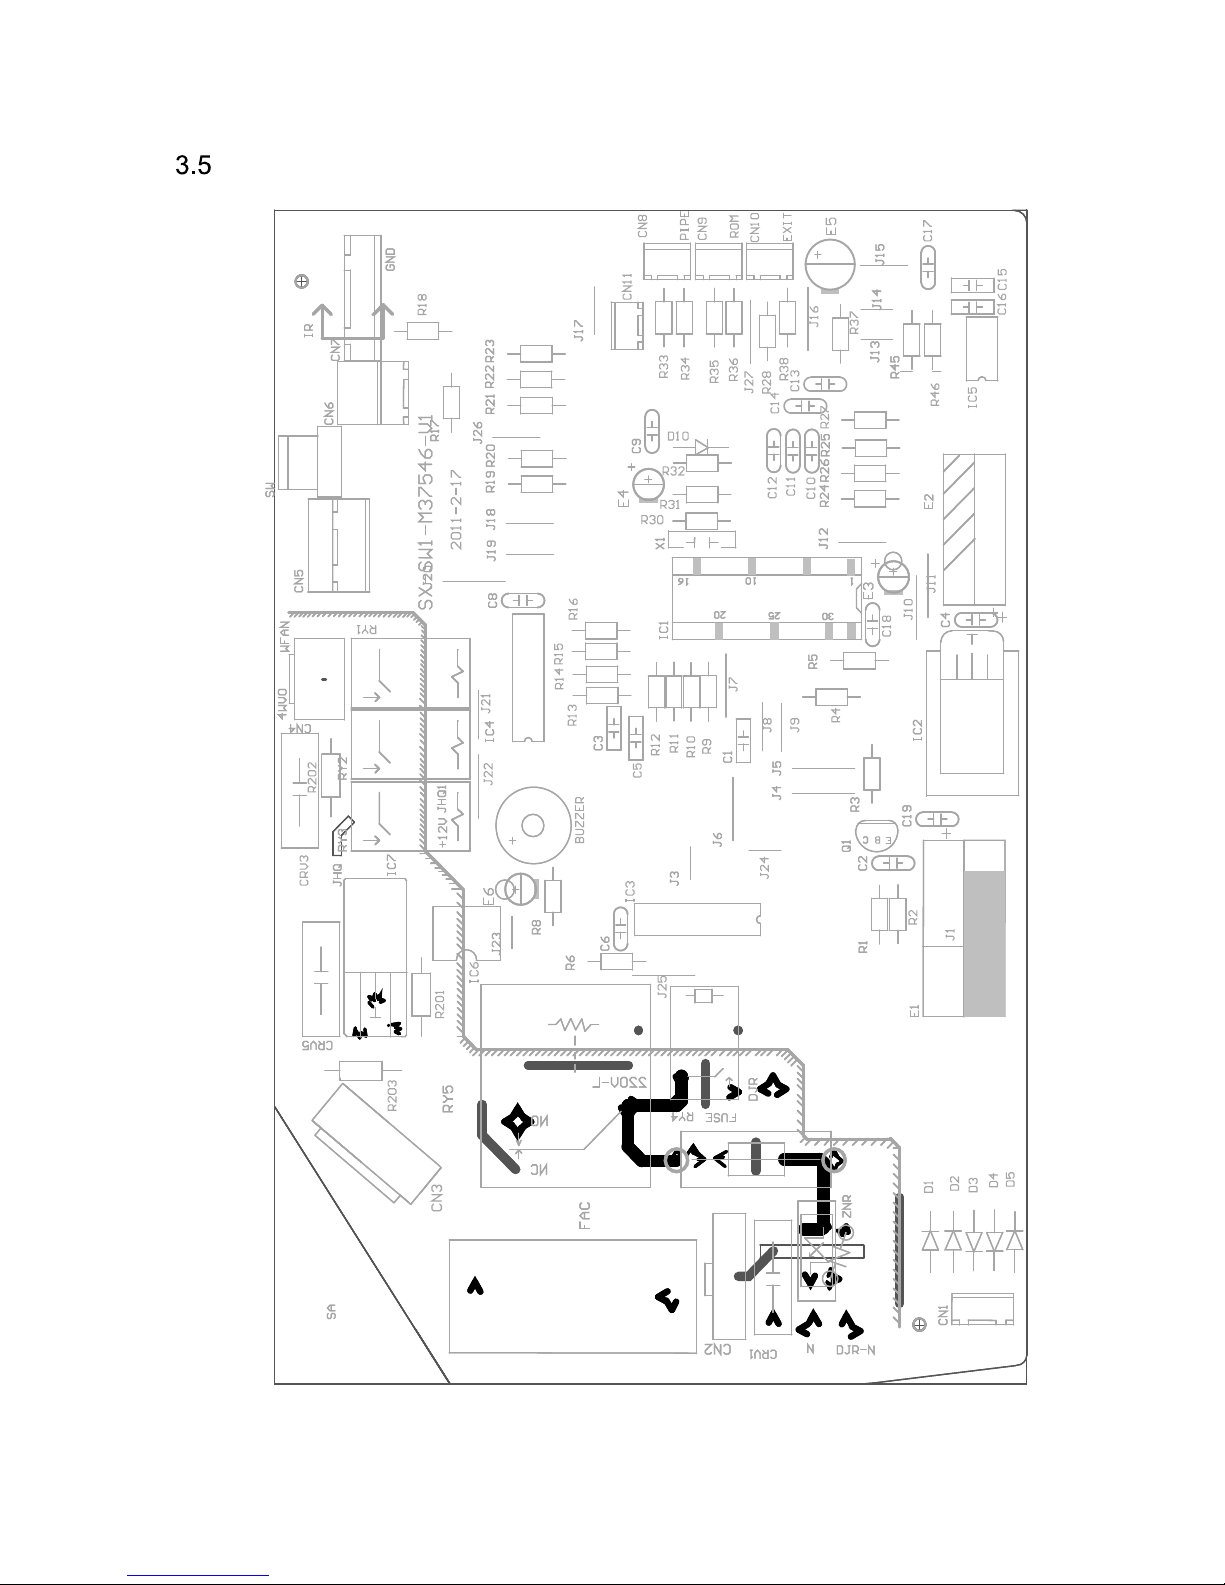
Chapter 11 Current & Diagram of PCB
Page 59
.59.
3.2
Page 60

.60.
3.3
Page 61

.61.
Page 62
.62.
Page 63

 Loading...