

Page 1
Installation Instructions
IMPORTANT
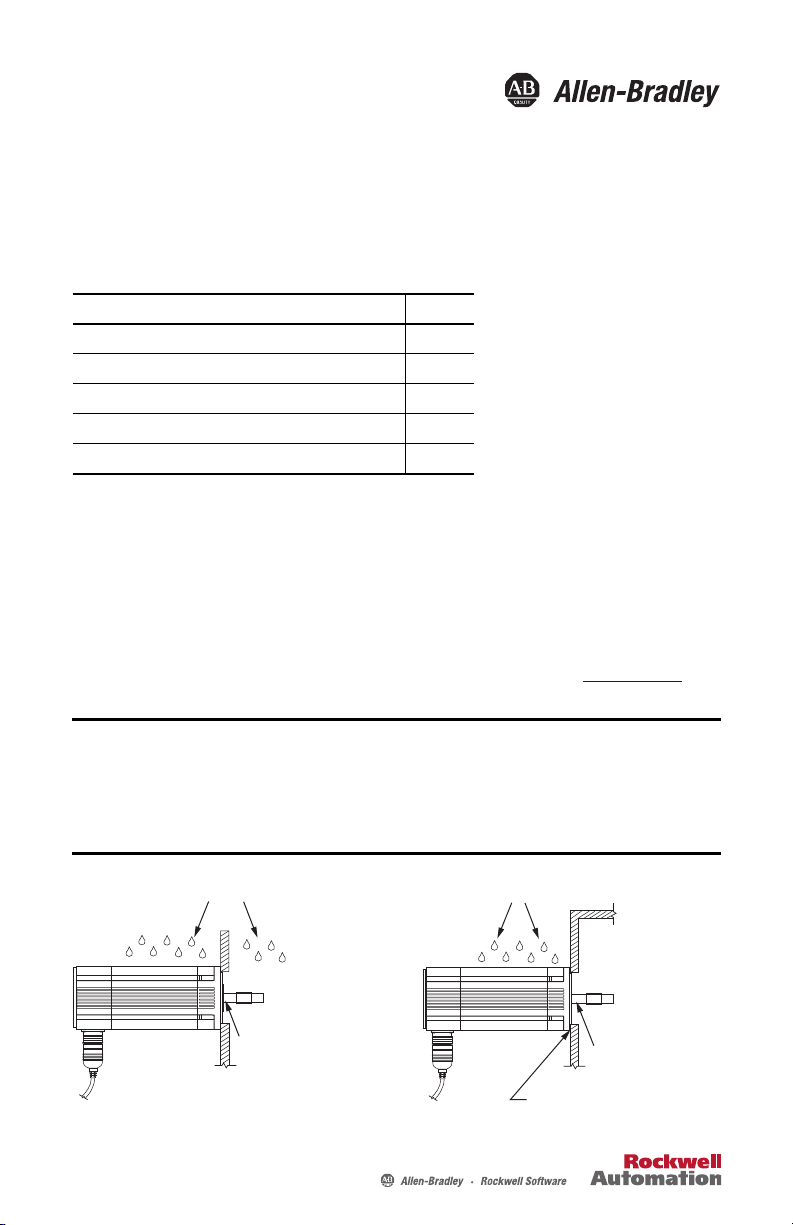
Oil, Fluids, and Fine Dust
Oil, Fluids, and Fine Dust
Shaft Seal Installation
is Recommended
Shaft Seal Installation
is Not Recommended
Sealant between Motor
and Machine (optional)
Motor Shaft and
End Bell are Exposed
to Containments
Motor Shaft and
End Bell are Protected
From Containments
Shaft Seal Kits
Catalog Numbers VPL-SSN, VPF-SSN, MPL-SSN, MPF-SST, MPS-SST, TL-SSN
Topi c Pag e
About Shaft Seals 1
Required Tools 2
Install a Shaft Seal 2
Shaft Seal Kit Catalog Numbers 4
Additional Resources 6
About Shaft Seals
A shaft seal is recommended if the motor shaft and end bell are exposed to significant amounts of
containments, such as oil, fluids, or fine dust. Use a shaft seal in these environments to prolong
the life of the motor. A shaft seal and Bulletin 2090 cables with environmentally sealed
connectors are required for an IP66 rating or greater.
See Kinetix® Motion Accessories Specifications Technical Data, publication GMC-TD004
find Bulletin 2090 cables with environmentally sealed connectors for your motor.
, to
The shaft seal is not recommended in applications where the motor shaft and end bell are free of oil, fluids, or
fine dust, and a lower IP rating is sufficient.
Shaft seals are subject to wear and require periodic inspection and replacement. Replacement is recommended
every 3 months, not to exceed 12 months, depending on use.
If you paint the motor, do not get paint on the shaft seal area or the shaft. This can decrease the life of the shaft
seal.
Page 2
2 Shaft Seal Kits
IMPORTANT
IMPORTANT
Required Tools
Use these tools to install a shaft seal:
• Rubber/wooden mallet, or a metal hammer and wooden work piece
• Socket, pipe, or tubing (various sizes)
• Abrasive cloth (to remove any nicks or burrs from the motor shaft)
Install a Shaft Seal
ATT EN TI ON : To avoid injury or damage to the equipment, remove power from the motor before installing the
shaft seal.
Follow these steps to install the shaft seal.
1. Verify that power is removed from the motor.
2. Remove the shaft key (if installed).
3. Remove the old shaft seal (if installed).
4. Remove any dirt or grease from the motor shaft and the area around the front end bell of
the motor near the bearing.
5. Use an abrasive cloth to remove any nicks or burrs from the motor shaft.
6. Cover the sharp edges of the keyway with tape to protect the seal lip from damage.
7. Lubricate the inner and outer lip of the shaft seal with the lubricant in the kit.
Shaft seals must be lubricated. Lubricant is supplied with the shaft seal kits.
8. Position the shaft seal so that the sealing lip faces outward on the shaft.
9. Slide the shaft seal onto the motor shaft.
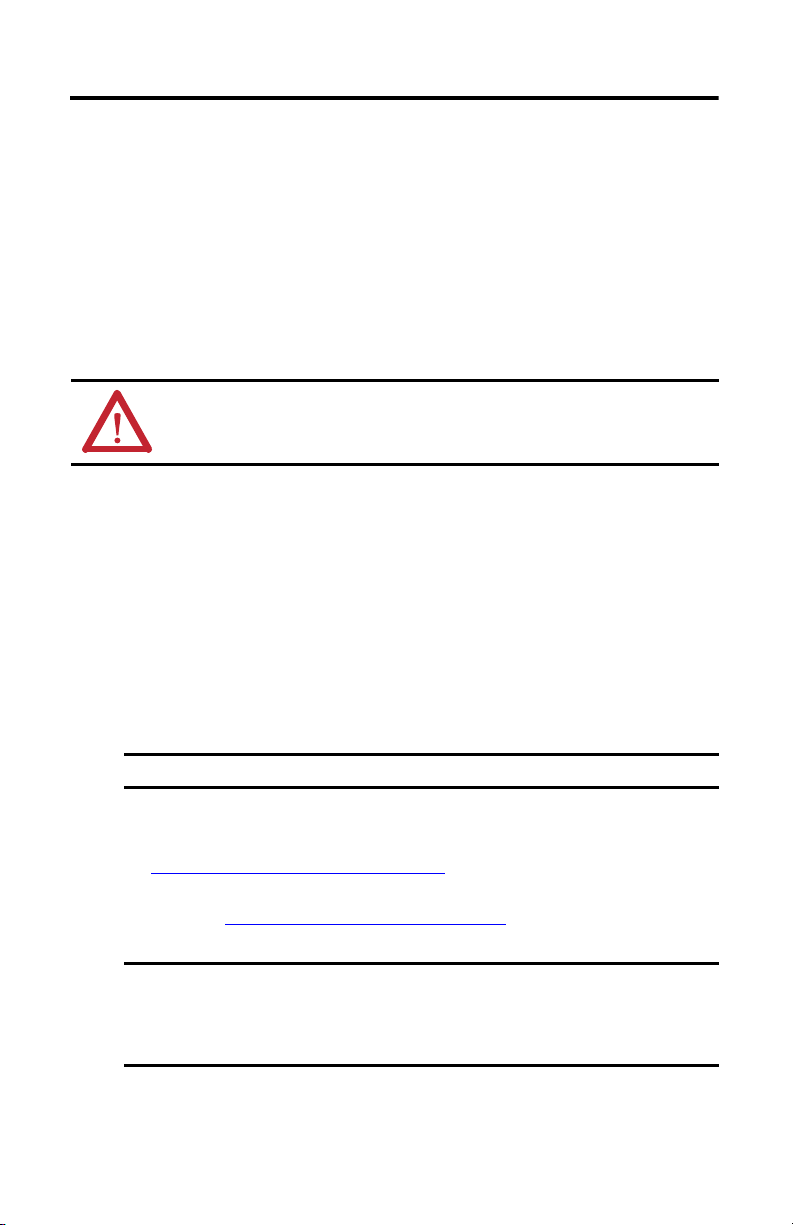
10. See Shaft Seal Installation Clearances
the shaft seal.
11. Use one of the Shaft Seal Installation Methods
diameter of the shaft seal into the motor.
Verify that the shaft seal is installed to the correct installation clearance.
If the shaft seal is installed too deep, it can be subject to excessive wear and require frequent
replacement.
If the shaft seal is installed too shallow, it can reduce the effectiveness of the protective seal.
Rockwell Automation Publication 2090-IN012C-EN-P - February 2014
on page 3 for the correct installation clearance of
on page 4 to gently press the outer
Page 3
Shaft Seal Kits 3
Front Surface
of Motor
Shaft Seal Pressed
Flush with Front
Surface of Motor
Shaft Seal Pressed
Below Front
Surface of Motor
Front Surface
of Motor
Nom
Nom
Min
Max
Shaft Seal Installation Clearances
Motor Cat. No. Shaft Seal Installation Clearance
Min, mm (in.) Nom, mm (in.) Max, mm (in.)
VPL-A/Bxxx Press the shaft seal so that the seal is flush or below the front surface of the motor.
VPF-A/Bxxx
VPS-Bxxx
MPL-A/B15xx
MPL-A/B2xx
All other MPL-A/Bxxx Press the shaft seal so that the seal is flush or below the front surface of the motor.
MPF-A/Bxxx
MPS-A/Bxxx
MPM-xxxx Press the shaft seal so that the seal is flush or below the front surface of the motor.
MDF-SBxxx 1.40 (0.055) 1.50 (0.060) 1.65 (0.065)
TL-Series Press the shaft seal so that the seal is flush or below the front surface of the motor.
1.40 (0.055) 1.50 (0.060) 1.65 (0.065)
1.50 (0.060) 2.00 (0.080) 3.00 (0.120)
1.40 (0.055) 1.50 (0.060) 1.65 (0.065)
Rockwell Automation Publication 2090-IN012C-EN-P - February 2014
Page 4

4 Shaft Seal Kits
IMPORTANT
IMPORTANT
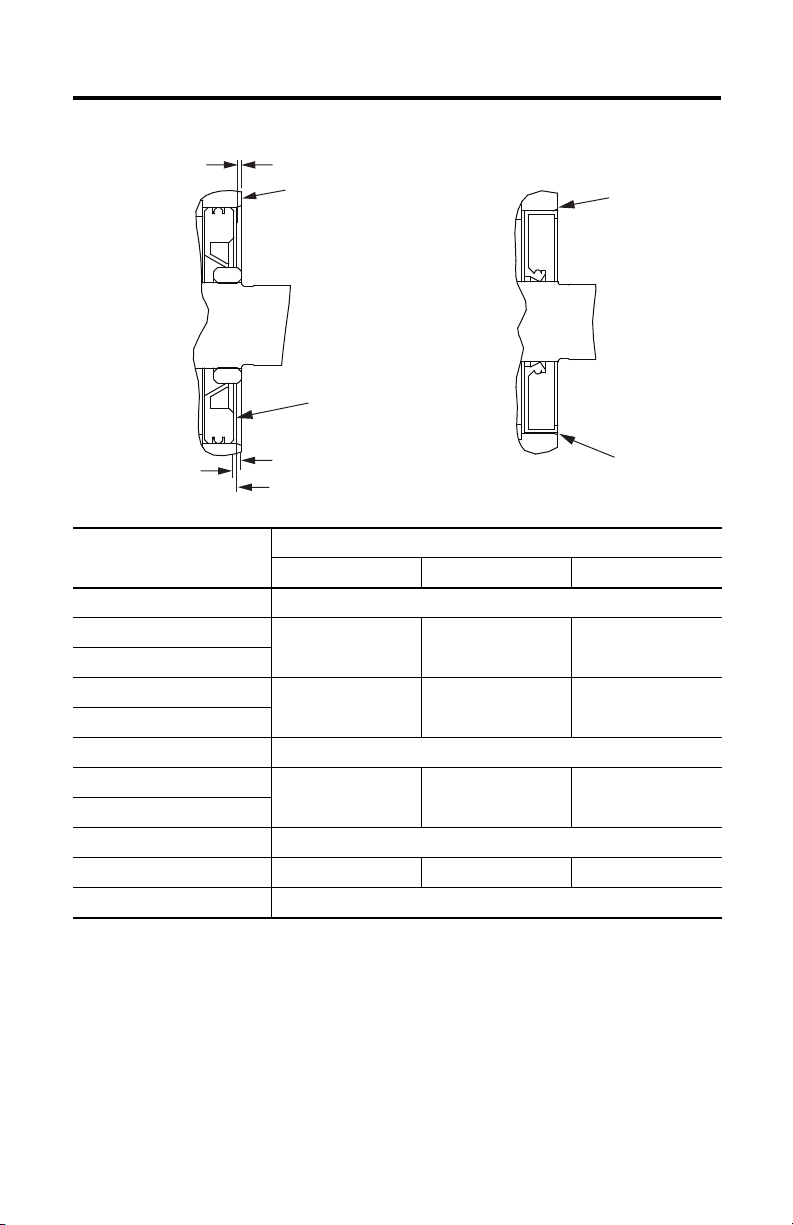
Socket, Pipe, or Tubing
(supplied by the customer)
Motor
Metal
Hammer
Shaft Seal
Wood en
Work
Piece
Rubber or
Wooden Mallet
Motor
Shaft Seal
Socket, Pipe, or Tubing
(supplied by the customer)
Or
Shaft Seal Installation Methods
This section shows the recommended installation methods for the shaft seals.
Do not hammer directly on the shaft seal. Gently tap the socket, pipe, or tubing evenly around the outer
edge of the shaft seal until the shaft seal is pressed into place.
Shaft Seal Kit Catalog Numbers
Third-party shaft seals are not approved for use with these motors. The use of third-party shaft seals voids any
implied or expressed warranties.
Kinetix VP Low Inertia Motors
Motor Cat. No. Shaft Se al Kit Cat. No.
VPL-A063xx and VPL-B063xx
VPL-A075xx and VPL-B075xx
VPL-A100xx and VPL-B100xx MPL-SSN-A3B3
VPL-A115xx and VPL-B115xx MPL-SSN-A4B4
VPL-A130xx and VPL-B130xx MPL-SSN-A5B5
VPL-B165xx MPL-SSN-F165
Rockwell Automation Publication 2090-IN012C-EN-P - February 2014
VPL-SSN-F063075
Kinetix VP Food Grade Motors
Motor Cat. No. Shaf t Seal Kit Cat. No.
VPF-A063xx and VPF-B063xx
VPF-A075xx and VPF-B075xx
VPF-A100xx and VPF-B100xx MPF-SST-A3B3
VPF-A115xx and VPF-B115xx MPF-SST-A4B4
VPF-A130xx and VPF-B130xx MPF-SST-A45B45
VPF-B165xx MPF-SST-F165
Kinetix VP Stainless Steel Motors
Motor Cat. No. Shaf t Seal Kit Cat. No.
VPS-B1304D MPS-SST-A45B45
VPS-B1653D MPS-SST-F165
VPF-SSN-F063075
Page 5

Shaft Seal Kits 5
MP-Series Low Inertia Motors
Motor Cat. No. Shaft Seal Kit Cat. No.
MPL-A15xx and MPL-B15xx
MPL-A2xx and MPL-B2xx
MPL-A3xx and MPL-B3xx MPL-SSN-A3B3
MPL-A4xx and MPL-B4xx MPL-SSN-A4B4
MPL-A45xx and MPL-B45xx MPL-SSN-A5B5
MP L-A52 0 and MPL- B520
MP L-A54 0 and MPL- B540
MP L-A56 0 and MPL- B560
MPL-B580 MPL-SSN-F165-32MM
MPL-B6xx MPL-SSN-A6B6
MPL-B8xx MPL-SSN-A8B8
MPL-B9xx MPL-SSN-A9B9
MPL-SSN-F63F75
MPL-SSN-F165
MP-Series Food Grade Motors
Motor Cat. No. Shaft Seal Kit Cat. No.
MPF-A3xx and MPF-B3xx MPF-SST-A3B3
MPF-A4xx and MPF-B4xx MPF-SST-A4B4
MPF-A45xx and MPF-B45xx MPF-SST-A45B45
MPF-A5xx and MPF-B5xx MPF-SST-F165
MP-Series Medium Inertia Motors
Motor Cat. No. Shaft S eal Kit Cat. No.
MPM-A115xx and MPM-B115xx MPL-SSN-A4B4
MPM-A130xx and MPM-B130xx MPL-SSN-A5B5
MPM-A165xx and MPM-B165xx MPL-SSN-F165
MPM-A215xx and MPM-A215xx MPL-SSN-A6B6
Kinetix 6000M Integrated Drive-Motor
Motor Cat. No. Shaft Seal Kit Cat. No.
MDF-SB1003 MPF-SST-A3B3
MDF-SB1153 MPF-SST-A4B4
MDF-SB1304 MPF-SST-A45B45
TL-Series Motors
Motor Cat. No. Shaft Seal Kit Cat. No.
TLY-A1xx and TL-A1xx TL-SSN-1
TLY-A2xx and TL-A2xx TL-SSN-2
TLY-A25xx and TL-A25xx
TLY-A3xx
TL-A4xx TL-SSN-4
TL-SSN-3
MP-Series Stainless Steel Motors
Motor Cat. No. Shaft Seal Kit Cat. No.
MPS-A3xx and MPS-B3xx MPS-SST-A3B3
MPS-A45xx and MPS-B45xx MPS-SST-A45B45
MPS-B5xx MPS -SST-F165
Rockwell Automation Publication 2090-IN012C-EN-P - February 2014
Page 6

6 Shaft Seal Kits
Additional Resources
These documents contain additional information concerning related products from Rockwell
Automation.
Resource Description
Kinetix Motion Control Selection Guide,
publication GMC-SG001
Kinetix Rotary Motion Specifications,
publication GMC-TD001
Kinetix Motion Accessories Specifications,
publication GMC-TD004
Industrial Automation Wiring and Grounding
Guidelines, publication 1770-4.1
Product Certifications website, http://www.ab.com
Overview of Kinetix servo drives, motors, actuators, and motion
accessories designed to help make initial decisions for the motion control
products best suited for your system requirements.
Product specifications for Kinetix VP (Bulletin VPL, VPF, VPS), MP-Series™
(Bulletin MPL, MPM, M PF, MPS), Kine tix 6000M (Bulletin MDF),
TL-Series™, RDD-Series™, and HPK-Series™ rotary motors.
Product specifications for Bulletin 2090 motor and interface cables,
low-profile connector kits, drive power components, and other servo drive
accessory items.
Provides general guidelines for installing a Rockwell Automation industrial
system.
Provides declarati ons of conformity, cer tificates, and other ce rtification
details.
You can view or download publications at http://www.rockwellautomation.com/literature/
. To
order paper copies of technical documentation, contact your local Allen-Bradley distributor or
Rockwell Automation sales representative.
Rockwell Automation Publication 2090-IN012C-EN-P - February 2014
Page 7

Notes:
Shaft Seal Kits 7
Rockwell Automation Publication 2090-IN012C-EN-P - February 2014
Page 8

Rockwell Automation Support
Rockwell Automation provides tec hnical information on the Web to assist you in using its products.
At http://www.rockwellautomation.com/support
service packs. You can also visit our Support Center at https://rockwellautomation.custhelp.com/
and forums, technical information, FAQs, and to sign up for product notification updates.
In addition, we offer multiple support programs for installation, configuration, and troubleshooting. For more information, contact
your local distributor or Rockwell Automation representative, or visit http://www.rockwellautomation.com/services/online-phone
Installation Assistance
If you experience a problem within the first 24 hours of installation, please review the information that's contained in this manual.
You can also contact a special Customer Support number for initial help in getting your product up and running.
United States or Canada 1.440.646.3434
Outside United States or
Canada
Use the Wor ldwi de Loc ator
http://www.rockwellautomation.com/rockwellautomation/support/overview.page
local Rockwell Automation representative.
New Product Satisfaction Return
Rockwell Automation tests all of its products to help ensure that they are fully operational when shipped from the manufacturing
facility. However, if your product is not functioning and needs to be returned, follow these procedures.
you can find technical and application notes, sample code, and links to software
for software updates, support chats
at
, or contact your
.
United States
Outside United States Please contact your local Rockwell Automation representative for the return procedure.
Contact your distributor. You must provide a Customer Support case number (call the phone number
above to obtain one) to your distributor to complete the return process.
Documentation Feedback
Your comments will help us serve your documentation needs better. If you have any suggestions on how to improve this document,
complete this form, publication RA-DU002
Allen-Bradley, Rockwe ll Software, Rockwell Automation, Kinetix, MP-Series , RDD-Series, HPK-S eries, and TL-Series are trademarks of
Rockwell Automation, Inc.
Rockwell Otomasyon Ticaret A.Ş., Kar Plaza İş Merkezi E Blok Kat:6 34752 İçerenköy, İstanbul, Tel: +90 (216) 5698400
Publication 2090-IN012C-EN-P - February 2014 PN-237636
Supersedes Publication 2090-IN012B-EN-P - January 2007 Copyright © 2014 Rockwell Automation, Inc. All rights reserved. Printed in the U.S.A.
, available at http://www.rockwellautomation.com/literature/.
 Loading...