

Page 1

DPI Wireless
Interface Module
20-WIM-N1
20-WIM-N4S
PowerFlex 70 NEMA 4X/12 WIM
FRN 1.xxx
User Manual
Page 2

Important User Information
Solid state equipment has operational characteristics differing from those of
electromechanical equipment. Safety Guidelines for the Application, Installation and
Maintenance of Solid State Controls (Publication SGI-1.1 available from your local
Rockwell Automation sales office or online at http://www.rockwellautomation.com/
literature) describes some important differences between solid state equipment and
hard-wired electromechanical devices. Because of this difference, and also because
of the wide variety of uses for solid state equipment, all persons responsible for
applying this equipment must satisfy themselves that each intended application of
this equipment is acceptable.
In no event will Rockwell Automation, Inc. be responsible or liable for indirect or
consequential damages resulting from the use or application of this equipment.
The examples and diagrams in this manual are included solely for illustrative
purposes. Because of the many variables and requirements associated with any
particular installation, Rockwell Automation, Inc. cannot assume responsibility or
liability for actual use based on the examples and diagrams.
No patent liability is assumed by Rockwell Automation, Inc. with respect to use of
information, circuits, equipment, or software described in this manual.
Reproduction of the contents of this manual, in whole or in part, without written
permission of Rockwell Automation, Inc. is prohibited.
Throughout this manual, when necessary we use notes to make you aware of safety
considerations.
WARNING: Identifies information about practices or circumstances
that can cause an explosion in a hazardous environment, which may
lead to personal injury or death, property damage, or economic loss.
Important: Identifies information that is critical for successful application and
understanding of the product.
ATTENTION: Identifies information about practices or circumstances
that can lead to personal injury or death, property damage, or economic
loss. Attentions help you identify a hazard, avoid the hazard, and
recognize the consequences.
Shock Hazard labels may be located on or inside the equipment (e.g.,
drive or motor) to alert people that dangerous voltage may be present.
Burn Hazard labels may be located on or inside the equipment (e.g.,
drive or motor) to alert people that surfaces may be at dangerous
temperatures.
Allen-Bradley, PowerFlex, Pocket DriveExplorer for Pocket PC, DriveExplorer, DriveExecutive, and DPI are
either registered trademarks or trademarks of Rockwell Automation, Inc.
®
The Bluetooth
DeviceNet is a trademark of the Open DeviceNet Vendor Association.
ControlNet is a trademark of ControlNet International Ltd.
Windows and Microsoft are registered trademarks of Microsoft Corp.
word mark and logos are owned by the Bluetooth SIG, Inc.
Page 3

Summary of Changes
The information below summarizes the changes made to this manual
since its last release (July 2005):
Description of Change Page(s)
In Chapter 3 in the “Using Pocket DriveExplorer for Pocket PC” section, added
the new subsection “Assigning a Name for the WIM.”
In Chapter 3 in the “Using DriveExplorer/DriveExplorer Lite” section, added the
new subsection “Assigning a Name for the WIM.”
In Chapter 3 in the “Using DriveExecutive” section, added the new subsection
“Assigning a Name for the WIM.”
The information below summarizes the changes made to this manual
since its last release (March 2005):
Description of Change Page(s)
In Chapter 1 in the “Equipment Shipped with the WIM” section, added
categories and items for the 20-WIM-N4S and PowerFlex 70 NEMA 4X / 12
WIM.
In Chapter 3:
• Revised Sub step A in Step 10.
• Changed error checking setting in Step 8 from “Change to CRC” to “Any
setting.”
• Added subheading “To use the WIM when security mode is enable” and
related information.
• Added Important statement that the wireless connection will break after
resetting the WIM, and that the connection must be re-established.
In Chapter 4 in the “Viewing and Clearing Events” section, added the SCANpor t
Product Event List.
In Appendix C in the “Using Pocket DriveExplorer for Pocket PC” section,
combined Steps 8 and 9, and re-numbered subsequent steps.
3-8
3-14
3-23
1-3
3-7
3-20
3-25
3-26
4-5
C-5
Page 4

soc-ii Summary of Changes
Page 5

Preface About This Manual
Related Documentation . . . . . . . . . . . . . . . . . . . . . . . . . . . . . P-1
Rockwell Automation Support. . . . . . . . . . . . . . . . . . . . . . . . P-2
Conventions Used in This Manual . . . . . . . . . . . . . . . . . . . . . P-3
Third-Party Bluetooth Support. . . . . . . . . . . . . . . . . . . . . . . . P-3
Chapter 1 Getting Started
Components . . . . . . . . . . . . . . . . . . . . . . . . . . . . . . . . . . . . . . 1-1
Features . . . . . . . . . . . . . . . . . . . . . . . . . . . . . . . . . . . . . . . . . 1-2
Compatible Products . . . . . . . . . . . . . . . . . . . . . . . . . . . . . . . 1-2
Required Equipment . . . . . . . . . . . . . . . . . . . . . . . . . . . . . . . 1-3
Safety Precautions . . . . . . . . . . . . . . . . . . . . . . . . . . . . . . . . . 1-4
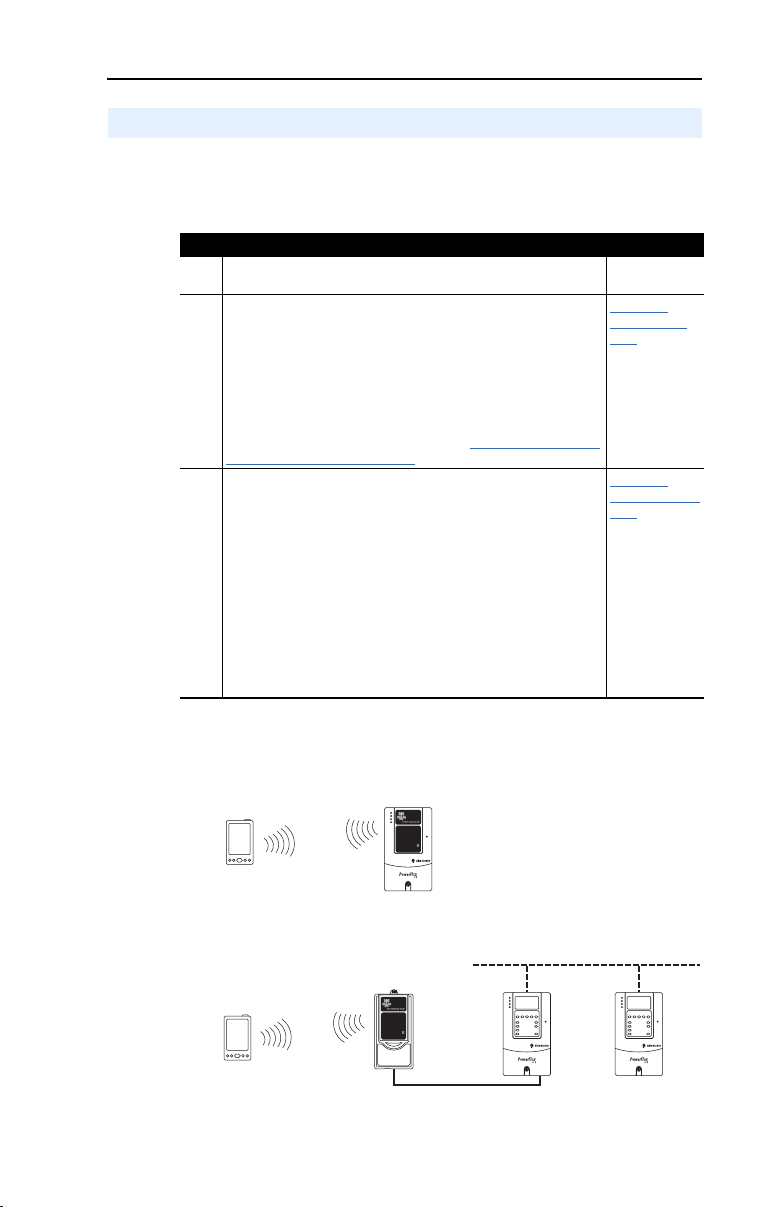
Quick Start . . . . . . . . . . . . . . . . . . . . . . . . . . . . . . . . . . . . . . . 1-5
Status Indicator . . . . . . . . . . . . . . . . . . . . . . . . . . . . . . . . . . . 1-6
Chapter 2 Installing the WIM
Installing the NEMA 1 WIM (20-WIM-N1) . . . . . . . . . . . . . 2-1
Installing the NEMA 4 WIM (20-WIM-N4S) . . . . . . . . . . . . 2-3
Removing the NEMA 1 WIM (20-WIM-N1) . . . . . . . . . . . . 2-5
Chapter 3 Configuring the WIM
Configuration Tools . . . . . . . . . . . . . . . . . . . . . . . . . . . . . . . . 3-1
Using Pocket DriveExplorer for Pocket PC. . . . . . . . . . . . . . 3-2
Using DriveExplorer/DriveExplorer Lite. . . . . . . . . . . . . . . 3-10
Using DriveExecutive . . . . . . . . . . . . . . . . . . . . . . . . . . . . . 3-16
Setting the Fault Action . . . . . . . . . . . . . . . . . . . . . . . . . . . . 3-24
Enabling and Setting the Security Mode . . . . . . . . . . . . . . . 3-25
Resetting the WIM . . . . . . . . . . . . . . . . . . . . . . . . . . . . . . . . 3-26
Table of Contents
Chapter 4 Troubleshooting
Appendix A Specifications
Understanding the Status Indicator . . . . . . . . . . . . . . . . . . . . 4-1
Viewing WIM Diagnostic Items . . . . . . . . . . . . . . . . . . . . . . 4-3
Viewing and Clearing Events. . . . . . . . . . . . . . . . . . . . . . . . . 4-4
Viewing and Clearing DF1 Communication Statistics . . . . . 4-6
Communications . . . . . . . . . . . . . . . . . . . . . . . . . . . . . . . . . A-1
Electrical . . . . . . . . . . . . . . . . . . . . . . . . . . . . . . . . . . . . . . . A-1
Mechanical . . . . . . . . . . . . . . . . . . . . . . . . . . . . . . . . . . . . . . A-1
Environmental . . . . . . . . . . . . . . . . . . . . . . . . . . . . . . . . . . . A-2
Regulatory Compliance . . . . . . . . . . . . . . . . . . . . . . . . . . . . A-2
Page 6

ii Table of Contents
Appendix B WIM Parameters
About Parameter Numbers. . . . . . . . . . . . . . . . . . . . . . . . . . . B-1
Parameter List for DPI Products . . . . . . . . . . . . . . . . . . . . . . B-2
Parameter List for SCANport Products . . . . . . . . . . . . . . . . . B-3
Appendix C Wireless Flash Updating DPI Devices
Using Pocket DriveExplorer for Pocket PC. . . . . . . . . . . . . . C-1
Using DriveExplorer/DriveExplorer Lite. . . . . . . . . . . . . . . . C-7
Using DriveExecutive . . . . . . . . . . . . . . . . . . . . . . . . . . . . . C-12
Glossary
Index
Page 7

Preface
About This Manual
Topic Page
Related Documentation
Rockwell Automation Support P-2
Conventions Used in This Manual P-3
Third-Party Bluetooth Support P-3
Related Documentation
For: Refer to: Publication
Pocket DriveExplorer™ for
Pocket PC
DriveExplorer™ http://www.ab.com/drives/driveexplorer, and
DriveTools™ SP (includes
DriveExecutive™)
HIM HIM Quick Reference 20HIM-QR001…
PowerFl ex
PowerFl ex
Powe rFlex
PowerFl ex
PowerFl ex
(Frames 1 through 6)
PowerFl ex
(Frames 9 through 11)
RSLinx™
or RSLinx Lite
Bluetooth
technology
®
70/70EC Drive PowerFlex 70 User Manual
®
700/700VC Drive
®
700 Series B Drive
®
700H Drive PowerFlex 700H Installation Instructions
®
700S Drive
®
700S Drive
®
wireless
http://www.ab.com/drives/driveexplorer, and
Pocket DriveExplorer for Pocket PC online help
(installed with the software)
DriveExplorer online help (installed with the software)
http://www.ab.com/drives/drivetools, and
DriveExecutive online help (installed with the software)
PowerFlex 70/700 Reference Manual
PowerFlex 700 User Manual
PowerFlex 700 Series B User Manual
PowerFlex 70/700 Reference Manual
PowerFlex 700H Programming Manual
PowerFlex 700S with Phase I Control User Manual
PowerFlex 700S with Phase II Control User Manual
PowerFlex 700S Reference Manual
PowerFlex 700S Installation Instructions
PowerFlex 700S with Phase I Control User Manual
PowerFlex 700S with Phase II Control User Manual
PowerFlex 700S Reference Manual
Getting Results with RSLinx Guide,
and online help (installed with the software)
http://www.Bluetooth.org or
http://www.Bluetooth.com
P-1
—
—
—
20A-UM001…
PFLEX-RM001…
20B-UM001…
20B-UM002…
PFLEX-RM001…
PFLEX-IN006…
20C-PM001…
20D-UM001…
20D-UM006…
PFLEX-RM002…
PFLEX-IN006…
20D-UM001…
20D-UM006…
PFLEX-RM002…
LINX-GR001…
—
Documentation can be obtained online at
http://www.rockwellautomation.com/literature
.
Page 8

P-2 About This Manual
Rockwell Automation Support
Rockwell Automation, Inc. offers support services worldwide, with over
75 sales/support offices, over 500 authorized distributors, and over 250
authorized systems integrators located throughout the United States
alone. In addition, Rockwell Automation, Inc. representatives are in
every major country in the world.
Local Product Support
Contact your local Rockwell Automation, Inc. representative for:
• Sales and order support
• Product technical training
• Warranty support
• Support service agreements
Technical Product Assistance
If you need to contact Rockwell Automation, Inc. for technical
assistance, please review the information in Chapter 4
first. If you still have problems, then access the Allen-Bradley Technical
Support web site at www.ab.com/support/abdrives.
, Troubleshooting,
Page 9

About This Manual P-3
Conventions Used in This Manual
The following conventions are used throughout this manual:
• Parameter names are shown in the format Parameter xx - [*]. The xx
represents the parameter number, and the * represents the parameter
name — for example Parameter 01 - [DPI Port].
• Menu commands are shown in bold type face and follow the format
Menu > Command. For example, if you read “Select File > Open,”
you should click the File menu and then click the Open command.
• The firmware release is displayed as FRN X.xxx. The “FRN”
signifies Firmware Release Number. The “X” is the major release
number. The “xxx” is the minor update number.
• Pocket DriveExplorer for Pocket PC (version 1.01), My Bluetooth
Places software (version 1.4.2), DriveExplorer Lite (version 4.04),
and DriveExecutive (version 3.01) were used for the screen pictures in
this manual. Different versions of the software may differ in
appearance and procedures.
• This manual provides information about the 20-WIM-N* Wireless
Interface Module (WIM) and using it with PowerFlex 7-Class drives.
The module can be used with other products that support DPI or
SCANport.
Third-Party Bluetooth Support
Since the WIM requires a Pocket PC, laptop PC or desktop PC equipped
with Bluetooth wireless technology, you may need to install a
third-party, vendor-specific Bluetooth driver. If this driver fails to
establish wireless communication with the WIM, refer to its
documentation for assistance. Furthermore, troubleshooting help may be
available on the vendor web site.
Page 10

P-4 About This Manual
Notes:
Page 11

Chapter 1
Getting Started
The 20-WIM-N* Wireless Interface Module (WIM) provides a wireless
communications interface between a Pocket PC, laptop computer or
desktop computer equipped with Bluetooth wireless technology and any
Allen-Bradley product supporting DPI. The WIM uses the full-duplex
DF1 protocol
Important: The WIM also supports legacy Allen-Bradley AC drives
Topic Page
Components
Features
Compatible Products 1-2
Required Equipment 1-3
Safety Precautions 1-4
Quick Start 1-5
Status Indicator 1-6
.
that use the SCANport protocol.
1-1
1-2
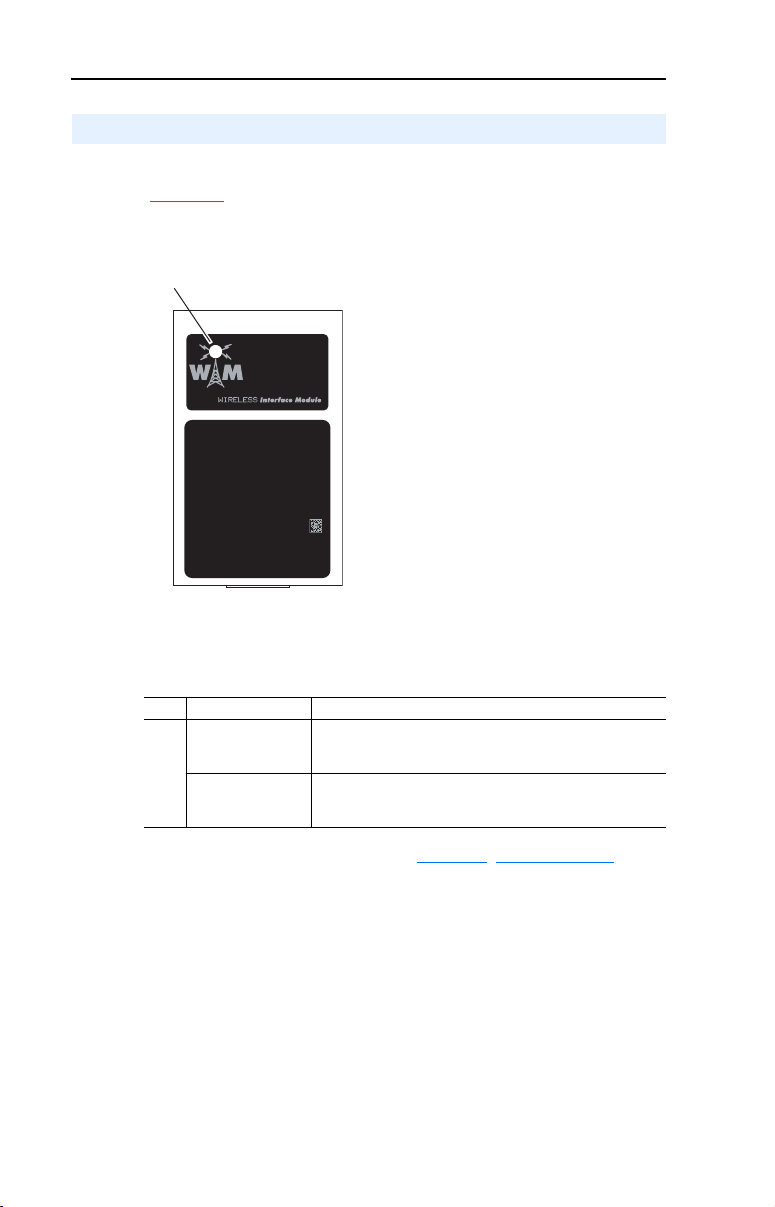
Components
Figure 1.1 Components of the WIM
➊
Contains FCC ID: SNT-2XWIMNX
IC: 5450A-2XWIMNX
This device complies with Part 15 of the FCC rules.
Operation is subject to the following two conditions:
1) this device may not cause harmful interference, and
2) this device must accept any interference received,
including interference that may cause undesired operation
(NEMA 1 WIM shown)
Item Part Description
Status
➊
Indicator
LED that indicates WIM
operation, when data is being
received from the Bluetooth
wireless technology enabled
Pocket PC or computer, and
when data is being sent to
the Pocket PC or computer.
Refer to Status Indicator
page 1-6, and Chapter 4,
Troubleshooting for more
information.
on
Page 12

1-2 Getting Started
Features
Features of the WIM include the following:
• A status indicator (LED) that reports the operating status of the
module.
• Connectivity to products implementing DPI, such as PowerFlex
7-Class drives and peripherals, and products implementing
SCANport, such as legacy Allen-Bradley drives. When used with a
product, the WIM will autobaud to the DPI or SCANport data rate
that is used by the product.
• The WIM receives power from the drive. An outside power source is
not needed.
• The following tools can be used to configure the WIM:
– Pocket DriveExplorer for Pocket PC (version 1.01 or higher)
– DriveExplorer (version 4.04 or higher)
– DriveExecutive (version 3.01 or higher)
– PowerFlex 7-Class HIM
• The WIM can be used with compatible Allen-Bradley software tools
through wireless communication to flash upgrade itself and other DPI
products (PowerFlex 7-Class drives and communication adapters) to
take full advantage of new firmware features as they become
available.
Compatible Products
DPI Products
DPI is a second generation peripheral communication interface. The
WIM can be used with Allen-Bradley Architecture Class (PowerFlex
7-Class) drives and other products that support DPI. At the time of
publication, compatible DPI products include all the following types of:
• PowerFlex 70 drives • PowerFlex 700S drives
• PowerFlex 700 drives • PowerFlex 7000 drives
• PowerFlex 700H drives • SMC-Flex
Page 13

Getting Started 1-3
SCANport Products
The WIM is also compatible with drives and other products that support
SCANport. At the time of publication, compatible products include:
• 1305 drives • 1336 REGEN drives • 2364F RGU
• 1336 PLUS drives • 1336 SPIDER drives • SMC Dialog Plus
• 1336 PLUS II drives • 1394 Servo drives • SMP-3
• 1336 IMPACT drives • 1397 drives
• 1336 FORCE drives • 1557 drives
Required Equipment
Equipment Shipped with the WIM
When you unpack the WIM, verify that the package includes:
20-WIM-N1 20-WIM-N4S
❑ One Wireless Interface Module ❑ One Wireless Interface Module
❑ This manual ❑ One 1202-C30 Cable
❑ This manual
PowerFlex 70 NEMA 4X/12 WIM
❑ One Drive Cover with Integral Wireless Interface Module
❑ This manual
User-Supplied Equipment
To configure the WIM, you must use one of the following:
❑ Pocket DriveExplorer for Pocket PC software (version 1.01 or
higher) running on a Pocket PC equipped with Bluetooth wireless
technology
❑ DriveExplorer software (version 4.04 or higher) running on a laptop
or desktop computer equipped with Bluetooth wireless technology
❑ DriveExecutive stand-alone software (version 3.01 or higher) or
bundled with the DriveTools SP suite (version 1.01 or higher)
running on a laptop or desktop computer equipped with Bluetooth
wireless technology
❑ PowerFlex 7-Class HIM (20-HIM-*)
Page 14

1-4 Getting Started
Safety Precautions
Please read the following safety precautions carefully.
ATTENTION: Risk of injury or death exists from machine motion
when using wireless communications and software to Start/Stop/Jog,
!
configure or otherwise communicate with a drive.
Using the control bar feature in Pocket DriveExplorer for Pocket PC,
DriveExplorer or DriveExecutive with wireless communications may
present safety hazards due to potential loss of the wireless connection.
For example, if the wireless connection is interrupted after a start or jog
command is initiated from the control bar, the drive cannot be stopped
using the control bar until the wireless connection is restored. For this
reason, it is required to always use an additional hard-wired stop circuit
to disable the drive.
ATTENTION: Risk of injury or equipment damage exists. Only
personnel familiar with drive and power products and the associated
!
machinery should plan or implement the installation, start-up,
configuration, and subsequent maintenance of the product using the
WIM. Failure to comply may result in injury and/or equipment damage.
ATTENTION: Risk of injury or equipment damage exists.
Parameter 02 - [Comm Flt Action] lets you determine the action of
!
the WIM and connected drive if wireless communications are
disrupted. By default, this parameter faults the drive. You can set this
parameter so that the drive continues to run. Precautions should be
taken to ensure that the setting of this parameter does not create a risk
of injury or equipment damage. When commissioning the drive, verify
that your system responds correctly to various situations (for example, a
communication disruption or a faulted controller).
Page 15
Getting Started 1-5
Quick Start
This section is designed to help experienced users quickly start using the
WIM. If you are unsure how to complete a step, refer to the referenced
chapter.
Step Action Refer to…
1 Review the safety precautions for the WIM. Throughout
2 Install the WIM.
For the NEMA 1 WIM (20-WIM-N1), remove the HIM from the
drive cradle and replace it with the WIM. To install the WIM in a
remote-mounted HIM bezel (20-HIM-B1), first install the bezel
(see Publication 20HIM-IN001...). Make sure the HIM bezel is
connected to the drive port using the supplied 1203-C30 cable,
and then place the WIM in the bezel cradle.
For the NEMA 4 WIM (20-WIM-N4S), see Installing the NEMA 4
WIM (20-WIM-N4S) on page 2-3 for installation instructions.
3 Configure the WIM parameters.
The WIM is provided ready for use. It is only necessary to
configure the WIM if you want to:
• Change the default setting (0 = Fault) for a Communication
Fault Action using:
– Parameter 02 - [Comm Flt Action] for DPI drives
– Parameter 04 - [Comm Flt Action] for SCANport drives
• Enable the WIM security mode using:
– Parameters 03 - [Security Mode] and 04 - [Security PIN]
for DPI drives
– Parameters 02 - [Security Mode] and 03 - [Security PIN]
for SCANport drives
this manual
2,
Chapter
Installing the
WIM
Chapter 3,
Configuring the
WIM
Figure 1.2 NEMA 1 WIM (20-WIM-N1) Installed in a Drive
Pocket PC,
Laptop or Desktop
Computer
Figure 1.3 NEMA 1 WIM (20-WIM-N1) Installed in a HIM Bezel (20-HIM-B1)
Pocket PC,
Laptop or Desktop
Computer
PowerFlex 70/700 Drive
with Installed WIM
Contains FCC ID: SNT-2XWIMNX
IC: 5450A-2XWIMNX
This device complies with Part 15 of the FCC rules.
Operation is subject to the following two conditions:
1) this device may not cause harmful interference, and
2) this device must accept any interference received,
including interference that may cause undesired operation
HIM Bezel with
Installed WIM
Contains FCC ID: SNT-2XWIMNX
IC: 5450A-2XWIMNX
This device complies with Part 15 of the FCC rules.
Operation is subject to the following two conditions:
1) this device may not cause harmful interference, and
2) this device must accept any interference received,
including interference that may cause undesired operation
Network (DeviceNet, ControlNet, etc.)
PowerFlex 70/700 Drives
(with 20-COMM-* Adapter)
Page 16
1-6 Getting Started
Status Indicator
The WIM reports its operating status using a tri-color status indicator
(Figure 1.4).
Figure 1.4 Status Indications of the WIM
➊
Contains FCC ID: SNT-2XWIMNX
IC: 5450A-2XWIMNX
This device complies with Part 15 of the FCC rules.
Operation is subject to the following two conditions:
1) this device may not cause harmful interference, and
2) this device must accept any interference received,
including interference that may cause undesired operation
(NEMA 1 WIM shown)
Status indications under normal operation are described below:
Item Status Indication Description
Solid Blue The WIM is receiving data from the Bluetooth wireless
➊
Flashing Green The WIM is operating, but has not established wireless
If any other conditions occur, refer to Chapter 4
technology enabled Pocket PC or computer, or transmitting
data to the Pocket PC or computer.
communication with the Bluetooth wireless technology
enabled Pocket PC or computer.
, Troubleshooting.
Page 17

Chapter 2
Installing the WIM
Chapter 2 provides instructions for installing and removing the WIM.
Topic Page
Installing the NEMA 1 WIM (20-WIM-N1)
Installing the NEMA 4 WIM (20-WIM-N4S) 2-3
Removing the NEMA 1 WIM (20-WIM-N1) 2-5
The WIM is offered in two styles: a NEMA 1 module (20-WIM-N1) and
a NEMA 4 module (20-WIM-N4S). Each style is installed differently.
Installing the NEMA 1 WIM (20-WIM-N1)
2-1
The NEMA 1 WIM (20-WIM-N1) typically replaces the HIM, and is
normally installed in the HIM (Human Interface Module) cradle on the
front of the drive. When a HIM is still required and occupies the cradle,
the 20-WIM-N1 module can be installed in a HIM bezel (20-HIM-B1)
mounted in a remote location.
Installing the WIM in a Drive
1. If a HIM is installed on the drive, remove the HIM, and replace it
with the WIM (Figure 2.1
Important: If the drive is mounted in an enclosure, the NEMA 1
2. The status LED on the WIM momentarily flashes red on powerup
and then flashes green to indicate it is ready to establish wireless
communication with the Pocket PC or computer.
3. Establish wireless communication between the WIM and the Pocket
PC or computer. For this procedure, refer to the respective section in
Chapter 3 that corresponds to the drive software tool you are using:
WIM must be installed in a HIM bezel or you must use
a NEMA 4 WIM. Using the NEMA 1 WIM installed at
the drive (DPI Port 1) in the enclosure will decrease
wireless signal transfer, resulting in possible
intermittent disconnection of the drive.
).
Page 18
2-2 Installing the WIM
• Using Pocket DriveExplorer for Pocket PC on page 3-2
• Using DriveExplorer/DriveExplorer Lite on page 3-10
• Using DriveExecutive on page 3-16.
When communication is achieved, the WIM status LED will turn
solid blue.
Figure 2.1 Installing the WIM in a Drive
(Human Interface Module)
HIM
Contains FCC ID: SNT-2XWIMNX
IC: 5450A-2XWIMNX
This device complies with Part 15 of the FCC rules.
Operation is subject to the following two conditions:
1) this device may not cause harmful interference, and
2) this device must accept any interference received,
including interference that may cause undesired operation
PowerFlex 70/700 Drive
20-WIM-N1
(Wireless Interface Module)
Installing the WIM in a HIM Bezel (20-HIM-B1)
1. If the HIM bezel is not mounted, refer to the HIM Bezel Installation
Instructions (Publication No. 20HIM-IN002…) for mounting details.
2. Route the bezel cable to the drive. Connect the bezel cable to the DPI
port on the bottom of the drive.
3. Install the WIM into the HIM bezel cradle (Figure 2.2
Figure 2.2 Installing the WIM in a HIM Bezel
Contains FCC ID: SNT-2XWIMNX
IC: 5450A-2XWIMNX
This device complies with Part 15 of the FCC rules.
Operation is subject to the following two conditions:
1) this device may not cause harmful interference, and
2) this device must accept any interference received,
including interference that may cause undesired operation
20-WIM-N1
(Wireless Interface Module)
).
20-HIM-B1
Bezel
3 m (9.8 ft.)
Bezel Cable*
*Distance can be increased up to 100 m (328 ft.) using
1202-H* Extension cable(s) or 1202-CBL-KIT-100M cable.
A cable distance greater than 30 m is not CE compliant.
PowerFlex 70/700 Drive
with Installed HIM
Page 19
Installing the WIM 2-3
4. The status LED on the WIM momentarily flashes red on powerup
and then flashes green to indicate it is ready to establish wireless
communication with the Pocket PC or computer.
5. Establish wireless communication between the WIM and the Pocket
PC or computer. For this procedure, refer to the respective section in
Chapter 3 that corresponds to the drive software tool you are using:
• Using Pocket DriveExplorer for Pocket PC
• Using DriveExplorer/DriveExplorer Lite on page 3-10
• Using DriveExecutive on page 3-16
When communication is achieved, the WIM status LED will turn
solid blue.
on page 3-2
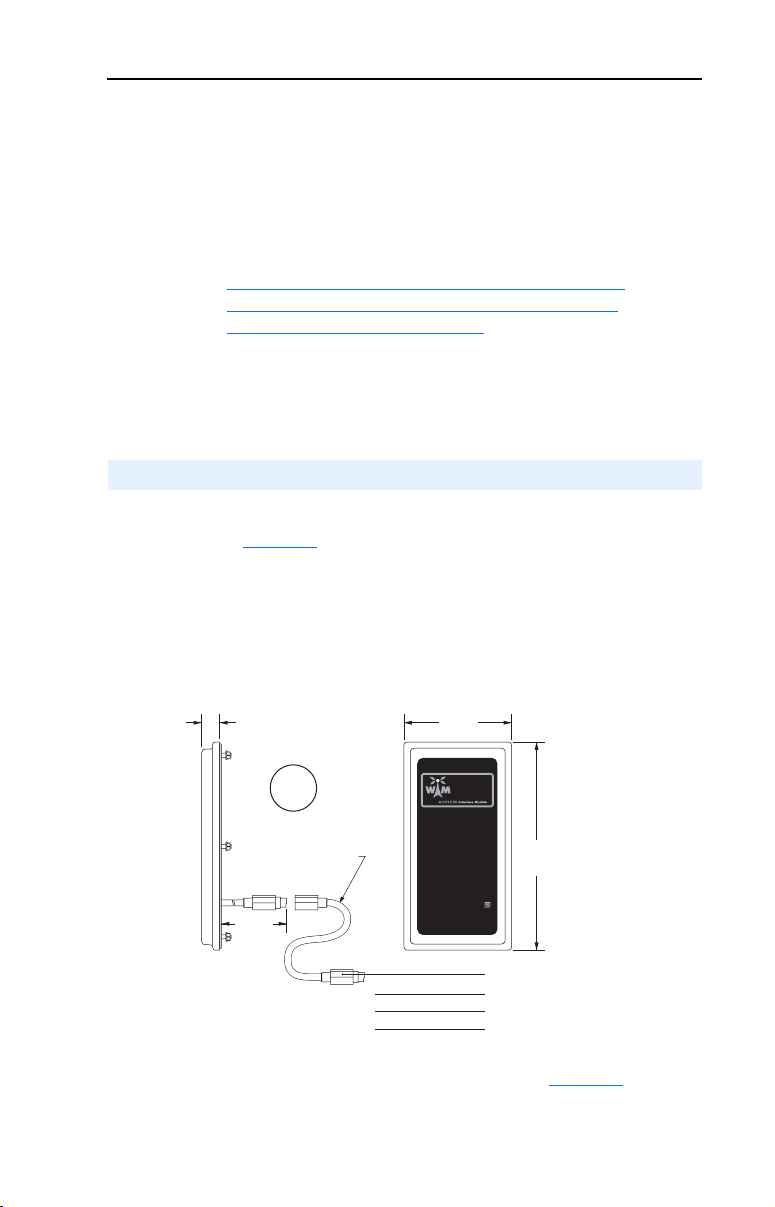
Installing the NEMA 4 WIM (20-WIM-N4S)
The NEMA 4 WIM (20-WIM-N4S) is designed for remote installation.
Refer to Figure 2.3
location to mount the NEMA 4 WIM. The distance between the WIM
and drive can be increased up to 100 m (328 ft.) by using 1202-H*
extension cable(s) or 1202-CBL-KIT-100M cable. A cable distance
greater than 30 m is not CE compliant.
Figure 2.3 NEMA 4 WIM Dimensions
25,0
(0.98)
Extension Cable
(supplied separately)
3.0 m
for overall WIM dimensions. Choose an appropriate
93,0
(3.66)
mm
(in.)
180,0
(7.08)
Contains FCC ID: SNT-2XWIMNX
IC: 5450A-2XWIMNX
This device complies with Part 15 of the FCC Rules.
Operation is subject to the following two conditions:
1) this device may not cause harmful interference, and
2) this device must accept any interference received,
including interference that may cause undesired operation
1202-H03 = 0.3 m
1202-H10 = 1.0 m
1202-H30 = 3.0 m
1. Drill the required hole pattern in the panel. See Figure 2.4 for
dimensions.
or 1202-CBL-KIT-100M
Page 20
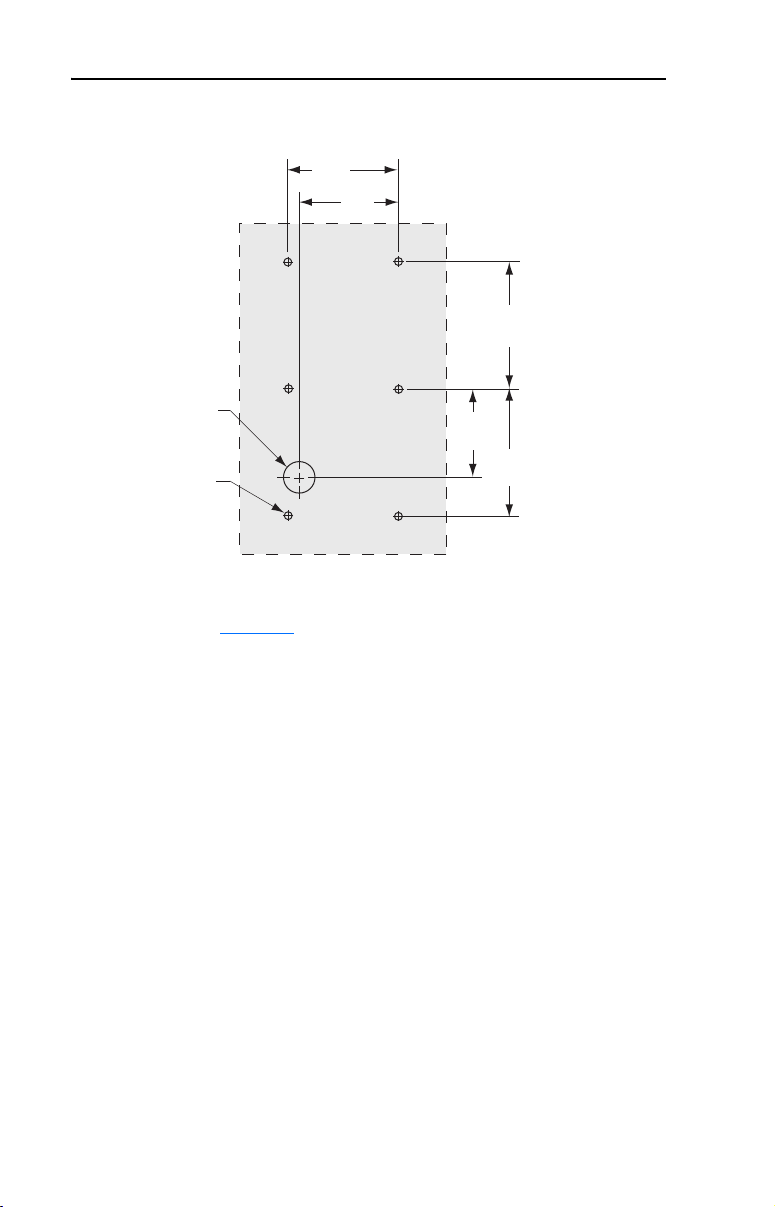
2-4 Installing the WIM
Figure 2.4 Hole Pattern for Mounting NEMA 4 WIM
∅
19,1
(0.75)
∅
4,8
(0.19)
2. Peel the protective film from the gasketed surface on the back of the
WIM (Figure 2.5).
67,0
(2.63)
60,0
(2.36)
77,0
(3.03)
53,5
(2.11)
77,0
(3.03)
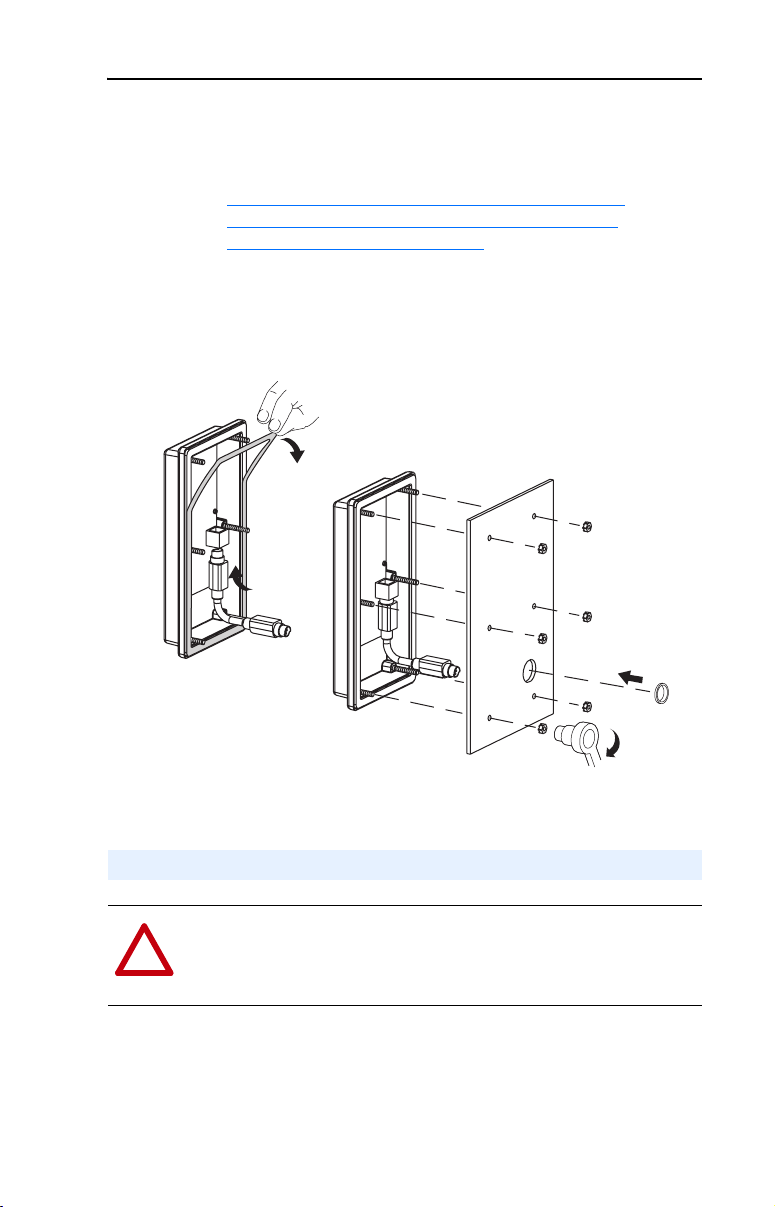
3. Insert the supplied 3 m (9.8 ft.) WIM cable into the mating socket on
the back of the WIM.
4. Install the supplied O-ring into the cable routing hole on the panel to
protect the cable. Then route the WIM cable through the cable
routing hole on the panel.
5. Align the six threaded studs of the WIM with the panel clearance
holes, and place the WIM against the panel.
6. Tighten the nuts onto the six threaded studs of the WIM extending
behind the panel. Recommended torque is 0.68 N-m (6.0 lb.-in.).
7. Route the WIM cable to the drive. Connect the WIM cable to the DPI
port on the bottom of the drive.
8. Apply power to the drive. The status LED on the WIM momentarily
flashes red on powerup and then flashes green to indicate it is ready
to establish wireless communication with the Pocket PC or computer.
Page 21
Installing the WIM 2-5
9. Establish wireless communication between the WIM and the Pocket
PC or computer. For this procedure, refer to the respective section in
Chapter 3 that corresponds to the drive software tool you are using:
• Using Pocket DriveExplorer for Pocket PC
• Using DriveExplorer/DriveExplorer Lite on page 3-10
• Using DriveExecutive on page 3-16
When communication is achieved, the WIM status LED will turn
solid blue.
Figure 2.5 Mounting NEMA 4 WIM onto Panel
➋
➎
on page 3-2
➌
➏
(6.0 lb.-in.)
➍
0.68 N-m
Removing the NEMA 1 WIM (20-WIM-N1)
ATTENTION: Risk of injury or equipment damage exists. If the HIM
bezel cable (for a bezel-mounted WIM) is disconnected from Port 2 on
!
the bottom of the drive, the drive may fault. Determine how the drive
will respond before disconnecting the cable.
The drive can remain powered when removing a WIM.
Remove the WIM from the drive HIM cradle or the remote-mounted
HIM bezel.
Page 22

2-6 Installing the WIM
Notes:
Page 23

Chapter 3
Configuring the WIM
Chapter 3 provides information about configuring the WIM.
Topic Page
Configuration Tools
Using Pocket DriveExplorer for Pocket PC 3-2
Using DriveExplorer/DriveExplorer Lite 3-10
Using DriveExecutive 3-16
Setting the Fault Action 3-24
Enabling and Setting the Security Mode 3-25
Resetting the WIM 3-26
TIP: The WIM is provided ready for use. It is only necessary to
configure the WIM if you want to:
• Change the default setting (0 = Fault) for:
– Parameter 02 - [Comm Flt Action] for DPI products
– Parameter 04 - [Comm Flt Action] for SCANport products
• Enable the security mode using:
– Parameters 03 - [Security Mode] and 04 - [Security PIN] for
DPI products
– Parameters 02 - [Security Mode] and 03 - [Security PIN] for
SCANport products
3-1
For a list of parameters, refer to Appendix
definitions of terms in this chapter, refer to the Glossary.
B, WIM Parameters. For
Configuration Tools
The WIM stores parameters and other information in its own
Non-Volatile Storage (NVS). You must, therefore, access the WIM to
view and edit its parameters. The following table lists tools that you can
use to access the WIM and edit its parameters.
Device Type Tool Refer to…
Pocket PC Pocket DriveExplorer for Pocket PC (version 1.01 or higher) Page 3-2
Laptop or
Desktop
Computer
DriveExplorer software (version 4.04 or higher) Page 3-10
DriveExecutive software (version 3.01 or higher) Page 3-16
Powe rF lex H IM —
Page 24

3-2 Configuring the WIM
Using Pocket DriveExplorer for Pocket PC
With Pocket DriveExplorer for Pocket PC software running on a Pocket
PC equipped with Bluetooth wireless technology, you can edit parameters
in the WIM, connected drive, and any of the attached peripherals.
If you are unsure how to use Pocket DriveExplorer for Pocket PC, refer
to the online help (select Help > Help Topics).
ATTENTION: Risk of injury or death exists from machine motion
when using wireless communications and software to Start/Stop/Jog,
!
configure or otherwise communicate with a drive.
Using the control bar feature in Pocket DriveExplorer for Pocket PC
(version 2.01 or higher) with wireless communications may present
safety hazards due to potential loss of the wireless connection. For
example, if the wireless connection is interrupted after a start or jog
command is initiated from the control bar, the drive cannot be stopped
using the control bar until the wireless connection is restored. For this
reason, it is required to always use an additional hard-wired stop circuit
to disable the drive.
Establishing Wireless Communication Between the WIM and Pocket PC
1. Launch Pocket DriveExplorer for Pocket PC from the Today Screen
to create a new connection using the Connection Manager
(Figure 3.1
Figure 3.1 Connection Manager Screen
).
Page 25
Configuring the WIM 3-3
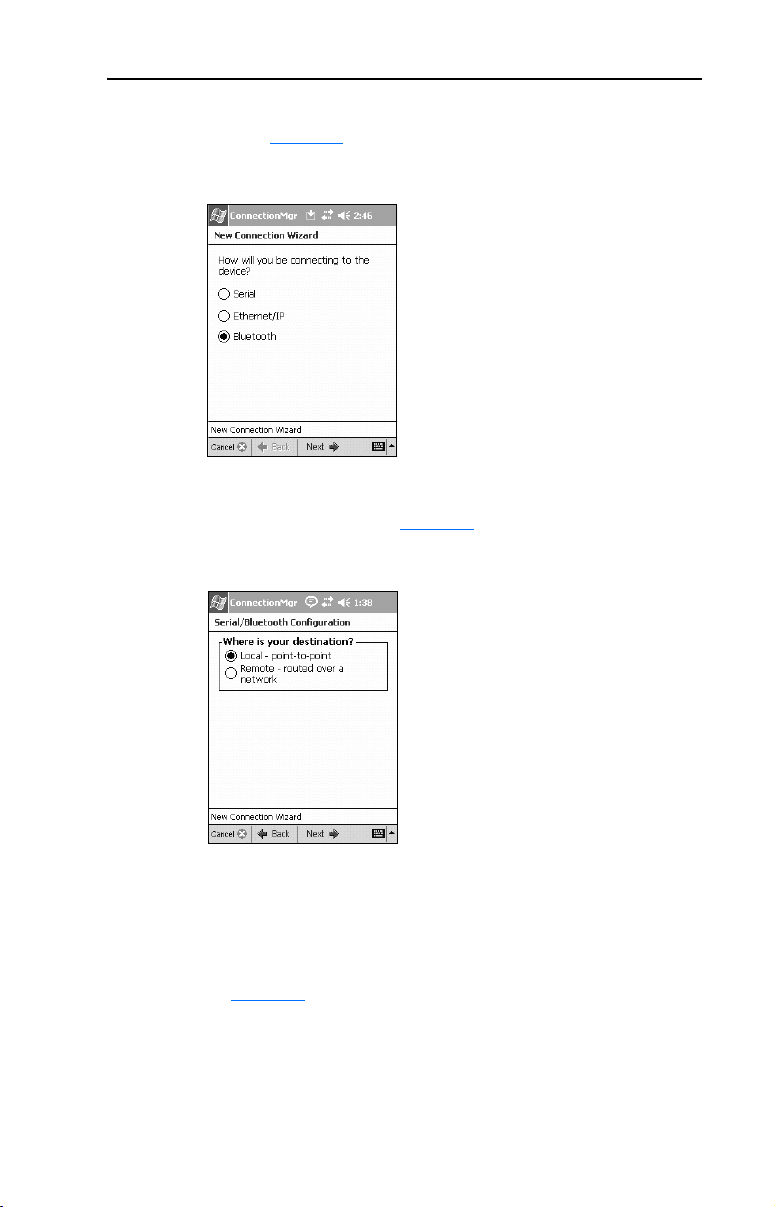
2. Select Connect > New from the menu list. The New Connection
Wizard ( Figure 3.2
Figure 3.2 New Connection Wizard Screen
3. Select the “Bluetooth” radio button and tap Next ->. The “Where is
your destination?” screen (Figure 3.3
Figure 3.3 “Where is your destination?” Screen
) appears.
) appears.
4. Select one of the radio button choices:
• Local - point-to-point: Choose “Local” if you want to connect
only to a local drive using the WIM. Selecting “Local” and
tapping Next -> displays the “Local Connection” screen
(Figure 3.4
reuse.
• Remote - routed over a network: Choose “Remote” if you want
to connect to a local drive using the WIM and then route through it
to a remote device on DeviceNet™ (via 20- COMM-D adapter),
ControlNet™ (via 20-COMM-C adapter) or EtherNet/IP (via
) which requests you to name the connection for later
Page 26
3-4 Configuring the WIM
20-COMM-E adapter). If you select “Remote,” disregard Step 5
and instead go directly to Step 10 on Page 3-6
sub-steps A through D. Step 10 must be performed before
proceeding with Step 6 below.
Figure 3.4 Local Connection Screen
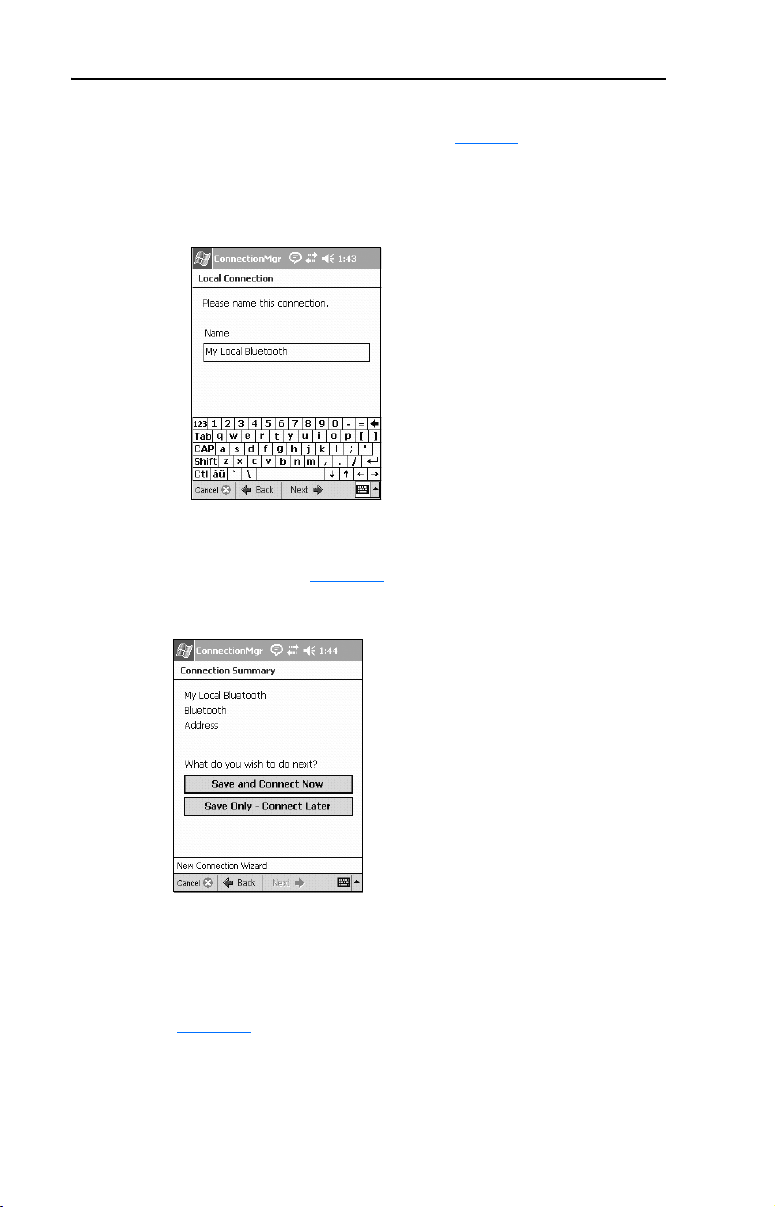
5. Enter a desired connection name and tap Next ->. The “Connection
Summary” screen (Figure 3.5) appears.
Figure 3.5 Connection Summary Screen
and perform
6. You can save the connection information and connect immediately,
or save the connection for connecting later.
After making a selection, the “Location for saved connection” screen
(Figure 3.6
on the Pocket PC to store connections.
) appears, enabling you to navigate to a desired location
Page 27
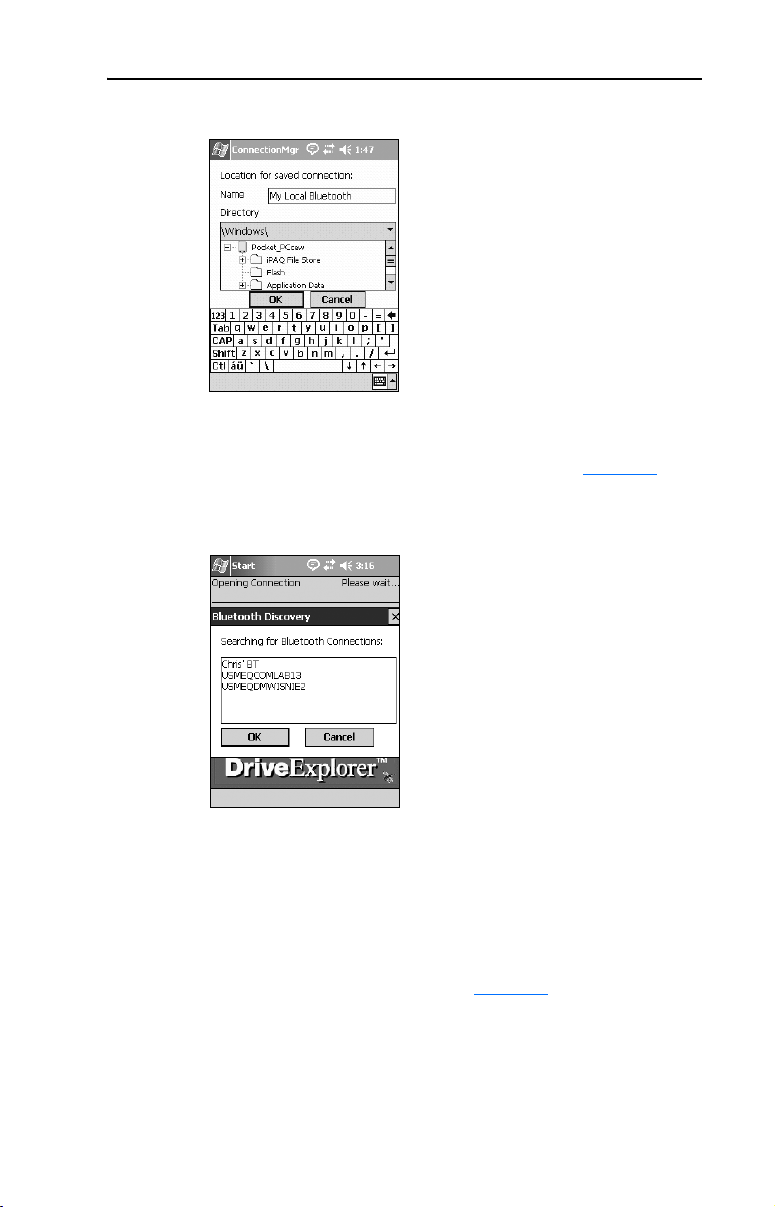
Configuring the WIM 3-5
Figure 3.6 “Location for saved connection” Screen
7. Ta p OK to save the connection file and begin the connection process.
The “Searching for Bluetooth Connections” screen (Figure 3.7
appears, asking you to select a detected Bluetooth device.
Figure 3.7 Searching for Bluetooth Connections Screen
)
8. Select the Bluetooth device from this screen and tap OK. This screen
only appears the first time you connect to this Bluetooth device. Its
address is saved to the connection file. The next time you open the
connection, if this same device is within range, Pocket DriveExplorer
for Pocket PC will immediately connect.
The connection process then begins (Figure 3.8
).
Page 28
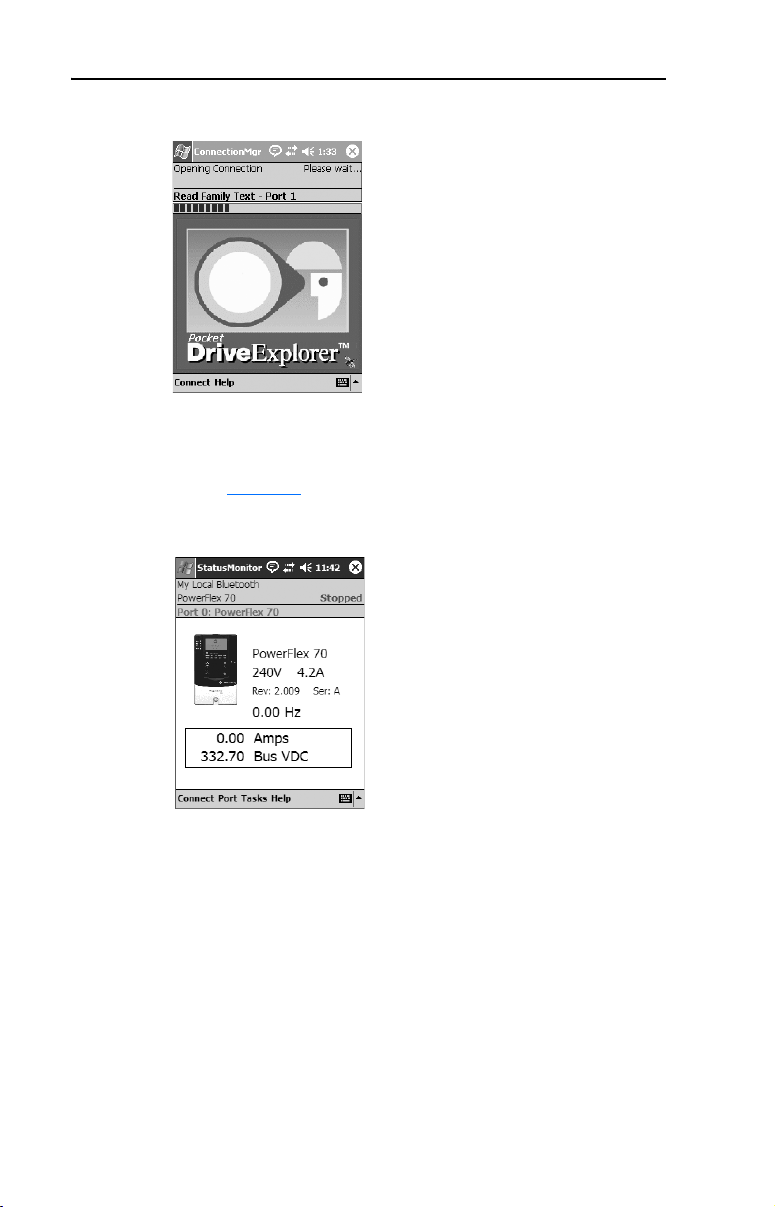
3-6 Configuring the WIM
Figure 3.8 Opening Connection Screen
9. The status bar will update and then when connection is complete, the
StatusMonitor application will launch and show the “StatusMonitor”
screen (Figure 3.9
Figure 3.9 Drive StatusMonitor Screen
) for the drive.
You can then select other devices from the Port menu, or other
functions from the Tasks menu.
10. If you will be routing to a remote networked device, you will need to
perform sub-steps A through D in this step. This requires that you
are able to connect to the Bluetooth card/module (cannot be done
offline) because Pocket DriveExplorer for Pocket PC must
interrogate the device and determine what kinds of network adapters
are present.
Page 29

Configuring the WIM 3-7
A. With the “Where is your destination?” screen (Figure 3.10)
displayed and “Remote” selected, tap Next -> to display the
“Bluetooth Browser” screen (Figure 3.11
Bluetooth devices. Select the device to which you want to
connect, and tap OK. Pocket DriveExplorer for Pocket PC will
connect to the Bluetooth device.
) that lists the detected
Figure 3.10 “Where is your
destination?” Screen
Figure 3.11 Bluetooth Browser
Screen
B. If the device has more than one network card, you will be
prompted to select one (Figure 3.12
not, Pocket DriveExplorer for Pocket PC will display a message
indicating that no network cards were found to support this
routing feature. Therefore, a “Local - point-to-point” connection
is required.
Figure 3.12 “More than one network card…” Screen
), and then tap Next ->. If
Page 30

3-8 Configuring the WIM
C. You will need to enter a name and address for the remote device
on its network (see Figure 3.13
or Figure 3.14).
Figure 3.13 DeviceNet and
D. Tap Next -> and return back to Step 6 on Page 3-4
Assigning a Name for the WIM (optional)
The WIM can be assigned a custom name (up to 16 alpha-numeric
characters) that represents its associated drive’s application function,
such as Pump 1 or Conveyor A. After successfully establishing a custom
WIM name, it replaces the default drive name (for example, PowerFlex
70 480V 5.0A) that appears in the “Searching for Bluetooth
Connections” screen and will now be recognized on the network.
ControlNet Remote
Configuration Address
Screen
Figure 3.14 EtherNet/IP
Remote
Configuration
Address Screen
to continue.
Page 31

Configuring the WIM 3-9
1. From the drive StatusMonitor screen (Figure 3.9), tap the Port menu
and select the drive port to which the WIM is connected. For this
example, Port 1 is selected (Figure 3.15
installed in the drive’s HIM cradle. The WIM StatusMonitor screen
(Figure 3.16
Figure 3.15 Port Selection Screen Figure 3.16 WIM StatusMonitor Screen
2. On the WIM StatusMonitor screen (Figure 3.16
the white area above the “20-WIM-Nx” catalog number to display
the User Text entry screen (Figure 3.17
desired name for the WIM (for example, Pump 1 shown in
Figure 3.18) and tap OK. The WIM StatusMonitor screen reappears
with the entered name.
) appears.
) because the WIM is
), tap the stylus on
). In the text box, enter the
Figure 3.17 User Text Entry Screen Figure 3.18 Pump 1 Screen
3. For the entered name to be recognized on the network, either reset
the WIM or power cycle the drive. Then re-establish wireless
communication between the WIM and Pocket PC.
Page 32

3-10 Configuring the WIM
Using DriveExplorer/DriveExplorer Lite
With DriveExplorer software running on a computer equipped with
Bluetooth wireless technology, you can edit parameters in the WIM,
connected drive, and any of the attached peripherals. DriveExplorer Lite,
a free, limited-feature version of DriveExplorer, can be downloaded
from http://www.ab.com/drives/driveexplorer
If you are unsure how to use DriveExplorer or DriveExplorer Lite, refer
to the online help (select Help > Help Topics).
ATTENTION: Risk of injury or death exists from machine motion
when using wireless communications and software to Start/Stop/Jog,
!
configure or otherwise communicate with a drive.
Using the control bar feature in DriveExplorer (version 2.01 or higher)
with wireless communications may present safety hazards due to
potential loss of the wireless connection. For example, if the wireless
connection is interrupted after a start or jog command is initiated from
the control bar, the drive cannot be stopped using the control bar until
the wireless connection is restored. For this reason, it is required to
always use an additional hard-wired stop circuit to disable the drive.
.
Establishing Wireless Communication Between the WIM and Computer
Bluetooth wireless technology enabled cards/modules installed in a
computer are typically provided with a software program to establish
communication with other wireless devices. The following example
procedure describes how to establish communication using the software
program “My Bluetooth Places” (version 1.4.2), which was included
with a specific brand Bluetooth wireless technology module. Different
versions of this software and different programs may differ in
appearance and procedures.
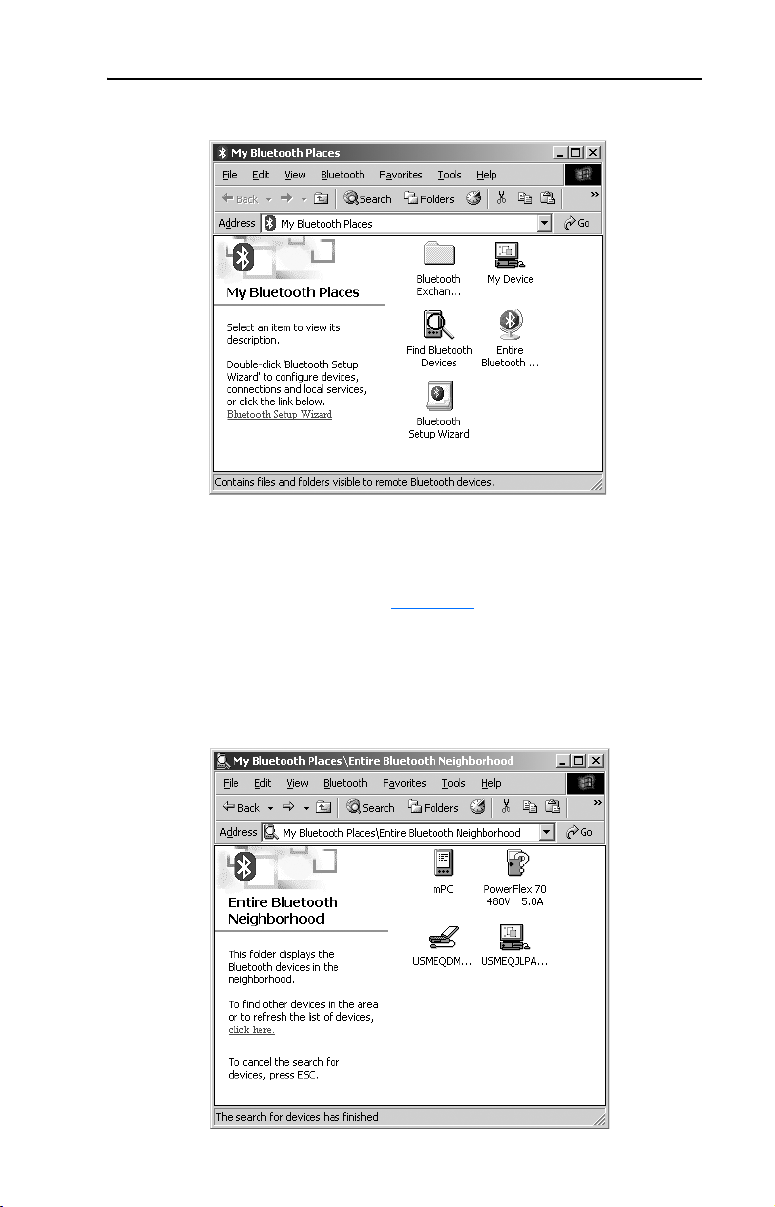
1. Launch the “My Bluetooth Places” program. The program window
(Figure 3.19
) will appear.
Page 33

Configuring the WIM 3-11
Figure 3.19 My Bluetooth Places Program Window
2. In the “My Bluetooth Places” program window, double-click the
“Find Bluetooth Devices” icon, which starts a search to find the
device to which you want to connect. The “Entire Bluetooth
Neighborhood” window (Figure 3.20
all Bluetooth wireless technology enabled devices detected by the
computer card or module that are within its reception range.
) appears, displaying icons of
Important: Wait for the search to complete before proceeding.
Figure 3.20 Entire Bluetooth Neighborhood Window
Page 34

3-12 Configuring the WIM
3. In the “Entire Bluetooth Neighborhood” window, double-click on the
device icon to which you want to establish wireless communication
(for this example, the “PowerFlex 70” icon). The “PowerFlex 70”
connection window (Figure 3.21
Figure 3.21 PowerFlex 70 Connection Window
) will appear.
4. In the “PowerFlex 70” connection window, double-click the “COM1
on PowerFlex…” icon to initiate the wireless communication
connection. A pop-up dialog box (Figure 3.22) appears, indicating
the specific COM port to use for the connection (COM8 for this
example). Click OK.
Important: Always note the COM port shown in the dialog box
because this same specific port must be selected in the
Figure 3.22 COM8 Dialog Box
DriveExplorer/DriveExplorer Lite Configure
Communication window (Step 6).
Page 35

Configuring the WIM 3-13
The “PowerFlex 70” connection window (Figure 3.23) re-appears,
but this time with the “COM1 on PowerFlex…” icon lit up in green,
indicating that a wireless communication connection now exists.
Figure 3.23 PowerFlex 70 Connection Window with Lit Green Icon
5. Launch DriveExplorer or DriveExplorer Lite to access parameters in
the WIM, connected drive, and any of the attached peripherals. Then
select Explore > Configure Communication. The Configure
Communication screen (Figure 3.24
Figure 3.24 DriveExplorer/DriveExplorer Lite Configure Communication
Screen
) will appear.
6. Select the same COM port established by the Bluetooth wireless
technology enabled computer (noted in Step 4). For this example,
COM8 is used. There is no need to set the baud rate or any other
settings. Then click OK.
Page 36
3-14 Configuring the WIM
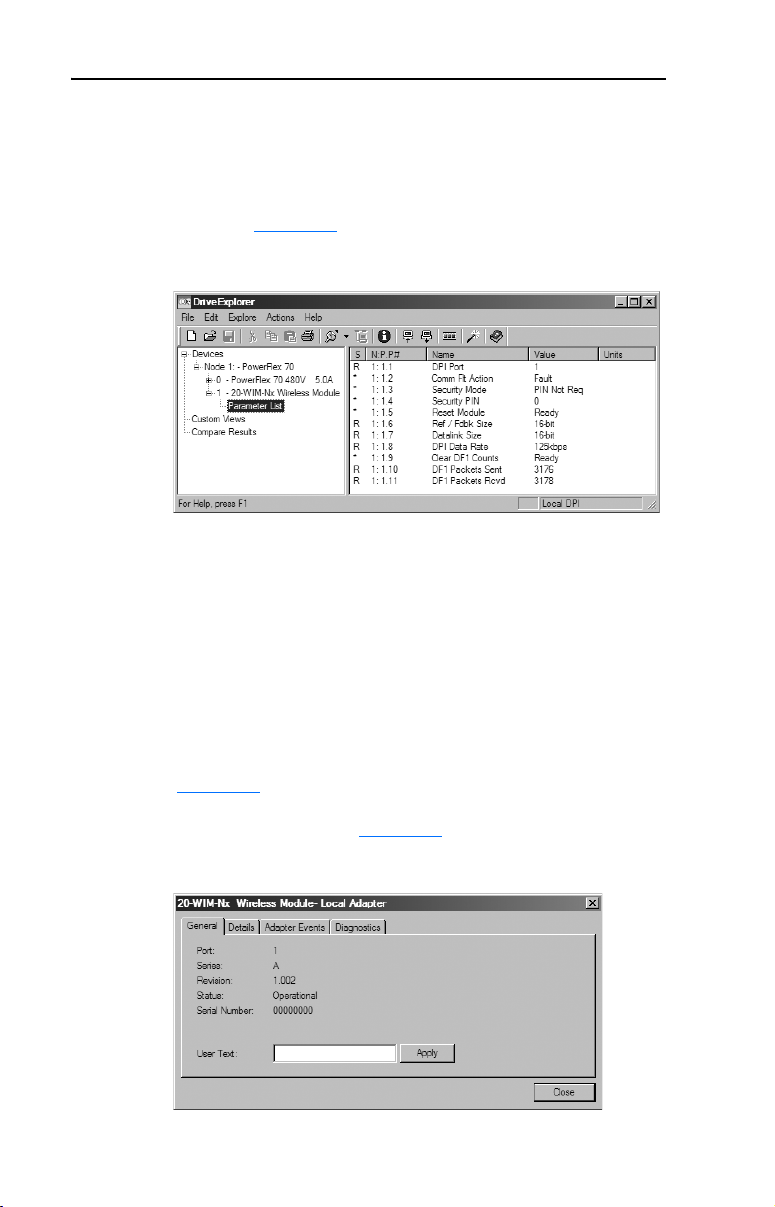
7. In the DriveExplorer or DriveExplorer Lite window, select Explore
> Connect > Serial Point-to-Point to display the DriveExplorer
menu tree window. In the left pane, click the + signs to expand the
tree. For this example, expand the “20-WIM-Nx Wireless Module”
and click on “Parameter List” to display the WIM parameters in the
right pane (Figure 3.25
Figure 3.25 DriveExplorer/DriveExplorer Lite Menu Tree Window
Assigning a Name for the WIM (optional)
The WIM can be assigned a custom name (up to 16 alpha-numeric
characters) that represents its associated drive’s application function,
such as Pump 1 or Conveyor A. After successfully establishing a custom
WIM name, it replaces the default drive name (for example, PowerFlex
70 480V 5.0A) that appears in the “Entire Bluetooth Neighborhood”
screen and will now be recognized on the network.
). Double-click a parameter to edit it.
1. With the DriveExplorer/DriveExplorer Lite Menu Tree window
(Figure 3.25
selected, select Explore > Device Properties… to display the
WIM’s properties screen (Figure 3.26
) displayed and the “20-WIM-Nx Wireless Module”
).
Figure 3.26 WIM Properties Screen
Page 37

Configuring the WIM 3-15
2. In the text box, enter the desired name (for example, Pump 1) and
click Apply. Then click Close to close the WIM properties screen.
TIP: When using DriveExplorer version 5.01 or higher, you can also
name the WIM with this alternate method:
A. With the DriveExplorer/DriveExplorer Lite Menu Tree window
(Figure 3.25
in the tree view to display the WIM Product Window (Figure 3.27) in
the right pane.
Figure 3.27 WIM Product Window
) displayed, select the “20-WIM-Nx Wireless Module”
B. Click the gray “20-WIM-Nx” title header in the WIM Product
Window to display a name entry text box. Enter the desired name
(for example, Pump 1) and click Apply.
3. For the entered name to be recognized on the network, either reset
the WIM or power cycle the drive. Then re-establish wireless
communication between the WIM and the desktop or laptop
computer.
Page 38

3-16 Configuring the WIM
Using DriveExecutive
With DriveExecutive software running on a computer equipped with
Bluetooth wireless technology, you can edit parameters in the WIM,
connected drive, and any of the attached peripherals.
If you are unsure how to use DriveExecutive, refer to the online help
(select Help > Help Topics).
ATTENTION: Risk of injury or death exists from machine motion
when using wireless communications and software to Start/Stop/Jog,
!
configure or otherwise communicate with a drive.
Using the control bar feature in DriveExecutive (version 4.01 or higher)
with wireless communications may present safety hazards due to
potential loss of the wireless connection. For example, if the wireless
connection is interrupted after a start or jog command is initiated from
the control bar, the drive cannot be stopped using the control bar until
the wireless connection is restored. For this reason, it is required to
always use an additional hard-wired stop circuit to disable the drive.
Establishing Wireless Communication Between the WIM and Computer
Bluetooth wireless technology enabled cards/modules installed in a
computer are typically provided with a software program to establish
communication with other wireless devices. The following example
procedure describes how to establish communication using the software
program “My Bluetooth Places” (version 1.4.2), which was included
with a specific brand Bluetooth wireless technology module. Different
versions of this software and different programs may differ in
appearance and procedures.
1. Launch the “My Bluetooth Places” program. The program window
(Figure 3.28
) will appear.
Page 39
Configuring the WIM 3-17
Figure 3.28 My Bluetooth Places Program Window
2. In the “My Bluetooth Places” program window, double-click the
“Find Bluetooth Devices” icon, which starts a search to find the
device to which you want to connect. The “Entire Bluetooth
Neighborhood” window (Figure 3.29
all Bluetooth wireless technology enabled devices detected by the
computer card or module that are within its reception range.
) appears, displaying icons of
Important: Wait for the search to complete before proceeding.
Figure 3.29 Entire Bluetooth Neighborhood Window
Page 40

3-18 Configuring the WIM
3. In the “Entire Bluetooth Neighborhood” window, double-click on the
device icon to which you want to establish wireless communication
(for this example, the “PowerFlex 70” icon). The “PowerFlex 70”
connection window (Figure 3.30
Figure 3.30 PowerFlex 70 Connection Window
) will appear.
4. In the “PowerFlex 70” connection window, double-click the “COM1
on PowerFlex…” icon to initiate the wireless communication
connection. A pop-up dialog box (Figure 3.31) appears, indicating
the specific COM port to use for the connection (COM8 for this
example). Click OK.
Important: Always note the COM port shown in the dialog box
because this same specific port must be selected in the
Figure 3.31 COM8 Dialog Box
RSLinx Configure RS-232 DF1 Devices window
(Step 6).
Page 41

Configuring the WIM 3-19
The “PowerFlex 70” connection window (Figure 3.32) re-appears,
but this time with the “COM1 on PowerFlex…” icon lit up in green,
indicating that a wireless communication connection now exists.
Figure 3.32 PowerFlex 70 Connection Window with Lit Green Icon
5. Launch RSLinx to create a driver to represent the connection on
COM8 (communication port assigned in Step 4 on Page 3-18
6. Select Communications > Configure Drivers… to display the
Configure Drivers screen. From the Available Driver Types
pull-down list, select “RS-232 DF1 devices” as shown in
Figure 3.33
Figure 3.33 Configure Drivers Screen
.
).
Page 42

3-20 Configuring the WIM
7. After the driver is selected, click the Add New… button. The Add
New RSLinx Driver screen will appear. Create a name for the new
driver or use the default name, and click OK.
8. The Configure RS-232 DF1 Devices window (Figure 3.34
Figure 3.34 Configure RS-232 DF1 Devices Window
Use the following settings:
Configuration Field Setting
Comm Port Select the same COM port established by the Bluetooth
Device 1770-KF2/1785-KE/SCANport
Baud Rate Any setting
Station Number 00
Parity None
Error Checking Any setting
Stop Bits 1
Protocol Full Duplex
wireless technology enabled computer (noted in Step 4). For
this example, COM8 is used.
) appears.
Then click OK.
9. The Configure Drivers window (Figure 3.35) will re-appear. Verify
that the status of the newly created driver is “Running.” Then click
Close.
Page 43

Configuring the WIM 3-21
Figure 3.35 Configure Drivers Window
10. Select Communications > RSWho to display the browse window.
Then expand the menu tree in the left pane to display the “DPI” icon
to verify that the driver is communicating with the device. The screen
should look similar to Figure 3.36
Figure 3.36 RSLinx Browse Window
.
Important: Due to RSLinx update times, allow enough browse time
to cycle through all nodes at least several times, or until
the node 1 icon appears.
11. Launch DriveExecutive to access parameters in the WIM, connected
drive, and any connected peripherals.
12. In the DriveExecutive window, select Drive > Connect to Drive…
to display the Connect to Drive menu tree window. Then expand the
menu tree in the left pane to display the “DPI” icon. The screen
should look similar to Figure 3.37
.
Page 44

3-22 Configuring the WIM
Figure 3.37 Connect to Drive Window
13. Then click OK. DriveExecutive will begin updating drive
information such as parameter names, diagnostics, etc. and store
them in a DriveExecutive directory established for this purpose.
14. In the left pane of the DriveExecutive menu tree window, click the +
signs to expand the tree. For this example, click on “20-WIM-Nx”
and click “Linear List” to display the WIM parameters in the right
pane (Figure 3.38
Value column pull-down menu.
Figure 3.38 DriveExecutive Menu Tree Window
). To edit a parameter, double-click it or use the
Page 45

Configuring the WIM 3-23
Assigning a Name for the WIM (optional)
The WIM can be assigned a custom name (up to 16 alpha-numeric
characters) that represents its associated drive’s application function,
such as Pump 1 or Conveyor A. After successfully establishing a custom
WIM name, it replaces the default drive name (for example, PowerFlex
70 480V 5.0A) that appears in the “Searching for Bluetooth
Connections” screen and will now be recognized on the network.
1. With the DriveExecutive Menu Tree window (Figure 3.38
and the “20-WIM-Nx” selected, select Peripheral > Properties… to
display the WIM’s Properties screen (Figure 3.39
Figure 3.39 WIM Properties Screen
) displayed
).
2. In the text box, enter the desired name (for example, Pump 1) and
click OK.
3. For the entered name to be recognized on the network, either reset
the WIM or power cycle the drive. Then re-establish wireless
communication between the WIM and the desktop or laptop
computer.
Page 46

3-24 Configuring the WIM
Setting the Fault Action
By default, when communications are disrupted (for example, loss of
wireless communication), the WIM and connected drive respond by
faulting. You can configure a different response to communication
disruptions using Parameter 02 - [Comm Flt Action] for DPI drives or
Parameter 04 - [Comm Flt Action] for SCANport drives.
ATTENTION: Risk of injury or equipment damage exists.
Parameter 02 - [Comm Flt Action] (or Parameter 04 - [Comm Flt
!
Action] for SCANport drives) lets you determine the action of the
WIM and connected drive if communications are disrupted. By default,
this parameter faults the drive. You can set this parameter so that the
drive continues to run. Precautions should be taken to ensure that the
setting of this parameter does not create a risk of injury or equipment
damage. When commissioning the drive, verify that your system
responds correctly to various situations (for example, disruption of
wireless communication).
To change the fault action
Set the value of Parameter 02 - [Comm Flt Action] (or Parameter 04 [Comm Flt Action] for SCANport drives) to the desired response:
Value Action Description
0 Fault The drive will fault.
1 Stop The drive will stop and not fault (DPI host products only).
2 Zero Data The drive is sent 0 for output data after a communications
3 Hold Last The drive continues in its present state after a communications
disruption. This does not command a stop.
disruption.
Changes to this parameter take effect immediately. A reset is not
required.
Page 47

Configuring the WIM 3-25
Enabling and Setting the Security Mode
The WIM has a security mode to prevent access to its configuration
settings. For DPI drives, you can enable the security mode using
Parameter 03 - [Security Mode], and set a desired PIN number using
Parameter 04 - [Security PIN]. For SCANport drives, use Parameters
02 - [Security Mode] and 03 - [Security PIN].
To enable the WIM security mode
1. Set Parameter 03 - [Security Mode] for DPI drives (or Parameter
02 - [Security Mode] for SCANport drives) to “PIN Required.”
Value Description
0 PIN Not Required (Default)
1 PIN Required
2. Reset the WIM (see Resetting the WIM
on page 3-26).
To set a PIN number
1. Set Parameter 04 - [Security PIN] for DPI drives (or Parameter 03
- [Security PIN] for SCANport drives) to a desired 4-digit number
(0000-9999). The default is “0000.”
For your convenience, please write down your assigned PIN number
and store it in a safe place:
PIN Number = ___ ___ ___ ___
2. Reset the WIM (see Resetting the WIM
on page 3-26).
To use the WIM when security mode is enabled
When establishing a wireless connection to the WIM for the first time,
entry of the PIN number will be requested. However, PIN number entry
will not be requested for any subsequent connection when using the
same device (Pocket PC, desktop computer or laptop computer). If you
do not secure your Pocket PC or computer against unauthorized use, the
WIM security feature will not provide its intended protection.
Page 48

3-26 Configuring the WIM
To reset a PIN number when misplaced or forgotten
If you misplaced or forgot the assigned PIN number, you will not be able
to connect to the WIM using drive software.
• DPI Drive – To reset the PIN number, you will first need to access
the WIM through a different DPI peripheral (for example, a
20-HIM). Using that peripheral, select Parameter 03 - [Security
Mode] and set it to “0” (PIN Not Required). Then select Parameter
04 - [Security PIN] to view the stored PIN number.
• SCANport Drive – Since a SCANport drive does not support
peripheral routing, you cannot access the WIM parameters using a
legacy HIM (for example, a 1201-H*). To reset the PIN number, you
will need to disconnect the WIM and reconnect it to a DPI drive.
This enables access to the WIM parameters to reset or disable the
PIN number. For additional assistance, contact Drives Technical
Support at the numbers listed on Page P-2
Resetting the WIM
Changes to some WIM parameters require that you reset the WIM before
the new settings take effect. You can reset the WIM by cycling power to
the drive or by using Parameter 05 - [Reset Module].
.
Set Parameter 05 - [Reset Module] to Reset Module.
Value Description
0 Ready (Default)
1 Reset Module
2 Set Defaults
After you enter 1 = Reset Module, the WIM will be immediately reset.
Important: This will break the wireless connection, so you will need to
re-establish the connection.
When you enter 2 = Set Defaults, the WIM will set all WIM parameters
to their factory-default settings. After performing a Set Defaults, enter
1 = Reset Module so that the new values take effect. The value of this
parameter will be restored to 0 = Ready after performing the reset or
setting the defaults.
Page 49

Chapter 4
Troubleshooting
Chapter 4 provides information to troubleshoot the WIM.
Topic Page
Understanding the Status Indicator
Viewing WIM Diagnostic Items 4-3
Viewing and Clearing Events 4-4
Viewing and Clearing DF1 Communication Statistics 4-6
Understanding the Status Indicator
The WIM reports its operating status using a status indicator
).
(Figure 4.1
Figure 4.1 Status Indications of the WIM
➊
4-1
Contains FCC ID: SNT-2XWIMNX
IC: 5450A-2XWIMNX
This device complies with Part 15 of the FCC rules.
Operation is subject to the following two conditions:
1) this device may not cause harmful interference, and
2) this device must accept any interference received,
including interference that may cause undesired operation
(NEMA 1 WIM shown)
Status Indications
Status Cause Corrective Action
Off WIM is not powered. • Securely place WIM in cradle or bezel,
or securely connect bezel or WIM cable
to the drive.
• Apply power to the drive.
Page 50

4-2 Troubleshooting
Status Cause Corrective Action
Flashing
Green
Flashing
Green/Red
Solid Blue WIM is communicating with
Solid Red Internal communication error.
Flashing
Red
WIM is communicating with
drive, but not transmitting or
receiving wireless signals.
WIM is in boot mode, or WIM
may have a corrupted flash
file.
drive, or is in process of flash
updating (drive, WIM or
connected peripheral).
WIM diagnostic and
initialization sequence did
not complete.
WIM is not communicating
with drive.
This is normal behavior for a WIM when it is
operational, but not communicating with a
wireless device.
Establish wireless communication with the
Bluetooth wireless technology enabled
Pocket PC or computer. For this procedure,
refer to the respective section in Chapter 3
that corresponds to the drive software tool
you are using:
• Using Pocket DriveExplorer for Pocket
PC on page 3-2
• Using DriveExplorer/DriveExplorer
Lite on page 3-10
• Using DriveExecutive on page 3-16.
Re-flash WIM firmware. If issue persists,
return WIM to factory for repair/
replacement.
No action required.
• Power cycle the drive.
• Check cables and their connections.
• If issue persists, return WIM to factory
for repair/replacement.
• Power cycle the drive.
• Check cables and their connections.
• If issue persists, return WIM to factory
for repair/replacement.
Page 51

Troubleshooting 4-3
Viewing WIM Diagnostic Items
WIM Diagnostic Items can be viewed with the following tools:
• For Pocket PCs, use Pocket DriveExplorer for Pocket PC software
(version 1.01 or higher).
• For laptop or desktop computers, use DriveExplorer software
(version 4.04 or higher), DriveExecutive software (version 3.01 or
higher).
• An LCD PowerFlex 7-Class HIM.
If you encounter unexpected communications problems, diagnostic
items can help you or Rockwell Automation personnel troubleshoot the
problem.
No. Name Description
1 Common Logic
Cmd
2 Prod Logic Cmd The present value of the Product Specific Logic Command being
3 Reference The present value of the Product Specific Reference being
4 Common Logic
Sts
5 Prod Logic Sts The present value of the Product Specific Logic Status being
6 Feedback The present value of the Product Specific Feedback being
7 DPI Rx Err Cntr The present value of the DPI CAN Receive Error Counter
8 DPI Rx Err Max The maximum value of the DPI CAN Receive Error Counter
9 DPI Tx Err Cntr The present value of the DPI CAN Transmit Error Counter
10 DPI Tx Err Max The maximum value of the DPI CAN Transmit Error Counter
11 Field Flash Cntr The present value of the Field Flash Counter.
The present value of the Common Logic Command being
transmitted to the drive by the WIM.
transmitted to the drive by the WIM.
transmitted to the drive by the WIM.
The present value of the Common Logic Status being received
from the drive by the WIM.
received from the drive by the WIM.
received from the drive by the WIM.
register.
register.
register.
register.
Page 52

4-4 Troubleshooting
Viewing and Clearing Events
The WIM maintains an event queue that reports the history of its actions.
You can view the event queue with the following tools:
• For Pocket PCs, use Pocket DriveExplorer for Pocket PC software
(version 1.01 or higher).
• For laptop or desktop computers, use DriveExplorer software
(version 4.04 or higher), DriveExecutive software (version 3.01 or
higher).
• An LCD PowerFlex 7-Class HIM.
To view the event queue
1. Access the event queue using a configuration tool.
2. Scroll through events in the event queue.
Events
Many events in the Event queue occur under normal operation. If you
encounter unexpected communications problems, the events may help
you or Allen-Bradley personnel troubleshoot the problem. The following
events may appear in the event queue:
DPI Product Event List
Event Description
Control Disabled The WIM has sent a “Soft Control Disable” command to the DPI drive.
Control Enabled The WIM has sent a “Soft Control Enable” command to the DPI drive.
DPI Bus Off Flt A bus-off condition was detected on DPI. This event may be caused by loose or
DPI Fault Clear The DPI drive has issued a fault clear message.
DPI Fault Msg The drive entered a faulted state.
Dup. Port Flt Another peripheral with the same port number is already in use.
EEPROM Sum Flt The EEPROM in the WIM is corrupt.
Host Sent Reset The DPI drive issued this event because it was reset.
Message Timeout The DPI drive did not respond to a message request. Verify the cables are
No Event Empty event queue entry.
Normal Startup WIM initially powered up or was reset.
Online @ 125kbps The WIM and DPI drive are communicating at 125kbps.
Online @ 500kbps The WIM and DPI drive are communicating at 500kbps.
broken cables or by noise.
correct.
Page 53

Troubleshooting 4-5
Event Description
PCCC I/O Time Flt The WIM has not received a PCCC Control message for longer than the
Ping in Message An unexpected ping was received.
Ping Time Flt A ping message was not received on DPI within the specified time.
Port Change Flt The DPI port changed.
Port ID Flt The WIM is not connected to a correct port on a DPI drive.
Type 0 Login The WIM has logged in for type 0 control.
Type 0 Time Flt The WIM has not received a type 0 status message within the specified time.
Event Description
Adapter Reset The WIM was reset or power cycled.
Clear SP Fault The SCANport product issued this because a fault was cleared in it.
Clear SP Warning The SCANport product issued this because a warning was cleared.
Empty Queue No event is in the queue.
Message Timeout The SCANport product did not respond to a message request. Verify the cables
No SCANport Ping The WIM issued this because no SCANport pings were detected within a 2
Pin ID Change The WIM issued this because the SCANport Pin ID was changed. This event is
SCANport Bus Off The WIM issued this because its SCANport CAN chip went bus off. This event
SCANport Fault The SCANport product issued this because it was faulted. See its fault queue.
SCANport Reset The SCANpor t product issued this because it was reset.
SCANport Warning The SCANport product issued this because it had a warning.
SP Pin ID = 7 The WIM issued this because its Pin ID has a value of 7. It should have a value
specified PCCC Control Time-out.
SCANport Product Event List
are correct.
second period. This event may be caused by a broken cable, a broken serial
converter or a malfunction in the SCANport product.
normal after a power cycle or reset.
may be caused by loose or broken cables, or by noise.
between 1 and 6. This event may be caused by a loose or broken cable.
To clear the event queue
1. Access the event queue using a configuration tool.
2. Set the value of 1 > Clr Event Queue to Enable, and then press
Enter to clear the event queue.
Page 54

4-6 Troubleshooting
Viewing and Clearing DF1 Communication Statistics
If you encounter unexpected communications problems or are creating
an application that uses DF1 data, you can view the communications
statistics in the WIM. For DPI drives, Parameters 10 - [DF1 Packets
Sent] and 11 - [DF1 Packets Rcvd] store this data. For SCANport
drives, Parameters 07 - [DF1 Packets Sent] and 08 - [DF1 Packets
Rcvd] store this data.
To view and clear DF1 data, you must access the main menu in the WIM
firmware.
To view DF1 data
1. Access the parameters in the WIM using a configuration tool.
2. Scroll through the DF1 Parameters 10 and 11 (or DF1 Parameters 07
and 08 for SCANport drives), which contain DF1 data. For a
description of each parameter, refer to Appendix B
Parameters.
To clear DF1 data
, WIM
1. Access the parameters in the WIM using a configuration tool.
2. Set the value of Parameter 09 - [Clear DF1 Counts] (or Parameter
06 - [Clear DF1 Counts] for SCANport drives) to “1 = Clear
Counts,” and then press Enter to clear the DF1 data.
Page 55

Specifications
Appendix A provides the specifications for the WIM.
Topic Page
Communications
Electrical A-1
Mechanical A-1
Environmental A-2
Regulatory Compliance A-2
Communications
Radio
Drive
Transceiver
Frequency
Power
Range
Protocol
Data Rates
National Semiconductor LMX9820A Bluetooth Serial Port
2.402 to 2.480 GHz Frequency Hopping
2.5mW Maximum RF Output
Class II – 10 m (32.8 ft.) anticipated* range
Drive Peripheral Interface (DPI)
125 kbps/500 kbps
A-1
Module, V1.1 Bluetooth Compliant Component
(*will vary due to environmental conditions)
Appendix A
Electrical
Consumption 130mA at +12V DC
The WIM draws the required power from the connected
product. An external power source is not required.
Mechanical
Dimensions
Height
Width
Depth
Weight 85g (3.0 oz.) 161g (5.7 oz.)
NEMA 1 WIM (20-WIM-N1) NEMA 4 WIM (20-WIM-N4S)
116.0 mm (4.57 in.) 180.0 mm (7.08 in.)
70.0 mm (2.75 in.) 93.0 mm (3.66 in.)
16.0 mm (0.63 in.) 25.0 mm (0.98 in.)
Page 56

A-2 Specifications
Environmental
Temperature
Operating
Storage
Relative Humidity 5 to 95% non-condensing
Atmosphere Important: The WIM must not be installed in an area where
Vibration
Operating
Non-Operating
Shock
Operating
Non-Operating
Regulatory Compliance
Certification Specification
UL
cUL
CE
CTick
FCC ID
IC
0 to 50° C (32 to 122° F)
-40 to 85° C (-40 to 185° F)
the ambient atmosphere contains volatile or corrosive gas,
vapors or dust. If the WIM is not going to be installed for a
period of time, it must be stored in an area where it will not be
exposed to a corrosive atmosphere.
2.5G @5Hz-2KHz
5 G @5Hz-2KHz
30 G peak acceleration, 11 (±1) ms pulse width
50 G peak acceleration, 11 (±1) ms pulse width
UL508C
CAN / CSA C22.2 No. 14-M91
EN50178 and EN61800-3
AS / NZS 2064, Group 1, Class A
SNT-2XWIMNX
5450A-2XWIMNX
NOTE: This is a product of category C2 according to IEC 61800-3. In a
domestic environment this product may cause radio interference in
which case supplementary mitigation measures may be required.
FCC Statement of Conditions
Compliance Statement (Part 15.19)
This device complies with Part 15 of the FCC rules. Operation is subject
to the following two conditions:
1. This device may not cause harmful interference, and
2. This device must accept any interference received, including
interference that may cause undesired operation.
Page 57

Specifications A-3
Warning (Part 15.21)
Changes or modifications not expressly approved by the party
responsible for compliance could void the user’s authority to operate this
equipment.
This device must not be co-located or operated in conjunction with any
other antenna or transmitter.
RF Exposure (OET Bulletin 65)
To comply with FCC RF exposure requirements for mobile transmitting
devices, this transmitter should only be used or installed at locations
where there is at least 20 cm (7.9 inches) separation distance between the
antenna and all persons.
Industry Canada Statement
The term “IC” before the certification/registration number only signifies
that the Industry Canada technical specifications were met.
Page 58

A-4 Specifications
Notes:
Page 59

Appendix B
WIM Parameters
Appendix B presents information about the WIM parameters.
Topic Page
About Parameter Numbers
Parameter List for DPI Products B-2
Parameter List for SCANport Products B-3
About Parameter Numbers
The parameters in the WIM are numbered consecutively. You can use the
following configuration tools to access the parameters in the WIM.
Configuration Tool Numbering Scheme
• Pocket DriveExplorer for Pocket PC
• DriveExplorer
• DriveExecutive
• HIM
B-1
The adapter parameters begin with parameter
01. For example, Parameter 01 - [DPI Port] is
parameter 01 as indicated by this manual.
Page 60

B-2 WIM Parameters
Parameter List for DPI Products
No. Name and Description Details
01 [DPI Port]
Displays the port on the drive to which the WIM is
connected.
02 [Comm Flt Action]
Sets the action that the WIM and drive will take if the
WIM detects that wireless communications are
disrupted. This setting is effective only if control I/O is
transmitted through the WIM.
ATTENTION: Risk of injur y or equipment damage exists. Parameter 02 -
[Comm Flt Action] lets you determine the action of the WIM and connected
drive if communications are disrupted. By default, this parameter faults the drive.
!
You can set this parameter so that the drive continues to run. Precautions
should be taken to ensure that the setting of this parameter does not create a
risk of injury or equipment damage. When commissioning the drive, verify that
your system responds correctly to various situations (for example, loss of
wireless communication).
Default: 0
Minimum: 0
Maximum: 7
Type: Read Only
Default: 0 = Fault
Values: 0 = Fault
Type: Read/Write
Reset Required: No
1 = Stop
2 = Zero Data
3 = Hold Last
03 [Security Mode]
Enables/disables the security mode for the WIM, which
prevents accessing its parameters and the connected
drive for configuration.
04 [Security PIN]
Sets the PIN number to access WIM parameters for
configuration when Parameter 03 - [Security Mode] is
set to 1 = PIN Required. See Page 3-25
05 [Reset Module]
No action if set to “Ready.” Resets the WIM if set to
“Reset Module.” Restores the WIM to its factory default
settings if set to “Set Defaults.” This parameter is a
command. It will be set to “0 = Ready” after the
command has been performed.
06 [Ref/Fdbk Size]
Displays the size of the Reference/Feedback. The drive
determines the size of the Reference/Feedback. The
WIM automatically uses the correct size.
07 [Datalink Size]
Displays the size of each Datalink word. The drive
determines the size of Datalinks.
08 [DPI Data Rate]
Displays the data rate used by the DPI drive. This data
rate is set in the drive, and the WIM autobauds to it.
ATTENTION: Risk of injur y or equipment damage exists.The drive will fault
when you remove or reset the WIM. Determine how the drive will respond before
removing or resetting the WIM.
!
for details.
Default: 0
Values: 0 = PIN Not Req’d
Type: Read/Write
Reset Required: Yes
Default: 0
Minimum: 0
Maximum: 9999
Type: Read/Write
Reset Required: Yes
Default: 0 = Ready
Values: 0 = Ready
Type: Read/Write
Reset Required: No
Default: 0 = 16-bit
Value: 0 = 16-bit
Type: Read Only
Default: 0 = 16-bit
Values: 0 = 16-bit
Type: Read Only
Default: 0
Values: 0 = 125 kbps
Type: Read Only
1 = PIN Required
1 = Reset Module
2 = Set Defaults
1 = 32-bit
1 = 32-bit
1 = 500 kbps
Page 61

No. Name and Description Details
09 [Clear DF1 Counts]
No action if set to “Ready.” Resets the DF1 statistical
parameters 10 and 11 to 0 if set to “1 = Clear Counts.”
This parameter is a command. It will be reset to
“0 = Ready” after a “Clear Counts” command has been
performed.
10 [DF1 Packets Sent]
Displays the number of DF1 packets sent by the WIM.
The value of this parameter is normally approximately
equal to the Parameter 11 - [DFI Packets Rcvd] value.
11 [DF1 Packets Rcvd]
Displays the number of DF1 packets received by the
WIM. The value of this parameter is normally
approximately equal to the Parameter 10 - [DFI
Packets Sent] value.
Default: 0 = Ready
Values: 0 = Ready
Type: Read/Write
Reset Required: No
Default: 0
Minimum: 0
Maximum: 4294967295
Type: Read Only
Default: 0
Minimum: 0
Maximum: 4294967295
Type: Read Only
Parameter List for SCANport Products
WIM Parameters B-3
1 = Clear Counts
No. Name and Description Details
01 [Adapter Port]
Displays the port on the drive to which the WIM is
connected.
02 [Security Mode]
Enables/disables the security mode for the WIM, which
prevents accessing its parameters and the connected
drive for configuration.
03 [Security PIN]
Sets the PIN number to access WIM parameters for
configuration when Parameter 03 - [Security Mode] is
set to 1 = PIN Required. See Page 3-25
04 [Comm Flt Action]
Sets the action that the WIM and drive will take if the
WIM detects that wireless communications are
disrupted. This setting is effective only if control I/O is
transmitted through the WIM.
Default: 0
Minimum: 0
Maximum: 7
Type: Read Only
Default: 0
Values: 0 = PIN Not Req’d
Type: Read/Write
Reset Required: Yes
Default: 0
Minimum: 0
for details.
ATTENTION: Risk of injur y or equipment damage exists. Parameter 04 -
[Comm Flt Action] lets you determine the action of the WIM and connected
drive if communications are disrupted. By default, this parameter faults the drive.
!
You can set this parameter so that the drive continues to run. Precautions
should be taken to ensure that the setting of this parameter does not create a
risk of injury or equipment damage. When commissioning the drive, verify that
your system responds correctly to various situations (for example, loss of
wireless communication).
Maximum: 9999
Type: Read/Write
Reset Required: Yes
Default: 0 = Fault
Values: 0 = Fault
Type: Read/Write
Reset Required: No
1 = PIN Required
1 = Stop
2 = Zero Data
3 = Hold Last
Page 62

B-4 WIM Parameters
No. Name and Description Details
05 [Reset Module]
No action if set to “Ready.” Resets the WIM if set to
“Reset Module.” Restores the WIM to its factory default
settings if set to “Set Defaults.” This parameter is a
command. It will be set to “0 = Ready” after the
command has been performed.
ATTENTION: Risk of injur y or equipment damage exists.The drive will fault
when you remove or reset the WIM. Determine how the drive will respond before
removing or resetting the WIM.
!
Default: 0 = Ready
Values: 0 = Ready
Type: Read/Write
Reset Required: No
1 = Reset Module
2 = Set Defaults
06 [Clear DF1 Counts]
No action if set to “Ready.” Resets the DF1 statistical
parameters 10 and 11 to 0 if set to “1 = Clear Counts.”
This parameter is a command. It will be reset to
“0 = Ready” after a “Clear Counts” command has been
performed.
07 [DF1 Packets Sent]
Displays the number of DF1 packets sent by the WIM.
The value of this parameter is normally approximately
equal to the Parameter 11 - [DFI Packets Rcvd] value.
08 [DF1 Packets Rcvd]
Displays the number of DF1 packets received by the
WIM. The value of this parameter is normally
approximately equal to the Parameter 10 - [DFI
Packets Sent] value.
Default: 0 = Ready
Values: 0 = Ready
Type: Read/Write
Reset Required: No
Default: 0
Minimum: 0
Maximum: 4294967295
Type: Read Only
Default: 0
Minimum: 0
Maximum: 4294967295
Type: Read Only
1 = Clear Counts
Page 63

Appendix C
Wireless Flash Updating DPI Devices
Appendix C provides information about using the WIM with compatible
Allen-Bradley software tools through wireless communication to flash
update itself and other DPI devices, such as PowerFlex 7-Class drives
and communication adapters, to take full advantage of new firmware
features as they become available.
Important: Using a hard-wired cable connection is the preferred
method to flash update a device. However, if the application
circumstances dictate that a flash update using wireless
communication is necessary, then follow the procedure for
the respective software tool in this appendix.
Topic Page
Using Pocket DriveExplorer for Pocket PC
Using DriveExplorer/DriveExplorer Lite C-7
Using DriveExecutive C-12
C-1
Using Pocket DriveExplorer for Pocket PC
This wireless flash update procedure uses a PowerFlex 70 drive as the
example device being flashed. When flashing other DPI devices, screens
associated with that device will be different than those shown in this
procedure.
1. Visit the following Allen-Bradley web site to obtain the appropriate
firmware update for the device:
http://www.ab.com/support/abdrives/webupdate/
At this web site, click on the device to access all of its firmware
updates. Then select Firmware Updates > Application Firmware
Updates (or vx.xxx Flash Kit) > vx.xxx Flash Kit.
2. Click on the appropriate flash kit version to open the File Download
screen (Figure C.1
).
Page 64

C-2 Wireless Flash Updating DPI Devices
Figure C.1 File Download Screen
Important: The Pocket PC must be docked with the desktop or
laptop computer during the synchronization process.
Click Open to launch the firmware installation tool. Then click
Next > to launch the ControlFLASH wizard to install the device’s
firmware update on the desktop or laptop computer. Follow the
instructions on the ControlFLASH wizard screens.
Important: In the last screen, the ControlFLASH Setup Complete
screen (Figure C.2
Finish.
Figure C.2 ControlFLASH Setup Complete Screen
), uncheck both boxes and click
Page 65

Wireless Flash Updating DPI Devices C-3
3. With the PDE Flash File Xfer (Transfer) Utility installed on your
desktop or laptop PC, launch this program (Figure C.3
Figure C.3 Flash File Transfer Utility Screen
).
4. In the Select Available Product window (Figure C.4), select the
product to list available updates on the desktop or laptop PC (for this
example, PowerFlex 70). In the Select Available Update window,
select the firmware version to be transferred to the Pocket PC for
flash updating (for this example, 2.007.123).
Figure C.4 Flash File Firmware Version Screen
Then click Tra ns fer. Click OK after the files were successfully
transferred. Then click Exit to close the utility program.
Page 66

C-4 Wireless Flash Updating DPI Devices
5. Establish wireless communication between the WIM and Pocket PC.
For this procedure, refer to Using Pocket DriveExplorer for Pocket
PCn page 3-2.
6. With the StatusMonitor screen (Figure C.5) for the drive displayed,
select Tasks > Flash Update to open the DeviceFlash screen
(Figure C.6
Figure C.5 Drive StatusMonitor Screen Figure C.6 DeviceFlash Screen
).
7. In the Available Updates list, select the appropriate firmware version
(for this example, 2.007.123). Then tap Next to continue. The flash
update warning screen (Figure C.7) appears.
Figure C.7 DeviceFlash Update Warning Screen
Page 67

Wireless Flash Updating DPI Devices C-5
8. Ta p Flash to start the flash update (Figure C.8). When the flash
update is complete, Pocket DriveExplorer for Pocket PC will reset
the device (Figure C.9
).
Figure C.8 Flash Update Progress
Note: The WIM status indicator changes from solid blue to flashing
red, and then to flashing green after the reset process is complete.
9. Ta p Close to exit the flash update process (Figure C.10
Figure C.10 DeviceFlash Completed Screen
Screen
Figure C.9 Device Reset Screen
).
The WIM status indicator changes from flashing green to solid blue,
and the StatusMonitor screen will reappear.
Page 68

C-6 Wireless Flash Updating DPI Devices
10. From the StatusMonitor screen, select Tasks > Device Properties
(Figure C.11
(communication adapter or WIM) was flash updated, select Port >
and then the appropriate port number (for example, Port 1) to show
information for that device.
Figure C.11 StatusMonitor Task Menu Screen
11. With the DeviceProperties screen (Figure C.12) displayed, verify
that the Product Revision number matches the firmware version that
was flashed to the device.
Figure C.12 DeviceProperties Screen
) to display drive information. If a peripheral device
Page 69

Wireless Flash Updating DPI Devices C-7
Using DriveExplorer/DriveExplorer Lite
This wireless flash update procedure uses a PowerFlex 70 drive as the
example device being flashed. When flashing other DPI devices, screens
associated with that device will be different than those shown in this
procedure.
1. Visit the following Allen-Bradley web site to obtain the appropriate
firmware update for the device:
http://www.ab.com/support/abdrives/webupdate/
At this web site, click on the device to access all of its firmware
updates. Then select Firmware Updates > Application Firmware
Updates (or vx.xxx Flash Kit) > vx.xxx Flash Kit.
2. Click on the appropriate flash kit version to open the File Download
screen (Figure C.13
Figure C.13 File Download Screen
).
Click Open to launch the firmware installation tool. Then click
Next > to launch the ControlFLASH wizard to install the device’s
firmware update on the desktop or laptop computer. Follow the
instructions on the ControlFLASH wizard screens.
Important: In the last screen, the ControlFLASH Setup Complete
screen (Figure C.14
Finish.
), uncheck both boxes and click
Page 70

C-8 Wireless Flash Updating DPI Devices
Figure C.14 ControlFLASH Setup Complete Screen
3. Establish wireless communication between the WIM and the desktop
or laptop computer. For this procedure, refer to Using DriveExplorer/
DriveExplorer Liten page 3-10.
4. With the DriveExplorer linear list screen (Figure C.15
click on the device to be flash updated (for this example, a
PowerFlex 70 drive).
Figure C.15 DriveExplorer Linear List Screen
) displayed,
5. Select Explore > Device Properties… to display the device’s
information screen. Then click the Details tab to show a screen
(Figure C.16
) with the device’s firmware revision information.
Page 71

Wireless Flash Updating DPI Devices C-9
Figure C.16 Details Tab Screen
6. In the Details tab screen, click the Flash Update… button to open
the Select Flash Update screen (Figure C.17).
Figure C.17 Select Flash Update Screen
In the Available Flash Updates window on this screen, select the
appropriate firmware version from the list (for this example,
2.007.123). Then click Next > to continue. The Confirm Flash
Update warning screen (Figure C.18
) appears.
Page 72

C-10 Wireless Flash Updating DPI Devices
Figure C.18 Confirm Flash Update Warning Screen
7. Click FLASH to start the flash update (Figure C.19).
Figure C.19 Executing Flash Update Progress Screen
Note: Near the end of the flash update process, the WIM status
indicator changes from solid blue to flashing red, and then to
flashing green.
8. When the flash update is completed, the message window in the
Executing Flash Update screen changes to indicate that flash update
was completed (Figure C.20
).
Page 73

Wireless Flash Updating DPI Devices C-11
Figure C.20 Executing Flash Update Completed Screen
Click Close to exit the Flash Update Completed screen. The Device
Firmware Changed dialog box (Figure C.21
Figure C.21 Device Firmware Changed Dialog Box
) will appear.
9. Depending on the device being flash updated, do one of the following:
– When flashing a drive or peripheral (not the WIM), click Ye s .
DriveExplorer will re-establish the wireless connection to the
device. Then power cycle the drive to initialize the device with
the WIM.
– When flashing the WIM, click No. The wireless connection to
the WIM breaks after the flash update, requiring a manual
reconnection. Use the Bluetooth Manager to re-establish the
wireless connection to the WIM. After wireless communication
is re-established, DriveExplorer will automatically reconnect to
the WIM.
10. With the DriveExplorer linear list screen (Figure C.15
select the device (for this example, a PowerFlex 70 drive). Then
select Explore > Device Properties… to verify that the Revision
number shown on the General tab screen matches the firmware
version flashed into the device.
) displayed,
Page 74

C-12 Wireless Flash Updating DPI Devices
Using DriveExecutive
This wireless flash update procedure uses a PowerFlex 70 drive as the
example device being flashed. When flashing other DPI devices, screens
associated with that device will be different than those shown in this
procedure.
1. Visit the following Allen-Bradley web site to obtain the appropriate
firmware update for the device:
http://www.ab.com/support/abdrives/webupdate/
At this web site, click on the device to access all of its firmware
updates. Then select Firmware Updates > Application Firmware
Updates (or vx.xxx Flash Kit) > vx.xxx Flash Kit.
2. Click on the appropriate flash kit version to open the File Download
screen (Figure C.22
Figure C.22 File Download Screen
).
Click Open to launch the firmware installation tool. Then click
Next > to launch the ControlFLASH wizard to install the device’s
firmware update on the desktop or laptop computer. Follow the
instructions on the ControlFLASH wizard screens.
Important: In the last screen, the ControlFLASH Setup Complete
screen (Figure C.23
Finish.
), uncheck both boxes and click
Page 75

Wireless Flash Updating DPI Devices C-13
Figure C.23 ControlFLASH Setup Complete Screen
3. Establish wireless communication between the WIM and the desktop
or laptop computer. For this procedure, refer to Using
DriveExecutiven page 3-16.
4. With the DriveExecutive linear list screen (Figure C.24) displayed,
right-click on the device to be flash updated (for this example, a
PowerFlex 70 drive).
Figure C.24 DriveExecutive Linear List Screen
5. Select Properties… to display the device’s general information
screen. Then click the Component Details tab to show its related
screen (Figure C.25
).
Page 76

C-14 Wireless Flash Updating DPI Devices
Figure C.25 Component Details Tab Screen
6. In the Component Details tab screen, click the Flash Update button
to open the Select Device to Update screen (Figure C.26), which
shows the device’s firmware revision information.
Figure C.26 Select Device to Update Screen
Click on the device to be flashed (for this example, a PowerFlex 70
drive), and then click Next > to continue. The Select Flash Update
screen (Figure C.27
) appears.
Page 77

Wireless Flash Updating DPI Devices C-15
Figure C.27 Select Flash Update Screen
7. Select the desired firmware version from the Available Flash
Updates list (for this example, 2.007.123). Then click Next > to
continue. The Confirm Flash Update warning screen (Figure C.28
appears.
Figure C.28 Confirm Flash Update Warning Screen
)
8. Click FLASH to start the flash update. The Executing Flash Update
screen (Figure C.29) appears.
Page 78

C-16 Wireless Flash Updating DPI Devices
Figure C.29 Executing Flash Update Progress Screen
Note: Near the end of the flash update process, the WIM status
indicator changes from solid blue to flashing red, and then to
flashing green.
9. When the flash update is completed, the message window in the
Executing Flash Update screen changes to indicate that flash update
was completed (Figure C.30
Figure C.30 Executing Flash Update Completed Screen
).
Click Close to exit the Flash Update Completed screen. The Select
Device to Update screen (Figure C.26) reappears along with the
Windows in-process icon (typically, the hourglass icon). When
flashing a drive or peripheral, wait for this icon to disappear
(approximately 30 seconds). When flashing the WIM, the icon
remains displayed until after the wireless connection is
re-established (Step 11).
Page 79

Wireless Flash Updating DPI Devices C-17
10. Power cycle the drive to initialize the device with the WIM.
11. Use the Bluetooth Manager to re-establish the wireless connection to
the device.
12. On the Select Device to Update screen, verify that the Revision
number shown now matches the firmware version flashed into the
device.
13. Click Cancel to close the Select Device to Update screen. Then click
Cancel again to close the device’s general information screen. The
DriveExecutive online window is now ready for use.
Page 80

C-18 Wireless Flash Updating DPI Devices
Notes:
Page 81

A Application Code
Code that runs in the WIM after the boot code calls it. It performs the
normal operations of the system.
B BCC (Block Check Character)
An error detection scheme where the 2’s complement of the 8-bit sum
(modulo-256 arithmetic sum) of all data bytes in a transmission block. It
provides a means of checking the accuracy of each message
transmission.
Bluetooth Wireless Technology
Bluetooth wireless technology enables cable-free connection of devices
that would normally be physically linked by wires, such as a drive
connected to a computer.
Boot Code
Code that runs when the WIM first receives power. It checks basic
operations and then calls the application code.
Bus Off
A bus off condition occurs when an abnormal rate of errors is detected on
the Control Area Network (CAN) bus in a device. The bus-off device
cannot receive or transmit messages. This condition is often caused by
corruption of the network data signals due to noise or data rate mismatch.
Glossary
C CAN (Controller Area Network)
A CAN is a serial bus protocol on which DPI is based.
ControlFLASH
ControlFLASH is an Allen-Bradley software tool that lets users
electronically update firmware on printed circuit boards. The tool takes
advantage of the growing use of flash memory (electronic erasable
chips) across industrial control products.
CRC (Cyclic Redundancy Check)
An error detection scheme where all of the characters in a message are
treated as a string of bits representing a binary number. This number is
divided by a predetermined binary number (a polynomial) and the
remainder is appended to the message as a CRC character. A similar
operation occurs at the receiving end to prove transmission integrity.
Page 82

Glossary-2
D DF1 Protocol
A peer-to-peer link layer protocol that combines features of ANSI
X3.28-1976 specification subcategories D1 (data transparency) and F1
(two-way simultaneous transmission with embedded responses).
DF1 Rate
A unit of signaling speed equal to the number of discrete conditions or
signal events per second. It is also called “baud rate” or “serial port rate.”
DPI (Drive Peripheral Interface)
DPI is a second generation peripheral communication interface used by
various Allen-Bradley drives and power products, such as PowerFlex 70
and PowerFlex 700 drives. It is a functional enhancement to SCANport.
DPI Peripheral
A device that provides an interface between DPI and a network or user.
Peripheral devices are also referred to as “adapters” or “modules.” The
WIM and PowerFlex 7-Class HIMs (20-HIM-xxx) are examples of DPI
peripherals.
DPI Product
A device that uses the DPI communications interface to communicate
with one or more peripheral devices. For example, a motor drive such as
a PowerFlex 7-Class drive is a DPI product. In this manual, a DPI
product is also referred to as “drive” or “host.”
DriveExplorer Software
DriveExplorer software is a tool for monitoring and configuring
Allen-Bradley products and adapters. It can be run on computers running
various Microsoft Windows operating systems. DriveExplorer (version
3.xx or higher) can be used to configure the WIM and PowerFlex drives.
Information about DriveExplorer and a free Lite version can be accessed
at http://www.ab.com/drives/driveexplorer
DriveTools SP Software
A software suite designed for running on various Microsoft Windows
operating systems. This software suite provides a family of tools,
including DriveExecutive, that can be used to program, monitor, control,
troubleshoot, and maintain Allen-Bradley products. DriveTools SP
(version 1.01 or higher) can be used with PowerFlex drives. Information
about DriveTools SP can be accessed at http://www.ab.com/drives/
drivetools.
.
Page 83

E EDS (Electronic Data Sheet) Files
EDS files are simple text files that are used by network configuration
tools such as RSNetWorx for DeviceNet to describe products so that you
can easily commission them on a network. EDS files describe a product
device type, revision, and configurable parameters. EDS files for many
Allen-Bradley products can be found at http://www.ab.com/networks/
eds.
F Flash Update
The process of updating firmware in a device. The WIM can be flash
updated using the Allen-Bradley software tool ControlFLASH in
combination with an Allen-Bradley drive-configuration software tool,
such as Pocket DriveExplorer for Pocket PC, DriveExplorer or
DriveExecutive.
H HIM (Human Interface Module)
A device that can be used to configure and control a SCANport or DPI
drive. PowerFlex 7-Class HIMs (20-HIM-xxx) can also be used to
configure connected peripherals such as the WIM.
Hold Last
When communications are disrupted (for example, a cable is
disconnected), the WIM and PowerFlex drive can respond by holding
last. Hold last results in the drive receiving the last data received via the
DF1 connection before the disruption. If the drive was running and using
the Reference from the module, it will continue to run at the same
Reference.
Glossary-3
N NVS (Non-Volatile Storage)
NVS is the permanent memory of a device. Devices such as the WIM
and drive store parameters and other information in NVS so that they are
not lost when the device loses power. NVS is sometimes called
“EEPROM.”
P PCCC (Programmable Controller Communications Commands)
PCCC is the protocol used by some controllers to communicate with
devices on a network. Some software products (for example,
DriveExplorer and DriveExecutive) also use PCCC to communicate.
Ping
A ping is a message that is sent by a SCANport or DPI product to its
peripheral devices. They use the ping to gather data about the product,
Page 84

Glossary-4
including whether it can receive messages and whether they can log in
for control.
Pocket DriveExplorer for Pocket PC Software
Pocket DriveExplorer for Pocket PC software is a Pocket PC tool for
monitoring and configuring Allen-Bradley products and adapters. It can
be run on a Pocket PC running Microsoft Windows Mobile 2003 (or
higher) operating system. Pocket DriveExplorer for Pocket PC (version
1.xx or higher) can be used to configure the WIM and PowerFlex drives.
Information about Pocket DriveExplorer for Pocket PC can be accessed
at http://www.ab.com/drives/driveexplorer
PowerFlex 7-Class (Architecture Class) Drives
The Allen-Bradley PowerFlex 7-Class family of AC drives includes
PowerFlex 70, PowerFlex 700, PowerFlex 700H, PowerFlex 700S, and
PowerFlex 7000. These drives can be used for applications ranging from
0.37 kW (0.5 HP) to 3,000 kW (4,000 HP).
S SCANport
SCANport is a standard peripheral communication interface used by
various Allen-Bradley drives and power products, such as 1305 and 1336
PLUS II drives.
.
SCANport Peripheral
A device that provides an interface between SCANport and a network or
user. Peripheral devices are also referred to as “modules” and “adapters.”
The 1203-SSS serial converter and legacy drive HIMs (1201-H*) are
examples of SCANport peripherals.
SCANport Product
A device that uses the SCANport communications interface to
communicate with one or more peripheral devices. For example, a motor
drive such as a 1336 PLUS II drive is a SCANport product.
Status Indicator
A status indicator is an LED that is used to report the status of a device.
The WIM has one status indicator that emits blue, green, or red
indications.
T Type 0/Type 1/Type 2 Control
When transmitting I/O, an Allen-Bradley communications adapter can
use different types of messages for control. The Type 0, Type 1, and
Page 85

Type 2 events help Allen-Bradley personnel identify the type of
messages that an adapter is using.
W WIM (Wireless Interface Module)
The WIM provides a wireless communications interface between any
Allen-Bradley DPI drive and a computer or Pocket PC with an RS-232
port. The WIM uses a full-duplex DF1 protocol. The WIM may also be
referred to as “20-WIM-N*,” “DPI peripheral,” or “module.”
Z Zero Data
When communications are disrupted (for example, a cable is
disconnected), the module and drive can respond with zero data. Zero
data results in the drive receiving zero as values for Logic Command,
Reference, and Datalink data. If the drive was running and using the
Reference from the module, it will stay running but at zero Reference.
Glossary-5
Page 86

Glossary-6
Notes:
Page 87

Index
A
accessing parameters, 3-1
Adapter Port parameter (only for
SCANport products), B-3
application code, G-1
assigning name for WIM (optional)
using DriveExecutive, 3-23
using DriveExplorer, 3-14
using Pocket DriveExplorer for
Pocket PC, 3-8
attentions, 1-4
B
baud rate, see DF1 rate
BCC (Block Check Character), G-1
Bluetooth wireless technology, G-1
boot code, G-1
bus off, G-1
C
CAN (Controller Area Network), G-1
Clear DF1 Counts parameter
for DPI products, B-3
for SCANport products, B-4
clearing DF1 data, 4-6
clearing events, 4-5
Comm Flt Action parameter
for DPI products, B-2
for SCANport products, B-3
communications specifications, A-1
compatible products, 1-2, 1-3
components, 1-1
configuration tools for parameters,
3-1
ControlFLASH, G-1
CRC (Cyclic Redundancy Check),
G-1
D
Datalink Size parameter (only for DPI
products), B-2
DF1 Packets Rcvd parameter
for DPI products, B-3
for SCANport products, B-4
DF1 Packets Sent parameter
for DPI products, B-3
for SCANport products, B-4
DF1 protocol, G-2
DF1 rate, G-2
diagnostic items, 4-3
dimensions, A-1
DPI
compatible products, 1-2
definition, G-2
peripheral definition, G-2
product definition, G-2
DPI Data Rate parameter (only for
DPI products), B-2
DPI Port parameter (only for DPI
products), B-2
DriveExecutive
using to establish wireless
connection, 3-16
web site, see DriveTools SP
DriveExplorer
definition, G-2
free Lite version, G-2
using to establish wireless
connection, 3-10, 3-16
web site, G-2
drives, see DPI products
Page 88

Index-2
DriveTools SP
definition, G-2
web site, G-2
E
EDS (Electronic Data Sheet) Files
definition, G-3
web site, G-3
EEPROM, see Non-Volatile Storage
(NVS)
equipment
required, 1-3
supplied, 1-3
event queue
clearing events, 4-5
list of events
for DPI products, 4-4
for SCANport products, 4-5
viewing events, 4-4
F
fault action, 3-24
fault queue, see event queue
firmware
parameters in, 3-1
release, P-3
flash update, G-3
flash updating DPI devices wirelessly
using DriveExecutive, C-12
using DriveExplorer, C-7
using Pocket DriveExplorer for
Pocket PC, C-1
H
HIM (Human Interface Module), G-3
hold last
definition, G-3
setting, 3-24
I
installing the WIM
NEMA 1, 2-1
NEMA 4, 2-3
L
LED, see status indicator
M
manual
conventions, P-3
related documentation, P-1
web site, P-1
mechanical specifications, A-1
N
naming the WIM (optional)
using DriveExecutive, 3-23
using DriveExplorer, 3-14
using Pocket DriveExplorer for
Pocket PC, 3-8
Non-Volatile Storage (NVS), G-3
P
parameters
accessing, 3-1
configuration tools for, 3-1
convention, P-3
list
for DPI products, B-2–B-3
for SCANport products, B-3–
B-4
numbers of, B-1
PCCC (Programmable Controller
Communications
Commands), G-3
ping, G-3
Page 89

Index-3
Pocket DriveExplorer for Pocket PC
definition, G-4
using to establish wireless
connection, 3-2
web site, G-4
power consumption, A-1
power cycle, 3-26
PowerFlex drives, G-4
products, see DPI products
Q
quick start, 1-5
R
radio
frequency, A-1
power, A-1
range, A-1
transceiver, A-1
Ref/Fdbk Size parameter (only for
DPI products), B-2
regulatory compliance, A-2
related documentation, P-1
removing the WIM, 2-5
Reset Module parameter (only for DPI
products), B-2
Reset Module parameter (only for
SCANport products), B-4
resetting the WIM, 3-26
RSLinx, P-1
S
safety precautions, 1-4
SCANport
compatible products, 1-3
definition, G-4
peripheral definition, G-4
product definition, G-4
Security Mode parameter
for DPI products, B-2
for SCANport products, B-3
Security PIN parameter
for DPI products, B-2
for SCANport products, B-3
serial port rate, see DF1 rate
specifications, A-1
status indicator
definition, G-4
locating, 1-6
troubleshooting with, 4-1
understanding, 4-1
T
technical support, P-2
tools, see equipment
troubleshooting, 4-1
U
update, see flash update
V
viewing
DF1 data, 4-6
diagnostic items, 4-3
W
web site
DriveExecutive, G-2
DriveExplorer, G-2
DriveTools SP, G-2
Pocket DriveExplorer for Pocket
PC, G-4
technical manuals/
documentation, P-1
Page 90

Index-4
WIM
assigning a name (optional)
using DriveExecutive, 3-23
using DriveExplorer, 3-14
using Pocket DriveExplorer for
Pocket PC, 3-8
components, 1-1
configuration tools for parameters,
3-1
diagnostic items, 4-3
event queue, 4-4
features, 1-2
illustration, 1-1
installing, 2-1, 2-3
parameters
for DPI products, B-2–B-3
for SCANport products, B-3–
B-4
removing, 2-5
resetting, 3-26
wireless flash updating DPI devices
using DriveExecutive, C-12
using DriveExplorer, C-7
using Pocket DriveExplorer for
Pocket PC, C-1
Z
zero data
definition, G-5
setting, 3-24
Page 91

Page 92

A
A
U.S. Allen-Bradley Drives Technical Support
Tel: (1) 262.512.8176, Fax: (1) 262.512.2222, Email: support@drives.ra.rockwell.com, Online: www.ab.com/support/abdrives
www.rockwellautomation.com
Power, Control and Information Solutions Headquarters
mericas: Rockwell Automation, 1201 South Second Street, Milwaukee, WI 53204-2496 USA, Tel: (1) 414.382.2000, Fax: (1) 414.382.4444
Europe/Middle East/Africa: Rockwell Automation, Vor stlaan/Boulevard du Souverain 36, 1170 Brussels, Belgium, Tel: (32) 2 663 0600, Fax: (32) 2 663 0640
sia Pacific: Rockwell Automation, Level 14, Core F, Cyberport 3, 100 Cyberpor t Road, Hong Kong, Tel: (852) 2887 4788, Fax: (852) 2508 1846
Publication 20WIM-UM001C-EN-P – October, 2006 P/N 353368-P03
Supersedes 20WIM-UM001B-EN-P July, 2005 Copyright © 2006 Rockwell Automation, Inc. All rights reserved. Printed in USA.
 Loading...