

Page 1
Installation Instructions
Replacing or Upgrading
Replacing or Upgrading
Replacing or UpgradingReplacing or Upgrading DiskOnChip Memory
DiskOnChip Memory
DiskOnChip MemoryDiskOnChip Memory
Objectives
This document describes how to replace or upgrade DiskOnChip flash
memory in a RAC6182 Industrial Computer.
European Union Compliance
The RAC6182 Industrial Computer meets the European Union Directive
requirements when installed within the European Union or EEA regions
and has the CE mark. A copy of the Declaration of Conformity is
available at the Rockwell Automation/Allen-Bradley Internet site:
www.ab.com.
ATTENTION: The RAC6182 Industrial Computer is
intended to operate in an industrial or control room
environment, which utilizes some form of power isolation
from the public low voltage mains. Some configurations
may not comply with the EN 61000-3-2 Harmonic
Emissions standard as specified by the EMC Directive of
the European Union. Obtain permission from the local
power authority before connecting any configuration that
draws more than 75 watts of AC power directly from the
public mains.
Publication 6182-IN002A-EN-P
Page 2
2 Replacing or Upgrading DiskOnChip Memory
Safety Precautions
The RAC6182 Industrial Computer contains line voltages. Make sure you
disconnect all power to the RAC6182 before removing covers or access
screws.
ATTENTION: Disconnect all power from the RAC6182
before removing components. Failure to disconnect
power could result in severe electrical shock or damage to
the RAC6182 Computer.
Internal RAC6182 computer components may be damaged by Electrostatic
Discharge (ESD). Make sure you wear a grounding strap whenever
handling circuit boards, memory modules or other internal components.
ATTENTION: Wear a wrist strap (well grounded) and
perform work in a static safe environment. Electrostatic
discharge can damage the RAC6182 and components.
Publication 6182-IN002A-EN-P
Page 3
Replacing or Upgrading DiskOnChip Memory 3
DiskOnChip Memory
The RAC6182 processor board contains a socketed DiskOnChip (DOC)
flash memory device, which stores the Windows CE operating system and
any loaded software applications and data. This DOC flash memory can
be upgraded or replaced. A special Allen-Bradley DOC extraction tool is
required to remove the original DOC device, and is included with the DOC
removal/installation kit.
ATTENTION: Replacing the DOC will require you to
re-install the operating system and re-load all software
applications and data.
The following DiskOnChip flash memory devices can be ordered from
Rockwell Automation:
Part Number Description
6189-2FL64 64MB flash DOC and chip extractor tool
ATTENTION: The DOC memory is sensitive to ESD
and requires careful handling. Hold the DOC by the
package – do not touch the pins. After removing the
DOC, place the device in an anti-static wrapper.
Publication 6182-IN002A-EN-P
Page 4

4 Replacing or Upgrading DiskOnChip Memory
Preparing to Re-install the Operating System, Software Applications and Data Files
Replacing the DOC will require you to re-install the operating system and
re-load all software applications and data. To accomplish this, you will
need a bootable PC ATA memory card and a desktop computer with a
PCMCIA drive.
The following bootable PC memory cards can be ordered from Rockwell
Automation:
Part Number Description
6189-ATA32 32MB ATA PC memory card
6189-ATA64 64MB ATA PC memory card
Note:
You can also back up and replace software applications and
data using a desktop PC running Microsoft ActiveSync.
Please see the RAC6182 Users Manual for information
about loading Microsoft ActiveSync onto a desktop PC and
creating an ActiveSync connection between the RAC6182
Industrial Computer and a desktop PC.
The Operating System
The Windows CE operating system is included on the RAC6182
Applications and Accessories CD-ROM, which was shipped with your
RAC6182 Industrial Computer.
Note:
This CD-ROM can be purchased separately. Consult your
User Manual or Allen-Bradley distributor for ordering
information.
Publication 6182-IN002A-EN-P
Page 5

Replacing or Upgrading DiskOnChip Memory 5
To format the replacement DOC, you will need to copy the operating
system binary file onto your bootable PC memory card:
Important:
You must copy the operating system binary file to a
bootable PC memory card. If you do not, you will not be
able to format the replacement DOC or re-install the
operating system.
1. Insert the bootable PC Memory Card in the PCMCIA drive of your
laptop or desktop computer.
2. Insert the RAC6182 Applications and Accessories CD in the CD-ROM
drive of your computer and open the folder called “Win CE 3.0 OS”.
3. Copy the operating system binary file, RAC6182-2.00p4.bin, from the
RAC6182 Applications and Accessories CD-ROM to the PC Memory
Card.
4. Rename the file RAC6182.bin.
To re-install Windows CE on the RAC6182, you must copy the system
files to the PC Memory Card:
1. Insert the bootable PC Memory Card in the PCMCIA drive of your
laptop or desktop computer.
2. Insert the RAC6182 Applications and Accessories CD in the CD-ROM
drive of your laptop or desktop computer.
3. Copy the “Storage Card” folder from the RAC6182 Applications and
Accessories CD-ROM to the PC Memory Card.
Publication 6182-IN002A-EN-P
Page 6

6 Replacing or Upgrading DiskOnChip Memory
Software Applications
The RAC6182 Recovery Media CD-ROM contains all the files and
instructions needed to re-install RSView Machine Edition on the
RAC6182. You must first upgrade the RAC6182 Operating System as
described in this document before installing RSView Machine Edition.
You will have to locate the installation files for any other applications you
may have installed on the RAC6182.
Application Data
Before replacing the DOC, you must first back up all application data files
from your RAC6182:
1. Insert the PC Memory Card into either RAC6182 PCMCIA slot.
2. Copy the necessary application data files to the PC Memory Card.
Publication 6182-IN002A-EN-P
Page 7
Replacing or Upgrading DiskOnChip Memory 7
Opening and Closing the Chassis
You will have to open and close the RAC6182 chassis to access internal
components.
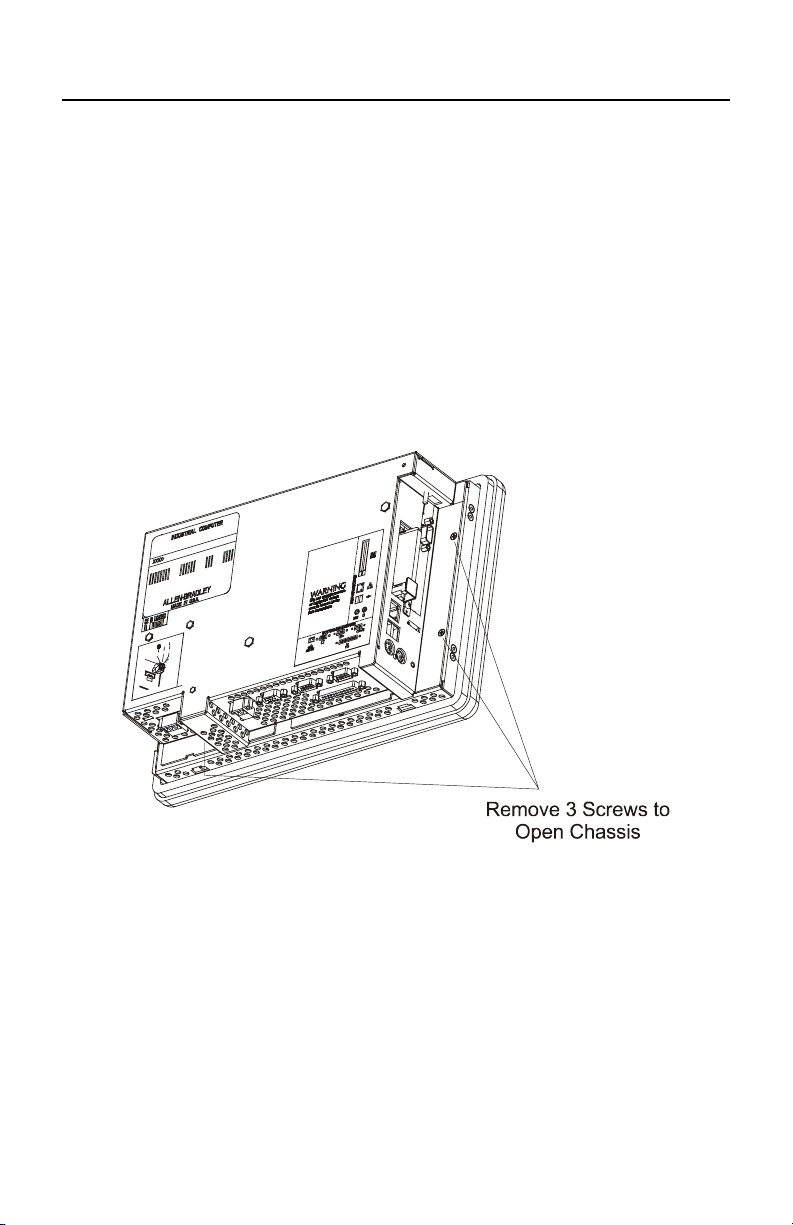
To open and close the chassis (display versions):
1. Disconnect power from the RAC6182 .
2. Using a Phillips screwdriver, remove the 3 screws securing the chassis
to the front bezel.
3. Open the hinged chassis away from the front bezel. Be careful not to
stress or disconnect the internal cables running between the chassis
and front bezel.
4. To close the chassis, slowly pivot the chassis back against the front
bezel. Be careful not to pinch the internal cables.
Publication 6182-IN002A-EN-P
Page 8

8 Replacing or Upgrading DiskOnChip Memory
5. Reinstall the 3 screws to secure the chassis to the front bezel. Tighten
the screws to a torque of 6 - 8 in–lbs (0.7 - 0.9 N•m).
To open and close the chassis (non-display versions):
1. Disconnect power from the RAC6182.
2. Remove the 4 nuts securing the chassis to the front plate.
6. To close the chassis, reinstall the 4 nuts to secure the chassis to the
front plate. Tighten the nuts to 6 - 8 in–lbs (0.7 - 0.9 N•m).
Publication 6182-IN002A-EN-P
Page 9

Replacing or Upgrading DiskOnChip Memory 9
Replacing the DiskOnChip Memory Device
1. Disconnect power to the RAC6182.
2. Follow the procedures on pages 7 - 8 to open the chassis.
3. Locate the DOC socket on the processor board, as shown on the
diagram below.
Publication 6182-IN002A-EN-P
Page 10

10 Replacing or Upgrading DiskOnChip Memory
4. Use the special DOC extraction tool to hook the edges of the DOC.
Be careful to hook only the DOC with the extraction tool, and not the
socket located directly below the DOC.
DOC Extraction Tool
DiskOnChip Device
Chip Socket
7. Remove the DOC from its socket. Pull the device straight up. Be
careful not to bend or damage the DOC pins.
ATTENTION: Make sure to hook only the DOC with
the extraction tool, and not the socket located directly
below the DOC. Do not pull the socket from the printed
circuit board assembly. Irreparable damage will result.
8. Store the removed DOC memory chip in an anti-static wrapper.
Publication 6182-IN002A-EN-P
Page 11

Replacing or Upgrading DiskOnChip Memory 11
9. Before installing the new replacement DOC memory chip, be sure it is
properly oriented with regard to the chip socket. On one end of the
DOC chip is a beveled corner, an inked notch, and a dot (see below).
DiskOnChip Device
Inked notch
Dot
Beveled corner
The chip socket itself contains a notch on one end (see below).
Chip Socket
Notch
Align the end of the DOC chip containing the inked notch, dot and
beveled corner with the end of the chip socket containing the notch.
10. To install the DOC memory chip, carefully align all the pins with the
chip socket. Gently push the pins into the socket until the chip is
seated against the socket base. Make sure not to bend any pins.
11. Follow the procedures on pages 7 - 8 to close the chassis.
Publication 6182-IN002A-EN-P
Page 12

12 Replacing or Upgrading DiskOnChip Memory
Formatting the DiskOnChip Memory Device
1. With the RAC6182 still powered down, insert the bootable PC
Memory Card containing the operating system binary file
(RAC6182.bin) into either RAC6182 PCMCIA slot.
2. Reconnect power to the RAC6182, and turn it on.
3. From the Start Menu / Programs / Command Prompt, open the
Command Prompt dialog box. You should see a window with the
following text:
Pocket CMD v 3.0
\>
4. In the Command Prompt dialog box, type the following command and
press the Enter key:
\>format
5. It will take approximately 45 seconds for the RAC6182 to format the
entire DOC. The RAC6182 will automatically reboot into the new
operating system.
6. Rename or remove the RAC6182.bin file from the PC Memory Card.
Important:
If you do not rename or remove the RAC6182.bin file from
the PC Memory Card, this operating system will be loaded
whenever the RAC6182 is booted with that memory card.
Publication 6182-IN002A-EN-P
Page 13

Replacing or Upgrading DiskOnChip Memory 13
Re-installing the Operating System
1. Using Windows Explorer (Start Menu / Programs / Windows
Explorer), open the Storage Card2 folder, which is on the PC Memory
Card.
2. Copy the Bin, Platform, and Windows folders from the PC Memory
Card to the Storage Card folder on the RAC6182. Use the Windows
Explorer “Copy” and “Paste” commands in the Edit menu.
3. Open the Storage Card folder. Open the Platform folder.
4. Run the khinit.exe program by double-clicking on the khinit icon.
This program initializes the Keypad Handler file and path in the
Windows CE registry.
5. When the khinit.exe program is completed, you will be prompted to
reboot the RAC6182 computer. The operating system upgrade is
complete.
Re-installing Software Applications and Data Files
Re-install the necessary software applications according to their
installation instructions. Copy application data files from the PC memory
card to the appropriate file folders on the RAC6182.
Publication 6182-IN002A-EN-P
Page 14

14 Replacing or Upgrading DiskOnChip Memory
Publication 6182-IN002A-EN-P
Page 15

Replacing or Upgrading DiskOnChip Memory 15
Publication 6182-IN002A-EN-P
Page 16

Publication 6182-IN002A-EN-P–January 2002
Copyright 2002 Rockwell Automation
41061-229-01(1)
All rights reserved. Printed in USA.
 Loading...