

Page 1

User Manual
PowerMonitor Wireless 250 Monitor
Catalog Numbers 1425
Page 2
Important User Information
IMPORTANT
Solid-state equipment has operational characteristics differing from those of electromechanical equipment. Safety
Guidelines for the Application, Installation and Maintenance of Solid State Controls (publication SGI-1.1
your local Rockwell Automation® sales office or online at http://www.rockwellautomation.com/literature/
important differences between solid-state equipment and hard-wired electromechanical devices. Because of this difference,
and also because of the wide variety of uses for solid-state equipment, all persons responsible for applying this equipment
must satisfy themselves that each intended application of this equipment is acceptable.
In no event will Rockwell Automation, Inc. be responsible or liable for indirect or consequential damages resulting from the
use or application of this equipment.
The examples and diagrams in this manual are included solely for illustrative purposes. Because of the many variables and
requirements associated with any particular installation, Rockwell Automation, Inc. cannot assume responsibility or
liability for actual use based on the examples and diagrams.
No patent liability is assumed by Rockwell Automation, Inc. with respect to use of information, circuits, equipment, or
software described in this manual.
Reproduction of the contents of this manual, in whole or in part, without written permission of Rockwell Automation,
Inc., is prohibited.
Throughout this manual, when necessary, we use notes to make you aware of safety considerations.
available from
) describes some
WARNING: Identifies information about practices or circumstances that can cause an explosion in a hazardous environment,
which may lead to personal injury or death, property damage, or economic loss.
ATTENTION: Identifies information about practices or circumstances that can lead to personal injury or death, property
damage, or economic loss. Attentions help you identify a hazard, avoid a hazard, and recognize the consequence.
SHOCK HAZARD: Labels may be on or inside the equipment, for example, a drive or motor, to alert people that dangerous
voltage may be present.
BURN HAZARD: Labels may be on or inside the equipment, for example, a drive or motor, to alert people that surfaces may
reach dangerous temperatures.
Identifies information that is critical for successful application and understanding of the product.
Allen-Bradley, Rockwell Software, Rockwell Automation, PowerMonitor, RSPower, RSEnergyMetrix, and TechConnect are trademarks of Rockwell Automation, Inc.
Trademarks not belonging to Rockwell Automation are property of their respective companies.
Page 3

PowerMonitor W250 Unit Overview
Hardware Installation
Table of Contents
Preface
Additional Resources . . . . . . . . . . . . . . . . . . . . . . . . . . . . . . . . . . . . . . . . . . . . . . . 5
Chapter 1
About the PowerMonitor W250 Unit . . . . . . . . . . . . . . . . . . . . . . . . . . . . . . . 7
PowerMonitor W250 Unit . . . . . . . . . . . . . . . . . . . . . . . . . . . . . . . . . . . . . . . . . 9
Wireless Mesh Network Components . . . . . . . . . . . . . . . . . . . . . . . . . . . . . 11
Wireless Network Description . . . . . . . . . . . . . . . . . . . . . . . . . . . . . . . . . . . . 13
Chapter 2
Safety Considerations . . . . . . . . . . . . . . . . . . . . . . . . . . . . . . . . . . . . . . . . . . . . 15
Before You Begin . . . . . . . . . . . . . . . . . . . . . . . . . . . . . . . . . . . . . . . . . . . . . . . . 15
Network Deployment Recommendations . . . . . . . . . . . . . . . . . . . . . . . . . . 16
PowerMonitor W250 Mounting . . . . . . . . . . . . . . . . . . . . . . . . . . . . . . . . . . 22
PowerMonitor W250 Unit Wiring . . . . . . . . . . . . . . . . . . . . . . . . . . . . . . . . 24
Network Commissioning . . . . . . . . . . . . . . . . . . . . . . . . . . . . . . . . . . . . . . . . . 32
Software Interface
Certifications
Specifications
Glossary
Chapter 3
Introduction. . . . . . . . . . . . . . . . . . . . . . . . . . . . . . . . . . . . . . . . . . . . . . . . . . . . . 35
PowerMonitor W250 Modbus Register Table . . . . . . . . . . . . . . . . . . . . . . 35
PC Receiver Modbus Registers . . . . . . . . . . . . . . . . . . . . . . . . . . . . . . . . . . . . 46
Chapter 4
UL. . . . . . . . . . . . . . . . . . . . . . . . . . . . . . . . . . . . . . . . . . . . . . . . . . . . . . . . . . . . . . 51
European Communities (EC) Directive Compliance. . . . . . . . . . . . . . . . 51
FCC, IC . . . . . . . . . . . . . . . . . . . . . . . . . . . . . . . . . . . . . . . . . . . . . . . . . . . . . . . . 52
Appendix A
General and Environmental Specifications . . . . . . . . . . . . . . . . . . . . . . . . . 55
Wireless Network Characteristics . . . . . . . . . . . . . . . . . . . . . . . . . . . . . . . . . 57
. . . . . . . . . . . . . . . . . . . . . . . . . . . . . . . . . . . . . . . . . . . . . . . . . . . . . . . . . . . . . . . . . 59
Index
Rockwell Automation Publication 1425-UM001A-EN-P - January 2012 3
Page 4

Table of Contents
Notes:
4 Rockwell Automation Publication 1425-UM001A-EN-P - January 2012
Page 5

Preface
The information in this manual applies to the PowerMonitor W250 wireless
power monitor.
Additional Resources
These documents contain additional information concerning related products
from Rockwell Automation.
Resource Description
Industrial Automation Wiring and Grounding Guidelines,
publication 1770-4.1
Product Certifications website, http://www.ab.com
Provides general guidelines for installing a Rockwell
Automation industrial system.
Provides declarations of conformity, certificates, and
other certification details.
You can view or download publications at
http:/www.rockwellautomation.com/literature/
. To order paper copies of
technical documentation, contact your local Allen-Bradley® distributor or
Rockwell Automation sales representative.
Rockwell Automation Publication 1425-UM001A-EN-P - January 2012 5
Page 6

Preface
Notes:
6 Rockwell Automation Publication 1425-UM001A-EN-P - January 2012
Page 7
PowerMonitor W250 Unit Overview
Chapter 1
About the PowerMonitor W250 Unit
The PowerMonitor W250 product family provides a cost-effective, wireless submetering solution for use with RSPower™, version 5.0 or later, data visualization
and RSEnergyMetrix™, version 1.9 or later, energy monitoring, load profiling,
and reporting software. The PowerMonitor W250 family includes a selection of
power monitors, receivers, and routers that communicate wirelessly in a mesh
arrangement designed for robust, reliable energy data collection.
Figure 1 - Wireless PowerMonitor W250 System Overview
Rockwell Automation Publication 1425-UM001A-EN-P - January 2012 7
Page 8
Chapter 1 PowerMonitor W250 Unit Overview
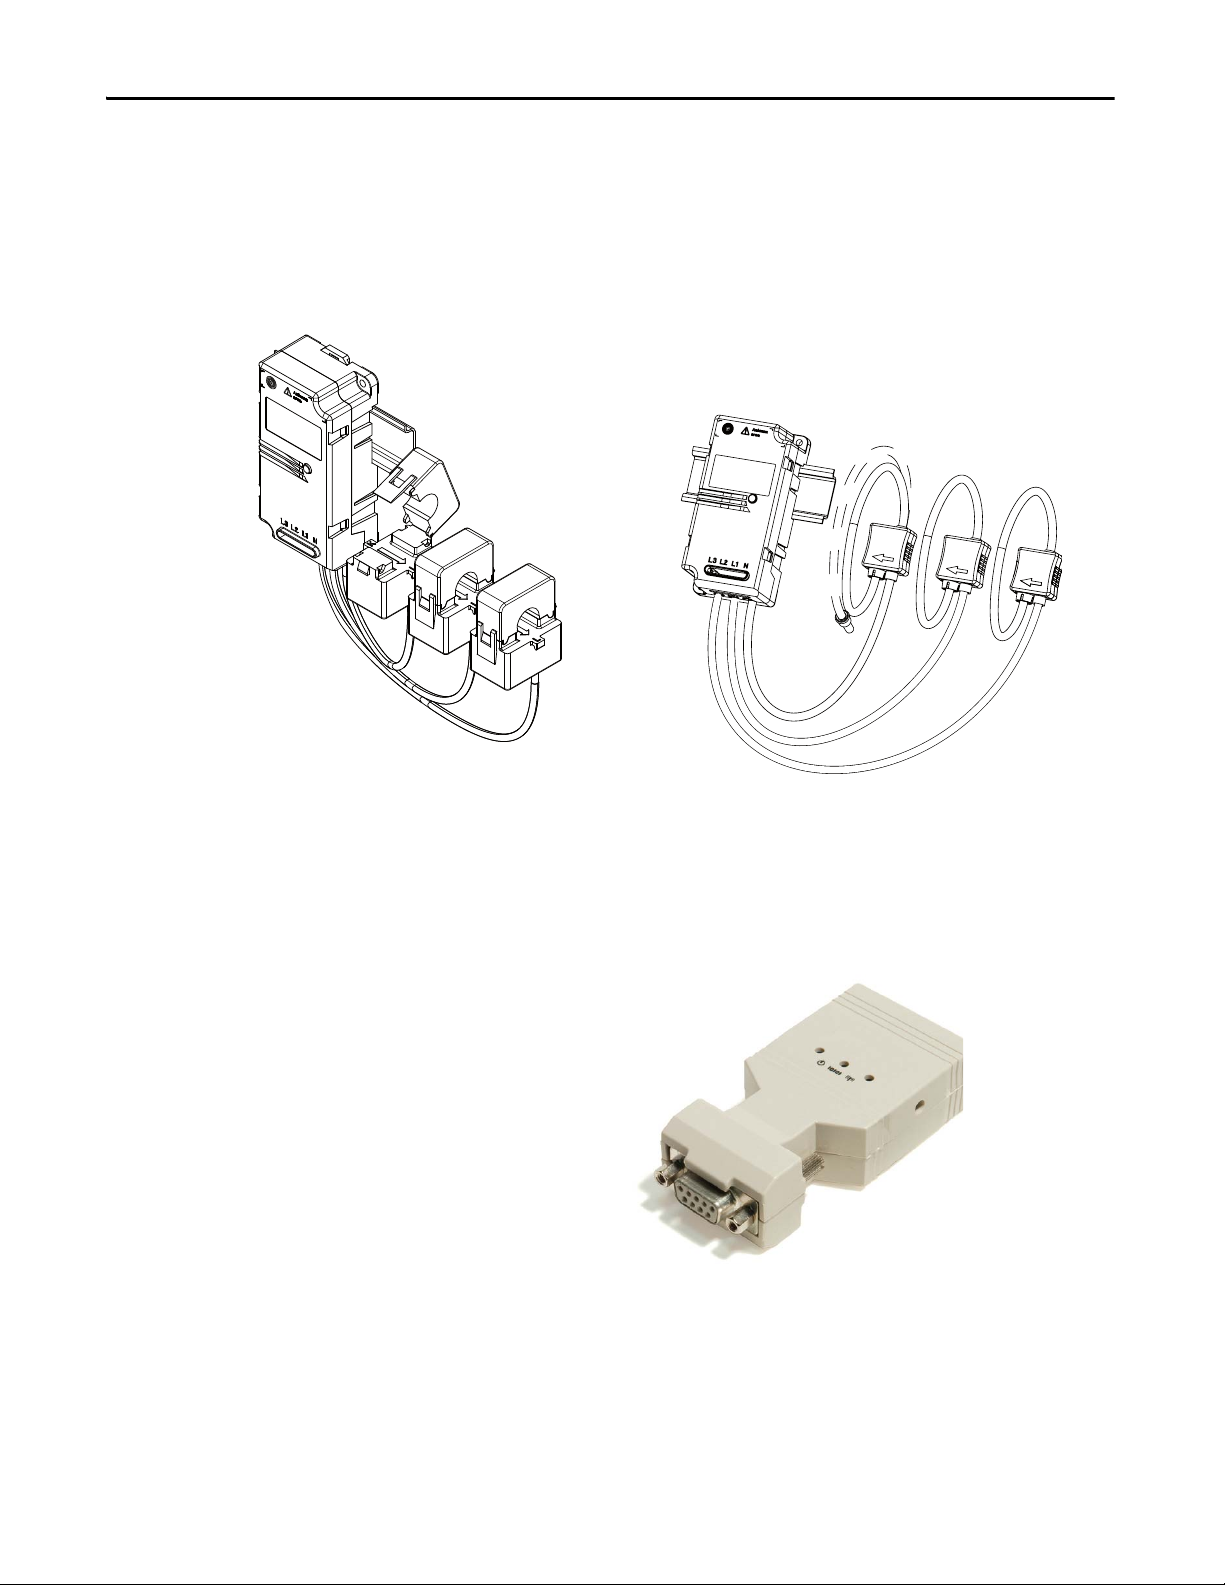
The PowerMonitor W250 unit consists of three main parts:
• Wireless power monitor: The PowerMonitor W250 unit is a sub-meter
that measures and calculates several electrical parameters. The unit is
equipped with pre-wired split core current transformers or Rogowski coils
and embedded wireless data transmission capabilities.
Figure 2 - Wireless Power Monitor
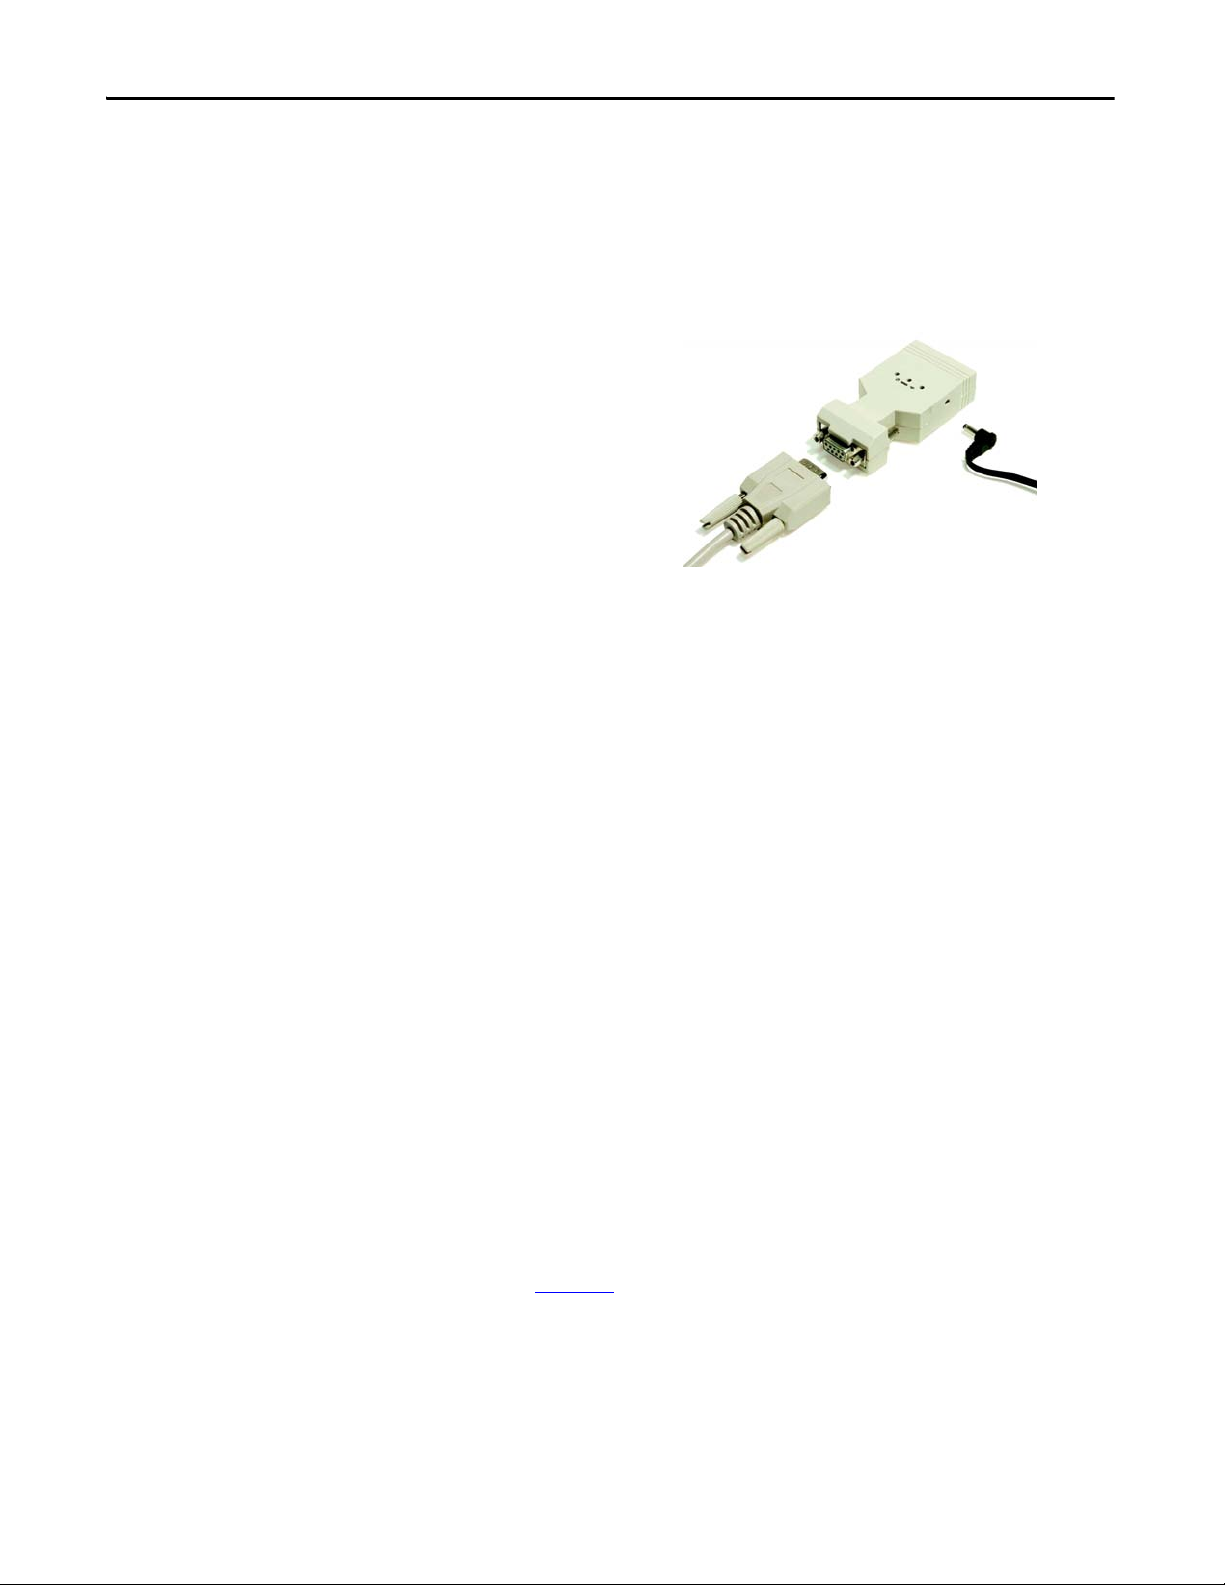
• Wireless PC Receiver: The receiver is a standalone gateway that manages
the wireless network and collects data periodically sent by PowerMonitor
W250 units. The receiver transmits data through its serial port to the data
logging system for analysis. An optional, user-provided serial to Ethernet
converter connects the receiver to your local area network.
Figure 3 - Wireless PC Receiver
8 Rockwell Automation Publication 1425-UM001A-EN-P - January 2012
Page 9
PowerMonitor W250 Unit Overview Chapter 1
PowerMonitor W250 Unit with Current Transformers (CT)
PowerMonitor W250 Unit with Rogowski Coils
1
2
3
4
5
6
5
• Wireless router: The router is a repeater that extends the distance of the
wireless transmission range and can provide multiple signal paths between
the PowerMonitor W250 unit and the receiver when needed.
Figure 4 - Wireless Router
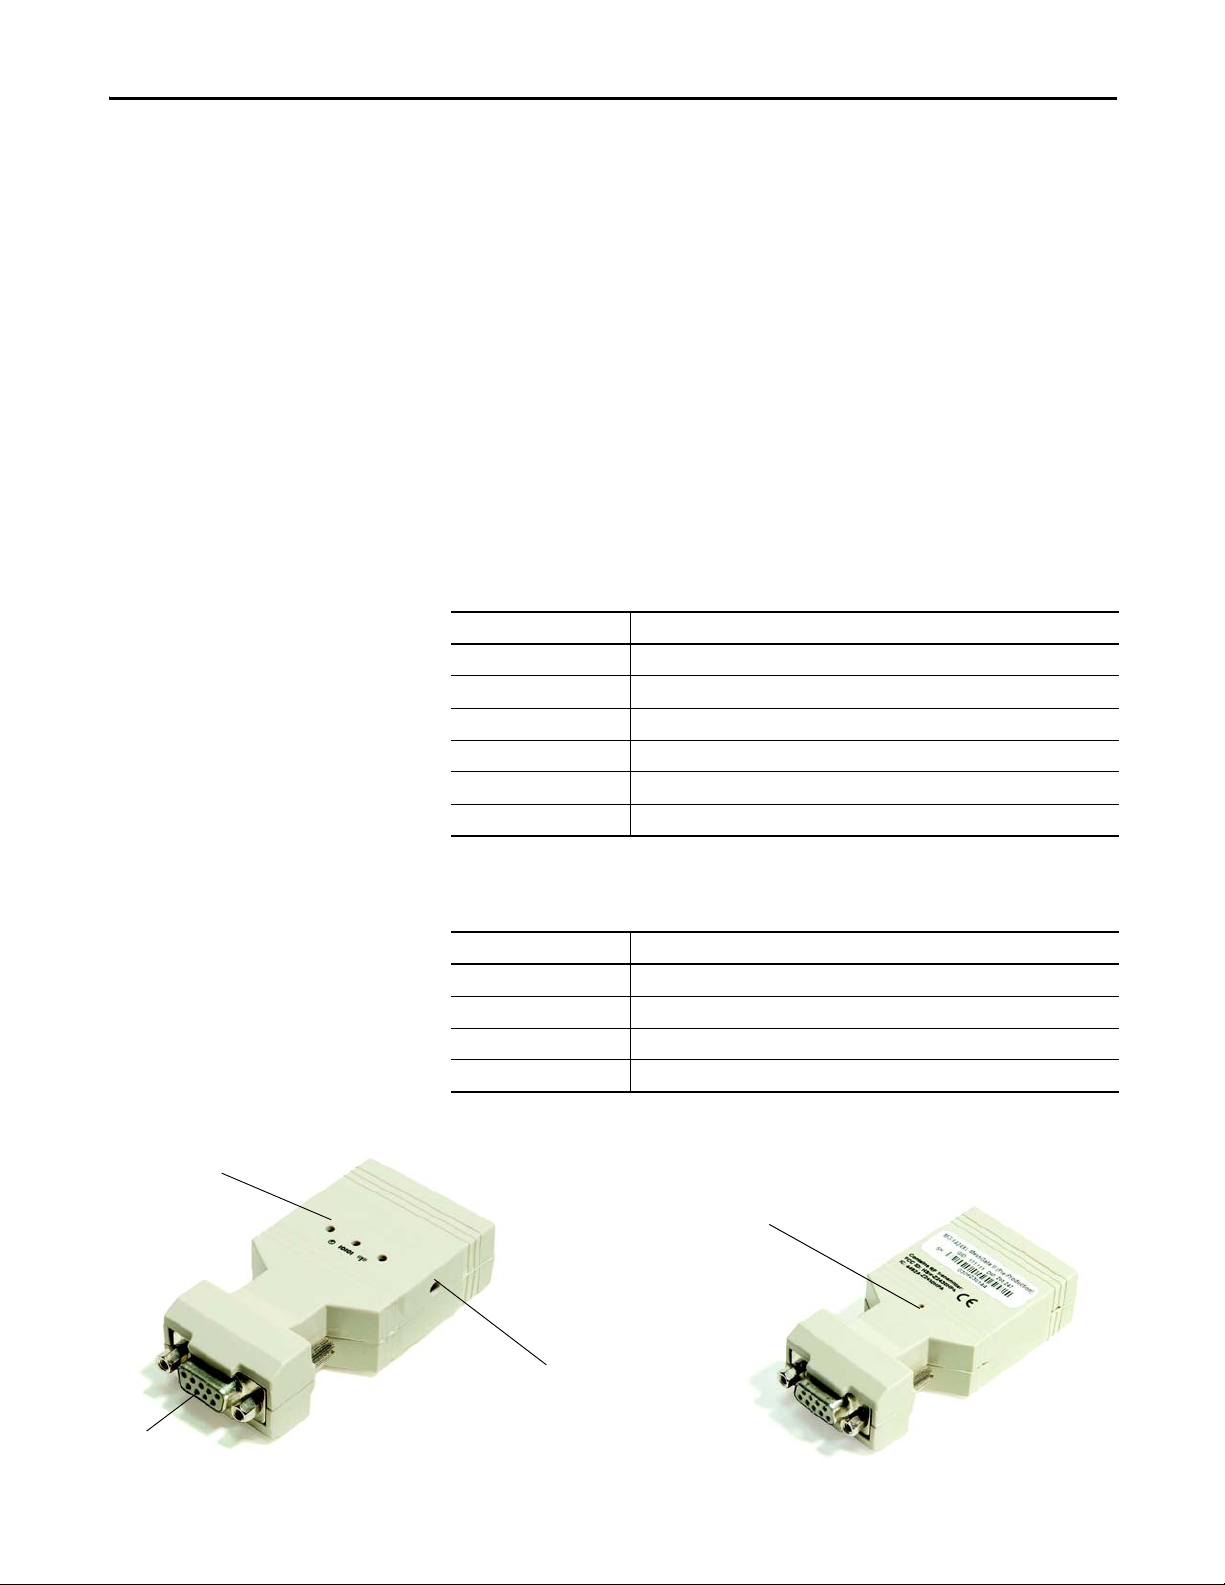
PowerMonitor W250 Unit
The PowerMonitor W250 unit is a 3-phase electric meter with wireless
communication. The following illustration highlights its major components.
Table 1 - PowerMonitor W250 Major Components
Item Description
1. Status indicator - Operation of the status indicator is described on page 31
2. Antenna location
3. DIN-rail mounting fixture
4. Product identification label Identification
5. Current transformer (CT) or Rogowski coil
6. Voltage input terminals
Figure 5 - PowerMonitor W250 Unit
.
Rockwell Automation Publication 1425-UM001A-EN-P - January 2012 9
Page 10

Chapter 1 PowerMonitor W250 Unit Overview
PowerMonitor W250 Data Overview
The PowerMonitor W250 unit sends data to the wireless receiver periodically.
The meter data is split into three sections:
• Cumulative Energy Consumption Metering Data: The power monitor
transmits accumulated real, reactive, and apparent energy, per-phase and
total, once per minute. The transmission is accompanied with the time
stamp of the most recent reading.
• Interval Metering Data: The power monitor sends, at the end of the userselected interval, a time-stamped record of the following data: real,
reactive, and apparent energy per phase and sum; minimum voltage per
phase and maximum current per phase during recording interval;
frequency.
• Node Identification, Configuration, and Status: Node configuration and
version; recording interval time setup, command and status word.
PowerMonitor W250 Model Description
The following table lists the available models of the PowerMonitor W250 unit.
Table 2 - Model Description
Cat. No. Description Current
Rating (A)
1425-D1002-MOD PowerMonitor Wireless, 100A, 300V Delta 100 300 Delta, 3 W CT 111
1425-D1002-MOD-480 PowerMonitor Wireless, 100A, 480V Delta 100 480 Delta, 3 W Rogowski Coil 111
1425-W1003-MOD PowerMonitor Wireless, 100A, 300V Wye 100 300 Wye, 4 W CT 000
1425-D2002-MOD PowerMonitor Wireless, 200A, 300V Delta 200 300 Delta, 3 W CT 111
1425-W2003-MOD PowerMonitor Wireless, 200A, 300V Wye 200 300 Wye, 4 W CT 000
1425-D5002-MOD PowerMonitor Wireless, 500A, 300V Delta 500 300 Delta, 3 W CT 111
1425-D5002-MOD-480 PowerMonitor Wireless, 500A, 480V Delta 500 480 Delta, 3 W Rogowski Coil 111
1425-W5003-MOD PowerMonitor Wireless, 500A, 300V Wye 500 300 Wye, 4 W CT 000
1425-D10002-MOD PowerMonitor Wireless, 1000A, 300V Delta 1000 300 Delta, 3 W CT 111
1425-W10003-MOD PowerMonitor Wireless, 1000A, 300V Wye 1000 300 Wye, 4 W CT 000
1425-D20002-MOD PowerMonitor Wireless, 2000A, 300V Delta 2000 300 Delta, 3 W CT 111
1425-D20002-MOD-480 PowerMonitor Wireless, 2000A, 480V Delta 2000 480 Delta, 3 W Rogowski Coil 111
1425-W20003-MOD PowerMonitor Wireless, 2000A, 300V Wye 2000 300 Wye, 4 W CT 000
(1) Maximum voltage on sensing terminals must not exceed the following:
a.300V Delta, 3 W: 300V AC line-to-line maximum
b.300V Wye, 4 W: 300V AC line-to-neutral maximum
c.480V Delta, 3 W: 520V AC line-to-line, 300V AC line-to-neutral maximum
Max
Volt age
Delta/Wye Current
(1)
Sensing
Model
Code
10 Rockwell Automation Publication 1425-UM001A-EN-P - January 2012
Page 11
PowerMonitor W250 Unit Overview Chapter 1
4
2
1
3
Wireless Mesh Network Components
The PowerMonitor W250 unit communicates by using a wireless mesh network,
capable of forming multiple paths in order to increase the robustness of the
network and respond to dynamic radio environments that may obstruct radio
transmission. In general, mesh network nodes are positioned at the point of
sensing and control to eliminate or minimize wiring. The PC Receiver is the
gateway between the wireless mesh network and RSEnergyMetrix software or
other client application. The wireless router extends the range of mesh network
nodes to accommodate long distances between PowerMonitor W250 units,
overcome physical barriers, and provide for multiple routing.
Wireless PC Receiver Overview
The wireless PC Receiver acts as a gateway that manages the wireless
communication network, and collects data from, and transmits control
commands to, the PowerMonitor W250 units that are members of the network.
Table 3 - Wireless PC Receiver and Accessories
Cat. No. Description
1425-GAT10 PowerMonitor Wireless PC Receiver, 10 Nodes
1425-GAT100 PowerMonitor Wireless PC Receiver, 100 Nodes
1425-GAT200 PowerMonitor Wireless PC Receiver, 200 Nodes
1425-ADR1 PowerMonitor Adapter, US
1425-ADR2 PowerMonitor Adapter, EMEA
1425-ADR3 PowerMonitor Adapter, UK
Physical features of the wireless PC Receiver unit are listed below.
Table 4 - PC Receiver Features
Item Description
1. Status indicators
2. Power supply connector 6…30V DC
3. RS-232/485 DB-9F connector
4. Internal push button (accessible with a < 1 mm rod, such as an unbent paper clip)
Figure 6 - PC Receiver
Rockwell Automation Publication 1425-UM001A-EN-P - January 2012 11
Page 12
Chapter 1 PowerMonitor W250 Unit Overview
2
3
1
Table 5 - PC Receiver Status Indicators
Indicator Position Status Description
Power Left Green ON Power OK
OFF Power has been removed
Communication Middle Green ON Modbus mode
Amber ON Standard (MASC) mode for Meshscape Network Monitor or
Meshscape programmer use
Red ON Programming in progress
RF activity Right Green ON Initialization, PC Receiver not operating
Flashing Green RF activity
Wireless Router Description
The Wireless Router extends the range of the mesh network to accommodate
longer distances between nodes, overcome physical barriers, and provide for
multiple signal routing.
Table 6 - Wireless Router and Accessories
Cat. No. Description
1425-NOD Wireless Power Monitor Router
1425-ADR1 PowerMonitor Router Adapter, US
1425-ADR2 PowerMonitor Router Adapter, EMEA
1425-ADR3 PowerMonitor Router Adapter, UK
Table 7 - Wireless Router Features
Item Description
1 Status indicators (see Tab le 8)
2 Power supply connector 6…30V DC
3 Connector panel access cover (ON/OFF switch)
Figure 7 - Wireless Router
12 Rockwell Automation Publication 1425-UM001A-EN-P - January 2012
Page 13

PowerMonitor W250 Unit Overview Chapter 1
Table 8 - Wireless Router Status Indicators
Indicator Status Description
PWR ON Power ON.
OFF No power.
RF Activity Flashing Router detects RF activity. The RF activity indicator will flash
OFF No RF activity detected.
STS ON Solid Green Device has established two or more connections with other
Blinking The router has established a single connection; additional
OFF The router is not on the network: additional routers are
when detecting valid packets (packets destined for device)
and may also flash when detecting invalid packets (packets
destined for other devices) or environmental noise. Only
valid packets are processed by the device.
devices.
routers may be needed to increase robustness.
needed for this device to connect to the network.
Wireless Network Description
The PowerMonitor W250 unit communicates with the PC Receiver node by
using a self-configuring, wireless mesh network. Node IDs (addresses) are
programmed at the factory and usually do not need to be changed. Please contact
Rockwell Automation for assistance if you need to change the node ID of a
device.
In a wireless mesh network, messages may be received and retransmitted by
several devices, depending on the design and layout of the network. Each wireless
retransmission between the power monitor and the PC Receiver through one or
more Routers is called a ‘hop’. When operating, the network automatically selects
the path with the least hops through routers if it is available.
Strategies to design the wireless network to increase robustness and overcome
challenges presented by the environment are discussed in Chapter 2
, Hardware
Installation.
Each PowerMonitor W250 unit and the PC Receiver are equipped with a radio
module. The PC Receiver buffers in its RAM the metering values received from
the power monitors. The measurement values of the PowerMonitor W250 unit
are buffered in the PC Receiver's RAM.
When a Modbus master station reads data from PowerMonitor W250 registers,
it reads the buffered values from the PC Receiver.
However, when a Modbus master station transmits a command to a power
monitor, the command is forwarded to the power monitor. A delay of 2…4
minutes may occur until the PC Receiver transmits the response message.
Rockwell Automation Publication 1425-UM001A-EN-P - January 2012 13
Page 14

Chapter 1 PowerMonitor W250 Unit Overview
Notes:
14 Rockwell Automation Publication 1425-UM001A-EN-P - January 2012
Page 15

Safety Considerations
Chapter 2
Hardware Installation
This chapter describes how to install the hardware to set up the Wireless Mesh
Sub-meter Network.
ATT EN TI ON : Only qualified personnel, following accepted safety procedures,
should install, wire and service the PowerMonitor W250 unit and its associated
components. Before beginning any work, disconnect all sources of power and
verify that they are de-energized and locked out. Failure to follow these
instructions may result in personal injury or death, property damage, or
economic loss.
This equipment is designed to be installed in an enclosure with access restricted to
qualified personnel. Installation is to be performed in accordance with all
applicable codes, regulations, laws, and standards.
Before You Begin
• The equipment must be installed in an appropriate enclosure to provide
protection to personnel and is suitable for the physical installation
environment.
• Do not remove or change any part of the product, or cut any cables, as
doing so may damage it or other equipment or cause serious injury or
death.
• If the equipment or any part of it is damaged, do not install it. Remove and
replace any damaged equipment.
• Check carefully that the PowerMonitor W250 model received is
appropriate for the system to be monitored. Otherwise, wrong or
incomplete data may be sent to the wireless PC Receiver.
• Carefully read this manual and observe any notes, cautions, or warnings.
Rockwell Automation Publication 1425-UM001A-EN-P - January 2012 15
Page 16

Chapter 2 Hardware Installation
IMPORTANT
Network Deployment Recommendations
Prior to defining your network and the elements location, read the following
information.
We recommend you apply power to the Wireless PC Receiver before applying
power to the PowerMonitor W250 unit or Router nodes.
ATT EN TI ON : All devices are designed for indoor use only.
Planning Your Installation
Follow this information before installing your PowerMonitor W250 unit.
Building Audit
Mesh devices all communicate via wireless radio frequencies and are influenced
by several factors (electrical wires, metal objects, heavy concrete walls, direction
of installed devices, and so on).
Consider the following items in network configuration:
• Number of floors, layout
• Network topology - dense versus spread out/serial
• Typ e o f b uil di ng ma teri al
• Power availability for routers and receivers not attached to meters
• Any known obstacles or RF interferences (for example, heating pipes,
electrical room)
• ‘Bridge’ router placement
• Detect other 2.4 GHz interference
Walls and Floors
Inside a building, radio waves deflect on walls and other objects create
interference.
When the PowerMonitor W250 unit or other system components are mounted
on a wall or where the RF signal travels through a wall or other construction, be
aware of the materials used in the construction (both sides). Note that certain
materials will reduce the signal strength and maximum distance between nodes.
Usually, floors are most difficult for radio frequency signals to penetrate due to
materials used (for example, concrete, cement, and tiles). So, consider placing
routers in stairways and other open spaces available between floors.
16 Rockwell Automation Publication 1425-UM001A-EN-P - January 2012
Page 17

Hardware I nstallation Chapter 2
Effect of Different Materials on Signal Strength and Maximum Node-to-node Distance
Glass, sheet rock, and wood have the least impact to the RF signal.
Steel-reinforced concrete, brick walls, and corrugated steel surfaces are much
more difficult for the RF signal to penetrate. The maximum node-to-node
distance could be cut in half compared to the unobstructed maximum distance.
In any case, the maximum distance between two nodes depends on the geometry
of the signal path and the number, thickness, and composition of any
obstructions.
Metal blocks virtually all radio communication. RF transmission through metal
is facilitated by openings (slits, holes, and gaps) in the metal.
Network Topologies
The robustness and reliability of communication between PowerMonitor W250
devices and RSEnergyMetrix software or other clients depends primarily on
network RF signal strength. In turn, RF signal strength is dependent upon the
topology of the network. In general, a mesh network topology that provides
parallel links between devices provides better RF signal strength resulting in
more robust communication. Linear topologies that offer only a single path from
device to client can create bottlenecks that reduce effective RF signal strength
and adversely impact communication robustness. You may add more routers to a
network topology to accommodate longer distances or add parallel routes
through the network in areas that present a challenging environment.
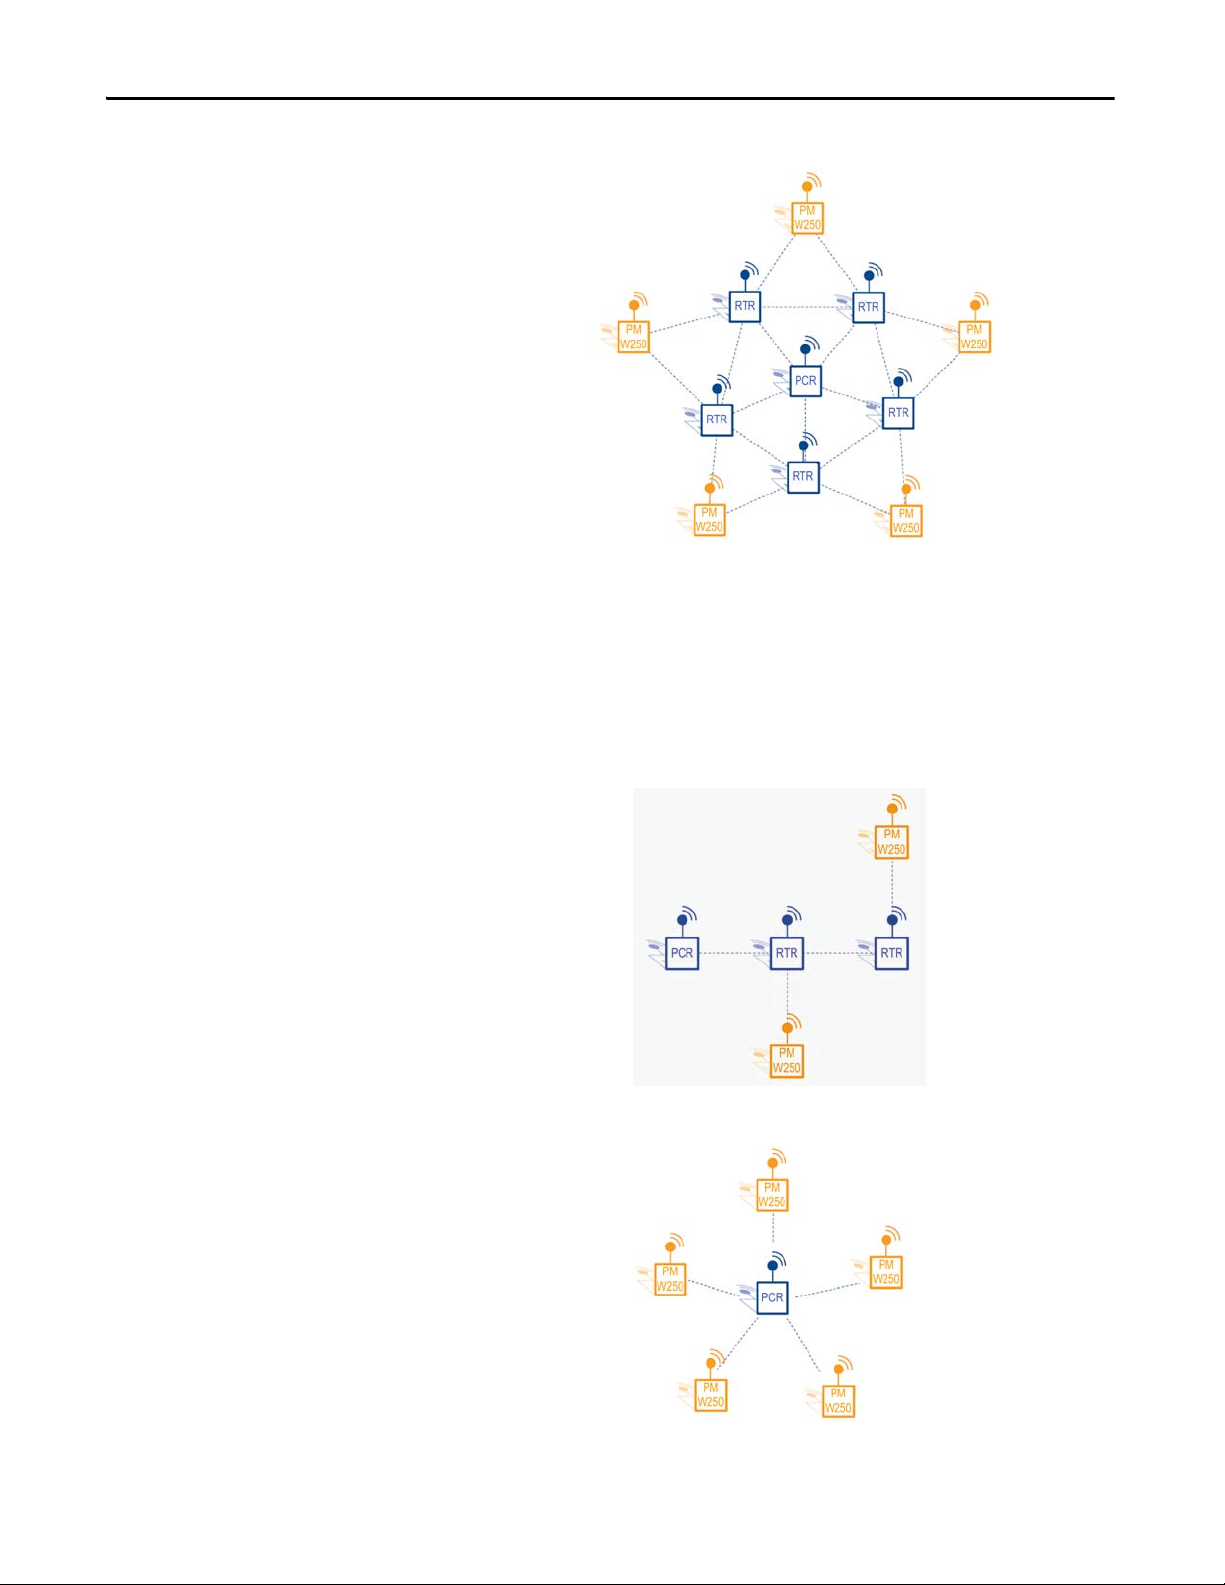
Preferred Network Topology
An ideal network topology is ‘Star-Mesh’, where all nodes are evenly distributed
from the PC Receiver and offer multiple, parallel communication links.
In such a configuration, all devices can communicate with multiple nodes, so that
if one router fails or if a radio link experiences interference, the network will
reconfigure itself through the remaining nodes. Having multiple routes to the
gateway will also improve the estimated sampling rate.
Rockwell Automation Publication 1425-UM001A-EN-P - January 2012 17
Page 18
Chapter 2 Hardware Installation
Figure 8 - Star Mesh Topology (Best)
Alternative Topologies
The network topologies shown below are not as robust as the Star Mesh
topology. However, for simple installations within an environment that is
favorable, these topologies may provide acceptable network performance.
Figure 9 - Linear Topology (Good)
Figure 10 - Star Topology (Better)
18 Rockwell Automation Publication 1425-UM001A-EN-P - January 2012
Page 19
Hardware I nstallation Chapter 2
Constricted Topology: Not Recommended
In some cases, PowerMonitor W250 devices might be located far away from the
PC Receiver and all data from the network has to travel over a single path. Such a
situation creates bottlenecks and increases the risk of losing data packets.
We recommend avoiding such topologies by adding additional routers to provide
parallel links to the PC Receiver.
Figure 11 - Constricted Topology
PM
W250
RTRRTR RTR
RTR
PCR
PM
W250
Bottlenecks
PC Receiver Location and Connection
Consider these suggestions when locating your PC Receiver:
• When possible, locate the PC Receiver near the geographical center of the
RF network.
• It may be helpful to have a notebook personal computer for startup,
diagnostics, and troubleshooting.
Follow these steps to connect the PC Receiver.
1. Apply power to the PC Receiver by plugging in the DC power supply
adapter.
We recommend that you apply power to the PC Receiver prior to applying
power to any PowerMonitor W250 devices.
Rockwell Automation Publication 1425-UM001A-EN-P - January 2012 19
Page 20
Chapter 2 Hardware Installation
TIP
2. Connect the PC Receiver's data port (DB-9F connector) to the serial port
of a host computer, a serial to Ethernet converter, or similar device.
To connect to a USB port, the Allen-Bradley 9300-USBS USB to serial
adapter (or equivalent) is recommended. Please contact your local
Rockwell Automation representative for more information.
Figure 12 - Connect the PC Receiver Data Port to the Personal Computer
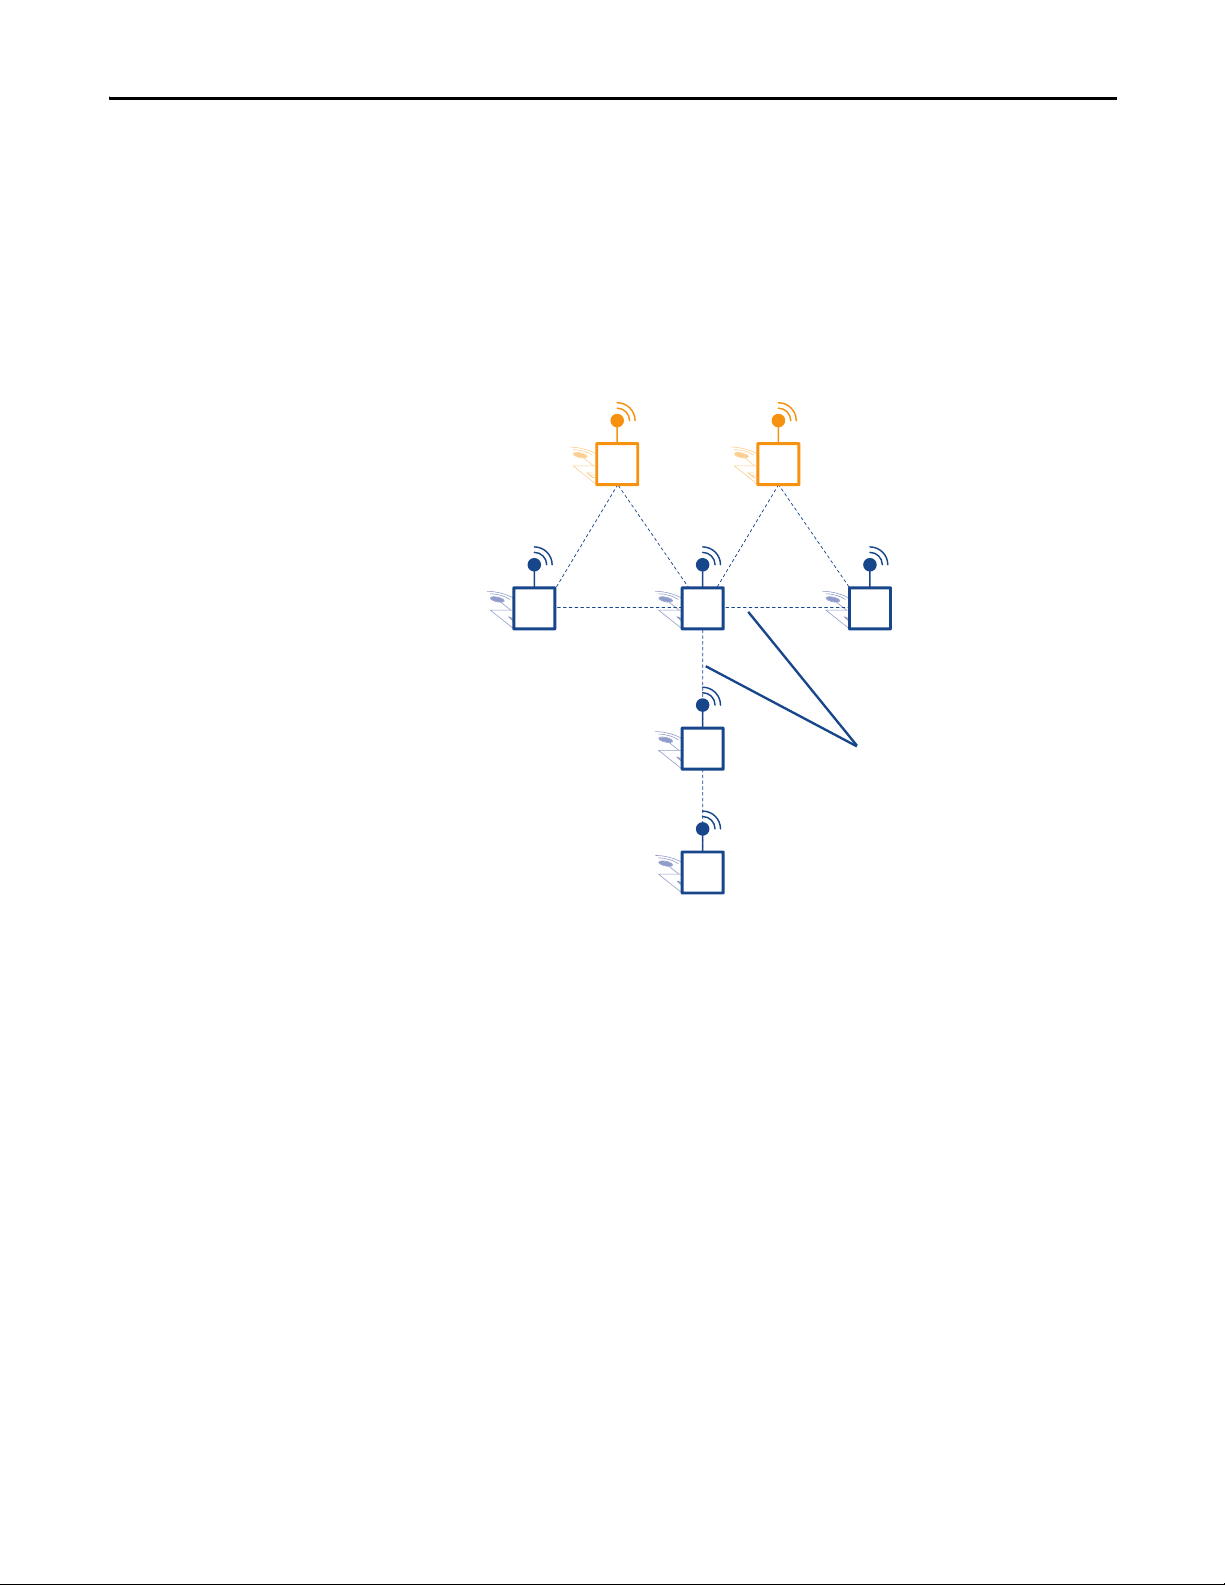
Router Location and Connection
Router location and orientation is important. The router is designed to be
mounted horizontally. The radio antenna, on the router, transmits in a
horizontal, circular pattern when the signal path is not obstructed. The following
guidelines help you locate router devices to attain acceptable radio signal strength
and system performance:
• It is best to mount routers in a horizontal orientation. It is less desirable,
but acceptable, to orient one router horizontally and another vertically. It
is not recommended to orient all routers vertically, unless doing so
intentionally to route the radio signal vertically through a stairway, chase,
or elevator shaft.
• Mount power monitors in a vertical orientation.
• Avoid locating a router directly underneath a PowerMonitor W250 device.
The internal electronic circuitry in the power monitor may obstruct the
radio signal.
• Avoid installing routers directly onto a horizontal metal surface. Use
spacers to create a free space of 3…5 mm between the router and the metal
surface.
• When the radio signal must penetrate an obstruction such as a concrete
wall, locate network devices (routers and/or power monitors) on opposite
sides of the wall to create a short, direct signal path. Signal loss may occur if
a long path exists through an obstruction.
See Figure 13
20 Rockwell Automation Publication 1425-UM001A-EN-P - January 2012
.
Page 21

Figure 13 - Router Orientation Guidelines
Wors e
Better
Best Acceptable Not Recommended
Hardware I nstallation Chapter 2
Figure 14 - Relative Orientation of Routers
Apply power to the Router by plugging in the power supply adapter.
Figure 15 - Connect the Router Power Supply
Rockwell Automation Publication 1425-UM001A-EN-P - January 2012 21
Page 22

Chapter 2 Hardware Installation
PowerMonitor W250 Mounting
WARNING: Disconnect and lock out all sources of electric power to the location
in which the PowerMonitor W250 unit is to be installed and the circuit to which
it will be connected.
WARNING: The PowerMonitor W250 unit must be installed vertically as shown
in Figure 16
.
PowerMonitor W250 Location
Be aware of the location and orientation of the PowerMonitor W250 unit’s
internal antenna when selecting an installation location. The internal antenna
faces the front of the unit, in the upper left corner. The following sections provide
detailed recommendations for various installation conditions.
Basic Guidelines
To obtain the best effectiveness of the network, apply the following
recommendations:
• Avoid installing the PowerMonitor W250 unit in front of or close to
metallic parts. Doing so may reduce the efficiency of the embedded
antenna.
• Avoid installing the PowerMonitor W250 unit near sources of
electromagnetic induction.
• Refer to the illustrated layout for guidelines to optimize the orientation of
the antenna.
Inside a Metallic Cabinet
Typical electrical enclosures or cabinets are never completely sealed due to
openings and gaps. This permits a certain level of RF communication, although it
may be highly attenuated.
When the PowerMonitor W250 unit must be installed inside a metal enclosure,
to get the best effectiveness, the following guidelines apply:
• Avoid installing the PowerMonitor W250 unit in the center of the cabinet
where most electrical cables are located.
• Install the PowerMonitor W250 on one side, close to a door gap or
opening if any exist.
• If there are openings for cable routing in the top, bottom, or sides of the
enclosure, locate the PowerMonitor W250 unit close to these openings.
• Install a Router within 1 meter of the enclosure to counteract the
attenuation of the RF signal.
22 Rockwell Automation Publication 1425-UM001A-EN-P - January 2012
Page 23

Hardware I nstallation Chapter 2
100.1 mm (3.94 in)
42.6 mm (1.68 in.)
2
x
4
.
2
m
m
(0
.
1
7
i
n.)
IMPORTANT
Wall and Panel Mounting
1. Prepare the mounting holes to suit.
2. Secure the PowerMonitor W250 unit to the wall or the panel with
4 mm (6-32) screws.
Figure 16 - Wall or Panel Mounting
Tighten mounting screws snugly. Maximum fastening torque is 2.8 N•m
(2 lb•ft).
Rockwell Automation Publication 1425-UM001A-EN-P - January 2012 23
Page 24

Chapter 2 Hardware Installation
DIN Rail Mounting
1. Clip the PowerMonitor W250 unit onto the DIN rail.
2. Pull up the top clip (see detail) to remove the PowerMonitor W250 unit
from the DIN rail.
Figure 17 - DIN Rail Mounting
PowerMonitor W250 Unit Wiring
This section shows the types of wiring and how to connect the
PowerMonitor W250 unit.
24 Rockwell Automation Publication 1425-UM001A-EN-P - January 2012
Page 25

Wiring Diagrams
CT1
CT3
L1
Fuses (customer provided)
L2 L3
PowerMonitor W250 Unit
L3 L2 L1 N
Figure 18 - Delta, 3-wire, 1425-Dxxx(x)3-MOD Unit
Hardware I nstallation Chapter 2
Maximum voltage V(L1-L2) and V(L2-L3) is 300V AC rms. Not for use on
400V AC or 480V AC circuits.
WARNING: Do not connect the N terminal to earth ground.
Rockwell Automation Publication 1425-UM001A-EN-P - January 2012 25
Page 26

Chapter 2 Hardware Installation
CT1
CT3
L1
Fuses (customer provided)
L2 L3
PowerMonitor W250 Unit
L3 L2 L1 N
N
CT2
Figure 19 - Wye, 4-wire, 1425-Wxxx(x)3-MOD Unit
Maximum voltage V(L1-N), V(L2-N) and V(L3-N) is 300V AC rms.
WARNING: Do not connect the N terminal to earth ground.
26 Rockwell Automation Publication 1425-UM001A-EN-P - January 2012
Page 27

Figure 20 - Delta, 3-wire, 480V AC, 1425-Dxxx(x)3-MOD-480 Unit
RT1
RT3
L1
Fuses (customer provided)
L2 L3
PowerMonitor W250 Unit
L3 L2 L1 N
24V DC Power (customer provided)
+
BLK
BRN
TIP
Hardware I nstallation Chapter 2
Maximum voltage V(L1-L2) and V(L2-L3) is 520V AC rms; V(L1-N),
V(L2-N) and V(L3-N) is 300V AC rms. Designed for use on up to 520V AC
circuits. This device is Isolation Class 1. The green/yellow wire must be
connected to earth ground. The 24V DC power supply must be NEC Class 2. An
example of a suitable power supply is the Allen-Bradley 1606-XLP15E, 15-watt,
24 V DC with a single-phase AC input.
Note that the black 24V DC - wire is internally connected to the green/yellow
ground wire.
Current Transformers
ATT EN TI ON : Disconnect and lock out all sources of electric power to the
location in which the PowerMonitor W250 wire is to be installed and the circuit
to which it will be connected.
The current sensors are intended to be used only on insulated cable. Do not apply
to uninsulated cable or bus bar. The current sensors are intended for no more than
50 open/close operations. Do not attempt to use them as a clamp-on meter.
The current transformer mating surfaces must be kept free of particles and other
contamination, otherwise accuracy may be compromised.
1. Observe the correct phase assignment of current transformers with respect
to the voltage phase connections.
Refer to the wiring diagram for the applicable PowerMonitor W250
model. If phase assignment and polarity are not correctly observed, the
PowerMonitor W250 unit produces incorrect energy data.
Rockwell Automation Publication 1425-UM001A-EN-P - January 2012 27
Page 28

Chapter 2 Hardware Installation
Generator
Side
Load
Side
Generator
Side
Load
Side
2
1
6
5
4
3
2. Verify that the arrow (3) points in the direction of current flow from the
supply (line) to the load.
In the illustration, the label (6) is facing the load.
3. Close the Current Transformer around the cable (1).
Be sure the clip is snapped shut.
4. Use the mounting clip (5) and a cable tie (4) to attach the Current
Transformer to the cable.
Figure 21 - Current Transformer Mounting
28 Rockwell Automation Publication 1425-UM001A-EN-P - January 2012
Page 29

Hardware I nstallation Chapter 2
Load Side
Generator
Side
Load Side
Generator
Side
2
1
4
3
3
IMPORTANT
Rogowski Coil
ATT EN TI ON : When installing a Rogowski coil, take care not to kink, pinch,
twist, or sharply bend the coil. Applying such mechanical stress to the coil may
reduce the accuracy of the PowerMonitor W250.
1. Observe the correct phase assignment of Rogowski coils with respect to
the voltage phase connections.
Refer to the wiring diagram for the applicable PowerMonitor W250
model. If phase assignment and polarity are not correctly observed, the
PowerMonitor W250 unit will produce incorrect energy data.
2. Verify that the arrow (3) points in the direction of current flow from the
supply (line) to the load.
3. Close the Rogowski (2) coil around the cable (1).
Be sure that the coil is well locked (fully inserted until a click is heard).
Figure 22 - Rogowski Coil Mounting
The arrow indicating the current direction must be inside the loop (3) when
closed as shown.
The Rogowski coil can be oriented freely around the cable/conductor. It
does not need to be attached. The position of the conductor within the
Rogowski coil does not affect the accuracy more than 0.5%.
Rockwell Automation Publication 1425-UM001A-EN-P - January 2012 29
Page 30

Chapter 2 Hardware Installation
Voltage Input Connection
ATT EN TI ON : A set of fuses or a circuit breaker must be installed between the
main supply and the PowerMonitor W250 unit for line protection. The
protection device must be installed near the PowerMonitor W250 device, be
easily accessible, and be identified as the circuit protection for the
PowerMonitor W250 unit.
Use fuses or a circuit breaker with the following characteristics.
Table 9 - Fuse and Circuit Breaker Characteristics
Protection Range (A) Wiring (mm2)/AWG Single Fault Condition Max Trip
6.3 1 /18 30 ms
10 1.5 /16 30 ms
16 2.5 /14 30 ms
Time (ms)
WARNING: Disconnect and lock out all sources of electric power to the location
in which the PowerMonitor W250 unit is to be installed and the circuit to which
it will be connected.
Connect voltage sensing wiring according to the applicable wiring diagram for
the model. Wiring terminals will accept a single 2.5 mm
2
(18 AWG) conductors. Use wire with a minimum 65° C rating.
mm
Please refer to Wiring Diagrams
on page 24.
2
(14 AWG) or two 1
For PowerMonitor W250 catalog numbers ending in -480, connect the two
power supply wires to a 24V DC power supply you provide:
• Brown = +24V DC
• Black = V DC common
The power supply output must be in the range of 21.6…26.4V DC and should
not supply power to any devices except for other nearby PowerMonitor W250
units.
Connect the green/yellow wire to a low impedance earth ground connection.
30 Rockwell Automation Publication 1425-UM001A-EN-P - January 2012
Page 31

Hardware I nstallation Chapter 2
Status Indicator
Status Indicator Description
The PowerMonitor W250 status indicator indicates the unit status as follows.
Figure 23 - PowerMonitor W250 Status Indicator
Table 10 - Status Indicator Description
Indicator Status Description
1 blink, wait 2 seconds Normal operation and direct serial communication mode from firmware revision 2.02.
2 blinks, wait 1 second Radio module communication error: PowerMonitor W250 unit is unable to send data.
3 blinks, wait 1 second Frequency out of range of 45…66 Hz.
4 blinks, wait 1 second Communication and frequency error together.
5 blinks, wait 1 second Device Error: Ind icates a firmware checksum error. To recover, try a reset-meter
6 blinks, wait 1 second Direct serial communication mode (factory use only) until firmware revision 2.01.
7 blinks, wait 1 second Internal hardware failure. Please contact Rockwell Automation for service.
command followed by an OFF/ON sequence. If this does not reset this error, the
calibration memory is corrupt and the device needs to be returned to Rockwell
Automation for repa ir.
Rockwell Automation Publication 1425-UM001A-EN-P - January 2012 31
Page 32

Chapter 2 Hardware Installation
TIP
Network Commissioning
This section describes the module identification and PC Receiver connection.
Module Identification
Figure 24 - Label
Table 11 - Label Information
Item Description
1Group ID
2 Device ID
3 Firmware revision
4 Manufacture date code
Each module has two identification numbers: Group ID and Device ID, each
defined by 2 bytes.
The Group ID and Device ID are printed on labels on the following:
• PowerMonitor W250 unit front side
• Router or PC Receiver rear side
All modules, including the PC Receiver, must be set with the same Group ID to
communicate together on the same network. All parts are delivered from
factory with default GID: 111.111.
The devices are addressed at the factory, as shown in the following table.
Table 12 - Device Addresses
Device Type Device High byte Low Byte
End Node Devices (high
byte 1…159)
Router Devices (high byte
160 …255, except 248 &
249)
PC Receiver PC Receiver 160 …255 (except 248 &
PowerMonitor W250 1…30 1…216
Reserved 41…159 100 …216
Reserved 160…209 1…216
Router 210…219, 240…247 217 …246
249)
(Modbus address)
247
32 Rockwell Automation Publication 1425-UM001A-EN-P - January 2012
Page 33

Hardware I nstallation Chapter 2
IMPORTANT
The device ID low byte defines the Modbus network address for the module.
The Modbus address of each device on the network must be unique.
The PC Receiver's Device ID high byte determines the maximum number of
devices supported in the network.
Table 13 - Number of Devices
PC Receiver ID High Byte Max Number of Devices
170 10
200 100
220 200
The Group ID and Device ID should not be modified except under exceptional
circumstances. One such circumstance would be operating two or more
independent PowerMonitor W250 networks in such close proximity that RF
interference with each other occurs. Please contact Rockwell Automation
support services for more information or if assistance is required.
PC Receiver Connection
This section describes the RS-232 and RS-485 connections.
RS-232 Data Port Use and Configuration
DB-9 style connector: RS-232 Data Port connector with standard DCE
connections for transmit data, receive data, RTS input, and CTS output.
The PC Receiver is factory configured with the following parameters:
• Communication Rate - 115,200
• Data Bits - 8
• Parity - None
• Stop Bits - 1
Rockwell Automation Publication 1425-UM001A-EN-P - January 2012 33
Page 34

Chapter 2 Hardware Installation
1
5
9
6
1
2
3
4
5
6
7
8
9
Inverting Signal -
NC
GND
Non-inverting Signal +
NC
PC Receiver RS-485 Data Port Use and Configuration
The RS-485 mode of the PC Receiver requires special wiring for the DB9
connection. In order to activate the RS-485 mode, please connect the data port as
follows.
Figure 25 - PC Receiver RS-485 Wiring Diagram
As soon as the PC Receiver is powered on, it will choose the serial mode RS-232
or RS-485 according to the DB9 wiring. This mode will remain until the PC
Receiver will be power cycled (removing the DB9 connector will have no effect).
RS-485 mode is available on the PC Receiver unit with the date code 10267 or
later with firmware revision (or later) 1.5.15 (100 and 200 node) or 1.7.5.15 (10
node). Upgrade of an older PC Receiver (before date code 10267) is not possible,
as it is a different hardware revision.
RS-485 mode sets the device Modbus address to 247. The address may not be
changed. Only point-to-point communication is supported.
34 Rockwell Automation Publication 1425-UM001A-EN-P - January 2012
Page 35

Software Interface
Chapter 3
Introduction
This chapter describes the parameters and the registers available for software
development. Data is presented using Modbus RTU protocol in Holding
Registers. Modbus register addresses listed in these tables are zero-based. Modbus
client applications may require that you add a constant value such as 40,000 to
the Modbus register address. RSEnergyMetrix software uses the basic zero-based
register addressing scheme.
PowerMonitor W250 Modbus Register Table
Table 14 - PowerMonitor W250 Modbus Register Map
Modbus Register Description Type/Length Storage Unit Access
0 Real Energy Consumption, Phase 1 MSW S32 NV Wh R
1 Real Energy Consumption, Phase 1 LSW NV Wh R
2 Real Energy Consumption, Phase 2 MSW S32 NV Wh R
3 Real Energy Consumption, Phase 2 LSW NV Wh R
4 Real Energy Consumption, Phase 3 MSW S32 NV Wh R
5 Real Energy Consumption, Phase 3 LSW NV Wh R
6 Real Energy Consumption, Phase Sum MSW S32 NV Wh R
7 Real Energy Consumption, Phase Sum LSW NV Wh R
8 Reactive Energy Consumption, Phase 1 MSW S32 NV VARh R
9 Reactive Energy Consumption, Phase 1 LSW NV VARh R
10 Reactive Energy Consumption, Phase 2 MSW S32 NV VARh R
11 Reactive Energy Consumption, Phase 2 LSW NV VARh R
12 Reactive Energy Consumption, Phase 3 MSW S32 NV VARh R
13 Reactive Energy Consumption, Phase 3 LSW NV VARh R
14 Reactive Energy Consumption, Phase Sum MSW S32 NV VARh R
15 Reactive Energy Consumption, Phase Sum LSW NV VARh R
16 Apparent Energy Consumption, Phase 1 MSW U32 NV VAh R
17 Apparent Energy Consumption, Phase 1 LSW NV VAh R
18 Apparent Energy Consumption, Phase 2 MSW U32 NV VAh R
19 Apparent Energy Consumption, Phase 2 LSW NV VAh R
20 Apparent Energy Consumption, Phase 3 MSW U32 NV VAh R
21 Apparent Energy Consumption, Phase 3 LSW NV VAh R
The following table reports Modbus registers specific to PowerMonitor W250
products.
Rockwell Automation Publication 1425-UM001A-EN-P - January 2012 35
Page 36

Chapter 3 Software Interface
Table 14 - PowerMonitor W250 Modbus Register Map
Modbus Register Description Type/Length Storage Unit Access
22 Apparent Energy Consumption, Phase Sum MSW U32 NV VAh R
23 Apparent Energy Consumption, Phase Sum LSW NV VAh R
24 Energy Counter Timestamp, Min / Sec U16 V R
25 Energy Counter Timestamp, Day / Hour U16 V R
26 Energy Counter Timestamp, Year / Month U16 V R
27 Line Frequency U16 V Hz R
28 Recording Interval Timestamp, Min / Sec U16 V R
29 Recording Interval Timestamp, Day / Hour U16 V R
30 Recording Interval Timestamp, Year / Month U16 V R
31 Recording Interval Real Energy, Phase 1 S16 V Wh R
32 Recording Interval Real Energy, Phase 2 S16 V Wh R
33 Recording Interval Real Energy, Phase 3 S16 V Wh R
34 Recording Interval Real Energy, Phase Sum S16 V Wh R
35 Recording Interval Reactive Energy, Phase 1 S16 V VARh R
36 Recording Interval Reactive Energy, Phase 2 S16 V VARh R
37 Recording Interval Reactive Energy, Phase 3 S16 V VARh R
38 Recording Interval Reactive Energy, Phase Sum S16 V VARh R
39 Recording Interval Apparent Energy, Phase 1 U16 V VAh R
40 Recording Interval Apparent Energy, Phase 2 U16 V VAh R
41 Recording Interval Apparent Energy, Phase 3 U16 V VAh R
42 Recording Interval Apparent Energy, Phase Sum U16 V VAh R
43 Maximum Current in Interval, Phase 1 U16 V A R
44 Maximum Current in Interval, Phase 2 U16 V A R
45 Maximum Current in Interval, Phase 3 U16 V A R
46 Minimum Voltage in Interval, Phase 1 U16 V V R
47 Minimum Voltage in Interval, Phase 2 U16 V V R
48 Minimum Voltage in Interval, Phase 3 U16 V V R
49 PowerMonitor W250 models Configuration (current range,
connection diagram)
50 Software Version (bits 8…15) S oftware Revision (bits 0…7) U16 NV R
51 Status Word U16 NV R
52 Command Word U16 V R/W
53 Recording Interval Time S etting U16 NV min R/W
70 Zero Power Detection U16 NV LSB R/W
U16 NV R
36 Rockwell Automation Publication 1425-UM001A-EN-P - January 2012
Page 37

Software Interface Chapter 3
Table 15 - Information for Table 14
Term Description Comments
NV Non-volatile Value is restored after a power cycle
V Volatile Value is not restored after a power cycle
S16 Signed 16-bit INT Range -32,768…32767
U16 Unsigned 16-bit INT Range 0…65,535
S32 Signed 32-bit INT Range -2,147,483,648…2,147,483,647
U32 Unsigned 32-bit INT Range 0…4,294,967,297
MSW Most Significant Word
LSW Least Significant Word
Comments on PowerMonitor W250 Modbus Register Tables
The following sections provide comments on the Modbus register tables.
Energy Usage Data (Register 0…23)
These registers contain the raw, unscaled total consumed energy measured by the
PowerMonitor W250 unit. The scaling factors listed in the next section must be
applied to obtain energy values in the applicable engineering units of wH, VARh,
and VAh. The energy counter time-stamp indicates when the data is sent to the
gateway.
Energy usage data increments positive for energy consumed and negative for
energy generated.
Real, reactive, and apparent energy consumption values are stored as 32-bit
integer values using two Modbus registers. The lower register address contains
the high (most significant) word (MSW), the higher register contains the low
(least significant) word value (LSW).
See Scaling Factors
registers.
Table 16 - Energy Counters
0, 2, …22 1, 3, …23
MSW LSW
for information on scaling the raw energy values in these
Rockwell Automation Publication 1425-UM001A-EN-P - January 2012 37
Page 38

Chapter 3 Software Interface
Scaling Factors
To obtain correct metering results, divide the raw values obtained from the listed
Modbus registers by the applicable scaling factor from Ta b l e 1 7
Table 17 - For All PowerMonitor W250 Models Except -480 Models with External 24V DC Control Power (up to 300V AC rms)
Current Range 100 A 200 A 500 A 1000 A 2000 A
Real Energy Wh [Intvl] 3.2 1.6 0.64 0.32 0.16
Real Energy Wh [Counter] 0.4 0.2 0.08 0.04 0.02
Reactive Energy VARh [Intvl] 3.2 1.6 0.64 0.32 0.16
Reactive Energy VARh [Counter] 0.4 0.2 0.08 0.04 0.02
Apparent Energy VAh [Intvl] 3.2 1.6 0.64 0.32 0.16
Apparent Energy VAh [Counter] 0.4 0.2 0.08 0.04 0.02
Volts rms 25 25 25 25 25
Amperes rms 60 30 12 6 3
Frequency, Hz 16 16 16 16 16
and Ta b l e 1 8 .
Table 18 - For PowerMonitor W250 Models Ending in -480 (24V DC powered)
Current Range 100 A 500 A 2000 A
Real Energy Wh (Interval) 1.6 0.32 0.08
Real Energy Wh (Counter) 0.2 0.04 0.01
Reactive Energy VARh Interval 1.6 0.32 0.08
Reactive Energy VARh (Counter) 0.2 0.04 0.01
Apparent Energy VAh (Interval) 1.6 0.32 0.08
Apparent Energy VAh (Counter) 0.2 0.04 0.01
Voltage, rms 12 12 12
Amperes, rms 60 12 3
Frequency, Hz 16 16 16
Energy and Recording Interval Time Stamps
The energy counter time stamp, read from Modbus registers 24…26 and the
recording interval data time stamp, read from registers 28…29, are organized as
shown in Ta b l e 1 9
Table 19 - Time Stamp Data Syntax
Register High Byte Low Byte
24 28 Minute Second
25 29 Day Hour
26 30 Year Month
.
Frequency (register 27)
The line frequency is measured on phase 1 of the line voltage. The most recent
value measured within the recording interval is kept in this register.
38 Rockwell Automation Publication 1425-UM001A-EN-P - January 2012
Page 39

Software Interface Chapter 3
Interval Energy Usage Data (Register 28 …48)
Energy is integrated over a user-selectable recording time interval. Refer to
Recording Interval Time (Register 53)
The interval energy usage values are calculated over the recording interval. At the
end of each recording interval, the values are stored in the interval energy
registers. The recording interval timestamp indicates the time at the end of the
recording interval.
Interval real and reactive energy values are expressed in a signed 16-bit INT
register with a raw value range of -32,768…32,767. Interval apparent energy
values are similarly expressed in an unsigned INT with a raw value range of
0…65,535. The raw value is the value before the scaling factor is applied.
With certain combinations of load and interval time, the interval energy may
exceed the range of the registers. In this case the registers will roll over (like a car
odometer) and report incorrect interval energy. The tables below list calculated
interval energy register raw values at various percentages of nominal phase
current (Ipn) and nominal voltage for the particular power monitor model
(240V or 480V) and 100% power factor. Values in bold font in the tables indicate
where a value rollover is likely to occur.
.
We recommend that you adjust the interval to a shorter time period to avoid this
issue.
Ta b l e 2 0
lists real or reactive energy values (one phase/sum of phases) at varying
percent of nominal phase currents with nominal voltage 240V or 480V for SP2
model and 100% power factor (0% power factor for reactive energy).
Table 20 - Real or Reactive Interval Energy Raw Values
Load Current 25% Ipn 50% Ipn 100% Ipn 120% Ipn
Interval Time (min)
5 1600 / 4800 3200 / 9600 6400 / 19200 7680 /23,040
6 1920 / 5760 3840 / 11,520 7680 / 23,040 9216 /27,648
10 3200 / 9600 6400 / 19,200 12,800 / 38,400 15,360 / 46,080
12 3840 / 11,520 7680 / 23,040 15,360 / 46,080 18,432 / 55,296
15 4800 / 14,400 9600 / 28,800 19,200 / 57,600 23,040 / 69,120
20 6400 / 19,200 12,800 / 38,400 25,600 / 76,800 30,720 / 92,160
30 9600 / 28,800 19,200 / 5,7600 38,400 / 115,200 46,080 / 138,240
Rockwell Automation Publication 1425-UM001A-EN-P - January 2012 39
Page 40

Chapter 3 Software Interface
Ta b l e 2 1 lists apparent energy raw values (one phase/sum of phases) at varying
percent of nominal phase currents with nominal voltage 240V or 480V for SP2
model.
Table 21 - Apparent Energy Raw Values
Load Current 25% Ipn 50% Ipn 100% Ipn 120% Ipn
Interval Time (min)
5 1600 / 4800 3200 / 9600 6400 / 19,200 7680 /23,040
6 1920 / 5760 3840 / 11,520 7680 / 23,040 9216 /27,648
10 3200 / 9600 6400 / 19,200 12,800 / 38,400 15,360 / 46,080
12 3840 / 11,520 7680 / 23,040 15,360 / 46,080 18,432 / 55,296
15 4800 / 14,400 9600 / 28,800 19,200 / 57,600 23,040 / 69,120
20 6400 / 19,200 12,800 / 38,400 25,600 / 76,800 30,720 / 92,160
30 9600 / 28,800 19,200 / 57,600 38,400 / 115,200 46,080 / 138,240
Maximum Current (register 43…45)
The rms current is averaged over 10 cycles (200 mS in a 50 Hz system, 167 ms in
a 60 Hz system). The maximum average current in each phase, measured during
the recording interval, is kept in registers 43…45.
Minimum Voltage (register 46…48)
The rms voltage for each phase is averaged over 10 cycles. The minimum voltage
value measured during the recording interval is kept in registers 46…48.
Model Configuration (register 49)
15 14 13 12 11 10 09 08 07 06 05 04 03 02 01 00
Not Used
Voltage
Range
00
01
Reserved
300V Maximum
520V Maximum
Rated Current
01 00
01 01
01 10
Connection
Diagram
000
111
100 A
200 A
500 A
Bit Number
4-wire Wye
3-wire Delta
10 00
10 10
40 Rockwell Automation Publication 1425-UM001A-EN-P - January 2012
1000 A
2000 A
Page 41

Software Interface Chapter 3
15 14 13 12 11 10 09 08 07 06 05 04 03 02 01 00
Reserved Reserved
Bit Number
1 = Reset Meter -
Resets the energy
usage and interval
usage counters.
Reserved = Writing a 1
disables RF communication.
Cycle power to the unit to
restore RF communication.
Firmware Revision (register 50)
The firmware revision reflects the major release number of the PowerMonitor
W250 firmware.
The high byte of this register contains the version number.
The low byte of this register contains the revision number.
Status Word (register 51)
The Status Word indicates through a bit map the status items shown in the
diagram.
15 14 13 12 11 10 09 08 07 06 05 04 03 02 01 00
Reserved
1 = Checksum Error
1 = Synchronized to 50/60 Hz
Command Word (register 52)
The PowerMonitor W250 unit is able to execute commands after a write to a
command word, which is mapped to a read/write register. Setting a bit in the
command word executes the command.
Bit Number
Reset Meter
This command resets the energy counters to zero in both RAM and nonvolatile
RAM. This command does not affect the reporting interval values.
Recording Interval Time (Register 53)
The recording interval time is a configurable parameter that defines the
recording interval in minutes.
It can take the values 5, 6, 10, 12, 15, 20, 30.
Rockwell Automation Publication 1425-UM001A-EN-P - January 2012 41
Page 42

Chapter 3 Software Interface
IMPORTANT
The start of such an interval is at the hour + n* interval.
When writing a value other than the ones listed to this parameter, it will be
discarded and the PowerMonitor W250 unit will continue to use the previous set
value.
Note that the PC Receiver will respond with an ‘ACK’ to a write of a valid or
non-valid value as it does not check the contents of the message sent to the
PowerMonitor W250 unit.
When changing the interval time, the PowerMonitor W250 unit will calculate
the end of the next recording interval time while keeping the current interval
measurements. This means that at the end of the recording interval, the
timestamp will be correct with respect to the new setting, but the first interval
values are not guaranteed to be integrated over the set interval time and thus
should be discarded by the master application software.
Zero Power Detection (register 70)
This register defines a Zero Power Multiplier integer value between 0…10, with a
default value of 3. The formula below utilizes this value to define a Zero Power
Threshold, below which the power monitor will consider the value as zero. A
value of less than 3 for the multiplier is not recommended.
The Zero Power Threshold level expressed in watts, is then:
(Zero Power Multiplier * 8.8) / Interval Energy Scaling Factor.
For instance, considering a PowerMonitor W250-100 device.
Zero power threshold = 3 * 8.8 / 3.2 = 8.25 watts.
When the measured value of power is less than the zero power threshold, Real,
Reactive, and Apparent Energy registers do not increment, and the Maximum
Current registers are set to 0.
42 Rockwell Automation Publication 1425-UM001A-EN-P - January 2012
Page 43

Software Interface Chapter 3
RF Communication Configuration and Status Modbus Register Table
This table lists the common registers used by all devices (power monitors,
routers, and PC receiver).
Table 22 - RF Communication Configuration and Status
Modbus Register Description Type/Length Storage Unit Access
201 Hop count U16 V R
202 First hop ID U16 V R
203 Last hop ID U16 V R
204 RSSI (high byte) and Supply
voltage (low byte)
220 Device ID (high byte and
low byte)
221 Group ID (high byte and
low byte)
222 Sampling interval U16 NV R
224 Network channel (11…26) U16 NV R
347 Device ID (high byte and
low byte)
348 Group ID (high byte and
low byte)
349 Sampling interval U16 V W
351 Network channel (11…26) U16 NV W
U16 V R
U16 NV R
U16 NV R
U16 NV See warning below
U16 NV See warning below
WARNING: Do not change the value of the Device ID or Group ID, registers 347
and 348. Doing so will cause the device to drop off the network and require
factory service to restore operation.
Table 23 - Information for Table 22
Term Description Comments
NV Nonvolatile Value is restored after a power cycle
V Volatile Value is not restored after a power
U16 Unsigned 16-bit INT Range 0…65,535
High byte Bits 8…15
Low byte Bits 0…7
cycle
Rockwell Automation Publication 1425-UM001A-EN-P - January 2012 43
Page 44

Chapter 3 Software Interface
Comments on RF Communication Configuration and Status
The following sections provide comments on the RF communication
configuration and status tables.
Hop Count (register 201)
This register reports the number of network node hops taken by a packet
delivered from the device to the PC Receiver. A device with a hop count equal to
1 is communicating directly with the PC Receiver.
For hop counts greater than 1, the First Hop ID (register 202) and the Last Hop
ID (register 203) report the device ID of respectively the first Router and the last
Router on the path used by a packet to get to the PC Receiver.
Radio Signal Strength Indicator, RSSI (register 204)
RSSI value is stored in the high byte of Register 204 and can be either positive or
negative (signed integer).
When negative, the value is expressed by using 2's complement. The following
table shows some examples of RSSI representation and the significance of the
values.
Table 24 - RSSI Register 204
RSSI Value Register 204 Low Byte in Decimal
(hex)
≥-20 236 (0xEC) Strong
-20…-35 236 (0xEC)…221 (0xDD) Good
-35…-45 221 (0xD)…211 (0xD3) Weak
< -45 211 (0xD3) Not acceptable
Signal Strength Category
The second byte of register 204 is the battery voltage raw data, which can be
converted into voltage value in decimal as follows:
Battery Voltage = (1.225*1023.0)/(blRaw+344)
where blRaw is the raw value in decimal. For instance, a battery reading of 0x19
(2nd byte of register 204) would be 25 in decimal, then Battery Voltage =
(1.225*1023) / (25+344) = 3.3961V.
44 Rockwell Automation Publication 1425-UM001A-EN-P - January 2012
Page 45

Software Interface Chapter 3
IMPORTANT
Device and Group ID
Device ID and Group ID can be directly read respectively in registers 220 and
221. They can be modified by registers 347 (Device ID) and 348 (Group ID).
ATT EN TI ON : The Group ID and Device ID should not be modified except under
exceptional circumstances. One such circumstance would be operating two or
more independent PowerMonitor W250 networks in such close proximity that
RF interference with each other occurs. Please contact Rockwell Automation
support services for more information or if assistance is required.
Network Channel
The Network Channel can be read in register 224 and overwritten into register
351 by any value between 11 and 26.
The Network Channel should not be modified except where interference with
other RF communication occurs. Please contact Rockwell Automation support
services for more information or if assistance is required.
ATT EN TI ON : Modifying the Network Channel may result in loss of
communication between the device and the network. This will require return of
the device to Rockwell Automation for factory service.
Sampling Interval
This interval time is the maximum period for a heartbeat to be sent by any node,
when no data is transmitted within that period, in order to indicate that the
device is still online. The sampling interval is expressed in tenths of seconds from
0…65,535 (65,535 = 109 minutes), read from register 222 and written into
register 349.
The PowerMonitor W250 unit uses a default value of 30 s (value 300).
Rockwell Automation Publication 1425-UM001A-EN-P - January 2012 45
Page 46

Chapter 3 Software Interface
PC Receiver Modbus Registers
These registers hold information about the PC Receiver and the wireless
network.
Table 25 - PC Receiver Register Table
Modbus Register Description Storage Type Read/Write
0 Group ID V U16 R
1 PC Receiver device ID V U16 R
2…17 Online device ID list bitmap (including the PC
Receiver ID)
18 Total online device count V U16 R
19…20 Network UTC time V U16 R/W
37 PC Receiver firmware version major number V U16 R
38 PC Receiver firmware version minor number V U16 R
39 PC Receiver firmware version revision number V U16 R
40…44 Reser ved for future use V U16
45 Radio channel number (11…26) V U16 R/W
VU16 R
Comments on PC Receiver Register Table
The following sections provide comments on the PC receiver register table.
Active End Node List (registers 2…17)
Table 26 - Online Device Matrix
Register Device Modbus Address / 1 = Active, 0 = Inactive
Bit #0123456789101112131415
2240241242243244245246247--------
3 224 225 226 227 228 229 230 231 232 233 234 235 236 237 238 239
4 208 209 210 211 212 213 214 215 216 217 218 219 220 221 222 223
5 192 193 194 195 196 197 198 199 200 201 202 203 204 205 206 207
6 176 177 178 179 180 181 182 183 184 185 186 187 188 189 190 191
7 160 161 162 163 164 165 166 167 168 169 170 171 172 173 174 175
8 144 145 146 147 148 149 150 151 152 153 154 155 156 157 158 159
9 128 129 130 131 132 133 134 135 136 137 138 139 140 141 142 143
10 112 113 114 115 116 117 118 119 120 121 122 123 124 125 126 127
11 96 97 98 99 100 101 102 103 104 105 106 107 108 109 110 111
12 80 81 82 83 84 85 86 87 88 89 90 91 92 93 94 95
13 64 65 66 67 68 69 70 71 72 73 74 75 76 77 78 79
14 48 49 50 51 52 53 54 55 56 57 58 59 60 61 62 63
15 32 33 34 35 36 37 38 39 40 41 42 43 44 45 46 47
16 16 17 18 19 20 21 22 23 24 25 26 27 28 29 30 31
170123456789101112131415
46 Rockwell Automation Publication 1425-UM001A-EN-P - January 2012
Page 47

Software Interface Chapter 3
IMPORTANT
Each bit of the 16 registers corresponds to a Modbus slave address. The Modbus
address is mapped to bit number as follows:
Examples:
• PowerMonitor W250 N° 25: register 16, bit 9 = 1
• PowerMonitor W250 N°16: register 16, bit 0 = 1
PC Receiver Network Channel (register 45)
As already stated, the Network Channel should not be modified except where
interference with other RF communication occurs. Please contact Rockwell
Automation support services for more information or if assistance is required.
The PC Receiver indicates and permits changing the channel number through
this ModBus register.
If you decide to change this parameter in the PC Receiver, the routers and end
devices (power monitors) will then scan for the PC Receiver and synchronize on
the same channel. The process of synchronizing may take several minutes.
ATT EN TI ON : Before changing the channel number of a network, power down
all devices in any other PowerMonitor W250 network within radio range, to
prevent devices from the other network from synchronizing their channel to the
incorrect PC Receiver.
PC Receiver Network UTC Time (registers 19…20)
The PC Receiver stores the reference time for the entire network in these
registers. Registers: 19 (MSW) and 20 (LSW) concatenate to form a 32-bit
UTC value. The value is equal to the number of seconds elapsed since January 1,
1970.
Routers and PowerMonitor W250 units will synchronize their internal real time
clocks after powerup, and thereafter at periodic intervals (2…4 minutes).
The initial synchronisation can take up to 6 minutes, depending on the network
configuration/number of hops from the PC Receiver to the PowerMonitor
W250 units.
The PC Receiver is not equipped with a battery, so the internal time is not kept
when power is removed. It is thus necessary to set the PC Receiver time
immediately after powerup.
Since time drift can be up to several seconds per day, synchronizing the PC
Receiver's time periodically with the Master application's time is necessary.
Rockwell Automation Publication 1425-UM001A-EN-P - January 2012 47
Page 48

Chapter 3 Software Interface
IMPORTANT
IMPORTANT
IMPORTANT
When setting the time in the PC Receiver, both UTC registers need to be written
in one command.
The ongoing recording intervals in the PowerMonitor W250 units will be
disrupted by a change of the PC Receiver time.
Modbus Command Interface
The Wireless Mesh Network communicates with client devices by using the
Modbus RTU protocol. Modbus ASCII is not supported. Please refer to the
Modbus Application Protocol Specification, v1.1b, December 28, 2006, available
from http://www.modbus.org
ASCII mode is not supported.
A client application acting as a Modbus RTU Master communicates through the
PC Receiver to obtain data (and issue commands) to end devices (power
monitors) in the wireless network. The PC Receiver may be directly addressed by
using Modbus address 247.
.
In this mode, the following commands are supported:
• Read Holding Registers (0x03)
• Write Multiple Registers (0x10)
• Read Device Identification (0x2B/0x0E)
The PC Receiver also acts as a proxy for the power monitors in the network. As
described earlier, the power monitors periodically broadcast data to the PC
Receiver. The PC Receiver in turn buffers the data and responds to commands
issued by the Modbus Master that are addressed to the power monitors. Available
Modbus commands are:
• Read Holding Registers (0x03)
• Write Multiple Registers (0x10)
Response of a write command will always be an ‘acknowledge’ response.To
verify if a write command is successful, poll the register that it was written to.
The PC Receiver will respond to a write command with an ‘acknowledge’
exception code 0x05. This indicates the server (or slave) has accepted the request
and is processing it, but a long duration of time will be required to do so. This
response is returned to prevent a time-out error from occurring in the client (or
master). The client (or master) can next issue a Poll Program Complete message
to determine if processing is completed. (From the Modbus Application Protocol
Specification, v. 1.1b, December 28, 2006.)
48 Rockwell Automation Publication 1425-UM001A-EN-P - January 2012
Page 49

Software Interface Chapter 3
Network Identification of PowerMonitor W250
Each of the PowerMonitor W250 units has a unique 16-bit Device ID, which is
printed on the label in the form of [High Byte].[Low Byte].
The low byte of the Device ID is the device Modbus address.
Modbus Communication Reference
The PowerMonitor W250 units are seen as Modbus slaves through the PC
Receiver. The maximum size of a Modbus RTU frame is 256 bytes. A Modbus
request has the following general format.
Table 27 - Modbus Request Format
Description Slave Address Function Code Request Data CRC
Byte Count 1 1 4 (typical, see below) 2 (LSB | MSB)
Read Holding Registers (Function code 0x03)
Table 28 - Master Request Format
Description Slave Address Function Code Request Data CRC
Hex 0xID 0x03 0xXX …0x7D 0xLSB 0xMSB
Table 29 - Slave Request Format
Description Slave Address Func tion Code Request Data CRC
Hex 0xID 0x03 0xXX 0xYY 0xLSB 0xMSB
The following is a Modbus master read request packet. A request is referred to as
a packet sent from the Modbus master application to the gateway slave. This has a
function code value of 0x03, Read Holding Registers.
The Request Data includes a 2-byte starting address offset value and a 2-byte
length value specifying the length of data to be returned in a 16-bit word
(number of Holding Registers, 1…125 (0x7D).
Examples
Read the frequency from the PowerMonitor W250 with Modbus address 63:
• Modbus address - 0x3F
• Starting register - 0x1B (register 27 decimal)
• Length - 0x01
[3F 03 00 1B 00 01 F0 D3]
Rockwell Automation Publication 1425-UM001A-EN-P - January 2012 49
Page 50

Chapter 3 Software Interface
Read all current and voltage values from the PowerMonitor W250 with Modbus
address 63:
• Modbus address - 0x3F
• Starting register - 0x2B (register 43 decimal)
• Length - 0x06
[3F 03 00 2B 00 06 B1 1E]
50 Rockwell Automation Publication 1425-UM001A-EN-P - January 2012
Page 51

Certifications
Chapter 4
UL
European Communities (EC) Directive Compliance
The power monitors are certified by UL to the following standards: UL 61010-1
and CSA C22.2 No. 61010-1.
If this product has the CE mark, it is approved for installation within the
European Union and EEA regions. It has been designed and tested to meet the
following directives.
• Low Voltage Directive (2006/95/EC)
• R&TTE Directive (1999/5/EC)
• EMC Directive (2004/108/EC)
Refer toAdditional Resources
DoC for this product.
This equipment may be operated in AUT, BEL, BUL, CZE, CYP, DNK, EST, FIN, F, D,
GRC, HNG, ISL, IRL, I, LVA, LIE, LTU, LUX, MLT, HOL, POL, POR, ROU, SVK, SVN, E, SUI,
S, G, BIH, GEO, HRV, MDA, MKD, MNE, SRB, TUR.
The use of this equipment requires a license in NOR, RUS, UKR.
on page 5 for instructions on how to get a CE
Rockwell Automation Publication 1425-UM001A-EN-P - January 2012 51
Page 52

Chapter 4 Certifications
IMPORTANT
FCC, IC
PowerMonitor W250 units have the following approvals and certifications.
Federal Communication Commission Interference Statement
This equipment has been tested and found to comply with the limits for a Class B
digital device, pursuant to Part 15 of the FCC Rules. These limits are designed to
provide reasonable protection against harmful interference in a residential
installation. This equipment generates, uses and can radiate radio frequency
energy and, if not installed and used in accordance with the instructions, may
cause harmful interference to radio communications. However, there is no
guarantee that interference will not occur in a particular installation. If this
equipment does cause harmful interference to radio or television reception,
which can be determined by turning the equipment off and on, the user is
encouraged to try to correct the interference by one of the following measures:
• Reorient or relocate the receiving antenna.
• Increase the separation between the equipment and receiver.
• Connect the equipment into an outlet on a circuit different from that to
which the receiver is connected.
• Consult the dealer or an experienced radio/TV technician for help.
FCC Caution: Any changes or modifications not expressly approved by the party
responsible for compliance could void the user's authority to operate this
equipment. (15.21)
This device complies with Part 15 of the FCC Rules. Operation is subject to the
following two conditions: (1) This device may not cause harmful interference,
and (2) this device must accept any interference received, including interference
that may cause undesired operation. (15.19)
FCC Radiation Exposure Statement:
This equipment complies with FCC radiation exposure limits set forth for an
uncontrolled environment. This equipment should be installed and operated
with a minimum distance of 20 cm between the radiator and your body.
This transmitter must not be co-located or operating in conjunction with any
other antenna or transmitter.
52 Rockwell Automation Publication 1425-UM001A-EN-P - January 2012
Page 53

Certifications Chapter 4
IMPORTANT
• Industry Canada statement:
This device complies with RSS-210 of the Industry Canada Rules.
Operation is subject to the following two conditions:
1. This device may not cause harmful interference.
2. This device must accept any interference received, including interference
that may cause undesired operation.
Radiation Exposure Statement:
This equipment complies with IC radiation exposure limits set forth for an
uncontrolled environment. This equipment should be installed and operated
with minimum distance 20 cm between the radiator and your body.
Rockwell Automation Publication 1425-UM001A-EN-P - January 2012 53
Page 54

Chapter 4 Certifications
Notes:
54 Rockwell Automation Publication 1425-UM001A-EN-P - January 2012
Page 55

Specifications
Appendix A
General and Environmental Specifications
Table 30 - PowerMonitor W250, Line Powered up to 300V AC rms
Attribute Value
Primary nominal current 20…2000 A (depending on the model)
Primary voltage, measuring range (neutral/phase) (VPN) 90…300V rms
Primary voltage, nom range (N/L) (VPN) 100…272V rms
Absolute min/max input voltage (N/L) 90 …300V rms
Frequency 50/60 Hz
Max power consumption 2 W
Max supply current (N-L1) 0.2 A rms
Ambient operating temperature (90% rH) (TA) -10 …55 °C (14…131 °F)
For indoor use only
Altitude Up to 2000 m (6562 ft)
Protection degree IP2X
Pollution degree PD2
Isolation Isolation class II
IEC 61010-1 CAT III 300V RMS
Table 31 - PowerMonitor W250, External 24V DC Powered (-480 modes)
Attribute Value
Primary nom current (IPN) 100…2000 A (depending on the model)
Primary voltage, measuring range (VPN) 180…520V rms
Frequency 50/60 Hz
External power supply (+/- 10%)
Max supply current 50 mA DC
Ambient operating temperature (90% rH) (TA) -10…55 °C (14…131 °F)
For indoor use only
Altitude Up to 2000 m (6562 ft)
Protection degree IP2X
Pollution degree PD2
Isolation Isolation class I
(1) The product must be connected to earth (ground).
Rockwell Automation Publication 1425-UM001A-EN-P - January 2012 55
(1)
24V DC
IEC 61010-1 CAT III 300V RMS
(1)
Page 56

Appendix A Specifications
Table 32 - Accuracy and Range
Parameter Accuracy in % of Reading at 25 °C
(77 °F) (50/60 Hz)
Voltage Min value in interval 1.5% D3 model: 240V 3-wire Delta/
Current Max value in interval 1.5% Depending on model, monitor load
Frequency Based of Phase 1 50 or 60 Hz/ 45…66 Hz
Energy functions: kWH IEC 62053-21 Class 1 ± 1%
Energy functions: kVARH IEC 62053-23 Class 3 ± 3%
Metering update rate kWh, kVarh, kVAh counters @
Nom/Range
90…300V AC line-to-line
277V line-to-neutral 4-wire WYE/
90…300V AC line-to-neutral
480 models: 480V 3-wire Delta/
90…520V AC line-to-line
range 100…2000 A
1 minute;
Interval Energy Data @ configurable
5, 6, 10, 12, 15, 20, or 30 minutes
Table 33 - Input and Output Ratings
Attribute Value
Control power 100…277V rms AC at 50/60 Hz (line-to-neutral)
2 W max consumption
24V DC power for 480 models
Table 34 - General Specifications
Attribute Value
Dielectric withstand CT-based model 3500V
Rogowski-based model 3500V
Terminal blocks 2.5 mm sq. for input voltage (18…24 AWG)
0.5 N•m (0.37 lb•ft)
Certifications CE, cULus (power monitors only), FCC Part 15, Industry
Canada RSS-210
56 Rockwell Automation Publication 1425-UM001A-EN-P - January 2012
Page 57

Table 35 - General Environmental Specifications
Attribute Value
Temperature, operating -10…55 °C (14…131 °F)
Temperature, nonoperating -25…70 °C (-13…158 °F)
Humidity 90% RH max
Mass 0.4 kg (0.88 lb)
Protection index IP 2X
Standards EN 50178: 1997
EN 61010-1: 2001
Specifications Appendix A
Wireless Network Characteristics
• Radio standard - IEEE 802.15.4 (ISO/IEC 8802.15.4)
• Protocol - Proprietary
• RF Band - 2.4 GHz
Table 36 - RF Power Operating Range (line of sight)
Attribute PC Receiver and Router PowerMonitor W250
RF max power 100 mW (20 dBm) 10 mW (10 dBm)
Operating range between PowerMonitor
W250 and PC Receiver or Router
Operating range between PC Receiver and
Routers
Table 37 - Wireless Communication Operating Range (line-of-sight)
Attribute Value
PC Receiver to Monitor 25 m (82 ft)
Monitor to Router 25 m (82 ft)
PC Receiver to Router 260 m (853 ft)
30 m (95 ft) -
228 m (750 ft) -
ATT EN TI ON : The operating range could change depending on building
configuration and network layout.
Rockwell Automation Publication 1425-UM001A-EN-P - January 2012 57
Page 58

Appendix A Specifications
Notes:
58 Rockwell Automation Publication 1425-UM001A-EN-P - January 2012
Page 59

Glossary
The following terms and abbreviations are used throughout this manual. For
definitions of terms not listed here, refer to the Allen-Bradley Industrial
Automation Glossary, publication AG-7.1
RTC Real Time Clock
UTC Coordinated Universal Time. Number of seconds passed since 1.1.1970
PC Receiver Gateway device that controls the RF network and provides a serial interface for
the customer
Router RF router/repeater
End Node RF communication module integrated in the PowerMonitor W250
Hop Count Number of network node hops taken by a packet delivered from a node to the PC
Receiver
For example: End Node - PC Receiver = 1 hop,
.
End Node - Router - PC Receiver = 2 hops
(each additional Router will add another hop).
Modbus RTU Serial communication protocol used by the PC Receiver
SELV Safety Extra Low Voltage
Rockwell Automation Publication 1425-UM001A-EN-P - January 2012 59
Page 60

Glossary
Notes:
60 Rockwell Automation Publication 1425-UM001A-EN-P - January 2012
Page 61

Index
A
about PowerMonitor W250 unit 7
56
accuracy
active end node list
additional resources
apparent energy value
46
5
40
B
building audit 16
C
certifications 51
changing interval time
circuit breakers
command interface
command word
connection
PC receiver
router 20
RS-232
33
RS-485
34
voltage input 30
connection PC receiver
constricted topology
current transformers
42
30
48
41
33
19
19
9, 27
formula zero power threshold
frequency register 27
30
fuses
42
38
G
general specifications 55
59
glossary
group ID
45
H
hardware installation 15
13
hop
hop count
44
I
IC statement 53
input ratings
installation planning
interval energy usage data register 28 …48
interval time
56
building audit
signal strength
walls and floors 16
16
17
39
45
16
D
data overview 10
device addresses
device ID
DIN rail mount
32
45
24
E
EC directive compliance 51
effects on signal strength
energy and recording interval time stamps
energy counters
energy usage data
energy and recording interval time stamps
energy counter
frequency
interval energy usage data
register 0…23
scaling factors
environmental specifications
37
38
17
37
39
37
38
55, 57
F
FCC rules 52
features
PC receiver
wireless router
firmware revision
11
12
41
label 32
linear topology
location
router
location PC receiver
loss of communication
maximum current 40
38
minimum voltage
Modbus
38
communication reference
RTU protocol
Modbus command interface
Modbus register table
modbus register table
Modbus registers
PC receiver
model configuration
model description
modifying network channel
Modubus register
energy usage
module identification
L
18
20
19
45
M
40
49
48
48
35
43
46
40
10
45
37
32
Rockwell Automation Publication 1425-UM001A-EN-P - January 2012 61
Page 62

Index
mounting 22
23
torque
N
network
commissioning
network channel
network description
network identification
network topologies
13
node ID
32
45
13
49
17
O
operating range
57
RF power
wireless communication
output ratings
56
57
P
PanelView W250
DIN rail mount
panel mounting 23
PC receiver
connection
location
Modbus registers 46
network channel
PC receiver connection
PC receiver netnwork UTC time
PowerMonitor W250
about
current transformers 9
data overview
location
location guidelines 22
location in cabinet
model description
mounting
Rogowski coils
RSEnergyMetrix
RSPower
status indicator
wall mounting
wireless PC receiver
wireless power monitor
wireless router
wiring diagrams
24
8
19
19
47
33
47
9
7
10
22
22
10
22
9
7
7
31
23
8
8
9
25, 26, 27
R
radio signal strength indicator 44
56
range
reactive interval energy value
read device identification
read holding registers
real interval energy values
recording interval time
39
48
48, 49
39
41
register 0…23
register 19 and 20
register 201
register 204
register 27
register 28 …48
register 43…45
register 45
register 46…48
register 49
register 50
register 51
register 52
register 53
register 70
registers 2…17
reset meter
RF communication configuration
RF power operating range
RF status
Rogowski coil
router
connection
location
orientation 21
RS-232 connection
RS-485 connection
37
47
44
44
38
39
40
47
40
40
41
41
41
41
42
46
41
57
43
9, 29
9
20
20
33
34
S
safety considerations 15
sampling interval
scaling factors
software interface
specifications
environmental
general
star topology
star-mesh topology
status indicator
PowerMonitor W250
status indicators
PC receiver
wireless router
status word
45
38
35
55
55
18
17
31
12
13
41
T
time stamps 38
topologies
17
constricted
linear
18
18
star
star-mesh
19
17
U
UTC time 47
43
62 Rockwell Automation Publication 1425-UM001A-EN-P - January 2012
Page 63

V
voltage input
circuit breakers
fuses
30
voltage input connection
30
30
W
wireless communication operating range 57
wireless mesh network
wireless network description
wireless PC receiver
11
features
overview
11
status indicators
wireless power monitor 8
wireless router
accessories
description
features
12
status indicator 13
wiring diagrams
write multiple registers
11
13
8
12
9
12
12
25, 26, 27
48
Index
Z
zero power detection 42
zero power multiplier
42
Rockwell Automation Publication 1425-UM001A-EN-P - January 2012 63
Page 64

Index
Notes:
64 Rockwell Automation Publication 1425-UM001A-EN-P - January 2012
Page 65

Page 66

Rockwell Otomasyon Ticaret A.Ş., Kar Plaza İş Merkezi E Blok Kat:6 34752 İçerenköy, İstanbul, Tel: +90 (216) 5698400
Rockwell Automation Support
Power, Control and Information Solutions Headquarters
Americas: Rockwell Automation, 1201 South Second Street, Milwaukee, WI 53204-2496 USA, Tel: (1) 414.382.2000, Fax: (1) 414.382.4444
Europe/Middle East/Africa: Rockwell Automation NV, Pegasus Park, De Kleetlaan 12a, 1831 Diegem, Belgium, Tel : (32) 2 663 0600, Fax: (32) 2 663 0640
Asia Pacic: Rockwell Automation, Level 14, Core F, Cyberport 3, 100 Cyberport Road, Hong Kong, Tel: (852) 2887 4788, Fax: (852) 2508 1846
www.rockwel lautomation.com
Rockwell Automation provides technical information on the Web to assist you in using its products.
http://www.rockwellautomation.com/support/, you can find technical manuals, a knowledge base of FAQs, technical and
At
application notes, sample code and links to software service packs, and a MySupport feature that you can customize to
make the best use of these tools.
For an additional level of technical phone support for installation, configuration, and troubleshooting, we offer
Te c h C o n n e ct
representative, or visit
SM
support programs. For more information, contact your local distributor or Rockwell Automation
http://www.rockwellautomation.com/support/.
Installation Assistance
If you experience a problem within the first 24 hours of installation, review the information that is contained in this
manual. You can contact Customer Support for initial help in getting your product up and running.
United States or Canada 1.440.646.3434
Outside United States or Canada Use the Wo rldw ide Loc ator
Automation representative.
at http://www.rockwellautomation.com/support/americas/phone_en.html, or contact your local Rockwell
New Product Satisfaction Return
Rockwell Automation tests all of its products to ensure that they are fully operational when shipped from the
manufacturing facility. However, if your product is not functioning and needs to be returned, follow these procedures.
United States Contact your distributor. You must provide a Customer Support case number (call the phone number above to obtain one) to your
Outside United States Please contact your local Rockwell Automation representative for the return procedure.
distributor to complete the return process.
Documentation Feedback
Your comments will help us serve your documentation needs better. If you have any suggestions on how to improve this
document, complete this form, publication
Publication 1425-UM001A-EN-P - January 2012
RA-DU002, available at http://www.rockwellautomation.com/literature/.
Copyright © 2012 Rockwell Auto mation, Inc. All rights reserved. Pr inted in the U.S.A.
 Loading...