

Page 1

User Manual
Capacitor Bank Controller
Catalog Number
1413-CAP
Page 2
Important User Information
IMPORTANT
Solid-state equipment has operational characteristics differing from those of electromechanical equipment. Safety
Guidelines for the Application, Installation and Maintenance of Solid State Controls (publication SGI-1.1
your local Rockwell Automation sales office or online at http://www.rockwellautomation.com/literature/
important differences between solid-state equipment and hard-wired electromechanical devices. Because of this difference,
and also because of the wide variety of uses for solid-state equipment, all persons responsible for applying this equipment
must satisfy themselves that each intended application of this equipment is acceptable.
In no event will Rockwell Automation, Inc. be responsible or liable for indirect or consequential damages resulting from
the use or application of this equipment.
The examples and diagrams in this manual are included solely for illustrative purposes. Because of the many variables and
requirements associated with any particular installation, Rockwell Automation, Inc. cannot assume responsibility or
liability for actual use based on the examples and diagrams.
No patent liability is assumed by Rockwell Automation, Inc. with respect to use of information, circuits, equipment, or
software described in this manual.
Reproduction of the contents of this manual, in whole or in part, without written permission of Rockwell Automation,
Inc., is prohibited.
Throughout this manual, when necessary, we use notes to make you aware of safety considerations.
WARNING: Identifies information about practices or circumstances that can cause an explosion in a hazardous
environment, which may lead to personal injury or death, property damage, or economic loss.
available from
) describes some
ATTENTION: Identifies information about practices or circumstances that can lead to personal injury or death,
property damage, or economic loss. Attentions help you identify a hazard, avoid a hazard, and recognize the
consequence
SHOCK HAZARD: Labels may be on or inside the equipment, for example, a drive or motor, to alert people that
dangerous voltage may be present.
BURN HAZARD: Labels may be on or inside the equipment, for example, a drive or motor, to alert people that
surfaces may reach dangerous temperatures.
Identifies information that is critical for successful application and understanding of the product.
Allen-Bradley, Rockwell Software, Rockwell Automation, PanelView, PanelView Component, Powermonitor, Powermonitor 1000, MicroLogix, and TechConnect are trademarks of Rockwell Automation, Inc.
Trademarks not belonging to Rockwell Automation are property of their respective companies.
Page 3

Table of Contents
Preface
Who Should Use This Manual . . . . . . . . . . . . . . . . . . . . . . . . . . . . . . . . . . . . . . 5
Additional Resources . . . . . . . . . . . . . . . . . . . . . . . . . . . . . . . . . . . . . . . . . . . . . . . 5
Chapter 1
General Information
Installation
Introduction. . . . . . . . . . . . . . . . . . . . . . . . . . . . . . . . . . . . . . . . . . . . . . . . . . . . . . . 7
Description of the Capacitor Bank Controller . . . . . . . . . . . . . . . . . . . . . . . . 7
Functions. . . . . . . . . . . . . . . . . . . . . . . . . . . . . . . . . . . . . . . . . . . . . . . . . . . . . . 7
Options . . . . . . . . . . . . . . . . . . . . . . . . . . . . . . . . . . . . . . . . . . . . . . . . . . . . . . . 8
Chapter 2
System Components . . . . . . . . . . . . . . . . . . . . . . . . . . . . . . . . . . . . . . . . . . . . . . . 9
Optional Additional PowerMonitor 1000 Meters . . . . . . . . . . . . . . . 10
System Architecture . . . . . . . . . . . . . . . . . . . . . . . . . . . . . . . . . . . . . . . . . . . . . . 10
Mount and Connect Your Controller. . . . . . . . . . . . . . . . . . . . . . . . . . . . . . 11
Mount the Controller . . . . . . . . . . . . . . . . . . . . . . . . . . . . . . . . . . . . . . . . 12
Using the Battery. . . . . . . . . . . . . . . . . . . . . . . . . . . . . . . . . . . . . . . . . . . . . 15
Wire the MicroLogix 1400 Controller . . . . . . . . . . . . . . . . . . . . . . . . . 17
Install the PanelView Component C600 Touch Terminal . . . . . . . . . . . 18
Minimum Spacing. . . . . . . . . . . . . . . . . . . . . . . . . . . . . . . . . . . . . . . . . . . . 19
Mounting Angle. . . . . . . . . . . . . . . . . . . . . . . . . . . . . . . . . . . . . . . . . . . . . . 19
Panel Guidelines . . . . . . . . . . . . . . . . . . . . . . . . . . . . . . . . . . . . . . . . . . . . . 19
Panel Cutout Dimensions. . . . . . . . . . . . . . . . . . . . . . . . . . . . . . . . . . . . . 19
Mount the PanelView Component C600 Terminal . . . . . . . . . . . . . 20
Connect Power. . . . . . . . . . . . . . . . . . . . . . . . . . . . . . . . . . . . . . . . . . . . . . . 24
Mount the PowerMonitor 1000 Unit. . . . . . . . . . . . . . . . . . . . . . . . . . . . . . 25
Panel Mount . . . . . . . . . . . . . . . . . . . . . . . . . . . . . . . . . . . . . . . . . . . . . . . . . 25
DIN-rail Mount. . . . . . . . . . . . . . . . . . . . . . . . . . . . . . . . . . . . . . . . . . . . . . 25
Connect the Controller, PanelView Component Terminal,
and the PowerMonitor 1000 Meter. . . . . . . . . . . . . . . . . . . . . . . . . . . . . . . . 26
Configuration
Chapter 3
Overview . . . . . . . . . . . . . . . . . . . . . . . . . . . . . . . . . . . . . . . . . . . . . . . . . . . . . . . . 29
Communication Settings . . . . . . . . . . . . . . . . . . . . . . . . . . . . . . . . . . . . . . . . . 30
Base Unit . . . . . . . . . . . . . . . . . . . . . . . . . . . . . . . . . . . . . . . . . . . . . . . . . . . . 30
Ethernet HMI Option . . . . . . . . . . . . . . . . . . . . . . . . . . . . . . . . . . . . . . . . 30
MicroLogix 1400 Controller . . . . . . . . . . . . . . . . . . . . . . . . . . . . . . . . . . . . . . 31
Operating Buttons. . . . . . . . . . . . . . . . . . . . . . . . . . . . . . . . . . . . . . . . . . . . 31
Using Menus to Choose Values. . . . . . . . . . . . . . . . . . . . . . . . . . . . . . . . 31
Selecting Between Menu Items . . . . . . . . . . . . . . . . . . . . . . . . . . . . . . . . 32
Cursor Display . . . . . . . . . . . . . . . . . . . . . . . . . . . . . . . . . . . . . . . . . . . . . . . 32
Setting Values . . . . . . . . . . . . . . . . . . . . . . . . . . . . . . . . . . . . . . . . . . . . . . . . 33
Controller Configuration . . . . . . . . . . . . . . . . . . . . . . . . . . . . . . . . . . . . . 33
View MicroLogix 1400 Controller Ethernet Status . . . . . . . . . . . . . . 39
Rockwell Automation Publication 1413-UM001D-EN-P - November 2010 3
Page 4

Table of Contents
Operation
SCADA Interface
PowerMonitor 1000 Meter Configuration. . . . . . . . . . . . . . . . . . . . . . . . . . 42
Parameter Descriptions. . . . . . . . . . . . . . . . . . . . . . . . . . . . . . . . . . . . . . . . 43
Set Parameters with the PowerMonitor 1000 Unit . . . . . . . . . . . . . . 43
Configuration with the PanelView Component C600
Terminal (optional HMI only) . . . . . . . . . . . . . . . . . . . . . . . . . . . . . . . . . . . . 47
Capacitor Bank Commissioning Checklist. . . . . . . . . . . . . . . . . . . . . . 53
Chapter 4
Introduction . . . . . . . . . . . . . . . . . . . . . . . . . . . . . . . . . . . . . . . . . . . . . . . . . . . . . 55
Operating Modes. . . . . . . . . . . . . . . . . . . . . . . . . . . . . . . . . . . . . . . . . . . . . . . . . 55
Fault Relay Operation. . . . . . . . . . . . . . . . . . . . . . . . . . . . . . . . . . . . . . . . . 56
Alarms. . . . . . . . . . . . . . . . . . . . . . . . . . . . . . . . . . . . . . . . . . . . . . . . . . . . . . . . . . . 58
Edit and View Data . . . . . . . . . . . . . . . . . . . . . . . . . . . . . . . . . . . . . . . . . . . . . . . 58
MicroLogix 1400 Controller. . . . . . . . . . . . . . . . . . . . . . . . . . . . . . . . . . . 58
Optional PanelView Component C600 HMI . . . . . . . . . . . . . . . . . . . 59
Chapter 5
Power-circuit Parameters. . . . . . . . . . . . . . . . . . . . . . . . . . . . . . . . . . . . . . . . . . 65
Catalog Number Explanation
Appendix A
Base Unit with Ethernet 1413-CAP-ME
PowerMonitor Meter . . . . . . . . . . . . . . . . . . . . . . . . . . . . . . . . . . . . . . . . . . . . . 67
Ethernet Base Unit with 1413-CAP-ME-PE
Ethernet HMI . . . . . . . . . . . . . . . . . . . . . . . . . . . . . . . . . . . . . . . . . . . . . . . . . . . 68
Glossary
Index
4 Rockwell Automation Publication 1413-UM001D-EN-P - November 2010
Page 5

Read this to familiarize yourself with the rest of the manual. It provides
information concerning the following:
• Who should use this manual
• Where to go for more information
Preface
Who Should Use This Manual
Additional Resources
Use this manual if you are responsible for designing, installing, programming, or
troubleshooting the Capacitor Bank Controller system.
You should have a basic understanding of electrical circuitry and familiarity with
relay logic. If you do not, obtain the proper training before using this product.
Please refer to the following publications for additional information on how to
assemble, install, connect, operate, and maintain your capacitor bank controller.
Resource Description
MicroLogix 1400 Programmable Controllers
Installation Instructions, publication 1766-IN001
MicroLogix 1400 Programmable Controllers User
Manual, publication 1766-UM001
PowerMonitor 1000 Installation Manual,
publication 1408-IN001
PowerMonitor 1000 User Manual, publication
1408-UM001
PanelView Component Installation Instructions,
publication 2711C-IN001
PanelView Component User Manual, publication
2711C-UM001
Industrial Automation Wiring and Grounding
Guidelines, publication 1770-4.1
Product Certifications website,
http://www.ab.com
Provides procedures you use to install and wire
your controller.
Provides procedures you use to install, wire, and
troubleshoot your controller.
Provides product description and functionality.
Provides a guide to set up communication with
the 1408 PowerMonitor 1000 unit by using other
applications and controllers.
Provides instructions for installing a PanelView
Component terminal.
Provides information for configuring a PanelView
Component terminal.
Provides general guidelines for installing a
Rockwell Automation industrial system.
Provides declarations of conformity, certificates,
and other certification details.
You can view or download publications at http://www.rockwellautomation.com/
literature/. To order paper copies of technical documentation, contact your local
Rockwell Automation distributor or sales representative.
Rockwell Automation Publication 1413-UM001D-EN-P - November 2010 5
Page 6

Preface
Notes:
6 Rockwell Automation Publication 1413-UM001D-EN-P - November 2010
Page 7

General Information
Chapter
1
Introduction
Description of the Capacitor Bank Controller
The capacitor bank controller is intended for standard, fixed-function capacitor
banks. The controller consists of standard, off-the-shelf, Allen-Bradley hardware
with the application ladder code necessary to perform power factor correction.
The controller is designed to provide the same base functionality as a fixedfunction capacitor bank controller.
The capacitor bank controller is a pre-engineered control system containing a
MicroLogix 1400 controller, one or more PowerMonitor 1000 modules, and an
optional human-machine interface (HMI). Pre-engineered ladder logic code in
the controller gathers real and reactive power data from up to four power feeds
(utility feeds and/or generators). The logic operates on the data in standard
engineering units of kVAR and kW and minimizes imported and exported
reactive power by switching up to 10 steps of capacitance. This strategy controls
power factor while reducing the likelihood of voltage surge caused by excessive
kVAR expor t.
Functions
• Auto configure
• Manual configure
• Discharge timer on each step
• Selectable operating modes
– Manual operation
– First In, Last Out (FILO)
– Balanced, level-out usage of capacitor steps
– Best fit, finds best match of capacitor step to system kVAR needs
Rockwell Automation Publication 1413-UM001D-EN-P - November 2010 7
Page 8

Chapter 1 General Information
• Alarms
– Bad step, indicates blown fuse, capacitor failure
– Target power factor not achieved
– High / Low voltage
– Metering
– Communication loss
• PowerMonitor data concentrated into the MicroLogix 1400 controller
• Phase current, line voltage, frequency, real and reactive power, and power
factor
Options
• Up to three additional PowerMonitor 1000 meters to aggregate up to four
total feeds
• The PanelView Component C600 Touch HMI terminal with Ethernet
communication provides ease of navigation, viewing, and configuration of
the capacitor bank controller application
8 Rockwell Automation Publication 1413-UM001D-EN-P - November 2010
Page 9
Chapter
IMPORTANT
IMPORTANT
2
Installation
The capacitor bank controller system is supplied as a number of components that
you assemble, install, and connect in a suitable enclosure.
System Components
Table 1 - Base Configurations
Key Quantity Cat. No. Description
1 1 1408-EM3-ENT-A PowerMonitor 1000 unit
2 1 1766-L32BWA MicroLogix 1400 controller
3 Ethernet cable (customer supplied)
Table 2 - Optional Components
Key Quantity Cat. No. Description
4 1 2711C-T6M PanelView Component C600 Touch Terminal
The key number in the component lists are referenced in the illustrations that
follow.
The PanelView Component terminal can be powered through a 24V DC,
10 W (minimum) power supply that you provide. We recommend an
Allen-Bradley Bulletin 1606 power supply.
Table 3 - Customer Supplied Components (optional)
Quantity Cat. No. Description
1 - Ethernet cable 3.05 m (10 ft)
1 - Ethernet switch
Use standard Ethernet cable (Cat 5 10Base-T) with the Ethernet switch.
Rockwell Automation Publication 1413-UM001D-EN-P - November 2010 9
Page 10
Chapter 2 Installation
1
2
3
4
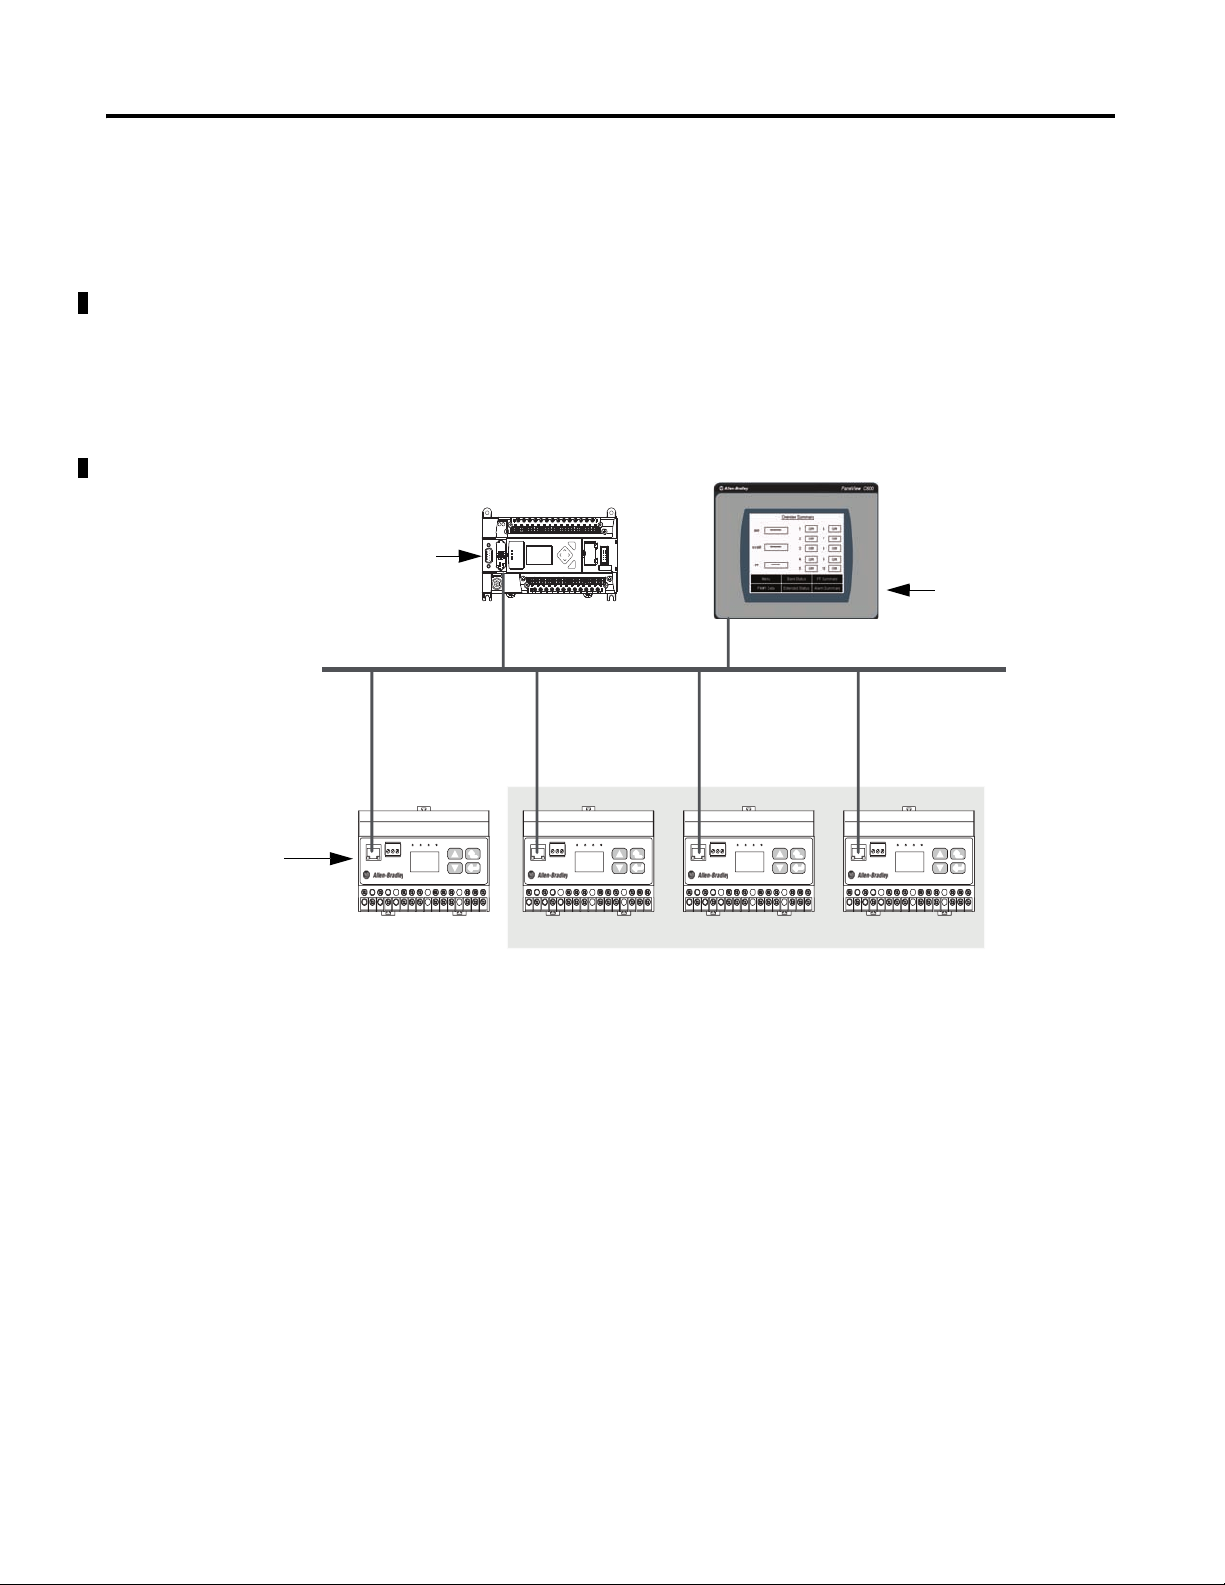
MicroLogix 1400 Controller
Optional Ethernet HMI
PowerMonitor 1000 Meter Optional PowerMonitor 1000 Meters (up to 3)
Ethernet Local
Area Network
Optional Additional PowerMonitor 1000 Meters
The controller is designed to operate with up to three additional
PowerMonitor 1000 meters. Additional PowerMonitor 1000 meters must be
ordered separately. Please contact your local Rockwell Automation distributor for
information.
System Architecture
This section illustrates the base system with Ethernet communication.
Figure 1 - Local Area Network Connection
ESC
OK
RS-485
EtherNet/IP
RS-485 STATUS
Powermonitor 1000
RX TX Mod Net
+ - SHLD
ACT LNK
RS-485
EtherNet/IP
RS-485 STATUS
Powermonitor 1000
RX TX Mod Net
+ - SHLD
ACT LNK
RS-485
EtherNet/IP
RS-485 STATUS
Powermonitor 1000
RX TX Mod Net
+ - SHLD
ACT LNK
RS-485
EtherNet/IP
RS-485 STATUS
Powermonitor 1000
RX TX Mod Net
+ - SHLD
ACT LNK
10 Rockwell Automation Publication 1413-UM001D-EN-P - November 2010
Page 11
Installation Chapter 2
1
Left Side View Top View
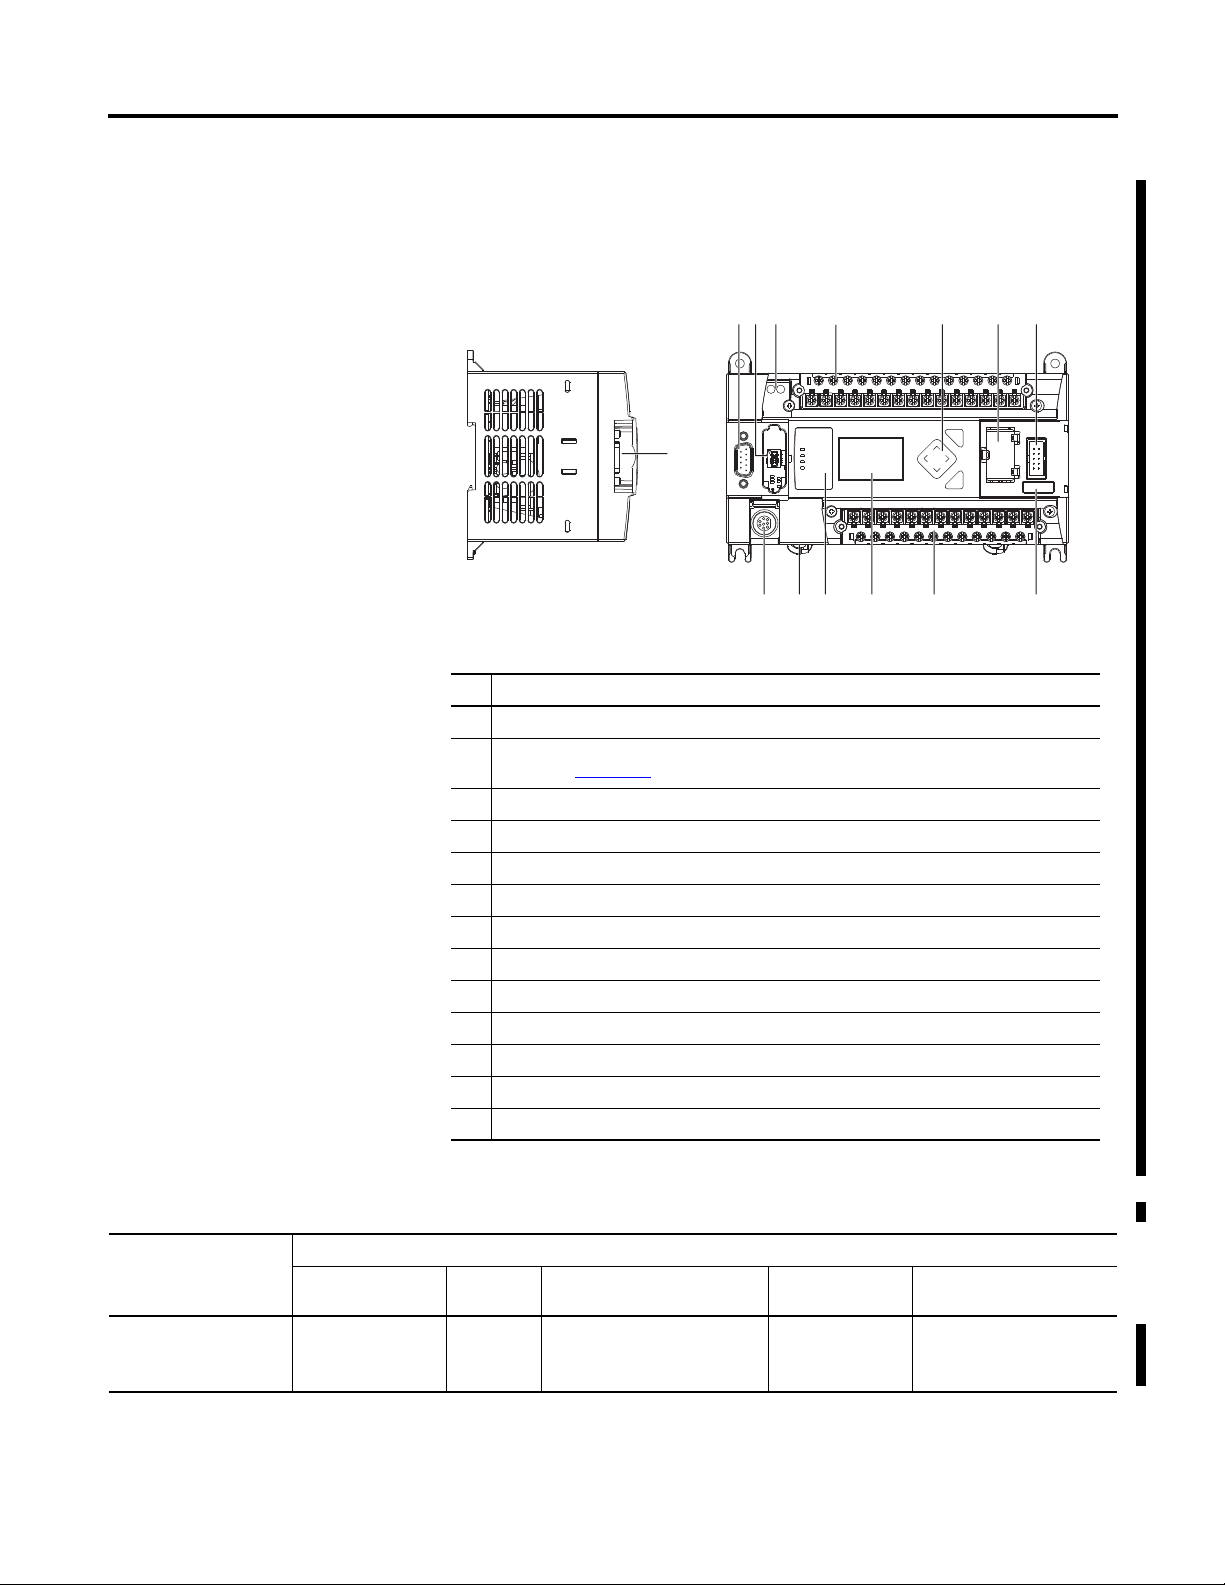
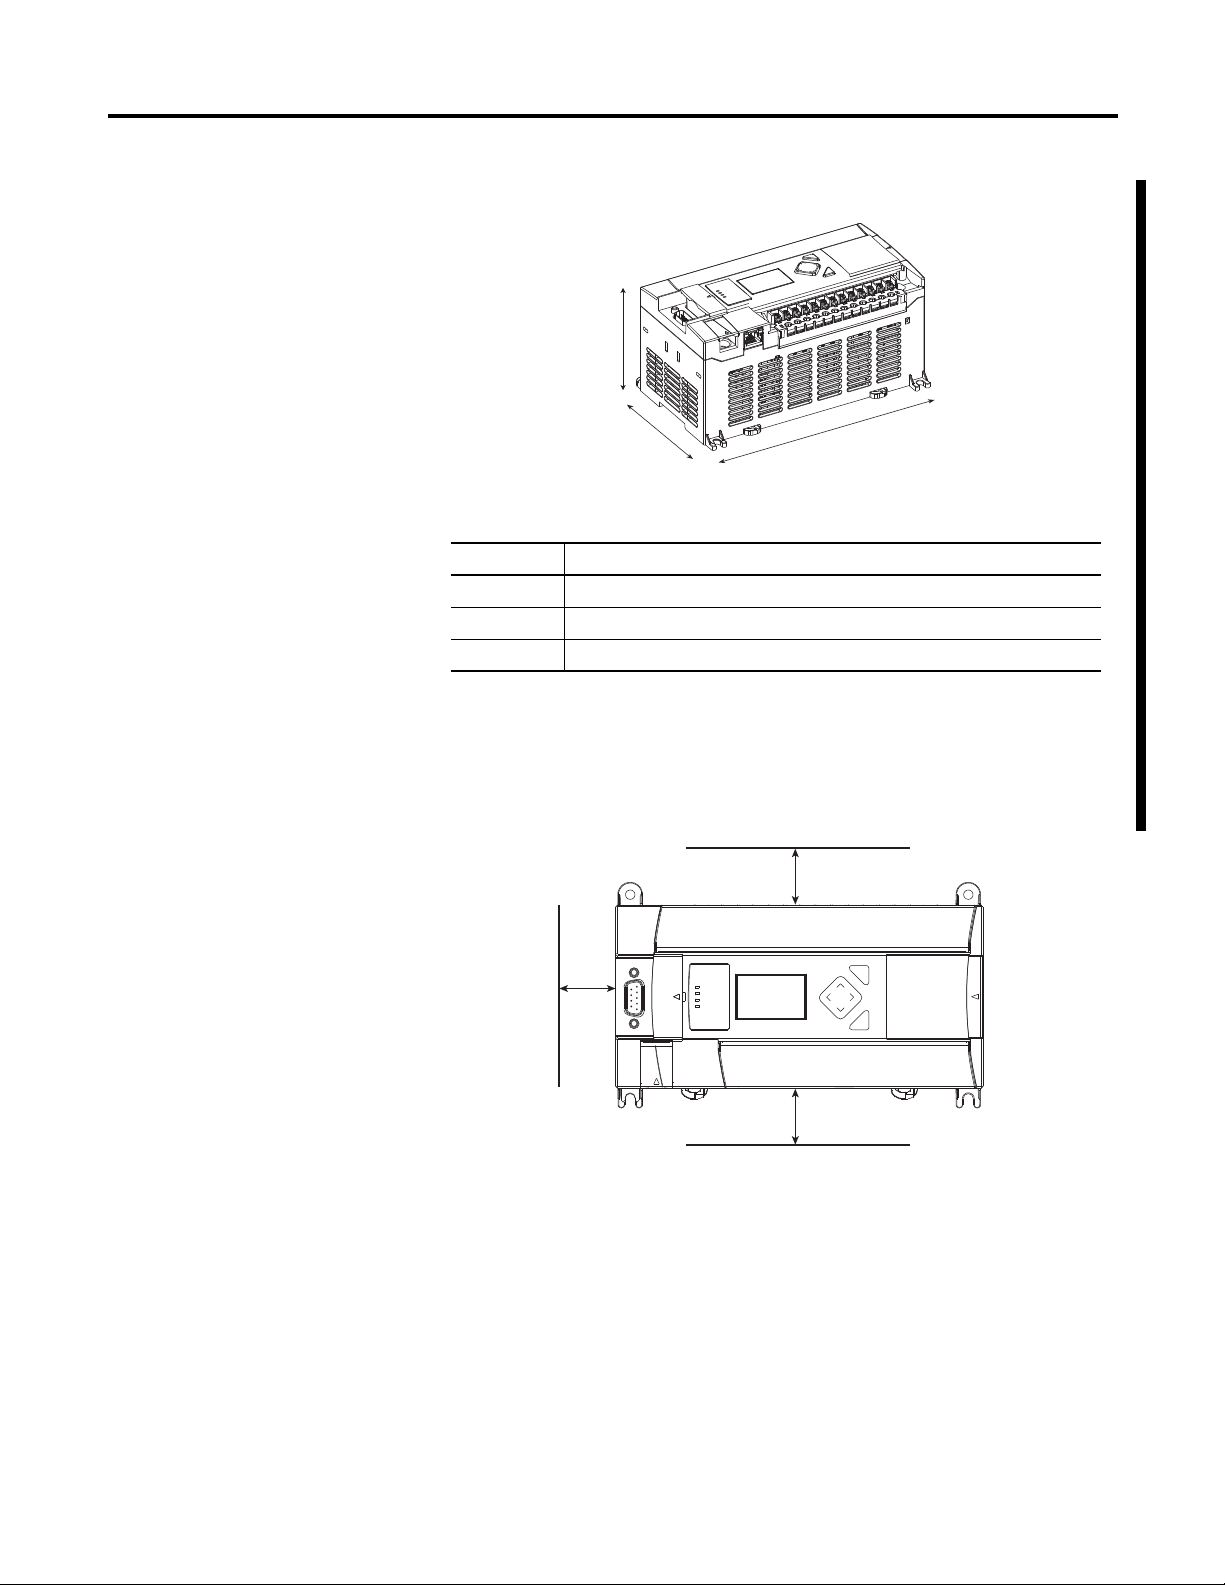
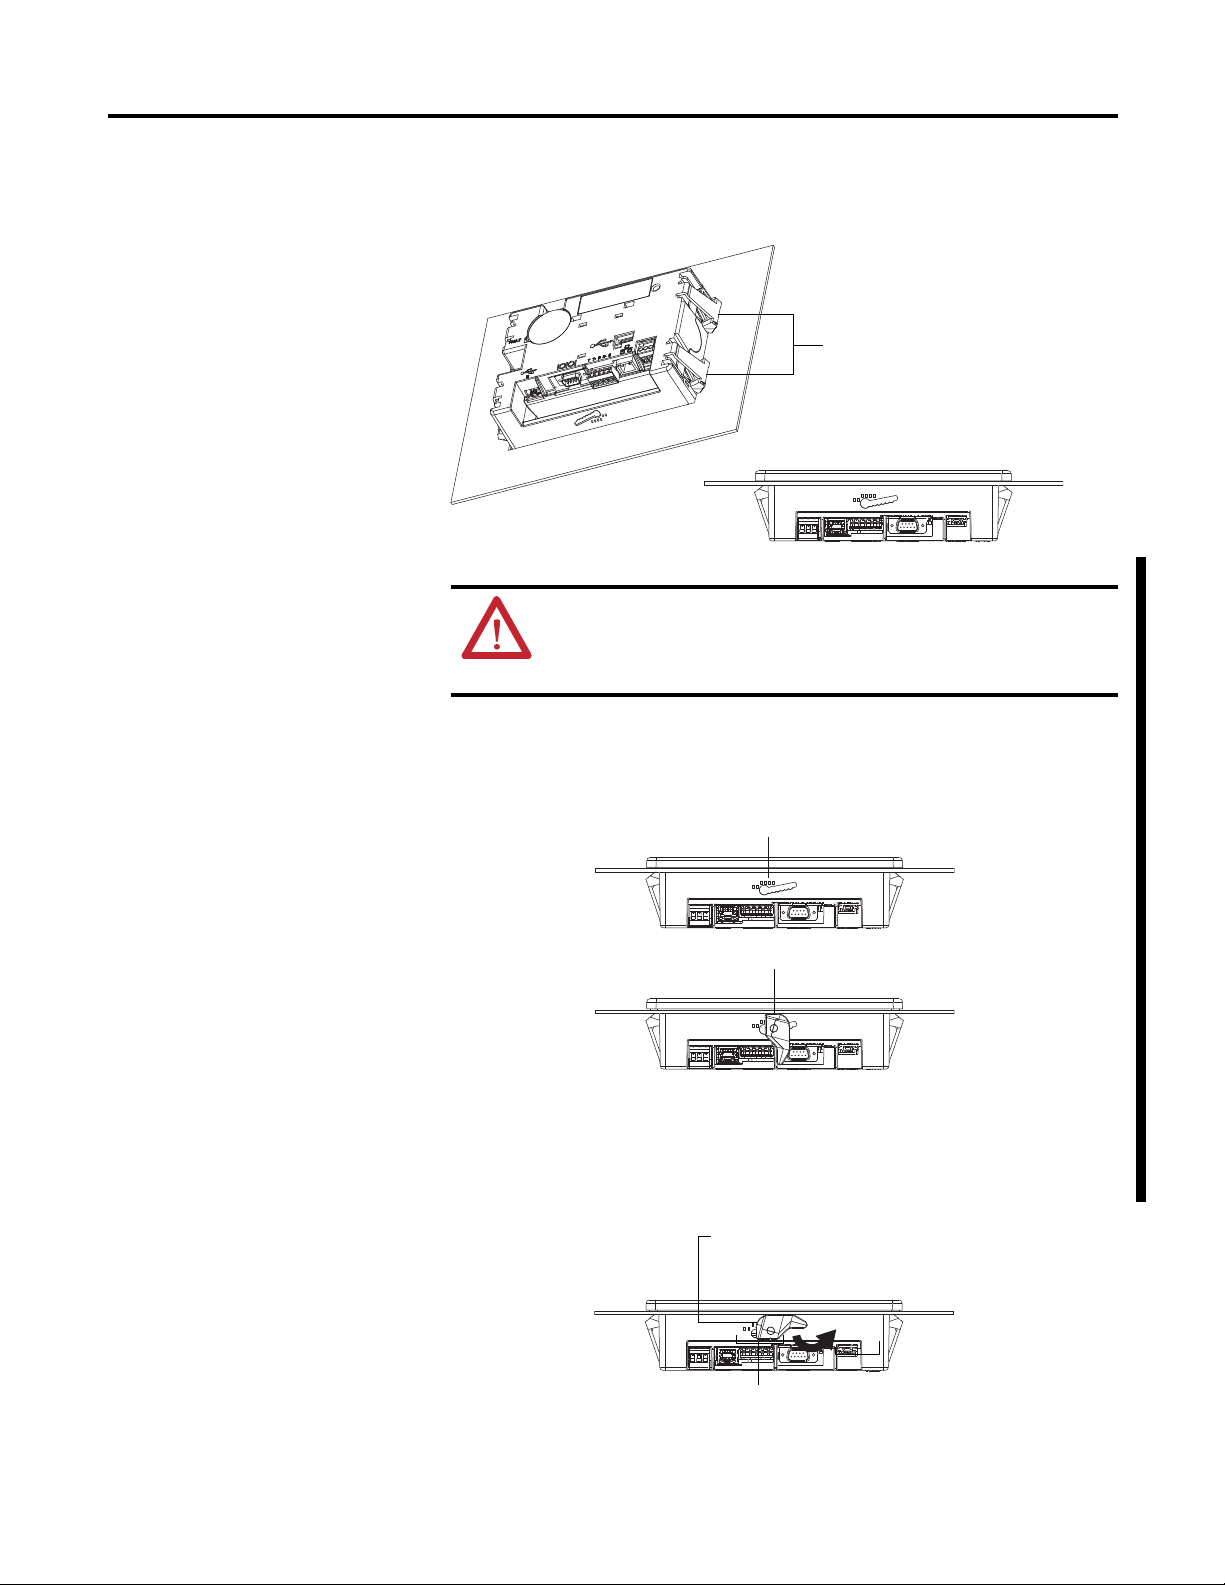
Mount and Connect Your Controller
This section describes how to mount the MicroLogix 1400 controller and
connect it to a PanelView Component module for use with the capacitor bank
controller.
Figure 2 - Controller Description
1
256 7
Description
1 Comm port 2 - 9-pin D-Shell RS-232C connector
2 Memory module (refer to MicroLogix 1400 Memory Module Installation Instructions,
publication 1766-IN010
3 Output ±24V DC, 240 mA
4 Input terminal block
5 LCD display keypad (ESC, OK, Up, Down, Left, Right)
6 Battery compartment
7 1762 expansion bus connector
8 Battery connector
9 Output terminal block
10 LCD display
11 Indicator status indicator panel
12 Comm port 1 - RJ45 connector
13 Comm port 0 - 8-pin mini DIN RS-232C/RS-485 connector
, for instructions on installing the memory module).
43
ESC
OK
9101113 12
8
Table 4 - Controller Input and Output Description
Cat. No. Description
Input
Power
1766-L32BWA 100/240V AC 24V DC,
Rockwell Automation Publication 1413-UM001D-EN-P - November 2010 11
User
Power
240 mA
Embedded
Discrete I/O
12 Fast 24V DC Inputs
8 Normal 24V DC Inputs
12 Relay Outputs
Embedded
Analog I/O
None 1 RS232/RS485
Comm.
Ports
1 Ethernet/IP
1 RS232
Page 12
Chapter 2 Installation
Mount the Controller
Most applications require installation in an industrial enclosure to reduce the
effects of electrical interference and environmental exposure. Locate your
controller as far as possible from power lines, load lines, and other sources of
electrical noise such as hard-contact switches, relays, and AC motor drives. For
more information on proper grounding guidelines, see the Industrial Automation
Wiring and Grounding Guidelines, publication 1770-4.1
ATTENTION: Mount the controller horizontally only. Vertical mounting is
not supported due to thermal considerations.
ATTENTION: Be careful of metal chips when drilling mounting holes for
your controller or other equipment within the enclosure or panel. Drilled
fragments that fall into the controller could cause damage. Do not drill
holes above a mounted controller if the protective debris strips have been
removed.
.
WARNING: Do not place the MicroLogix 1400 Programmable Controller
in direct sunlight. Prolonged exposure to direct sunlight could degrade the
LCD display.
WARNING: The local programming terminal port is intended for
temporary use only and must not be connected or disconnected unless the
area is assured to be nonhazardous.
12 Rockwell Automation Publication 1413-UM001D-EN-P - November 2010
Page 13
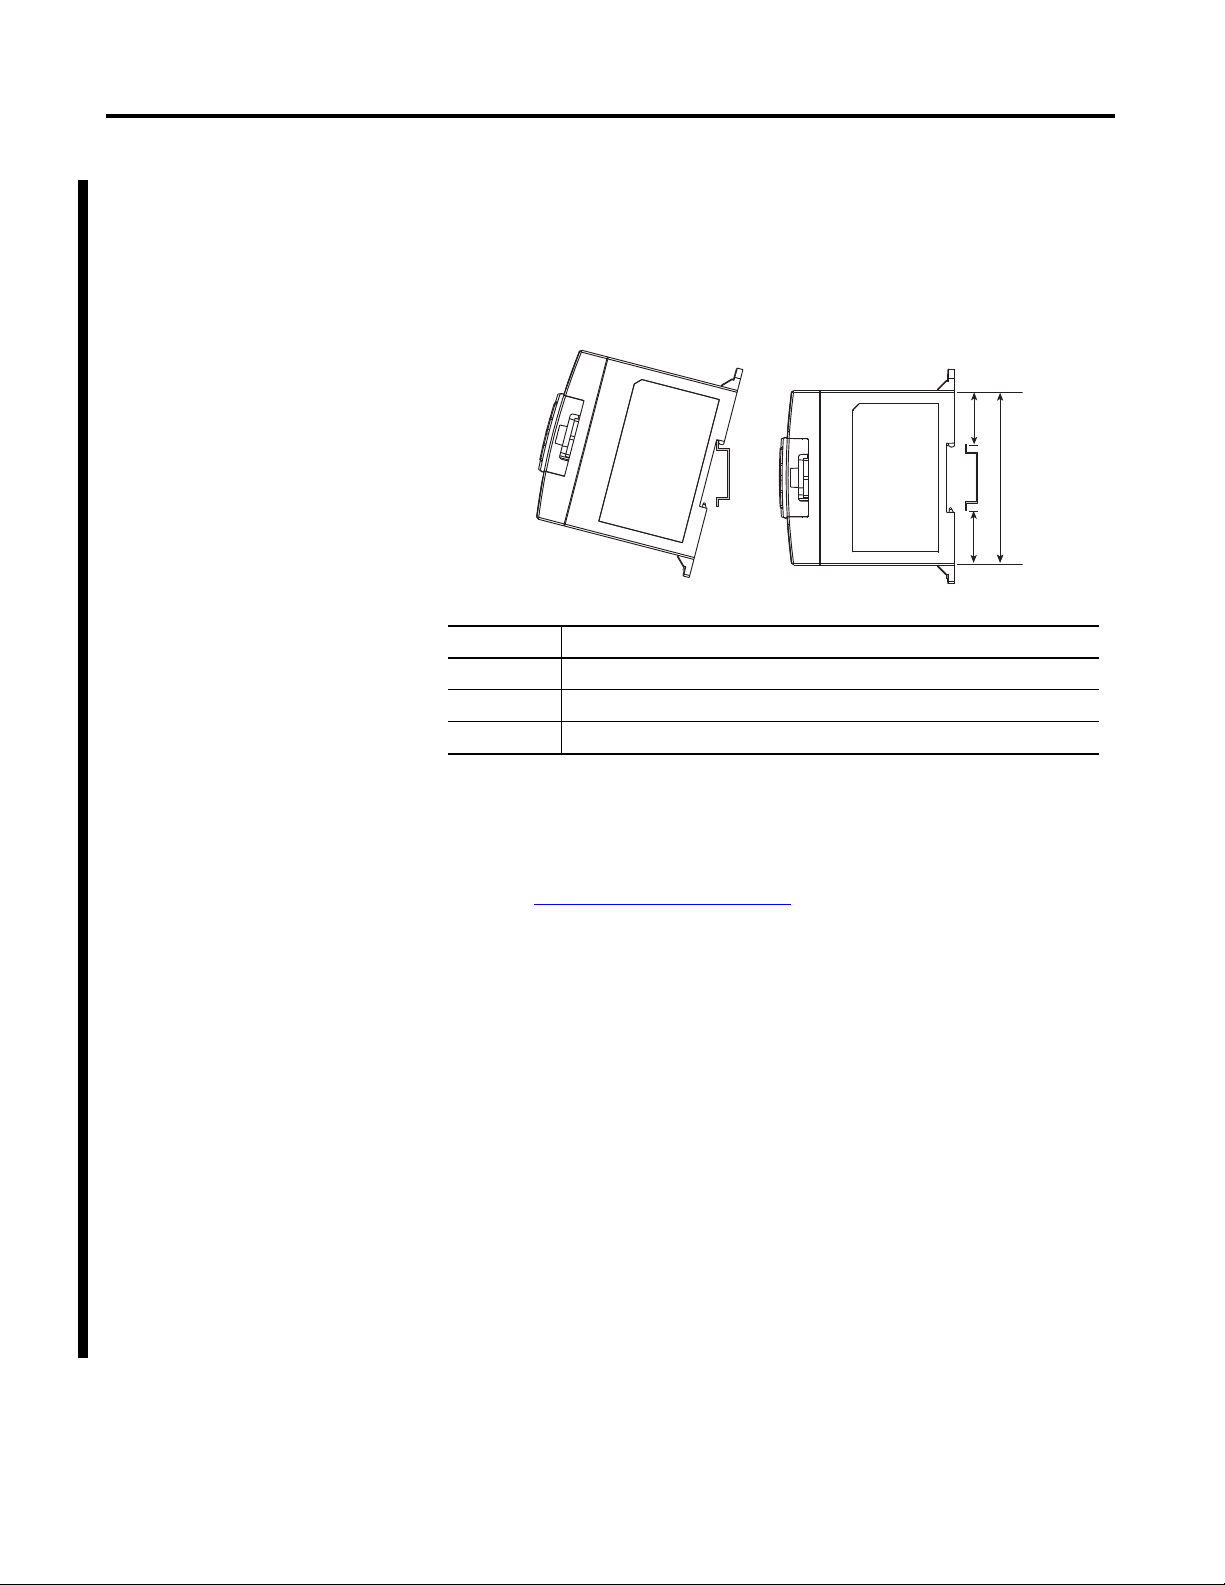
Mounting Dimensions
1766-L32BWA, 1766-L32AWA, 1766-L32BXB,
1766-L32BWAA, 1766-L32AWAA, 1766-L32BXBA
ESC
OK
To p
Bottom
Side
C
Installation Chapter 2
A
B
Dimension Height
A 90 mm (3.5 in.)
B 180 mm (7.087 in.)
C 87 mm (3.43 in.)
Controller Spacing
The controller mounts horizontally, with the expansion I/O extending to the
right of the controller. Allow 50 mm (2 in.) of space on all but the right side for
adequate ventilation, as shown below.
Rockwell Automation Publication 1413-UM001D-EN-P - November 2010 13
Page 14
Chapter 2 Installation
DIN Rail Mounting
The maximum extension of the latch is 14 mm (0.55 in.) in the open position. A
screwdriver is required for removal of the controller. The controller can be
mounted to EN50022-35x7.5 or EN50022-35x15 DIN rails. DIN rail mounting
dimensions are shown below.
B
A
C
Dimension Height
A 90 mm (3.5 in.)
B 27.5 mm (1.08 in.)
C 27.5 mm (1.08 in.)
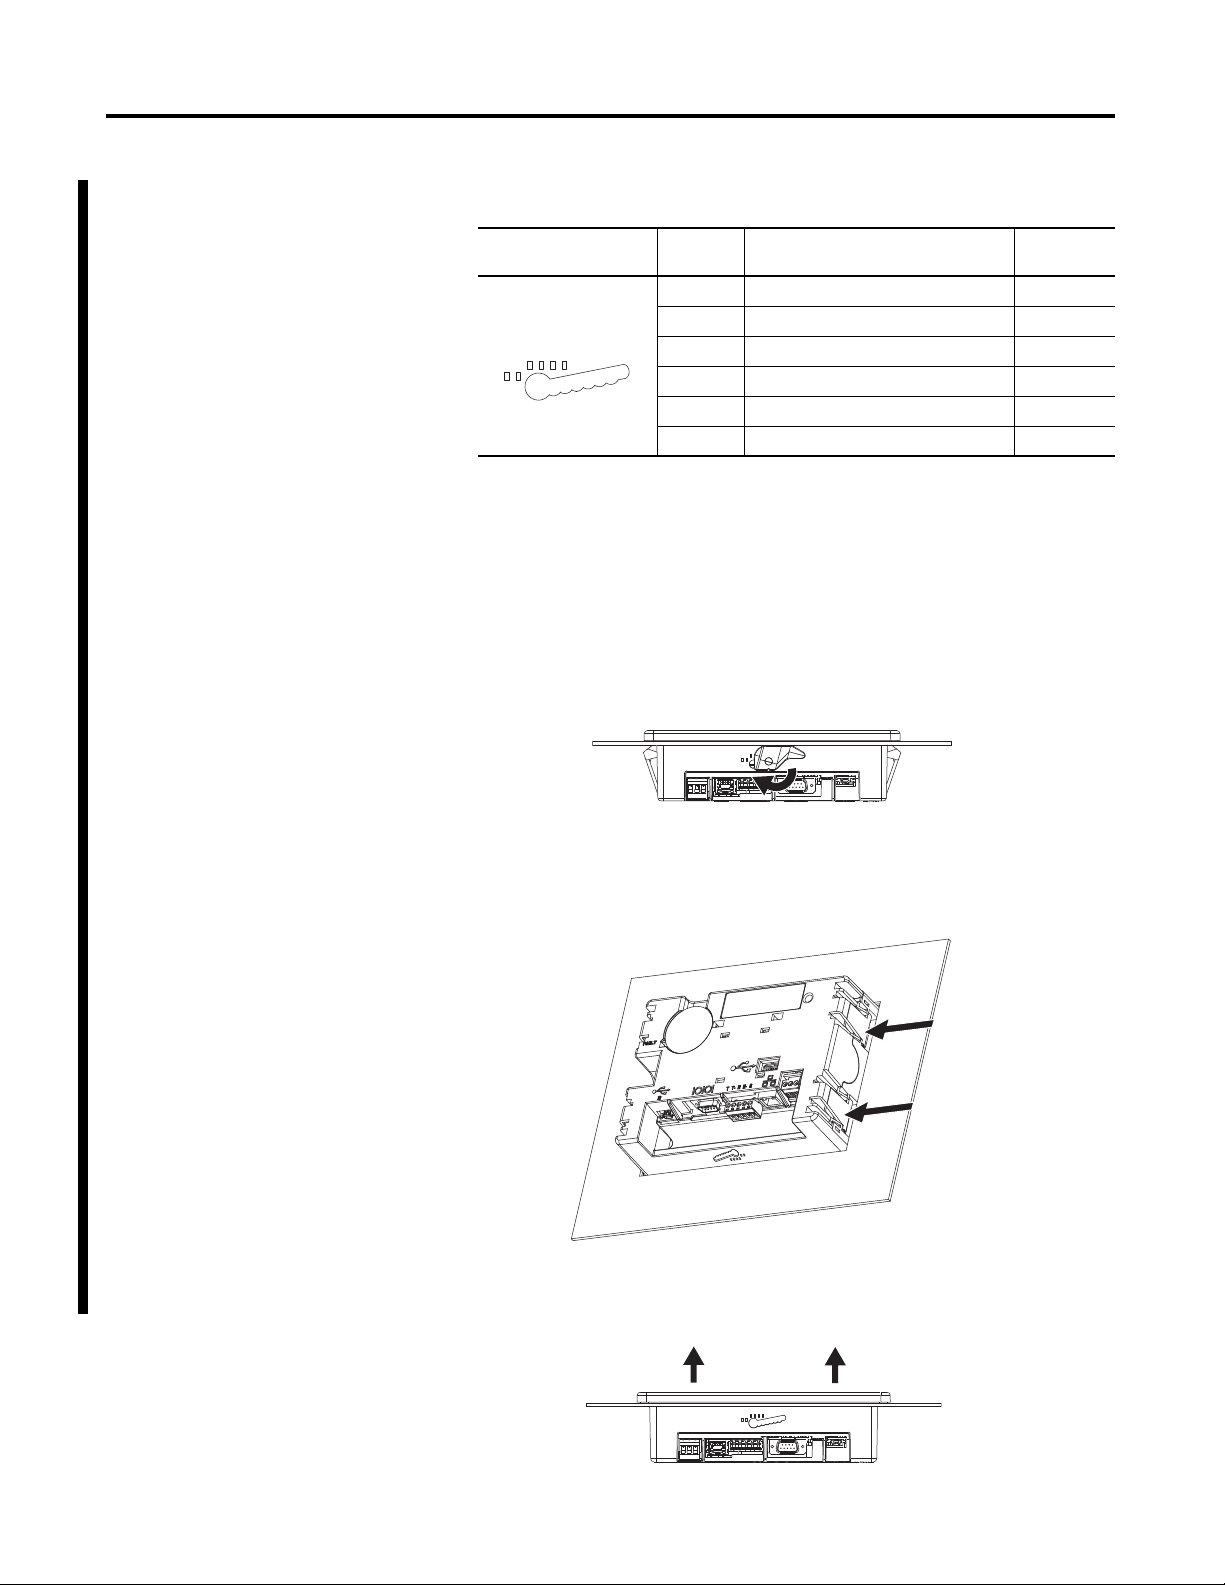
Follow these steps to install your controller on the DIN rail.
1. Mount your DIN rail. Make sure that the placement of the controller on
the DIN rail meets the recommended spacing requirements
Controller Spacing on page 13 for more information).
(see
Refer to the mounting template inside the back cover of this document.
2. If it is open, close the DIN latch.
3. Hook the top slot over the DIN rail.
4. While pressing the controller down against the top of the rail, snap the
bottom of the controller into position.
5. Leave the protective debris strip attached until you are finished wiring the
controller and any other devices.
Follow these steps to remove your controller from the DIN rail.
1. Place a screwdriver in the DIN rail latch at the bottom of the controller.
2. Holding the controller, pry downward on the latch until the latch locks in
the open position.
3. Repeat steps 1 and 2 for the second DIN rail latch.
14 Rockwell Automation Publication 1413-UM001D-EN-P - November 2010
Page 15

Installation Chapter 2
Open Closed
ESC
OK
Mounting Template
4. Unhook the top of the DIN rail slot from the rail.
ESC
OK
Panel Mounting
Mount to panel by using #8 screws. Follow these steps to install your controller
with mounting screws.
1. Remove the mounting template from inside the back cover of this
document.
2. Secure the template to the mounting surface, making sure your controller is
spaced properly (see
information).
Controller Spacing on page 13 for more
3. Drill holes through the template.
4. Remove the mounting
template.
5. Mount the controller.
6. Leave the protective debris
strip in place until you are
finished wiring the controller
and any other devices
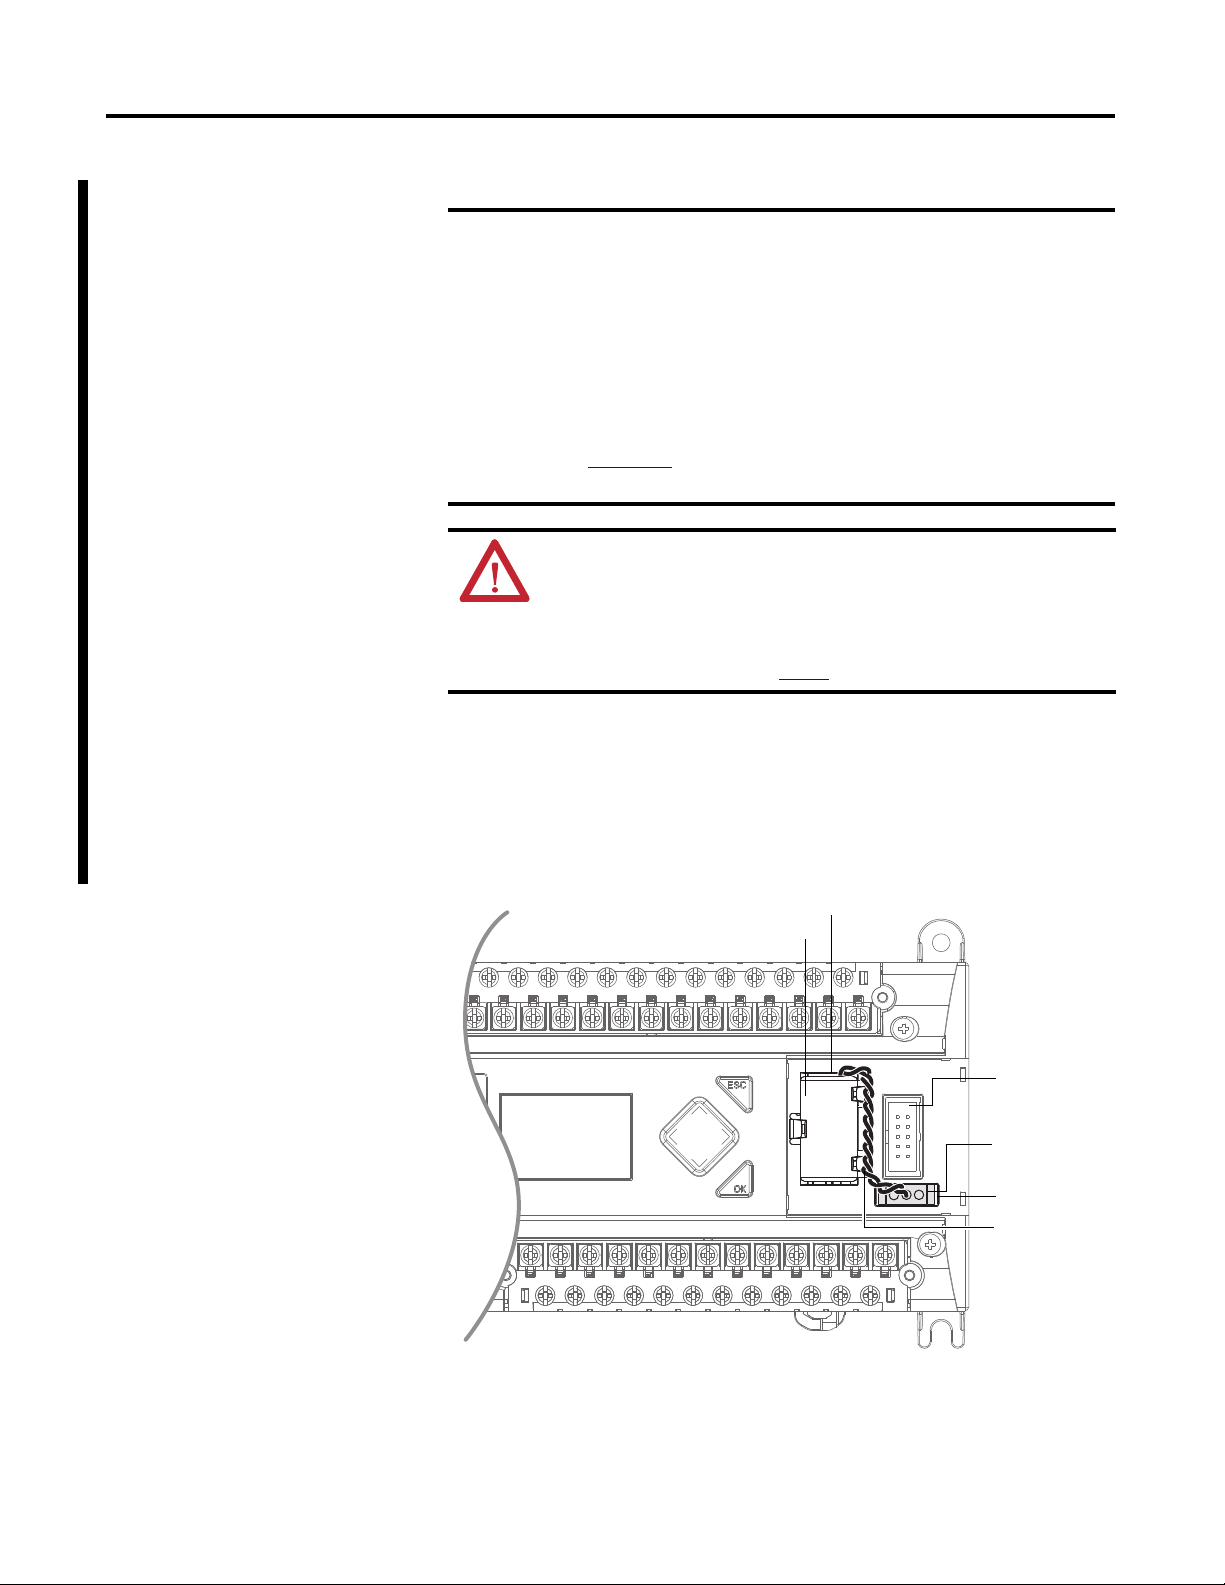
Using the Battery
The MicroLogix 1400 controller is equipped with a replaceable battery (catalog
number 1747-BA). The Battery Low indicator on the LCD display of the
controller shows the status of the replaceable battery. When the battery is low, the
indicator is set (displayed as a solid rectangle). This means that either the battery
wire connector is disconnected, or the battery may fail within 2 days if it is
connected.
This product contains a sealed lithium battery which may need to be
replaced during the life of the product.
At the end of its life, the battery contained in this product should be collected
separately from any unsorted municipal waste.
The collection and recycling of batteries helps protect the environment and
contributes to the conservation of natural resources as valuable materials
are recovered.
Rockwell Automation Publication 1413-UM001D-EN-P - November 2010 15
Page 16
Chapter 2 Installation
IMPORTANT
1762 I/O
Expansion Bus
Connector
Battery Wires
Twist ed Pair
Battery
Battery Wire
Connector
Battery
Connector
Battery Compartment
The MicroLogix 1400 controller ships with the battery wire connector
connected.
Be sure that the battery wire connector is inserted into the connector port
if your application needs battery power. For example, when using a realtime clock (RTC).
Replacing the battery when the controller is powered down will lose all
user application memory. Replace the battery when the controller is
powered on.
Refer to the SLC 500 Lithium Battery Installation Instructions, publication
1747-IN515
, for more information on installation, handling, usage,
storage, and disposal of the battery.
WARNING: When you connect or disconnect the battery an electrical arc
can occur. This could cause an explosion in hazardous location
installations. Be sure that the area is nonhazardous before proceeding.
For Safety information on the handling of lithium batteries, including
handling and disposal of leaking batteries, see Guidelines for Handling
Lithium Batteries, publication AG-5.4
.
Follow these steps to connect the replaceable battery.
1. Insert the replaceable battery wire connector into the controller’s battery
connector.
2. Secure the battery connector wires so that it does not block the 1762
expansion bus connector as shown below.
16 Rockwell Automation Publication 1413-UM001D-EN-P - November 2010
Page 17
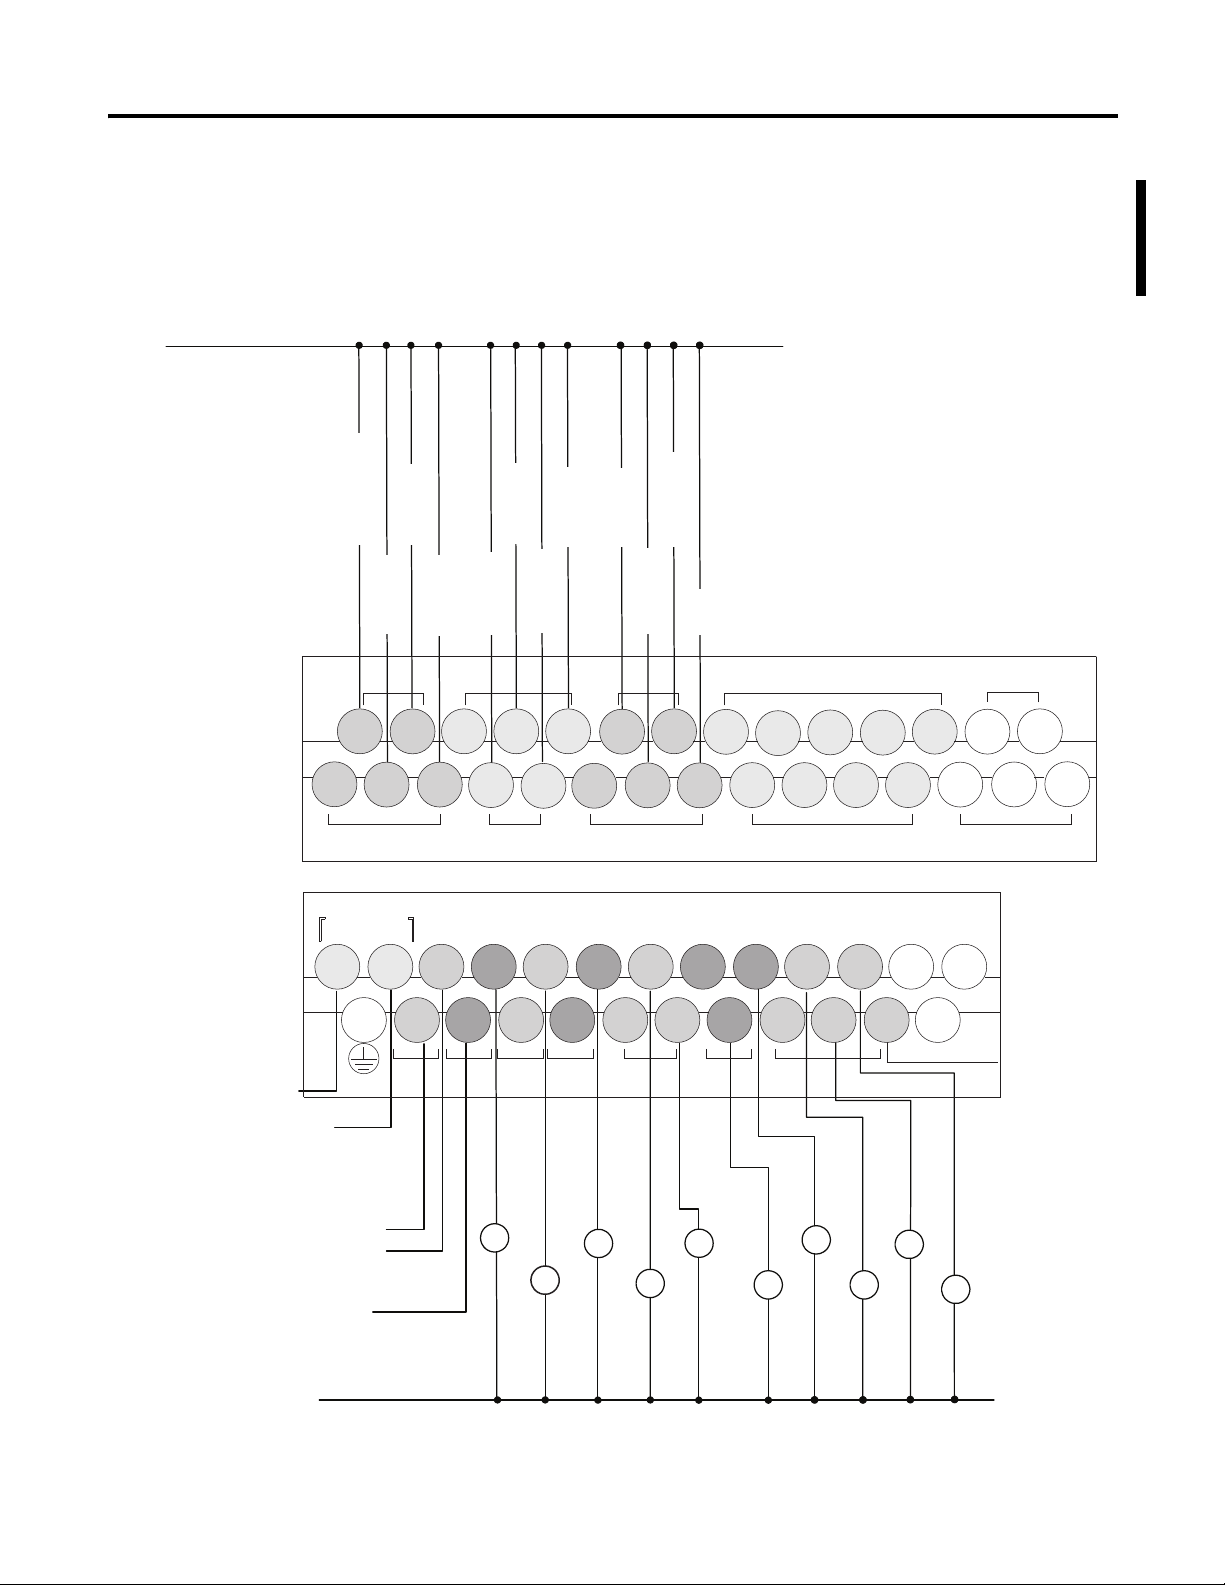
Wire the MicroLogix 1400 Controller
Ground
3
3
Capacitor Step Contactors or Interposing Relays
Capacitor Step Contactors or Interposing Relays
2
4
5
6
7
8
9
10
1
Spare Output
120V AC
Control
Power
Fault Relay 1
Fault Relay 2
Fault Relay 3
Fault Relay 4
Fault Relay 5
Fault Relay 6
Fault Relay 7
Fault Relay 8
Fault Relay 9
Fault Relay 10
Reset
Master Fault Relay
Inputs
Outputs
Isolated Alarm Output
Capacitor Step
Control Power
COM 1
IV1(+)
IV3(+)
IN5 IN7
IN4
IN6
COM 2
IN8
IN10
IN9 IN11
COM 3
IN13
IN15
IN17
IN19
IN12 IN14 IN16 IN18
COM
ANA
L1 OV1
OUT0
OUT1 OUT2 OUT3 OUT4
OUT5
OUT7 OUT8 OUT10
OUT6 OUT9 OUT11
OV0
VAC
L2/N
VAC
DC1
VAC
DC2
VAC
DC3
VAC
DC4
VAC
DC6
VAC
COM
ANA
DC5
VAC
Group 0 Group 1 Group 2 Group 3 Group 5Group 4 Group 6
COM 0
IN1 IN3
IN0
IN2
IV0(+)
IV2(+)
DC0
VAC
Follow the diagram to wire the MicroLogix 1400 controller to the capacitor bank
controller.
Installation Chapter 2
Rockwell Automation Publication 1413-UM001D-EN-P - November 2010 17
Page 18
Chapter 2 Installation
IMPORTANT
234 6 7
8
1
11
10
9
FAULT
B
61
T T- R R- S
5
PanelView C600
(C600 Series C terminal shown)
Install the PanelView Component C600 Touch Terminal
Before installing the terminal in a panel, review minimum clearances, panel
guidelines, panel cutout dimensions, and product dimensions.
The capacitor bank controller is compatible with the PanelView
Component C600 terminal firmware revision 1.3 or later.
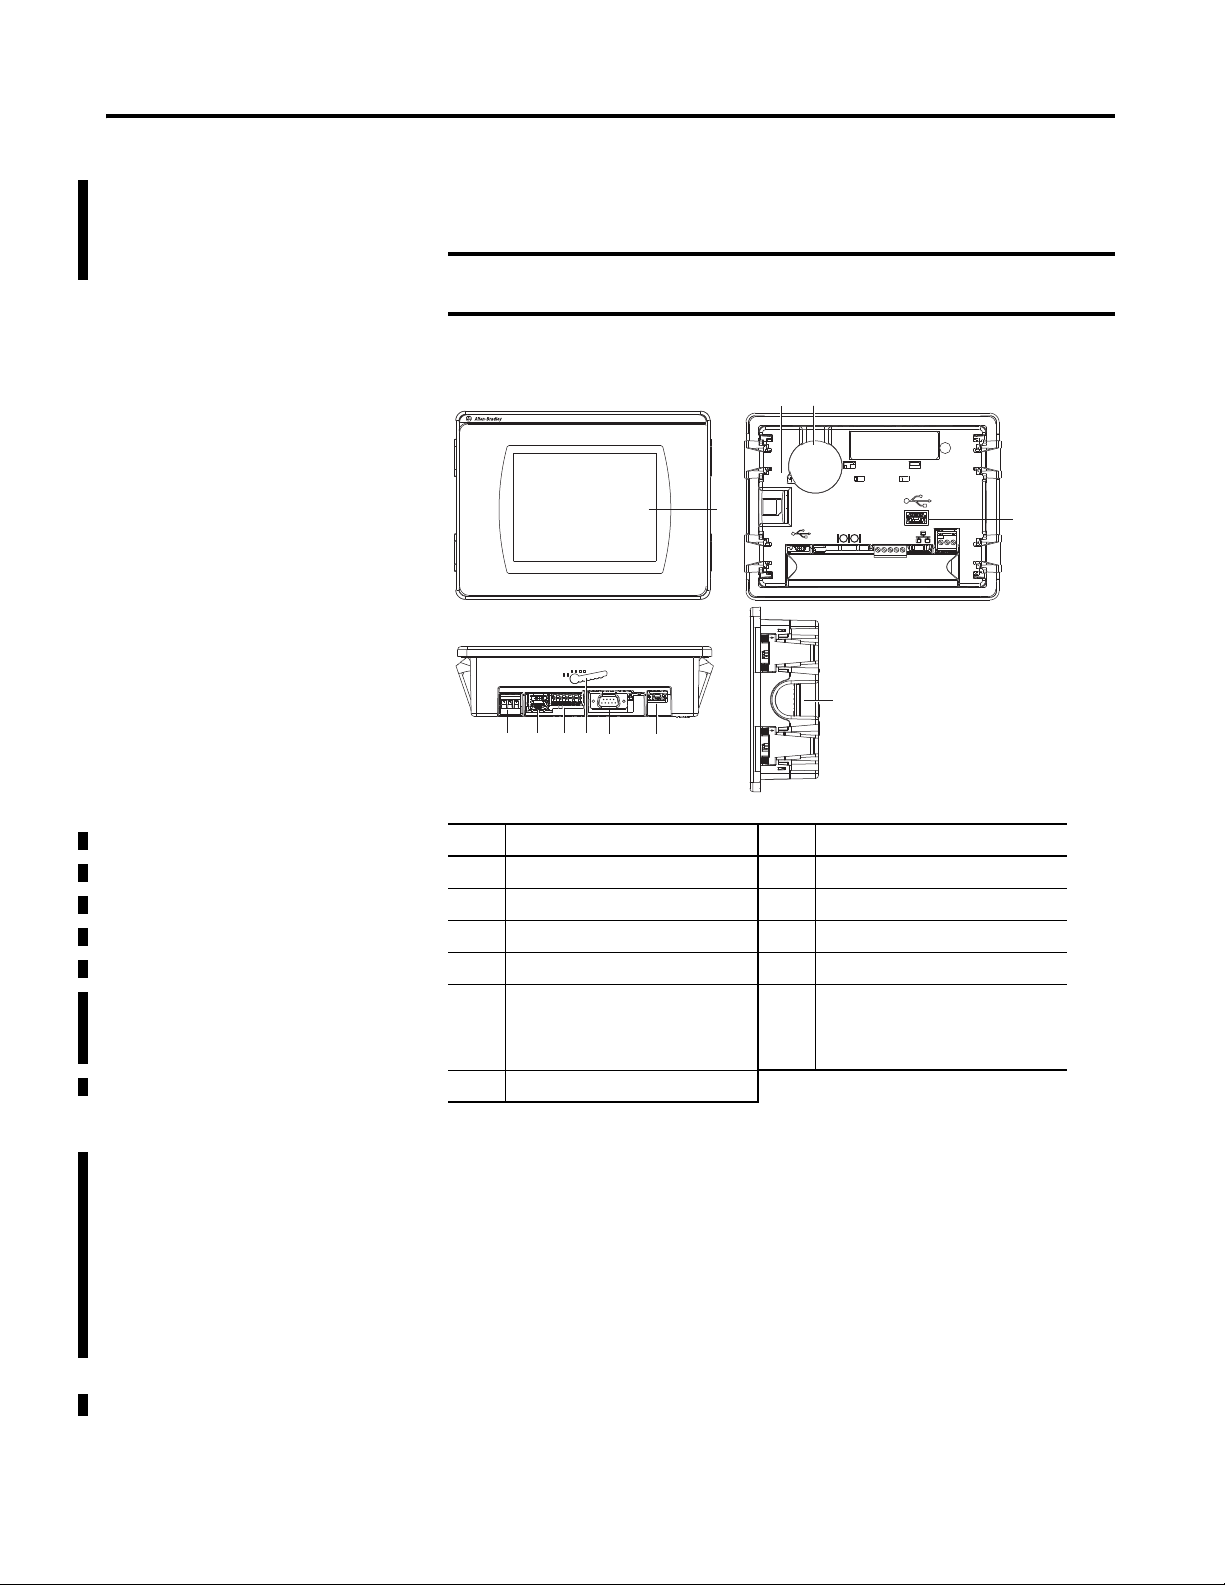
Figure 3 - PanelView Component C600 Terminal
Item Description Item Description
1 Touch display 7 USB device port
2 24V DC power input 8 Diagnostic status indicator
3 10/100 MBit Ethernet port 9 Replaceable real-time clock battery
4 RS-422 or RS-485 port 10 USB host port
5 Mounting slots
(for 2711C-T6M, -T6C Series C or
later, 2711C-T6T Series A or later
only)
6 RS-232 serial port
11 Secure digital (SD) card slot
Parts List
PanelView Component terminals ship with these items:
• Power terminal block
• RS-422/RS-485 5-pin terminal block
• Panel cutout template
• Accessory CD
• A pair of mounting levers (for PanelView Component C600 terminals —
2711C-T6M, 2711C-T6C Series C or later, 2711C-T6T Series A or later)
18 Rockwell Automation Publication 1413-UM001D-EN-P - November 2010
Page 19
Installation Chapter 2
TIP
Minimum Spacing
Plan for adequate space around the terminal, inside the enclosure, for ventilation
and cabling. Consider heat produced by other devices in the enclosure. The
ambient temperature around the terminal must be 0…50 °C (32…122 °F).
PanelView
Component
C200 and C300 Keypad
C600 Touch
Top Bottom Sides Back
51 mm (2 in.) 51 mm (2 in.) 25 mm (1 in.) 13 mm (0.5 in.)
The minimum spacing requirements are sufficient for connecting cables
and inserting or removing a memory card. Plan for additional clearance if
using the USB host port on the back of the unit.
Mounting Angle
You can mount the terminal vertically against the panel, or tilted forward or
backwards, up to a 45° angle. For mounting angles greater than 45°, the operating
temperature is restricted to 40 °C (104 °F).
Panel Guidelines
Supporting panels must be at least 16 gauge to provide proper sealing against
water and dust and to provide proper support. The panel surface must be flat and
free of imperfections to maintain an adequate seal and NEMA Type ratings.
Panel Cutout Dimensions
Use the template shipped with your terminal to mark the cutout dimensions.
PanelView Component Terminal Height, Approx., mm (in.) Width, Approx., mm (in.)
C600 Touch 135.0 ± 1.0 (5.31 ± 0.04) 189.0 ± 1.0 (7.44 ±0.04)
Rockwell Automation Publication 1413-UM001D-EN-P - November 2010 19
Page 20
Chapter 2 Installation
IMPORTANT
IMPORTANT
PanelView C600
PanelView C600
PanelView C600
Mount the PanelView Component C600 Terminal
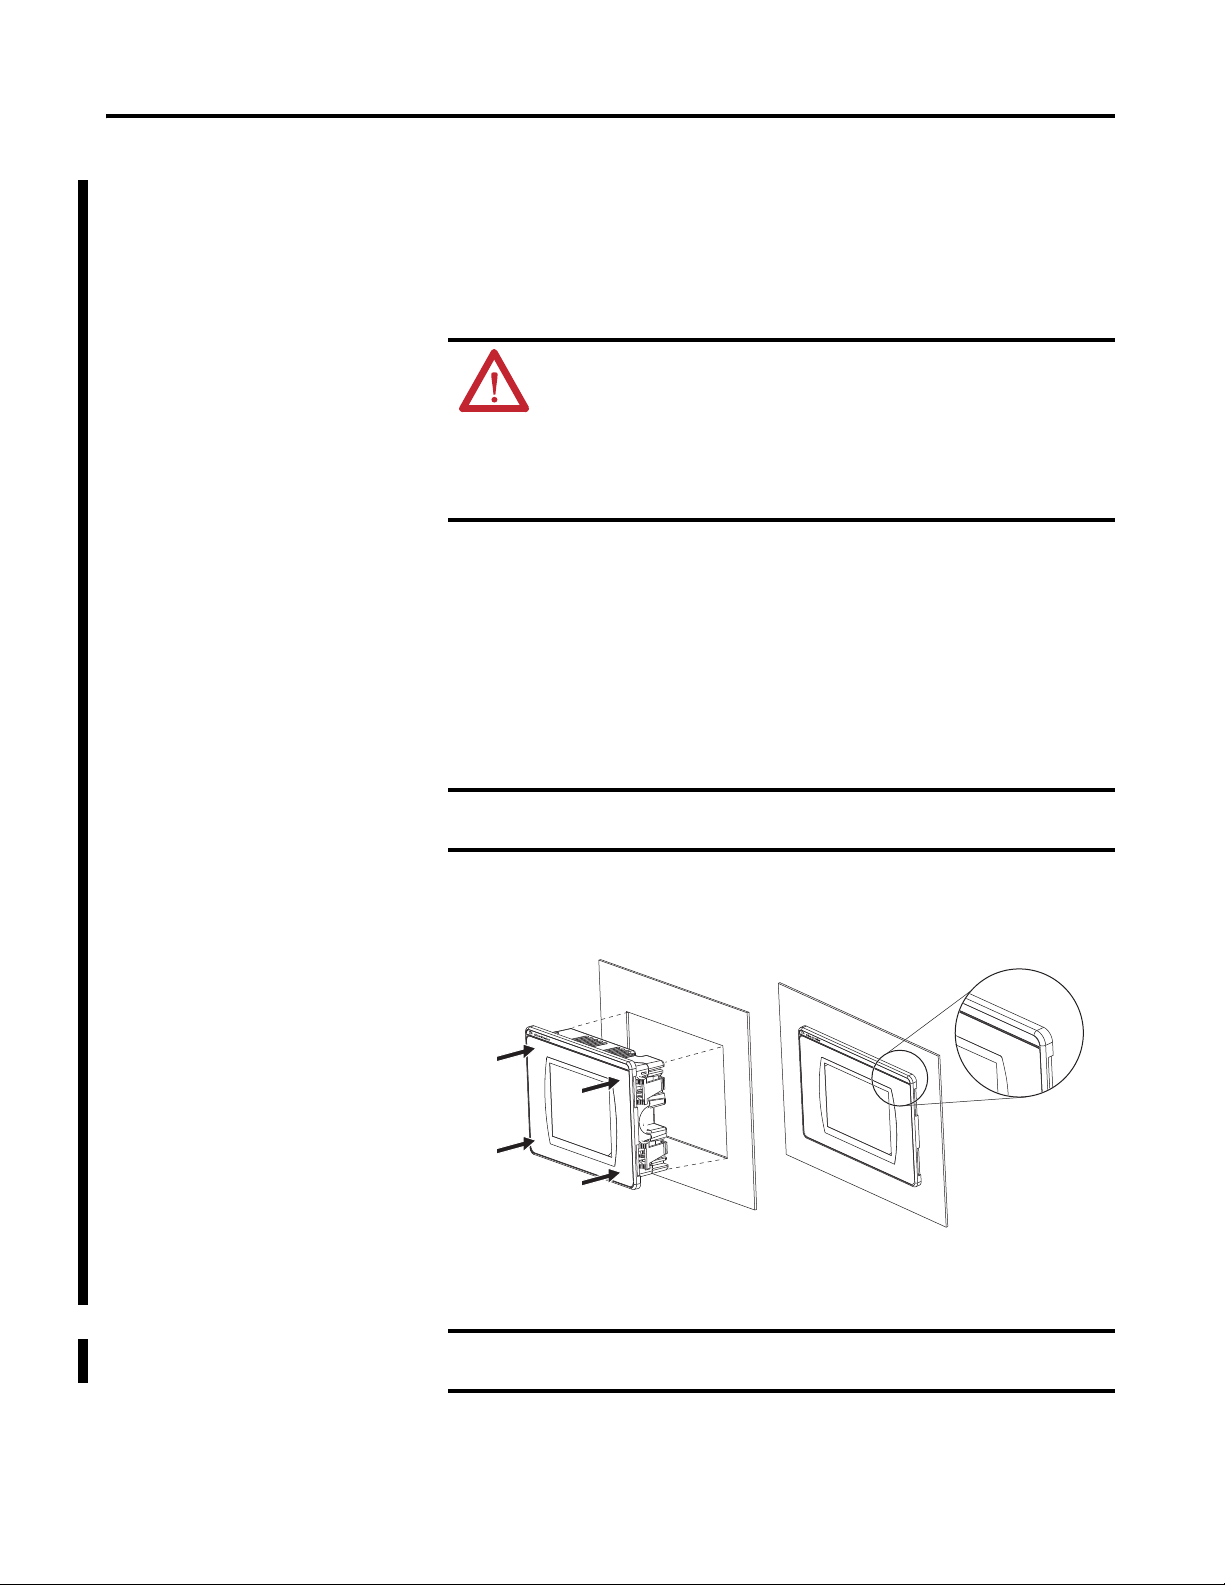
PanelView Component C600 terminals install easily in a panel without any tools
or hardware. The terminals have panel clamps that automatically latch when the
terminal is pushed into the panel opening.
ATTENTION:
• Disconnect all electrical power from the panel before making the panel
cutout.
• Make sure the area around the panel cutout is clear.
• Take precautions so metal cuttings do not enter any components already
installed in the panel.
• Failure to follow these instructions may result in personal injury or damage to
panel components.
Follow these steps to mount the terminal in a panel.
1. Cut an opening in the panel by using the template shipped with the
terminal.
2. Make sure the sealing gasket is properly positioned on the terminal.
This gasket forms a compression type seal. Do not use sealing compounds.
3. Place the terminal in the panel cutout.
The terminal temperature must be greater than 0 °C (32 °F) during panel
installation.
4. Push the terminal firmly into the cutout on all sides and corners until the
plastic bezel contacts the enclosure and the gasket is fully compressed.
You will hear a series of clicks as the clamps self-adjust to the panel
thickness.
Do not push on the display when pushing the terminal into the panel or
20 Rockwell Automation Publication 1413-UM001D-EN-P - November 2010
you may damage the display.
Page 21
Installation Chapter 2
Fully extended panel clamps
Mounting Slot
Short, Flat Side of Mounting Lever
6
Rotate until the short, flat side of the lever
aligns with an alignment mark on the
terminal.
Six Alignment Marks
These views show the panel clamps fully extended to secure the terminal
against the rear of the panel.
6
1
61
ATTENTION: Follow the instructions to provide a proper seal and to
prevent potential damage to the terminal. Allen-Bradley assumes no
responsibility for water or chemical damage to the terminal or other
equipment within the enclosure because of improper installation.
5. Insert a mounting lever into each mounting slot on the terminal, sliding
each lever until the short, flat side of the lever touches the surface of the
panel.
61
61
6. When both levers are in place, slide each lever an additional notch or two
until you hear a click.
7. Rotate each lever in the direction indicated until it is in the final latch
position.
Rockwell Automation Publication 1413-UM001D-EN-P - November 2010 21
Page 22
Chapter 2 Installation
61
Use this table as a guide to provide an adequate gasket seal between the
terminal and the panel.
Terminal Markings for
Alignment
Lever
Position
1 1.52…2.01 mm (0.060…0.079 in.) 16
2 2.03…2.64 mm (0.08…0.104 in.) 14
3 2.67…3.15 mm (0.105…0.124 in.) 12
4 3.17…3.66 mm (0.125…0.144 in.) 10
5 3.68…4.16 mm (0.145…0.164 in.) 8/9
6 4.19…4.75 mm (0.165…0.187 in.) 7
Panel Thickness Range Typical
Gauge
Remove the PanelView Component C600 Terminal from the Panel
Follow these steps to remove the terminal from the panel.
1. Disconnect power to the terminal.
2. Release the mounting lever by rotating it in the direction indicated, slide it
to the bottom of the mounting slot, and remove it.
6
3. Push each panel clamp in until it is fully depressed and locked.
Depressed and locked, the panel clamps provide adequate clearance to
remove the terminal.
6
1
4. Grip the sides of the bezel and gently pull the terminal out of the panel
opening.
22 Rockwell Automation Publication 1413-UM001D-EN-P - November 2010
61
Page 23
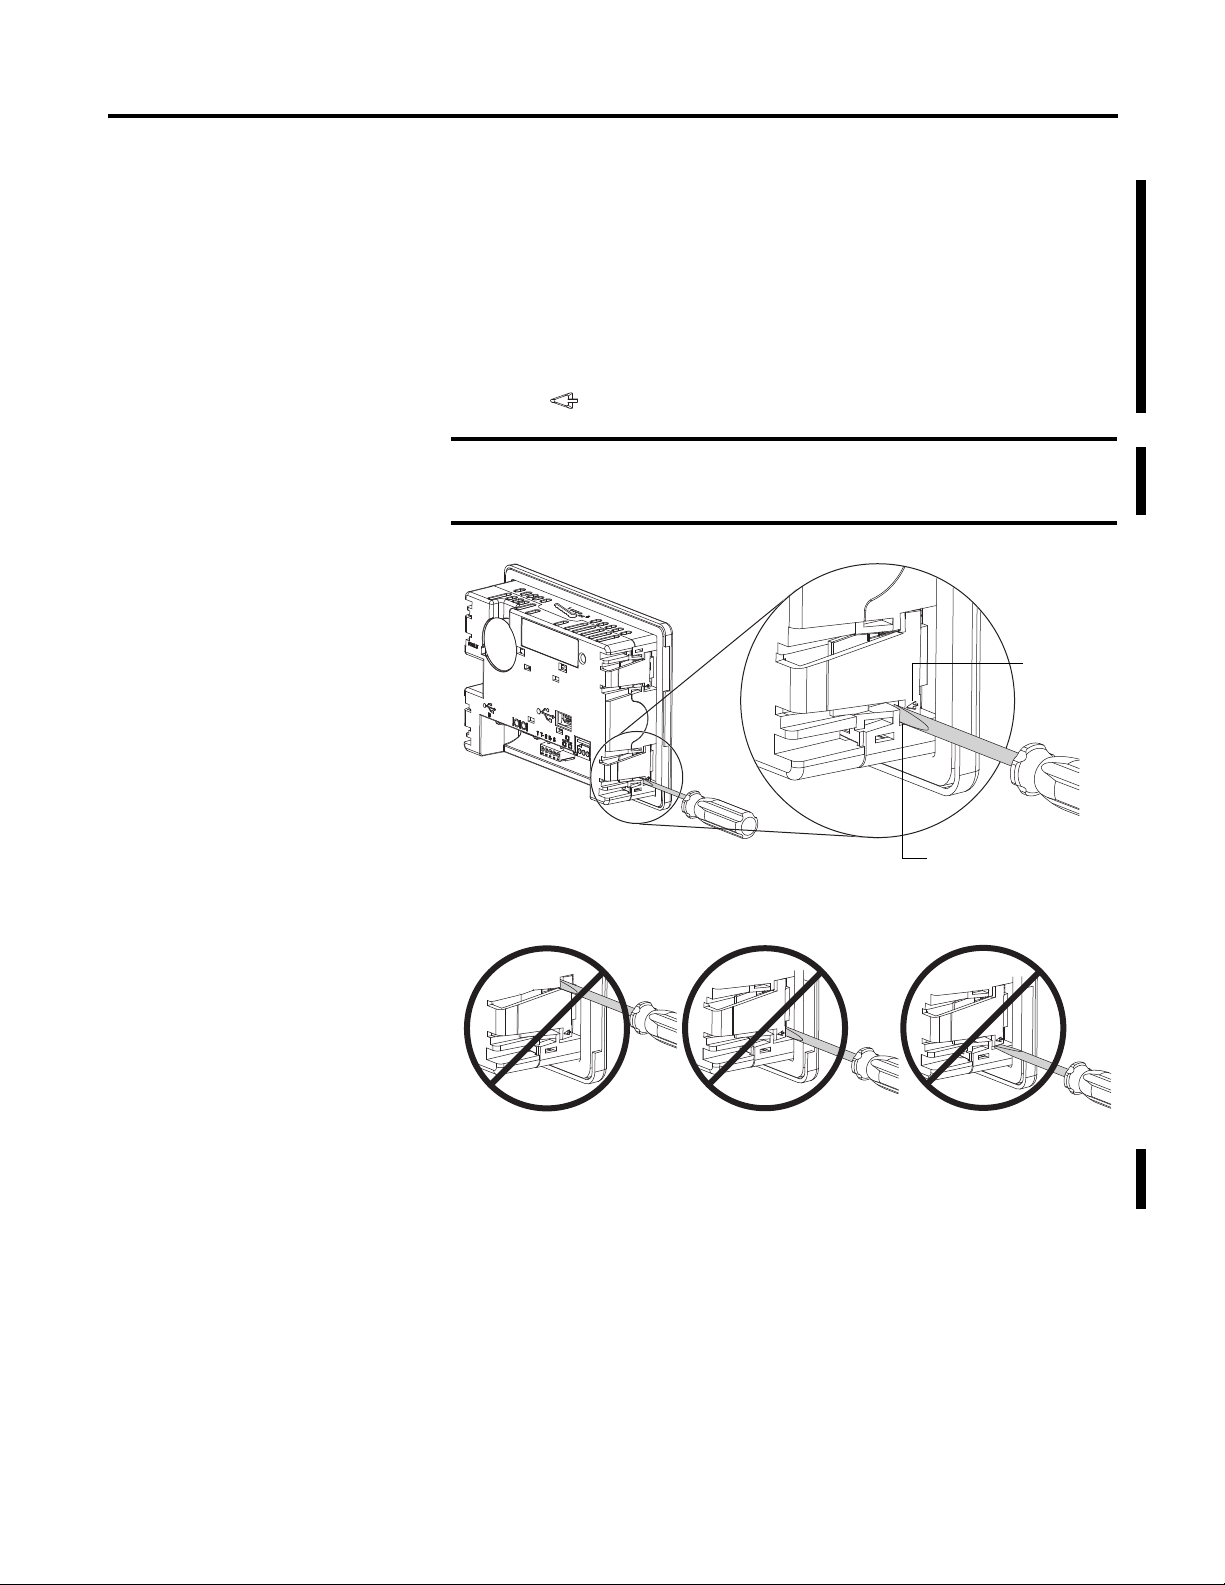
Installation Chapter 2
IMPORTANT
Other Incorrect Locations for Inserting The
Screwdriver
Incorrect Side of
Clamp
Arrow
Icon
Insert screwdriver
here.
Before reinstalling the terminal in the panel opening, you must release each panel
clamp from its locked position. Do this as soon as possible after the removing the
terminal from the panel.
Follow these steps to unlock each panel clamp.
1. Insert the tip of a #3 - #6, screwdriver, approximately
5 mm (0.20 in.), into the location shown on each clamp, next to the arrow
icon , and pull the screwdriver straight out.
Take care to insert the screwdriver in the correct orientation and on the
correct side of each clamp, as indicated by the arrow icon. Do not pry the
plastic with the screwdriver or you may damage the clamp.
The panel clamp will release and return to its unlocked position.
2. Reinstall the terminal in the panel after unlocking all the panel clamps.
Rockwell Automation Publication 1413-UM001D-EN-P - November 2010 23
Page 24

Chapter 2 Installation
Connect Power
The PanelView Component terminal connects to a customer supplied 24V DC,
(1)
10 W (minimum) power source
Table 5 - Power Ratings
. The table shows the power rating.
PanelView
Component
C600 18…30V DC (24V DC nom) 10 W (0.42 A)
Input Voltage Range Power Consumption, Max
The internal, nonisolated power supply is protected against reverse polarity of the
DC+ and DC- connections.
ATTENTION: Connecting DC+ or DC- source to the functional earth
terminal may damage the device. Miswiring the DC+ source to the DCinput while connected to other equipment through nonisolated ports may
cause a ground loop current and damage the device.
The input power terminal block supports these wire sizes.
Table 6 - Wire Specifications for Input Power Terminal Block
Wire Type Dual-wire Gauge
Stranded or
solid
(1) Two-wire maximum per terminal.
Cu 90 °C (194 °F) 0.33…1.31 mm
(22…16 AWG)
ATTENTION: Disconnect all power before installing or replacing
components. Failure to disconnect power may result in electrical shock or
damage to the terminal.
(1)
2
Single-wire
Gauge
0.33…2.08 mm
(22…14 AWG)
Terminal Screw
Torque
2
0.45…0.56 N•m
(4…5 lb•in)
Follow these steps to connect power.
1. Verify that the terminal is not connected to a power source.
2. Secure the 24V DC power wires to the terminal block.
3. Secure the functional earth ground wire to the functional earth ground
terminal screw on the terminal block.
(1) We recommend an Allen-Bradley Bulletin 1606 power supply.
24 Rockwell Automation Publication 1413-UM001D-EN-P - November 2010
Page 25

4. Apply 24V DC power to the terminal.
+
DC
DC
Functional
Earth Ground
to Ground Bus
Installation Chapter 2
Mount the PowerMonitor 1000 Unit
The PowerMonitor 1000 unit can be mounted on a panel or a DIN rail.
Panel Mount
Follow these steps to mount the unit on a panel or any flat surface.
1. Extend the top and bottom DIN-rail clips to the panel mount position.
2. Insert a small screwdriver under the spring pin to move the clip, lift it, and
pull the clip forward until it extends approximately 6 mm (0.25 in.) from
the enclosure.
3. Release the pin and lock the clip in the panel mount position.
4. Mount the unit by using three #8 machine screws.
DIN-rail Mount
You can mount the unit on standard 35 x 7.5 mm (EN 50 022 – 35 x 7.7) DINrail. To mount on a DIN-rail, leave the mounting clips retracted so the mounting
holes are hidden behind the unit.
Install on a DIN-rail
Follow these steps to mount the unit on a DIN-rail.
1. Tilt the bottom of the unit slightly away from the rail until the notches
grab onto the top flange of the DIN-rail.
2. Push the bottom of the enclosure forward towards the DIN-rail.
The spring-loaded clip snaps onto the bottom of the rail and holds the unit
firmly in place.
Rockwell Automation Publication 1413-UM001D-EN-P - November 2010 25
Page 26

Chapter 2 Installation
IMPORTANT
Remove from a DIN Rail
Follow these steps to remove the unit from a DIN-rail.
1. Insert a small screwdriver into the exposed slot in the tab to remove the
unit from the DIN rail.
2. Pull enclosure forward and remove from the rail.
Connect the Controller, PanelView Component Terminal, and the PowerMonitor 1000 Meter
Follow these steps to connect the Capacitor Bank controller parts.
1. Connect a source of 120/230V AC to the control power terminals on the
MicroLogix 1400 controller.
See the MicroLogix 1400 Programmable Controllers Installation
Instructions, publication 1766-IN001,
2. Connect a source of 24V DC to the PanelView Component terminal.
The 24V DC power can be obtained from a 24V DC, 10 W (minimum)
power supply
See the PanelView Component Installation Instructions, publication
2711C-IN001
3. Connect the PowerMonitor 1000 meter to the power circuit, control
power, and earth ground.
(1)
that you provide.
, for wiring recommendations.
Verify that the PowerMonitor 1000 meter is wired properly and
that the power metering is correct. Incorrect wiring of the PTs and
CTs will cause unpredictable capacitor bank control.
for wiring recommendations.
(1) We recommend an Allen-Bradley Bulletin 1606 power supply.
26 Rockwell Automation Publication 1413-UM001D-EN-P - November 2010
Page 27

See the PowerMonitor 1000 Installation Instructions,
ESC
OK
RS-485
Powermonitor 1000
RS-485 STATUS
RX TX Mod Net
ACT LNK
+ - SHLD
EtherNet/IP
RS-485
Powermonitor 1000
RS-485 STATUS
RX TX Mod Net
ACT LNK
+ - SHLD
EtherNet/IP
RS-485
Powermonitor 1000
RS-485 STATUS
RX TX Mod Net
ACT LNK
+ - SHLD
EtherNet/IP
RS-485
Powermonitor 1000
RS-485 STATUS
RX TX Mod Net
ACT LNK
+ - SHLD
EtherNet/IP
MicroLogix 1400 Controller
Optional Ethernet HMI
PowerMonitor 1000 Meter
Optional PowerMonitor 1000 Meters (up to 3)
Ethernet Local
Area Network
publication 1408-IN001
for wiring recommendations.
Installation Chapter 2
4. Connect the cummunication cable between the components and the local
area Ethernet network or the optional Ethernet switch that you provide.
Rockwell Automation Publication 1413-UM001D-EN-P - November 2010 27
Page 28

Chapter 2 Installation
Notes:
28 Rockwell Automation Publication 1413-UM001D-EN-P - November 2010
Page 29

Configuration
IMPORTANT
Chapter
3
Overview
The capacitor bank controller base unit has been set up to require minimal outof-box configuration.
The base system has default communication settings. Certain circumstances and
options require additional communication configuration, which may include the
use of programming software not included with the controller.
You are required to configure the PowerMonitor 1000 meters to coordinate them
to the power circuit in the base unit and all options. Configuration of the
PowerMonitor 1000 meter is performed by using the display on the meter.
The MicroLogix 1400 controller requires configuration to coordinate it to the
number and size of steps that exist in the capacitor bank being controlled, as well
as the desired operating mode and other selections. Use the built-in LCD
interface on the MicroLogix 1400 controller or the optional PanelView
Component C600 terminal to configure the controller.
ATTENTION: Do not operate the capacitor bank controller without first
configuring it to suit the controlled capacitor bank and system options.
Unpredictable operation, including undesirable power system effects,
may result.
The capacitor bank controller is compatible with the PanelView
Component C600 terminal firmware revision 1.3 or later.
Rockwell Automation Publication 1413-UM001D-EN-P - November 2010 29
Page 30

Chapter 3 Configuration
Communication Settings
The following sections provide information on configuring communication for
the components.
Base Unit
Communication settings are factory configured. The MicroLogix 1400
controller settings are contained in the EEPROM memory module.
PowerMonitor 1000 meter settings are stored in onboard nonvolatile memory
(NVRAM). Configuration settings are listed below.
Table 7 - Communication Settings
Device/Parameter MicroLogix 1400 Controller PowerMonitor Meter 1
Protocol EtherNet/IP EtherNet/IP
Ethernet HMI Option
This option allows the PanelView Component C600 terminal to connect to your
Ethernet network. The PanelView Component C600 Touch HMI terminal with
Ethernet communication provides ease of navigation, viewing, and configuration
of the capacitor bank controller application.
Default communication settings are factory configured.
Table 8 - PanelView Component C600 Ethernet Configuration Settings
Device/Parameter MicroLogix 1400 Controller PanelView Componet C600
IP Address 192.168.254.100
Subnet Mask 255.255.0.0 255.255.0.0 255.255.0.0
(1) See MicroLogix 1400 Controller Installation Instructions, publication 1766-UM001 for instructions on changing the controller’s IP Address. If you change the controller’s IP
Adress, make sure all of the Capacitor Bank devices are on the same network or IP Address range.
(2) The default Gateway for the PowerMonitor 1000 is 128.1.1.1.
(1)
Operator Terminal
192.168.254.105 192.168.254.64
PowerMonitor 1000 Meter 1
(2)
30 Rockwell Automation Publication 1413-UM001D-EN-P - November 2010
Page 31

Configuration Chapter 3
ESC
OK
OK
ESC
MicroLogix 1400 Controller
This section describes how to use the LCD and keypad on the MicroLogix 1400
controller.
Operating Buttons
Button Function
Cursor Buttons Move cursor
Select menu item
Choose file numbers, values, etc.
OK Next menu level, store your entry, apply the
changes
ESC Previous menu level, cancel your entry
Using Menus to Choose Values
Press To
• Go to next menu level.
• Store your entry.
• Apply the changes.
• Go to previous menu level.
• Cancel your entry since the last Ok.
• Press repeatedly to go to the main menu.
• Change menu item.
• Change value.
• Change position.
Rockwell Automation Publication 1413-UM001D-EN-P - November 2010 31
Page 32

Chapter 3 Configuration
Cursor up or down
Apply or Enter
The symbol " " is used as the cursor.
There are two different cursor types:
Selection cursor (the symbol “ ”) is displayed left to the
selected item.
• Move cursor with the up/down arrows
Full block navigation is shown as a flashing block:
• Change position with left/right arrows
• Change values with up/down arrows
Selecting Between Menu Items
OK
Cursor Display
32 Rockwell Automation Publication 1413-UM001D-EN-P - November 2010
Page 33

Setting Values
Change value = up/down arrows
Move cursor between digits = left/right arrows
Stores Entries
Retain previous value
Left/right arrow moves the cursor between the digits of the
value .
Up/down arrow changes the value.
Up arrow = increment
Down arrow = decrement
ESC
OK
Configuration Chapter 3
Controller Configuration
You may view and edit the Capacitor Bank Controller parameters by using the
LCD interface. The optional PanelView Component terminal provides
configuration screens for viewing and editing the parameters, as indicated in the
Control and Status Parameter table (Screens: 1 = Configuration, X1 = Extended
Configuration 1, X2 = Extended Configuration 2). The range of each integer
parameter is 0 … 32,768 unless otherwise specified. The parameters are stored in
Rockwell Automation Publication 1413-UM001D-EN-P - November 2010 33
contiguous locations in data files N7 and N139 (integer) and B3 (Boolean) in the
controller.
Use the LCD Interface for Configuration
The LCD interface provides a basic configuration interface for the capacitor
bank controller. In Integer mode, the LCD interface provides read/write access to
the configuration parameters listed in the Control and Status Parameters table.
Use the LCD interface to manually change the controller configuration
parameters.
1. Scroll to and select the desired configuration parameter.
Refer to the Control and Status Parameters table on page 34
.
Page 34

Chapter 3 Configuration
TIP
Table 9 - Control and Status Parameters
2. Press the Enter key to edit the parameter.
3. Use the up/down keys to change the value of the parameter.
If the data is protected or undefined, pressing the up/down key
scrolls to the next data element.
4. Press the Enter key to store the new value.
Esc key will discard the new value.
5. Repeat steps 2…5 as needed.
Address Parameter Unit Description Configurable Range Default PanelView
N7:0 Capacitor Step 1 -
Measured Size
N7:1 Capacitor Step 2 -
Measured Size
N7:2 Capacitor Step 3 -
Measured Size
N7:3 Capacitor Step 4 -
Measured Size
N7:4 Capacitor Step 5 -
Measured Size
N7:5 Capacitor Step 6 -
Measured Size
N7:6 Capacitor Step 7 -
Measured Size
N7:7 Capacitor Step 8 -
Measured Size
N7:8 Capacitor Step 9 -
Measured Size
N7:9 Capacitor Step 10 -
Measured Size
kVAR Measured and averaged capacitor size for
each step
kVAR No - Configuration
kVAR No - Configuration
kVAR No - Configuration
kVAR No - Configuration
kVAR No - Configuration
kVAR No - Configuration
kVAR No - Configuration
kVAR No - Configuration
kVAR No - Configuration
No - Configuration
Component
Screen
34 Rockwell Automation Publication 1413-UM001D-EN-P - November 2010
Page 35

Table 9 - Control and Status Parameters
Configuration Chapter 3
Address Parameter Unit Description Configurable Range Default PanelView
Component
Screen
N7:10 Capacitor Step 1 -
kVAR Nameplate capacitor size for each step Yes 50 Configuration
Effective Size
N7:11 Capacitor Step 2 -
kVAR Yes
(2)
50 Configuration
Effective Size
N7:12 Capacitor Step 3 -
kVAR Yes
(2)
50 Configuration
Effective Size
N7:13 Capacitor Step 4 -
kVAR Yes
(2)
50 Configuration
Effective Size
N7:14 Capacitor Step 5 -
kVAR Yes
(2)
50 Configuration
Effective Size
N7:15 Capacitor Step 6 -
kVAR Yes
(2)
50 Configuration
Effective Size
N7:16 Capacitor Step 7 -
kVAR Yes
(2)
50 Configuration
Effective Size
N7:17 Capacitor Step 8 -
kVAR Yes
(2)
50 Configuration
Effective Size
N7:18 Capacitor Step 9 -
kVAR Yes
(2)
50 Configuration
Effective Size
N7:19 Capacitor Step 10 -
kVAR Yes
(2)
50 Configuration
Effective Size
N7:30 Capacitor
Discharge Time
seconds The amount of time after a capacitor step is
turned off, before a capacitor step is
Yes 60 Configuration
considered fully discharged
N7:31 Nominal Voltage volts The nominal bus voltage of the system Yes 480 Ext Configuration 1
N7:32 Voltage Threshold
- High and Low
% The voltage percentage from nominal, that
will determine high and low limits for
Yes 1…10 5 Ext Configuration 1
alarming
N7:34 Lead Deadband kVAR The leading kVAR limit allowed for the
Yes 20 Configuration
system, before the controller acts to correct
lead, typically 33% of smallest capacitor step
N7:35 Lag Deadband kVAR The lagging kVAR limit allowed for the
Yes 35 Configuration
system, before the controller acts to correct
lag, typically 66% of largest capacitor step
N7:36 Step Tolerance
Low Limit
N7:37 Power Factor Out-
of-Range Time
% The kVAR percentage of effective, that will
determine low limits for each capacitor step
seconds The amount of time the system kVAR must be
out of the range of the lead or lag deadband,
Yes 0…10 5 Ext Configuration 2
Yes 60 Ext Configuration 1
before the controller acts to correct
N7:39 Step Tolerance
Tim e
seconds The amount of time after a capacitor step is
actuated, before taking a sample reading of
Yes 30 Ext Configuration 2
the system kVAR difference, to determine if
the capacitor step is above the step tolerance
low limit
N7:40 Voltage High In-
Range Time
seconds The amount of time the bus voltage must be
below the high limit before resetting the
Yes 120 Ext Configuration 1
Voltage High Alarm
N7:41 Voltage Low In-
Range Time
seconds The amount of time the bus voltage must be
above the low limit before resetting the
Yes 120 Ext Configuration 1
Voltage Low Alarm
Rockwell Automation Publication 1413-UM001D-EN-P - November 2010 35
Page 36

Chapter 3 Configuration
Table 9 - Control and Status Parameters
Address Parameter Unit Description Configurable Range Default PanelView
Component
Screen
N7:42 Voltage In-Range
Tim e
seconds The amount of time after the Voltage High
and Voltage Low alarms have been reset,
Yes 120 Ext Configuration 1
before signifying that the voltage is in an
acceptable range
N7:43 Control Word
(1)
This is the control word for the capacitor
bank controller. Bit 4 is used to initiate a
restore of factory defaults. This should be
treated as a momentary state. Bit 5 is used to
initiate the step size buffer. This bit should
also be treated as a momentary state. Bit 6 is
used for disabling step tolerance. The BCD
Yes
See Ta bl e 1 0 ,
Control Word
(N7:43) for
more
information.
Ext Configuration 2
value for each bit is available for easy setup
N7:45 Number of
PowerMonitor
1000 meters
N7:46 Number of
Capacitor Steps
N7:47 Operating Mode The operating mode:
The number of PowerMonitor meters to
include in the aggregate kW and kVAR
calculations
The number of capacitor steps to be
controlled
Yes 1…4 1 Configuration
Yes 1…10 10 Configuration
Yes 0…3 0 Configuration
0 - Manual
1 - FILO
2 - Balanced
3 - Best Fit
N7:56 Nominal Voltage
Multiplier scale 1, 10, 100, or 1000 Yes 1 Ext Configuration 1
Scale
N7:59 Number of
Samples
The number of kVAR samples to average
together when auto-configuring capacitor
Yes 1…10 5 Ext Configuration 1
step sizes
N139:10 Write IP address Writes IP address for the PowerMonitor 1000
Yes Ad min
meter to MicroLogix 1400 controller for
messaging (Bit 0), toggle bit 0 to 1 to 0
N139:12 PowerMonitor 1 IP
1st byte (octet) of PowerMonitor IP Address Yes 0…255 192 Admin
Byte A
N139:13 PowerMonitor 1 IP
2nd byte (octet) of PowerMonitor IP Address Yes 0…255 168 Admin
Byte B
N139:15 PowerMonitor 1 IP
3rd byte (octet) of PowerMonitor IP Address Yes 0…255 254 Admin
Byte C
N139:16 PowerMonitor 1 IP
4th byte (octet) of PowerMonitor IP Address Yes 0…255 64 Admin
Byte D
N139:22 PowerMonitor 2 IP
1st byte (octet) of PowerMonitor IP Address Yes
(3)
0…255 192 Admin
Byte A
N139:23 PowerMonitor 2 IP
2nd byte (octet) of PowerMonitor IP Address Yes
(3)
0…255 168 Admin
Byte B
N139:25 PowerMonitor 2 IP
3rd byte (octet) of PowerMonitor IP Address Yes
(3)
0…255 254 Admin
Byte C
N139:26 PowerMonitor 2 IP
4th byte (octet) of PowerMonitor IP Address Yes
(3)
0…255 65 Admin
Byte D
N139:32 PowerMonitor 3 IP
1st byte (octet) of PowerMonitor IP Address Yes
(3)
0…255 192 Admin
Byte A
N139:33 PowerMonitor 3 IP
2nd byte (octet) of PowerMonitor IP Address Yes
(3)
0…255 168 Admin
Byte B
36 Rockwell Automation Publication 1413-UM001D-EN-P - November 2010
Page 37

Table 9 - Control and Status Parameters
Configuration Chapter 3
Address Parameter Unit Description Configurable Range Default PanelView
Component
Screen
N139:35 PowerMonitor 3 IP
3rd byte (octet) of PowerMonitor IP Address Yes
(3)
0…255 254 Admin
Byte C
N139:36 PowerMonitor 3 IP
4th byte (octet) of PowerMonitor IP Address Yes
(3)
0…255 66 Admin
Byte D
N139:42 PowerMonitor 4 IP
1st byte (octet) of PowerMonitor IP Address Yes
(3)
0…255 192 Admin
Byte A
N139:43 PowerMonitor 4 IP
2nd byte (octet) of PowerMonitor IP Address Yes
(3)
0…255 168 Admin
Byte B
N139:45 PowerMonitor 4 IP
3rd byte (octet) of PowerMonitor IP Address Yes
(3)
0…255 254 Admin
Byte C
N139:46 PowerMonitor 4 IP
4th byte (octet) of PowerMonitor IP Address Yes
(3)
0…255 67 Admin
Byte D
N139:52 Reset Input Reset all the Inputs. Bit 1 (write a value of 2,
Yes Ext Configuration 2
and then back to 0 will Reset all inputs)
N139:99 Wiring diagnostic Perfoms wiring diagnostic for the
Yes Ad min
PowerMonitor wiring (Bit 0)
(1) See Table 10, Control Word (N7:43) for more information.
(2) Depends on the number of capacitor steps in N7:46.
(3) Depends on the number of PowerMonitor 1000 meters in N7:45.
Table 10 - Control Word (N7:43)
Bit Parameter BCD Value
4 Restore Factory Defaults 16
5 Initialize Step Buffer 32
6 Disable Step Tolerance; 0 = False, 1 = True 64
7 Enable Input Mode; 0 = False, 1 = True 128
Rockwell Automation Publication 1413-UM001D-EN-P - November 2010 37
Page 38

Chapter 3 Configuration
Table 11 - Binary (bit) Elements
Address Parameter Configurable Value PanelView Component
Terminal Screen
B3:0/0 Capacitor Step 1 - Status No 0 = Off, 1 = On Bank Status
B3:0/1 Capacitor Step 2 - Status No
B3:0/2 Capacitor Step 3 - Status No
B3:0/3 Capacitor Step 4 - Status No
B3:0/4 Capacitor Step 5 - Status No
B3:0/5 Capacitor Step 6 - Status No
B3:0/6 Capacitor Step 7 - Status No
B3:0/7 Capacitor Step 8 - Status No
B3:0/8 Capacitor Step 9 - Status No
B3:0/9 Capacitor Step 10 - Status No
B3:0/10 Capacitor Step 1 - Alarm No 0 = No Alarm, 1 = In Alarm
B3:0/11 Capacitor Step 2 - Alarm No
B3:0/12 Capacitor Step 3 - Alarm No
B3:0/13 Capacitor Step 4 - Alarm No
B3:0/14 Capacitor Step 5 - Alarm No
B3:0/15 Capacitor Step 6 - Alarm No
B3:1/0 Capacitor Step 7 - Alarm No
B3:1/1 Capacitor Step 8 - Alarm No
B3:1/2 Capacitor Step 9 - Alarm No
B3:1/3 Capacitor Step 10 - Alarm No
B3:1/4 Capacitor Step 1 - Mode Yes 0 = Manual, 1 = Auto Step Control
B3:1/5 Capacitor Step 2 - Mode Yes
B3:1/6 Capacitor Step 3 - Mode Yes
B3:1/7 Capacitor Step 4 - Mode Yes
(1)
(1)
(1)
38 Rockwell Automation Publication 1413-UM001D-EN-P - November 2010
Page 39

Table 11 - Binary (bit) Elements
Configuration Chapter 3
Address Parameter Configurable Value PanelView Component
Terminal Screen
B3:1/8 Capacitor Step 5 - Mode Yes
B3:1/9 Capacitor Step 6 - Mode Yes
B3:1/10 Capacitor Step 7 - Mode Yes
B3:1/11 Capacitor Step 8 - Mode Yes
B3:1/12 Capacitor Step 9 - Mode Yes
B3:1/13 Capacitor Step 10 - Mode Yes
(1)
(1)
(1)
(1)
(1)
(1)
0 = Manual, 1 = Auto Step Control
B3:1/14 Capacitor Step 1 - Manual Command Yes 0 = Command Off,
B3:1/15 Capacitor Step 2 - Manual Command Yes
B3:2/0 Capacitor Step 3 - Manual Command Yes
B3:2/1 Capacitor Step 4 - Manual Command Yes
B3:2/2 Capacitor Step 5 - Manual Command Yes
B3:2/3 Capacitor Step 6 - Manual Command Yes
B3:2/4 Capacitor Step 7 - Manual Command Yes
B3:2/5 Capacitor Step 8 - Manual Command Yes
B3:2/6 Capacitor Step 9 - Manual Command Yes
B3:2/7 Capacitor Step 10 - Manual Command Yes
(1)
(1)
(1)
(1)
(1)
(1)
(1)
(1)
(1)
1 = Command On
B3:2/8 Auto Configure Capacitor Step Sizes Yes Set to 1 to initiate Configuration
B3:2/9 System Alarm No 0 = No Alarm, 1 = In Alarm Alarm Summary
B3:2/10 Bad Step Alarm No
B3:2/11 Power Factor Not Achieved Alarm No
B3:2/12 Voltage Alarm No
(1) Depends on the number of capacitor steps in N7:46.
Rockwell Automation Publication 1413-UM001D-EN-P - November 2010 39
View MicroLogix 1400 Controller Ethernet Status
The Ethernet configuration screen of the LCD displays the MAC and IP
addresses assigned to the MicroLogix 1400 controller.
Follow these steps to view the Ethernet configuration for your controller.
1. On the Main Menu screen, select Advanced Set by using the Up and Down
keys on the LCD keypad, as shown below.
Page 40

Chapter 3 Configuration
If the menu items shown in the figure below are not displayed on the Main
Menu screen, you need to scroll down the screen by pressing the Down key.
2. Press the OK key on the LCD keypad.
The Advanced Set Menu screen is displayed, as shown below.
3. If ENET Cfg is selected, press the OK key, otherwise, select ENET Cfg by
using the Up and Down keys, and then press the OK key.
The Ethernet Configuration screen is displayed.
4. Press the OK key on the LCD Status menu.
When an IP address is not yet assigned to your controller, only the MAC
address that is assigned to your controller, represented as
XXXXXXXXXXXX below, is displayed.
40 Rockwell Automation Publication 1413-UM001D-EN-P - November 2010
Page 41

Configuration Chapter 3
A MAC address is a 12-digit hexadecimal number. Your controller ships
with a unique MAC address assigned in the factory. You can identify the
MAC address of your controller by opening the expansion module cover
on your controller.
When an IP address is assigned to your controller, both the MAC and IP
addresses of your controller are displayed, as shown below. In this example,
the MAC address is represented as XXXXXXXXXXXX. The IP address
is represented as xxx.xxx.xxx.xxx, where each xxx is a decimal number
between 0…255.
5. Press the ESC key to return to the Advanced Set Menu screen, as shown in
.
step 2
Rockwell Automation Publication 1413-UM001D-EN-P - November 2010 41
Page 42

Chapter 3 Configuration
TIP
PowerMonitor 1000 Meter Configuration
The table below lists the configuration parameters that must be set up for correct
operation of the capacitor bank controller.
For additional information regarding PowerMonitor 1000 meter configuration,
please refer to the PowerMonitor 1000 User Manual, publication 1408-UM001
Table 12 - PowerMonitor Meter Configuration Parameters
Parameter PowerMonitor 1 PowerMonitor 2 PowerMonitor 3 PowerMonitor 4
Wiring mode
PT (VT) primary voltage
PT (VT) secondary voltage
CT primary current
I4 primary current
IP address 192.168.254.64 192.168.254.65
Subnet mask 255.255.0.0
Default gateway address 128.1.1.1
(1) This IP Address is not the default configuration.
When using multiple PowerMonitor meters, they all must be installed on
the same bus voltage level.
(1)
192.168.254.66
(1)
192.168.254.67
.
(1)
42 Rockwell Automation Publication 1413-UM001D-EN-P - November 2010
Page 43

Configuration Chapter 3
Up Arrow
Escape
Enter
Down Arrow
Parameter Descriptions
• Wiring mode – selected to match the physical connections to the power
system
– Direct Delta
– Open Delta
– Wy e
– Single phase
– 1 PT 1 CT - LL
– 1 PT 1 CT - LN
• PT (VT) primary voltage – reflects the voltage rating on the high side of
the potential/voltage transformers. Range 1…50,000V, default 480V
• PT (VT) secondary voltage – reflects the voltage rating on the low side of
the potential/voltage transformers. Range 1…600 V, default 480V
• CT primary current – reflects the current rating on the high side of the
phase current transformers. Range 1…50,000 A, default 5. The CT
secondary current is also adjustable but the default value of 5 A is standard
• IP address, subnet mask, default gateway – Ethernet port settings
required for communications with the user’s local area network
Set Parameters with the PowerMonitor 1000 Unit
The Basic Configuration table contains the configuration parameters needed for
initial setup of the PowerMonitor meter in the base system.
The diagram and table shows the LCD interface buttons and their functions.
Figure 4 - LCD Interface
RS-485 STATUS
RX TX Mod Net
The buttons function differently in each mode. The PowerMonitor 1000 unit
enters into Display mode by default.
Powermonitor 1000
Rockwell Automation Publication 1413-UM001D-EN-P - November 2010 43
Page 44

Chapter 3 Configuration
Chart Key
Default
Screen
Select
Level 1
Level 2
Level 4
Level 3
Next Item
(within current level)
Previous Item
(within current level)
Table 13 - Button Function
Button Mode
Display Program Edit
Escape Returns to parent menu
Up arrow Steps back to the previous parameter or menu
Down arrow Steps forward to the next parameter or menu
Enter Steps into a sub-menu
Up and down
arrows
together
At top menu, selects default screen
item
item
Steps into a sub-
or sets default screen
menu, selects the
parameter to be
modified or changes
to Edit mode
Refreshes the display No effect Moves the highlight cursor
Cancels changes to the
parameter and returns to
Program mode
Increments the value of the
highlighted digit
Decrements the value of the
highlighted digit
Saves the parameter change
and returns to Program mode
one character to the left
User choices for display and configuration are organized in a hierarchical menu
system within the PowerMonitor 1000 unit.
This diagram shows how to navigate in the display and configuration menu.
Figure 5 - Menu Navigation
44 Rockwell Automation Publication 1413-UM001D-EN-P - November 2010
Page 45

LCD Screen Display and Configuration Menu Map
Default
Screen?
Display
Config
Setup
Program
Passwor d?
Display
Metering
I1
I2
I3
I Average
V LN1
V LN2
V LN3
V L12
V L23
V L31
V LN Avg
V LL Avg
Frequency
Unbalance V
Unbalance I
Display
Metering Volts
Amps
Frequency(1)
Metering
Power( 1)(2)
Level 1
Level 2
Level 3
PF 1
PF 2
PF 3
PF Total
KW 1
KW 2
KW 3
KW Total
KVAR 1
KVAR 2
KVAR 3
KVAR T otal
KVA 1
KVA 2
KVA 3
KVA Total
Metering
Energy(1)
Status 1 Cnt
Status 2 Cnt
kWH F w d
kWH Rev
kWH
kVARH Fwd
kVARH Rev
kVARH
kVAH
kW Demand
kVAR Demand
kVA Dema nd
PF Demand
kW Proj Demand
kVAR Proj Demand
kVA Proj Demand
Level 4
See Setup
Submenu
(1)
The Catalog Number and
Voltage mode determine which
parameters are displayed.
(2)
Individual phase parameters
are not displayed in Delta modes.
Figure 6 - Main Menu, Page 1
Configuration Chapter 3
Rockwell Automation Publication 1413-UM001D-EN-P - November 2010 45
Page 46

Chapter 3 Configuration
Level 2 Program Mode, Level 3 Display Mode
Level 3, 4
Configuration Mode
Analog Input Advanced RS485 Ethernet
IP Address Byte a
IP Address Byte b
IP Address Byte c
IP Address Byte d
Subnet Mask Byte a
Subnet Mask Byte b
Subnet Mask Byte c
Subnet Mask Byte d
Gateway Byte a
Gateway Byte b
Gateway Byte c
Gateway Byte d
SNTP Mode Select
SNTP Update Rate
SNTP Time Zone
Time Server Byte a
Time Server Byte b
Time Server Byte c
Time Server Byte d
Broadcast Mode
Broadcast Port
Protocol Setting
Serial Delay mS
Baud Rate
Serial Address
Serial Data Format
Inter Character
Timeout
Max Node Address
New Password
Date
Time
Meter Averaging
DST Enable
DST Start
Month, Wk, Day
DST Start Hour
DST End
Month, Wk, Day
DST End Hour
KYZ Output Select
KYZ Output Scale
KYZ Pulse Duration
Status 1 Input Scale
Status 2 Input Scale
Demand Source
Demand Length
Demand Periods
Demand Sync Delay
Unit Error Action
Error Log Full Action
LCD Display Contrast
Voltage Mode
PT Primary
PT Secondary
CT Primary
System PF Setting
Default Screen
The PowerMonitor 1000 unit lets you select and navigate to a default screen. The
default screen displays at startup and is displayed after the display has been
dormant for approximately 30 minutes. To set the current screen as the default,
press Enter and click Yes. If you’re in another menu and want to get back to the
default screen, continue pressing Escape until you are prompted To Default
Screen? Click Yes to display the default screen.
Figure 7 - Main Menu, Page 2
Level 2
Display Wiring
Diagnostics
Level 3
Wiring Status
Volts Input Missing
Volts Input Inverted
Amps Input Missing
Amps Input Inverted
Voltage Rotation
Amps ROtation
VOlts Ph1 Angle
Volts Ph1 Magnitude
Volts Ph2 Angle
Volts Ph2 Magnitude
Volts Ph3 Angle
Volts Ph3 Magnitude
Amps Ph1 Angle
Amps Ph1 Magnitude
Amps Ph2 Angle
Amps Ph2 Magnitude
Amps Ph3 Angle
Amps Ph3 Magnitude
Display Run
Status
Series Number
Catalog Number
Comm Type
WIN Number
Application FRN
Boot Code FRN
Default Device ID
Ethernet Interface
Input Over Range
Phase Loss Detection
Terminals Locked
Accuracy Class
Overall Status
Flash Memory
SRAM Memory
NVRAM Memory
SPI Interface
Real Time Clock
Watchdog Timer
Metering Status
LCD Interface
Serial Interface
Display I/O
Status
Date
Time
KYZ Status
S1 Status
S1 Status Count
S2 Status
S2 Status Count
Output Word
Program
Commands
Clear kWh Registers
Clear kVARh Registers
Clear kVAh Registers
Clear Status 1 Count
Clear Status 2 Count
Remove KYZ Force
Test Wiring Connections
Clear Min/Max Log
Perform Wiring Diagram
Clear Load Factor Log
Troubleshooting Password
Clear Energy All
Registers
Force KYZ On
Force KYZ Off
Restore Defaults
Reset System
Store Load Factor
Record
Store TOU Record
Clear TOU Log
Program
Setup
See Setup
Submenu
46 Rockwell Automation Publication 1413-UM001D-EN-P - November 2010
Figure 8 - Setup Submenu
Page 47

Configuration Chapter 3
TIP
TIP
These images show the navigation through the
PanelView Component terminal.
Clicking each button provides navigation to the
configuration and metering screens.
This screen shows current realtime Power (kW,
kVAR, and powerfactor) and displays the status of
which capacitor bank steps are currently On or OFF.
The Navication/Menu screen provides navigation
to the different screens.
Edit a Parameter
Follow these guidelines to edit a parameter:
• Press <up> or <down> to change the highlighted digit.
• Press <up> and <down> together to move the highlight cursor one place
to the left, and press <up> or <down> to set the selected digit’s value.
Continue in the same way until the correct value is entered then press <enter>
when done.
Configuration with the PanelView Component C600 Terminal (optional HMI only)
The optional PanelView Component C600 terminal provides you with a more
user-friendly interface to the capacitor bank controller. Use the navigation
buttons on the bottom of each screen to navigate through the screens.
If the Capacitor Bank HMI screens are not showing up, you will need to
run the application through the PanelView Component terminal menu.
The application project name is 1413-CAP-V3.
Only solid fields are configurable; that is, the values in solid fields can be
changed.
Rockwell Automation Publication 1413-UM001D-EN-P - November 2010 47
Page 48

Chapter 3 Configuration
In this screen you can configure:
• the number of steps. The default value is 10; that will
show all 10 steps. Num Step is between 1 and 10.
• Number of PowerMonitors from 1…4. Default is 1.
At least one PowerMonitor unit must be configured.
• Steps in kVAR. This is the size of each capacitor.
Step 1 is wired to Output 1 (Capacitor Bank step 1
contact) of the MicroLogix controller and step 10 is
wired to output 10 (Capacitor Bank step 10 contact).
IMPORTANT
IMPORTANT
TIP
Configure the capacitor bank controller by using the optional PanelView
terminal.
1. Press Menu to view the Menu from the Overview screen.
2. Press Configuration to view the Configuration screen from the Menu.
Stages and/or sizes of the Capacitor Bank typically require a
Power Quality study. The Capacitor Bank modes are Manual, FILO,
Balanced, and Best Fit.
For Discharge Time, check with the Capacitor Bank vendor for the
appropriate value. One discharge Capacitor Bank value applies to
all capacitor steps.
3. To edit a value, touch the desired field and the keypad appears.
4. Enter the desired value by using the keypad and press Enter to store the
new value.
Pressing ESC cancels a change.
This Auto Detect kVAR feature is used in the commissioning phase. It is
recommended that the only load is the capacitor bank while using this
feature. It may require physically installing the current transformers only
for the capacitors. After running this feature, install your Current
Transformers to your power side.
48 Rockwell Automation Publication 1413-UM001D-EN-P - November 2010
Page 49

Configuration Chapter 3
TIP
5. Press Auto Detect kVAR to navigate to the Auto Configure Effective
kVAR proces s.
The number of measurements to average for each step is entered
on the Extended Configuration Screen #2 (F10).
6. Follow steps 1…3 on this screen, then press Auto Detect Cap Size to
initiate the auto-configuration process.
7. Navigate to the Extended Status screen and write down the Measured
kVAR for each of your capacitor banks.
8. Navigate to the Configuration screen and configure the steps with the
measured kVAR data.
Rockwell Automation Publication 1413-UM001D-EN-P - November 2010 49
Page 50

Chapter 3 Configuration
These guidelines apply in the Configuration
screen:
• Nominal Volts is a number between 0 and
9999 using the scale
1/10/100/1000. Therefore, a voltage of
13,400V would be entered as 1340.
• Vol t R an ge % is used for voltage high/low
alarms.
• Timer preset is for high and low values for
the high/low voltage alarms.
• PF timer is used to generate alarm if
Powerfactor is not achieve in that time.
TIP
These guidelines apply in the Configuration screen:
• The Samples to Avg number is between 5
and 10.
• The kVAR tolerance % of each capacitor to
trigger alarming.
• Input mode is disabled by default. If you are
using fault relays for respective steps, we
recommend that you use Input mode. Reset
inputs will clear controller alarms.
TIP
9. Navigate to Menu then to Extended Configuration 1.
This screen operates in the same way as the initial configuration screen.
50 Rockwell Automation Publication 1413-UM001D-EN-P - November 2010
All timers are in seconds.
10. Press Extended Config 2 to navigate to the Extended Configuration 2
screen from the Extended Configuration 1 screen.
The leading kVAR limit allowed for the system, before the controller acts
to correct lead, typically is 33% of smallest capacitor step. The lagging
kVAR limit allowed for the system, before the controller acts to correct
lag, typically is 66% of largest capacitor step.
Page 51

11. Set the Step Control to Manual or Auto.
This screen shows the step control of the Capacitor
Bank controller. Step Control screens let you place a step
in Auto (A) or Manual (M) mode.
When using the Balanced, Best Fit, or FILO operating
mode, make sure all the steps are in Auto mode. Just
pressing the step will toggle the step in Auto (A) or
Manual (M) mode.
The first row (from the left) is to configure the step; the
second row is the status of step (A or M).
The third row is Manual command. You can press the
respective step and if it is in Manual mode you can turn
that step On or Off.
The second-last row indicates On/Off status of each
step. The last row shows discharging status. If a
Capacitor Bank is discharging, it will show a flashing ‘D’.
Configuration Chapter 3
Rockwell Automation Publication 1413-UM001D-EN-P - November 2010 51
Page 52

Chapter 3 Configuration
This screen shows the Operating mode. Verify your
steps are configured properly before making Operating
mode selections:
• Manual (mode = 0) – This mode disables all
automatic operating modes. Manual mode is the
default configuration. All capacitor steps have a
default configuration of auto.
• FILO (mode = 1) – This mode of operation
switches the capacitor steps on and off in first-in,
last-out (FILO) order. That is, the first step on is
the last step turned off. This is most useful when
all the capacitor steps are of similar size.
• Balanced (mode = 2) – This mode counts the
number of opening operations on each capacitor
step and switch-capacitor steps to balance the
number of opening operations equally across all
of the employed capacitor steps. This mode is also
most useful when all of the steps are of similar
size.
• Best Fit (mode = 3) – This mode selects capacitor
steps to be switched on and off to most closely
achieve the target power factor and kVAR needs
of the system. When the system’s kVAR needs to
increase, the available step or steps with the
closest (aggregated) kVAR rating is added. On
decreasing kVAR demand, steps are switched off
in similar fashion.
12. Navigate to Menu then to Operating Mode and select your operating
mode.
52 Rockwell Automation Publication 1413-UM001D-EN-P - November 2010
Page 53

13. Navigate to Menu then to ADMIN Screen.
The Admin screen provides the IP address of the
PowerMonitor units used in the Capacitor Bank
controller.
The default IP address for the Powermointor 1000 unit
in this application is 192.168.254.64. After changing the
IP address, you must press Config IP for the controller
to change the IP address in the explicit messaging.
ATTENTION: Changing the IP address causes all of the capacitors to turn
off and that can cause a power disturbance.
Configuration Chapter 3
Capacitor Bank Commissioning Checklist
Follow this checklist prior to using the Capacitor Bank:
• Wear proper personal protective equipment (PPE).
• Complete a Power Quality study to understand the power profile to
staging the right step sizes of the Capacitor Bank.
• Check that the PowerMonitor unit is wired correctly.
• Check that the Overview screen shows valid Power data (kW, kVar, and
Powerfactor). If no data is displayed, go to the Admin screen and verify the
IP address of the PowerMonitor unit.
Rockwell Automation Publication 1413-UM001D-EN-P - November 2010 53
Page 54

Chapter 3 Configuration
As a minimum, the following configurations are required.
• Configuration is the number of steps configured with Discharge time, lead
and/or lag settings.
• Configuration 1 and 2 are Nominal voltage, Voltage high/low limits,
Powerfactor timers, samples to average, and Input modes.
• Step Control configures all the steps in the appropriate mode.
• Operating mode is one of the three Automatic modes, FILO, Balanced, or
Best Fit.
54 Rockwell Automation Publication 1413-UM001D-EN-P - November 2010
Page 55

Operation
PF
Aggregate
KW
Aggregate
KW
Aggregate
2
KVAR
Aggregate
2
+
------------------------------------------------------------------------------
=
Chapter
4
Introduction
The capacitor bank controller gathers real- and reactive-power data by using one
or more PowerMonitor meters. The processor manipulates data in engineering
units of kVAR and kW. The unit does not directly control power factor, but
rather works to actively minimize imported and exported kVAR. The net result
of this philosophy indirectly controls power factor and minimizes voltage
excursions associated with excessive kVAR export.
The capacitor bank controller can accommodate up to four different utility feeds
and/or generators. Each feed requires an individual PowerMonitor 1000 meter.
The unit sums the kW and kVAR readings from each of the PowerMonitor 1000
meters to arrive at an aggregate kVAR so that a single capacitor bank could be
used to compensate several feeds simultaneously.
The traditional C/k ratio is not required for the capacitor bank controller
because we are working in engineering units within the processor.
Aggregate Power Factor is calculated and displayed by using this formula:
The PowerMonitor 1000 meter data is gathered over Ethernet by using the
MicroLogix 1400 controller.
Operating Modes
Each capacitor step can be individually selected to on, off, or auto status. The
capacitor discharge-timer interlock is in effect in Manual mode to prevent
capacitor bank damage. In Auto mode, a step is available to any of the automatic
sequences described below. In the On or Off mode, a step is unavailable to any
automatic operating mode:
• Manual (mode = 0) – This mode disables all automatic operating modes.
Manual mode is the default configuration. All capacitor steps have a
default configuration of auto.
• FILO (mode = 1) – This mode of operation switches the capacitor steps
on and off in first-in, last-out (FILO) order. That is, the first step on is the
last step turned off. This is most useful when all the capacitor steps are of
similar sized.
Rockwell Automation Publication 1413-UM001D-EN-P - November 2010 55
Page 56

Chapter 4 Operation
• Balanced (mode = 2) – This mode counts the number of opening
operations on each capacitor step and switch-capacitor steps to balance the
number of opening operations equally across all of the employed capacitor
steps. This mode is also most useful when all of the steps are of similar size.
• Best Fit (mode = 3) – This mode selects capacitor steps to be switched on
and off to most closely achieve the target power factor and kVAR needs of
the system. When the system’s kVAR needs increase, the available step or
steps with the closest (aggregated) kVAR rating is added. On decreasing
kVAR demand, steps are switched off in similar fashion.
Fault Relay Operation
Fault-protection relays can be used to immediately discharge all or specific
capacitor steps during a fault occurrence. Input 0 is wired to a normally closed
fault-protection relay and discharges all capacitor steps during a fault occurrence
(low-state condition). Inputs 1… 10 are wired to normally closed fault-protection
relays, and discharges its respective capacitor step during a fault occurrence (lowstate condition). If fault protection is not being used for a specific capacitor step,
then that respective input is wired closed by using the controller supplied
24V DC power.
A normally-open momentary pushbutton is wired to Input 11. This pushbutton
is used to reset the controller after a fault occurrence.
Output 0 is used as an alarm relay and is wired normally open to an external alarm
indicator. Outputs 1…10 are wired to normally-open contactors for each
respective capacitor step.
56 Rockwell Automation Publication 1413-UM001D-EN-P - November 2010
Page 57

Figure 9 - Controller Wiring Diagram
Capacitor Step Contactors or Interposing Relays
Fault Relay 2
Master Fault Relay
Fault Relay 5
Fault Relay 7
Fault Relay 8
Operation Chapter 4
Fault Relay 10
Inputs
Outputs
Fault Relay 6
Fault Relay 4
Fault Relay 3
Fault Relay 1
IN0
COM 0
L1 OV1
VAC
Ground
120V AC
Control
Power
Isolated Alarm Output
Capacitor Step
Control Power
COM 1
IN2
IN1 IN3
VAC
L2/N
DC0
VAC
Group 0 Group 1 Group 2 Group 3 Group 5Group 4 Group 6
IN5 IN7
IN4
OUT0
OUT1 OUT2 OUT3 OUT4
DC1
DC2
VAC
VAC
1
Capacitor Step Contactors or Interposing Relays
IN8
COM 2
IN6
DC3
DC4
VAC
VAC
3
3
2
Reset
Fault Relay 9
IN10
COM 3
IN9 IN11
VAC
DC5
OUT5
OUT6 OUT9 OUT11
5
4
IN13
IN12 IN14 IN16 IN18
OUT7 OUT8 OUT10
DC6
VAC
6
COM
ANA
10
IV0(+)
IV2(+)
IV1(+)
Spare Output
IV3(+)
IN15
7
IN19
IN17
COM
ANA
OV0
9
8
Input Interlock Mode
The Input Interlock mode allows fault protection for each capacitor step through
the use of fault-protection relays. Wire normally closed fault-protection relays to
each input from 0…10 of the controller. Wire a normally-open momentary
pushbutton to Input 11. This pushbutton serves as a reset button.
During a fault occurrence, the controller discharges and locks-out the respective
capacitor step associated with the fault relay that tripped. The fault-protection
relay wired to Input 0 discharges and locks-out all capacitor steps. The remaining
fault-protection relays discharge and lock-out their respective capacitor step (that
is, Input 1 discharges and locks-out capacitor step 1).
In order to place a capacitor step back into the sequence, a fault must not be
present for that step, and a reset must be initiated by pushing the Reset
pushbutton.
Rockwell Automation Publication 1413-UM001D-EN-P - November 2010 57
Page 58

Chapter 4 Operation
Alarms
Edit and View Data
The capacitor bank controller offers these alarms:
• Bad Step - This alarm indicates a blown fuse and/or loss of capacitor
condition. The controller measures actual VAR output from a capacitor
step, averages, and compares this value with the original effective capacitor
value. When actual VAR is more than the user-configurable
StepKvarTolerance (default 5%) below the effective step size for a userconfigurable delay (default 30 seconds), the alarm is activated. The alarm is
reset when actual VAR output is greater than or equal to the setpoint for
the same delay. The step will be latched as tripped/offline if the VAR
output falls below 90% of nominal.
• Target power factor not achieved - If actual power is less than setpoint for
a user-adjustable number of seconds, then the alarm flag is set.
• PowerMonitor Communication Loss - If the MicroLogix controller loses
communication with the PowerMonitor meter, then the alarm flag is set.
• High and Low Voltage - If BusVolts is outside either limit, this alarm is
activated immediately. After the voltage returns to the proper range for a
configurable amount of time, this alarm is reset.
You can use the MicroLogix 1400 controller to edit and view Integer and Bit files.
The PanelView Component C600 terminal provides an operator interface.
MicroLogix 1400 Controller
The LCD interface provides access to all data registers.
The Binary (bit) Elements and Integer (Word) Elements tables define how these
register assignments are made.
See page 34
Elements.
Refer to pages 31
parameters.
for the Integer (word) Elements and page 38 for the Binary (bit)
…33 for information on using the LCD to edit configuration
58 Rockwell Automation Publication 1413-UM001D-EN-P - November 2010
Page 59

Operation Chapter 4
Optional PanelView Component C600 HMI
The optional PanelView Component C600 HMI provides you with a user
interface. During operation these screens are provided:
• Overview Summary
• Navigation/Menu
• Bank Status
• Extended Status
• Step Control
• Power Factor Summary
• Powermonitoring Data x4
• Alarm Summary
• System Configuration
These status screens show the operation of the capacitor bank controller.
Rockwell Automation Publication 1413-UM001D-EN-P - November 2010 59
Page 60

Chapter 4 Operation
Extended
Configuration 2
Extended
Configuration
Configuration
Alarm
Summary
Power Factor
Summary
Step Status
Extended
Status
Step Control
Overview
Summary
PowerMonitor
1000 #1
Data
PowerMonitor
1000 #4
Data
(optional)
PowerMonitor
1000 #3
Data
(optional)
PowerMonitor
1000 #2
Data
(optional)
Navigation/
Menu
Screen Navigation Tree
Overview Summary Screen
This is the home screen and displays after you apply power. Press Menu to
navigate to the Menu screen.
60 Rockwell Automation Publication 1413-UM001D-EN-P - November 2010
Page 61

Navigation/Menu Screen
Bank Status Screen
Operation Chapter 4
The status for the steps is listed in vertical columns from 1…10. There are no
configurations on this screen. It displays status data only.
Mode: A = Automatic, which means the step is controlled based on the operation
mode selected. M = Manual, which means you can force the step on or off via the
keypad.
Step Status: 1 = On, 0 = Off.
Discharge Status: ‘ ’ = Not Discharging, D = Discharging.
Alarm: ‘ ’ = No Alarm, ‘A’ = In Alarm.
You can press Extended Status to navigate to the Extended Status Screen.
Press Menu then Overview to return to the Overview Summary Screen.
Rockwell Automation Publication 1413-UM001D-EN-P - November 2010 61
Page 62

Chapter 4 Operation
Extended Status Screen
Press Reset Counters to navigate to the Reset Counters screen.
There are no other user-configurable fields on this screen. Press Menu and then
Overview to return to the Overview Summary Screen.
Power Factor Summary Screen
There are no user-configurable fields on this screen. Press Menu then Overview
to return to the Overview Summary Screen.
Alarm Summary Screen
62 Rockwell Automation Publication 1413-UM001D-EN-P - November 2010
Page 63

Operation Chapter 4
Alarms are listed in the center of the screen. Alarms can be cleared at the PLC or
HMI level by using the corresponding buttons on this screen.
Press Menu then Overview to return to the Overview Summary Screen.
PowerMonitor Meter Screen
There are four instances of this screen, one for each of the PowerMonitor meters.
There are no user-configurable fields on this screen. Use the navigation buttons
on the bottom of the screen to navigate to each PowerMonitor Data Screen. Press
Menu then Overview to return to the Overview Summary Screen.
Rockwell Automation Publication 1413-UM001D-EN-P - November 2010 63
Page 64

Chapter 4 Operation
Notes:
64 Rockwell Automation Publication 1413-UM001D-EN-P - November 2010
Page 65

SCADA Interface
Chapter
5
Power-circuit Parameters
The capacitor bank controller reads power-circuit parameters from the
PowerMonitor meters and makes that data available in its data table for use by
other applications such as SCADA or HMI systems.
This table lists the PowerMonitor meter data available in the controller. The
symbol x indicates the PowerMonitor meter number. Addresses related to
PowerMonitor meter no. 1 begin with F11:0, addresses related to PowerMonitor
meter no. 2 begin with F12:0.
Table 14 - Available PowerMonitor Meter Data
Address Parameter
F1x:0 L1 Current
F1x:1 L2 Current
F1x:2 L3 Current
F1x:3 L1-L2 Voltage
F1x:4 L2-L3 Voltage
F1x:5 L3-L1 Voltage
F1x:6 Frequency
F1x:7 L1 Real Power
F1x:8 L2 Real Power
F1x:9 L3 Real Power
F1x:10 Total Real Power
F1x:11 L1 Reactive Power
F1x:12 L2 Reactive Power
F1x:13 L3 Reactive Power
F1x:14 Total Reactive Power
F1x:15 L1 Power Factor
F1x:16 L2 Power Factor
F1x:17 L3 Power Factor
F1x:18 Total Power Factor
Rockwell Automation Publication 1413-UM001D-EN-P - November 2010 65
Page 66

Chapter 5 SCADA Interface
Additional data is available in systems with the Ethernet PowerMonitor meter
option.
In these systems, all PowerMonitor meter data may be accessed by using the
Ethernet communications port integral to the PowerMonitor meter.
Please refer to the PowerMonitor 1000 User Manual, publication 1408-UM001
for further information.
,
66 Rockwell Automation Publication 1413-UM001D-EN-P - November 2010
Page 67

Catalog Number Explanation
1413 CAP ME PE C---
Bulletin Number
1413 - Power and
Energy Controllers
Type of Device
CAP - Capacitor
Bank Controller
Base Unit Type
ME Communicate with
one Ethernet
PowerMonitor 1000
Additional HMI
PE - Ethernet
PanelView Component
C600
Series
C - Series C
Appendix
A
Base Unit with Ethernet 1413-CAP-ME PowerMonitor Meter
This includes a base controller and one PowerMonitor 1000 meter on the
Ethernet network. Note that ME = Ethernet meter communication.
Communication between the MicroLogix controller and the PowerMonitor
meter are through the Ethernet network. The MicroLogix 1400 controller LCD
interface is used to configure the capacitor bank. There is no HMI terminal for
viewing or configuring data with this option.
Rockwell Automation Publication 1413-UM001D-EN-P - November 2010 67
Page 68

Appendix A Catalog Number Explanation
Ethernet Base Unit with 1413-CAP-ME-PE Ethernet HMI
To add PanelView Component C600 terminal to the system, add PE to the
catalog number. A PE indicates HMI with Ethernet communications.
This option includes a PanelView Component terminal as the HMI to configure
or view the capacitor bank controller in addition to the MicroLogix 1400
controller and the PowerMonitor 1000 meter. This option provides access for
quick configurations.
Table 15 - Summary
Cat. No. PowerMonitor
Meters
1413-CAP-ME C Ethernet None Ethernet Ethernet
1413-CAP-ME-PE C Ethernet Ethernet Ethernet Ethernet
PanelView
Terminals
MicroLogix
Controller to
PowerMonitor
Communication
MicroLogix
Controller to
SCADA
Communication
68 Rockwell Automation Publication 1413-UM001D-EN-P - November 2010
Page 69

Glossary
The following terms and abbreviations are used throughout this manual.
For definitions of terms not listed here, refer to the Allen-Bradley Industrial
Automation Glossary, publication AG-7.1
Bank An overall capacitor or tuned-filter assembly. This controller is designed to
manage and control one bank consisting of 10 steps.
Instance An instance of an object represents a complete iteration of an object and all of its
attributes and methods. For example, the vacuum switch describes a typical
vacuum switch. Each physical switch would result in one instance of a vacuum
switch object. Each instance of an object must be managed independently in the
software.
PM See PowerMonitor meter.
PowerMonitor meter The power measuring device located at the plant mains. There may be more than
one PowerMonitor meter in a system depending on the number of electrical feeds
into the plant.
Step A single switched circuit in a capacitor or filter bank. There are up to 10 steps in a
bank. Others in the industry may also refer to these as stages.
.
Rockwell Automation Publication 1413-UM001D-EN-P - November 2010 69
Page 70

Glossary
Notes:
70 Rockwell Automation Publication 1413-UM001D-EN-P - November 2010
Page 71

A
additional Powermonitors 10
additional resources
alarm summary screen
8, 58
alarms
5
62
status
39
extended status screen
F
functions 7
Index
62
B
bank status screen 61
battery
15
connection
disposal 15
buttons
16
31
C
catalog number explanation 67
communication configuration
base unit
Ethernet HMI option 30
configuration
Powermonitor meter
connect controller
PanelView Component C600 Ethernet
controller
battery
dimensions
DIN rail mounting
location 12
panel mounting
spacing
wiring
wiring diagram 57
controller configuration
control and status parameters
control word
LCD
LCD input interlock mode
LCD manual configuration
PanelView Component C600
use LCD
with PanelView Component C600
controller description 11
input
output
cursor display
30
29
42
11
15
13
14
15
13
56
33
37
33
57
33
33
11
11
32
30
59
34
47
18
G
general information 7
glossary
69
H
HMI 7
I
installation 9
M
menu navigation 44
MicroLogix 1400
Modes
Display mode
mount controller
PanelView Component C600 Ethernet
mount the Powermonitor unit 25
mount the unit
DIN rail mount
panel mount 25
7, 11
43
11, 12
25
N
navigation menu screen 61
O
operating buttons 31
operating modes
operation
operator interface
overview summary screen
7, 55
55
58
60
18
P
D
description 7
DIN rail
25
14, 25
mount
Powermonitor 1000
25
E
Ethernet
9
cable
Rockwell Automation Publication 1413-UM001D-EN-P - November 2010 71
panel mount 25
Powermonitor 1000
panel mounting controller
PanelView Component
connect power
PanelView Component C600
guidelines
mounting
mounting angle
mounting lever
19
20
25
15
24
19
21
8
Page 72

Index
panel cutout dimensions 19
parts list
removal 22
spacing
unlock panel clamp
PanelView Component C600 Ethernet
power factor summary screen
power supply
power-circuit parameters
Powermonitor 1000
button function
configuration 42
DIN rail mount
edit parameter
menu map 45, 46
menu navigation
panel mount
parameter descriptions 43
screen
set parameters
sub menu 46
18
19
23
62
9
65
7
44
25
47
44
25
63
43
S
SCADA interface 65
power-circuit parameters
screen navigation tree 60
setup
menu map
45, 46
65
18
menu navigation
sub menu
system architecture 10
Ethernet options
system components
system connection
Ethernet switch
local Ethernet network
44
46
10
9
10, 26
27
27
U
unit mounting 25
DIN rail mount
panel mount
unit setup
menu map
menu navigation 44
sub menu
use LCD
33, 43
25
25
45, 46
46
V
view Ethernet status 39
W
wiring diagram controller 57
72 Rockwell Automation Publication 1413-UM001D-EN-P - November 2010
Page 73

Notes:
Page 74

Notes:
Page 75

Page 76

Rockwell Otomasyon Ticaret A.Ş., Kar Plaza İş Merkezi E Blok Kat:6 34752 İçerenköy, İstanbul, Tel: +90 (216) 5698400
Rockwell Automation Support
Rockwell Automation provides technical information on the Web to assist you in using its products.
At http://www.rockwellautomation.com/support/
application notes, sample code and links to software service packs, and a MySupport feature that you can customize to make the
best use of these tools.
For an additional level of technical phone support for installation, configuration, and troubleshooting, we offer TechConnect
support programs. For more information, contact your local distributor or Rockwell Automation representative,
or visit http://www.rockwellautomation.com/support/
Installation Assistance
If you experience a problem within the first 24 hours of installation, review the information that is contained in this manual.
You can contact Customer Support for initial help in getting your product up and running.
United States or Canada 1.440.646.3434
Outside United States or
Canada
Use the Worldwide Locator
your local Rockwell Automation representative.
, you can find technical manuals, a knowledge base of FAQs, technical and
.
at http://www.rockwellautomation.com/support/americas/phone_en.html, or contact
New Product Satisfaction Return
Rockwell Automation tests all of its products to ensure that they are fully operational when shipped from the manufacturing facility.
However, if your product is not functioning and needs to be returned, follow these procedures.
United States Contact your distributor. You must provide a Customer Support case number (call the phone number above to obtain
Outside United States Please contact your local Rockwell Automation representative for the return procedure.
one) to your distributor to complete the return process.
Documentation Feedback
Your comments will help us serve your documentation needs better. If you have any suggestions on how to improve this document,
complete this form, publication RA-DU002
, available at http://www.rockwellautomation.com/literature/.
Publication 1413-UM001D-EN-P - November 2010 76 PN-94831
Supersedes Publication 1413-UM001C-EN-P - May 2006 Copyright © 2010 Rockwell Automation, Inc. All rights reserved. Printed in the U.S.A.
 Loading...