

Page 1

Digital Modeling Preamp
MANUAL
o
16 Amplifier Emulations
o
Direct Recording Capabilities
o
128 User Programable Presets Available
o
HUSH Noise Reduction
o
Rocktron's Hallmark Effects
o
Reverb, Delay, HUSH, & one additional
effect available at all times!
Suggested Footcontroller(s) - Rocktron MIDI Mate, Rocktron MIDI I.T.
or Rocktron All Access.
Suggested MIDI Cable(s) - Rocktron M7 Pin MIDI Cable Model #
RMM900
Suggested Power Amplifier(s) - Rocktron Velocity 100 (2x50 Watt)
Suggested Speaker Cabinets(s) - Rocktron Velocity S112 (1x12 cabs)
May be covered by one or more of the following: U.S. Patents #4538297, 4647876, 4696044, 4745309, 4881047,
4893099, 5124657, 5263091, 5268527, 5319713, 5333201, 5402498 and 5493617.
Other patents pending. Foreign patents pending.
1
Page 2
Your Rocktron RepliTone MP preamp has been tested and complies with the following
Standards and Directives as set forth by the European Union:
Standard(s): IEC60065 Professional Audio/Video or Similar
Equipment, EN55013:1997, EN61000-3-2 (1995)
EN61000-3-3(1995), EN55020:1995, CSA E65-94
This means that this product has been designed to meet stringent guidelines on how much RF
energy it can emit, and that it should be immune from other sources of interference when
properly used. Improper use of this equipment could result in increased RF emissions, which may
or may not interfere with other electronic products.
To insure against this possibility, always use good shielded cables for all audio input connections.
This will help insure compliance with the Directive(s).
Copyright © 2002 GHS Corporation
All Rights Reserved.
2
Page 3

rr
Contents
1. Introduction to the RepliTone MP.................................... 4
2. RepliTone MP Quick Start ................................................ 5
3. RepliTone Models ............................................................... 5
4. Precautions .......................................................................... 6
5. RepliTone Emulations ........................................................ 7
6. Front Panel .......................................................................... 8
7. Rear Panel ......................................................................... 10
8. MIDI Implementation ...................................................... 12
9. PC Interface ..................................................................... 15
10. Effects .............................................................................. 16
11. Connections ..................................................................... 19
12. Specifications................................................................... 23
13. Other Rocktron Products............................................... 24
3
Page 4

1. Introduction to the RepliTone MP
The Rocktron RepliTone MP is a 24-bit DSP professional guitar preamp & direct recording
device containing 16 different amp emulation models and 128 user programmable presets (15 user
presets on the front panel with a total of 128 presets available via a Rocktron MIDI footcontroller).
The RepliT one MP also offers ef fect algorithms and superb sound quality . Full MIDI implementation
and a user-friendly operating format ensure that designing unique and useful preset sounds is as
simple as possible.
In addition, the RepliT one MP also features:
• Advanced Speaker Simulation, which provides a strikingly realistic
approximation of a miked speaker cabinet at line-level specifically for
"direct recording", and mixer input to play directly over a PA system or
headphone listening.
• Rocktron's patented HUSH® noise reduction provides noise reduc-
tion while playing and complete silence when not.
• High-quality digital effects, including:
- Reverb - Phaser
- Tremolo (1 & 2) - Flanger
- Detune - Compression
- Chorus - Delay
- Wah - Rotary
• Effects Loop, MIDI In Out/Thru with Phantom Power for MIDI
Footcontroller
• Suggested Power Amplifier - Rocktron Velocity 100 (2x50Watt
Single Space Rack Mount Power Amp)
• Suggested Footcontrollers - Rocktron MIDI Mate, Rocktron MIDI
I.T. or Rocktron All Access
For a thorough explanation of the RepliT one MP and its features, please read this manual carefully and keep it for future reference. After removing the RepliT one MP from the box, save all packing materials in case it becomes necessary to ship the unit.
NOTE: Product and manufacturer names are trademarks of their respective owners and
are in no way associated with Rocktron. The names are mentioned solely for the purpose of
describing certain amplifier tones and emulations produced by the RepliTone MP.
1
4
Page 5

2.
RepliTone MP Quick Start
Turn the MASTER VOLUME control all the way down on the RepliTone
MP and Power Amp.
Using high quality 1/4" guitar cables (standard guitar cables are OK)
connection the RepliTone MP to Power amp as such:
-RepliTone MP Left Pre-amp "OUT" to - "IN" on the Power Amp
-RepliTone MP Right Pre-amp "OUT" to - "IN" on the Power Amp"
Plug the supplied power adapter into the AC INPUT socket on the rear
panel, and plug the other end into an AC wall socket.
Connect your guitar to the INPUT jack.
Press the POWER button on the RepliTone MP and then power on the
Power amp.
Select a PRESET position (or MANUAL).
MP
1 x 12
Select an AMP Model.
Set the GAIN and LEVEL controls to your taste. Adjust the Master
Volume on the RepliTone MP and on the Power Amp to a comfortable
level. Set the BASS, MID, and TREBLE.
Set the EFFECTS SELECT knob to the desired Effect and modify as
needed with the EFFECTS ADJUST control.
Play!
Available RepliTone Products3.
Modeling Preamp - Stereo - Single Rack Space Preamp with Multi-effects and amp
models. The HEADPHONES and LOOP SEND/RETURN jacks are stereo.
Mono, 60 watt combo amp with a single 12 inch speaker . The HEADPHONES
and LOOP SEND/RETURN jacks are stereo.
2 x 12
Stereo, 100 watt combo amp with two 12 inch speakers. The
HEADPHONES and LOOP SEND/RETURN jacks are stereo.
5
Page 6

4. Precautions
NOTE: IT IS VERY IMPORTANT THAT YOU READ THIS SECTION TO PROVIDE
YEARS OF TROUBLE FREE USE. THIS UNIT REQUIRES CAREFUL HANDLING.
• All warnings on this equipment and in the operating instructions should be
adhered to and all operating instructions should be followed.
• Do not use this equipment near water. Care should be taken so that objects do
not fall and liquids are not spilled into the unit through any openings.
• The power cord should be unplugged from the outlet when left unused for a
long period of time.
DO NOT ATTEMPT TO SERVICE THIS EQUIPMENT. THIS EQUIPMENT SHOULD
BE SERVICED BY QUALIFIED PERSONNEL ONLY. DO NOT MAKE ANY INTERNAL
ADJUSTMENTS OR ADDITIONS TO THIS EQUIPMENT AT ANY TIME. DO NOT
TAMPER WITH INTERNAL ELECTRONIC COMPONENTS AT ANY TIME. FAILURE
TO FOLLOW THESE INSTRUCTIONS MAY VOID THE WARRANTY OF THIS
EQUIPMENT , AS WELL AS CAUSING SHOCK HAZARD.
OPERATING TEMPERATURE
Do not expose this unit to excessive heat. This unit is designed to operate between 32° F and
104° F (0° C and 40° C). This unit may not function properly under extreme temperatures.
6
Page 7

RepliTone MP Emulations5.
Note: Fender, Marshall, Vox, Boogie and other amplifier model designations are all trademarks of their respective owners and are not associated or affiliated with Rocktron. The names are
used solely to describe the amplifier tones produced using the RepliT one's emulating software.
Amp Emulation Name Original Amp Name
BRIT CLASS A VOX AC30
BRIT BLUES Marshall Bluesbreaker
BRIT CLASSIC Marshall Plexi 100W into 1960A 4 x 12 Cabinet
BRIT HI GAIN Marshall JCM 800 into 1960A 4 x 12 Cabinet
HI GAIN Rocktron Prophesy Channel 3
MEGA GAIN Rocktron Vendetta VP4 Channel 4
THRASH Voodu V alve High Gain, with mid scoop
GRUNGE MEGA GAIN but with LF boost on pre-EQ
FUZZ Dallas-Arbiter Fuzzface
70's Mesa Boogie Mk llB
TEXAS Rocktron Vendetta Head Channel 2
BLUES Fender '65 Deluxe Reverb
TWEED Fender '59 Bassman 4 x 10
POL Y JAZZ "Inspired" by a Polytone
CLEAN 2 Fender T win with Bright switch ON
CLEAN 1 Fender Twin Reverb
7
Page 8
6. Front Panel
9
1
POWER switch
1
2
3
4
5
6
8
7
10
11
12
14
13
15
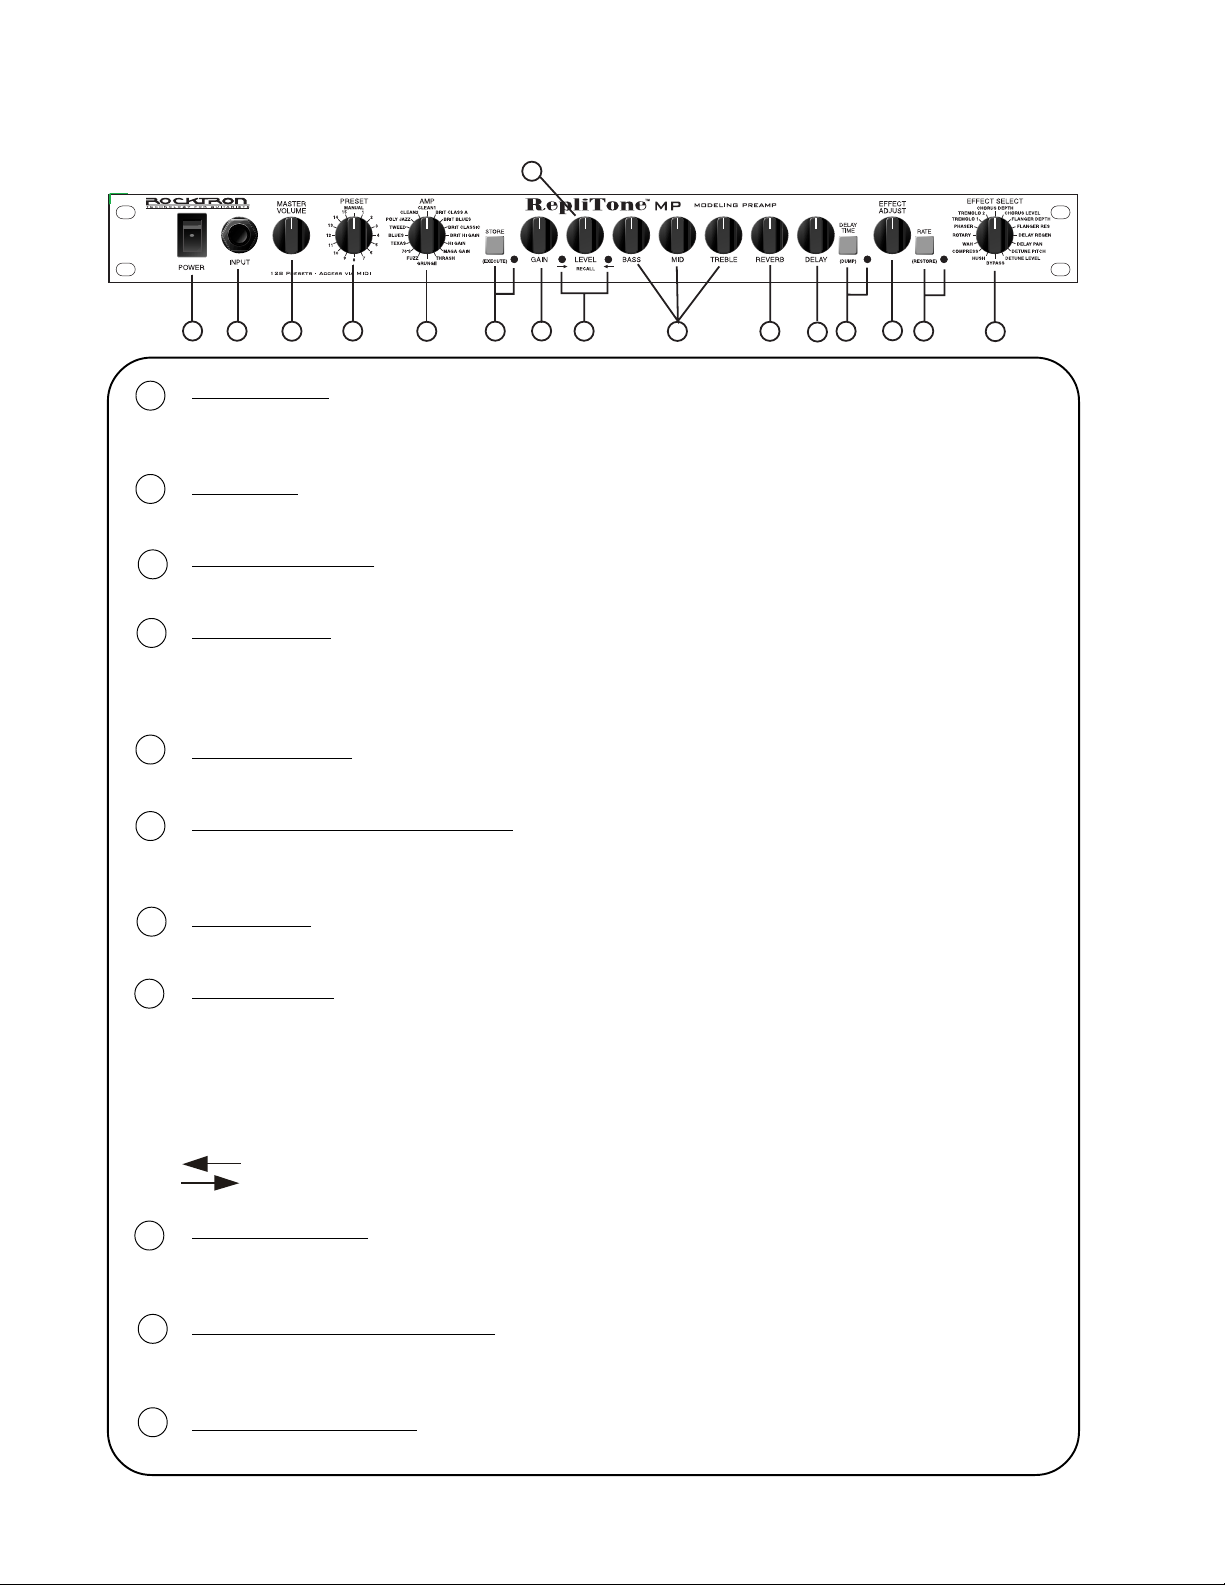
On/Off switch - Note: when powering up your rack be sure to turn all preamps and effects on first before
you turn on your power amp. When powering down your rack set up always turn the power amp off first.
INPUT jack
2
This ¼" jack accepts the output from the guitar.
MASTER VOLUME
3
Controls overall output level of the amp and also headphone volume.
PRESET switch
4
Selects one of 16 channels, as desired. MANUAL position uses all current control positions to determine
sound as opposed to stored values. These correspond to MIDI program change numbers 1 - 15. 113 more
user presets are accessible only via MIDI program changes (16 - 128).
AMP select switch
5
Selects one of 16 available Amp Emulations.
STORE/EXECUTE Button and LED
6
This button is used to store values into the RepliTone's presets when settings are altered - see "Storing
Changed Preset Parameters" for more information on this procedure.
16
GAIN control
7
Adjusts the amount of drive. Higher settings increase distortion and sustain.
RECALL LEDS
8
Allows you to get back to your "original" setting. Whenever a knob is turned (even just slightly) these
LEDs will light. To get back to the "original" setting (not the knob position - but the actual setting of the
control) start turning the knob you changed. When the LEDs go "out" the knob is at its original (or
stored) setting. If you pass the original setting and only one LED is lit, turn the knob in the direction of
the arrow. For example:
Left LED is Lit:
Turn the knob slowly to the right until both LEDs are out.
Turn the knob slowly to the left until both LEDs are out.
LEVEL CONTROL
9
Controls the relative volume level of the preset (or channel). Used to balance between two different
sounds.
BASS, MID and TREBLE controls
10
The BASS, MID and TREBLE controls are like any standard guitar amp. Levels are adjusted over the
ranges appropriate for the amp emulation selected.
11
REVERB LEVEL control
Adjusts the amount of reverb. (Reverb is always available.)
8
Page 9
DELAY LEVEL control
12
Adjusts the overall level of the delayed signal at the output relative to the direct signal and other effect
signals. (Delay is always available.)
DELAY TIME button and LED
13
Adjusts the current delay time. To set the delay time, tap the button twice at the interval desired (up to
one second). The LED flashes to indicate the set time. For the longest delay time tap button only once.
EFFECT ADJUST control
14
Adjusts one effect parameter, depending upon the effect selected (see Effect Select Control section (16)
for more detailed information).
EFFECT SELECT EFFECT ADJUST knob controls.
Chorus Depth Depth of Chorus
Chorus Level Level of Chorus
Flanger Depth Depth of Flanger
Flanger Res Resonance of Flanger
Delay Regen Regeneration of Delay
Delay Pan Pan of delay - knob turned full left - delay is on left
knob turned full right - delay is on right.
Detune Pitch Amount of Detune Pitch
Detune Level Level of Detune Pitch
Bypass Nothing
HUSH Threshold (HUSH is always active)
Compressor Threshold
Wa h Frequency of Wah - knob sets only the one
frequency - but you can use an expression pedal to
get the wah wah effect
Rotary Slow Speed of Rotary
Phaser Depth of Phaser
Tremolo 1 Depth of Tremolo 1
Tremolo 2 Depth of Tremolo 2
RATE button & LED
15
Sets the modulation rate of the selected effect. To set, press the button twice at the rate you want. The
LED flashes to indicate the setting. When the Rotary effect is selected, tap the button once to change
between the two rates. To set the slowest rate tap the button just once.
EFFECT SELECT control
16
Selects one of the available effects and selects which parameter is controlled with the EFFECT ADJUST
control.
Chorus Depth Bypass
Chorus Level Hush
Flanger Depth Compressor
Flanger Res Wa h
Delay Regen Rotary
Delay Pan Phaser
Detune Pitch Tremolo 1 (Sine wave modulation)
Detune Level Tremolo 2 (Square wave modulation)
9
Page 10
7. Rear Panel
6
1
PRE-AMP OUT (To Power Amp)
4
1
2
3
5
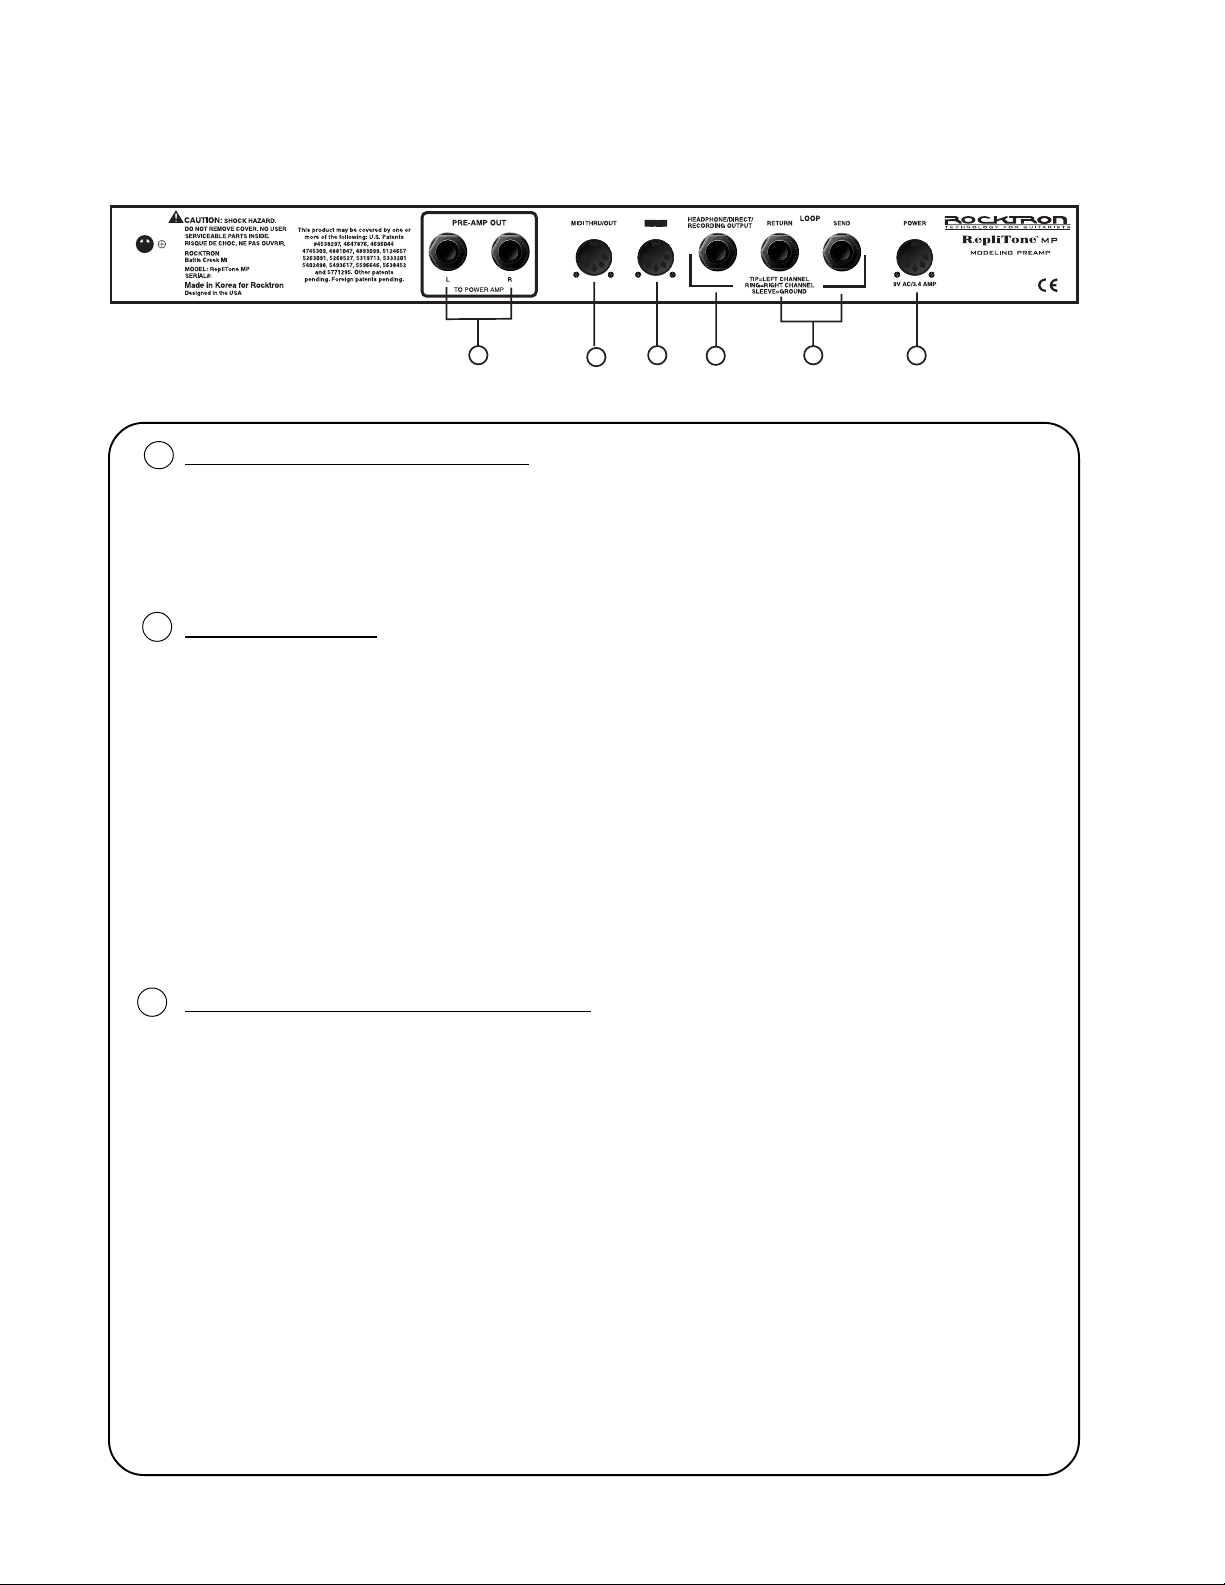
Jacks for connection to a power amp (we suggest the Rocktron Velocity 100 power amp
- 2x50 watts - stereo). These are stereo output jacks that should be connected to a
power amp input.
2
MIDI THRU/OUT
This standard 5-pin DIN connector can be connected to the MIDI IN jack of another
device via a standard MIDI cable. There are limitations to the number of devices that
can be chained (or series connected) in this fashion.
NOTE: There is a limit to the number of devices which can be chained together
(connected in series). With more than three devices, a slight distortion of the MIDI
signal can occur (due to signal degradation) which can cause an error in MIDI signal
transmission. Should this problem arise, a MIDI Thru box can be used which connects
directly to the MIDI device. The MIDI Thru box transmits MIDI information through
multiple connectors to the devices receiving MIDI. MIDI cables should not exceed 50
feet (15 meters) in length.
10
3
MIDI IN and Suggested Footcontrollers
This 7-pin DIN connector is specially designed to receive MIDI program changes from a
Rocktron MIDI Footcontroller and to provide phantom power to that controller.
Although, you may use a standard 5-pin MIDI cable and any MIDI footcontroller to run
this unit, we suggest that you use the Rocktron RMM900 MIDI Cable and the Rocktron
MIDI Mate or MIDI I.T. footcontrollers (available at your Rocktron dealer). We have
designed the RepliTone MP to have a 7-pin Din connector where Pins 6 & 7 carry
phantom power to a Rocktron MIDI Mate or MIDI I.T. footcontroller. Using this set up
you can power your footcontroller directly from the RepliT one MP thus eliminating the
need to plug in your footcontroller on stage. This will eliminate additional wires and
cables from the front of the stage.
This connector must be connected to the MIDI OUT jack of the transmitting MIDI
device via the Rocktron RMM900 7-pin DIN MIDI cable or a standard 5 -pin MIDI
cable, or the MIDI THRU jack of the preceding device (if this unit is within a chain of
MIDI devices).
Page 11
Please note, however, that this phantom power feature may not work with other MIDI
controllers. The Rocktron MIDI Controllers run on 9V AC current - others may not.
Therefore, please be sure you are fully aware of the functions and operation of other MIDI
controllers before using a 7-Pin DIN cable.
WARNING!! - The Rocktron RepliTone MP's phantom power is supplied to your footcontroller from the
RepliTone MP's adapter (you do not have to plug your Rocktron foot controller's adapter into the back of
the of the unit like you do on some other Rocktron models). Therefore, if you are using a 7-pin DIN MIDI
cable do NOT plug your foot controller's adapter into the footcontroller itself. Doing so may damage the
RepliTone MP and/or your foot controller. Please note that Rocktron does not assume any liability for
improper connections to or from this product.
HEADPHONE/DIRECT/RECORDING OUTPUT jack
4
Plugging either headphones or a stereo Y cable into this jack will activate the RepliT one
MP's speaker simulator . This jack has been specifically designed to be used in several ways:
-For Direct Recording (use a stereo Y cable for left and right)
-For Direct connection to a PA system (use a stereo Y cable for left and right)
-For Headphone listing.
This feature allows you to use a stereo Y cable (not included) to run into a PA system
(eliminating the need to haul the power amp and speaker cabinets to the gig) or allow you
to record direct into a mixing board or home studio.
If you do not have a stereo Y cable you can activate the speaker simulator out of the Left &
Right Pre-amp outputs by plugging in a 1/4” guitar cable or 1/4” stereo dummy jack into
this headphone/direct/recording output jack and then use two standard 1/4” guitar cables
from the Pre-amp outputs into the PA or recording device.
5
LOOP SEND and RETURN jacks
The effects loop is provided to allow for a chain of external stereo (L/R) effects devices to
be inserted into the signal path after the preamp and built-in effects and before the power
amp.
NOTE: To maintain stereo operation, the effects loop must be used in a stereo configuration. This requires
only stereo RTS connections to be made to the send and return jacks. Using mono TS (tip-sleeve) connections
will mute the right channel.
POWER jack and ADAPTER
6
Provides AC power to the Replitone MP - please use the enclosed 9VAC 3.4 amp adapter
for this product only. Do not use any adapter other than the included adapter. Rocktron is
not responsible for improper use. Please follow all precaution instuctions included in the
front of this manual. Replacement adapters are available. Here are the model numbers:
Model Number 006-1211 - this is a 1 10V 9VAC 3.4A Adapter 4 Pin/Din for RepliTone MP
Model Number 006-1224 - this is a 220V 9VAC 3.4A adapter 4 Pin/Din for RepliTone MP
Please check our website for more details www.rocktron.com
11
11
Page 12

8. MIDI Implementation
There are 128 user programmable presets. The first 15 are accessible from the front panel PRESET knob and
correspond to MIDI program change numbers 1 to 15. ("Manual" is not a MIDI accessible preset.) The remaining
113 user presets are accessible only via MIDI program changes (program numbers 16 to 128) through a footcontroller .
The MIDI IN jack is a 7-pin DIN for phantom powering MIDI controllers, however, 5-pin DIN cables can be used
and are most common. The MIDI channel will be permanently set to OMNI, you can plug in any MIDI pedal and it
will work. However for the best function we recommend the Rocktron MIDI Mate or MIDI I.T . and the RMM900 7pin MIDI Cable.
Storing Presets
o Storing Presets to Exisiting Location:
Once you have achieved a sound that you like, you may want to save it for later use. If any parameter has been
modified, the STORE LED will light. Press the STORE (EXECUTE) button. The STORE (EXECUTE) LED will
start flashing. If you would like to store the changed sound at the current or exisiting preset - press the store button
again to execute the change or complete the store.
o Storing Presets to a different location:
If you would like to save the changed sound to a different preset - press the STORE (EXECUTE) button. The
STORE (EXECUTE) LED will start flashing. Now turn the preset knob to the number where you want to save or
choose the location number on your MIDI Footcontroller. You will now hear the sound of the preset location which
you selected when turning the knob. Now hit the STORE/EXECUTE button to execute the change. At this point
the LED will turn OFF and the sound that you had created will be stored to that preset location.
Note: To cancel any store, turn the "AMP" select knob in any direction and the store will be cancelled.
Note: The RepliTone MP's unique function requires that the modulation effect be adjusted last before storing a
preset. The modulation effects are Chorus, Flanger, Tremolo 1, Tremolo 2, Phaser, Rotary and Detune/Pitch.
Therefore, when you find a sound that you like and you would like to add Chorus, turn the "Effect Select" to Chorus
Level or Depth - which ever you want to adjust - make the adjustment and hit "store".
When editing a preset that uses a modulation effect - after editing the preset, the "EFFECTS SELECT" knob must
be turned back to the modulation effect used in the preset before storing for it to "store" the effect.
Restoring Factory Presets
To restore any or all of the 128 user presets to their factory settings, place the PRESET switch in the MANUAL
position with the unit OFF. Press and hold the RATE (RESTORE) button while turning on the power switch. The
STORE/EXECUTE LED and the RATE/RESTORE LED will start flashing. Release the RATE (RESTORE)
button.
T o restore all presets press the STORE (EXECUTE) button. The LED's will flash, indicating success, after restore
is complete.
To restore a single preset, set the PRESET knob to the desired preset to restore (1-15). Press the STORE (EXECUTE) button. LED's will flash, indicating success. To restore a single preset to factory settings on presets 16128 you will need to use the Replitone MP's PC Interface on our website or dump to a MIDI Sysex file. You can
then save all of your presets and then restore all presets on the RepliTone MP following the instructions above.
Then using the PC interface you can download the presets you want to use back into your RepliTone MP - instructions how to do this can be found in the manual or on the website. www.rocktron.com
12
Page 13

8. MIDI Implementation continued...
Dump Functions
To dump all presets: place the PRESET switch in the MANUAL position with the unit OFF. Press and hold the
DELAY TIME (DUMP) button while turning on the power switch. The STORE (EXECUTE), DELAY TIME
(DUMP) LED and the RATE (RESTORE) LED's will start flashing. Release the DELAY TIME (DUMP) button.
To dump all the presets, press the STORE (EXECUTE) button. The LED's will flash to indicate success.
To dump a single preset, set the PRESET knob to the desired preset to dump (1-15). Press the DELAY TIME
(DUMP) button. The LED's will flash, indicating success.
Cancelling Dump and Store/Restor e Functions Escape
You can change your mind and exit the Dump, Store or Restore Modes. To cancel and escape the Special Function
Mode, turn the AMP select knob one step in either direction. The amp will now be in normal operating mode.
13
Page 14

Continuous Controller Assignments - Version 1.00
The Controller Assignments for some of the RepliT one MP's parameters such as volume, delay , reverb and
effects can be adjusted for "real-time" control by continuous controller assignments or midi and/or expresssion
pedal.
Here are the RepliT one assignments:
Controller Lower Upper
Function Change Number Value Value
Tap Delay 015 0 127
EFX Rate 016 0 127
Volume 017 0 127
Delay Mute 018 0 127
Reverb Mute 019 0 127
EFX Mute 020 0 127
Wah In/Out 021 0 127
EFX Adjust 1 022 0 127
EFX Adjust 2 023 0 127
Rotary On/Off 024 0 127
EFX1 and EFX2 will control any adjust parameters associated with the algorithm recalled.
For example - Wah W ah = [On/Of f = cc#21 Value - 0 = off 127=on] W ah Frequency = CC#22 Value
0----127
Here is a breakdown of the controller numbers per effect for quick reference:
Effect Parameter On/Off Effect Adjust
Delay Tap - 15
Rate Tap - 16
Volume - 17
Delay Mute 18 Reverb Mute 19 Chorus Depth 20 22
Chorus Level 20 23
Flanger Depth 20 22
Flanger Res (Resonance) 20 23
Delay Regen (Regeneration) 18 22
Delay Pan 18 23
Detune Pitch 20 22
Detune Level 20 23
Bypass - HUSH - 22
Compressor - 22
W ah (In/Out) 21 22
Rotary 20 24
Phaser (Depth) 20 22
Tremolo 1 (Depth) 20 22
Tremolo 2 (Depth) 20 22
14
Page 15
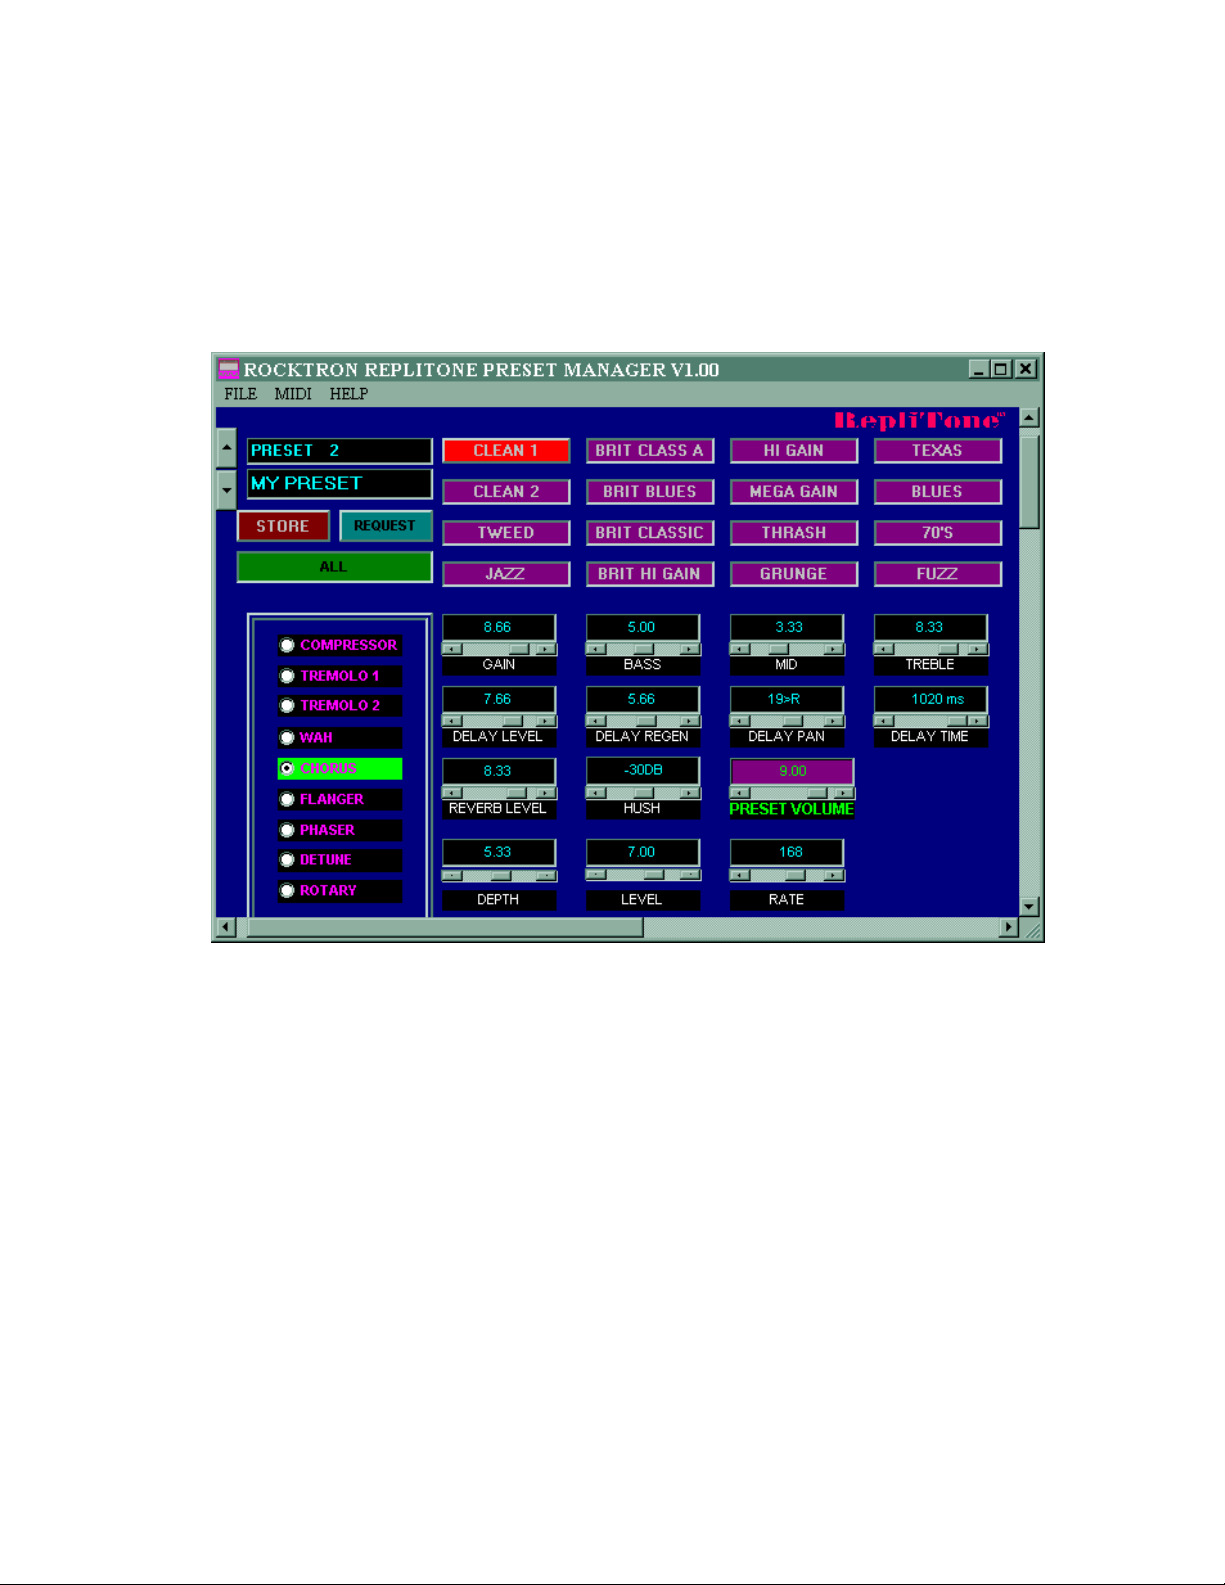
9. PC Interface - Download Presets
Edit presets with your computer, save, store or share presets with other users. The Replitone MP's pc interface
allows you total flexibility with your new product. If you are like most players - sometimes you play electric
heavy rock - sometimes the classics - sometimes weddings...the list goes on an on. Within a very short time you
can set up all of your gigs and put the presets in the order you use them for each gig using the PC interface.
You can then download the presets to fit the appropriate gigs.
1) Download the Rocktron RepliTone MP Preset Manager at www.rocktron.com.
2) Open the RepliTone MP Preset Manager on your PC. Try to move one of the slider bars to make sure the program
is working correctly.
3) Set all controls (Gain, Level, Bass, Mid, Treble, Delay Level, Reverb Level, and Effect Adjust) on your RepliTone
to OFF by turning the knobs full to the left. You will need a MIDI-to-Game-Port cable to make the necessary
connections. This cable is available at most music stores selling pro-audio gear.
4) Connect the 15 pin side of the cable to your computer's game port connector jack.
5) Connect your PC Midi In connector to the RepliTone MP's Midi Out jack.
6) Connect your PC Midi Out connector to the RepliTone MP's Midi In connection.
7) Adjust the Gain Control on the RepliTone MP Preset Manager. Flashing LED's on the RepliTone MP confirm the
connection from the PC is made.
8) Click on the REQUEST button. The RepliTone will upload the 128 existing presets to the RepliTone Preset
Manager for editing.
15
Page 16

10. Effects
There are some great sounding, Rocktron Intellifex quality effects in the RepliTone MP. To pick the
effect you want to hear , turn the EFFECT knob. You can control the character of the effect by tapping
the RATE button and turning the EFFECT ADJUST knob.
Chorus Depth
&
Chorus Level
Flanger Depth
&
Flanger Res
Chorus simulates the sound of several guitars playing at once, making the overall sound "fatter". The chorus effect is produced by using two delayed signals
(Voice 1 and V oice 2) and modulating the delay time for a slight pitch bend and
greater perceived spaciousness. For Chorus Depth & Level the same chorus is
active, the two positions on the EFFECT SELECT knob determine what the
EFFECT ADJUST knob is adjusting. Adjusting with the EFFECT ADJUST
knob changes the Depth (amount of modulation) on Chorus Depth and the Level
(volume of Voice 1 and Voice 2) on Chorus Level.
The Flanger effect creates a "whooshy", "swirly" sound. Flanging is very similar to chorus, but the delay time is shorter, so that when summed back with the
direct signal, phase cancellations and peaks will occur to create a comb filter.
Modulating the delay time will cause the "teeth" of the comb filter to move up
and down in frequency . Adjusting with the EFFECT ADJUST knob changes the
Depth (amount of modulation) on Flanger Depth and the Resonance (more jet
airplane effect) on Flanger Res.
Rotary
Detune Pitch
&
Detune Level
Compressor
Bypass
The Rotary effect simulates a miked, rotating speaker horn (i.e. Leslie). Pressing the RATE button will change from a slow to a fast rotation rate or viceversa. The EFFECT ADJUST changes the slow rotation rate.
The EFFECT ADJUST knob adjusts the Pitch (in 2-cent increments from -30 to
+30 cents) on Detune Pitch and the Level on Detune Level.
The Compressor effect allows you to compress the signal prior to the distortion
stage. It compresses the sound so that the softer sounds are louder. Compression is used to maintain an even level when using clean tones, and also to increase sustain when using distorted tones or at lower volume levels.
Bypasses the effects -- turns them OFF -- except for Delay , Reverb, and HUSH,
which are always available unless muted separately via MIDI commands.
16
Page 17

Effects, continued...
HUSH
Wah
HUSH is Rocktron's patented single-ended noise reduction system. The HUSH
system contained in the RepliT one MP is a fully digital implementation achieved
through Digital Signal Processing (DSP). The HUSH circuit is located after the
A/D converter in the signal chain to reduce any noise generated from the guitar
and the A/D converter. This insures a quiet input signal to the preamp section.
Because the preamp section is digital, it is virtually noise-free. Therefore, a
quiet input signal to the preamp will result in a quiet output signal. The HUSH
effect is always ON. When HUSH is selected on the EFFECT SELECT button,
turning the EFFECT ADJUST knob allows you to adjust the HUSH Threshold.
Note: HUSH works best w/Hi Gain settings. When playing using "clean" tones,
the HUSH usually insn't necessary - turn it down for greater clean dynamics.
The W ah effect is an internal type of frequency filter (which varies the bass and
treble content of a signal) that adds expressive vocal-like characteristics to the
guitar. Use of this feature allows for an expression pedal to be used as a wahwah pedal instead of a conventional wah-wah pedal and long audio cables.
T o use an expression pedal as a wah-wah pedal, connect it to a MIDI controller
(such as a Rocktron MIDI Mate or MIDI I.T.)
Delay Regen
&
Delay Pan
Phaser
Tremolo 1 & 2
The Delay effect is a reproduction of the input signal, occurring at a prescribed
time (usually expressed in milliseconds) following the input signal. The Regen
and Pan positions allow you to use the EFFECT ADJUST knob to set the Regeneration (the number of times the signal repeats itself) on Delay Regen and
the Pan (movement of the signal between the left and right channels) on Delay
Pan.
Phase shifting involves splitting the input signal into two signals, then shifting
the phase of different frequencies of one signal and mixing it back with the
original signal. This also creates a comb filter like the flanger, but without as
many "teeth". Adjusting the EFFECT ADJUST knob will change the depth
parameter . Higher parameter settings result in the sweep of the filtering ef fect
occurring over a wider frequency range.
Tremolo is the rapid wavering of the volume (not pitch, like vibrato) that makes
your guitar sound as if you are playing it through a slowly moving electric fan.
Tremolo 1 has a triangle wave modulation which is slightly more subtle than
Tremolo 2 which has a square wave modulation for a more pronounced effect.
The EFFECT ADJUST knob adjusts the depth parameter on both settings. Lower
depth settings produce more subtle tremolo effects, while higher settings will
result in a more extreme tremolo effect.
17
Page 18

Effects, continued...
Reverb
Delay Level
Delay Time
Phase Rate
Chorus Rate
The Reverb function is always available independent of the setting of the EFFECT SELECT knob. It simulates the natural acoustics of playing in a large
hall or auditorium. This is also known as "ambience".
Reverb is useful for creating a "surf guitar" sound or for adding sustain to clean
guitars. Just a touch of reverb will embellish your sound without being discernable
as an effect.
The REVERB knob allows you to control the level of the reverb signal at the
output in relation to the Direct Signal and other effects signals.
The DELA Y LEVEL knob determines the overall level of the delayed signal at
the output relative to the direct signal and other effects signals.
T o set the time of delay - tap the "DELA Y TIME" button. The interval between
the taps will set the time of the delay. This works great for setting the time of
delay to correspond with the time of the music being played.
T o set the rate of the phaser - first select "Phaser" on the "EFFECTS SELECT"
knob. Next tap the "RATE" button. The interval between taps will set the rate
of the phase.
To set the rate of the chorus - first select either "Chrous Depth" or "Chorus
Level" on the "EFFECTS SELECT" knob. Next tap the "RATE" button - the
interval between taps will set the rate of chorus.
18
T remolo Rate
Flanger Rate
T o set the rate of tremolo - first select either "Tremolo 1" or "T remolo 2" on the
"EFFECTS SELECT" knob. Next tap the "RATE" button - the interval between taps will set the rate of tremolo.
To set the rate of flanger - first select either "Flanger Depth" or "Flanger Res"
on the "EFFECTS SELECT" knob. Next tap the "RATE" button - the interval
between taps will set the rate of flange.
Page 19
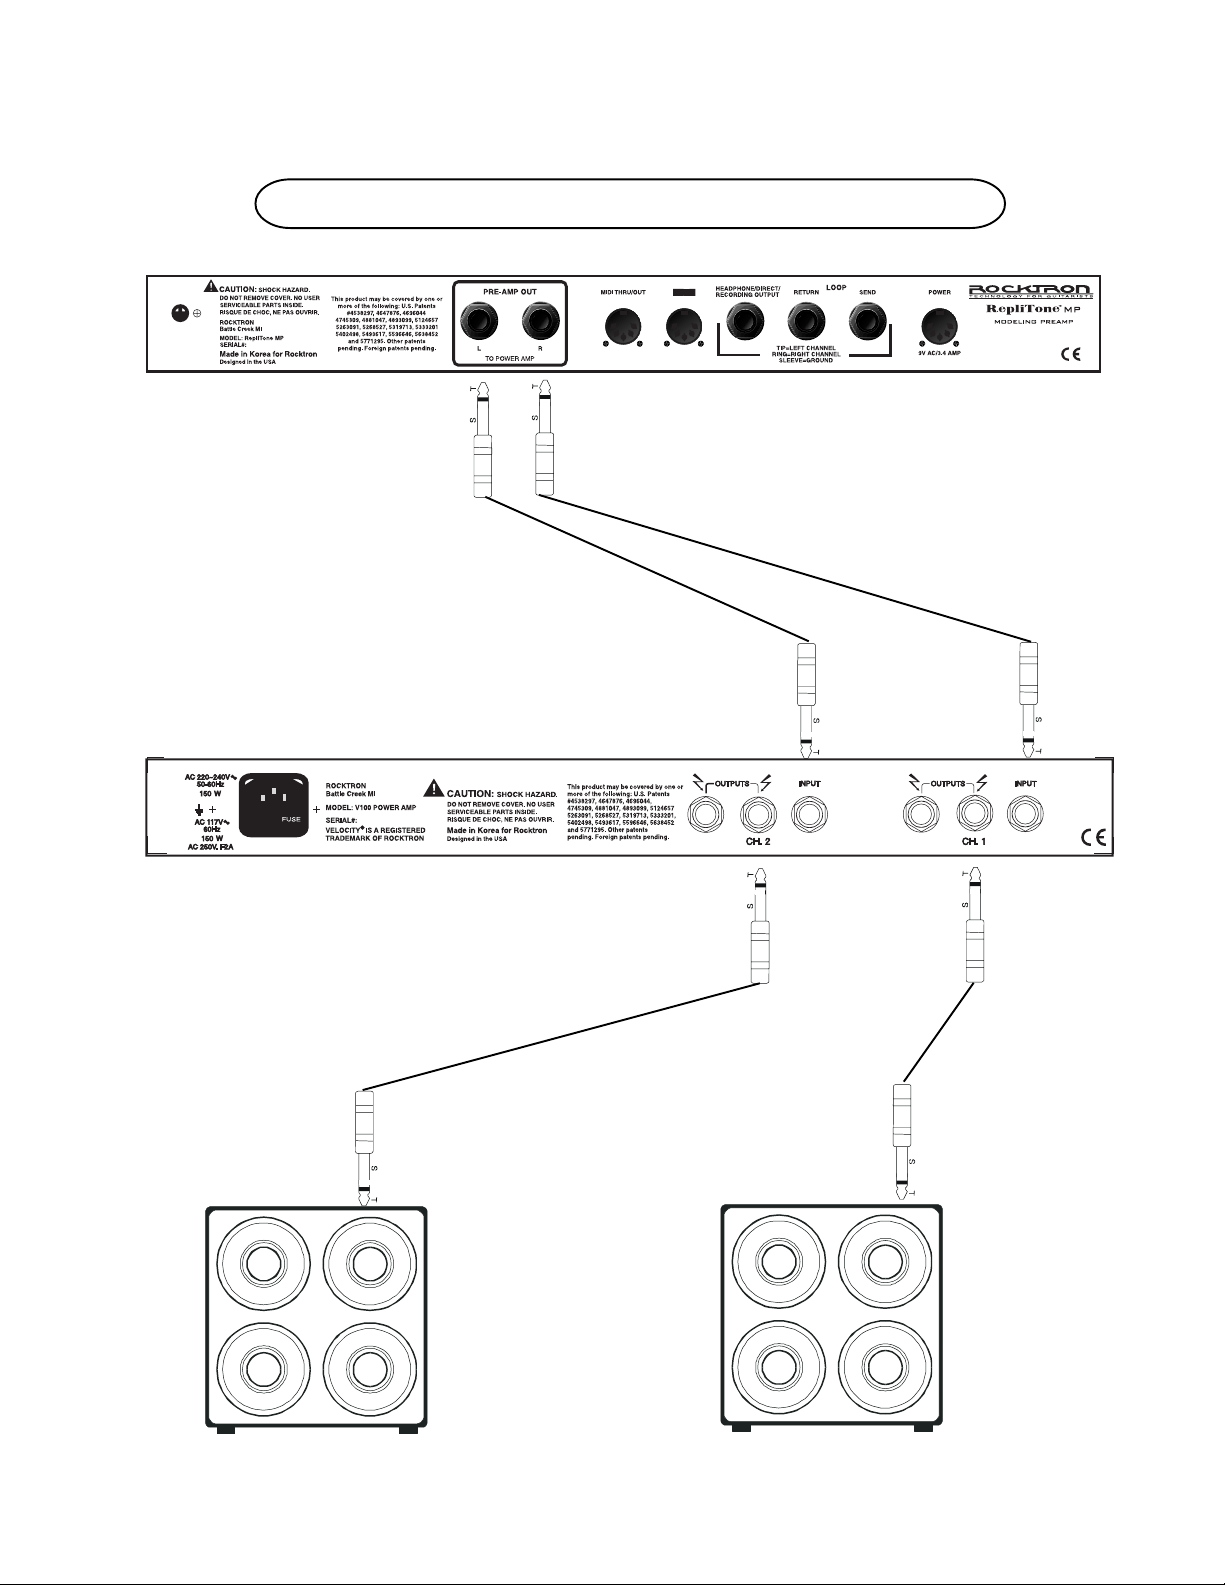
Connections11.
Connecting the RepliTone MP to a Power Amp
19
Page 20
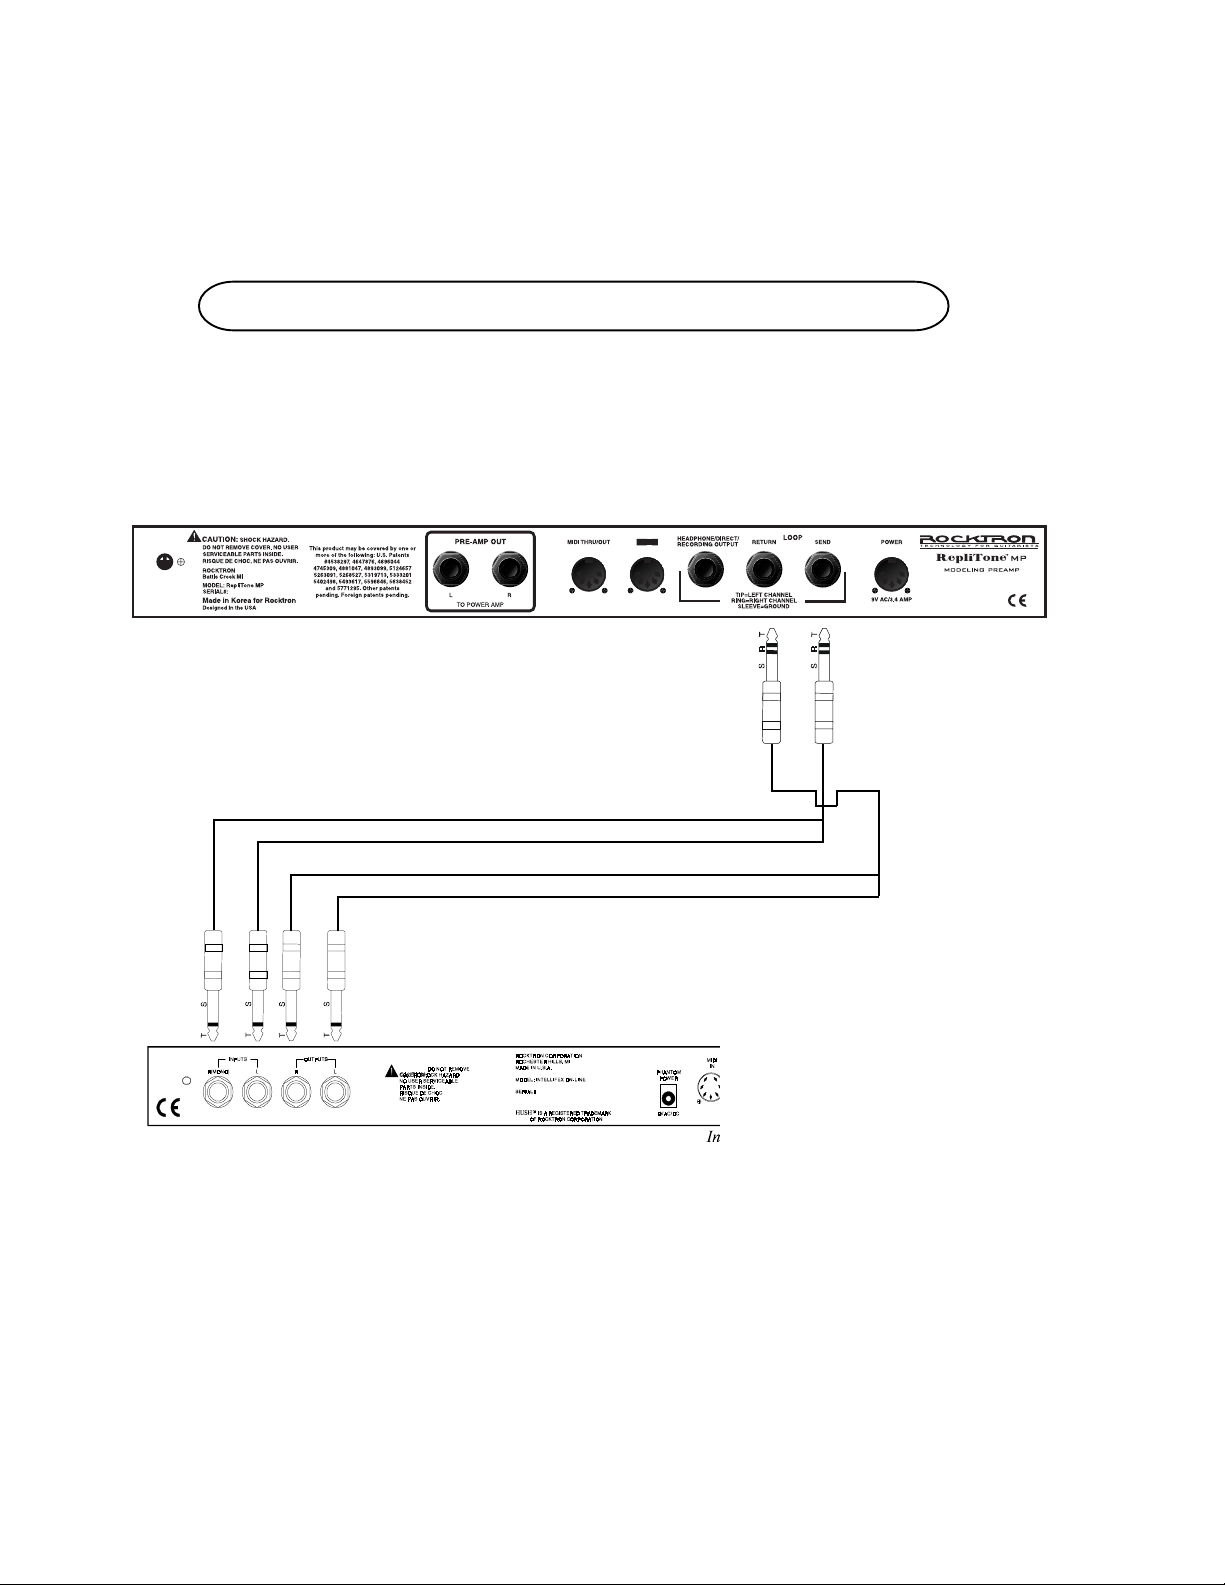
Connections, continued.....
Connecting the RepliTone MP to effects equipment
20
Page 21
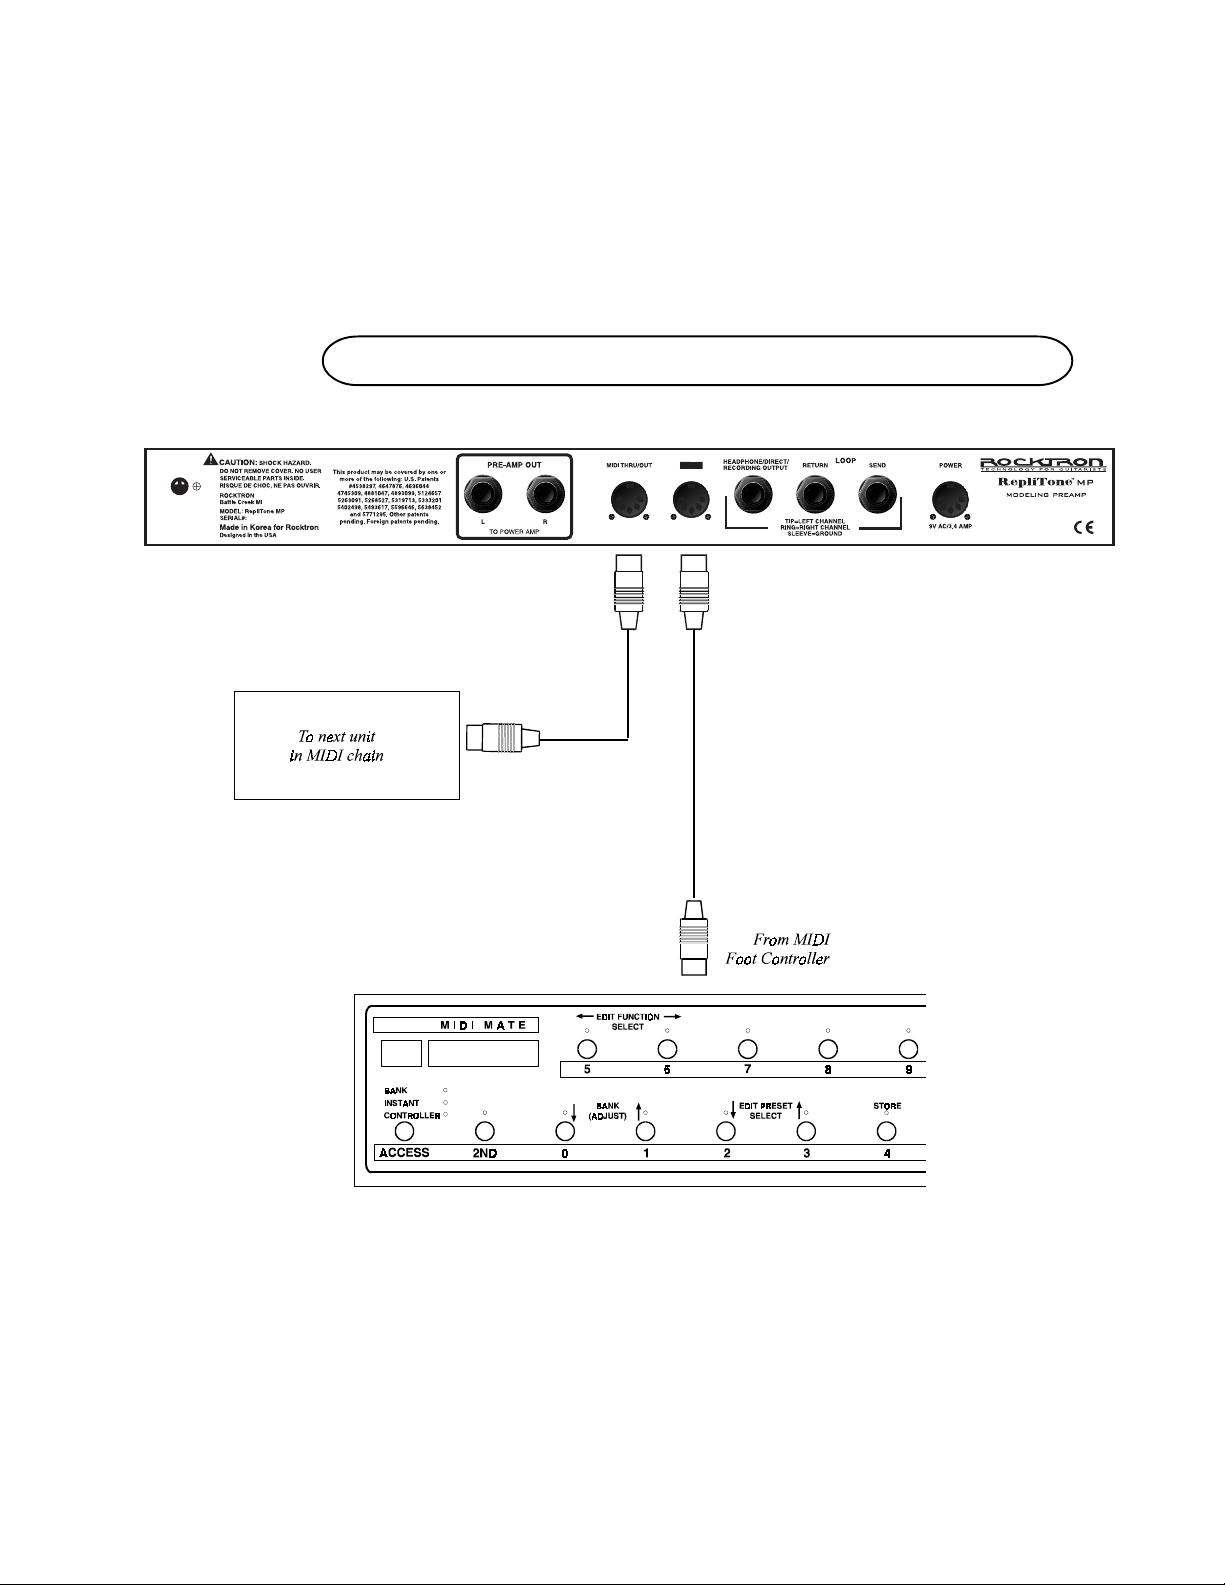
Connections, continued.....
Connecting the RepliTone MP to MIDI equipment
5-pin DIN
7-pin DIN (provided phantom
power) or 5-pin DIN
21
Page 22
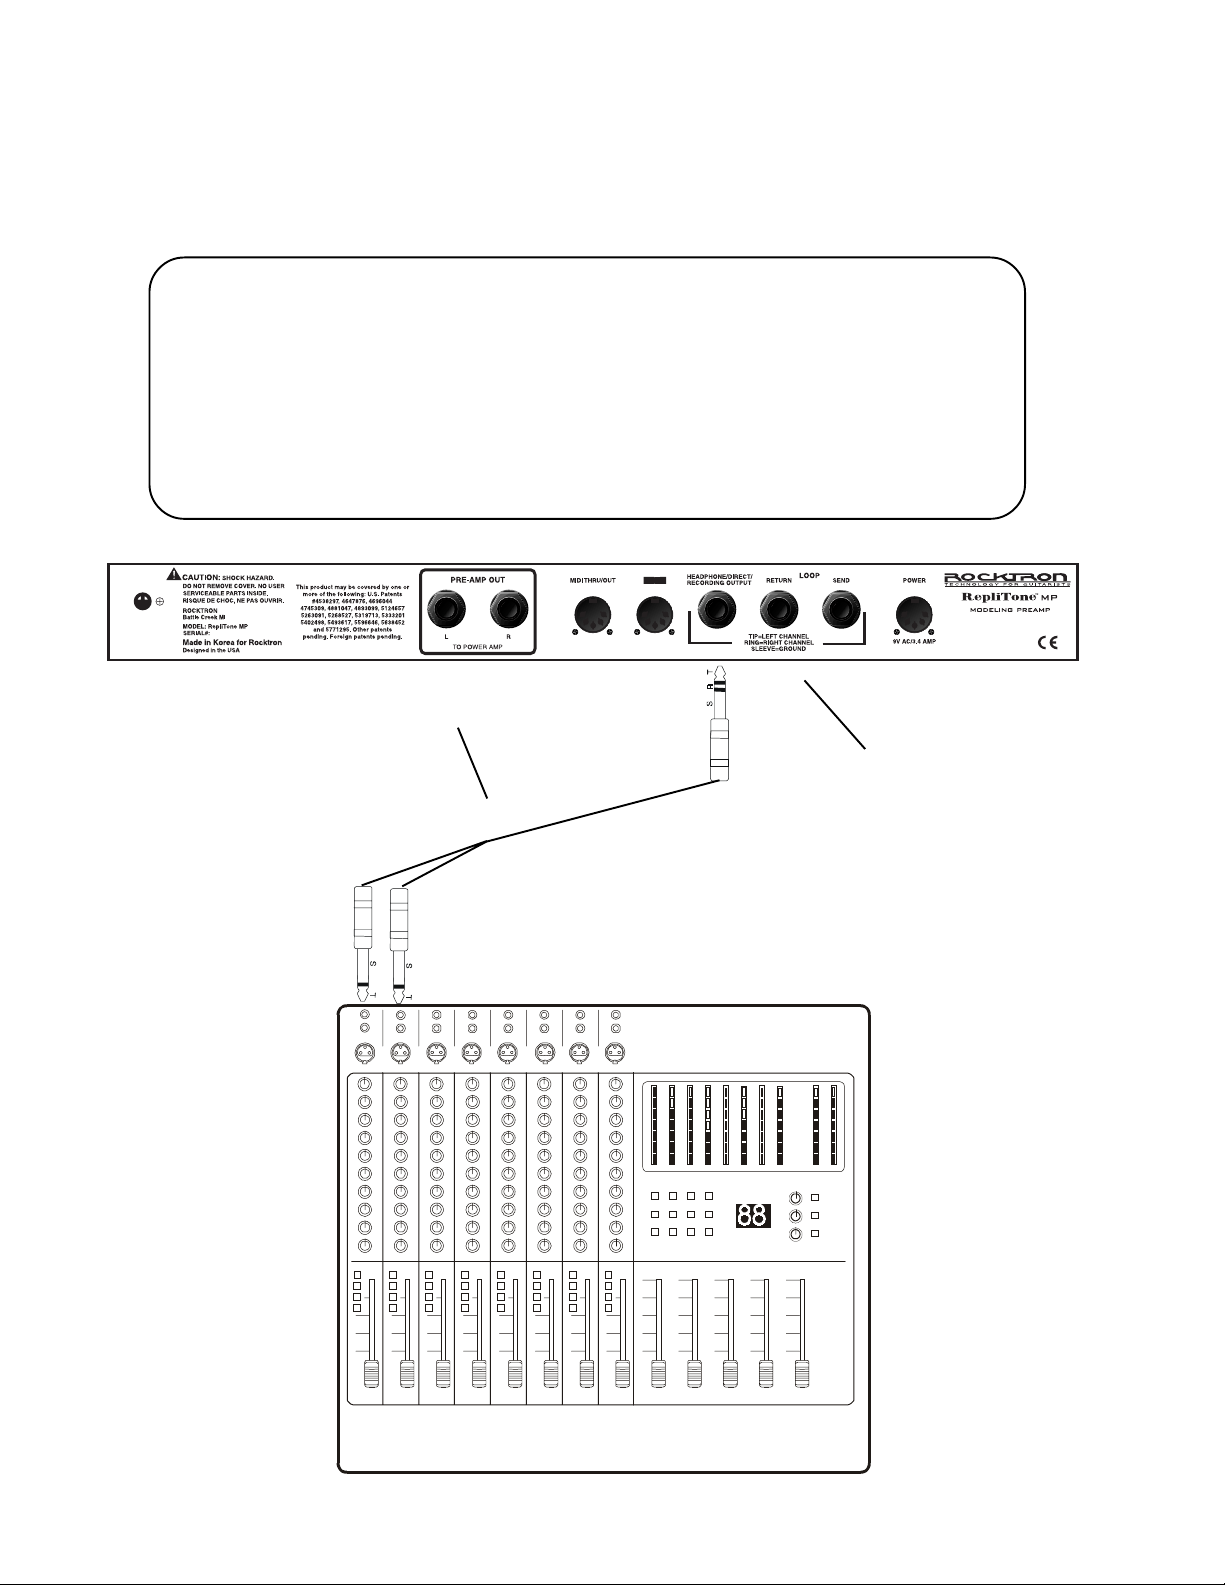
Connecting the RepliTone MP to a PA System or
Multi-track recording device.
The RepliTone MP sounds AWESOME when plugged straight into a PA system.
Doing this can eliminate the need to carry your amplifier to the gig. Rocktron's
built in speaker simiulation is world class and sounds so good - you might just
sell your amp. In this set up you do not need a power amp - just the PA's power.
Additionally, you can pr oduce professional sounding recordings with the
RepliTone MP - plug the MP directly into your home studio and you will hear
why our amp simulations are world class and sound like the real thing!
StereoStereo Y cable required for this connection
(Not Included)
Stereo Spacing
To increase
stereo field -
turn pan knob
on channel 1
hard left and
turn pan knob
on channel 2
hard right
Speaker Simulator
already engaged
Multi-track Recorder, Home Studio or Mixer/PA System
22
Page 23

13. Specifications
Input Impedance
Maximum Input Level
Input Jack
Output Impedance
Maximum Output Level
Output Jacks
MIDI In
MIDI Thru/Out
Power Requirements
Effects Loop
470k
0dBu
1/4" Mono
<150 Ohms
+7dBu
1/4 Left and Right
7-pin Din - Pins 6&7 Carry Phantom Power to run
Rocktron MIDI Mate and MIDI I.T. Footcontrollers.
5-pin Din
9VAC / 3.4A
1/4" stereo jack (TRS) for send and return. Tip is left
channel. Ring is right channel.
Dimensions
19" x 7" x 1 3/4"
23
Page 24

Check out some of our other products:
Rack Gear:
Gainiac (preamp w/12ax7 tube) Chameleon 2000 (preamp w/multi-effects)
Voodu Valve (preamp w/12ax7 tube and multi-effects)
Prophesy (our top of the line preamp with multi-effects)
Intellifex On Line (Multi-effects processor) HUSH Super C (guitar noise silencing system)
Vendetta VP4 Preamp (All Tube 4-Channel Guitar preamp - 2 Rack Space)
Stomp Boxes:
Rampage Distortion, Tsunami Chorus, Austin Gold Overdrive,
Vertigo Vibe Rotating Vibe Pedal, HUSH The Pedal
Electric Guitar - Acoustic Guitar and Bass Amplifiers:
Vendetta Head(100 W Head 4-Channels All Tube - MIDI Switchable)
Vendetta Combo (100W 2x12 Combo - Celestion 90s all Tube -4-Channel - MIDI Switchable)
R80DSP (80W 1x12 Amp w/Digital Effects) RT80 (80W 1x12 Amp w/Reverb & Built-in Tuner)
R120DSP (120W 2x10 Amp w/Digital Effects)
R120C (120W 2x12 Amp w/Stereo Chorus and Reverb)
RT122C (120W 2x12 Amp w/Stereo Chorus, Reverb & Chromatic Tuner)
R50DSP (50 Watt 2x8"Guitar Amp w/Digital Effects)
R50C (50 Watt 2x8"Guitar Amp w/Reverb & Chorus)
R20 (20 Watt 1x8"Amp w/Reverb) R10 (10 Watt 1x6.5")
ACOUSTIC (60 Watt Acoustic Amp with Chorus & Reverb)
RA50DSP (50W Acoustic Amp w/Digital Effects - Wedge Shape)
RA30DSP (30W Acoustic Amp w/Digital Effects - Wedge Shape)
RB20 (Bass Amp 20W with 8" Speaker) RB30 (Basss Amp 30W with 10" Speaker)
RB60 (Bass Amp 60W with 12" Speaker) RB100 (Basss Amp 100W with 15" Speaker)
Foot Controllers:
MIDI Mate (Midi Foot Controller) MIDI I.T. (MIDI Footcontroller)
All Access (Midi Foot Controller RMM900(7-pin Din MIDI Cable)
24
RFS1 and RFS2 (Single and Double Latching Footswitchs for Rampage Amps)
Page 25

252627
Page 26

Page 27

Page 28
Rocktron -A Division of GHS Corporation
2813 Wilber Avenue
Battle Creek MI 49015
USA
Rocktron Phone: 1-(616)-968-3351
Email: [email protected]
Check us out on the web at:
2002-0001
Rev. 1/03/02
28
www .rocktron.com
 Loading...